
Custom Field – WorkDo Dash SaaS Add-On Guide
Learn how to create and manage custom fields across modules in WorkDo Dash SaaS.
Introduction
The Custom Field Add-On allows you to extend Dash SaaS by adding your own custom fields to different modules across the system, such as Proposals, Invoices, Customers, Vendors, Employees, Leads, Deals, Items, and Projects. With twenty different field types available, including text, number, date, dropdown, checkbox, repeater, and more, you can capture exactly the information your business needs, in the format that fits best, without relying on default system fields alone.
How to Install the Add-On?
To Set Up the Custom Field Add-On, you can follow this link: Setup Add-On.
How to Use The Custom Field Add-On?
Manage Custom Fields
To add a new Custom Field, click the “Create” button to open the Create Custom Field form and enter a Field Name, then choose a Field Type from the dropdown. Note that the field type cannot be changed after creation, so select carefully.
When creating a custom field, you can select from twenty different field types, including:
- Text for simple text input, such as names, titles, or short descriptions, where users can enter any text content
- Email for email addresses with automatic format validation to ensure proper email structure
- Number for numeric values only, such as quantities, amounts, or measurements, where only numerical input is accepted
- URL for website addresses with automatic format validation to ensure proper URL structure
- Date for date selection with a calendar picker interface, allowing users to choose specific dates
- Time Picker for selecting specific times of day with hour and minute selection
- Date Range for selecting a period between two dates, useful for duration tracking or date spans
- DateTime Range for selecting both date and time ranges, combining the date range with specific time periods
- Currency for monetary values with proper formatting and currency symbols
- Phone for telephone numbers with format validation to ensure proper phone number structure
- Rich Text for formatted text content with styling options like bold, italic, lists, and other text formatting capabilities
- Tags for creating and assigning multiple keyword labels or categories to records
- Rating for star or numerical rating systems, allowing users to provide scores or feedback
- Slider for selecting values within a range using a visual slider interface
- Textarea for longer text content, such as descriptions, comments, or detailed information that requires multiple lines of text
- Select (Dropdown) for single selection from predefined lists of options, where users can choose one item from a list you create
- A checkbox for multiple choice options, where users can select several items at once from the available choices
- Radio for single choice selection from multiple options where only one option can be selected at a time
- Media (Attachment) for file uploads, including documents, images, videos, certificates, or any other files that users need to attach
- A repeater for adding multiple sets of the same fields, allowing users to create repeating groups of information
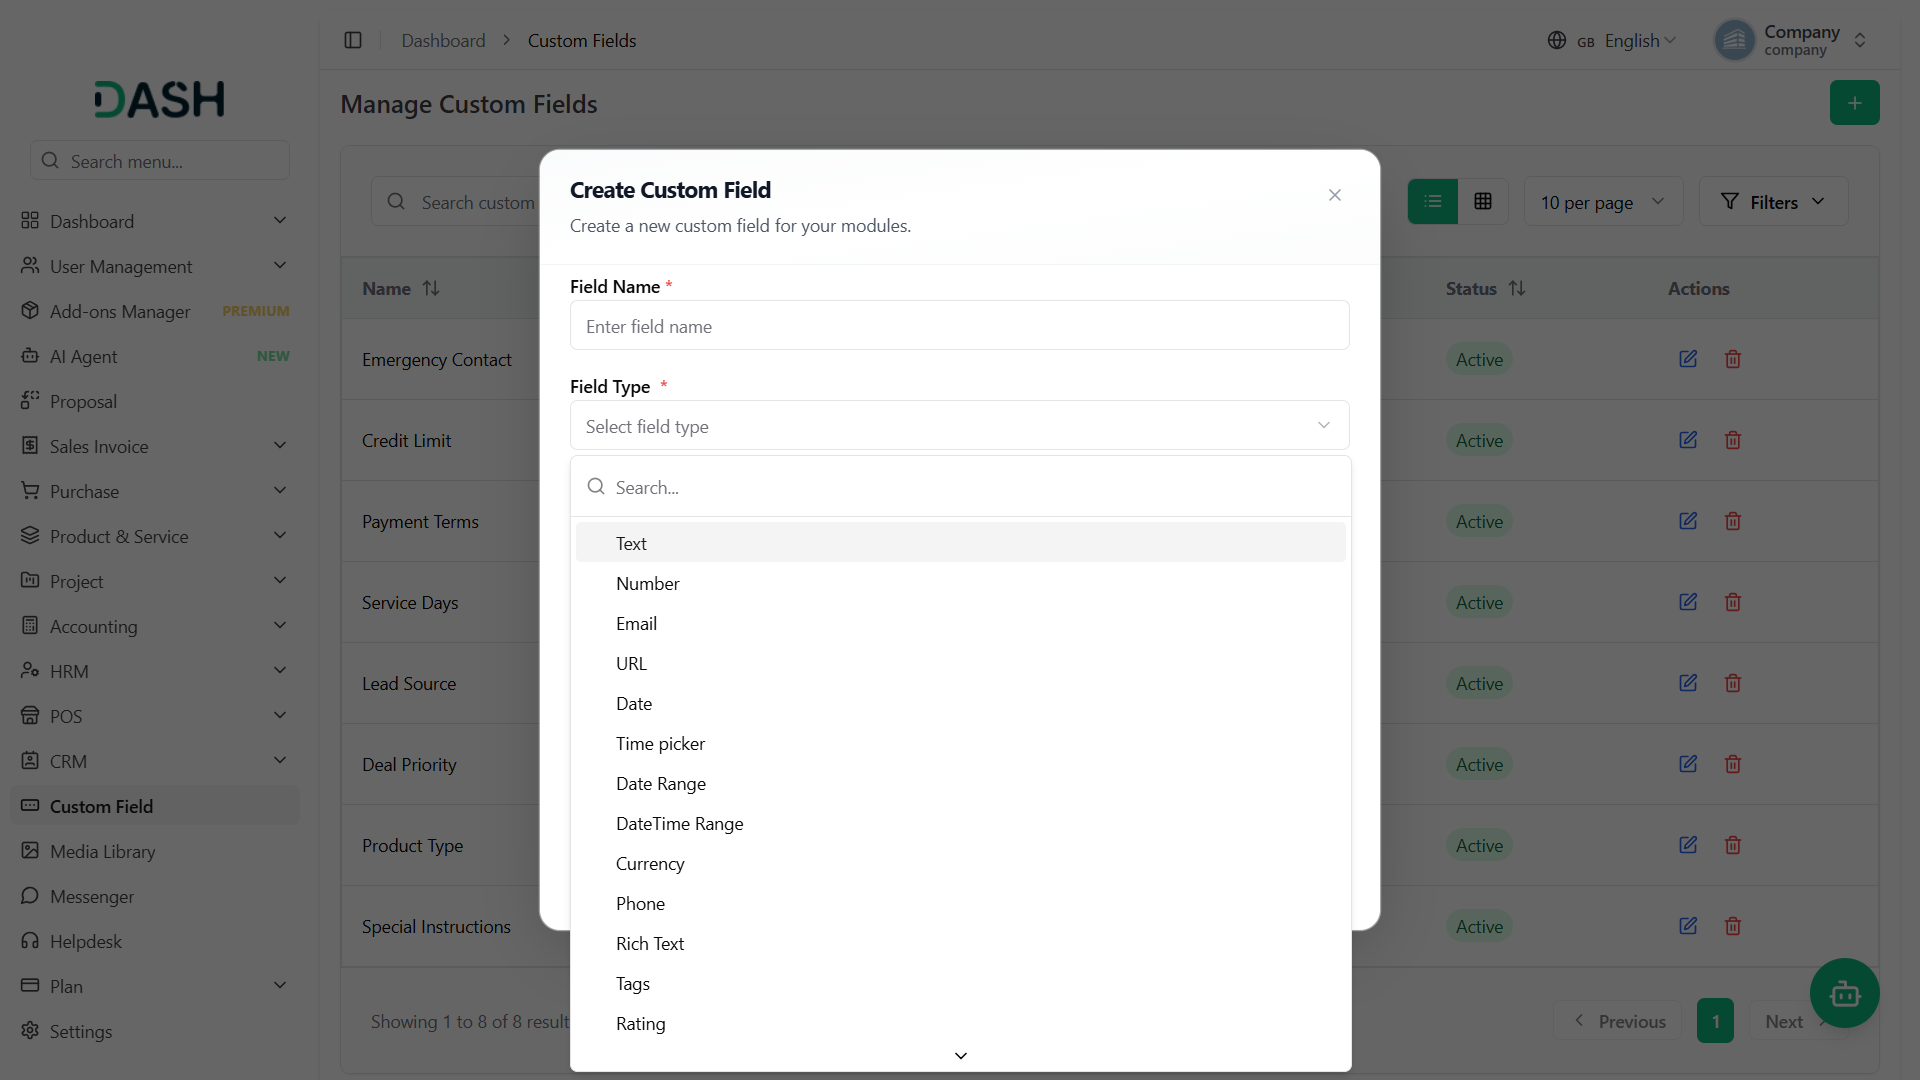
- Next, add a Placeholder to show sample text inside the field, and select a Module from the dropdown to choose the main section where you want this custom field to appear.
- If you selected a field like ‘Select’, ‘Radio’, ‘Checkbox’, or ‘Options’, a section will now appear here, starting with Item 1. Enter a Value (the stored option value) and a Label (the text shown to users) for each option, and use the delete icon to remove an item if needed. Click “+ Add Option” to add more items, repeating as needed to build your full list of selectable options.
- If you selected Repeater as the field type, a Repeater Fields section will appear here instead, starting with Item 1, which includes its own Field Name and Placeholder inputs. Click “+ Add Field” to add more fields within the repeater, and use the delete icon to remove any item you no longer need.
- Finally, set a Sort Order to control its display position, and toggle Active on or off to control whether the field is currently in use. Click Create to save the field and add it to your list.
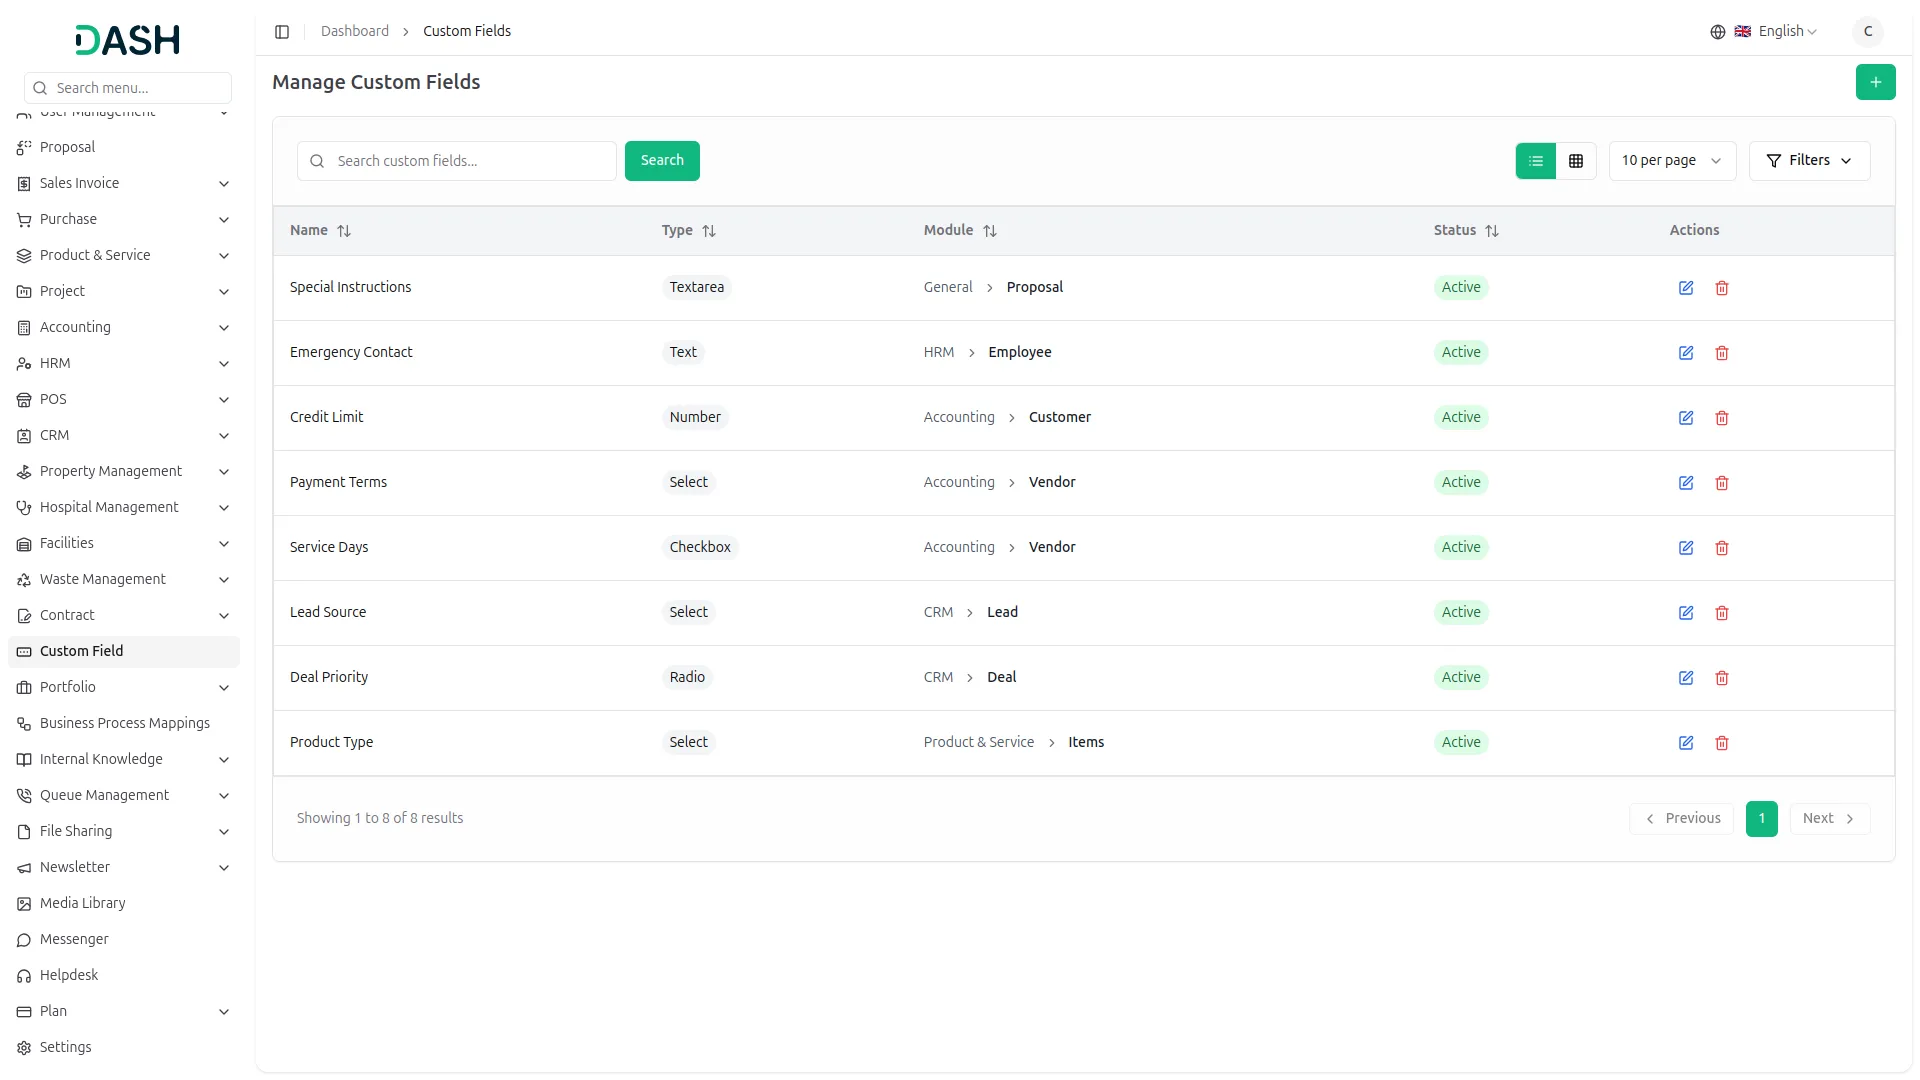
- The Custom Fields page displays a table of custom fields with columns for Name, Type, Module, Status, and Actions. In the Actions column, you can use the edit option to modify the record and also use the delete option to remove the record.
- You can use the search functionality to find a specific custom field. Along with choosing the toggle (list/grid) option and clicking the Filters option, select the Module, Field Type, or Status through the dropdowns, then click the “Apply” button, or also remove the filters and click the “Clear” button.
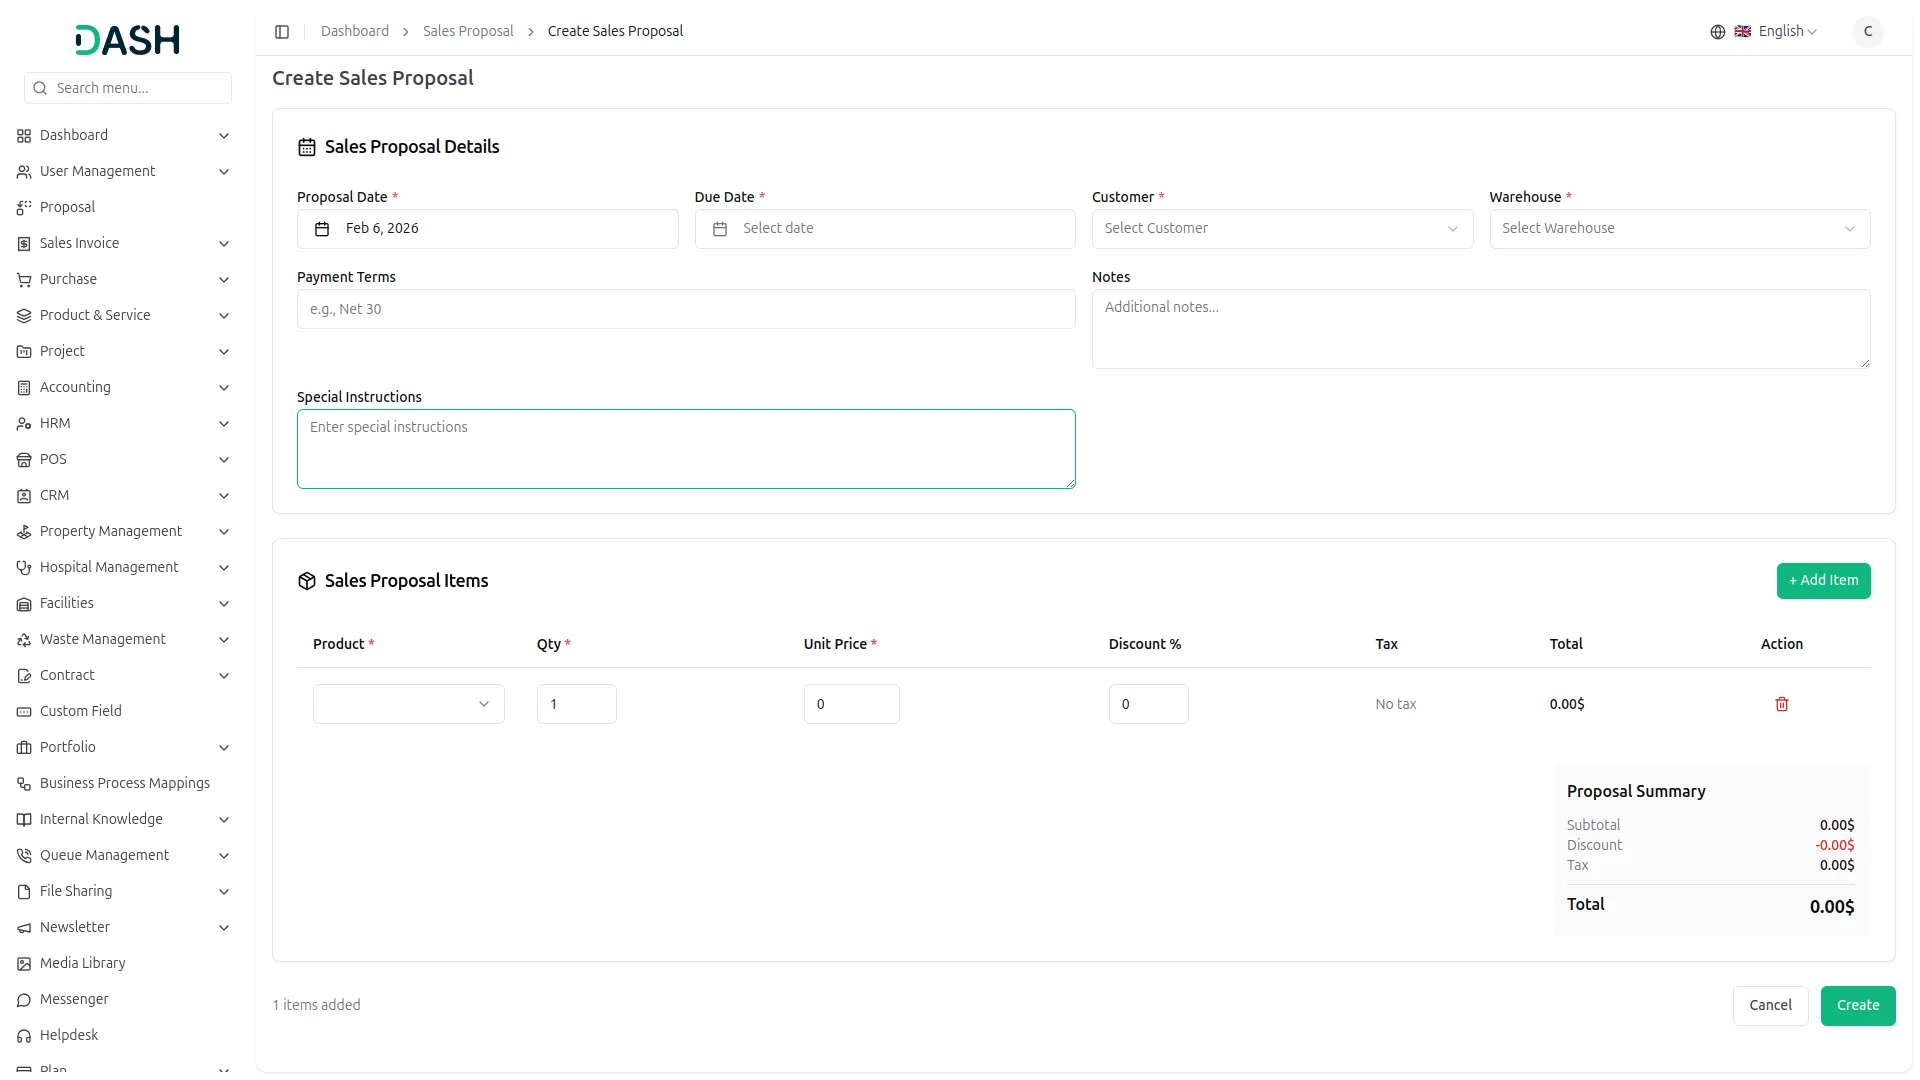
- In Sales Invoice and Purchase Invoice, you can also view your created custom fields in the invoice view and include them when downloading or exporting the invoice.
- You can add custom fields to many different areas of your system. Here are the available Add-Ons and their Parents:
Available Add-Ons and Parent
You can add custom fields to many different areas of your system. Here are the available Add-Ons and their Parents:
| Add-On | Parent |
|---|---|
| General | Proposal, Sales Invoice, Purchase Invoice, Warehouse |
| Account | Customer, Vendor |
| Hrm | Employee |
| CRM | Lead, Deal |
| ProductService | Items |
| Project | Projects, Tasks, Bugs |
Example Usage
- If you want to add a custom field to the Customer section in the Account module, enter Field Name as “Industry Type” which will be the label shown to customer, select Field Type as “Dropdown” to create a selection list, select Module as “Account” for the main section, select Parent as “Customer” for the specific area, set Rule as “Required” to make it mandatory, then add options like “Manufacturing”, “Retail”, “Services”, “Technology”, “Healthcare” by clicking the plus icon multiple times, and finally click Create to save the custom field. Now, this custom field will appear when creating or editing a customer in the Account Add-On, allowing users to select the industry type from the dropdown list you created, and they must fill this field before saving the customer record since it is set as Required.
-
Categories
Related articles
- Pipedrive – WorkDo Dash SaaS Add-On Guide
- PayTabs – BookingGo SaaS Add-On Guide
- PhonePe – WorkDo Dash SaaS Add-On Guide
- Marketing Plan – WorkDo Dash SaaS Add-On Guide
- Paystack – BookingGo SaaS Add-On Guide
- Trello – WorkDo Dash SaaS Add-On Guide
- Send and Close – TicketGo Add-On Guide
- Marketing Module – eCommerceGo SaaS Add-On Guide
- Out of Office – TicketGo Add-On Guide
- Frequently Product – eCommerceGo SaaS Add-On Guide
- Square – WorkDo Dash SaaS Add-On Guide
- Coupon List – eCommerceGo SaaS Add-On Guide
We're Here to Help - Let's Talk
Have questions about our solutions, customization services, or business tools? Our team is here to help you. let's talk.