Documentation For Set Up
This Documentation set up file will guide you through the installation and configuration of the product. While the installation process is rather simple.
- 1. Welcome
- 2. License
- 3. Installation
- 4. Creating A New Database
- 5. Useful resources
- 6. Uploading Files
- 7. Useful resources
- 8. Installation Wizard
- 9. System Requirements
- 10. Directory Permissions
- 11. Nginx Server Setup
- 12. Useful resources
- 13. Database/Environment Setting
- 14. Exit
- 15. Default Login Details
- 16. CPanel Installation Guide
- 17. Plesk Installation Guide
- 18. Upgrade Process
- 19. Language Manager
- 20. Time Tracker
- 21. Features Smtp Settings
- 22. Storage Settings
- 23. Slack
- 24. Telegram
- 25. Twilio
- 26. Zoom
- 27. Pusher
- 28. Custom Landing Page
- 29. FAQ
1. Welcome
This documentation file will guide you through the installation and configuration of the product.
While the installation process is rather simple, some of the instructions presented here will require a minimum understanding of working with databases and managing files on a server.
If you’re not familiar with the following steps, feel free to reach out to our support
2. License
-
Regular License
Use, by you or one client, in a single end product which end users are not charged for. The total price includes the item price and a buyer fee.
-
Extended License
Use, by you or one client, in a single end product which end users can be charged for. The total price includes the item price and a buyer fee.
- Please purchase an Extended License if you are going to sell as a service. Envato License Policy
3. Installation
3.1 Ubuntu Installation Guide
This video is a complete guide to how you can install the product in Ubuntu. Here you will get clear instructions for the Ubuntu Installation process.
3.2 Windows Installation Guide
This video is a complete guide to how you can install the product in Windows. Here you will get clear instructions for the Windows Installation process.
The Product comes with a built-in installer. Please follow the below steps to install it on your server.
3.3 Server Requirements
The tool is built on PHP 8.2 and has the following minimum server requirements. During the installation, the installer will check if your server meets them. If you don’t, please contact your hosting provider and ask them for help.
- PHP >= 8.2
- BCMath PHP Extension
- Ctype PHP Extension
- Fileinfo PHP extension
- JSON PHP Extension
- Mbstring PHP Extension
- OpenSSL PHP Extension
- PDO PHP Extension
- Tokenizer PHP Extension
- XML PHP Extension
4. Creating A New Database
Before installing, you will need to create a new database. If you already know how to do this or have already created one, skip to the next step. Please use an empty database. In most cases, you should be able to create a database inside your server control panel.
5. Useful resources
cPanel – MySQL Database Wizard


Now you need to create a new user. On the same page go to Create a New Database user

Now add the user to the database

Select full database permissions for that user

6. Uploading Files
On some operating systems, the dotfiles are hidden by default. Before starting to upload the files, please make sure your file explorer has the option to view hidden files turned on.
After creating a database, upload what’s inside the main_file folder on the web root folder of your domain. This folder is generally called public_html, html, or example.com, but depending on your server’s configuration, it might be named differently.
8. Installation Wizard
To start the installation wizard, please visit :
yourdomain.com/install
Now you should see the installer. In the welcome screen. hit the “Check Requirements” button.

9. System Requirements
After clicking the “Check Requirements” button, the installation wizard will check your server. if everything is OK, hit “Check Permissions” to go to the next step.

10. Directory Permissions
In this step, you’ll be asked to set the appropriate permissions for the directories listed in the installation wizard:
To change permissions, please type sudo chmod 777 directory_name in the terminal window. For example sudo chmod 777 app
11. Nginx Server Setup
Switching from an Apache server to an Nginx server for a Laravel project involves a few configuration changes. Here are the key steps:
- Make sure Nginx is installed on your server. Replace your Apache configuration with Nginx configuration.
- Create a new Nginx server block configuration file. This is often located in /etc/nginx/sites-available/.
-
server { listen 80; server_name your_domain.com; # Replace with your actual domain root /path/to/your/laravel; # Adjust the path to your Laravel public directory index index.php index.html index.htm; location / { try_files $uri $uri/ /index.php?$query_string; } location ~ \.php$ { include snippets/fastcgi-php.conf; fastcgi_pass unix:/var/run/php/php8.2-fpm.sock; # Adjust the PHP version if necessary fastcgi_param SCRIPT_FILENAME $document_root$fastcgi_script_name; include fastcgi_params; } location ~ /\.ht { deny all; } location ~* \.(css|js|png|jpg|jpeg|gif|ico|woff|woff2|ttf|svg)$ { expires max; log_not_found off; access_log off; } location ~* ^/public/(css|assets|market_assets|images|landing|uploads|storage|installer|js|vendor)/(.*)$ { rewrite ^/public/(css|assets|market_assets|images|landing|uploads|storage|installer|js|vendor)/(.*)$ /public/$1/$2 break; } error_log /path/to/your/logs/error.log; access_log /path/to/your/logs/access.log; } - Be sure to replace your_domain.com with your actual domain and adjust paths accordingly. After making these changes, restart Nginx to apply the new configurations.
12. Useful resources
cPanel – Update file or folder permissions
Plesk – Setting file and directory access permissions

13. Database/Environment Setting
In this step, you’ll be asked to fill in your database credentials

14. Exit
If everything is configured correctly, you can now exit the installation wizard.

You will get the default login details once you complete the installation process.
15. Default Login Details
15.1 Payment Gateways
For please refer to this link. Here you will get to see the details of all the Payment Gateways. https://workdo.io/documents-category/payment-gateway/
16. CPanel Installation Guide
This video is a complete guide to how you can install the product with the help of CPanel. Here you will get clear instructions for the CPanel Installation process
17. Plesk Installation Guide
This video is a complete guide to how you can install the product with the help of Plesk. Here you will get clear instructions for the Plesk Installation process.
18. Upgrade Process
- Before making an update, always remember to do a complete backup of your website.
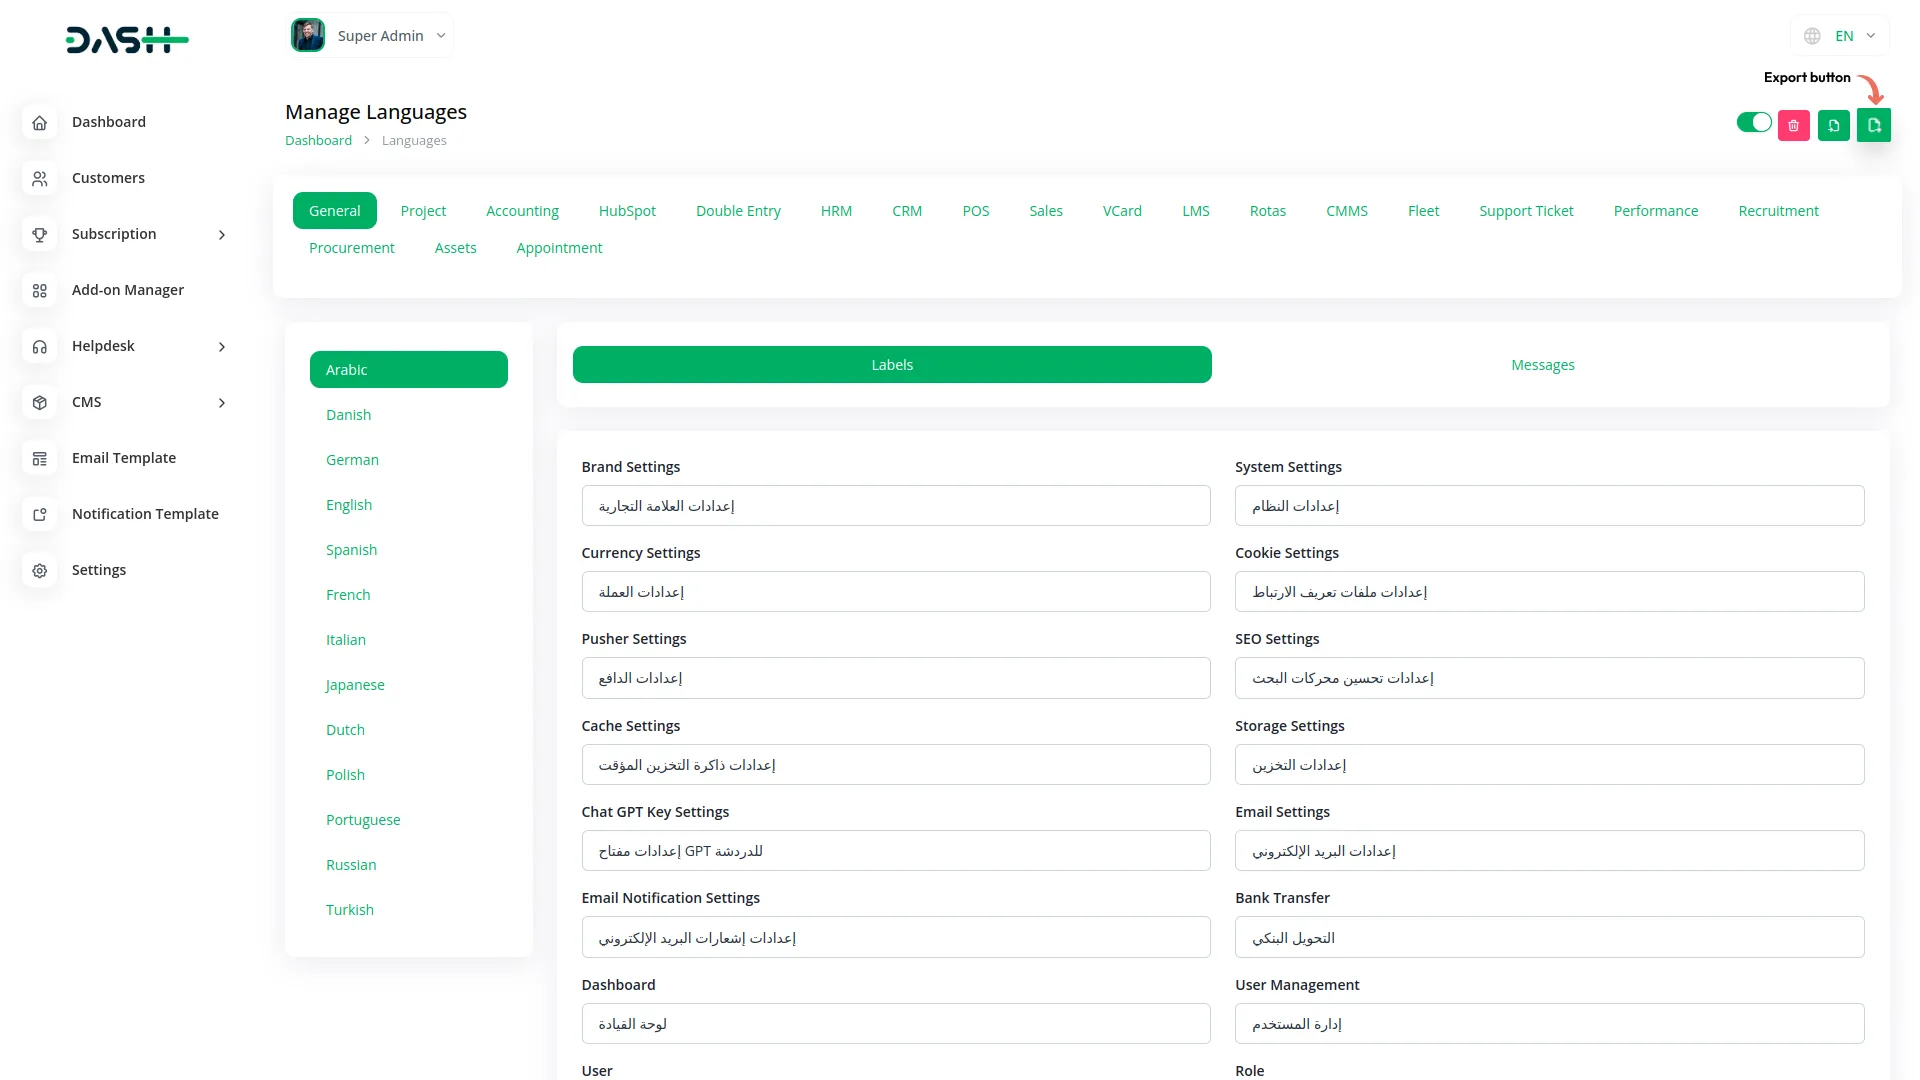
- If you have made any changes in the language, just click on the export button at the top before updating the latest code (Previous Version), so that the back up of your previous language string will be taken easily in the form of zip file.
-

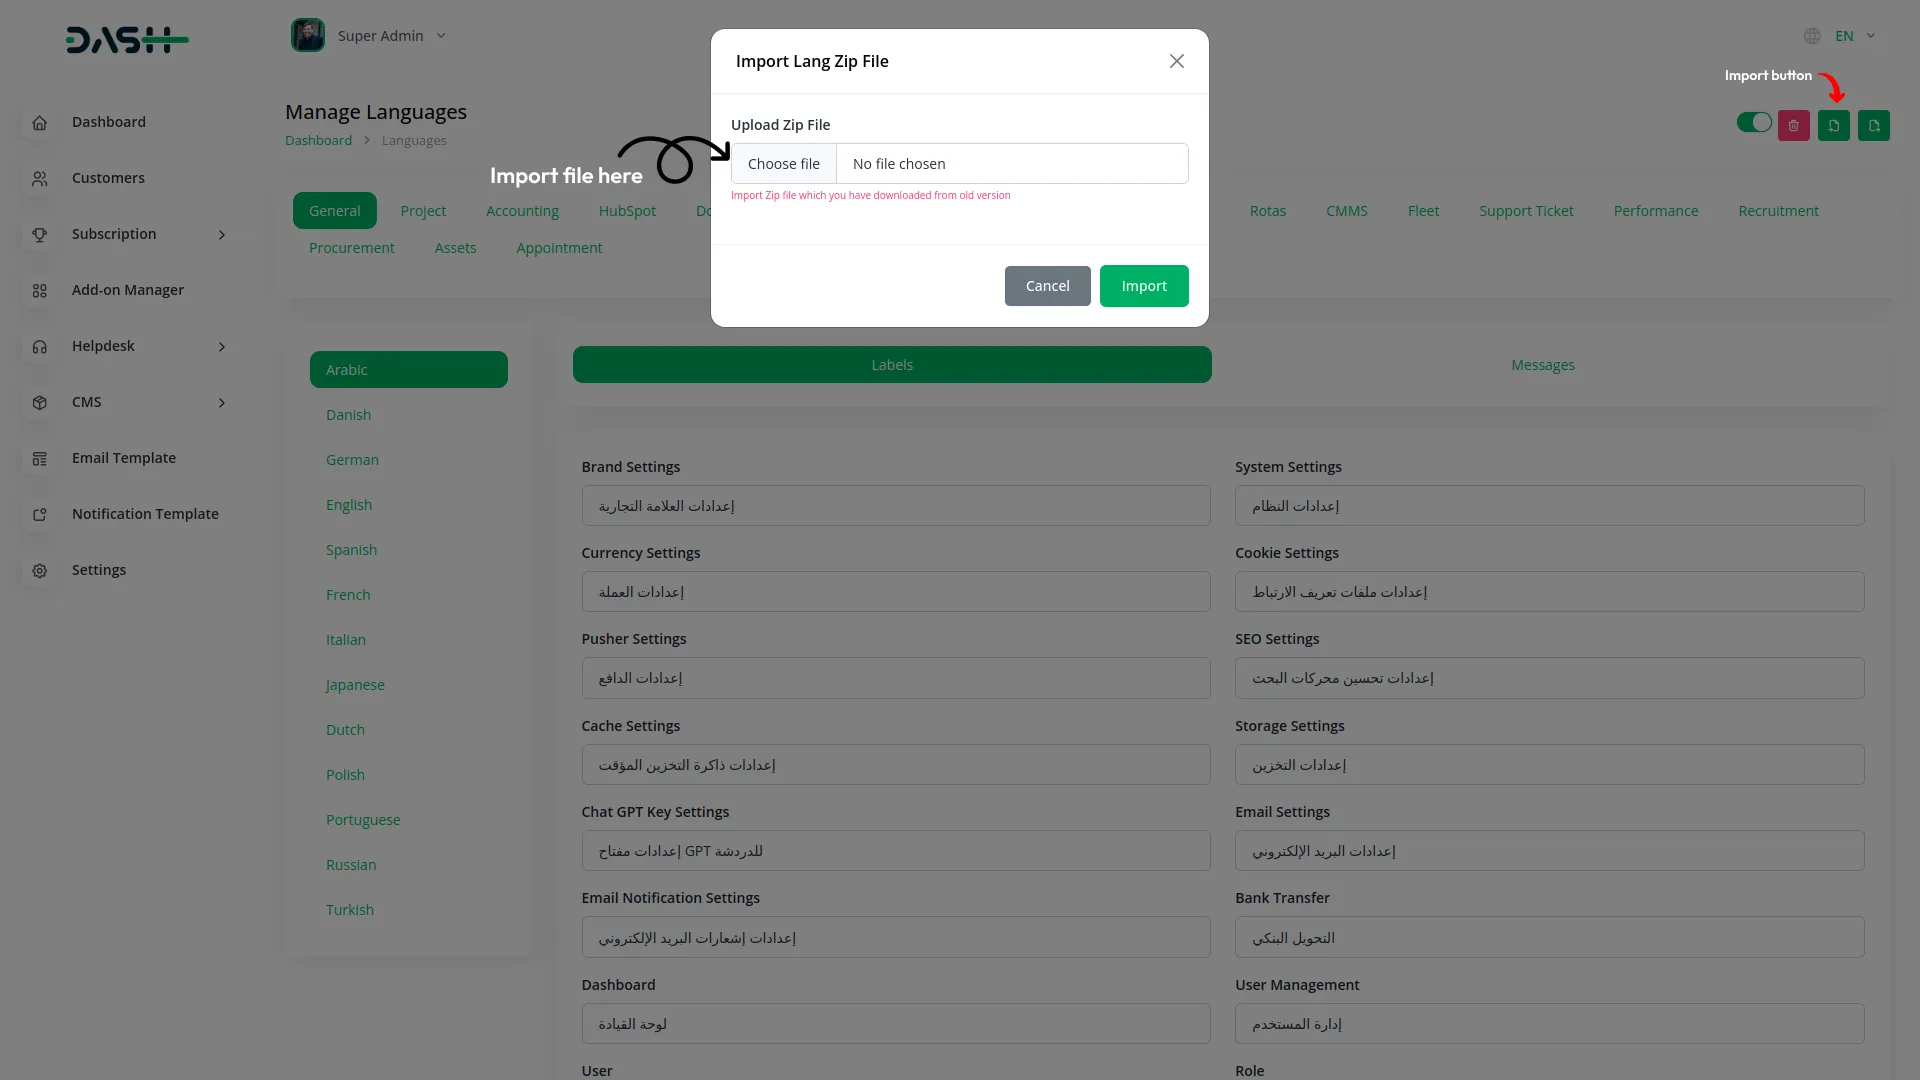
- After updating the latest code, import the downloaded zip file of your previous version so that your old data can be reverted easily along with the new language strings.
-

- If you’ve made any modifications to software files, your changes will be lost.
- We’re not responsible for the data lost during a manual update.
- Make a backup of the .env, storage, uploads, and .htaccess files located on your server.
- Upload and replace all the files on your server with what’s inside the main_file folder.
- Restore your .env config, storage,uploads and .htaccess file on your server.
- Log in and follow the update wizard.
19. Language Manager
To get information about the language manager, click on the link given below. https://workdo.io/documents/language-manager/
20. Time Tracker
To learn about the time tracker feature, you can click on the link given below. https://workdo.io/documents/time-tracker/
21. Email SMTP Settings
To learn about the email of Smtp settings, click on the link given below. https://workdo.io/documents/email-smtp-settings/
22. Storage Settings
This link will give you all the information regarding the storage settings. https://workdo.io/documents/storage-settings/
23. Slack
- Head over to this page and create a new Slack app.
- Envet the app name, choose a workspace, and click Create app.
- Next, go to the app settings page select incoming Webhooks, and click the toggle switch to Activate Incoming Webhooks
- Refresh the page (if it does not do so automatically) and click a new option that just appears L Add New Webhook to Workspace
- Pick a channel that the app will port to and click Authorize your app. If it’s a private channel, you must first be in the channel.
- Once you’re sent back to your app settings, you should see a new Webhook URL which you can now copy over to the app.
- To generate the API key, you can follow this link: https://api.slack.com/messaging/webhooks
24. Telegram
To generate the API key, you can follow this link: https://www.loom.com/share/f0391420203843b6a6cc8d9241af5693
25. Twilio
- Log into your Twilio account.
- You can find your Twilio details on the homepage after you log into your Twilio account.
- For more information on getting Twilio API Keys, please visit this page
- To generate the API keys follow this link: https://www.twilio.com/docs/iam/access-tokens
26. Zoom
- To find the Zoom Account ID, Zoom Client ID, and Zoom Client Secret you can check out this video.
27. Pusher
Click on this link to learn about the Pusher. https://workdo.io/documents/pusher/
28. Custom Landing Page
This link will give you all the information regarding the custom landing page. https://workdo.io/documents/custom-landing-page/
29. FAQ
RewriteCond %{HTTPS} !=on
RewriteRule ^/?(.*) https://%{HTTP_HOST}%{REQUEST_URI} [R,L]
Reach Out to Us
Have questions or need assistance? We're here to help! Reach out to our team for support, inquiries, or feedback. Your needs are important to us, and we’re ready to assist you!


Related document
We give a helping hand to make sure you start with the right foot.
Bulk Delete Module Integration in eCommerceGo SaaS
Introduction to the Bulk Delete Module Managing a large inventory can be daunting, but the […]
Porter’s Five Model Integration in Dash SaaS
Porter’s Five Forces Model is a strategic analysis software designed to help businesses evaluate competitive forces within their industry.
Coupon List Integration in eCommerceGo SaaS
Enhance discount management and boost customer satisfaction with our Coupon List Module. Streamline your eCommerce process now.
Google Wallet Integration in Dash SaaS
Google Wallet is a digital wallet integration section that allows you to add business cards from the vCard Add-on directly to Google Wallet.
Event Integration in vCard SaaS
The Event add-on is a powerful tool that enables users to create professional, branded landing pages that seamlessly redirect visitors to their event information and registration pages.
Vehicle Trade Detailed Documentation
The Vehicle Trade Management software is a comprehensive solution designed to help automotive dealerships and vehicle trading businesses efficiently manage their entire vehicle trading operations.
How To Generate The YouTube Credentials
Learn how to generate YouTube API credentials using Google Cloud Console.
Proposal, Invoice, & Print Settings
Once it is done, by default it will be stored as a draft. This proposal can be shared via email with the client from the system.
Product Badge Management – eCommerceGo Addon
Enhance customer engagement and increase conversions with eCommerceGo’s powerful Product Badge Management module. Get started today!
Easy Deposit Payments Integration in BookingGo SaaS
Discover how the integration of Easy Deposit Payments module in BookingGo SaaS simplifies payment management for businesses.
Audit Inspection Integration in Dash SaaS
The Audit Inspection software is a comprehensive Add-On designed to manage and streamline audit processes across multiple factories and facilities.
Consultancy Integration in Dash SaaS
The Consultancy Management Add-On is a complete business solution designed to help consultancy firms manage their services, customers, and operations efficiently.
Need more help?
If you’re still uncertain or need professional guidance, don’t hesitate to contact us. You can contact us via email or submit a ticket with a description of your issue. Our team of experts is always available to help you with any questions. Rest assured that we’ll respond to your inquiry promptly.
Love what you see?
Do you like the quality of our products, themes, and applications, or perhaps the design of our website caught your eye? You can have similarly outstanding designs for your website or apps. Contact us, and we’ll bring your ideas to life.
