Storage Settings
Integrating cloud data storage services like AWS (Amazon Web Services) and Wasabi with your local infrastructure can provide you with a flexible and scalable data storage solution. Below, I’ll provide a general overview of how you can integrate these services into your data storage strategy.
Introduction
We have 3 types of storage options. “Local”, “Wasabi”, “AWS”. Following is the explanation of how you can set up Wasabi, and AWS in your product.
Wasabi Integration Settings:
Access Wasabi Console:
- Go to the Wasabi Console and log in as the root user.
Navigate to Access Keys:
- Click on “Access Keys” from the left menu.
Create New Access Key:
- Click on “CREATE NEW ACCESS KEY”.
- Choose whether the keys are for the root account or a sub-user.
- Select “CREATE” to generate the key pair.
Copy Keys to Clipboard:
- Click on “COPY KEYS TO CLIPBOARD.”
Paste in Text Editor:
- Open a text editor and paste the copied content.
- You’ll find the Access key and Secret key.
Add Credentials to WorkDo:
- In your WorkDo app, go to the Settings panel.
- Find the Wasabi Integration settings.
- Enter the Access key and Secret key.
- Click “Save & authorize.”
Verify Authorization:
- If everything is correct, you’ll see a success message.
- The status should now be “Authorized.”
How to create buckets in Wasabi.
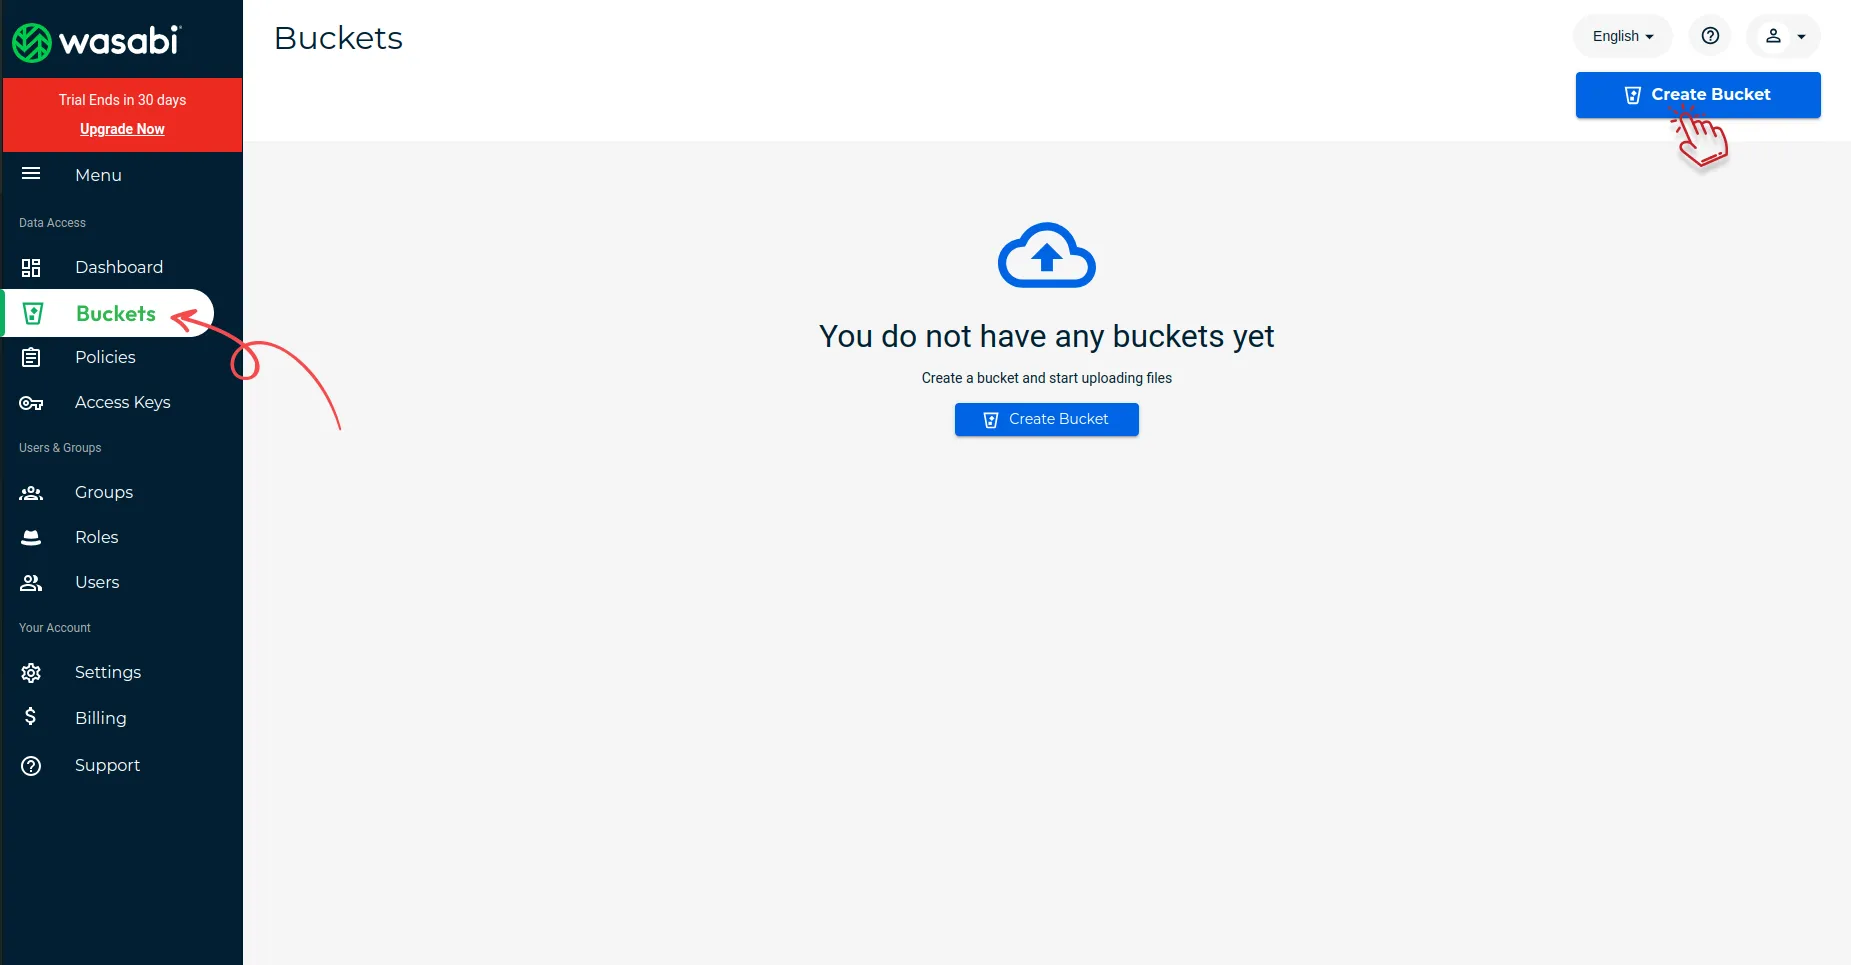
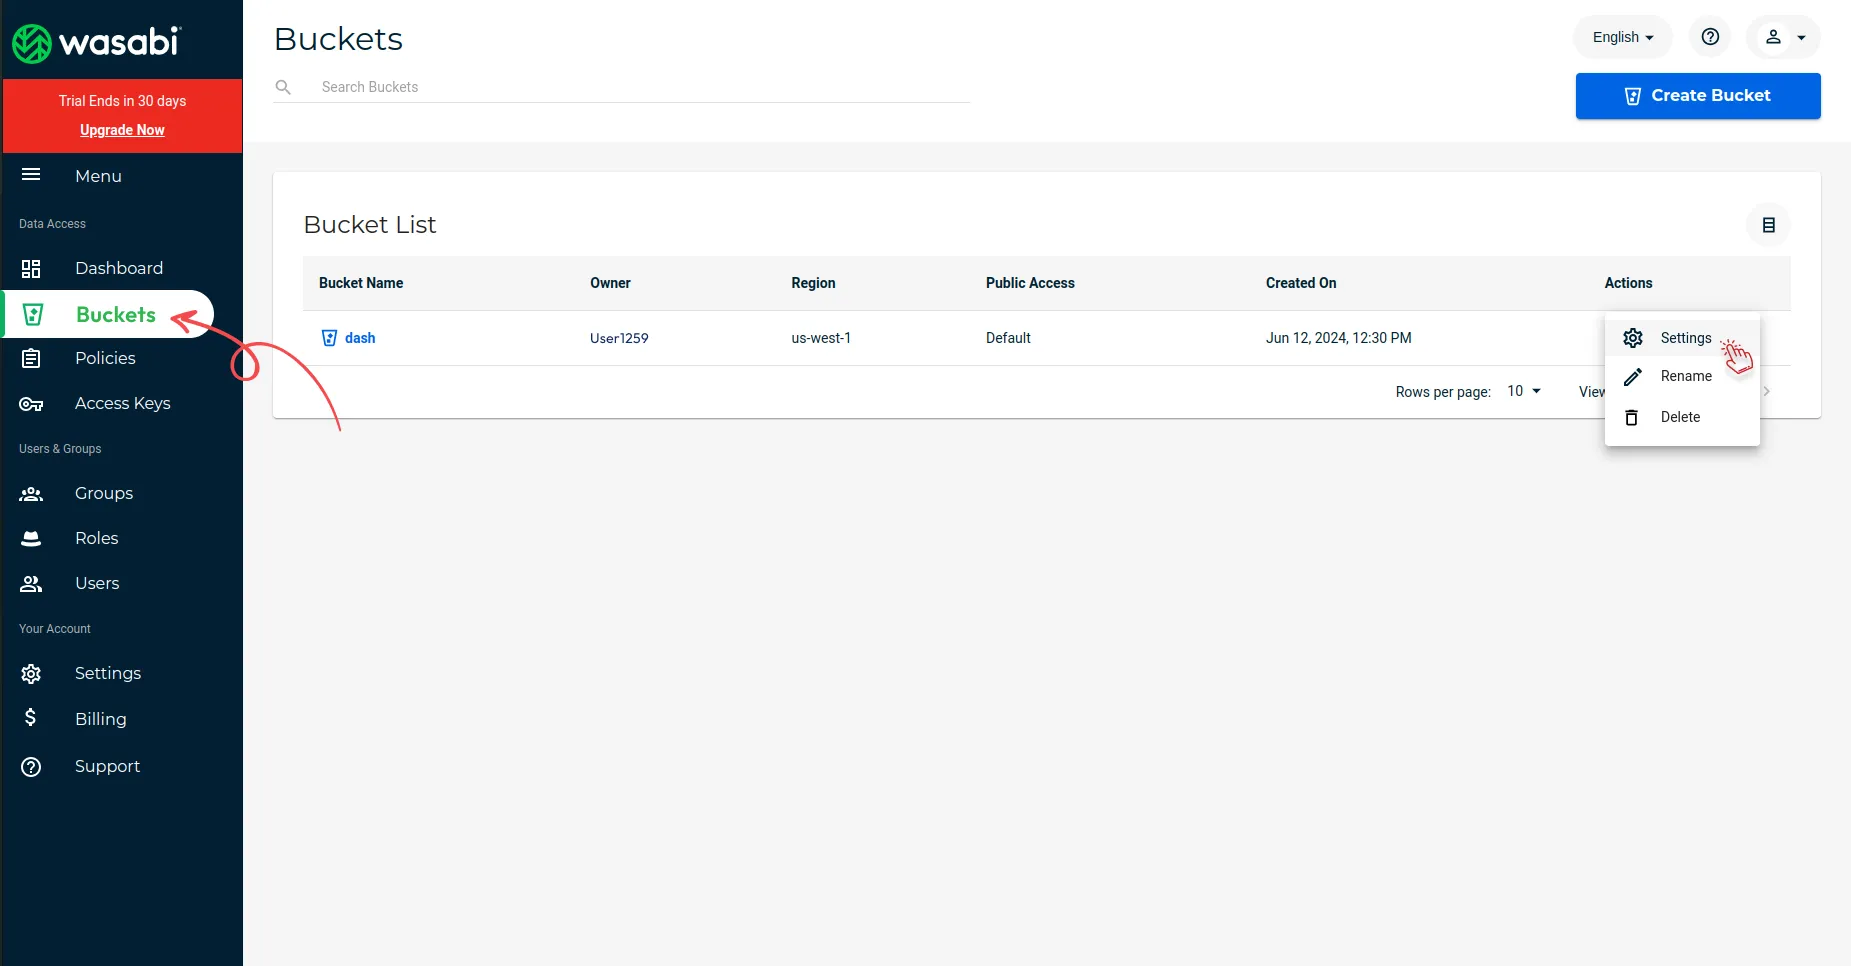
- First of all, click on the bucket button given in the sidebar.
- On that page, you will see the list of buckets you have created. If not, click on the Create Bucket button to create a new bucket.
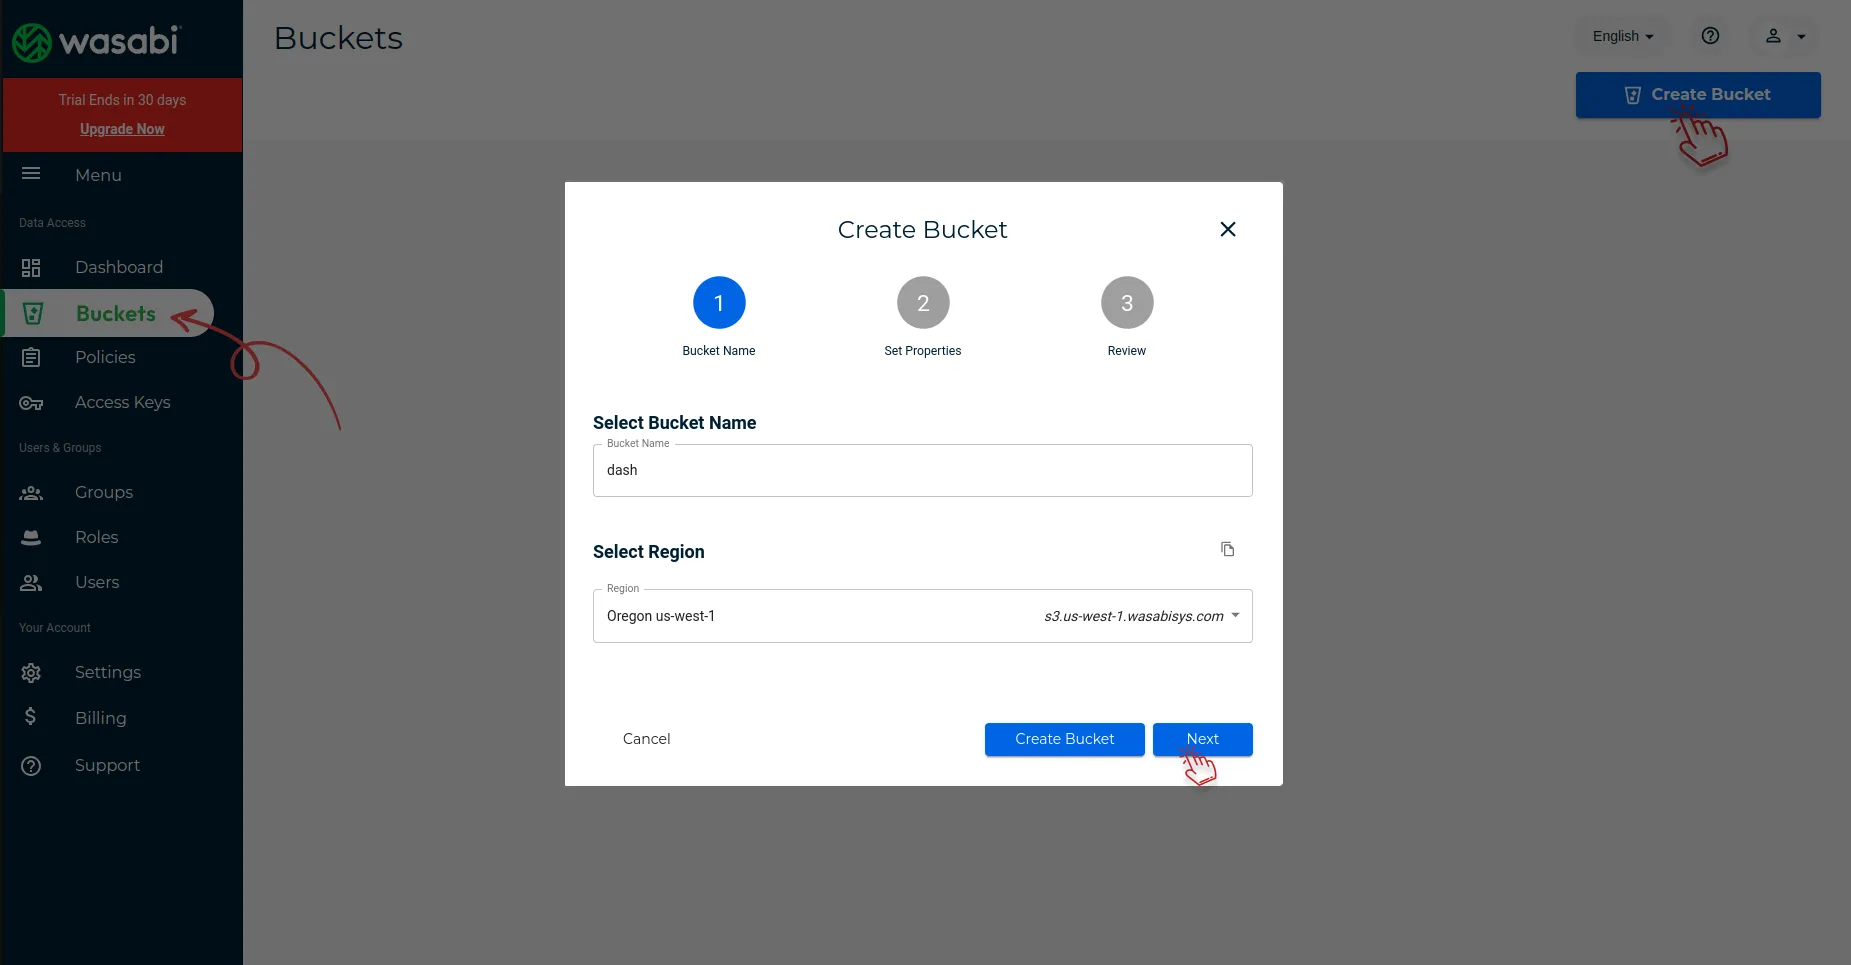
- Add the name of your bucket, and select the server region from the given options.
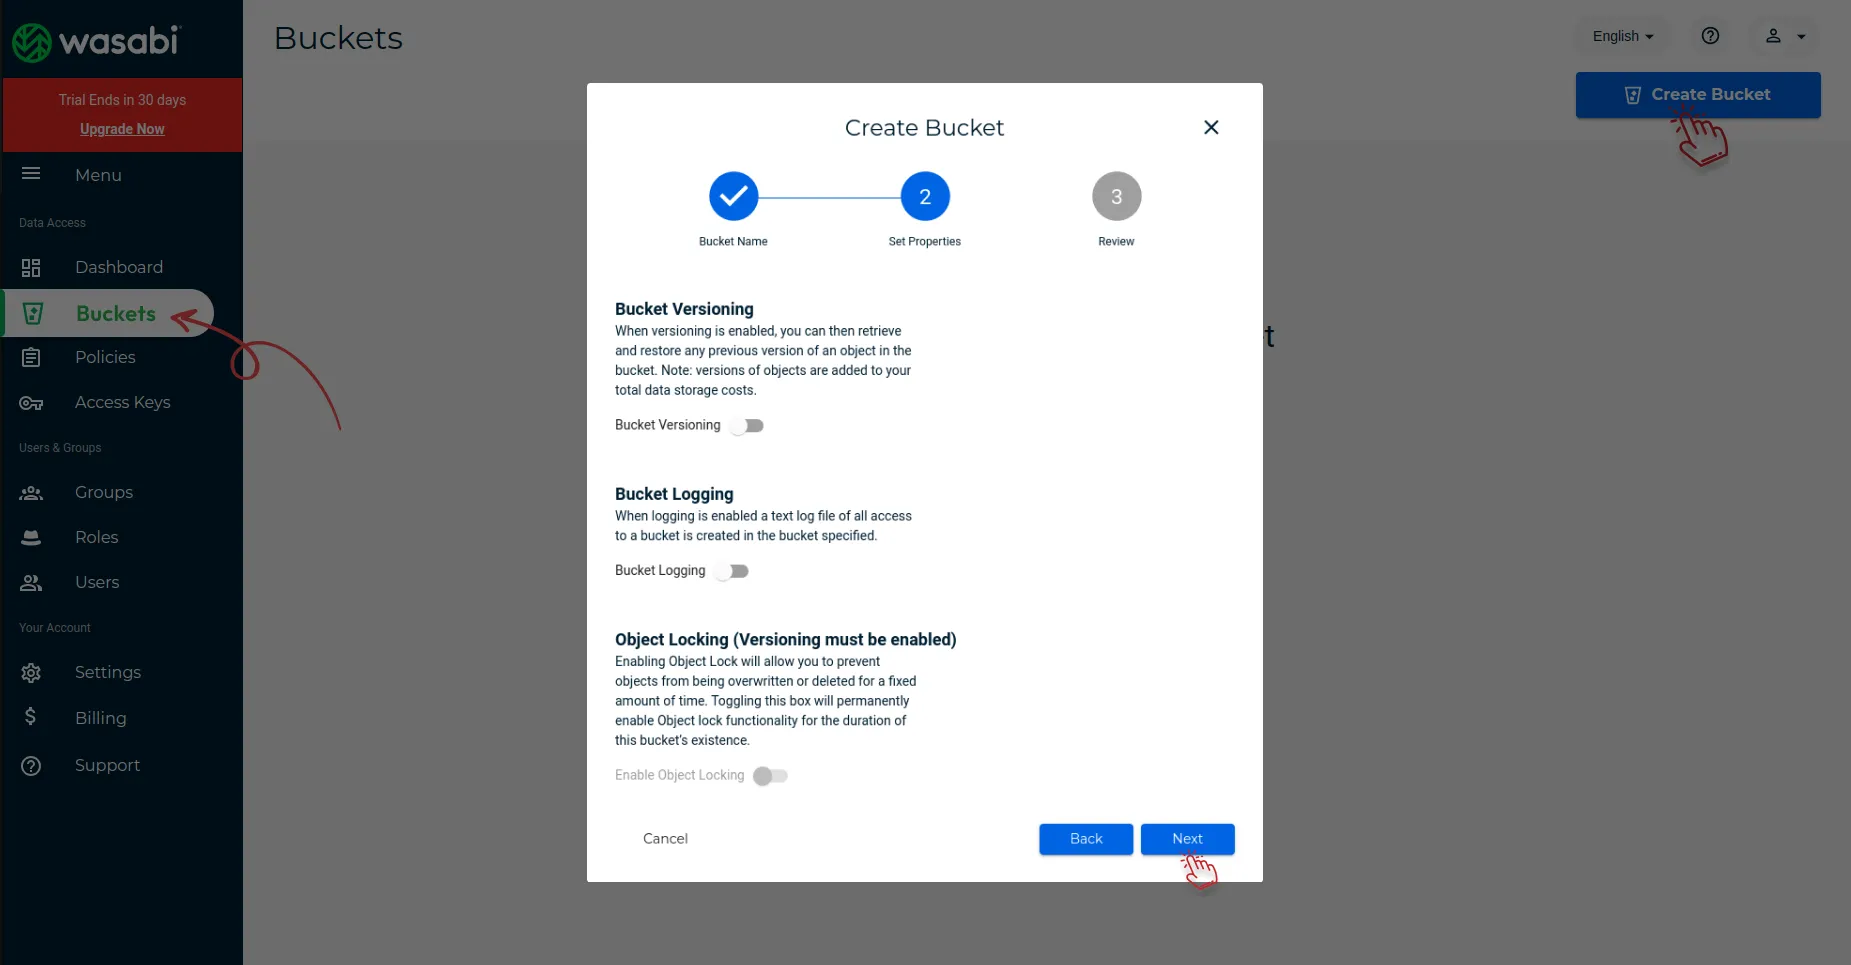
- Once you do this, click on the next button, after that, you will be navigated to the page of properties “disable” all the buttons present over there, and click on the next button.
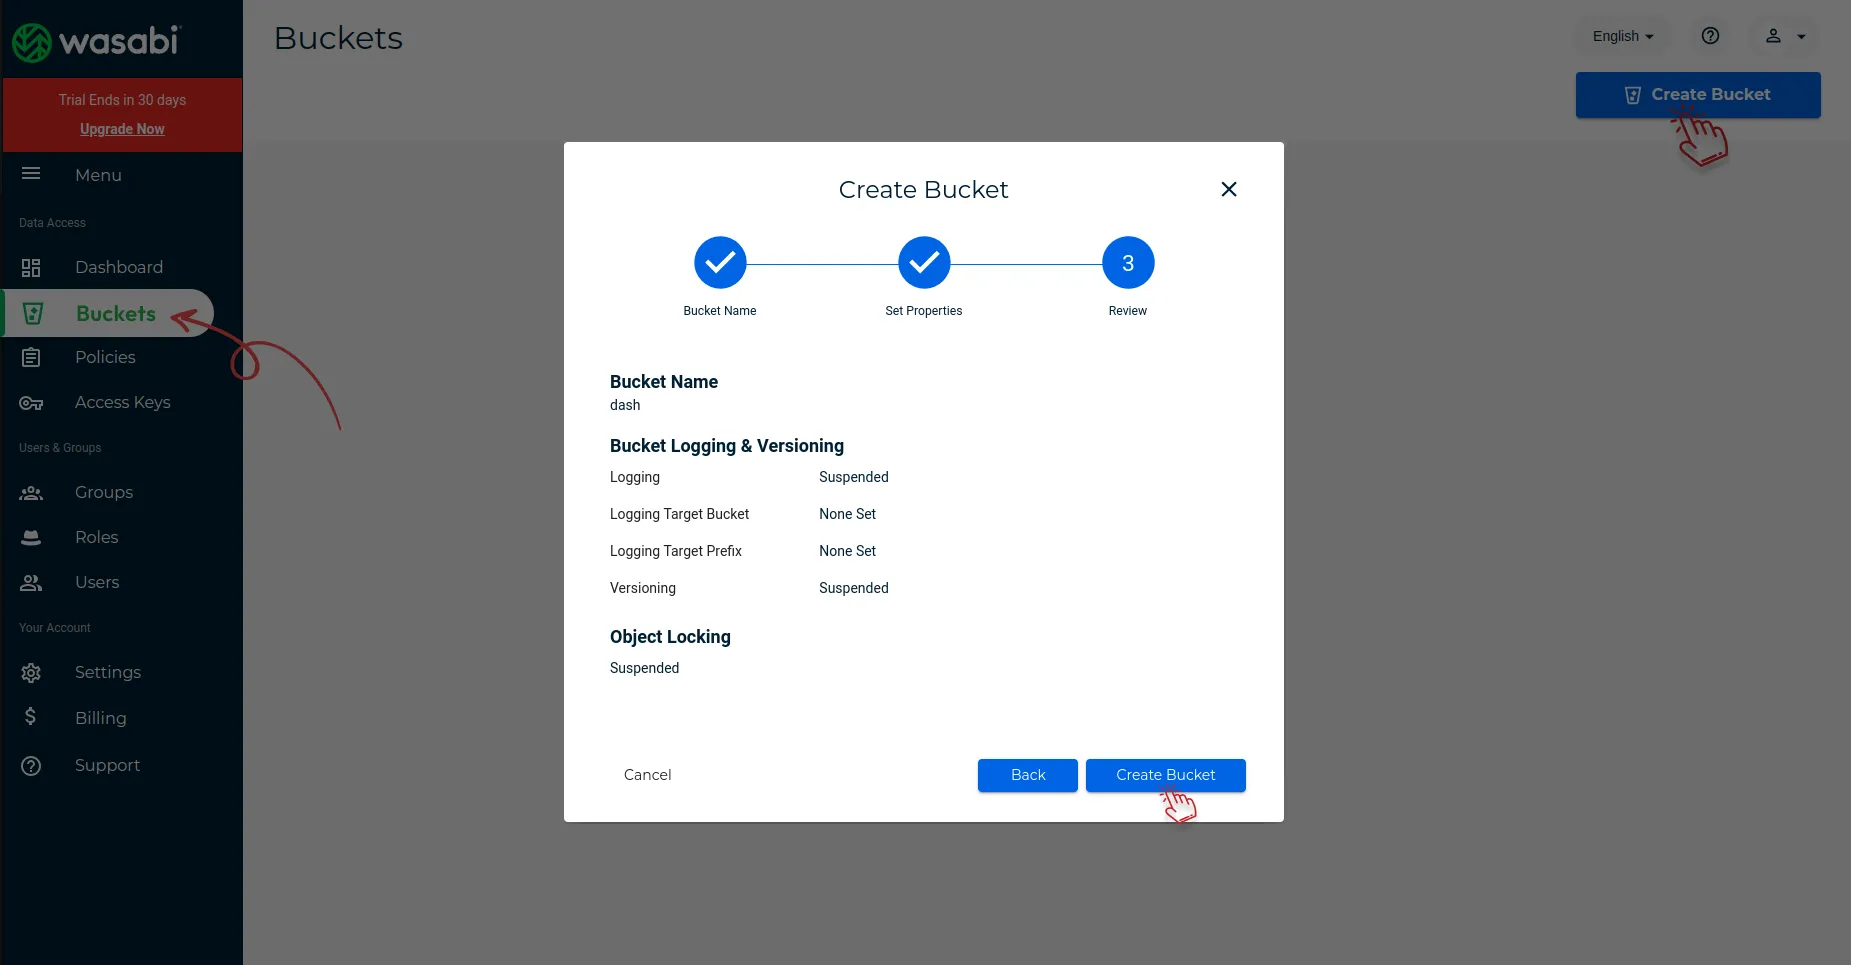
- At last, review the details you have added, and click on the create bucket button.
- Once your bucket gets created it will be visible on the buckets page.
- In that list, you will get to see an action column, where you will see three options. Click on the settings button.
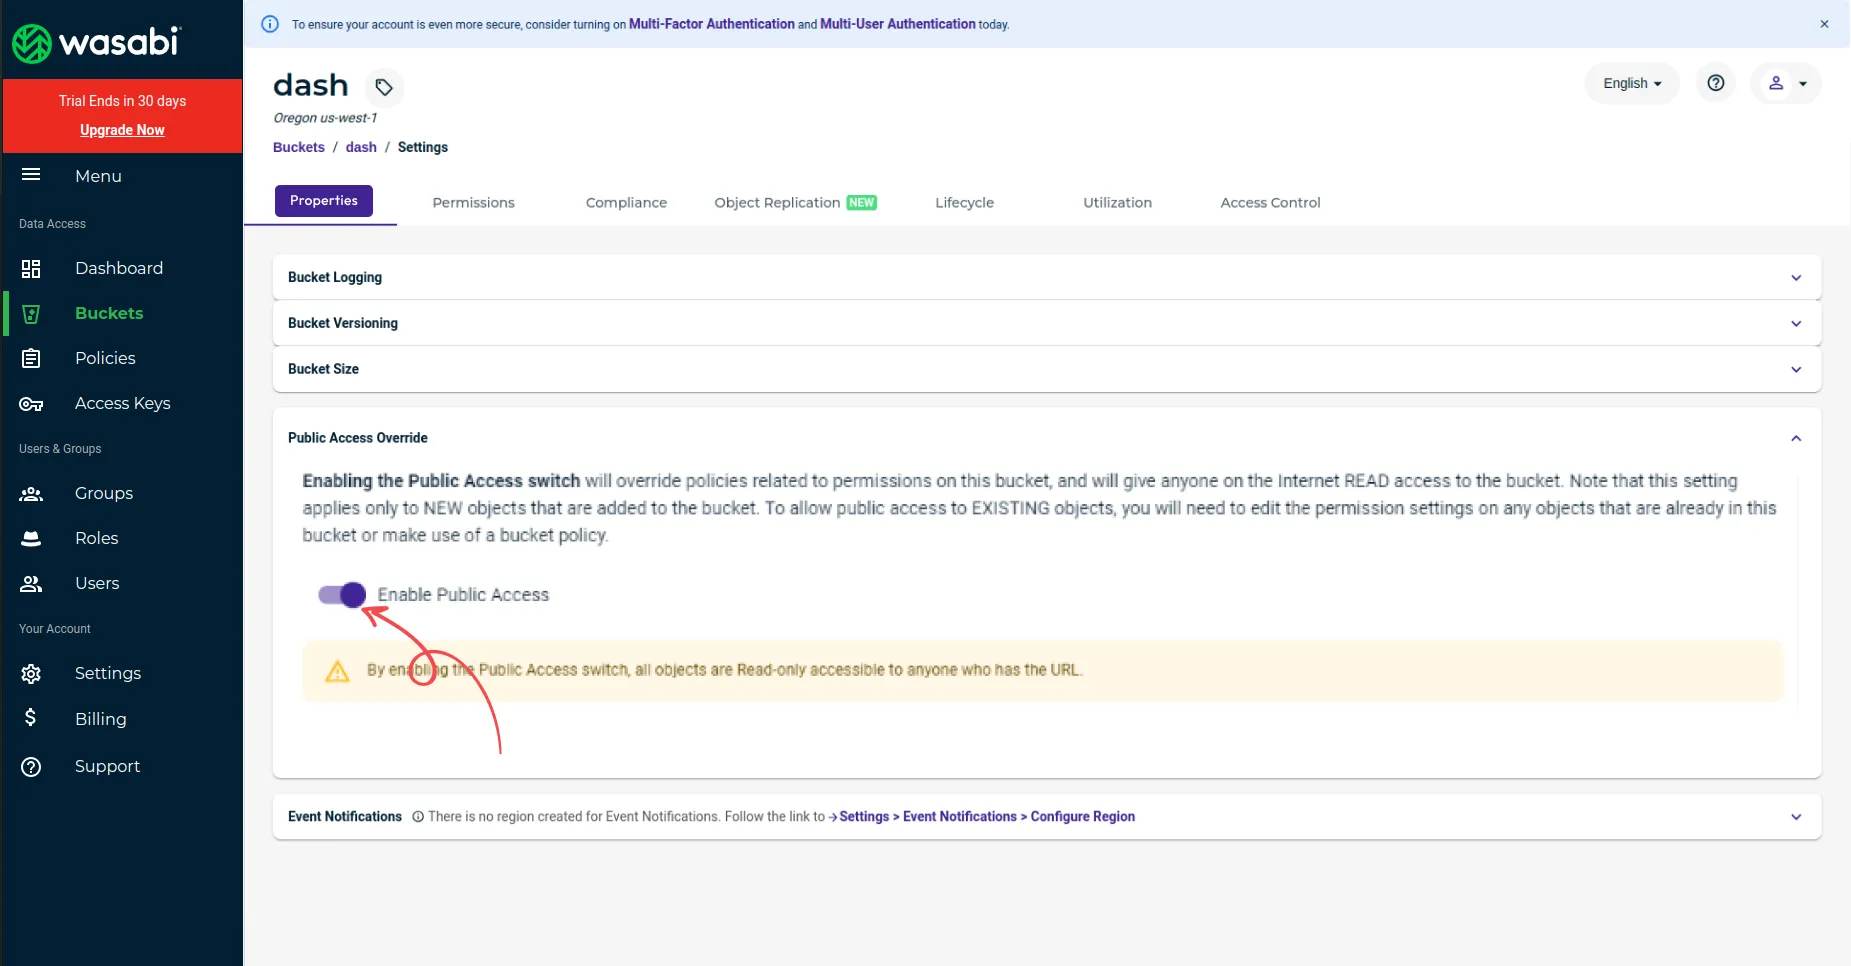
- Over there you will see a button for Public Access, “enable” that button.
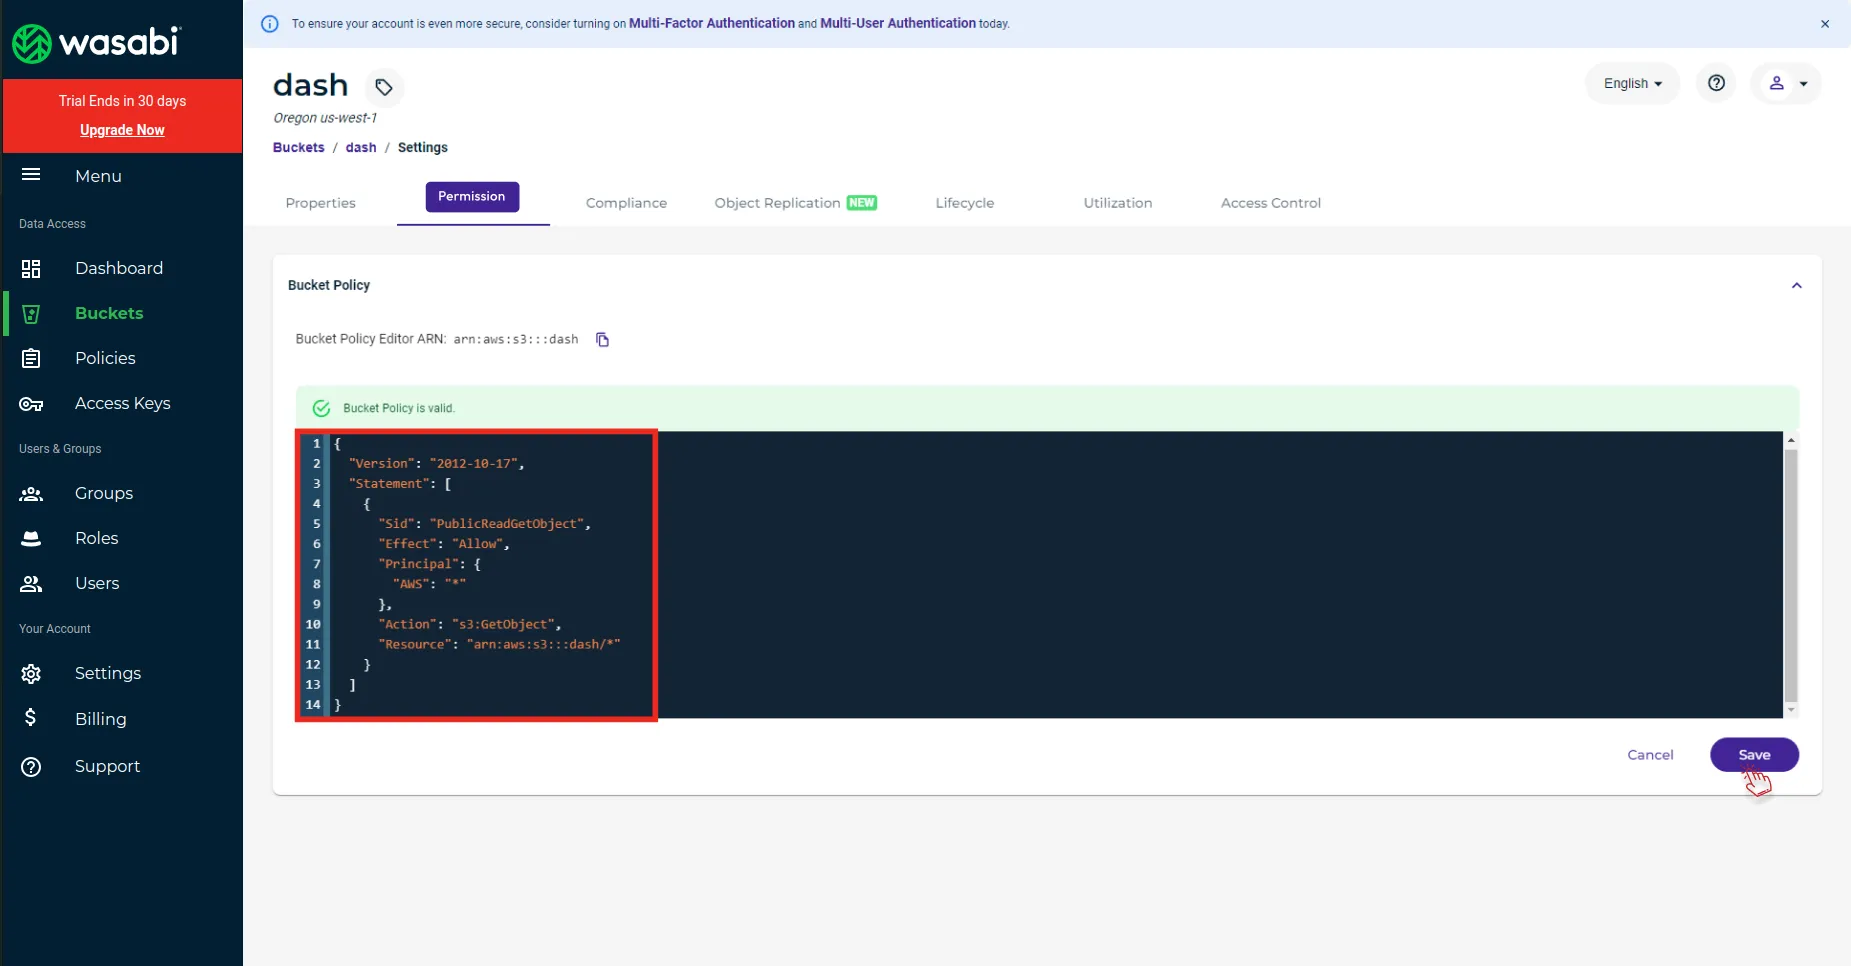
- After you enable that button. Click on the permissions button given at the top.
- On the permissions page, add the policy that is given below.
- Once you do this, your bucket will be created successfully.
        {
            "Version": "2012-10-17",
            "Statement": [
              {
                "Sid": "PublicReadGetObject",
                "Effect": "Allow",
                "Principal": {
                  "AWS": "*"
                },
                "Action": "s3:GetObject",
                "Resource": "arn:aws:s3:::dash/*"
              }
            ]
          }
AWS S3 Integration Settings:
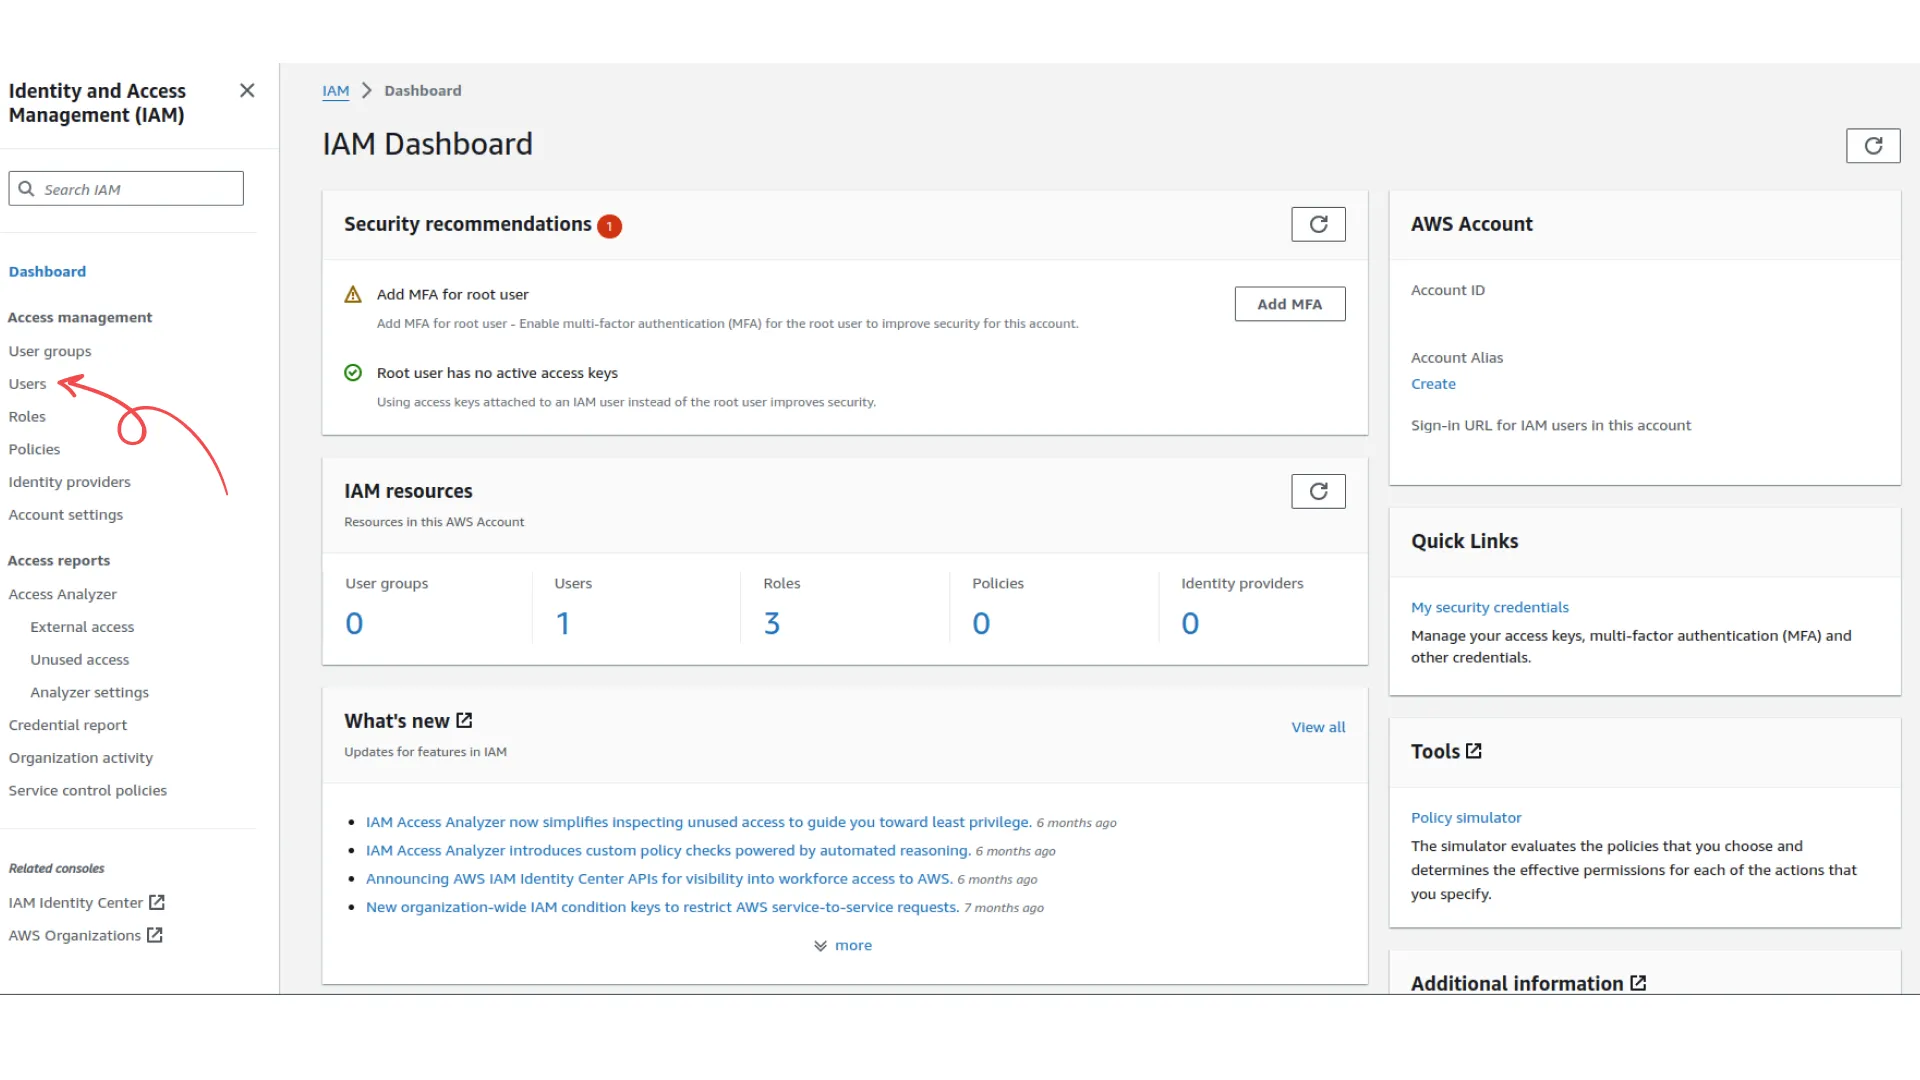
Access IAM Console:
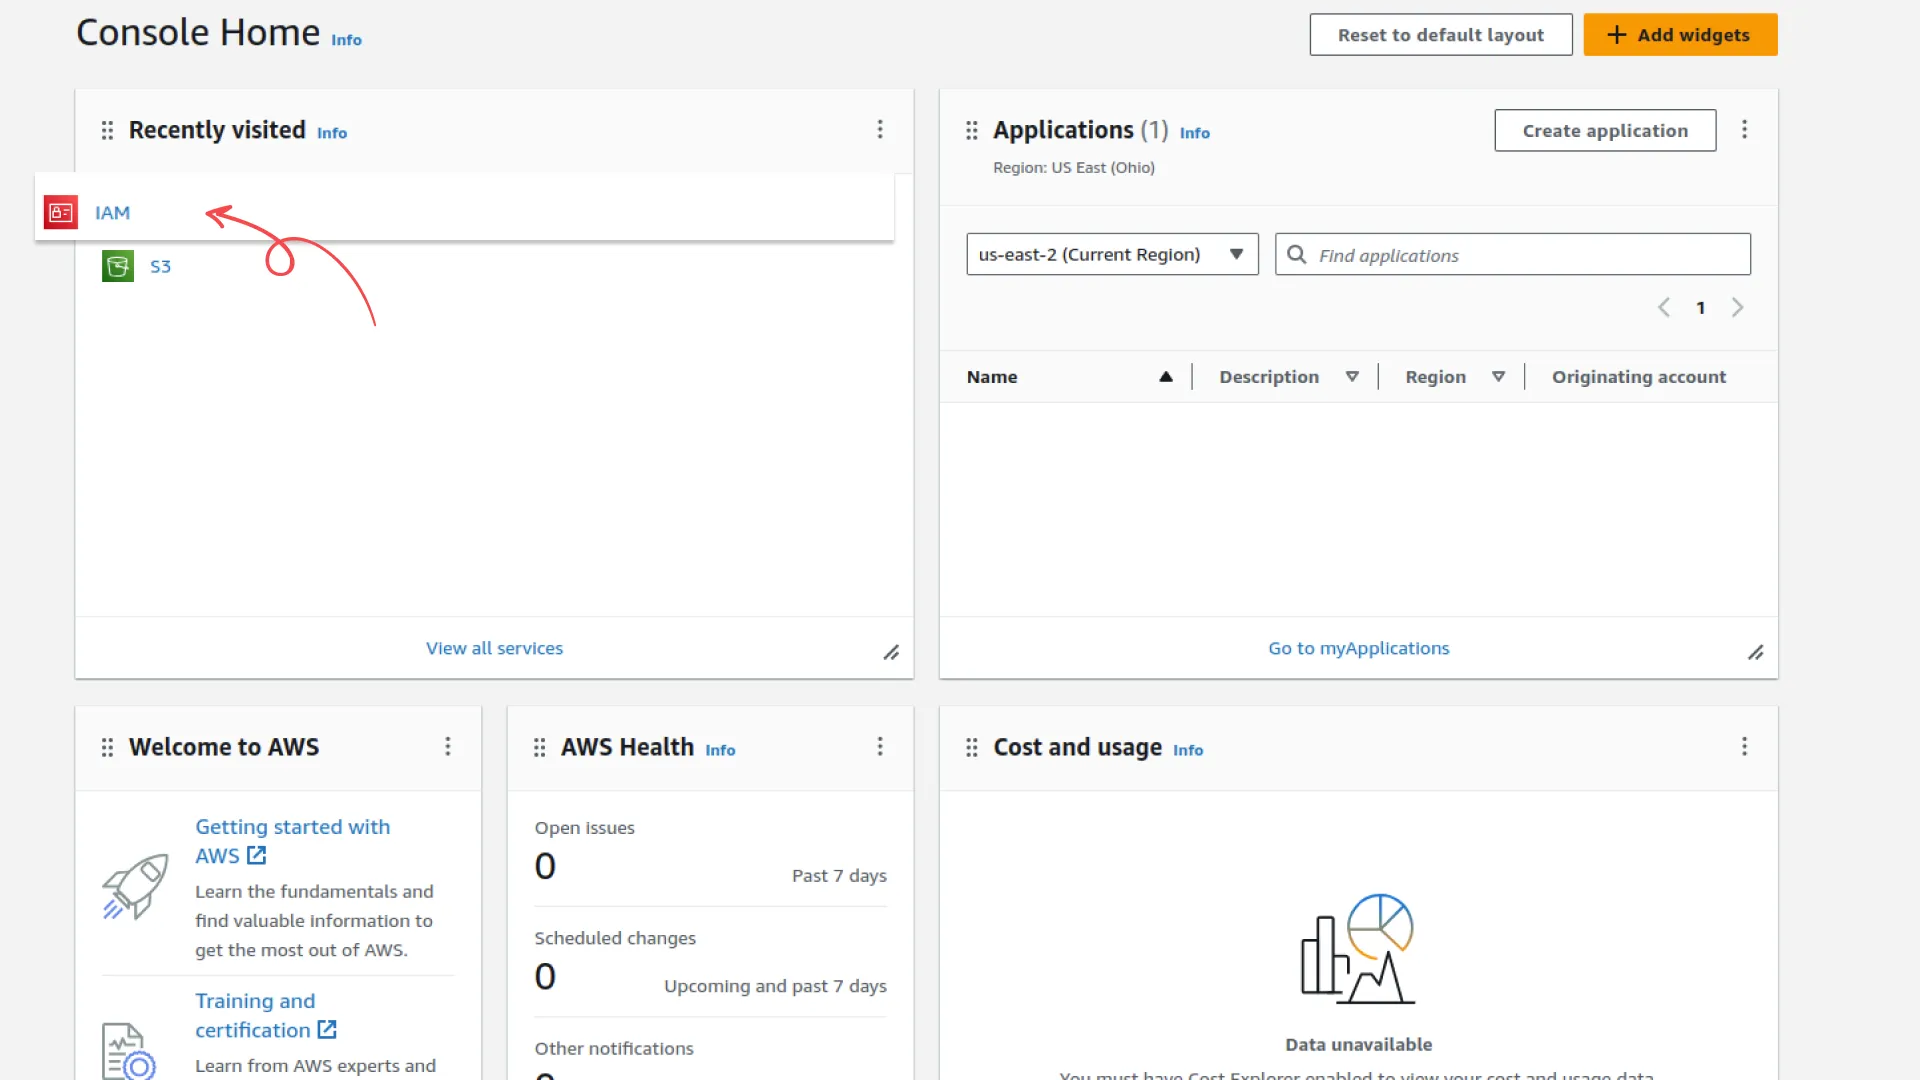
- Open the Visit IAM Console..
Navigate to User Settings:
- From the navigation menu, click on “Users.”
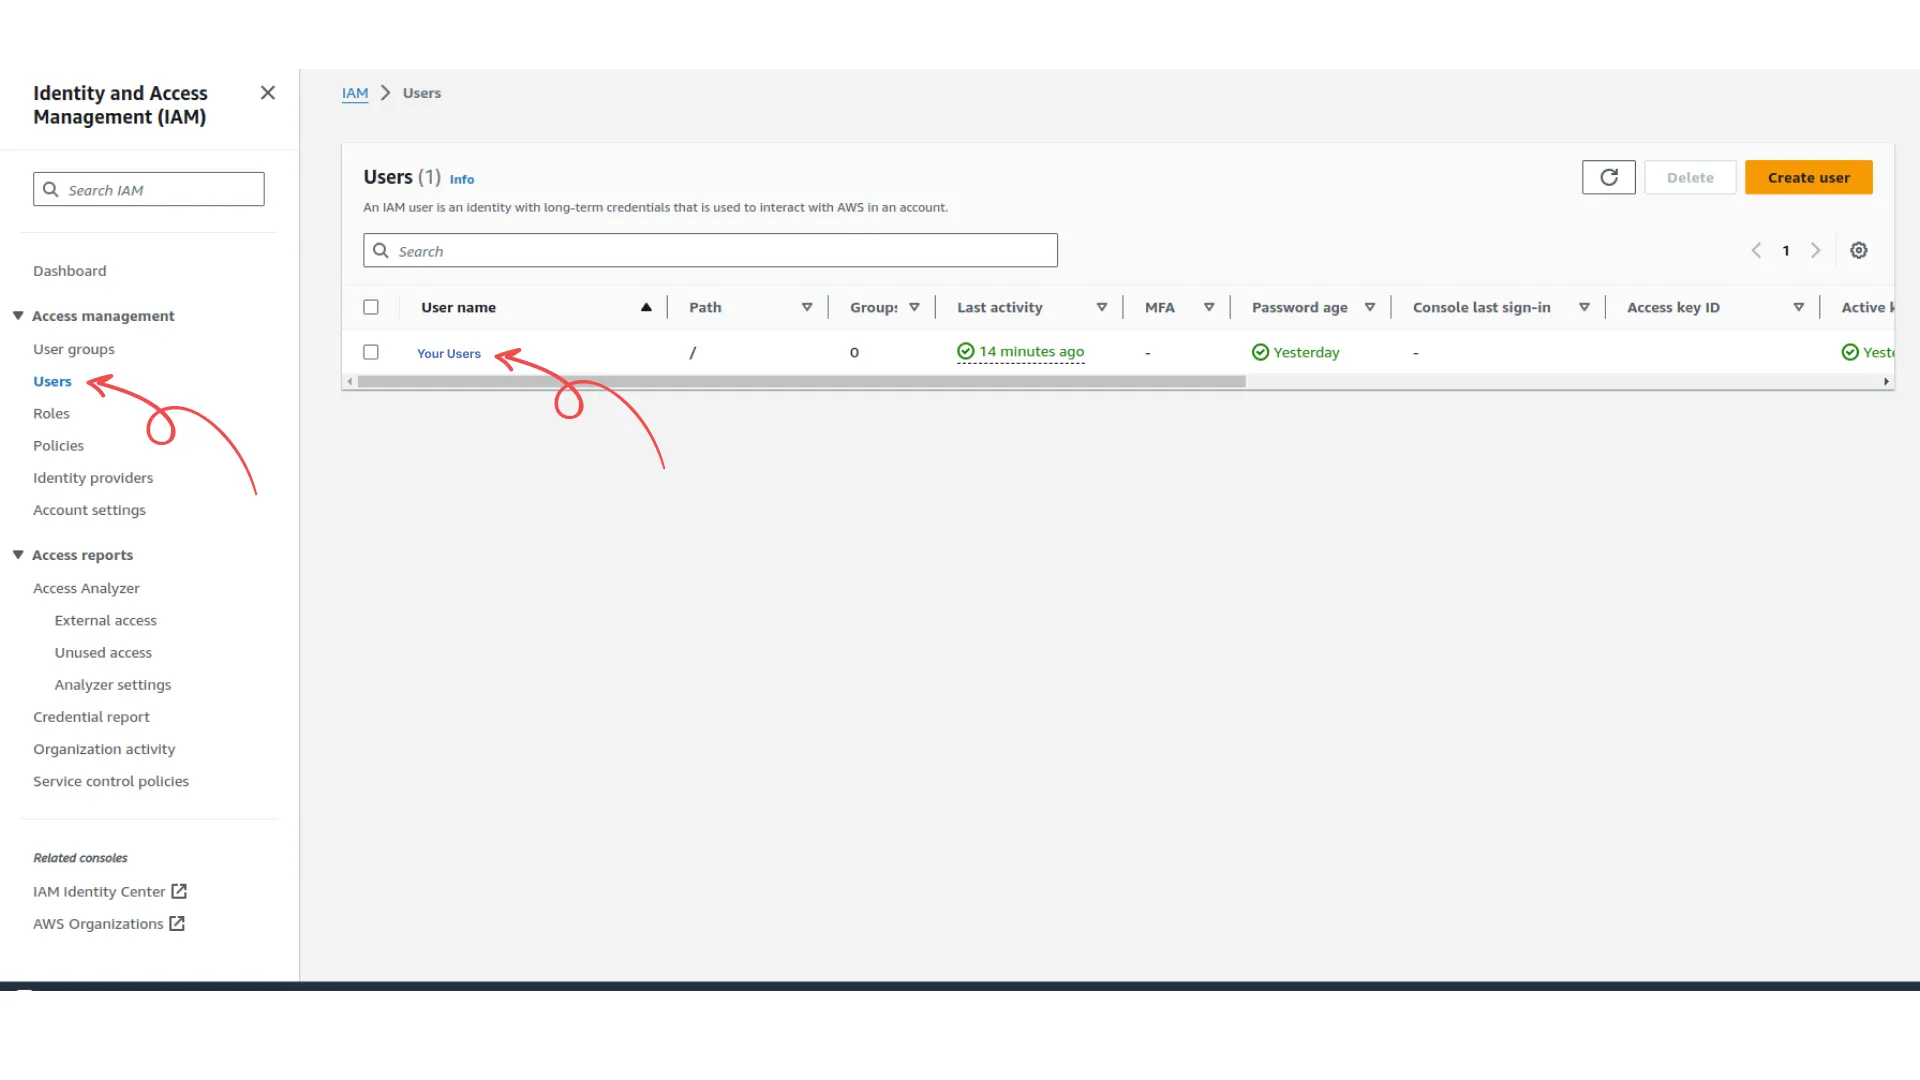
Select Your IAM User:
- Click on your IAM user name.
Manage Access Keys:
- Click “User Actions” and then “Manage Access Keys.”
Create Access Key:
- Click “Create Access Key.”
Download Credentials:
- Your keys will be displayed.
- Access key ID example: AKIAIOSFODNN7EXAMPLE
- Secret access key example: wJalrXUtnFEMI/K7MDENG/bPxRfiCYEXAMPLEKEY
- Click “Download Credentials” and store the keys securely.
Permissions
- Click on the IAM Console Button.
- Go to the user’s page.
- Click on the “your users” button.
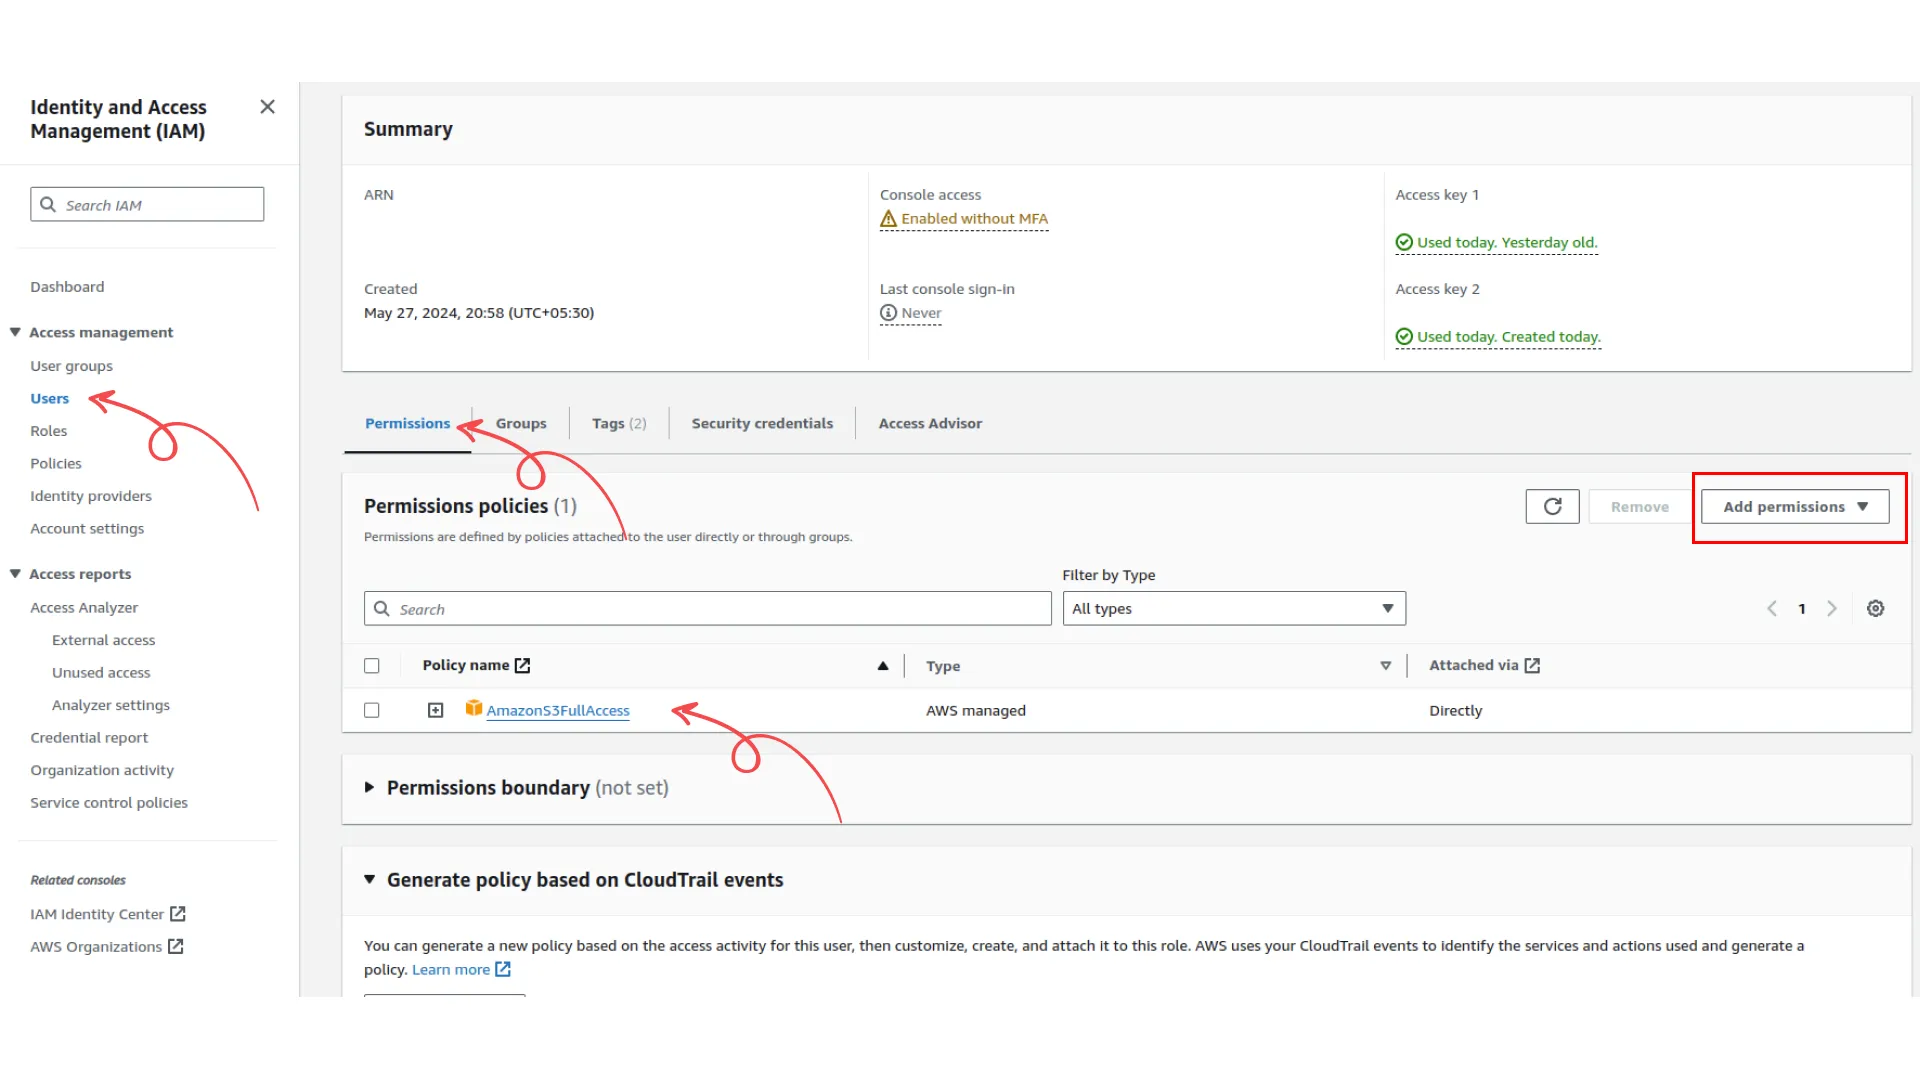
- To get permission, go to the users’ column, click on your users’ button, and click the permissions button.
- After that click on your permission, you can also create new permission if you don’t have one.
How to Create New Buckets
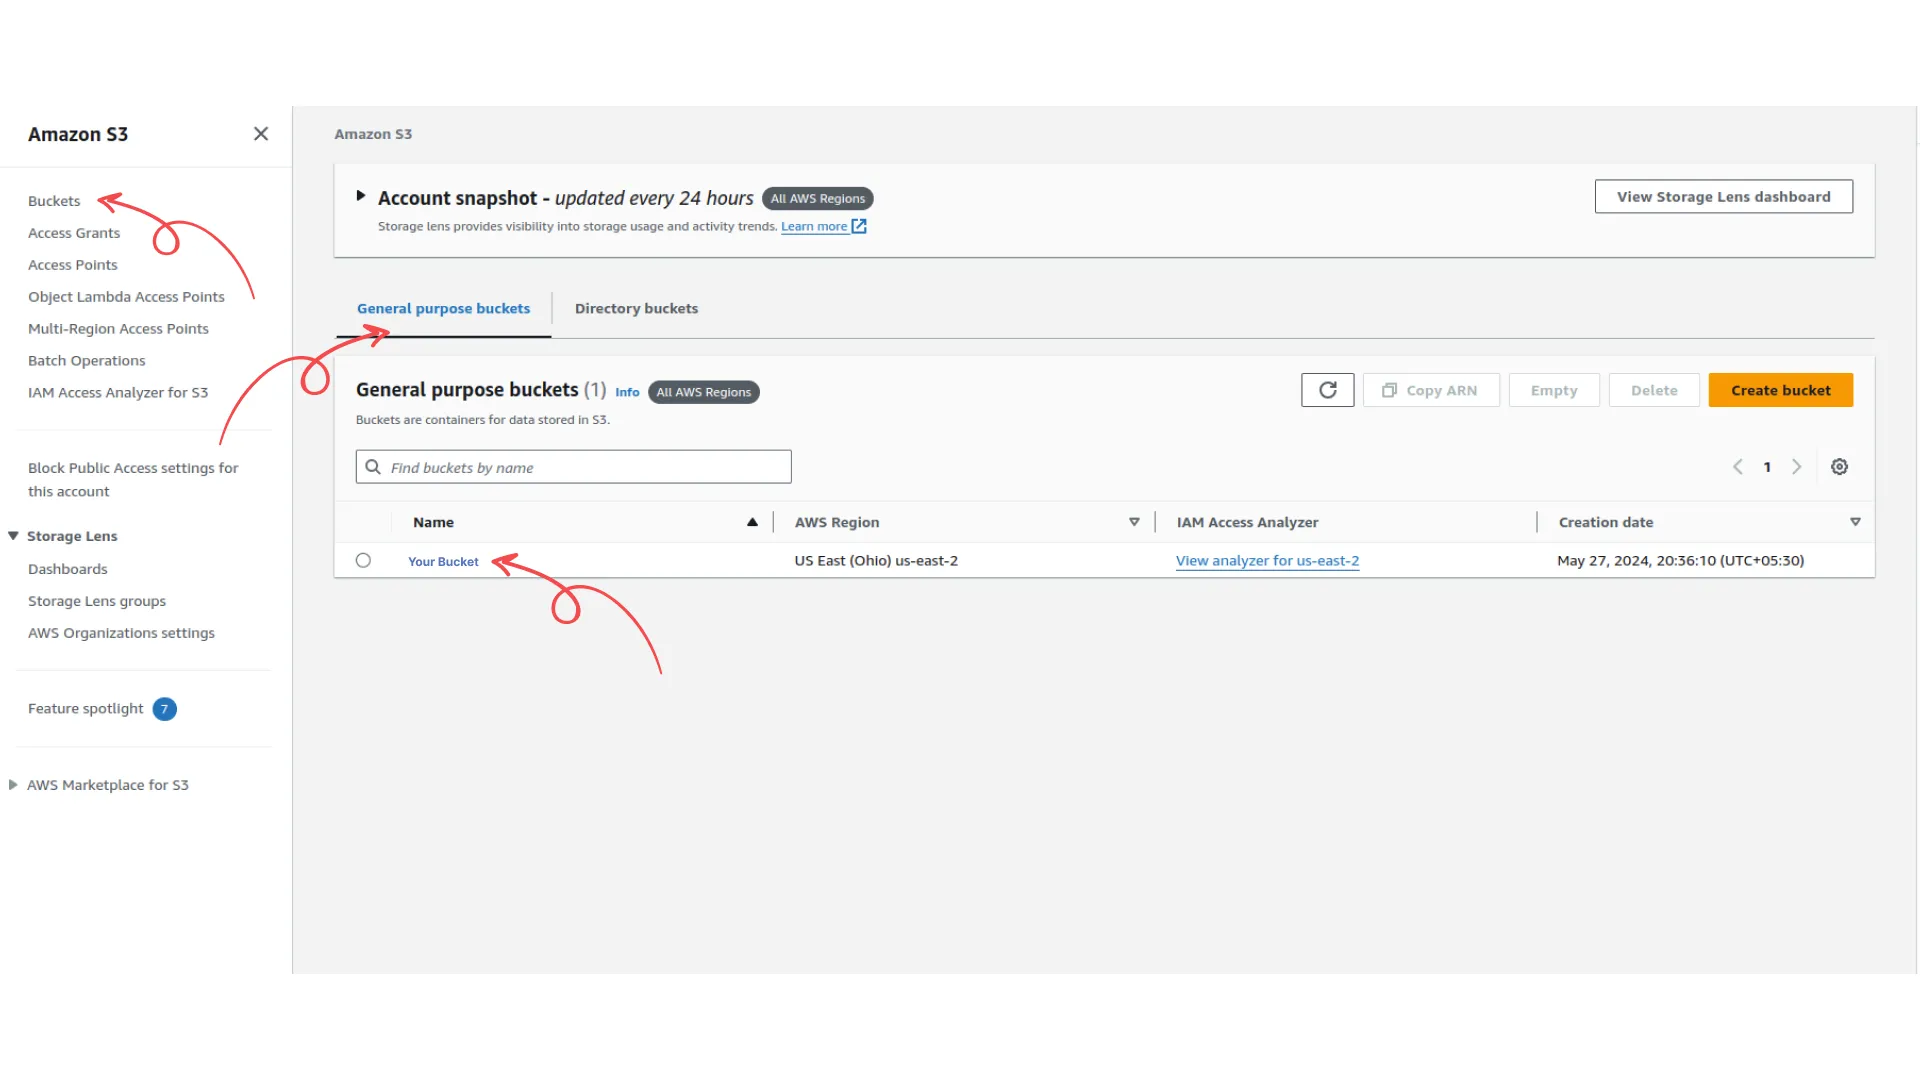
- To create new buckets, go to the buckets page and select the general purpose buckets.
- Click on the “your bucket” button, you can also create a new bucket if you don’t have one.
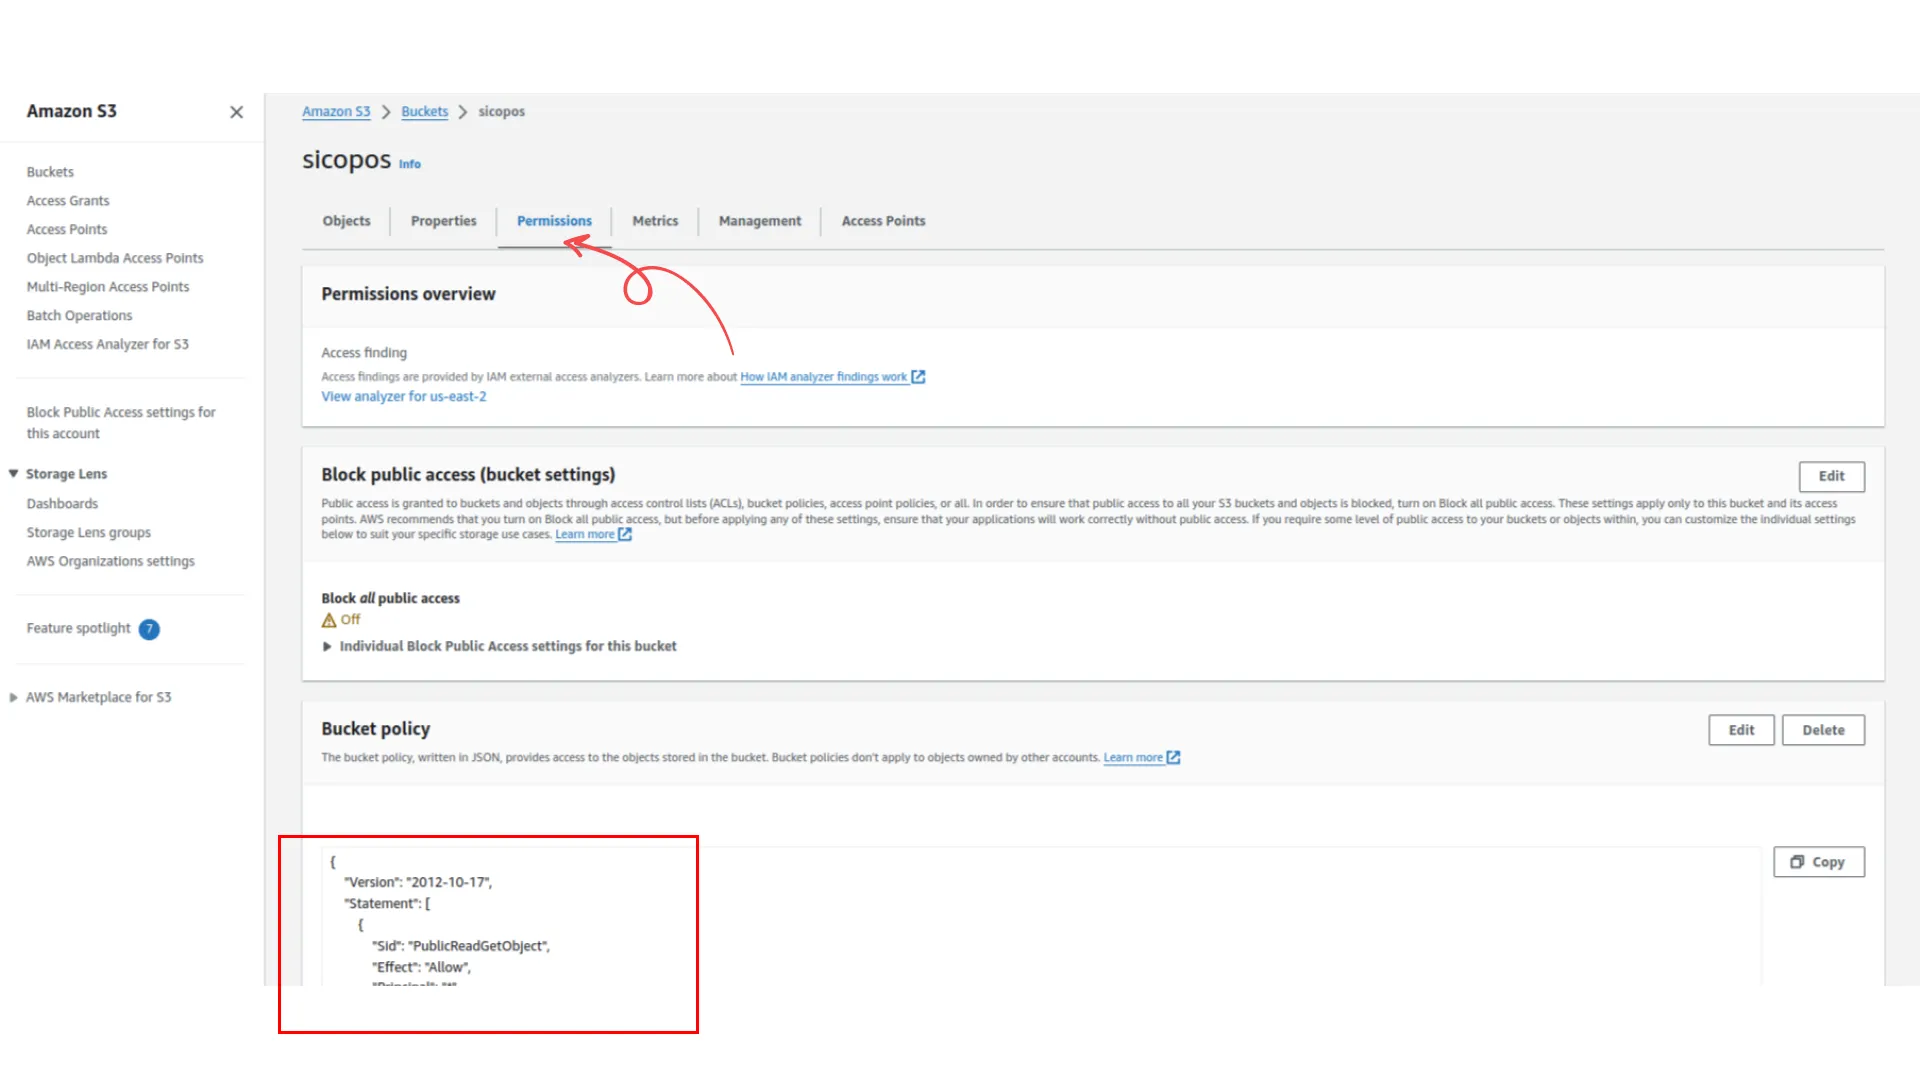
- Now on the permissions page, go to the bucket policy, and add the policy given below.
- Don’t forget to turn off the “block all public access” button given over there.
Policy
    {
        "Version": "2012-10-17",
        "Statement": [
            {
                "Sid": "PublicReadGetObject",
                "Effect": "Allow",
                "Principal": "*",
                "Action": "s3:GetObject",
                "Resource": "arn:aws:s3:::your bucket/*"
            }
        ]
    }
Add Credentials to WorkDo:
- In your WorkDo app, go to the Settings panel.
- Find the AWS S3 Integration settings.
- Enter the Access key and Secret key.
Categories
Related articles
- Proposal, Invoice, & Print Settings
- Google Wallet Settings
- Basic System Settings
- Customer & Vendor Statement
- Launching Your Own SaaS Business With WorkDo Dash
- Contracts in AccountGo
- Pusher
- Language Manager
- Performance in HRMGo
- Launching Your Own SaaS Business with BookingGo SaaS
- Budget Planner in AccountGo
- Branding & Personalization – White Label Setting
Reach Out to Us
Have questions or need assistance? We're here to help! Reach out to our team for support, inquiries, or feedback. Your needs are important to us, and we’re ready to assist you!


Need more help?
If you’re still uncertain or need professional guidance, don’t hesitate to contact us. You can contact us via email or submit a ticket with a description of your issue. Our team of experts is always available to help you with any questions. Rest assured that we’ll respond to your inquiry promptly.
Love what you see?
Do you like the quality of our products, themes, and applications, or perhaps the design of our website caught your eye? You can have similarly outstanding designs for your website or apps. Contact us, and we’ll bring your ideas to life.
