
Google Meet – WorkDo Dash SaaS Add-On Guide
Learn how to schedule and manage virtual meetings with Google Meet in WorkDo Dash SaaS.
Introduction
The Google Meet Integration Add-On lets you create, schedule, and manage Google Meet video conferences directly from the platform. Once you connect your Google account through a simple one-time setup, you can schedule meetings, invite participants, assign a host, and track every meeting’s status, all without leaving the system. This makes it easy to organize virtual meetings, keep everyone informed, and manage your video calls in one place, without needing to switch between different tools.
How To Install Add-On?
To Set Up the Google Meet Add-On, you can follow this link: Setup Add-On.
Integration with Multiple Add-Ons
- If the Add-Ons like Google Calendar and Outlook Calendar are enabled, and if you enable the toggle button given for Google Meet, then the meeting that has been created will be visible on Google Calendar and Outlook Calendar.
How To Use Google Meet Add-On?
System Settings
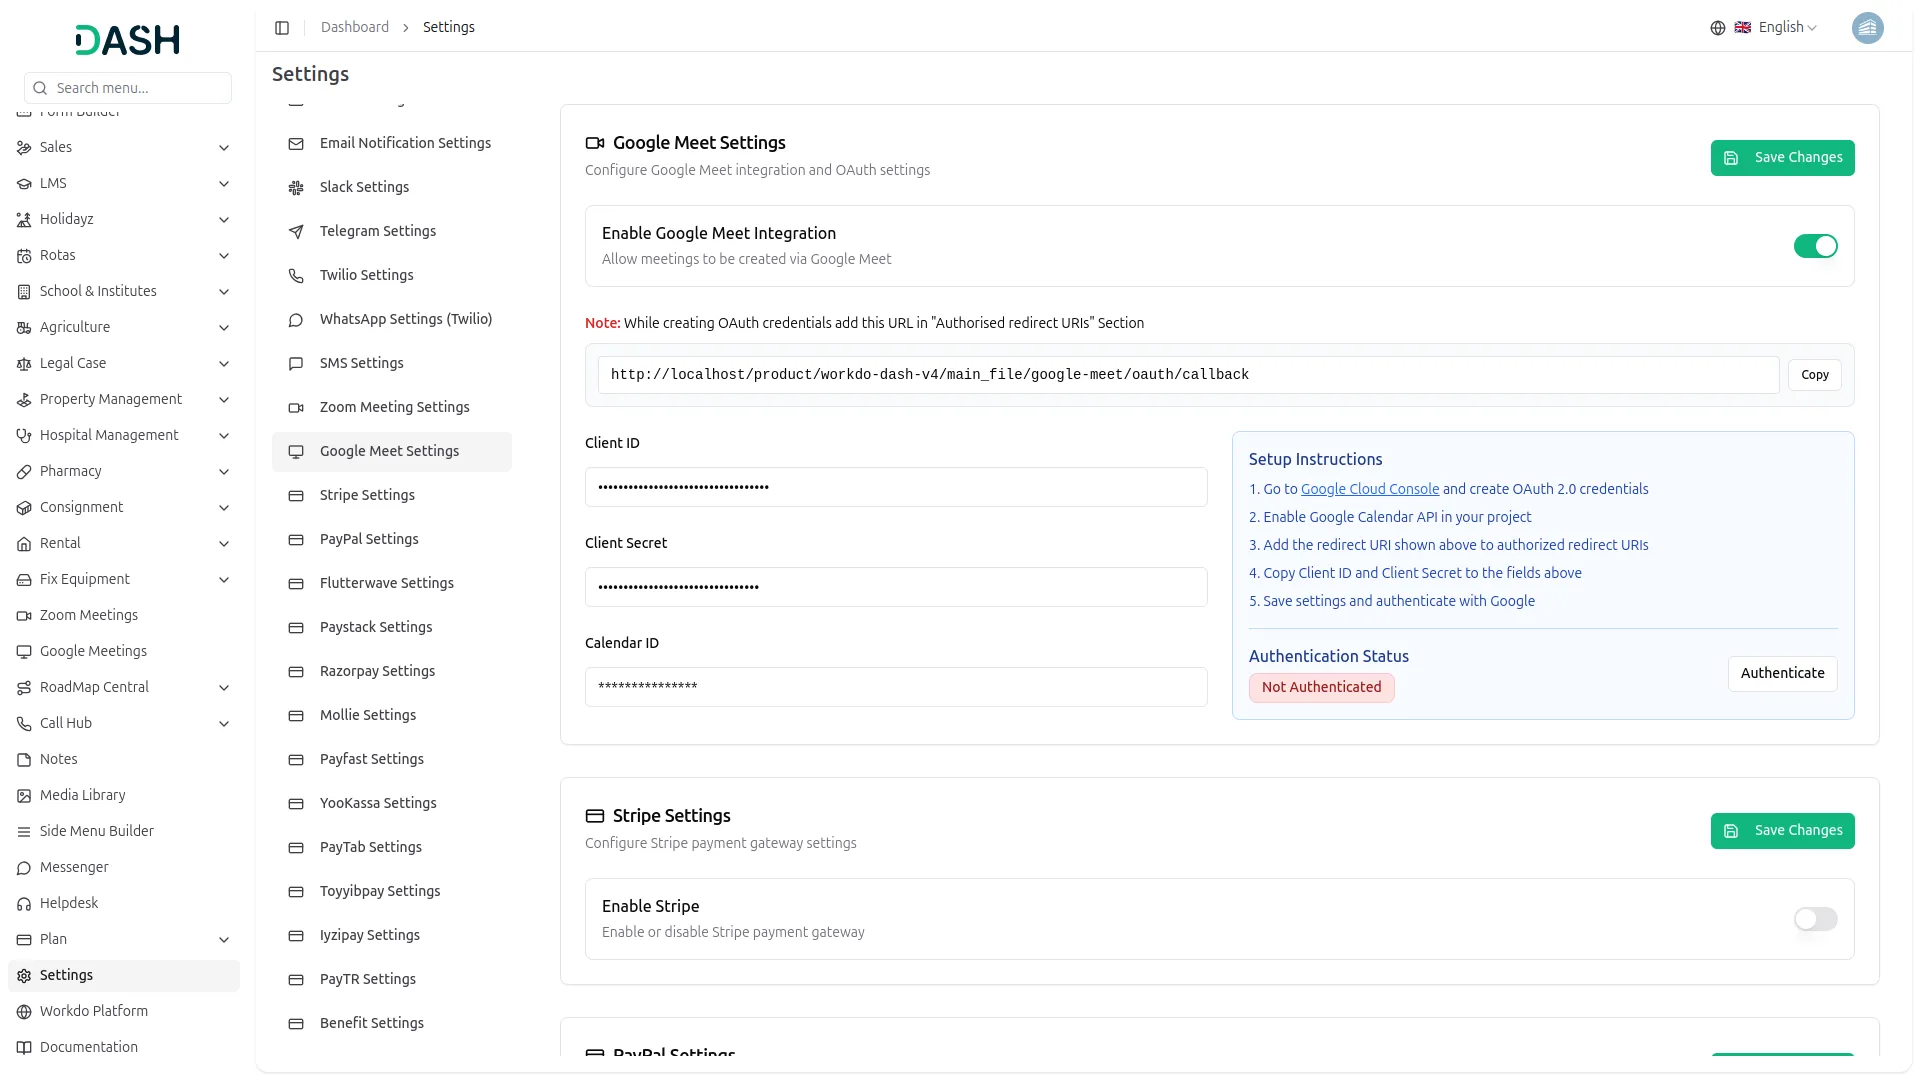
- To activate this Add-On, navigate to the Settings page and find the Google Meet Settings section. Toggle Enable Google Meet Integration to allow meetings to be created via Google Meet.
- Before creating your OAuth credentials in Google Cloud Console, copy the redirect URL shown on this page and add it under the “Authorised redirect URIs” section while setting up your credentials.
- Once enabled, enter your Client ID, Client Secret, and Calendar ID. The Calendar ID tells the system which calendar to sync meetings with, and it’s set to “primary” by default, referring to your main Google Calendar.
- To help you generate the Client ID and Client Secret, the settings page includes a “Setup Instructions” guide with the following steps:
- Go to Google Cloud Console and create OAuth 2.0 credentials
- Enable the Google Calendar API in your project
- Add the redirect URI shown above to the authorized redirect URIs
- Copy the Client ID and Client Secret into the fields above
- Save the settings and authenticate with Google
- After entering all required details, click the Save Changes button. Once your credentials are saved, click Authenticate to complete the OAuth connection with Google. The Authentication Status section will update to reflect whether your account is connected.
Google Meet Management
- To create a new meeting, click the “Create” button on the Manage Google Meetings page to open the Create Google Meeting form. Enter a Title for the meeting, add a Description to provide context about the agenda, and select the Start Time.
- Enter the Duration in minutes, and select the meeting Status by choosing one of the available radio button options (Scheduled, Started, Ended, or Cancelled), select Participants from the dropdown, or choose Host from the dropdown (which comes from the user management). Click “Create” to save the meeting, or “Cancel” to discard your changes.
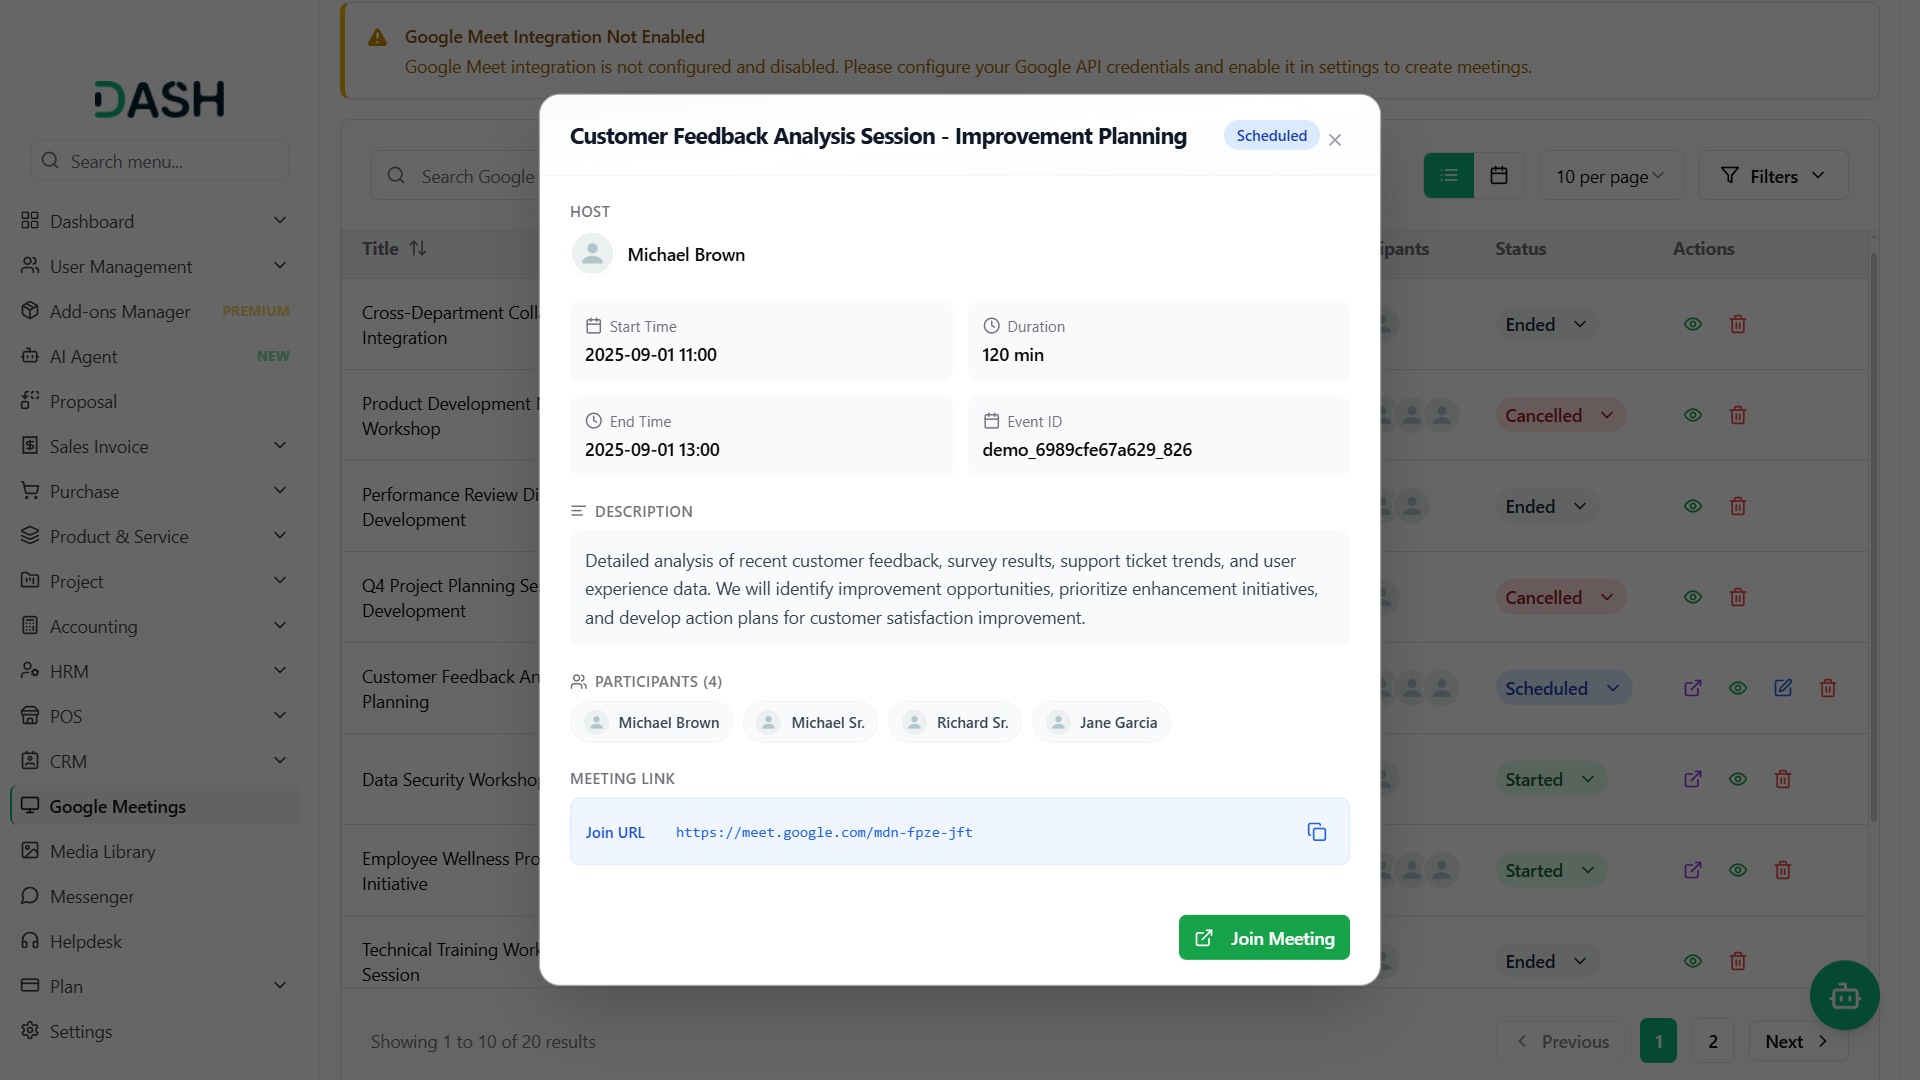
- Before you can create a meeting, the system checks whether Google Meet integration is properly configured and authenticated. If it isn’t, a warning banner appears at the top of the Manage Google Meetings page, letting you know that the integration is not enabled and needs to be configured in Settings.
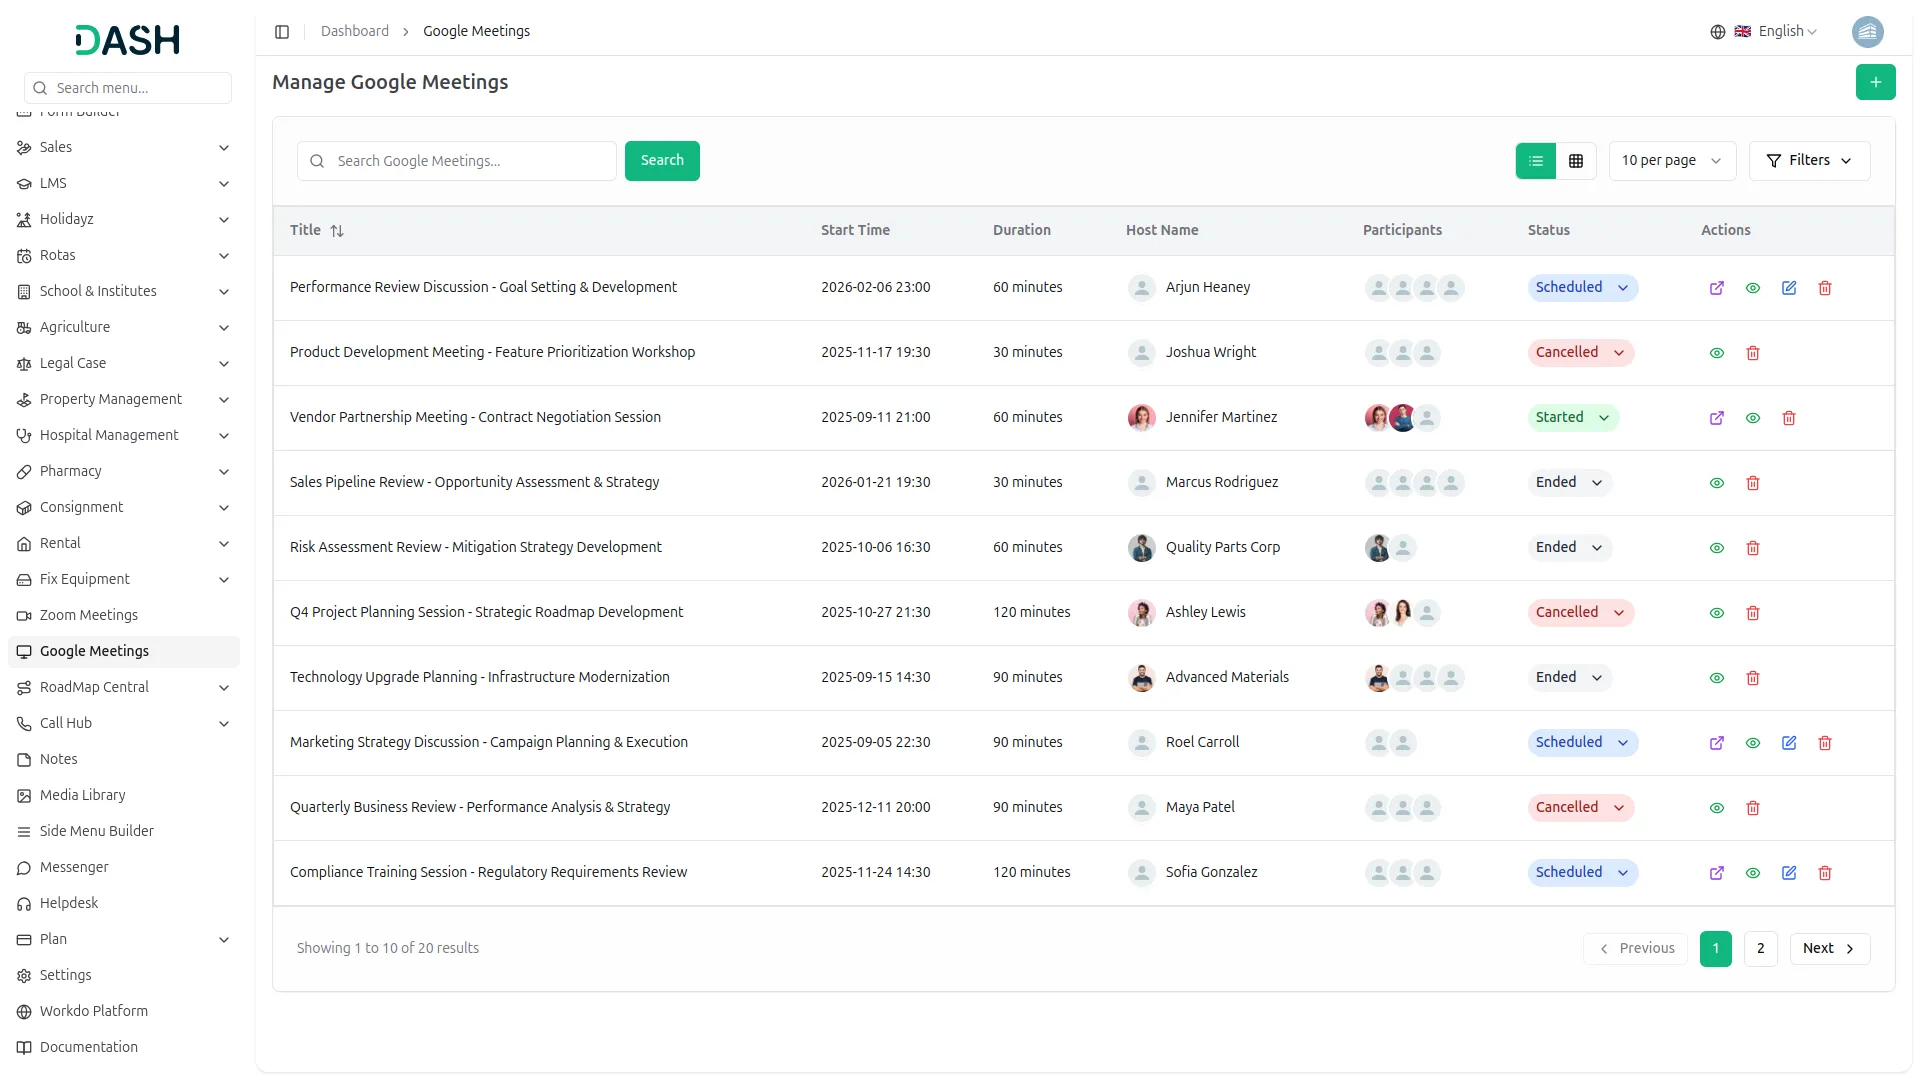
- The Manage Google Meetings page displays all scheduled meetings in a table, showing the Title, Start Time, Duration, Host Name, Participants (shown as avatars), Status, and Actions for each meeting. The Status badge can be changed directly from the list using the dropdown next to it.
- Choose the meeting Status: Scheduled (the meeting is set for a future date/time), Started (the meeting is currently in progress), Ended (the meeting has concluded), or Cancelled (the meeting has been called off).
- Use the Search Google Meetings bar to find a specific meeting, and use the Filters section to narrow the list by Status or Date Range, then click “Apply” to filter or “Clear” to reset. Toggle between list and calendar view using the icons near the top right.
- The available actions depend on the meeting status: Scheduled meetings allow Join Meeting, View, Edit, and Delete; Started meetings allow Join Meeting, View, and Delete; and Ended or Cancelled meetings allow only View and Delete.
User Management
- When you create a meeting, all invited users will automatically see the option to join the meeting when they log into the system, making it easy for participants to access meetings without needing separate invitations or meeting details.
- The meetings list page displays all scheduled meetings with columns showing Title, Start Time, Duration, Host Name, Participants, Status, and available Actions.
- You can use the Search and Filters buttons to manage your meeting list effectively. For each record, you can use the action buttons such as the Join Meeting Button to Join URL for users, View for accessing detailed meeting information, Edit the record to update any details, or Delete for removing meetings from the system.
Categories
Related articles
- E-Invoice – WorkDo Dash SaaS Add-On Guide
- Discord – TicketGo Add-On Guide
- BlueSnap – WorkDo Dash SaaS Add-On Guide
- Google Calendar – WorkDo Dash SaaS Add-On Guide
- Free Shipping Pop-Up – eCommerceGo SaaS Add-On Guide
- SMS Integration – TicketGo Add-On Guide
- Omise – BookingGo SaaS Add-On Guide
- WHMCS – WorkDo Dash SaaS Add-On Guide
- Zapier – WorkDo Dash SaaS Add-On Guide
- MSG91 – WorkDo Dash SaaS Add-On Guide
- Ticket Number – TicketGo Add-On Guide
- Zendesk – WorkDo Dash SaaS Add-On Guide
We're Here to Help - Let's Talk
Have questions about our solutions, customization services, or business tools? Our team is here to help you. let's talk.