Yoga Classes Integration in Dash SaaS
YogaClasses is a complete yoga course management platform designed to help administrators manage yoga courses, instructors, members, and related content.
Introduction
YogaClasses is a complete yoga course management platform designed to help administrators manage yoga courses, instructors, members, and related content. The Add-On provides a complete solution for creating and selling online yoga courses, managing user subscriptions, handling payments, and maintaining a professional yoga business website. The Add-On supports two user types, including instructors and members, with features for course creation, content management, payment processing, certificate generation, and community engagement through blogs and testimonials.
How To Install The Add-On?
To Set Up the Yoga Classes Management Add-On, you can follow this link: Setup Add-On.
How To Use The Yoga Classes Management Add-On?
Yoga Classes Dashboard
- After purchasing the Add-On, install it and go to the dashboard. Then search for the Yoga Classes Add-On and start using it.
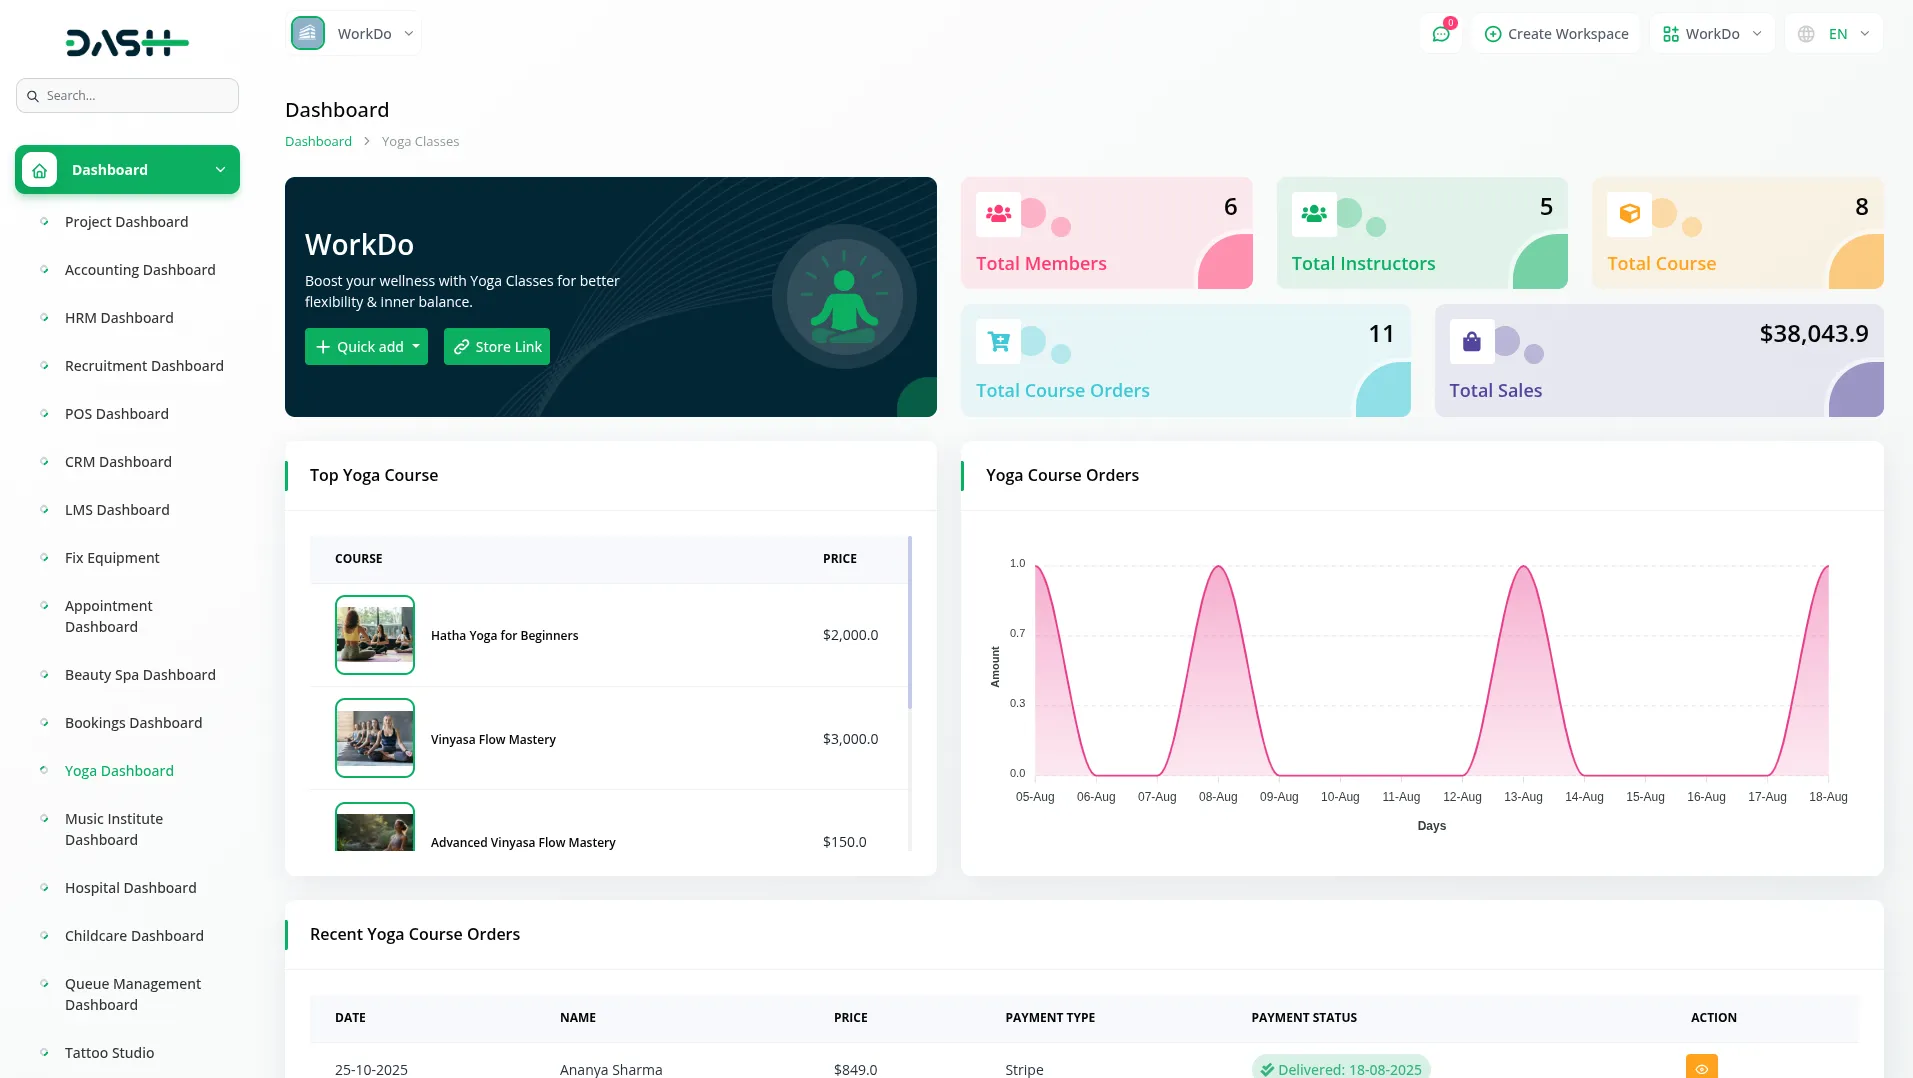
- The Dashboard provides a central overview of your yoga business with quick access to key functions and important metrics. The dashboard displays several information cards showing Total Members, Total Instructors, Total Courses, Total Course Orders, and Total Sales.
- You can quickly add new content using the quick add buttons for a new course, a new category, and a new blog. A Store link is available for copying and sharing your yoga website with others.
- The dashboard includes a table showing the Top 5 Yoga Courses with their prices, helping you track your most popular offerings. A line chart displays Yoga Course Orders over time, allowing you to monitor sales trends and patterns.
- Recent activity is shown through a table of the 5 most recent Yoga Course Orders, keeping you updated on new purchases and customer activity.
Important Note: Only the sections set through System Setup will be displayed on the website. Please ensure the desired sections are properly configured.
Manage Course
- To create a new Course, click the “Create” button at the top of the course page. Enter the Course Title, Number of Lessons, and Duration for the course structure. Set the Regular Price and optionally add a Latest Price if you want to offer special pricing.
- Configure the Show Latest Price toggle button to control price display – when ON, it will show discounted pricing if the latest price is lower than the regular price or hide the regular price if the latest price is higher. When OFF, only the regular price displays. Set the Certificate Included toggle button to ON if members should receive a certificate upon completion.
- Select the Access Time from the dropdown options of Lifetime, Three Months, Six Months, or 1 year. Choose the appropriate Level from the Beginner, Intermediate, or Expert options. Select the Yoga Style from the dropdown, which comes from the System Setup → Yoga Style section, and choose an Instructor from the dropdown that comes from the instructor section.
- Add the Language, upload a Course Thumbnail image, and select Course Category from the System Setup → Category section. Fill in the Short Description, Overview, Requirements, Learning Objectives, and Suitable For sections to provide complete course information.
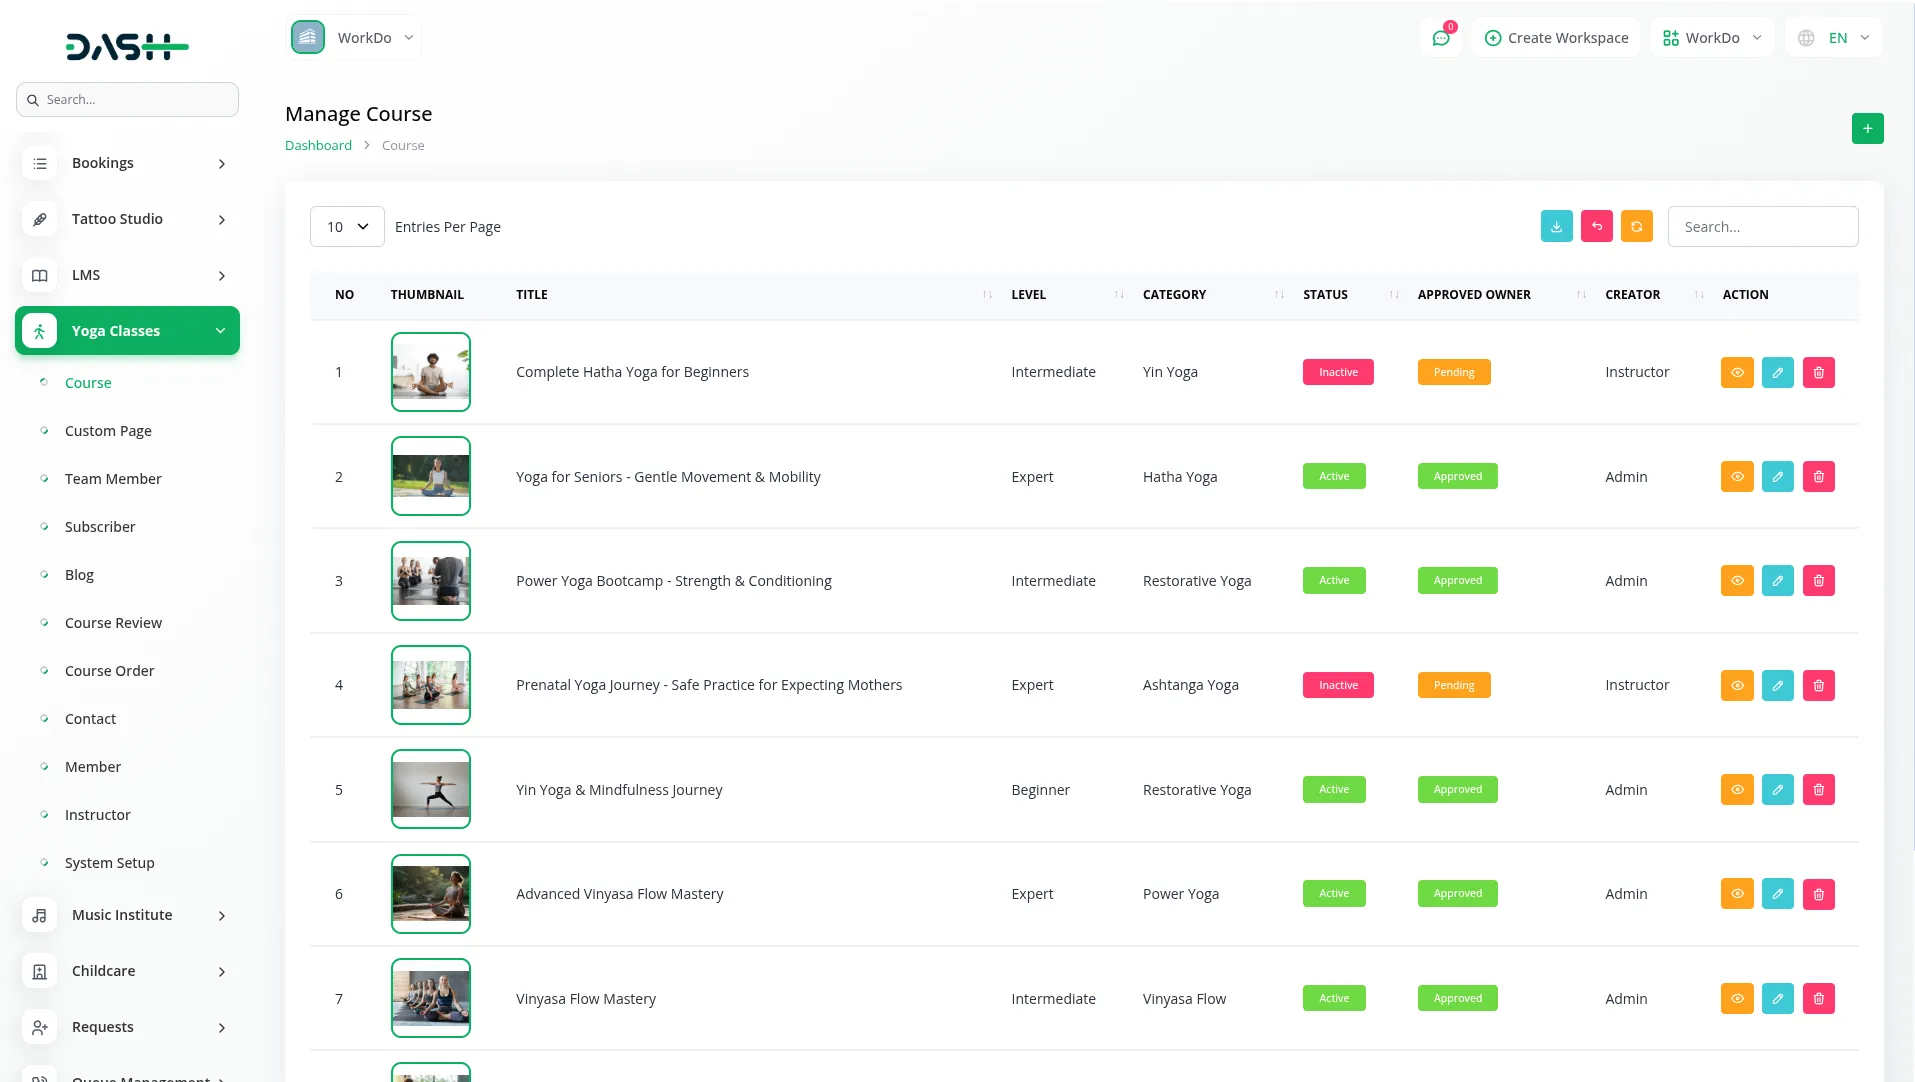
- The list page shows all courses with columns for Thumbnail, Title, Level, Category, Status (Active, Inactive), Approved Owner (Pending, Approved, Reject), and Creator (Instructor, Admin). Use the search, export, reset, and reload buttons to manage your course list page.
- In the Action column, click View to show Course Details – when an instructor creates a course from the front end, it appears pending by default and requires admin approval or rejection. Click Edit to modify course information, or Delete to remove courses.
- When clicking Edit, you can modify the same fields as the create form, plus add a Status control (Active, Inactive). The edit page includes a Header Section where you can create a course structure by adding Header Name entries. Edit and delete functionality is available.
- When creating chapters, enter the Chapter Name, select Chapter Type from Video URL, Video File, iFrame, or Text Content, and add Chapter Description. Upload External Files as needed. Based on the Chapter Type selection, additional fields appear – Video URL shows URL and Duration fields, Video File shows upload and Duration fields, iFrame shows URL and Duration fields, and Text Content shows a text editor. Each chapter can be edited or deleted from the chapter list view.
- On your website, members can find courses by clicking the Courses page in the header. The courses page helps members find the right course by letting them filter by course category using a dropdown menu.
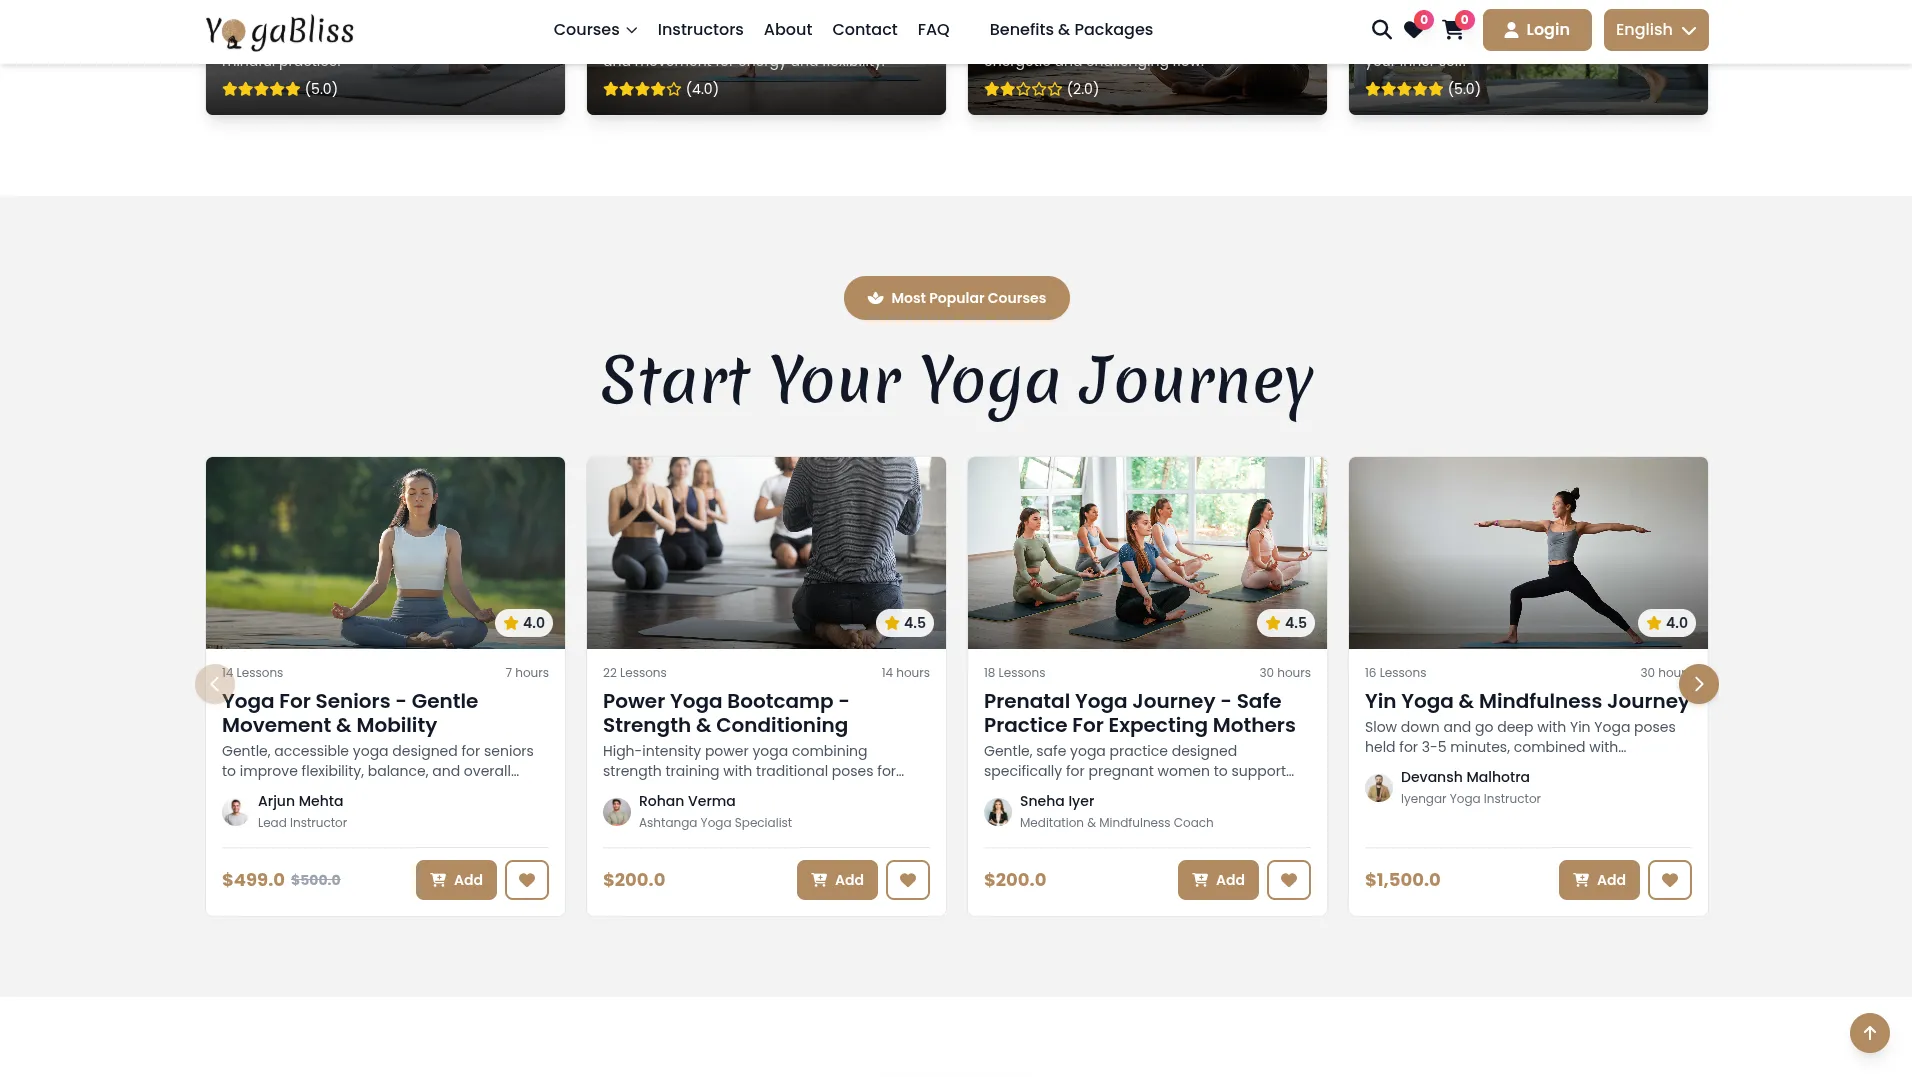
- On the home page, there is a Popular Courses section that shows the latest courses. You can add courses to the cart and wishlist.
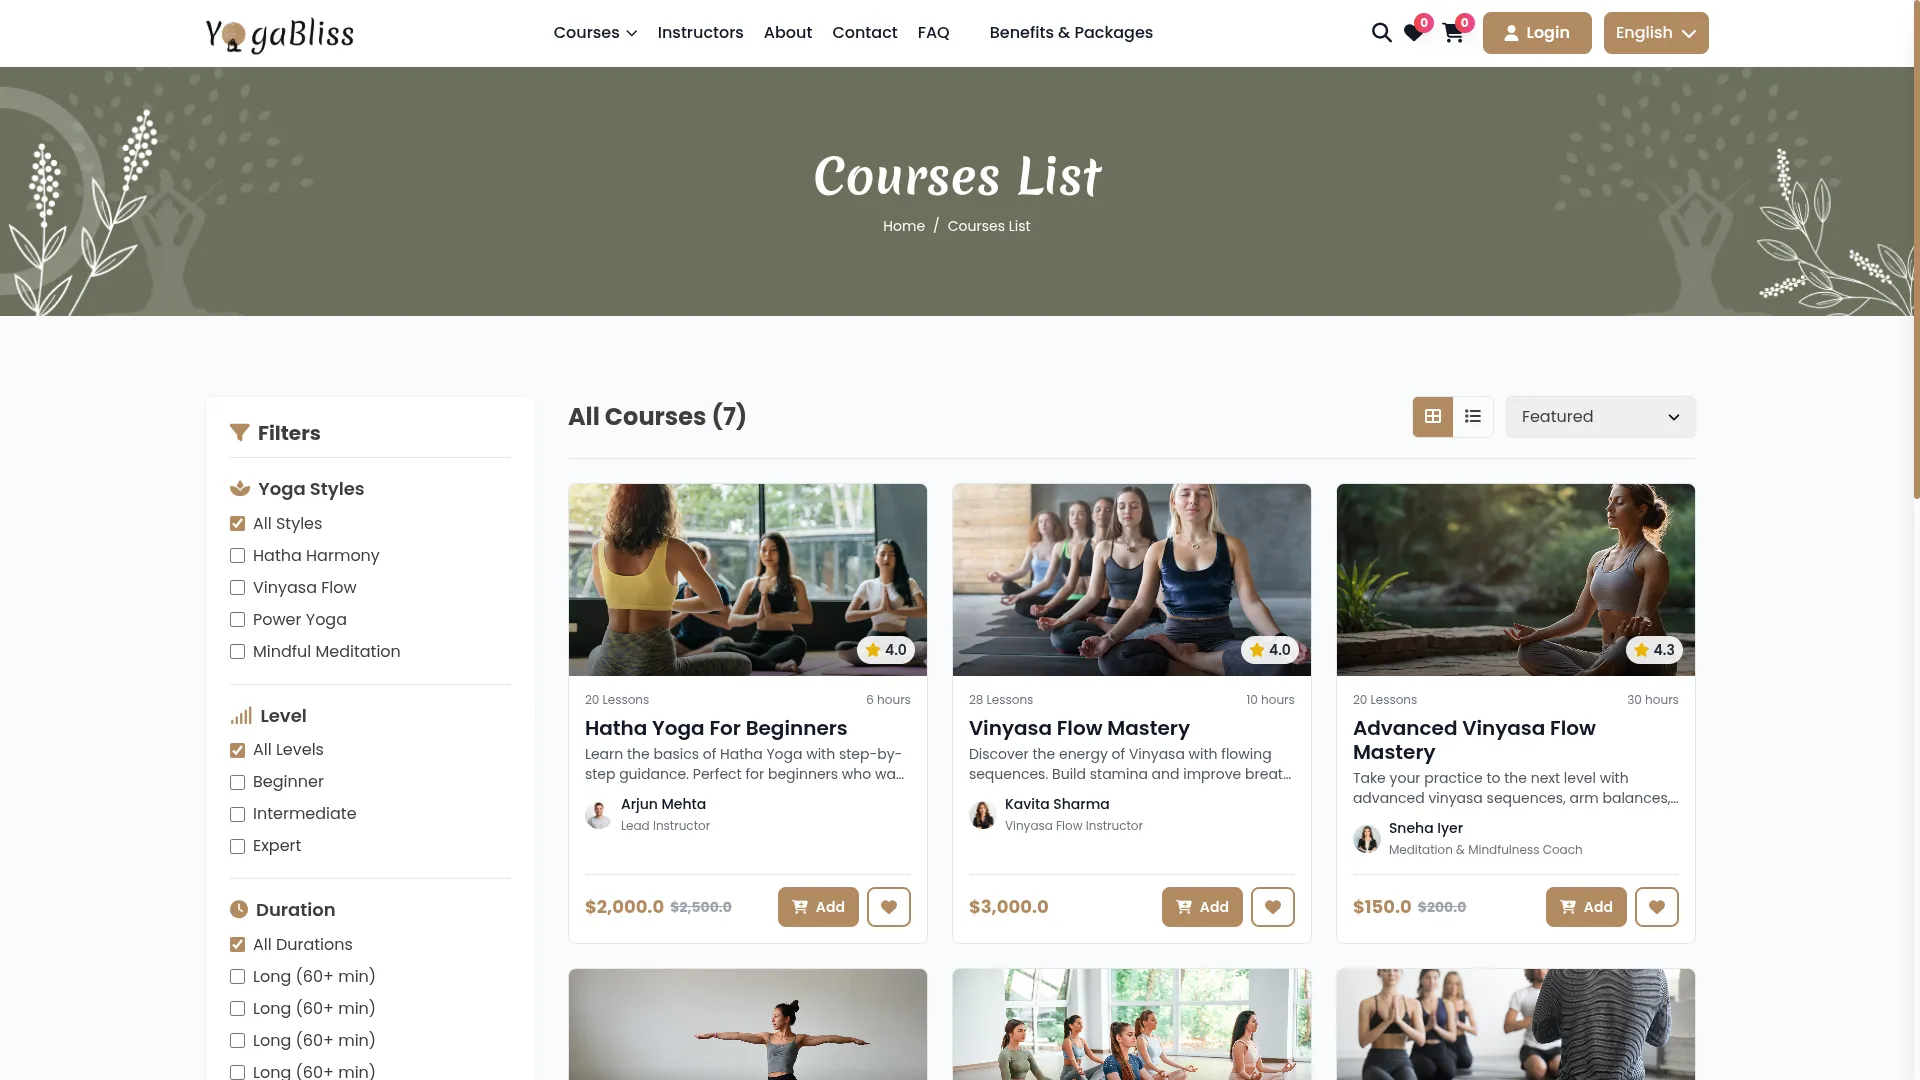
- Members can filter feature courses by price (high to low or low to high) or by newest courses. Each course card shows the Course Thumbnail, Course Title, Instructor, official Price, Discount Price (if available), and Course Rating. Users can click the rating section to navigate to the Course detail page.
- All the courses you have added to the cart will be displayed inside that header. And also, you can add a wishlist that displays in the header section.
Course detailed page
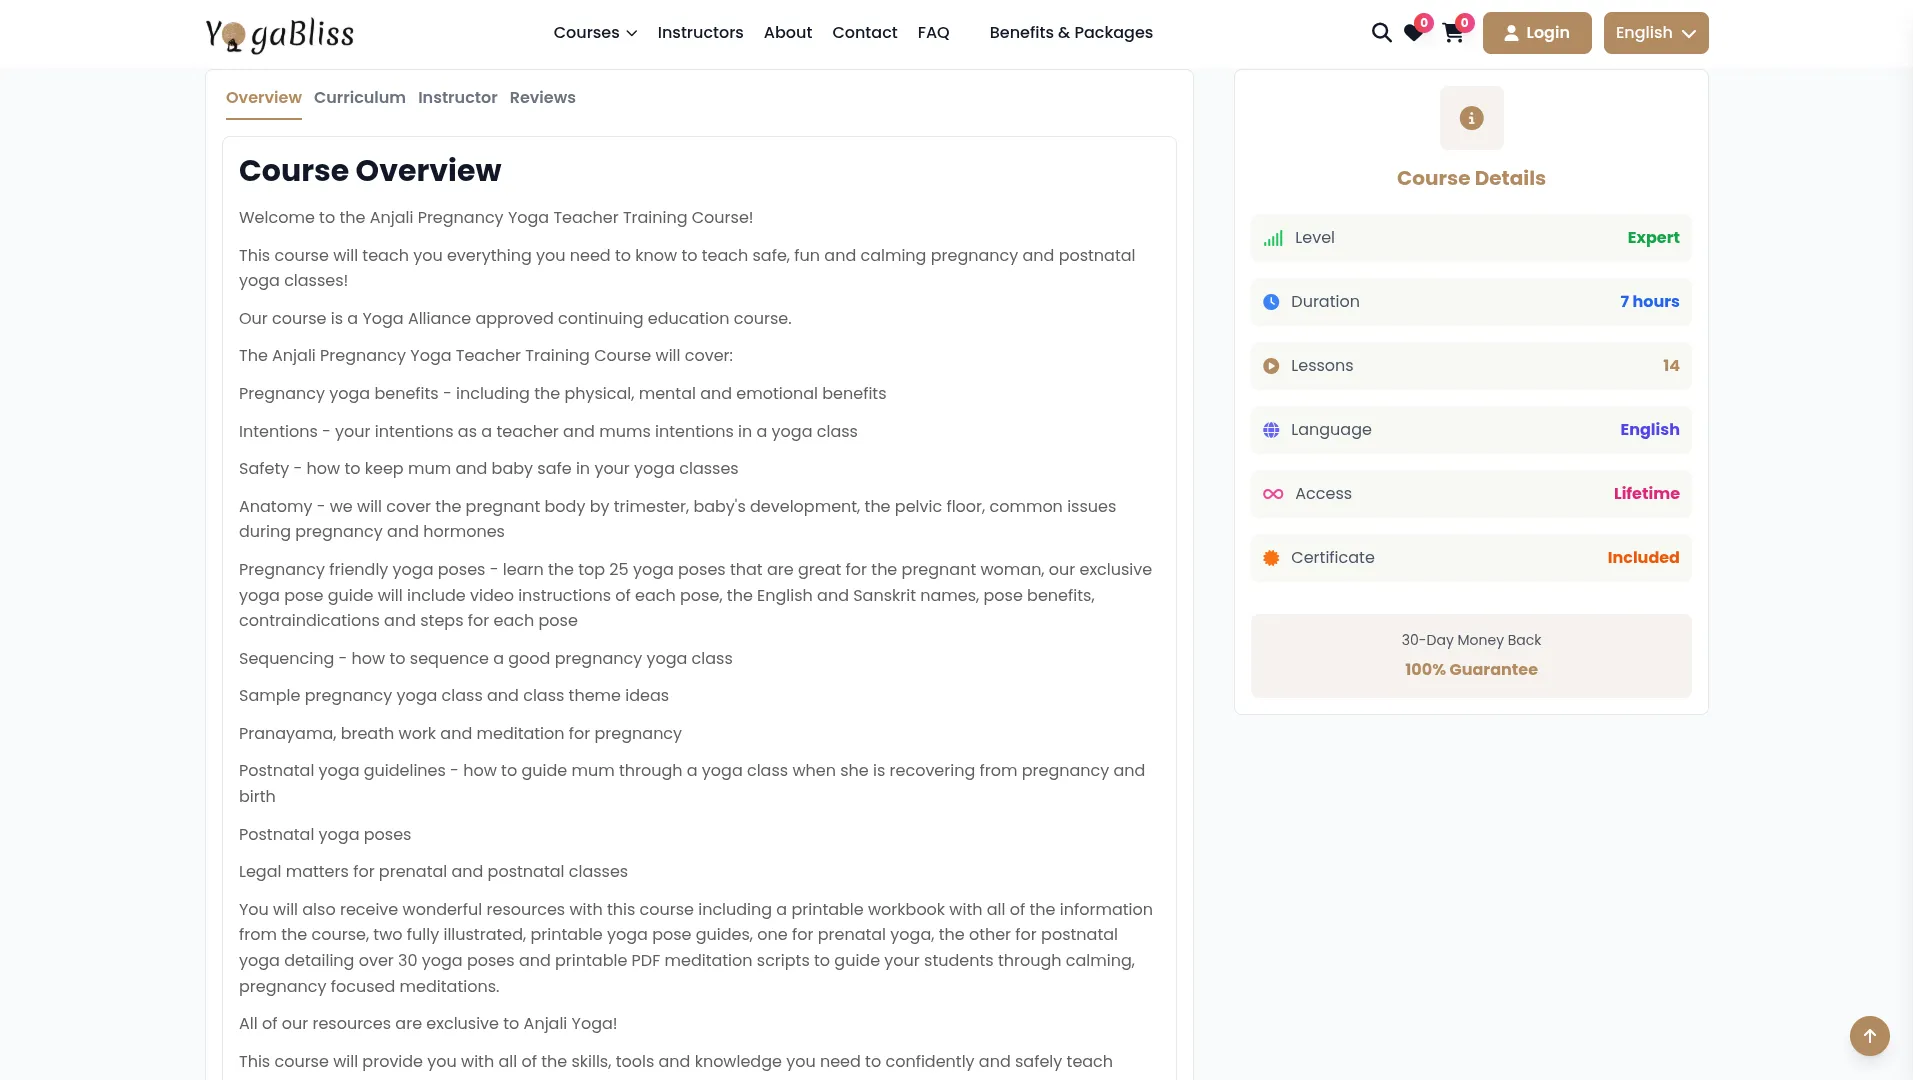
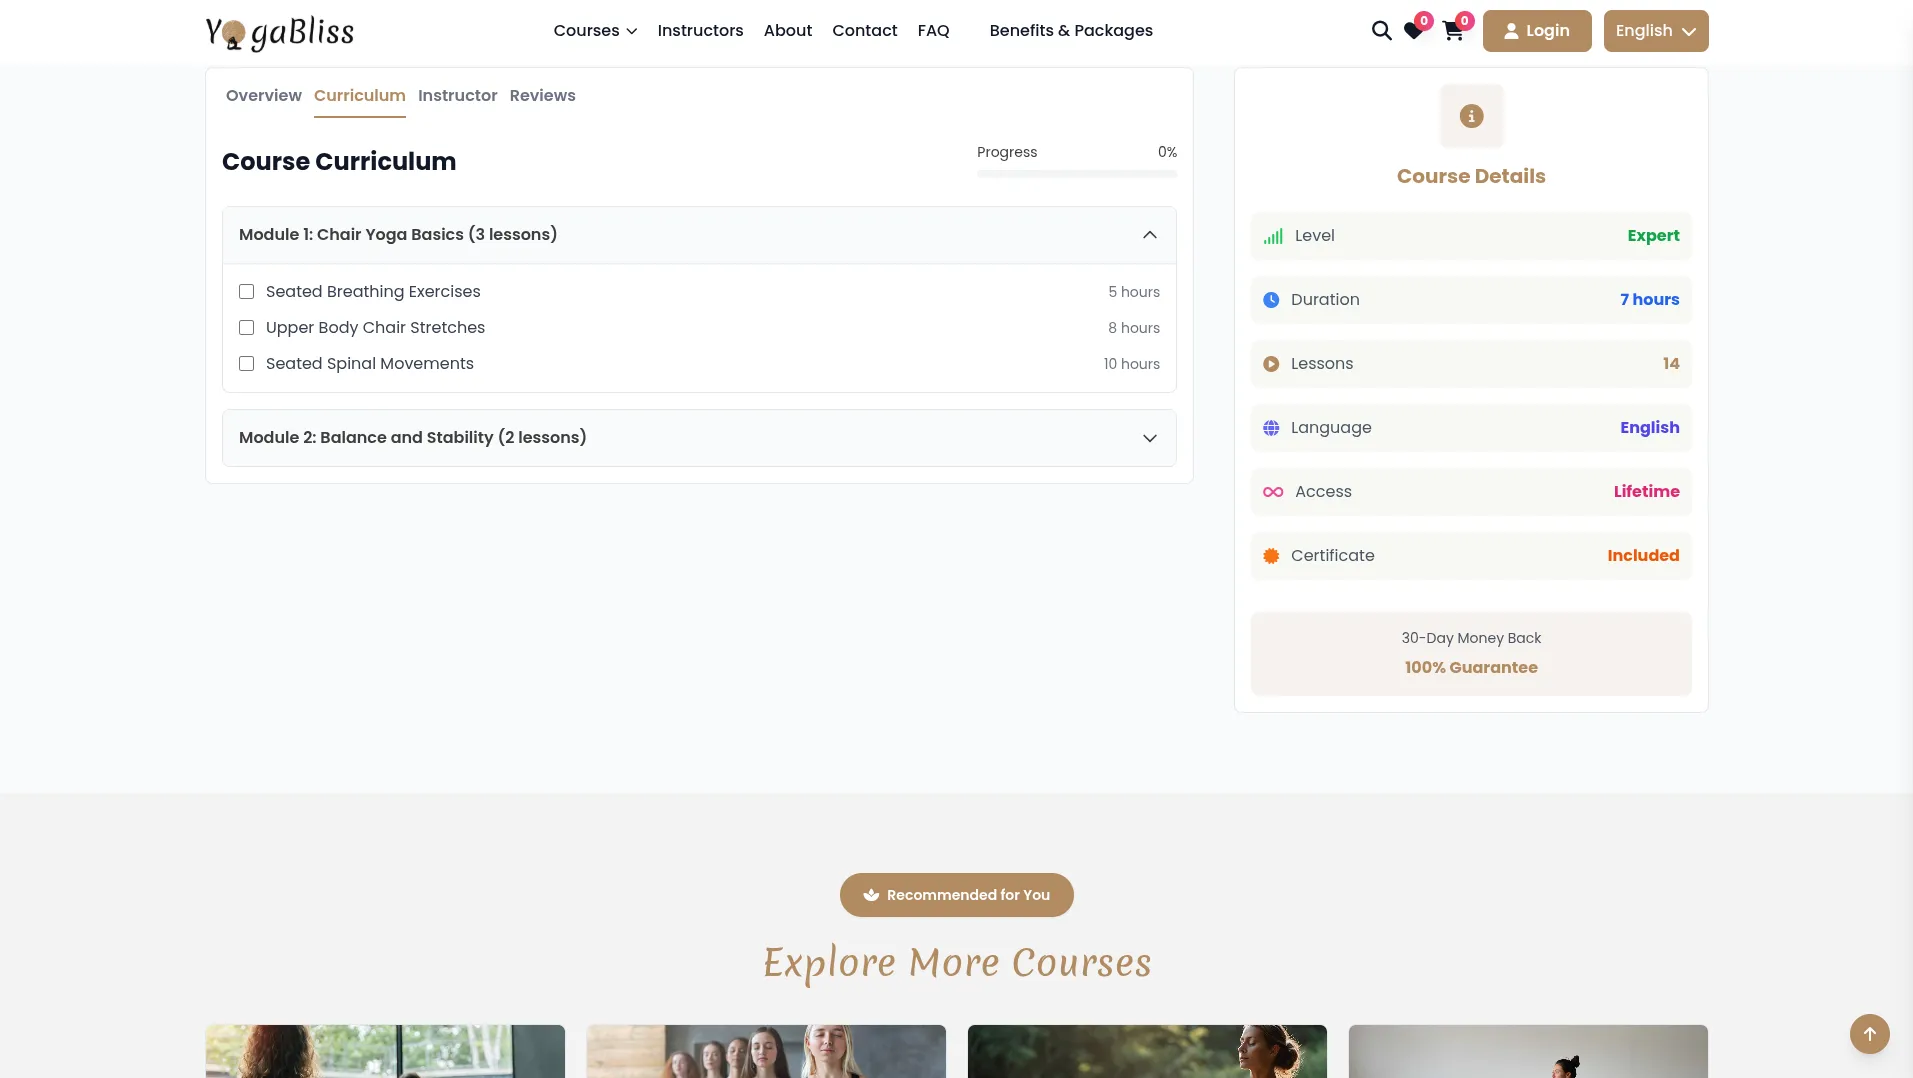
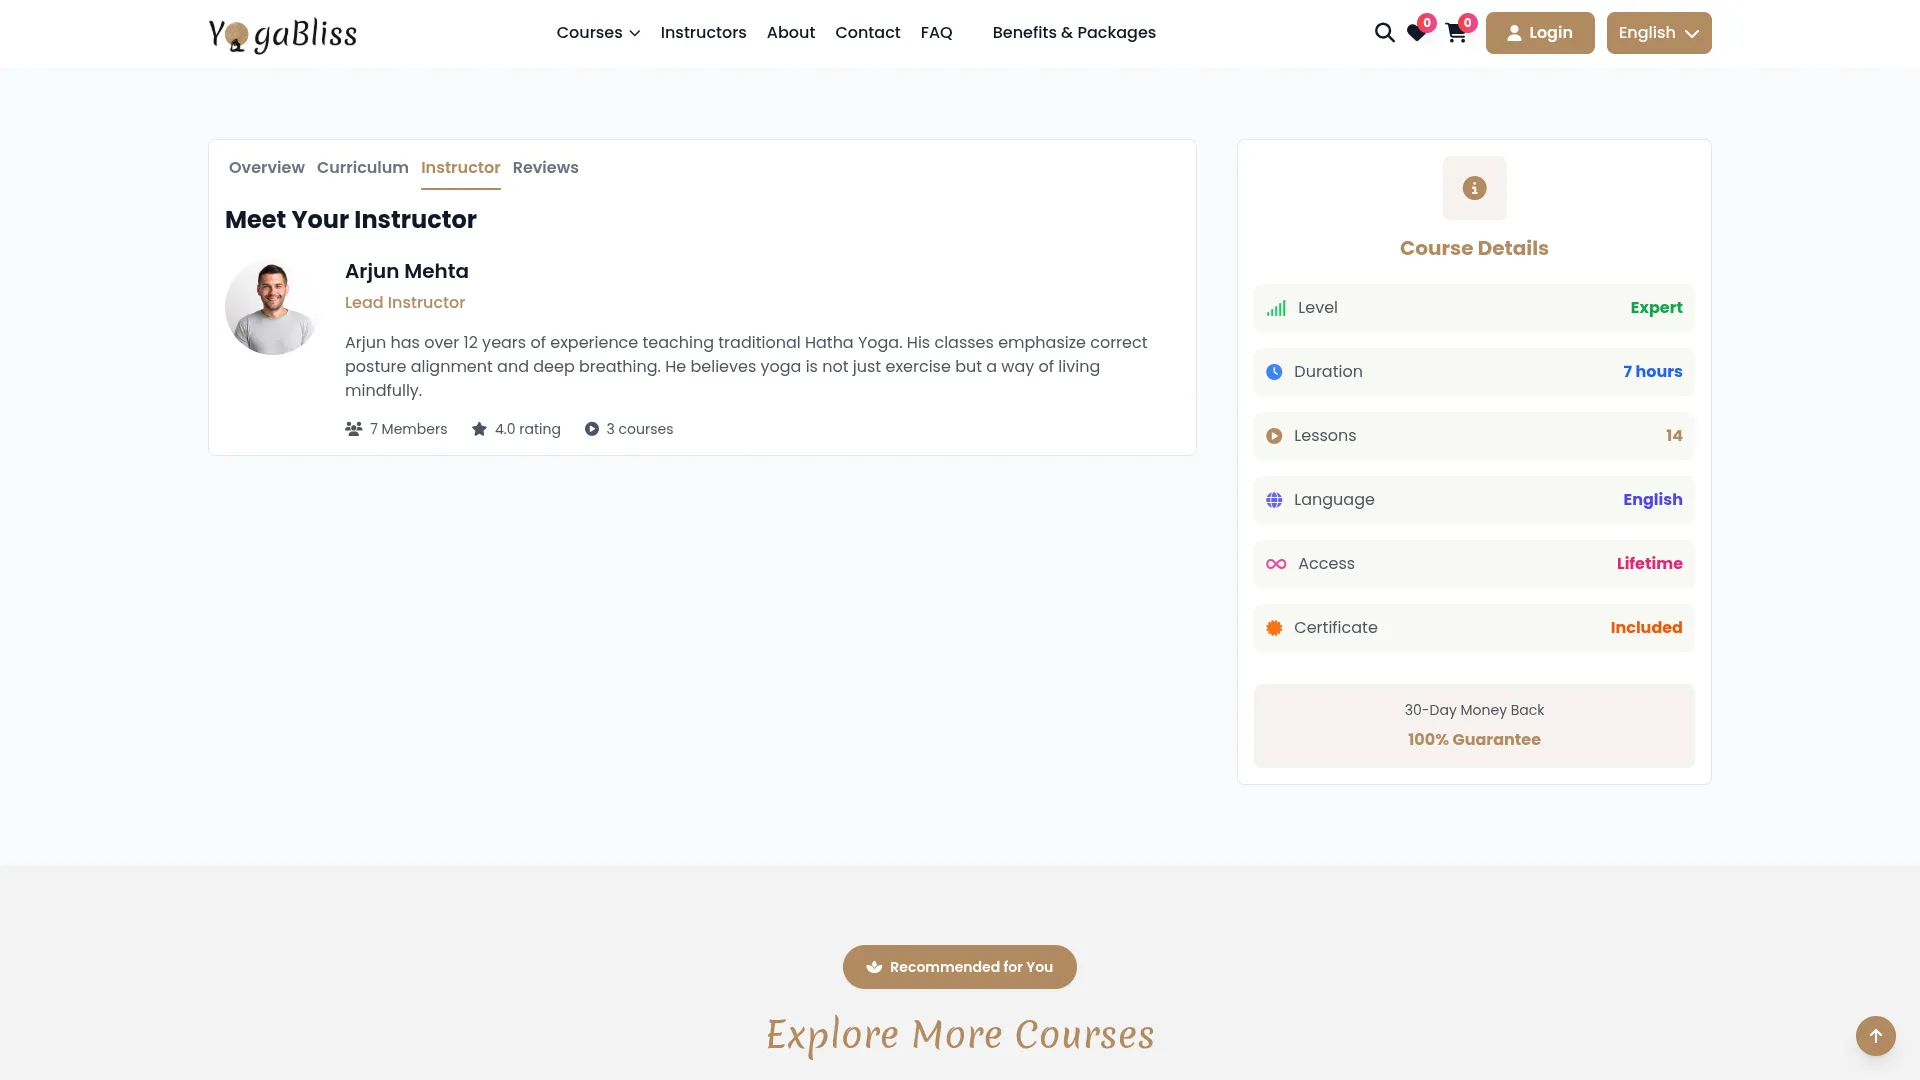
- Provides four main sections for complete course information: first is an overview, second is the Curriculum, third is the instructor, and fourth is the review section.

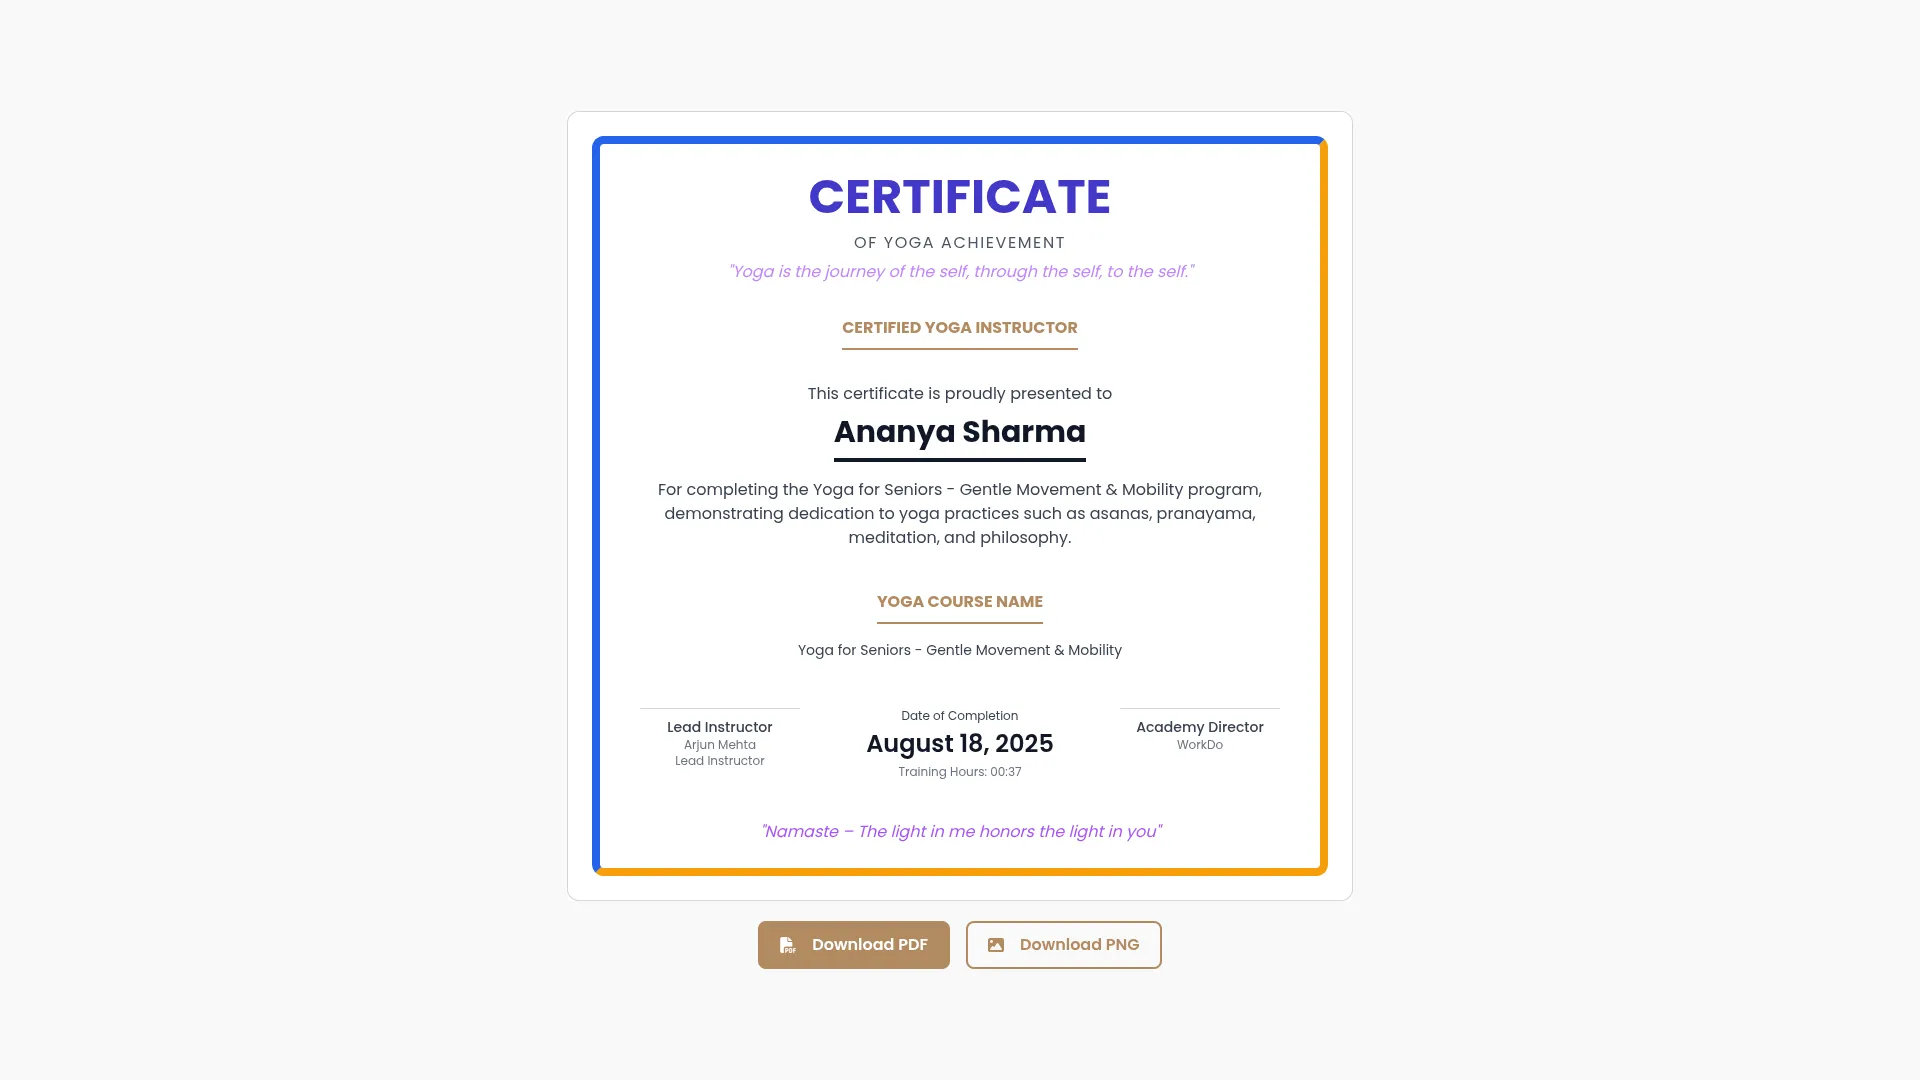
- The Overview tab shows detailed course descriptions, pricing, instructor information, and enrollment options. The Curriculum tab displays all course chapters with individual content, a “Mark as Complete” option for each chapter, a progress bar showing completion percentage, and a “Get Certificate” button appearing after 100% completion that generates downloadable PDF and PNG certificates with the member’s or instructor’s name, course title, and completion date.
- The Instructor tab shows detailed information about the course creator, including their experience, qualifications, and teaching philosophy. Members can add course reviews and ratings after enrollment.
Custom Page Management
- After creating a course page, navigate to the Custom Page section. To add a new custom page, click the “Create” button at the top of the section. You need to enter the page Name and add your Content using the text editor provided.
- Use the Page Header Display toggle button to control whether the page name appears in the website’s top header navigation. When set to ON, members can click the page name in the header to view the page’s dynamic content.
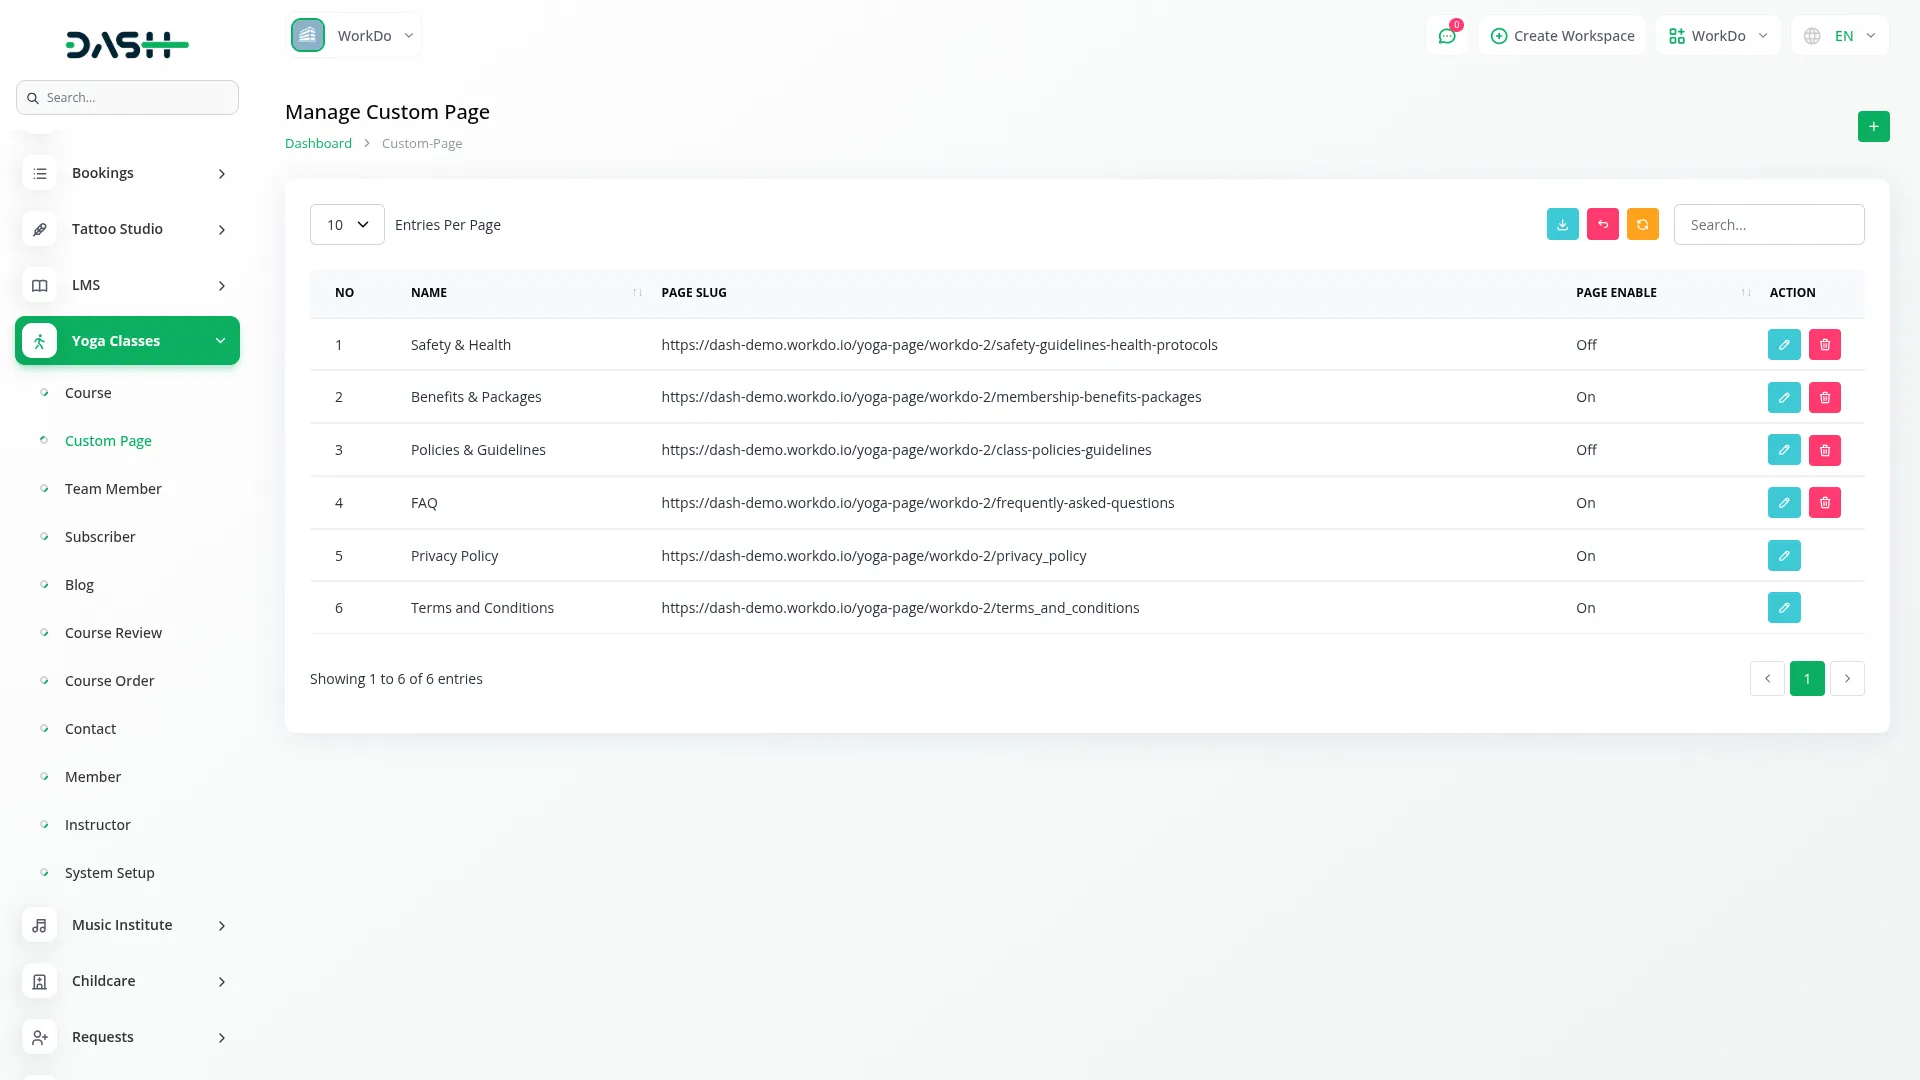
- On this page, you’ll get to see a custom list that displays with columns for Name, Page Slug (page link), and Header (on/off status). You can easily manage a custom page with search, export, reset, and reload buttons.
- In the Action column, click Edit to modify the record. Click Delete to remove pages that are no longer needed.
- Note: Terms and Conditions and Privacy Policy pages are set by default and cannot be removed. These special pages will appear in the footer section of the website, regardless of the toggle setting. And in the Action column, you can only edit to modify that data on the backend side.
- When you create a custom page from the backend, you will find an On/Off toggle option to enable or disable the page. Only if this toggle is turned ON, the custom page will be visible on the website header. If it is set to OFF, the page will not appear on the frontend.

Team Member Management
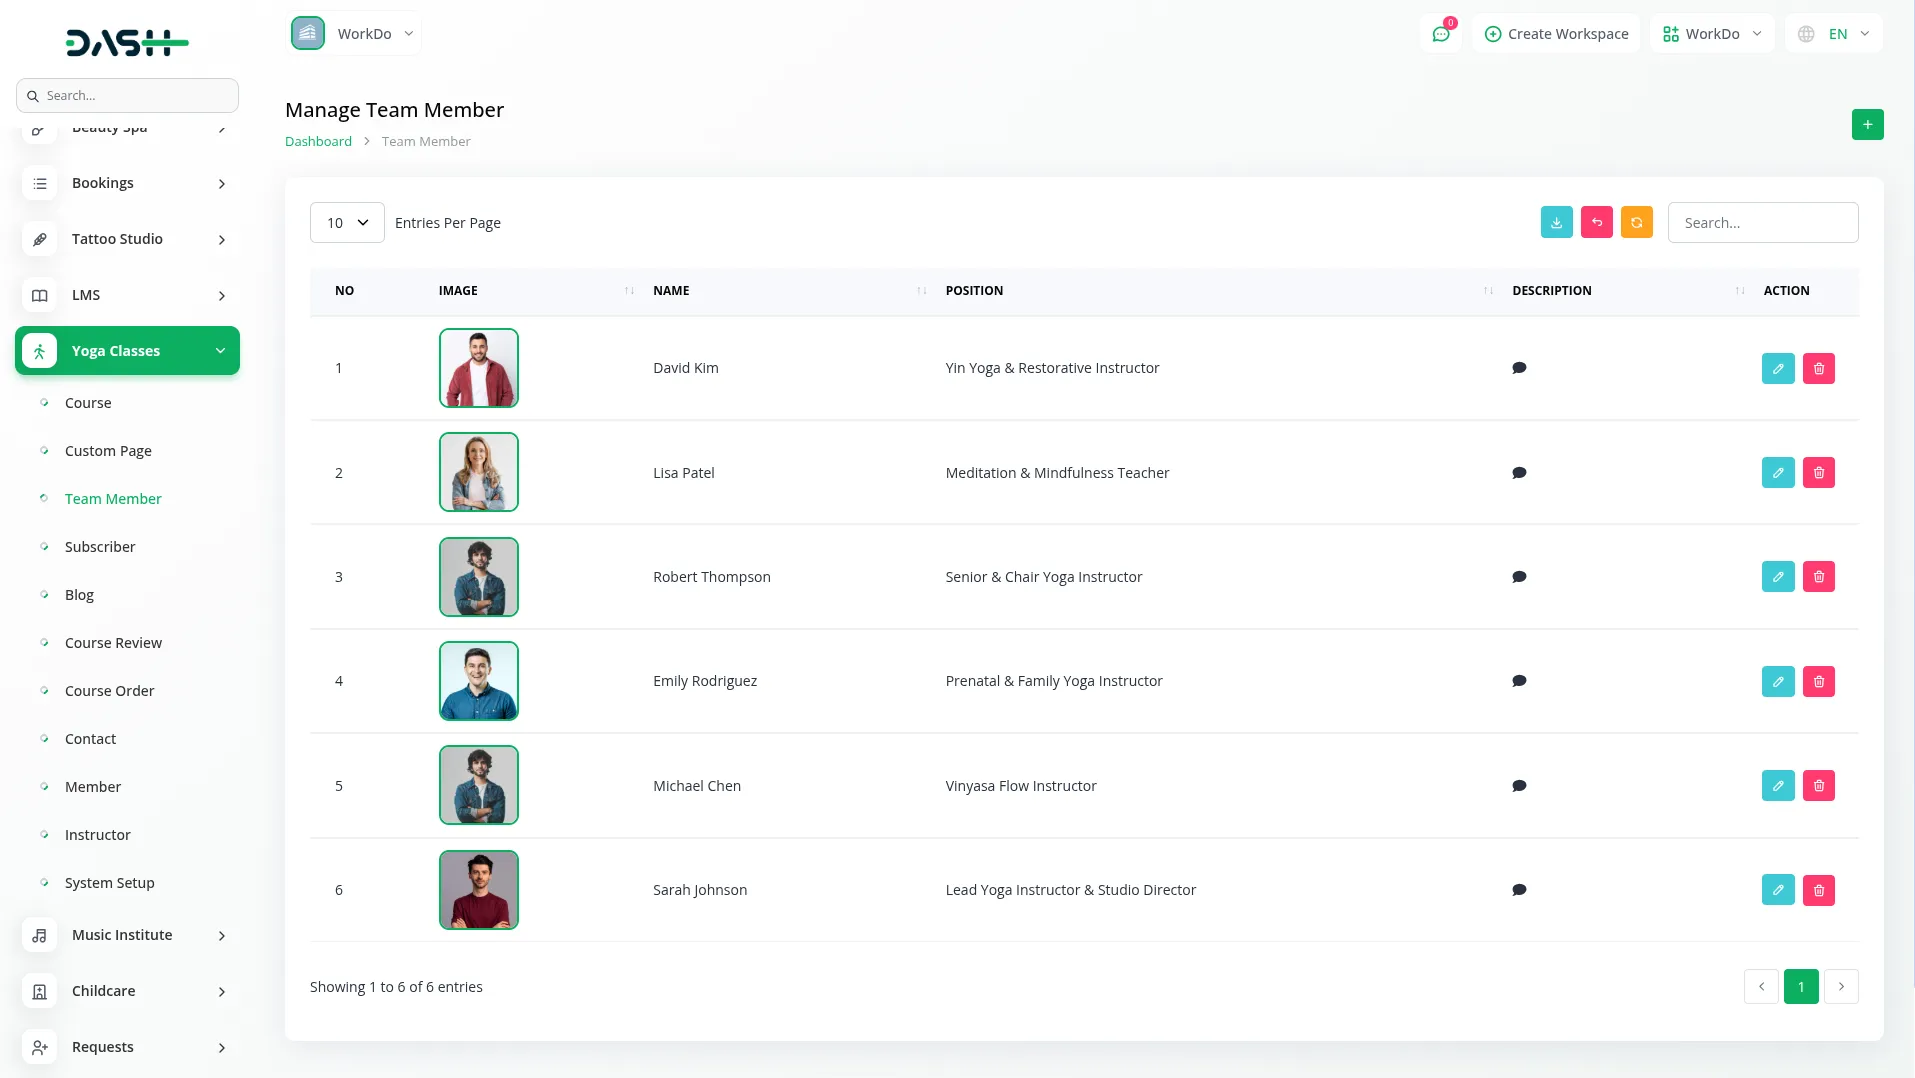
- On this page, you can create a new team member by clicking the “Create” button at the top of the team member page. Fill in the required details, like entering the Name and Position within your organisation.
- Add a detailed Description explaining their role, expertise, or background information. Upload an Image to display their photo on the website.
- The list page shows all team members with columns for No, Image, Name, Position, Description, and Action. Use the search bar, export, reset, and reload buttons to manage a team member list page.
- Additionally, help of the Action column: click Edit to modify a detail or click Delete to remove team member profiles.
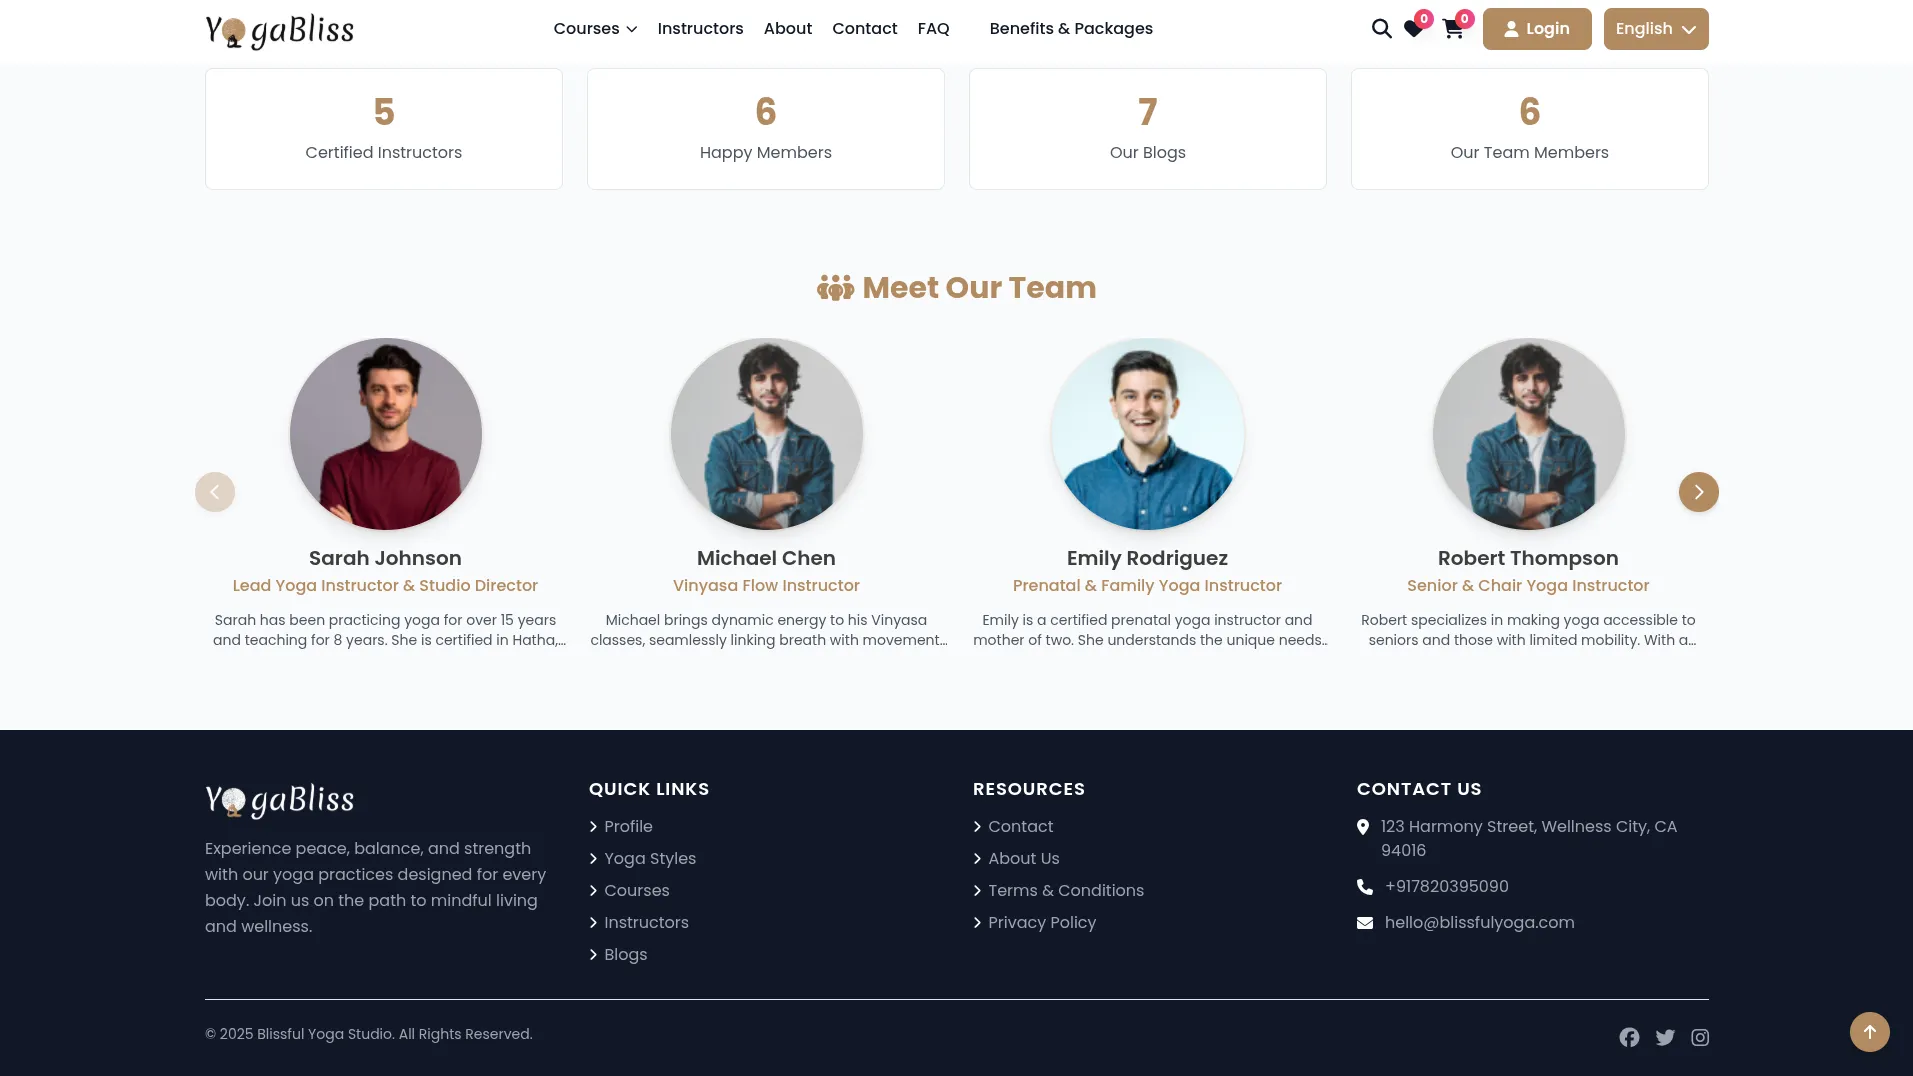
- The details you create in the Team Member section will appear on the About page of the website. In the Meet Over Team section, images, names, positions, and descriptions are displayed, allowing members to easily view and understand the team members’ profiles.
Subscriber Management
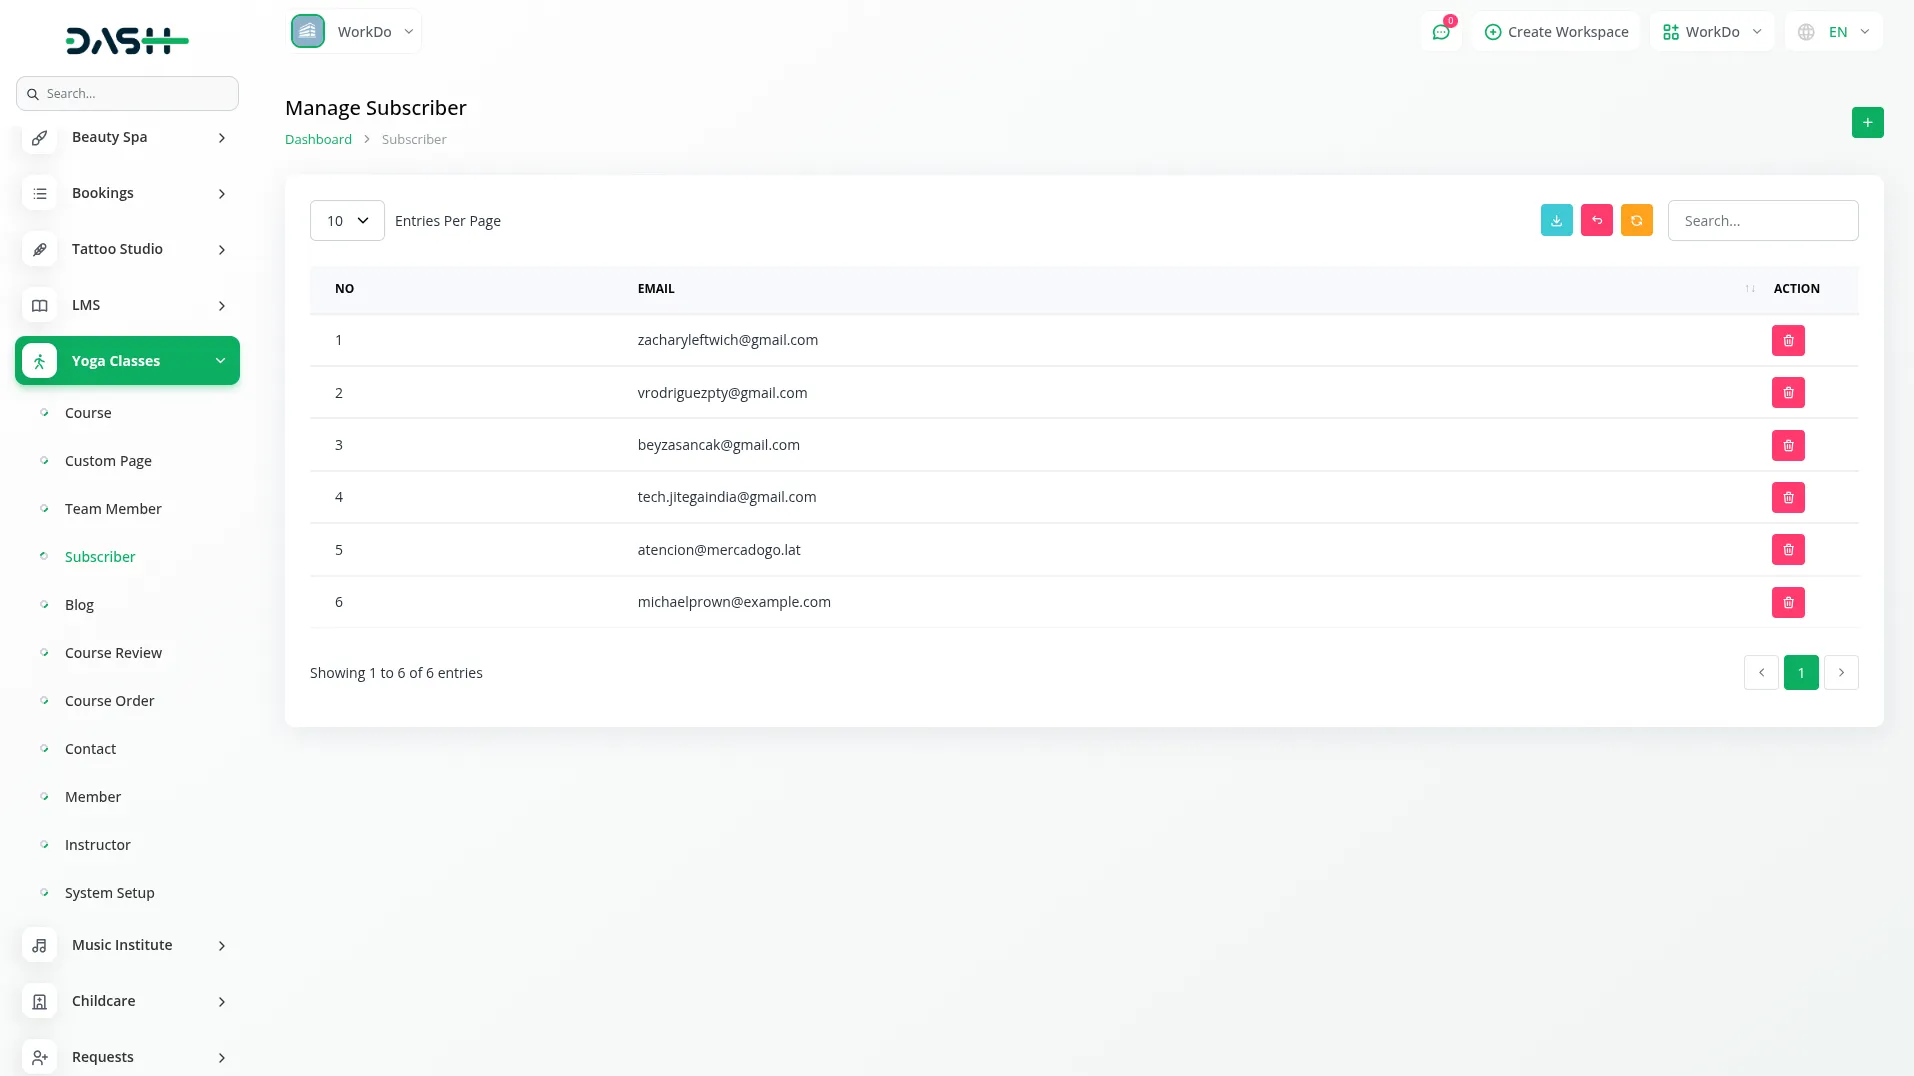
- To add a new Subscriber manually, click the “Create” button at the top of the subscriber page. Enter the subscriber’s Email address in the provided field.
- On the list page, you’ll get to see all subscribers displayed with columns for No, Email, and Action. Use the search, export, reset, and reload buttons to manage this list page. With the help of the action column, delete to remove the unnecessary record.
- Most subscribers are added automatically when members use the subscription form on your website’s community section, but this manual option allows you to add email addresses directly, and the Article page also includes a subscription section to easily begin to become a subscriber.
Blog Management
- On this page, you can create a new Blog post by clicking the “Create” button at the top of the page. Fill in the required details, like entering the blog Title and selecting an Instructor from the dropdown (comes from the instructor section).
- Add relevant Tags to help categorise and organise your blog content. Upload an Image that will serve as the featured image for the blog post. Write the detailed content in the Detail field using the text editor.
- The list page shows all blog posts with columns for No, Image, Title, and Created at. You can easily use the search bar, export, reset, and reload buttons to manage the blog list page.
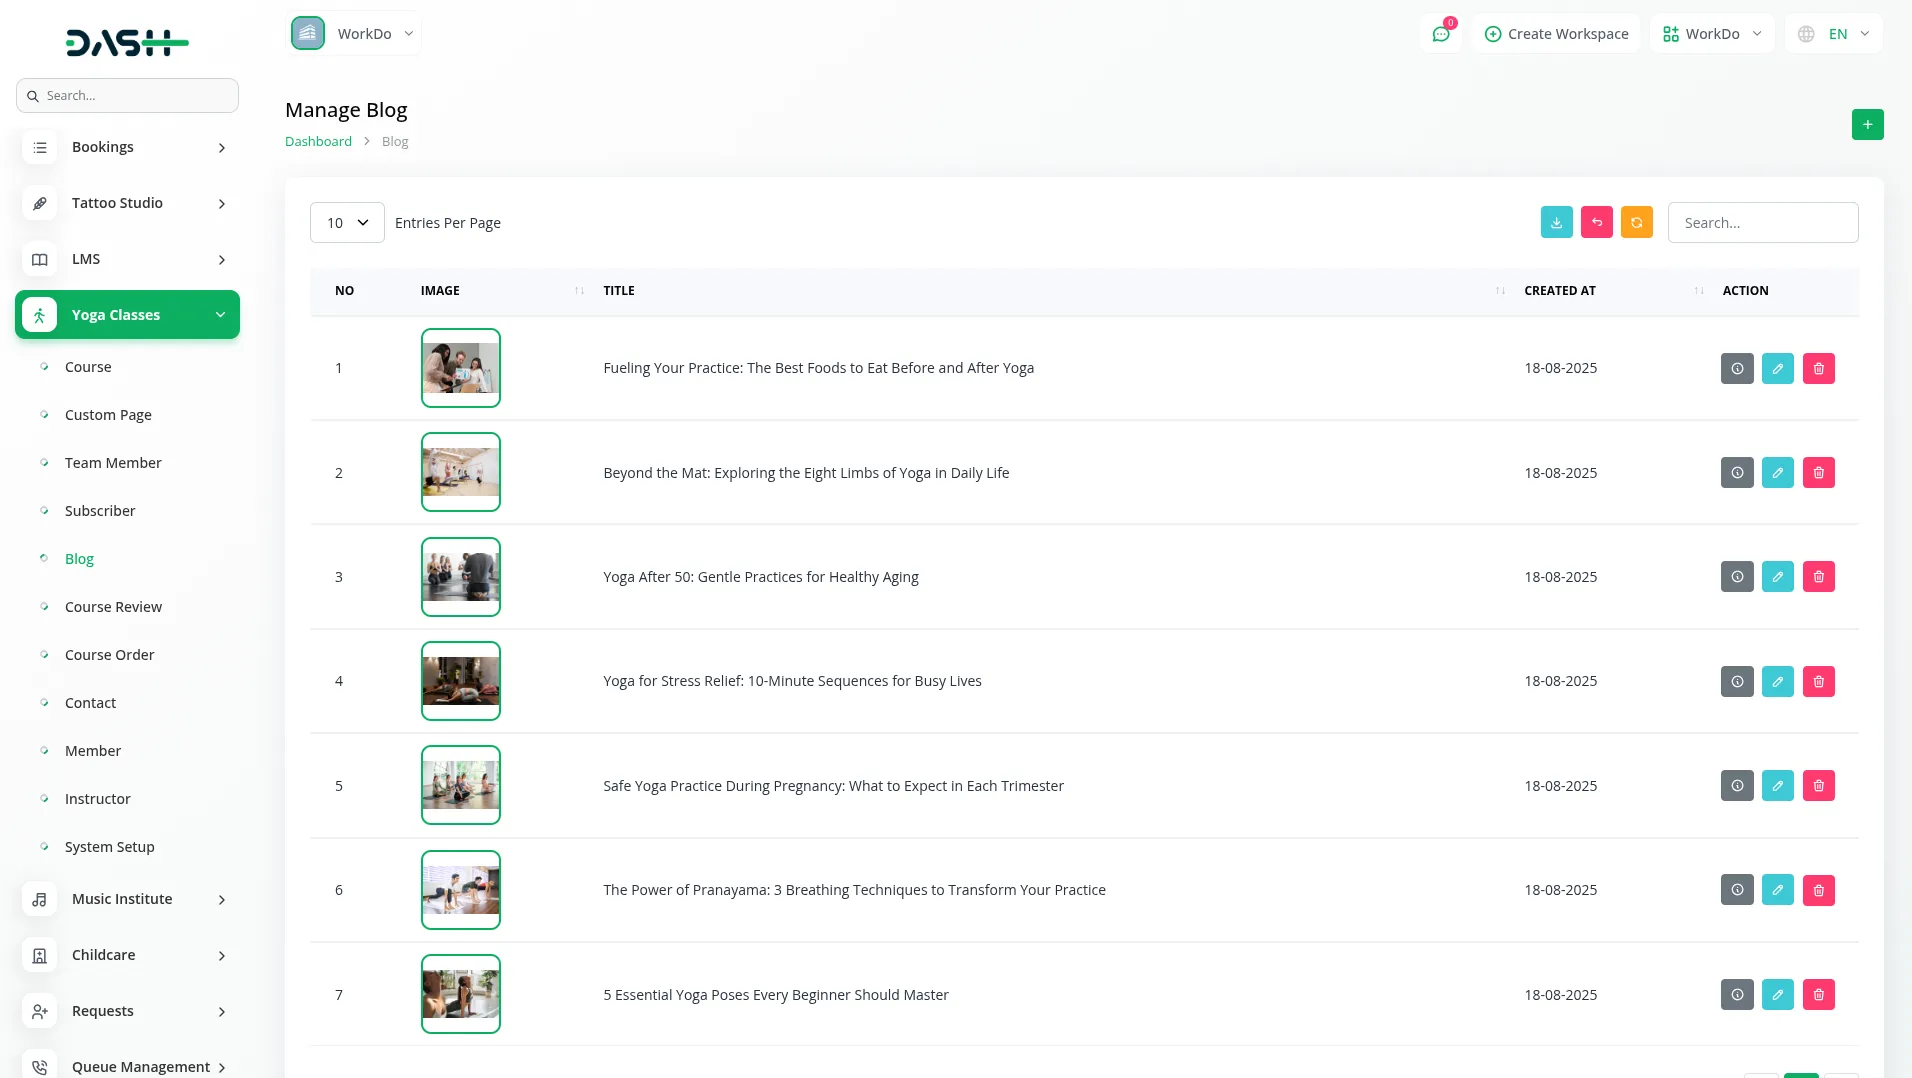
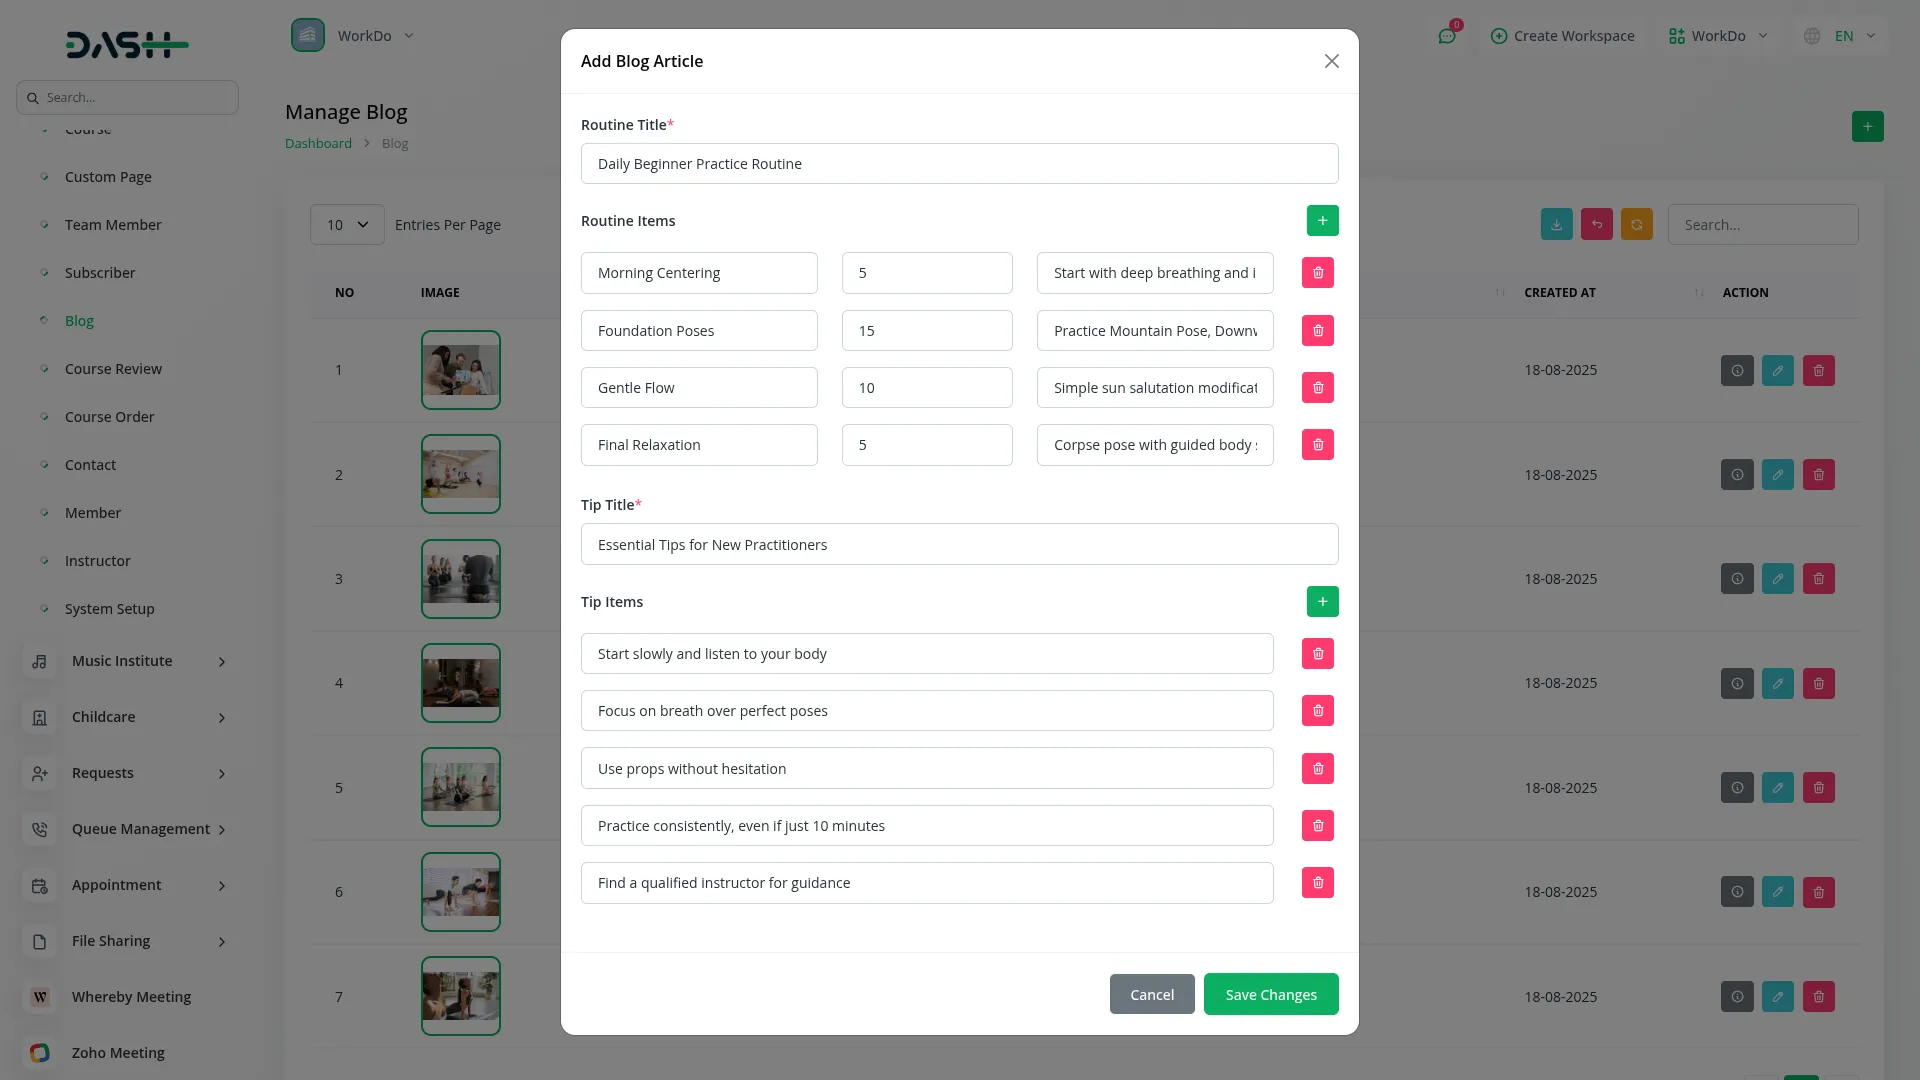
- With the Action column, you can use the Article add to create additional article content for the blog post. This opens a form where you can enter a Routine Title and add multiple Routine Items using the repeater function. You can also add Tip Title and multiple Tip Items using the repeater feature.
- You can also use the edit button to modify the blog post or delete it to remove unwanted records.
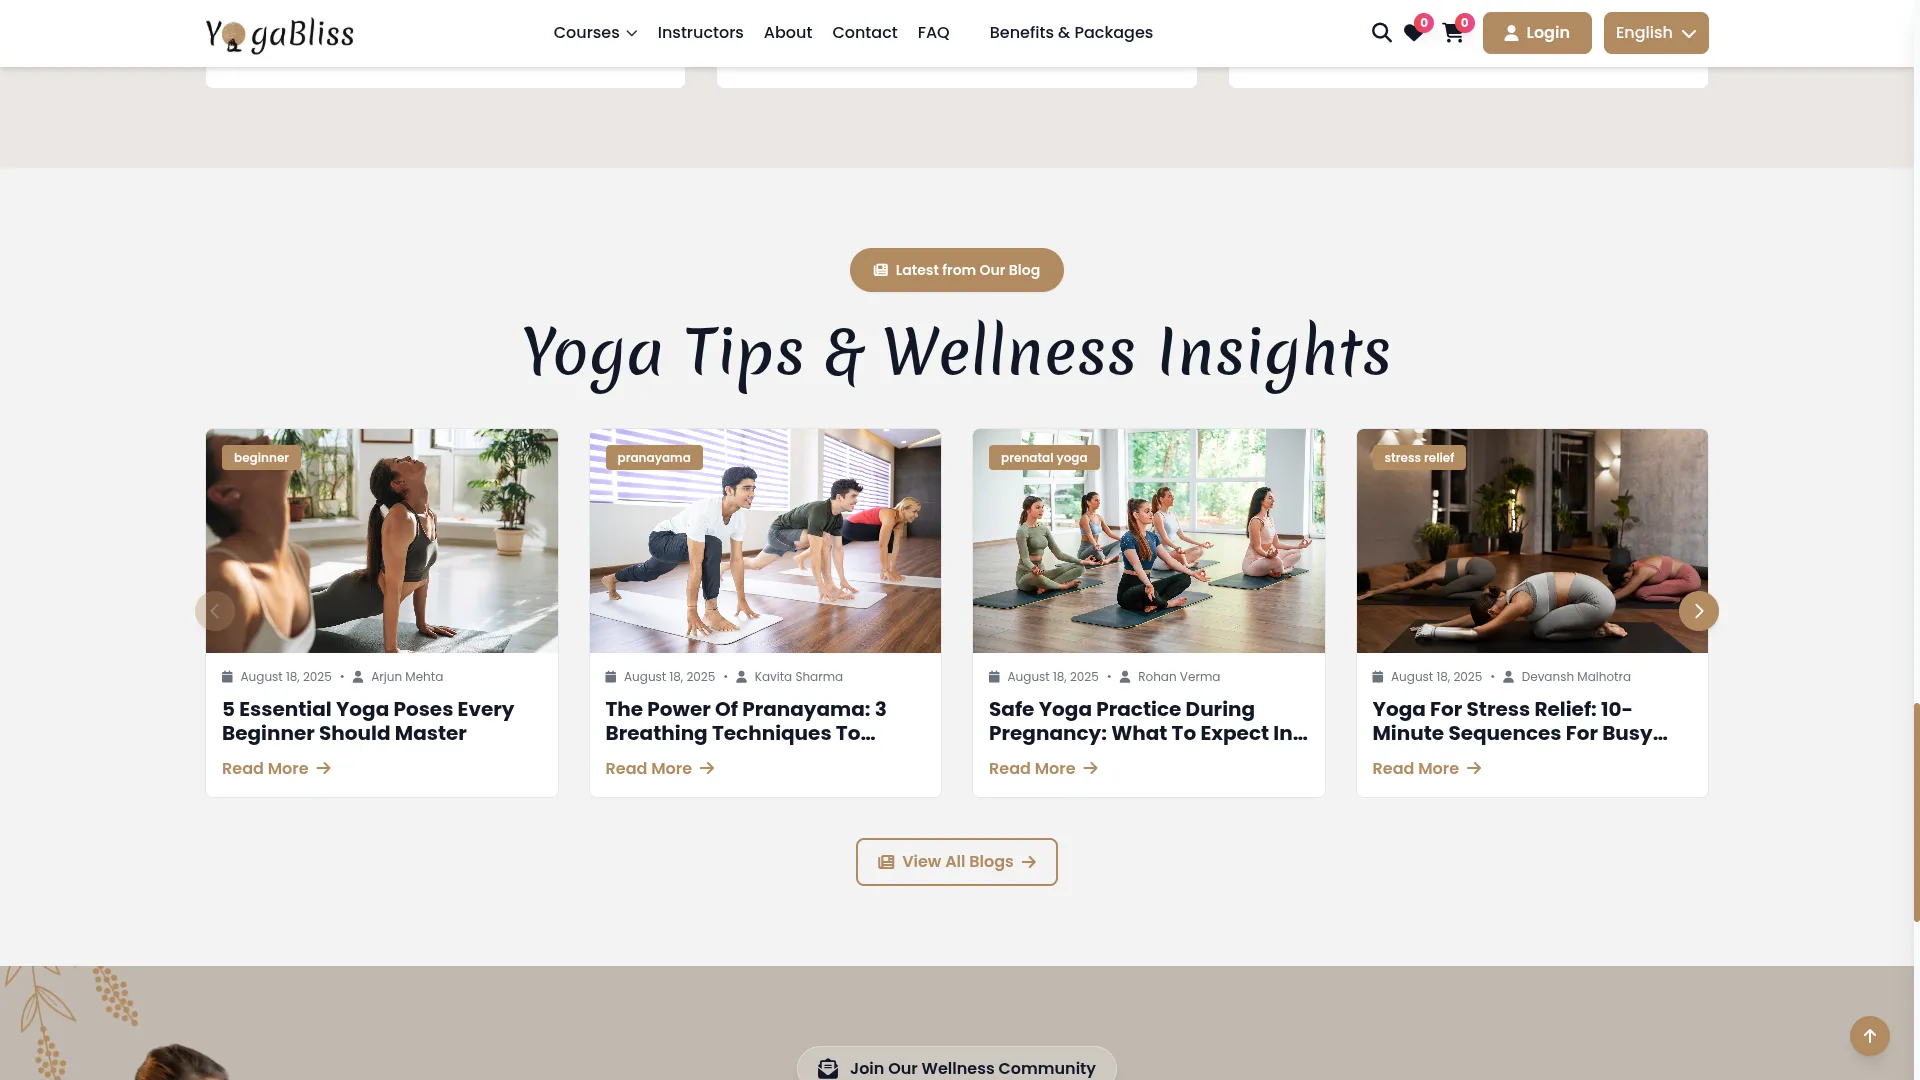
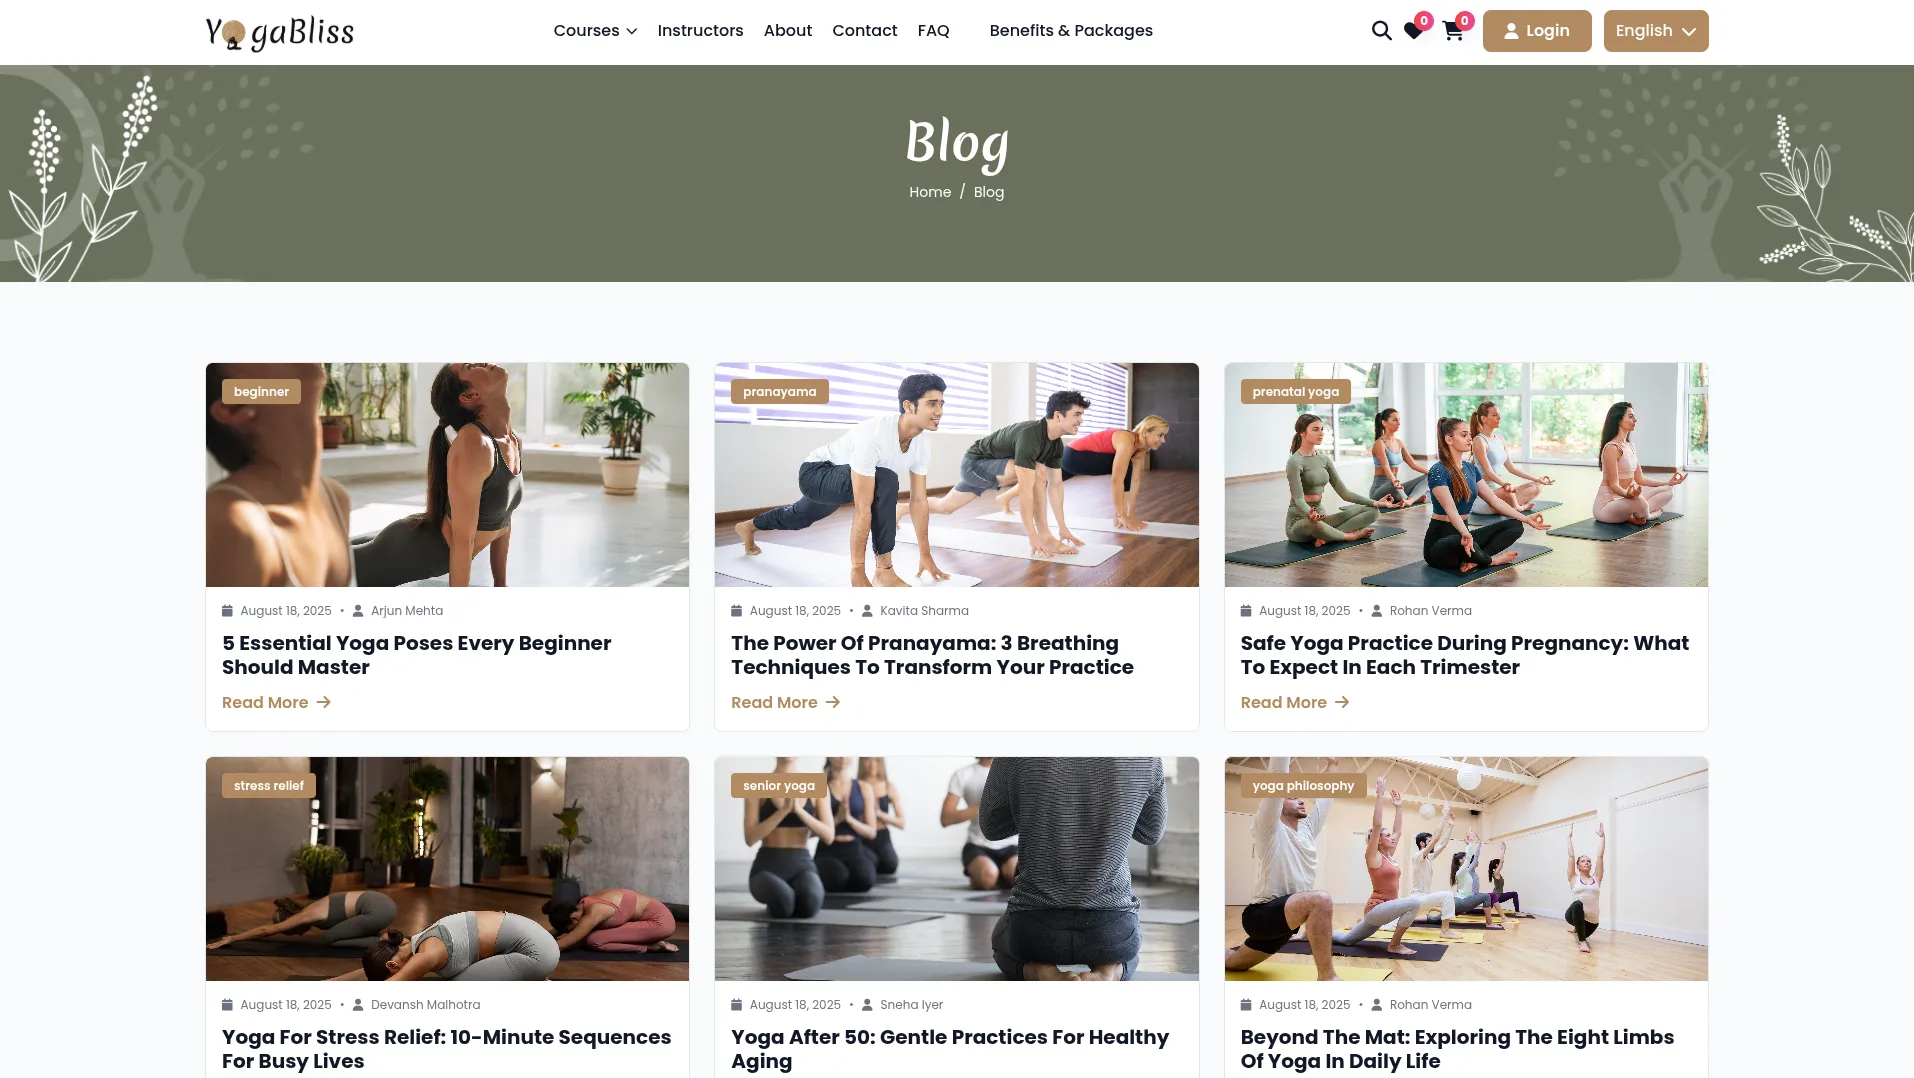
- On the Home Page, there is a Latest Blog section that shows your blogs. If you click the View All Blogs button, you will go to the blog page, where all blogs are shown in a grid view.
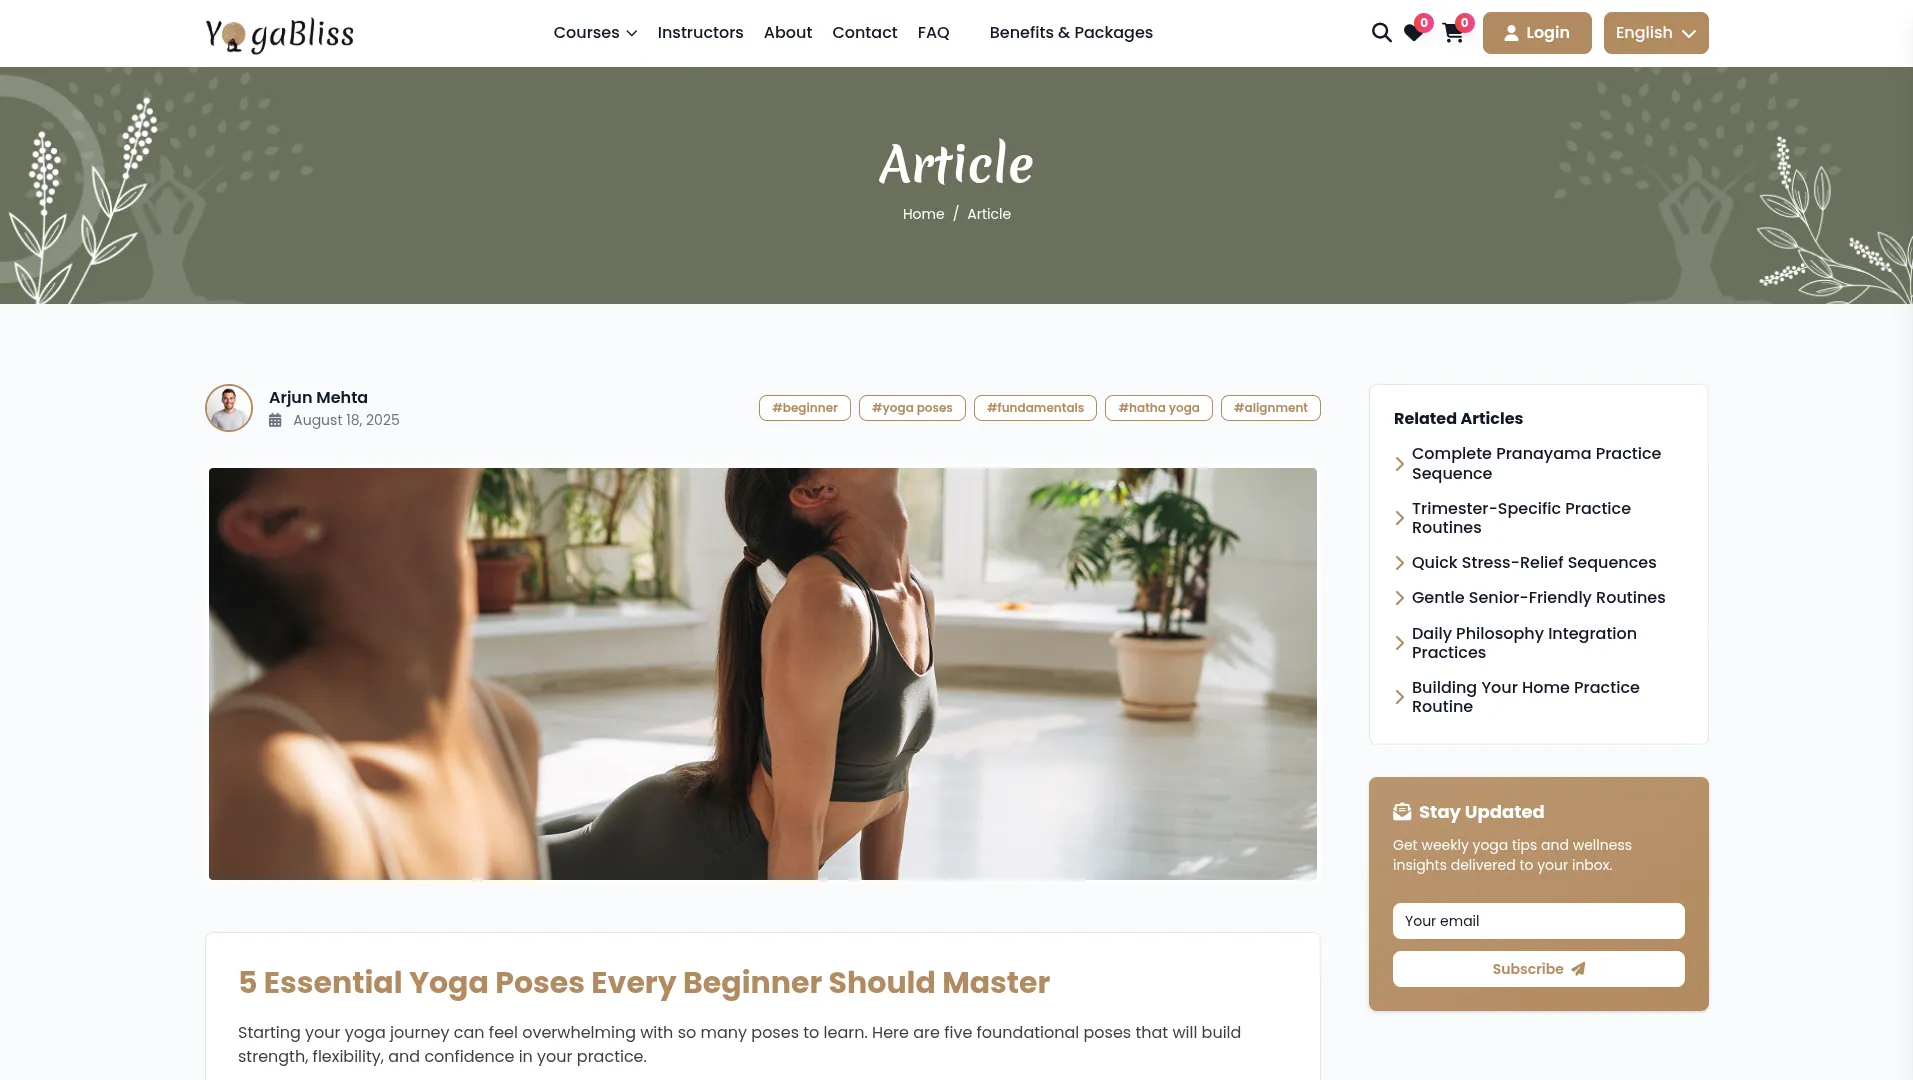
- When you click ‘Read More’, you will be navigated to the Article Page, where the details of that particular blog are shown. On this page, you will also find a Related Articles filter option and a Subscribe option. To subscribe, you just need to enter your email ID and complete the process.
Course Review Management
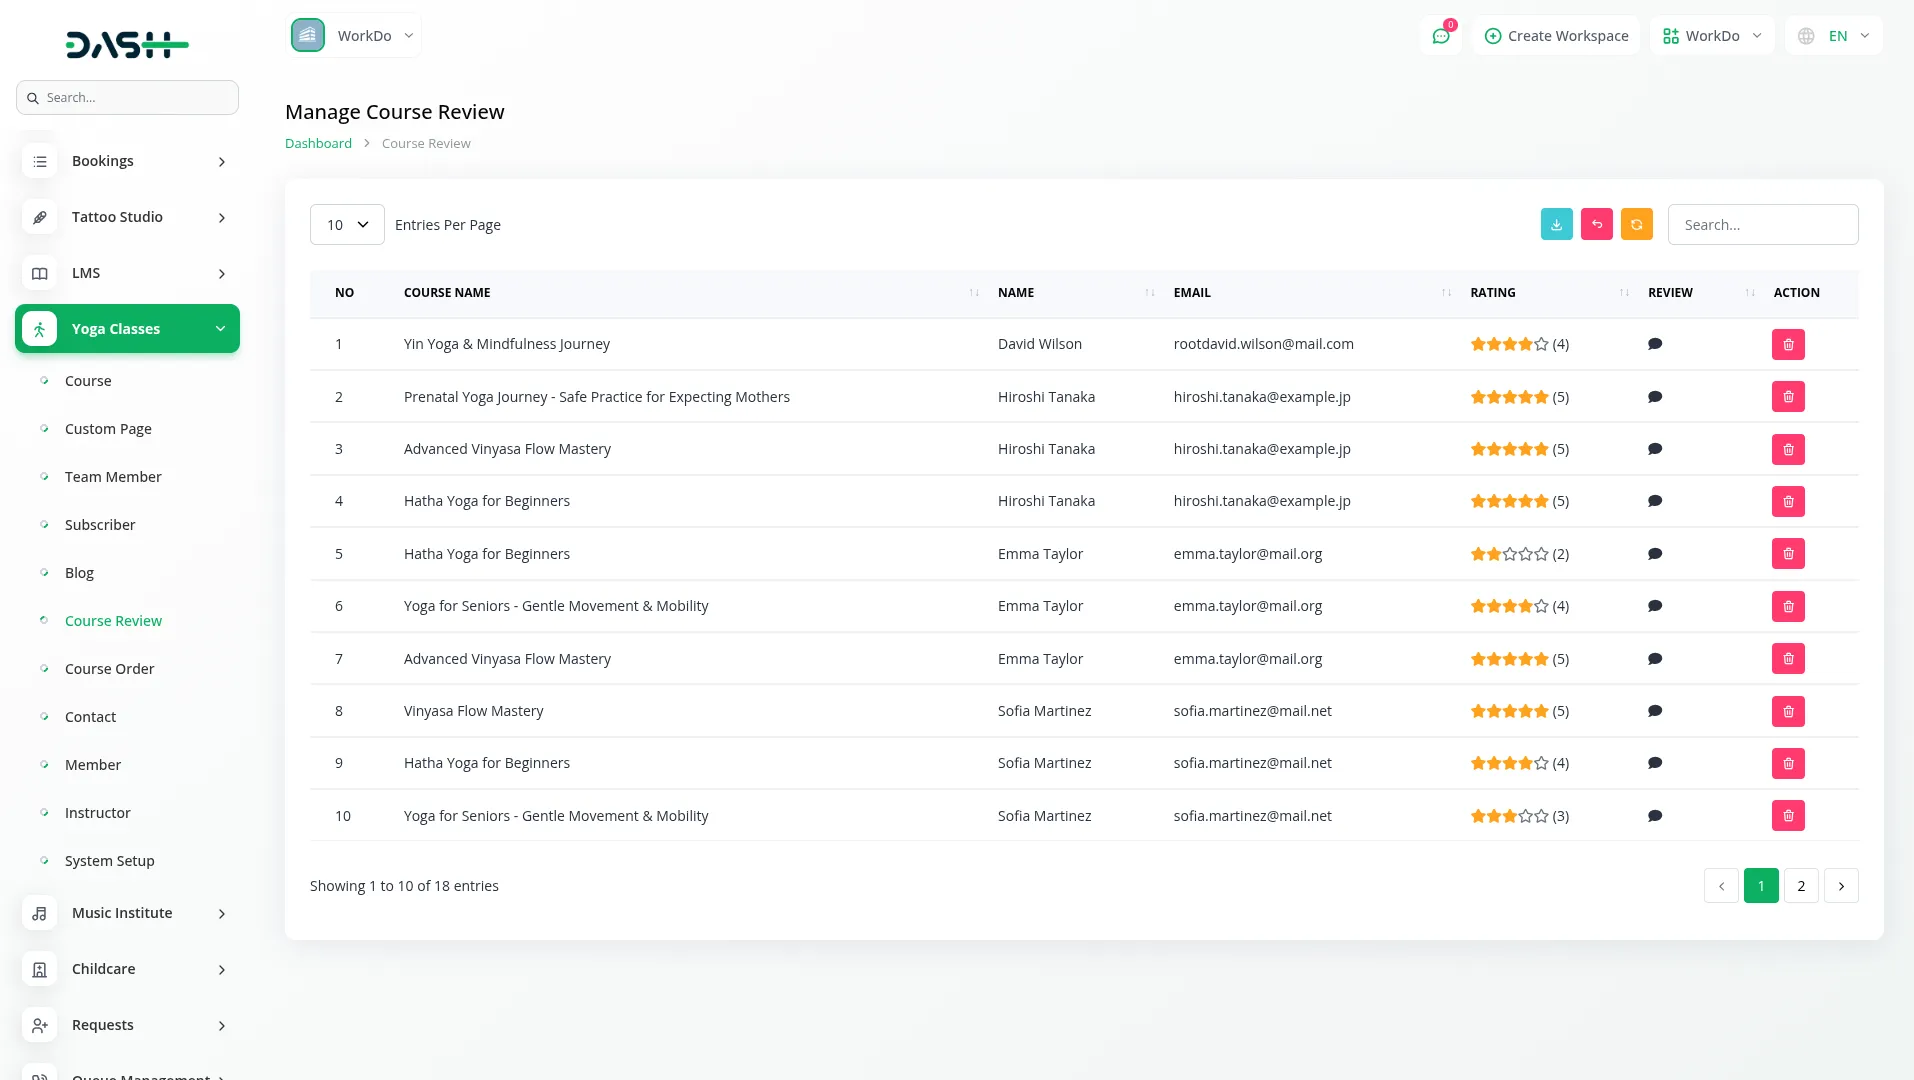
- The Course Review section displays all reviews submitted by members for your courses. This is a view-only section where you can monitor feedback and ratings.
- On this page, you’ll get to see the complete list of course reviews that display with columns for Course Name, Name (reviewer name), Email, Rating, and Review message. You can search or export, reset, and reload buttons to manage this page.
- In the Action column, click Delete to remove inappropriate reviews or spam content. Note that you cannot edit reviews, as they represent authentic user feedback, but you can remove them if they violate your content guidelines.
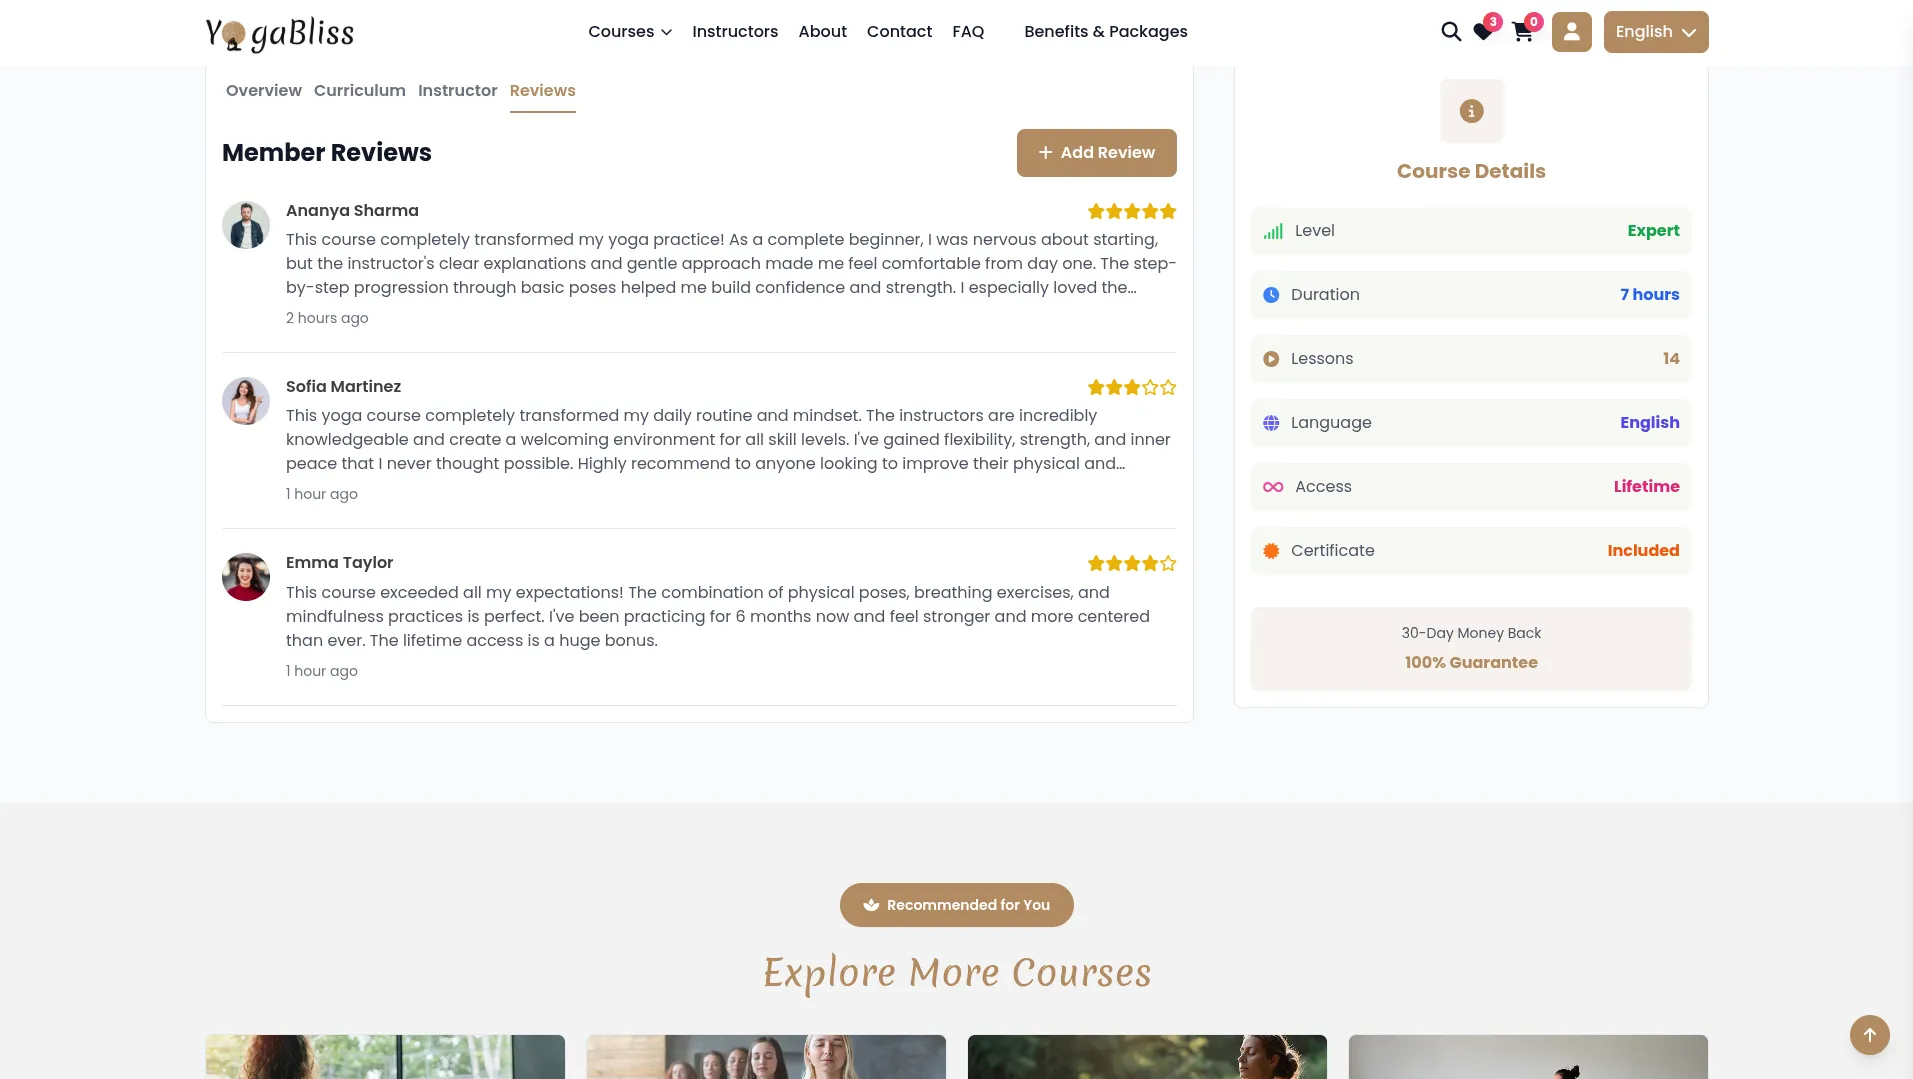
- On the course detail page of the website, members can view other members’ reviews and ratings. Members can share their feedback to help others know more about the course.
Course Order Management
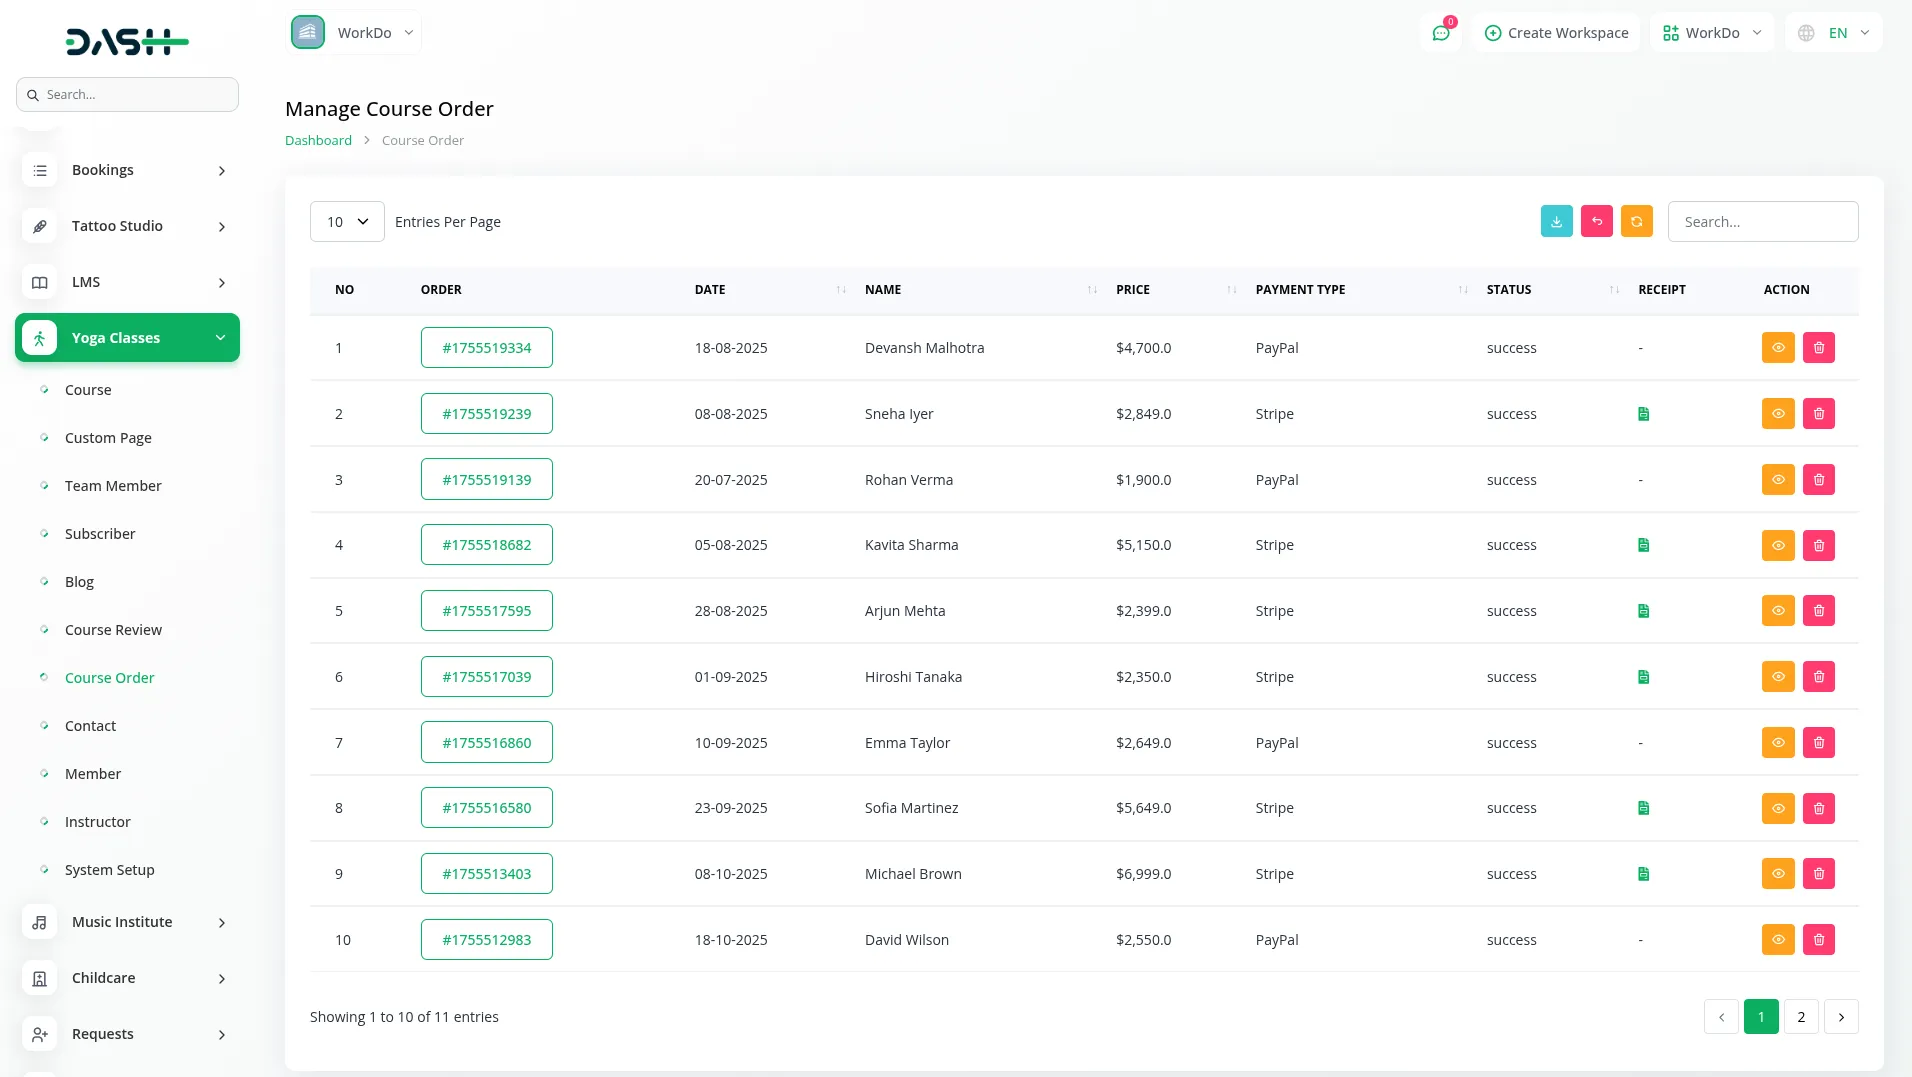
- The Course Order section displays all purchase transactions made by members and instructors. This section helps you track sales and manage order information.
- The list page shows all orders with columns for Order (order number), Date, Name (purchaser name), Price, Payment Type, Status, and Receipt. You can use the search or export, reset, and reload buttons to manage the course order page.
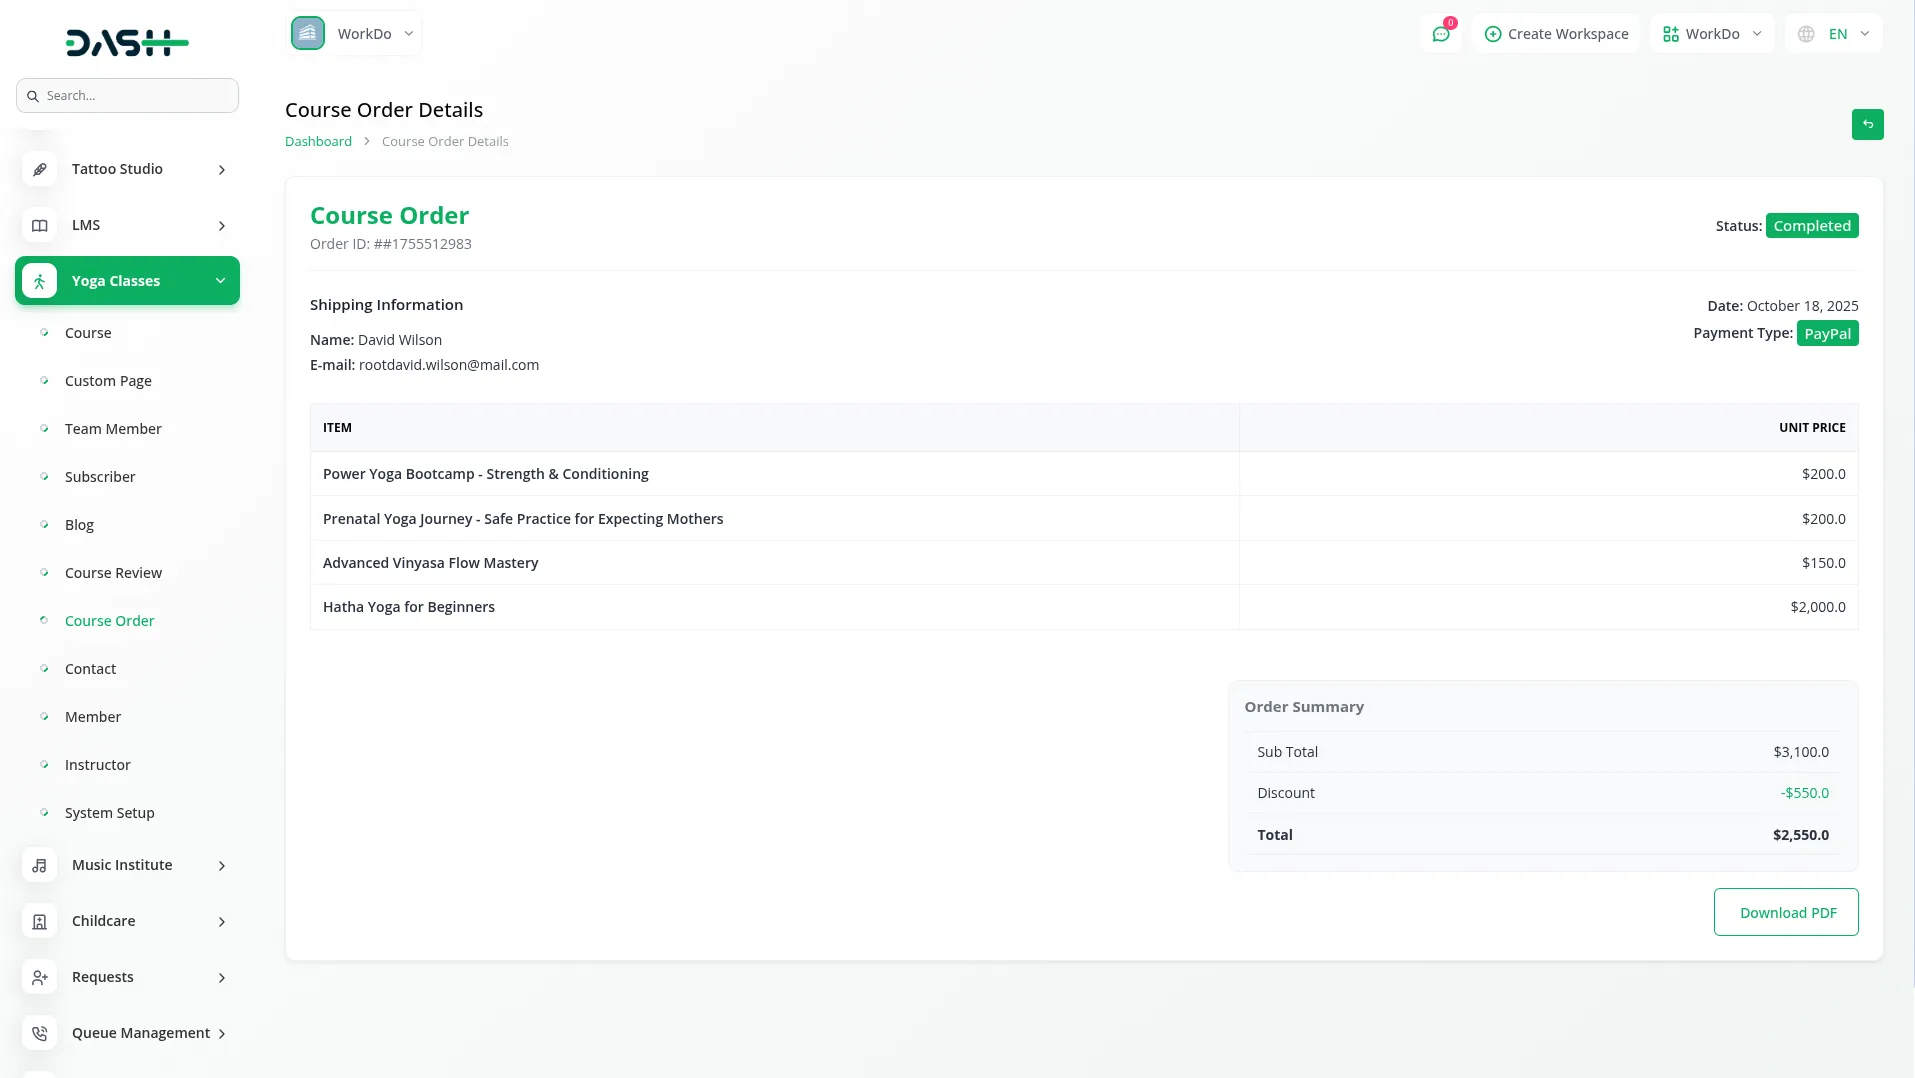
- In the Action column, click View to show complete Course Order Details, including customer information, course details, and payment information. This view also allows you to download the Course Order as a PDF for record-keeping or customer service purposes, or to click delete to remove order records.
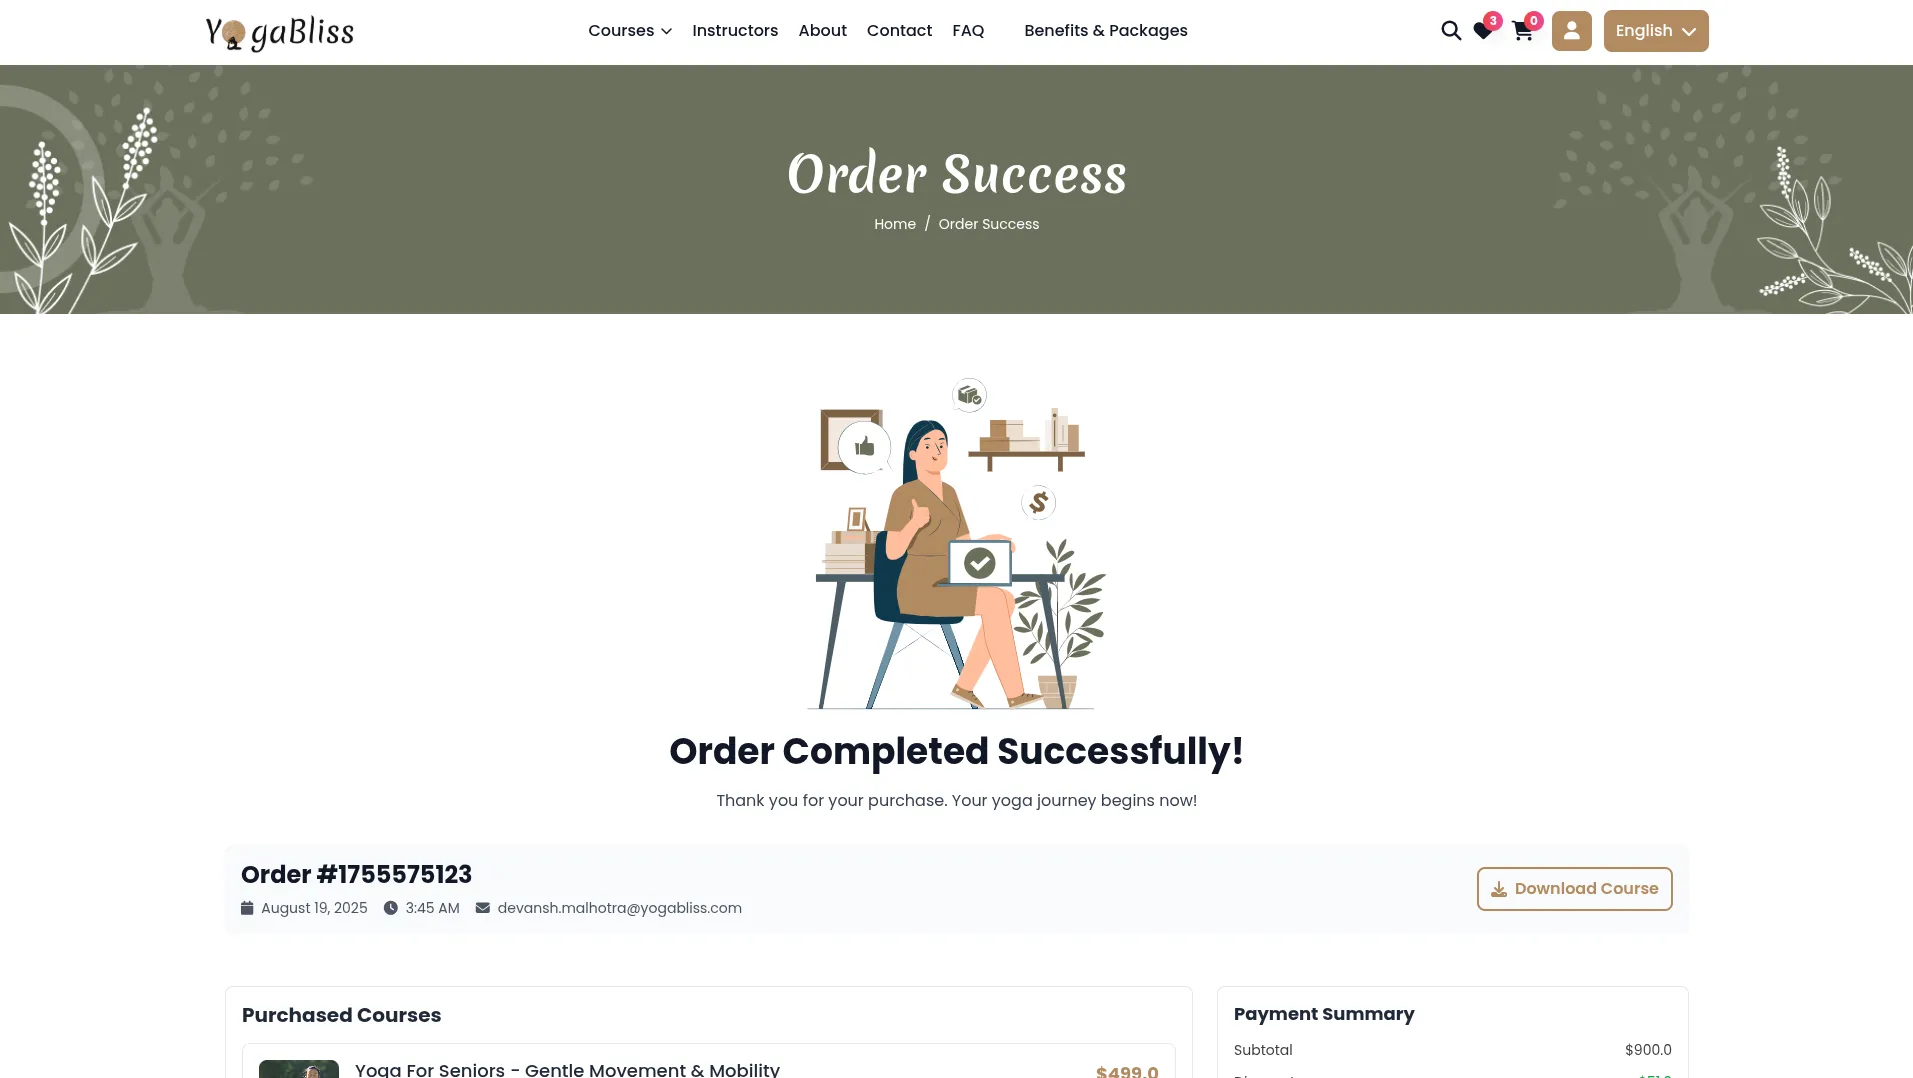
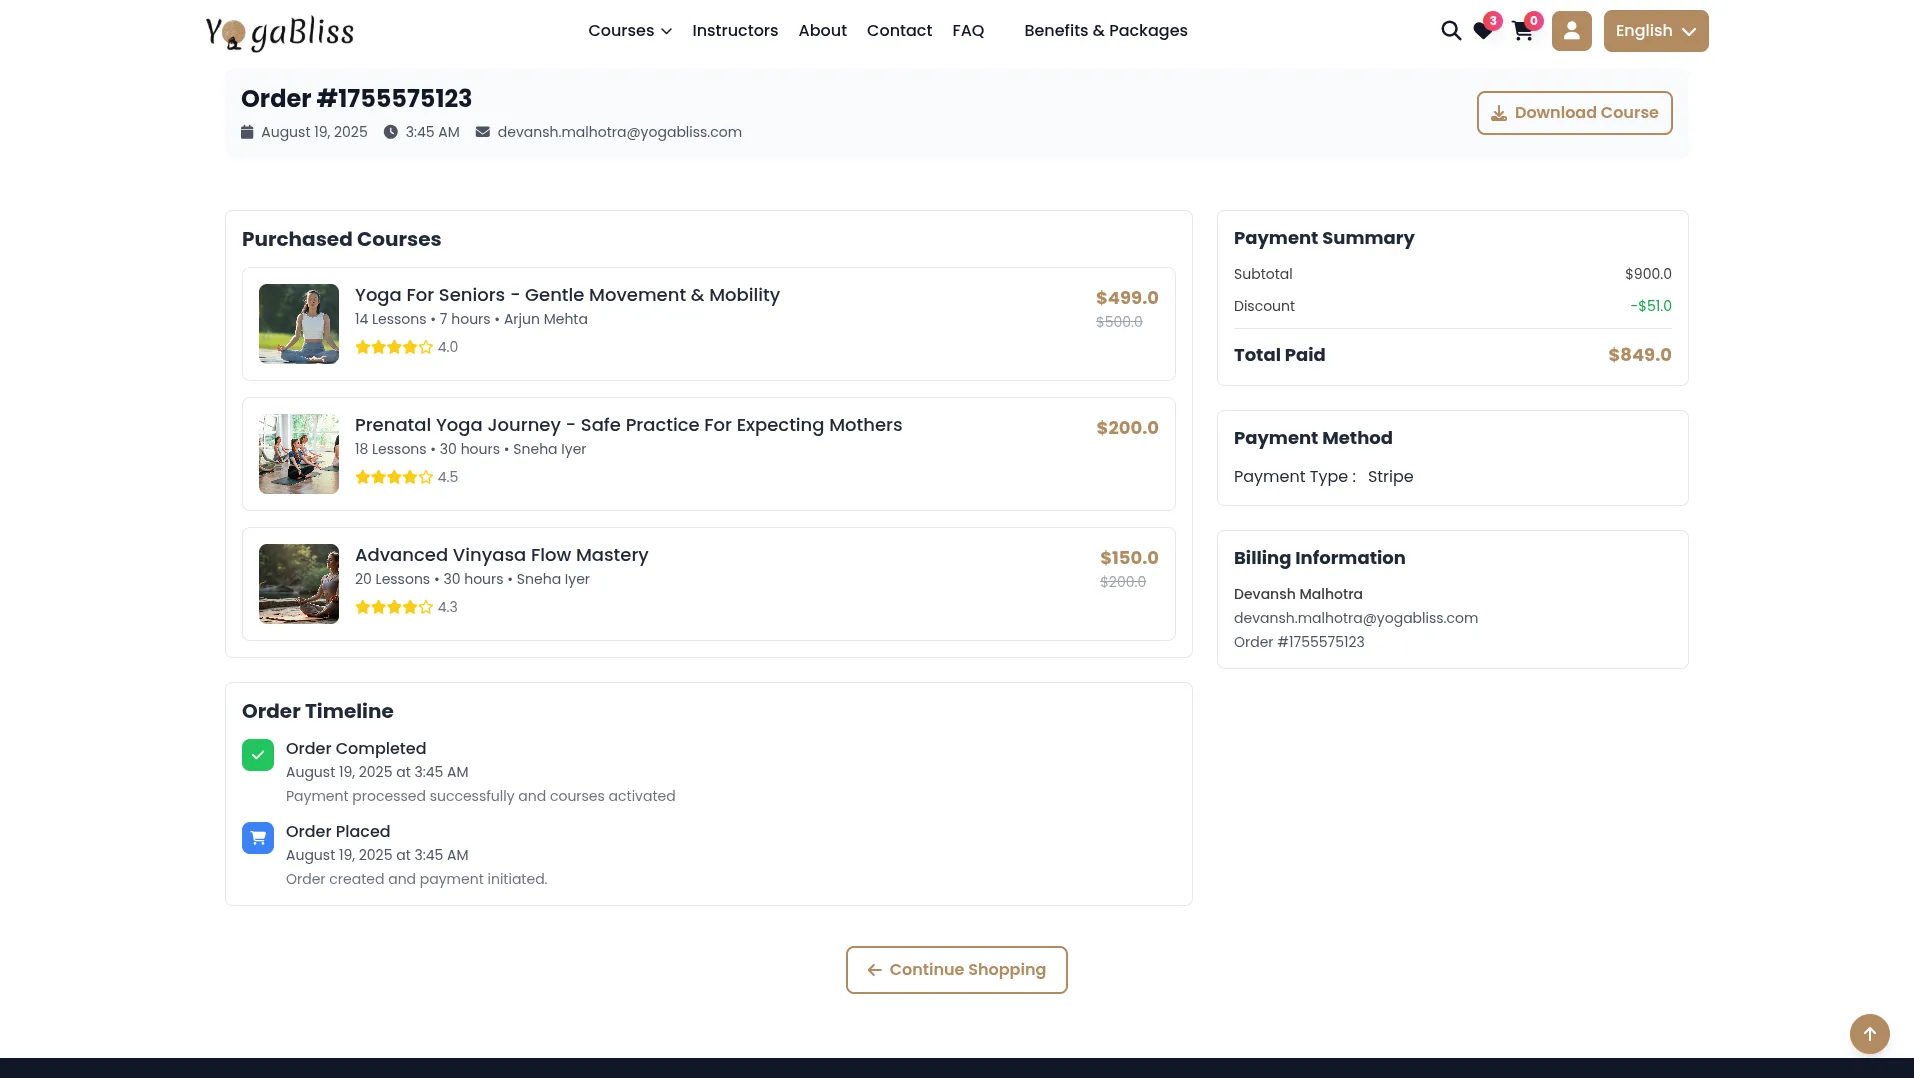
- After completing your purchase, you’ll see the Order Success page confirming your order. Here, you can view your Order ID, Purchased Courses, Payment Details, and Billing Information. Use the Download Course button to access your course right away.
- The Order Timeline shows the progress of your order, and the Continue Shopping button lets you explore more courses.
Contact Management
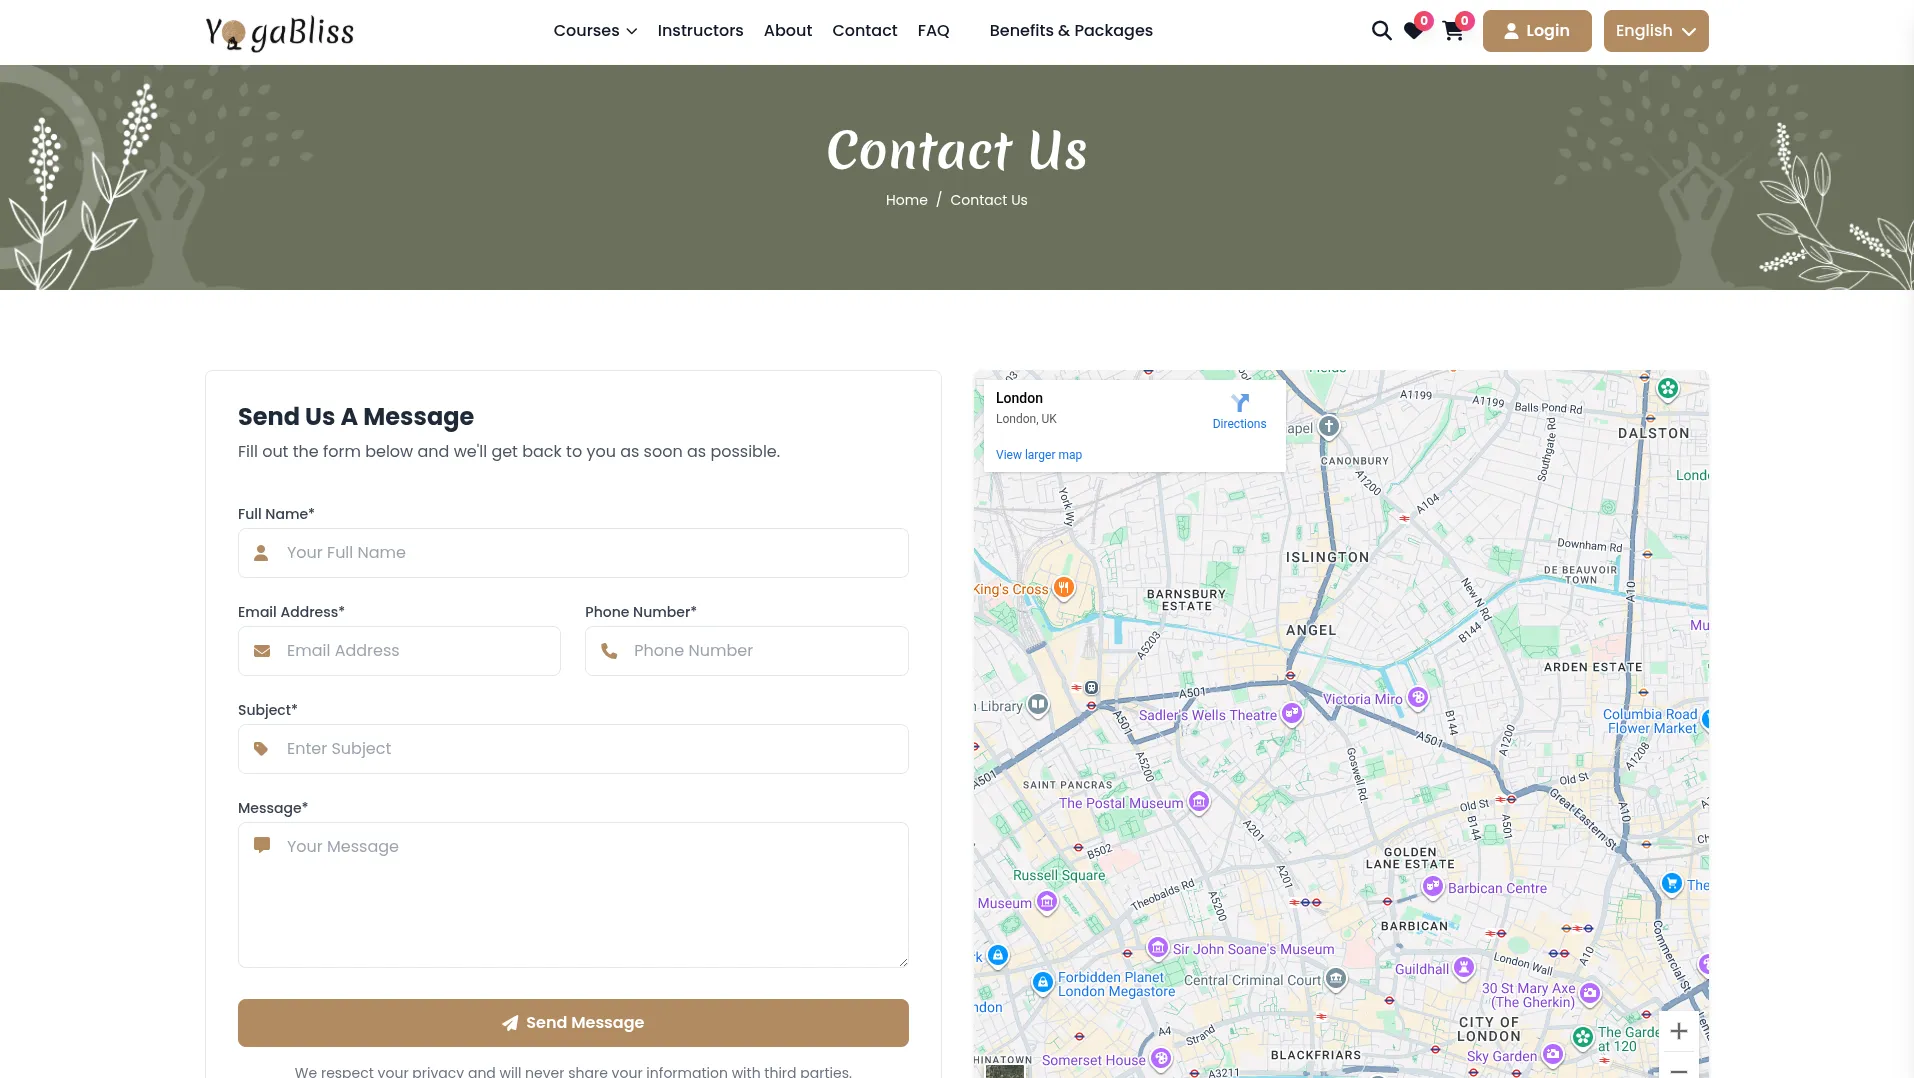
- The Contact Page has a form on the left to enter your Full Name, Email Address, Phone Number, Subject, and Message on the frontend side. The right, the map shows the class location. The data submitted through the form is shown in the backend for the admin to manage.
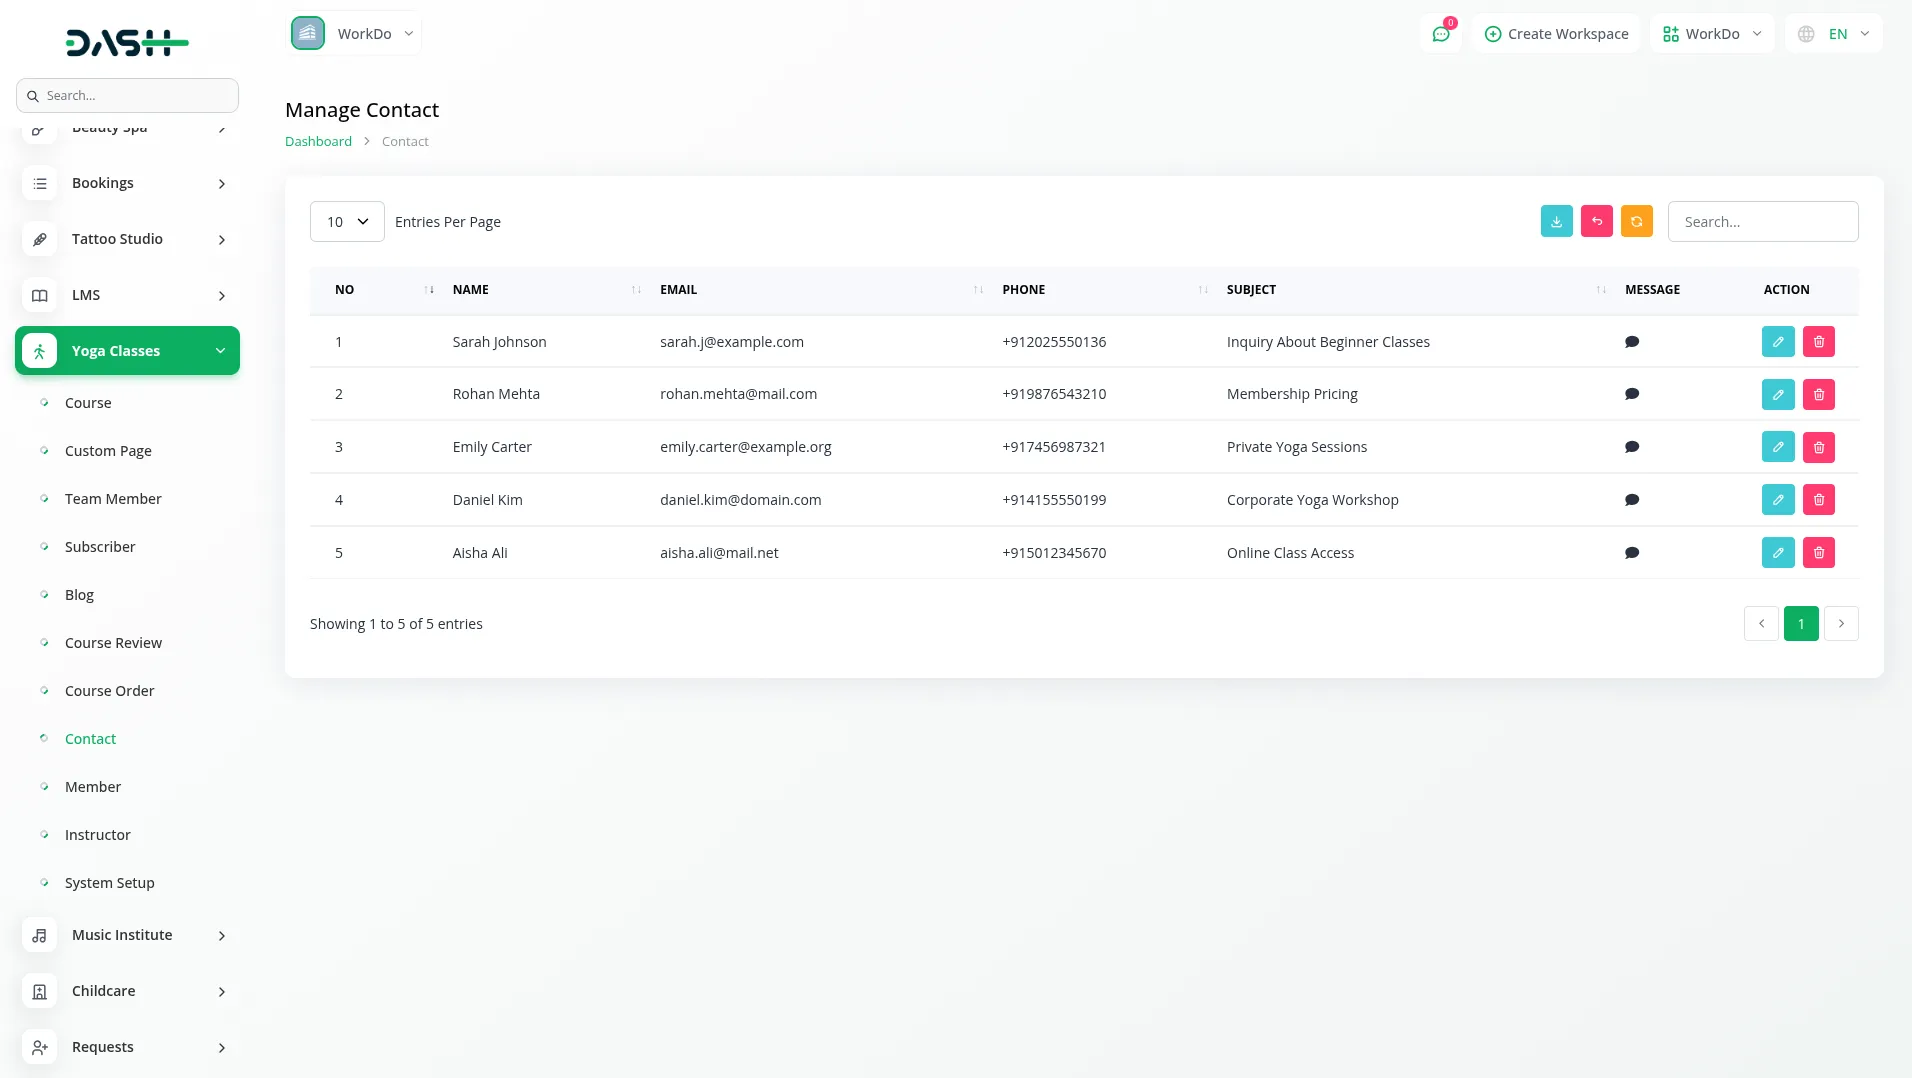
- The Contact section manages all enquiries submitted by members and instructors through the website’s contact form. These messages come from the front-end contact page.
- On the list page, you’ll get to see all the contact submissions with columns for Name, Email, Phone Number, Subject, and Message. You can easily use the search or export, reset, and reload buttons to manage the list page.
- Additionally, you’ll see an Action column, which is an edit button to modify data or a delete button to remove that data.
Member Management
- To create a new Member account, click the “Create” button at the top of the Member page. Enter the member’s Name and Email address for their login credentials.
- Add their Phone Number for contact purposes and upload an Image for their profile photo. Set a Password for their account login.
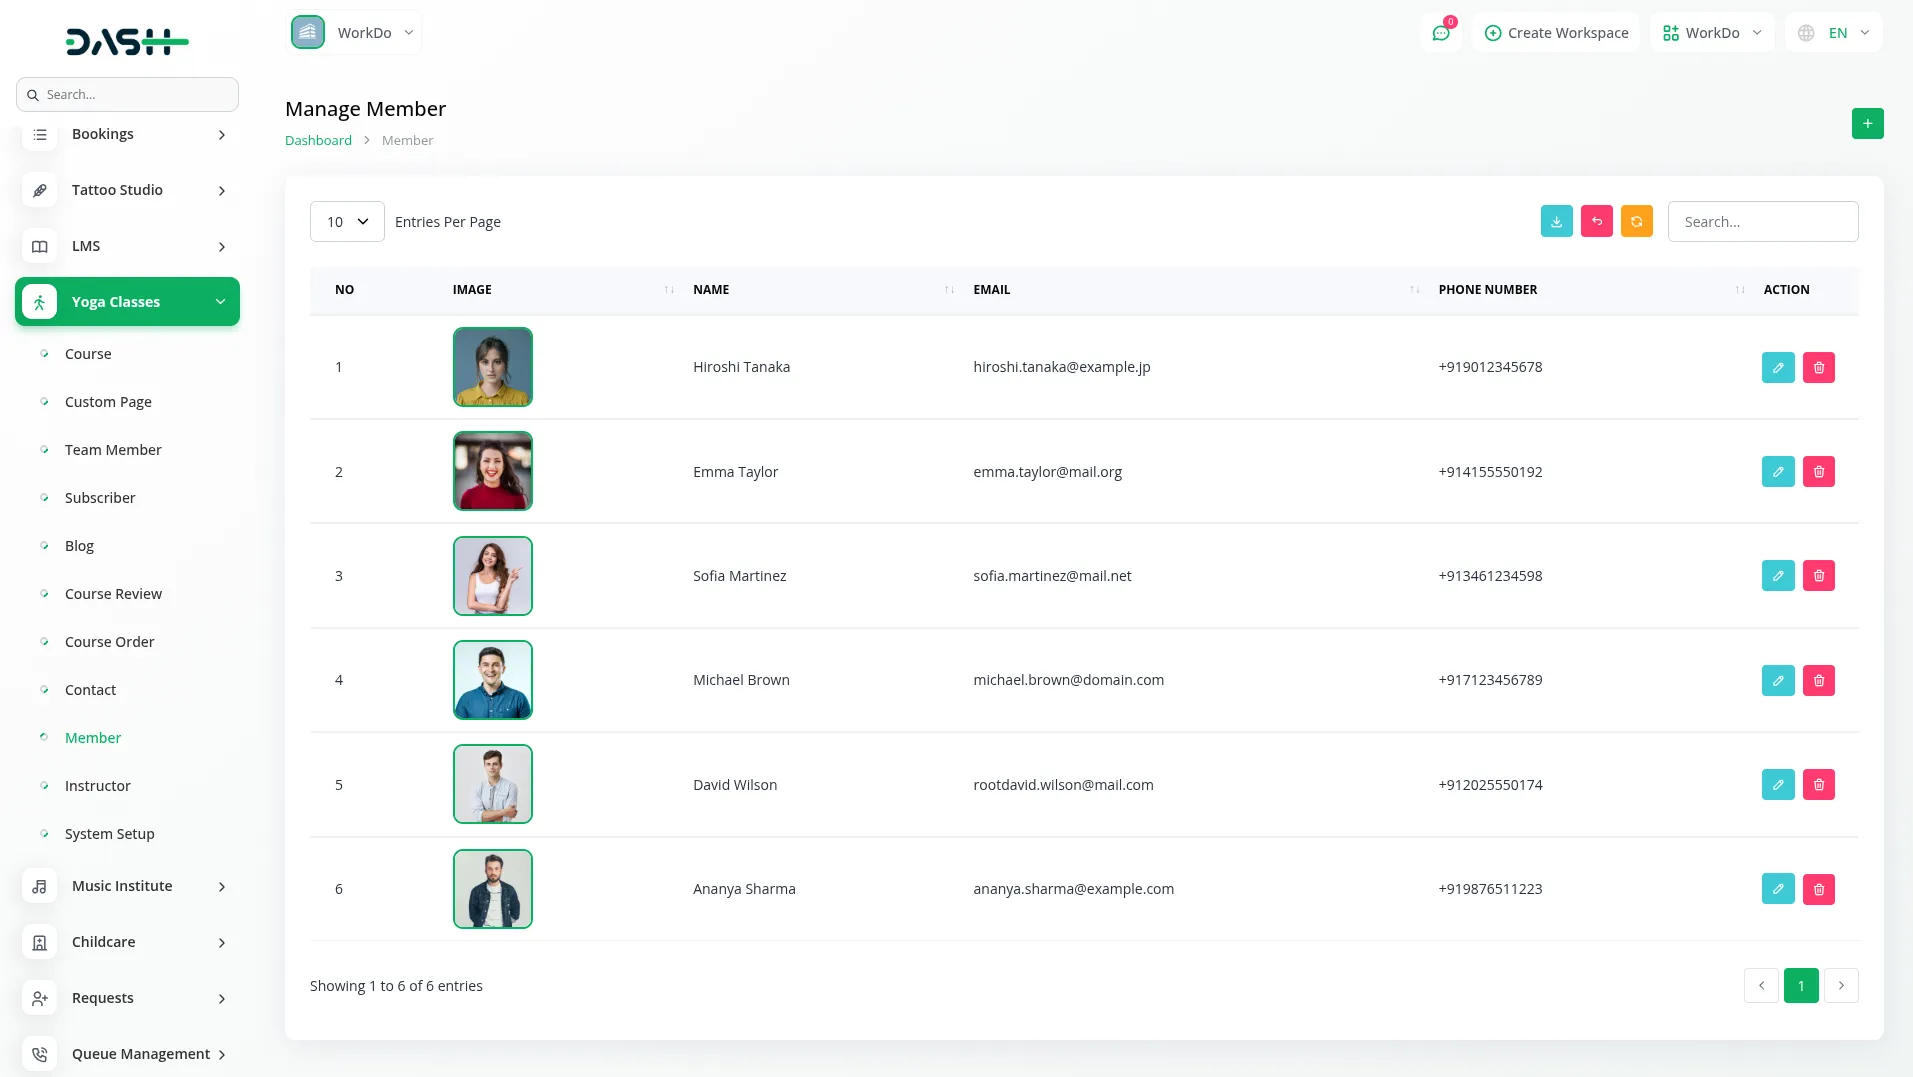
- The list page shows all members with columns for No, Image, Name, Email, and Phone Number. Use the search, export, reset, and reload buttons to manage this page. With the help of an action column, you can easily edit to modify your record and delete to remove it.
Instructor Management
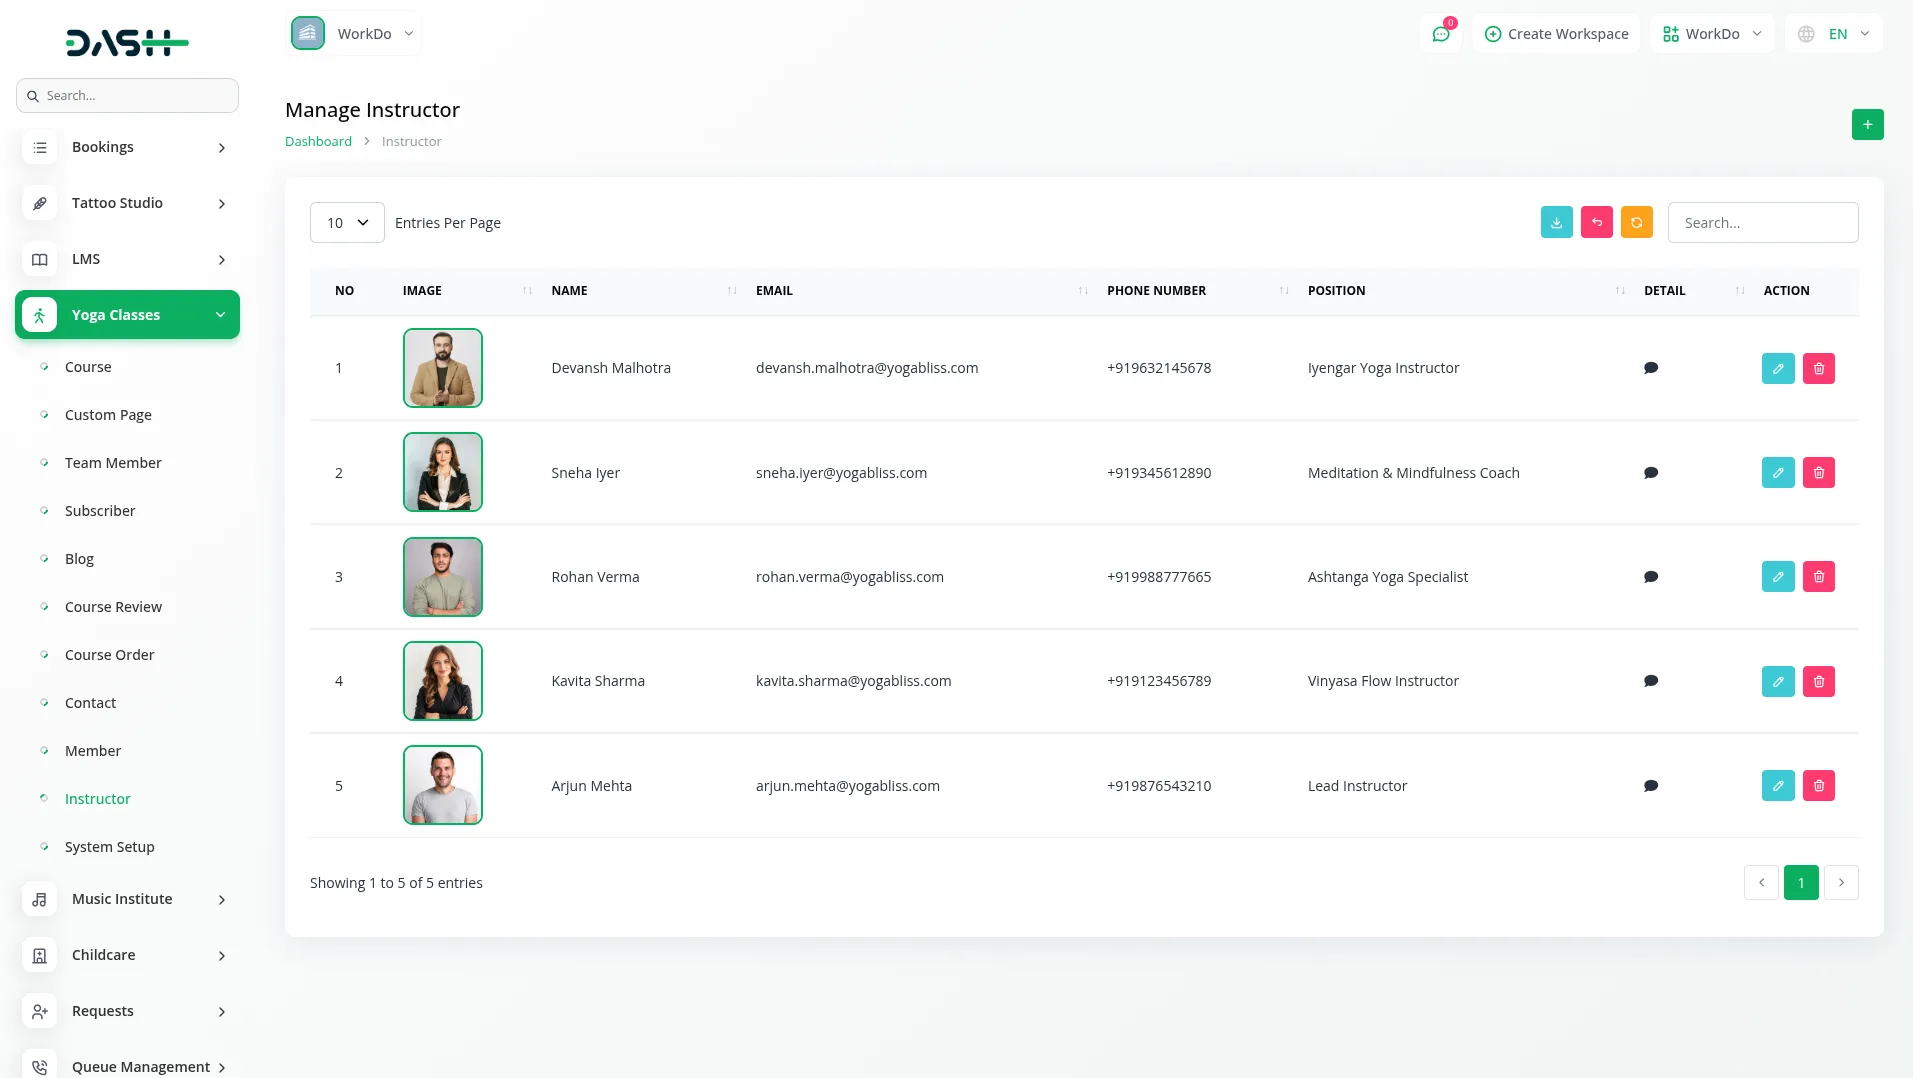
- On this page, to add a new Instructor account, click the “Create” button at the top of the instructor page. Enter the instructor’s Name and Email address for their login credentials.
- Add their Phone Number for contact purposes and upload an Image for their profile photo. Set a Password for their account login.
- On this page, you’ll get to see the list page that shows all instructors with columns for Image, Name, Email, Phone Number, Position, and Detail. You can easily use the search, export, reset, and reload buttons to manage this page’s data.
- In the Action column, you can use the edit button to modify a record, including updating the instructor’s position and details, while delete removes it.
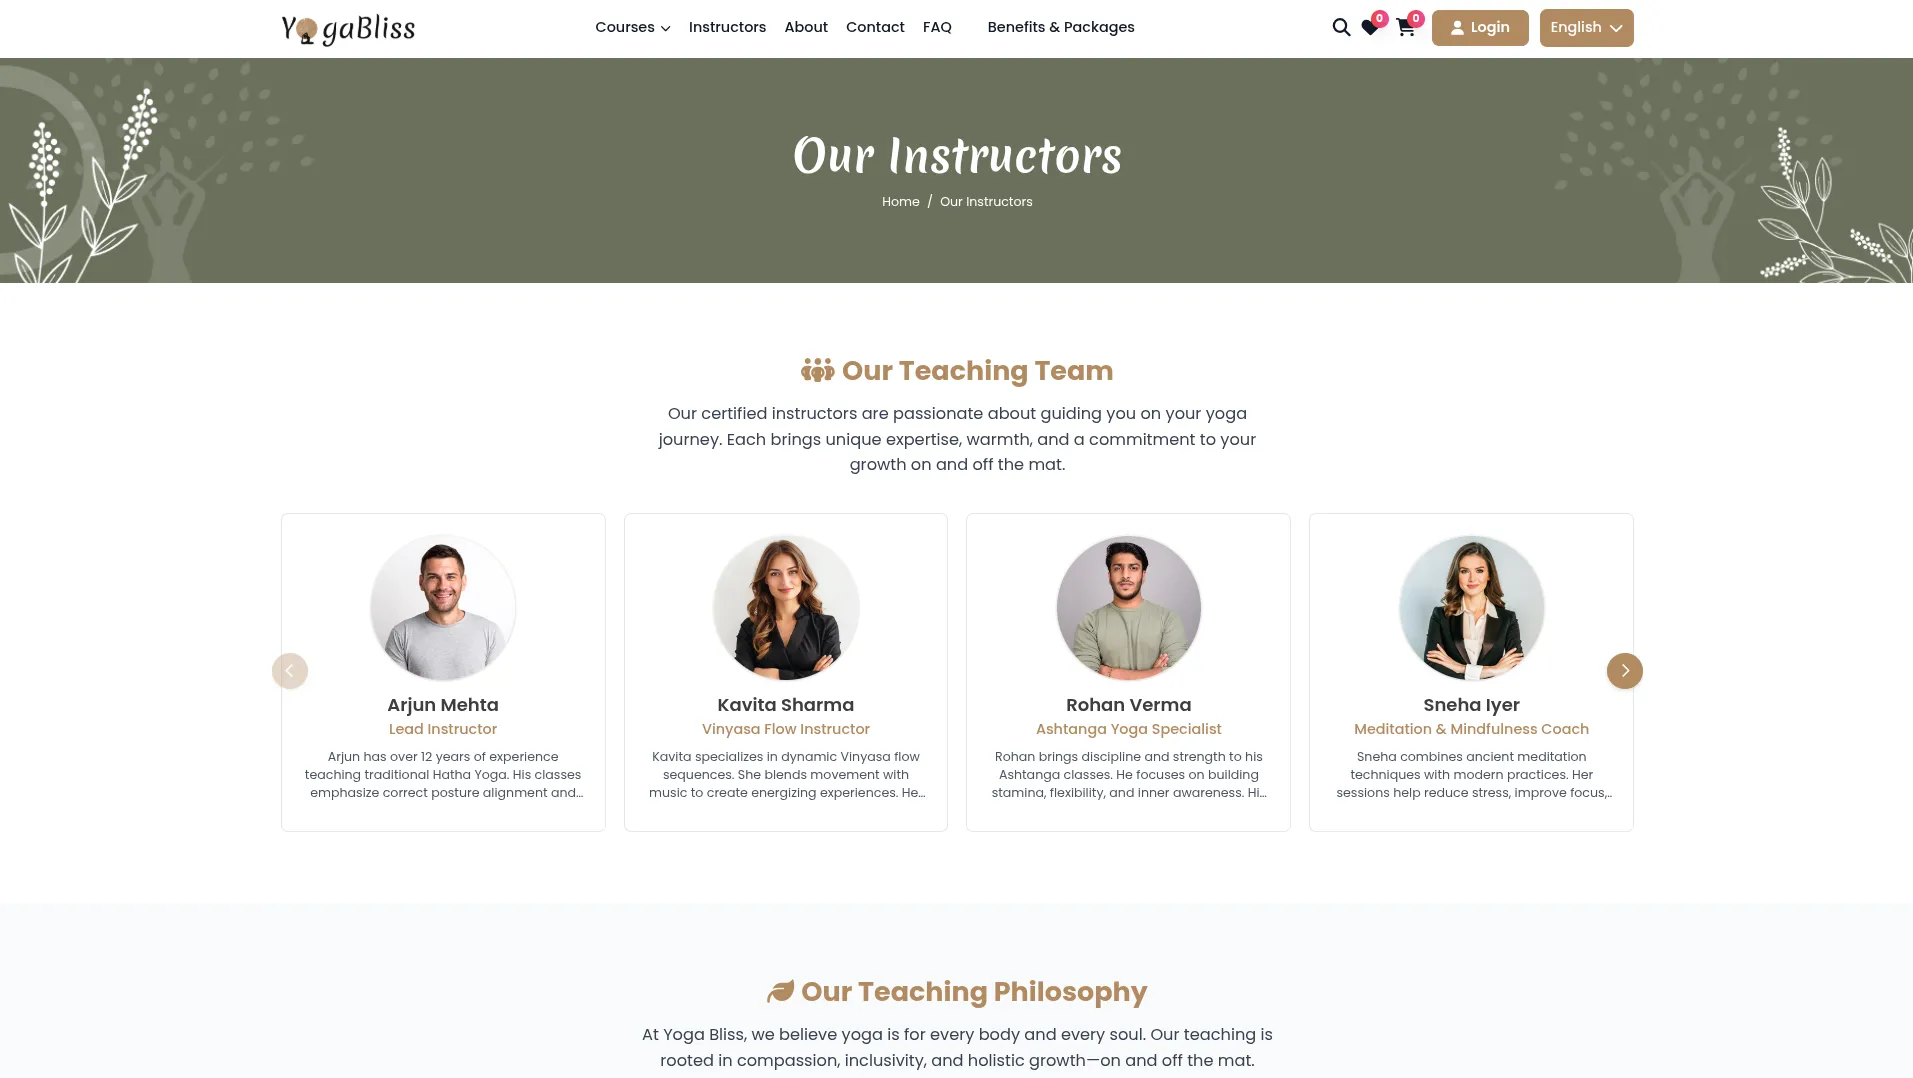
- On the Instructor Page in the frontend, you can see the instructors added from the backend. Each profile shows the instructor’s name, position, and details.
System Setup
System Setup is used to configure your website’s front-end display and behaviour. This section contains multiple sub-modules that control how your website appears to members and how different sections function.
Category Management
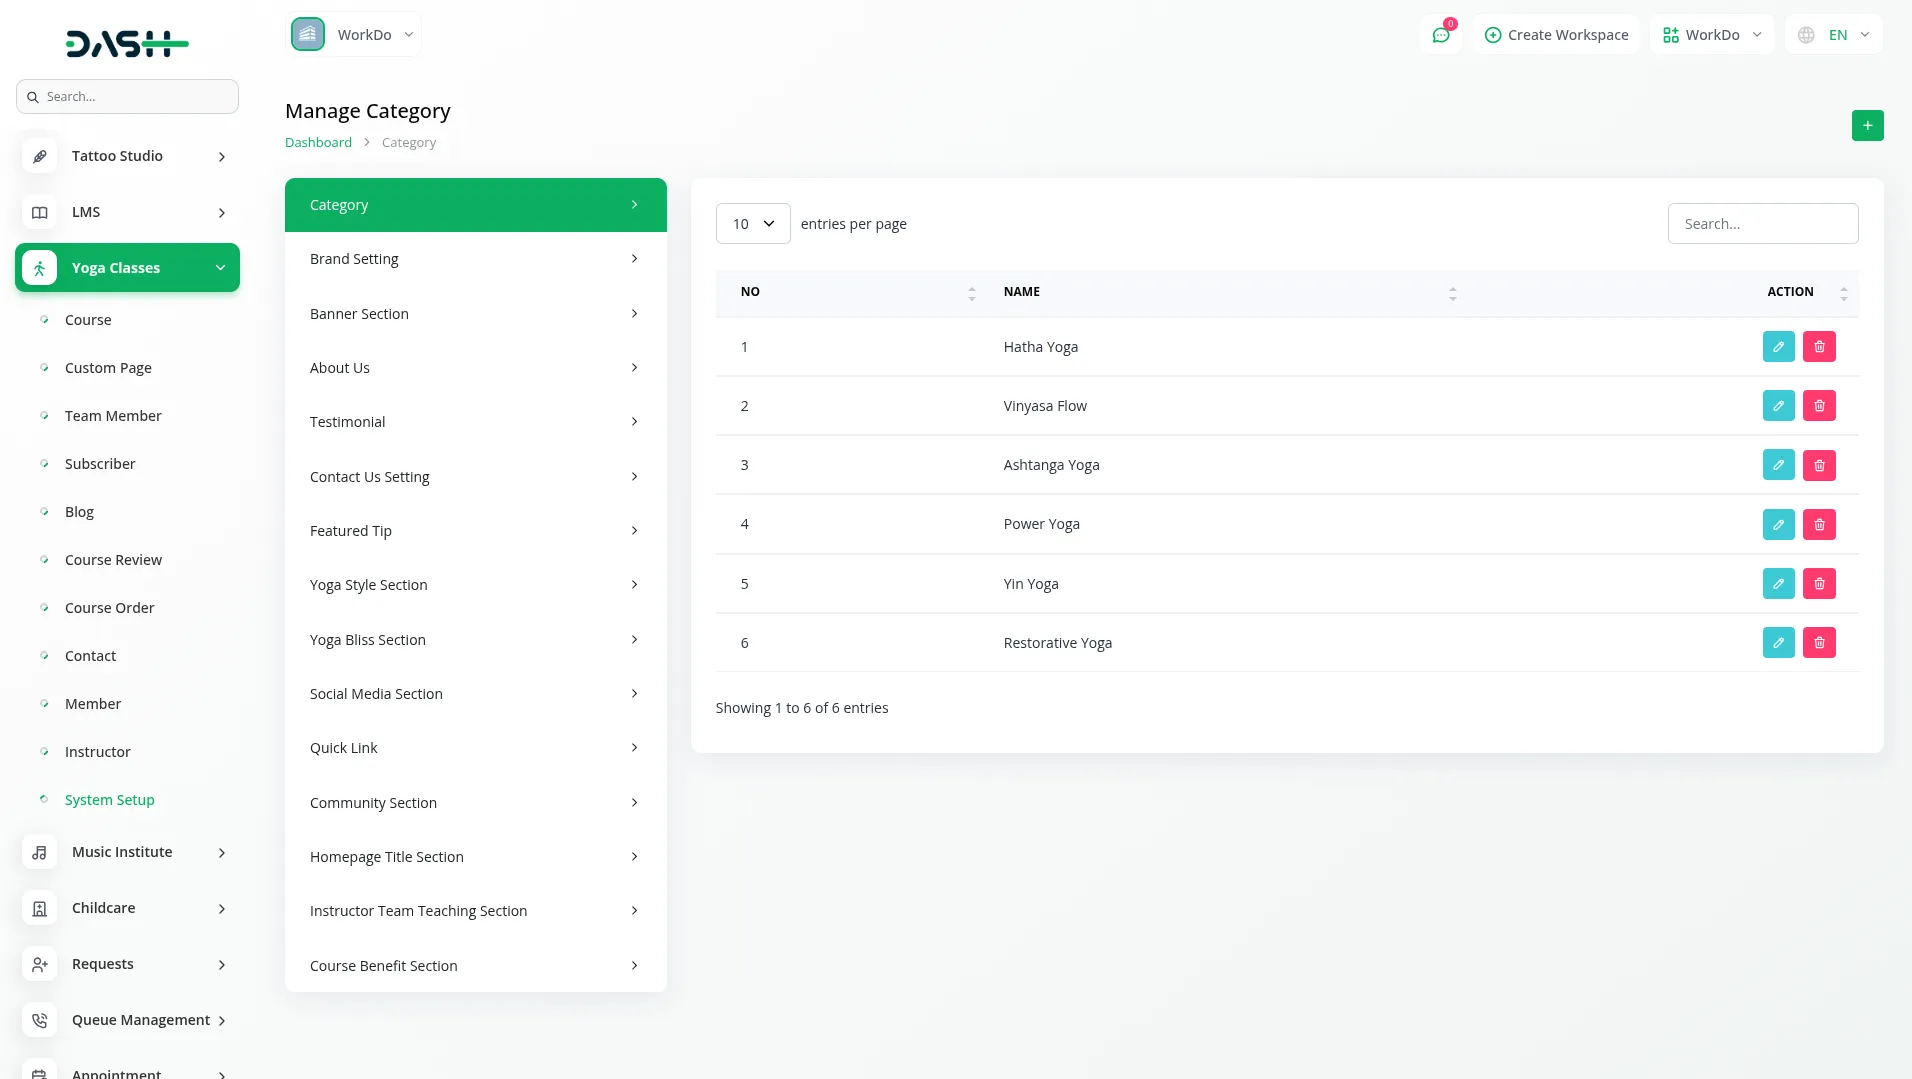
- To create a new course category, click the “Create” button in the Category section. Enter the category Name, which will be used to organise courses on your website and in dropdown menus throughout the system.
- The category list shows all categories with columns for Number, Name, and Actions. Use the Edit action to modify category names or Delete to remove categories. Note that deleting a category may affect courses that use that category.
Brand Setting
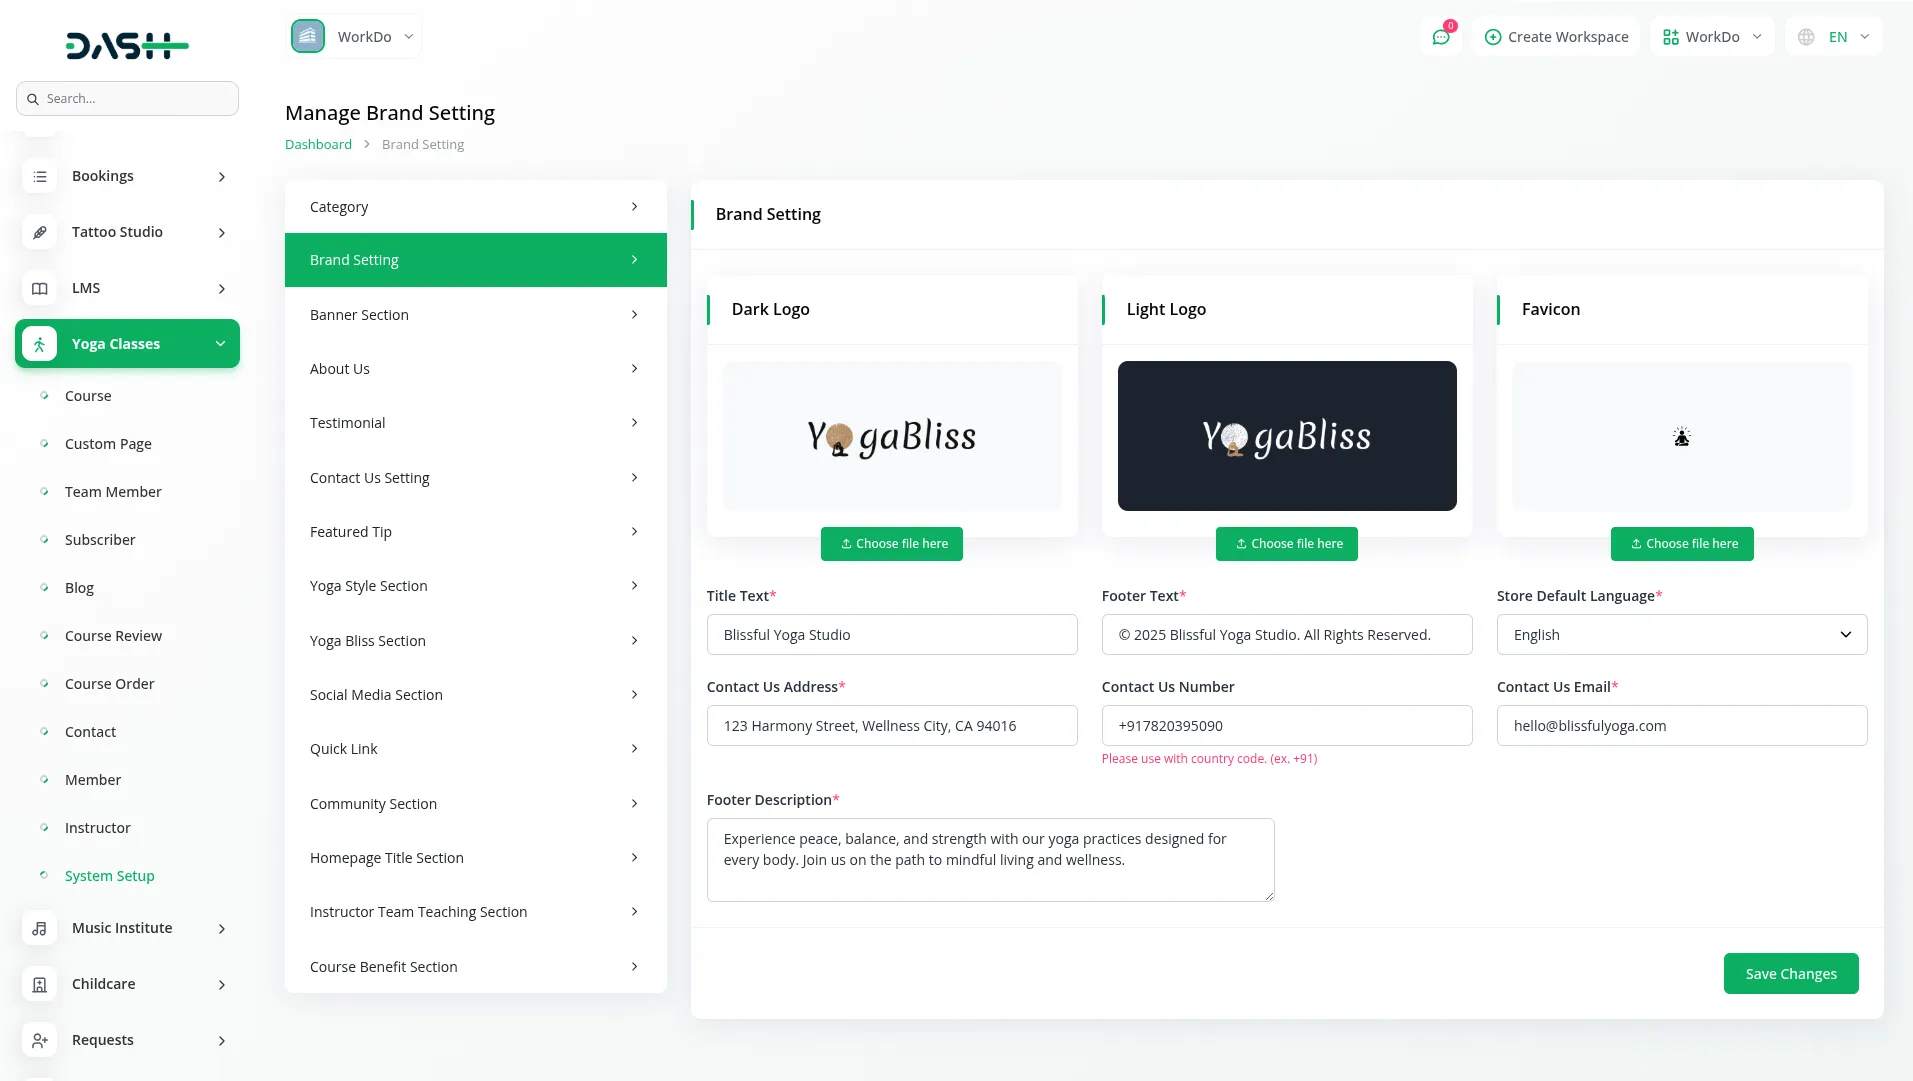
- Access Brand Setting to configure your website’s core branding elements. Upload your Dark Logo and Light Logo images, which will be used in different sections of your website. Set your Favicon (the small icon that appears in browser tabs) and enter your Title Text for the website.
- On your website, members will see your favicon as a tiny icon in their browser tab and your logos in the header at the top of every page. When people click on your logo, it takes them back to your homepage. The website automatically chooses between your dark and light logo depending on your site’s colors.
- Your header shows a menu with links to Home, Courses, Instructors, About, Contact, and any custom pages you make. On the right side of the header, there’s a search box where members can look for courses and a heart icon that shows how many courses they’ve saved to their wishlist.
- Add Footer Text that appears at the bottom of your website and select your Store Default Language. Configure your contact information, including Contact Us Address, Contact Us Number, and Contact Us Email. Write your Footer Description that provides additional information about your yoga business.
Banner Setting
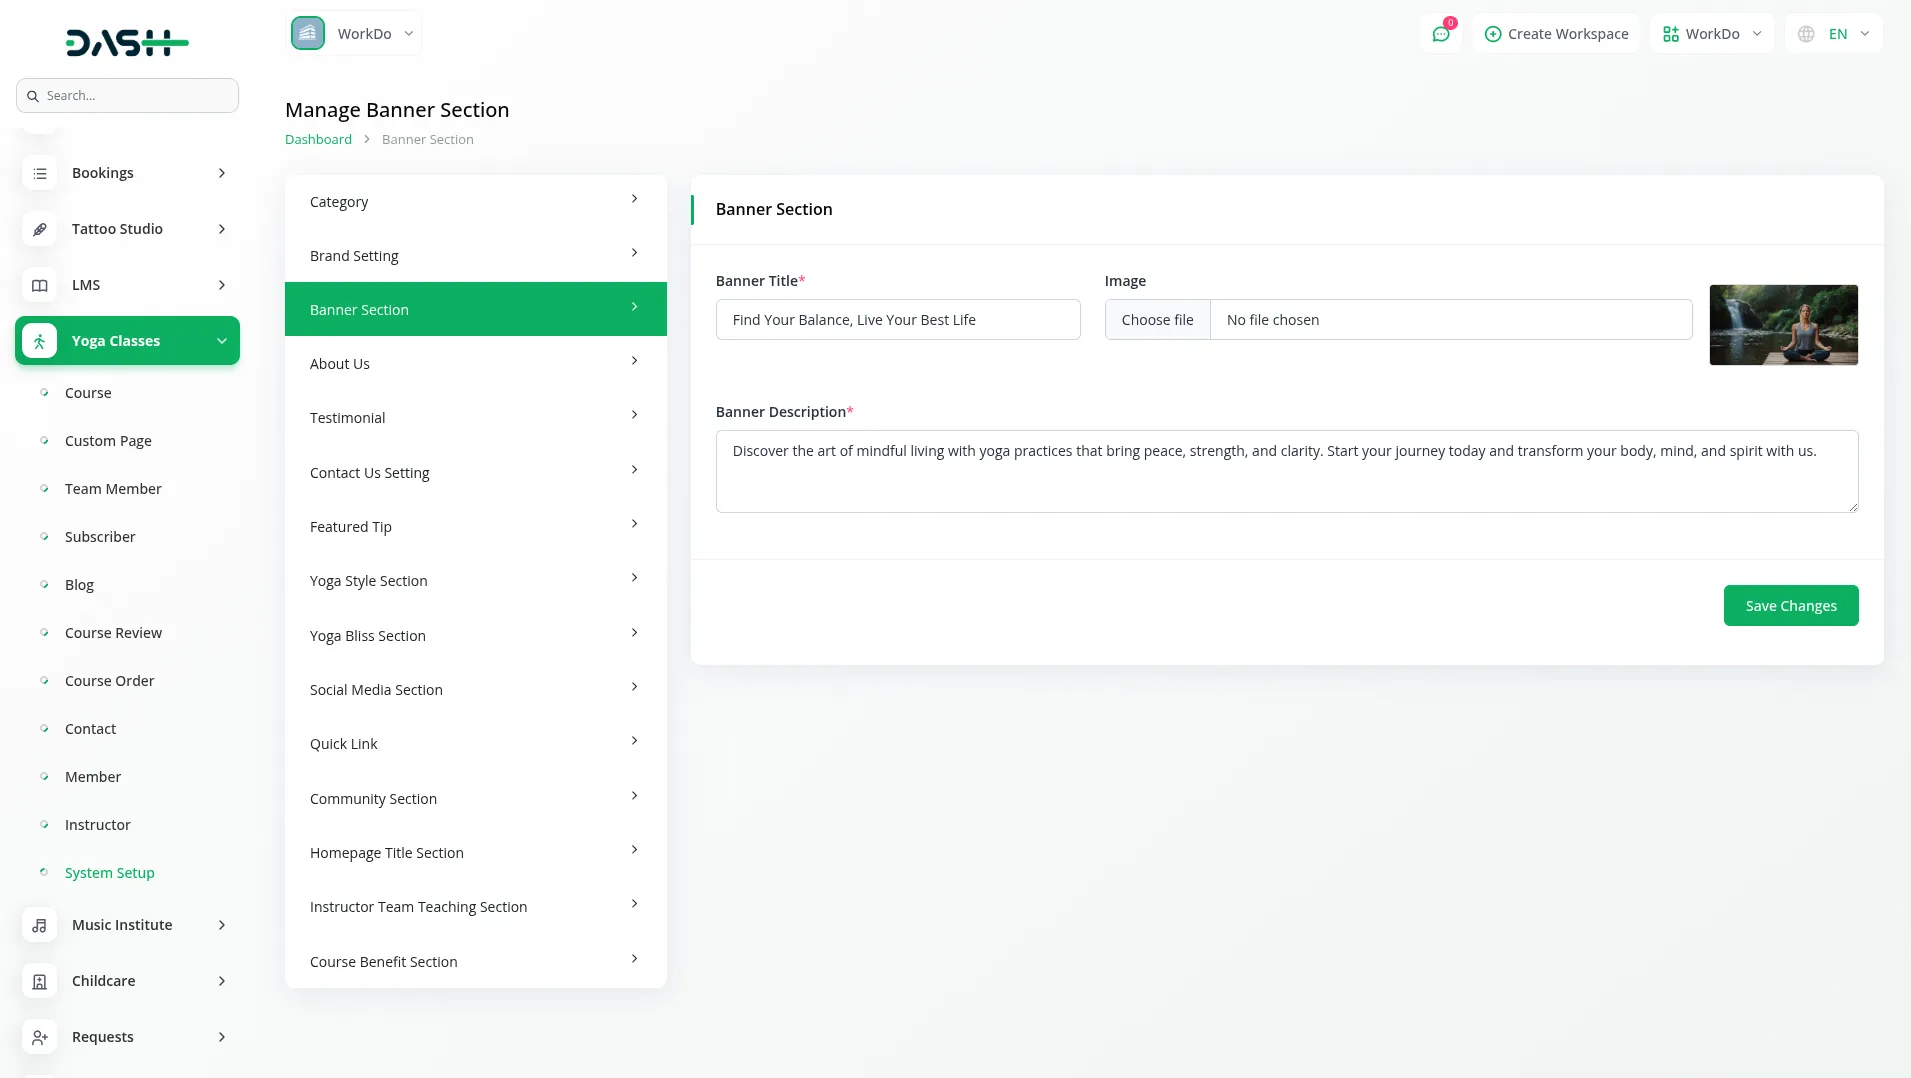
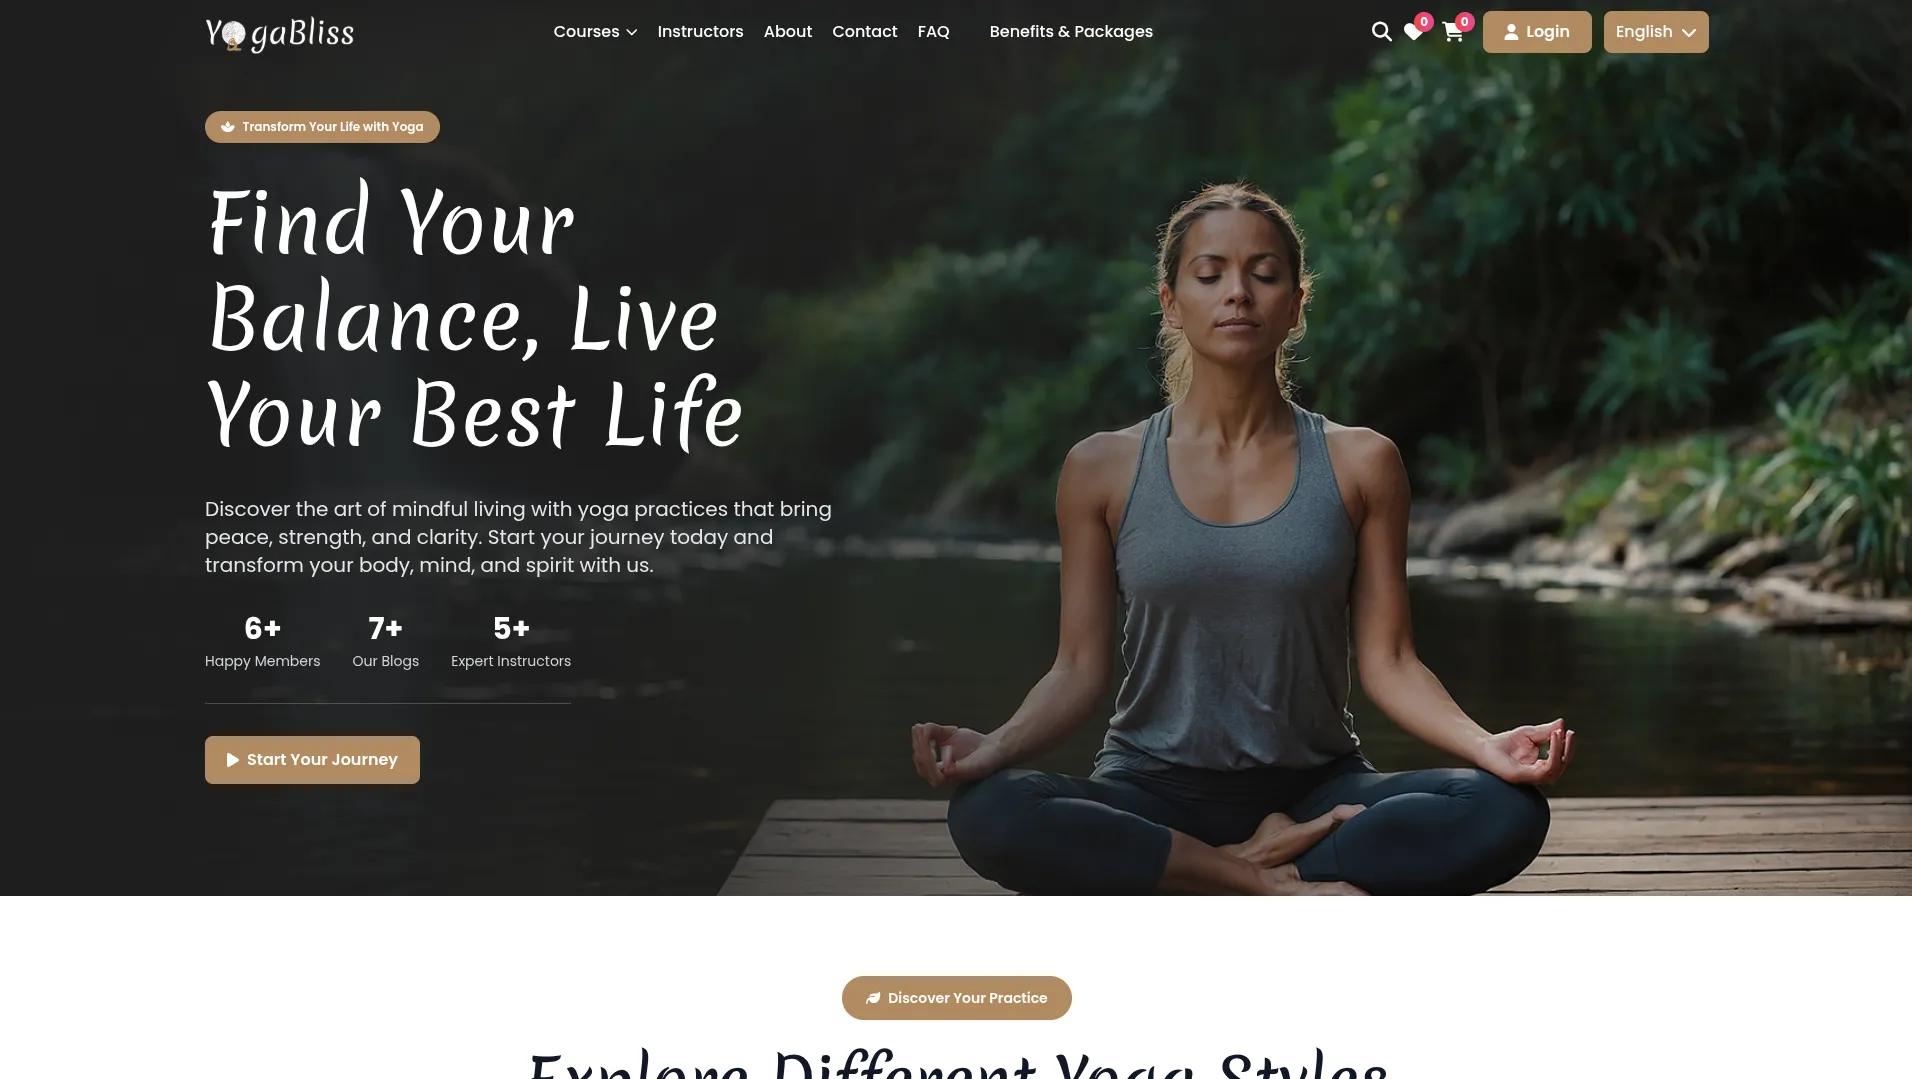
- Configure your homepage banner by entering a compelling Title and uploading a Banner Image. Add a Banner Description that explains your yoga services and encourages members to explore your courses.
- On your homepage, members see this as the main Banner Section that displays your homepage introduction with visual impact. The title, image, and description you set here are automatically pulled from these banner settings to create an engaging first impression for your website members.
About Us
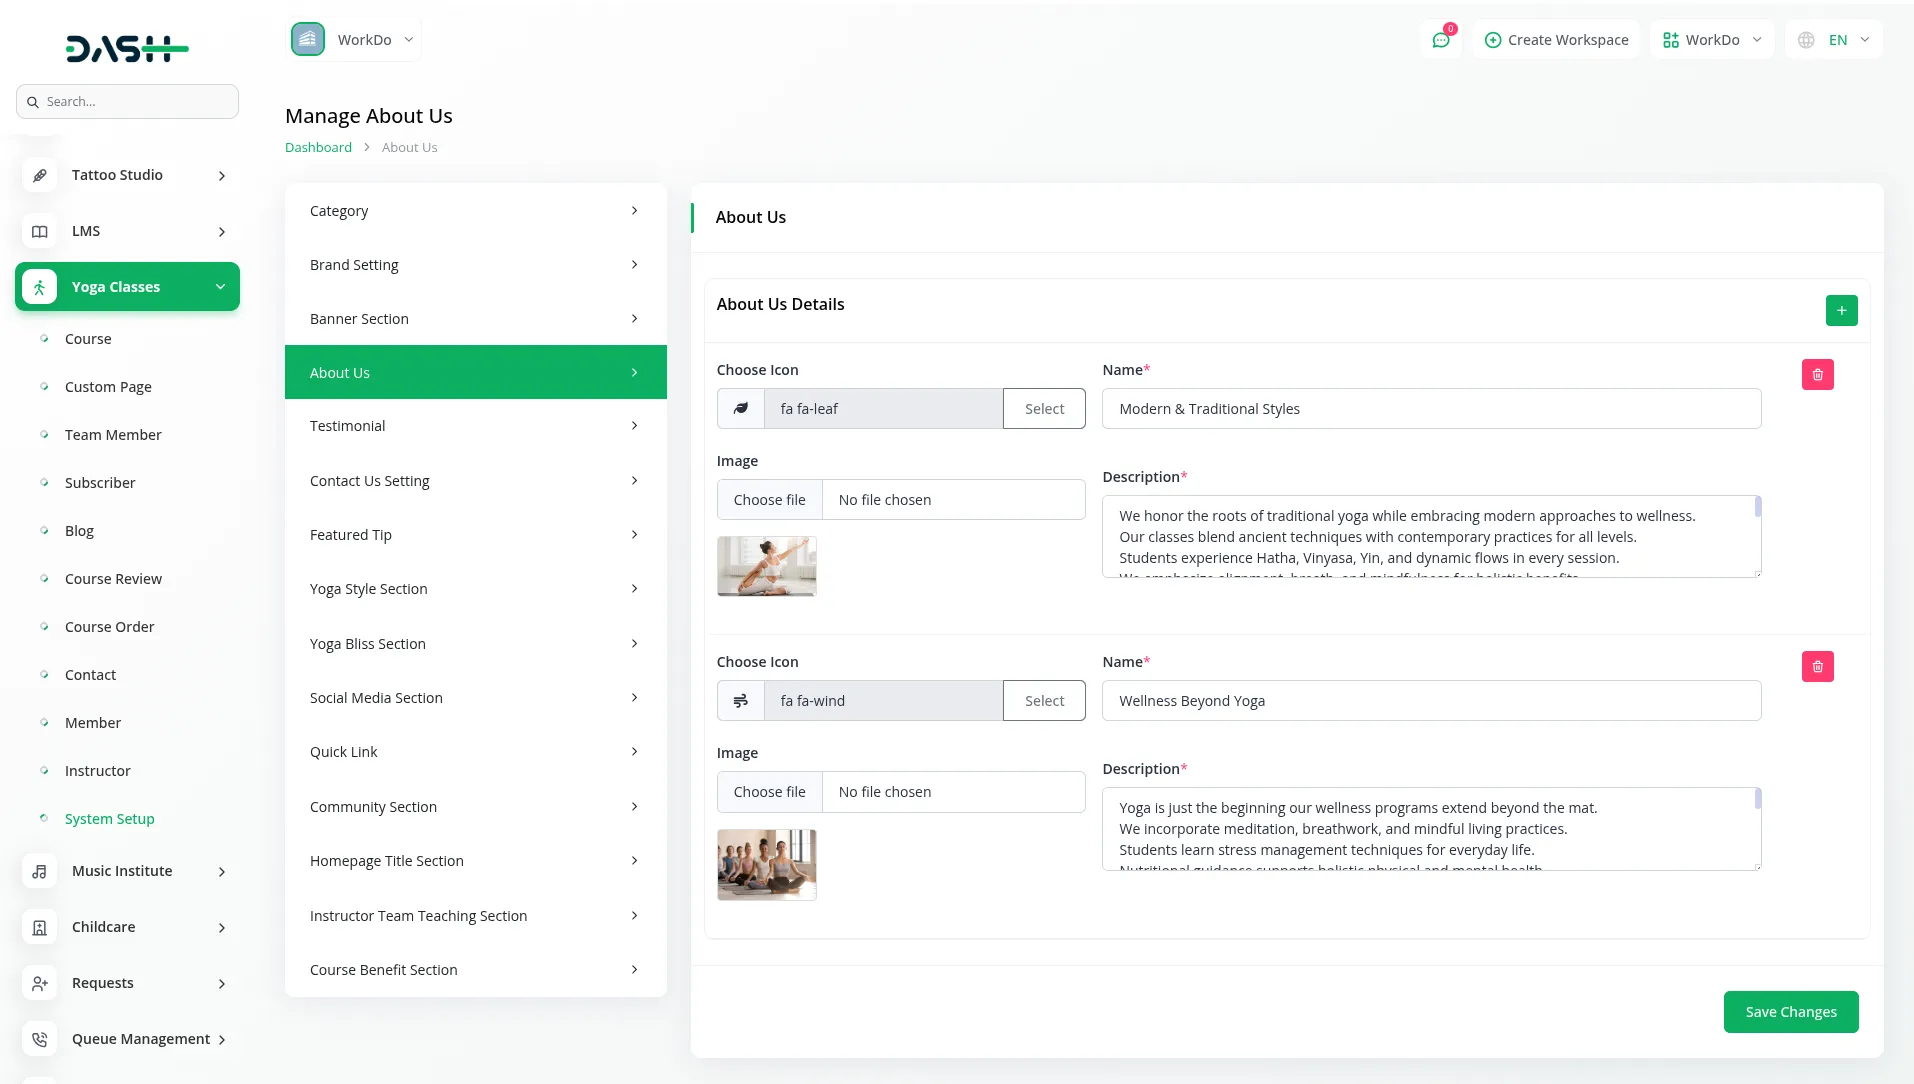
- The About Us section uses a repeater system where you can add multiple details about your business. For each About Us entry, choose an Icon, enter a Name and Description, and upload an Image. These details will appear on your About page and help members understand your yoga philosophy and services.
- On your website’s About Page, members see this as the About Section that displays comprehensive information about your yoga classes and background. Your entries create an engaging story about your business that helps build trust with potential members.

Testimonial Management
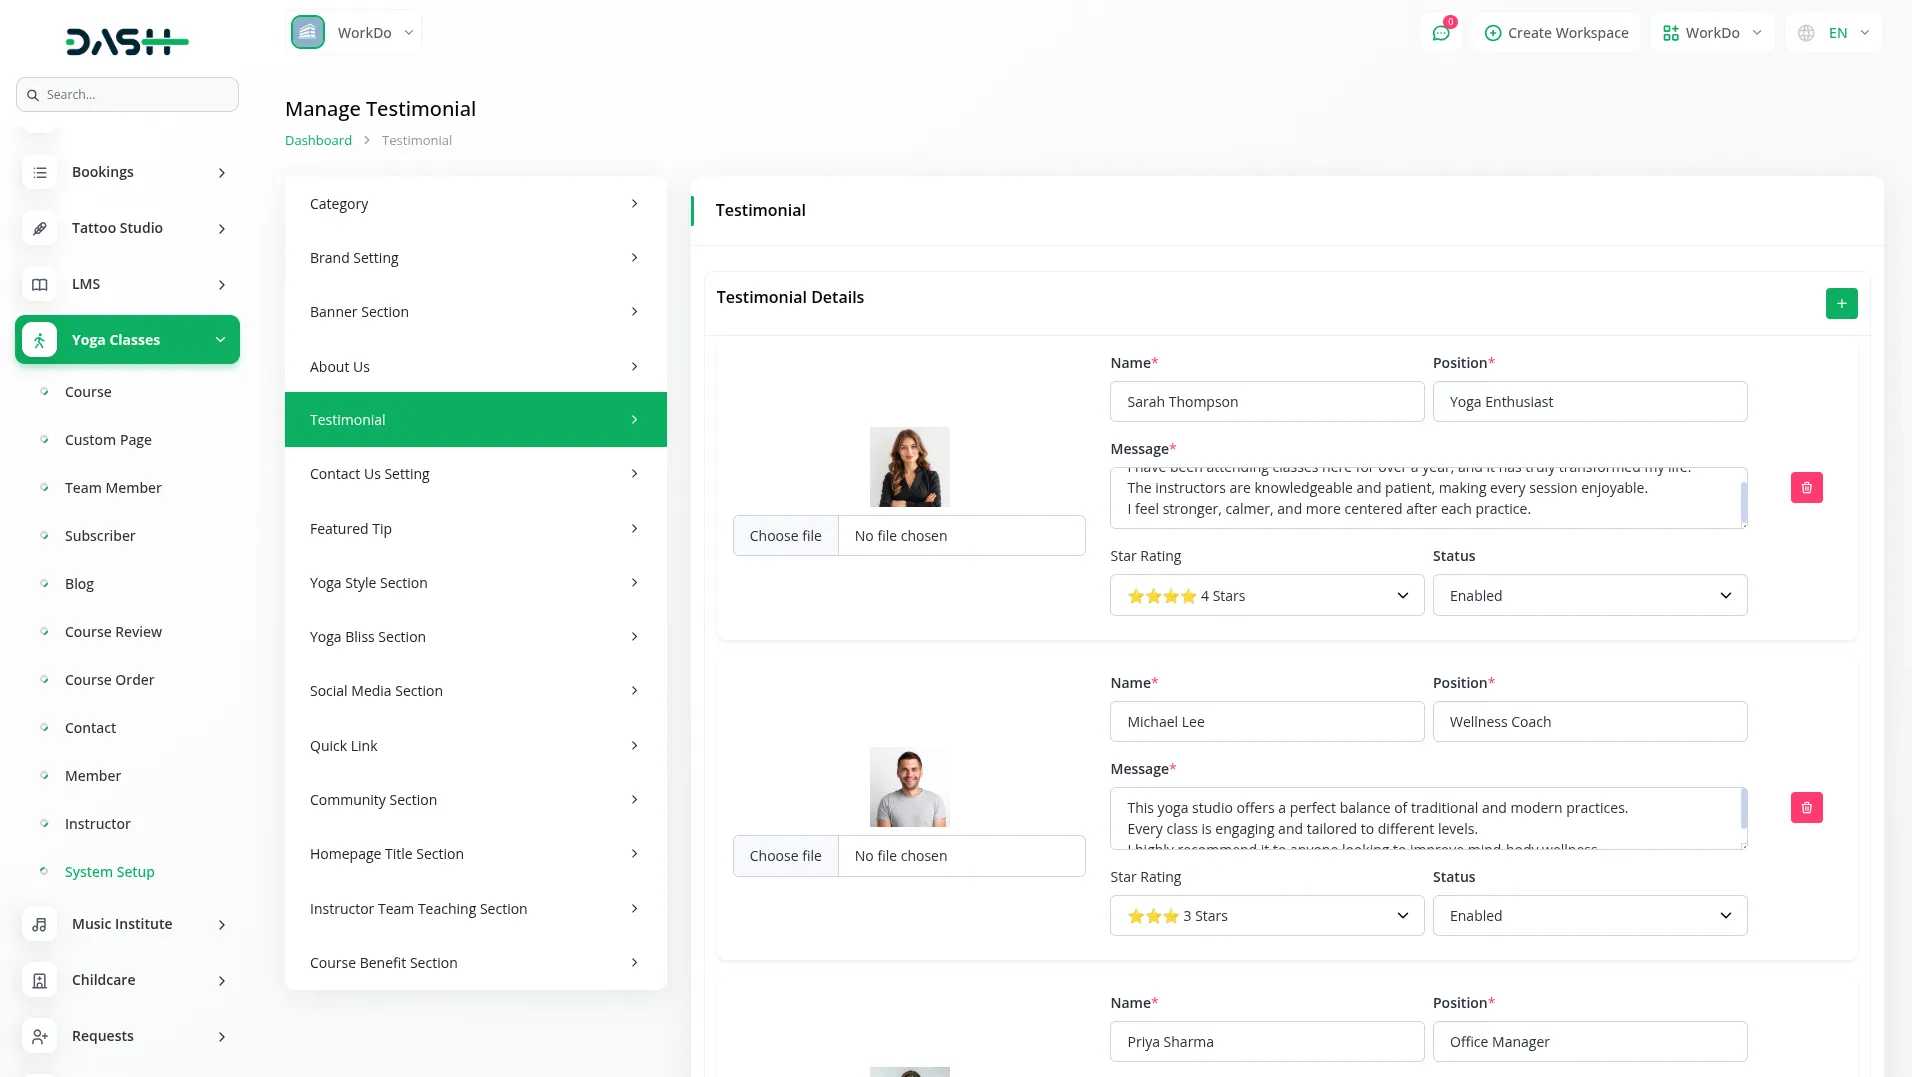
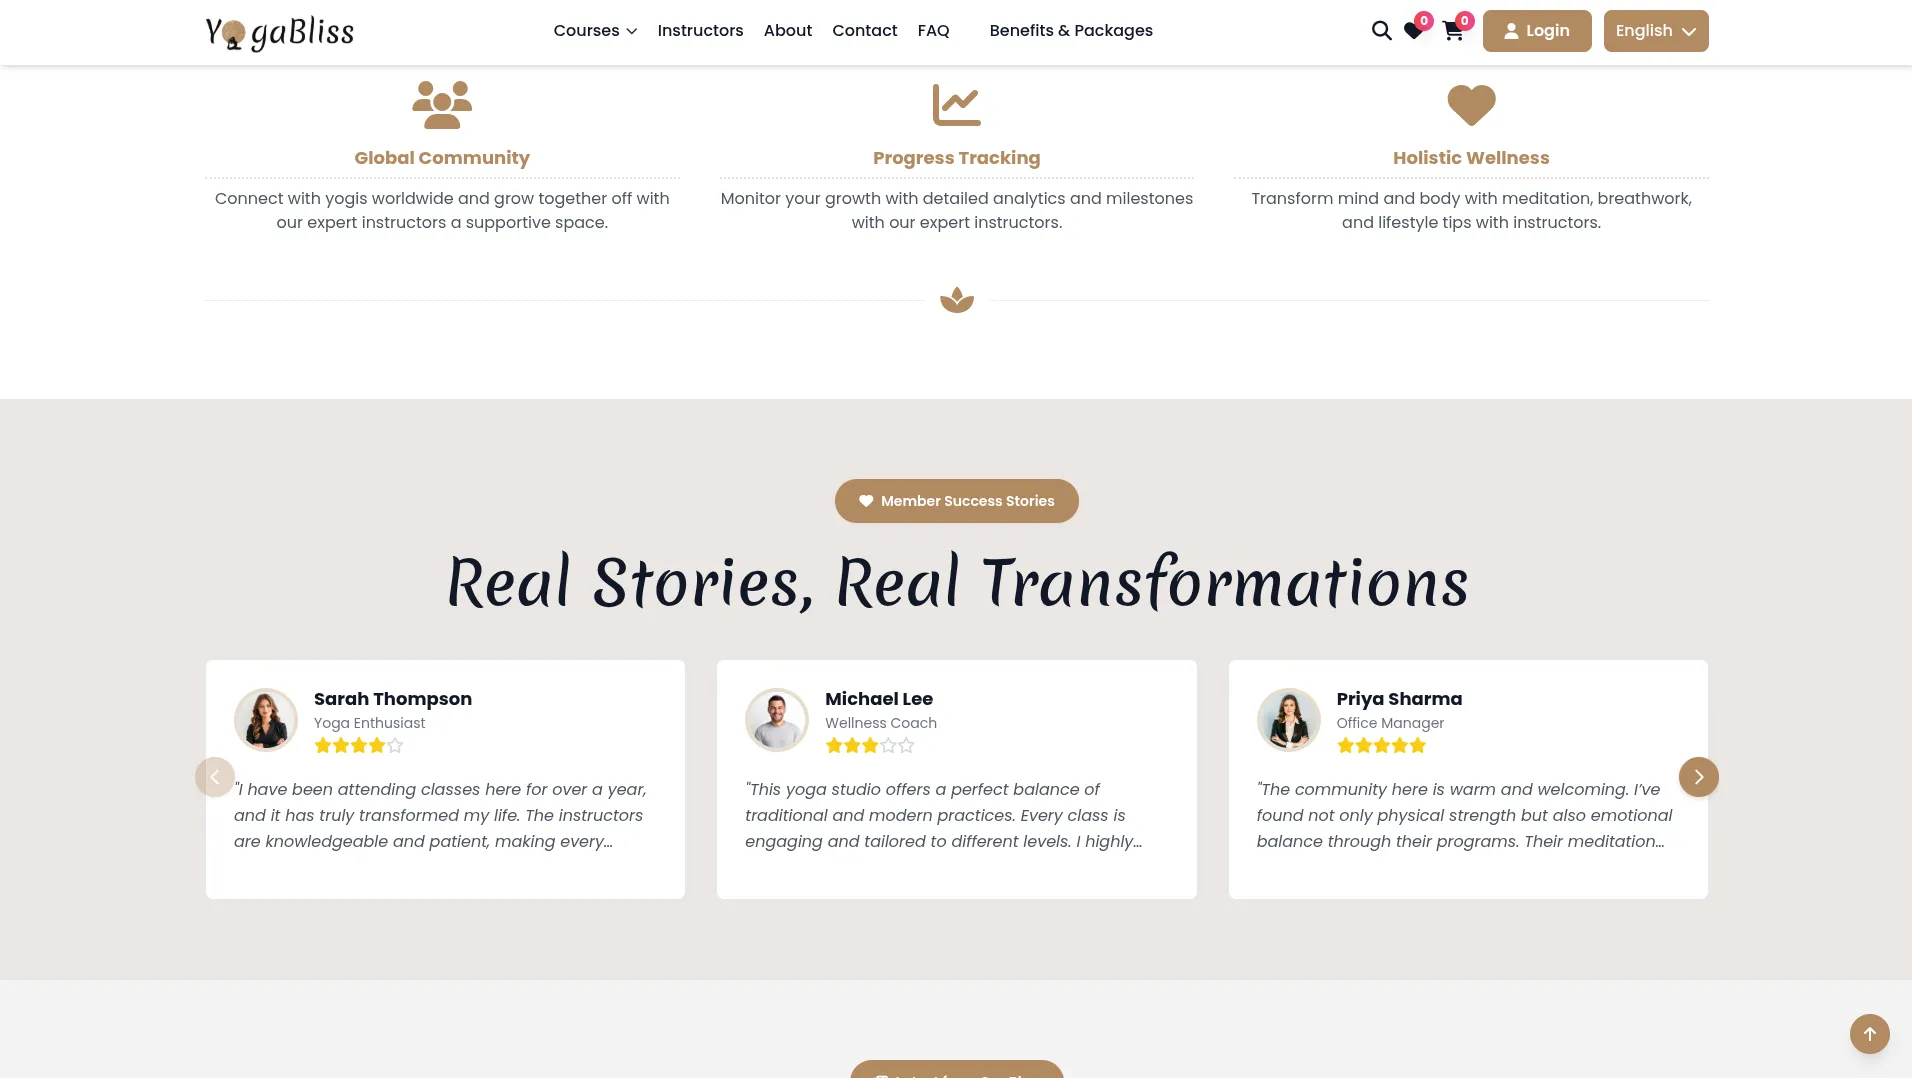
- Configure customer testimonials using the repeater system. For each testimonial, upload the customer’s Image, enter their Name and Position, add their testimonial Message, and set their Rating. Use the Status dropdown (Enabled/Disabled) to control which testimonials appear on your website’s front end.
- On your website’s homepage, this appears as the Testimonial Section that displays member feedback and success stories. Members can see the icon, name, position, rating, and message from your satisfied members, helping build credibility and trust for your yoga classes.
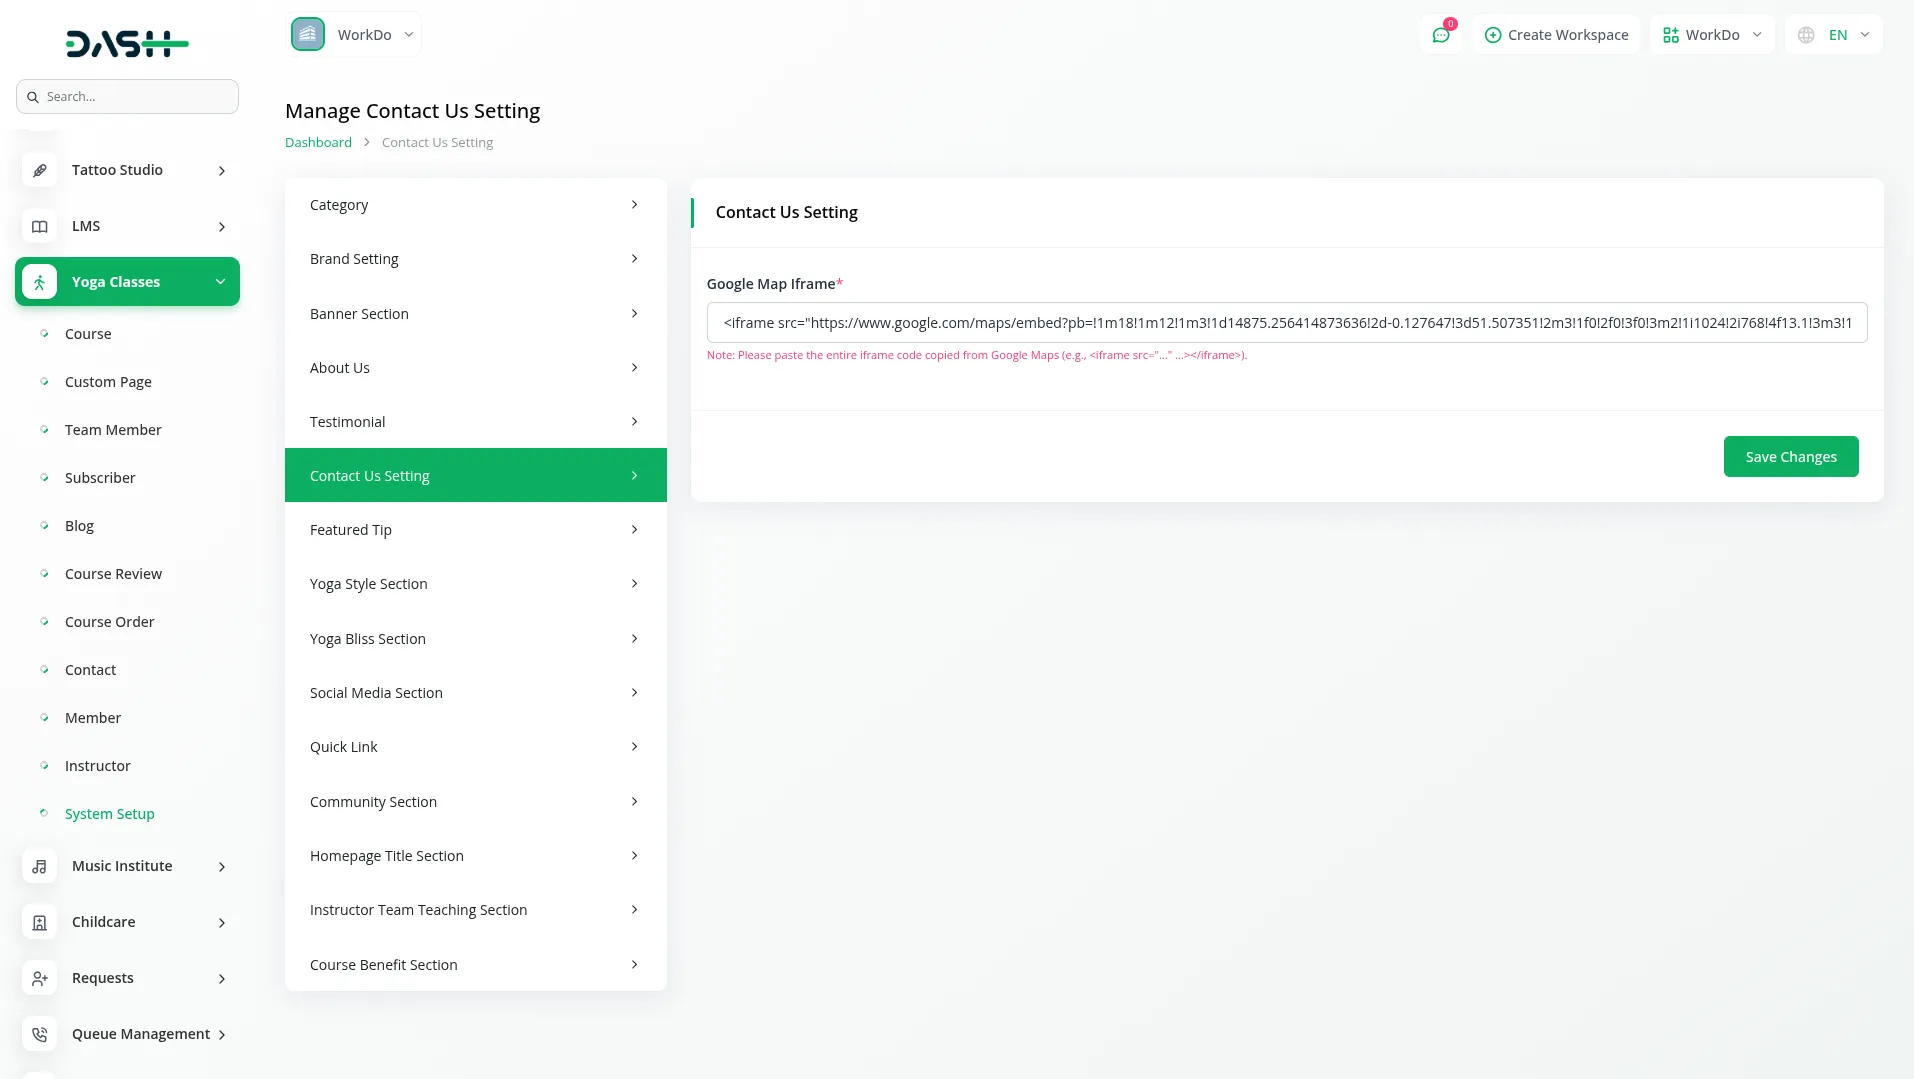
Contact Us Setting
- Set up your Google Map integration by entering the Google Map Iframe code. When properly configured, this will display an interactive map on your Contact Us page showing your Classes location.
- On your Contact Us Page, members see the Contact Form & Map Section that includes a contact form for enquiries and integrated map functionality. This makes it easy for potential members to find your location and get in touch with questions about your yoga classes.
Featured Tips
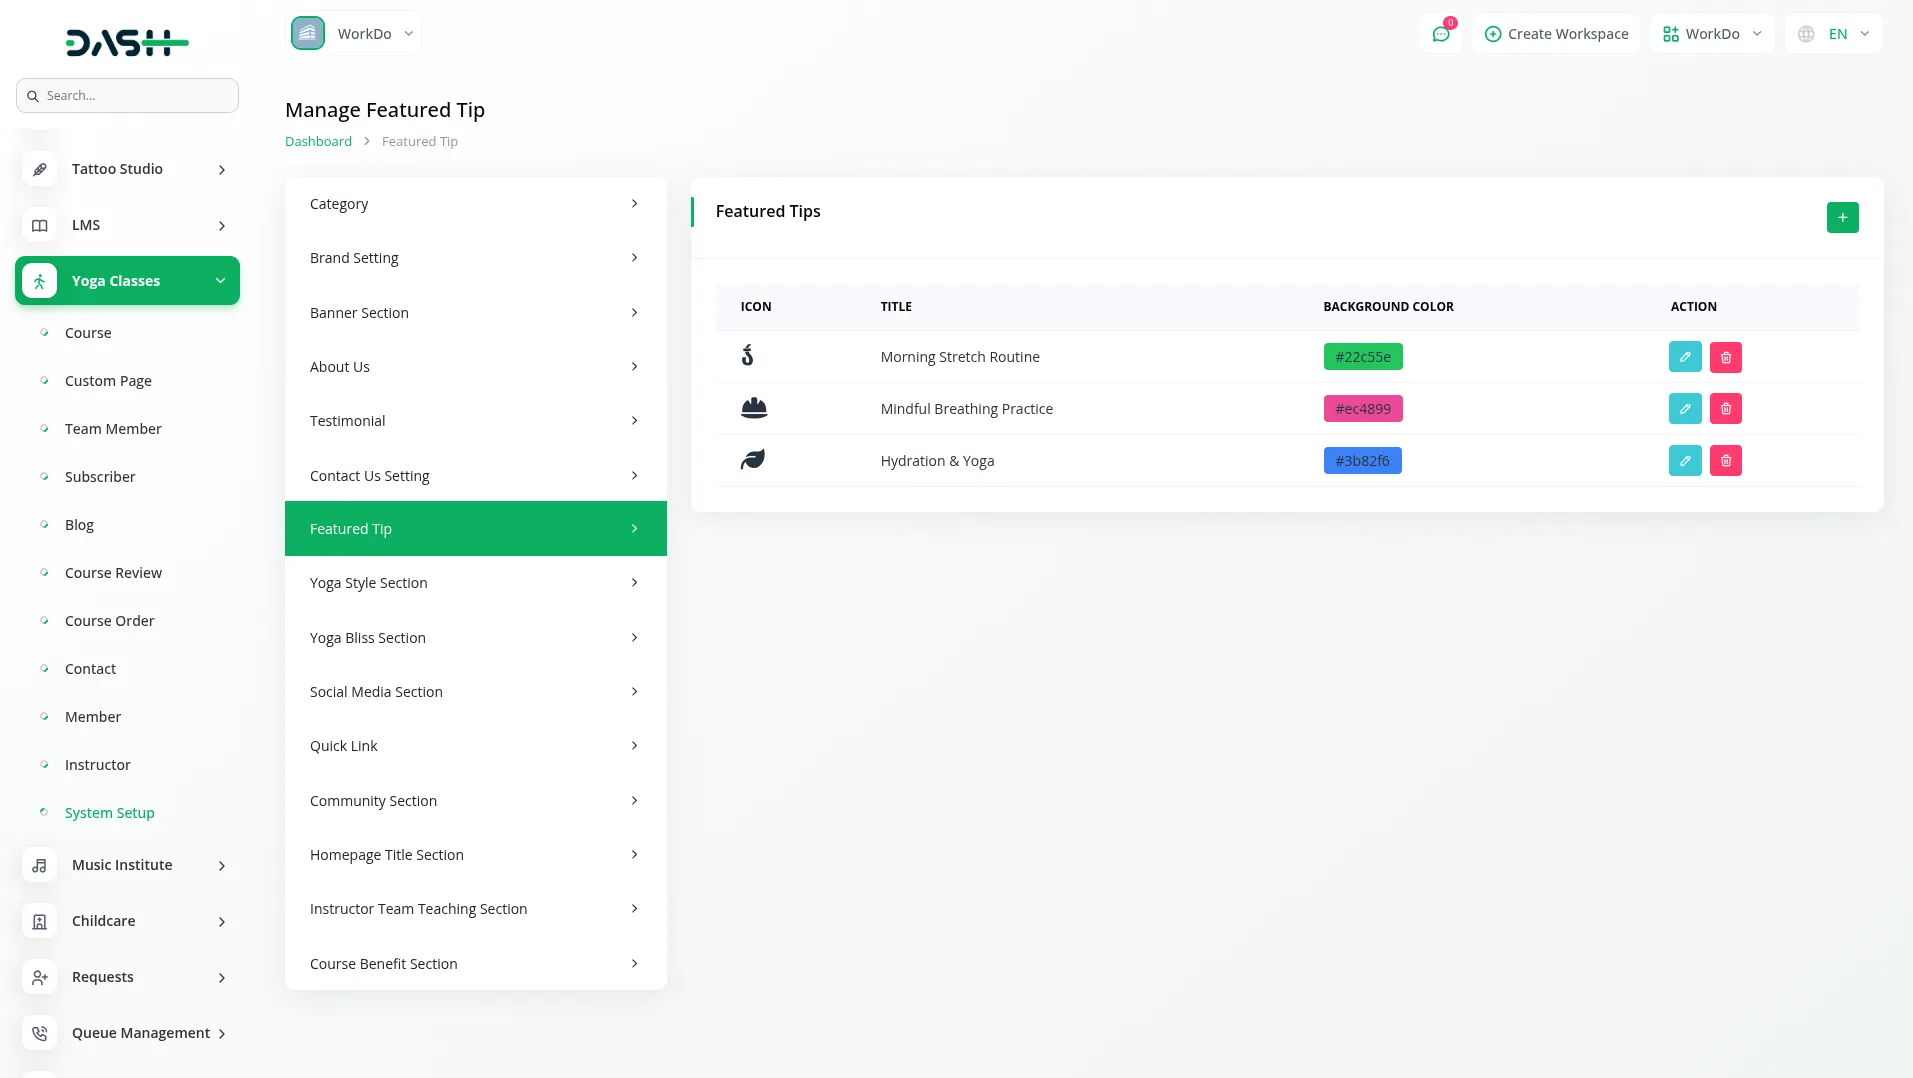
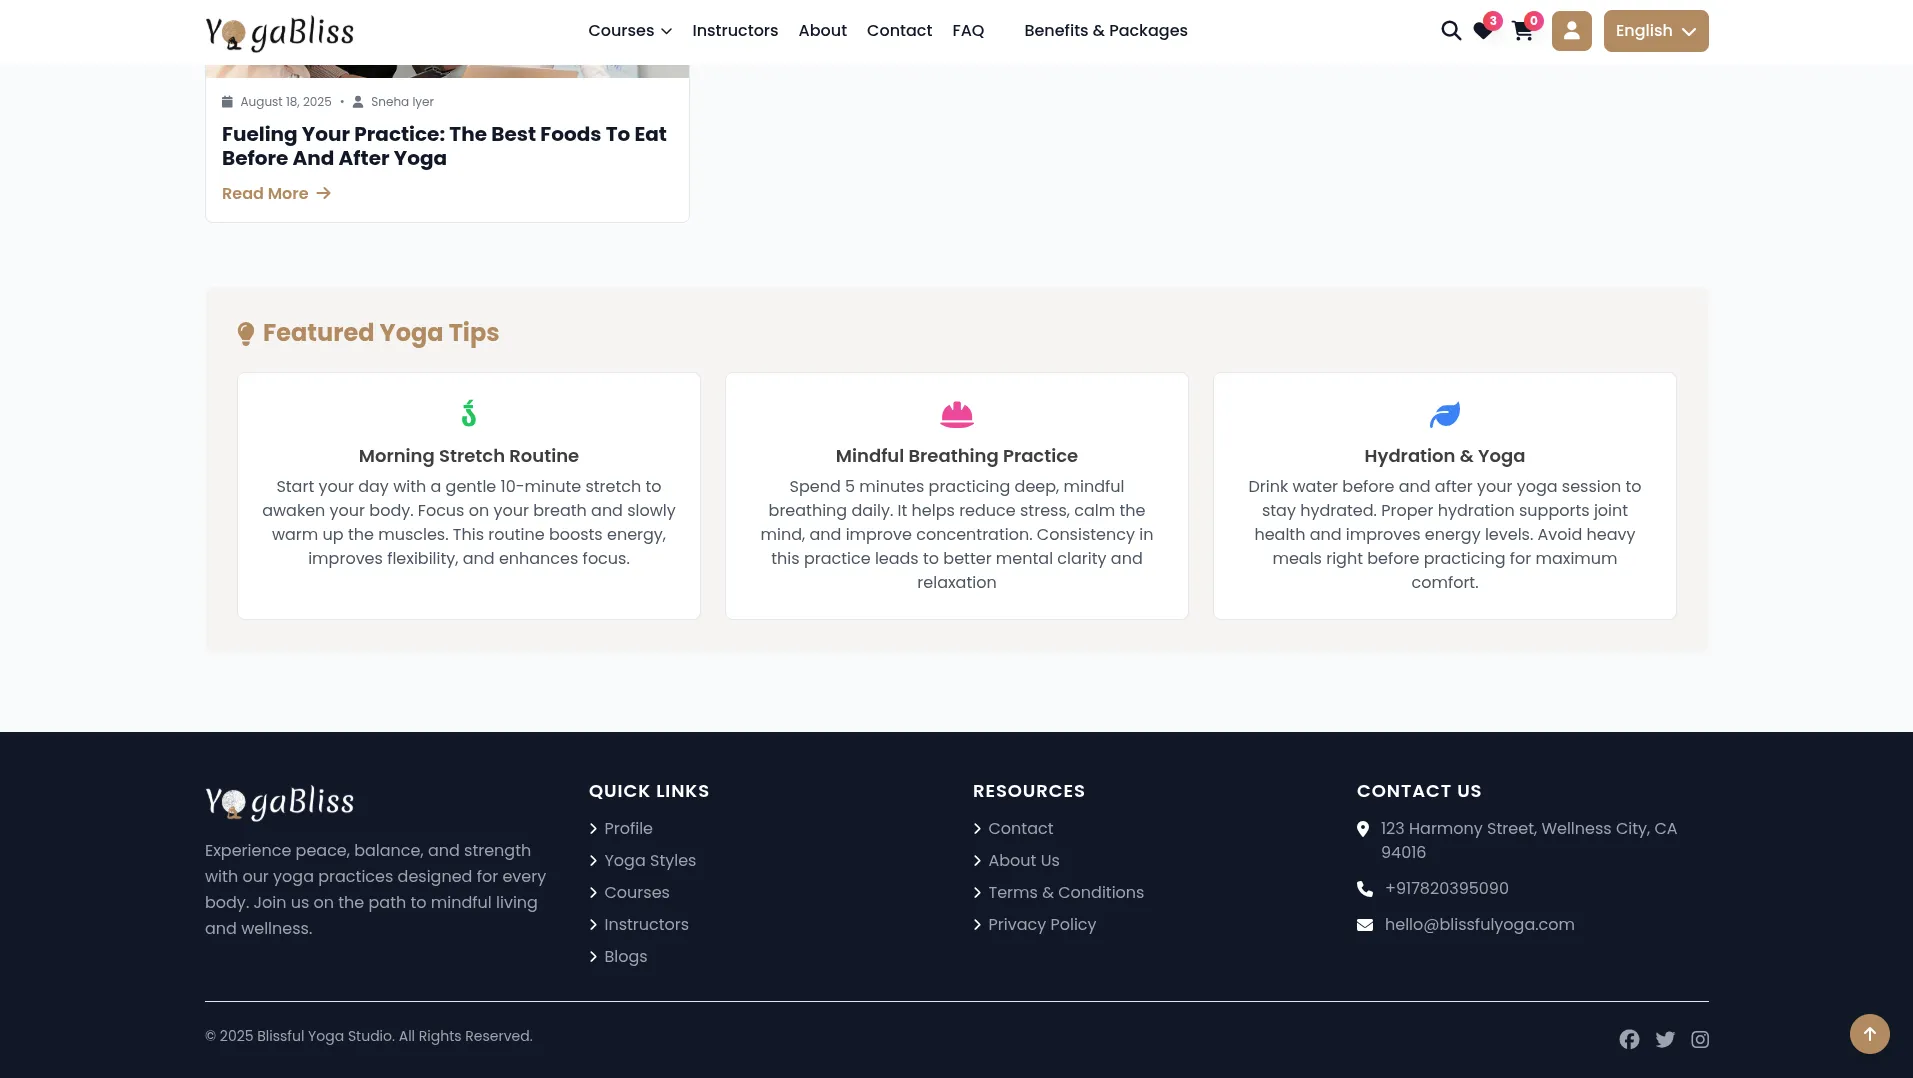
- To create featured tips for your website, click the “Create” button in the Featured Tips section. Enter a Title and Description for the tip. Choose an Icon and select a Background Color that will be displayed with the tip. The Icon Preview shows how your tip will appear on the website.
- The featured tips list displays all tips with columns for Icon, Title, Background Colour, and Actions. Use Edit to modify tips or Delete to remove them from your website.
- On your website homepage, all the tips you create here appear in the Featured Yoga Tips section, which is located above the footer section. Members can see your tips with the chosen icons, titles, descriptions, and background colours, providing them with helpful yoga advice and wellness guidance that enhances their experience on your website.
Yoga Styles Section
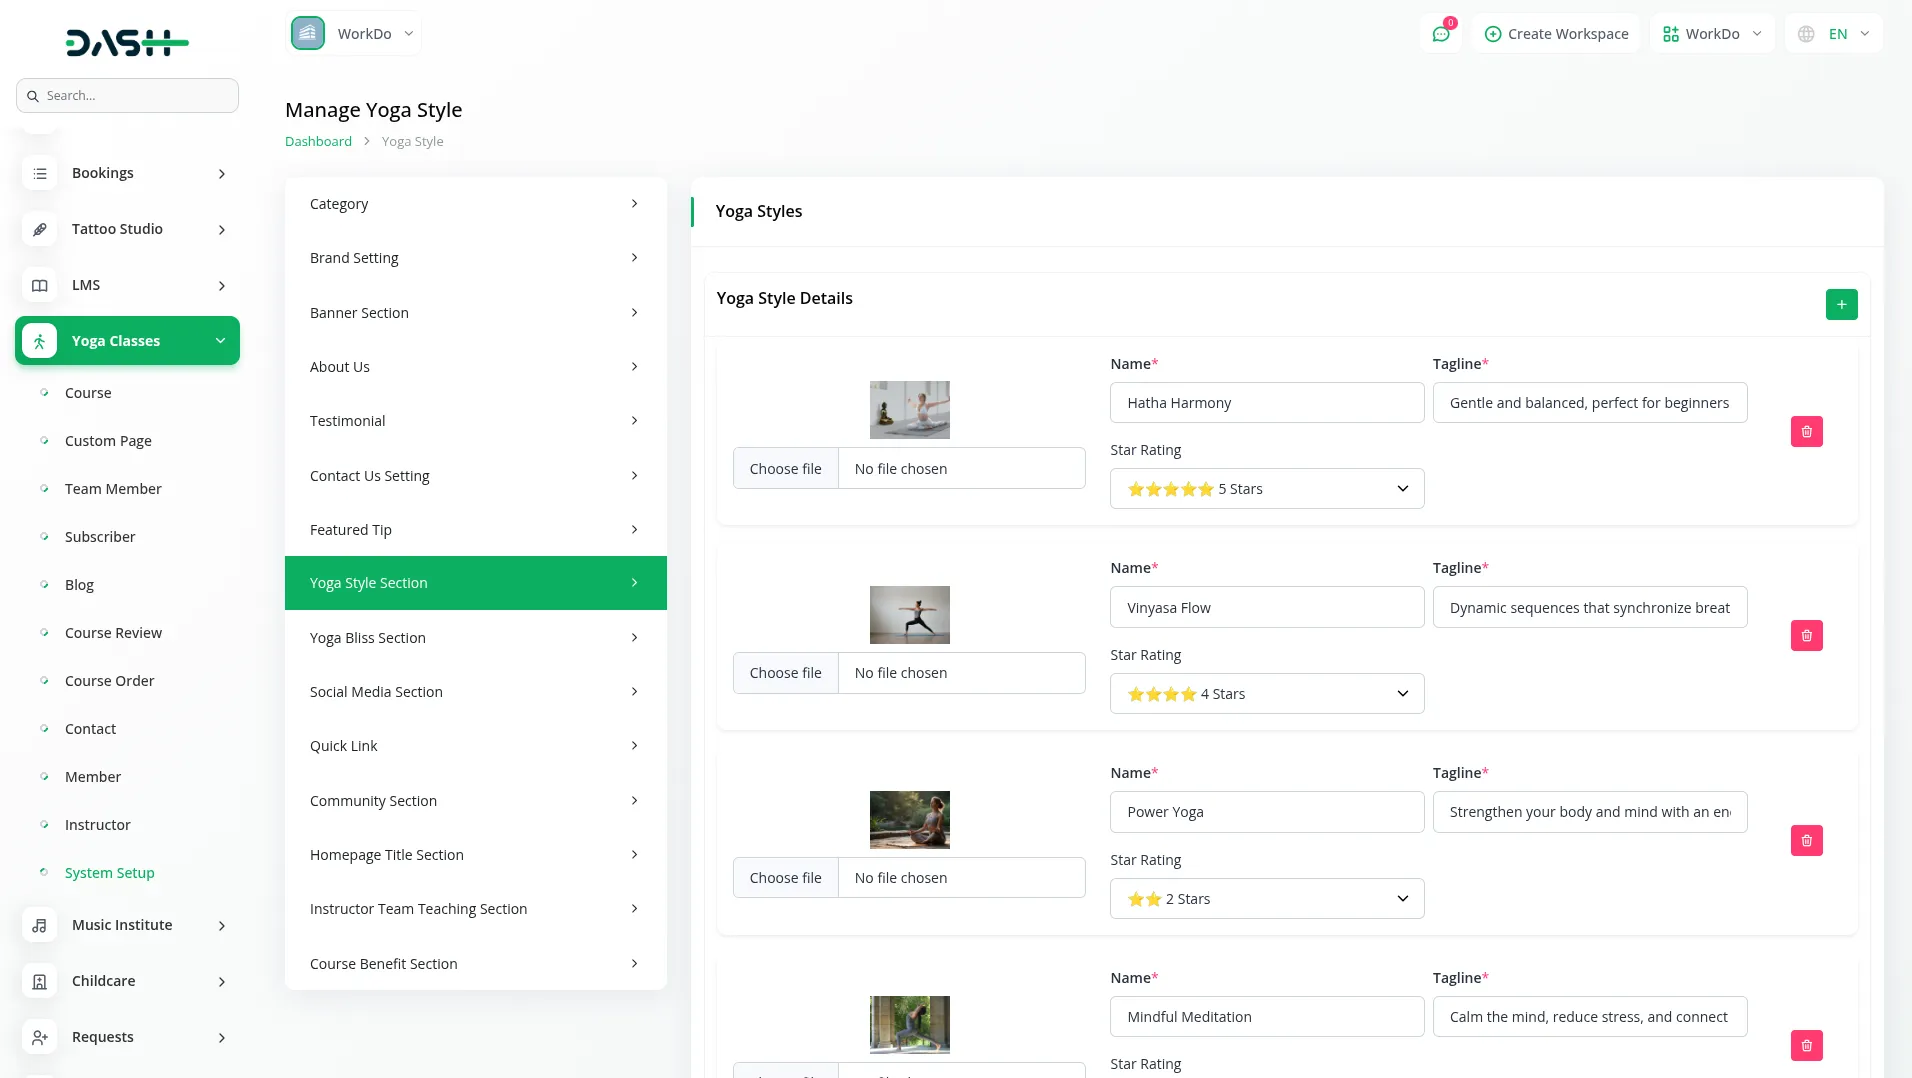
- Configure different yoga styles using the repeater system. For each yoga style, upload an Image, enter the Name and Tagline, and set a Rating. These yoga styles will be used in course creation and displayed on your website’s homepage.
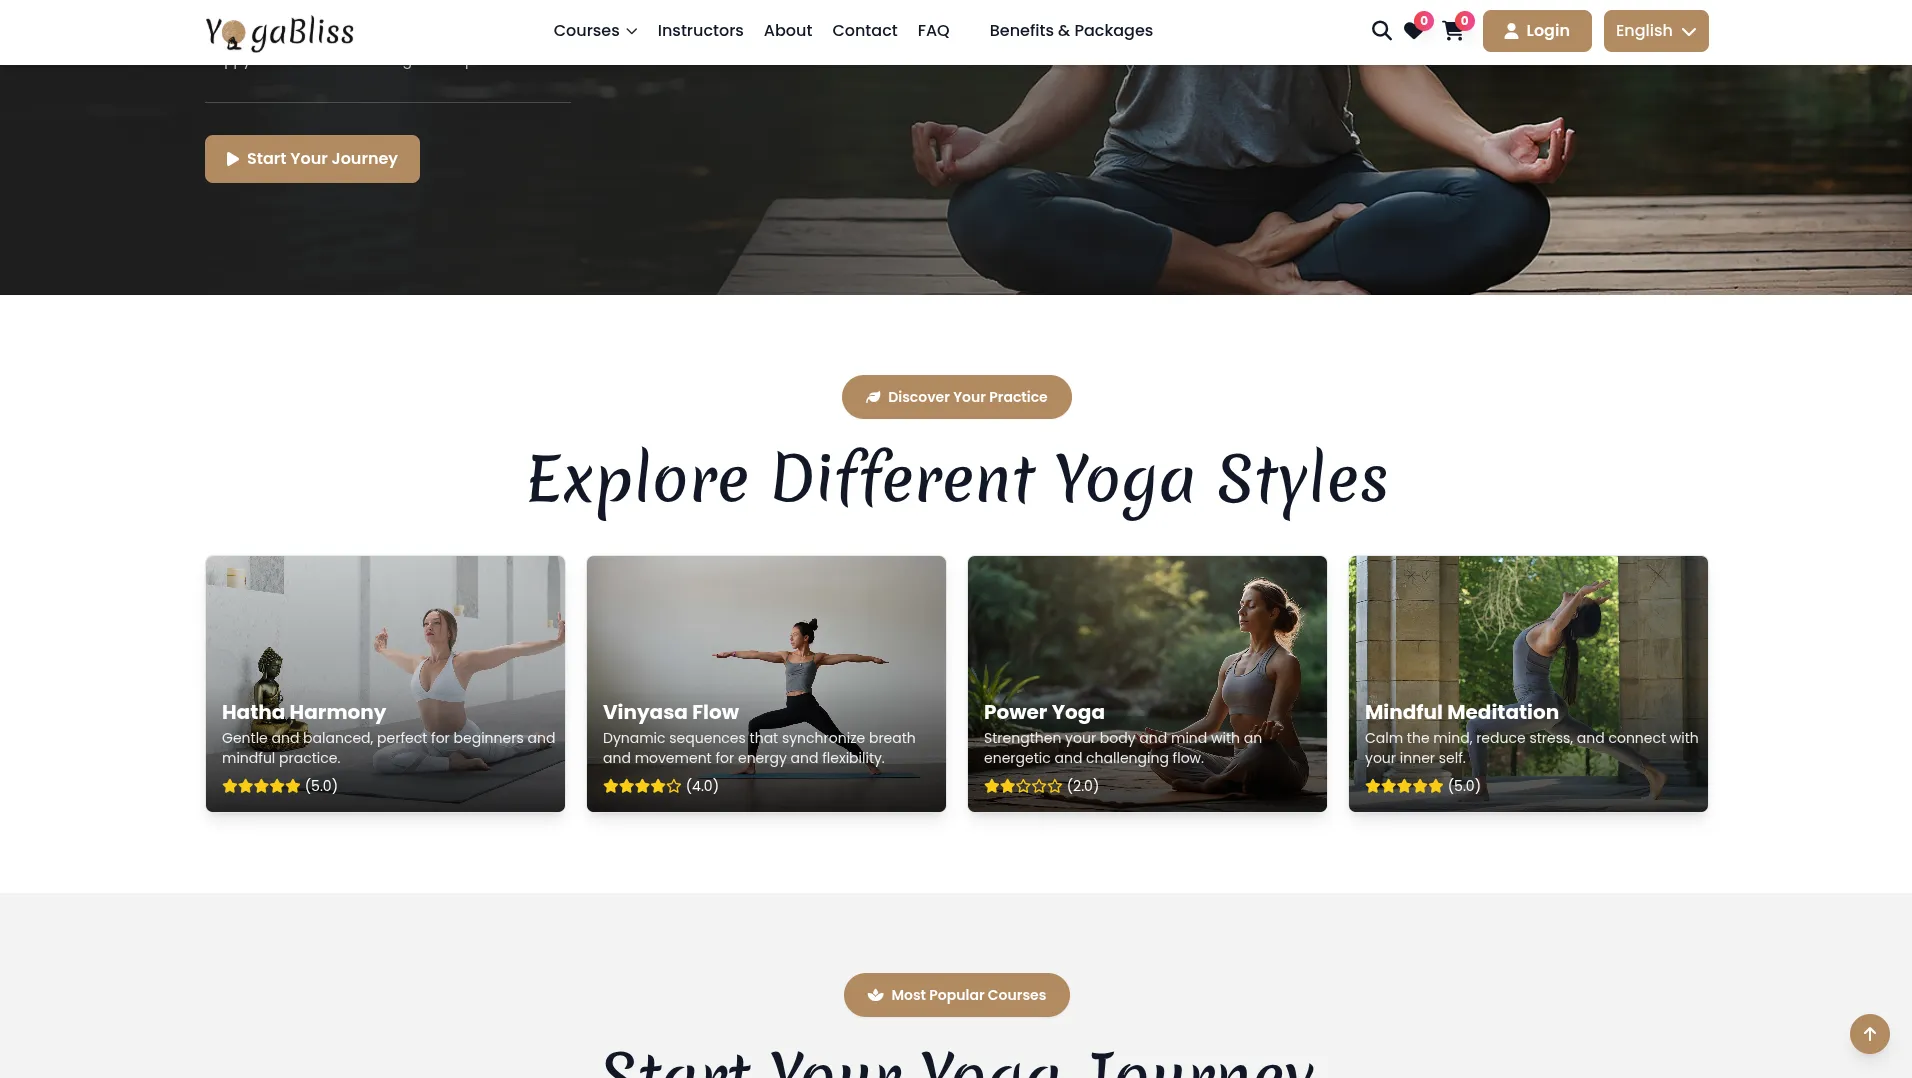
- On your homepage, this creates the Yoga Style Section that showcases different yoga styles offered by your classes. Members can see the image, name, tagline, and rating for each yoga style, helping them understand the variety of practices you offer and choose what interests them most.
Yoga Bliss Section
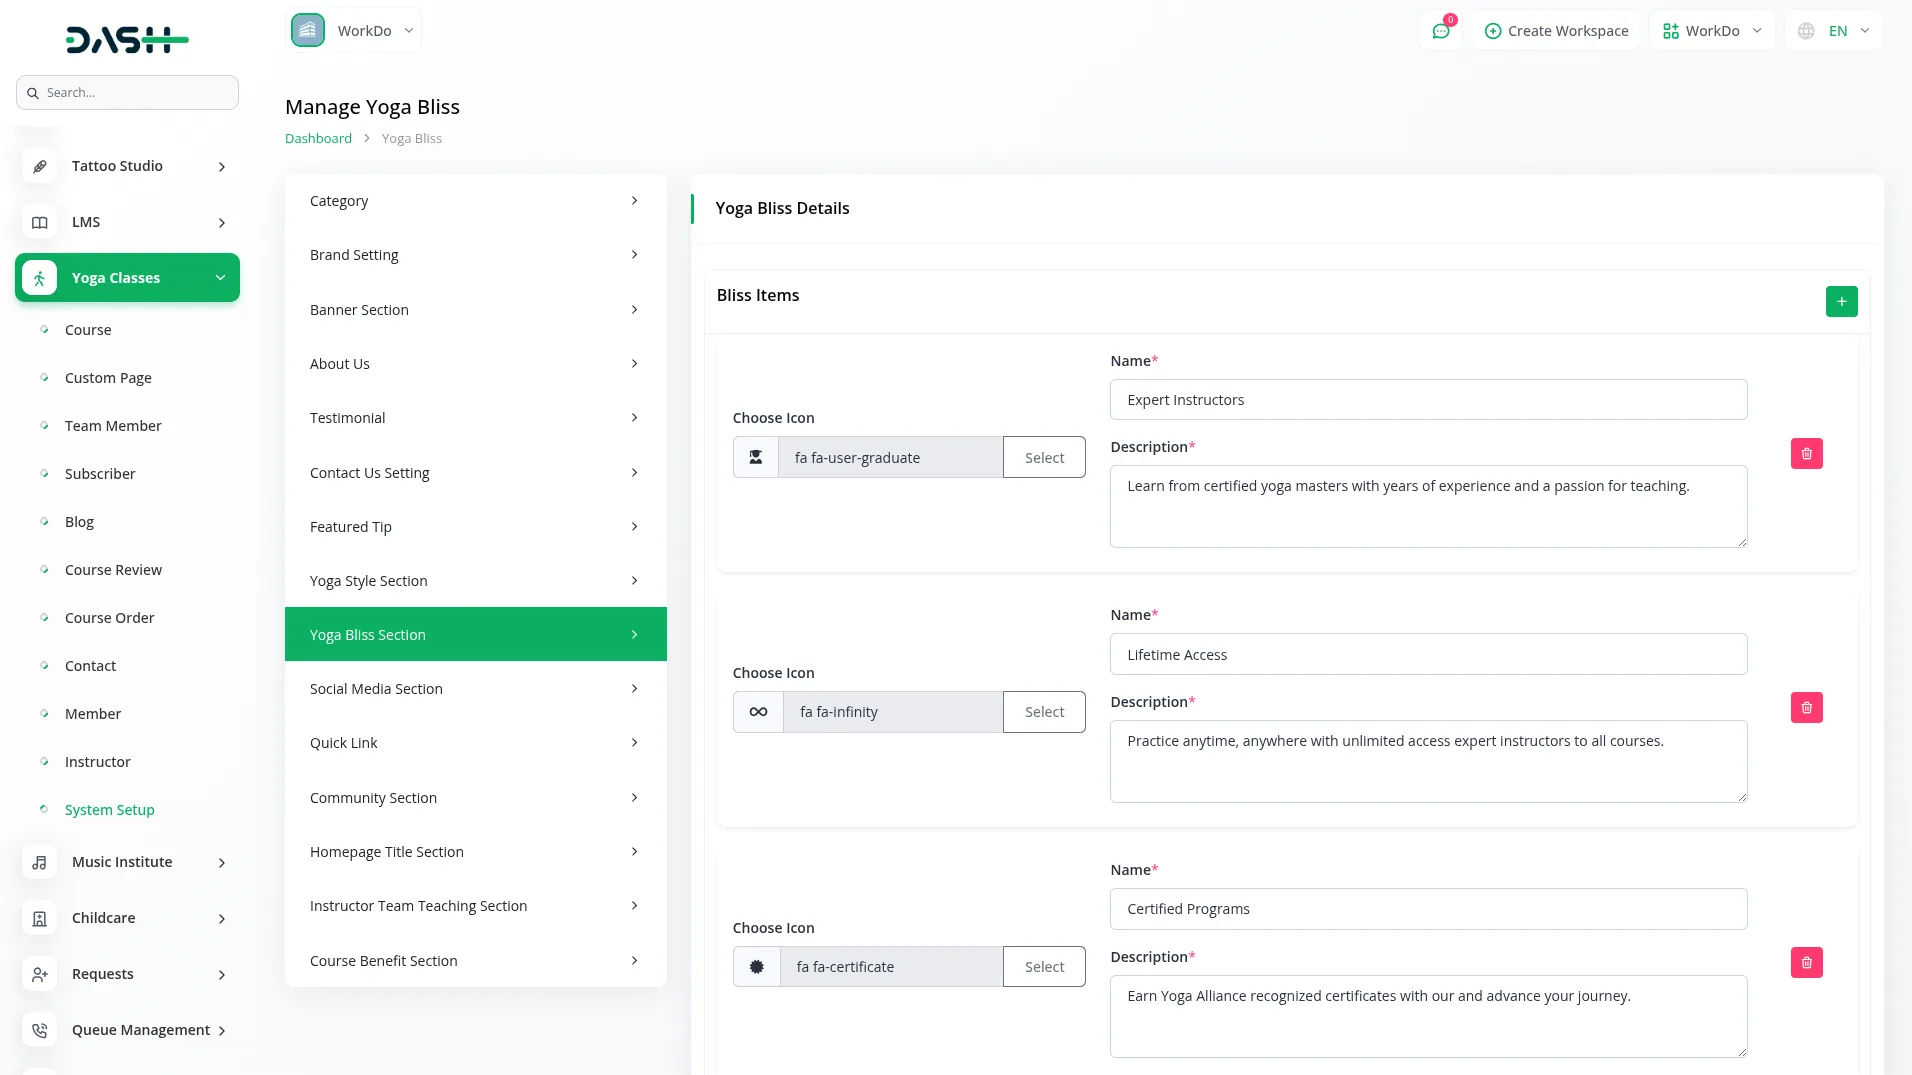
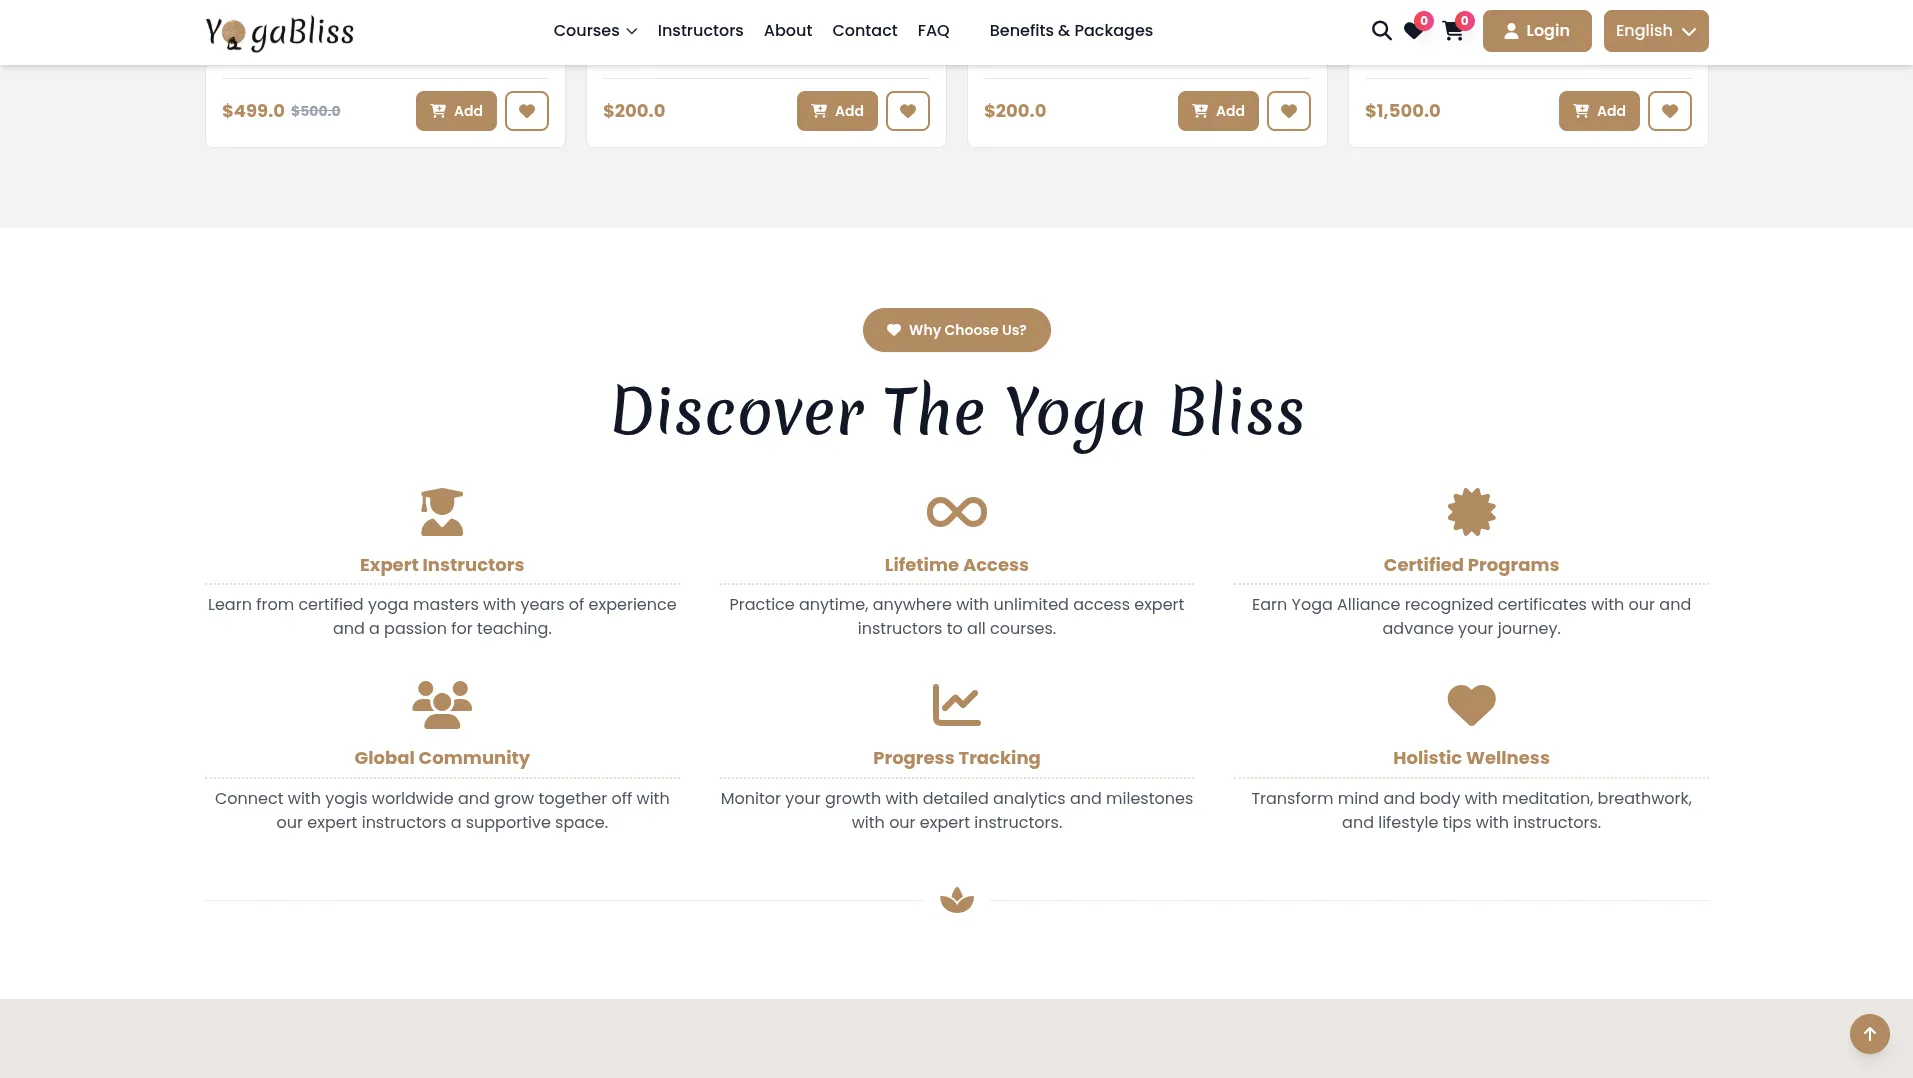
- Set up your yoga bliss section using the repeater system. For each benefit, choose an Icon, enter a Name, and write a Description explaining the benefit. These will be displayed on your homepage to highlight the advantages of your yoga programmes.
- On your homepage, this appears as the Yoga Bliss Section that highlights the benefits and philosophy of yoga practice. Members see the icon, name, and description for each yoga benefit you’ve configured, helping them understand why yoga is valuable and encouraging them to join your classes.
Social Media Section
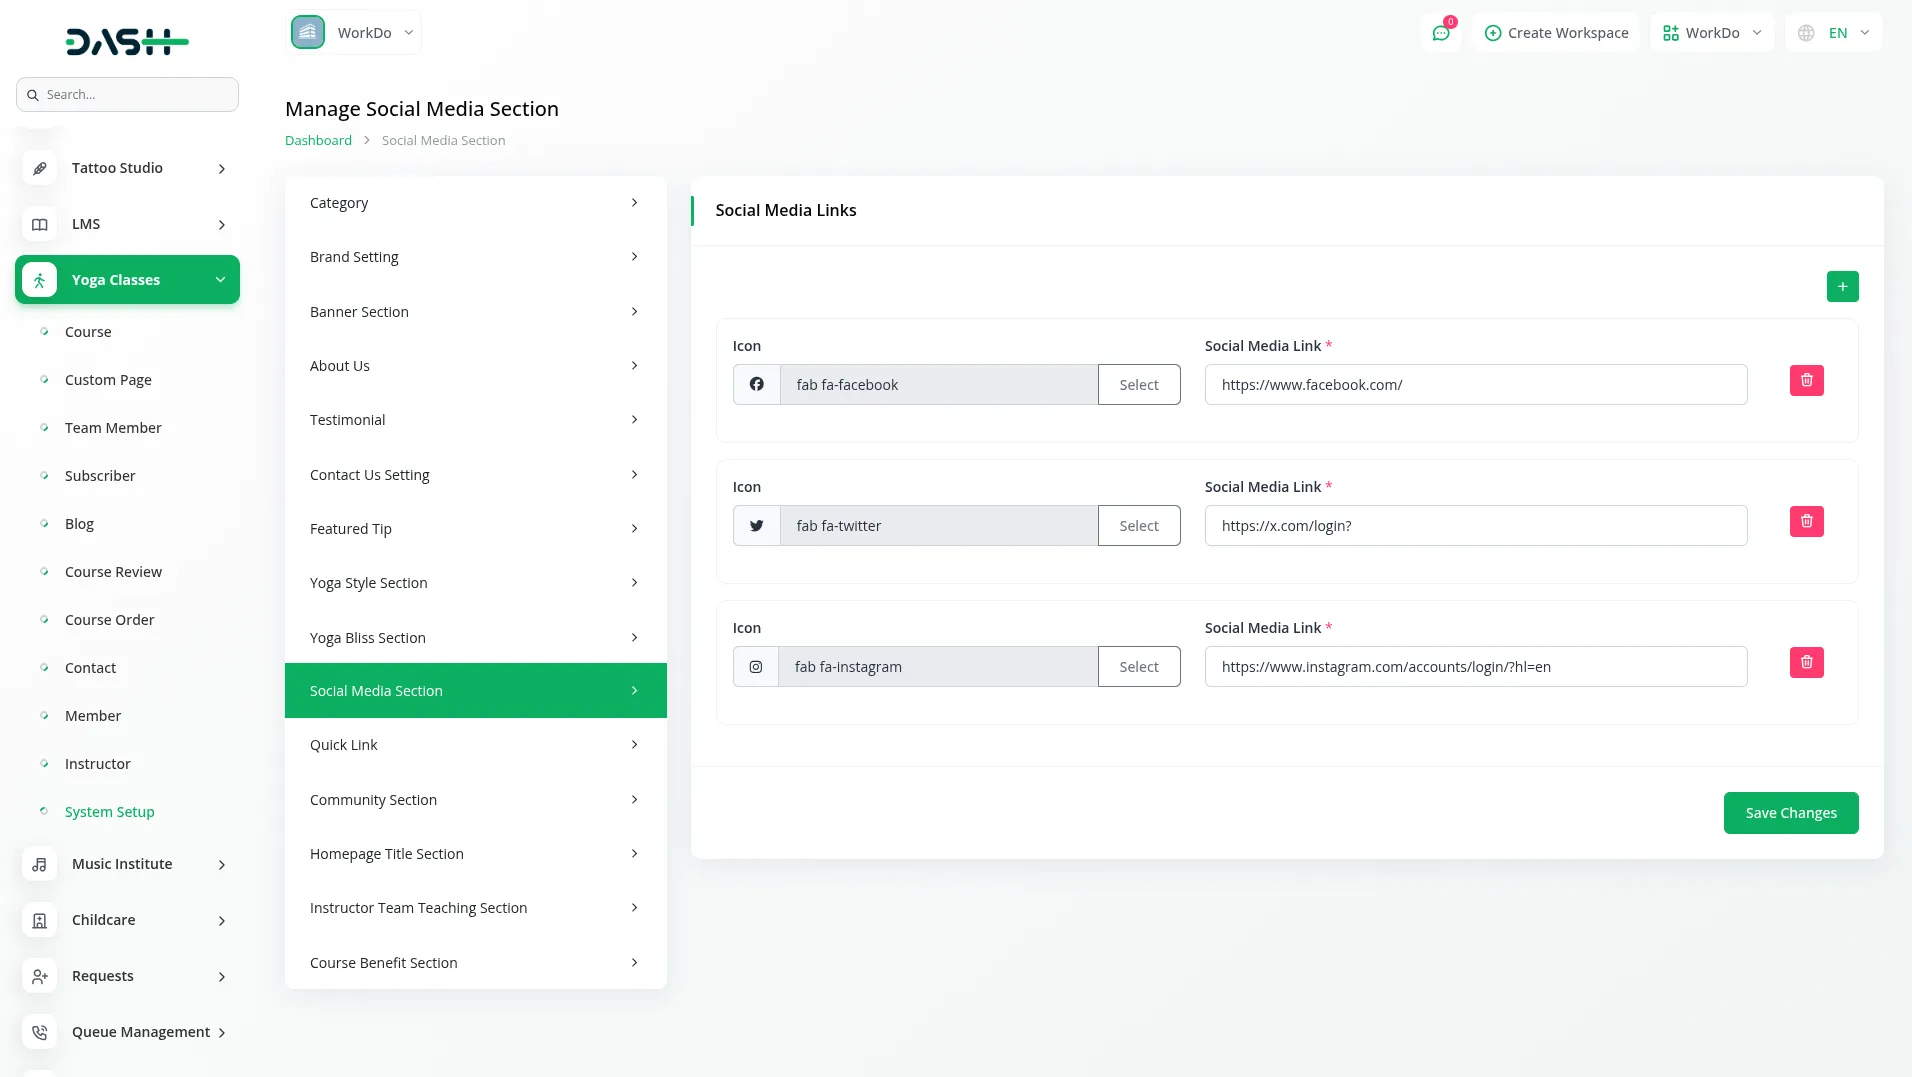
- Add your social media links using the repeater system. For each social media platform, choose the appropriate Icon and enter the Link to your profile. These will appear in your website footer and help members connect with you on social platforms.
- On your website footer, members can see all the social media platforms you’ve added here. The social media icons you configure will be displayed at the bottom of every page, making it easy for members to follow your yoga updates, connect with your community, and stay engaged with your content across different social platforms.
Quick Links
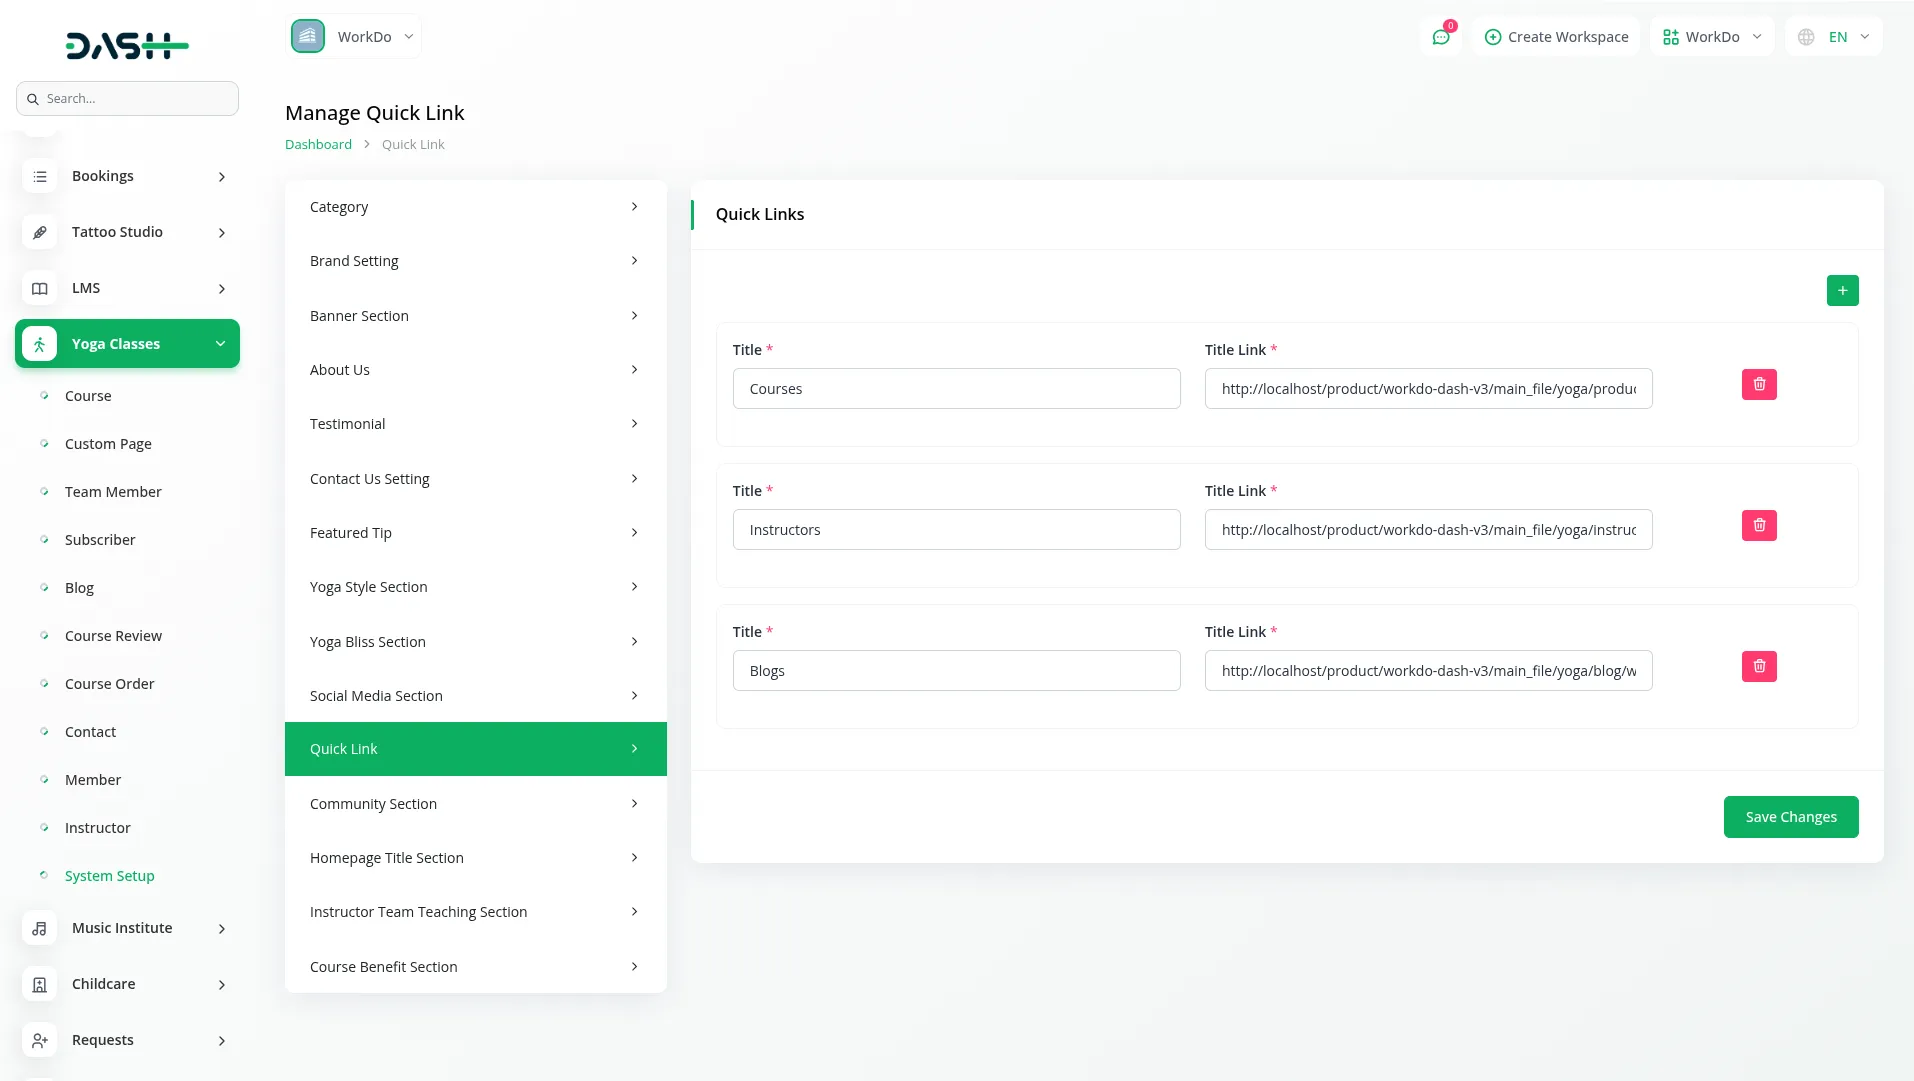
- Create navigation links for your website footer using the repeater system. For each quick link, enter a Title and the Title Link (URL) where members should be directed when they click the link.
- These quick links appear in your website footer, making it easy for members to navigate to important pages quickly from any page on your site.
Community Section
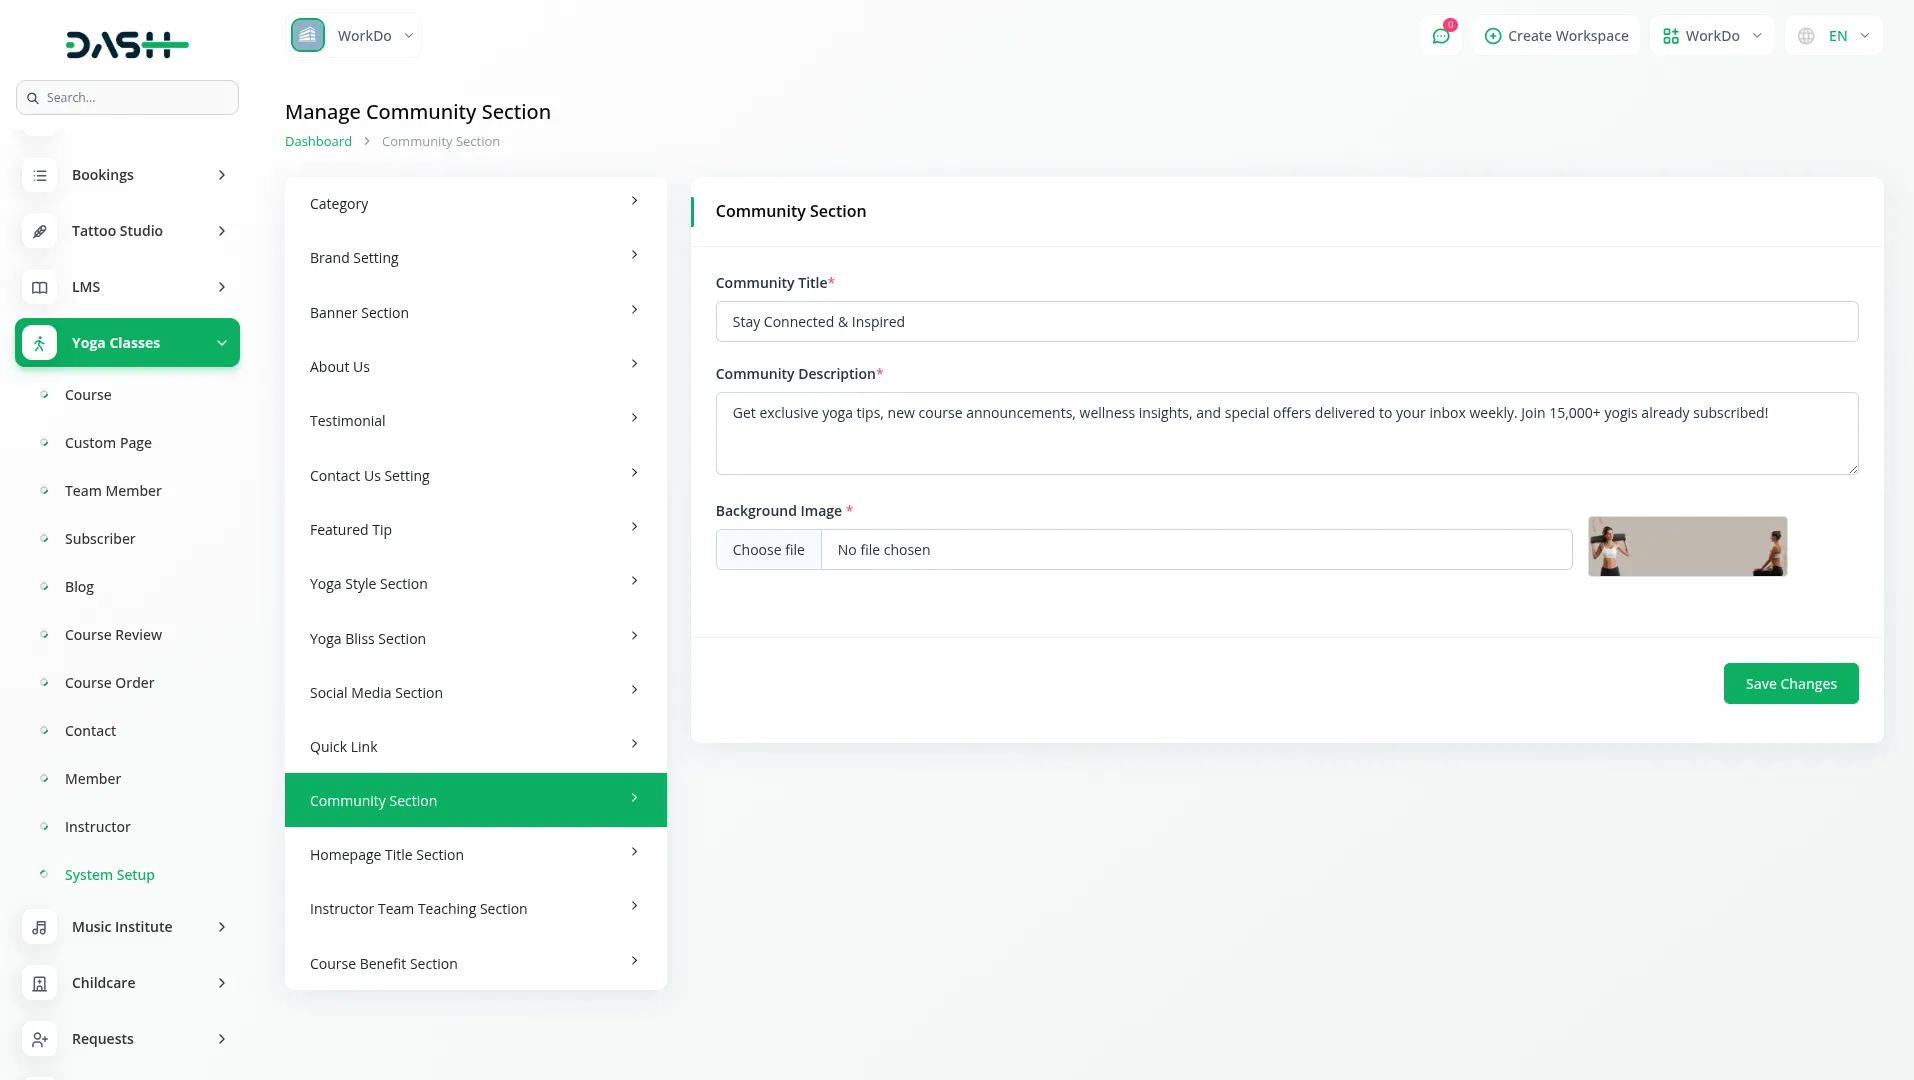
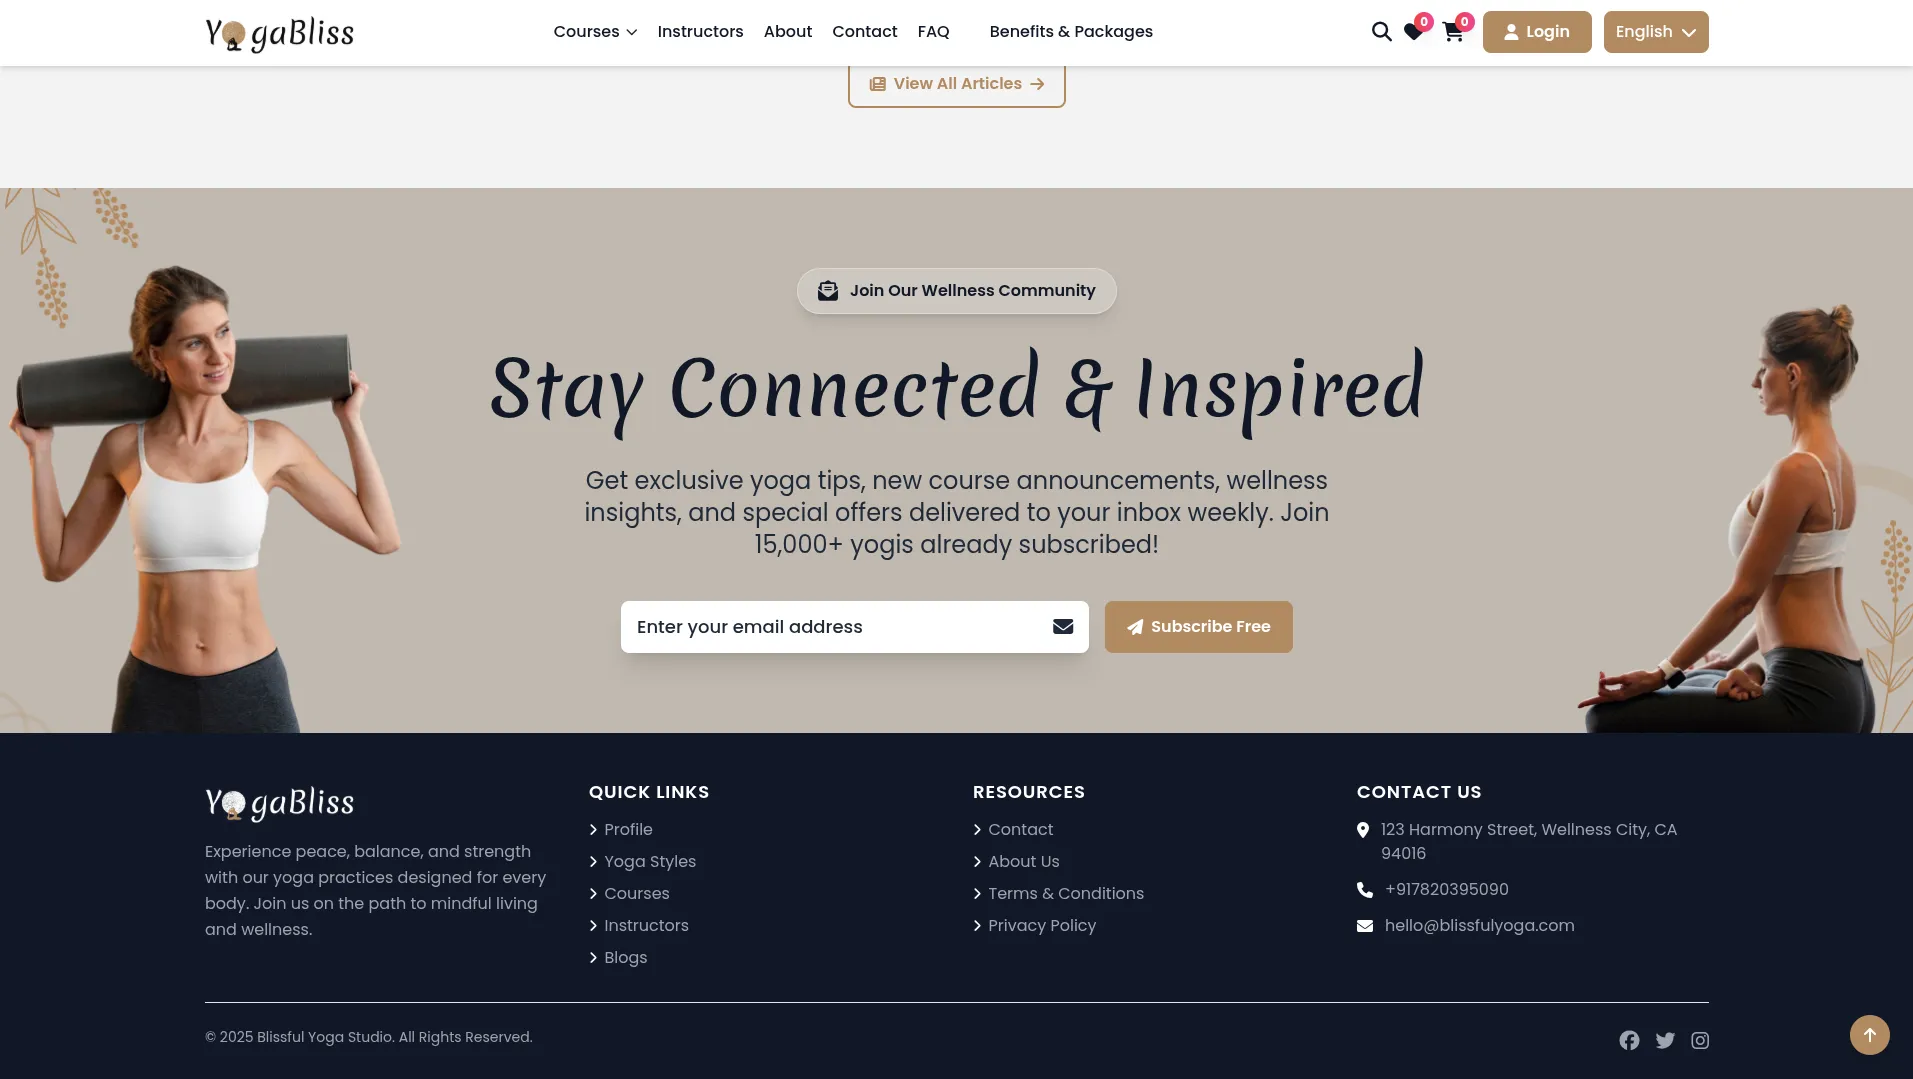
- Configure the community section that appears on your homepage. Enter a compelling Title, upload a Background Image, and write a Description that encourages members to join your yoga community.
- On your homepage on the website, this creates the Community Section that encourages visitor engagement and newsletter subscription. Members see your title, background image, description, and a subscription form with an email field and button. When people subscribe, their emails are automatically stored in your Subscriber section for future marketing.
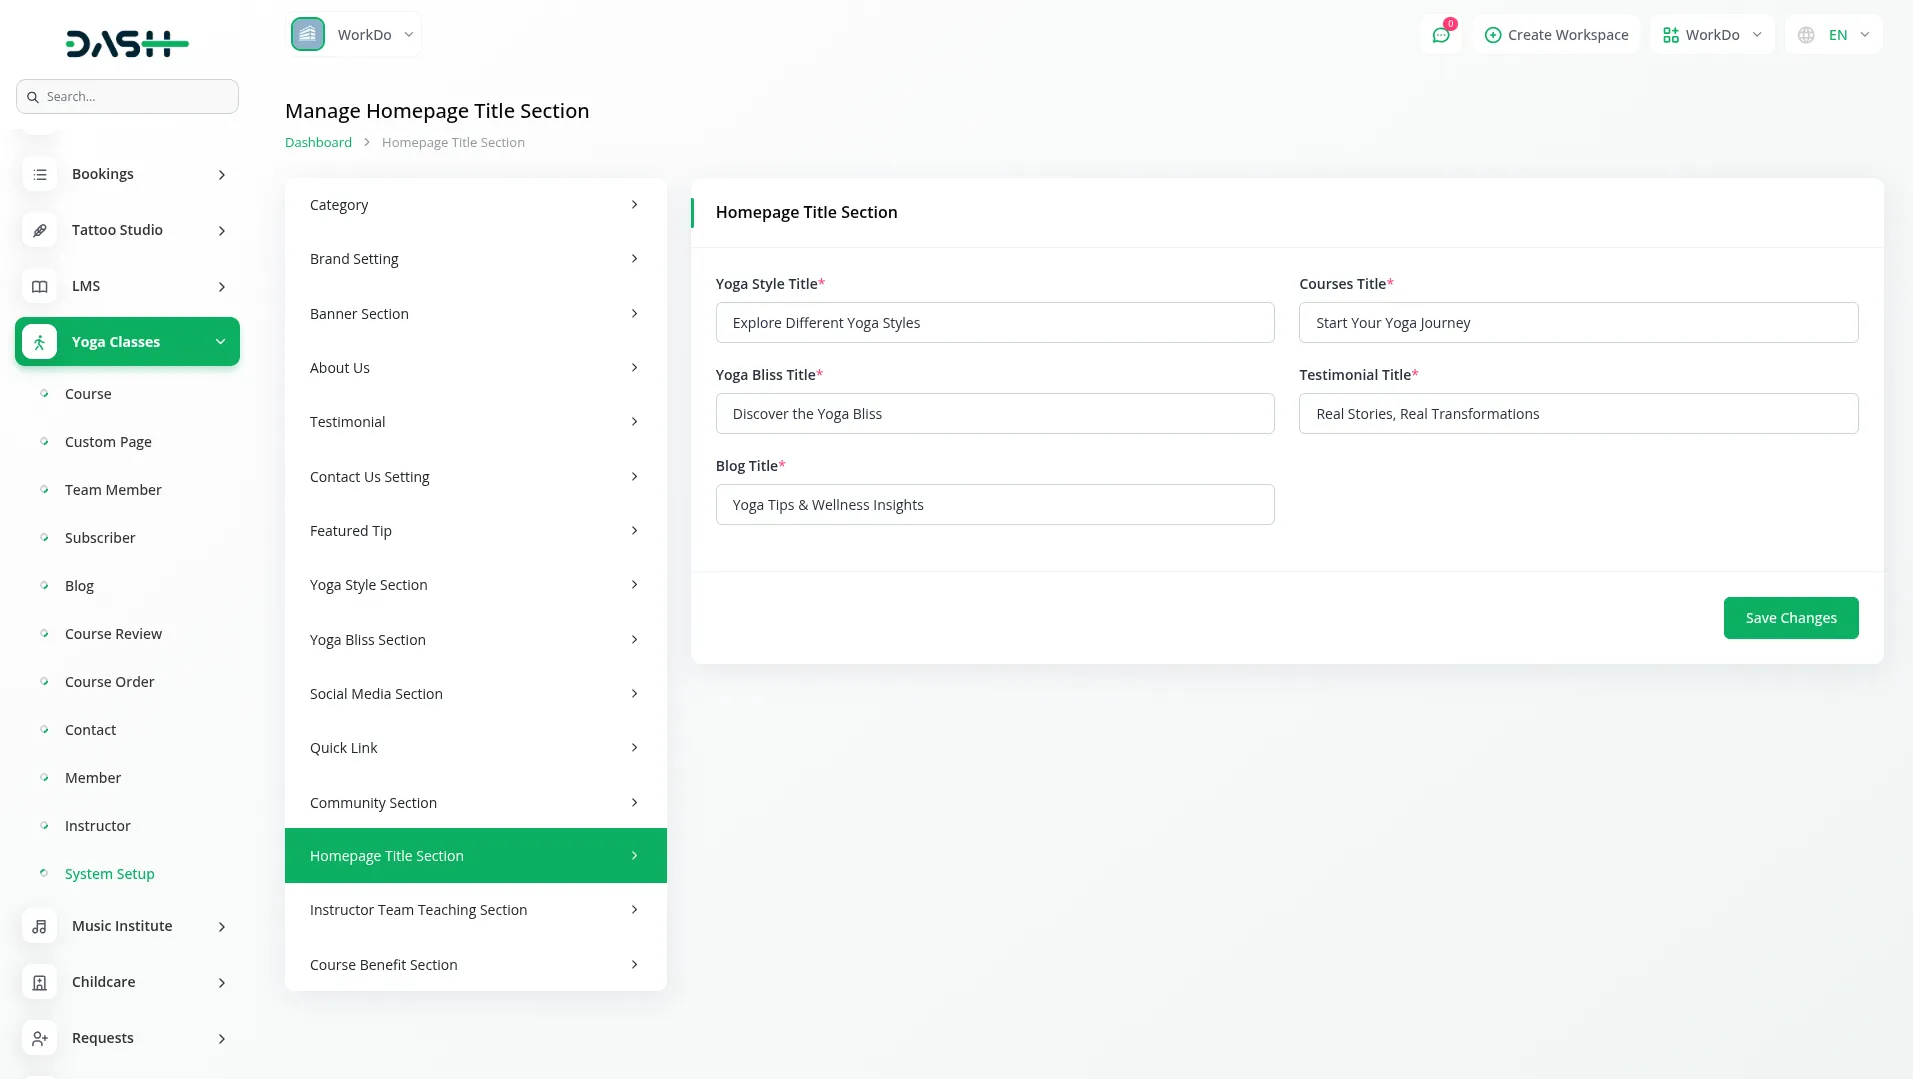
Homepage Title Section
- Set the main headings that appear on your homepage by entering the Yoga Style Title, Course Title, Yoga Bliss Title, Testimonial Title, and Blog Title. These titles help organize your homepage content and guide members through different sections.
- On your homepage on the website, members see these titles above different sections: the Course Title appears above your Popular Course Section that features your most popular yoga courses, the Success Stories Title appears above your Testimonial Section, the Blog Title appears above your Blog Section that showcases recent yoga articles, and other titles organize the various homepage sections to create a clear, professional layout.
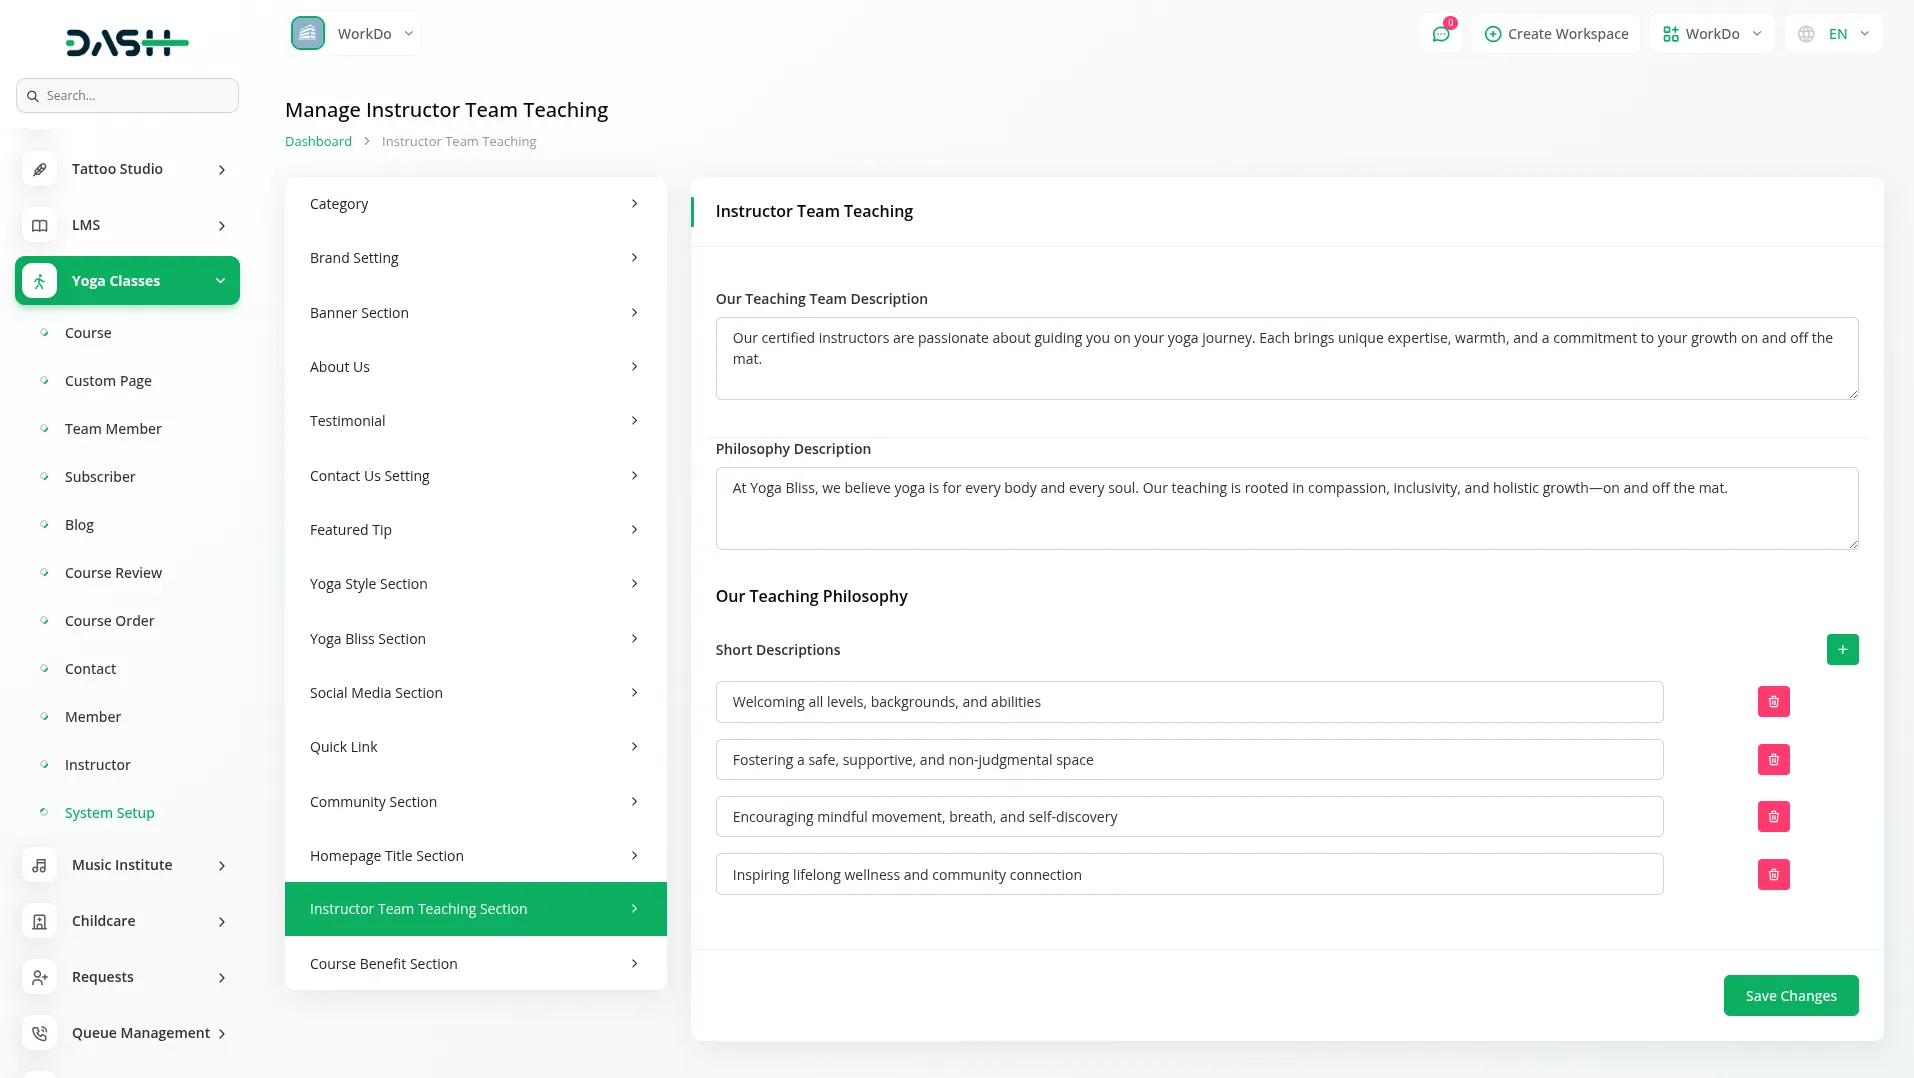
Instructor Team Teaching Section
- Add a description for your teaching team in the Our Teaching Team Description field. Use the repeater system for Our Teaching Philosophy to add multiple philosophy entries, each with a Philosophy Description and a Short Description that explain your teaching approach.
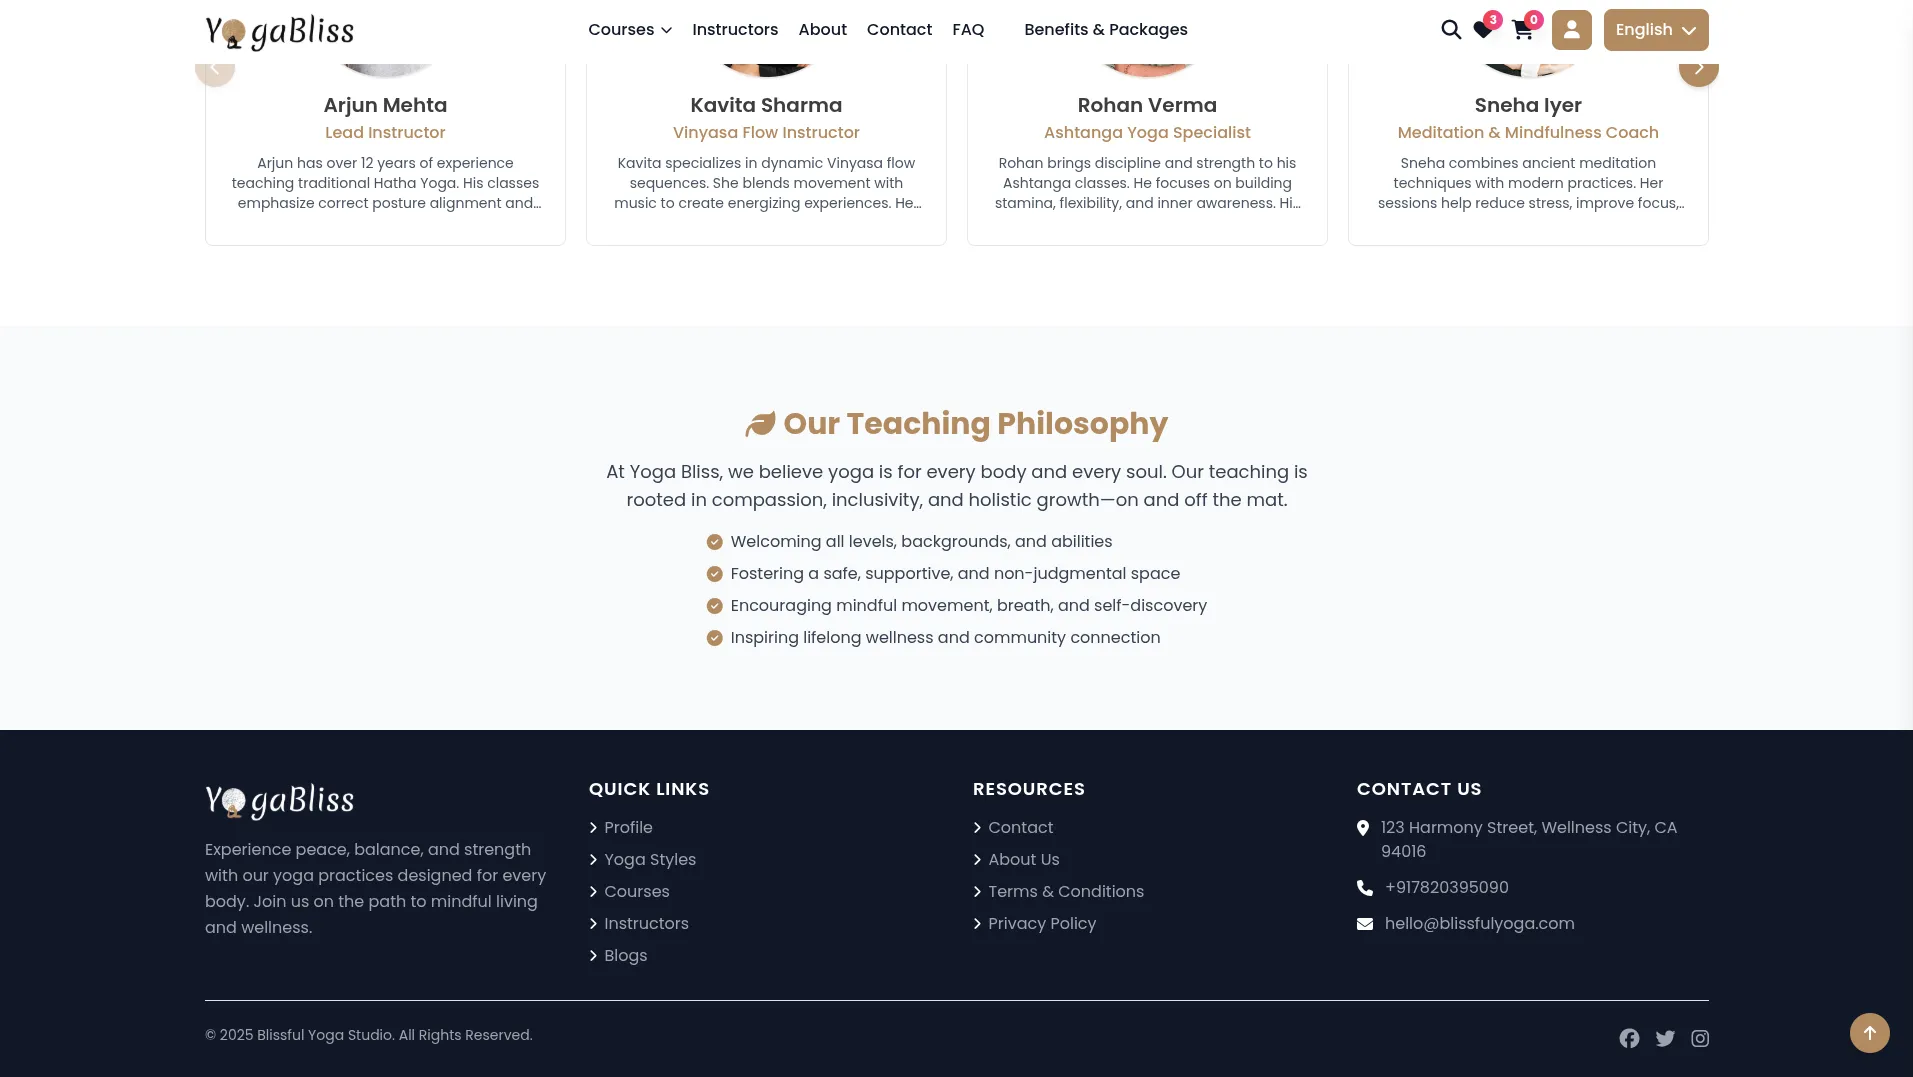
- On your Instructors Page on the website, members see this as the Our Teaching Team Description and Teaching Philosophy sections. The instructor section displays all instructors from your admin panel, along with your teaching philosophy descriptions and titles, helping members understand your teaching approach and connect with your instructors’ expertise.
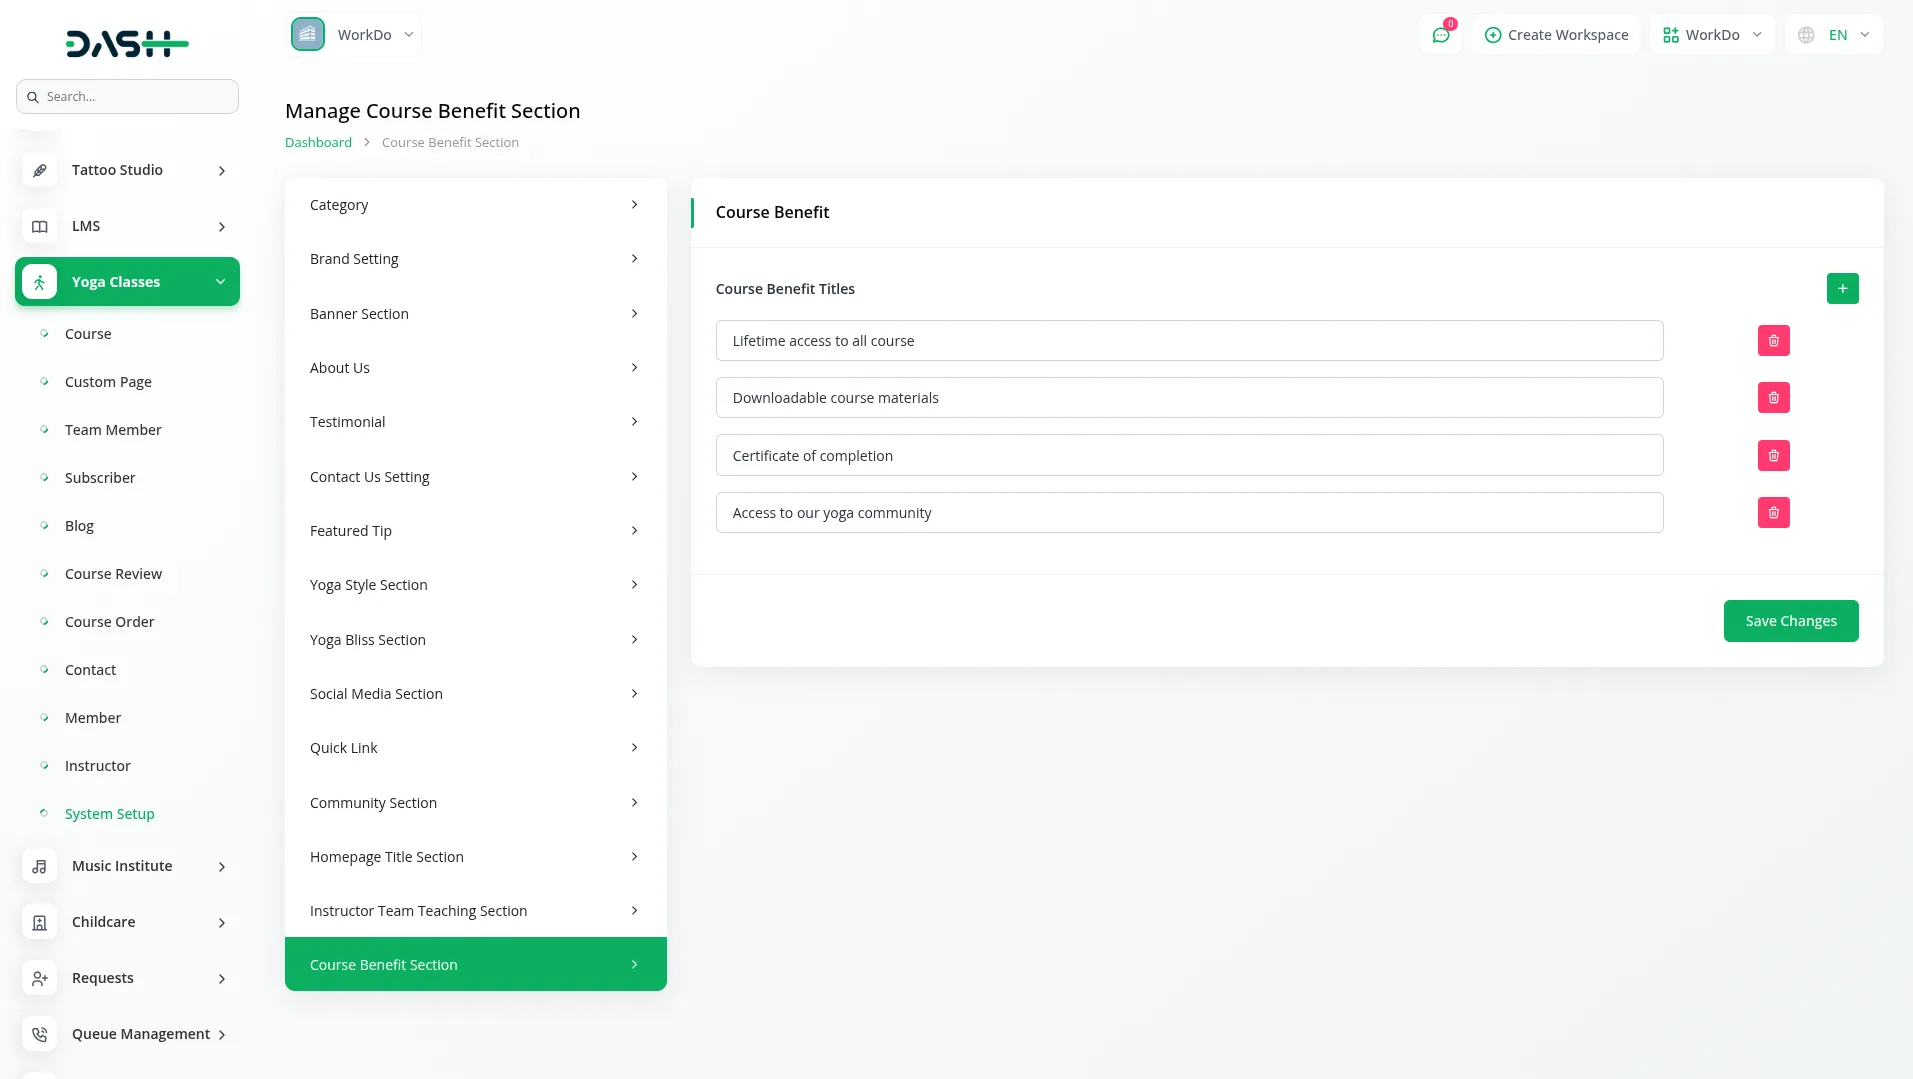
Course Benefit Section
- Create course benefits using the repeater system. For each benefit, enter a Benefit Title that explains what members will gain from your courses. These benefits will be displayed during the checkout process to encourage course purchases.
- Important Note: Only the sections you configure through System Setup will be displayed on your website. Make sure to properly set up all desired sections to ensure your website displays the content you want members to see.
User Authentication (Sign In and Registration)
Sign-In Page
- The Sign In page is where both members and instructors can log into their accounts. Simply enter your Email Address and Password, then click the “Sign In” button.
- Don’t have an account yet? Click “Sign Up Here” to create a new account. The system provides separate login forms for Members and Instructors, so make sure you’re using the right one for your account type.
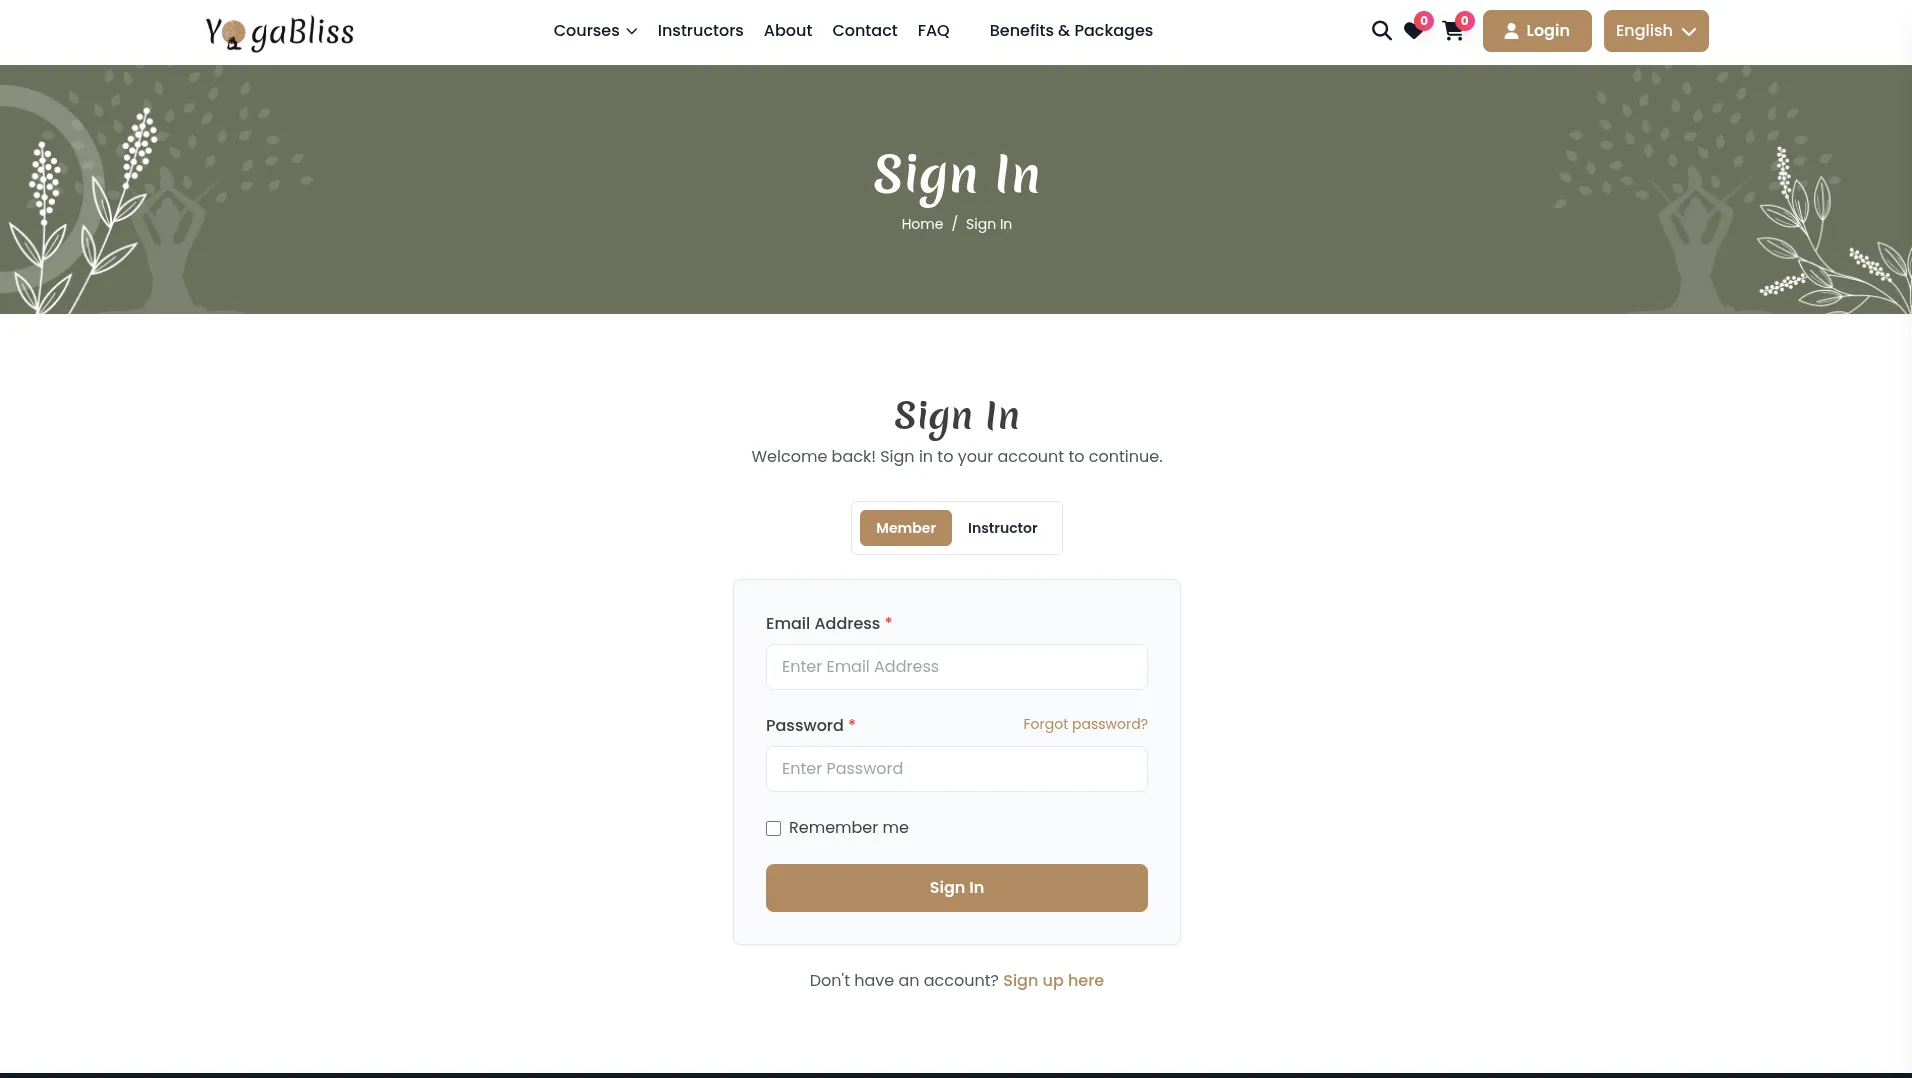
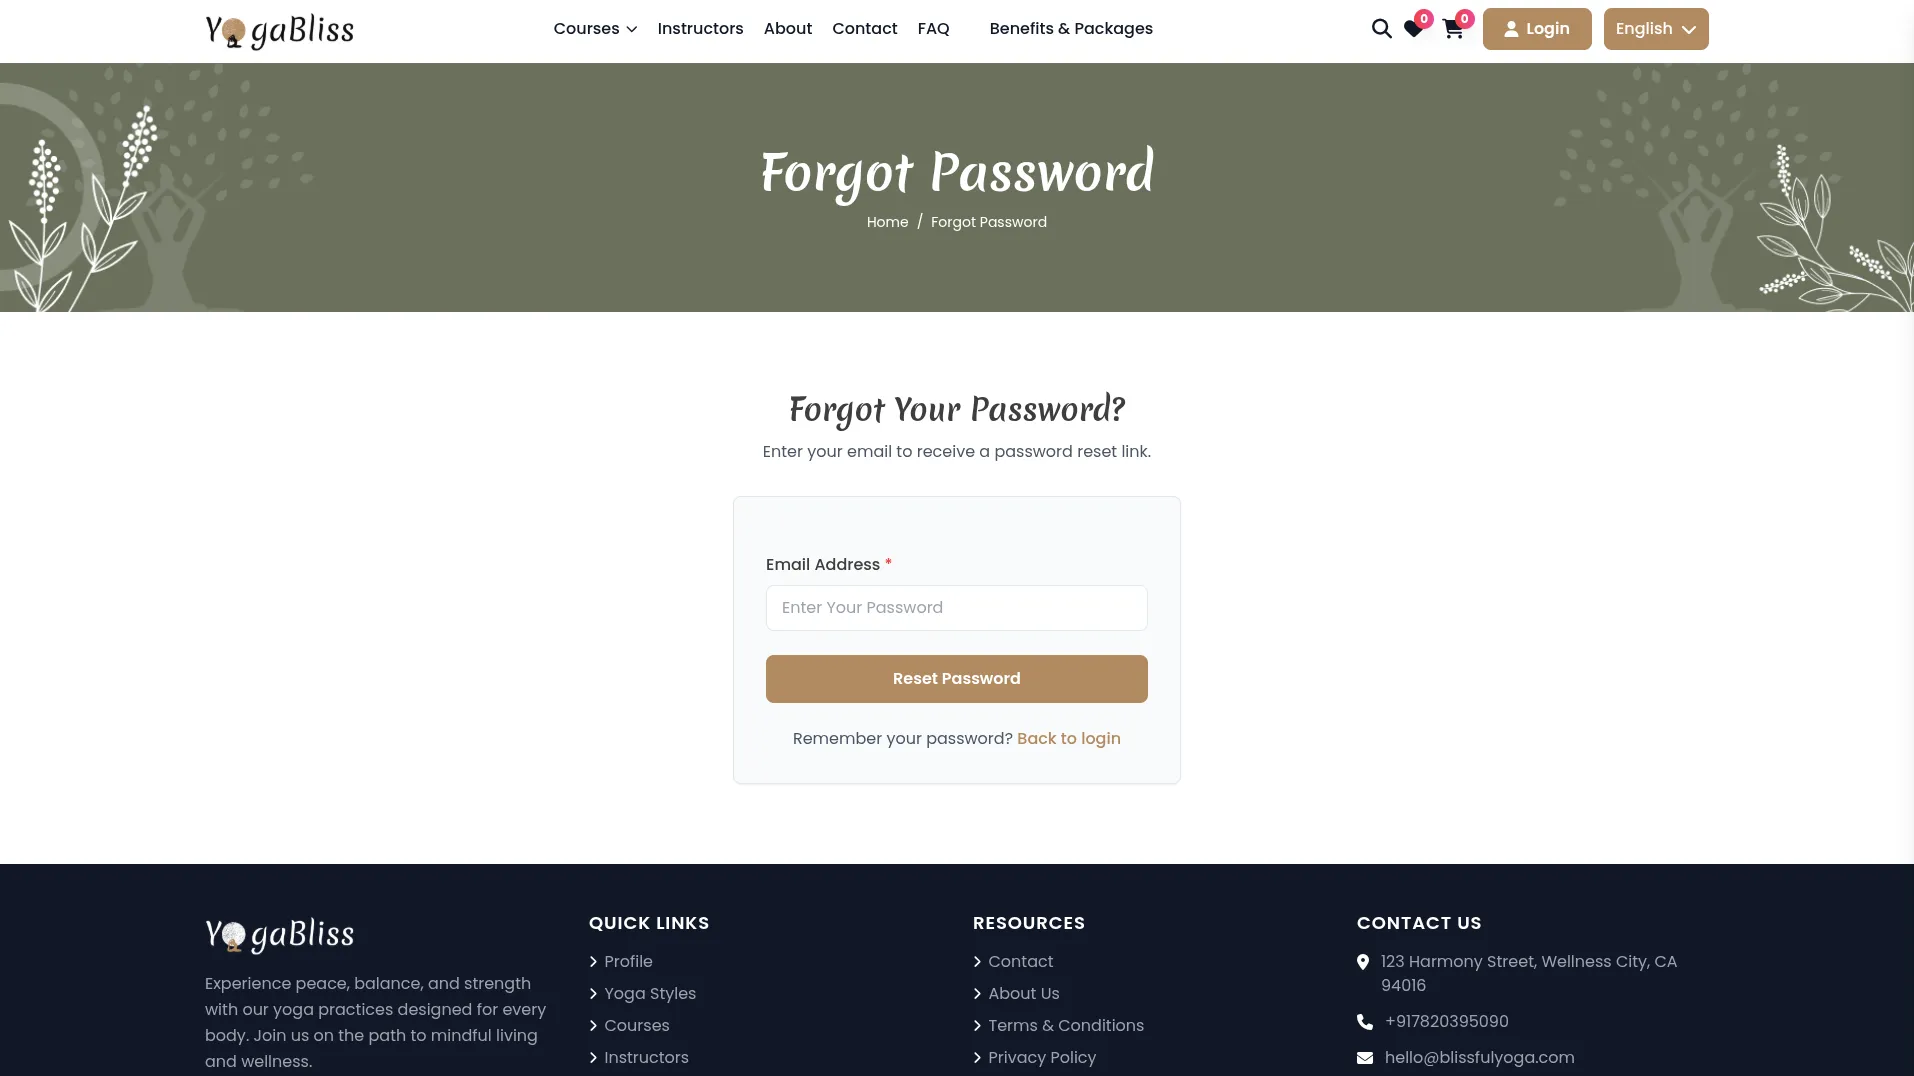
- You can check the “Remember Me” box to stay logged in on your device, which saves you from typing your login details every time. If you forget your password, click “Forgot Password” to reset it easily. Once you enter your email, the system will send a password change email to the email address you provided. From there, you can add your new password.
Registration Page
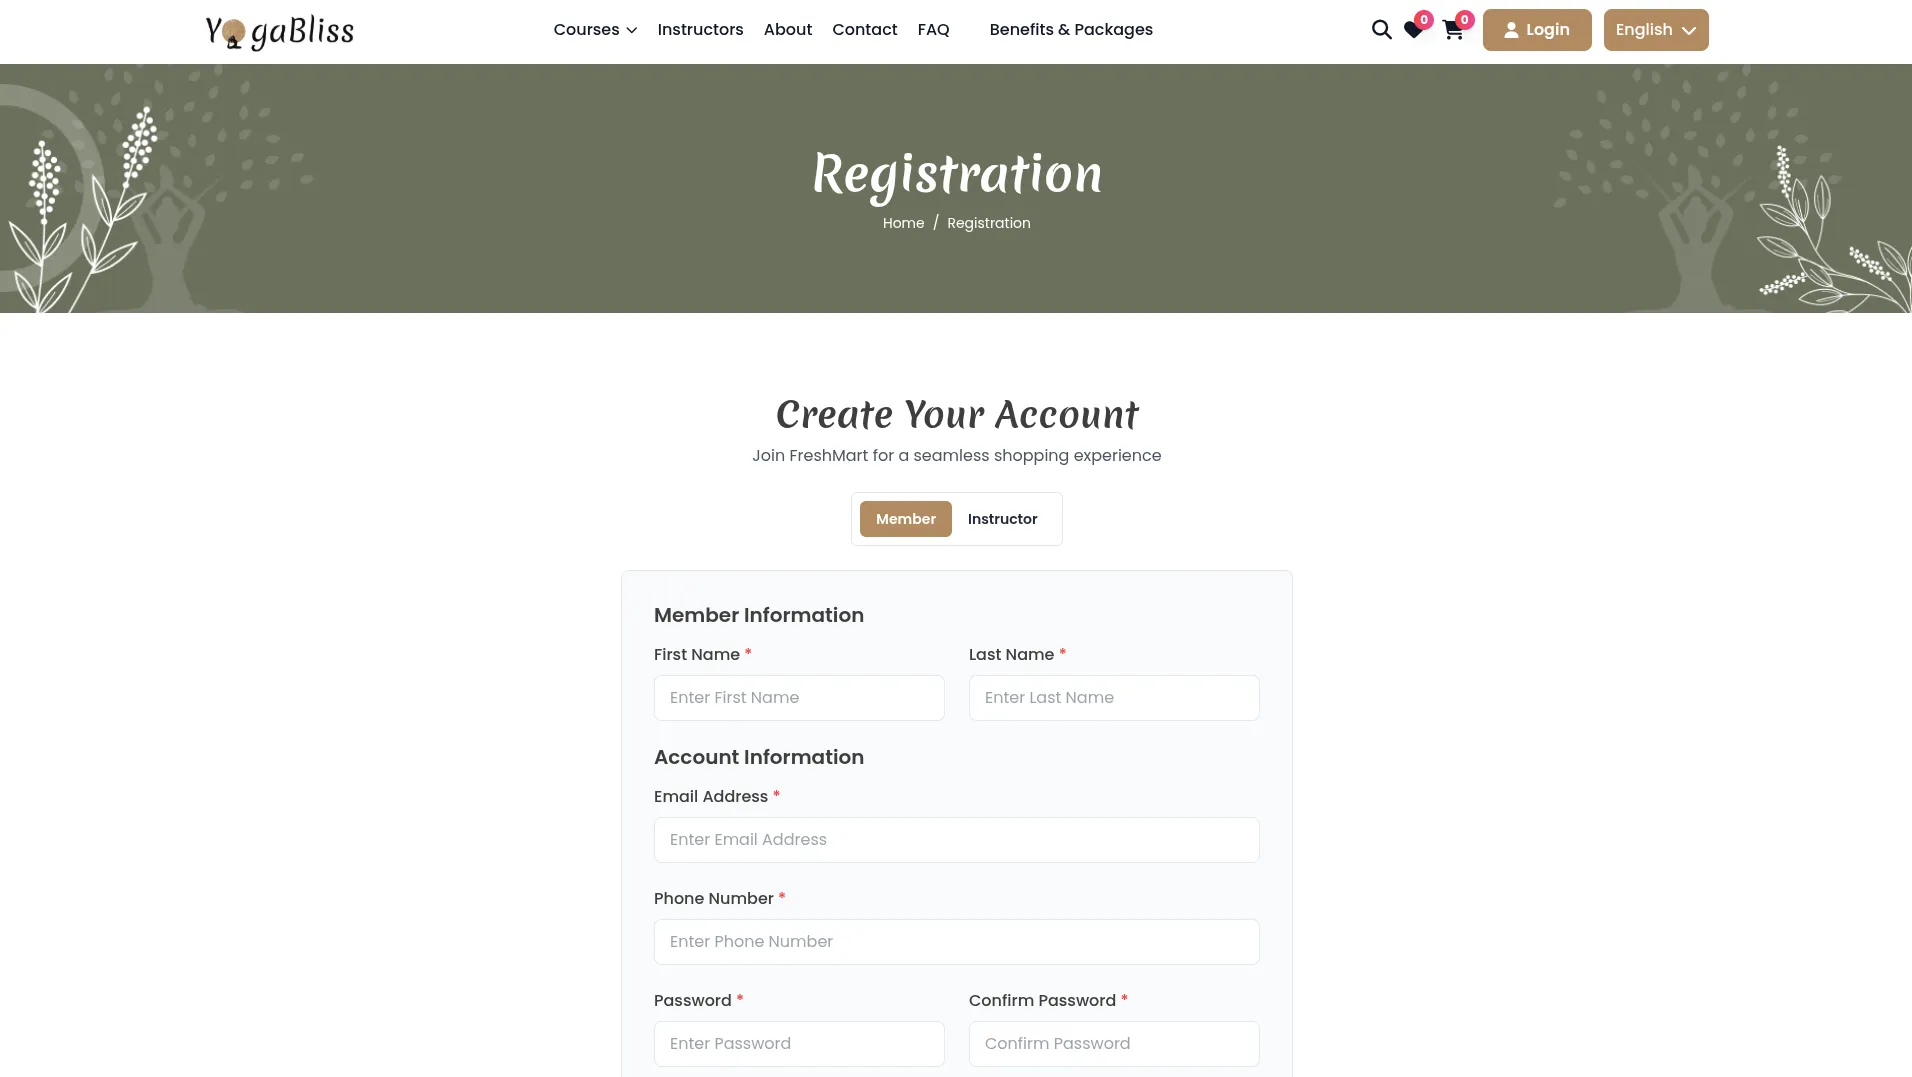
- The Registration Page is where new users can create their accounts. At the top of the page, you can choose whether you want to register as a Member or Instructor by clicking the right option.
- To sign up, fill in all the required information: First Name, Last Name, Email Address, Phone Number, and create a Password. You’ll need to type your password twice to confirm it’s correct.
- After completing the form, click the registration button to create your account. Once you register, the system will send a confirmation email to the email address you provided. Make sure to check your email and follow any instructions to complete your account setup.
- The system provides separate registration forms for both Members and Instructors, making it simple for both types of users to join. The Forgotten Password feature is always available if you need to recover your password later, making it easy to get back into your account even if you forget your login details.
Cart Page
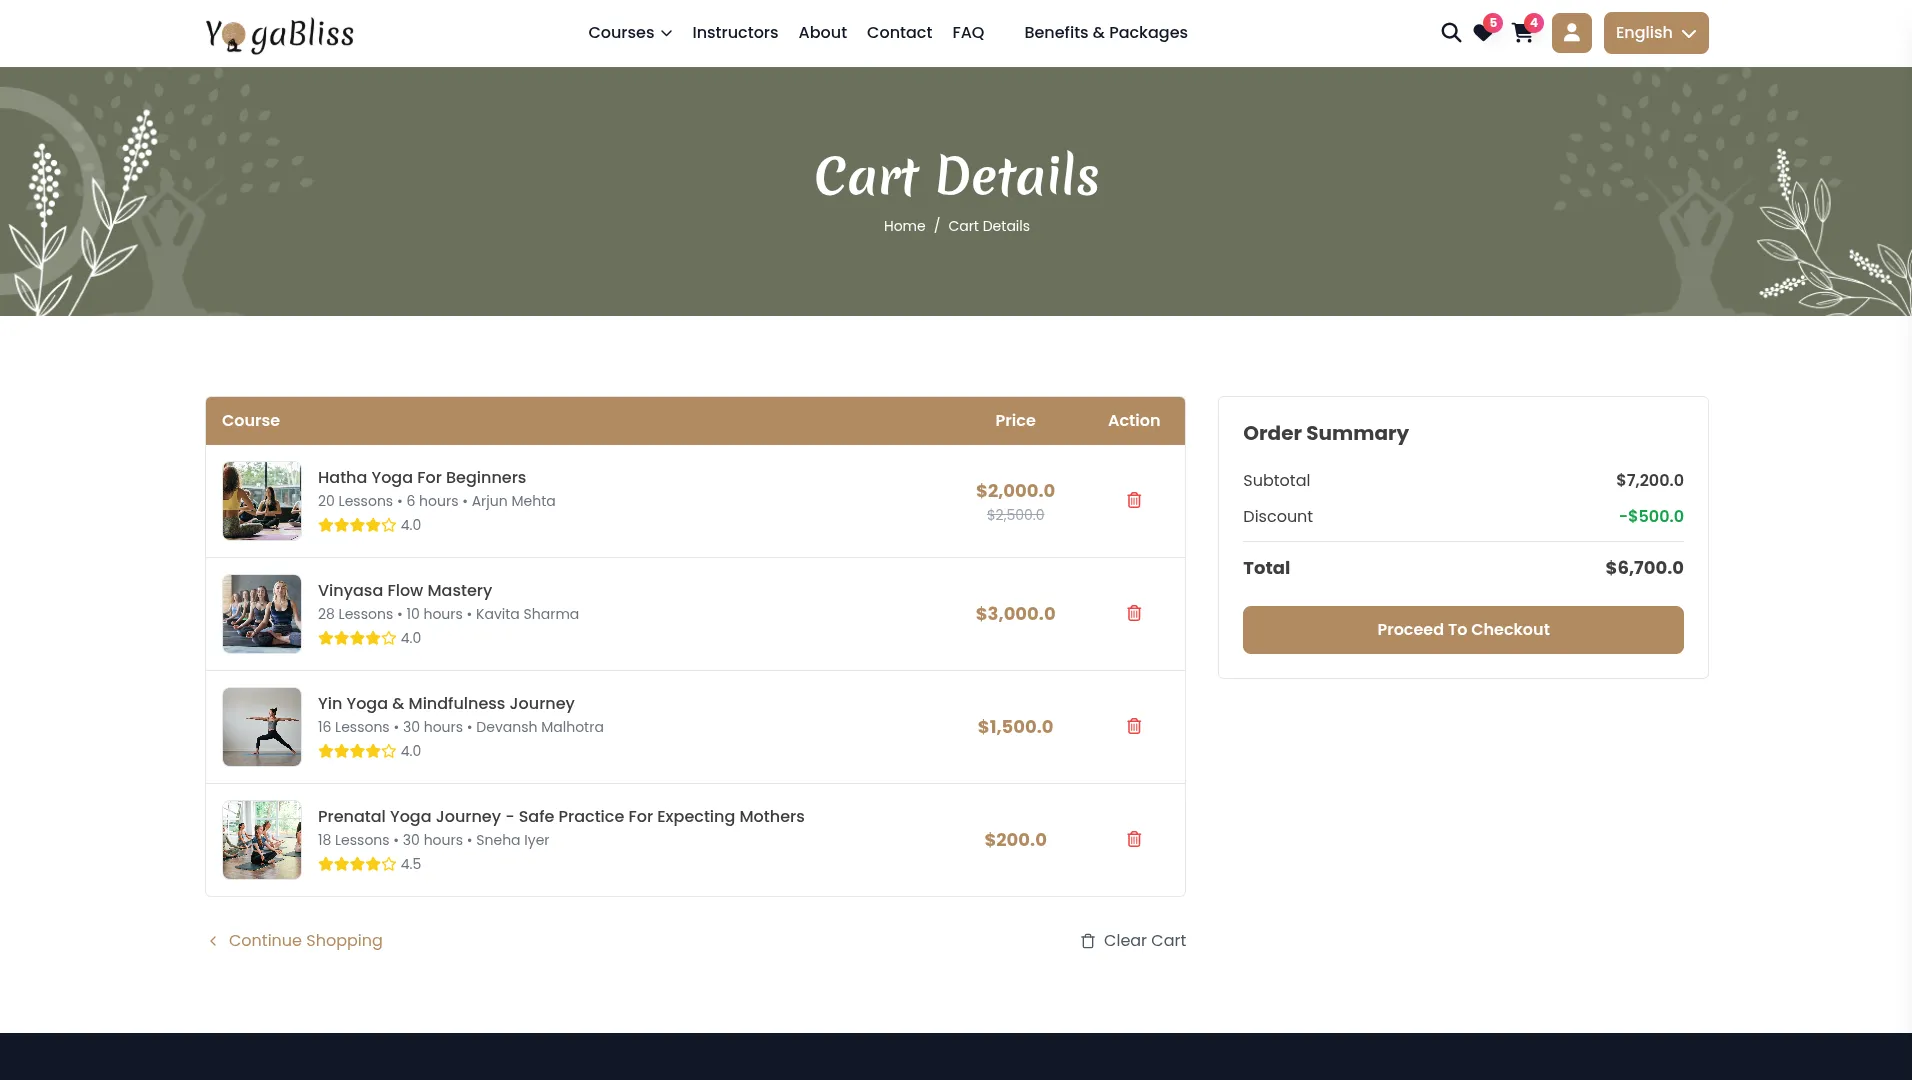
- The Cart Page is where members or instructors can review their selected courses and prepare for checkout. This page provides shopping cart management and checkout preparation features to ensure a smooth purchasing experience.
Common Banner Section
- Every page includes a Common Banner Section that provides consistent branding elements across the website, giving you a familiar look and feel no matter which page you’re visiting.
Course Details Section
- In the Course Details Section, members or instructors can view comprehensive information about each course in their cart. The system displays the Course Image, Course Title, Total number of lessons, Total hours of content, Instructor name, member Rating, and Price for each selected course.
Cart Management Features
- Members or instructors have several options to manage their cart contents effectively. They can remove individual courses from their cart if they change their mind about a specific course or use the ‘Remove all courses’ option to clear their entire cart at once. A Continue Shopping button is available for members who want to browse and add more courses before checking out.
Order Summary
- The Order Summary section provides a clear breakdown of the purchase details. It shows the Total course price for all selected courses, applies any Discount calculations if promotional codes or special pricing are available, and displays the Final total price. From this section, members or instructors can initiate the Checkout process to complete their purchase and gain access to their chosen yoga courses.
Checkout Page
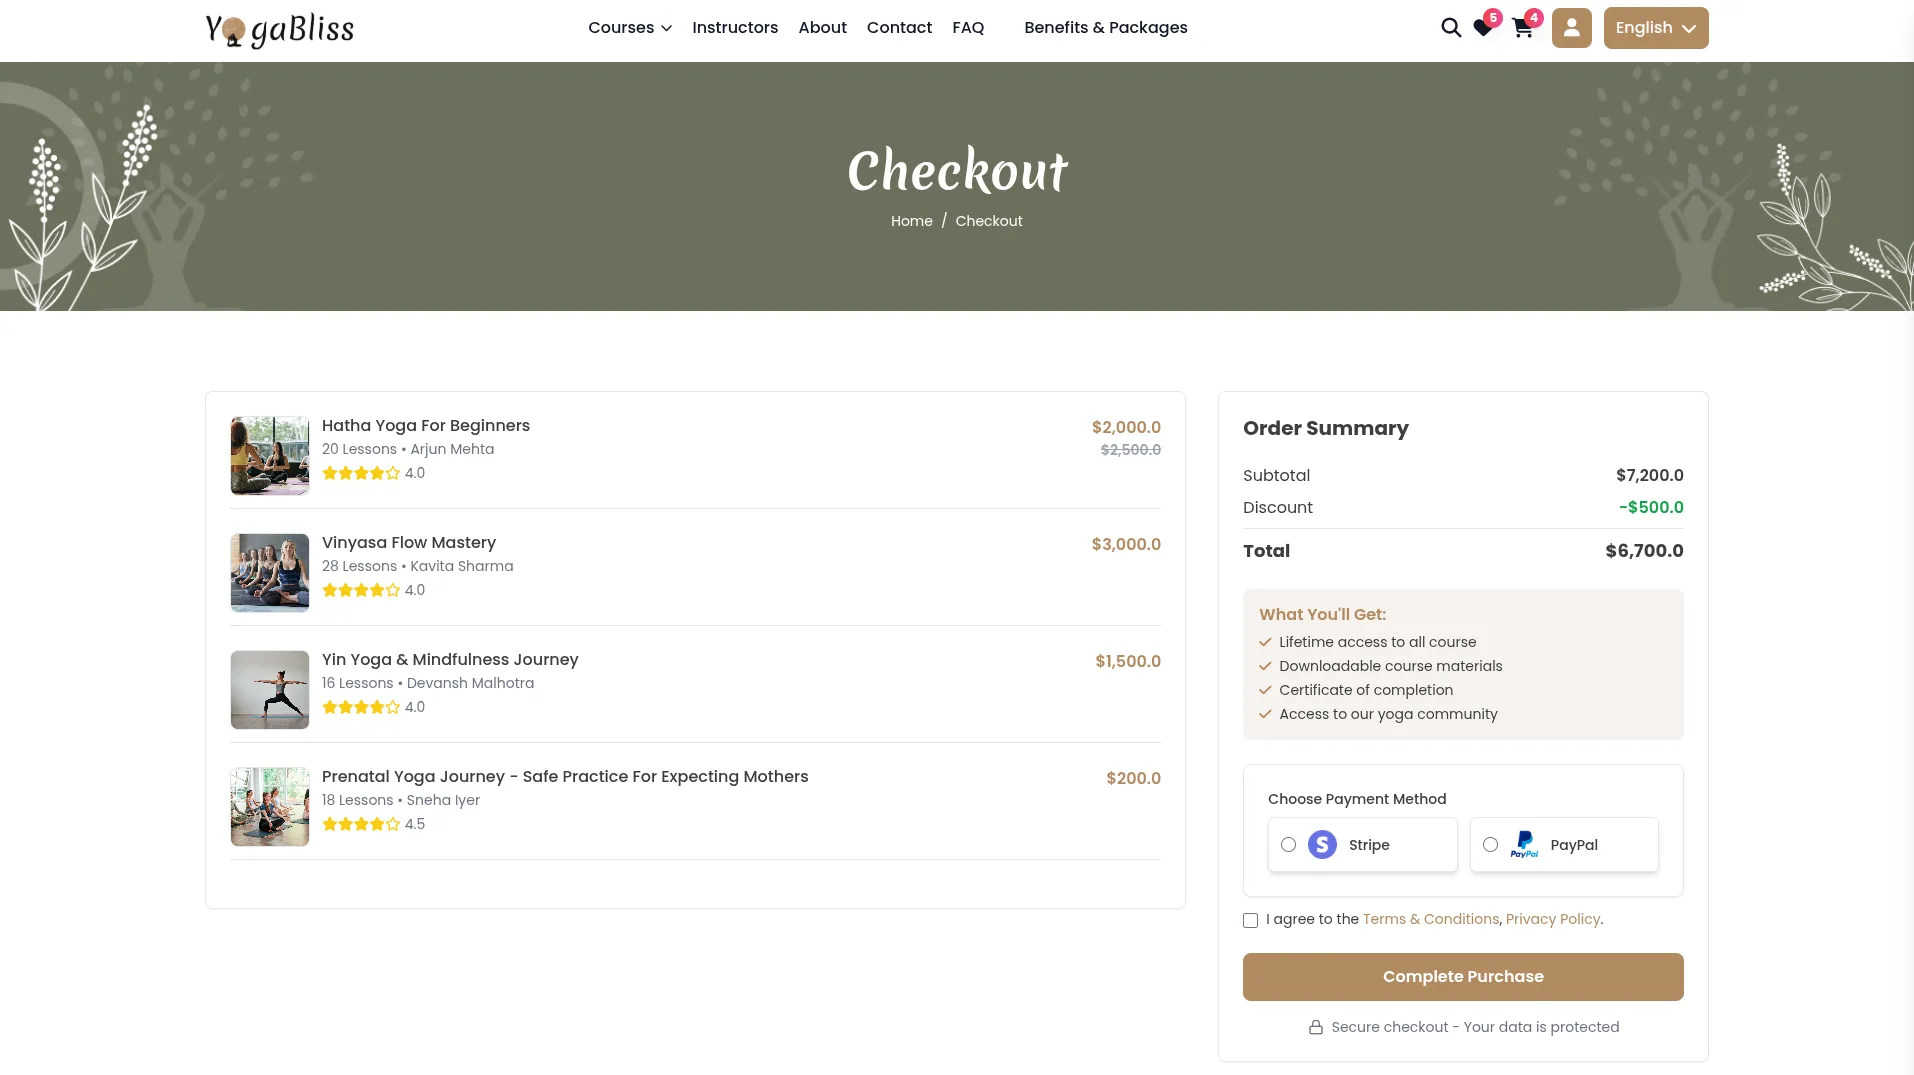
- The Checkout Page is where members or instructors complete their final purchase processing and payment method selection. This page guides members through the last steps of buying their selected yoga courses and ensures a secure, user-friendly payment experience.
Common Banner Section
- Every page includes a Common Banner Section that provides consistent branding across the checkout process, maintaining familiar visual elements that reassure customers during their purchase journey.
Checkout Page Section
- The checkout process is designed to be clear and comprehensive, providing all necessary information for informed purchasing decisions.
- Course Display shows essential course information for final review, including the Course Image, Course Title, Total number of lessons, Instructor name, member Rating, and Price. This helps members or instructors confirm they’re purchasing the right courses before completing payment.
- Order Summary provides a detailed breakdown of the purchase, displaying the Total course price for all selected courses, any Discount displayed if promotional codes or special pricing apply, and the Final total calculation that members or instructors will be charged.
- The Course Benefits section displays the “What you’ll get” information that you’ve configured in System Setup → Course Benefit Section Setting. This reminds members or instructors of the value they’ll receive from their purchase, encouraging them to complete the checkout. Process.
- Payment Options are clearly presented with radio button selection between Stripe and PayPal payment processors, giving members or instructors flexibility in how they prefer to pay for their courses.
- Process Completion ensures a smooth post-purchase experience. After successful payment processing, the system automatically redirects members or instructors to the Order Complete page for confirmation. The purchased courses are immediately added to the member’s or instructor’s account, allowing them to begin their yoga learning journey right away.
Wishlist Page
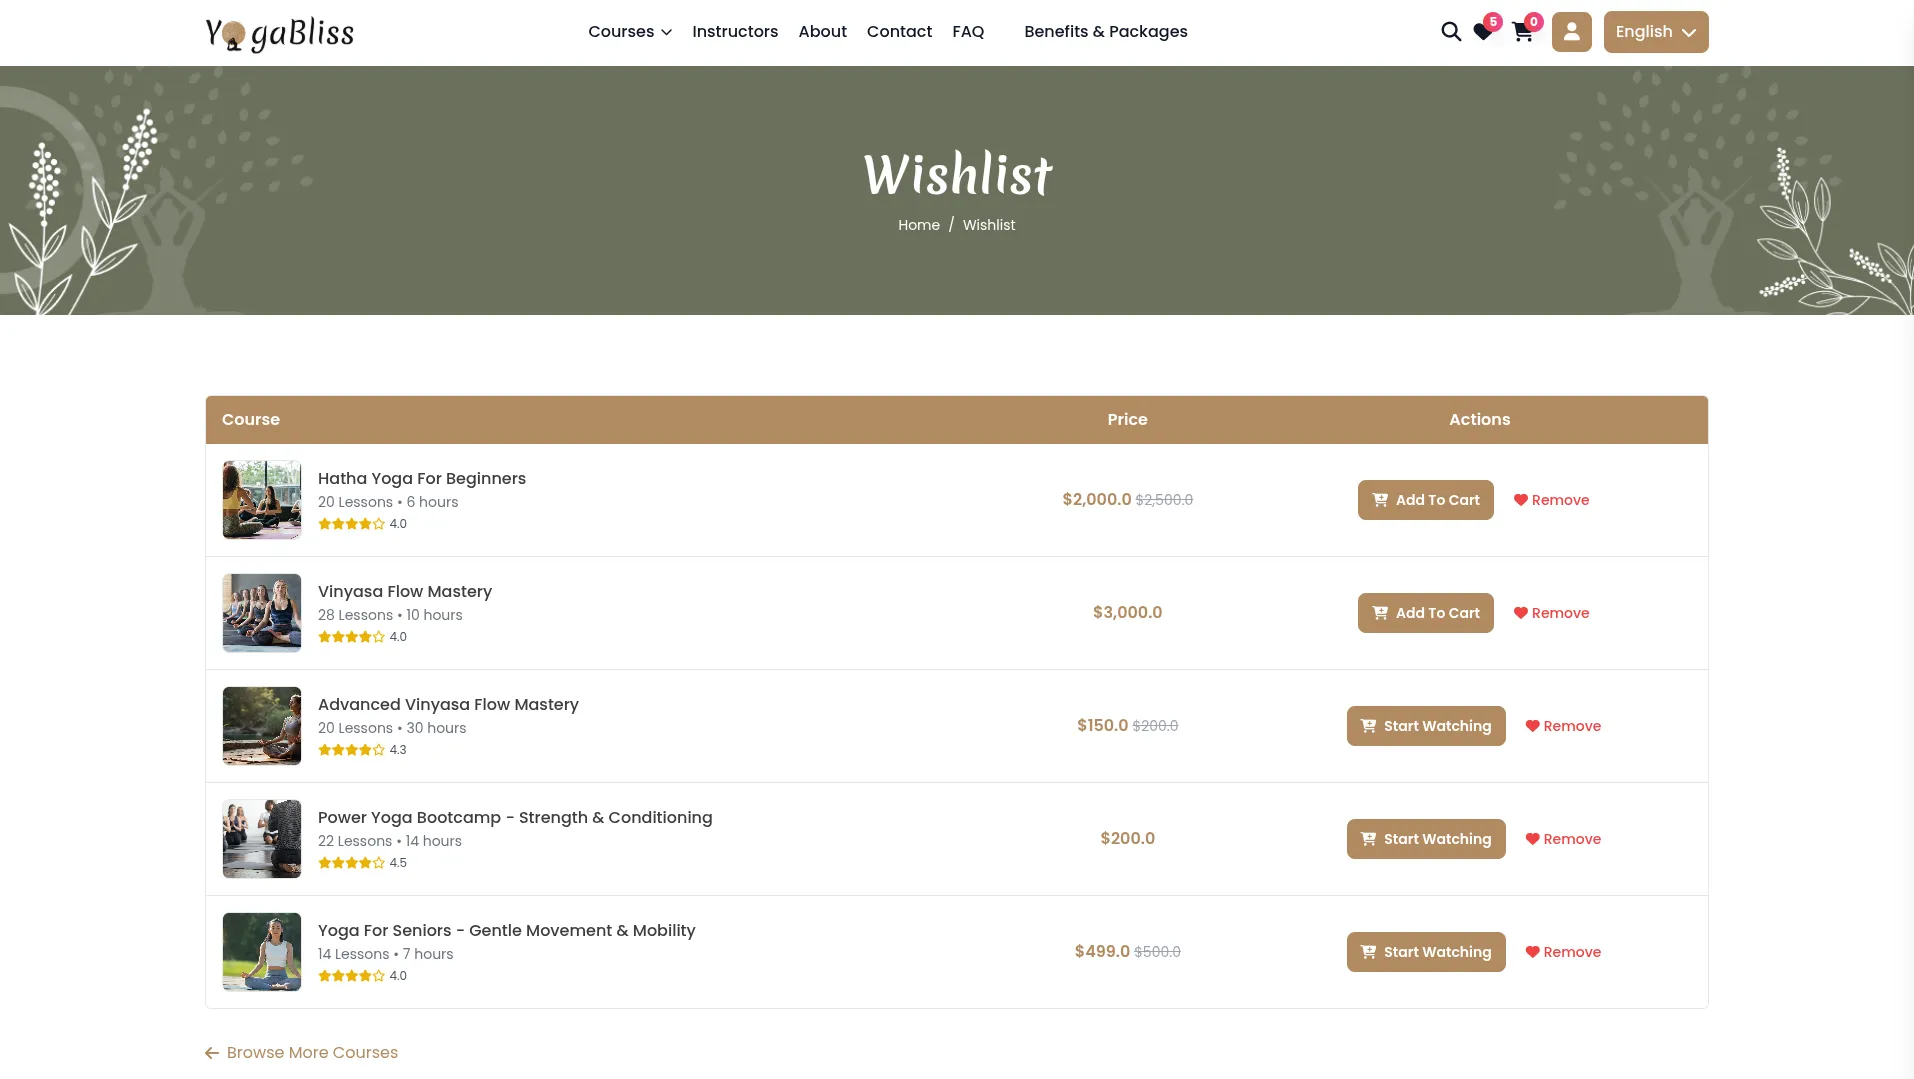
- The Wishlist Page is where you can manage your personal collection of saved courses and easily move them to your shopping cart when you’re ready to buy.
Common Banner Section
- Every page includes a Common Banner Section that provides consistent branding elements across the website, giving you a familiar look and feel no matter which page you’re visiting.
Course Details Section
- In the Course Details Section, you can view all the important information about each course you’ve saved. The system displays the Course Image, Course Title, Total number of lessons, Total hours of content, member Rating, and Price for each course in your wishlist
- You have two main actions available for each course: you can add courses directly to your cart when you’re ready to purchase or remove courses from your wishlist if you’re no longer interested. This makes it easy to manage your saved courses and convert your interest into actual purchases when you’re ready.
Create Course Page
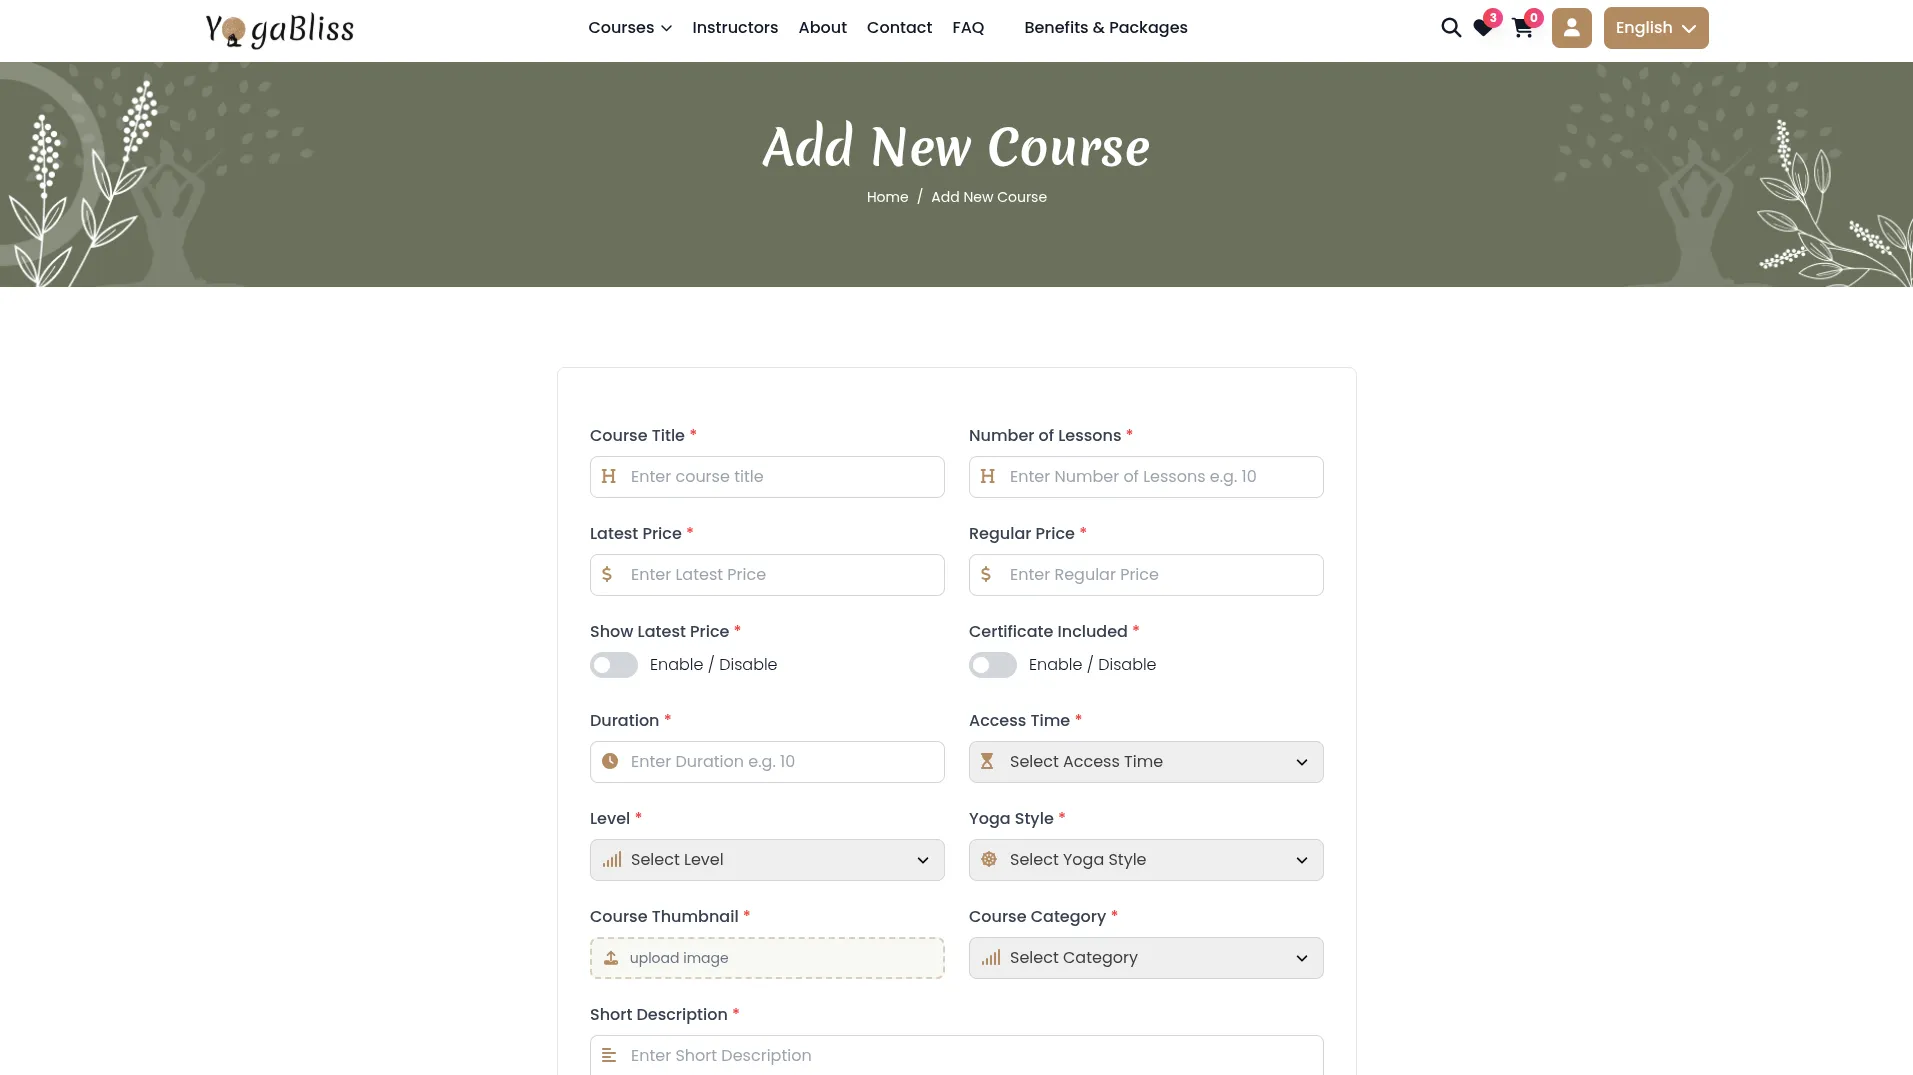
- The Create Course page is only for Instructors who have instructor accounts. This is where yoga instructors can make their own courses on the platform.
- To get to this page, Instructors need to log in first and go to Header → My Account → Create Courses. Only Instructors can see this option when they log in.
- Creating a course is easy. Fill out the course name, write about what the course teaches, set your price, and add details about what members will learn. Uses the same fields and sections as the admin panel for course creation.
- When Instructors create a course from their side, it will stay in pending status. The admin needs to approve or reject the course from the admin panel. Once the admin approves it, the course will show up on the website for members to see and buy.
- The system helps track how members are doing in your course and can give certificates when members finish. This makes your courses more valuable and helps members feel proud of what they learned.
My Courses Page
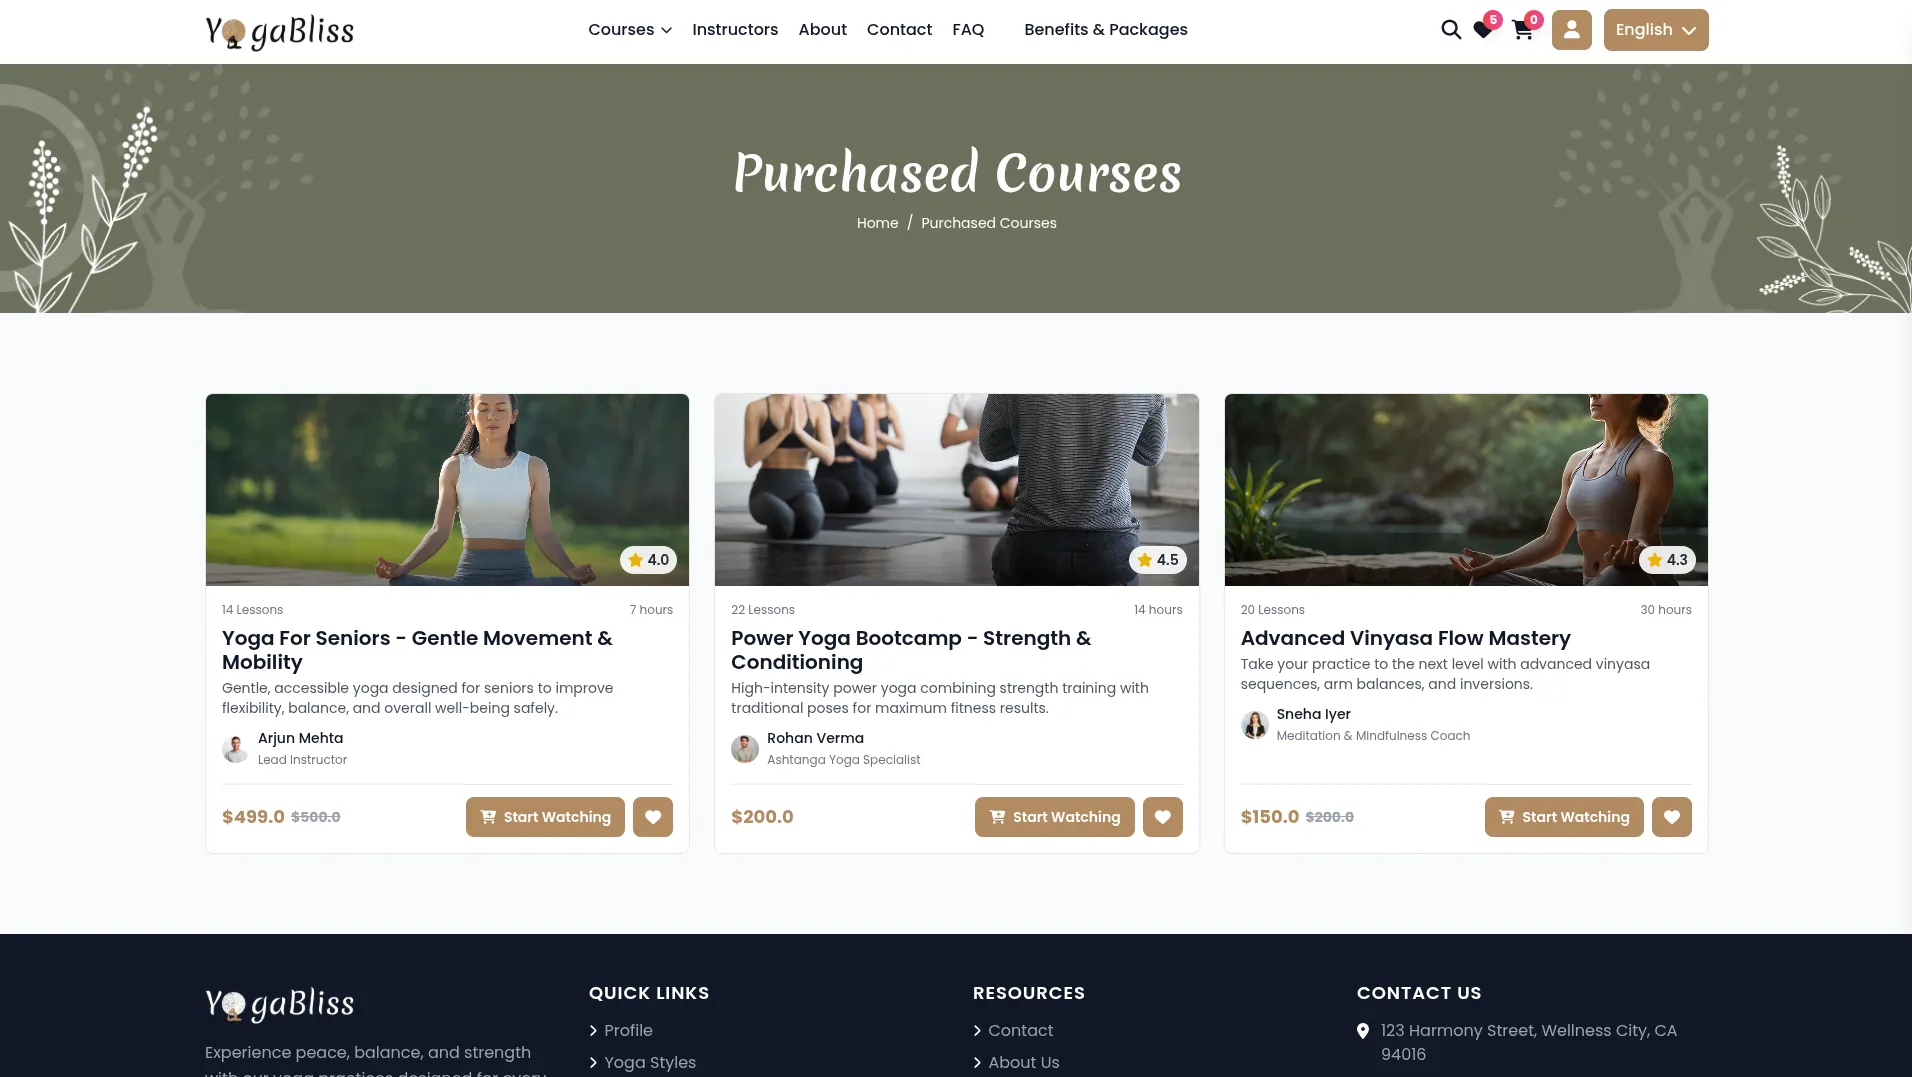
- The My Courses page is where members can see all the courses they bought and continue learning. To find your courses, log in and go to Header → My Account → My Courses.
- You can only see courses that you have purchased on this page. All your courses are shown in a nice grid with pictures, so you can easily find what you’re looking for. Each course shows the course name and how much of it you’ve completed with a progress bar.
- Each course has a “Start Watching” button that takes you straight to your lessons. The system remembers where you left off, so you can continue right where you stopped last time.
- When you click “Start Watching,” you go to the course page where you can watch all the lessons. You can see how far you’ve come and how close you are to finishing the course and getting your certificate.
Profile Page
- Your Profile page is like your personal account area, where you can see your progress, manage your certificates, and change your account settings. Go to Header → My Account → My Profile after logging in to see your profile.
Overview Tab
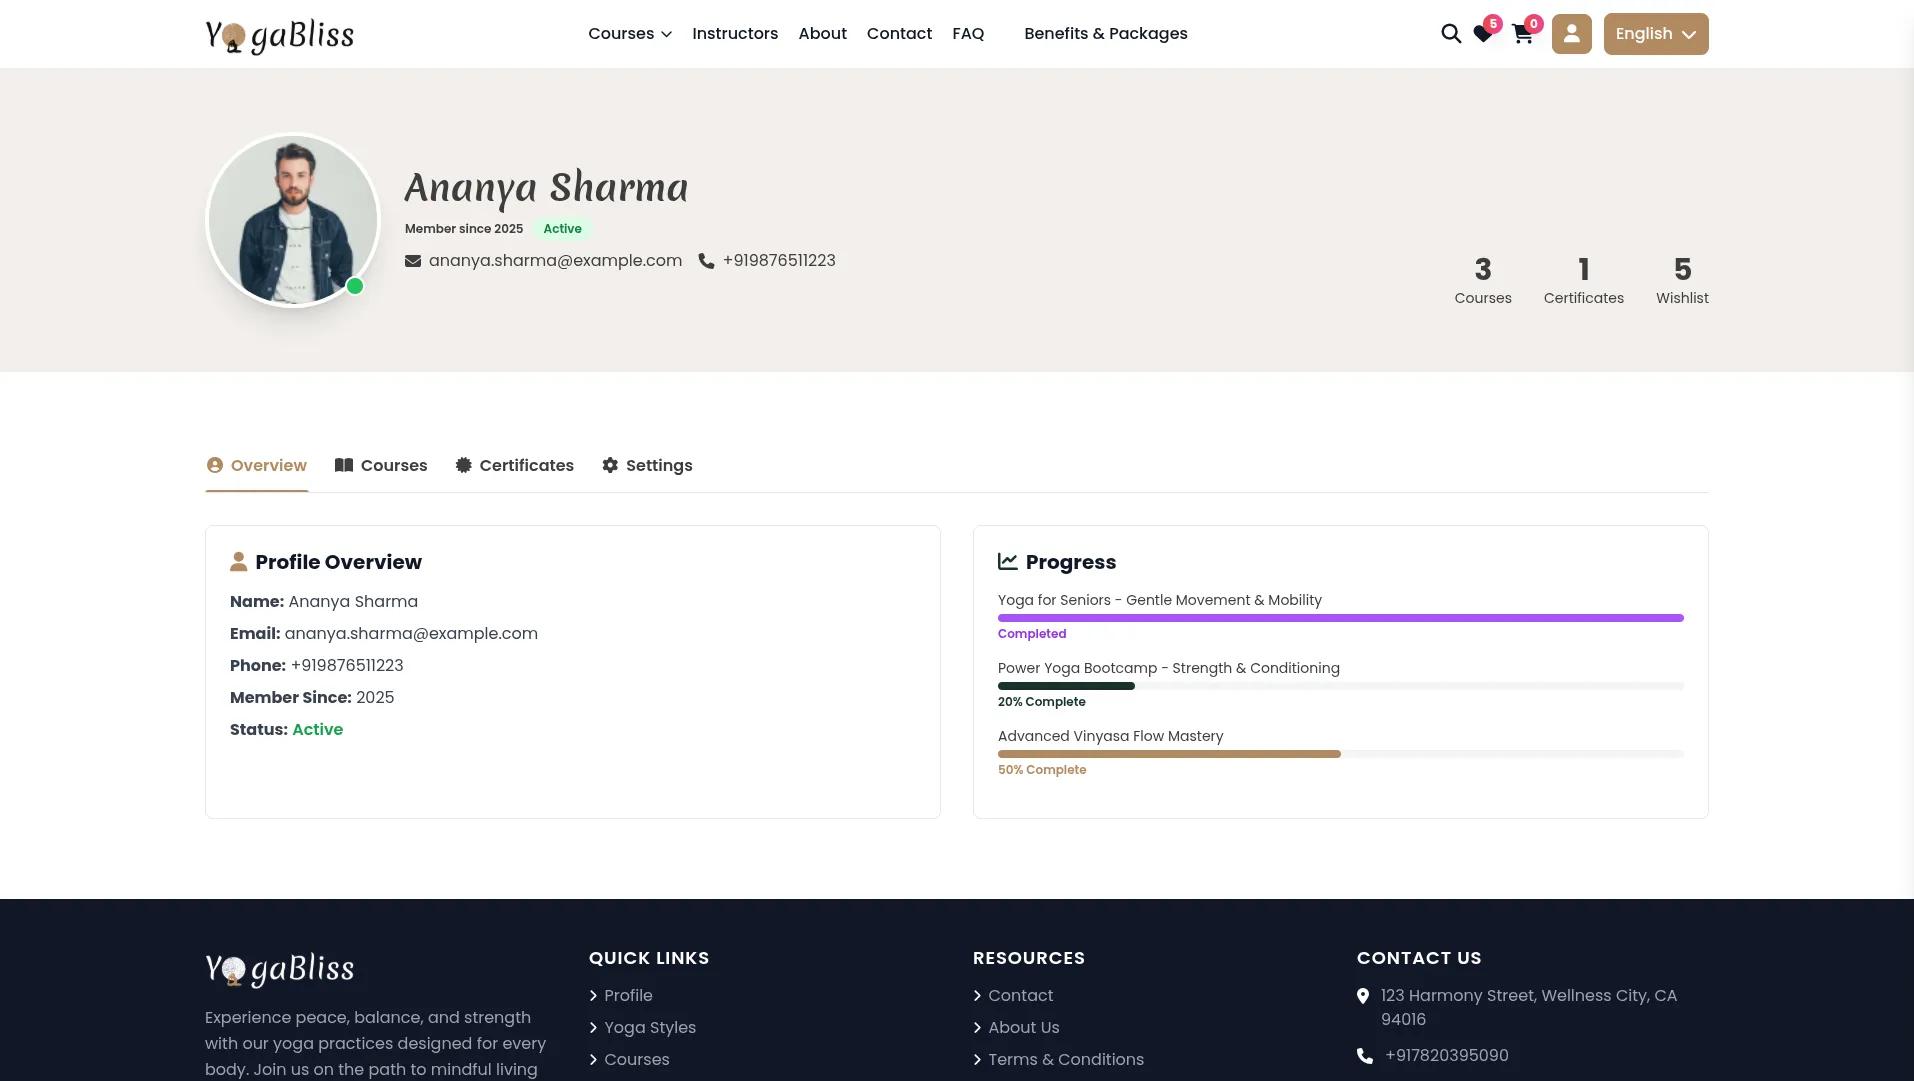
- The Overview tab shows your basic account information like your name, when you joined, your email, and phone number. You can see if your account is active with a colored dot.
- This tab also shows your learning stats, like how many courses you bought, how many certificates you earned, and how many courses are saved in your wishlist. You can see all your enrolled courses with progress bars showing how much you’ve completed.
Course List Tab
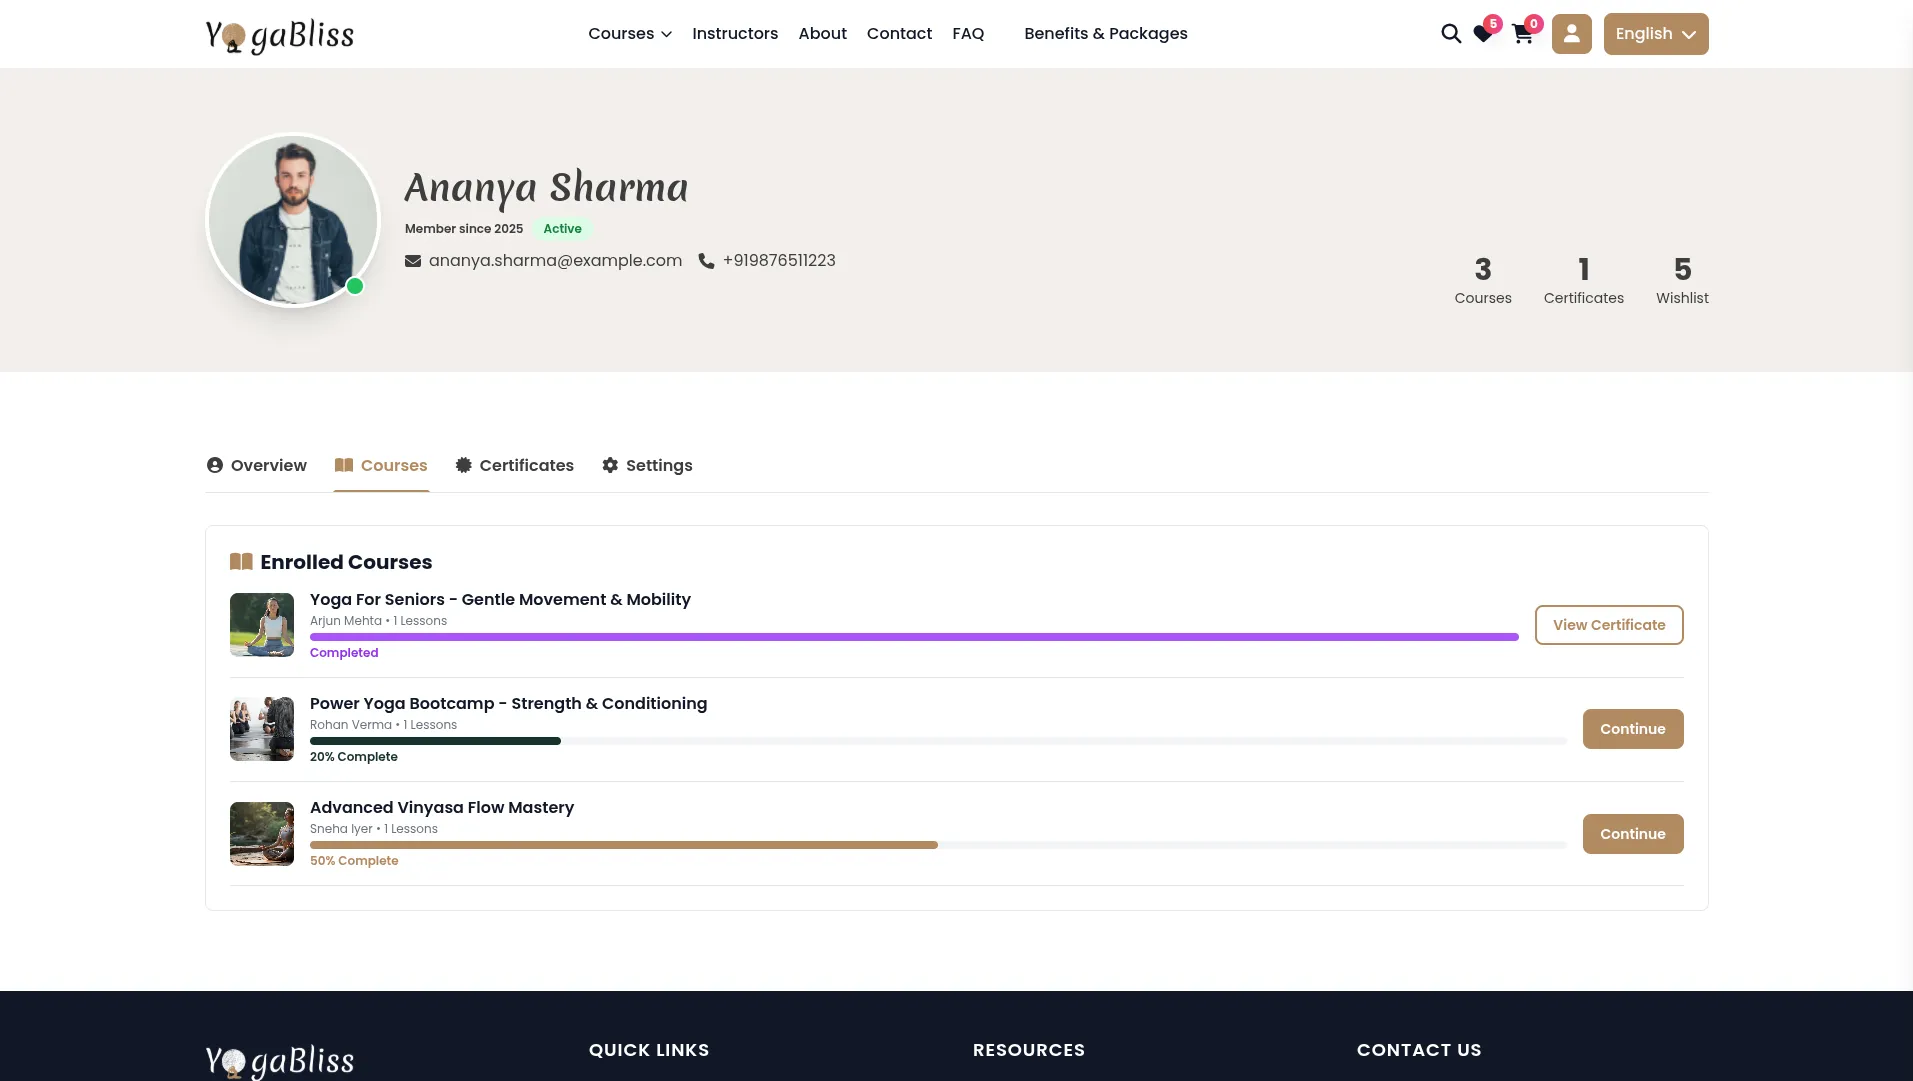
- The Course List tab helps you manage your course progress better. It splits your courses into different groups.
- Completed Courses shows all courses where you finished 100% of the lessons. For these courses, you’ll see a “View Certificate” button if the course gives certificates. You can download your certificate as a PDF file.
- In-Progress Courses shows courses you started but haven’t finished yet. These have “Continue Course” buttons so you can pick up right where you left off. You can see how much more you need to complete and how long it might take.
Certificates Tab
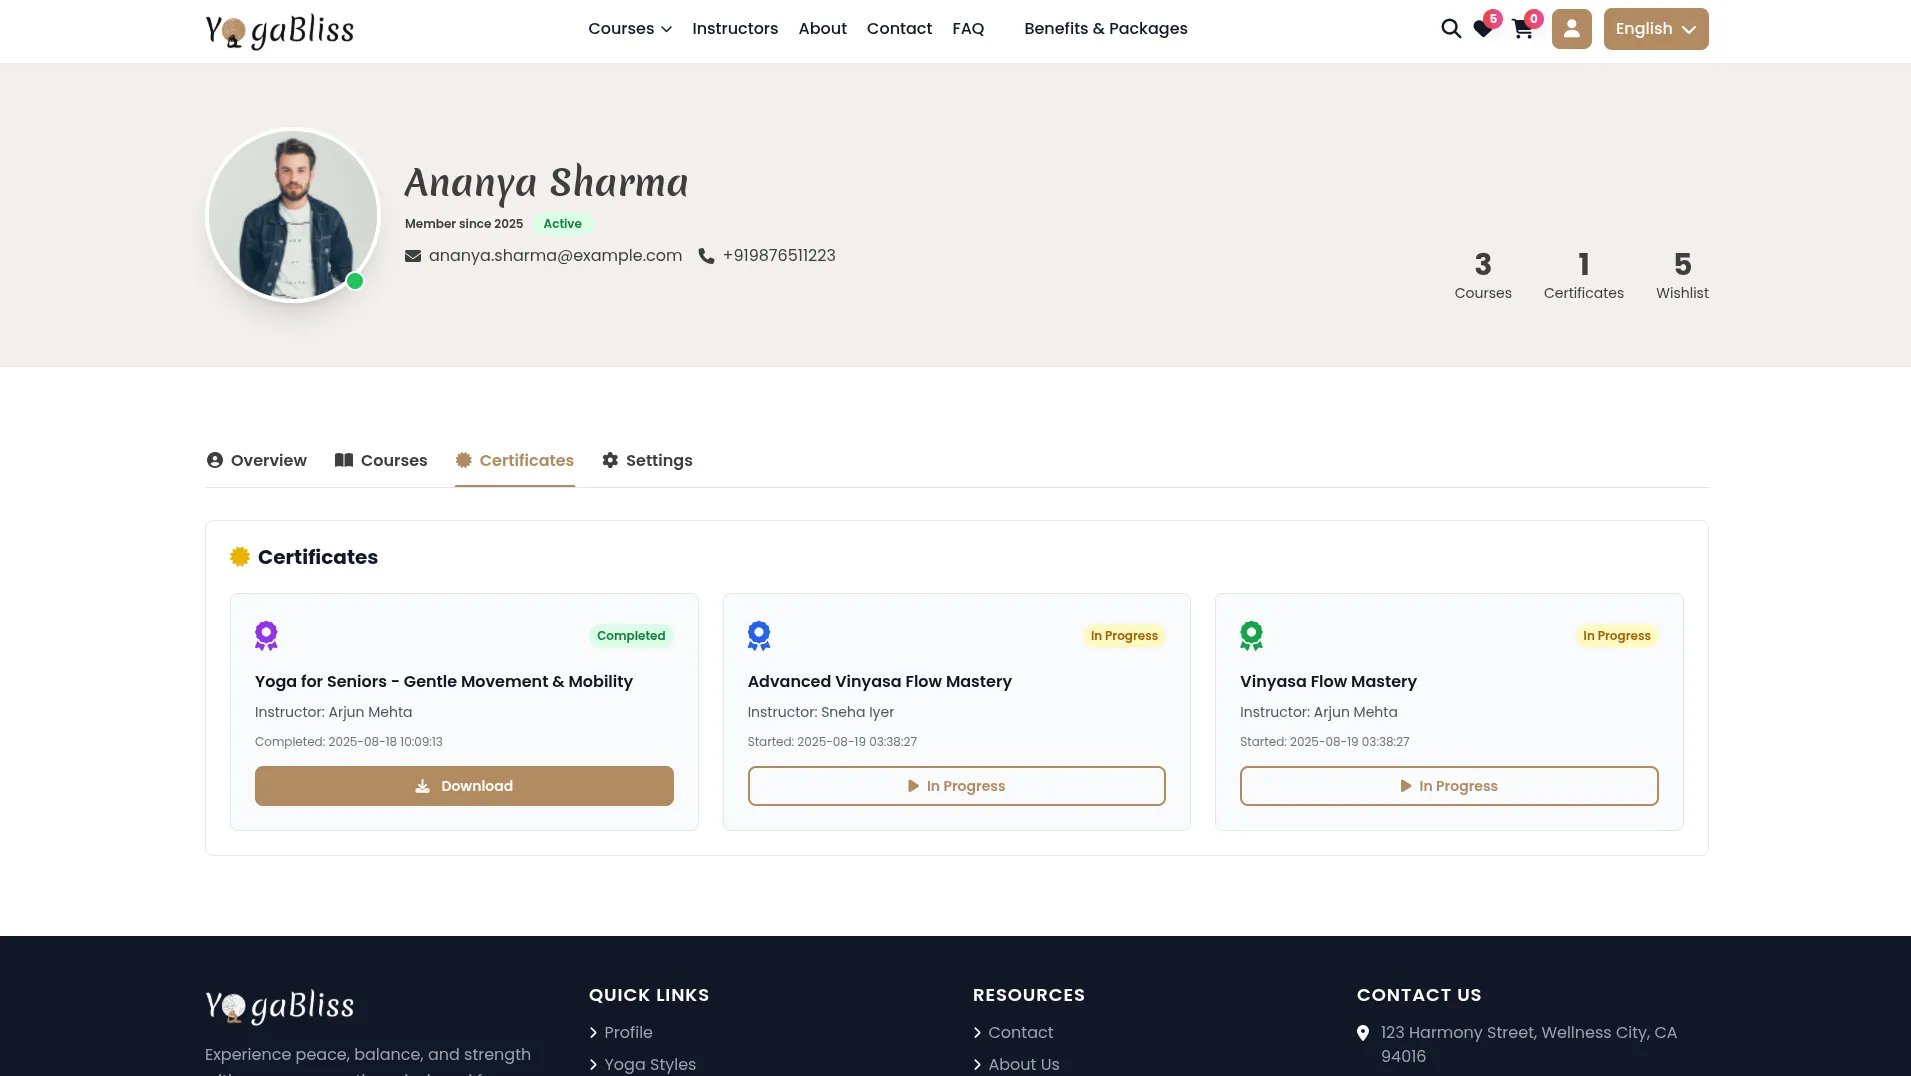
- The Certificates tab is where you manage all your course certificates. You can see how many certificates you can earn from all your courses.
- Completed certificates can be downloaded right away as PDF files. You can see when you earned each certificate and preview them before downloading. The PDFs are ready for printing if you want to hang them on your wall.
- In-progress certificates show you how close you are to earning them and what you still need to do. Not-started certificates show you which courses offer certificates that you haven’t begun working toward yet.
Settings Tab
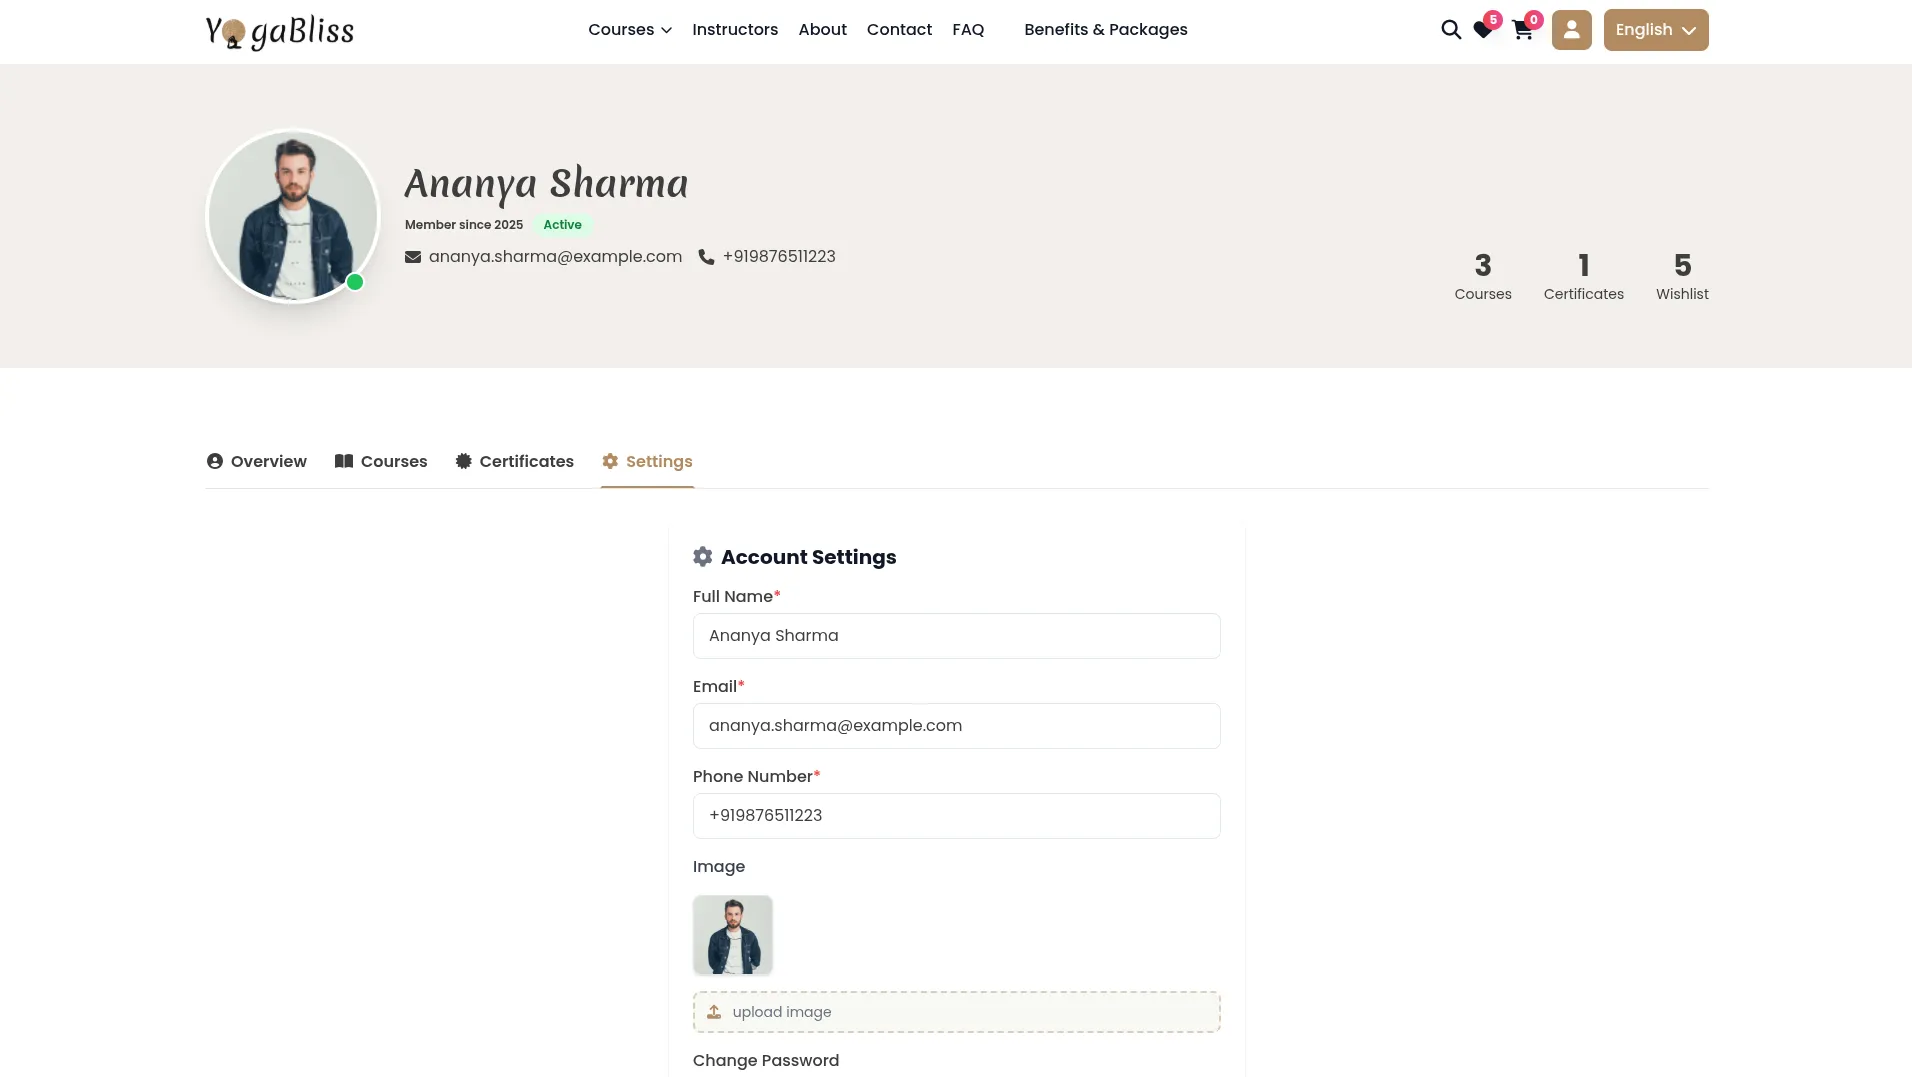
- The Settings tab is where you can change your account information and password. You can update your name, email, phone number, and upload a new profile picture.
- To change your password, you’ll need to enter your current password first for security. The system checks that all your information is correct and tells you if there are any problems. When you successfully make changes, you’ll see a confirmation message.
Website Navigation Features
Header Section Navigation
- The website header includes several helpful features for easy browsing. Next to the Login button, you’ll find a Language button that lets you choose your preferred language for the entire website experience.
- A Search Bar is also available in the header section, making it easy to quickly find and filter any information you’re looking for on the website. This search feature helps you locate courses without having to browse through multiple pages.
Footer Section
- At the bottom of the website, you’ll find the Footer section, which contains additional details and navigation options for smooth browsing. This bottom section appears on all pages and displays comprehensive information about your yoga classes and helpful navigation links.
- The footer shows your Light Logo from System Setup → Brand Setting, along with your Footer Description and Footer Text that you’ve written in the brand settings. Your contact information, like address, phone number, and email from the Contact Us settings in Brand Settings, also appears here.
- Members can find Quick Links that you’ve created in System Setup → Quick Link Section, making it easy to navigate to important pages. The footer also displays different Yoga Styles from System Setup → Yoga Style Section, helping members explore the different types of yoga you offer. Social Icons from System Setup → Social Media Section appear at the bottom, letting people connect with you on Facebook, Instagram, and other social platforms.
Categories
Related articles
- User Manual – WorkDo Dash SaaS
- Planning Module Detailed Integration in Dash SaaS
- Recent Orders – eCommerceGo Addon
- Catering Management Integration in Dash SaaS
- Jitsi Meet Detailed Documentation
- Flutterwave Payment Gateway in BookingGo SaaS
- Procurement Integration in Dash SaaS
- Square Payment Gateway in Dash SaaS
- Sign-In with Github Add-On Integration in Dash SaaS
- Team Workload Integration in Dash SaaS
- Flexible Hours Integration in BookingGo SaaS
- Hospital Management Integration in Dash SaaS
Reach Out to Us
Have questions or need assistance? We're here to help! Reach out to our team for support, inquiries, or feedback. Your needs are important to us, and we’re ready to assist you!


Need more help?
If you’re still uncertain or need professional guidance, don’t hesitate to contact us. You can contact us via email or submit a ticket with a description of your issue. Our team of experts is always available to help you with any questions. Rest assured that we’ll respond to your inquiry promptly.
Love what you see?
Do you like the quality of our products, themes, and applications, or perhaps the design of our website caught your eye? You can have similarly outstanding designs for your website or apps. Contact us, and we’ll bring your ideas to life.
