vCard Integration in Dash SaaS
Introducing vCard, the convenient and elegant solution for crafting and managing your business and personal digital cards. With vCard, creating your professional identity is a breeze, and it’s completely free.
Introduction
vCard is a comprehensive digital business card platform that allows you to create, customize, and share professional business cards online with 21+ custom themes and 4 color variants each. The system helps establish your digital presence, engage with customers, manage appointments, process payments, and build business networking connections. Users can create multiple business cards with different themes, collect customer contacts, manage appointment bookings, and track business performance through an integrated dashboard. Additionally, you will be provided with PWA settings for app-like functionality, password configuration for secure access, QR Code settings for customized sharing, and many more advanced features to enhance your digital business presence.
How to Install the vCard Add-On?
To Set Up the vCard Add-On, you can follow this link: Setup Add-On
How to Use the vCard Add-On?
vCard Dashboard
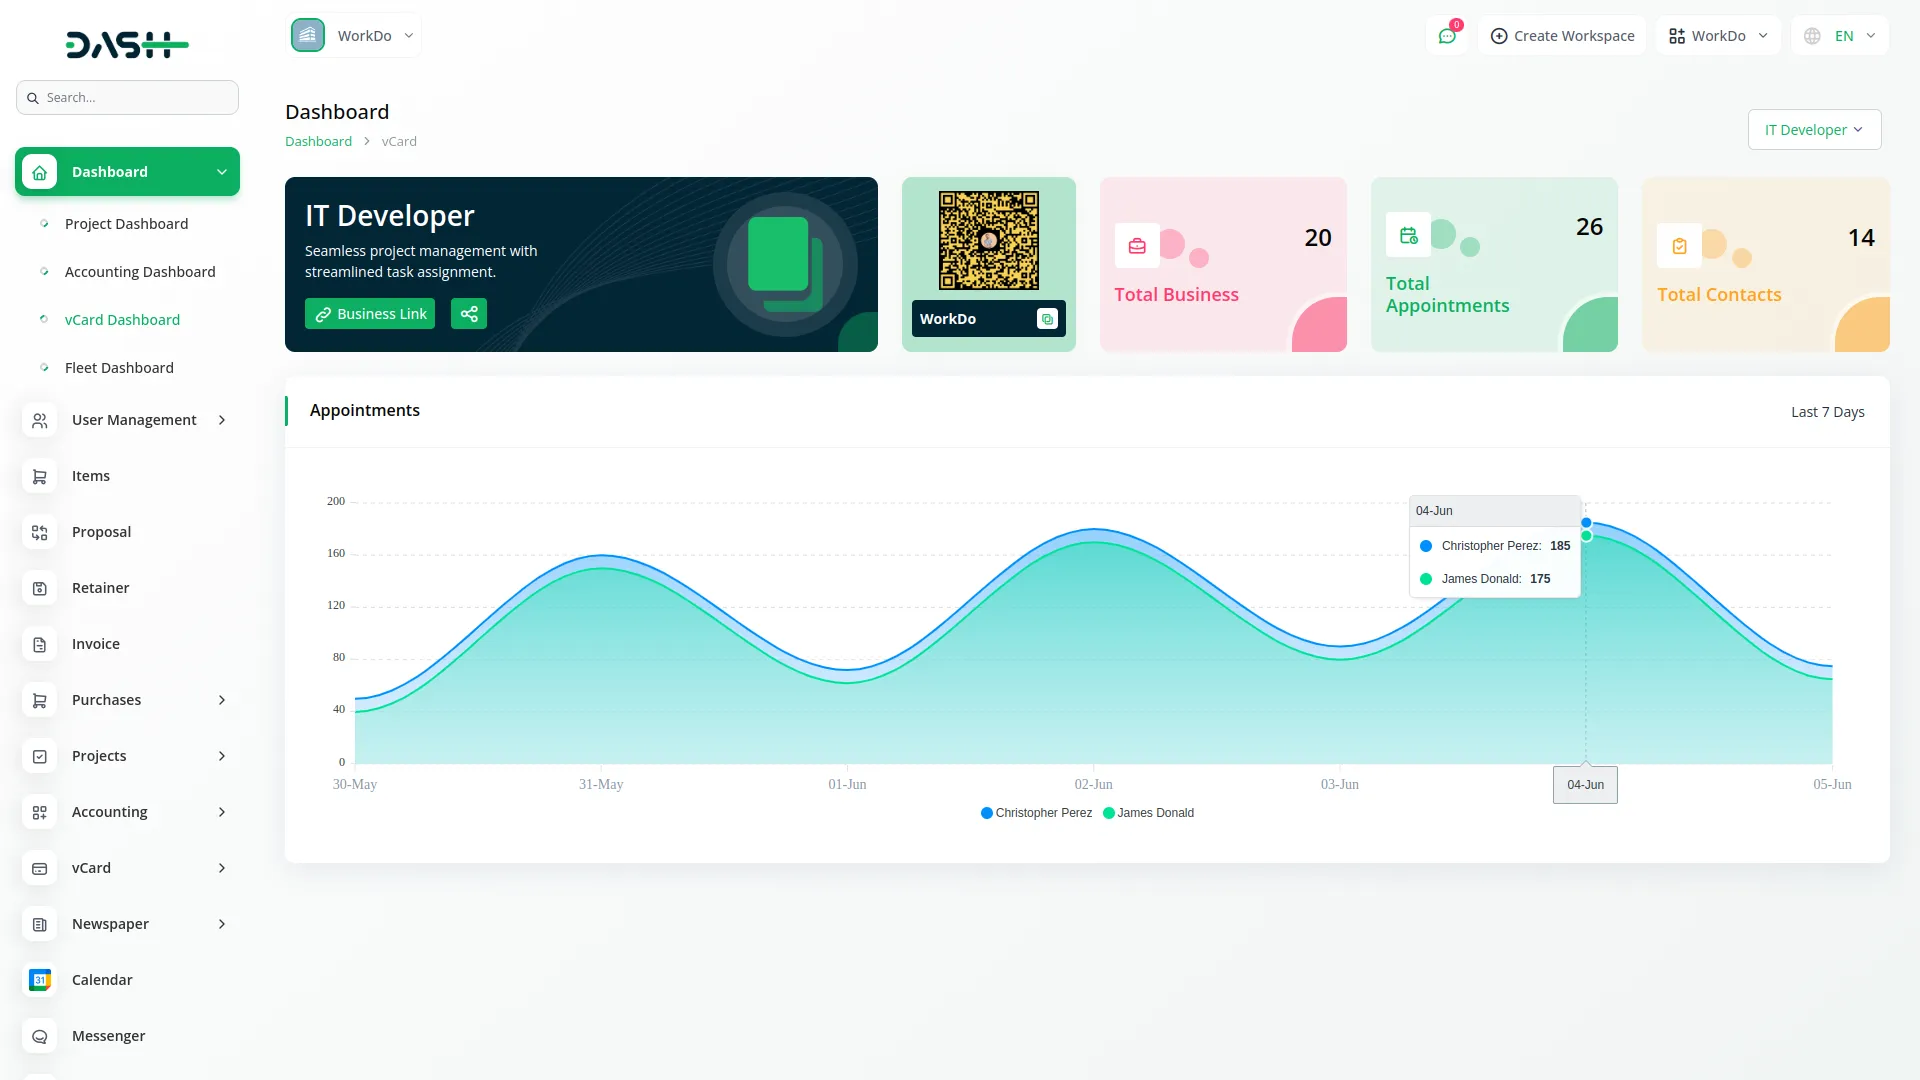
- The Dashboard provides a central overview of your business activities and performance. You can view key statistics and manage your business operations from one place.
- The dashboard displays several important cards and charts. You will see a booking link card that allows you to copy your store link and share it on social platforms like WhatsApp, Facebook, Twitter, Pinterest, and LinkedIn. There is also a QR code card that shows your QR code for scanning, along with your booking link for easy copying.
- The dashboard shows three summary cards displaying your Total Business count, Total Appointments, and Total Contacts. Additionally, you can view a Business Wise Appointments area chart that shows your appointment trends over the last 7 days to help track your business performance.
vCard Business Card Display
- When customers open your vCard link, they see a fully interactive digital business card with multiple sections and functionalities. The Business Branding section displays your logo, banner, business title, designation, and description to establish your identity and brand presence.
- The Contact section shows various contact icons, including WhatsApp, Phone, Email, Facebook, Instagram, LinkedIn, and more. Customers can click these icons to directly call, email, or message you. In the Book Appointment section, customers can see your available appointment slots and book appointments based on your configured business operating hours.
- The Explore Services & Products section displays your detailed services and products with action buttons. When customers click these buttons, they are redirected to your service or product pages or external links. The Testimonials section shows customer reviews, ratings with stars, and feedback to build trust and credibility with new visitors.
- Customers can make payments through secure Stripe or PayPal integration, with payment methods and amounts predefined by your business settings. The View Location section shows an embedded Google Map via iframe displaying your business location for easy navigation.
-

- The Gallery & Media section allows customers to watch videos or view images you have uploaded to showcase your work. In the Social Sharing section, customers can share your business card directly on various platforms.
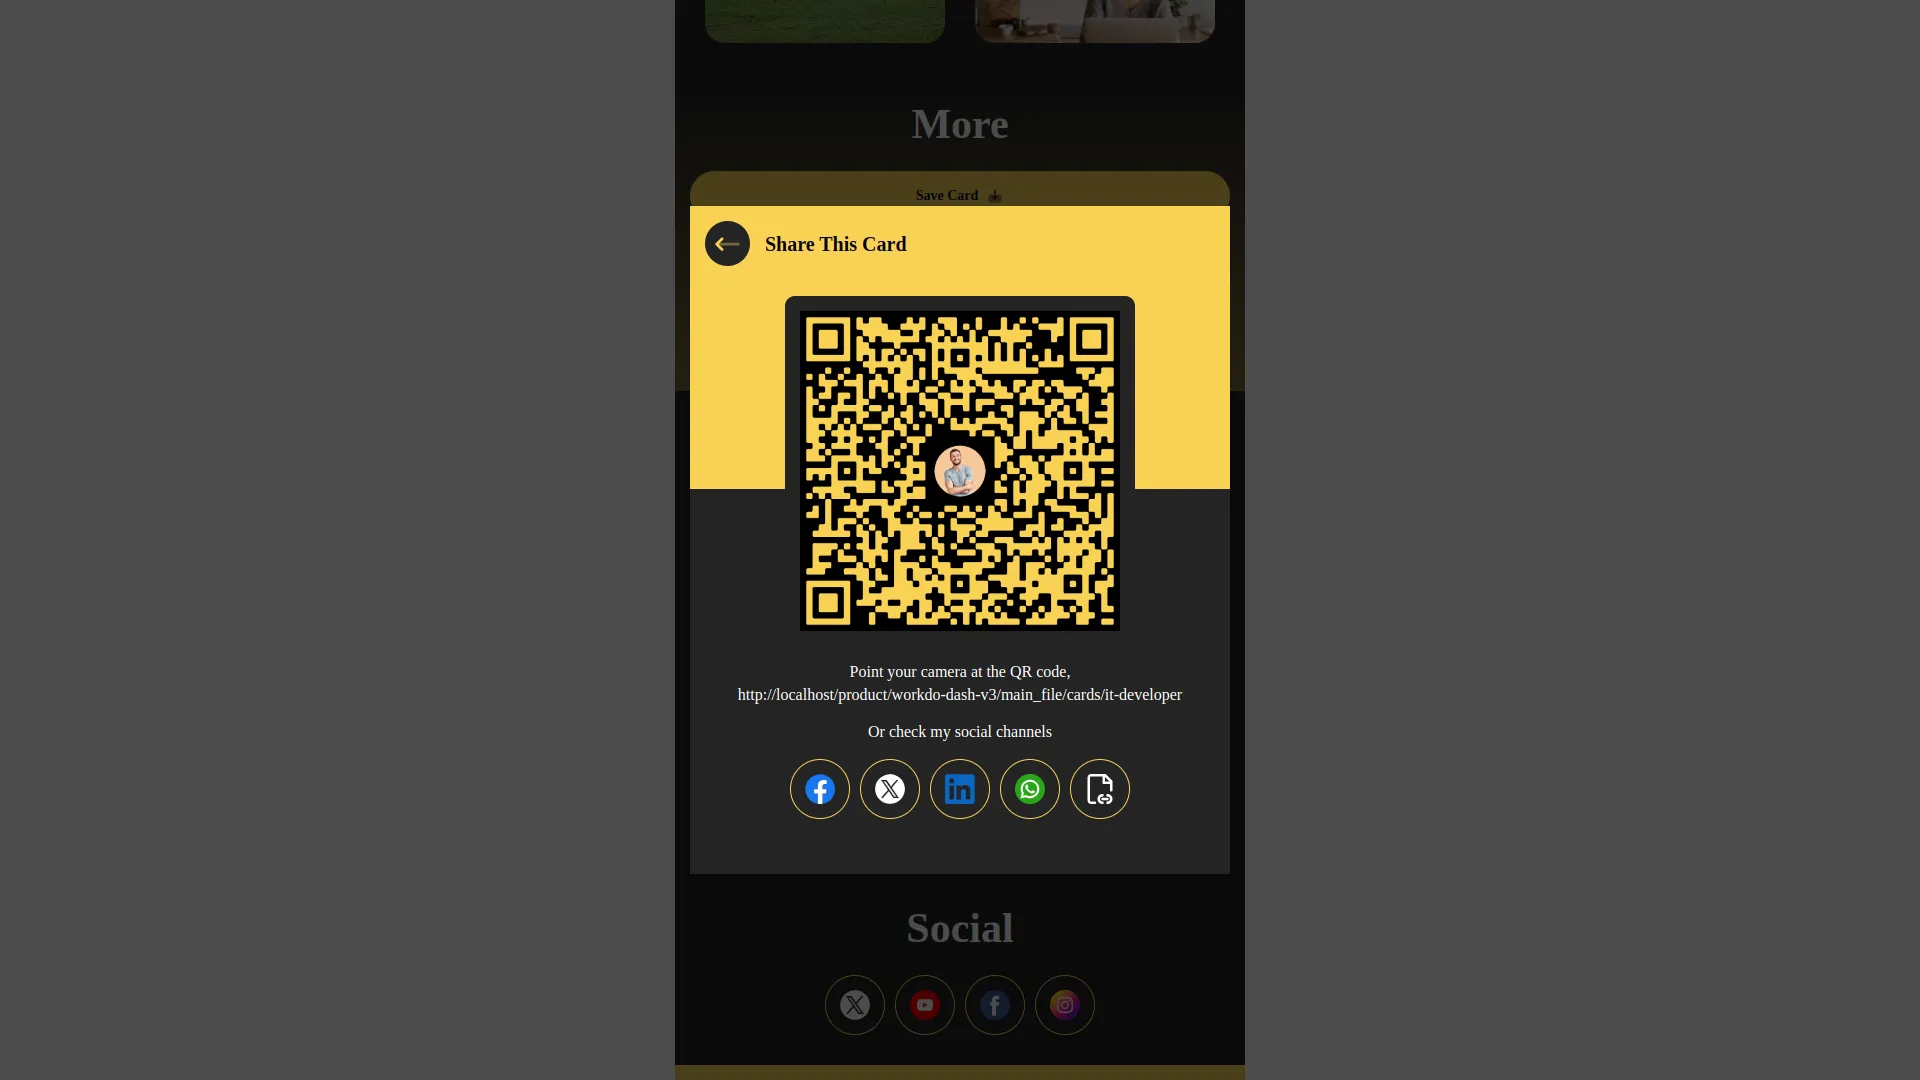
- The Share Card feature opens a modal when clicked, displaying a QR code for scanning, your business link for copying and sharing, and direct sharing options for Twitter, Facebook, LinkedIn, and WhatsApp. Customers can Save cards by downloading your vCard as a VCF file to add your contact information directly to their device contacts.
- App Store & Play Store buttons redirect customers to the respective app stores, opening the relevant external app or download page. The Business Hours section displays the days and hours your business is available based on your configured schedule, helping customers know when to contact you or visit.
- Enable app like functionality with PWA settings, secure your platform using password protection, and share content effortlessly through customizable QR code options to enhance your digital experience.
-
Business Management
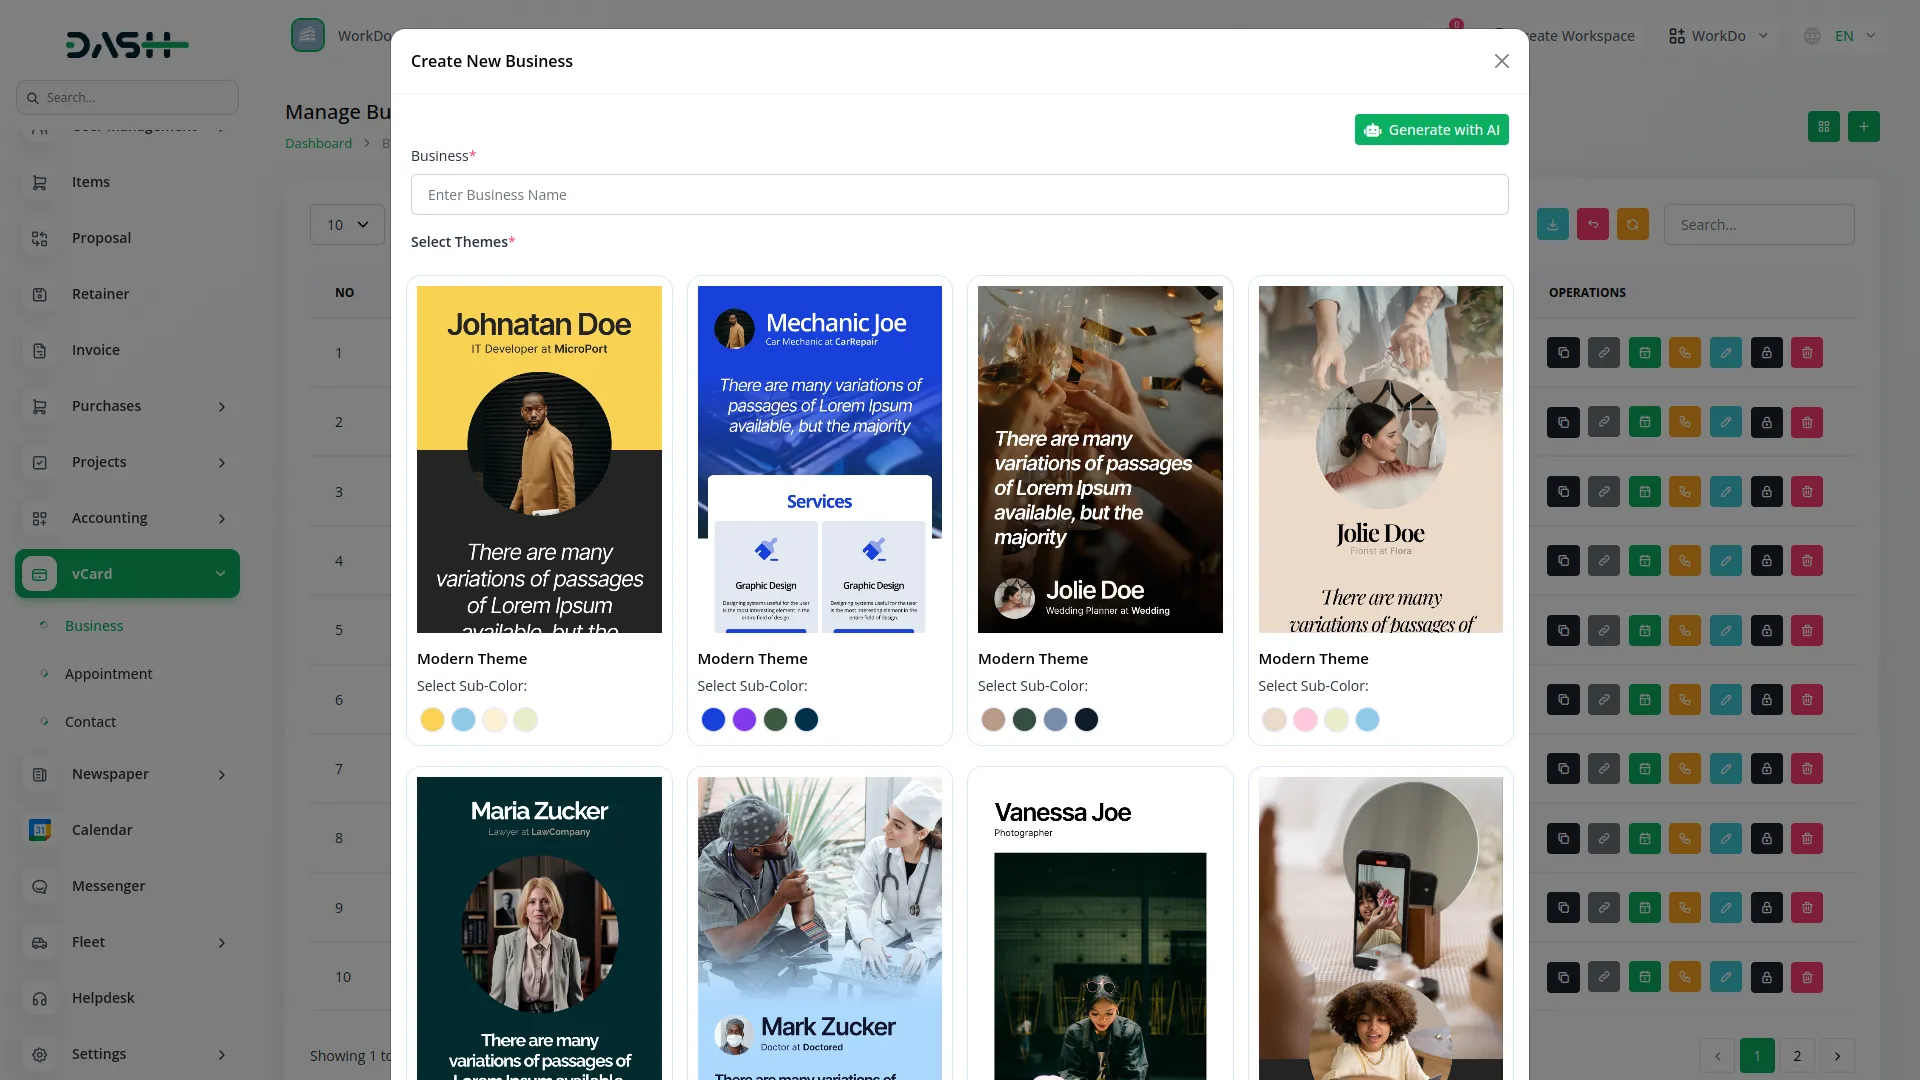
- To create a new business card, click the “Create” button at the top of the business page. Enter your business name and select from 21 available themes. When you choose a theme, a group of 4 color options will appear for you to select your preferred color variant.
-
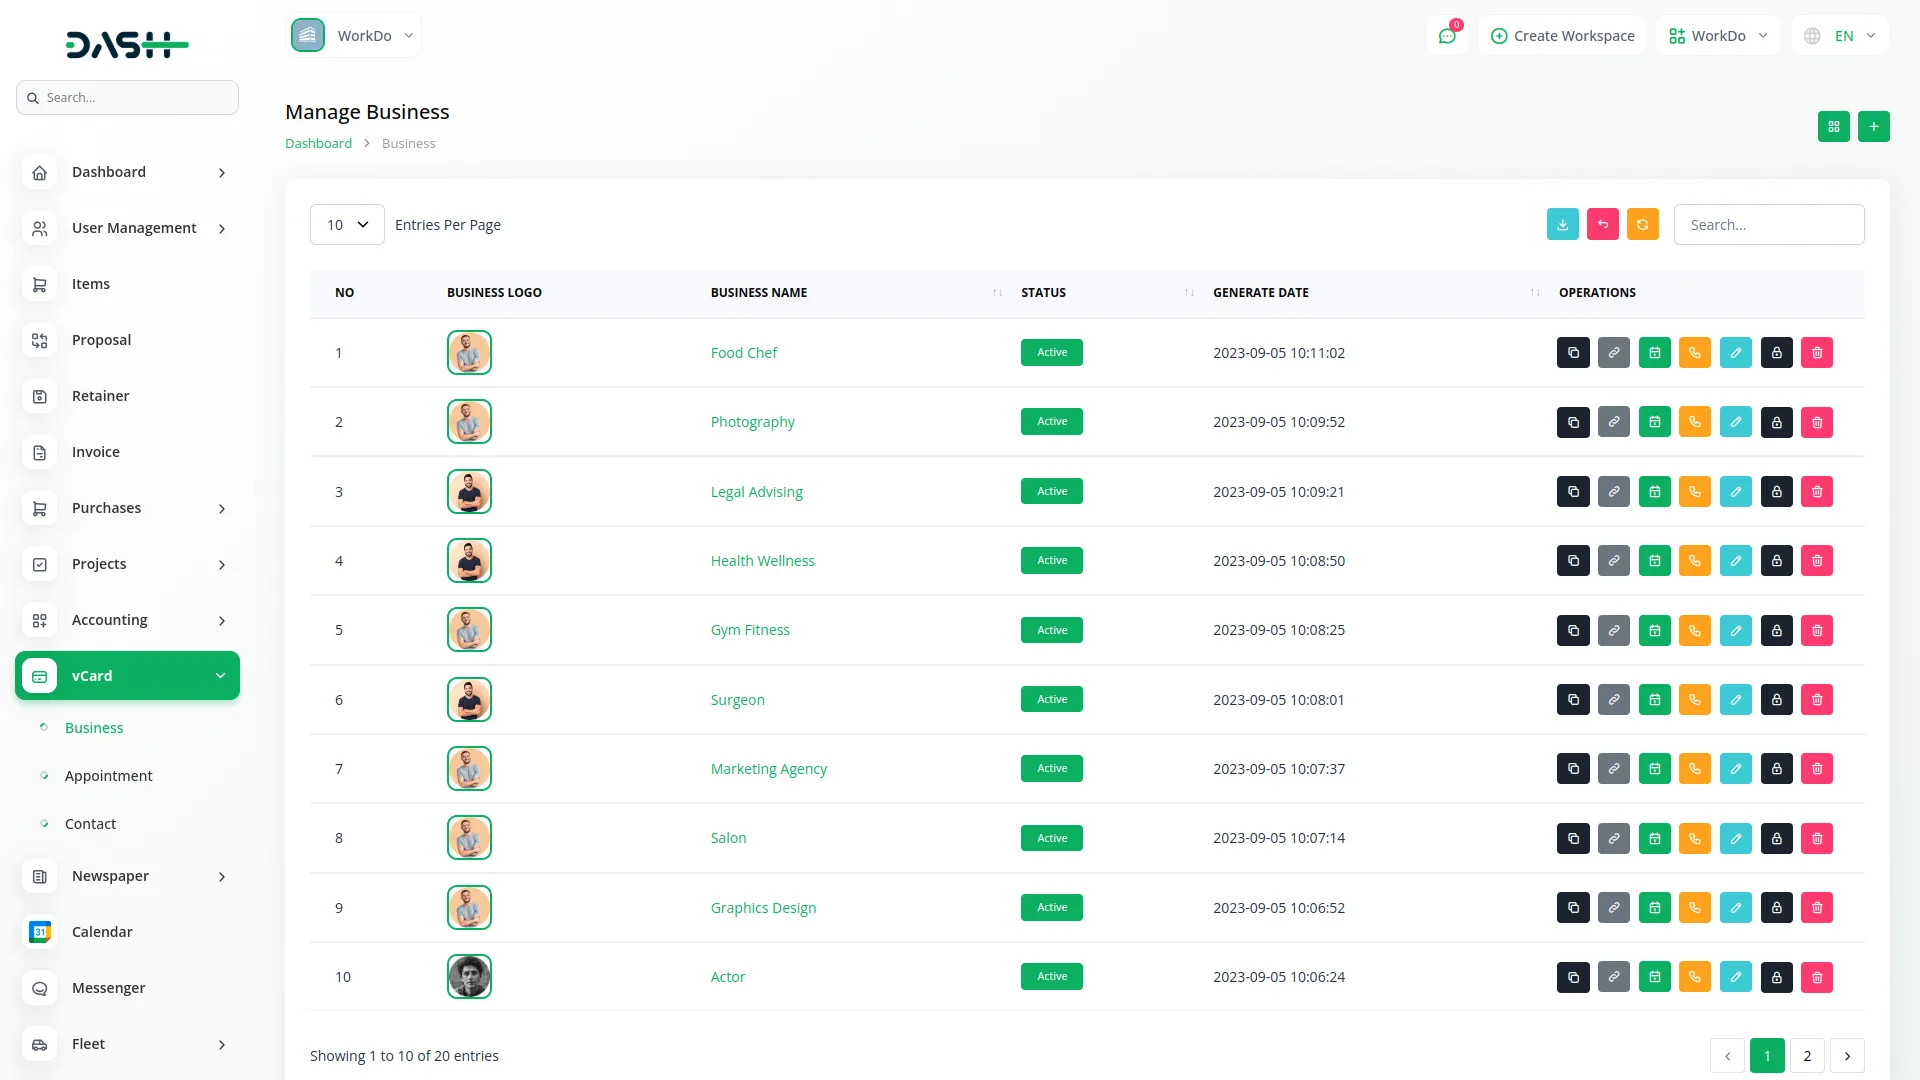
- You can view your businesses in two ways by clicking either “Grid View” or the default list view. Grid View displays your business cards showing Business Name, Business Generate Date, Business Image, Status (active or locked), along with quick action buttons for copying links, accessing the appointment calendar, and locking the business.
- The main list page shows all your businesses in a table with columns for Business Logo, Business Name, Status, Generate Date, and Actions. You can use the Search and Export buttons, or click “Create” to create new businesses.
- The available actions in the Action column include Business Duplicate, which creates a copy of the selected business with all its data. Click to copy the card link, which copies your business link to the clipboard for easy sharing.
- Appointment Calendar opens the calendar view where booked appointments are displayed by Year, Month, and Week formats. Business Contacts shows all contact form submissions from your business card. Business Edit opens the full editing interface, Business Lock disables the business card, and Delete removes the business entirely.
-
- When you click Business Edit, you will see action buttons at the top: WhatsApp Share, Click to copy card link, Appointment Calendar, Download, QR code, and Preview.
- WhatsApp Share opens a form where you enter a WhatsApp number and click Share to send your business card link directly. Download saves your business card as an image file. QR code downloads your business QR code, and Preview shows a real-time preview of your business card.
- The editing interface has 8 main tabs:
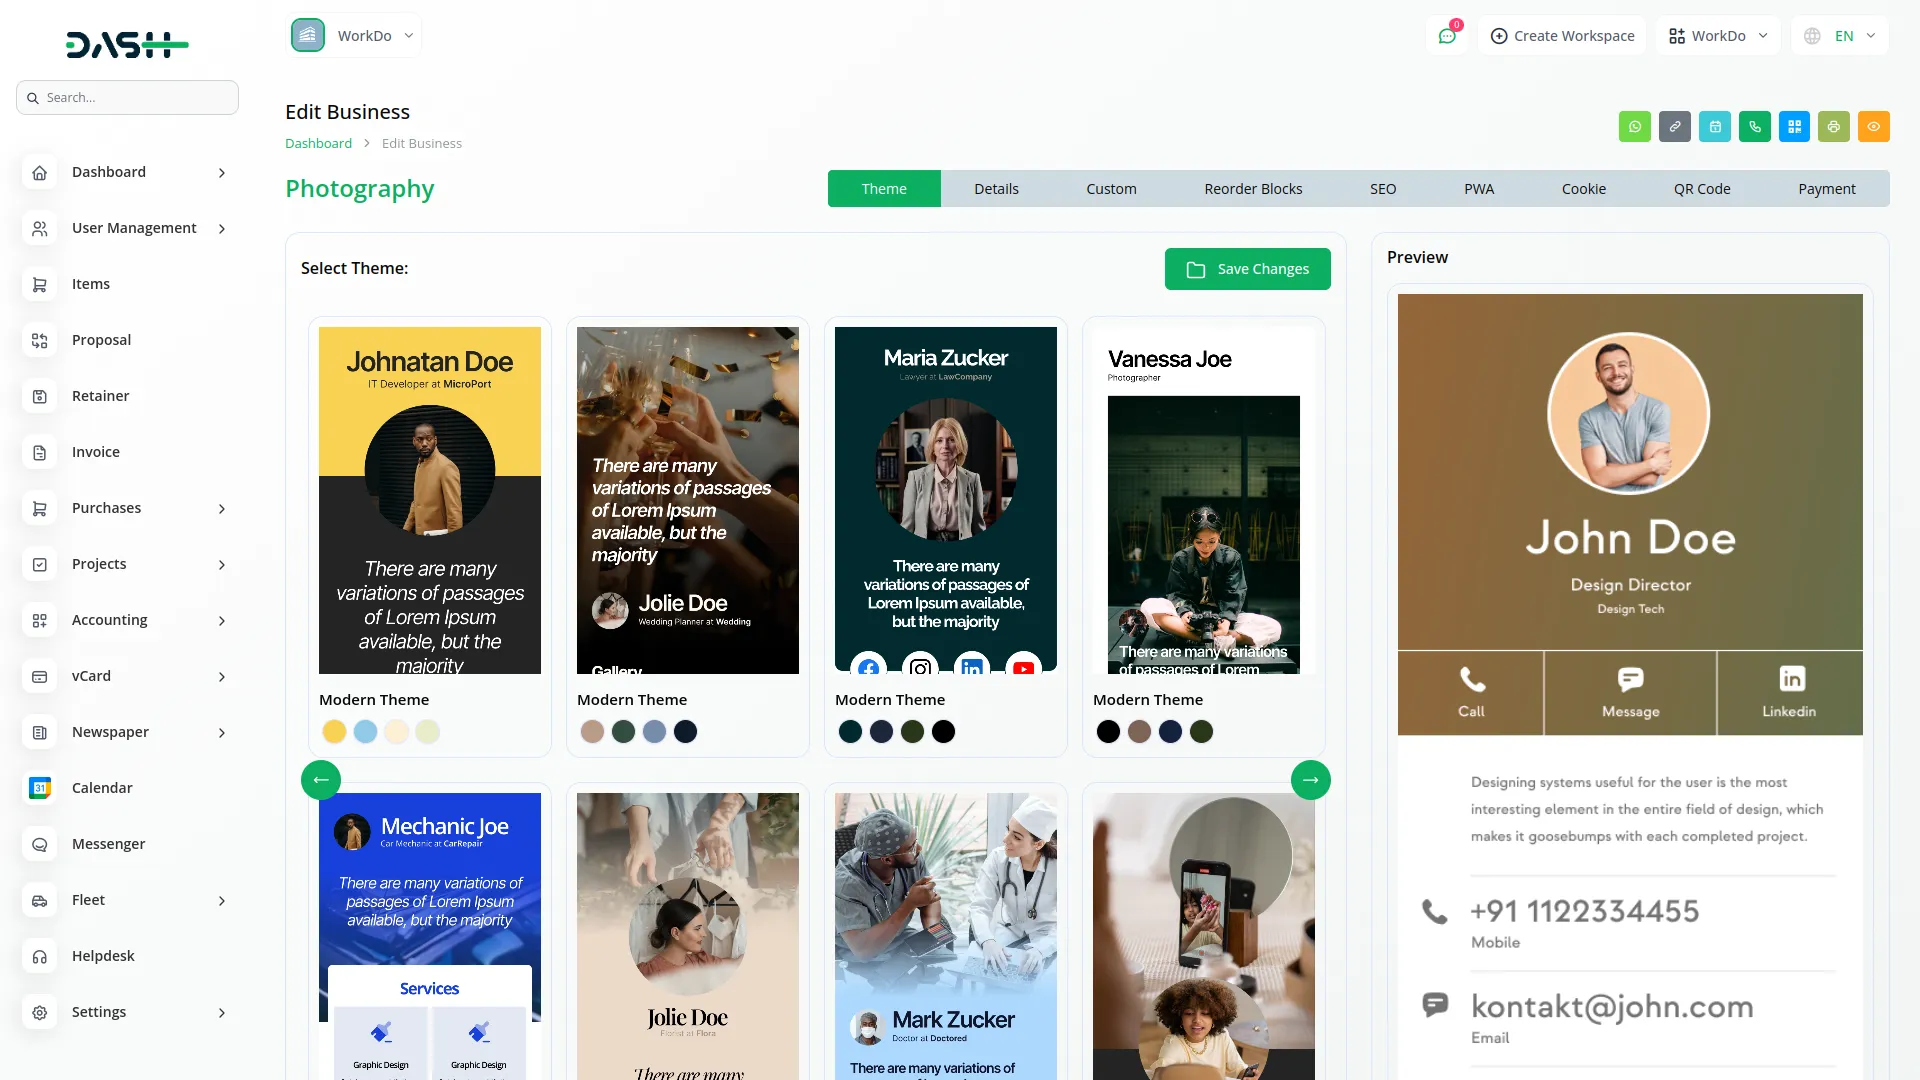
- Theme: Choose from 21 themes and select one of 4 color variants for each theme.
- Details: Edit your business information including Banner, Logo, Title, Designation, SubTitle, and Description. You can also create a personalized link using a unique slug.
- Custom, Reorder Blocks, PWA, Cookie, QR Code, and Payment offer additional customization and functionality options.
- In the Details tab:
- Use ON/OFF toggles to show/hide specific sections.
- Contact Info: Click “Add New Contact” to open a modal with contact icons like Facebook, Instagram, LinkedIn, Phone, Twitter, YouTube, Email, and others. Select an icon and enter the relevant link or detail.
- Business Hours: Set open days from Monday to Sunday with start and end times using checkboxes and time pickers.
- In the Appointments section:
- Click “Add New Appointment” to create time slots with Start Time, End Time, and a Delete button.
- These slots allow customers to book appointments during your business hours.
- In the Services section:
- Click “Add New Service” to add services with Image, Title, Description, Button Text, and Button Link.
- The service appears on your business card with the button text as the label, redirecting to your specified link when clicked.
- In Products, click “Add New Product” to add products with Image, Title, Description, Currency, Price, Button Text, and Button Link. For Testimonials, click “Add New Testimonials” to add customer reviews with Image, Rating (star selection), Name, and Description. In the Social section, click “Add New Social Link” to open a modal with social media icons, then enter the corresponding social media link.
- Other sections include Google Map where you add an embed link using iframe, Custom HTML where you enter custom HTML content, Apps Detail with Play Store Link, App Store Link, and App Variant selection from 5 design variants, and Gallery with four buttons: Video, Image, Custom Image, and Custom Video for uploading or linking media files.
- The Custom tab manages domain settings with three options: Business Link (shows default link with copy button), Domain (enter custom domain with IP configuration), and Subdomain (system-generated, read-only). Additional settings include Custom JS & CSS fields, Google Fonts selection which will be performed in your digital card, Password Protection toggle (You will see the verification note when you open the business card), and Branding toggle with description field.
- The Reorder Blocks tab lets you drag and drop sections to arrange their display order on your business card. You can toggle sections ON/OFF to control visibility, with real-time updates to your card preview.
- The PWA tab enables Progressive Web App functionality with fields for App Title, App Name, App Background Color, and App Theme Color when toggled ON. If you enable the PWA settings, the function will be performed under your digital business card.
- The Cookie tab manages cookie consent with Enable Logging, Strictly Necessary Cookies toggles, and fields for Cookie Title, Strictly Cookie Title, Cookie Description, Strictly Cookie Description, Contact Us Description, and Contact Us URL. There is also a Download button to export cookie acceptance data. If you enable this function, the pop up of cookies will be displayed whenever customers open the digital business card.
- The QR Code tab lets you customize your QR code with Foreground Color, Background Color, and Corner Radius settings. You can choose Normal for standard styling, Text to add custom text with color and size options, or Image to upload an image with size settings. The QR code you have made, will be visible to the customers and they scan the QR code to open the business card.
- The Payment tab enables payment functionality with Payment Amount field and toggles for Stripe and PayPal payment methods.
-
Appointments Management
- The Appointments section helps you manage all bookings made through your business cards. This section is connected to your Business section, so appointments booked through your business card links automatically appear here.
- At the top of the appointments page, select a business from the Business List dropdown to filter and view appointments for that specific business. You can also click “Calendar View” to switch between list and calendar formats.
- In Calendar View, you can filter appointments using Start Date, End Date, and Business fields, then click Apply or Reset. Each booked appointment appears as an event on the calendar. Click on any event to view the appointment time and customer details. The Appointment menu lists all appointments for the current month.
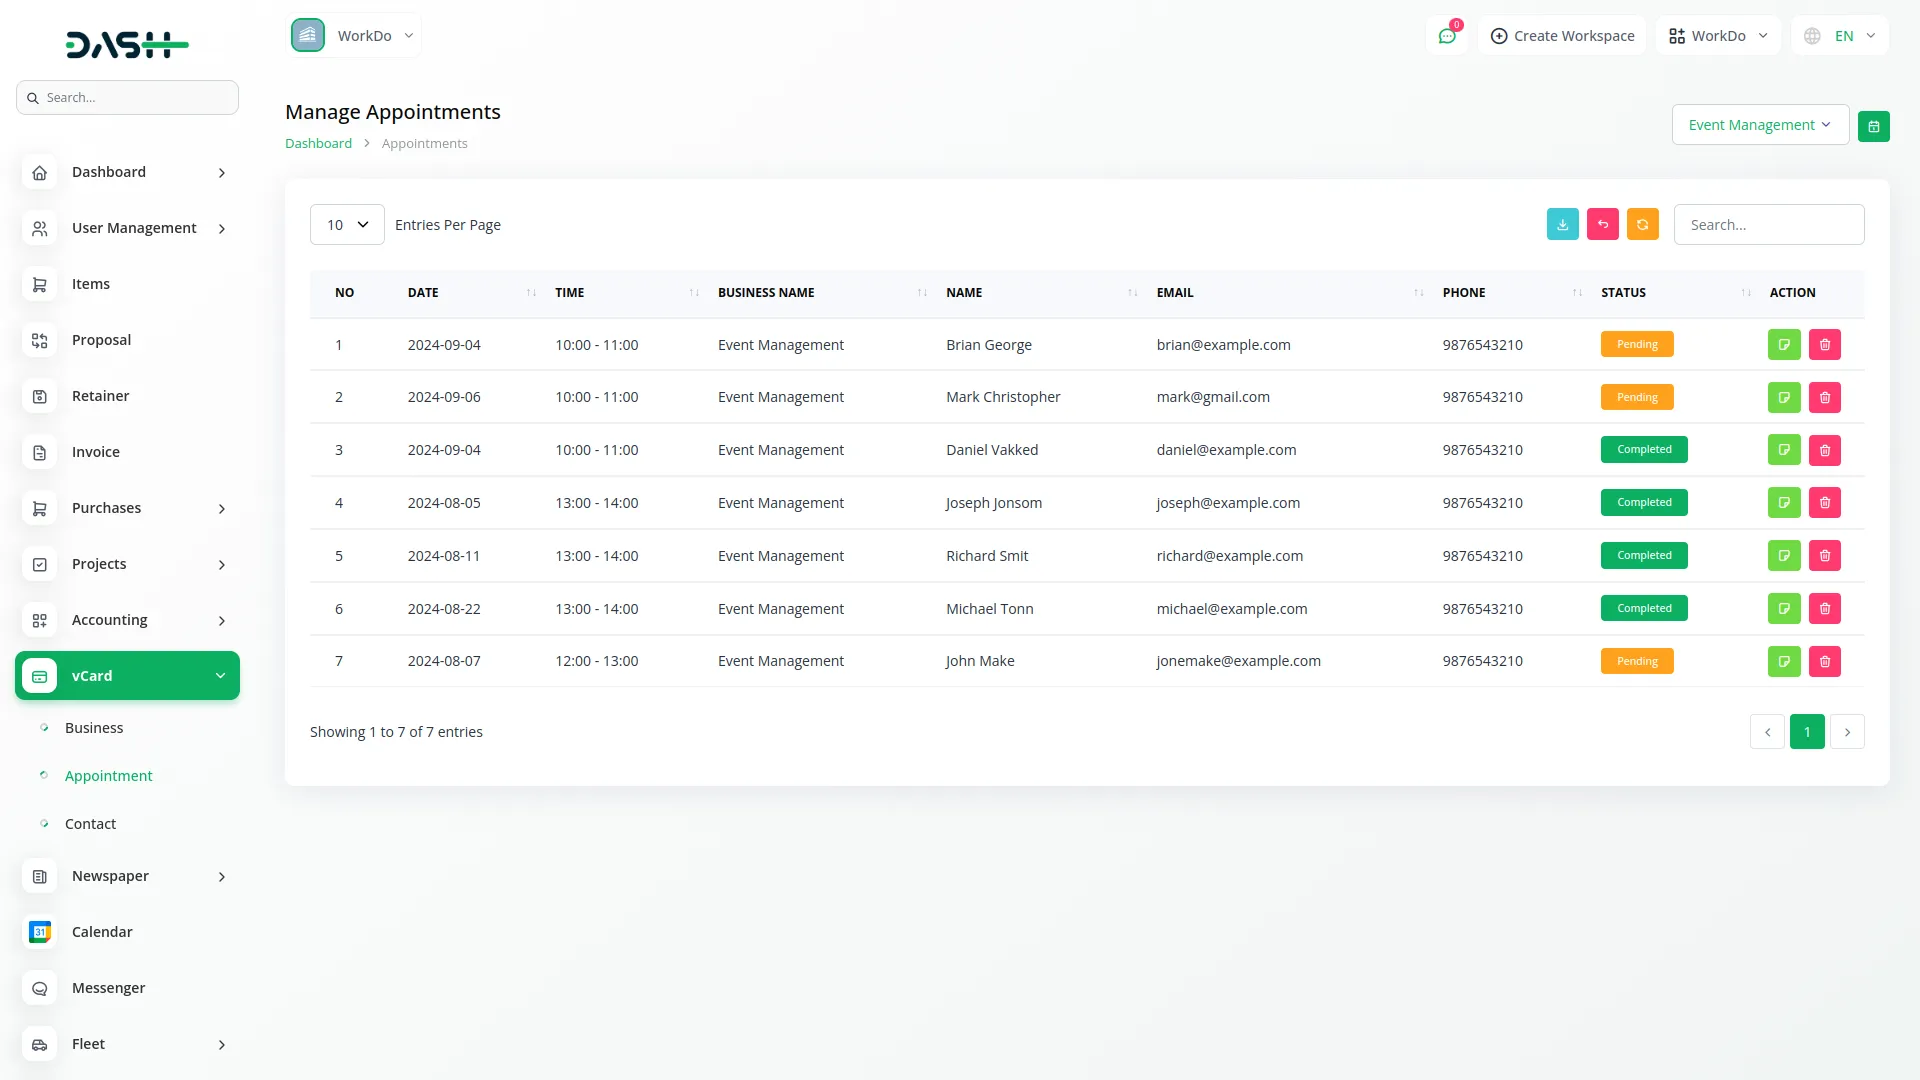
- The main list page shows appointments in a table with columns for Date, Time, Business Name, Name, Email, Phone, Status (Pending or Completed), and Action. You can use Search and Export buttons to find specific appointments or export data.
- In the Action column, click “Add note & change Status” to open a form where you can change the Status from Pending to Completed or add notes about the appointment. You can also Delete appointments when needed.
Contact Management
- The Contact section manages all customer inquiries submitted through your business card contact forms. This section connects to your Business section, automatically syncing contacts from your business cards.
- At the top of the contact page, use the Business List dropdown to select a specific business and filter contacts related to that business only.
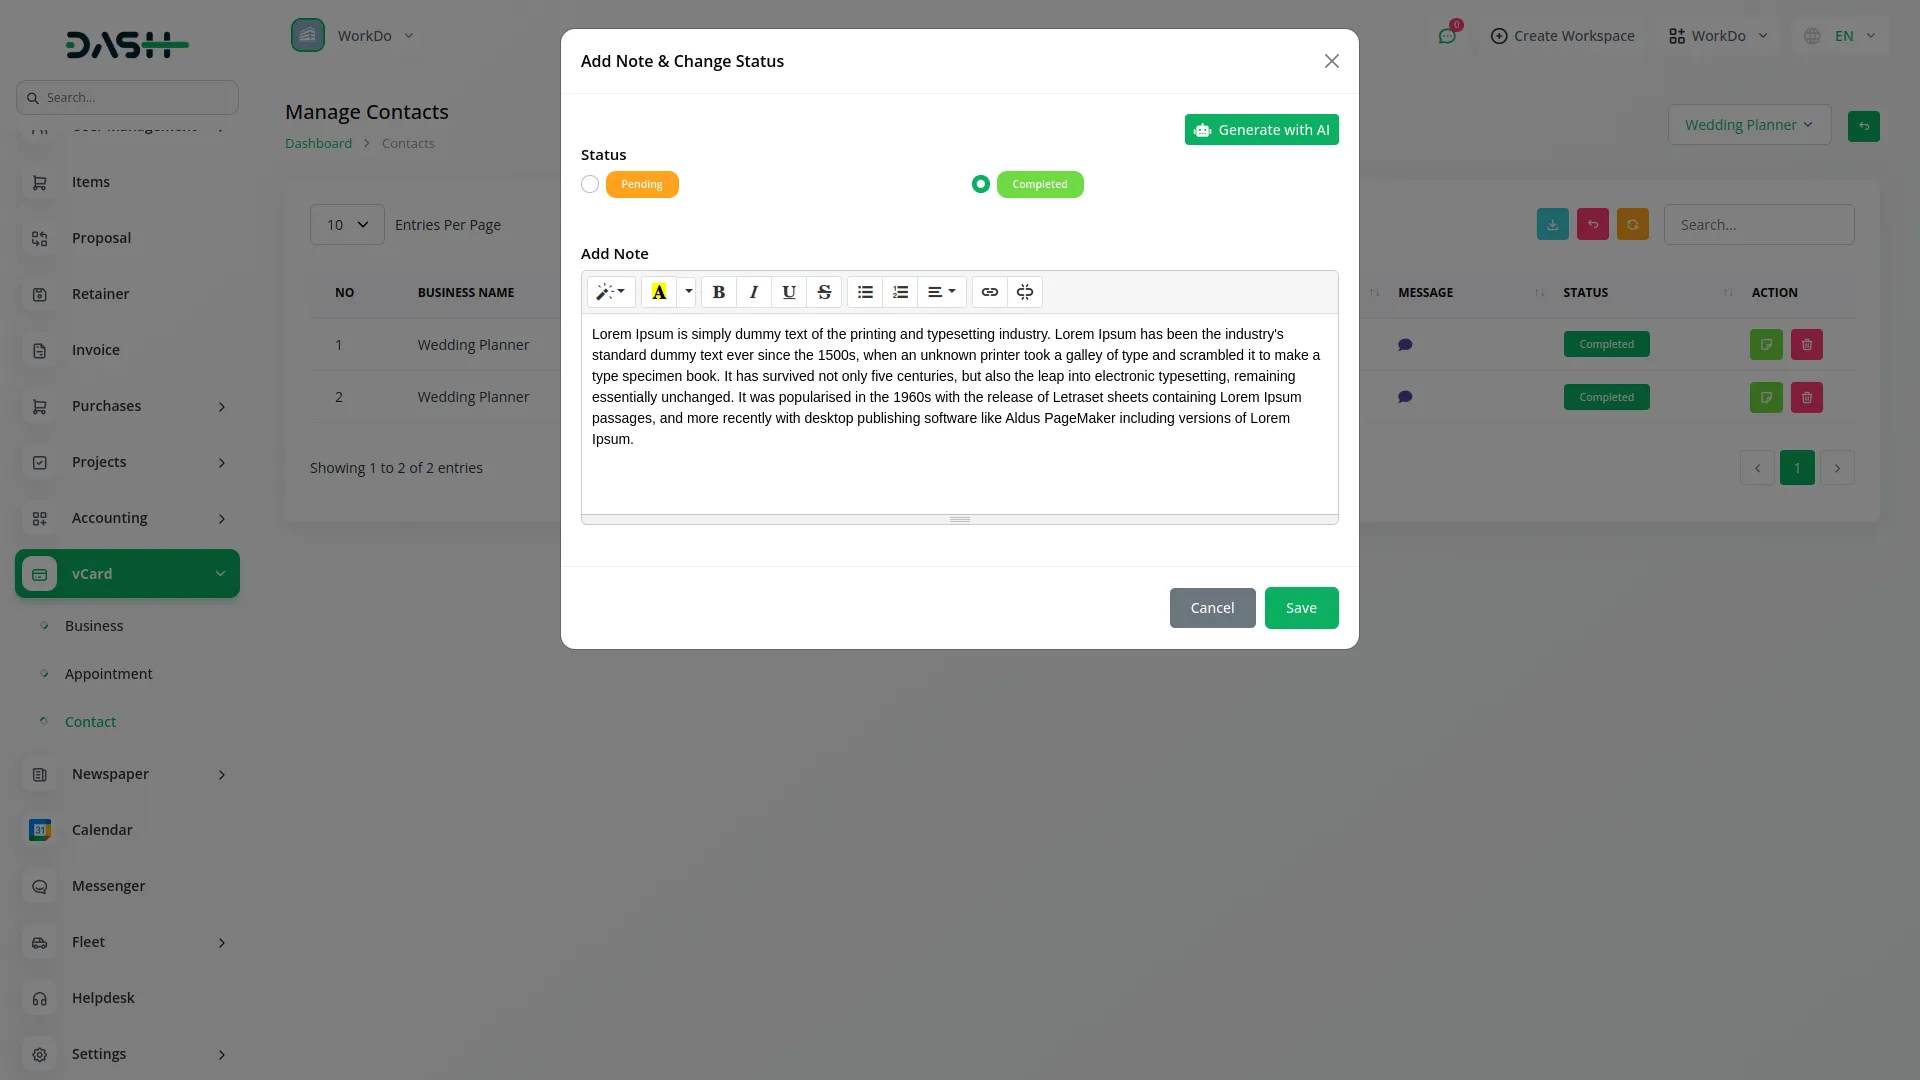
- The list page displays contacts in a table with columns for Business Name, Name, Email, Phone, Message, Status (Pending or Completed), Notes, and Action. The Notes column opens a popup showing contact notes when clicked. You can use Search and Export buttons to manage your contact data.
- In the Action column, click “Add note & change Status” to open a form where you can update the Status from Pending to Completed and add notes about the contact inquiry. You can also Delete contacts when necessary.
Categories
Related articles
- Business Model Integration in Dash SaaS
- Fire Safety Detailed Documentation
- NMI Payment Gateway Integration in Dash SaaS
- Financial Goal Integration in Dash SaaS
- Marketing Plan Integration in Dash SaaS
- Retainer Integration in Dash SaaS
- WhatSender Add-On Integration in Dash SaaS
- Nepalste Integration in Dash SaaS
- Rental Management Integration in Dash SaaS
- Pabbly Connect Integration in Dash SaaS
- Instamojo Payment Gateway Detailed Documentation
- Google Wallet Integration in Dash SaaS
Reach Out to Us
Have questions or need assistance? We're here to help! Reach out to our team for support, inquiries, or feedback. Your needs are important to us, and we’re ready to assist you!


Need more help?
If you’re still uncertain or need professional guidance, don’t hesitate to contact us. You can contact us via email or submit a ticket with a description of your issue. Our team of experts is always available to help you with any questions. Rest assured that we’ll respond to your inquiry promptly.
Love what you see?
Do you like the quality of our products, themes, and applications, or perhaps the design of our website caught your eye? You can have similarly outstanding designs for your website or apps. Contact us, and we’ll bring your ideas to life.
