Photo & Studio management Integration in Dash SaaS
The Photo & Studio Management integration is built to simplify operations for photography studios by allowing users to manage appointments, handle bookings, create service packages, and process billing and payments all in one place.
Introduction
Photo & Studio Management is a powerful software solution designed specifically for photography studios to manage their complete business operations. This Add-On helps studio owners manage appointments and bookings, handle services and packages, process billing and payments, track customer interactions, and maintain their online presence. The software includes a dashboard for monitoring key metrics, customer management tools, and a complete website management system that allows studios to showcase their work, set up a professional website with portfolio display, and manage digital presence effectively.
How To Install The Add-On?
To Set Up the Photo & Studio Management Add-On, you can follow this link: Setup Add-On.
How To Use The Photo & Studio Management Add-On?
Photo Studio Dashboard
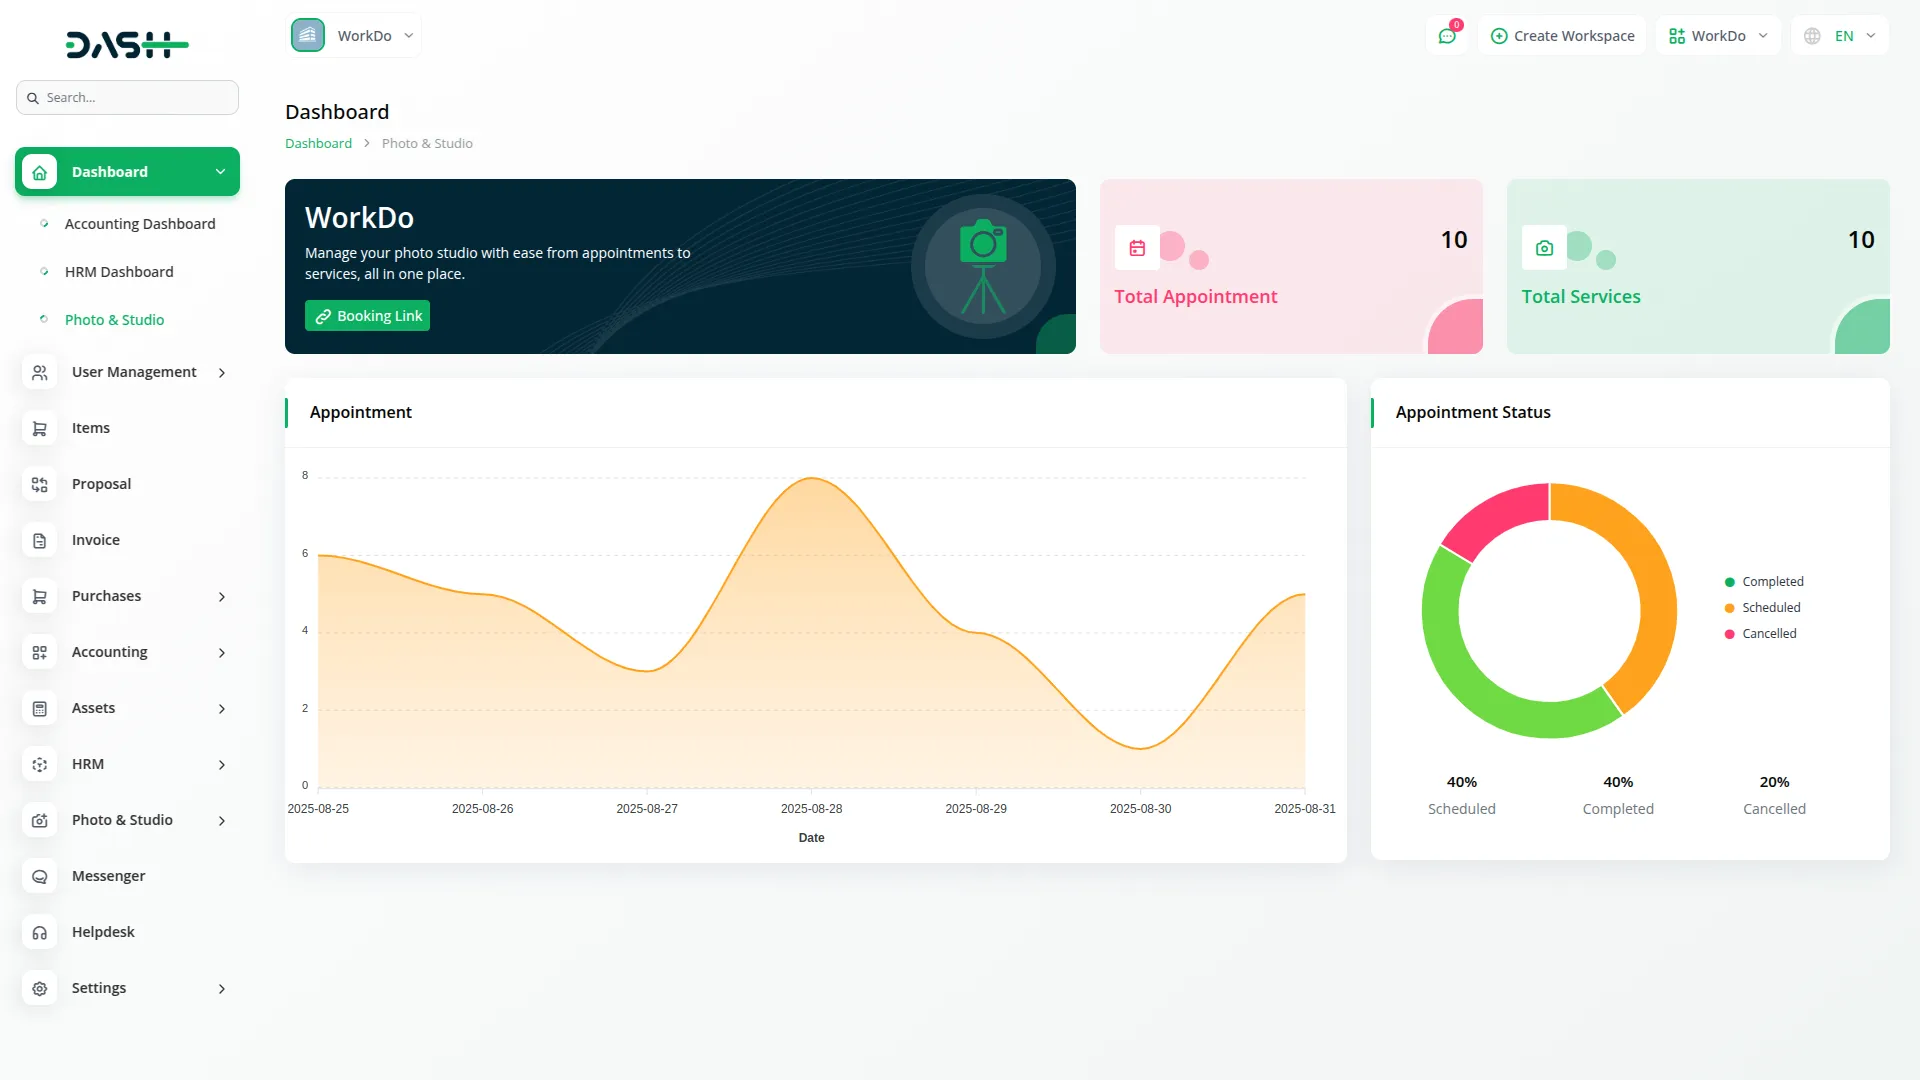
- After purchasing and installing this Add-On, go to the sidebar and search for the Photo & Studio Management Add-On. First, you will see the photo studio dashboard, which serves as the main control for your system; here, you can use the studio copy link located at the top of the dashboard to gain access.
- In addition to these details, the dashboard provides two summary cards that show your Total Appointments and Total Services, providing you with an instant overview of your business activity.
- The dashboard also includes visual charts to help you track performance. The Appointment Chart displays booking activity for the last 7 days, allowing you to see trends and busy periods.
- Beyond those details, there is an Appointment Status Pie Chart that breaks down your appointments by status, showing the distribution between Scheduled, Completed, and Cancelled appointments.
Services & Packages
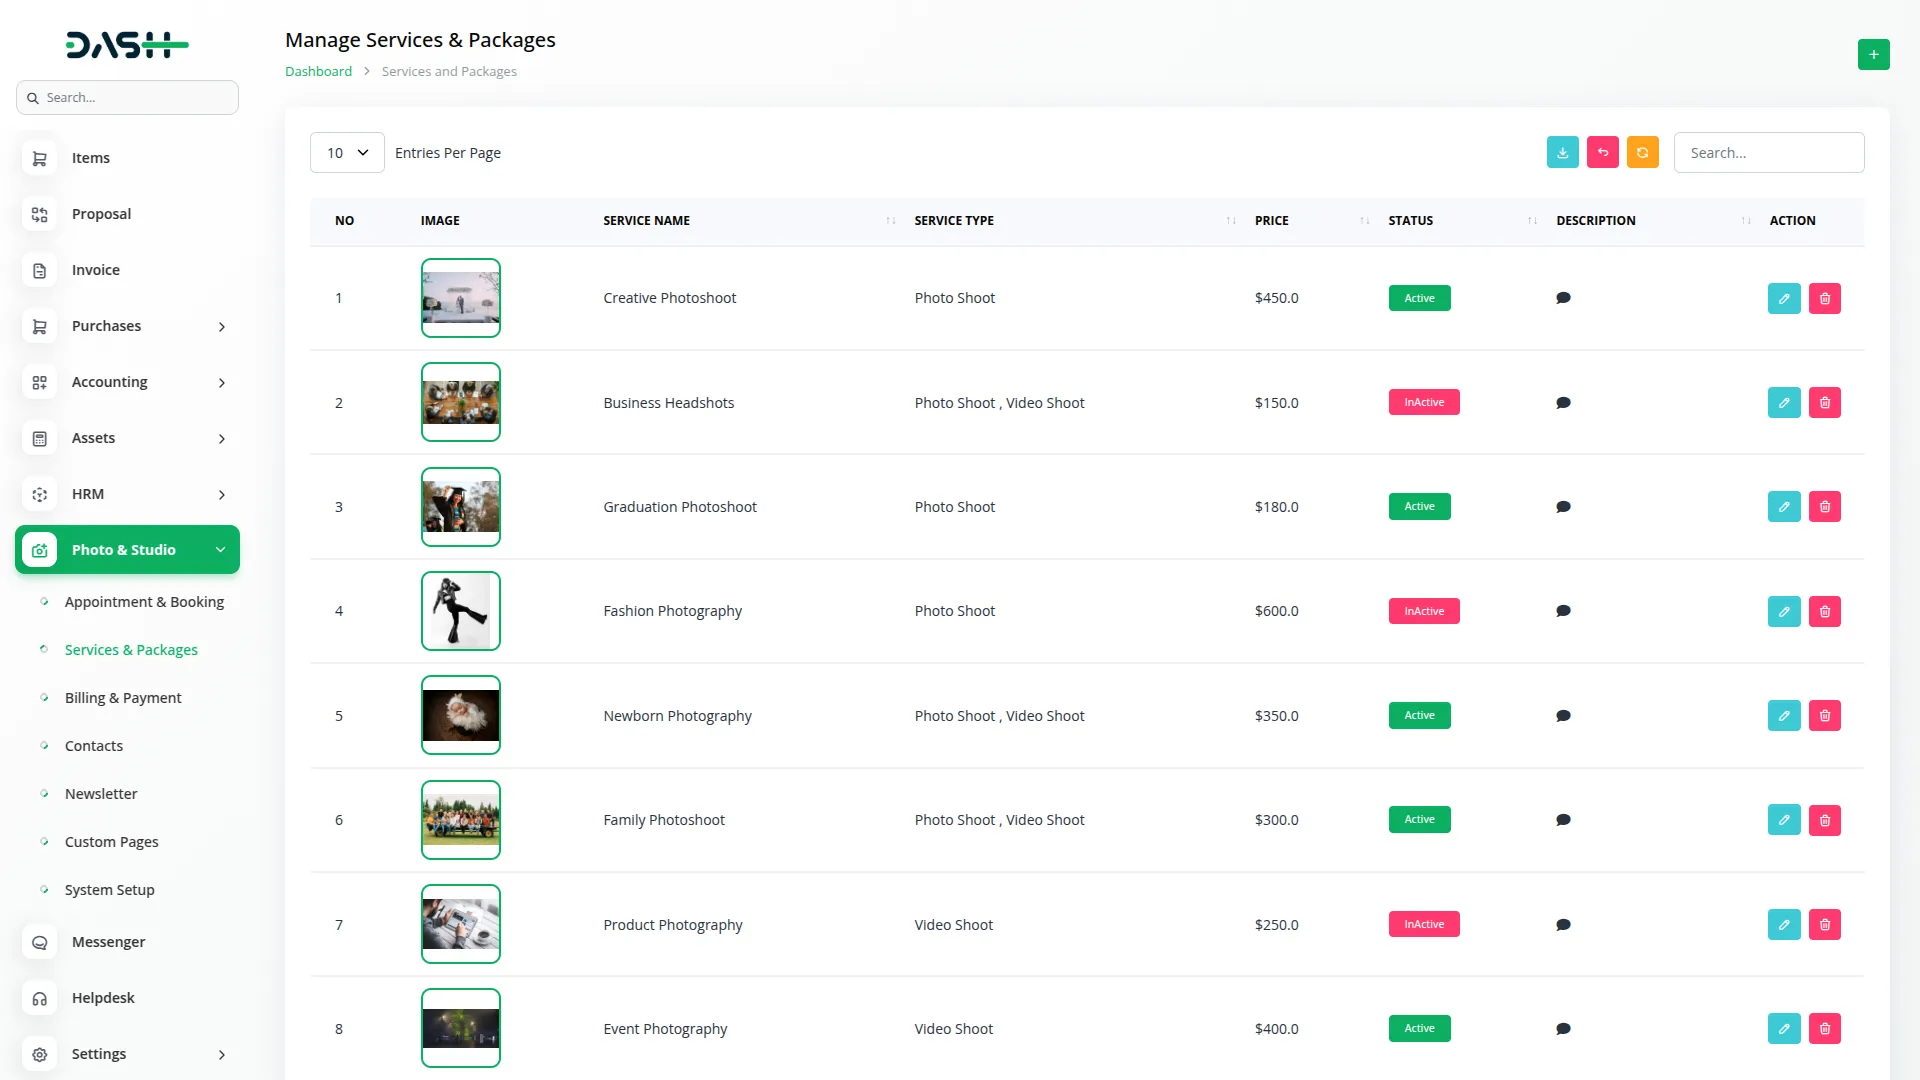
- To create a new service, click the “Create” button at the top of the services page. Enter the Service Name and select the Service Type from the dropdown menu, choosing either ‘Photo Shoot’ or ‘Video Shoot’. Set the Price for the service and choose the Status from the dropdown, selecting either ‘Active’ or ‘Inactive’. Upload a Service Image to showcase the service and add a Description by clicking the description icon.
- The list page displays all your services in a table format with columns for Number, Image, Service Name, Service Type, Price, Status, and Description. You can use the search button to filter specific data and also export, reset, or reload to manage your service list data. In the Actions column, you can click Edit to modify service details or Delete to remove a service from your offerings.
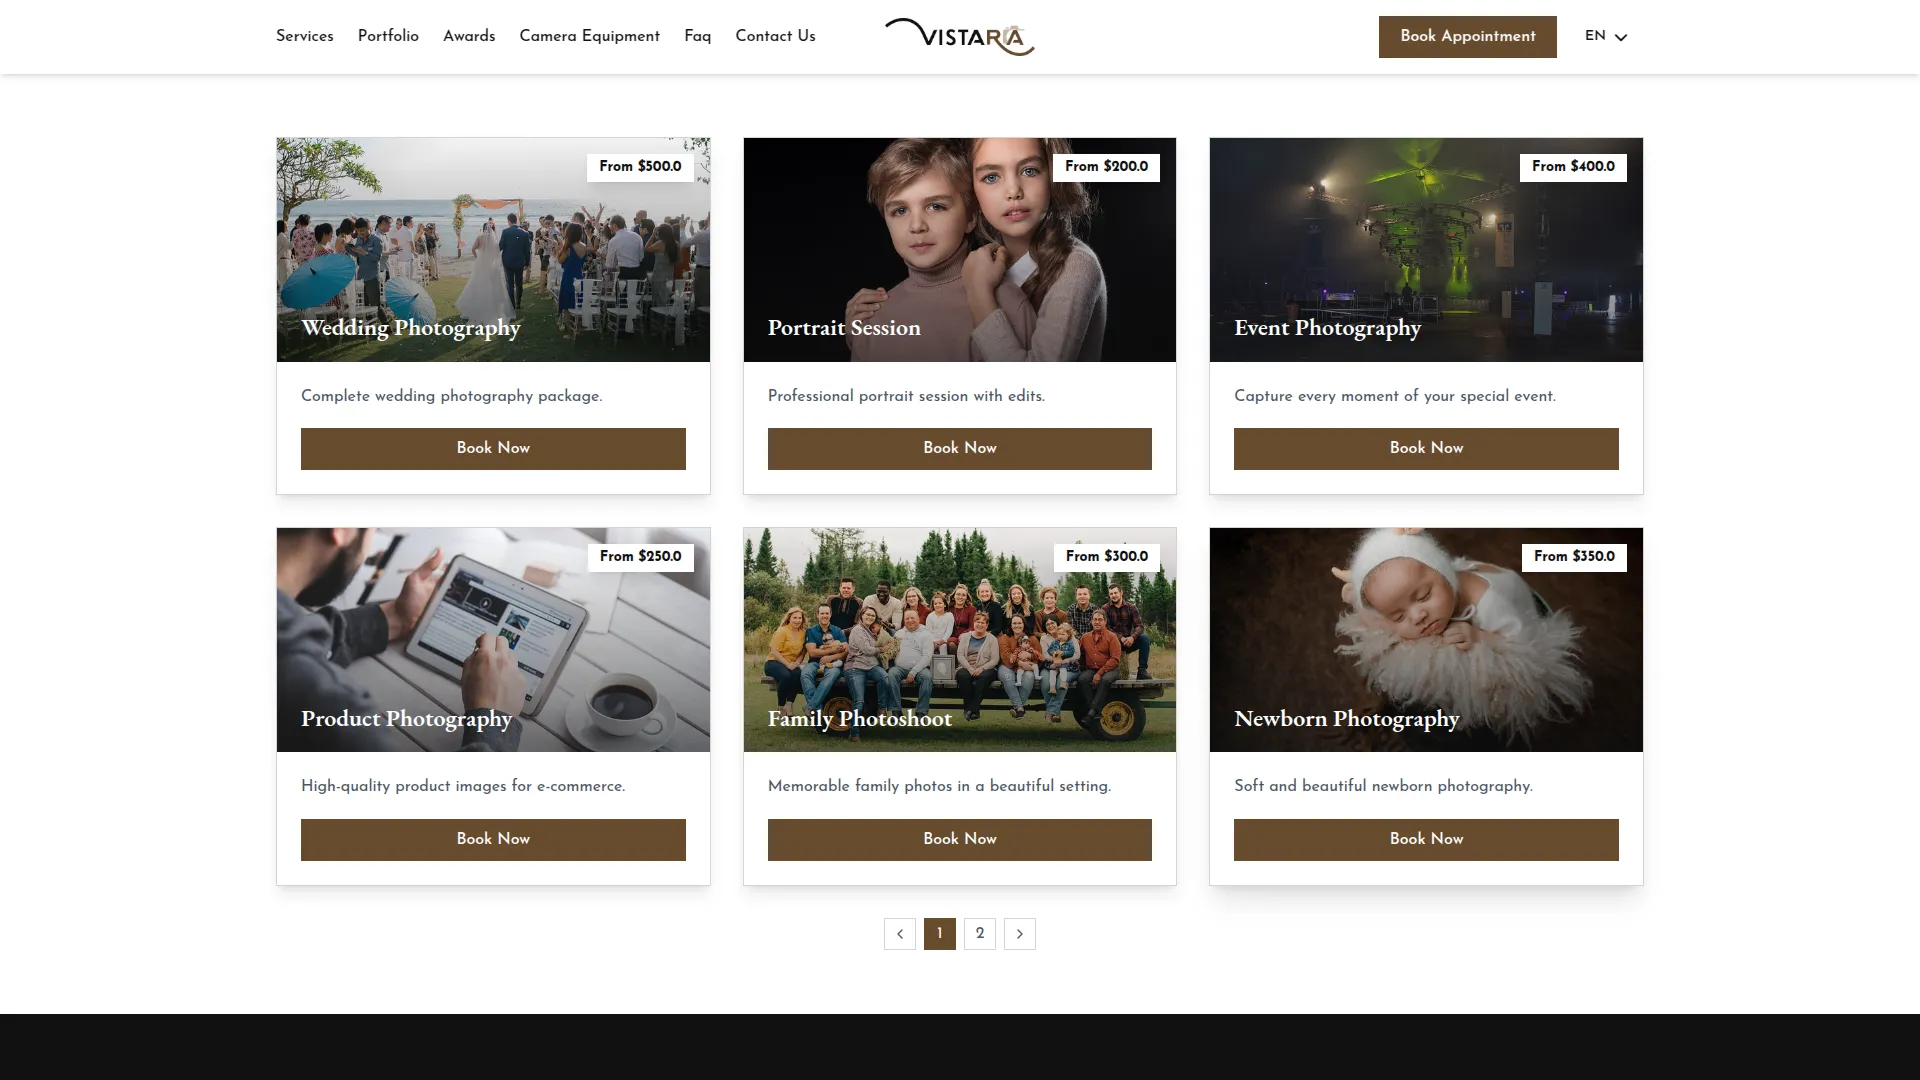
- All services are created from the backend, but they are displayed on the frontend under the Home Page. If you want to view all services, click the “All Services” button, and you will be navigated to the Services Page, where every service is listed for easy browsing.
- On your website’s services page, customers can view all active services in an attractive card layout. Each service card displays the service image, service name, pricing information, and a brief description.
- Each service card includes a “Book Now” button that allows customers to directly book appointments for that specific service. This frontend display automatically pulls data from your Services & Packages section, ensuring that only active services with uploaded images and complete information are visible to customers on your website.
Appointments & Booking
- To create a new appointment, click the “Create” button on the appointments page. You need to enter the customer’s Name, Email, and Mobile Number. Select the Staff member from the dropdown menu, which comes from the Users section.
- Choose the Appointment Date using the date picker and select the Service Type from the dropdown, which comes from the service section. The Price field will automatically fill based on the selected service. Finally, set the appointment Status by choosing from Scheduled, Completed, or Cancelled in the dropdown menu.
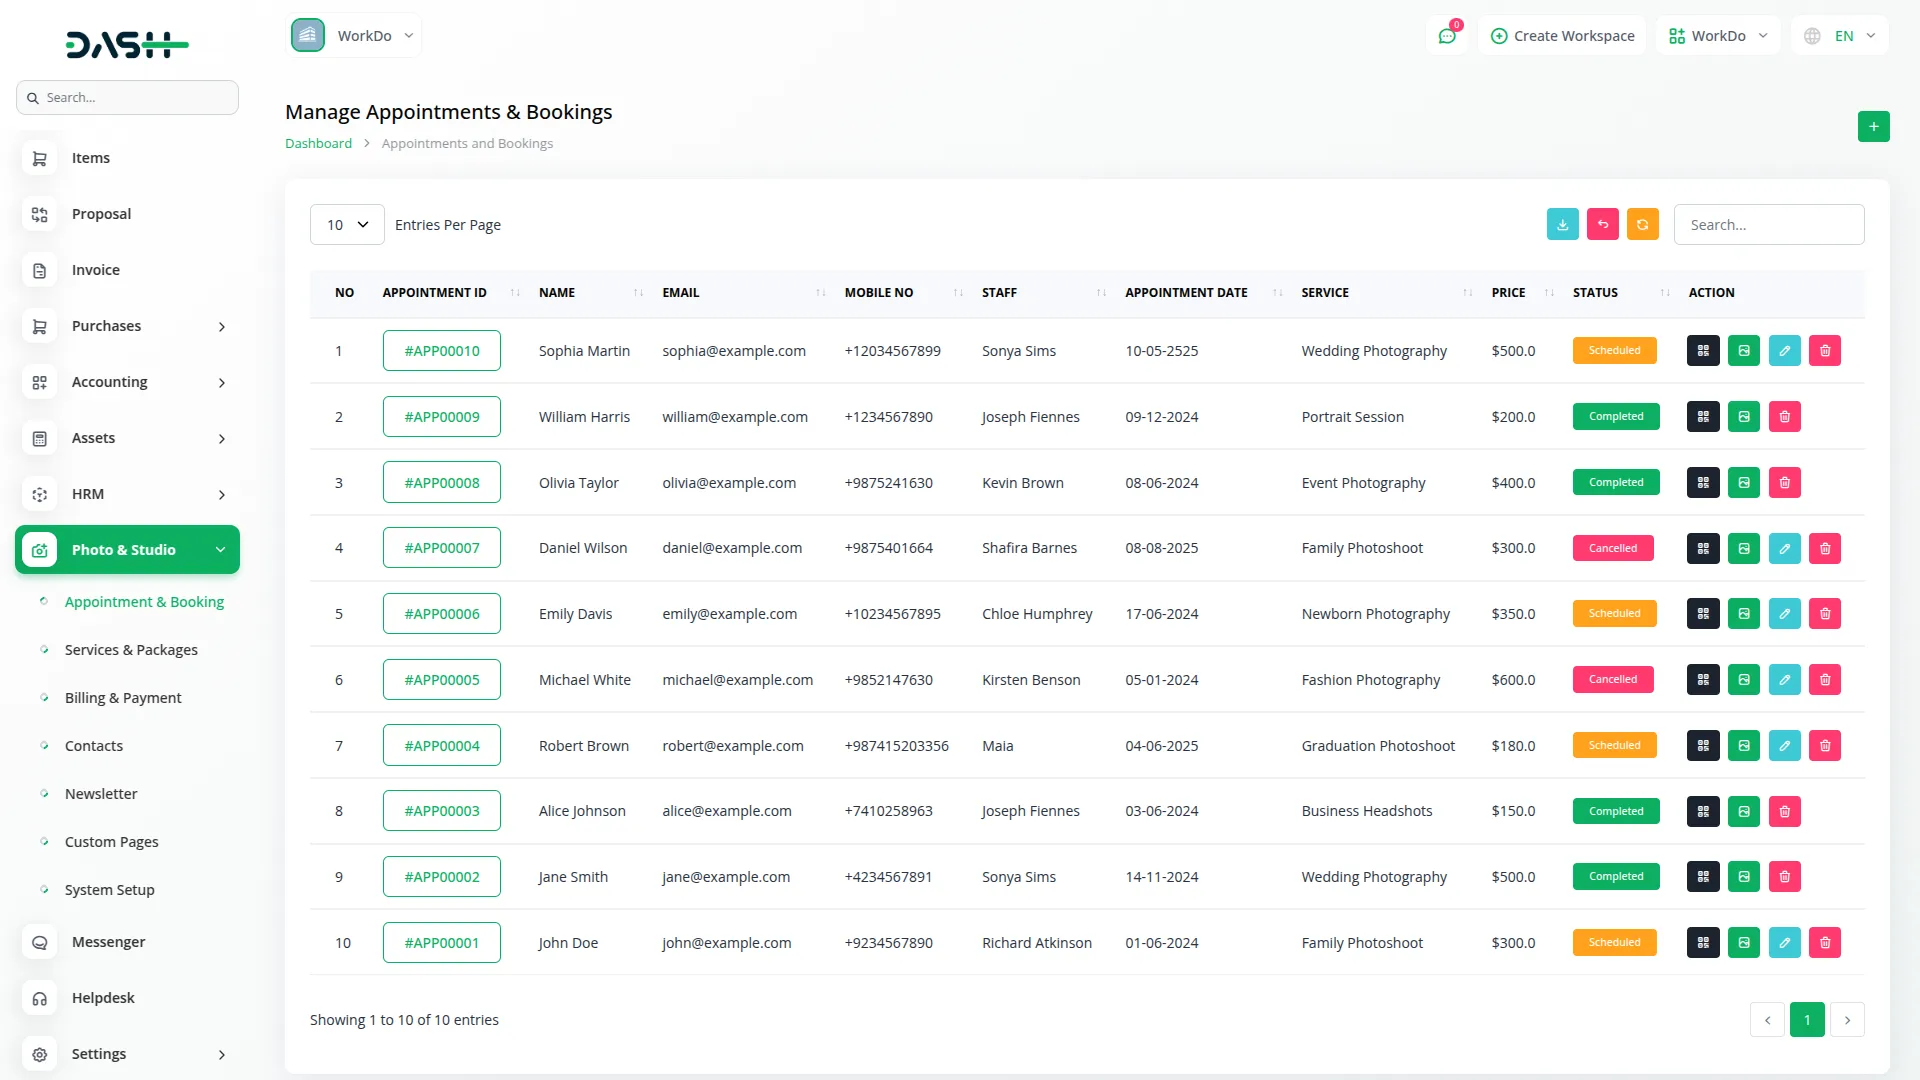
- The list page shows all appointments with columns for Number, Appointment ID, Name, Email, Mobile Number, Staff, Appointment Date, Service, Price, and Status. Click on the Appointment ID to view detailed appointment information.
- You can search for specific appointments and export, reset, or reload this section list for efficient management. With the help of the Action column, you can click ‘QrCode’ to scan or copy a link that opens the customer’s gallery, where they can download images and videos. Click Images to upload photos and videos for the appointment. Also, use edit to modify the details, or delete to remove them.
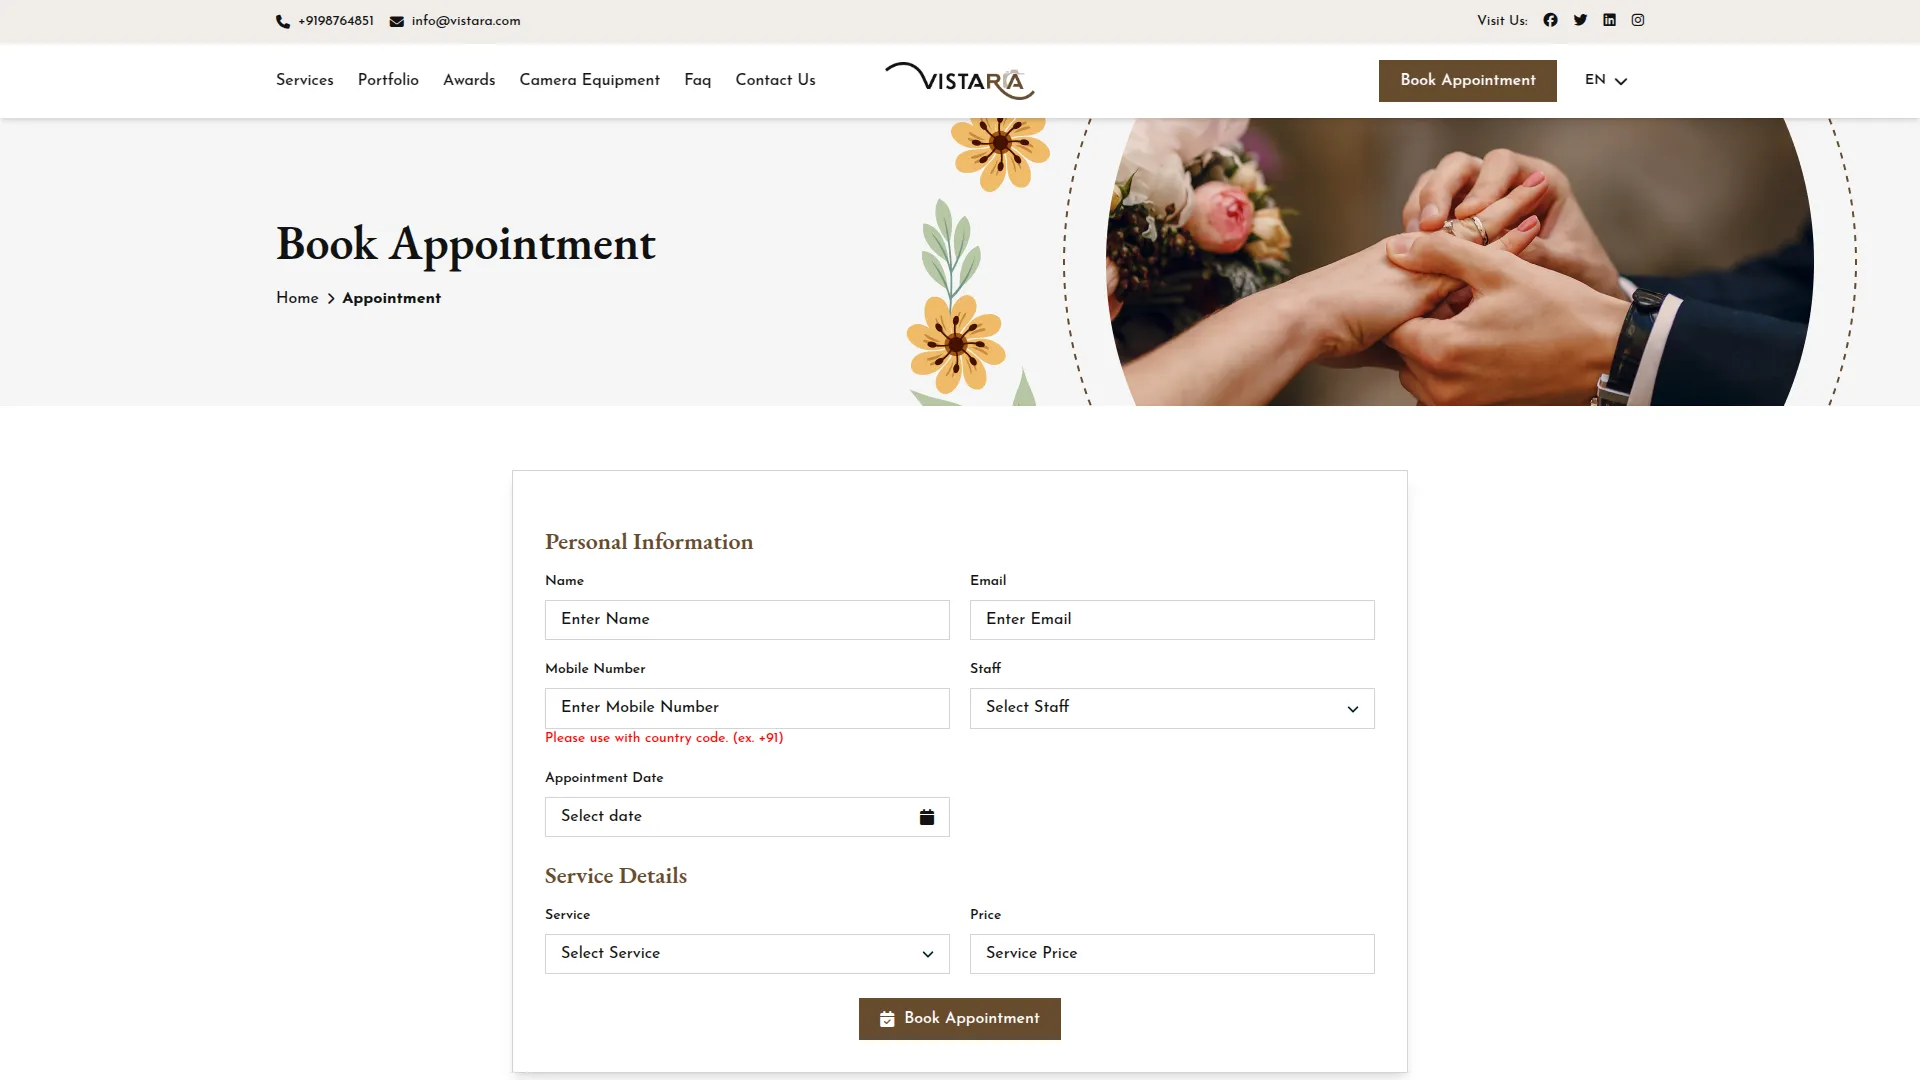
- All appointments are created from the backend, but they are available on the frontend for customers to book. Customers can enter their Name, Email, Mobile Number, select a Staff member from the dropdown, pick the Appointment Date, and choose a Service. The Price will automatically update, and once created, the appointment will also appear in the backend for management.
Billing & Payments
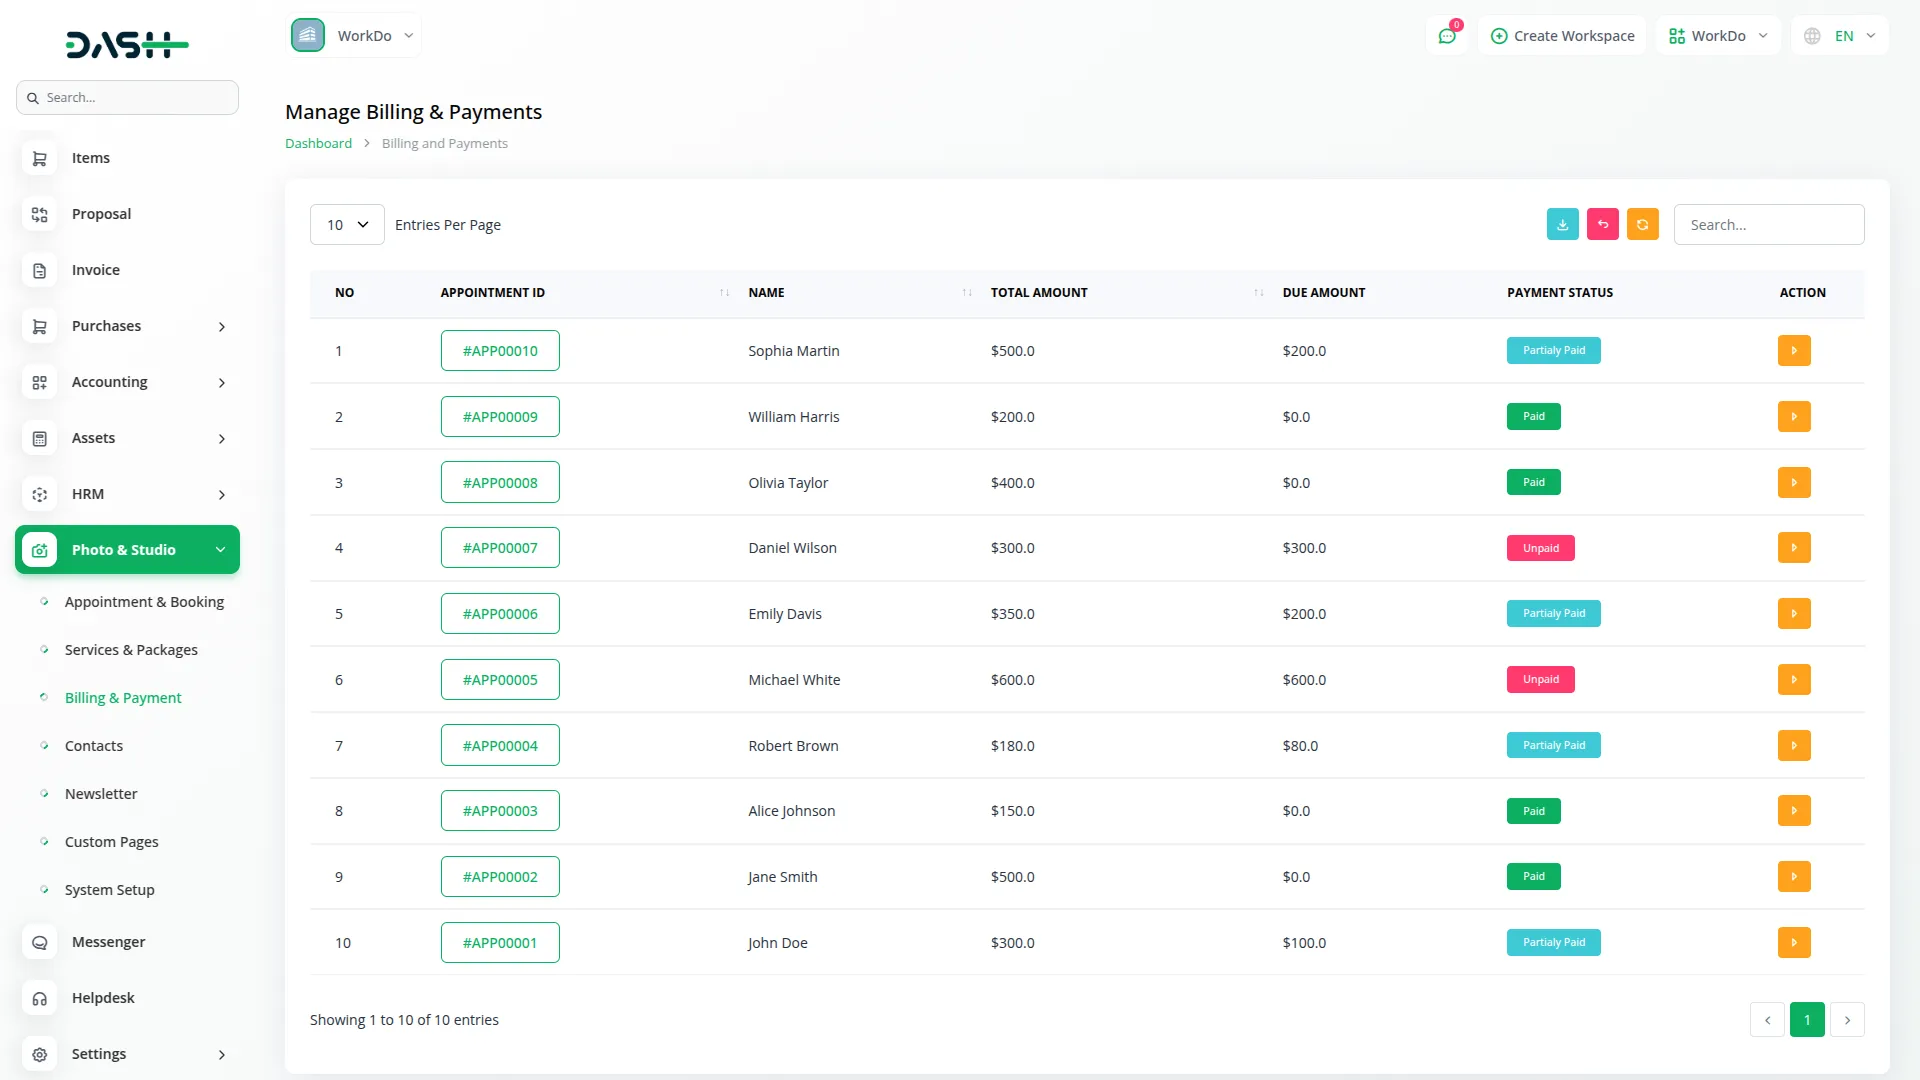
- This section operates as a list-only system that automatically generates billing records from your appointments. The list page displays all billing information with columns for Number, Appointment ID, Name, Total Amount, Due Amount, and Payment Status. The Payment Status column shows whether payments are Paid, Unpaid, or Partially Paid.
- Use the search, export, reset, and reload buttons to manage the billing & payments list efficiently. In the Actions column, click “Add Payment” to collect a payment from the customer. When you click this action, you can either record a new payment or view existing payment details, including the payer’s name, payment date, amount, description, and payment receipt.
- Use the search functionality to quickly locate specific billing records and the export feature to generate reports for accounting purposes.
Contacts
- The Contacts section manages all customer enquiries and messages received through your studio’s website contact form.
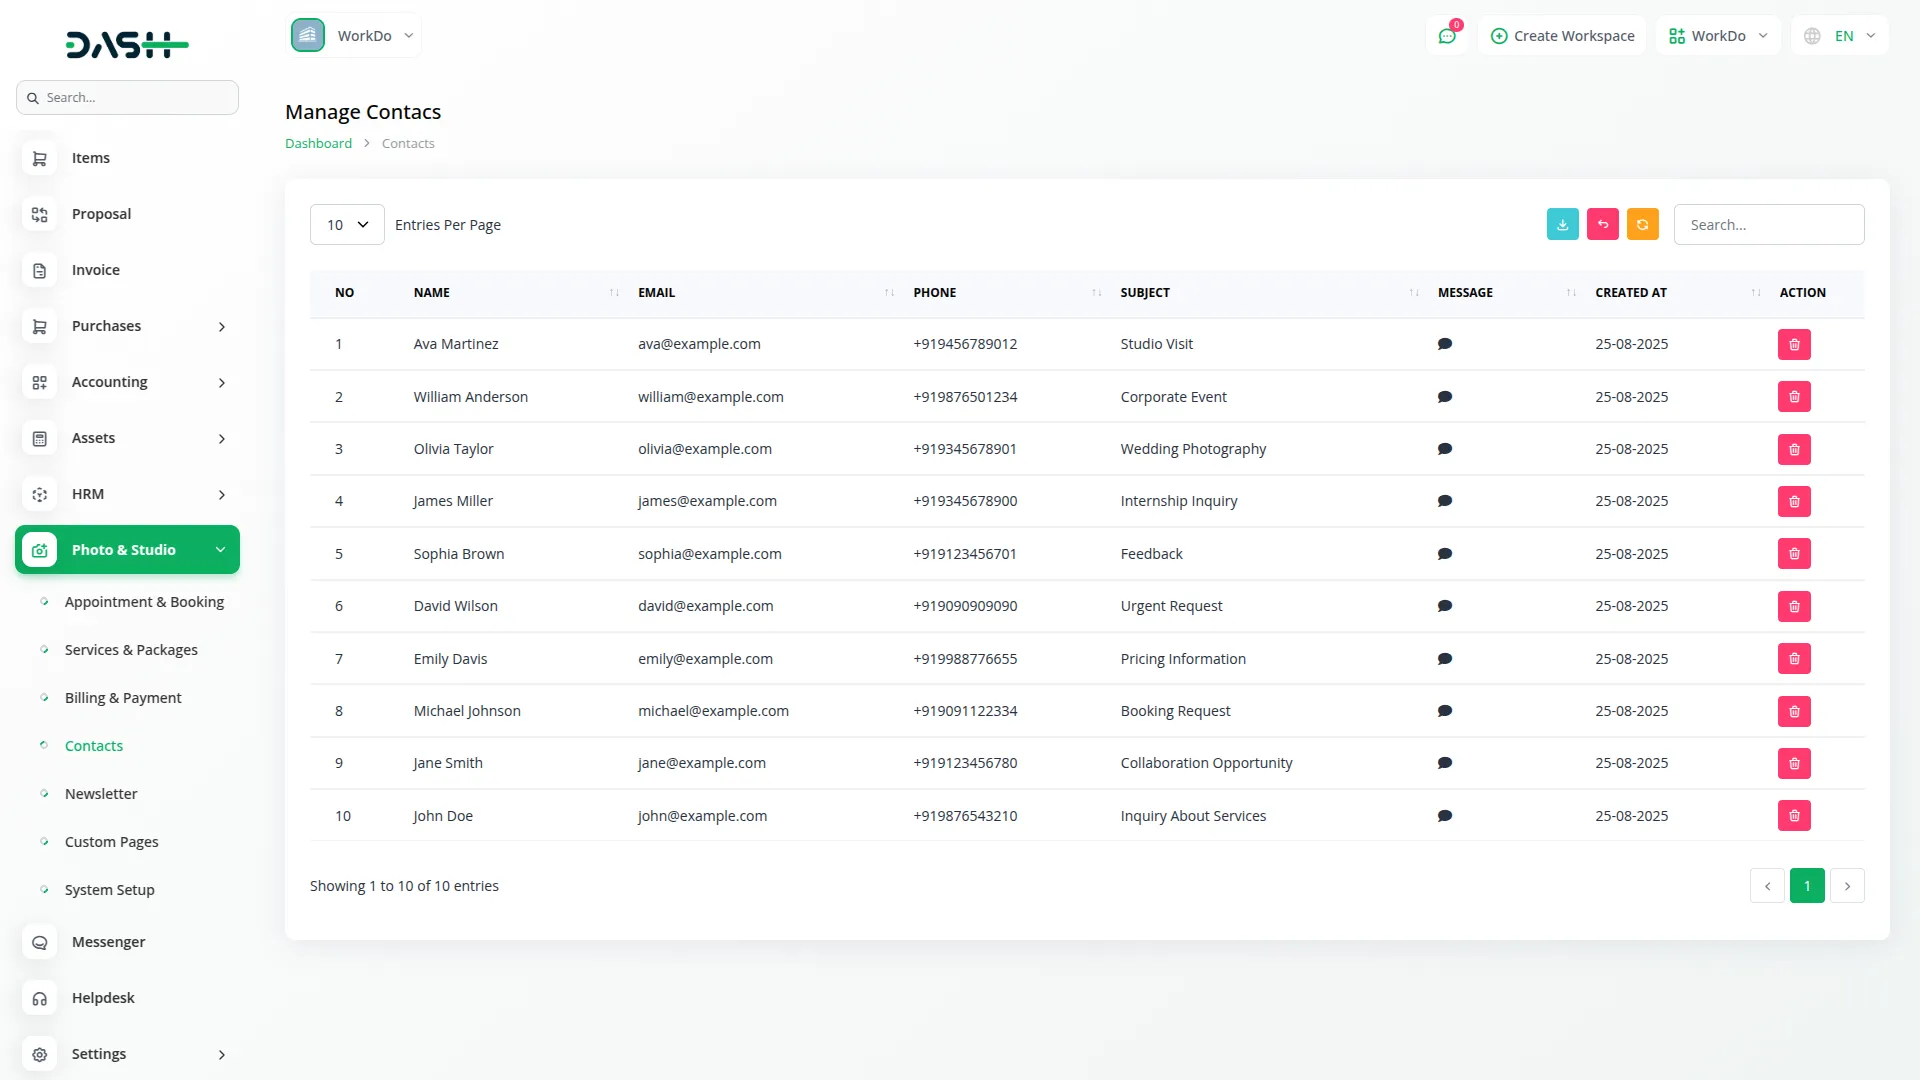
- This section operates as a list-only system that automatically captures contact information submitted through your website. The list page displays all contact submissions with columns for Number, Name, Email, Phone, Subject, Message, and Created At date. To read the full message content, click the message icon in the Message column.
- Use the search, export, reset, and reload buttons to manage the contacts list page. In the Action column, you can delete contact records whenever you want.
- Use this section to follow up with potential customers who have reached out through your website and to maintain a record of all customer communications.
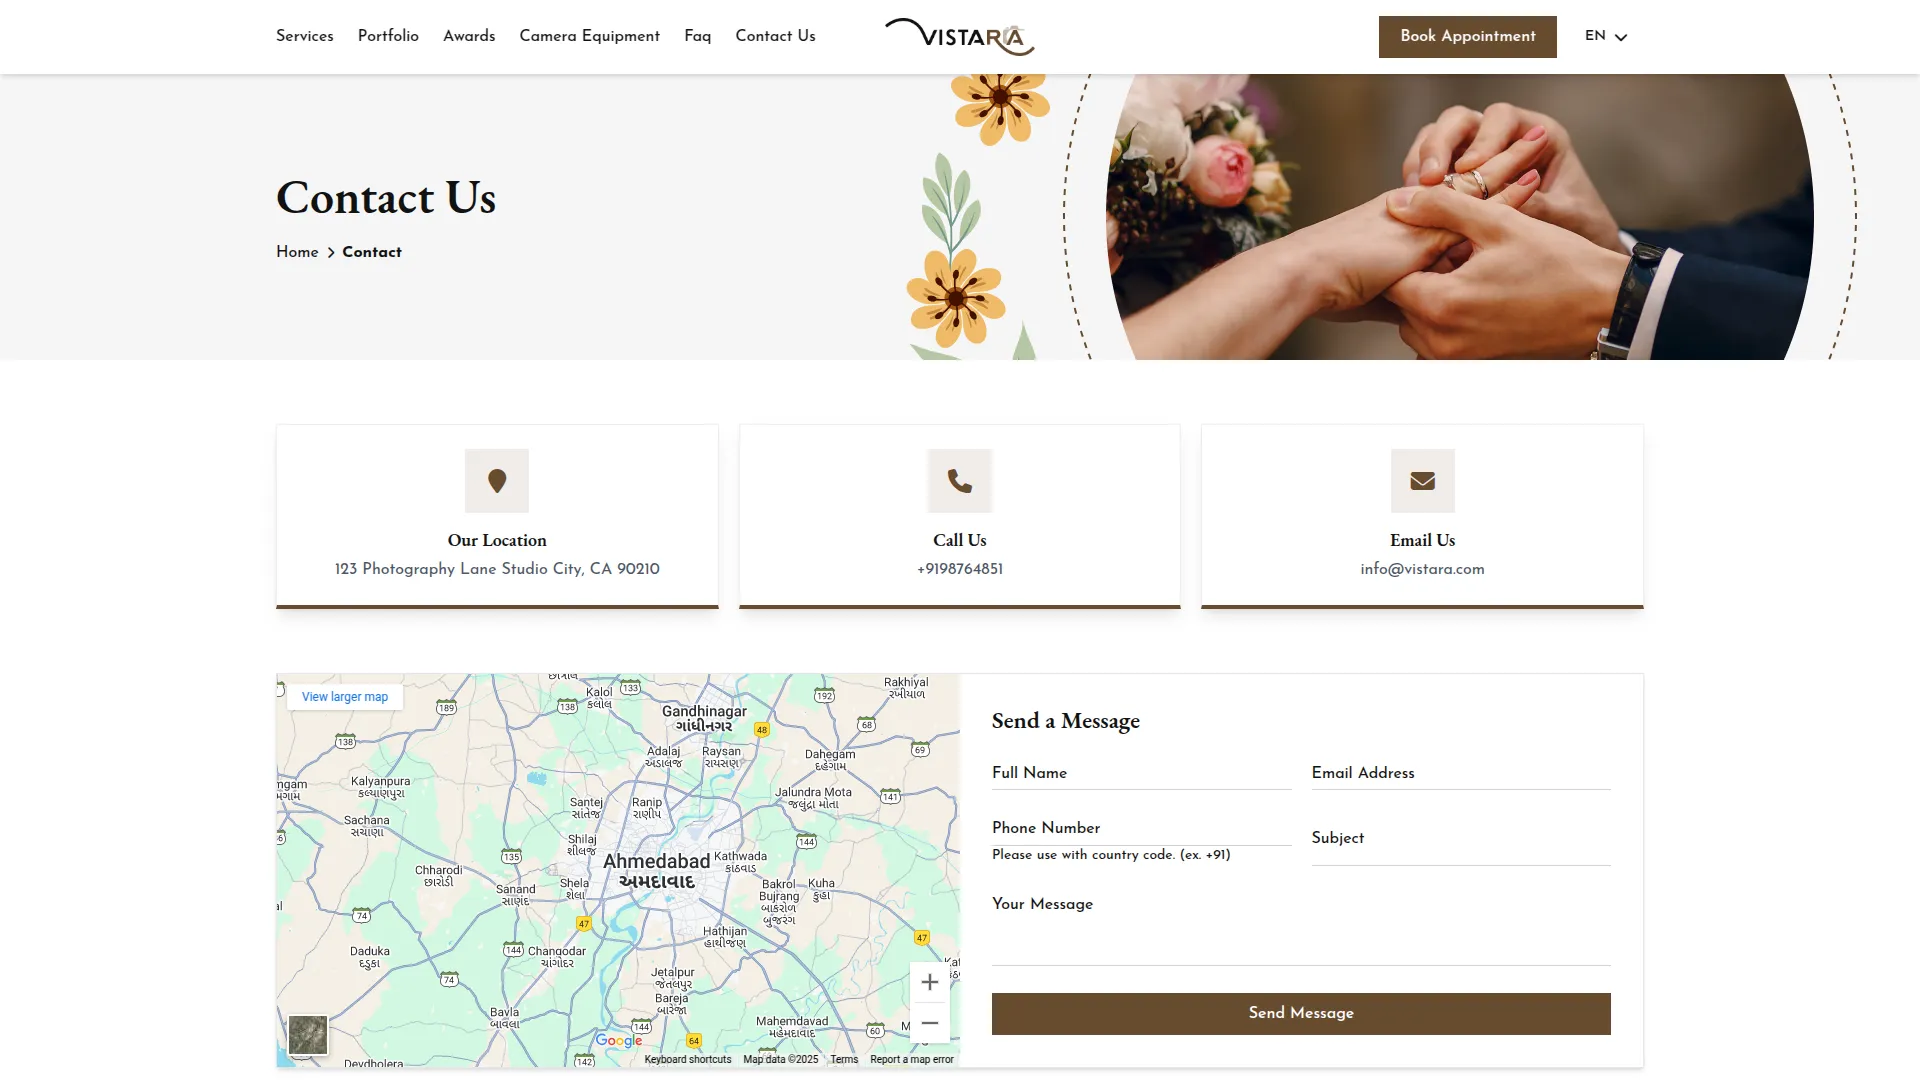
- The Contact Us page in the frontend displays a comprehensive contact section with multiple ways for customers to reach you. The page features three main contact information cards showing Our Location with the complete studio address, Call Us with the phone number for direct contact, and Email Us with your business email address.
- Below the contact information, there is a Google Maps section displaying an interactive map with your studio location, allowing customers to easily find directions to your studio. Next to the map is a “Send a Message” contact form where customers can fill in their Full Name, Email Address, Phone Number (with country code), Subject selection, and detailed Message. When customers click the “Send Message” button, their inquiry is automatically saved to your Contacts module for you to review and respond to.
Newsletter
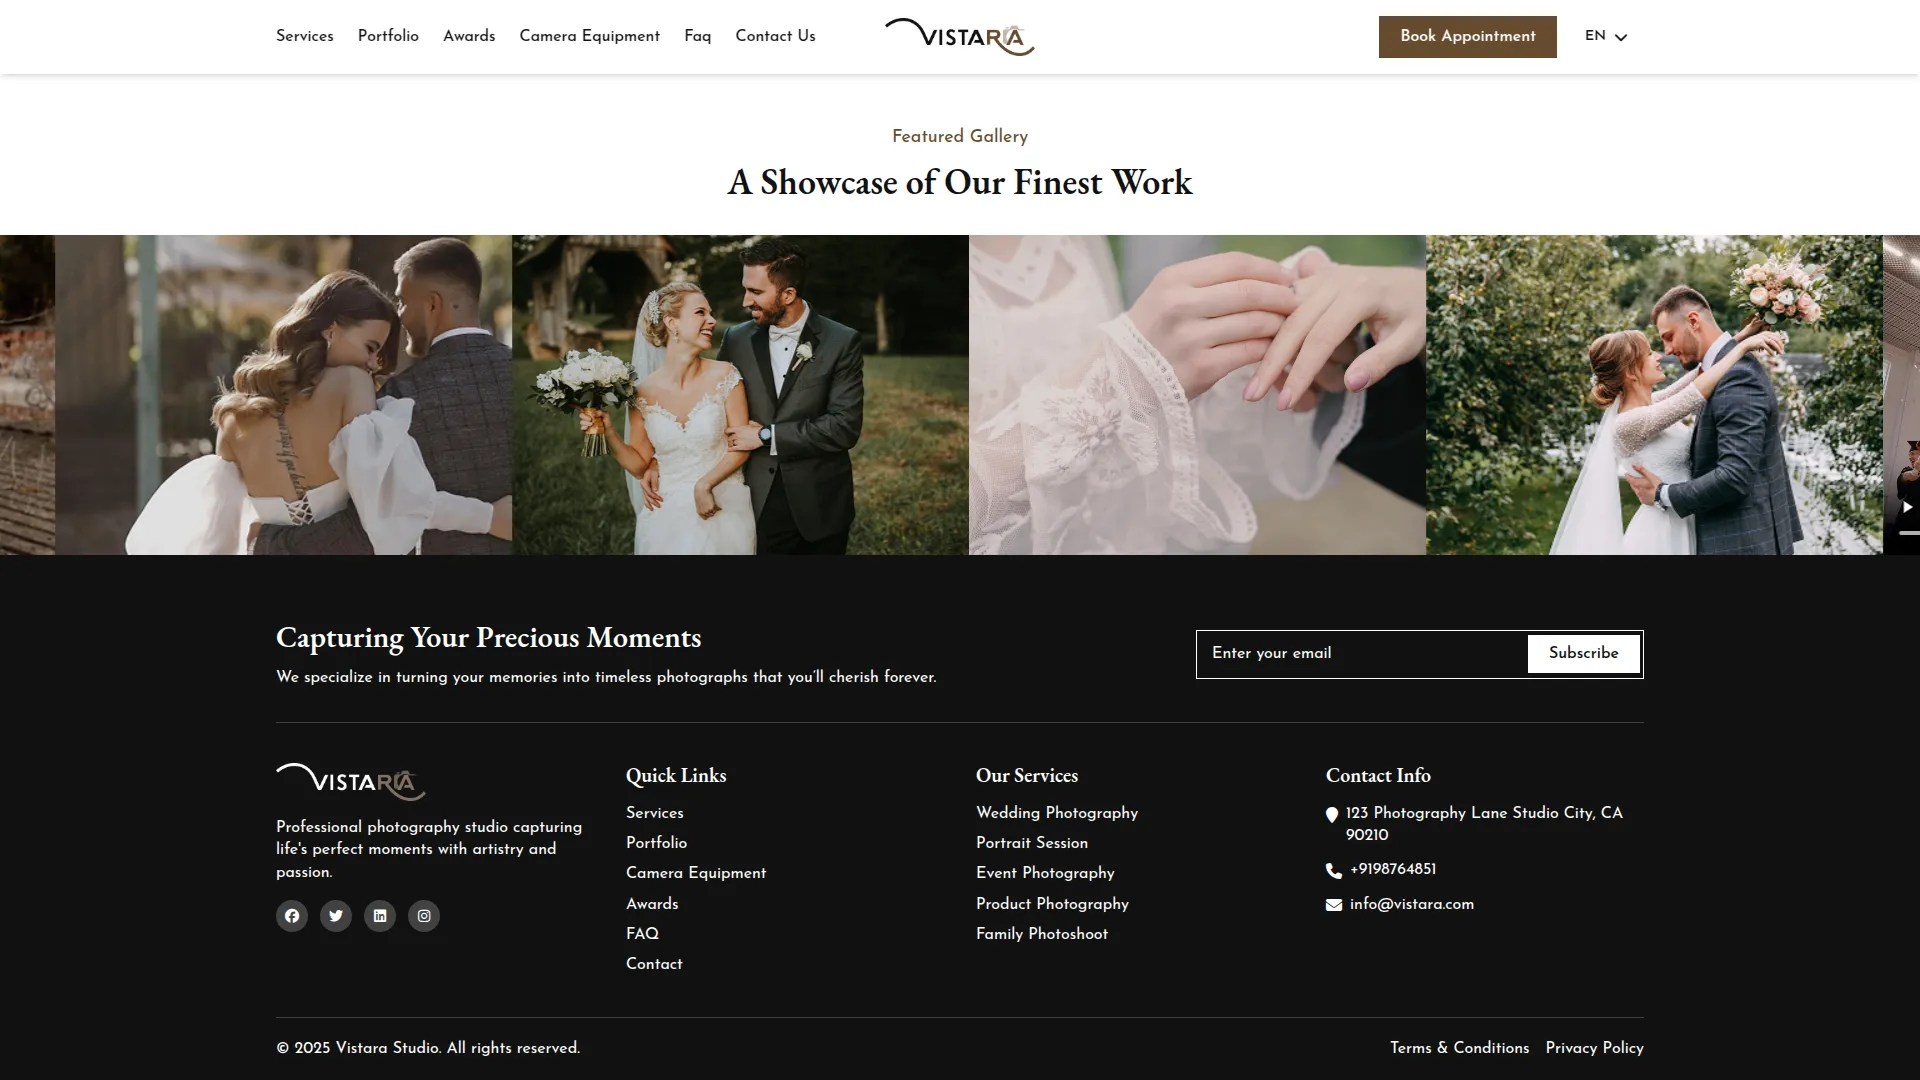
- The Newsletter section manages customer email subscriptions directly from your footer section website.
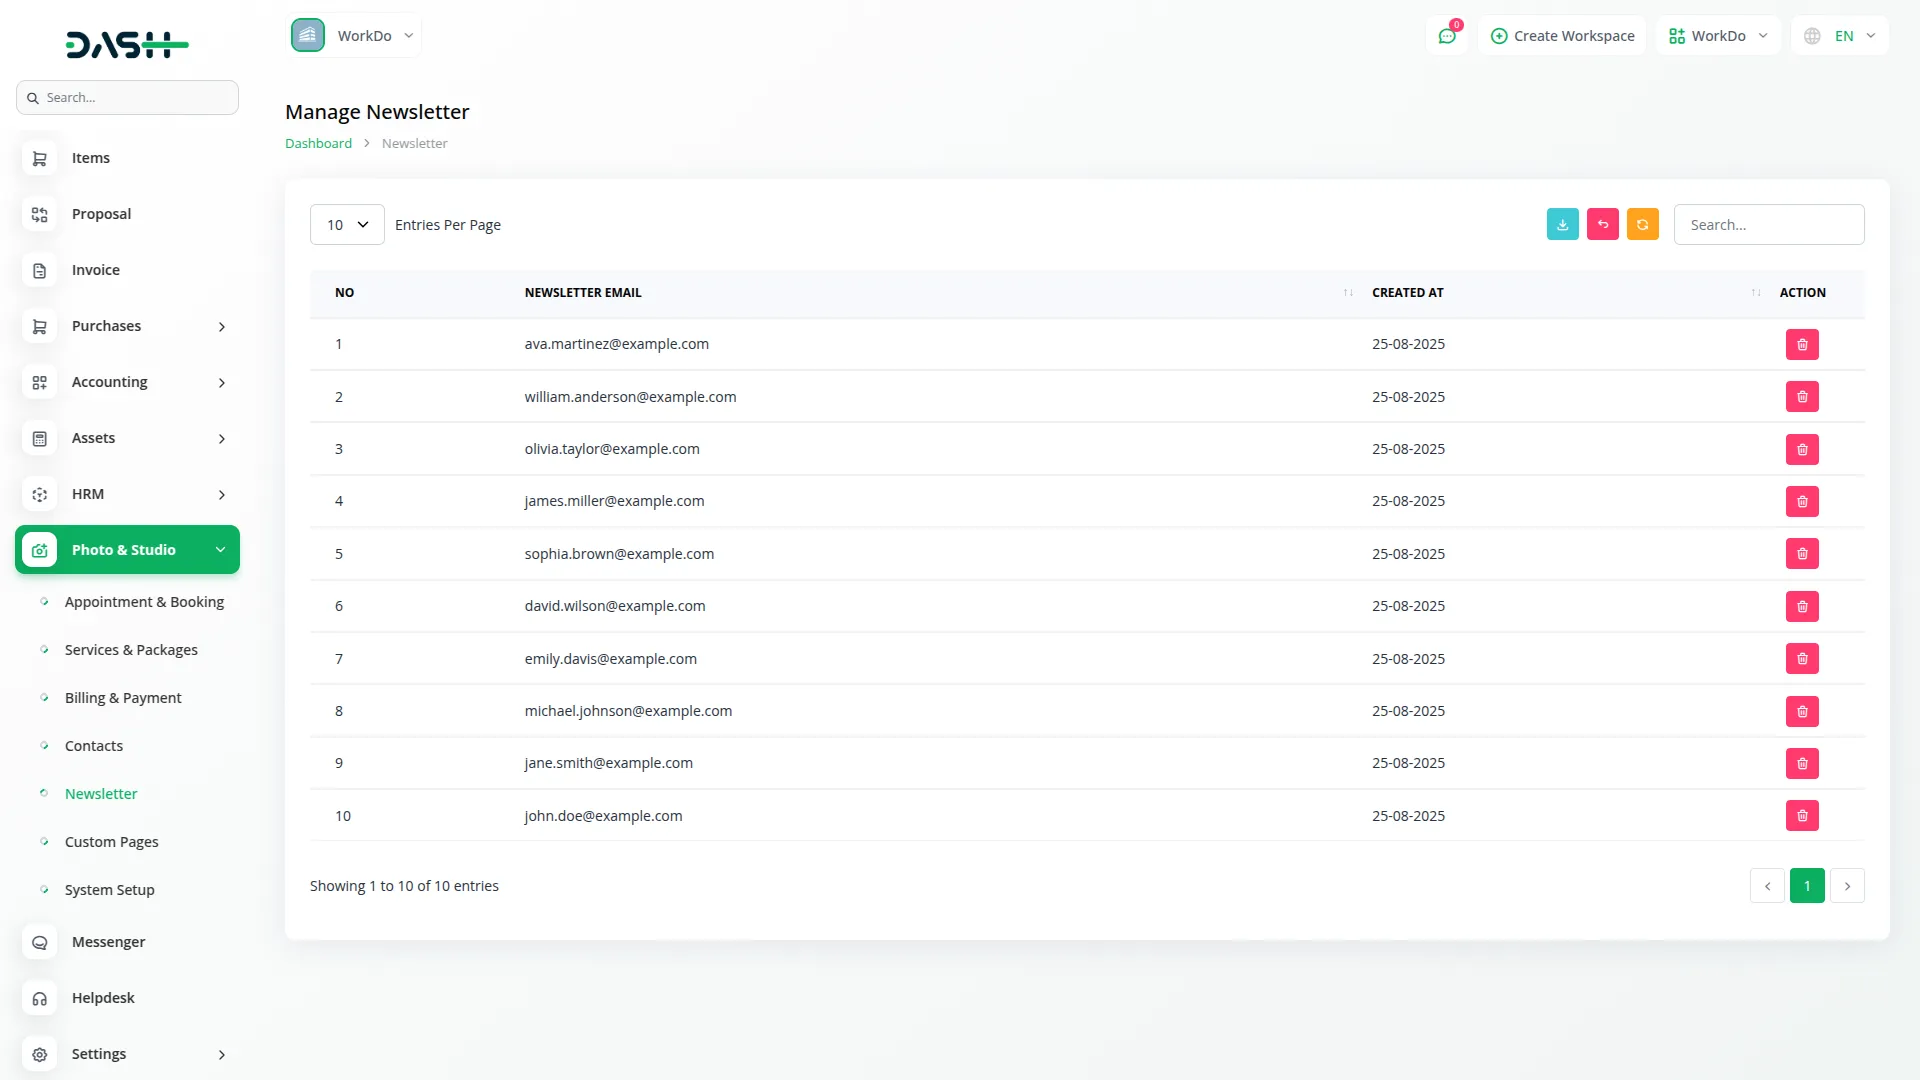
- This section operates as a list-only system that automatically captures email addresses when customers subscribe to your newsletter on your website. The list page displays all newsletter subscriptions with columns for Number, Newsletter Email, and Created At date, showing when each person subscribed.
- You can use the search for the specific email data and export, reset, or reload buttons to manage list page data on the backend side. In the Actions column, you can delete subscriber records when needed, such as when people unsubscribe or email addresses become invalid.
- Use this section to maintain your mailing list and track your newsletter subscriber growth over time.
Custom Page
- The Custom Page section allows you to create additional pages for your studio’s website that will appear in the footer navigation.
- To create a new custom page, click the “Create” button on the custom pages list. Enter the Page Name, Page title, which will be used as the page title and navigation link. Use the Page Display In Footer checkbox to choose whether this page should appear in your website’s footer navigation by selecting ON or OFF. In the Content field, write the page content using the text editor.
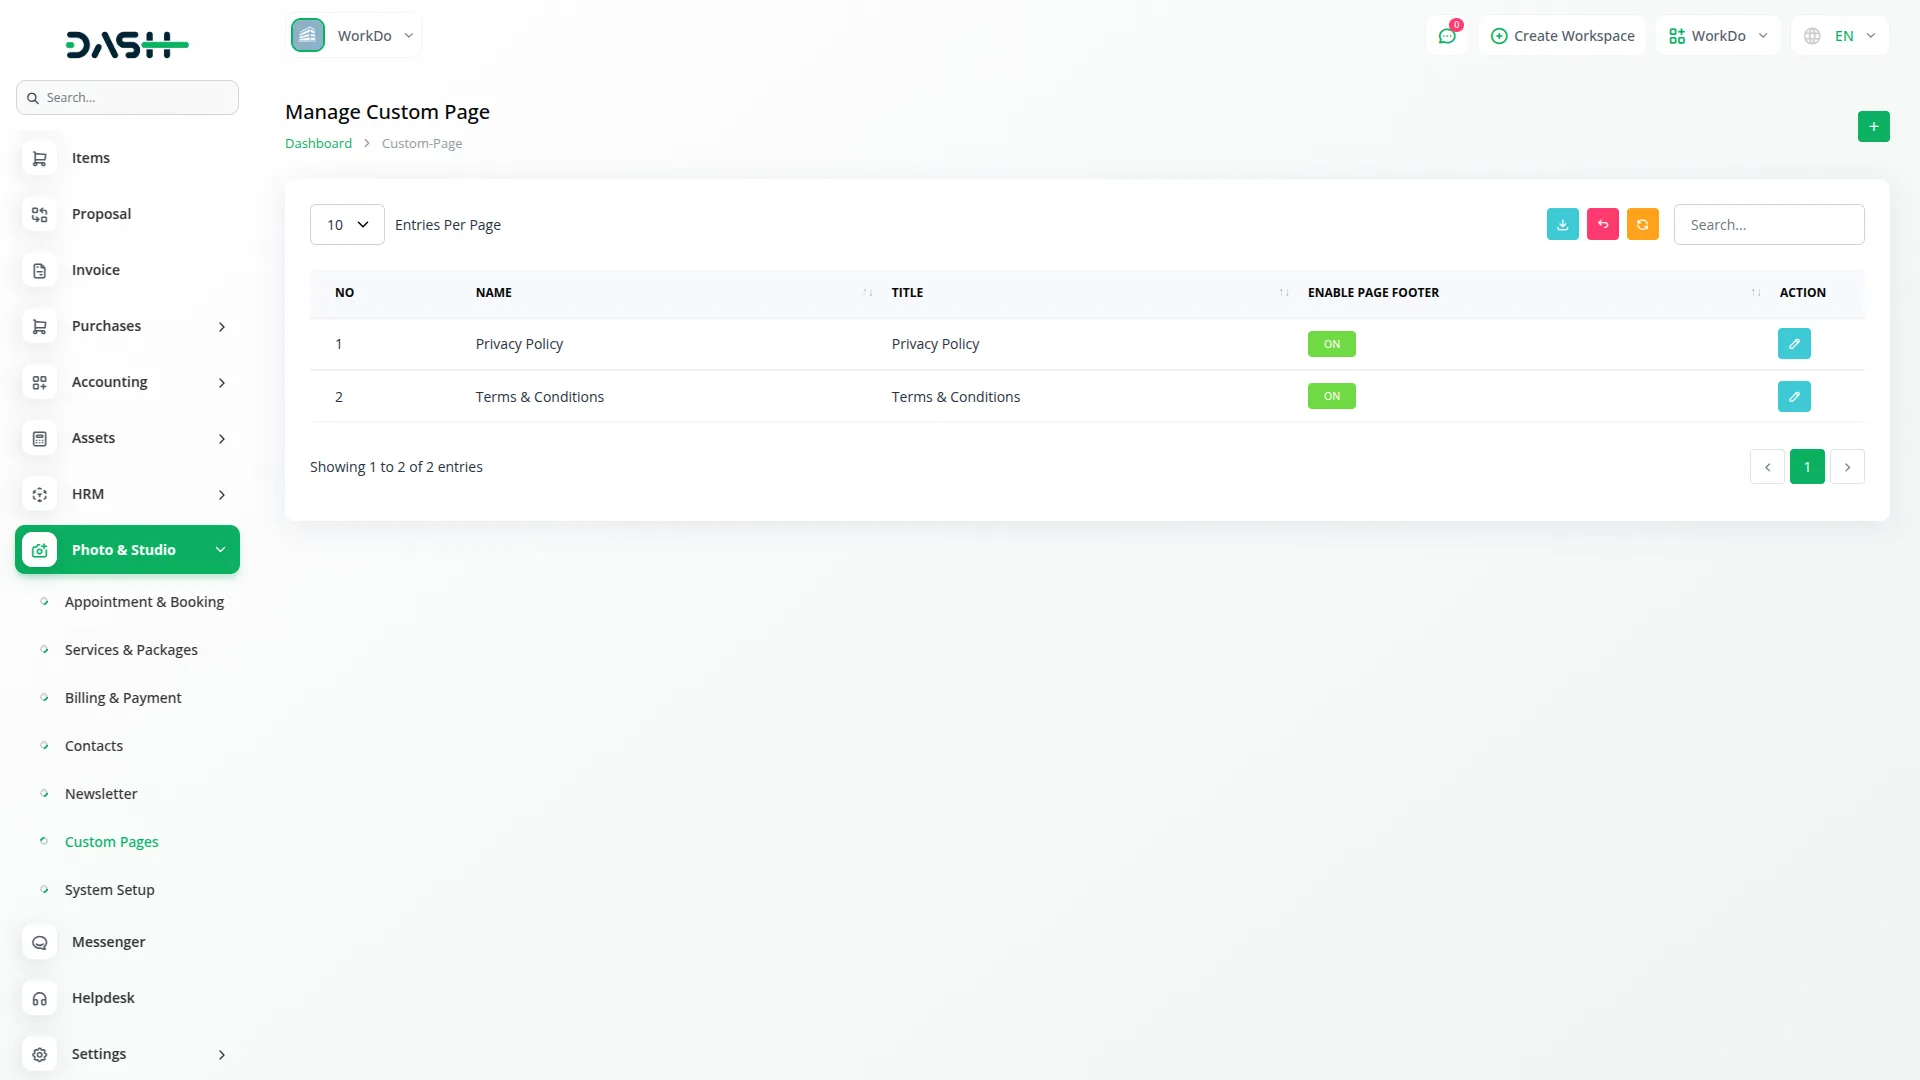
- The list page shows all your custom pages with columns for Number, Name, Title, and Enable Page Footer status, showing ON or OFF. You can search for specific pages or export your page data using the respective buttons. In the Actions column, you can click Edit to modify page content or Delete to remove pages you no longer need.
- Use this section to add important pages like Privacy Policy, Terms of Service, or About Us pages that will be accessible from your website’s footer.
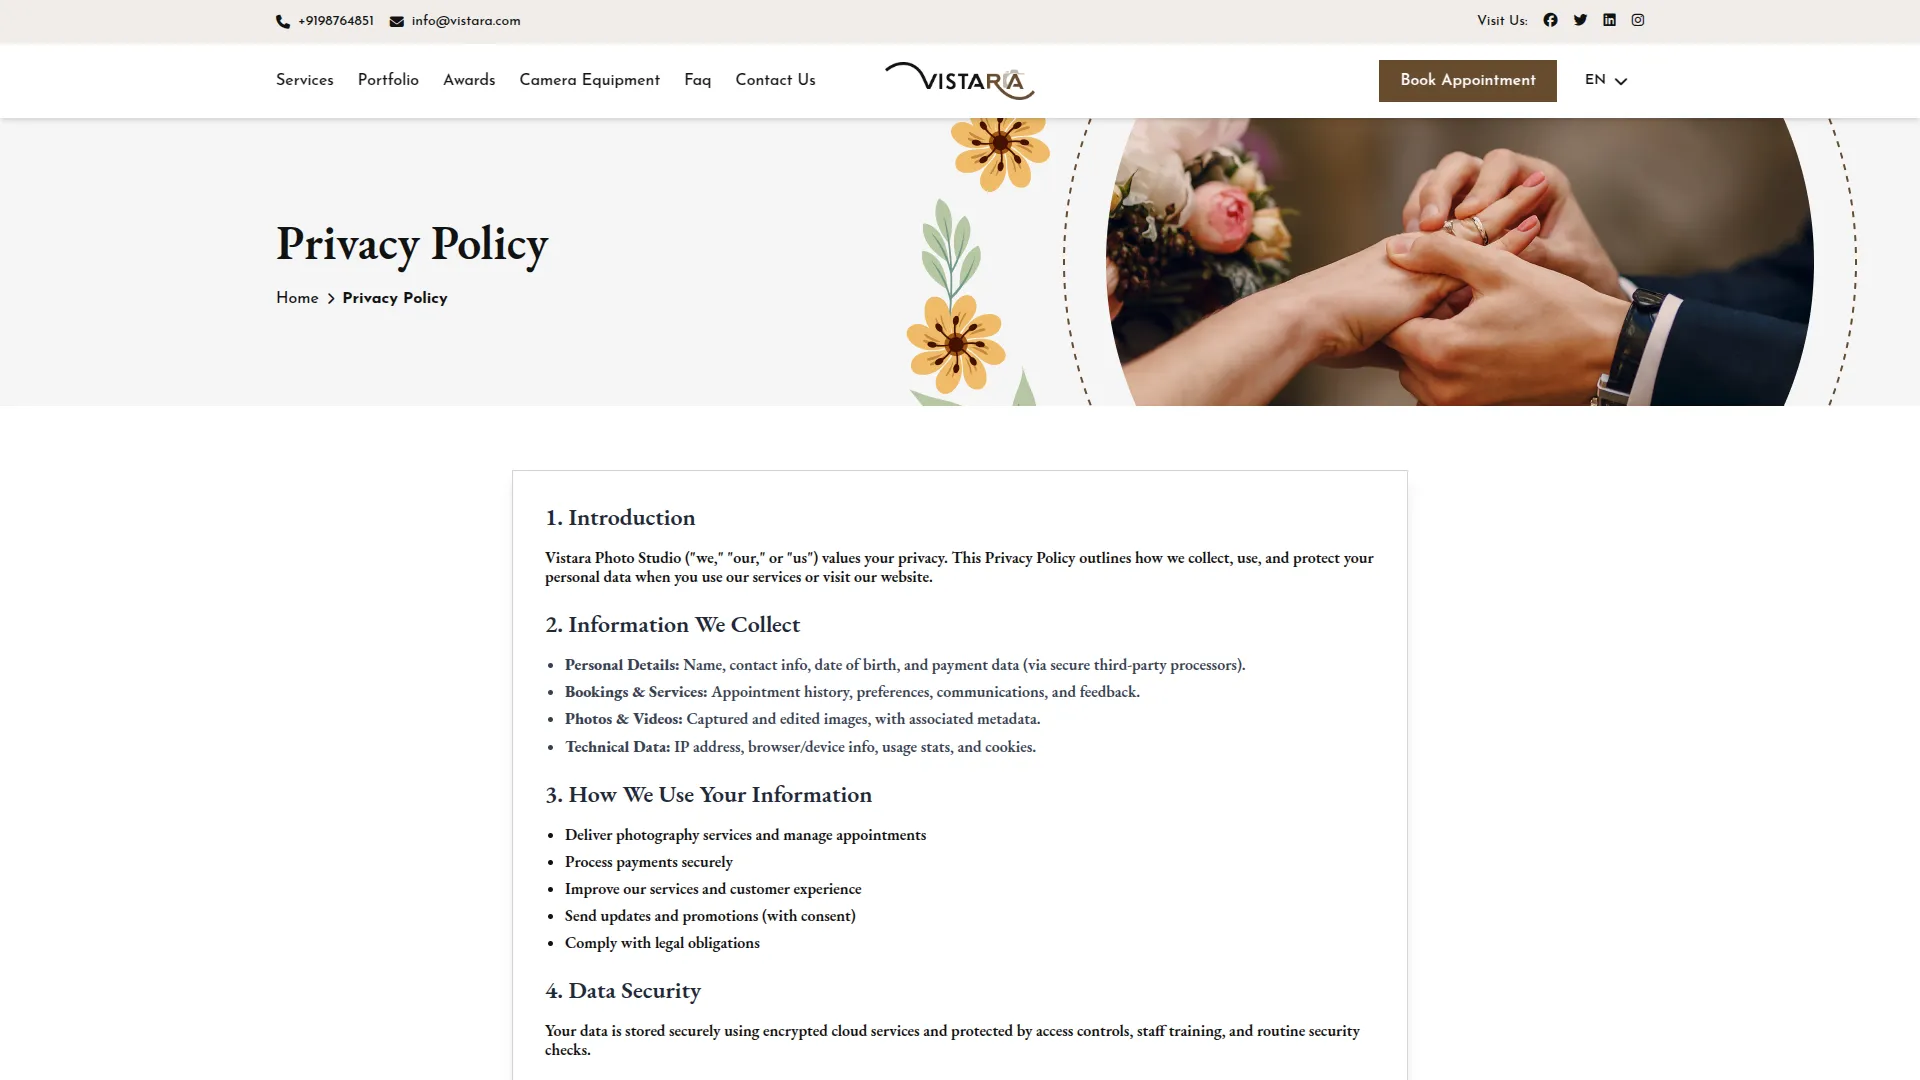
- All custom pages with “Page Display In Footer” enabled will automatically appear as clickable links in your website’s footer section. When customers click on these footer links, they are navigated to the specific custom page showing the full content you created. This allows customers to easily access important information like your privacy policy, terms of service, or other business details directly from any page on your website.
System Setup
The System Setup section contains all the configuration settings for your studio’s website and branding. This section is divided into multiple sections that control different aspects of your website.
Brand Setting Section
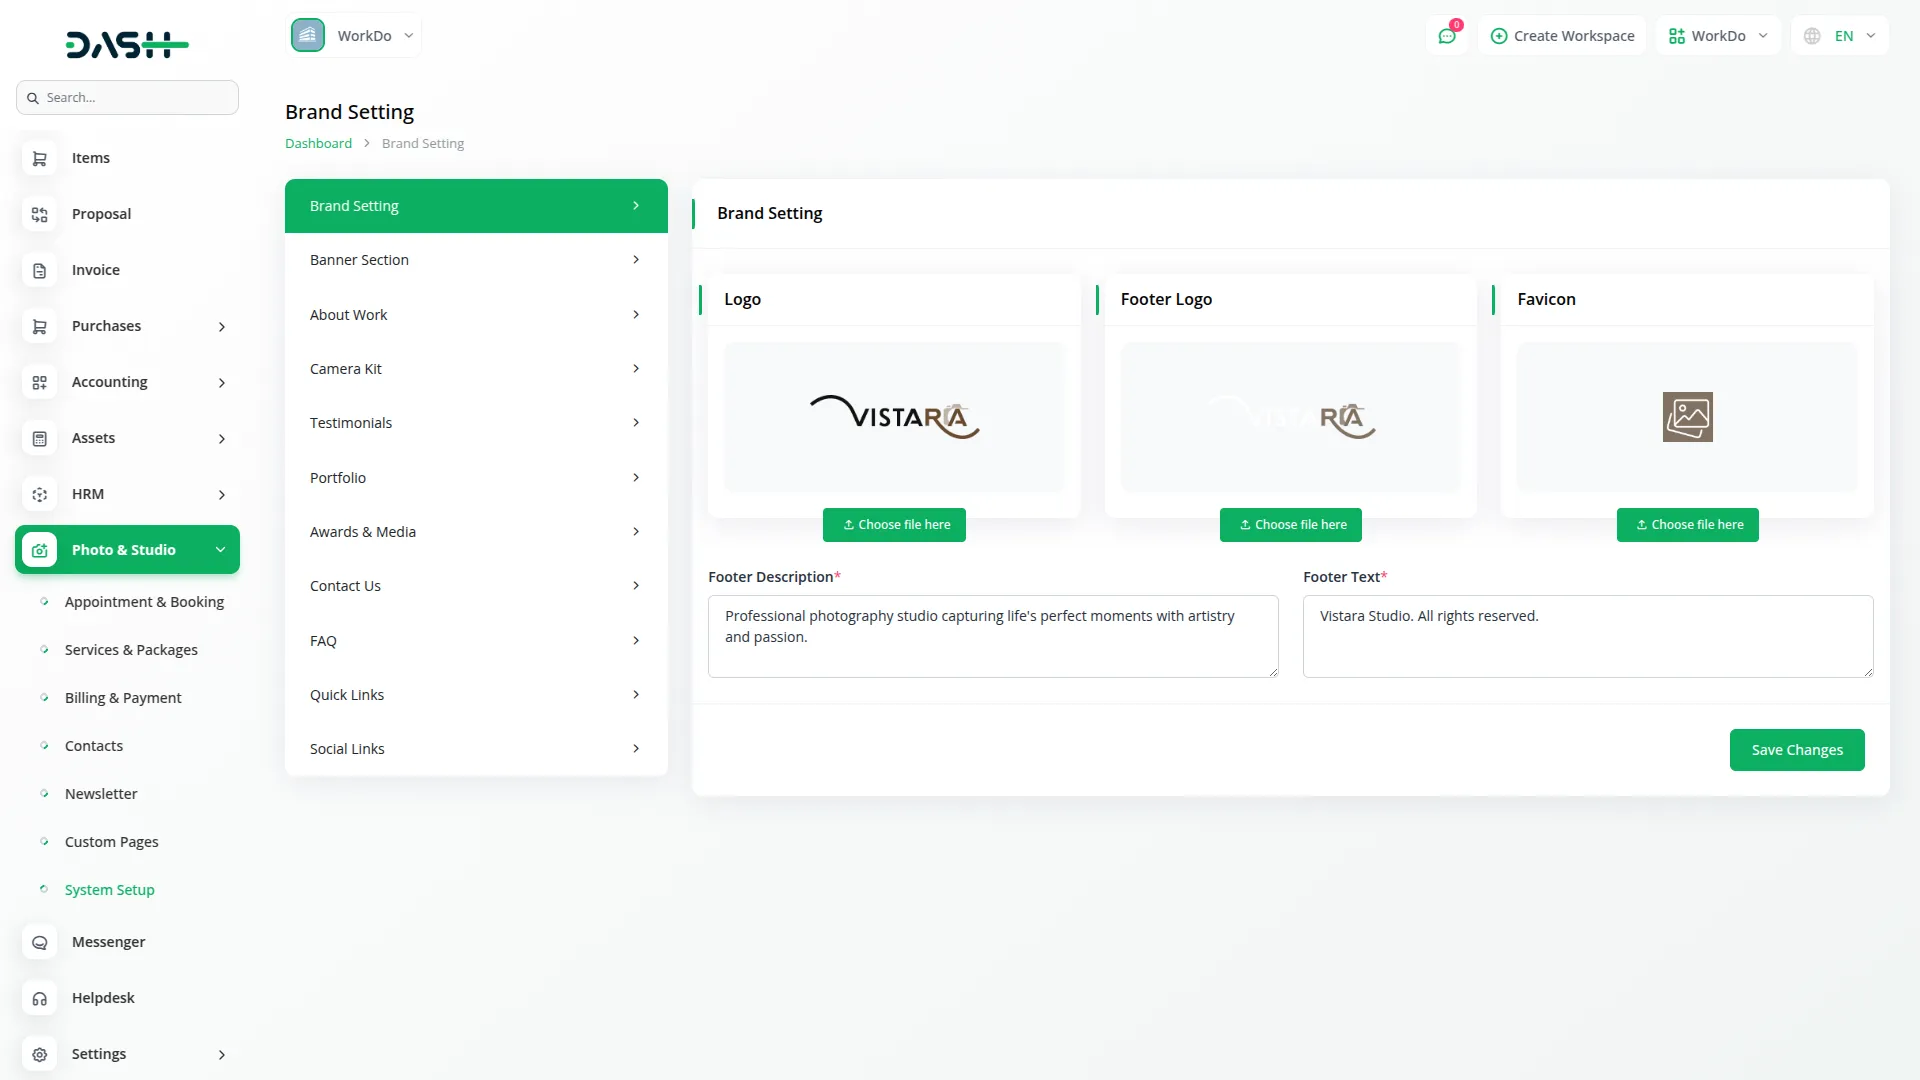
- Configure your studio’s branding elements by uploading your Logo Header, Logo Footer, and Favicon for your website. Enter your Footer Description and Footer Text.
- The Favicon you upload appears in browser tabs when customers visit your website. The Header Logo is displayed prominently in your website header alongside navigation menu items, including Services, Portfolio, Awards, Camera Equipment, FAQ, Contact Us, Book Appointment, and Language Dropdown. The Footer Logo appears at the bottom of every page along with your Footer Description and Footer Text copyright information.
Banner Section
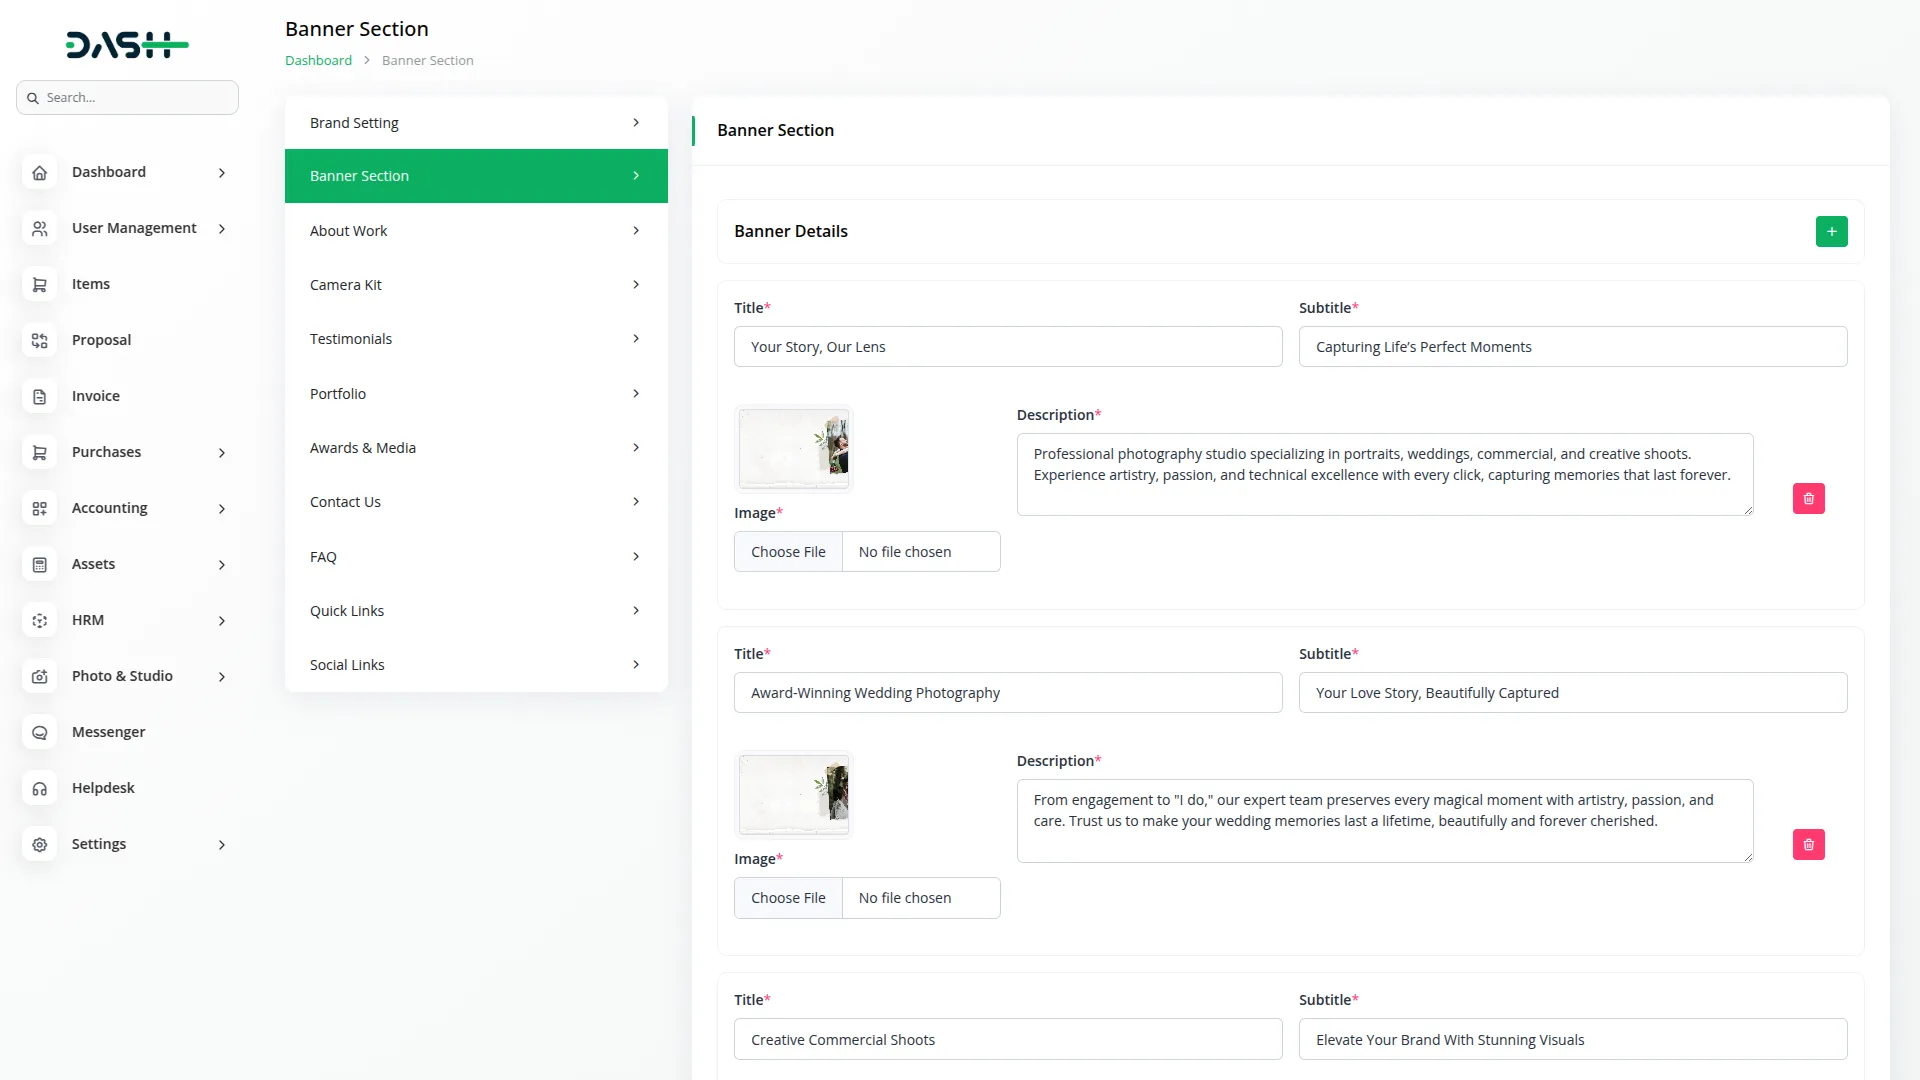
- Manage your website’s main banner content using the Banner Details repeater fields. For each banner slide, enter the Title, Subtitle, and Description. Upload a Banner Image that will be displayed prominently on your homepage.
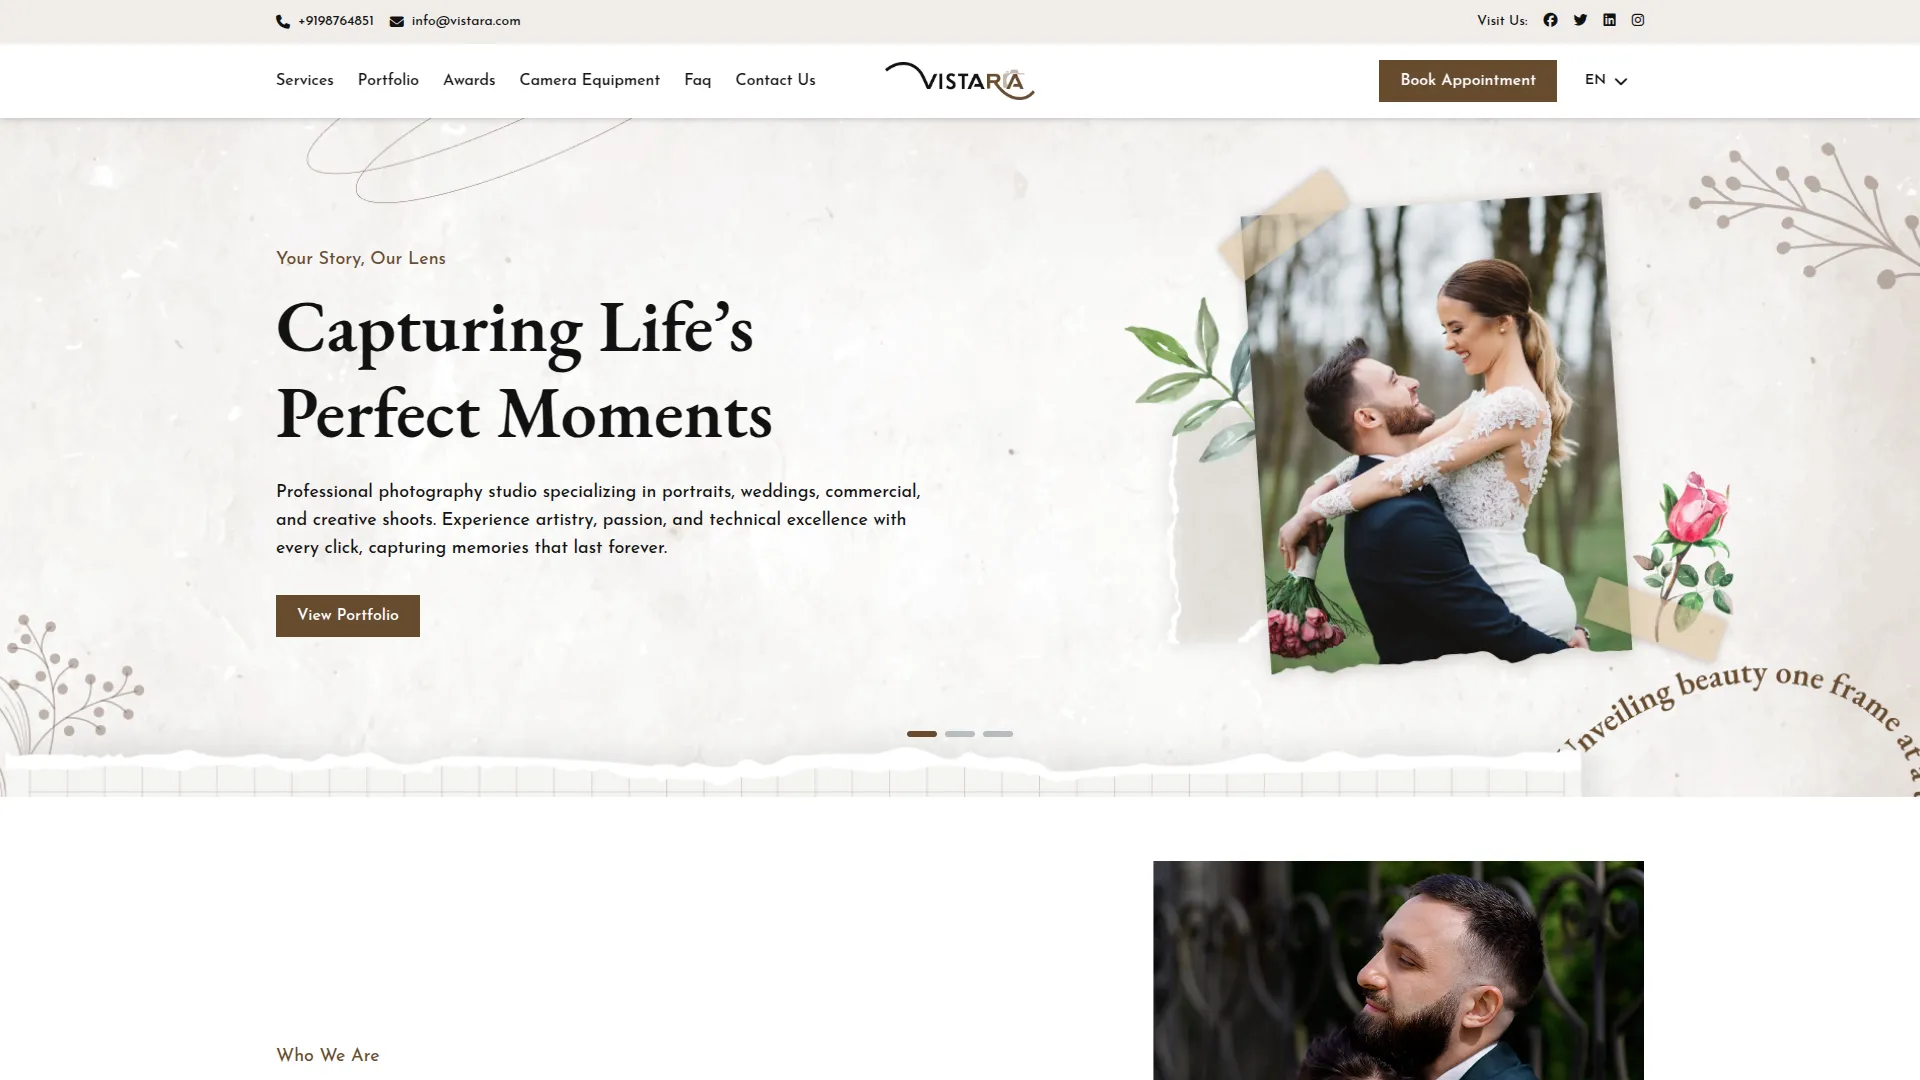
- The banners you create appear as a dynamic slideshow on your website’s homepage, displaying the Title, Subtitle, banner Image, and Description with smooth transitions between slides. The banner section includes a “View Portfolio” button that allows customers to see all your portfolio images directly from the homepage slideshow.
About Work Section
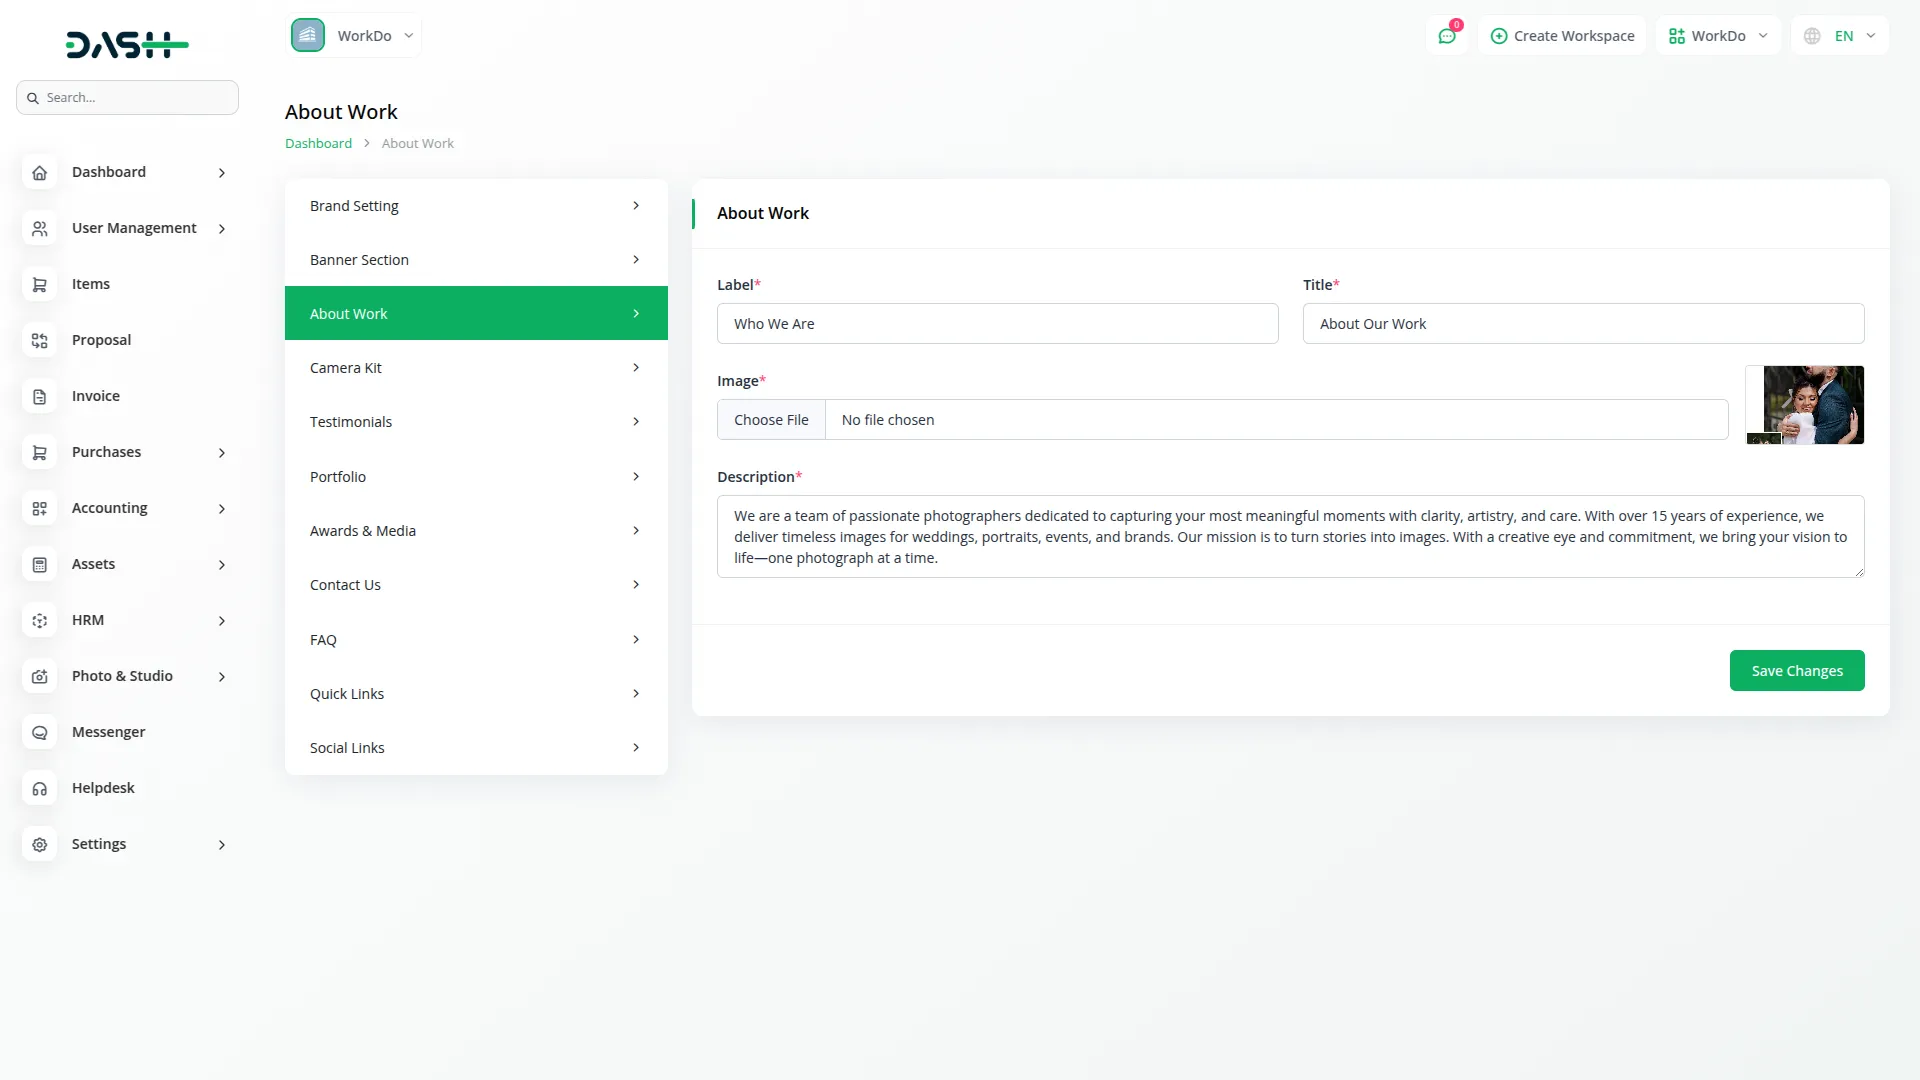
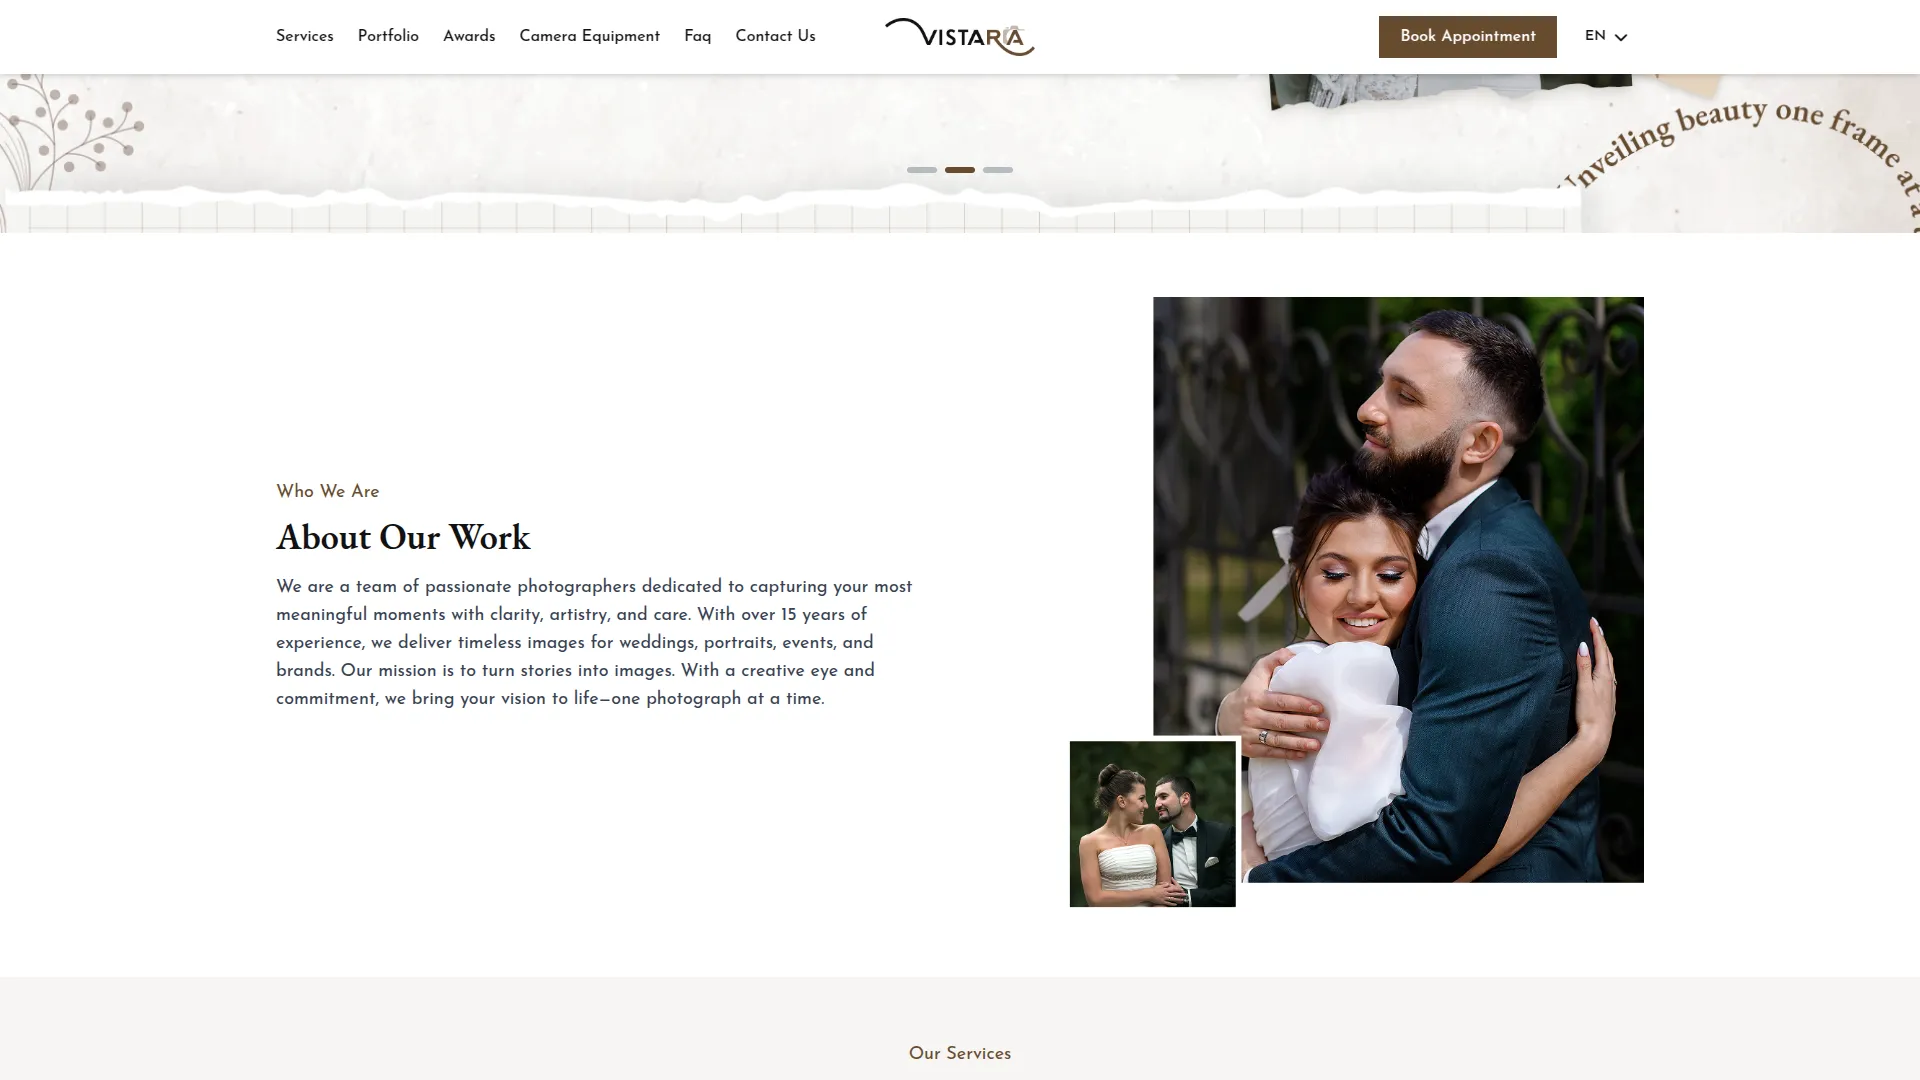
- Set up your studio’s about section by entering a Label and Title for this section. Upload an About Image and write a Description that tells customers about your studio’s work and expertise.
- On the frontend, the About Work section appears on the homepage, showing the Label, Title, uploaded Image, and Description. This section is designed to highlight your studio’s approach and expertise, helping visitors quickly understand your work style and build trust.
Camera Kit Section
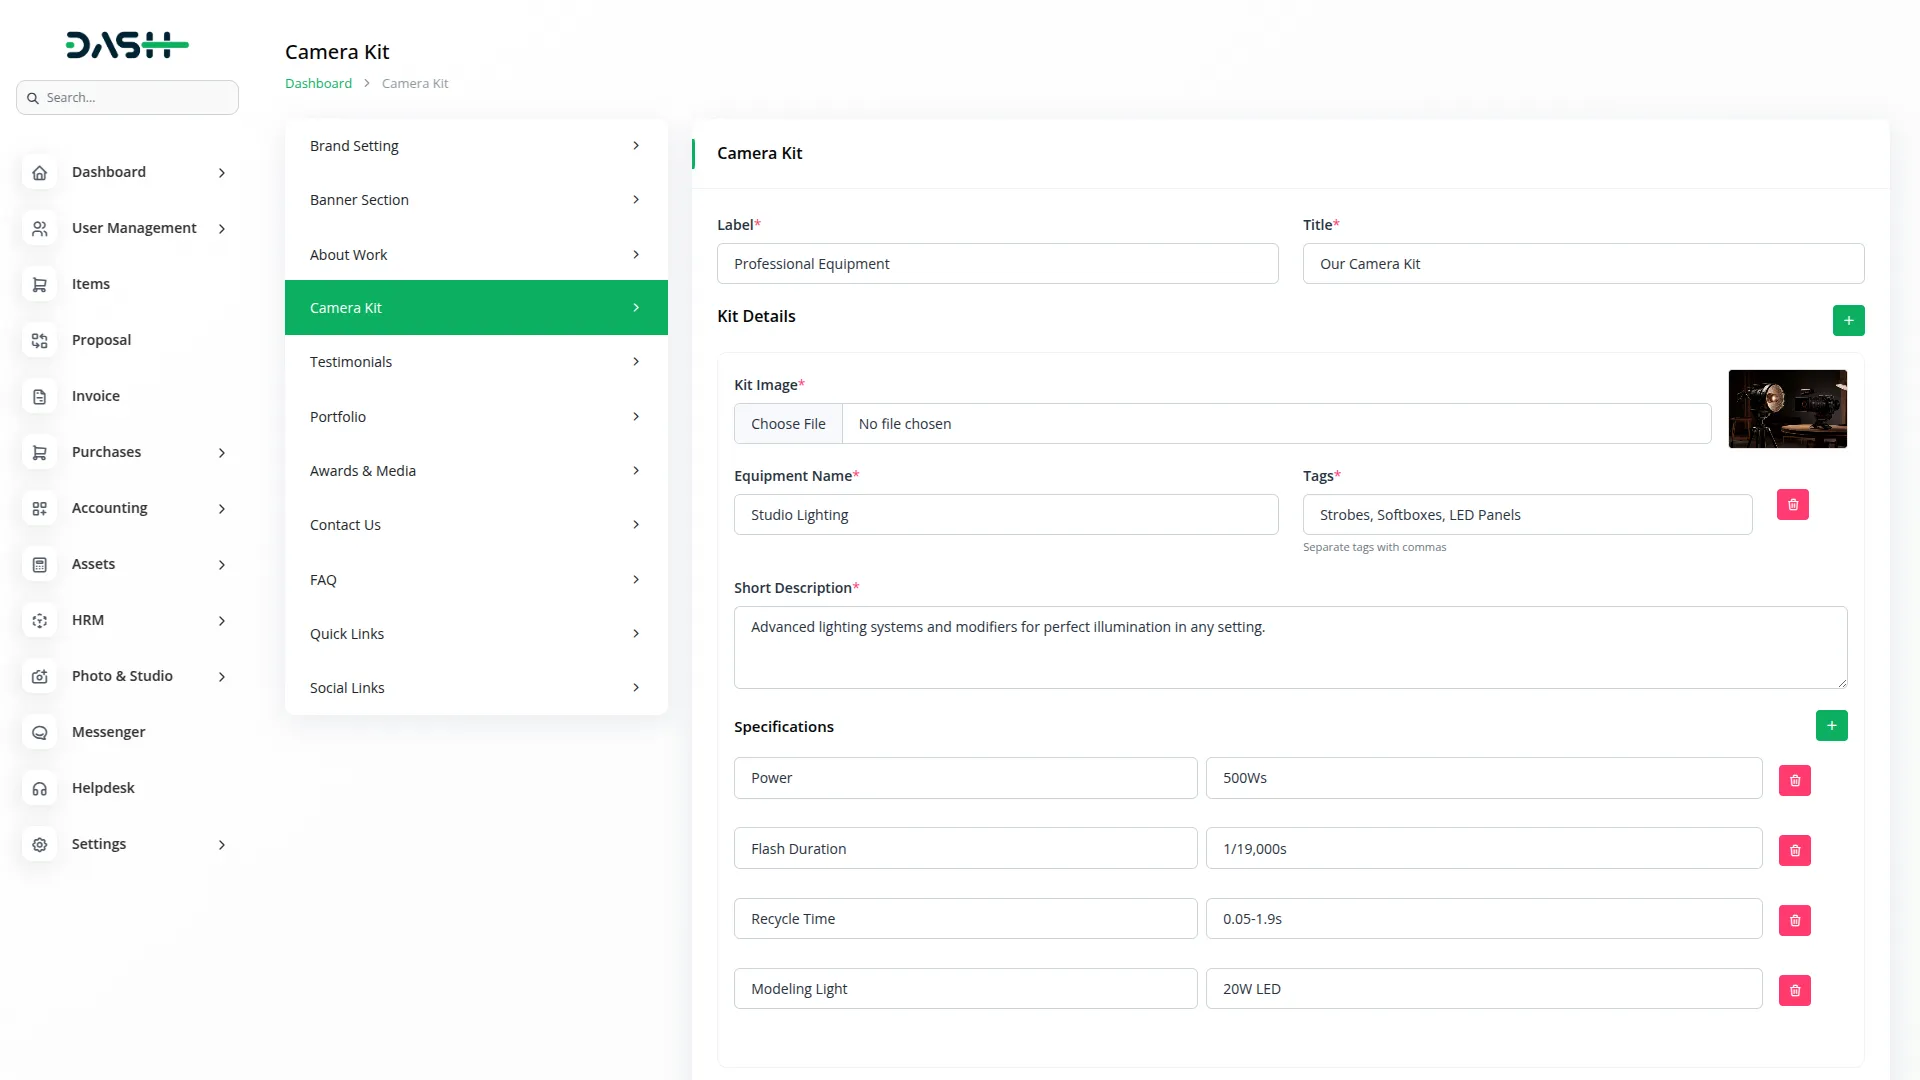
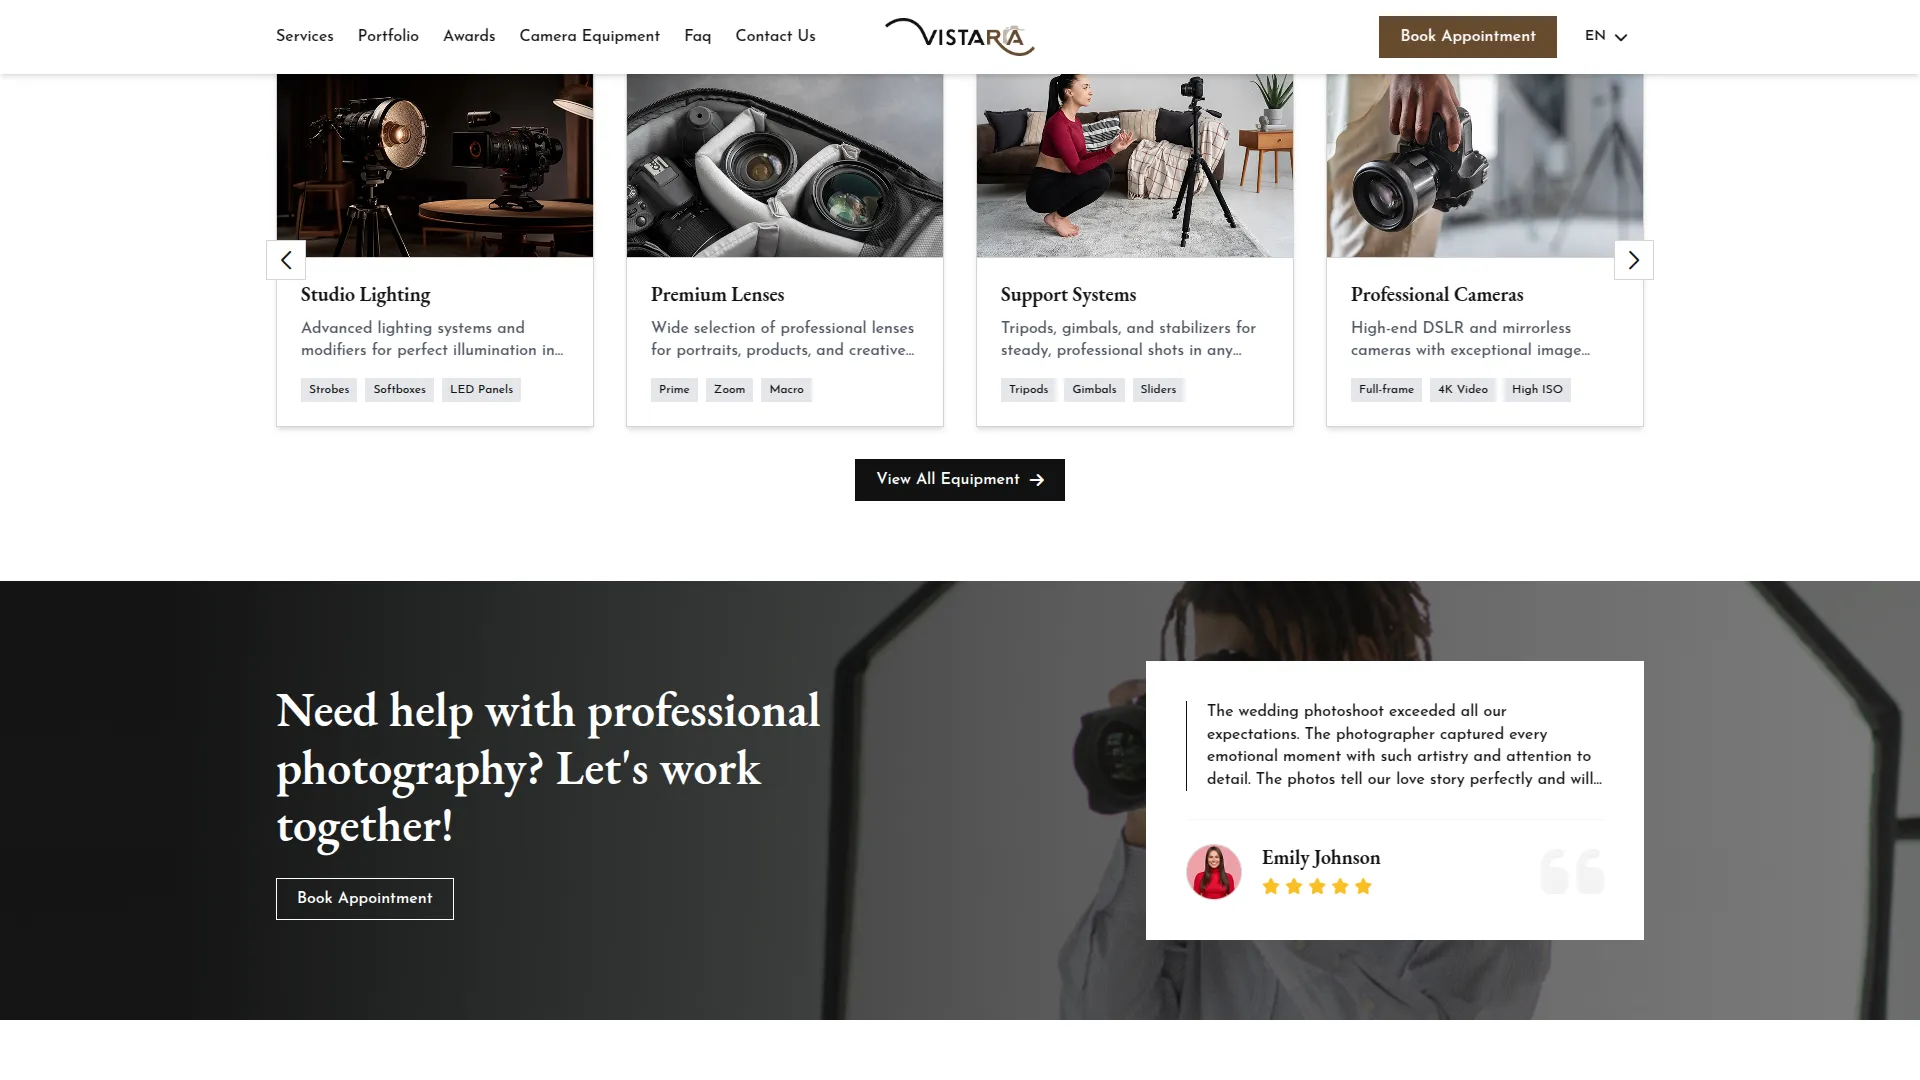
- Showcase your photography equipment by entering a Label and Title. In the Kit Details repeater fields, add each piece of equipment by uploading an Equipment Image, entering the Equipment Name, adding Tags separated by commas, and writing a Short Description. Within each kit detail, you can add additional information using the Title and Text repeater fields.
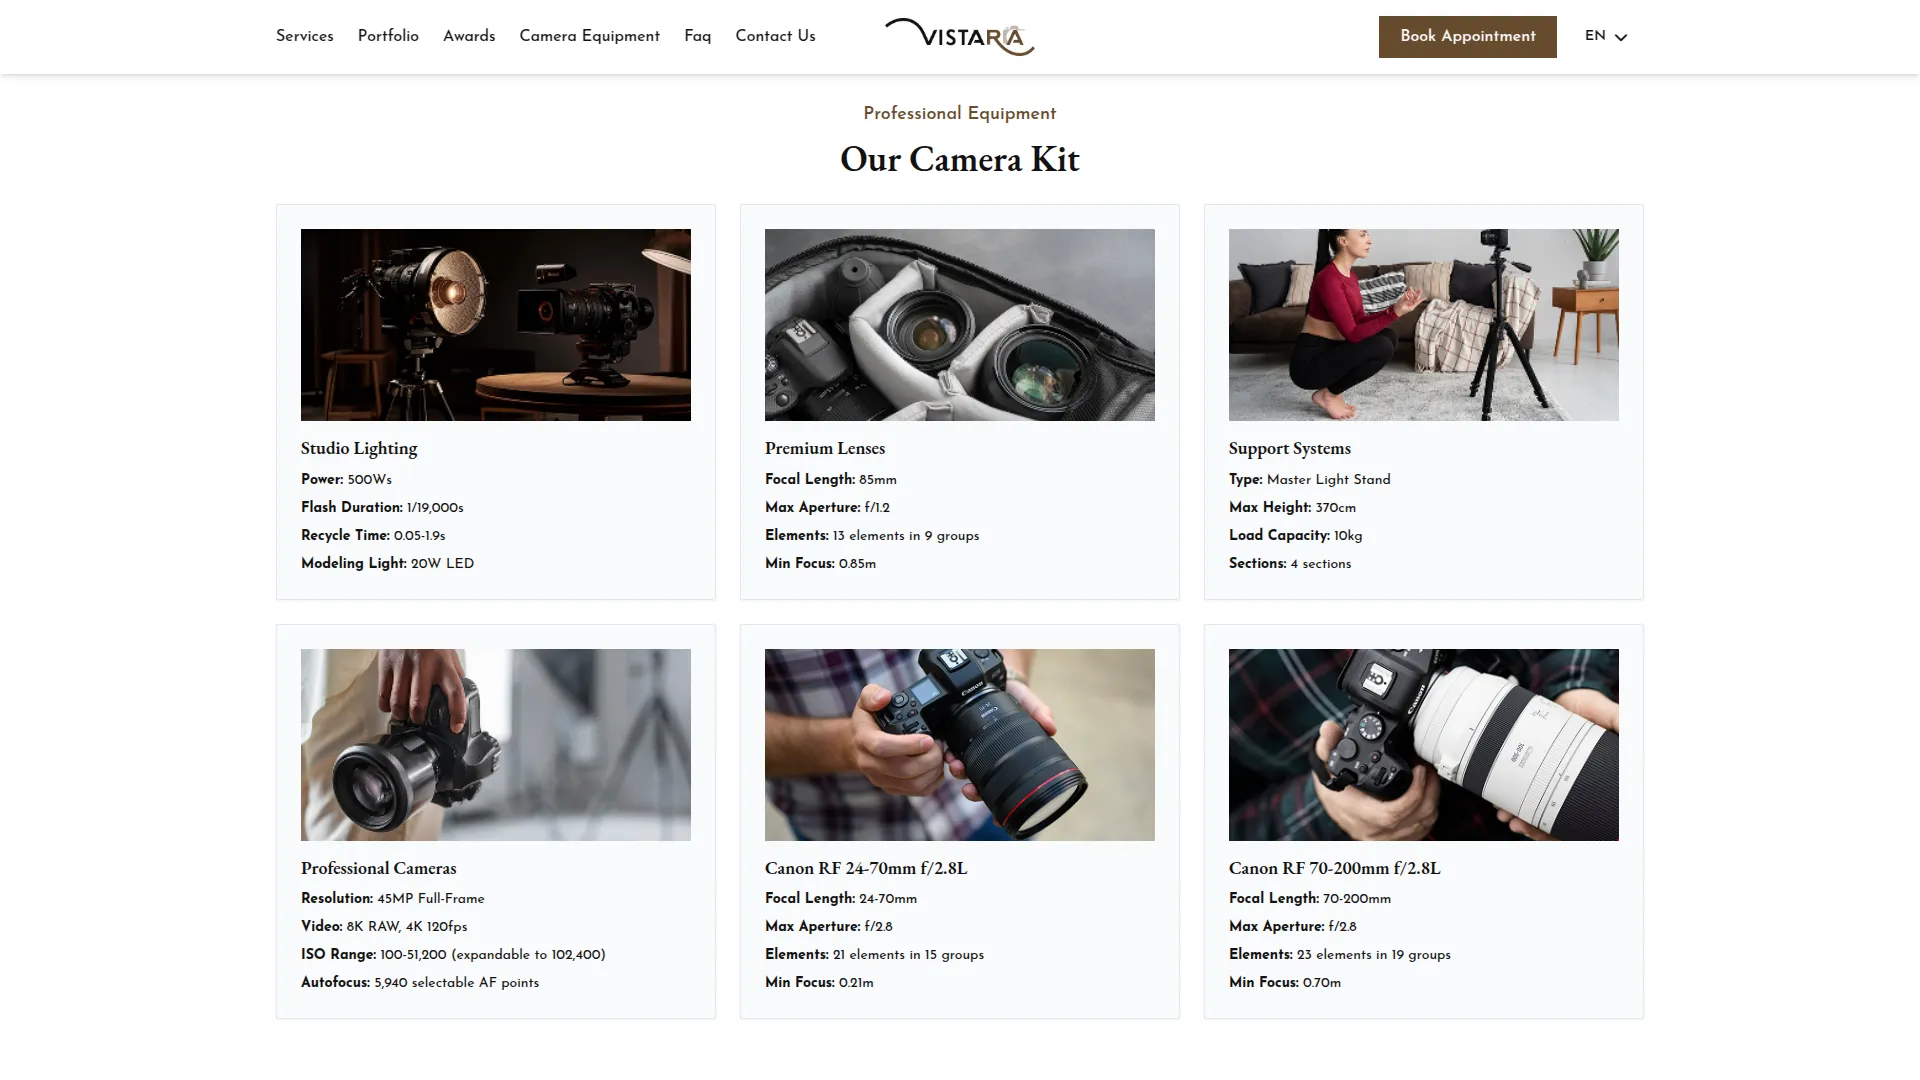
- On the frontend, the Camera Kit section is displayed on the homepage as an interactive equipment showcase with the Label and Title. Each equipment item appears in card format with its Image, Name, Tags, and Short Description, arranged in a sliding view. At the bottom, a “View All Equipment” button is shown, allowing visitors to explore the full equipment collection and detailed specifications.
Testimonial Section
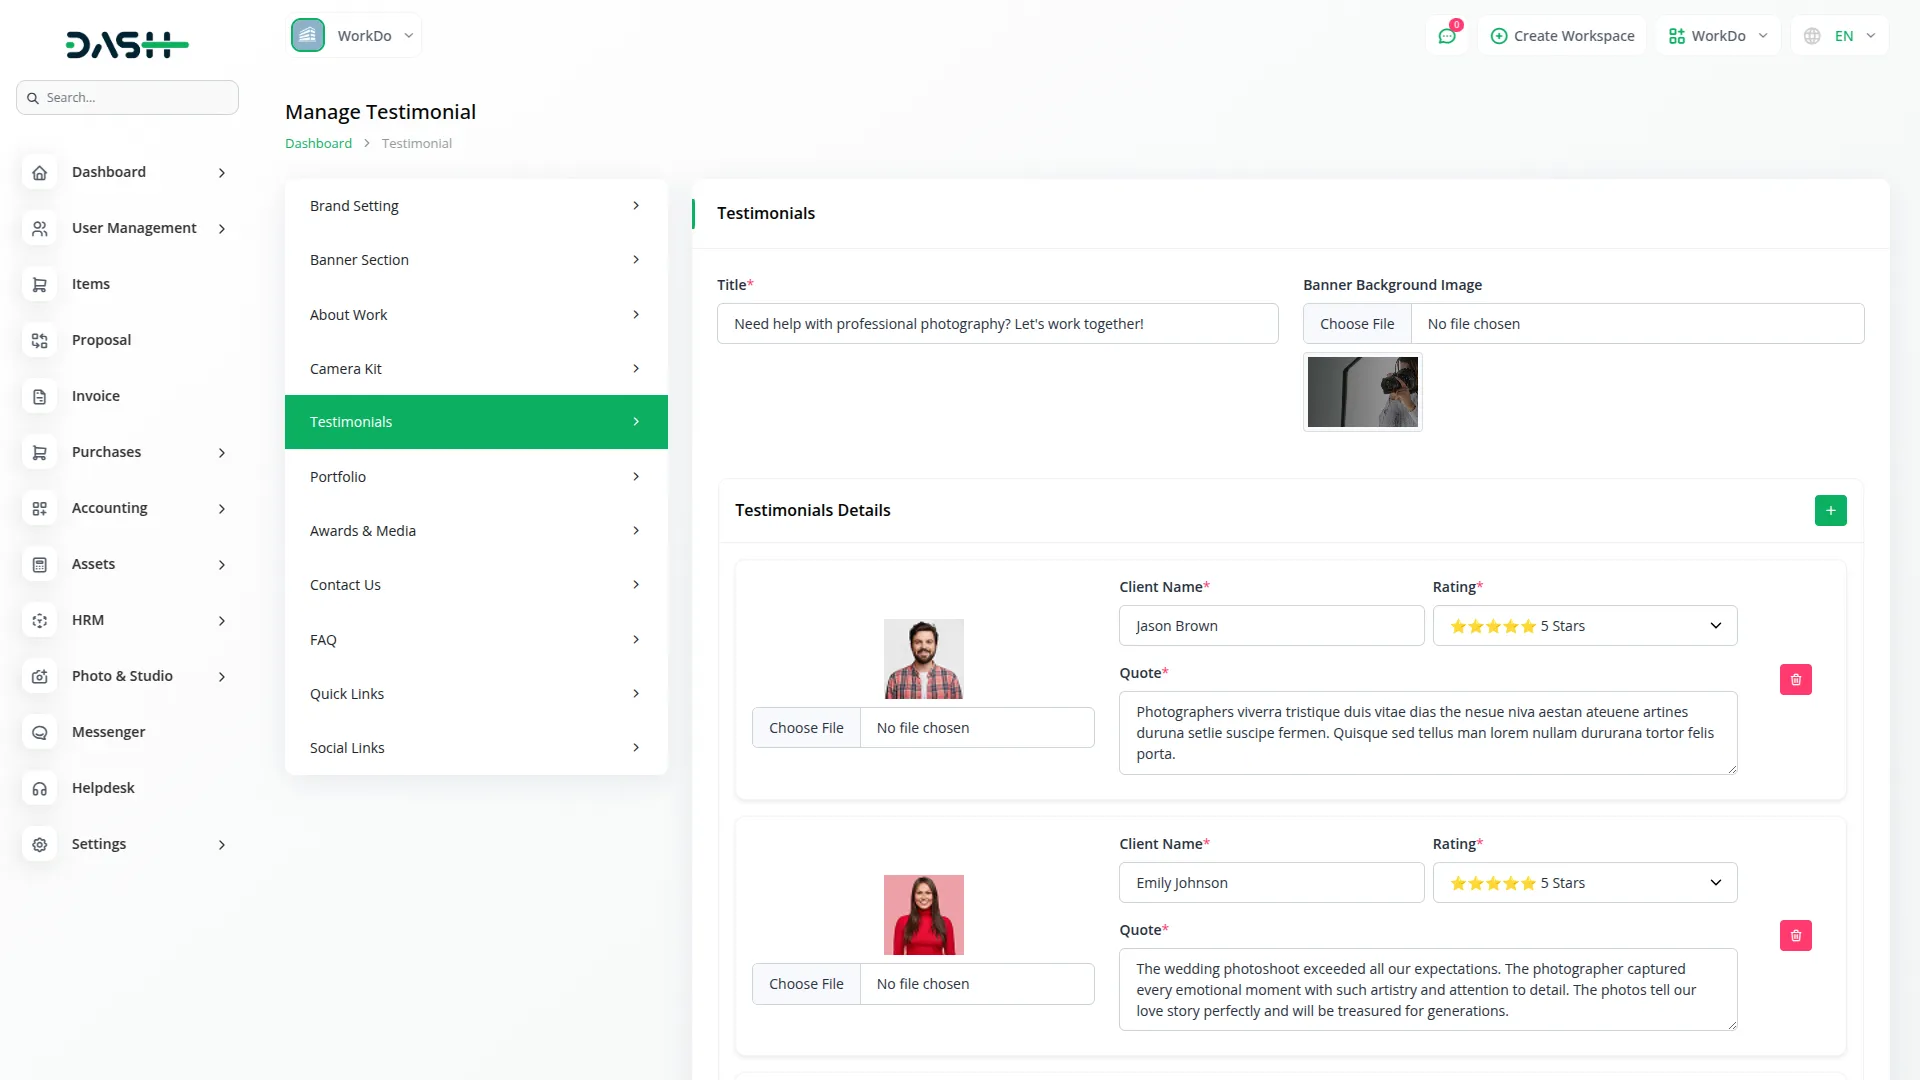
- Display customer reviews by entering a Title, and upload the common banner background image for your testimonials section. Use the Testimonial Details repeater fields to add each review by uploading the Client Image, entering the Client Name, setting the Rating, and adding their Quote.
- Once saved, all testimonials will automatically display on your homepage in a slider format. Each testimonial will show the client’s image, name, rating, and feedback, providing social proof to potential customers with a testimonial background image. The section also includes a Book Appointment button, encouraging visitors to take action after reading positive reviews.
Portfolio Section
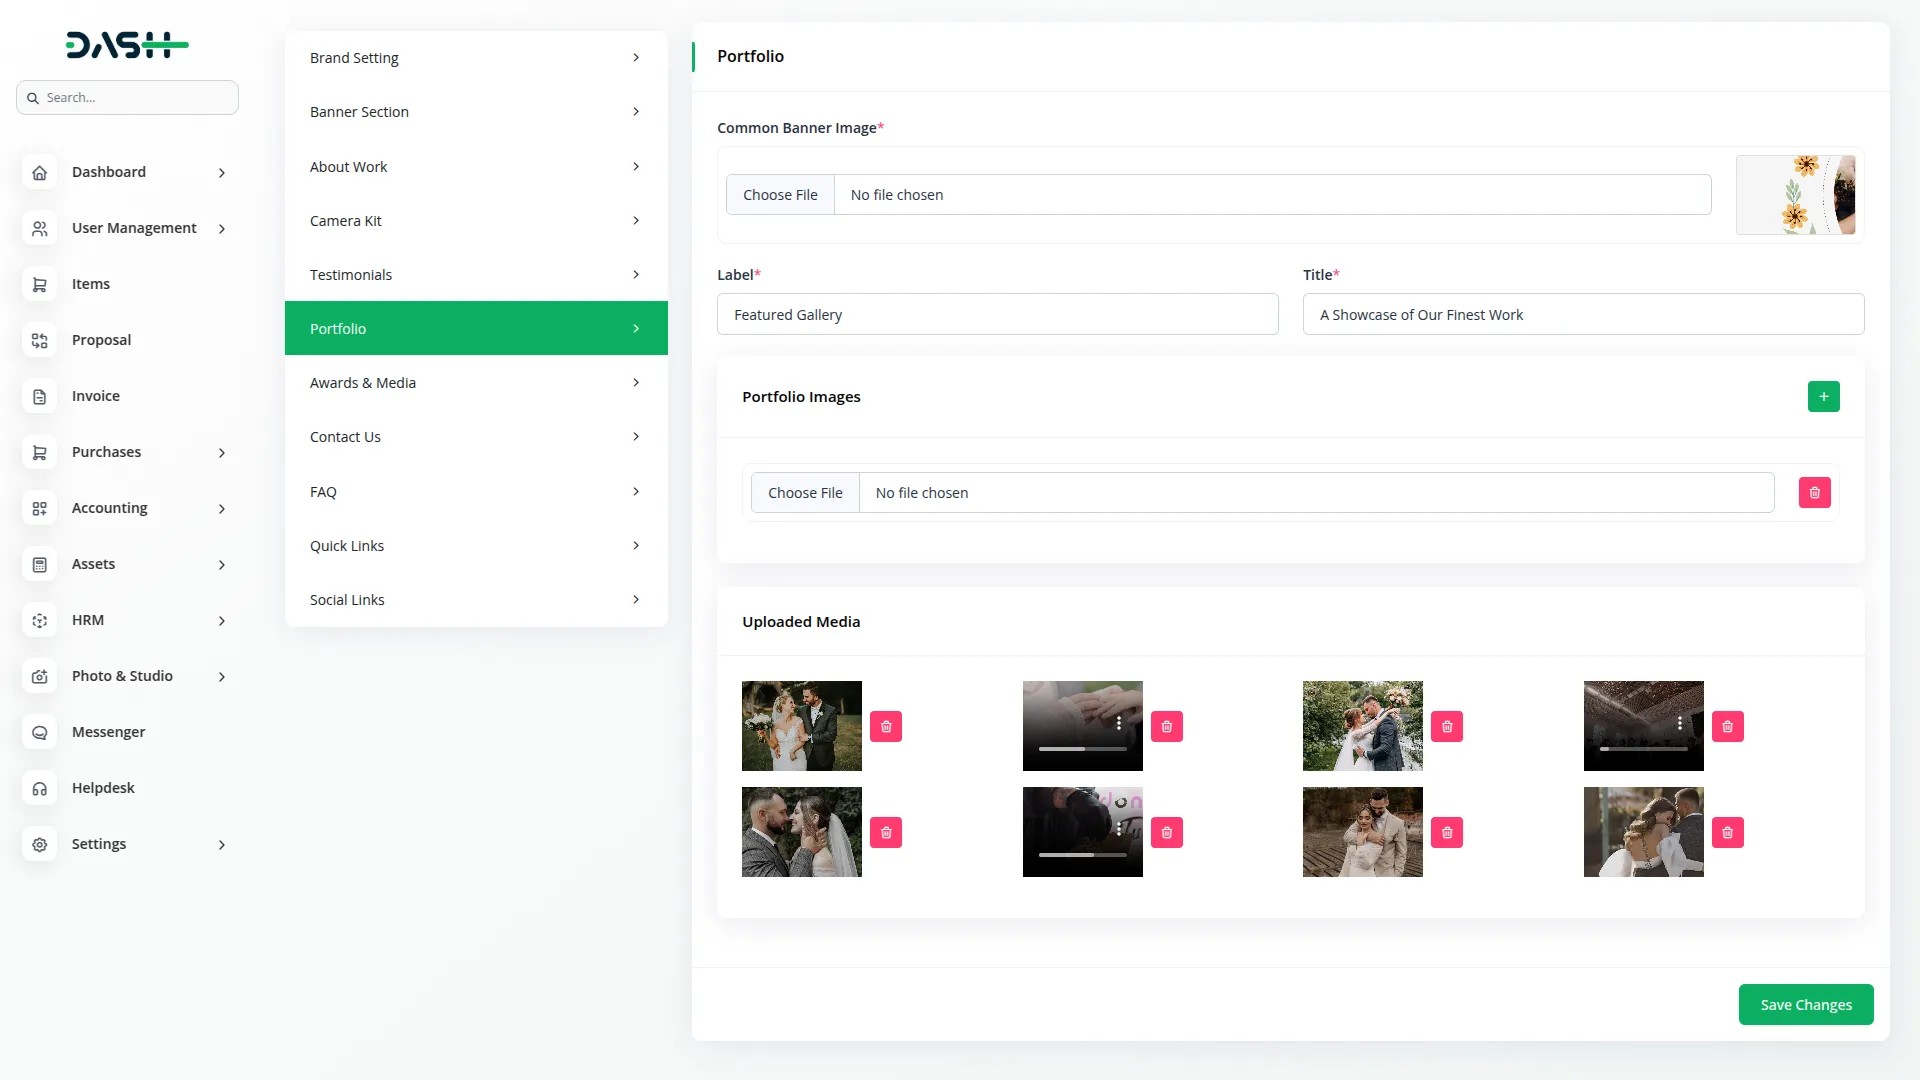
- Configure your portfolio display by uploading a Common Banner Image and entering a Label and Title. Use the Portfolio Image repeater field to add all the photos and videos you want to showcase in your portfolio gallery.
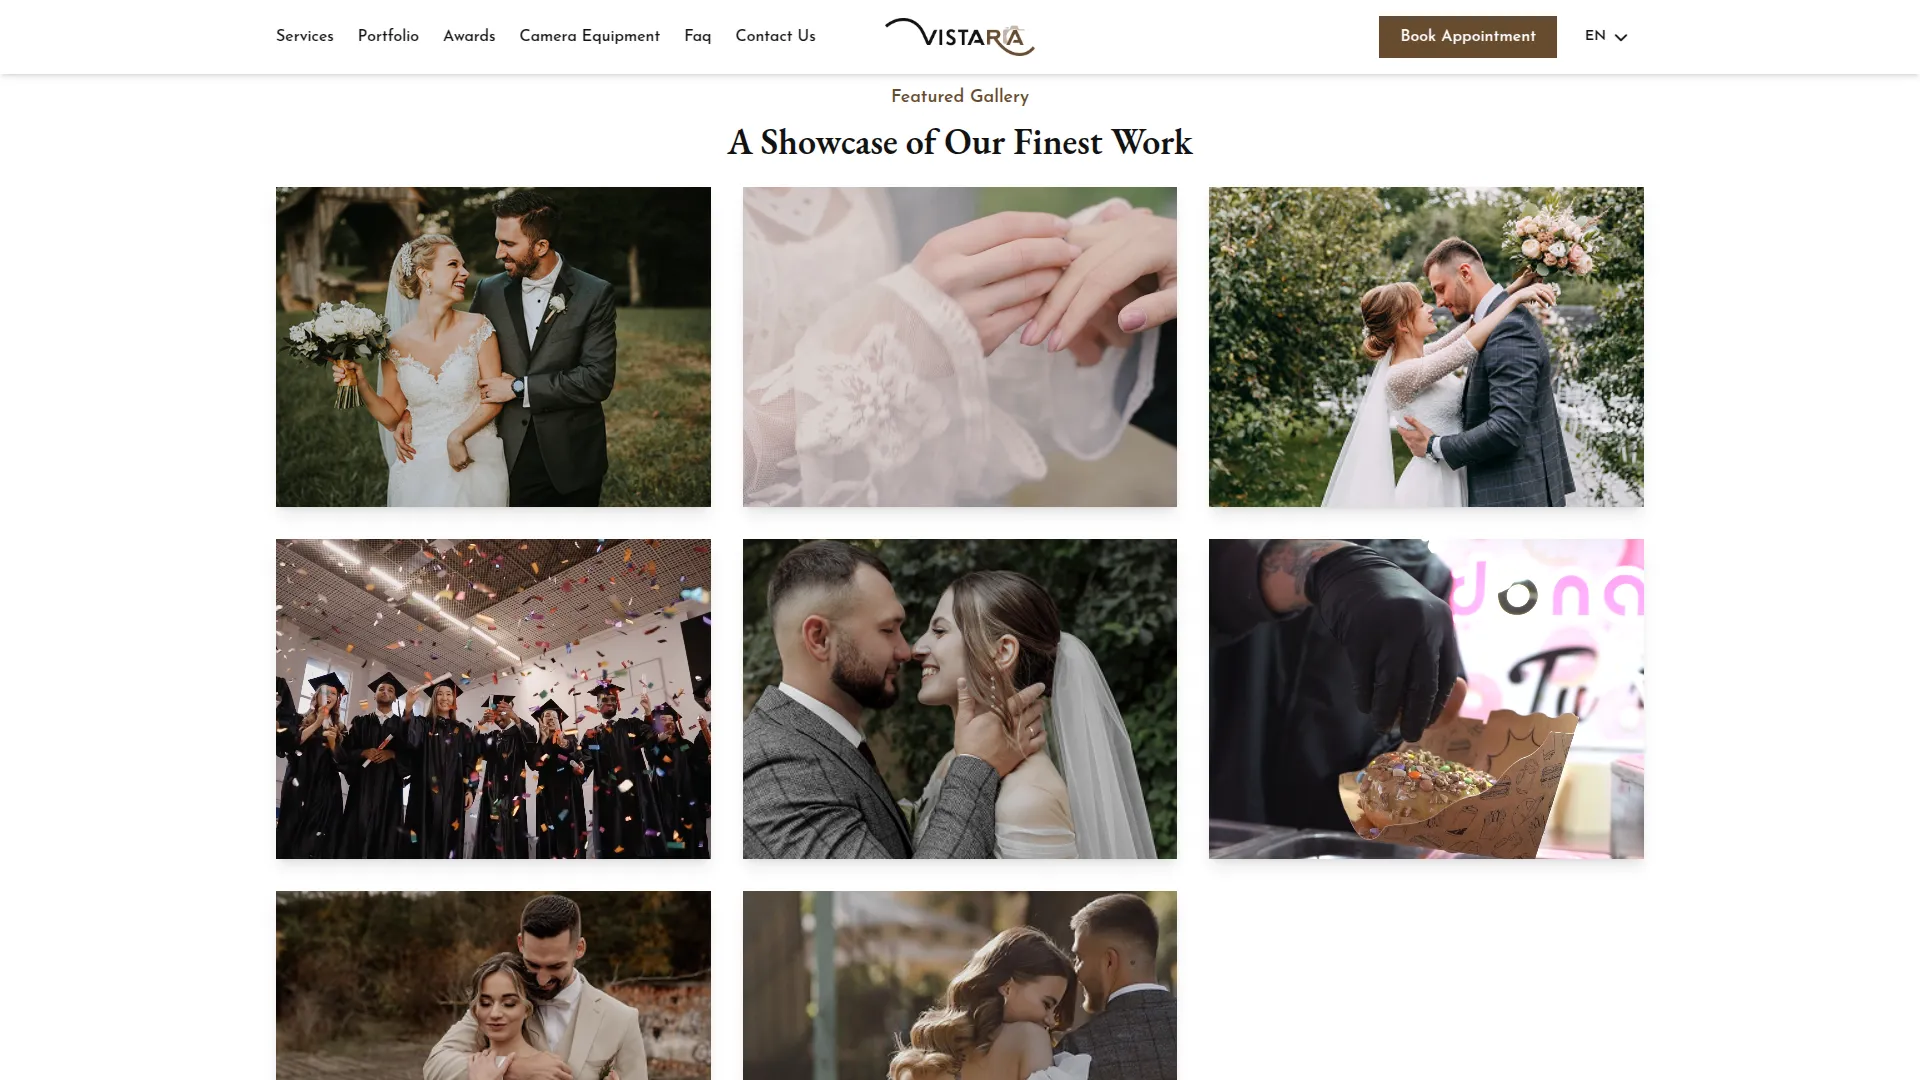
- On the frontend, the Portfolio section is shown on the homepage with the Label, Title, and work samples displayed in a stylish slider format. This Common Banner Image also displays in the header section across all website pages and can be updated directly from the Portfolio page settings. Visitors can view portfolio images directly on the homepage or click through to explore the full work collection on the dedicated Portfolio page.
Awards & Media Section
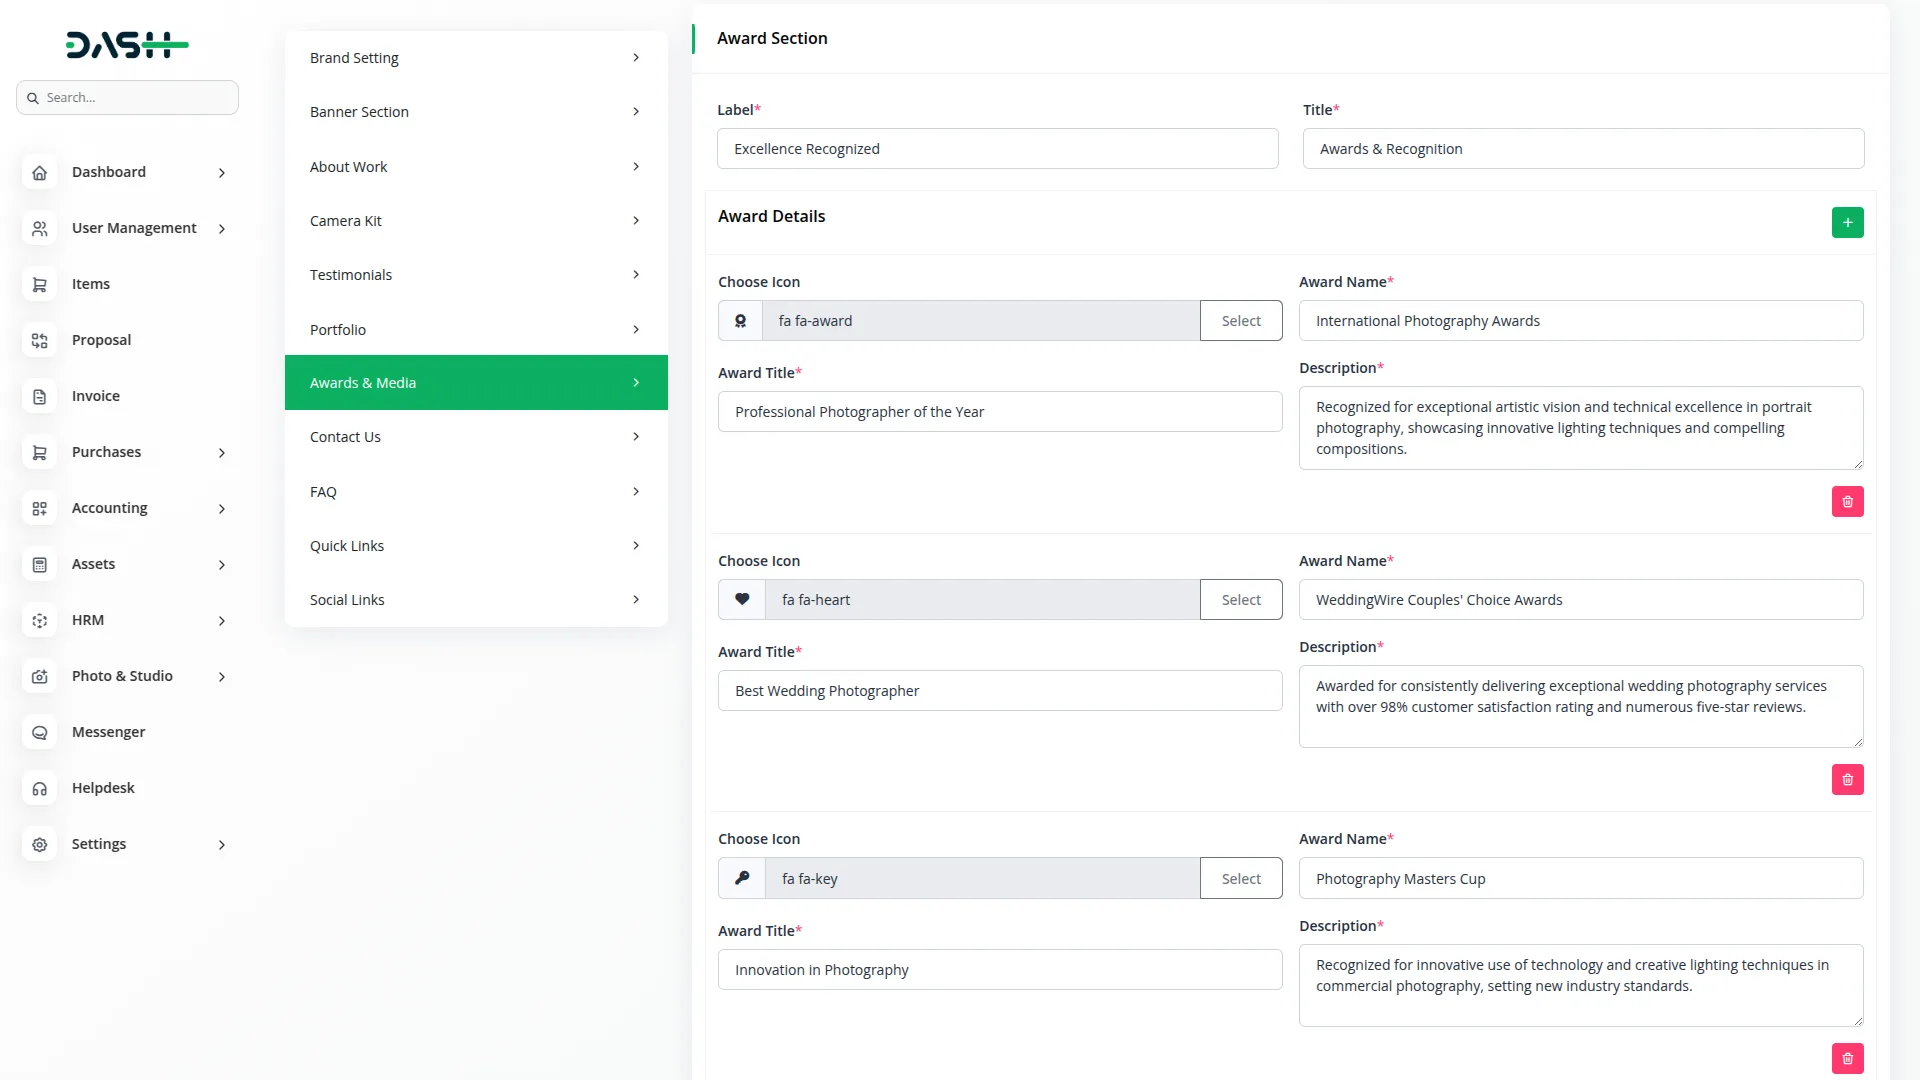
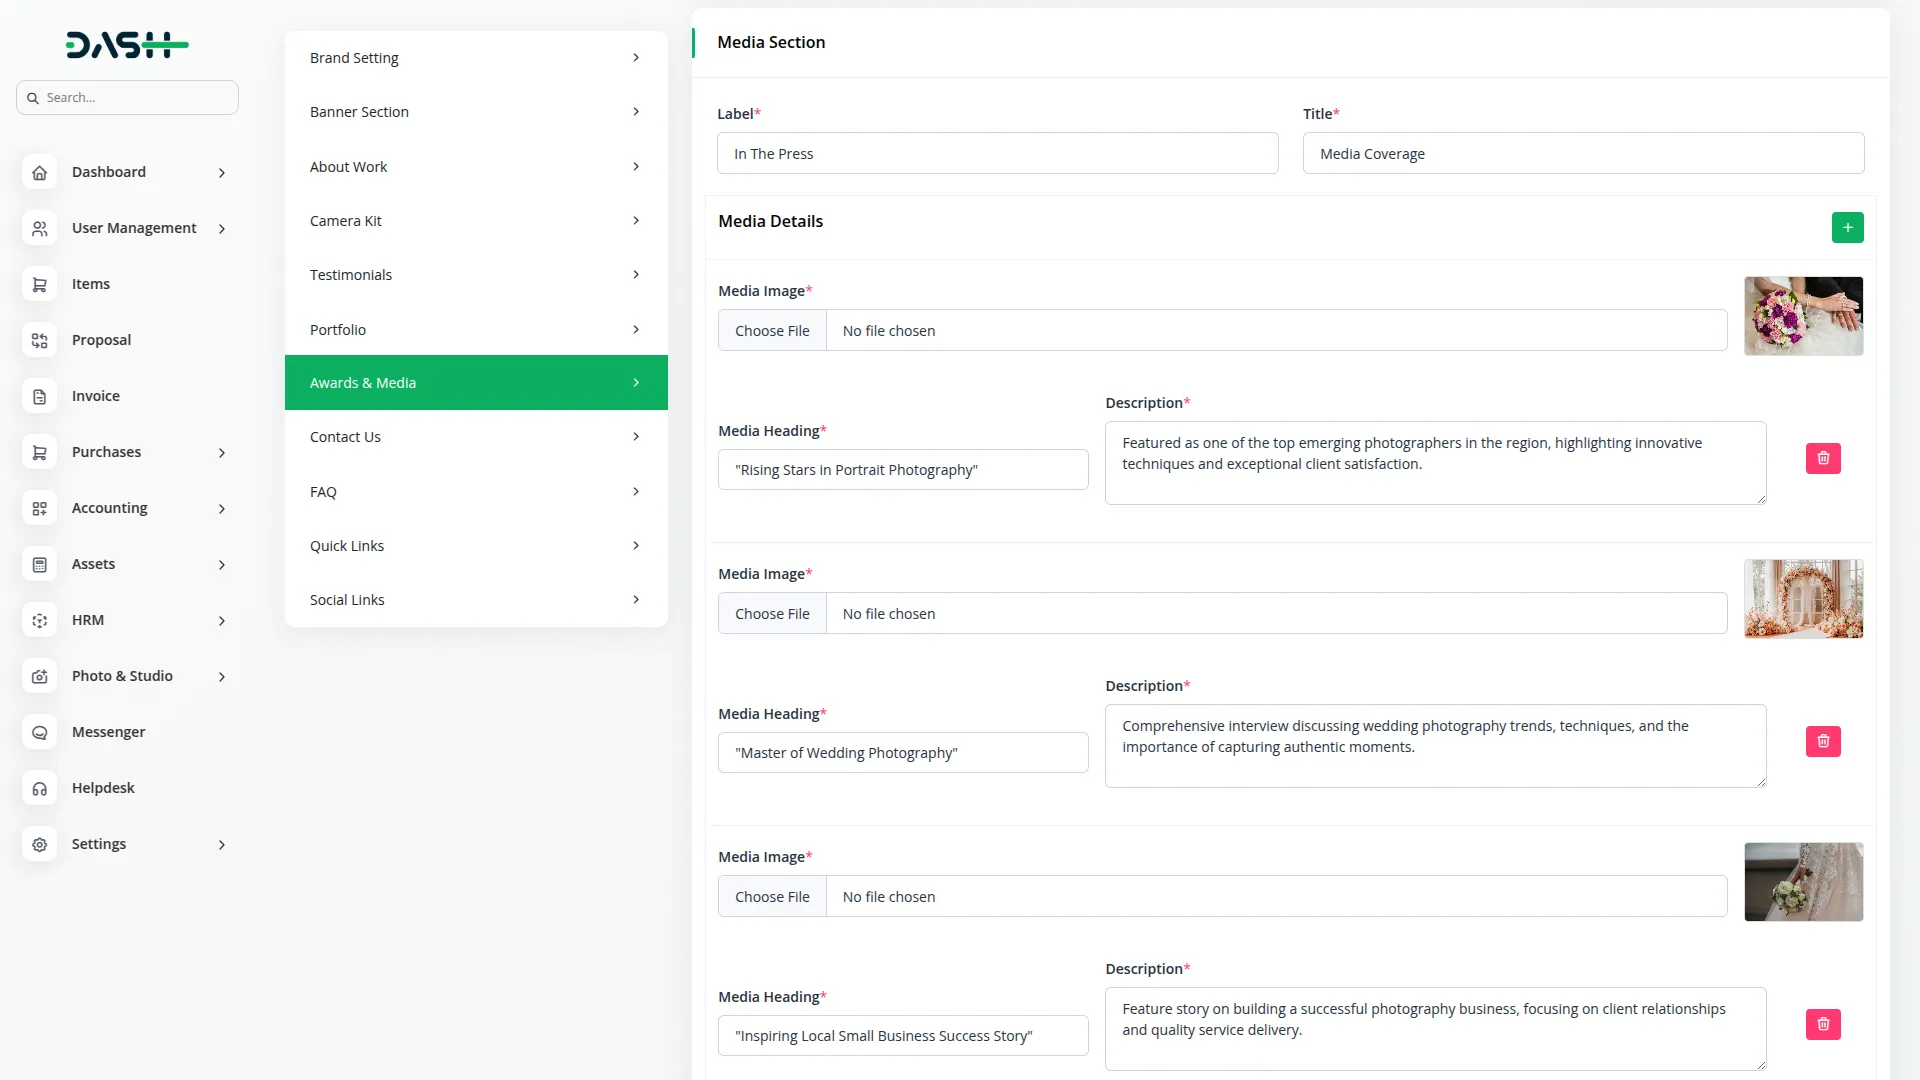
- This section has two parts. For the Award Section, enter a Label and Title, then use Award Details repeater fields to add each award by selecting an Icon, entering the Award Name, Award Title, and Description. For the Media Section, enter a Label and Title, then use Media Details repeater fields to add media coverage by uploading a Media Image, entering the Media Heading, and adding a Description.
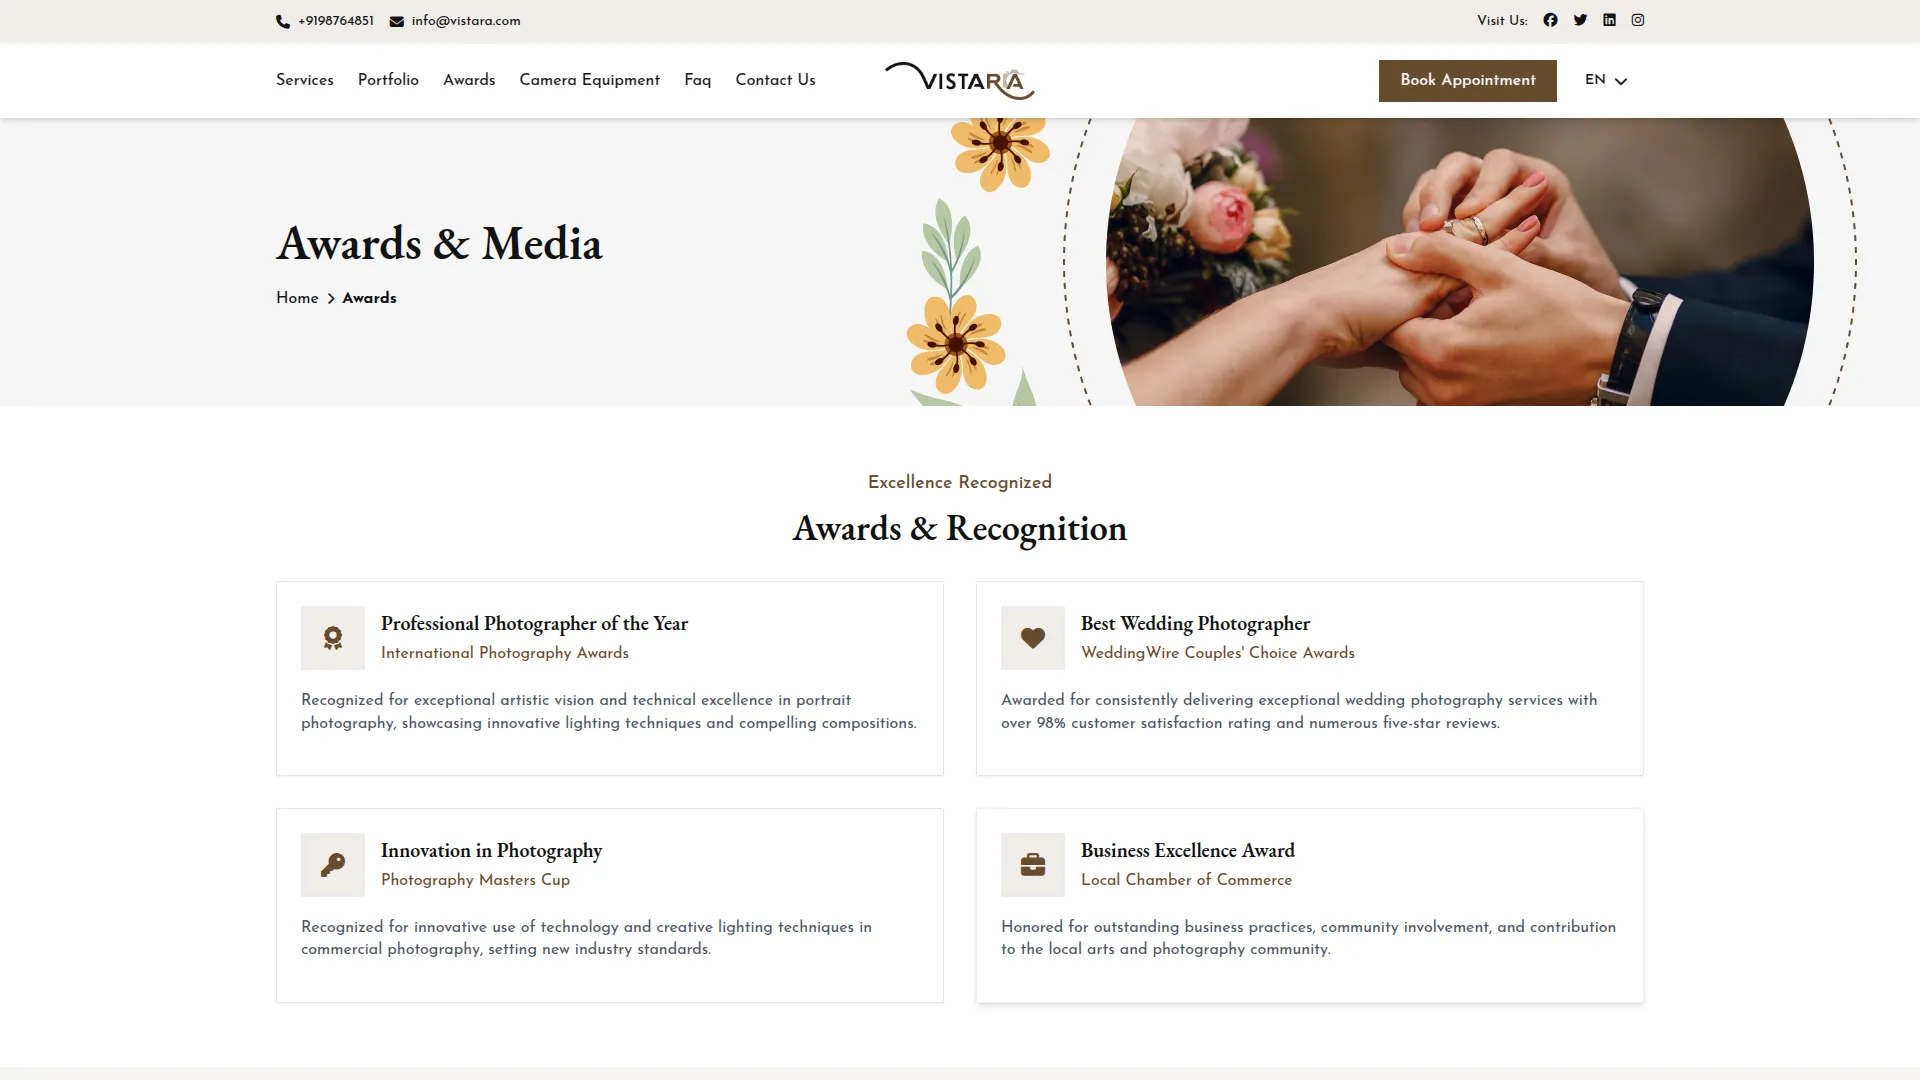
- On the frontend, the Awards section appears on your dedicated Awards page with the Label and Title you set. All your achievements are displayed in an organized layout with the selected Icons, Award Names, Titles, and Descriptions. On the same page, the Media section is also shown, featuring your press coverage and media mentions with Media Images, Headings, and Descriptions. This presentation highlights your accomplishments and helps build credibility and industry recognition for your studio.
Contact Us Section
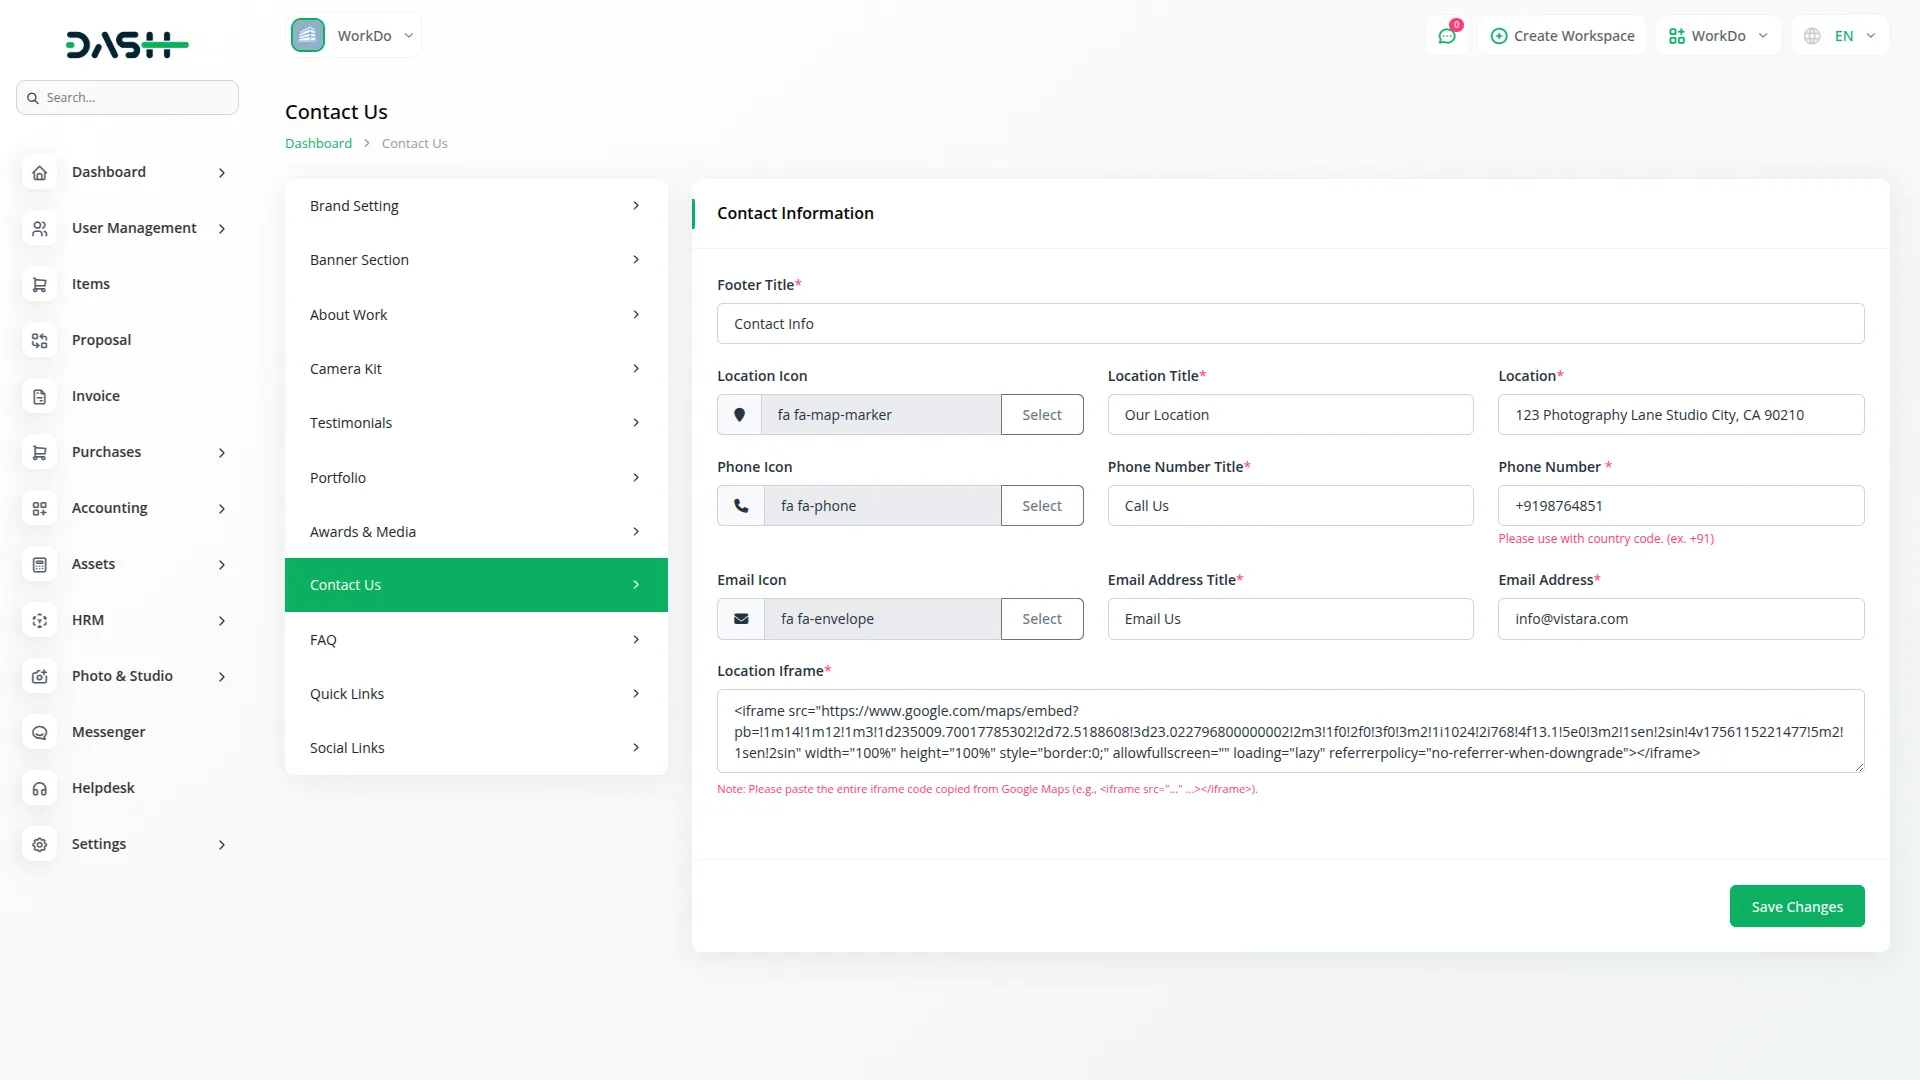
- Set up your contact information by entering a Footer Title. Configure your location details with a Location Icon, Location Title, and Location address. Add your phone information with a Phone Icon, Phone Number Title, and Phone Number. Include your email details with an Email Icon, Email Address Title, and Email Address. Finally, add a Location Iframe code for embedding Google Maps on your contact page.
- On the frontend, the Contact Us details show on your Contact Us page, in the footer section, and also in the header section. In the header, only the Mobile Number and Email Address are displayed, while the full details (Location, Phone Number, and Email Address) appear in neat contact cards with their icons and titles on the Contact Us page and footer. The Location Iframe adds a Google Map on the Contact Us page, making it easy for customers to find and reach your studio.
FAQ Section
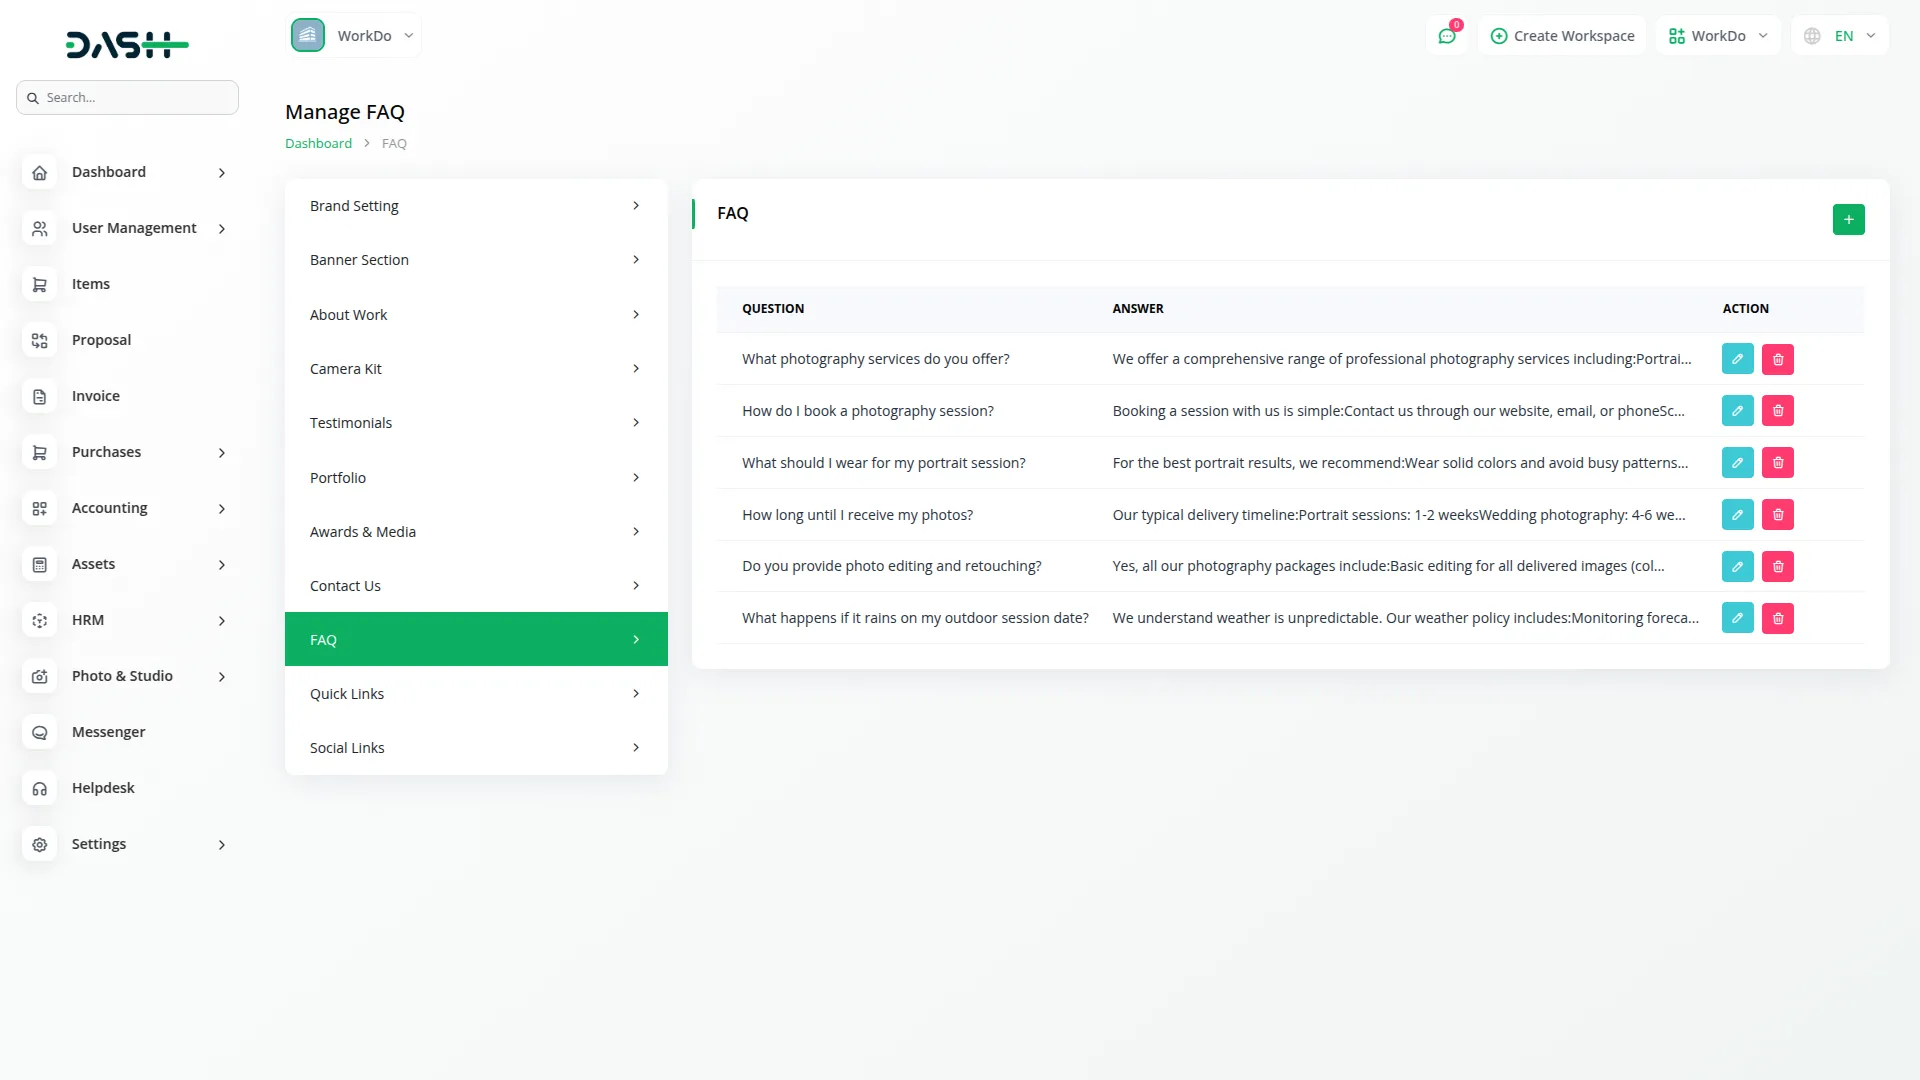
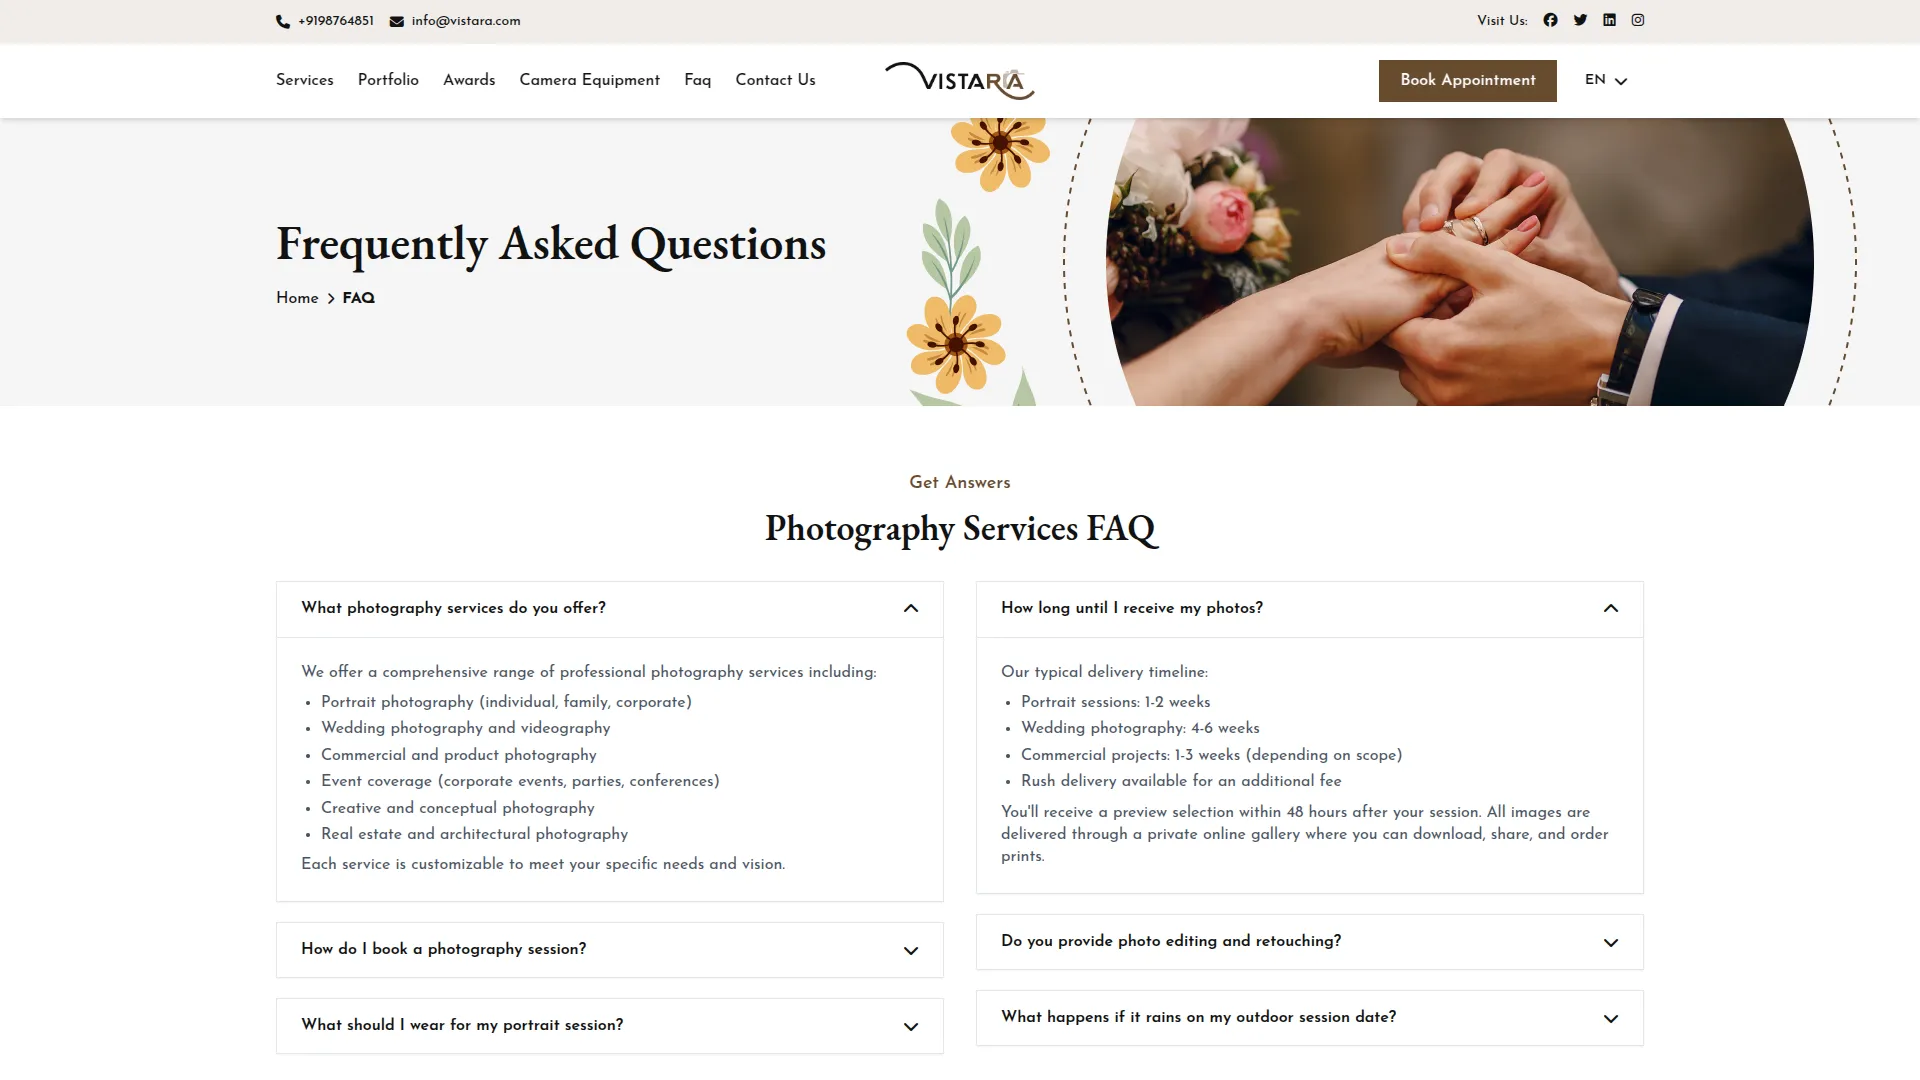
- To add frequently asked questions, click the “Create” button and enter the Question and Answer for each FAQ item. The list page shows all FAQs with columns for Questions and Answers. You can edit existing FAQs or delete ones that are no longer relevant.
- On the frontend, the FAQ section shows on the FAQ page. All questions are listed in an expandable format. When a customer clicks a question, the answer drops down right below it. This makes it easy and interactive for customers to find information about your services and policies.
Quick Link Section
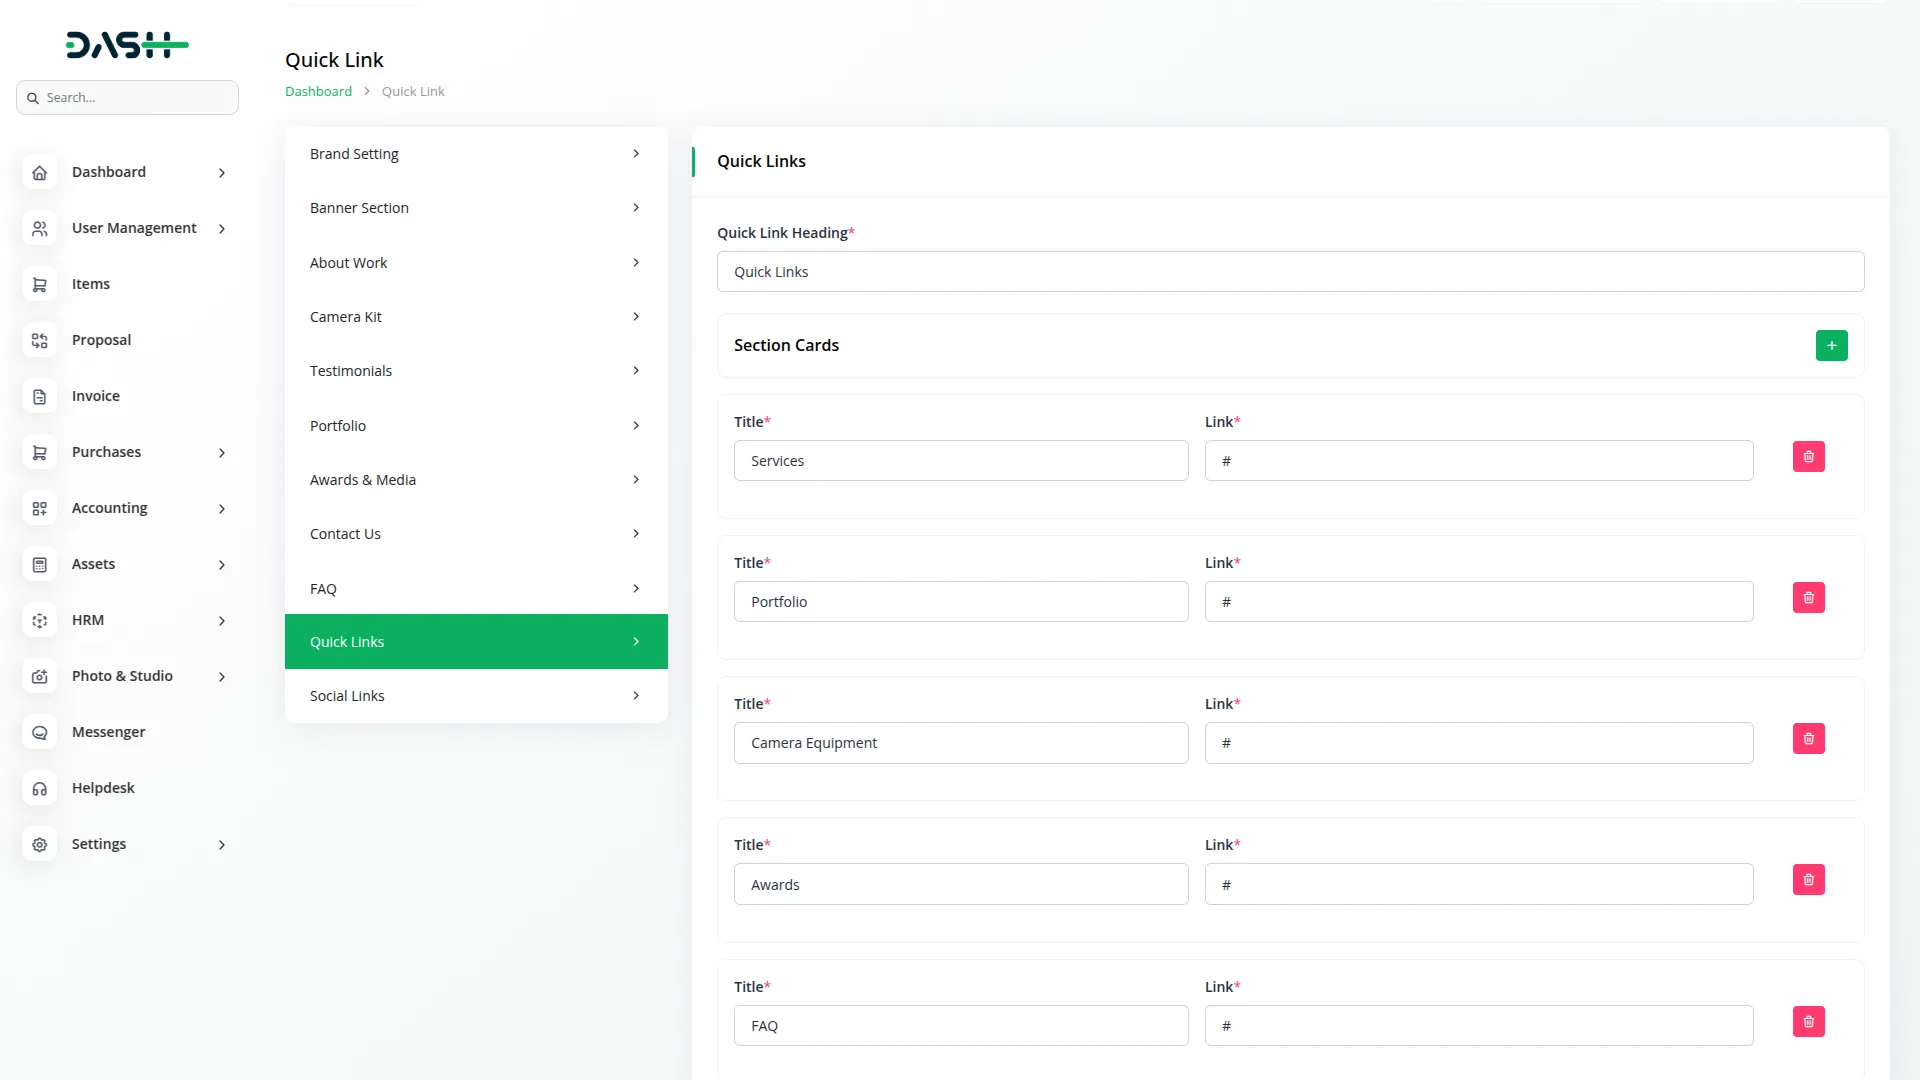
- Set up quick navigation links by entering a Quick Link Heading. Use the Section Cards repeater fields to add each link by entering the Title and Link URL for pages you want to highlight in your footer.
- Quick Links are created from the backend and displayed on the frontend under the heading you specify in the website footer. Each link shows its Title and navigates customers to important pages or sections, enhancing website usability and customer experience.
Social Links Section
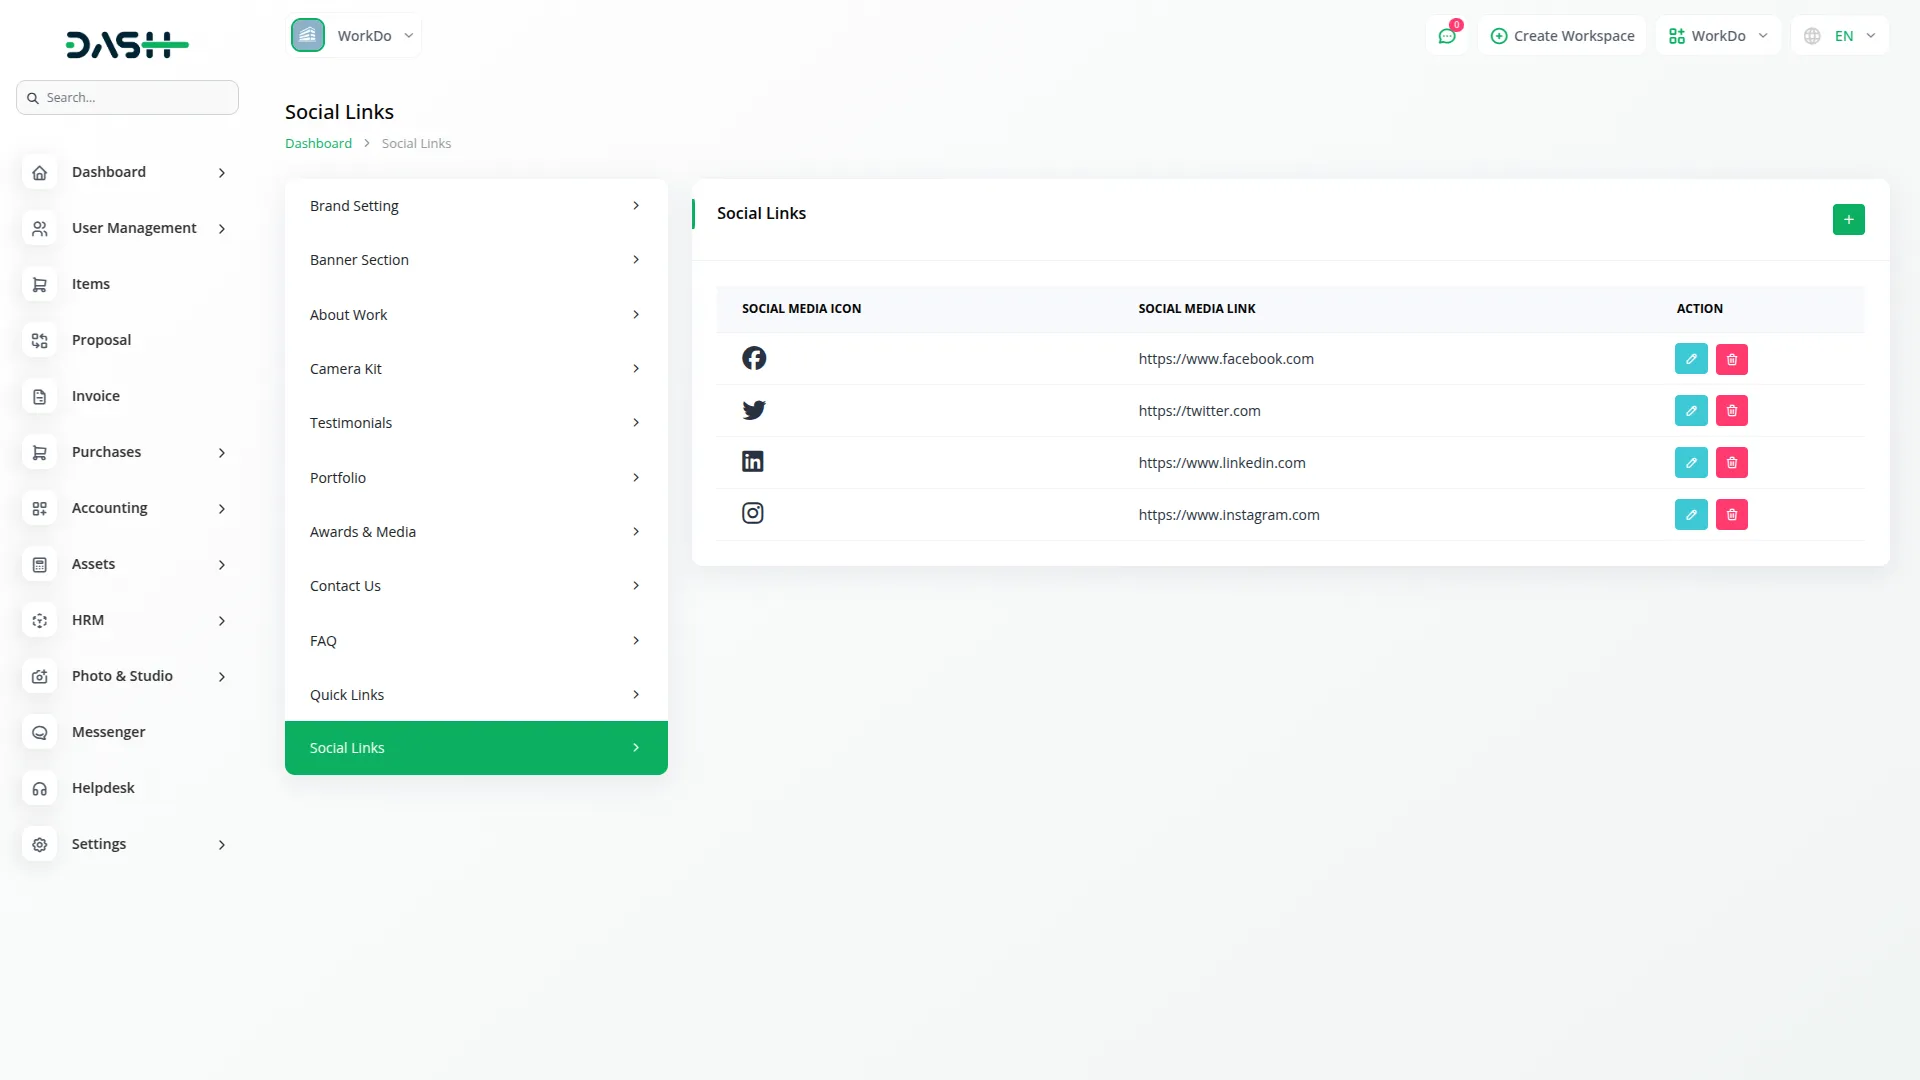
- To add social media links, click the “Create” button and select a Social Icon from the picker, then enter the Social Media Link URL. The list page displays all social links with columns showing the Social Media Icon and Social Media Link. You can edit existing social links or delete ones you no longer use.
- Social media icons and links are added from the backend and displayed on the frontend in your website’s footer as well as in the header section. The selected icons are clickable and take customers directly to your social media profiles, helping boost your online presence and engagement.
Categories
Related articles
- Art Showcase Integration in Dash SaaS
- Music Institute Integration in Dash SaaS
- UddoktaPay Payement Gateway in Dash SaaS
- Car Dealership Integration in Dash SaaS
- How To Generate Token of Meta
- Warranty Add-On Detailed Documentation
- Security Guard Management Integration in Dash SaaS
- Events Management Integration in Dash SaaS
- Driving School Integration in Dash SaaS
- PayU Payment Gateway Integration in Dash SaaS
- Documentation For Set Up
- Double Entry Integrational Entry Integration
Reach Out to Us
Have questions or need assistance? We're here to help! Reach out to our team for support, inquiries, or feedback. Your needs are important to us, and we’re ready to assist you!


Need more help?
If you’re still uncertain or need professional guidance, don’t hesitate to contact us. You can contact us via email or submit a ticket with a description of your issue. Our team of experts is always available to help you with any questions. Rest assured that we’ll respond to your inquiry promptly.
Love what you see?
Do you like the quality of our products, themes, and applications, or perhaps the design of our website caught your eye? You can have similarly outstanding designs for your website or apps. Contact us, and we’ll bring your ideas to life.
