Zapier Integration in Dash SaaS
Discover the power of Zapier integration in Dash SaaS to automate tasks and connect your favorite apps effortlessly. Boost productivity today!
Introduction
Introducing Zapier, the ultimate workflow automation platform that effortlessly connects thousands of popular apps, from Google Sheets to Slack, Shopify, Trello, Airtable, and many more. With Zapier, you can create automated workflows, known as Zaps, in just minutes, bringing your favorite apps together for increased efficiency. Say goodbye to the complexities of tool integration as Zapier simplifies the process, empowering your team to collaborate seamlessly and supercharge productivity. Experience a smoother, more impactful workflow with Zapier.
How To Install the Add-On?
To Set Up the Zapier Add-On, you can follow this link: Setup Add-On
How To Use The Zapier Add-On?
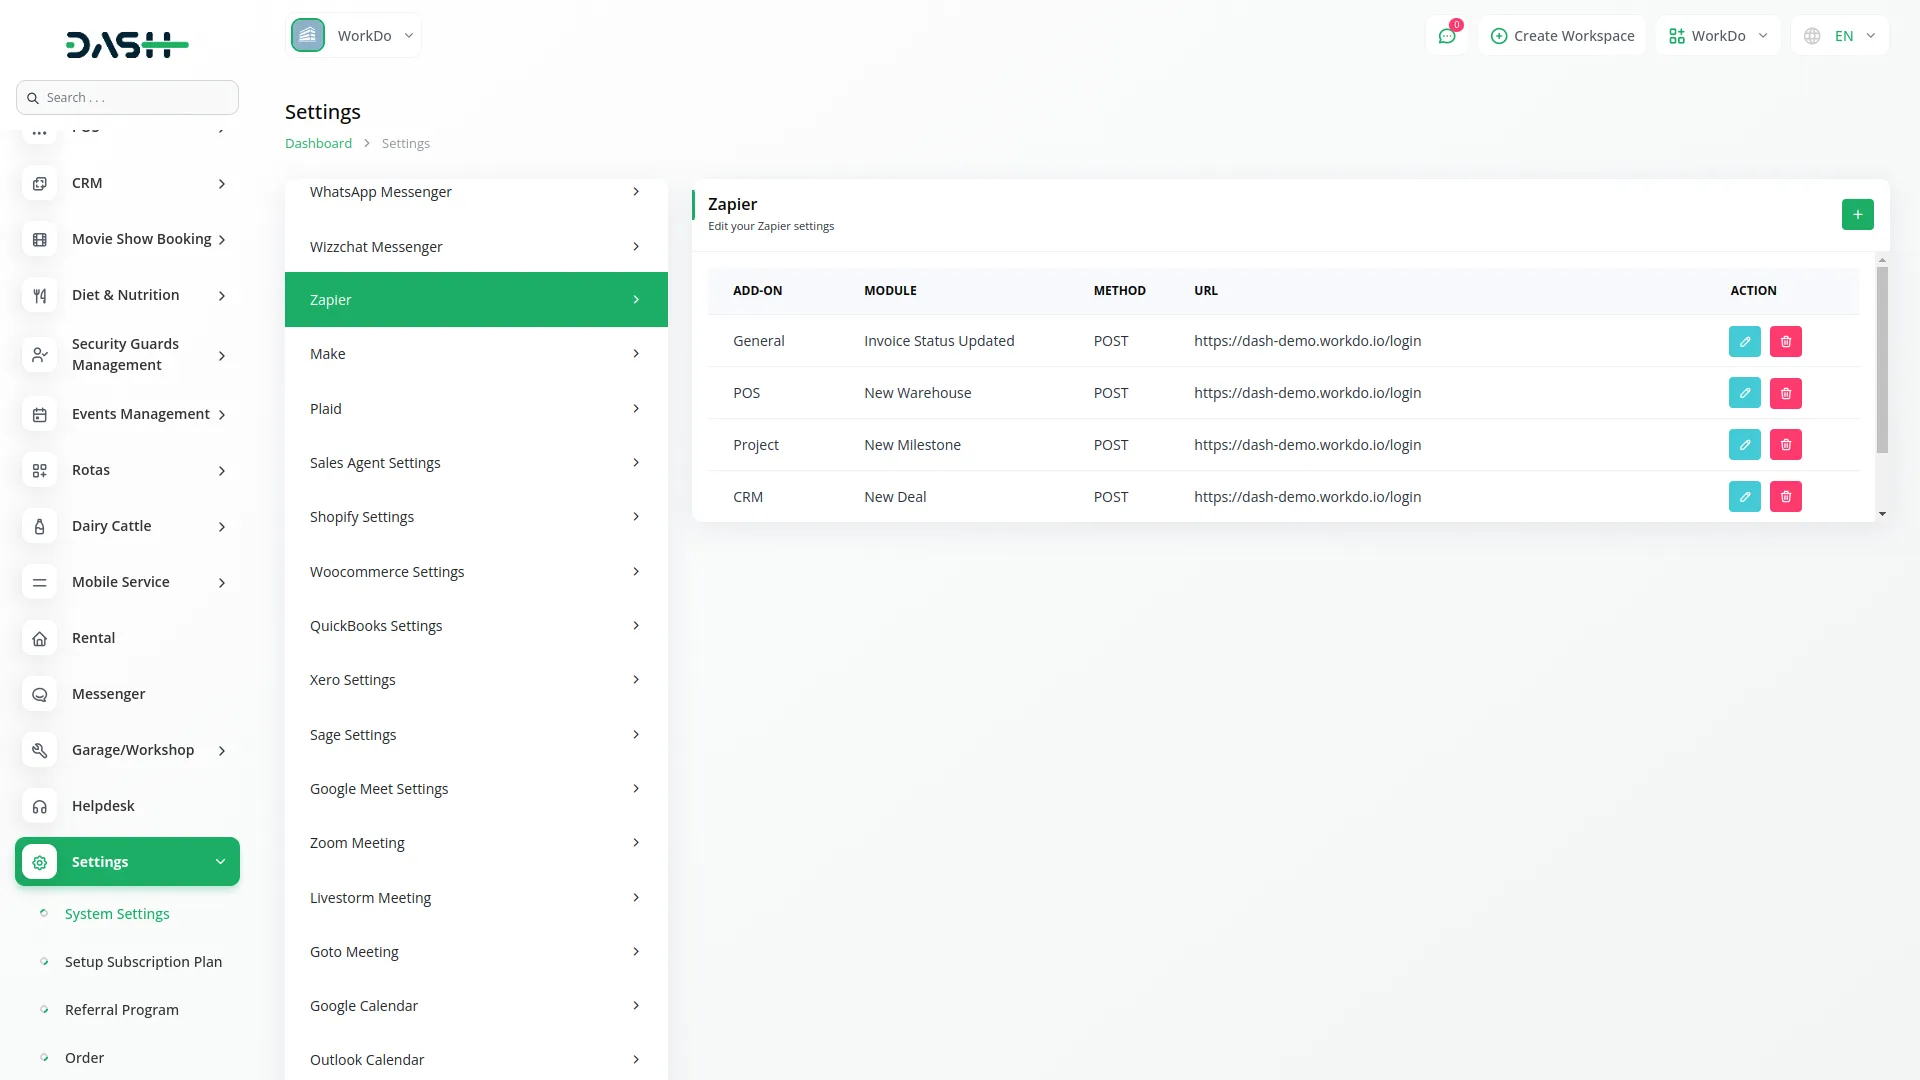
- Once you purchase the Add-On, navigate to the settings page, click on system settings, and find Zapier
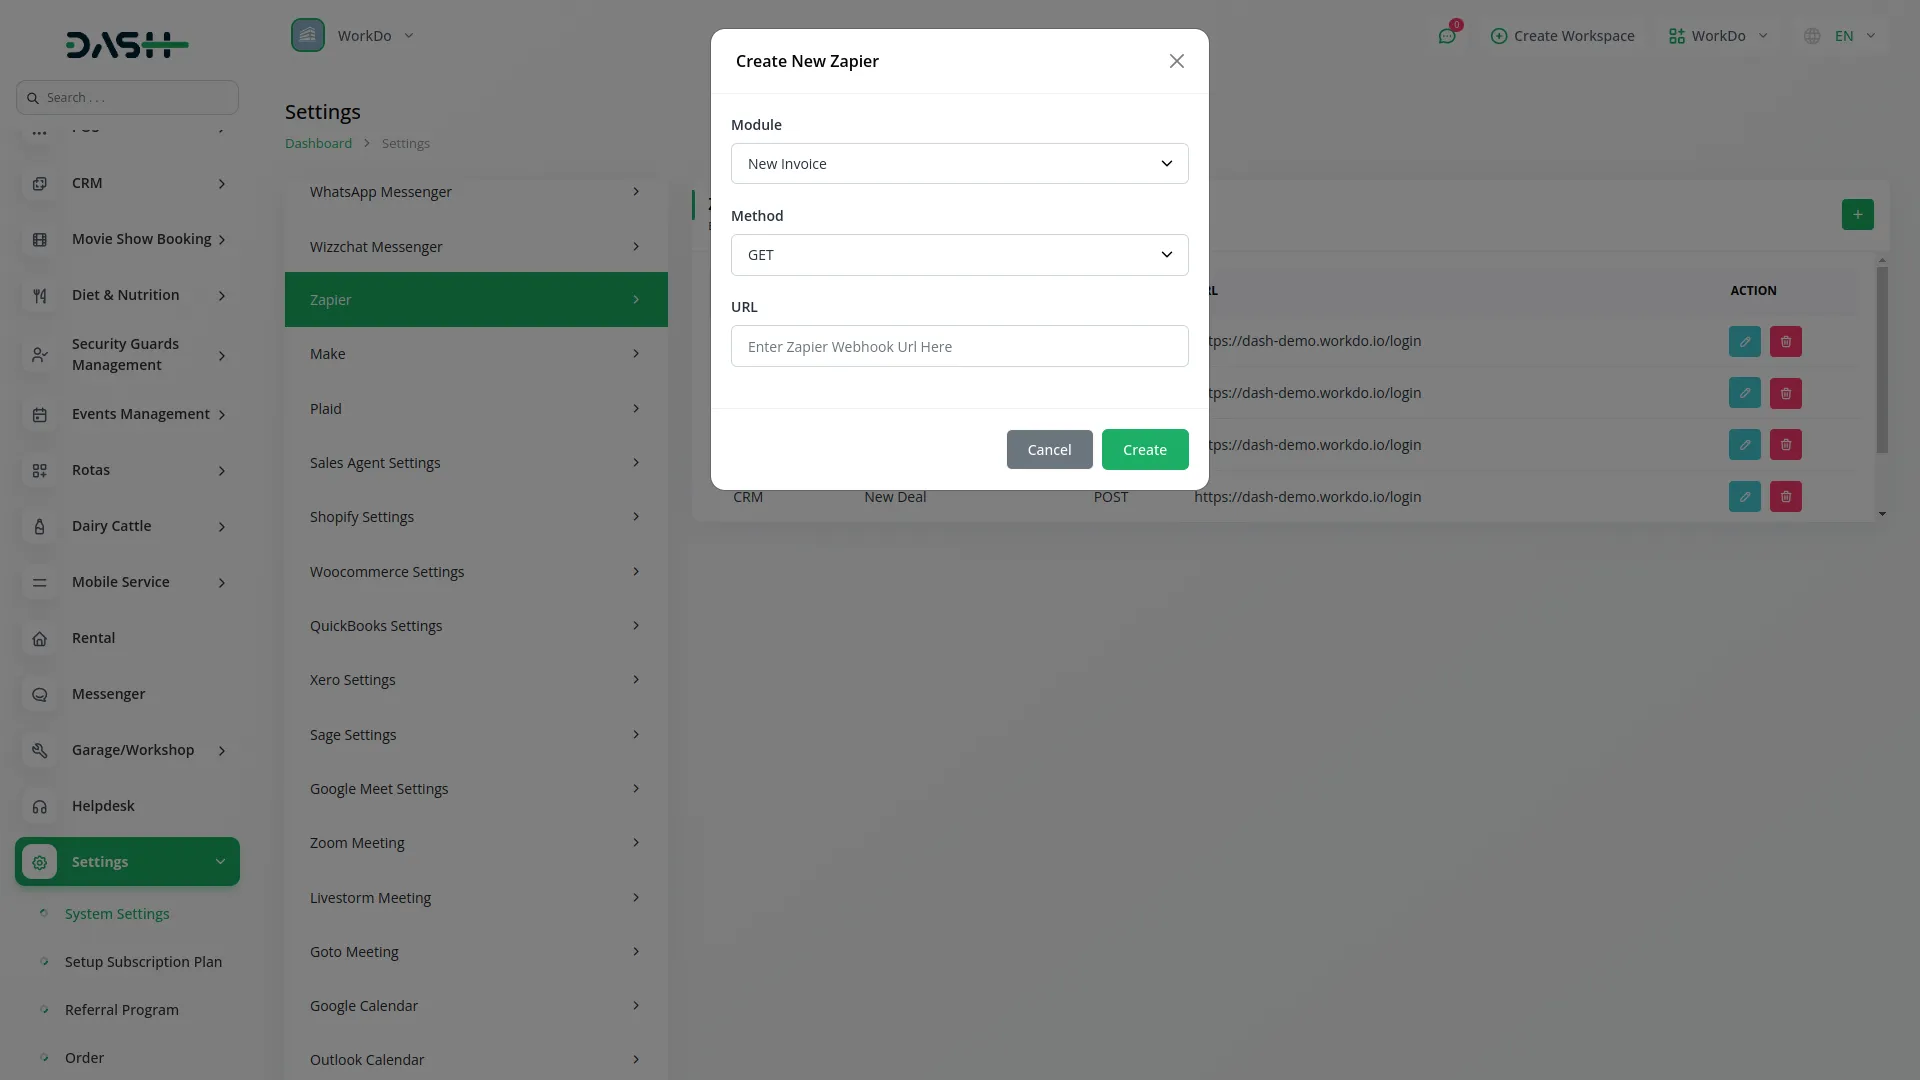
- To create a new Zapier, click on the “create” button.
- First of all, you have to choose the Add-On from the list given.
- Secondly, you have to choose the method between “Get”, “Put”, and “Post”.
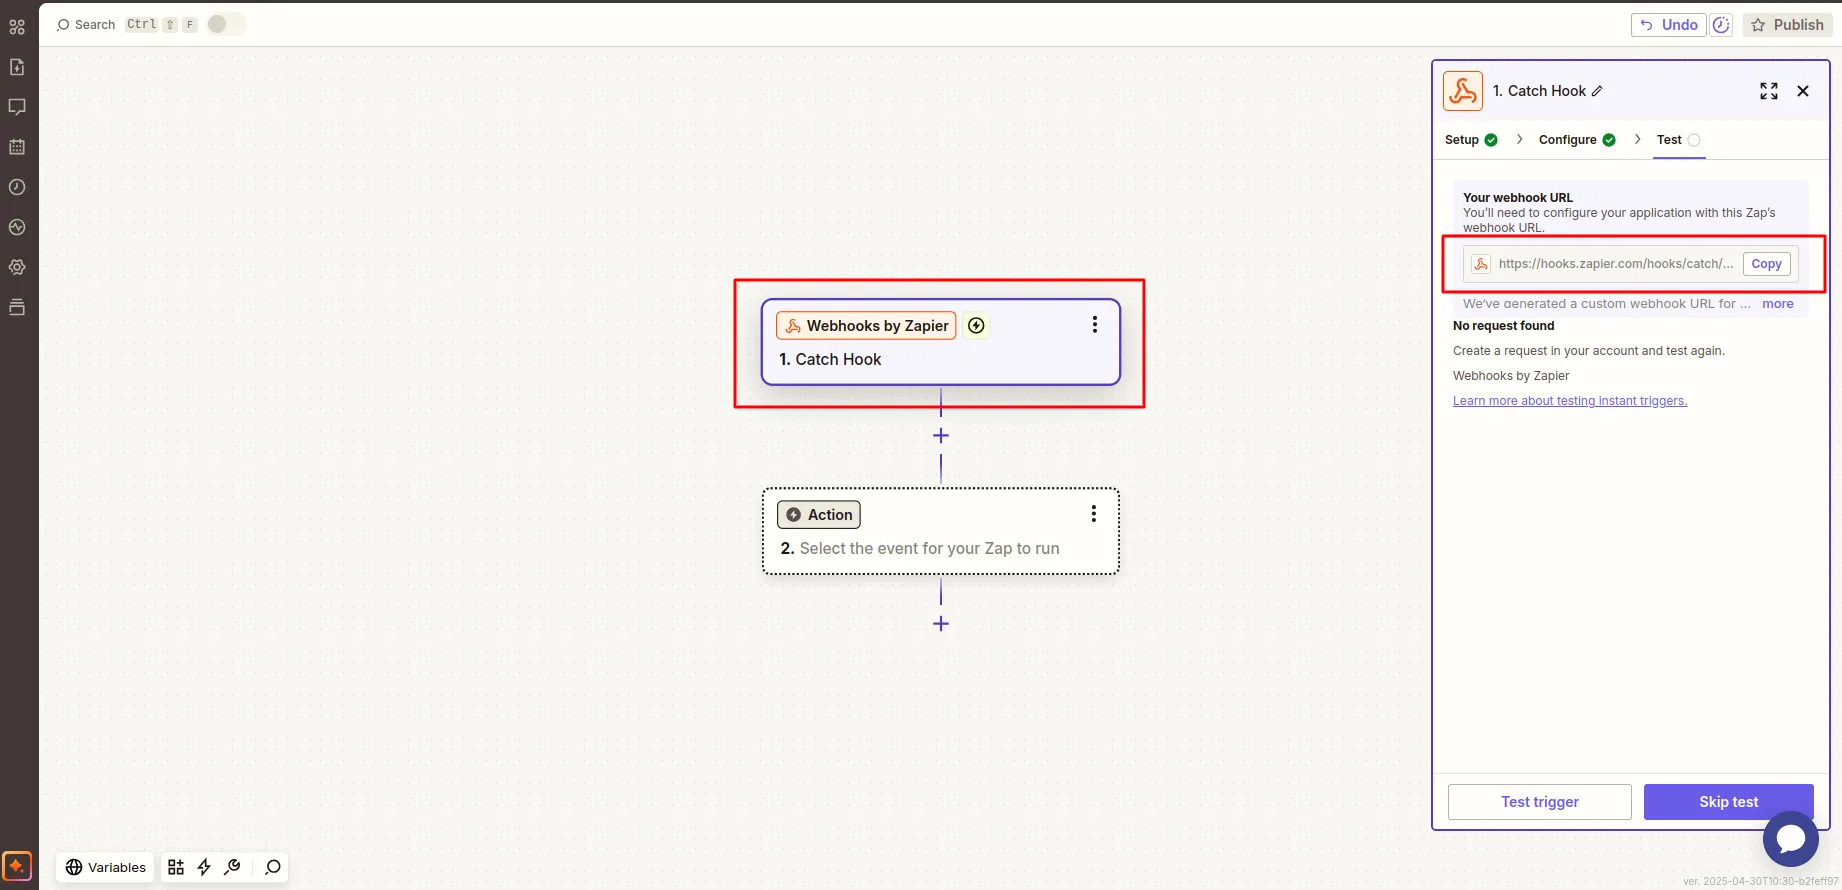
- To generate the Zapier Webhook URL, you can follow this link: https://docs.wpuserregistration.com/docs/user-registration-zapier/
- At last, you have to enter the Zapier Webhook URL, and your work will be done.
-
-
Here, I will explain to you an example of how to work the Zapier Add-On.
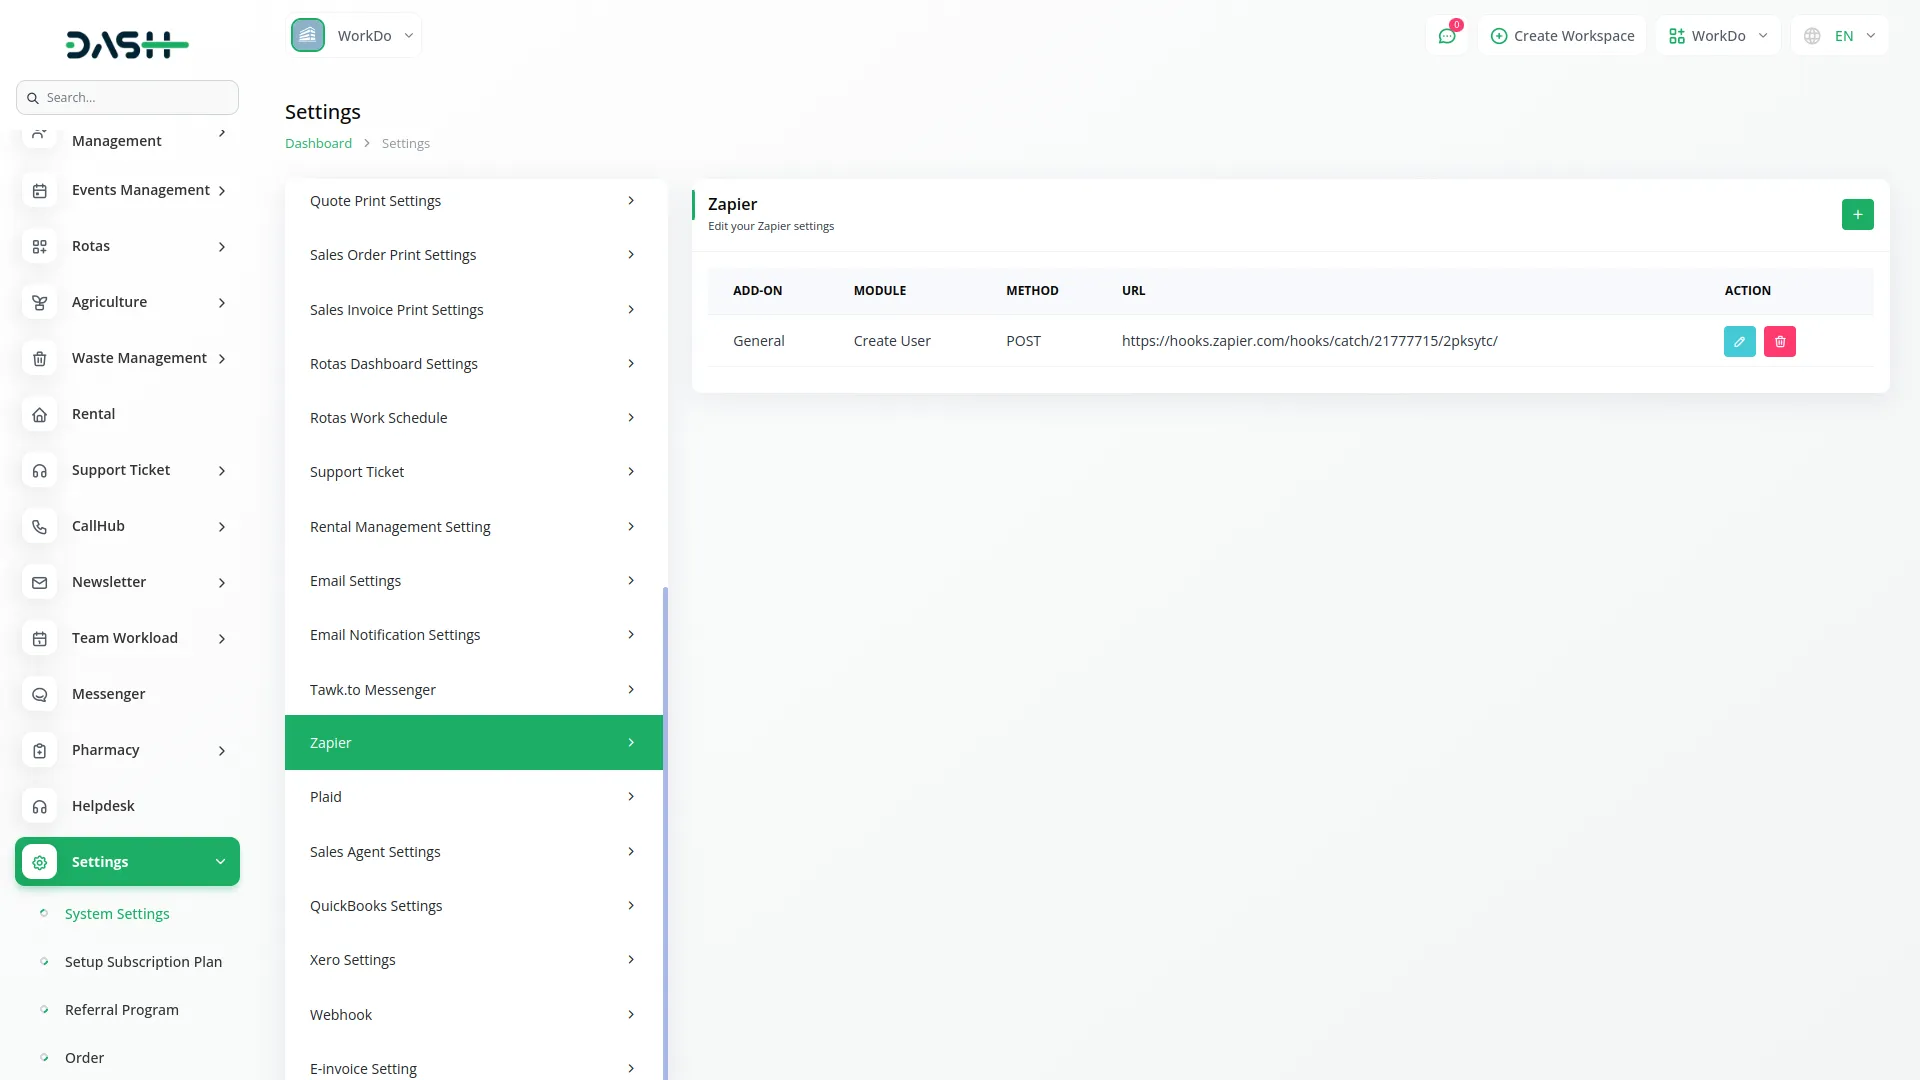
First of all, go to System Settings and scroll down until you find Zapier Settings. Then click on Zapier Settings, and here you can see the list of Add-Ons data that are connected to the Zapier Add-on.
You can see one “Create” button right side of this page. Click on this button and you will see a pop-up box.
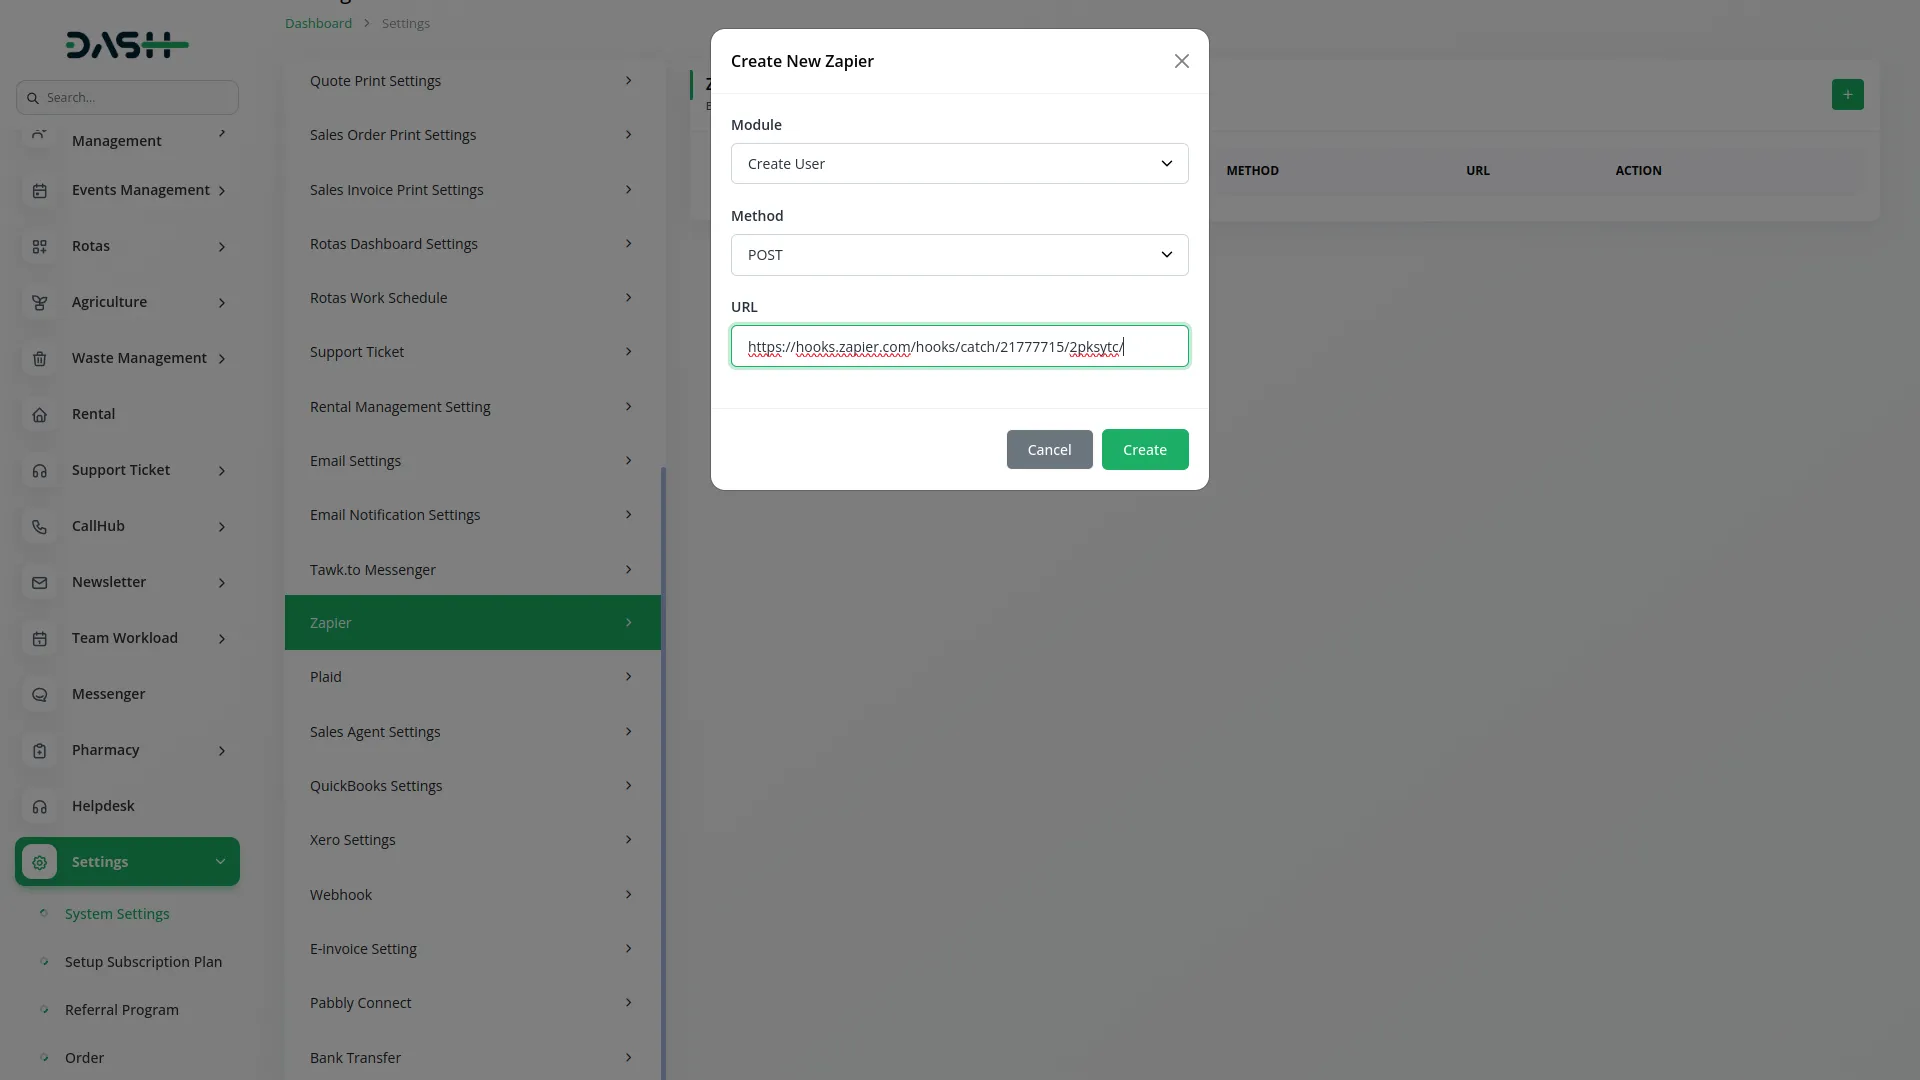
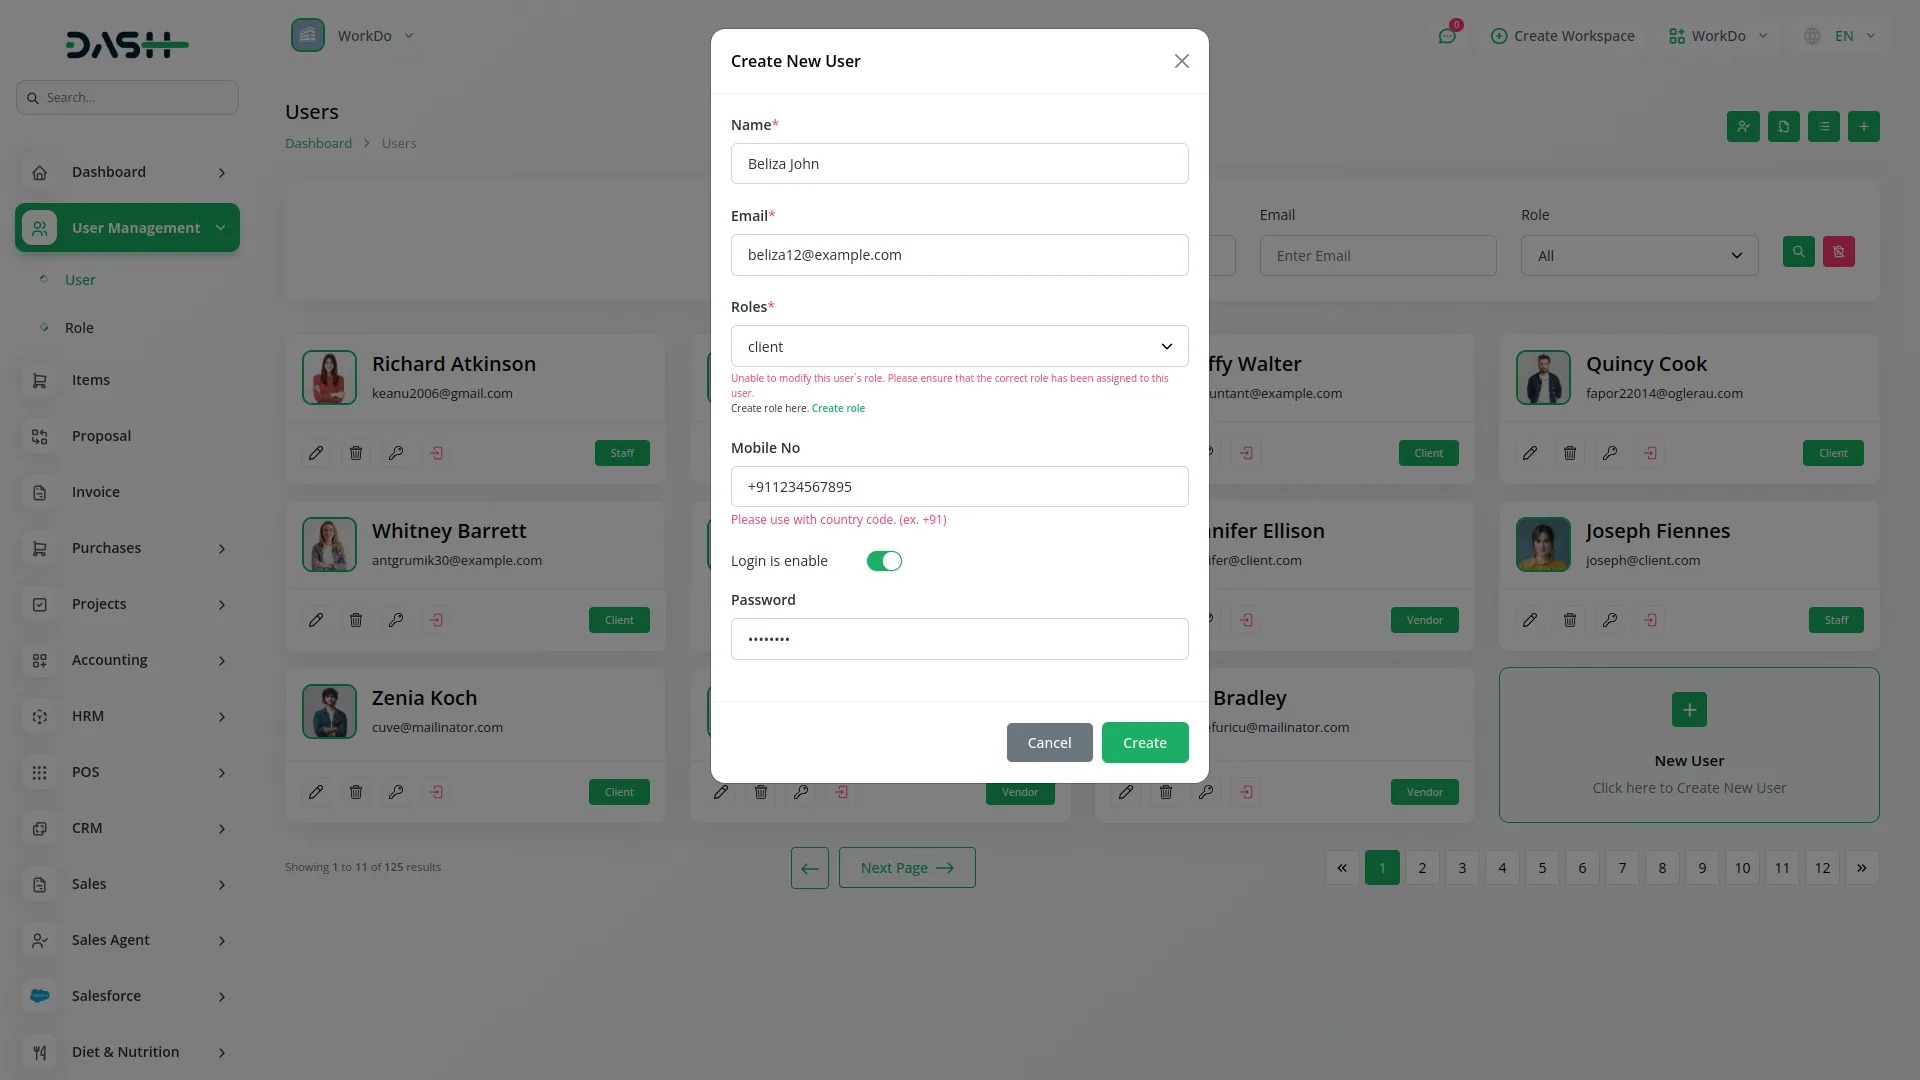
In this box, you can see the first field, Module. In this module selection box, you can see a list of add-ons that can connect to the Zapier Add-On. From this list, I choose Create User under General. Because I want to get the Create User detail using a Zapier Webhook Call.
Moving forward in this, you can see the Method fields. From this Method Selection box, you can choose the Method to connect the Zapier Webhook call, like GET or POST.
The POST Method is the most commonly used in Zapier. It is used to send data (like user info, updates, or notifications) to another server. This is perfect for tasks like creating new records in a connected app.
The GET Method is used to retrieve data or trigger an action on another server using parameters in the URL. It’s generally used when you only need to notify or fetch something without sending a lot of data. For example, pinging a service or checking a status.
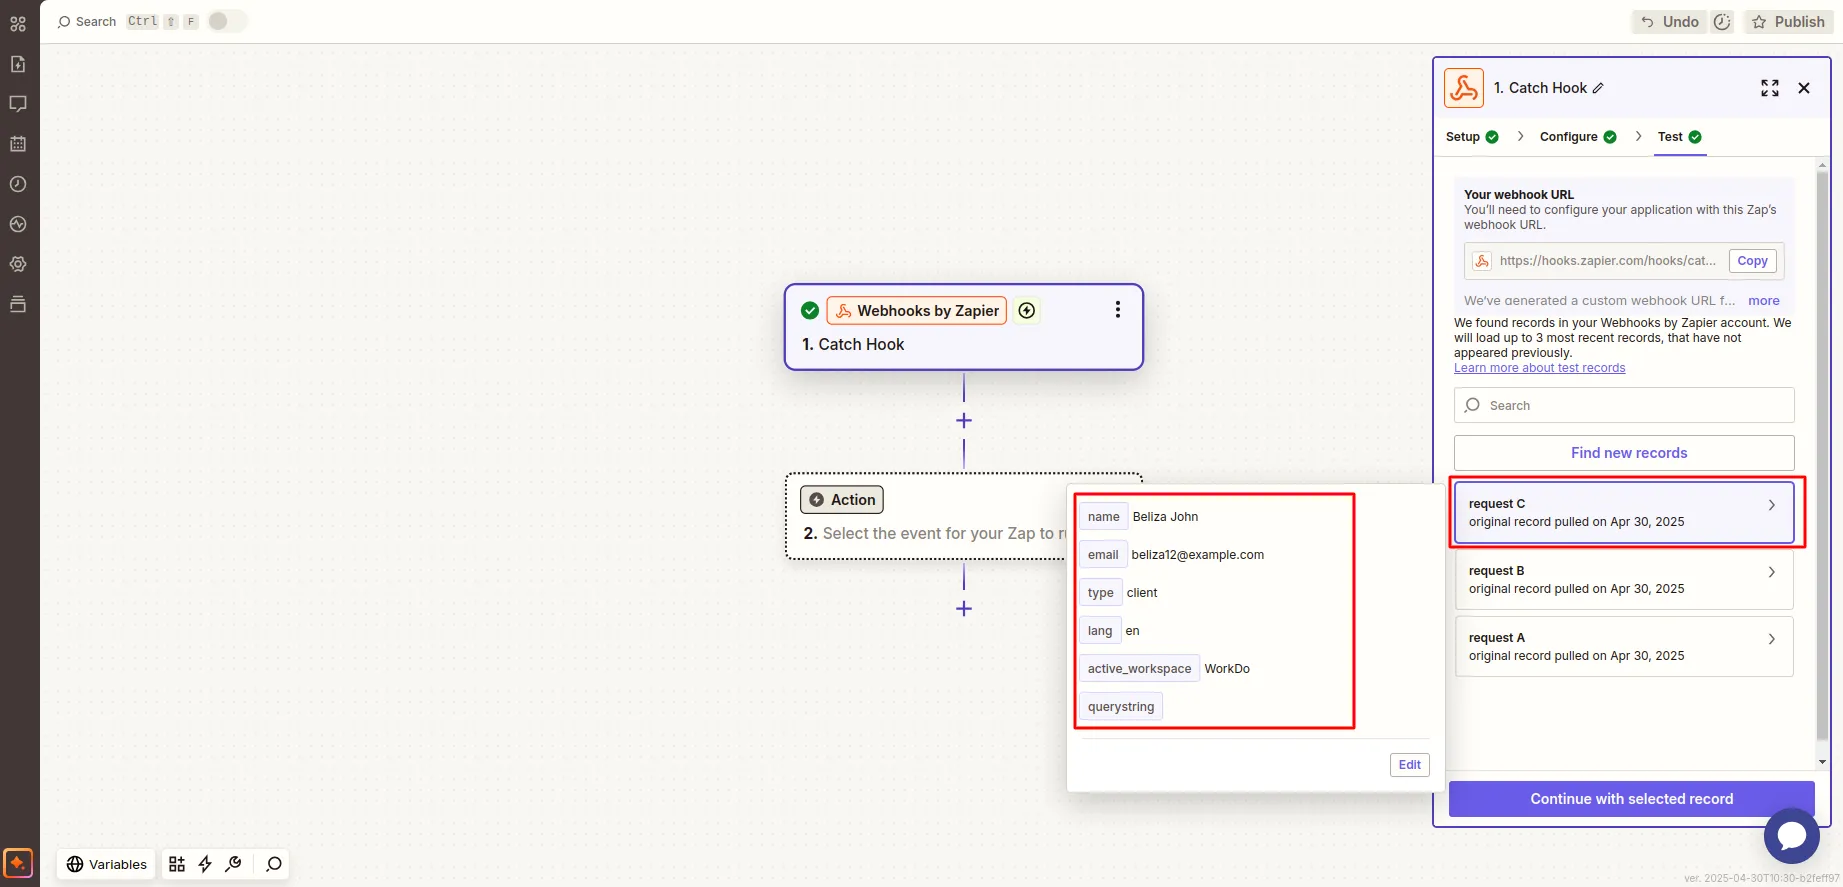
And last field, you can see the URL fields. In this field, you need to enter your Zapier Webhook URL on which you want to see the Created User details. Without this URL, you can not get a Zapier call. In this URL field, I add my webhook URL to get information about the User.
Here, I copied my Zapier webhook URL from one Zapier site, and I pasted this URL in my Zapier settings.
Note: Here is a list of some Add-Ons that we can easily connect to with the Zapier Add-On.
General
- Create User
- New Invoice
- Invoice Status Updated
- New Proposal
- Proposal Status Updated
Account
- New Customer
- New Bill
- New Vendor
- New Revenue
- New Payment
HRM
- New Award
- New Announcement
- New Holidays
- New Monthly Payslip
- New Event
- New Company Policy
Taskly
- New Project
- New Milestone
- New Task
- Task Stage Update
- New Task Comment
- New Bug
CRM
- New Lead
- New Deal
- Lead Moved
- Deal Moved
- Convert To Deal
ProductService
- New Product
Fleet
- New Driver
- New Customer
- New Vehicle
- New Booking
- New Fleet Payment
- New Insurance
- New Maintenance
- New Fuel
Sales Agent
- New Sales Agent
- New Sales Agent Program
- Sales Agent Request Accept
- Sales Agent Request Reject
- New Sales Agent Order
Hotel&Room Management
- New Hotel
- New Customer
- New Room
- New Features
- New Facilities
- New Hotel Services
- New Room Booking
- New Booking Coupon
- New Page Option
Fix Equipment
- New Asset
- New Accessories
- New Category
- New Component
- New Consumables
- New Depreciation
- New Licence
- New Location
- New Maintenance
- New Manufacturer
- New Pre Defined Kit
- New Status
- New Audit
Agriculture Management
- New Agriculture Fleet
- New Agriculture Process
- New Agriculture Equipment
- New Agriculture Claim Type
- New Agriculture Cycle
- New Agriculture Department
- New Agriculture Office
- New Agriculture Canal
- New Agriculture Season
- New Agriculture Season Type
- New Agriculture Service Product
- New Agriculture Crop
- New Agriculture User
- New Agriculture Cultivation
- Update Agriculture Cultivation Status
- Assign Cultivation Activity
- New Agriculture Activities
- New Agriculture Services
Tour & Travel Management
- New Season
- New Person Detail
- New Tour Booking
- New Tour Booking Payment
- New Tour
- New Tour Detail
- New Tour Inquiry
- New Transport Type
Property Management
- New Property
- New Property Units
- New Tenant
- New Property Invoice
- New Property Invoice Payment
Vehicle Inspection Management
- New Inspection Vehicle
- New Vehicle Inspection Request
- New Inspection List
- New Defects And Repairs
Childcare Management
- New Parent
- New Child
- New Class
- New Activity
- New Child Attendance
- Update Child Care
- New Fee
- New Fee Payment
- New Inquiry
- New Nutrition
Hospital Management
- New Specialization
- New Medicine Category
- New Bed Type
- New Ward
- New Hospital Bed
- New Doctor
- New Patient
- New Hospital Appointment
- New Hospital Medicine
- New Medical Records
Beverage Management
- New Manufacturing
- New Raw Material
- New Packaging
- New Collection Center
- New Bill of Material
- New Bill Item Material
Legal Case Management
- New Advocate
- New Case Initiator
- New Case
- New Court
- New Division
- New Expense
- New Fee Receive
- New Fee Reciept
- New Hearing
- New High Court
- New Fee Payment
Courier Management
- New Courier Branch
- New Courier Service Type
- New Courier Tracking Status
- New Courier Package Category
- New Courier
- New Courier Payment
Catering Management
- New Customer
- New Menu Selection
- New Event
- New Event Details
- New Menu Items
- New Catering Invoice
Medical Lab Management
- New Test Unit
- New Test Content
- New Lab Test
- New Lab Patient
- New Patient Card
- New Lab Request
- New Medical Appointment
Gym Management
- New Body Part
- New Diet
- New Equipment
- New Exercise
- New GYM Trainer
- New Measurement
- New Membership Plan
- New Skill
- New Workout Plan
Pharmacy Management
- New Medicine Category
- New Medicine
- New Medicine Type
- New Pharmacy Bill
- New Pharmacy Invoice
Car Dealership
- New Car Category
- New Tax
- New Dealership Product
- New Car Purchase
- New Car Purchase Payment
- New Car Sale
- New Car Sale Payment
Freight Management System
- New Freight Booking Request
- New Freight Container
- New Freight Customer
- New Freight Price
- New Freight Service
- New Freight Route
- New Freight Invoice
- Update Freight Shipping Order
- Update Freight Shipping Service
- Update Freight Shipping Container
Dairy & Cattle Management
- New Animal
- New Health
- New Breeding
- New Weight
- New Daily Milk Sheet
- New Milk Inventory
Innovation Center
- New Challenge Category
- New Creativity Stage
- New Creativity Status
- New Challenges
- New Creativity
Music Institute
- New Music Class
- New Music Lesson
- New Music Instrument
- New Music Student
- New Music Teacher
Movie Show Booking System
- New Cast Type
- New Show Type
- New Certificate
- New Movie Crew
- New Movie Cast
- New Seating Template
- New Seating Template Details
- New Movie Show
- New Movie Event
Exam
- New Exam Grade
- New Exam Hall
- New Exam Hall Receipt
- New Exam List
- New Exam Time Table
- New Manage Marks
Insurance Management
- New Insurance
- New Insurance Accept
- New Policy
- New Policy Type
- New Insurance Invoice
- New Insurance Claim
- Accept Insurance Claim
- Reject Insurance Claim
- New Insurance Claim Payment
Categories
Related articles
- Security Guard Management Integration in Dash SaaS
- Radiology Management Detailed Documentation
- PayNow Payment Gateway Integration in Dash SaaS
- How To Generate Token of Meta
- Document Template Integration in Dash SaaS
- Contract Integration in Dash SaaS
- eSewa Payment Gateway in Dash SaaS
- Legal Case Management Integration in Dash SaaS
- Form Builder Integration in Dash SaaS
- Google Forms Integration in Dash SaaS
- Sage Integration in Dash SaaS
- Queue Management Integration in Dash SaaS
Reach Out to Us
Have questions or need assistance? We're here to help! Reach out to our team for support, inquiries, or feedback. Your needs are important to us, and we’re ready to assist you!


Need more help?
If you’re still uncertain or need professional guidance, don’t hesitate to contact us. You can contact us via email or submit a ticket with a description of your issue. Our team of experts is always available to help you with any questions. Rest assured that we’ll respond to your inquiry promptly.
Love what you see?
Do you like the quality of our products, themes, and applications, or perhaps the design of our website caught your eye? You can have similarly outstanding designs for your website or apps. Contact us, and we’ll bring your ideas to life.
