Tour & Travel Management Integration in Dash SaaS
Tour and Travel Management is a comprehensive software solution designed to manage all aspects of tour and travel operations.
Introduction
Tour and Travel Management is a comprehensive software solution designed to manage all aspects of tour and travel operations. This Add-On helps travel agencies and tour operators streamline their business processes, including tour creation, booking management, customer inquiries, payment processing, and website content management. The software offers both administrative tools for managing tours, bookings, and customer data, as well as website integration features that enable customers to view tours, submit inquiries, and complete bookings online.
How to Install the Add-On?
To Set Up the Tour and Travel Management Add-On, you can follow this link: Setup Add-On.
How to Use The Tour and Travel Management Add-On?
Tour and Travel Management Dashboard
- Once you purchase and install the Add-On, the first step is to go to the sidebar and search for the Tour and Travel Management Add-On to access its features.
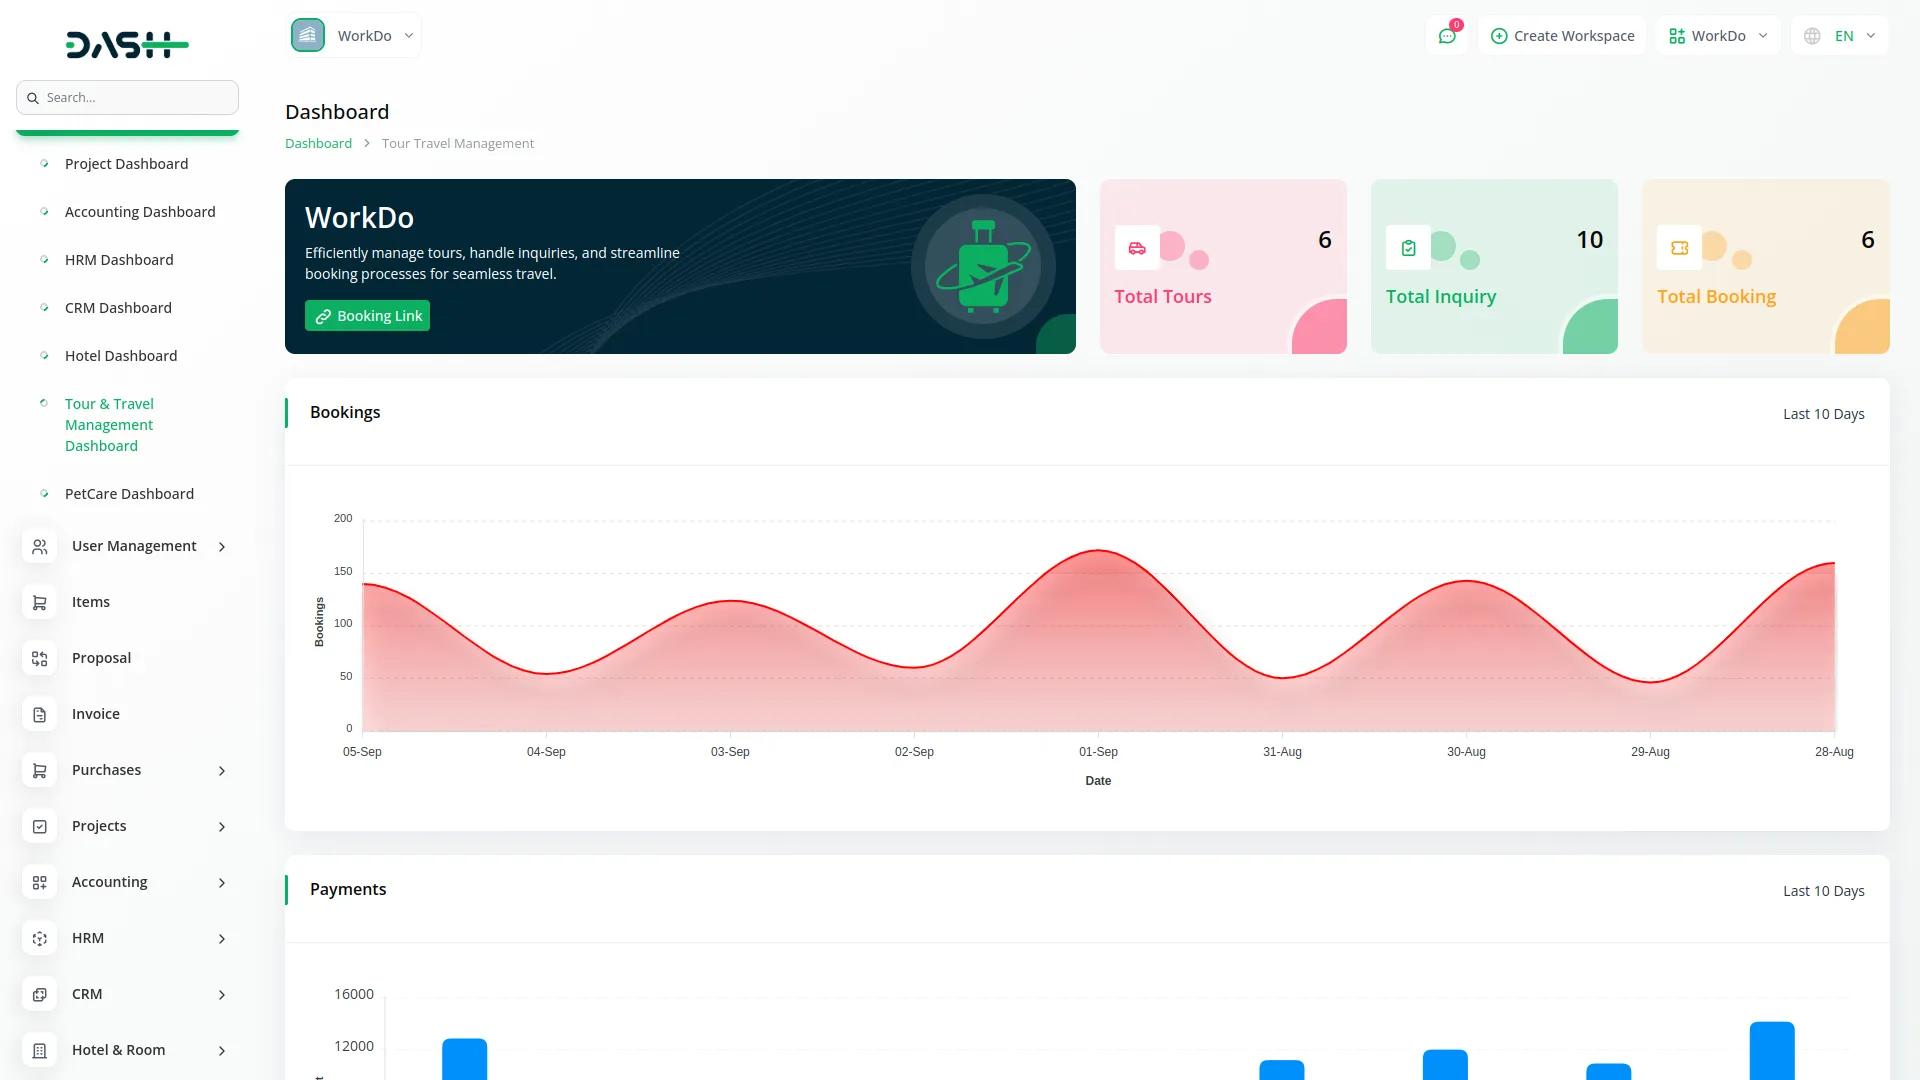
- The dashboard provides a quick overview of your business performance with essential metrics and tools. You will find a Booking Link feature that allows you to copy your booking link for easy sharing with customers.
- The dashboard displays three important cards showing Total Tours, Total Inquiry, and Total Booking counts, giving you an instant view of your business activity.
- Two interactive charts are available to track your business trends – the Tour Bookings chart shows booking patterns for the last 10 days, while the Payments chart displays payment trends over the same period, helping you monitor financial performance and booking patterns effectively.
Setting – System Setup
Tour Season
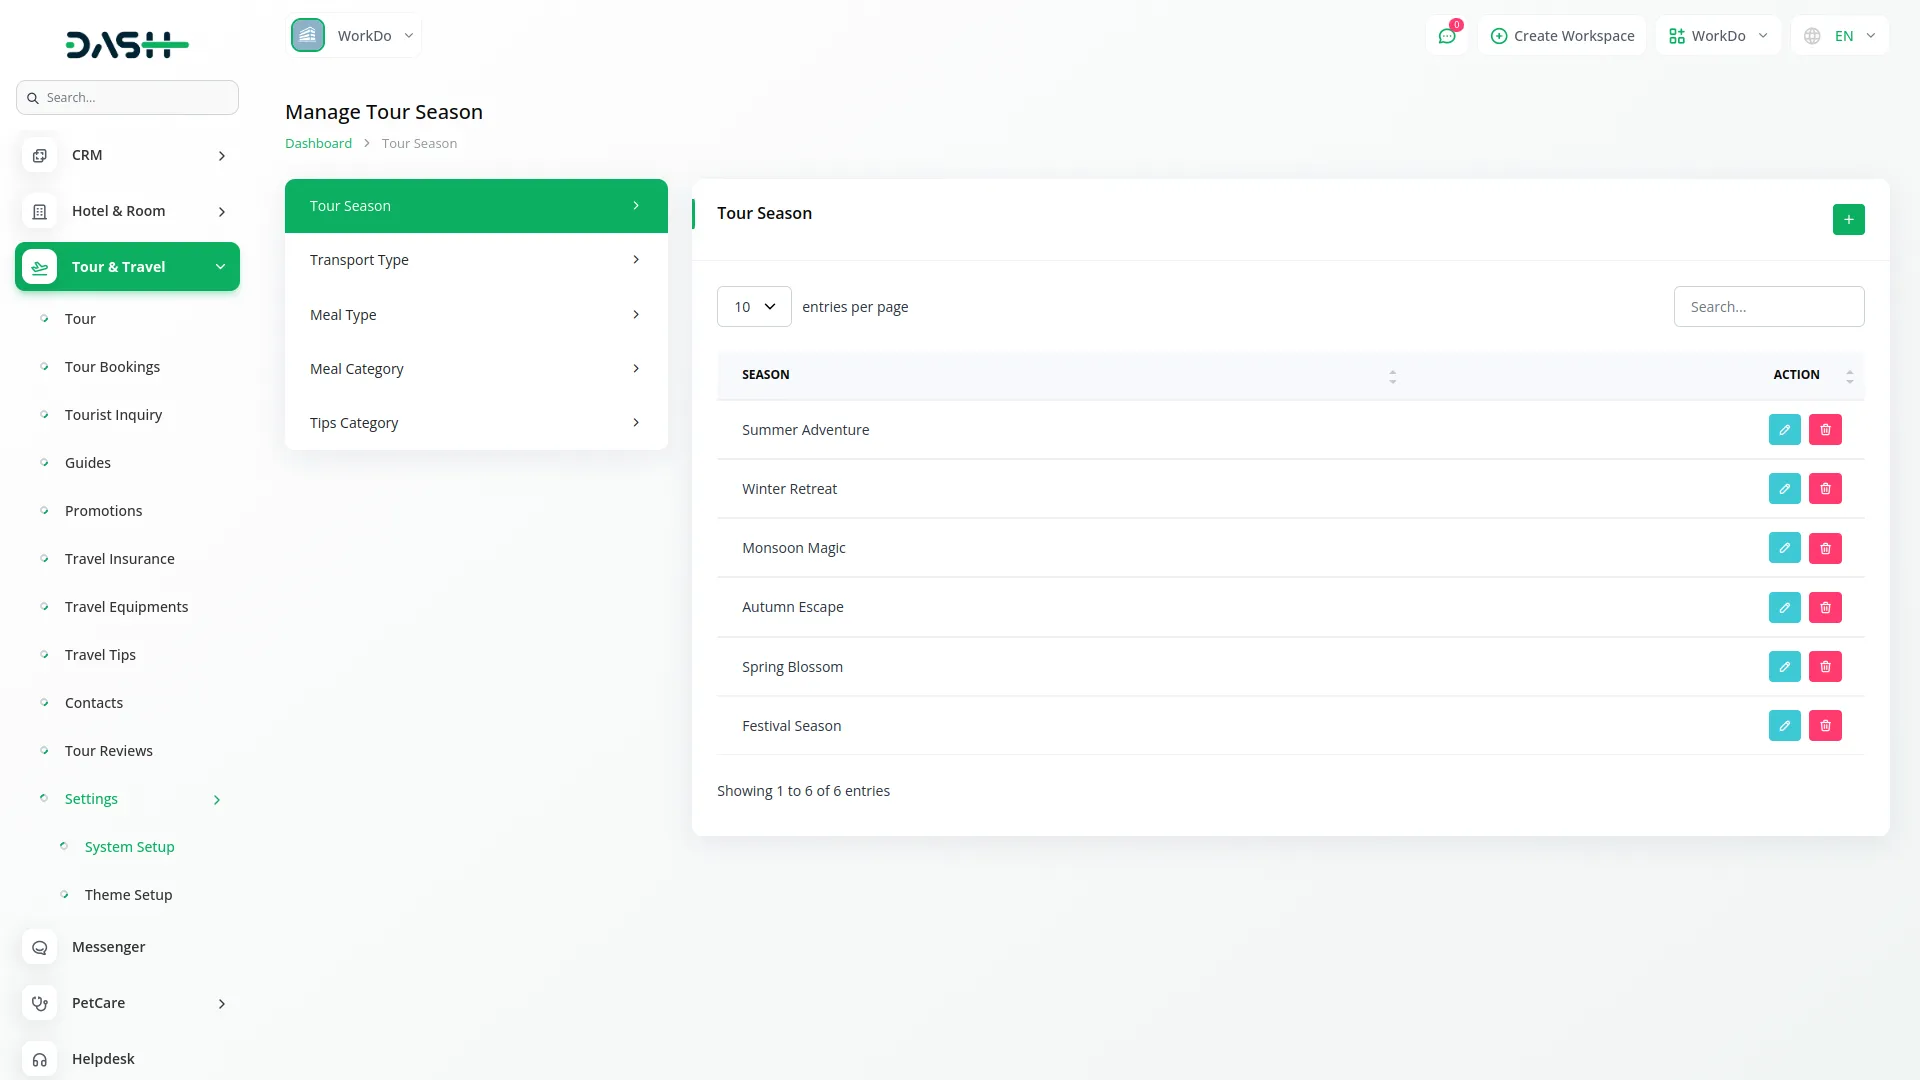
- To add a new tour season, click the “Create” button. Enter the Season Name in the provided field.
- The list page displays all seasons in a table with the Season Name column. You can search through existing seasons and perform actions like Edit to modify season details or Delete to remove seasons that are no longer needed.
- These tour seasons will be available for selection when creating tour dates in the Tour section.
Transport Type
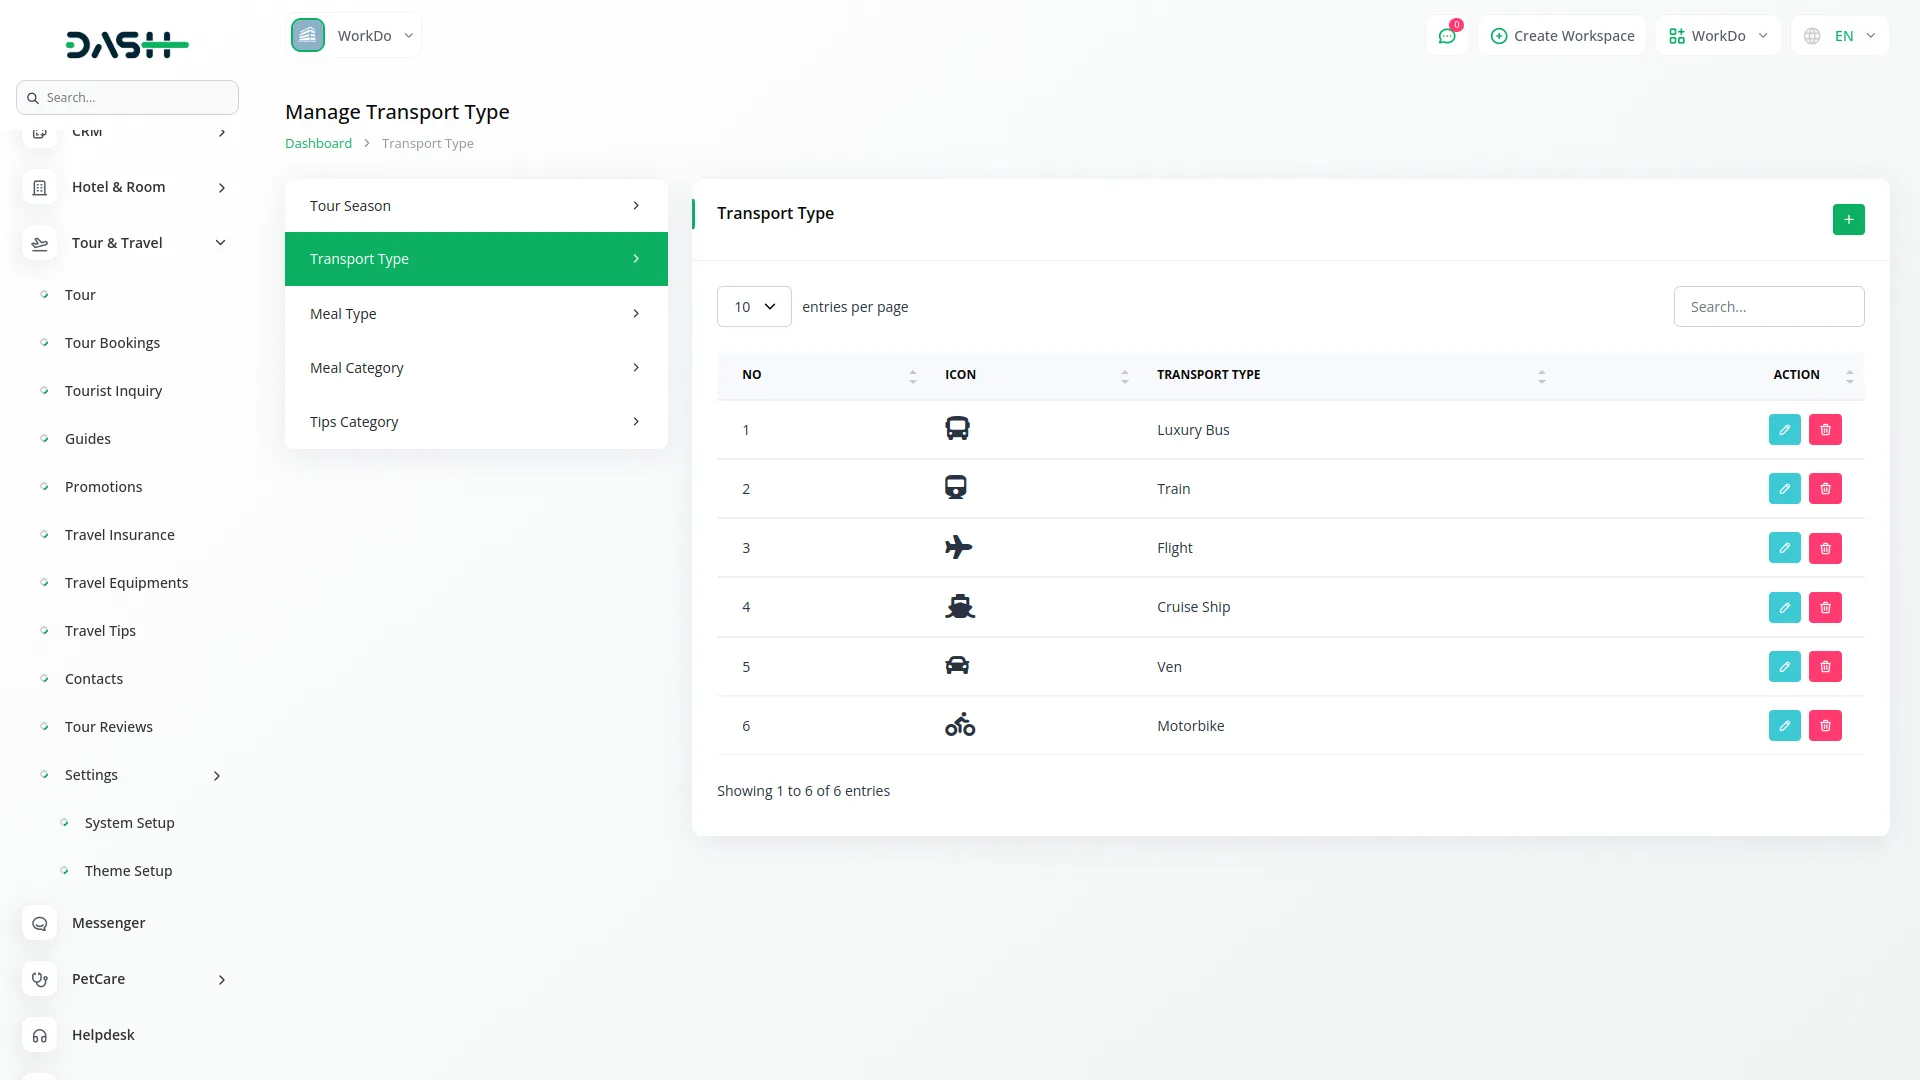
- To create a new transport type, click the “Create” button. Choose an appropriate icon from the various transport type icons available, then enter the Transport Type name.
- The list page shows all transport types with columns for Transportation Icon and Transportation Name. You can easily identify transport options through their visual icons and perform actions like Edit to update details or Delete to remove transport types.
- Once saved, these transport types will be available for selection in the Tour section when setting up tour transportation options.
Meal Type
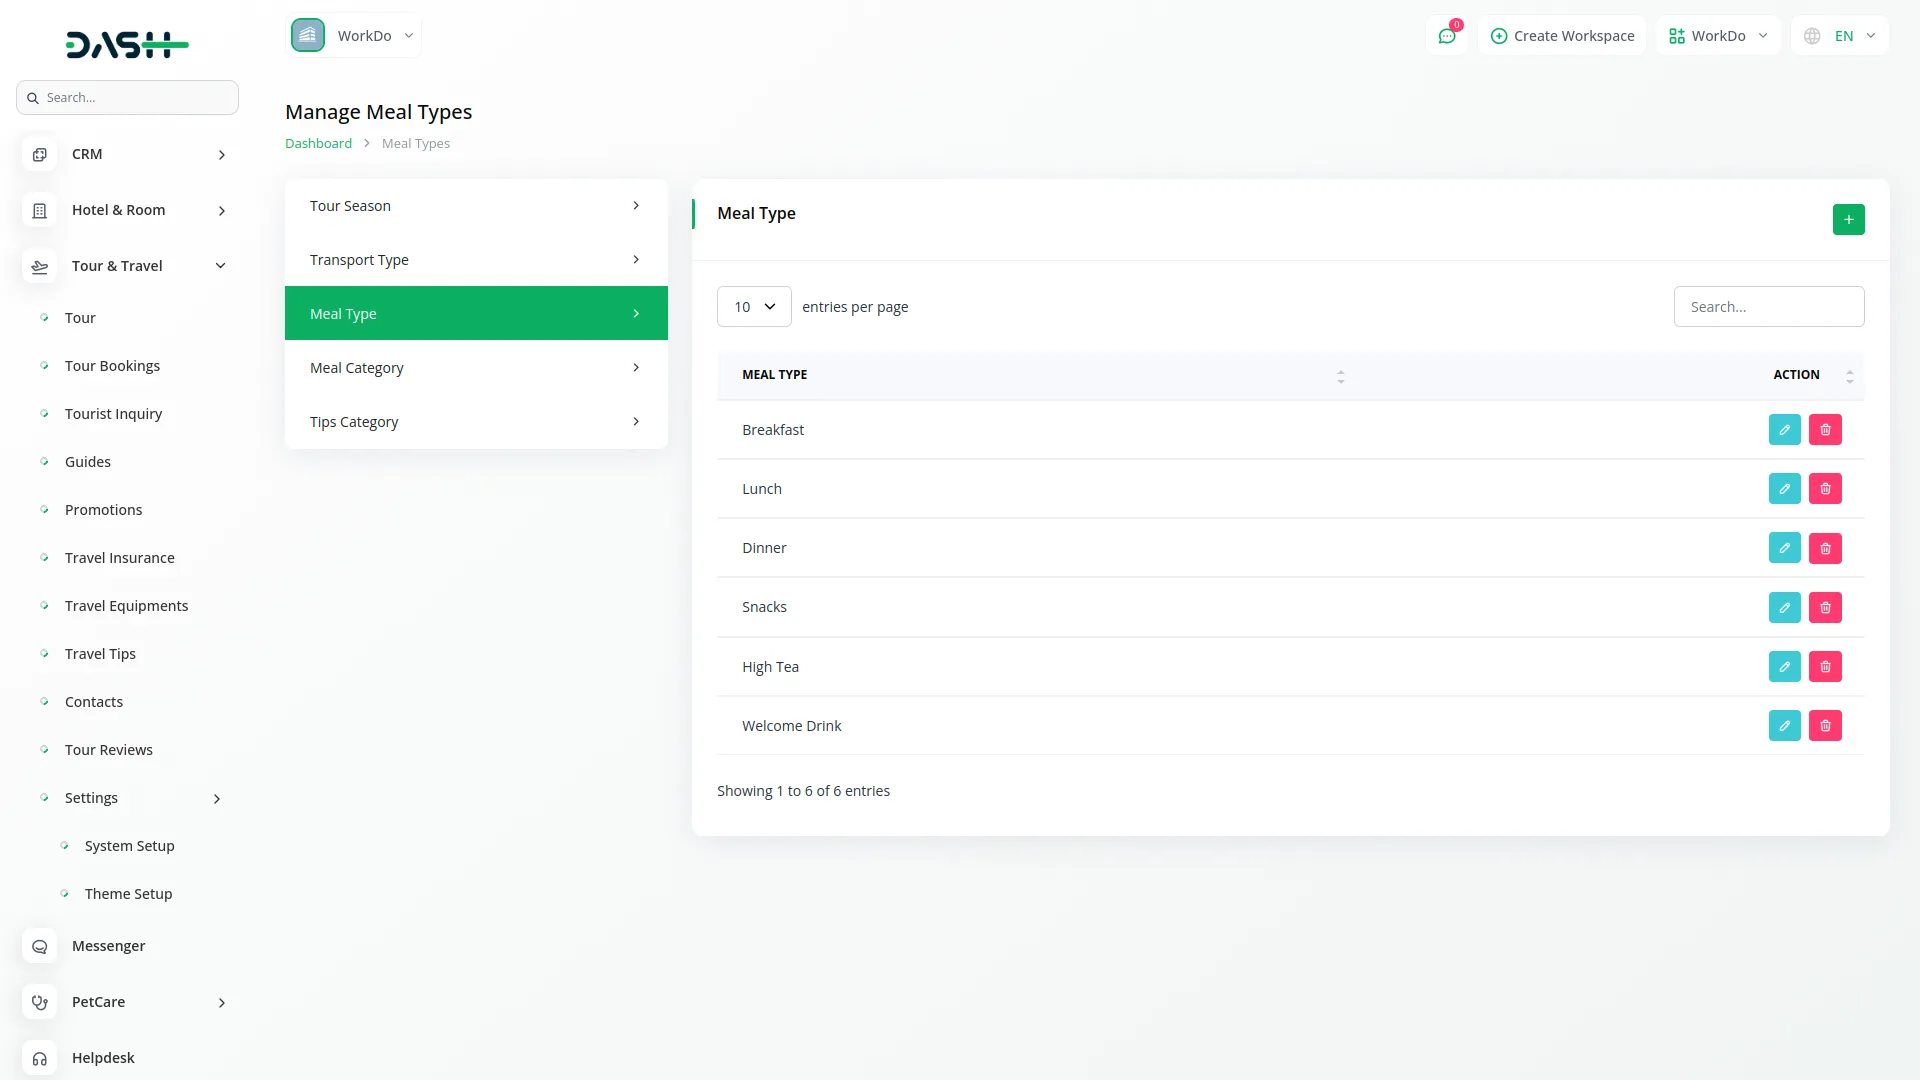
- To add a new meal type, click the “Create” button. You need to enter the Meal Type Name.
- The list page displays all meal types in a table showing the Meal Type Name column. You can search existing meal types and use actions like Edit to modify meal type details or Delete to remove them.
- These meal types will be available when setting up travel meals for specific tours, helping you categorize different meal options for travelers.
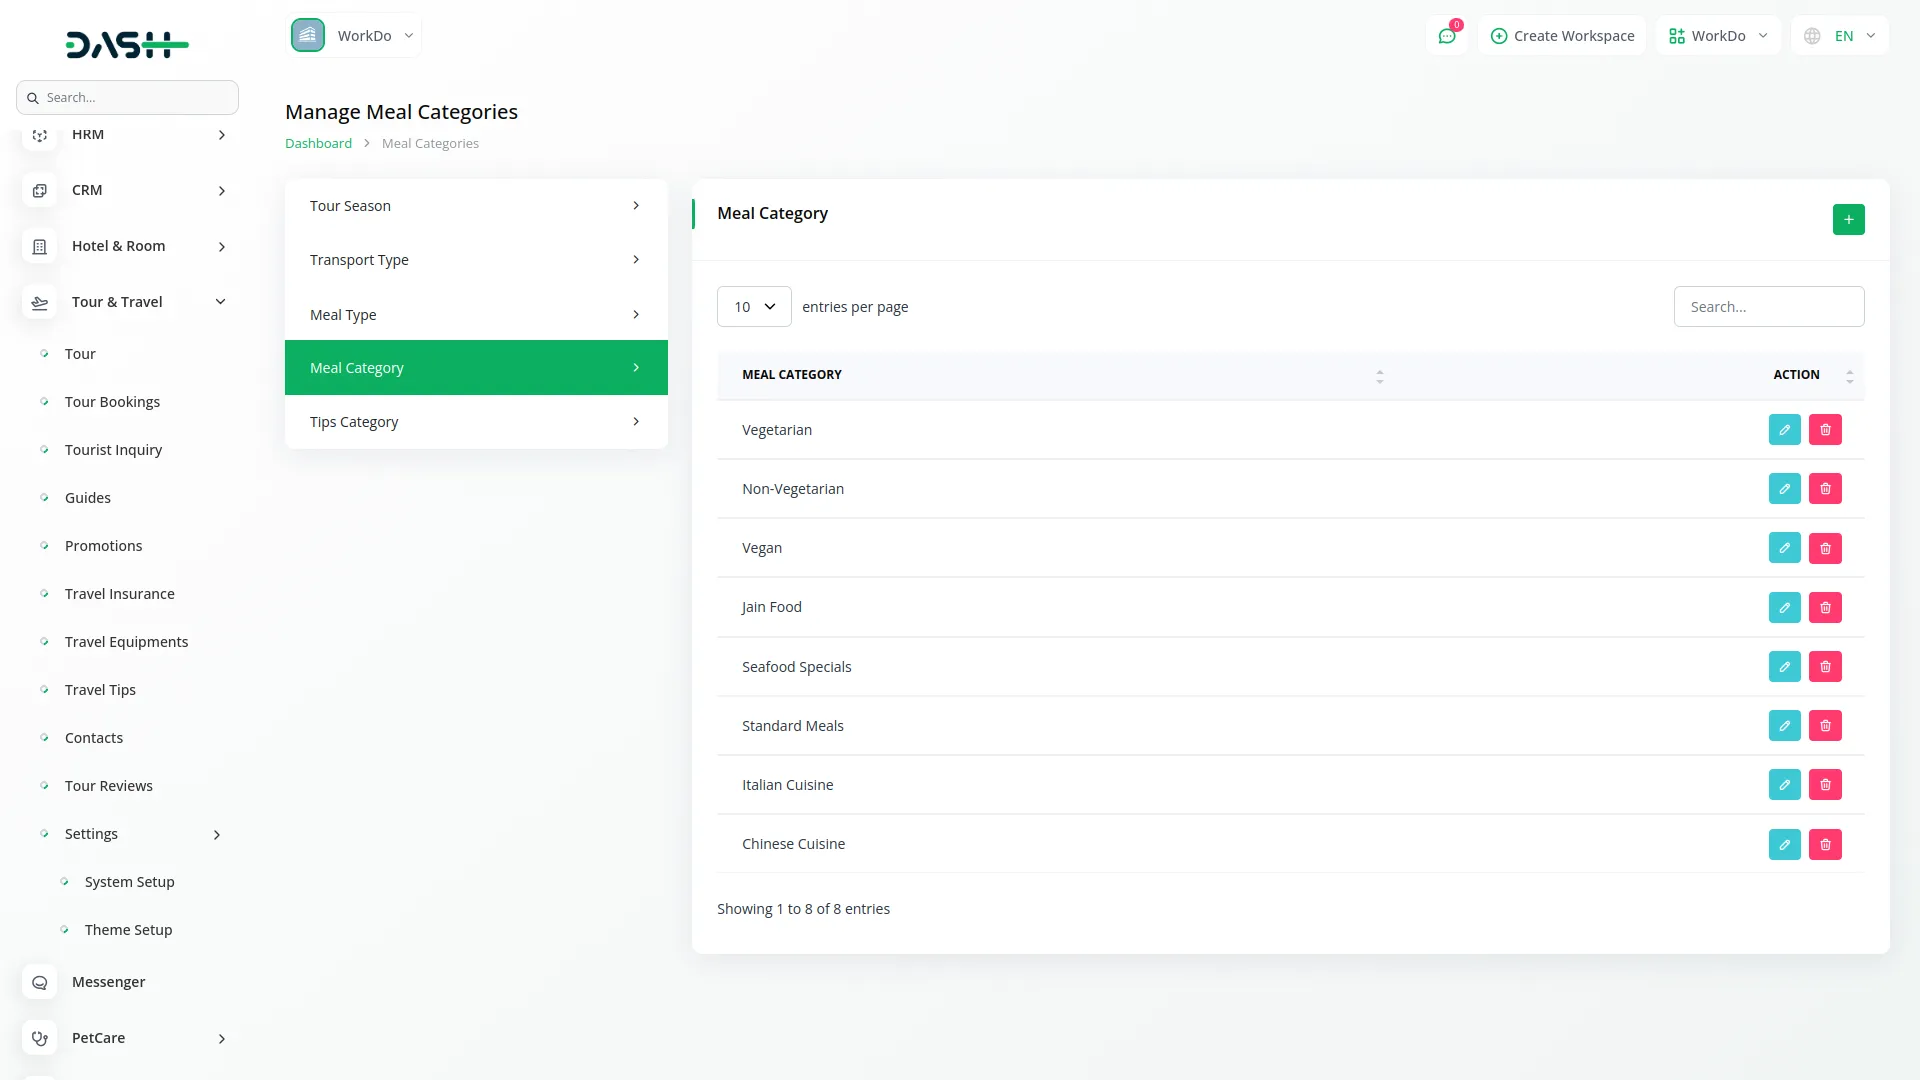
Meal Category
- To create a meal category, click the “Create” button. Fill in the Meal Category Name field.
- The list page shows all categories with the Meal Category Name column displayed. You can perform actions like Edit to update category information or Delete to remove unnecessary categories.
- Meal categories work together with meal types to provide detailed meal organization when planning travel meals for tours.
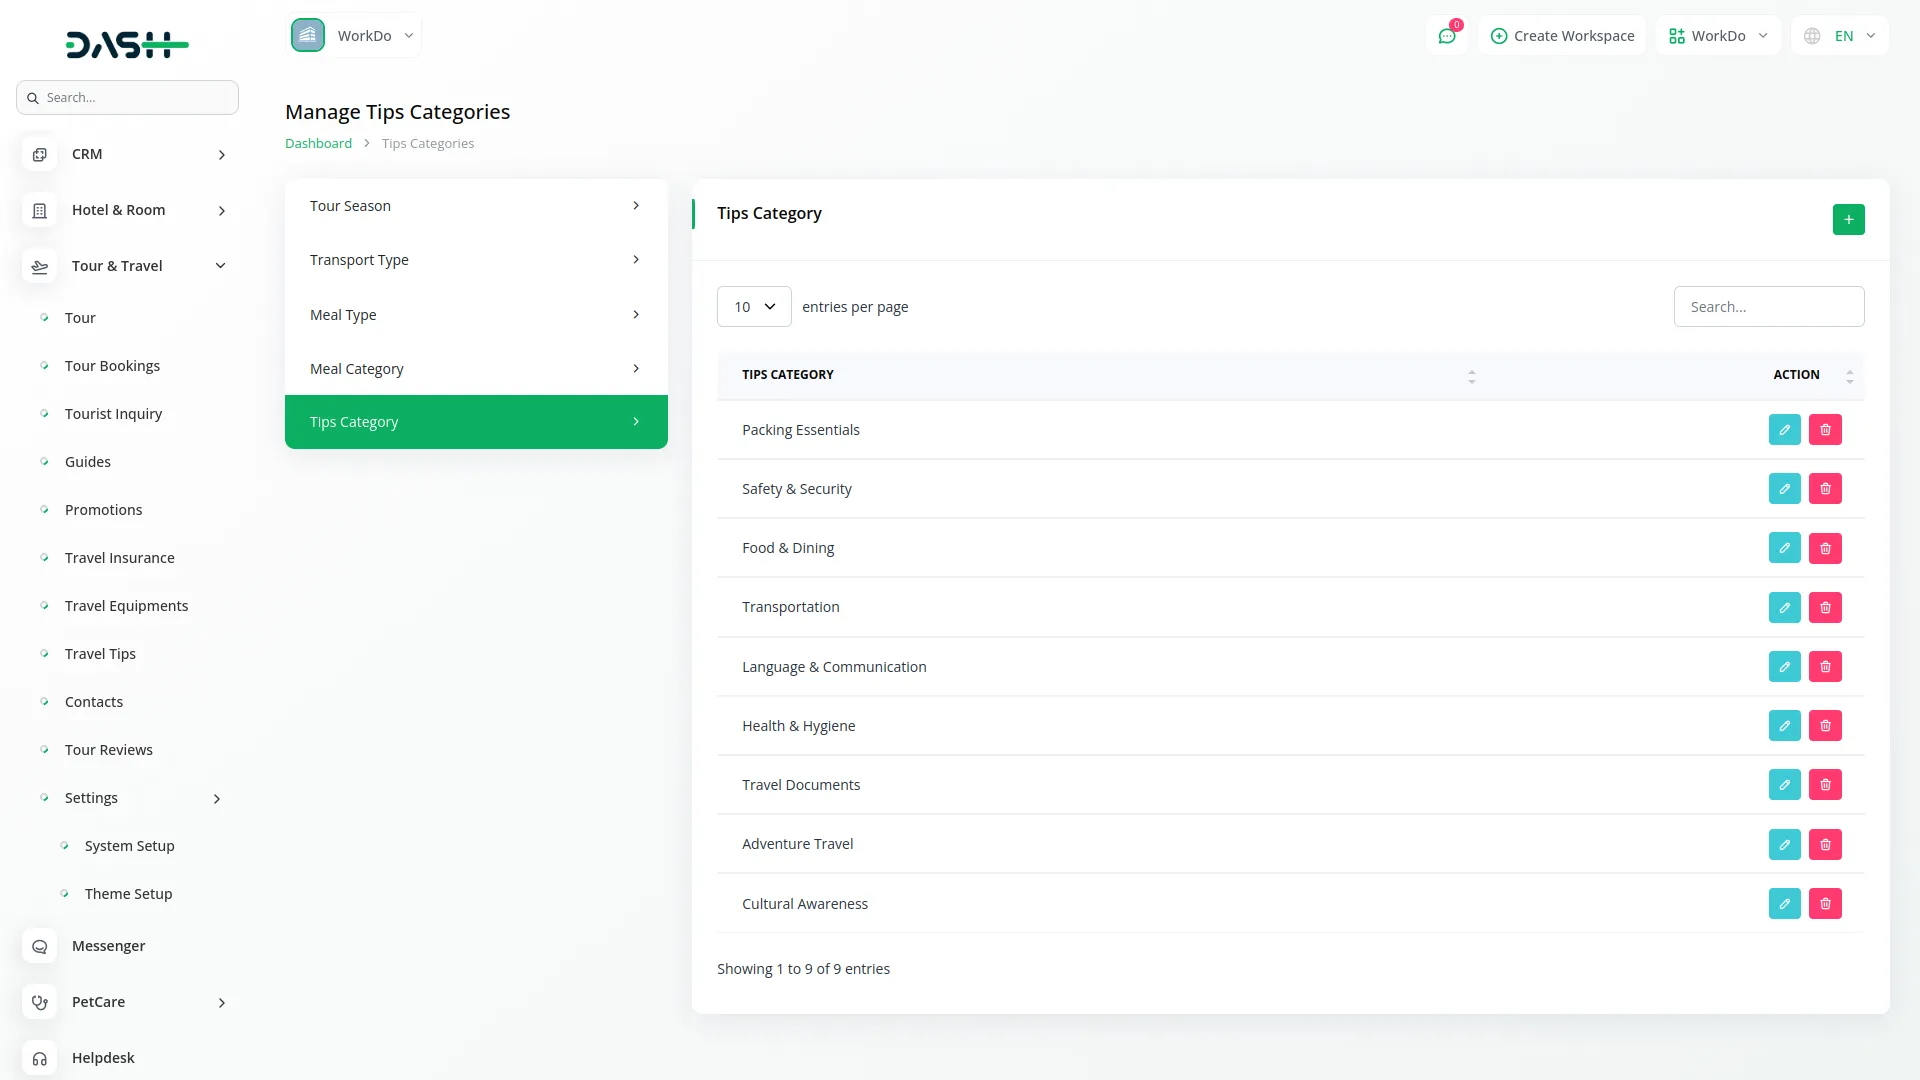
Tips Category
- To add a tips category, click the “Create” button. Enter the Tips Category Name in the form.
- The list page displays all tip categories in a table with the Tips Category Name column. Available actions include Edit for updating category details and Delete for removing categories.
- These tip categories will be used in the Travel Tips section to organize travel advice and recommendations by specific categories for better content management.
Setting – Theme Setup
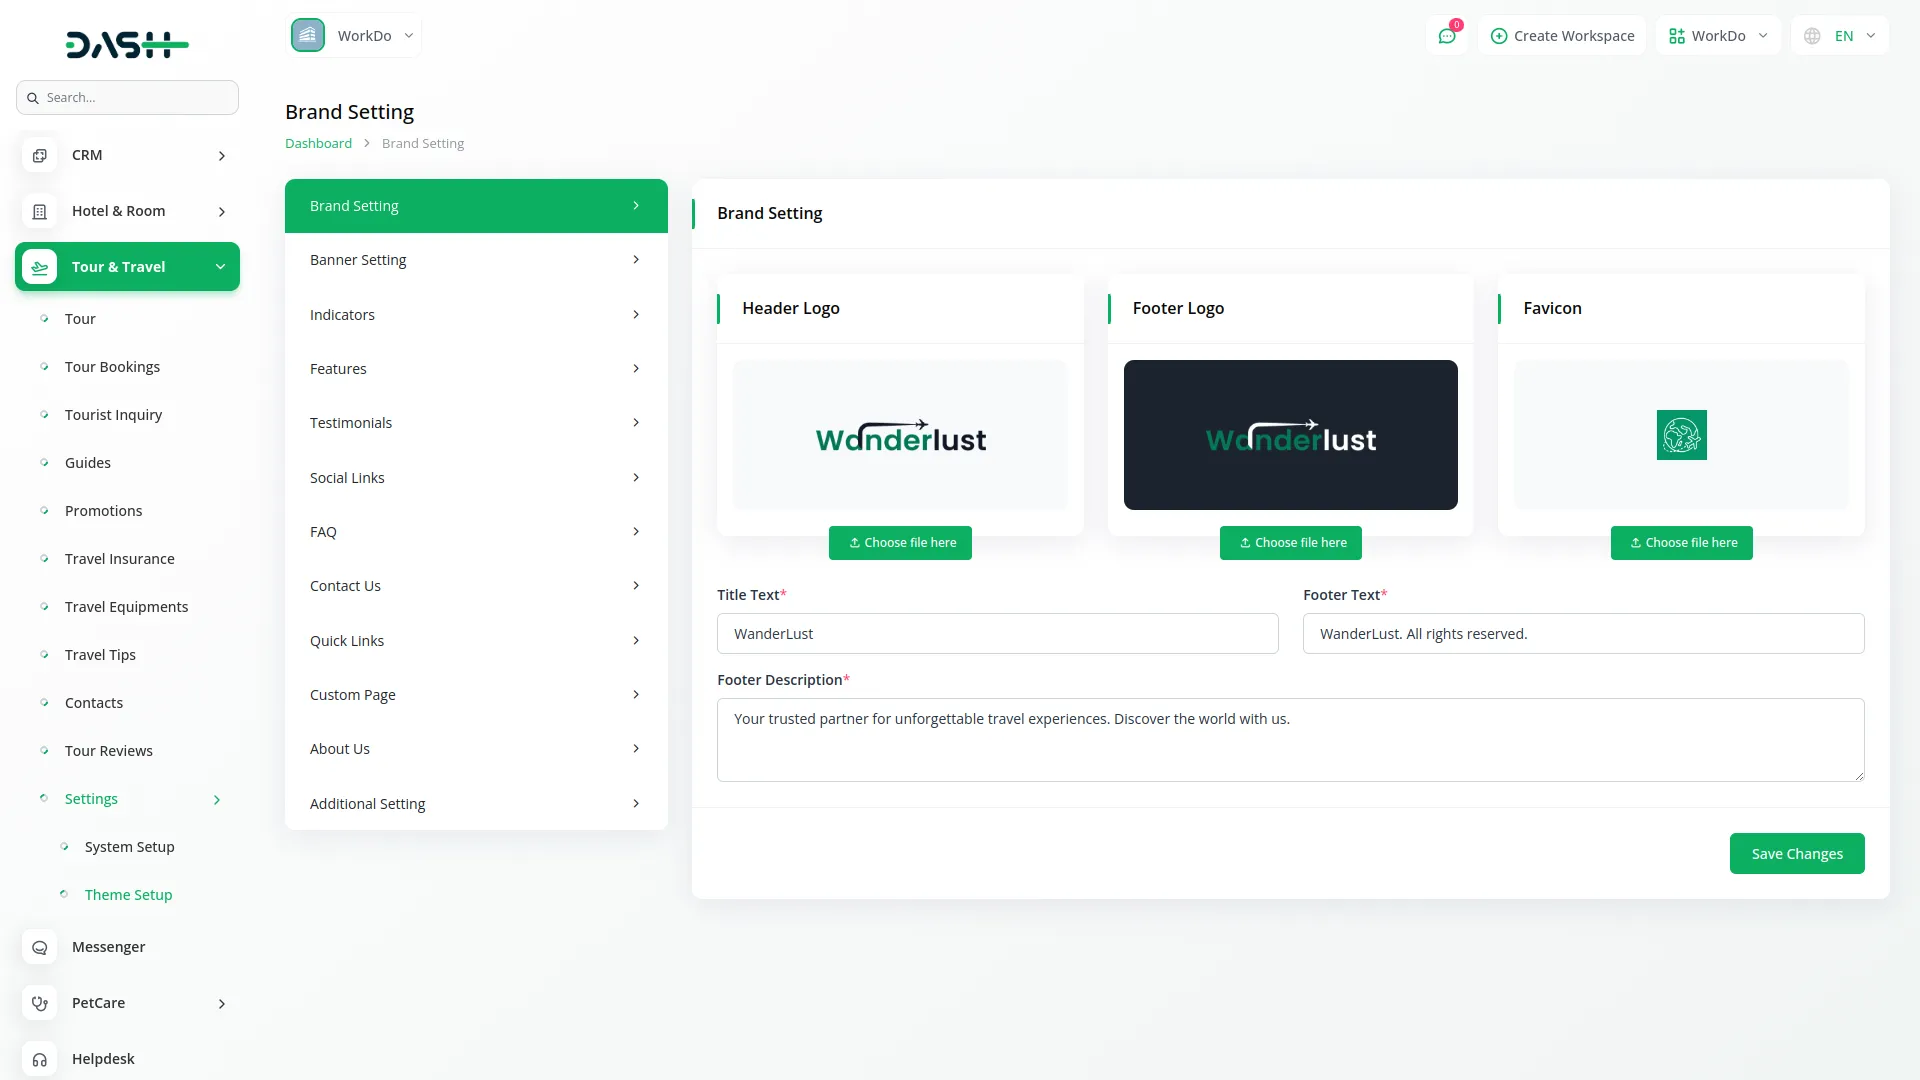
Brand Setting
- In the Brand Setting section, you will find fields for Logo (header & footer), Favicon (website), Footer Description, Title Text, and Footer Text (for the last footer text copyright sentence). Enter all the relevant details for your brand.
- Once saved, your Logo will appear in both the header and footer sections across your booking website, while the Favicon will display in browser tabs. The Title Text, Footer Text, and Footer Description will automatically appear in their respective sections on your frontend booking page, creating a professional and branded experience for your customers.
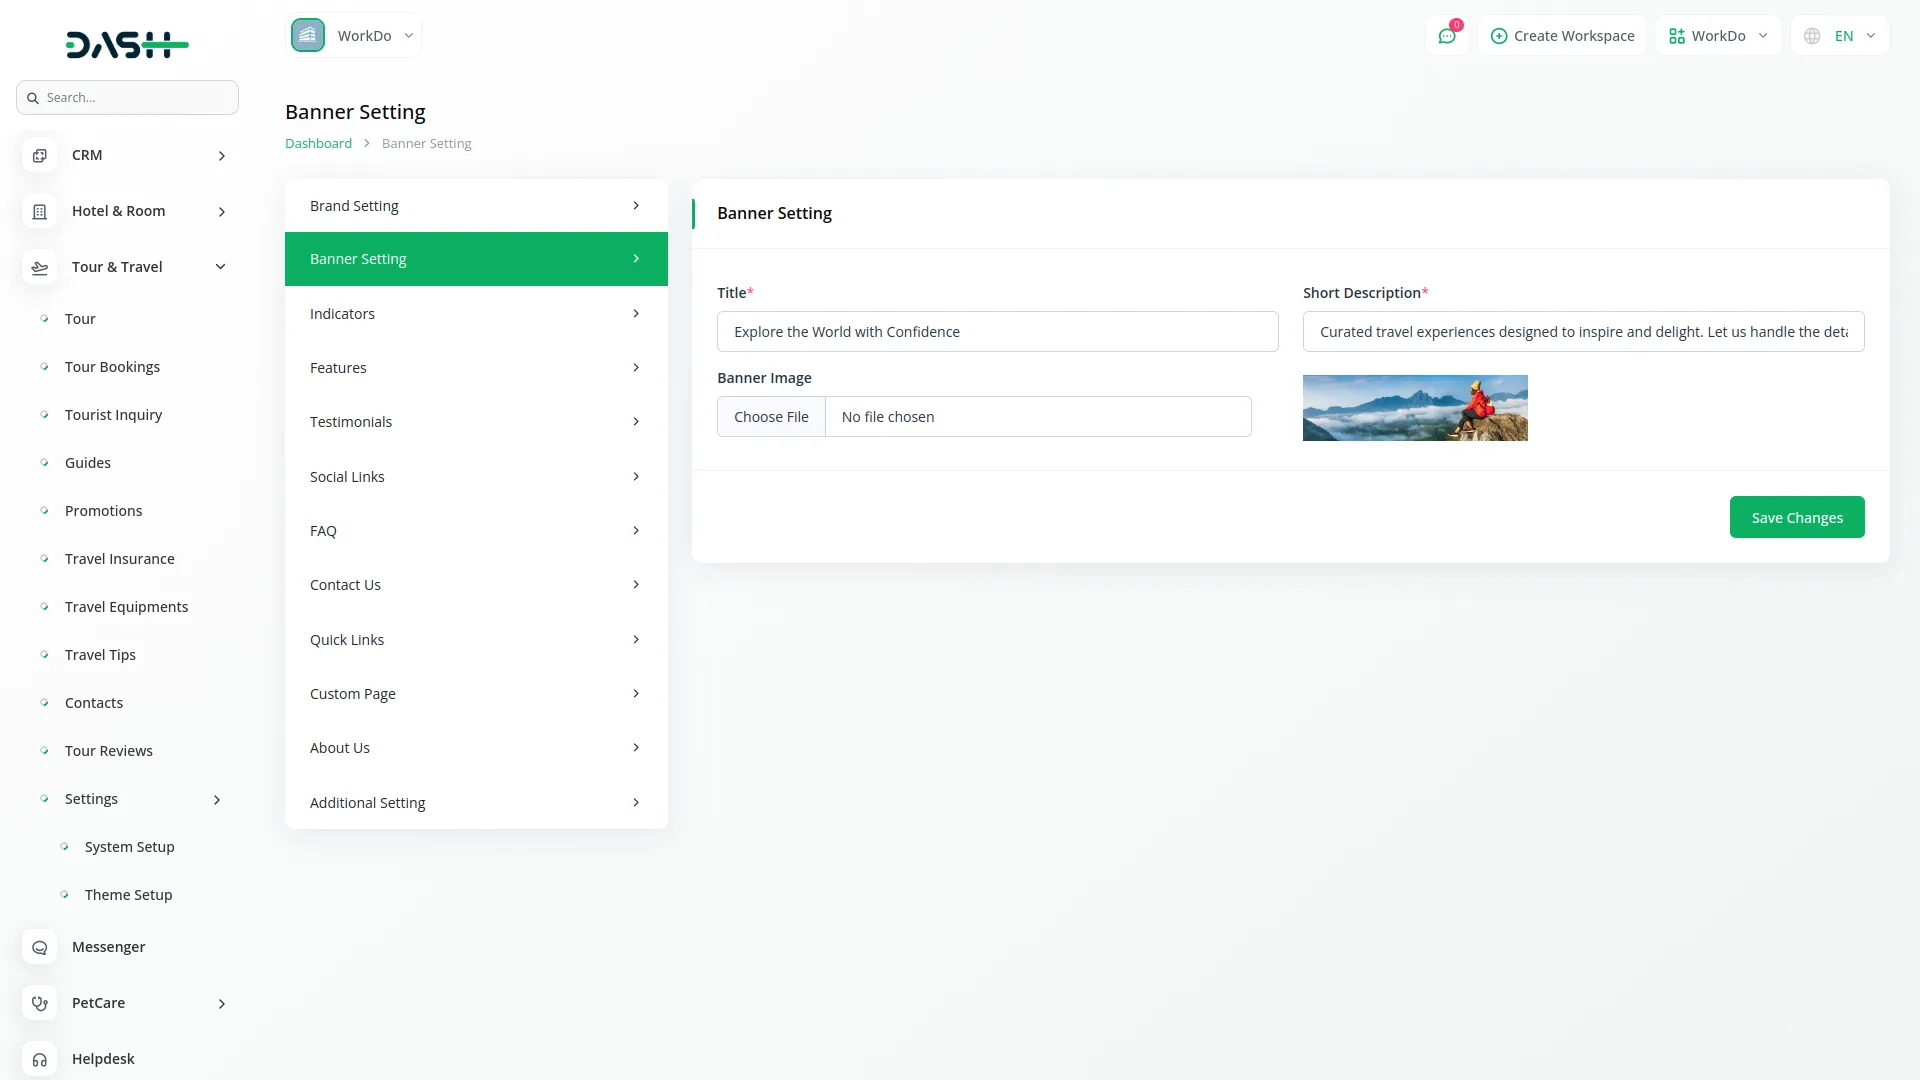
Banner Setting
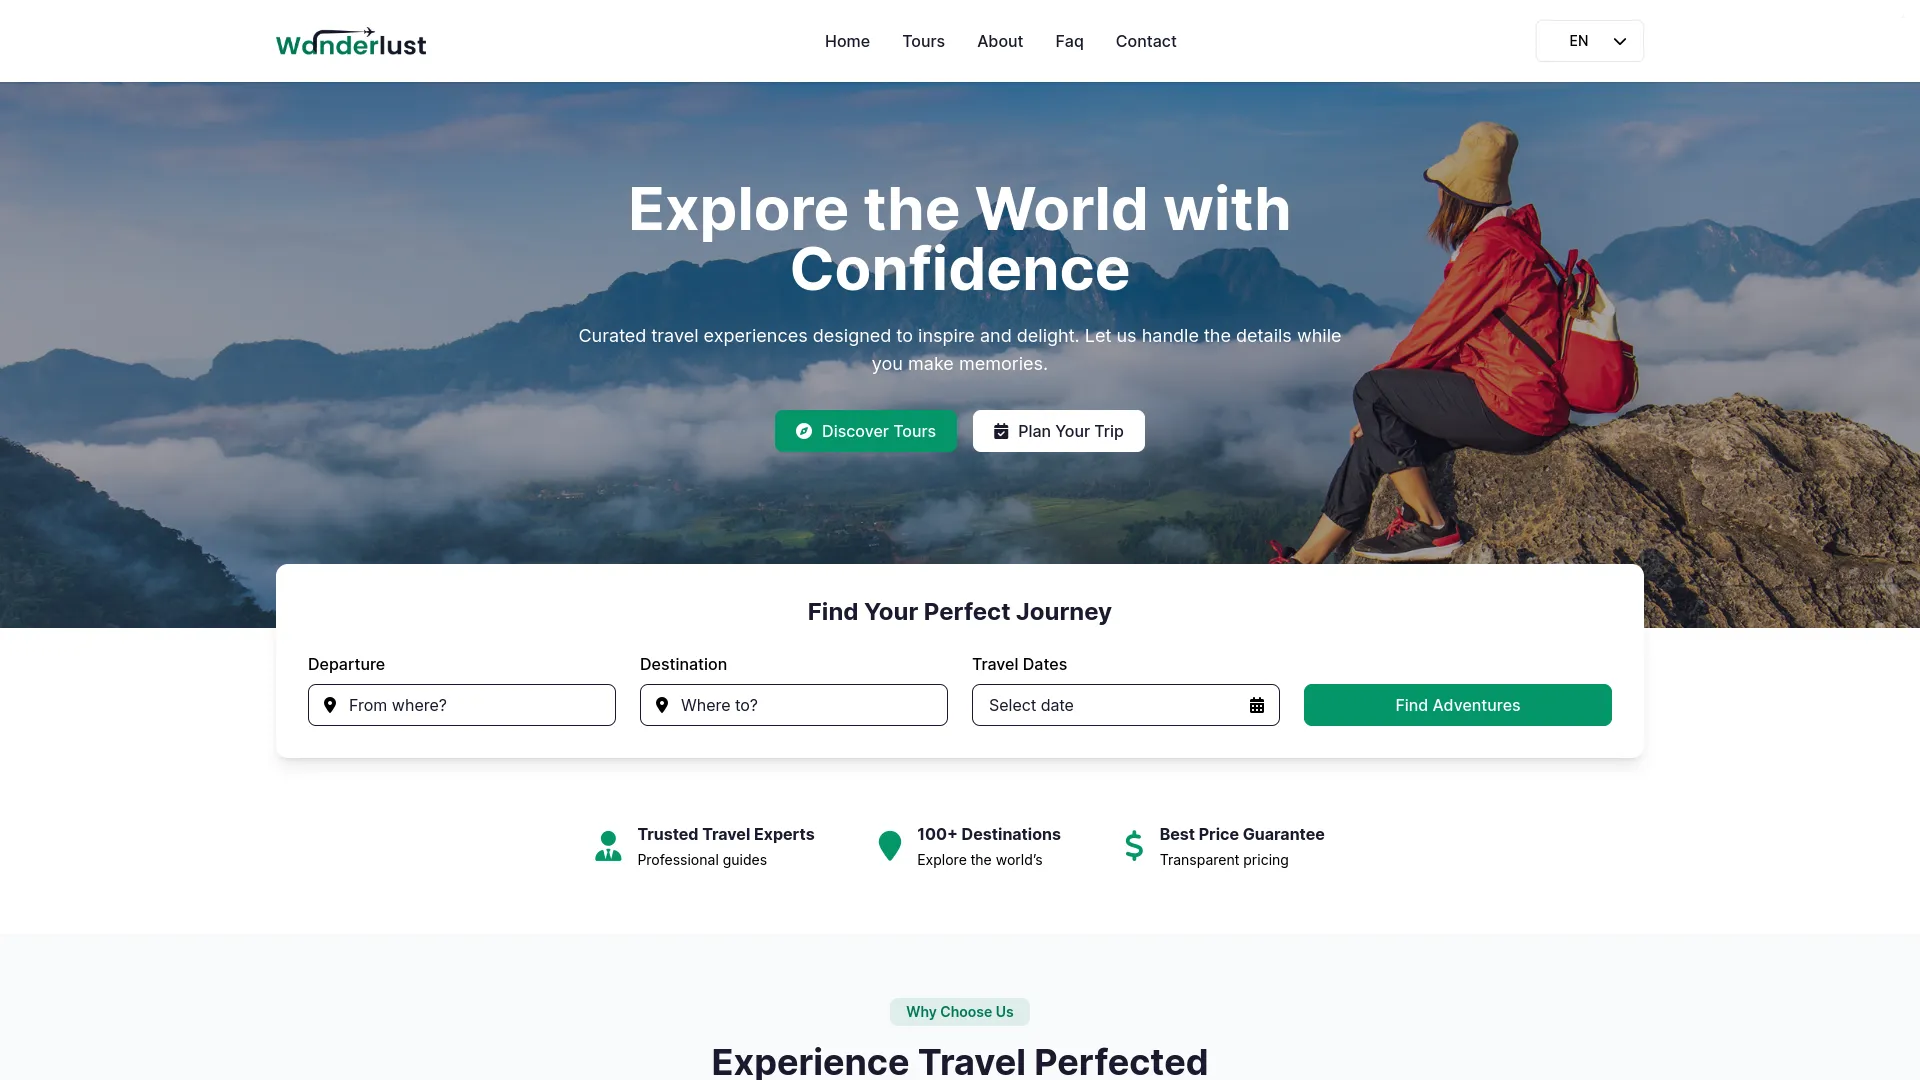
- In the Banner Setting section, you will find fields for Title, Short Description, and Banner Image. And at last, enter the details.
- Once saved, the entered Title, Short Description, and Banner Image will automatically appear in the banner section on your website’s homepage, giving visitors an attractive first impression and a clear understanding of your tour services.
Indicators
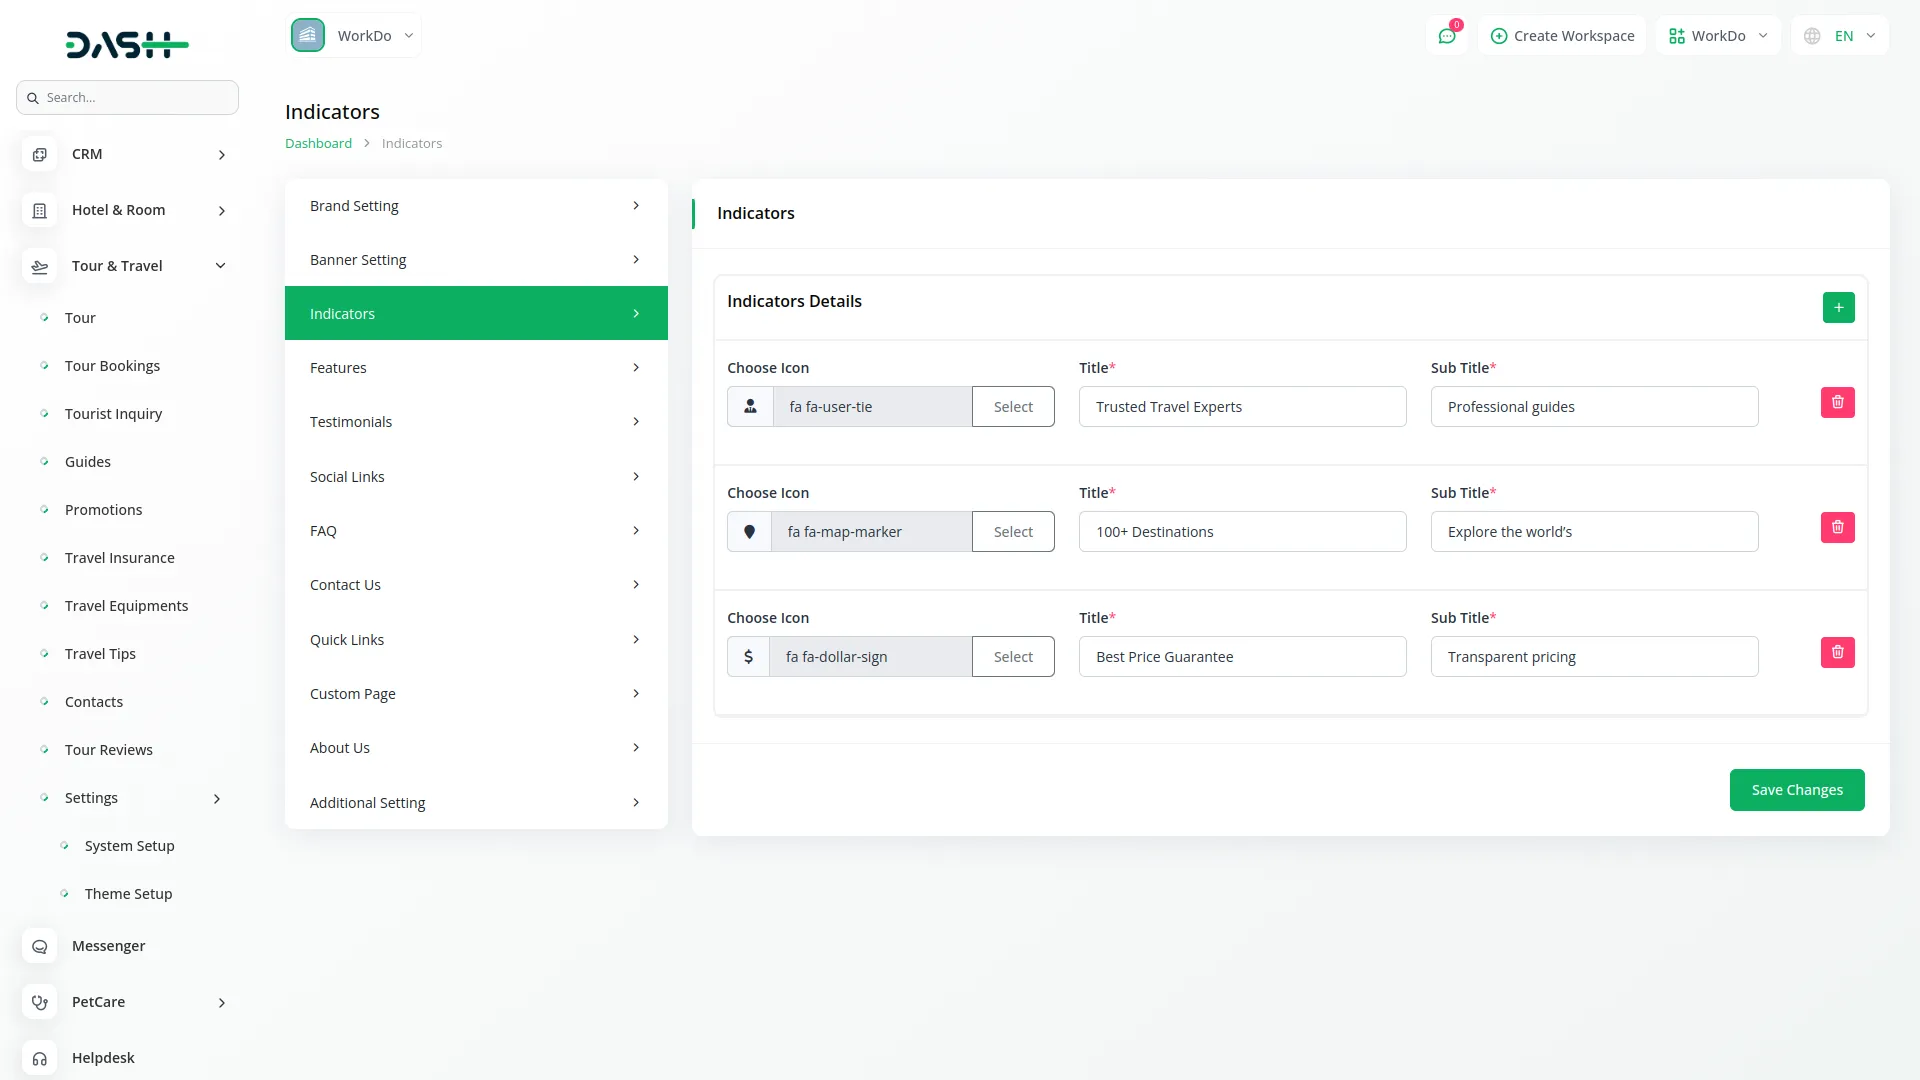
- To set up indicators for your homepage, enter the Tagline Label, Heading Title, and Sub Title in the main section. Then use the repeater feature to add multiple indicators by choosing appropriate icons from various indicator icons available and entering the Title and Sub Title for each indicator.
- Once configured, all indicators will be displayed in the indicators section on your website’s homepage, showcasing key features or statistics about your tour services in a visually appealing format.
Features
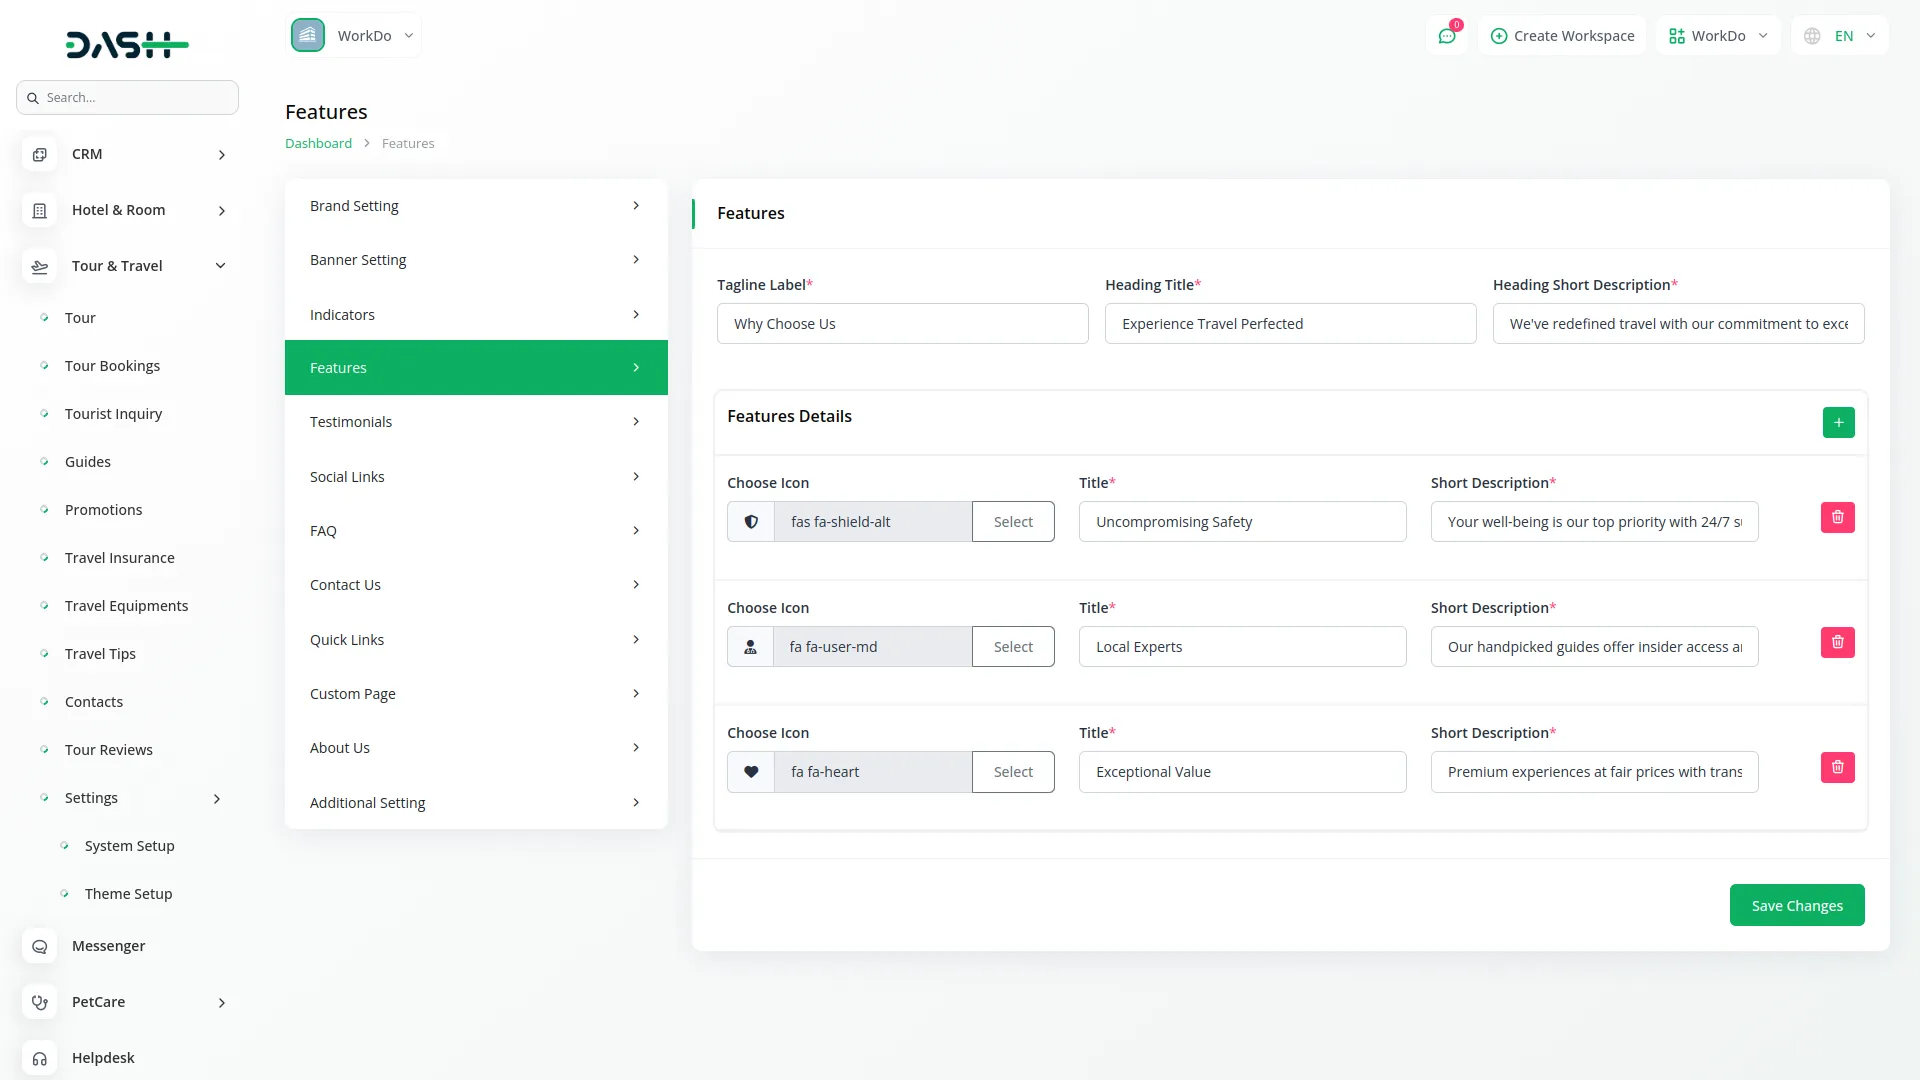
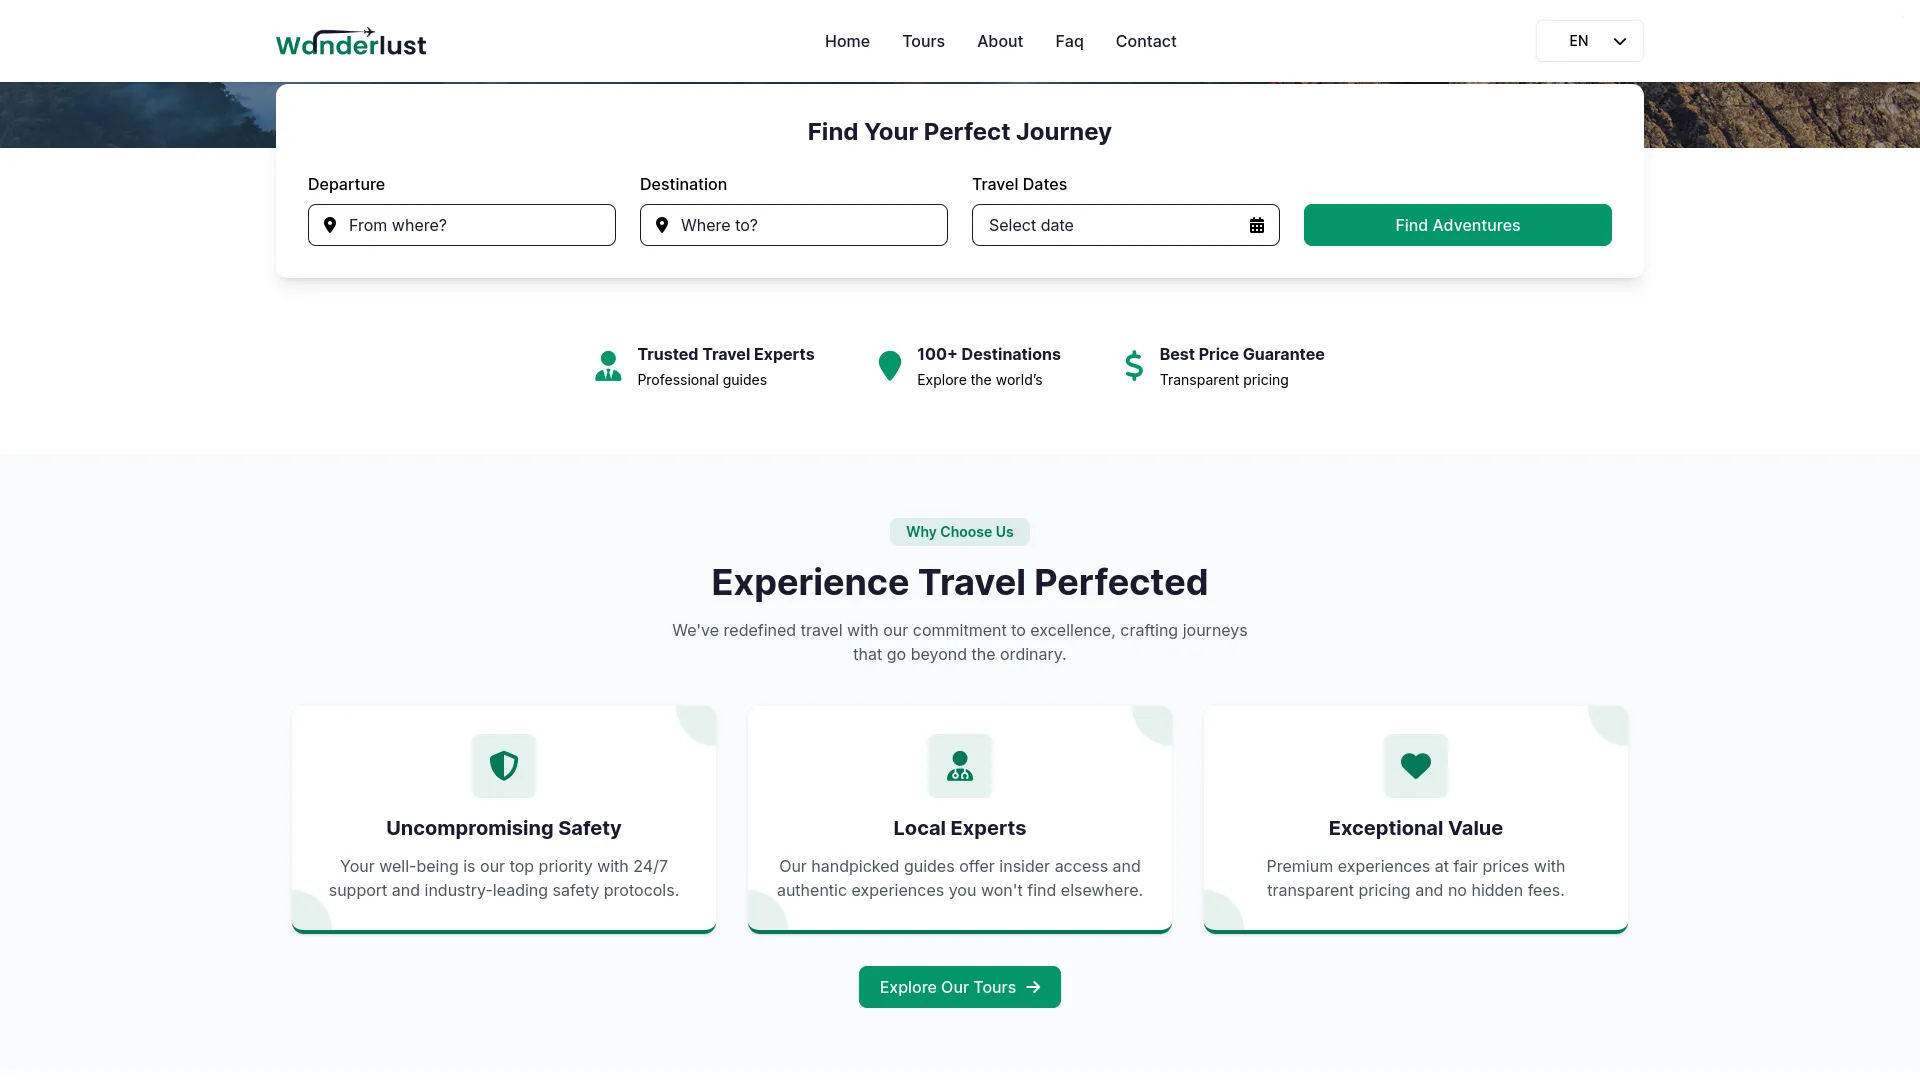
- Start by entering the Tagline Label, Heading Title, and Heading Short Description for the features section. Then use the repeater to add multiple features by selecting icons from various feature icons available and entering the Title and Short Description for each feature.
- After saving, all configured features will be displayed in the features section on your website’s homepage, highlighting the key benefits and services you offer to potential customers.
Testimonials
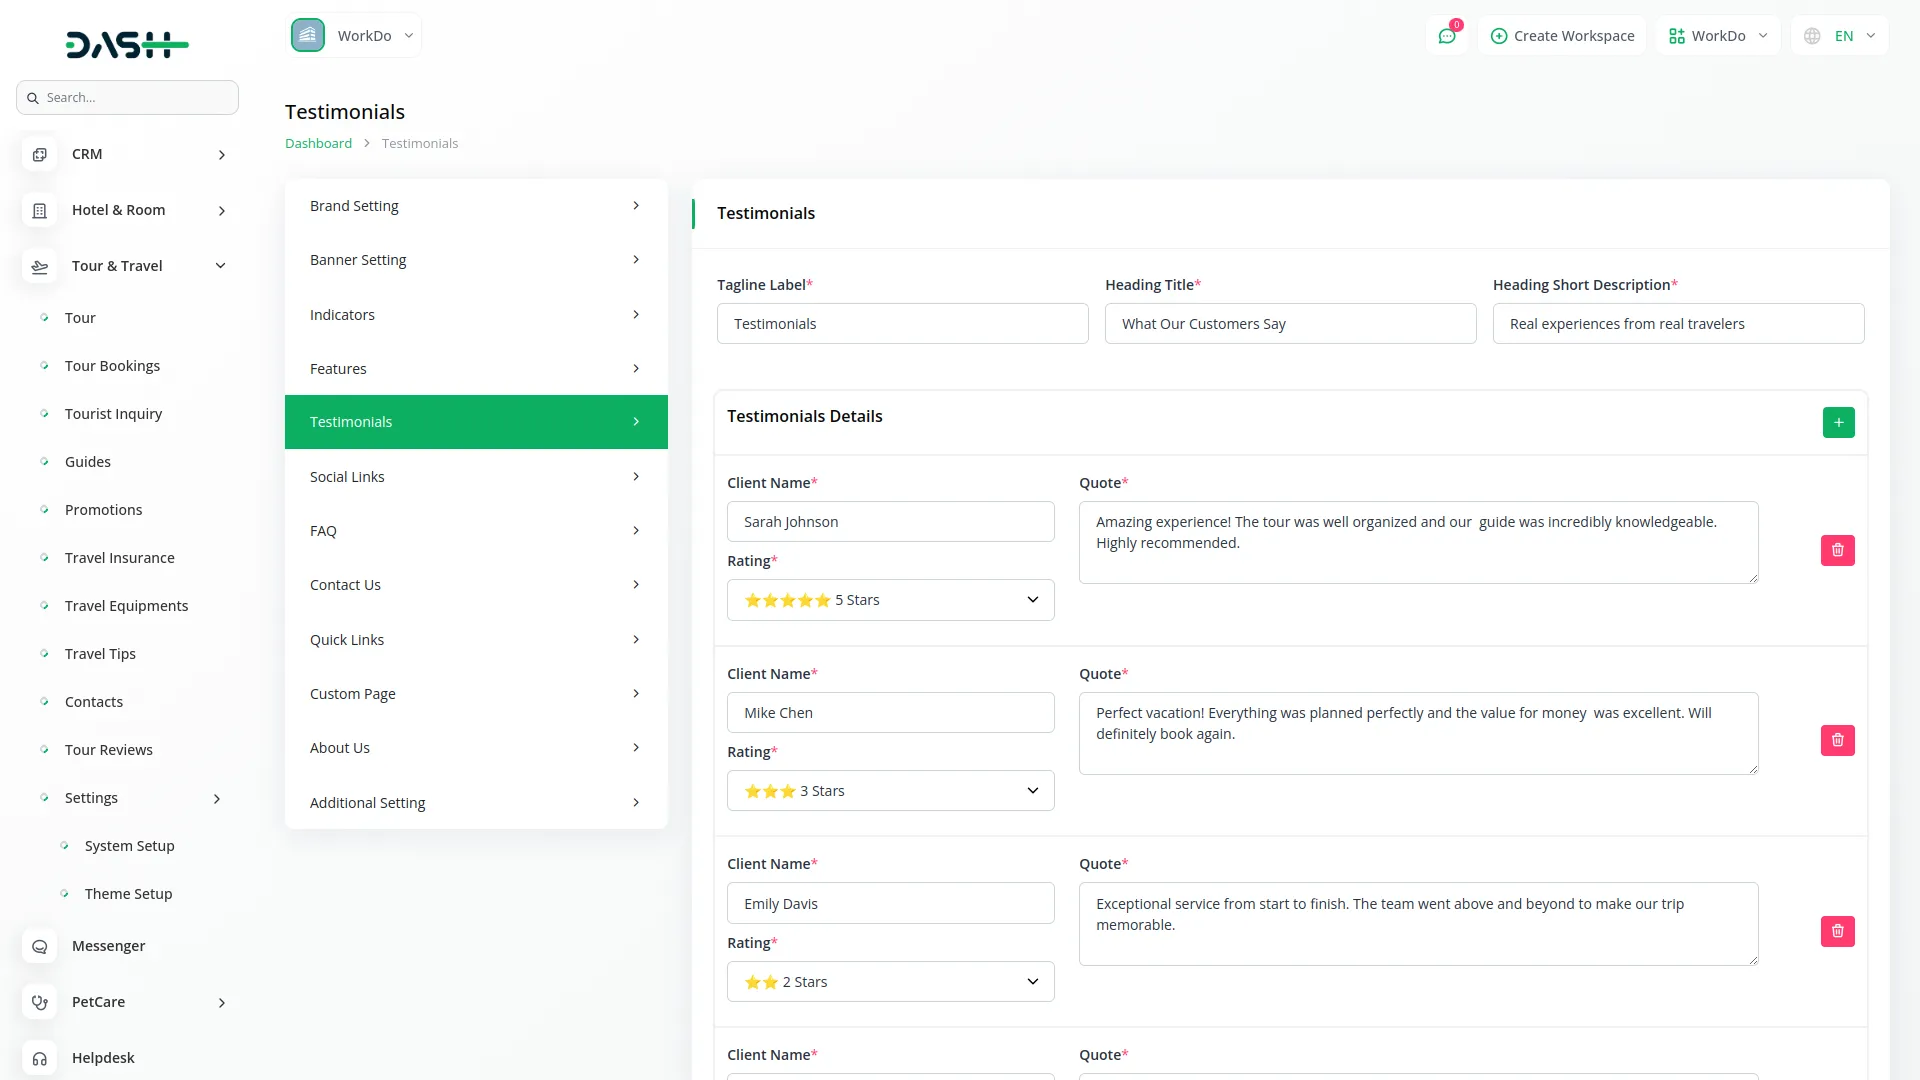
- Enter the Tagline Label, Heading Title, and Heading Short Description for the testimonials section. Use the repeater feature to add multiple testimonials by entering the Client Name, Quote, and Rating for each testimonial.
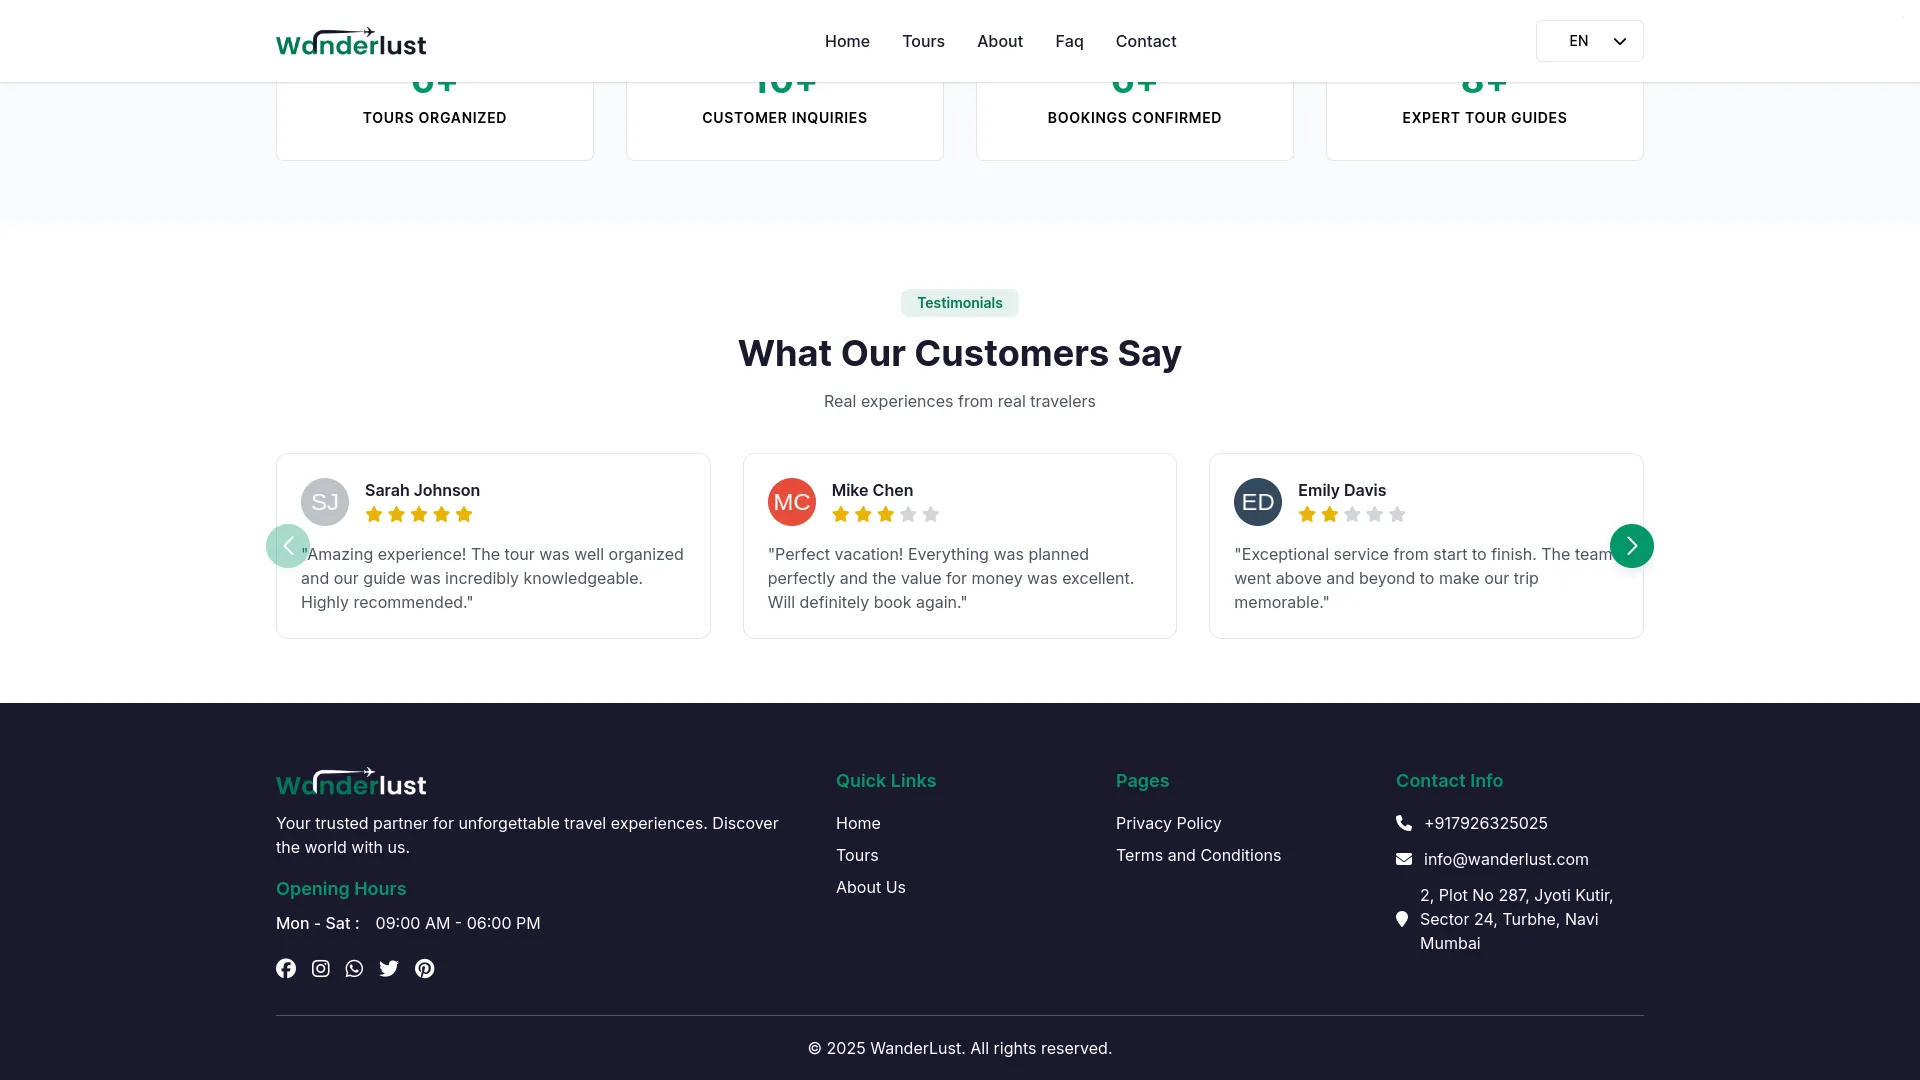
- Once saved, all testimonials will be displayed in the testimonials section on your website’s homepage, building trust and credibility with potential customers through authentic client feedback.
Social Links
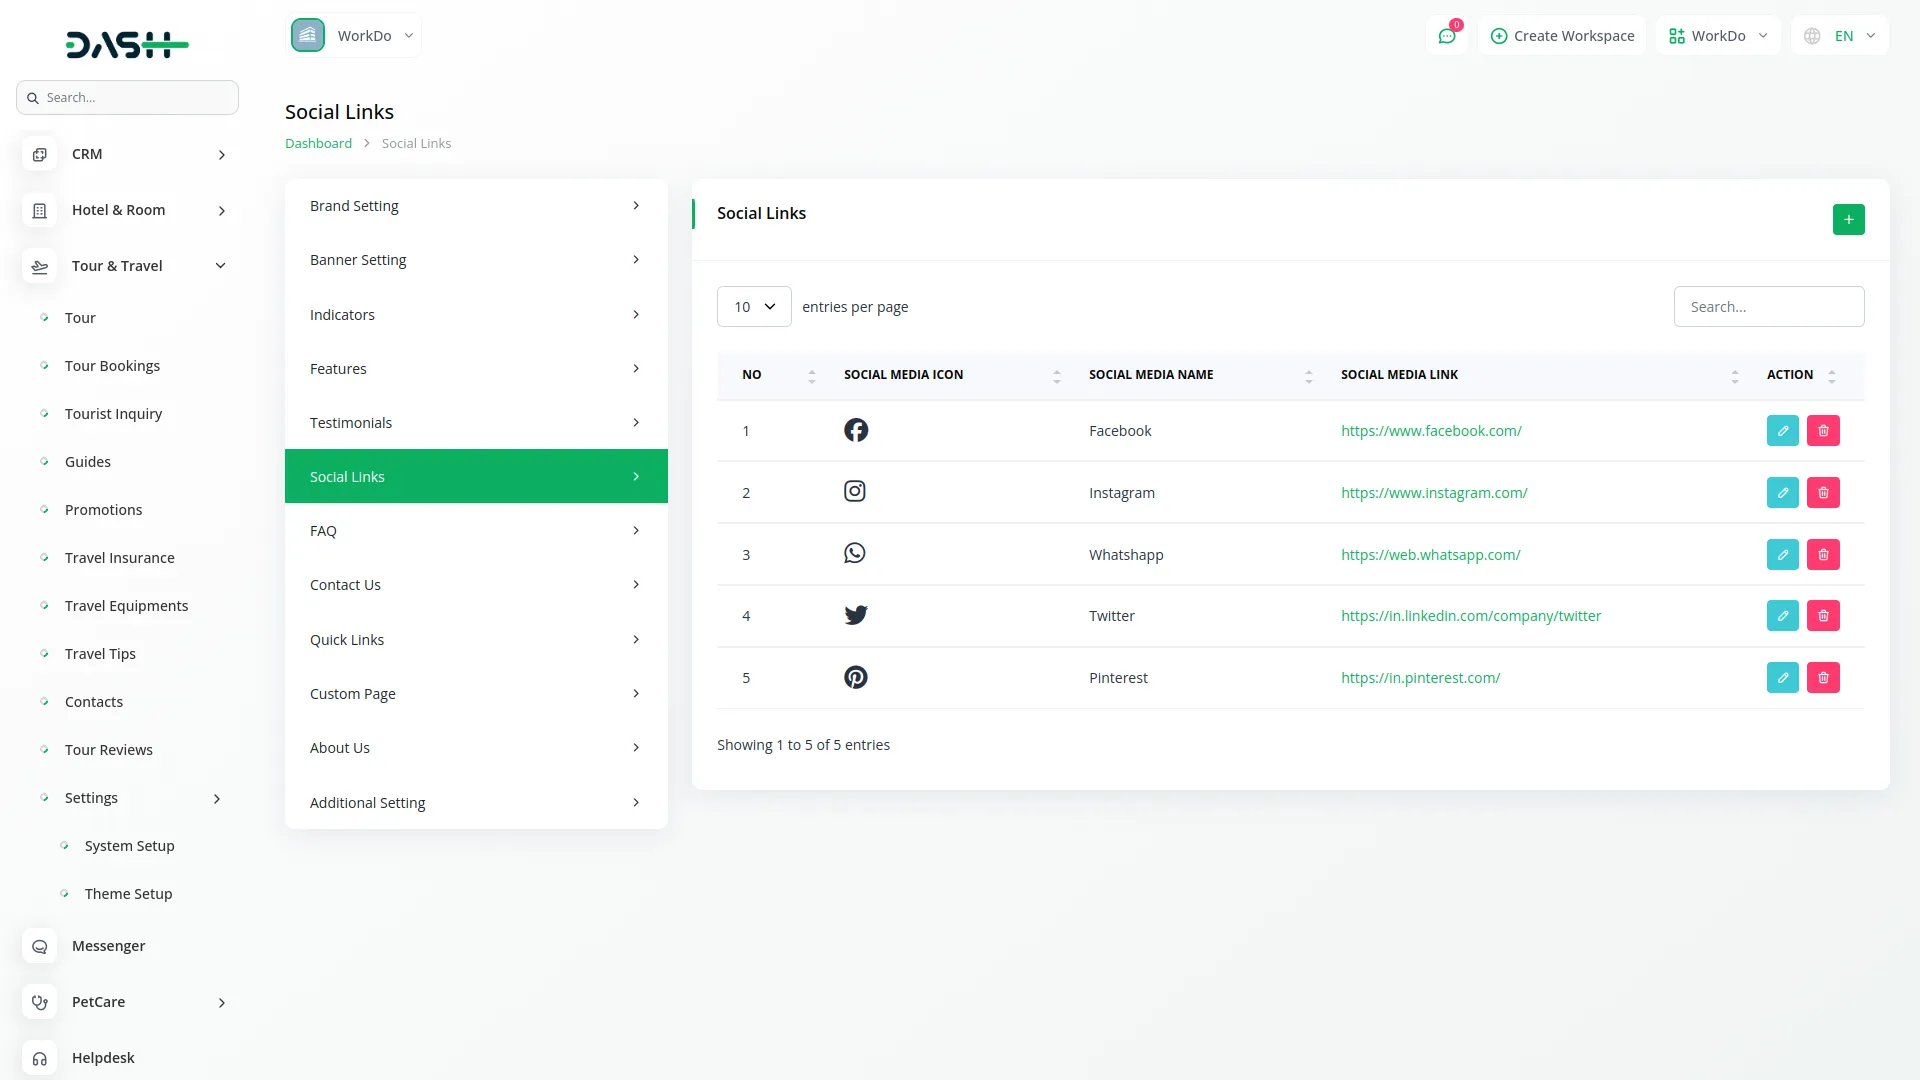
- To add a social media link, click the “Create” button. Select a Social Media Icon from the various social media icons available and enter the Social Media Link URL.
- The list page shows all social links with columns for No, Social Media Icon, Social Media Name, and Social Media Link. You can perform actions like Edit to update social media information or Delete to remove social links.
- Once configured, these social media links will be displayed in the footer of your website, allowing visitors to connect with your business on various social platforms.
FAQs
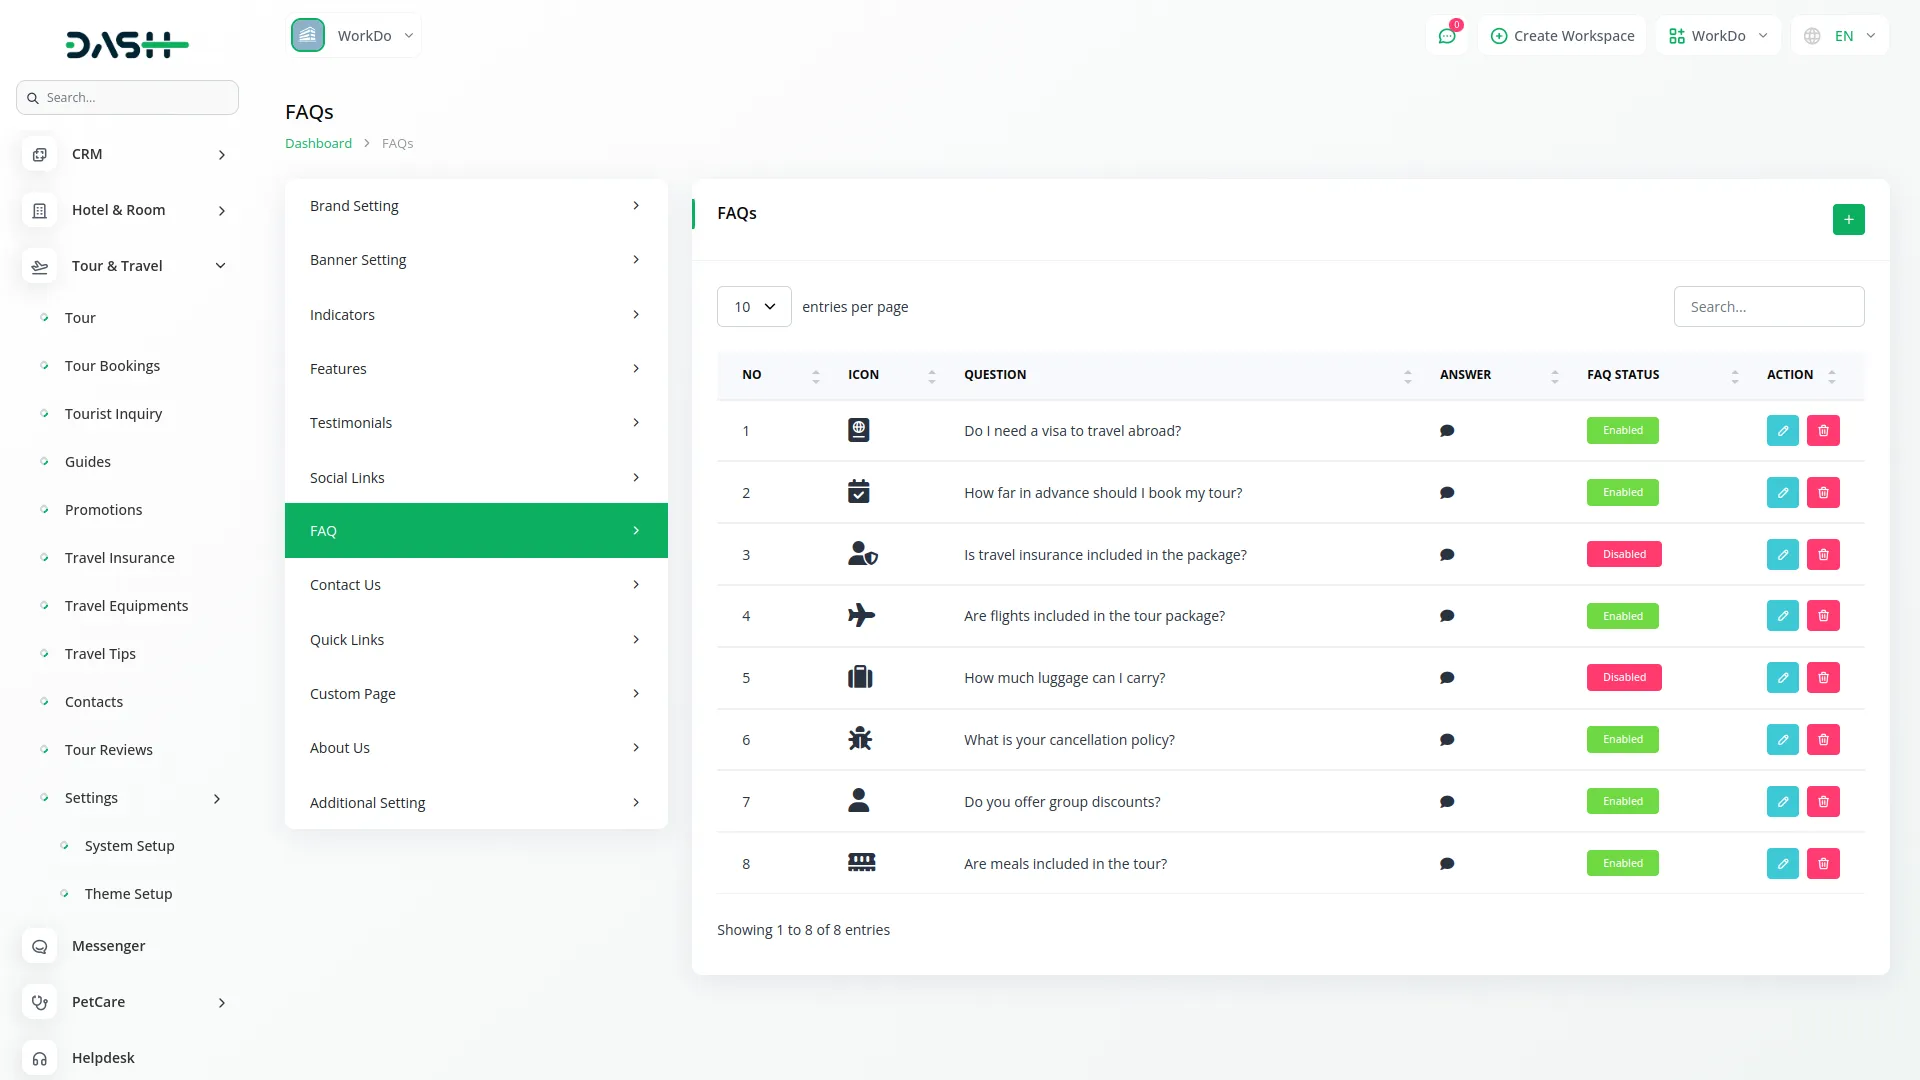
- To create a new FAQ, click the “Create” button. Select an Icon, enter the Question and Answer, then use the FAQ Status toggle to set whether the FAQ should be active or inactive.
- The list page displays all FAQs with columns showing No, FAQ Icon, Question, Answer, and FAQ Status. Available actions include Edit to modify FAQ details and Delete to remove FAQs.
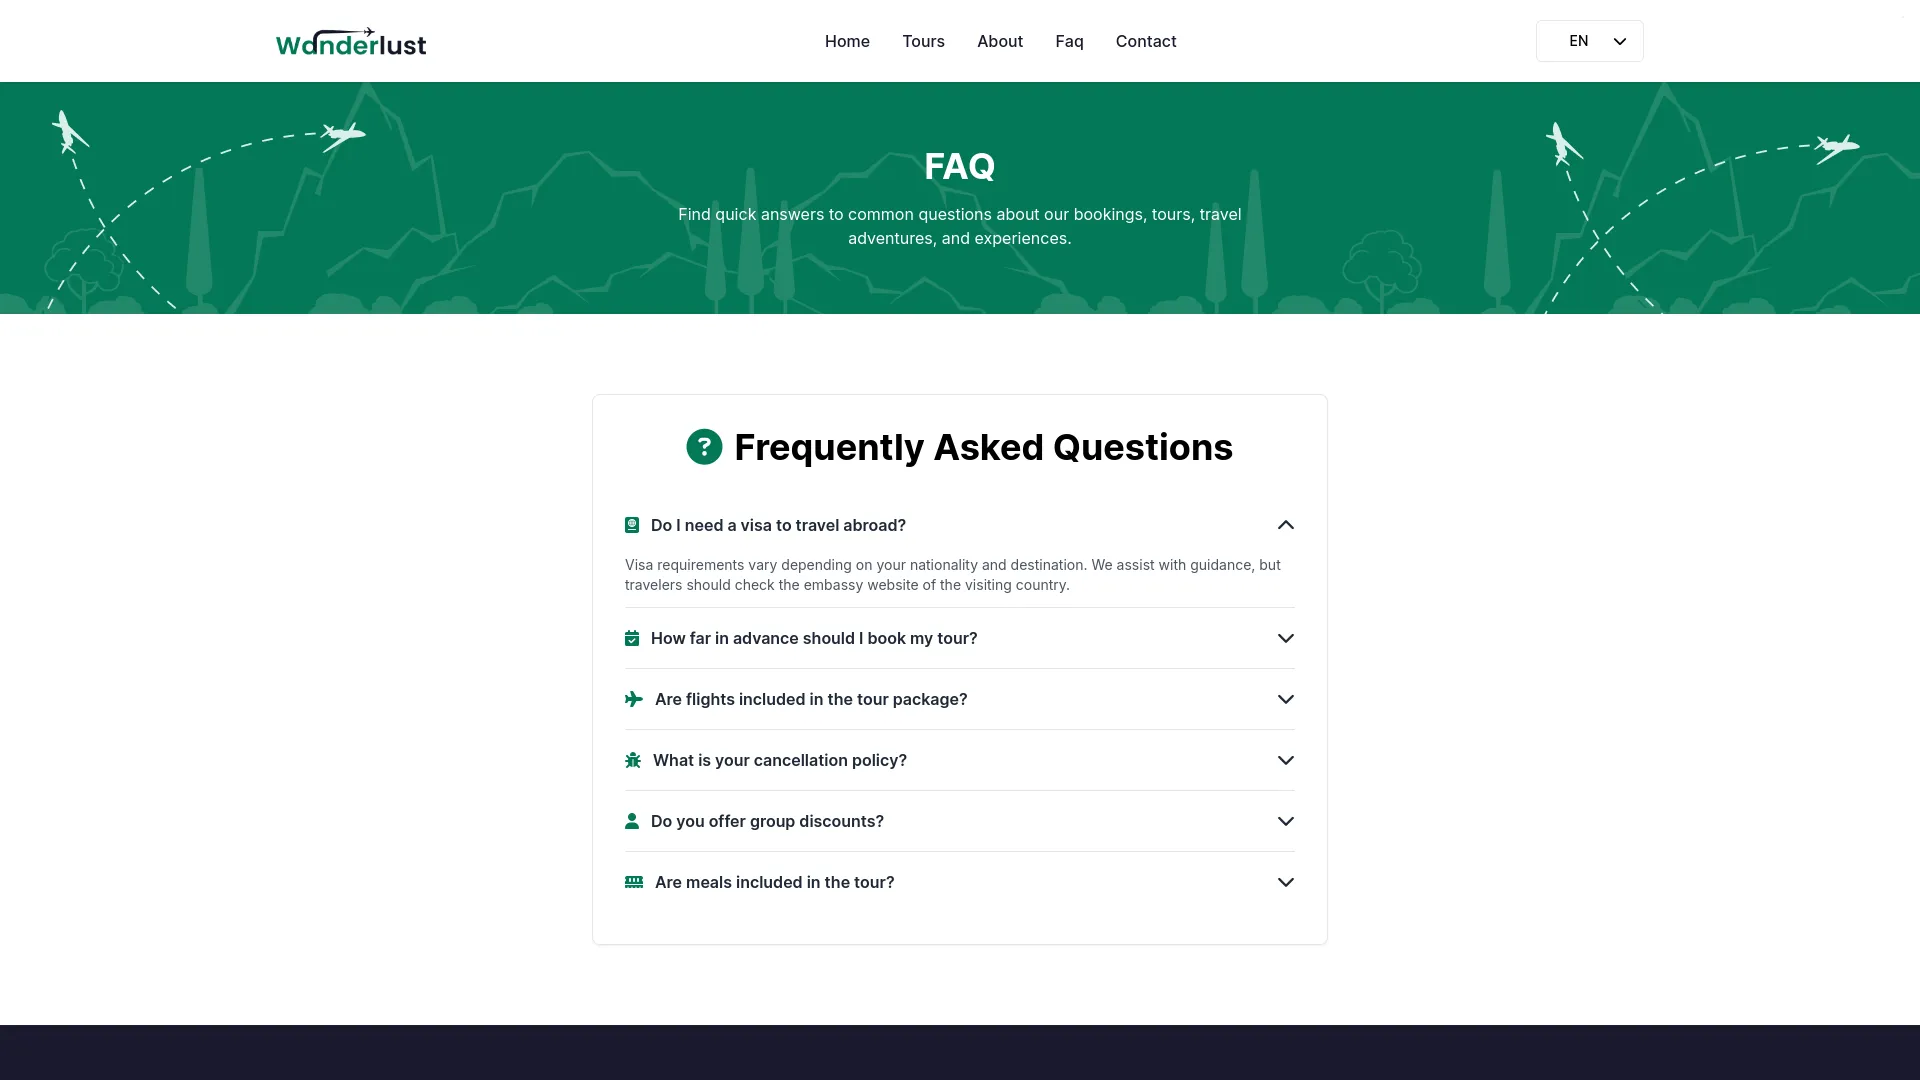
- All active FAQs will be displayed on your website’s FAQ page, helping customers find answers to common questions about your tour services.
Contact Info
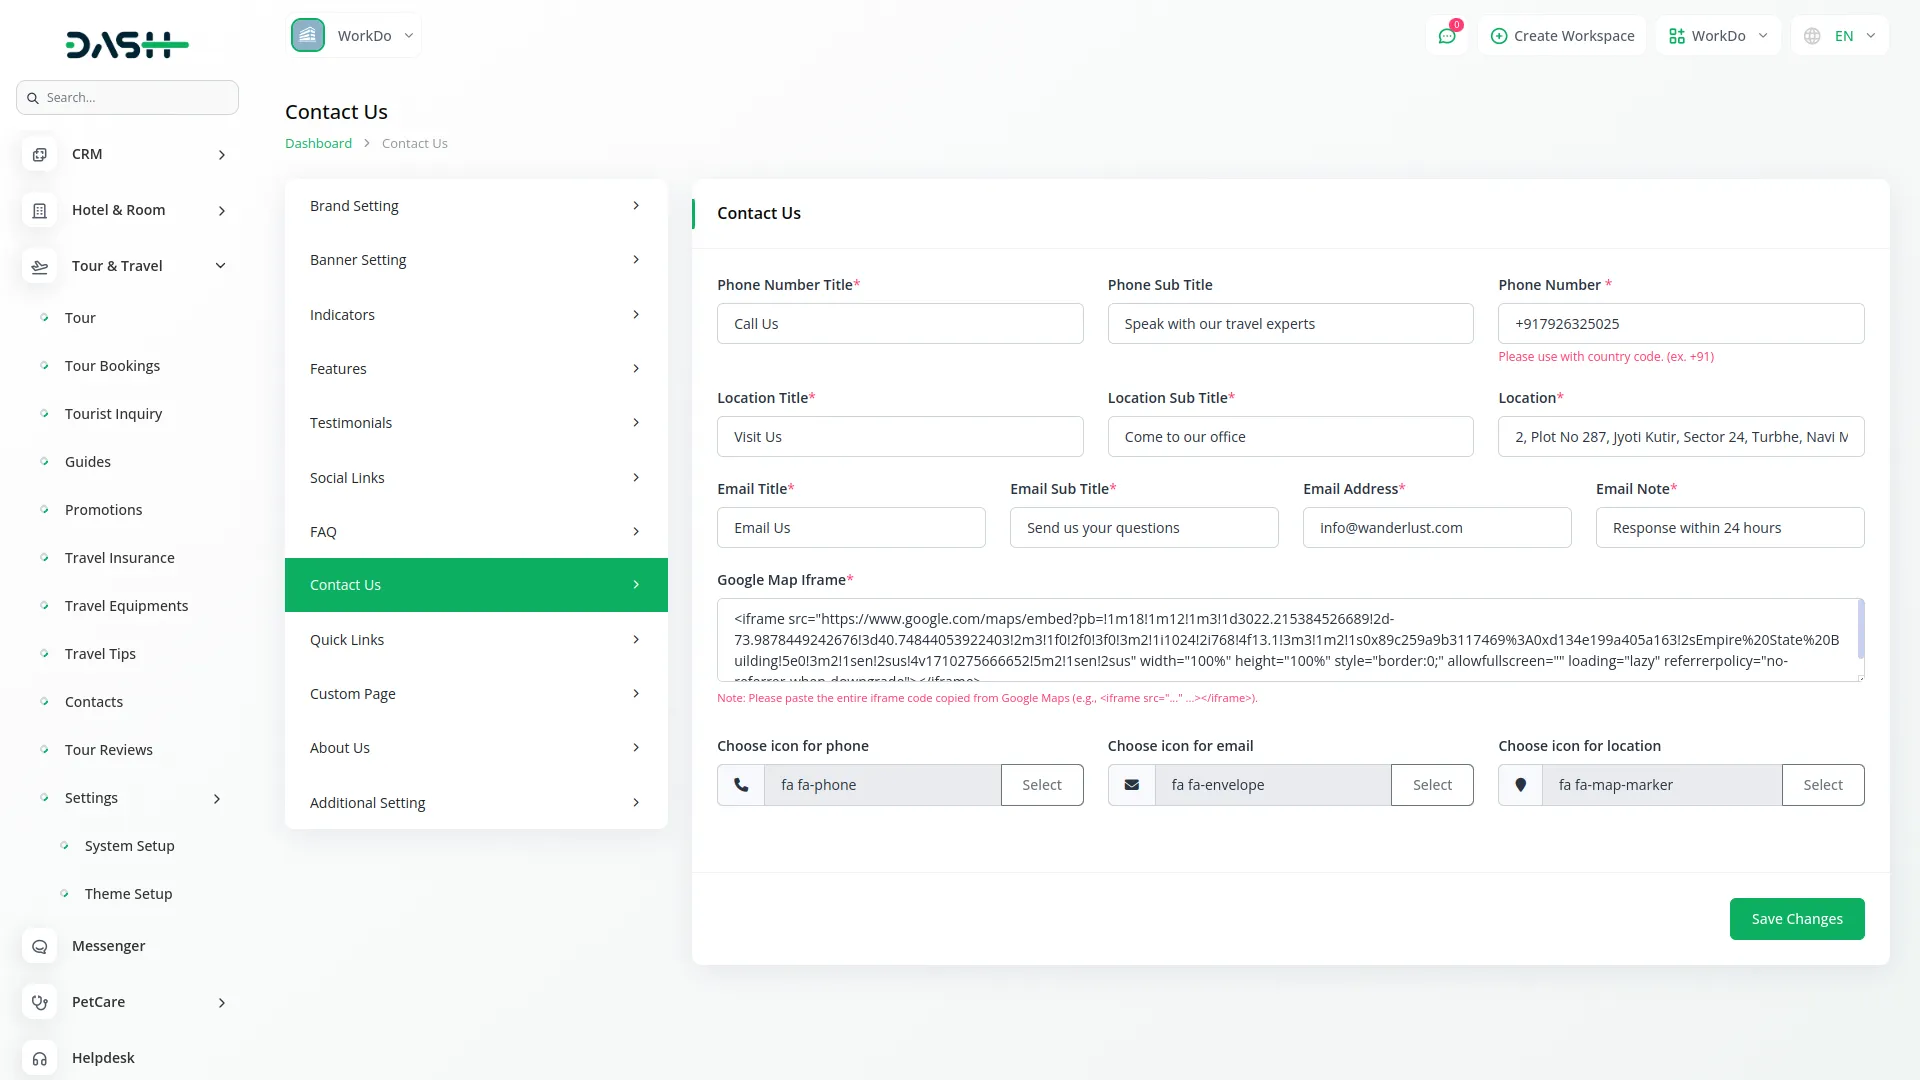
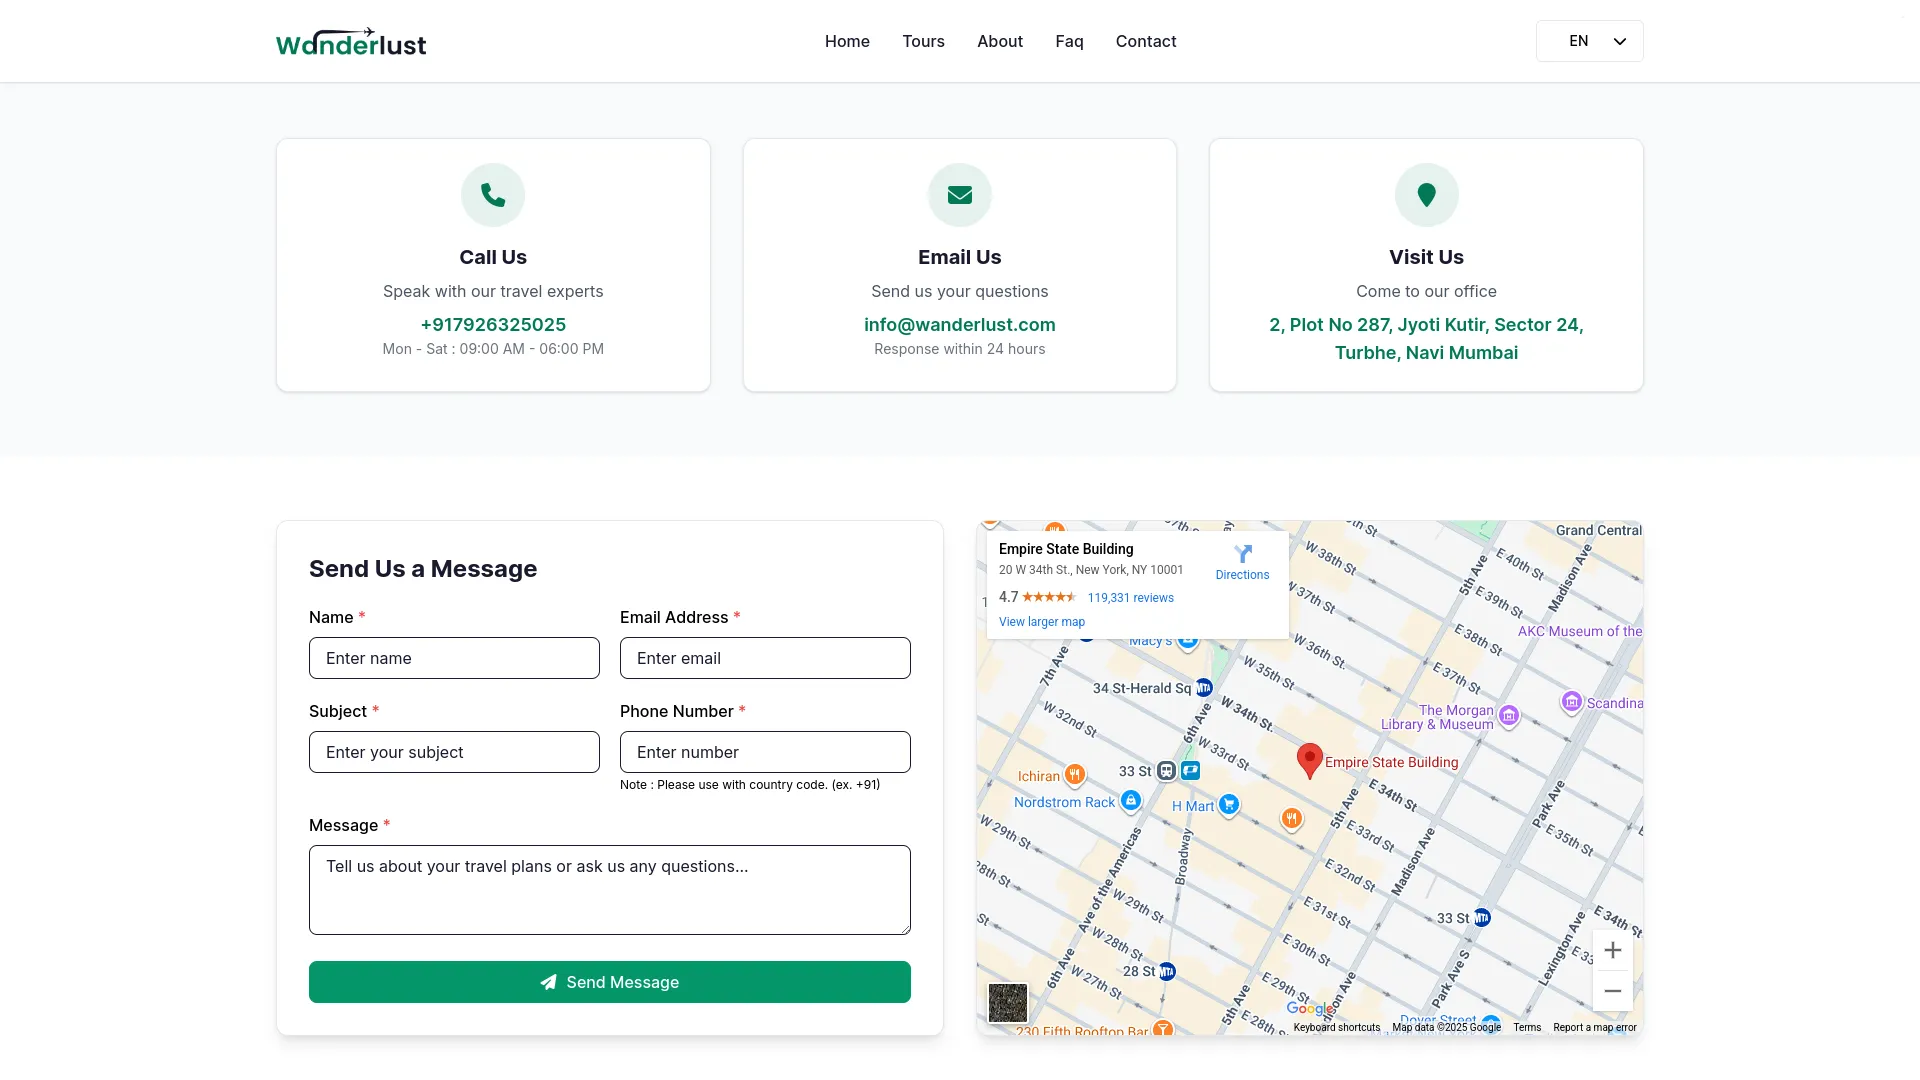
- In the Contact Information section, you will find comprehensive fields for your business contact details. Enter the Phone Number Title, Phone Sub Title, Phone Number, Location Title, Location Sub Title, Location, Email Title, Email Sub Title, Email Address, and Email Note. Also, add your Google Map Iframe code and choose appropriate icons for phone, email, and location.
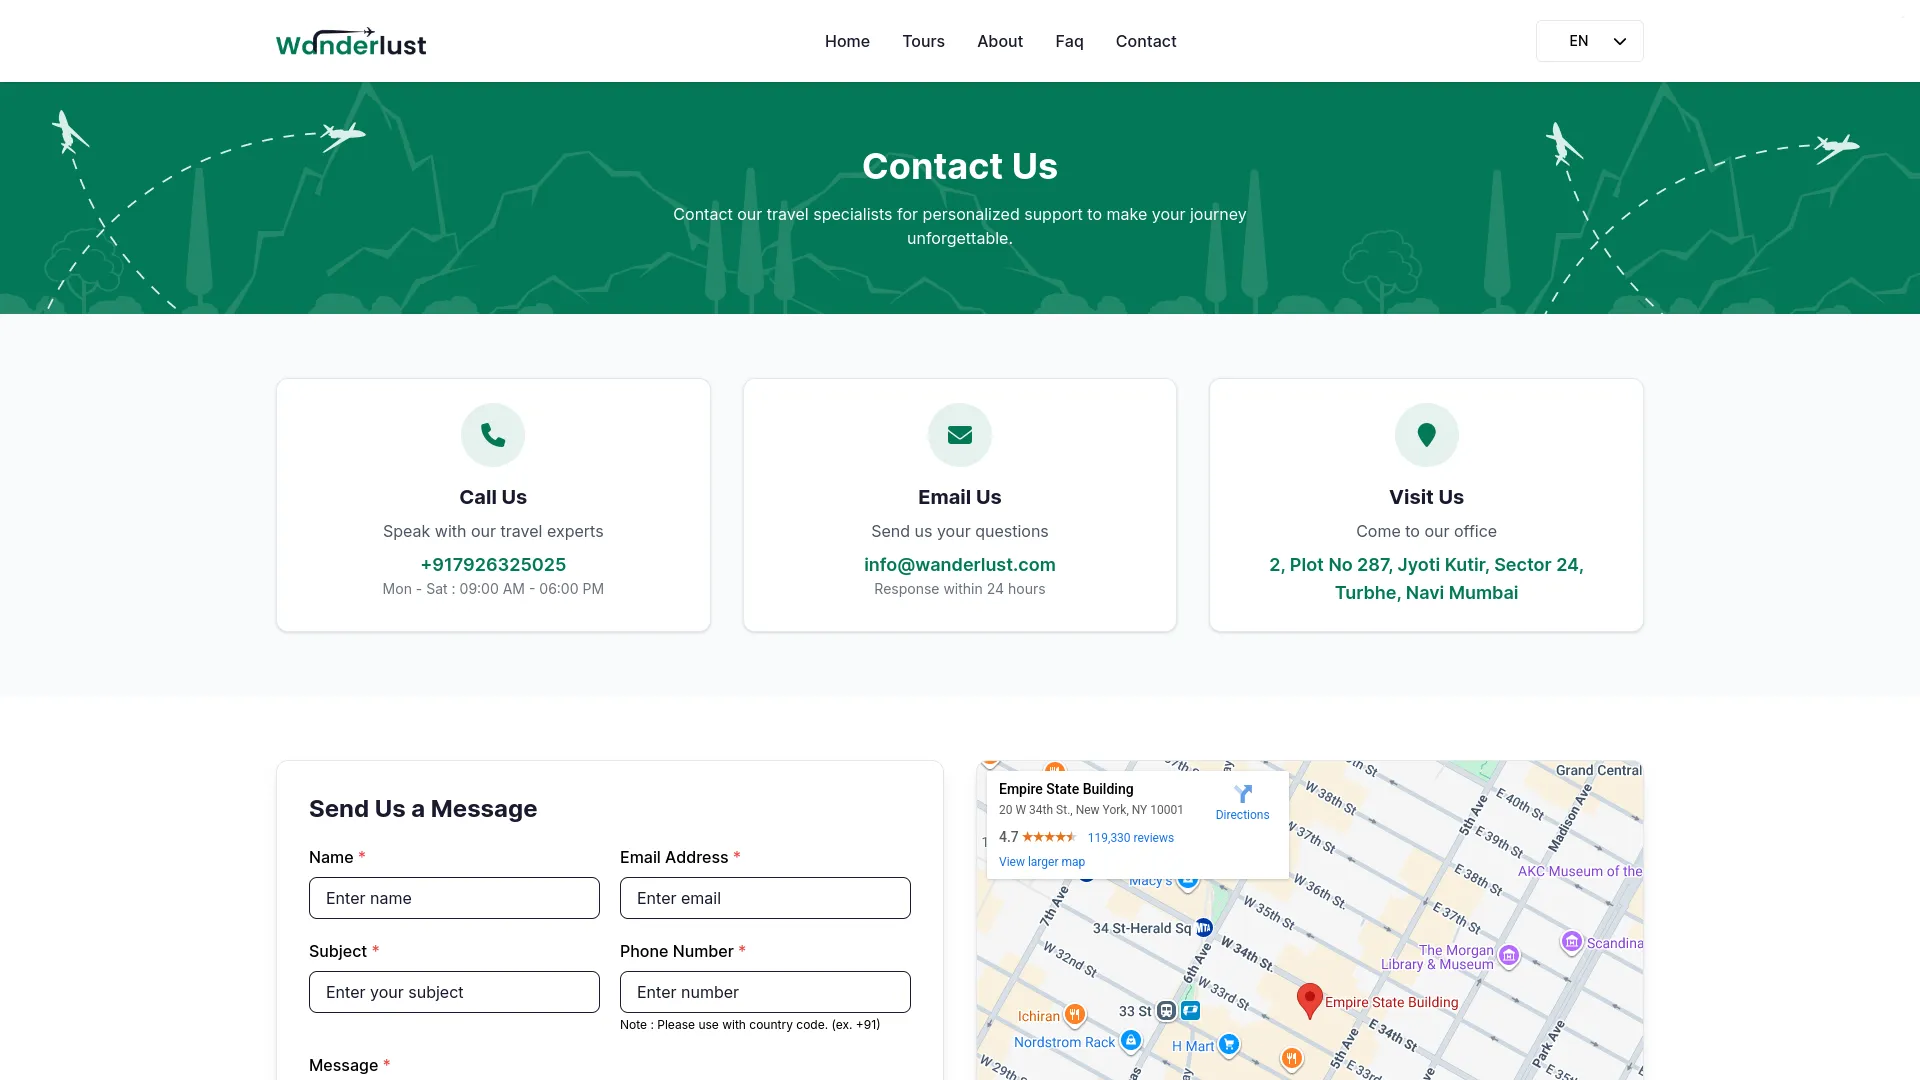
- Once saved, all this contact information will be displayed on your website’s contact us page, providing visitors with multiple ways to reach your business with proper visual icons and detailed descriptions.
Quick Links
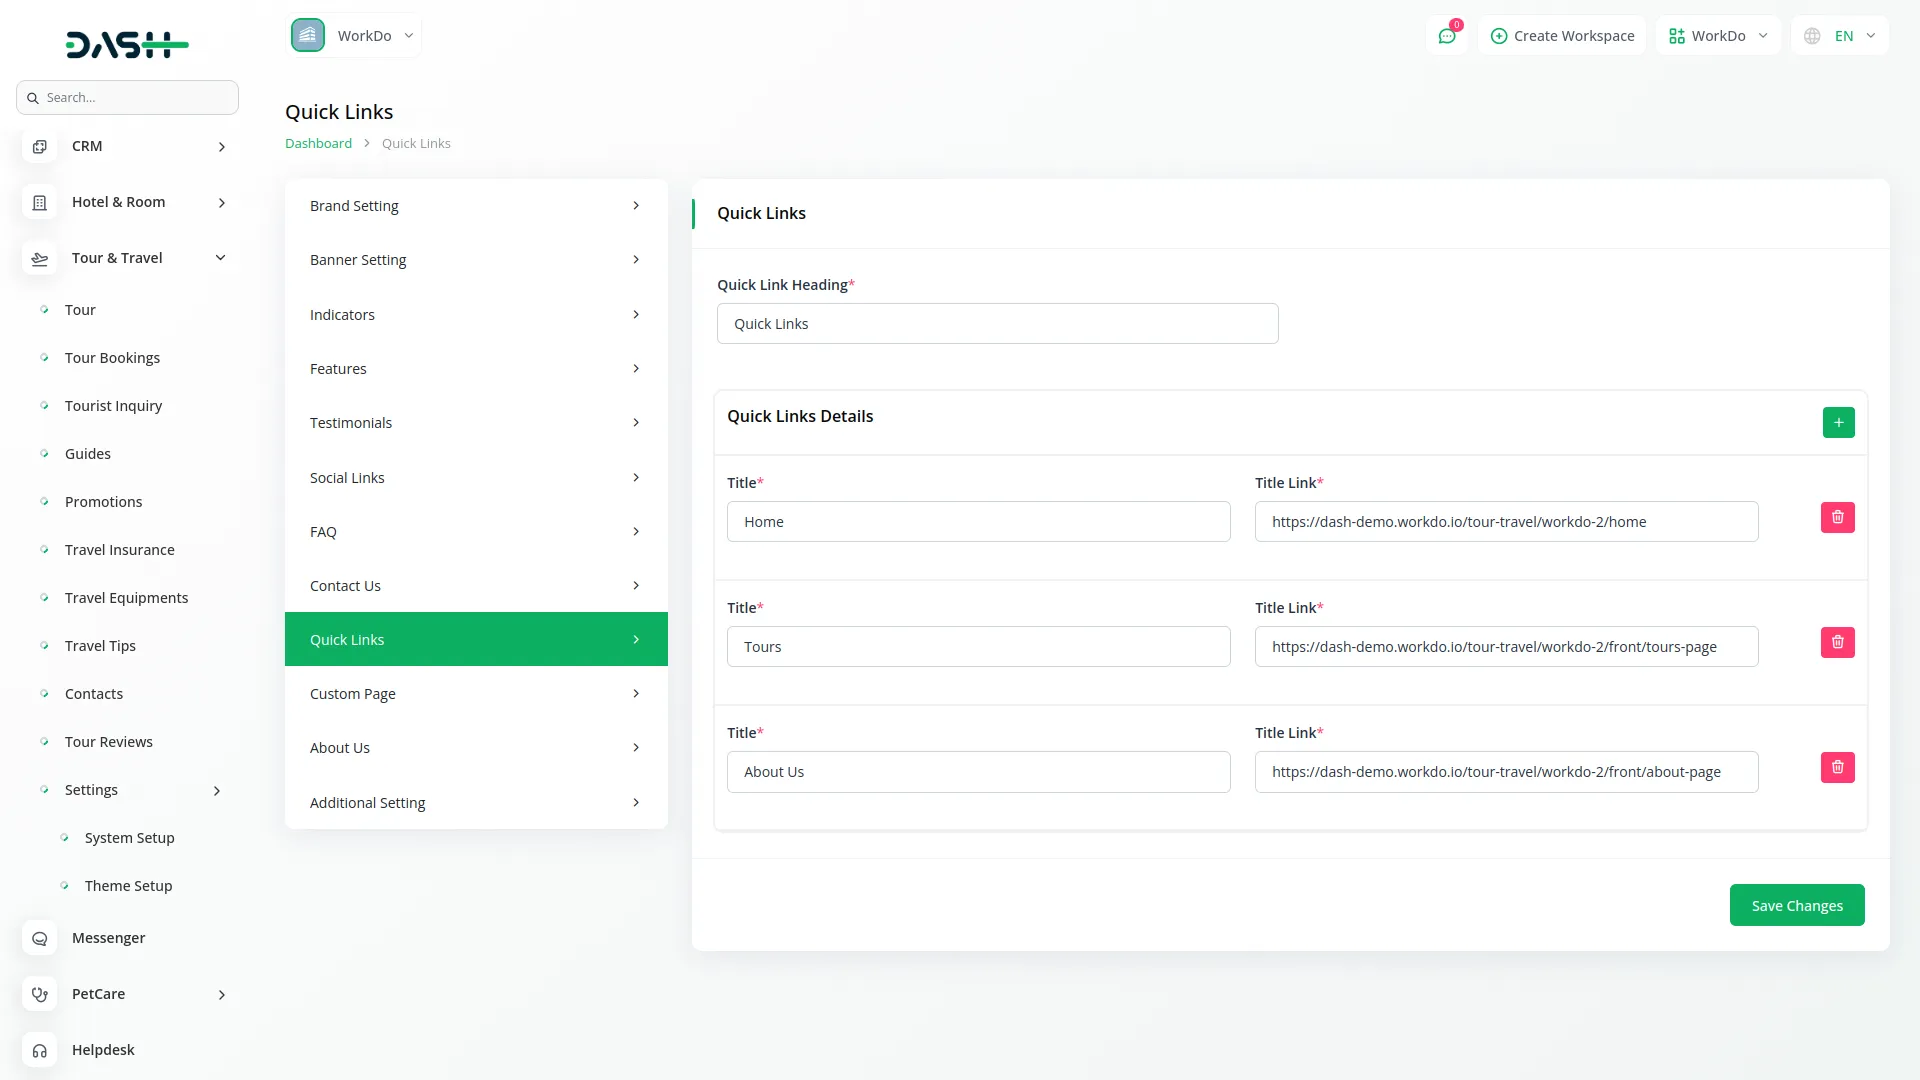
- Start by entering the Quick Link Heading for the section title. Then use the repeater feature to add multiple quick links by entering the Title and Title Link for each link you want to include.
- After saving, all configured quick links will be displayed in your website’s footer, providing visitors with easy access to important pages and resources on your website.
Custom Pages
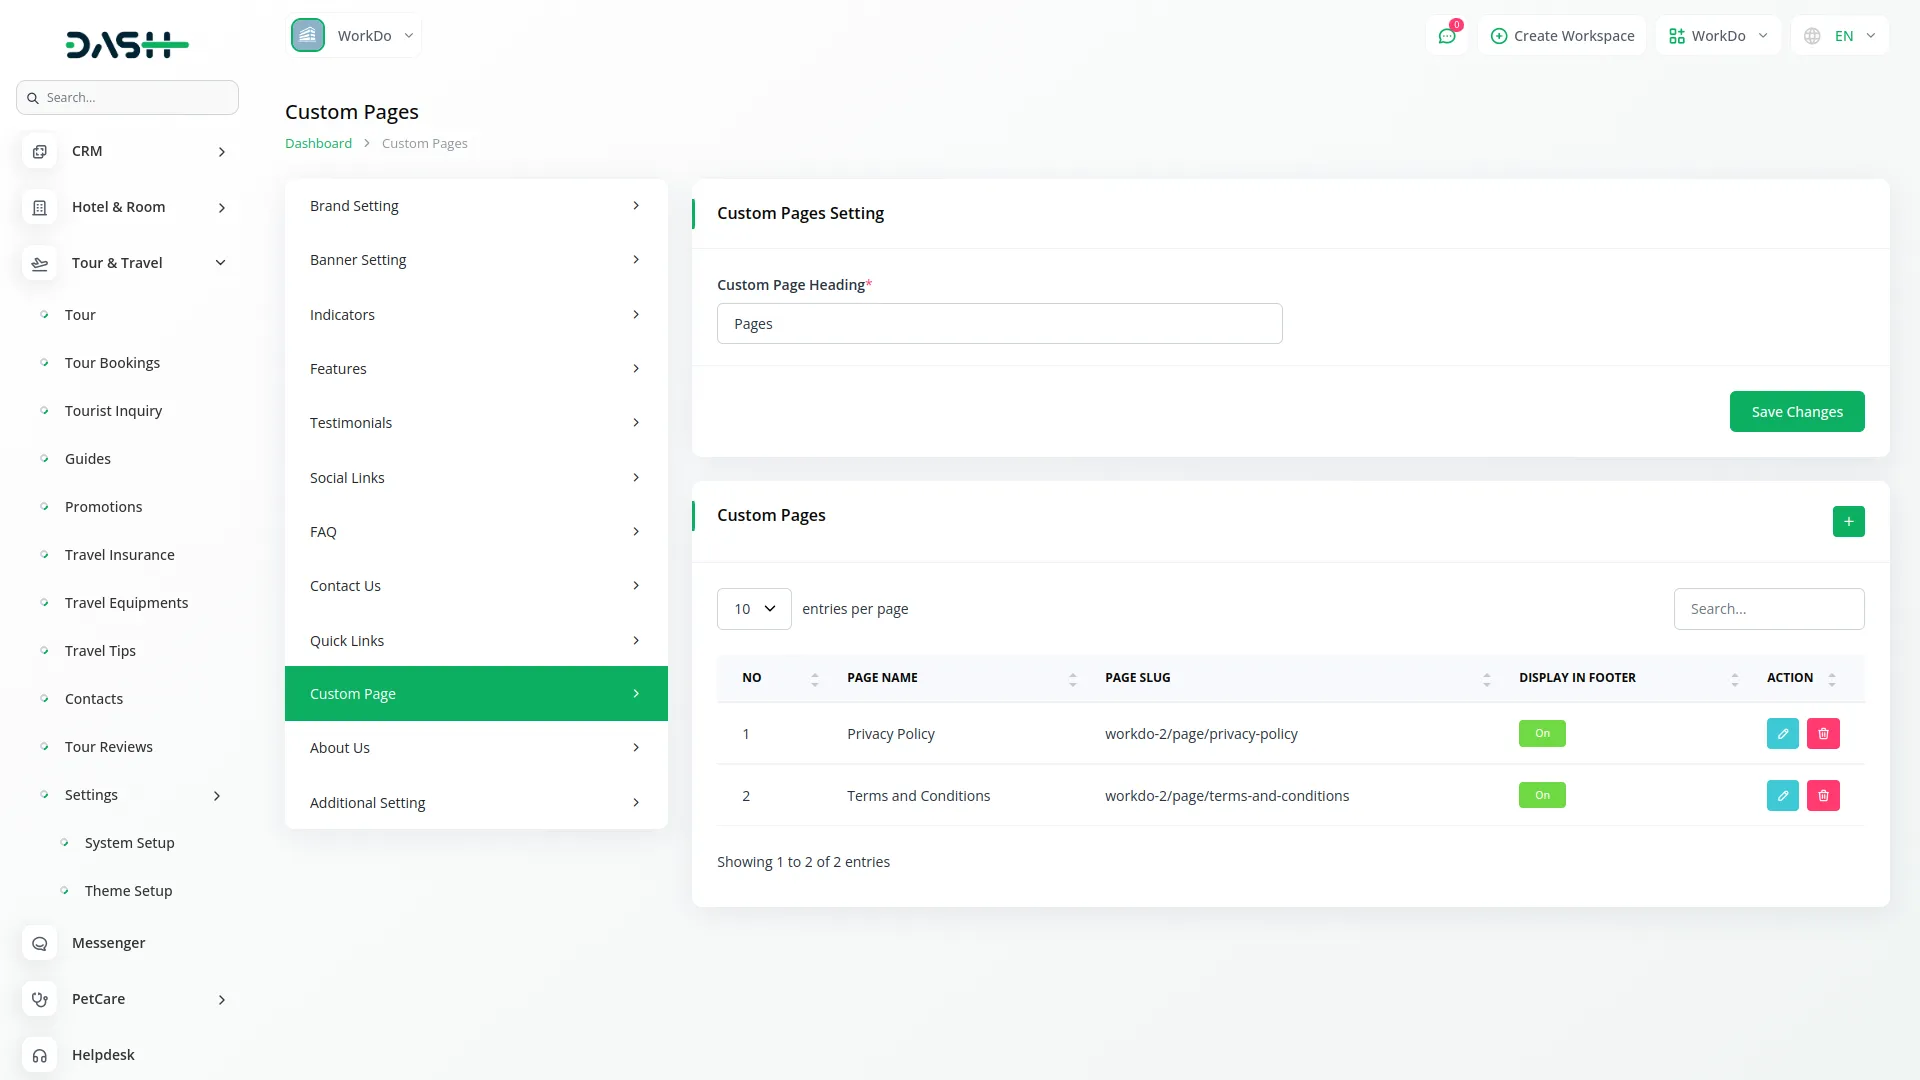
- To create a custom page, click the “Create” button. Enter the Page Name, Page Short Description, and Page Content. Use the Page Display In Footer toggle to control whether this page link appears in your footer.
- The list page shows all custom pages with columns for No, Page Name, Page Slug, and Page Display In Footer status. You can perform actions like Edit to modify page content or Delete to remove pages.
- Custom pages allow you to add additional content to your website, links to these pages will automatically appear in your website’s footer navigation.
About Us
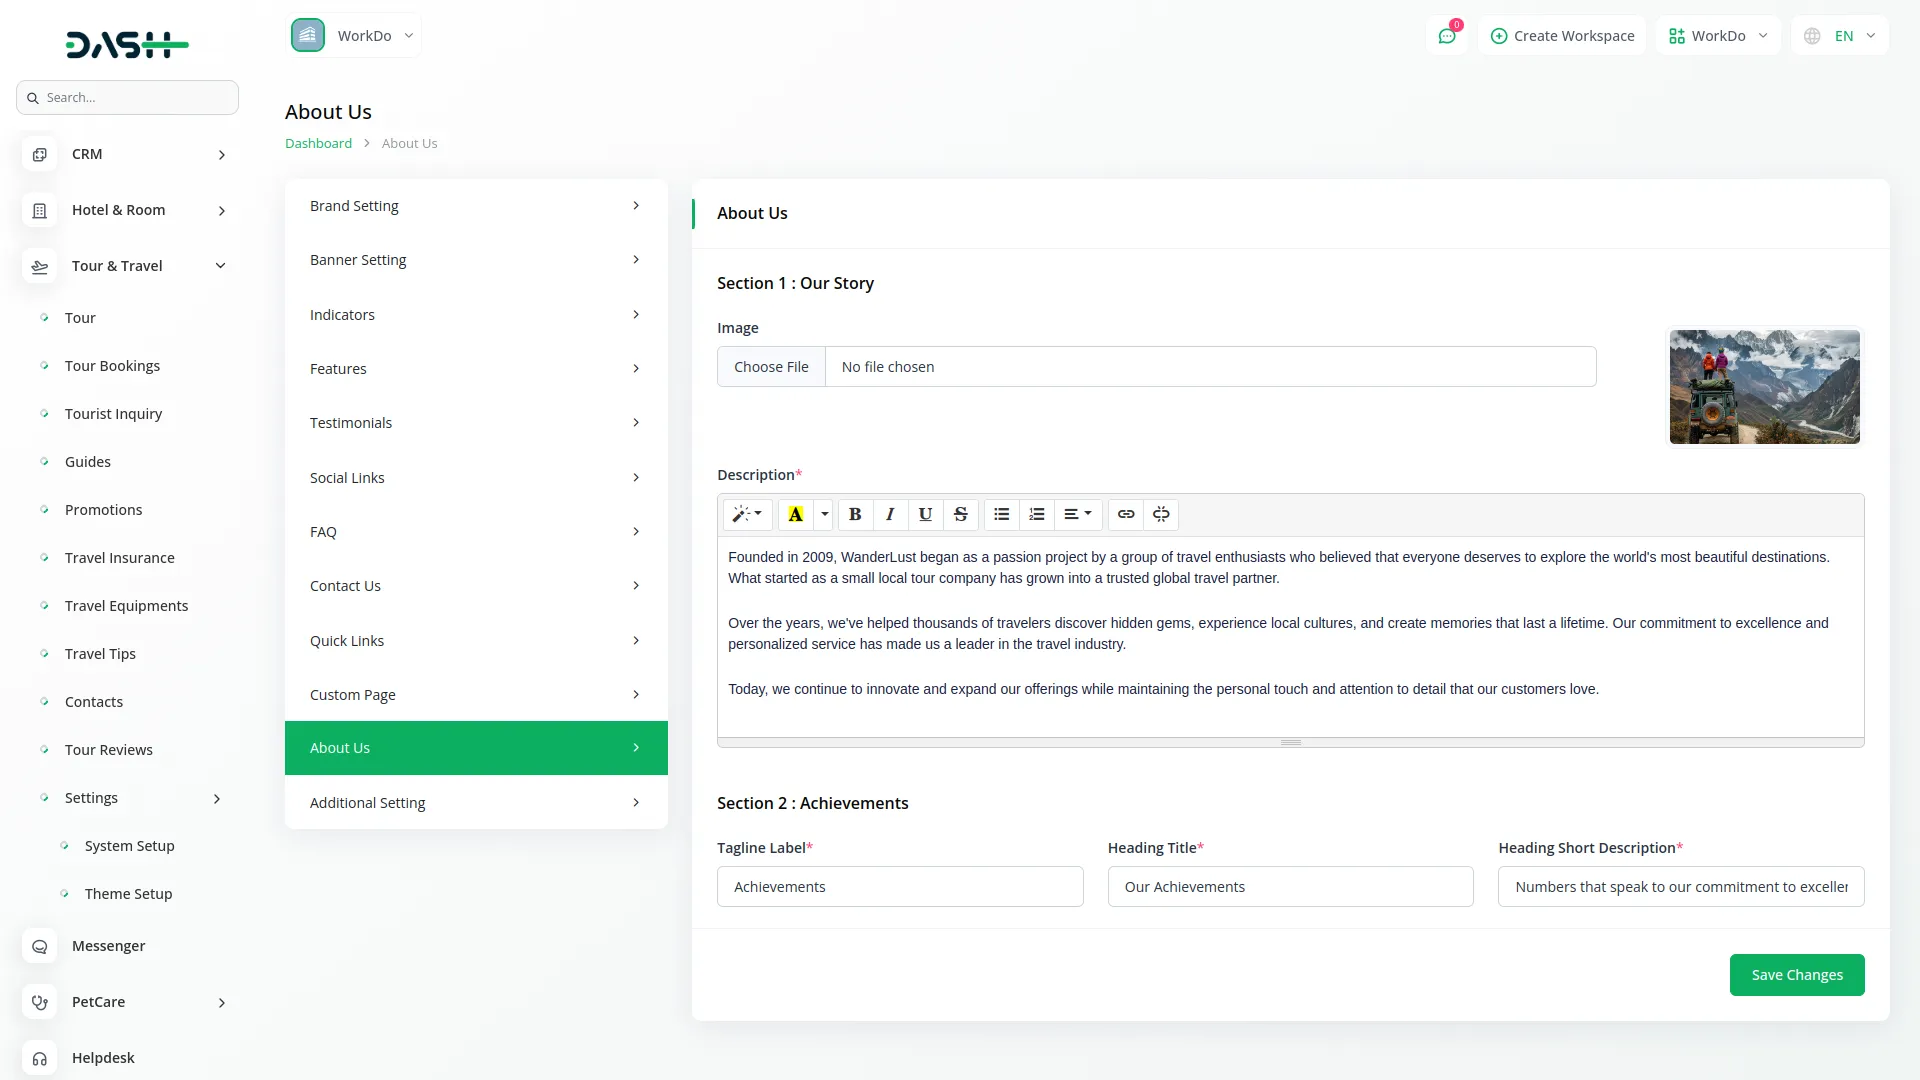
- In the Our Story section, upload an Image and enter a Description that tells your company’s story and background.
- In the Achievements section, enter the Tagline Label, Heading Title, and Heading Short Description to showcase your company’s accomplishments and milestones.
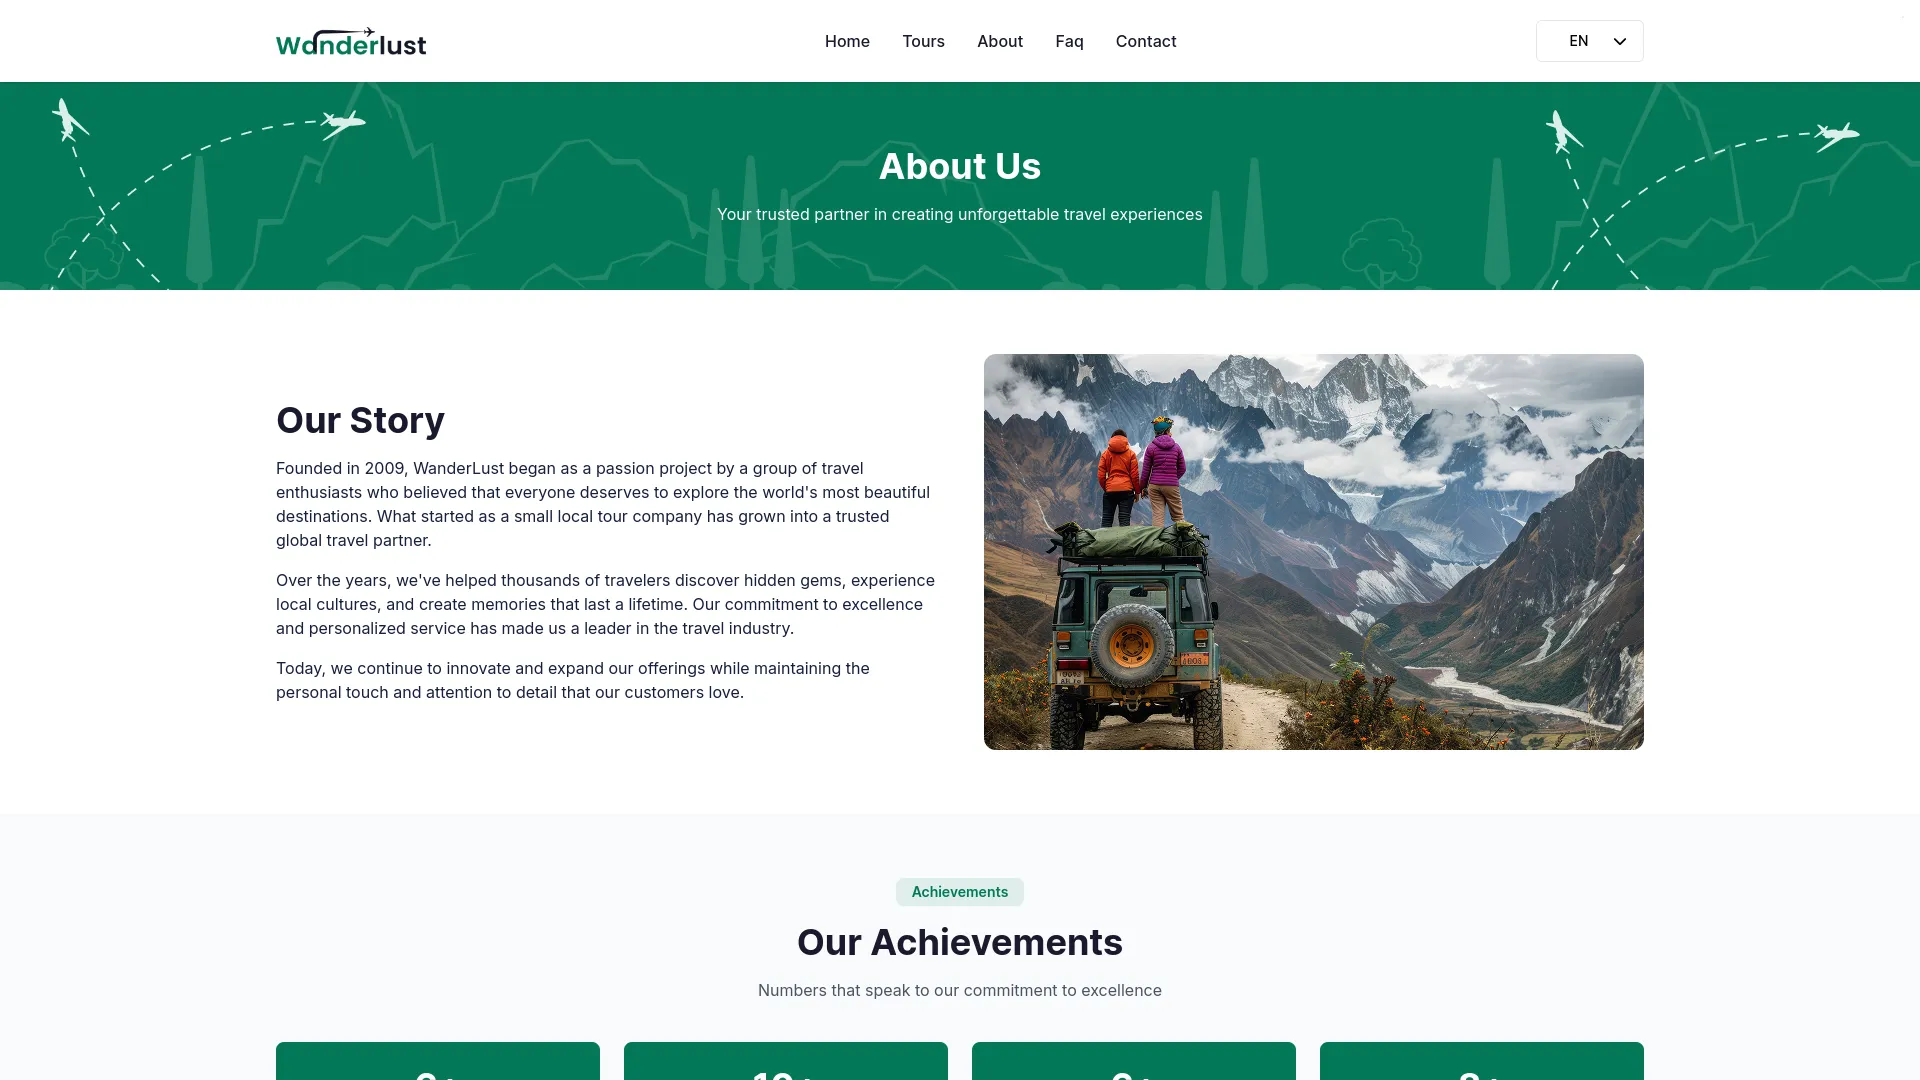
- Once configured, all this information will be displayed on your website’s about us page, helping visitors understand your company’s background, mission, and achievements in the travel industry.
Additional Setting
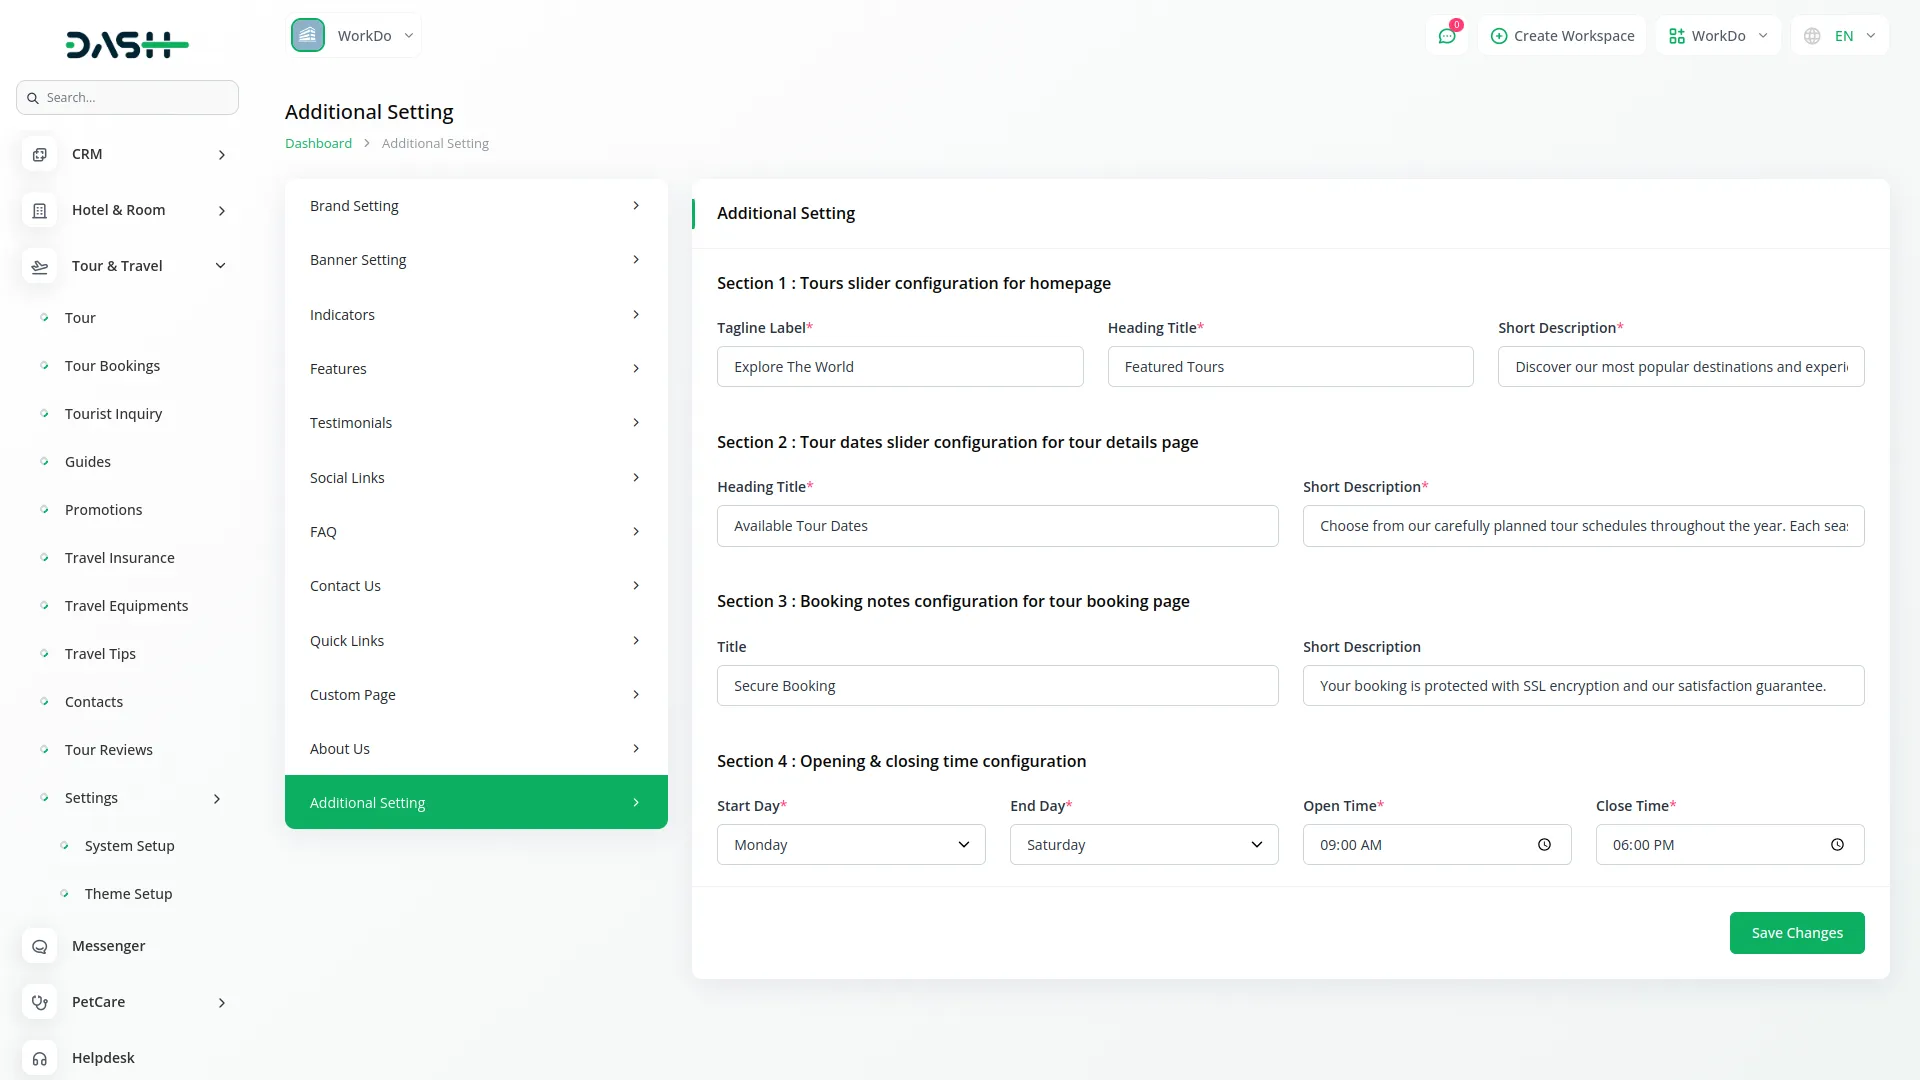
- This section allows you to configure content displayed across multiple pages of your website.
- In the Tours slider configuration for the homepage section, enter the Tagline Label, Heading Title, and Short Description that will appear above the tours display on your homepage.
- In the Tour dates slider configuration for the tour details page section, enter the Heading Title and Short Description that will be shown above the available tour dates on individual tour detail pages.
- In the Booking notes configuration for the tour booking page section, enter the Title and Short Description that will appear on the tour booking page to provide important booking information to customers.
- In the Opening & closing time configuration section, set your business hours by selecting the Start Day, End Day, Open Time, and Close Time to inform customers about your availability.
Tour Management
- To create a new tour, click the “Create” button at the top of the Tour management page. In the Tour Information section, enter the Tour Name, From location, To destination, Tour Days, Tour Date of Publish, select Transport Type from available options, specify Guides, and set Adult Price and Child Price.
- In the Tour Description section, provide a detailed Description of the tour experience and highlights.
- In the Tour Dates section, use the repeater to add multiple tour schedules by entering Tour Start Date, Tour End Date, selecting Season Name from available options, setting Booking Start Date, Booking End Date, Total Seat capacity, Number of Days, Number of Nights, and Available Seats for each tour date.
- In the Tour Images section, use the repeater to upload multiple Tour Images that showcase the destinations and experiences.
- In the Tour Highlights section, use the repeater to add multiple highlights by choosing appropriate icons and entering compelling titles.
- In the What’s Included in the Tour section, use the repeater to list multiple inclusions by entering titles of services, meals, accommodations, or activities included in the tour package.
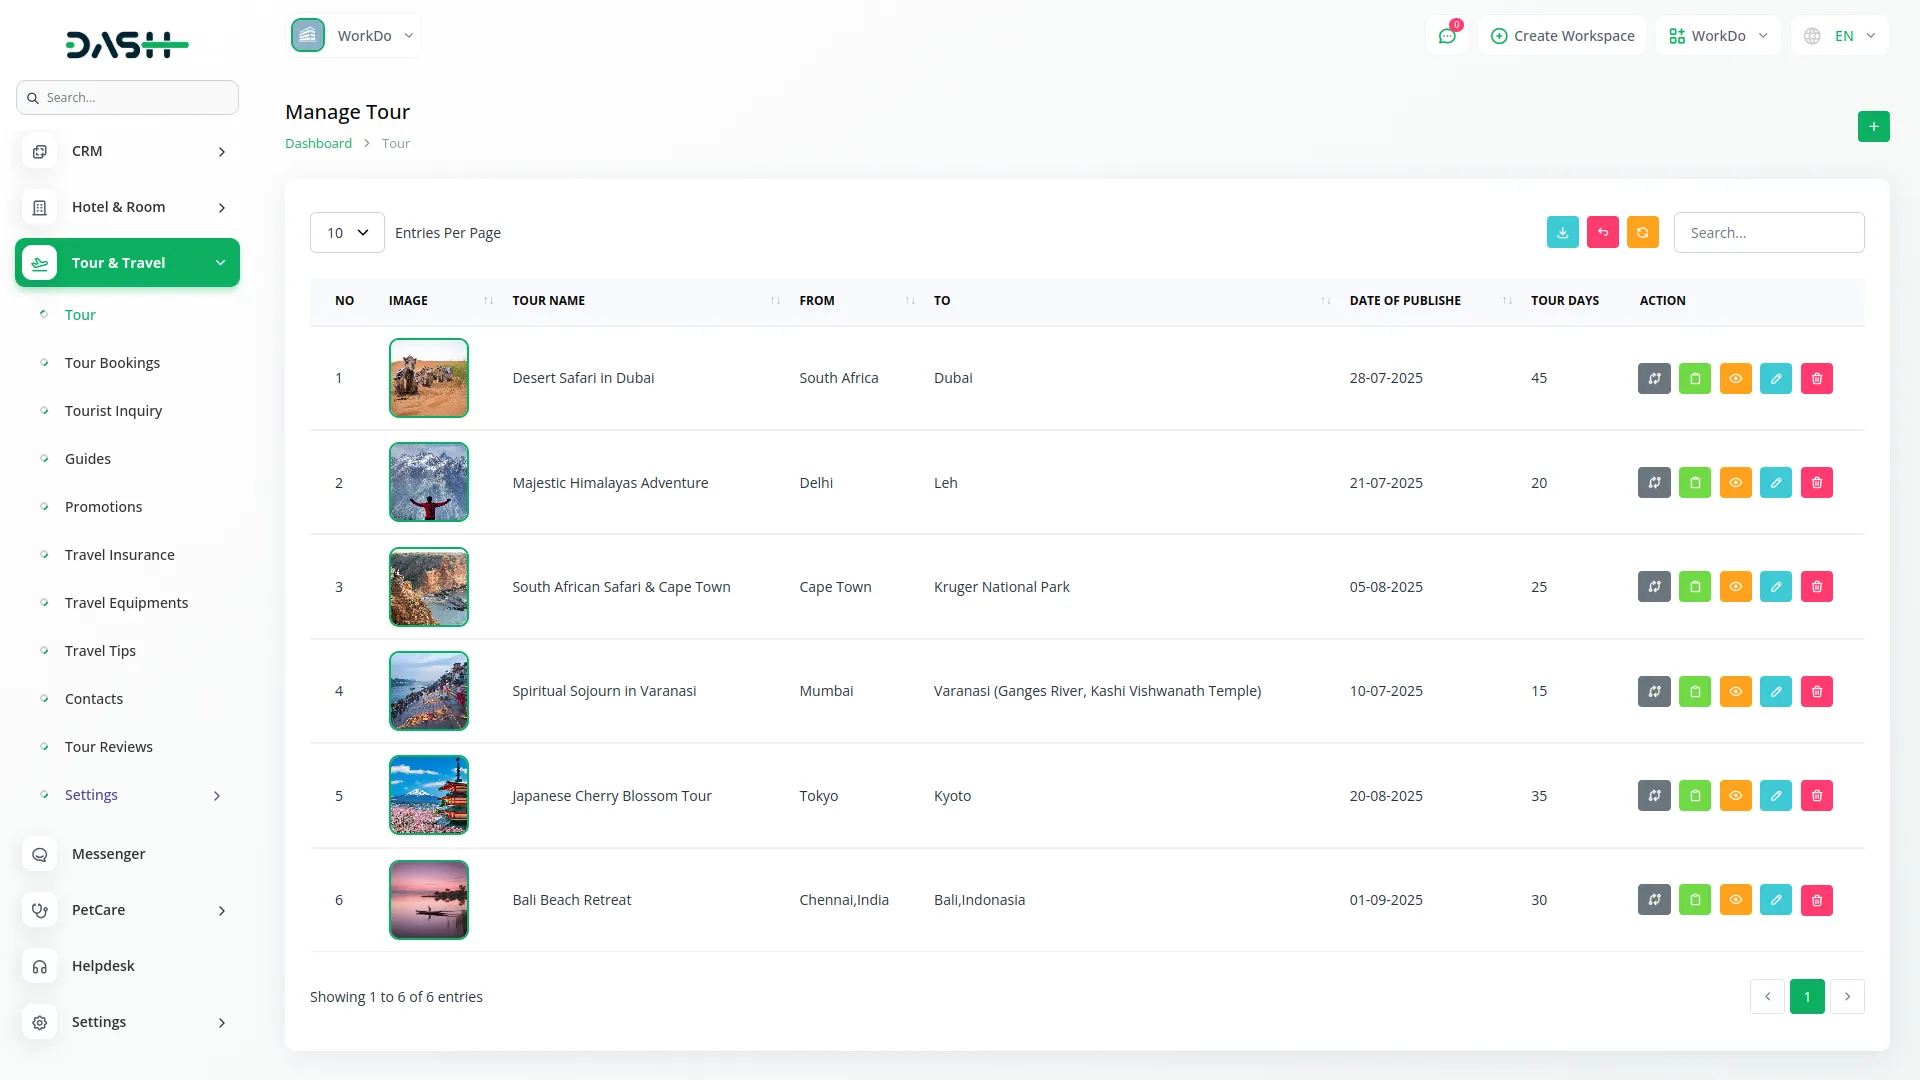
- The list page shows all tours with columns for No, Image, Tour Name, From, To, Tour Date of Publish, and Tour Days. Available buttons include Search, Export, Reset, and Reload for managing your tour inventory.
- In the Action column, a Delete button is displayed, allowing you to permanently remove the data.
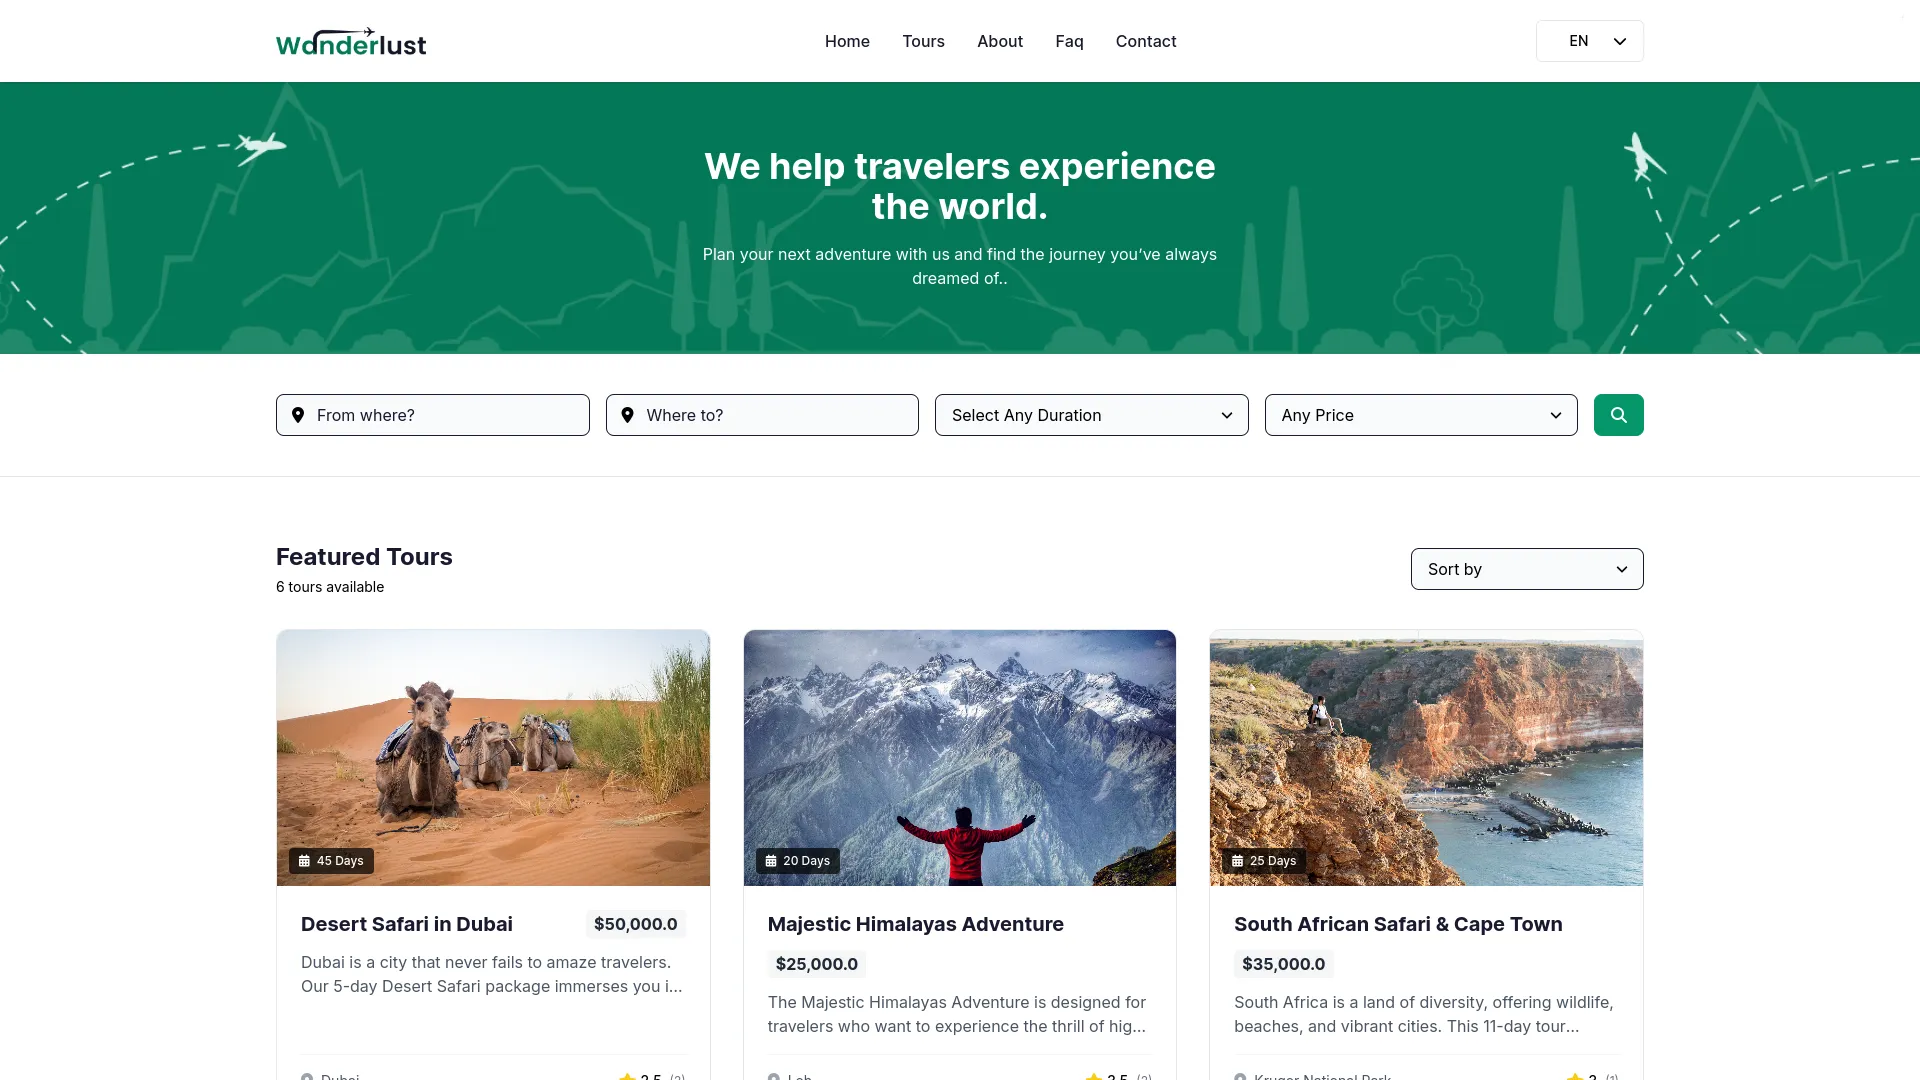
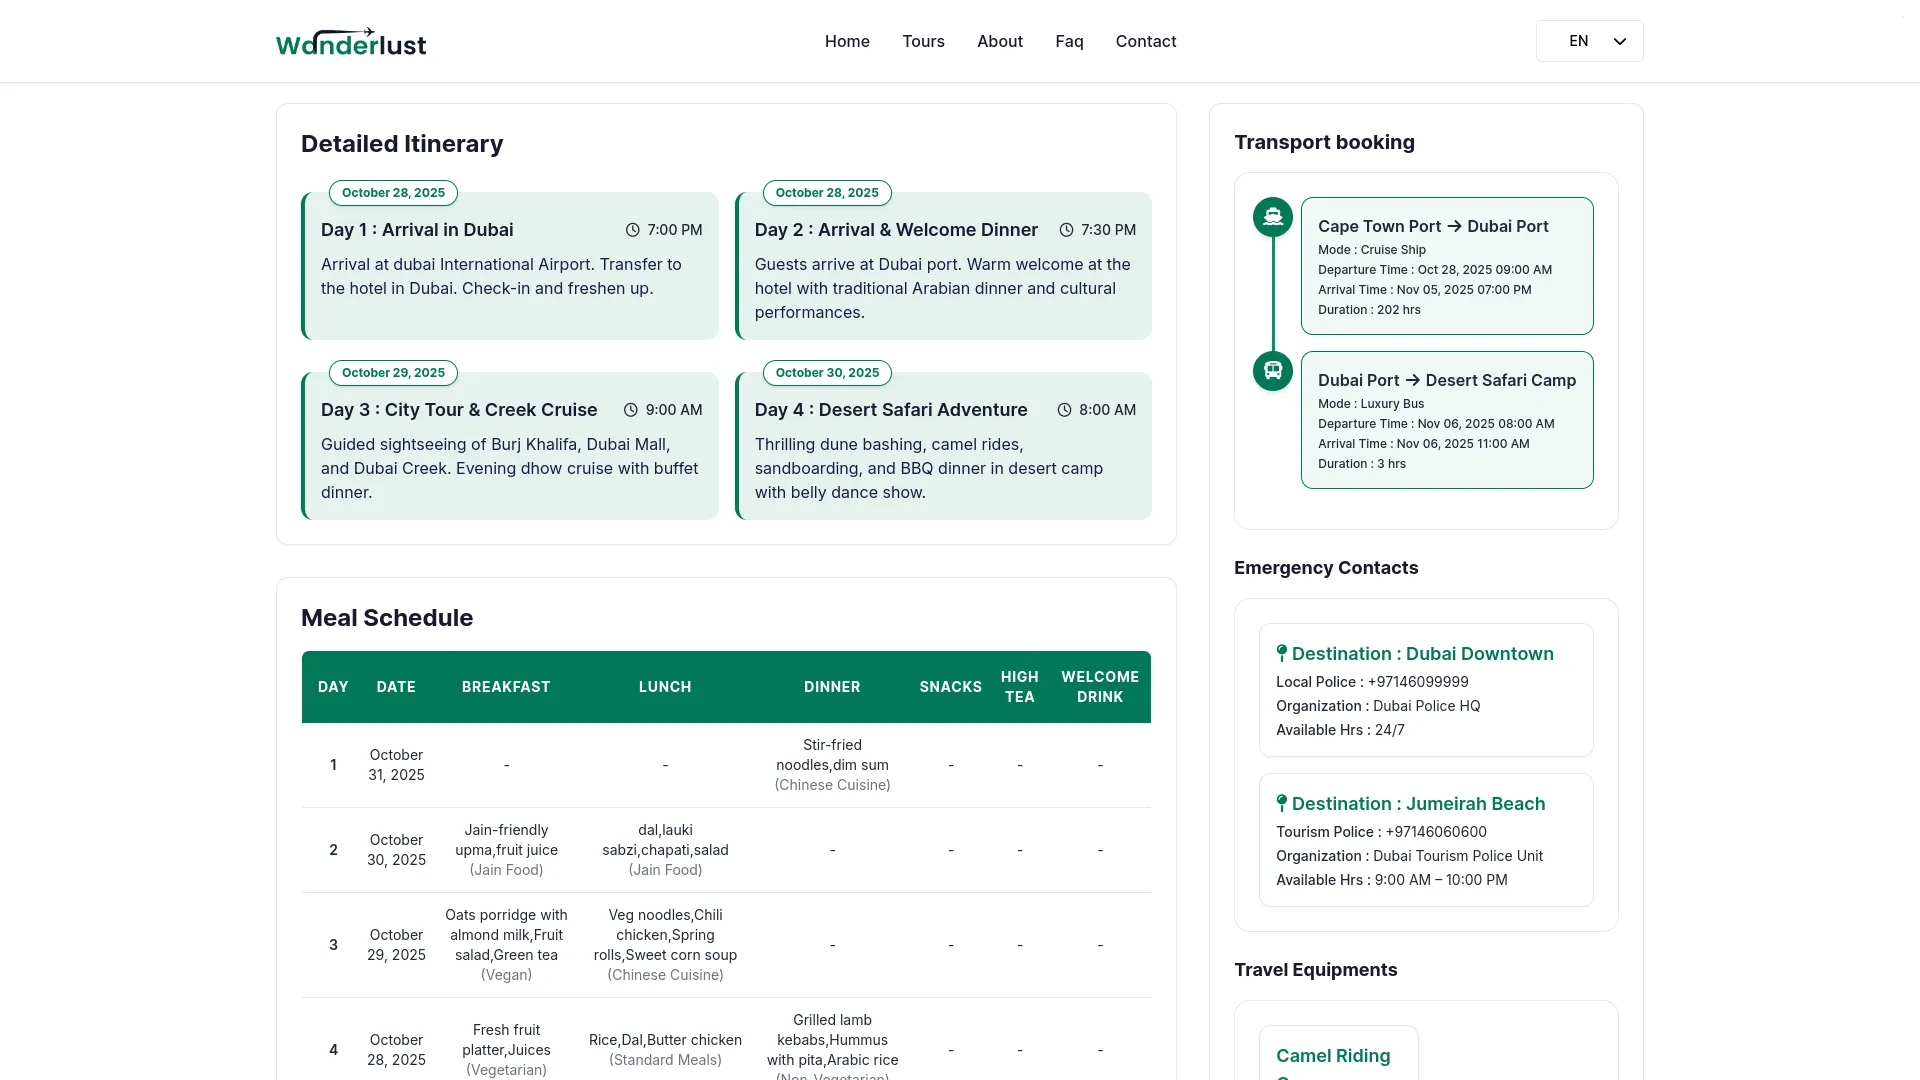
- All tours you create will be displayed on your website’s Home page tours slider section & Tours page for customers to browse and also shown in the home page slider tour section.
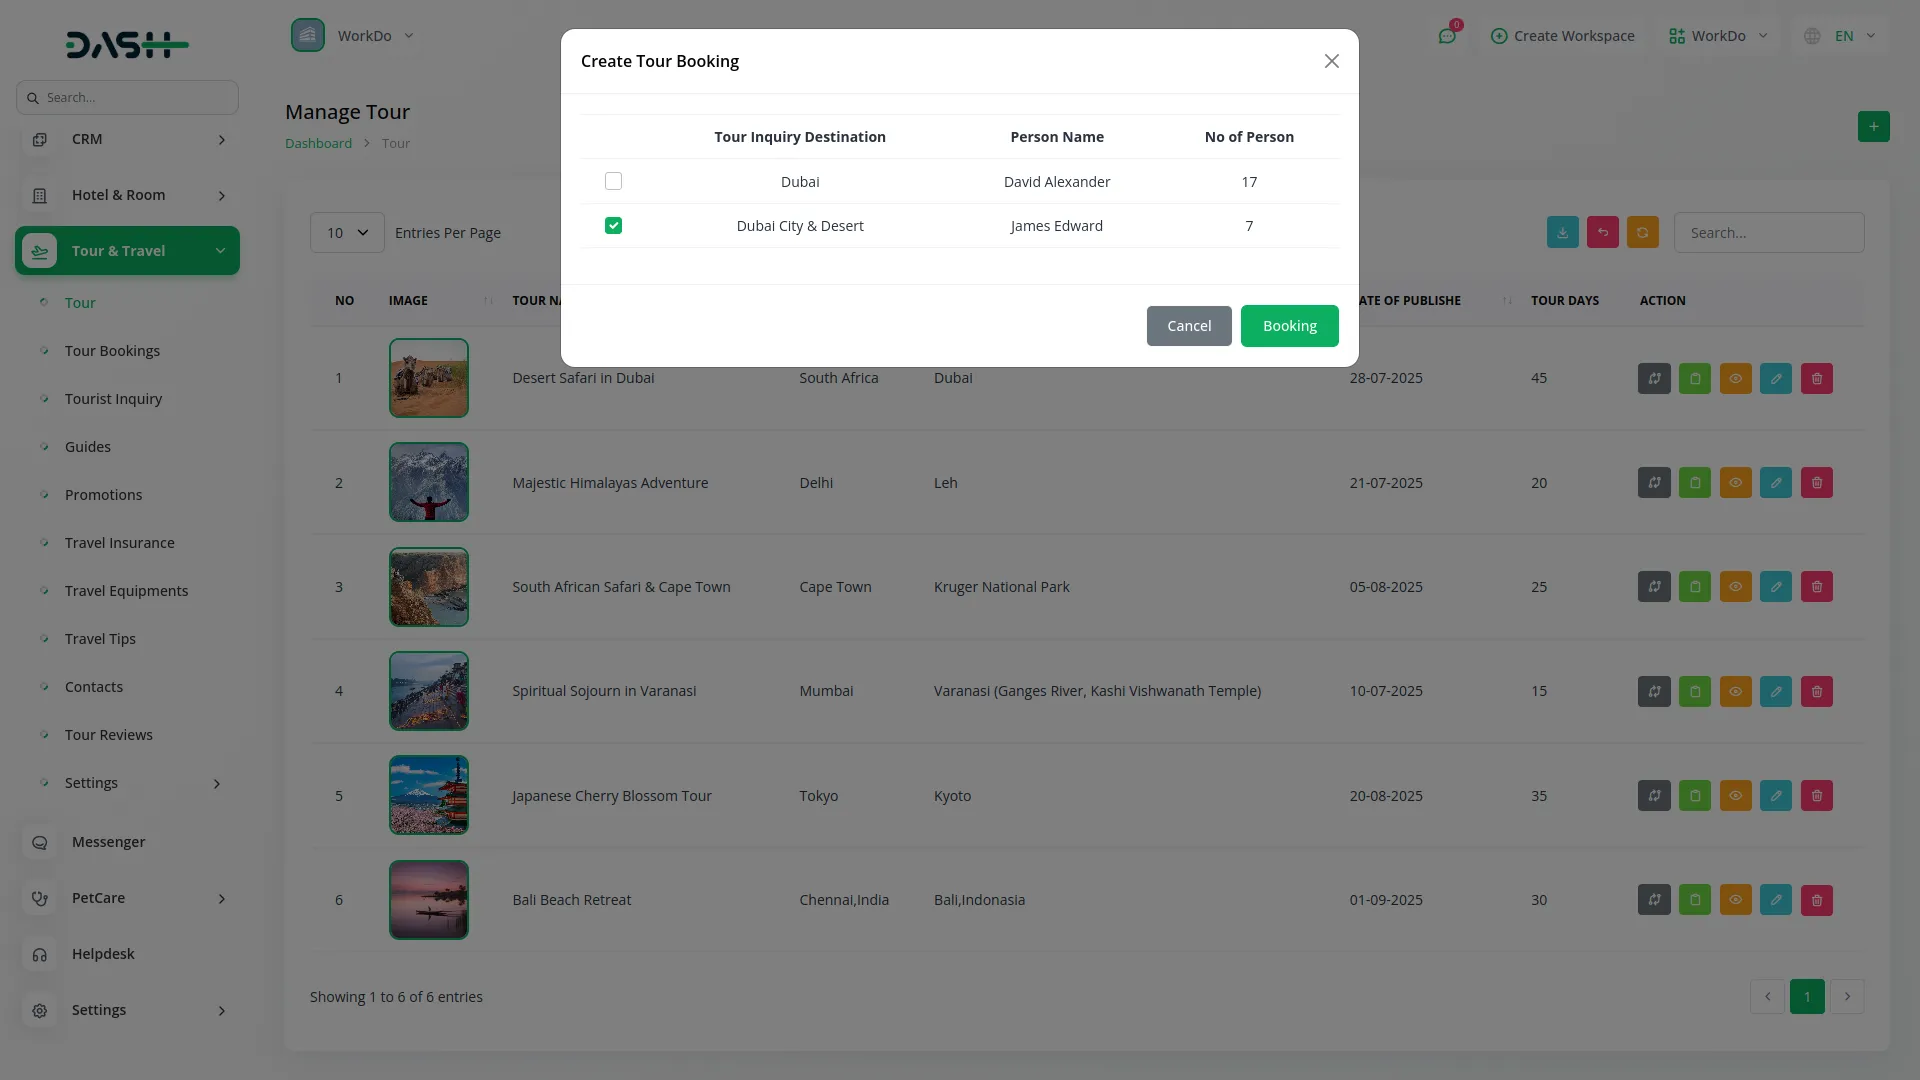
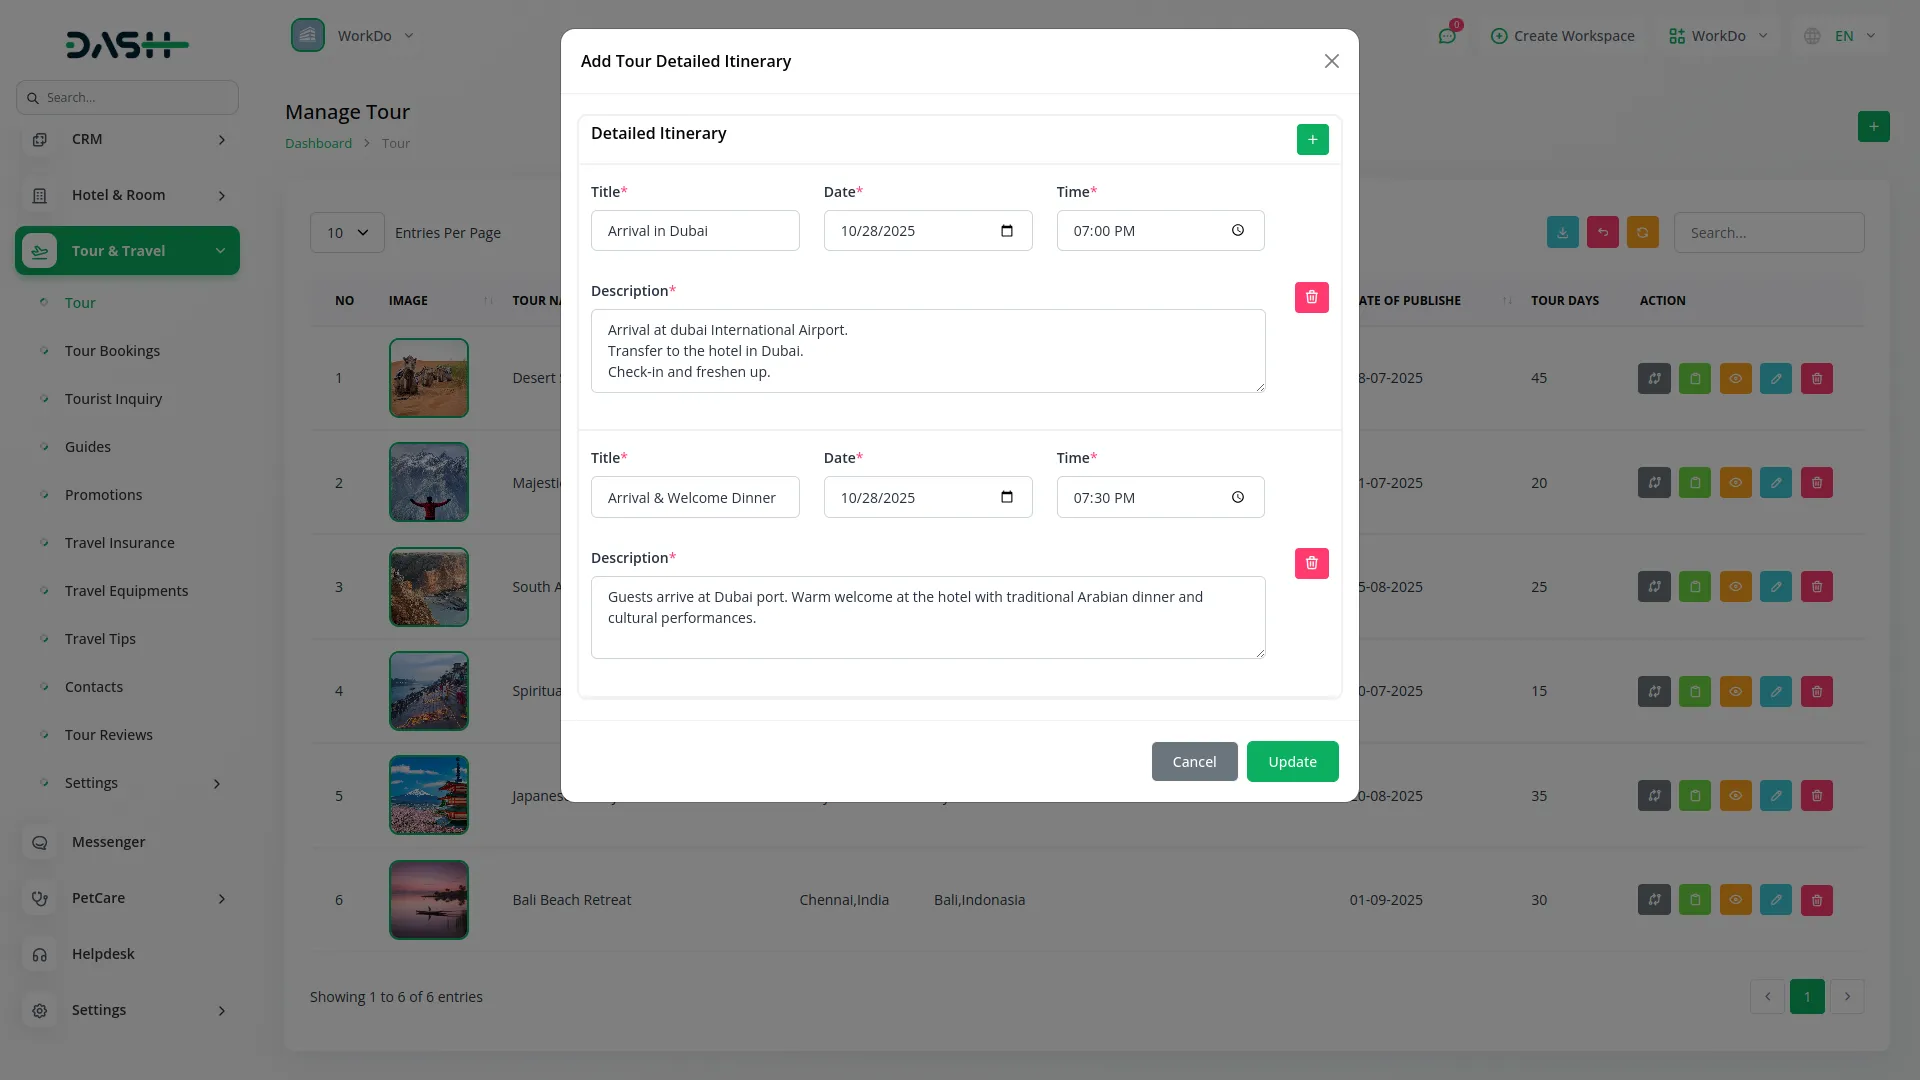
- In the Action column available button, you can use the “Convert to Tour Booking” button that displays all tour inquiries related to a specific tour and allows you to convert them into confirmed bookings. More “Tour Itinerary” after clicking opens a form where you can add detailed day-wise information with fields for Title, Date, Time, and Description that will be displayed on the tour details page.
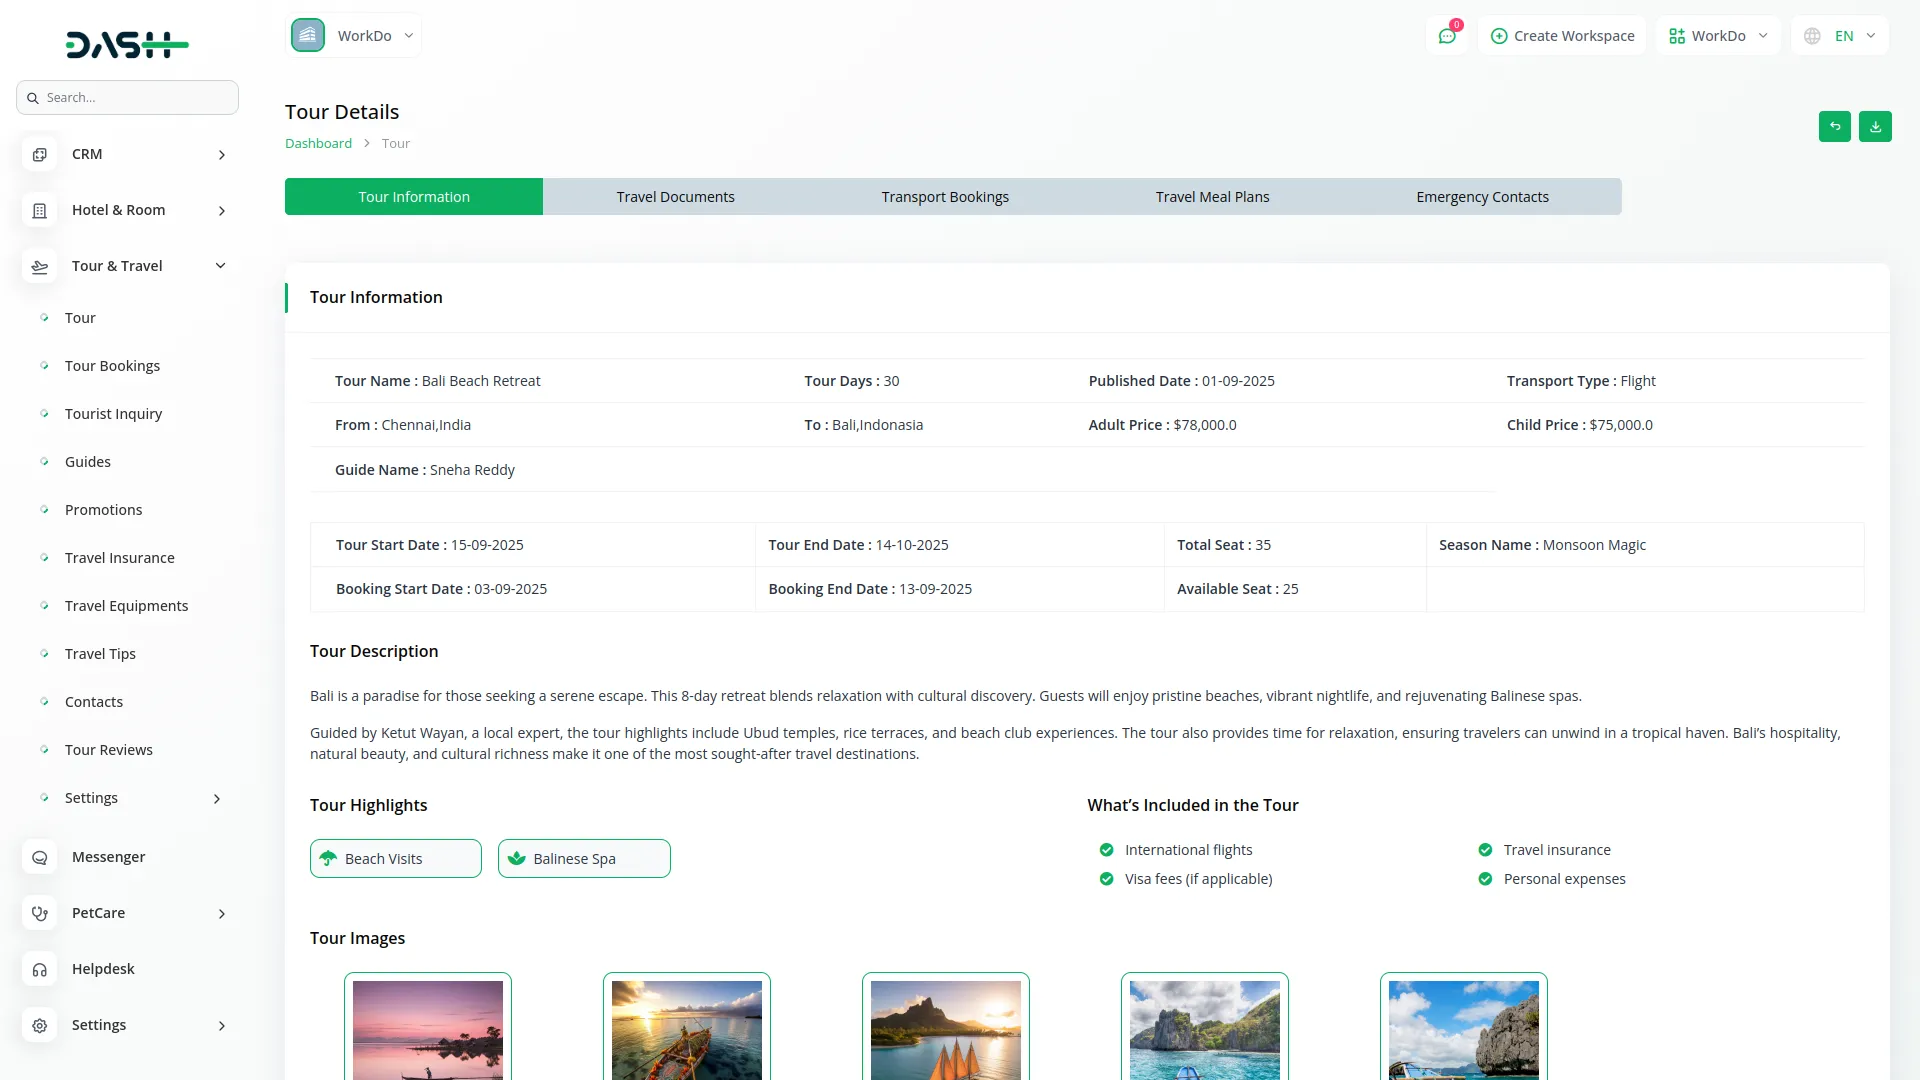
- In the Action column, Clicking the View action opens a detailed tour page with five tabs and provides an option to download a PDF containing all tour information.
- Tour Information Tab: This tab displays all details for the selected tour, including Tour Name, Tour Days, Tour Publish Date, Tour Description, Tour Highlights, Tour Images, and What’s Included in the Tour. If you have created the same tour with different Tour Start Dates, End Dates, Seasons, and Booking Dates, all these variations and their related information are shown together in this tab.
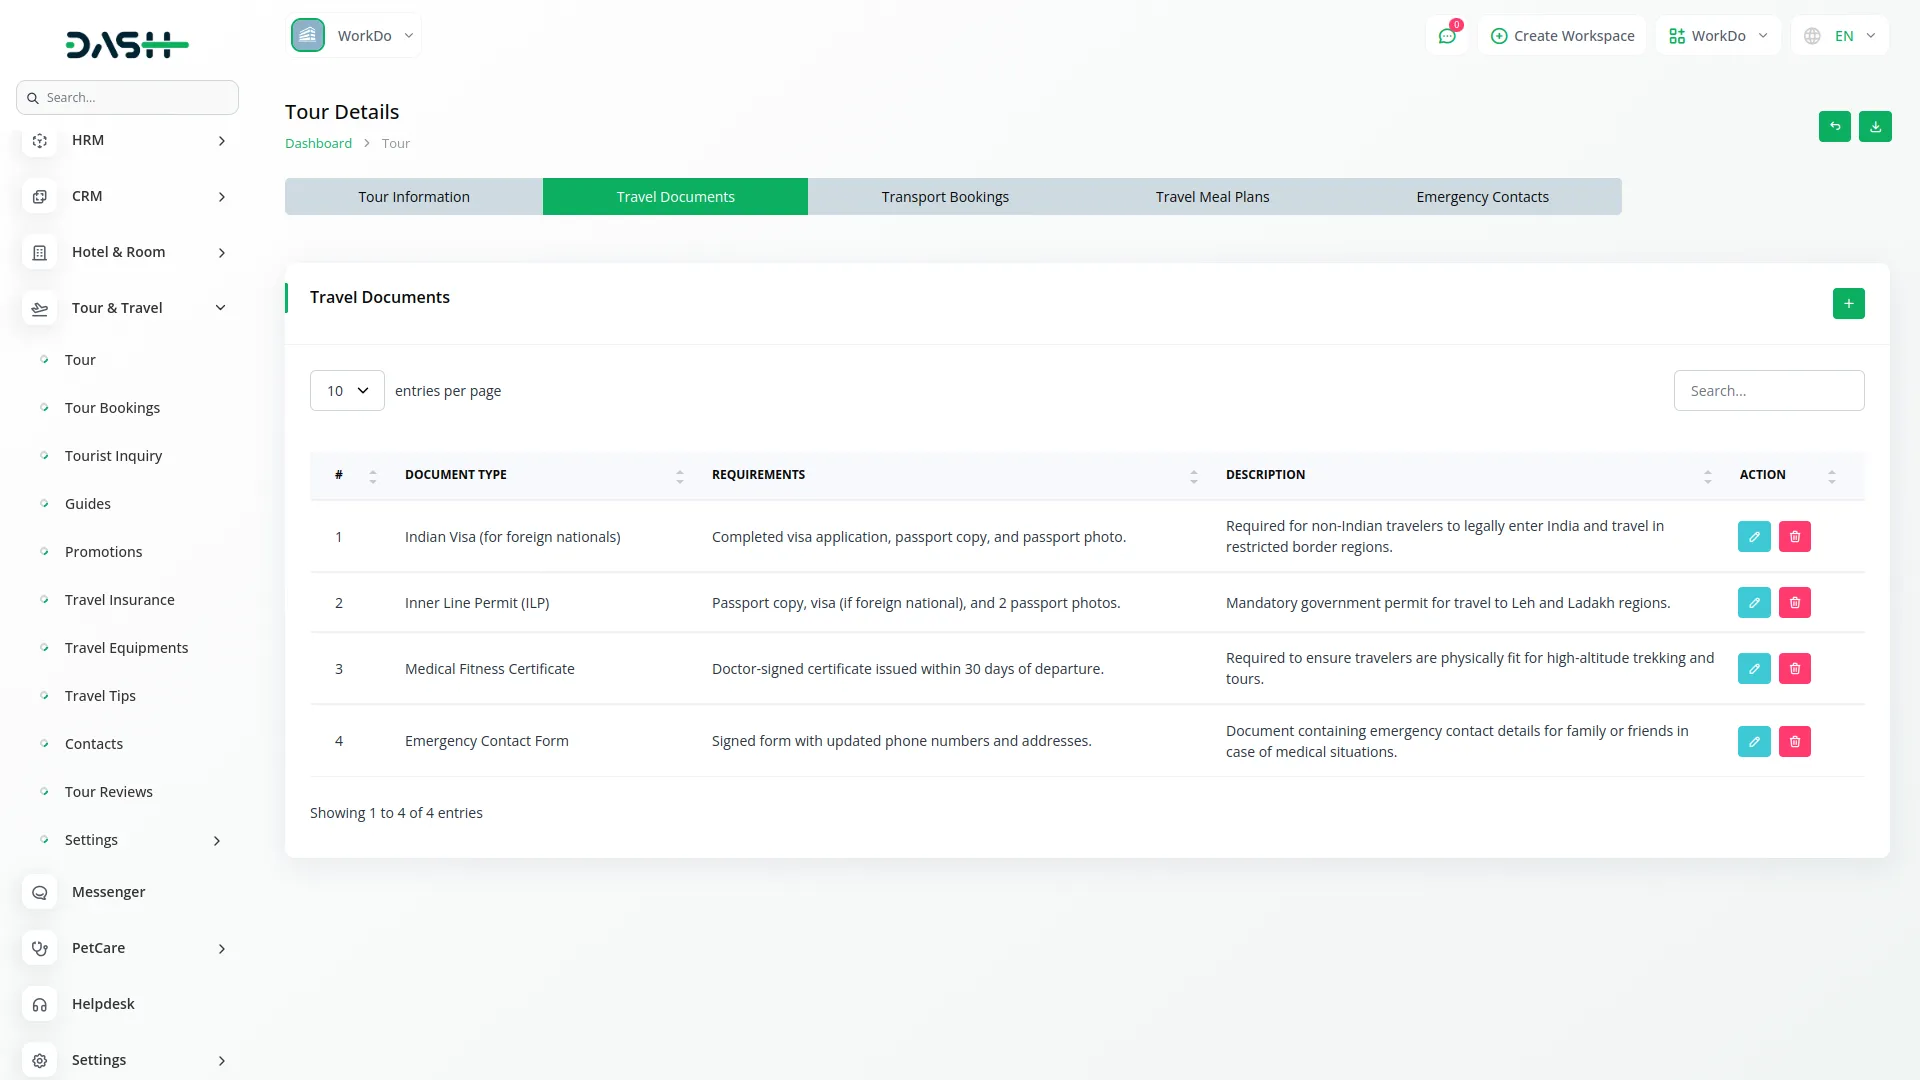
- Travel Documents Tab: This tab manages required travel documents for the tour. Click the “Create” button to create new document requirements. Fill in the Document Type (such as passport, visa, etc.), Requirements (specific criteria needed), and Description (detailed information about the document). The list shows all documents with Document Type, Requirements, and Description columns. You can edit existing document details or delete documents that are no longer needed.
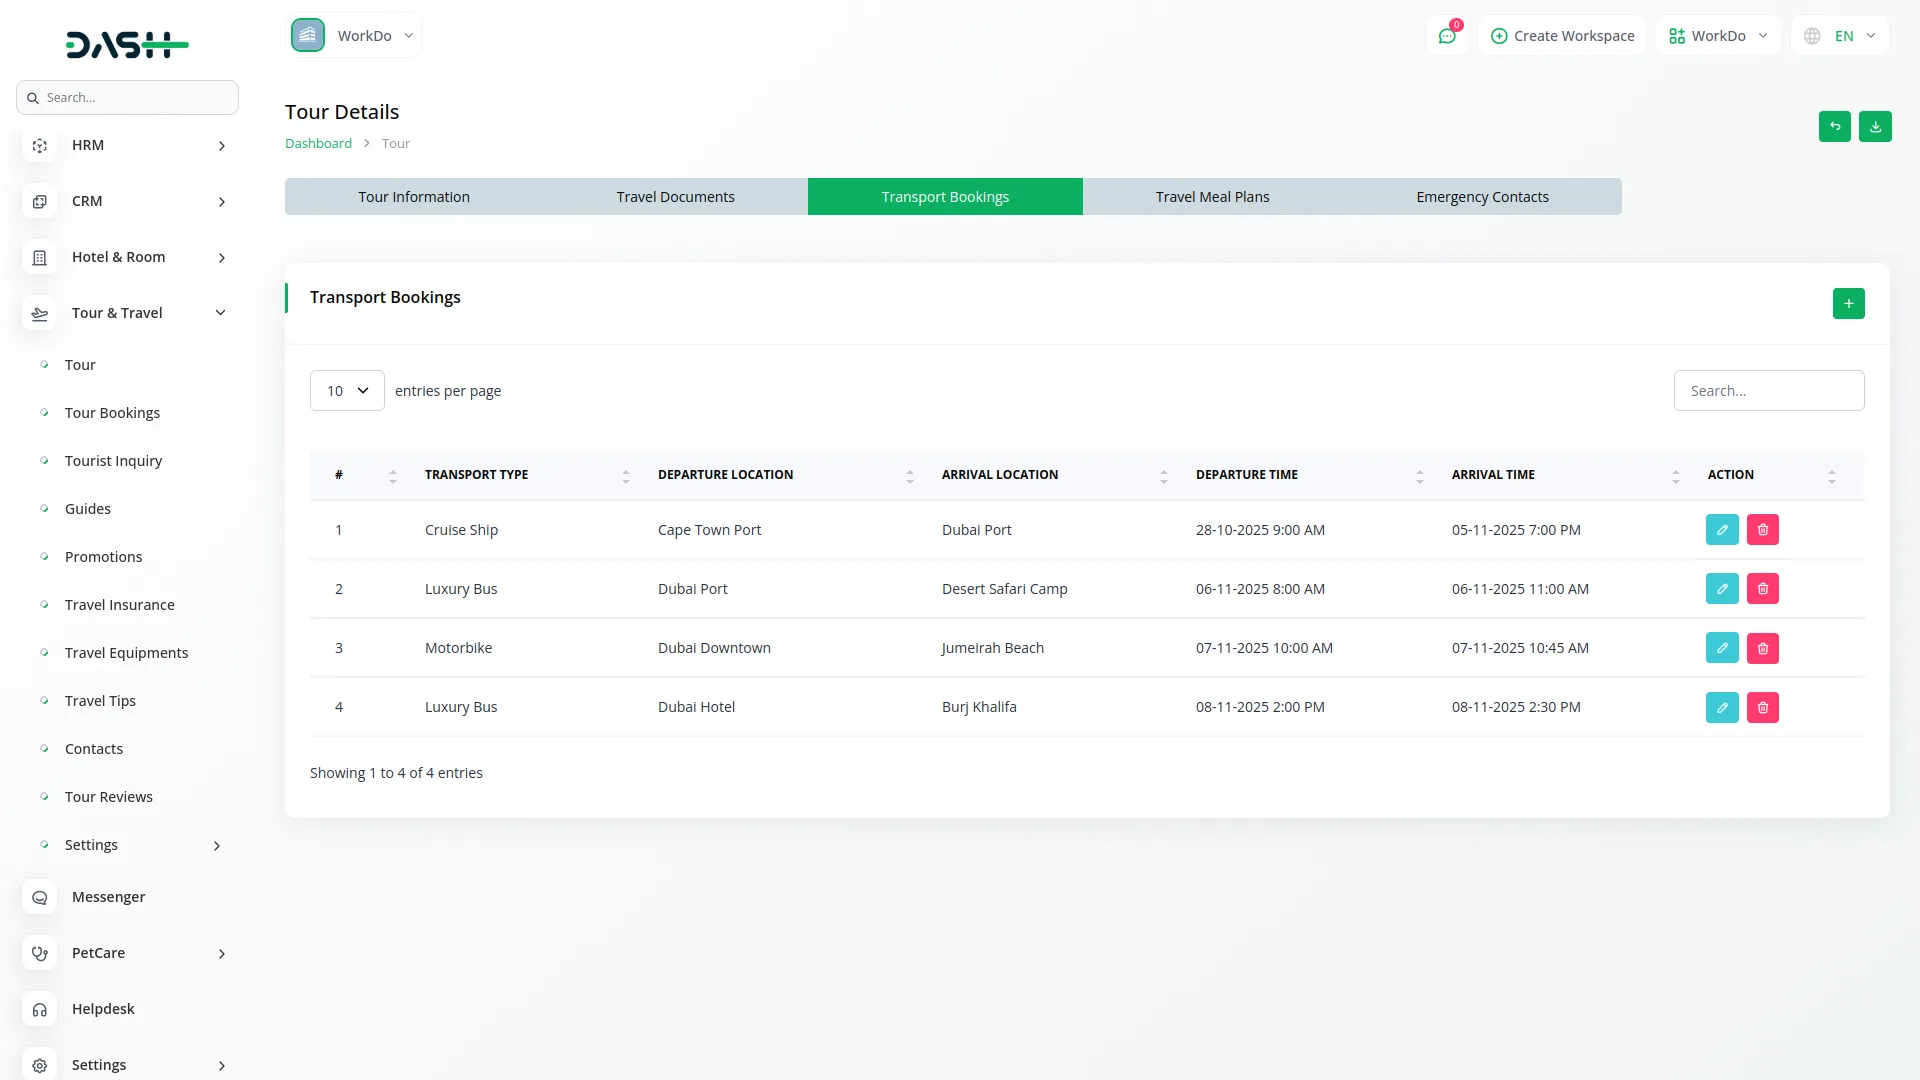
- Transport Bookings Tab: This tab handles all transportation arrangements for the tour. Click “Create” to create new transport bookings. Select the Transport Type from the options you’ve set up in System Setup, enter Departure Location and Arrival Location, then specify Departure Date/Time and Arrival Date/Time. The list displays all bookings showing Transport Type, Departure Location, Arrival Location, Departure Time, and Arrival Time. You can edit booking details or delete transportation arrangements.
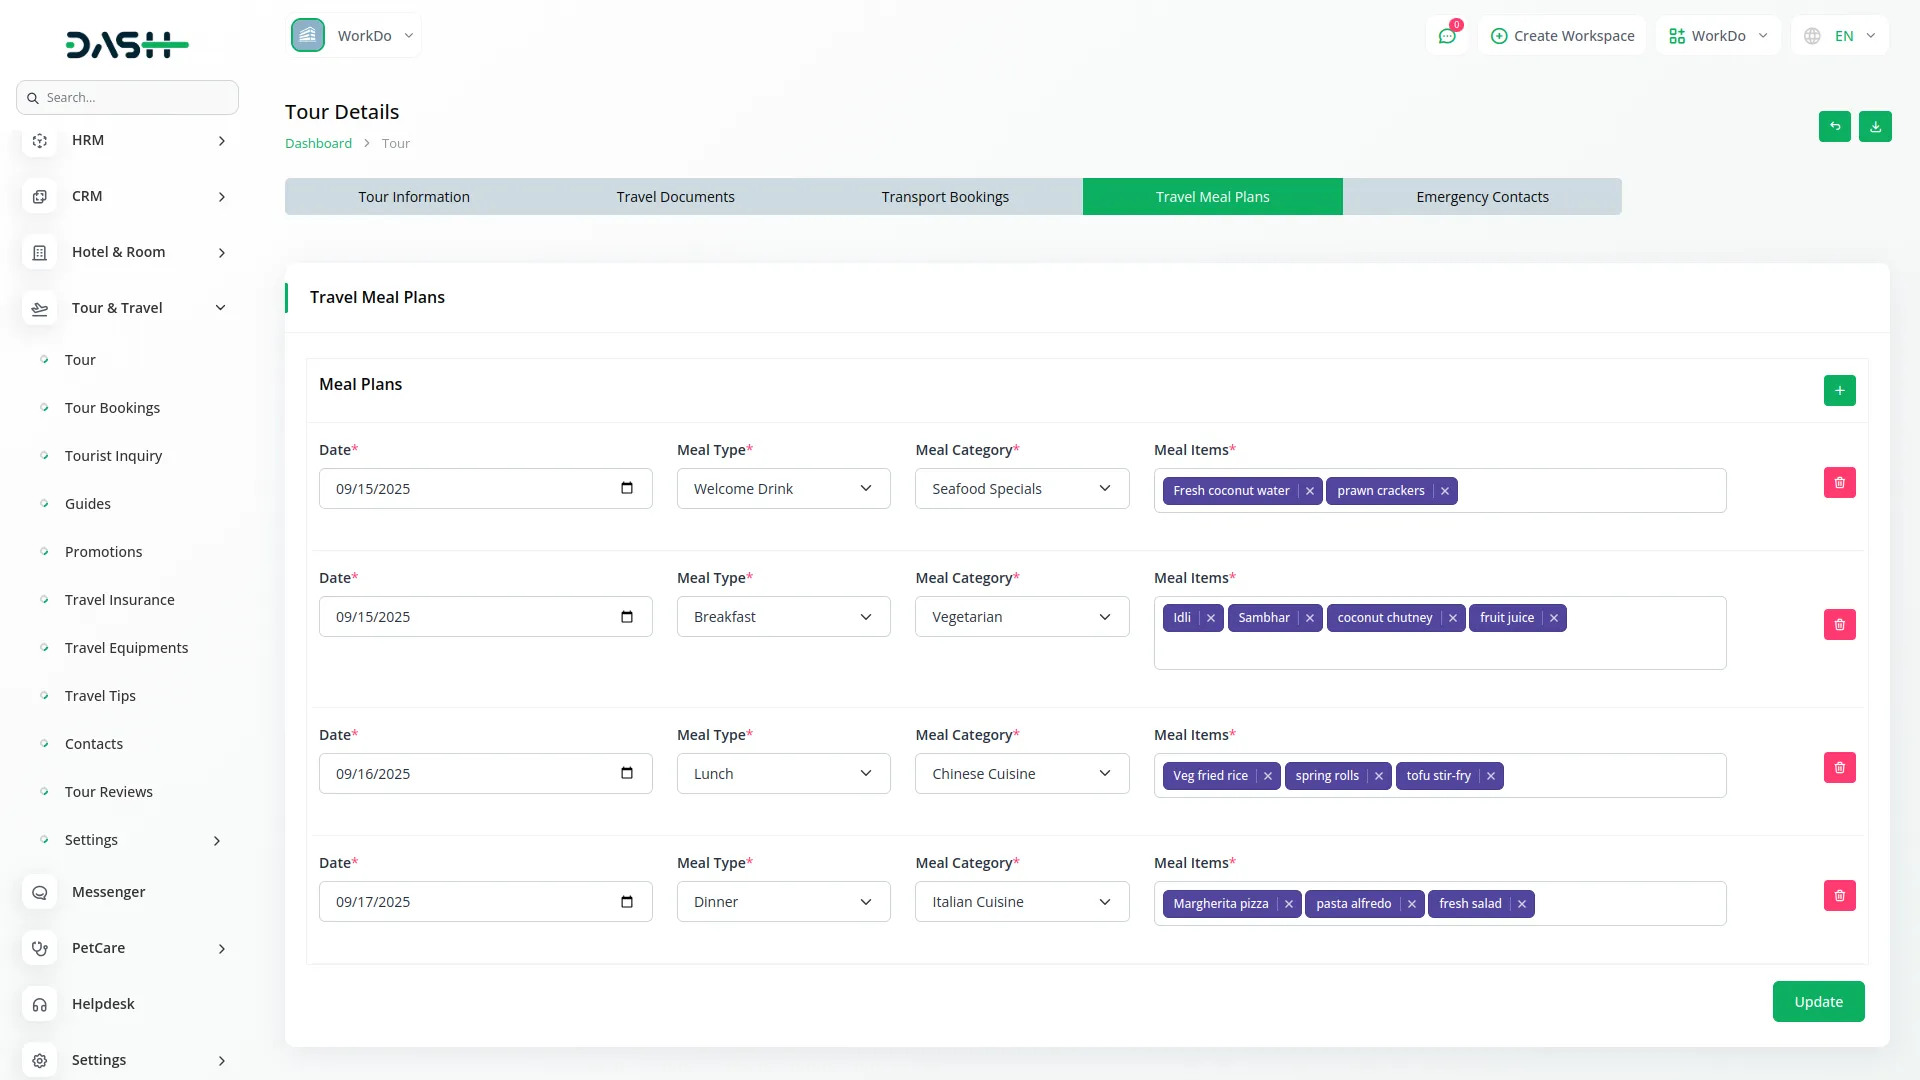
- Travel Meal Tab: This tab manages meal arrangements throughout the tour. Add meals by selecting the Date, choosing Meal Type from your System Setup options (breakfast, lunch, dinner, etc.), selecting Meal Category from available categories, and using the repeater feature to add multiple Meal Items for each meal service.
- Emergency Contacts Tab: This tab maintains important emergency contact information for the tour. Click “Create” to create emergency contacts. Enter Contact Type (hospital, police, etc.), Organization Name, Contact Number, Available Hours, Location, and Status (active/inactive). When a contact’s status is set to “active”, it will be displayed on the tour details page of the website. The list shows all contacts with columns for No, Contact Type, Organization Name, Contact Number, Available Hours, Location, and Status. You can edit contact information or delete contacts when needed.
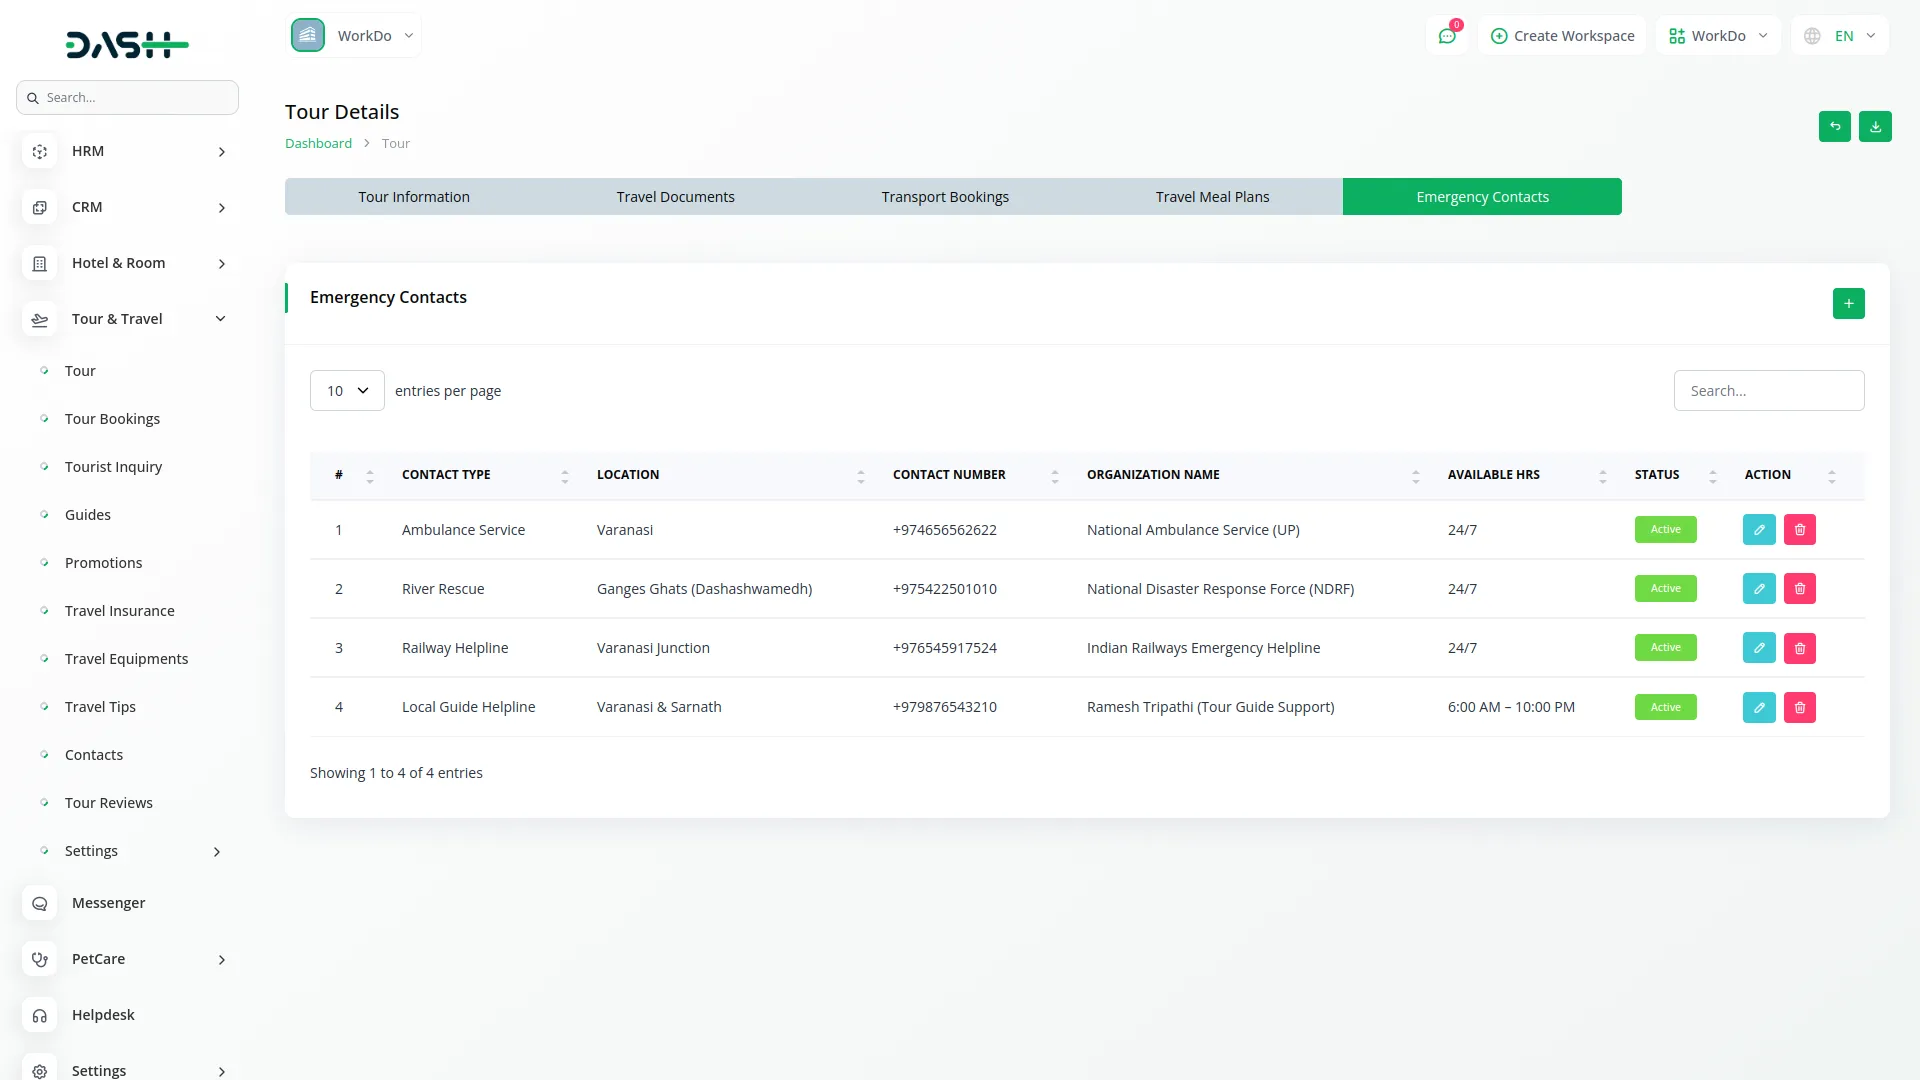
- The Travel Documents, Transport Bookings, Travel Meals, and Emergency Contacts you add in these tabs will appear on each tour’s individual details page on your website, providing comprehensive information to help customers make informed booking decisions.
Tourist Inquiry Management
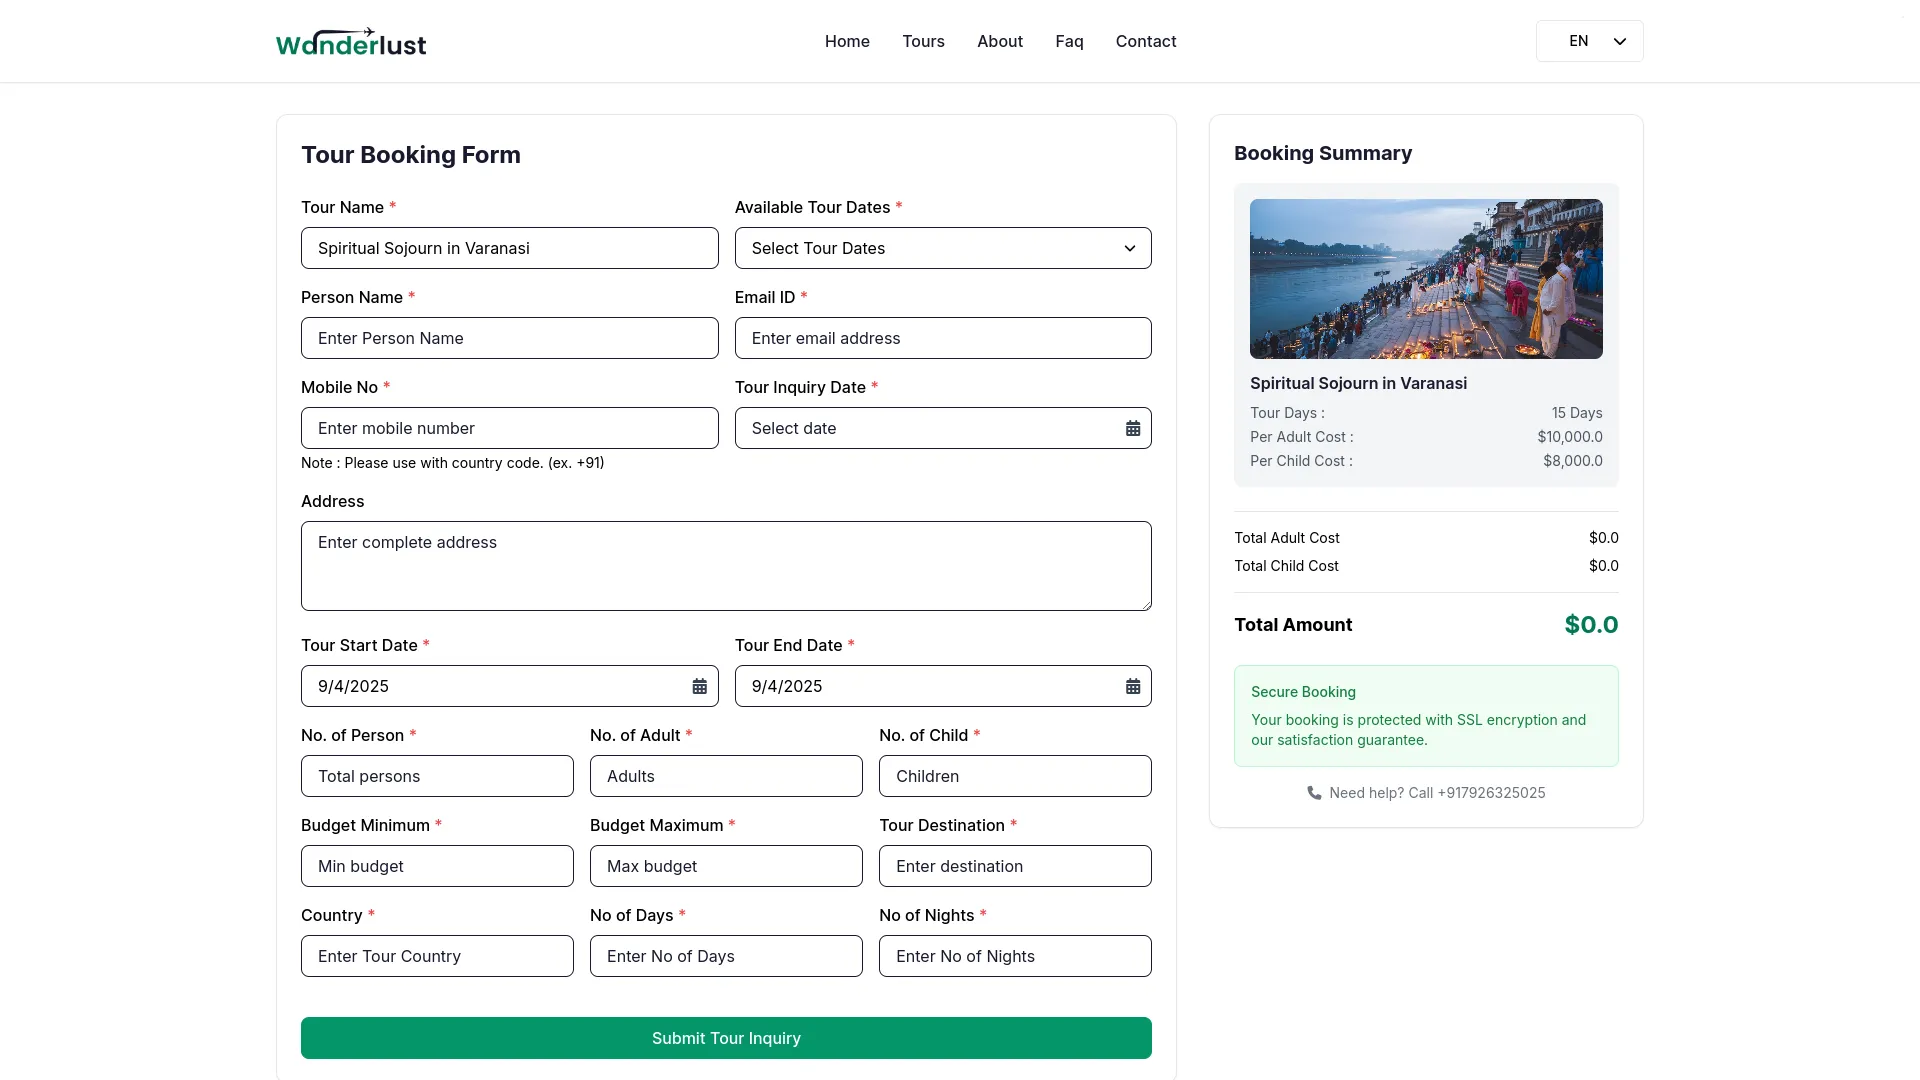
- To create a new tourist inquiry, click the “Create” button at the top of the Tourist Inquiry page. Select the Tour Name from available tours, then choose from Available Tour Dates that are generated based on the selected tour. Enter the Person Name, Email ID, Mobile No, and Address of the inquirer.
- Fill in the Tour Inquiry Date, desired Tour Start Date, and Tour End Date, specify No of persons, No of adults, No of children, and set the Budget Minimum and Budget Maximum ranges. Enter the Tour Destination, Country, No of Days, and No of Nights for the inquiry.
- The Cost Summary section automatically displays Per Adult and Per Child costs generated from the selected tour, along with calculated Total Adult Cost, Total Child Cost, and Total Amount based on the entered number of persons, adults, and children.
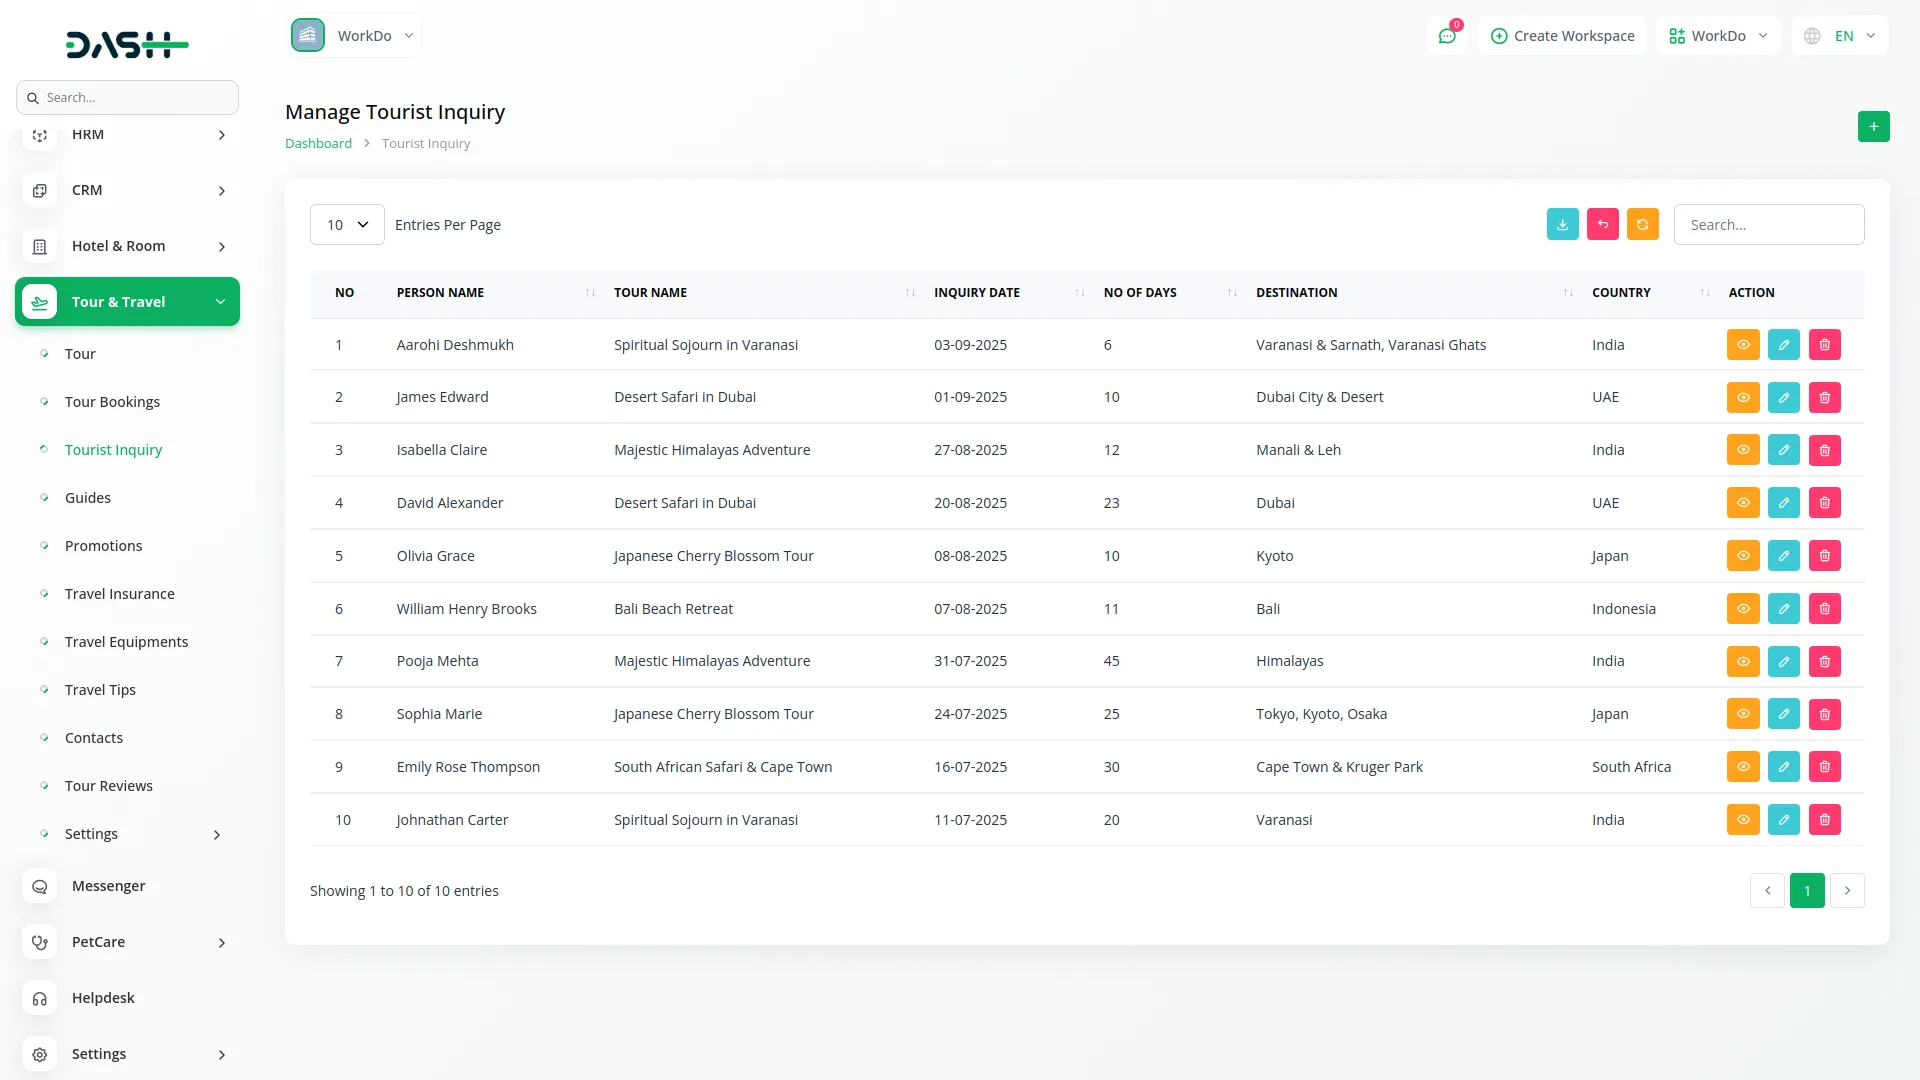
- On the list page, you’ll get to see all inquiries with columns for No, Person Name, Tour Name, Inquiry Date, No of Days, Destination, and Country. You can use the search, export, reset, or reload button to manage the Tourist inquiries list page.
- Actions include View to see complete Tourist Inquiry Details, Edit to modify inquiry information, and Delete to remove inquiries.
- Tour inquiries are also created directly from the website’s tour booking page by visitors.
Tour Bookings Management
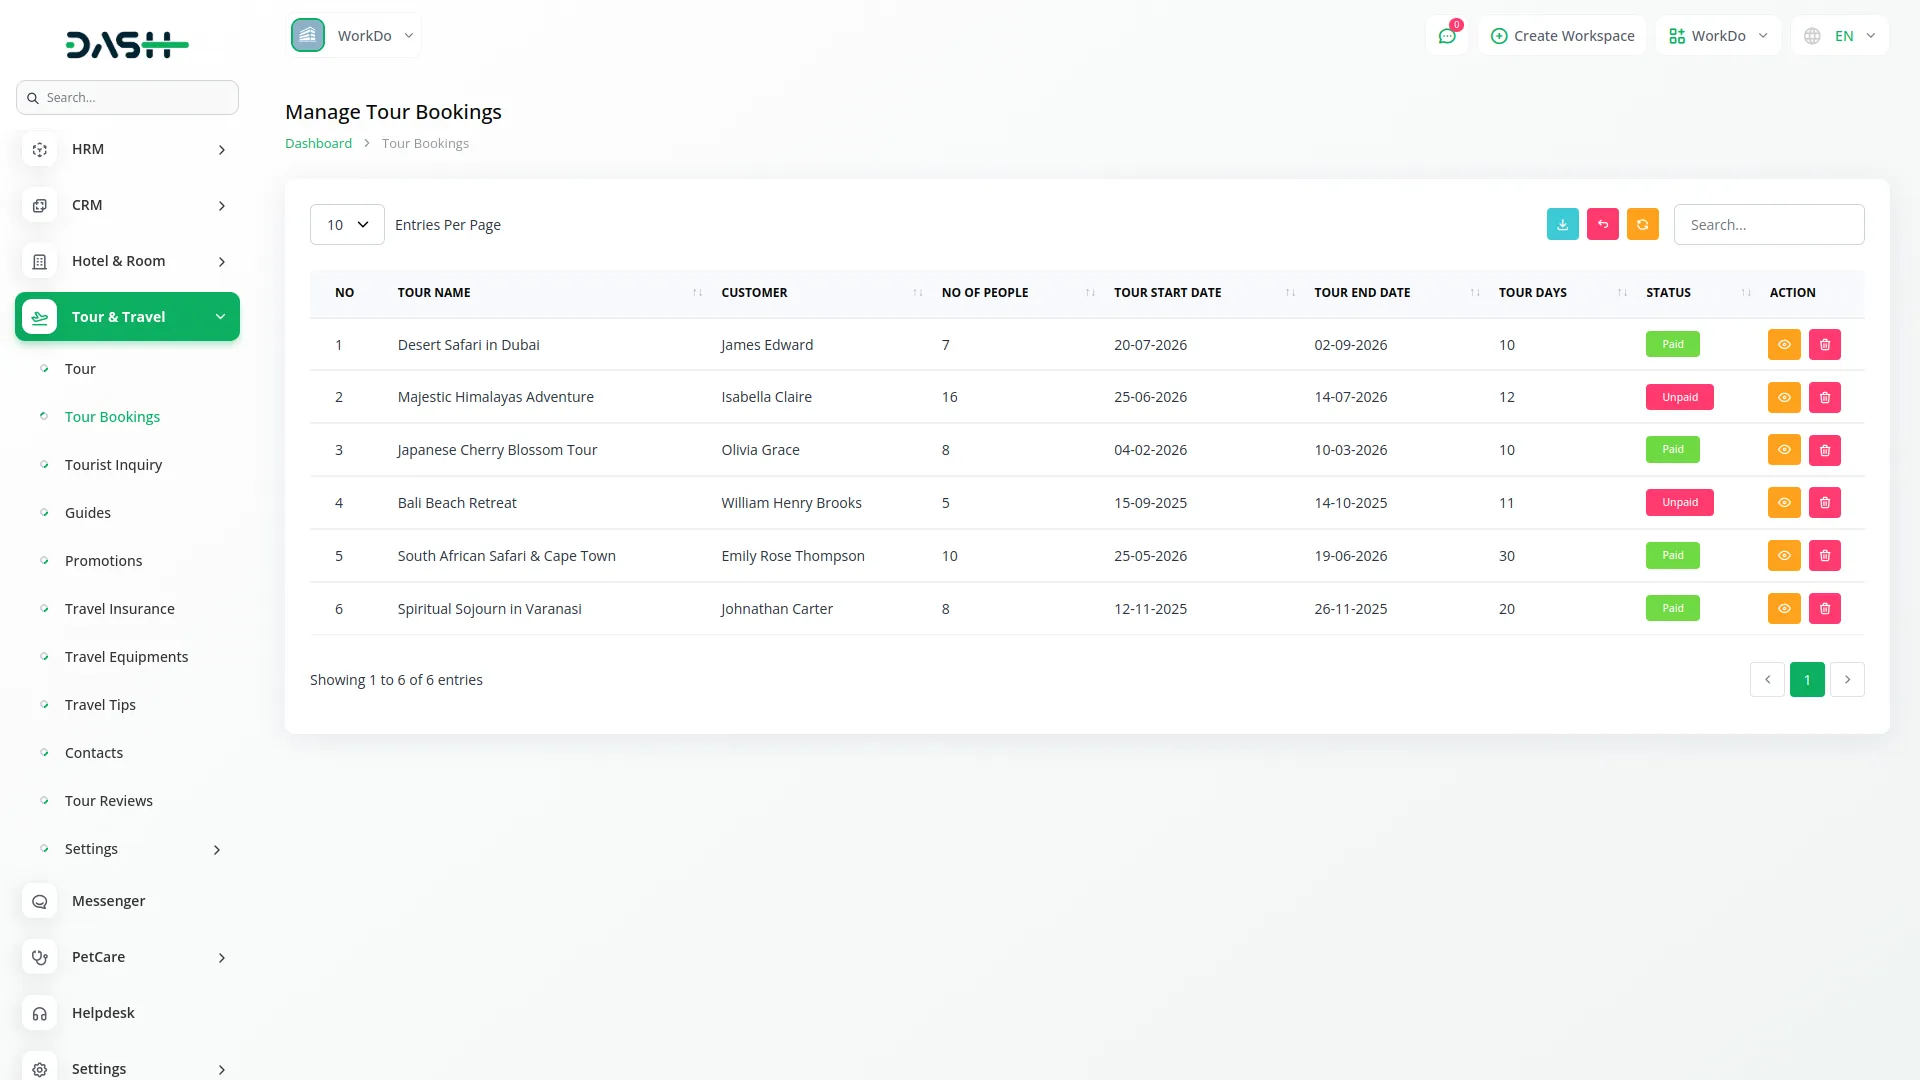
- The Tour Bookings list page displays all confirmed bookings with columns for No, Tour Name fetched from tours, Status showing Paid or Unpaid payment status, Customer Name, No of people, Tour Start Date, Tour End Date, and Tour Days belonging to the person who created the original inquiry.
- Available buttons include Search, Export, Reset, and Reload for managing the bookings list page. Available Actions include Delete to remove bookings and Click “view” to open the Tour Booking Details page with two tabs.
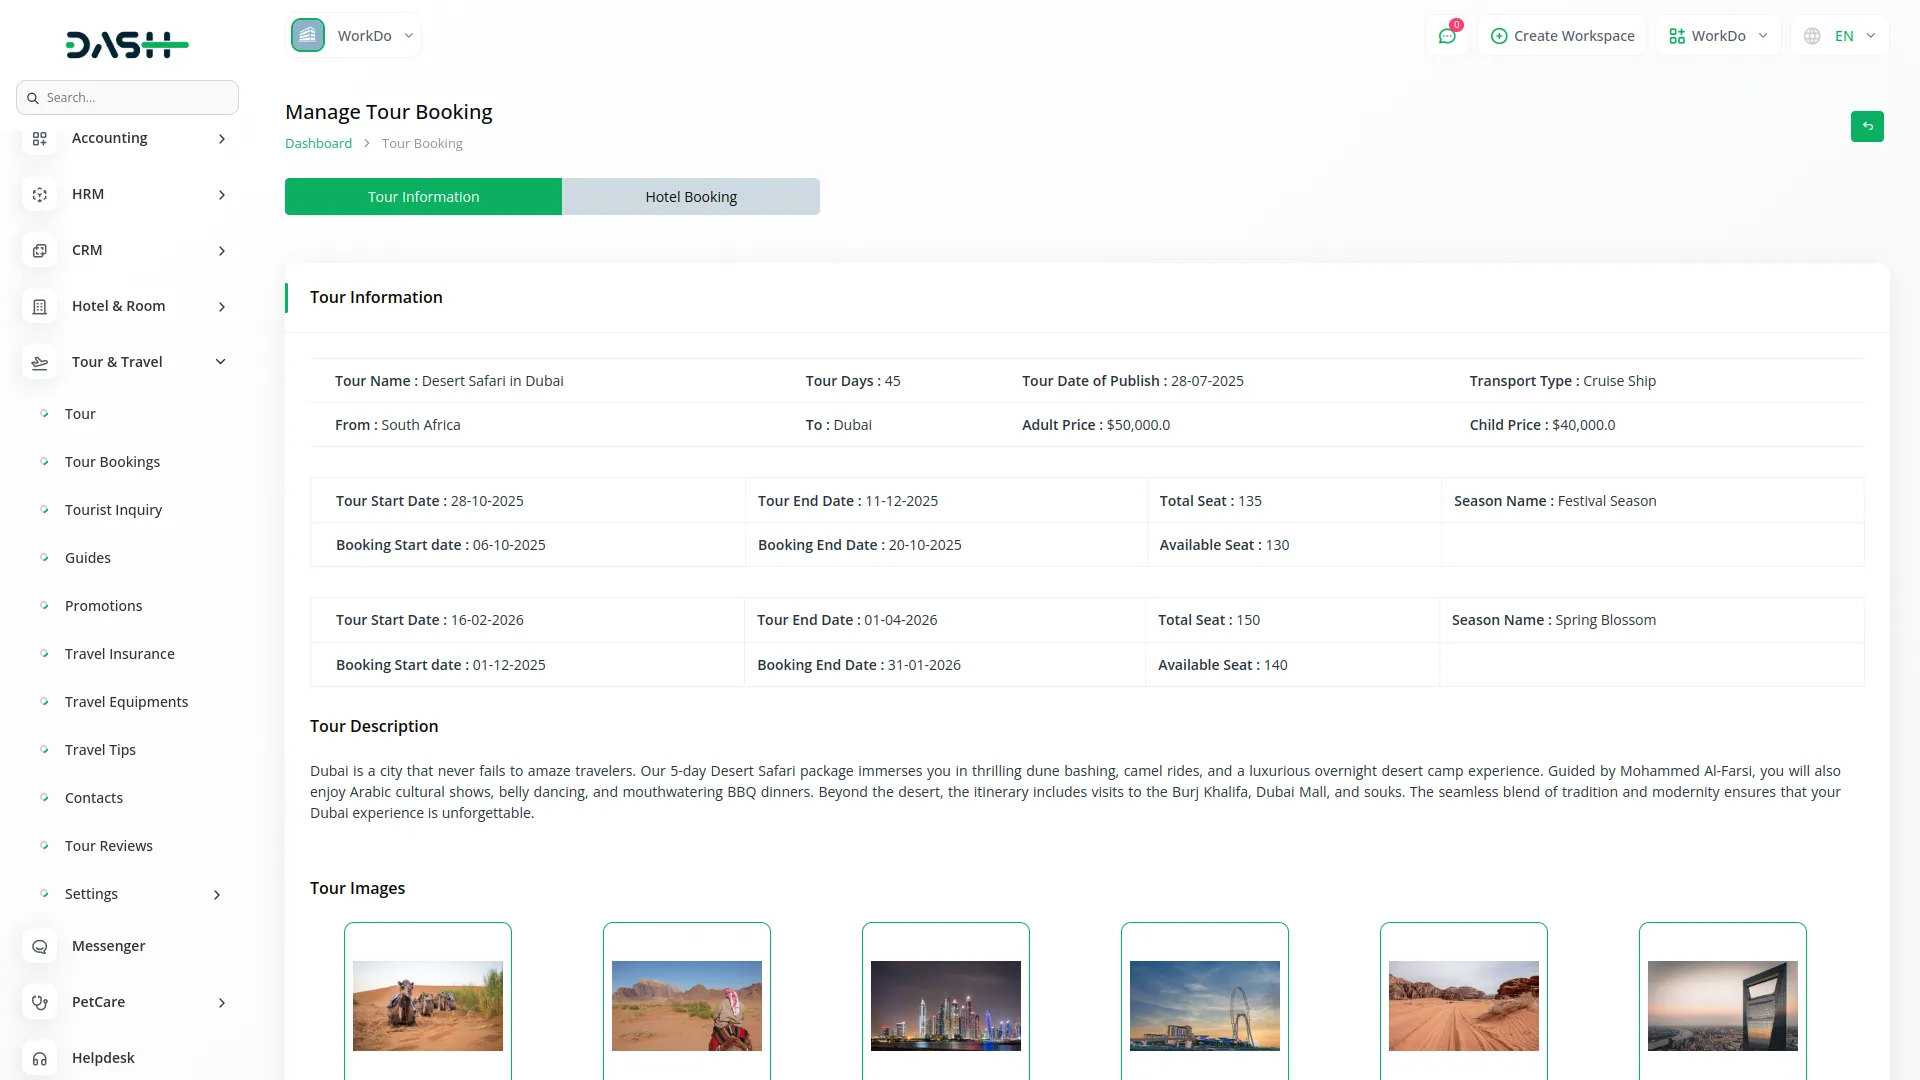
- Tour Information tab: displays complete tour details, including Tour Name, Tour Days, Tour Publish Date, Tour Description, Tour Highlights, Tour Images, and What’s Included information.
- More Tour Itinerary shows day-wise tour information with Title, Date, Time, and Description fields.
- The Person Details section allows you to add multiple person details related to the specific tour using fields for Person Name, Email ID, and Mobile No, with Add, Edit, and Delete actions available.
- Tour Inquiry List displays related inquiries with Person Name, Destination, No of Persons, Adult Amount, Child Amount, Total Amount, and Status. The Add Payment action appears when the payment status is Unpaid, opening a form with Date, Amount, Description, Reference, and Payment Receipt fields.
- Payment Details shows all payment records with Person Name, Destination, Payment Date, Amount, Reference, Description, Order ID, and Receipt download and preview options, with Delete action available.
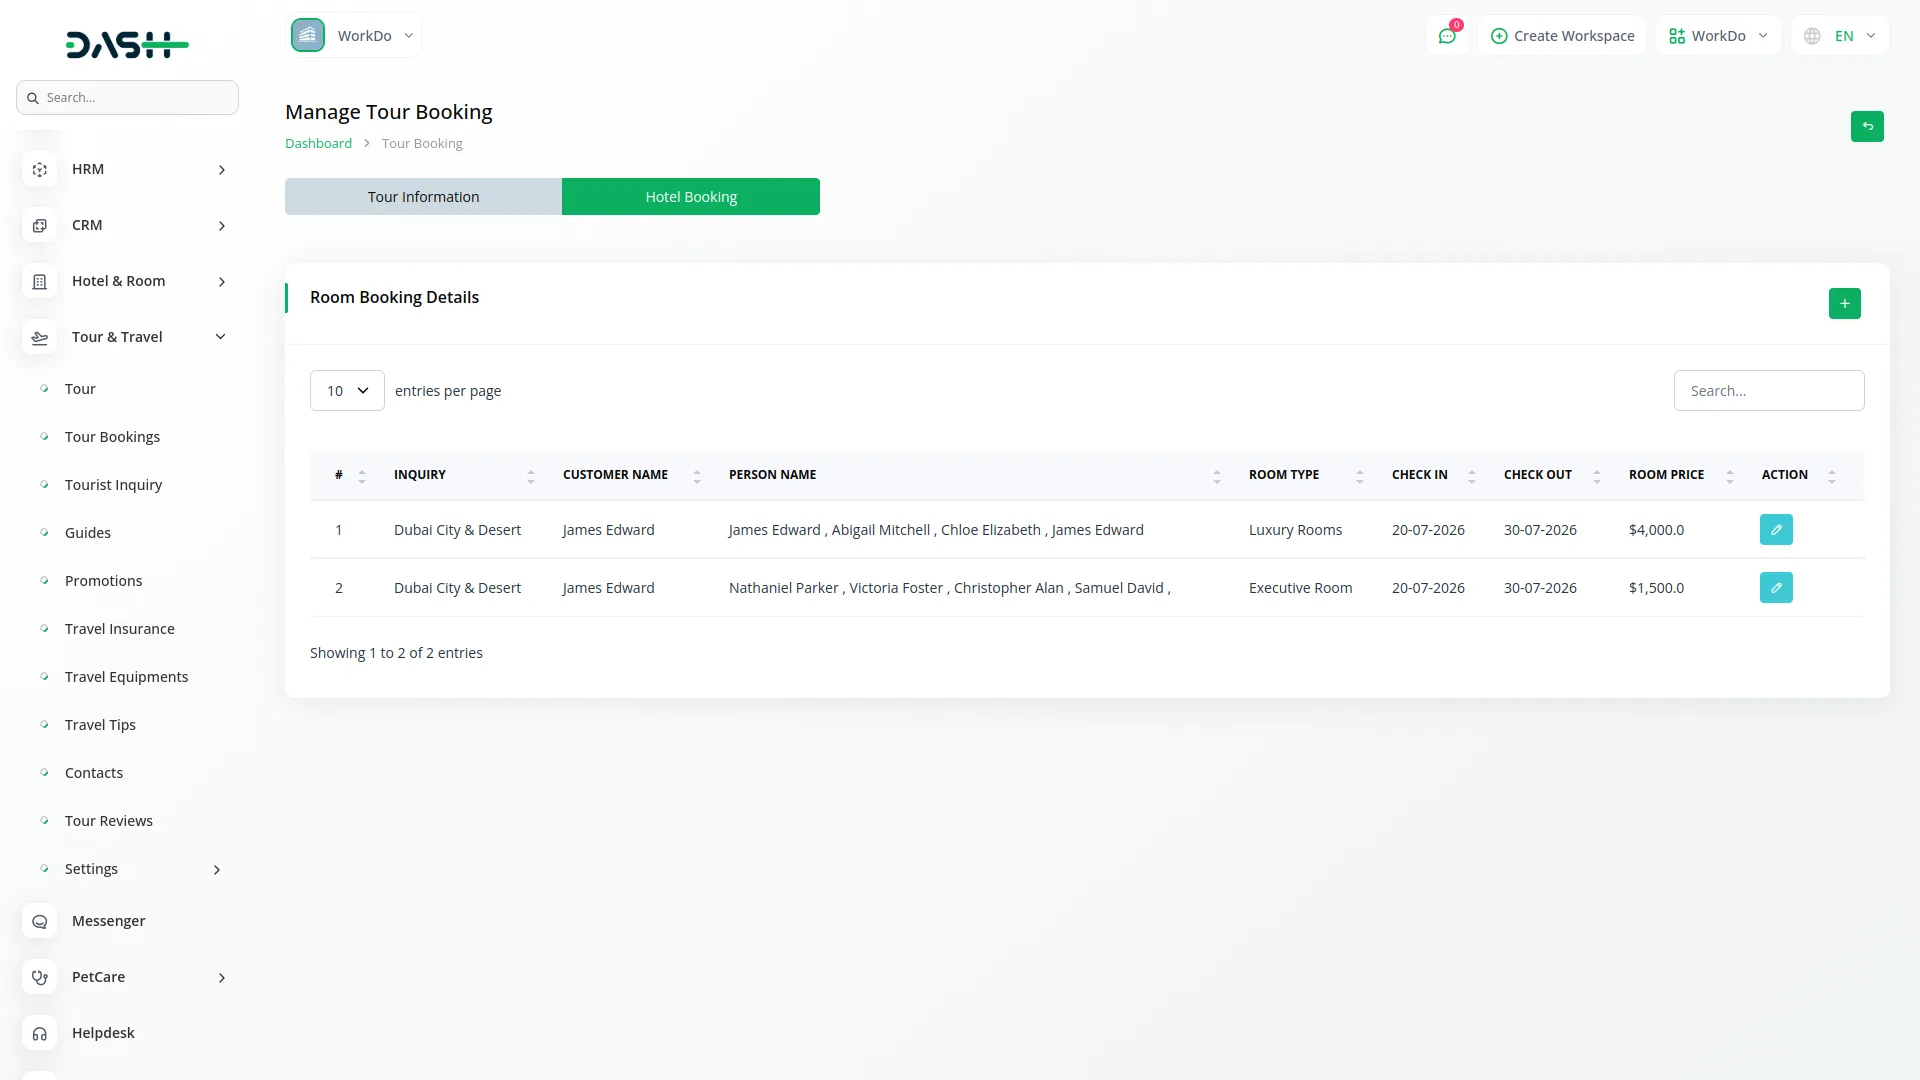
- Hotel Booking tab: allows you to book hotel rooms for your tours. To use this feature, you must first purchase the Hotel and Room Management section. Once active, you can make room bookings by filling in Tour Inquiries, Email ID, Password, Person Name, Room selection, Check In and Check Out dates, Total Room count, Total Rent, Payment Method, and Payment Status. You can add new bookings and edit existing room assignments.
Tour Guides Management
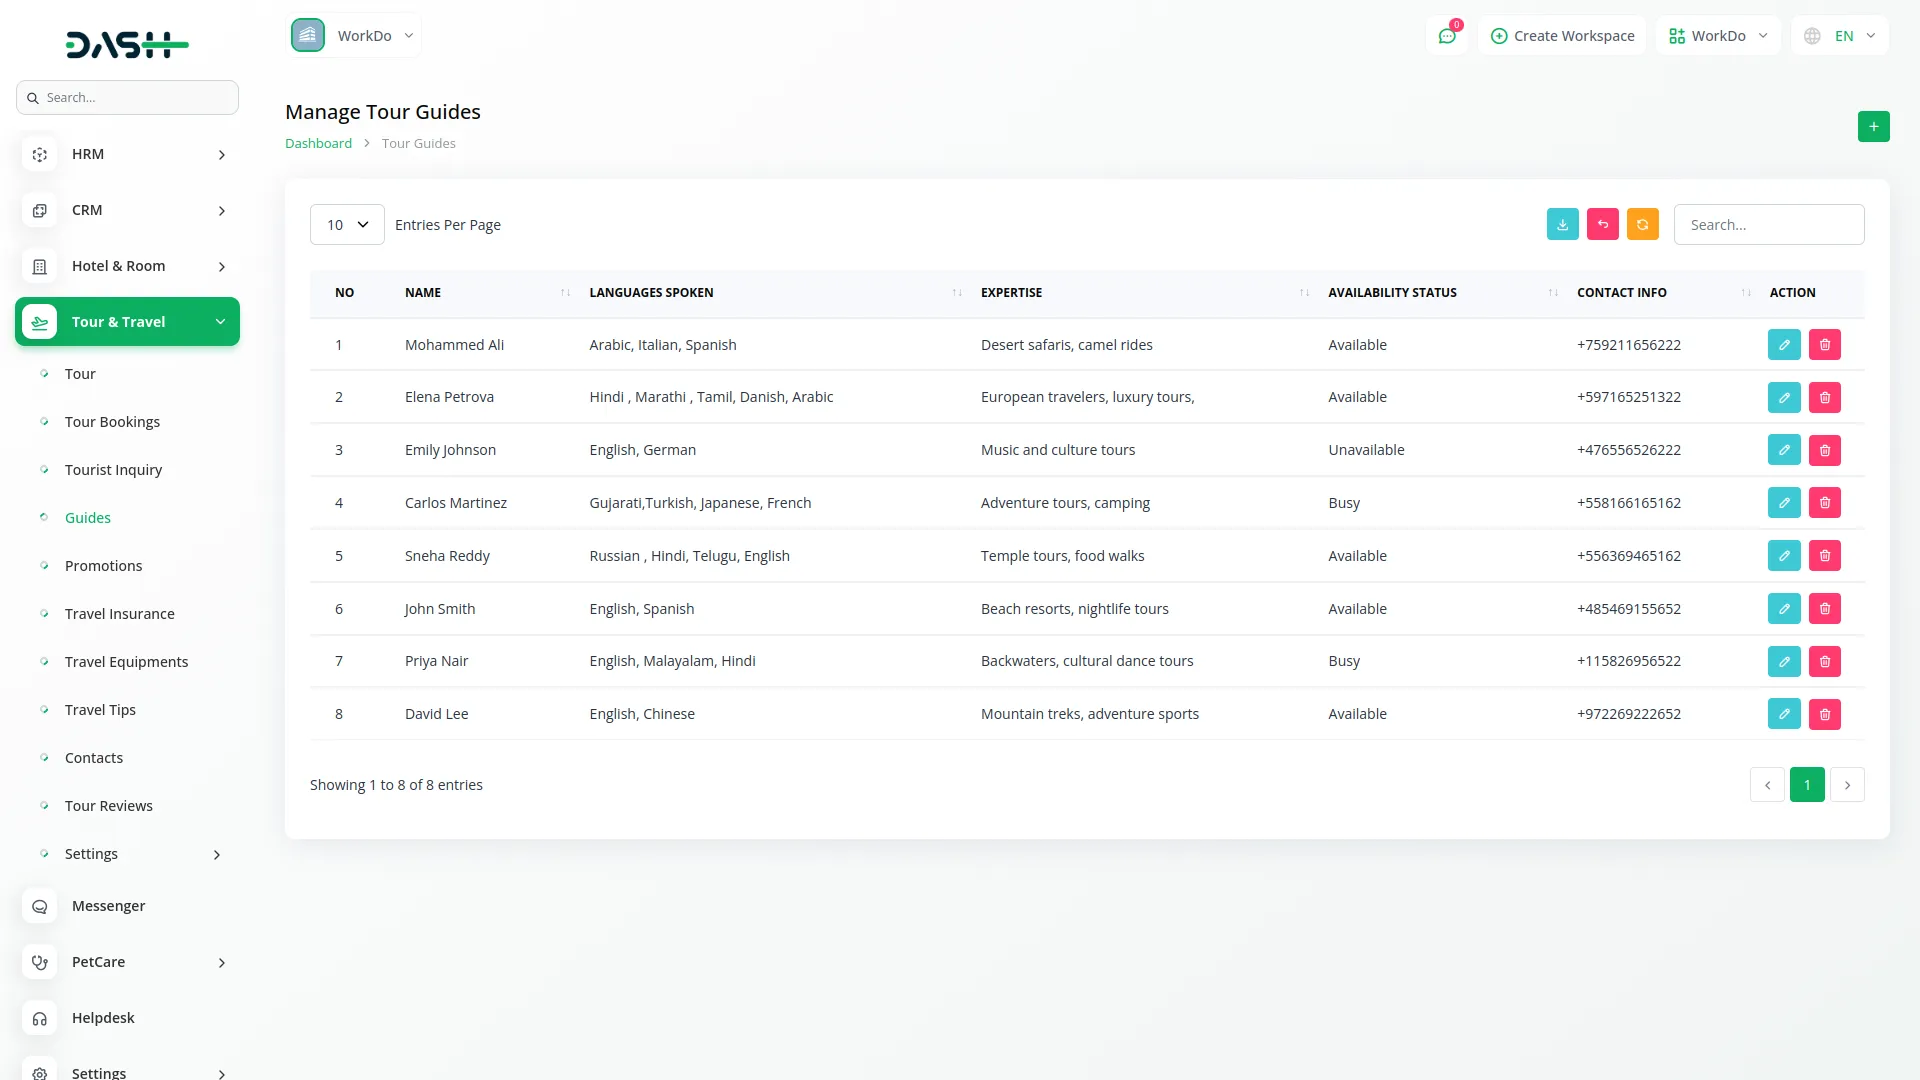
- To add a new tour guide, click the “Create” button at the top of the Tour Guides page. You need to enter the guide’s Name, Languages Spoken, Expertise areas, Availability Status, and Mobile No for contact purposes.
- The list page displays all guides with columns for No, Name, Languages Spoken, Expertise, Availability Status, and Contact Info. Use the search, export, reset, and reload buttons to manage the tour guide database. With the help of the action column, you can use the edit to modify guide information or delete it whenever you need.
Promotions Management
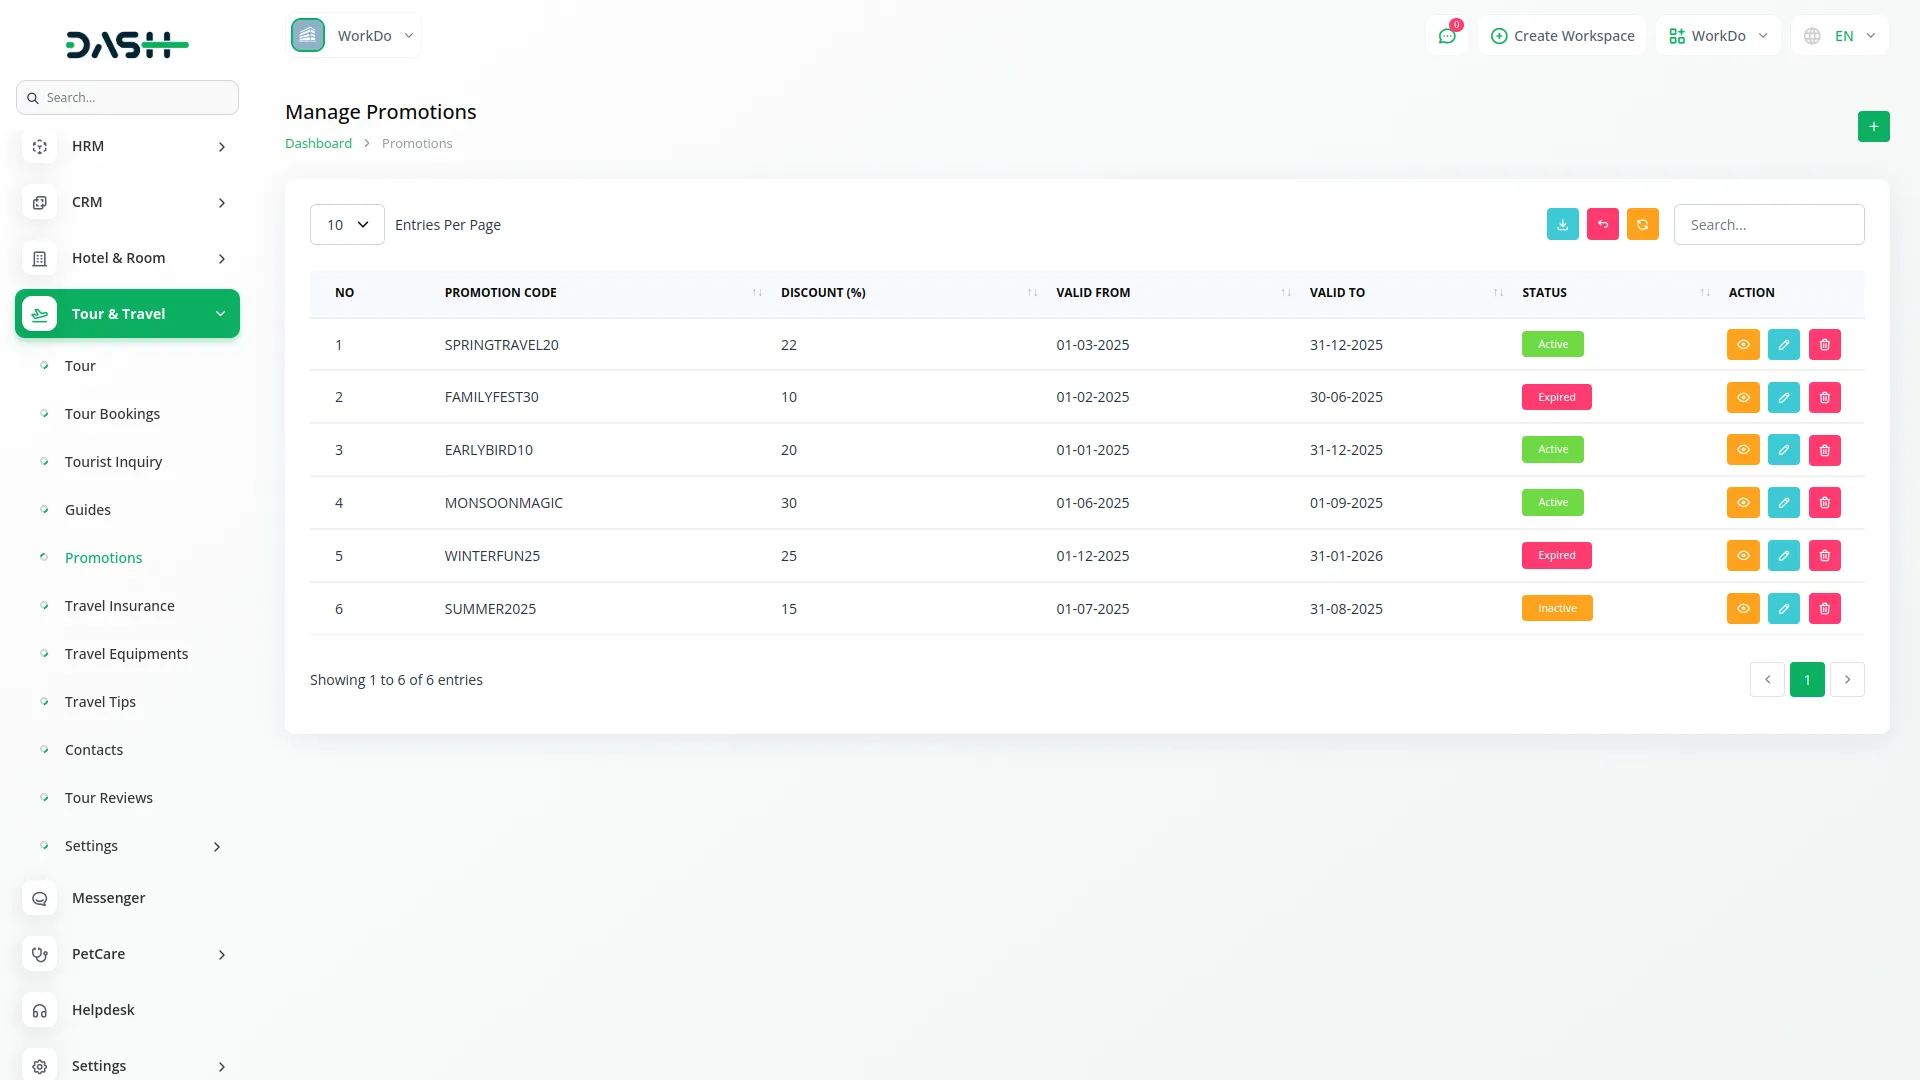
- On the promotion page, to create a new promotion, click the “Create” button given at the top of this page. Enter the unique Promotion Code, set the Discount percentage, specify Valid From and Valid To dates, select Status from Active, Inactive, or Expired options, and provide a Description of the promotion terms.
- The list page shows all promotions with columns for No, Promotion Code, Discount percentage, Valid From, Valid To, and Status. Available buttons include Search, Export, Reset, and Reload for managing promotional campaigns.
- Below the details, available Actions include View to show complete Promotion Details, Edit to modify promotion information, and Delete to remove expired or unwanted promotions from your system.
Travel Insurance Management
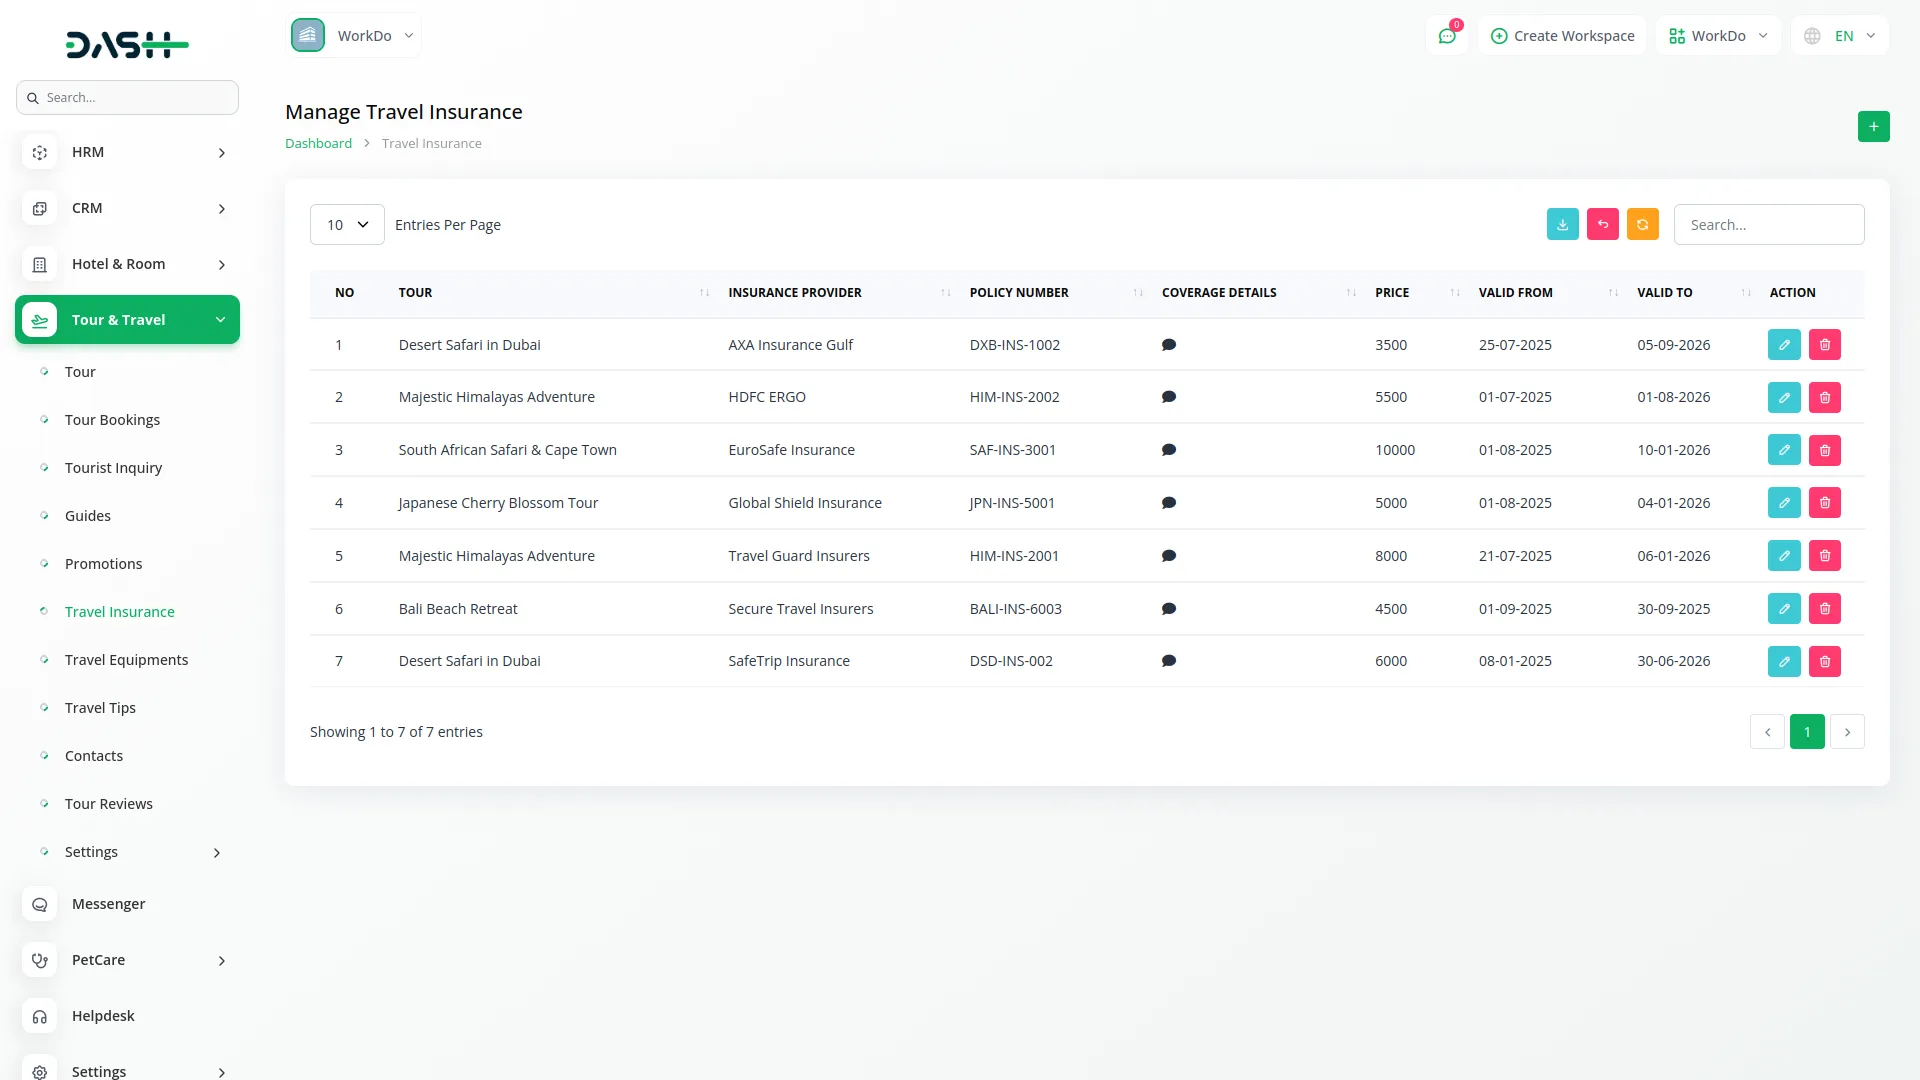
- To add travel insurance, click the “Create” button at the top of the Travel Insurance page. Select the Tour Name from available tours, enter the Insurance Provider name, Policy Number, Price, Valid From, and Valid To dates, and provide detailed Coverage Details.
- The list page displays all insurance policies with columns for No, Tour Name, Insurance Provider, Policy Number, Coverage Details button that opens a modal with full coverage information, Valid From, and Valid To dates. Use the search, export, reset, and reload to manage this page list.
- In the Actions column, include Edit to update insurance information and Delete to remove policies. Travel insurance details will be displayed on the website’s tour details page, providing customers with complete coverage information.
Travel Equipment Management
- To add travel equipment, click the “Create” button given at the top of the Travel Equipment page.
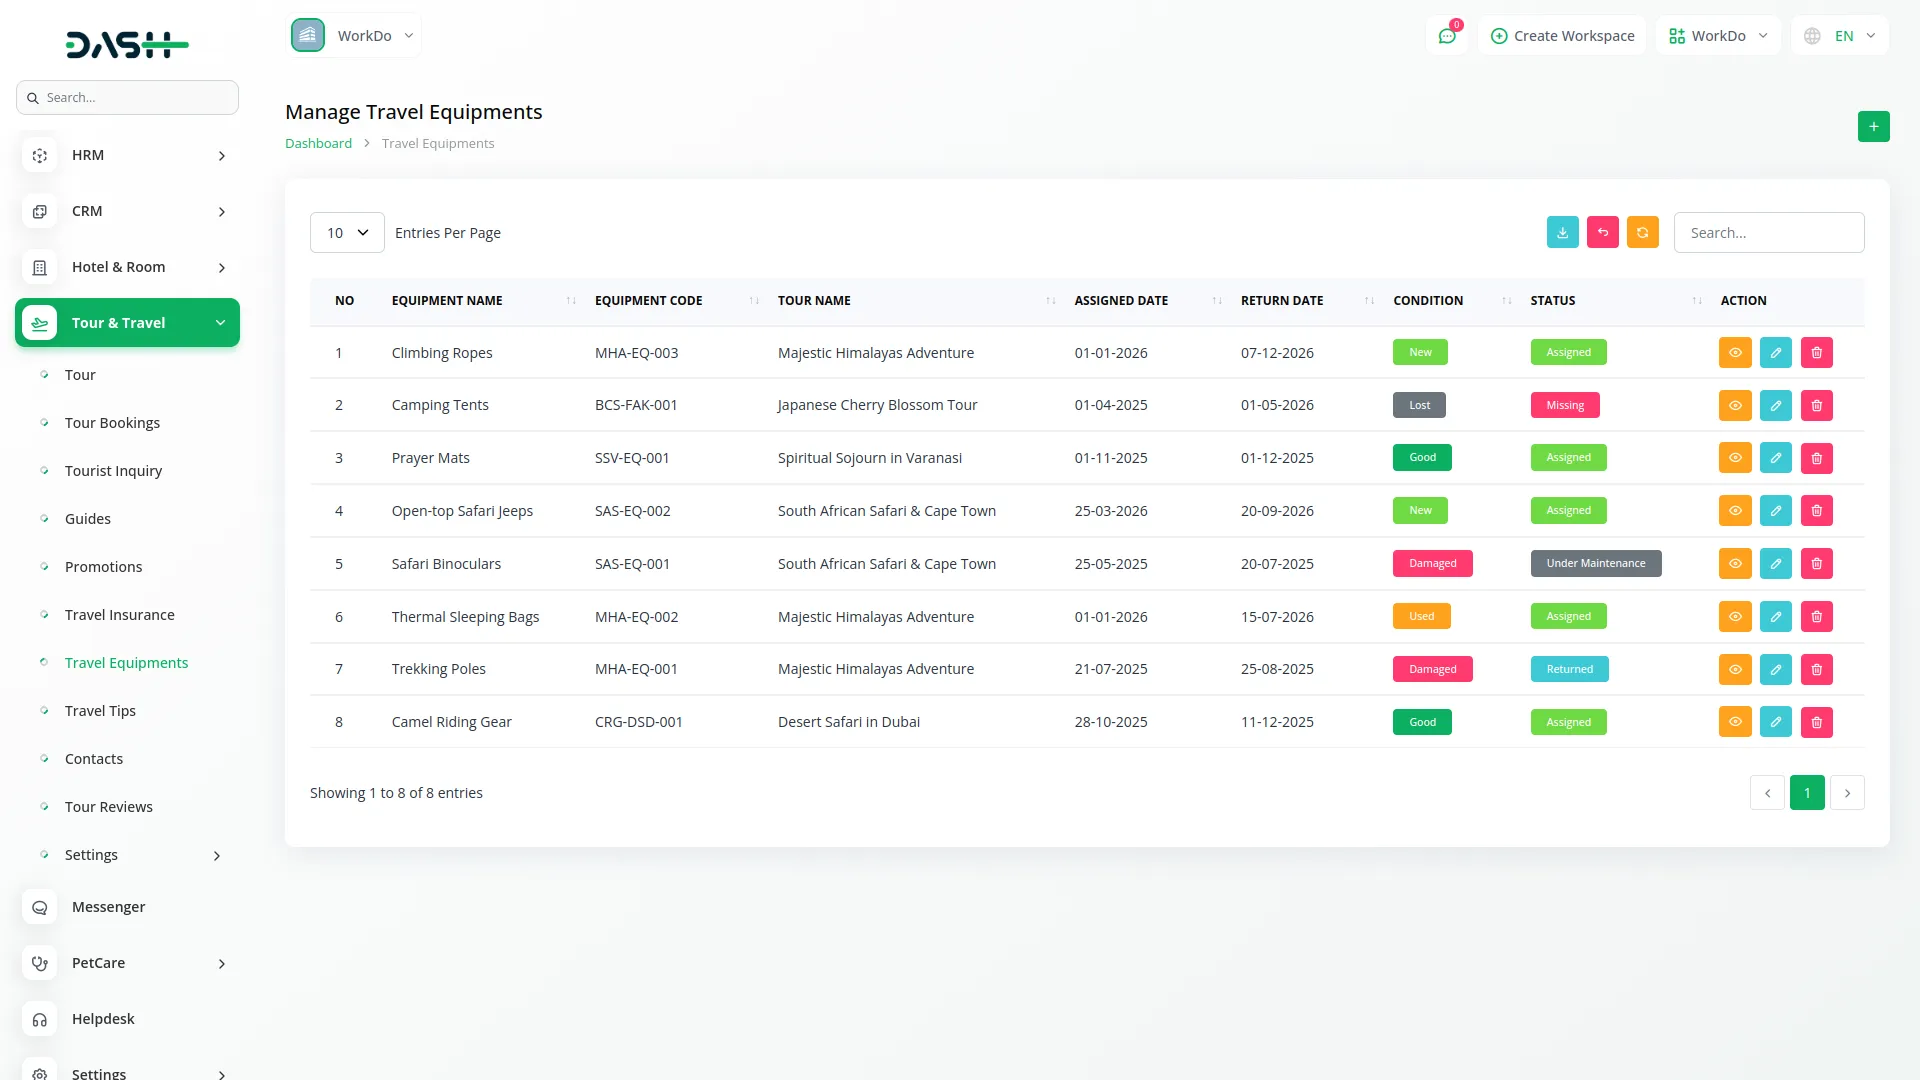
- Fill the required details, such as enter the Equipment Name, Equipment Code, select the Tour Name from available tours, specify Quantity, set Assigned Date and Return Date, select Condition from New, Good, Used, Damaged, or Lost options, choose Status from Assigned, Returned, Missing, or Under Maintenance, and add relevant Notes.
- The list page shows all equipment with columns for No, Equipment Name, Equipment Code, Tour Name, Quantity, Assigned Date, Return Date, Condition, and Status. You can use the search, export, reset, and reload buttons to manage this list page data.
- Additionally, available Actions include Edit to update equipment details and Delete to remove equipment records. Travel equipment information will be displayed on the website’s tour details page when its status is set to “assigned”. helping customers understand what equipment is provided or required.
Travel Tips Management
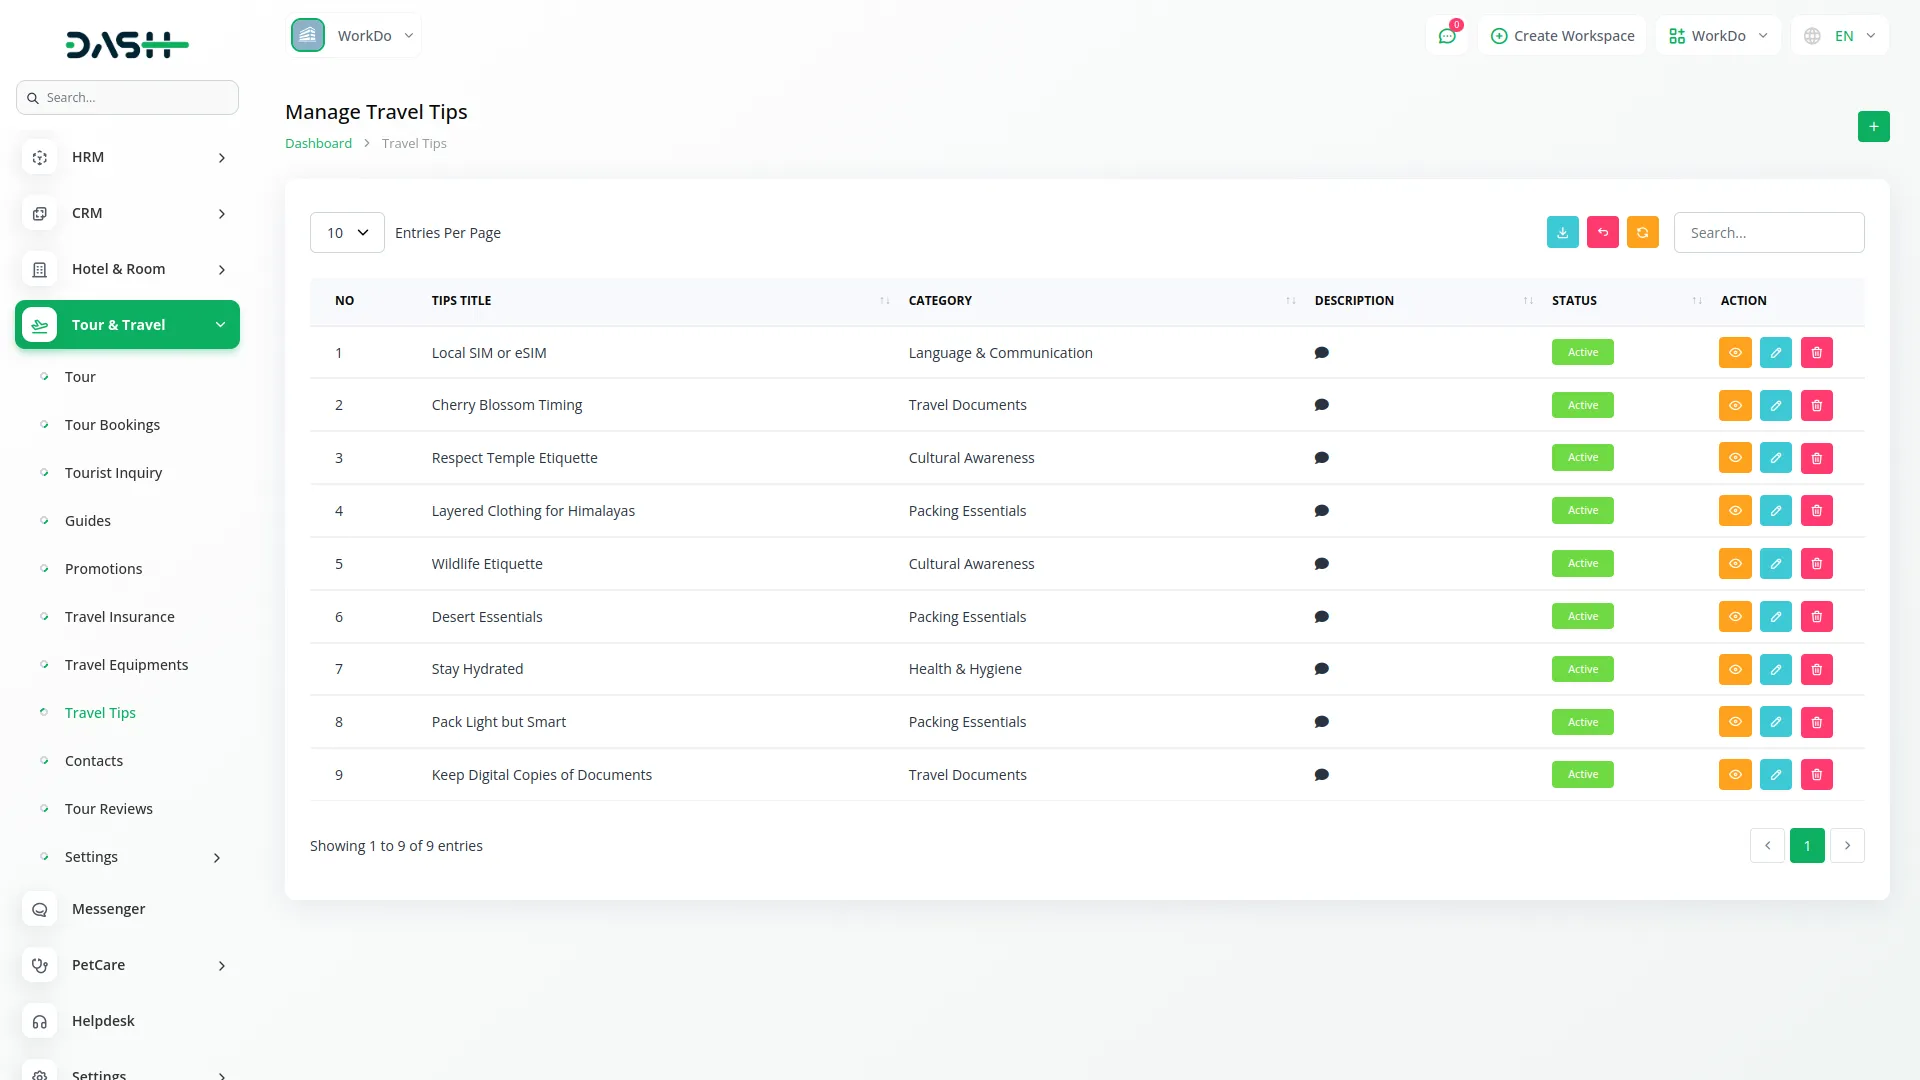
- To create travel tips, click the “Create” button given at the top of the Travel Tips page. First, enter the Tip Title, select Category from available tip categories in System Setup, choose Tour Name from available tours, select Season from tour seasons in System Setup, set Status to Active or Inactive, and provide a comprehensive Tip Description.
- The list page displays all tips with columns for No, Tip Title, Category, Description, and Status. Available buttons include Search, Export, Reset, and Reload for managing travel advice content.
- Available actions include Edit to update tip information and Delete to remove tips. Travel tips will be displayed on the website’s tour details page only when their status is set to “active”, providing valuable advice and recommendations to travelers based on seasons and destinations.
Contacts Management
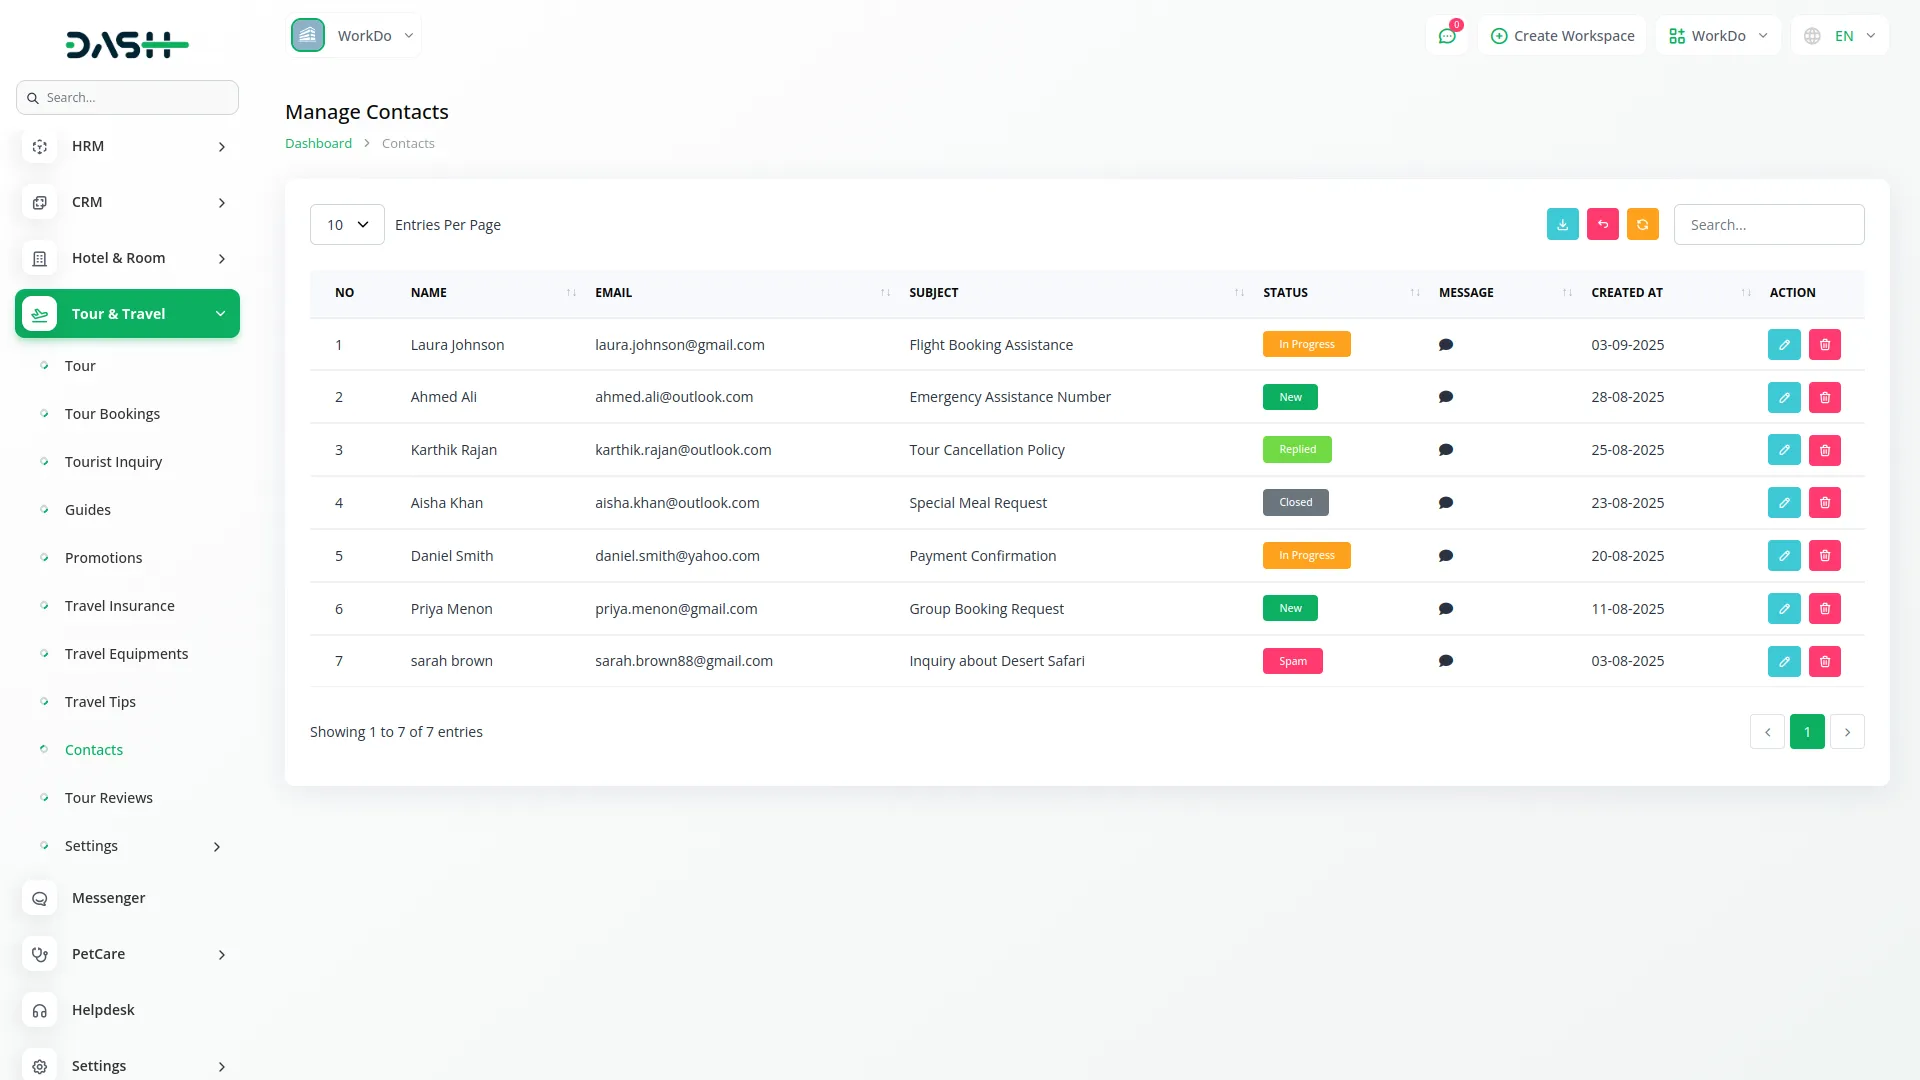
- The contacts list page shows all customer queries submitted through your website’s contact us page. The table displays columns for Name, Email, Subject, Status options including New, In Progress, Replied, Closed, and Spam, plus the complete Message content.
- You can use the Search, Export, Reset, and Reload to manage the contact management page list data. Available Actions include Edit to update contact status and responses, and Delete to remove contact records.
- This section helps you efficiently manage and respond to visitor inquiries, maintaining good customer service and tracking communication status with potential customers.
Tour Reviews Management
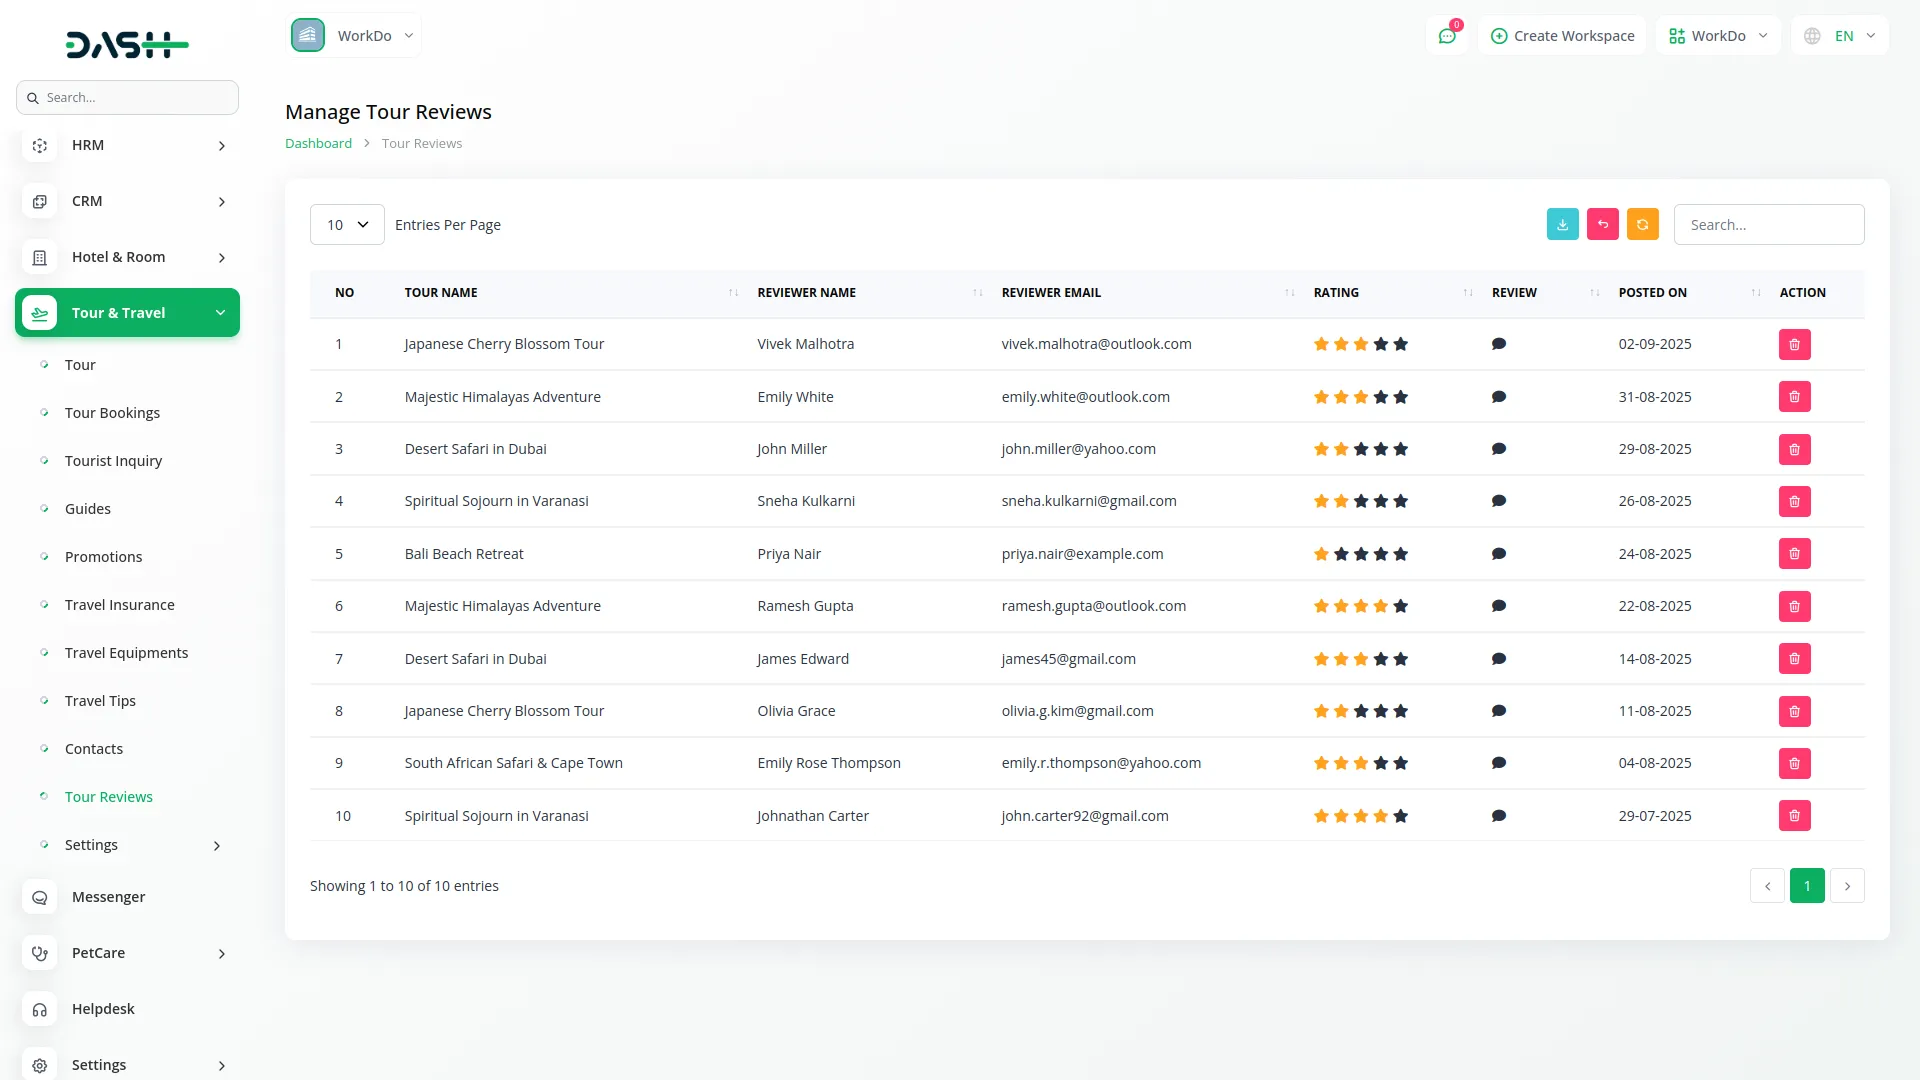
- The tour reviews list page displays all customer reviews submitted through your website’s tour details pages. The table shows columns for No, Tour Name from available tours, Reviewer Name, Reviewer Email, Rating, Review content, and Posted on date.
- Available buttons include Search, Export, Reload, and Reset for managing customer feedback. With the help of the Actions, you can Edit to modify and Delete to remove them.
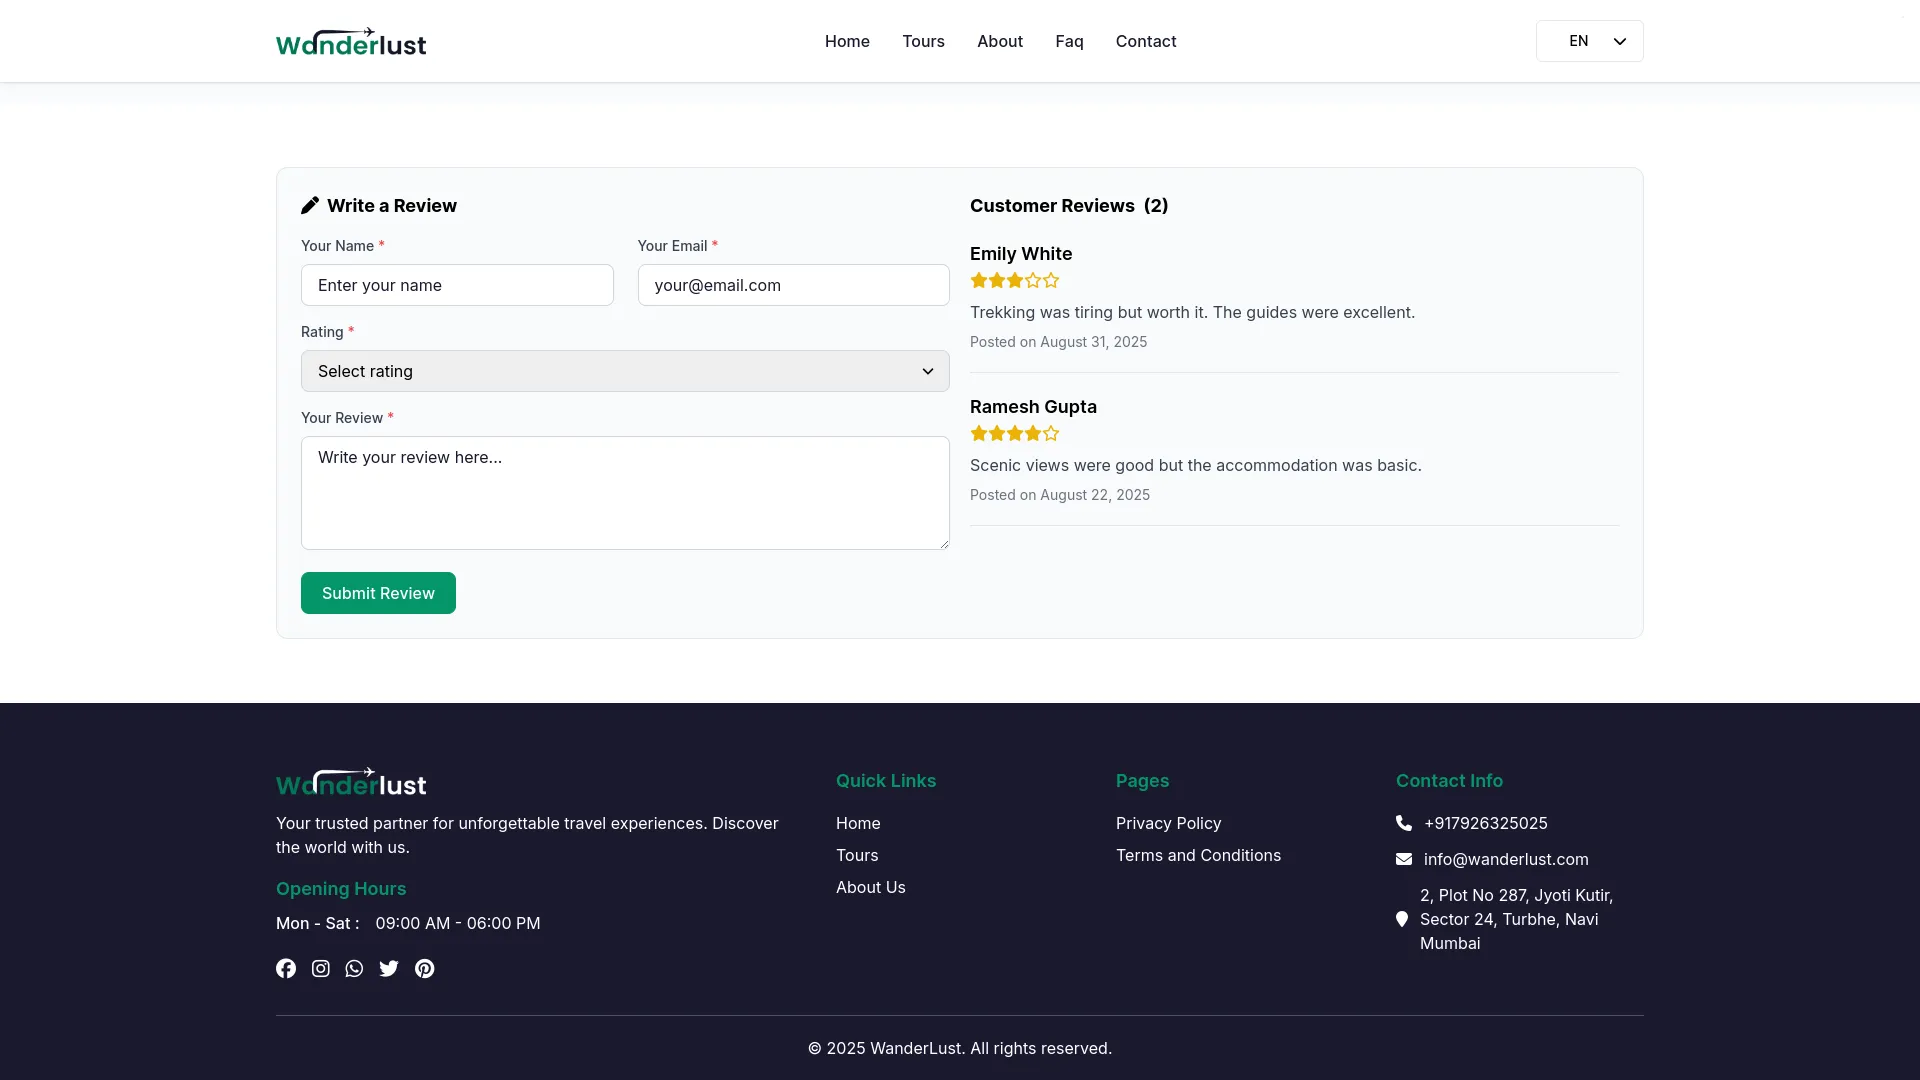
- This section allows you to manage customer feedback effectively, helping maintain quality control over displayed reviews and building credibility through authentic customer experiences on your website.
Categories
Related articles
- CyberSource Integration in Dash SaaS
- Performance Integration in Dash SaaS
- Zulip Chat Add-On Detailed Documentation
- SinchSMS Integration in Detailed Documentation
- Cleaning Management Integration in Dash SaaS
- Project Template Integration in Dash SaaS
- Microsoft To Do Integration in Dash SaaS
- OneDrive Integration in Dash SaaS
- Job Search Detailed Documentation
- Equipment Rental Detailed Documentation
- Restaurant Menu Integration in Dash SaaS
- Bakery Store Detailed Documentation
Reach Out to Us
Have questions or need assistance? We're here to help! Reach out to our team for support, inquiries, or feedback. Your needs are important to us, and we’re ready to assist you!


Need more help?
If you’re still uncertain or need professional guidance, don’t hesitate to contact us. You can contact us via email or submit a ticket with a description of your issue. Our team of experts is always available to help you with any questions. Rest assured that we’ll respond to your inquiry promptly.
Love what you see?
Do you like the quality of our products, themes, and applications, or perhaps the design of our website caught your eye? You can have similarly outstanding designs for your website or apps. Contact us, and we’ll bring your ideas to life.
