PetCare Integration in Dash SaaS
PetCare is a comprehensive pet care management software designed to streamline all aspects of pet services, appointments, adoptions, and business operations.
Introduction
PetCare is a comprehensive pet care management software designed to streamline all aspects of pet services, appointments, adoptions, and business operations. This Add-On enables pet care businesses to efficiently manage their services, handle customer appointments, process payments, manage pet adoptions, and maintain complete records of all activities. The software provides an integrated solution for pet service providers to organize their daily operations, track customer interactions, manage billing processes, and ensure smooth business workflow from appointment booking to payment completion.
How to Install the Add-On?
To Set Up the Pet Care Management Add-On, you can follow this link: Setup Add-On
How to use the Pet Care Management Add-On?
Dashboard
- After purchasing and installing the Add-On, navigate to the sidebar and search for the Pet Care Add-On.
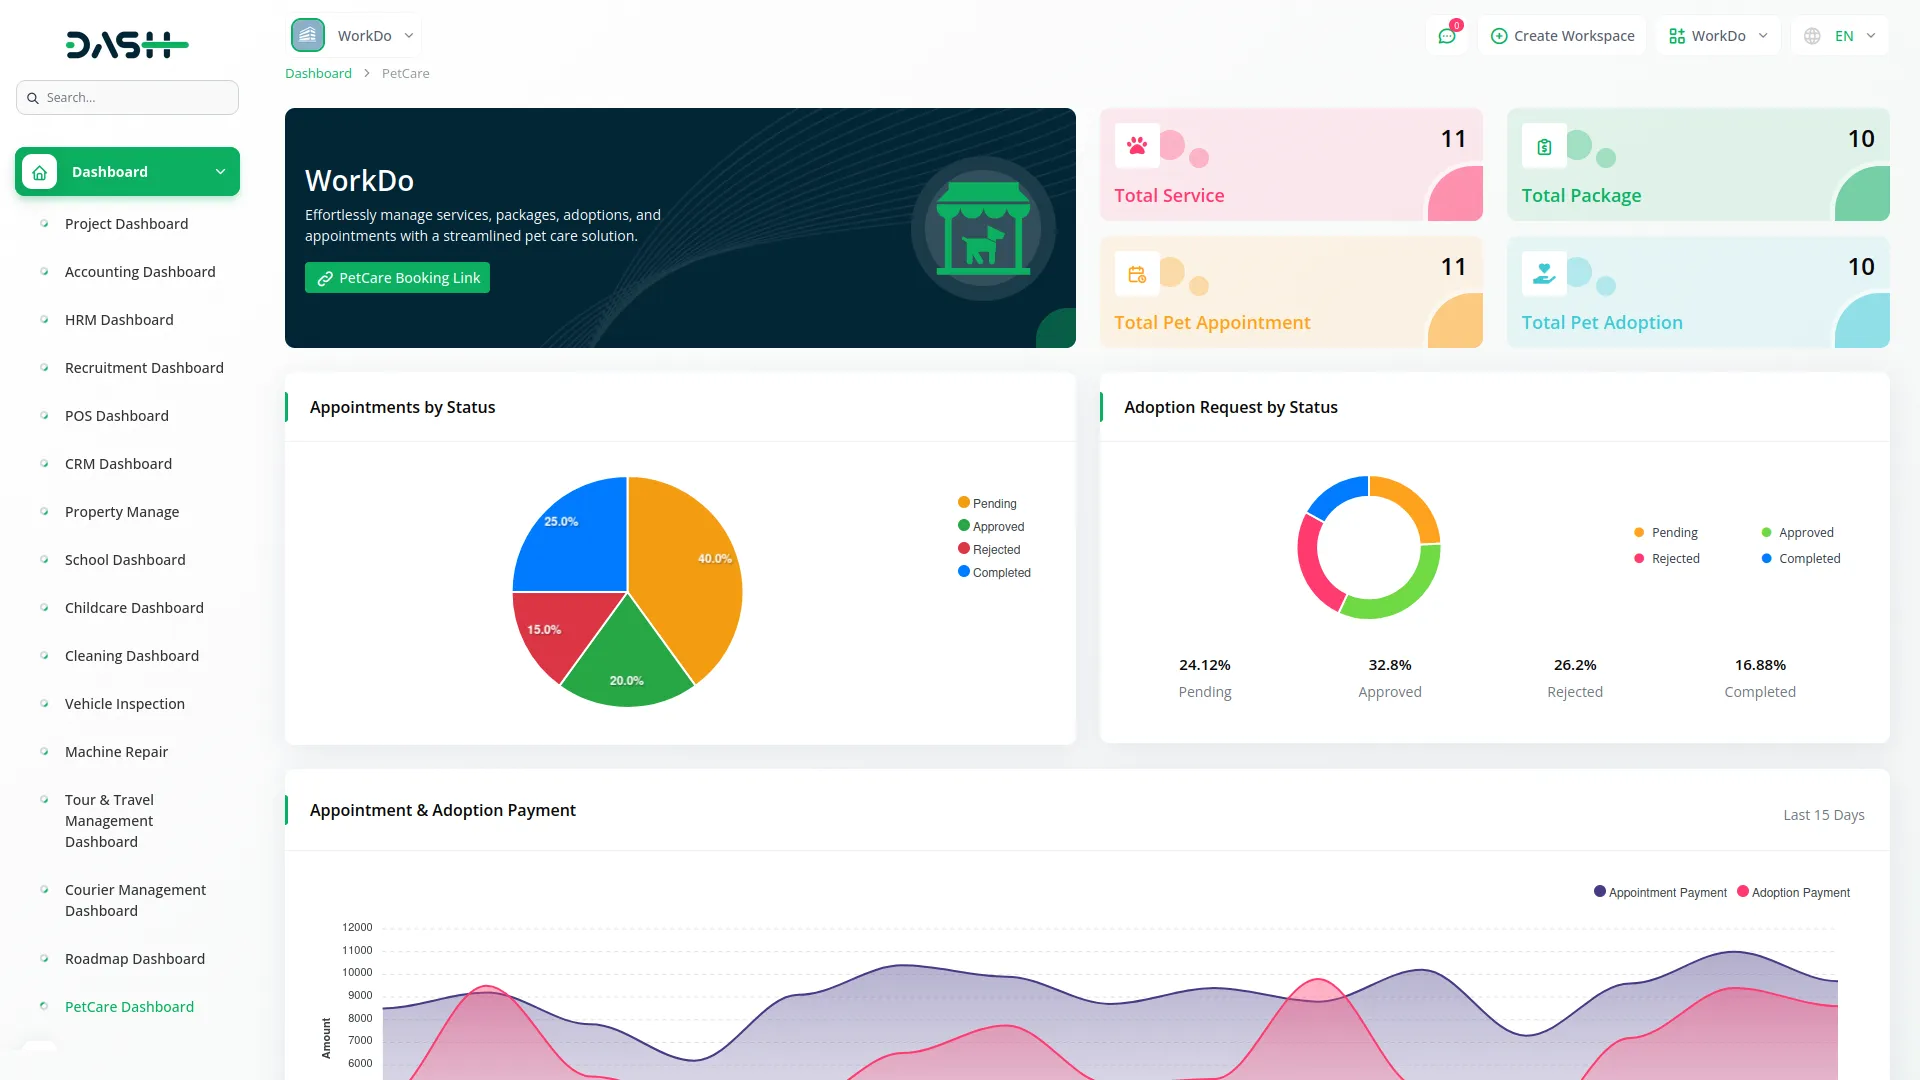
- At the top of the dashboard, you will find a “booking link” that allows you to copy and share your appointment booking URL with customers. This link can be distributed through various channels such as social media, email, or your website to enable direct customer bookings.
- Besides that, the dashboard displays four essential metric cards. These cards show Total Services available in your system, Total Packages offered, Total Pet Appointments scheduled, and Total Pet Adoptions processed.
- Below the metric cards, you will get to see data through interactive charts. The Pie section displays two important breakdowns – Pet Appointments distribution and Pet Adoption Overview. The dashboard also features a comprehensive Appointment & Adoption Payments chart that tracks financial transactions over the last 15 days.
Services Management
- To create a new service, navigate to the Services section and click the “Create” button at the top of the page.
- Then fill in the required details. Select an appropriate Service Icon from various available options that represents your service type, enter the Service Name, next specify the service Price, set the time duration, upload the service image, and finally write a detailed Description.
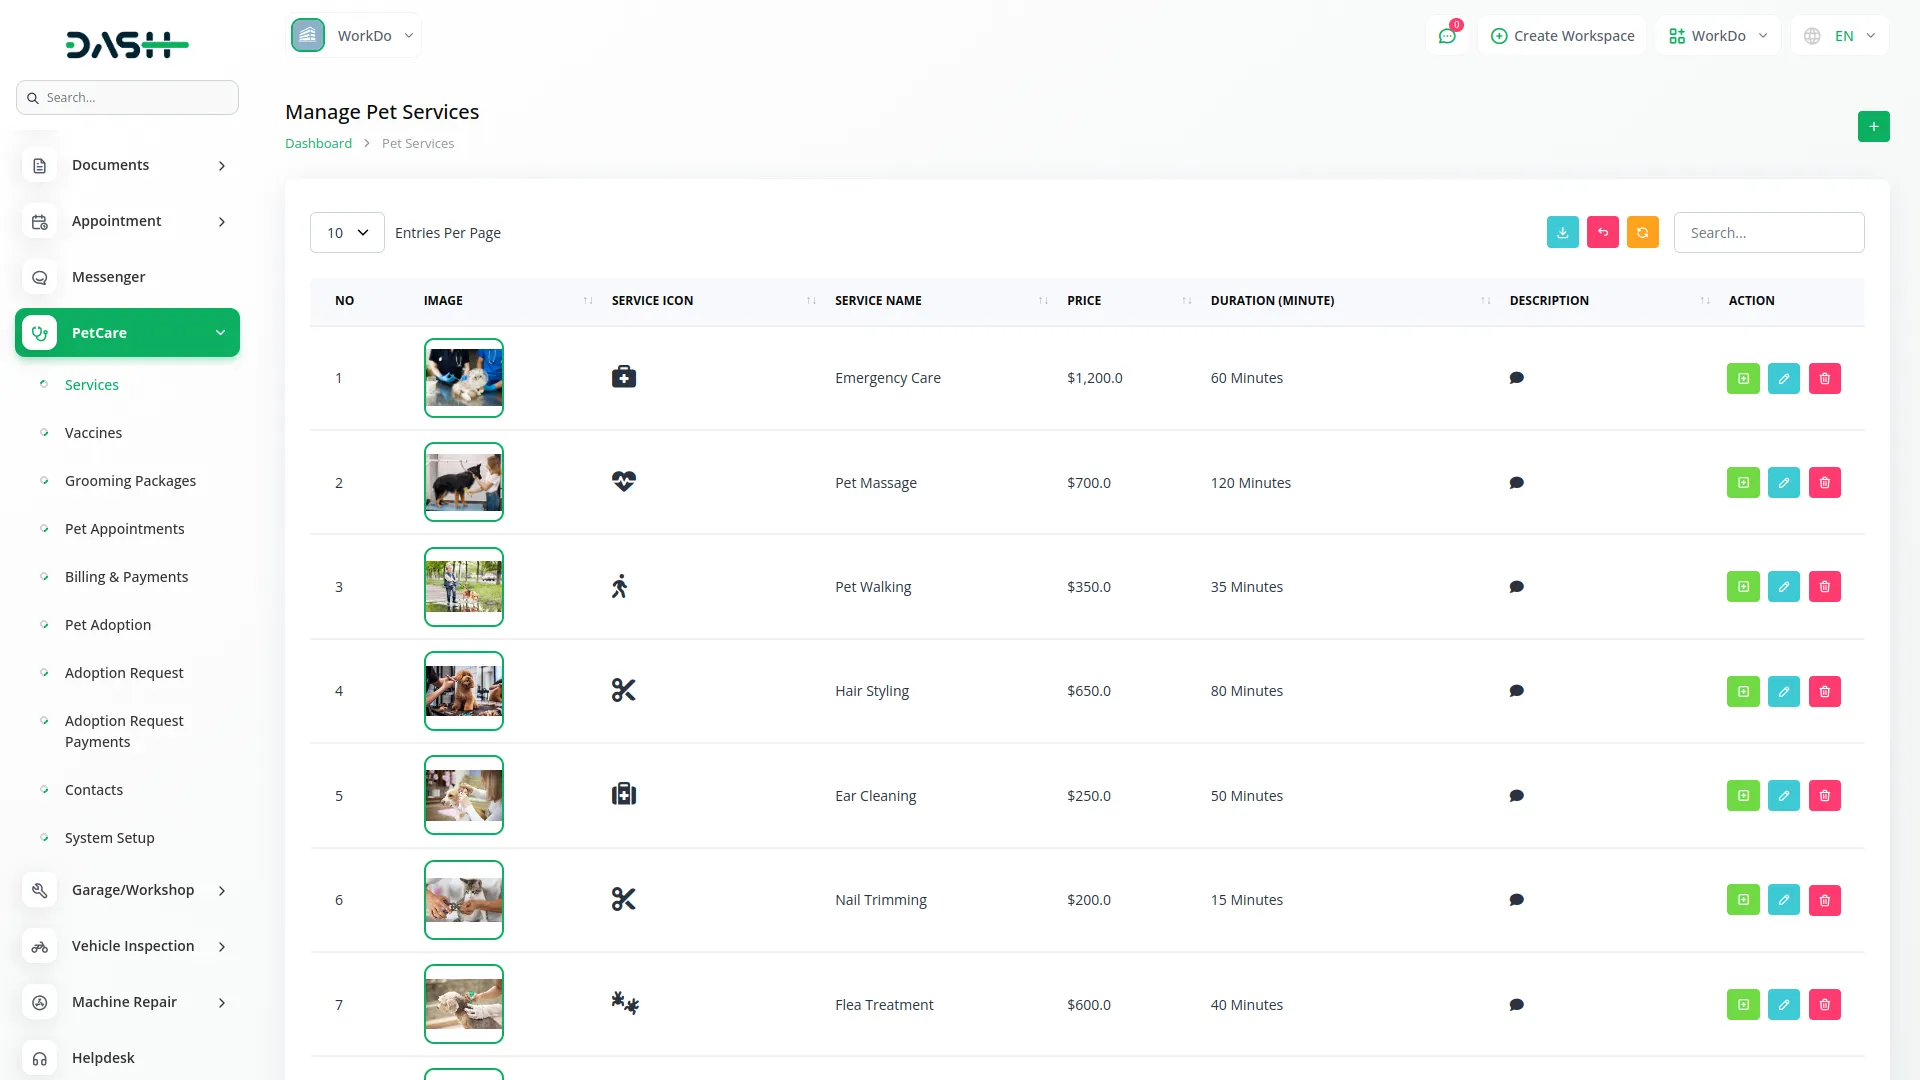
- The Services list page displays a table of columns including sequential Number, Service Image thumbnail, Service Icon, Service Name, Service Price, Service Duration, and Description for easy reference and comparison. You can use these features, like a search bar, export, reset, and reload buttons, to manage your service record.
- Besides these, you will get to see the three buttons in the Action column. The edit button allows you to modify service details, while the delete button removes services that are no longer offered.
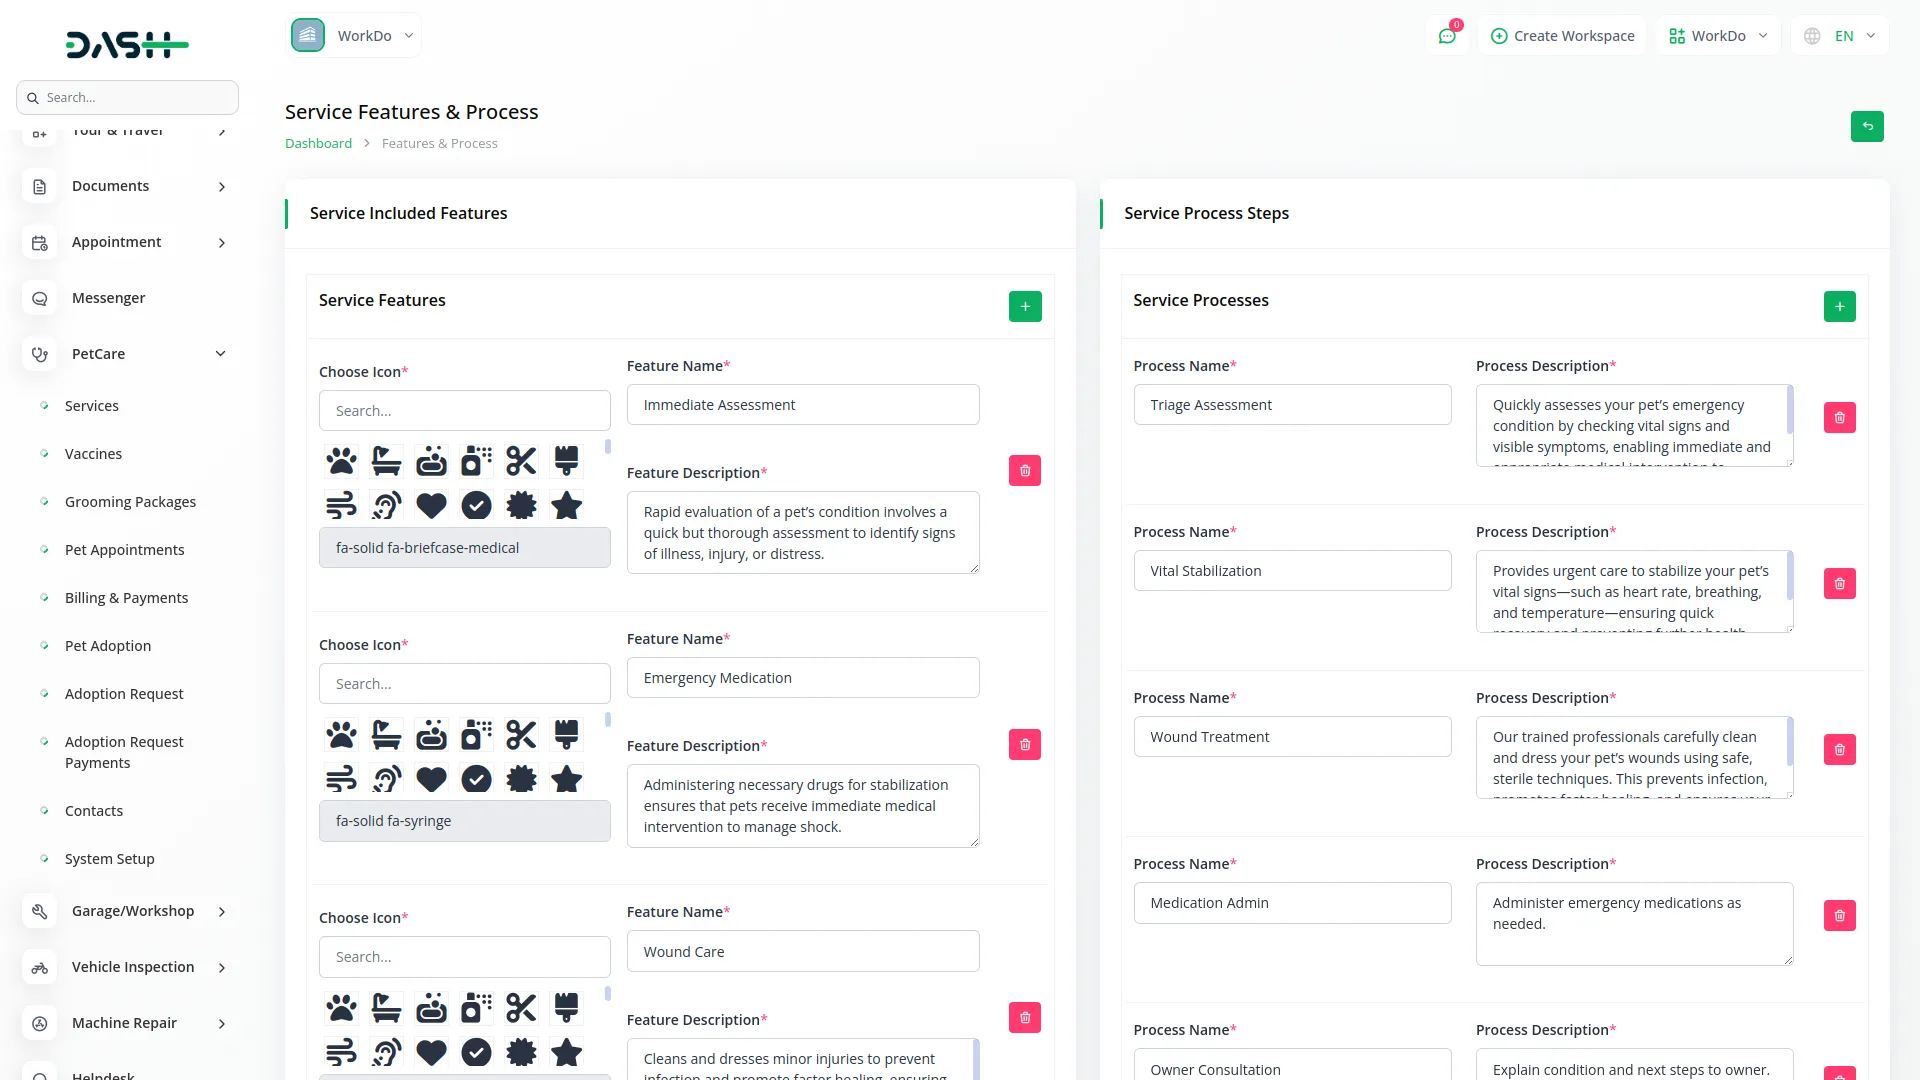
- Click the “Add Service Features & Process” button to open the Service Features & Process page. This page includes two repeatable sections: one for adding service features, where you can select appropriate icons, enter the feature name, and write a description.
- Second for defining service process steps by specifying the process name and description.
Vaccines Management
- To add a new vaccine record, click the “Create” button at the top of the Vaccines page. Enter the vaccine name, specify the price for the vaccine, and add a detailed description last.
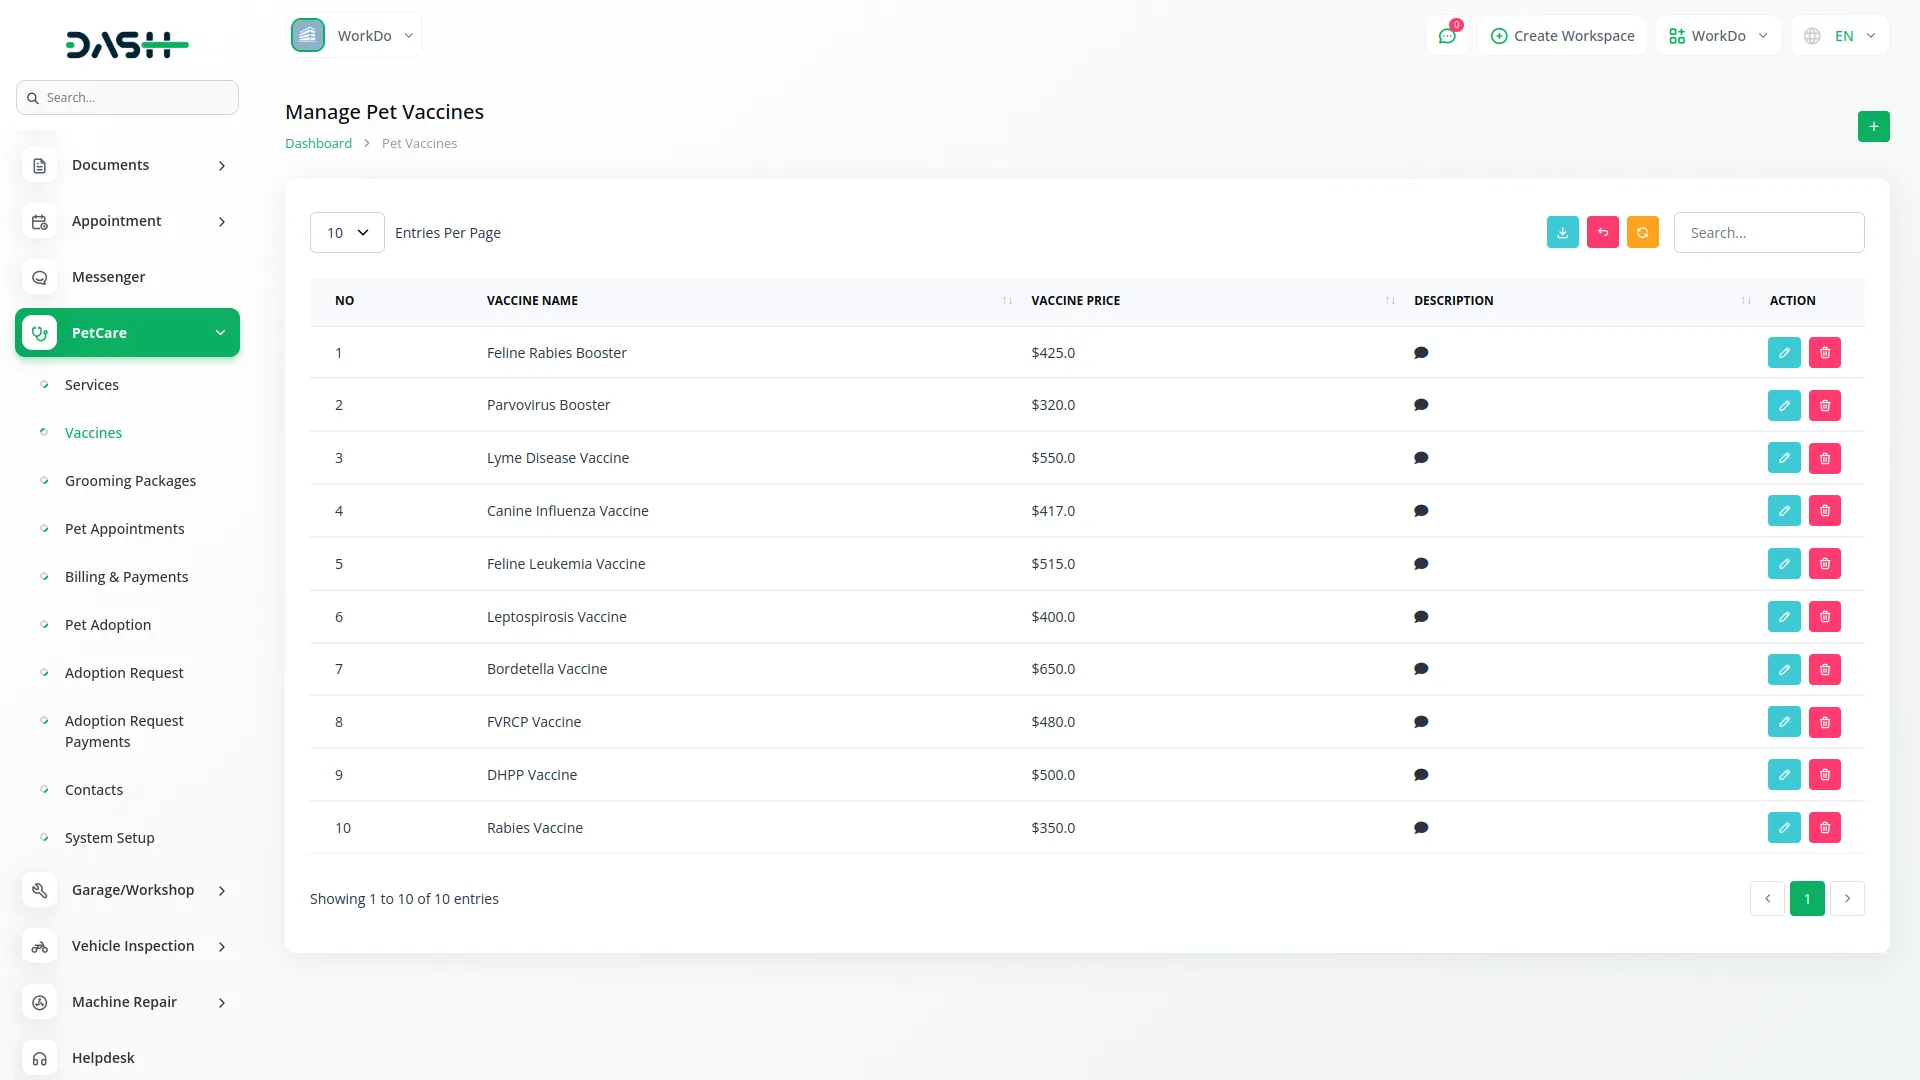
- On the list page, you can see all vaccines displayed in a table of columns, including sequential Number, Vaccine Name, Price, and Description for easy reference during appointment scheduling and package creation.
- Additionally, the list page also offers functions like search, export, reset, and reload buttons. With the help of an action column, you can easily edit or delete the vaccines whenever you want.
Grooming Packages Management
- To create a new grooming package, click the “Create” button on the Grooming Packages page. Select an appropriate Package Icon from the dropdown that represents your package type, and enter a Package Name.
- The Total Package Amount field will automatically add up all the prices when you choose services and vaccines. Write the package features or benefits of the package for customers, and at the end, add a description.
- Now you need to add services and vaccines to your package using the repeater. In the Services section, click the drop-down menu to see all your services. When you pick a service, its normal price will appear automatically. If you want to charge a different price for this package, you can change it.
- Similarly, in the Vaccines section. Click the dropdown to see all your vaccines. When you choose a vaccine, its regular price will show up. You can change this price if needed for your package.
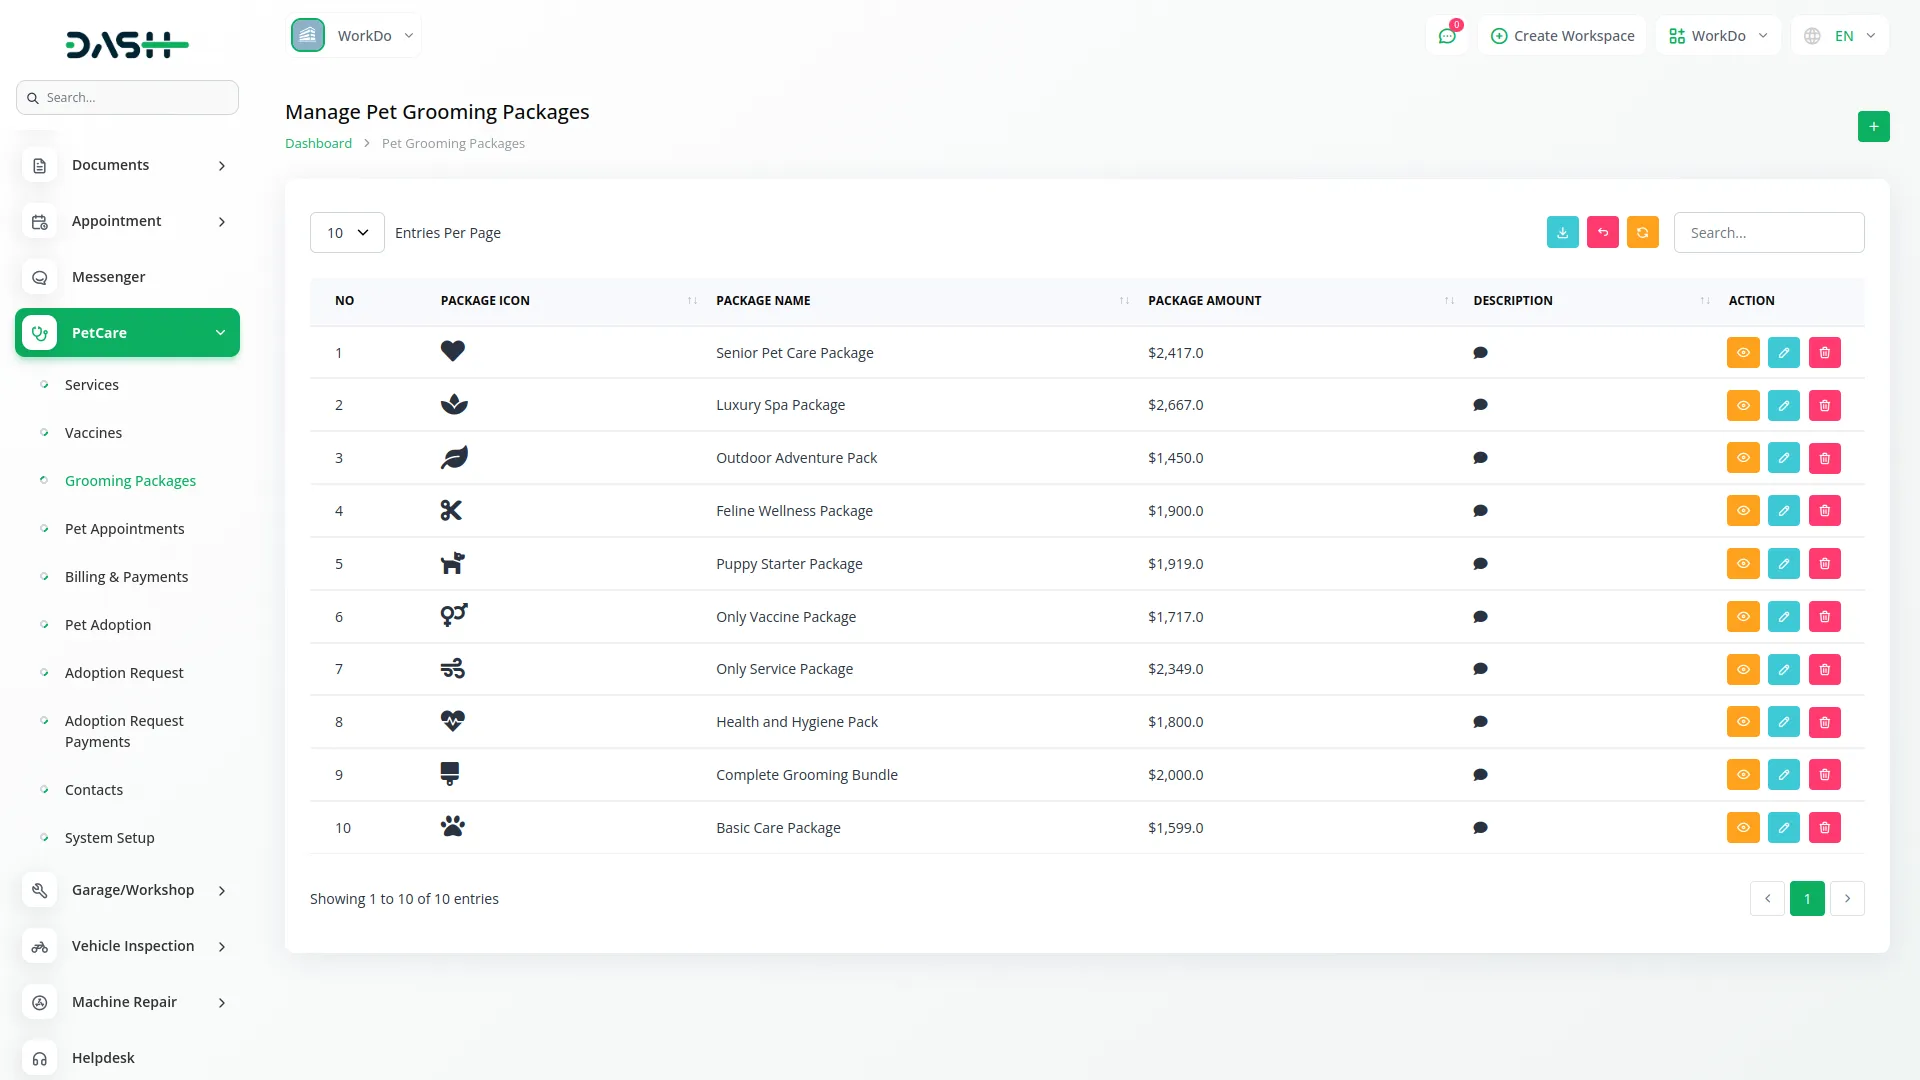
- The Grooming Packages list page displays a table of columns showing sequential Number, Package Icon, Package Name, Package Amount, and Description for easy comparison and management.
- Beyond these details, you can use the management buttons, including search, export, reset, and reload, to perform the functions with your data. In the Action column, you can use an edit button to modify the package record, while the delete button removes packages
- Along with that, click the view button to see a detailed Package Details page where you can see all included services, vaccines, and pricing information.
Pet Appointments Management
- To create a new pet appointment, click the “Create” button at the top of the Pet Appointments page. The appointment form is organized into three sub-page sections.
- First, in the Pet Owner Details section, you will need to include Owner Name, Email address for communication and confirmations, Contact Number for appointment reminders and updates, and complete Address information.
- Next, section the appointment details. You will need to include an assigned Staff member from a dropdown that (comes from your users). Set a date of appointment and time of appointment. Select a service from the dropdown (comes from the Pet Services section).
- Choose a package from the dropdown (comes from the Pet Grooming Packages section), and you get to automatically calculate the (Total Service/Package Amount) based on your selection. Finally, include notes or instructions.
- After that, in the Pet Details section, you can need to, including Pet Name, Species classification, specific Breed information, Date of Birth of the pet, and Gender.
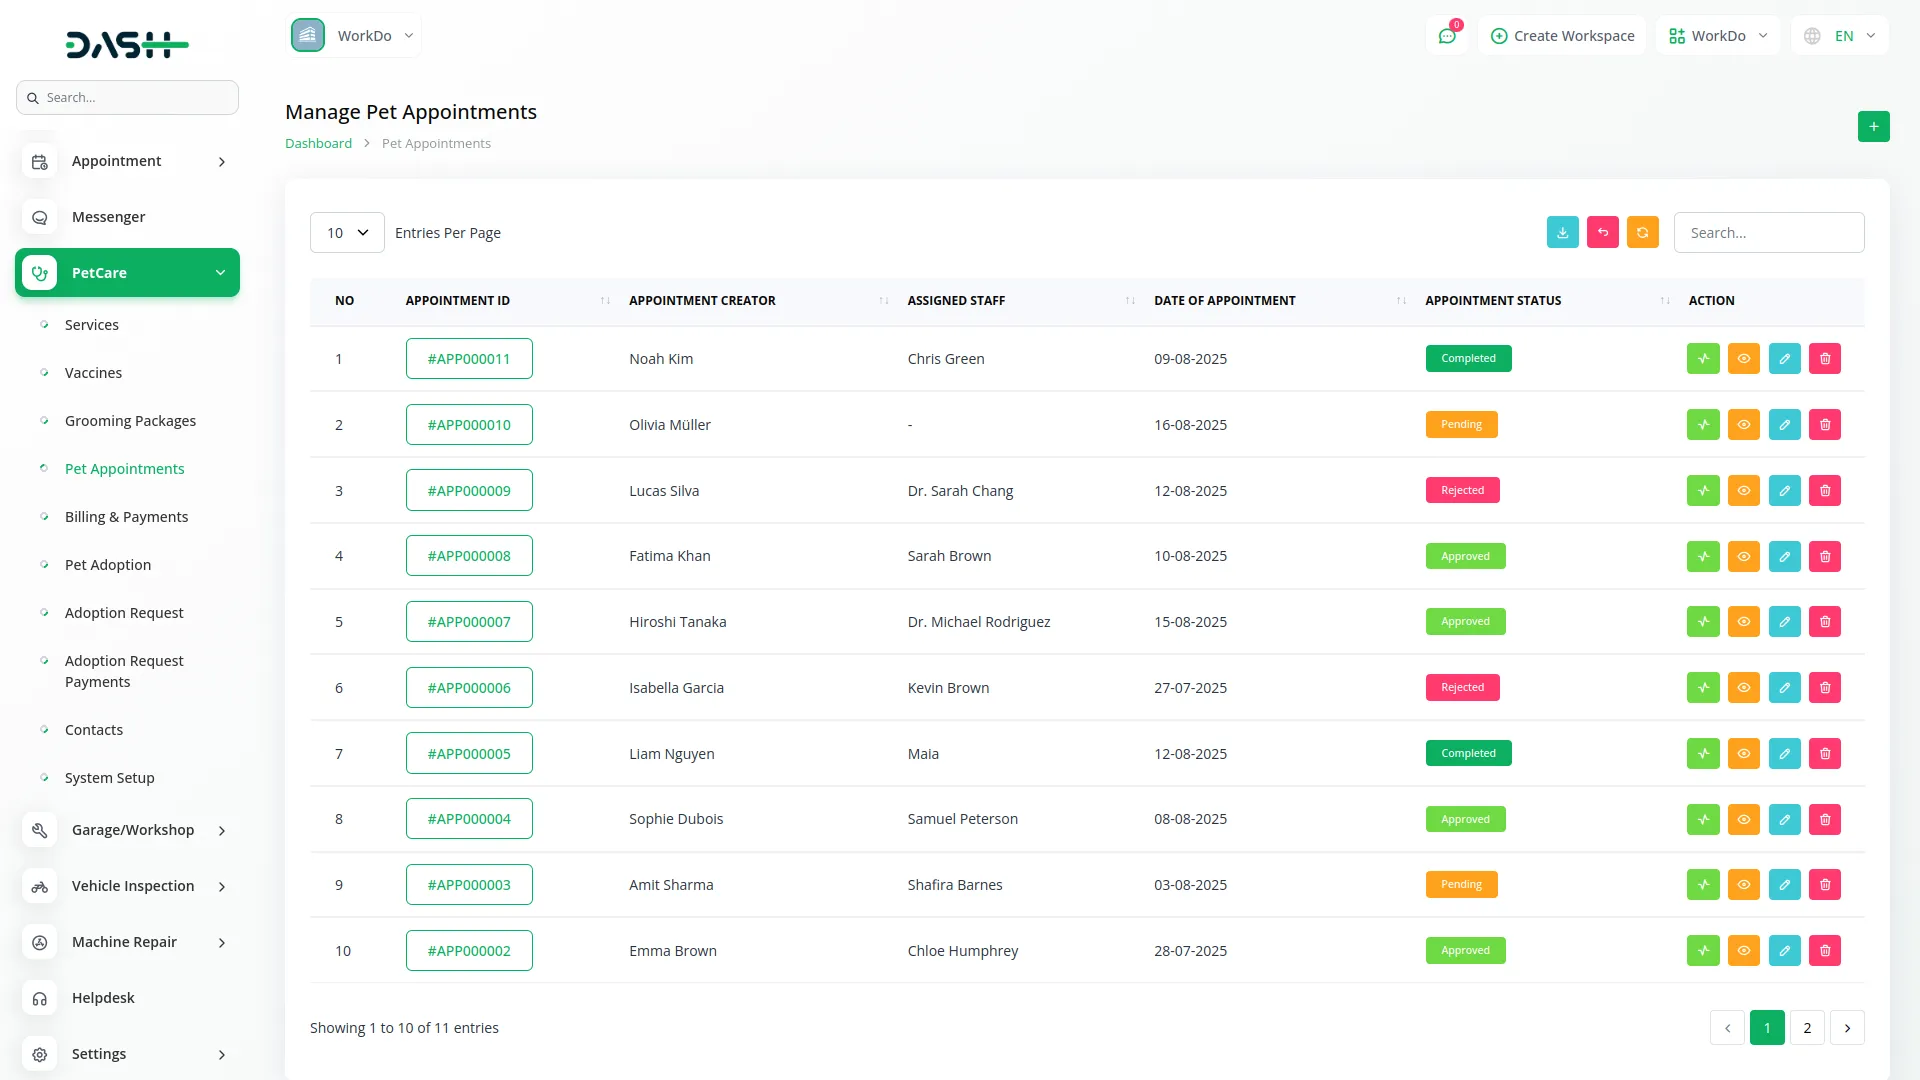
- On the list page, you get to see that all pet appointments are in a table of columns, including sequential Number, unique Appointment ID, Appointment Creator who scheduled the appointment, Assigned Staff Member responsible for service, Date of Appointment, and current Appointment Status.
- Along with that, the list page provides functions such as search, export, reset, and reload buttons to manage your appointment data.
- Under the list page, the Actions column offers several important management functions. Click the “Update Appointment Status” button to change the appointment status between (Pending, Approved, Completed, or Rejected). The status will only be completed once the billing payment is cleared.
- While an appointment status is set to ‘Approved’, it automatically becomes available in the ‘Manage Billing & Payments’ section.
- From the Action column, click the “View” button to see a pet appointment’s Details, including all customer, pet, and service information. You can easily edit appointment details or delete them whenever you want.
Billing & Payments Management
- In this section, you are directly connected to the Pet Appointments section. You automatically receive appointment data when appointment statuses are updated to ‘Approved’.
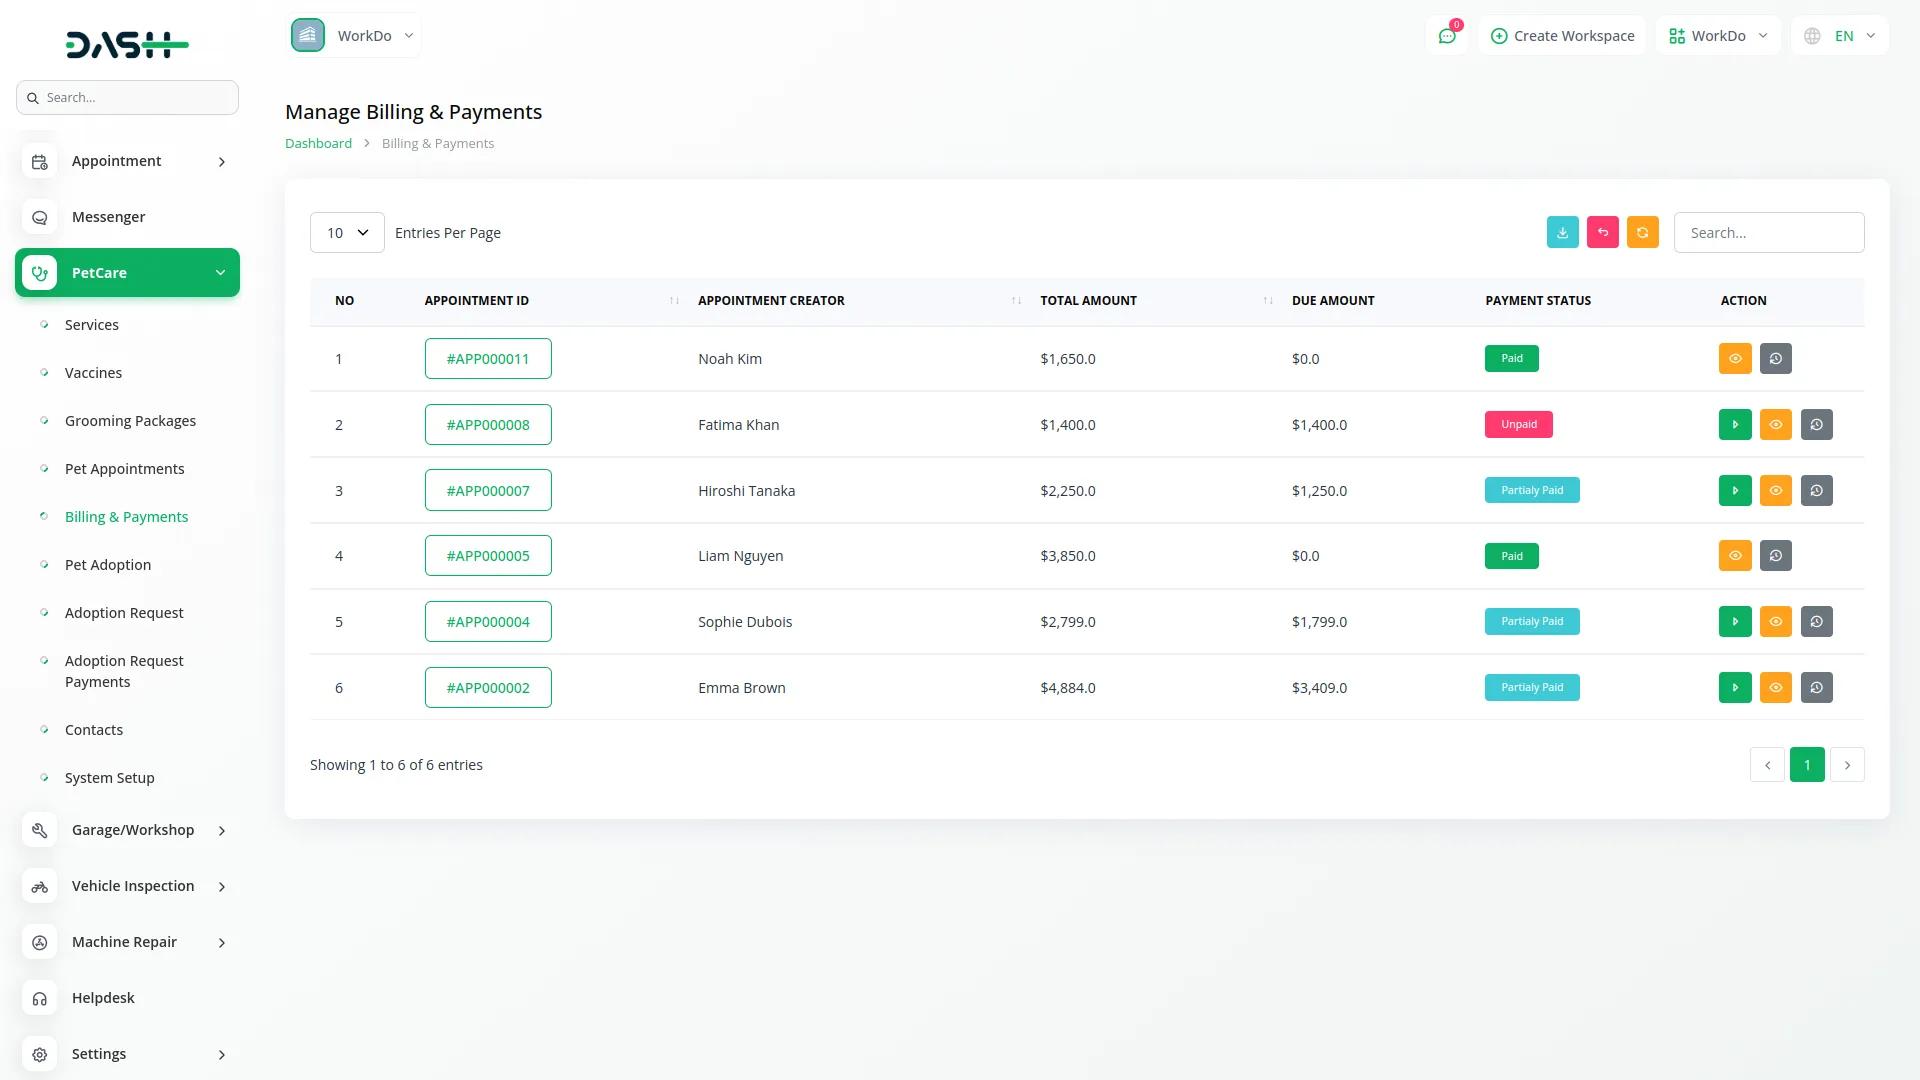
- The Billing & Payments table list page displays financial information, including sequential Number, unique Appointment ID, Appointment Creator, Total Amount, Due Amount, and Payment Status. Additionally, offer functions like Search, Export, reset, and reload buttons to manage the list page data.
- On the list page, the Actions column provides two buttons for payment management. ”Add Payment” & “Payment Summary”.
- Click the “Add Payment” button and fill in the required payment form includes fields for, Payer Name, Payment Amount, select Payment Method from the dropdown including (Cash, Bank Transfer, Cheque, or Other methods), Payment Date, Reference number, Payment Receipt upload, and Description field.+++
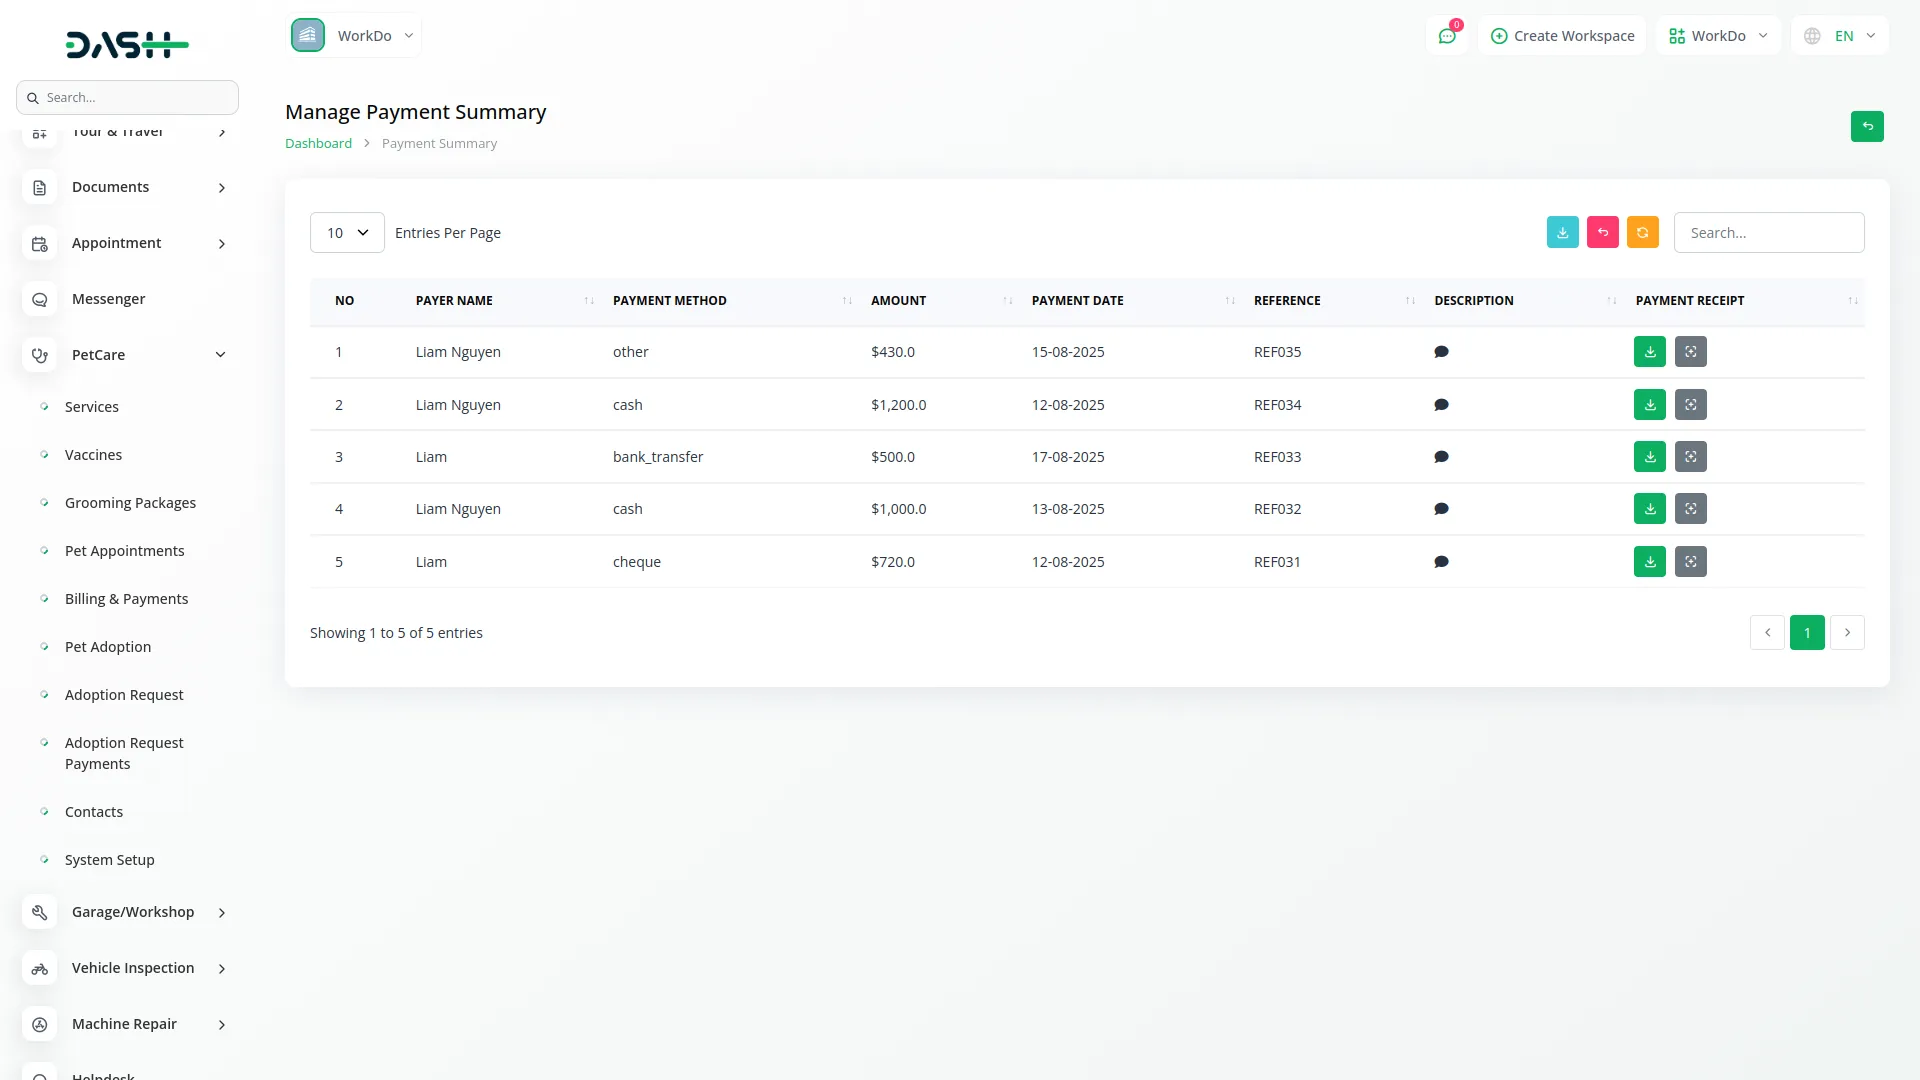
- Besides that, click the “Payment Summary” button after your display opens the “Manage Payment Summary” page. This summary page shows a table with columns including sequential Number, Payer Name, Payment Method, Payment Amount, Payment Date, Reference information, detailed Description, and Payment Receipt.
Pet Adoption Management
- To add a new pet for adoption, click the “Create” button given on the Pet Adoption page. Fill in the required details, enter the Pet Name, specify the species, such as dog, cat, or other animals, and add specific breed information.
- Set the Adoption Amount, enter the Pet’s Date of Birth, specify the Gender, and choose the Availability Status from the dropdown options (Available Now, Coming Soon, Adopted, or Not Available). Select the Health Status, add relevant Classification Tags, upload multiple Pet Images, and provide a detailed Description to complete the adoption listing.
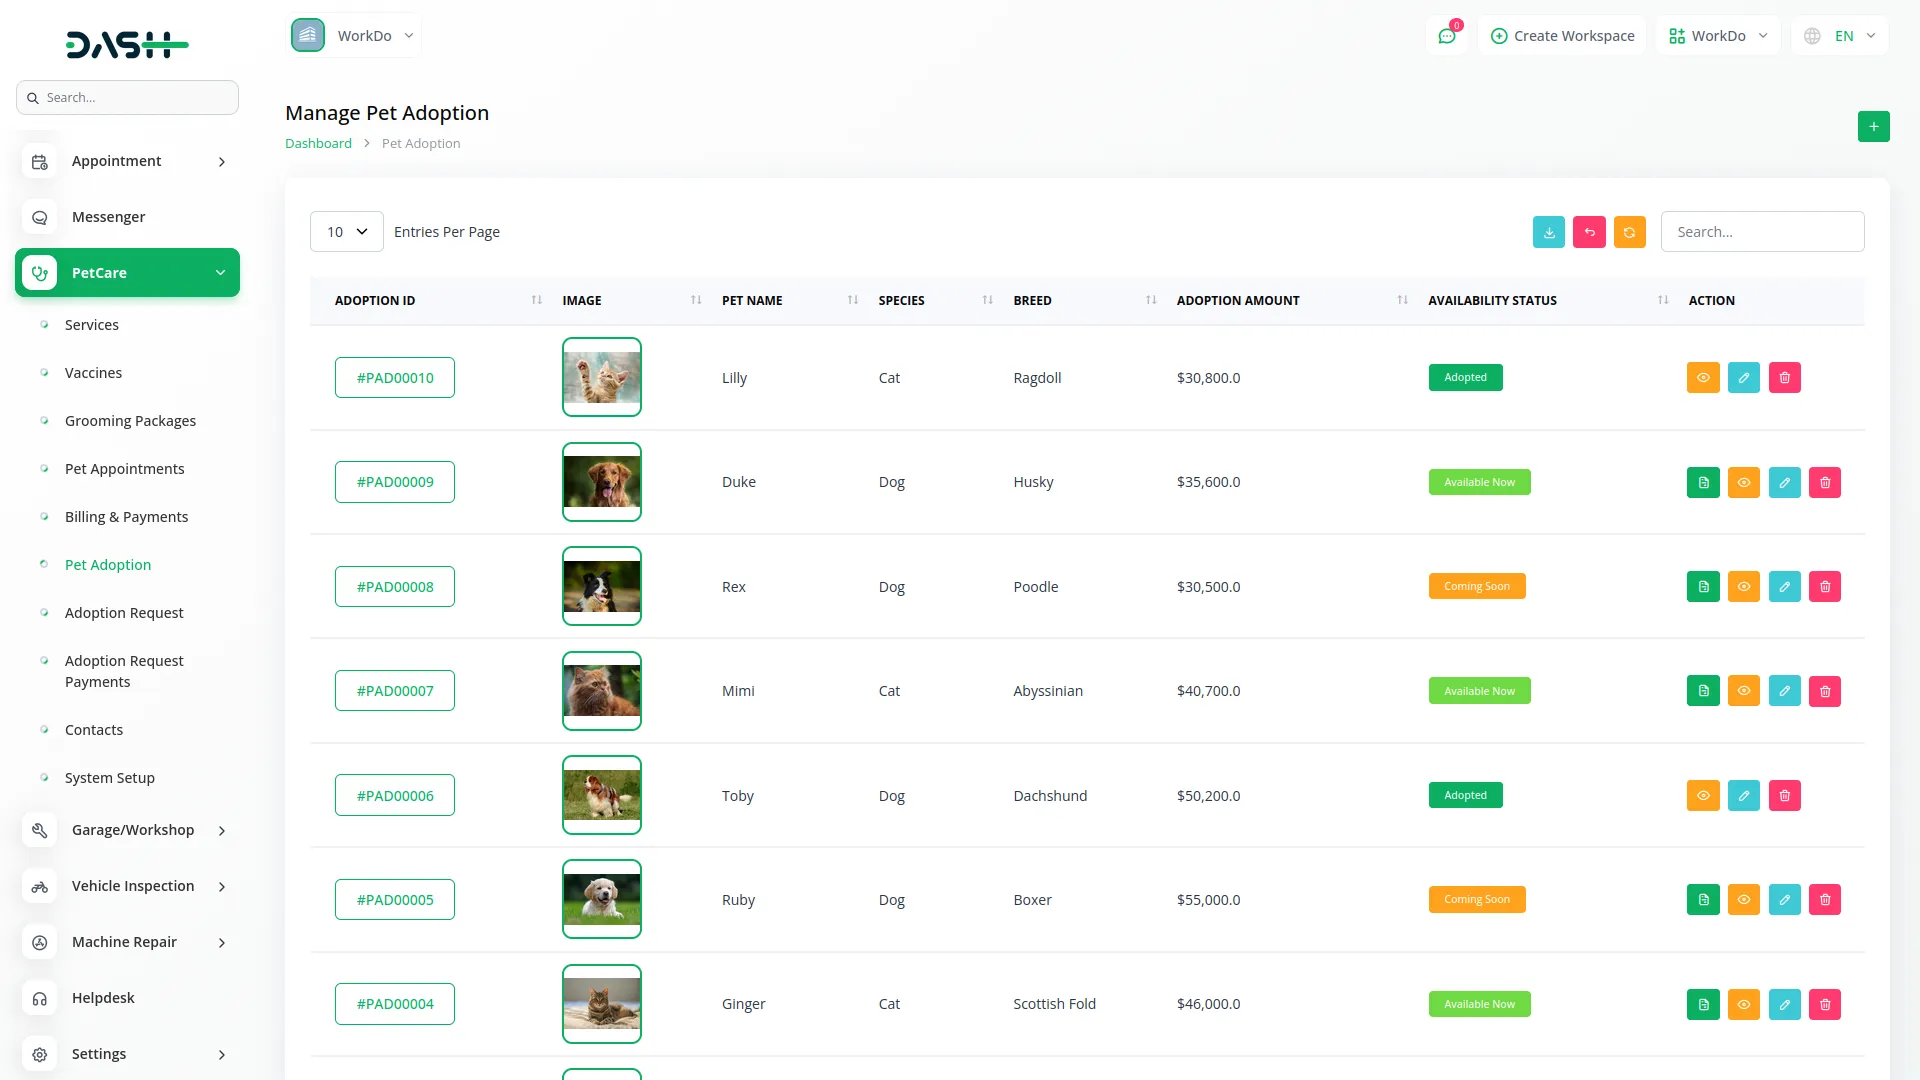
- The Pet Adoption list page offers efficient management tools, including Search functionality to quickly locate specific pet adoptions, Export capabilities for generating adoption reports and statistics, and the Add button for listing new pets.
- The table displays columns including a unique Adoption ID for tracking, Pet Image thumbnail for visual identification, Pet Name, Species classification, Breed specification, Adoption Amount, and current Availability Status.
- The Actions column provides several important management functions. Click the “Adoption Request Form” button and fill in the required details, including Adopter’s Name, Email, Contact Number, Pet Adoption Amount, which auto-fills based on the selected pet but can be adjusted if needed, and complete Residential Address.
- After that, clicking the “View” button opens Adoption Details, showing all pet information and adoption history, while the Edit button allows you to update data, and the Delete button removes records.
Adoption Request Management
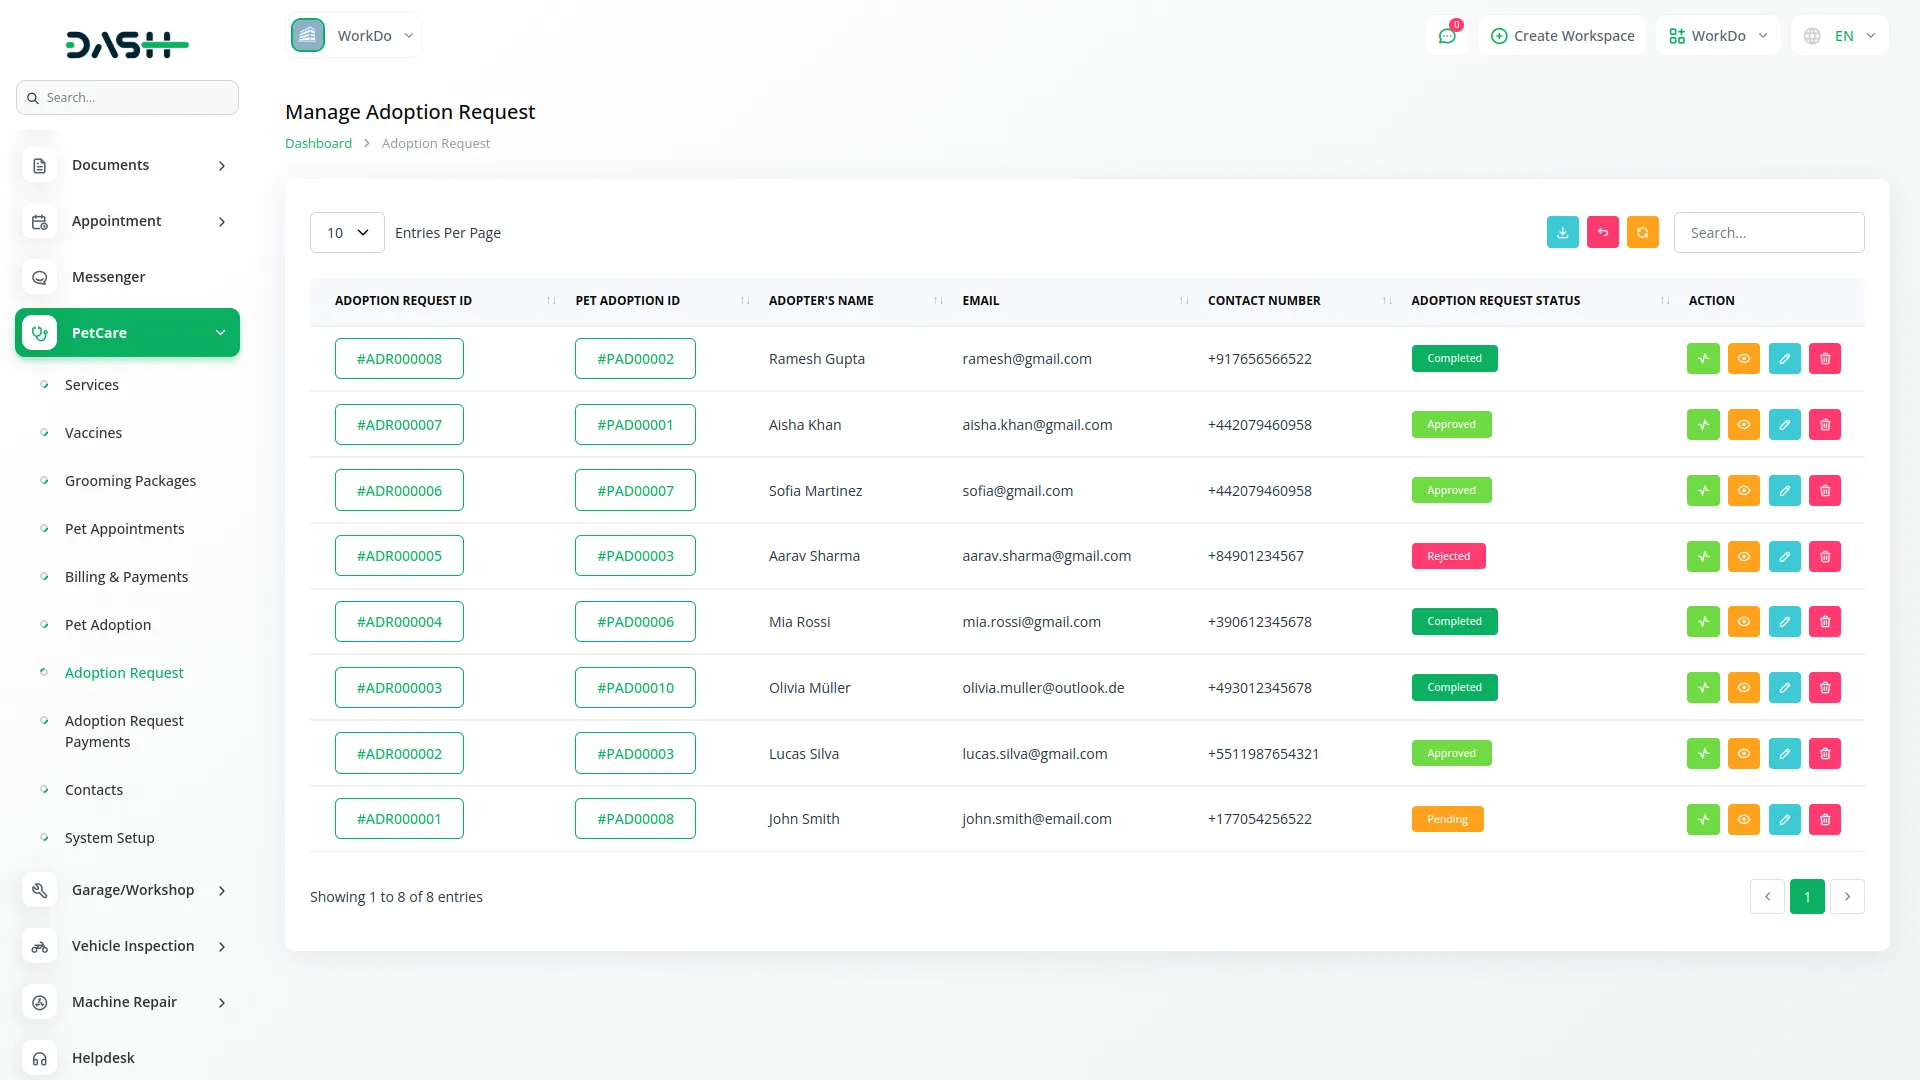
- On the list page, you get to see all the Adoption Requests in a table of details, including unique Adoption Request ID, Adoption Number linking back, Adopter’s Name, Email address, Contact Number, and Adoption Request Number.
- Also, provide efficient management with Search functionality, Export, reset, and reload buttons. The Actions column offers essential management functions for processing adoption applications.
- Click the “Update Adoption Request Status” button and open a modal where you can change the request status between Pending (for new applications), Approved (for accepted adopters), Completed (for finalized adoptions), or Rejected (for unsuitable applications). The status will only be completed once the billing payment is cleared.
- When a request status is set to ‘Approved’, it automatically becomes available in the ‘Adoption Request Payments’ system for processing adoption fees, creating a seamless workflow from application approval to payment collection.
- Click the “View” button to open detailed Adoption Request Details showing all adopter information, pet details, application responses, and processing history. The Edit button allows you to modify request details, while the Delete button removes requests.
Adoption Request Payment
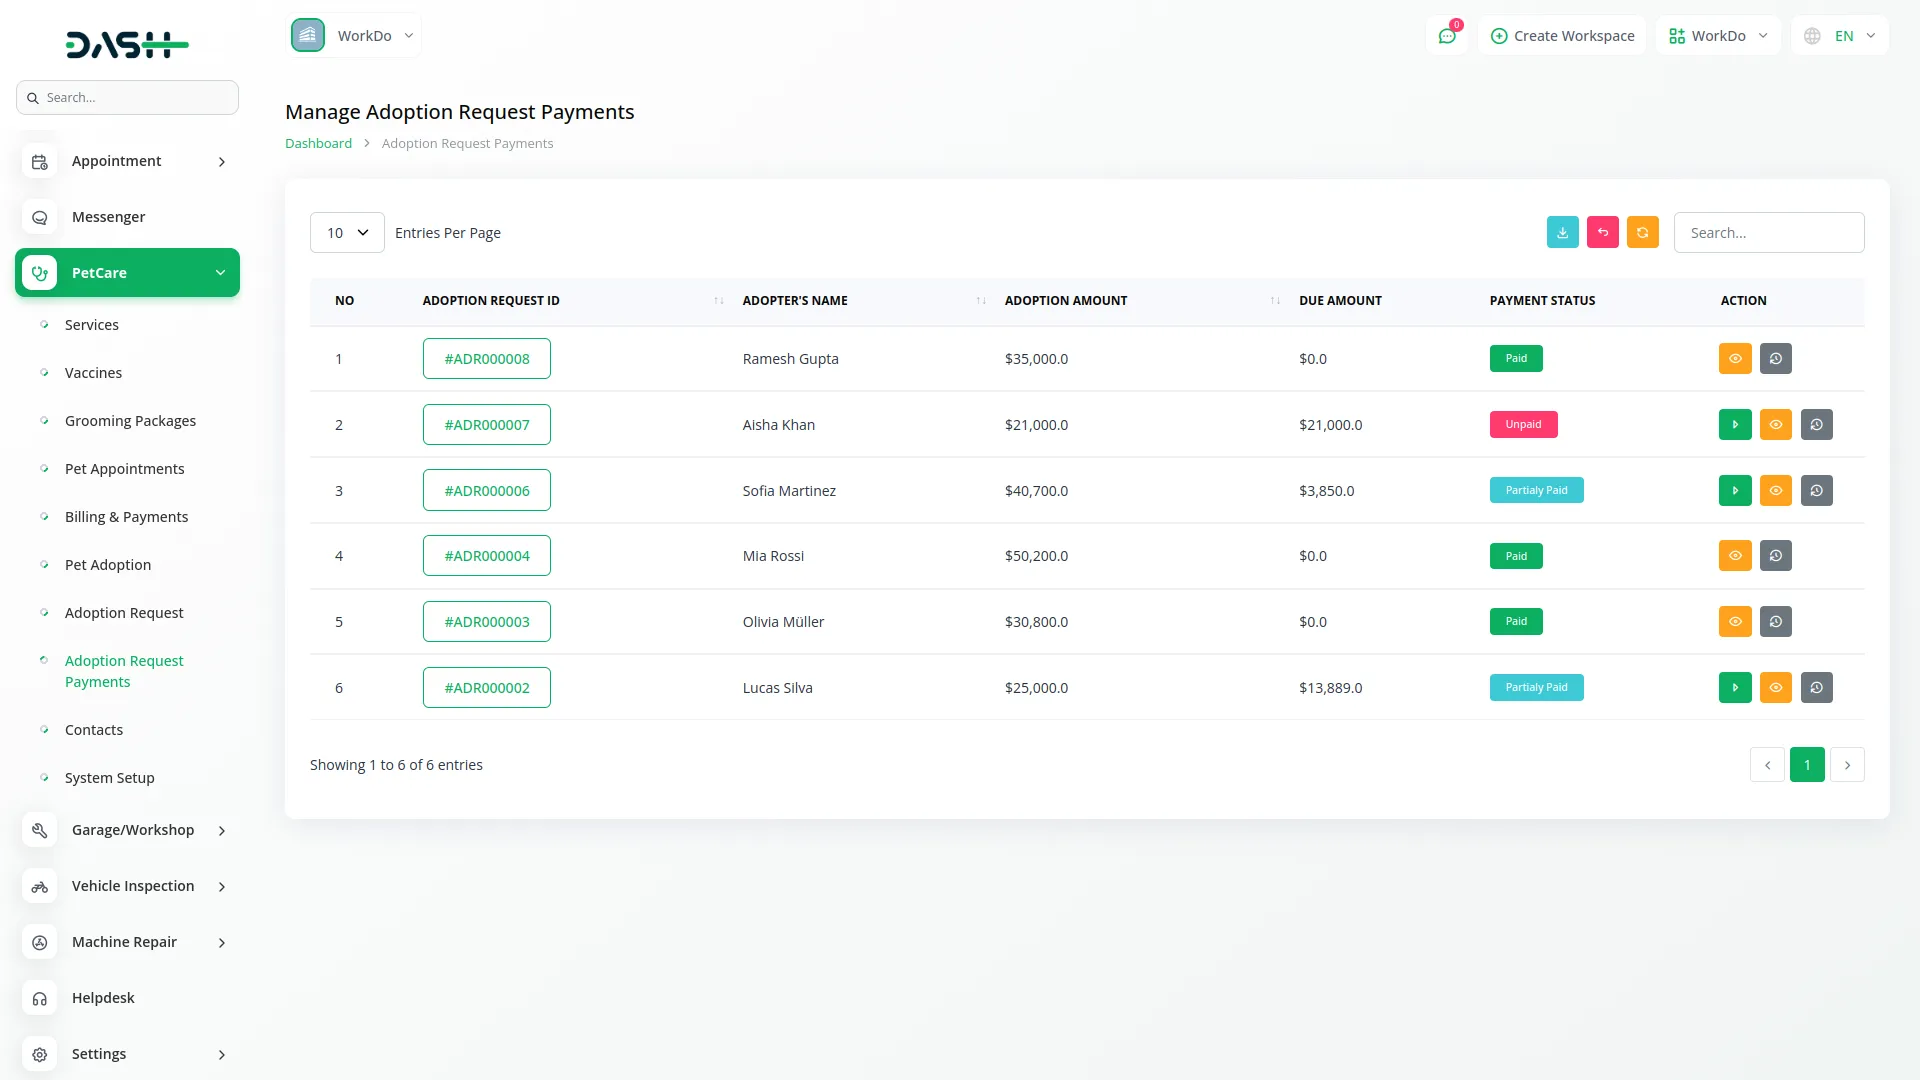
- The Adoption Request Payment is used to manage all payments related to pet adoption requests. It allows users to track payment status, collect adoption fees, and view summaries of completed transactions. Payments added here are linked to specific adoption requests. Adoption request data is automatically received when the status of an adoption request is updated to ‘Approved’, ensuring real-time synchronization and updates.
- The Adoption Request Payment table list page offers a detailed overview of financial records, including Sequential Number, unique Adoption Request ID, Adopter’s Name, Adoption Amount, Due Amount, and Payment Status. It also includes convenient tools such as Search, Export, Reset, and Reload buttons to help manage and navigate the data effectively.
- To record a new payment, click the “Add Payment” button next to the Add Adoption Request Payment section. In the form, fill in the Payer Name, Amount, select the Payment Method (Cash, Bank Transfer, Cheque, or Other), choose the Payment Date, add a Reference if needed, upload a Payment Receipt, and include any Description or notes for additional details.
- Click the View button to open the detailed page of a specific adoption request. This view displays comprehensive information about the pet and the adopter, providing a complete overview of the request.
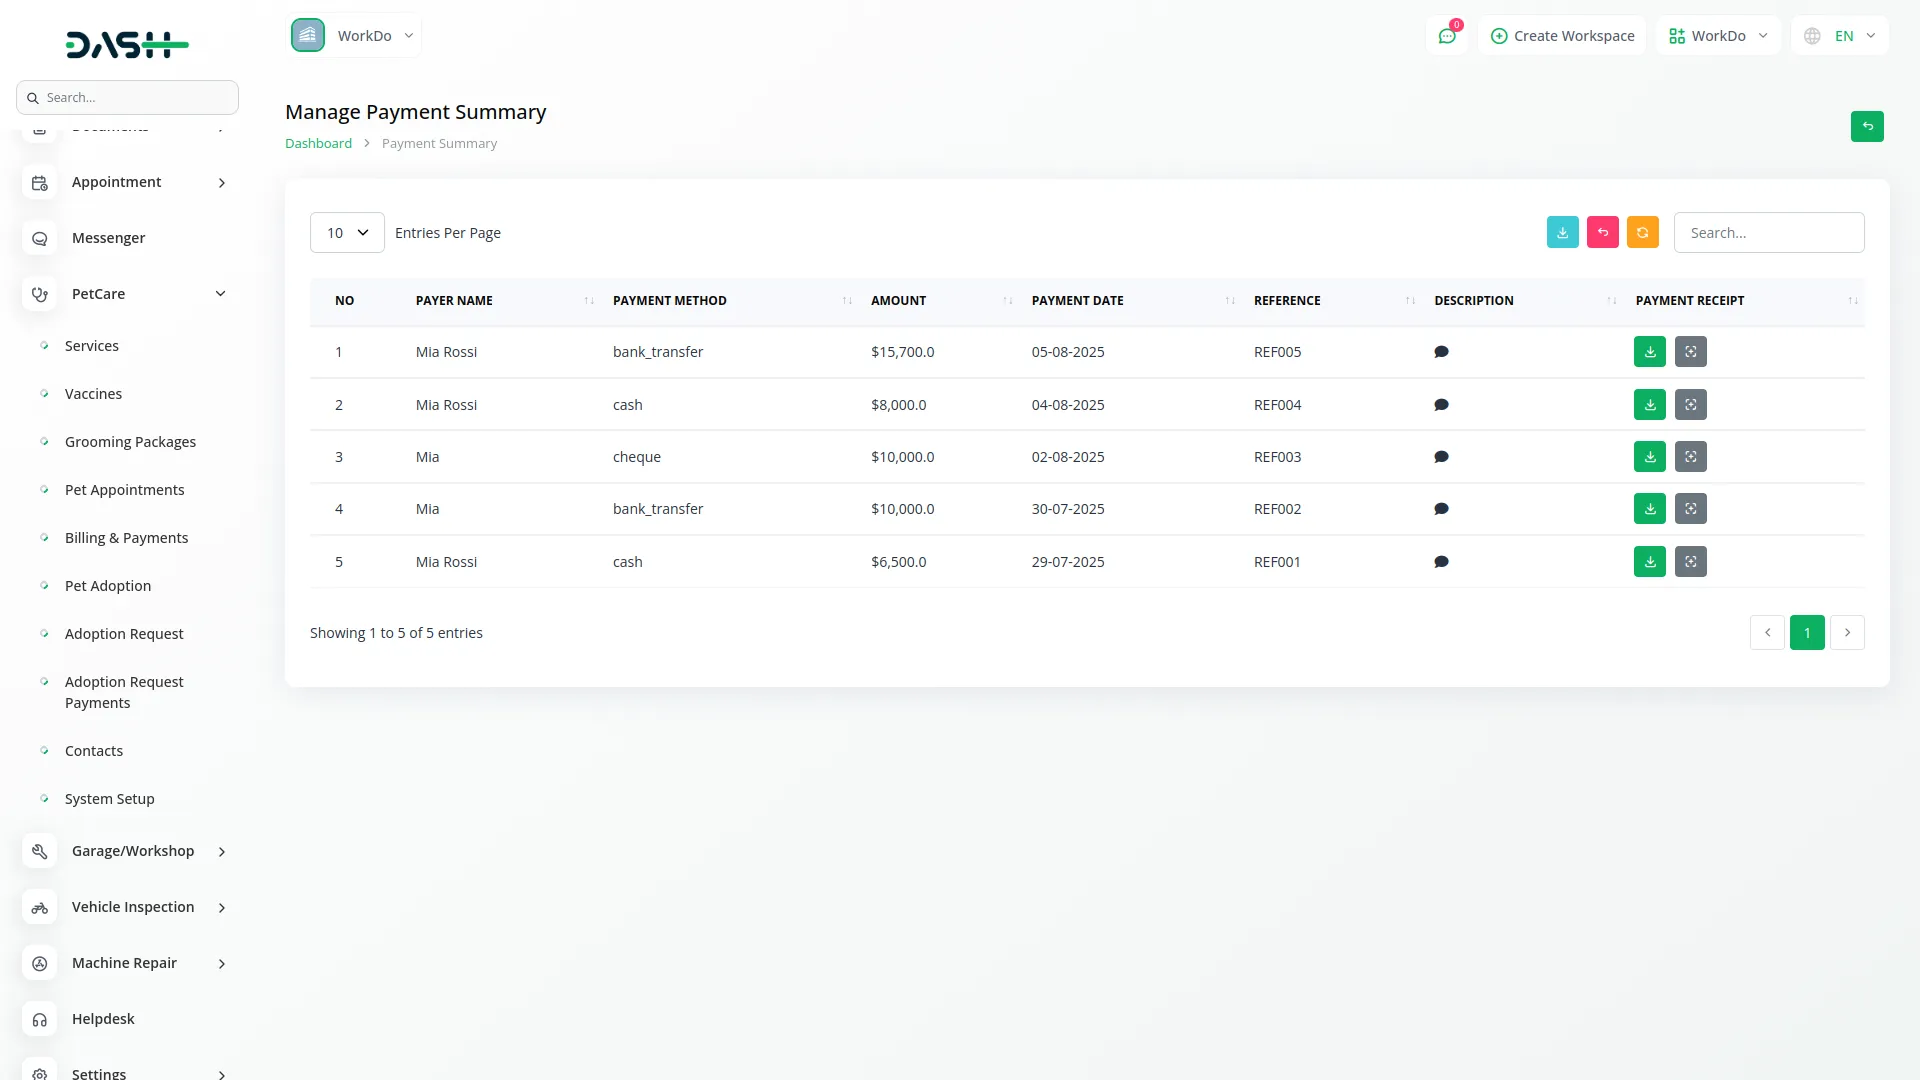
- Additionally, click the “Payment Summary” button to open the “Manage Payment Summary” page.
- This page displays a detailed table containing columns such as Sequential Number, Payer Name, Payment Method, Payment Amount, Payment Date, Reference Information, Detailed Description, and a link to the Payment Receipt. It provides a clear and organized view of all payments made for the selected adoption request.
Contacts Management
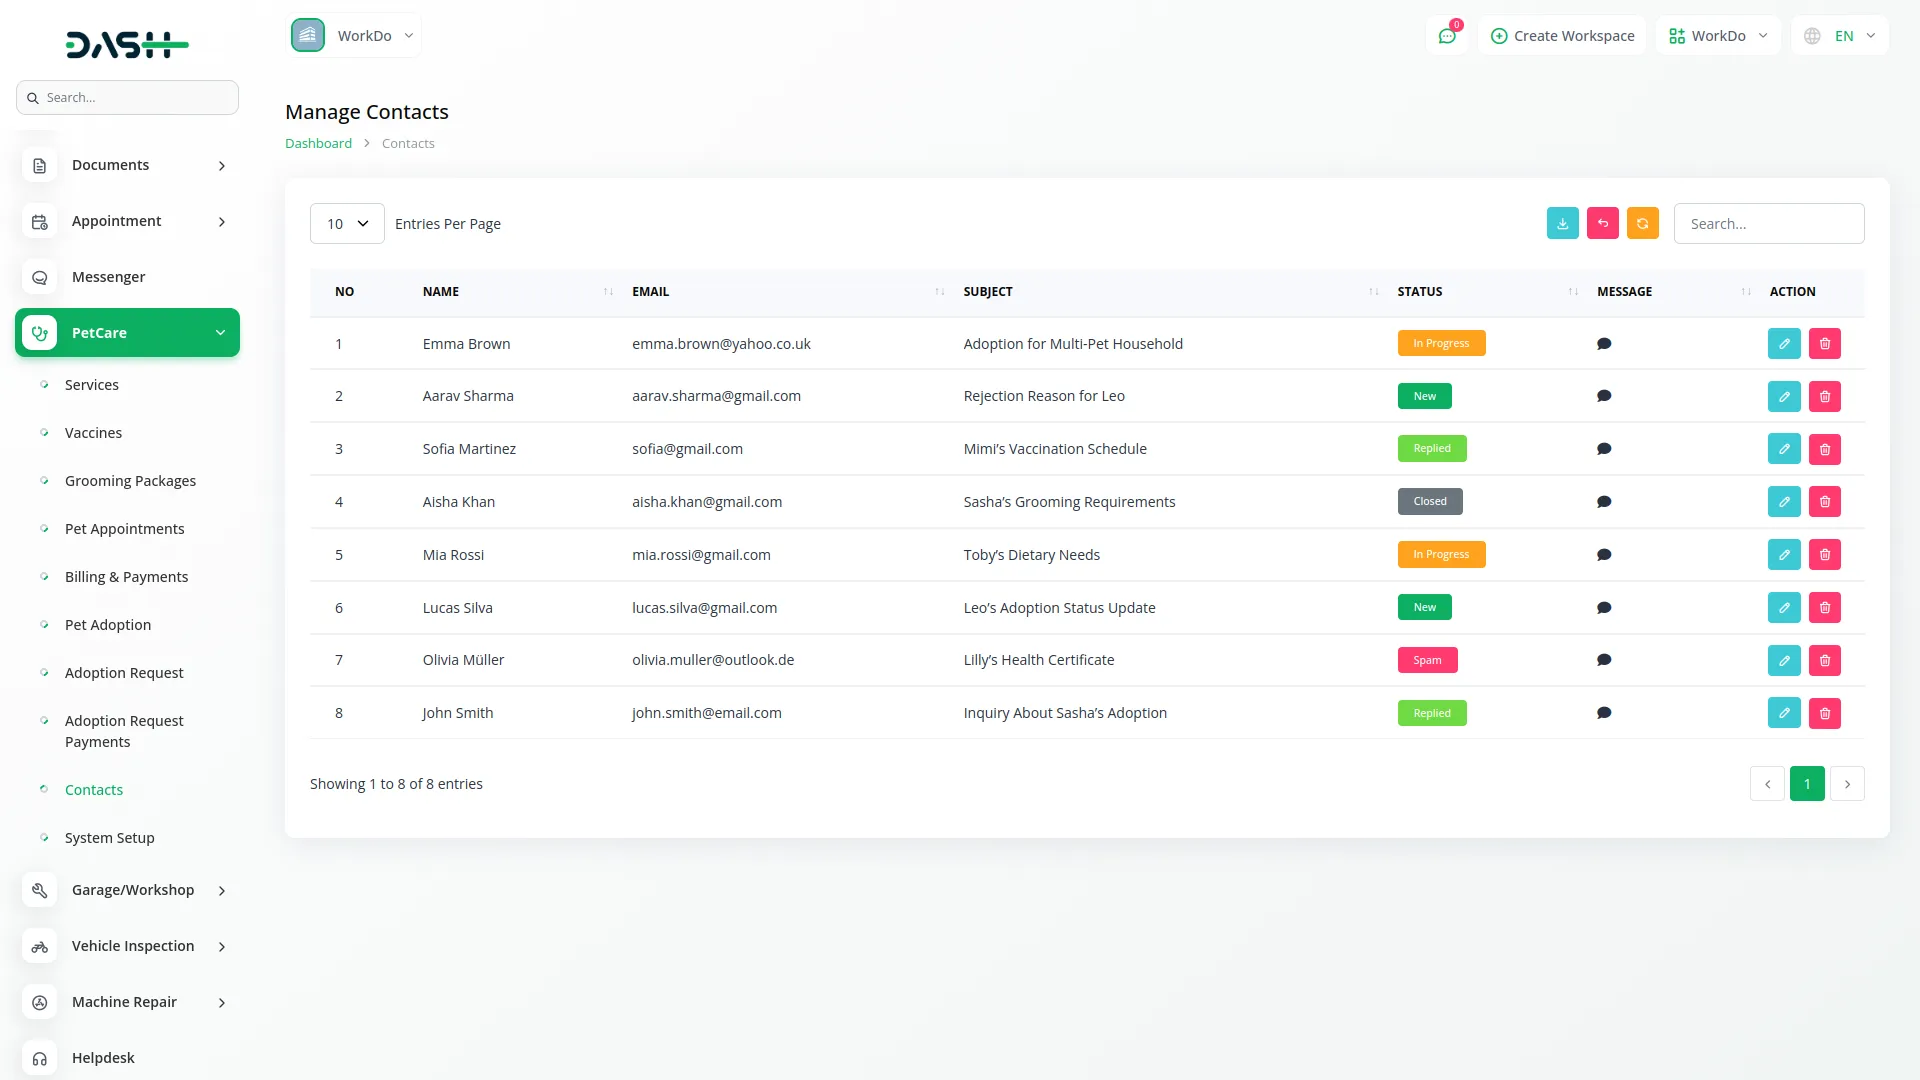
- The Contacts list page provides efficient communication management in Search functionality, Export, reset, and record buttons, with Create functionality for manually entering phone or in-person inquiries.
- All contacts shown in this section are automatically generated from your website’s contact us form.
- On the list page, you get to see the table in columns, including customer Name, Email address, inquiry Subject, current Status(New, In Progress/Replied/Closed/or marked as Spam), and the complete Message. With help in the action column, you can edit your contact data or delete it whenever you want.
System Setup Management
Brand Setting Configuration
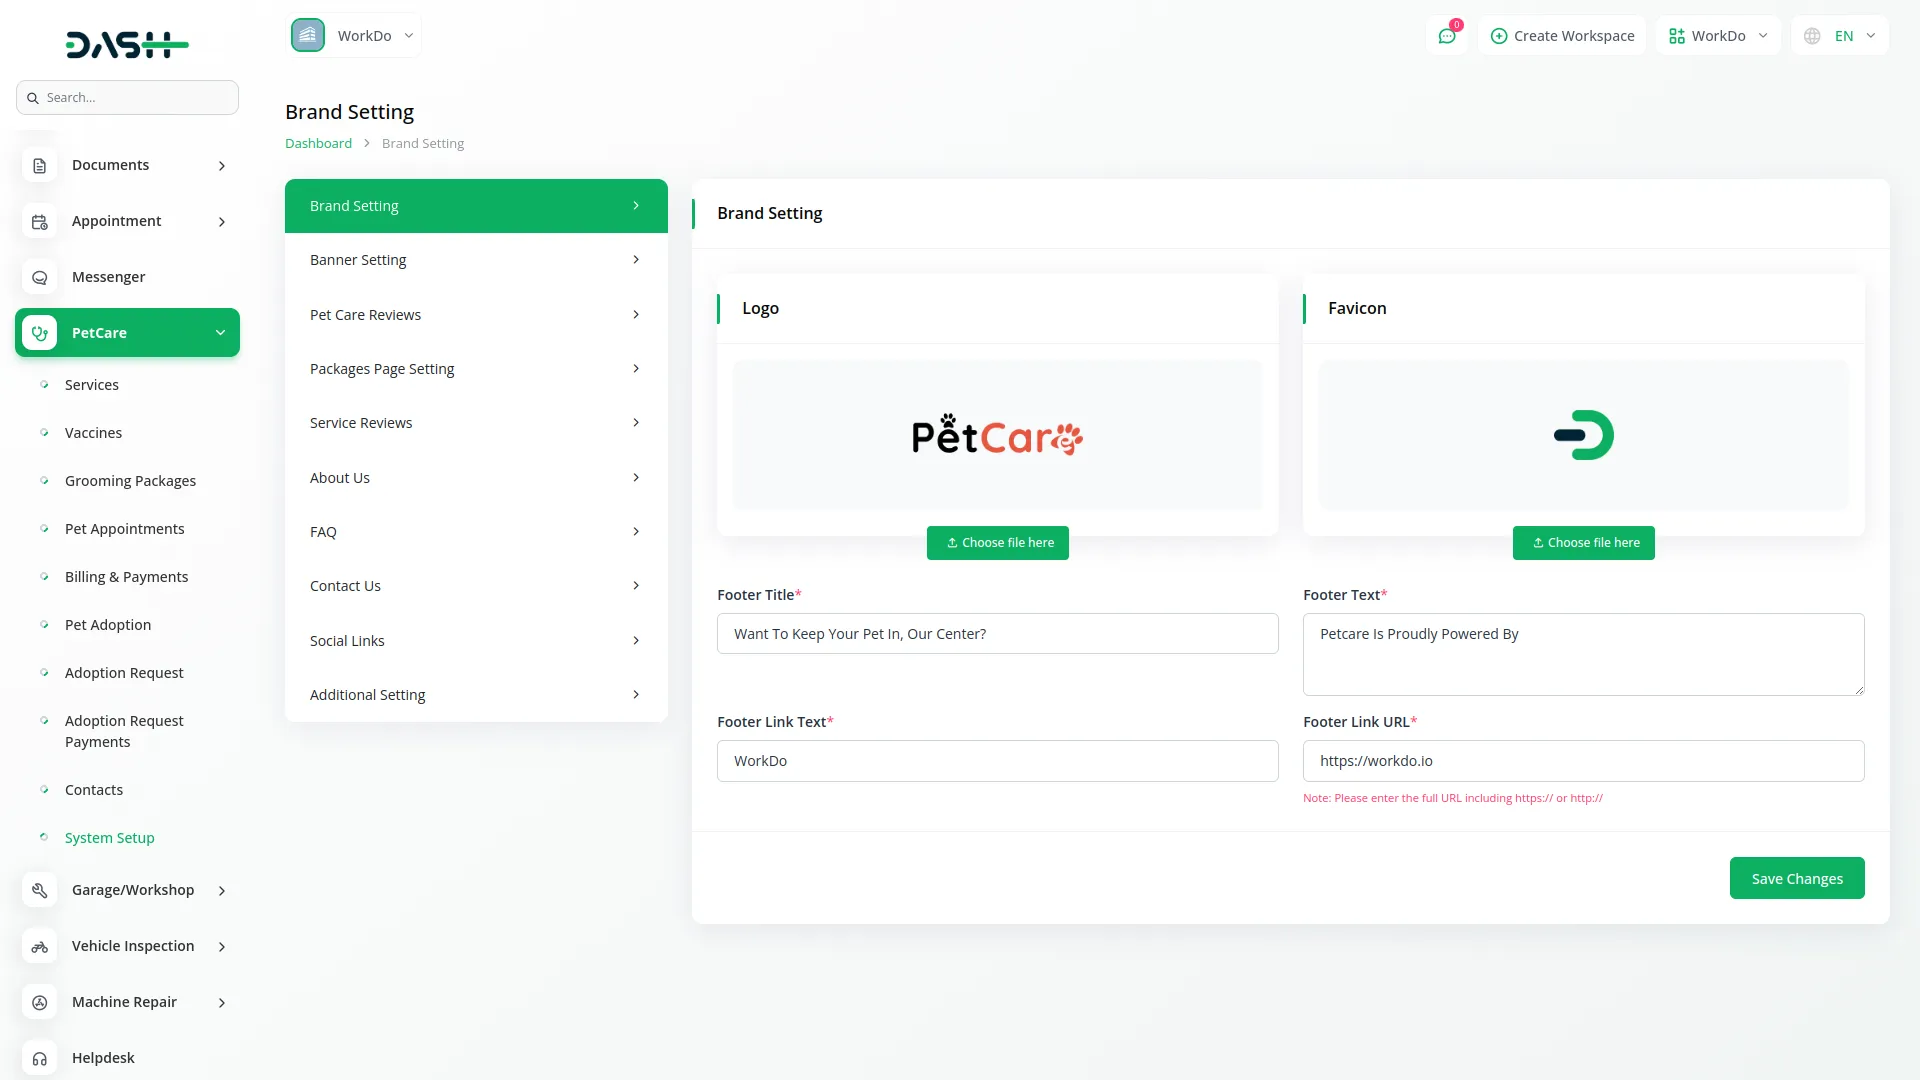
- Once, click the “Create” button to upload your company Logo, which will appear on the website. Set your Favicon, which appears in browser tabs. Additionally, you can set the Footer Title and Footer Text, which is typically used for the company name or copyright notice in the footer.
- Enter your Footer Link Text and its corresponding Footer Link URL to add a clickable link in the footer area of your website. This allows you to provide additional navigation options or direct users to important external or internal pages.
Banner Setting Configuration
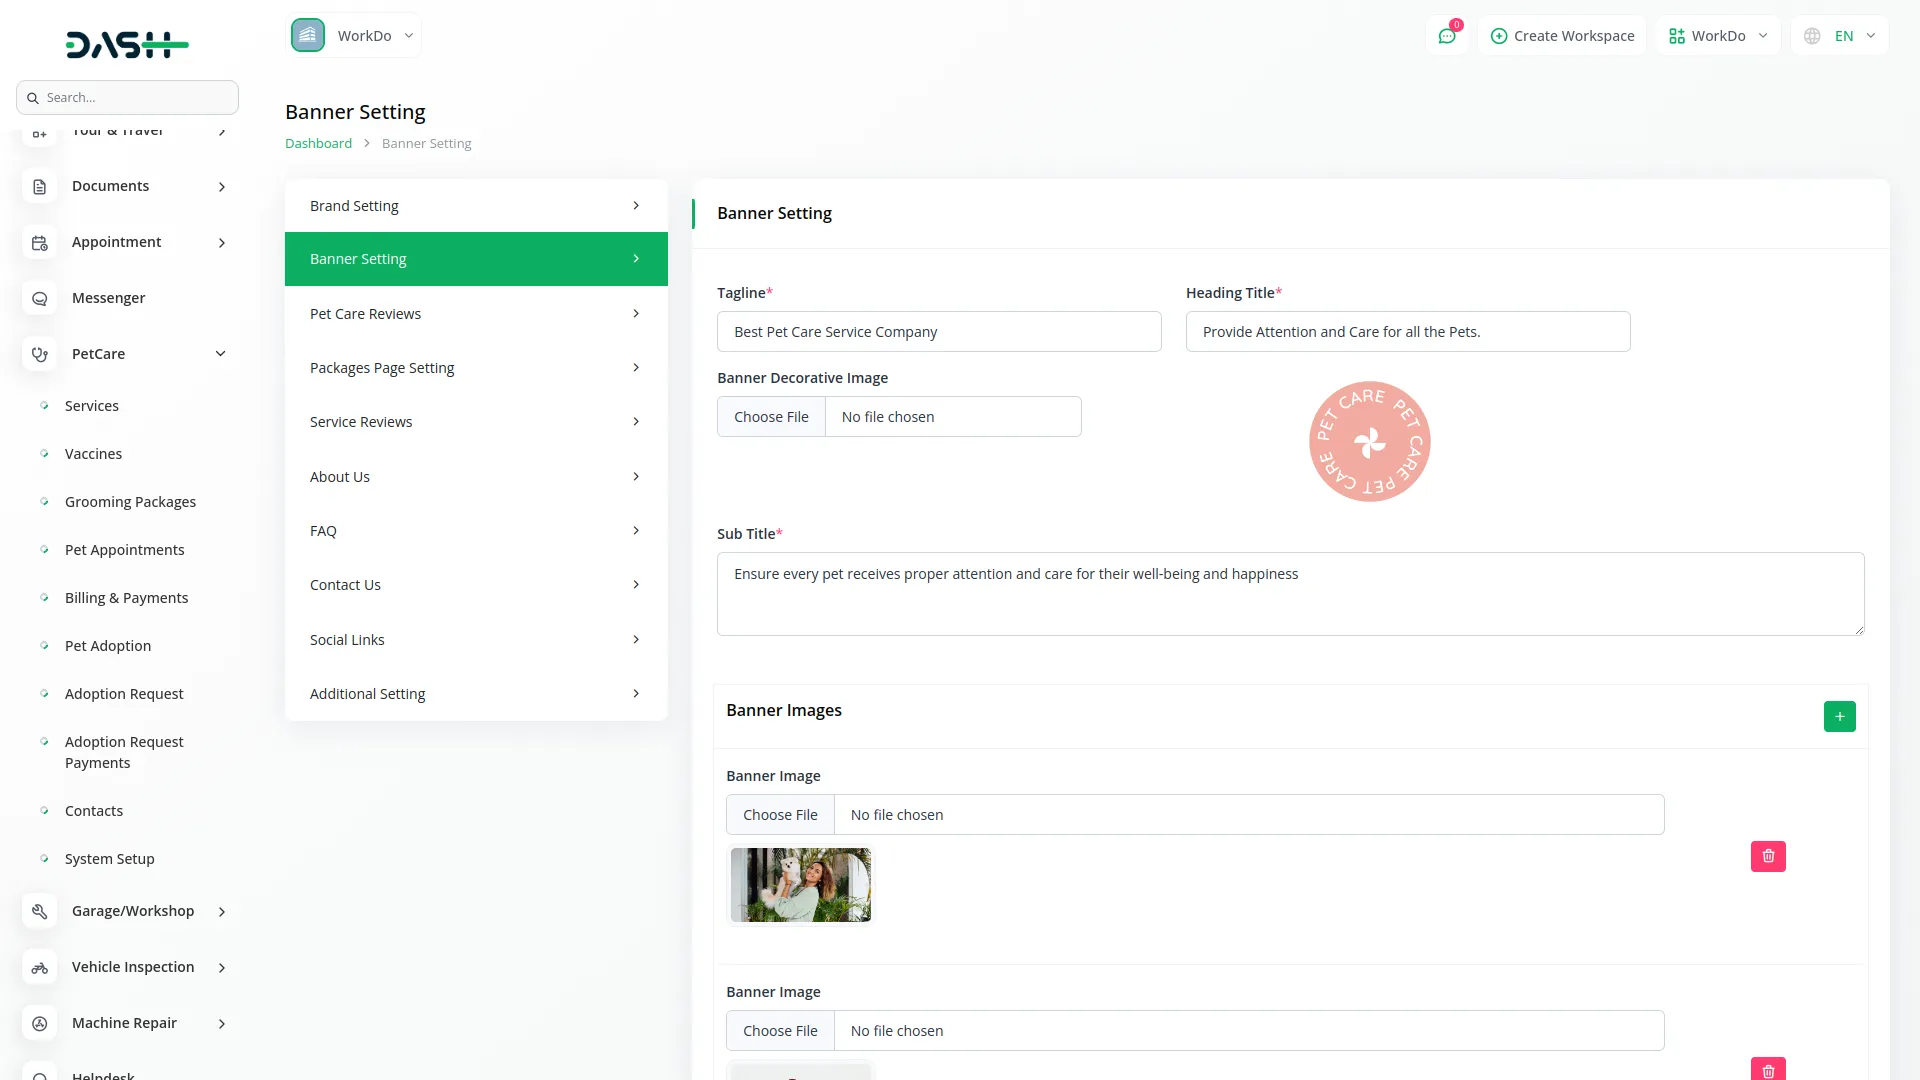
- Configure the banner settings by filling in the required details, including an engaging tagline, a compelling heading title, and a decorative banner image upload.
- Write an informative subtitle. You can use the Banner Images repeater function to upload multiple high-quality images that showcase your facilities, staff, and happy pets.
PetCare Reviews Setting Configuration
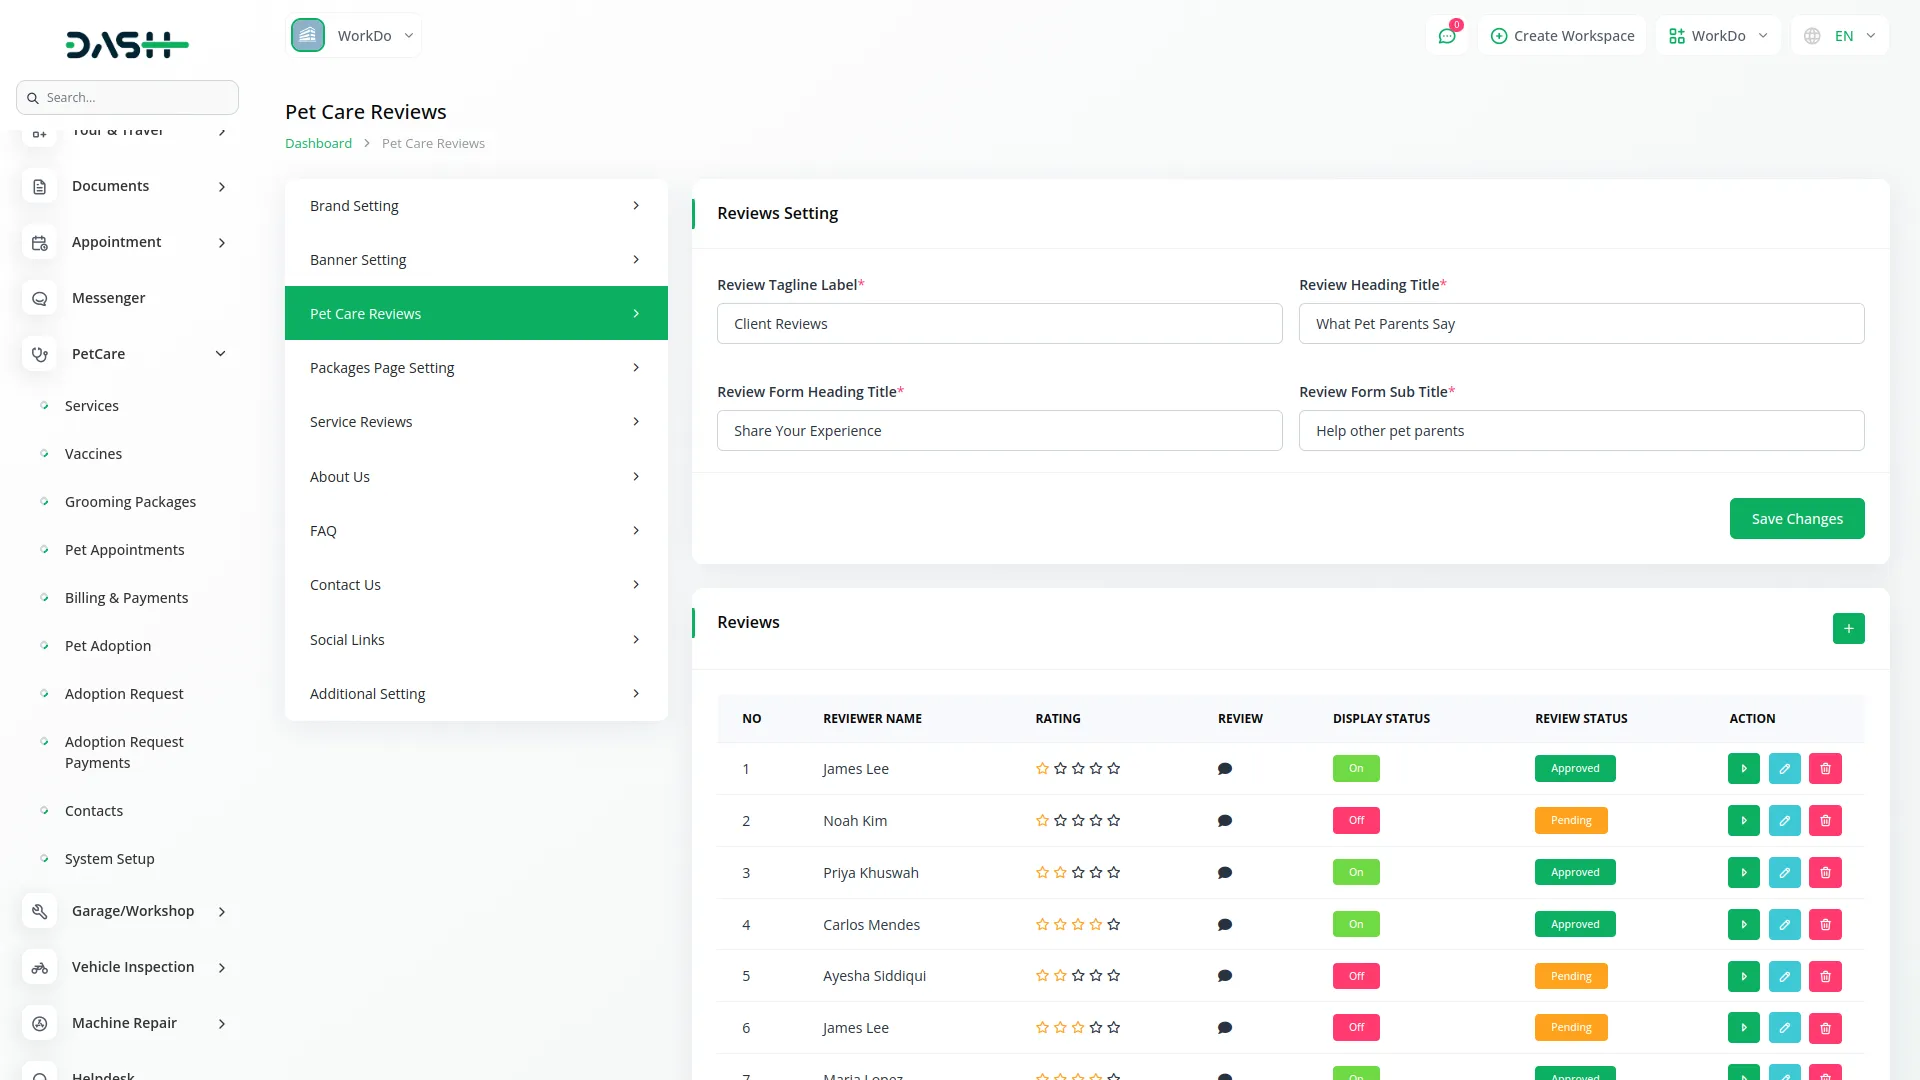
- Changes made in the PetCare Reviews Settings section will reflect on your website’s homepage. You can set a review tagline, define a heading title, and customize the appearance of the review section.
- To add a review manually, click the “Create” button at the top of the Reviews Section. Enter the Reviewer Name, Reviewer Email, complete Review text, star Rating from 1-5, and Display Status. Reviews submitted by users from the website’s front end will also appear here.
- Petcare reviews are submitted by visitors or customers for the entire site, covering sections such as pet visits, pet adoptions, and pet services.
- The reviews list page shows all submissions with columns including sequential Number, Reviewer Name, Star Rating, Display Status, and Review Status. The Review Action button opens detailed review information and allows Edit and Delete functions to provide additional review management.
Packages Page Setting Configuration
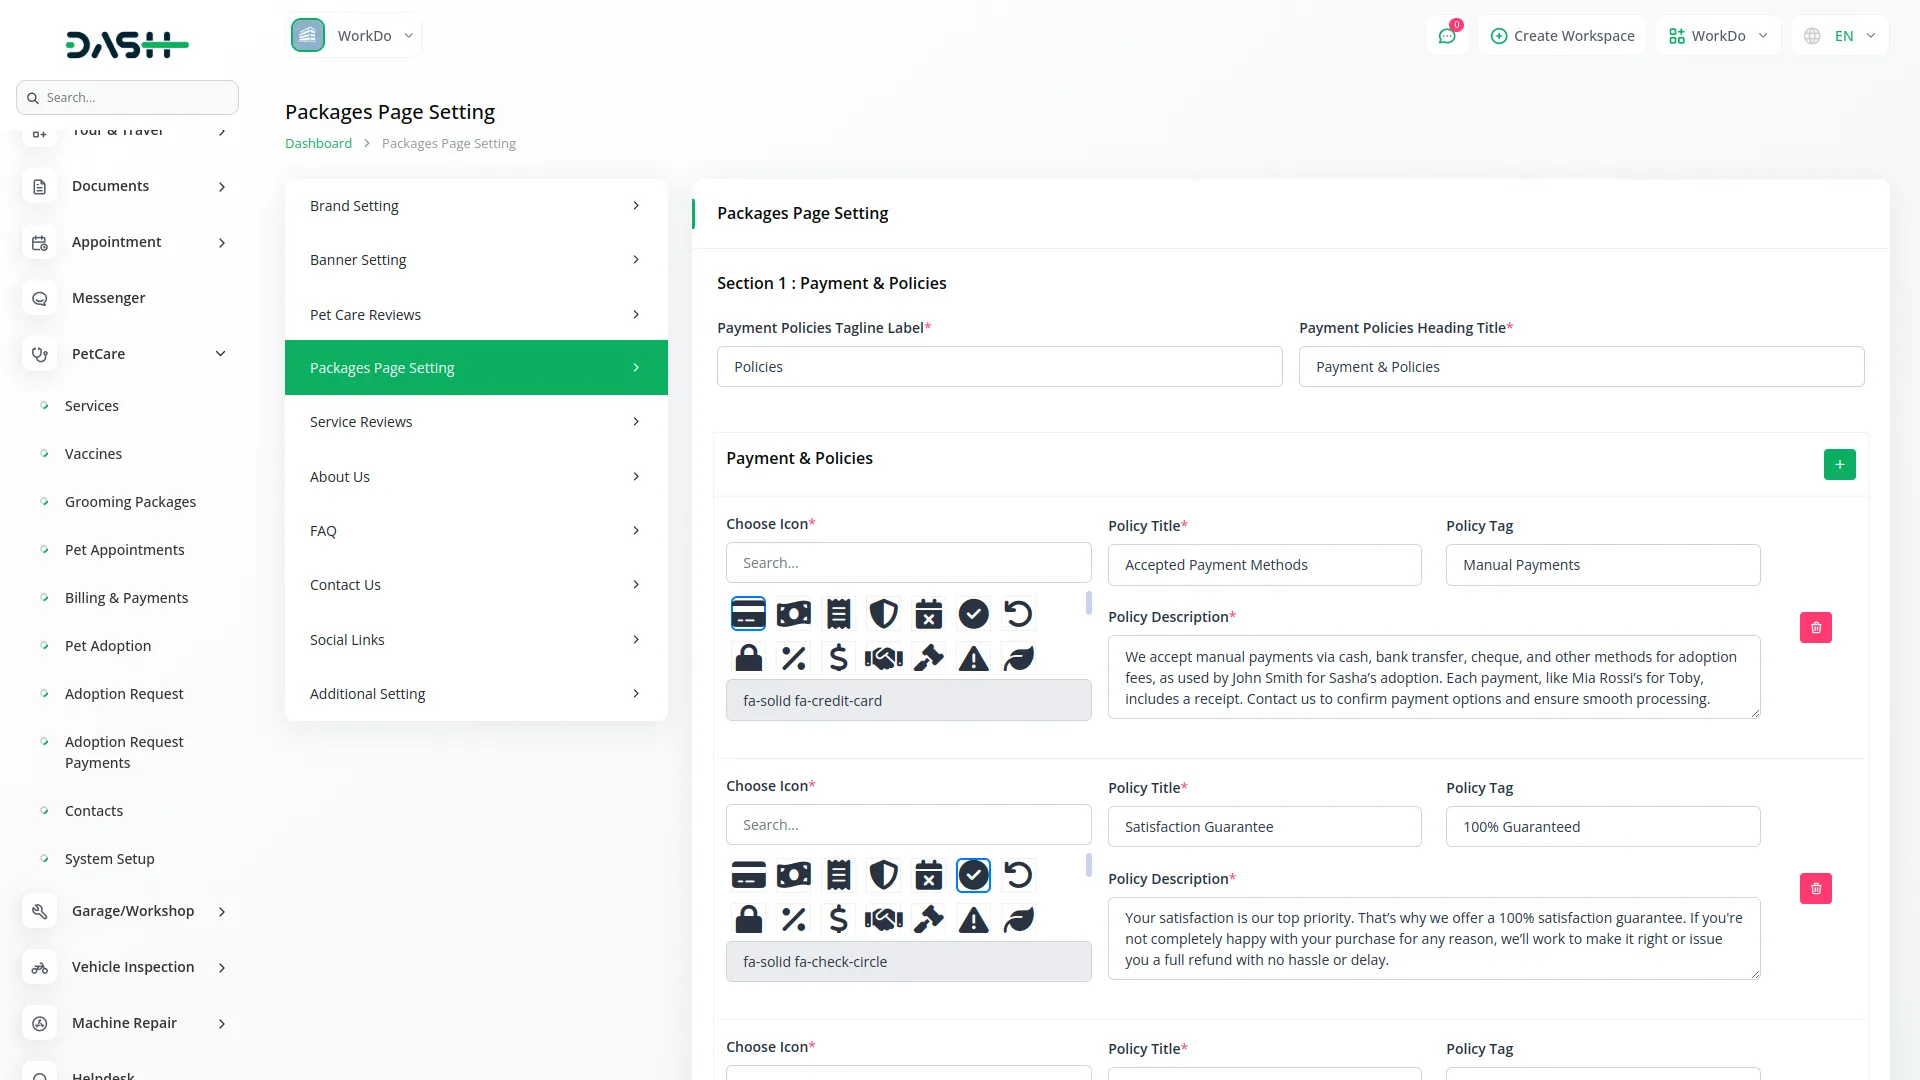
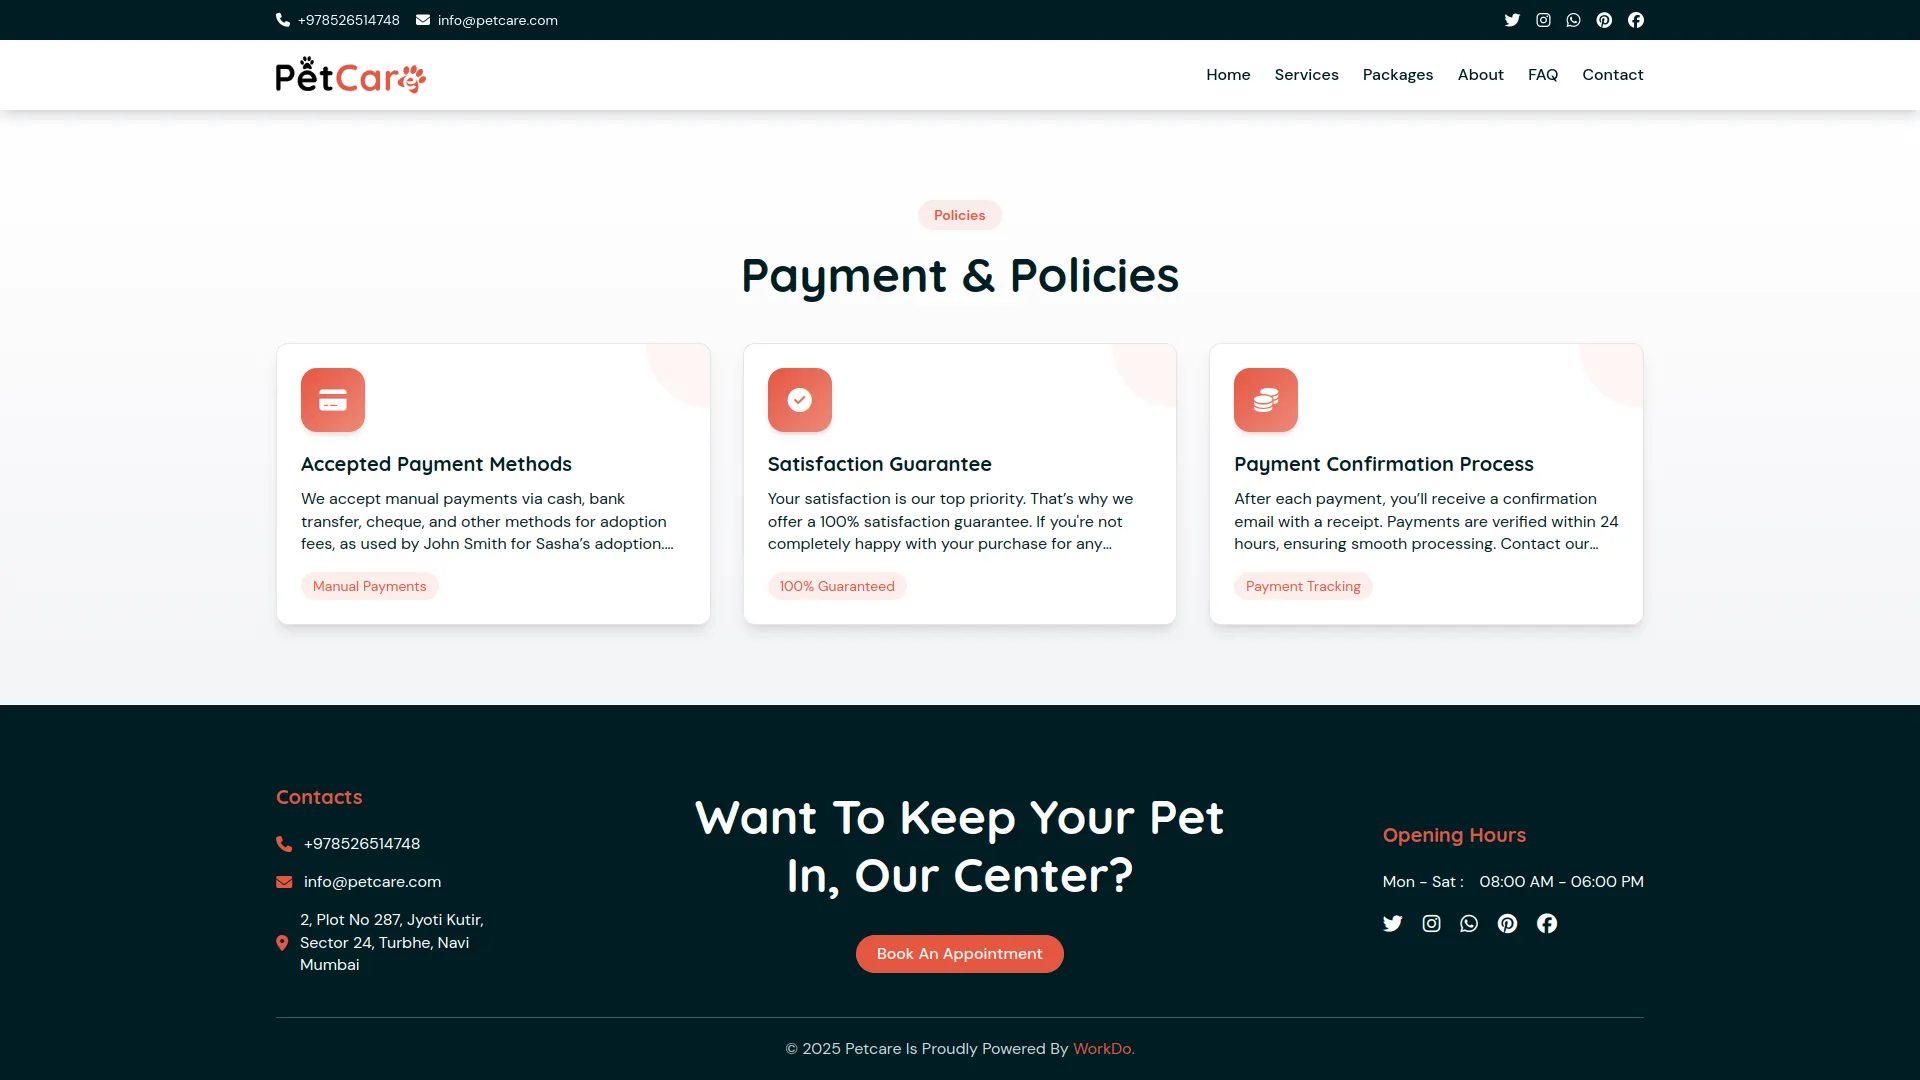
- In this section, you can configure the Packages page on the frontend. Set your payment policy details, including the tagline label and heading title.
- Use the payment & policies to add multiple policy items using the repeater. For each policy, choose an icon from the various payment & policy icons available, enter the policy title, policy tag, and at the last, add a policy description.
Service Reviews Configuration
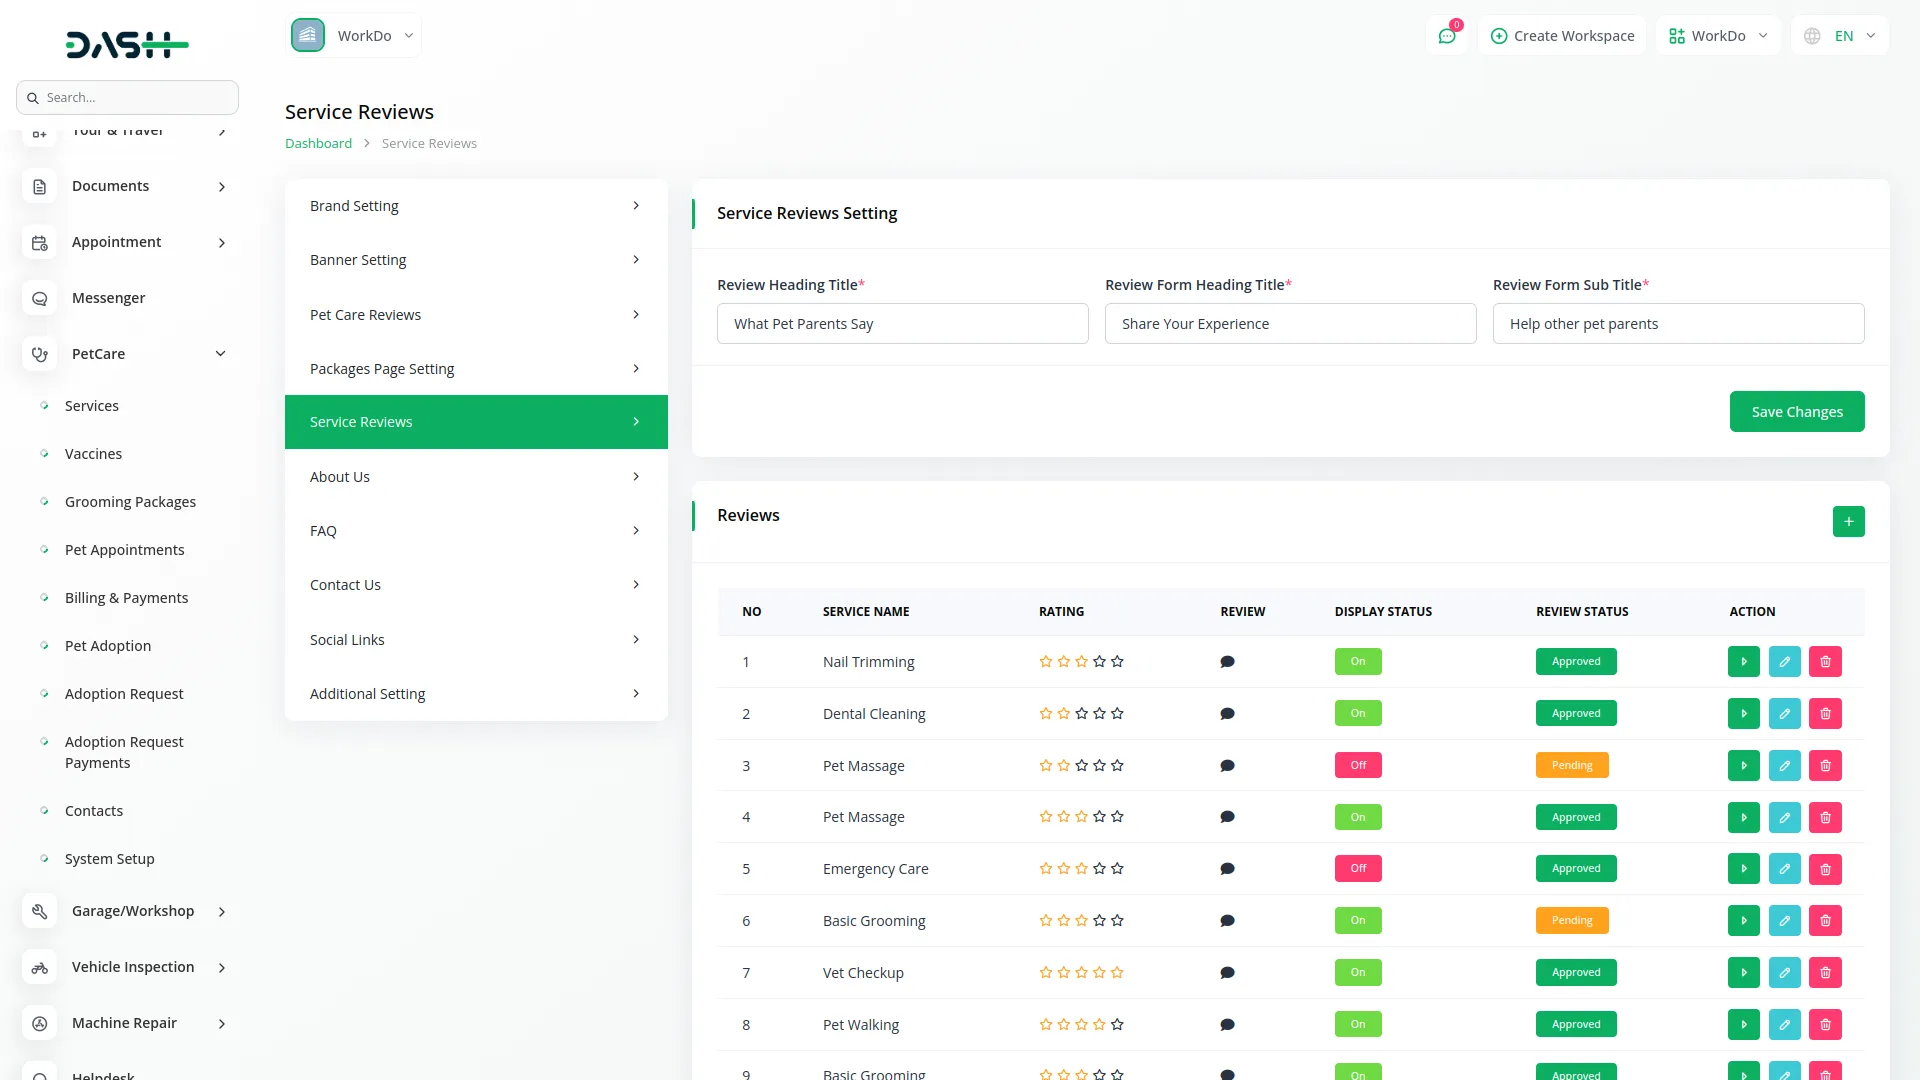
- The Service Reviews configuration section is displayed on the service details page of your website’s front end. The review form includes fields for the Reviewer Name, Reviewer Email, Review Text, Star Rating, and Display Status controls.
- Service reviews are specific to individual services and appear only on their respective detail pages, which are also submitted by visitors or customers.
- To manually add a service review, click the “Create” button at the top of the Reviews section. Fill in the Reviewer Name, Reviewer Email, complete Review Text, Star Rating (1–5), and Display Status.
- Apart from that, the service reviews list page displays columns including sequential Number, Service Name that the review relates to, star Rating, Review content, Display Status, and Review Status. You can update to(Approved or Rejected) by clicking the “Action” button. Standard Edit and Delete functions provide complete review management.
About Us Configuration
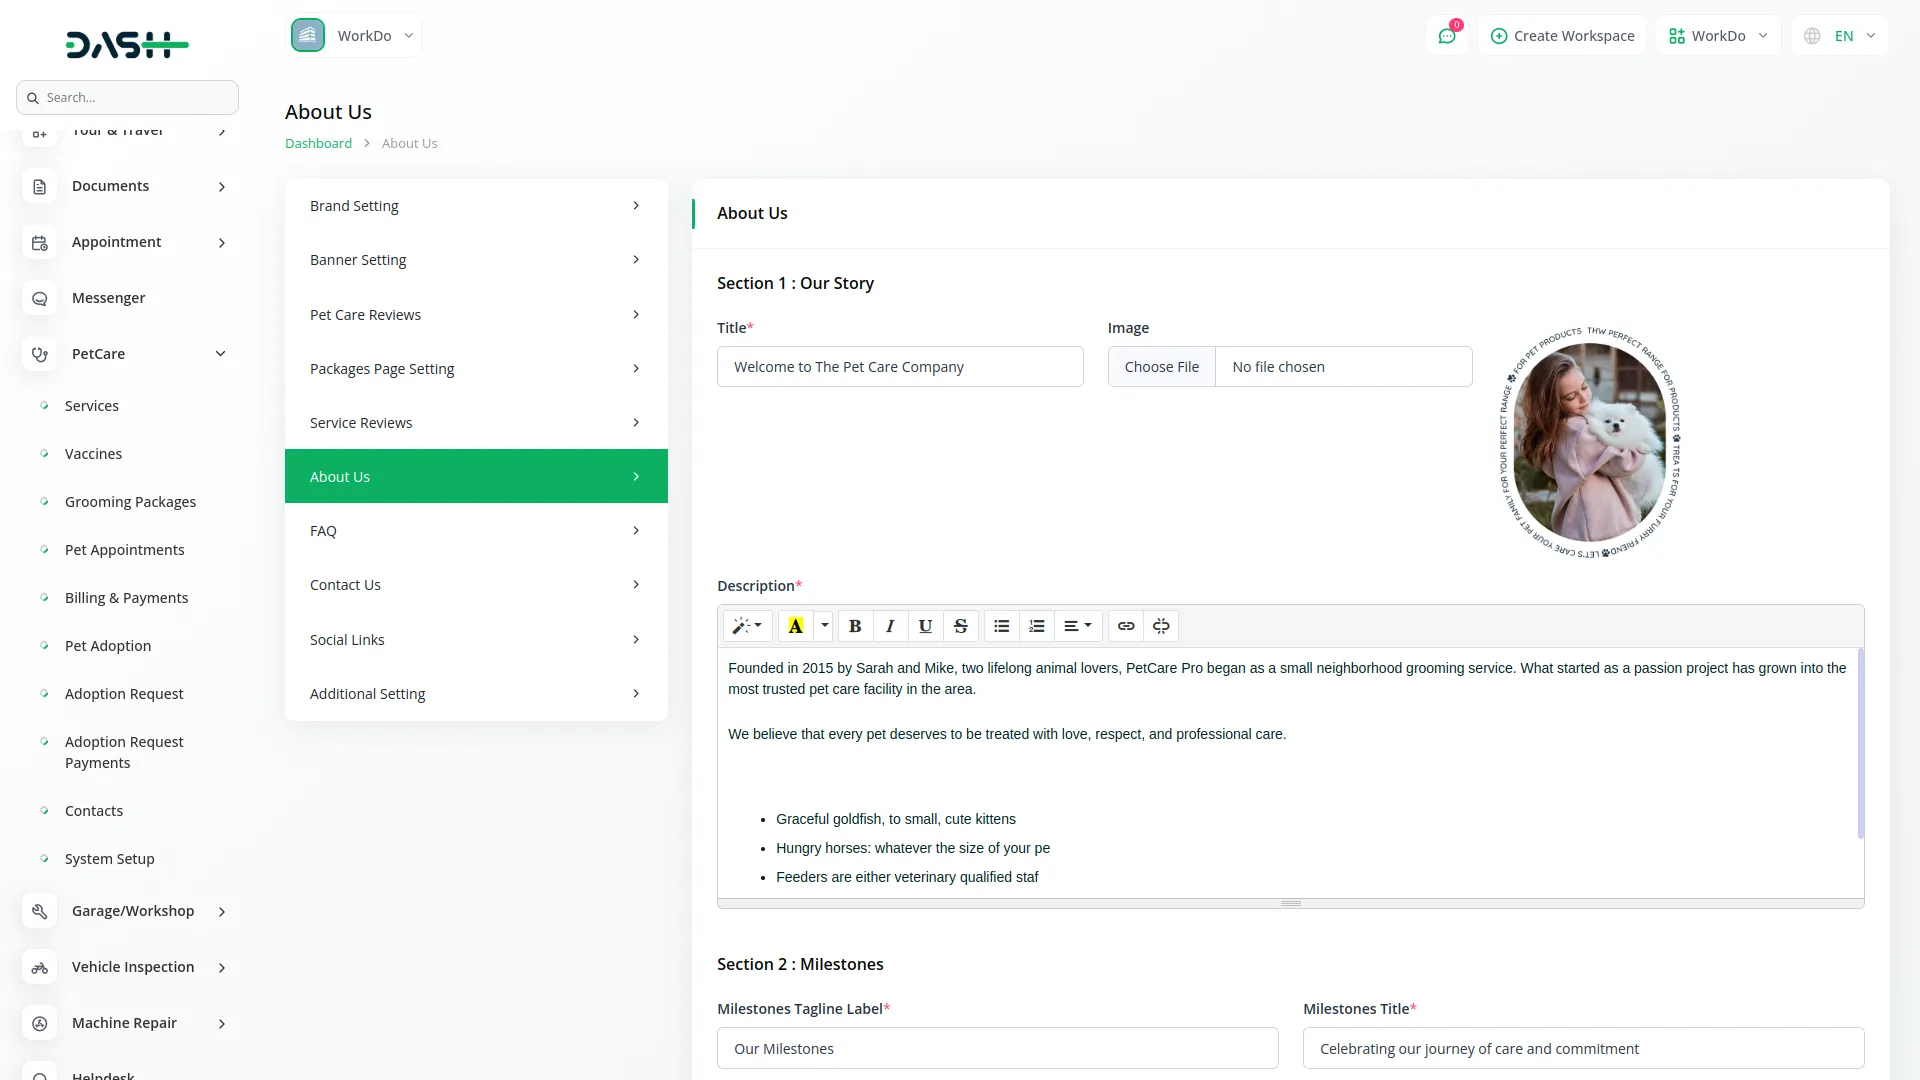
- You can create and showcase your brand story on the About Us page. Start by entering a Title, uploading a Brand Image, and adding a compelling Description.
- Additionally, configure the Milestones Tagline Label and Milestones Title, as well as the Team Tagline Label and Team Title, all of which will be displayed on the About Us page of your website.
FAQs Management
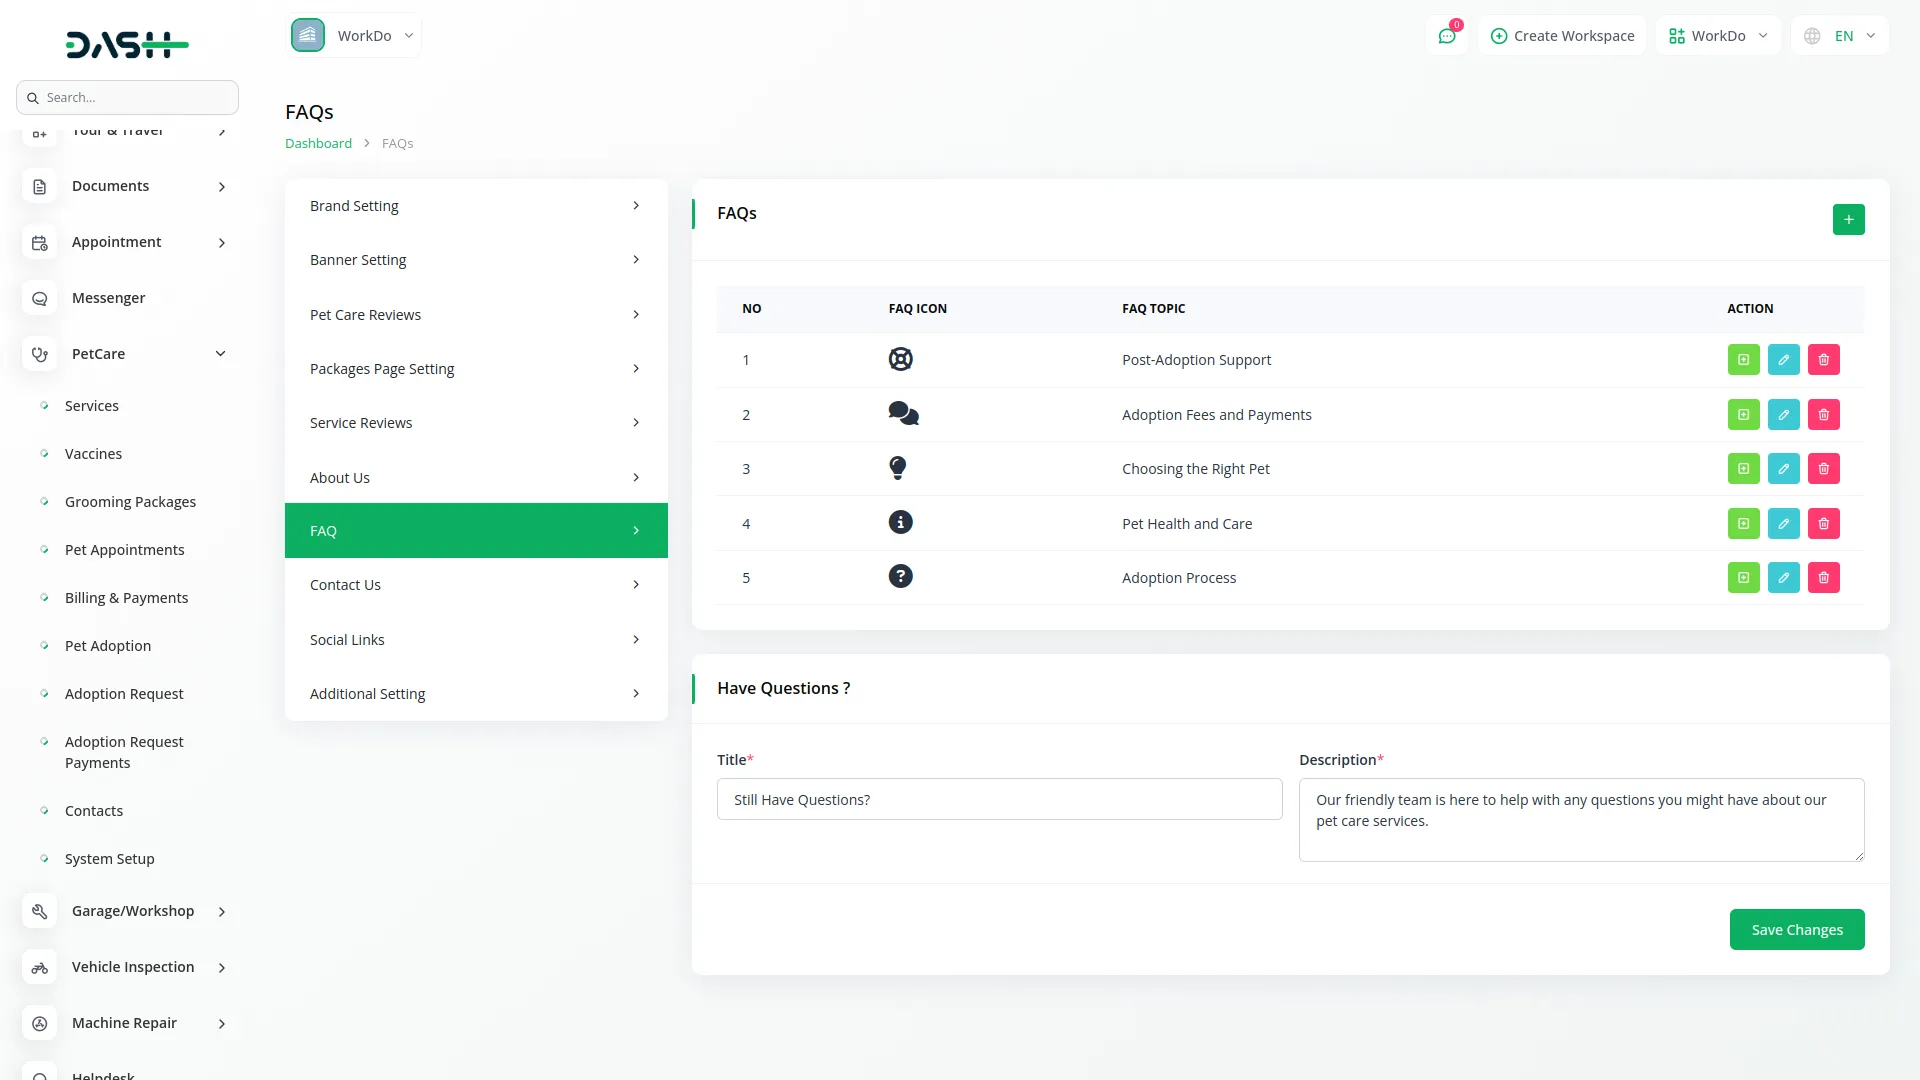
- FAQs allow you to create a new FAQ topic, select an appropriate FAQ Icon, and enter a clear Topic name.
- The FAQs list page displays all topics with columns showing sequential Number, FAQ Icon, and Topic name. You can click the “Add Question & Answer” button to open a page where you can use the repeater to add a Question & Answer. Additionally, edit and delete functions allow you to update or remove data.
- All created FAQs will be displayed on the FAQ page of your website’s front end.
Contact Us Configuration
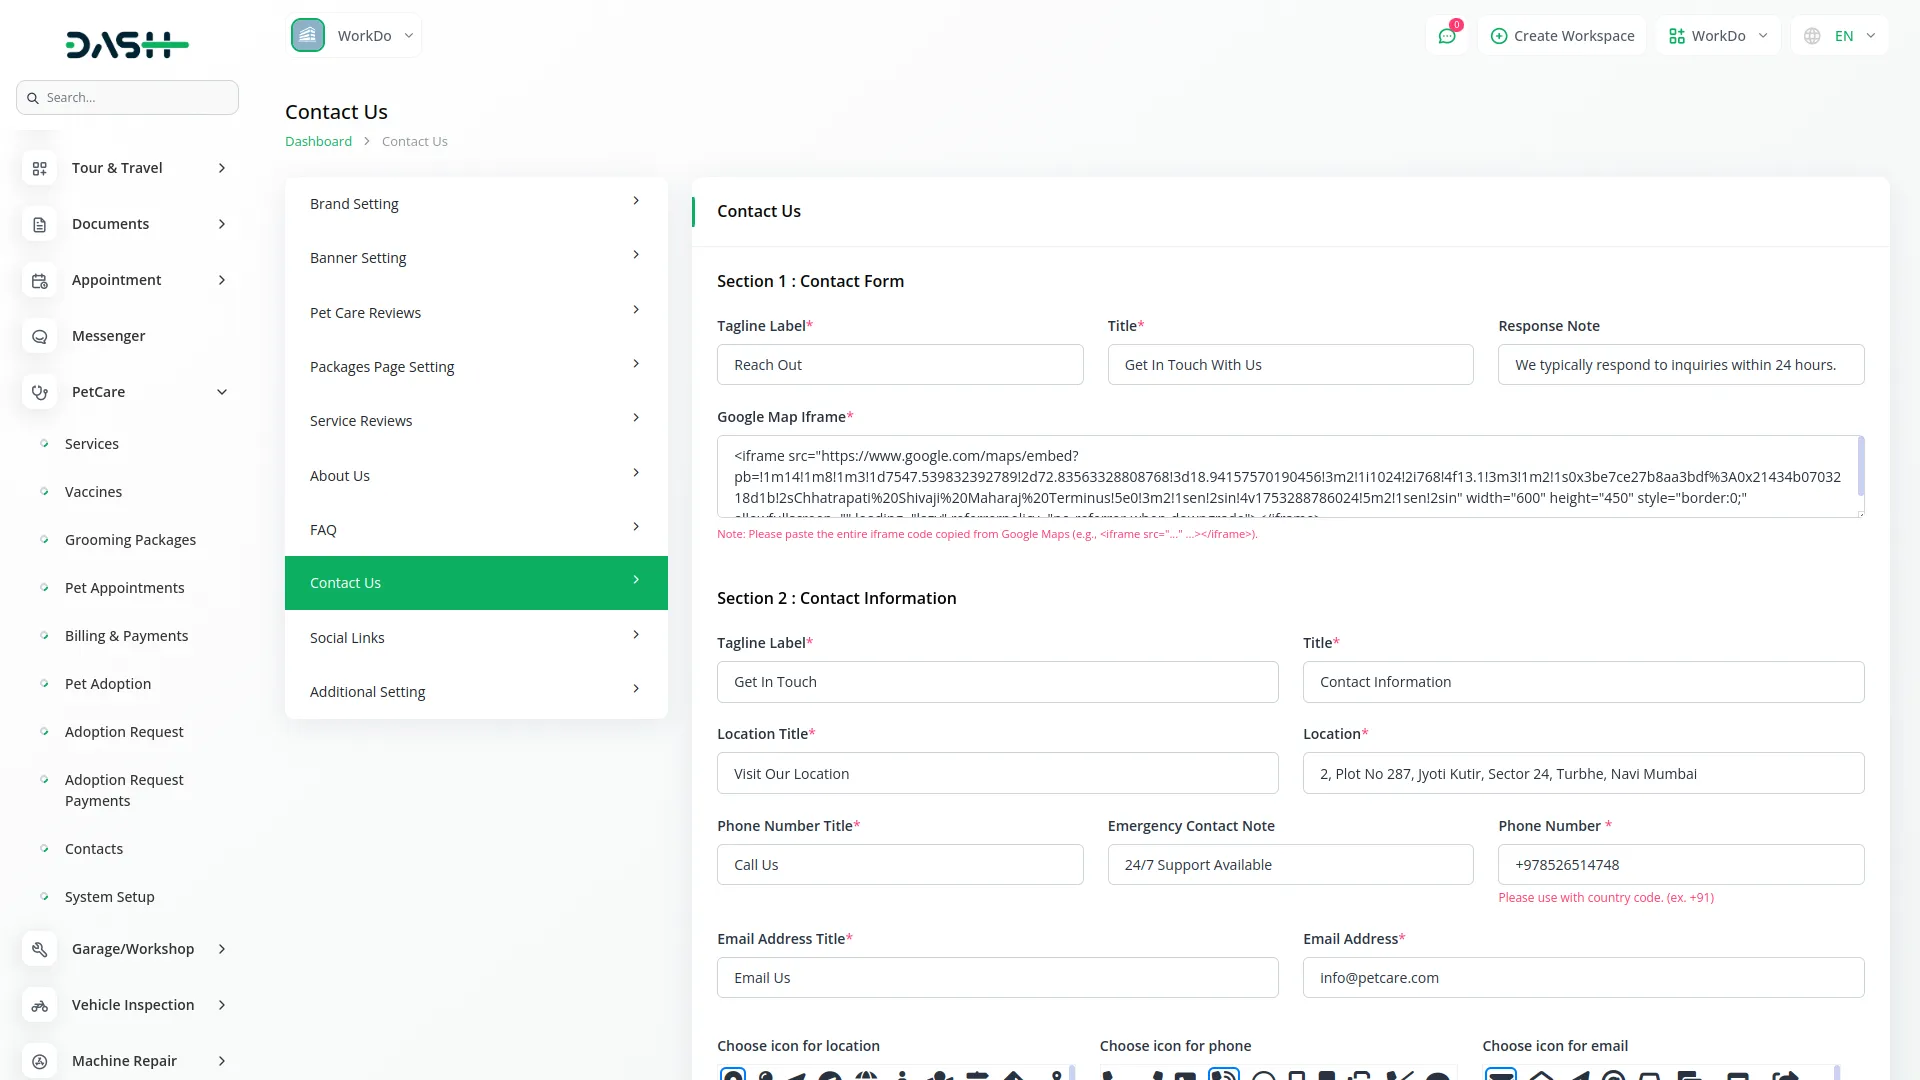
- Contact us in the configuration section. After that, fill in these required fields, including Tagline Label, Title, Response Note, and Google Map Iframe code.
- The Contact Information section displays your business details, including the Tagline Label, Title, Location Title, Phone Number Title, Email Address Title, Emergency Contact Note, and corresponding phone numbers, email addresses, and physical address. You can also choose icons for location, phone, and email to enhance clarity and make it easier for customers to reach you through their preferred method.
Social Links
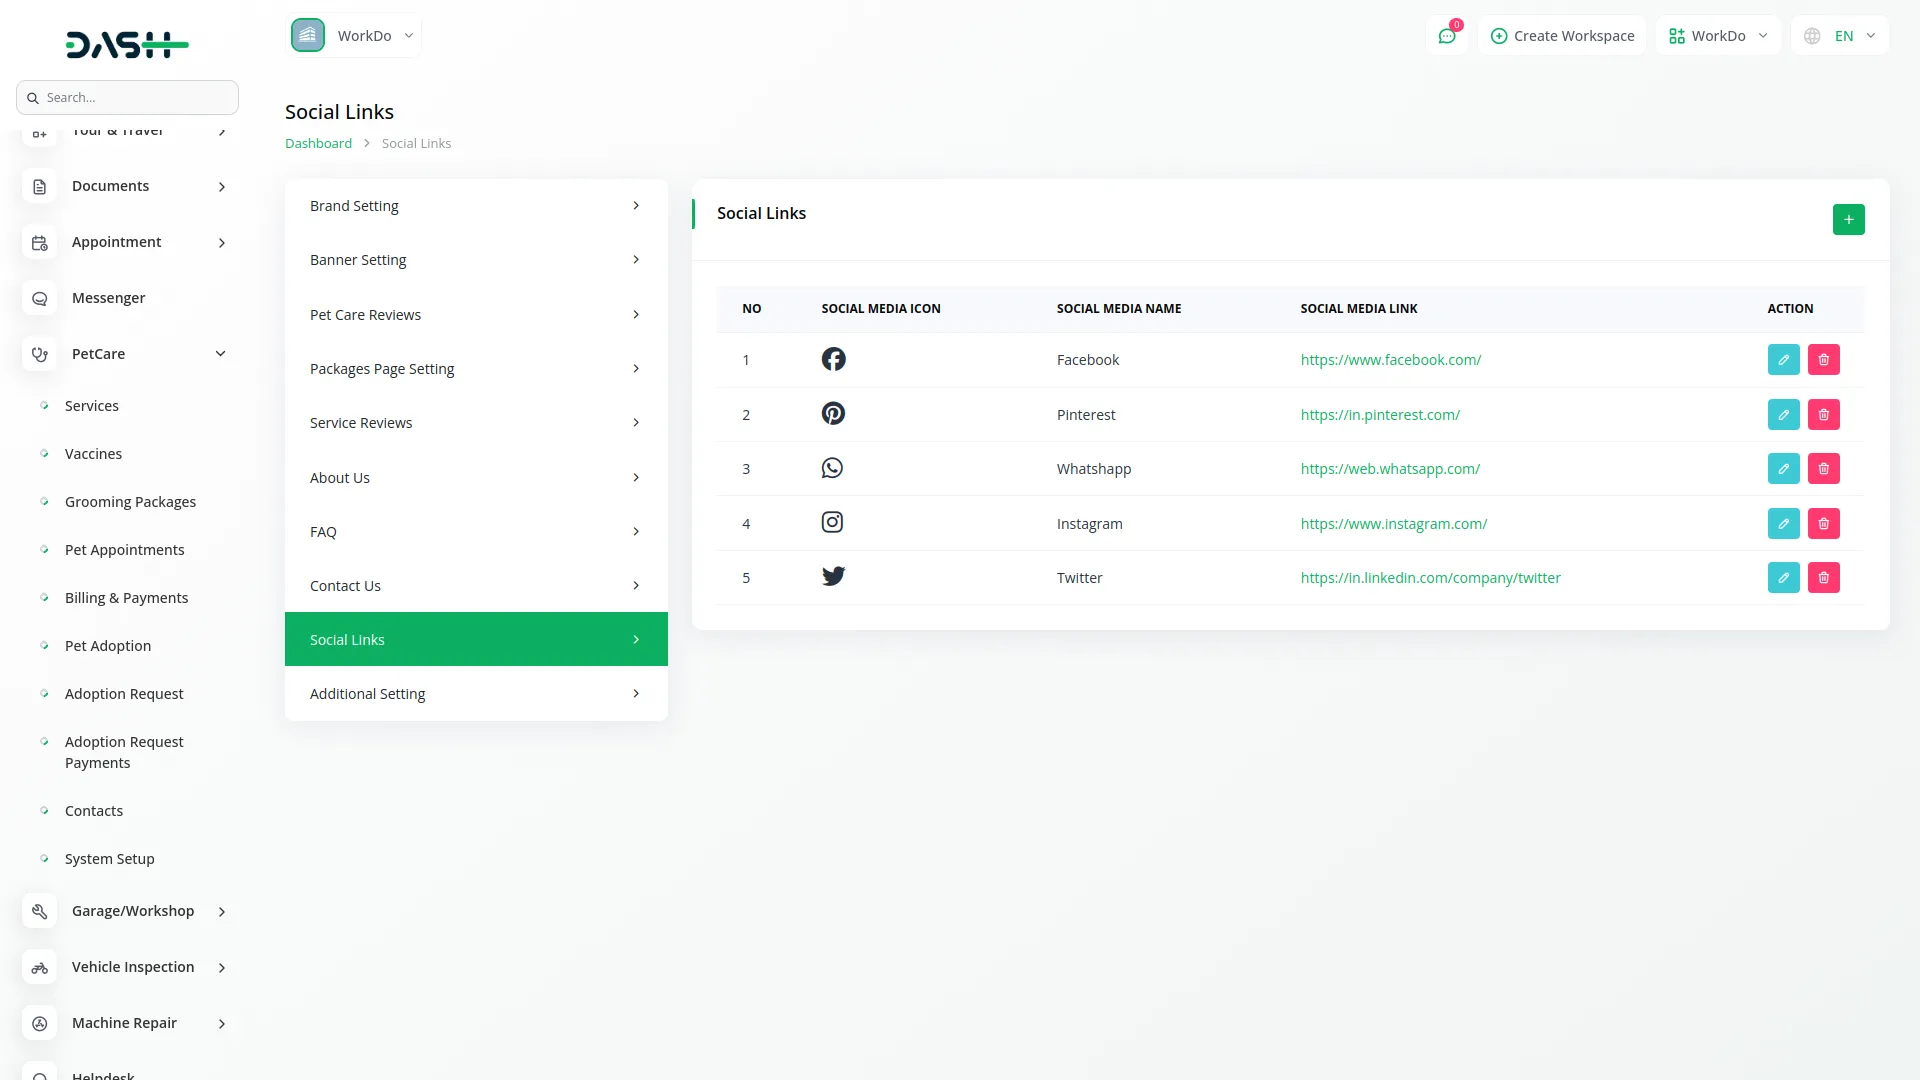
- To add a new social link, click the “Create” button on the social links page. Select a Social Media Icon from the available icon list and enter the Social Name, Social Media Link (such as Facebook, Instagram, or Twitter URL). Click Save to add the link.
- The list page shows all entries with columns such as No, Social Media Icon, Social Media Name, and Social Media Link.
- Under the Actions column, you can click Edit to change the icon, Social Media Name, Social Media Link, & Click Delete to remove the entry permanently.
Additional Details
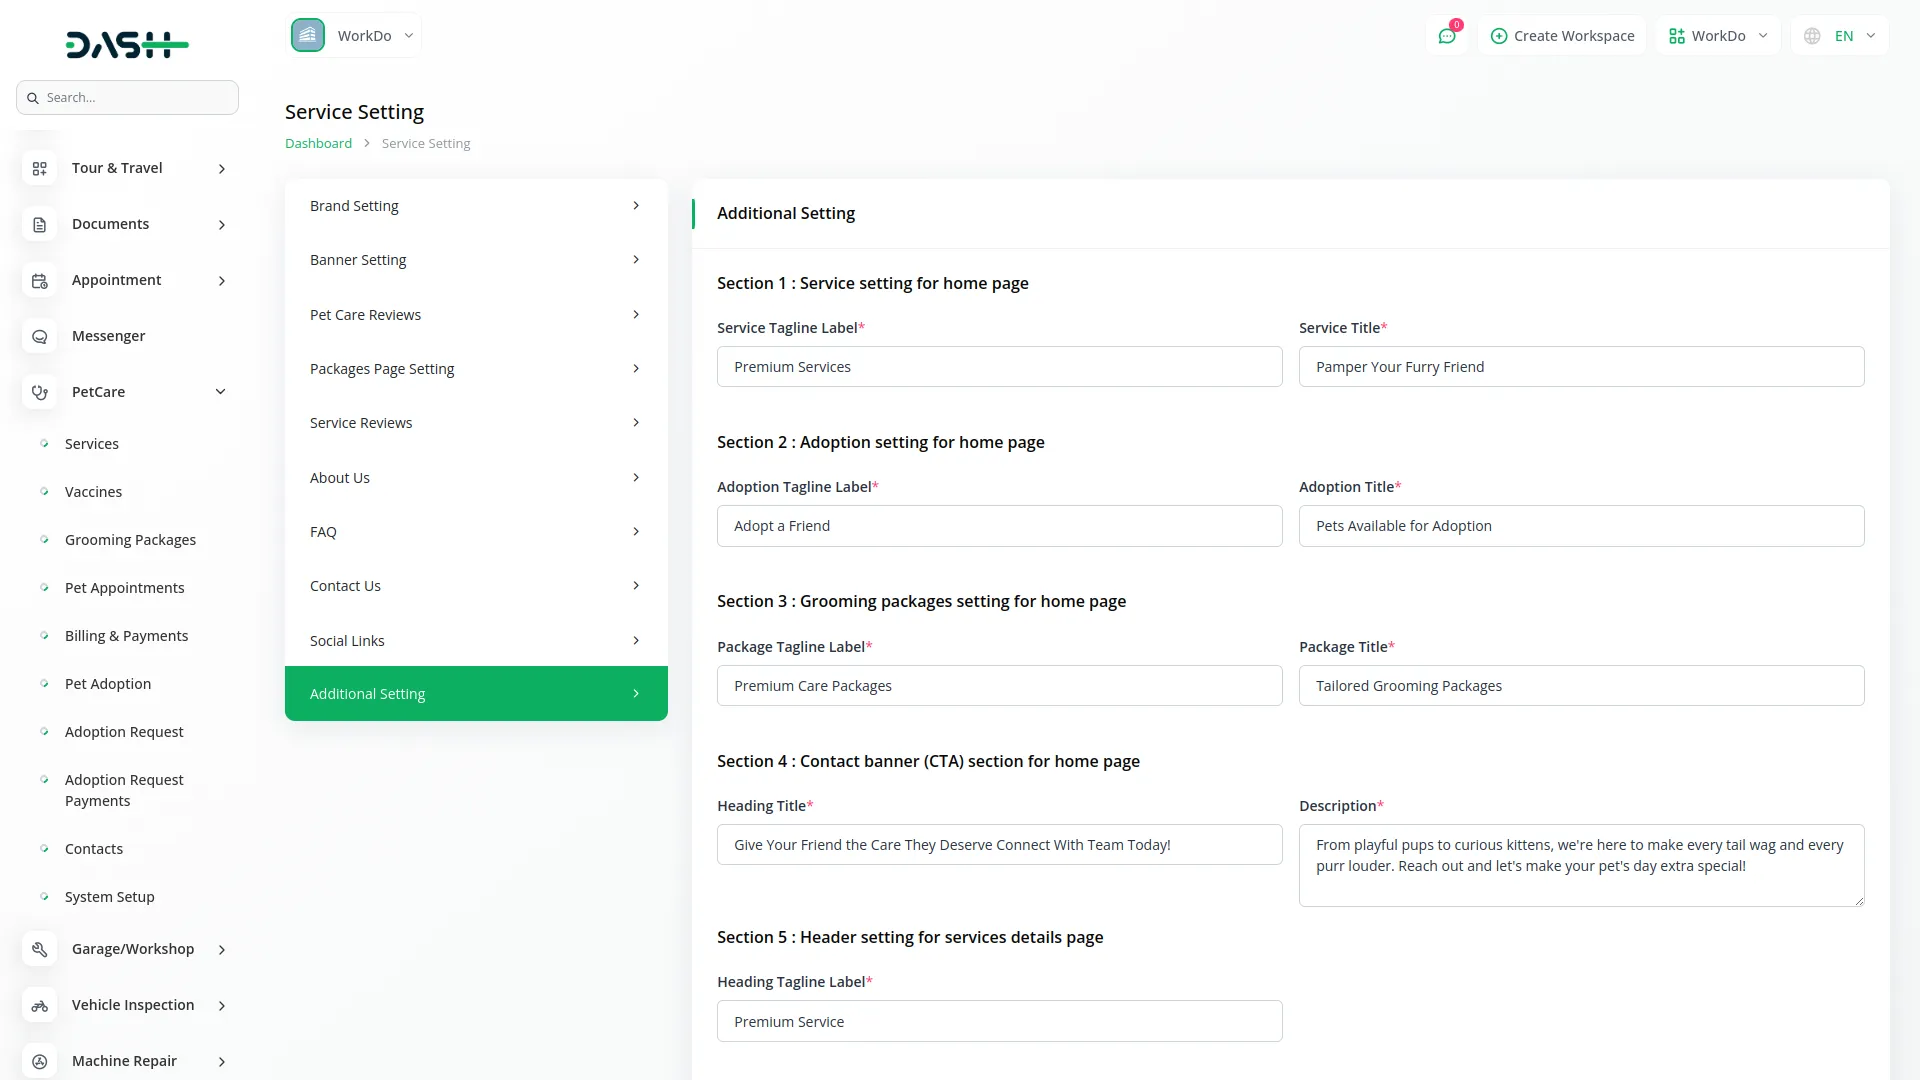
The Additional Settings is used to configure and manage dynamic content across various pages of the website, including the Home Page, Service Details Page, Adoption Request Page, and Appointment Booking Page. These settings allow admins to easily customize taglines, titles, and descriptions without code changes.
- To configure the Services section on the homepage, set the Service Tagline Label and Service Title under System Setup → Additional Settings → Section 1: Service Setting for Home Page. These fields control the tagline and heading displayed above the featured services on the homepage.
- To update the Adoption section on the homepage, provide an Adoption Tagline Label that highlights your adoption mission and an Adoption Title that encourages visitors to explore adoptable pets or start the adoption process. These settings can be configured under System Setup → Additional Settings → Section 2: Adoption Setting for Home Page, and they define the tagline and title displayed in the Adoption section of the homepage.
- To highlight grooming services on the homepage, provide a Package Tagline Label that grabs attention and a Package Title that clearly promotes your grooming offerings. These settings can be configured under System Setup → Additional Settings → Section 3: Grooming Packages Setting for Home Page, and they define the content displayed above the featured grooming packages.
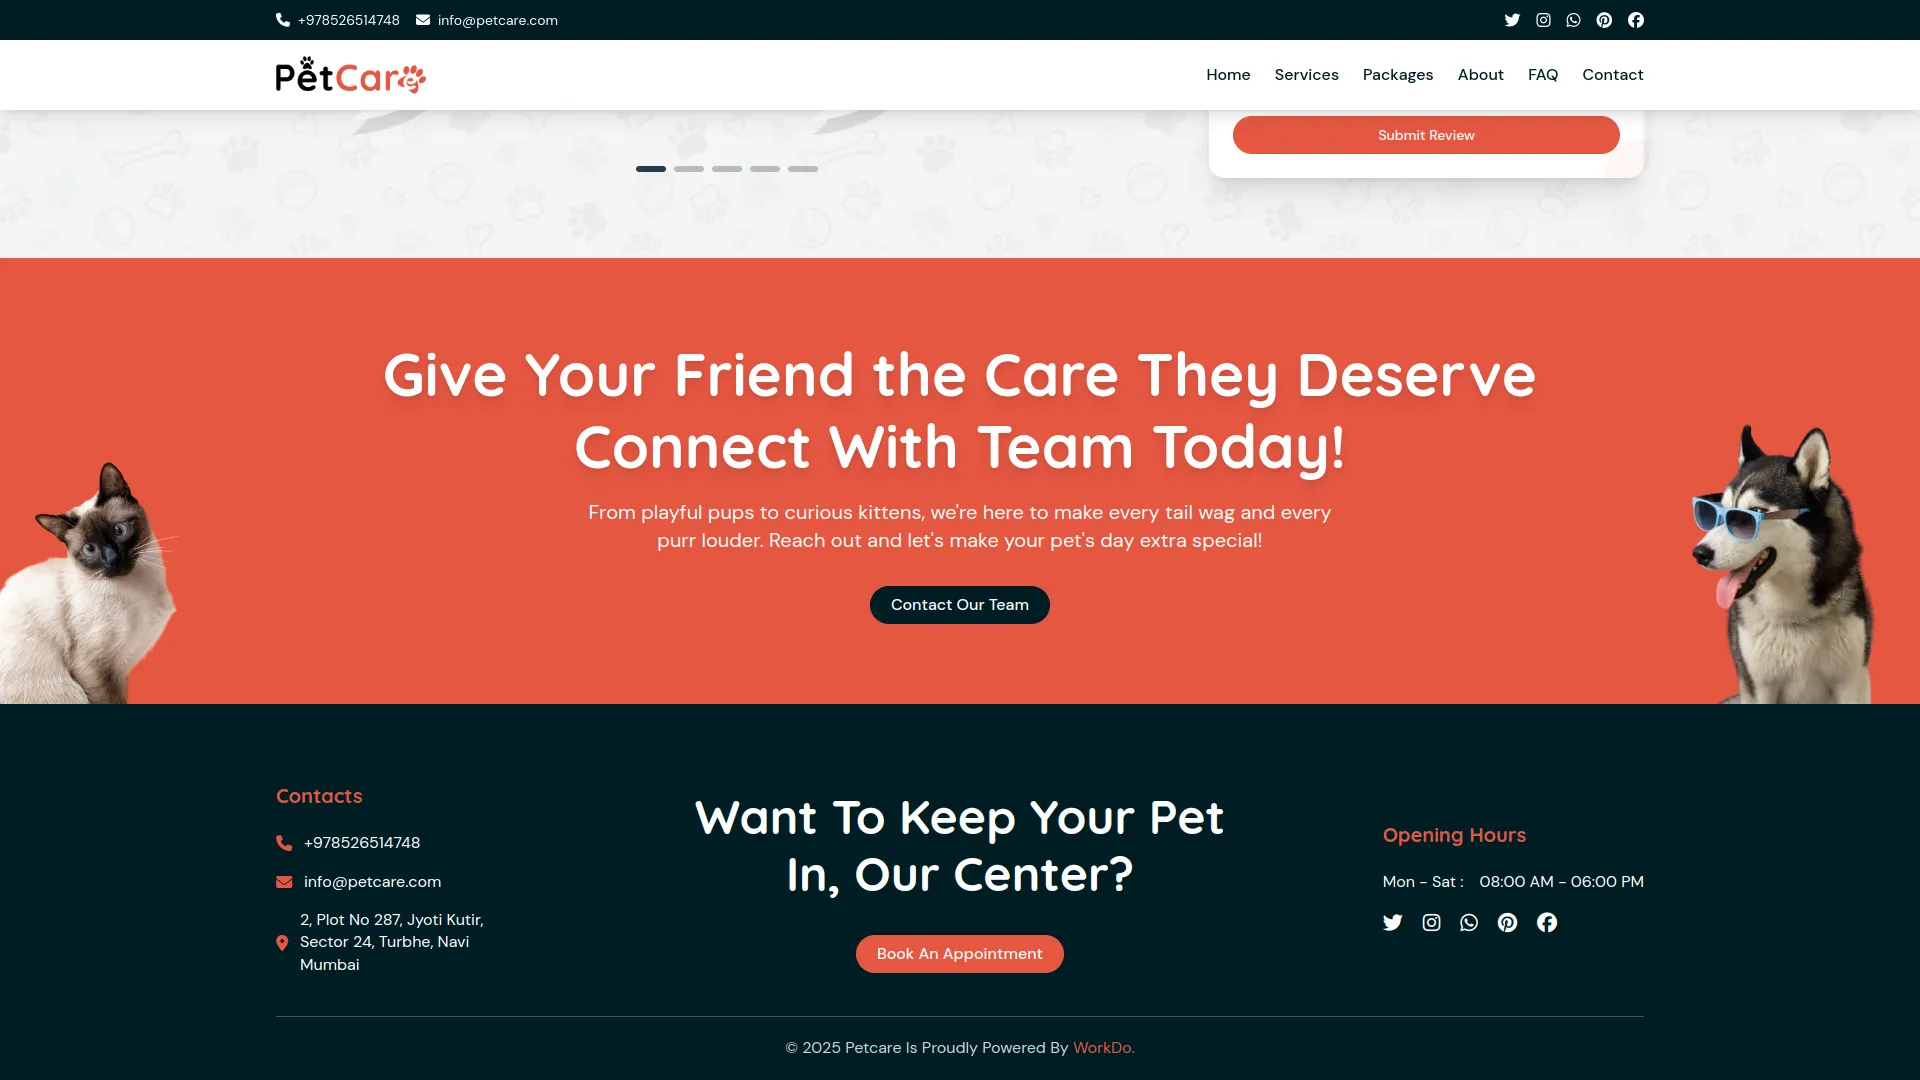
- Set a compelling Heading Title and a brief Description to encourage visitors to connect or book appointments. Configure this System Setup → Additional Settings → Section 4: Contact Banner (CTA) Section for Home Page. These fields define the call-to-action banner content on the homepage.
- Set the Heading Tagline Label to introduce and brand each service detail page. Configure it under System Setup → Additional Settings → Section 5: Header Setting for Service Details Page.
- Add a Tagline Label and Heading Title to highlight key features of each service. Configure these in System Setup → Additional Settings → Section 6: Features Setting for Service Details Page.
- Use the Tagline Label and Heading Title to highlight each step in the service process. Set them in System Setup → Additional Settings → Section 7: Process Steps Setting for Service Details Page.
- Guide users through the adoption process by setting a Tagline Label and Heading Title in System Setup → Additional Settings → Section 8: Header Setting for Adoption Application Form.
- Customize the appointment form by setting a Tagline Label, Heading Title, and Response Note in System Setup → Additional Settings → Section 9: Header Setting for Appointment Booking Form. These fields guide users and provide feedback after form submission.
Used to configure the general working schedule displayed on the website.
- Start Day: The first day of operation (e.g., Monday).
- End Day: The last day of operation (e.g., Saturday).
- Open Time: The time the facility or service opens each day.
- Close Time: The time the facility or service closes each day.
PetCare Website
Important Note:
Only the sections set through System Setup will be displayed on the website. Please ensure the desired sections are properly configured.
Favicon & Header
This section includes the browser tab icon (favicon) and the main navigation header visible on every page. The header contains the PetCare logo and a navigation menu linking to key sections such as Home, Services, Packages, About, FAQ, and Contact.
- The favicon and logo can be uploaded via System Setup → Brand Setting.
- The logo is retrieved dynamically and displayed across all pages of the website.
- while the menu links are automatically mapped to their respective page sections.
Home Page
Banner Section
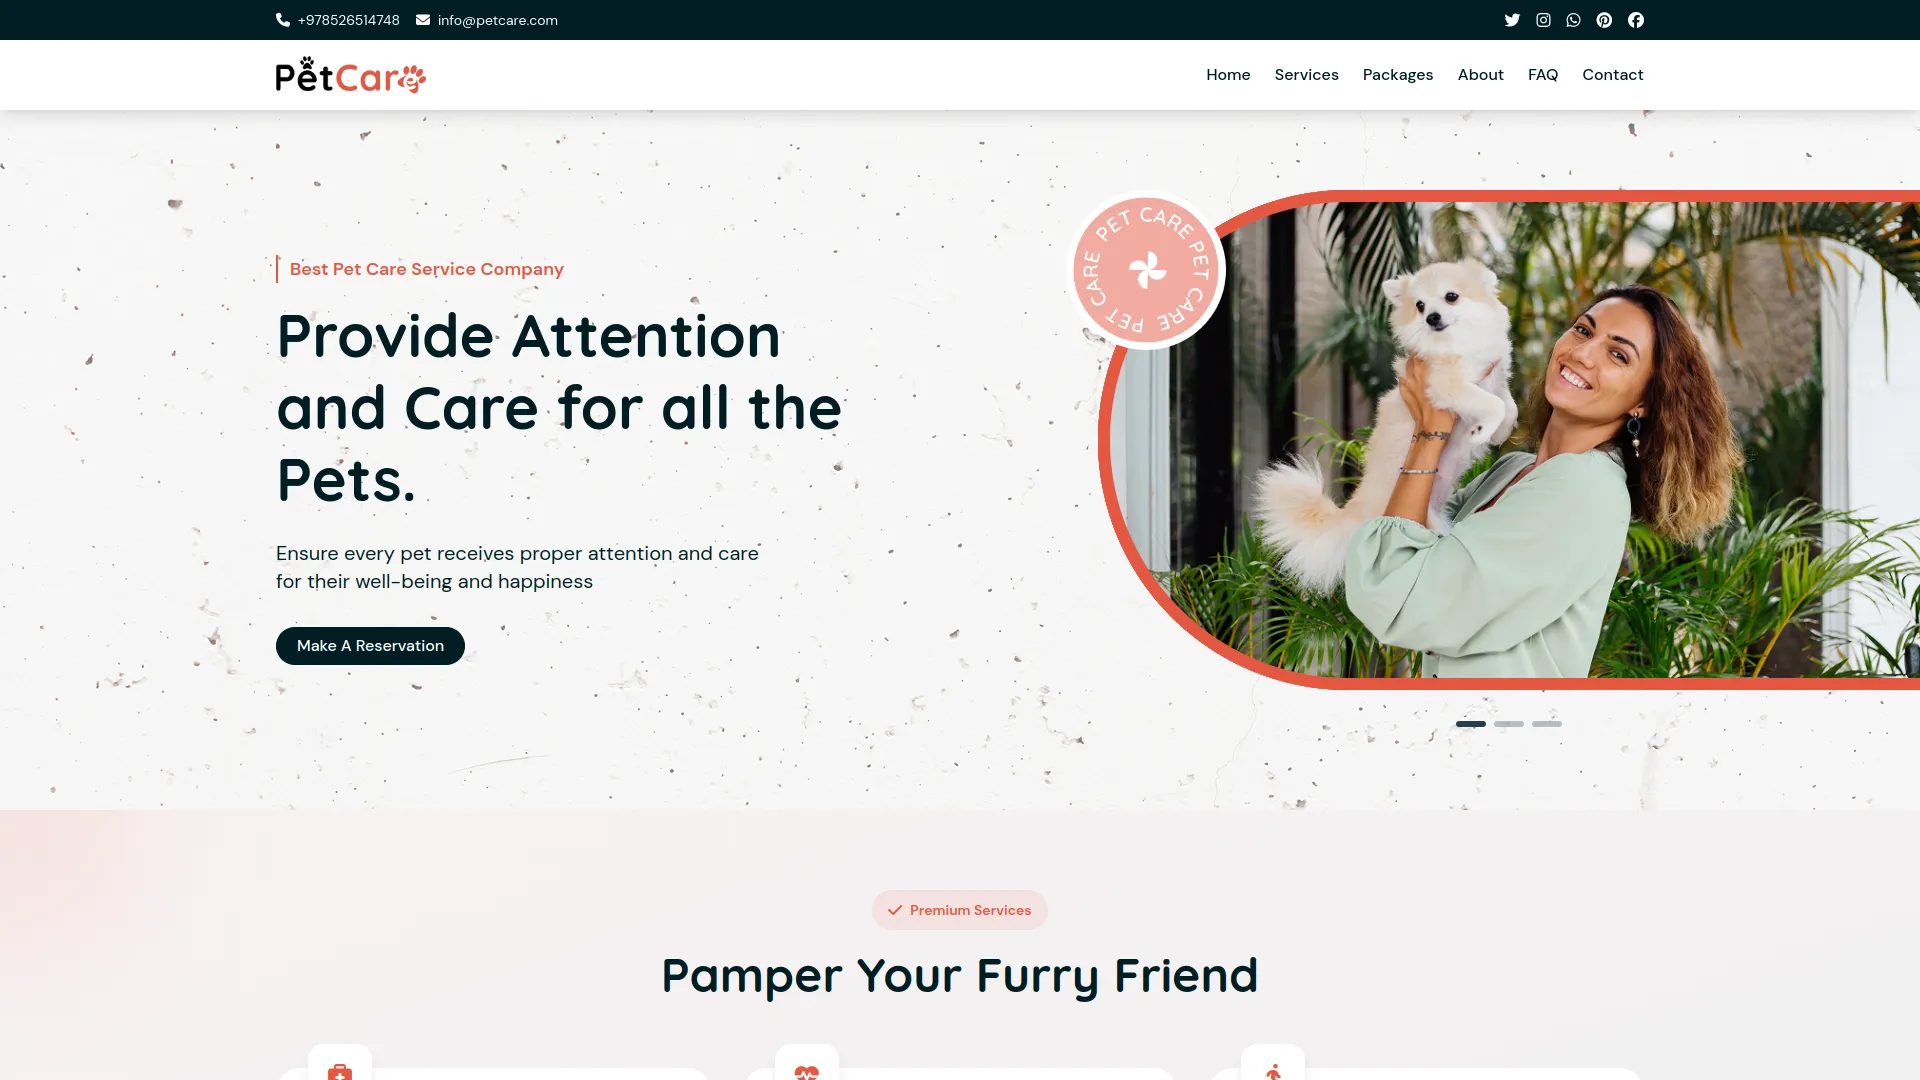
This is the top visual section of the homepage, featuring a banner image, title, and subtitle. Content for this section is managed from System Setup → Banner Setting.
- You can configure the Banner Title, Subtitle, Button Text, and Background Image from the admin panel. The banner section displays the configured title, subtitle, description, background image, and button with a custom URL as set in System Setup → Banner Setting.
- All fields, including the title, subtitle, description, image, and button, are displayed dynamically in the homepage banner based on the configured settings.
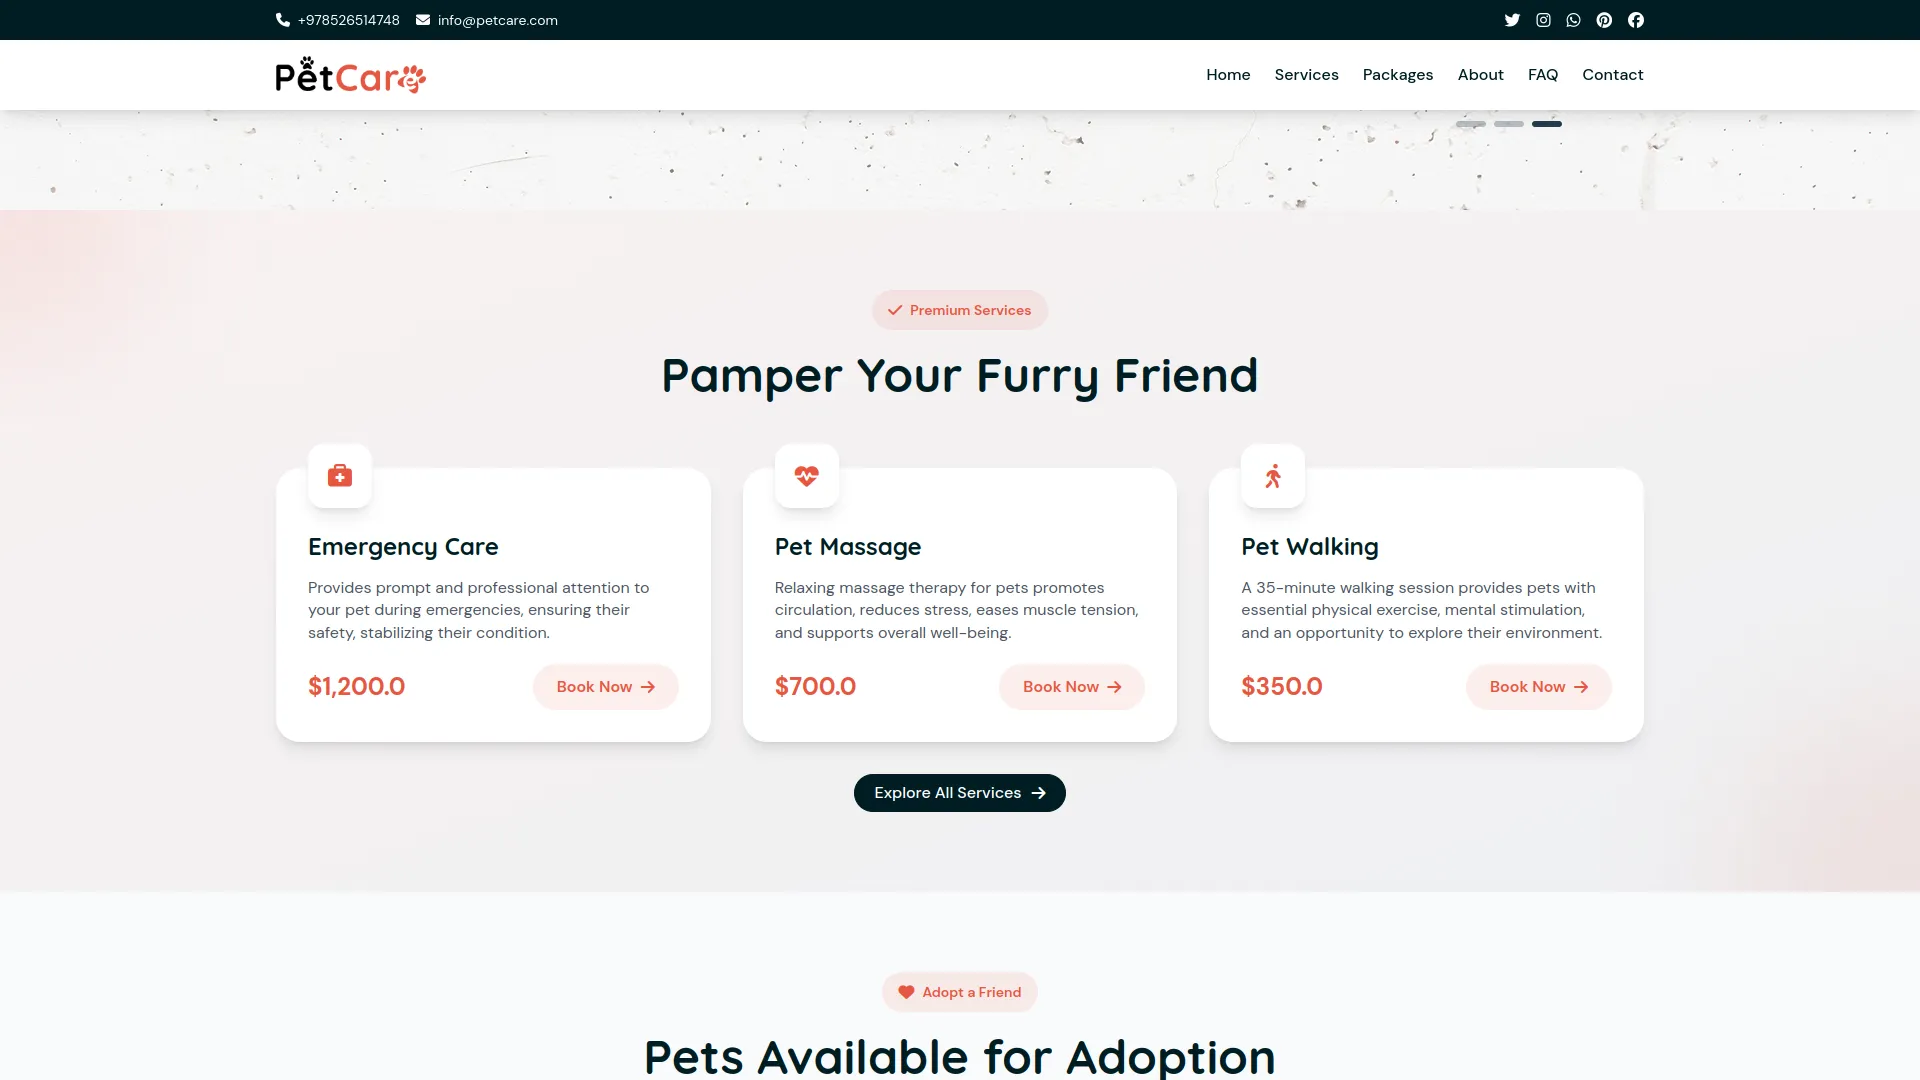
Service Section
This section showcases the essential services offered by the pet care center. Each service is displayed as an individual card or block with an icon, title, and short description, making it easy for visitors to explore offerings.
- The content of this section is controlled via the admin panel under: System Setup → Additional Settings → Section 1: Service Setting for Home Page, for setting the tagline and heading title.
- You can add or edit the Service Title, Icon, and Description under Pet Care → Services. This section allows you to manage individual service entries that are displayed on the homepage, helping ensure accurate and engaging content for visitors.
- Shows the latest 3 services from the Services section in the admin panel and displays them dynamically.
- Each service block includes a “Book Now” button that redirects to the Appointment Booking page.
- Additionally, an “Explore All Services” button is provided, linking to the full Services page for a complete overview.
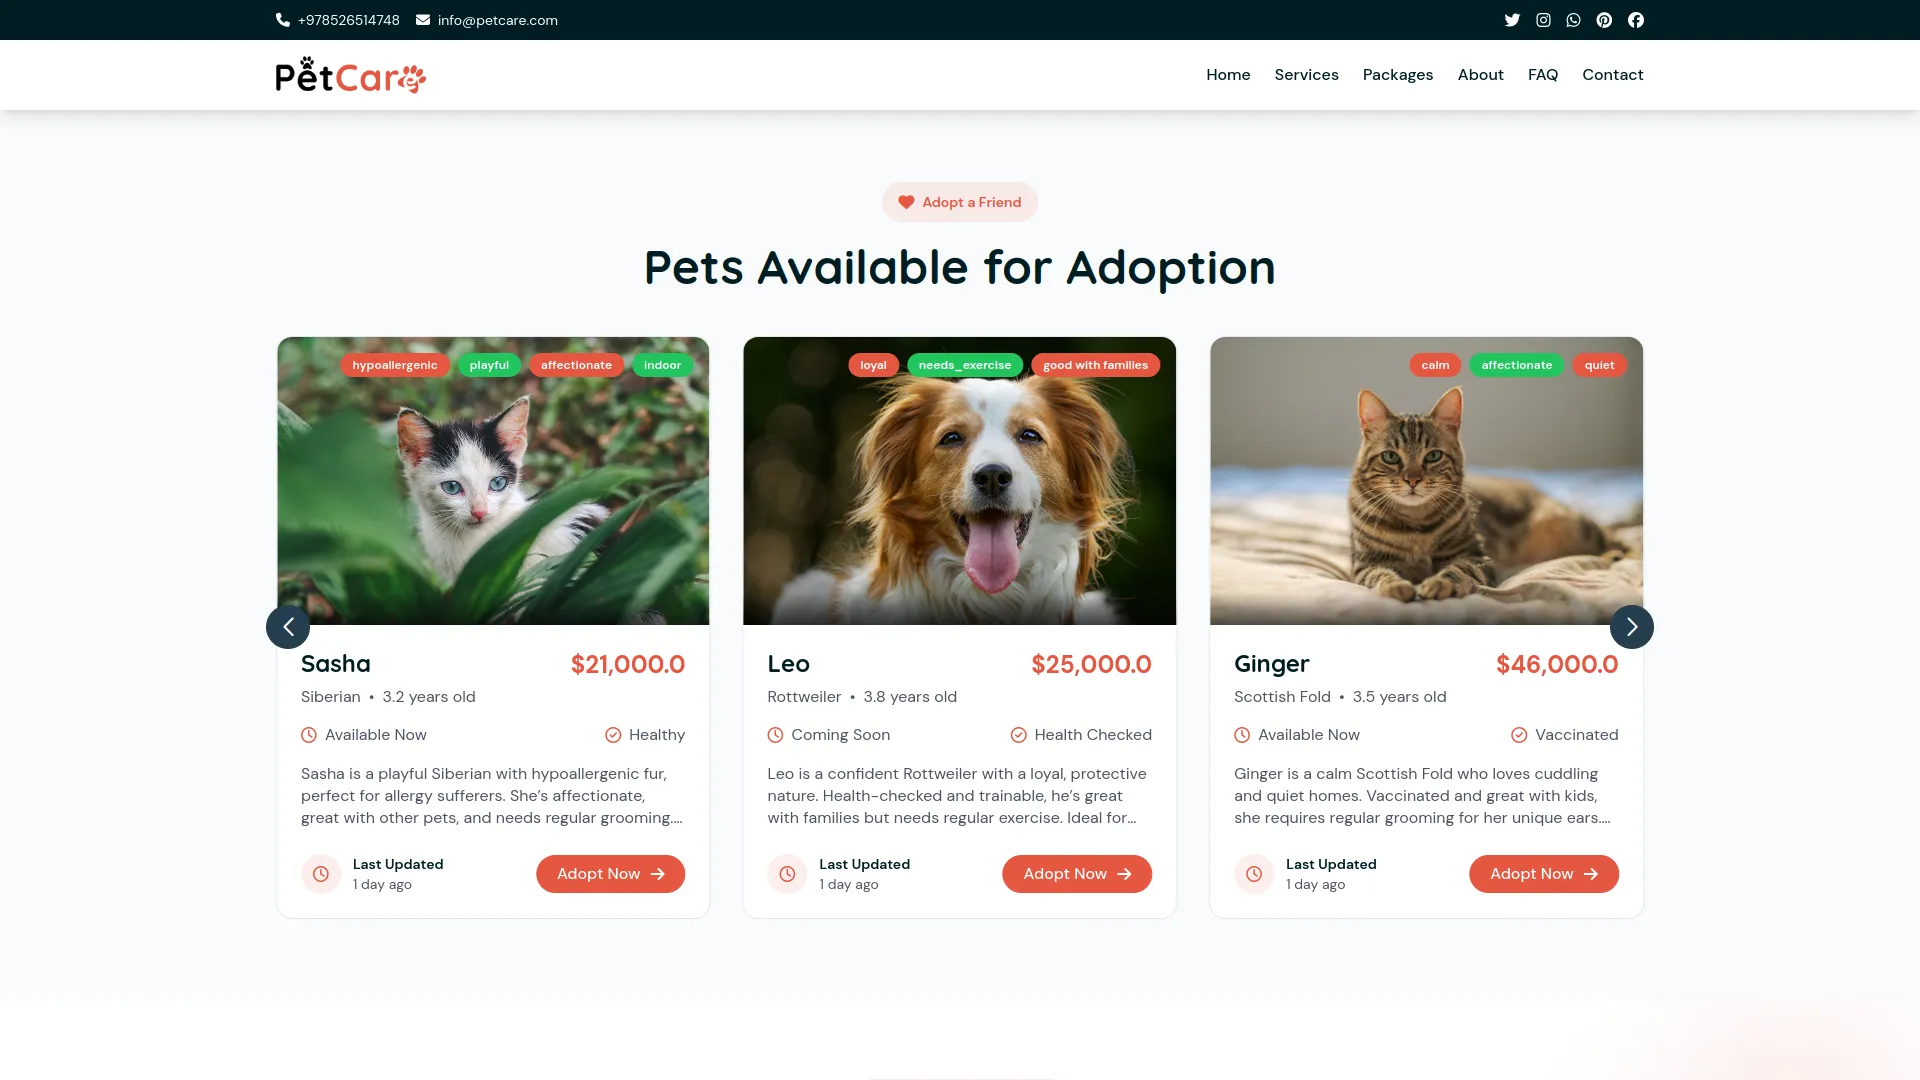
Pet Adoption Section
This section promotes pets available for adoption, encouraging visitors to explore and initiate the adoption process. It features a dynamic slider that showcases adoptable pets, including those currently available and those coming soon. Each listing provides essential details along with an option to apply for adoption, making it easy for users to take the next step.
- Content is managed from the admin panel under System Setup → Additional Settings → Section 2: Adoption Setting for Home Page, where the Tagline and Title are also configured.
- Pet listings in this section are dynamically pulled from the Pet Adoption section based on their status; only pets marked as “Coming Soon” or “Available Now” are displayed.
- Each listing includes an “Adopt Now” button, which redirects users to the Pet Adoption Application page, making it easy for interested visitors to take immediate action.
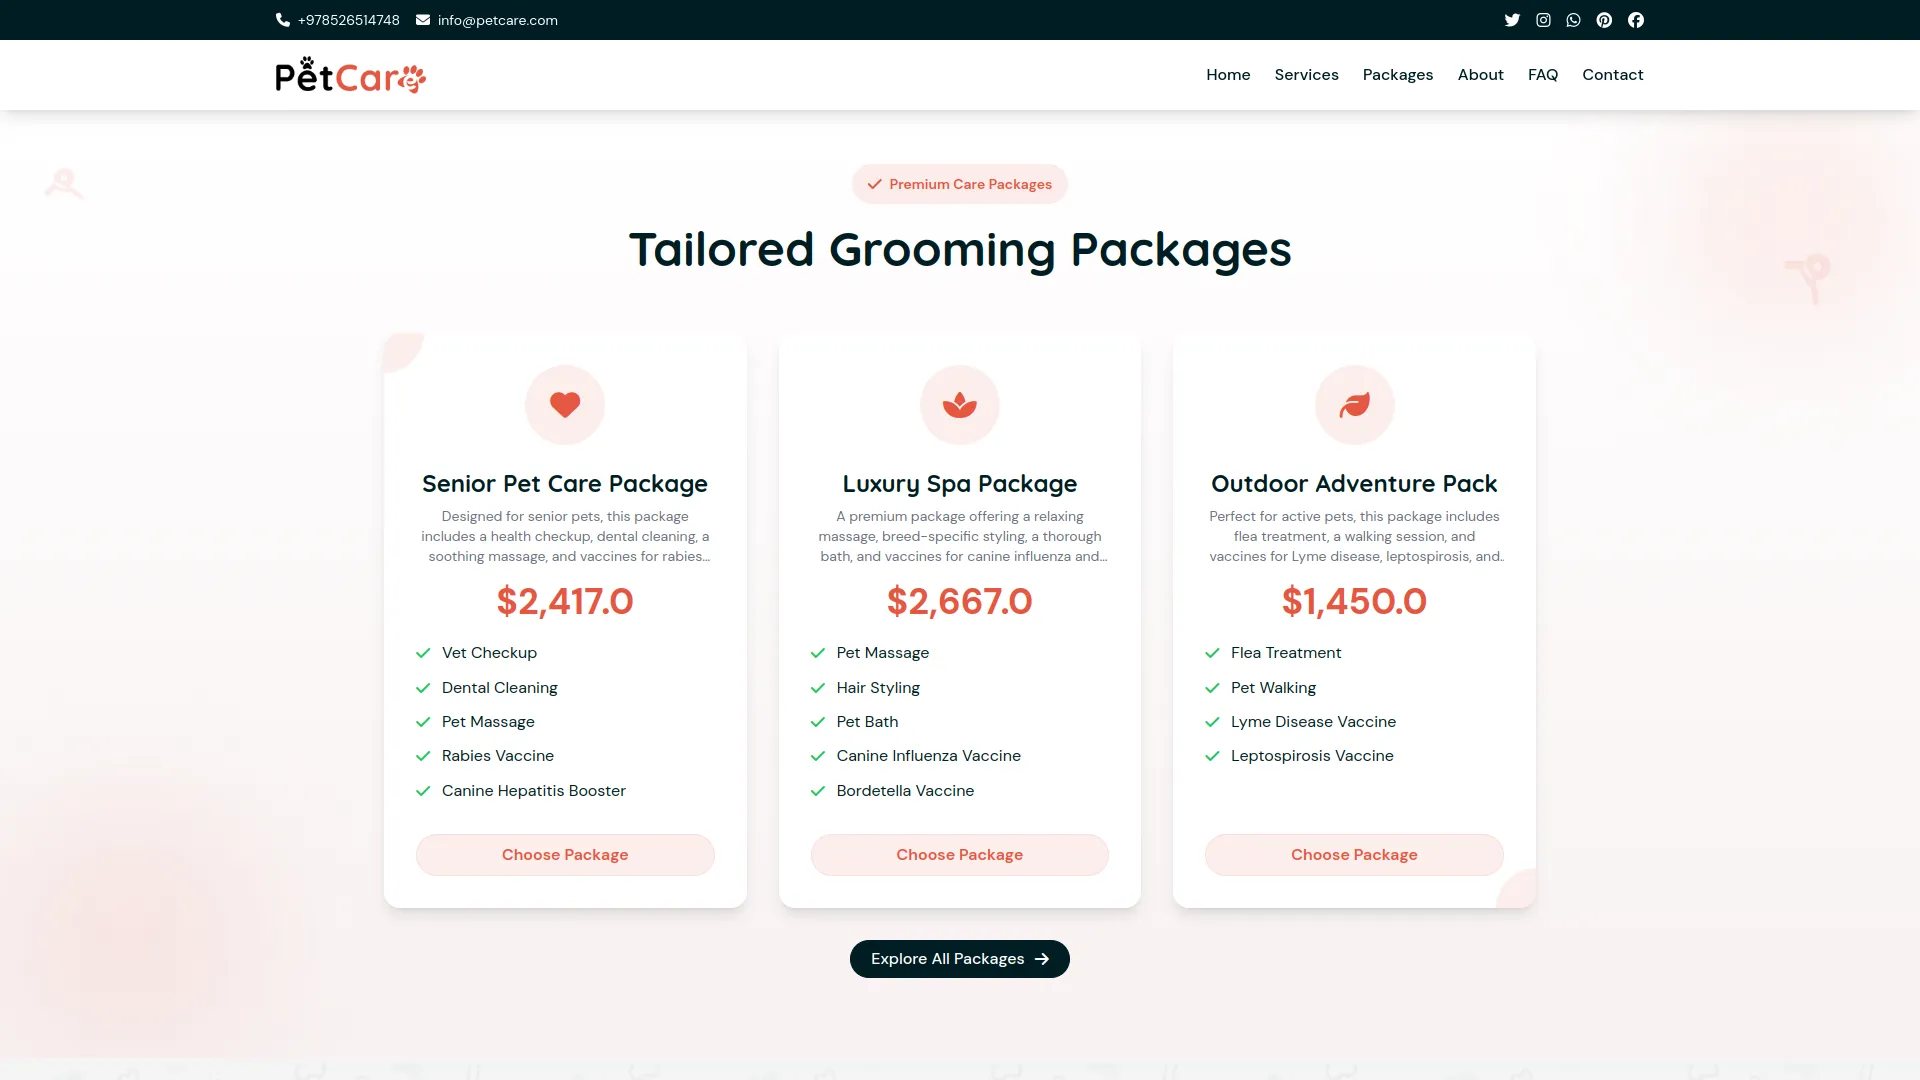
Grooming Packages Section
This section highlights select grooming packages available for pets, showcasing key offerings on the homepage. It presents available grooming packages along with their pricing and descriptions, encouraging visitors to explore and book services.
- The content is managed from the admin panel under System Setup → Additional Settings → Section 3: Grooming Packages Setting for Home Page. The Tagline and Title for this section are also set via the Additional Settings panel.
- The homepage displays the latest 3 packages dynamically pulled from the Grooming Packages section in the admin panel. Each package highlights essential details such as the title, key features, and pricing, giving visitors a quick overview of available offerings and encouraging them to explore further or book a service.
- The “Choose Package” button redirects users to the Appointment Booking page, allowing them to schedule a service directly.
- Additionally, the “Explore All Packages” button links to the full Packages page, where users can view the complete list of available grooming packages.
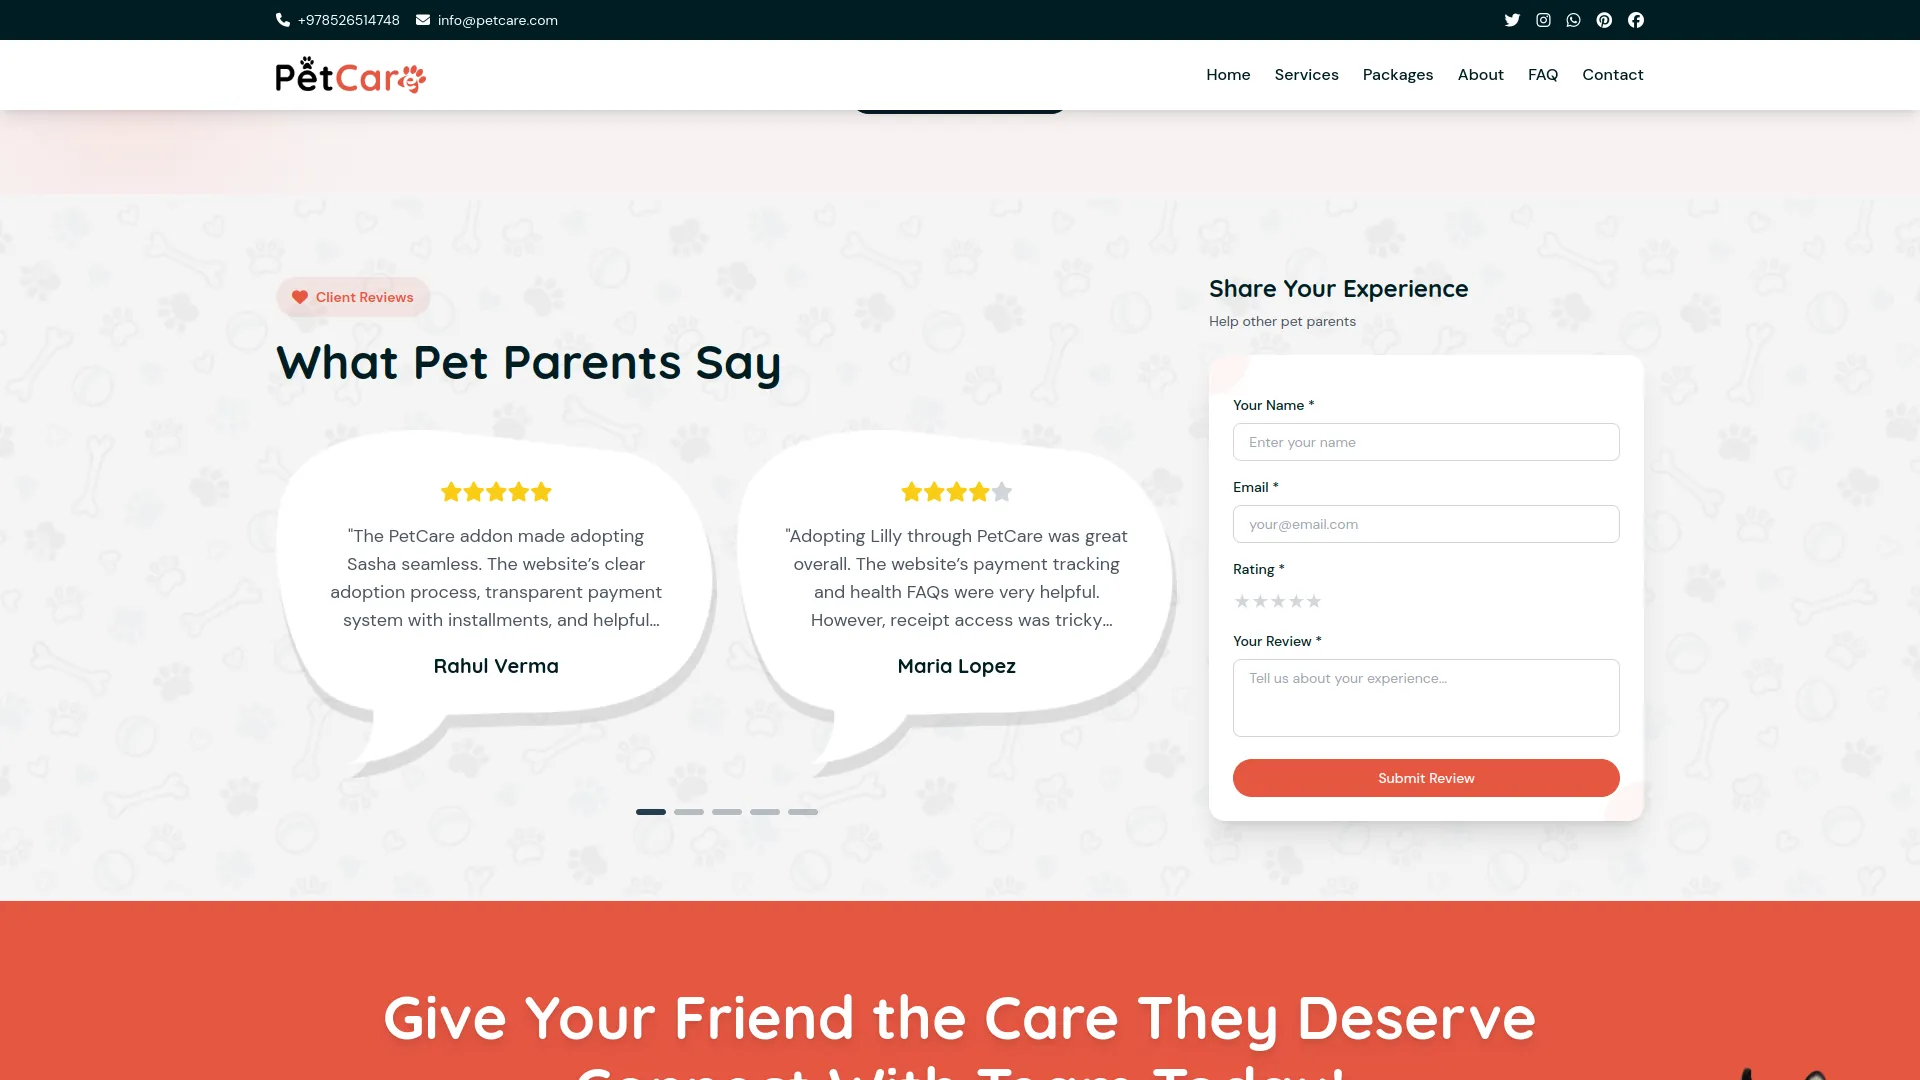
Review Section
This section allows visitors to submit and view reviews related to PetCare services, packages, adoptions, and the overall website experience. By showcasing genuine feedback from users, it helps build credibility, enhances trust, and encourages greater engagement with the platform.
- Displays the Tagline, Heading Title, Review Form Heading Title, and Review Form Sub Title from System Setup → Service Reviews. This section is displayed only if configured
- It also includes a Review Form where users can provide their Name, Email, Rating, and Review for a specific service.
- Reviews are displayed publicly only when their Review Status is set to “Approved” and the Review Display Status is turned “On” in System Setup → Service Review Settings. Once approved, each review showcases the client’s Name, Rating, and the content of their feedback.
CTA Section (Call to Action)
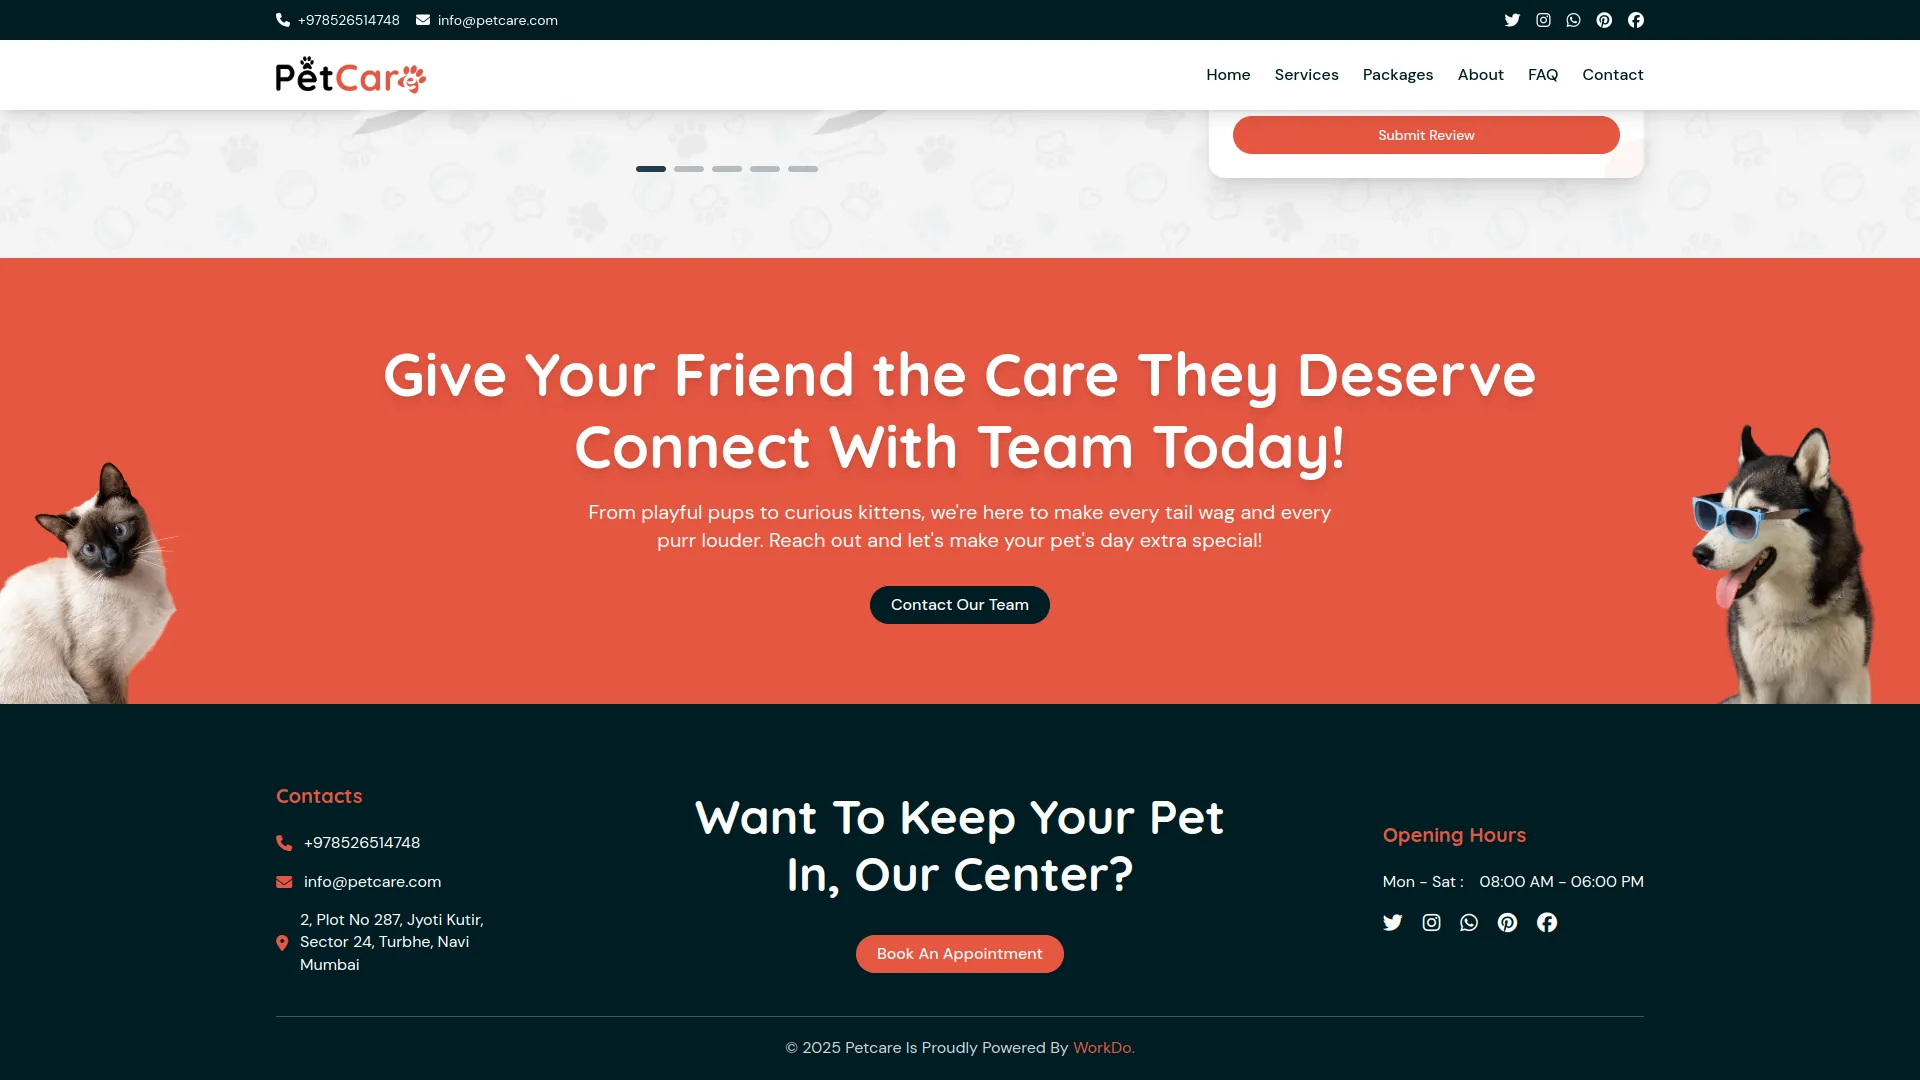
This section is a Call-to-Action (CTA) banner, strategically placed on the homepage to grab users’ attention and encourage them to take specific actions, typically booking a service or contacting the team. It serves as a visual prompt designed to increase user engagement and drive conversions.
- The Call-to-Action (CTA) section on the Home Page can be managed through System Setup → Additional Settings → Section 4: Contact Banner (CTA) Section for Home Page.
- You can update the CTA Heading Title and Description from this section. The CTA banner will appear on the homepage only if it is properly configured; otherwise, it will remain hidden.
Services Page
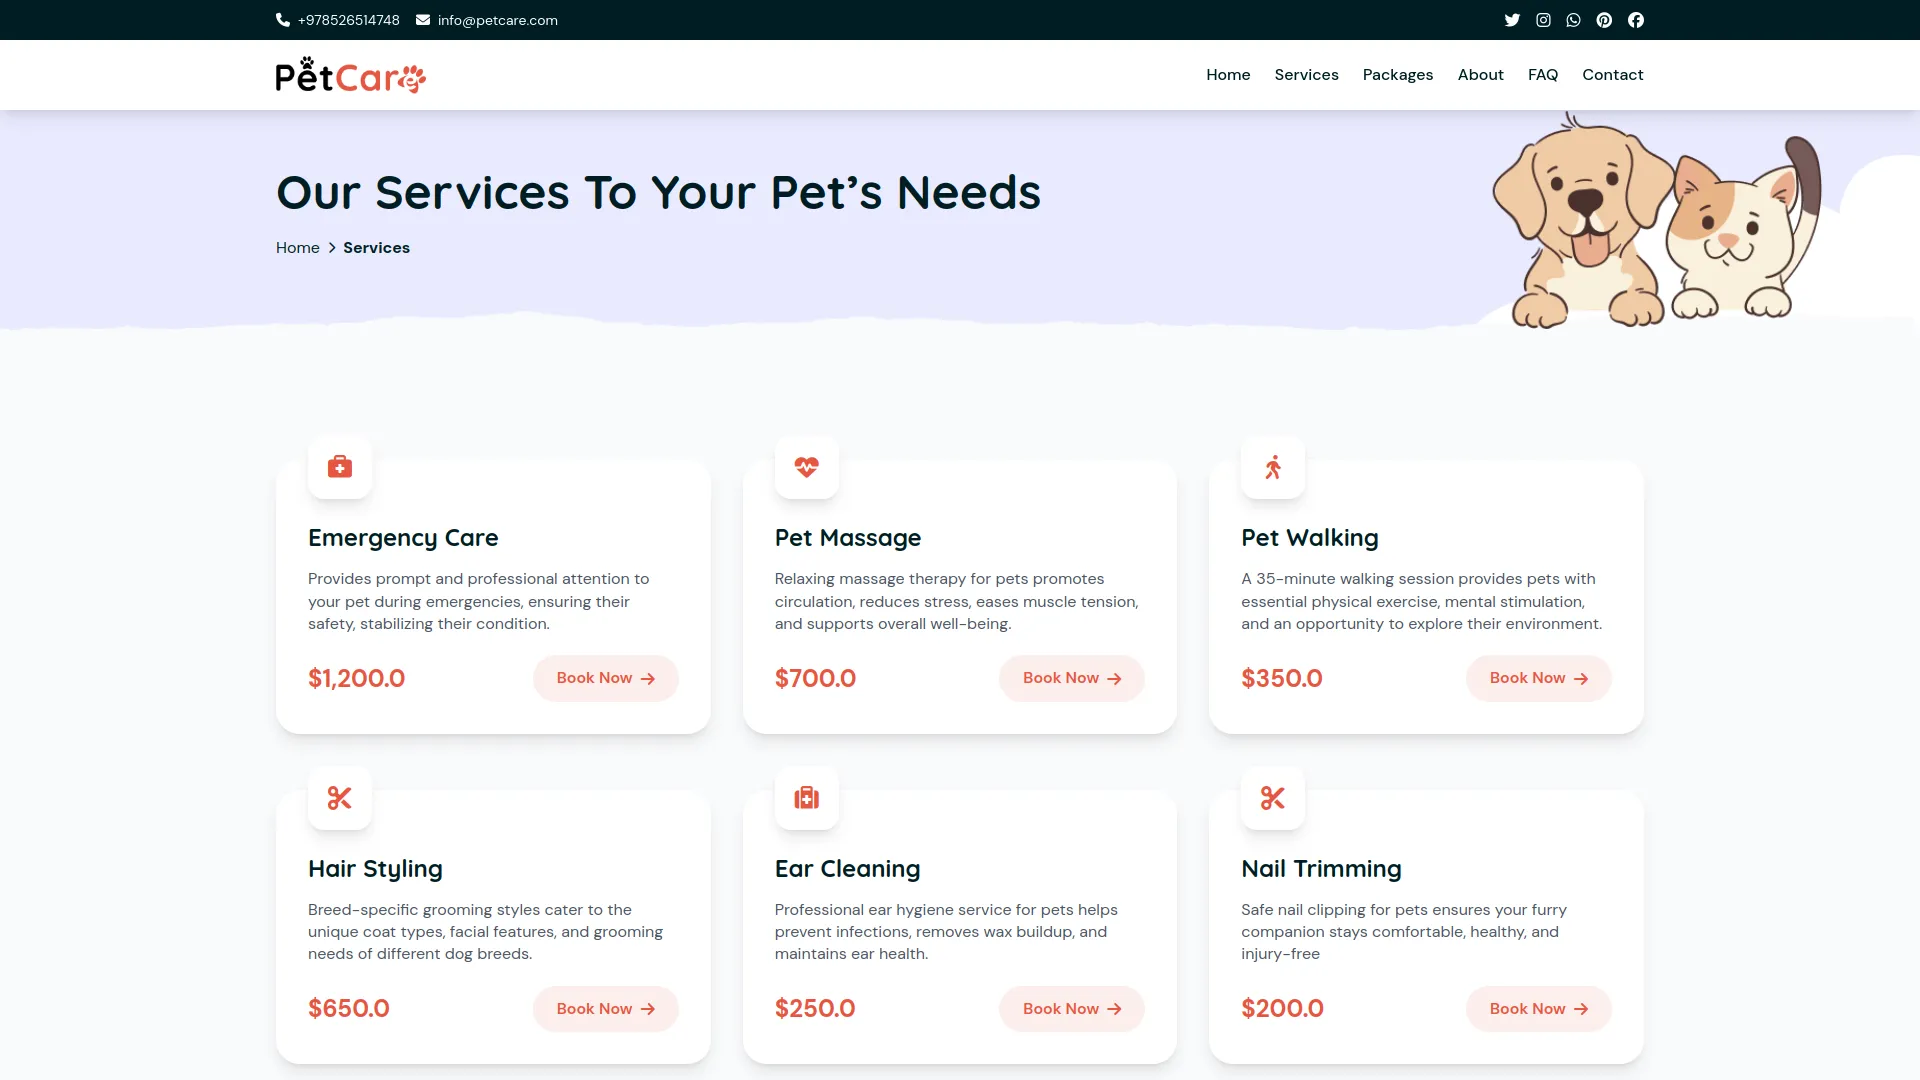
The Services Page provides a comprehensive overview of all pet care services offered, organized into a clear layout including a banner, service listings, and pagination options
- A fixed Common Banner is displayed at the top, containing text and images that are not editable. This content remains consistent across the site and cannot be modified by the user. The section serves as a uniform visual header across related pages, helping maintain design consistency and brand identity.
- Displays all services configured in the Services section of the admin panel.
- Each service entry typically includes the service name, short description, icon/image, and a “Book Now” button.
- Clicking on the service name navigates to the Service Details page for that specific service.
- The “Book Now” button redirects users to the Appointment Booking page, allowing them to schedule that particular service
Packages Page
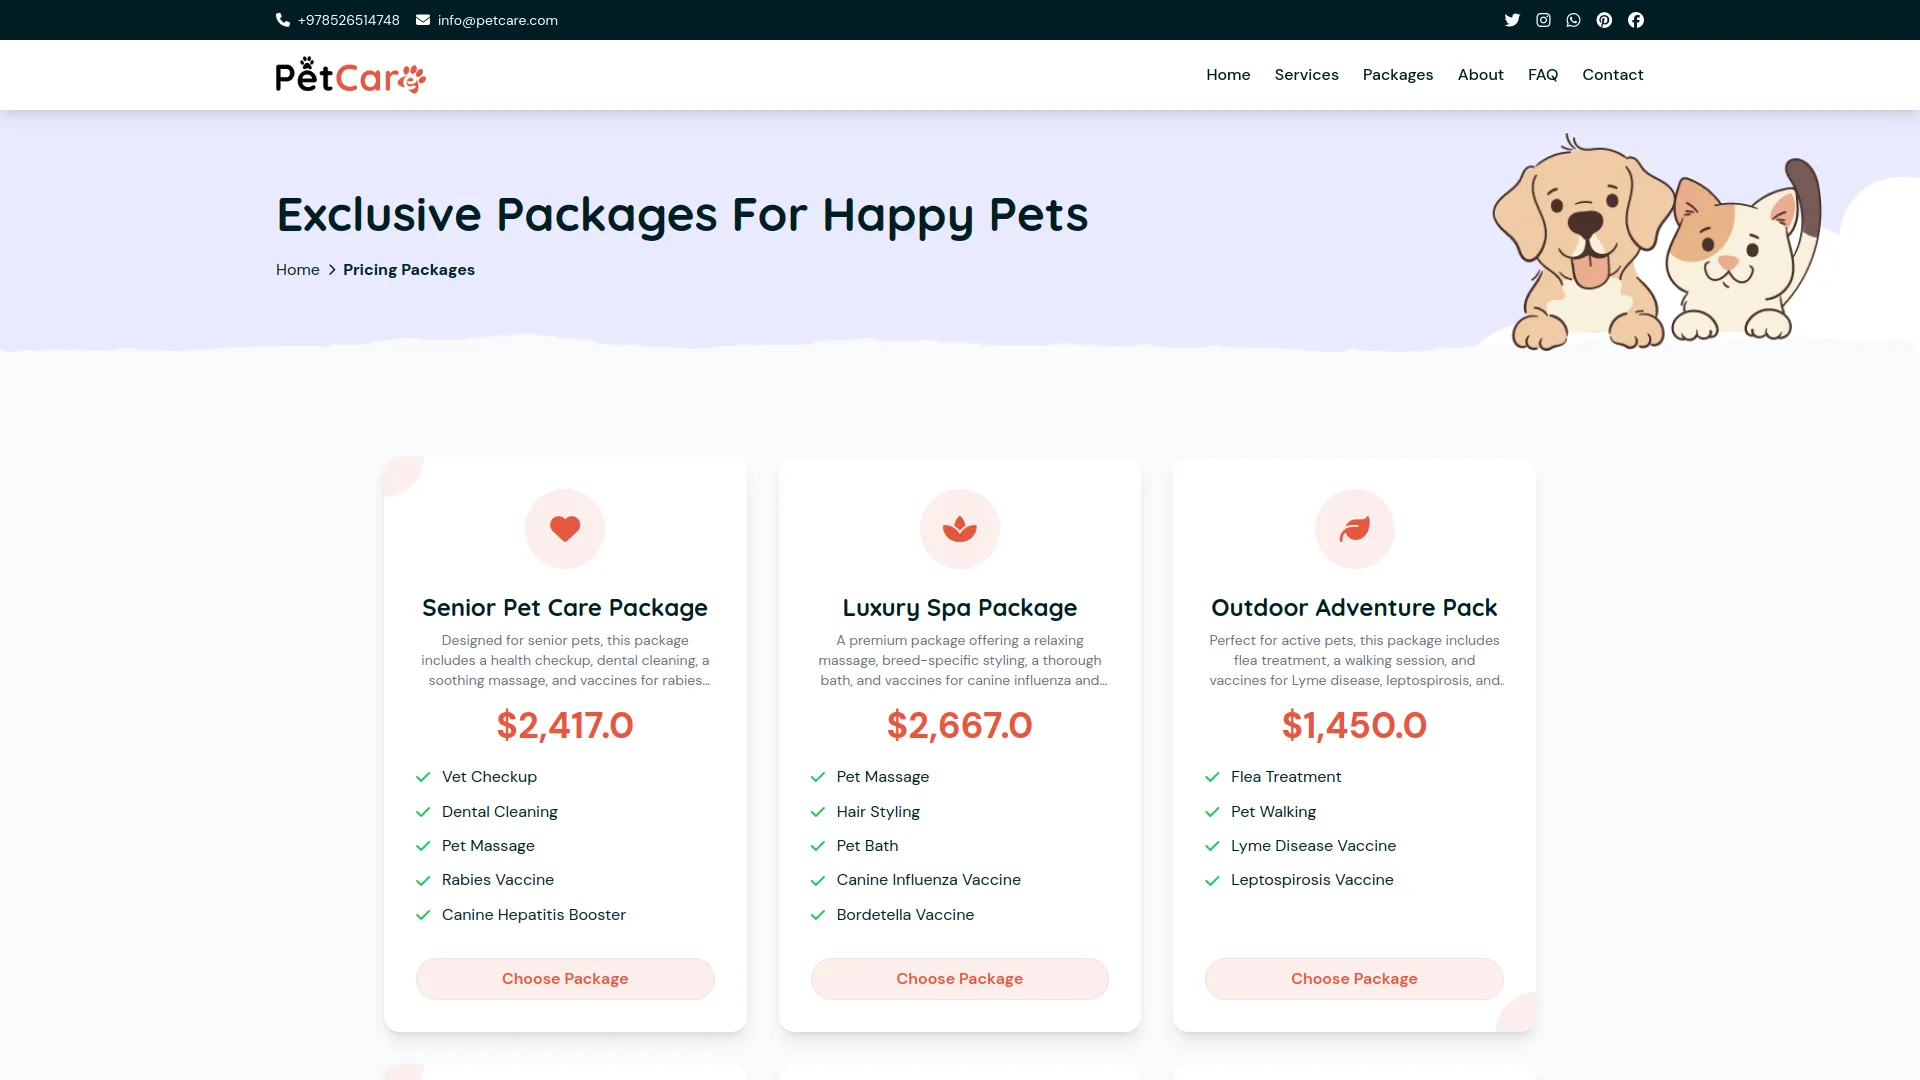
The Packages Page presents all available grooming packages in a user-friendly layout, including a banner, package listings, and optional payment policy information.
- The page includes a fixed Common Banner Section at the top, featuring preset text and images that cannot be modified. This section serves as a consistent visual header across related pages.
- Displays all packages listed under Grooming Packages in the admin panel.
- Each package includes relevant details such as name, price, description, and features.
- A “Choose Package” button is available for each package, which redirects users to the Appointment Booking page.
- The Payment Policies section is displayed only when configured in System Setup → Packages Page Setting (Section 1: Payment & Policies). It helps ensure transparency and clarity during the booking or payment process by showing the Payment Policies Tagline and Heading Title. If these fields are not set, the Payment & Policies section remains hidden.
Service Details Page
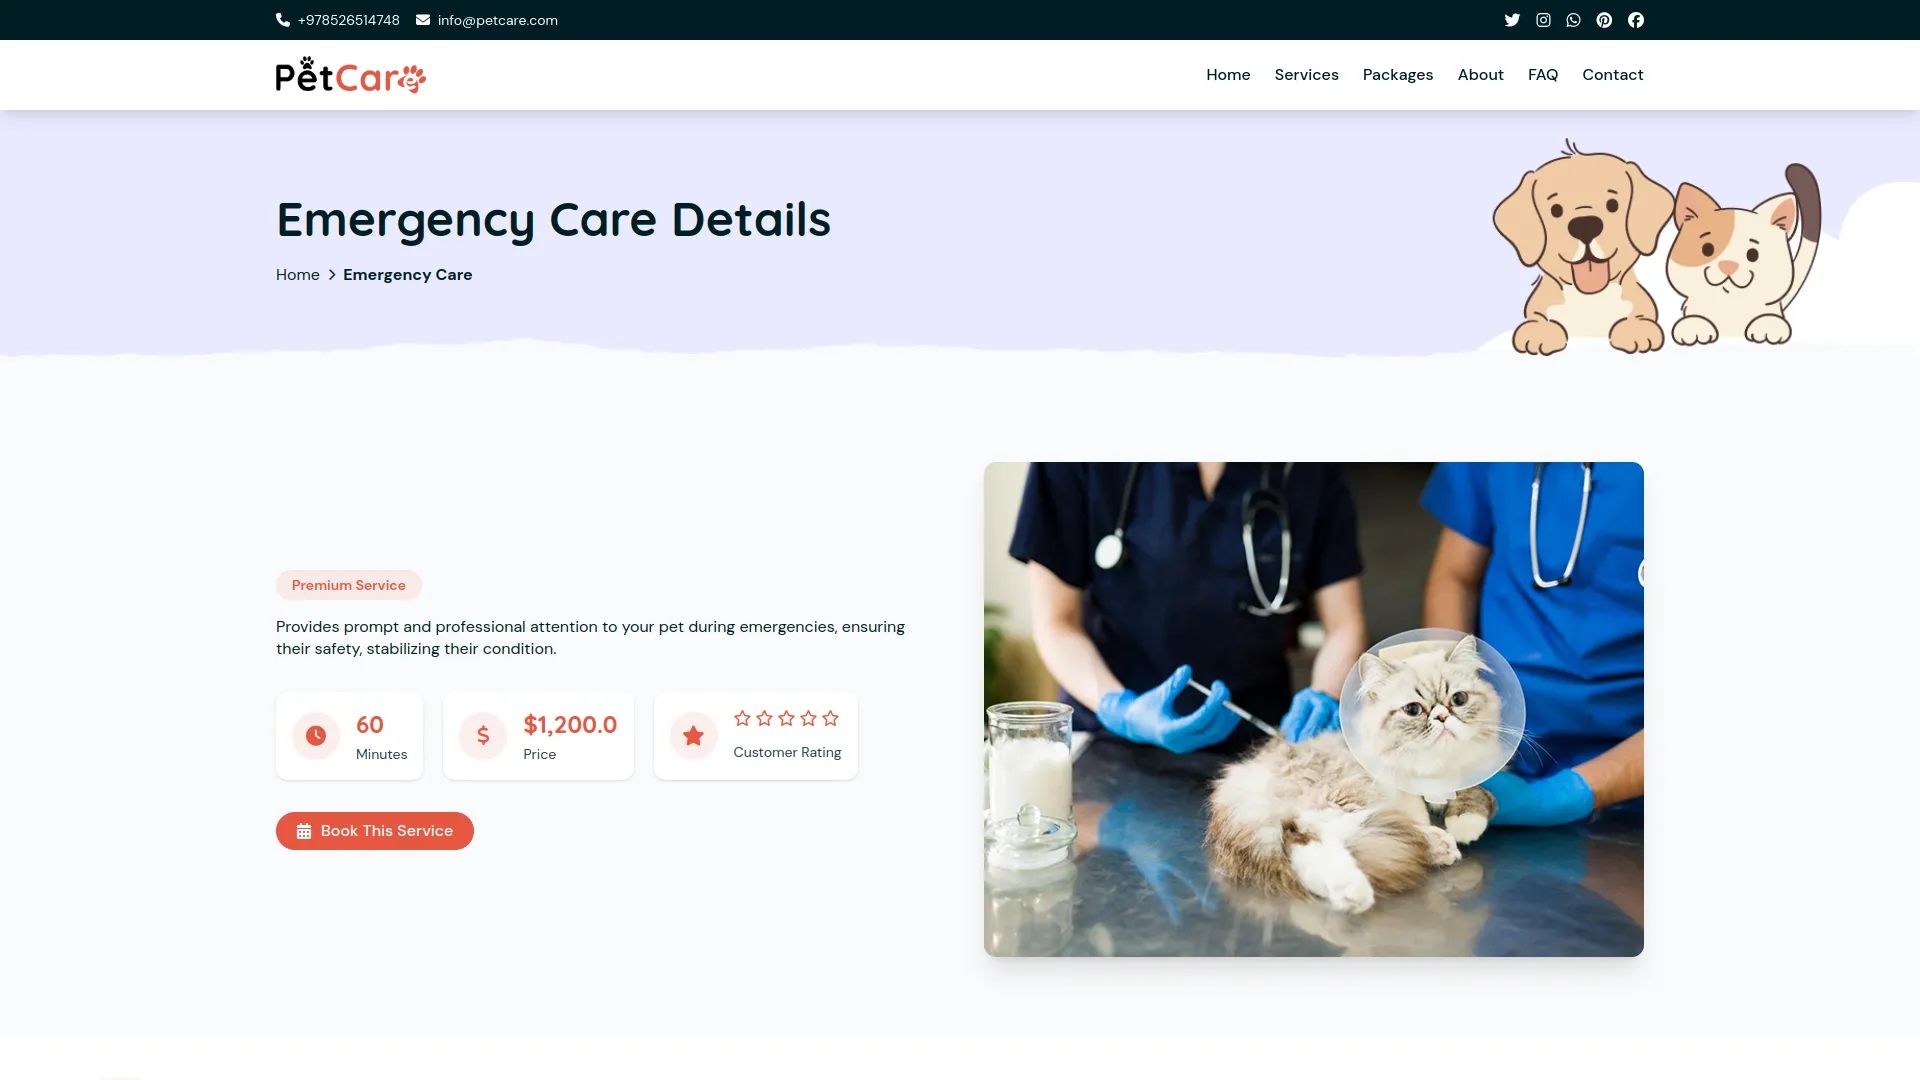
The Service Details Page offers comprehensive information about each service, organized into several key sections: Common Banner, Service Details, Service Features, Service Process, and Service Review.
- The Common Banner Section contains fixed text and images, which cannot be changed.
- Displays the Tagline from System Setup → Additional Settings (Section 5: Header setting for services details page). This section is only shown if the tagline is configured.
- Shows the specific Service Description, Price, and Duration pulled from the Services module in the admin panel.
- The Average Rating is automatically calculated based on reviews submitted by visitors or customers.
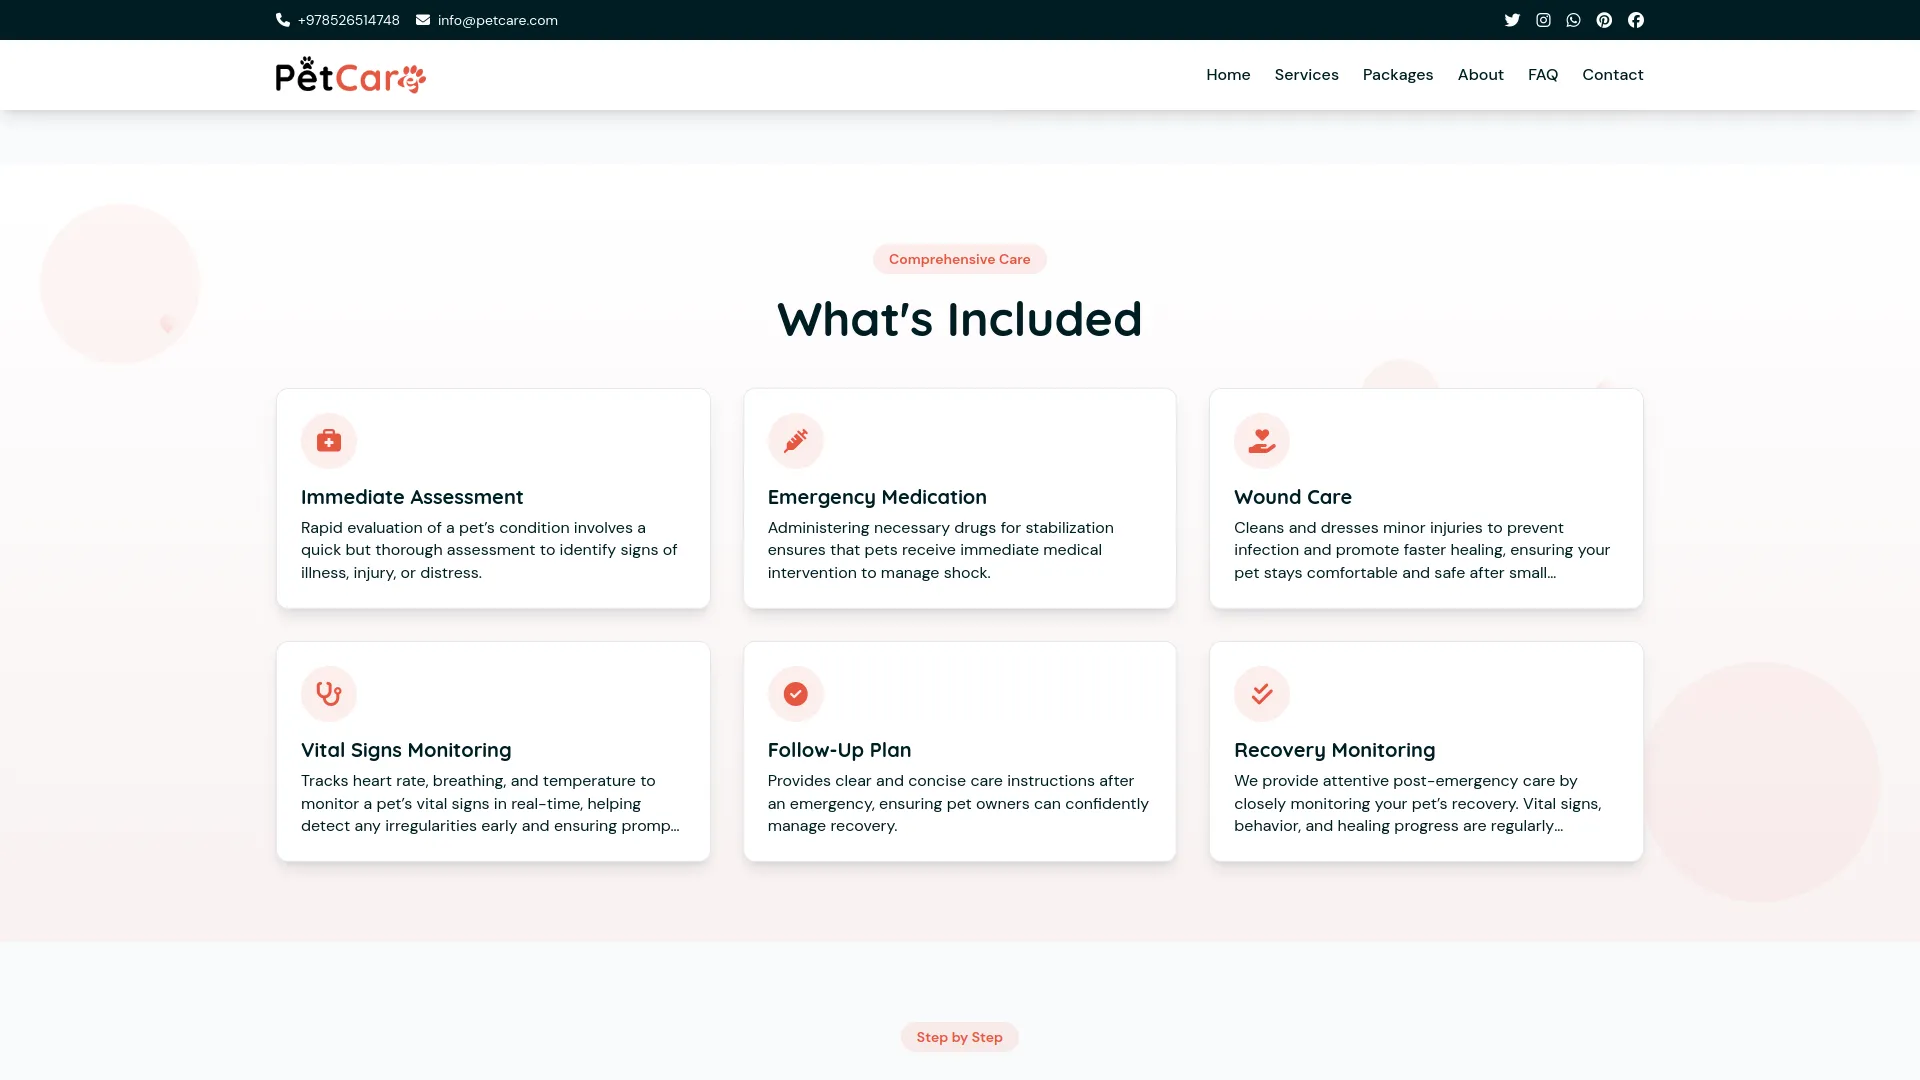
- This section displays the Tagline and Title configured in System Setup under Additional Settings (Section 6: Features setting for services details page). If not configured, the section remains hidden. It showcases all features of the specific service as defined in the Service Features & Process section of the admin panel.
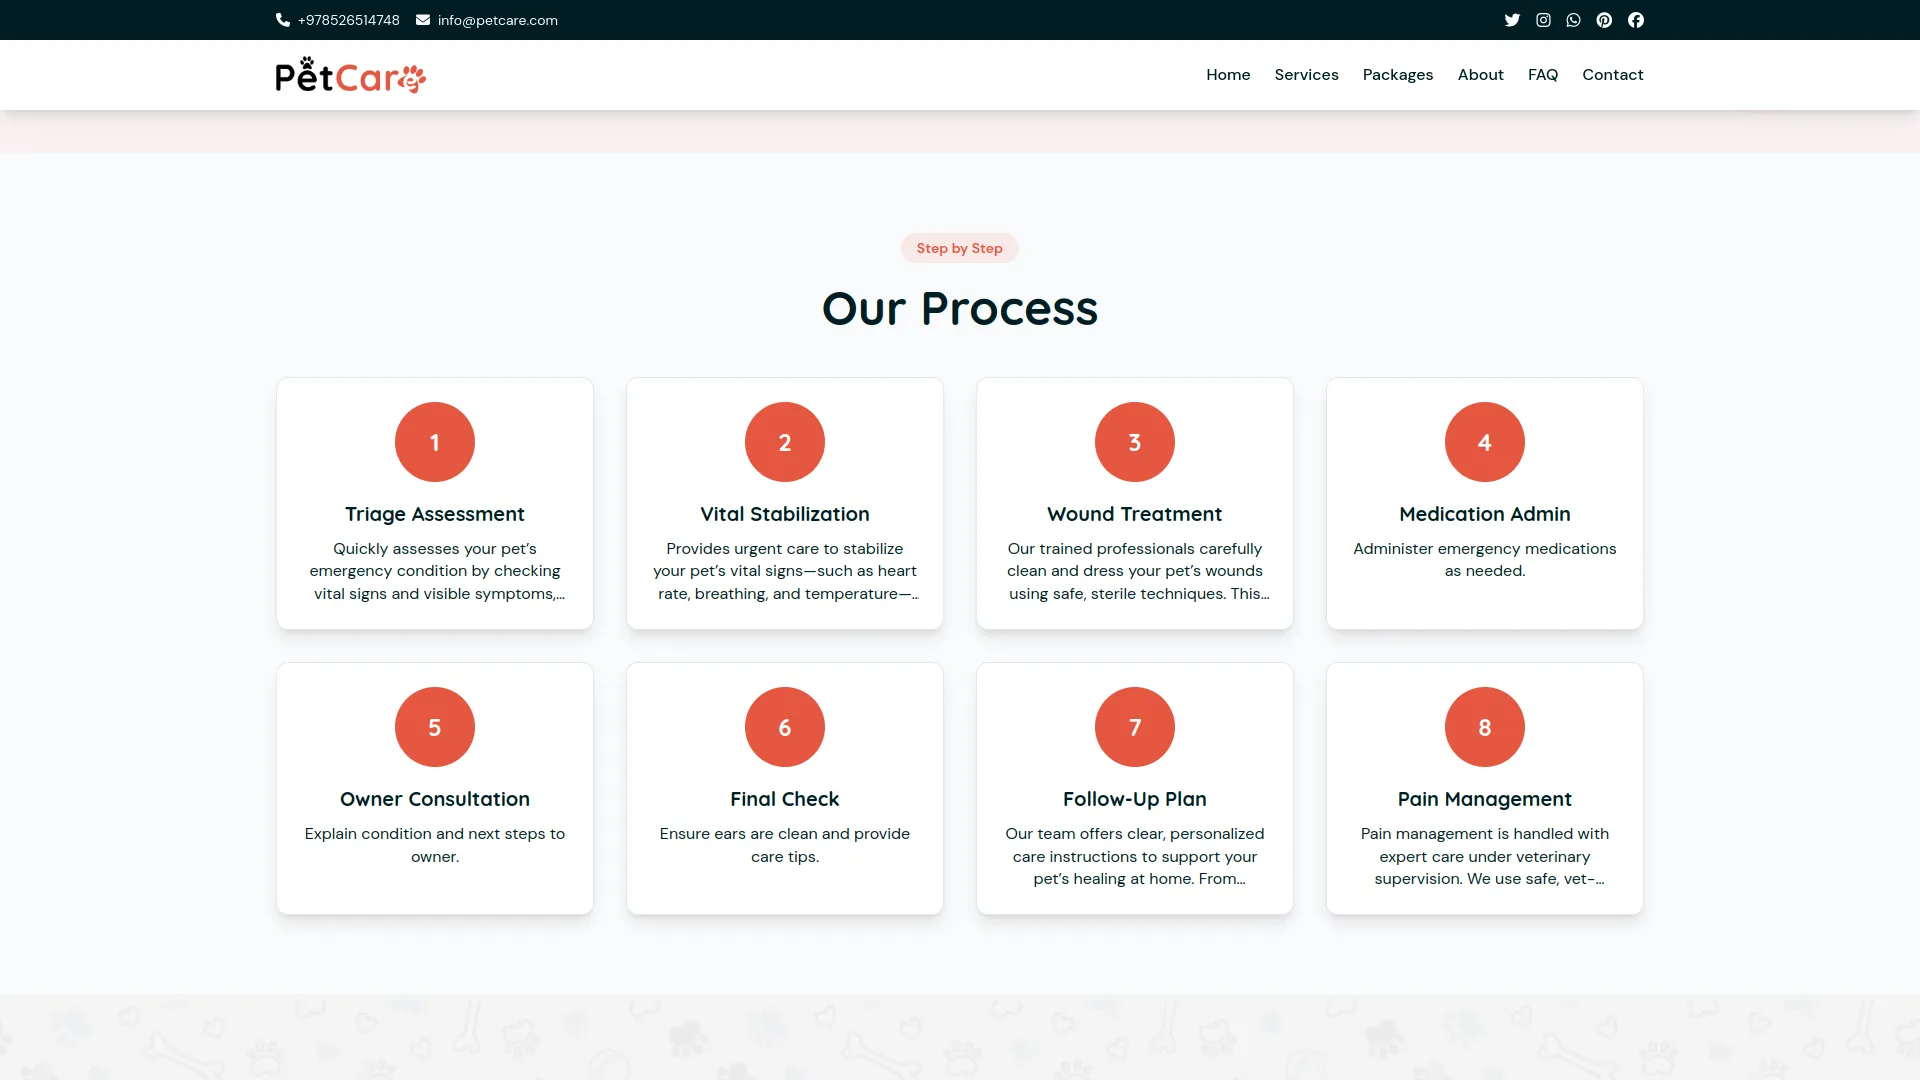
- Similar to the Features section, this displays the Tagline and Title from System Setup (Section 7: Process Steps setting for services details page), only if configured. It then lists all processes related to the specific service from the Service Features & Process section in the admin panel.
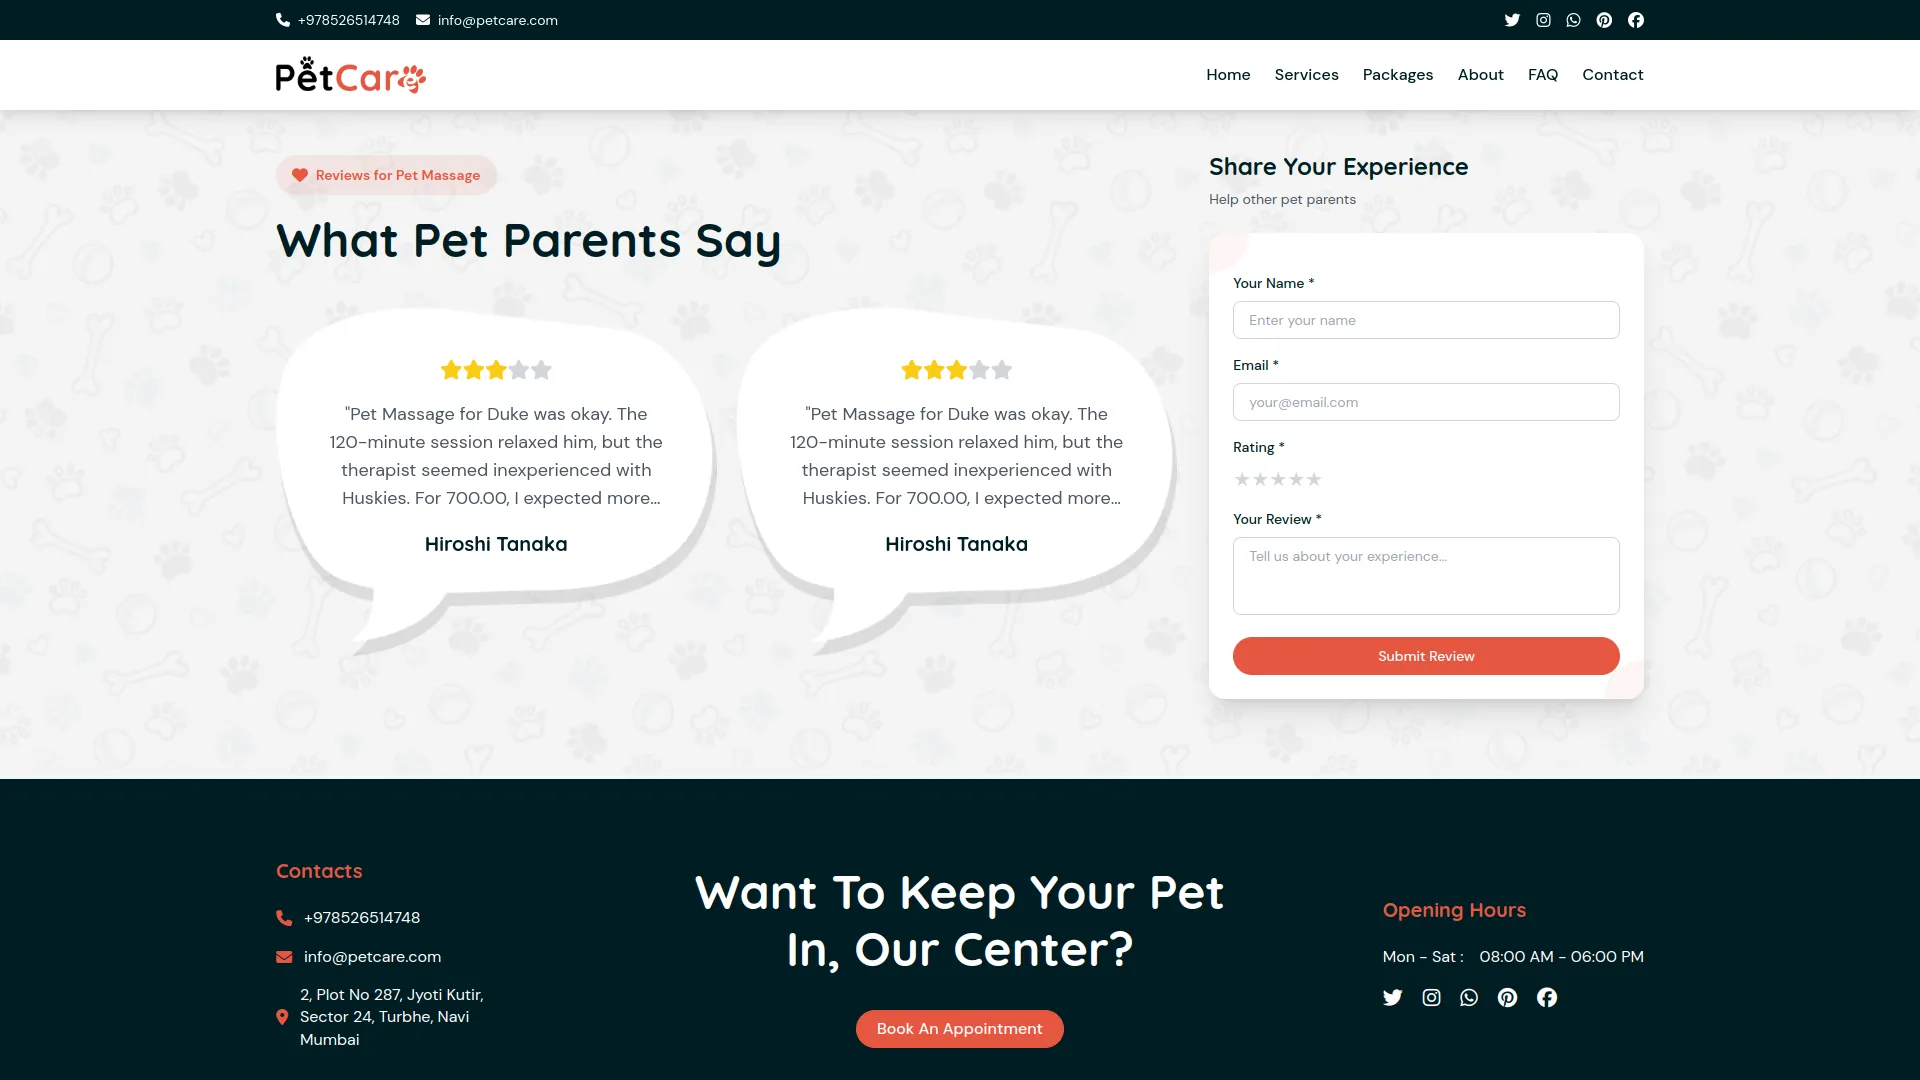
- A service-specific Review Section is included on the page, allowing visitors to share their feedback. This section features a Service Review Form where users can submit their Name, Email, Rating, and Review for the specific service.
- Displays the Tagline, Heading Title, Review Form Heading Title, and Review Form Sub Title from System Setup → Service Reviews. This section is displayed only if configured.
- Reviews are displayed publicly only when their Review Status is set to “Approved” and the Review Display Status is turned “On” in System Setup → Service Review Settings. Once approved, each review showcases the client’s Name, Rating, and the content of their feedback.
Appointment Booking Page
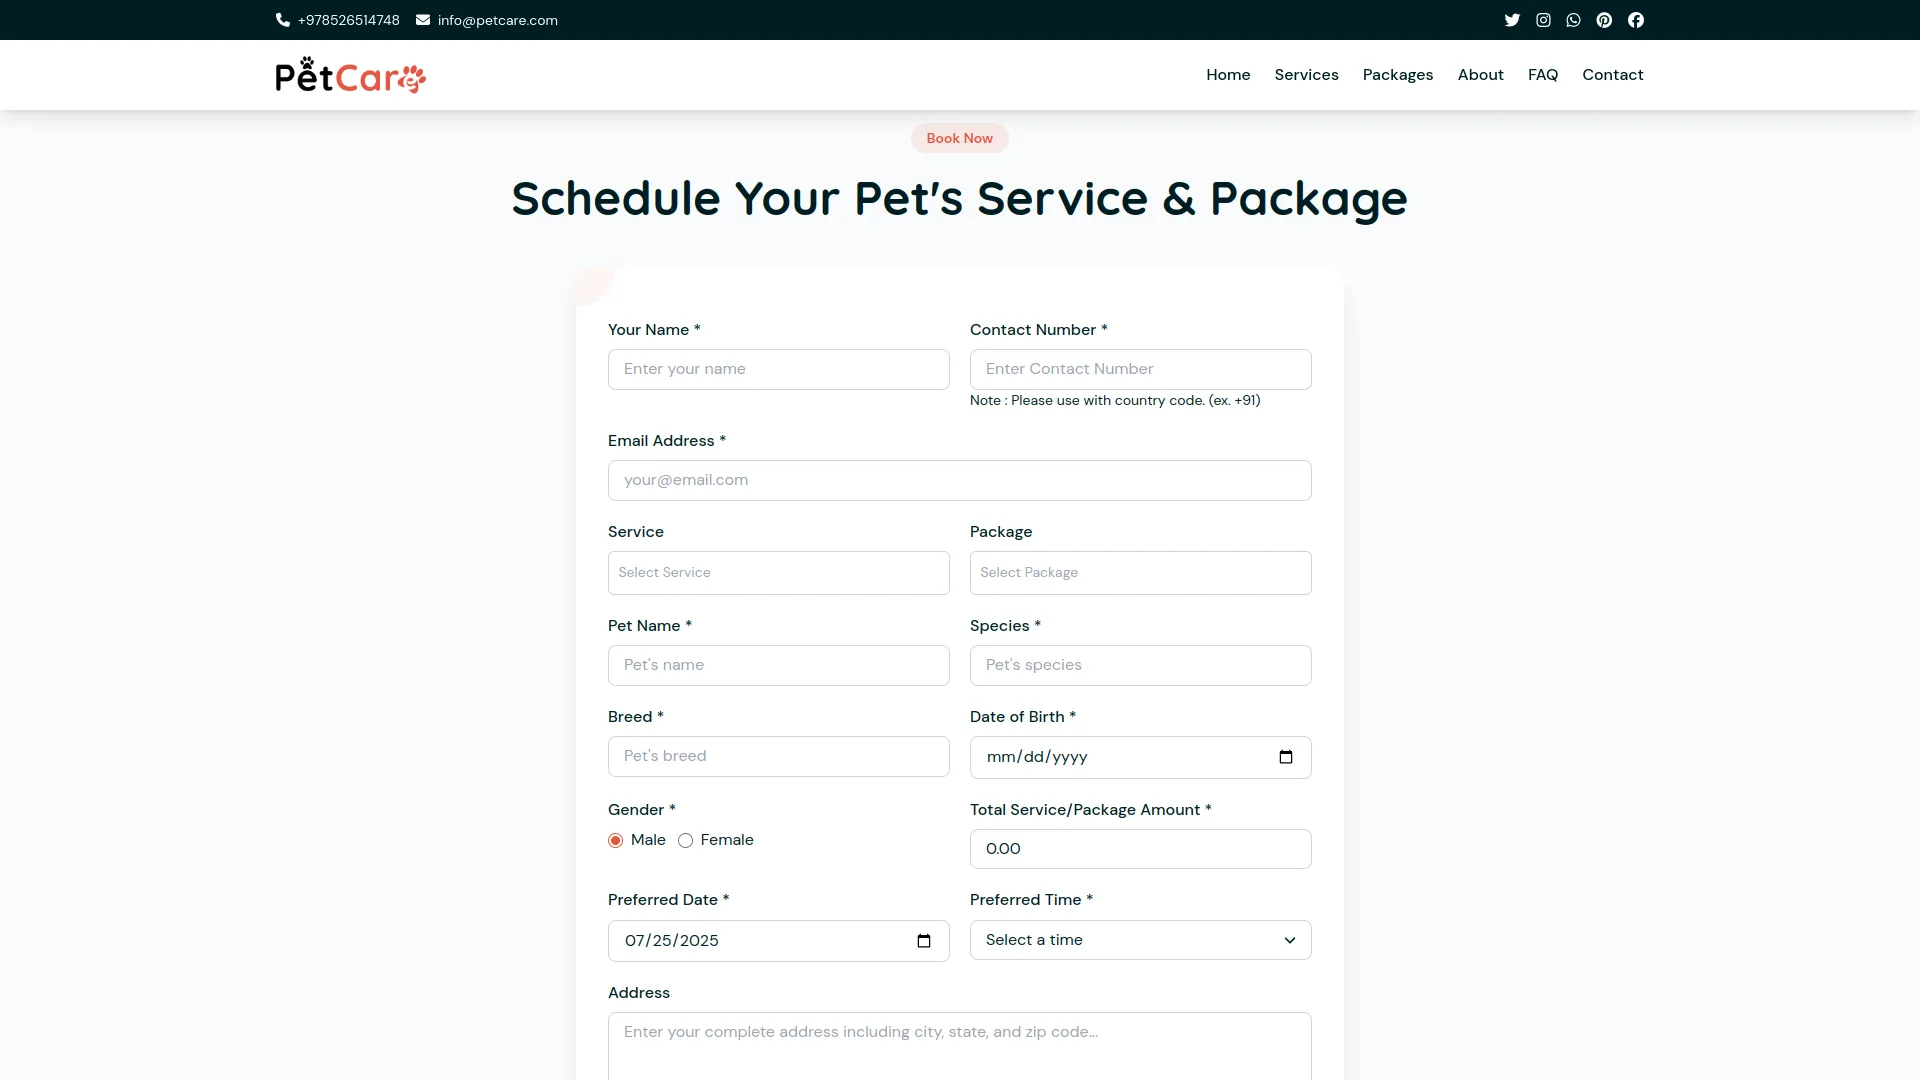
The Appointment (Service & Package) Booking Page allows customers to schedule services and packages for their pets.
- The booking page begins with a fixed Common Banner Section that cannot be modified, followed by the Appointment Booking Form Section.
- If configured via System Setup → Additional Settings (Section 9: Header Setting for Appointment Booking Form), the page displays a Tagline, Heading Title, and Response Note. If these fields are not set, the Appointment Booking Section will remain hidden.
The Appointment Form allows customers to schedule appointments by providing the following details :
- Customer Information: Name, Email, and Contact Number
- Services and Packages: Multi-select options for available services and packages
- Pet Details: Name, Species, Breed, Date of Birth, and Gender
- Total Amount: Automatically calculated based on selected services and packages
- Appointment Preferences: Preferred Date and Time
- Additional Information: Address and Special Requests or Notes
Pet Adoption Application (Request) Page
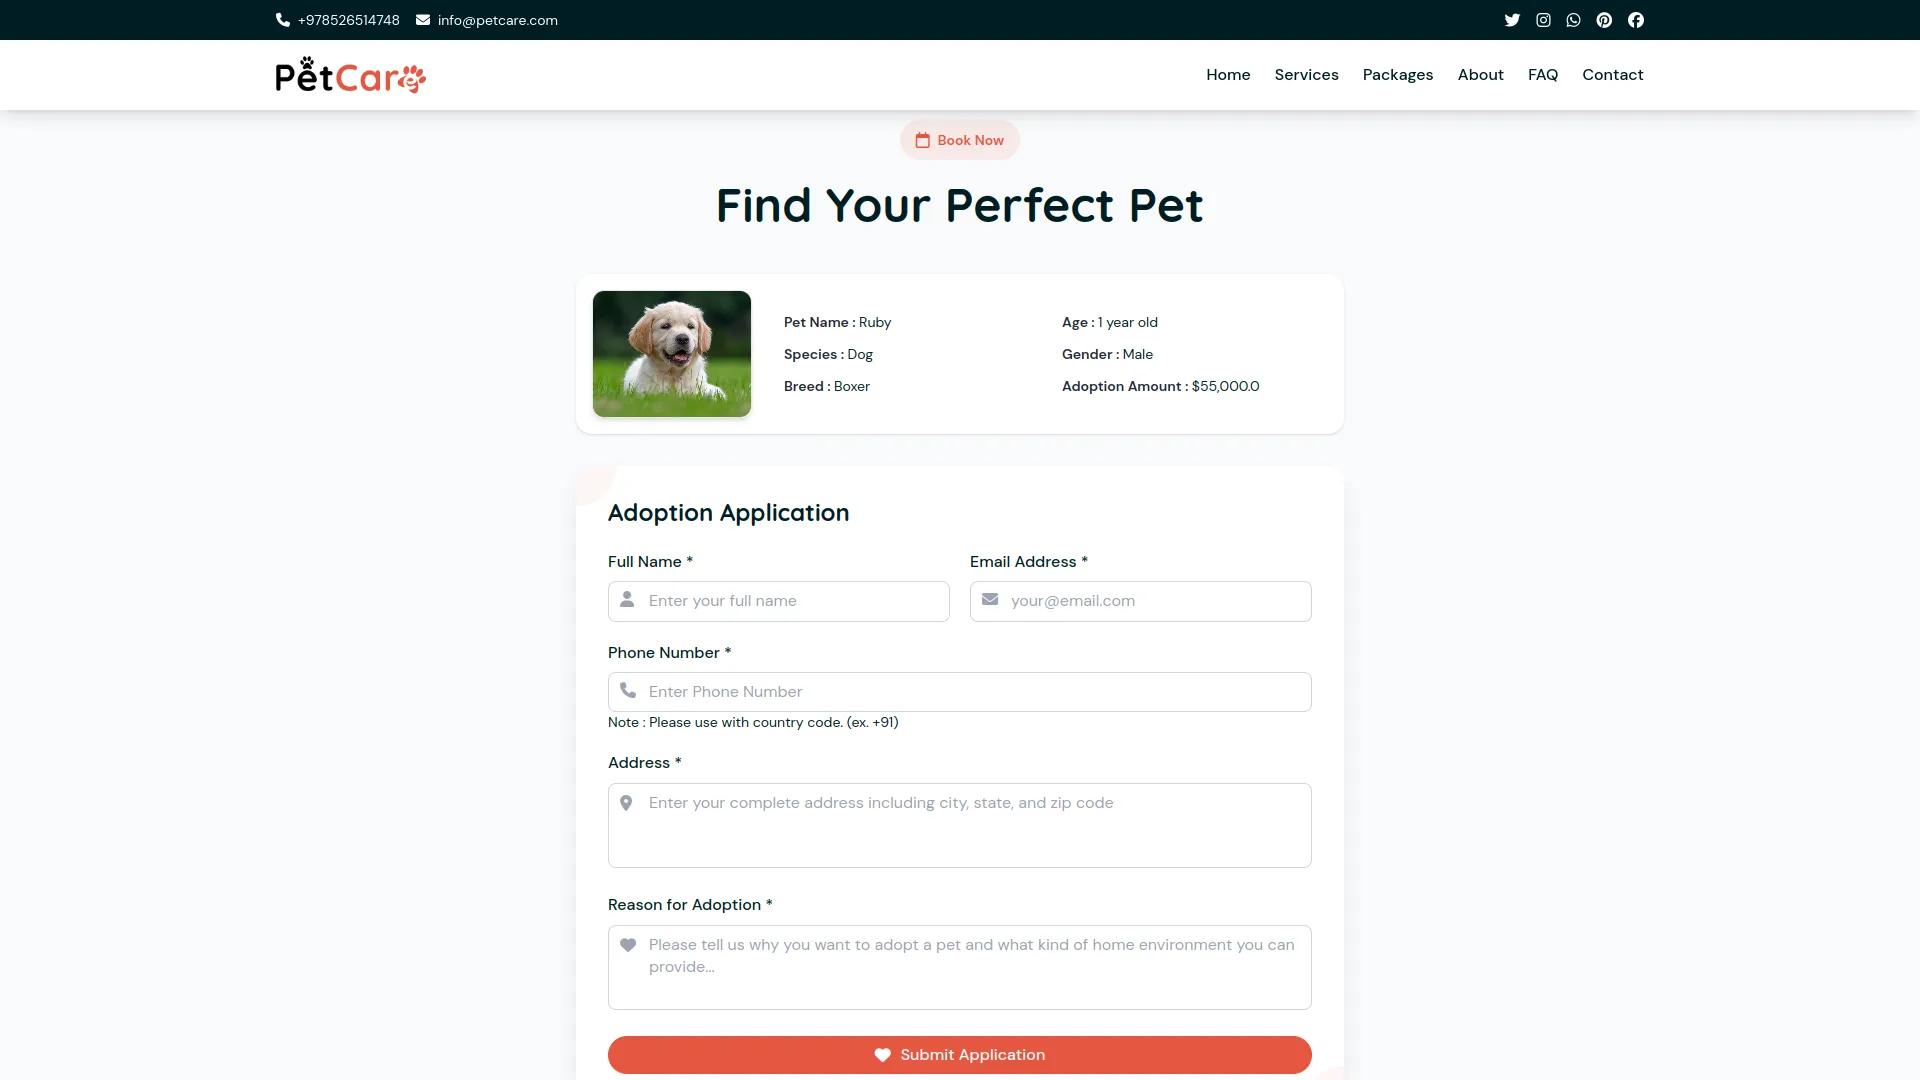
The Pet Adoption Application (Request) Booking Page enables users to apply to adopt a pet.
- The Pet Adoption Application page features a fixed Common Banner Section at the top, showcasing default text and images that cannot be modified.
- If configured through System Setup → Additional Settings (Section 8: Header setting for adoption application form), a tagline and heading title will be shown. If not set, the adoption booking section will remain hidden.
- This section displays detailed information fetched from the Pet Adoption module in the admin panel, including the pet’s Name, Species, Breed, Date of Birth, Gender, and Adoption Amount.
- Visitors can submit an application by filling out the Adoption Form, which collects their Name, Email, Phone Number, Address, and Reason for Adoption.
About Page
The About Page introduces the PetCare brand and includes several informative sections that highlight the organization’s background, key achievements, and dedicated team members. It provides visitors with insight into the story behind PetCare, its milestones, and the people driving its success.
- Text and images in the Common Banner Section are fixed and cannot be modified.
- The About Section showcases your story and can be customized via System Setup → About Us Section (Section 1: Our Story). It highlights your organization’s background, core values, and mission. If left unset, this section will remain hidden.
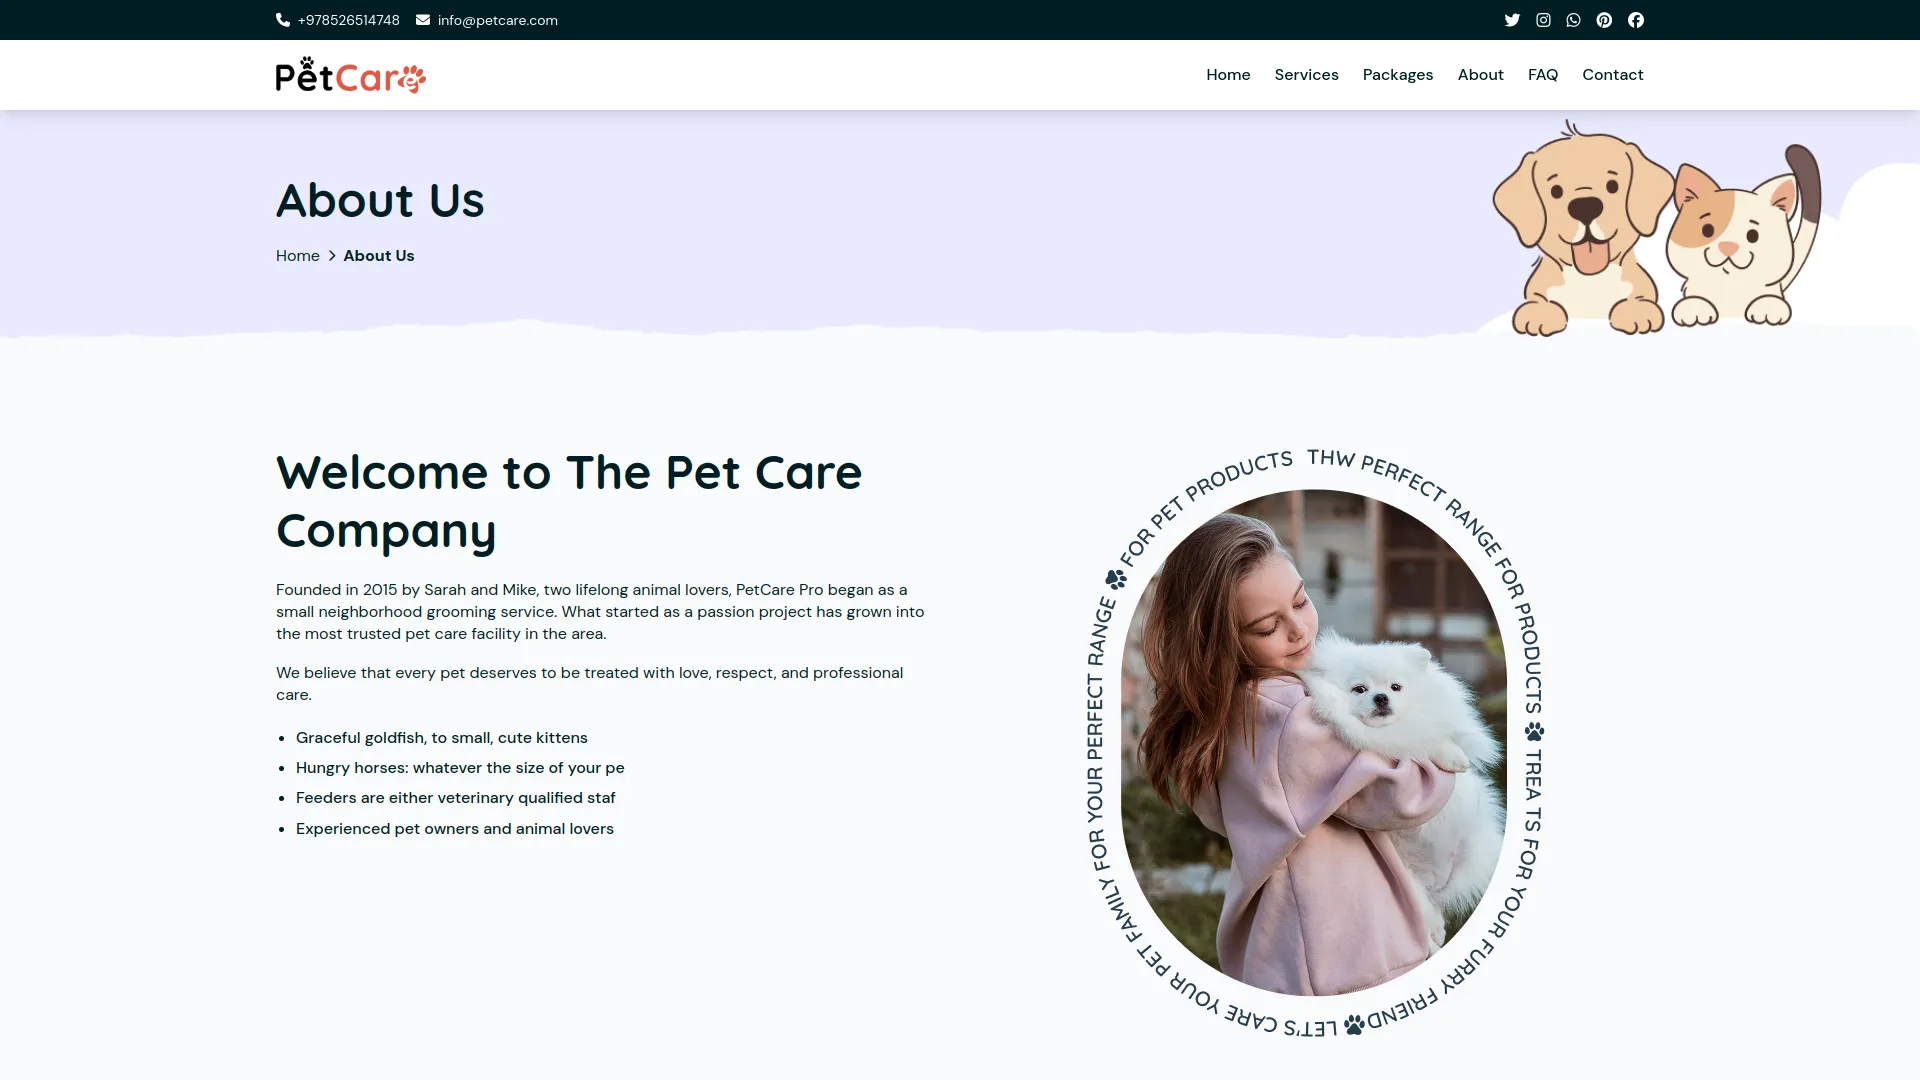
- The Milestones Section highlights key achievements and important events of your organization. It displays content configured through System Setup → About Us Section (Section 2: Milestones). If not configured, this section will remain hidden from the About Us page.
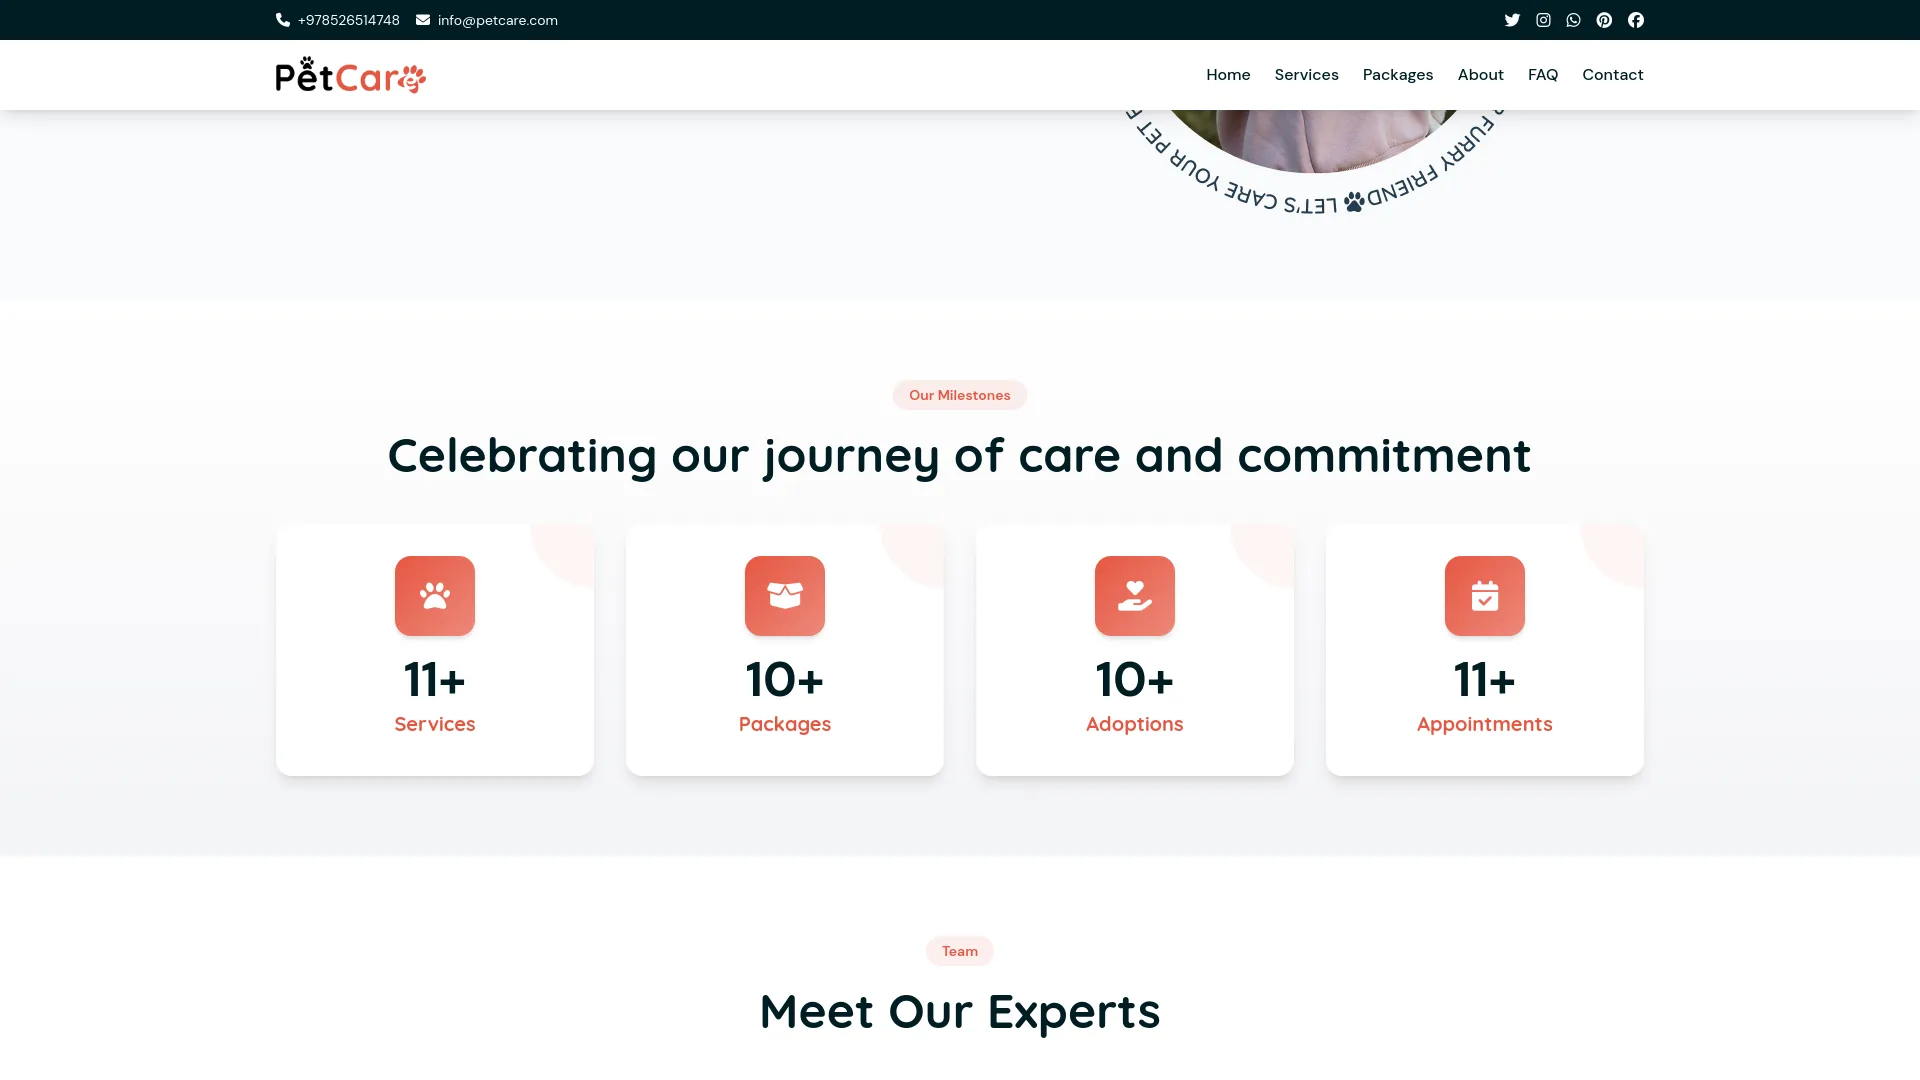
- The Team Member Section showcases profiles of your staff or experts and is managed via System Setup, About Us Section (Section 3: Team Member). If no data is configured, this section will remain hidden on the About Us page.
FAQ Page
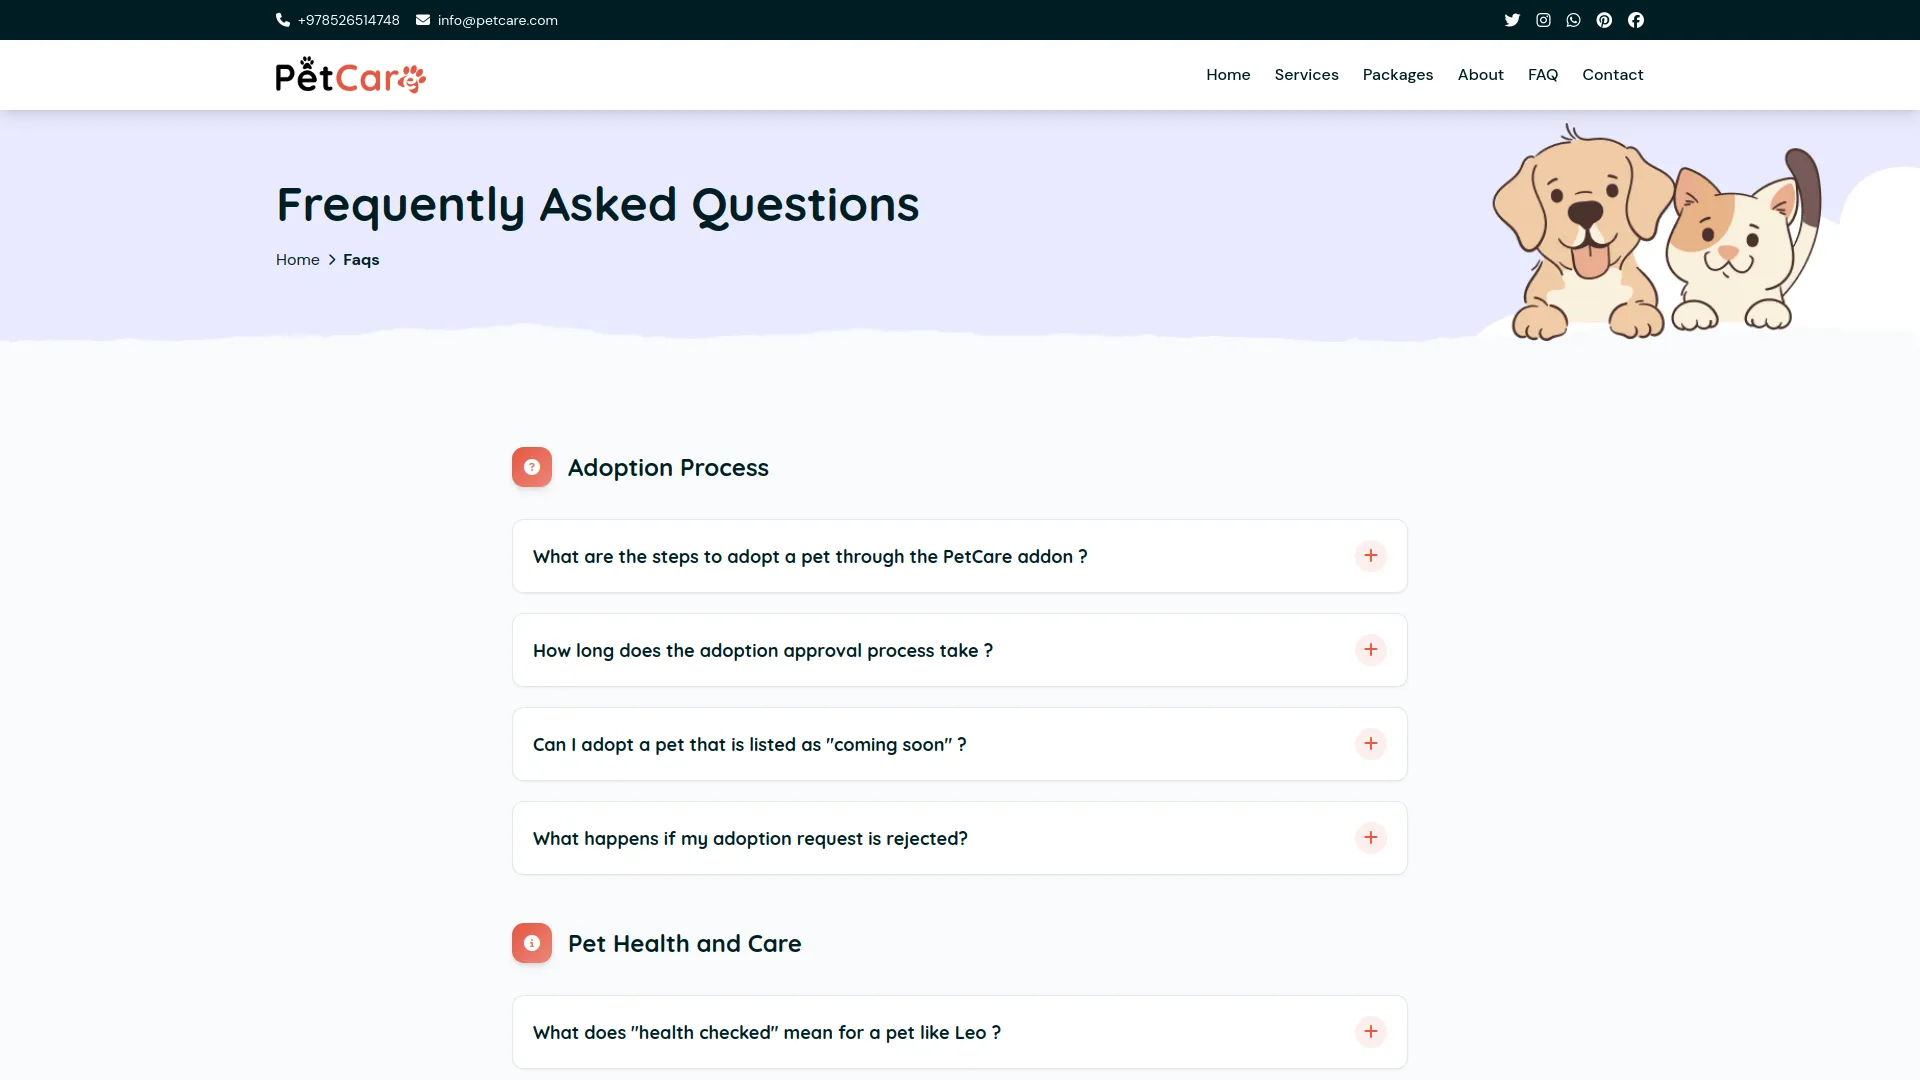
The FAQ page is structured into multiple sections, each designed to help visitors find clear answers to commonly asked questions quickly and efficiently.
- The FAQ page includes a fixed Common Banner Section, featuring static text and images that cannot be modified.
- The FAQ Section includes a FAQs Title and a list of Questions and Answers, both of which can be managed from System Setup → FAQ Section (FAQs and FAQs Question & Answer).
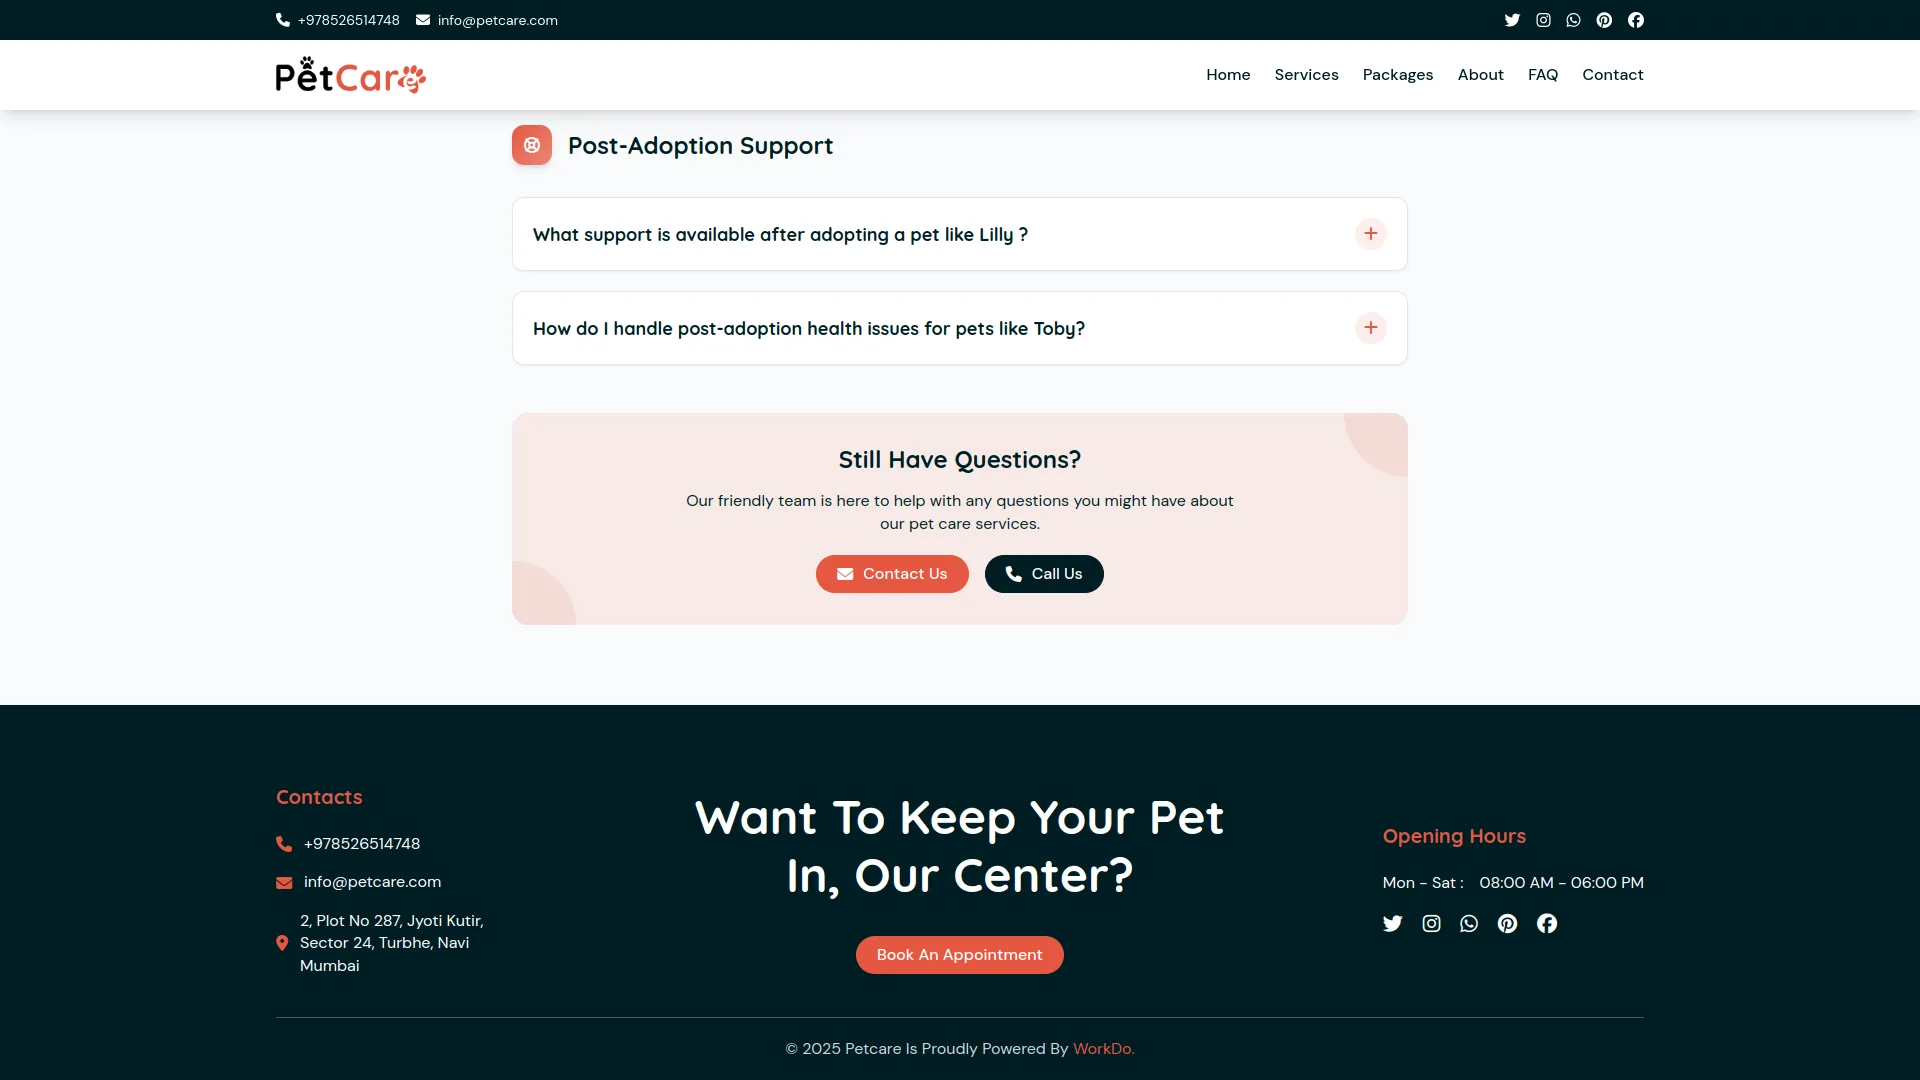
- The Have Questions Section, where additional support or contact options can be set through System Setup → FAQ Section (Have Questions).
Contact Page
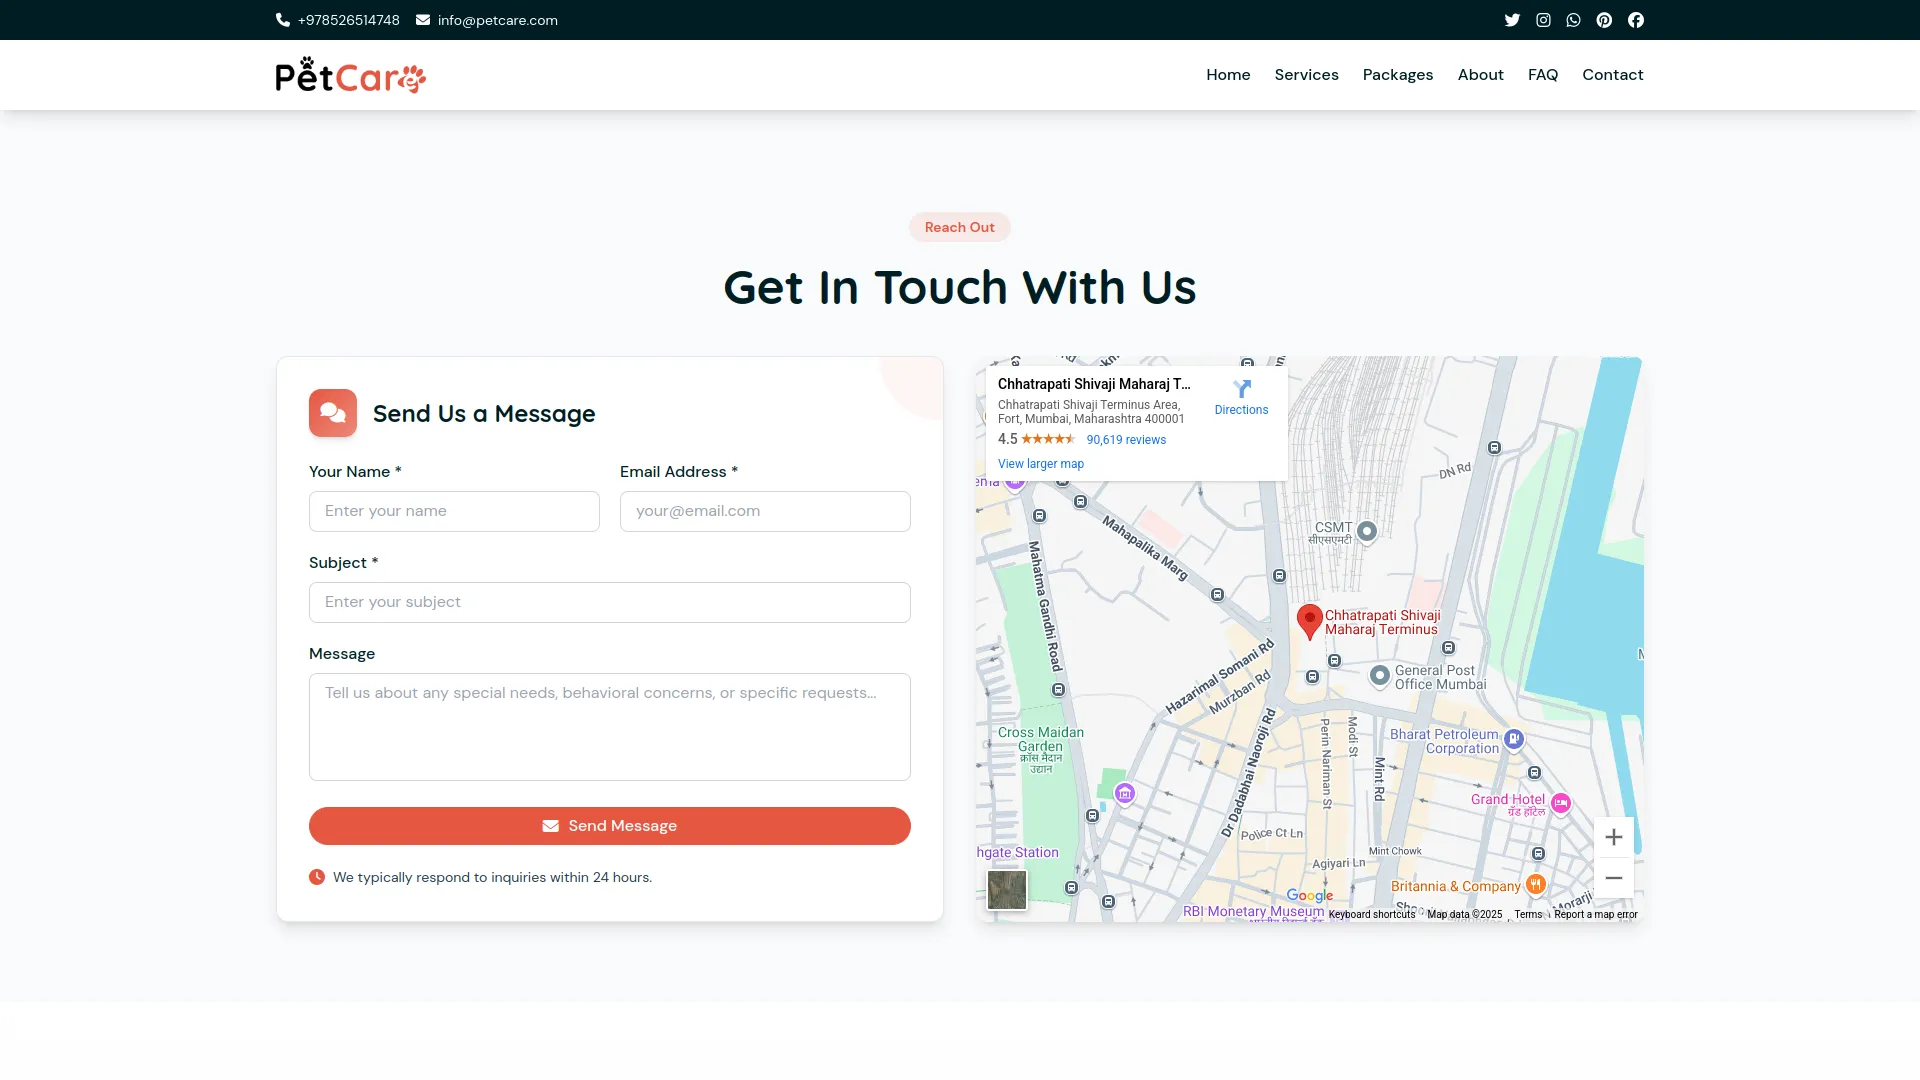
This page allows visitors to get in touch via a contact form and view business contact information.
- The Common Banner Section contains fixed text and images that cannot be modified.
- The Contact Form and Google Map are configured from System Setup → Contact Us (Section 1: Contact Form), allowing users to send inquiries directly.
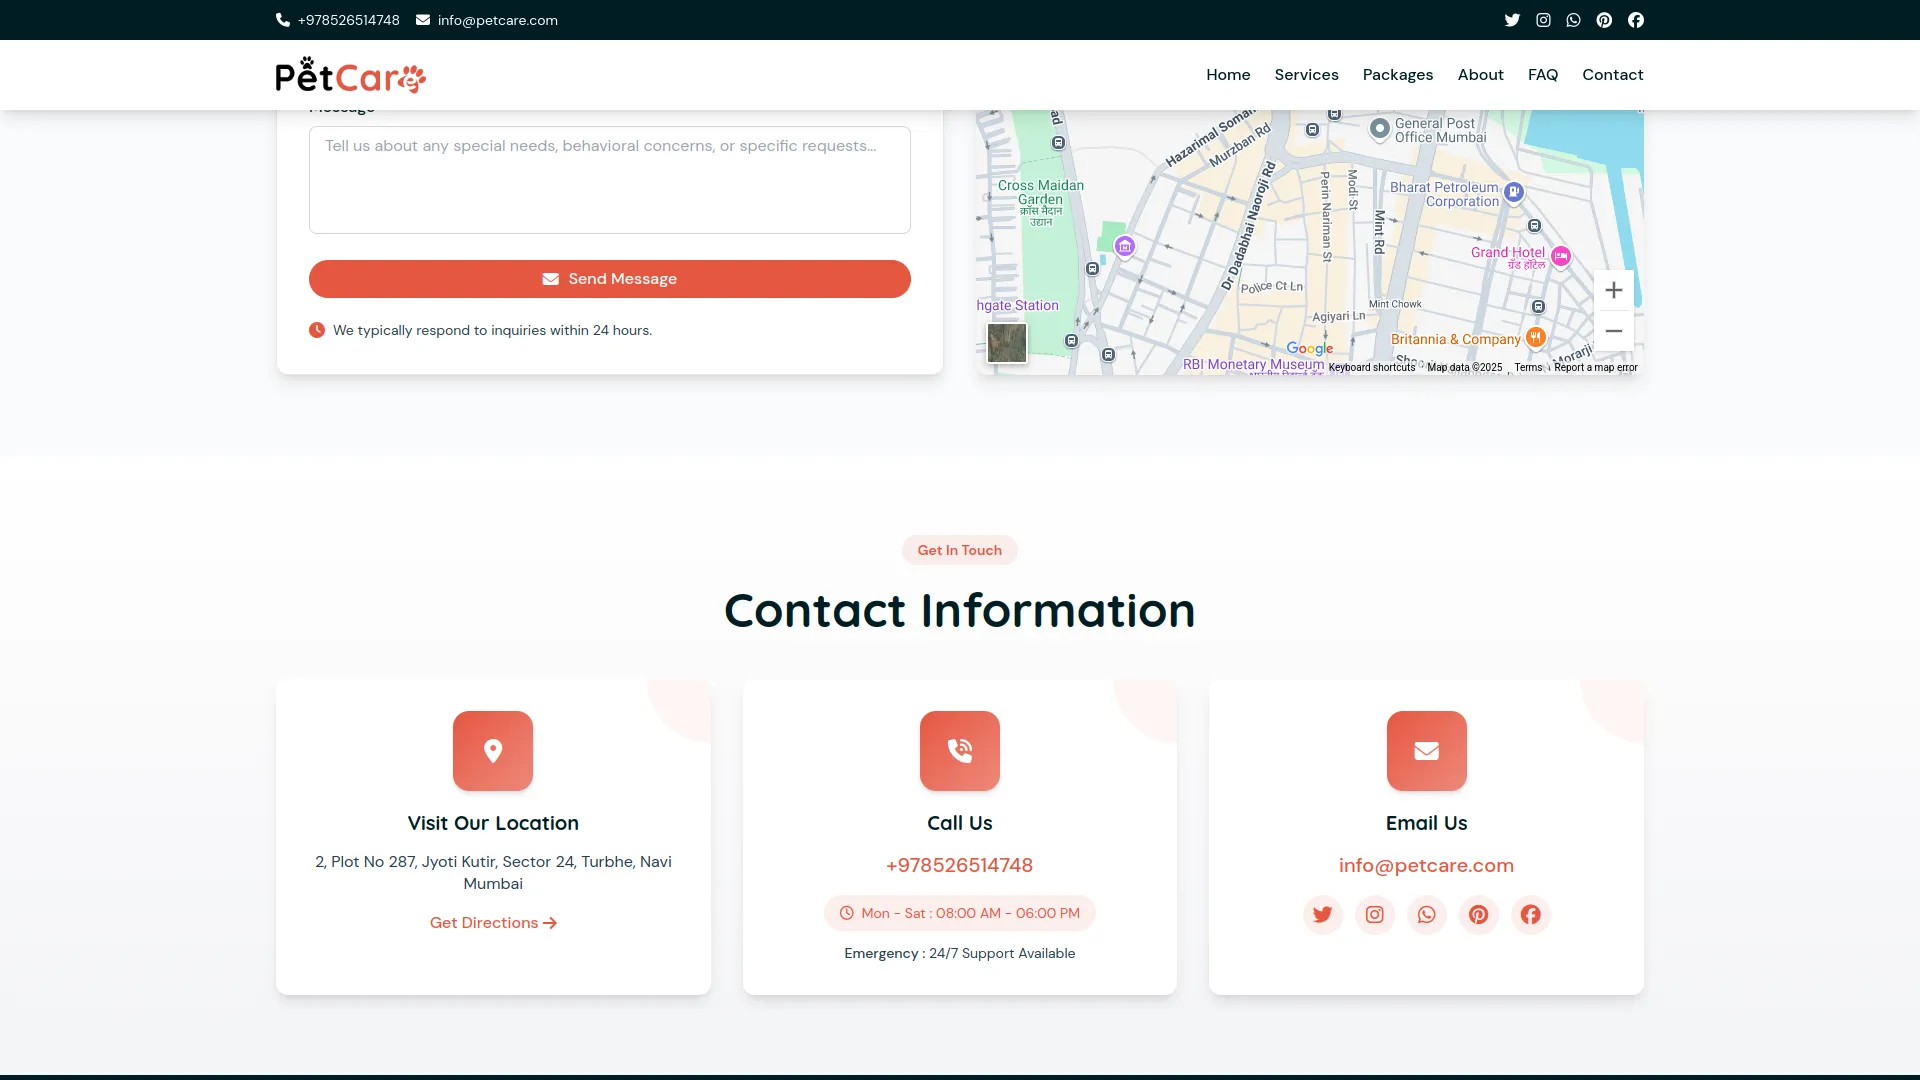
- The Contact Information Section displays details configured in System Setup → Contact Us (Section 2: Contact Information). This includes the business Location, Phone Numbers, Business Hours, and Email Address, allowing visitors to easily find key contact details.
Footer
The bottom section of the site displays key branding and contact information.
- Contact Info: From System Setup → Contact Us setting
- Opening/Closing Hours from Additional Setting – Section 10: Opening & Closing Time
- Copyright Text: From System Setup → Brand Setting
- Social Media Links: From System Setup → Social Links
Categories
Related articles
- Sofort Integration in Dash SaaS
- Bookings Integration in Dash SaaS
- API WorkDo Dash SaaS Add-On
- User Manual – WorkDo Dash SaaS
- Sports Club & Academy Management in Dash SaaS
- Flutter App Setup Handbook: A Step-by-Step Installation Guide
- Requests Integration in Dash SaaS
- Diet & Nutrition Consultant Integration in Dash SaaS
- Product Catelog Request Integration in eCommerceGo SaaS
- Elderly Care Detailed Documentation
- Google Authentication Integration in eCommerceGo SaaS
- Pet Tag Integration in vCard SaaS
Reach Out to Us
Have questions or need assistance? We're here to help! Reach out to our team for support, inquiries, or feedback. Your needs are important to us, and we’re ready to assist you!


Need more help?
If you’re still uncertain or need professional guidance, don’t hesitate to contact us. You can contact us via email or submit a ticket with a description of your issue. Our team of experts is always available to help you with any questions. Rest assured that we’ll respond to your inquiry promptly.
Love what you see?
Do you like the quality of our products, themes, and applications, or perhaps the design of our website caught your eye? You can have similarly outstanding designs for your website or apps. Contact us, and we’ll bring your ideas to life.
