
Whereby Meeting – WorkDo Dash SaaS Add-On Guide
Learn how to configure and manage Whereby Meeting integration in Dash SaaS.
Introduction
The Whereby Meeting Add-On helps you easily create and manage online meetings from within your platform by connecting it to your Whereby account. After installing the add-on, you simply enable the integration and add your API key to get started. You can then schedule meetings by setting details like title, time, duration, participants, and host. All meetings are organized in a single dashboard where you can view, search, filter, join, start, edit, or delete them, making meeting management simple and efficient.
How to Install the Add-On?
To install the Whereby Meeting Add-On, you can follow this link: Setup Add-On
How to Use the Whereby Meeting Add-On?
Setting Management
Once you have purchased and installed the Add-On, follow the steps below to configure it before you begin creating meetings.
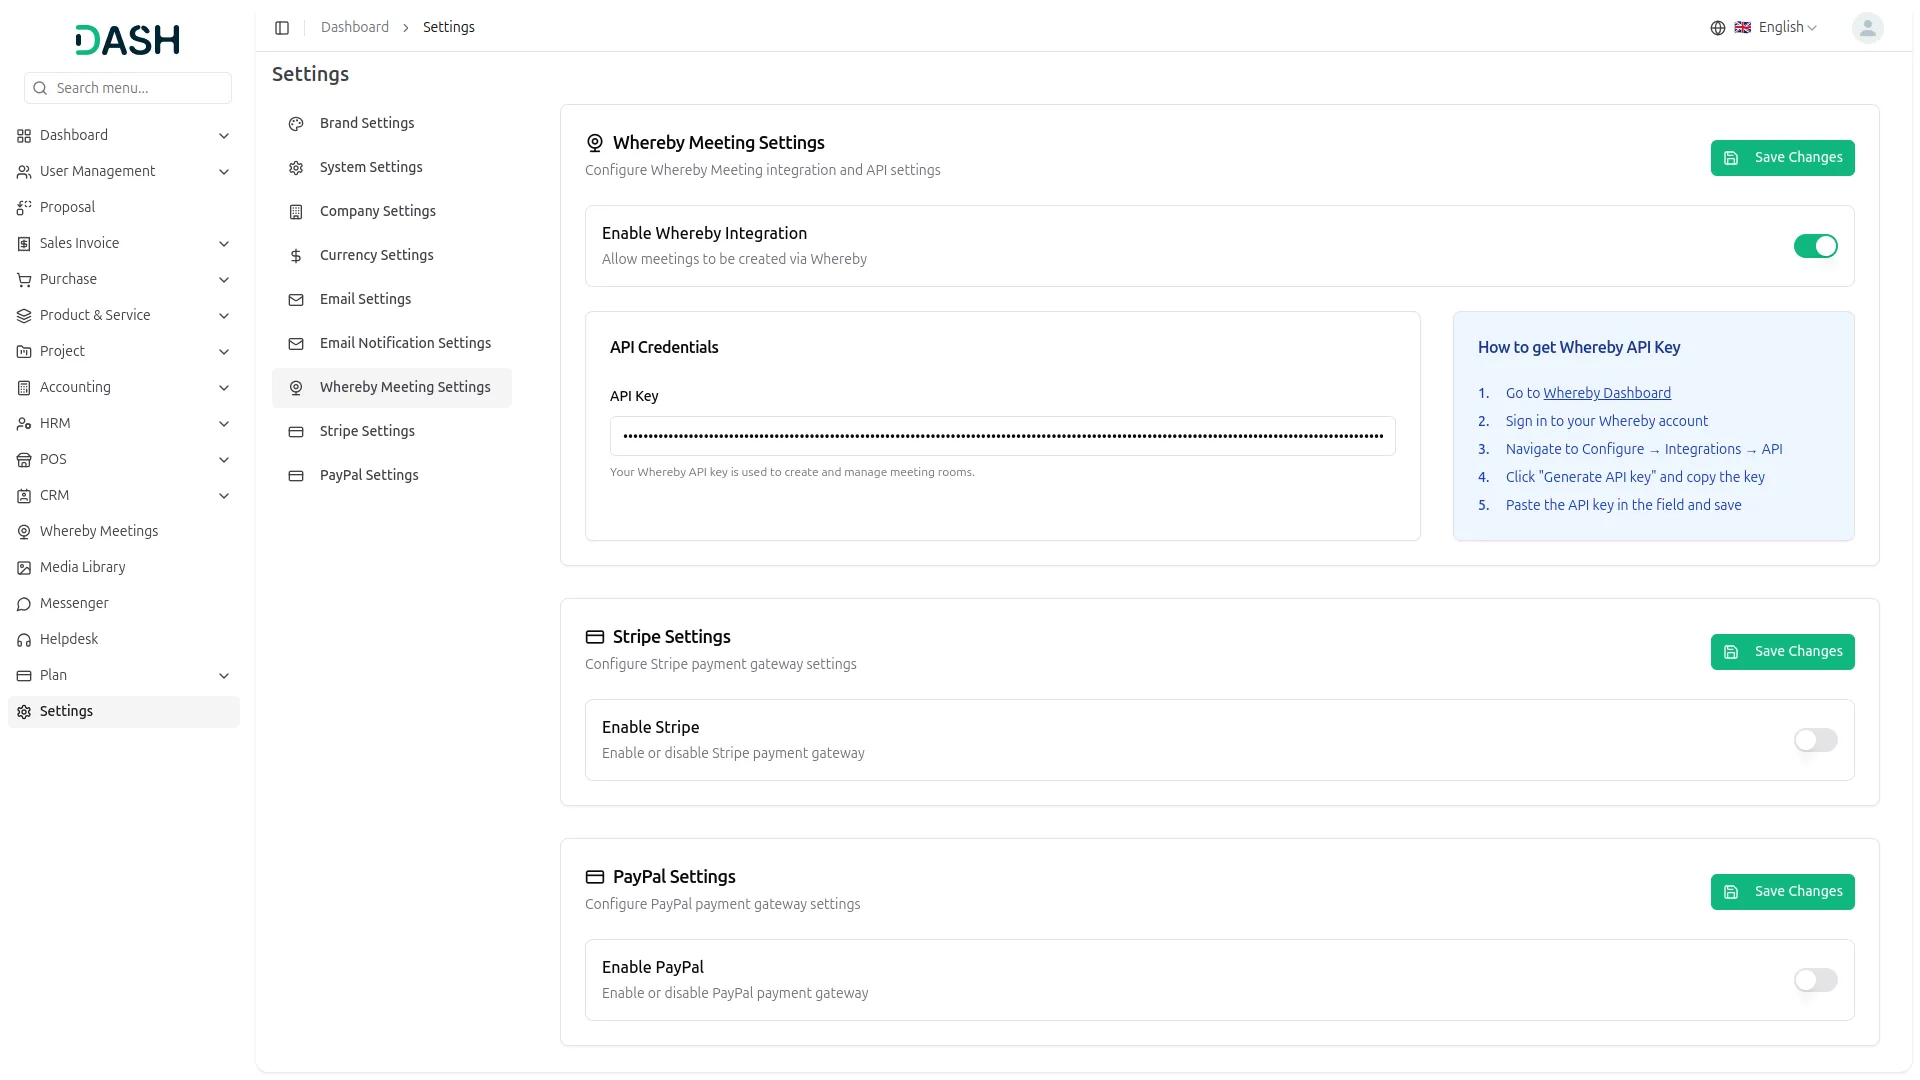
- Navigate to Settings from the sidebar and click on Whereby Meeting Settings.
- On the Whereby Meeting Settings page, you will find the Enable Whereby Integration toggle at the top. Make sure to turn it on to allow meetings to be created via Whereby.
- Below the toggle, you will find the API Credentials section, where you need to enter your Whereby API Key. If you are unsure how to get your API key, the page itself provides a handy reference guide on the right side. You can follow these steps directly from the settings page:
- Go to the Whereby Dashboard
- Sign in to your Whereby account
- Navigate to Configure → Integrations → API
- Click “Generate API key” and copy the key
- Paste the API key in the field and save
- Once you have entered the API key, click Save Changes to apply the configuration. Your Whereby integration is now active and ready to use.
Manage Whereby Meetings
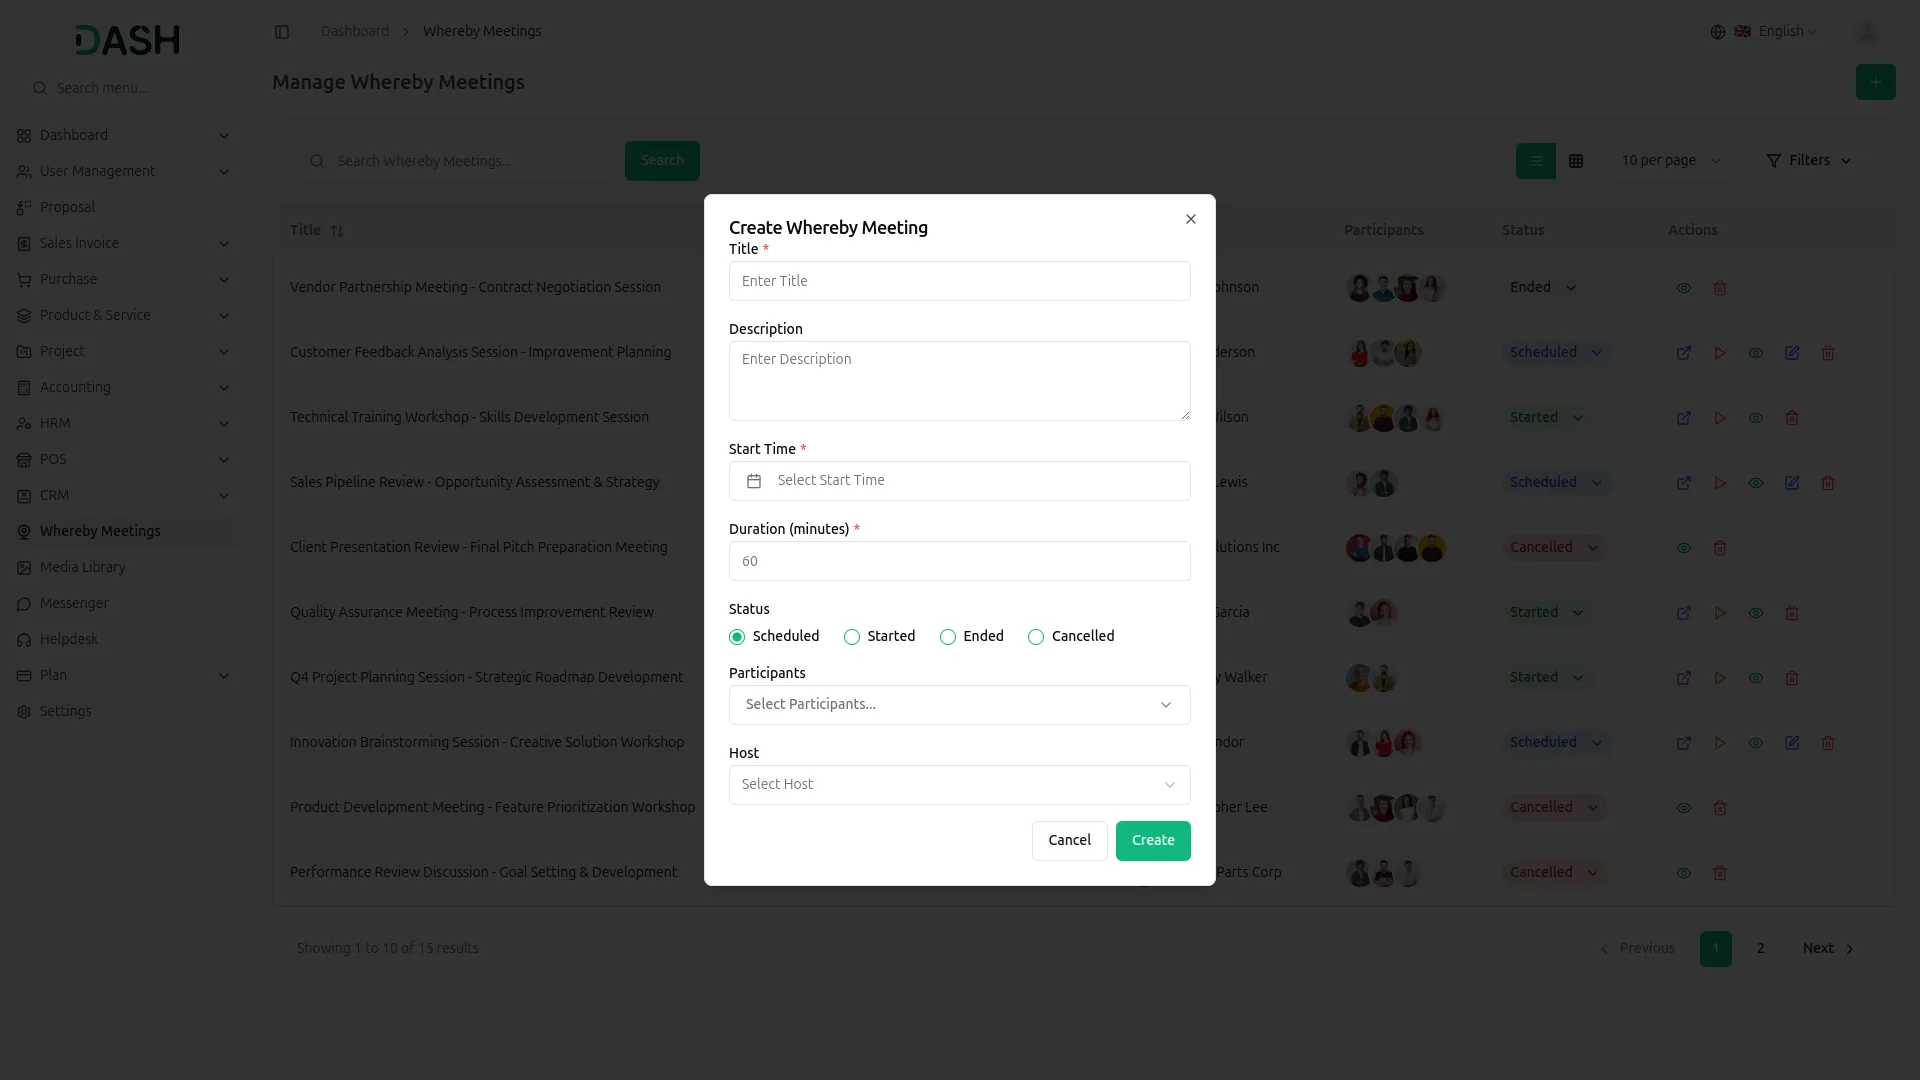
- To add a new Whereby meeting, click the “Create” button on the page. Fill the details, including entering the Title, Description, setting the Start Time, adding Duration (minutes), select the Status (Scheduled, Started, Ended, or Cancelled).
- Select the participants from the dropdown. Only the users you assign here will see the meeting in their login panel. Select the host responsible for managing the meeting, and click Create to schedule the meeting.
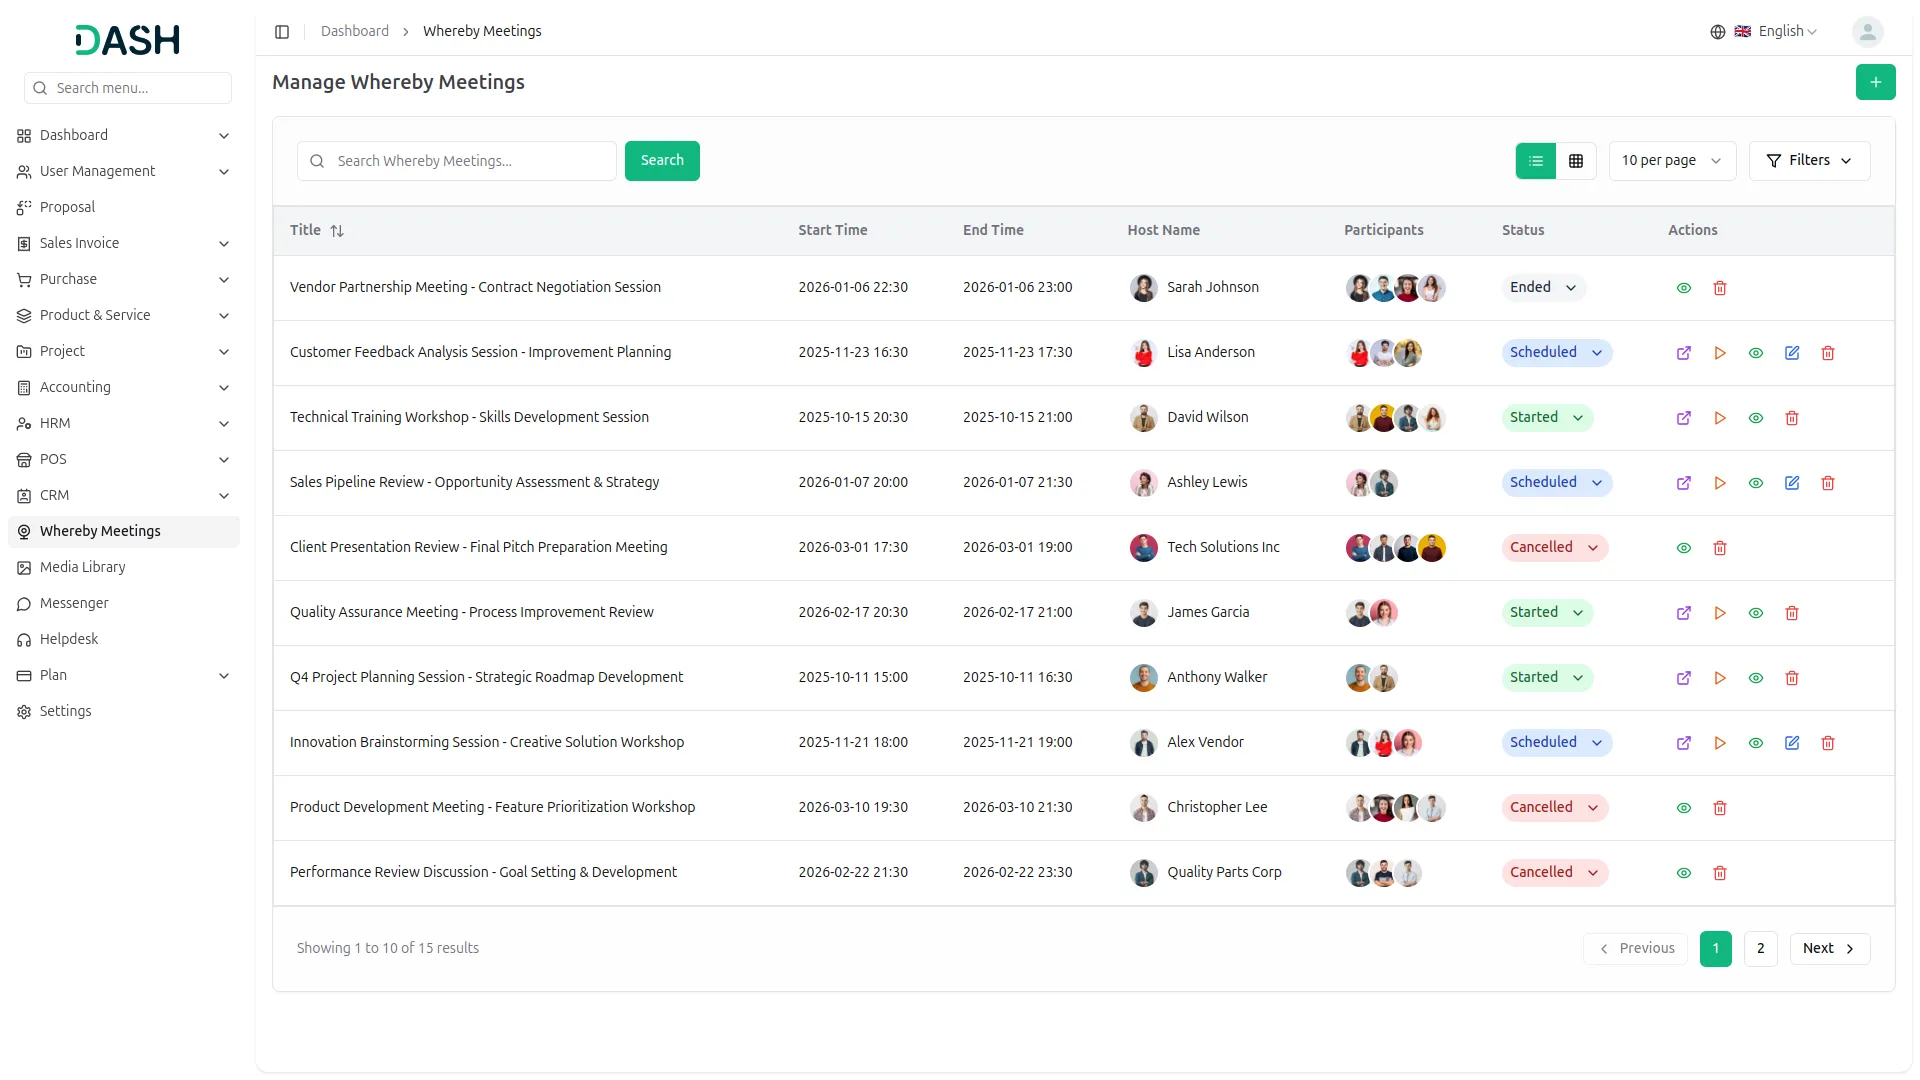
- In the list page, you’ll get to see all the created meetings displayed on the Manage Whereby Meetings page. The page also allows you to toggle between list view and grid view.
- You can also search for specific meetings using the Search Whereby Meetings bar and apply additional filters using the Filters option.
- In the Actions column, you can use Join meeting (Opens the meeting link directly), Start Meeting (Launches the meeting instantly).
- View (Opens the Meeting Details panel, which displays the meeting title, start and end time, host, status, description, participants, and both the Join URL and Host URL with copy options. You can also join or start the meeting from there.)
- Edit (Allows you to modify the meeting details), Delete (Permanently removes the meeting from the list).
Note: Meeting statuses are for quick reference: Scheduled, Started, Ended, and Cancelled. You can update the status of a meeting directly from the status dropdown in the list view.
Categories
Related articles
- WooCommerce Module Guide – eCommerceGo SaaS
- Slack – WorkDo Dash SaaS Add-On Guide
- Coupon Module Guide – eCommerceGo SaaS
- Franchise Management – WorkDo Dash SaaS Add-On Guide
- Internal Knowledge – WorkDo Dash SaaS Add-On Guide
- Shopify Sync – WorkDo Dash SaaS Add-On Guide
- Google Calendar Credentials Generation Guide
- Reward Club Point – eCommerceGo SaaS Add-On Guide
- Sign in with Twitter – eCommerceGo SaaS Add-On Guide
- WhatsApp API – BookingGo SaaS Add-On Guide
- Zoom, Slack & Telegram Integration Guide
- Make Documentation – TicketGo Add-On Guide
We're Here to Help - Let's Talk
Have questions about our solutions, customization services, or business tools? Our team is here to help you. let's talk.