Consultancy Integration in Dash SaaS
The Consultancy Management Add-On is a complete business solution designed to help consultancy firms manage their services, customers, and operations efficiently.
Introduction
The Consultancy Management Add-On is a complete business solution designed to help consultancy firms manage their services, customers, and operations efficiently. This system allows you to set up different types of services with their charges and required documents, manage customer applications from start to finish, handle payments through automated receipts, and track inquiries from potential clients. The Add-On connects all these functions – when you create services in the system setup, they become available for customer applications, which automatically generate receipts for payment tracking, while a separate inquiry section helps you convert leads into actual customers.
How to Install the Add-On?
To Set Up the Consultancy Add-On you can follow this link: Setup Add-On.
How to Use the Consultancy Add-On?
- Once you purchase the Add-On, go to the sidebar and find the Consultancy Add-On.
- In this Add-On, find out the Consultancy Add-On. Here in the Consultancy Add-On, you will get to see 4 more sub-pages.
System Setup
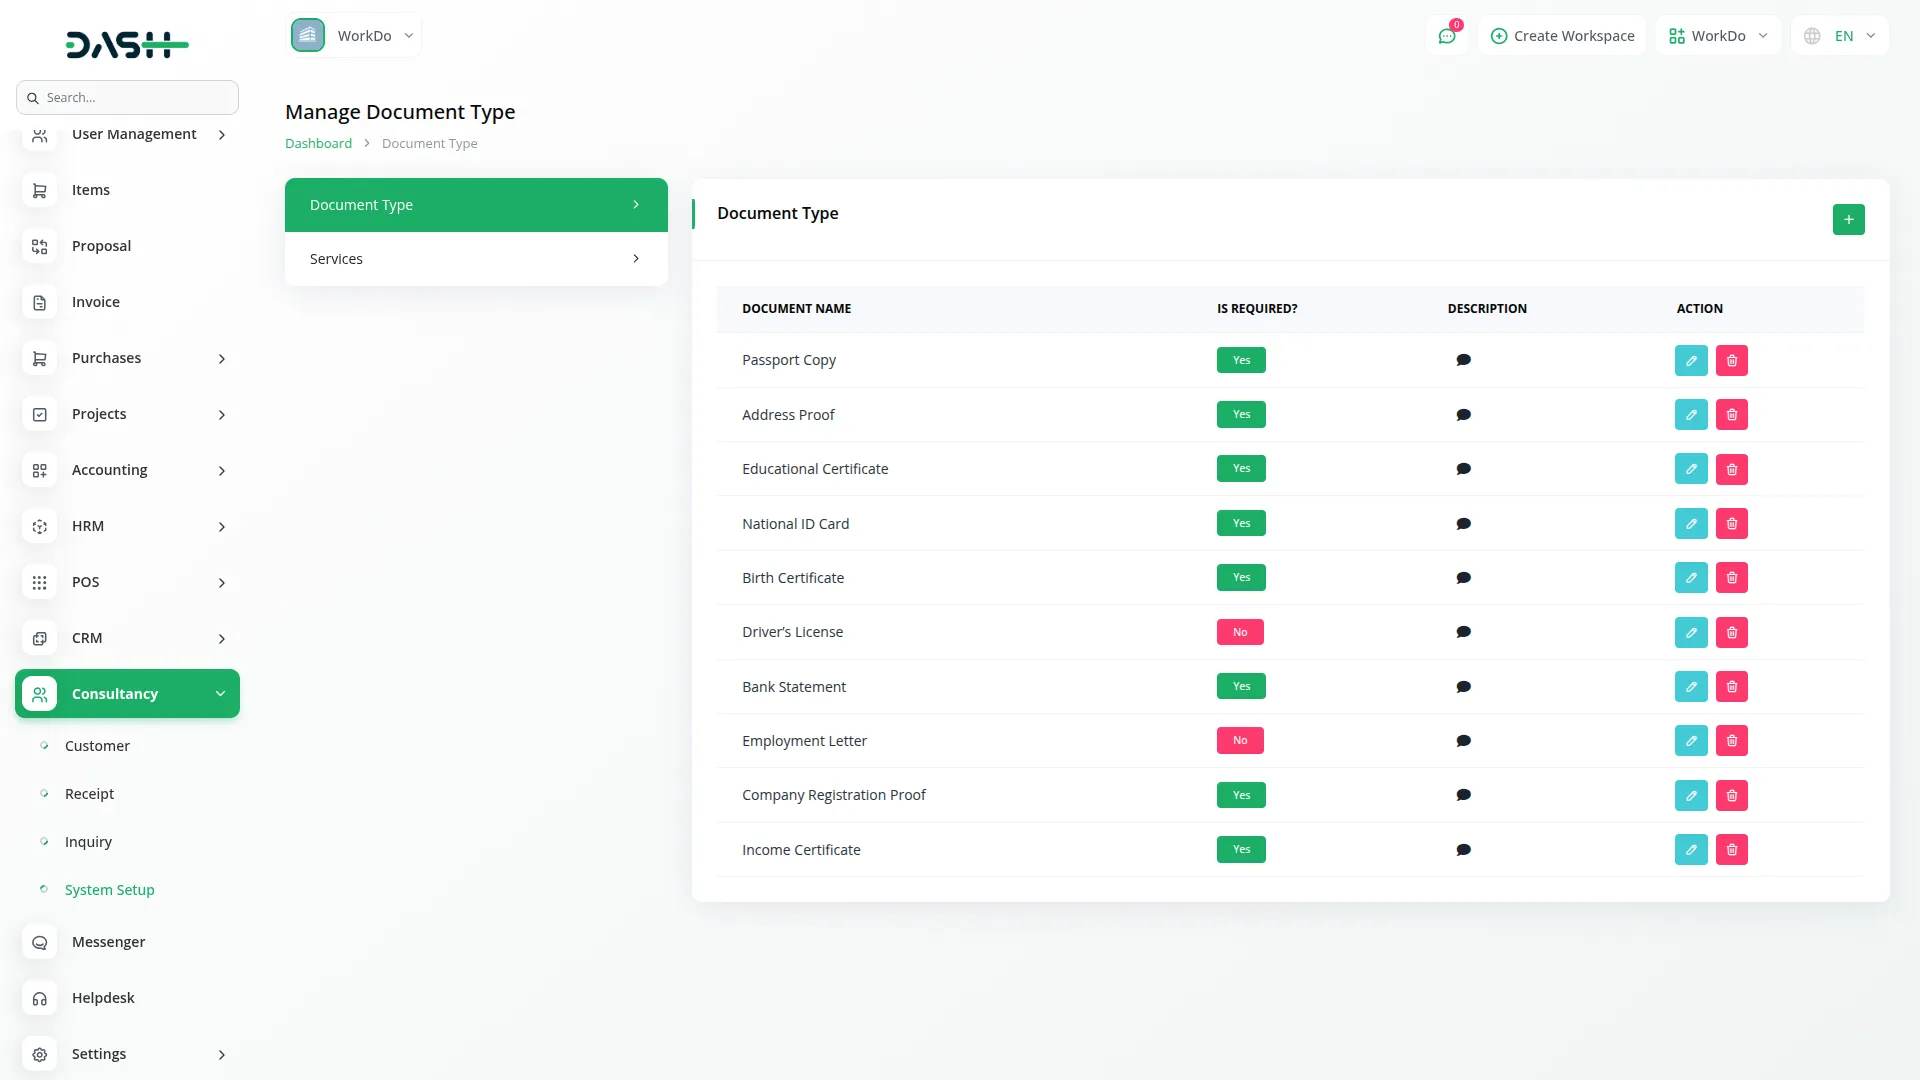
The System Setup module enables administrators to efficiently manage core configurations, including Document Types and Services. Document Types are defined with a name, description, and a required status to ensure proper documentation standards. Services are configured with essential attributes such as service name, charge, estimated completion time, associated required documents, and an activation toggle for operational control.
1. Document Type
- To create a new document type, click the “Create” button at the top of the document type page. Enter the Document Name for Service that describes what kind of document this is. Add a Description to explain more details about this document type.
- Choose whether this document is required by selecting the “is required?” option. The list page shows all document types with columns for Document name, description, and is required. status. You can edit any document type to change its details or delete it if no longer needed.
2. Manage Services
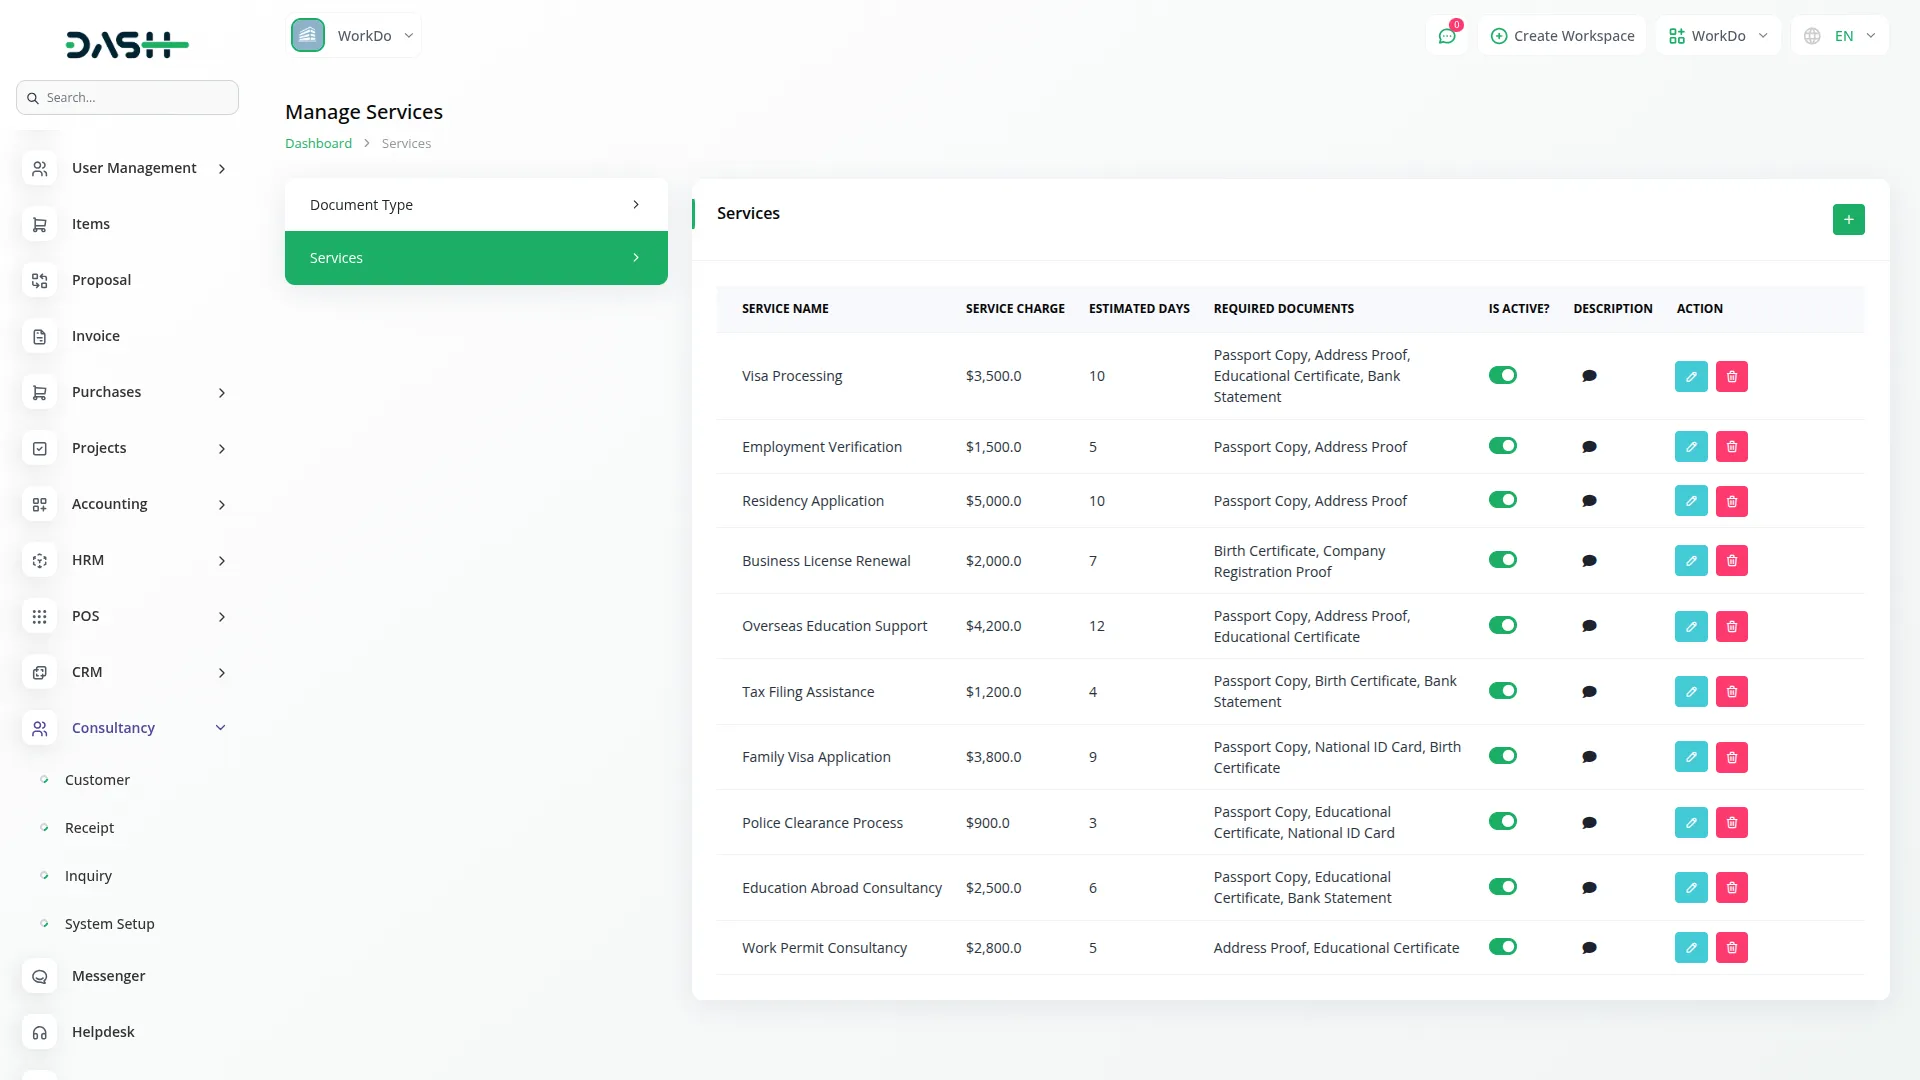
- To create a new service, click the “Create” button on the services page. Enter the Service Name that clearly describes what service you offer. Set the Service Charge that customers will pay for this service.
- Specify the Estimated Days it will take to complete this service. Select the Required Documents from the Document Type list that customers must provide for this service. Write a Description for the customer application that explains what this service includes.
- The list page displays all services with columns showing Service Name, Service Charge, Estimated Days, Required Documents from Document Type, Description, and is active? toggle switch. You can edit any service to update its information or delete services that are no longer offered. The toggle switch lets you activate or deactivate services without deleting them.
Customer Management
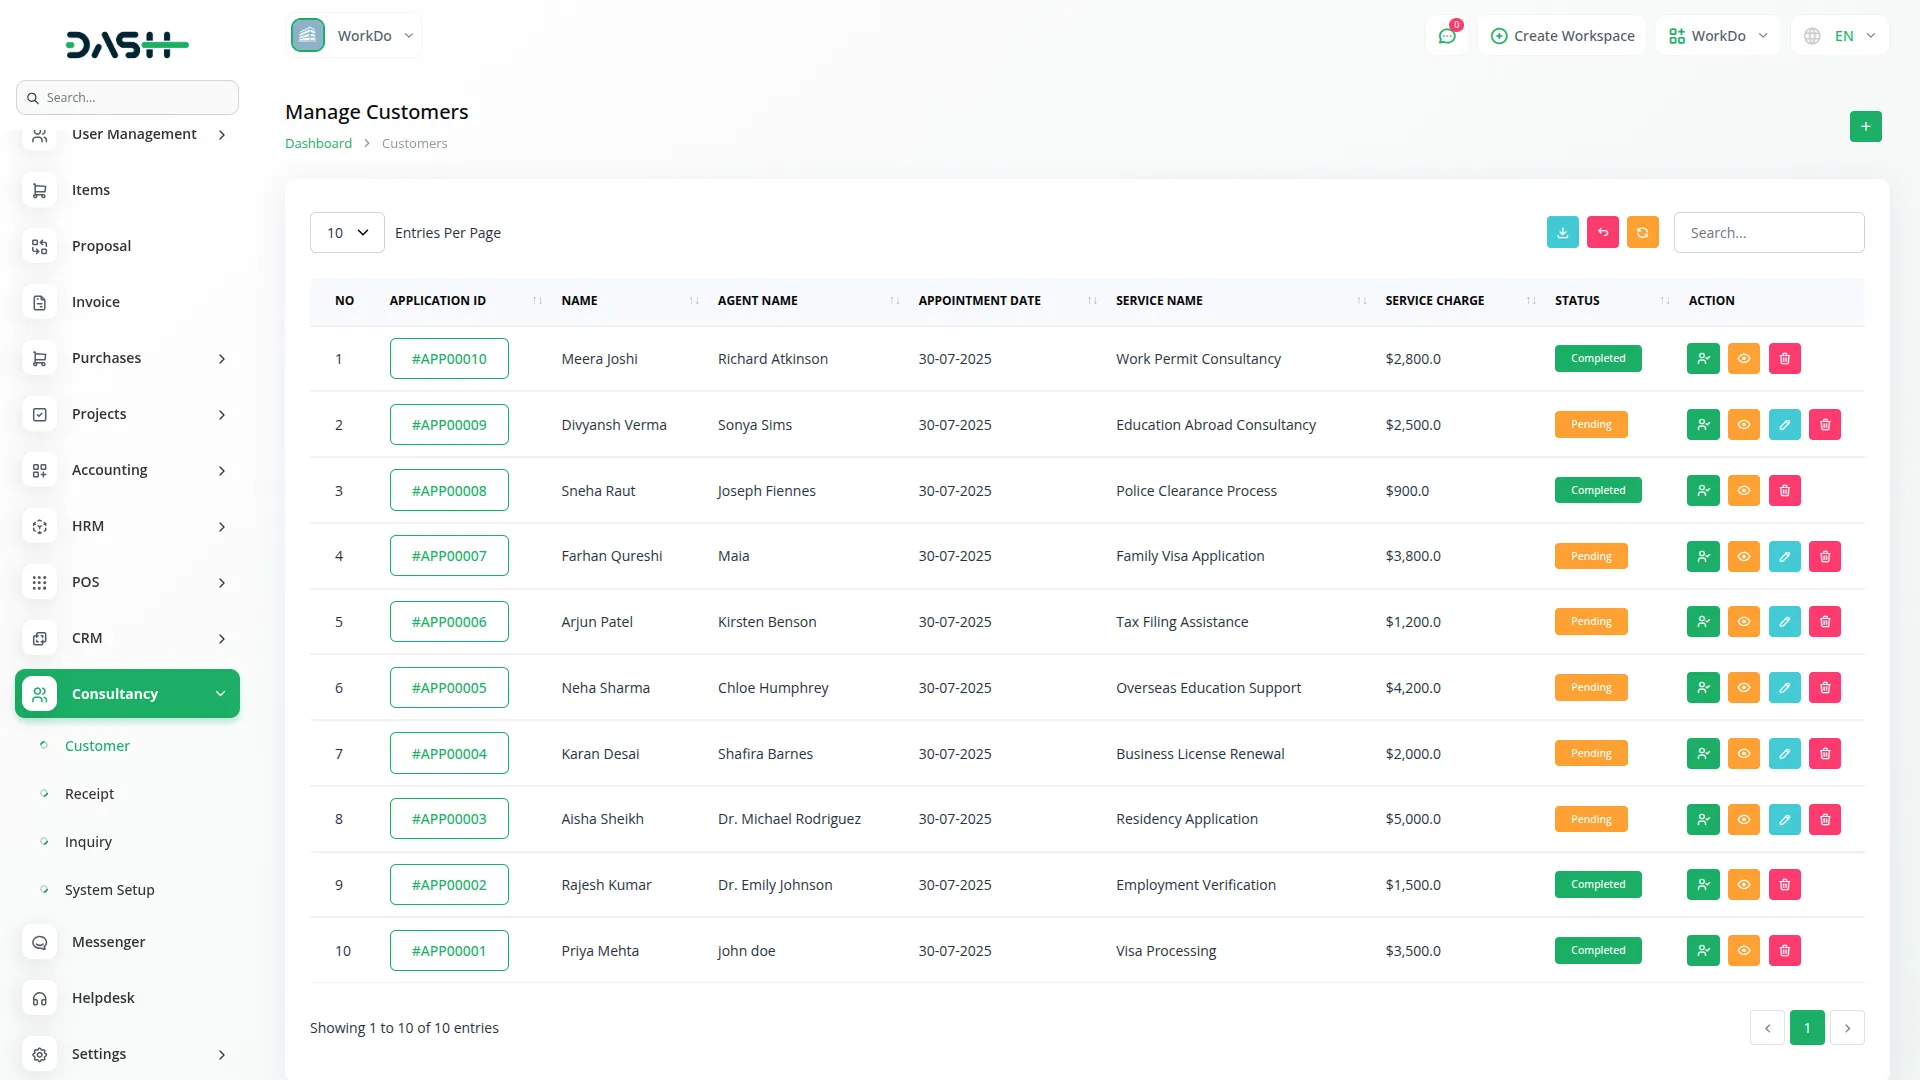
- To register a new customer and their application, click the “Create” button on the customer page. In the Details section, enter the customer’s Name, Email, and Contact No. Add their Date of Birth, select their gender, and provide their Address.
- Upload a Profile Image if available. In the Application section, the Application ID will be automatically generated and displayed as read-only. Choose the Service Type from the available services. The Service Charge and Required Documents will automatically appear as read-only based on your service selection from the system setup.
- Set the Appointment Date, which defaults to today’s date. Add any Remarks if needed. In the Documents section, you can Upload Document Images using the multiple upload option, though this is optional. The list page shows all customer applications with columns for No, Application ID, Customer Name, Agent Name, Appointment Date, Service name, Service charge, and Status, which can be Pending, Processing, completed, or Rejected, with Pending as the default.
- You can use Search to find specific applications or Export to download the list. From the Actions column, you can click Assign agent to open a form where you select an Agent connected with users having staff roles and add an Agent Description.
- Click View to see Customer Details, Agent Details, Application information, Documents with Download option available, and Tracking section where you can add Tracking No, set Tracking Status as Under review, Approved, or Rejected, enter Submission Date, Response Date, and Tracking Remarks for future use.
- Use Edit to update the Status, but note that when the status is completed, the edit option will not display. You can also delete applications if needed.
Customer detail
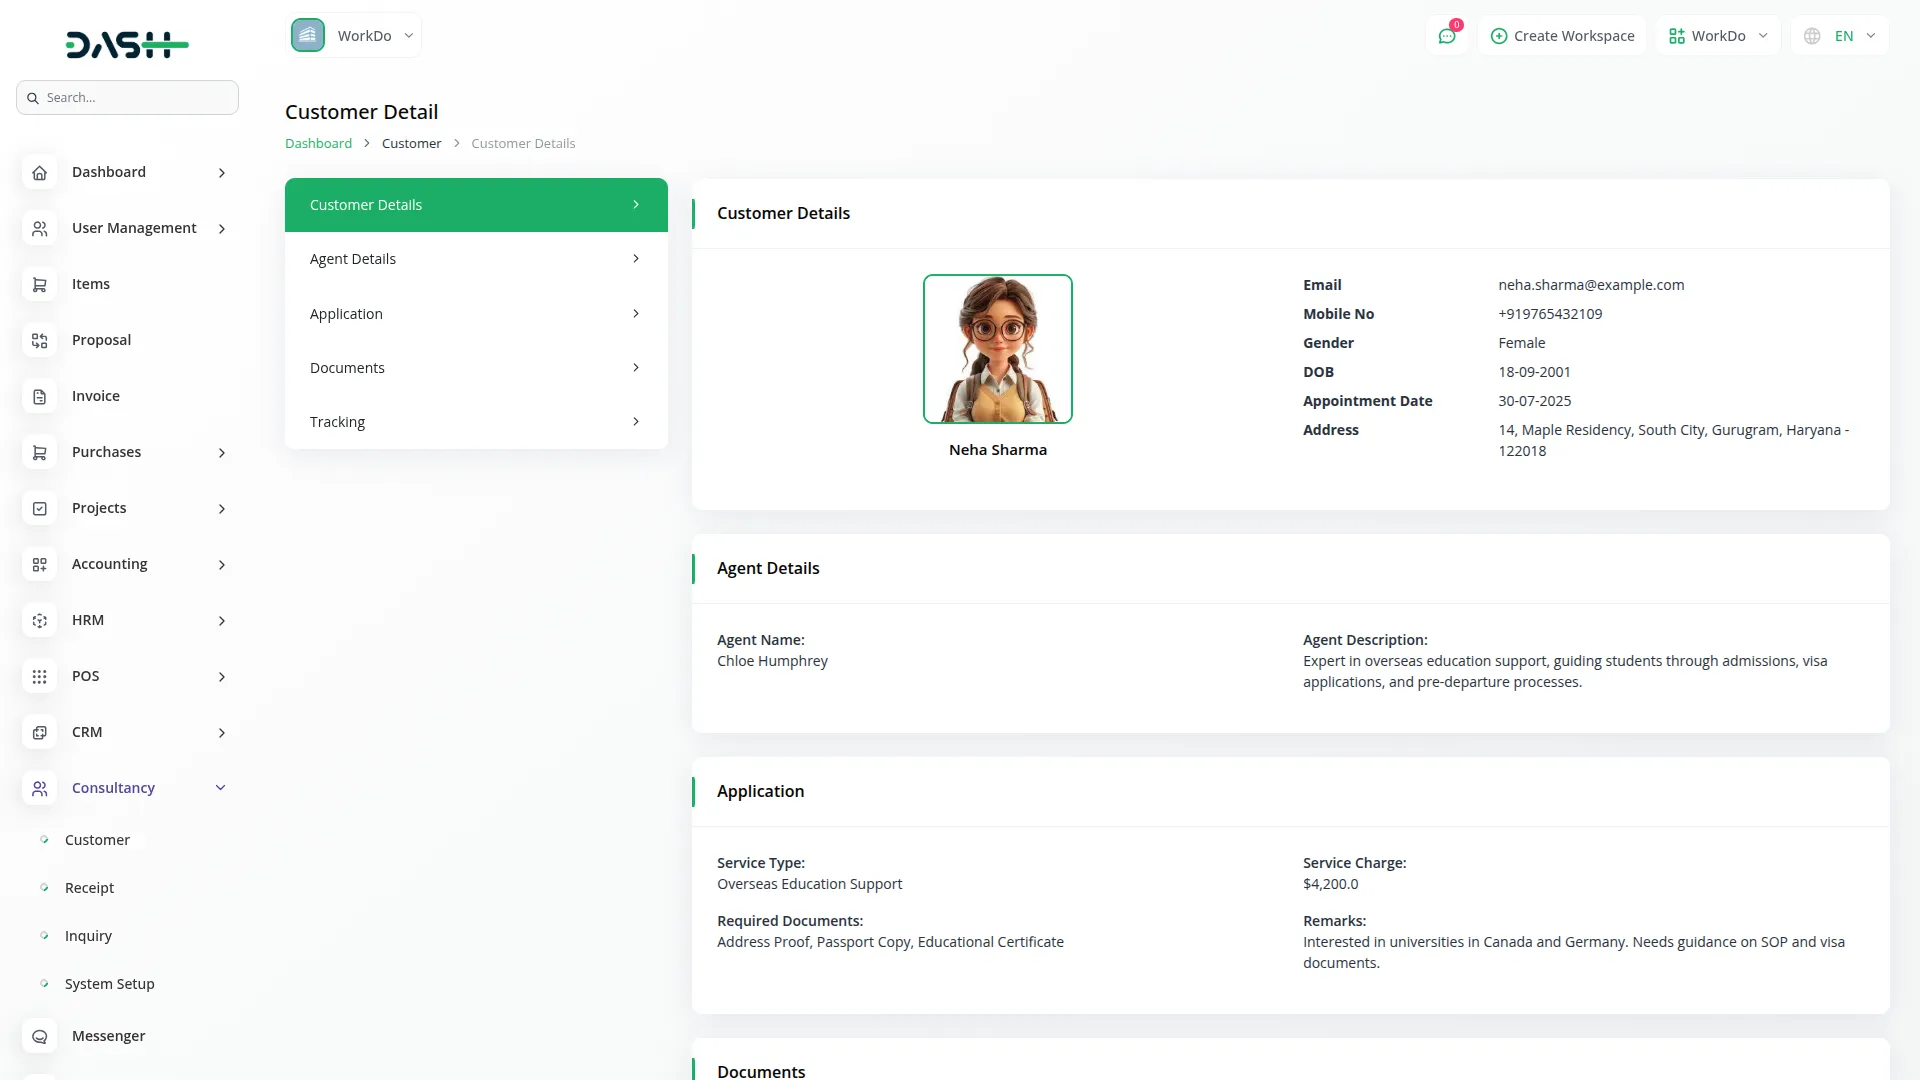
- On the customer detail section, you get to see all basic profile information of the selected customer, such as the customer’s image, email, mobile number, gender, date of birth, appointment date, and address.
Agent detail
- This section shows information about the agent assigned to the customer, like their agent name, agent description.
Application detail
- In this section, you get to see all service-specific application details submitted by the customer, such as the type of service that the customer applied for, service charge, list of required documents, and a remark note for the customer.
Document detail
- This section allows the upload and management of customer-submitted documents required for service processing.
Tracking detail
- This section displayed real-time tracking of the customer’s application status and workflow progress.
Receipt Management
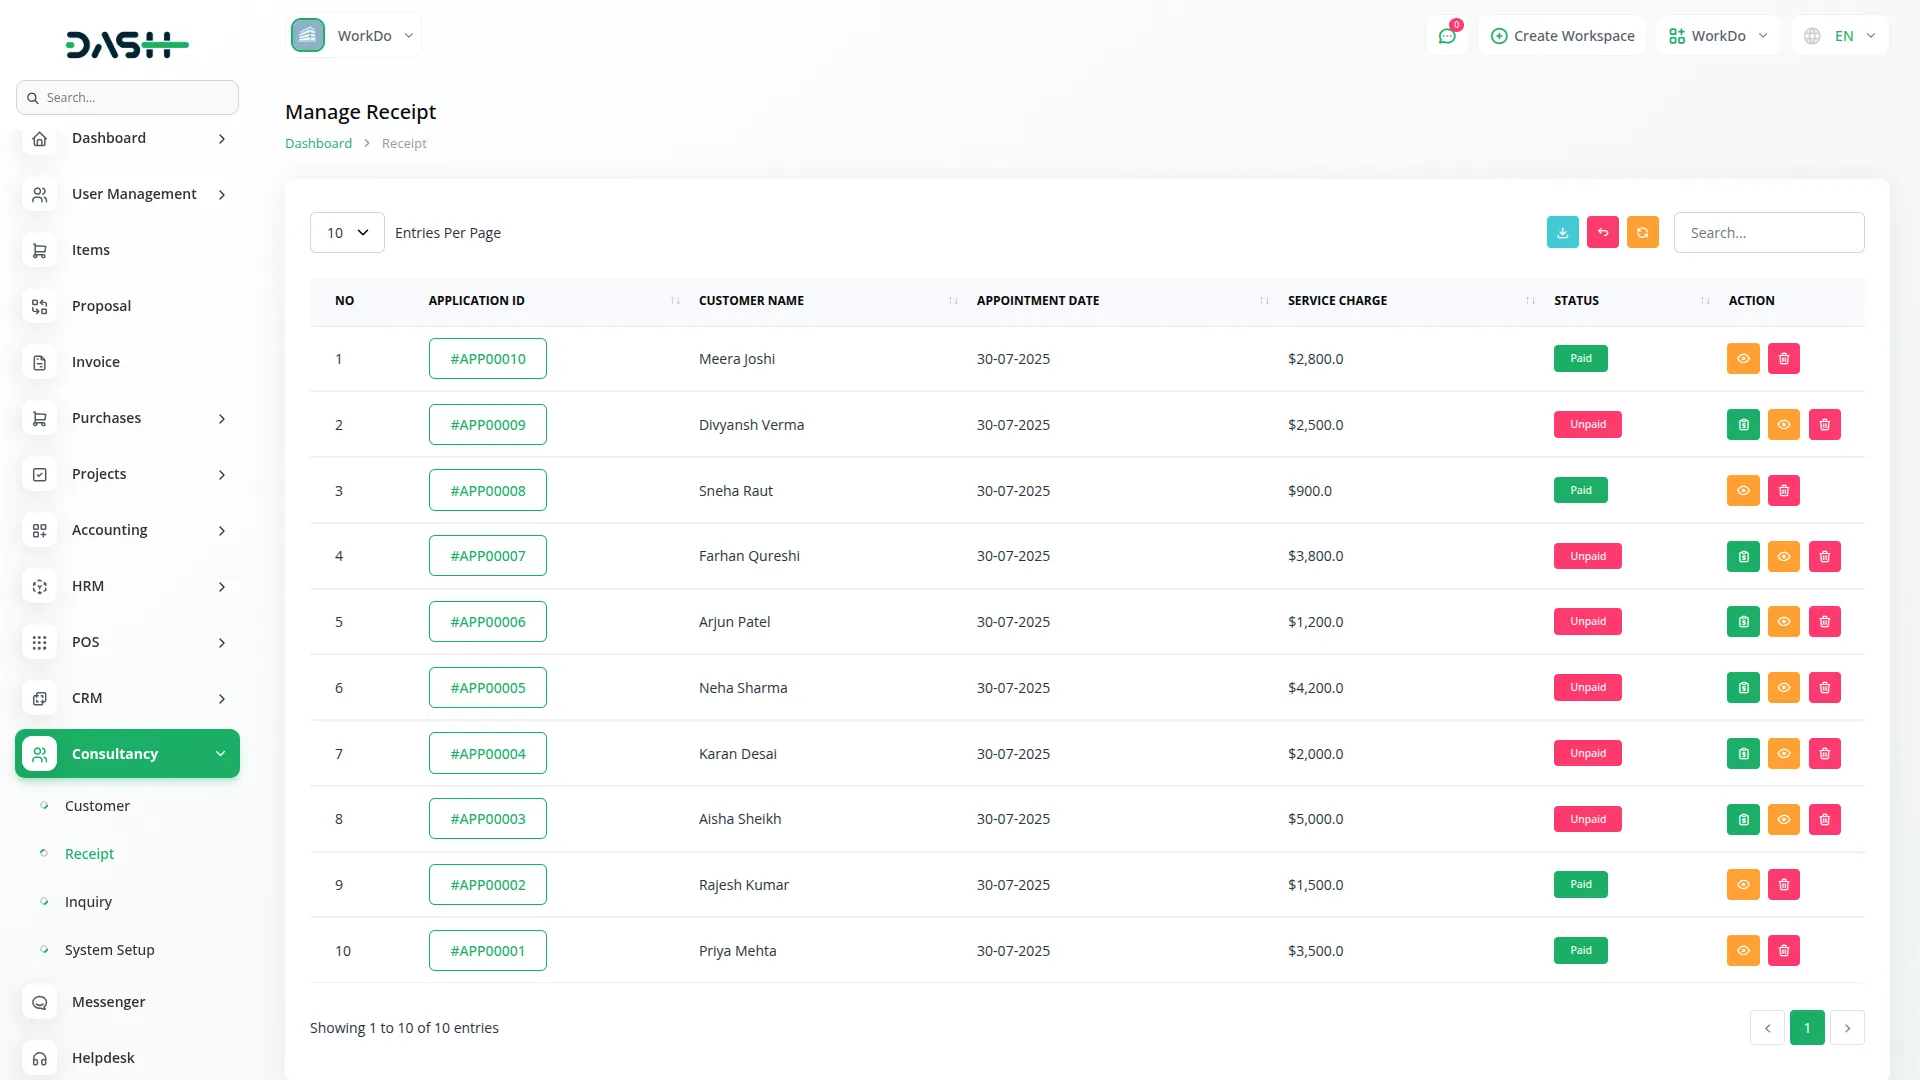
- The Receipt section automatically generates receipts when you create a Customer application. This section does not have a create function since receipts are generated automatically. The list page shows all receipts with columns for No, Application ID, Customer Name, Appointment Date, Service charge, and Status, showing either unpaid or paid.
- You can search for specific receipts or export the receipt list. From the Actions column, click Payment to process payment, but this option will not display when the status is already paid.
- When you set the payment, the Receipt status changes to paid, and the customer status becomes completed. Click View to download the Receipt for printing or saving. You can also delete receipts if necessary.
Inquiry Management
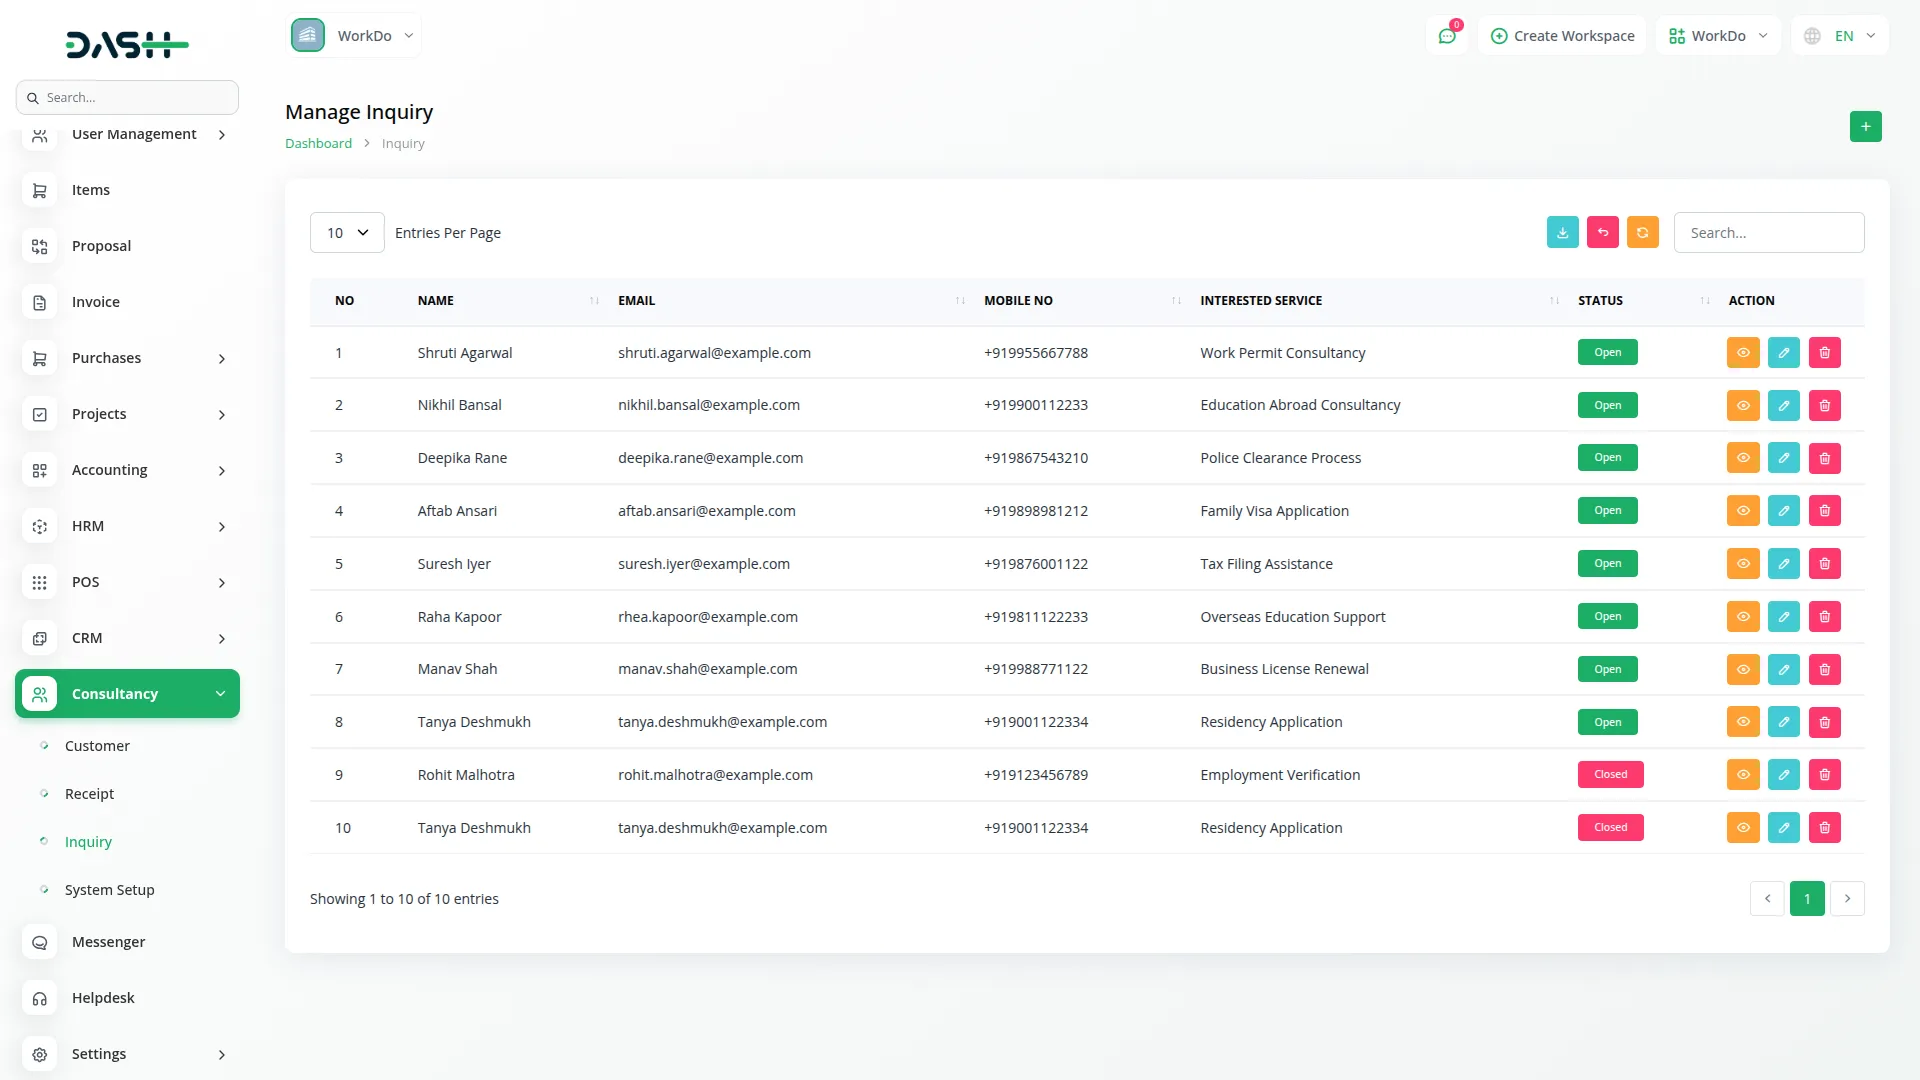
- To create a new inquiry, click the “Create” button on the inquiry page. Enter the person’s Name, Email, and Phone number. Select their Interested Service from the system setup services list. Provide their Address information.
- The list page displays all inquiries with columns showing No, Name, Email, Phone, Interested Service, and status, which can be either open or closed. You can search for specific inquiries or export the inquiry list. From the Actions column, click View to see full inquiry details, Edit to update the Status from the Edit option, or Delete to remove inquiries that are no longer needed.
Agent Workflow
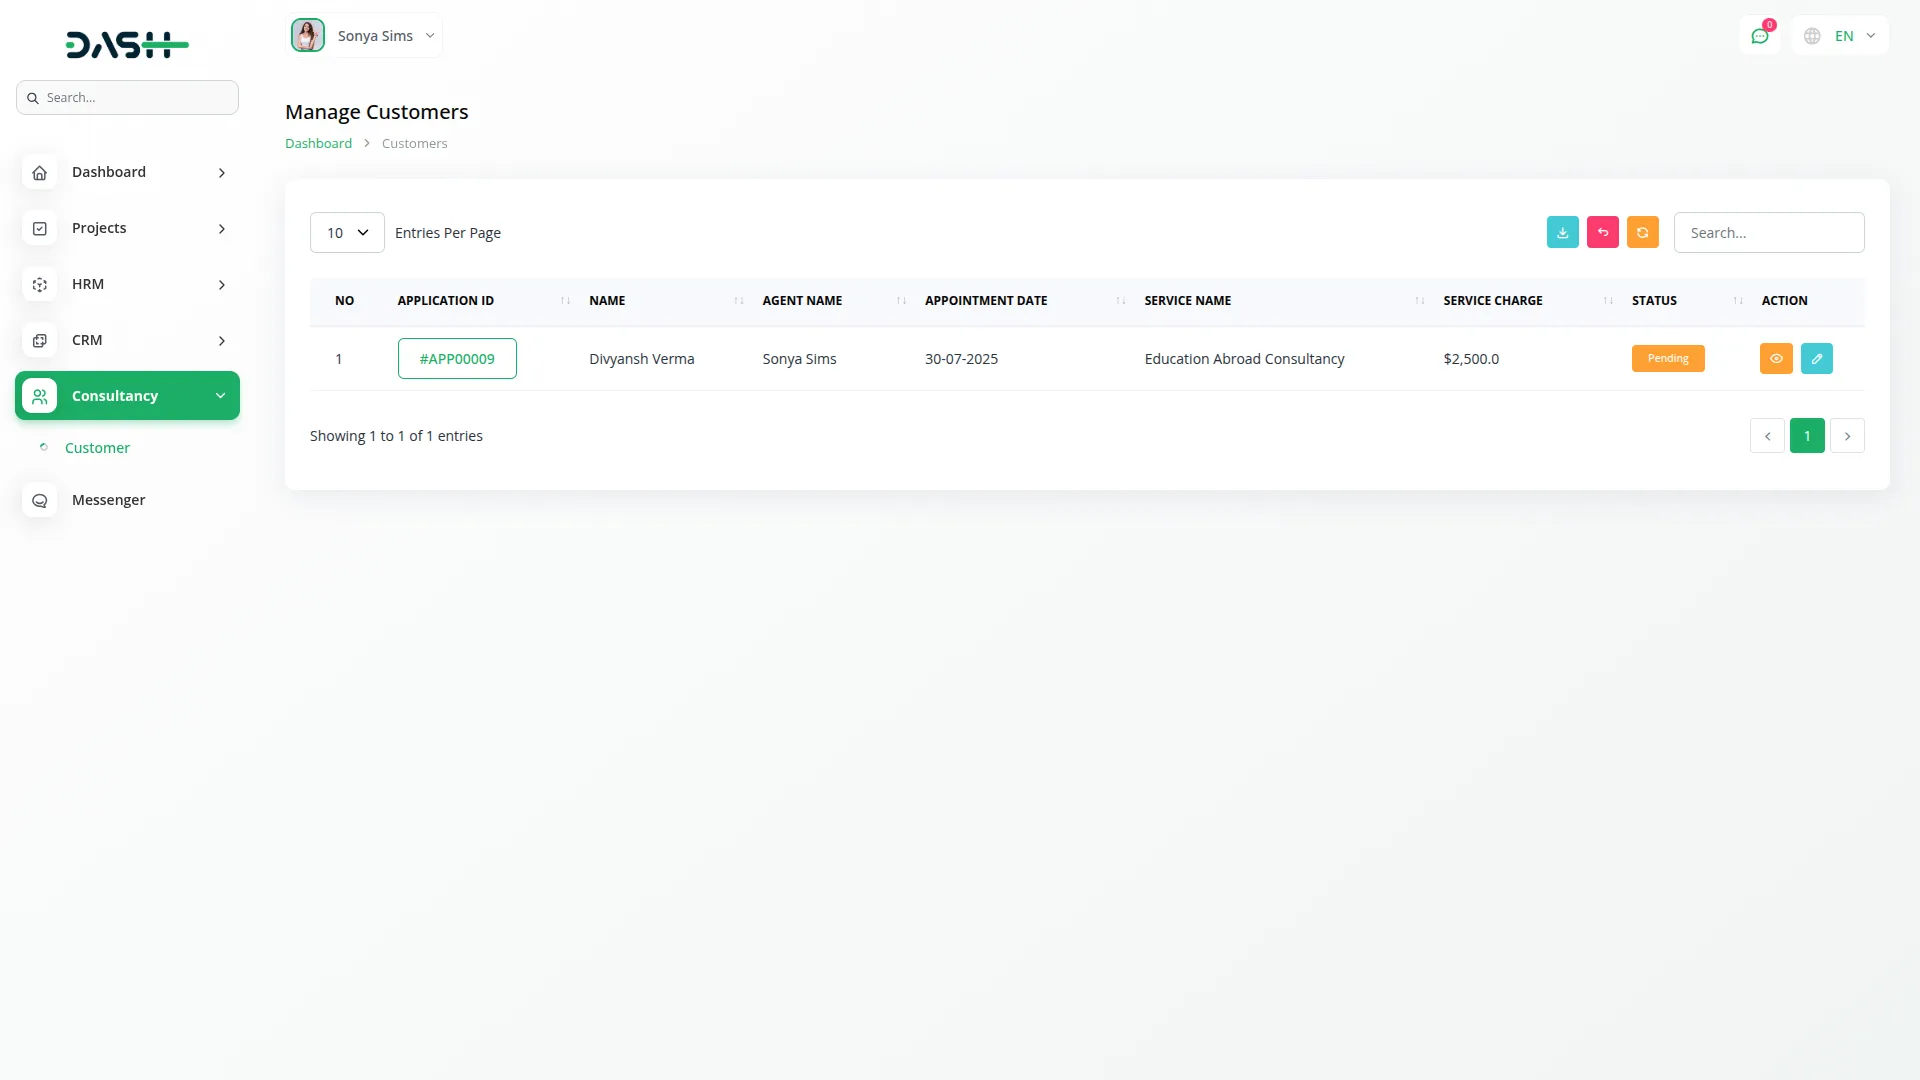
When a customer is assigned to an agent from the company panel, the assigned user (agent) can log in and access the Consultancy Add-on from their sidebar. Within the Customer section, the agent can view only their assigned customers, along with full application details, uploaded documents, and tracking history. They are allowed to update tracking information, edit application status (unless completed), and manage related documents. This ensures agents have a focused and secure view to handle their assigned consultancy cases efficiently.
Categories
Related articles
- eBook Integration in Dash SaaS
- Radiology Management Detailed Documentation
- vCardGo SaaS – Product Features
- Video Hub Integration in Dash SaaS
- Rental Management Integration in Dash SaaS
- PDF Qr Code Integration in vCard SaaS
- Marketing Plan Integration in Dash SaaS
- Microsoft To Do Integration in Dash SaaS
- Sendinblue Integration in Dash SaaS
- Frequently Product Integration in eCommerceGo SaaS
- Insurance Management Integration in Dash SaaS
- Support Ticket Integration in Dash SaaS
Reach Out to Us
Have questions or need assistance? We're here to help! Reach out to our team for support, inquiries, or feedback. Your needs are important to us, and we’re ready to assist you!


Need more help?
If you’re still uncertain or need professional guidance, don’t hesitate to contact us. You can contact us via email or submit a ticket with a description of your issue. Our team of experts is always available to help you with any questions. Rest assured that we’ll respond to your inquiry promptly.
Love what you see?
Do you like the quality of our products, themes, and applications, or perhaps the design of our website caught your eye? You can have similarly outstanding designs for your website or apps. Contact us, and we’ll bring your ideas to life.
