PrintPress Management Integration in Dash SaaS
PrintPress Management is a comprehensive Add-On solution designed to streamline and manage all aspects of a printing business.
Introduction
PrintPress Management is a comprehensive Add-On solution designed to streamline and manage all aspects of a printing business. The system helps you manage customer relationships, track orders from creation to delivery, monitor printing jobs across different machines, manage materials and inventory, track expenses, and coordinate deliveries. With its integrated dashboard, you can get real-time insights into your business operations, including total customers, orders, print jobs, materials, and machines. The software provides complete visibility into your printing operations while maintaining detailed records of all transactions and processes.
How to Install the Add-On?
To Set Up the PrintPress Management Add-On, you can follow this link: Setup Add-On.
How to use the PrintPress Management Add-On?
PrintPress Dashboard
- After purchasing and installing this Add-On, navigate to the sidebar and search for the PrintPress Dashboard.
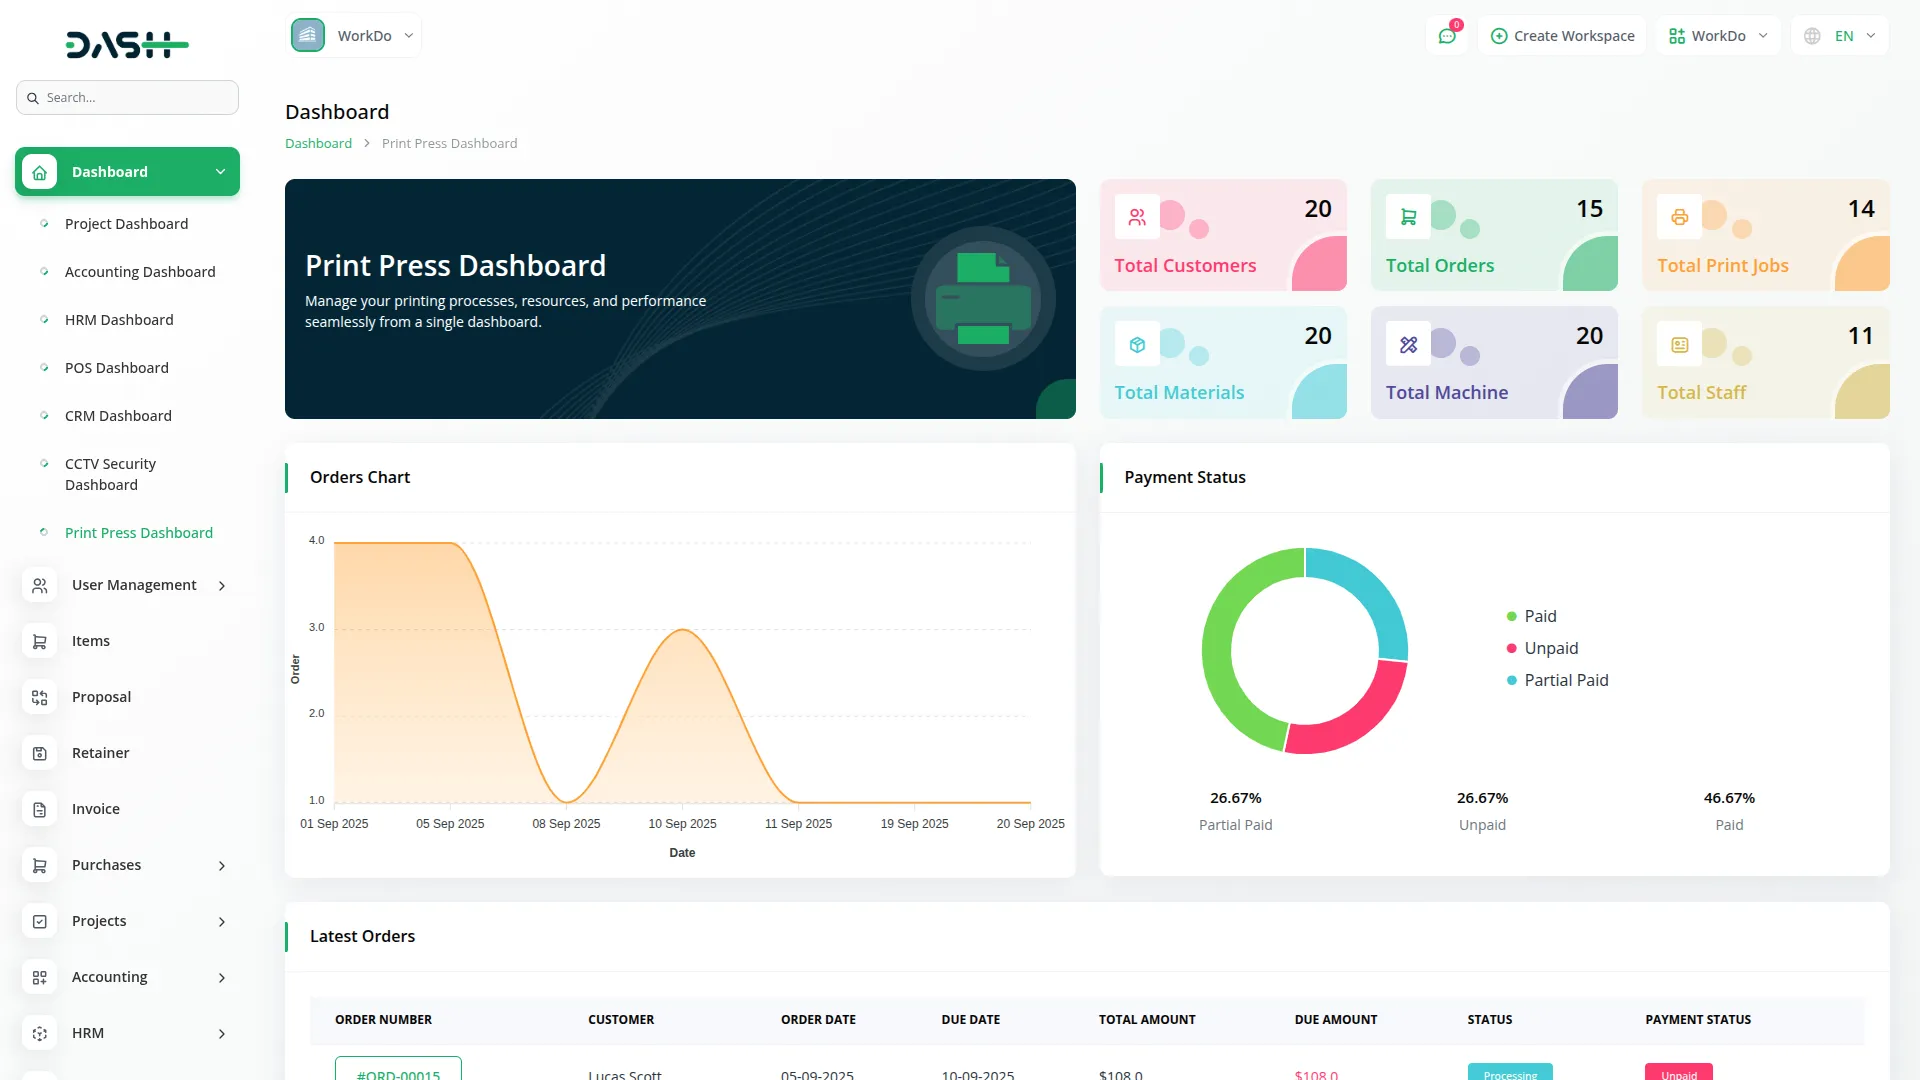
- When you access the dashboard, you will see six key performance cards displaying Total Customers, Total Orders, Total Print Jobs, Total Material, Total Machines, and Total Staff. These cards give you instant visibility into the current state of your business.
- Below the performance cards, you’ll find a chart that shows your orders data in a visual format, helping you track order trends over time.
- Additionally, there’s a Payment Status chart that displays a circular graph showing the breakdown of your payment collections. This chart uses different colours to represent Paid amounts in green, Unpaid amounts in red, and Partial Paid amounts in blue, giving you a quick visual overview of your payment collection status.
- The main section of the dashboard features an orders table that displays critical information, including Order Number, Customer, Order Date, Due Date, Total Amount, Due Amount, Status, and Payment Status. This table allows you to quickly identify urgent orders, payment statuses, and overall business performance at a glance.
Manage Customers
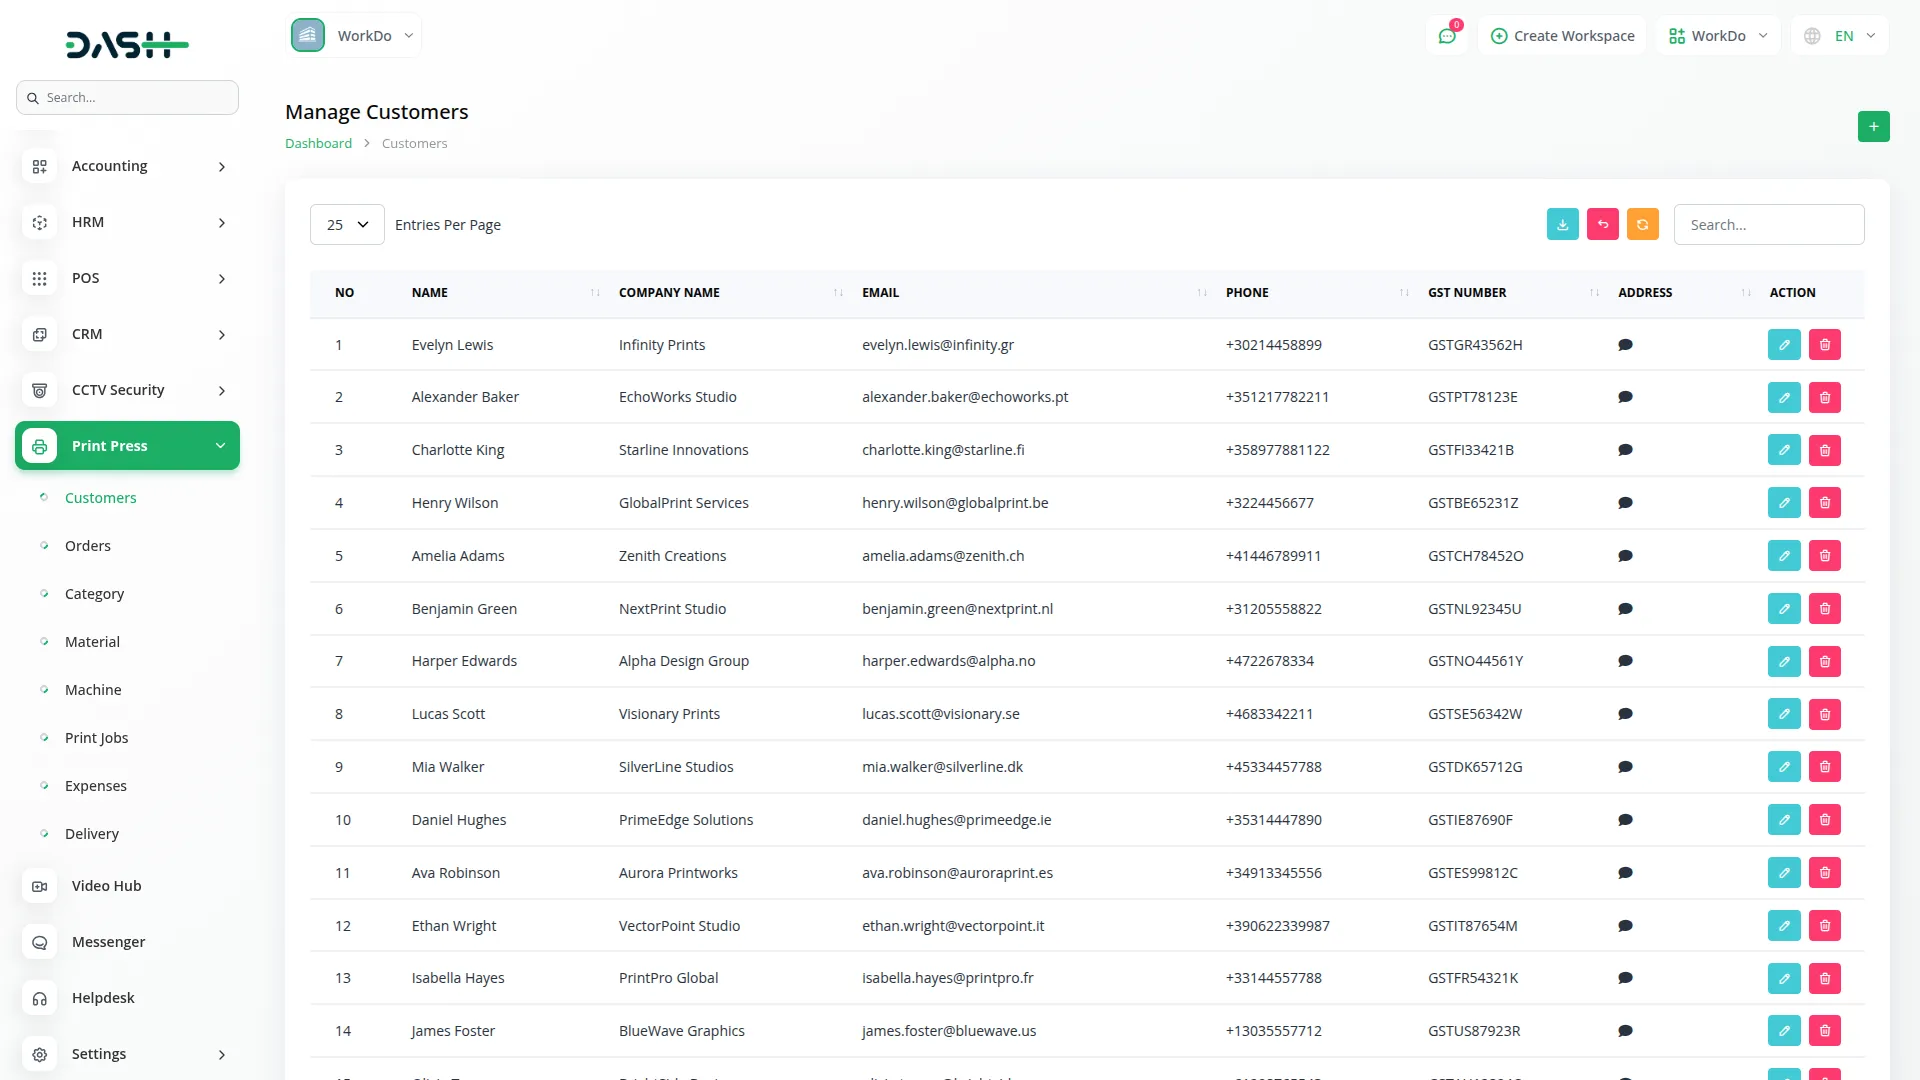
- To add a new customer, click the “Create” button at the top of the customers page. Fill out the customer form by entering the Name, Company Name, Phone, Email, Address, and GST Number.
- All these details help you maintain complete customer records for communication purposes. Once you’ve entered all the required information, click “Submit” to create the customer record.
- The customers list page displays all your customers in a table format with columns for No, Name, Company Name, Phone, Email, Address, and GST Number. You can use the Search function to quickly find specific customers or the Export button to download customer data. In the Actions column, you can click Edit to modify customer information or Delete to remove a customer record from the system.
Manage Category
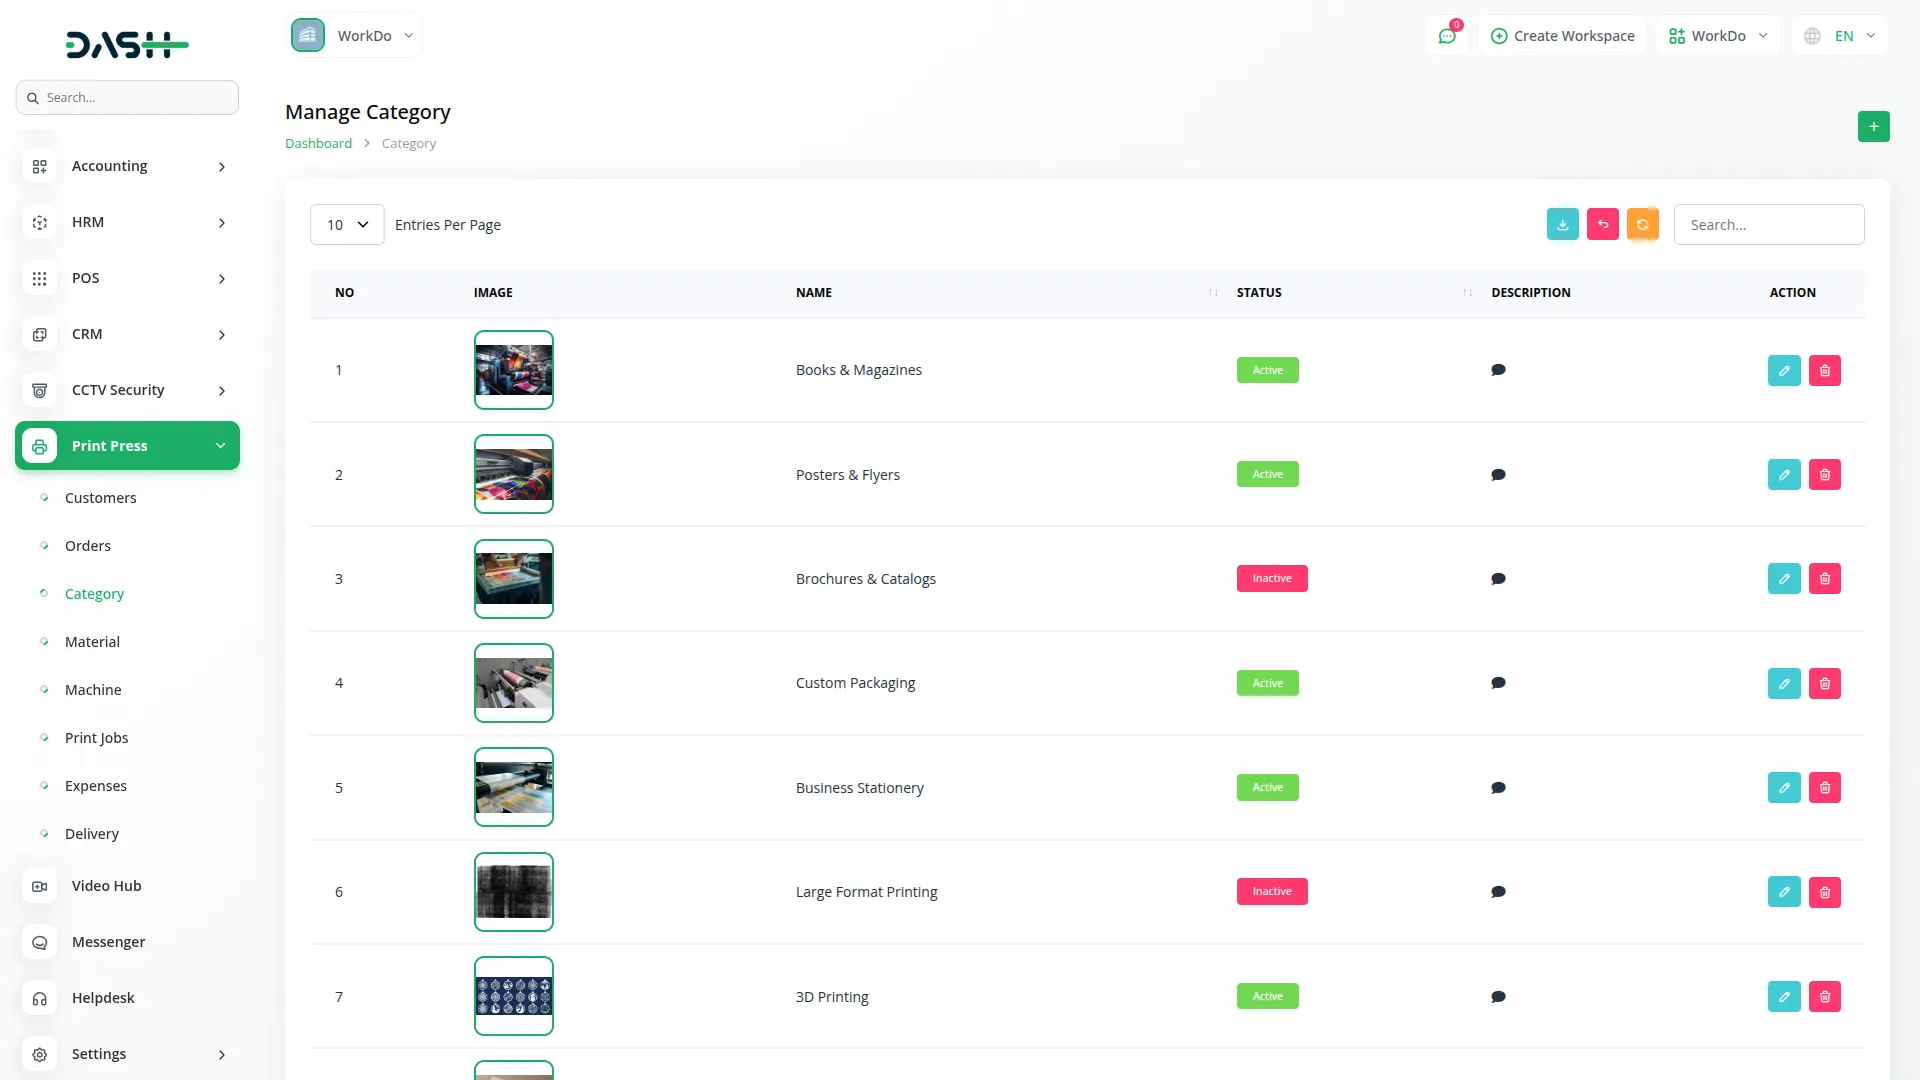
- To create a new category, click the “Create” button on the categories page. Enter the category Name, select the Status (either ‘Active’ or ‘Inactive’), upload an Image, and provide a Description. Categories help organise your materials and make them easier to find when creating orders.
- The categories list page displays all categories in a table with columns for No, Image, Name, Status, and Description. You can search through categories or export the data as needed. The Actions column provides Edit and Delete options to modify or remove categories from your system.
Manage Material
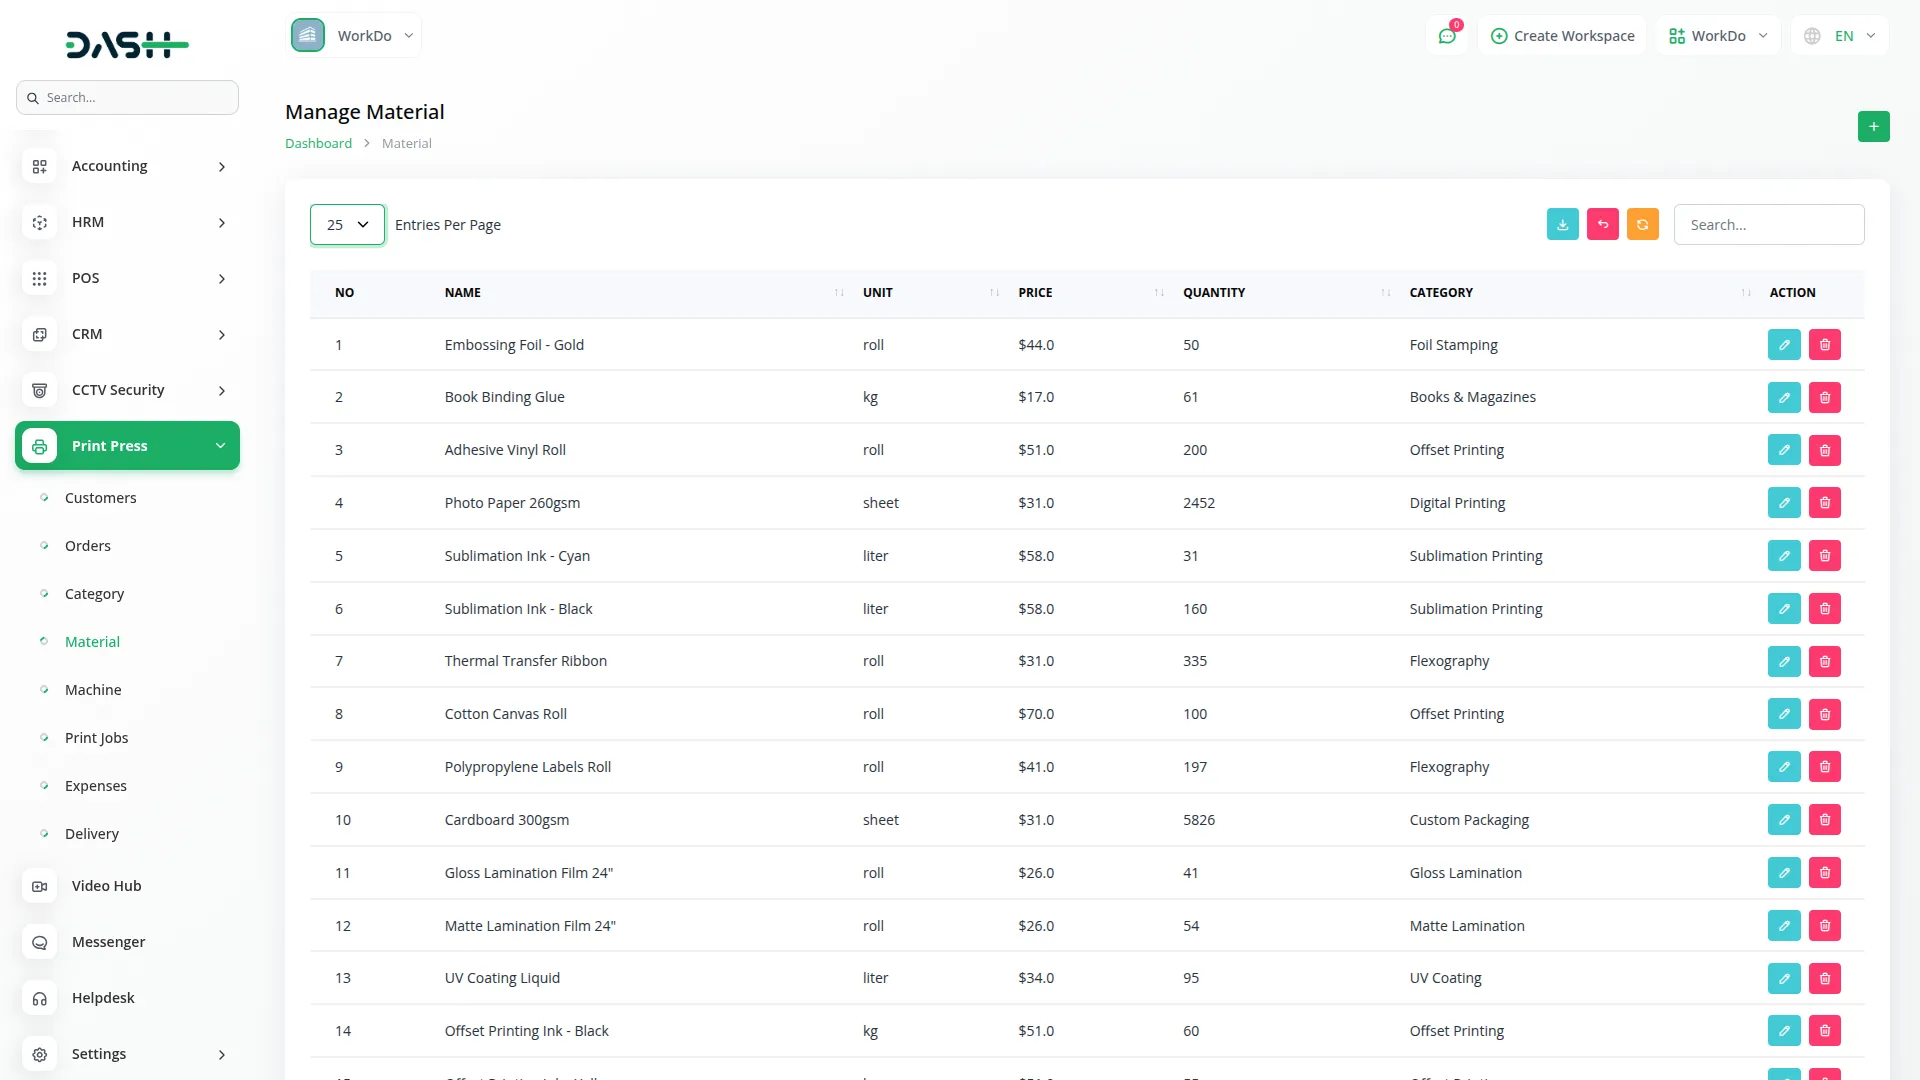
- On this page, to add a new material, click the “Create” button at the top of the material page. Fill in the required information, like material Name, Unit (such as pieces, kg, or metres), Price, Quantity, and select the appropriate Category from the dropdown menu. The Category dropdown generated all available categories you’ve created in the Category section, making it easy to organise your materials properly.
- The materials list page shows all your inventory items with columns for No, Name, Unit, Price, Quantity, and Category. Use the Search and Export buttons to find specific materials or download material data. In the Actions column, you can edit material details or delete materials that are no longer needed in your inventory.
- When an order is created, the system automatically reduces the quantity of the materials used for that order from the inventory. Conversely, when you record a material expense (like restocking), the system adds the quantity back into your inventory. This ensures your material quantities are always accurate and up to date.
Manage Orders
- After creating a customer, navigate to the manage order page to create a new order by clicking the “create” button given at the top of the page. Start by selecting the Customer from the dropdown menu, then enter the Order Date and Due Date. The Order Number will be automatically generated by the system, so you don’t need to enter this manually.
- In the materials section, you can add multiple materials to your order using the repeater functionality. For each material, select the Material from the dropdown, enter the Quantity (which you can edit as needed), and the Price will be automatically fetched based on the selected material. The system will automatically calculate the Amount for each material line and the Total Amount for the entire order.
- The orders list page shows all orders with columns for No, Order Number, Customer, Order Date, Due Date, Total Amount, Due Amount, Status, and Payment Status. You can search for specific orders or export the order data using the respective buttons.
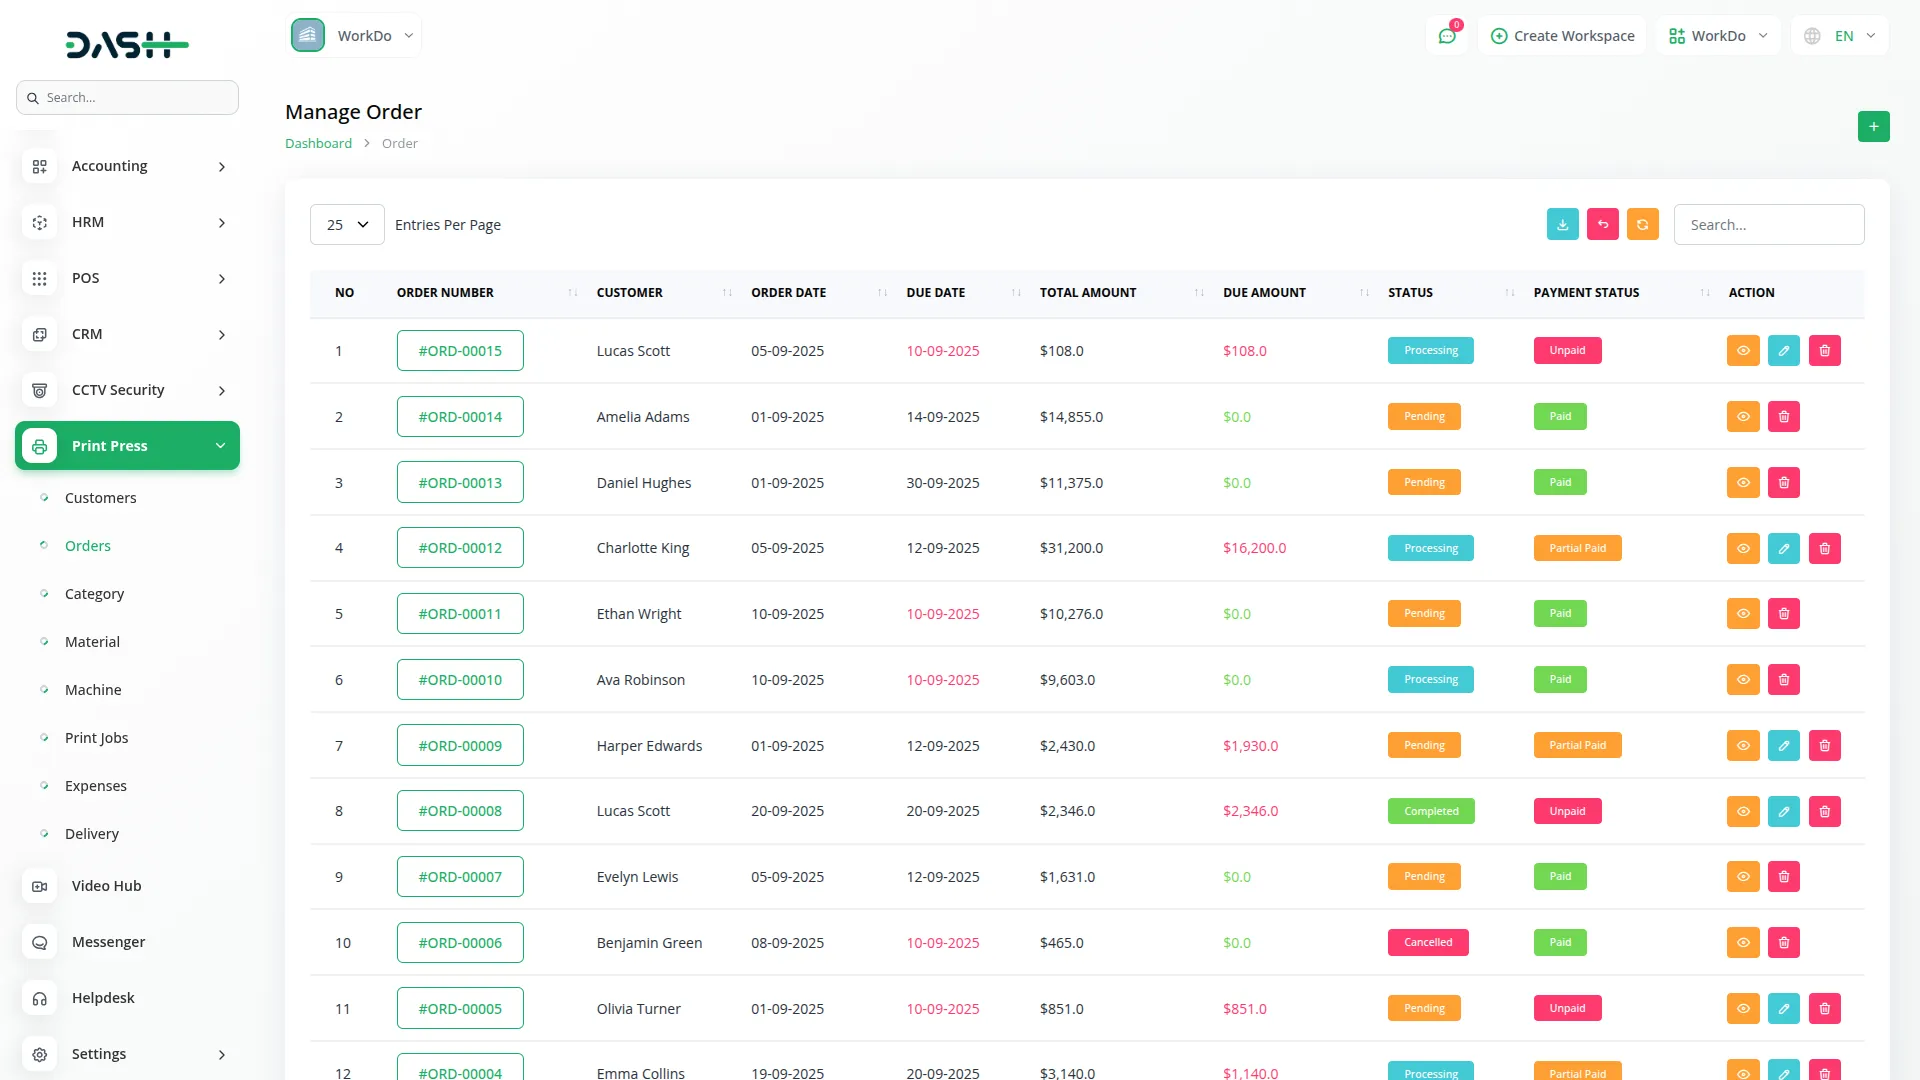
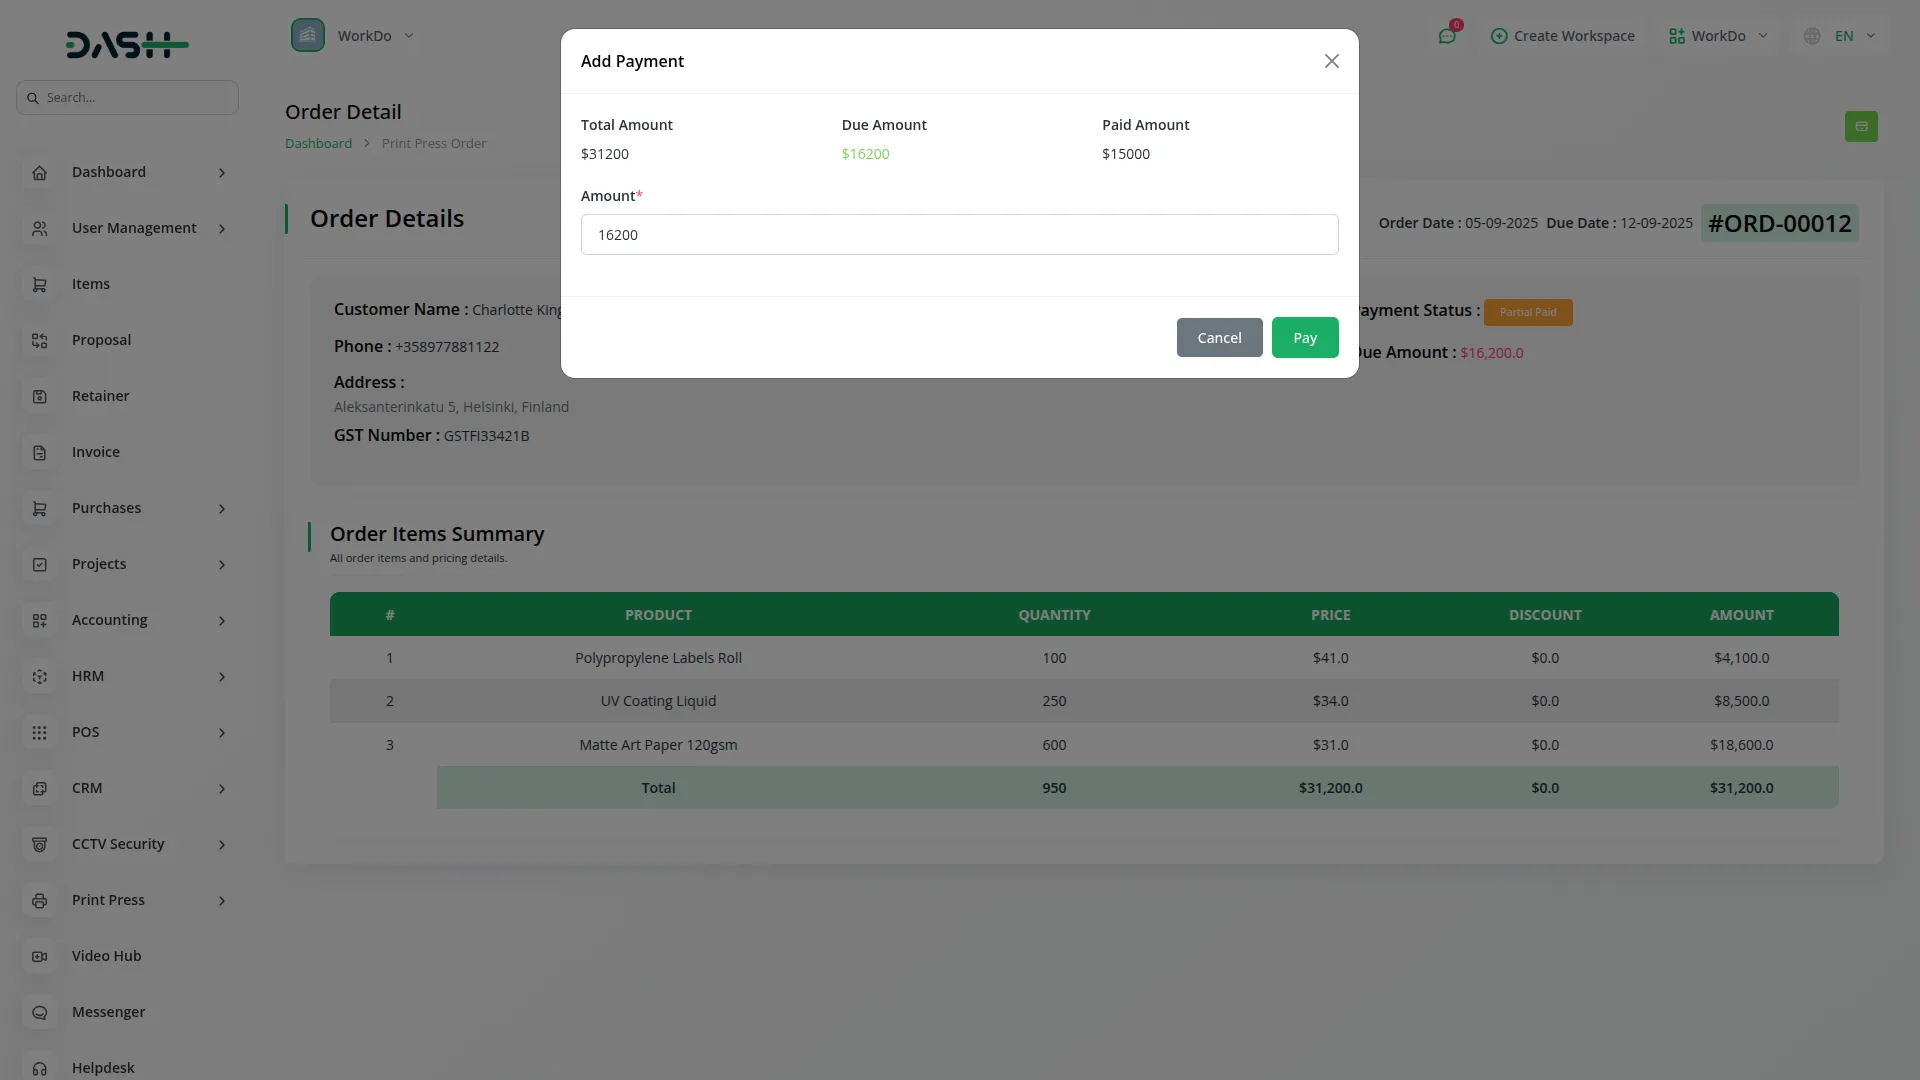
- In the Actions column, you have three options: View, Edit, and Delete. When you click View, you’ll see the complete order details along with a Payment button. Clicking the Payment button opens a payment form showing Total Amount, Due Amount, Paid Amount, and an Amount field where you can enter the payment amount. You can then click Pay to process the payment or Cancel to return without making changes.
Manage Machines
- To add a new machine, click the “Create” button on the machines page. Enter the machine Name, Serial Number, and select the Type from the available options, including Digital, Offset Lithography, Flexographic, Rotogravure, Screen, Letterpress, or 3D.
- Beyond that, choose the Status (Active, Maintenance, or Retired) based on the current condition of your machine. Enter the Purchase Date, Last Service Date, and Location where the machine is installed.
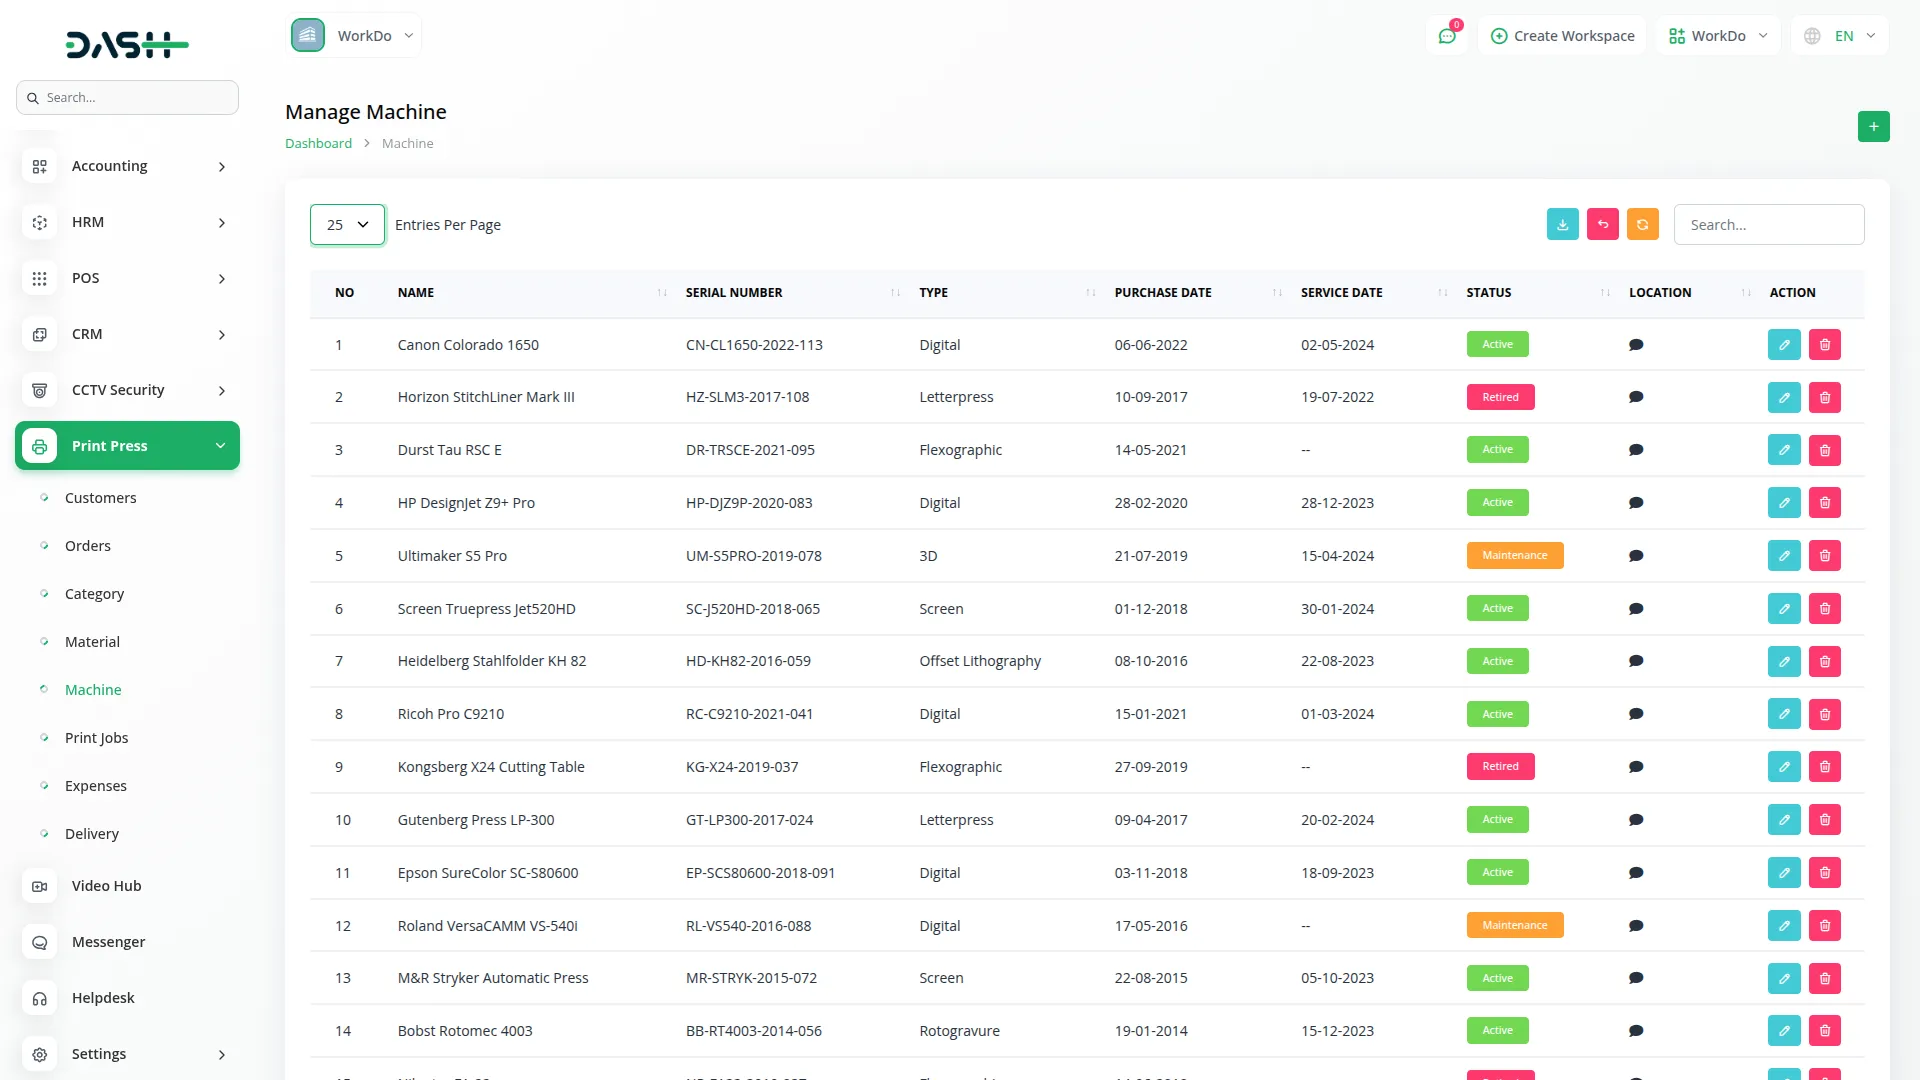
- The machines list page displays all your printing equipment with columns for No, Name, Serial Number, Type, Status, Purchase Date, Service Date, and Location. You can search for specific machines or export machine data using the respective buttons. The Actions column provides Edit and Delete options to update machine information or remove equipment records from the system.
Print Job Management
- To create a new print job, click the “Create” button on the print jobs page. Select the Order Number from the dropdown menu, which fetches all available orders from the Orders section. Choose the Machine from the dropdown that displays all machines from the Machines section.
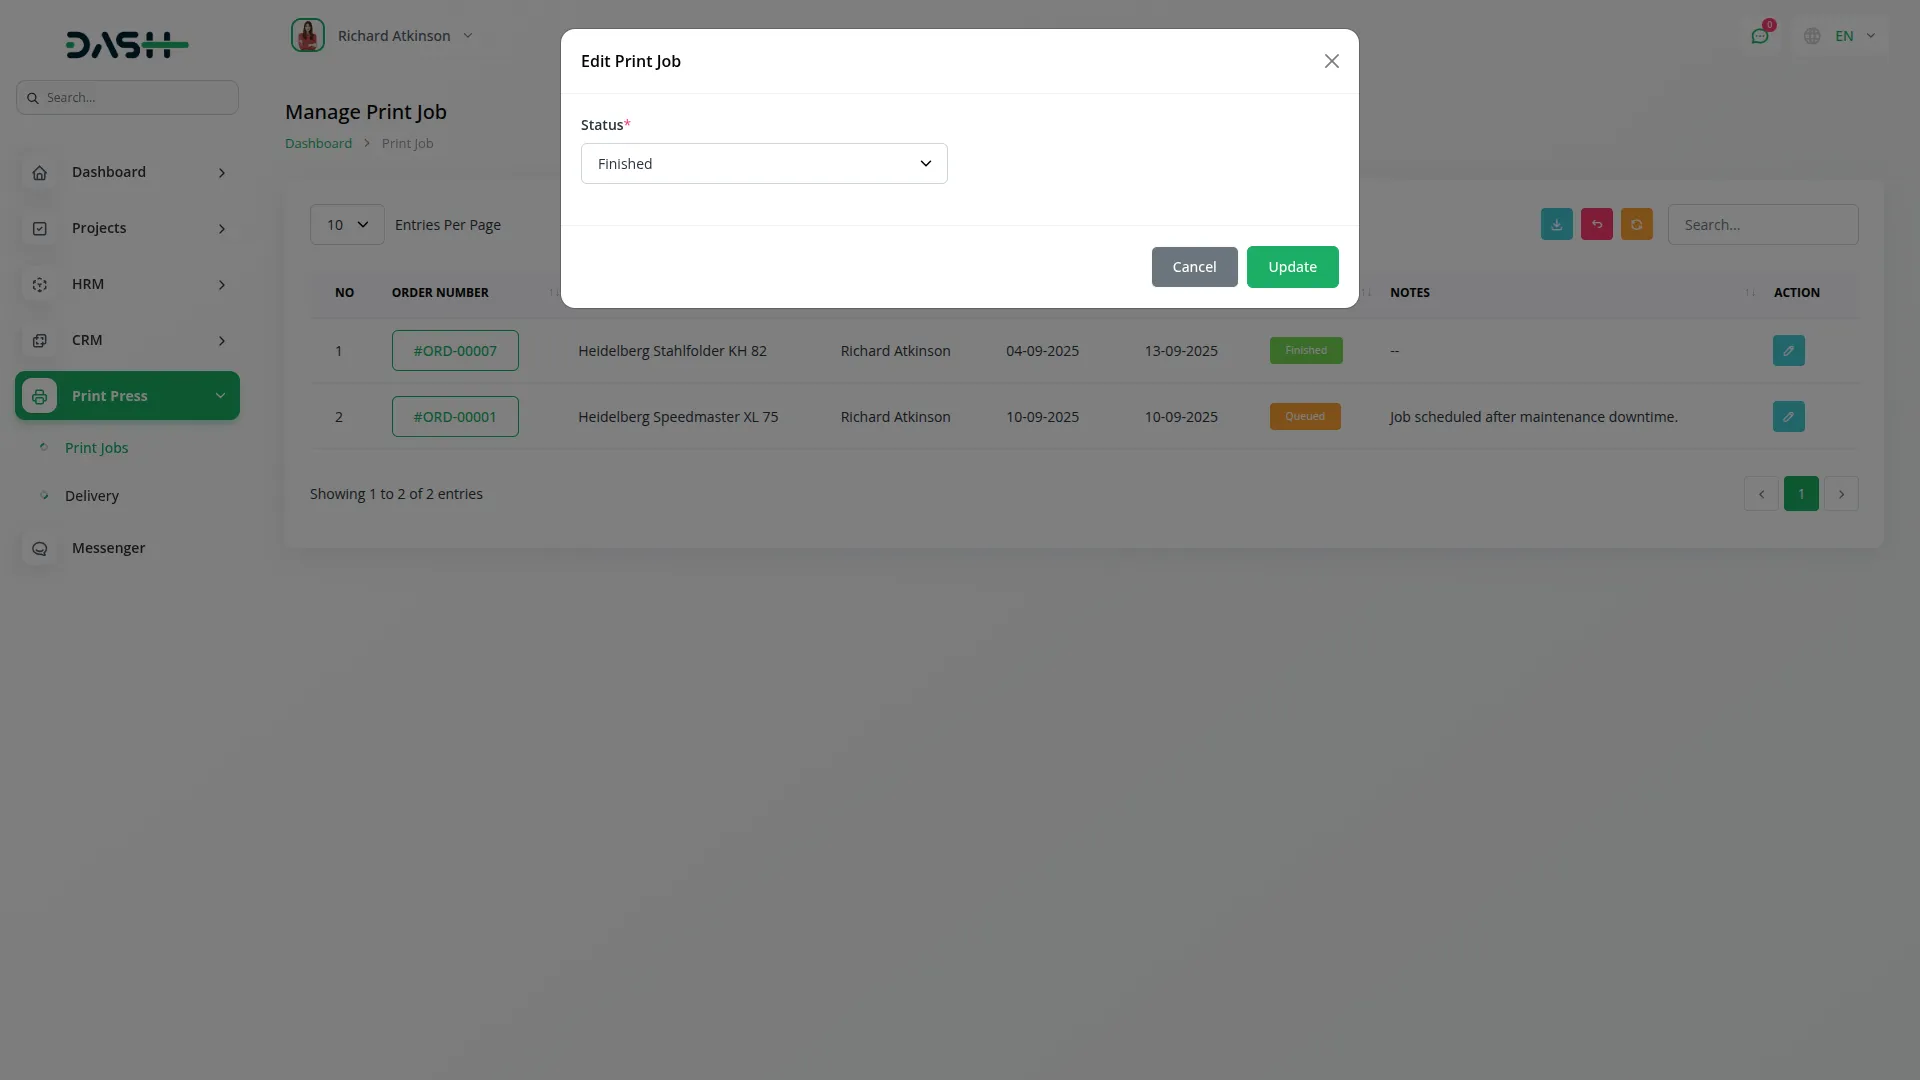
- Below the details, select the Staff member from the dropdown, which fetches users from the Users section. Enter the Start Date and End Date for the job, select the Status (Queued, Printing, Finished, or Cancelled), and add any relevant Notes about the job.
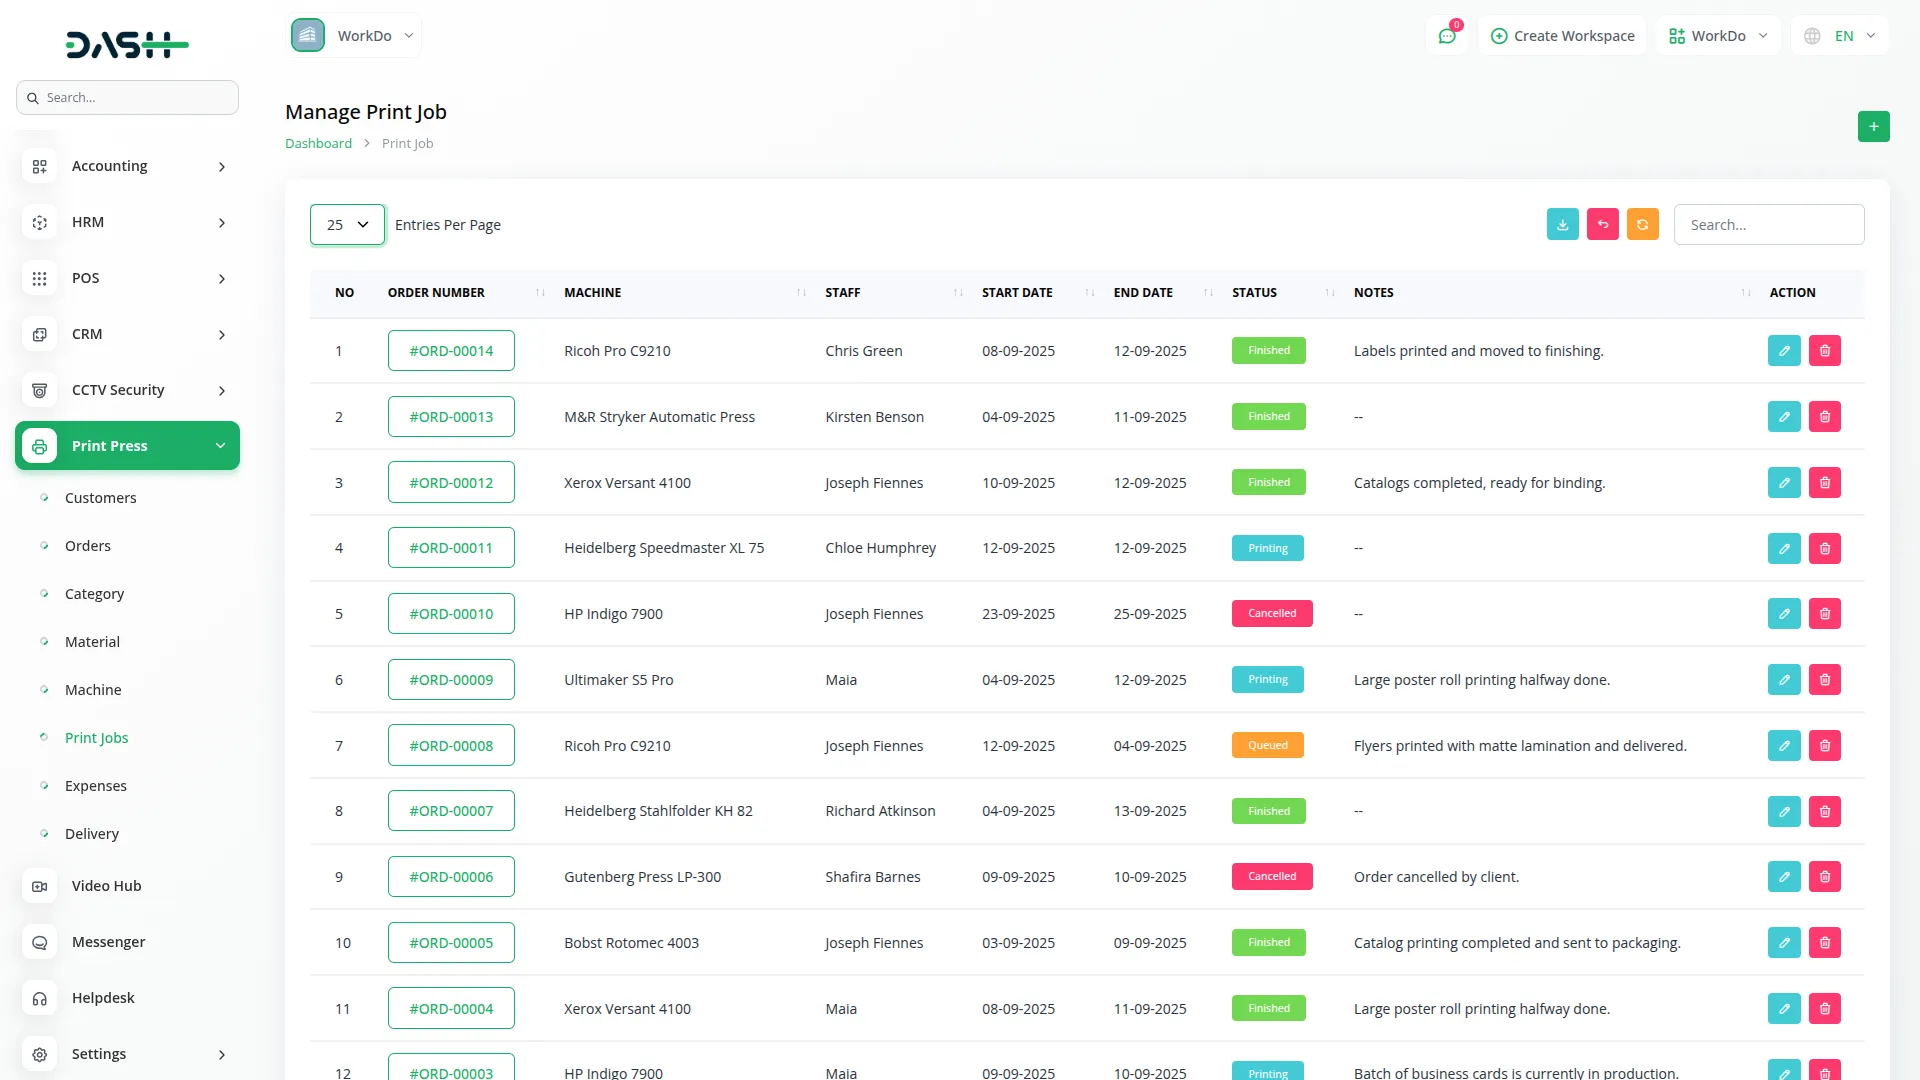
- The print jobs list page shows all printing tasks with columns for No, Order Number, Machine, Staff, Start Date, End Date, Status, and Notes. Use the Search and Export functions to find specific jobs or download job data. In the Actions column, you can Edit job details or Delete print jobs that are no longer needed.
- Staff members can log in to see the print jobs assigned to them. They can also update the status of each print job directly from their dashboard, ensuring all job progress is tracked in real time.
Manage Expense
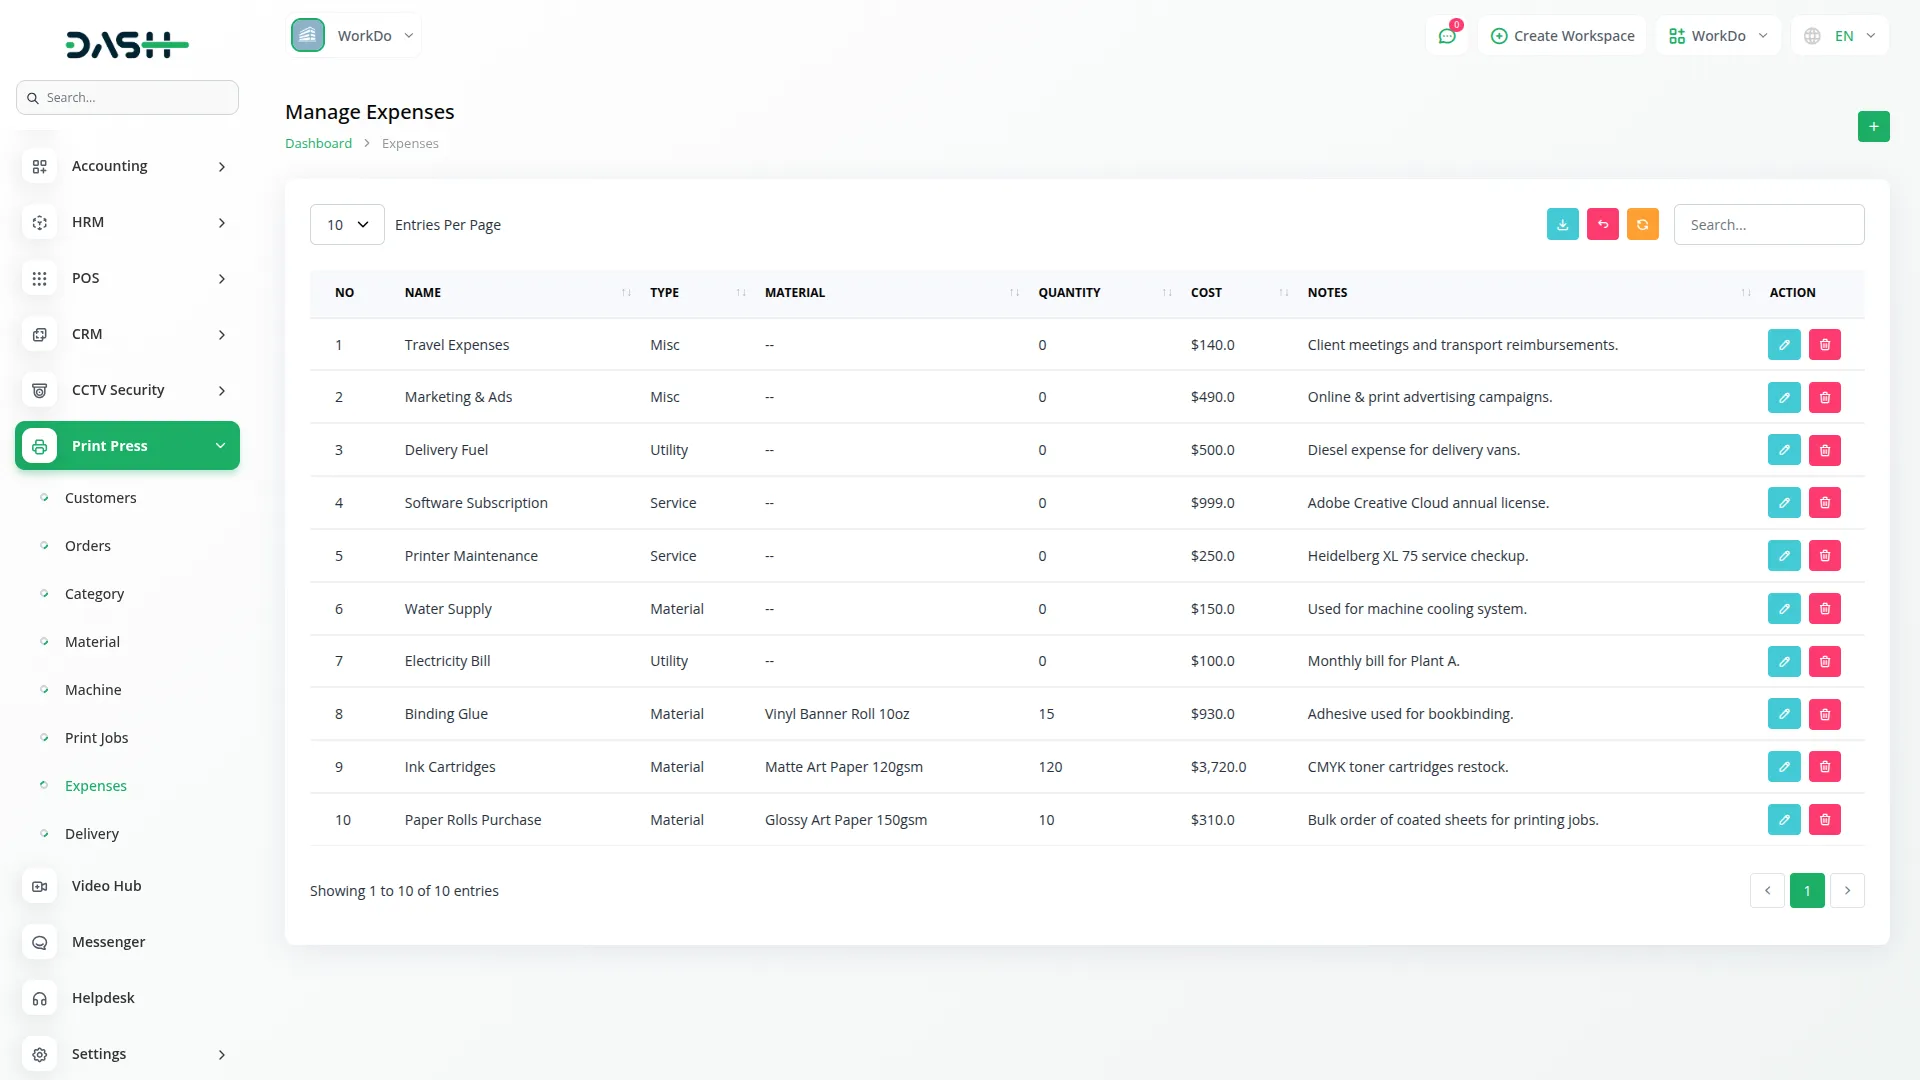
- To record a new expense, click the “Create” button on the expenses page. Enter the expense Name and select the Type from the options: Material, Utility, Service, or Misc. If the expense is material-related, select the Material from the dropdown, which fetches items from the Material section.
- Enter the Quantity used and the Cost will be automatically fetched based on the selected material, though you can edit the cost if needed. Add any relevant Notes to describe the expense in more detail.
- The expenses list page displays all recorded expenses with columns for No, Name, Type, Material, Quantity, Cost, and Notes. You can search through expenses or export expense data for accounting purposes. The Actions column offers Edit and Delete options to modify expense records or remove entries from the system.
Manage Delivery
- To schedule a new delivery, click the “Create” button on the deliveries page. Select the Order Number from the dropdown menu, which fetches all available orders from the Orders section.
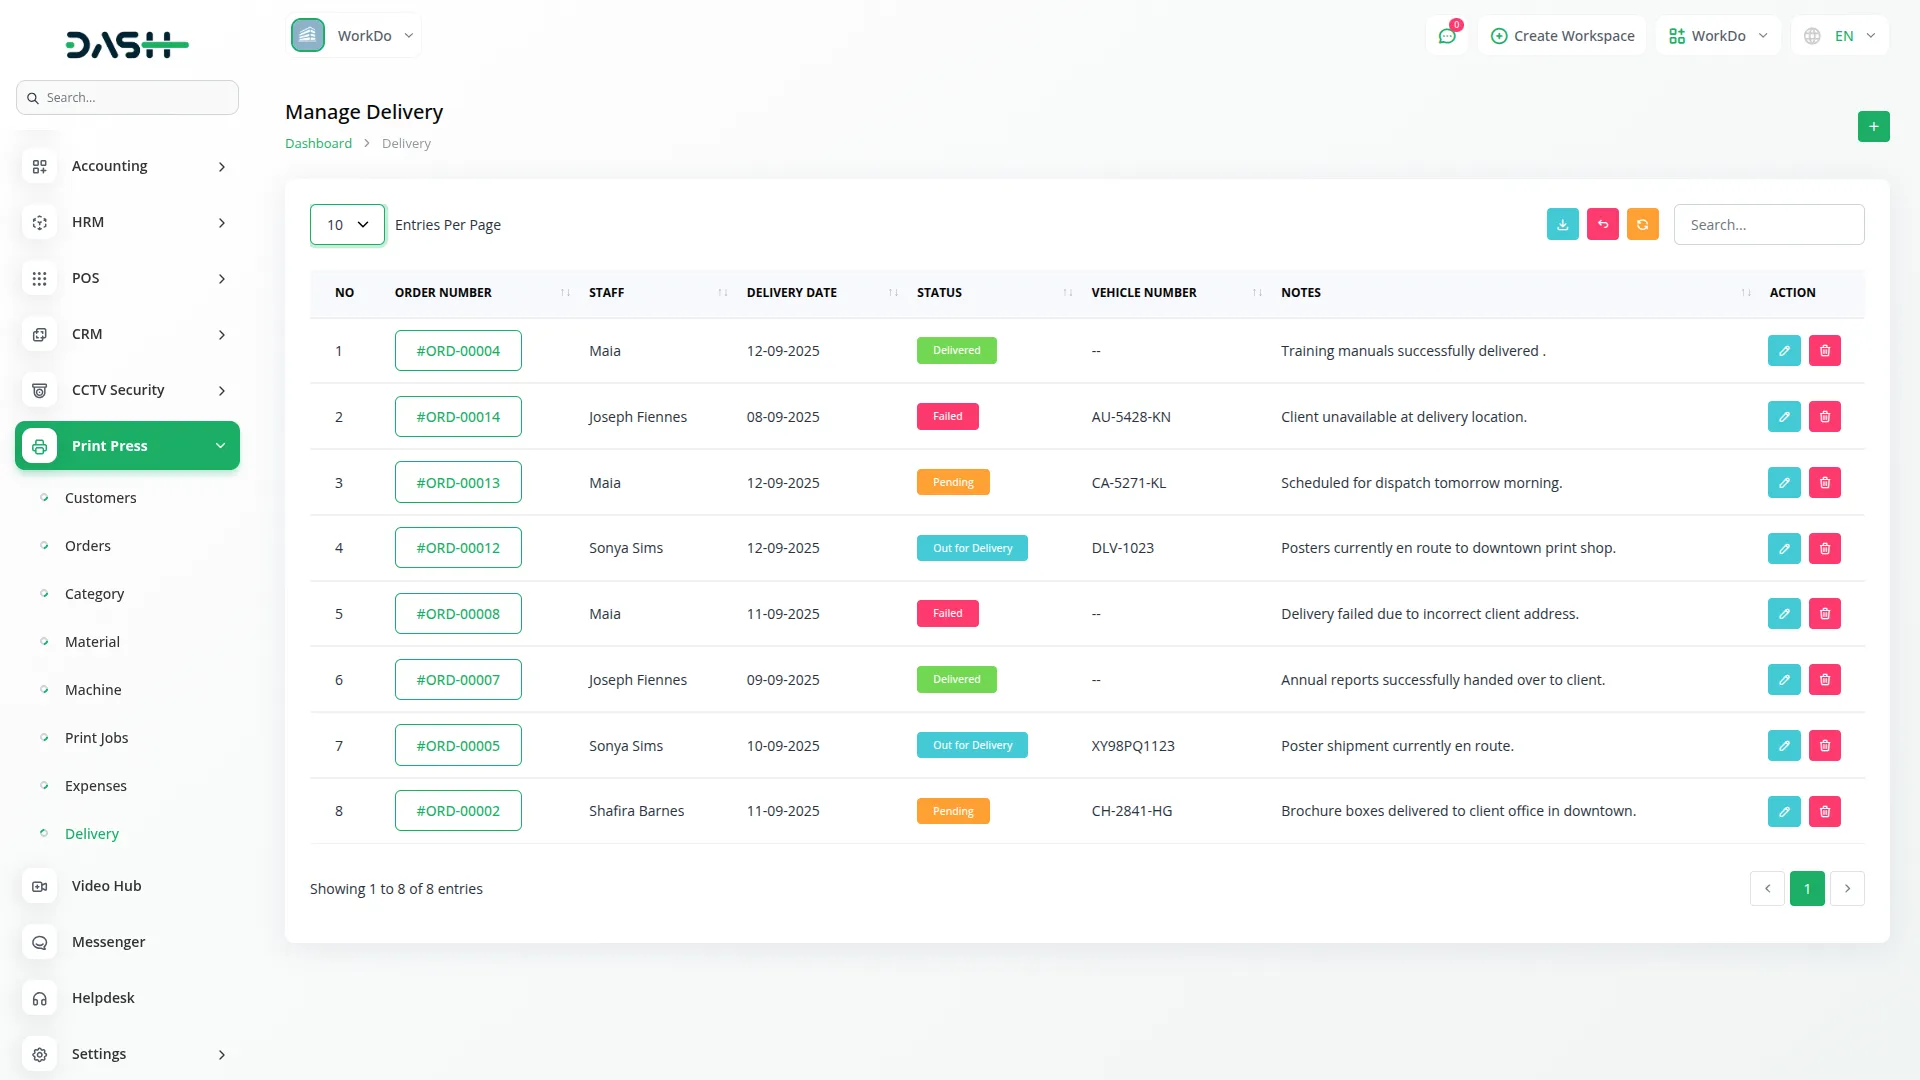
- Choose the Staff member responsible for delivery from the dropdown that pulls users from the Users section. Enter the Delivery Date, select the Status (Pending, Out for Delivery, Delivered, or Failed), enter the Vehicle number, and add any relevant Notes about the delivery.
- The deliveries list page shows all delivery schedules with columns for No, Order Number, Staff, Delivery Date, Status, Address, Vehicle number, and Notes. You can search for specific deliveries or export delivery data using the available buttons. In the Actions column, you can Edit delivery information or Delete delivery records that are no longer required.
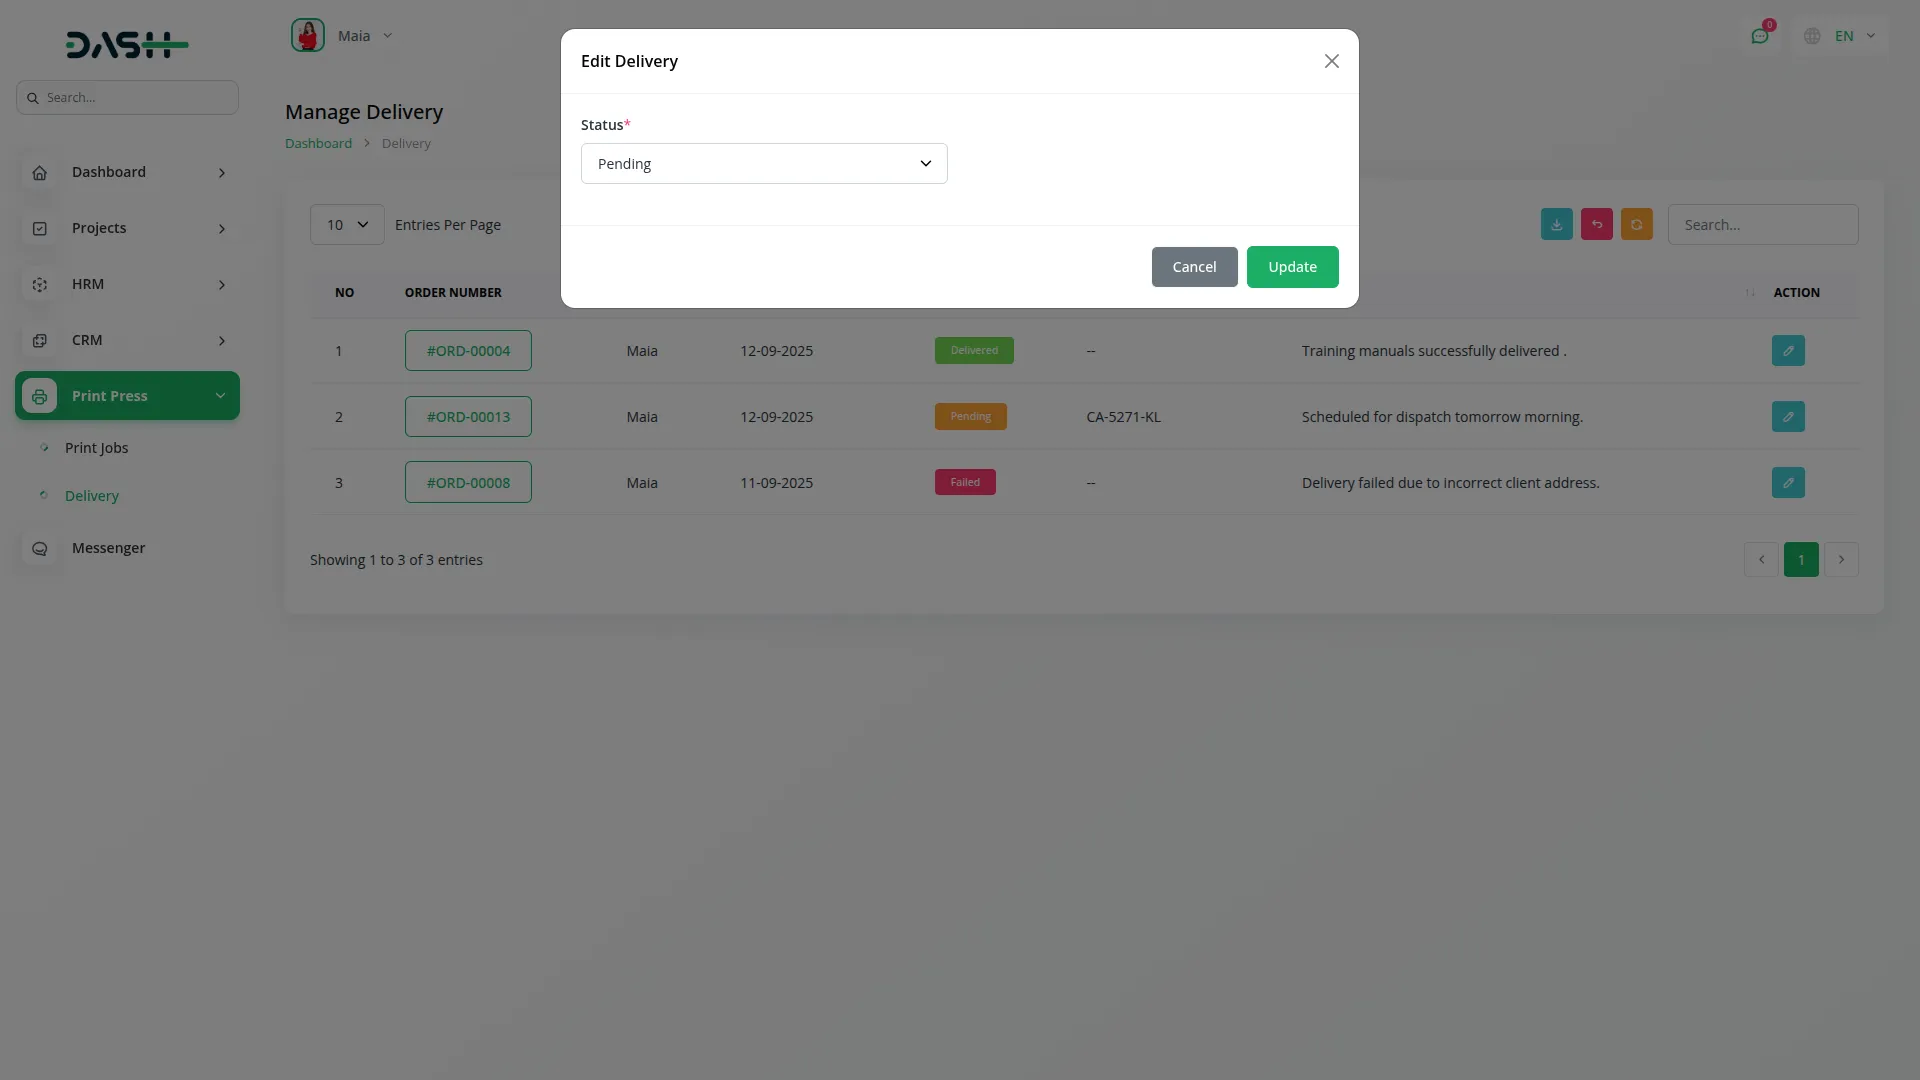
- Staff members can log in to see the deliveries assigned to them. They can also update the status of each delivery directly from their dashboard, keeping the system information up to date.
Categories
Related articles
- Coupon Integration in vCard SaaS
- Auction Product Integration in eCommerceGo SaaS
- Sales Integration in Dash SaaS
- Audit Inspection Integration in Dash SaaS
- Spin To Win Reward – eCommerceGo Addon
- Products PDF – eCommerceGo Addon
- App Download Integration in vCard SaaS
- How to Set up Add-On in WorkDo
- Medical Lab Management Integration in Dash SaaS
- Sign-In with BitBucket – eCommerceGo Addon
- Sign-In with Google Add-On Integration in Dash SaaS
- Consultancy Integration in Dash SaaS
Reach Out to Us
Have questions or need assistance? We're here to help! Reach out to our team for support, inquiries, or feedback. Your needs are important to us, and we’re ready to assist you!


Need more help?
If you’re still uncertain or need professional guidance, don’t hesitate to contact us. You can contact us via email or submit a ticket with a description of your issue. Our team of experts is always available to help you with any questions. Rest assured that we’ll respond to your inquiry promptly.
Love what you see?
Do you like the quality of our products, themes, and applications, or perhaps the design of our website caught your eye? You can have similarly outstanding designs for your website or apps. Contact us, and we’ll bring your ideas to life.
