Recruitment Integration in Dash SaaS
The Recruitment software is a comprehensive hiring management Add-On designed to streamline your entire recruitment process.
Introduction
The Recruitment software is a comprehensive hiring management Add-On designed to streamline your entire recruitment process. It allows you to create and manage job postings, track applications through different stages, schedule interviews, and manage candidates from application to onboarding. The system includes a complete frontend website where candidates can view job openings, apply for positions, and track their application status. You can customize your career page with branding, banners, FAQ sections, and custom pages to create a professional hiring experience for potential candidates.
How to Install the Add-On?
To Set Up the Recruitment Add-On, you can follow this link: Setup Add-On.
How to use the Recruitment Add-On?
Recruitment Dashboard
- After purchasing and installing this Add-On, go to the sidebar and search for the Recruitment Add-On.
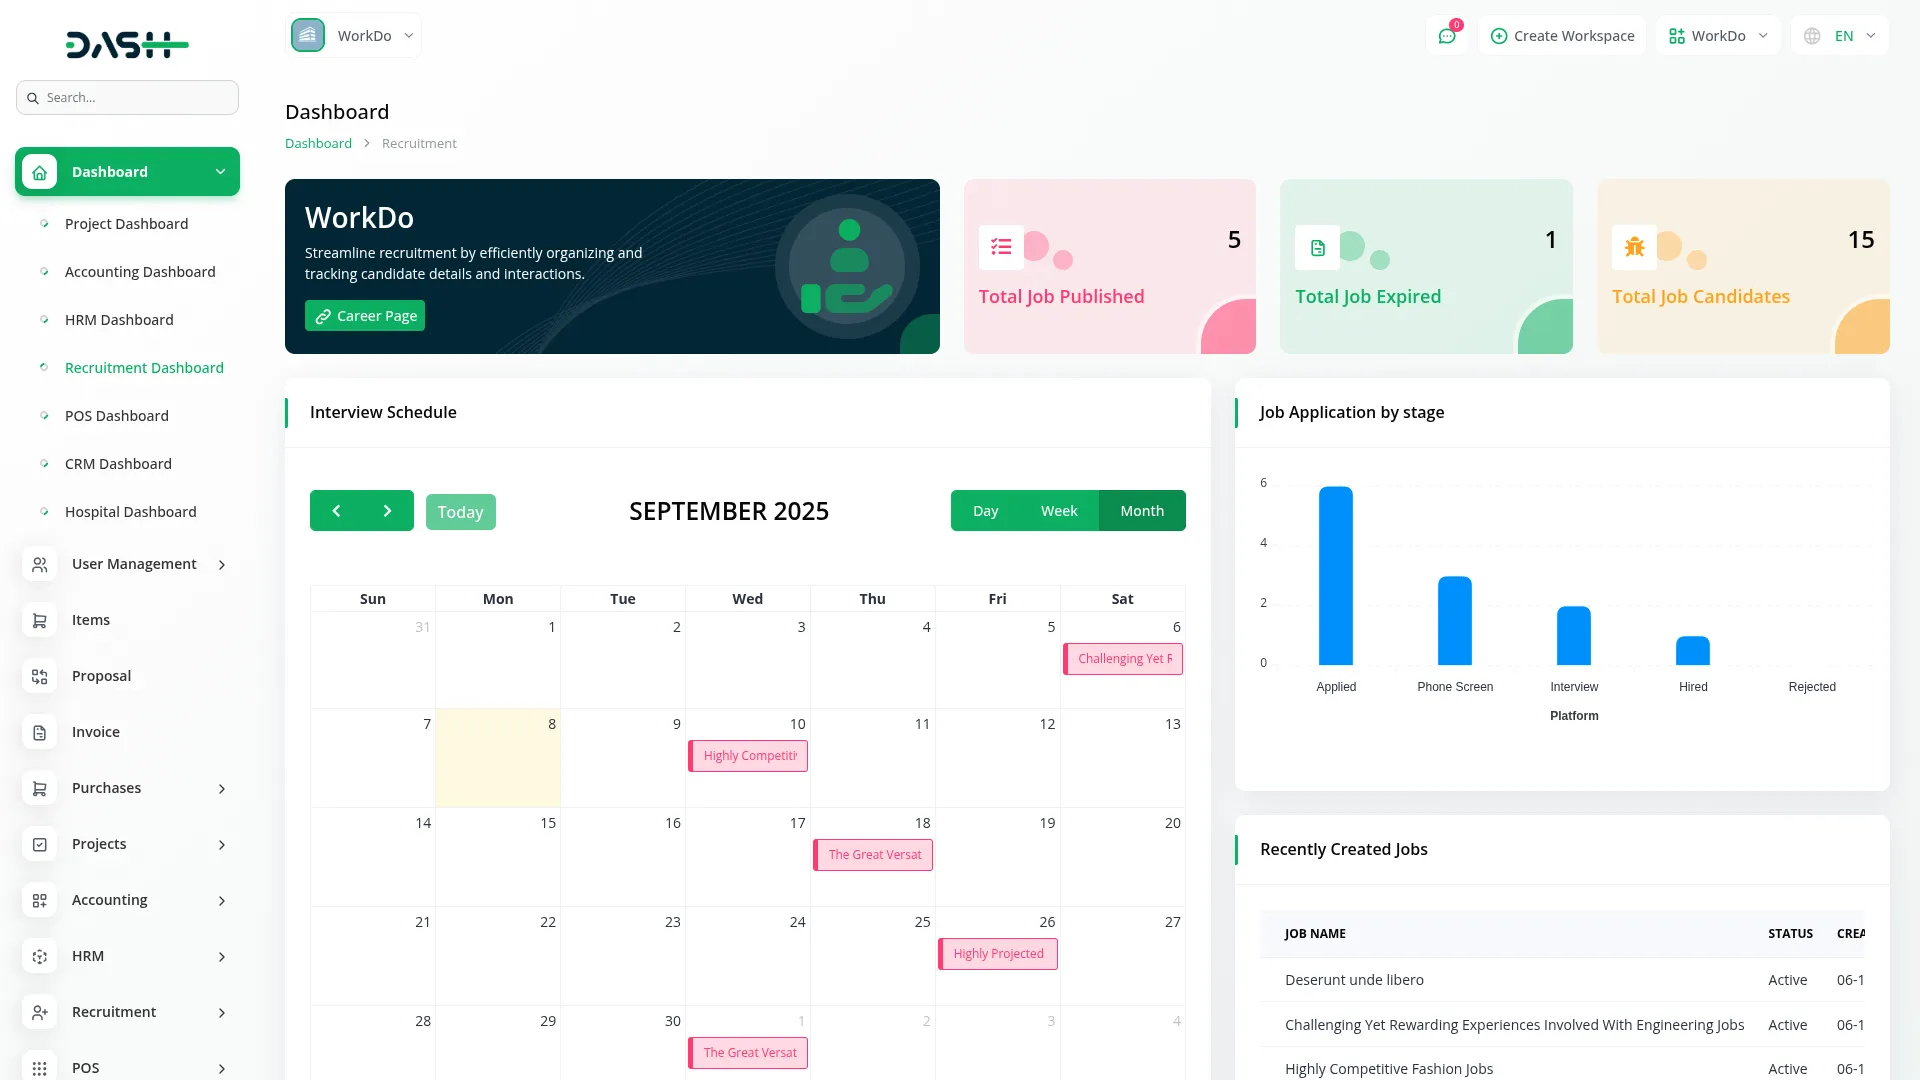
- The Recruitment Dashboard provides a complete overview of your hiring activities. At the top, you’ll find a Career Page Link option to copy your career page URL for sharing.
- The dashboard displays three key cards showing Total Job Published, Total Job Expired, and Total Job Candidates to give you quick insights into your recruitment metrics.
- The Interview Schedule calendar shows all your upcoming interview appointments in a visual format. A vertical bar chart displays job-stage-wise application data, helping you track where candidates are in your hiring process. The Recently Created Jobs section shows your 5 most recent job postings for quick access.
- This dashboard connects to all recruitment data stored in the backend system and displays real-time information from your job postings, applications, and interview schedules.
Manage Job
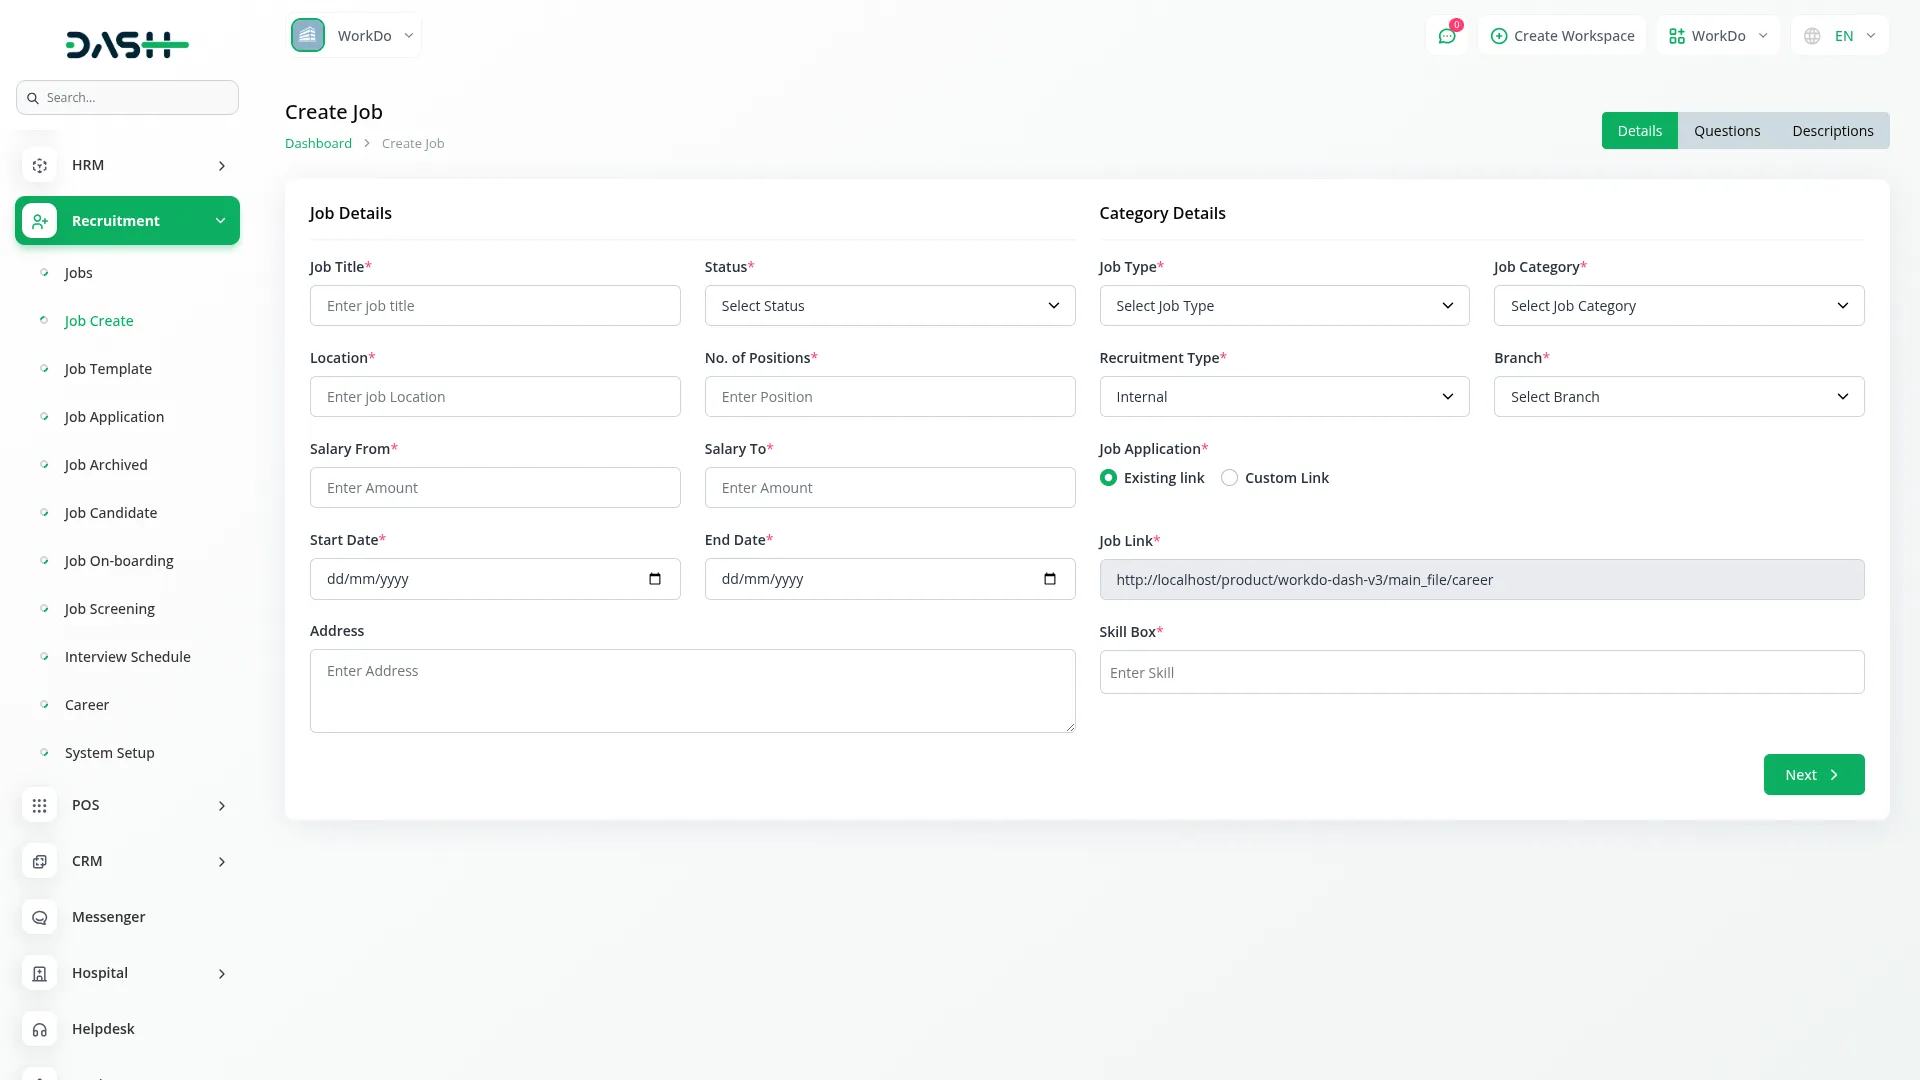
- To create a new job posting, click the “Create” button at the top of the job management page. In the Job Details section, enter the job title, select status from the dropdown (Active or Inactive), add location, specify the number of positions, set salary range with salary from and salary to fields, choose start date and end date, and provide the address.
- In the Category Details section, select job type from the dropdown, choose job category (which comes from your Job Category system setup), pick recruitment type (Internal or Client), and select branch (from HRM system setup – this shows only when Internal is selected). If you choose Client, select from the client dropdown (from users with the client role). Choose between the existing link or the custom link for the job application using the radio buttons, add the job link, and fill in the skill box.
- The Job Checkboxes section lets you decide what information to request from candidates. Check “Need to ask?” boxes for Gender, Date of Birth, and Country if you want these fields. Check “Need to show option?” boxes for Profile Image, Resume, Cover Letter, and Terms and Conditions to display these options to applicants.
- In the Questions Checkboxes section, select custom questions that come from your Job Screening setup. Finally, add job description, job requirement, and if you checked Terms and Conditions, add those details as well.
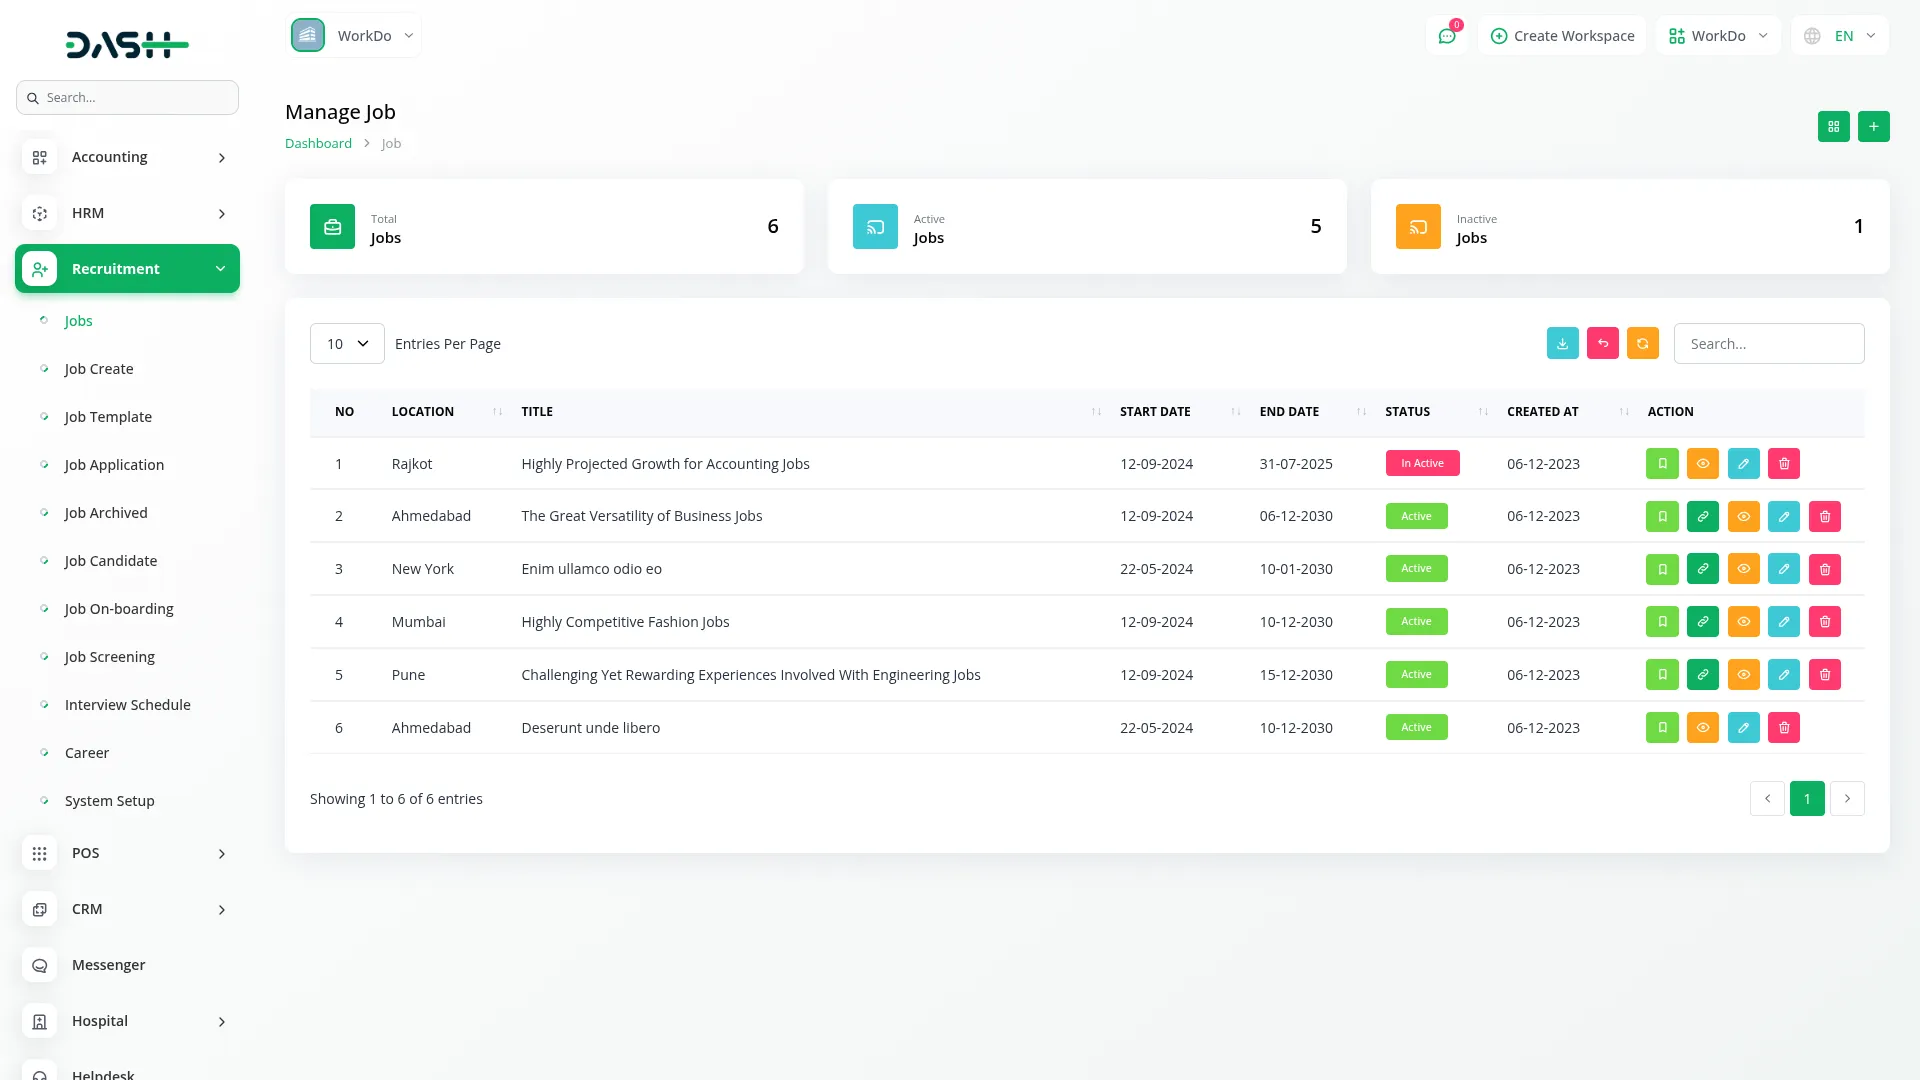
- The list page shows all your jobs with columns for No, Location, Title, Start Date, End Date, Status (Active/Inactive), and Created At. Use the Search, Export, Reset or Reload, and Grid View buttons to manage your listings.
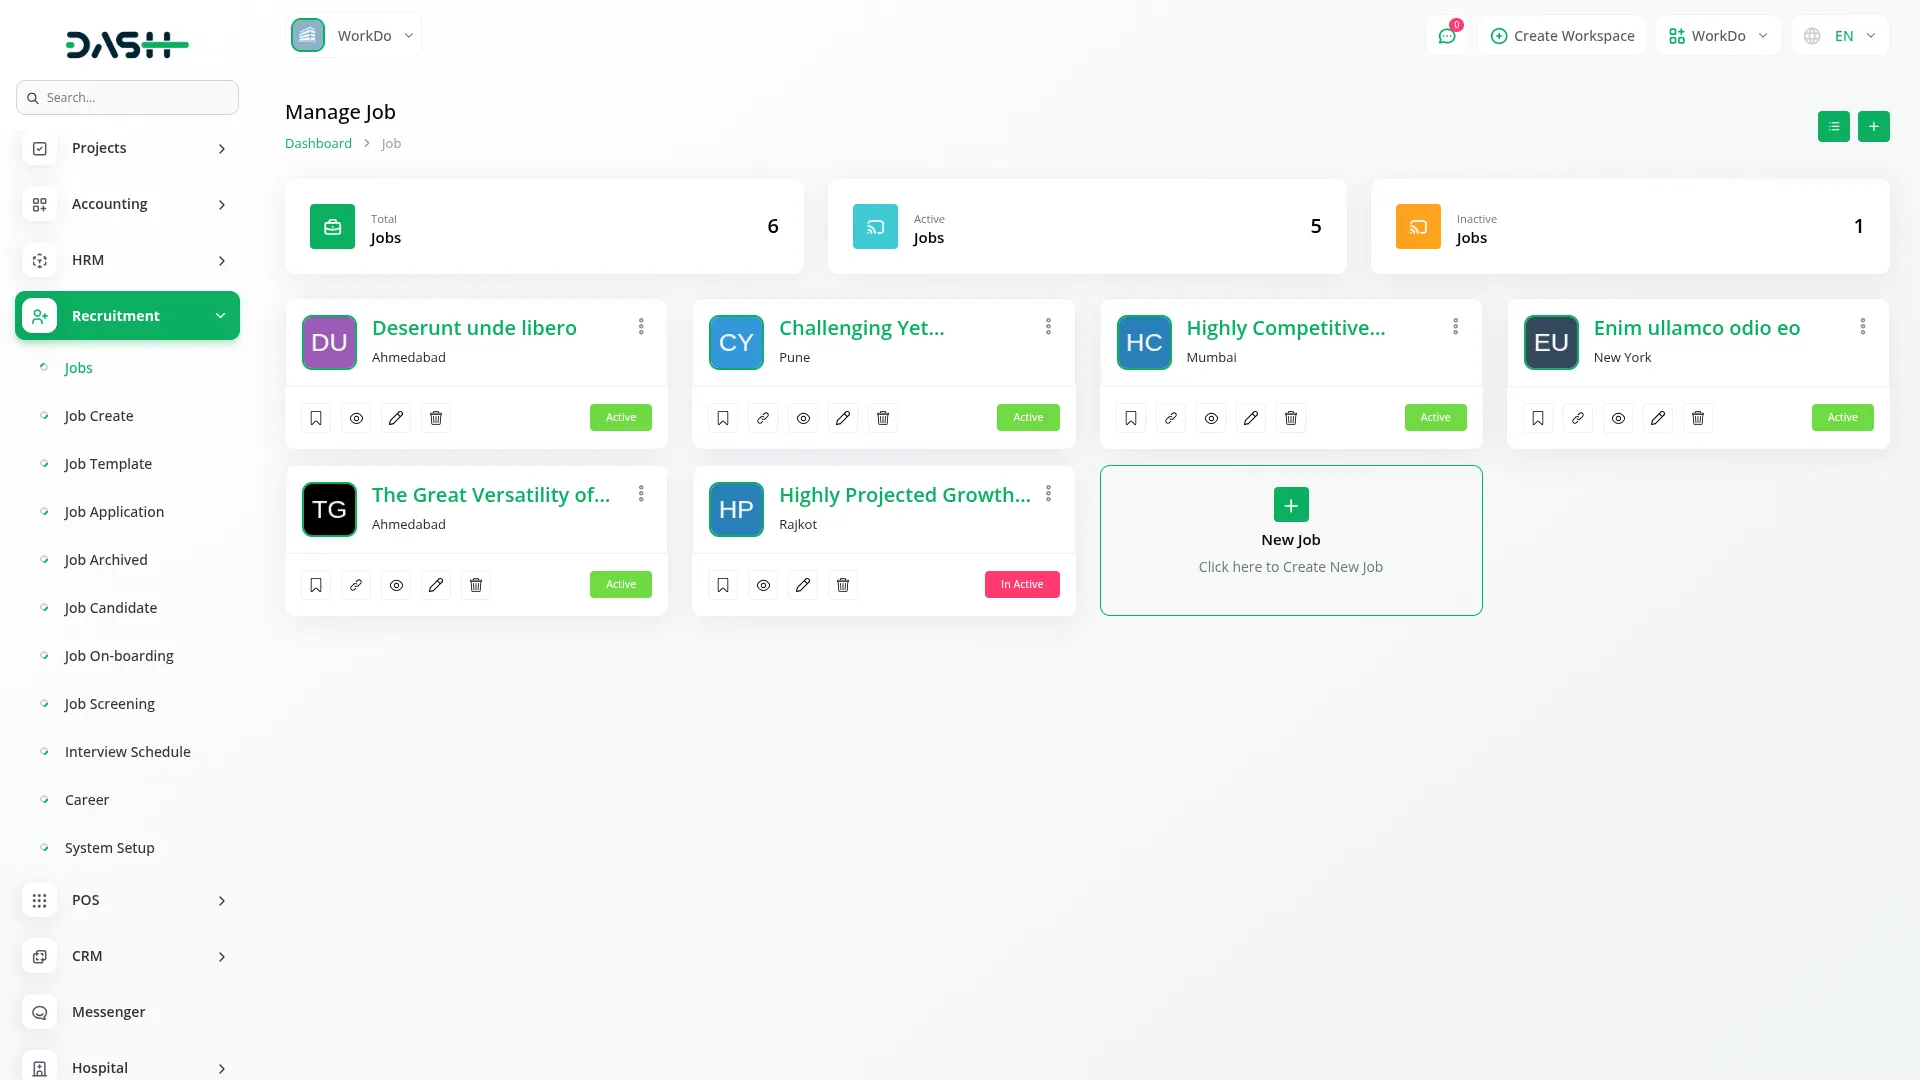
- In the Actions column, you can Save as Template (stores data in job template table), Copy Link (available after job status is posted), View (shows Job Details, Job Status Change, Question Details, Job Description, Job Requirement, Job Terms And Conditions Details, Job Application Details, plus Attachment, Notes, To Do, and Activity Log if those add-ons are enabled), also available edit, or delete functionality.
- Once you create jobs here, they automatically appear on your website’s frontend in multiple locations.
- On the Career Page and All Jobs Page, your job title, location, skills, job type, job category, and salary range display as job cards that candidates can browse and filter using the Location dropdown, Salary Range dropdown, Category checkbox list, Job Type checkbox list, and Vacancies checkbox list. Candidates can sort jobs by newest first, oldest first, or most vacancies, and use a keyword search to find specific jobs.
- When candidates click a job title, they are redirected to the Job Requirements page, where your job description, job requirements, and terms and conditions are displayed.
- The custom questions you selected will appear on the Apply now page when candidates click the Apply Now button, and any checkbox options you enabled (Profile Image, Resume, Cover Letter, Terms and Conditions) will show as form fields for candidate submission.
Manage Create Job
- To add a new job, click “Create” and fill in the Job Details section with job title, status dropdown (Active or Inactive), location, number of positions, salary from and to amounts, start date, end date, and address.
- Complete the Category Details by selecting job type, job category (from Job Category system setup), recruitment type (Internal or Client), and branch (from HRM system setup – shows when Internal is selected). For Client selection, choose from the client dropdown (users with the client role). Set job application as either an existing link or a custom link using radio buttons, add a job link, and enter skills in the skill box.
- Use Job Checkboxes to determine what candidate information to collect. Select “Need to ask?” options for Gender, Date Of Birth, and Country, and “Need to show option?” for Profile Image, Resume, Cover Letter, and Terms And Conditions.
- In Questions Checkboxes, choose custom questions from your Job Screening section. Add job description, job requirement, and terms and conditions (if the Terms and Conditions checkbox was selected).
Manage Job Template
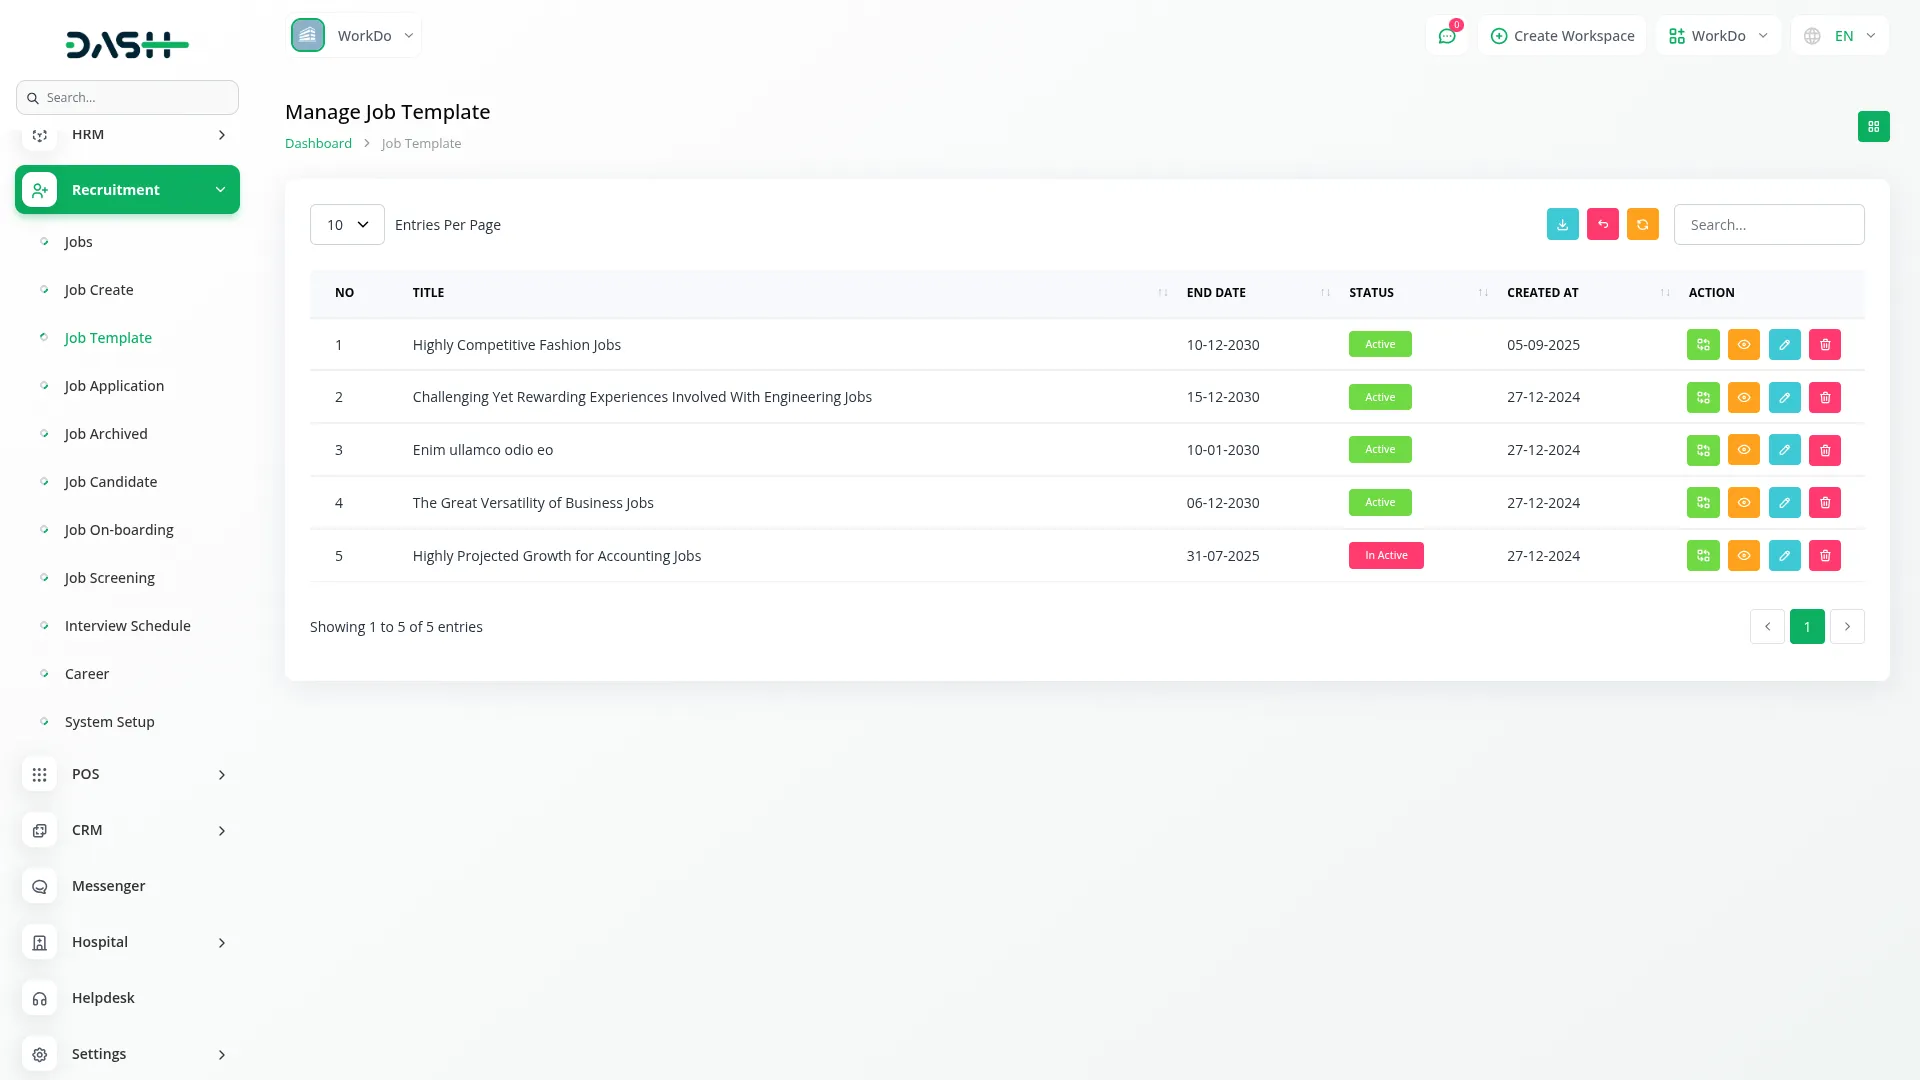
- The list page displays all your saved templates with columns showing No, Title, End Date, Status (Active or Inactive), and Created At. You can use the Search, Export, Reset, Reload, and Grid View buttons to manage your templates.
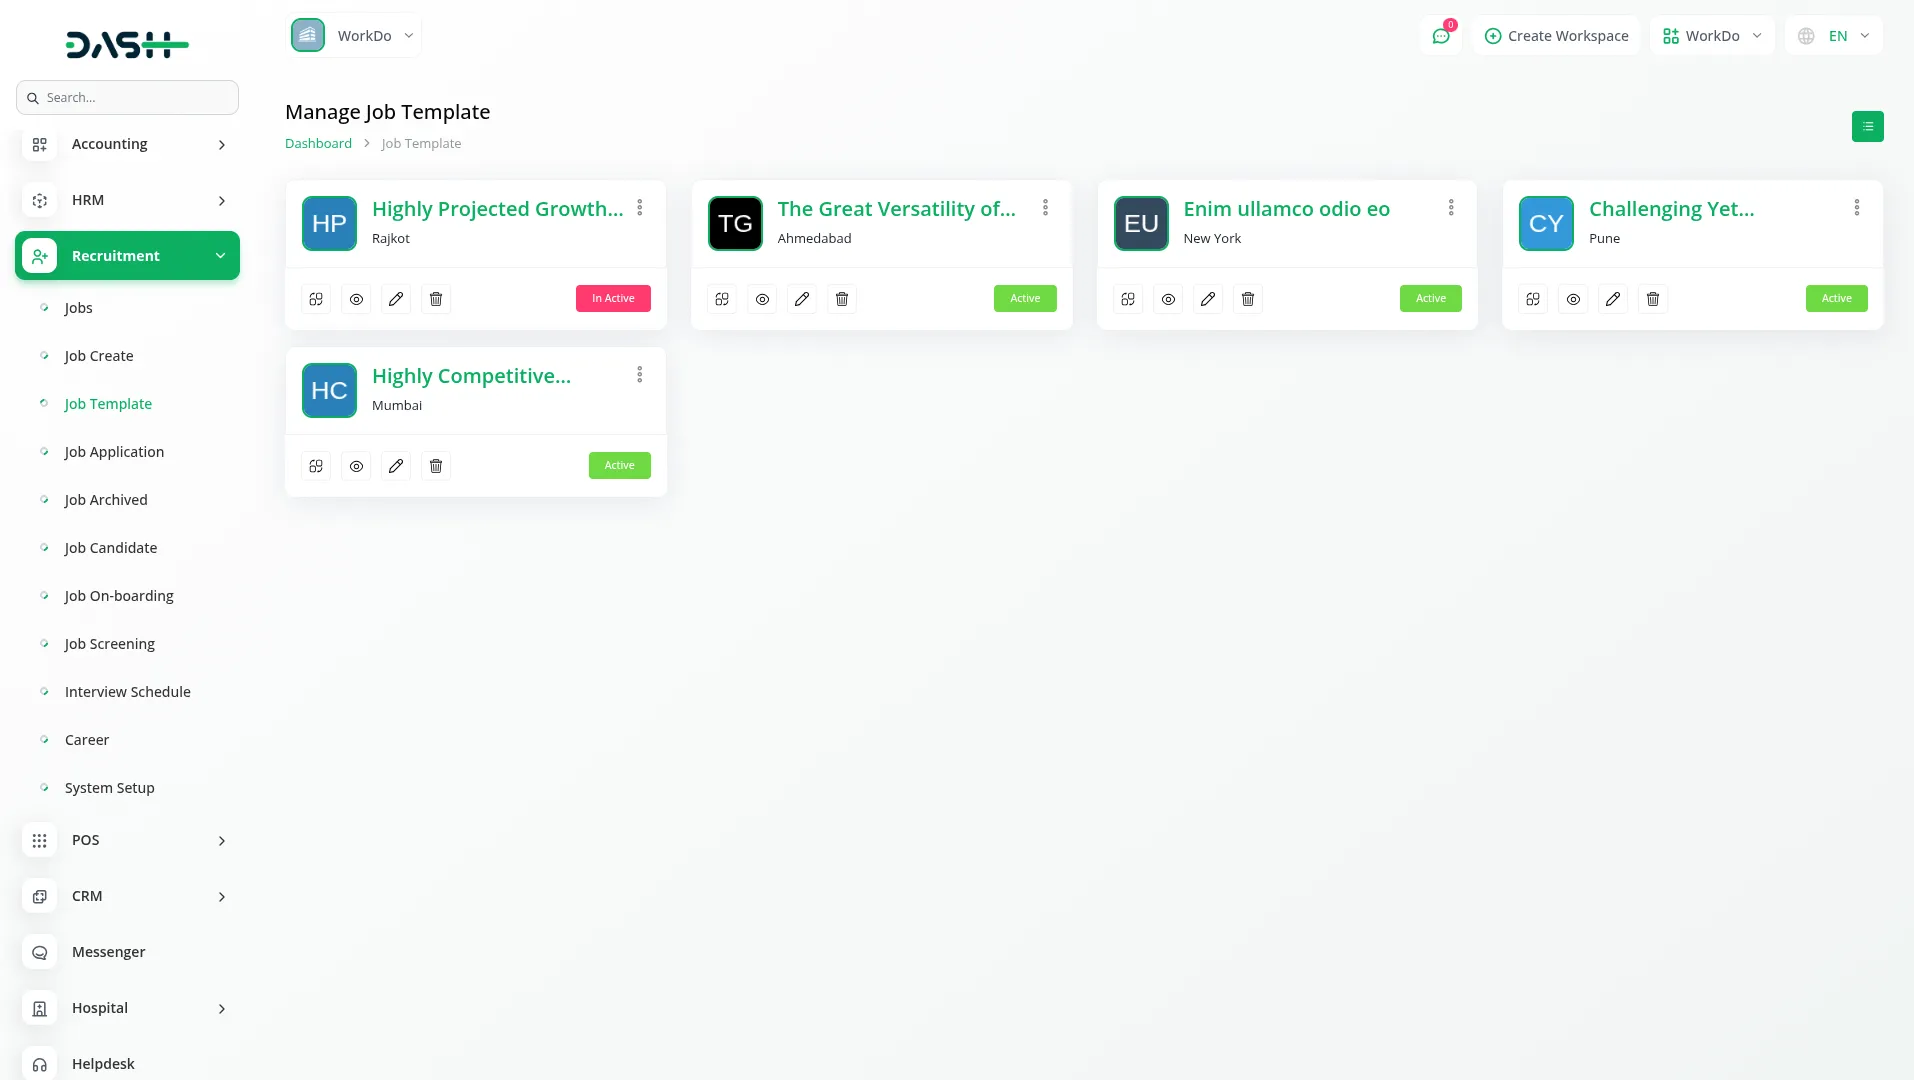
- In the Actions column, you can Convert To Job (which stores the template data in the Jobs table), View (displays Job Template Details, Question Details, and Job Description), Edit to modify template details, or Delete to remove templates you no longer need.
- Templates are created when you use the “Save as Template” action from the Manage Job section, allowing you to quickly create similar job postings without starting from scratch.
Manage Job Application
- To create a new job application, click the “Create” button at the top of the job application page. Select the Job from the dropdown (comes from your job section) and choose Application Type (new or job candidate). If you select the “job candidate” type, choose from the Job Candidate dropdown (comes from your job candidate section).
- Fill in the applicant’s Name, Email, and Phone. Additional fields appear based on the job’s settings: Date Of Birth (if checked during job creation), Gender dropdown with Male/Female options (if gender was checked), Country field (if country was checked), State and City fields (if those were enabled), Cover Letter field (if cover letter option was checked), Profile file upload (if profile image was checked), and CV/Resume file upload (if resume was checked).
- Custom Questions text fields will appear based on the question checkboxes selected during job creation.
- The main list page shows applications in a Kanban view, organized by job stages (comes from Job Stages system setup). Use buttons for Search, Export, Reset or Reload, Archive Jobs (shows all archived applications), and List View (displays all applications in table format with the same form fields available, plus Archive Jobs, Grid View, option, and filters for Start Date, End Date, Stage dropdown, and Job dropdown).
- In List View, the table shows columns for Name, Job, Stage, CV/Resume, Rating, Created At, and Actions including Archive Job, Show (displays all application details), and Delete to remove a permanent data permanently.
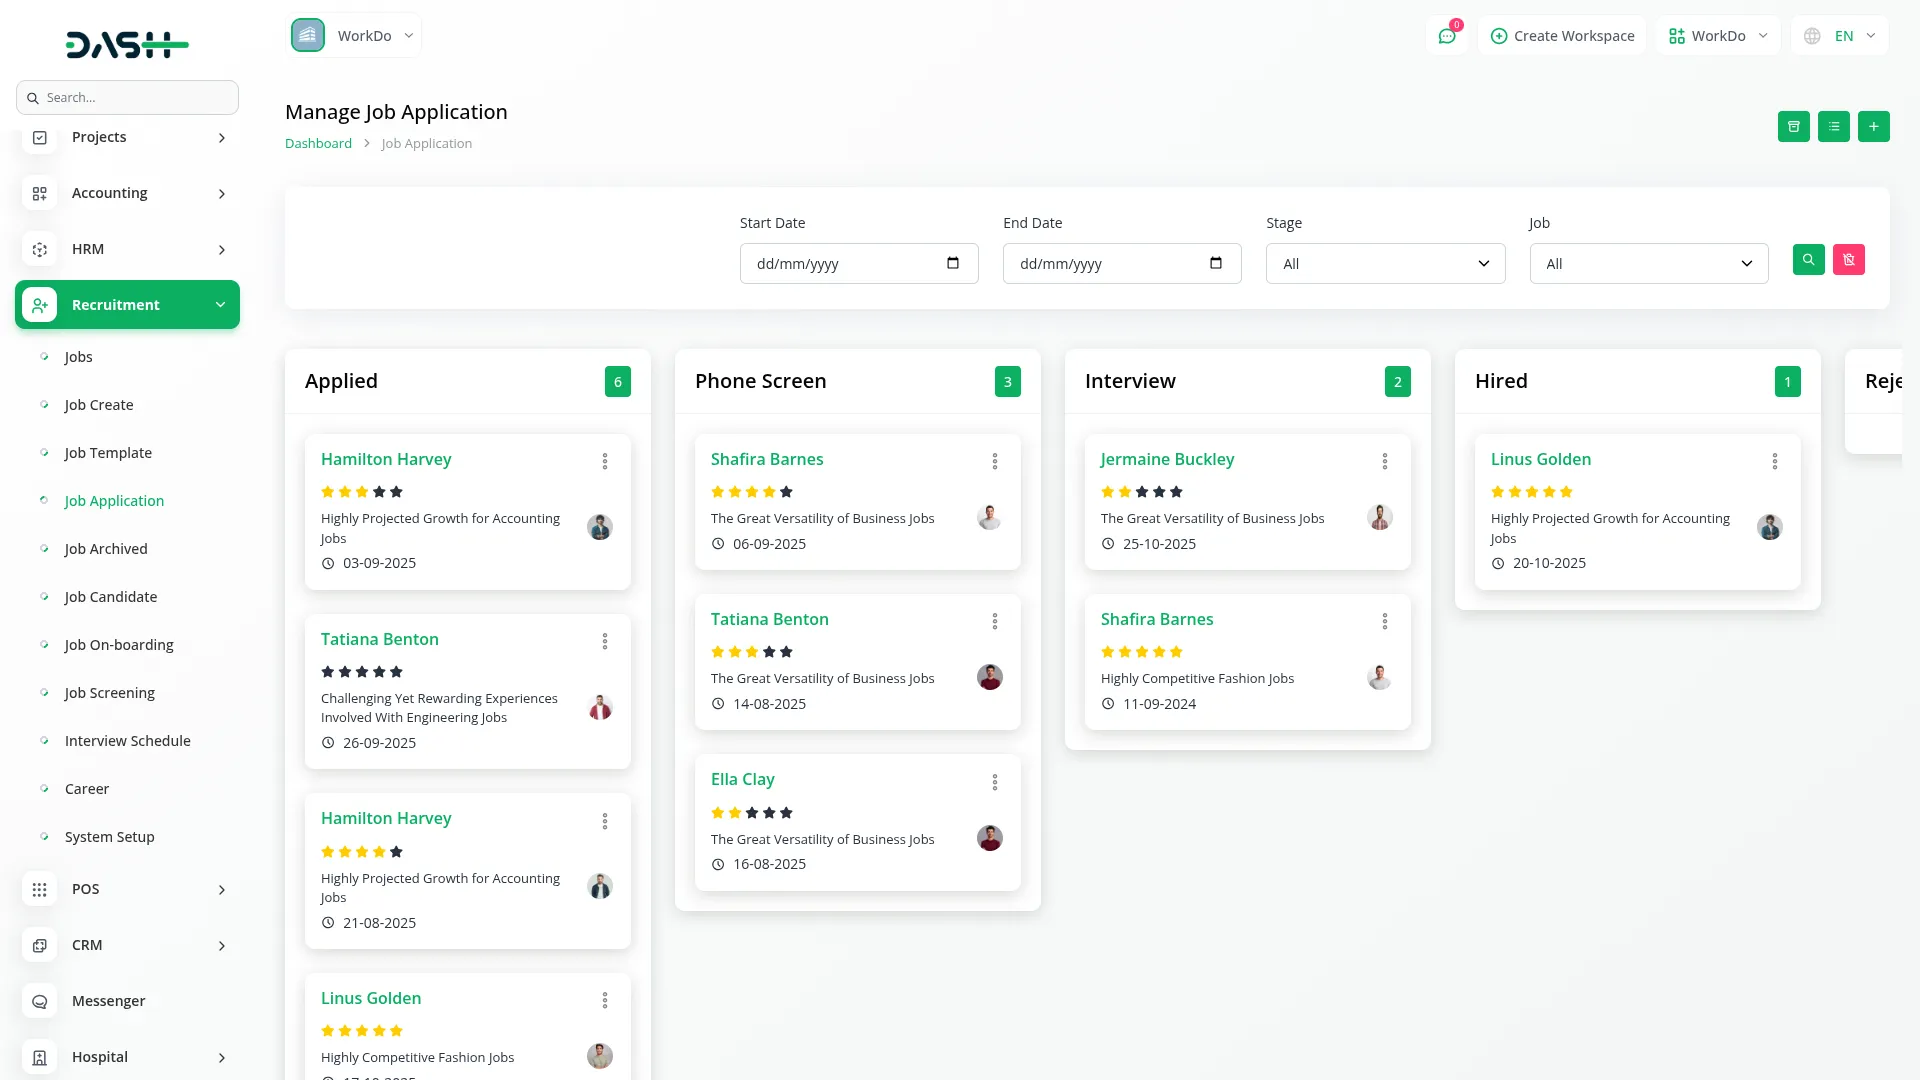
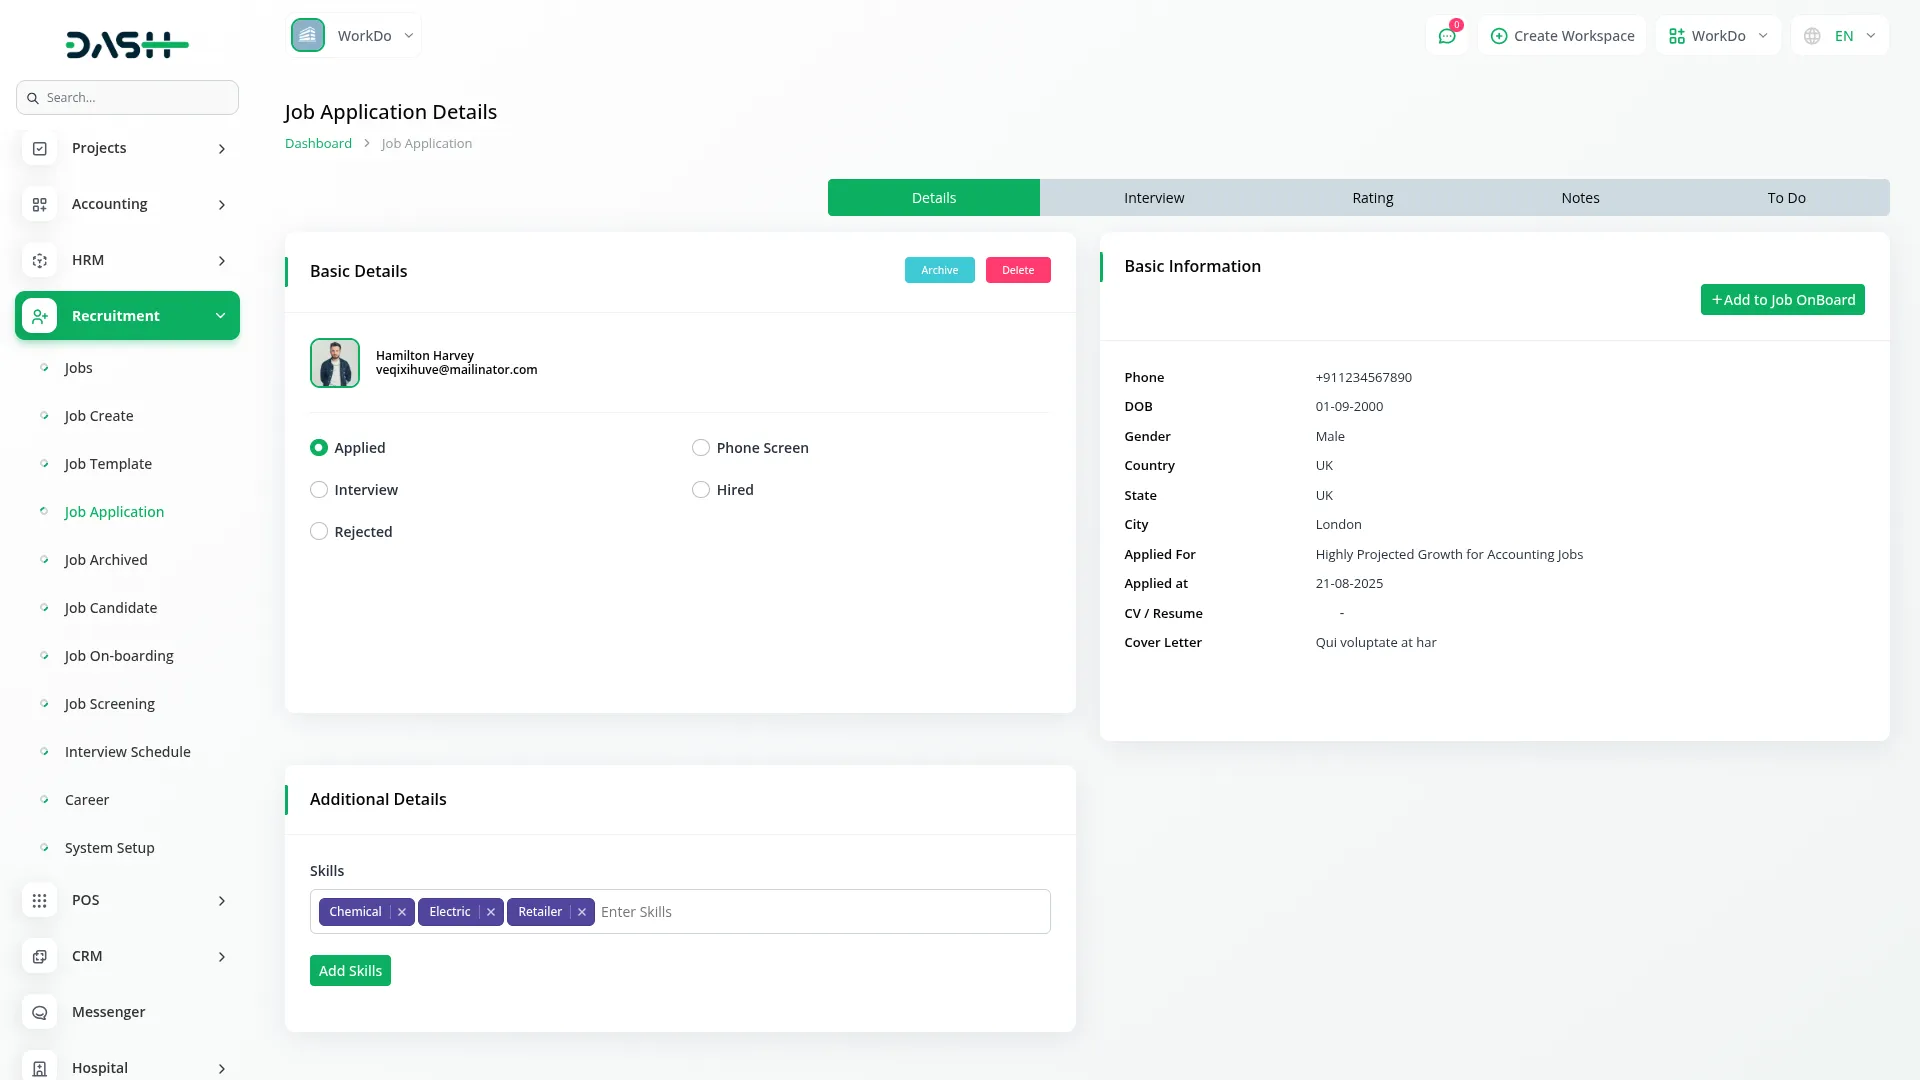
- Additionally, Available Action column of the kanban view, you can Archive applications, View to show Job Application Details, Basic Details, Basic Information, Additional Details, Interview Schedule Details, Rating with question answers and applicant notes, plus Attachment, Notes, To Do, and Activity Log if those add-ons are enabled, or Delete applications.
- This section connects to job data from your Manage Job section and displays candidate information that will also be visible in the backend job candidate records.
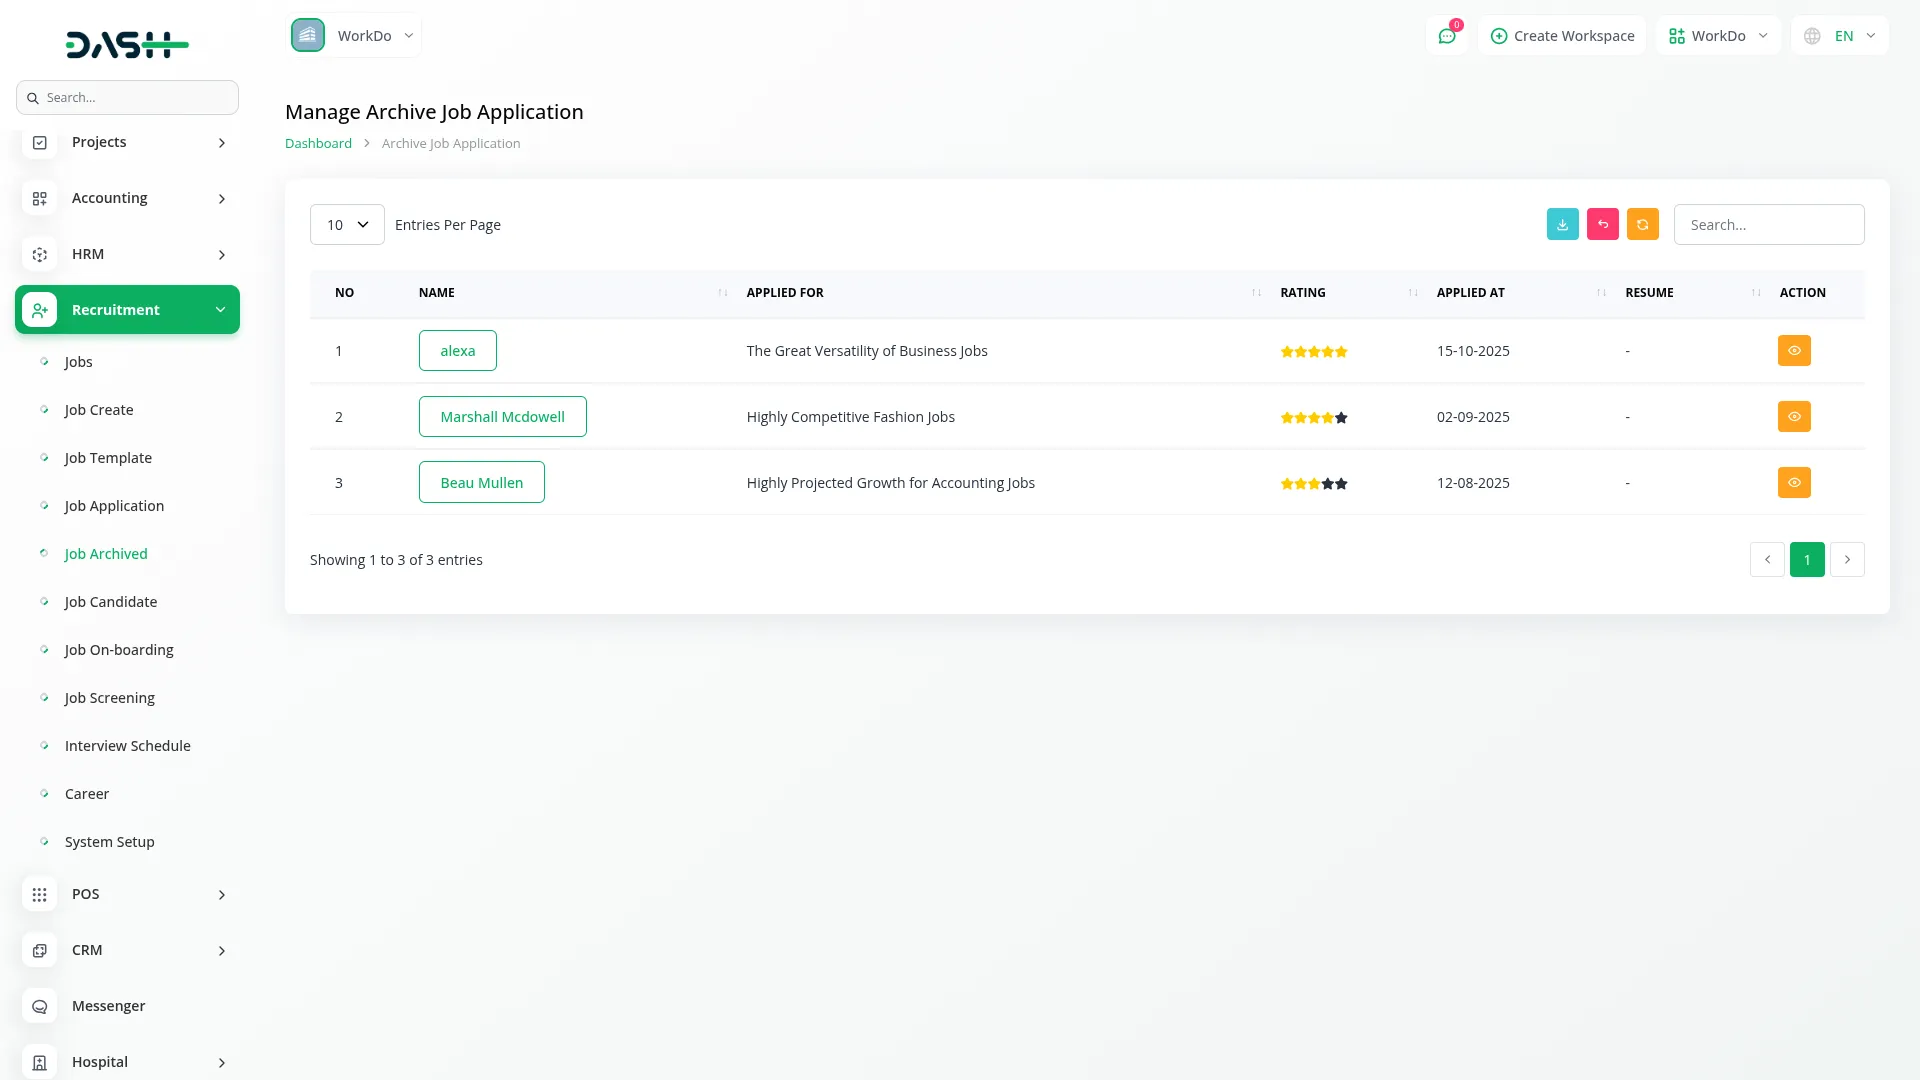
Manage Archive Job Application
- The list page shows archived applications with columns for No, Name, Applied For, Rating, Applied At, and Resume. You can use the Search and Export, Reset, or Reload buttons to manage application data.
- In the Actions column, click View to see complete Job Application Details, including Basic Details, Basic Information, Additional Details, Interview Schedule Details, and Rating section with question answers and applicant notes. If enabled, you can also access Attachment, Notes, To Do, and Activity Log add-on features.
- Archived applications maintain all their original data and connections to job postings, allowing you to review past candidates while keeping your active application list organized.
Manage Job Candidate
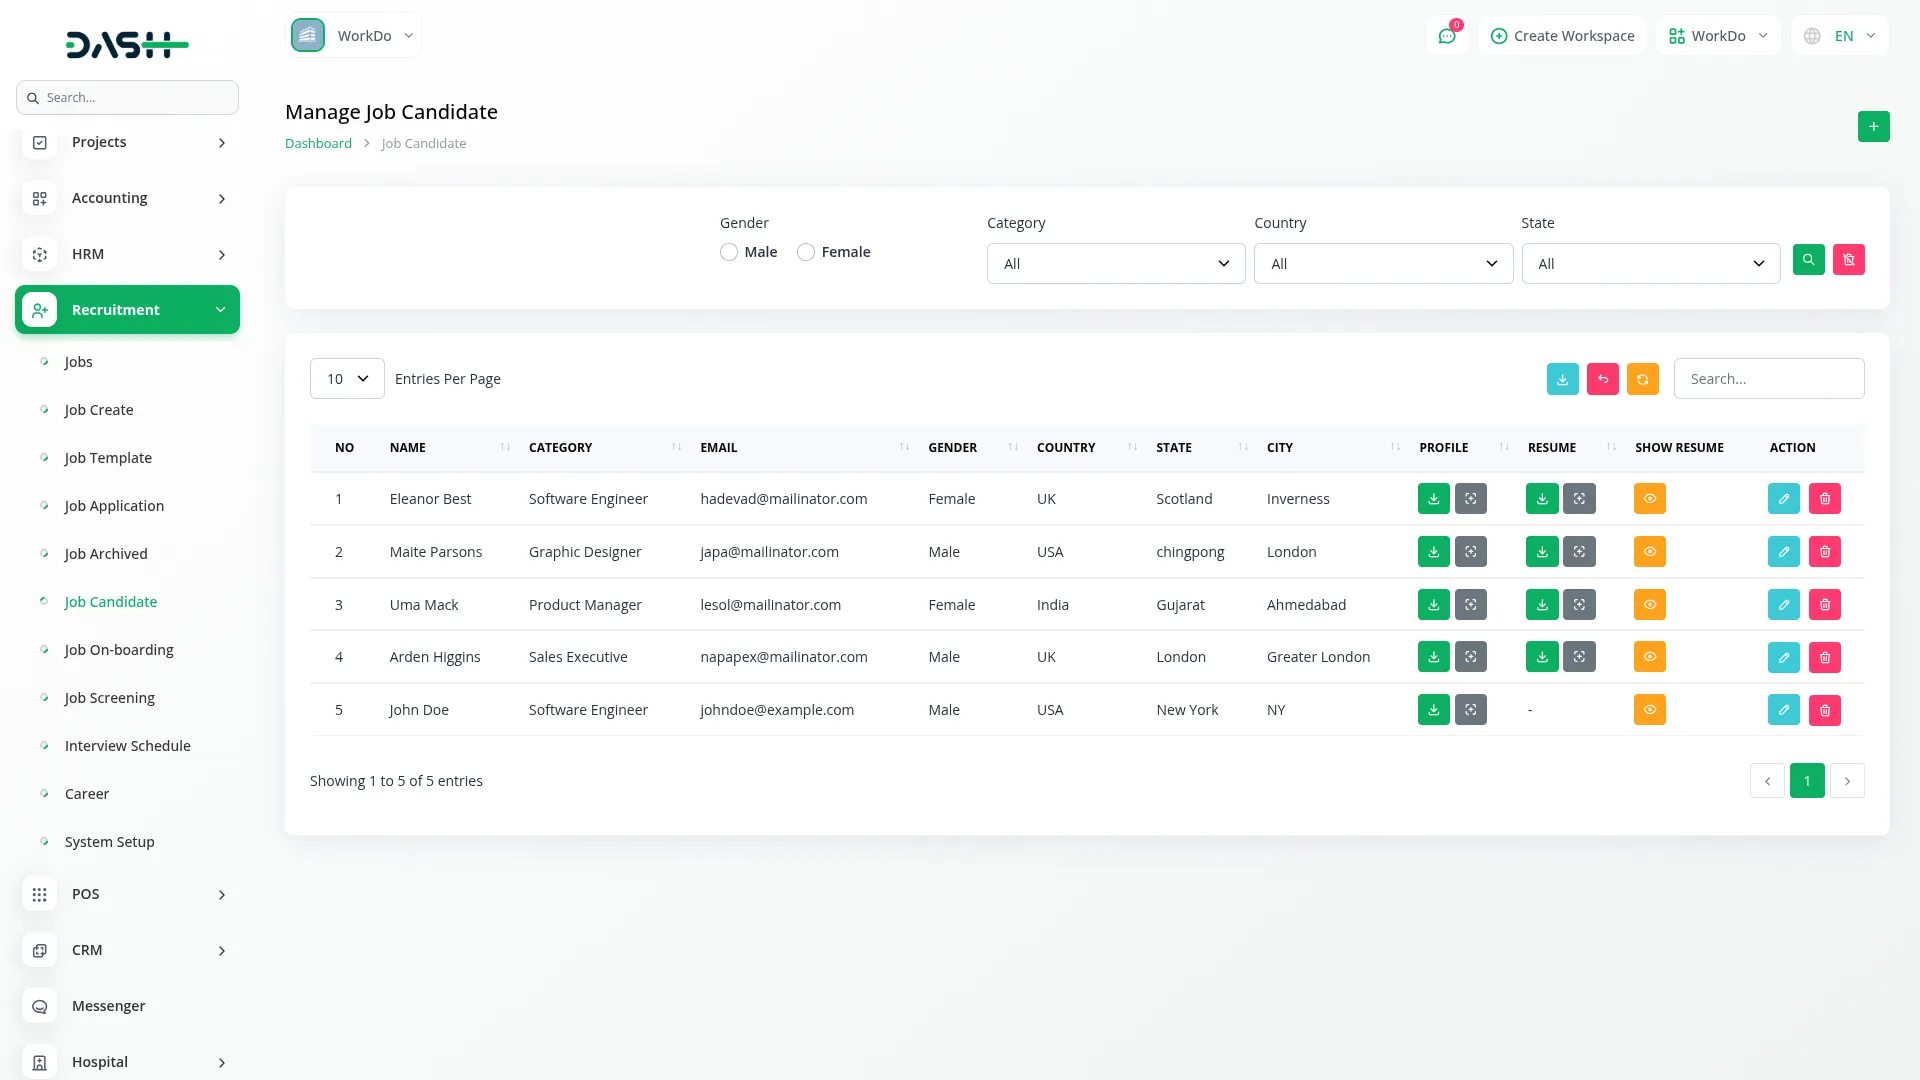
- To add a new job candidate, click the “Create” button at the top of the job Candidate. Enter the candidate’s Name, select Candidate Category (from the Recruitment system setup), provide Email, Phone, Date Of Birth, and select Gender (Male or Female). Add Address details, including Country, State, and City. Upload the candidate’s Profile image and CV/Resume files, then add a Description about the candidate.
- The list page displays all candidates with Search, Export, Reset, and Reload buttons available. Use filters for Gender (Male/Female), Category dropdown, Country dropdown, and State dropdown, then click Apply to filter results or Reset to clear filters. The table shows columns for No, Name, Category, Email, Gender, Country, State, City, Profile, Resume, and Show Resume.
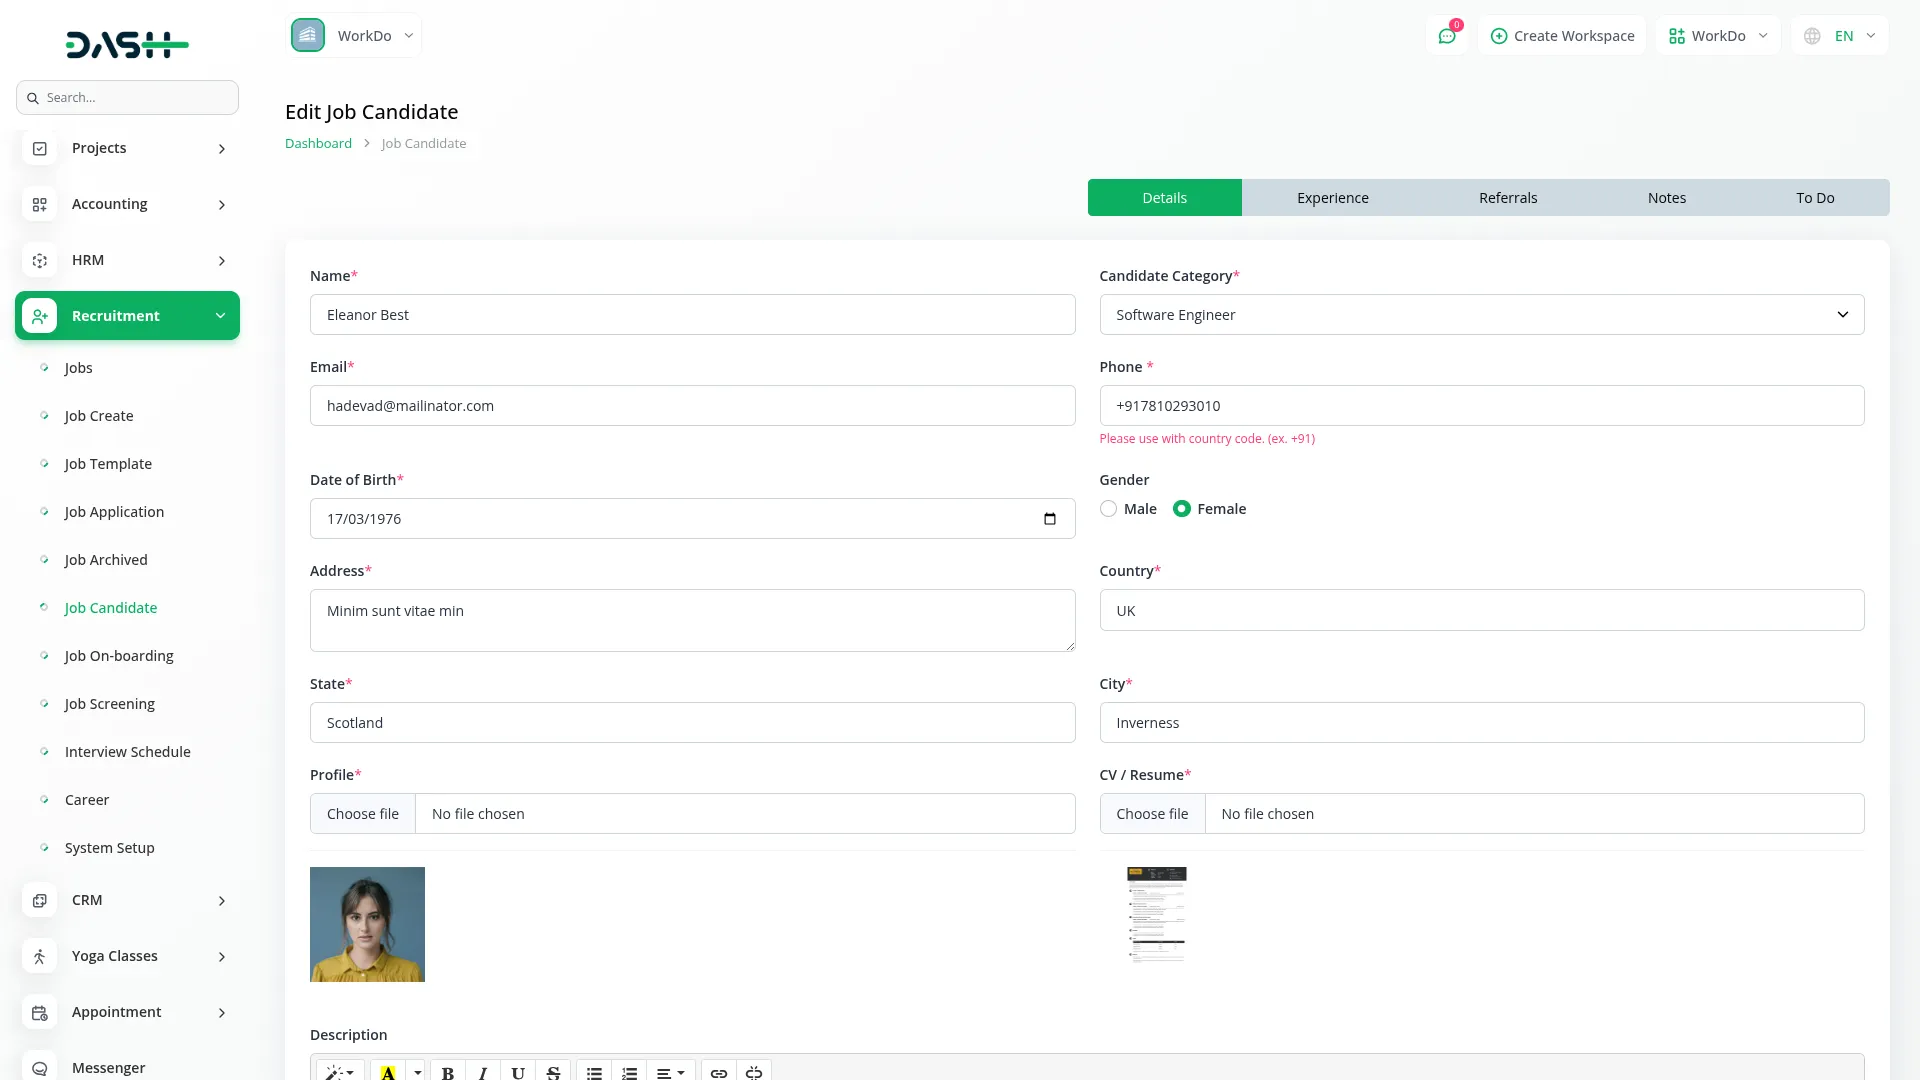
- In the Actions column, click Edit to access complete candidate management. The edit view includes an Experience tab with multiple sections: Manage Project (add Title, Organization, Start Date, End Date, Country, State, City, Reference yes/no option, and Description), and Manage Jobs (same fields as projects).
- Below the details, Manage Qualifications (same structure for educational background), Manage Skills (includes Type field plus standard details), Manage Awards (standard format for recognitions), and Manage Experience (detailed work history with Title, Organization, dates, location including Zip Code, Address, Phone, Email, Website, Experience Document upload, Reference enable radio button, and if enabled: Reference Full Name, Email, Phone, and Job Position).
- Additional sections include Manage Referrals (Title, Organization, dates, location, Experience Document, Reference yes/no, Description) and access to Attachment, Notes, To Do, and Activity Log add-ons if available. Each management section displays data in tables with Show, Edit, and Delete actions. You can also delete the entire candidate record.
- This candidate data integrates with the Job Application system, allowing you to select existing candidates when creating new applications.
Manage Job On-Boarding
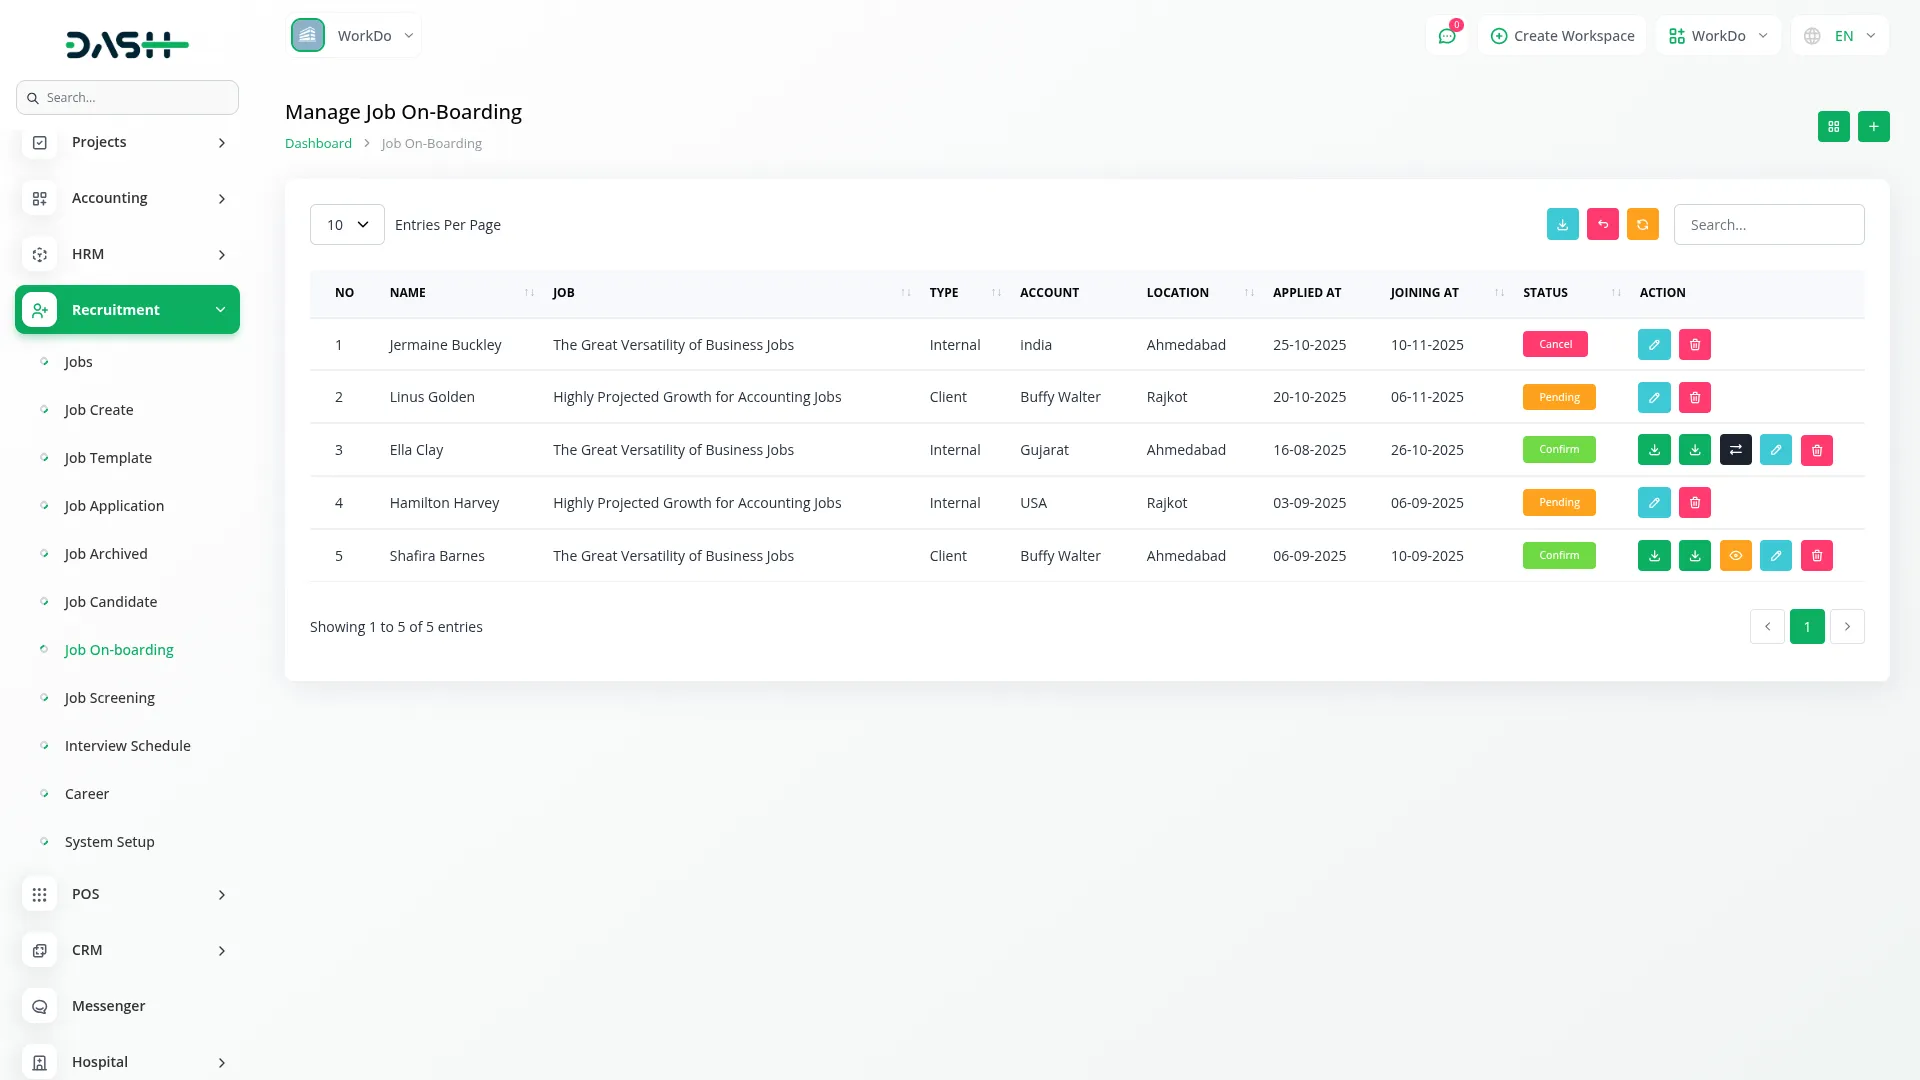
- To create a new onboarding record, click “Create” open from which you have to select Type (Internal or Client). When you choose Internal, select Account from the branch dropdown (comes from HRM Add-on system setup). When you select Client, choose Account from the client dropdown (users with client role).
- Below the details, Select Job Candidate from your candidate database, set Joining Date, specify Days of Week, enter Salary amount, choose Salary Type (from Recruitment system setup), select Salary Duration (Monthly or Weekly), pick Job Type (Full Time or Part Time), and set Status (Pending, Cancel, or Confirm). When status is Confirmed, select Account Type from the Accounting Add-on bank account options.
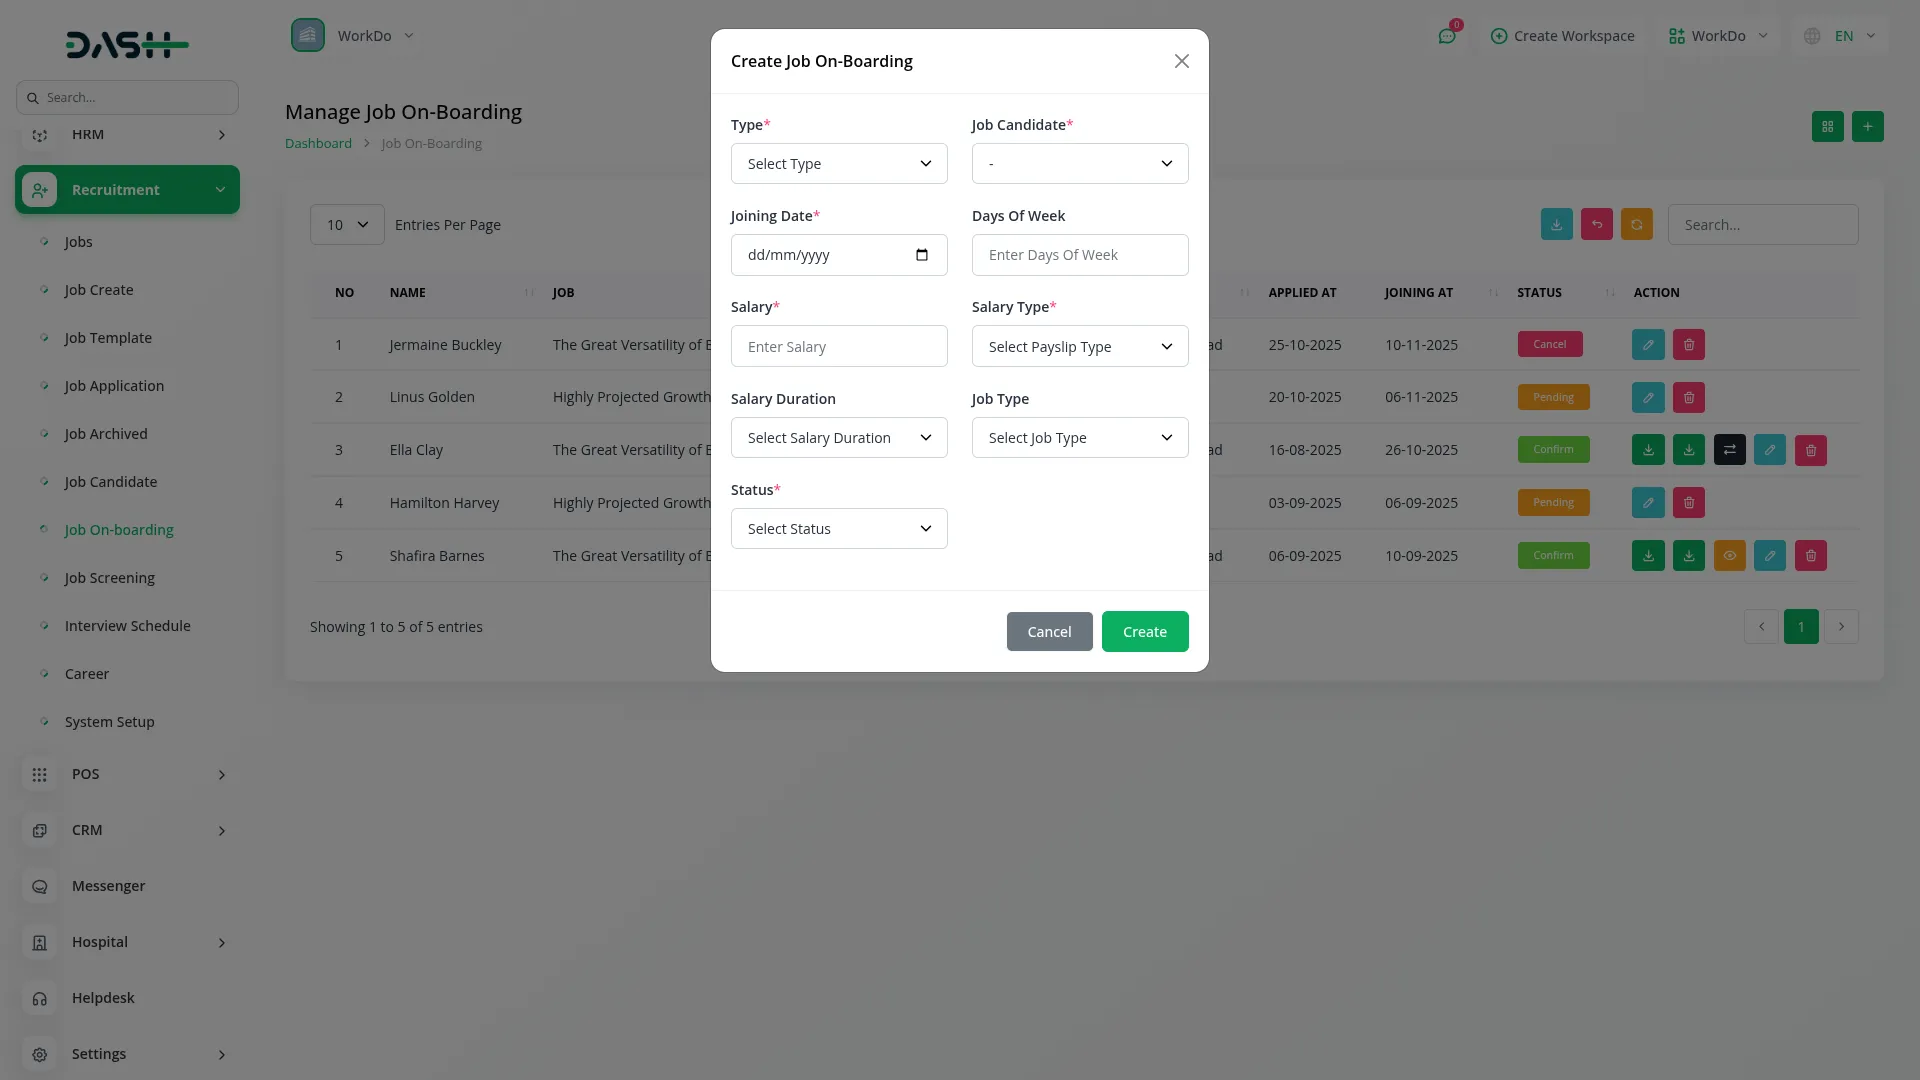
- The list page shows all onboarding records with Search, Export, Grid View, and Create buttons. Table columns display No, Name, Job, Type, Account, Location, Applied At, Joining At, and Status (Pending, Cancel, Confirm).
- In the Actions column, several options become available based on status. When status is Confirmed, you can generate Offer Letter PDF and Offer Letter DOC files, and use the Convert to Employee function. After converting to an employee, a View button appears to show Employee Details. Standard Edit and Delete options are always available.
- This section connects candidate data from the Job Candidate section with job information and integrates with HRM and Accounting add-ons for a complete employee onboarding workflow.
Manage Job Screening
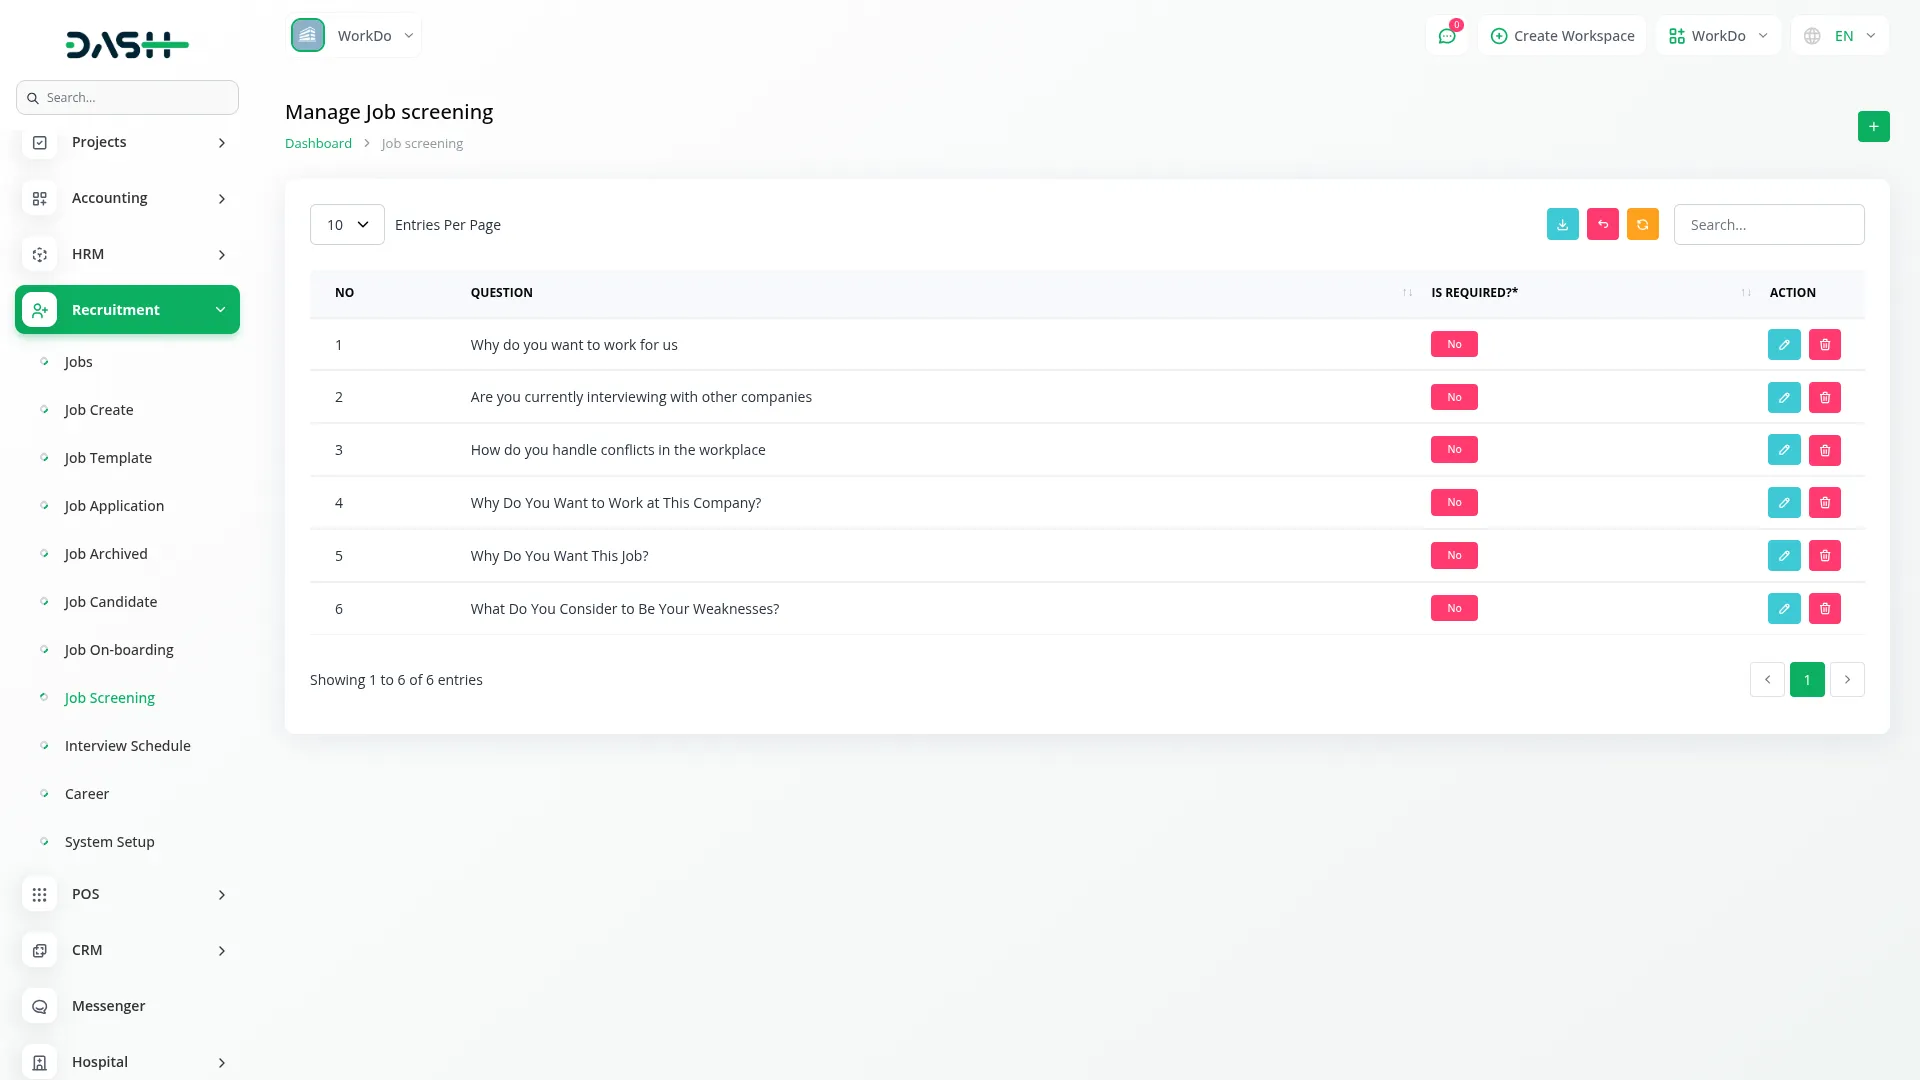
- To create screening questions, click “Create” and enter the Question text. Select Is Required (Yes or No) to make the question mandatory or optional. Choose Screening Type from your Recruitment system setup options, select Screen Indicator (also from system setup), and assign a Rating value.
- The list page displays all screening questions with Search, Export, Reset, or Reload buttons. The table shows columns for No, Question, Is Required, and Actions. In the Actions column, you can Edit questions to modify details or Delete questions you no longer need.
- These screening questions become available as custom questions in the Job creation process. When you select questions in the Questions Checkboxes section during job creation, they will appear on the frontend application form for candidates to answer.
Manage Interview Schedule
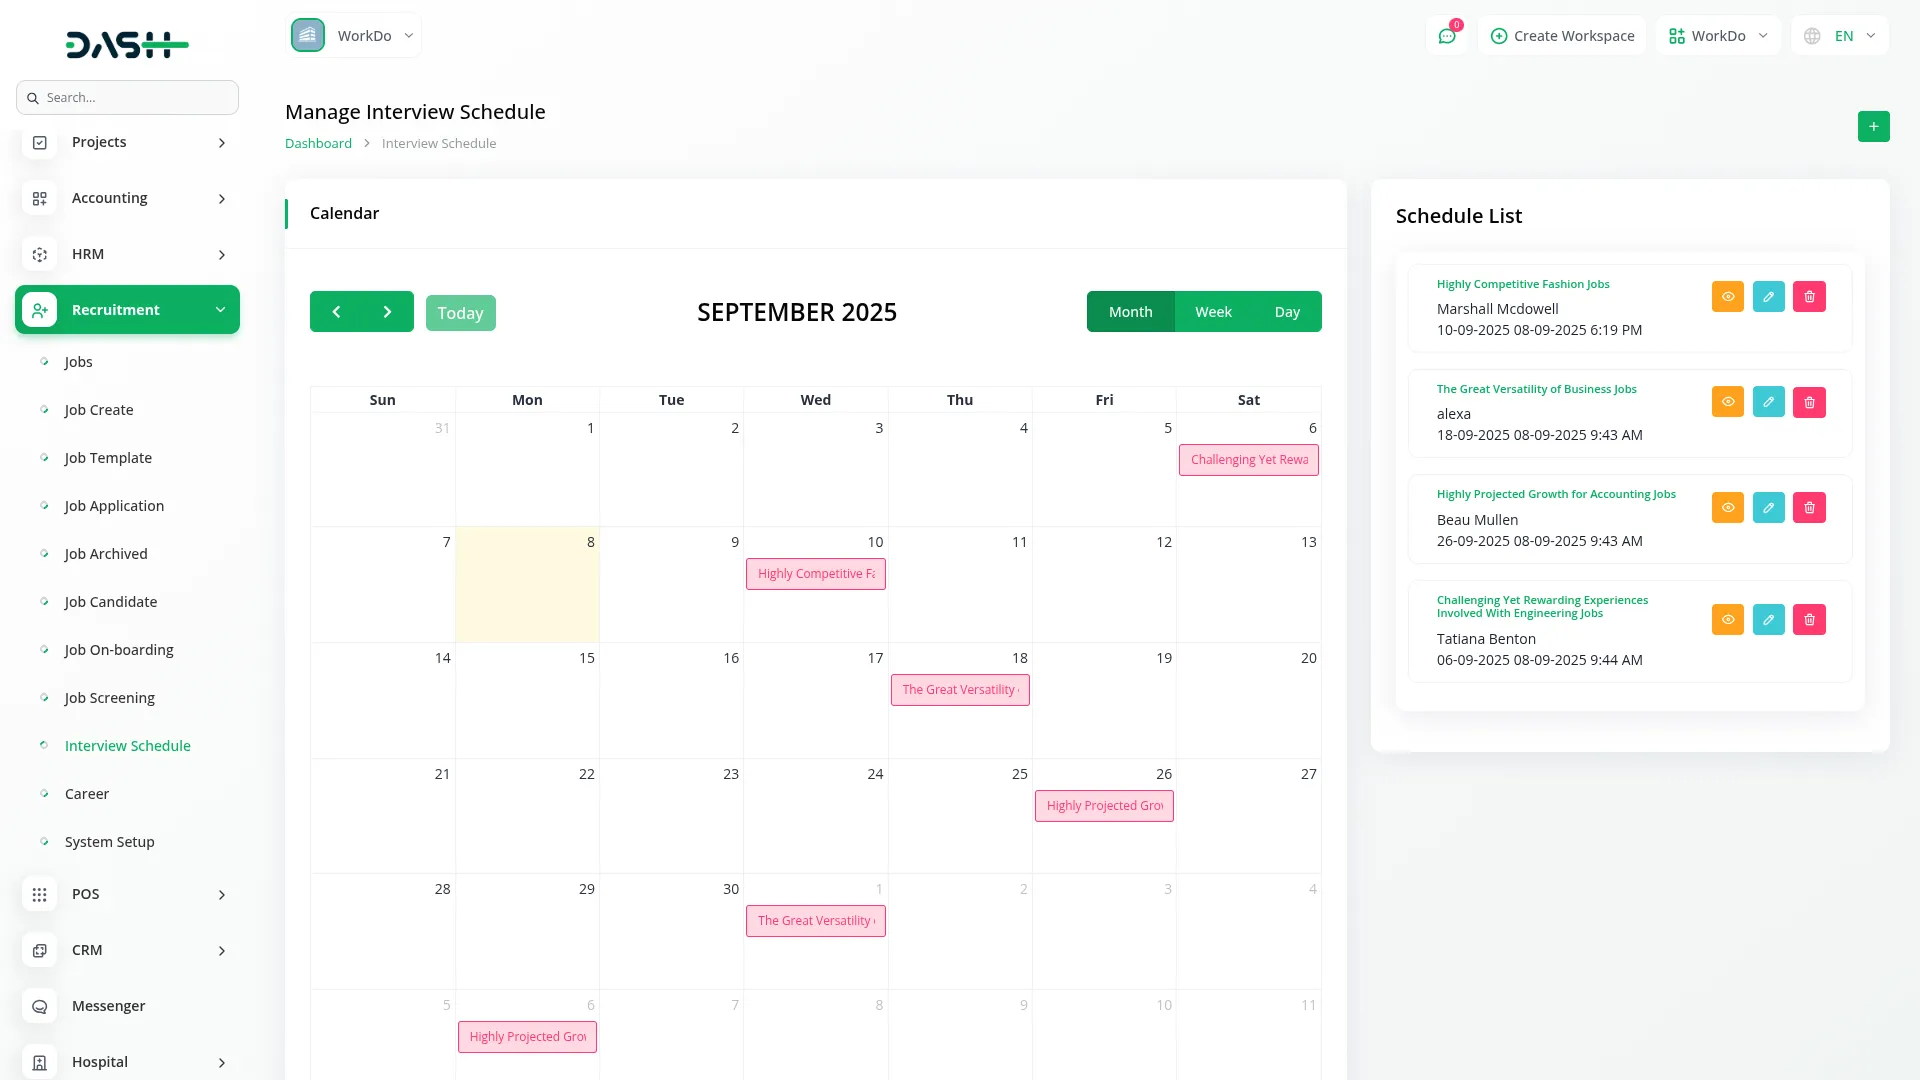
- To schedule an interview, click “Create” and select Job Candidate from your candidate database. Choose Assign Employee from the HRM Add-on employees list to designate the interviewer. Set an Interview Date and time for the appointment. If enabled, select Meeting Type between Zoom Meeting or Google Meet (these options appear only if the respective add-ons are activated). Add any relevant Comments about the interview.
- The main page displays a Calendar view showing all interview schedule data for the current month, plus a list of current month schedules below the calendar.
- Furthermore, in the Actions column, you can view complete Interview Schedule Details, edit appointments to modify timing or details, or delete interviews that are no longer needed.
- This scheduling data connects with candidate information from the Job Candidate section and employee data from the HRM add-on, and interview details appear in the Job Application view when candidates have scheduled interviews.
- On the website header, candidates will see a “Track Application” button. When they click this, a form opens asking for their Application ID and Email Address. After submitting the form, they navigate to the Application page, where their interview schedule is displayed. The schedule clearly shows two main fields: Date and Time.
System Setup Sections
Important Note: Only the sections configured through System Setup will be displayed on the website. Please ensure the desired sections are properly set up in the backend before they appear to visitors.
Manage Job Category
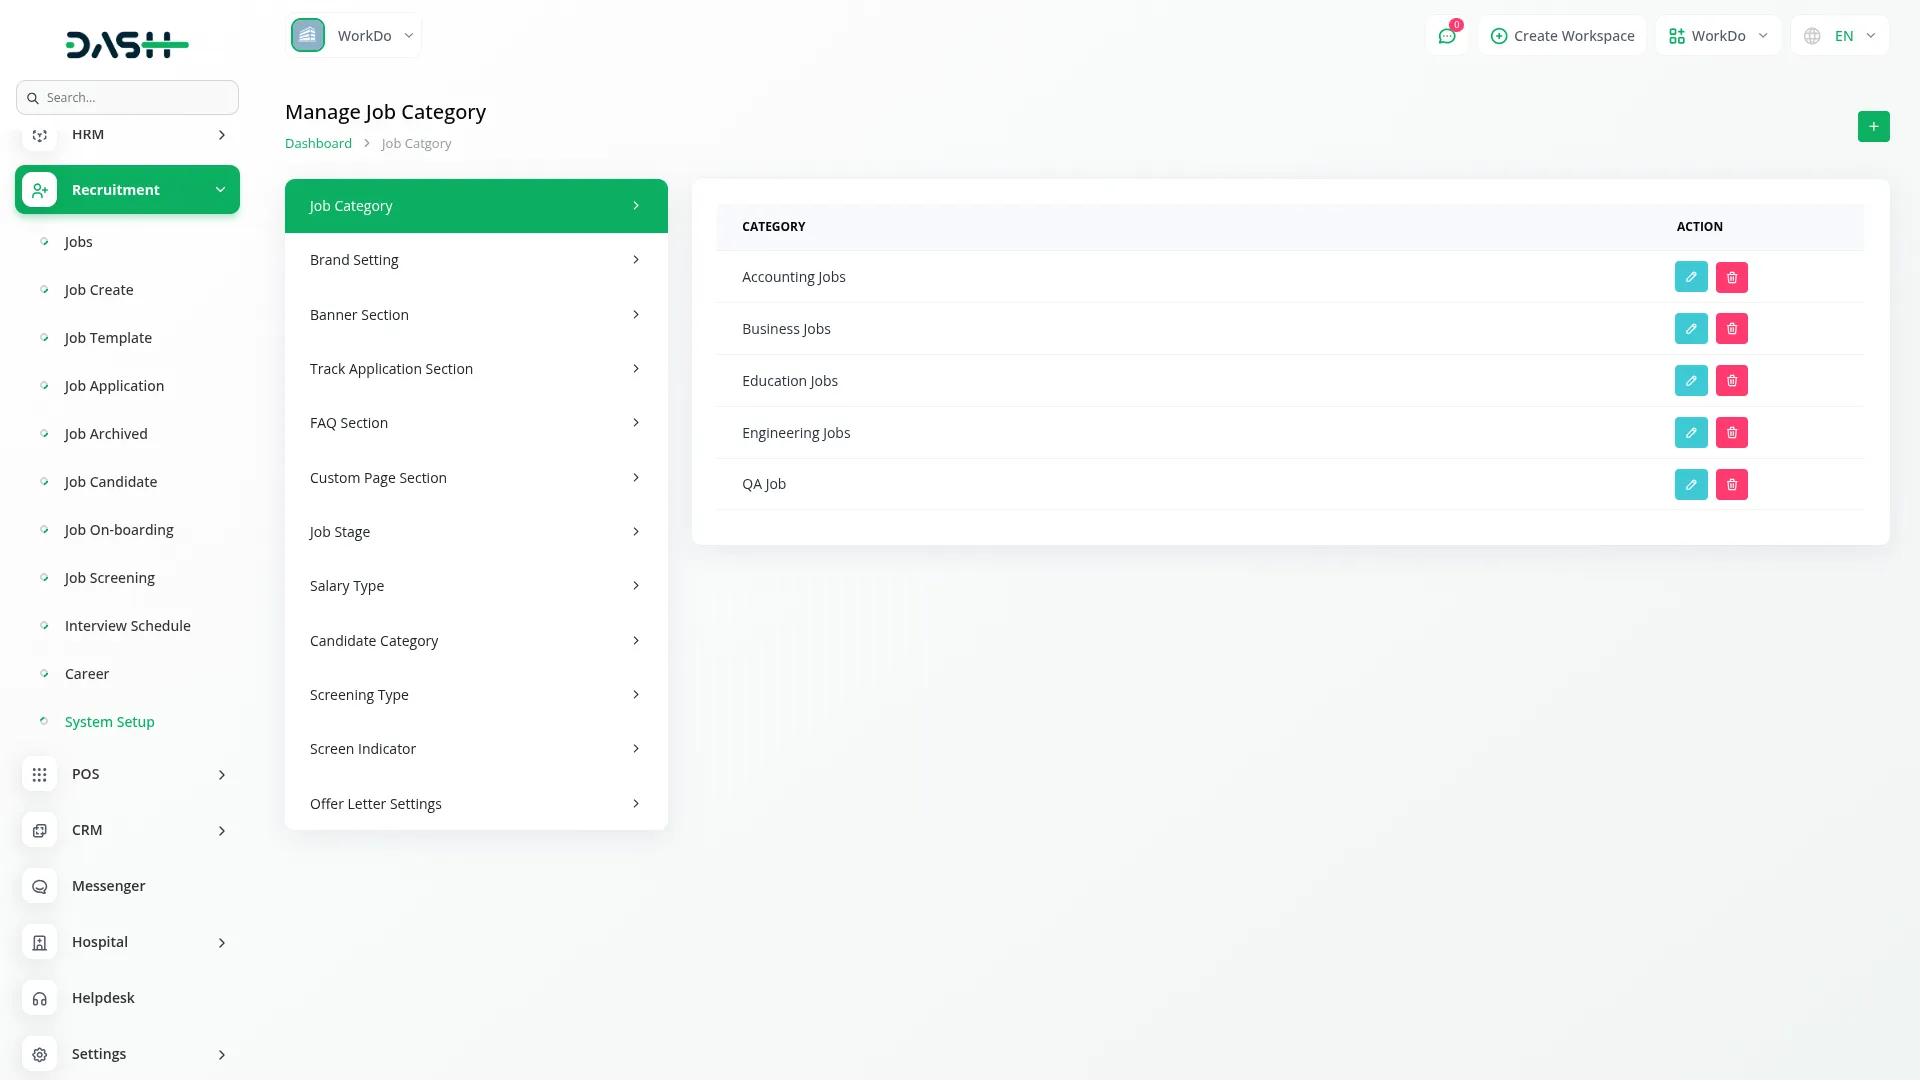
- To add a new job category, click “Create” and enter the Title for your category. The list page displays all categories in a simple table with the Category column. With the help of the Action column, you can edit existing categories to change their titles or delete categories you no longer need.
- These job categories are used in the Category Details section when creating jobs, appearing in the job category dropdown to help organize your job postings by type or department.
Manage Brand Setting
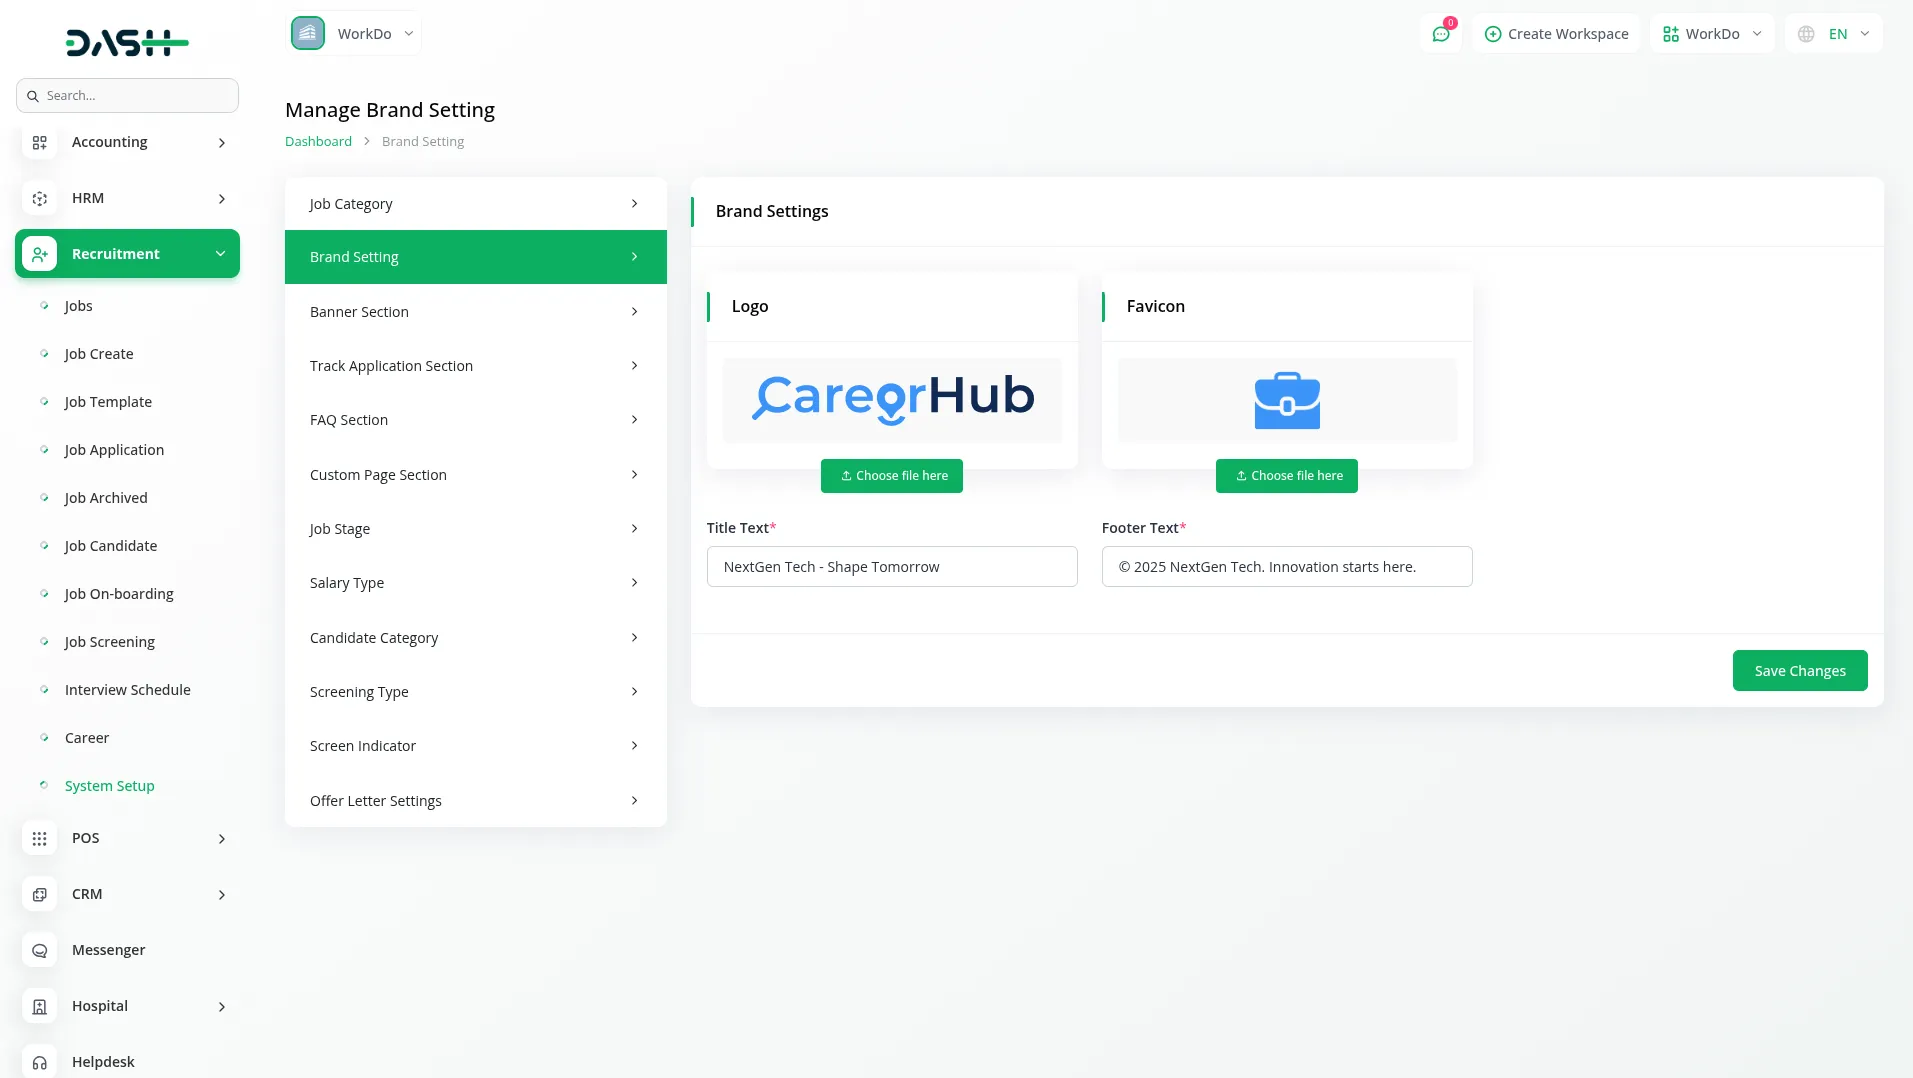
- After creating the job category, navigate to the Brand Setting section, where you will find fields for Logo (used in header and footer), Favicon (for website), Title Text, and Footer Text (for copyright sentence at the bottom). Enter all your branding details.
- Once saved, your Logo and Favicon will appear across your recruitment website, while the Title Text will display in the browser tab, and the Footer Text will automatically appear in the footer section of your frontend career page, creating a professional and branded experience for job seekers visiting your site.
Manage Banner Section
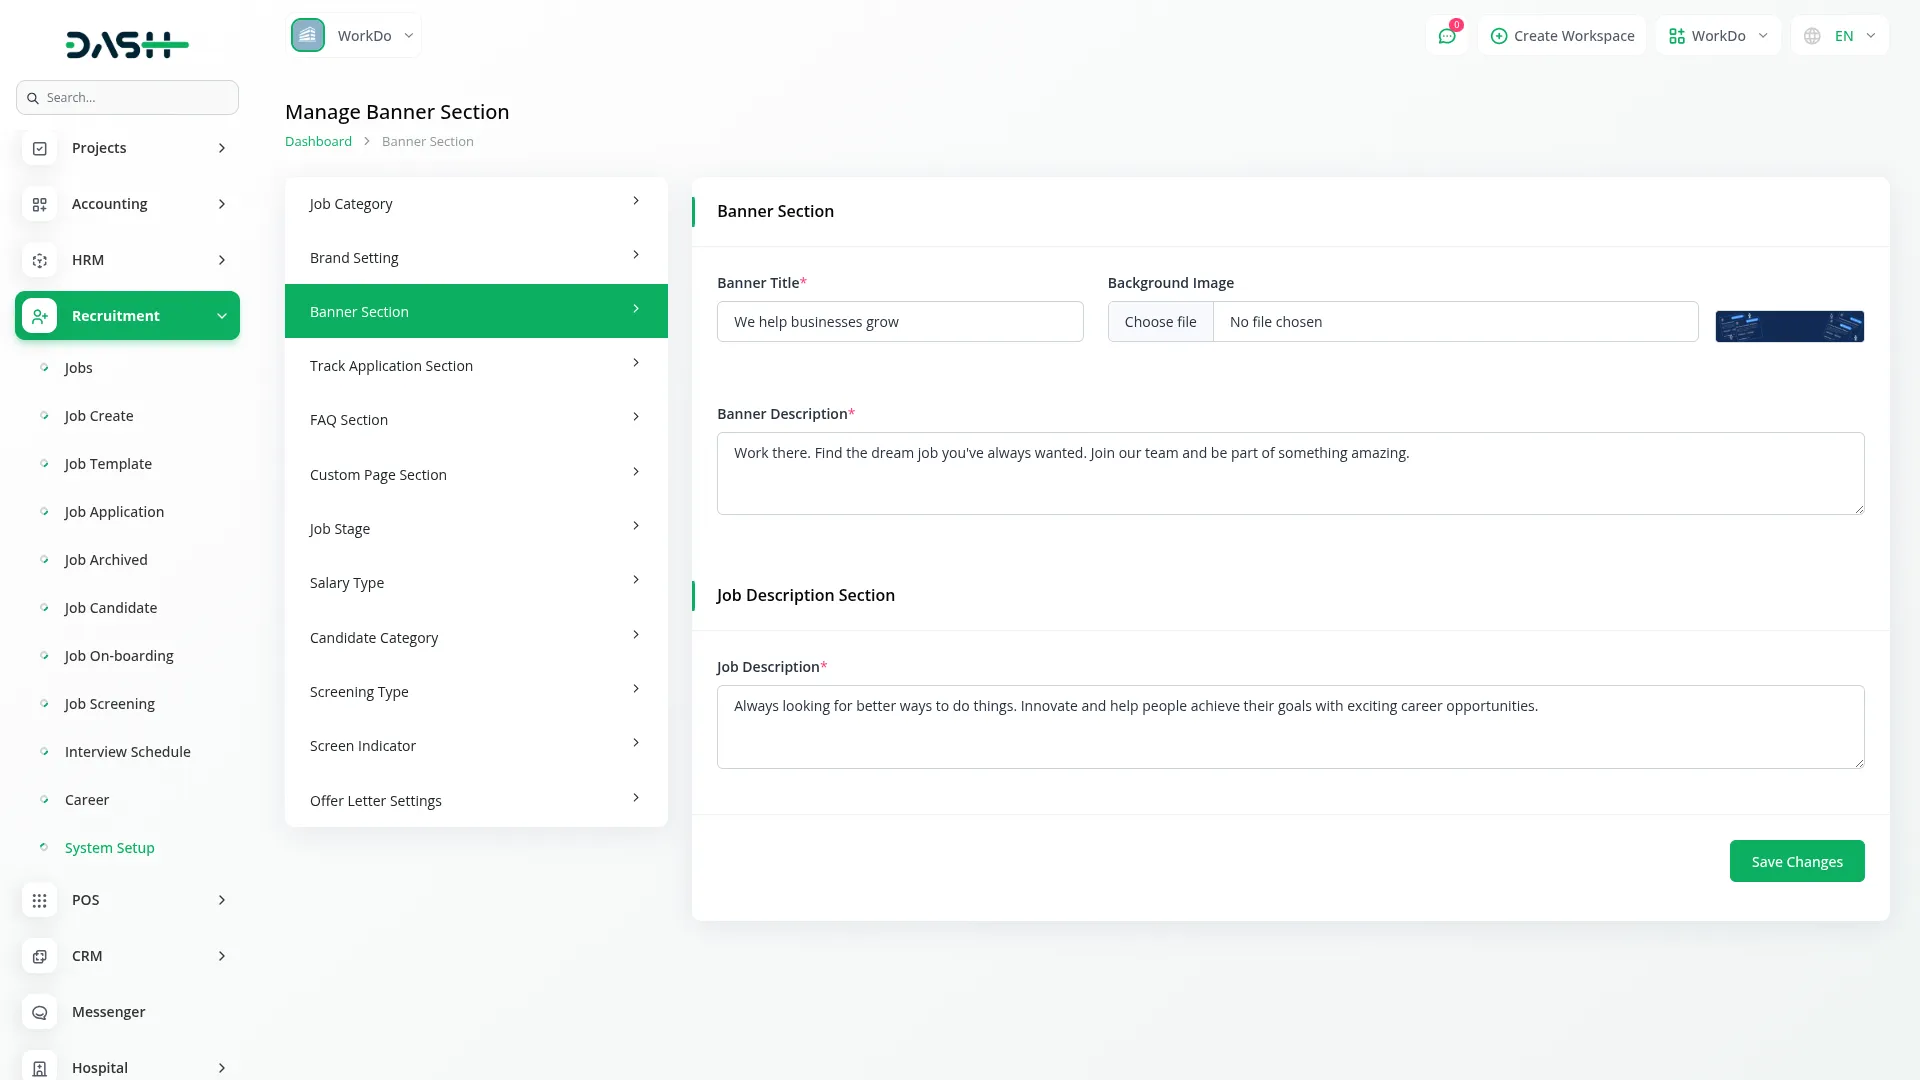
- In the Banner Section, you will find fields for Banner Title, Background Image, Banner Description, and Job Description. Enter your content details.
- Once saved, the Banner Title, Background Image, and Banner Description will automatically appear in the banner area of your website’s homepage, giving visitors an attractive first impression. The Job Description will be displayed in the Jobs Section of your career page to provide an overview information about available positions.
Track Application Section
- In the Track Application Section, you will find fields for Track Application Title and Track Application Description. In the Quicktip Section, use the repeater to add multiple Short Descriptions items for helpful tips. Enter all details.
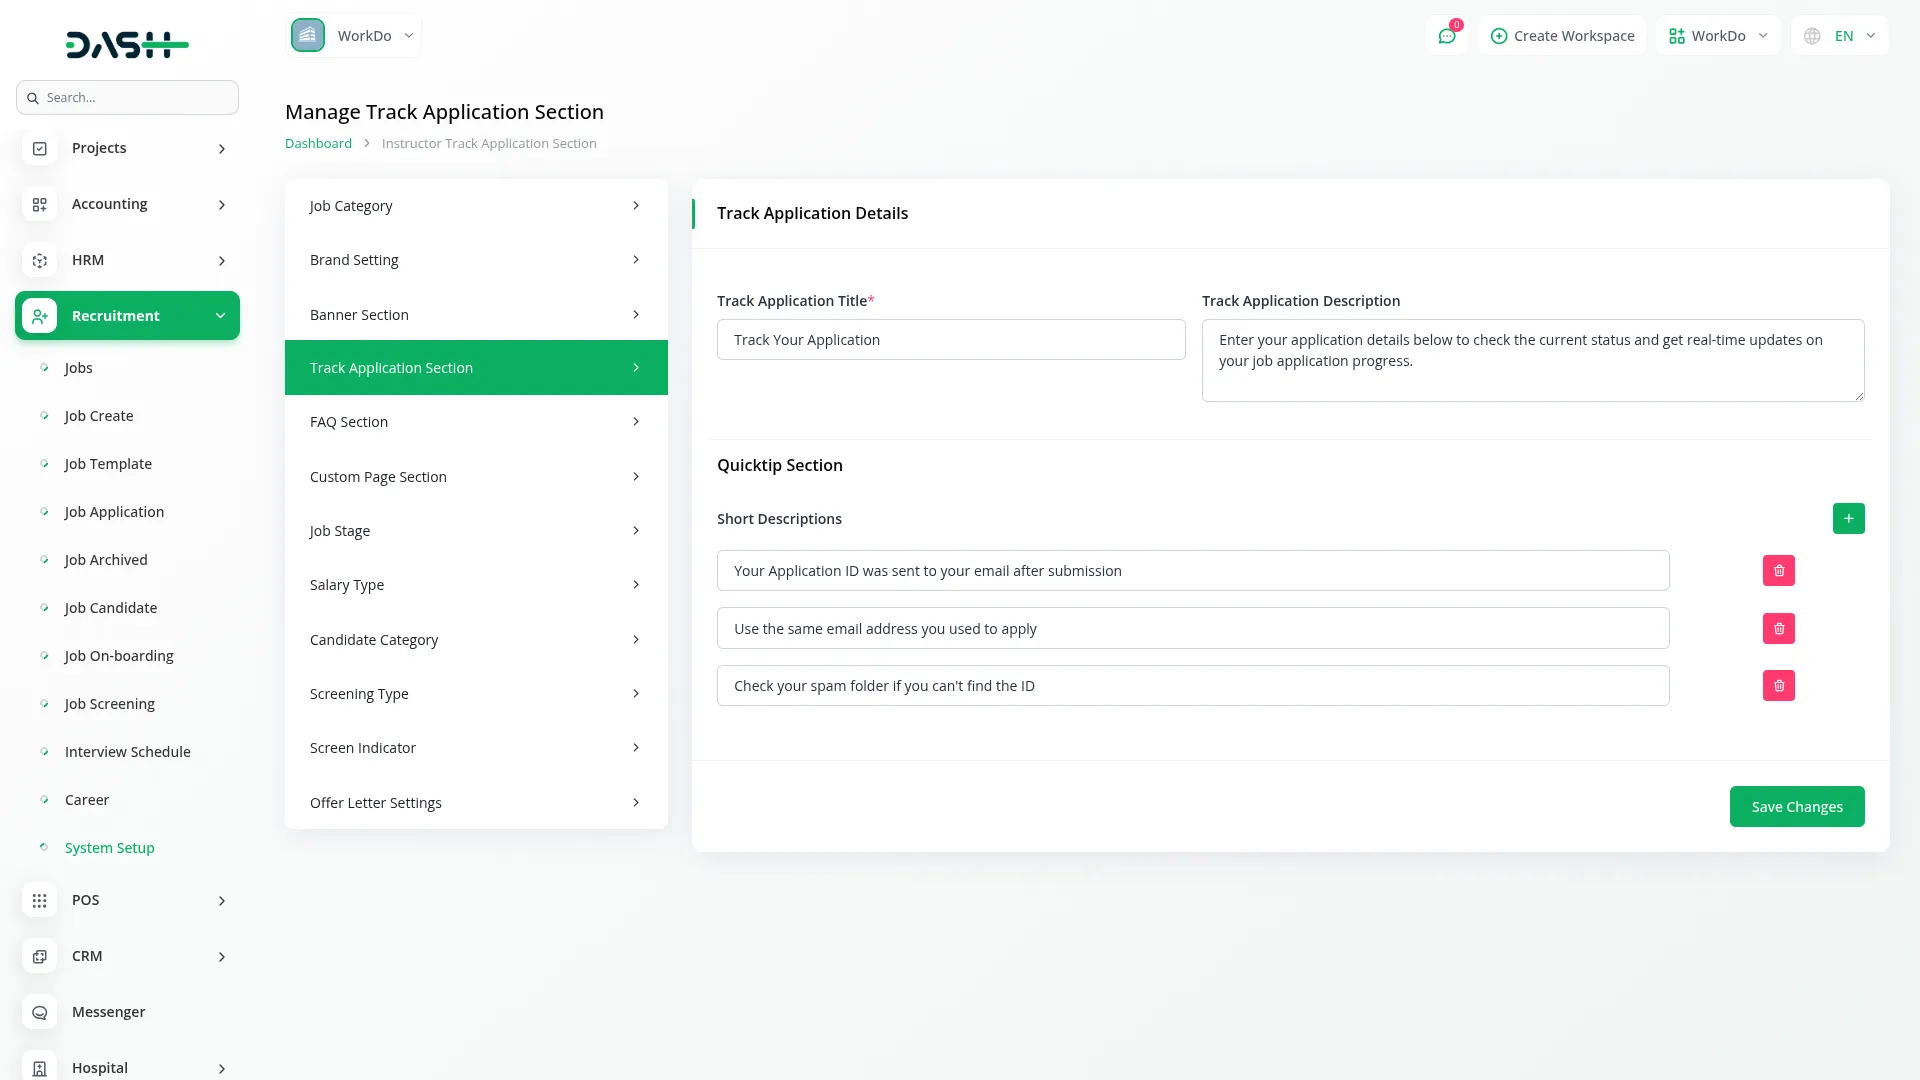
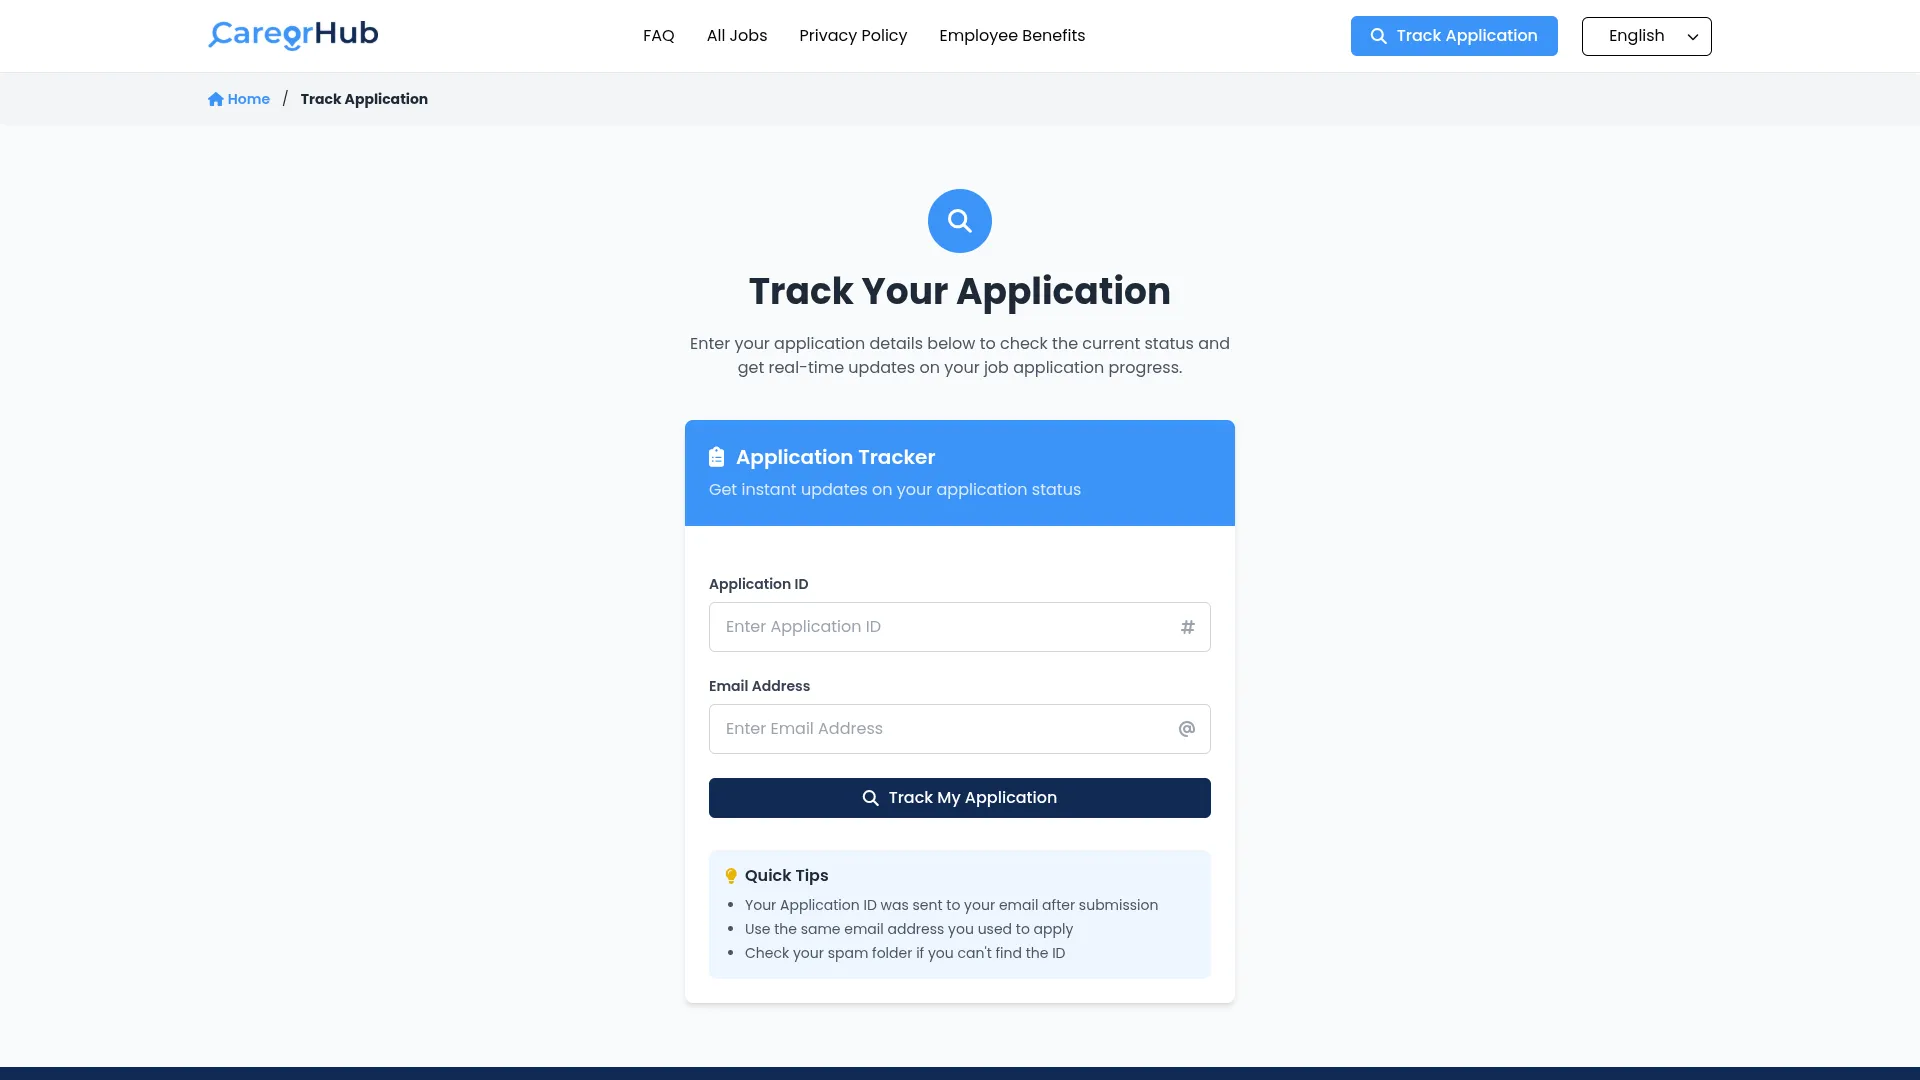
- Once saved, the Track Application Title and Description will automatically appear on your website’s track application page header. The Short Descriptions from the Quicktip Section will display as helpful tips for candidates using the application tracking feature, creating a user-friendly experience for job seekers wanting to check their application status.
- The Track Application page allows candidates to check their application status. The page structure includes Header, Track Application Section, Quicktip Section, and Footer. The Track Application Section displays your Track Application Title and Track Application Description from the Track Application Section system setup.
- The page includes a track application form with Application ID and Email Address fields for candidates to enter their information. The Quicktip Section shows helpful Short Descriptions you added in the system setup to guide candidates through the tracking process.
FAQ Section
- In the FAQ Section, you will find fields for FAQ Title and FAQ Description for the page header. The FAQ Categories repeater allows you to add multiple items with Category Icon, Category Title, and Category Descriptions. The FAQ Questions repeater lets you create multiple items with a Question Icon, a Question Title, and a Detailed Answer. Enter all your FAQ content.
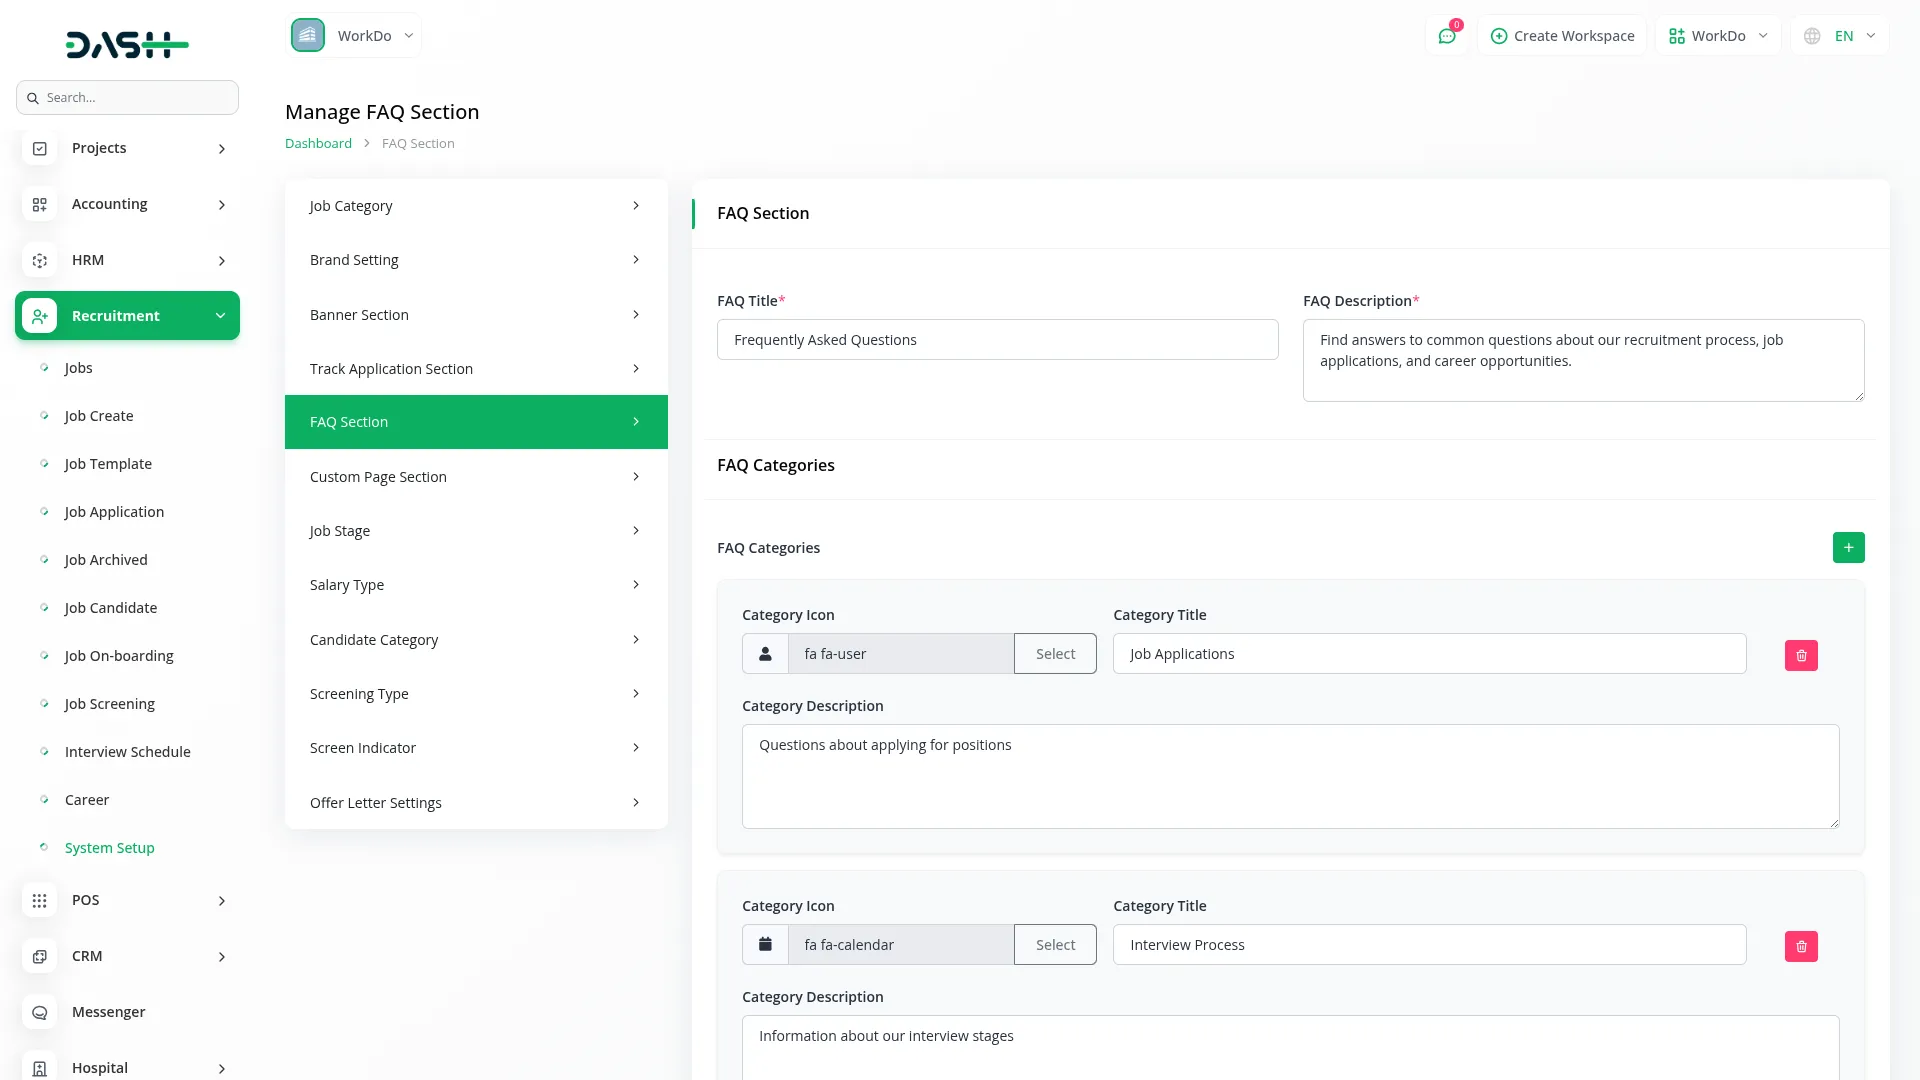
- Once saved, the FAQ Title and Description will appear at the top of your website’s FAQ page. The FAQ Categories will display as organized sections with their icons, titles, and descriptions, while the FAQ Questions will show with their icons, titles, and detailed answers, creating a complete help section for job seekers visiting your career site.
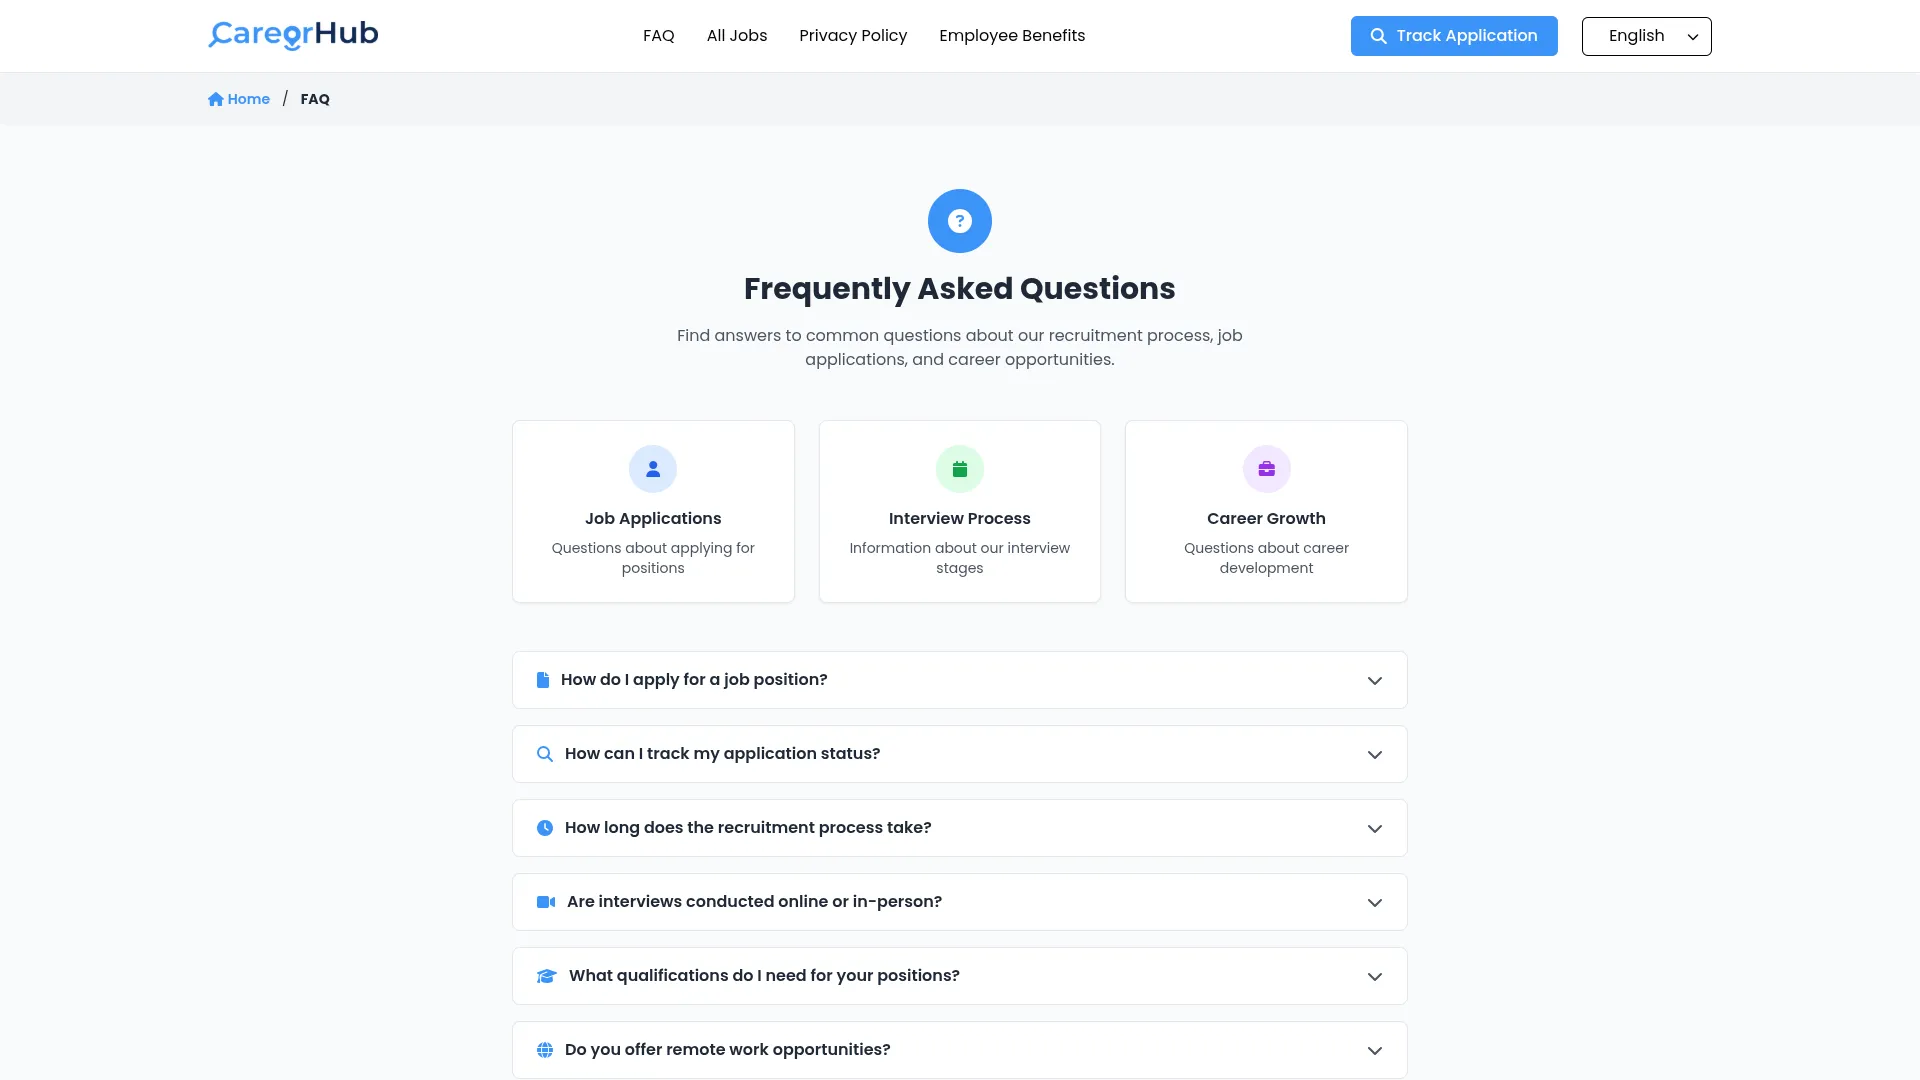
- The FAQ page helps candidates find answers to common questions about your hiring process. The page structure includes Header, FAQ Category Section, FAQ Question Section, and Footer components. The page displays your FAQ Title and FAQ Description from the FAQ Section system setup at the top.
- The FAQ Categories Section shows all categories you created with their Category Icons, Category Titles, and Category Descriptions in an organized layout. The FAQ Questions Section displays all questions with their Question Icons, Question Titles, and Detailed Answers, allowing candidates to quickly find relevant information about your application process.
Custom Page Section
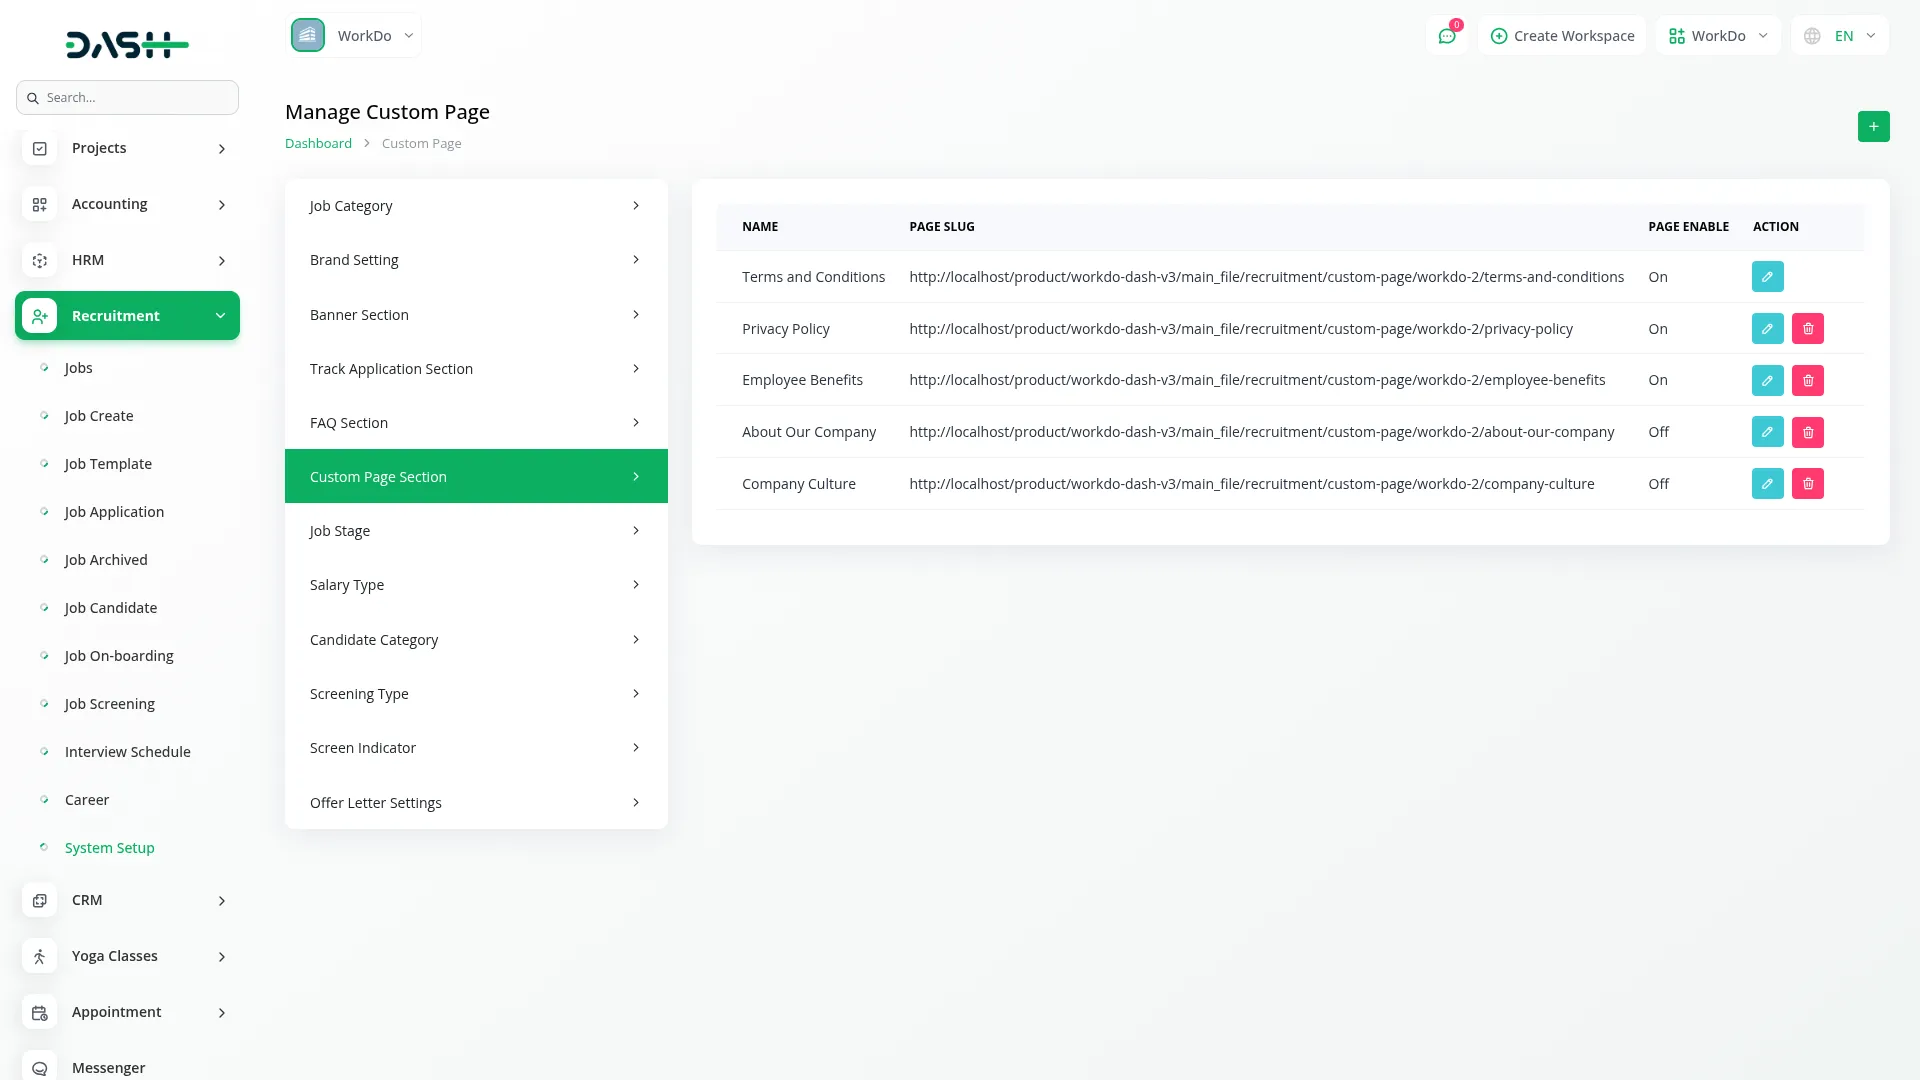
- To create a custom page, click “Create” and enter the page Name. Use the Page Header Display toggle button to control visibility – when ON, the page name appears in your website’s top header section. Add your Content using the rich text editor to create the page information.
- The list page shows all custom pages with columns for Name, Page Slug (page link), Page Enable (on/off status), and Actions. In the Actions column, you can Edit pages to modify content or Delete pages you no longer need.
- When Page Header Display is enabled, candidate can click the page name in your website header to view the dynamic Content you created. The Terms and Conditions page is set by default, cannot be removed, and will not appear in the website’s top header section.
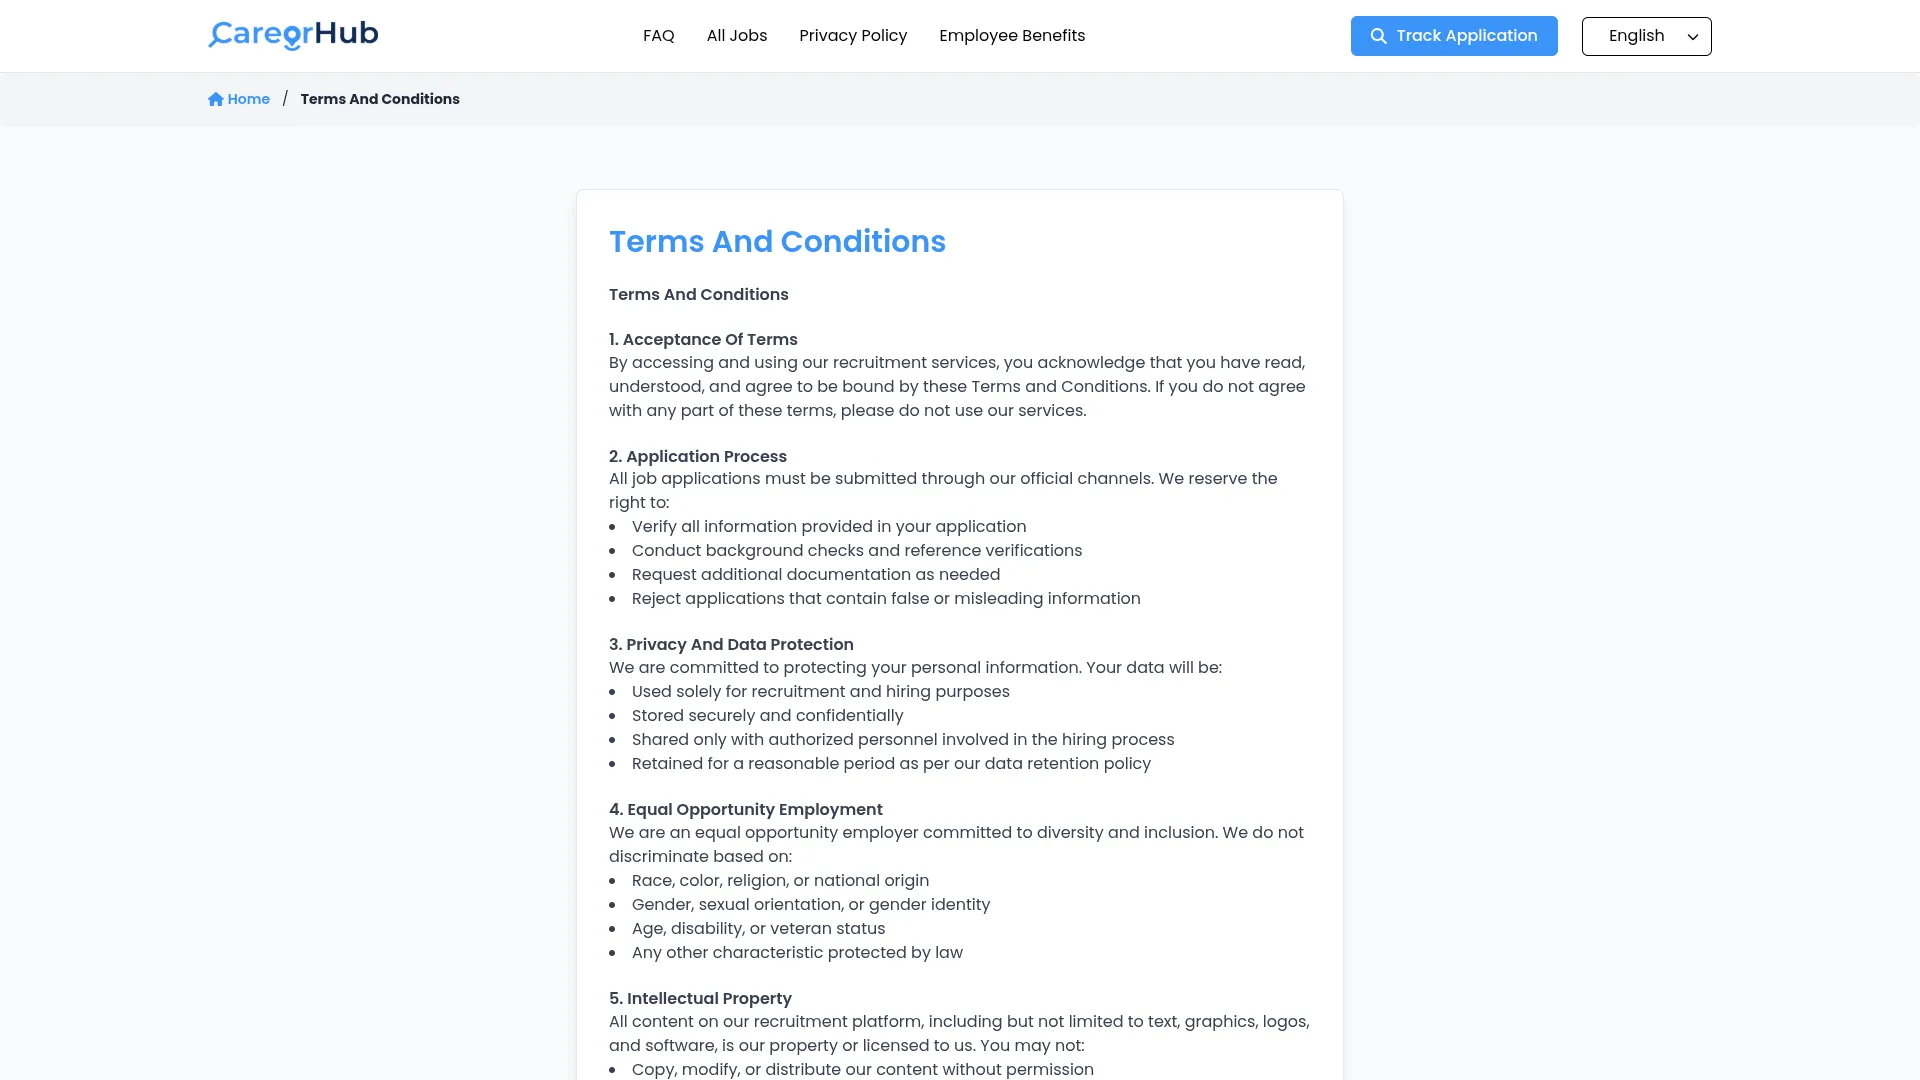
- Custom Pages display all additional pages you created in the Custom Page Section system setup. These pages appear in the website header navigation when you enable Page Header Display for each page. When candidates click on a custom page name in the header, they view the dynamic Content you created for that specific page.
- The Terms and Conditions page is included by default and provides important legal information, though it does not appear in the top header section navigation to maintain clean menu organization. Each custom page maintains the same header and footer structure as other pages, ensuring consistent branding and navigation throughout your recruitment website.
Manage Job Stage
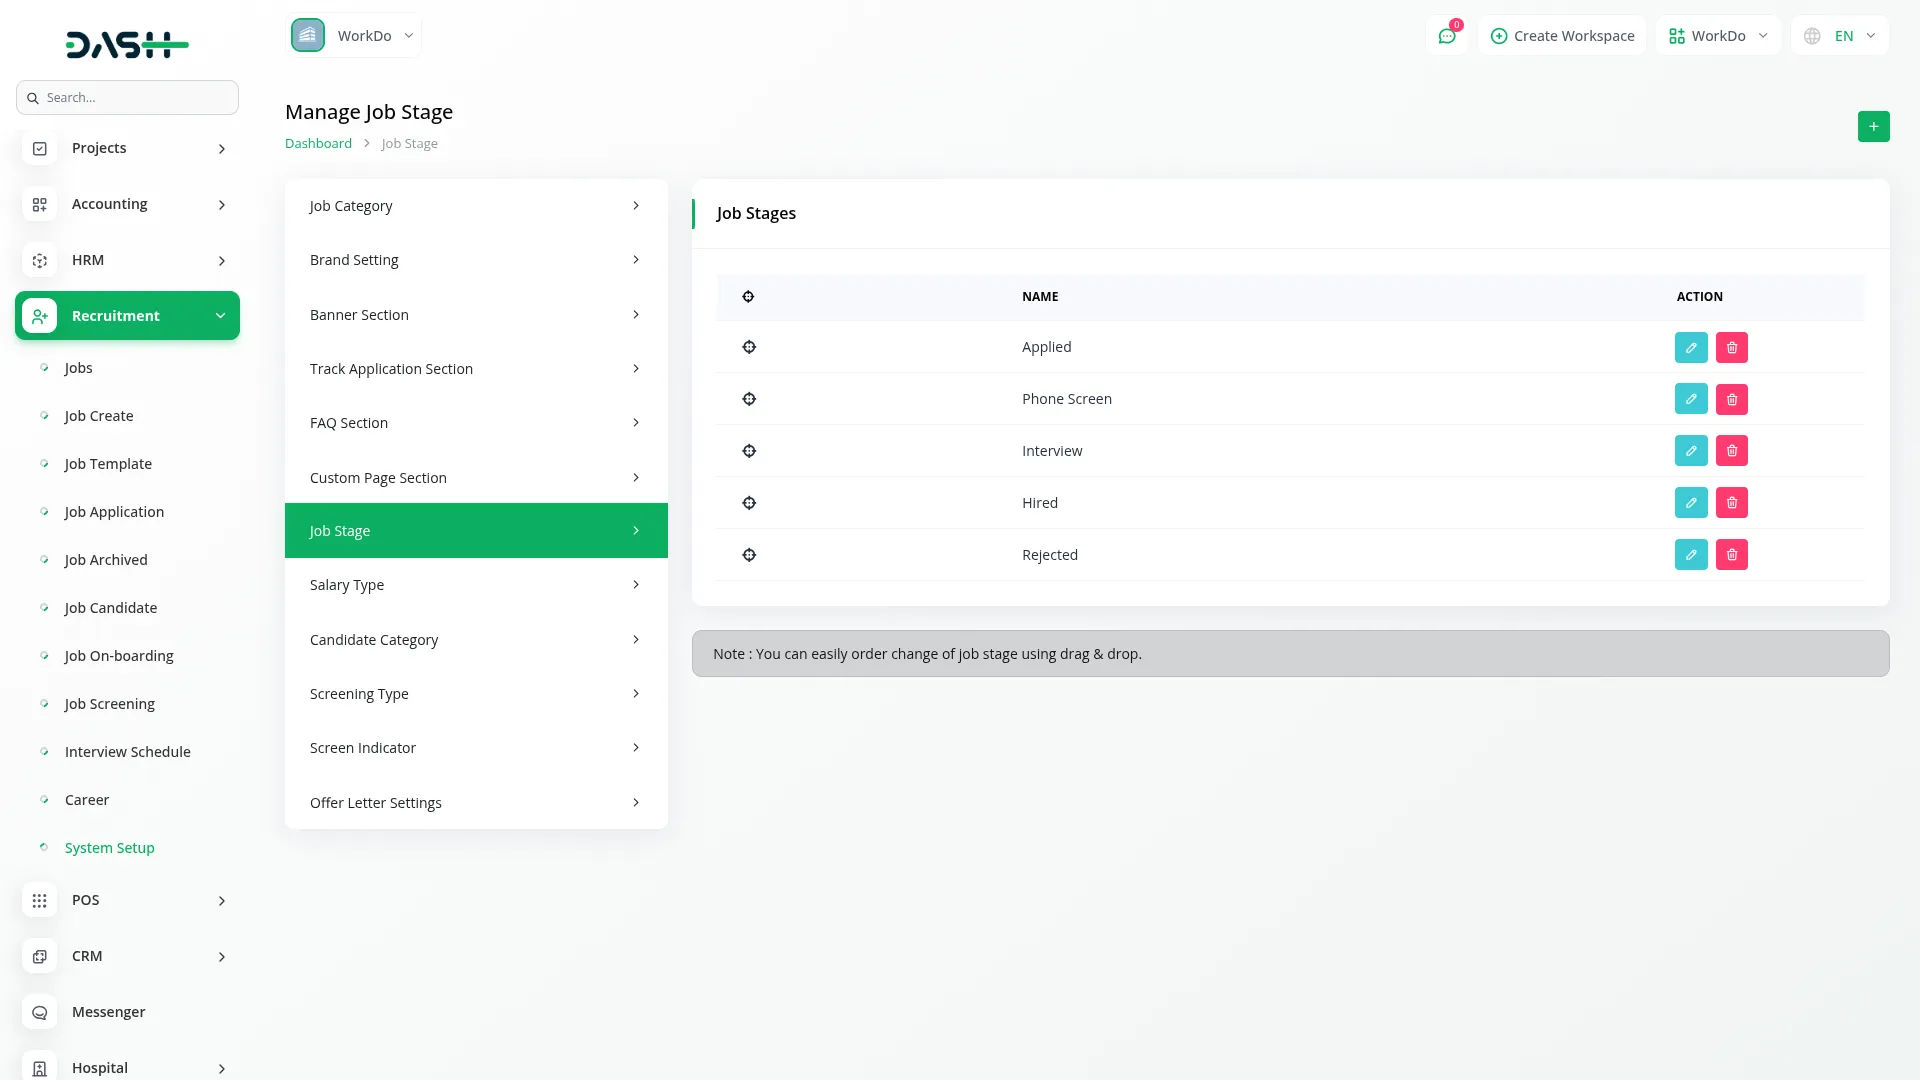
- To add a job stage, click “Create” and enter the Title for your stage (such as “Applied”, “Interview”, “Hired”). The list page displays all stages with a Name column. In the Actions column, you can edit stage titles or delete stages you no longer use.
- These job stages are used in the job application Kanban view and dropdown filters, helping you track candidates through different phases of your hiring process from application to final decision.
Manage Salary Type
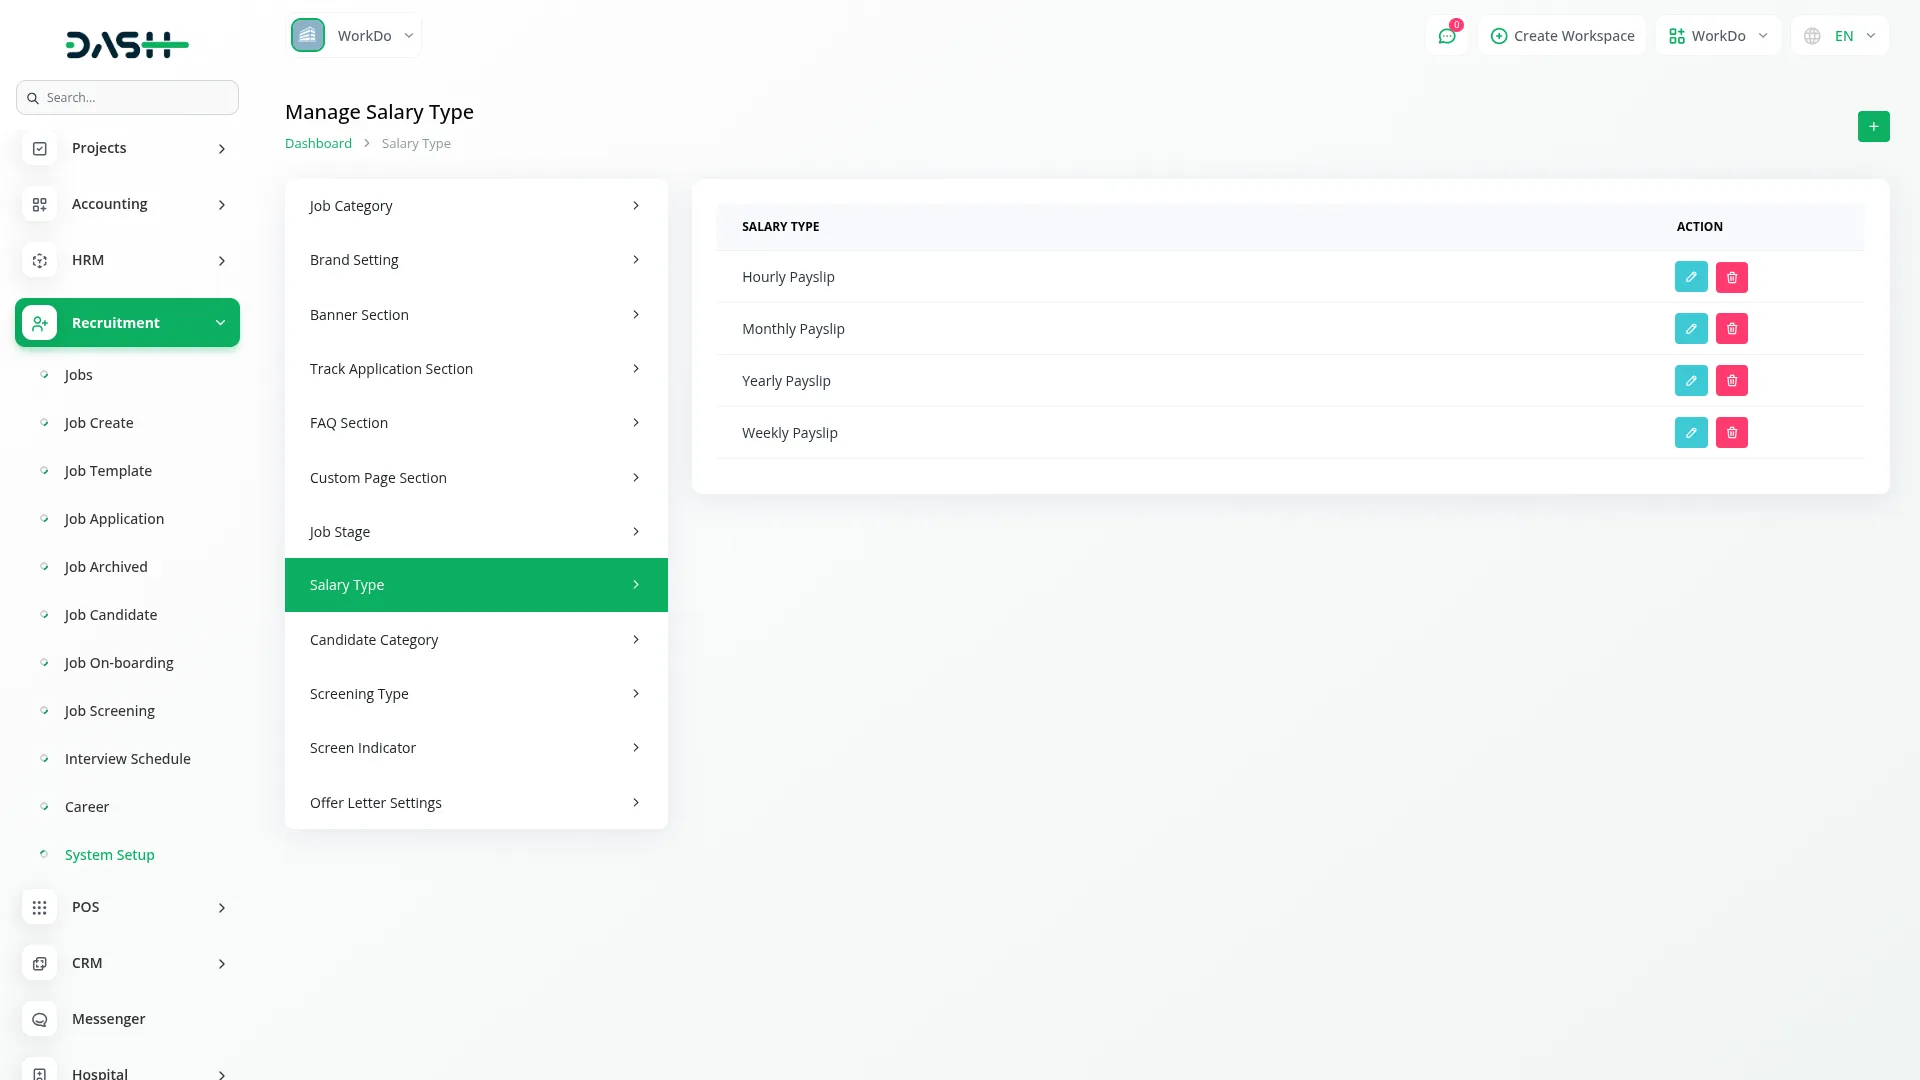
- To add a salary type, click “Create” and enter the Name (such as “Hourly”, “Annual”, “Contract”). The list page shows all salary types in the Salary Type column. Use the Actions column to edit names or delete salary types you don’t need.
- These salary types appear in the Job On-Boarding section dropdown, allowing you to specify different compensation structures when converting candidates to employees.
Manage Candidate Category
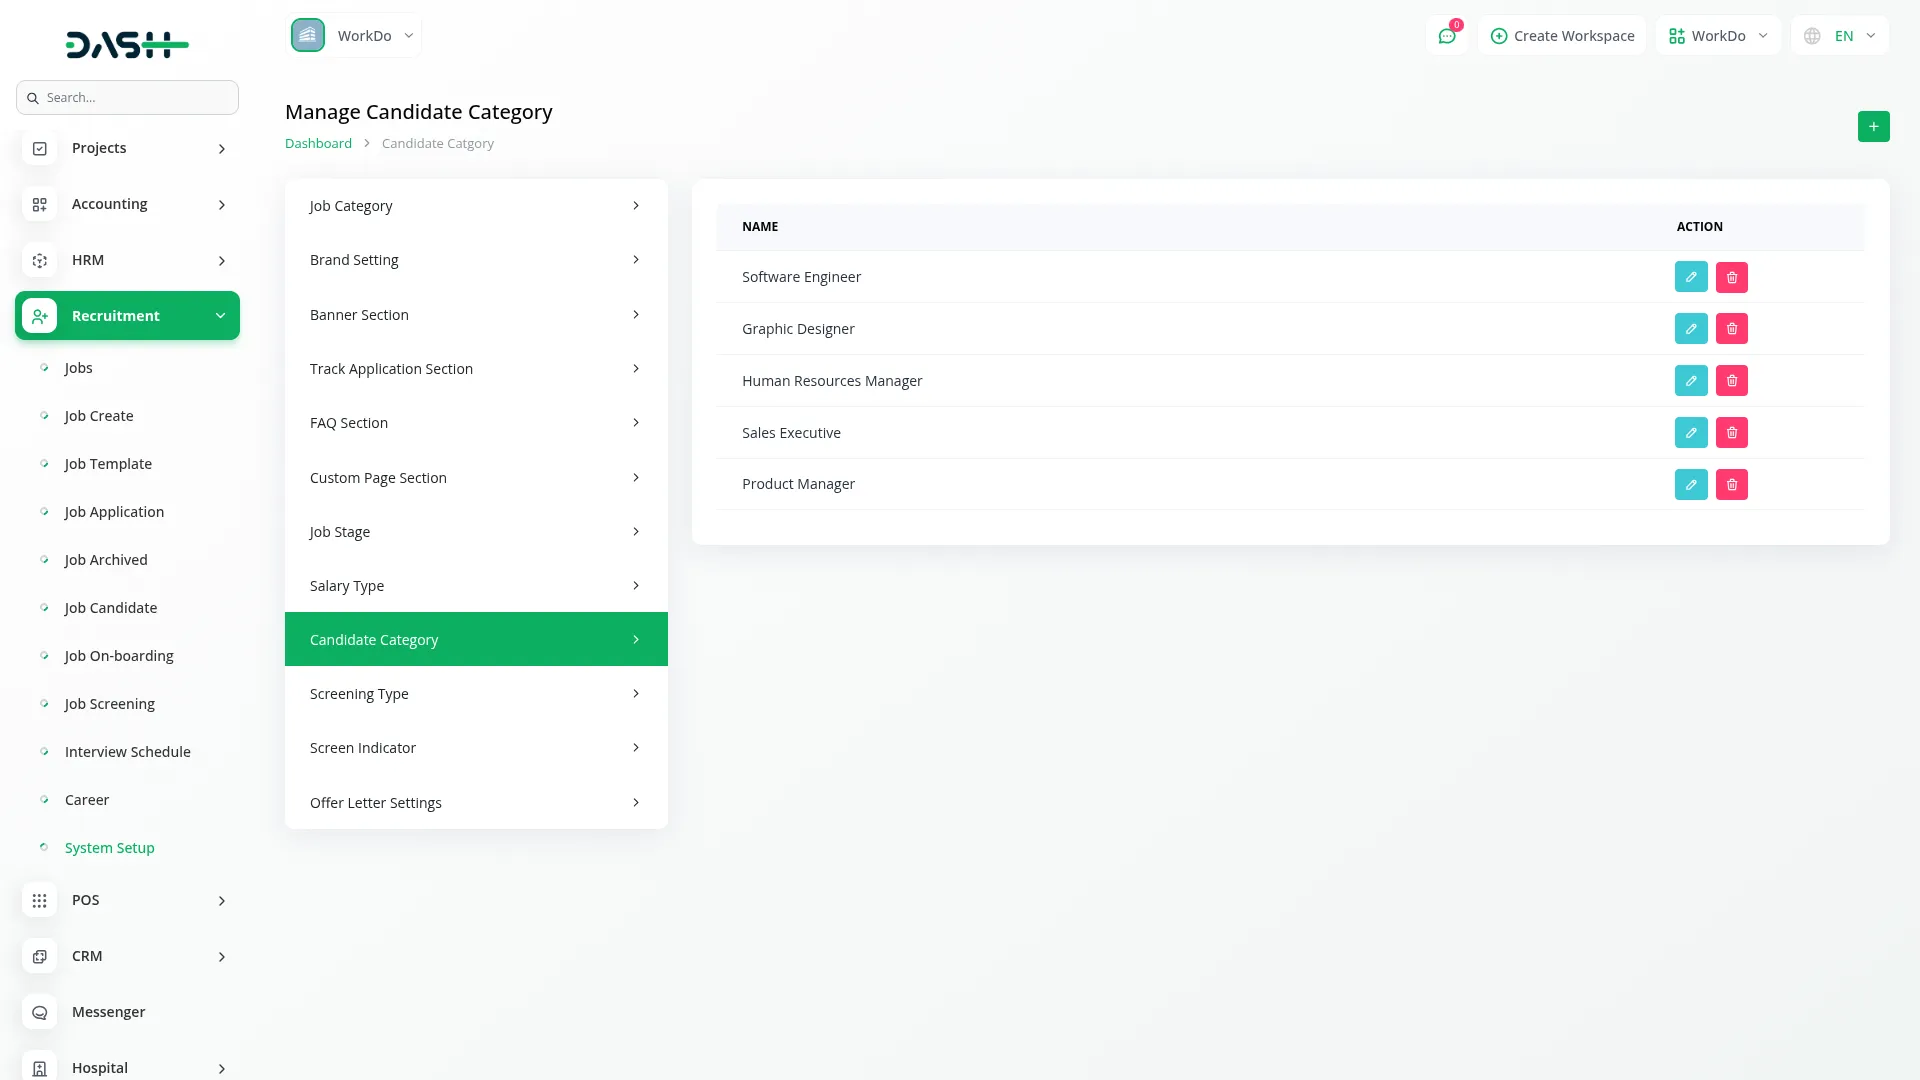
- To create a candidate category, click “Create” and enter the Name for your category (such as “Experienced”, “Fresh Graduate”, “Referral”). The list page displays categories in the Name column. In the Actions column, you can edit category names or delete categories you no longer use.
- These categories are used when creating job candidates, appearing in the Candidate Category dropdown, to help organize and filter your candidate database by different classification types.
Manage Screening Type
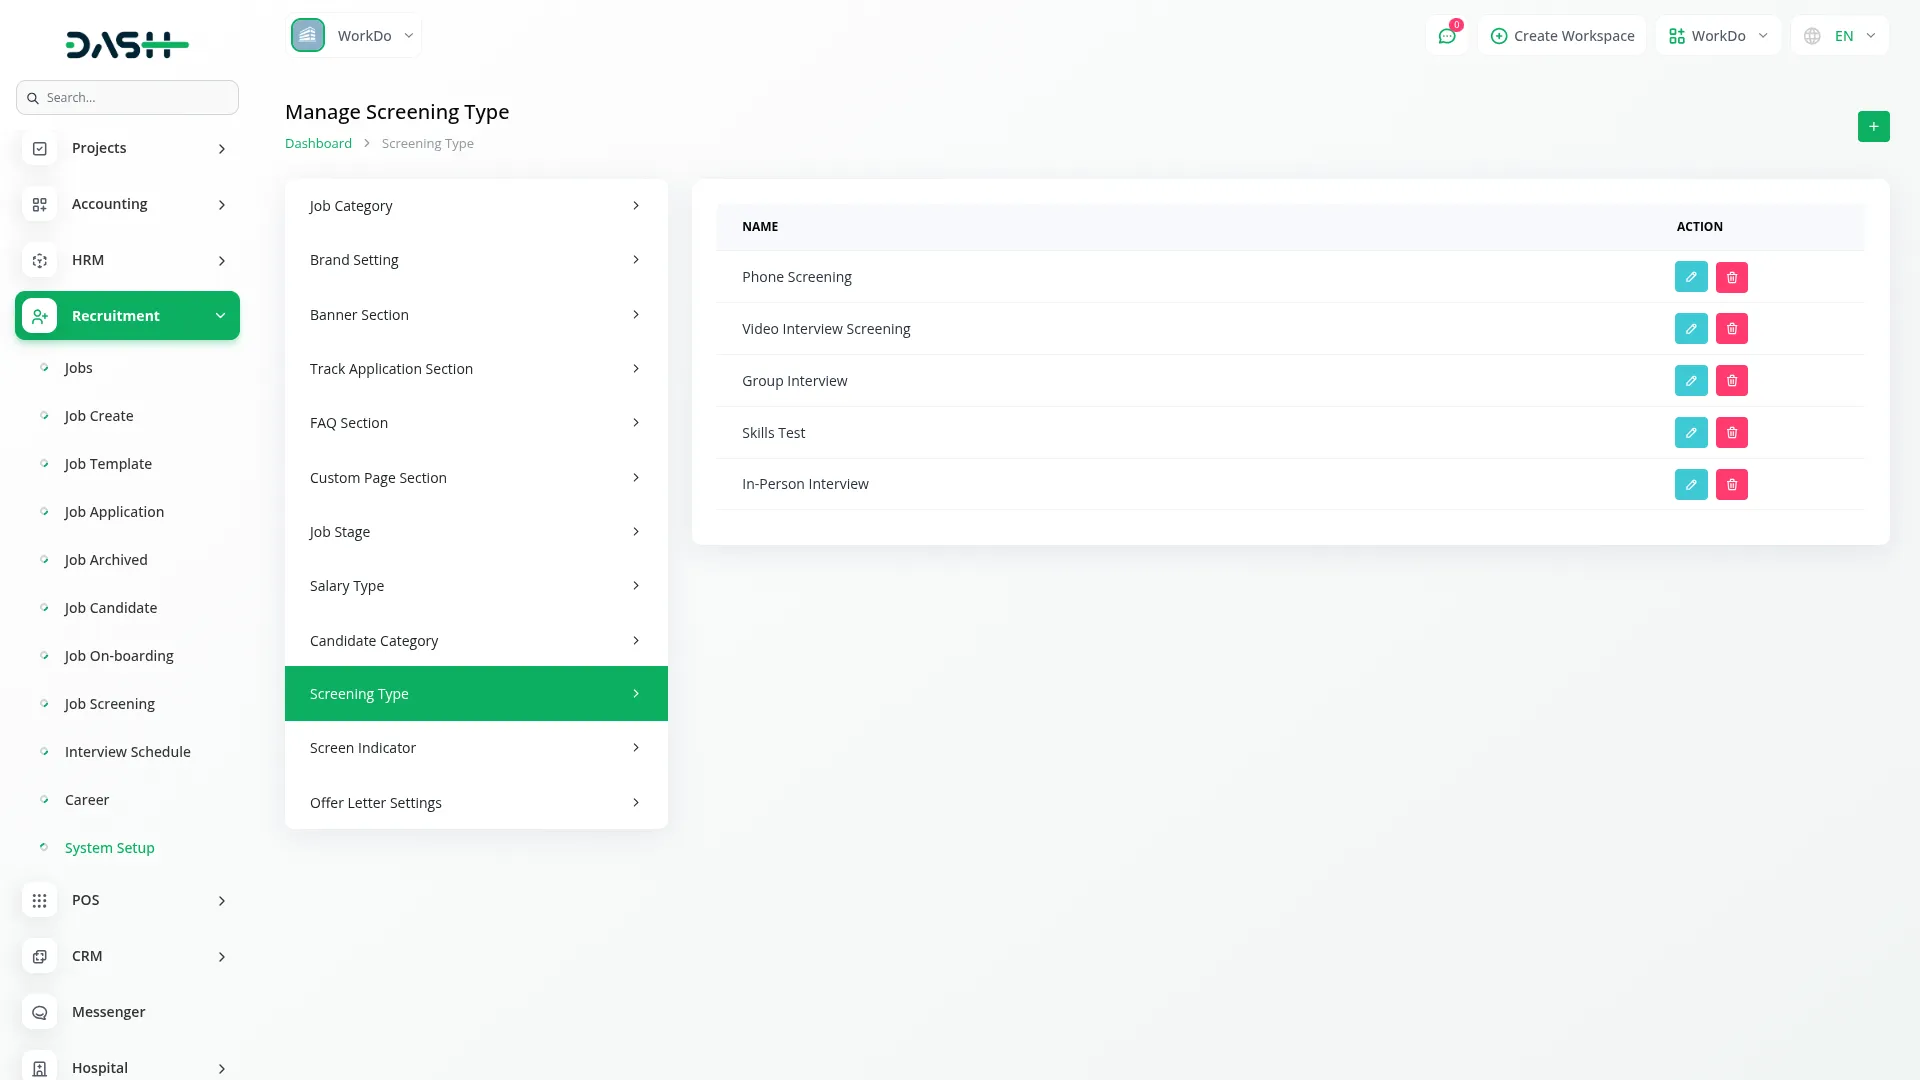
- To add a screening type, click “Create” and enter the Name for your screening method (such as “Technical”, “Behavioral”, “Cultural Fit”). The list page shows all screening types in the Name column. Use the Actions column to edit names or delete screening types you don’t need.
- These screening types are used in the Job Screening section and connect to Screen Indicator settings, helping you categorize different types of questions and evaluation methods for candidate assessment.
Manage Screen Indicator
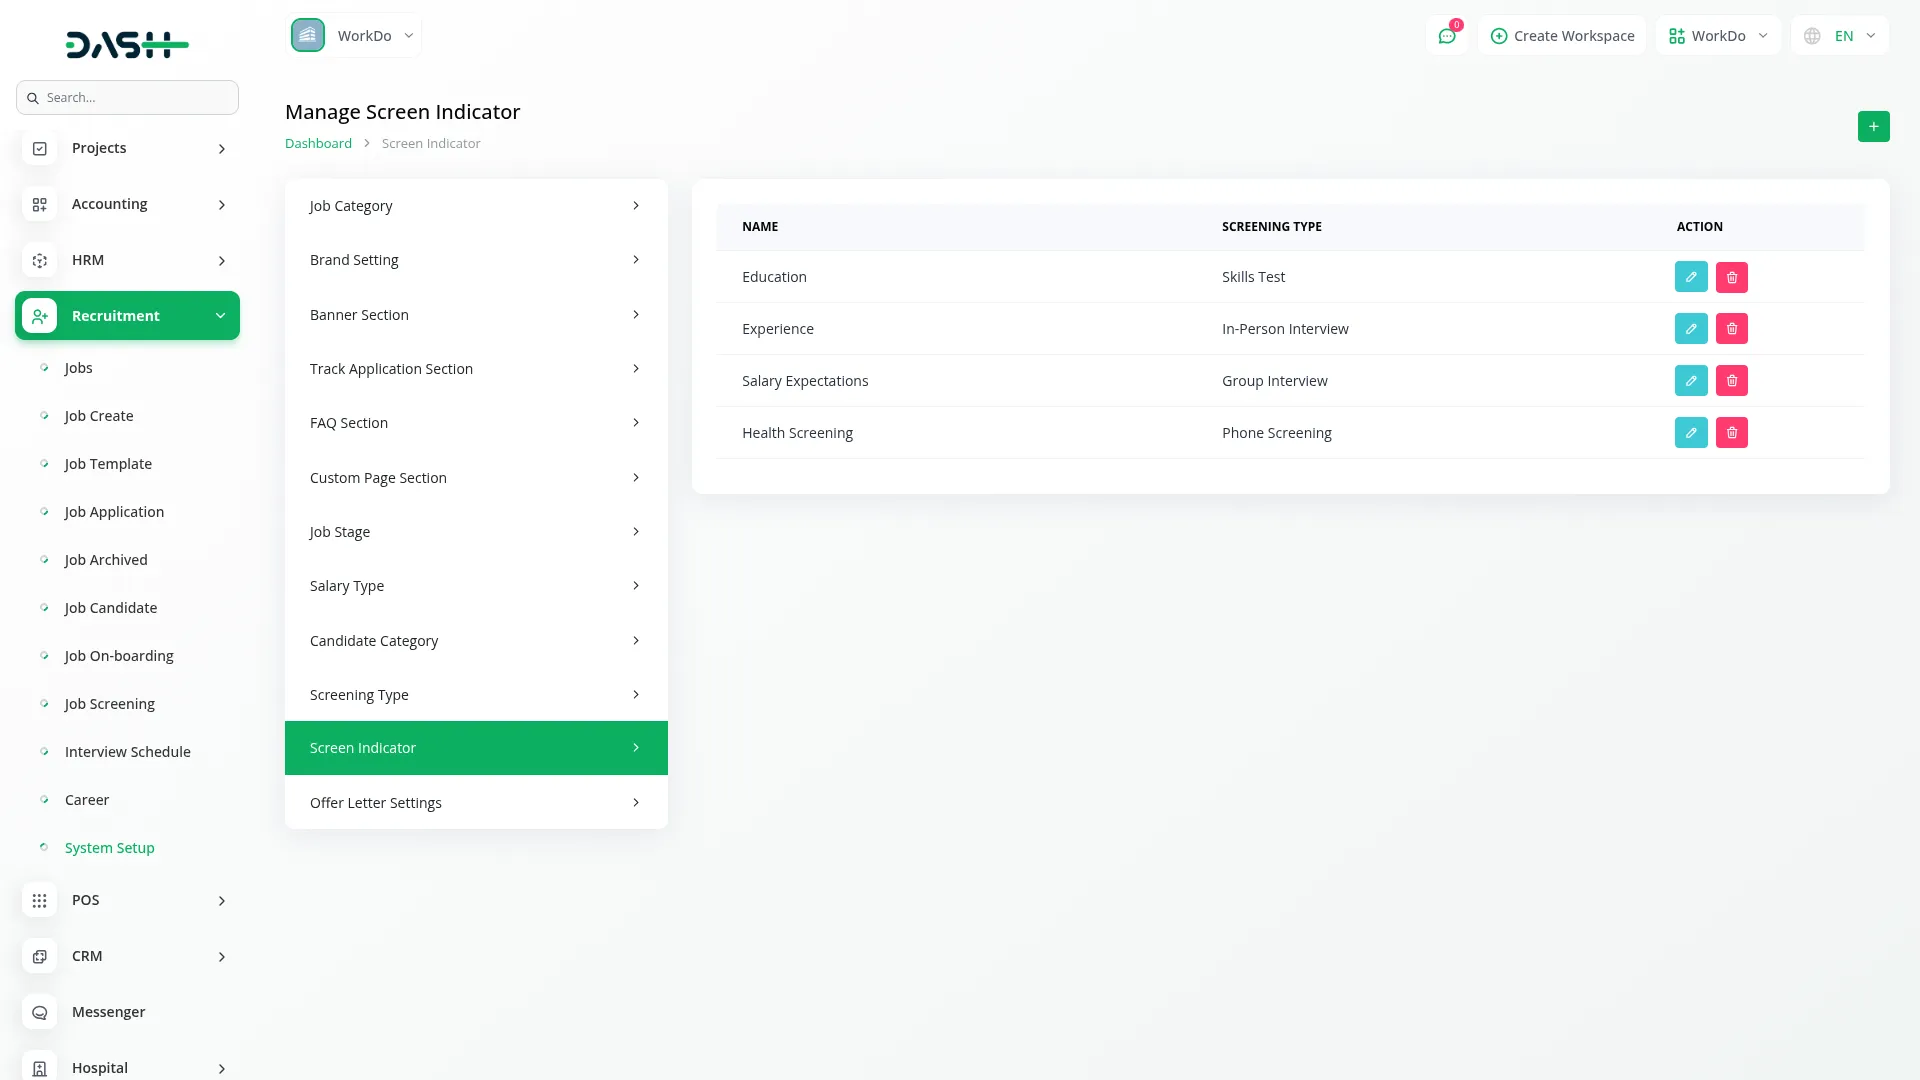
- To create a screen indicator, click “Create” and enter the Name for your indicator, then select the Screening Type from the dropdown (which comes from your Screening Type section). The list page displays indicators with Name and Screening Type columns. In the Actions column, you can edit indicators or delete ones you no longer use.
- These screen indicators work with screening types in the Job Screening section, providing specific criteria or measurements for evaluating candidate responses to different types of screening questions.
Manage Offer Letter Settings
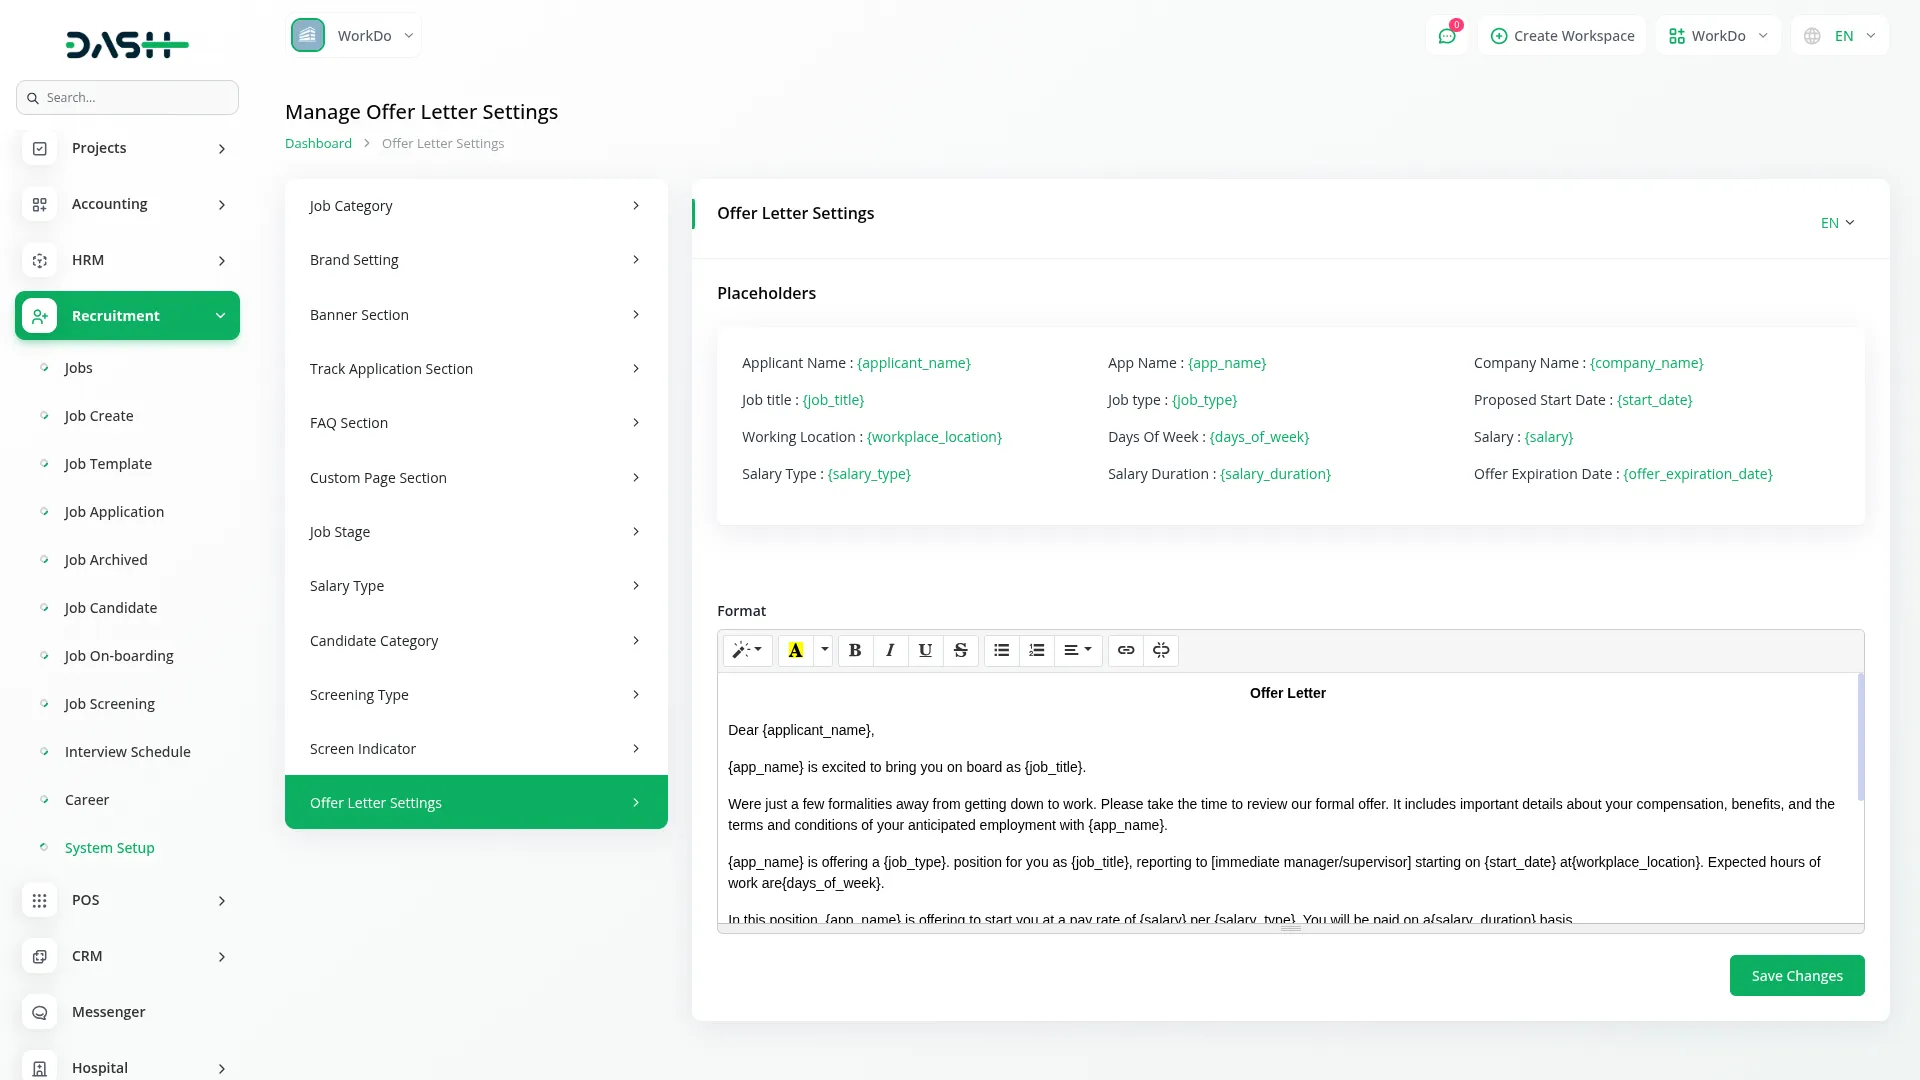
- In the Offer Letter Settings, use the Language button to switch between different language versions. The main area shows a format field using Summernote rich text editor for creating your offer letter document template. After customizing your template, click Save Changes.
- This template is used when generating Offer Letter PDF and DOC files from the Job On-Boarding section, ensuring consistent professional formatting for all candidate job offers across your organization.
Frontend Website Sections
Career Page
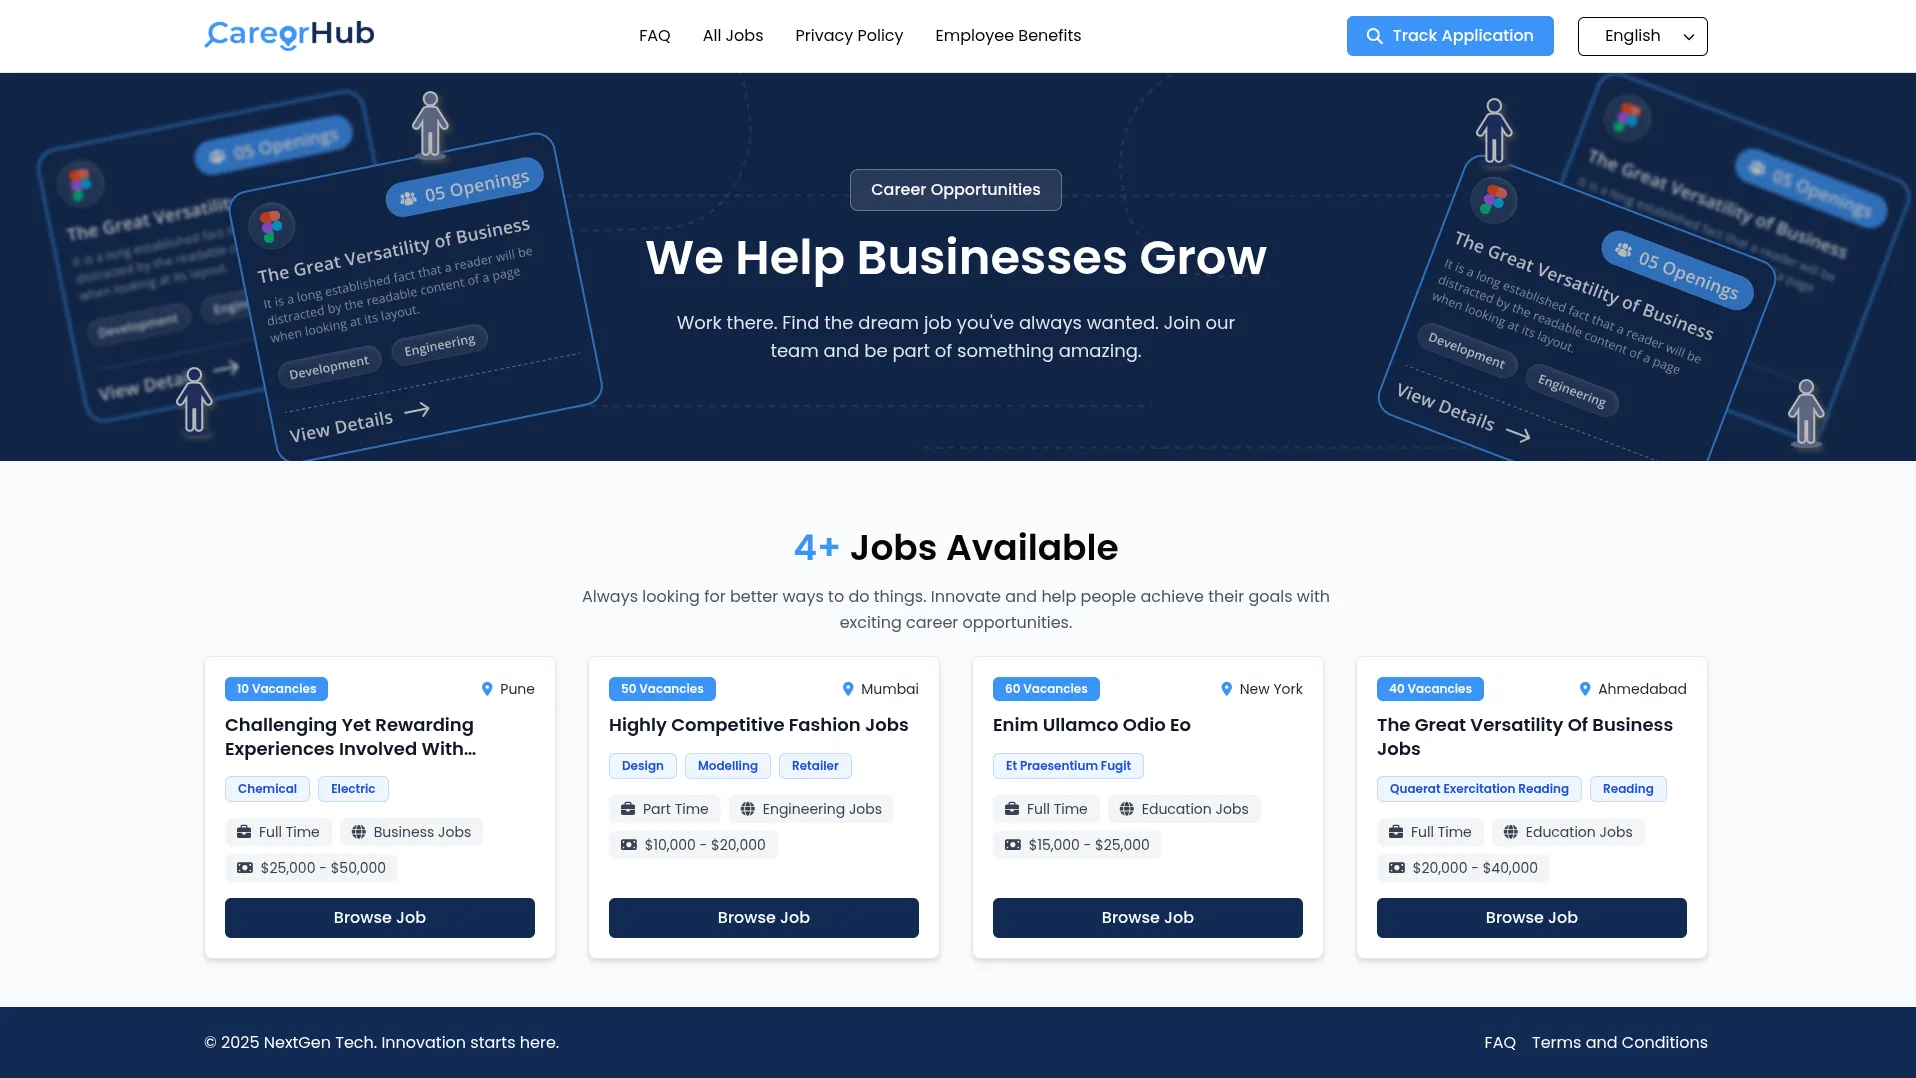
- The Career page serves as the main landing page for job seekers visiting your recruitment website. The page structure includes several key components that display information from your System Setup configurations.
- At the very top, the browser displays your Favicon and Title Text from the Brand Setting section. The Header contains your Logo from Brand Setting, a navigation Menu with links to FAQ, All Jobs, and any Custom Pages you created in the Custom Page Section. A Track Application button opens the track application page, and a Language dropdown provides multi-language support for international candidates.
- The main Career page displays the Banner Section with your Banner Title, Background Image, and Banner Description from the Banner Section system setup. Below this, the Total Jobs Section shows your Job Description from the Banner Section, along with active job listings displaying position titles, locations, skills, job types, job categories, and salary ranges from your Manage Job section. Candidates can click any job title to browse details and redirect to the Job Requirement page.
- The Footer displays your Footer Text from Brand Setting along with links to the FAQ and Terms and Conditions pages, maintaining consistent branding throughout the user experience.
All Jobs Page
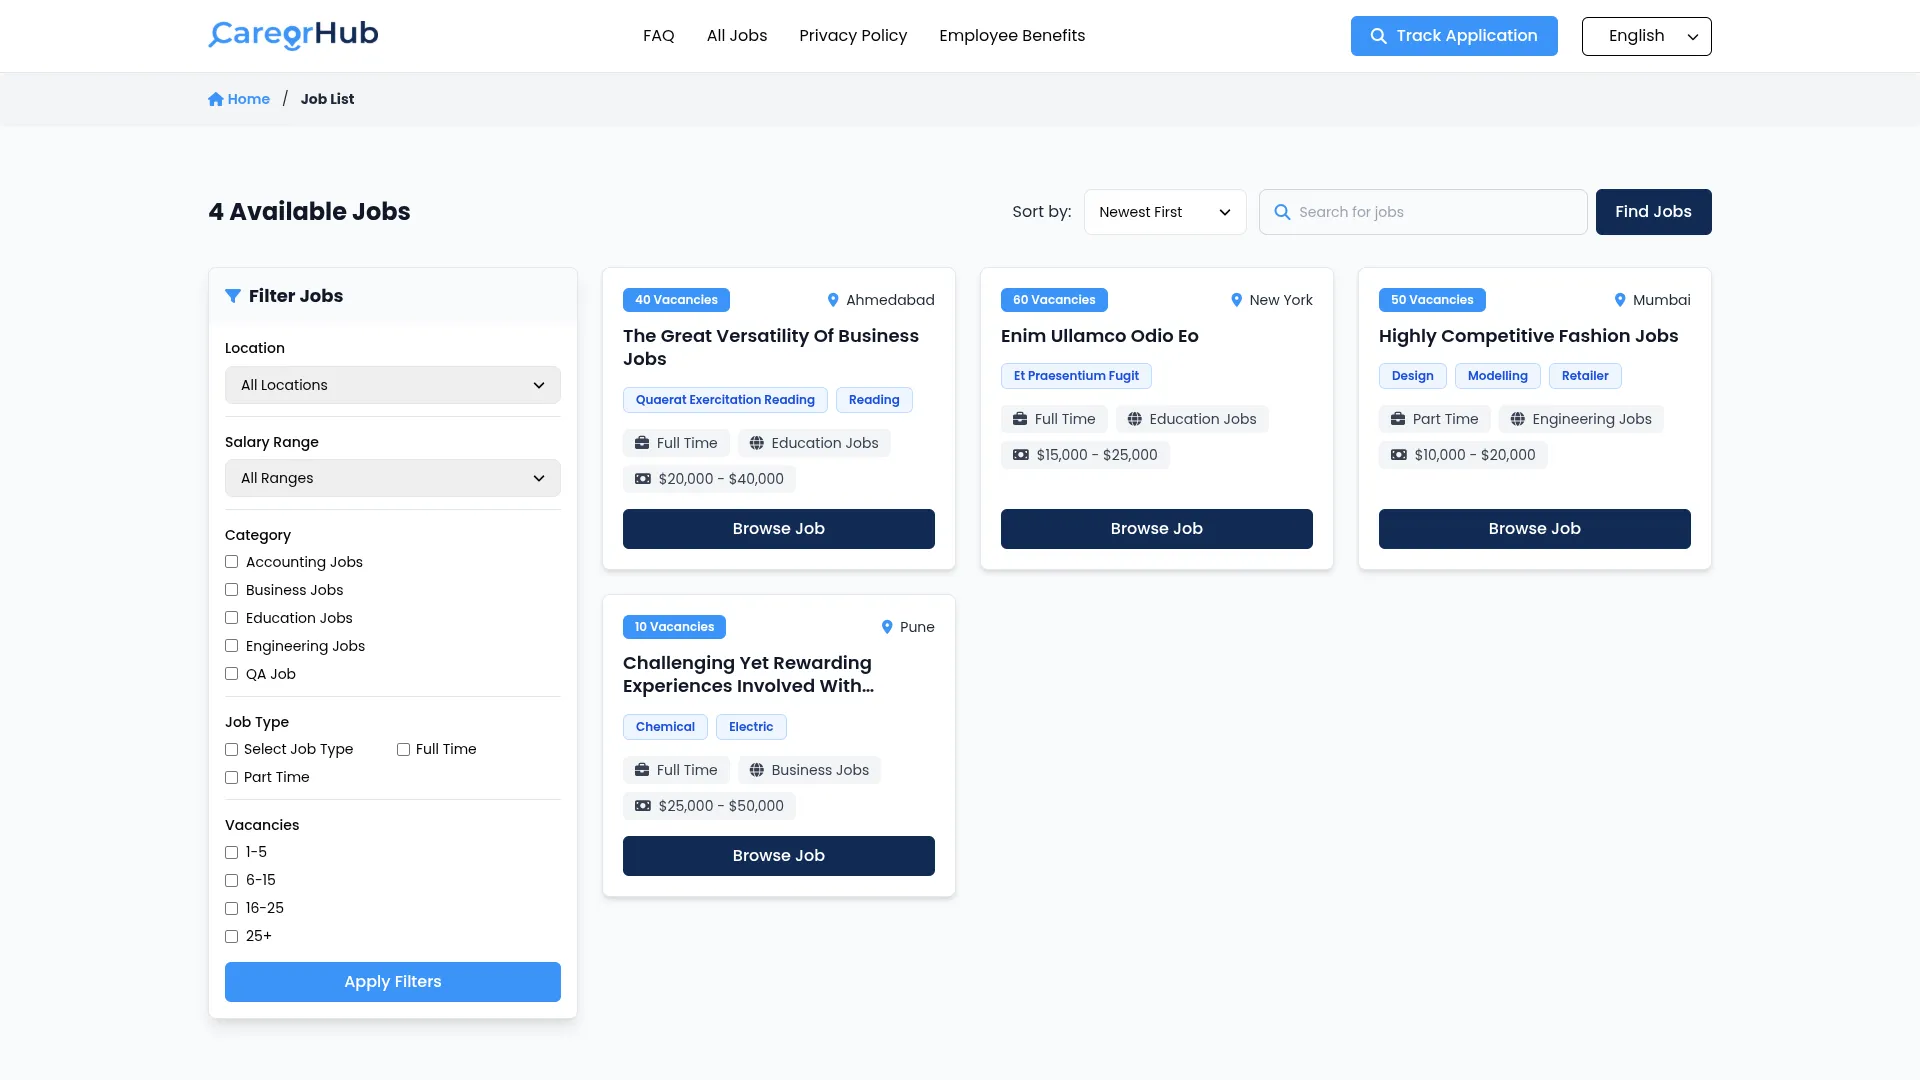
- The All Jobs page provides a complete job search experience with filtering capabilities. The page includes Header, Total Jobs Section with sidebar filters, and Footer components.
- The Sidebar Filters allow candidates to narrow their search using the Location dropdown, Salary Range dropdown, Category checkbox list, Job Type checkbox list, and Vacancies checkbox list. At the top right, two filtering options are available: a dropdown for sorting (newest first, oldest first, most vacancies) and a search option for keyword-based job searching.
- The main content area displays job cards showing positions, locations, titles, skills, job types, job categories, and salary ranges from your job postings, making it easy for candidates to browse and compare available opportunities.
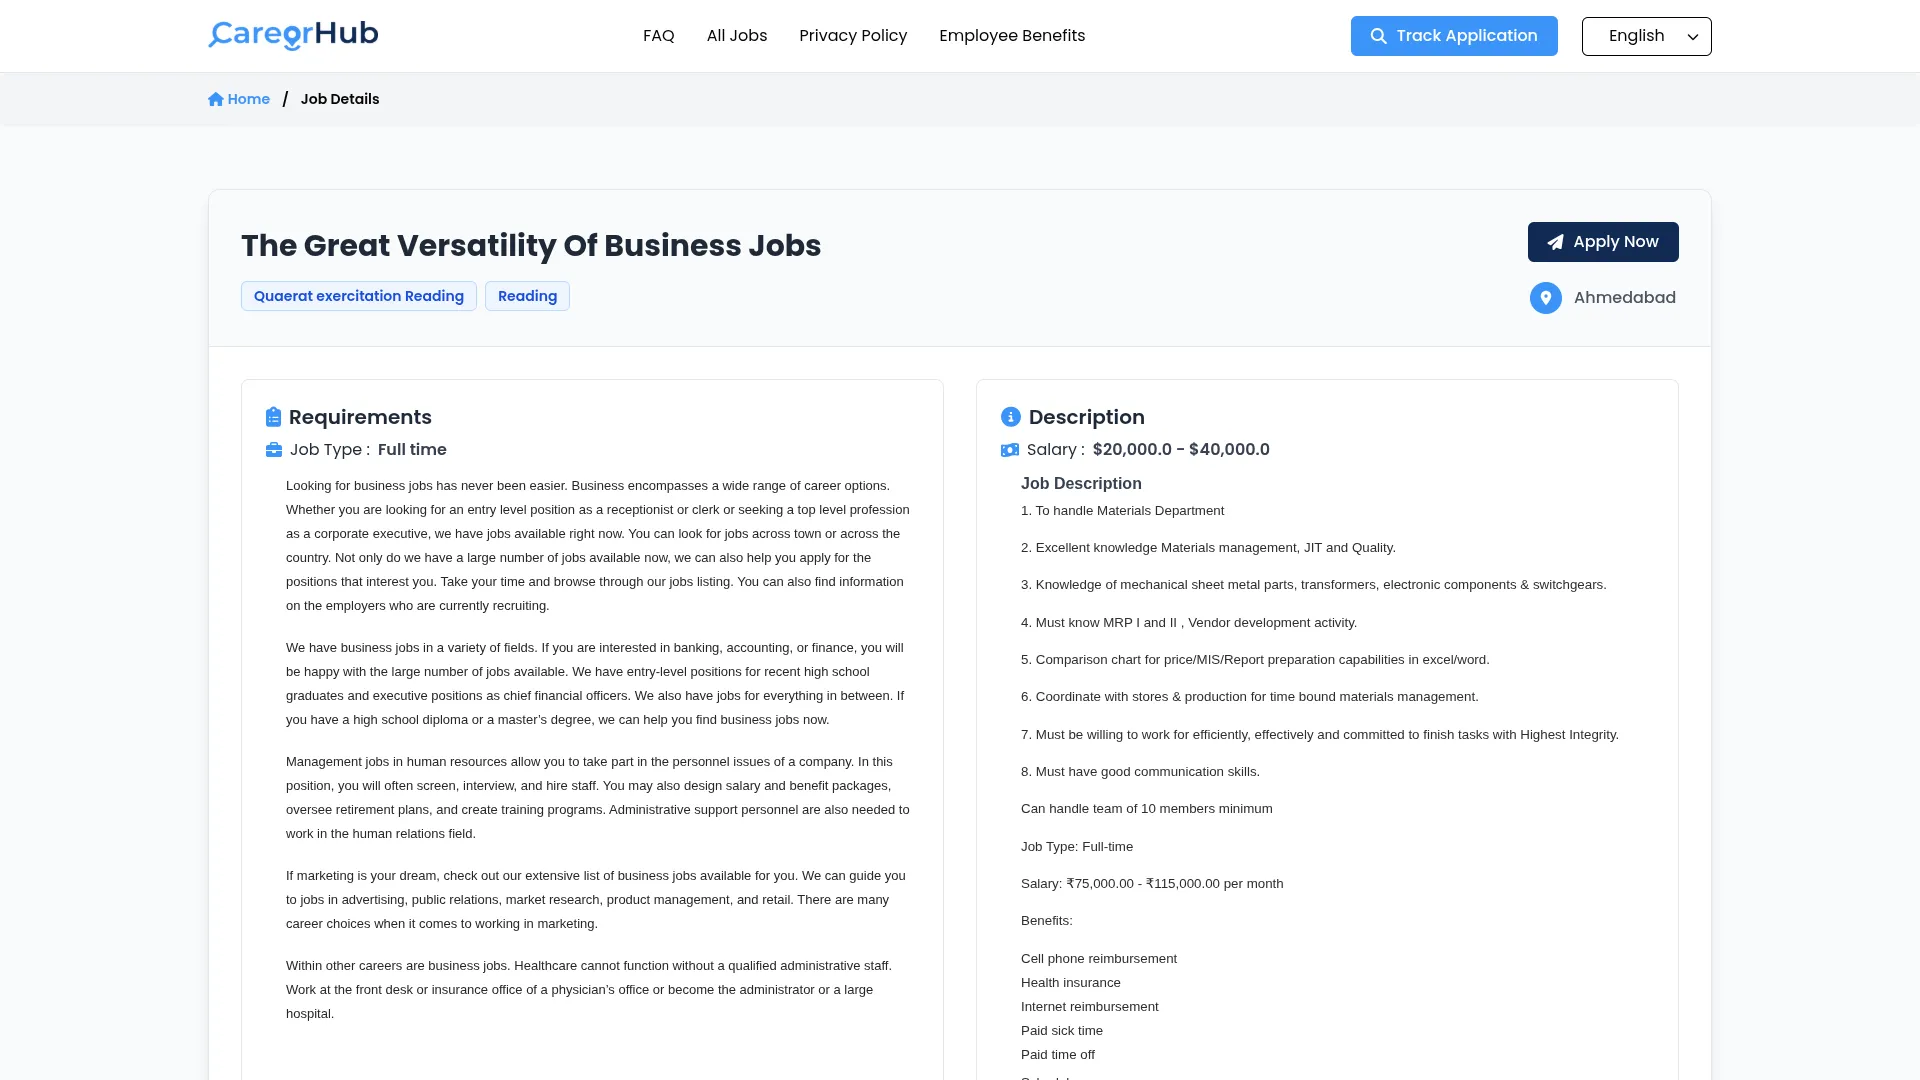
Job Requirement Page
- The Job Requirement page displays detailed information about specific job positions. The page structure includes Header, Job Requirements and Description Section, and Footer.
- The Requirement and Description Section shows the job requirements and description you entered during job creation in the Manage Job section. An Apply Now button redirects candidates to the Apply Now page, where they can submit their application for the position.
Apply Now Page
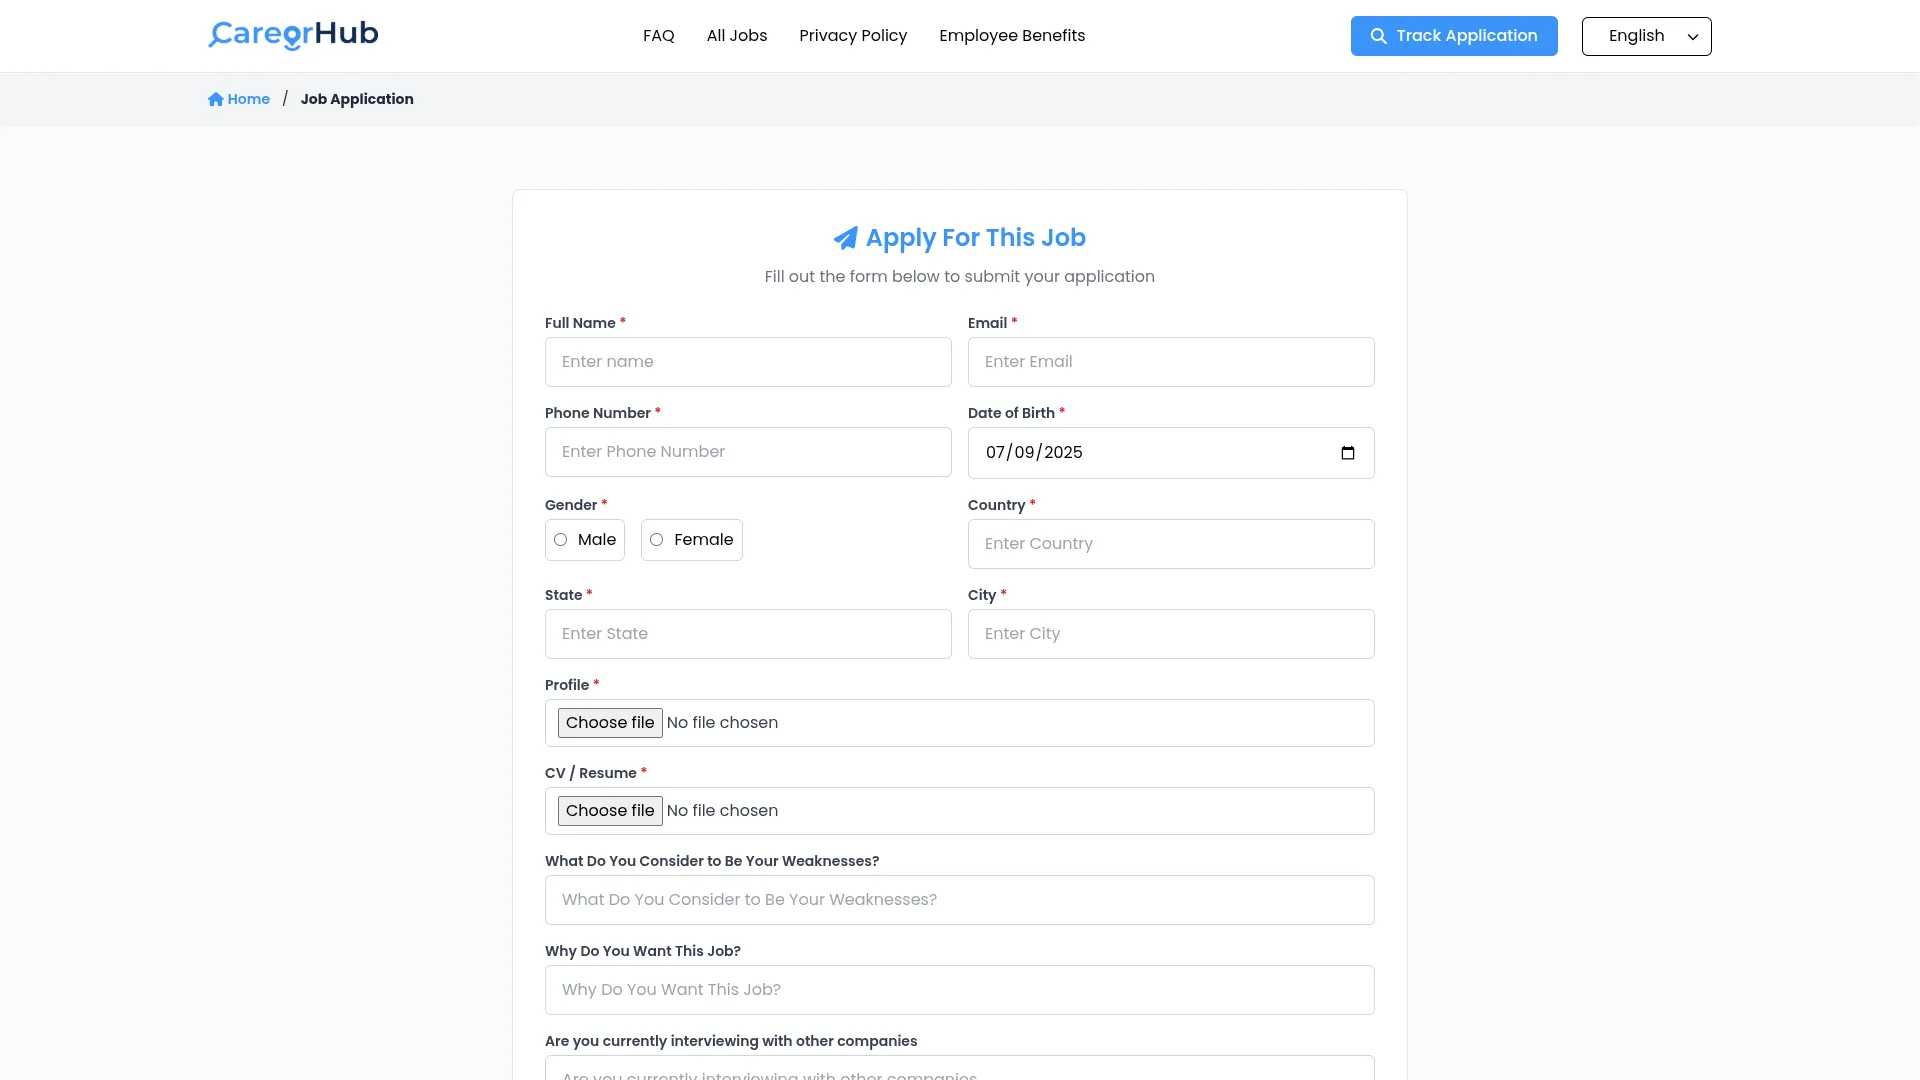
- The Apply Now page presents the job application form to candidates. The page includes Header, Jobs Application Form Section, and Footer components.
- The Jobs Application Form Section displays form fields based on your job creation settings. The form always includes Full Name, Email, and Phone Number as default required fields. Additional fields appear based on the checkboxes you selected during job creation: custom questions from your Questions Checkboxes selections, Date of Birth (if checked), Gender options (if required), Country field (if enabled), and file upload options for profile images, resumes, and cover letters based on your “need to show option” checkbox selections.
Job Application Detail Page
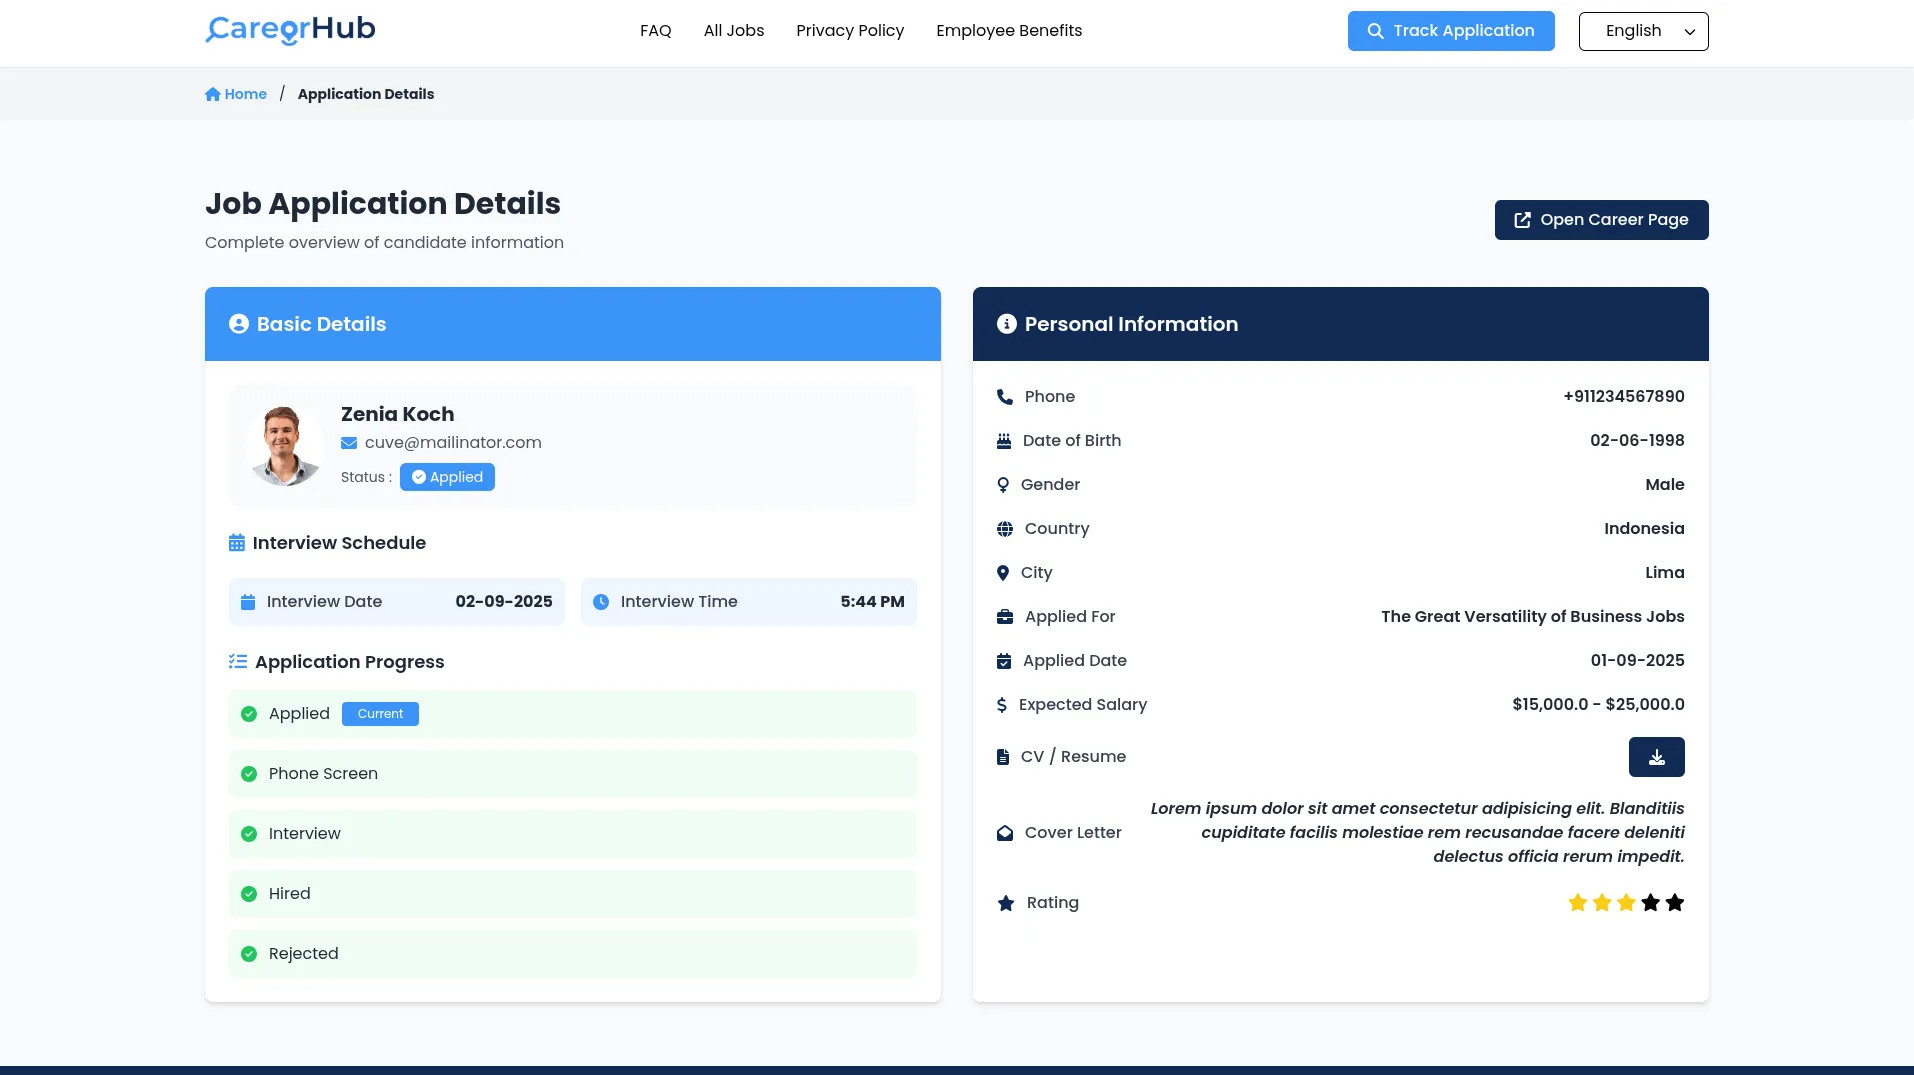
- The Job Application Detail page shows complete application information to candidates after they track their application. The page includes a Header, a Job Application Details Section, and a Footer.
- The Job Application Details Section displays complete candidate information organized in sections. Basic Details shows the candidate’s profile, email, application status, interview schedule (Interview Date and Interview Time if scheduled), and application progress through your job stages. Personal Information includes phone, date of birth, gender, country, city, applied for (job title), applied date, expected salary, CV/resume, cover letter, and rating if available.
- An Open Career Page button redirects candidates back to the main career page to browse other opportunities, creating a seamless user experience throughout your recruitment process.
Categories
Related articles
- Documents Integration in Dash SaaS
- Contract Integration in Dash SaaS
- Asana Project Management Detailed Documentation
- How To Generate Whatsapp API Permanent Access Token
- Zendesk Integration in Dash SaaS
- Mobile Service Management Integration in Dash SaaS
- Instagram Post Integration in Dash SaaS
- Reminder Module Integration in Dash SaaS
- ZitaSMS Integration in Dash SaaS
- Photo & Studio management Integration in Dash SaaS
- API WorkDo Dash SaaS Add-On
- Blog & Article Integration in Dash SaaS
Reach Out to Us
Have questions or need assistance? We're here to help! Reach out to our team for support, inquiries, or feedback. Your needs are important to us, and we’re ready to assist you!


Need more help?
If you’re still uncertain or need professional guidance, don’t hesitate to contact us. You can contact us via email or submit a ticket with a description of your issue. Our team of experts is always available to help you with any questions. Rest assured that we’ll respond to your inquiry promptly.
Love what you see?
Do you like the quality of our products, themes, and applications, or perhaps the design of our website caught your eye? You can have similarly outstanding designs for your website or apps. Contact us, and we’ll bring your ideas to life.
