Business Model Integration in Dash SaaS
The Business Model Add-On is a strategic business design tool that helps organizations create and visualize their business models using the Business Model Canvas framework.
Introduction
The Business Model Add-On is a strategic business design tool that helps organizations create and visualize their business models using the Business Model Canvas framework. This Add-On allows users to develop comprehensive business models covering nine essential building blocks including Key Partners, Key Activities, Value Propositions, Customer Relationships, Channels, Customer Segments, Cost Structure, Revenue Streams, and Key Resources. Users can link models to specific challenges, assign team members and roles, track progress through different stages, and manage multiple business models through various viewing options including grid, kanban, and tree structure layouts.
How to Install the Add-On?
To Set Up the Business Model Add-On, you can follow this link: Setup Add-On
Note: This Add-On is dependent on the Planning Add-On, so you need to purchase it first.
How to Use the Business Model Add-On?
Managing Business Models
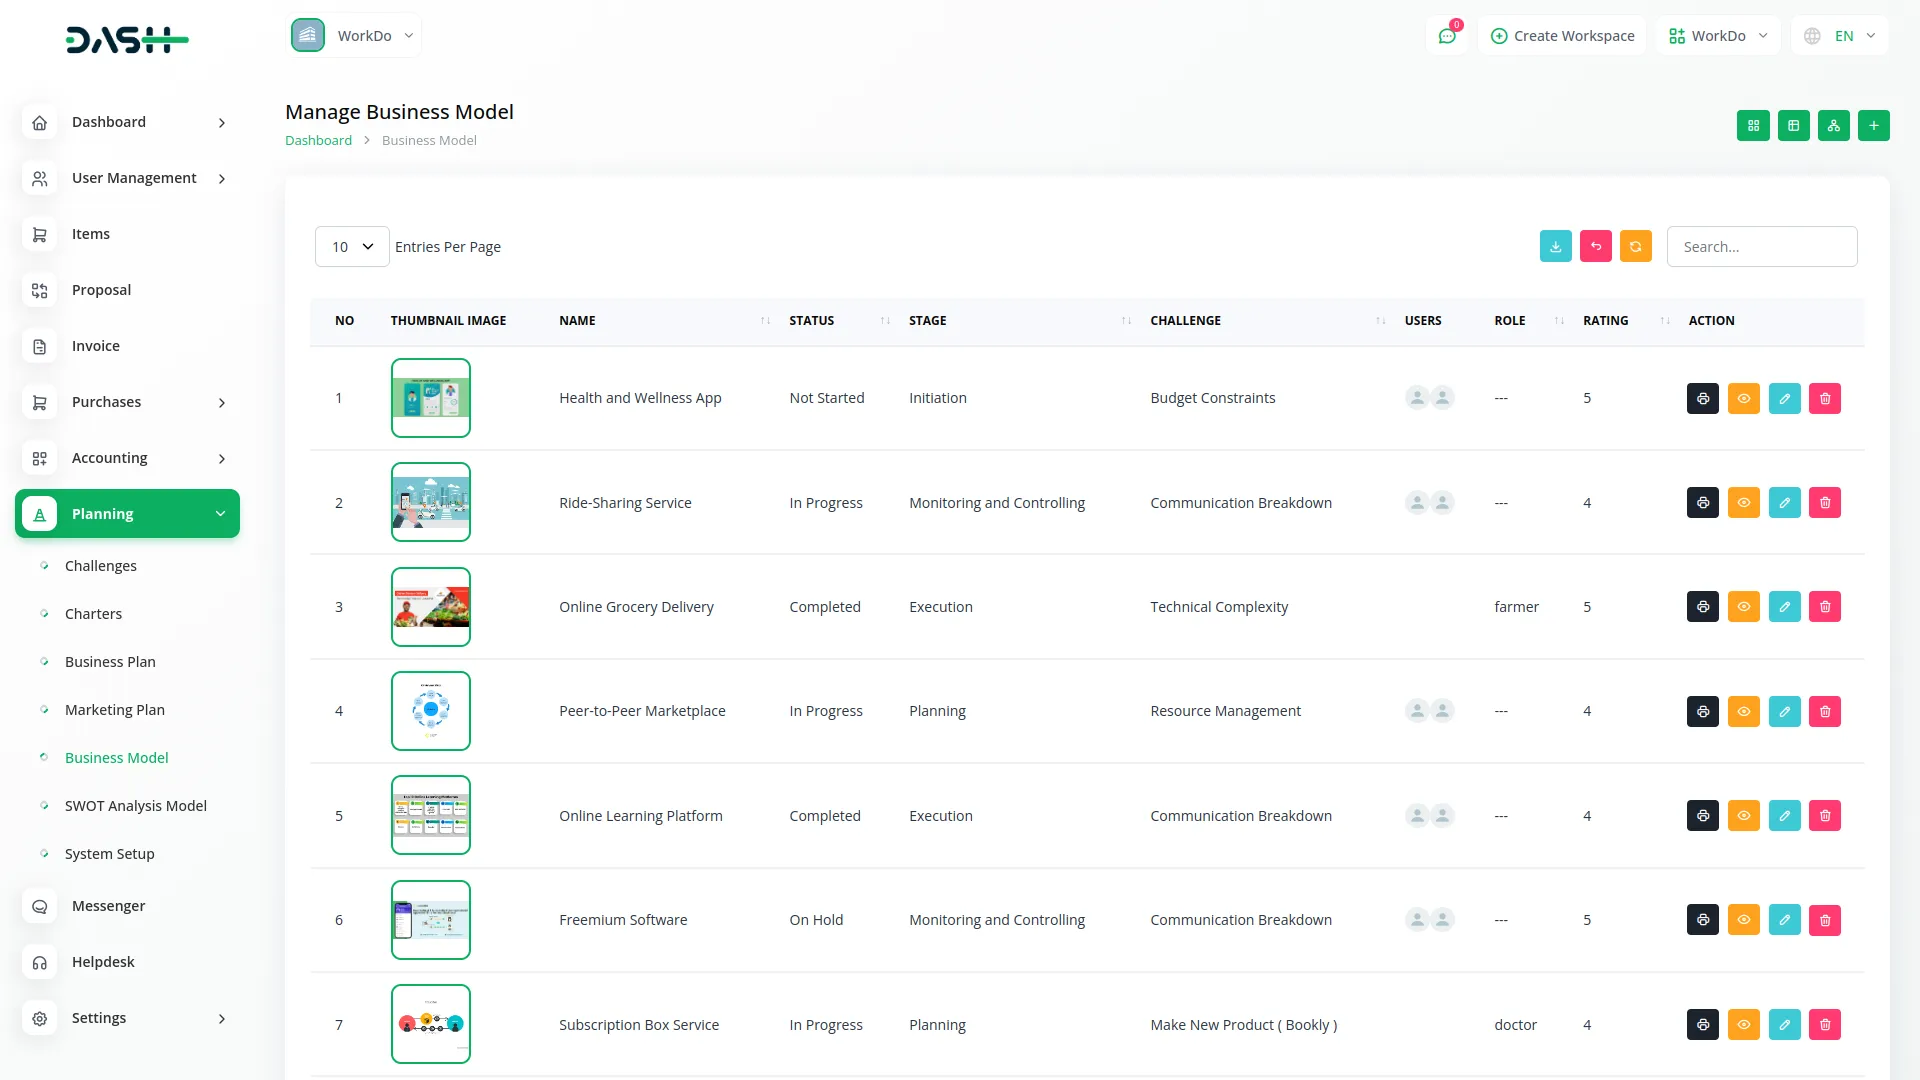
- The default List View displays all Business Models in a comprehensive table format with multiple management options. At the top of the page, you’ll find buttons for Create to add new models, plus three alternative viewing options for different management preferences.
- The main table presents detailed information with columns for Thumbnail Image providing visual identification, Name of the business model, Status fetched from System Setup showing current progress, Stage fetched from System Setup indicating model phase, Challenge fetched dynamically from Challenges showing associated business objectives, Users showing team members involved, Roles showing team responsibilities, Rating for performance tracking, and Action column with management options.
- In the Action column, you have powerful options available: Print button to generate the Business Model in PDF format for presentations and documentation, View to access complete model details and all business information, Edit to modify any aspect of the model including business canvas elements and team assignments, and Delete to remove models that are no longer relevant to your business strategy.
Creating a Business Model
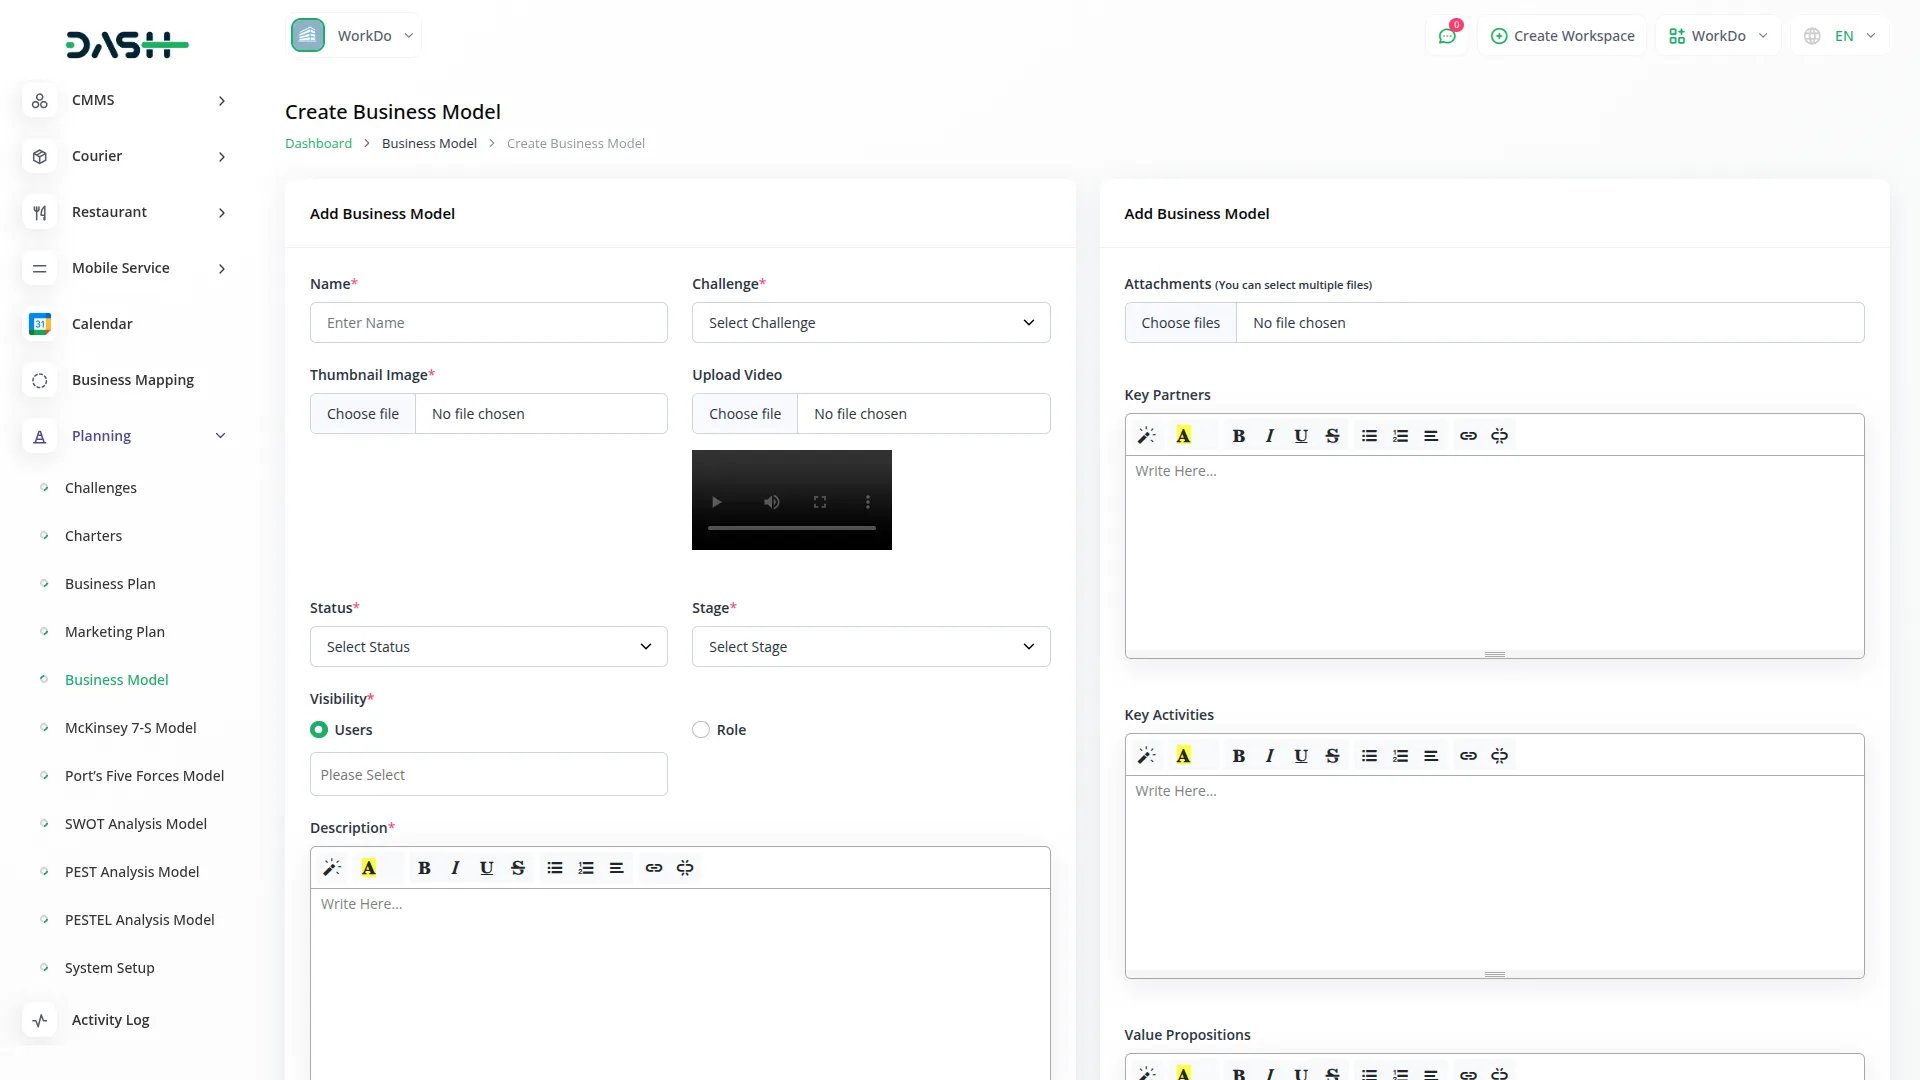
- To create a new Business Model, click the “Create” button at the top of the page. Start by entering the Name for your business model, which should clearly identify the scope or focus of your business design.
- Select the Challenge from the dropdown menu, which fetches data from the Challenge. Important note: if the current date is greater than the Challenge End Date, you will not be able to create a Business Model, ensuring all models remain aligned with active or future business challenges.
- Upload a Thumbnail Image to provide visual identification for your business model, and Upload Video content if you have supporting presentations or explanatory materials. Choose the appropriate Status from the dropdown menu, which fetches options from System Setup, and select the relevant Stage also fetched from System Setup to indicate the current phase of your model development.
- Assign the Users involved in this business modeling by selecting from the Users dropdown, and choose the appropriate Role from the Roles dropdown to define team member responsibilities. Add a comprehensive Description that outlines the purpose and scope of your business model.
- Continue with the business model canvas components by entering detailed information for Key Partners, identifying the network of suppliers and partners that make the business model work. Document your Key Activities by specifying the most important things your company must do to make the business model work.
- Add comprehensive details for Value Propositions, outlining the bundle of products and services that create value for a specific customer segment. Complete the customer relationship assessment by documenting Customer Relationships, identifying the types of relationships your company establishes with specific customer segments.
- Enter information for Channels, explaining how your company communicates with and reaches its customer segments to deliver value propositions. Document Customer Segments by identifying the different groups of people or organizations your enterprise aims to reach and serve.
- Add detailed Cost Structure information including the most important costs incurred while operating under your business model. Include the Revenue Stream section specifying the cash your company generates from each customer segment.
- Complete the Key Resources section with the most important assets required to make your business model work. Include relevant Notes for additional observations, methodology details, or business insights, and attach supporting files through the Attachments field for market research data, business documents, or reference materials. Once all fields are completed, click “Submit” to create your Business Model.
View Business Model
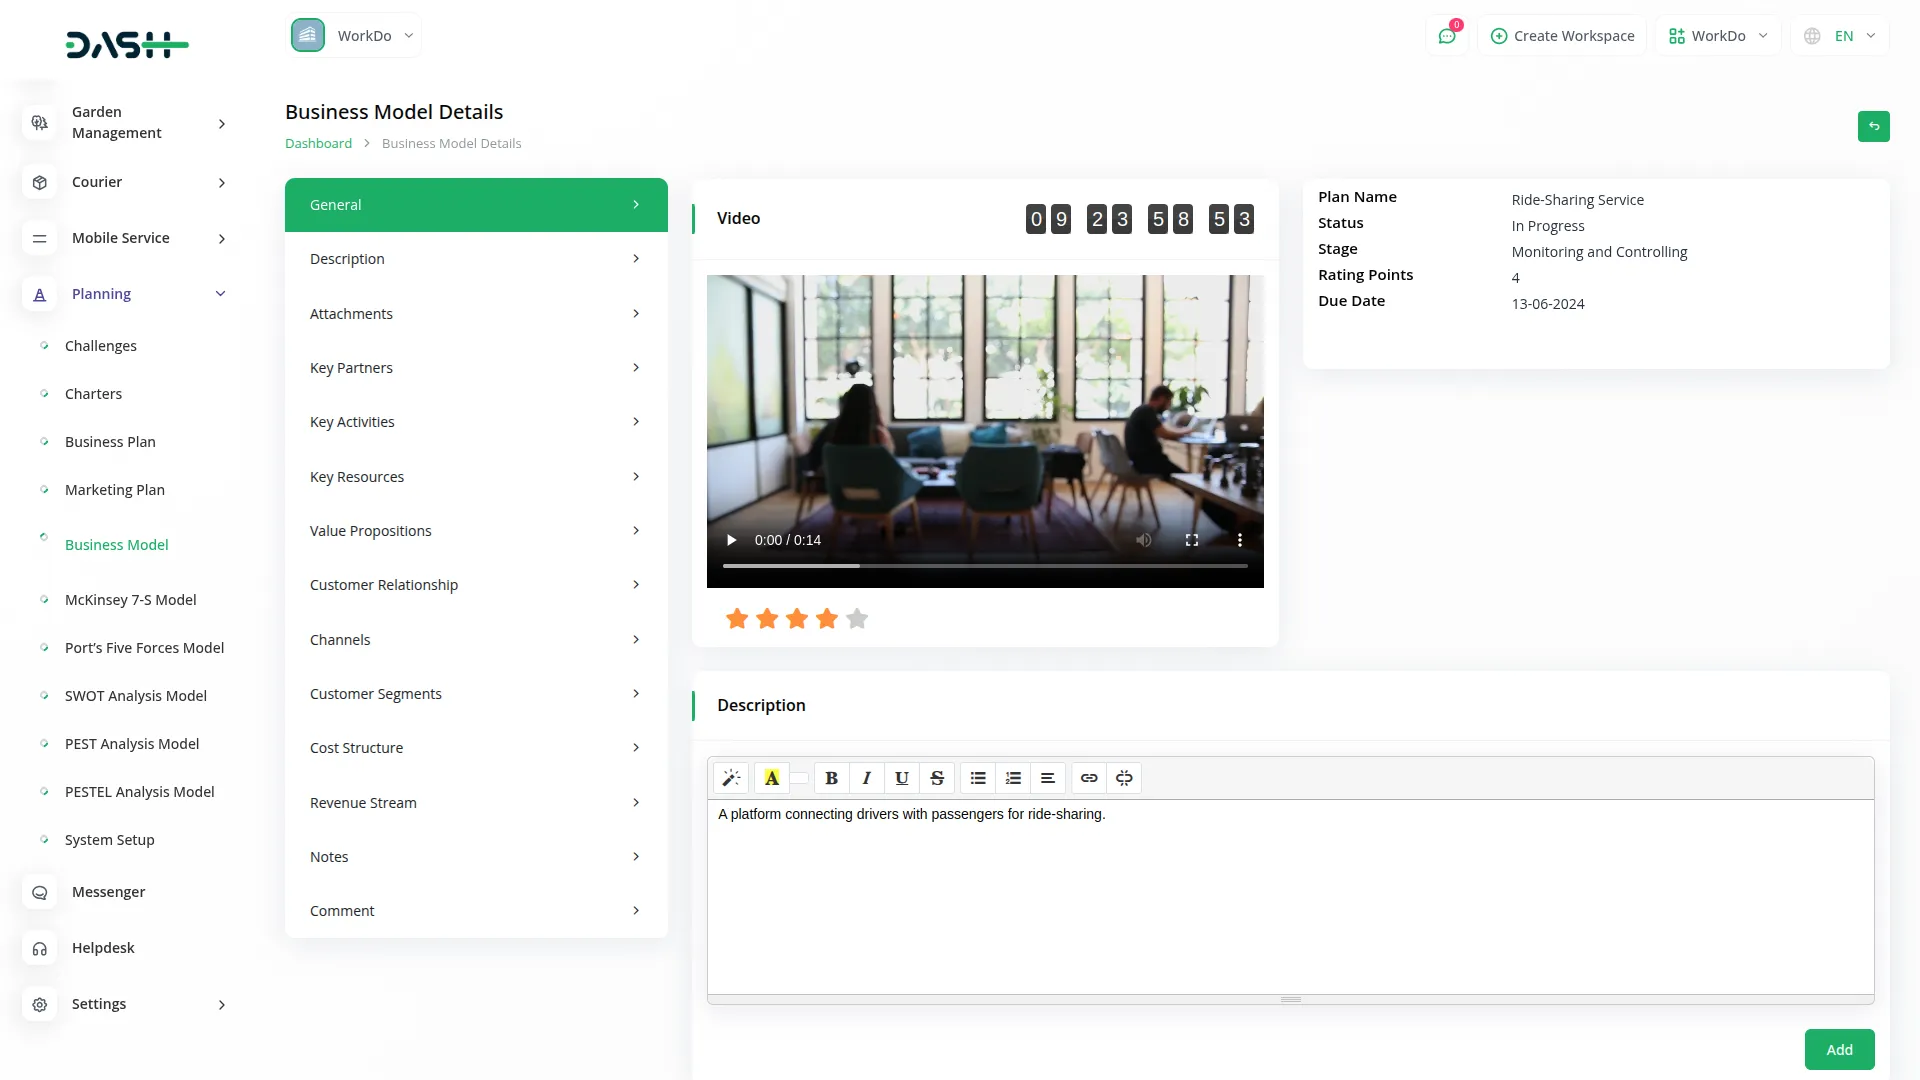
- To view a Business Model, click the “View” button in the Action column of any model in the list. This opens the Business Model Details page with a comprehensive view of all information organized in sections for easy navigation.
- The view page is structured with multiple sections starting with the General section which displays the model name, associated challenge, thumbnail image, uploaded video with playback controls, current status fetched from System Setup, stage information, assigned users from the Users Table, their designated roles from the Roles Table, and star rating system.
- The Description section shows the complete purpose and scope of the business model as entered during creation. This section provides detailed context about the model objectives and methodology. An “Add” button is available below this section to add new description content.
- The Attachments section provides access to all supporting files including market research data, business documents, reference materials, or any other documents uploaded during the model creation process. You can download or view these attachments directly from this section. Use the “Add” button below to upload additional attachments.
- The Key Partners section displays the network of suppliers and partners that make the business model work as documented during the modeling process. This section shows the complete key partners details identified during the business analysis process. Click the “Add” button below to include additional key partner information.
- The Key Activities section shows the most important things your company must do to make the business model work. Review the comprehensive key activities documentation identified in the model. The “Add” button allows you to document additional key activities as they are developed.
- The Value Propositions section displays the bundle of products and services that create value for specific customer segments documented during the business modeling process. This section outlines all the value propositions documented during the strategic planning process. Use the “Add” button to include new value proposition information as business offerings evolve.
- The Customer Relationships section shows information about the types of relationships your company establishes with specific customer segments. The Channels section displays how your company communicates with and reaches its customer segments to deliver value propositions. The “Add” button enables you to document additional customer relationship information as business interactions change.
- The Customer Segments section contains the different groups of people or organizations your enterprise aims to reach and serve. The Cost Structure section displays the most important costs incurred while operating under your business model. Use the “Add” button to add new customer segments as target markets evolve.
- The Revenue Stream section shows the cash your company generates from each customer segment. The Key Resources section contains the most important assets required to make your business model work. Click the “Add” button to include additional revenue stream documentation.
- The Notes section contains additional observations, methodology details, business insights, or any supplementary information added during the model creation.Click the “Add” button to include additional notes and observations.
- At the bottom is the Comment section where you can post comments easily. You can also attach files in the comments section if needed.
Grid View
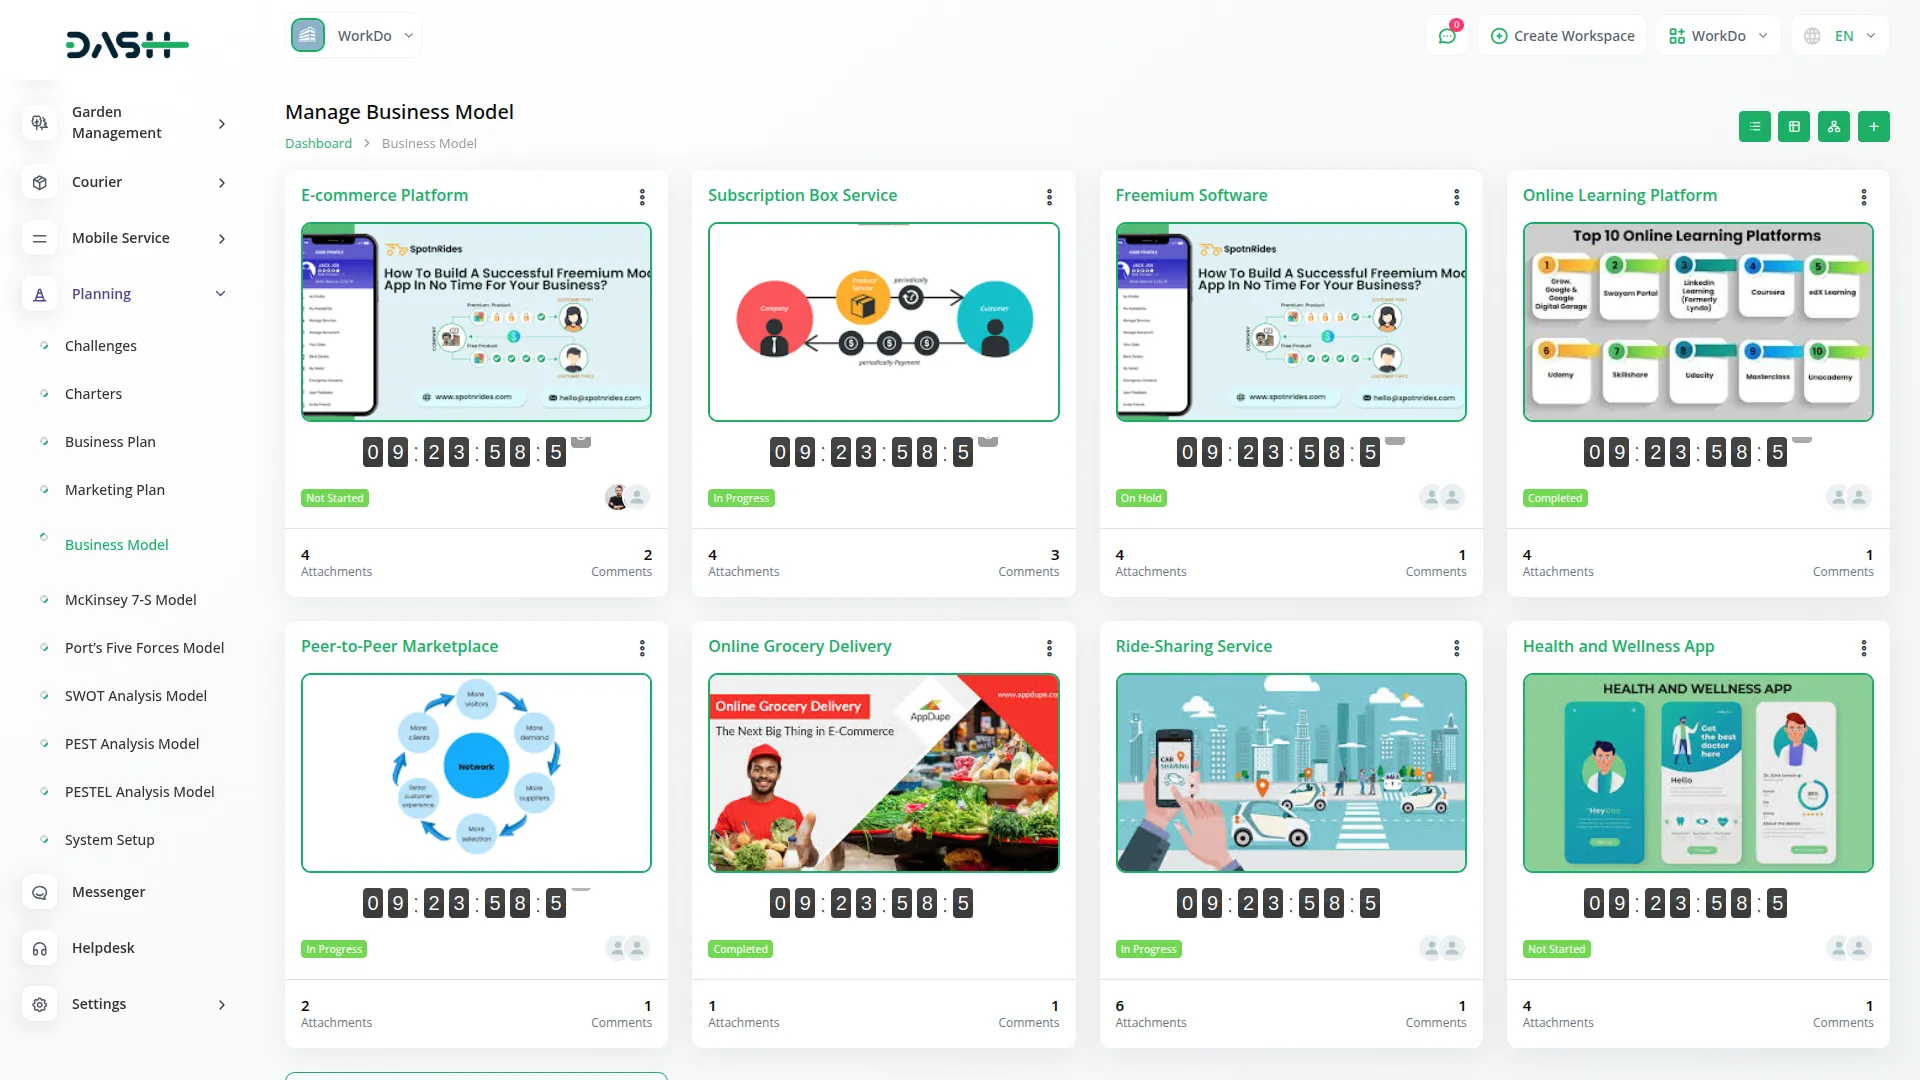
- The GridView displays Business Models in a visual card-based layout, making it easier to browse through multiple models at once. Each model appears as a card showing the thumbnail image, name, and key information for quick identification.
- Each grid card displays the total number of assigned users, total number of comments, total number of attachments, current status, and end time based on the associated challenge timeline.
- Action options are available on each card including Print to generate PDF format, View to see complete details, Edit to modify the model, and Delete to remove the model. This grid format is particularly useful when you need to compare multiple business models visually or when managing a large number of strategic planning models.
Kanban View
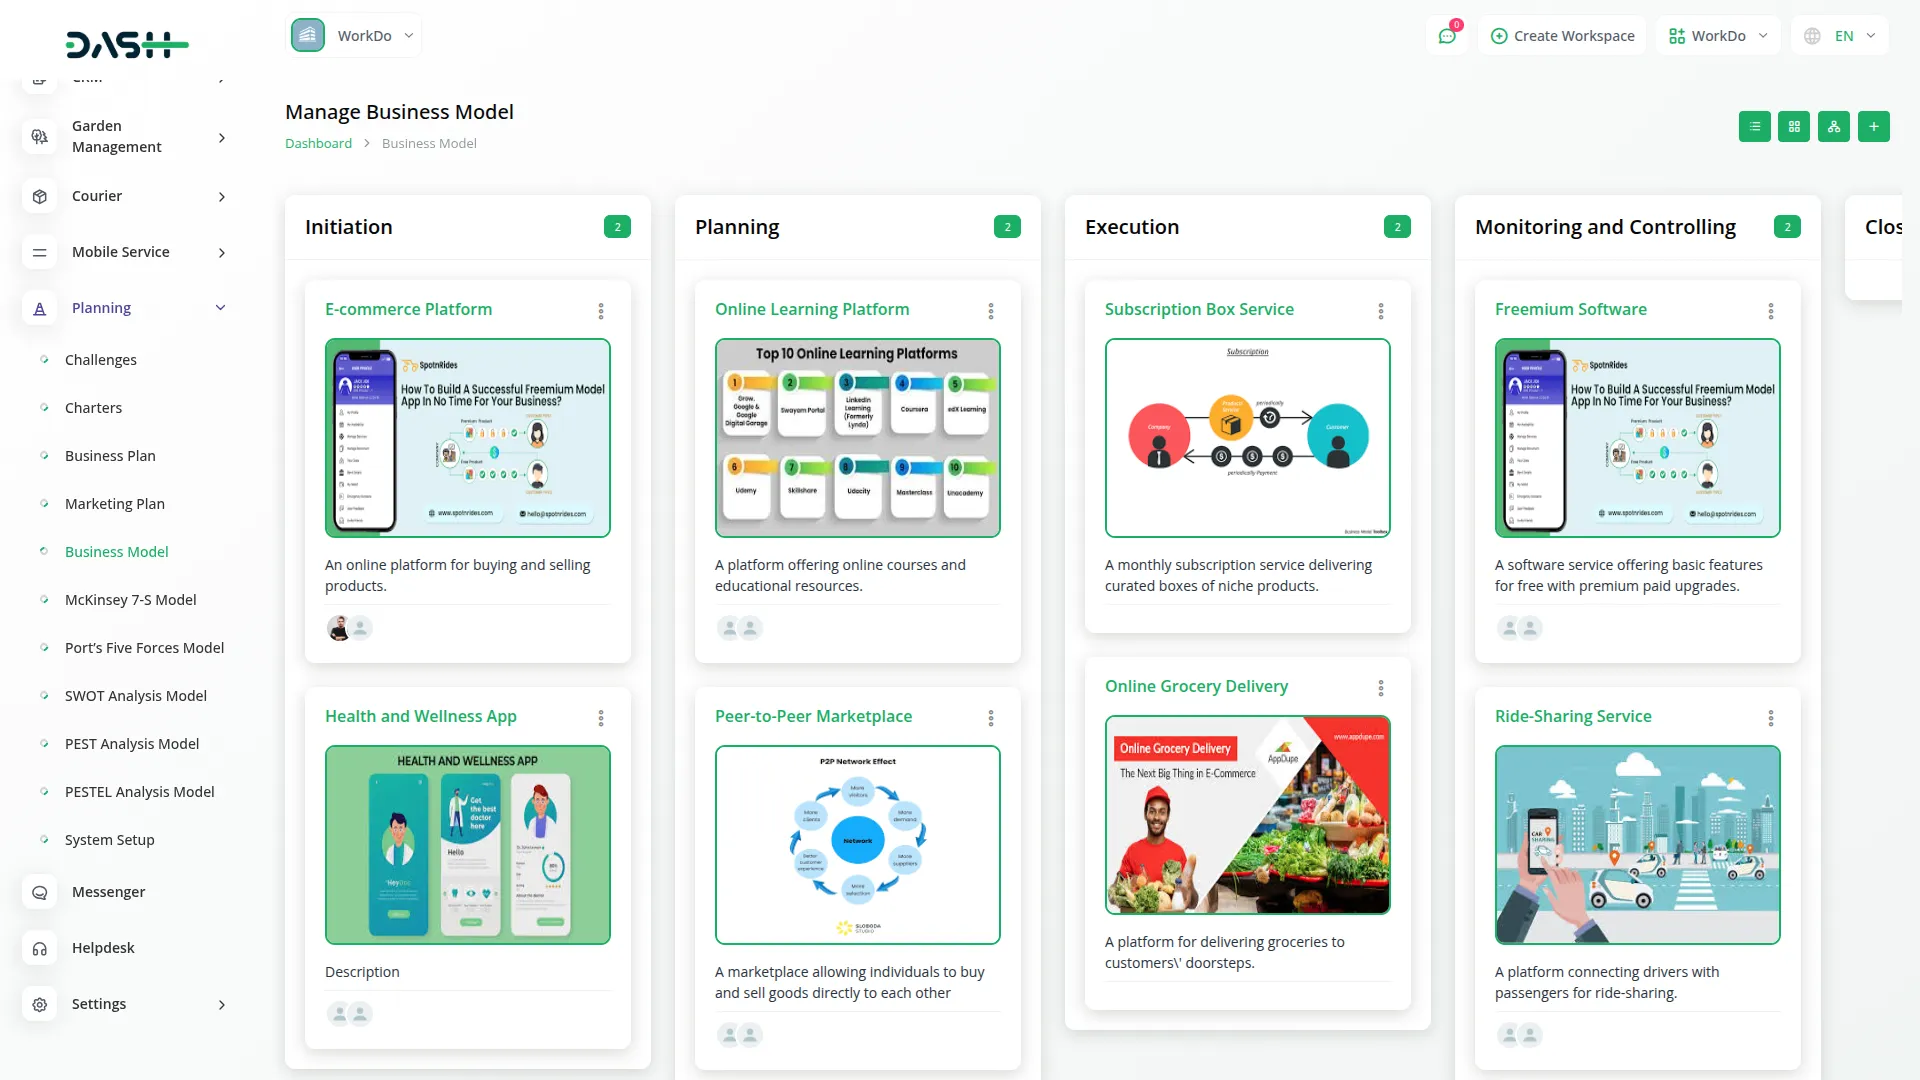
- The Kanban View organizes Business Models into columns based on their current stage, providing a workflow-based visualization with drag and drop functionality. You can easily move models between different stages by dragging cards from one column to another.
- Each Kanban card shows essential information including the total number of assigned users.
- The drag and drop functionality allows you to update the stage of any Business Model by simply moving it to the appropriate column. Action buttons on each card include Print for PDF generation, View for detailed information, Edit for modifications, and Delete for removal. This view is ideal for tracking the progress of multiple models through different stages of completion.
Tree View
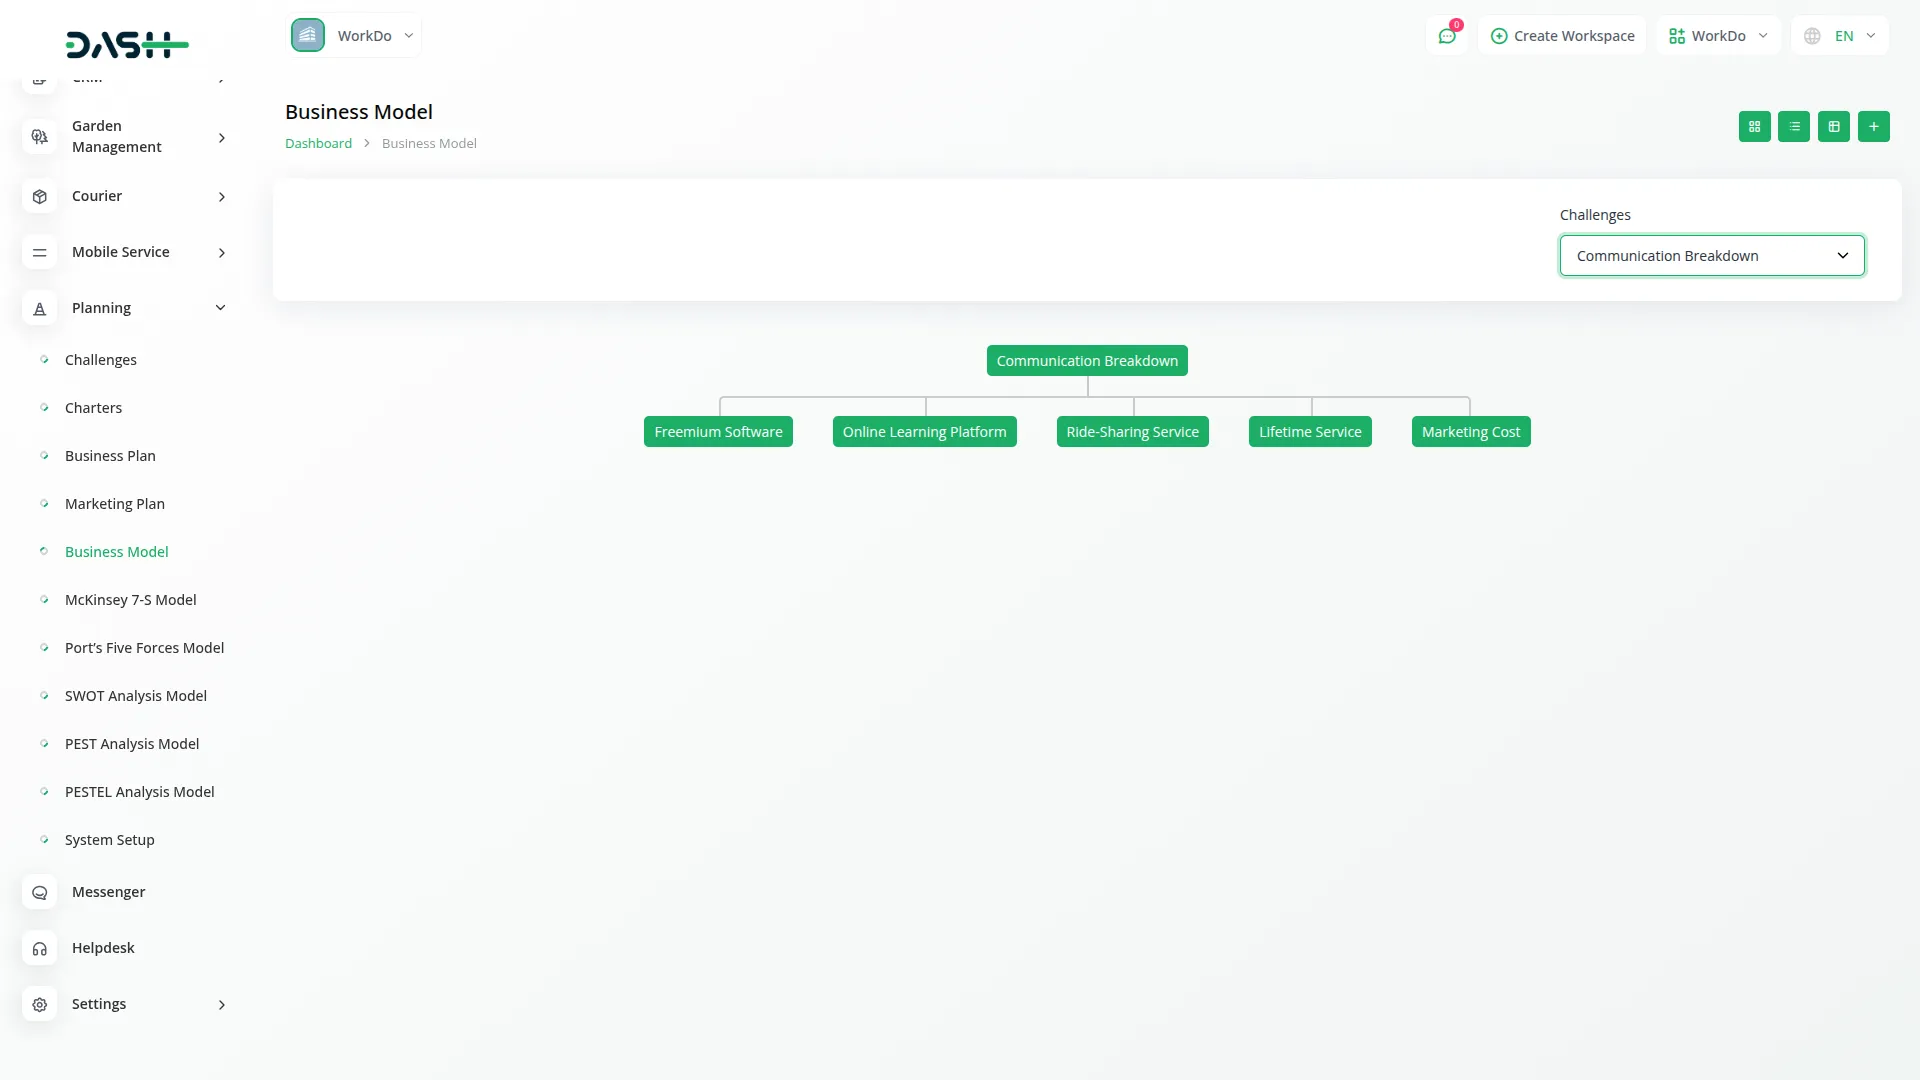
- The Tree View organizes Business Models in a hierarchical structure based on their associated challenges. This creates a tree-like display where challenges serve as parent nodes and their related business models appear as child nodes underneath.
- This organizational structure helps you understand the relationship between different challenges and their corresponding business models, making it easier to manage complex projects with multiple interconnected business objectives.
Categories
Related articles
- Outlook Calendar Credentials Generate
- Petty Cash Management Integration in Dash SaaS
- Sign-In with Facebook Add-On Integration in Dash SaaS
- Google Integration in vCard SaaS
- Asana Project Management Detailed Documentation
- Newspaper Distribution Management Integration in Dash SaaS
- Bookings Integration in Dash SaaS
- Skip Cart Module Integration in eCommerceGo SaaS
- Repair Management Integration in Dash SaaS
- WhatSender Add-On Integration in Dash SaaS
- Hospital Management Integration in Dash SaaS
- Zendesk Integration in Dash SaaS
Reach Out to Us
Have questions or need assistance? We're here to help! Reach out to our team for support, inquiries, or feedback. Your needs are important to us, and we’re ready to assist you!


Need more help?
If you’re still uncertain or need professional guidance, don’t hesitate to contact us. You can contact us via email or submit a ticket with a description of your issue. Our team of experts is always available to help you with any questions. Rest assured that we’ll respond to your inquiry promptly.
Love what you see?
Do you like the quality of our products, themes, and applications, or perhaps the design of our website caught your eye? You can have similarly outstanding designs for your website or apps. Contact us, and we’ll bring your ideas to life.
