Tattoo Studio Management Detailed Documentation
The Tattoo Studio Add-On is a comprehensive management system designed to help tattoo studios operate efficiently.
Introduction
The Tattoo Studio Add-On is a comprehensive management system designed to help tattoo studios operate efficiently. This software handles all aspects of your tattoo business, including appointment scheduling, artist management, tattoo portfolio management, supply tracking, customer follow-ups, and website management. The system includes a complete website solution with booking capabilities, gallery display, and contact management. Whether you’re managing daily appointments, tracking your tattoo collection, organizing supplies, or maintaining customer relationships, this software provides all the tools needed to run a professional tattoo studio.
How to Install the Add-On?
To Set Up the Tattoo Studio Management Add-On, you can follow this link: Setup Add-On
How to Use The Tattoo Studio Management Add-On?
Dashboard
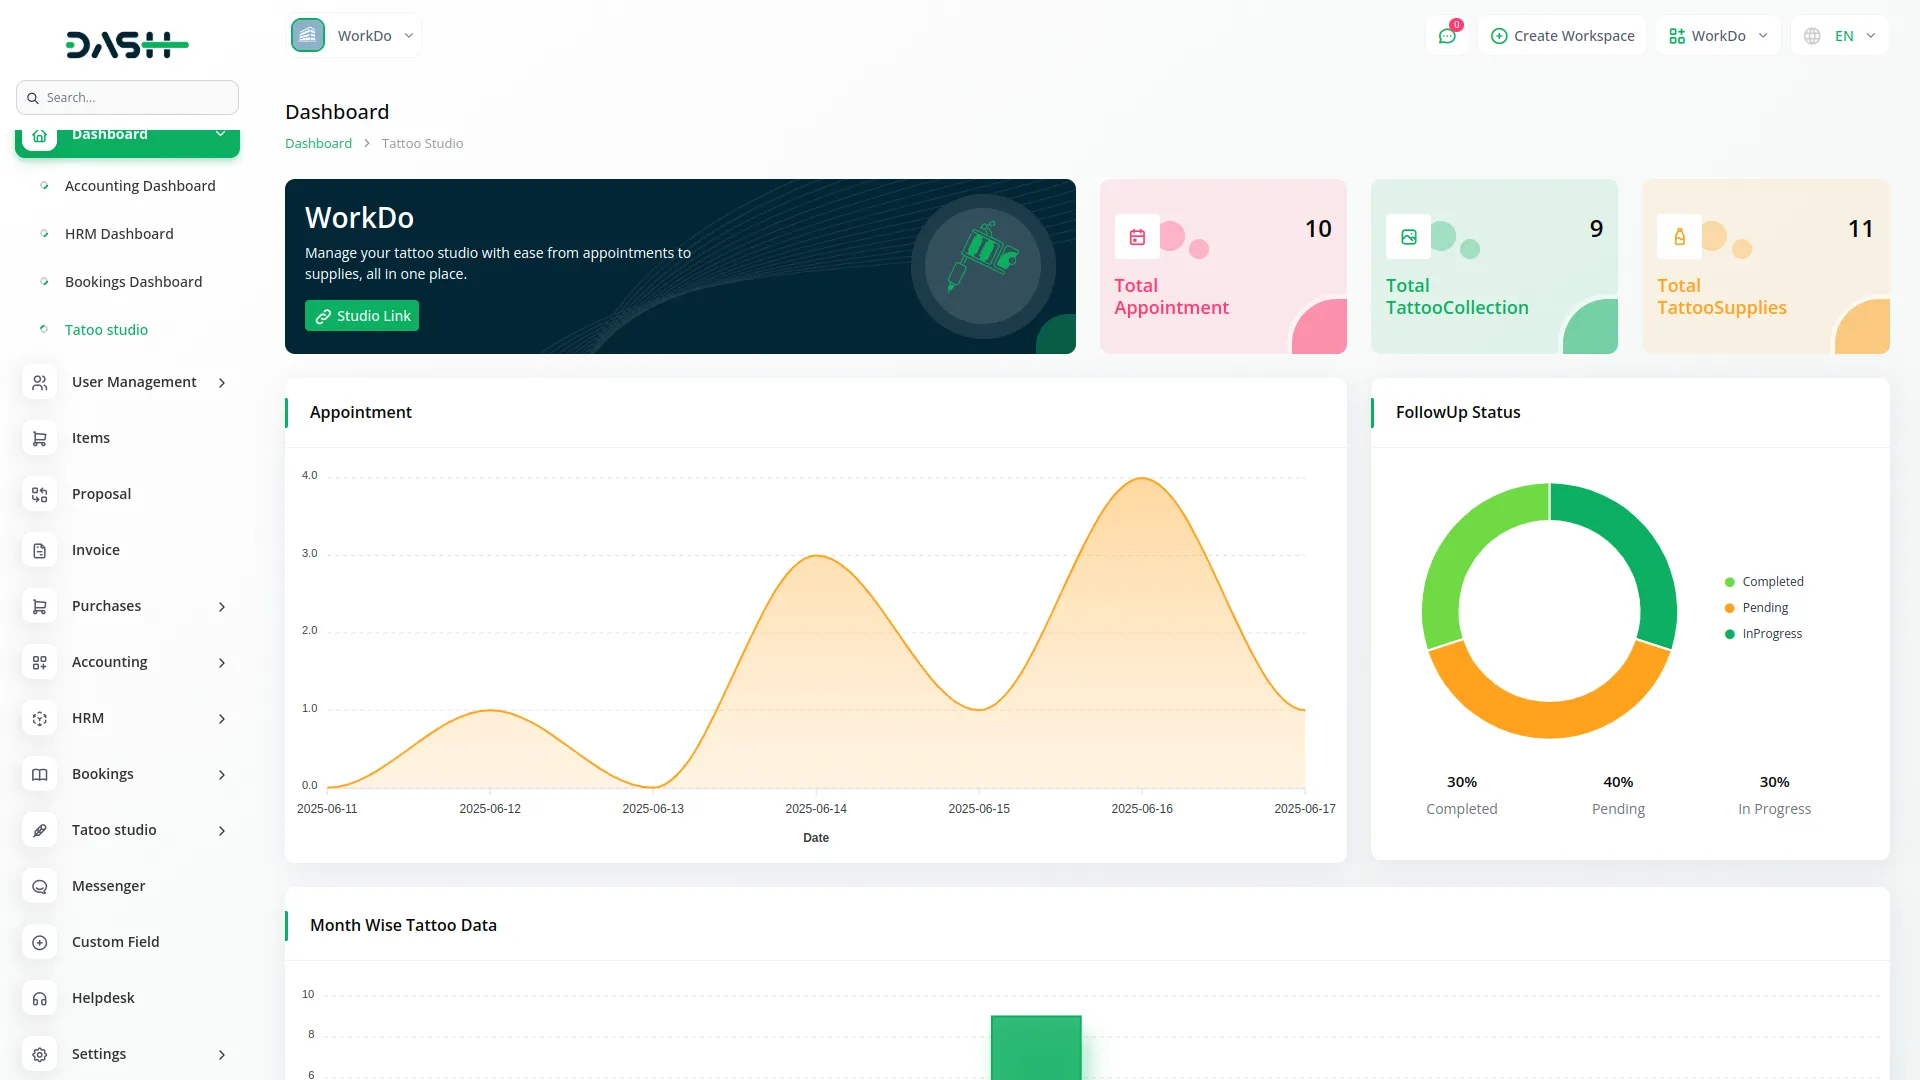
- When you log into the system, the dashboard displays key information about your tattoo studio operations.
- At the top, you can use the studio link option to copy your studio link for sharing. The dashboard shows three main information cards displaying Total Appointments, Total Tattoo Collection, and Total Tattoo Supplies giving you a quick overview of your business metrics.
- Below these cards, you will find an appointment chart showing appointment data for the last 7 days to track recent appointment trends. There is also a follow-up status pie chart that breaks down your follow-ups into three categories: Completed, Pending, and In Progress.
- Additionally, the dashboard displays month-wise data for tattoo activities to help you analyze your business performance over time.
System Setup
Tattoo Category
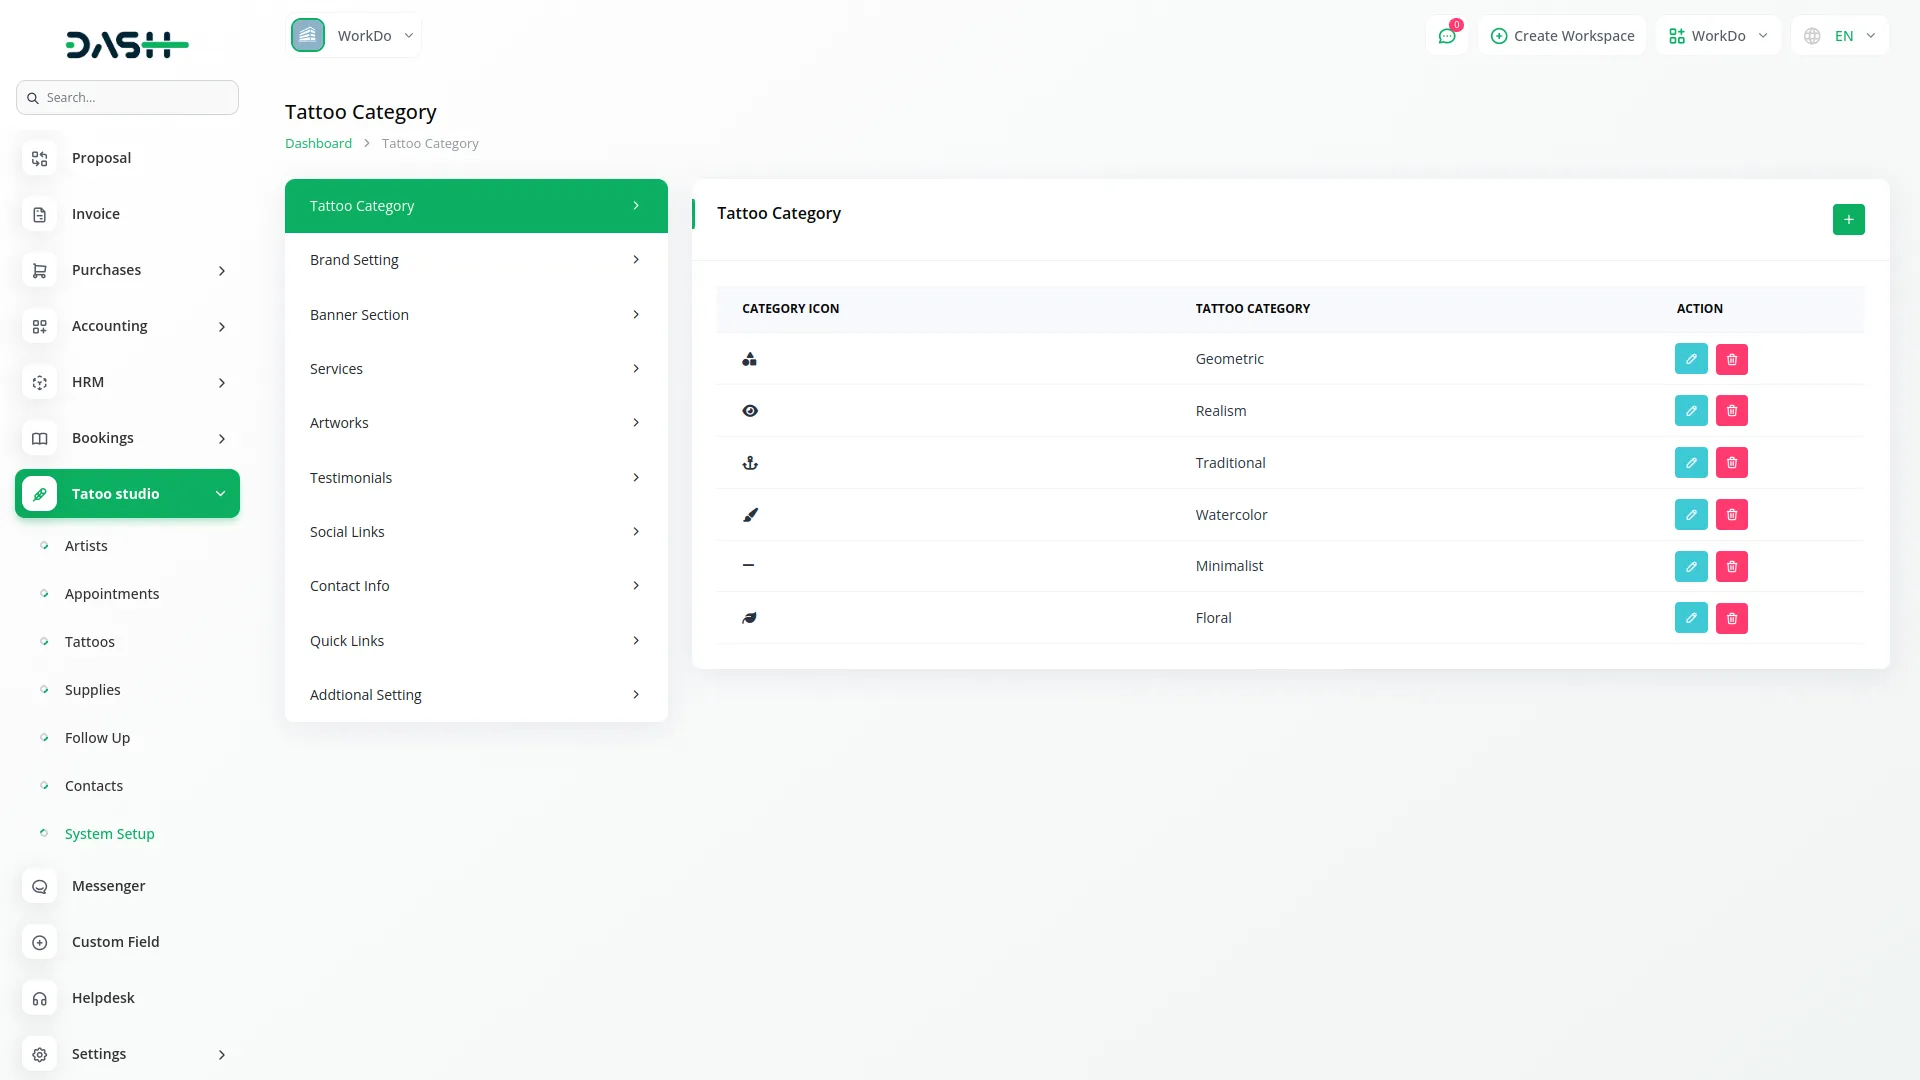
- To create a new tattoo category, click the “Create” button at the top of the tattoo category page. Enter the tattoo category name in the provided field and choose an icon for the tattoo category from the available options.
- After filling in the required information, click “Save” to create the category. In the actions column, you can click the Edit button to modify existing category information or Delete to remove categories from the system.
-
Brand Setting
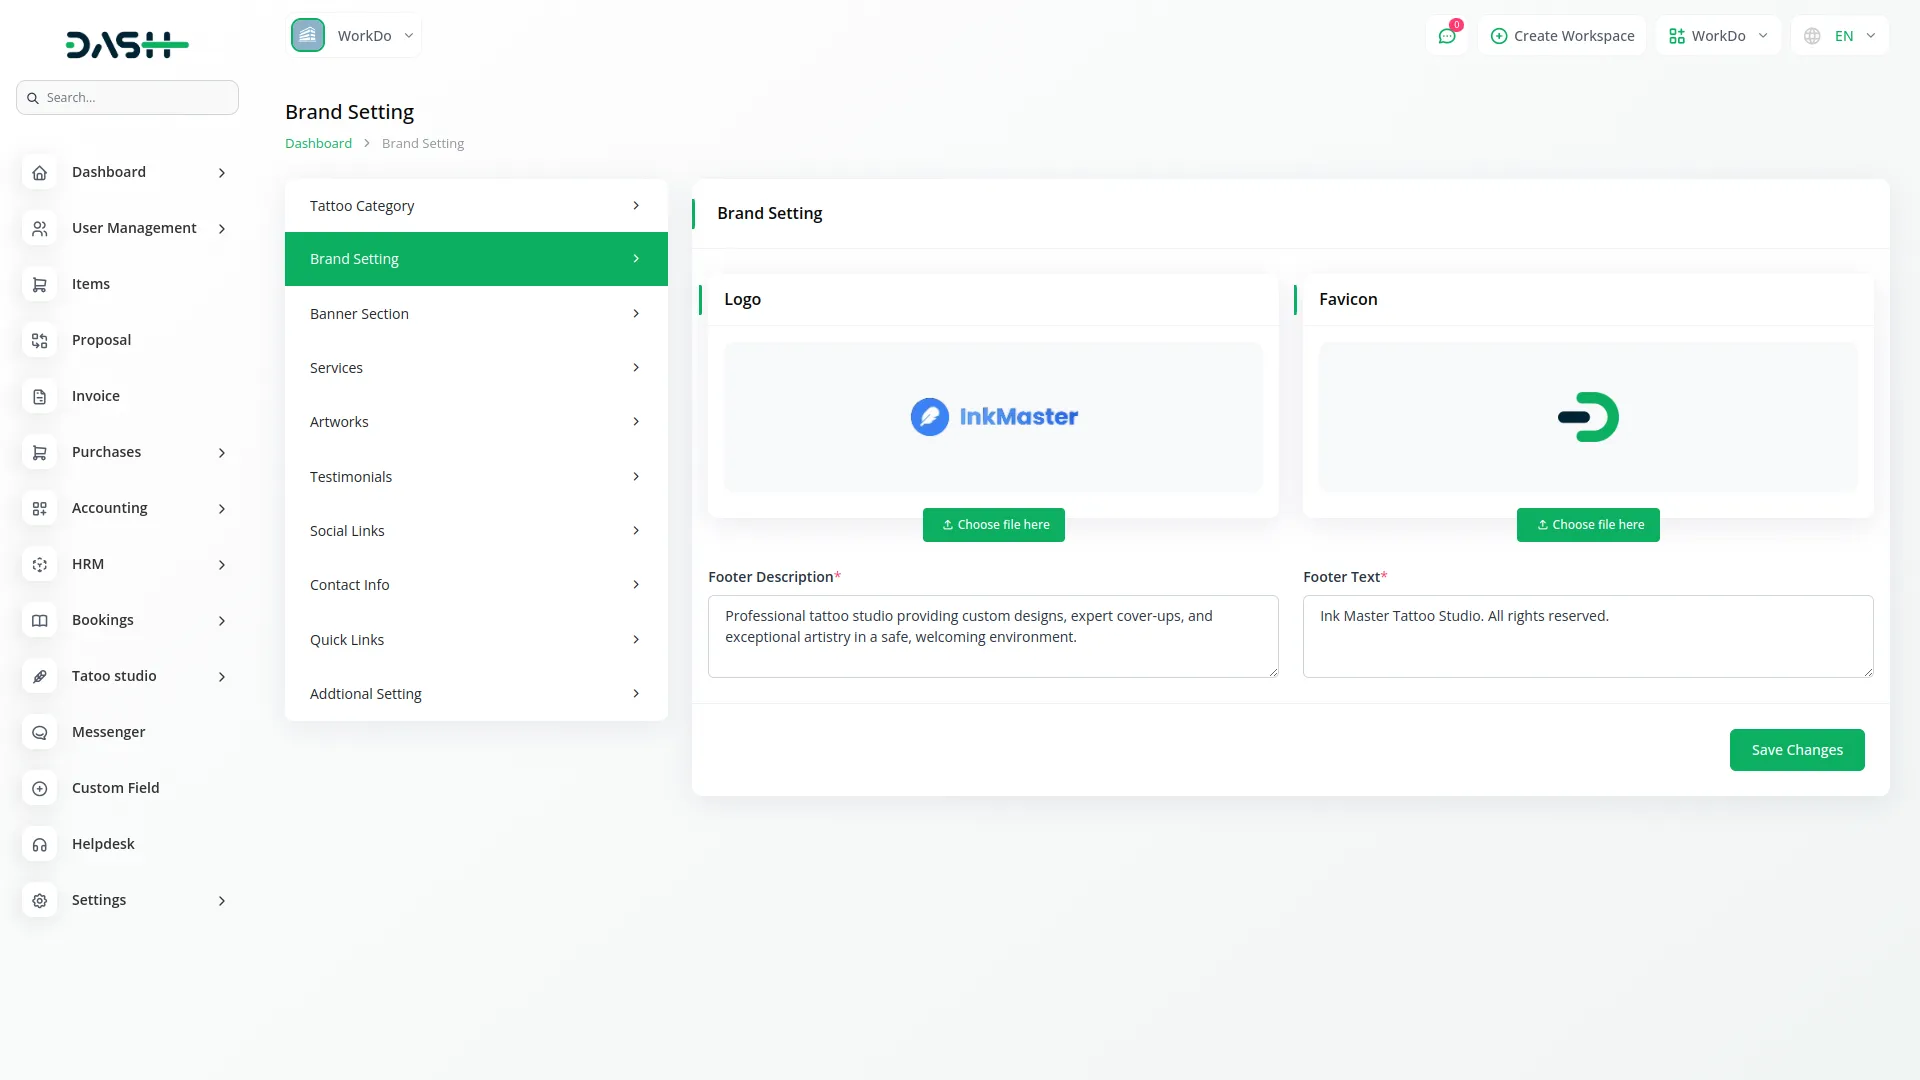
To configure your brand settings, access the brand setting section where you can customize your studio’s visual identity. Upload your logo, which will appear in both the header and footer of your website.
Set a favicon that will display in the browser tab when visitors view your website. Add footer description text that provides information about your studio. Enter footer text that will appear as the copyright sentence at the bottom of your website.
Banner Section
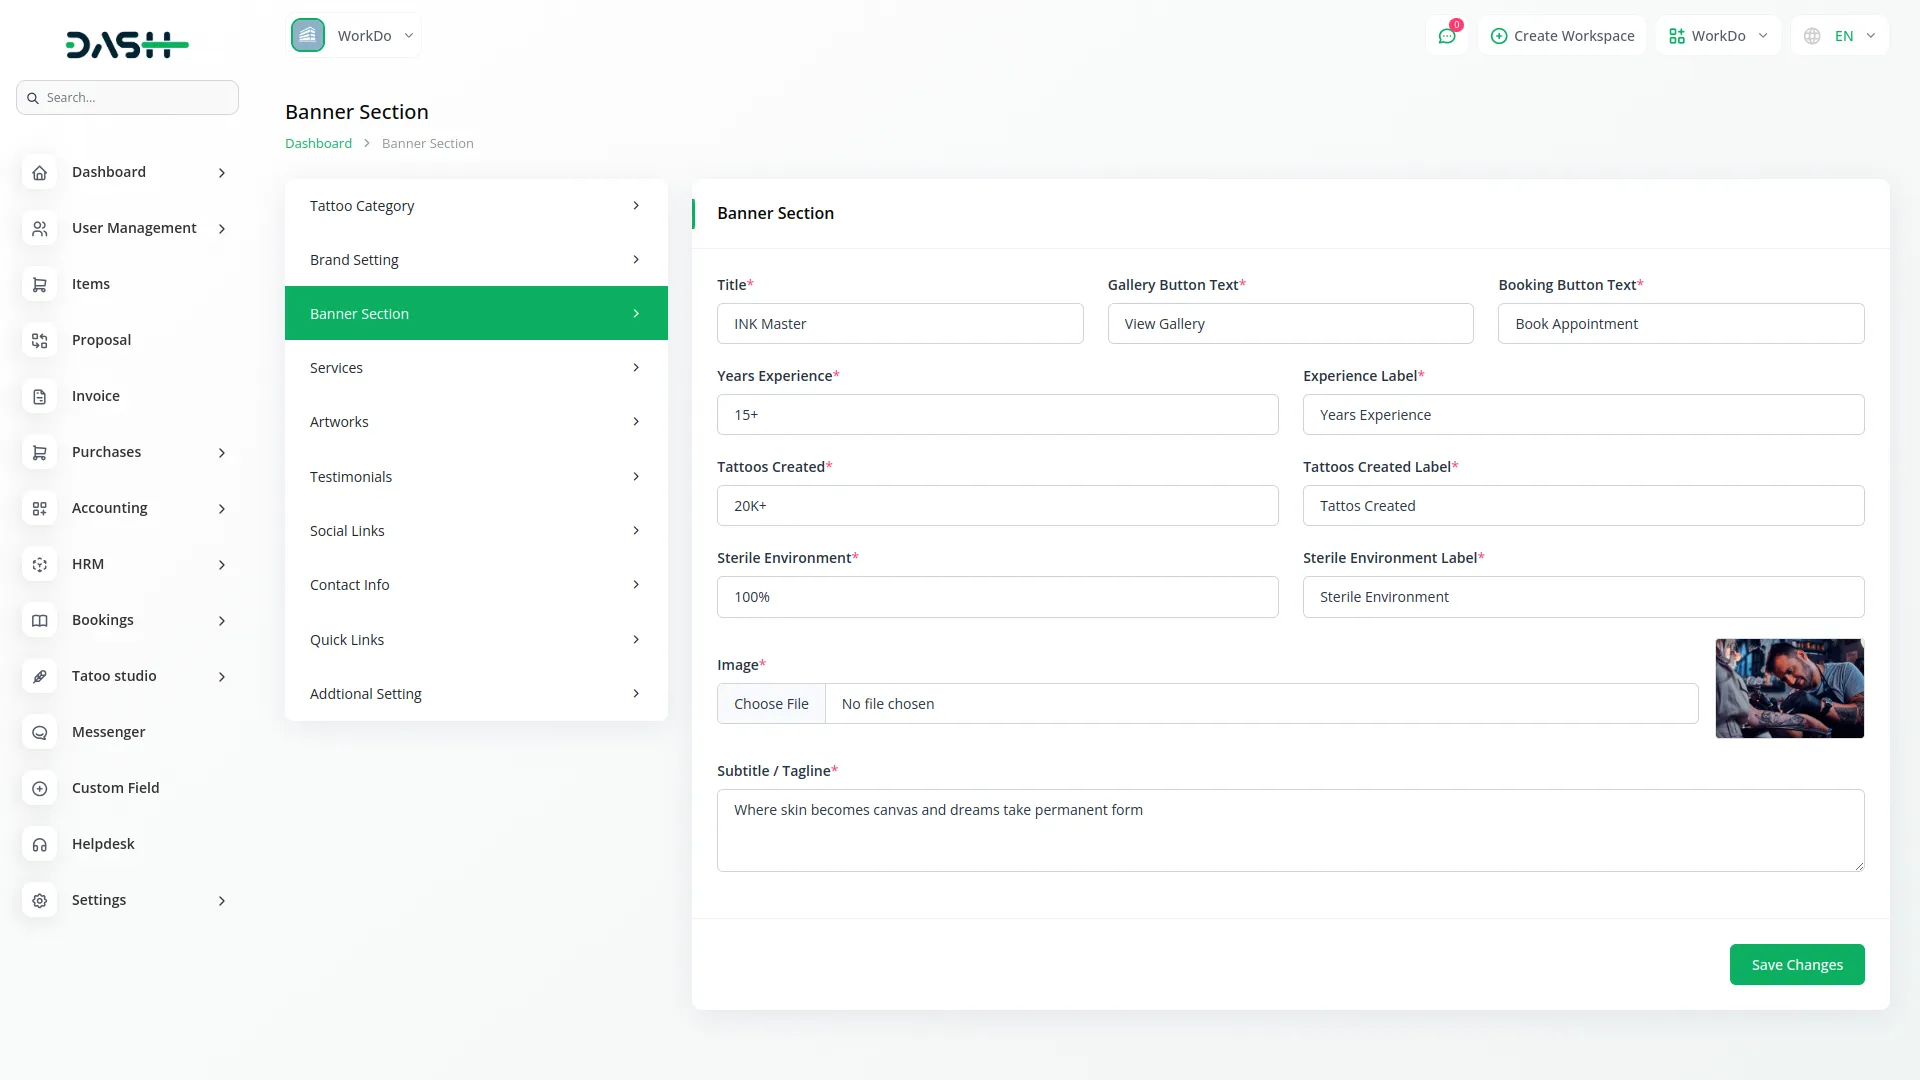
- To customize your website’s main banner, fill in the title that will be prominently displayed. Enter the gallery button text that visitors will see when they want to view your work.
- Set the booking button text for the appointment booking action. Add your years of experience as a number and provide an experience label to describe this metric. Enter the number of tattoos created and provide a label for the tattoos created.
- Include information about your sterile environment practices and add a sterile environment label. Upload a banner image that represents your studio and add a subtitle or tagline that captures your studio’s essence. All these elements will be displayed in the banner section of your website to create an impressive first impression.
Services
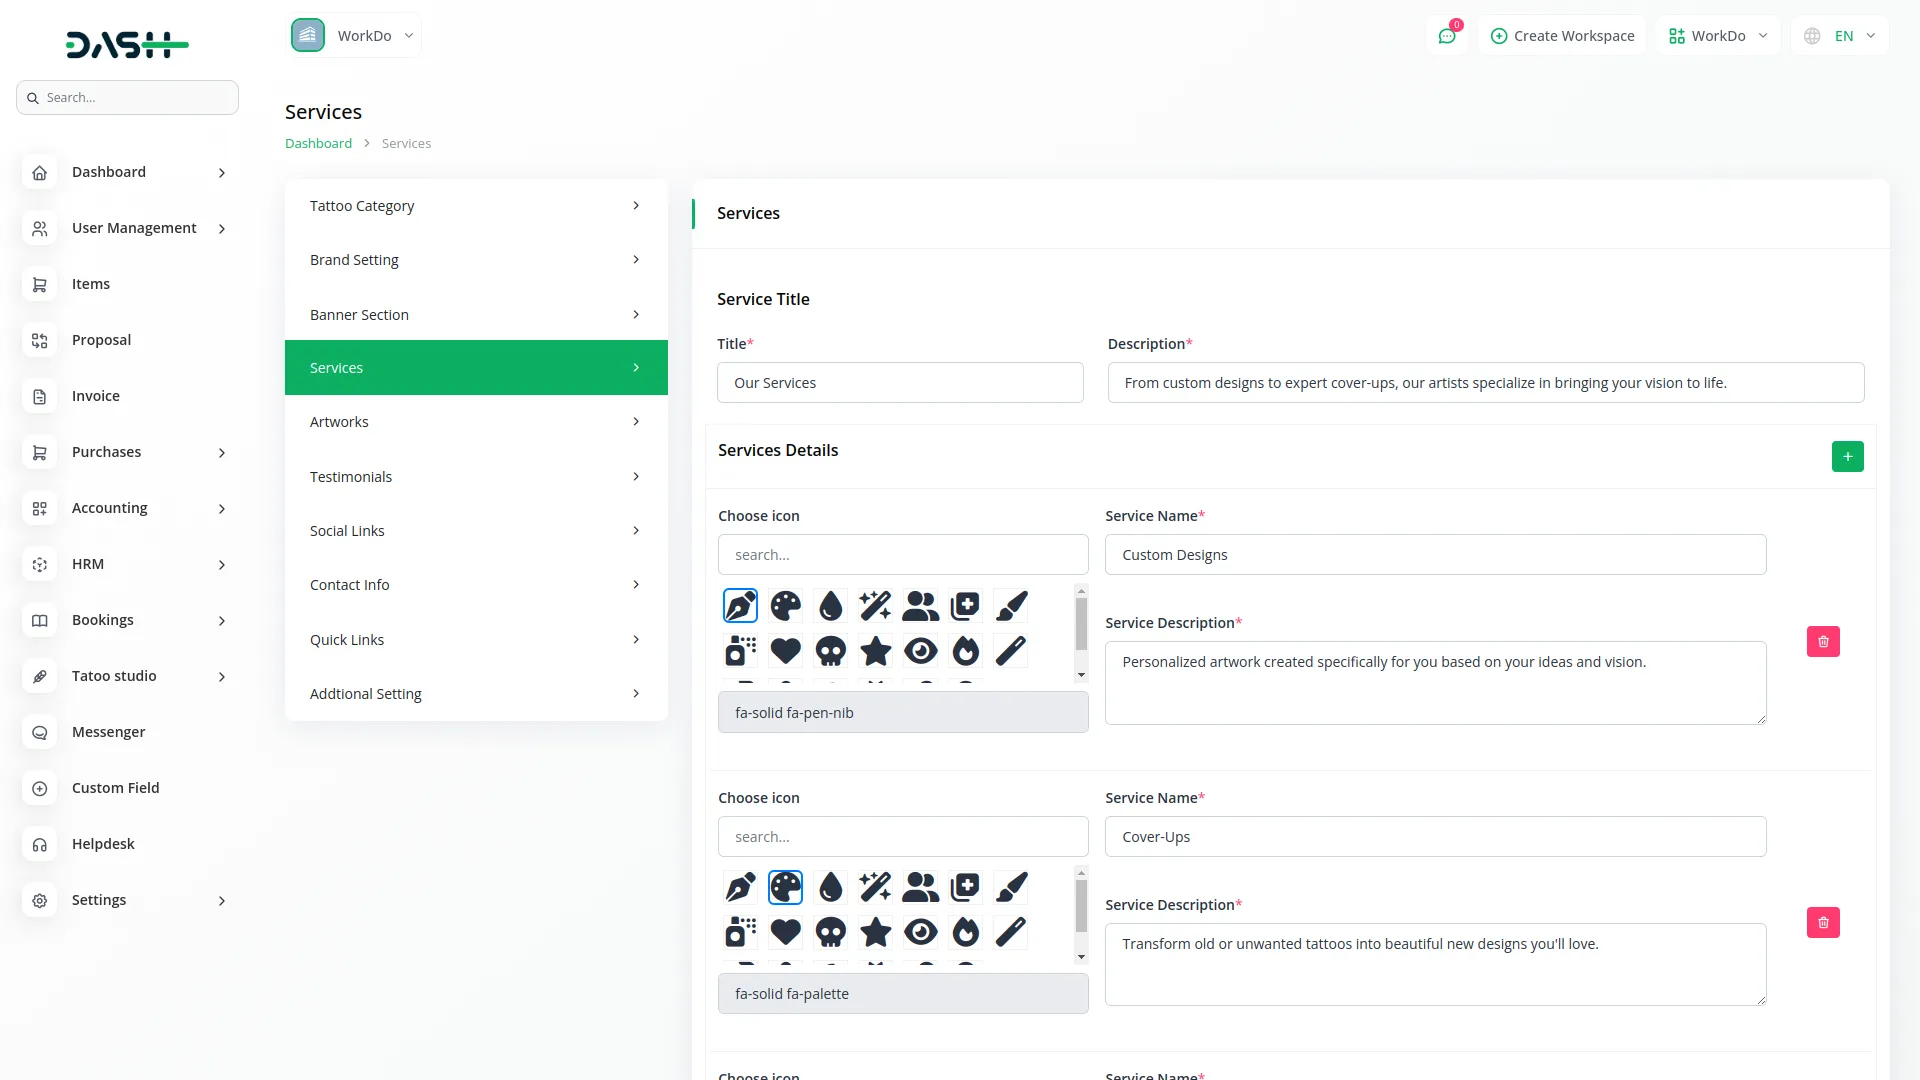
- To set up your services section, enter the main title that will appear at the top of the services area and provide a description that explains your services overview. In the services details section, you can add multiple individual services using the repeater function.
- For each service, choose an appropriate icon that represents the service type, enter the service name clearly, and provide a detailed service description explaining what the service includes. This information will appear in the services section of your website to inform potential customers about what you offer.
-
Artworks
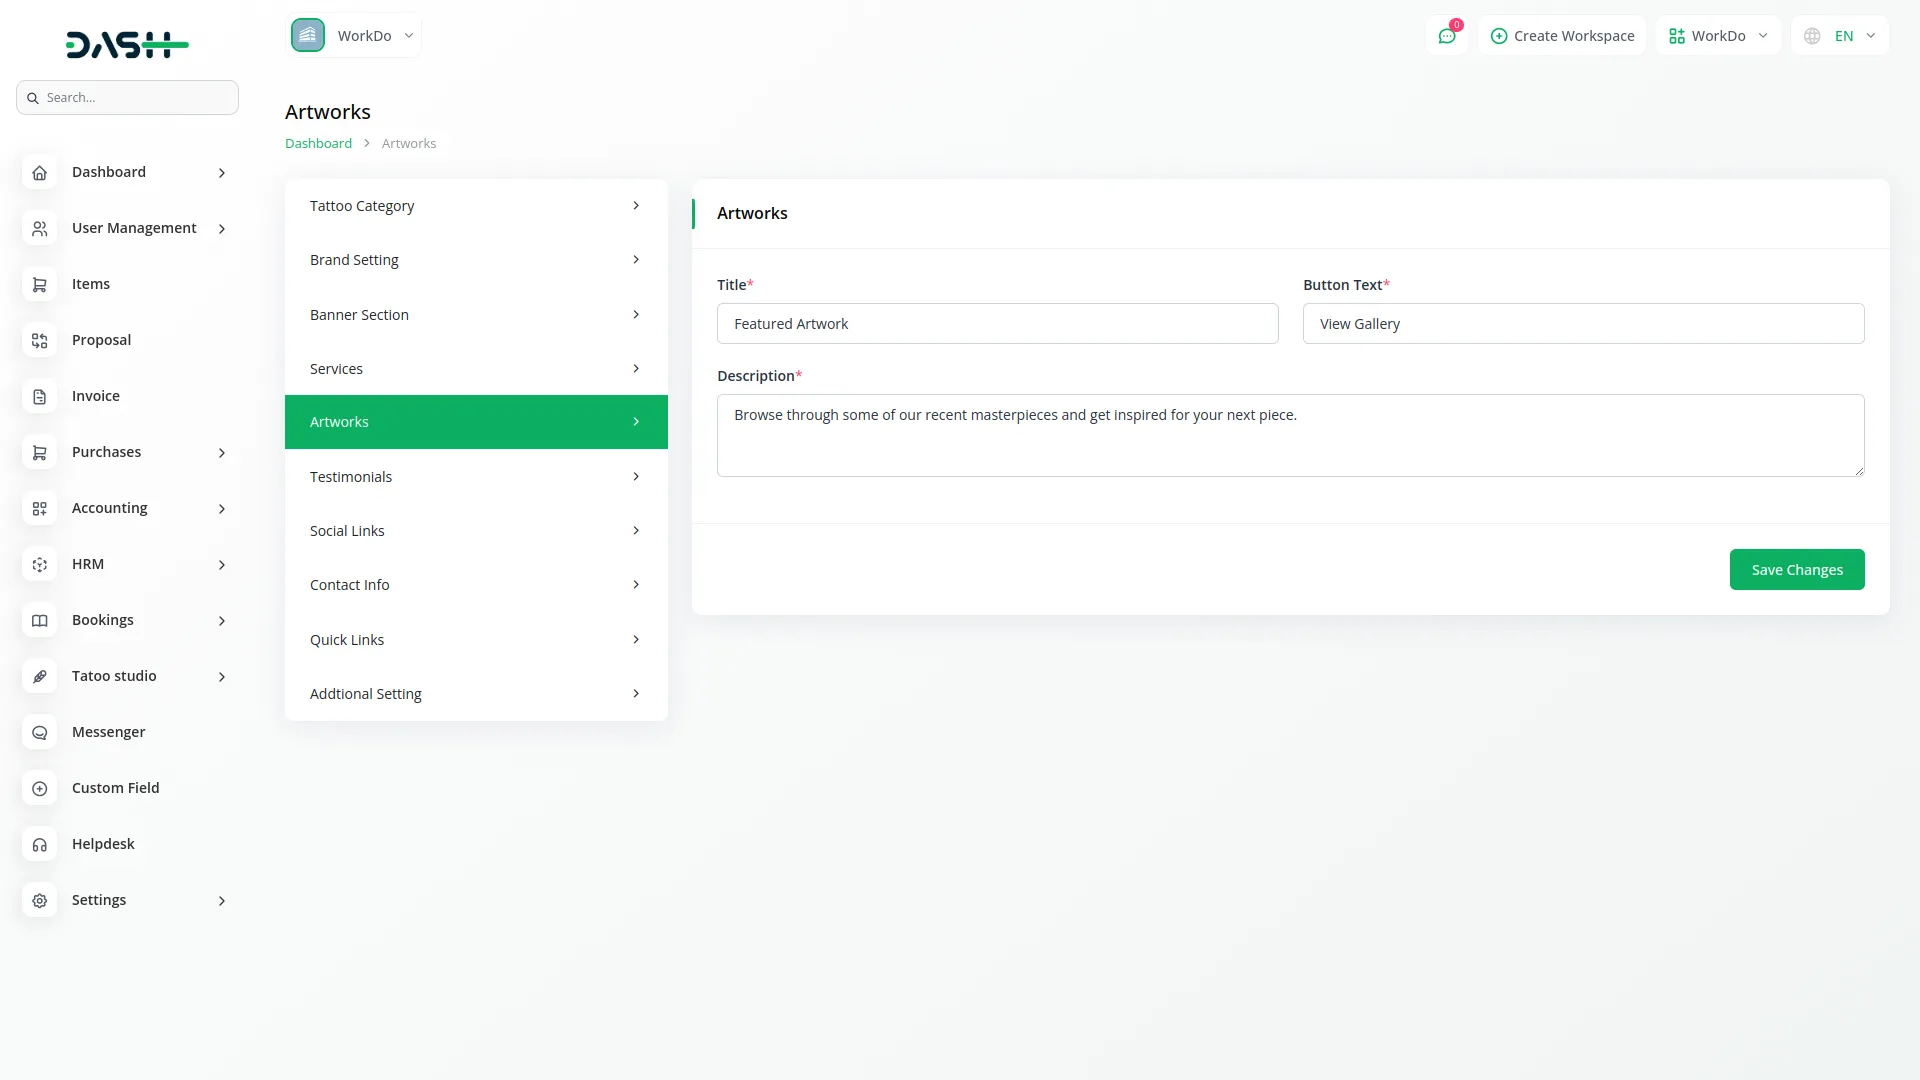
- To configure the artworks section of your website, enter a compelling title that will draw attention to your portfolio. Add button text that will appear on action buttons in this section.
- Provide a description that explains your artistic approach and showcases your expertise. This content will be displayed in the artwork section of your website, creating an engaging presentation of your tattoo portfolio.
Testimonials
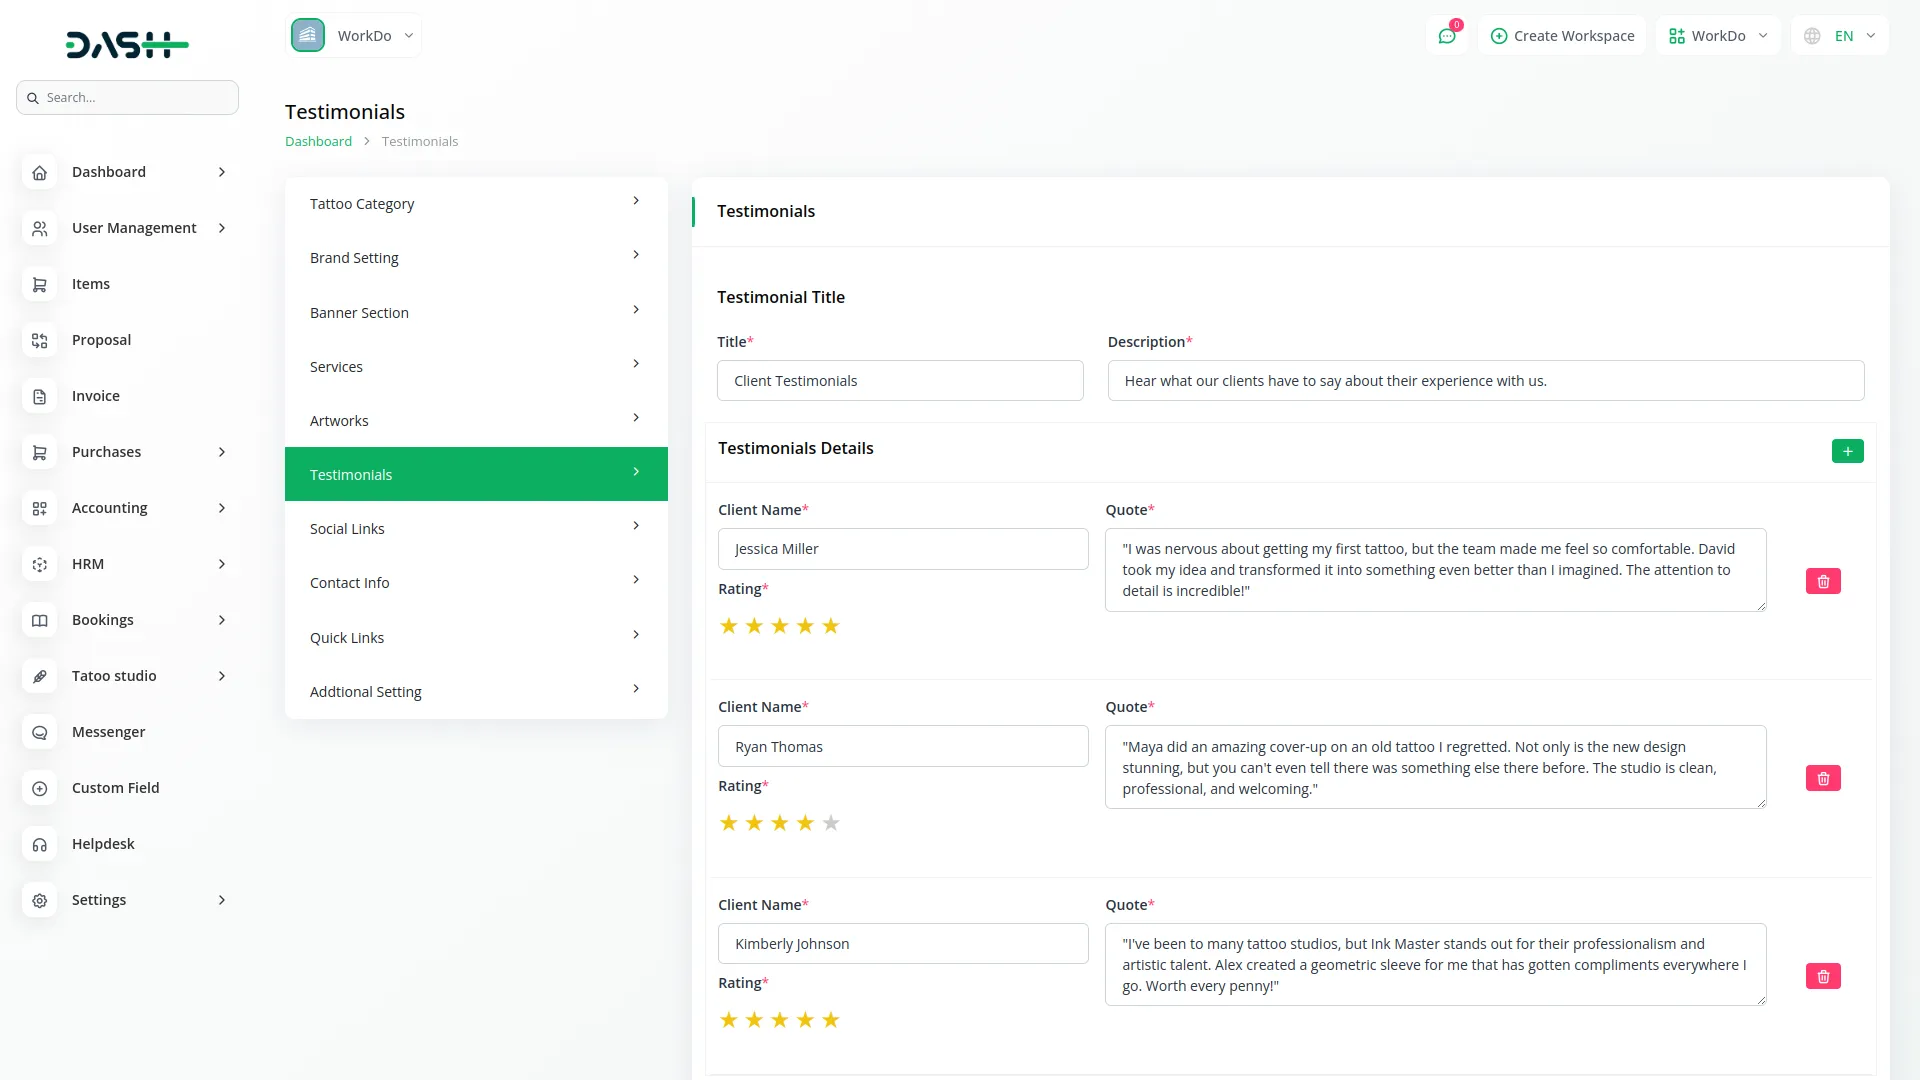
- To manage customer testimonials on your website, enter the main title for the testimonials section and provide a description that introduces the customer feedback. Use the testimonials details repeater to add multiple customer testimonials.
- For each testimonial, enter the client’s name who provided the feedback, assign a rating score, and include the actual quote or review text. These testimonials will appear in the testimonial section of your website to build trust with potential customers.
Social Link
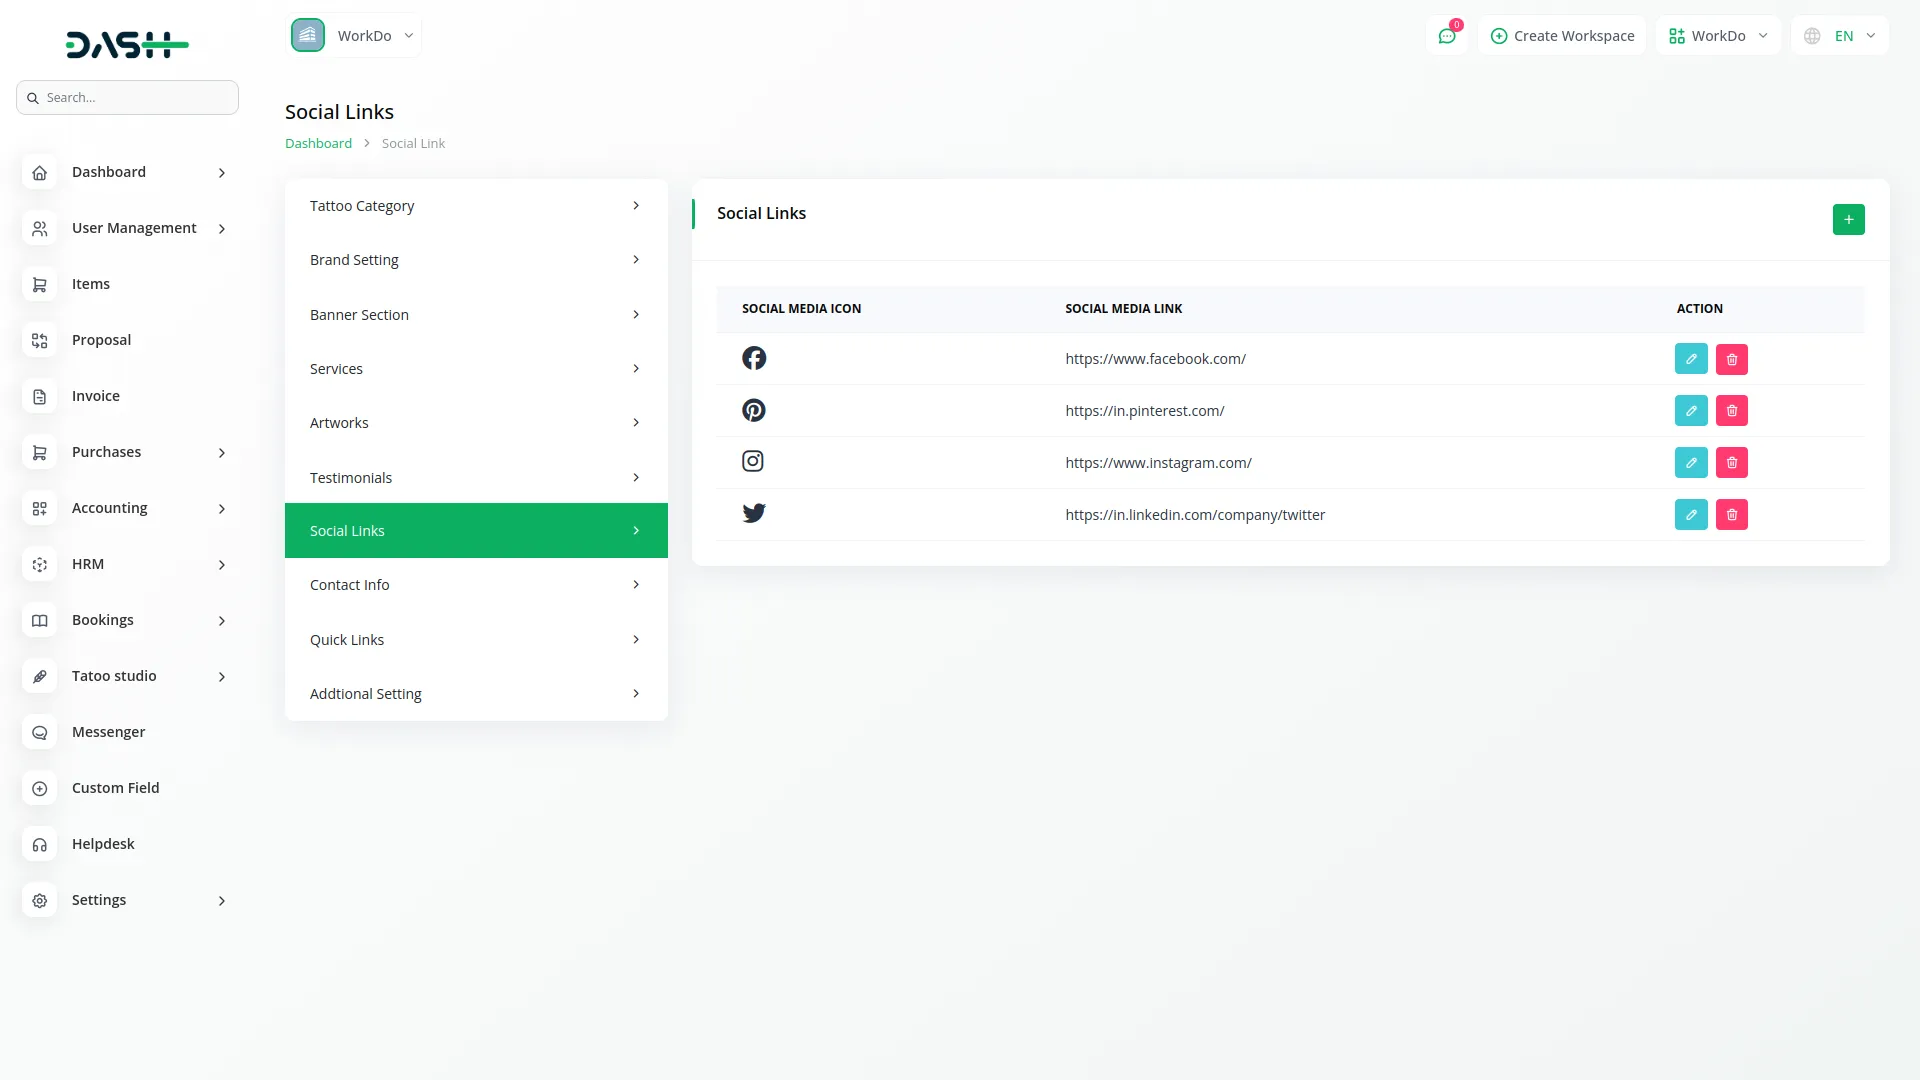
- To add a new social media link, click the “create” button on the social link page. Choose an icon that represents the social media platform you want to add. Enter the complete social media link URL for your studio’s profile.
- Select a background color that will appear behind the social media icon. The system will show an icon preview displaying how the selected icon and background color combination will appear in the contact information section of your website.
- The list page shows all your social media links in a table with columns for Social Media Icon and Social Media Link. In the actions column, you can click the Edit button to modify existing social media links or Delete to remove social media links from your website.
Contact Info
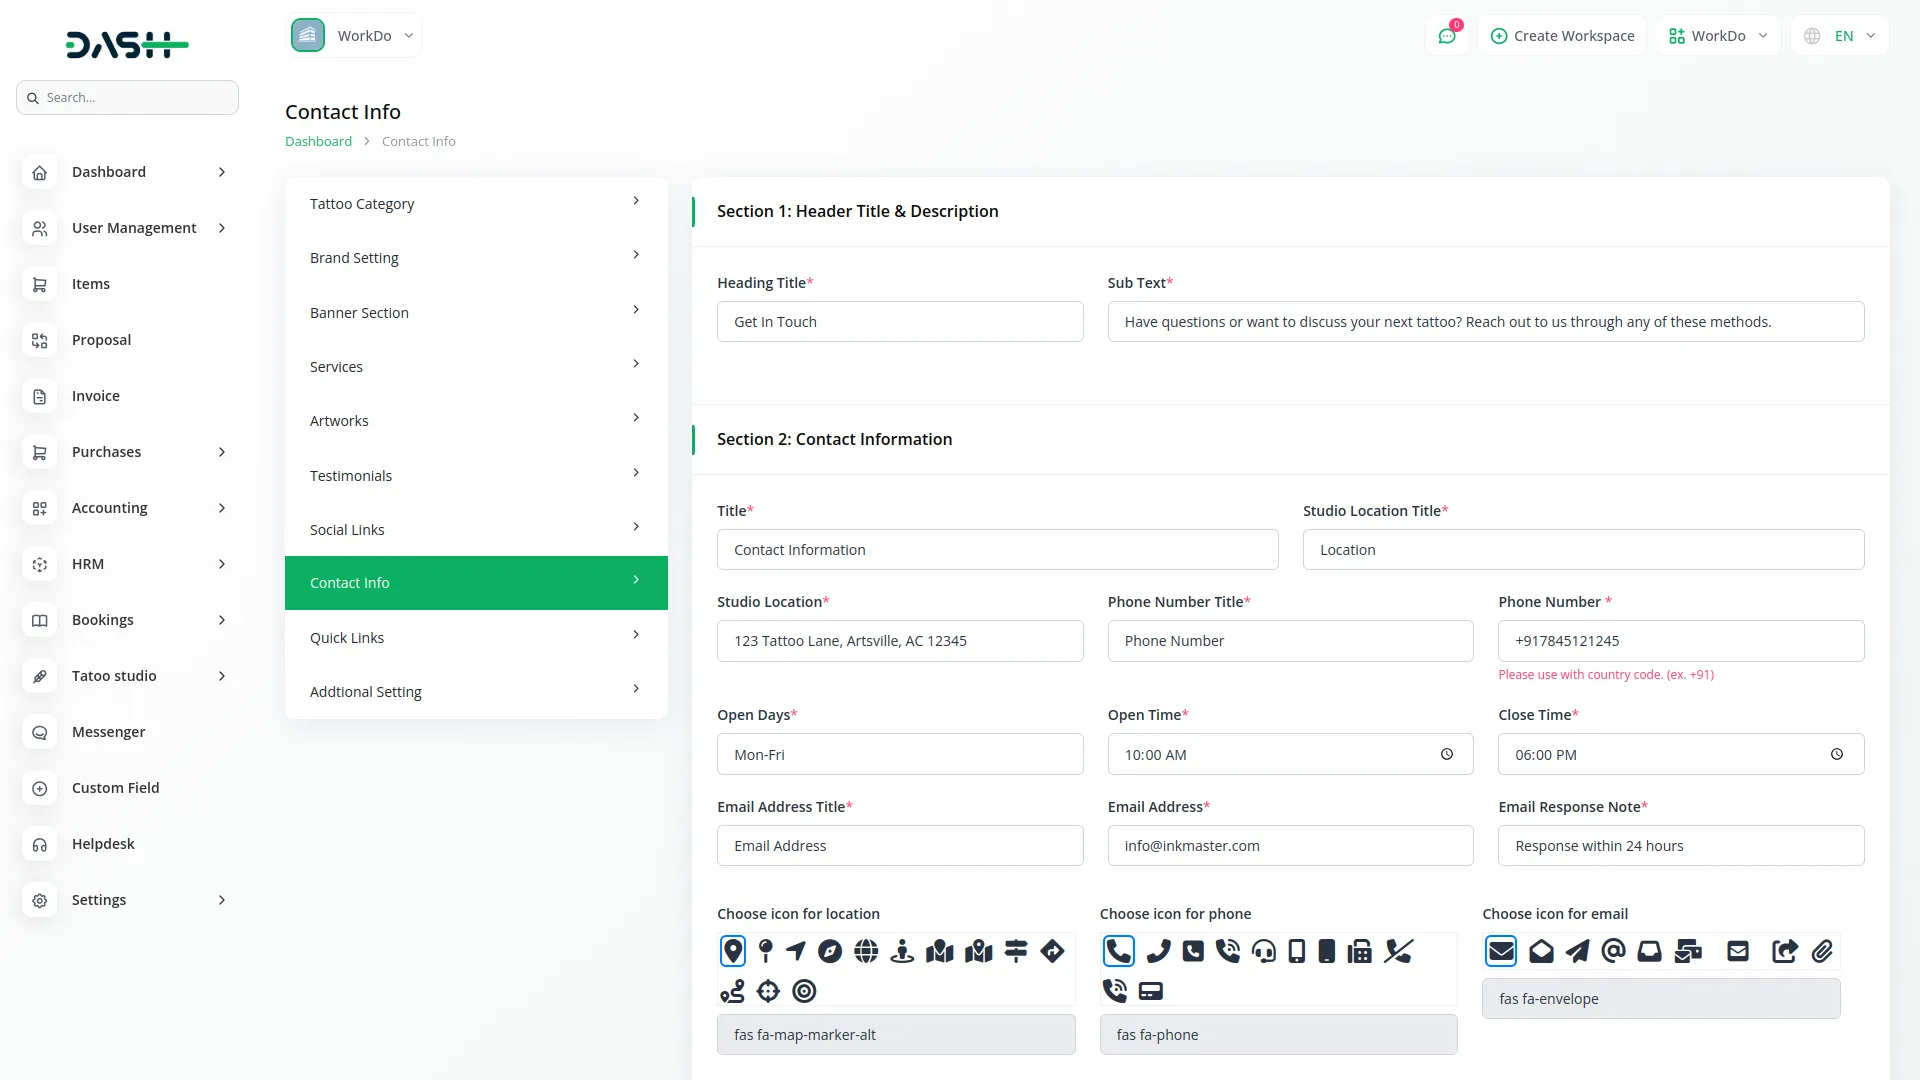
- To set up comprehensive contact information, configure three main sections. In the Header Title & Description section, enter a heading title that will appear at the top of your contact area and add subtext that provides additional context.
- In the Contact Information section, add a title for this section, enter your studio location title and the actual studio location address, provide a phone number title and your studio’s phone number, specify your open days and open and close times, add an email address title and your studio’s email address, include an email response note explaining your response timeframe, and choose appropriate icons for location, phone, and email that will visually represent each contact method.
- In the Follow Us section, enter a title for your social media area and provide a description encouraging visitors to follow your social media accounts.
Quick Link
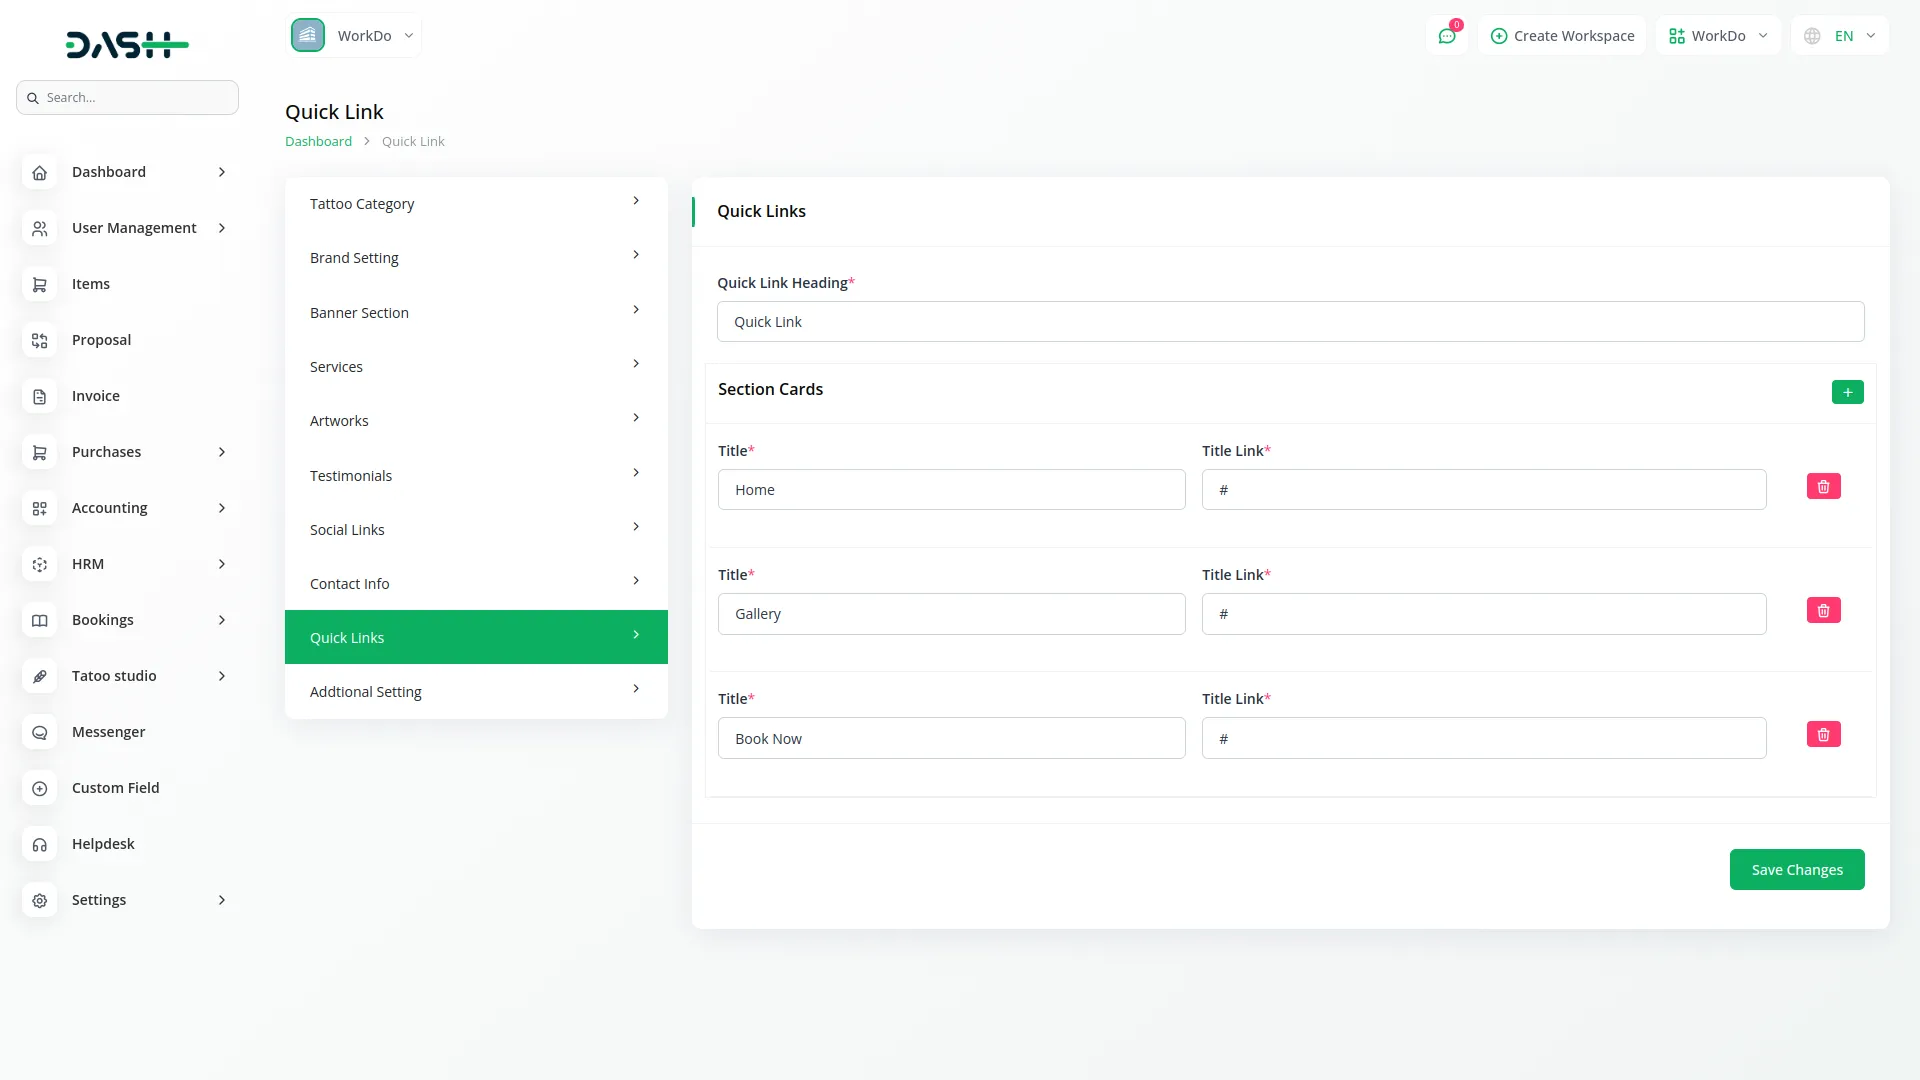
- To manage footer quick links that will appear at the bottom of your website, enter a quick link heading that will serve as the section title.
- Use the section cards repeater to add multiple quick links that will help visitors navigate to important pages. For each quick link, enter a descriptive title and provide the title link URL where visitors will be directed when they click on the link.
Additional Setting
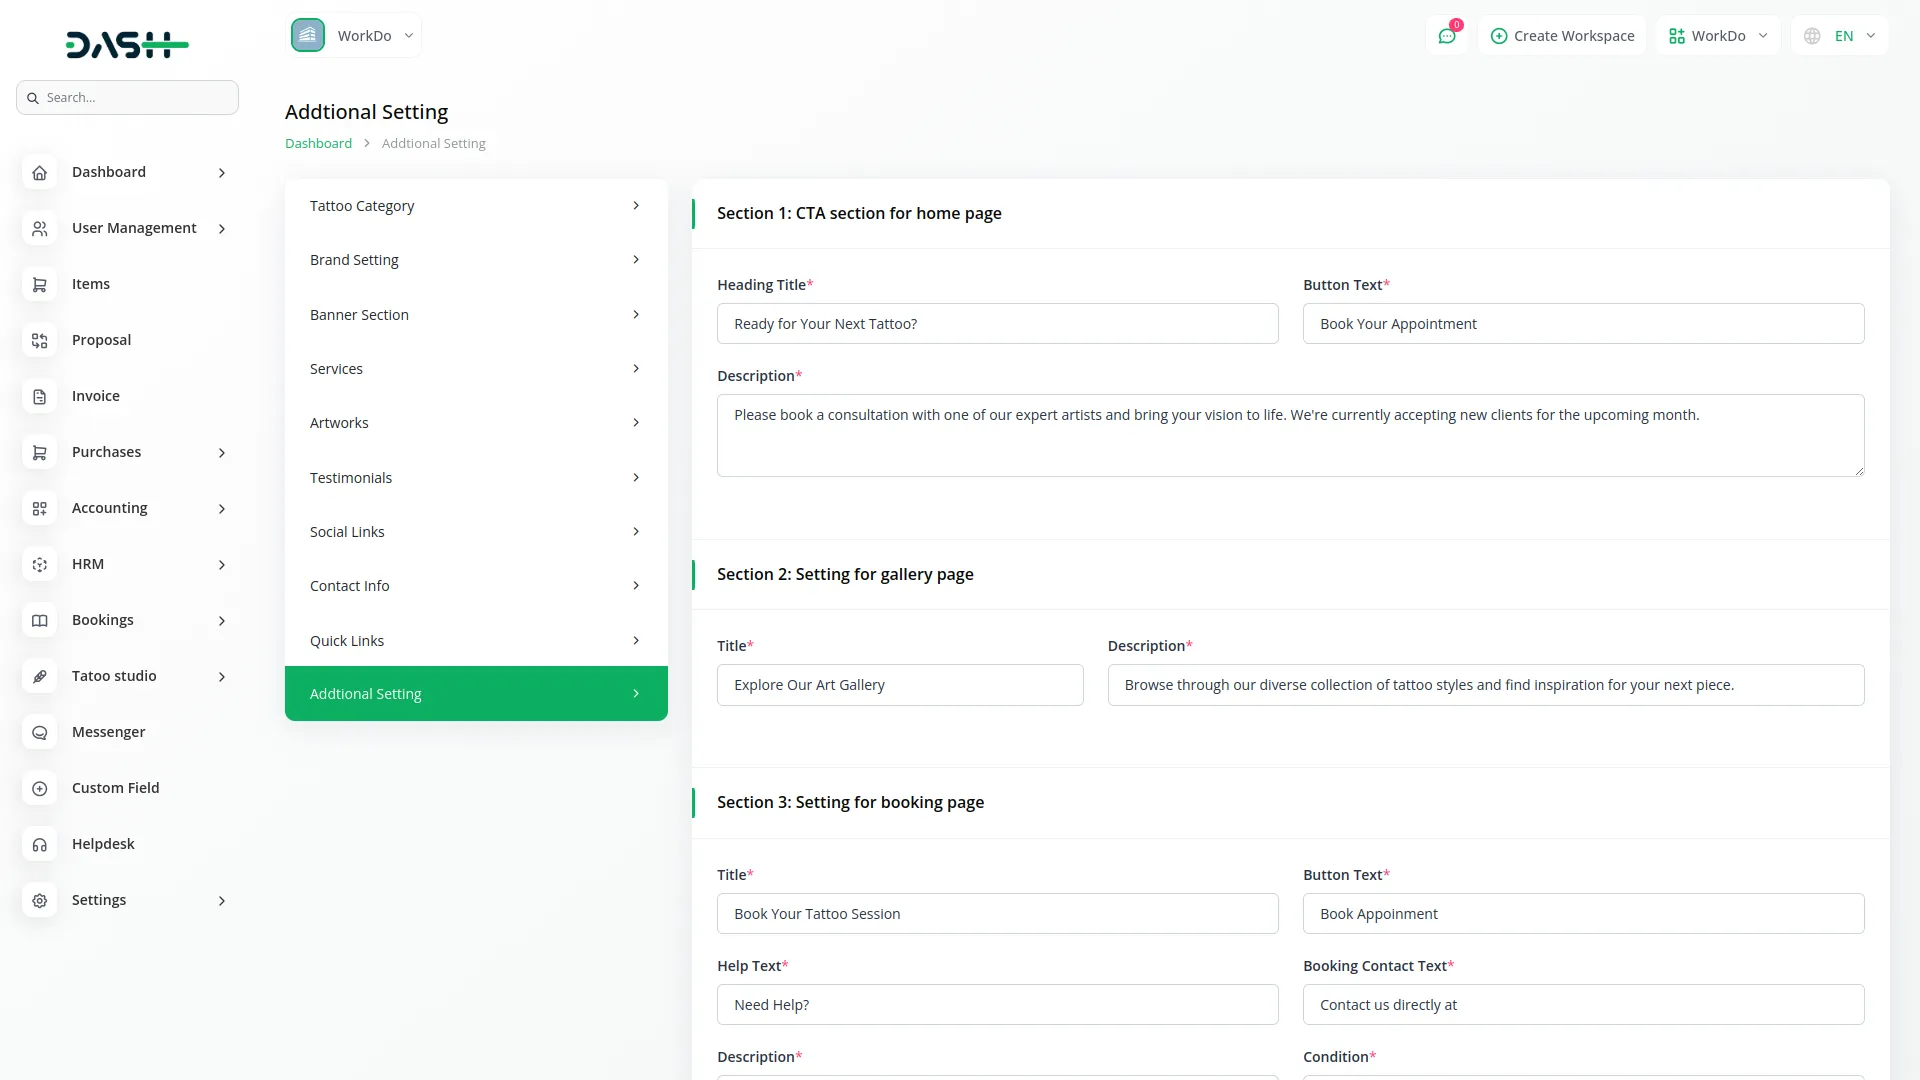
- To configure additional website settings, set up three important sections. In the CTA section for the home page, enter a compelling heading title, specify the button text that will encourage action, and provide a description that explains the call-to-action offer.
- This content will display in the CTA section of your website to drive customer engagement. In the setting for the gallery page, add a title for the gallery page and provide a description that will appear in the content area of your gallery page to introduce your artwork collection.
- In the setting for booking page, enter a title for the booking page, specify the button text for the booking action, add help text to guide customers through the booking process, provide booking contact text with contact information, include a description explaining the booking process, and add conditions or terms that customers should know before booking appointments.
Artists
- To create a new artist profile, click the “create” button at the top of the artists page. Enter the artist’s name in the designated field and provide their contact number for communication purposes.
- Add the artist’s email address for digital correspondence. Specify their specialty or area of expertise in tattooing. Enter their years of experience as a number to show their expertise level.
- Add the artist’s age and upload a professional image that will represent them on your website. Select the appropriate gender from the available options. After filling in all required information, click “Save” to create the artist profile.
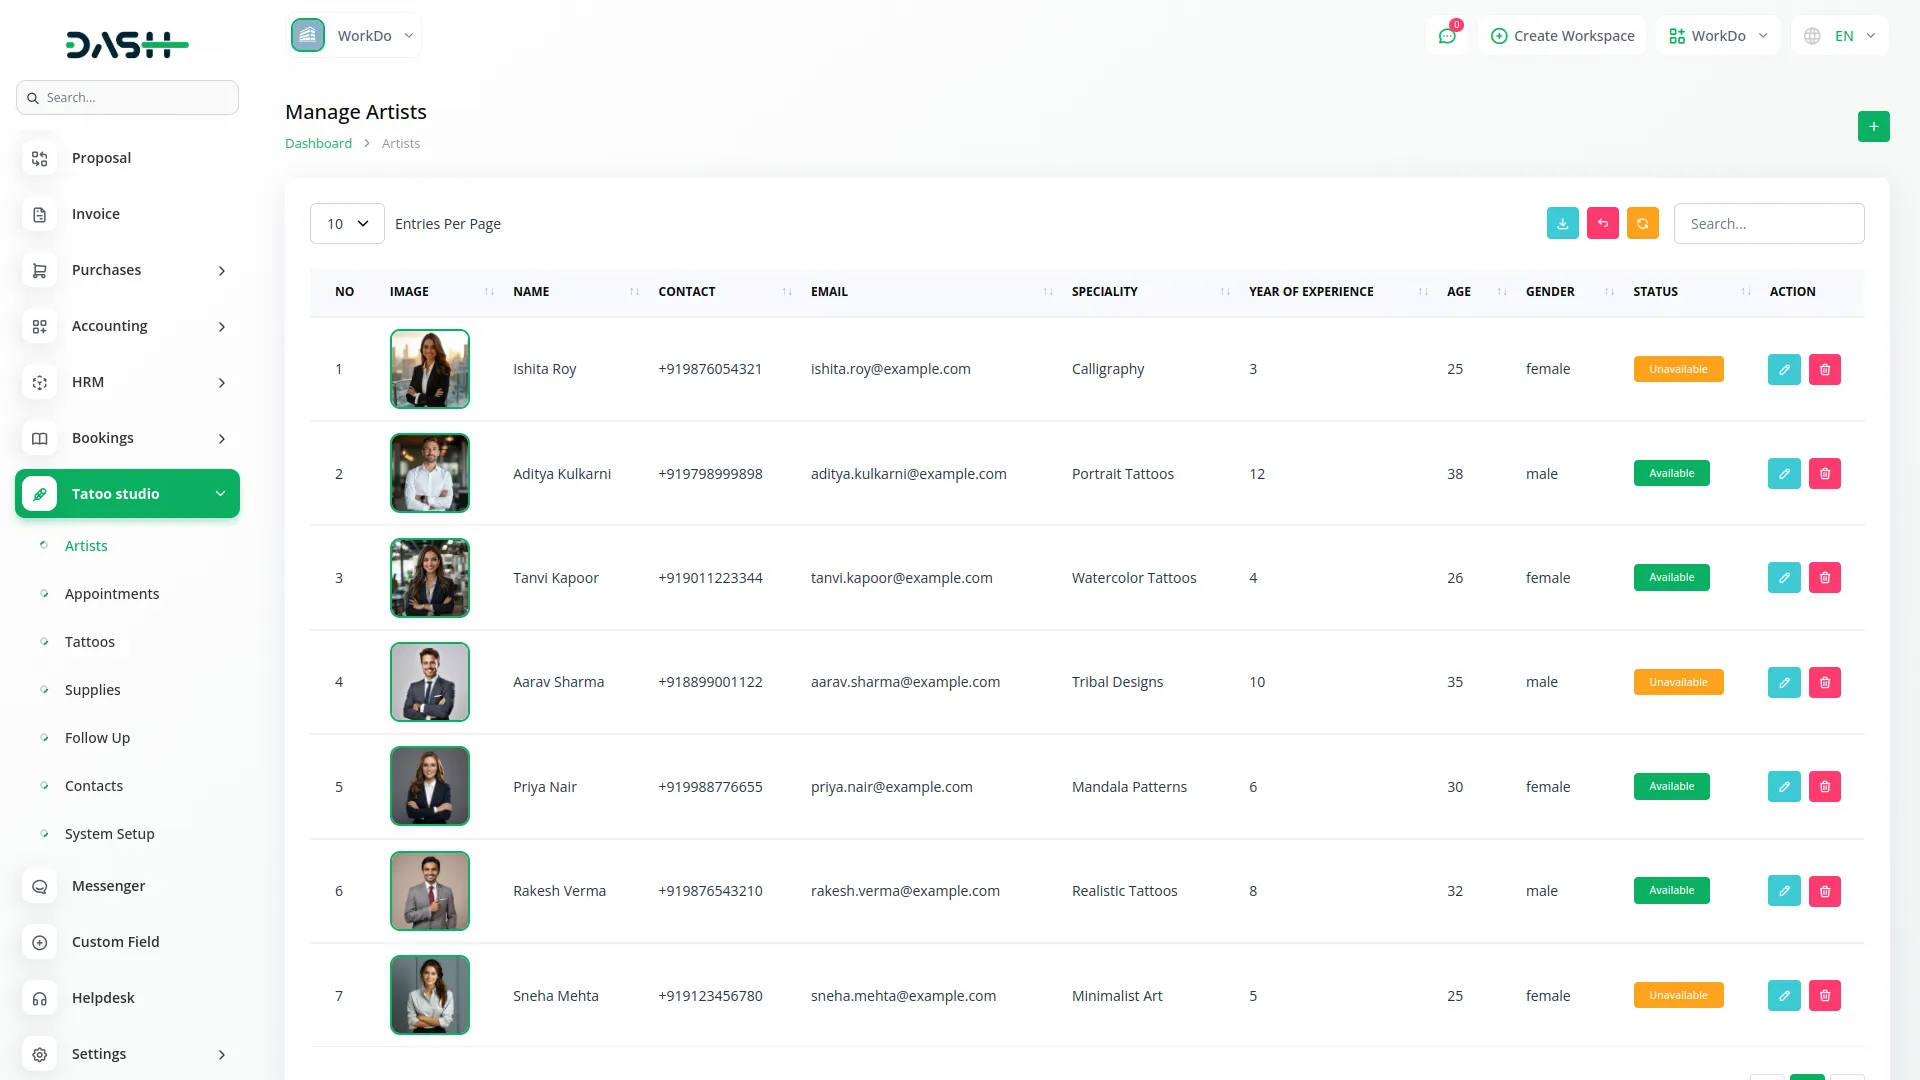
- The list page displays all artist profiles with Search, Export, and Add buttons at the top for easy management. The table shows detailed columns including No for sequential numbering, Image showing the artist’s photo, Name displaying the artist’s full name, Contact showing their phone number, Email displaying their email address, Speciality showing their area of expertise, Year of Experience indicating their experience level, Age showing the artist’s age, Gender displaying their gender, and Status which can be either Unavailable or Available.
- In the actions column, Edit to modify artist information, or Delete to remove artist profiles from the system.
Appointments
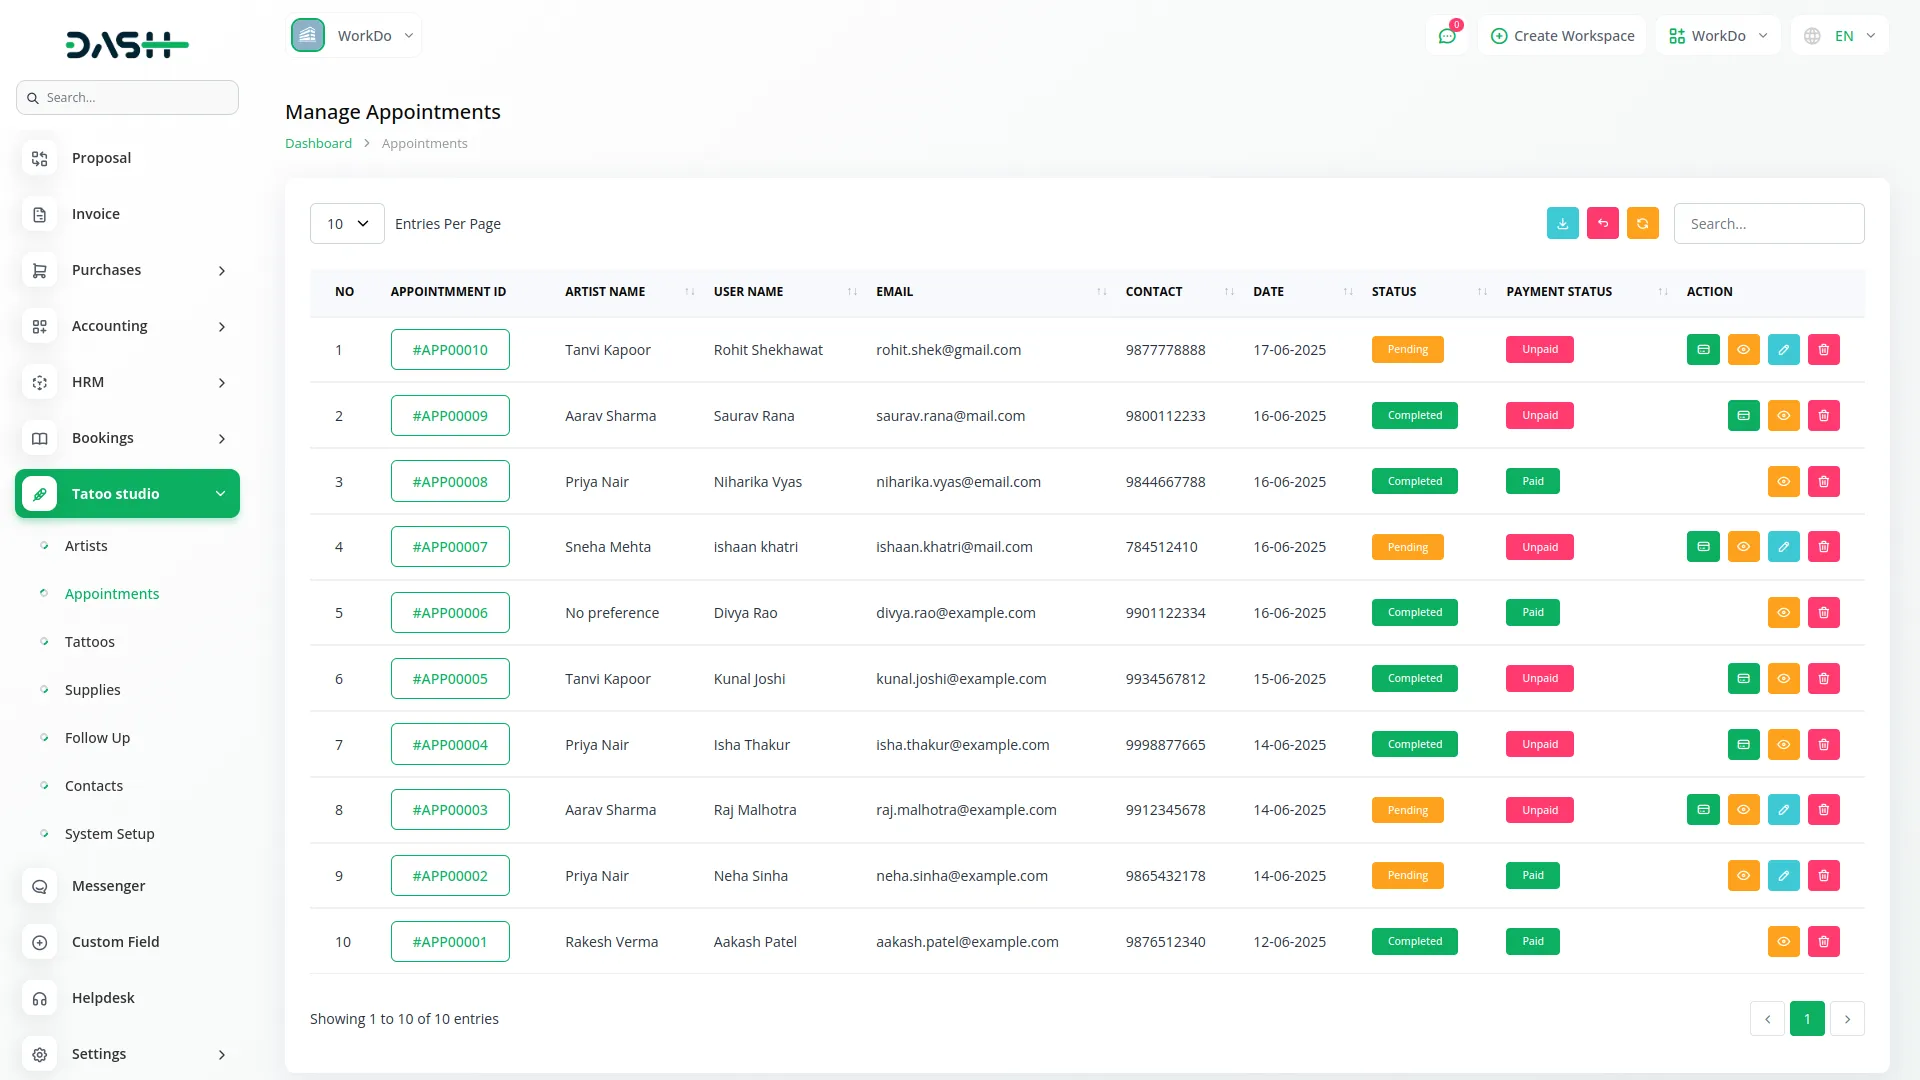
- The appointments section displays all appointments that have been submitted by customers through your website. This central hub allows you to manage all appointment booking requests and track their progress through your workflow.
- The list page includes Search, Export, and Add buttons at the top for comprehensive appointment management. The table displays columns for No showing sequential numbering, Appointment ID which opens a detailed modal when clicked, Artist Name chosen by the users, User Name displaying the customer’s name, Email showing the customer’s email address, Contact displaying the customer’s phone number, Date showing the scheduled appointment date, Status indicating whether the appointment is Pending, or Completed, and Payment Status showing whether it is Unpaid or Paid.
- In the actions column, you can click Payment to process payment (this option is not displayed if the payment status is already paid), Show to view complete appointment details, Edit to modify appointment information (this option is not available if the status is completed and also you can edit the status using this option), or Delete to remove appointments from the system.
Tattoos
- To add a new tattoo to your collection, click the “create” button at the top of the tattoos page. Select the artist name from the dropdown list of available artists. Enter a descriptive tattoo name that clearly identifies the design.
- Choose the appropriate category name from your predefined tattoo categories. Upload a high-quality image that showcases the tattoo design. Specify how many sessions will be needed to complete this tattoo.
- Set the price for the tattoo work. Provide a rating out of 5.0 stars to indicate the complexity or quality level. Add a detailed description explaining the tattoo design, style, and any special features. After completing all fields, click “Save” to add the tattoo to your collection.
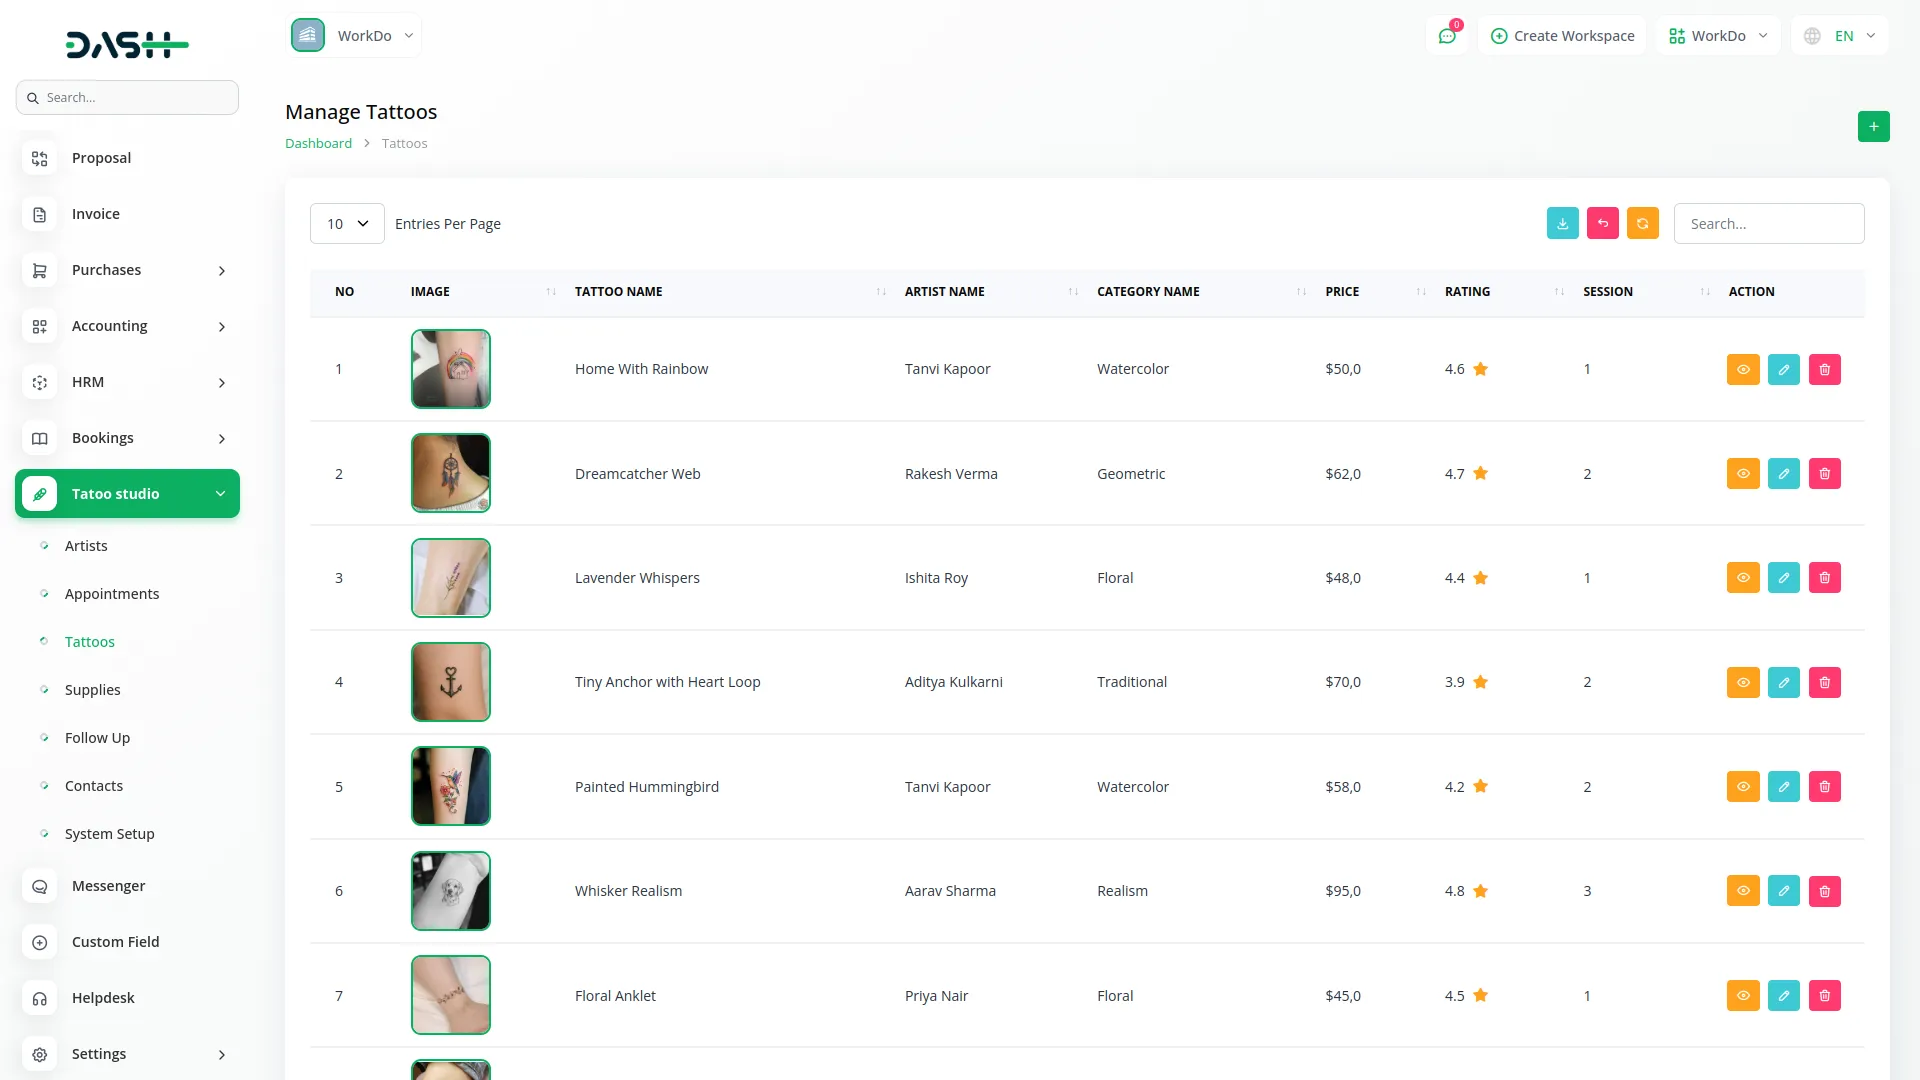
- The list page shows Search, Export, and Add buttons for easy tattoo management. The table displays columns for No with sequential numbering, Image showing the tattoo design, Tattoo Name displaying the tattoo title, Artist Name showing who created or specializes in this design, Category Name indicating the tattoo category, Price displaying the cost, Rating showing the star rating, and Session indicating how many sessions are required.
- In the actions column, you can click Show to view complete tattoo details, Edit to modify tattoo information and status, or Delete to remove tattoo entries from your collection.
Supplies
- To create a new supply entry for inventory management, click the “create” button at the top of the supplies page. Fill in the name, category, quantity, unit, brand, and any notes about the item. Add the current quantity available in your inventory. Indicate the unit of measurement for the supply.
- Enter the brand name of the supply item. Include any additional notes about the supply, such as usage instructions, expiration dates, or special handling requirements. Click “Save” to add the supply item to your inventory.
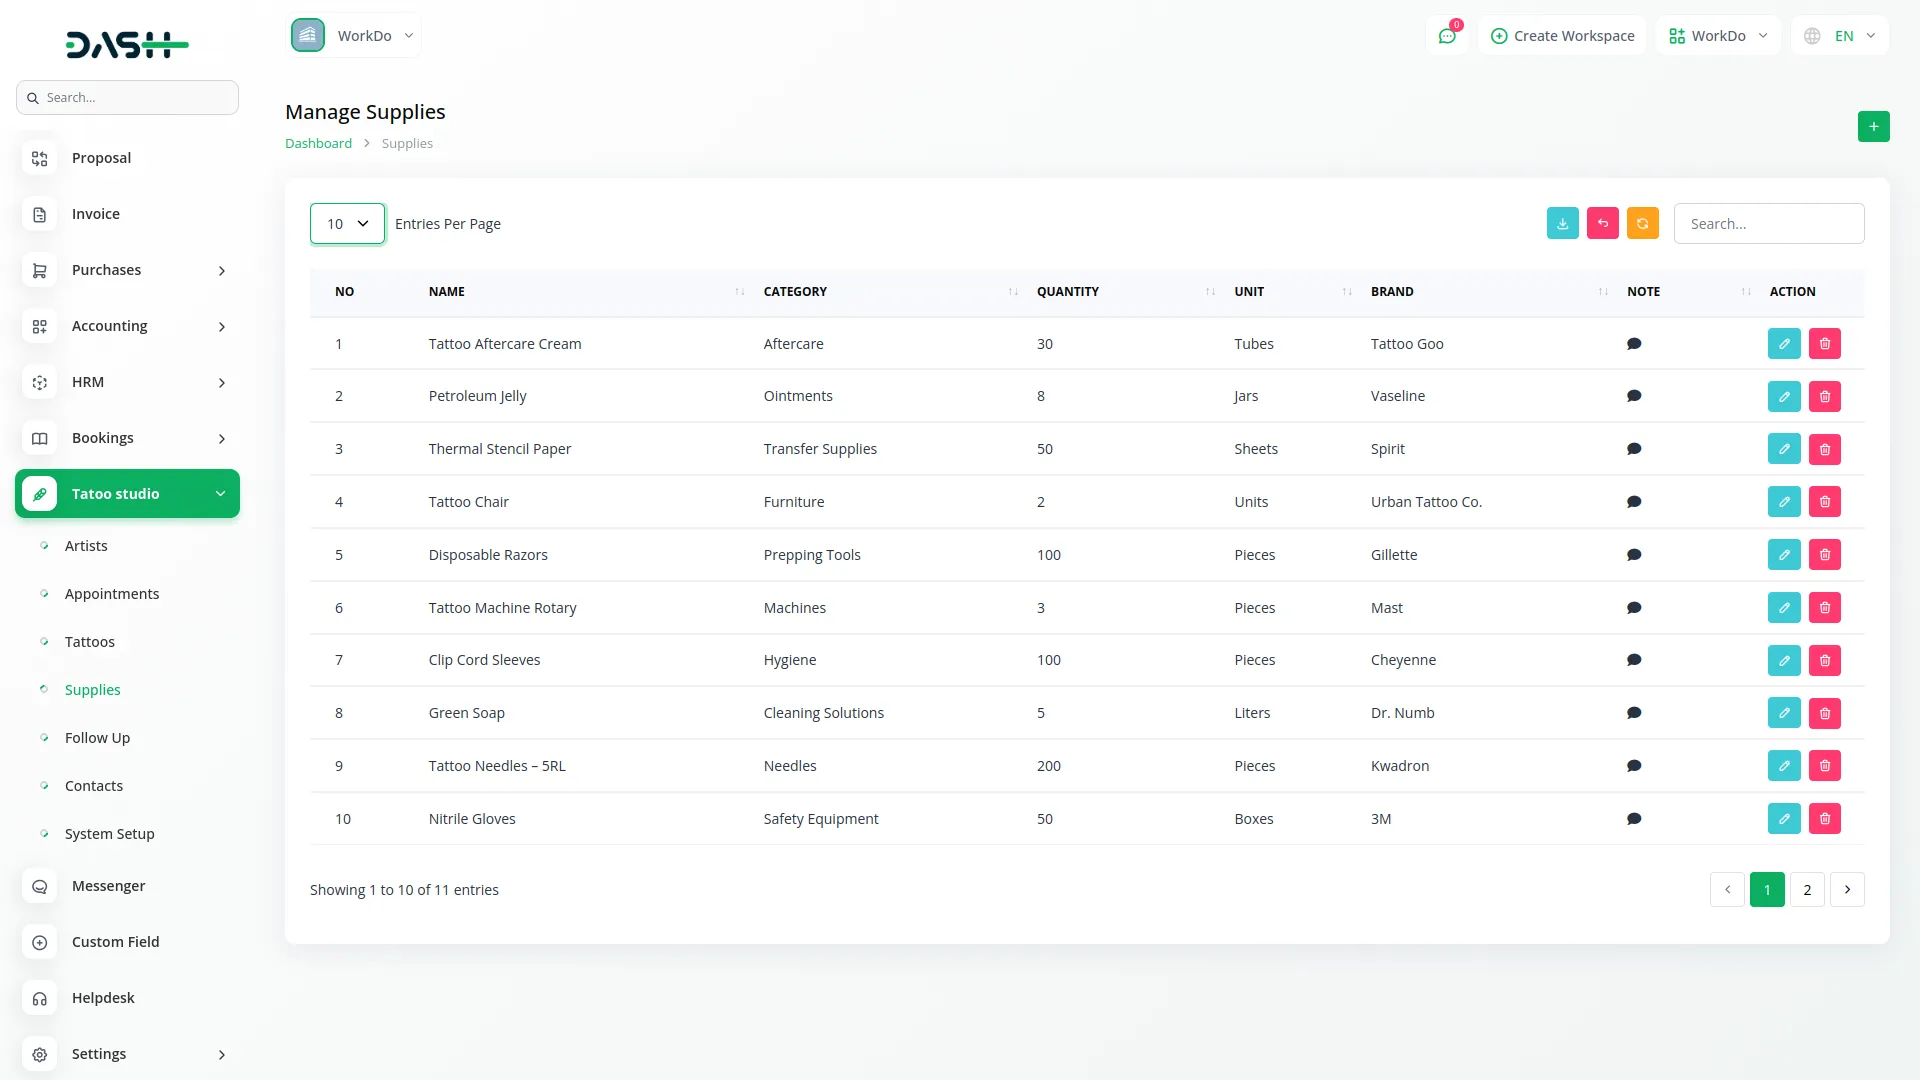
- The list page includes Search, Export, and Add buttons for comprehensive supply management. The table shows columns for No with sequential numbering, Name displaying the supply item name, Category showing the supply category, Quantity indicating current stock levels, Unit showing the measurement unit, Brand displaying the manufacturer, and Note showing any additional information.
- Click the Edit button to modify supply information, or the Delete button to remove supply entries from your inventory.
Follow Up
- To create a new follow-up record, click the “create” button at the top of the follow-up page. Select the appointment ID and corresponding tattoo name from the available options, keeping in mind that you can only create one follow-up record per appointment.
- The customer’s name will automatically populate based on the selected appointment. The follow-up date field will default to today’s date, but you can modify it as needed. Choose the appropriate follow-up type from the available options: Retouch, Consultation, Aftercare Review, or Touch Up.
- Set the status as New, Completed, or In Progress depending on the current state of the follow-up. Add relevant notes that document the follow-up details, customer concerns, or action items.
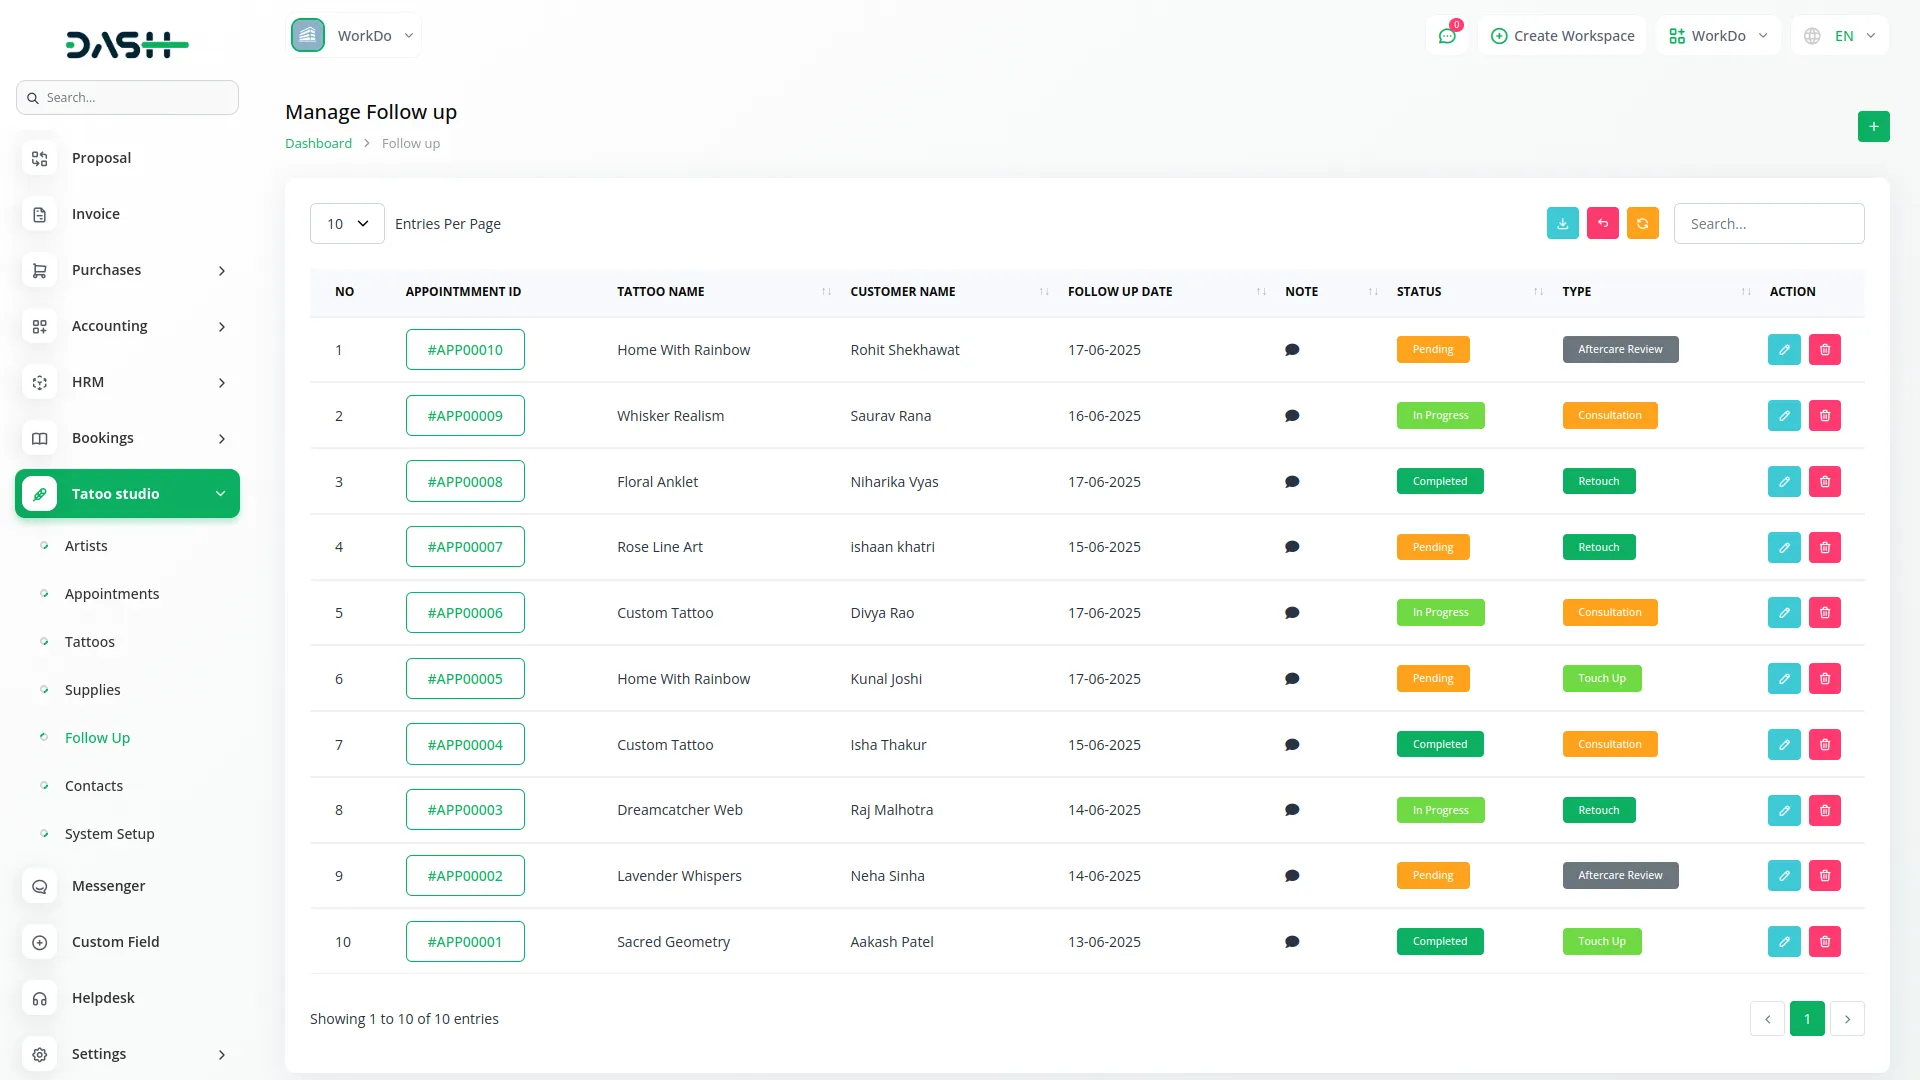
- The list page displays Search, Export, and Add buttons for efficient follow-up management. The table shows columns for No with sequential numbering, Appointment ID which displays appointment data when clicked, Tattoo Name showing the related tattoo, Customer Name displaying the client’s name, Follow Up Date showing when the follow-up is scheduled, Note displaying any recorded information, Status indicating the current follow-up state, and Type showing the follow-up category.
- In the actions column, you can click Edit to modify follow-up information or Delete to remove follow-up entries from the system.
Contacts
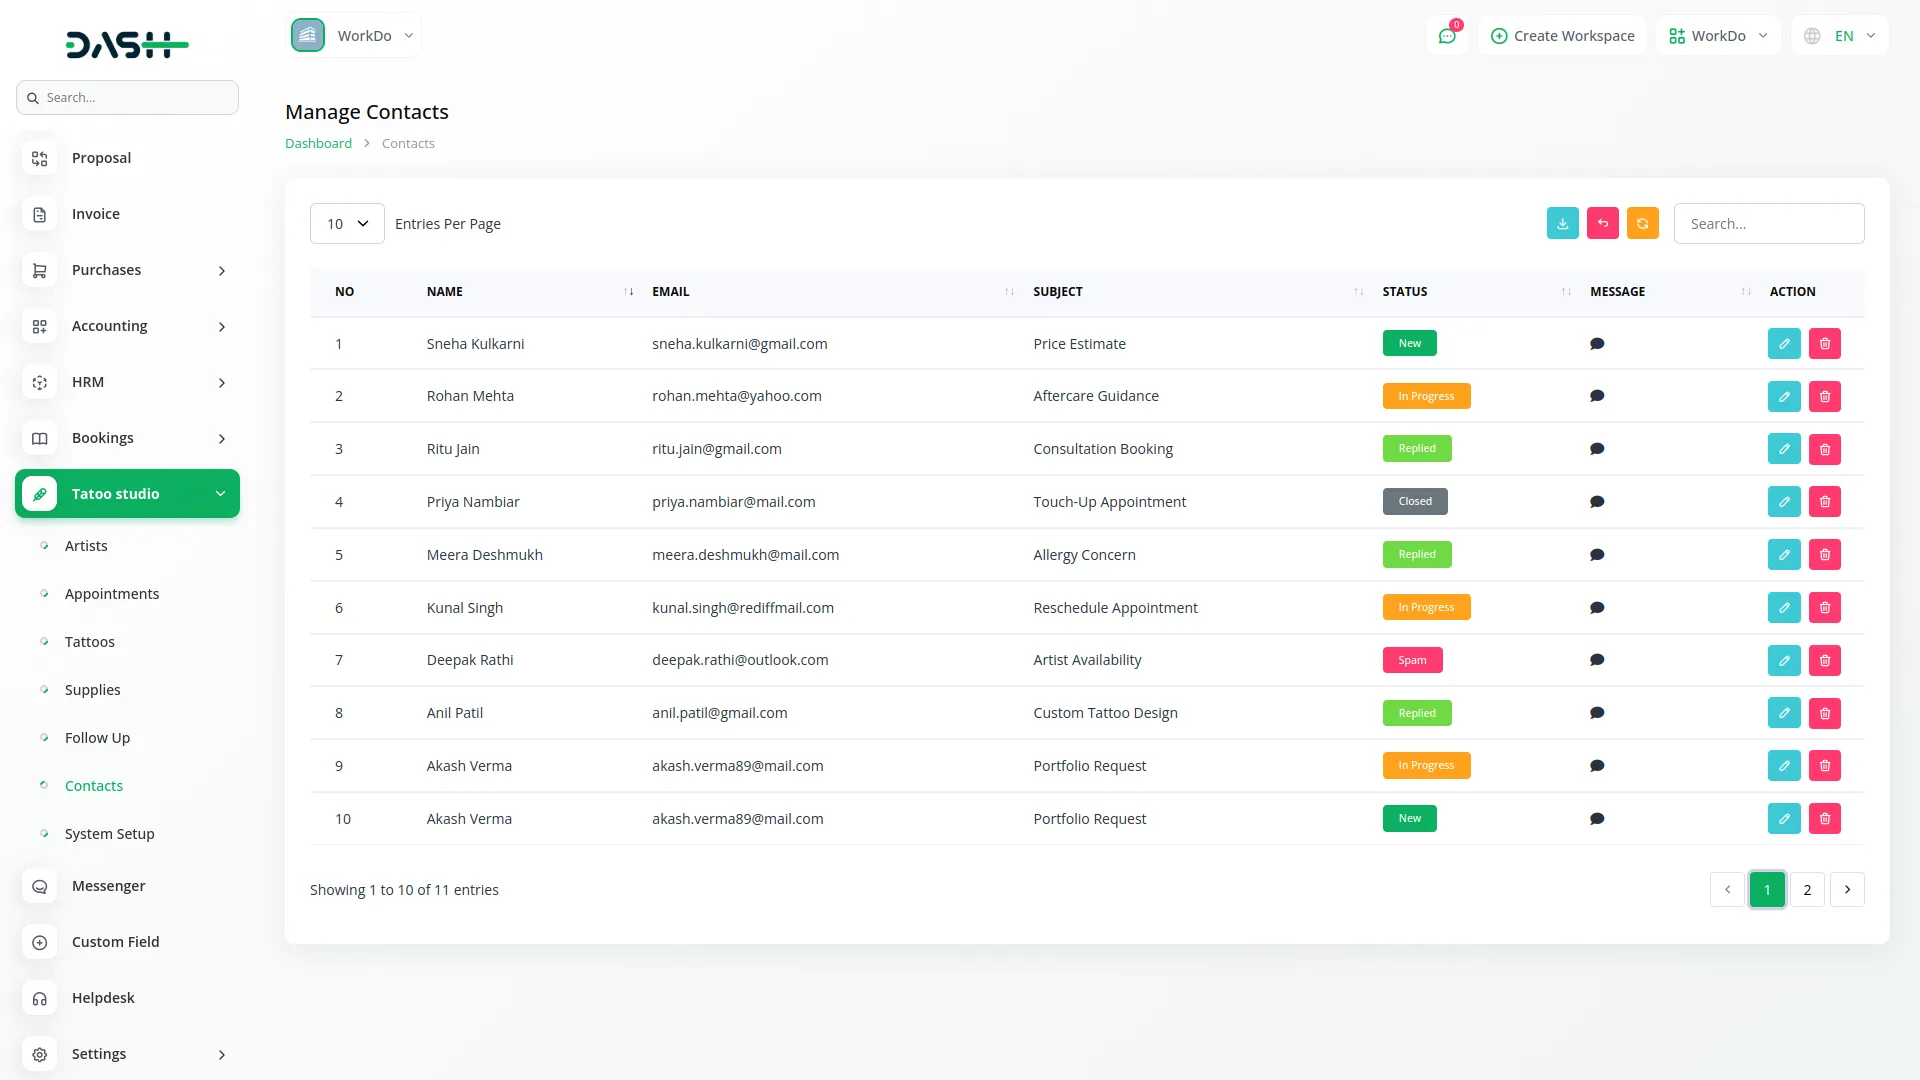
- The contacts section displays all contact us submissions that customers have sent through your website contact form. This allows you to manage all customer inquiries and communication requests in one centralized location.
- The list page includes Search, Export, and Add buttons for comprehensive contact management. The table displays columns for No with sequential numbering, Name showing the customer’s name, Email displaying their email address, Subject showing the inquiry topic, Status indicating whether the contact is New, In Progress, Replied, Closed, or marked as Spam, and Message displaying the customer’s inquiry or comment.
- In the actions column, Edit to modify contact information and status, or Delete to remove contact entries from the system.
Tattoo Studio Website
Important Note: Only the sections set through System Setup will be displayed on the website. Please ensure the desired sections are properly configured.
Favicon & Header
This section includes the small icon shown on the browser tab (favicon) and the main navigation header seen at the top of every page. The header displays the studio logo and a menu linking to key sections like Home, Services, Gallery, Testimonials, Contact, and Book Now.
- Go to System Setup → Brand Setting to upload the favicon and studio logo.
- The menu items are auto-linked to their respective page sections. No manual configuration is needed for these links.
- The logo file is retrieved dynamically and shown across all pages.
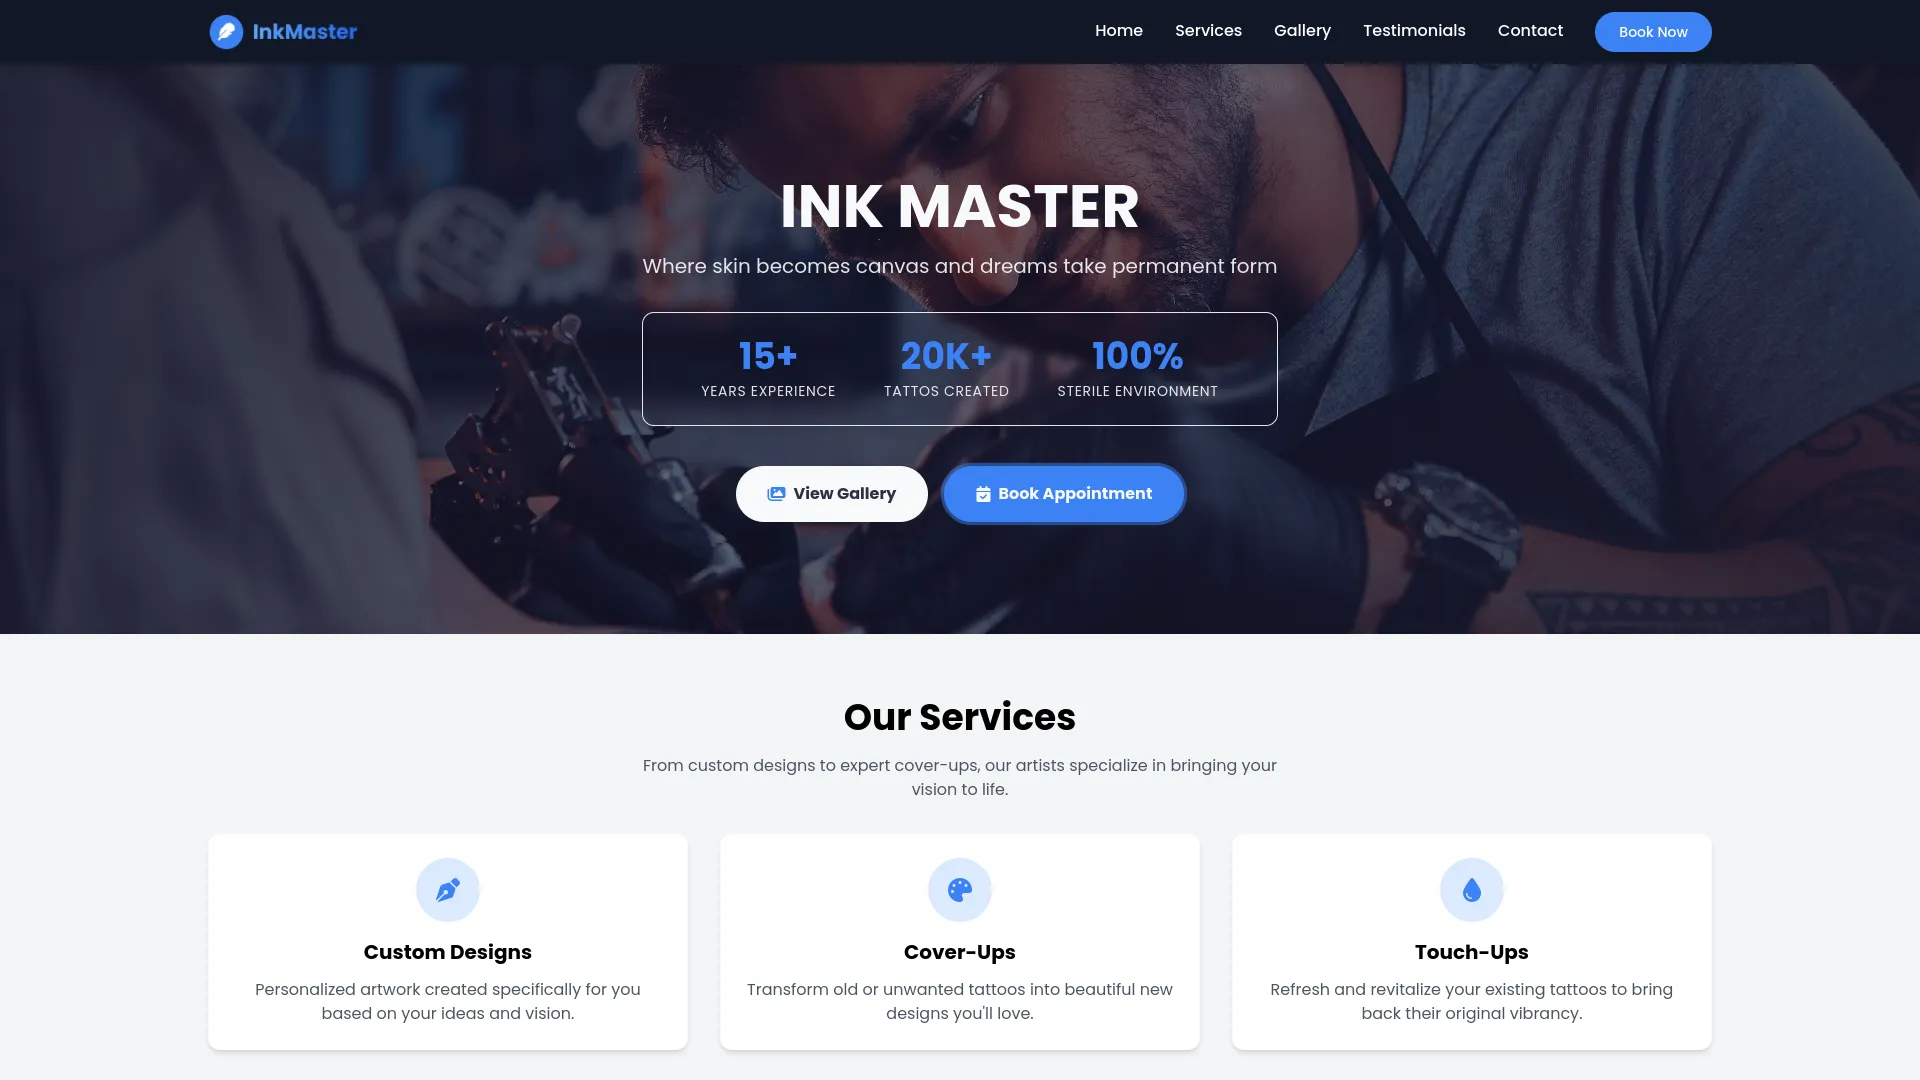
Banner Section
This is the top visual section of the homepage, usually showing a large image or background with a title, subtitle, and a call-to-action button. It introduces visitors to the studio and encourages interaction.
- Go to System Setup → Banner Section.
- You can set the following values:
- Banner Title, Subtitle / Tagline, Banner Button Text, Background Image.
- These fields are dynamically displayed on the homepage banner.
- The logo file is retrieved dynamically and shown across all pages.
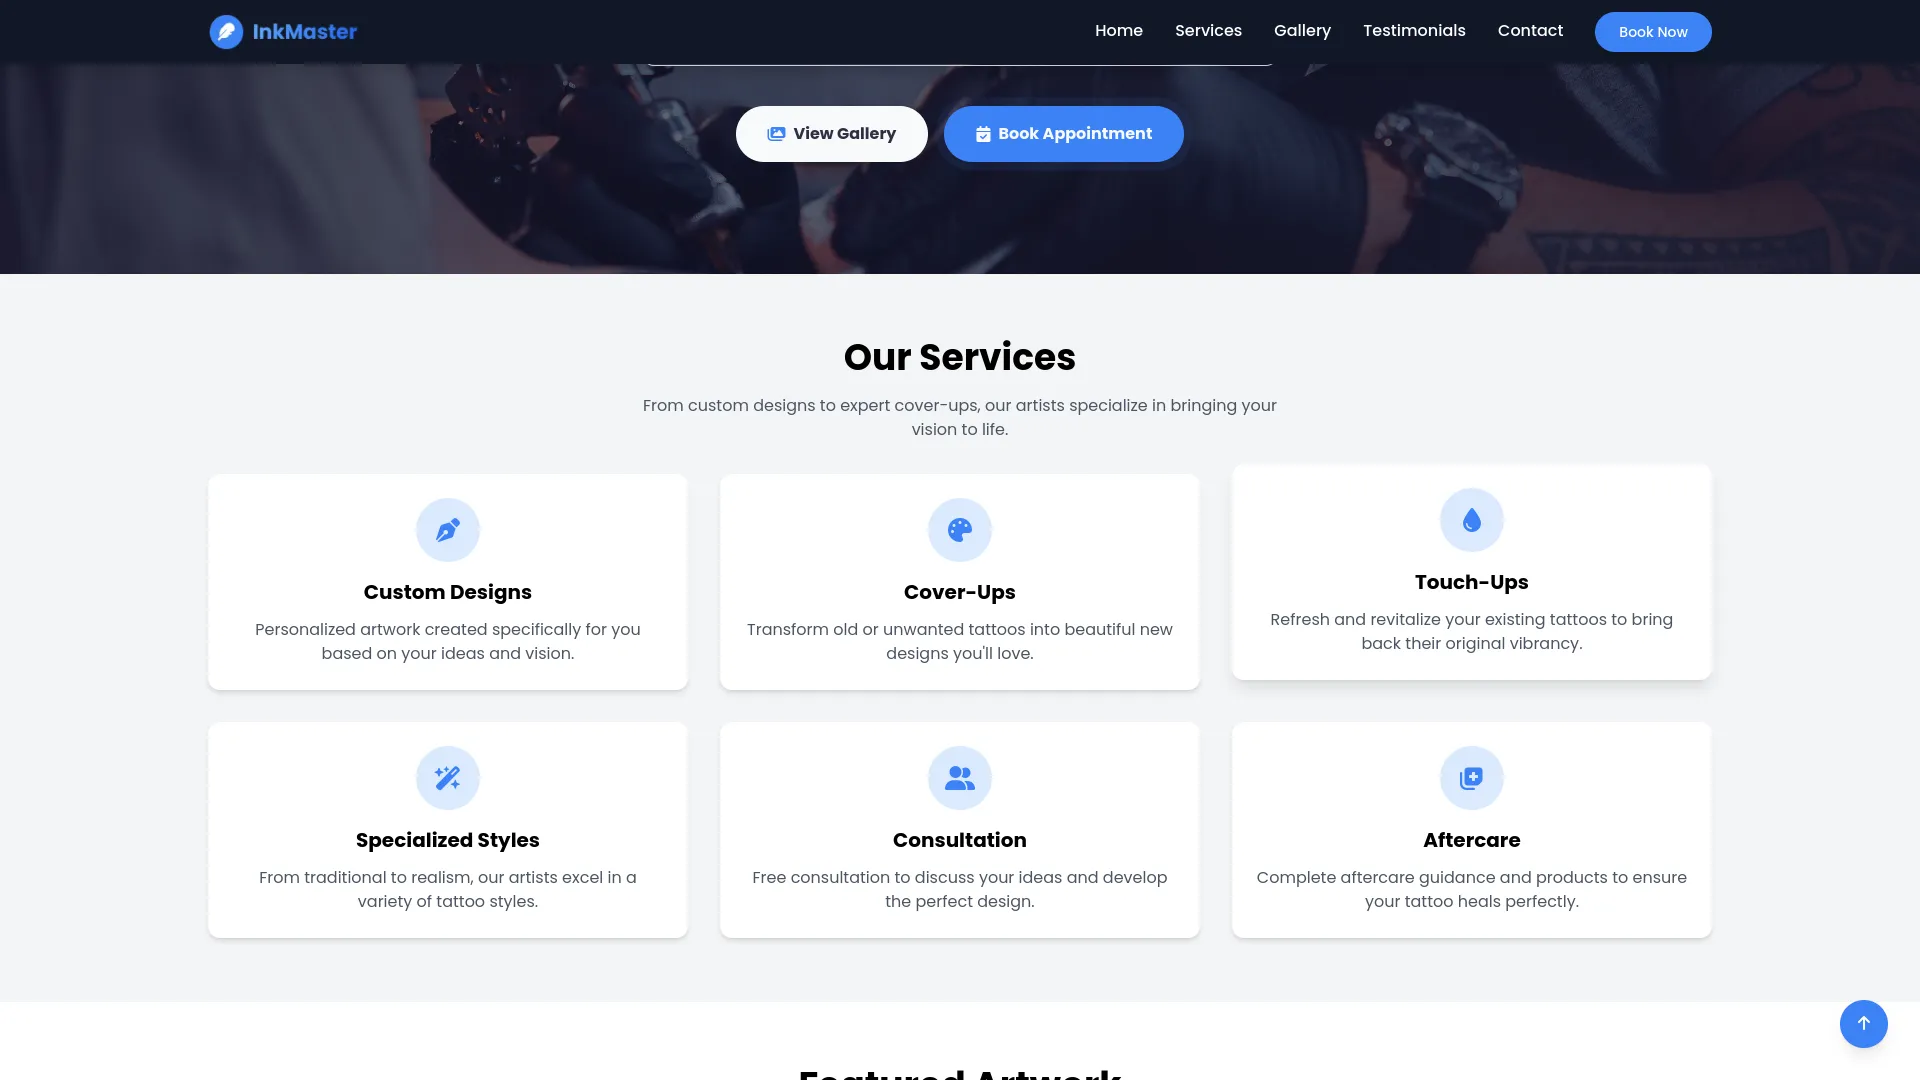
Service Section
This section showcases the types of tattoo services your studio offers. Each service is shown as a card or block with an icon, title, and description. It helps users understand what services are available at a glance.
- Go to System Setup → Services.
- You can add or edit:
- Service Title, Icon (visual identifier), Description.
- These fields are dynamically displayed on the homepage banner.
- The frontend dynamically loops through all service records and displays them on the homepage.
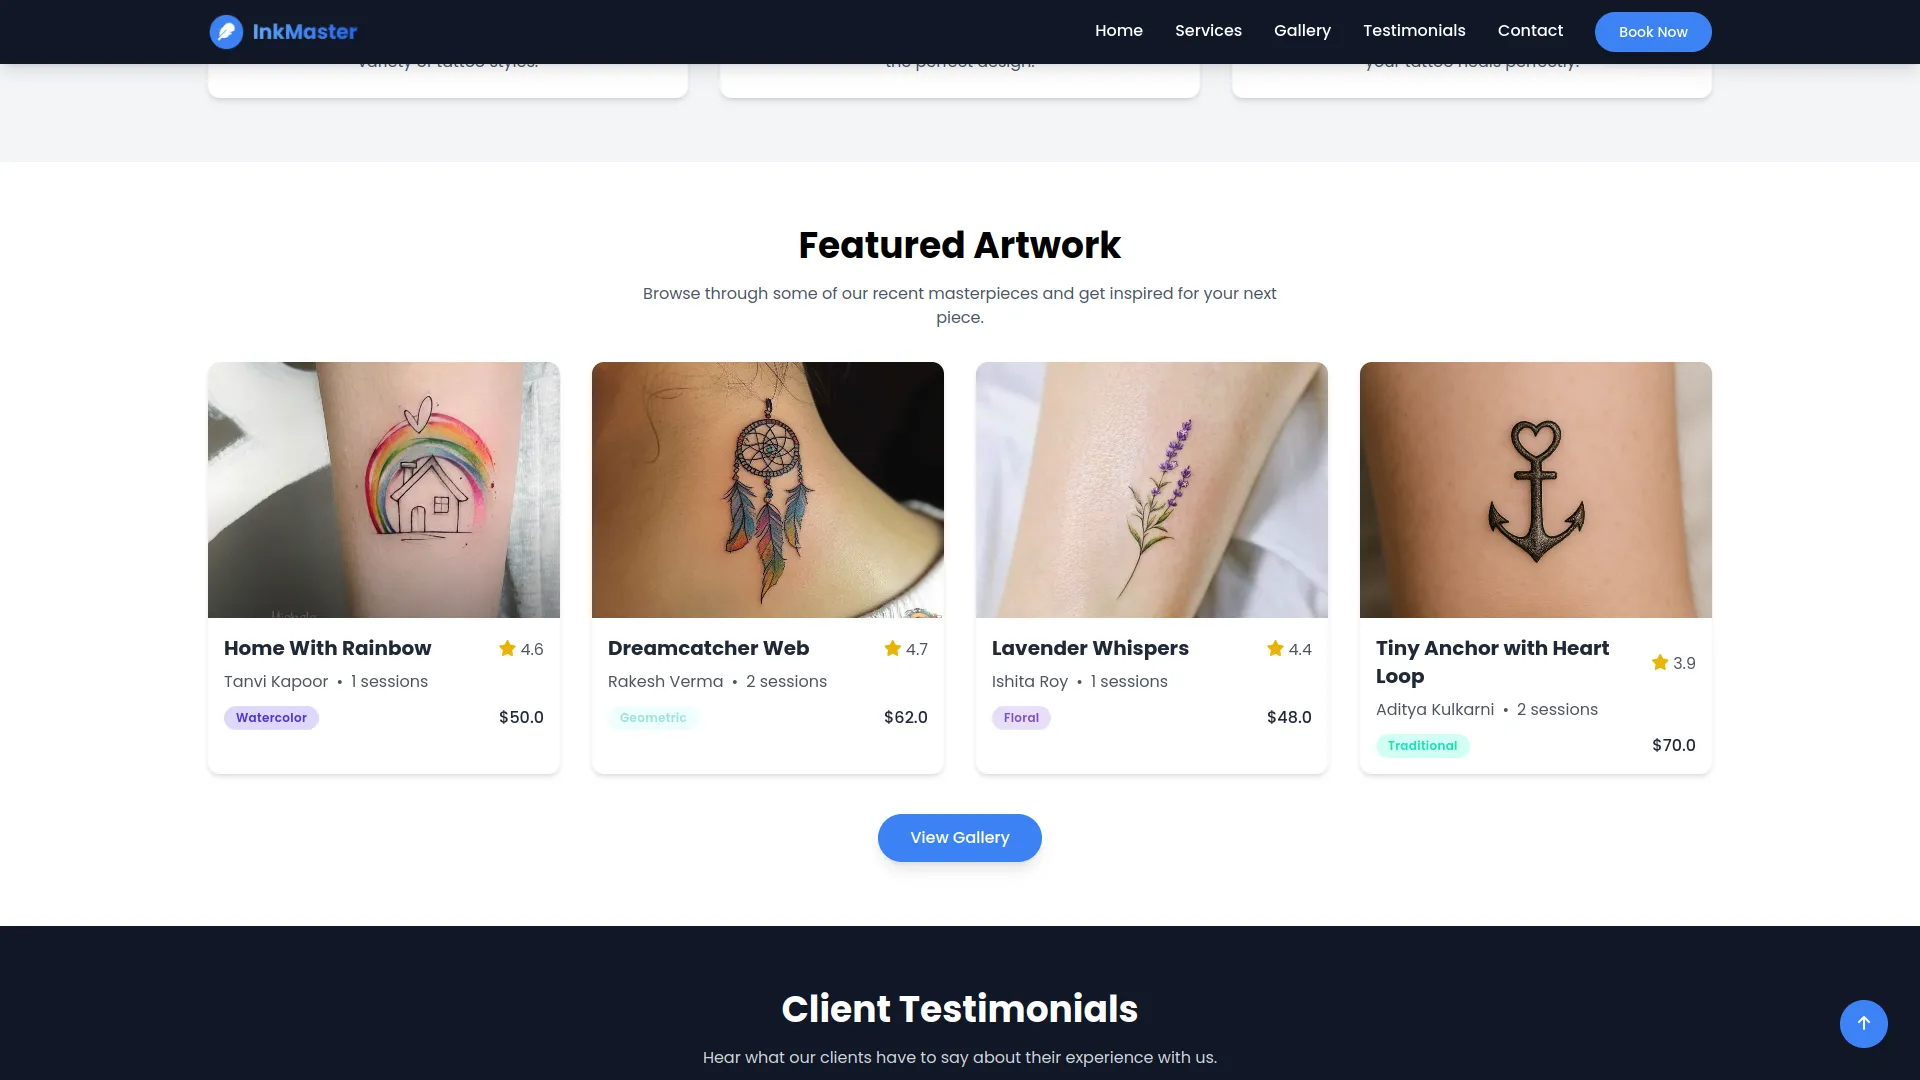
Artwork Section
This section features a short introduction to your tattoo portfolio and a visual preview of your work. It includes a title, description, and button (e.g., “View More”) and showcases artwork pulled from the Tattoos module.
- Title, description, and button text settings come from System Setup → Artworks.
- Tattoo images and descriptions are pulled dynamically from the Tattoos module.
- Ensure tattoos are added in the Tattoos module for this section to populate correctly.
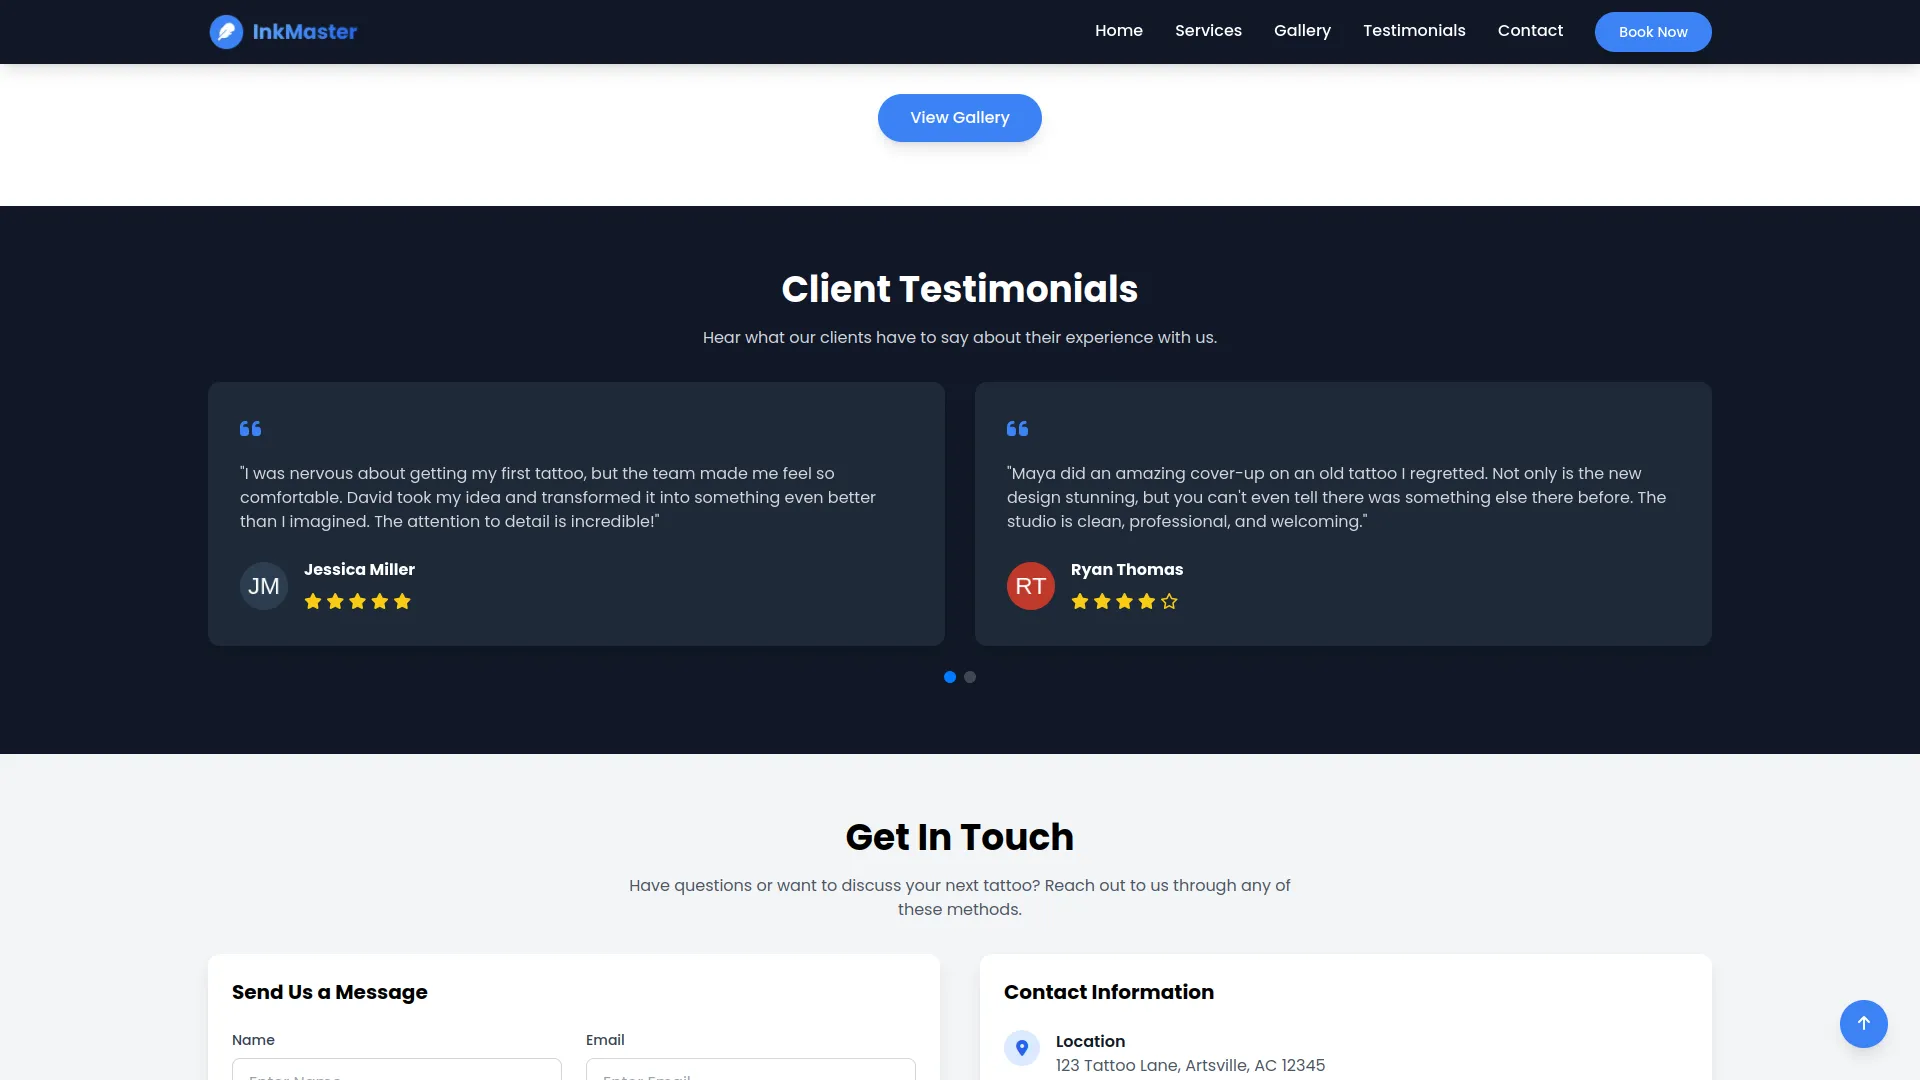
Testimonial Section
This section allows users to send inquiries and see your contact information. It includes a form (Name, Email, Subject, Message) and displays studio contact details and social media icons
- Contact Info (Phone, Address, Email) is managed in System Setup → Contact Info.
- Social media links (Facebook, Instagram, etc.) are pulled from System Setup → Social Links.
- The form sends messages that are stored and managed under the Contacts module.
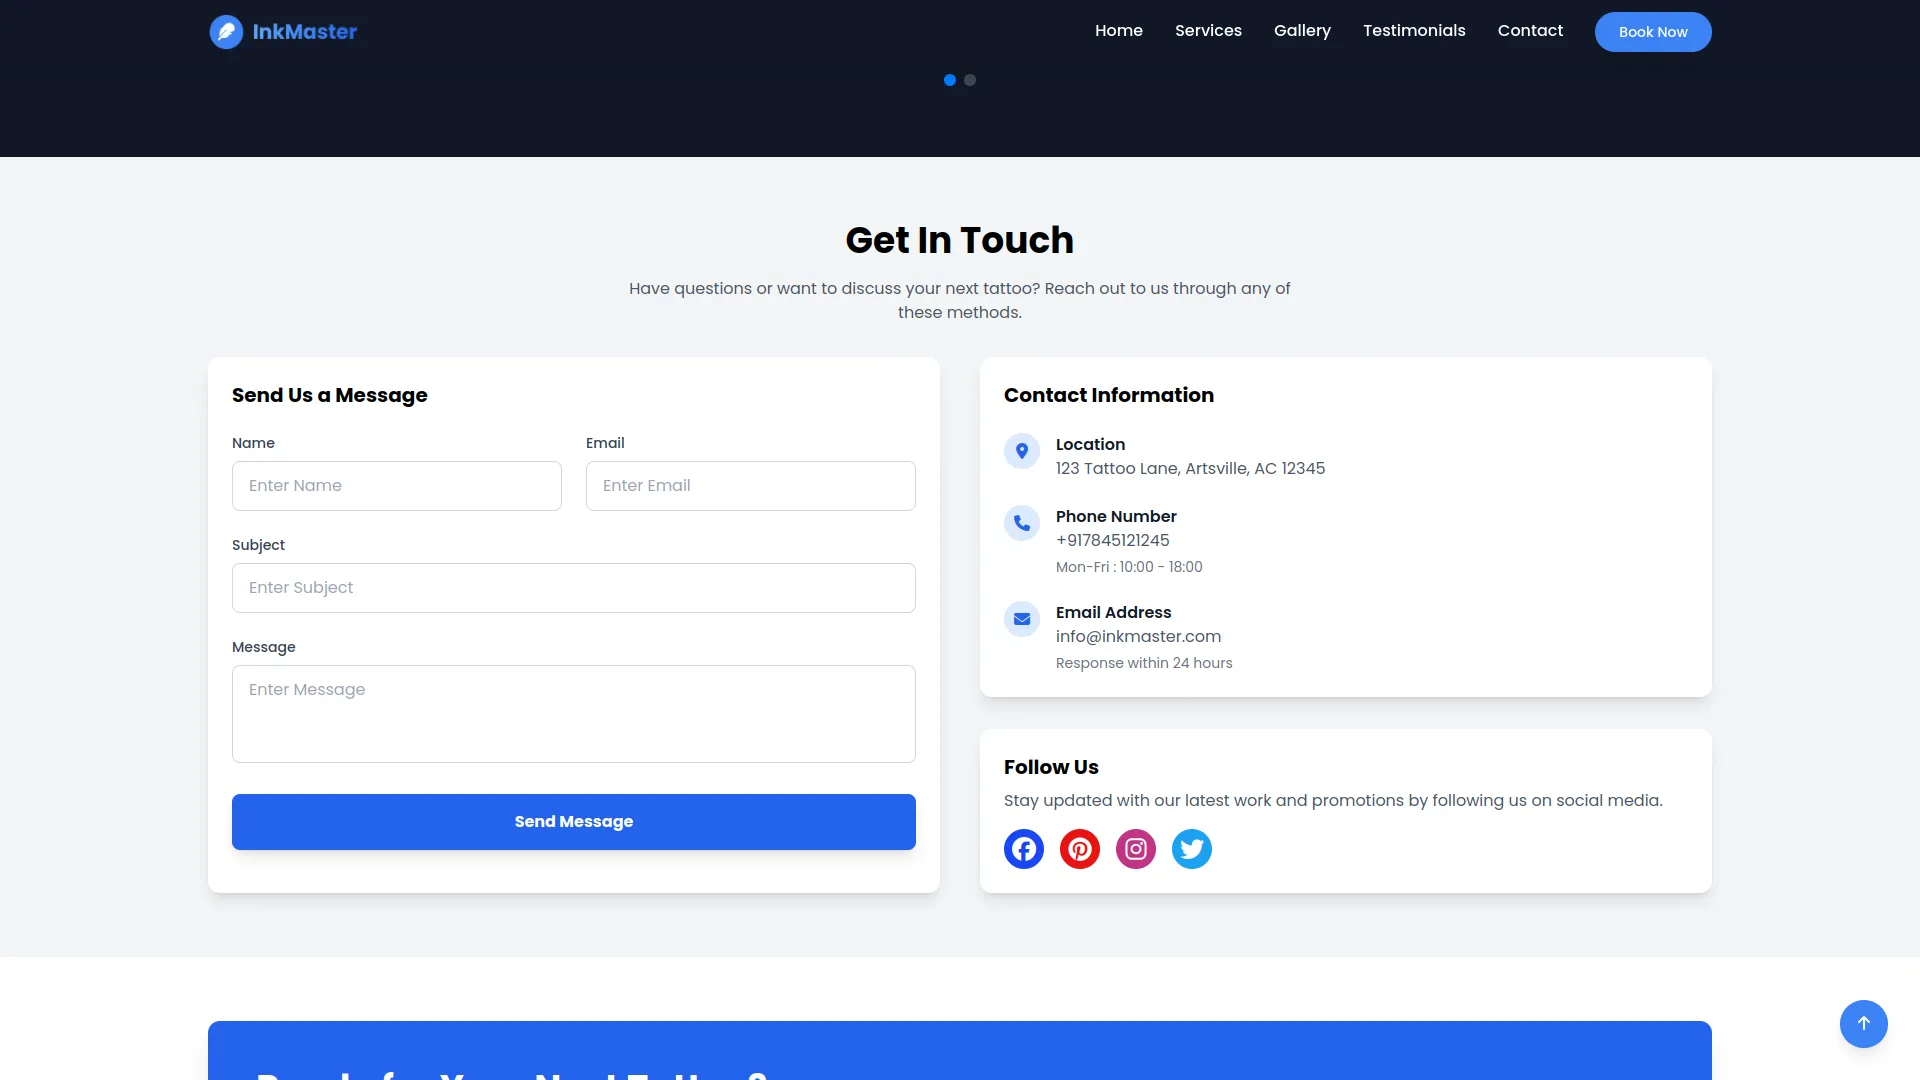
Contact Section
This section allows users to send inquiries and see your contact information. It includes a form (Name, Email, Subject, Message) and displays studio contact details and social media icons
- Contact Info (Phone, Address, Email) is managed in System Setup → Contact Info.
- Social media links (Facebook, Instagram, etc.) are pulled from System Setup → Social Links.
- The form sends messages that are stored and managed under the Contacts module.
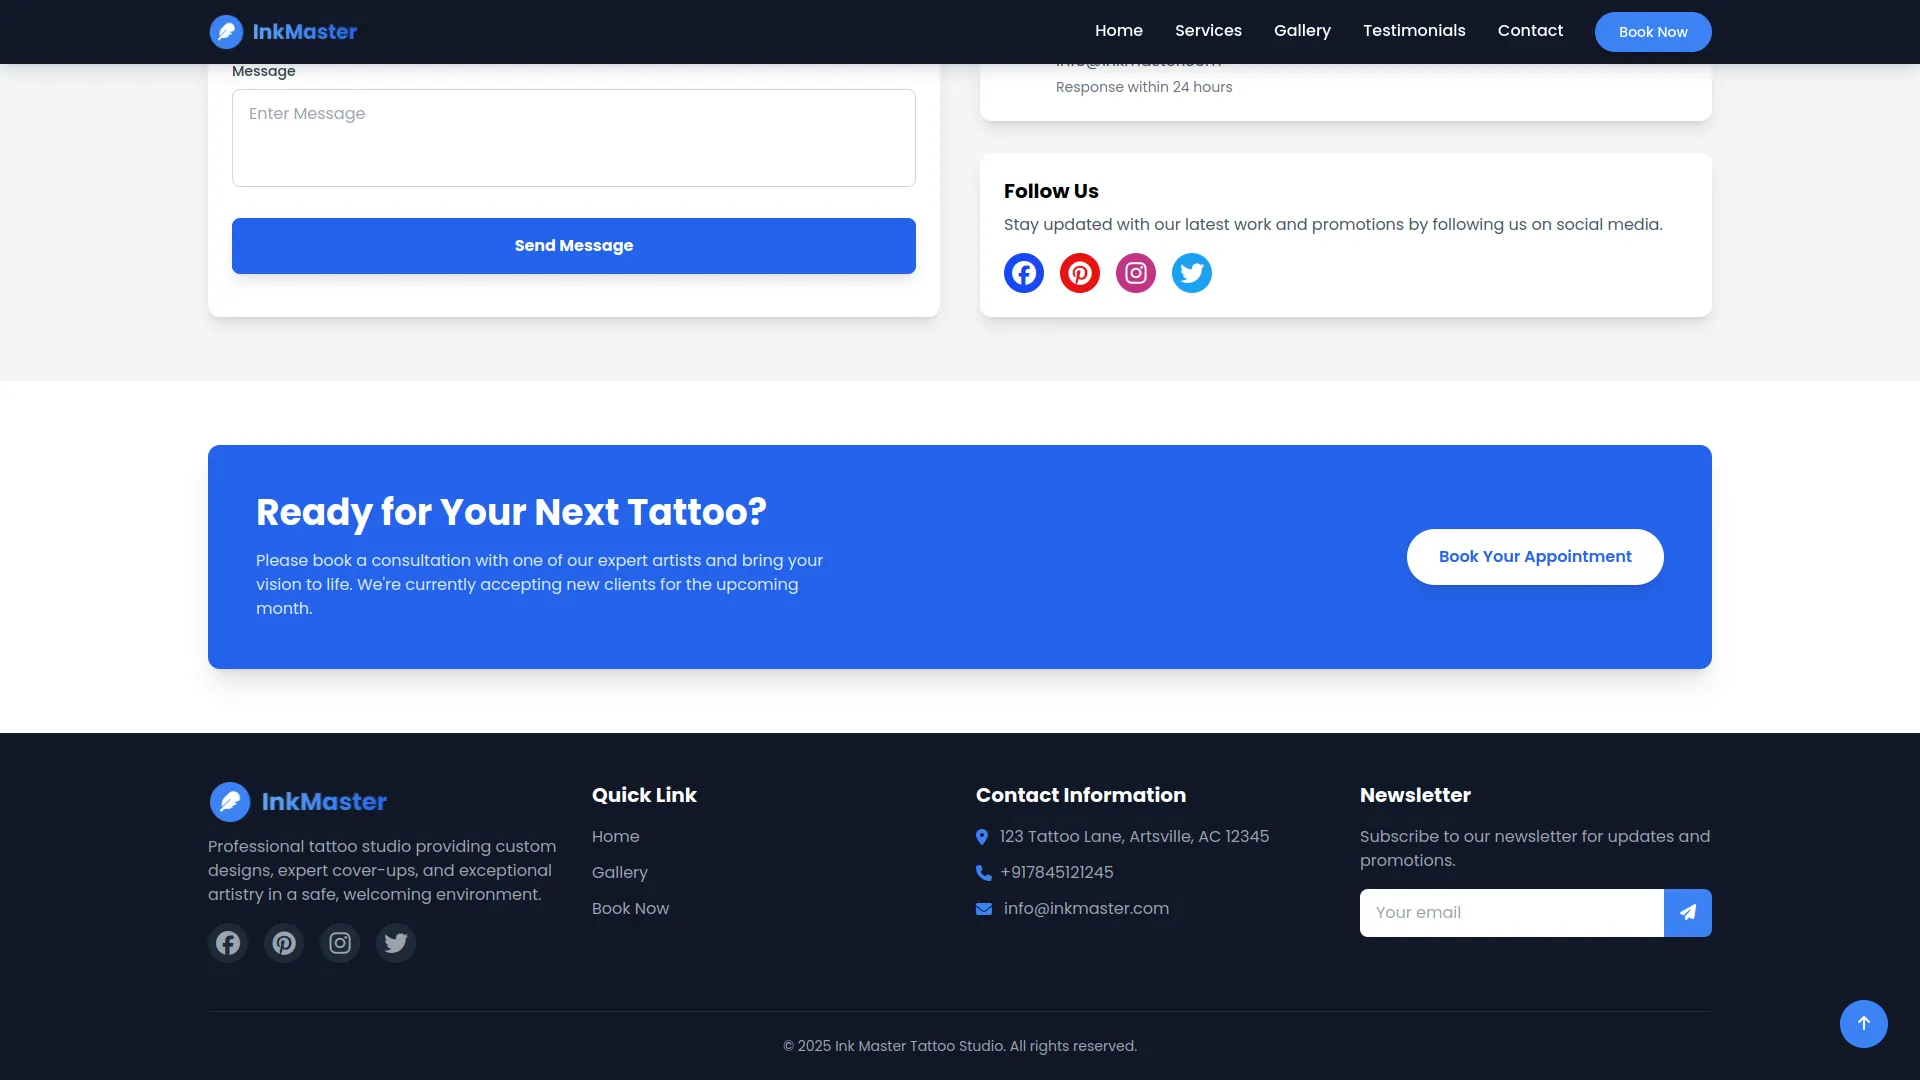
CTA Section (Call to Action)
This is a dedicated area on the homepage to encourage users to take action, such as booking a session or exploring the gallery. It usually contains a short message and a button.
- Go to System Setup → Additional Settings → Section 1: CTA Section for Home Page.
- You can update : CTA Title, CTA Description, CTA Button Text
- These values will render dynamically within the homepage CTA block.
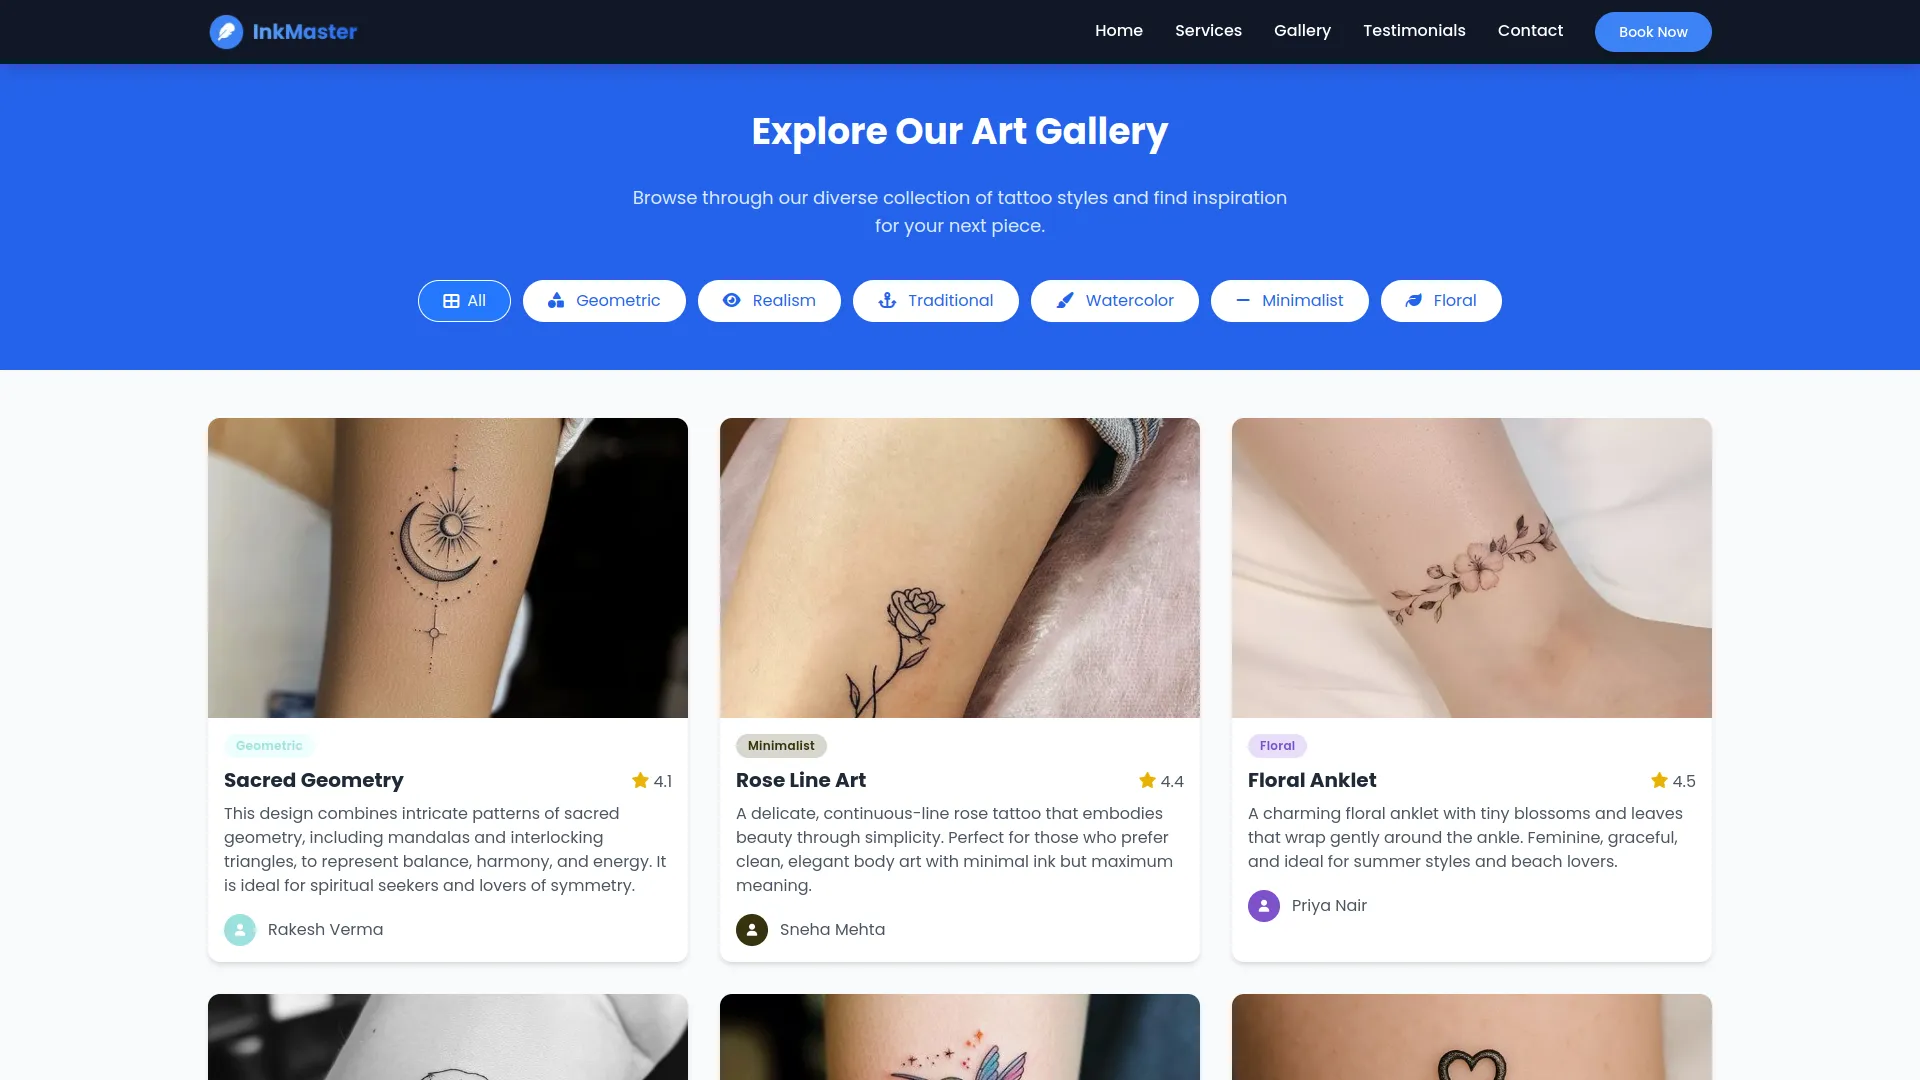
Gallery Page
This full-page view displays categorized tattoos to showcase your studio’s portfolio. Visitors can browse tattoos by style or type, with category filters and image previews.
- Title & Description: System Setup → Additional Settings → Section 2: Setting for Gallery Page
- Tattoo Categories: System Setup → Tattoo Category
- Tattoo Images & Info: Automatically pulled from the Tattoos module
- Each tattoo is displayed along with its assigned category, pricing, and details.
Book Now Page (Appointment Form)
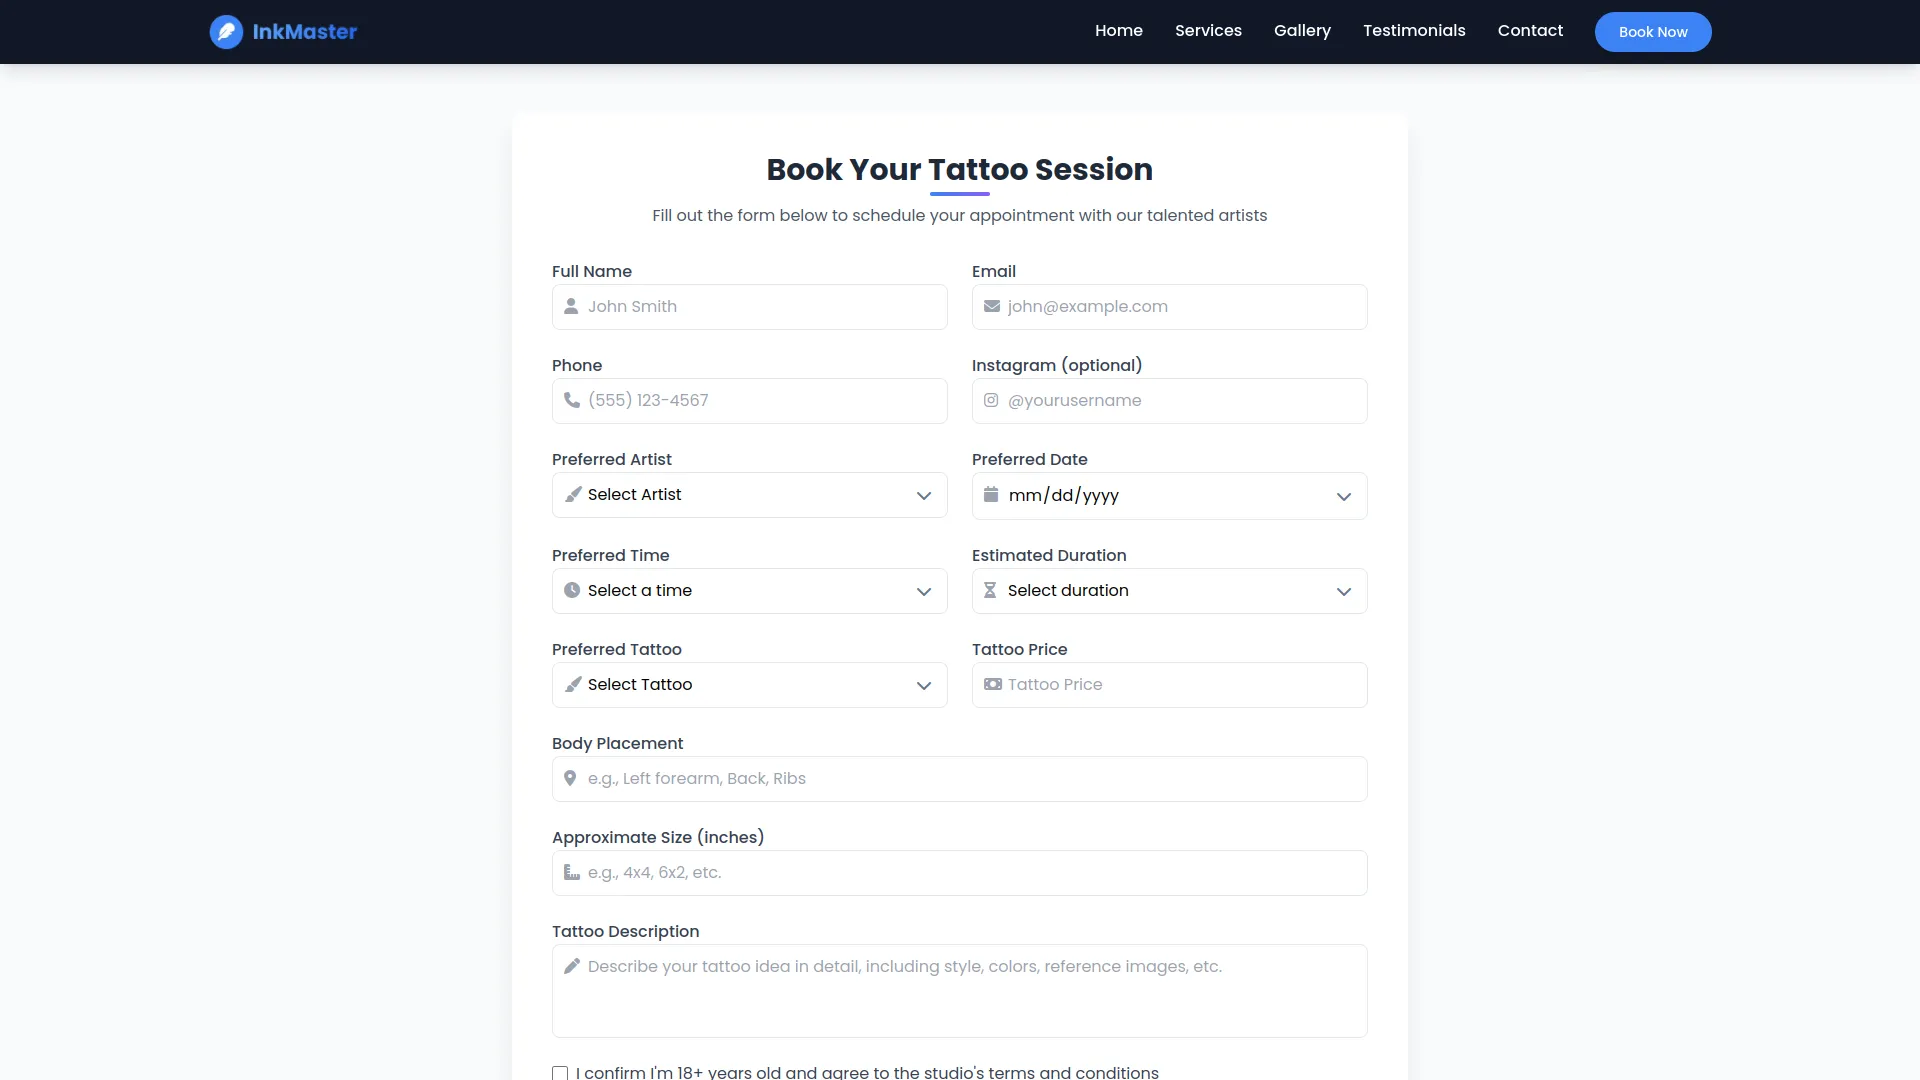
This page contains a detailed appointment booking form. Visitors can submit their preferences for artist, date, tattoo type, placement, and more.
- Page Title & Description: System Setup → Additional Settings → Section 3: Setting for Booking Page
- Time slots depend on System Setup → Contact Info → Open & Close Time
- The tattoo list shown in the “Preferred Tattoo” dropdown is from the Tattoos module
- The artist list in “Preferred Artist” comes from the Artists module
- Fields like Tattoo Price auto-populate based on the selected tattoo
- After form submission, the success message footer shows:
- Contact info (from Section 3 of Booking Page settings)
- Phone Number (from Contact Info)
- Social Media links (from Social Links)
Footer
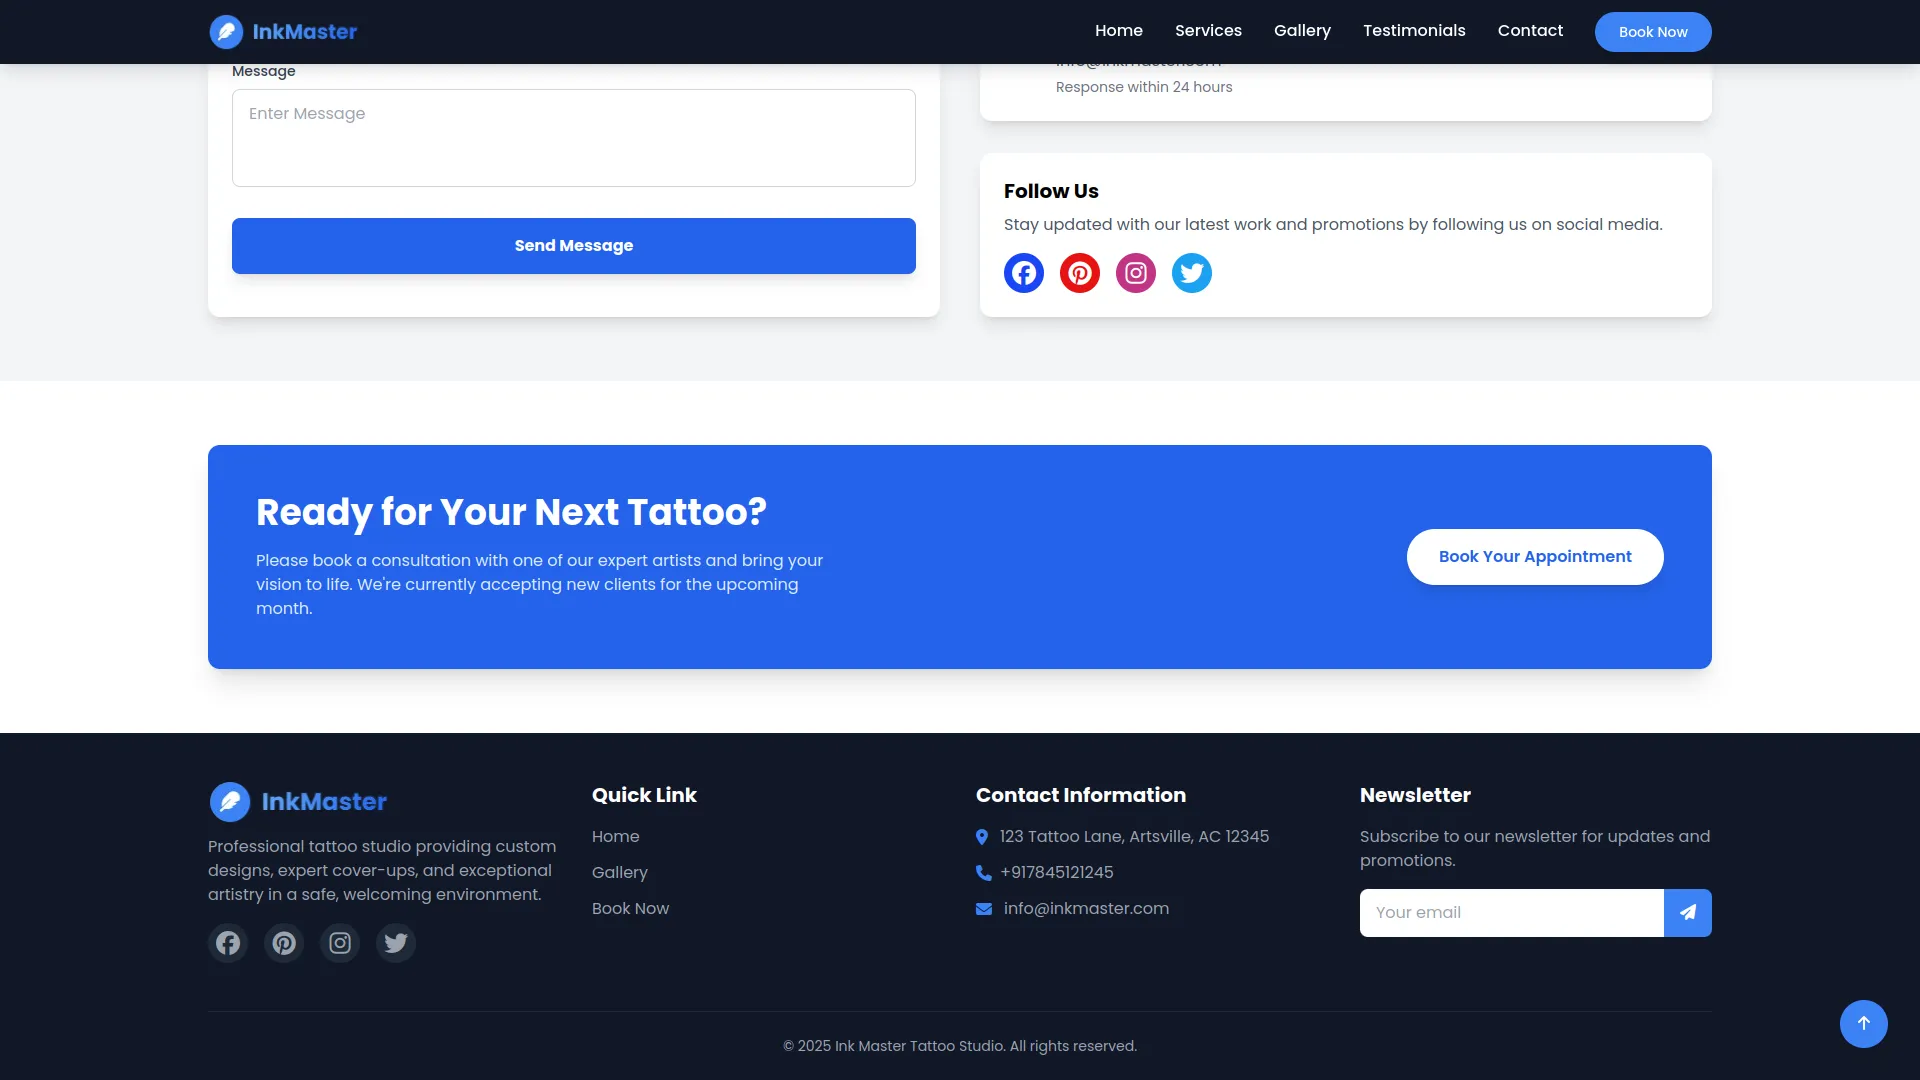
This is the bottom section of all pages, displaying your logo, contact info, quick navigation links, and copyright notice.
- Logo: System Setup → Brand Setting
- Quick Links: System Setup → Quick Links
- Contact Info: System Setup → Contact Info
- Copyright Text: System Setup → Brand Setting
Categories
Related articles
- Internal Knowledge Integration in Dash SaaS
- Contract Template Integration in Dash SaaS
- PayPay Payment Gateway
- Quotation Integration in Dash SaaS
- Hospital Management Integration in Dash SaaS
- Driving School Integration in Dash SaaS
- Shopify Sync Integration in Dash SaaS
- SinchSMS Integration in Detailed Documentation
- Movie & Tv Studio Integration in Dash SaaS
- Custom Field Integration in Dash SaaS
- Work Permit Detailed Documentation
- Marketing Plan Integration in Dash SaaS
Reach Out to Us
Have questions or need assistance? We're here to help! Reach out to our team for support, inquiries, or feedback. Your needs are important to us, and we’re ready to assist you!


Need more help?
If you’re still uncertain or need professional guidance, don’t hesitate to contact us. You can contact us via email or submit a ticket with a description of your issue. Our team of experts is always available to help you with any questions. Rest assured that we’ll respond to your inquiry promptly.
Love what you see?
Do you like the quality of our products, themes, and applications, or perhaps the design of our website caught your eye? You can have similarly outstanding designs for your website or apps. Contact us, and we’ll bring your ideas to life.

