
Boutique & Designer Studio – WorkDo Dash SaaS Add-On Guide
Learn how to manage boutique orders, designs, tailoring, and customers in WorkDo Dash SaaS.
Introduction
The Boutique & Designer Studio Add-On is a complete fashion boutique management solution that gives you full control over your studio, from configuring your brand identity, managing outfit collections, and handling bookings and payments, to tracking damage records, maintaining outfit care, and engaging clients through blogs, inquiries, and newsletters. Everything managed in the backend seamlessly reflects on your live boutique website, giving your clients a smooth and professional experience from browsing to booking.
How To Install the Add-On?
To Set Up the Boutique and Designer Add-On, you can follow this link: Setup Add-On.
How to Use the Boutique & Designer Add-On?
Boutique Dashboard
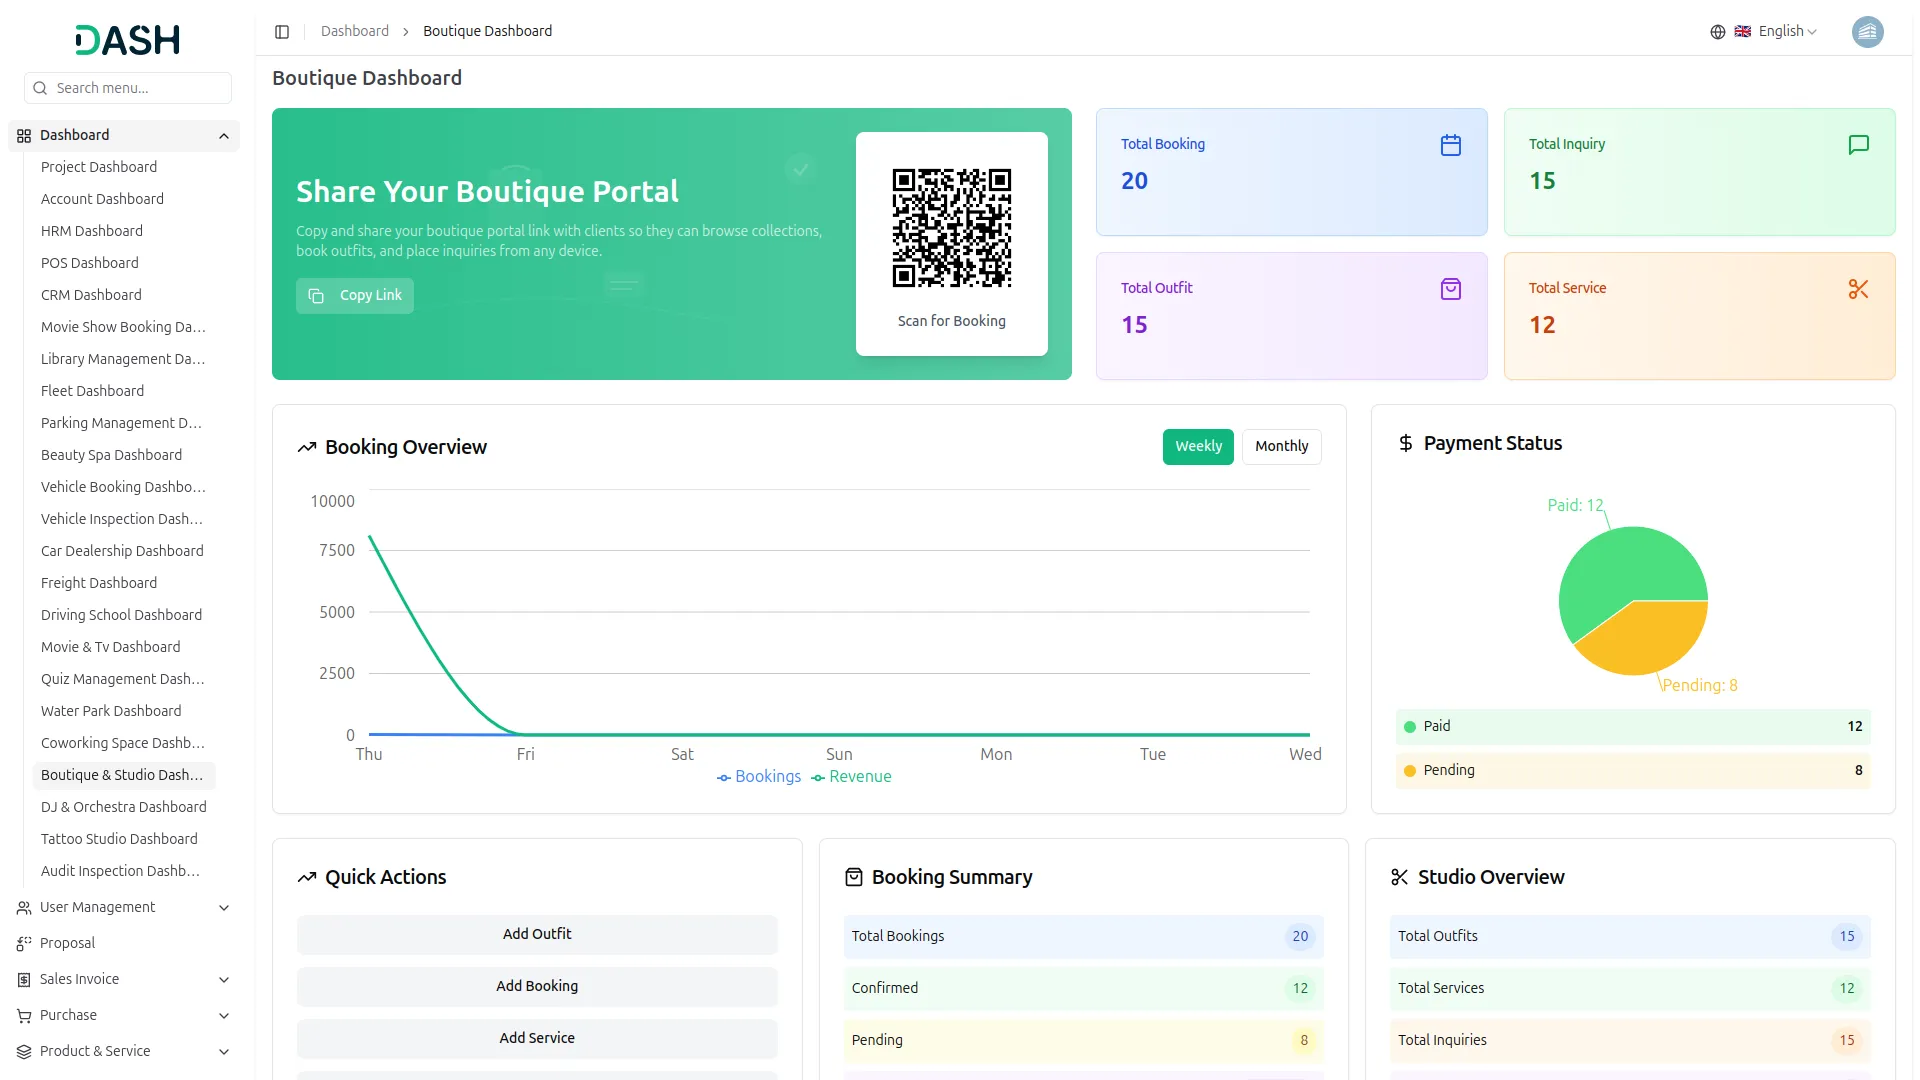
- The dashboard provides a complete overview of your boutique studio’s performance through various visual elements and quick access features.
- At the top, you’ll find a Share Your Boutique Portal card displaying a prompt to copy and share your boutique portal link with clients, along with a QR Code that clients can scan to directly access your portal to browse collections, book outfits, and place inquiries from any device, and a Copy Link button to instantly share your portal link with others.
- The dashboard displays important summary cards showing Total Bookings, Total Inquiries, Total Outfits, and Total Services, giving you instant insights into your boutique’s key metrics at a glance.
- The Booking Overview chart displays your boutique’s booking and revenue activity as a line graph. You can toggle between Weekly and Monthly views to track booking trends and revenue performance over time, helping you identify your busiest and most profitable periods.
- The Payment Status chart displays a donut chart showing the distribution of payments, split between Paid and Pending, giving you an instant visual snapshot of your boutique’s payment collection status.
- The Quick Actions panel provides shortcut buttons, Add Outfit, Add Booking, Add Service, and View Inquiries, allowing you to perform the most common tasks directly from the dashboard without navigating to individual sections.
- The Booking Summary panel gives you a consolidated view of your Total Bookings, Confirmed bookings, Pending bookings, and Total Revenue, so you always have a clear picture of your studio’s current booking health.
- The Studio Overview panel on the right displays a quick count of your Total Outfits, Total Services, Total Inquiries, and Categories, helping you keep track of your studio’s overall inventory and engagement.
- The Recent Bookings table at the bottom lists your latest booking records, with each entry displaying the Booking ID, Customer Name, Outfit Name, Pickup Date, Return Date, Status (Confirmed or Pending), and Amount, giving you a quick view of your most recent rental activity.
System Setup
Brand Settings
- In the Brand Settings section, you will find fields for Site Logo, Favicon, Site Title, Footer Text, and Footer Description. You can upload your logo and favicon using the Browse button. Enter all the required details and click Save Changes.
- In the Dashboard Welcome Card Settings, you will find fields for Card Title, Card Description, Button Text, and Button Icon. Enter all the details and click Save Changes.
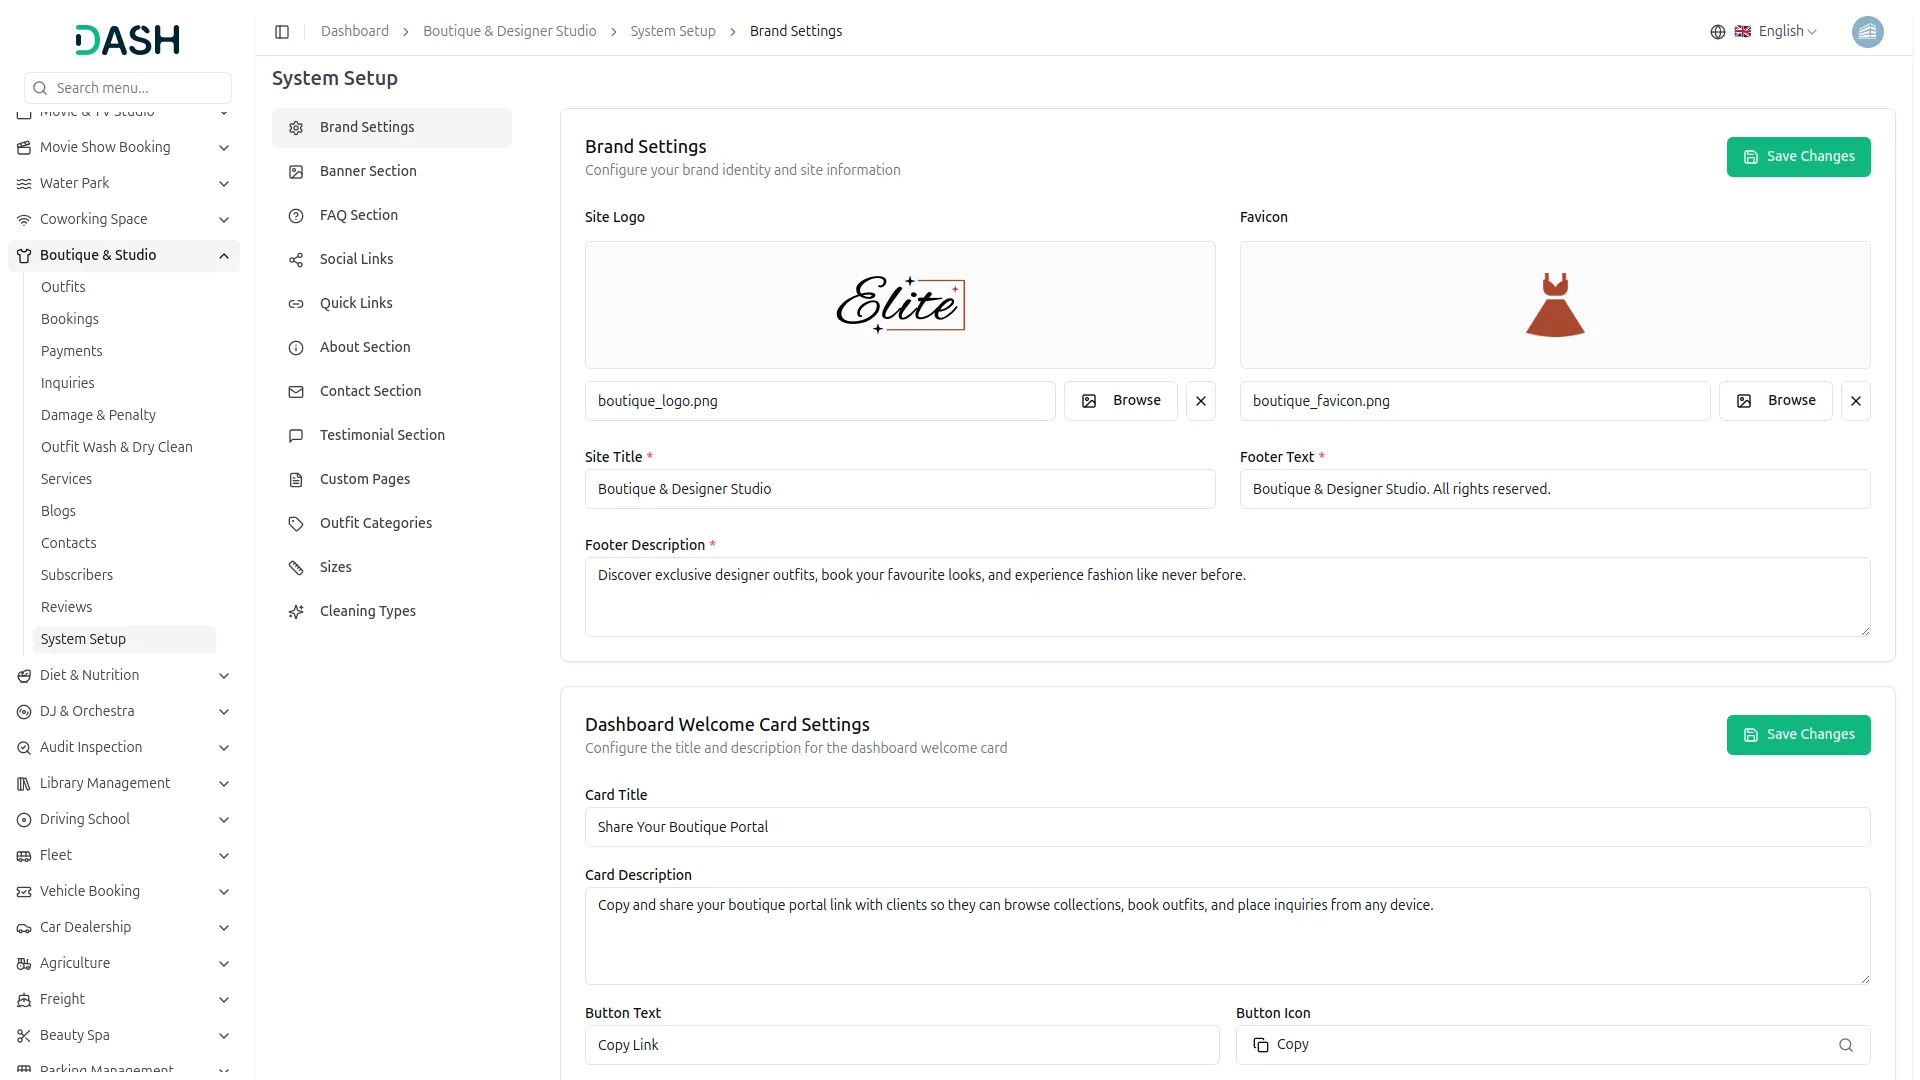
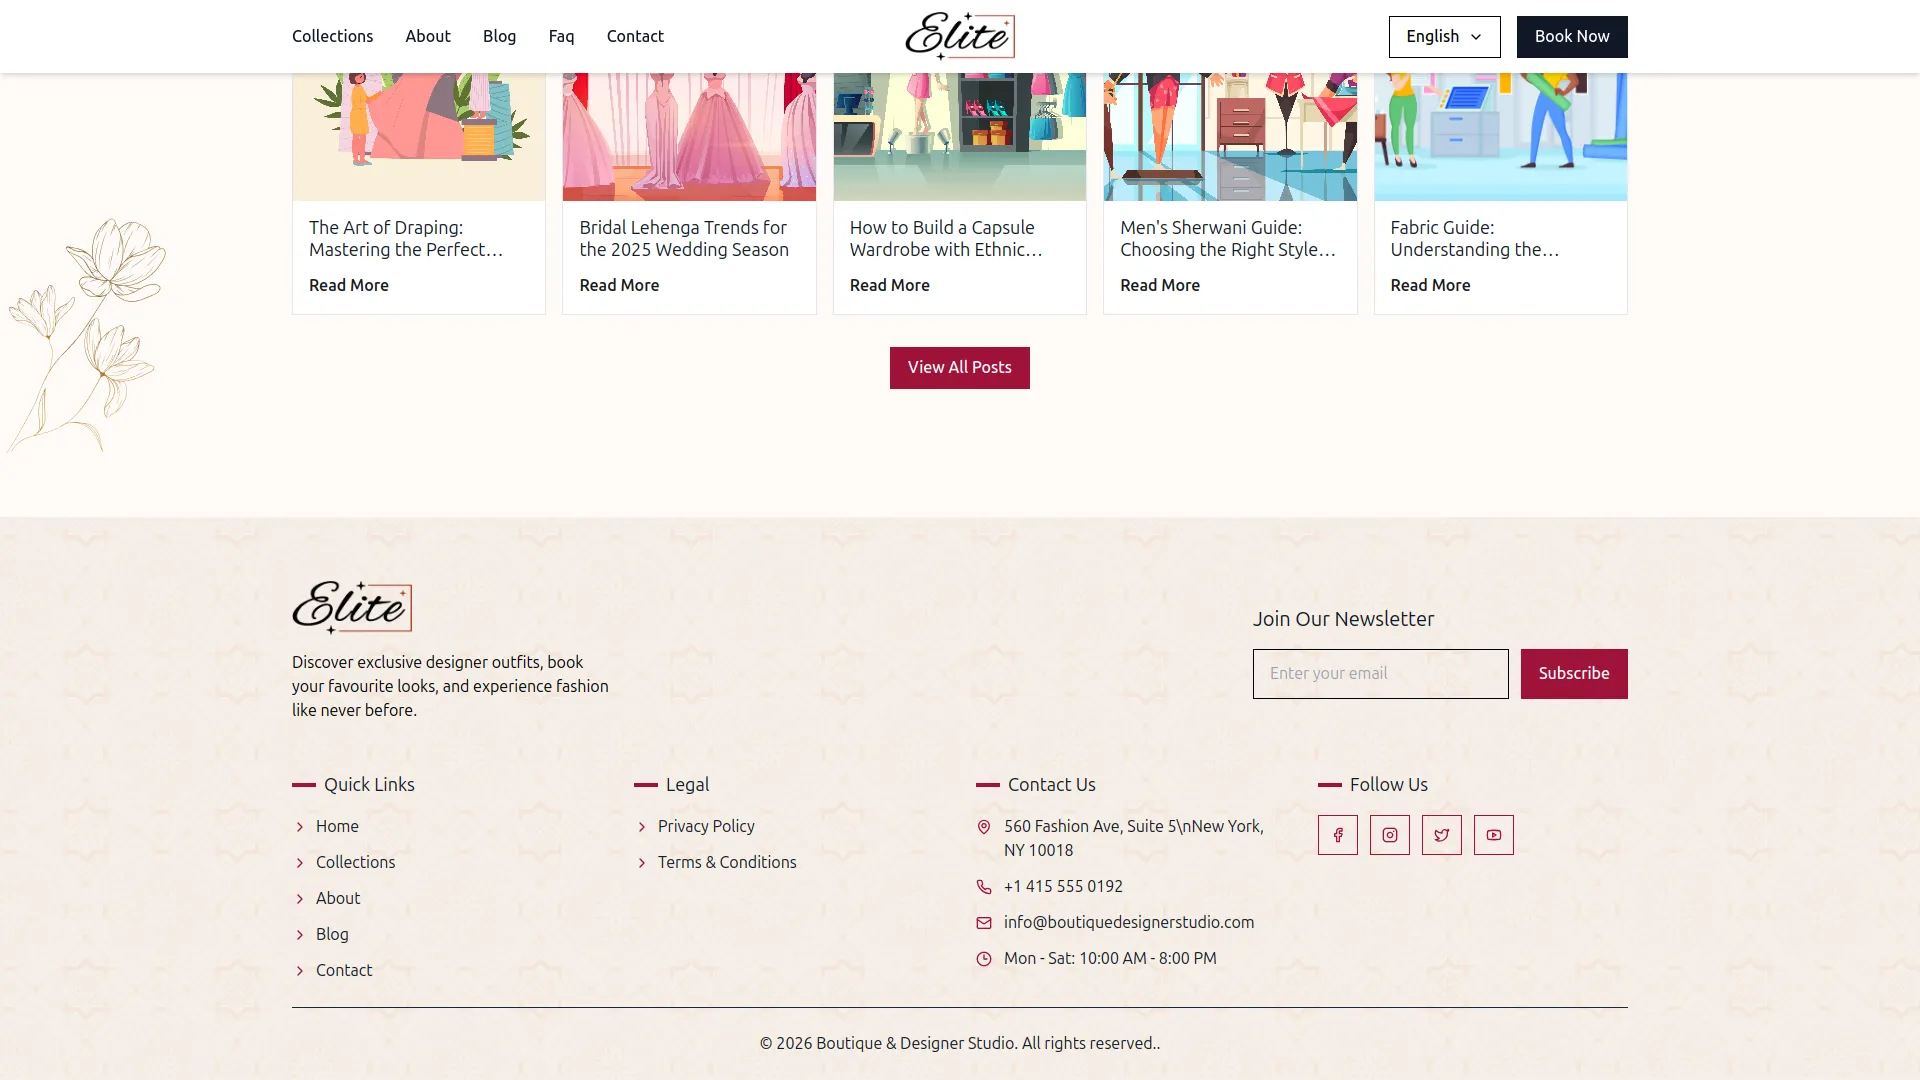
- Once saved, the Site Logo will appear in both the header and footer of your website. The Site Title will represent your boutique’s name across the site, the Footer Text will display as the copyright tagline at the bottom of every page, and the Footer Description will appear as the short introductory text in the footer section.
- The Card Title and Card Description will appear on the welcome card in your backend dashboard, along with the Button that allows you to copy and share your boutique portal link with clients.
Banner Section
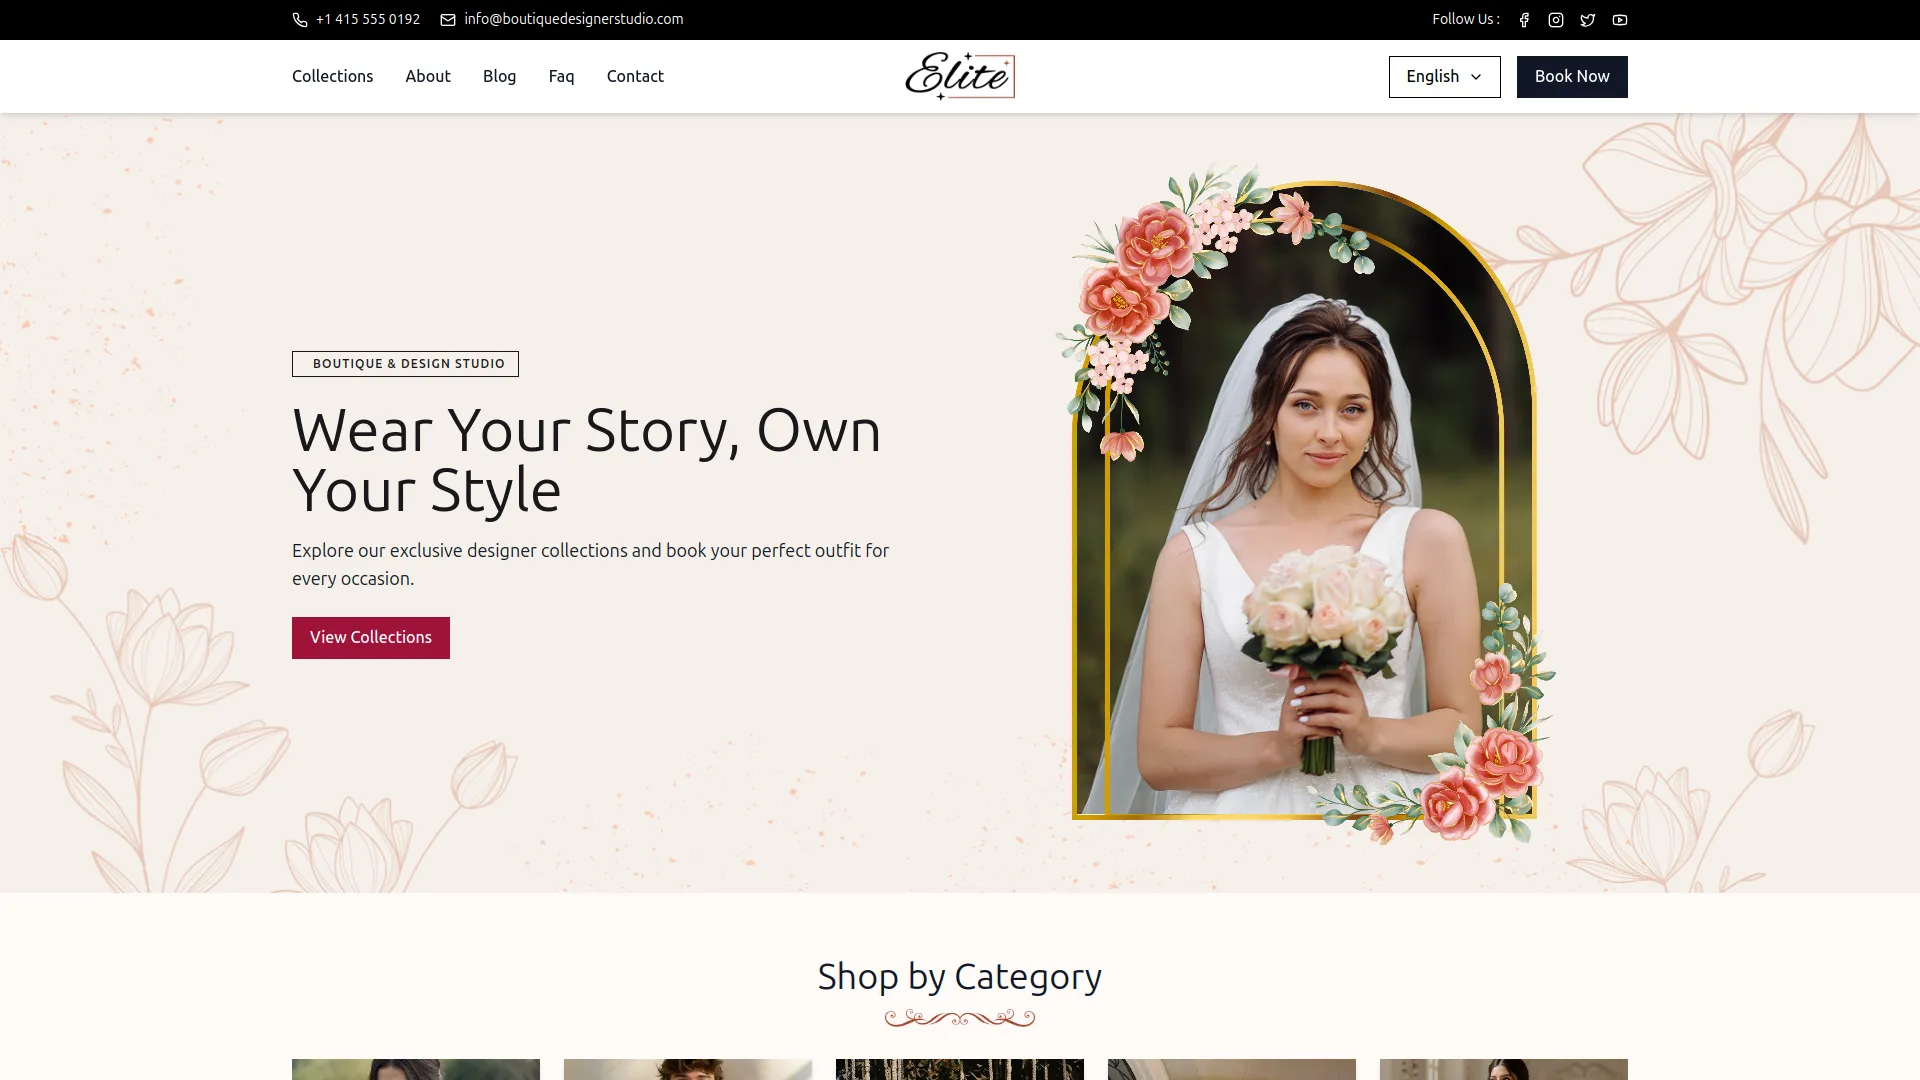
- In the Banner Settings section, you will find fields for Title, Description, and Banner Image. Upload your hero image using the Browse button and enter all the required details. Once done, click Save Changes.
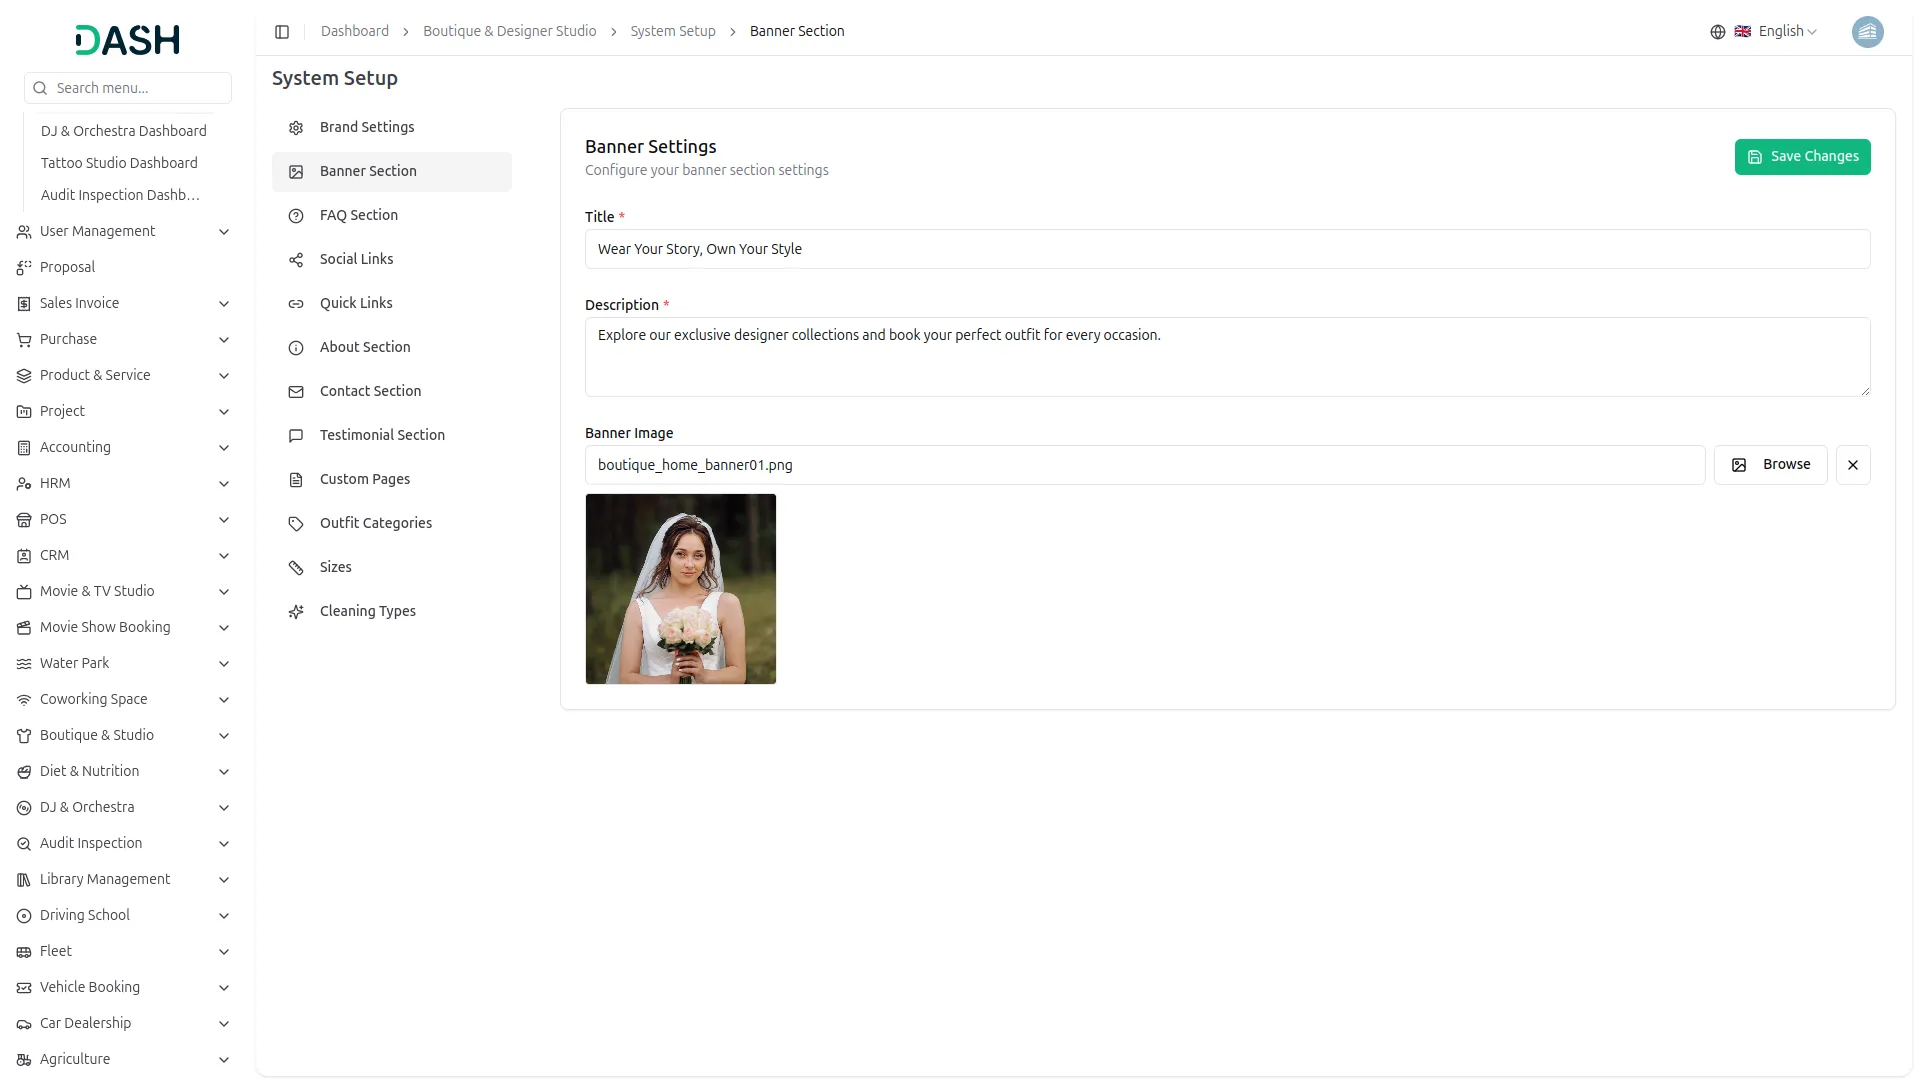
- Once saved, the Banner Title and Description will appear as the main headline and supporting text in the hero section on your homepage, and the Banner Image will display as the featured visual alongside it, giving visitors an engaging first impression of your boutique studio.
FAQ Section
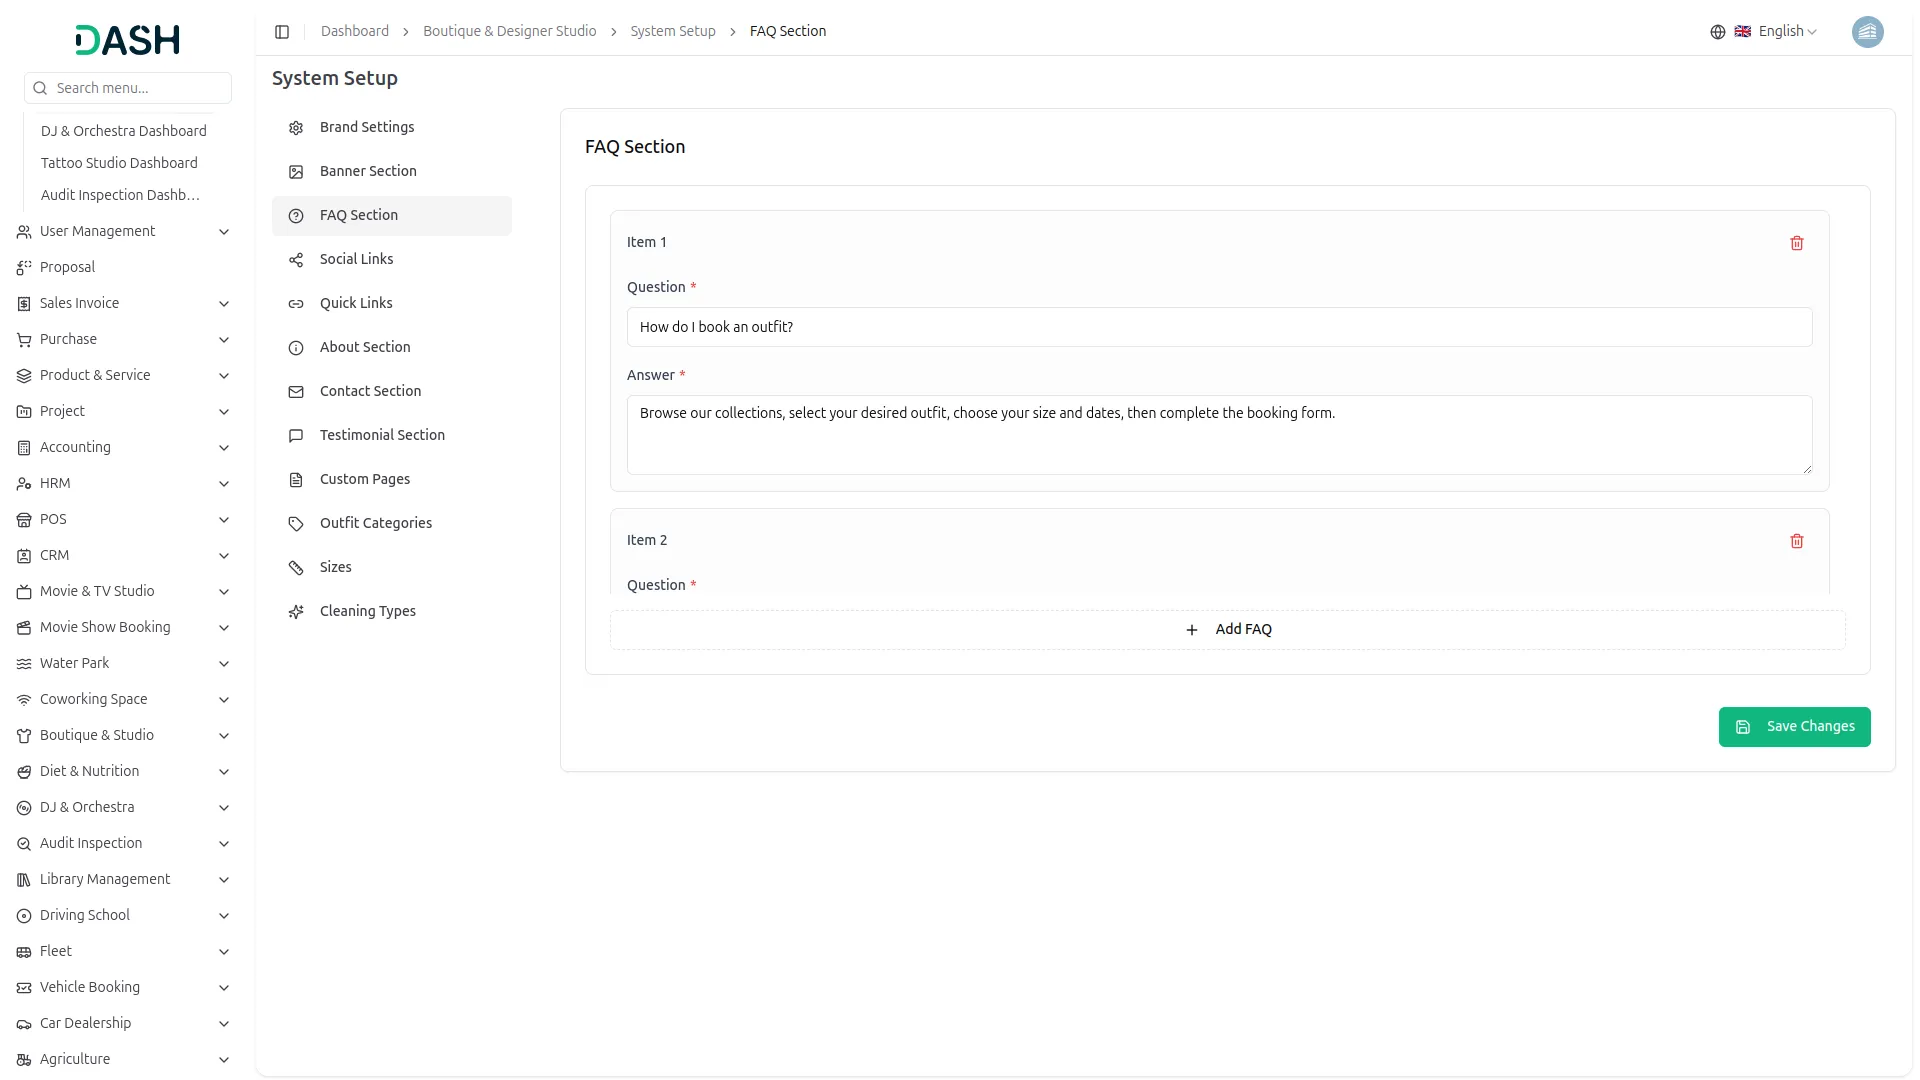
- In the FAQ Section, you will find a list of FAQ items. Each item requires a Question and an Answer. Click the “Add FAQ” button to add more items. Once all details are entered, click Save Changes. You can also remove any item using the delete icon on the top right of each entry.
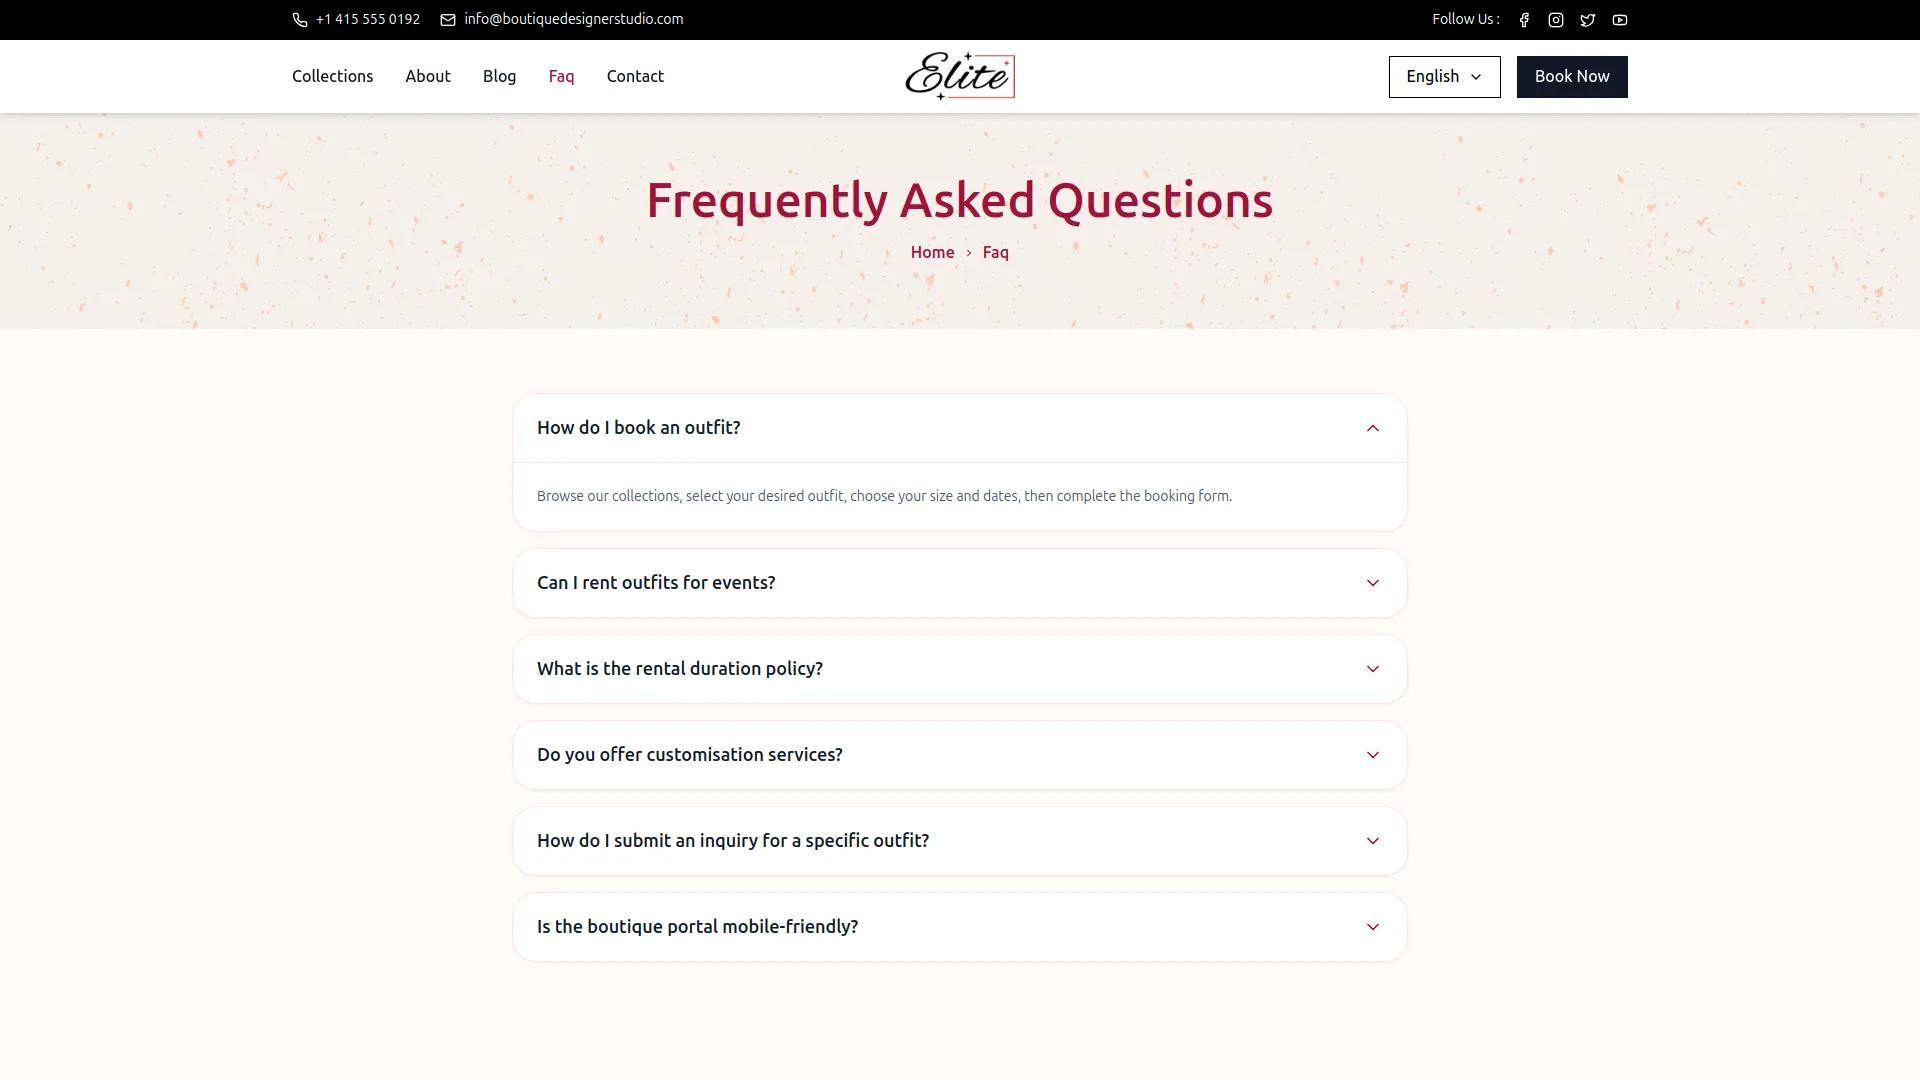
- Once saved, all FAQ items will appear on the FAQ page of your website as an accordion-style list, where each question expands to reveal its answer when clicked, helping clients quickly find information about bookings, rentals, customisation services, and more.
Social Links
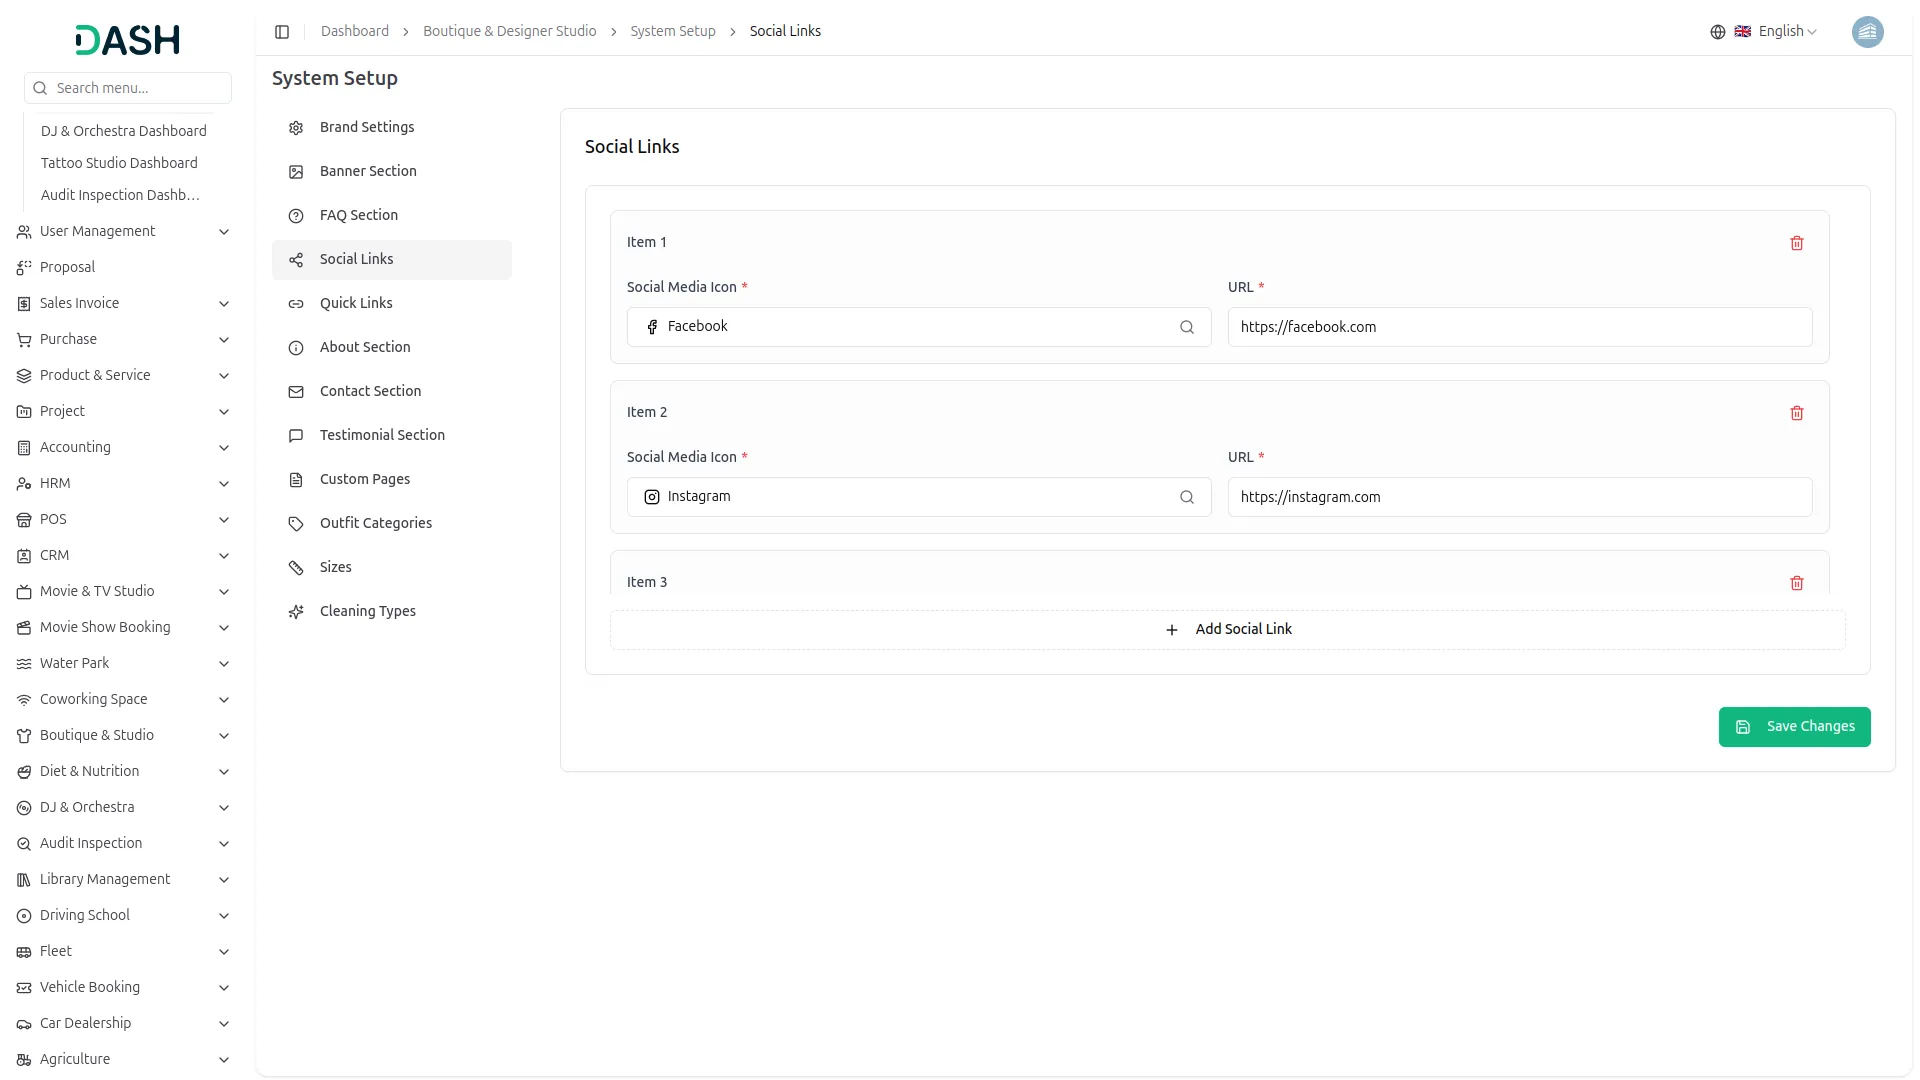
- In the Social Links section, you will find a list of social link items. Each item requires a Social Media Icon selected from the dropdown and a URL pointing to your social profile. Click the “Add Social Link” button to add more platforms. Once all details are entered, click Save Changes. You can remove any item using the delete icon.
- Once saved, all social media icons will appear in the top header bar and in the Follow Us section of the footer on your website, allowing visitors to navigate directly to your social media profiles, such as Facebook, Instagram, and others.
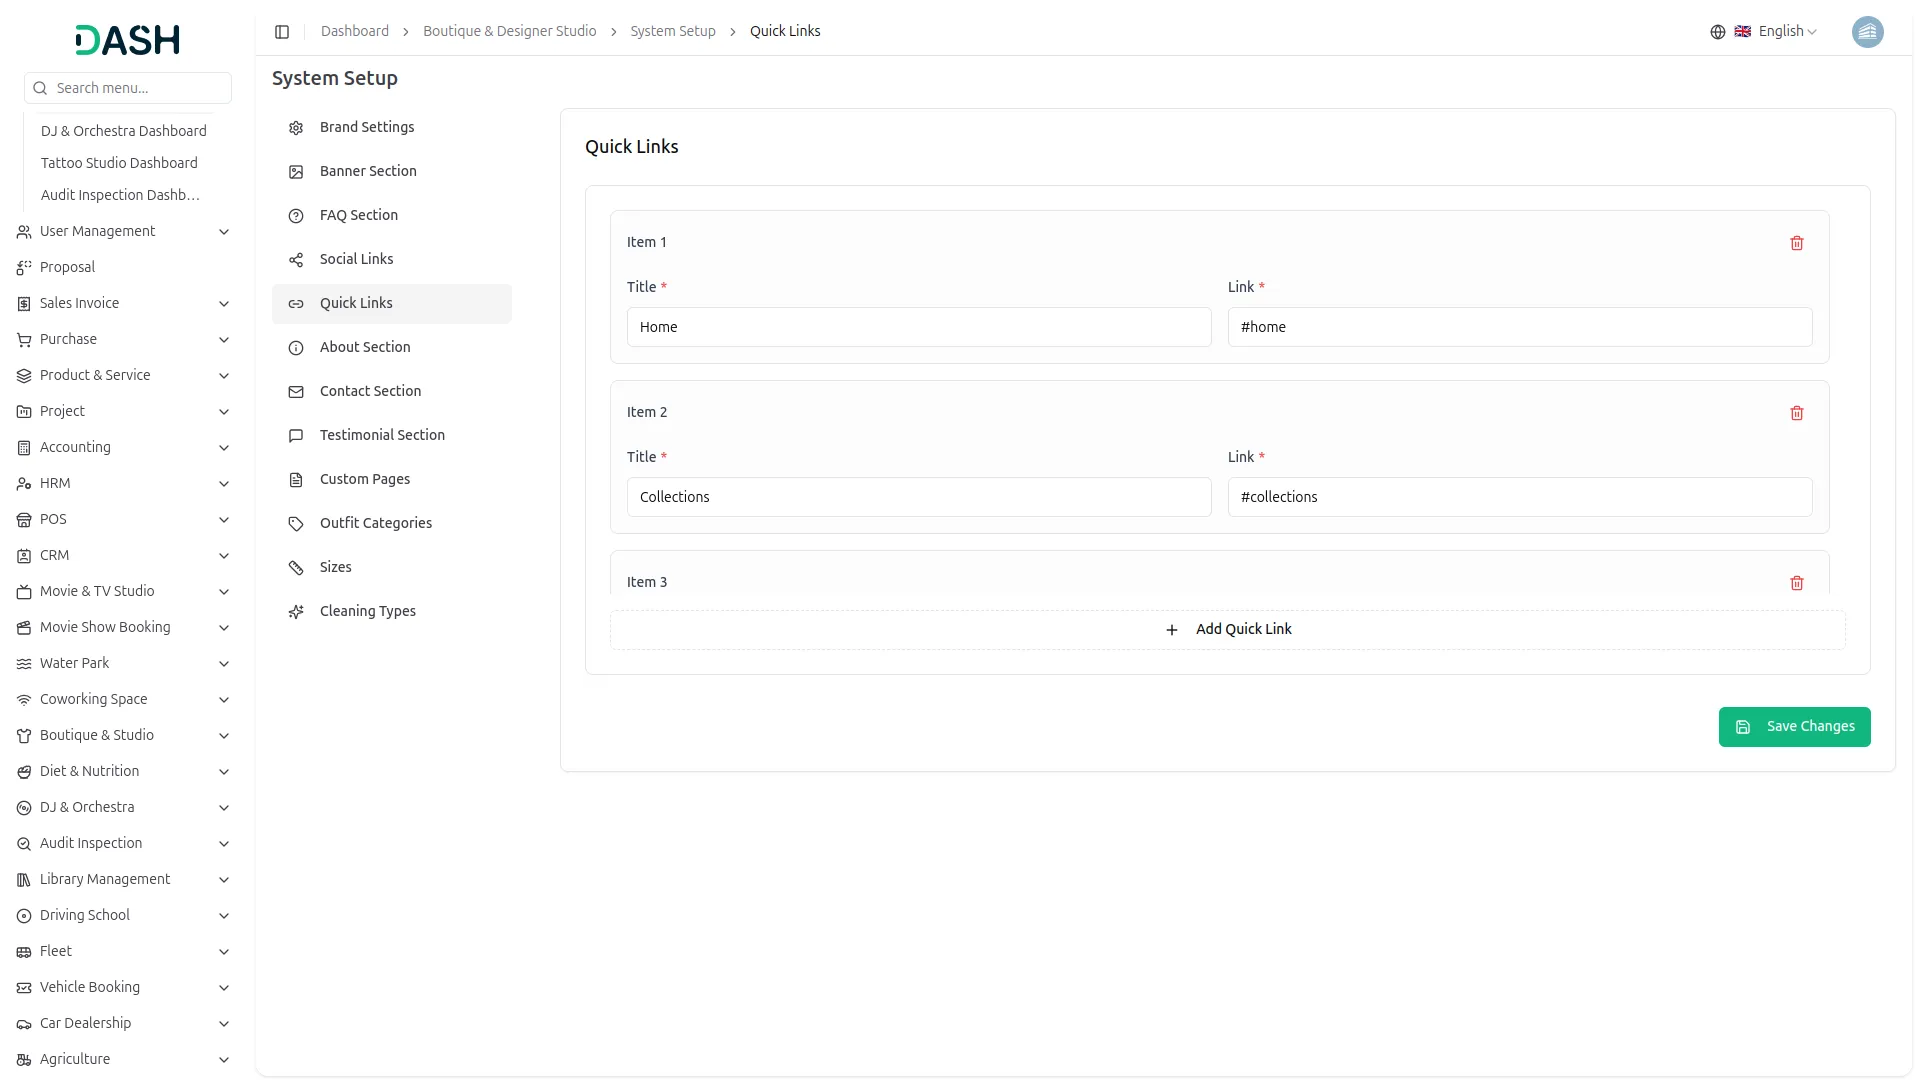
Quick Links
- In the Quick Links section, you will find a list of link items. Each item requires a Title (the link label) and a Link (the anchor or URL it points to). Click the “Add Quick Link” button to add more items. Once all details are entered, click Save Changes. You can remove any item using the delete icon.
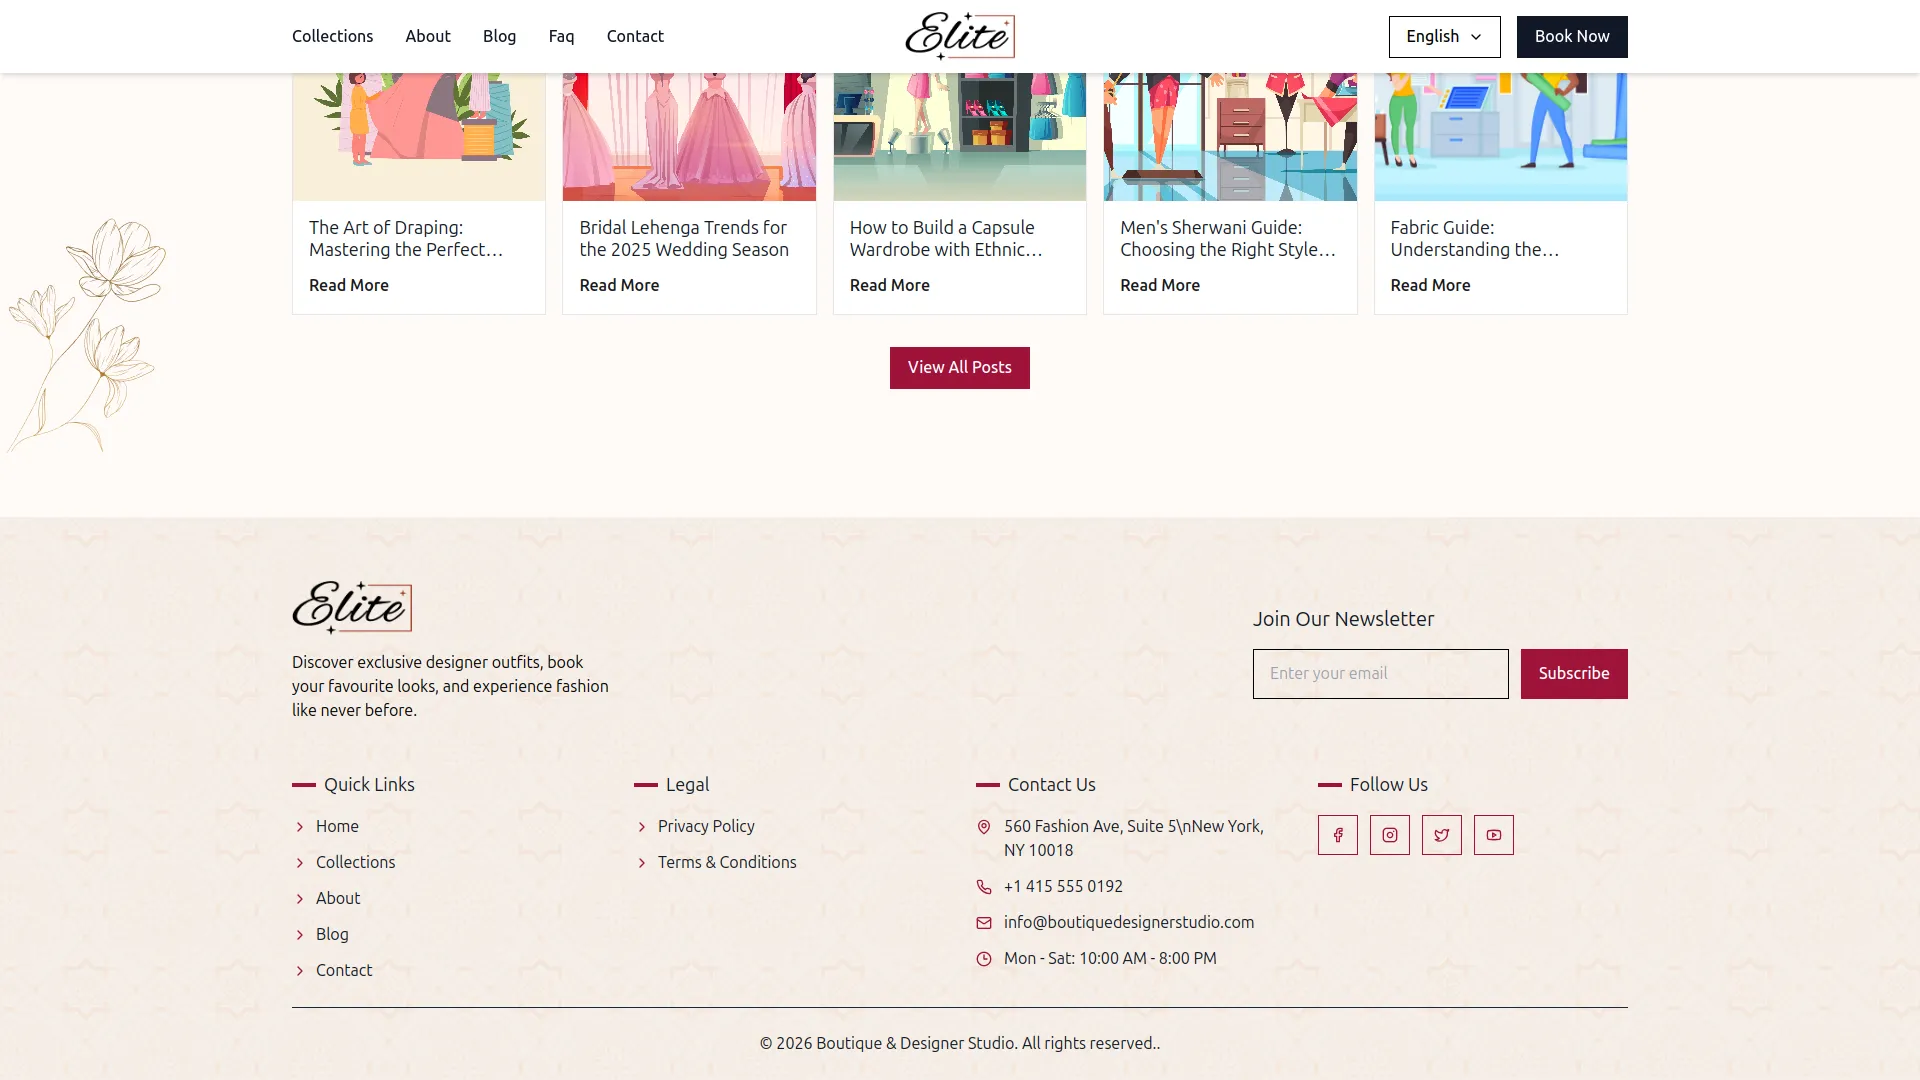
- Once saved, all quick links will appear under the Quick Links column in the footer of your website, giving visitors easy navigation access to key pages such as Home, Collections, About, Blog, and Contact.
About Section
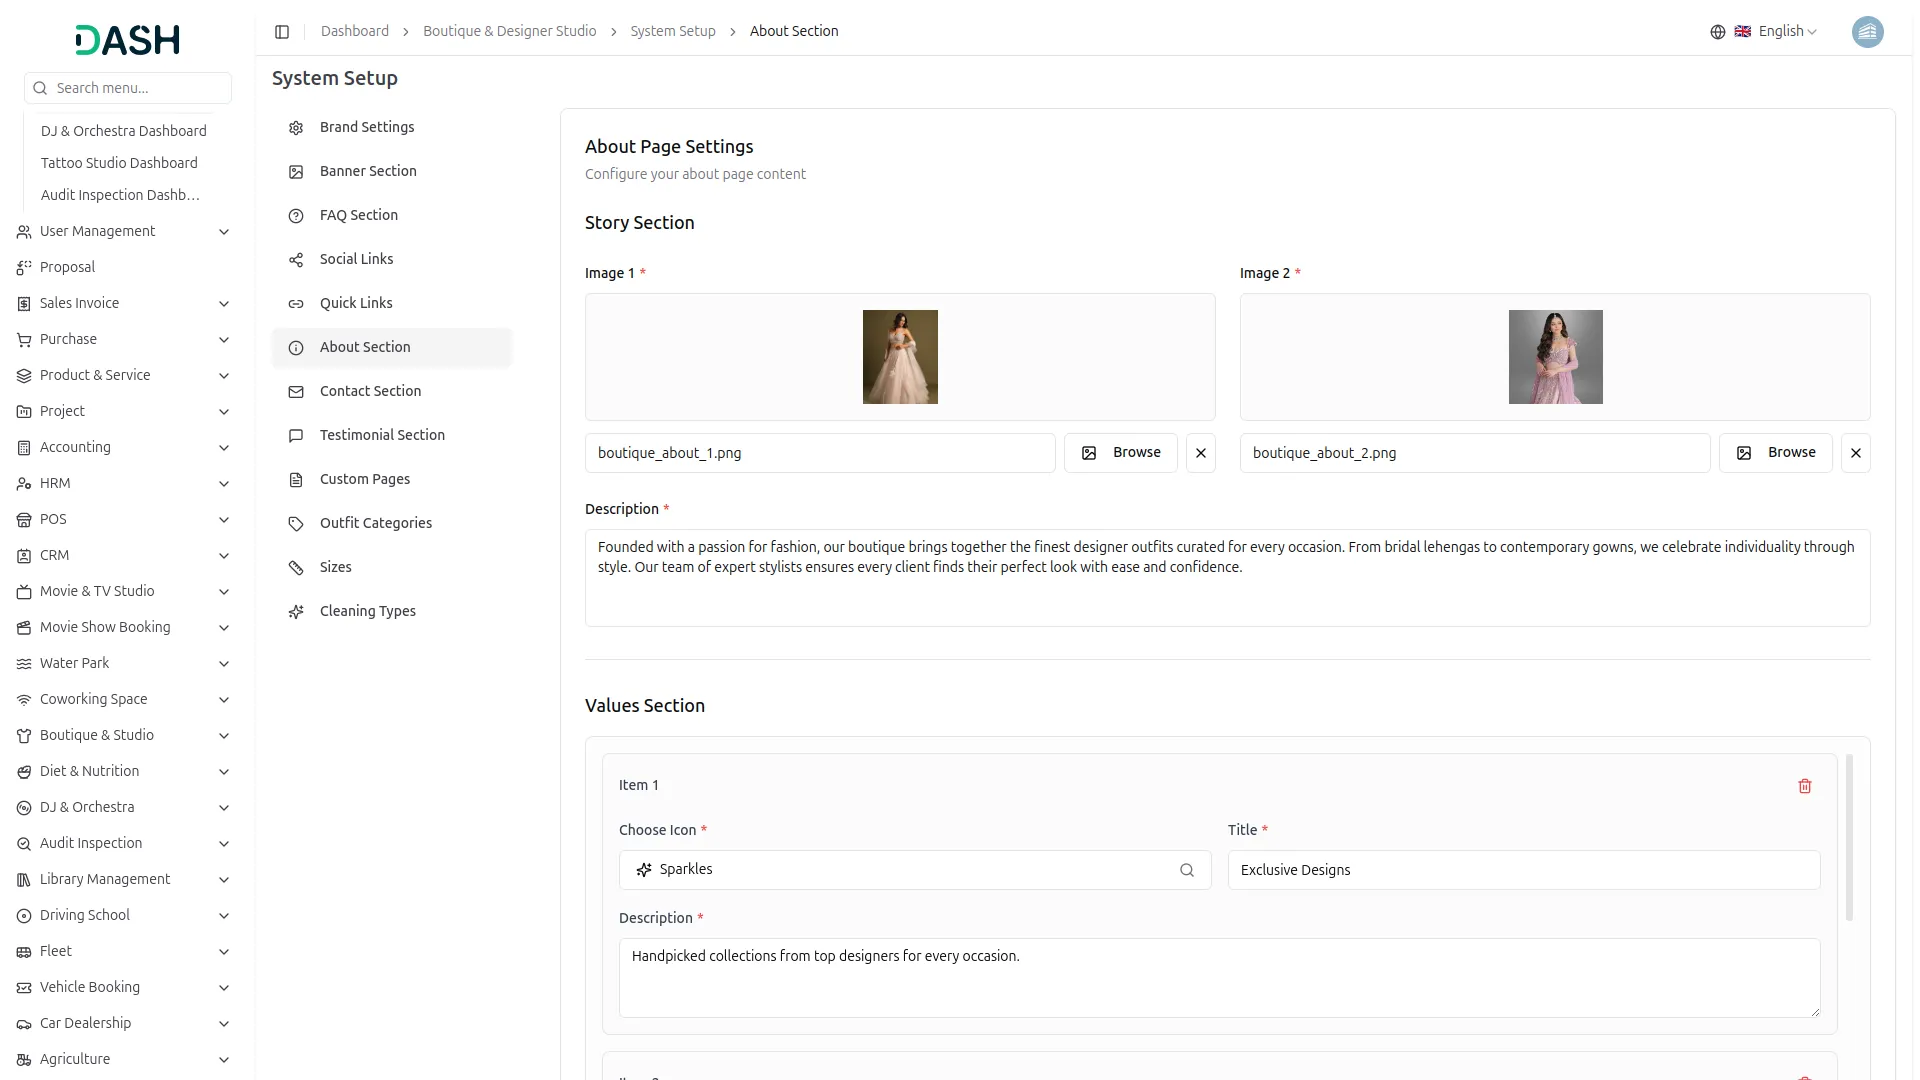
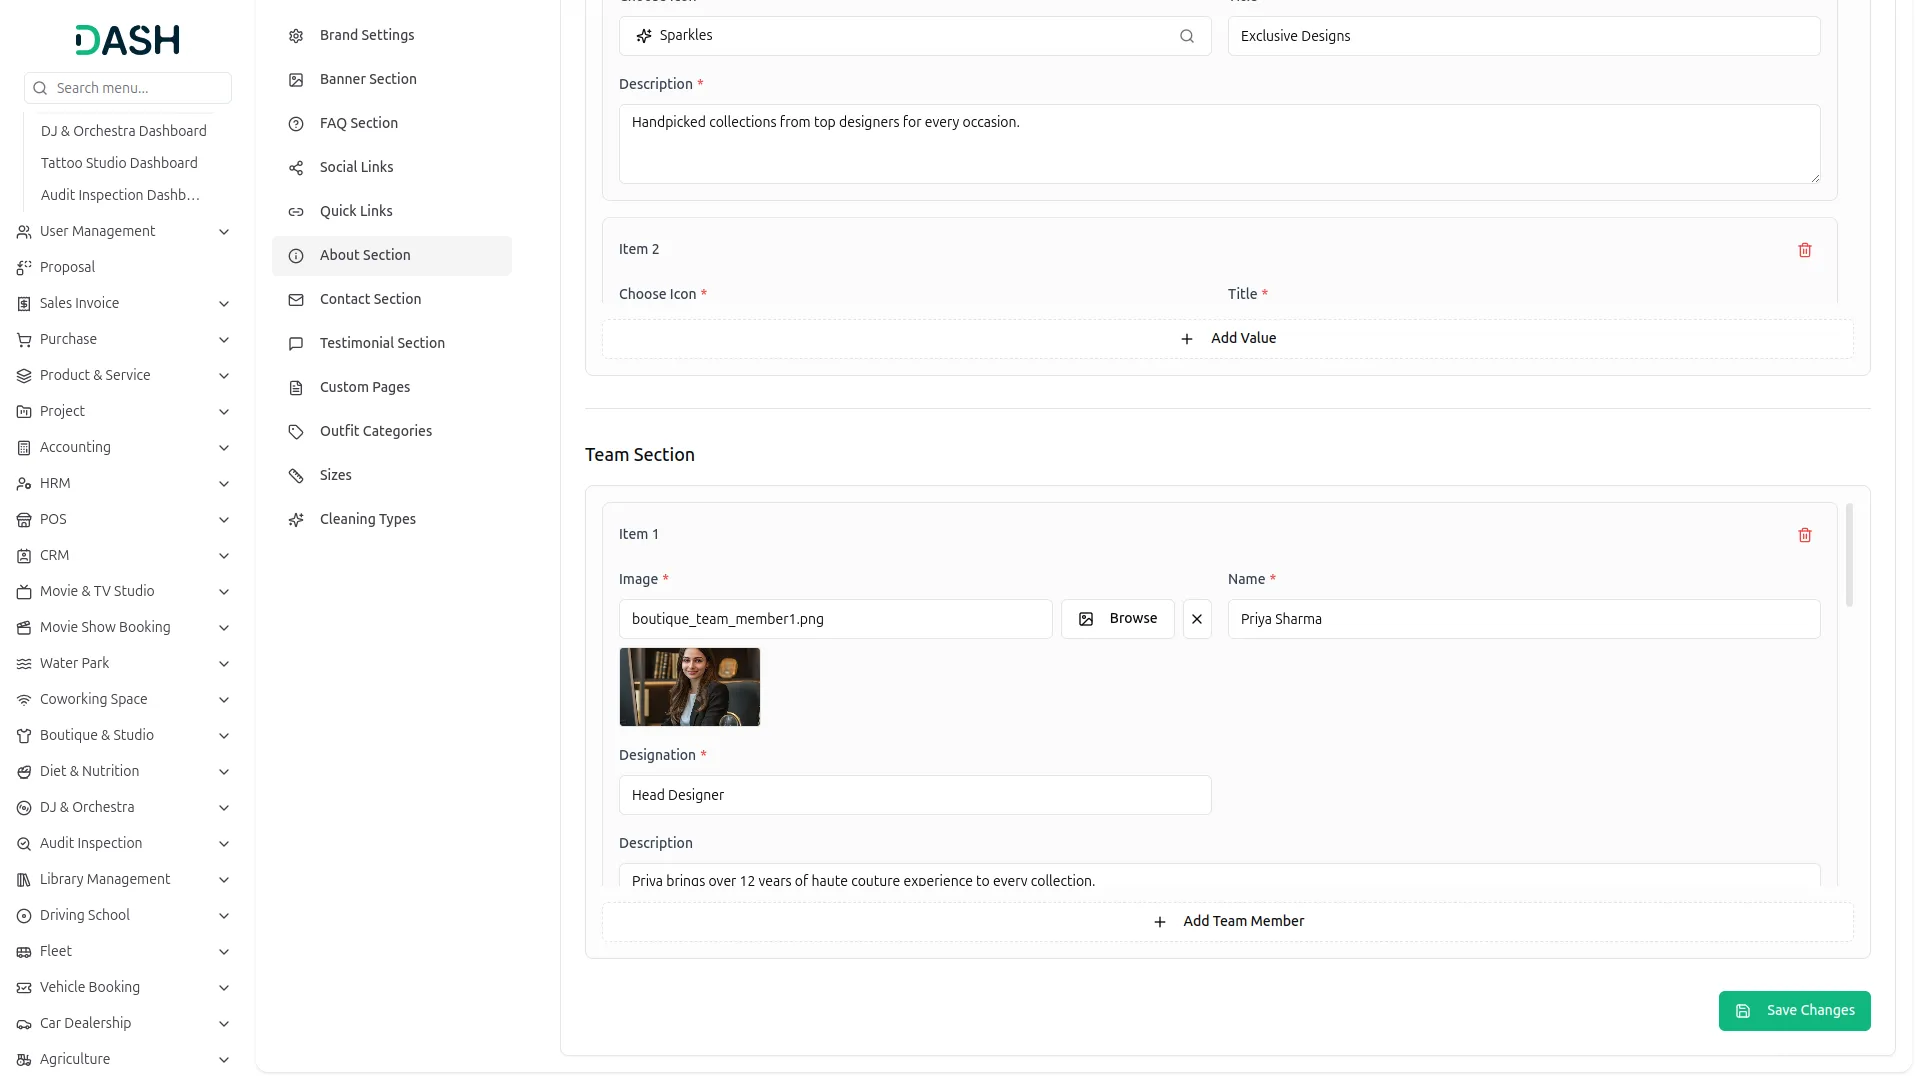
- In the About Page Settings, the Story Section contains fields for Image 1, Image 2, and a Description. Upload both images using the Browse button and enter the story text in the description field.
- In the Values Section, you can add multiple value items. Each item requires a Choose Icon, a Title, and a Description. Click the “Add Value” button to add more items.
- In the Team Section, you can add multiple team members. Each member requires an Image, Name, Designation, and Description. Click the “Add Team Member” button to add more entries. Once all sections are complete, click Save Changes.
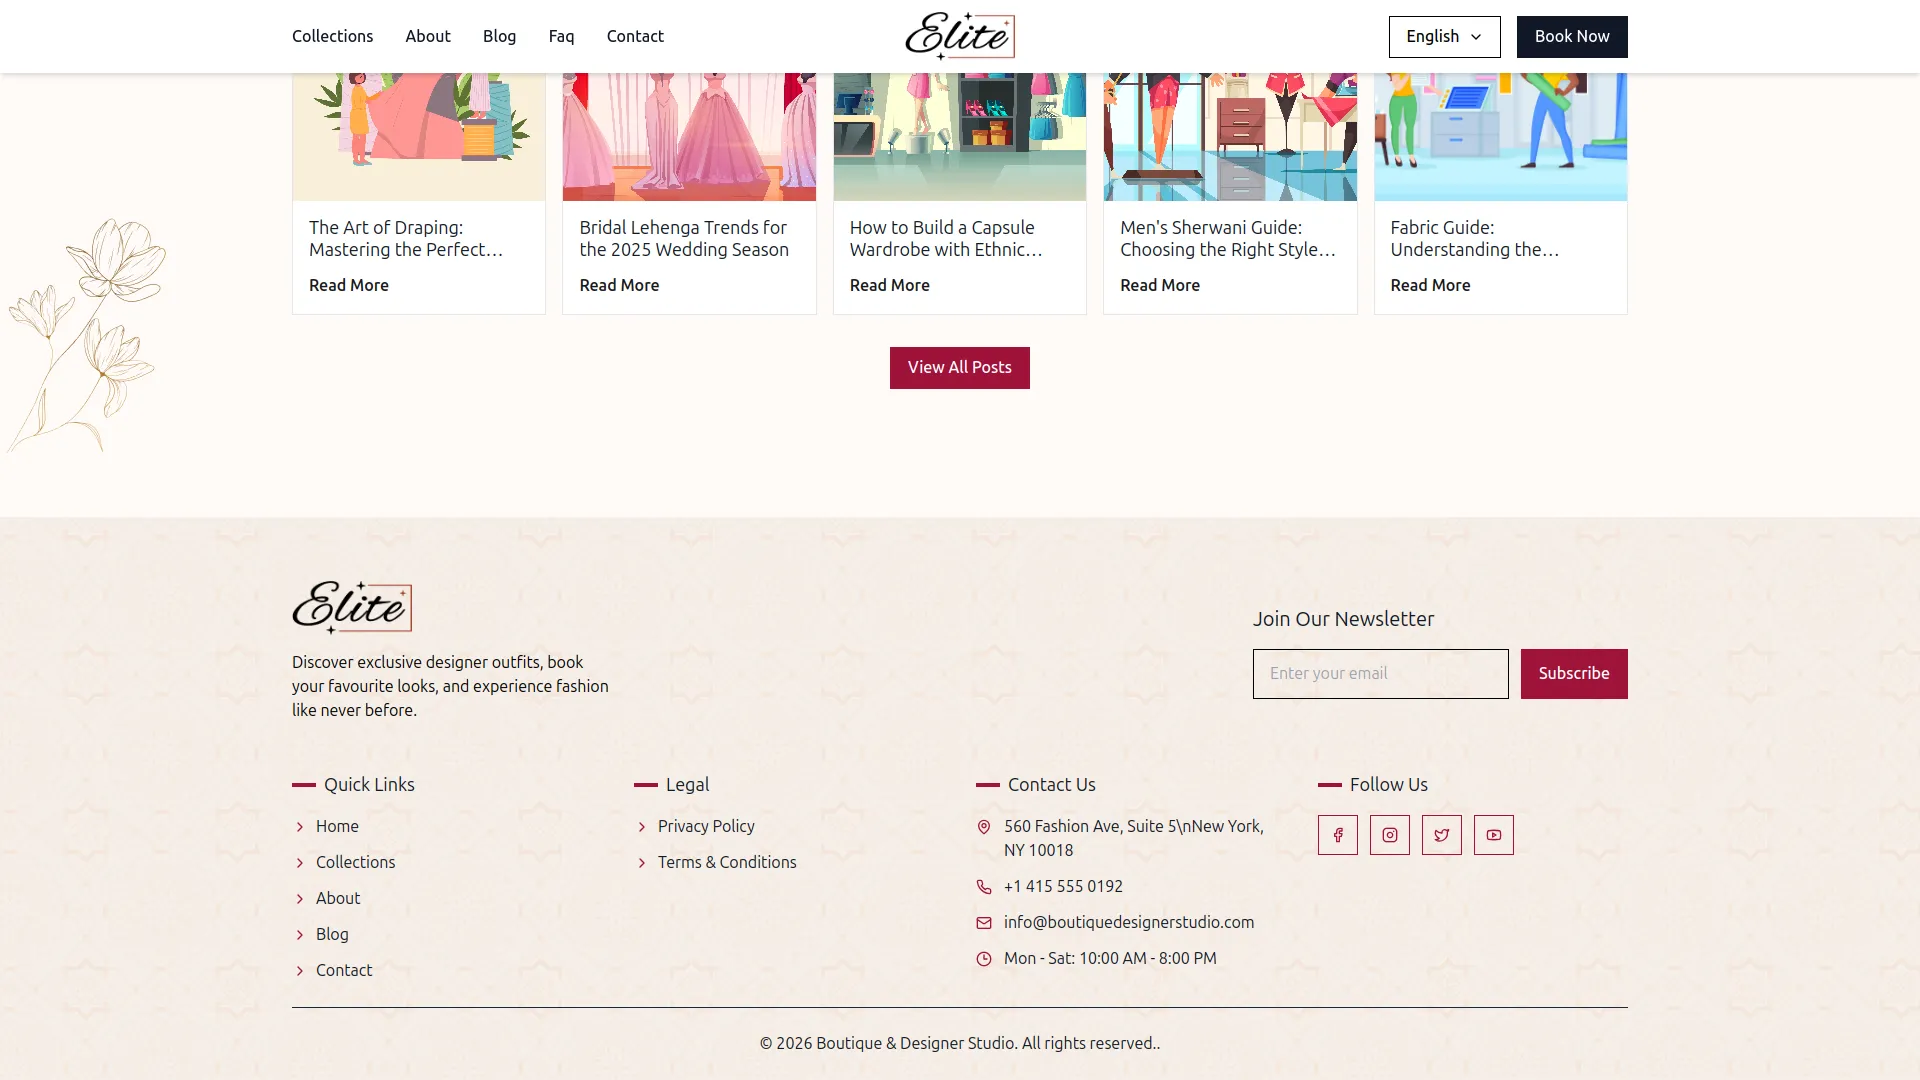
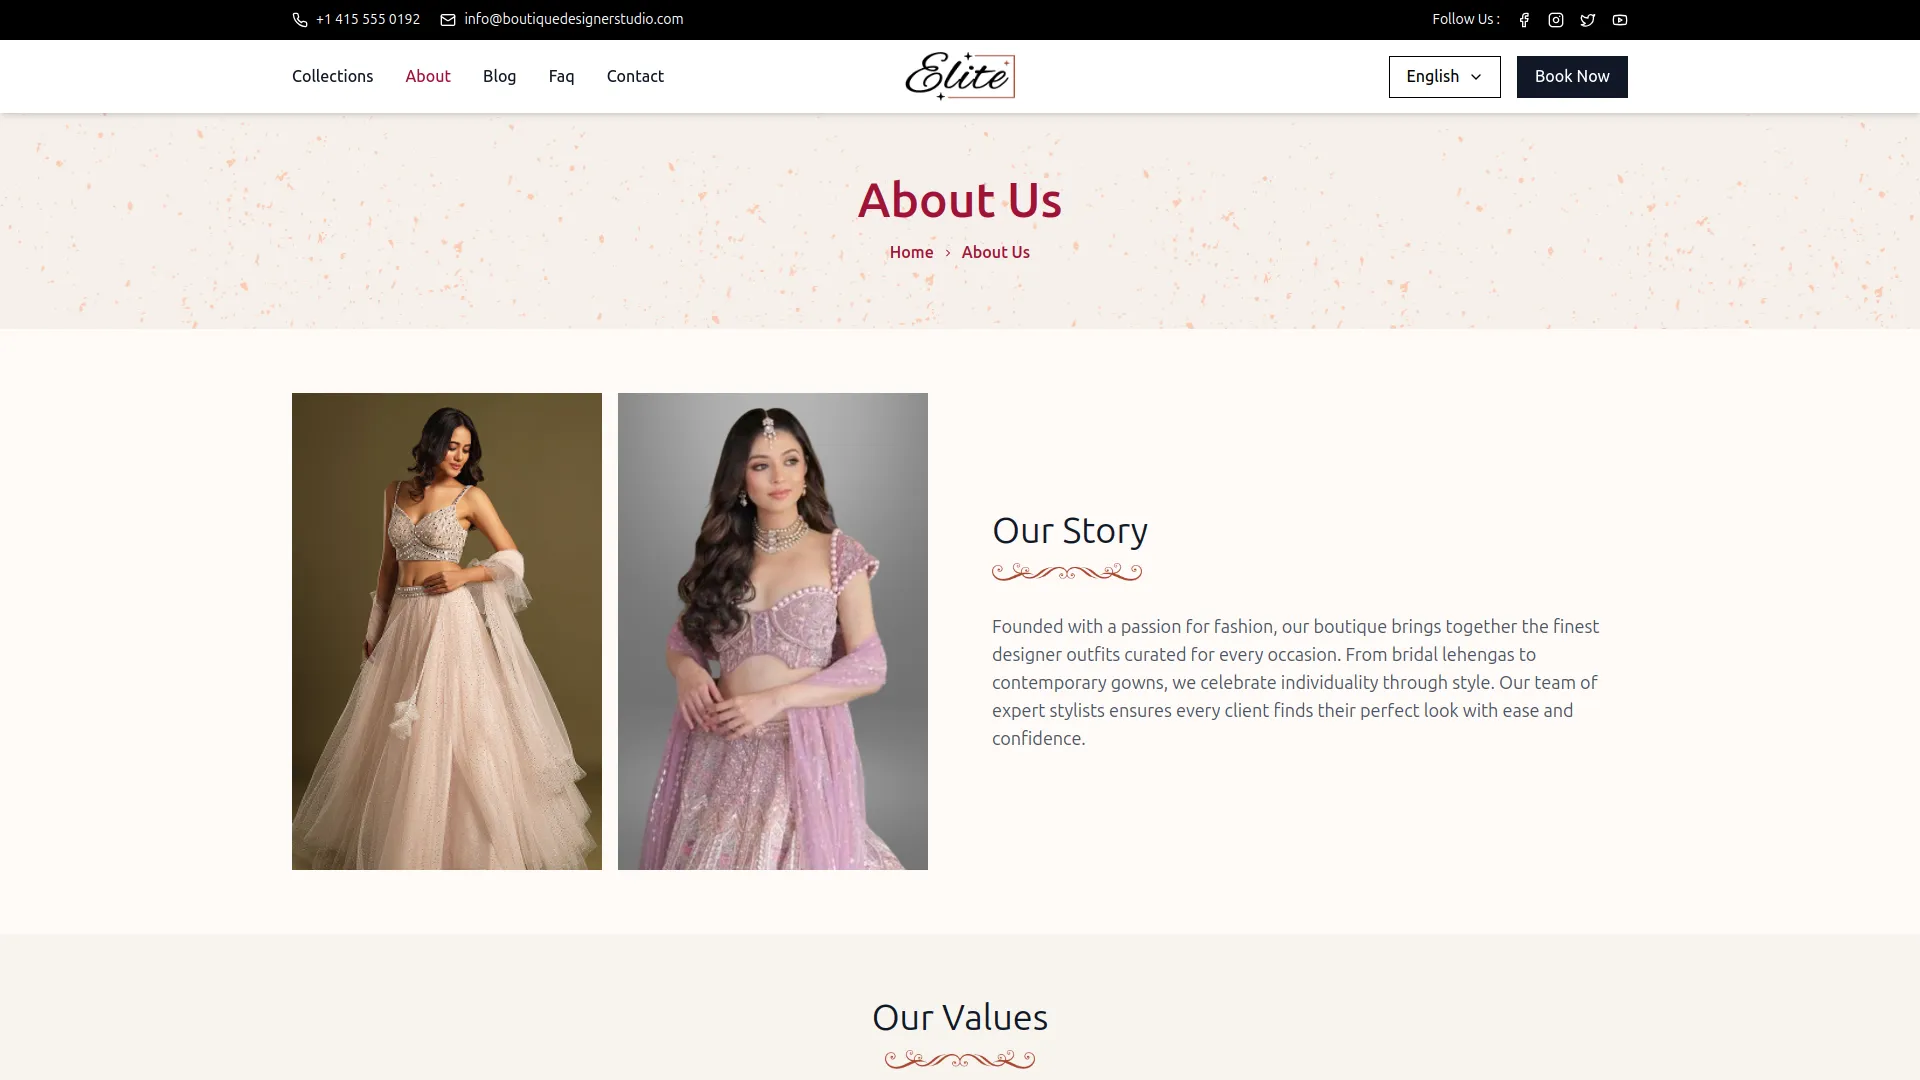
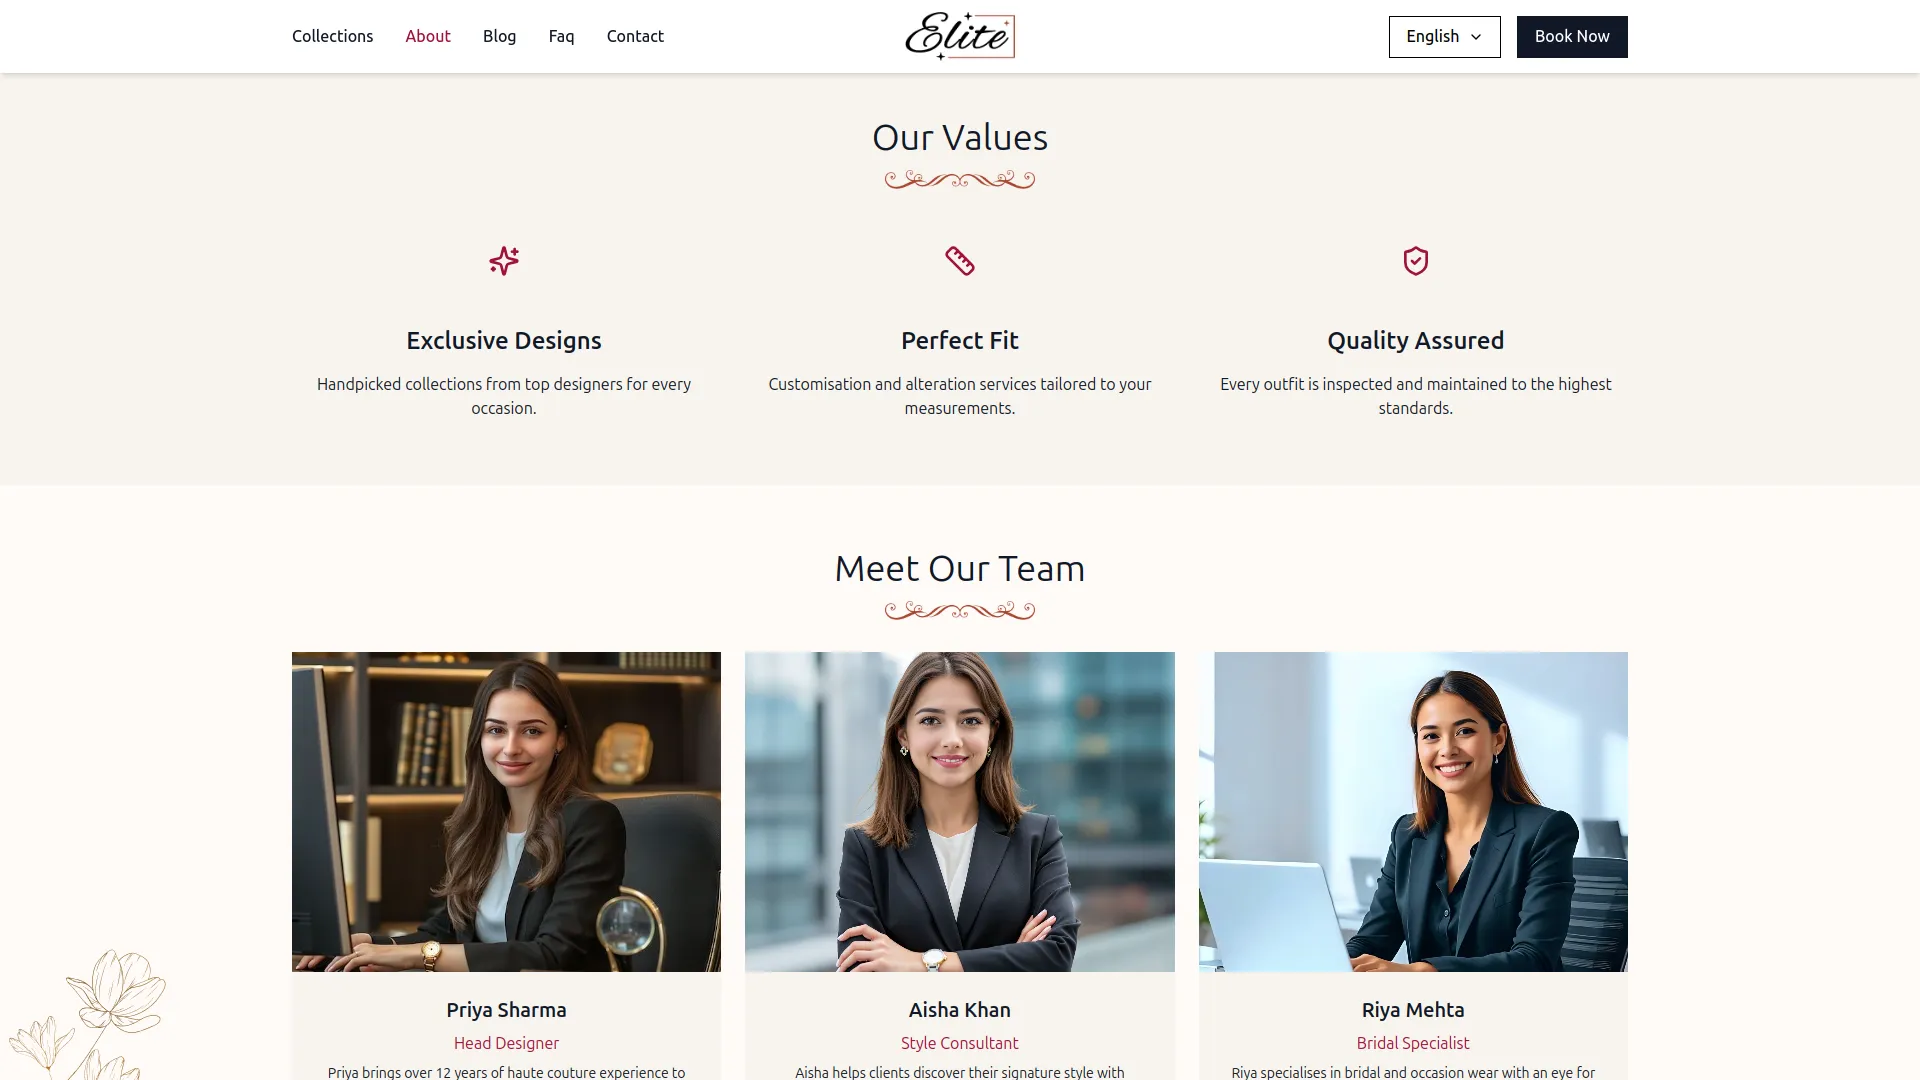
- Once saved, Image 1 and Image 2 will appear as the two side-by-side visuals in the Our Story section on the About Us page, with the Description displaying as the story paragraph beside them. Each value item’s Icon, Title, and Description will appear as individual cards in the Our Values section. Each team member’s Image, Name, Designation, and Description will display as a profile card in the Meet Our Team section on the About Us page.
Contact Section
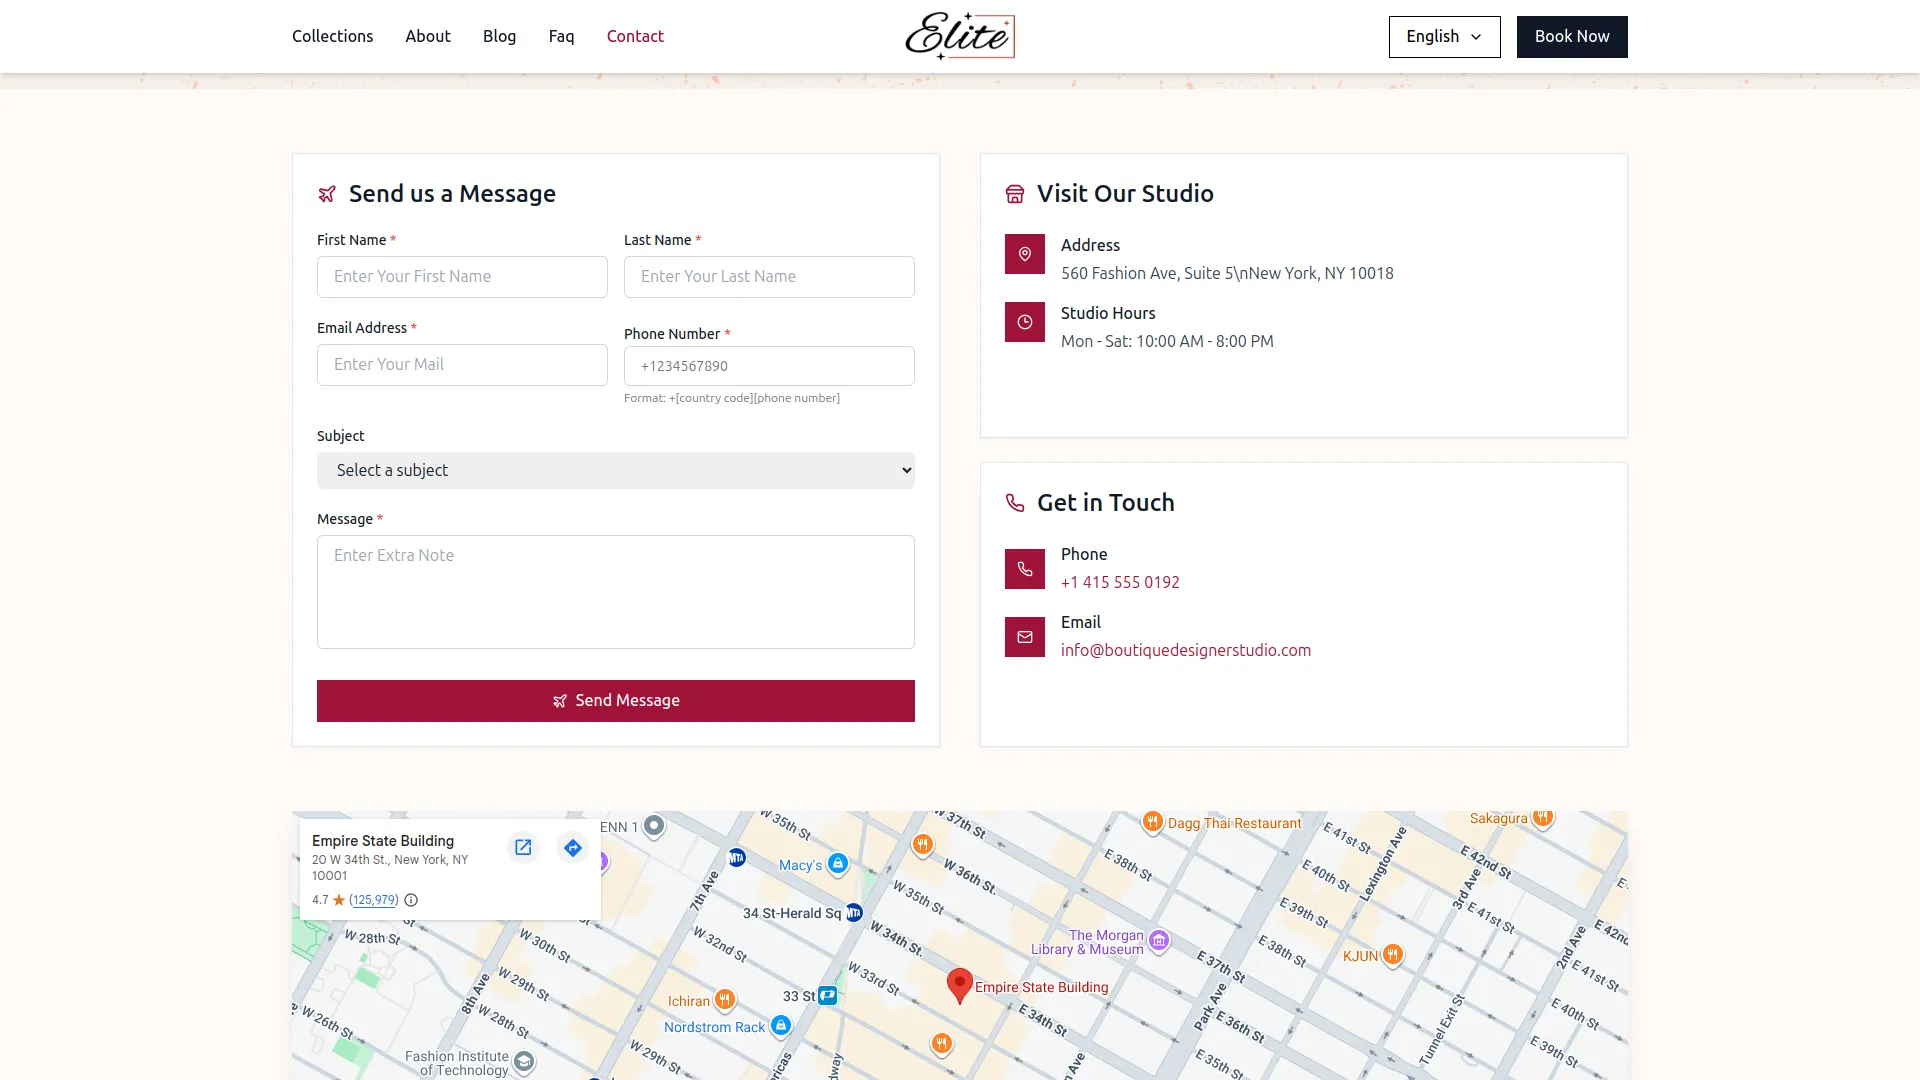
- In the Contact Information section, you will find fields for Phone, Email, and Address. Enter your studio’s contact details in the respective fields.
- In the Studio Hours section, you will find fields for Open Days, Open Time, and Close Time. Enter your studio’s working schedule accordingly.
- In the Google Map section, paste your Google Map iFrame embed code into the provided field. Once all details are filled in, click Save Changes.
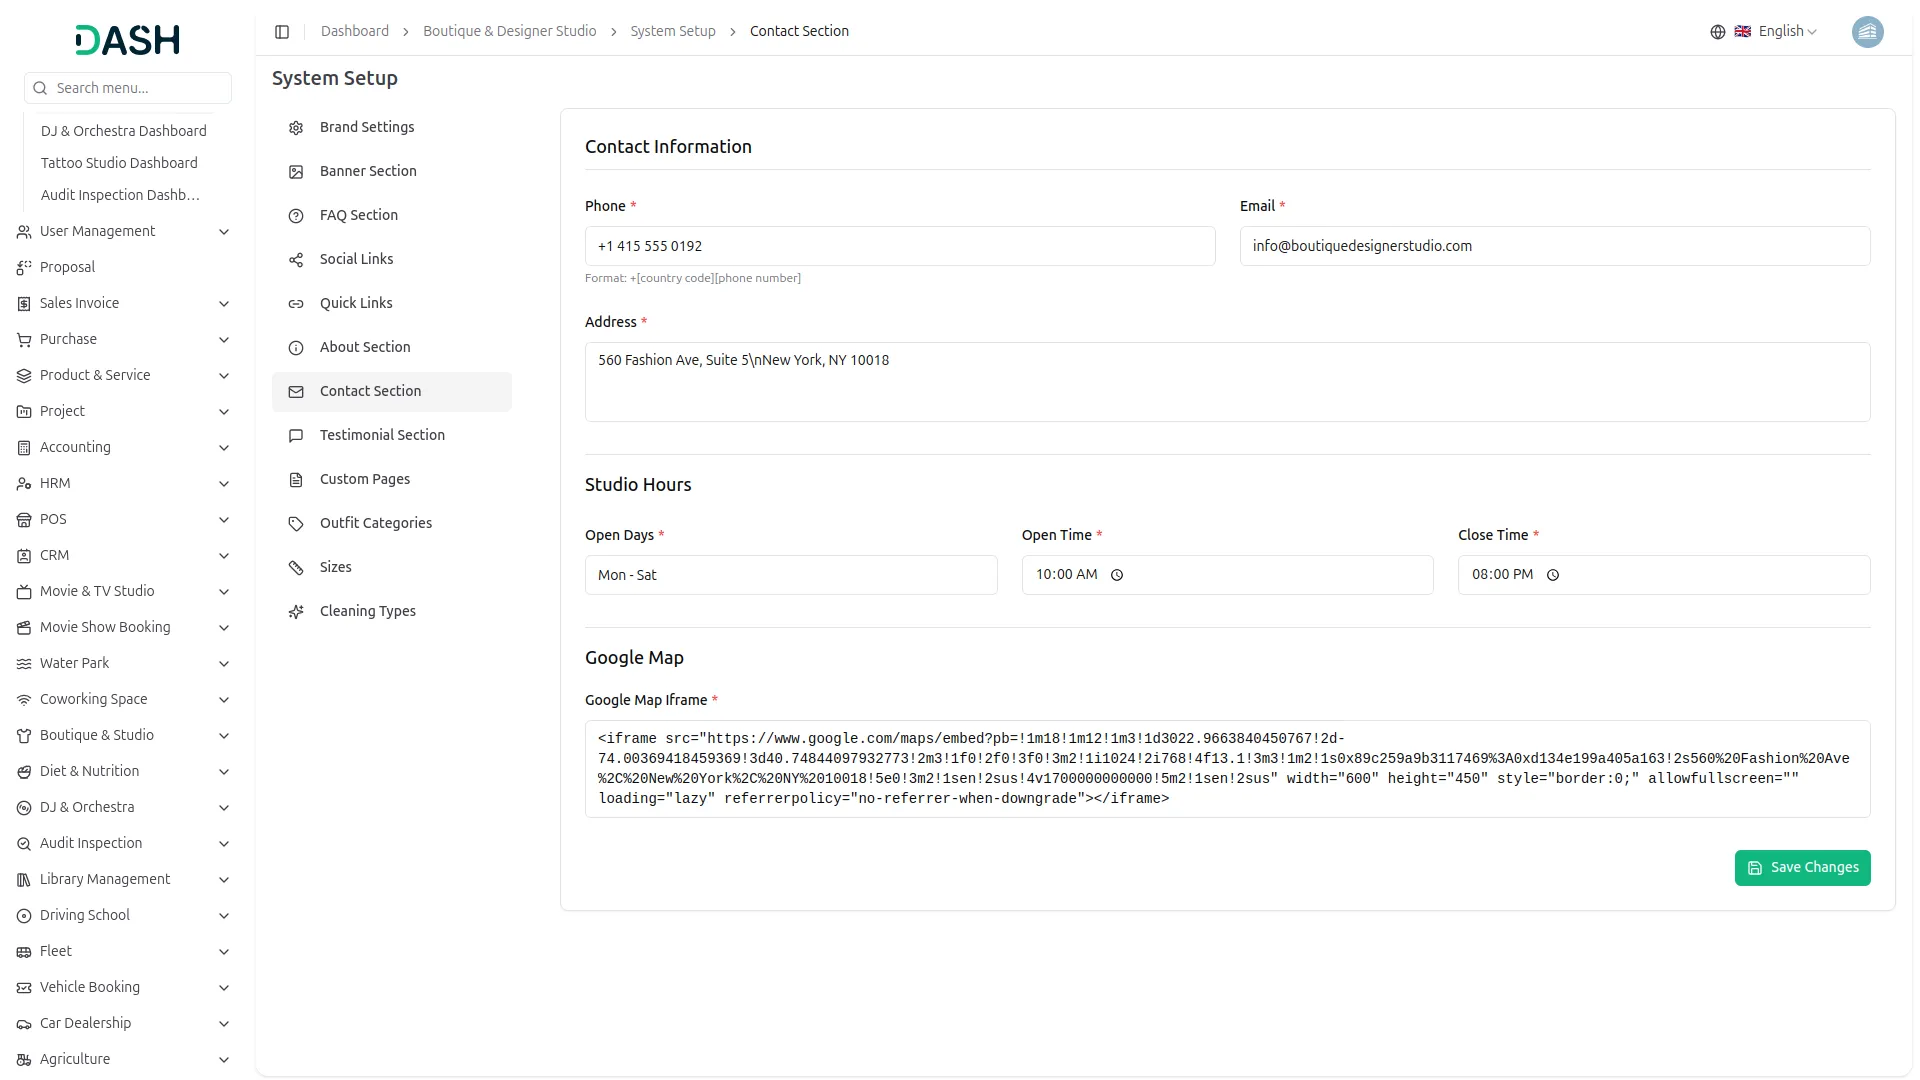
- Once saved, the Phone and Email will appear in both the top header bar of the website and in the Get in Touch panel on the Contact Us page. The Address and Studio Hours will display in the Visit Our Studio panel on the Contact Us page. The Google Map will appear as an interactive embedded map at the bottom of the Contact Us page, helping clients locate your studio easily.
Testimonial Section
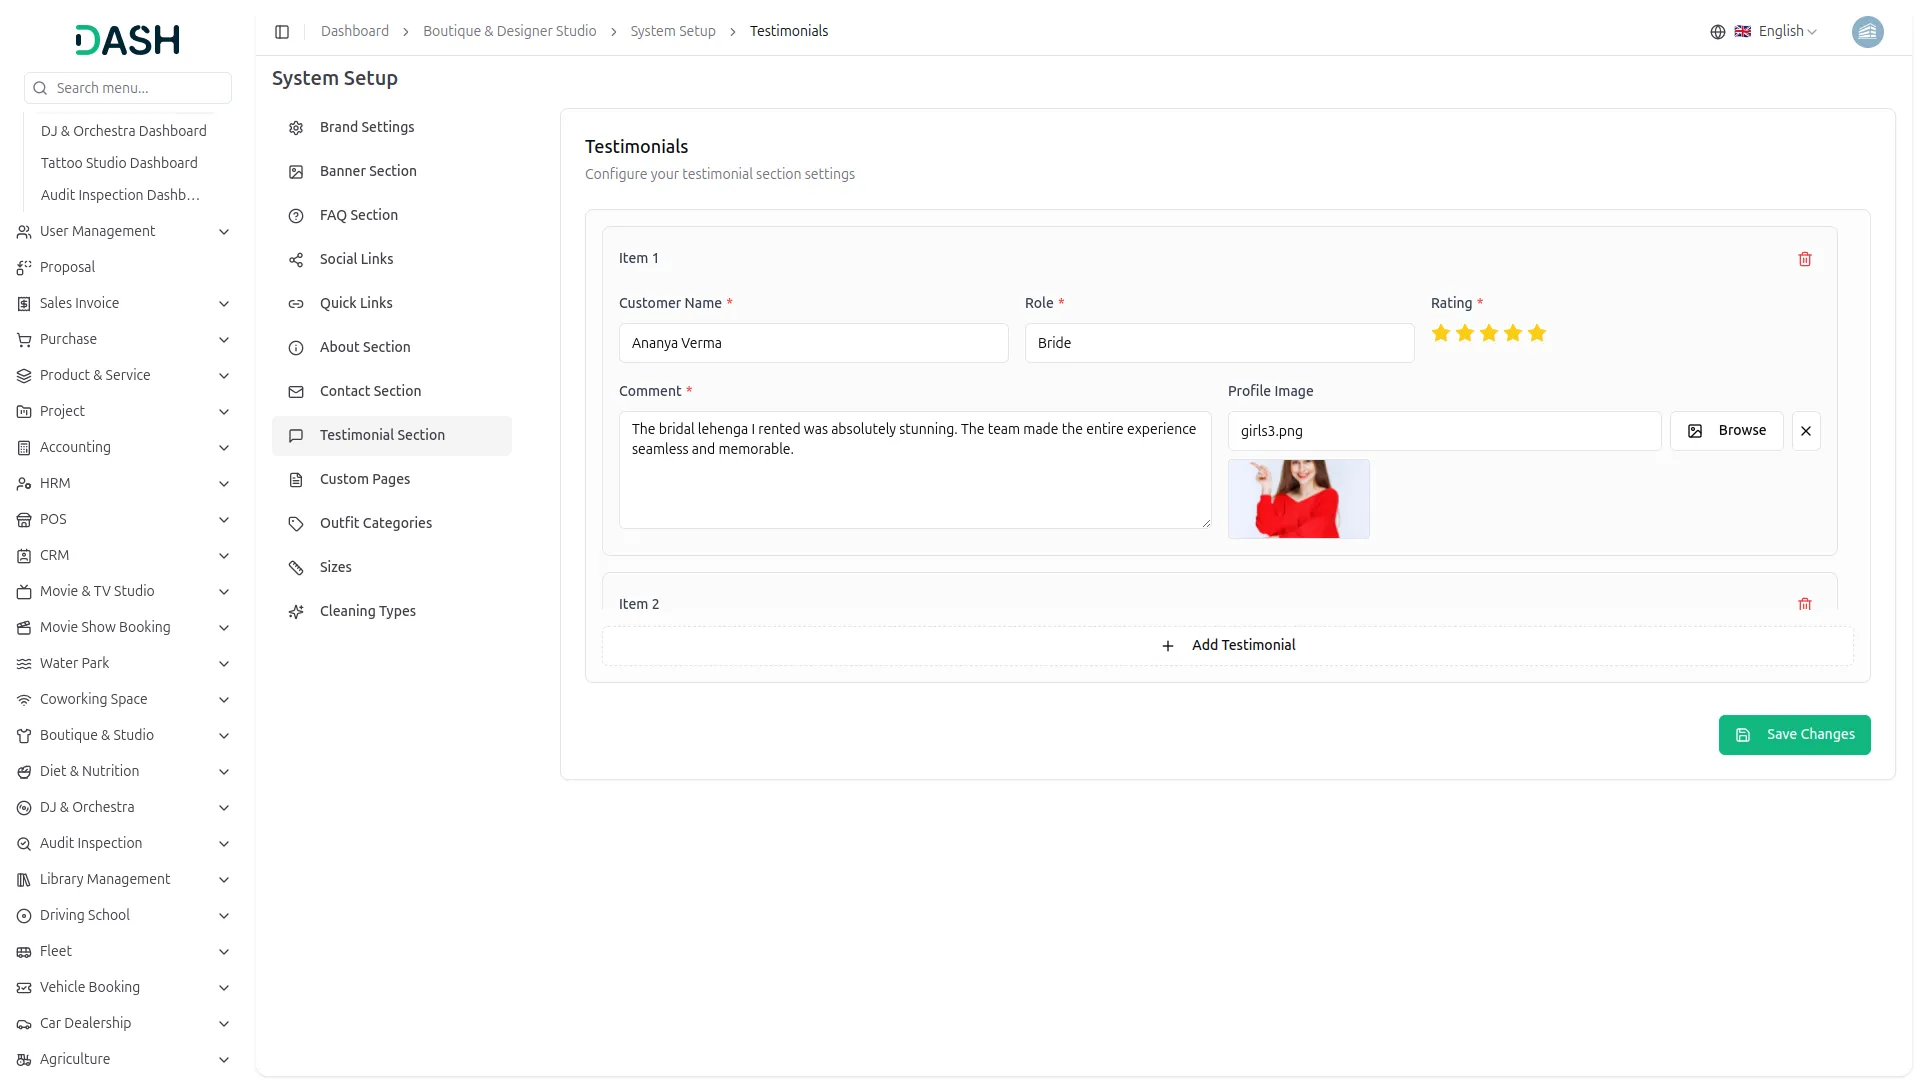
- In the Testimonials section, you will find a list of testimonial items. Each item requires a Customer Name, Role, Rating, Comment, and an optional Profile Image uploaded via the Browse button. Click the “Add Testimonial” button to add more entries. Once all details are entered, click Save Changes. You can remove any item using the delete icon.
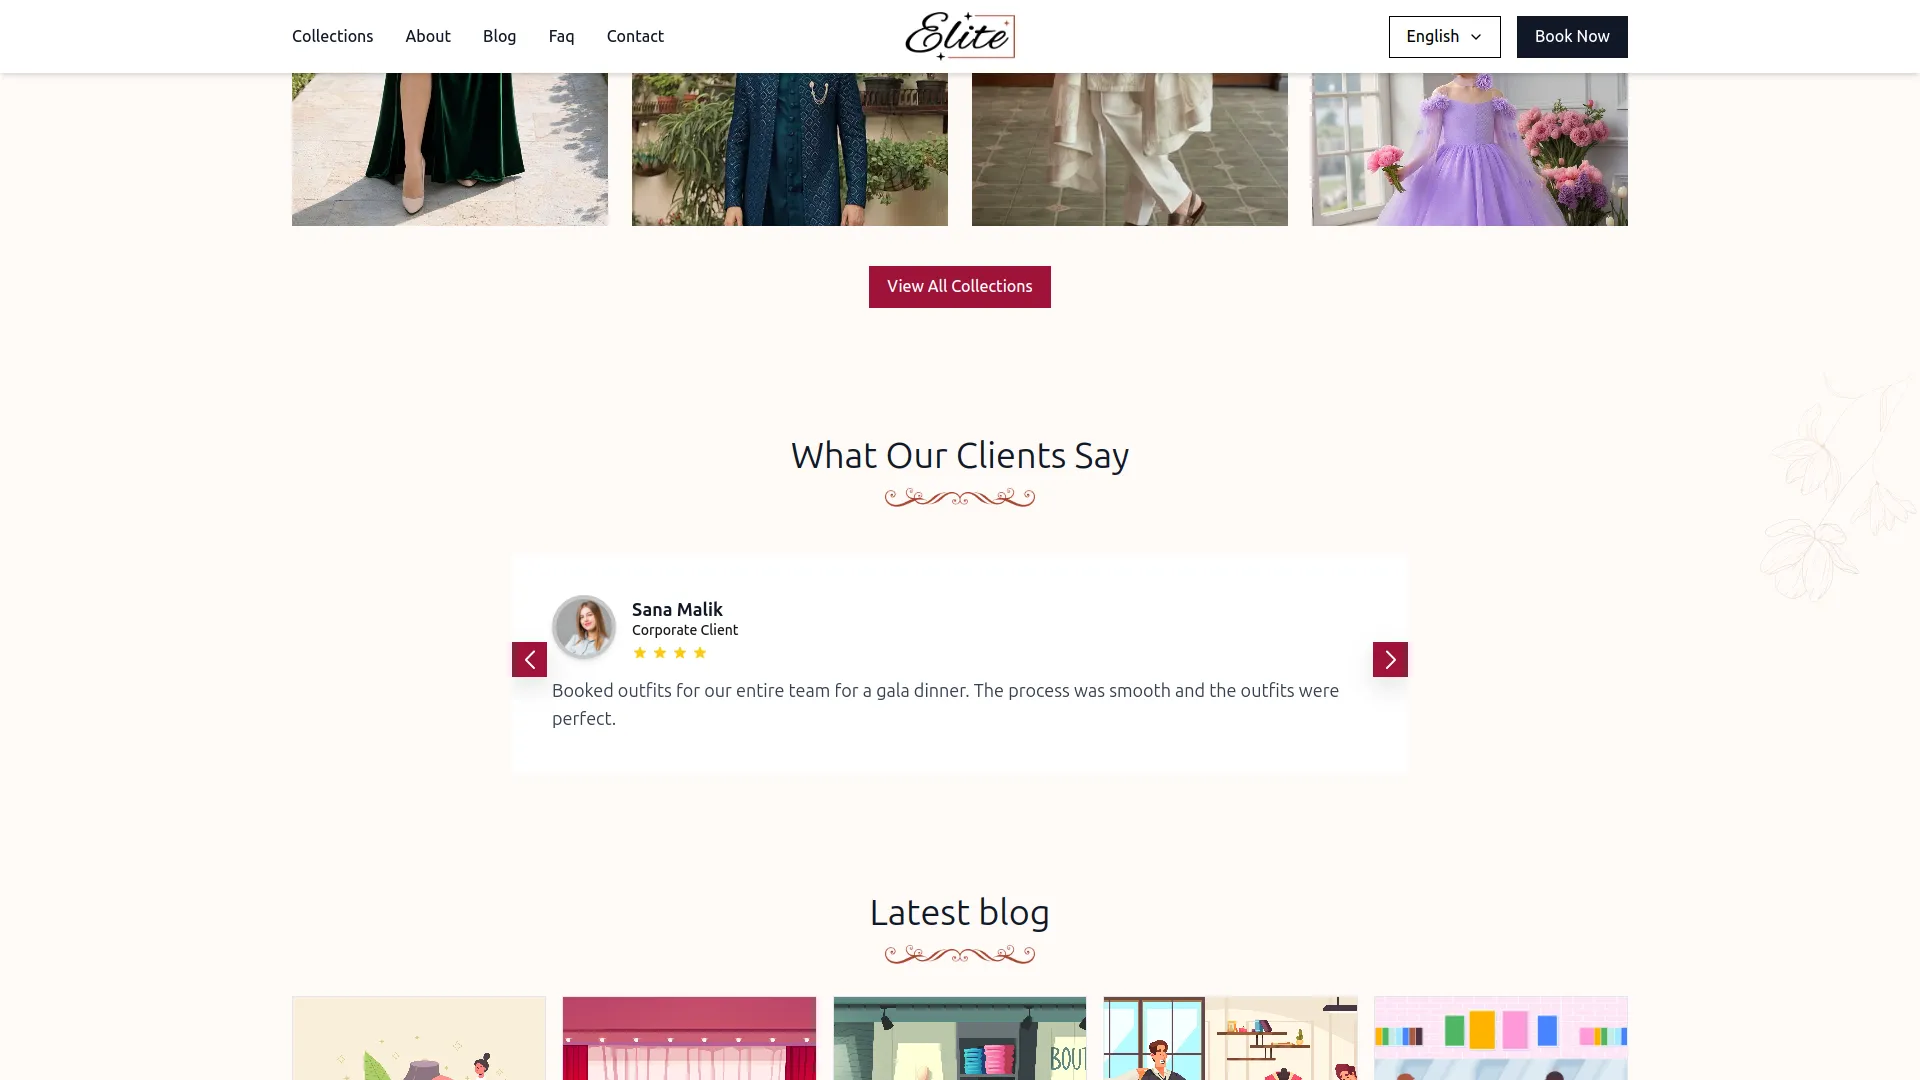
- Once saved, all testimonials will appear in the “What Our Clients Say” section on your homepage as a rotating slider, displaying each client’s profile photo, name, role, star rating, and comment, helping build trust and credibility with new visitors.
Custom Pages
- To add a new page, click the “Create” button at the top right. Enter the Title, a URL Slug (using only lowercase letters and hyphens), an optional Description, and the full page Contents using the rich text editor.
- In the Custom Pages section, you will find a list of all existing pages showing their Title, Slug, and Actions. In the Actions column, you can use the Edit to update the page content or click the external link icon next to the slug to preview the live page.
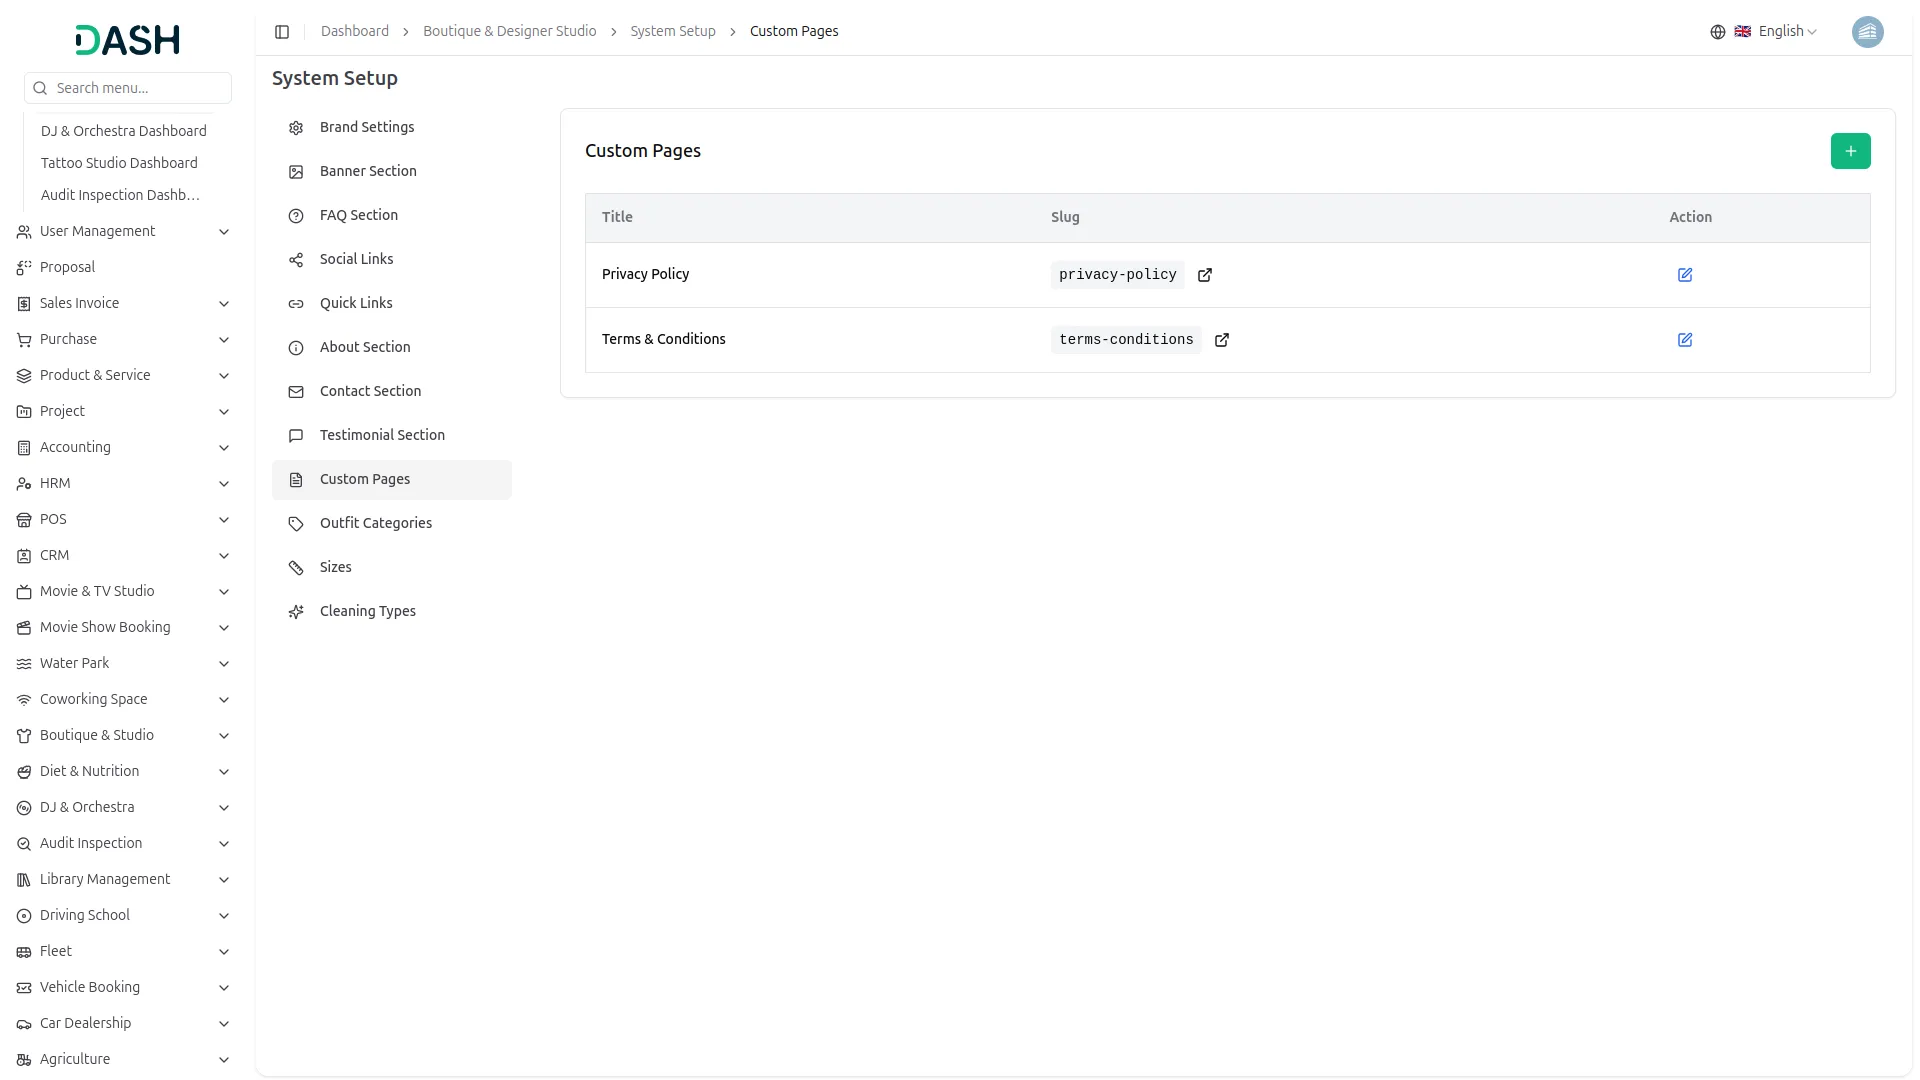
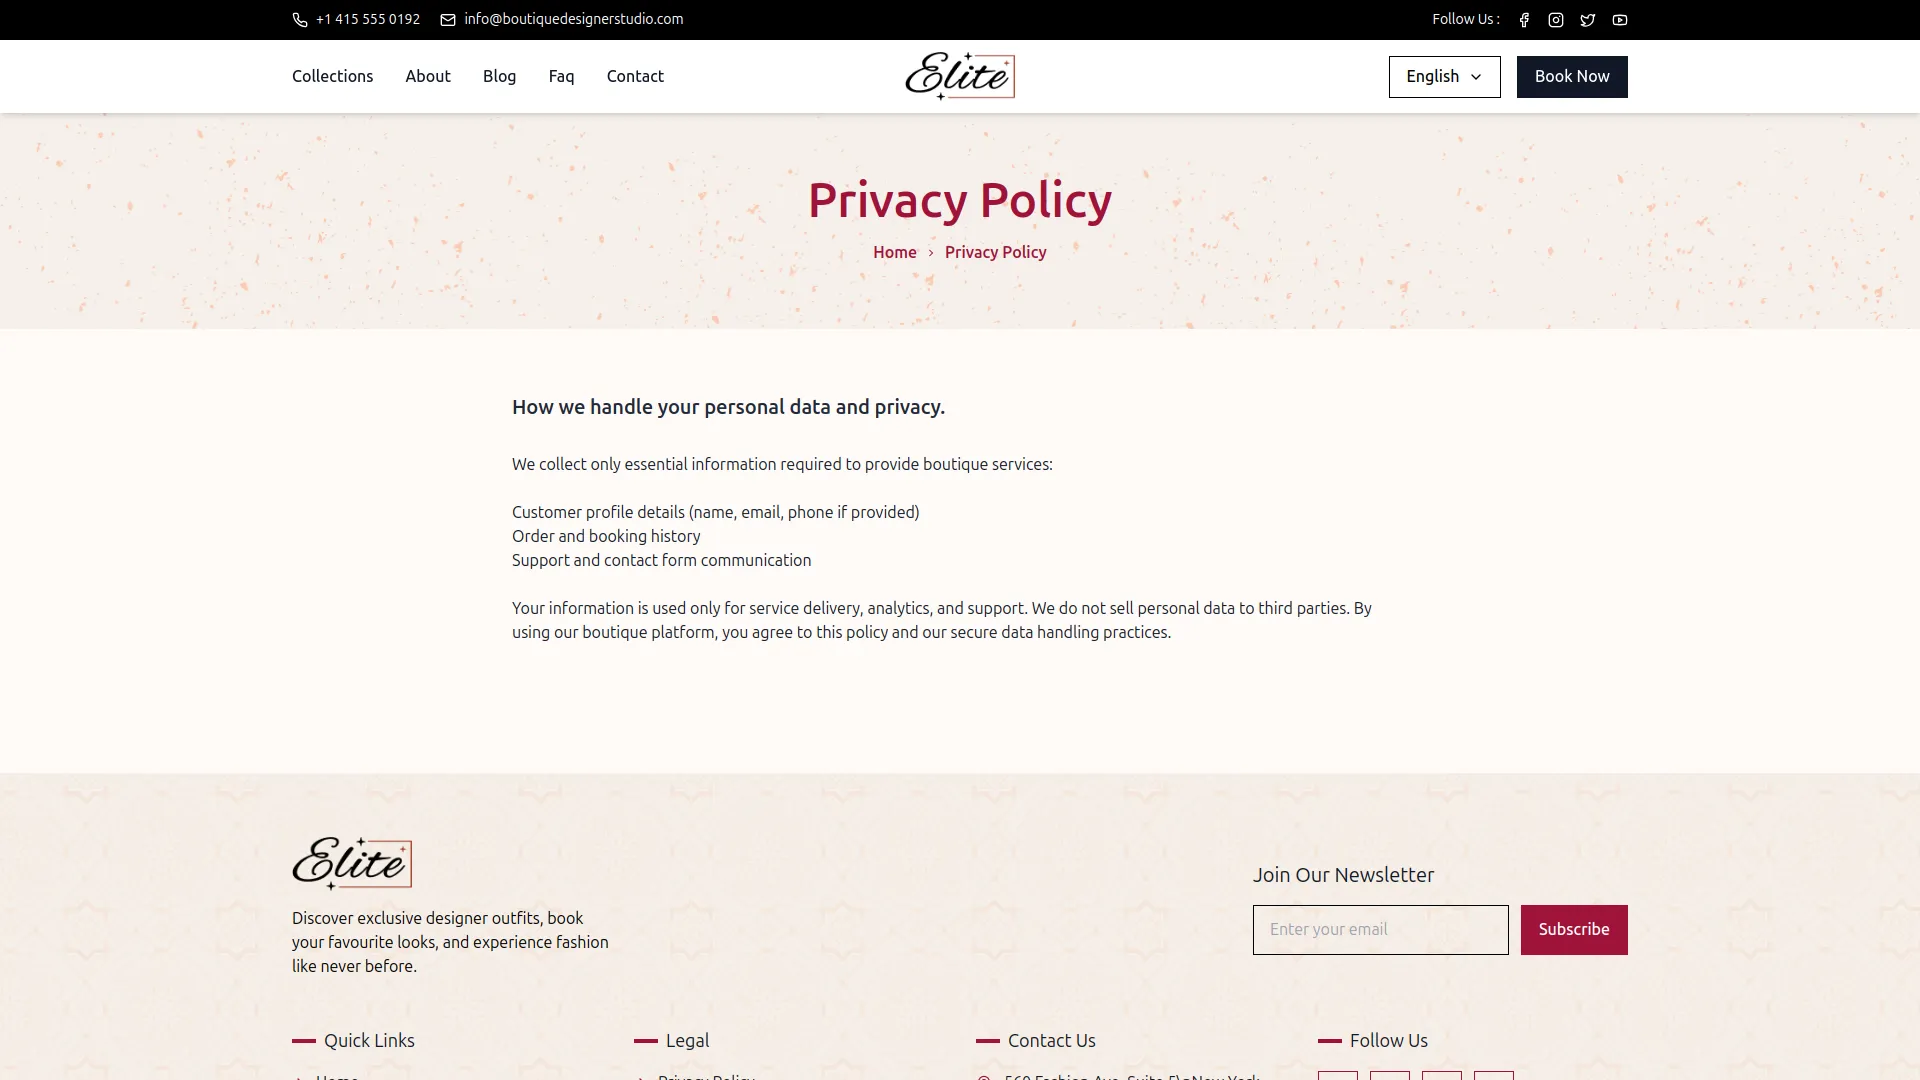
- Once saved, each custom page becomes a live, accessible page on your website via its unique slug URL. Pages such as Privacy Policy and Terms & Conditions will appear as clickable links in the Legal section of the footer, allowing clients to review your studio’s policies directly from the website.
Outfit Categories
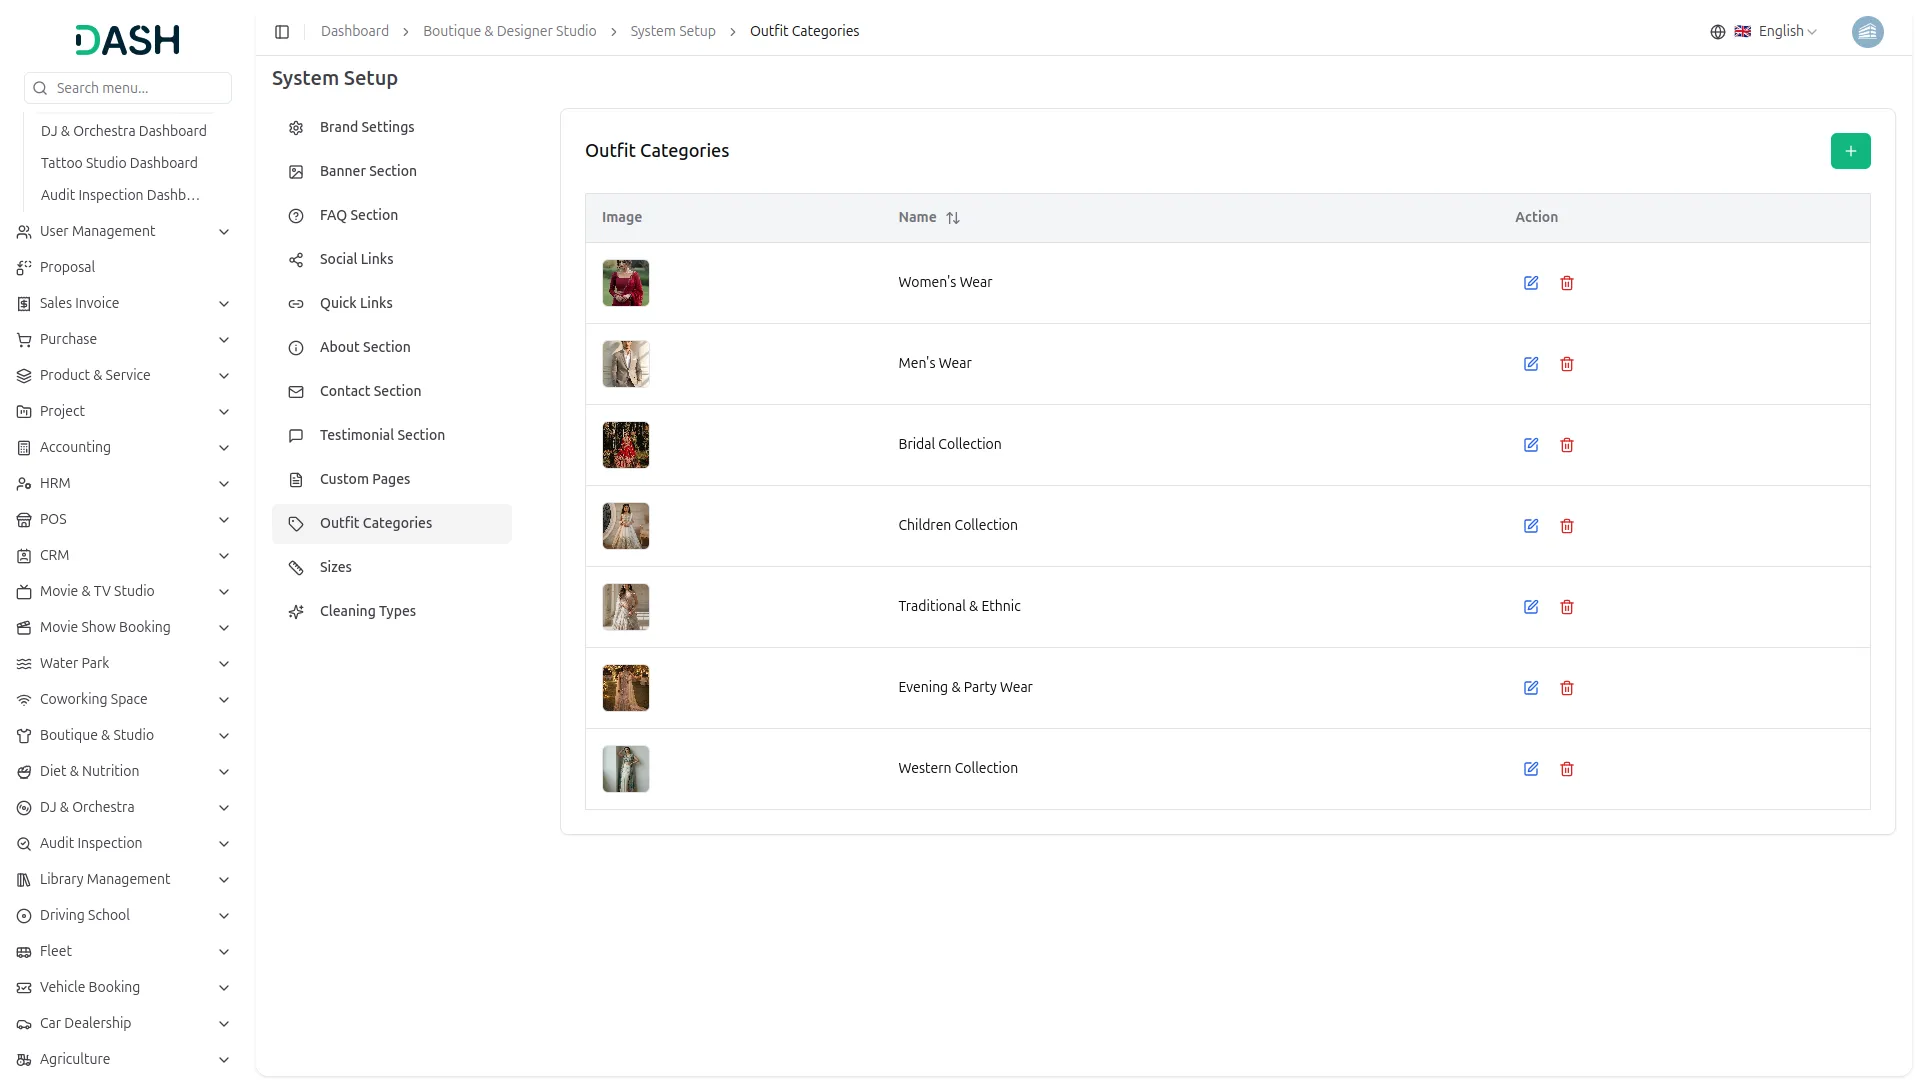
- To add a new category, click the “Create” button at the top right. In the Create Outfit Category form, upload a category Image using the Browse button, and enter the category Name.
- In the Outfit Categories section, you will find a list of all existing categories showing their Image, Name, and Actions. In the Actions column, you can use the Edit to update a category or the Delete to remove it.
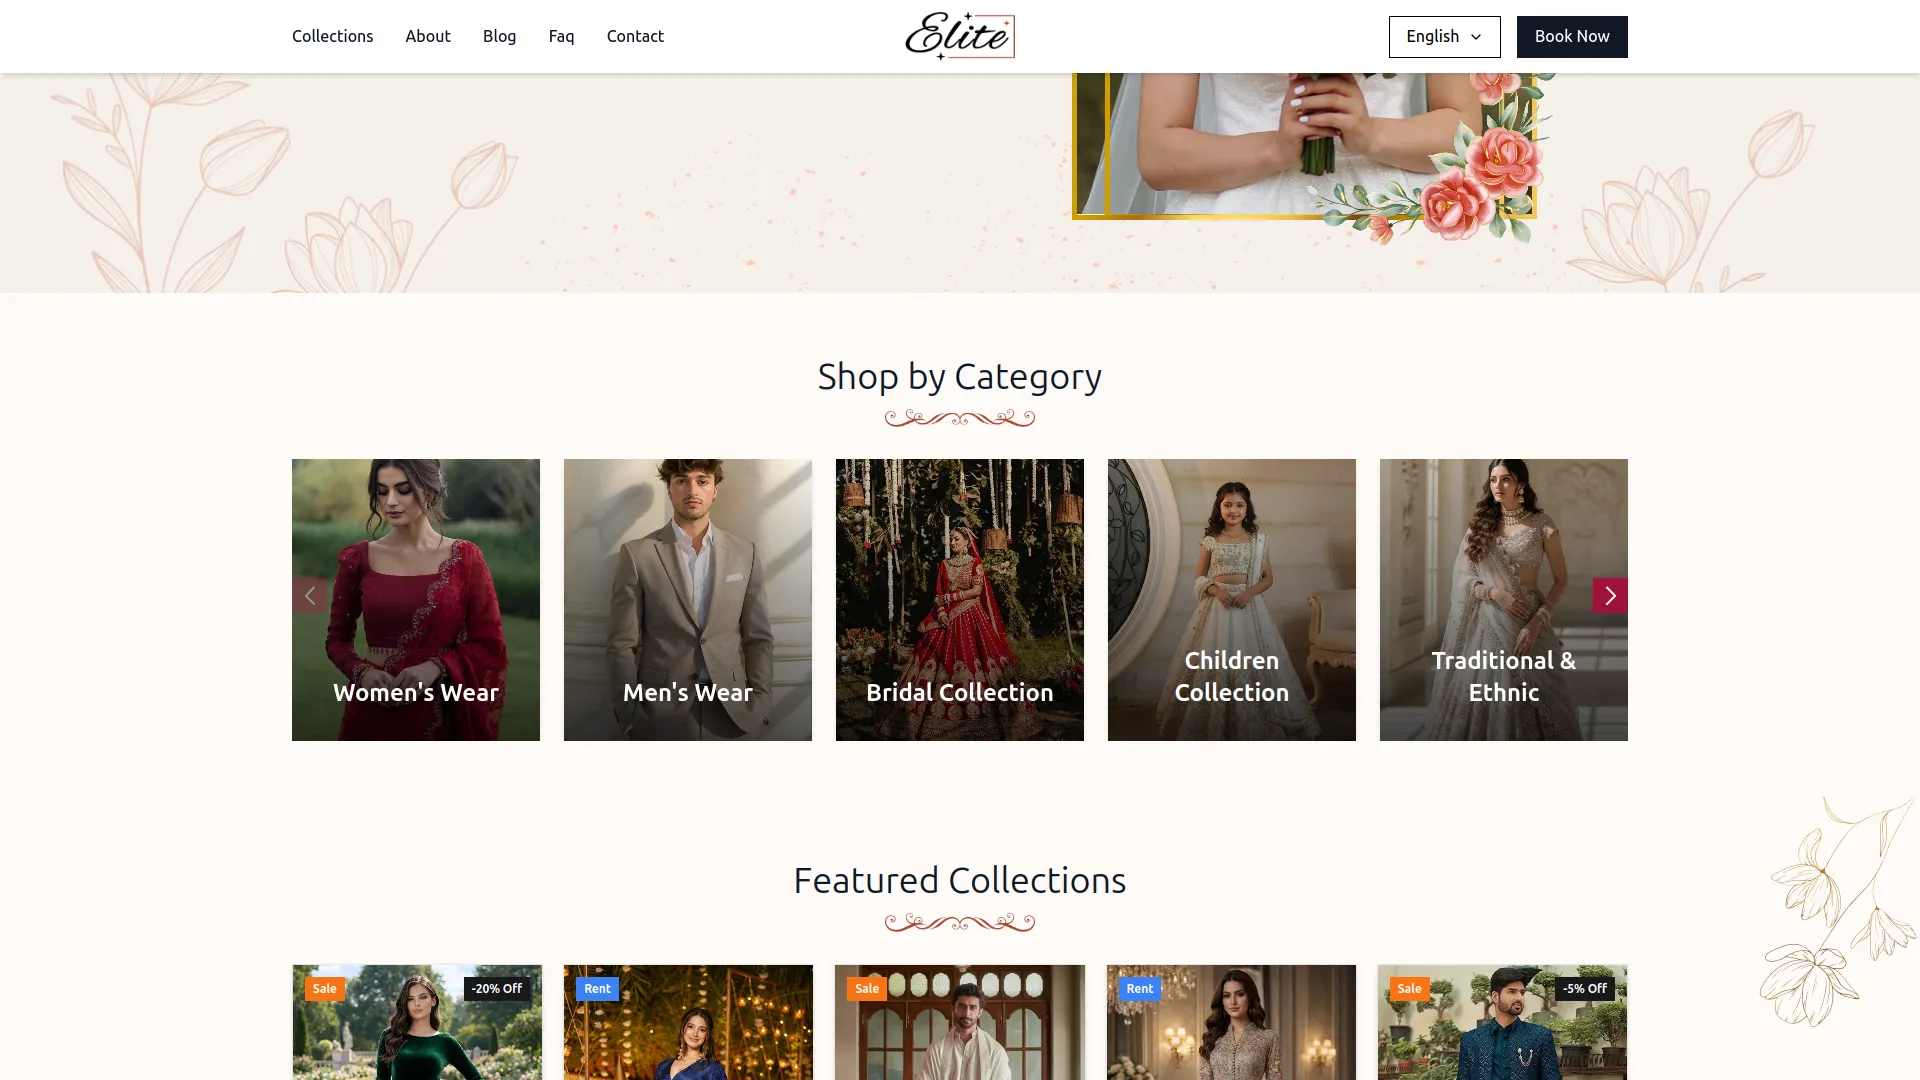
- Once saved, all outfit categories will appear in the Shop by Category section on your homepage as visual cards with their image and name. They will also appear as filter options in the Collection Type filter panel on the Collection List page, allowing visitors to browse outfits by category such as Women’s Wear, Men’s Wear, Bridal Collection, Children Collection, and more.
Sizes
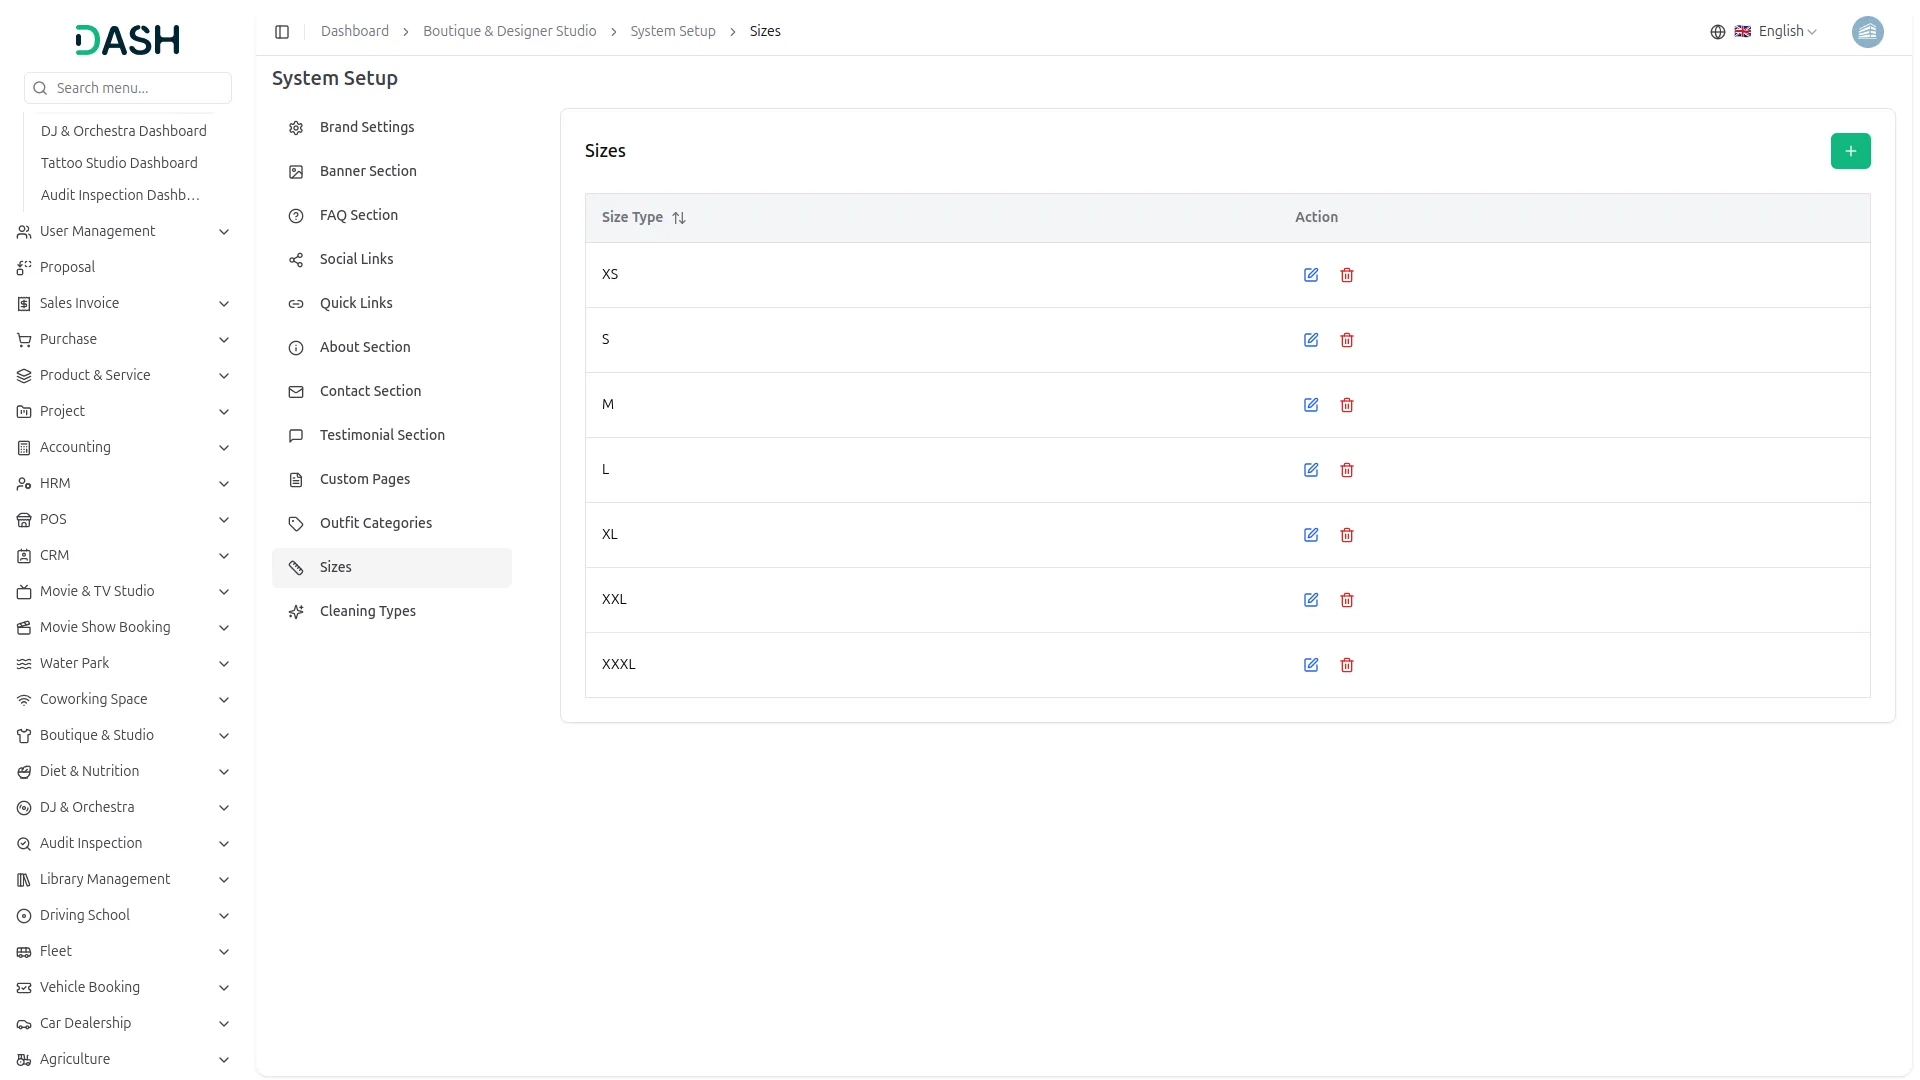
- To add a new size, click the “Create” button at the top right. In the Create Size form, enter the Size Type.
- In the Sizes section, you will find a list of all existing size types with their Size Type and Actions. In the Actions column, you can use the edit icon to update a size or the delete icon to remove it.
- Once saved, all sizes added here will be available for selection when creating or editing an outfit in the Manage Outfits section, allowing you to assign the correct sizes to each outfit in your collection.
Cleaning Types
- To add a new cleaning type, click the “Create” button at the top right. In the Create Cleaning Type form, enter the Cleaning Type.
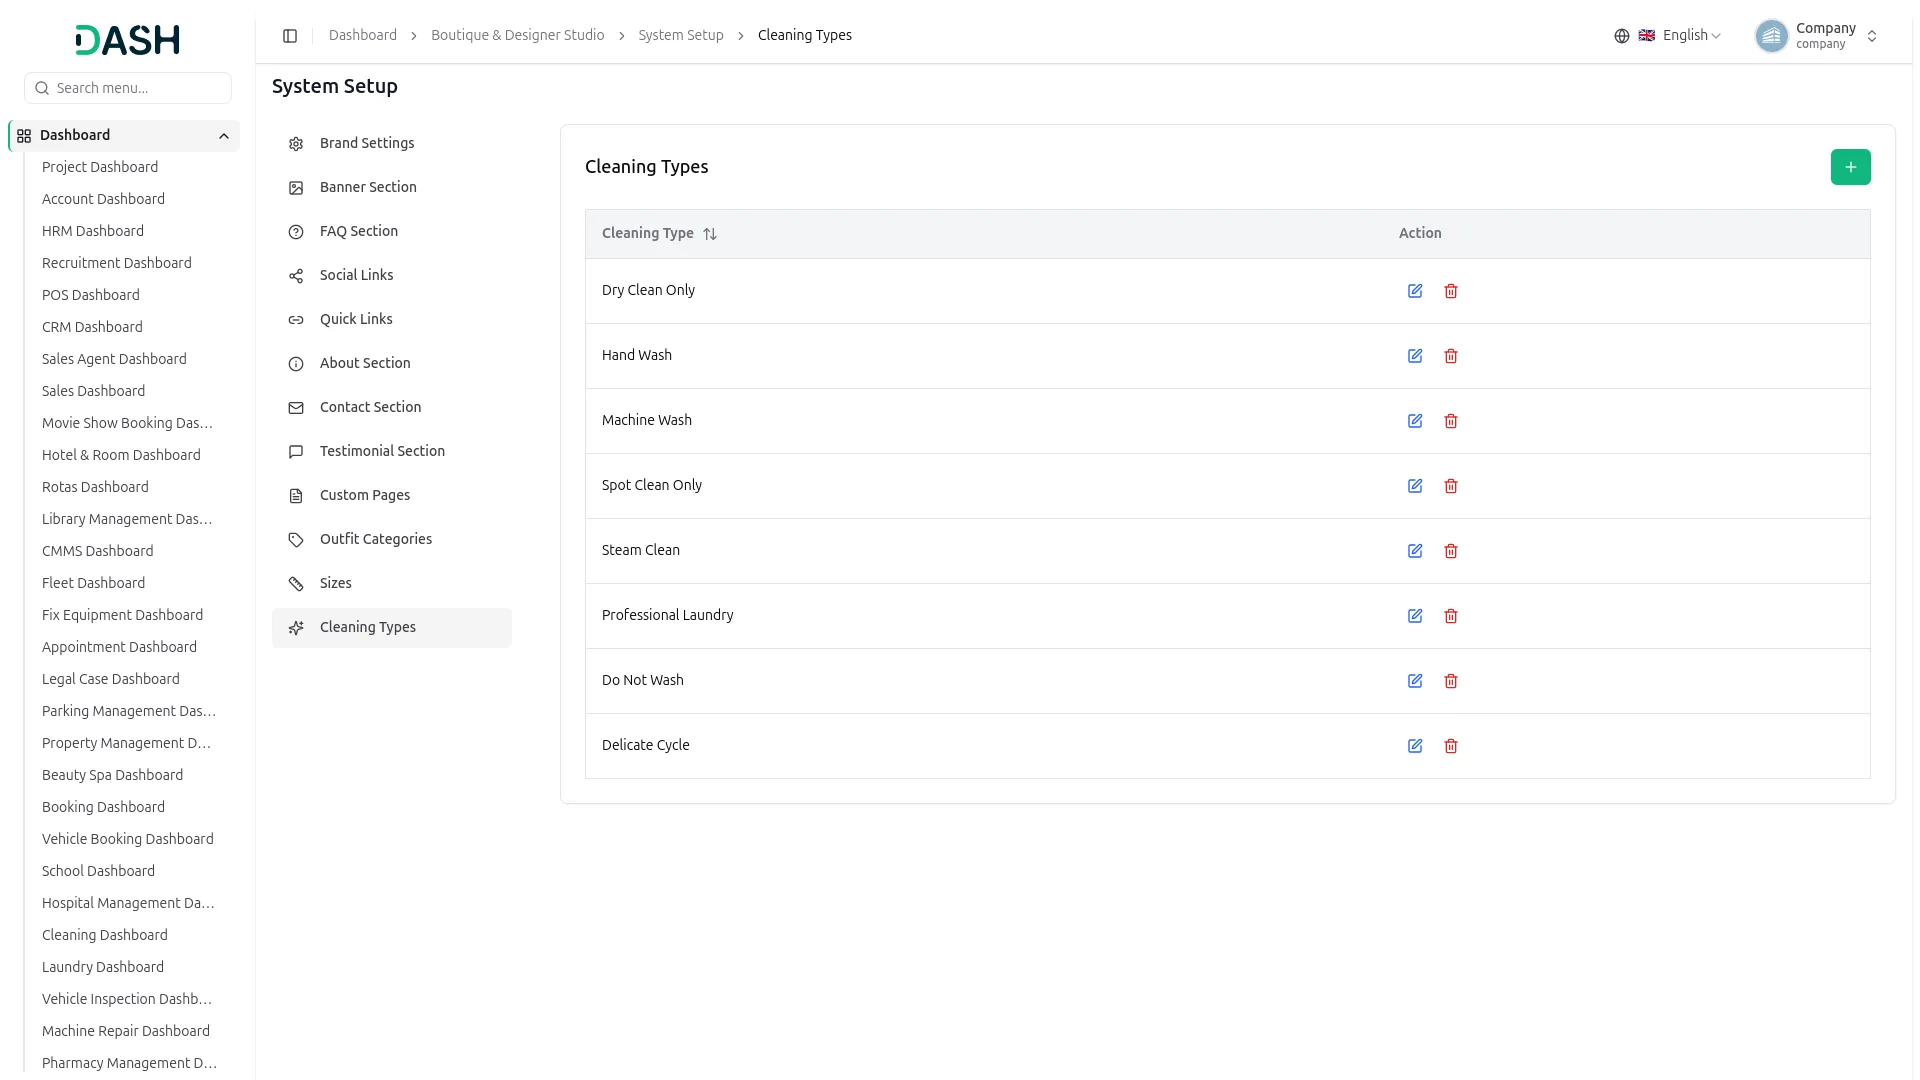
- In the Cleaning Types section, you will find a list of all existing cleaning types with their Cleaning Type and Actions. In the Actions column, you can use the edit icon to update a cleaning type or the delete icon to remove it.
- Once saved, all cleaning types added here will be available for selection in the Manage Outfit Wash & Dry Clean section, allowing you to schedule and track the proper cleaning of each outfit after a rental booking is completed, based on the care requirement of that specific outfit.
Manage Outfits
- To add a new outfit, click the “Create” button at the top right and fill in the form. In the Outfit Information section, enter the Outfit Name and Outfit Design No, select a Category from the dropdown (configuration under System Setup → Outfit Categories), pick a Color using the color picker, and select the Gender using the radio button, choosing either Male, Female, or Kids.
- Select one or more Sizes from the dropdown (created under System Setup → Sizes) and select the applicable Cleaning Types (created under System Setup → Cleaning Types).
- In the Pricing & Condition section, choose the Pricing Type using the radio button — select Sale to reveal the Sale Price and Discount (%) fields, or select Rent to reveal the Rental Price field.
- The pricing fields update dynamically based on your selection. Enter the Outfit Worked Type (e.g., Hand Embroidered, Machine Stitched), the Fabric Type (e.g., Silk, Cotton, Chiffon), and set the Condition Status using the radio button, selecting either New, Good, Fair, or Poor to reflect the current physical condition of the outfit. Write a detailed Description using the rich text editor to describe the outfit’s design, material, and styling notes.
- In the Outfit Images section, upload a Main Image using the Browse button, and upload one or more additional Outfit Images for the gallery.
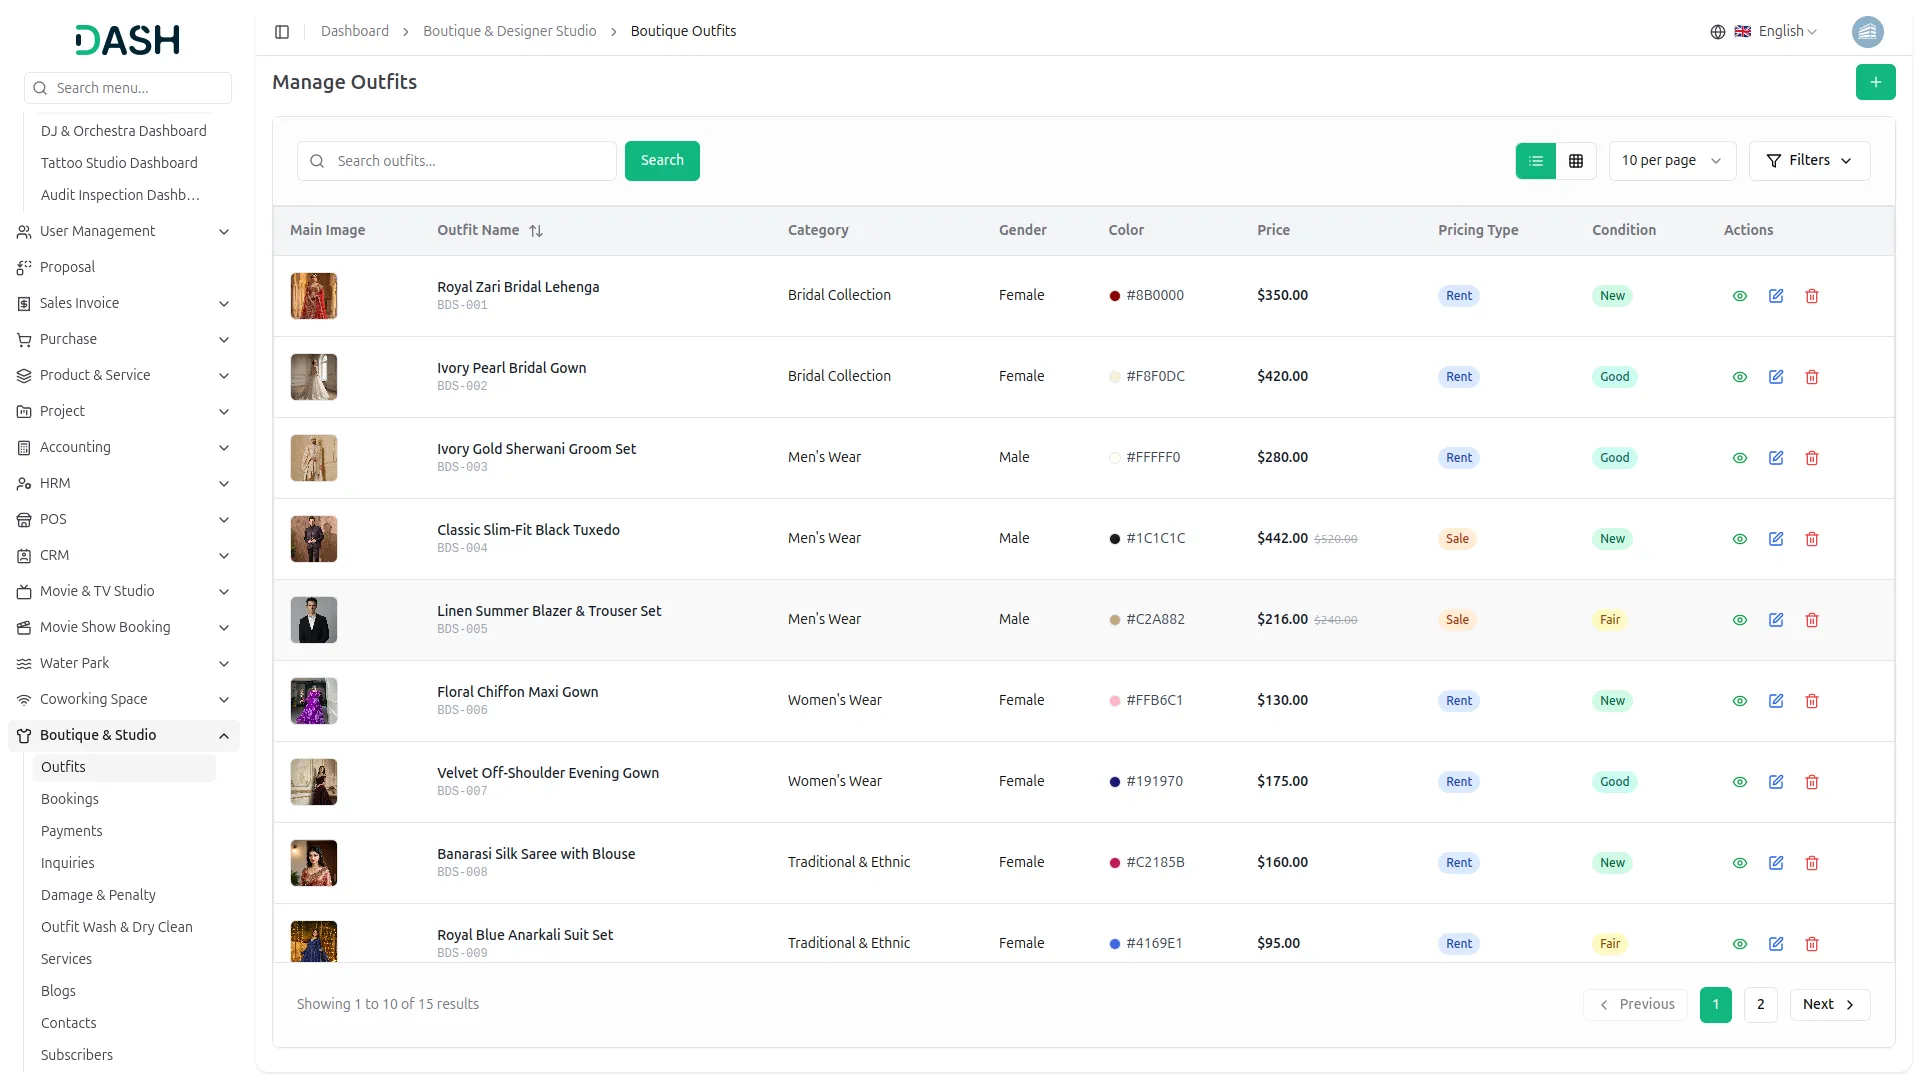
- The list page displays a table of columns including the outfit’s Main Image, Outfit Name, Category, Gender, Color, Price, Pricing Type, Condition, and Actions. Use the search bar to find a specific outfit by name. You can also switch between list view and grid view using the toggle button.
- Click the Filters button to apply filtering options, including filtering by Gender, Pricing Type, and Condition Status. Click the Apply button to filter the data or the Clear button to reset it.
- In the Actions column, you can use the View to see the full outfit details, the Edit to update the outfit’s information, or the Delete to permanently remove the outfit from the system.
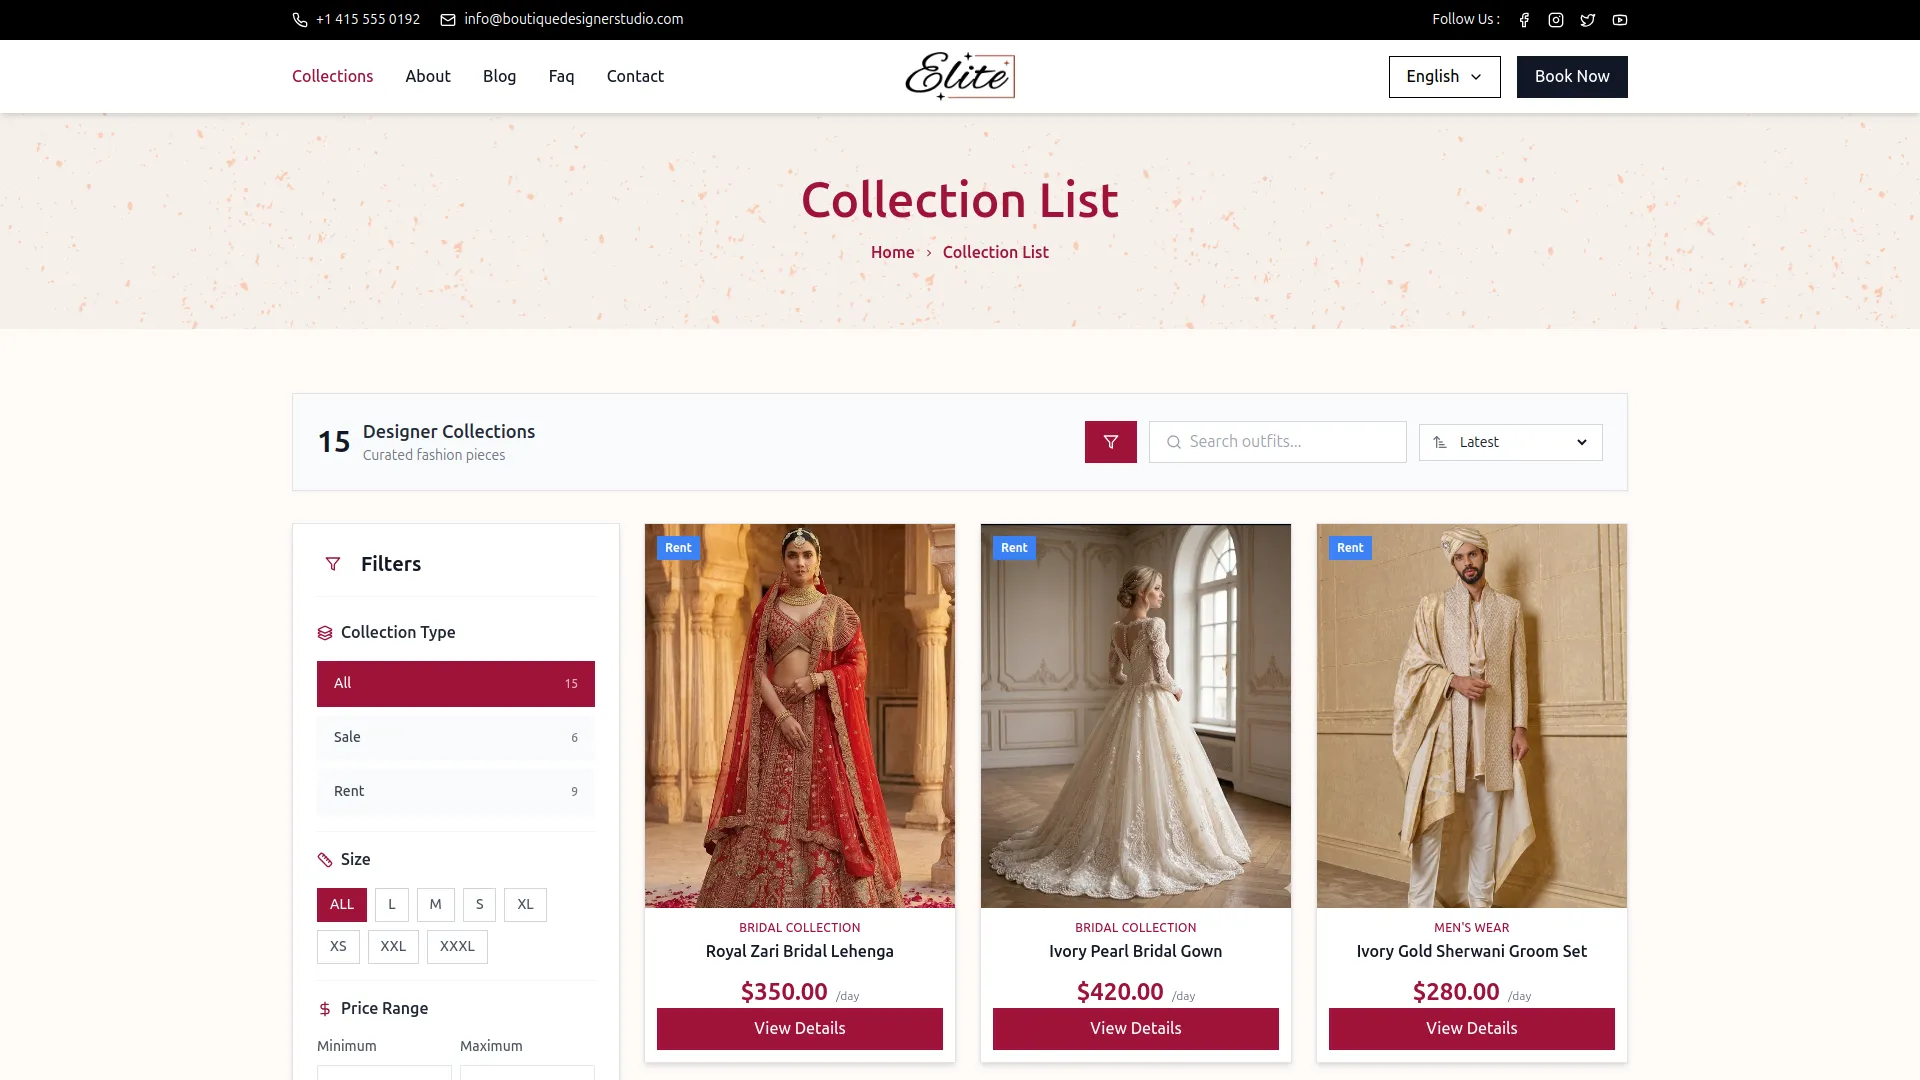
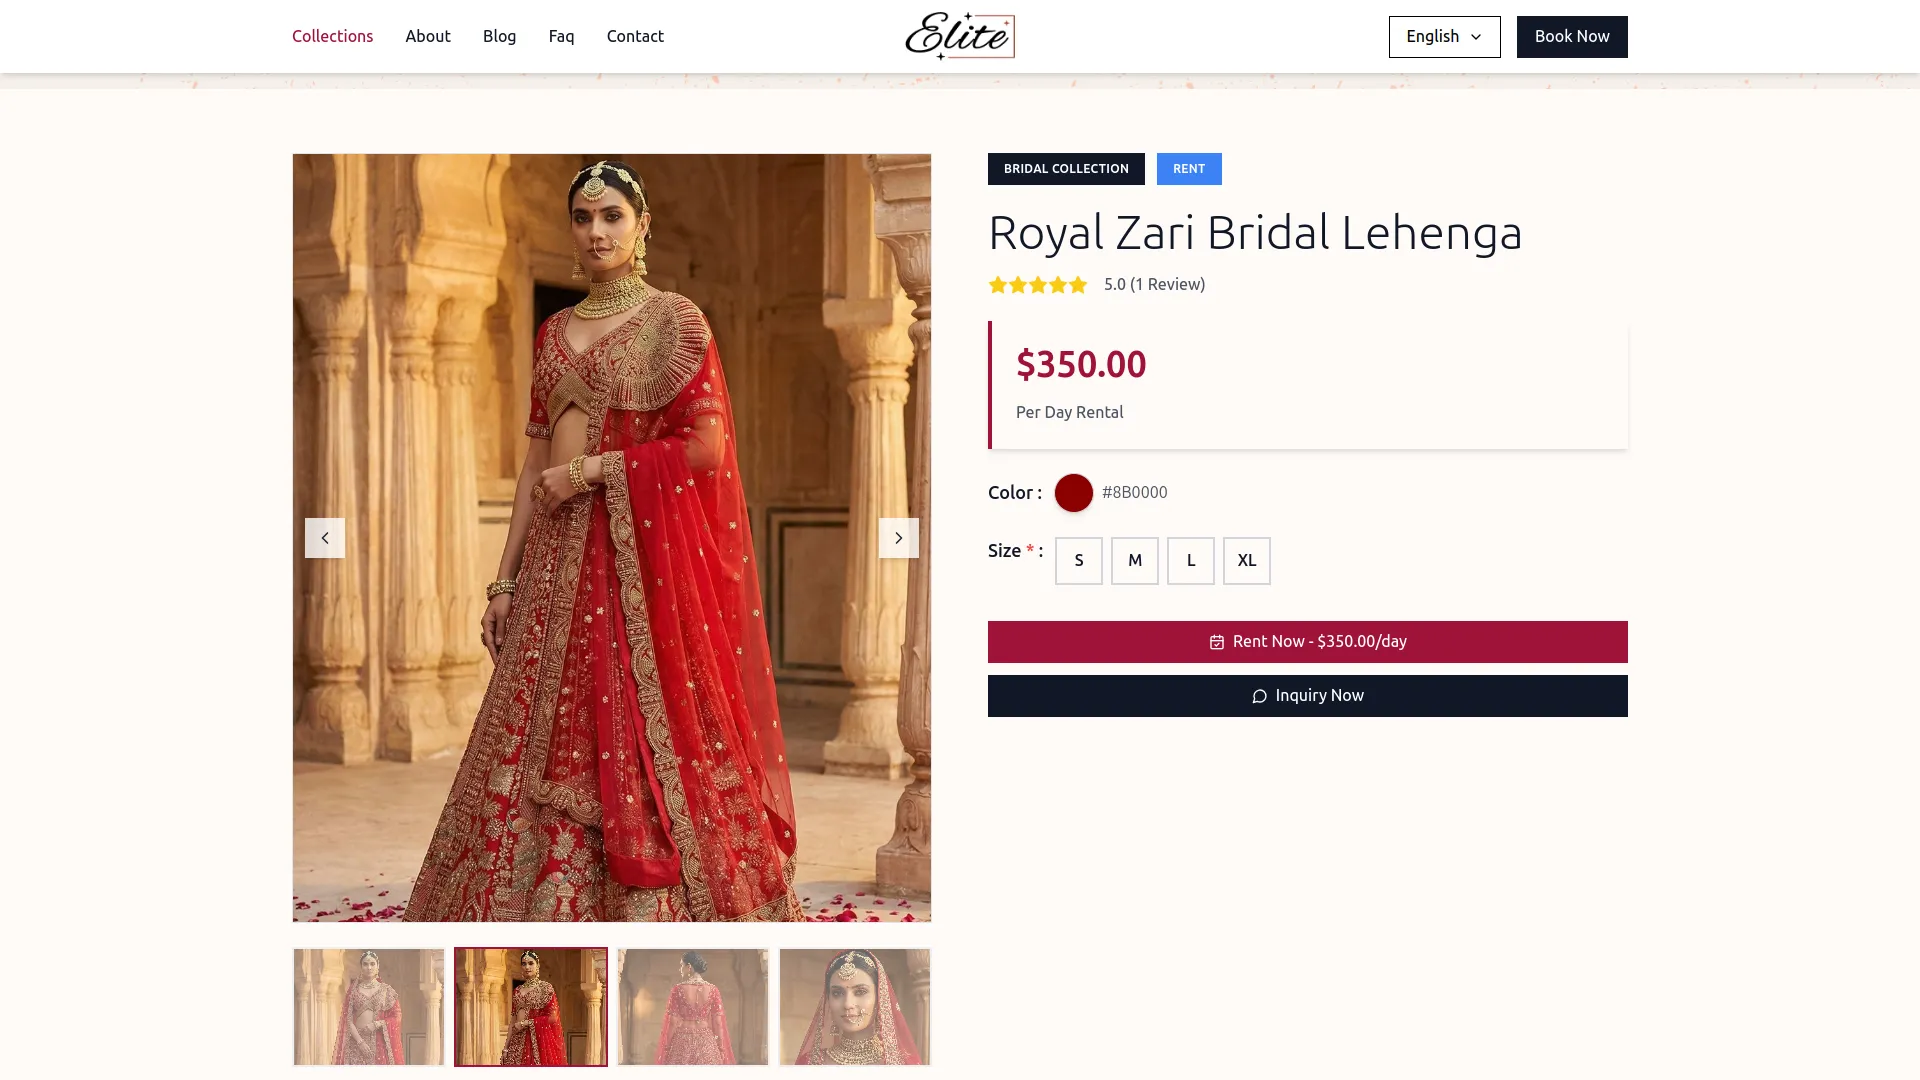
- Once an outfit is created, it will appear on the Collection List page of your website, displaying the main image, outfit name, category label, pricing type badge (Rent or Sale), price, and a View Details button. On the Collection Detail page, visitors will see the complete outfit information, including the full image gallery, color swatch, available sizes for selection, fabric type, work type, cleaning types, and the full description, giving clients everything they need to make a confident booking or inquiry decision.
Manage Bookings
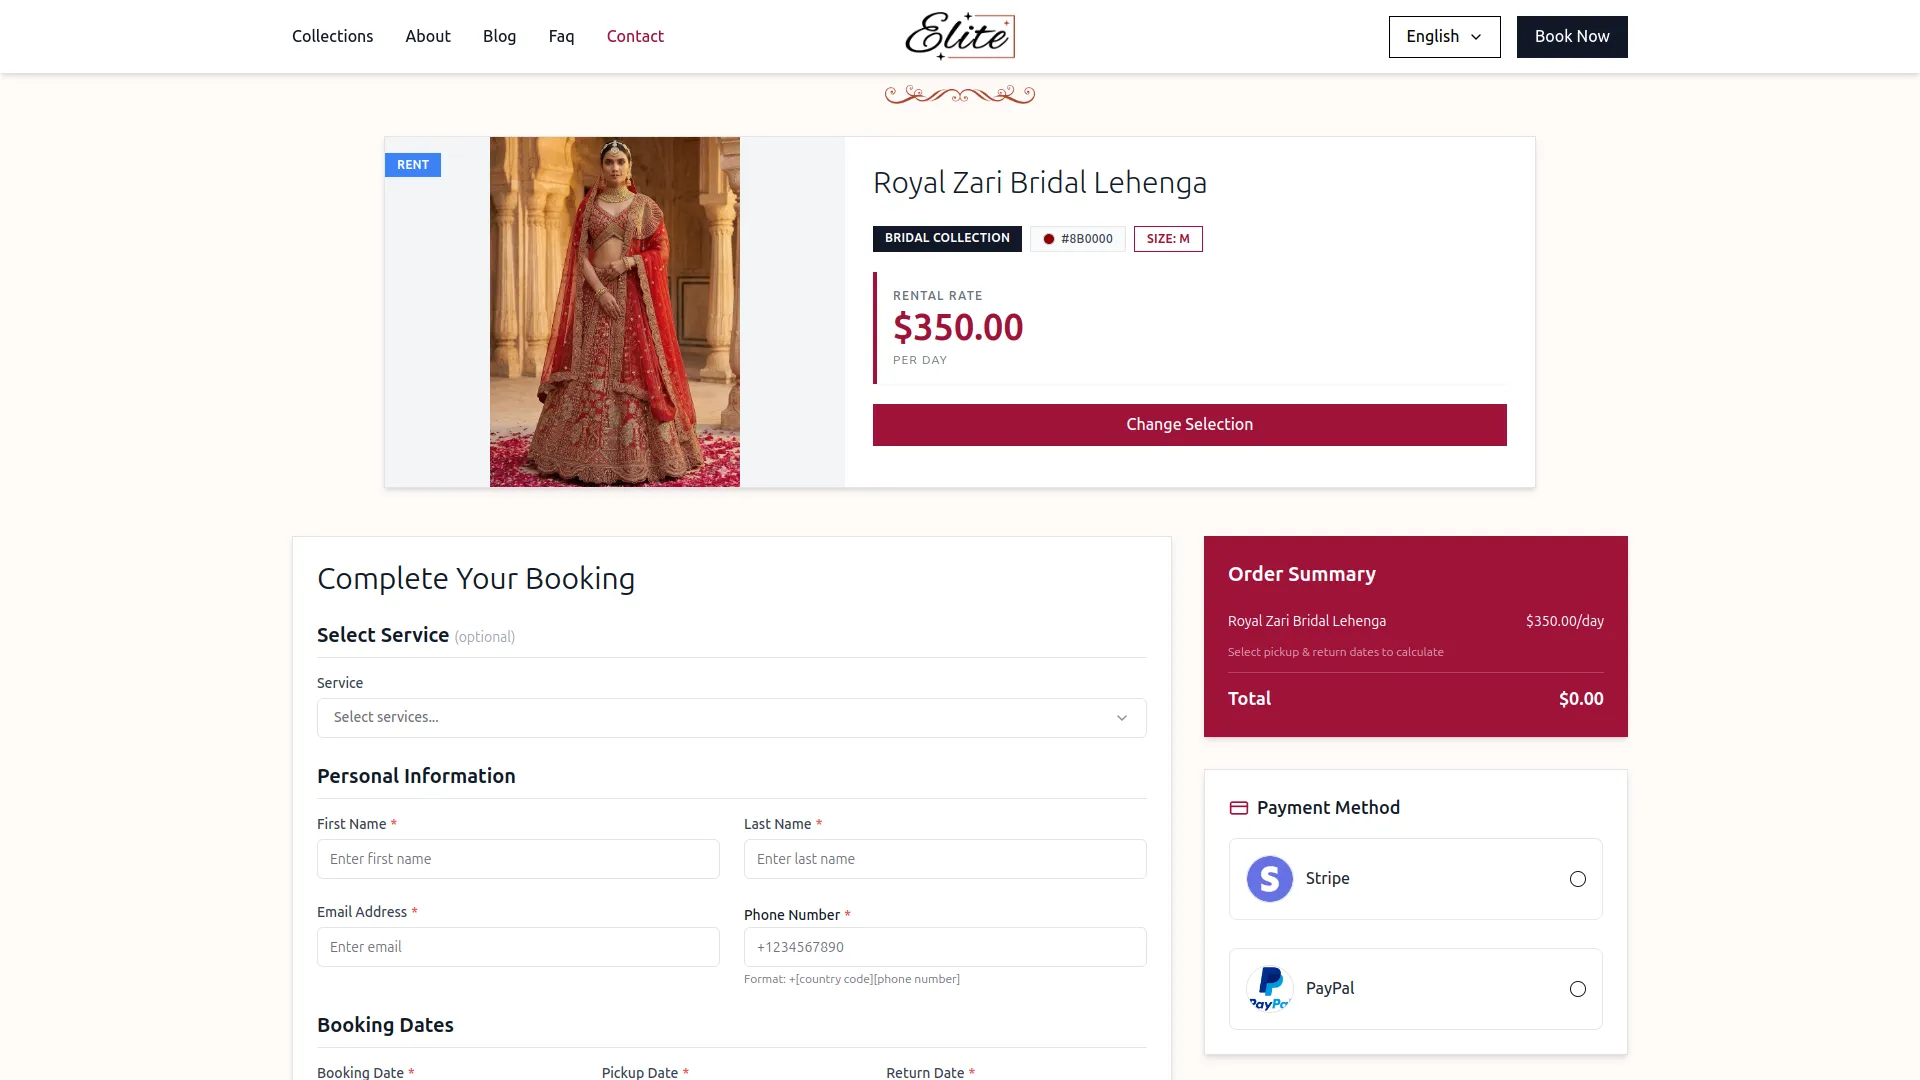
- When a visitor browses the Collection List page and finds an outfit they like, they click the “View Details” button to open the Collection Detail page. From there, they select their preferred Size and click the “Rent Now” or “Buy Now” button, which takes them directly to the “Book Your Perfect Rental” page to complete their booking.
- On the booking page, the selected outfit will appear under Your Selected Item along with the outfit image, name, and price. The customer then fills in their personal details, booking dates, and selects an optional service.
- The behavior of the booking dates depends on the outfit’s pricing type, if the outfit is set to Sale, only the Booking Date will be displayed. If the outfit is set to Rent, the Booking Date, Pickup Date, and Return Date will all be displayed, as the rental price is calculated per day based on the number of days between the pickup and return date.
- The Order Summary panel will display the total amount calculated accordingly, and the customer’s chosen payment method,Stripe or PayPal, will be captured at the time of booking submission.
- To add a new booking, click the “Create” button on the manage Booking page. Select an Outfit from the dropdown (comes from the Manage Outfits section), choose the Size, and the Price will populate automatically based on the selected outfit.
- In the Customer Information section, enter the customer’s First Name, Last Name, Email, Phone number, and full Address.
- In the Booking Dates section, select the Booking Date, Pickup Date, and Return Date. Optionally, select one or more Services from the dropdown, and add any special requests or notes in the Notes field. The Total Amount will be calculated automatically based on the outfit price and rental duration, displayed as an order summary at the bottom.
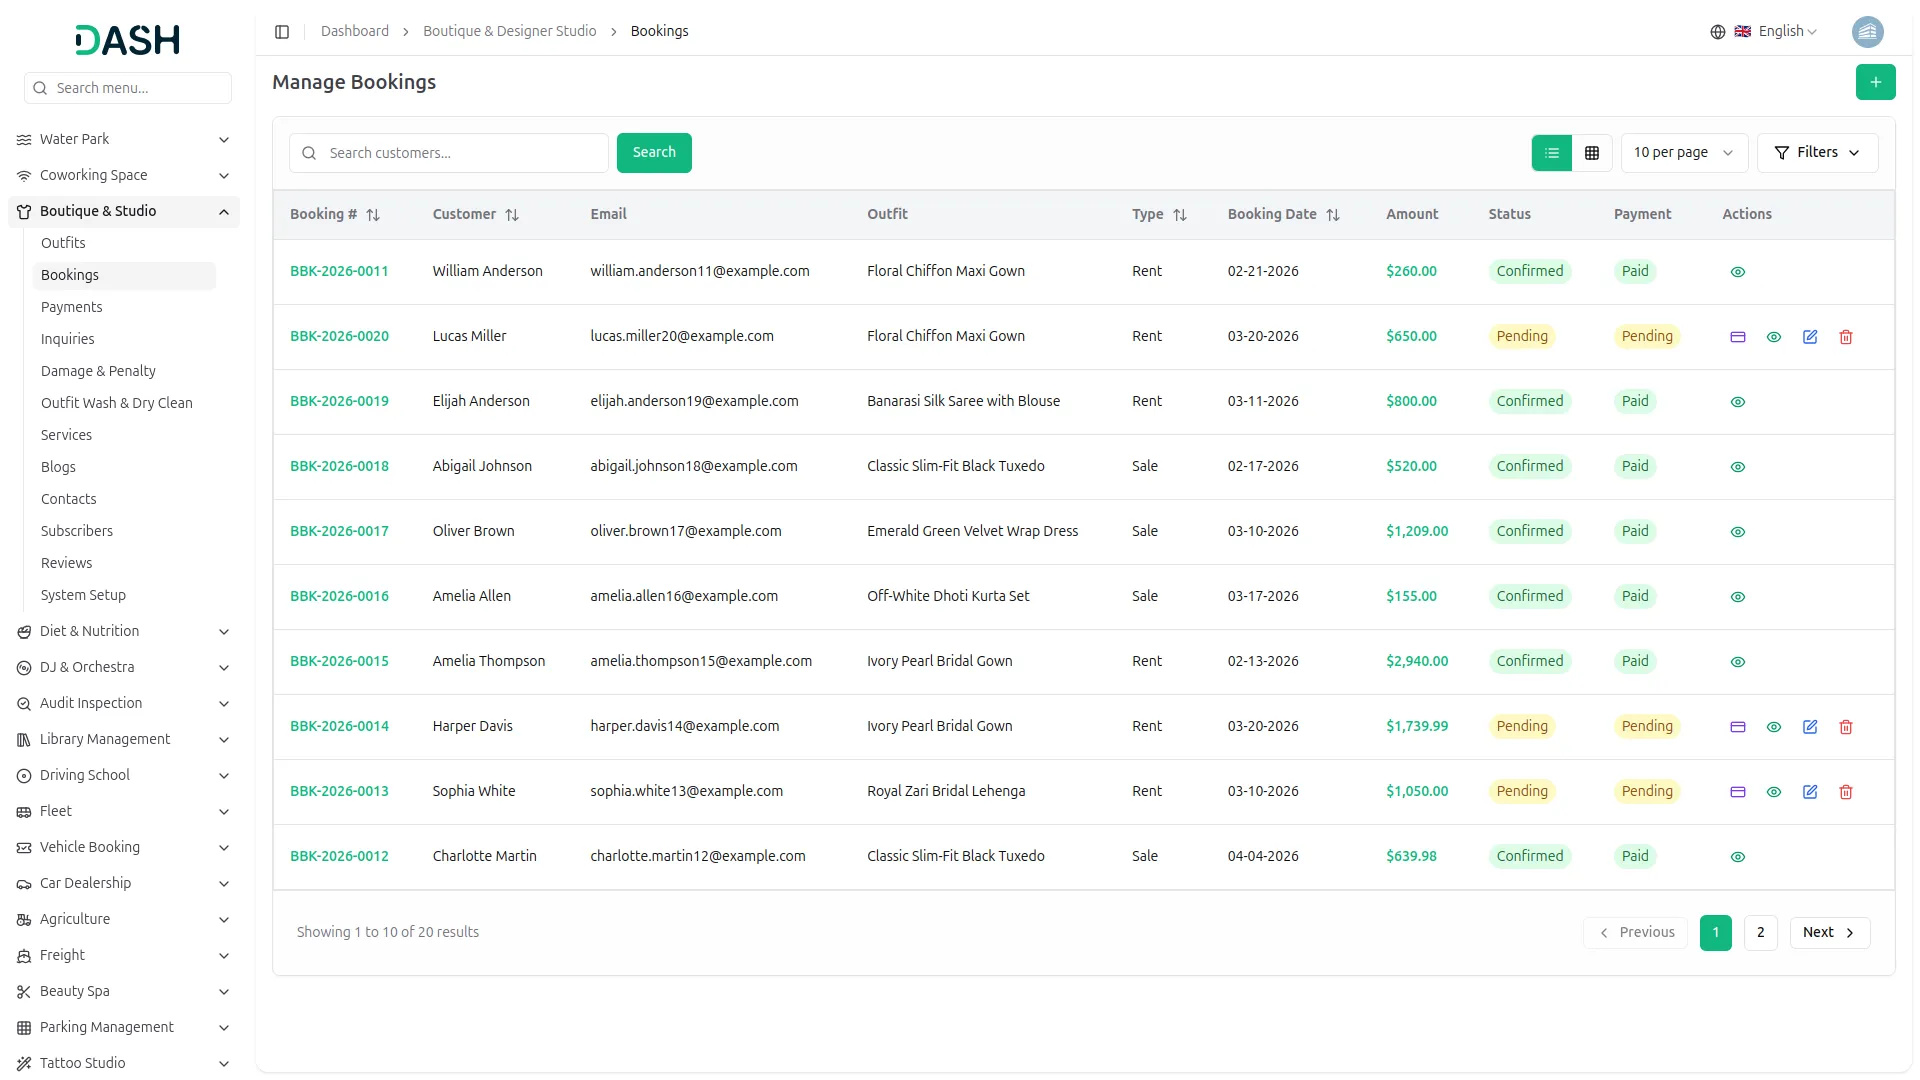
- The list page displays a table of columns including the Booking, Customer, Email, Outfit, Type, Booking Date, Amount, Status, Payment, and Actions. Use the search bar to find a specific booking by customer name. You can also switch between list view and grid view using the toggle button.
- Click the Filters button to apply filtering options, including filtering by Outfit, Booking Status, and Payment Status. Click the Apply button to filter the data or the Clear button to reset it.
- In the Actions column, you can use the Process Payment to manually record a payment for a pending booking. The Create Payment modal will open, showing the Booking Details (Booking, Customer, Email, Booking Date, and Total Amount). Enter the Payment Date, confirm the Amount, add an optional Reference Number and Notes, and click Add Payment to mark it as paid.
- You can also use the View to see the full booking details, the Edit to update the booking information, or the Delete to permanently remove the booking from the system.
- Note: The edit and delete options are only available for bookings with a Pending status. Confirmed and paid bookings can only be viewed.
Manage Payments
- The Manage Payments section gives you a centralized view of all payment records associated with your bookings.
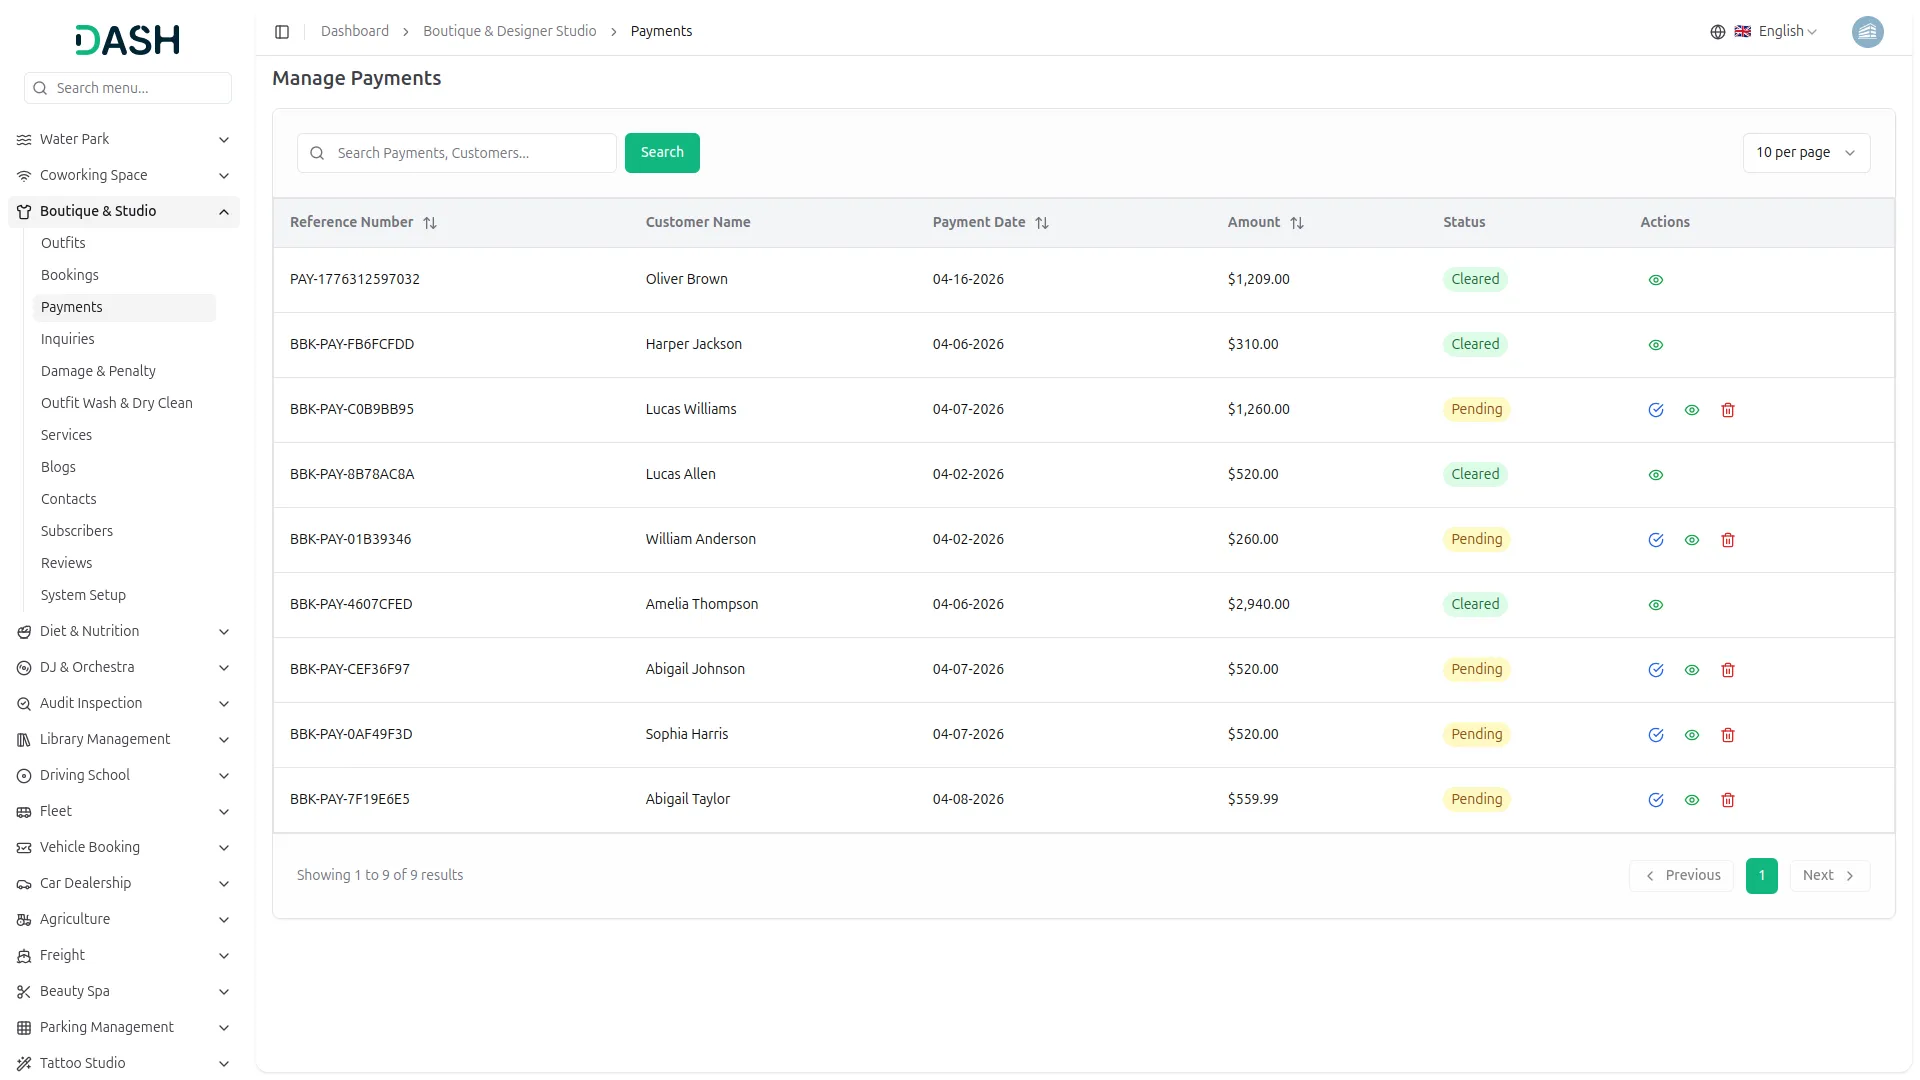
- The list page displays a table of columns including the Reference Number, Customer Name, Payment Date, Amount, Status, and Actions. Use the search bar to find a specific payment by reference number or customer name.
- In the Actions column, you can use the Approve to manually mark a pending payment as cleared, the View to see the full payment details, or the Delete to permanently remove the payment record from the system.
- Note: The approve and delete options are only available for payments with a Pending status. Payments that have already been cleared can only be viewed.
- The Manage Payments section is a purely backend operation. However, it directly impacts the Payment status displayed in the Manage Bookings list.
- Once a payment is approved and marked as Cleared, the corresponding booking’s payment status will update from Pending to Paid, and the booking status will reflect as Confirmed, giving the customer a fully confirmed rental record tied to their booking on the “Book Your Perfect Rental” page.
Manage Inquiries
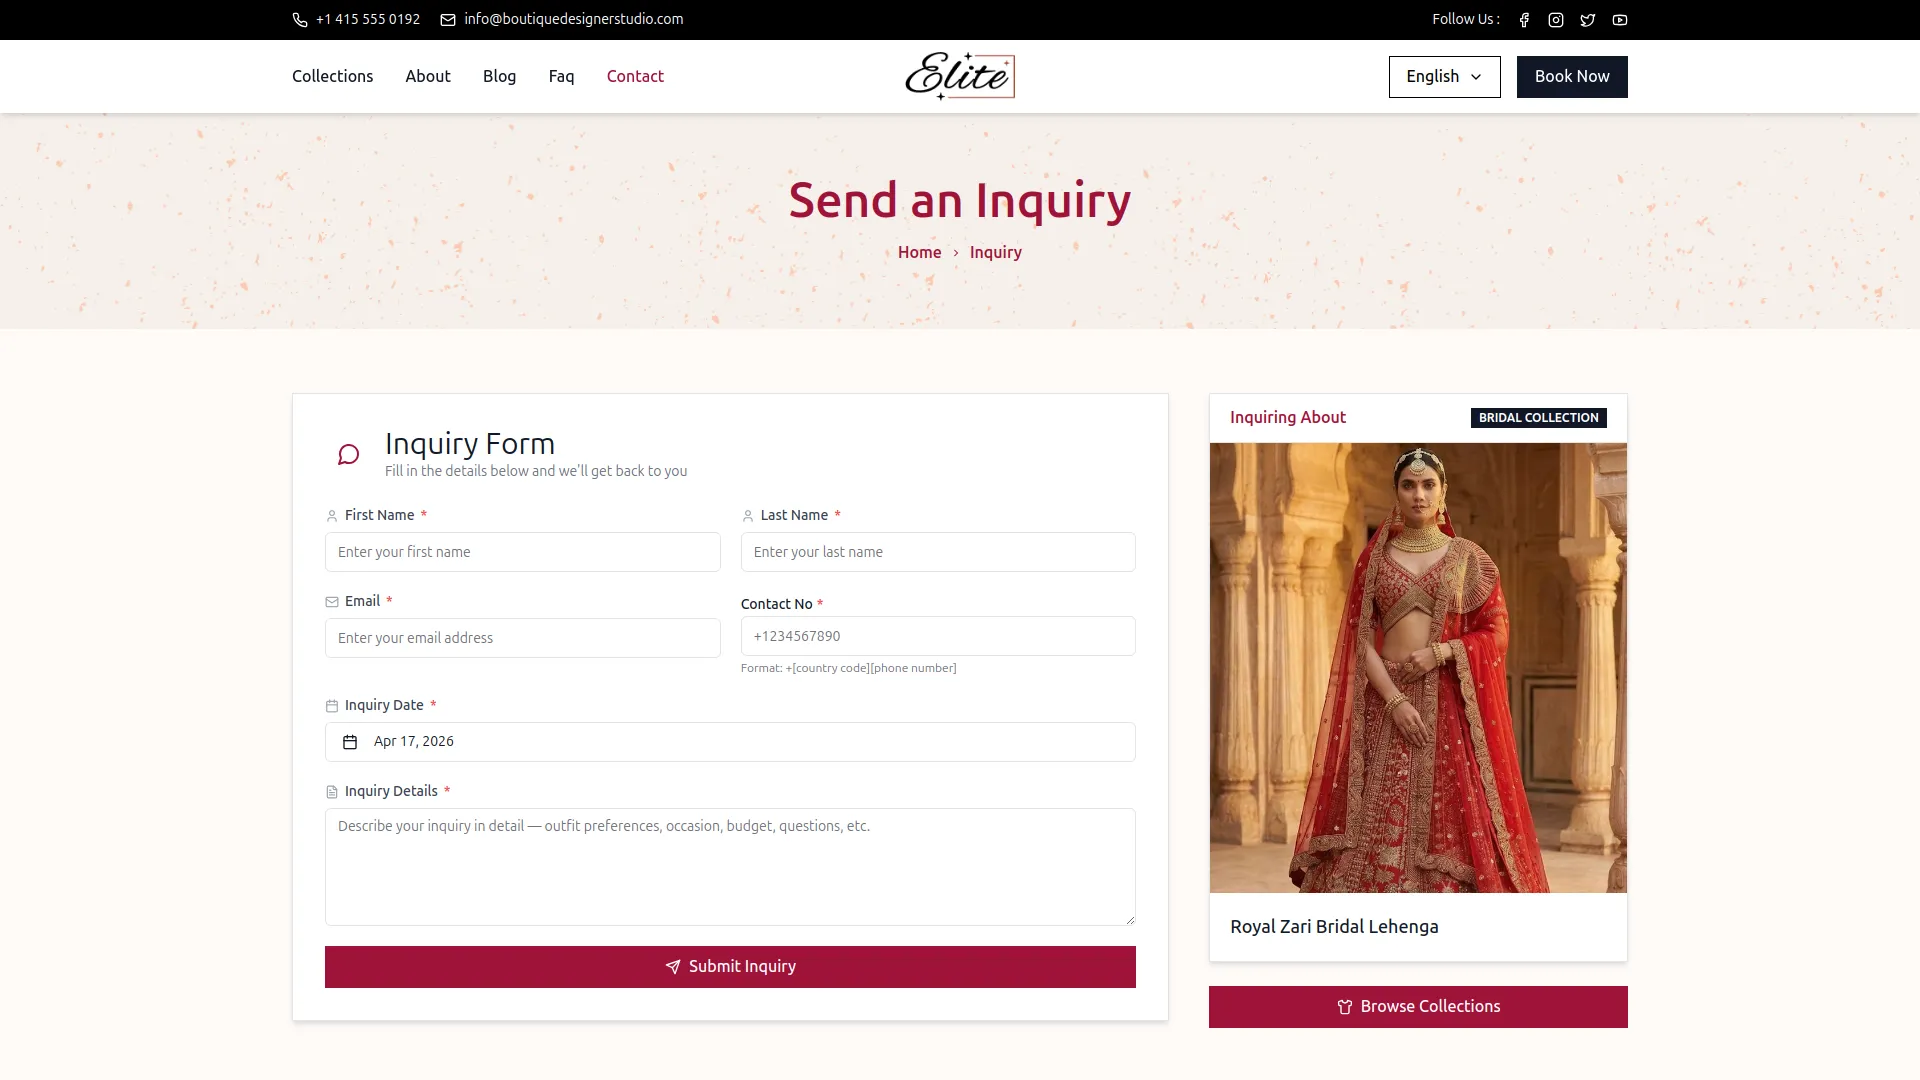
- When a visitor browses your website and finds an outfit they are interested in, they can click the “Inquiry Now” button on the Collection Detail page to submit their query about that specific outfit.
- This opens a dedicated Inquiry Form where the visitor fills in their First Name, Last Name, Email, Contact No, Inquiry Date, and Inquiry Details, describing their outfit preferences, occasion, budget, or any questions they may have.
- On the right side of the form, the “Inquiring About” panel displays the outfit’s image, name, and category badge, confirming exactly which outfit the inquiry is being submitted for. Once the visitor clicks Submit Inquiry, their details are instantly captured and recorded in the Manage Inquiries section in the backend with a Pending status, allowing you to review and follow up with the client promptly.
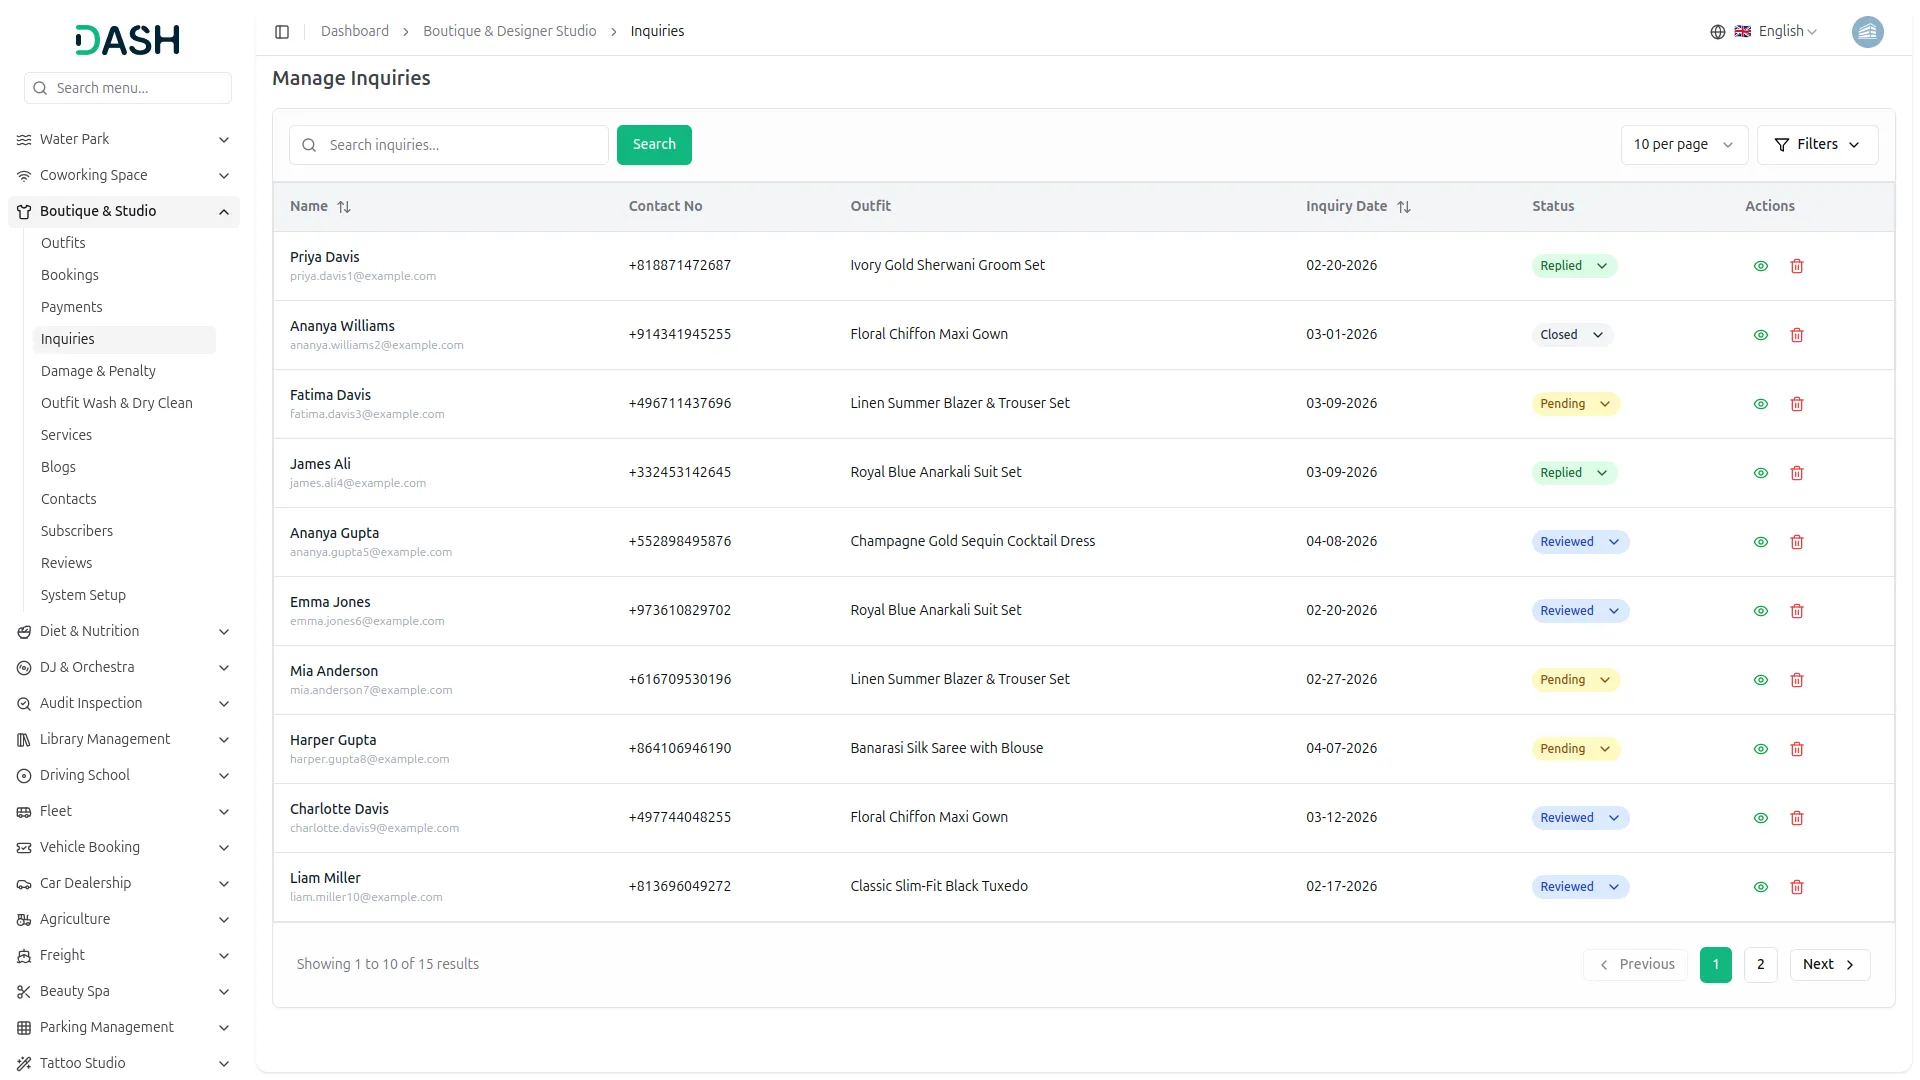
- The list page displays a table of columns including the Name, Contact No, Outfit, Inquiry Date, Status, and Actions. Use the search bar to find a specific inquiry by name.
- Click the Filters button to apply filtering options, including filtering by Status and Outfit. Click the Apply button to filter the data or the Clear button to reset it.
- Each inquiry has a Status dropdown that you can update directly from the list. Click on the status badge of any inquiry to change it to one of the following stages: Pending, Reviewed, Replied, or Closed, allowing you to track and manage the progress of each client inquiry efficiently.
- In the Actions column, you can use the View to see the full inquiry details or the Delete to permanently remove the inquiry from the system.
Damage & Penalty
- To add a new damage & penalty record, click the “Create” button on the damage & penalty page. Select a Booking from the dropdown (comes from the Manage Booking section). Note that only confirmed bookings without an existing damage record will appear in this list.
- Enter the Damage Type, enter the Penalty Fee, and select the Bank Account to which the penalty payment should be directed.
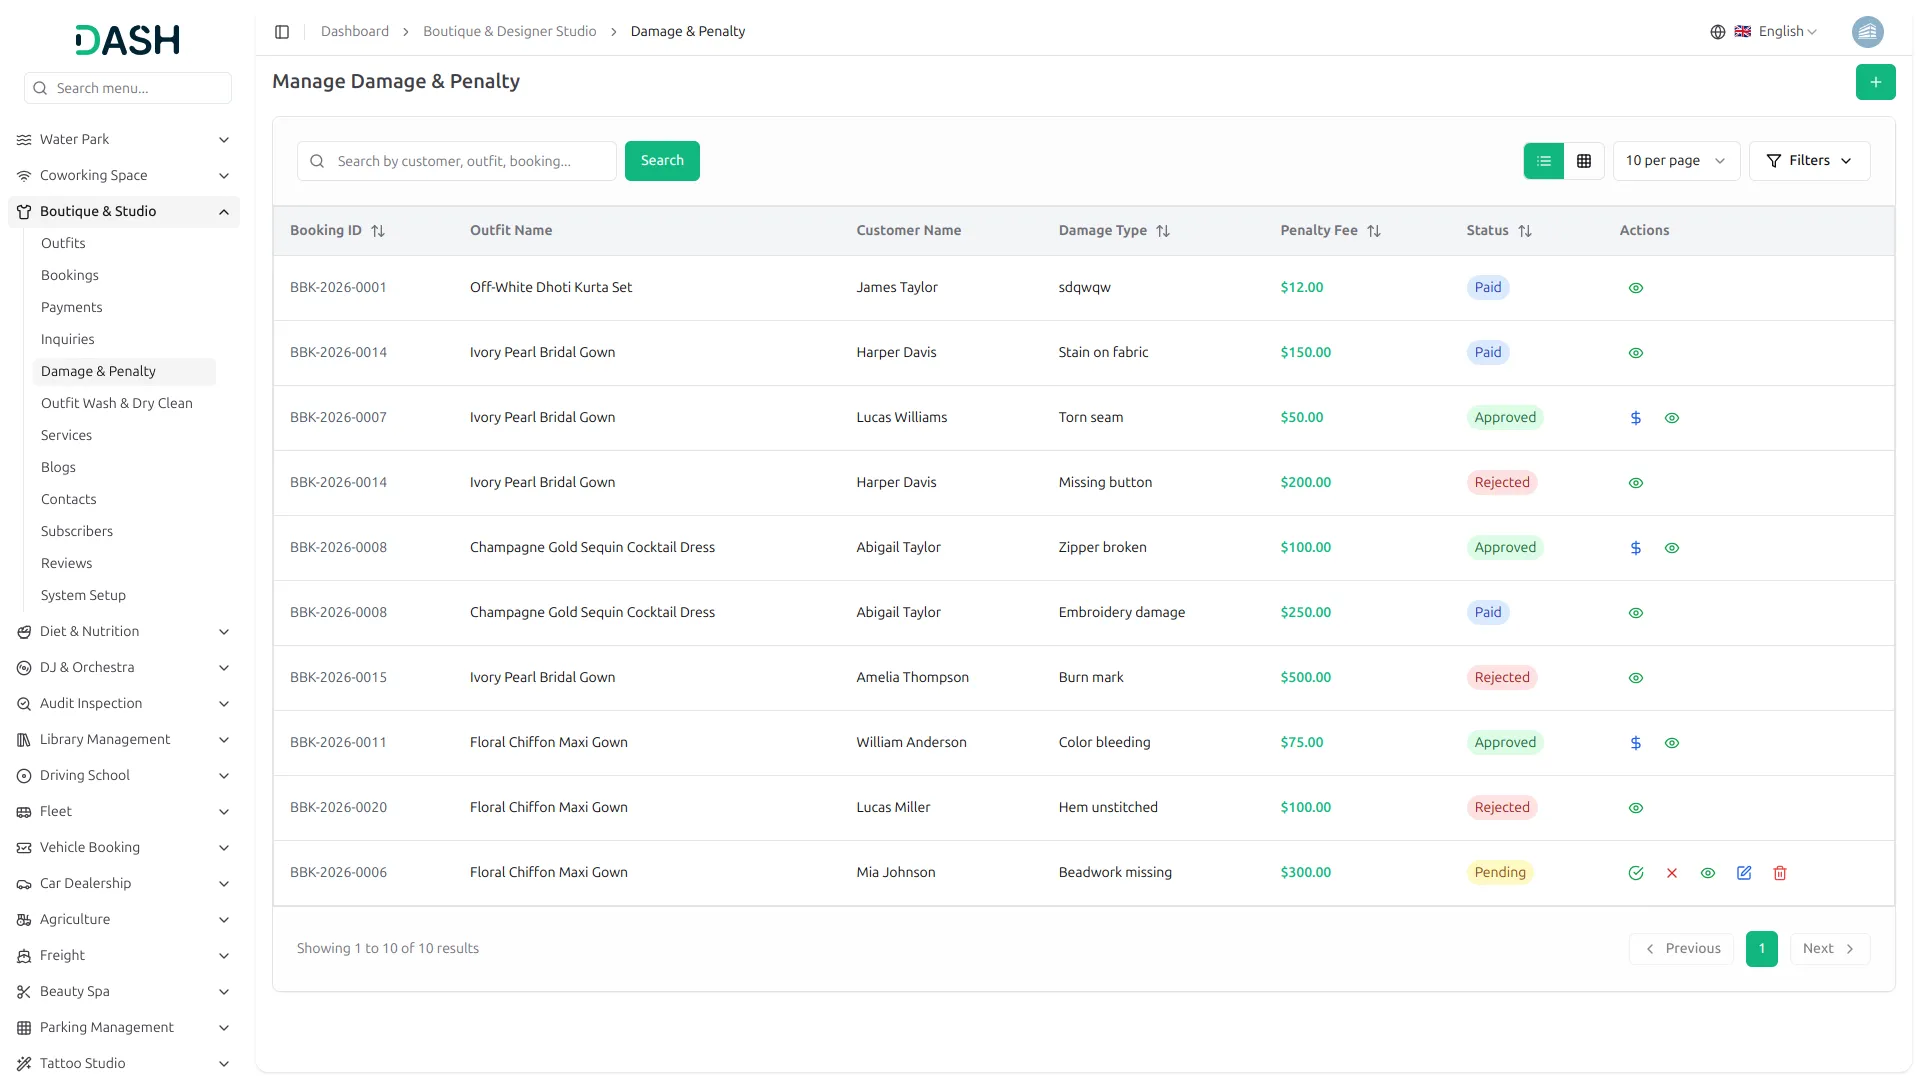
- The list page displays a table of columns including the Booking ID, Outfit Name, Customer Name, Damage Type, Penalty Fee, Status, and Actions. Use the search bar to find a specific record by name. You can also switch between list view and grid view using the toggle button.
- Click the Filters button to apply filtering options, including filtering by Status and Outfit. Click the Apply button to filter the data or the Clear button to reset it.
- In the Actions column, the available options depend on the current status of the record. For Pending records, you can use Approve to approve the damage claim, Reject to reject it, View to see full details, Edit to update the record, or Delete to remove it.
- For Approved records, you can use the Mark as Paid to confirm that the penalty fee has been collected, or View to review the details. For Paid and Rejected records, only the view is available.
- The Manage Damage & Penalty section is a backend operation that helps you manage post-rental damage disputes. While it does not directly display any content on the public-facing website, it is directly linked to confirmed bookings from your Collection Detail page.
- When a rented outfit is returned with damage, you can raise a damage record against the specific booking, track the penalty approval workflow from Pending through to Approved and Paid, and ensure all damage-related charges are properly recorded and settled, maintaining the quality and condition standard of every outfit in your boutique’s collection.
Outfit Wash & Dry Clean
- To add a new wash & dry clean record, click the “Create” button on the outfit wash & dry clean page. Select a Booking from the dropdown; only rental bookings without an existing cleaning record will appear in this list.
- Select the Cleaning Type from the dropdown (Configuration under System Setup → Cleaning Types), and select the Cleaning Date. Enter the Cleaning Cost, select the Next Cleaning Due Date to schedule the next maintenance, add any relevant Notes, and select the Bank Account.
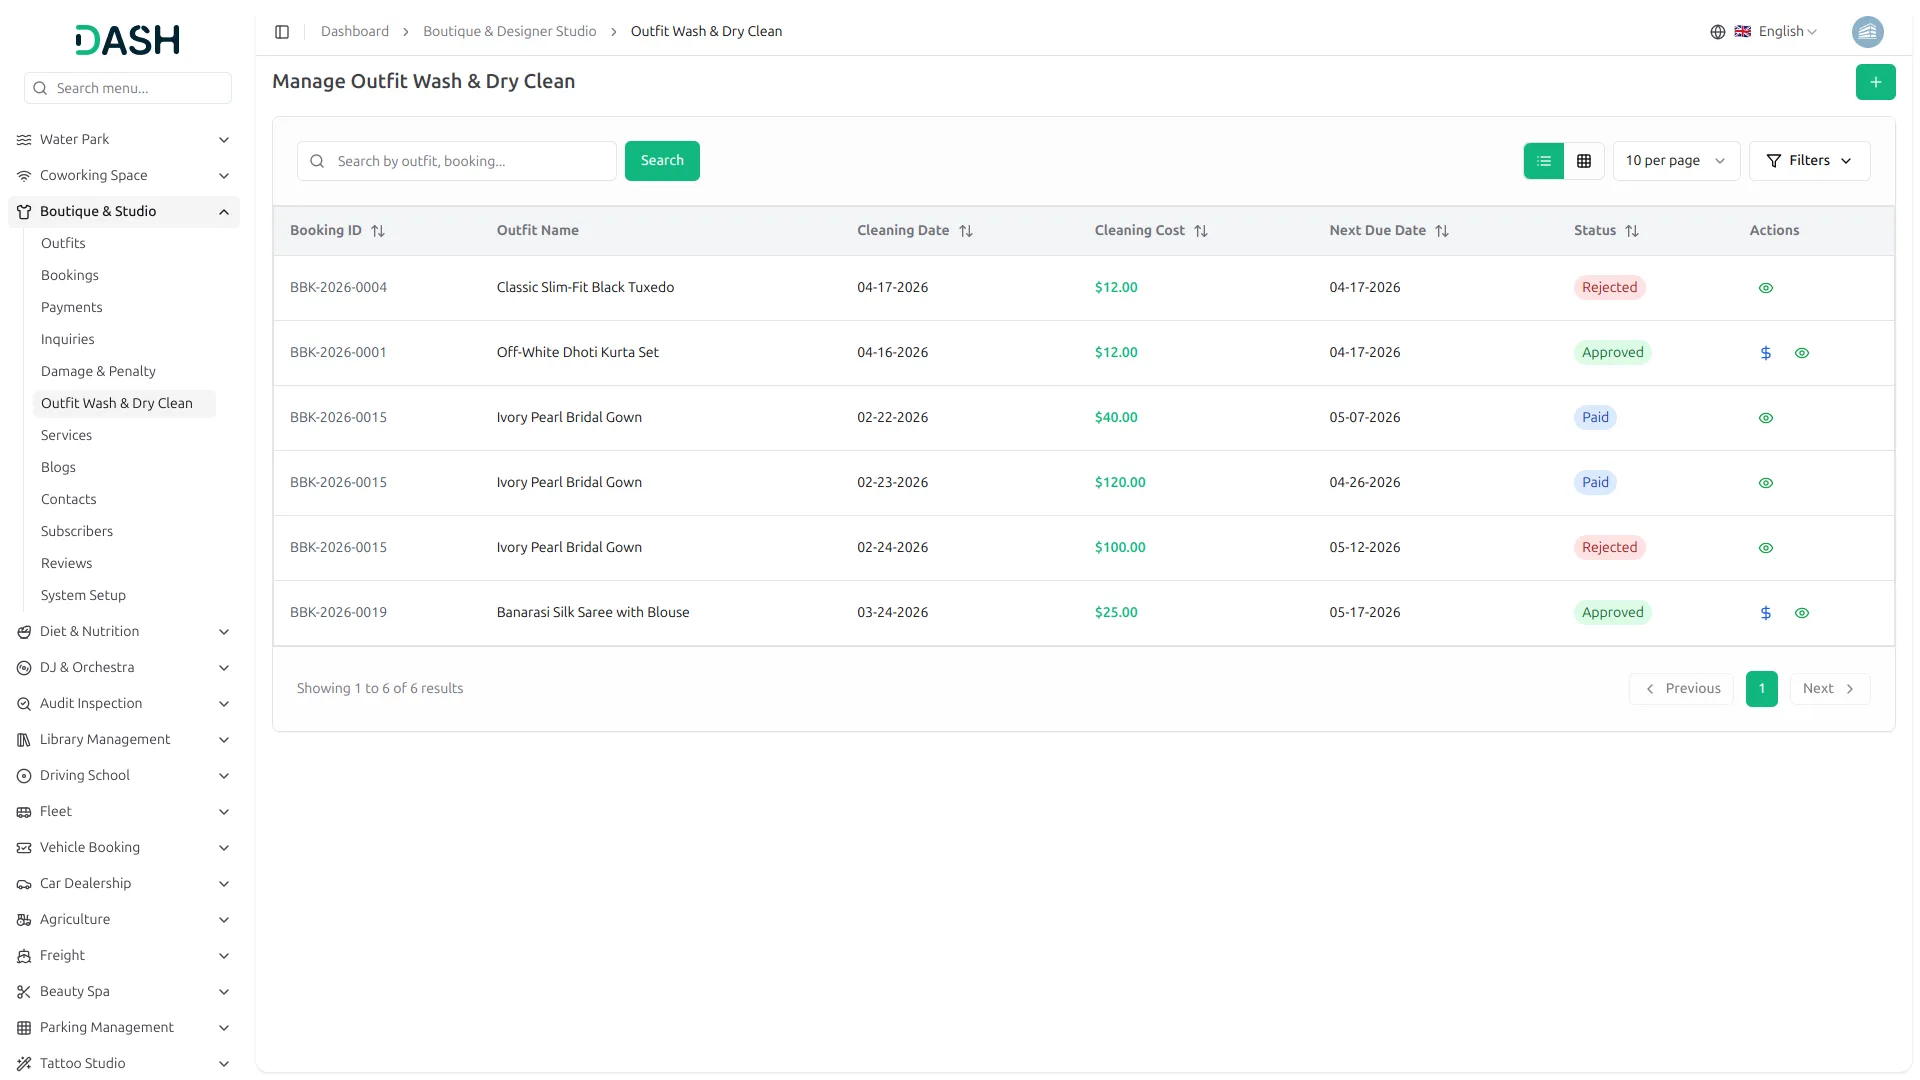
- The list page displays a table of columns including the Booking ID, Outfit Name, Cleaning Date, Cleaning Cost, Next Due Date, Status, and Actions. Use the search bar to find a specific record by outfit name or booking. You can also switch between list view and grid view using the toggle button.
- Click the Filters button to apply filtering options, including filtering by Status and Outfit. Click the Apply button to filter the data or the Clear button to reset it.
- In the Actions column, the available options depend on the current status of the record. For Approved records, you can use the Mark as Paid to confirm that the cleaning cost has been settled, or the View to review the full details. For Paid and Rejected records, only the View is available.
- The Manage Outfit Wash & Dry Clean section is a backend operation that helps you maintain the care and upkeep of every outfit in your collection after it has been rented. While it does not directly display any content on the public-facing website, it plays an important role in ensuring that each outfit returned from a rental booking is properly cleaned and maintained before being listed again on the Collection List page for the next client to browse and book.
Manage Services
- To add a new service, click the “Create” button on the manage service page. Enter the service Name, set the Price, and toggle the status to Active using the toggle switch to make it available for selection. Write a Description to explain what the service includes and offers to the client.
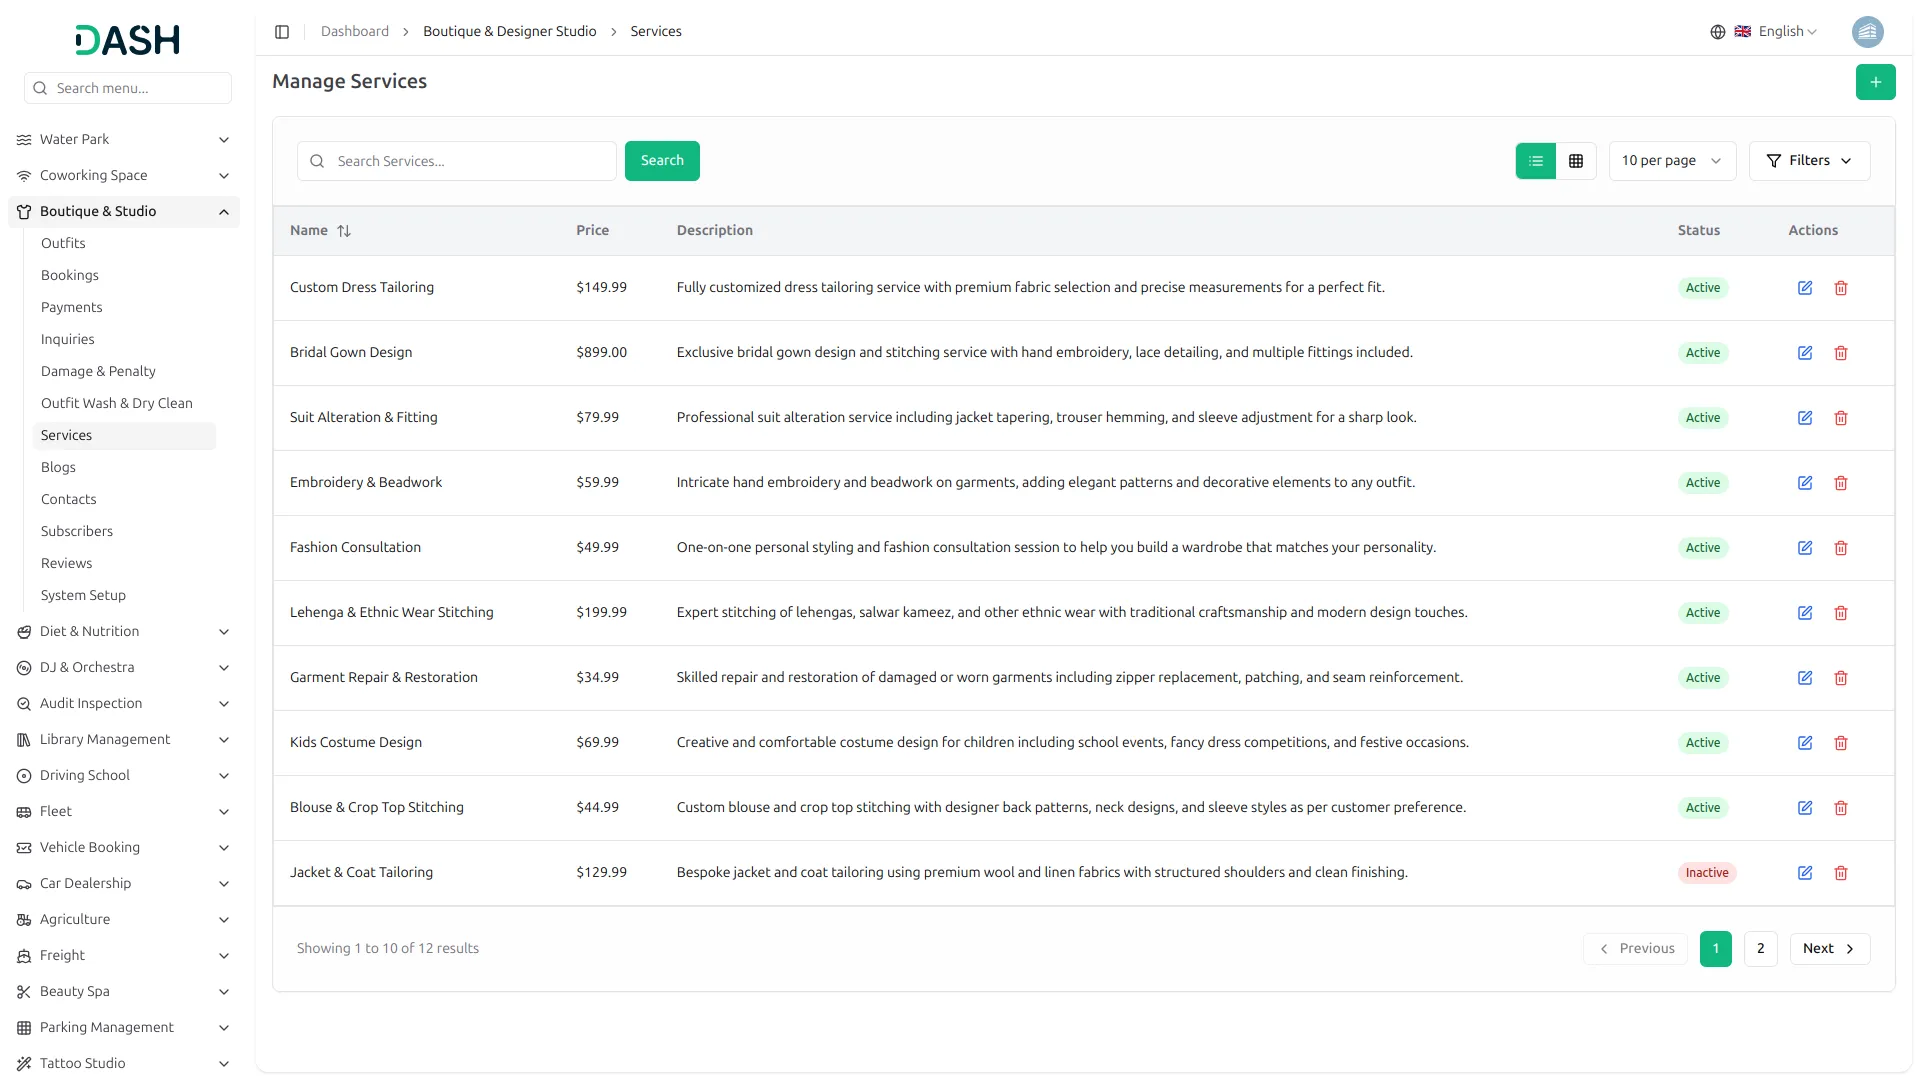
- The list page displays a table of columns including the service Name, Price, Description, Status, and Actions. Use the search bar to find a specific service by name. You can also switch between list view and grid view using the toggle button.
- Click the Filters button to apply filtering options, including filtering by Status. Click the Apply button to filter the data or the Clear button to reset it.
- In the Actions column, you can use the Edit to update the service information or the Delete to permanently remove the service from the system.
- Once a service is created and set to Active, it will appear as a selectable option in the Services dropdown on the frontend “Book Your Perfect Rental” booking page, allowing clients to add an additional service to their booking at the time of checkout.
- Based on the selected service, the service price will automatically reflect under the Order Summary section with the calculated total. Active services will also appear in the Services dropdown within the Create Booking form in the backend, allowing you to assign services to manually created bookings as well.
Manage Blogs
- To add a new blog, click the “Create” button on the Manage Blogs page. Enter the blog Title, and upload a Cover Image using the Browse button. Upload an Author Image using the Browse button, enter the Author Name, and enter the author’s Designation. Write a short Description to summarize what the blog is about, and write the full Blog Content using the rich text editor.
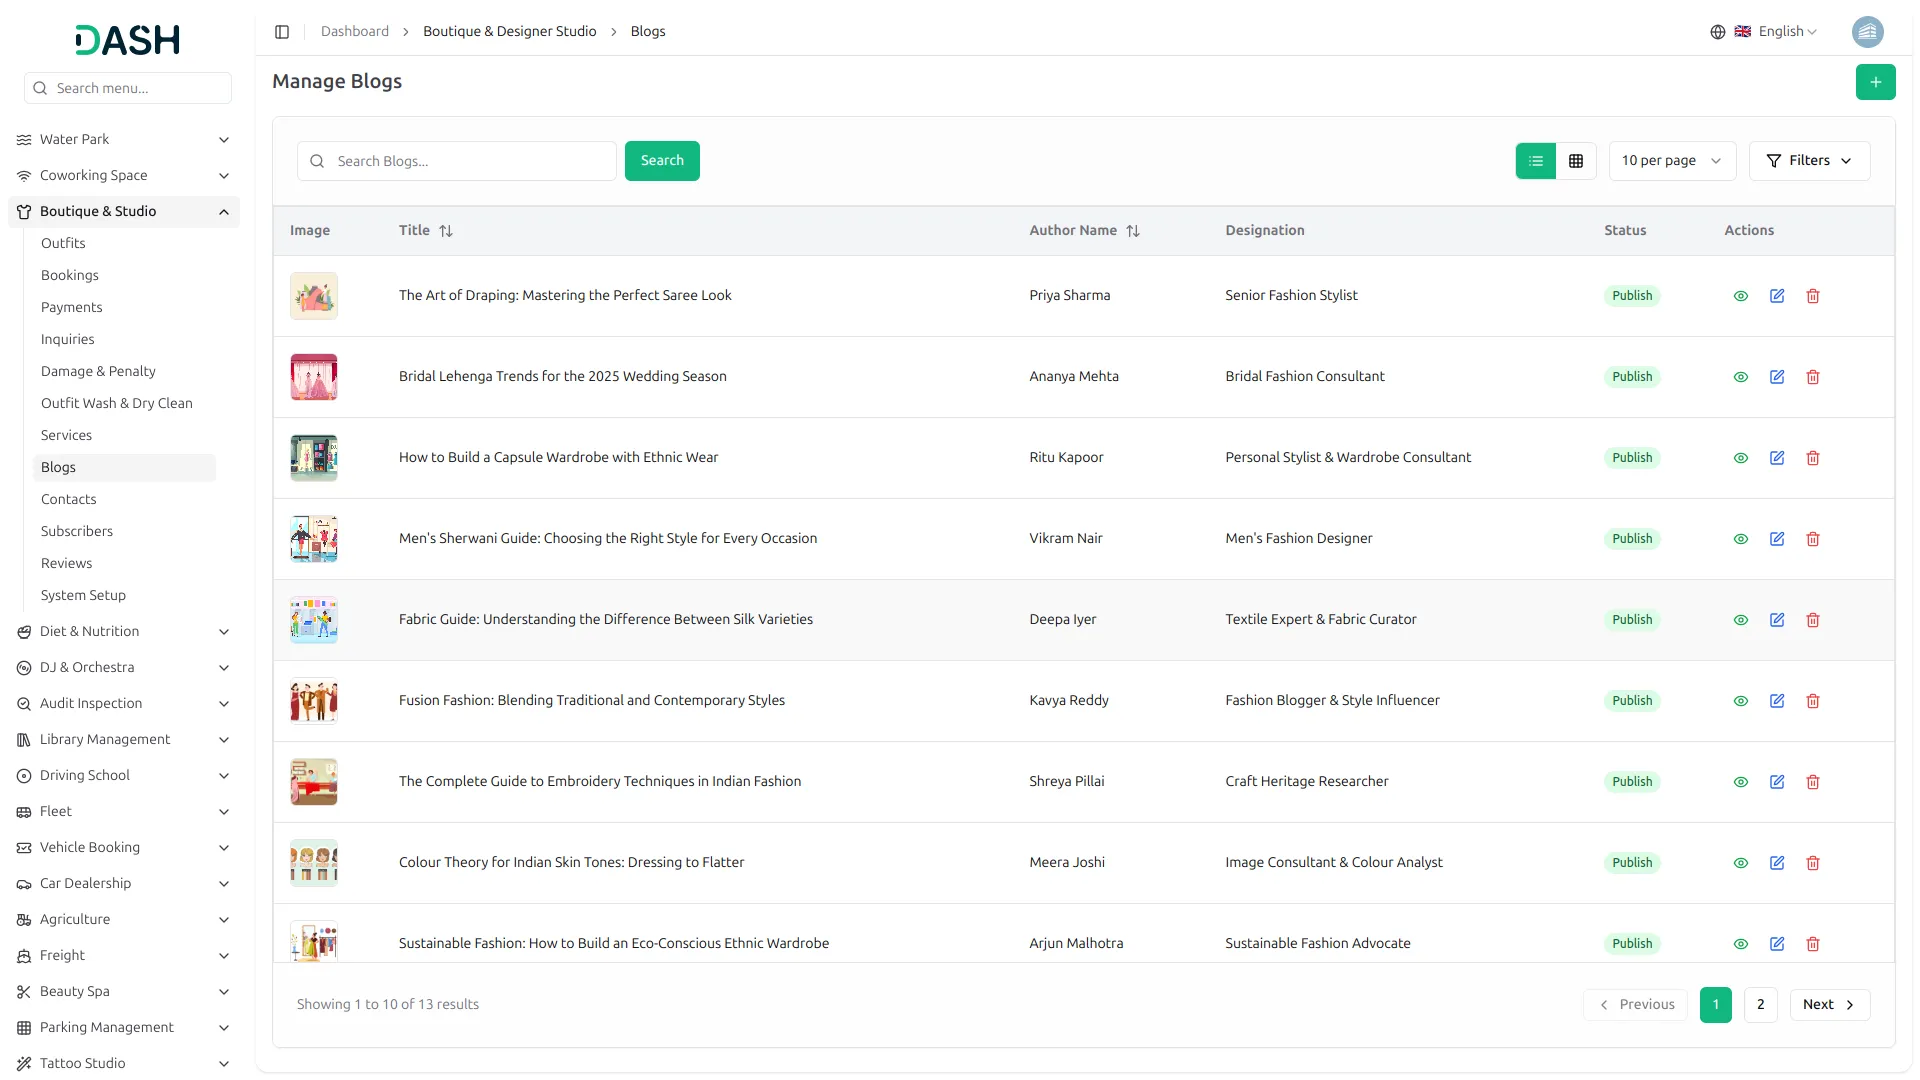
- The list page displays a table of columns including the blog Image, Title, Author Name, Designation, Status, and Actions. Use the search bar to find a specific blog by title. You can also switch between list view and grid view using the toggle button.
- Click the Filters button to apply filtering options, including filtering by Status. Click the Apply button to filter the data or the Clear button to reset it.
- In the Actions column, you can use the View to preview the full blog details, the Edit to update the blog information, or the Delete to permanently remove the blog from the system.
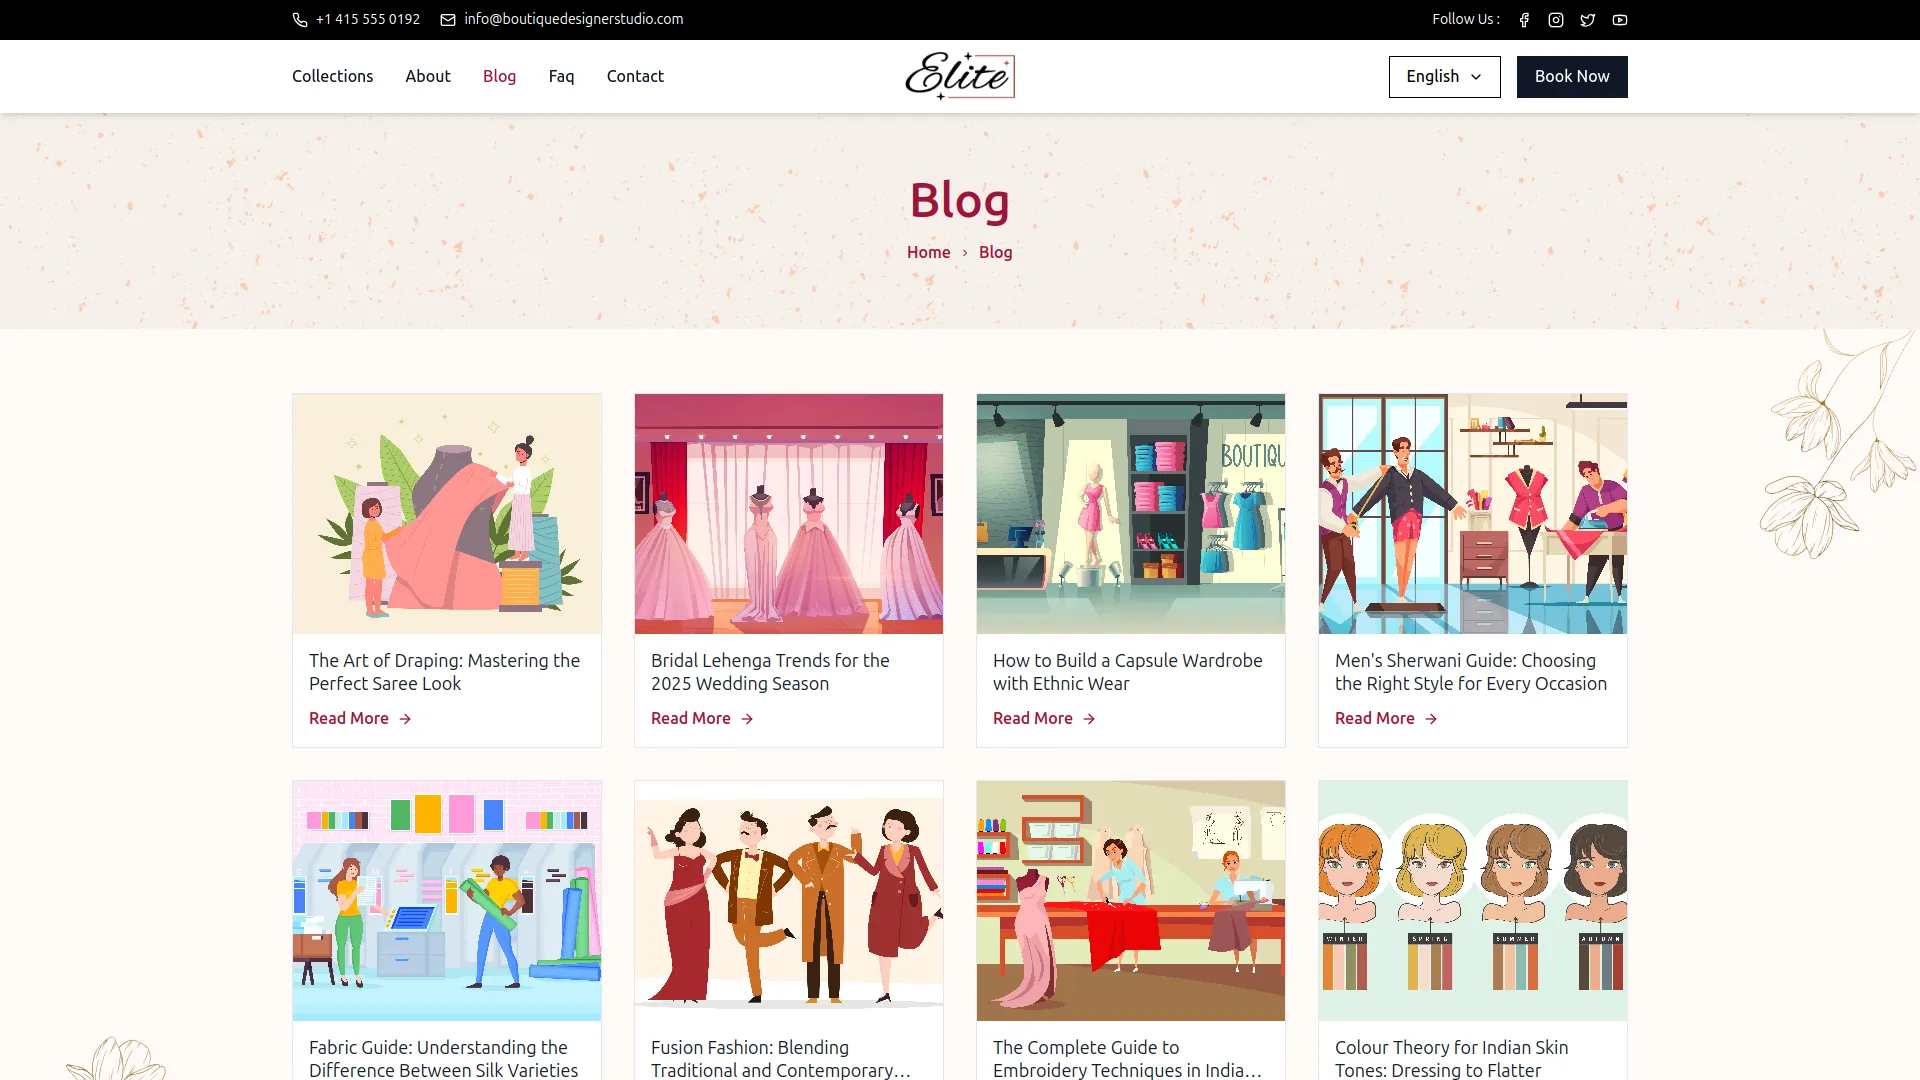
- Once a blog is created and set to Publish, it will appear on the Blog List page of your website, displaying the cover image, blog title, and a Read More button. When a visitor clicks Read More, they are taken to the Article Detail page, where they can read the full blog content.
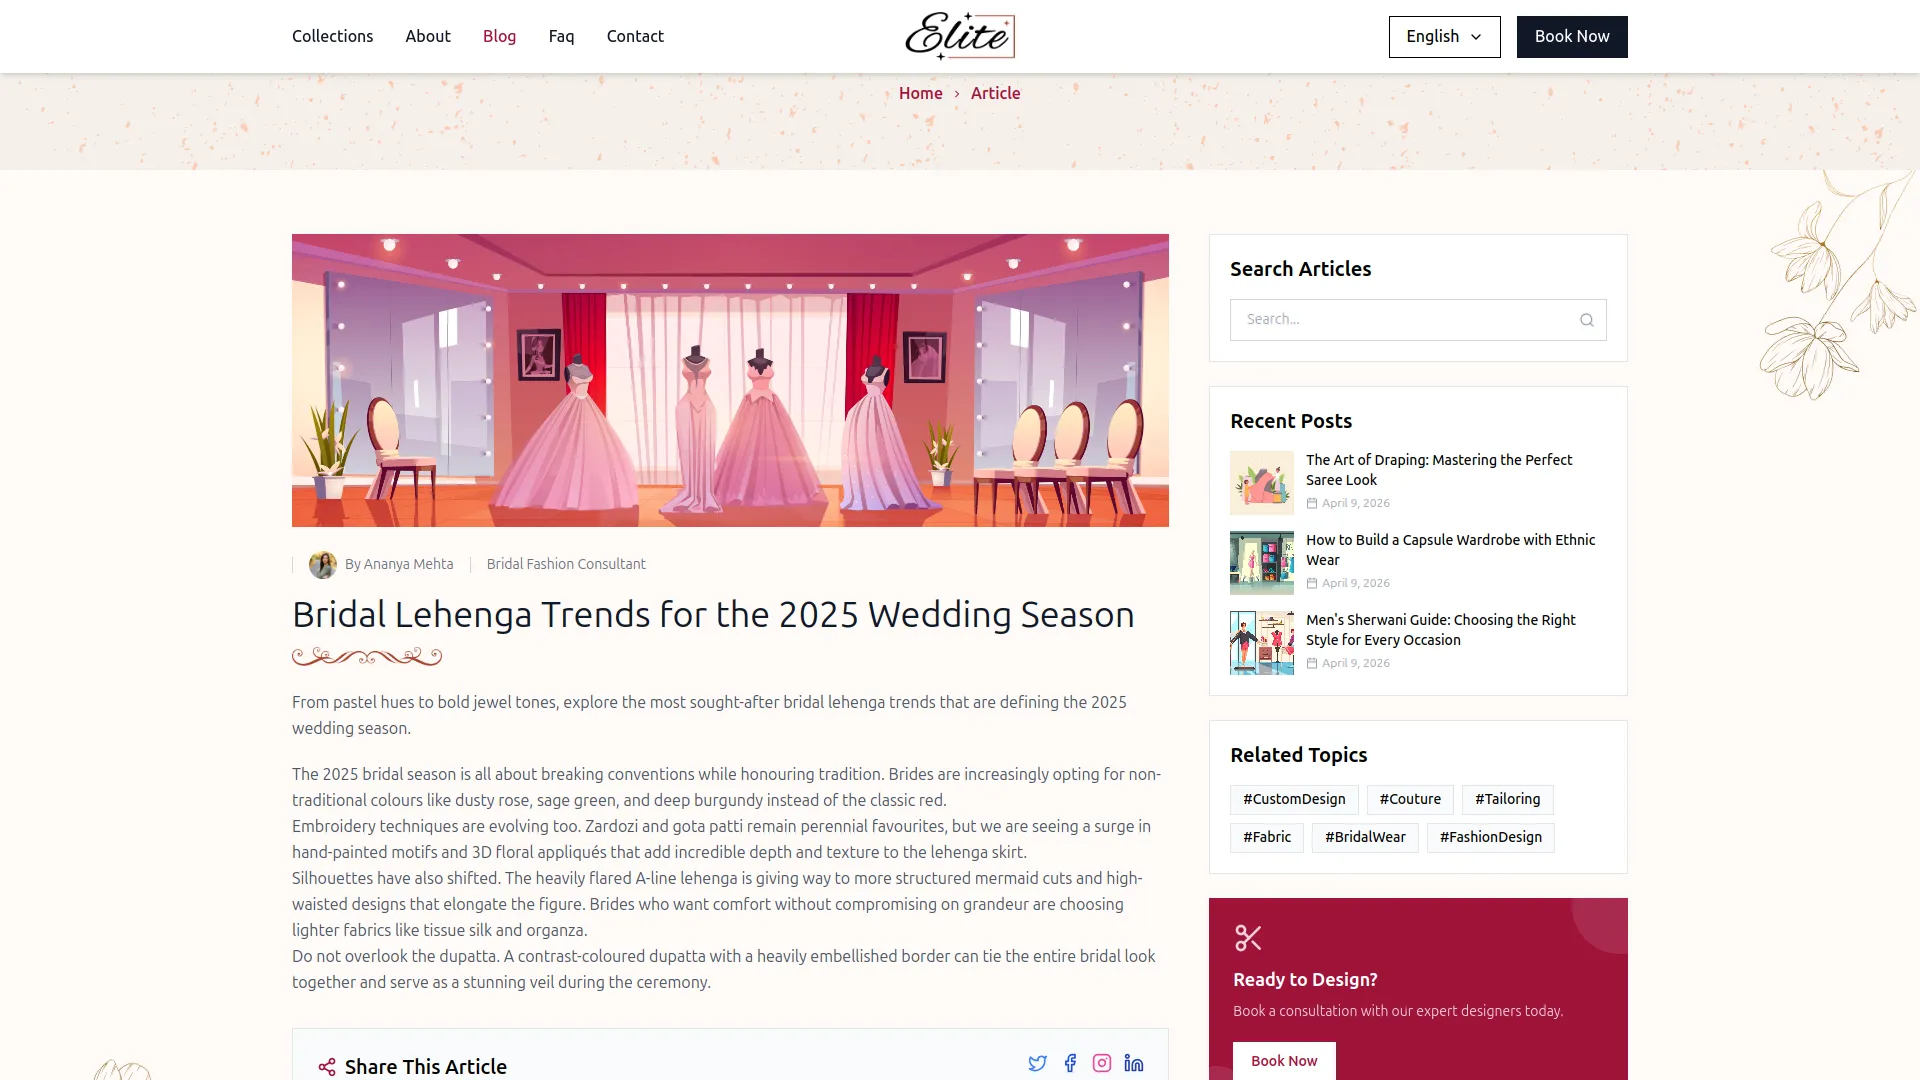
- The article page displays the Cover Image as the main banner at the top, followed by the Author Image, Author Name, and Designation shown together as the author profile. Below that, the Description appears as a highlighted introductory quote, and the full Blog Content is displayed as the main article body.
- The sidebar on the right shows a Search Articles bar, a Recent Posts panel listing the latest blogs with their cover image and publish date, and a Related Topics section displaying relevant hashtags, giving visitors a rich and engaging reading experience throughout your boutique’s blog.
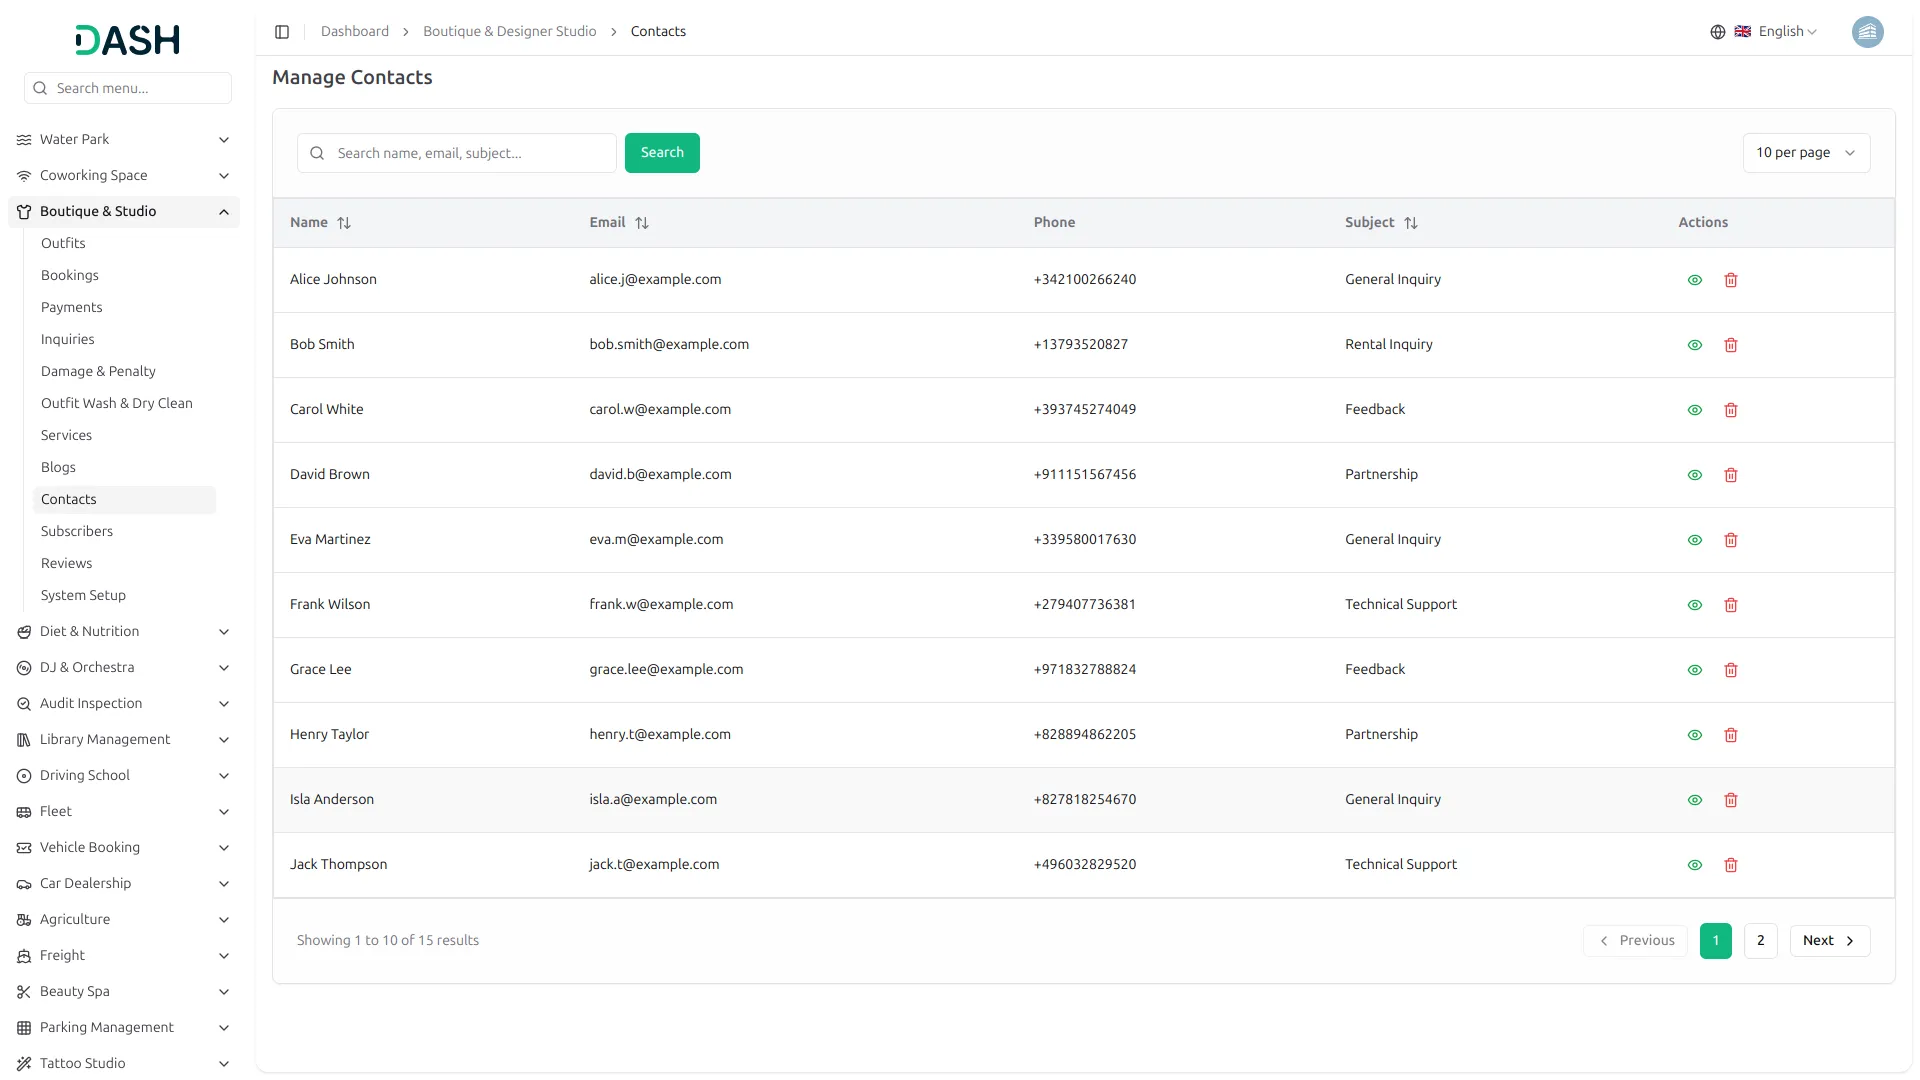
Manage Contacts
- The Manage Contacts section gives you a centralized view of all messages submitted by visitors through the Contact Us page of your website.
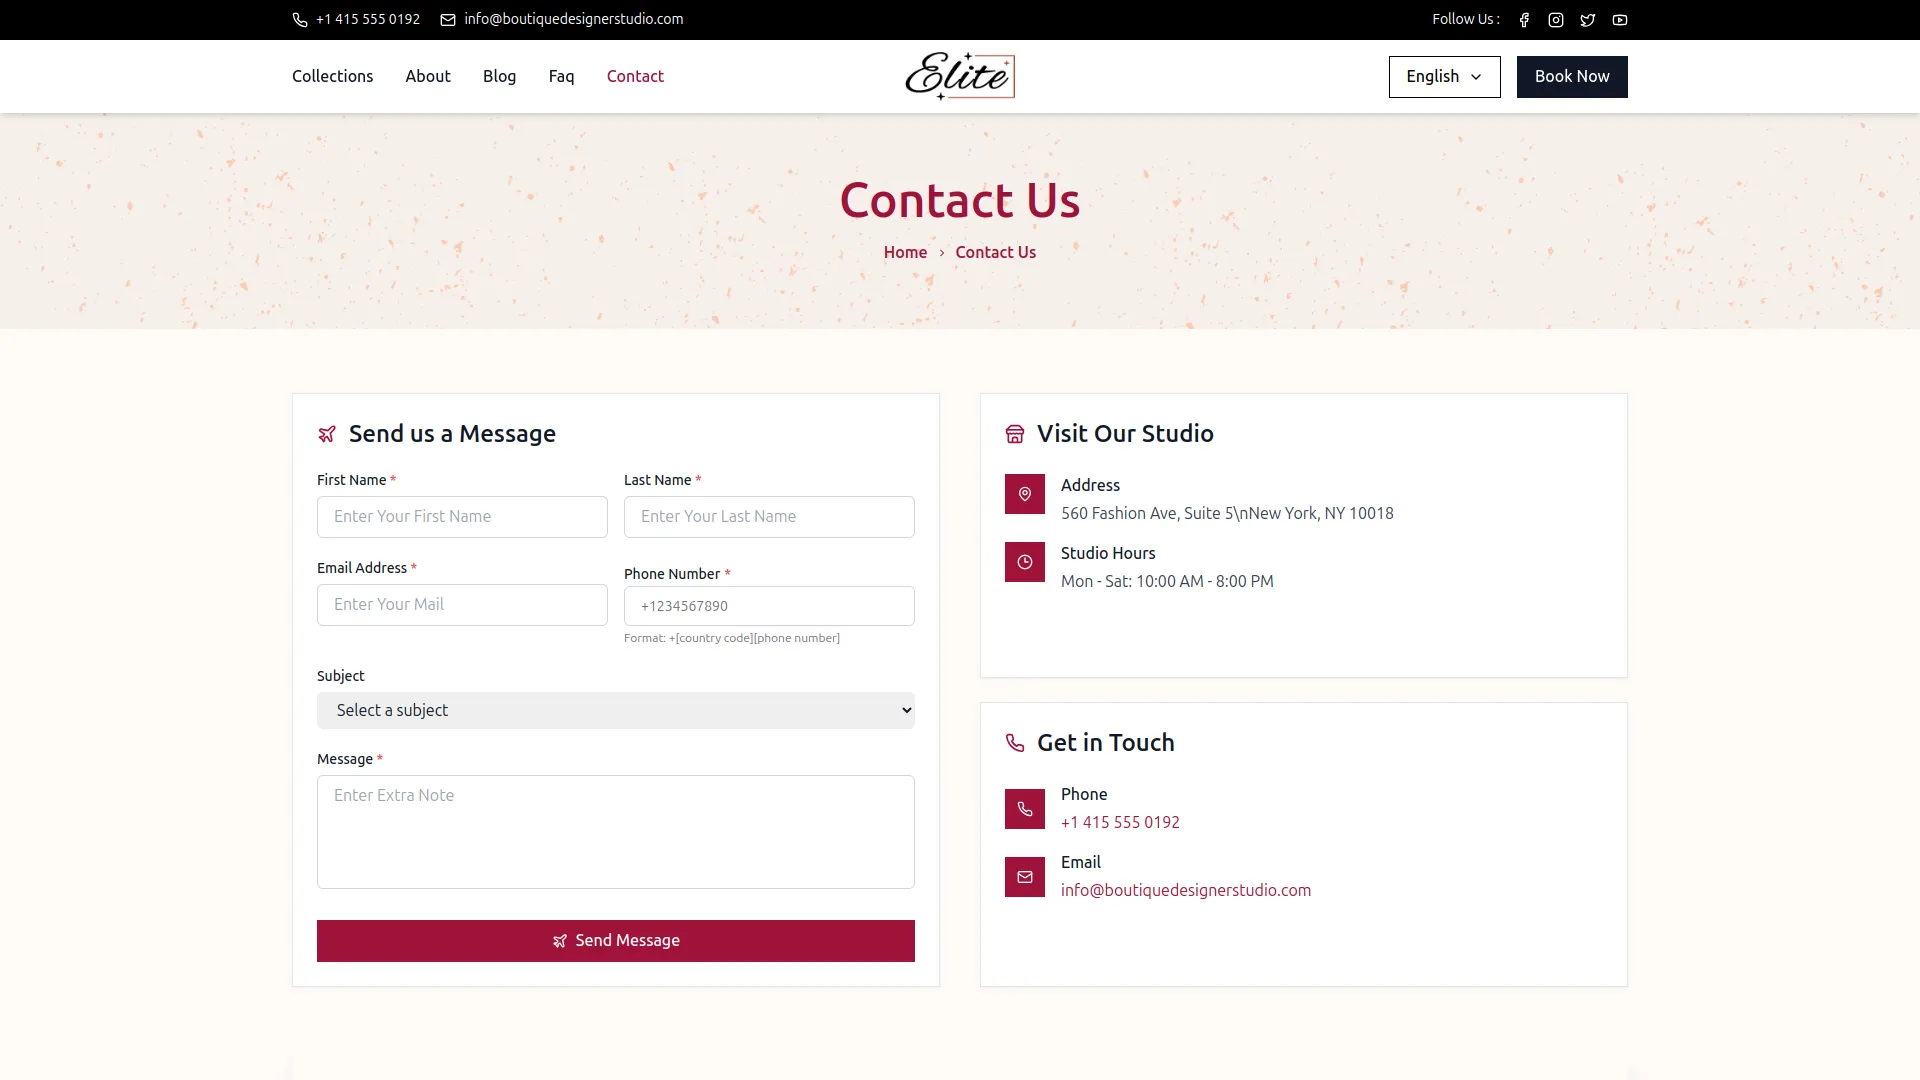
- Once a visitor fills in and submits the “Send us a Message” form on the frontend Contact Us page, entering their First Name, Last Name, Email Address, Phone Number, Subject, and Message, their submission is instantly captured and recorded here in the Manage Contacts section.
- The list page displays a table of columns including the Name, Email, Phone, Subject, and Actions. Use the search bar to find a specific contact by name, email, or subject.
- In the Actions column, you can use the View to read the full message details submitted by the visitor, or the Delete to permanently remove the contact record from the system.
- Each record allows you to review the visitor’s complete message and contact details, making it easy for your team to follow up on general inquiries, rental inquiries, feedback, partnership requests, technical support queries, and any other subjects your clients may reach out about.
Manage Subscribers
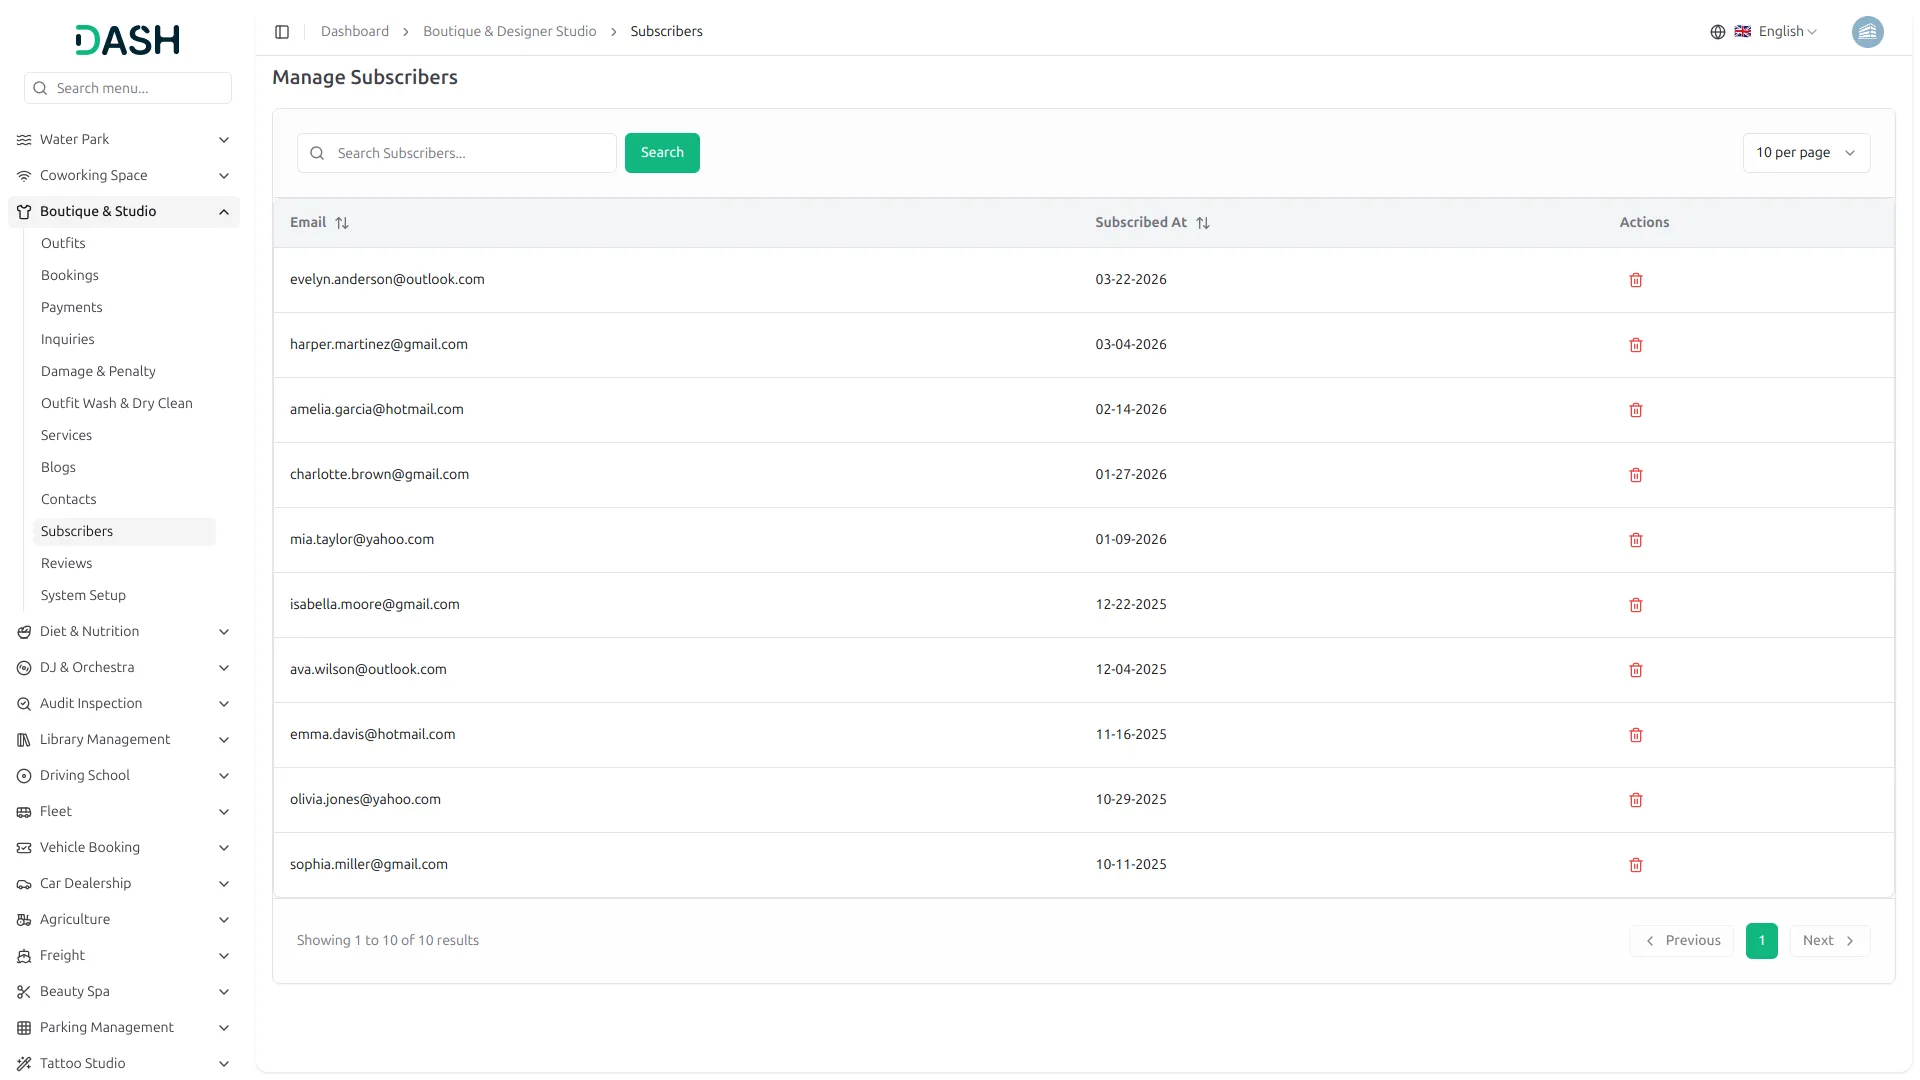
- The Manage Subscribers section gives you a centralized view of all email addresses collected through the newsletter subscription form on your website.
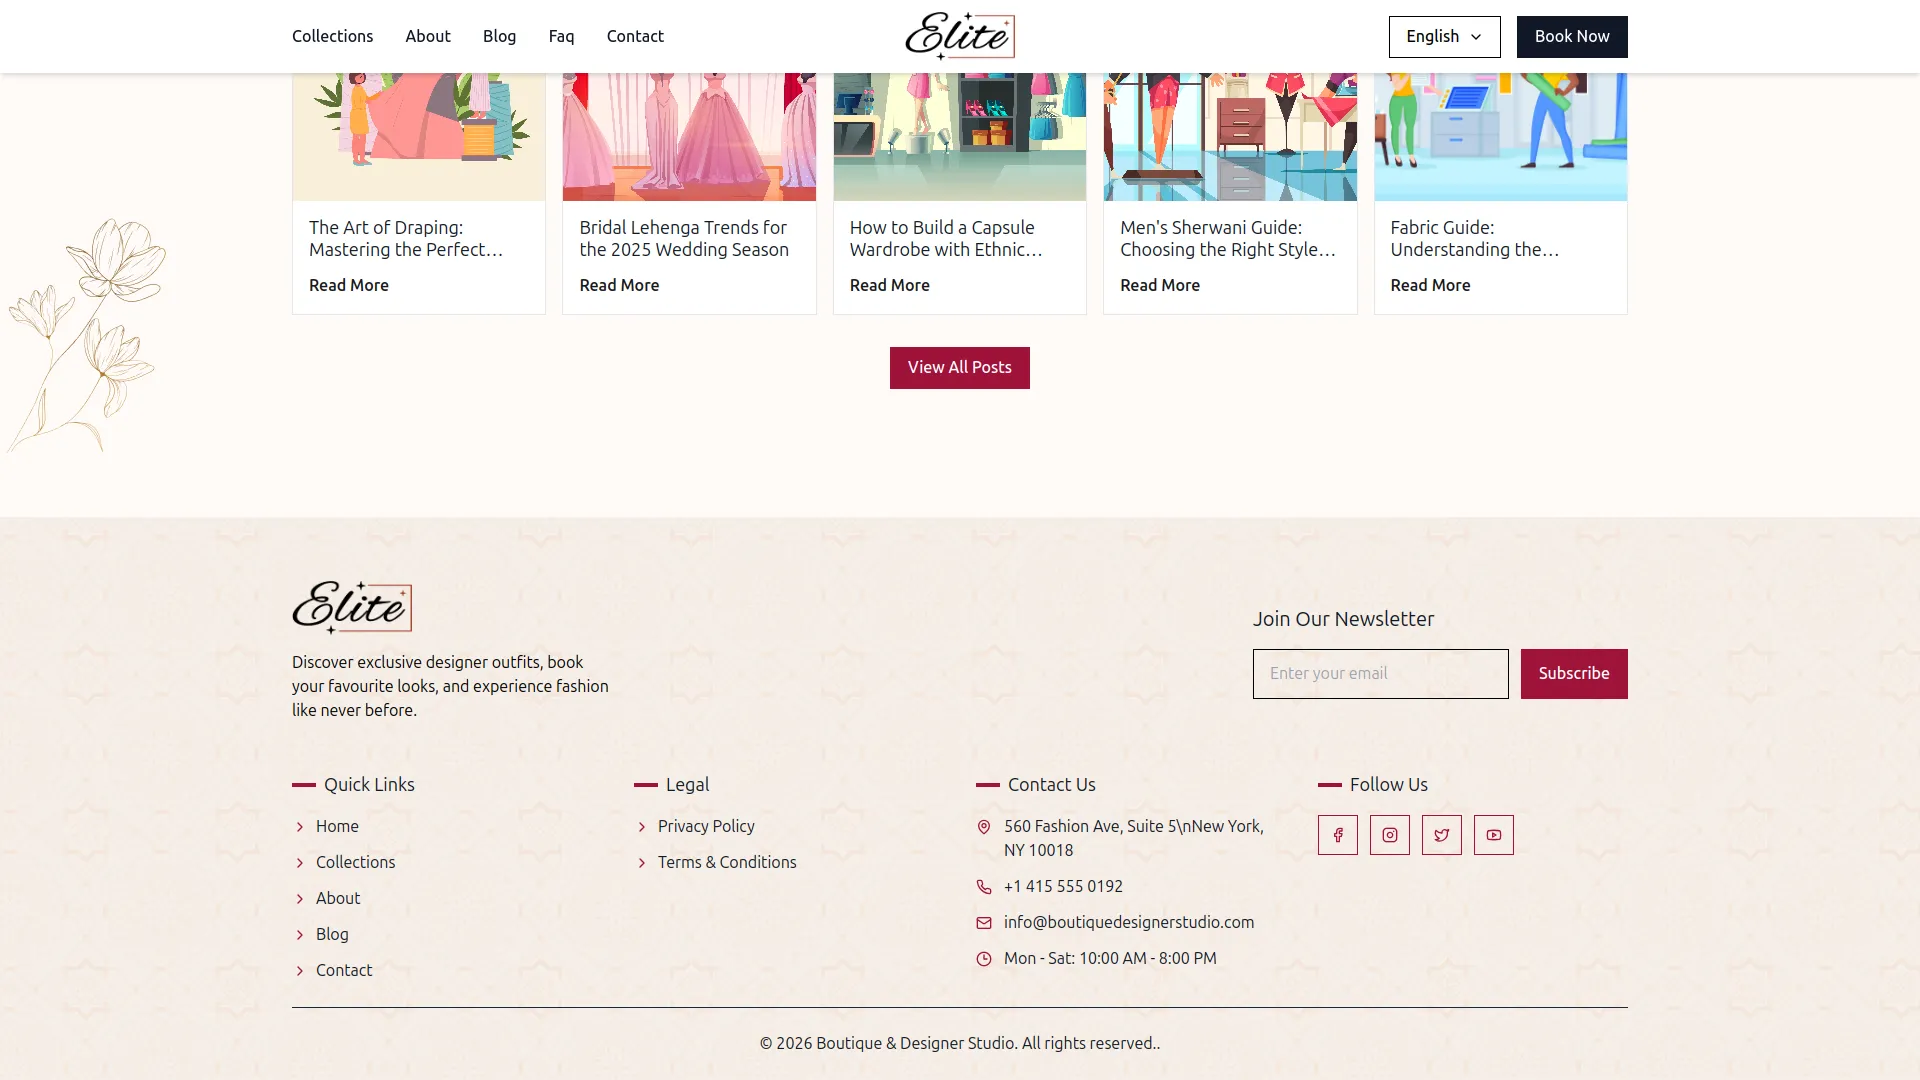
- Once a visitor enters their email address in the “Join Our Newsletter” subscription form and clicks the Subscribe button, which appears in the footer section across all pages of your website, including the Homepage, Collection List, About Us, Blog, Contact Us, and Booking pages, their email is instantly captured and recorded here in the Manage Subscribers section with the date they subscribed.
- The list page displays a table of columns, including the subscriber’s Email and Subscribed At date, showing exactly when each visitor signed up. Use the search bar to find a specific subscriber by email address.
- In the Actions column, you can use the Delete to permanently remove a subscriber from the list.
- This gives you a growing list of interested clients and fashion enthusiasts that you can reach out to for promotions, new collection announcements, seasonal offers, and boutique updates.
Manage Outfit Reviews
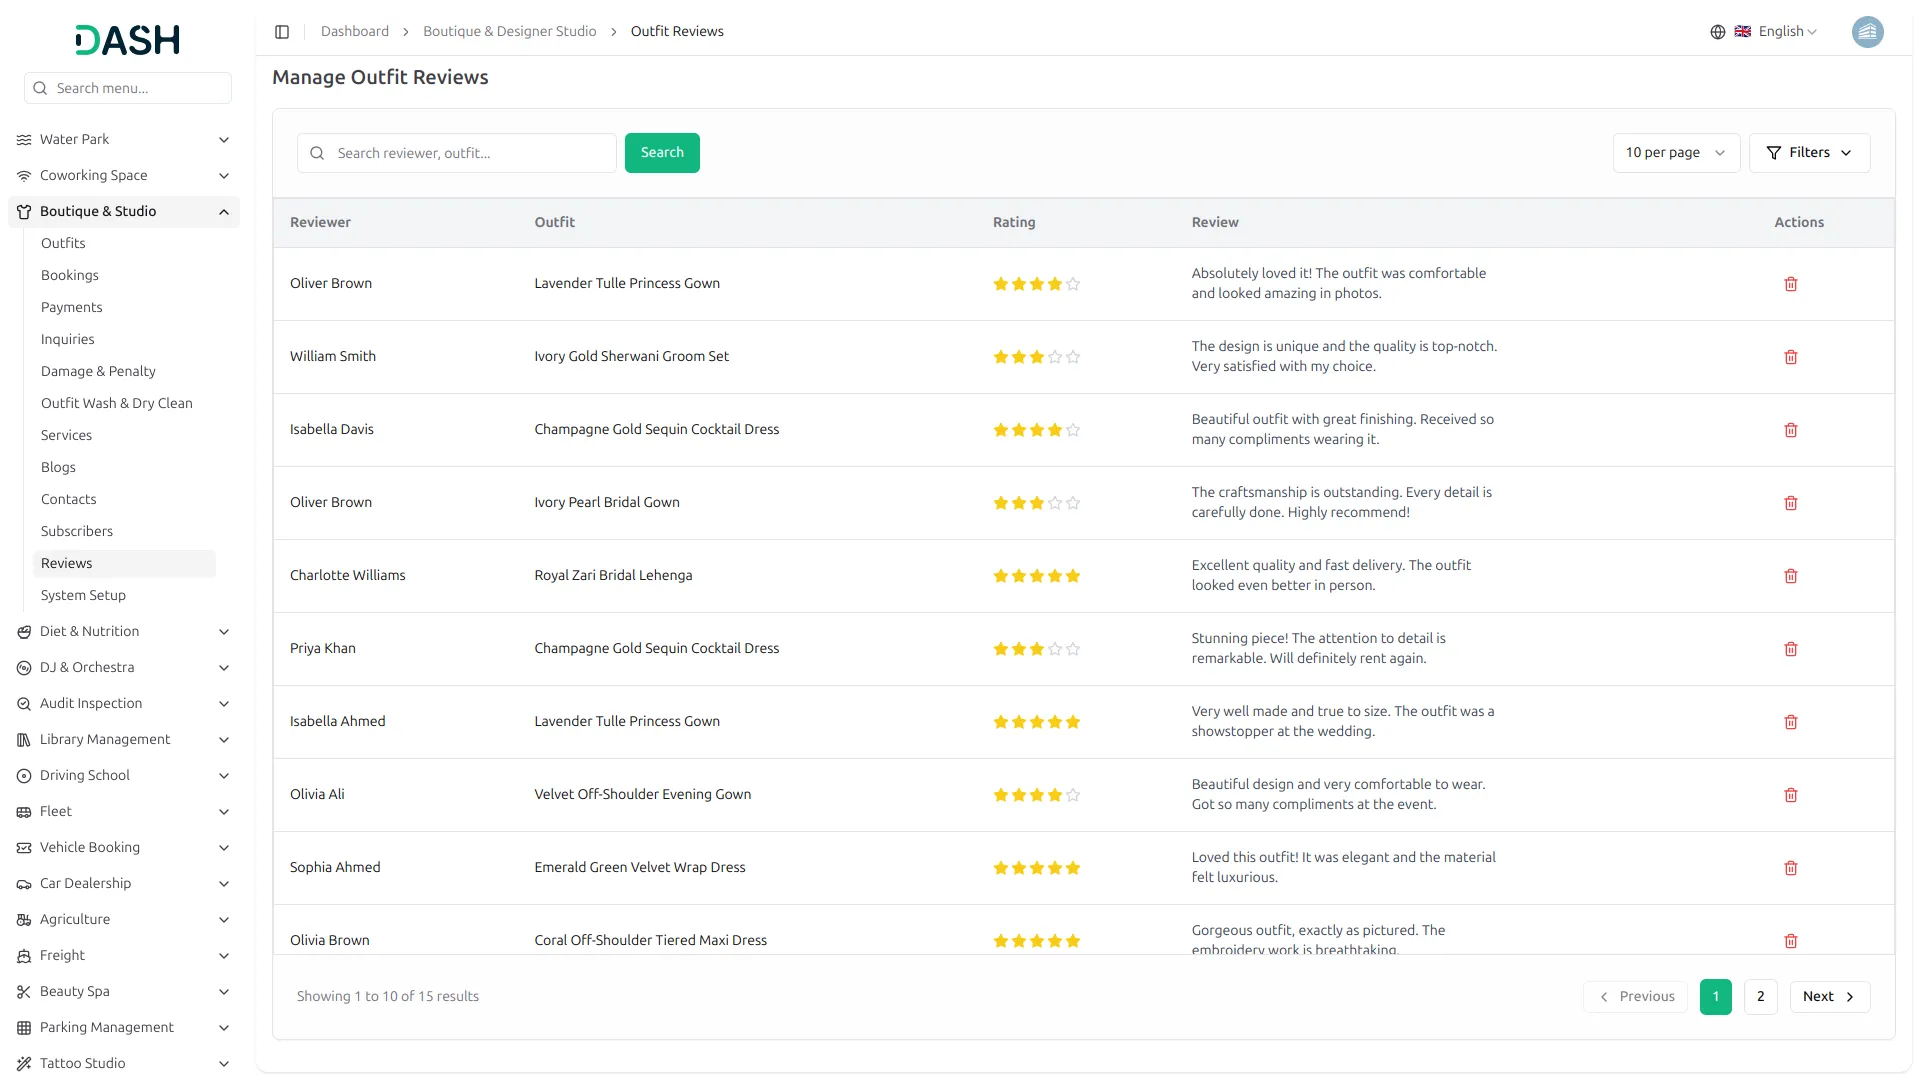
- The Manage Outfit Reviews page gives you a complete overview of all outfit reviews submitted by customers after their rental experience.
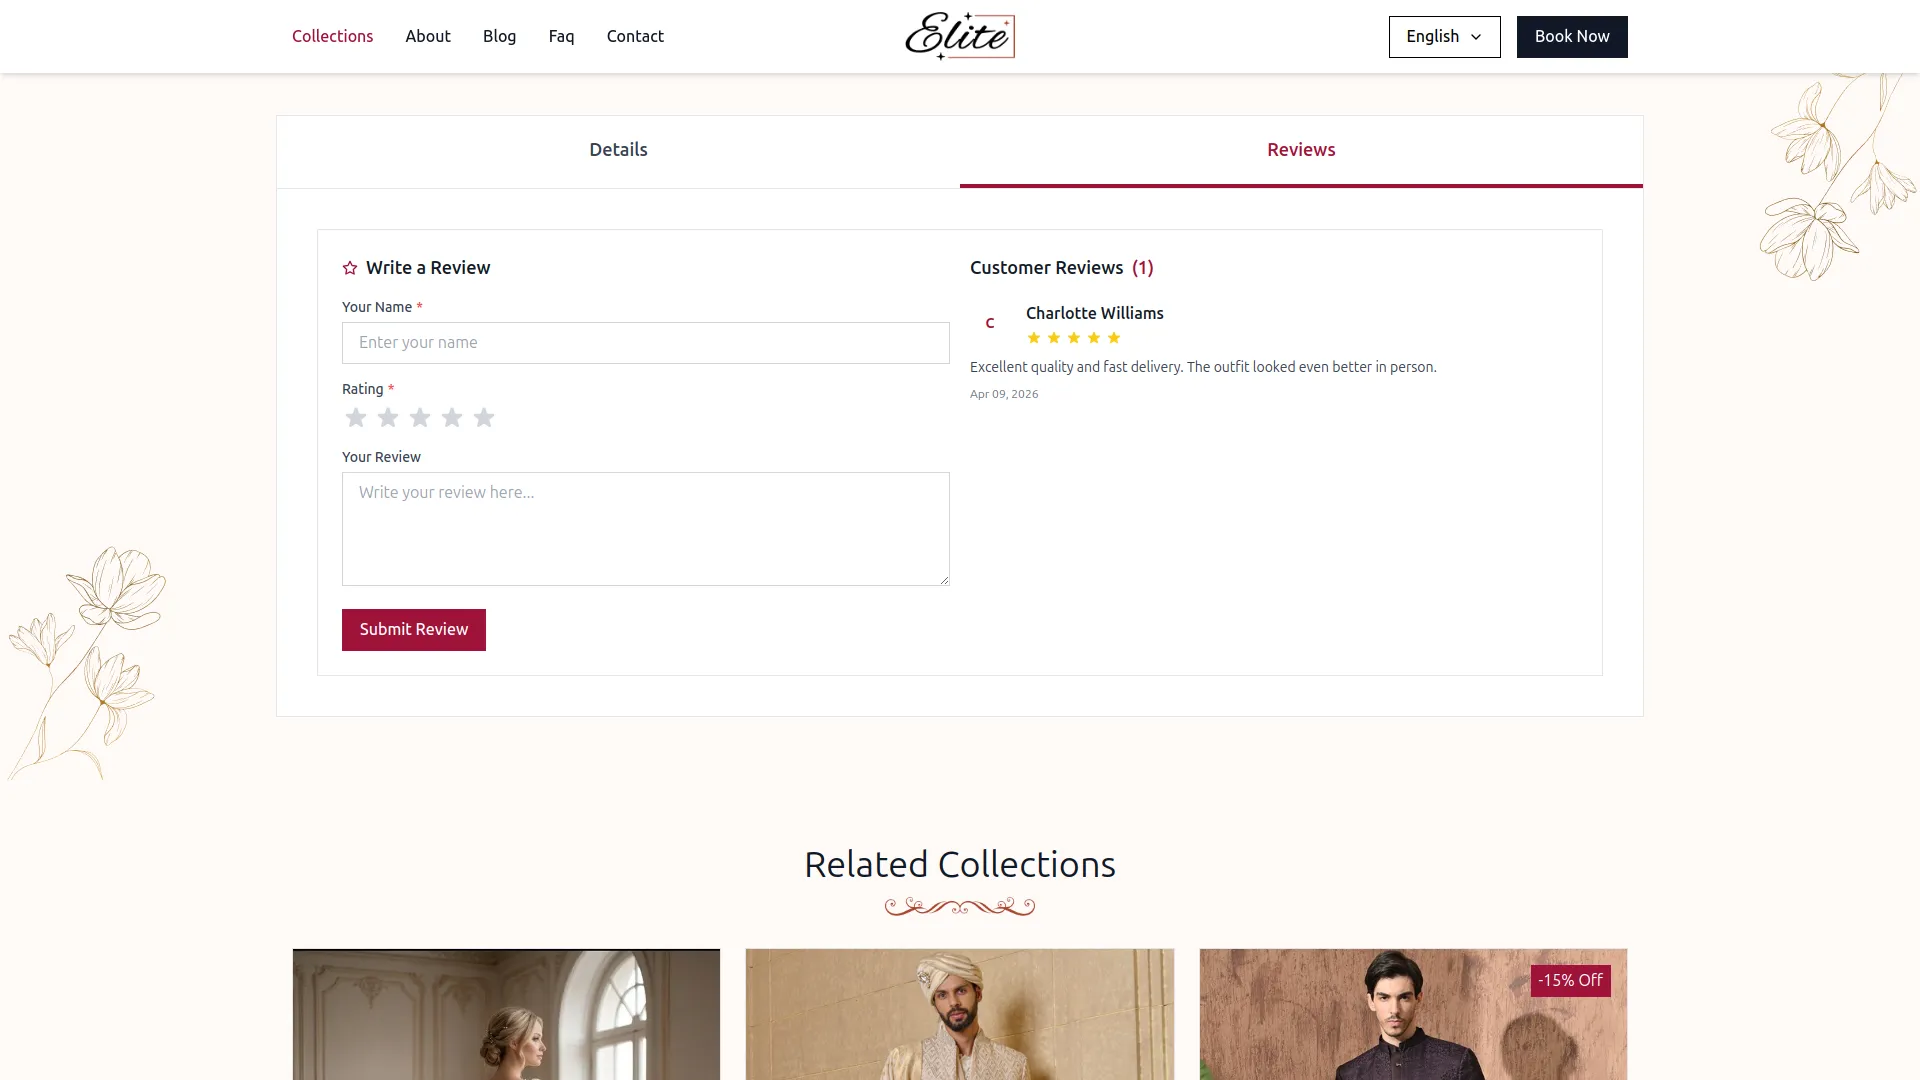
- On the Outfit Details page, visitors can also submit a review directly using the Write a Review form by entering their Name, Rating, and Review comment. Once submitted, the review will automatically appear in the Manage Outfit Reviews section on the backend, allowing you to monitor all customer feedback from one place. All previously submitted reviews are also displayed in the Customer Reviews section on the same Outfit Details page, giving potential customers confidence in your collection.
- The list page displays a table with columns for Reviewer, Outfit, Rating, Review, and Actions. Use the search bar at the top to find a specific review by reviewer name or outfit name. You can also filter results by outfit using the Filter by Outfit dropdown and clicking Apply to narrow down the list. Use the Clear button to reset the filter at any time.
- In the Actions column, you can use the Delete to permanently remove a review from the system.
Categories
Related articles
- Zoom Meeting – WorkDo Dash SaaS Add-On Guide
- User Manual – AccountGo
- Cashfree – BookingGo SaaS Add-On Guide
- Tags – TicketGo Add-On Guide
- Tattoo Studio Management – WorkDo Dash SaaS Add-On Guide
- HRM – WorkDo Dash SaaS Add-On Guide
- Google Sheets – WorkDo Dash SaaS Add-On Guide
- WorkDo Products Set Up Guide
- LinePay – BookingGo SaaS Add-On Guide
- Jitsi Meet – WorkDo Dash SaaS Add-On Guide
- Paytm – WorkDo Dash SaaS Add-On Guide
- Google Calendar – BookingGo SaaS Add-On Guide
We're Here to Help - Let's Talk
Have questions about our solutions, customization services, or business tools? Our team is here to help you. let's talk.