Investment system Integration in Dash SaaS
The Investment System is a powerful software solution designed to manage investment plans, investor accounts, and financial transactions.
Introduction
The Investment System is a powerful software solution designed to manage investment plans, investor accounts, and financial transactions. This Add-On allows companies to create and manage various investment plans with different return types, risk levels, and durations. Investors can register through the website, select plans, make deposits, track their investments, and request withdrawals. The system includes a complete website with customizable content, an investor dashboard, and administrative tools for managing all aspects of the investment business, including deposits, withdrawals, and investor communications.
How to Install the Add-On?
To Set Up the Investment System Add-On, you can follow this link: Setup Add-On.
How to Use The Investment System Central Add-On?
Investment System Dashboard
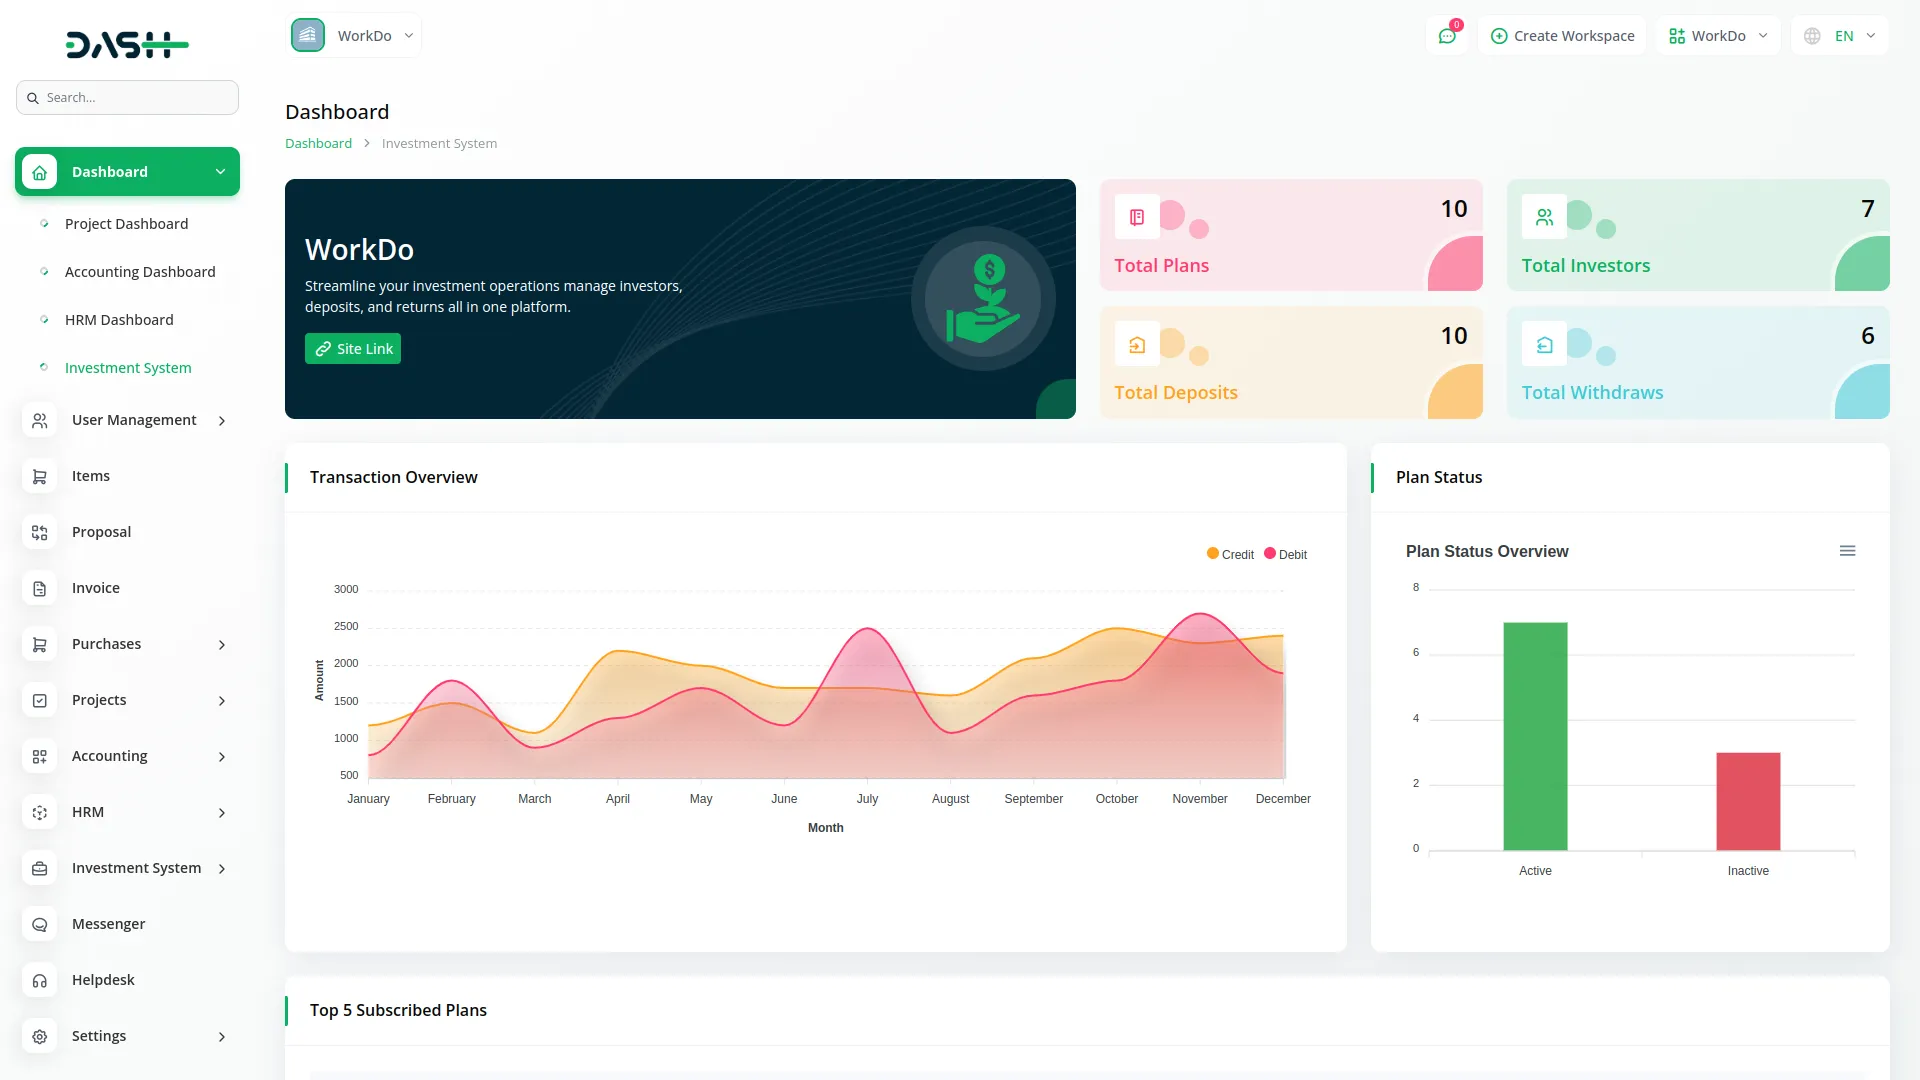
- When you log into the system, the dashboard displays key information about your Investment System Add-On.
- At the top, you can use the site link to copy your site URL for sharing. The dashboard shows four main information cards displaying Total Plans, Total Investors, Total Deposits, and Total Withdrawals, giving you a quick overview of your business performance.
- Below the cards, you will find a Transaction Chart that displays credit and debit transactions on a month-wise basis, helping you track financial flows over time. The Plan Status Bar Chart shows the comparison between Active Plans and Inactive Plans in your system.
- At the bottom, there is a Top 5 Subscribed Plans Table that displays your most popular investment plans. This table shows the rank, plan name, minimum investment amount, category, risk level, and investor count for each of the five highest subscribed plans.
System setup
The System Setup section manages these sub-sections, which include plan category, blog category, and subscriber mail.
Plan Category
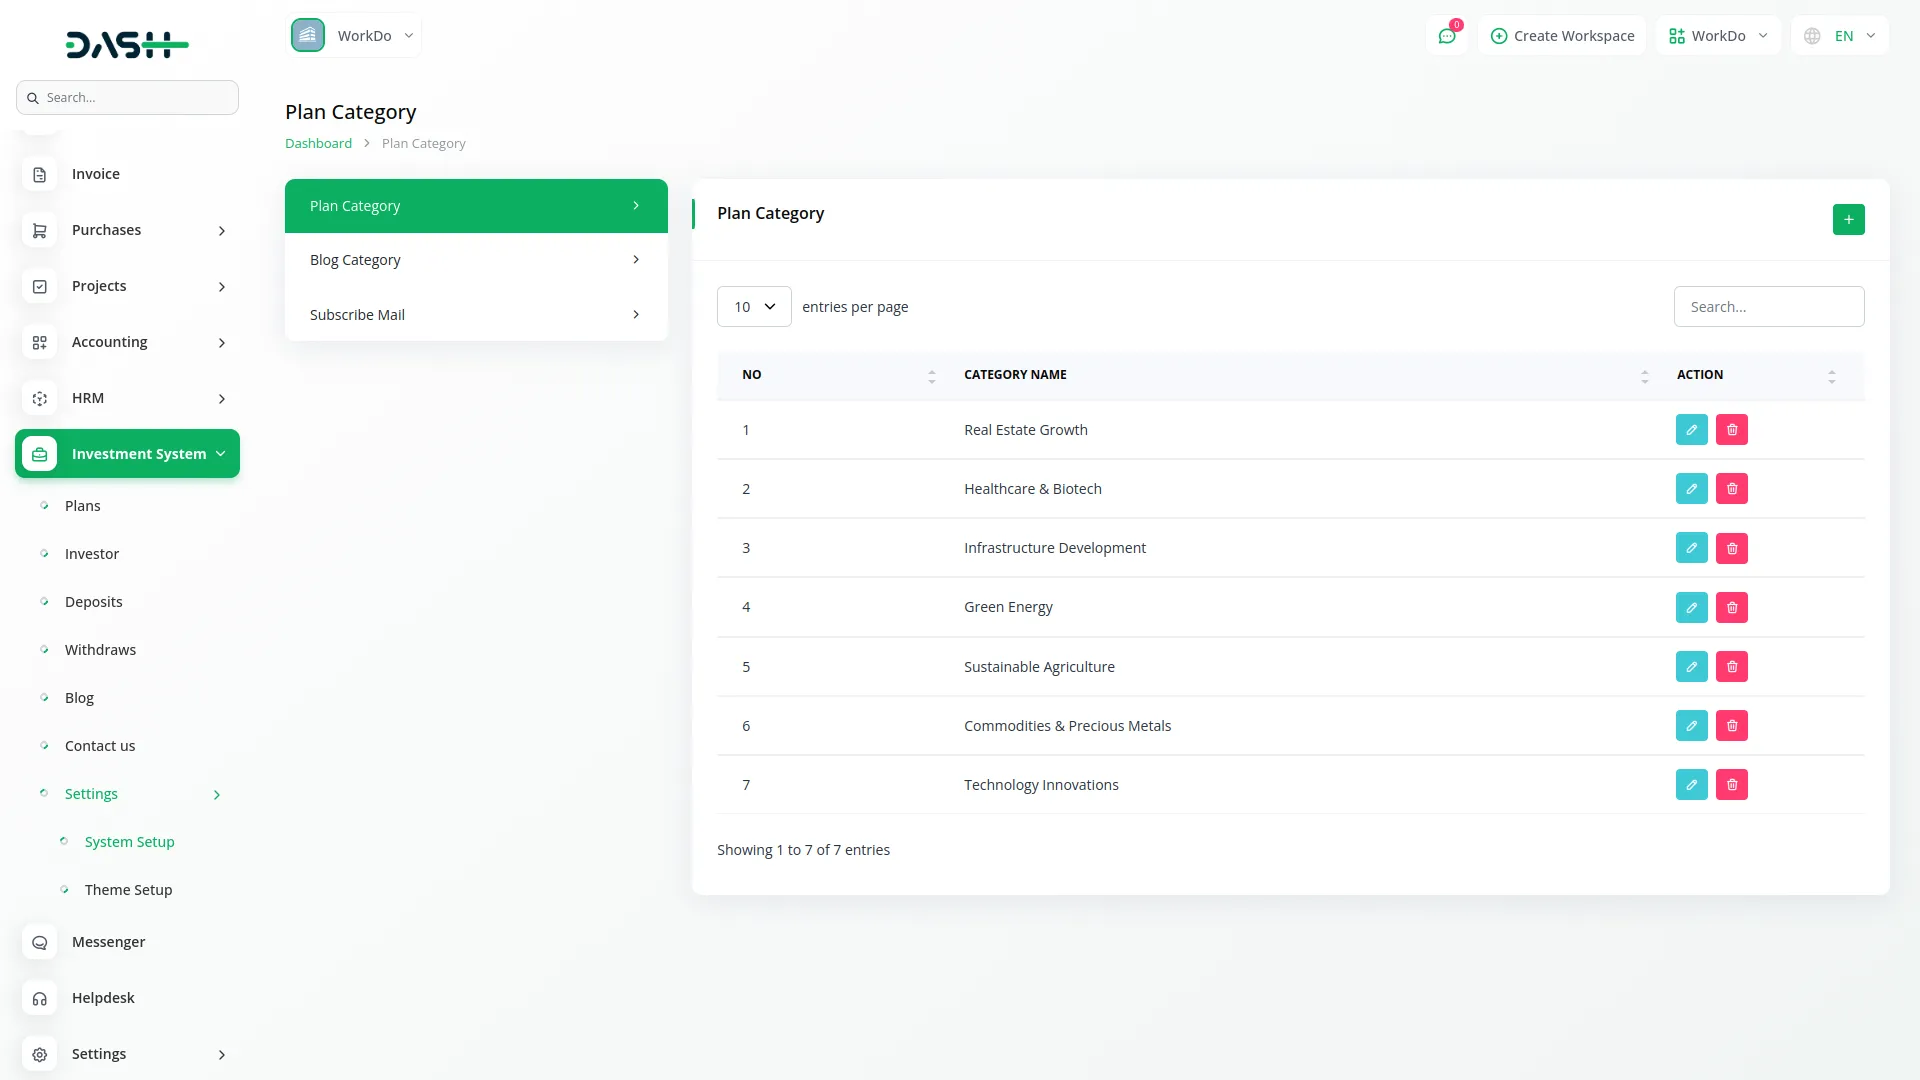
- To create a new plan category, click the “Create” button at the top of the page. Enter a “Plan Category Name” to create different types of investment offerings such as Short-term Plans, Long-term Plans, or High-yield Plans.
- The list page displays categories in a table with columns for Number and Category Name. Use the Actions column to “Edit” existing categories or “Delete” categories no longer in use.
Blog Category
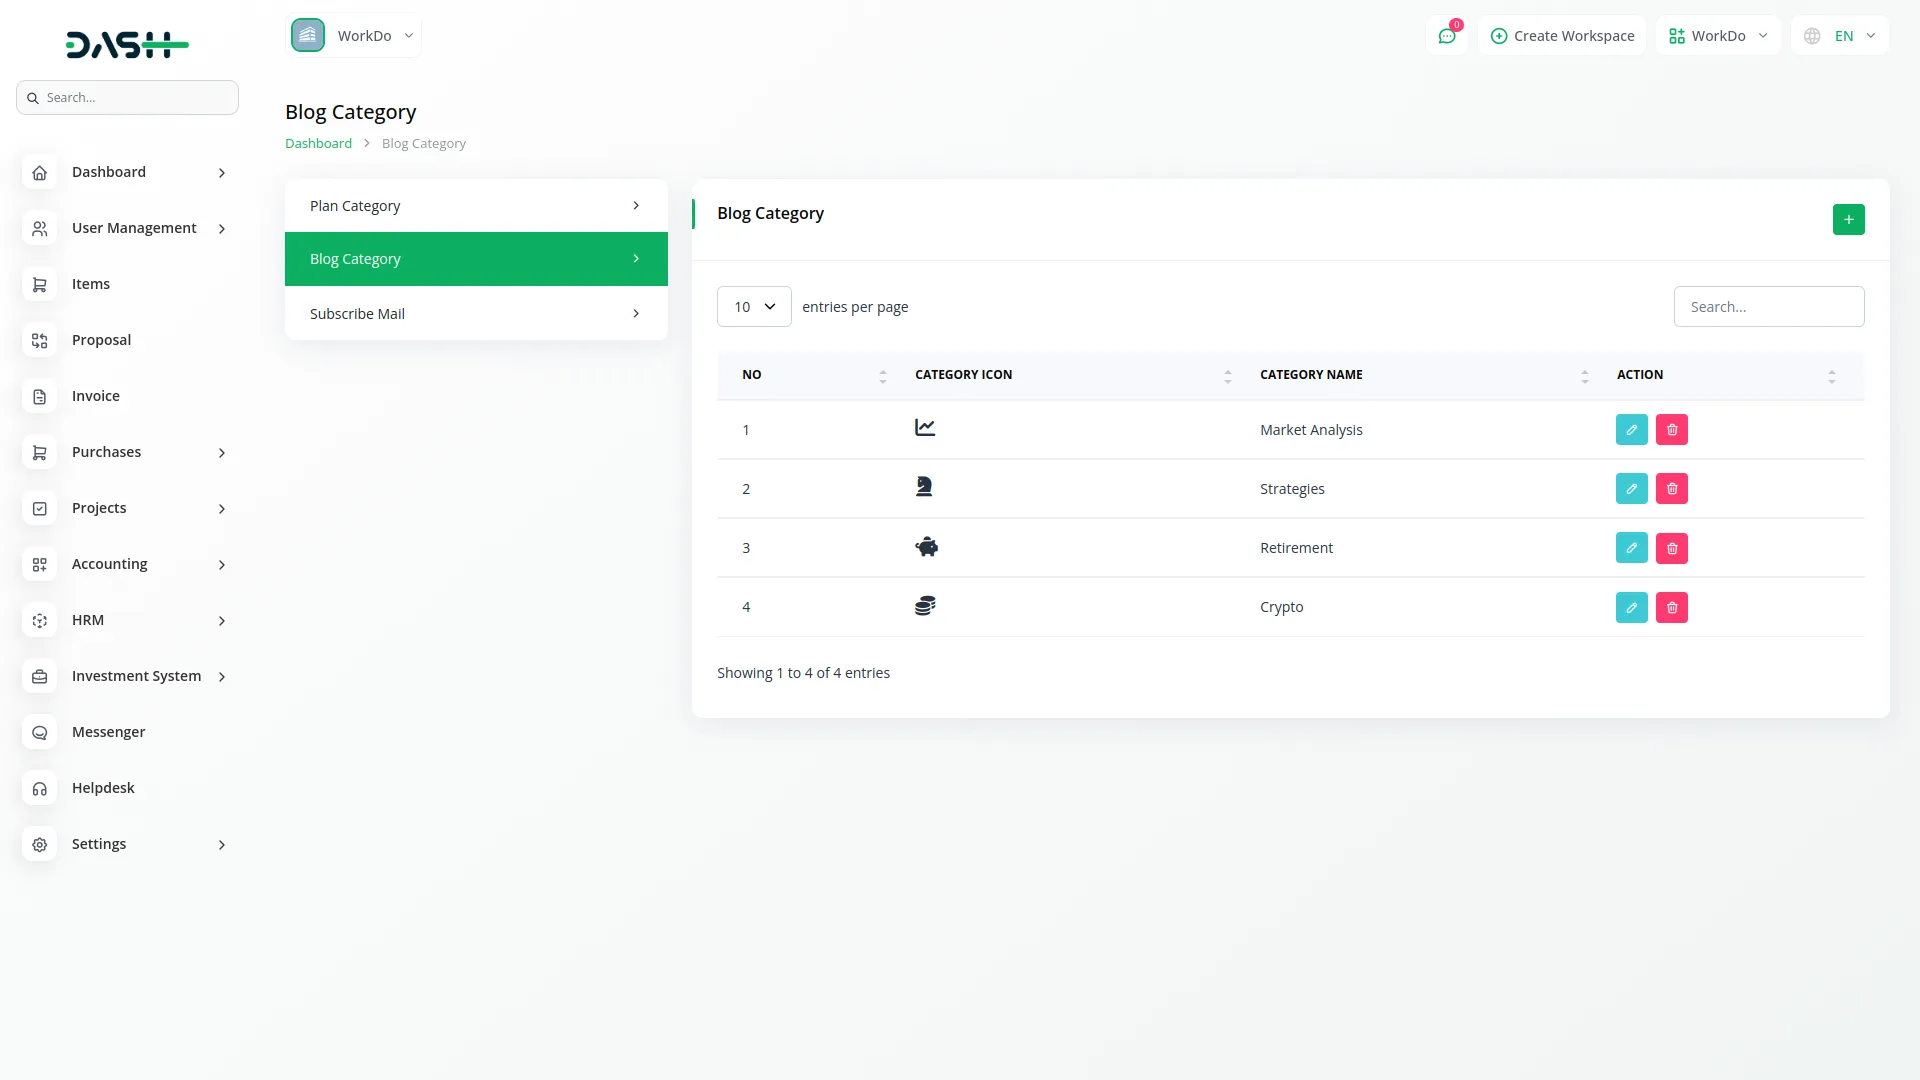
- To create a new blog category, click the “Create” button at the top of the page. Then fill in the required details, including entering a Blog Category Name and choosing an appropriate icon to represent topics like Market Analysis, Investment Tips, or Company News.
- The list page displays blog categories in a table with columns for Number, Category Icon, and Category Name. Use the Actions column to “Edit” existing categories or “Delete” categories no longer needed.
Subscribe Mail
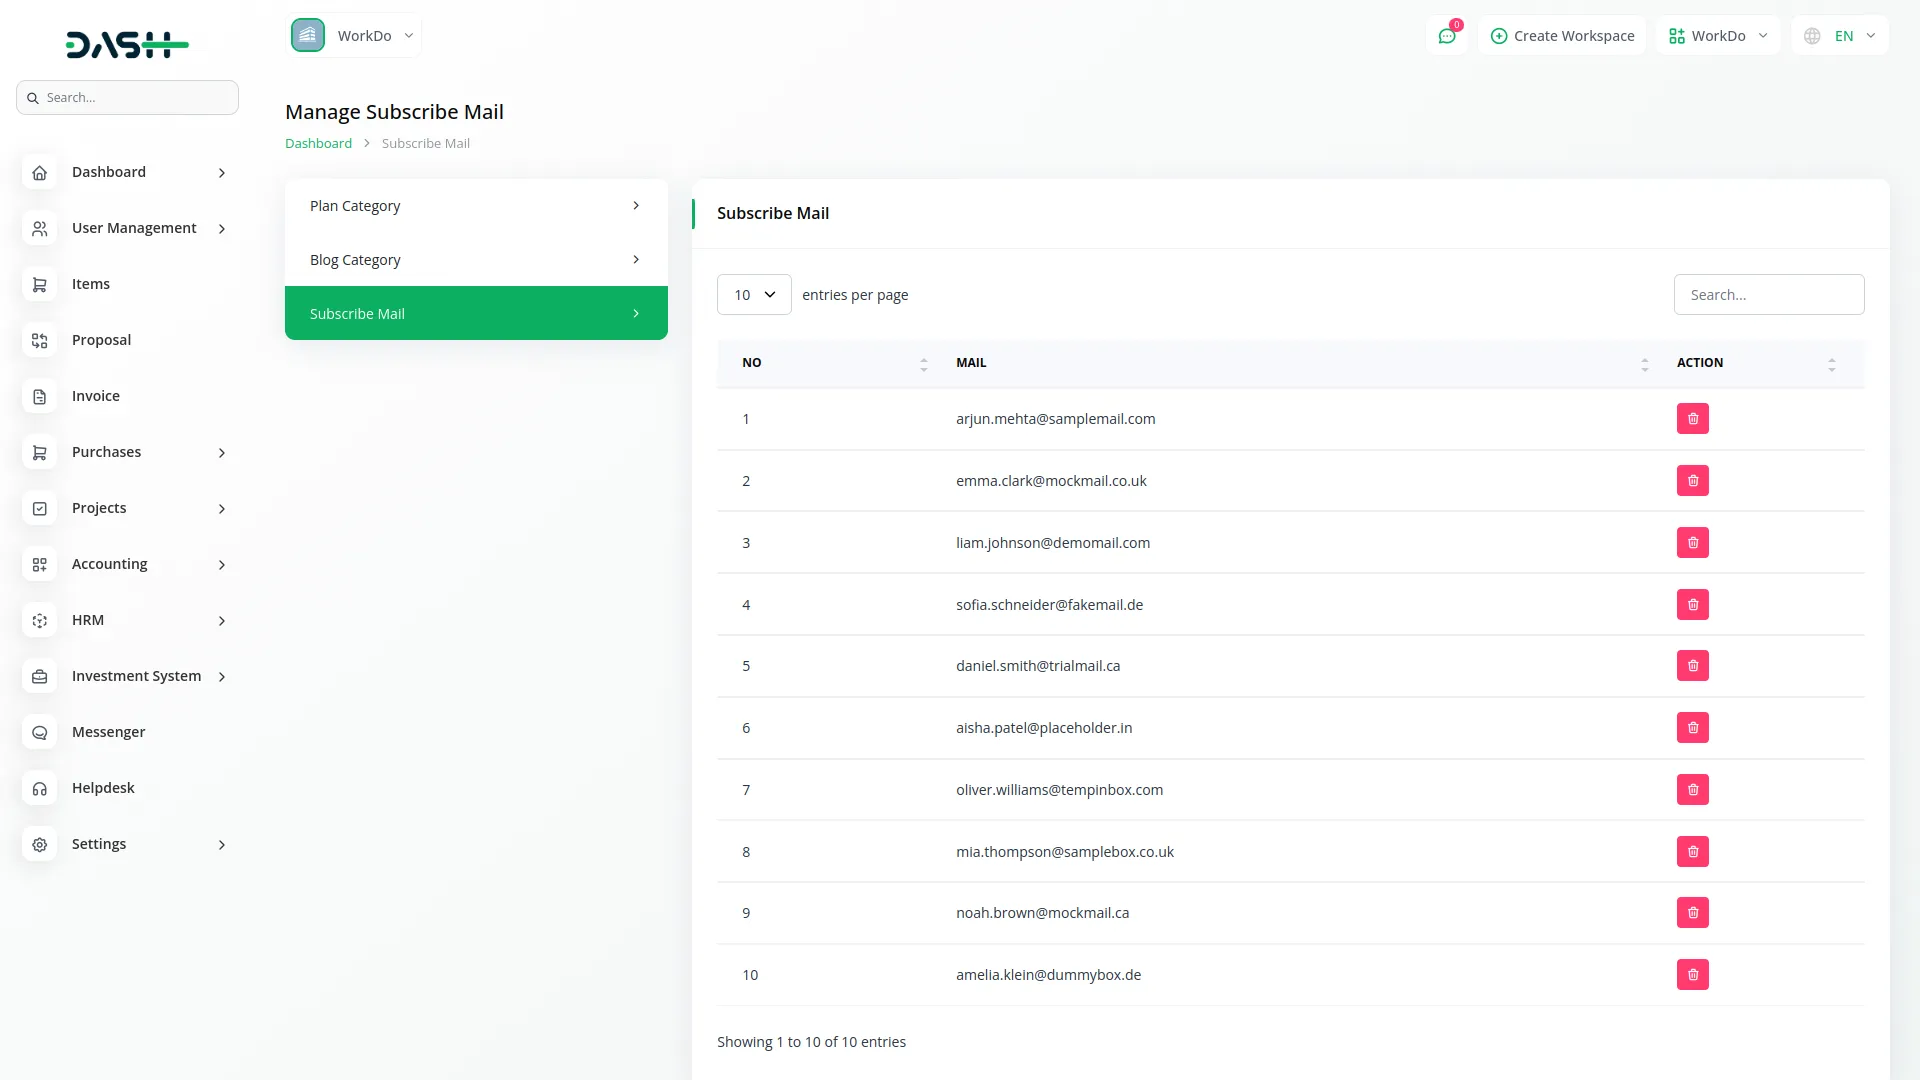
- To manage newsletter subscriptions, this section displays email addresses submitted by users through the newsletter section of your website.
- The list page shows subscriber emails in a table with columns for Number and email address. Use the Actions column to “Delete” subscribers who have unsubscribed or have invalid email addresses.
Theme setup
This section contains multiple sub-sections that control the fundamental settings and content for your entire Investment System website and application.
Brand Setting
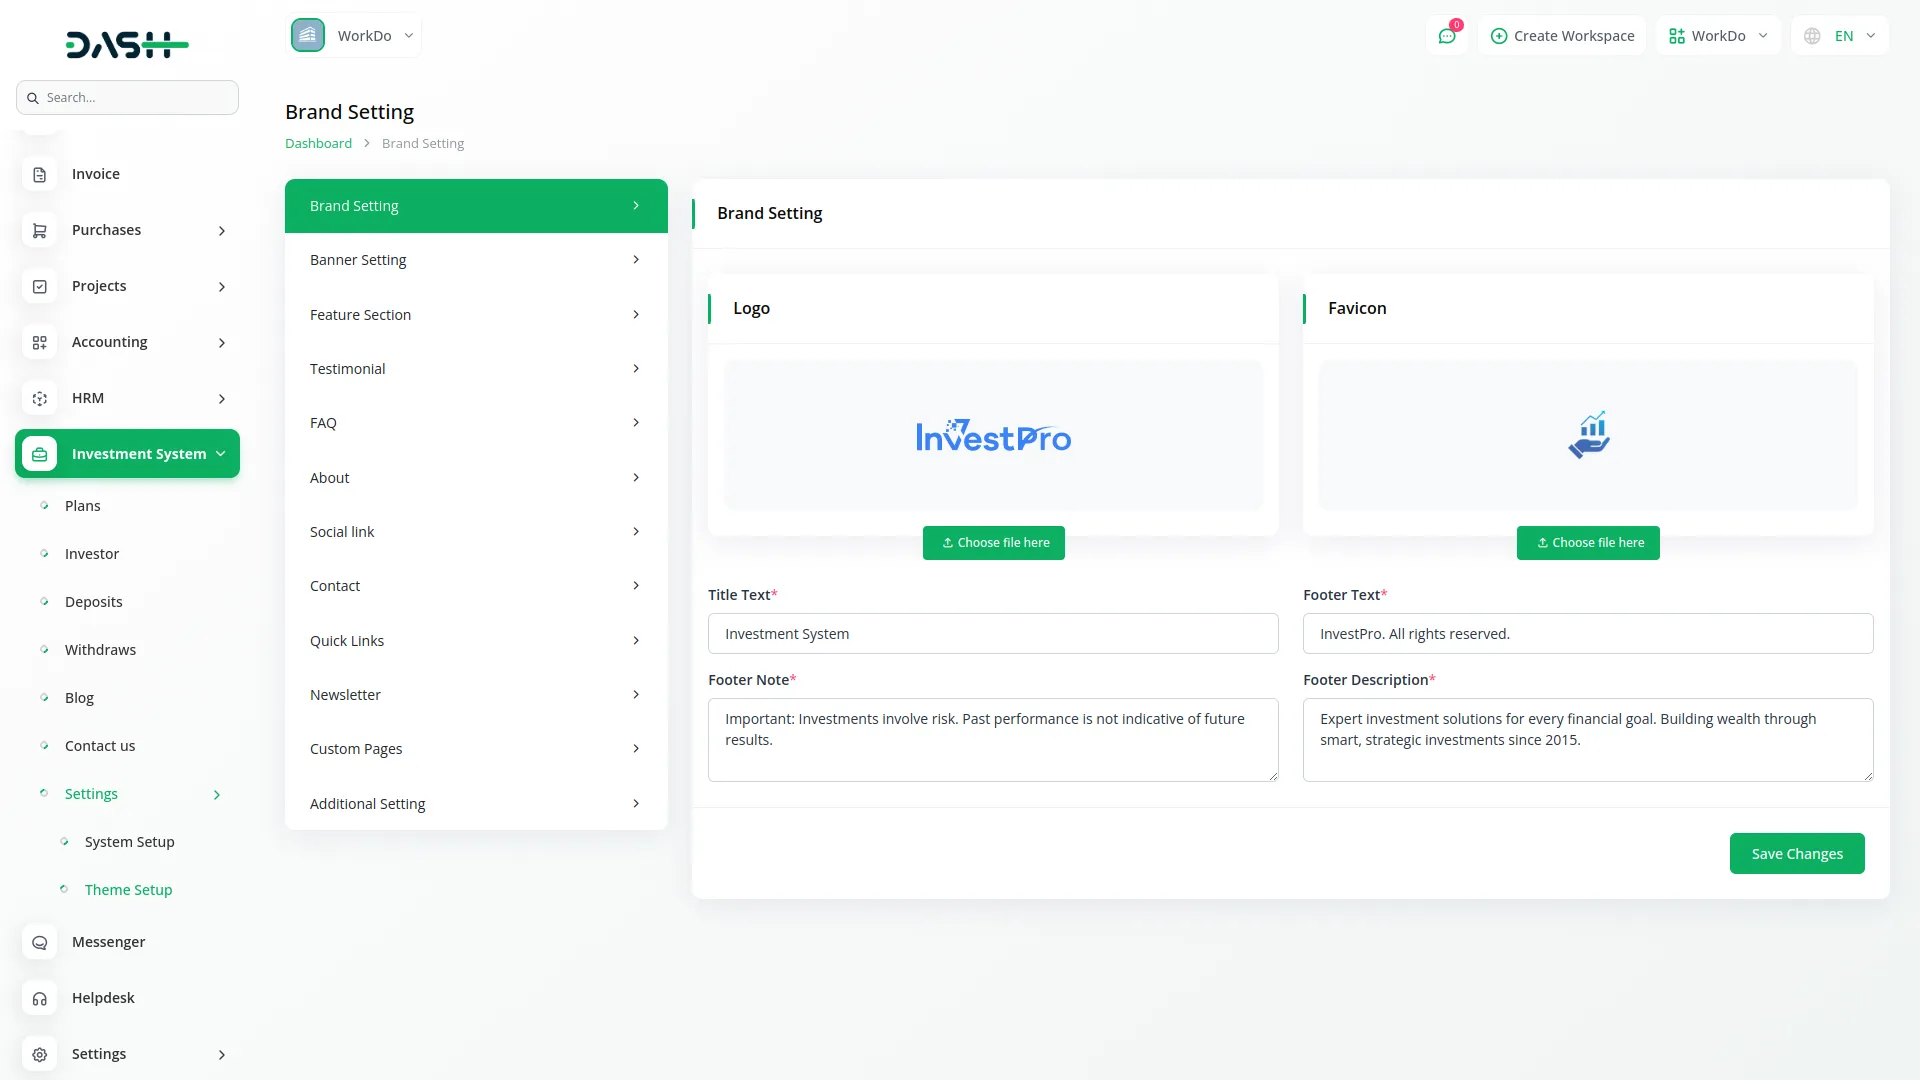
- To configure your brand identity, go to Theme Setup and select Brand Settings. Upload your Logo that will appear throughout your website.
- Add your Favicon and title text for the website tab. Enter your Footer Text, Footer Note, and Footer Description that will display at the bottom of your website.
Banner Setting
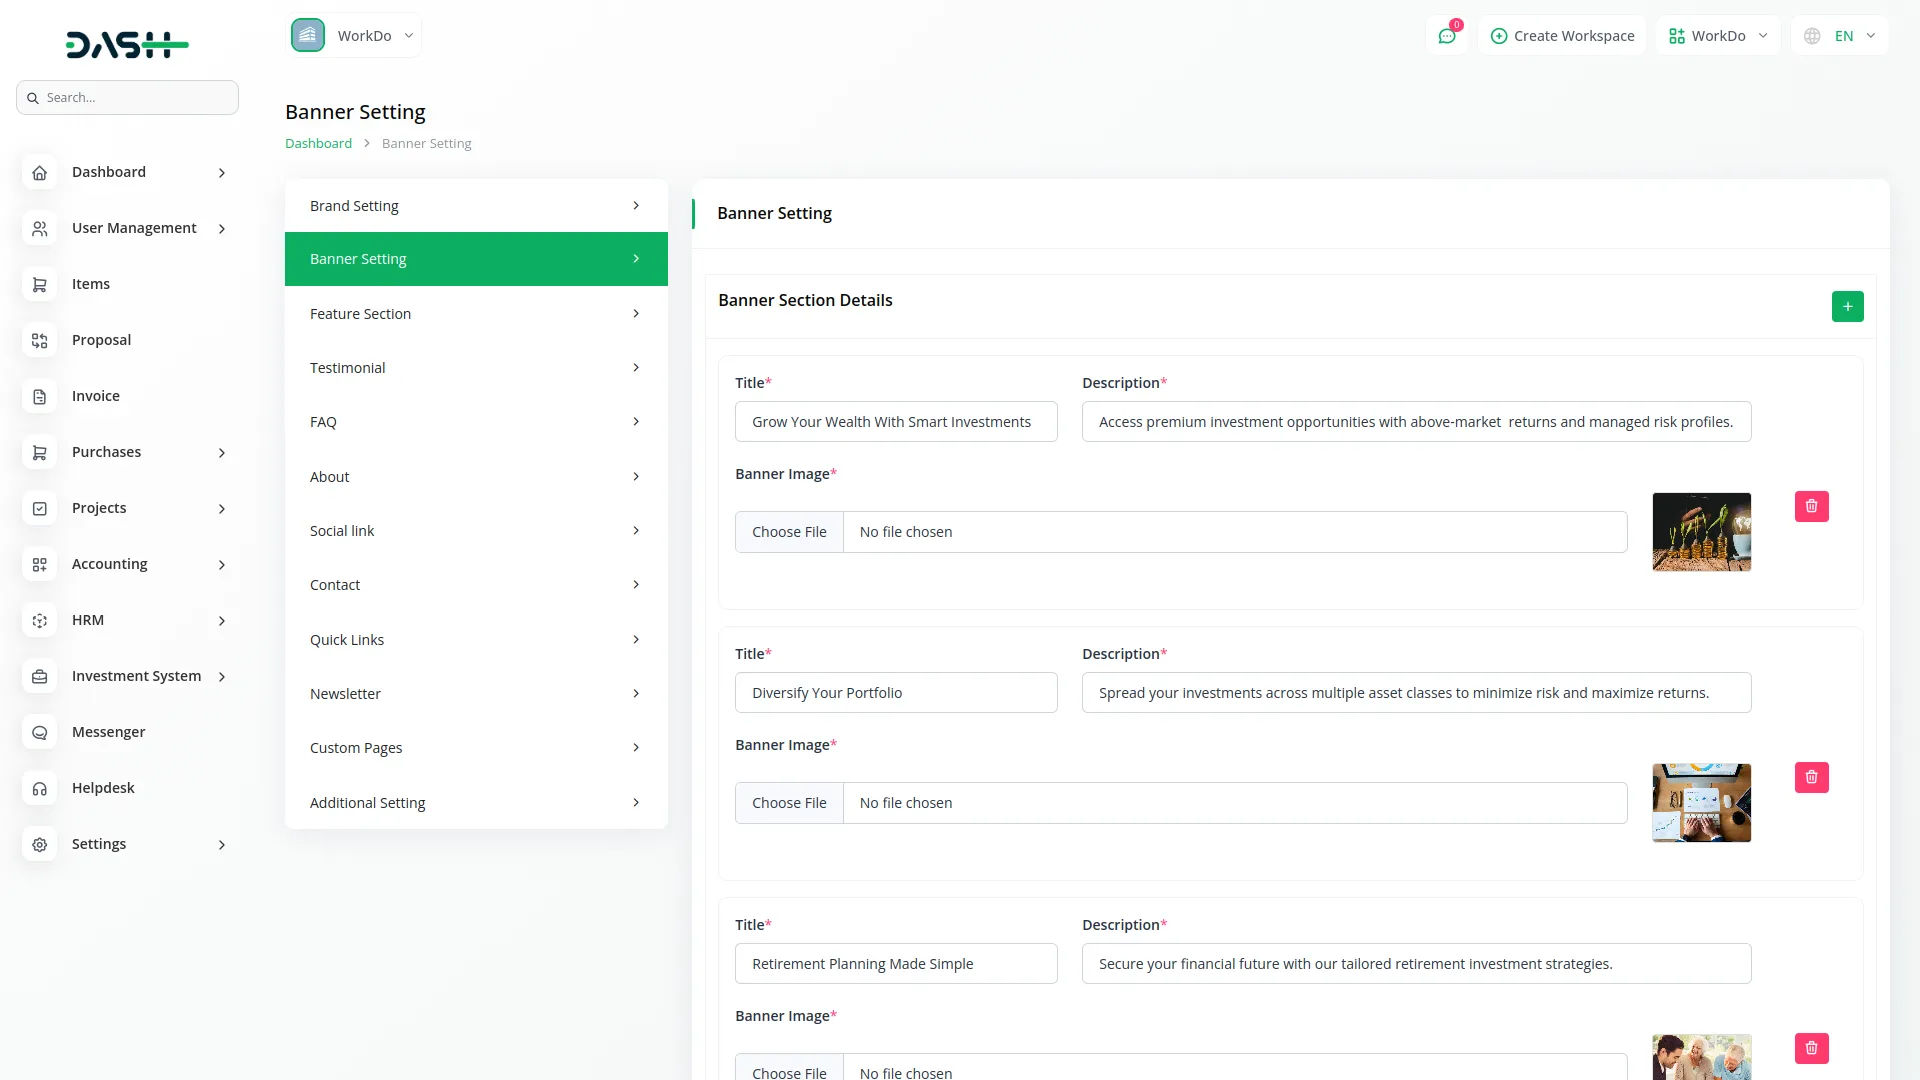
- To create your homepage banner, click Banner Settings. Enter the main Title and Description for your banner section.
- Upload multiple Images to create a banner slider. You can add multiple banner items using the slider functionality to showcase different aspects of your investment services.
Feature Section
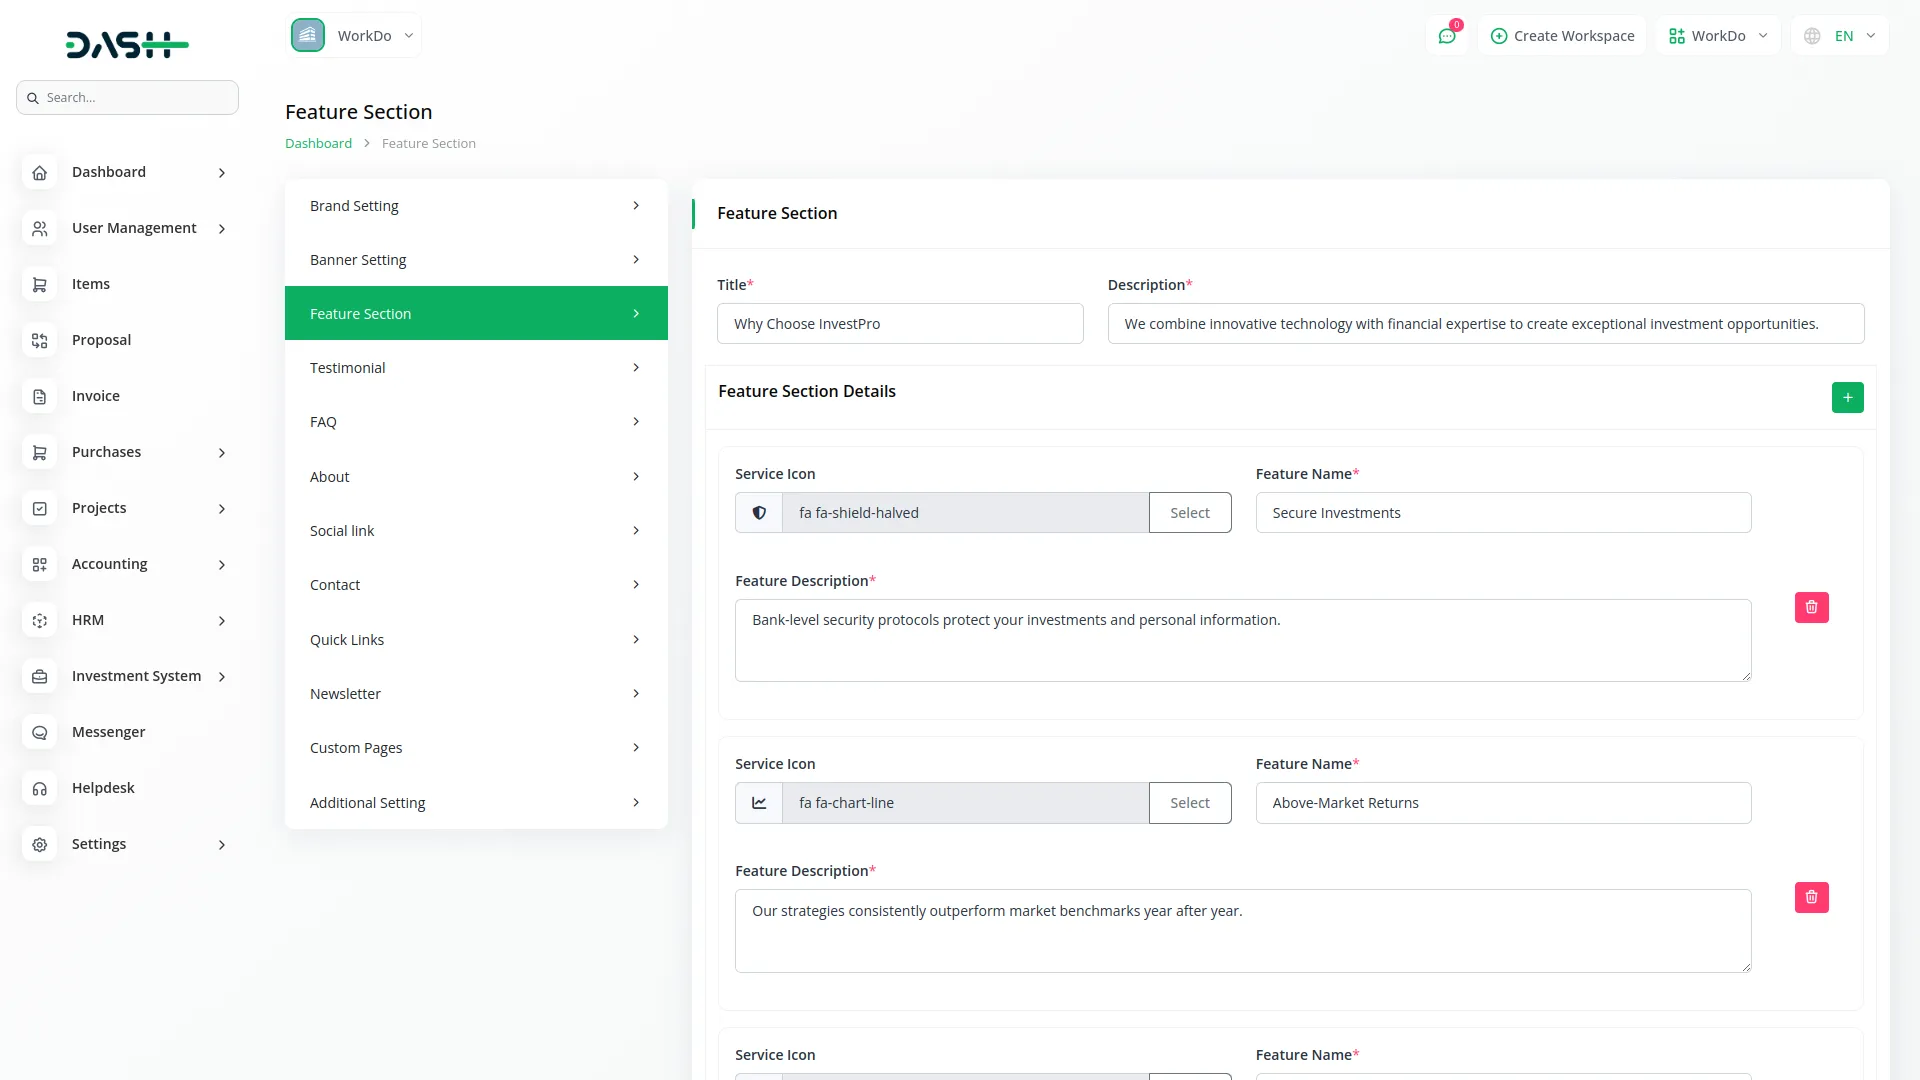
- To highlight your investment services, enter a section title and description that introduces your key features.
- In feature details, you can use the repeater function to add multiple features – for each feature, choose an appropriate icon, enter the feature name, and provide a detailed description of that particular service or benefit.
Testimonials
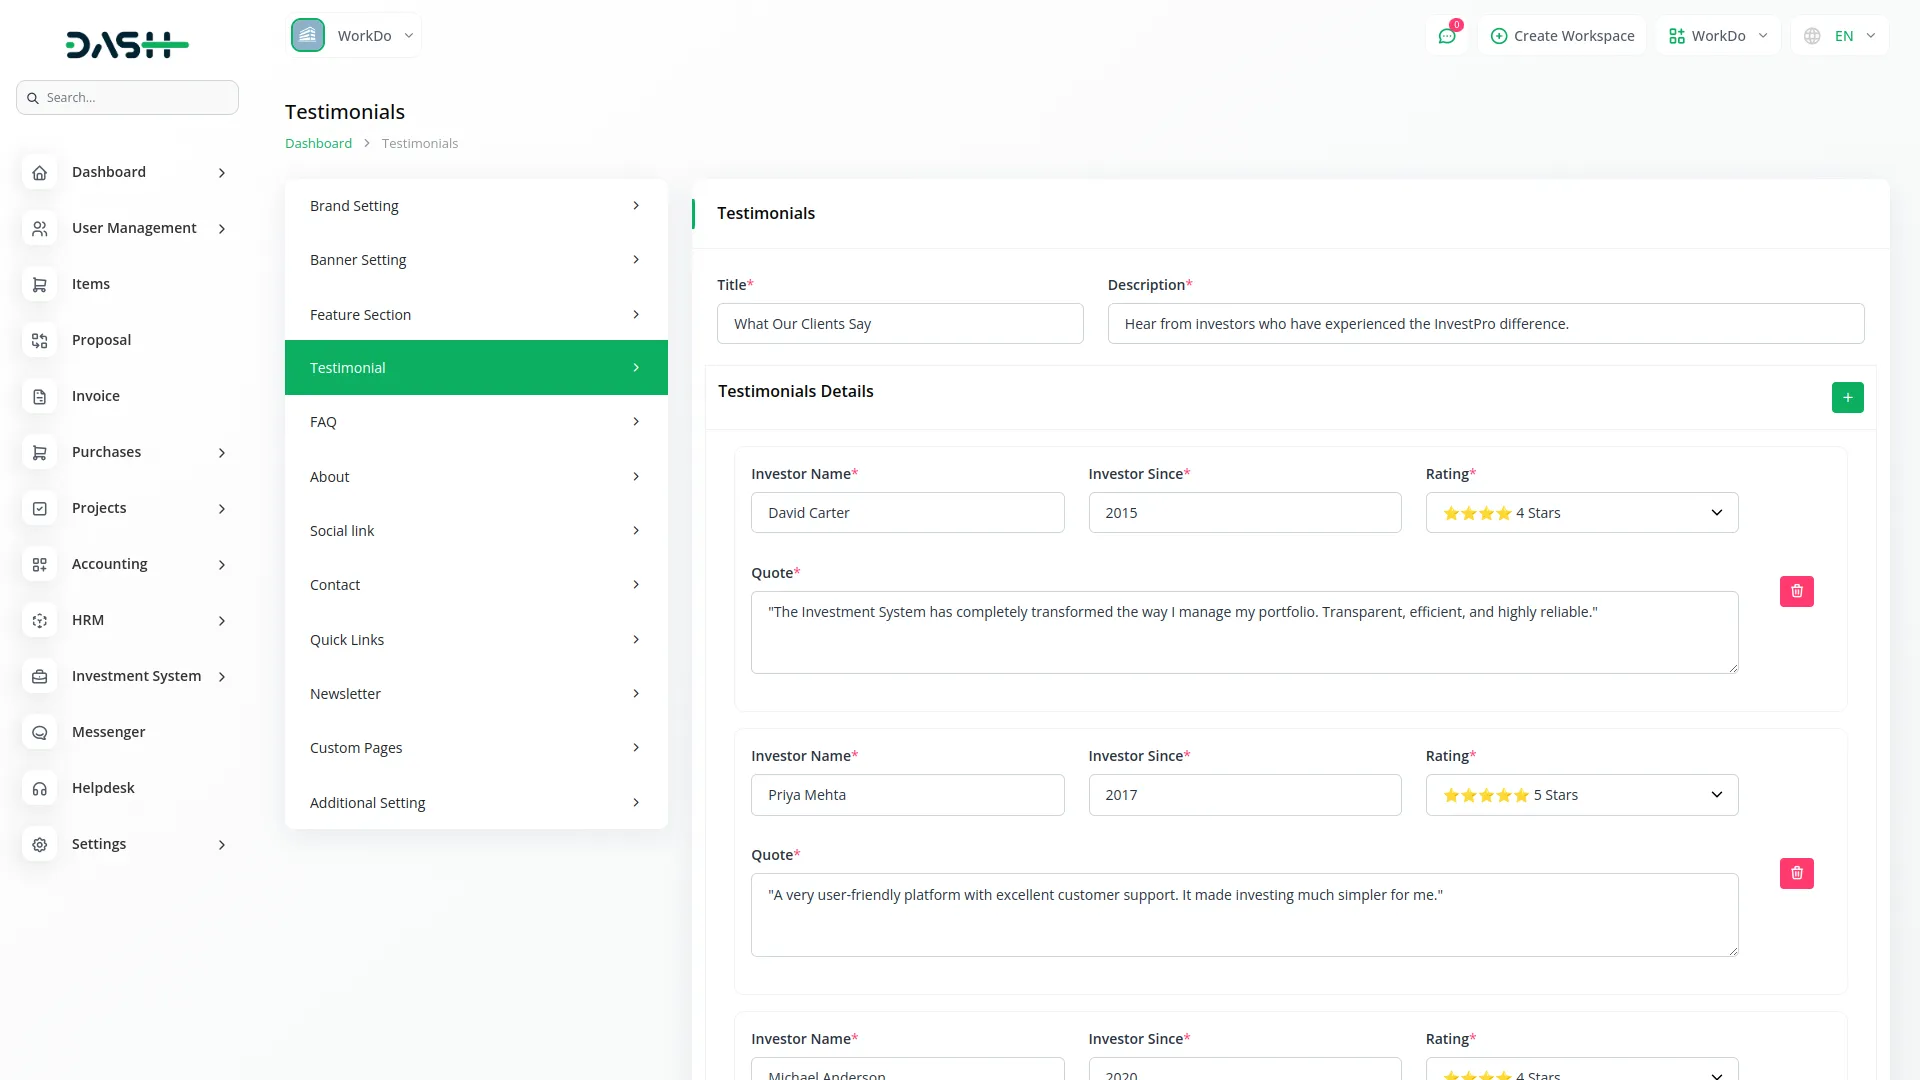
- Navigate to Testimonials to add customer reviews. Enter the section Title and Description.
- In Testimonial Details, use the repeater to add multiple testimonials. For each testimonial, enter the Investor Name, Investor Since date, Rating (usually 1-5 stars), and their Quote about your services.
FAQ Section
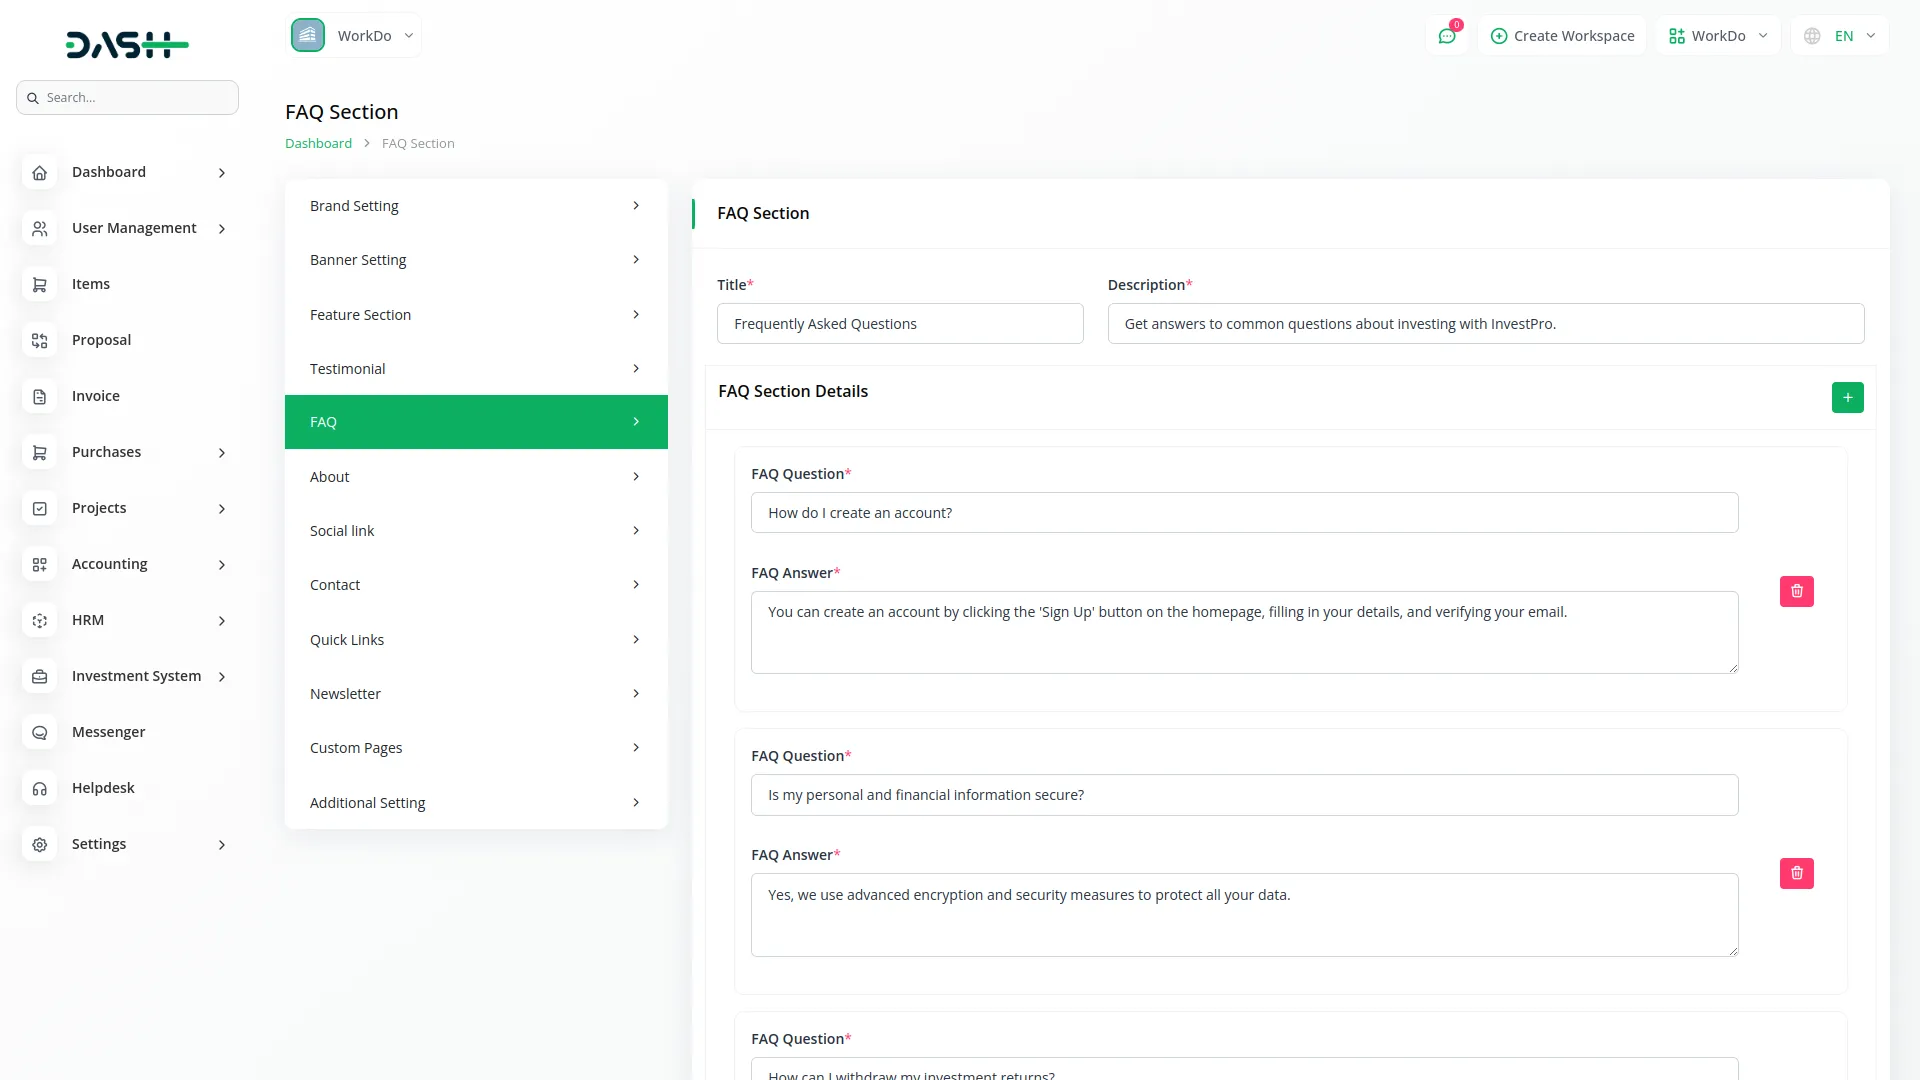
- Go to the FAQ Section to answer common questions. Add the main Title and Description for this section.
- In the FAQ details, use the repeater function to add multiple frequently asked questions – for each entry, provide the FAQ question and a complete FAQ answer that addresses investor concerns clearly.
About
- The About section contains multiple sub-sections that allow you to tell your company’s story and showcase your investment firm’s background, mission, leadership, and partnerships.
About Section
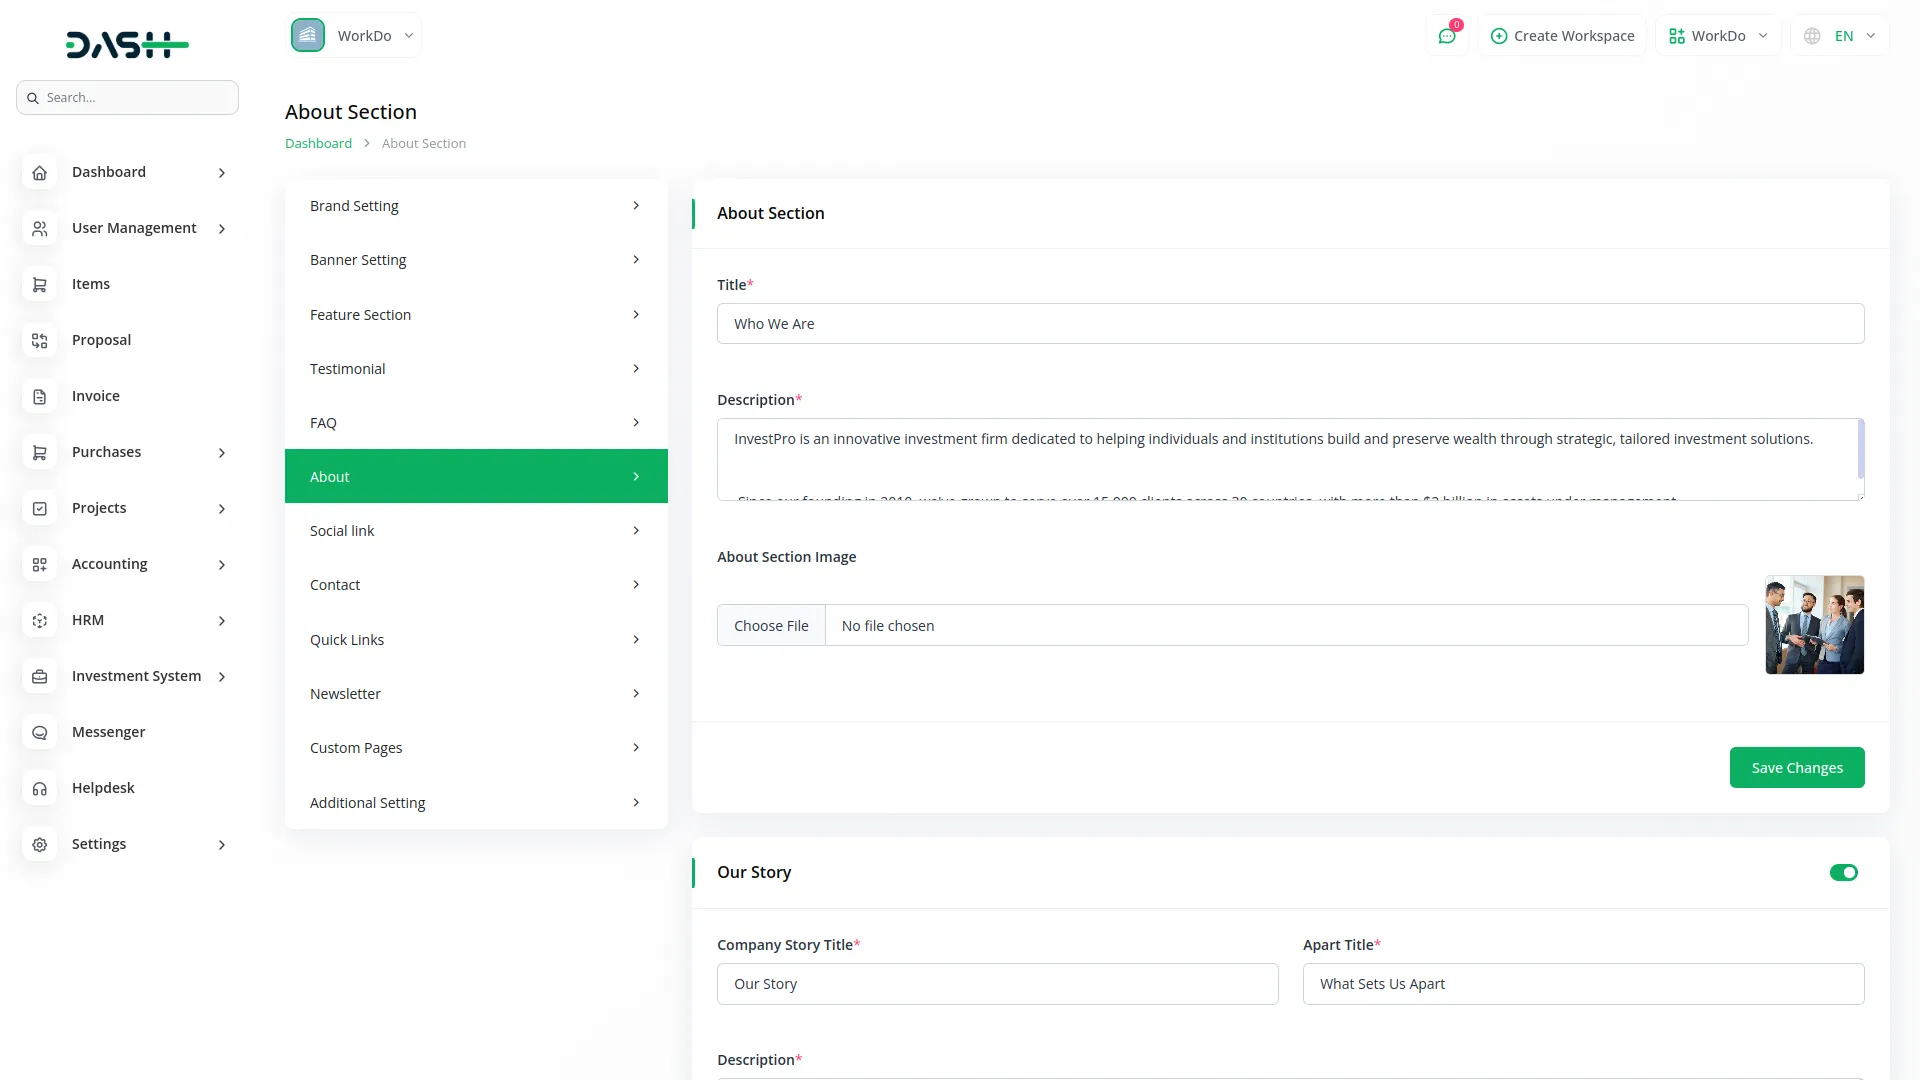
- To create your About page hero section, enter a compelling title, write a detailed description about your investment company, and upload an About section image that represents your firm.
Our Story
- The toggle button is enabled by default. If you switch it off, the section will no longer appear on the website.
- When enabled, enter your “Company Story Title” and “Apart Title” along with a comprehensive description.
- Use the repeater function to add multiple story elements – for each story item, choose an icon, enter a title, and provide a detailed description about that aspect of your company’s journey.
Mission & Vision
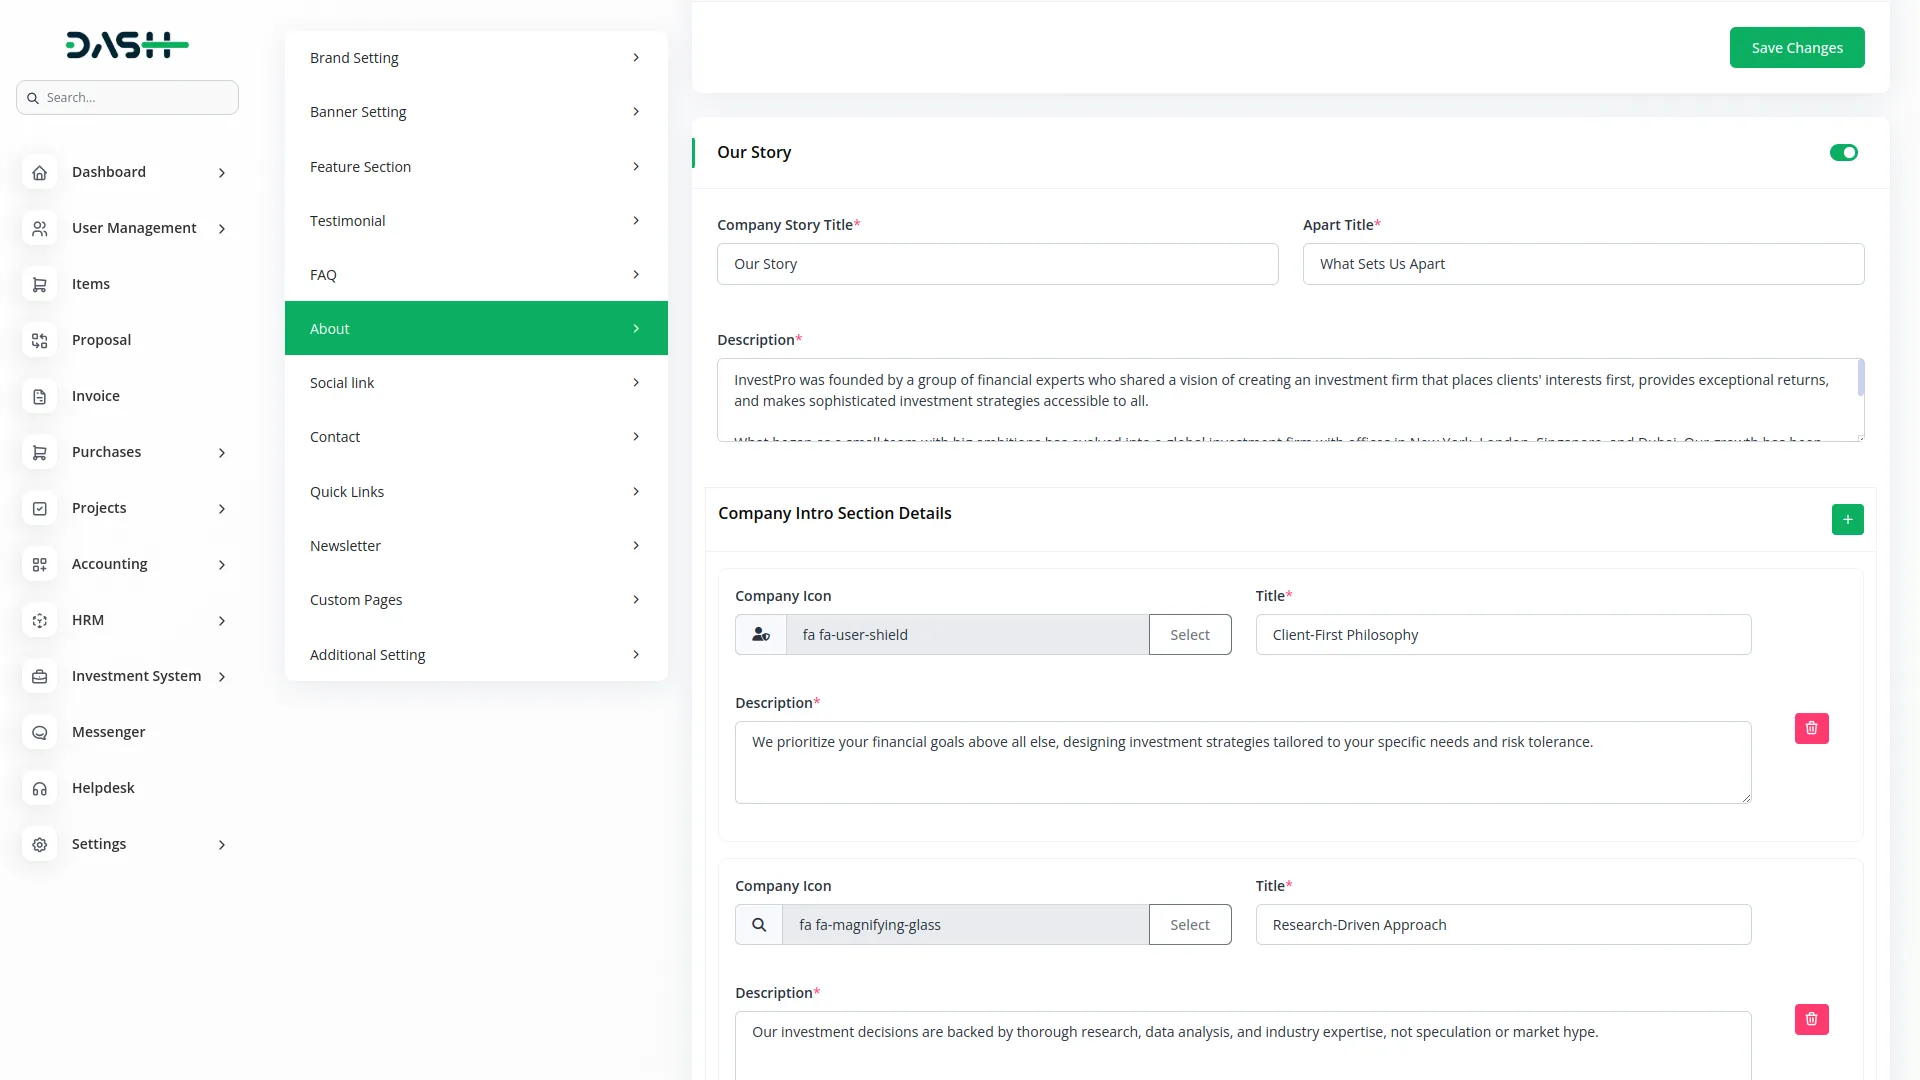
- The toggle button is enabled by default. If you switch it off, the section will no longer appear on the website.
- When enabled, enter your “Mission & Vision Title,” separate “Mission Title” and “Vision Title,” along with an overall “Mission & Vision Description.” Then provide specific descriptions for both your mission statement and vision statement.
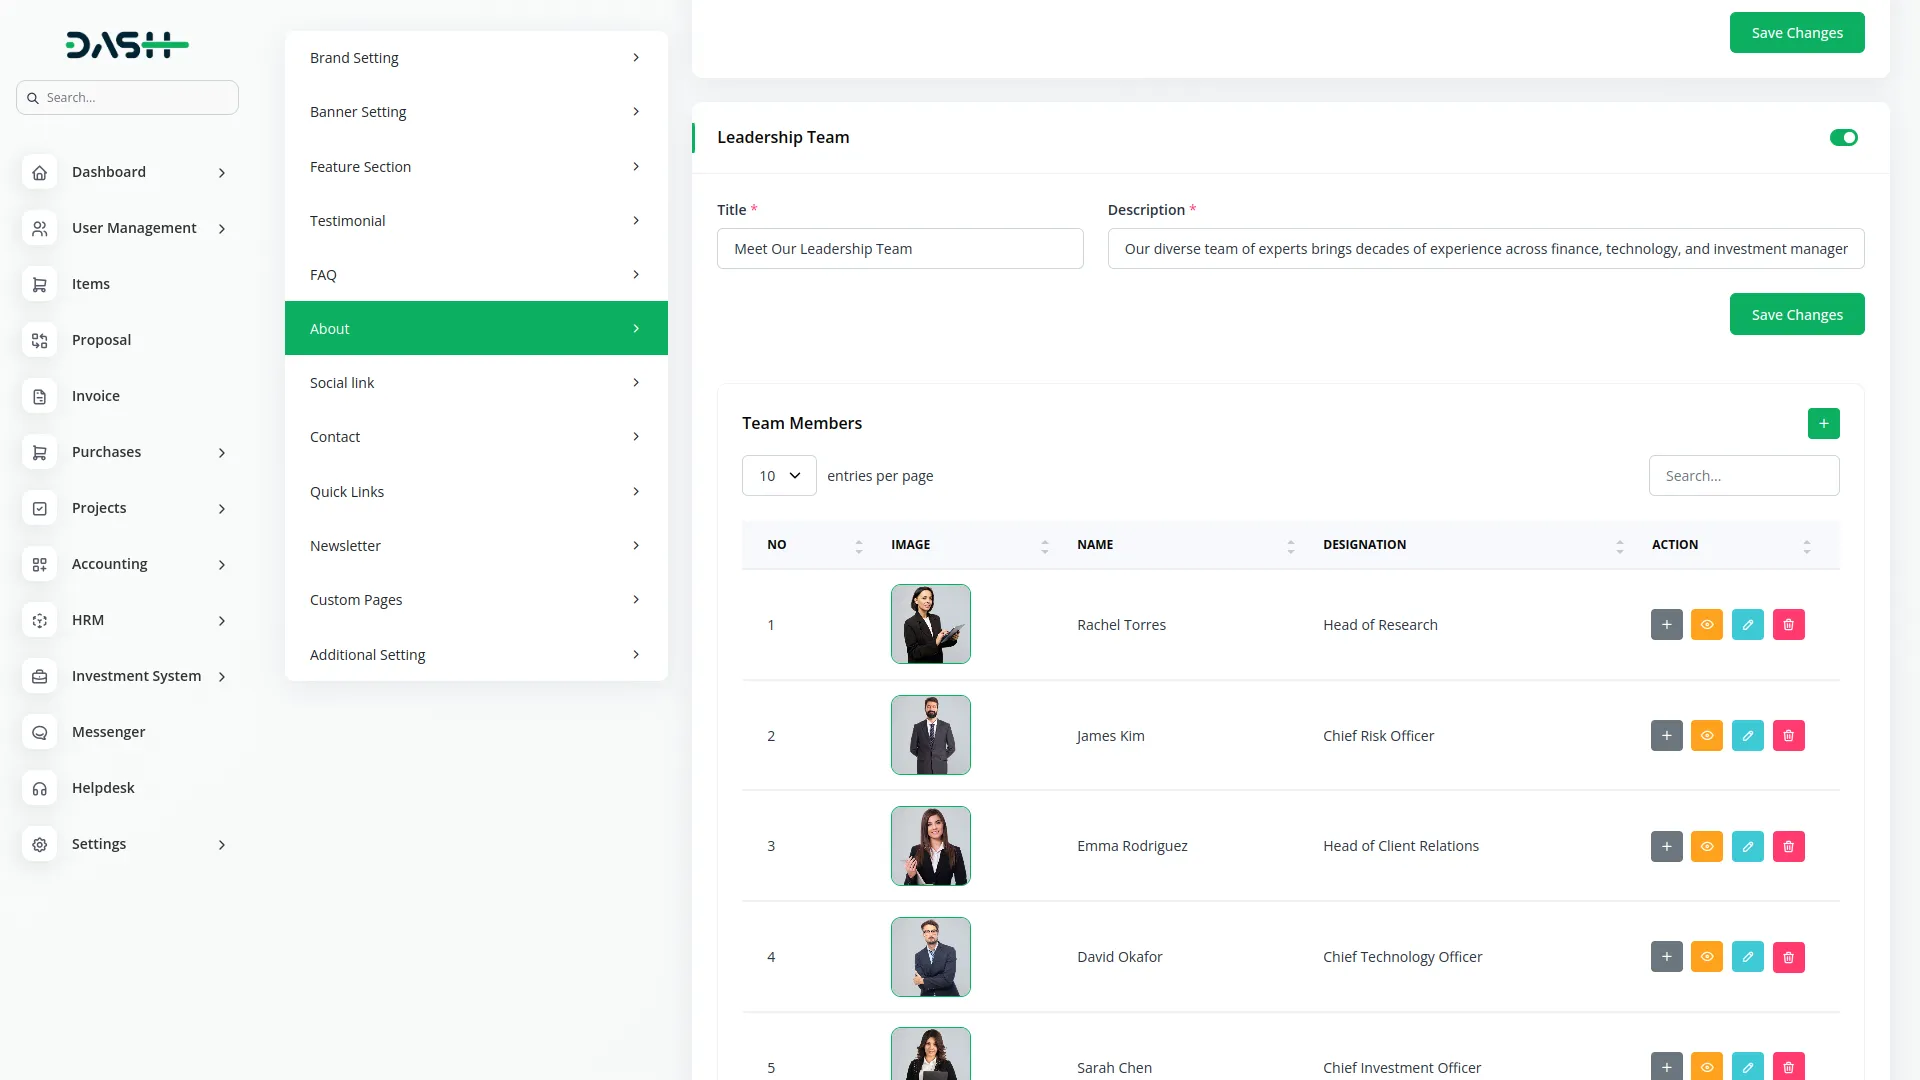
Leadership Team
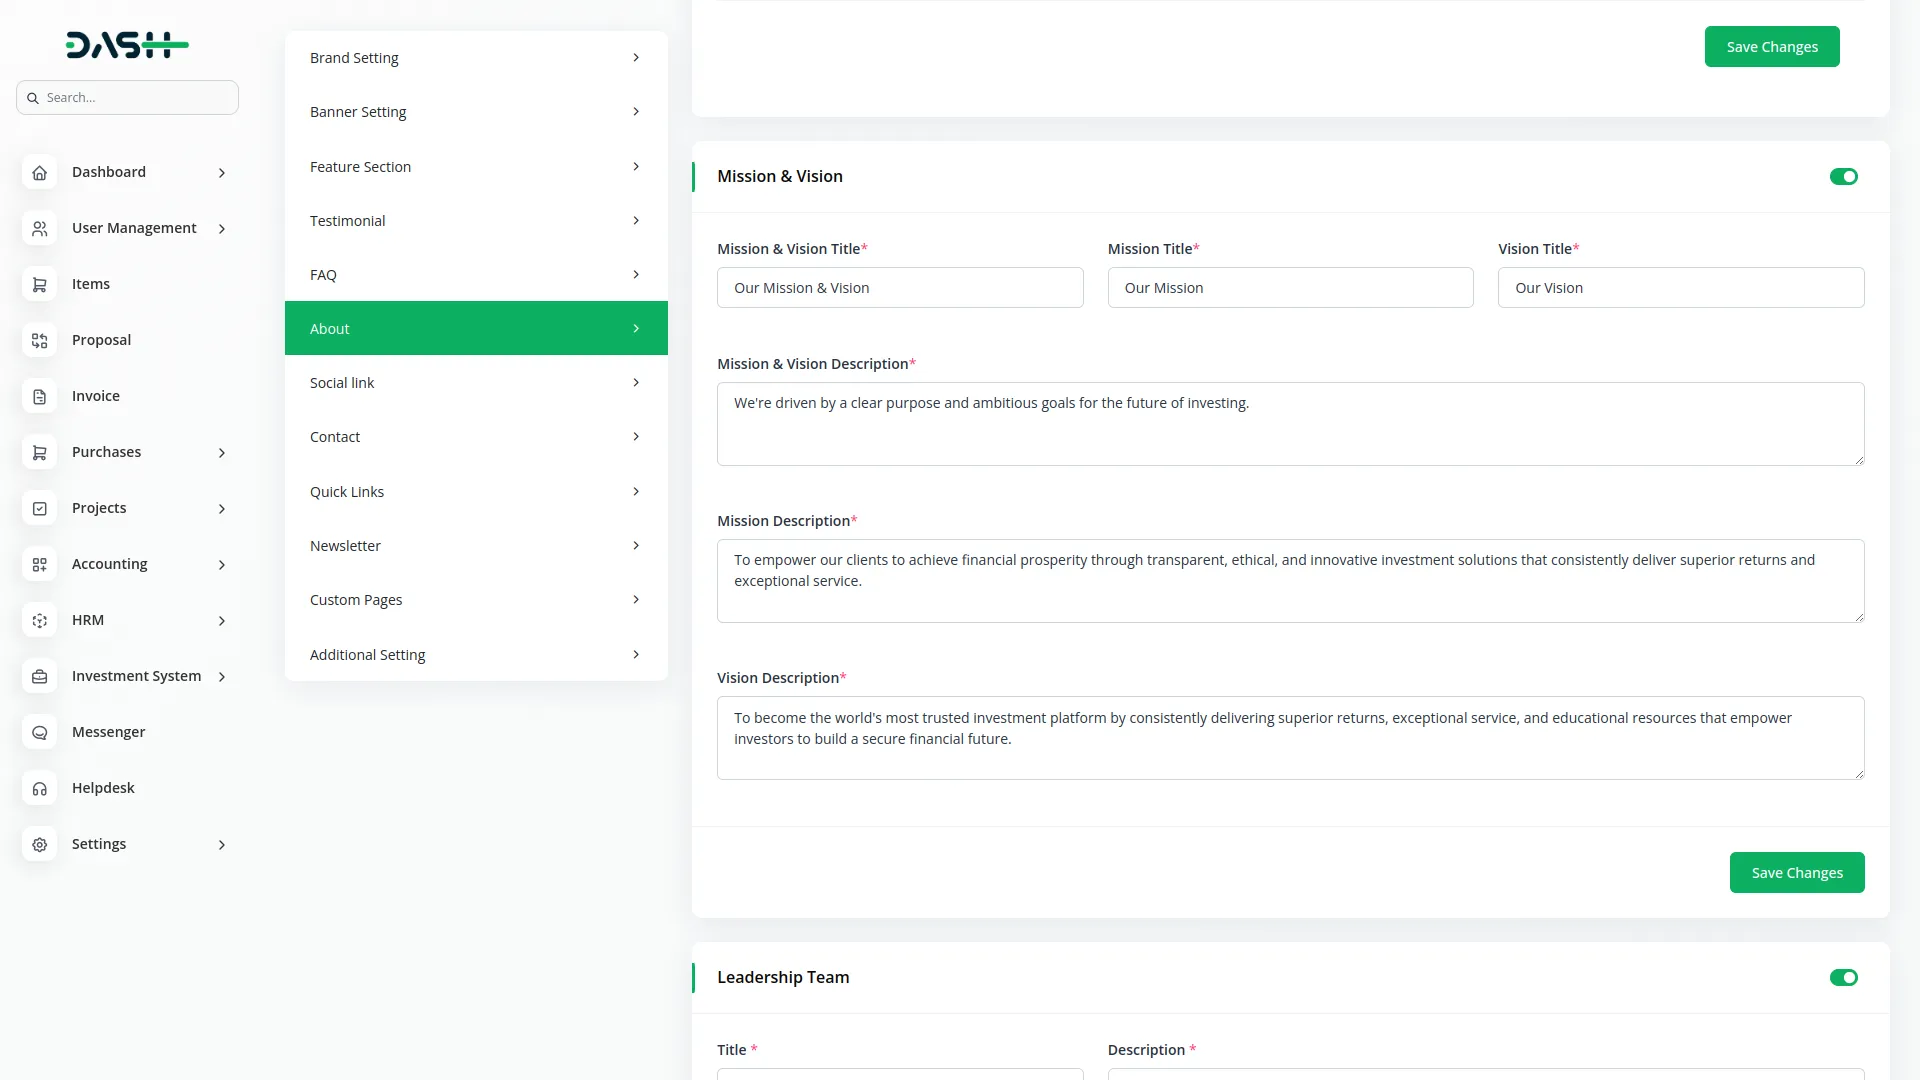
- The toggle button is enabled by default. If you switch it off, the section will no longer appear on the website.
- Enter a section title and description (if not added, the title and description will not display the section)to introduce your leadership team. Add team members by entering their name, designation, uploading their image, and writing a description of their background and expertise.
- The list page displays team members in a table with columns for Number, Image, Name, and Designation. Use the Actions column under “Social Info” to add multiple social media profiles, “View” member details, “Edit” member details, or “Delete” members.
Company journey
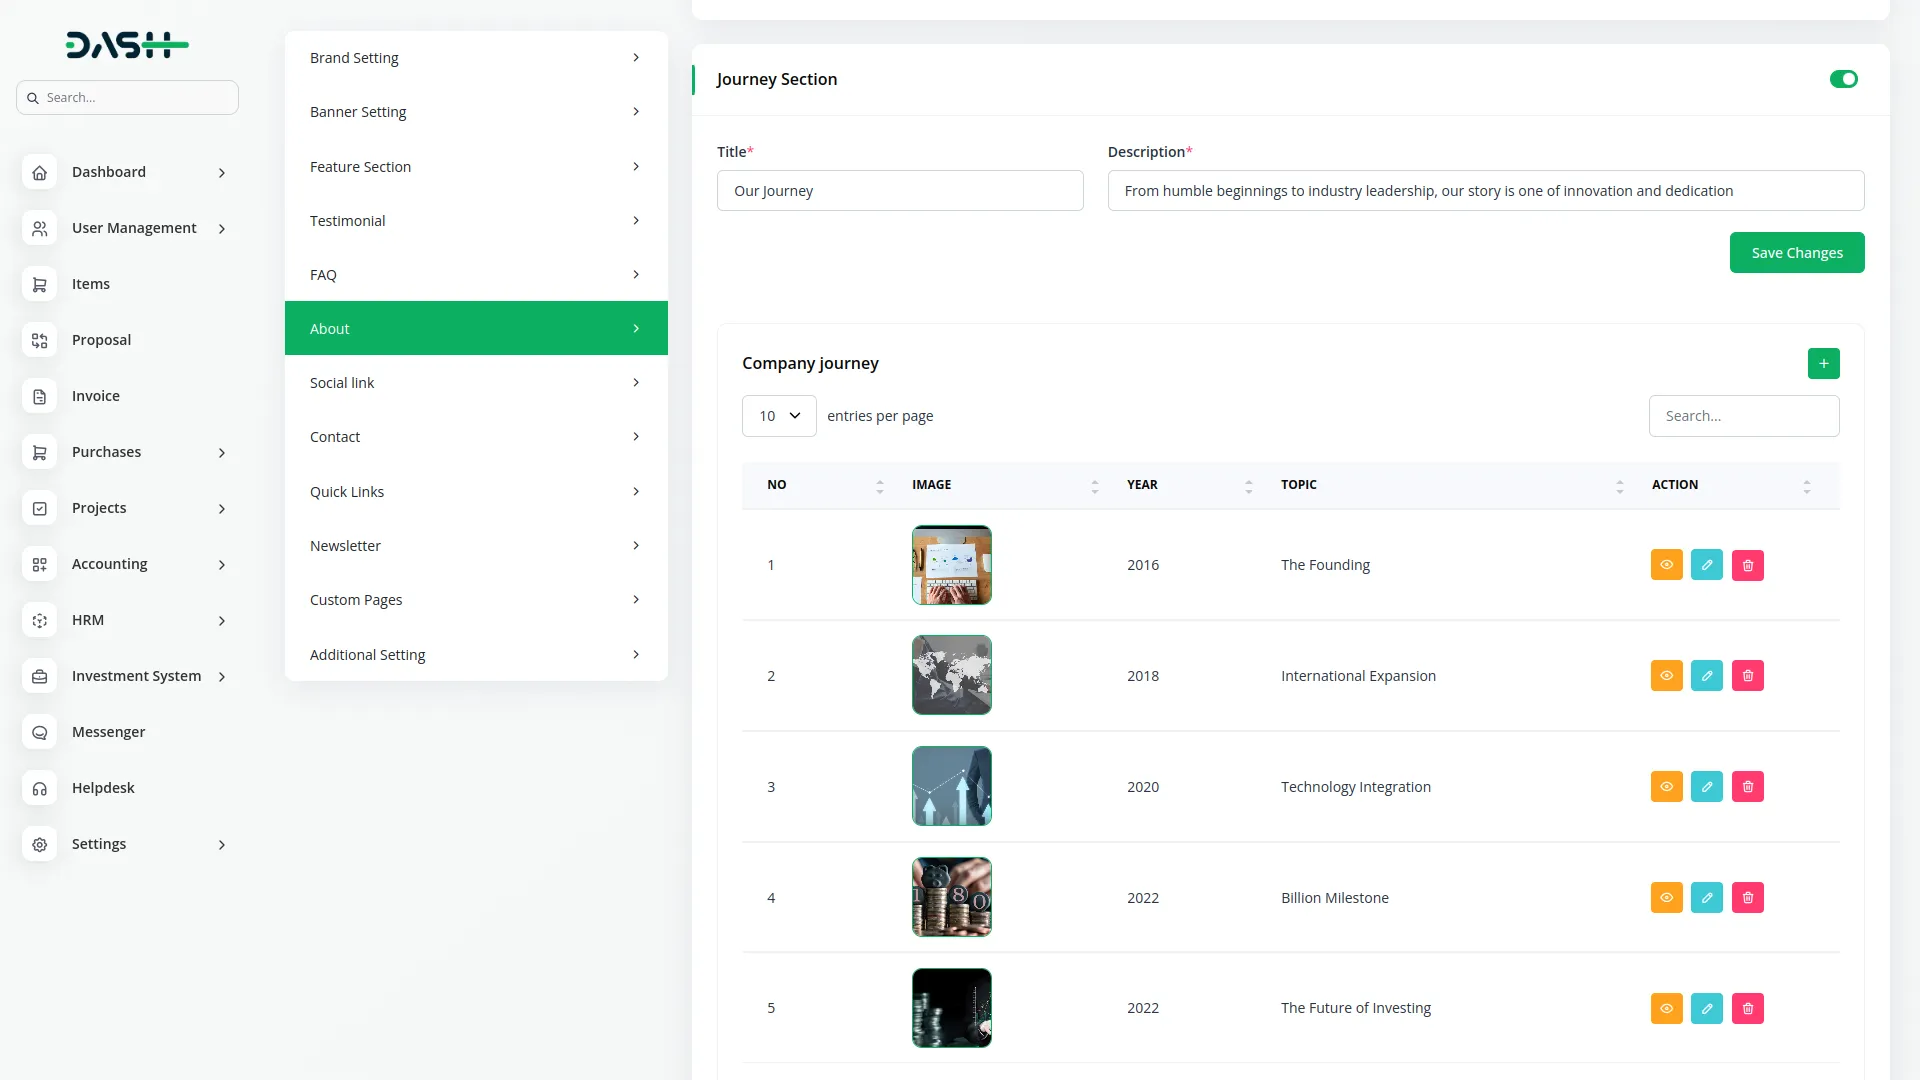
- The toggle button is enabled by default. If you switch it off, the section will no longer appear on the website.
- You need to enter a section title and description(if not added, the title and description will not display the section) to introduce your journey timeline. Add journey milestones by choosing an icon, selecting a color theme, entering the year, providing a topic title, uploading an image, adding relevant tags, and writing a detailed description.
- The list page displays journey entries in a table with columns for Number, Image, Year, and Topic. Use the Actions column to “View” milestone details, “Edit” existing entries, or “Delete” outdated milestones.
Partner Section
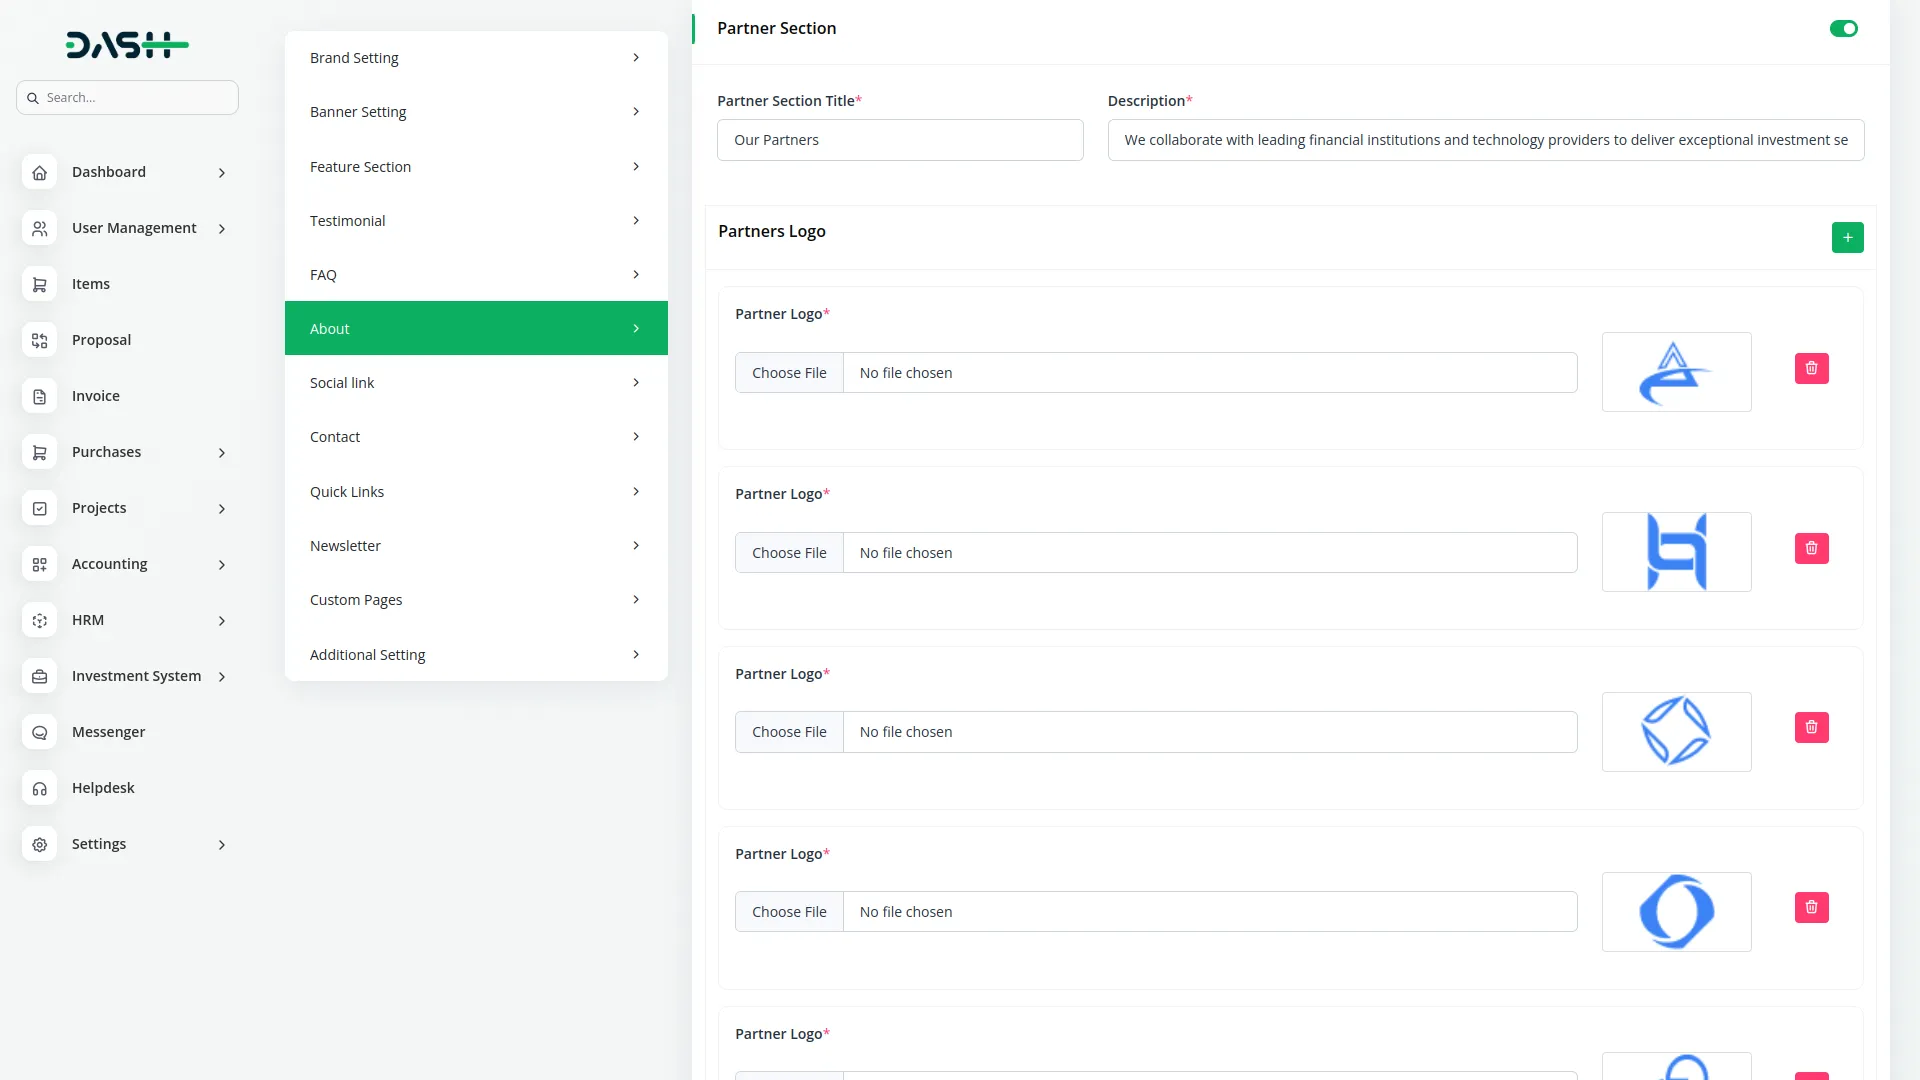
- The toggle button is enabled by default. If you switch it off, the section will no longer appear on the website.
- When enabled, enter a section title and description to introduce your partner network. Use the repeater function to add multiple partner logos that will be displayed in the Partners section of your About page.
Social Link
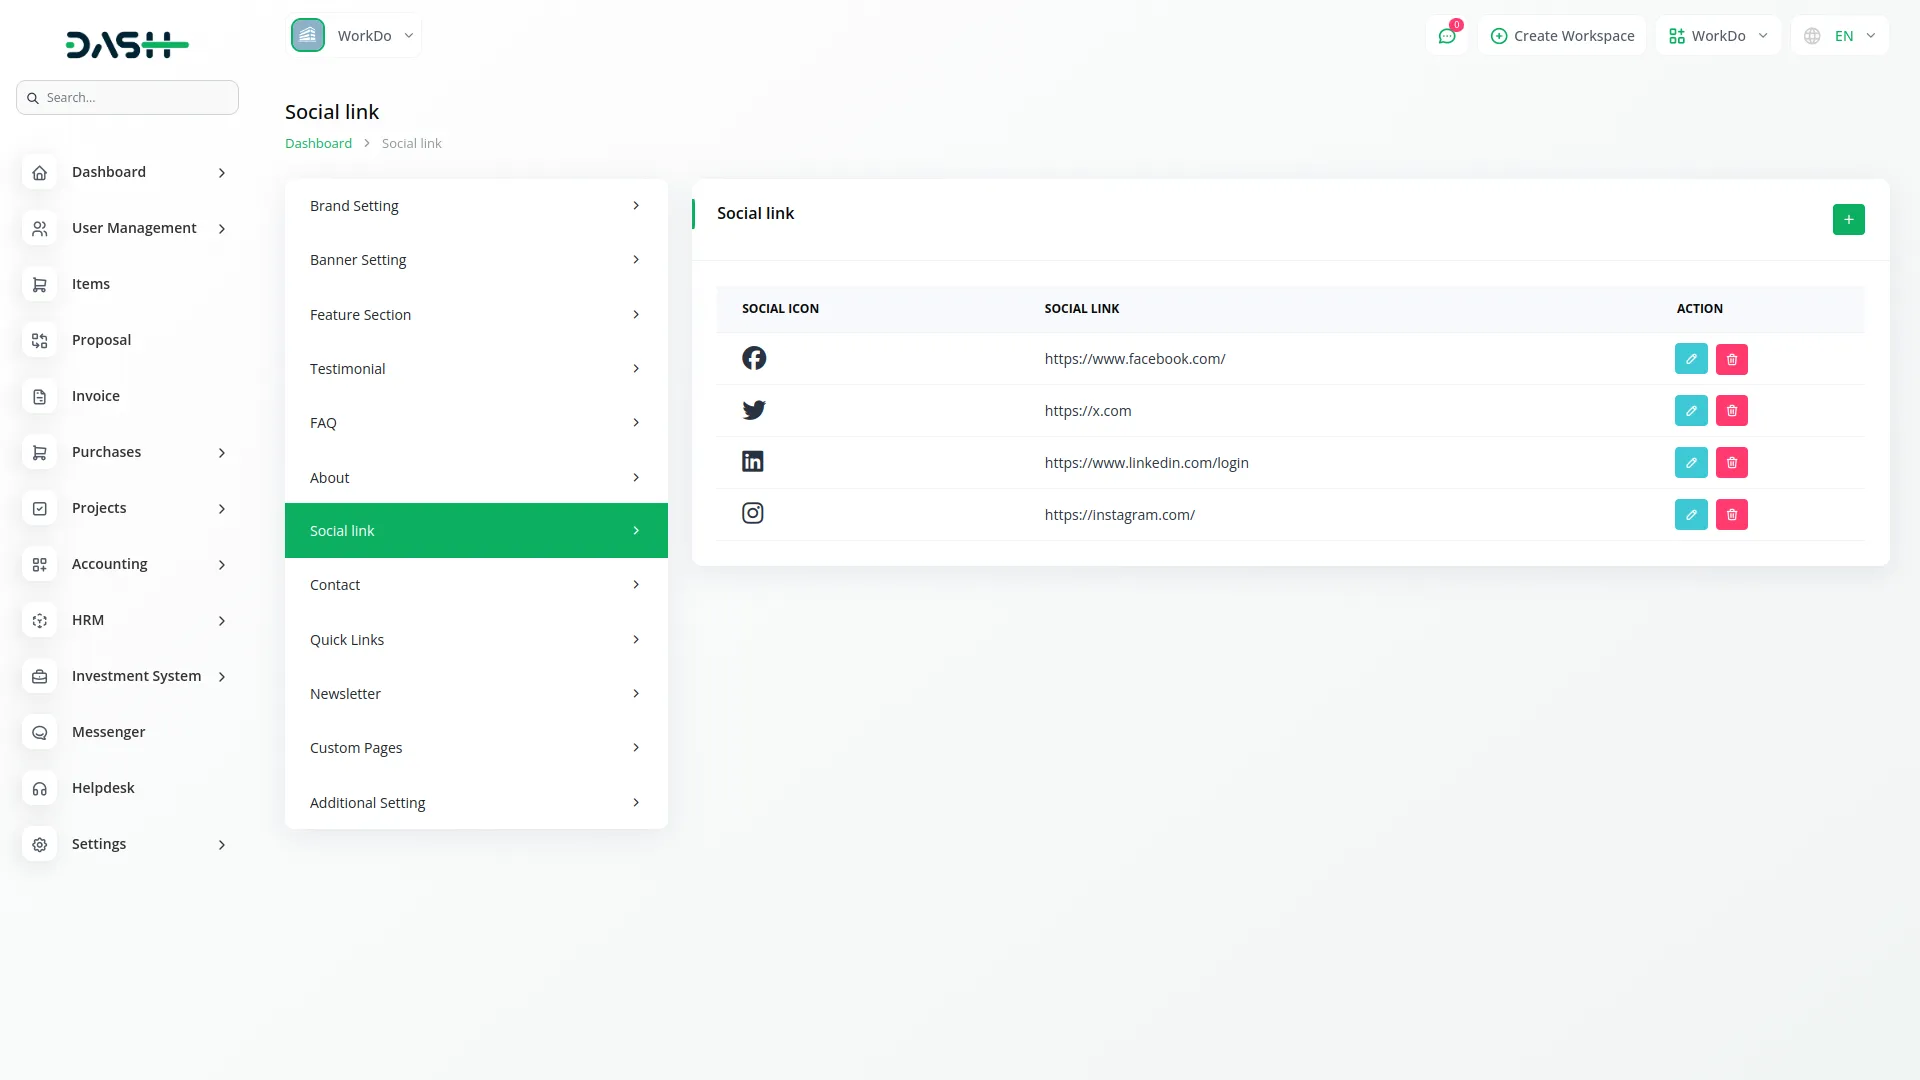
- To connect your website visitors with your social media presence, choose appropriate icons for each social platform and enter the corresponding social media links.
- The list page displays your social connections in a table with columns for Social Icon and Social Link. Use the Actions column to “Edit” existing social links or “Delete” outdated social media accounts.
Contact Section
Contact Information
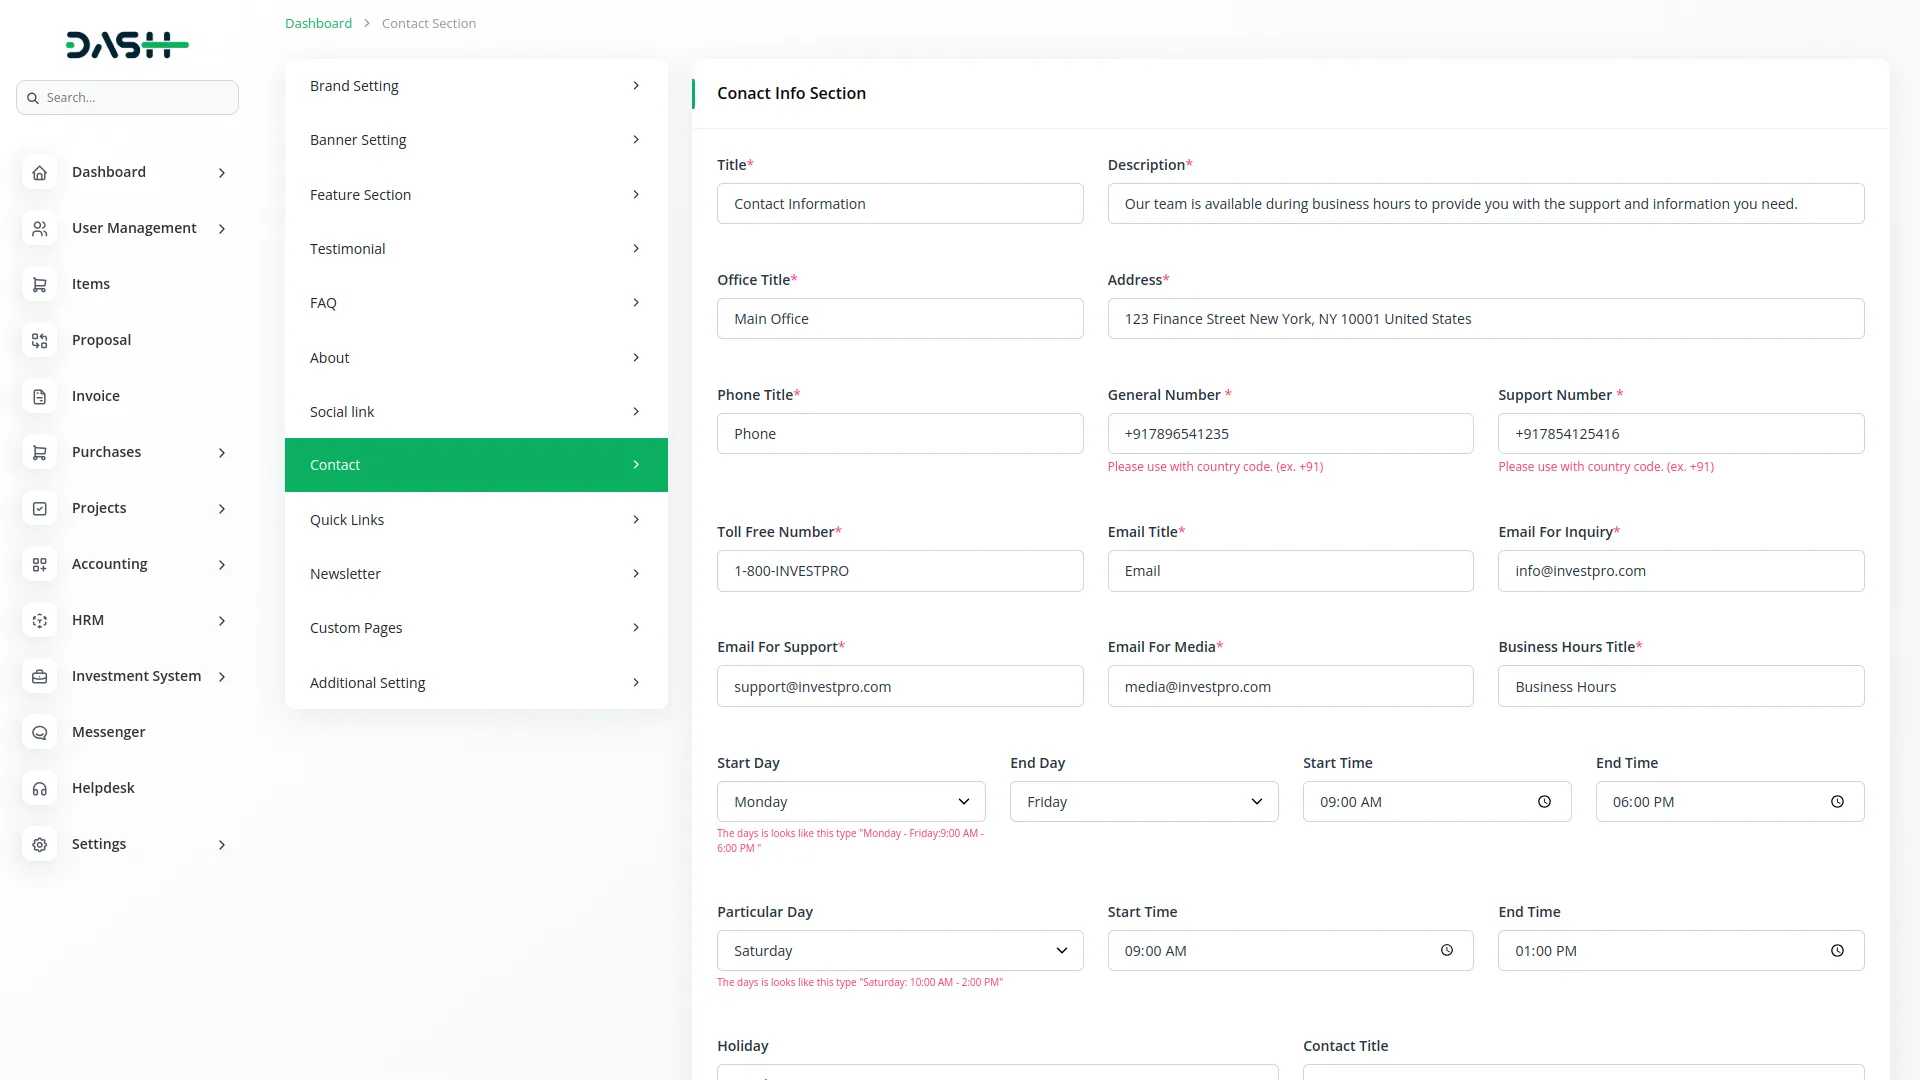
- To provide complete contact details, enter a section title and description. Add your office title and full address. For phone information, enter a phone title and provide your general number, support number, and toll-free number.
- For the email contacts, enter an email title and specify separate emails for inquiry, support, and media requests.
- Set up working hours by entering a title, defining weekdays with start day, end day, start time, and end time (e.g., Monday – Friday: 9:00 AM – 6:00 PM), adding particular day hours with specific start and end times (e.g., Saturday: 10:00 AM – 2:00 PM), and noting any holidays when you’re closed (e.g., Sunday: Closed).
- Finally, add a contact title for the overall section.
Location Section
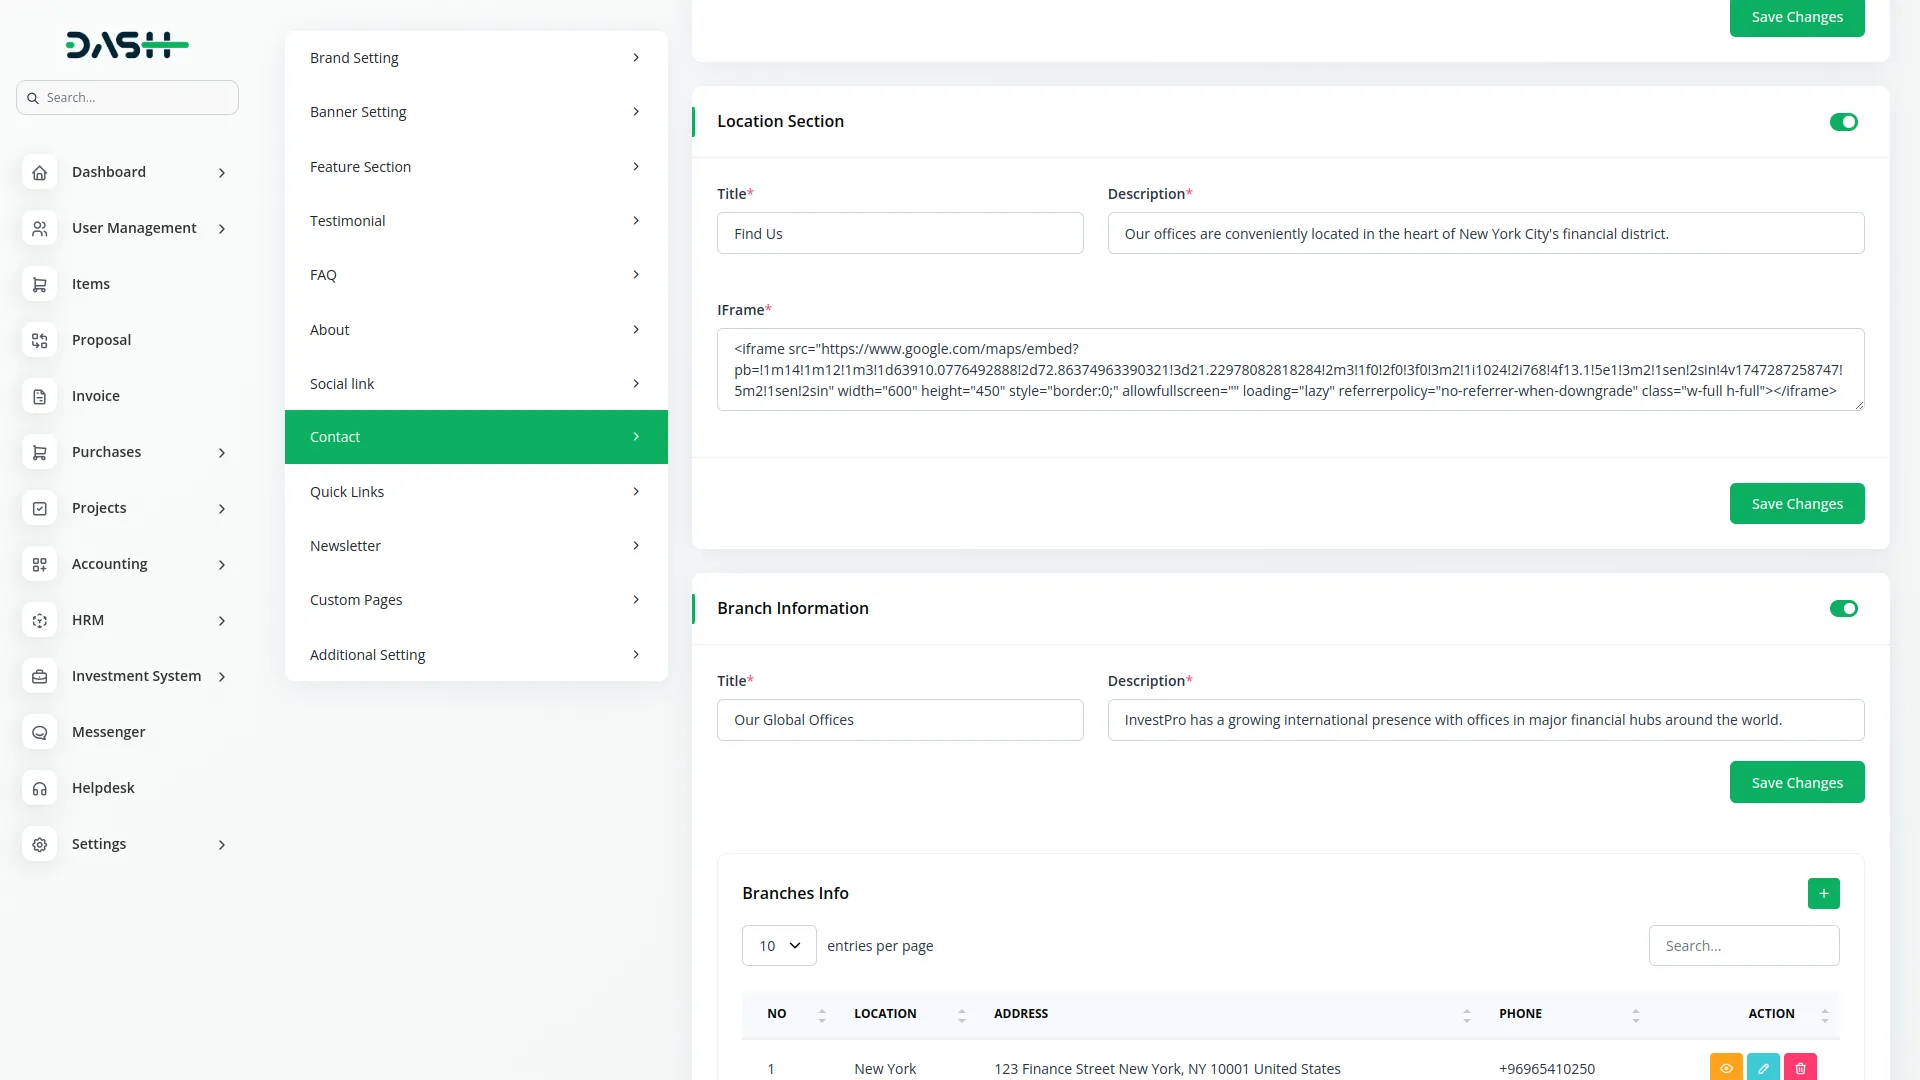
- The toggle button is enabled by default. If you switch it off, the section will no longer appear on the website. When enabled, enter a section title, description, and embed an iframe with your location map.
Branch Information
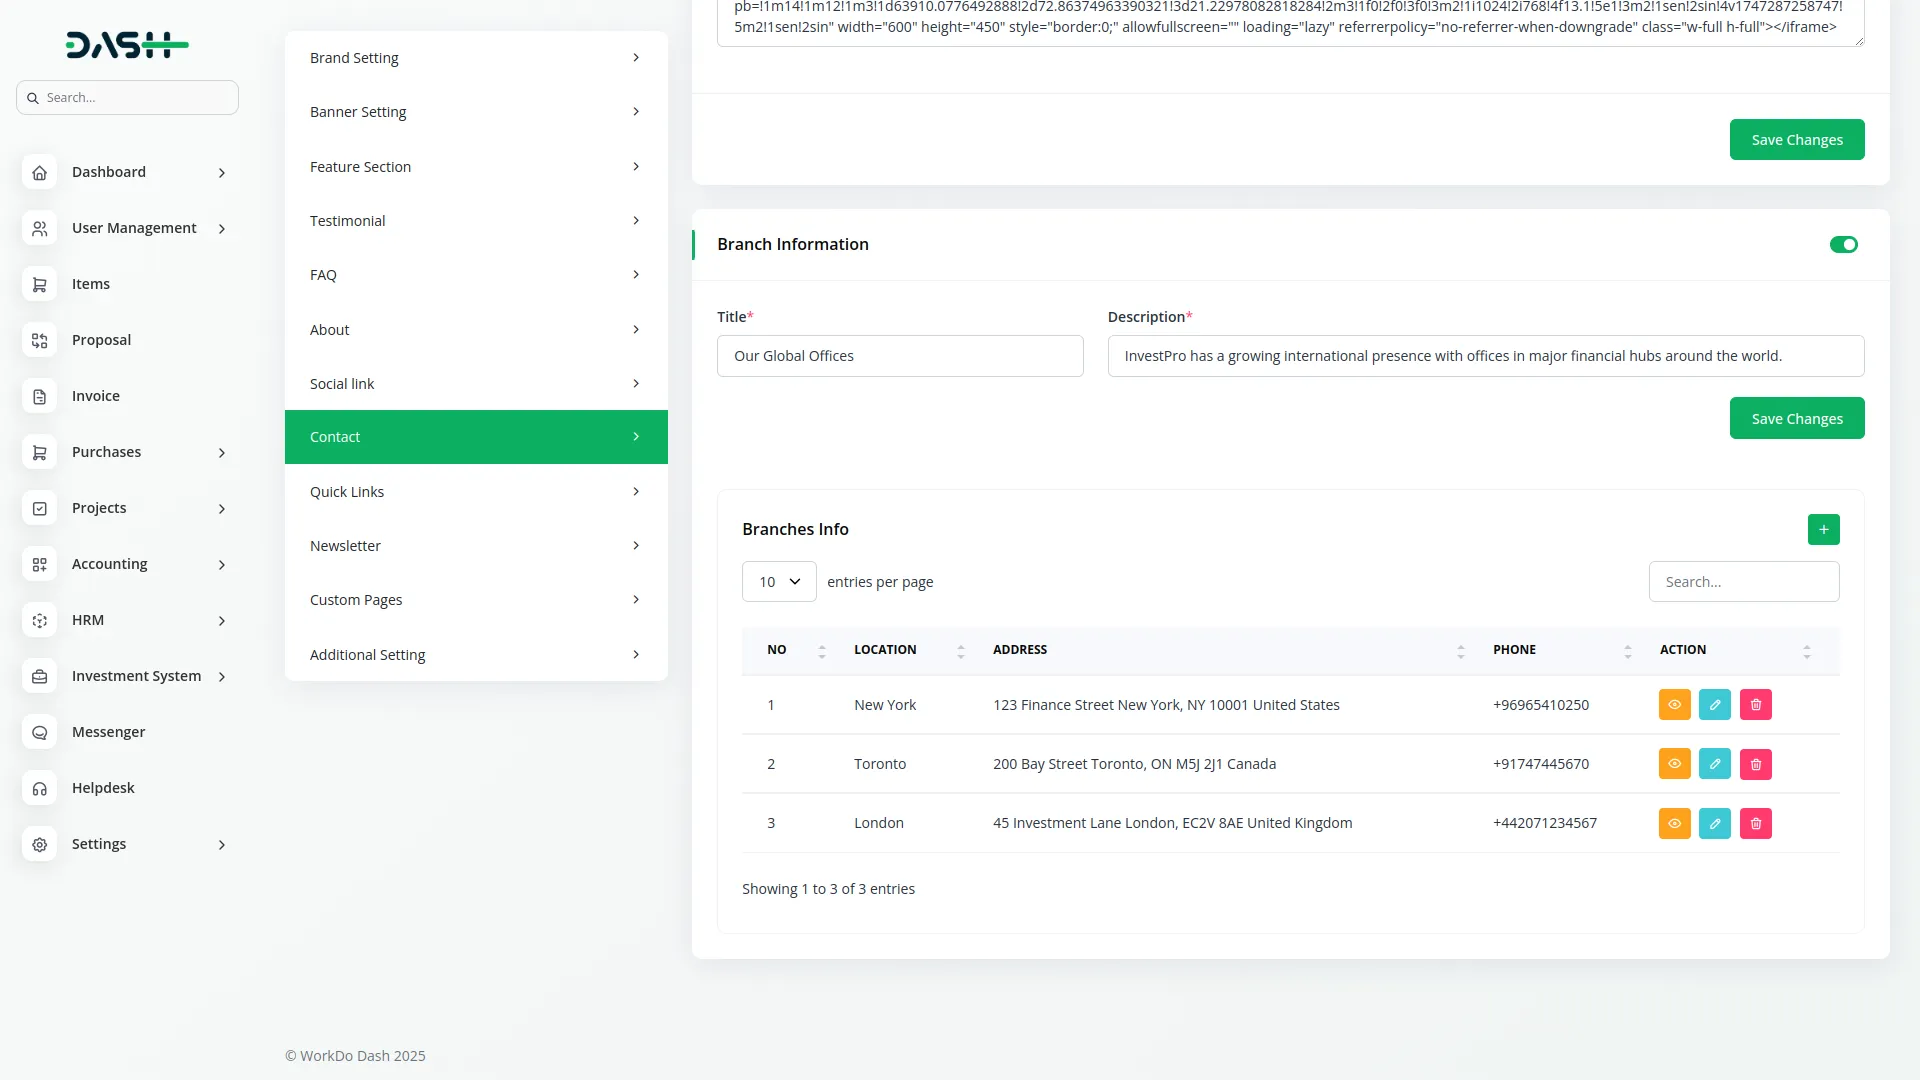
- The toggle button is enabled by default. If you switch it off, the section will no longer appear on the website. Enter a section title and description (if not added title and description will not display the section) for your branch network. Add branch details by choosing an icon for each branch, entering the location name, full address, contact number, and email address.
- The list page displays branches in a table with columns for Number, Location, Address, and Phone. Use the Actions column to “View” branch details, “Edit” existing information, or “Delete” closed branches.
Quick Link
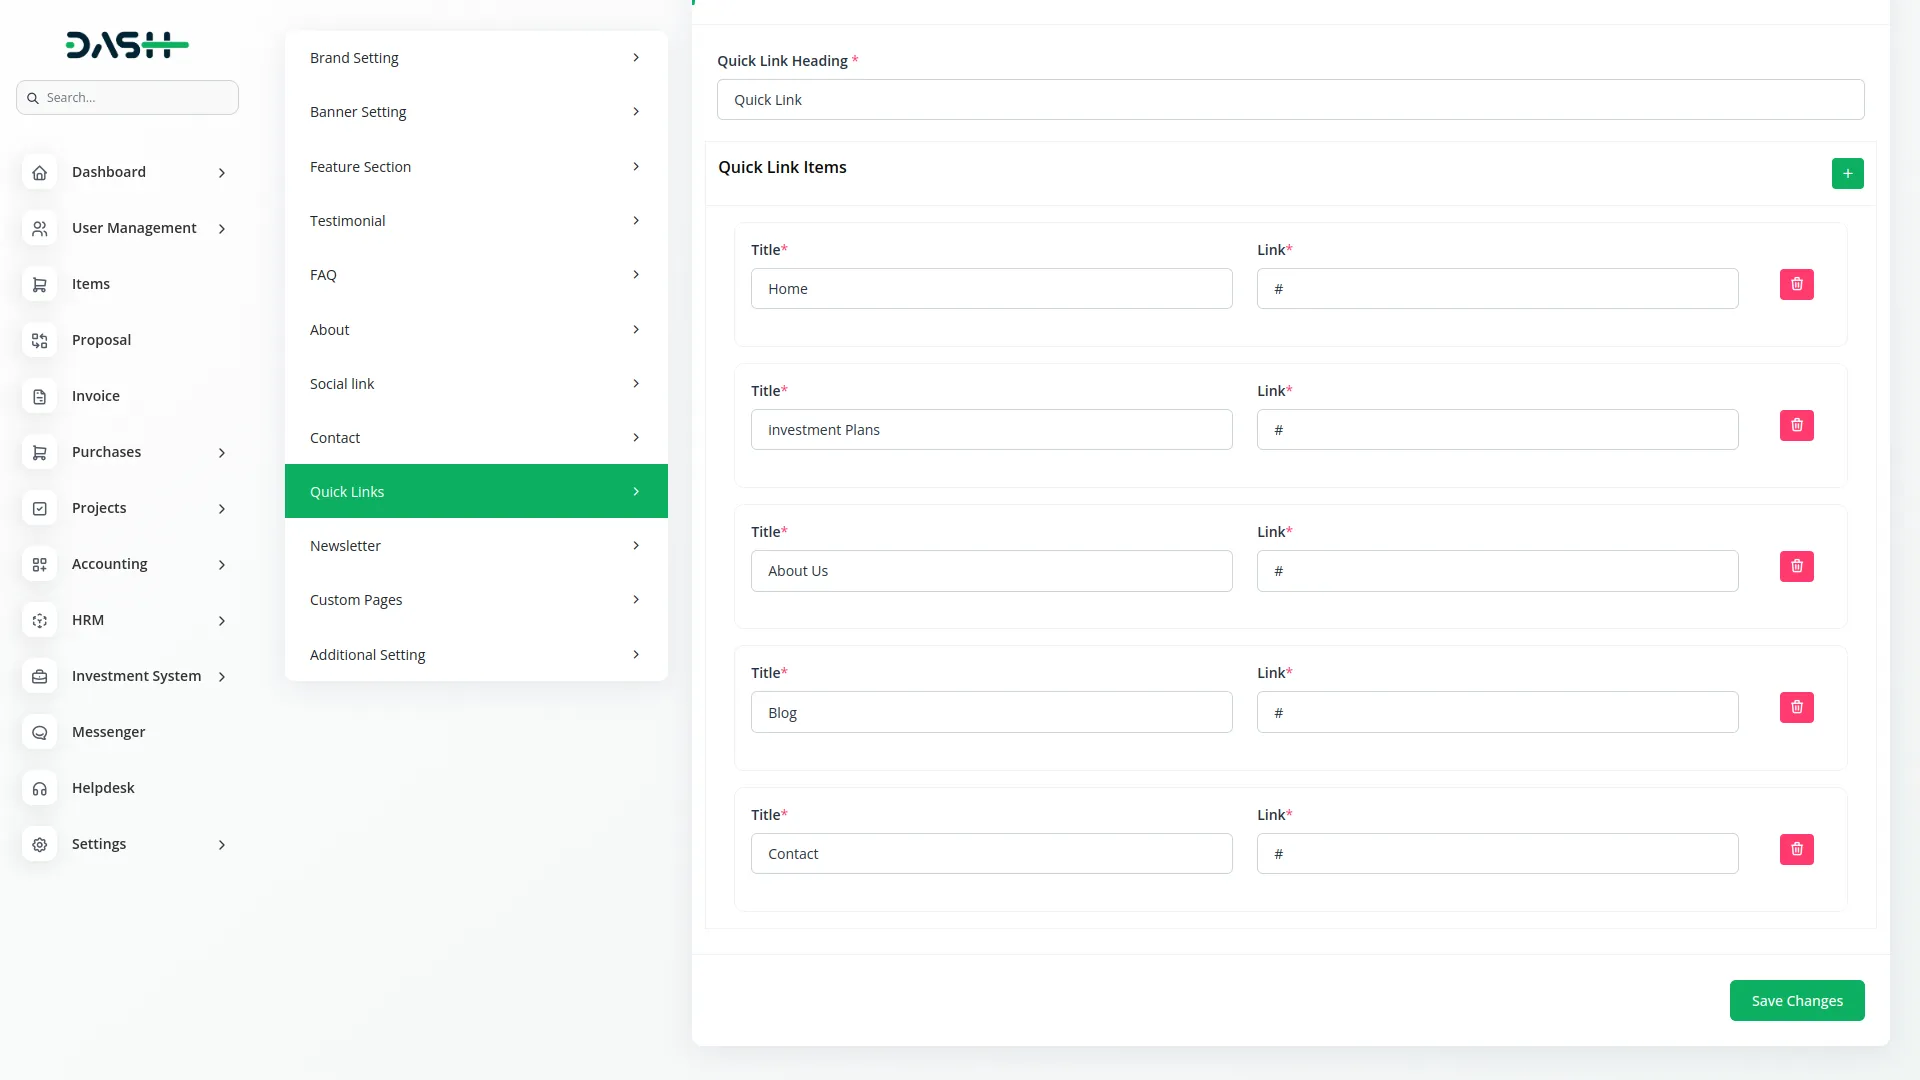
- To provide easy navigation in your website footer, enter a “Quick Link Heading” and use the repeater function to add multiple quick link items.
- For each quick link, enter the title text and the corresponding title link URL.
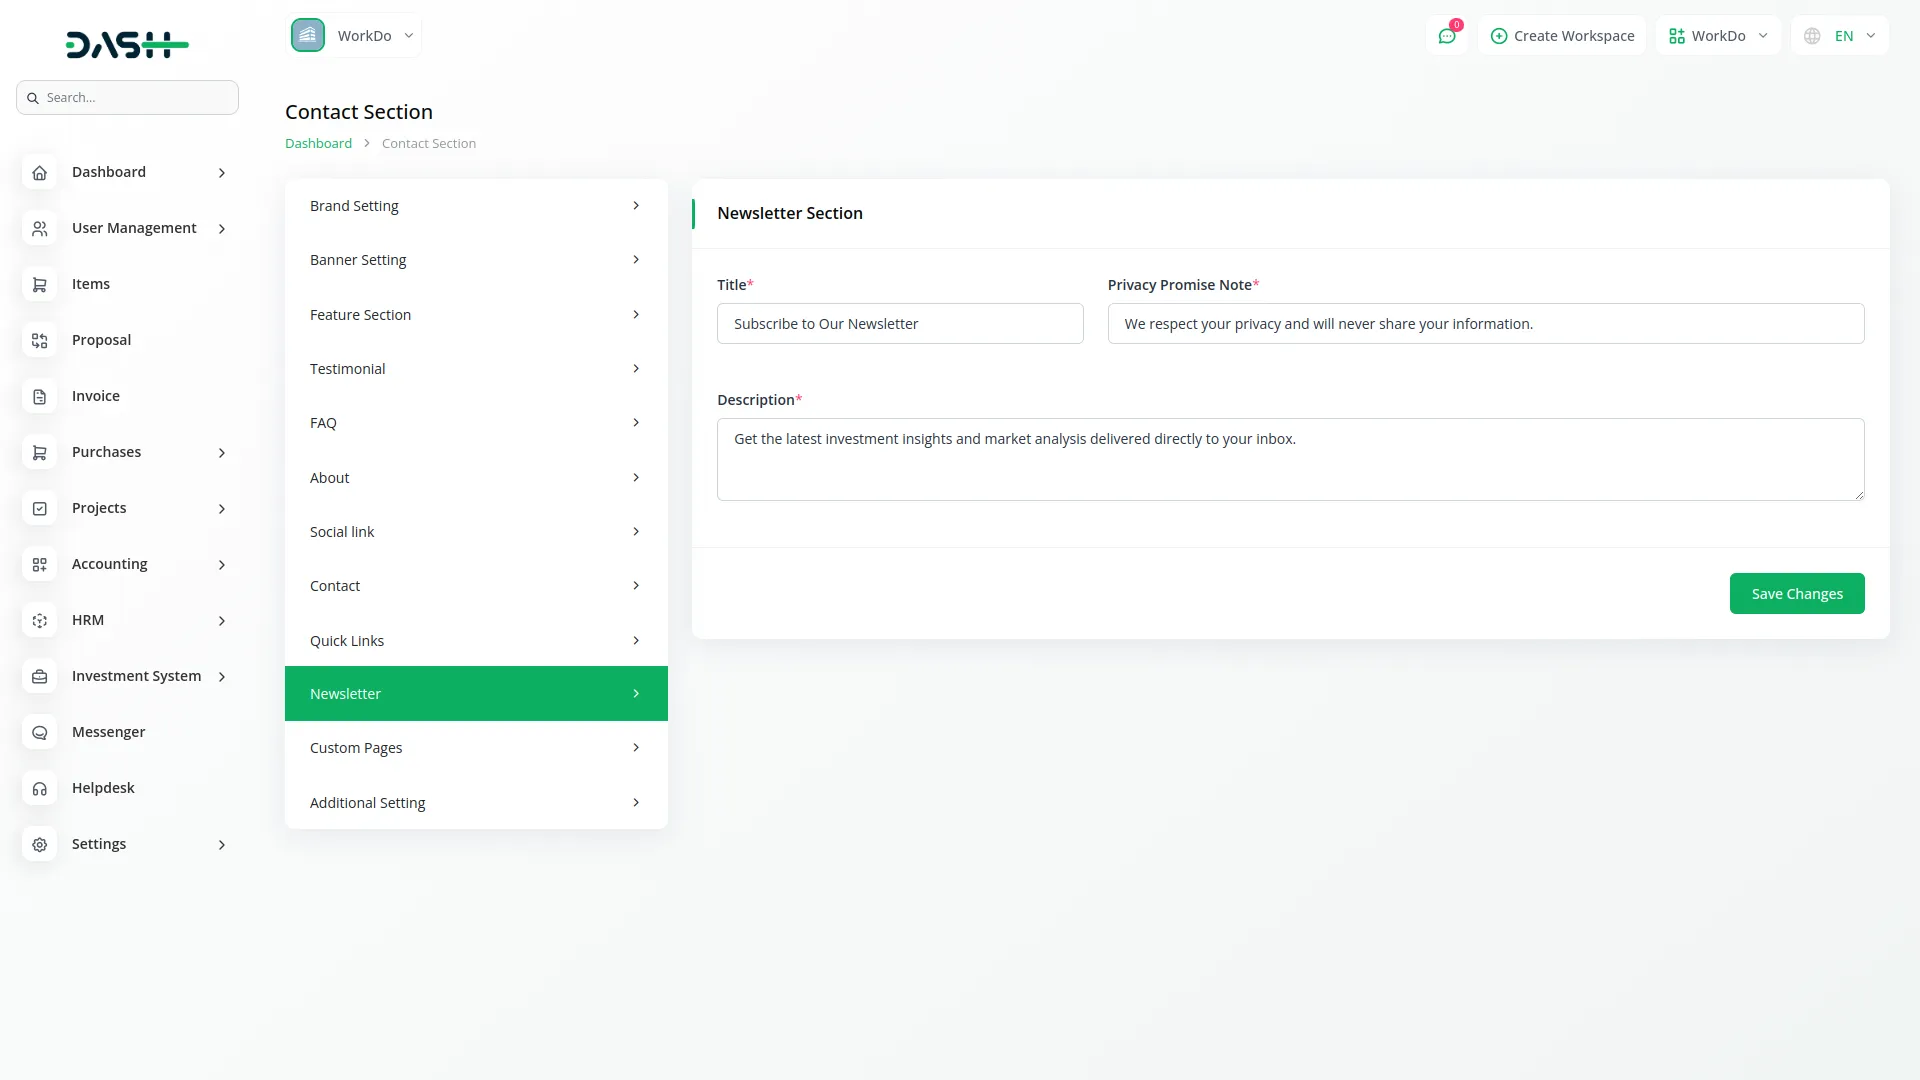
Newsletter Section
- To capture visitor email subscriptions, enter a compelling title, add a privacy promise note to assure visitors about data protection, and write a description explaining the benefits of subscribing to your investment newsletter.
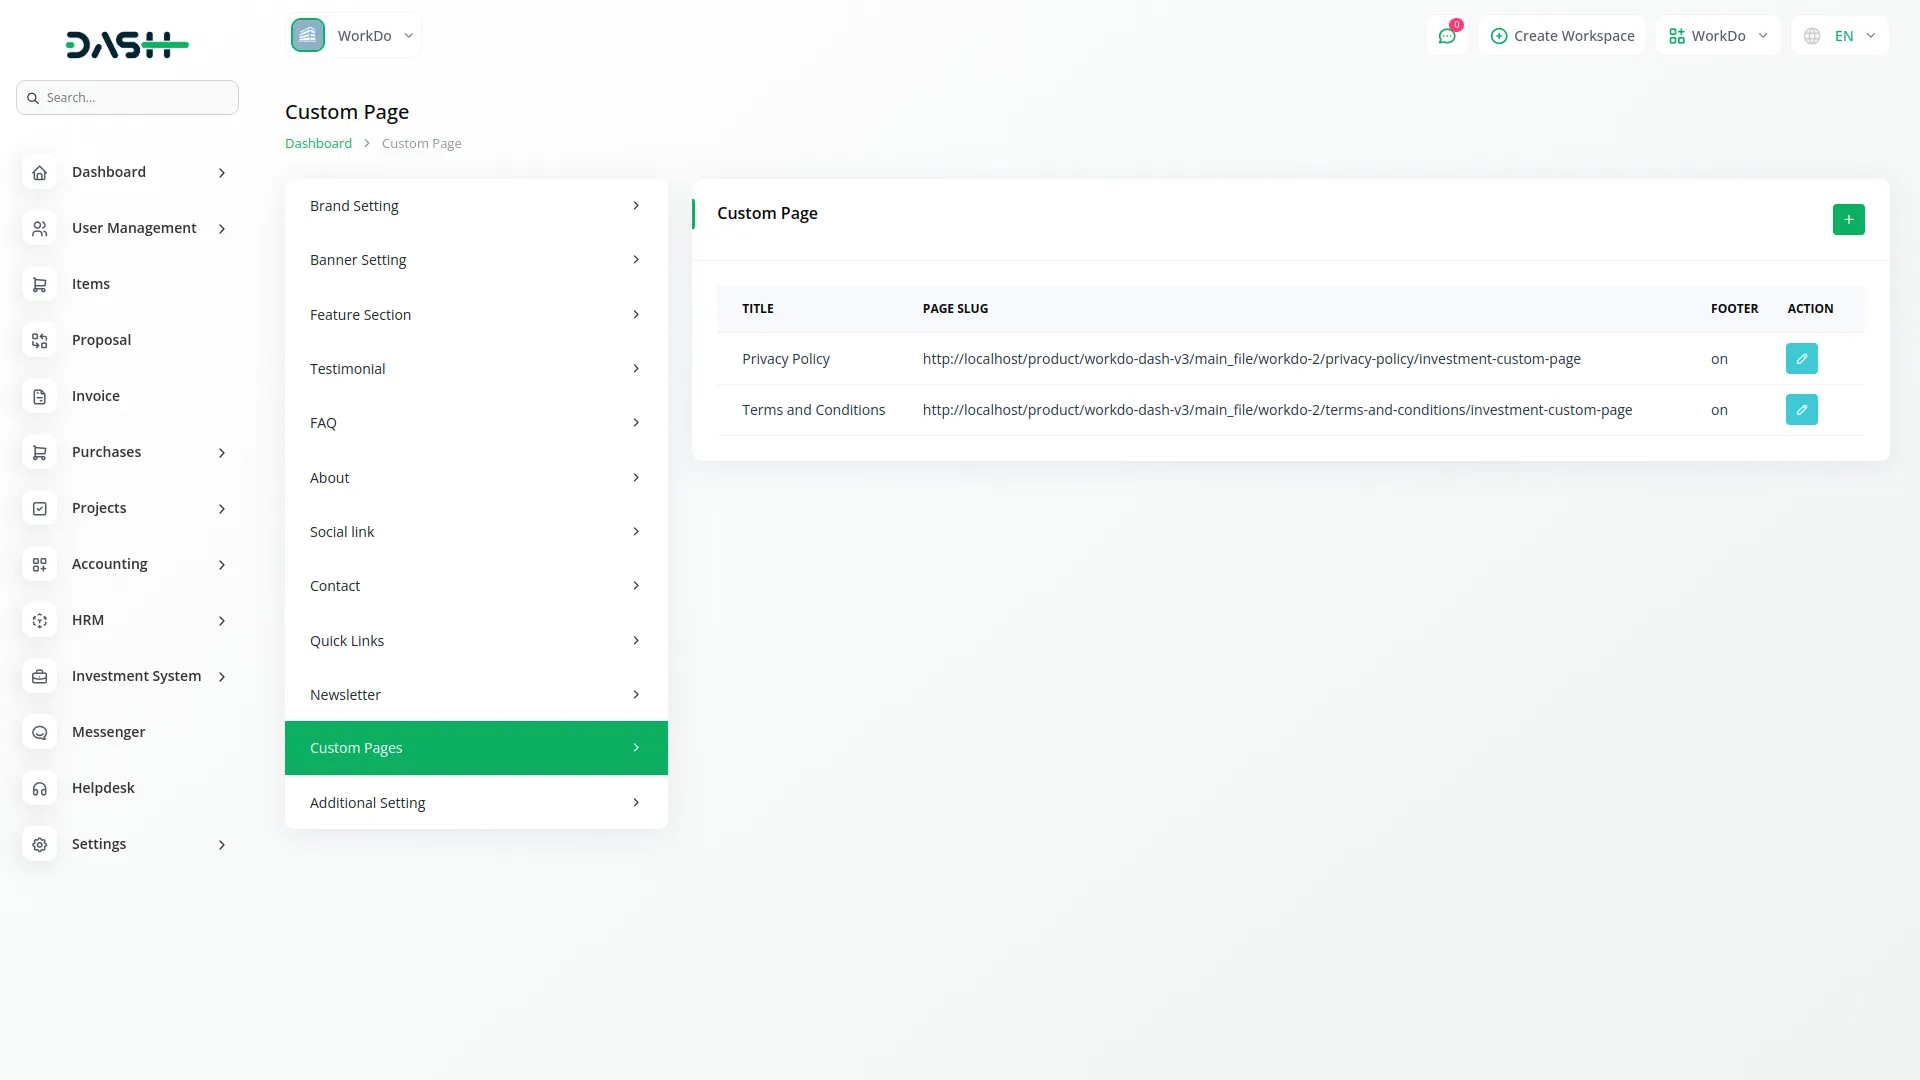
Custom Pages
- To manage your website’s legal and informational pages, this section displays default Privacy Policy and Terms & Conditions pages that cannot be deleted.
- You can add additional custom pages as needed by entering the page name, title, selecting whether the page appears in the footer display, and adding the page content.
- The list page displays custom pages in a table with columns for Name, Slug, and Footer Display status (On/Off). Use the Actions column to “Edit” existing pages or “Delete” custom pages you’ve added.
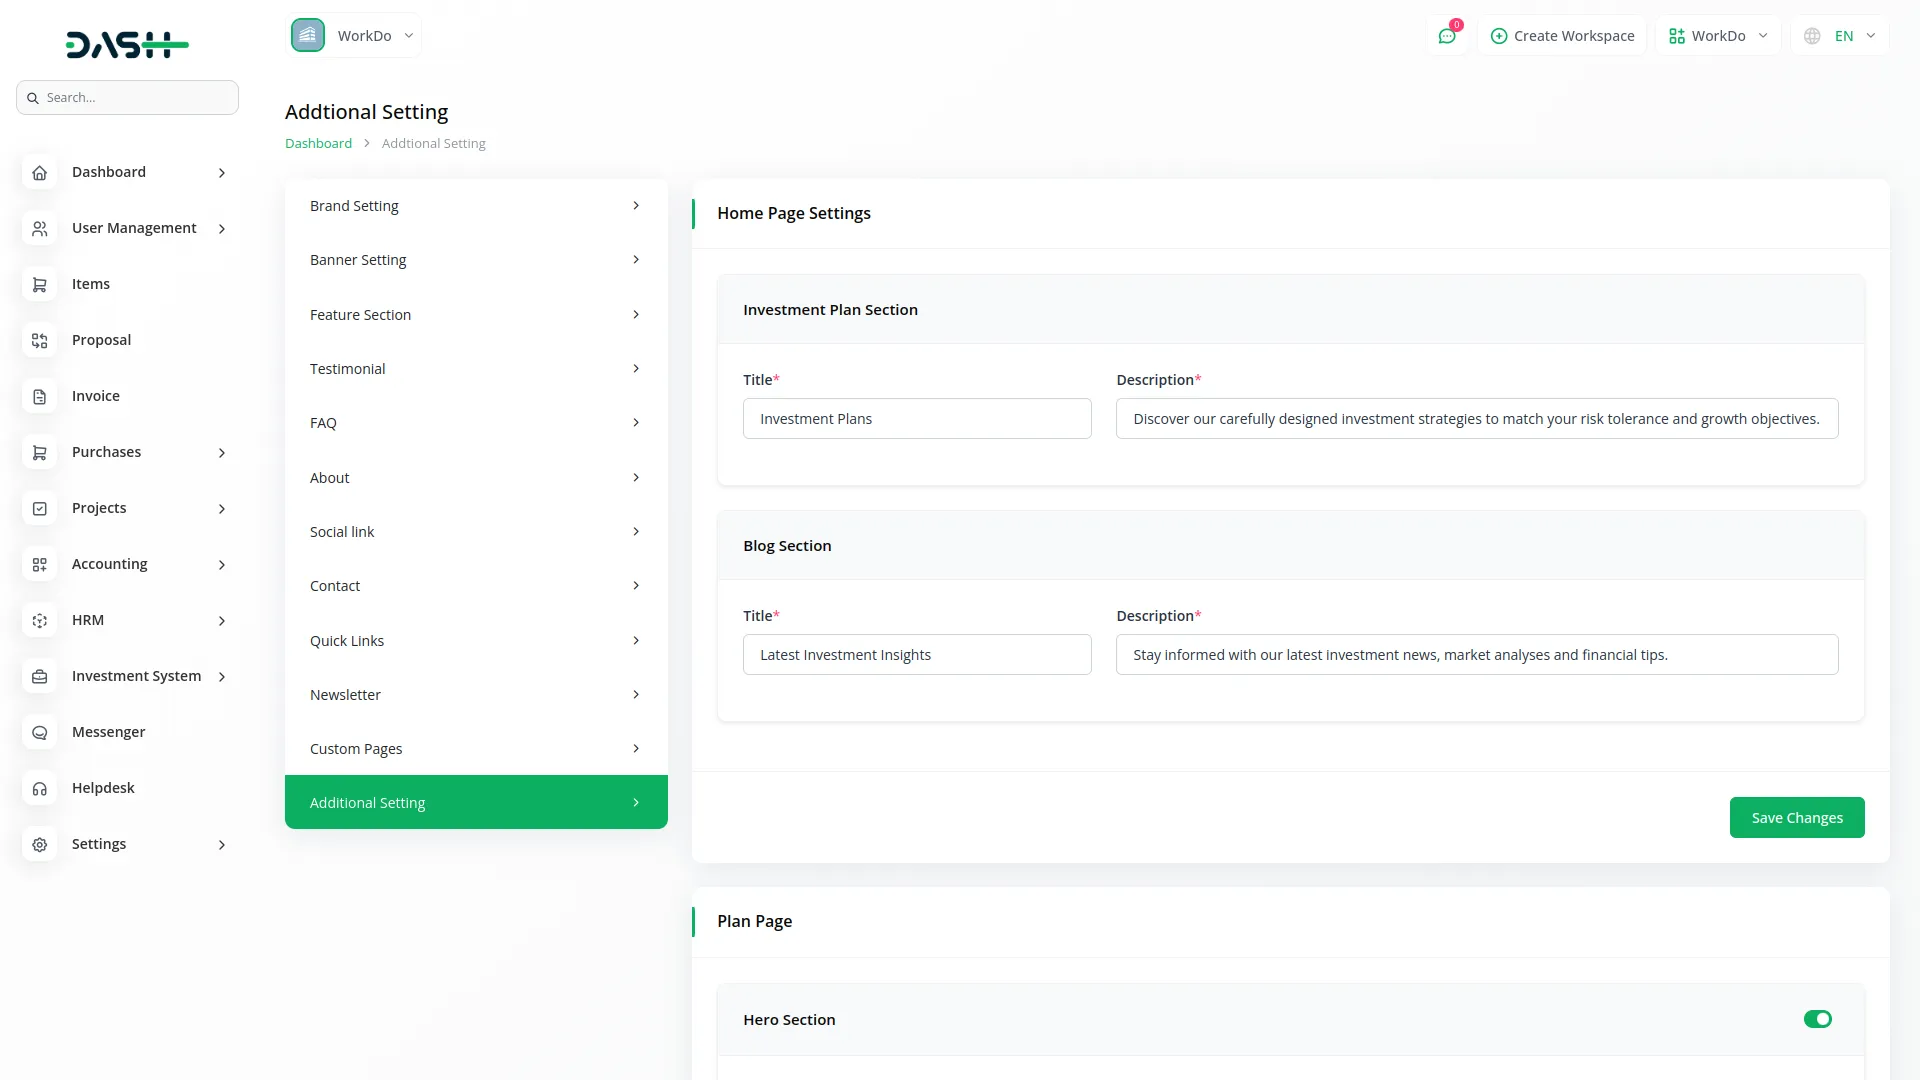
Additional Settings
- The Additional Settings section contains multiple sub-sections that control specific page configurations and features across your investment website.
Home Page Setting
- To customize your homepage investment sections, configure the Investment Plan Section by entering a title and description. Set up the Blog Section by entering a title and description that introduces your investment blog content.
- These settings control how your investment plans and blog content are presented on your main homepage.
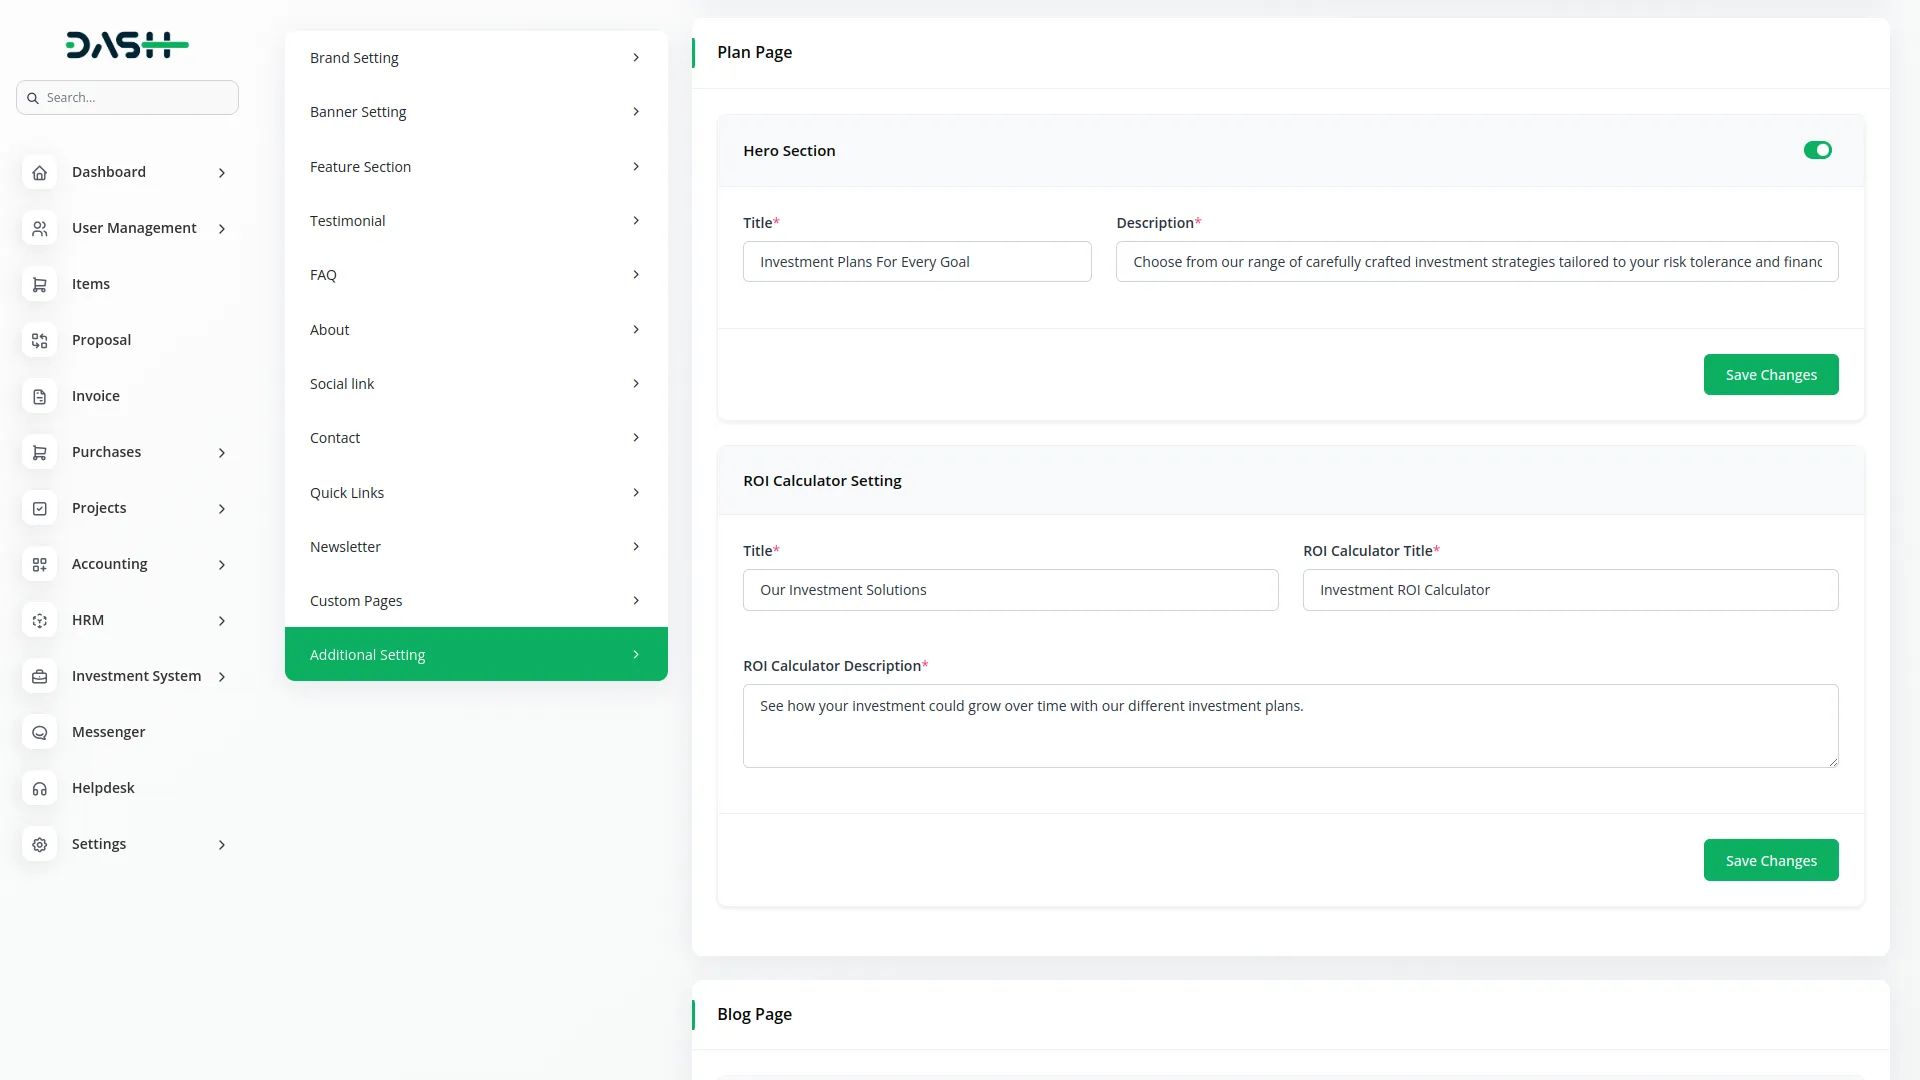
Plan Page
- The toggle button is enabled by default. If you switch it off, the section will no longer appear on the website.
- When enabled, configure the Hero Section by entering a title, button text, and description.
- Under the ROI Calculator Setting, add a title, ROI Calculator Title, and ROI Calculator Description to help investors understand potential returns.
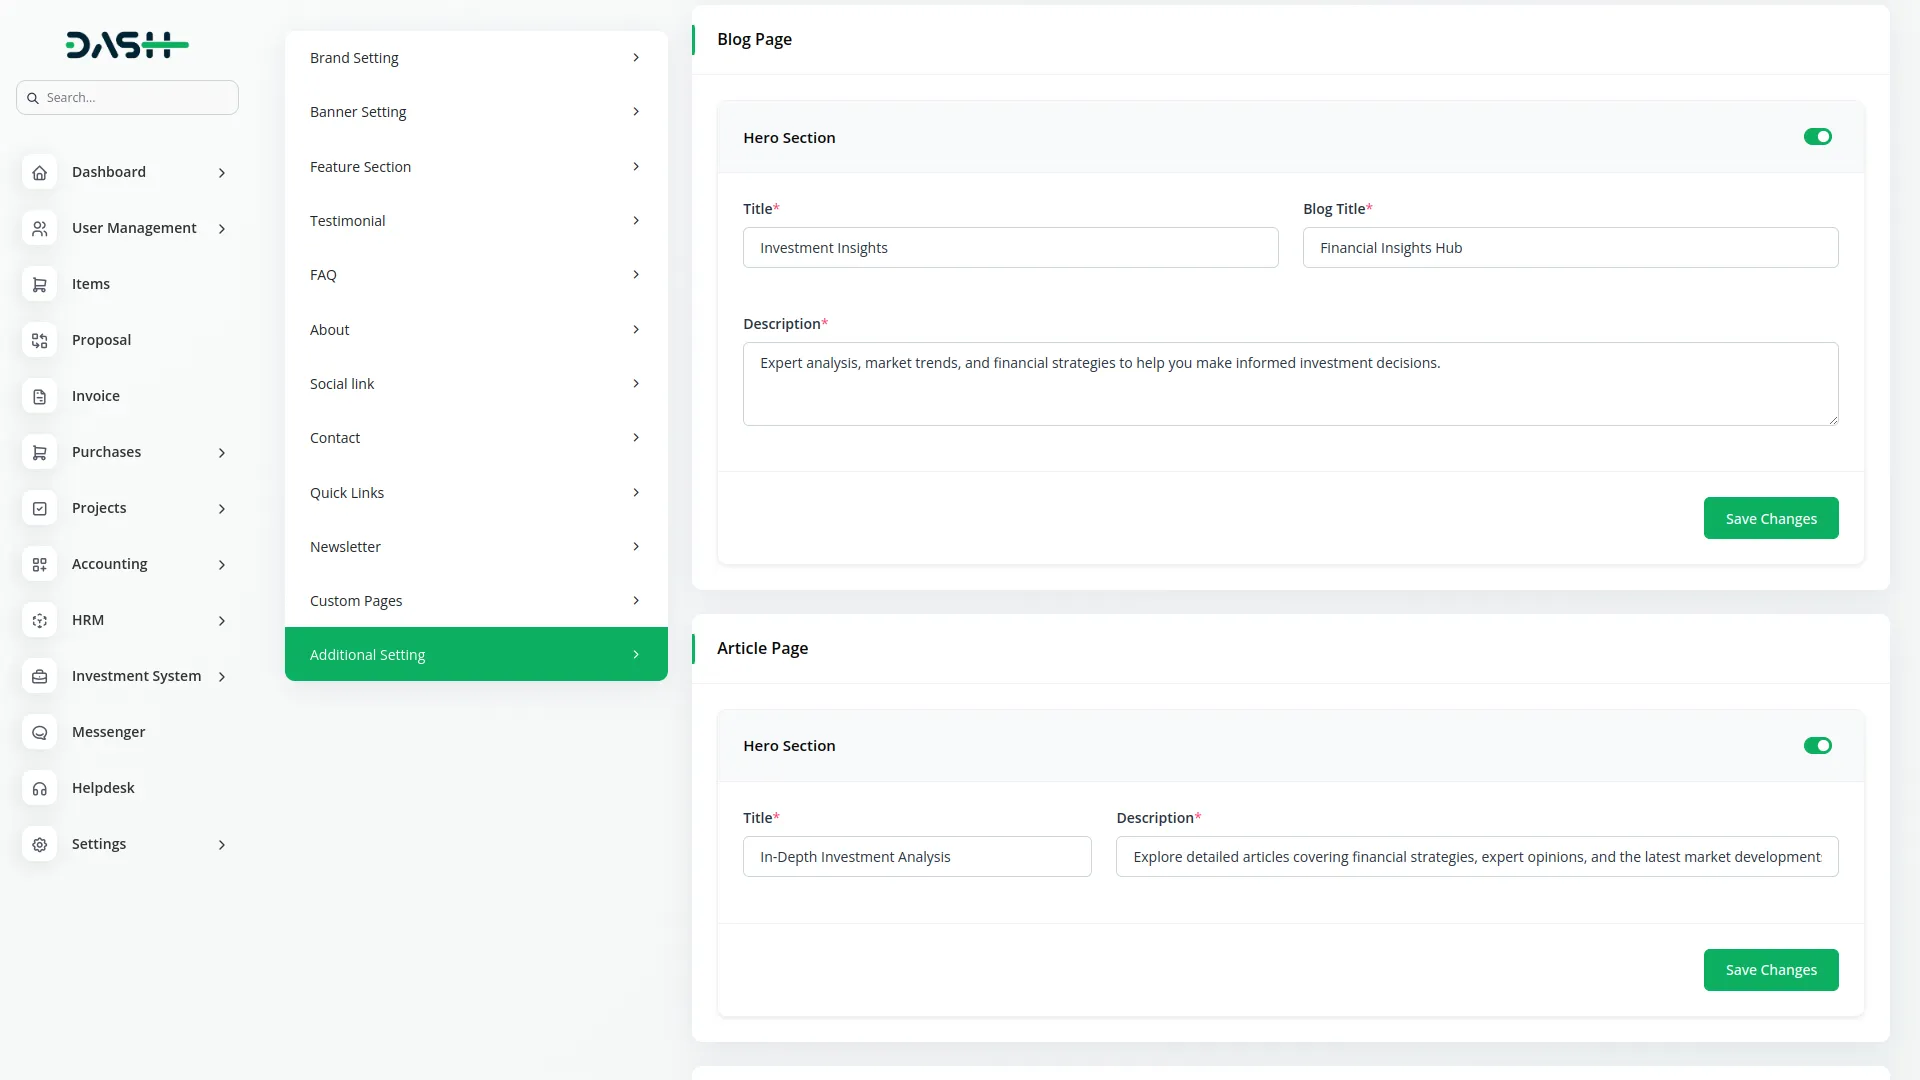
Blog Page
- The toggle button is enabled by default. If you switch it off, the section will no longer appear on the website.
- When enabled, configure the Hero Section by entering a title, blog title, and description that introduces your investment insights and market analysis content.
Article Page
- The toggle button is enabled by default. If you switch it off, the section will no longer appear on the website.
- When enabled, configure the Hero Section by entering a title and description that appear at the top of each article page.
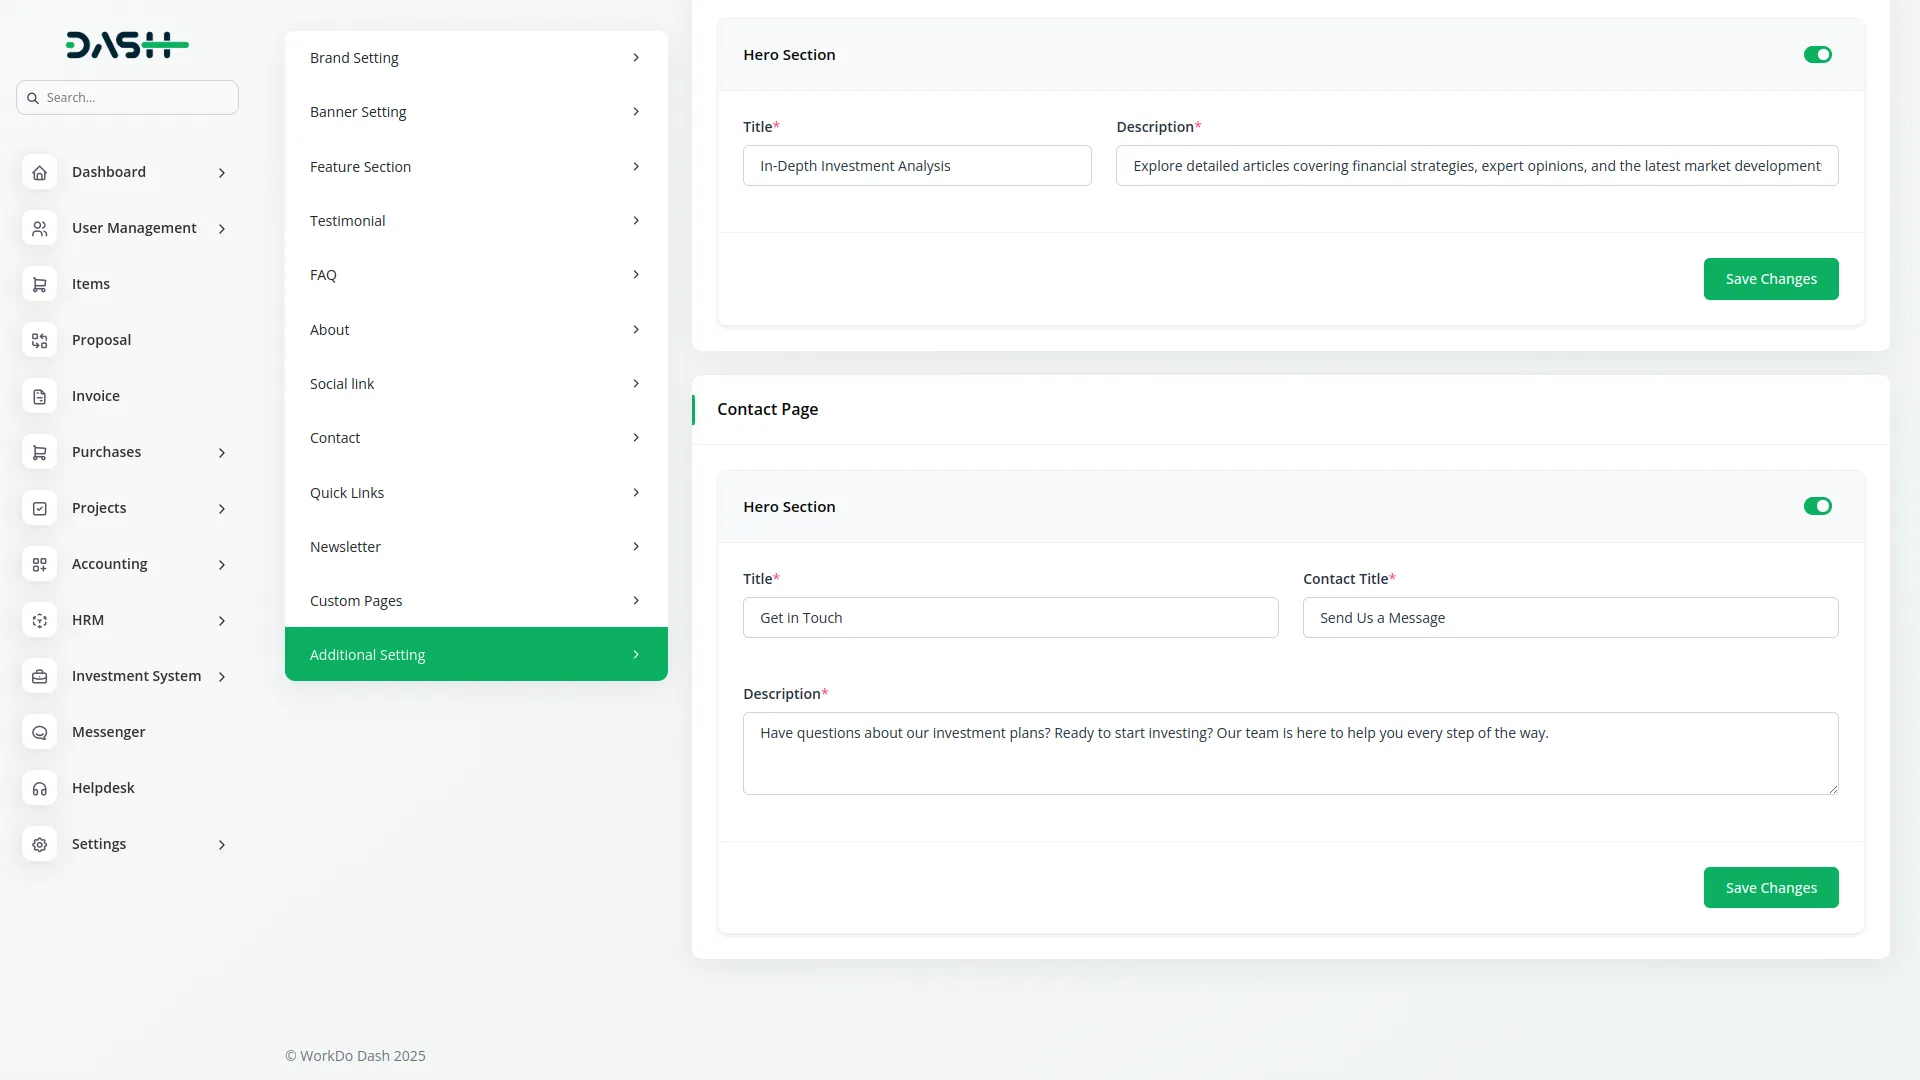
Contact Page
- The toggle button is enabled by default. If you switch it off, the section will no longer appear on the website.
- When enabled, configure the Hero Section by entering a title, contact title, and description that introduces your contact information and encourages visitor inquiries.
Plans Record
- To create a new plan, click the “Create” button at the top of the plans page. Enter the plan name and select a category name from the dropdown (which comes from the System setup plan category). Choose the return type as either Fix Return or Annual Return. If Fix Return is selected, enter the fix return value. If Annual Return is selected, enter both minimum return and maximum return values.
- Set the risk level for the investment plan and enter the minimum investment amount required. Choose the plan duration type as either Fixed or Range. Select the duration unit as Months or Years. If Fixed Duration is selected, enter the fixed duration value. If Range is selected, enter both minimum duration and maximum duration values.
- Add plan features using the tags input field and provide a detailed plan description. Set the plan status as either Active or Inactive to control visibility on the website.
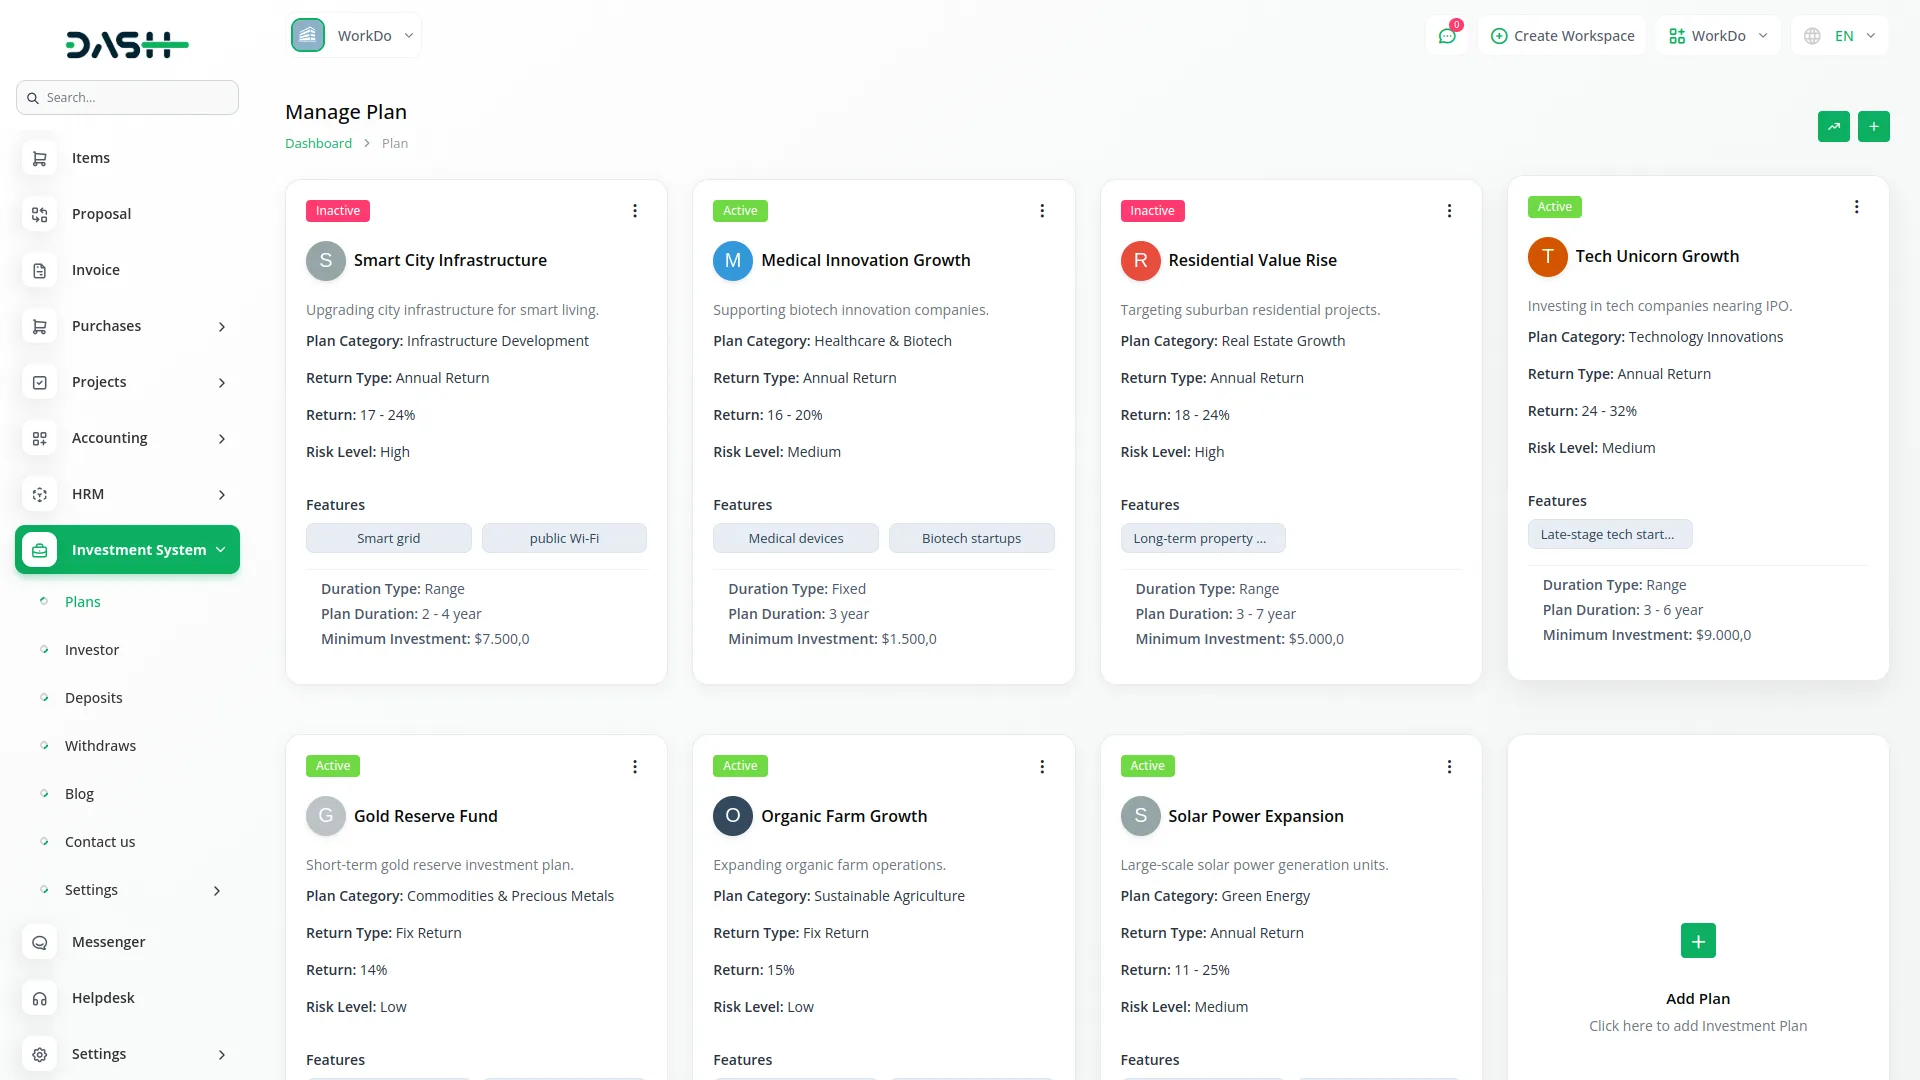
- The list page displays all plans in a grid card layout showing status badge, plan name with short description, category name, return type and value, risk level, plan features as tag badges, duration type and value, and minimum investment amount.
- In the Action column, you can use edit to modify your plan data, and delete to remove plans from the system.
Today Return
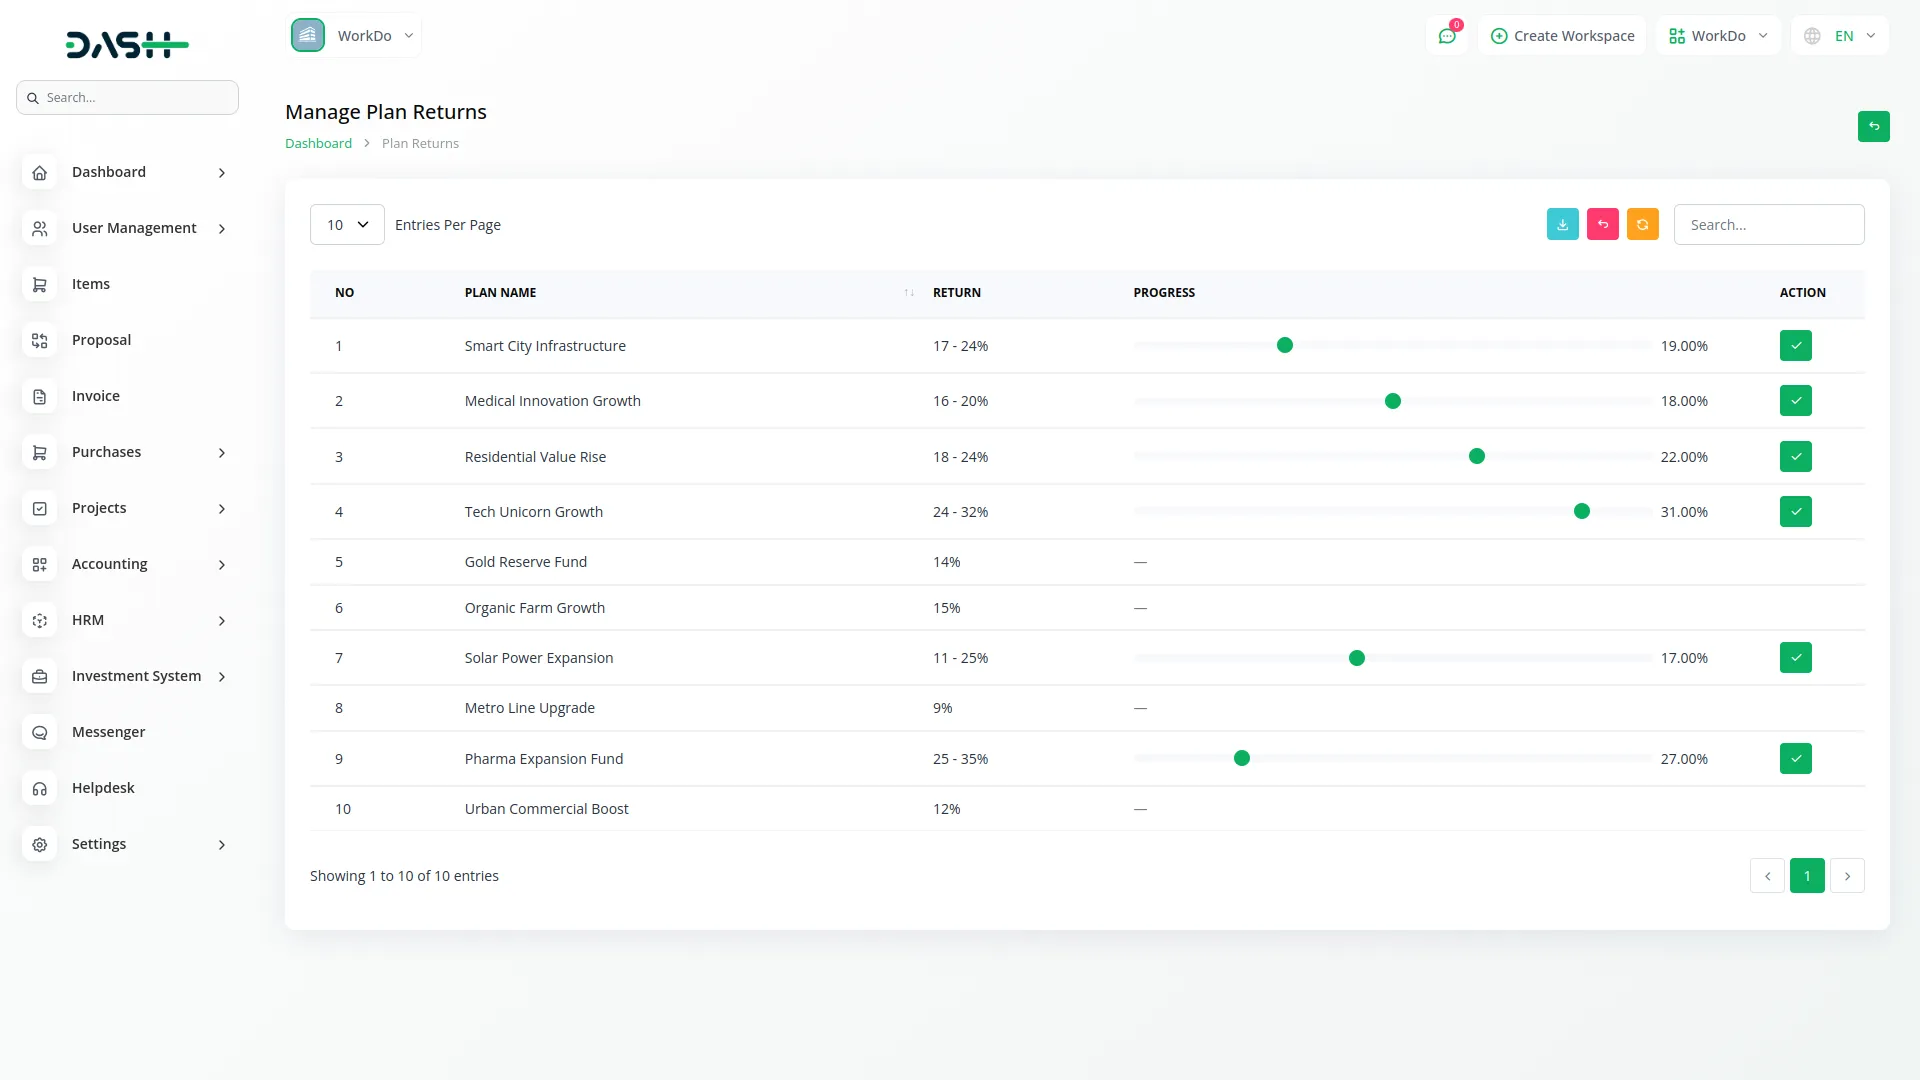
- The Today’s Return button shows a list of all your investment plans. However, the progress bar is only displayed for plans with the “Annual Return” type. This helps you easily identify and track their ongoing progress for the day.
- For Annual Return type plans, you can increase or decrease the return rate directly from this table before applying it. If you do not set any return value, the minimum return is automatically applied to ensure the process continues without interruption.
Investors Details
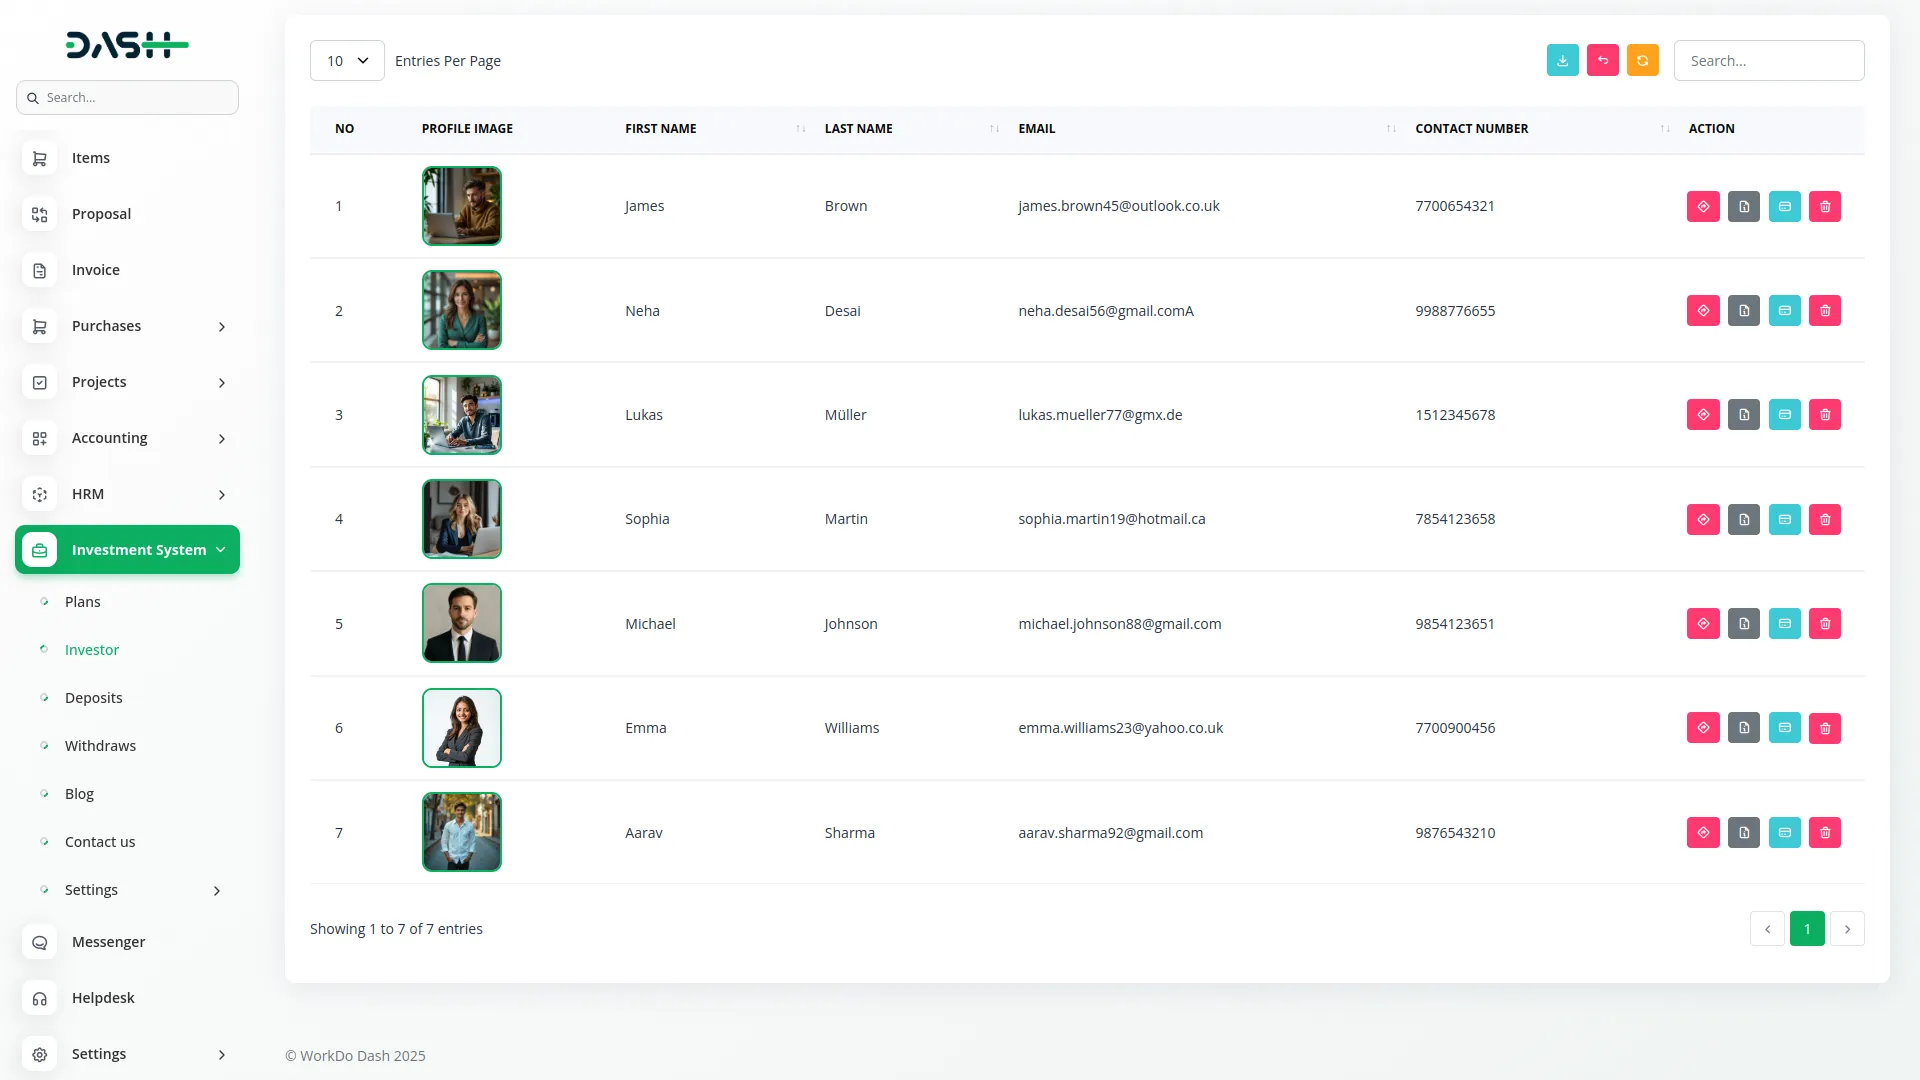
- In the list page, you’ll see a complete table of all investors registered through the website, including their profile details and contact information. The table displays columns for number, profile image, first name, last name, email, and contact number. At the top, you can use the search, export, reset, and reload buttons to easily manage investor data.
- This page’s Action column provides a “Login Disable” button to prevent a particular investor from accessing their account on the website. This security feature allows you to restrict access when needed.
- Next, use the “Investor Info” button to view detailed information about a specific investor’s investment activities. This displays all plans the investor has invested in, including invested amounts, return rates, duration, purchase dates, and expiry dates for each investment.
- Along with those details, the “Transaction Info” button shows all financial transactions for the selected investor. This shows transaction ID, plan name, transaction type (Debit/Credit), transaction details, and amounts for complete financial tracking.
- Additionally, you can use the delete button to completely remove an investor from your system when necessary.
Deposits List
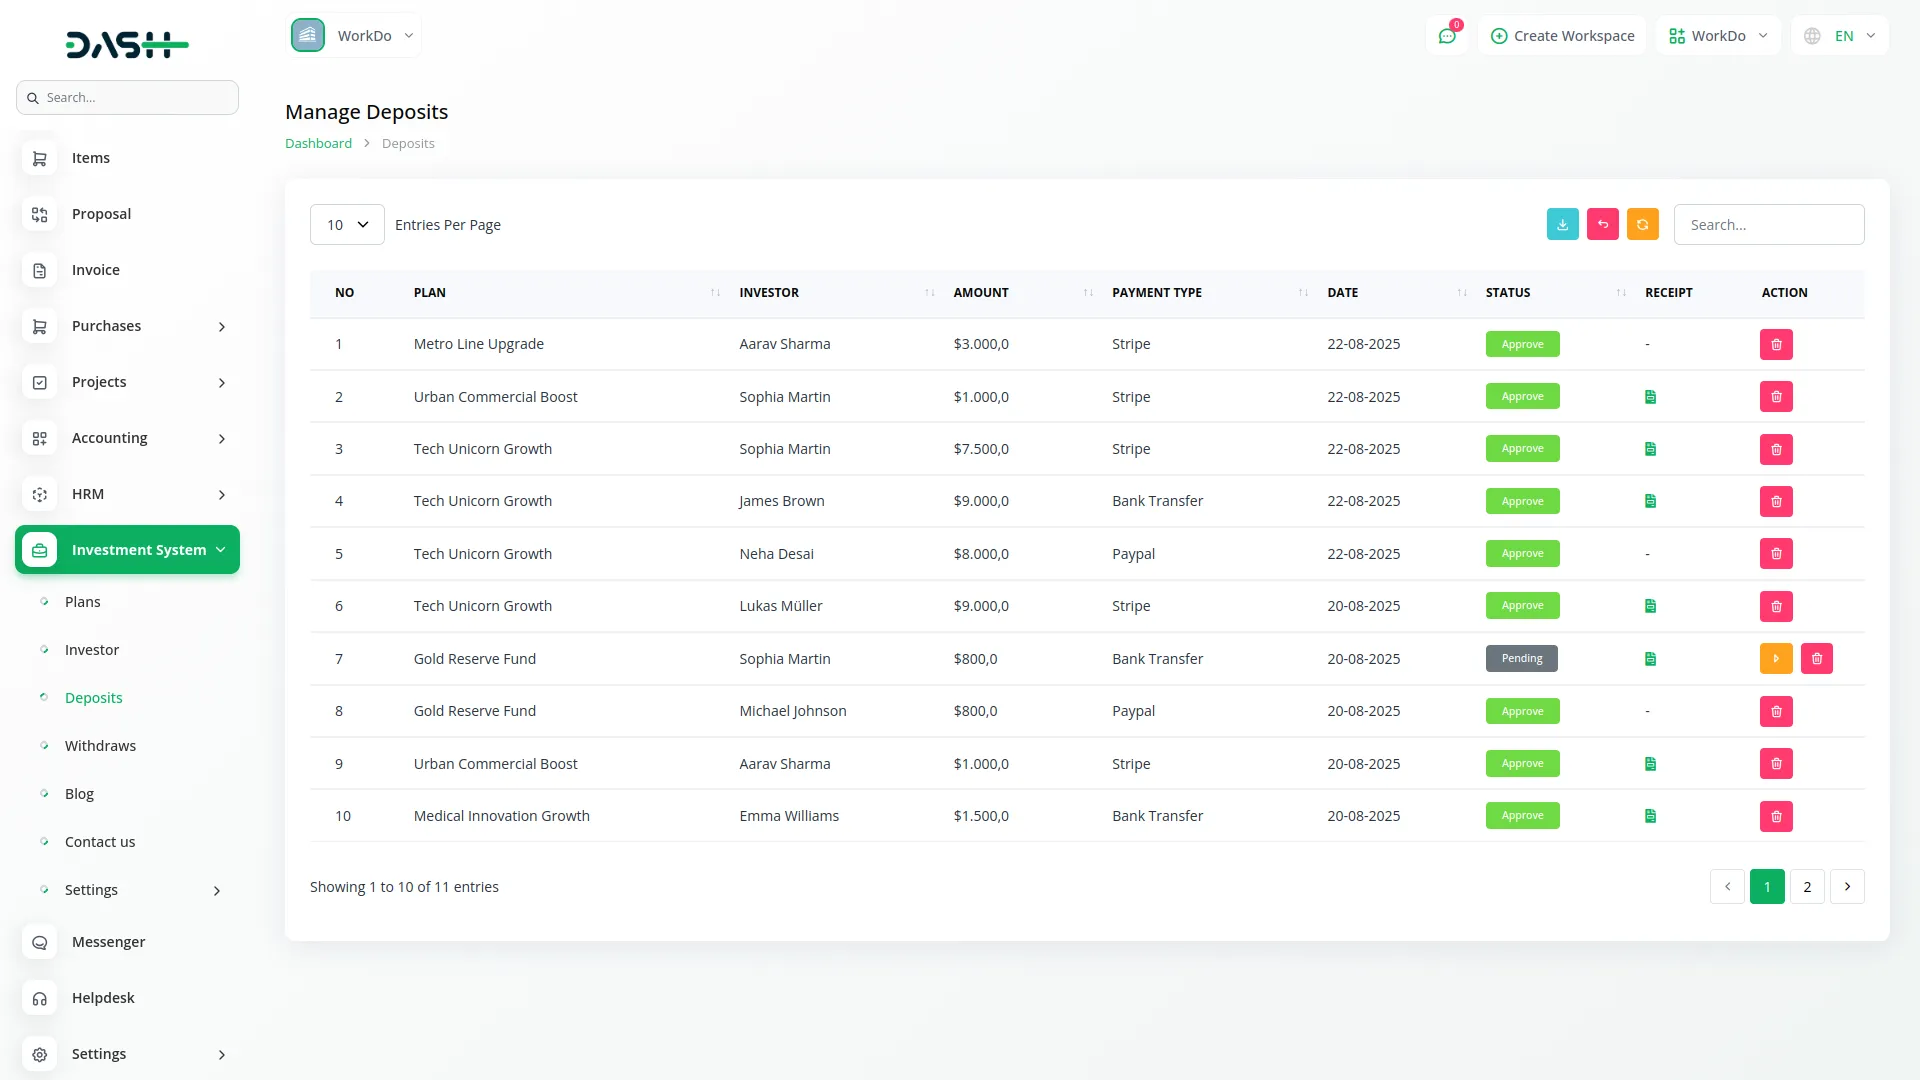
- The list page displays all deposit data with a table that shows columns for number, plan name, investor name, deposit amount, payment method (Bank Transfer, Stripe, or PayPal), transaction date, status (Pending or Approved), and receipt display for bank transfer payments. It provides a complete list of all deposits made by investors through the website, including their selected payment method.
- Use the search, export, reset, and reload buttons to manage the deposits list page data. With the help of an Action Column, you can use the “Payment Status” to set your pending deposit status. This action button is only visible for pending transactions that require manual approval. And a delete button to remove the deposit record from the system.
Note: The delete deposit entry only removes the transaction record and does not affect other parts of the investment system or investor balances.
Withdrawals Record
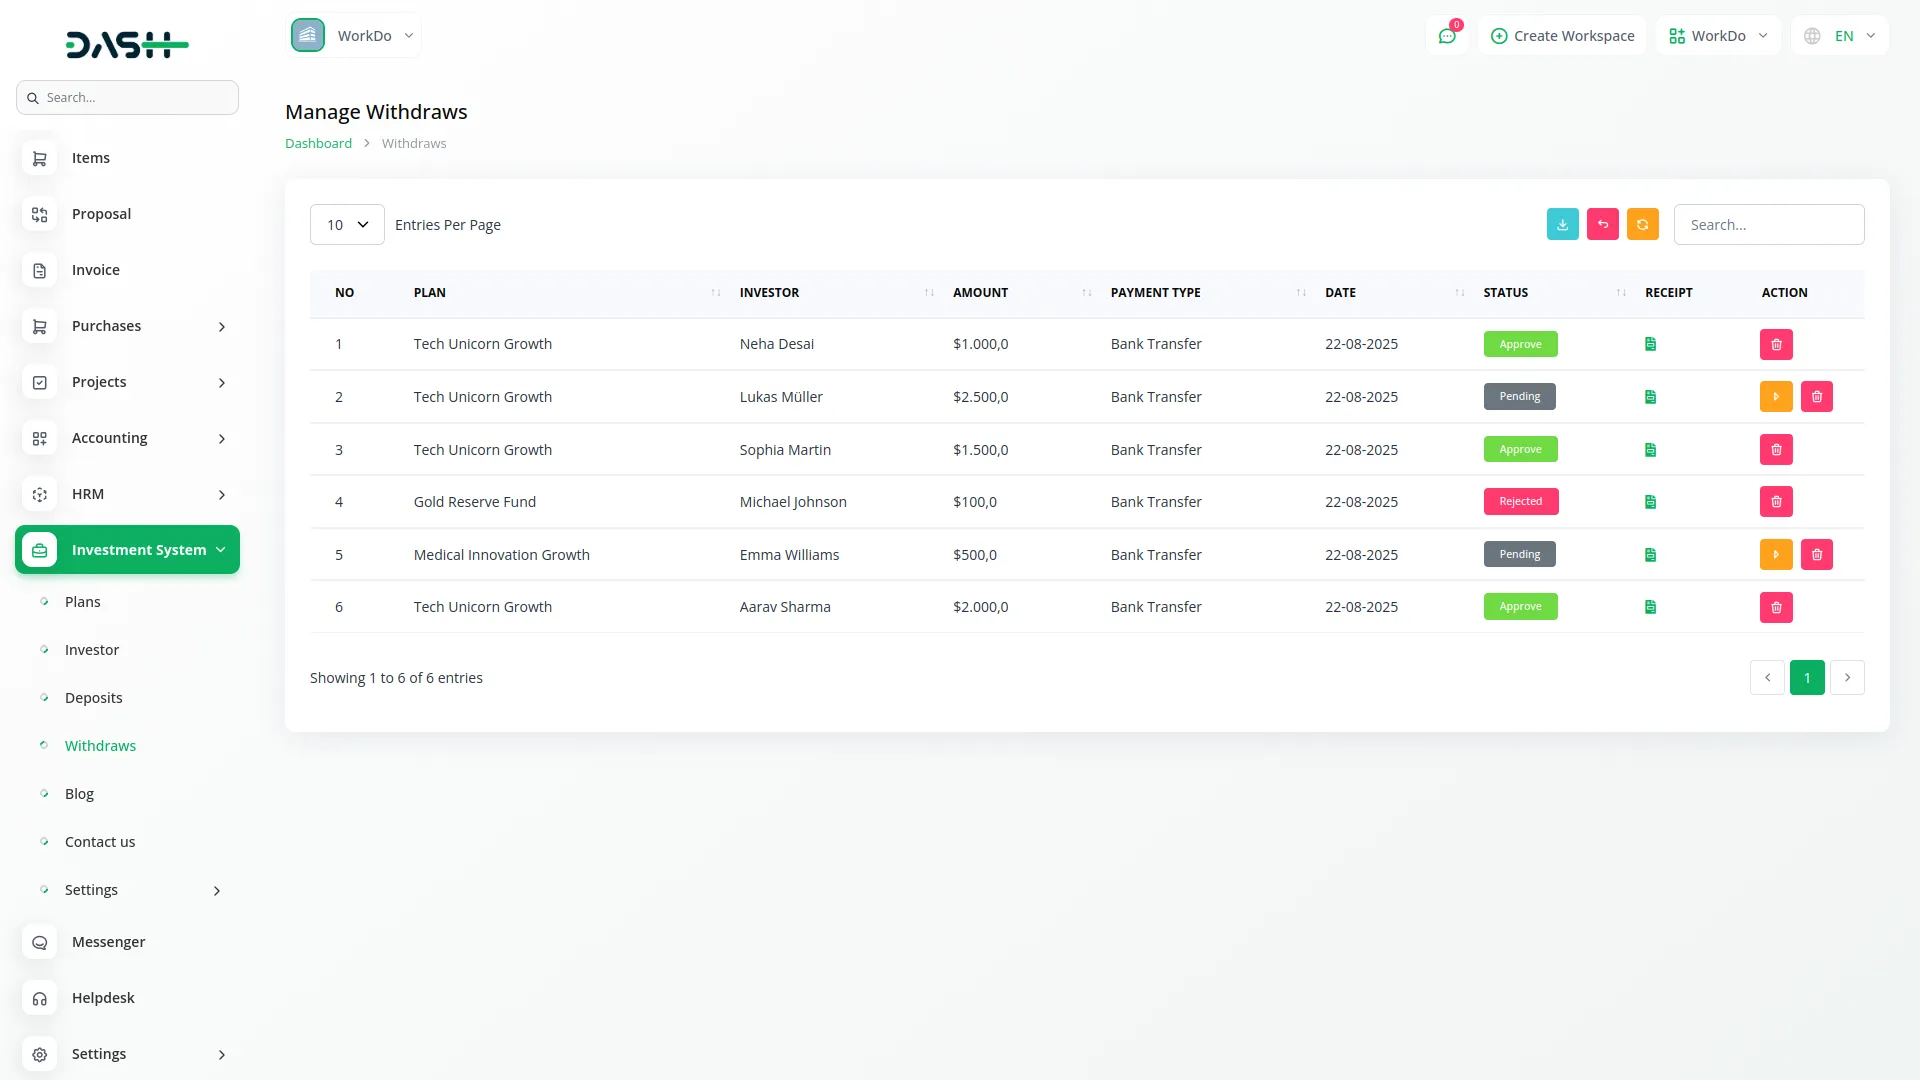
- In the list page, you’ll get to see all withdrawal data with a table that displays columns for number, plan name, investor name, withdrawal amount, payment method (Bank Transfer), transaction date, status (Pending or Approved), and receipt information for bank transfer withdrawals. It provides a complete list of all withdrawals made by investors through the website, including their selected payment method.
- You can use the “Payment Status” button to approve or process the withdrawal request and set your pending status. This action button is only for pending withdrawals that require manual approval from your side. And a delete button to remove withdrawal records from the system.
- When a withdrawal request is approved, the amount will be deducted from the investor’s balance. If the request is rejected, the amount will not be deducted.
Note: deleting a withdrawal entry only removes the transaction record and does not affect other parts of the investment system or investor account balances.
Blog Section
- To create a new blog post, click the “Create” button at the top of the blog page. Fill in the required details, like entering the blog title and selecting a category name from the dropdown (which comes from the System Setup blog Category), add the blog author’s name, and set the published date for the article.
- Next, enter blog tags to help categorize and search the content, then write a short description that will appear as a preview on the blog listing page. Upload a thumbnail image that will represent the blog post in listings and provide the main blog description with full content.
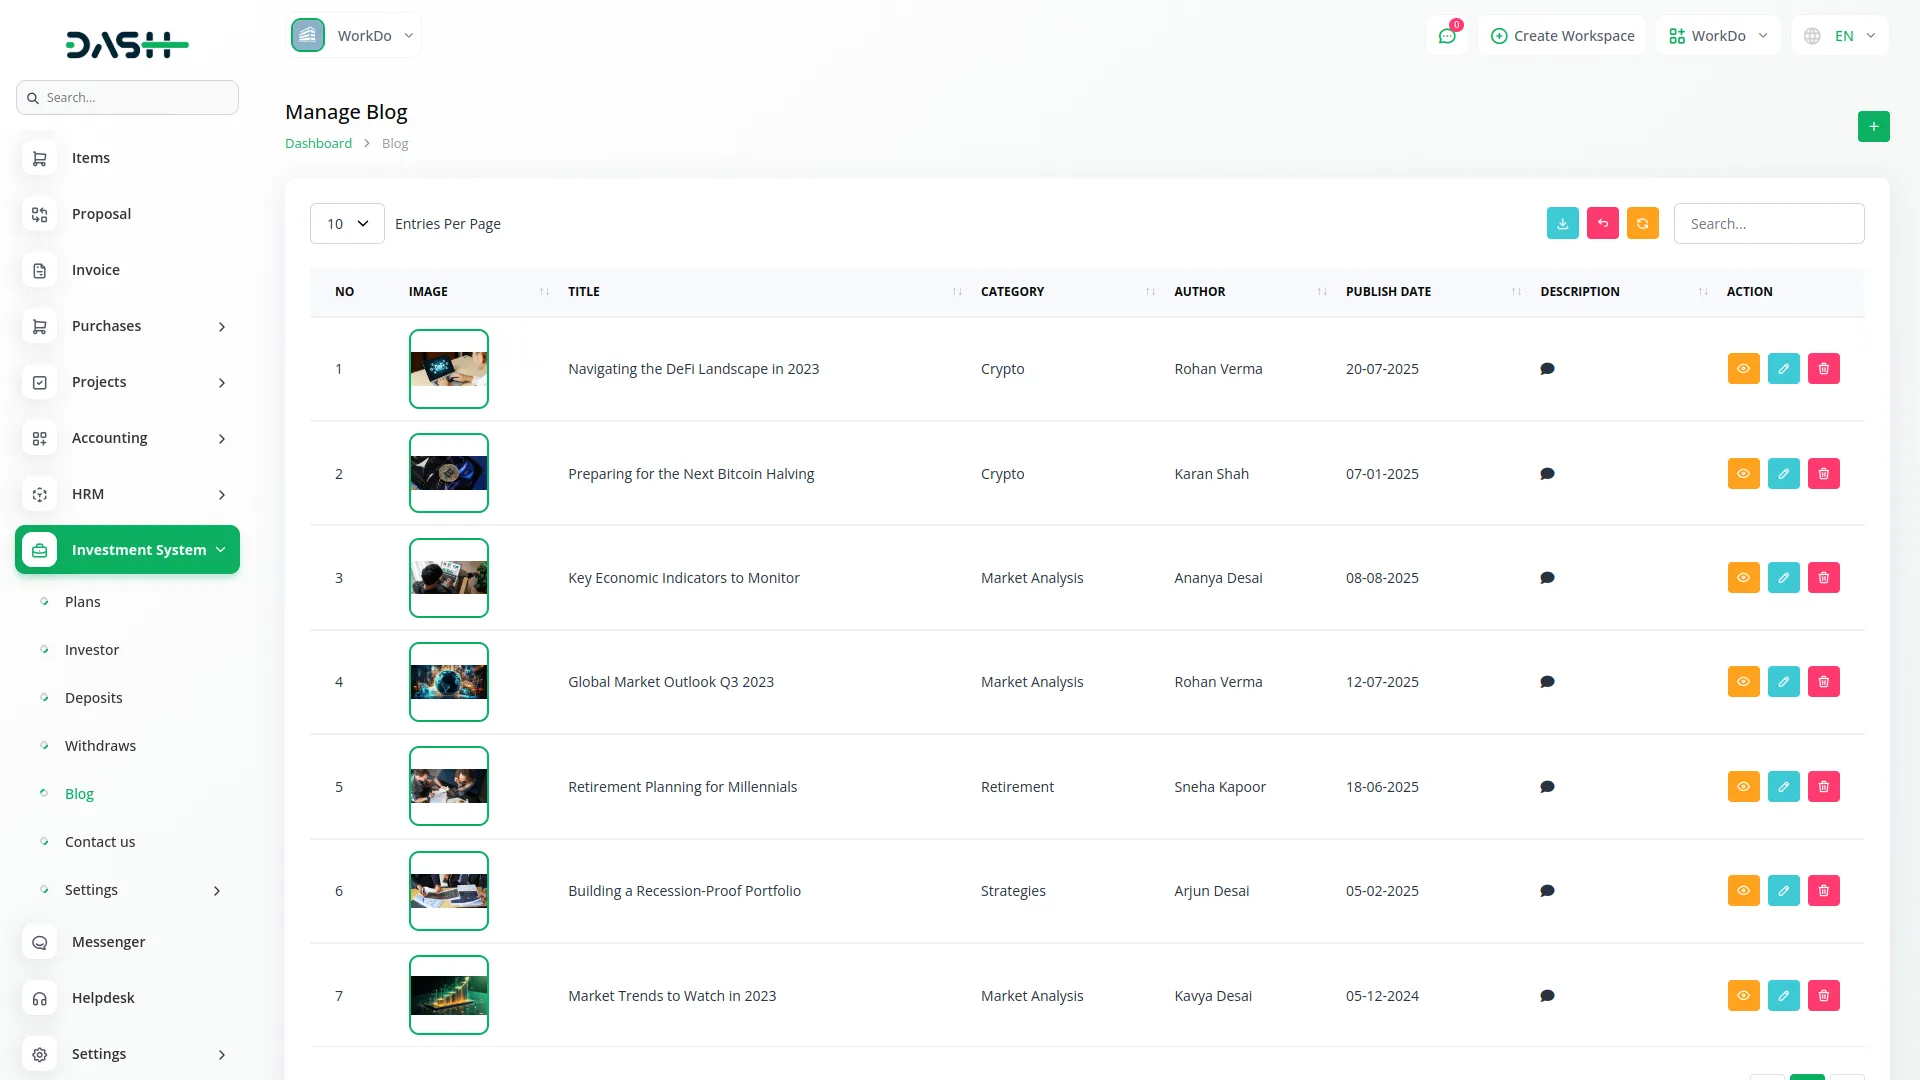
- The list page displays all blog records in a table showing columns for number, blog image, title, category, author, publish date, and description. Click the description icon to view the full blog content. You can use the search, export, reset, and reload buttons to manage this page list data.
- Additionally, you can use the Action column, in show to preview how the blog post appears on the website. And the edit to modify blog detail, or delete to remove the blog post from your system.
Contact Us
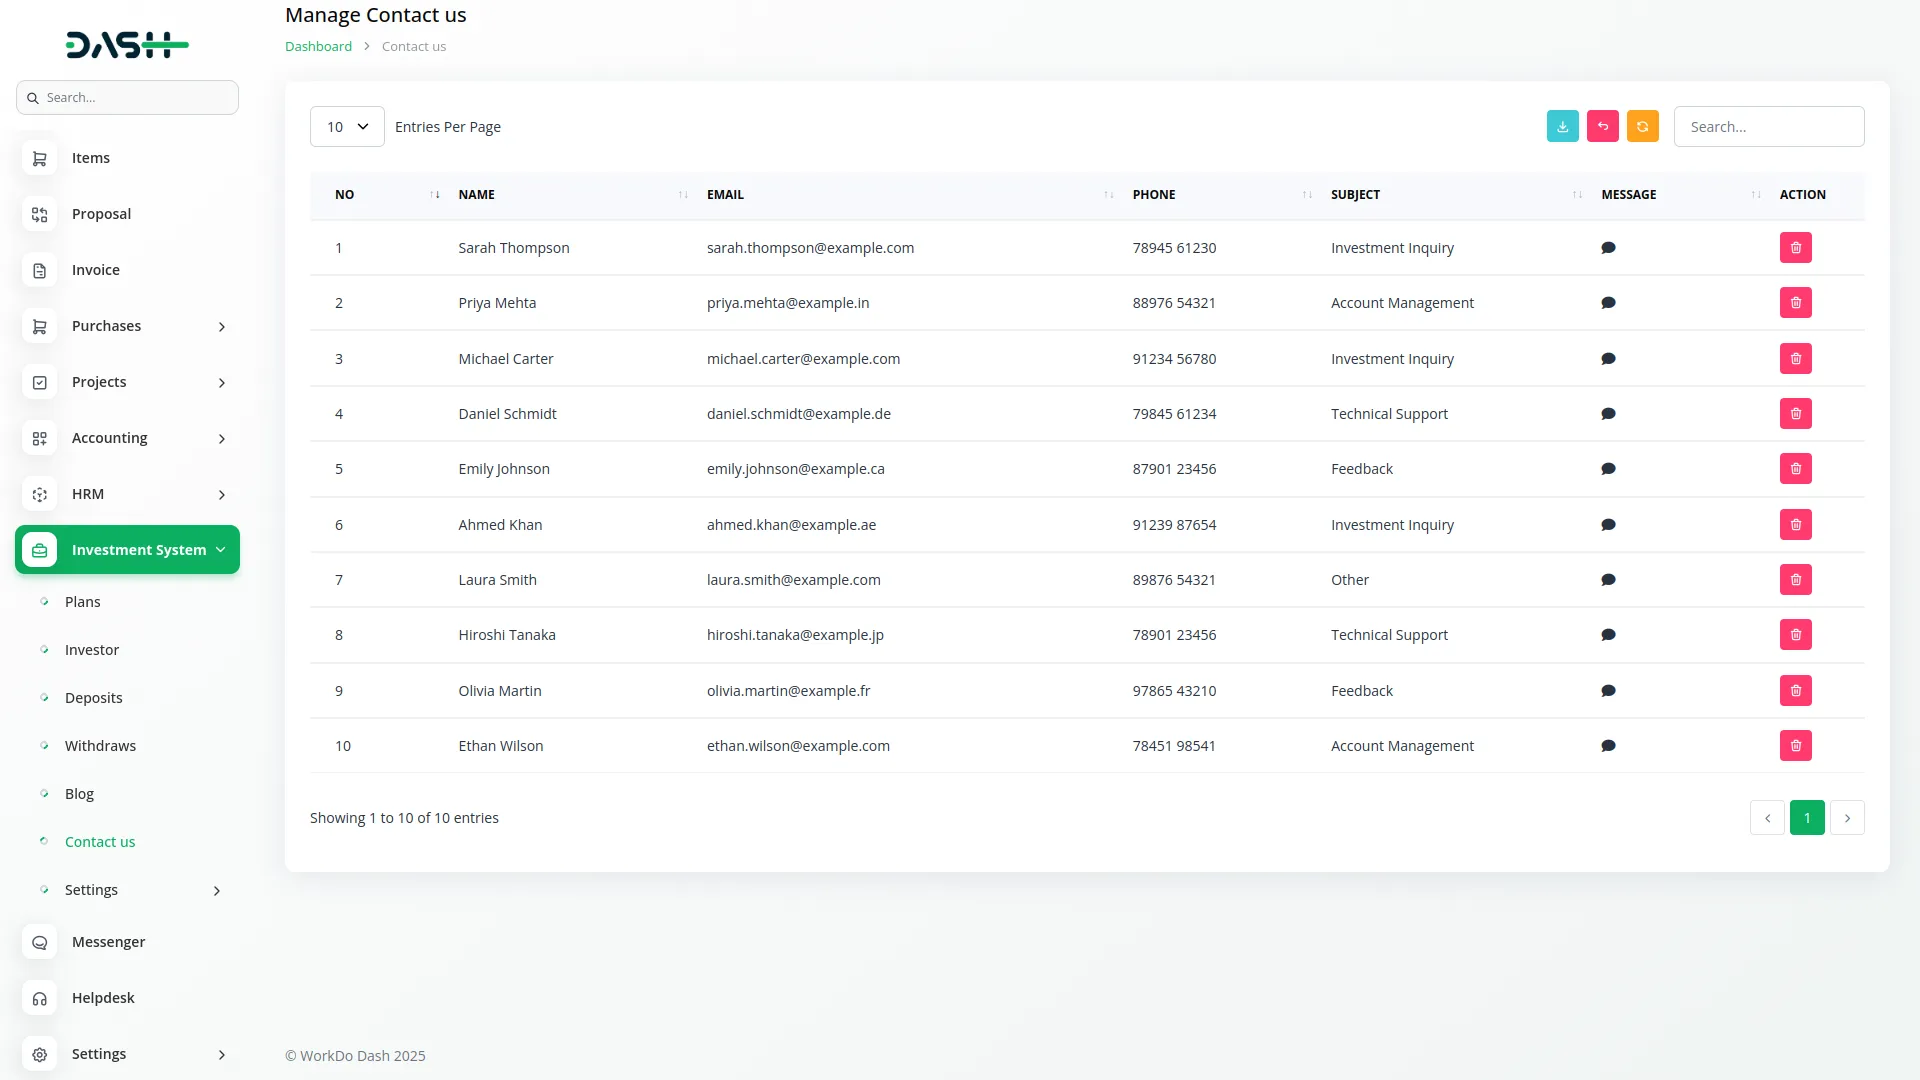
- On this page, you’ll get to see the contact list in a table that displays columns for number, name, email address, phone number, message subject, and message content. Click the message icon to read the full message content submitted by users.
- Use the search, export, reset, and reset buttons to manage contact data. With the help of an Action column, you can use the delete buttons to remove contact inquiries after reviewing and responding to them as needed.
Investment System (Website)
Important Note: Only the sections set through System Setup will be displayed on the website. Please ensure the desired sections are properly configured.
Section:
Favicon & Header
This section includes the small icon shown favicon, title text on the browser tab, and the main navigation header seen at the top of every page. The header displays the company logo and a menu linking to key sections like Home, Investment Plans, Blog, About, Contact, and Login. When investors are logged in, the Login button changes to a Dashboard button.
- Go to Theme Setup → Brand Settings to upload the favicon and company logo.
- The menu items (Home, Investment Plans, Blog, About, Contact) are auto-linked to their respective page sections. No manual configuration is needed for these links.
- The logo and favicon files are retrieved dynamically and shown across all pages.
- Add a Language Selector through System Setup to allow visitors to switch between different languages.
Home page:
Banner Section
This is the top visual section of the homepage, usually showing a large image or background with a title and, subtitle. It introduces visitors to the investment company and encourages them to explore investment opportunities.
- Go to Theme Setup → Banner Settings.
- Configure the banner content, including title, subtitle, and background image.
- These fields are dynamically displayed on the homepage banner section.
Feature Section
This section highlights the key features and benefits of your investment platform. It helps build trust and showcases what makes your investment services unique.
- Go to Theme Setup → Features Settings.
- Add multiple features with descriptions, icons, and titles.
- Each feature will be displayed as a card or block on the homepage.
Plan Section
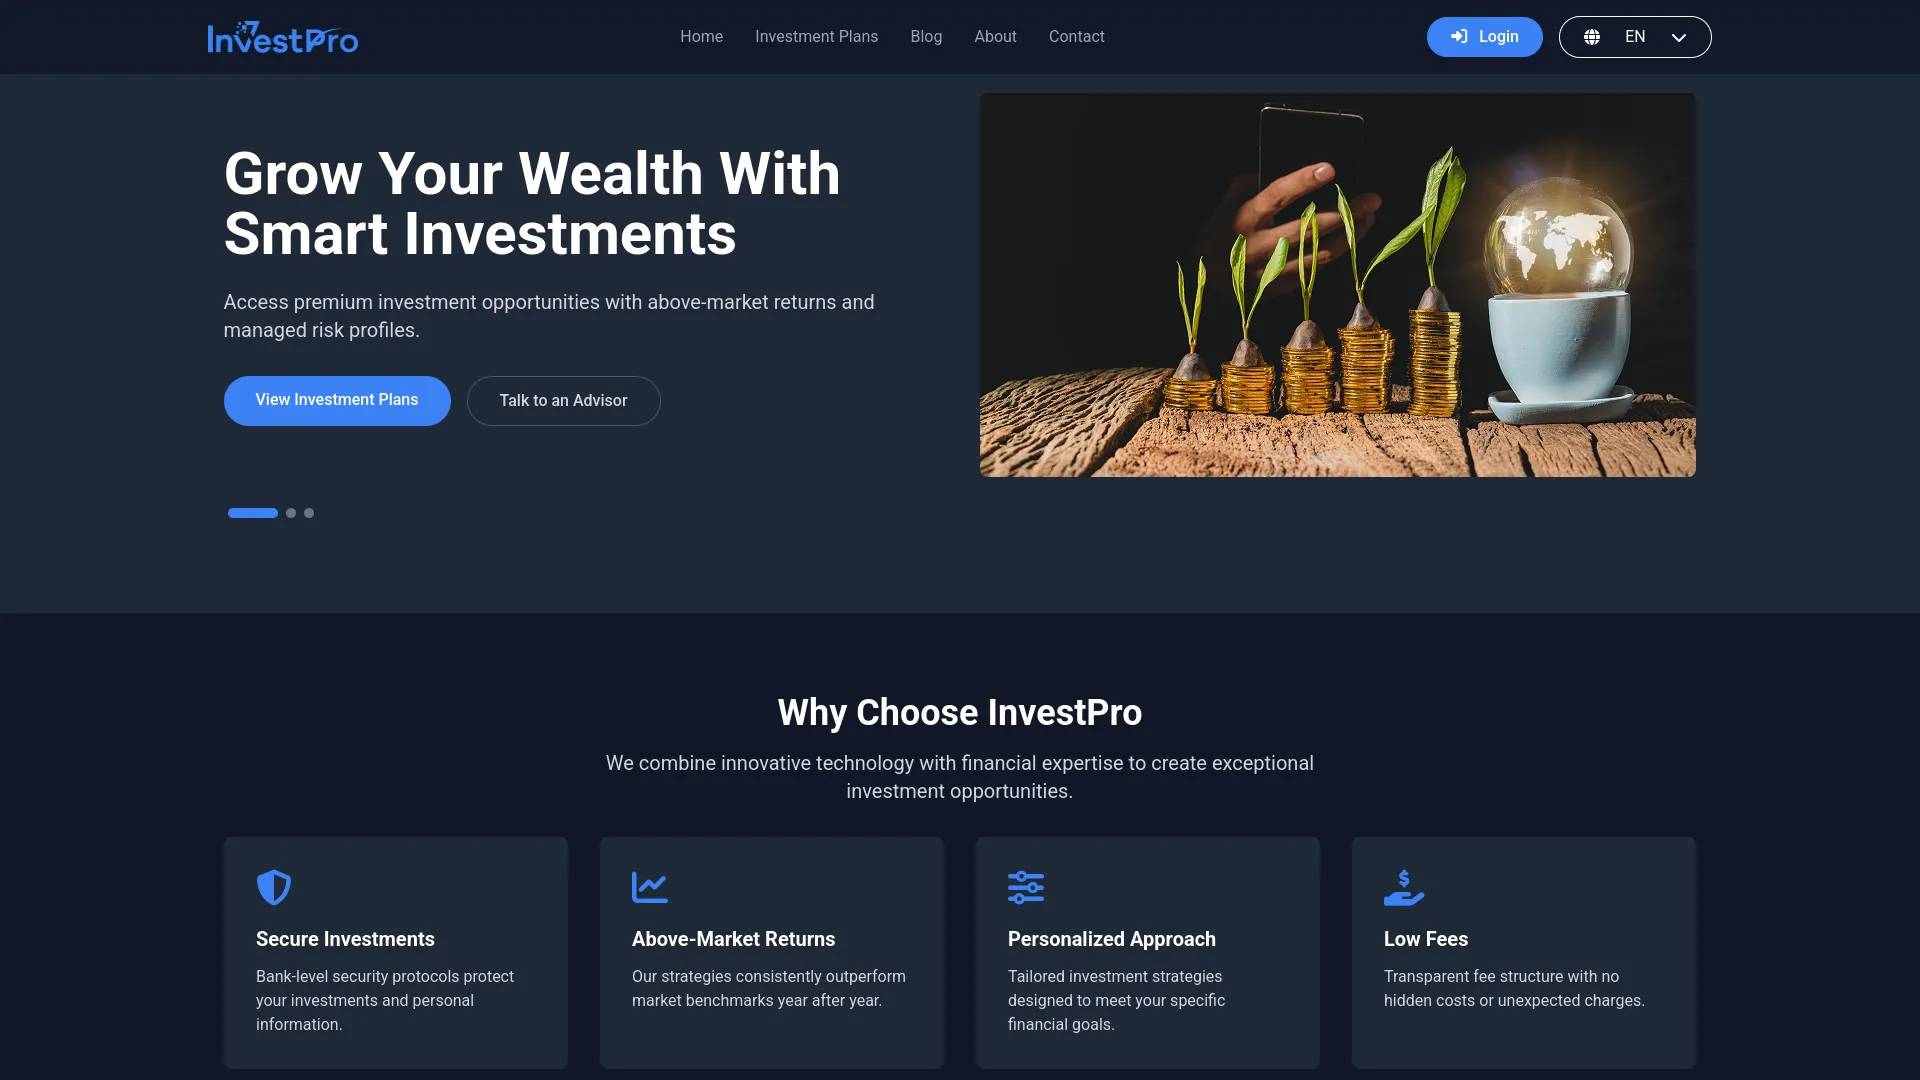
This section displays your active investment plans on the homepage, giving visitors a quick overview of available investment opportunities. This section only appears if properly configured.
- Go to Theme Setup → Additional Settings.
- Add a Title and Description for the Plan Section.
- If no title and description are added, this section will not appear on the homepage.
- The active investment plans you set in System Setup will automatically show in this section.
Testimonial Section
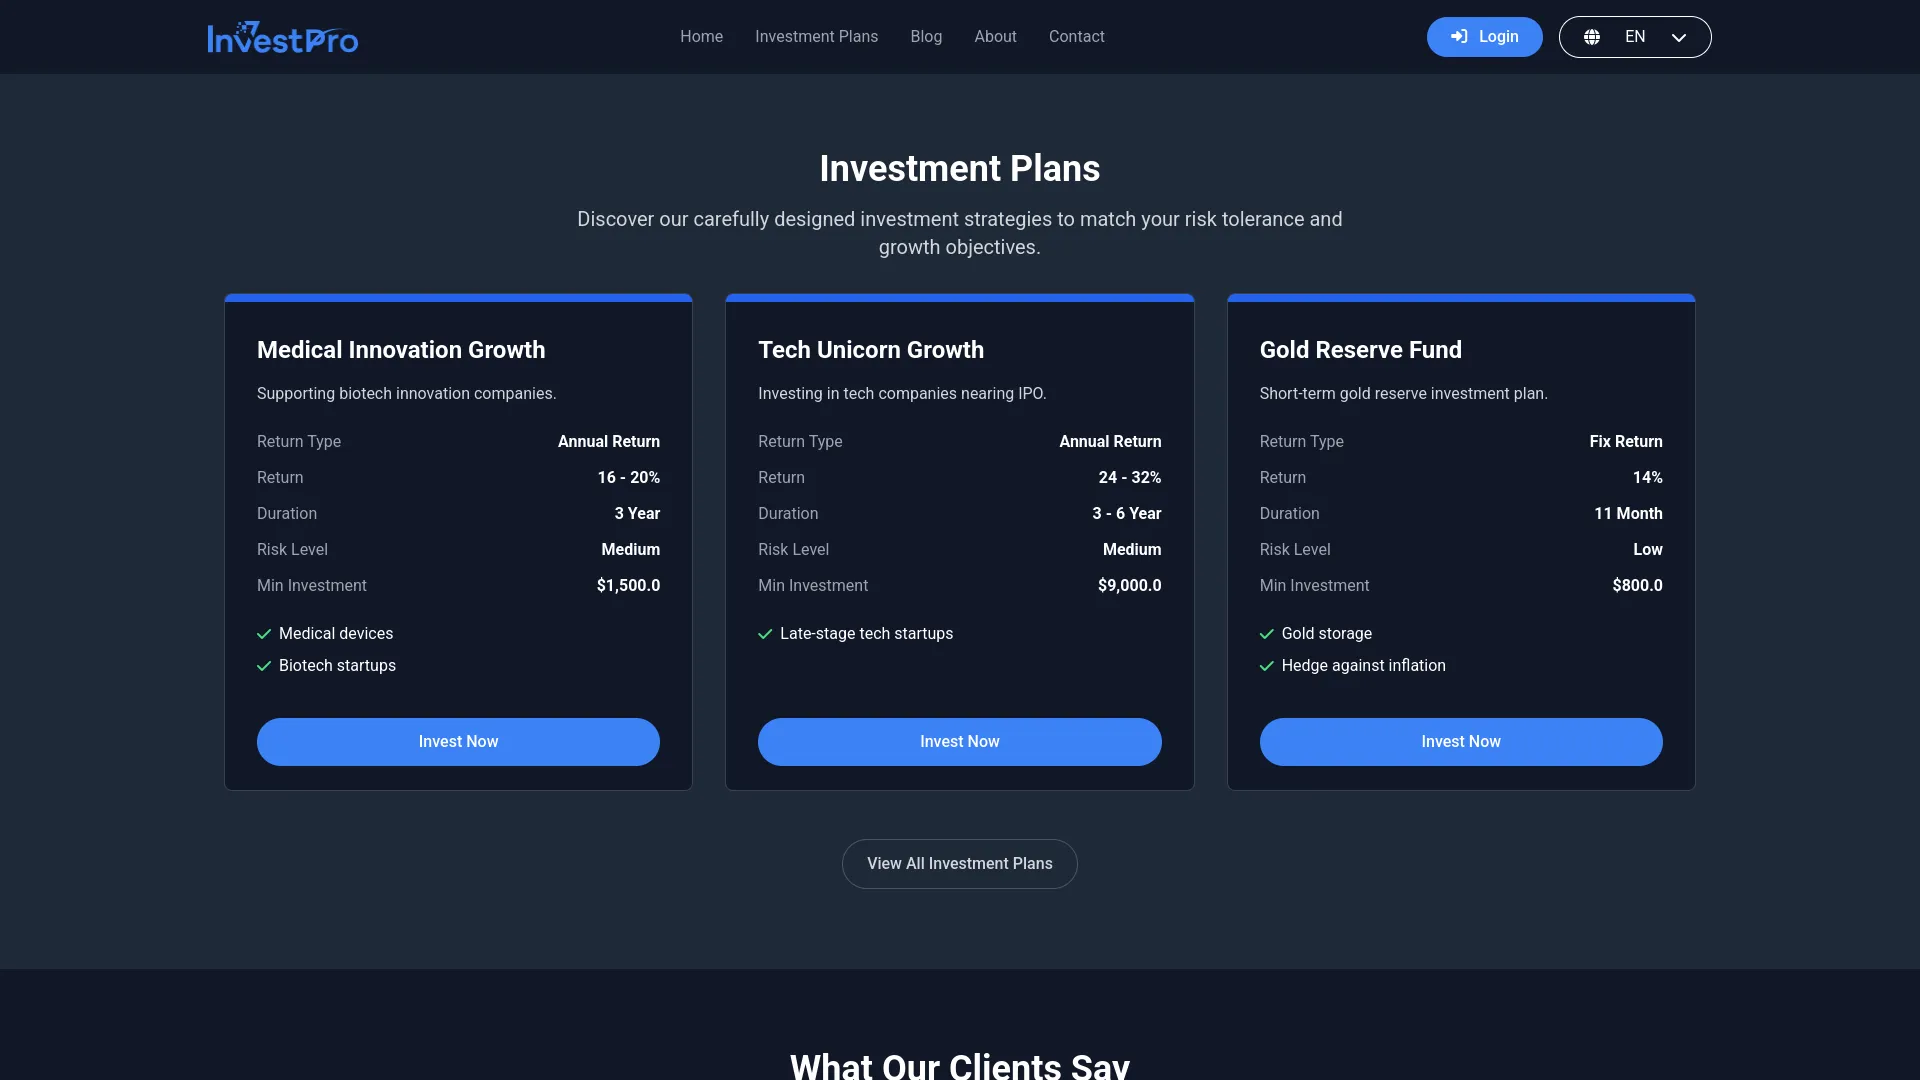
This section shows customer reviews and testimonials to build credibility and trust with potential investors.
- Go to Theme Setup → Testimonials section.
- Add customer testimonials with names, reviews.
- Testimonials on the homepage change automatically in a sliding view, one after another.
Blog Section
This section displays the latest 3 blog posts on the homepage to keep visitors informed about market insights, company news, and investment tips. This section only appears if properly configured.
- Go to Theme Setup → Additional Settings.
- Add a Title and Description for the Blog Section.
- If no title and description are provided, this section will not be displayed on the homepage.
- The 3 most recent blog posts from the Blog section are automatically pulled and displayed.
- Each blog post displays a short preview, and visitors can click the ‘Read More’ link to open the full article.
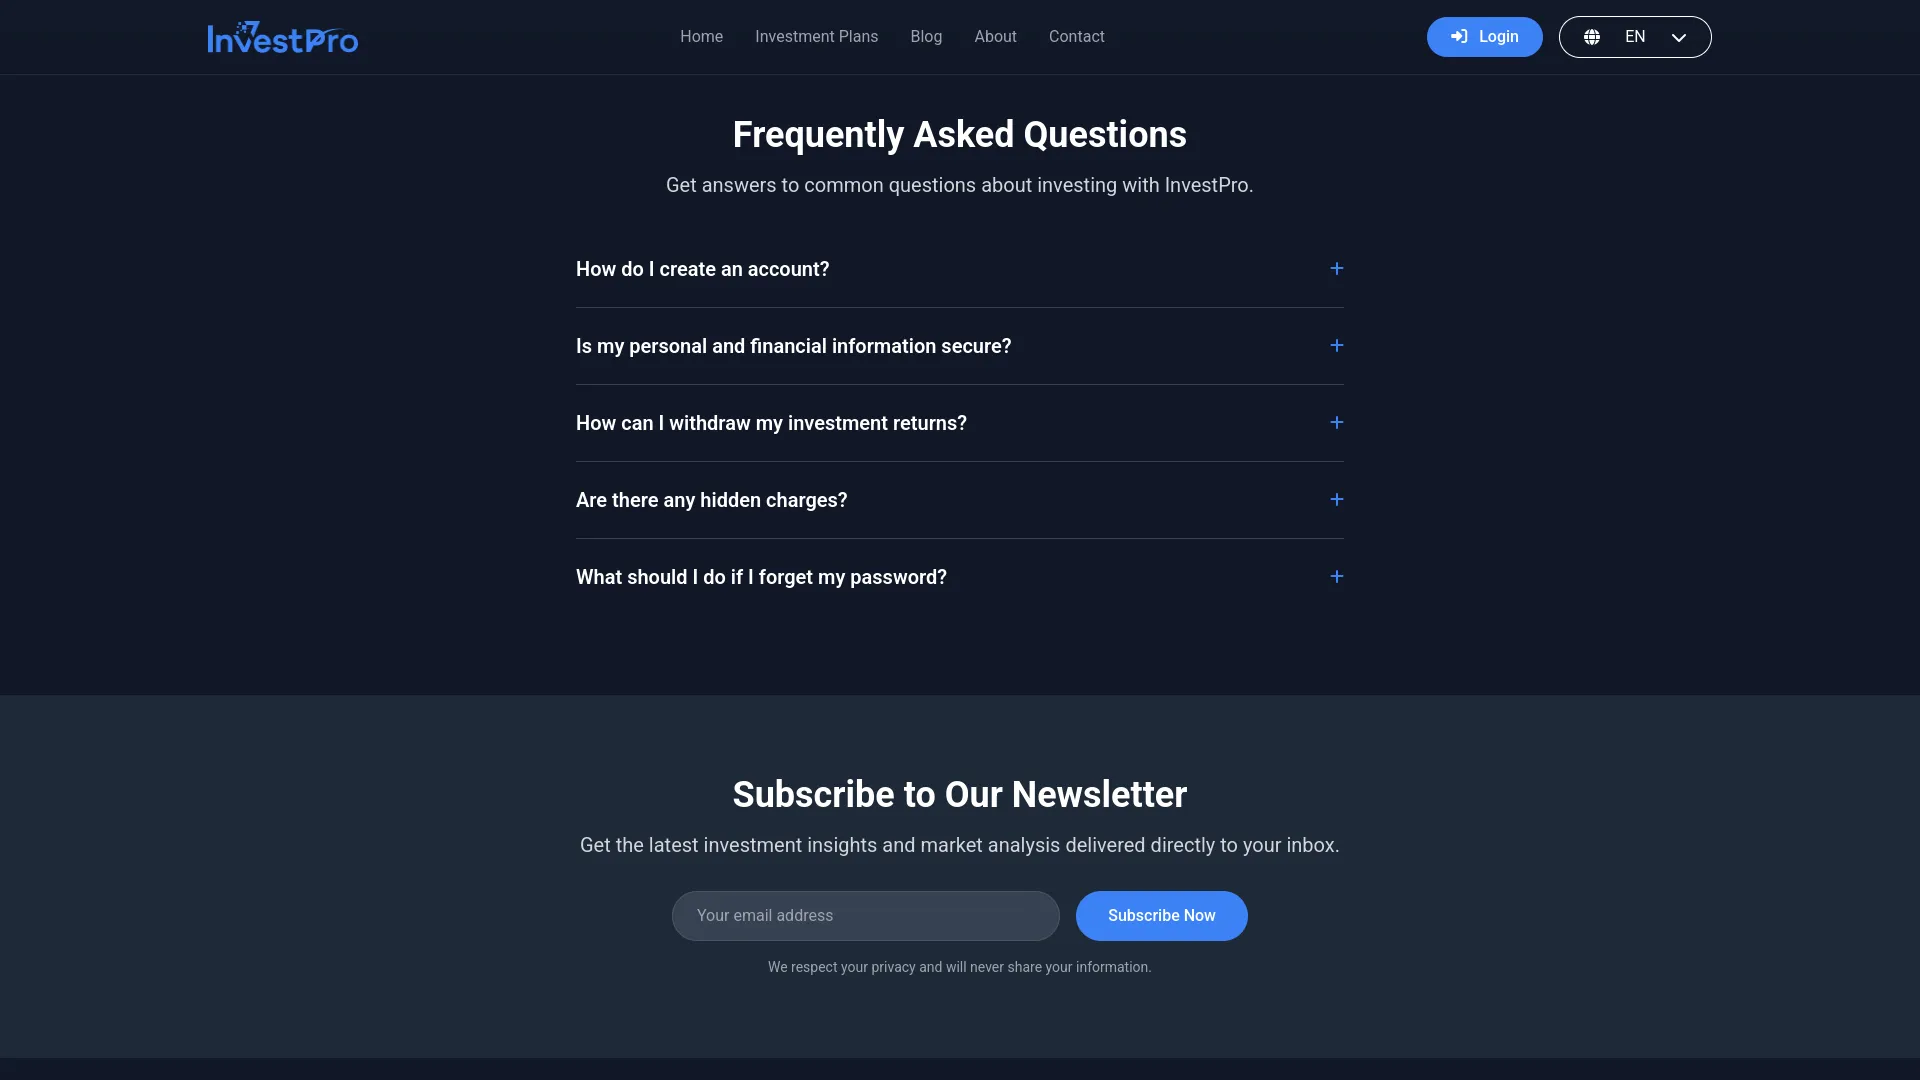
FAQ Section
This section answers common questions about your investment services, helping visitors understand your processes and build confidence in your platform.
- Go to Theme Setup → FAQ.
- Add frequently asked questions with detailed answers.
- Questions and answers are displayed in an expandable format on the homepage.
Newsletter Section
This section allows visitors to subscribe to your newsletter for updates about new investment opportunities, market insights, and company news.
- Go to Theme Setup → Newsletter section.
- Configure the newsletter signup form with title, description, and subscription settings.
- The newsletter signup form appears on multiple pages, including the homepage, investment plans, blog, about, and contact pages.
Investment Plans Page :
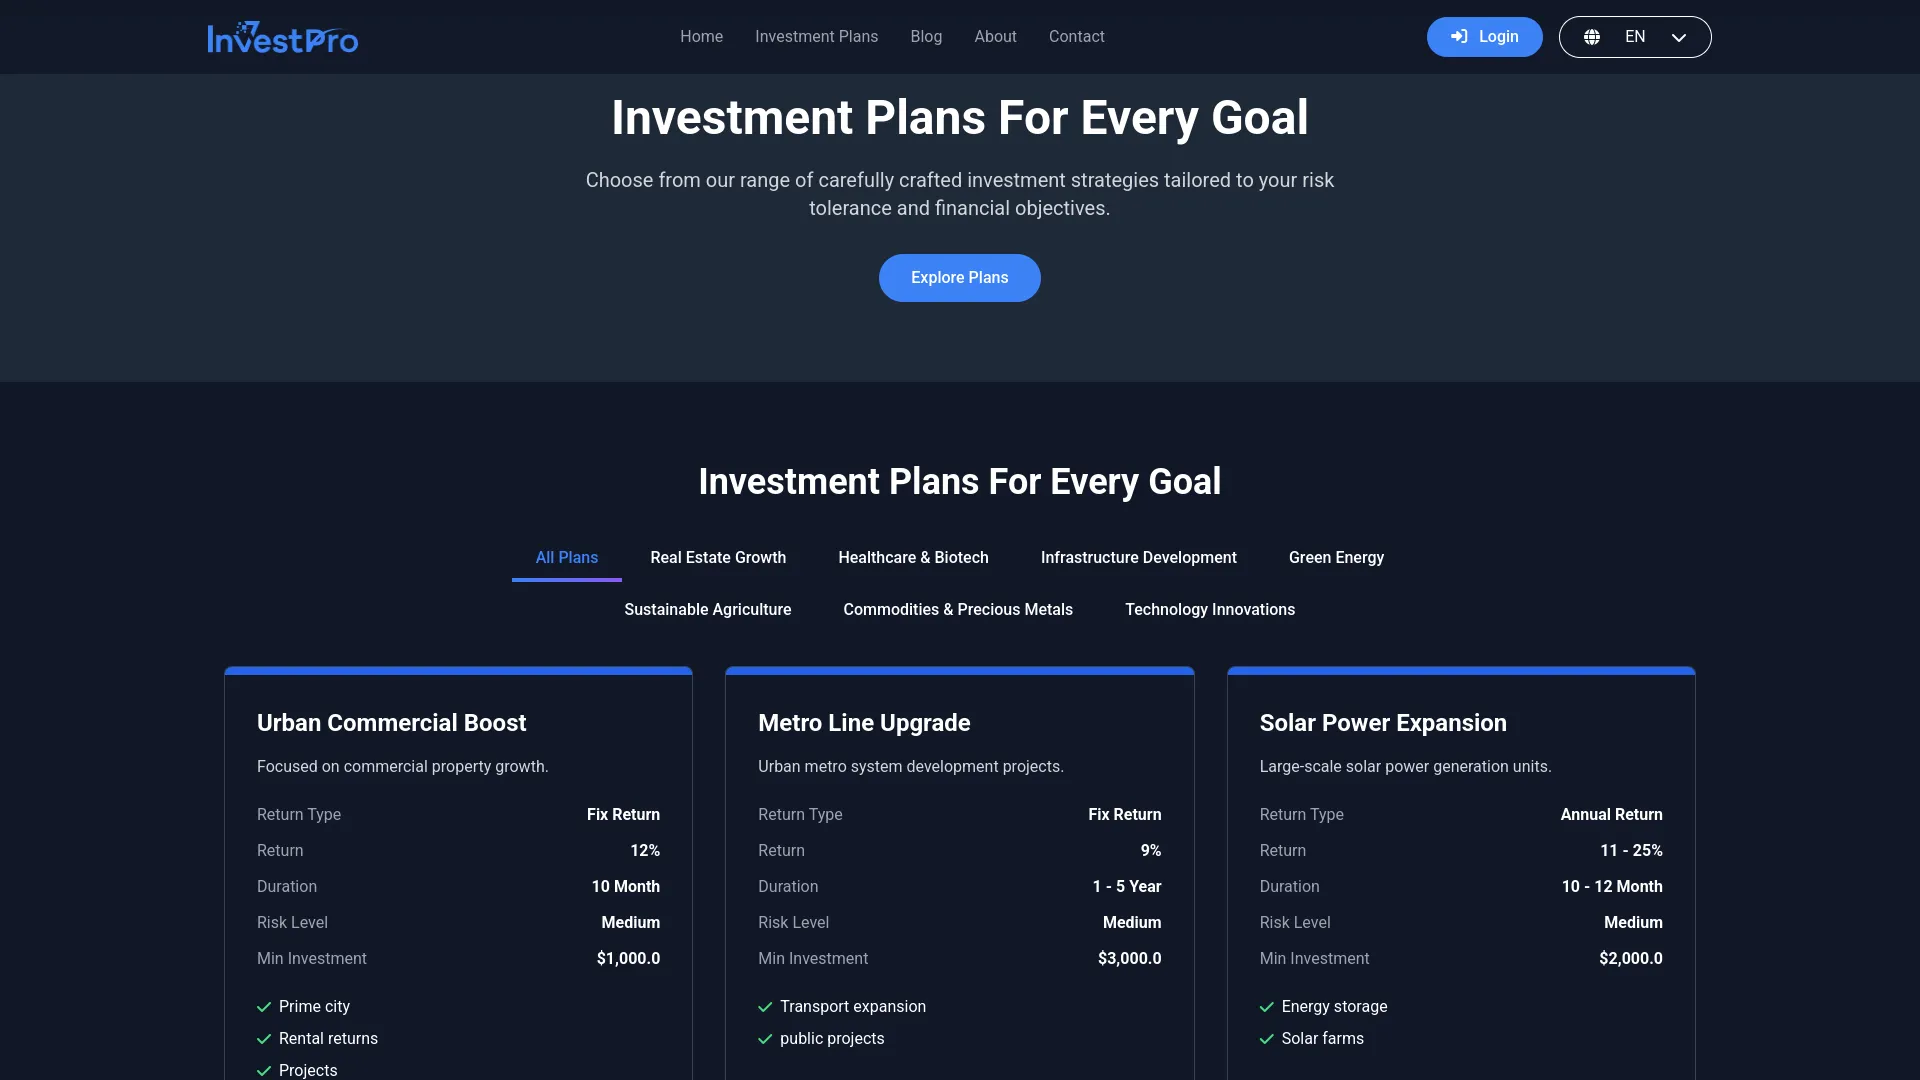
This dedicated page provides detailed information about all your investment plans, includes a ROI calculator, and allows visitors to compare different investment options.
Hero Section
This is the top section of the Investment Plans page that introduces visitors to your investment opportunities.
- Go to System Setup → Additional Settings.
- Configure the hero section content for the Investment Plans page.
- Set the title, subtitle for this page.
Plan Section
This section displays all active investment plans with detailed information and categories to help investors choose the right option.
- This section comes from the Plans section.
- Create and manage investment plans with categories, duration, returns, and terms.
- Only plans marked as “Active” will be displayed on the website.
- Plans are organized by categories for easier browsing.
ROI Calculator
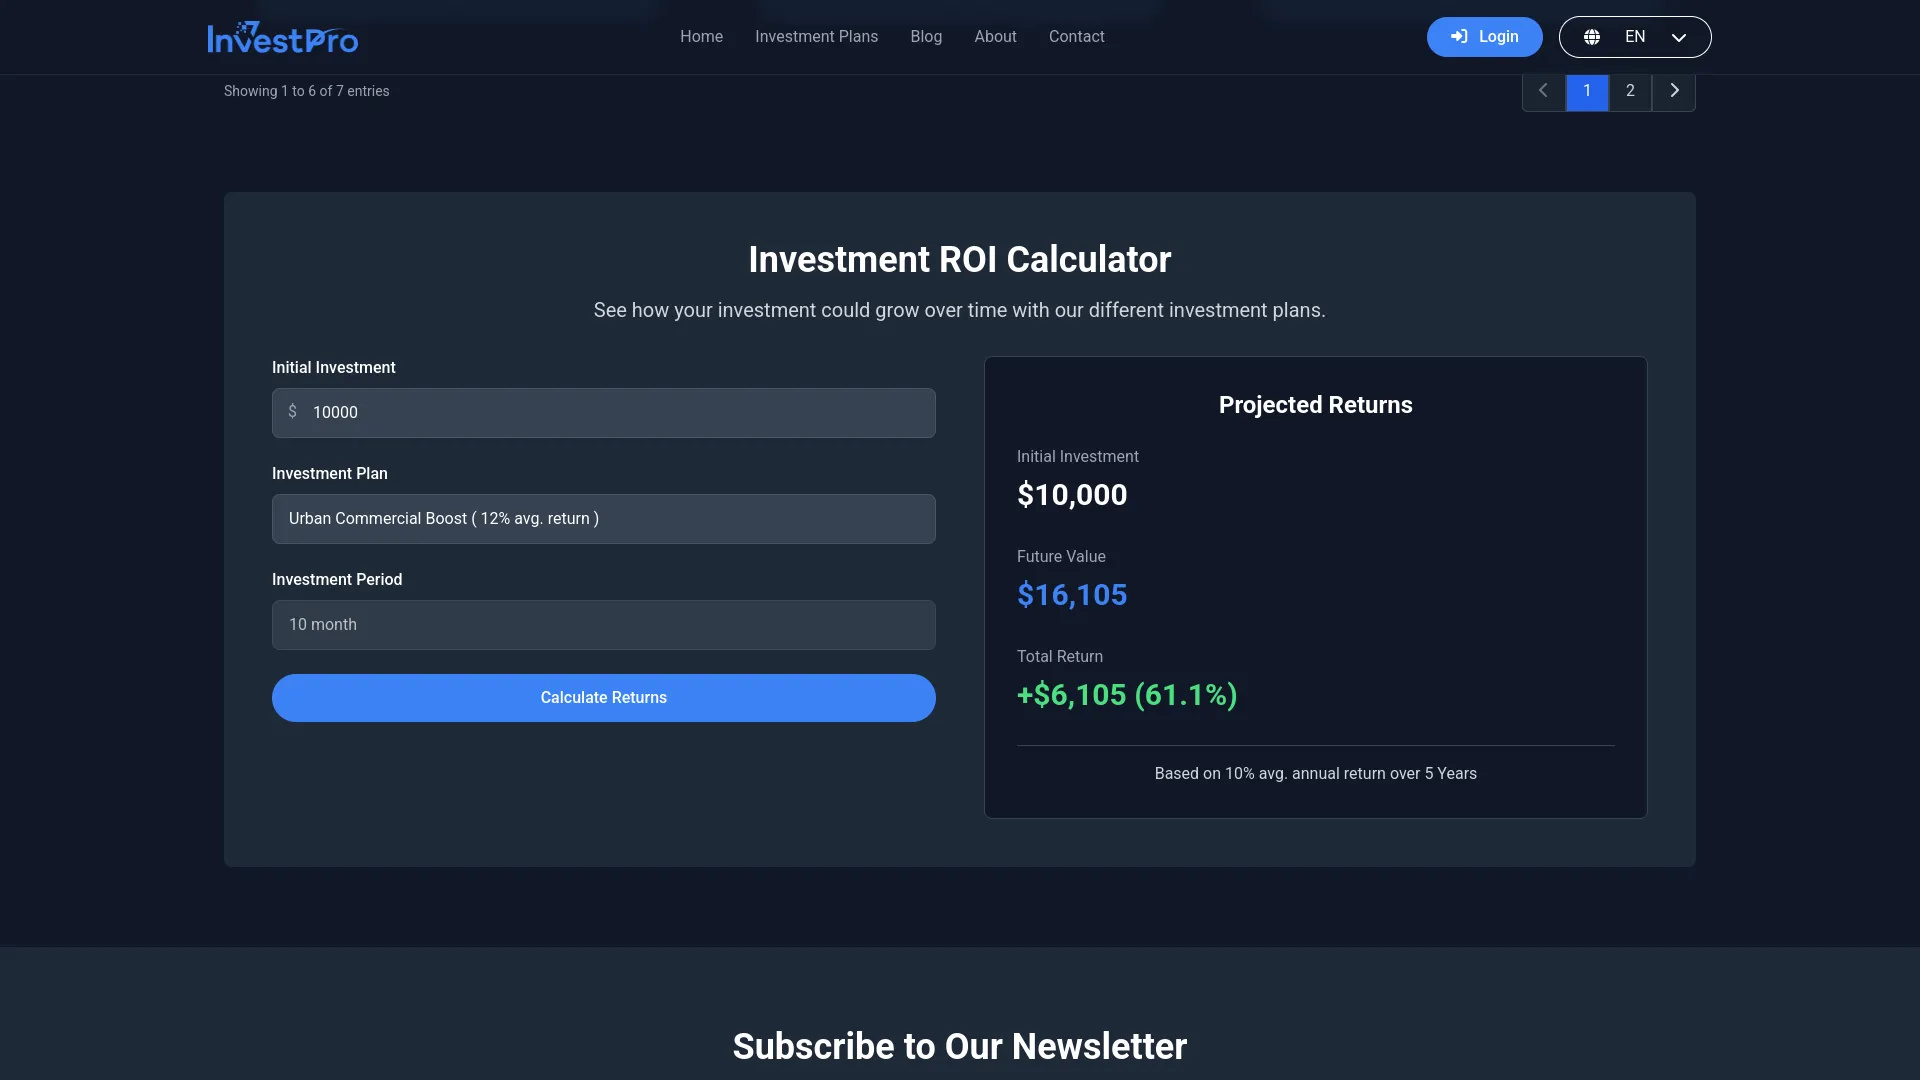
This interactive tool allows visitors to calculate potential returns on their investments based on the available plans.
- The ROI Calculator automatically uses plan details.
- Visitors can select a plan, enter an investment amount, and see projected returns.
- Calculations are based on the plan’s return rate and duration settings.
Blog Page:
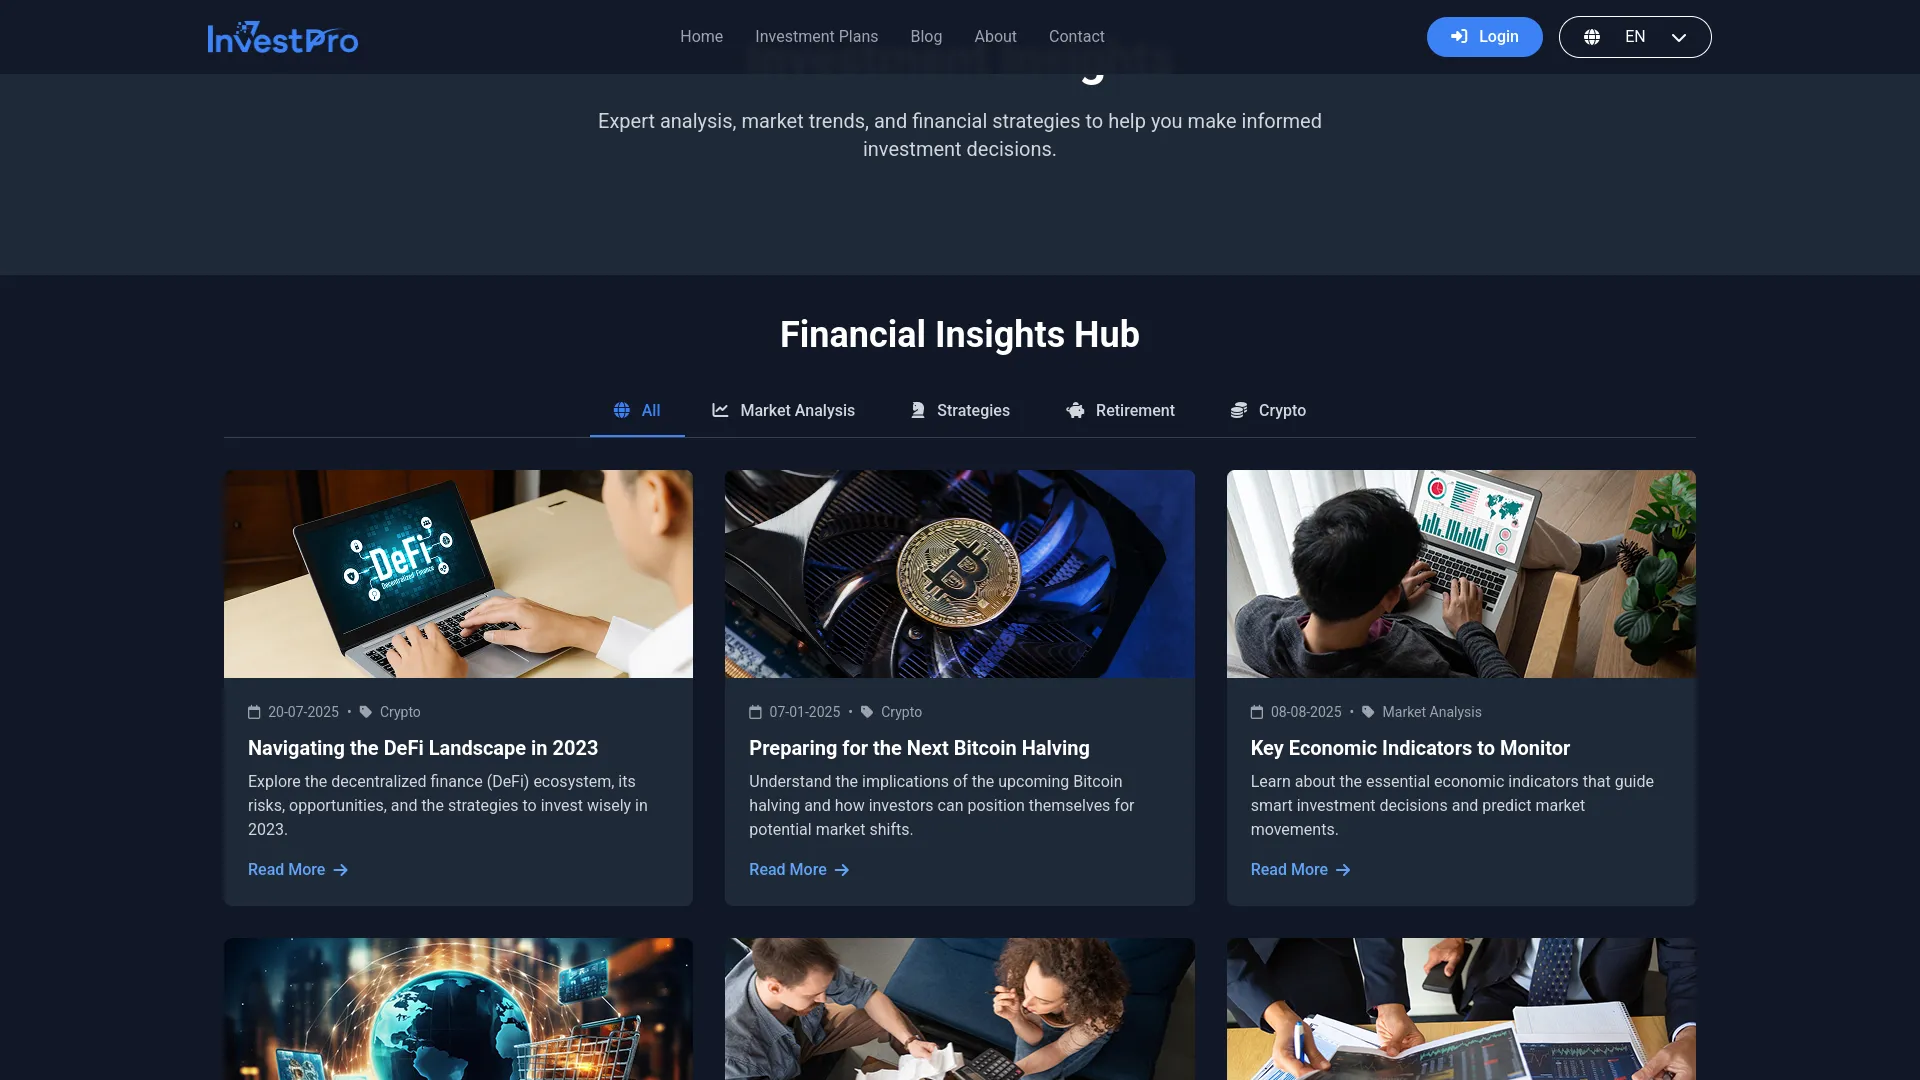
Hero Section
This is the top section of the Blog page that introduces visitors to your investment insights and company updates.
- Go to Theme Setup → Additional Settings.
- Configure the hero section content specifically for the Blog page.
- Set the title, subtitle, and background image for the blog section.
Blog Section
This section displays all published blog posts organized by categories, helping visitors find relevant investment information and company updates.
- This section comes from the Blog section.
- Create and manage blog posts with categories, featured images, and content.
- Blog posts are displayed with preview text and “Read More” links.
- Clicking “Read More” opens the full Article Page with complete content.
- Article Page: Individual blog posts open in a dedicated Article Page format.
- Each article includes a Hero Section with the blog title and featured image.
- The Content Section displays the full blog post content.
- Articles are automatically formatted based on the content added in the Blog section.
About Page:
Hero Section
This is the top section of the About page that introduces your company and investment philosophy to visitors.
- Go to Theme Setup → About.
- Configure the hero section with company introduction and key messaging.
Our Story Section
This section tells the story of your investment company, building trust and connection with potential investors.
- Go to Theme Setup → Our Story.
- Add your company’s founding story, background, and key milestones.
- Include images and a detailed narrative about your company’s journey.
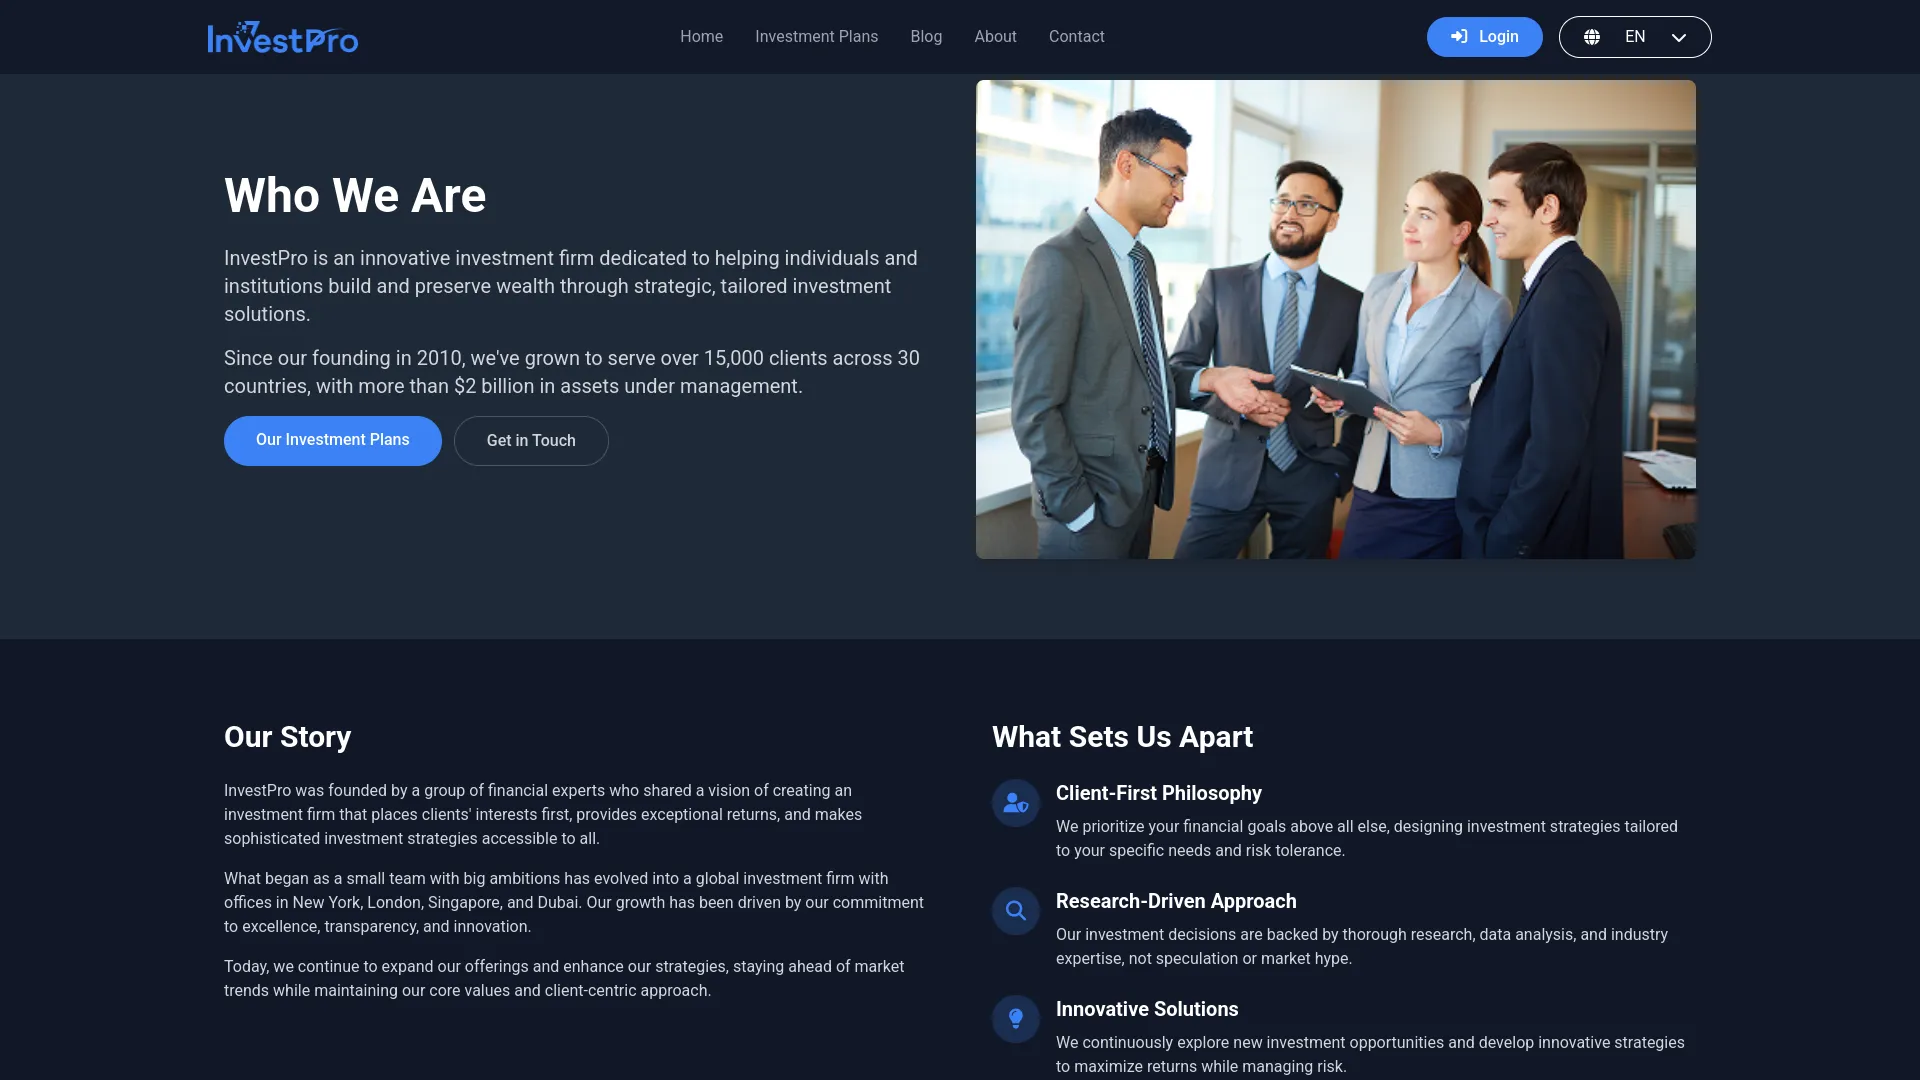
Mission & Vision Section
This section outlines your company’s mission statement and vision for the future, helping investors understand your values and goals.
- Go to Theme Setup → Mission & Vision.
- Define your company’s mission statement and vision.
- Add supporting content that explains your commitment to investors.
Leadership Team
This section introduces the key individuals behind your company, showcasing their expertise and roles. It helps investors and visitors understand who is leading the company, their experience, and how their leadership contributes to achieving the company’s mission and vision.
- Go to Theme Setup → Leadership Team
- Add profiles for each leader, including name, position, and photo.
- Provide a brief description of their background and contributions.
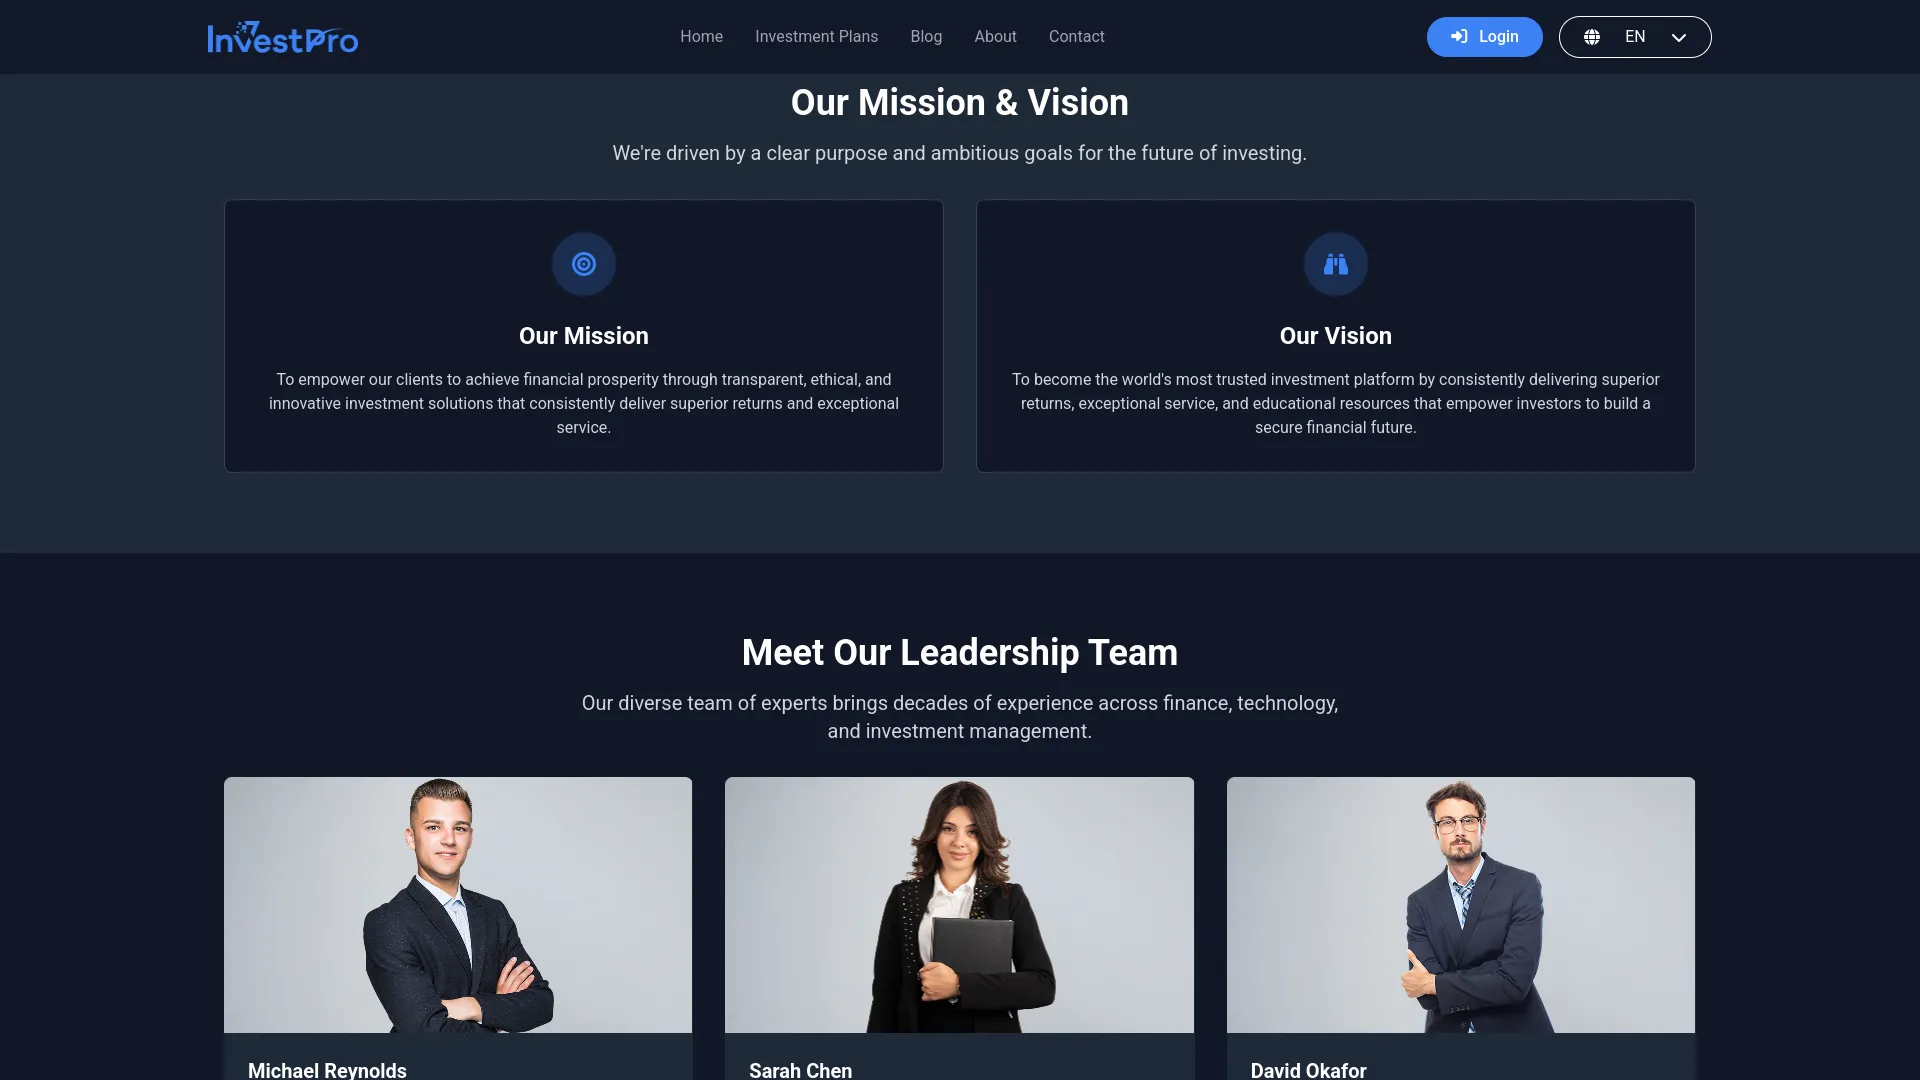
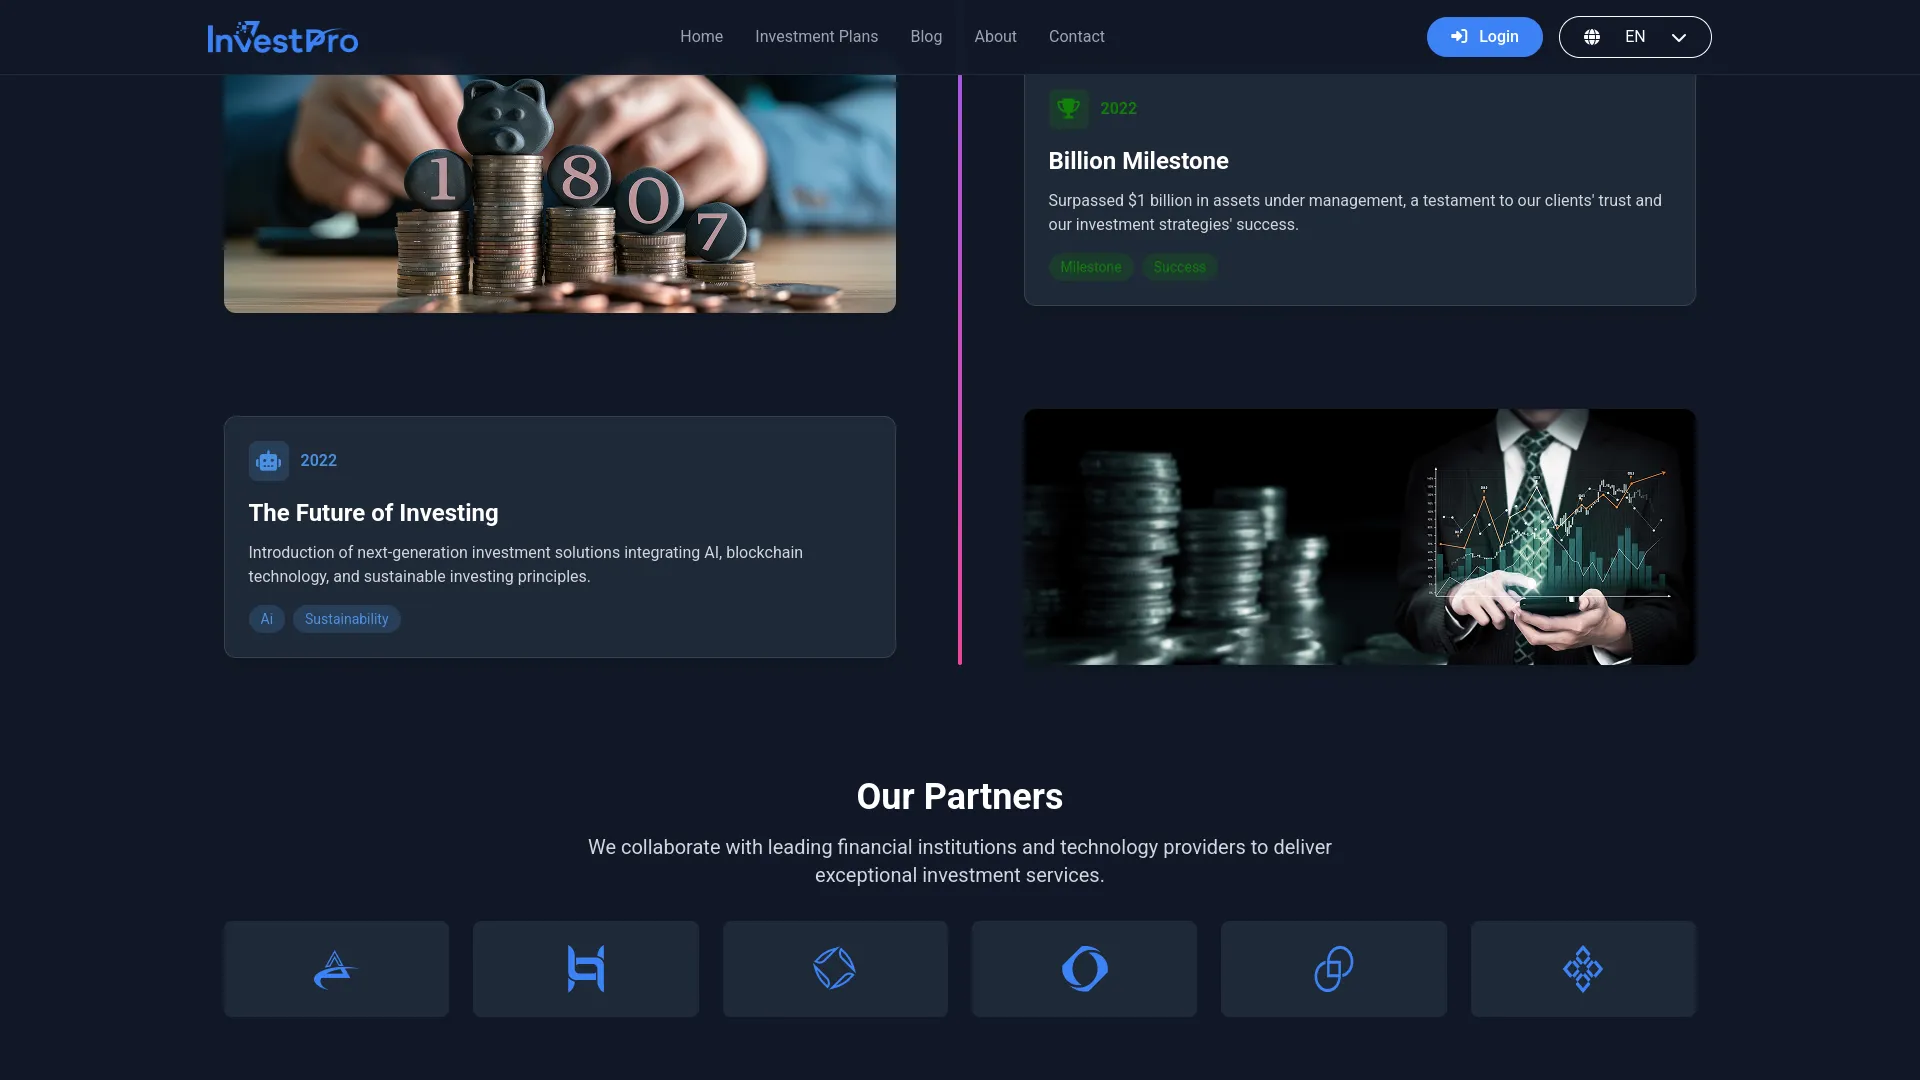
Company Journey Section
This section highlights important milestones and achievements in your company’s development over time.
- Go to Theme Setup → Company Journey.
- Add timeline events, achievements, and key company milestones.
- Include dates, descriptions, and any supporting images.
Partner Section
This section displays your business partners, sponsors, or affiliated organizations to build credibility.
- Go to Theme Setup → Partner.
- Upload partner logos and company information.
- Partners are displayed in a grid or carousel format.
Contact Page:
Hero Section
This is the top section of the Contact page that encourages visitors to get in touch with your investment team.
- Go to Theme Setup → Additional Settings.
- Configure the hero section content specifically for the Contact page.
- Set the title, subtitle, and background image for the contact section.
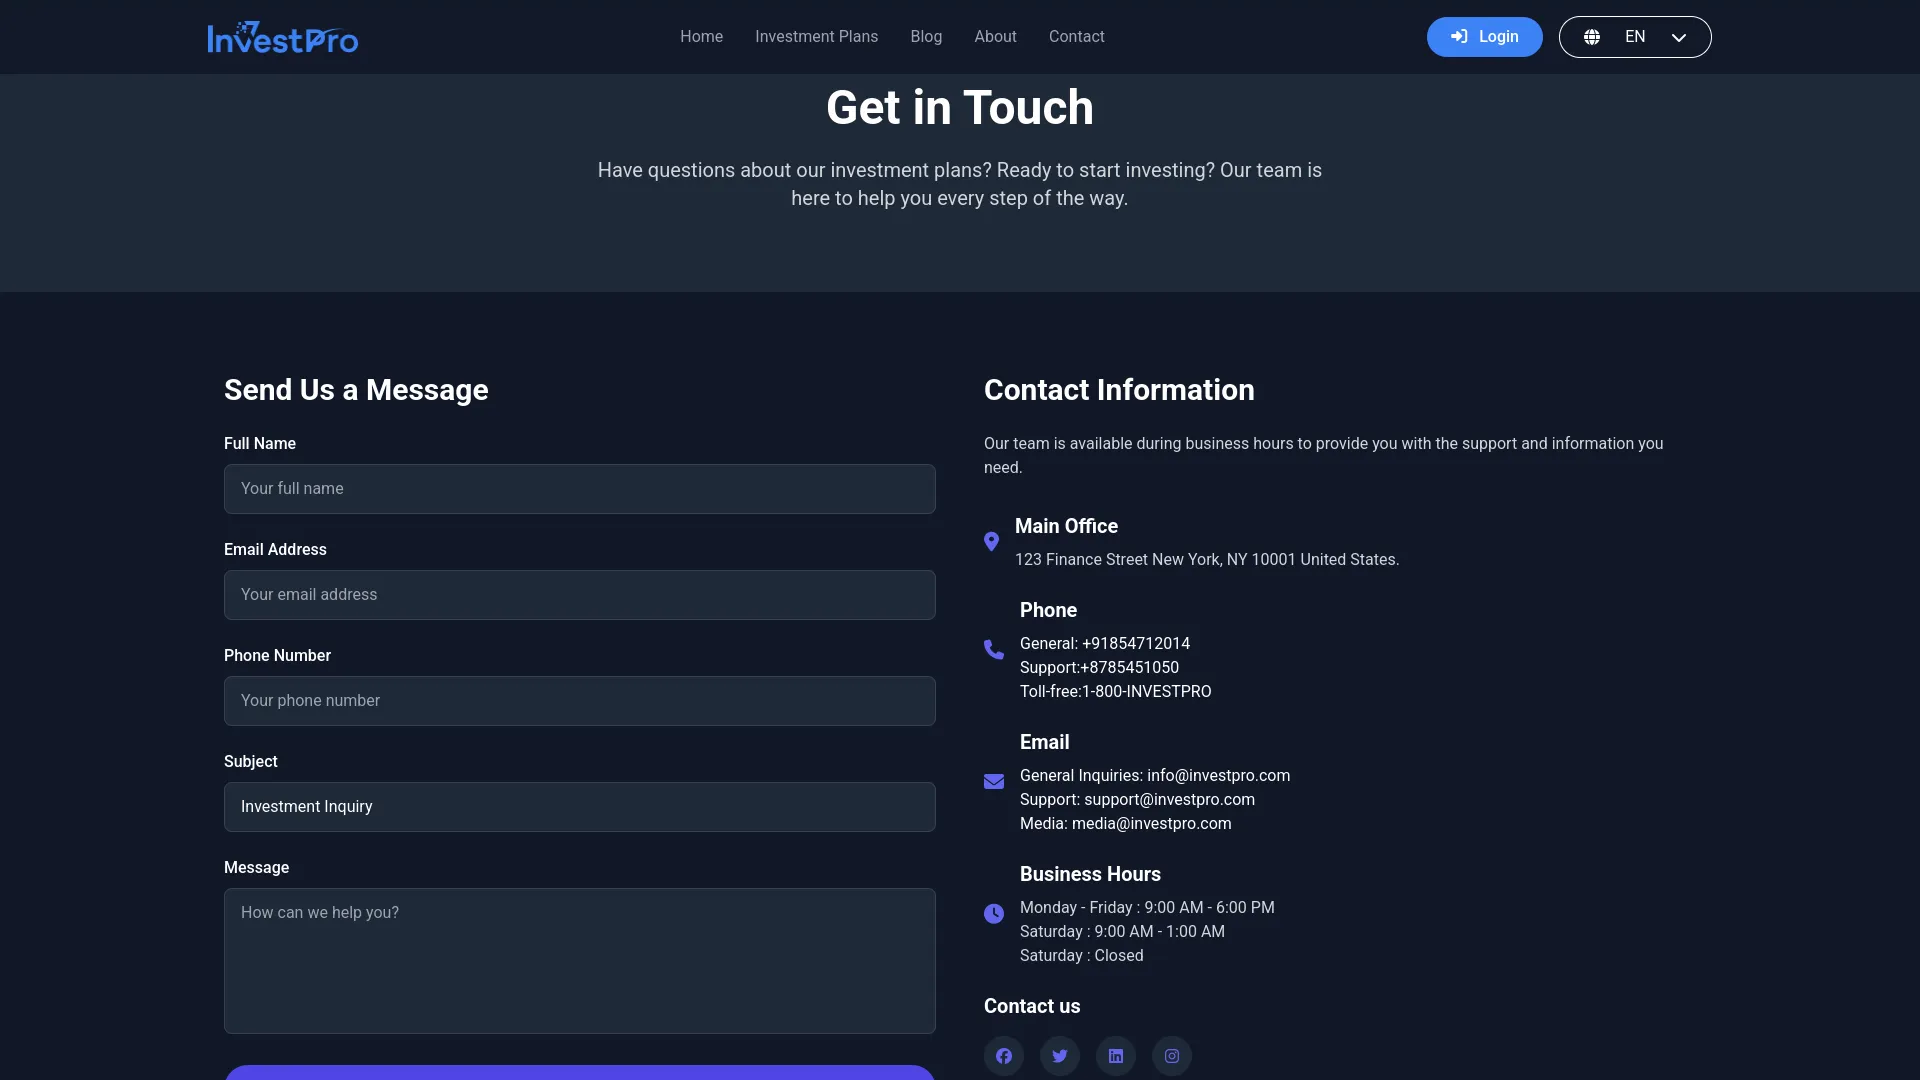
Contact Form and Details
This section provides multiple ways for visitors to contact your company, including a contact form and direct contact information.
- Go to Theme Setup → Contact section.
- Configure the contact form fields and contact information.
- Set up email addresses, phone numbers, and office hours.
- Form submissions are automatically processed and can trigger email notifications.
Location Section
This section displays your main office location with address and map information.
- Go to Theme Setup → Contact.
- Add your primary business address and location details.
- Include any additional location information or directions.
Branch Information
This section shows additional office locations or branch offices if your company has multiple locations.
- Go to Theme Setup → Contact.
- Add branch office addresses, contact numbers, and operating hours.
- Multiple branches can be listed with their specific contact details.
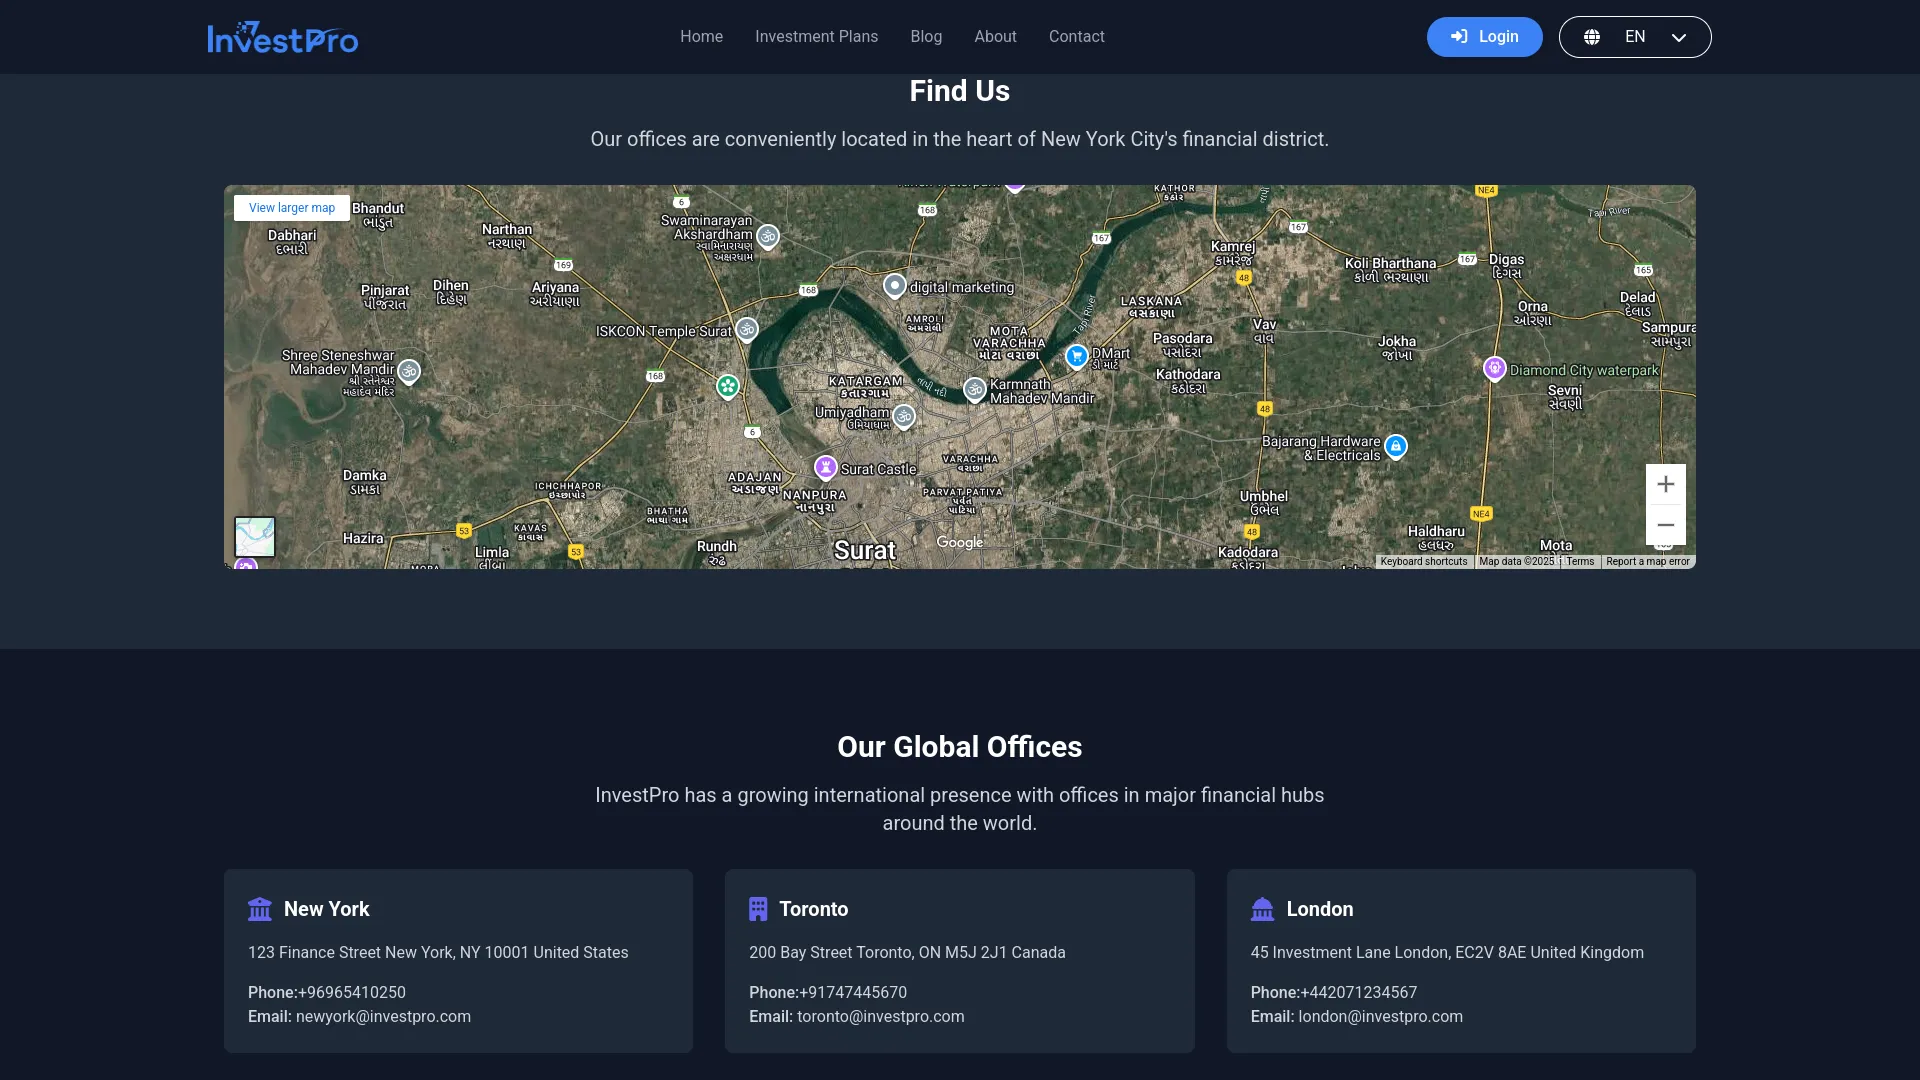
Footer:
Logo, Description, and Social Links
The footer appears on every page and includes your company logo, brief description, and social media links for consistent branding.
- Go to Theme Setup → Brand Settings to set the footer logo and company description.
- Go to Theme Setup → Social Link to add social media links.
- Footer content is automatically displayed across all pages.
Quick Links
This section provides easy navigation to important pages and sections of your website.
- Go to Theme Setup → Quick Link.
- Add links to key pages like Investment Plans, About, Contact, and other important sections.
- Quick links help visitors navigate your site more efficiently.
Legal Pages
This section includes links to important legal documents like Terms of Service, Privacy Policy, and other compliance pages.
- Go to Theme Setup → Custom Pages.
- Create and manage legal pages and policy documents.
- Legal page links are automatically added to the footer.
Contact Information
The footer displays essential contact information for easy access from any page.
- Go to Theme Setup → Contact.
- Add phone numbers, email addresses, and business hours.
- Contact information from this setting appears in the footer across all pages.
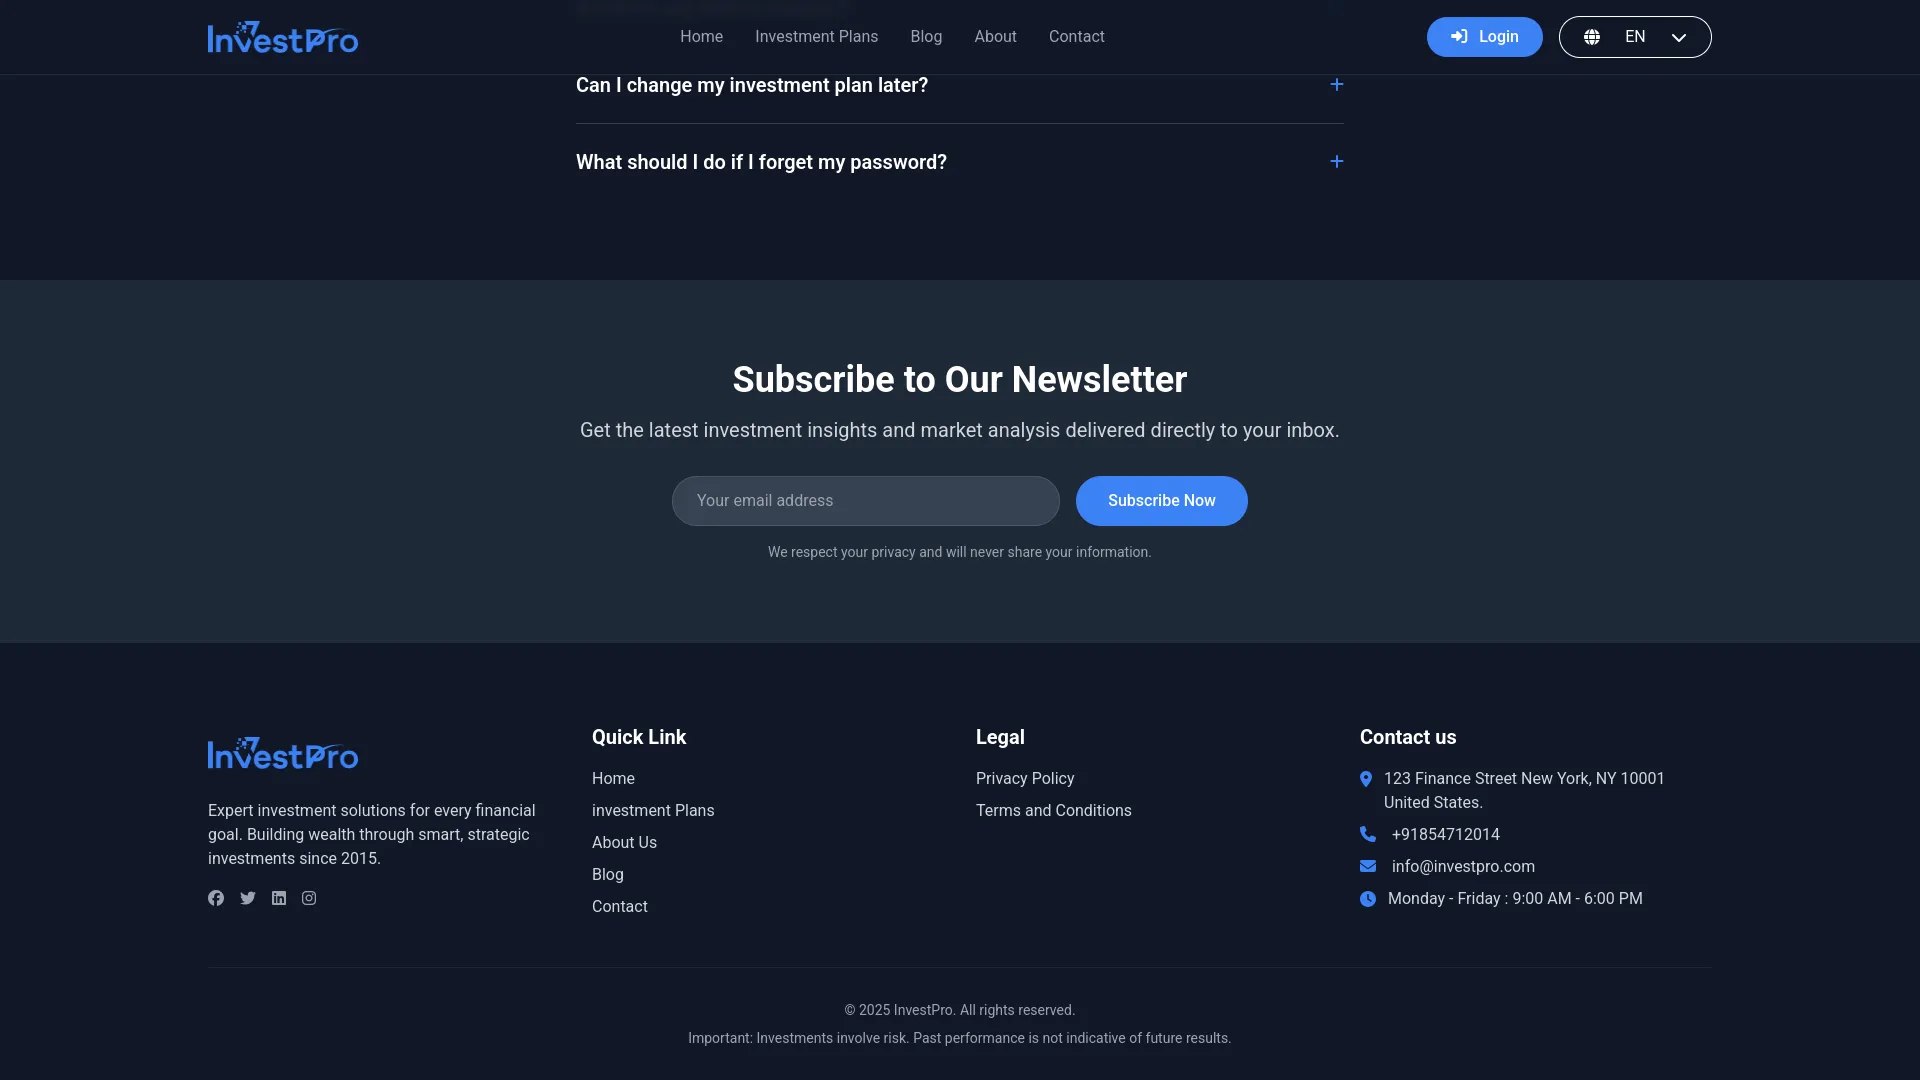
Investment System (Login and Register on Website)
Login Page
- The Login and Register system provides secure access for investors to manage their accounts and investments on your website.
- The Login Page allows registered investors to access their accounts using email and password credentials. The page includes a Register link that directs new visitors to create an investor account.
- The Forgot Password link provides password recovery options for investors who cannot remember their login credentials.
- Password Reset Process When investors click the Forgot Password link, the system automatically sends a password reset email without requiring additional configuration. The reset email contains a secure link that allows investors to create a new password. Once the password is changed, investors can log in using their new credentials immediately.
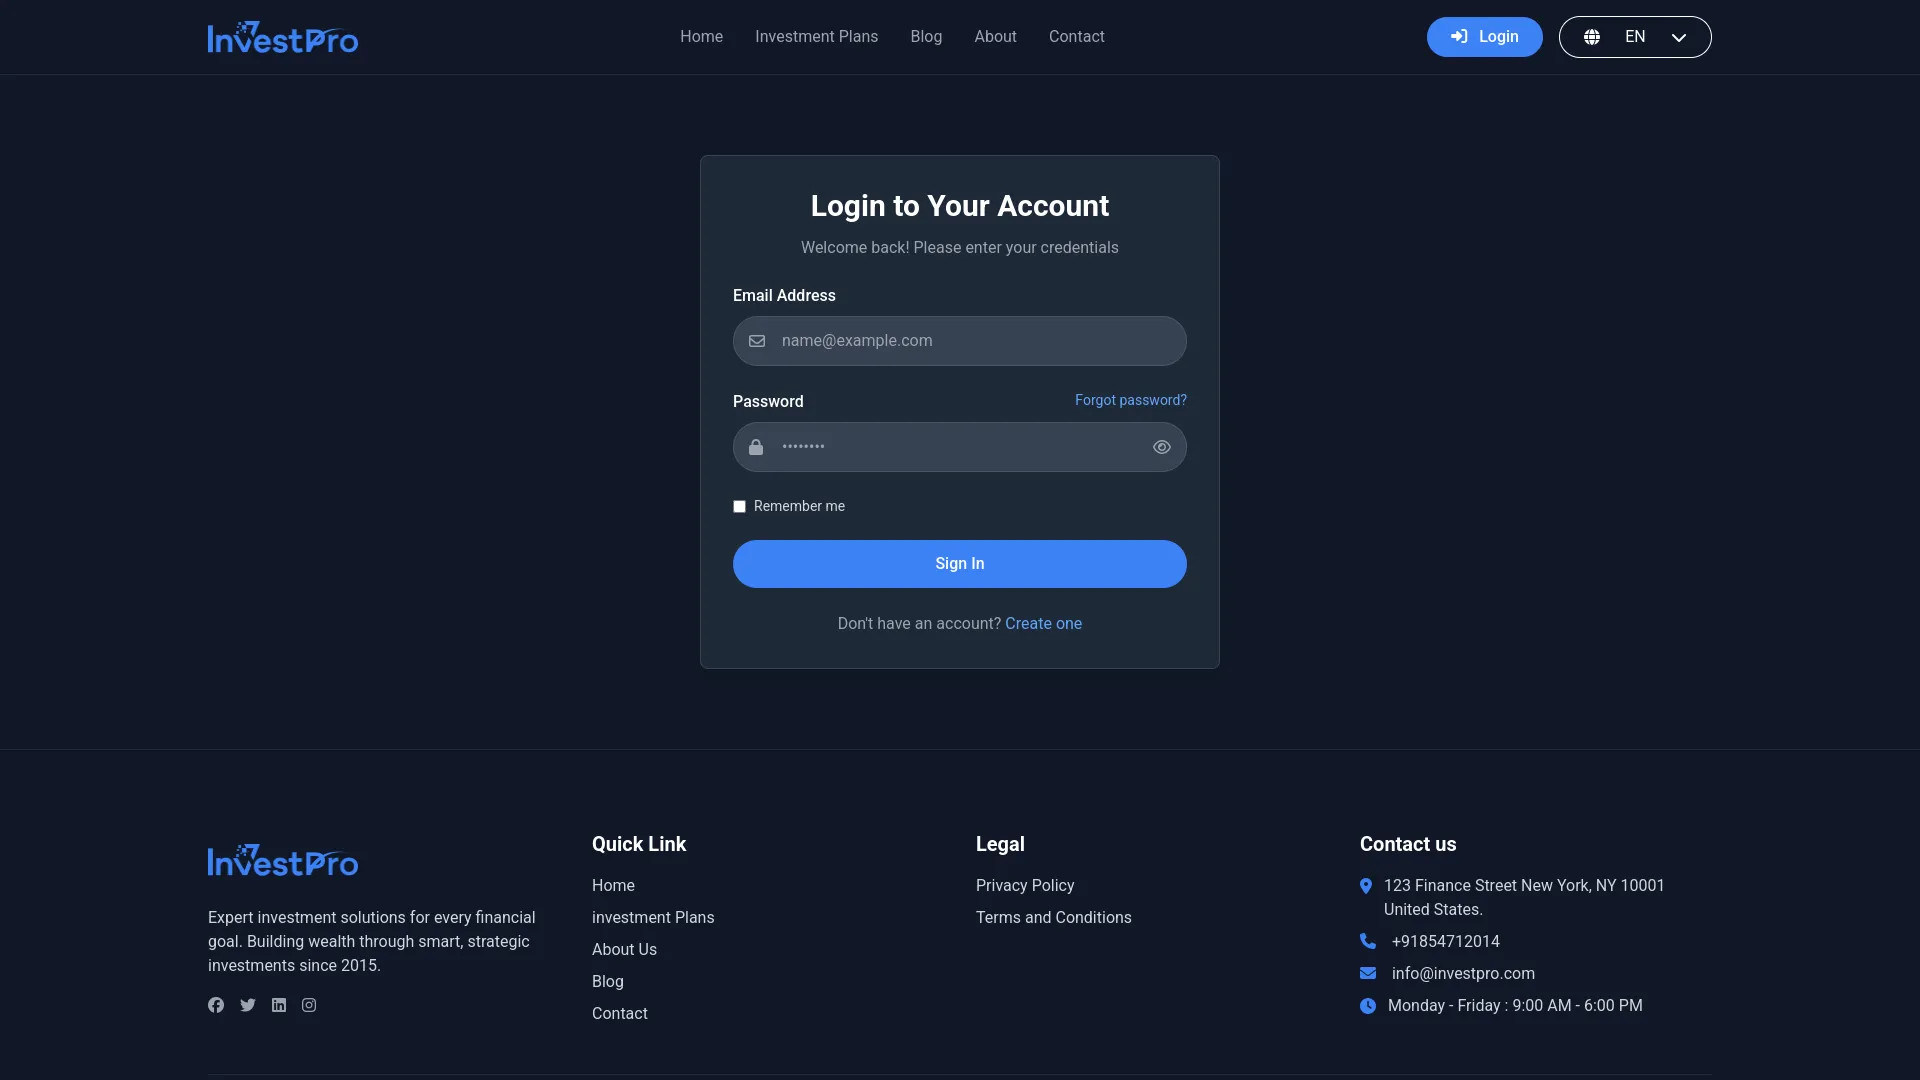
Register Page
- The Register Page allows new investors to create accounts on your platform. The registration form collects essential information, including name, email address, phone number, and secure password.
- Email Notification System: The Investment System includes automatic email notifications for new account creation. To configure email notifications for different languages, access the Super Admin panel and navigate to Settings, then Email Notification.
- Enable the “Send Mail for Account Creation” option for the Investment System. When this feature is enabled, the system automatically sends a welcome email to new investors immediately after successful account registration. This email confirms their account creation and may include login instructions or additional platform information.
- The email notification system supports multiple languages, allowing you to send welcome emails in the appropriate language based on your target audience or investor preferences.
- All registered investors automatically appear in the Investors section, where you can manage their accounts, view their investment activity, and control their login access if needed.
Investment System (Investor Dashboard)
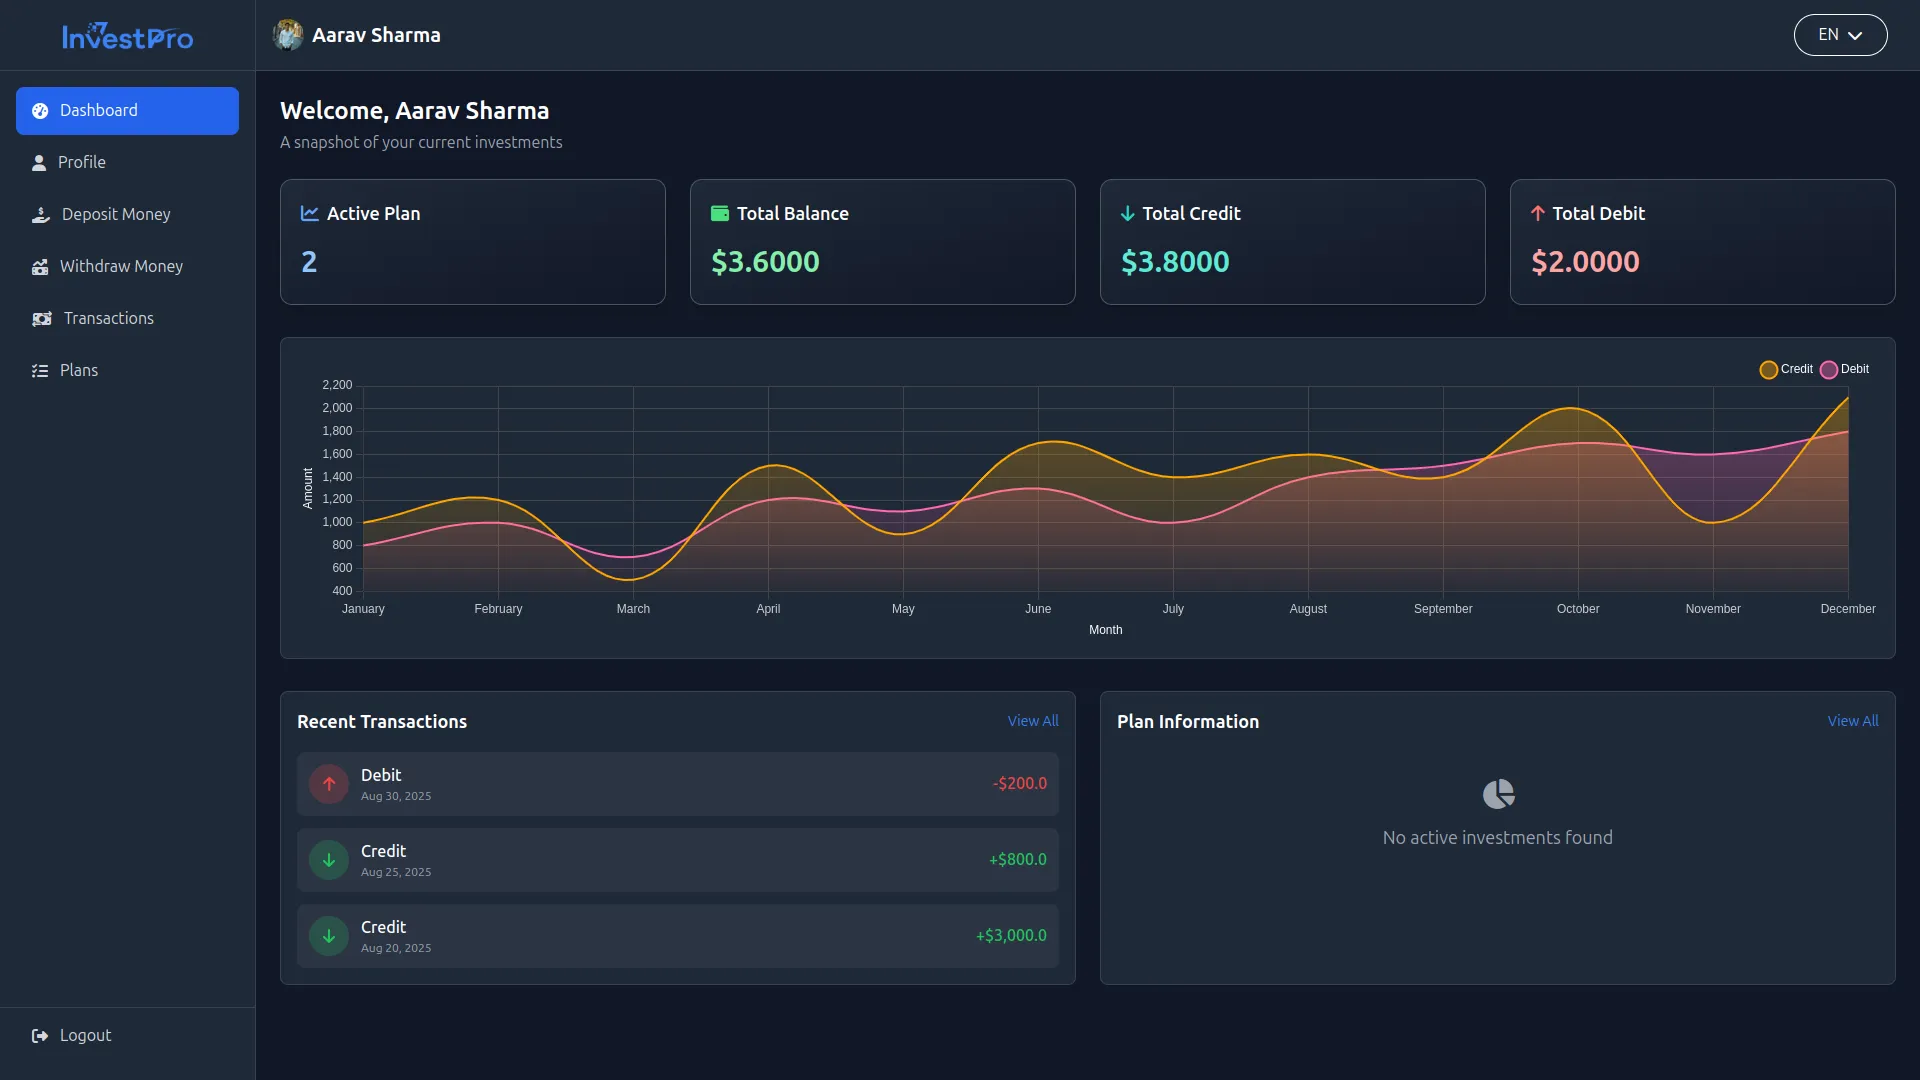
- The Investor Dashboard includes several sections to view and update your records, including registered investors managing their accounts, tracking investments, making deposits and withdrawals, and monitoring their financial activity after logging into the website.
Header Section
- The investor dashboard header displays the company Logo from Brand Settings, the investor’s Profile Image, their registered name, and a Language Selector for switching between available languages.
Dashboard Overview
- When investors log into their accounts, they see the main dashboard with key financial information displayed in four widget cards: Active Plans showing current investment count, Total Balance displaying available funds, Total Credit showing money added to their account, and Total Debit indicating money withdrawn or spent.
- The Credit and Debit Chart provides a visual representation of the investor’s financial activity over time, helping them understand their transaction patterns.
- The Recent Transactions section shows the latest financial activities, giving investors quick access to their most current account movements.
- The Active Plans Information displays details about current investments, including plan names, amounts invested, and expected returns.
Profile Management
Profile Settings
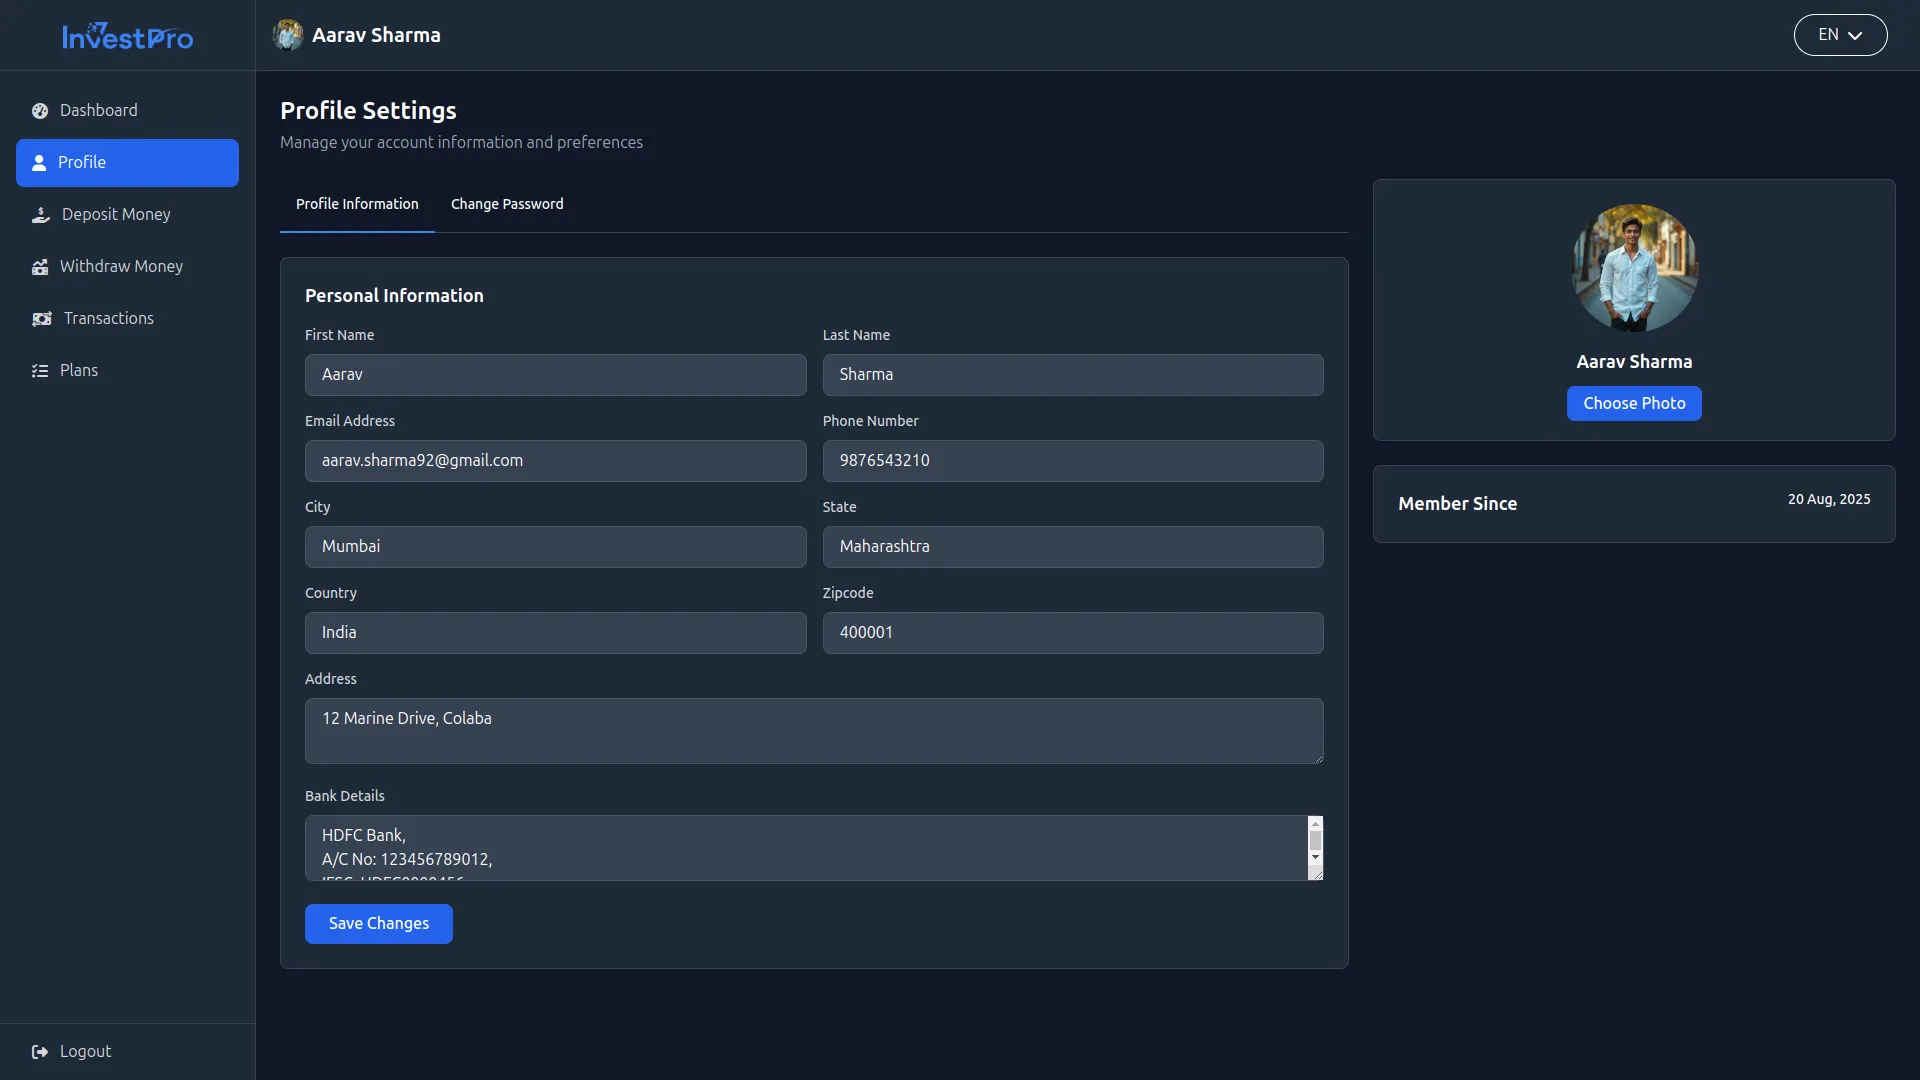
- Investors can update their personal information, including First Name, Last Name, Email Address, and Phone Number. These fields auto-display information from registration, but can be modified as needed.
- For withdrawal capabilities, investors must complete additional fields, including City, State, Country, Zipcode, Address, and Bank Details. Bank information is required before investors can submit withdrawal requests.
Change Password
- Investors can update their login credentials by entering their Current Password, then providing a New Password and confirming Password. This ensures account security and allows investors to maintain strong, updated passwords.
Profile Section
- Investors can upload and update their Profile Image for account personalization. The Member Since field automatically displays their account creation date and cannot be modified.
Deposit Money
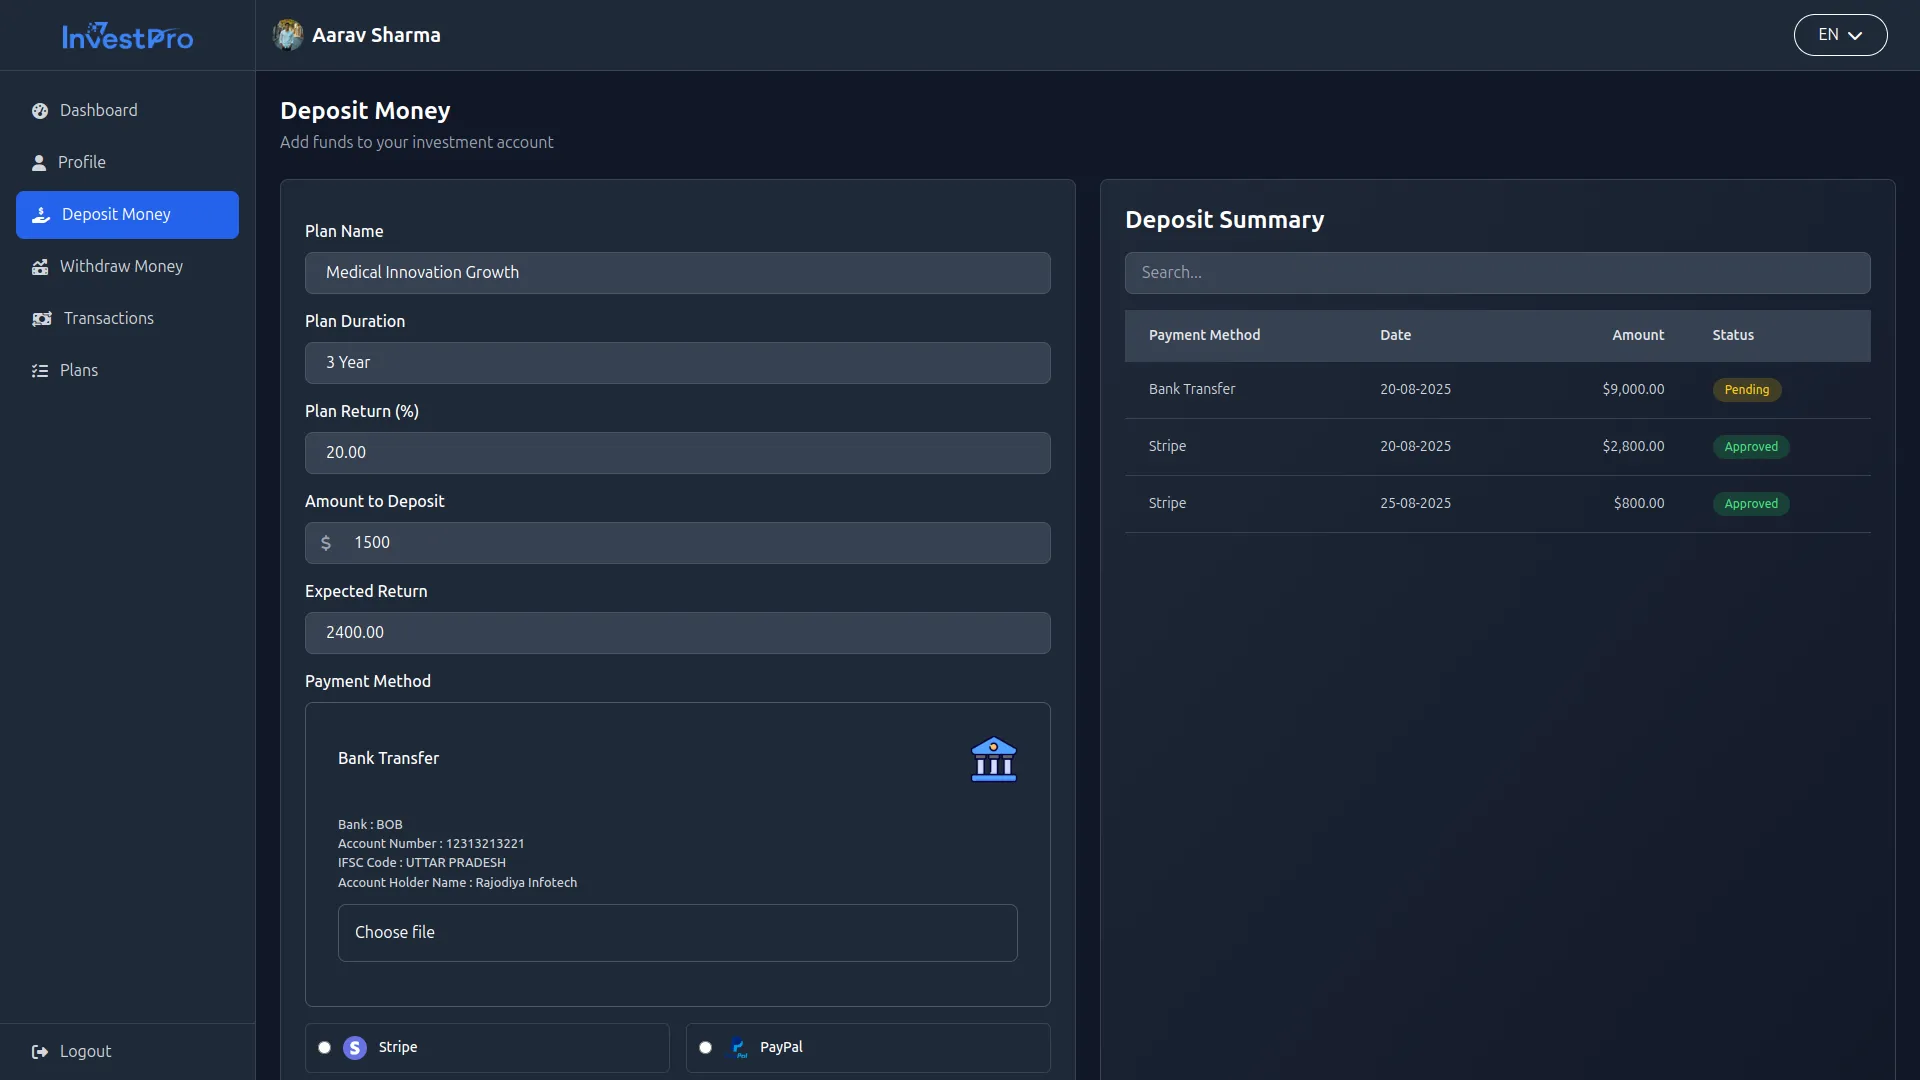
- The deposit functionality is only accessible after investors select an investment plan. If no plan is selected, the system displays the message “Please select a plan before making a deposit.”
Deposit Details
- When making a deposit, investors see the selected Plan Name and Plan Duration. If the plan offers a duration range, investors can select their preferred timeframe. For fixed-duration plans, this information displays as read-only.
- The system shows Plan Return information and allows investors to enter their Deposit Amount. The Expected Return is automatically calculated based on the plan details and deposit amount.
- Investors choose their Payment Method from available options, including Bank Transfer, Stripe, or PayPal. Each payment method may have different processing requirements and timeframes.
Deposit Summary
- After completing deposits, investors can view their deposit history showing Payment Method used, transaction Date, deposited Amount, and current Status (Approved or Pending).
Withdraw Money
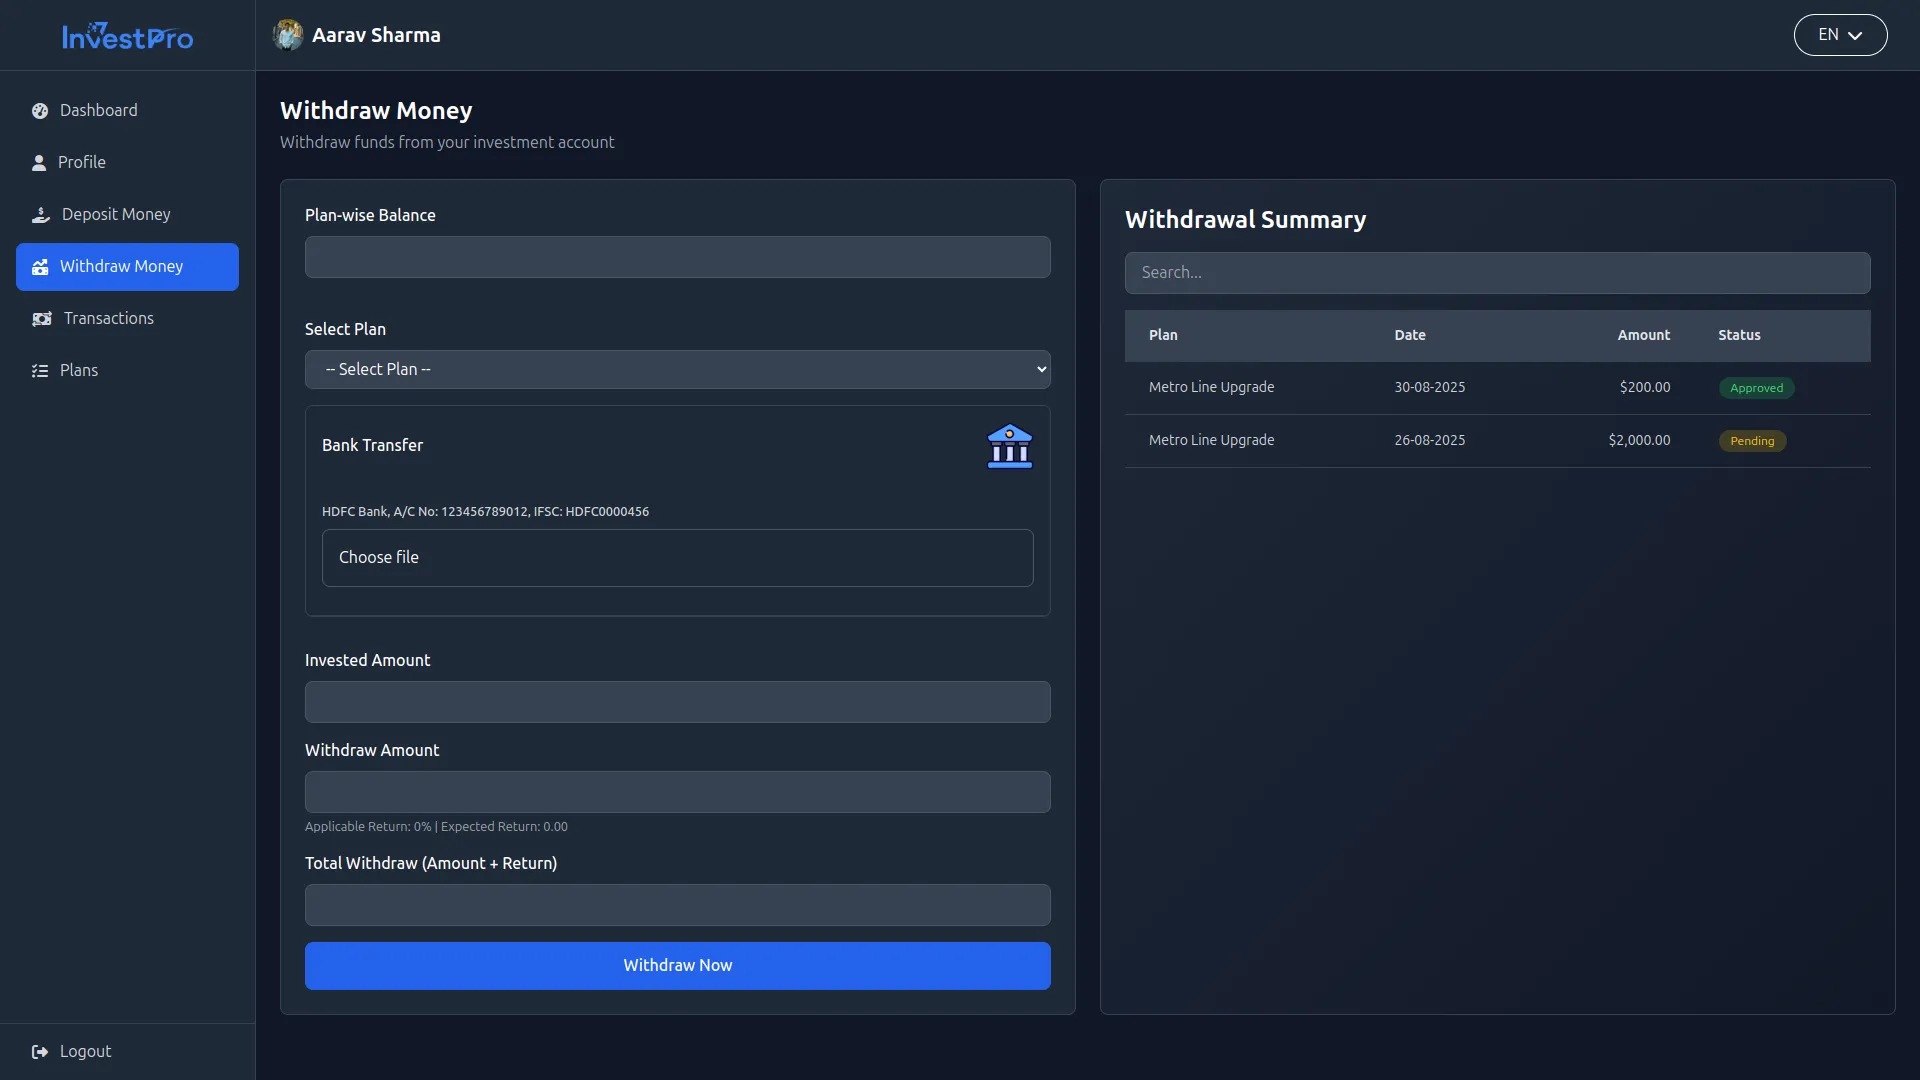
- The withdrawal section allows investors to access their returns and principal investments when eligible.
Withdraw Details
- The system displays Plan-wise Balance for each investment, helping investors understand available funds per plan. Bank Transfer Payment Method appears only if investors have added complete bank details in their Profile settings.
- When investors select a Plan for withdrawal, the Invested Amount auto-displays. They can then enter their desired Withdraw Amount up to the Total Withdrawable Amount, which includes both the original Invested Amount plus accumulated returns.
- When an investor submits a withdrawal request, the requested amount will only be deducted from their balance once it is approved.
Withdraw Summary
- Investors can track their withdrawal requests, showing the selected Plan, request Date, withdrawal Amount, and current Status (Approved or Pending). This provides visibility into pending and completed withdrawals.
Deposit and Withdrawal Calculations
- In our system, the interest rate calculation works like this
1. Daily Interest Calculation
The base interest is always calculated per day:

Where:
- Duration Unit = 30 (if plan uses months)
- Duration Unit = 365 (if plan uses years)
2. Deposit (Maturity) Example
Investor deposits $1,000 for 1 year at 12% annual return.

Investor receives $1,200 interest after 1 year, plus the original $1,000 principal.
3. Withdrawal Example (Early or Extended Duration)
If the investor withdraws before maturity (or keeps money for longer), interest is calculated based on actual completed days:

Investor keeps the same $1,000 for 1.5 years (547 days) at 12% annual return.

Investor earns $1,792.16 interest for 1.5 years, plus the $1,000 principal.
- Deposit: Calculates interest for the fixed plan duration.
- Withdrawal: Calculates interest only for the actual number of completed days.
Transactions
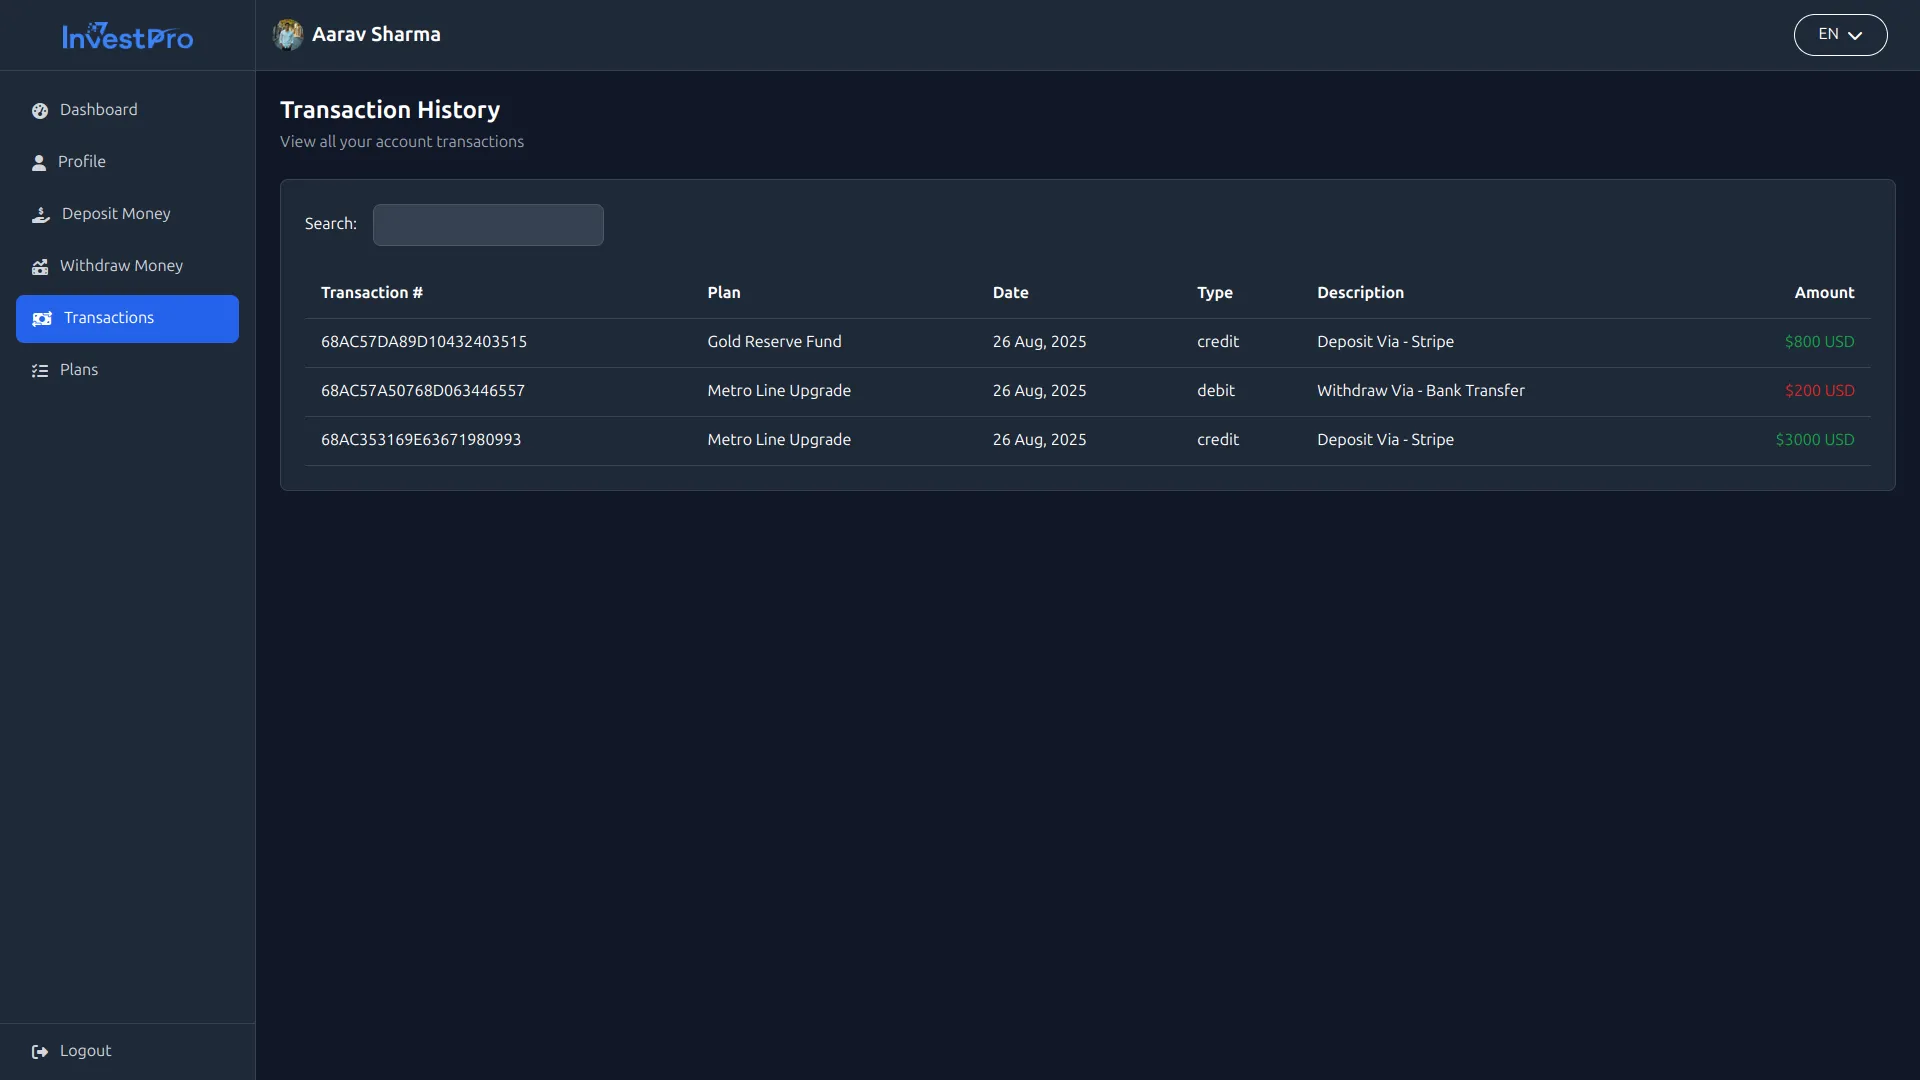
- The complete transaction history displays all account activity with Transaction ID for reference, associated Plan name, transaction Date, and Type (Credit or Debit).
- Below are the details, Description (such as Deposit via Stripe, Deposit via PayPal, Deposit via Bank Transfer, or Withdraw via Bank Transfer), and transaction Amount.
Plans
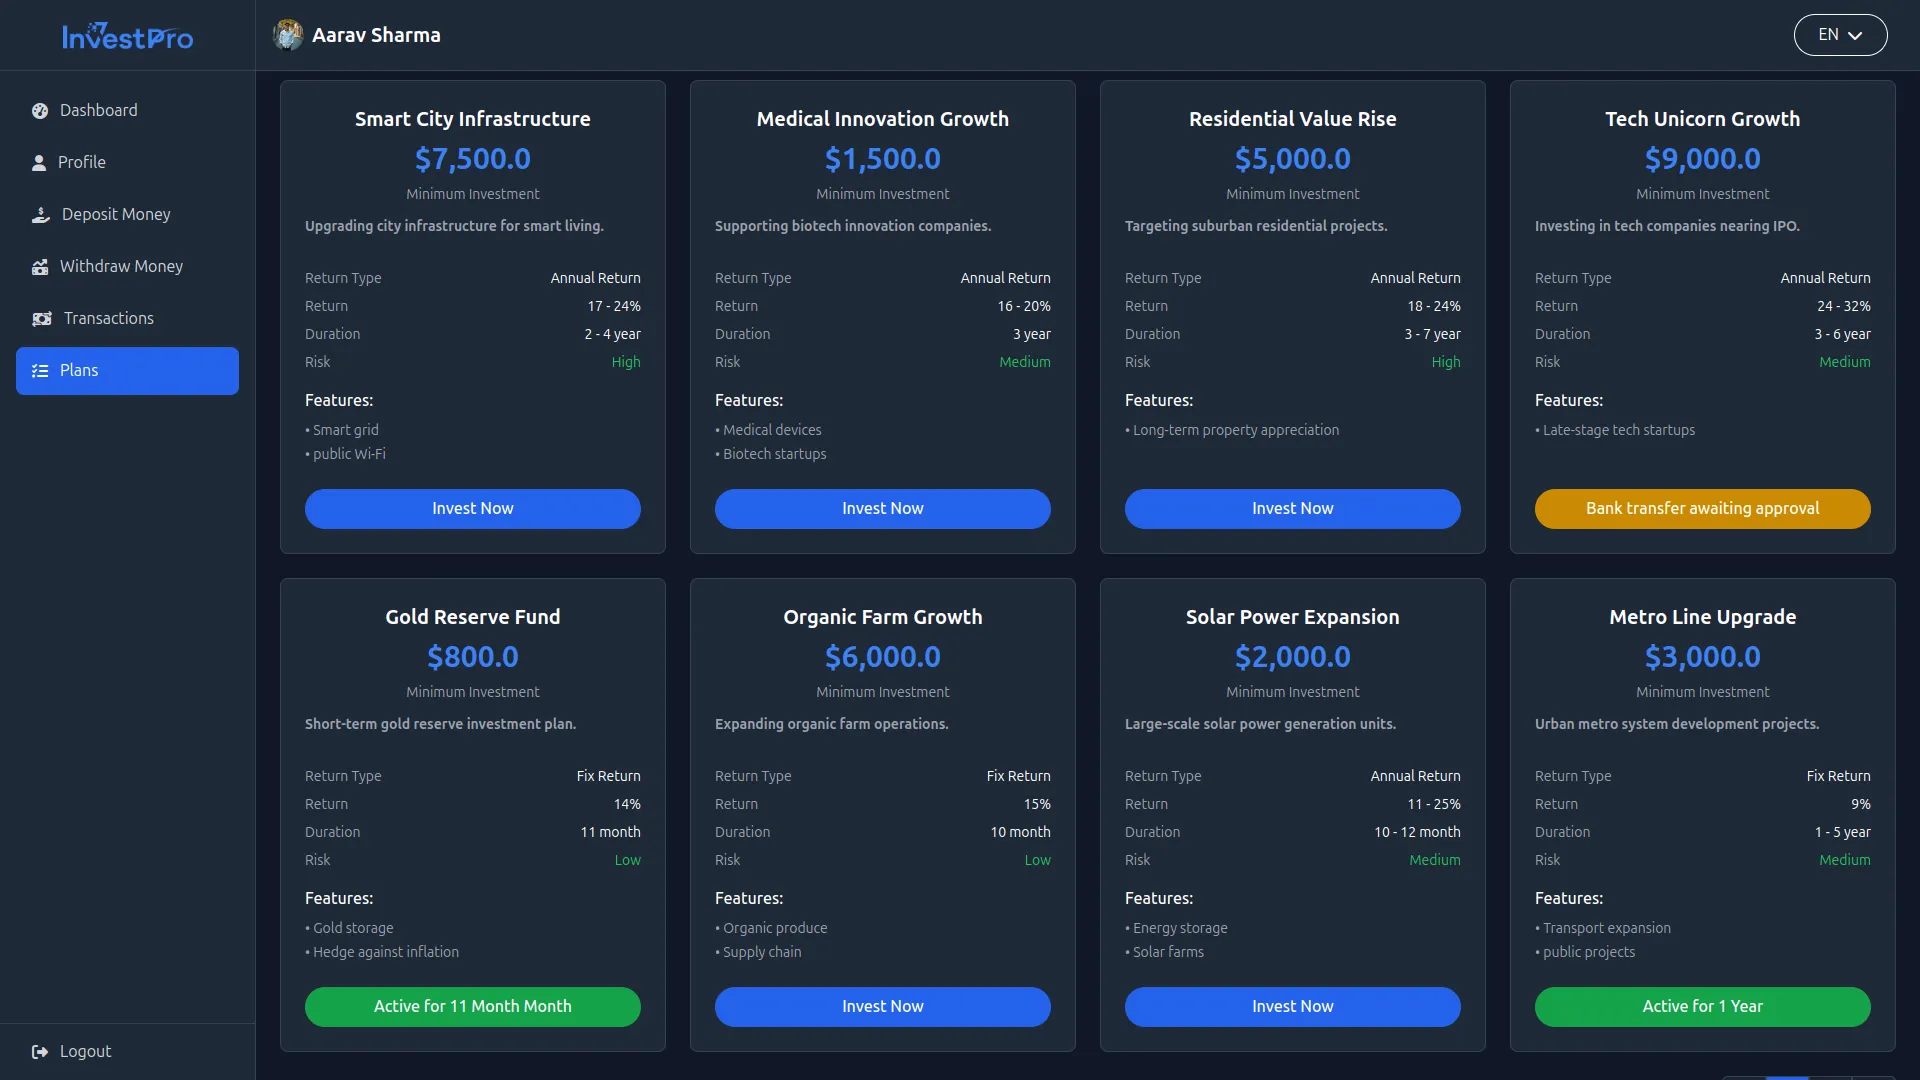
- The Plans section displays all active investment plans available from the company. Investors can browse available opportunities and set Plan activation Status for plans they’re interested in or currently invested in.
Logout
- Investors can securely log out of their dashboard using the Logout button, which ends their session and returns them to the public website login page.
- The Investor Dashboard provides a complete self-service experience, allowing investors to manage their accounts, make financial transactions, and track their investment performance without requiring administrator assistance for routine activities.
Categories
Related articles
- Product Enquiry Integration in eCommerceGo SaaS
- User Manual – BookingGo SaaS
- User Manual – Task
- Vehicle Wash Detailed Documentation
- Click Send Integration in Dash SaaS
- Zulip Chat Add-On Detailed Documentation
- Art Showcase Integration in Dash SaaS
- Additional Services Integration in BookingGo SaaS
- Google Calendar Integration in BookingGo SaaS
- Marketing Plan Integration in Dash SaaS
- Sign-In with Facebook Add-On Integration in Dash SaaS
- Document Template Integration in Dash SaaS
Reach Out to Us
Have questions or need assistance? We're here to help! Reach out to our team for support, inquiries, or feedback. Your needs are important to us, and we’re ready to assist you!


Need more help?
If you’re still uncertain or need professional guidance, don’t hesitate to contact us. You can contact us via email or submit a ticket with a description of your issue. Our team of experts is always available to help you with any questions. Rest assured that we’ll respond to your inquiry promptly.
Love what you see?
Do you like the quality of our products, themes, and applications, or perhaps the design of our website caught your eye? You can have similarly outstanding designs for your website or apps. Contact us, and we’ll bring your ideas to life.
