Dance Academy Integration in Dash SaaS
The Dance Academy Add-On is a complete management system designed to help dance studios and academies manage their daily operations efficiently.
Introduction
The Dance Academy Add-On is a complete management system designed to help dance studios and academies manage their daily operations efficiently. This Add-On allows you to handle everything from student enrolment and class scheduling to attendance tracking and fee management. The software includes modules for managing dance styles, class levels, classes, schedules, learner records, attendance, events, and payments. It provides an easy-to-use dashboard with important information and charts to help you monitor your academy’s performance and make informed decisions about your dance programmes.
How to Install the Add-On?
To Set Up the Dance Academy Add-On, you can follow this link: Setup Add-On.
How to use the Dance Academy Add-On?
Dashboard
- First, purchase the Add-On. After that, go to your sidebar and use the search option to find it. Once it appears, you can open and start using the Dance Academy Management Add-On from there.
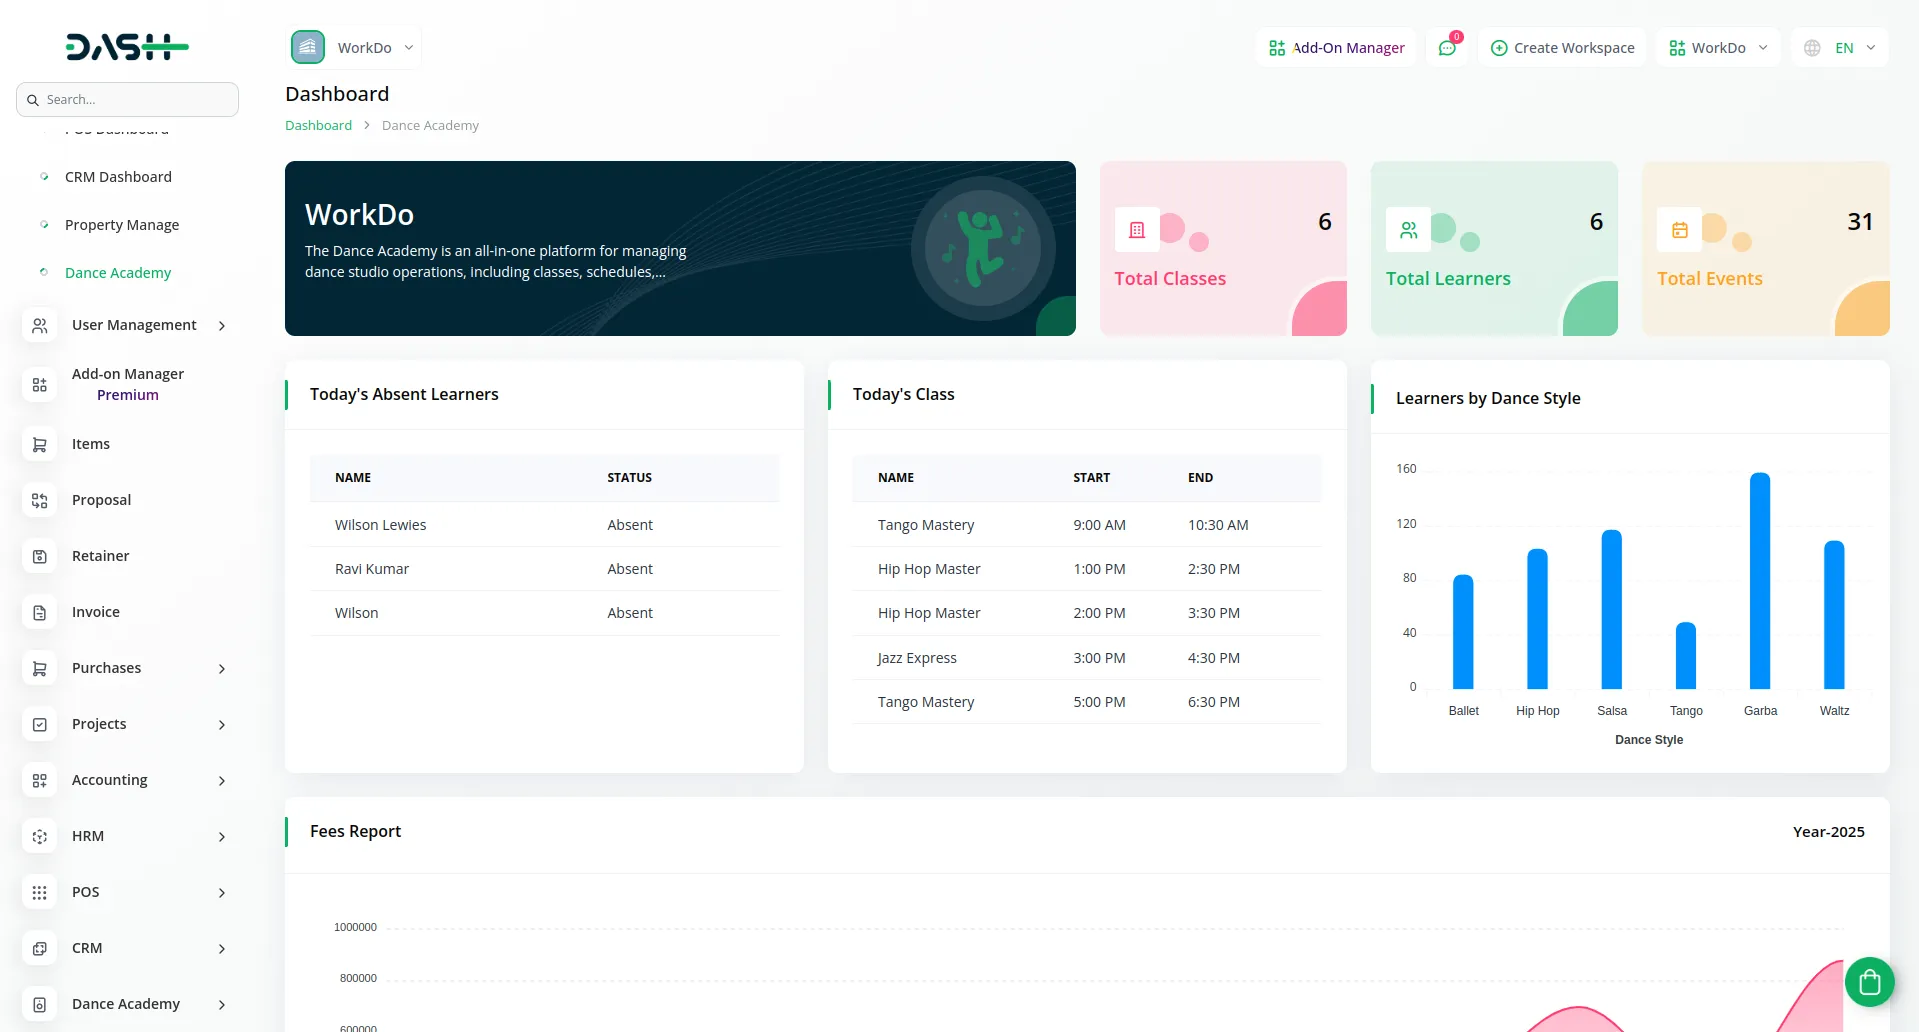
- The Dashboard is your main control centre that shows key information about your dance academy at a glance. When you open the software, you will see several cards and charts that present your academy’s current status.
- The top section displays three cards: Total Classes, Total Learners, and Total Events. These show the number of ongoing classes, enrolled students, and planned events.
- Below the cards, there is the Today’s Absent Learners List, showing students marked absent for the day. The Today’s Classes List shows all classes scheduled for today.
- The dashboard also includes two charts. The Learners by Dance Style Chart is a bar chart representing the number of students per dance style. The Fees Reports Chart is an area chart that visualises payments received over time.
System Setup
Dance Styles
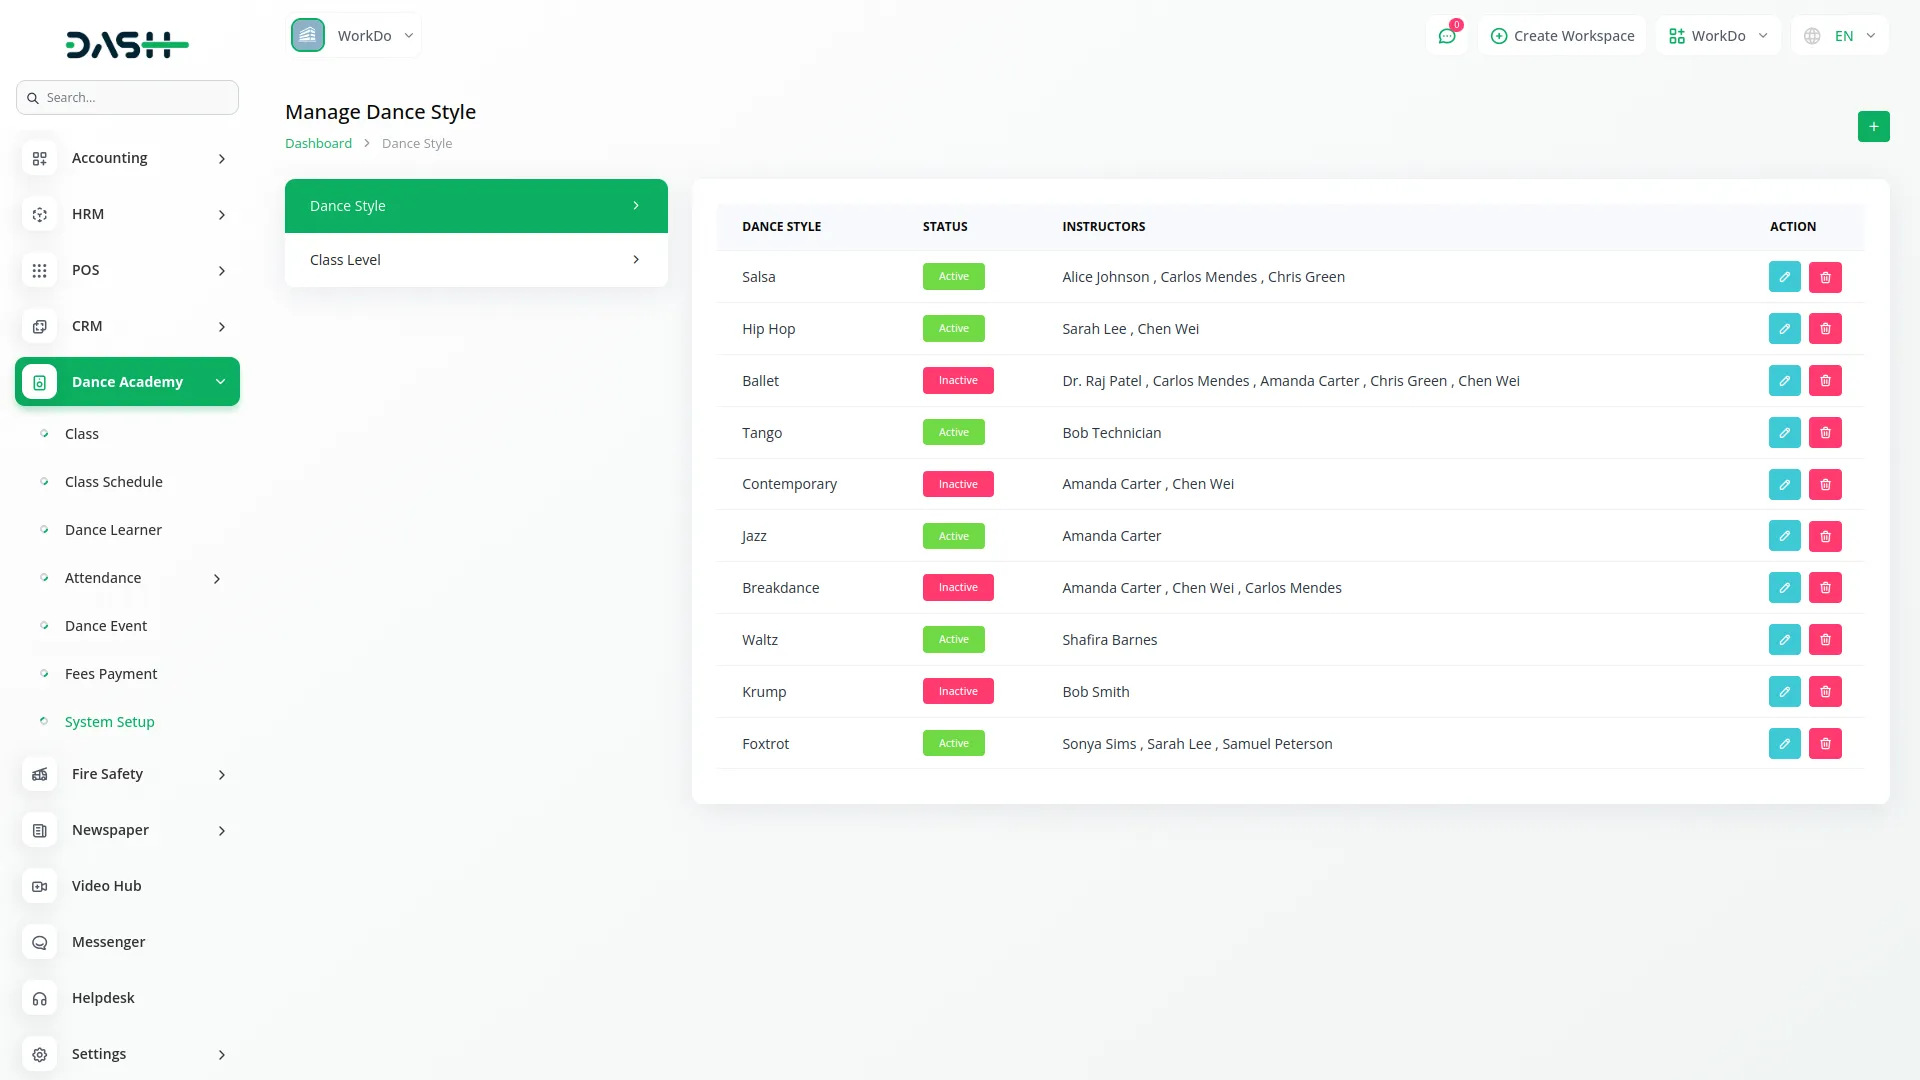
- To create a new Dance Style, click the “Create” button at the top of the dance styles page.
- You need to enter the Dance Style Name and select the Status from the dropdown menu, choosing either Active or Inactive. Then select the Instructors from the multi-select dropdown, which shows all available users in the system.
- On this page, you’ll see the list display all dance styles in a table with columns for Dance Style Name, Status, and Instructors. You can easily see which dance styles are active and which instructors are assigned to each style. With the help of an Actions column, you can click “Edit” to modify dance style details or “Delete” to remove a dance style from the system.
Class Levels
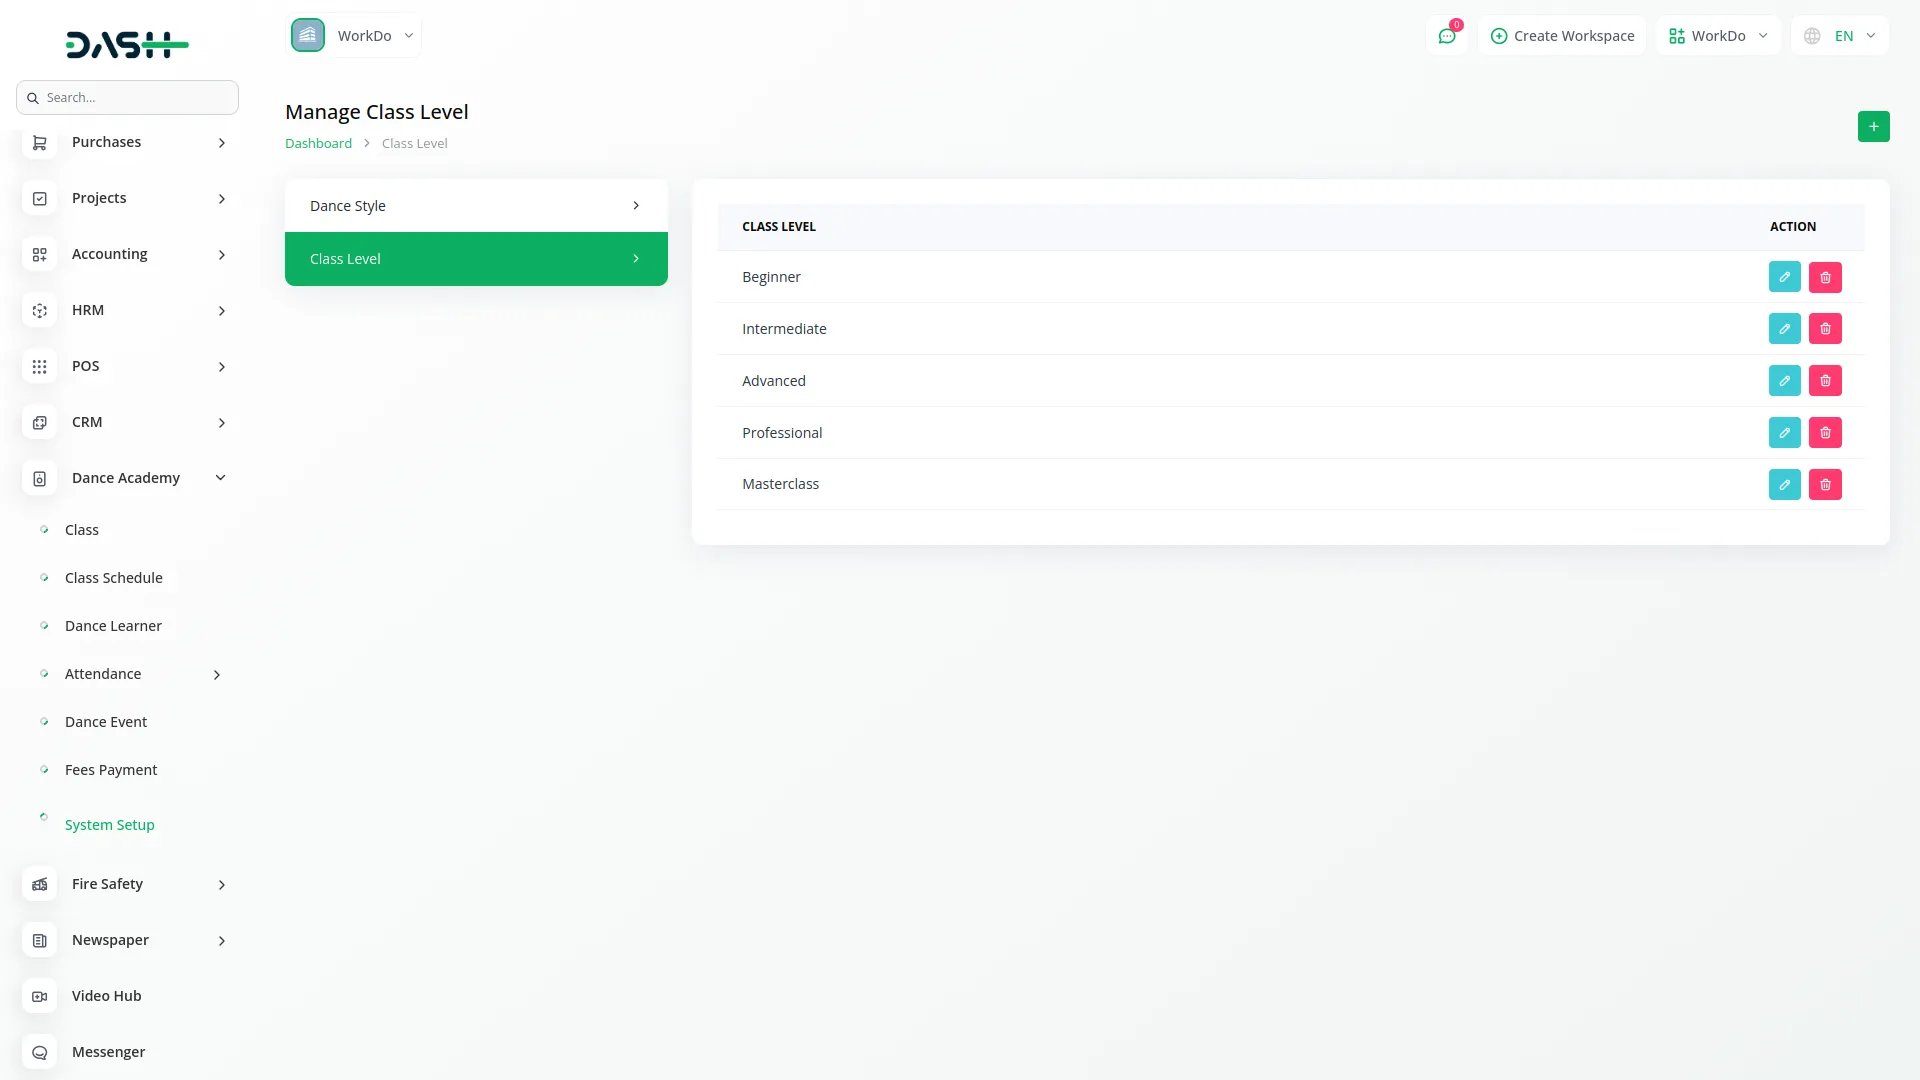
- To add a new Class Level, click the “Create” button on the class levels page. Simply enter the Level Name in the form field provided.
- The list page displays all class levels in a simple table with the Level Name column. In the Actions column, you can click “Edit” to modify class-level details or “Delete” to remove a class level from the system.
Manage Class
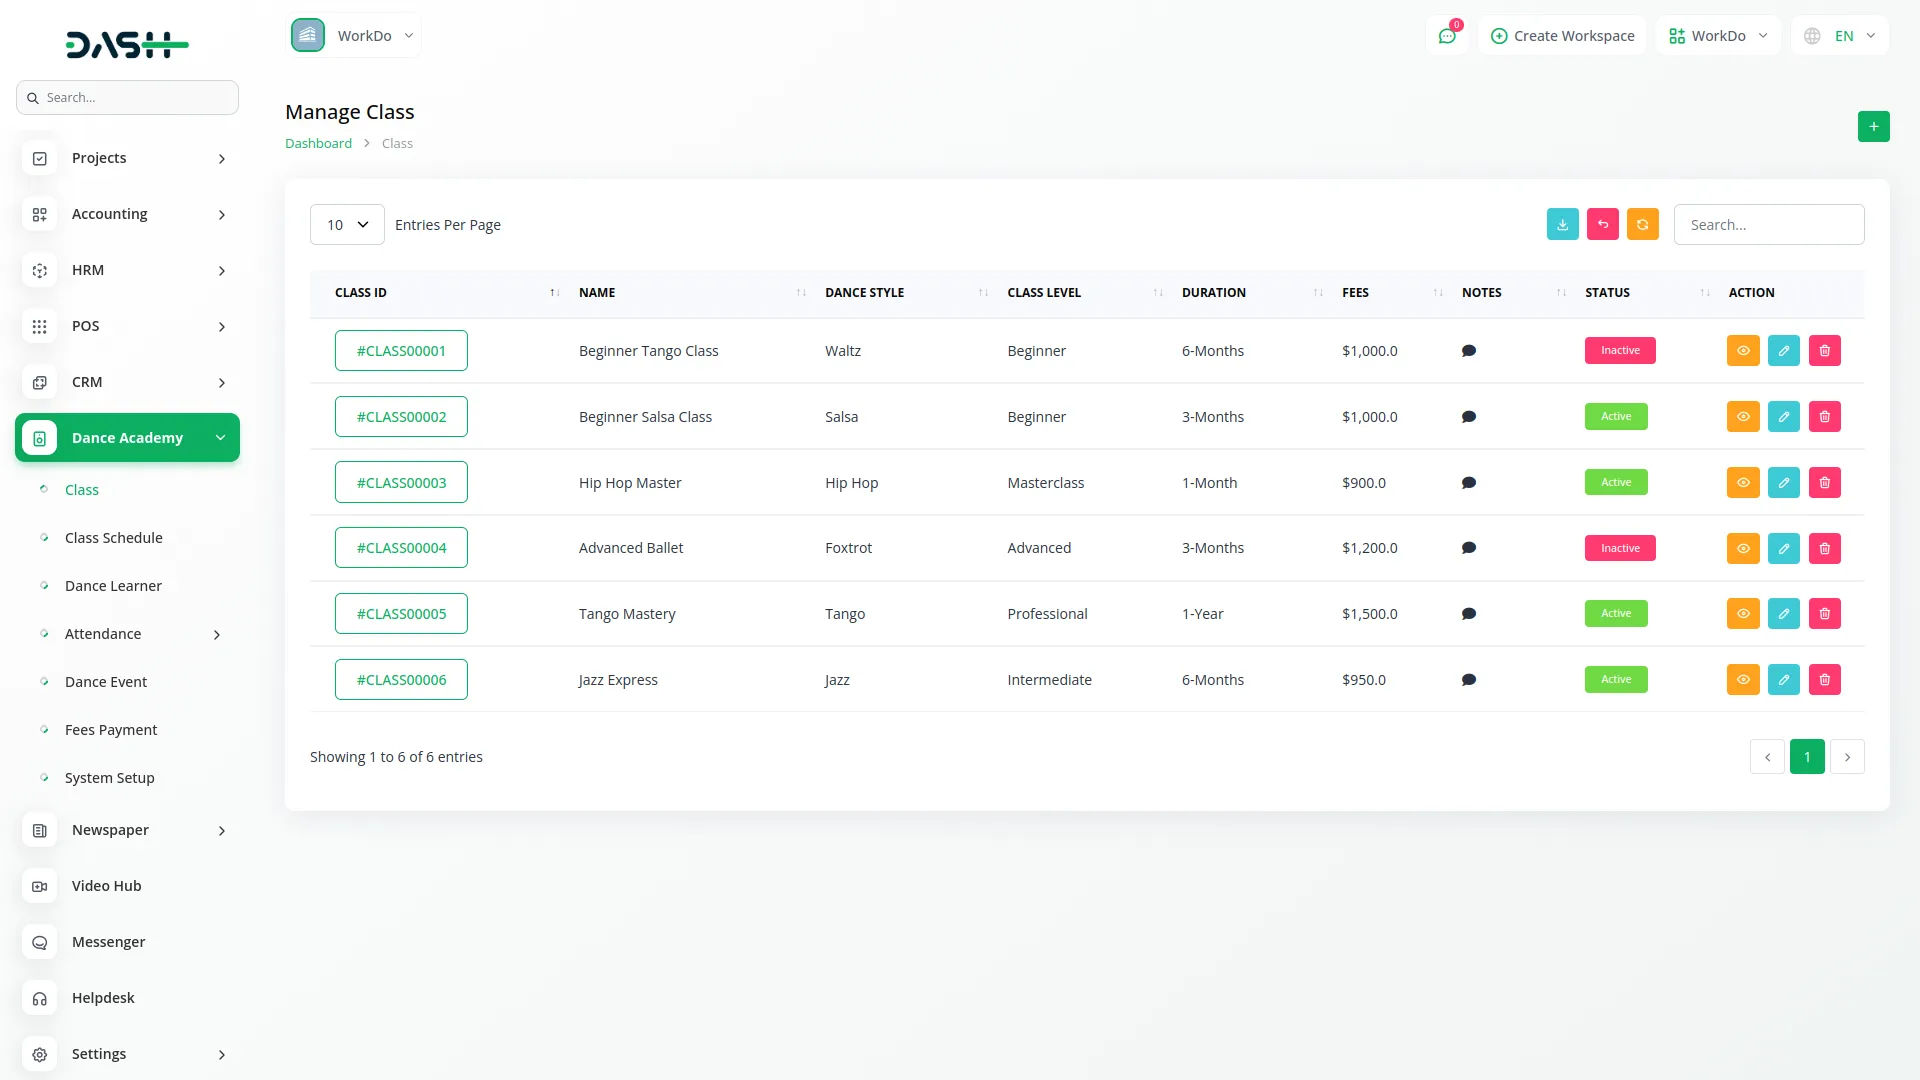
- On this page, you can add a new class by clicking the given “Create” button at the top of a manage class page. Start by entering the Class Name and selecting the Dance Style from the dropdown menu (comes from the Dance Styles section).
- Next, choose the Class Level from the dropdown (comes from the Class Levels section), and select an Instructor from the dropdown that shows available users.
- Along with these details, enter the Location where the class will be held and optionally specify the Max Capacity if you want to limit the number of students. Set the Fee amount for the class and choose the Start Date using the date picker.
- Select the Duration from the dropdown menu, choosing from 1-Month, 3-Month, 6-Month, or 12-Month options. You can add Notes if needed and set the Status to either Active or Inactive.
- The list page shows all classes in a table with columns for Class ID (which is automatically generated), Name, Dance Style, Class Level, Duration, Fees, and Status. Use the search bar and Export, reset, or reload buttons to manage the list page. In the Actions column, you can click “Edit” to modify class details, “Delete” to remove a class, or “Show” to view complete class information.
Class Schedule
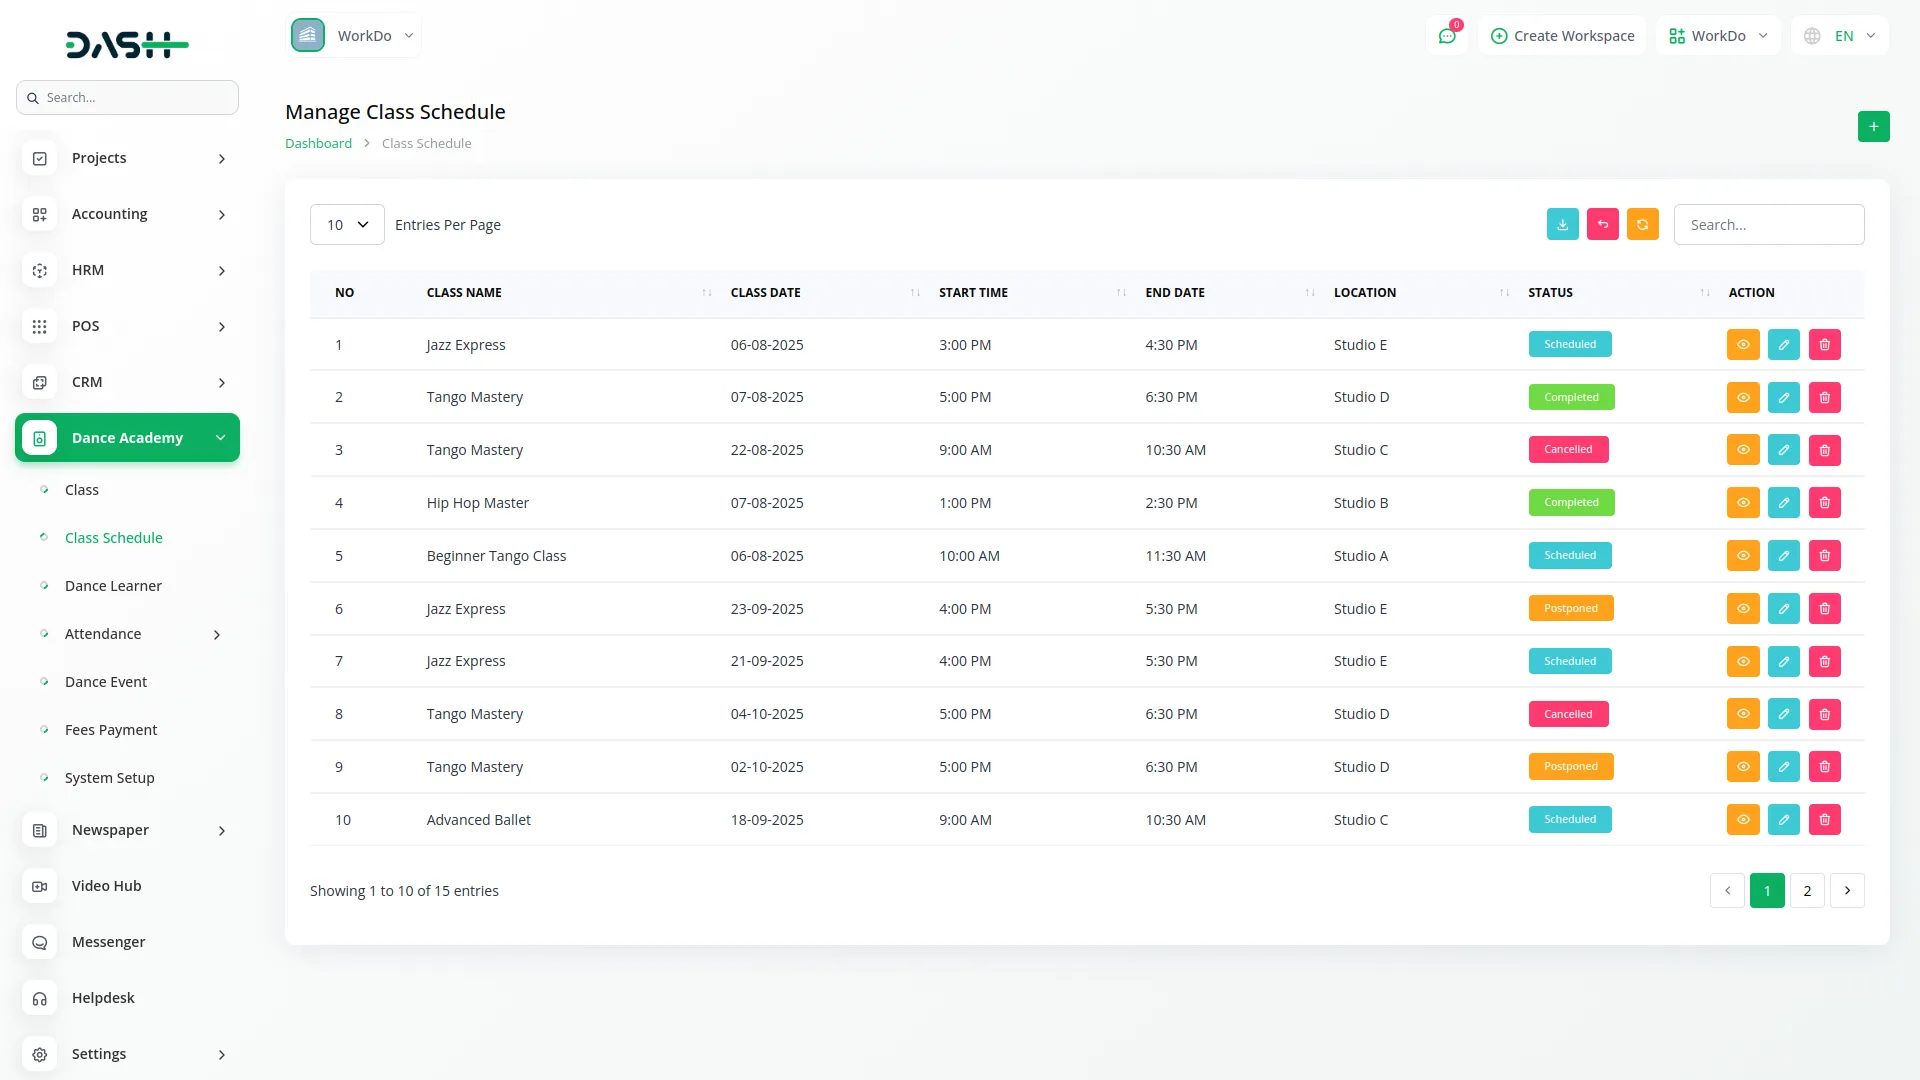
- After creating a class, navigate to the Schedule page and click the “Create” button to add a new schedule. Select the Class from the dropdown menu, which shows all available classes from the Classes section. Choose the Date when the class will take place and set the Start Time and End Time for the session.
- You can optionally enter a Location if it differs from the class’s default location. Select the Status from the dropdown, choosing from the Scheduled, Cancelled, or Completed options. And at last add any Notes.
- On the schedule list page, you’ll get to see all scheduled classes in a table with columns for Class Name, Date, Start Time, End Time, Location, and Status. You can use the search, export, reset, and reload buttons to manage this page. Additionally, you can use the edit button to modify details or the delete button to remove them whenever you want.
Learner Management
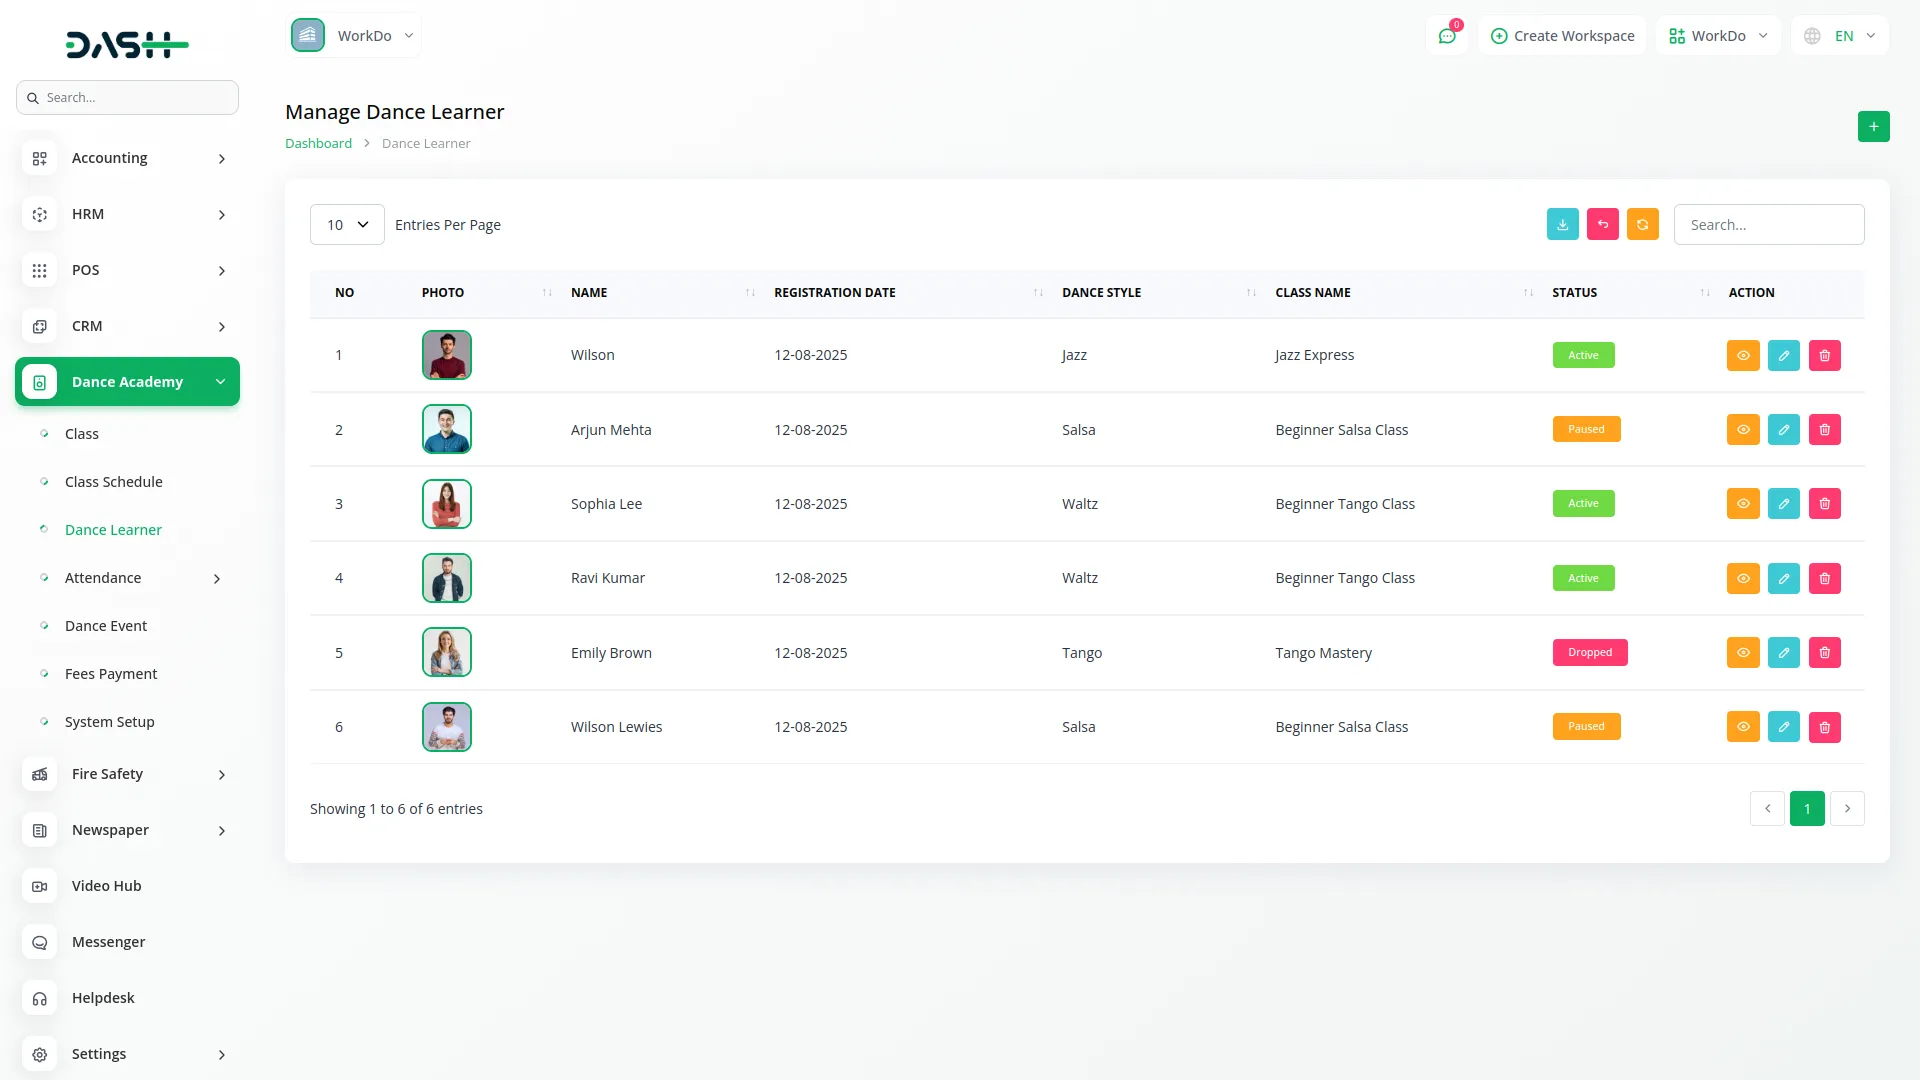
- To create a new Learner profile, click the “Create” button at the top of the learner page. Enter the learner’s Name and Registration Date, then provide the Email (optional) and Contact Phone number. You can upload a Photo if available and enter the Date of Birth.
- Upload the ID Proof document and select the Gender using the radio buttons for Male, Female, or Other. Choose the Dance Style from the dropdown menu (comes from the Dance Styles section) and select the specific Class from the dropdown that generated from the Class section.
- Add any Medical Notes if the learner has health conditions that instructors should know about. Set the Status from the dropdown, choosing Active, Paused, or Dropped. Finally, enter the complete Address information.
- The list page shows all learners in a table with columns for Photo, Name, Registration Date, Dance Style, Class Name, and Status. Use the Search bar, export, reset, and reload buttons to manage learner information. The Actions column allows you to easily edit learner details or delete them whenever necessary.
Manage Attendance
Mark Attendance
- To create an individual attendance entry, click the “Create” button on the Mark Attendance page. Select the Learner from the dropdown menu, choose the Date, and enter the Clock In and Clock Out times.
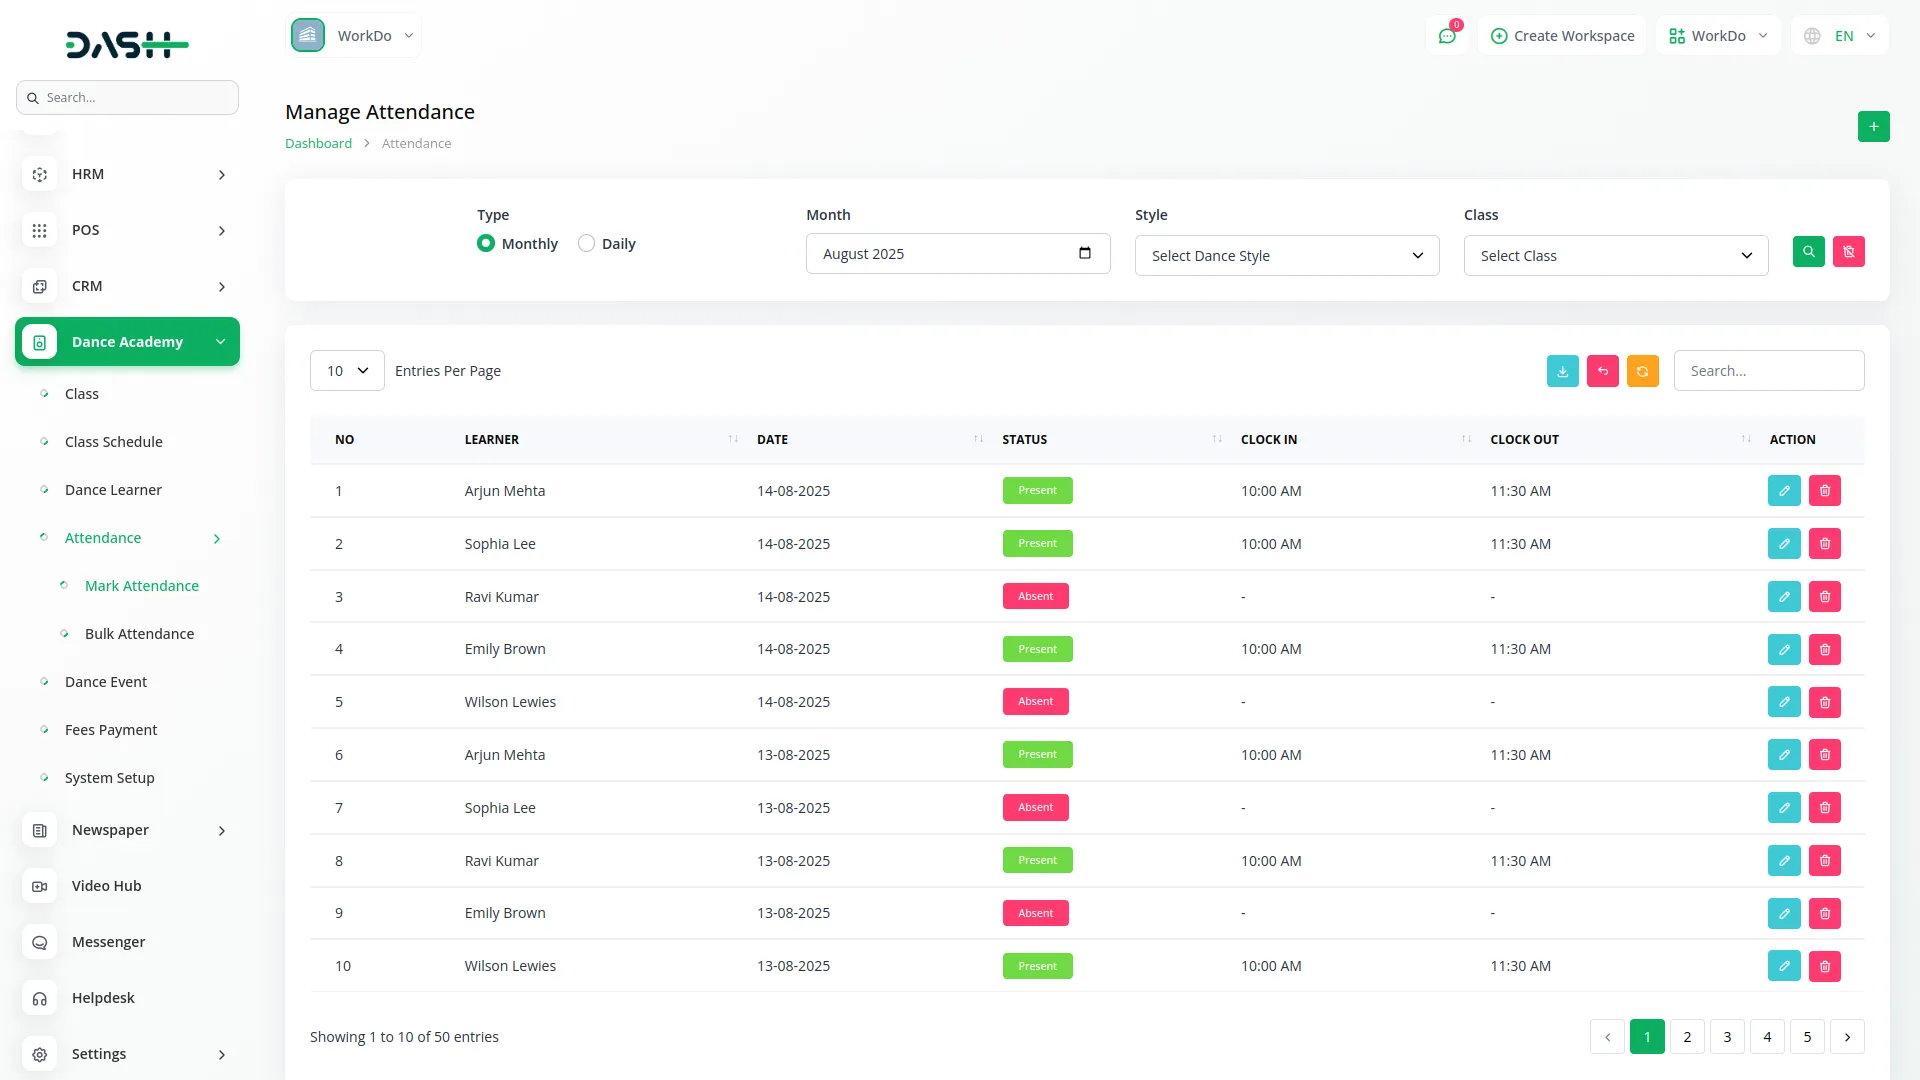
- The list page displays attendance records in a table with columns for Learner, Date, Clock In, Clock Out, and Status. You can filter the view by selecting Monthly or Daily, choosing a month, dance style, or class. Status is shown as Present or Absent.
- In the Actions column, click the blue edit icon to modify a record or the red delete icon to remove it.
Bulk Attendance
- To access the Bulk Attendance feature, select “Bulk Attendance” from the Attendance submenu.
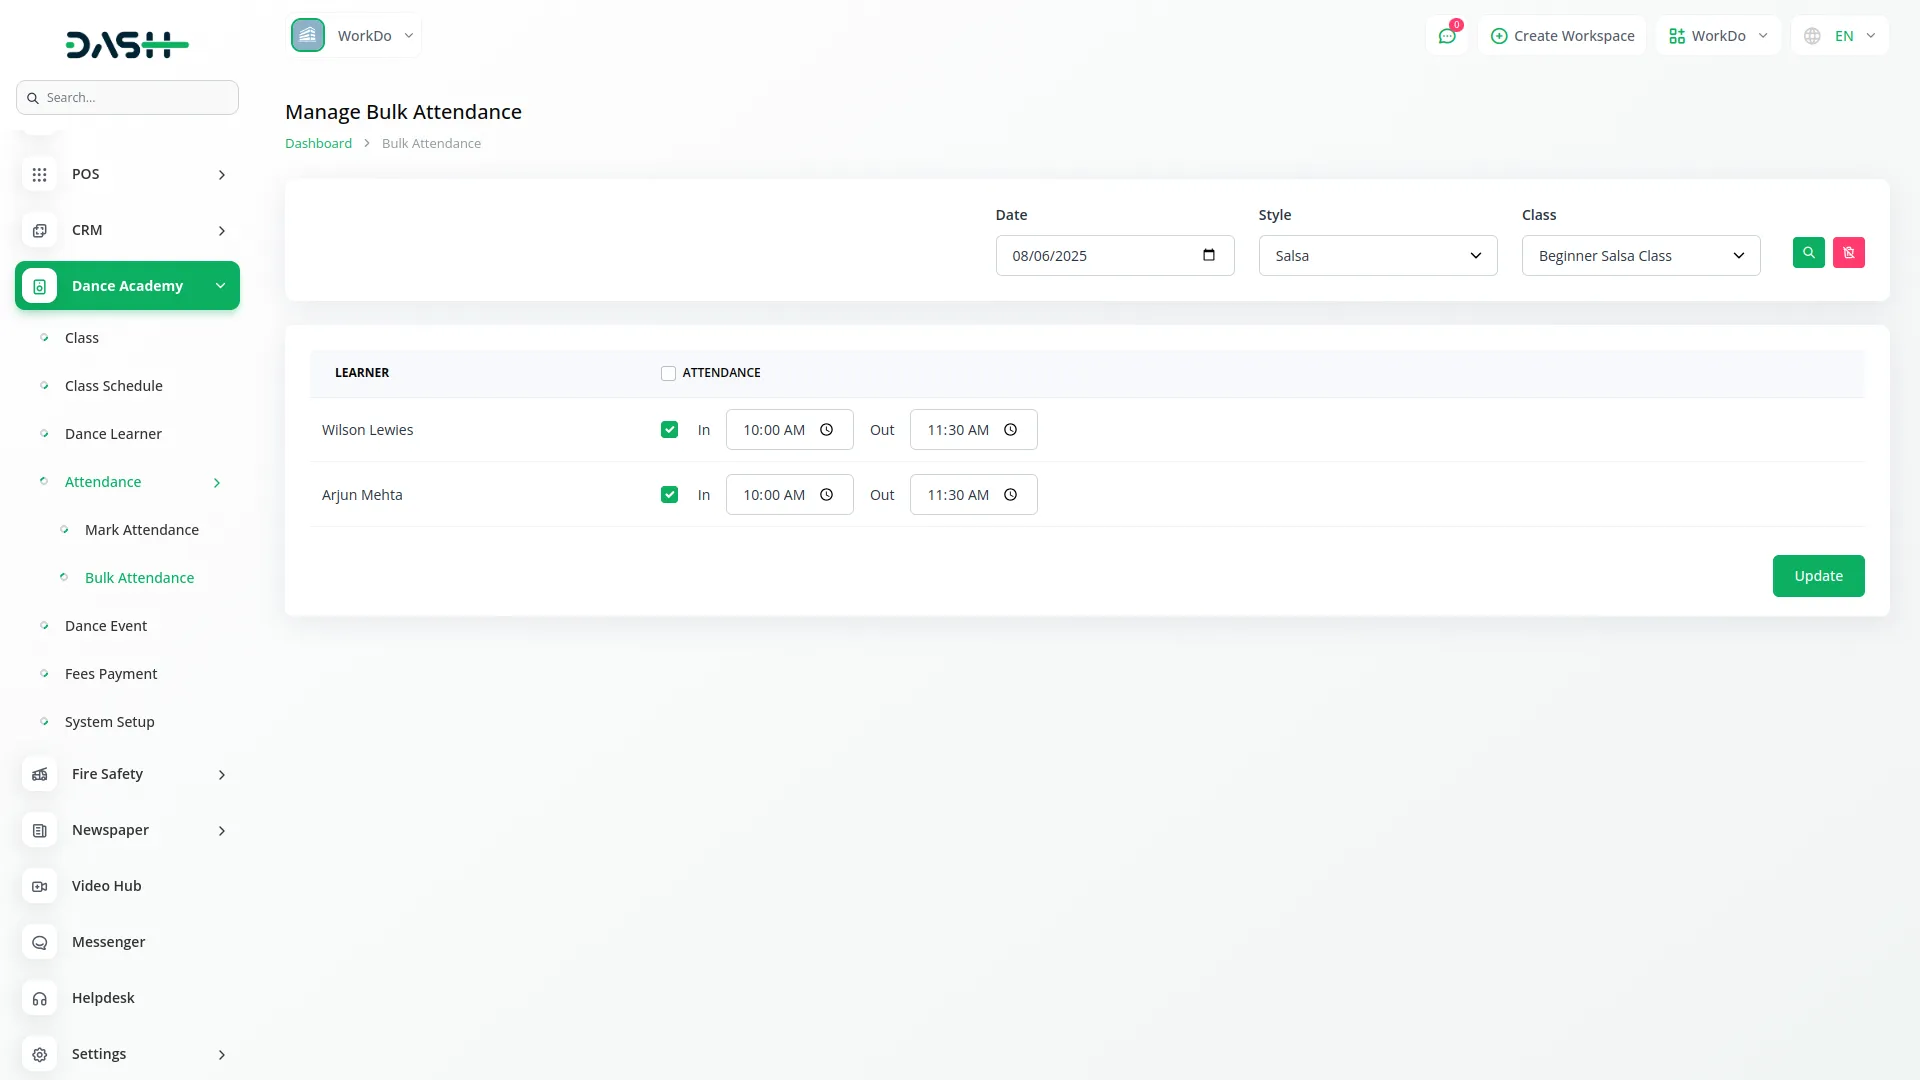
- At the top of the page, select the Date using the date picker, then choose the Style from the dropdown, and select the specific Class. Click the “Apply” search button to load the learners for that class and date.
- The page will display a list of learners enrolled in the selected class. Each learner has a checkbox in the Attendance column to mark them as present. For present learners, you can set the Clock In time and Clock Out time using the time pickers next to the “In” and “Out” labels.
- Learners who are not checked will be marked as absent. After selecting the present learners and setting their clock-in/out times, click the “Update” button at the bottom right to save the attendance records.
Dance Event
- To create a new Dance Event, click the “Create” button at the top of the events page. Fill in the required details, like entering the event Title and selecting the Dance Class using the multi-select option generated from the Classes section. You can optionally select a Coordinator from the dropdown that shows users from the Users section.
- Enter the Location where the event will take place (optional) and choose the Date for the event. Set the Time if needed and select the Status from the dropdown, choosing from the Scheduled, Cancelled, or completed options.
- You can upload a Poster file if you have promotional material for the event, and add a Description to provide more details about the event.
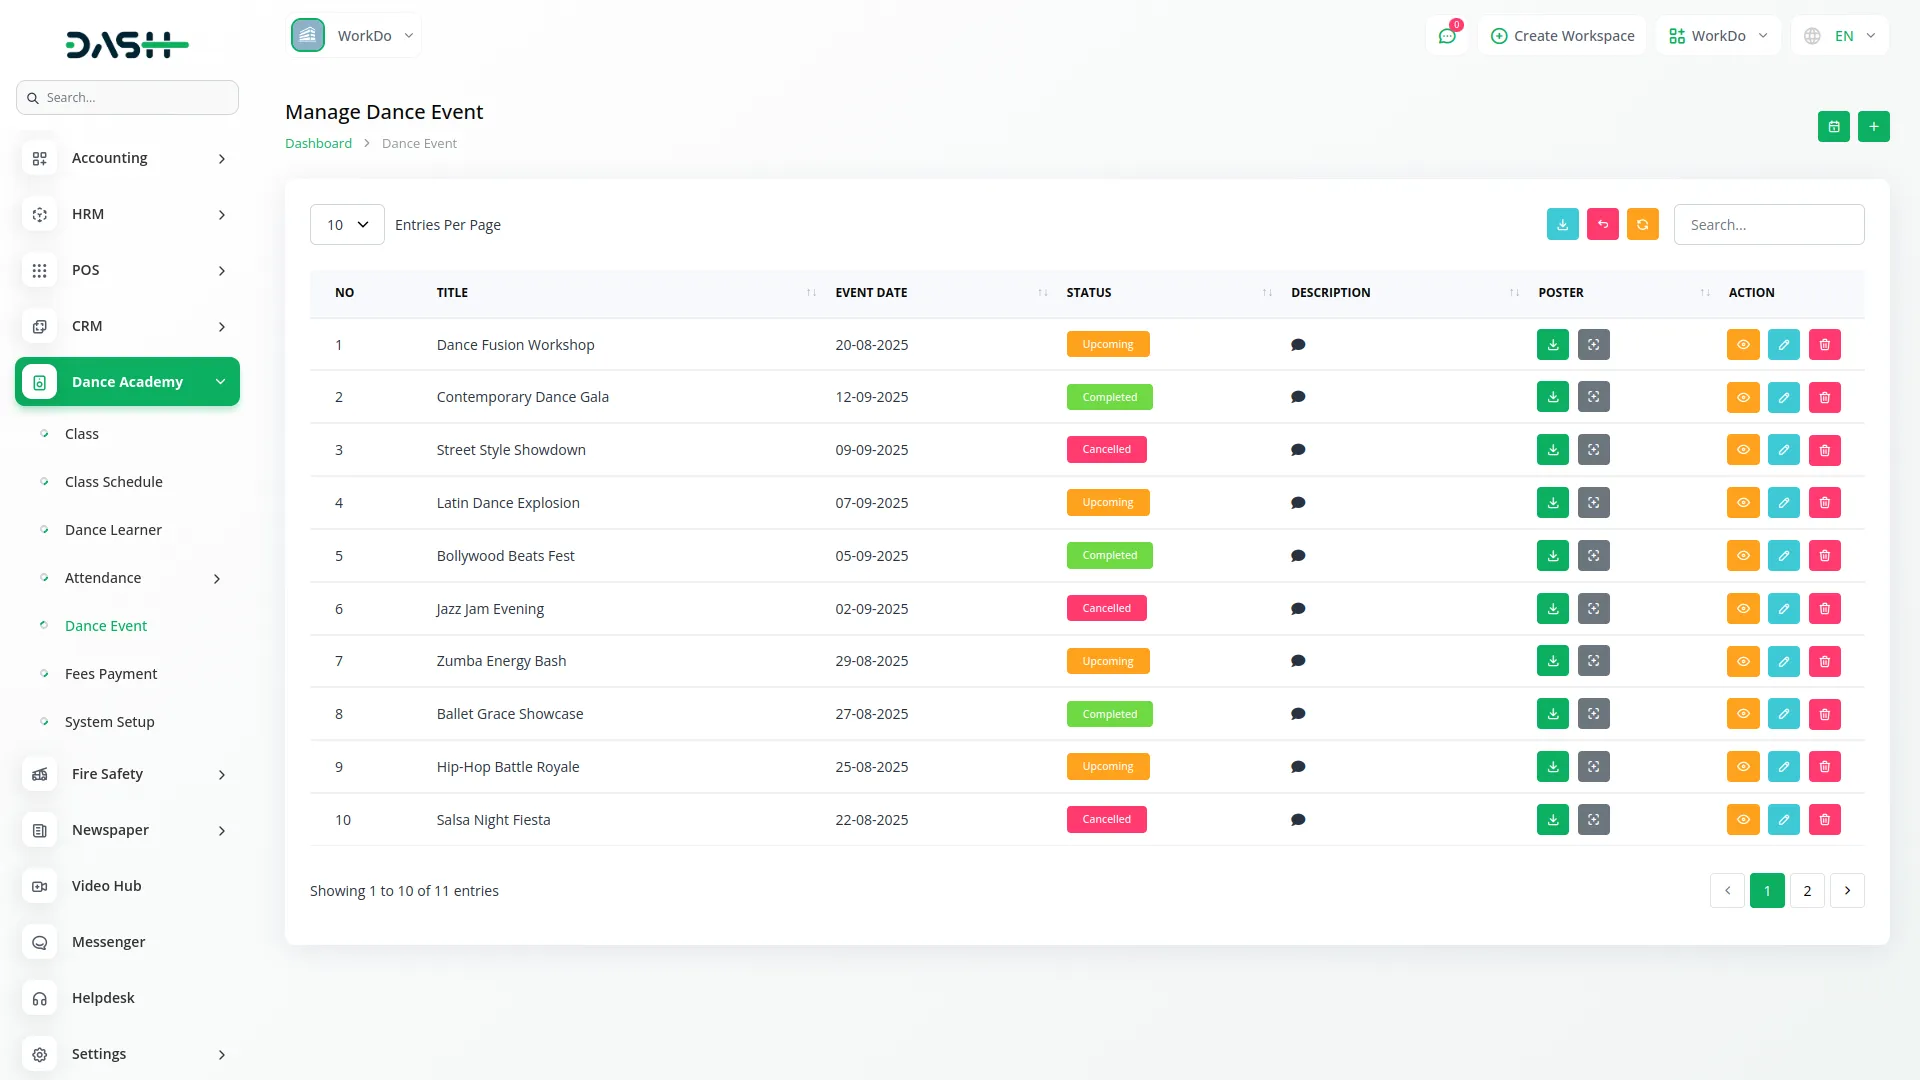
- The list page shows all events in a table with columns for Title, Event Date, Status, Description, and Poster. Use the search, export, reset, and reload buttons to manage your event page data.
- Apart from that, you can use the Actions column to easily edit or modify event data, delete to remove them, show to view complete event data, download to download the poster file, or preview to see a preview of the poster.
Calendar View
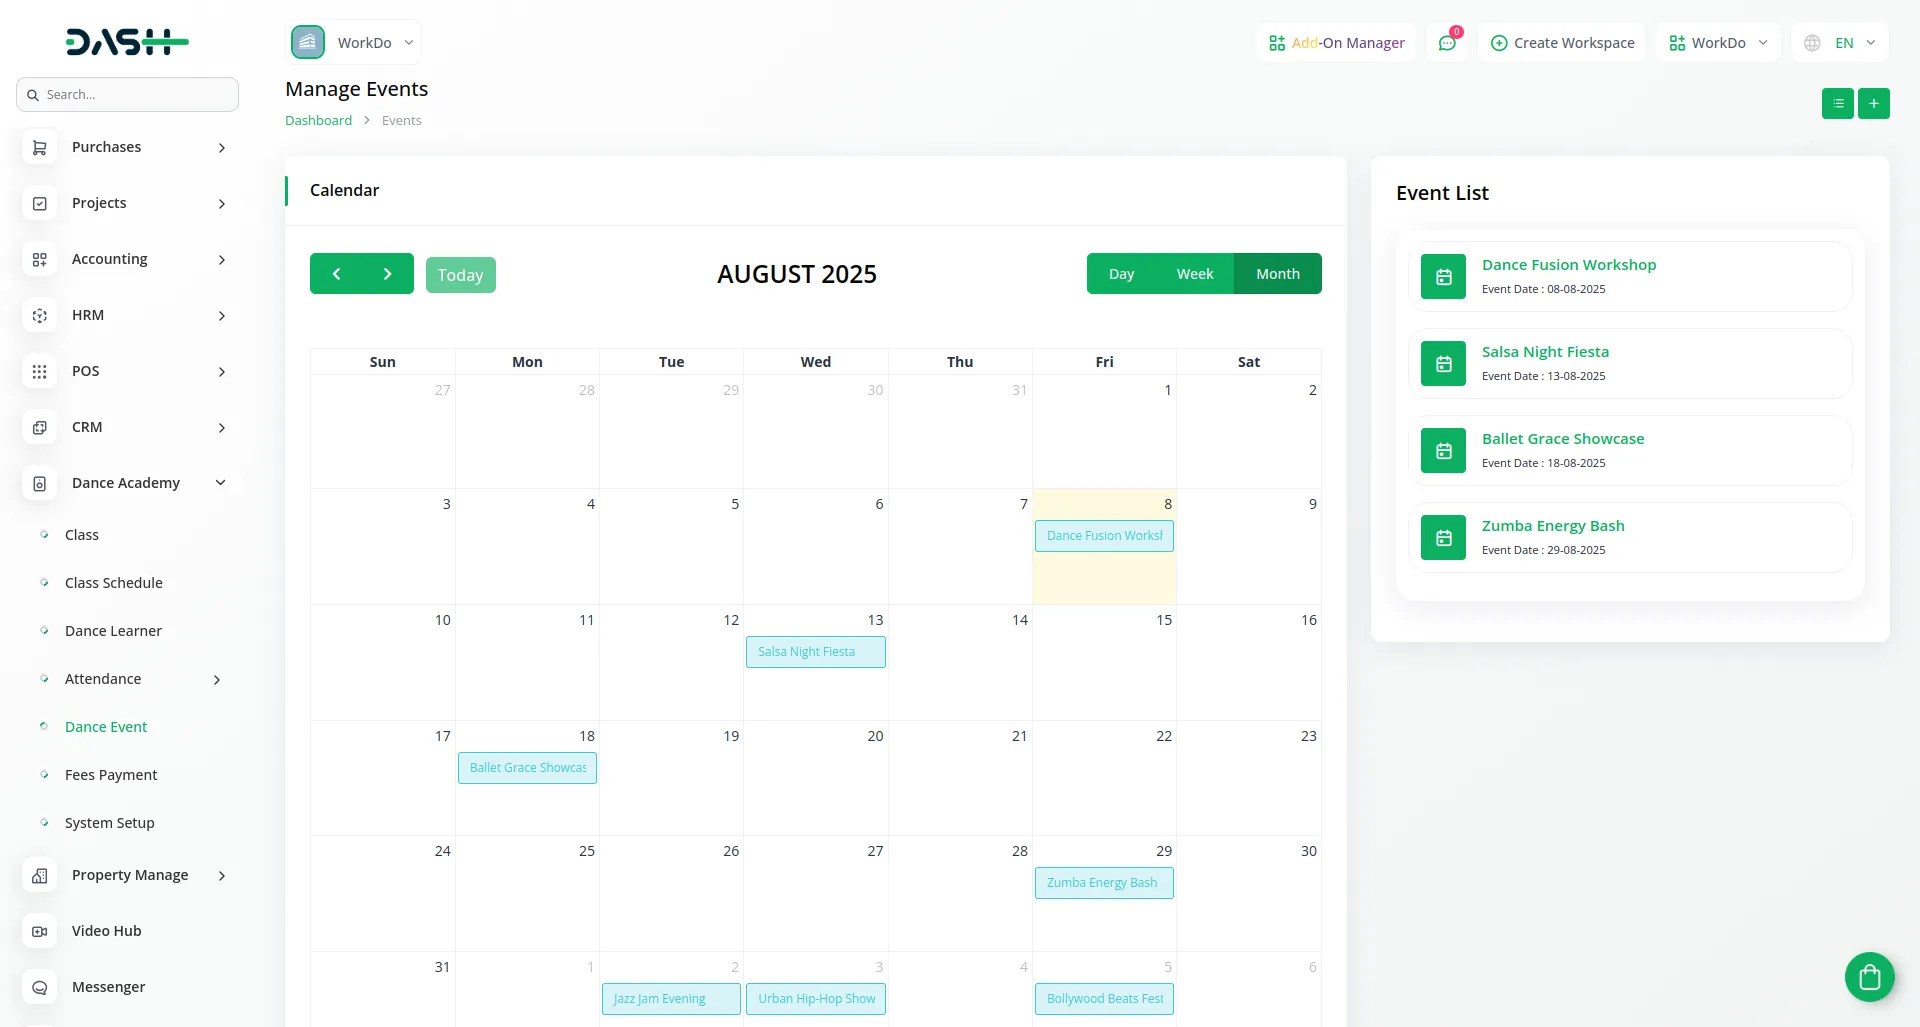
- The Calendar view provides a visual representation of all your dance events organized by date. You can access this view from the “Calendar” tab on the events page. The calendar shows events for the current month (August 2025) and displays event titles directly on their scheduled dates.
- Use the navigation arrows to move between months or click “Today” to return to the current month. You can switch between Day, Week, and Month views using the buttons at the top right of the calendar. Events are displayed as colored blocks on their respective dates, making it easy to see your event schedule at a glance.
- On the right side, the Event List shows all upcoming events with their titles and event dates, providing quick access to event details.
Fees Payment
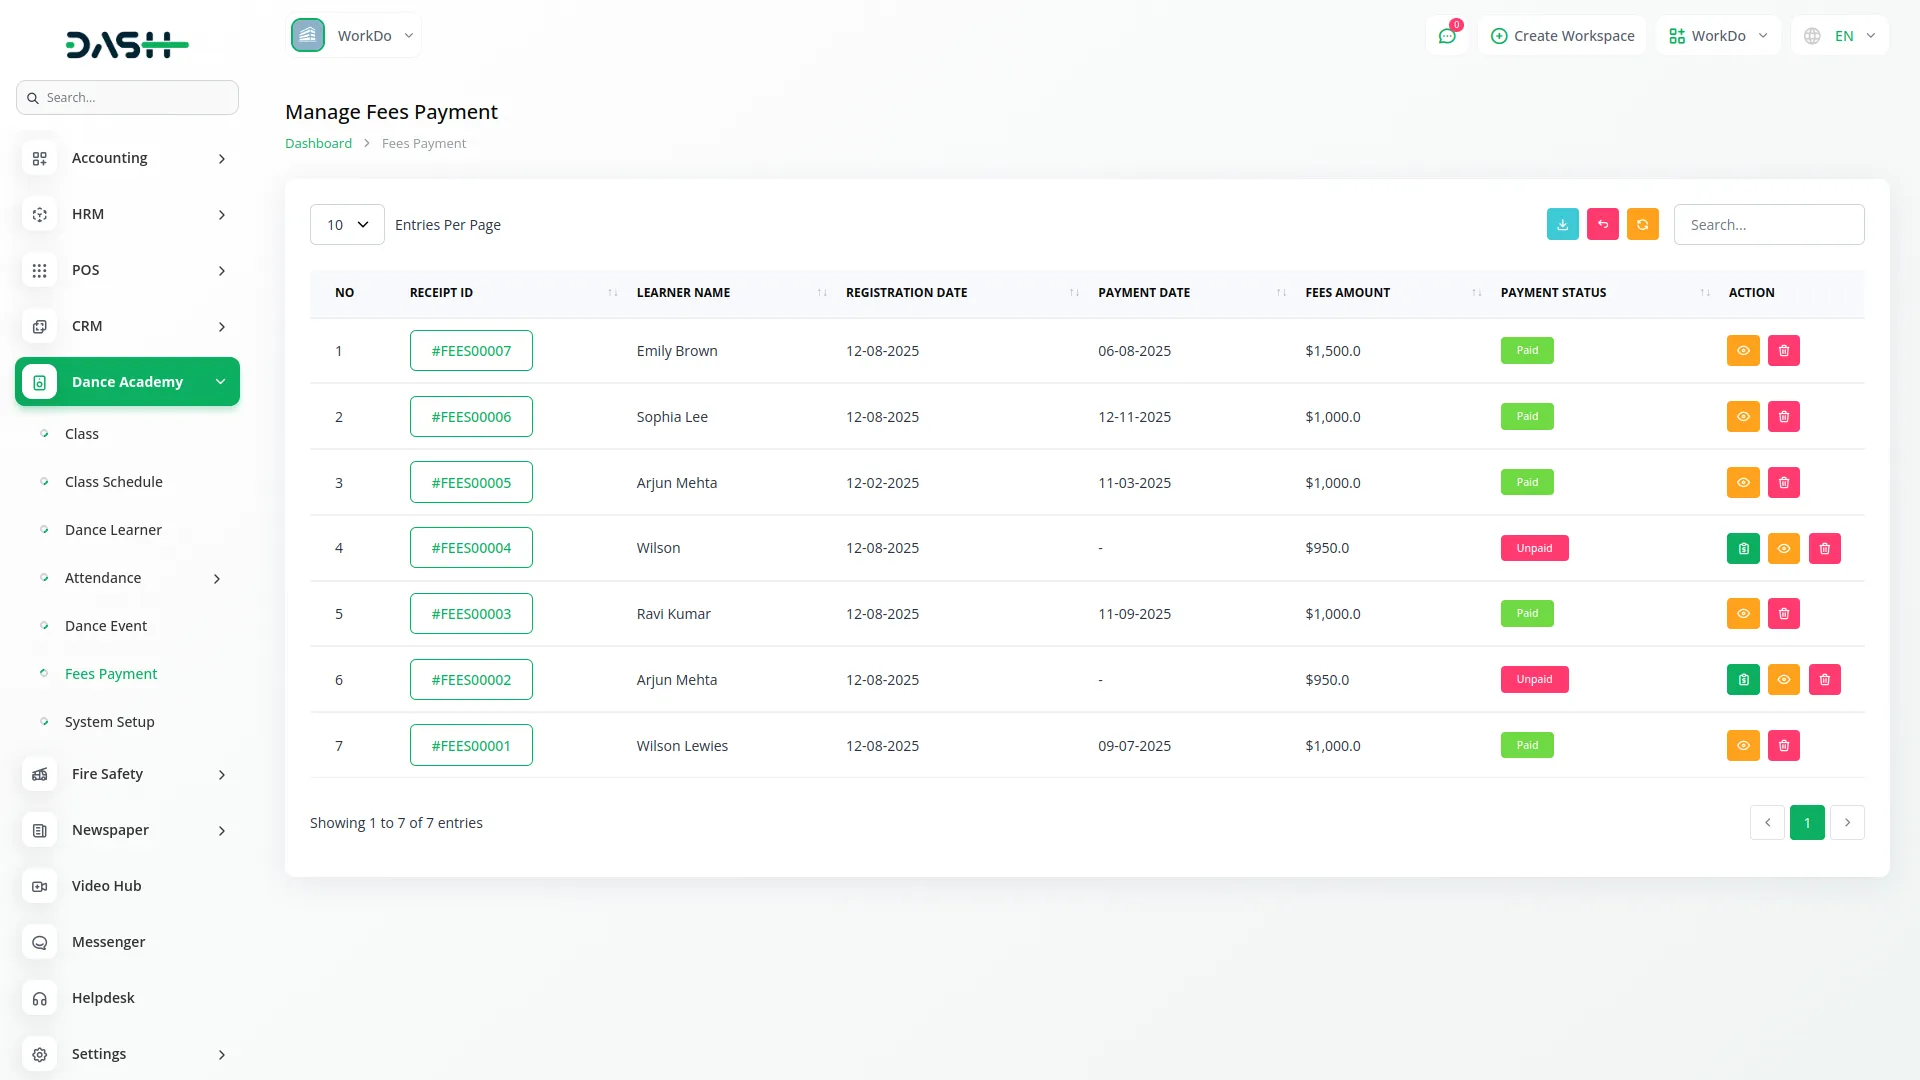
- The Fees Payment records are automatically generated when a learner is created or when their dance class is updated. You do not need to manually create these records, as the system handles this process automatically.
- The list page displays all fee payment records in a table with columns for Receipt ID (which is automatically generated), Learner Name (comes from the learner section), Registration Date, Payment Date, Fees Amount, and Payment Status. You can use the Search to filter the fees list and export, reset, and reload buttons to manage the fees record on this page.
- In the Actions column, you can use Delete to remove a fees record if needed, Show to view complete fees details, or Download to get the fees receipt for printing or email purposes.
Categories
Related articles
- Tailoring and Fashion Design Detailed Documentation
- PetCare Integration in Dash SaaS
- Quickbooks Integration in Dash SaaS
- WhatsApp Messenger Integration in Dash SaaS
- Vehicle Trade Detailed Documentation
- Additional Services Integration in BookingGo SaaS
- Tawk.to Messenger – eCommerceGo Addon
- Childcare Management Integration in Dash SaaS
- PDF Voucher – eCommerceGo Addon
- Product CSV – eCommerceGo Addon
- PowerTranz Payment Gateway in Dash SaaS
- StoreGo – Product Features
Reach Out to Us
Have questions or need assistance? We're here to help! Reach out to our team for support, inquiries, or feedback. Your needs are important to us, and we’re ready to assist you!


Need more help?
If you’re still uncertain or need professional guidance, don’t hesitate to contact us. You can contact us via email or submit a ticket with a description of your issue. Our team of experts is always available to help you with any questions. Rest assured that we’ll respond to your inquiry promptly.
Love what you see?
Do you like the quality of our products, themes, and applications, or perhaps the design of our website caught your eye? You can have similarly outstanding designs for your website or apps. Contact us, and we’ll bring your ideas to life.
