Agriculture Managemet Integration in Dash SaaS
The Agriculture Management software is a comprehensive platform designed to help agricultural organizations, farms, and farming cooperatives manage their entire agricultural operations efficiently.
Introduction
The Agriculture Management software is a comprehensive platform designed to help agricultural organizations, farms, and farming cooperatives manage their entire agricultural operations efficiently. This system provides complete control over farming activities from initial setup to final harvest, including crop management, resource allocation, equipment tracking, and financial planning. The software supports multiple aspects of agricultural management including fleet and equipment management, cultivation planning, activity tracking, inventory control, contract management, loan processing, pest control, weather monitoring, soil analysis, irrigation systems, research projects, and compliance reporting. Whether you’re managing a small farm or a large agricultural cooperative, this software provides all the tools needed to optimize productivity, track resources, monitor crop health, and ensure regulatory compliance while maintaining detailed records of all agricultural activities.
How to Install the Add-On?
To Set Up the Agriculture Management Add-On, you can follow this link: Setup Add-On
How to Use The Agriculture Management Add-On?
System Setup
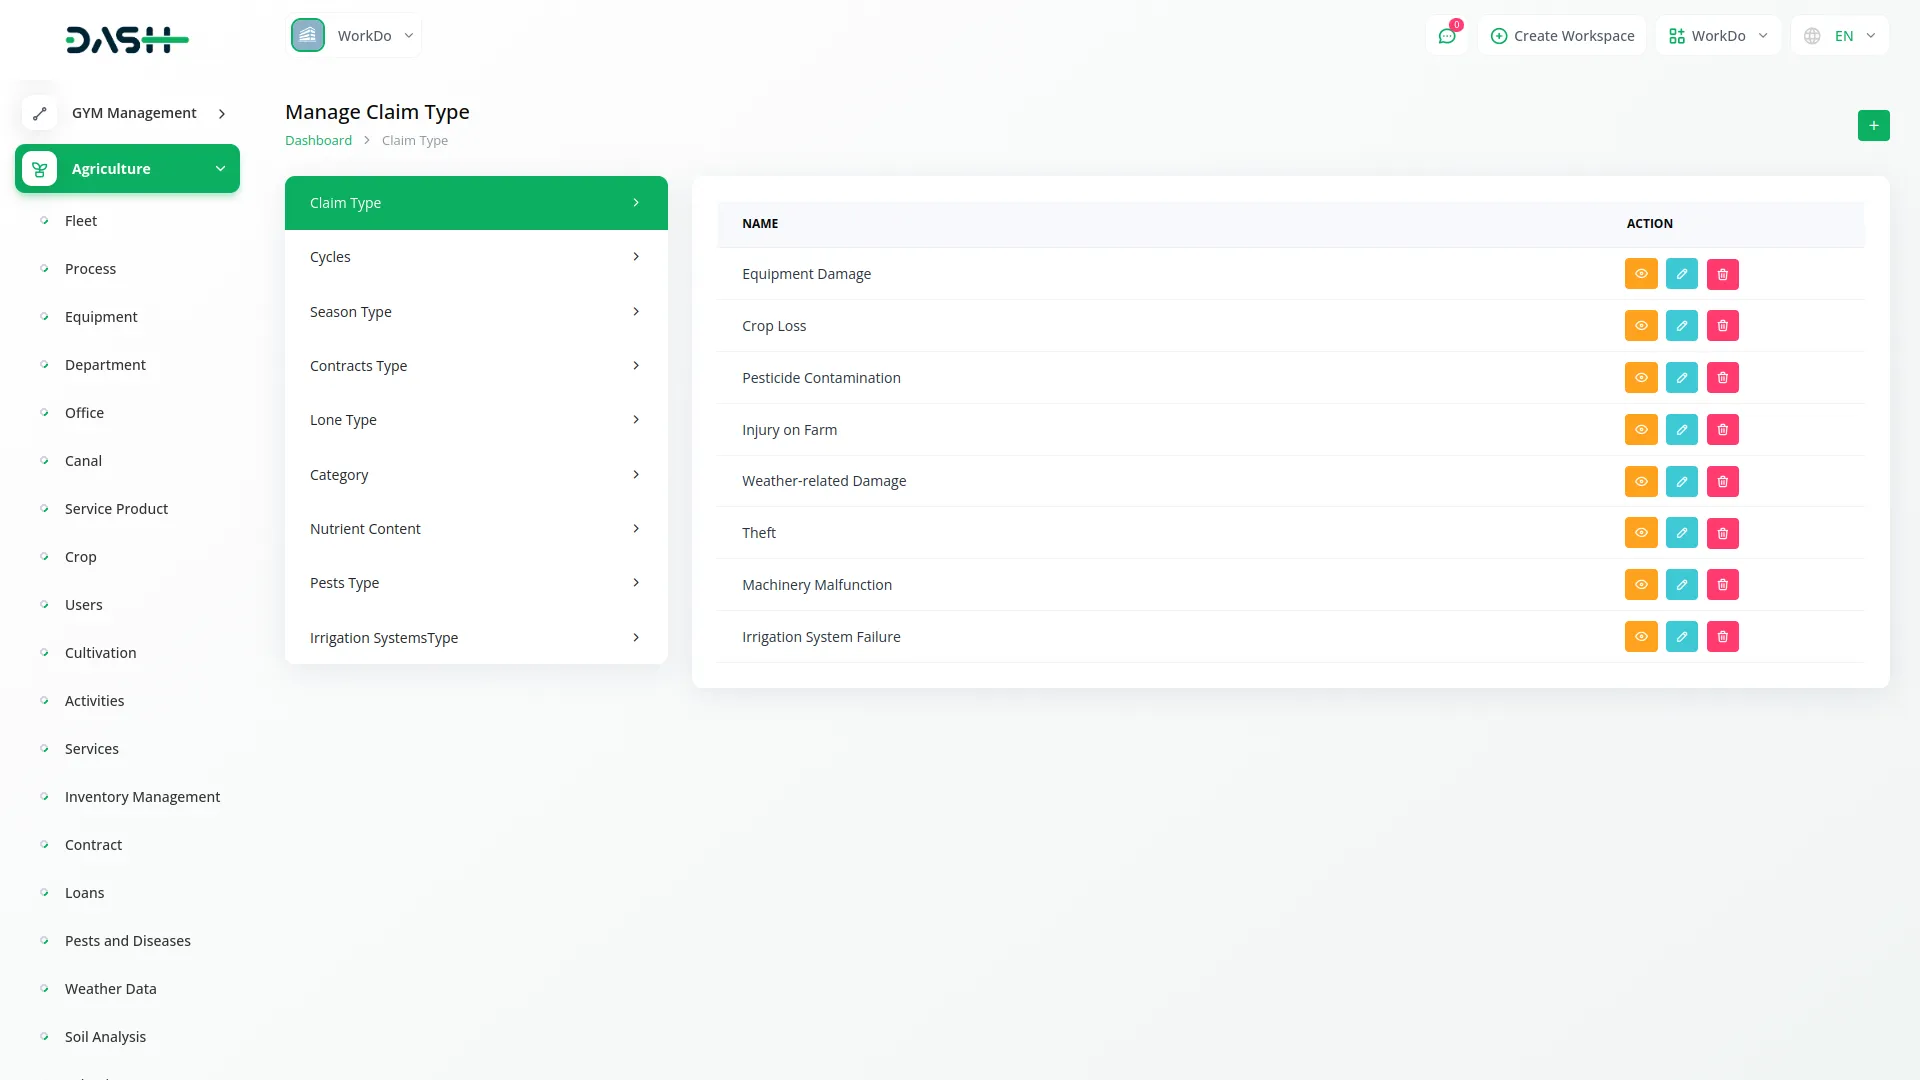
- The System Setup section contains nine foundational configuration menus that must be established before using other parts of the agriculture management system. These setup menus provide the basic data categories and types that will be used throughout the system.
- To create a new Claim Type, click the “Create” button at the top of the claim type page. Enter the Claim Type Name that will be used to categorize different types of claims in the system. The list page shows all claim types in a table with the Claim Type Name column. Available actions include Edit to modify existing claim types and Delete to remove claim types that are no longer needed.
- To add a new Cycle, click the “Create” button on the cycles page. Enter the Cycles Name that represents different agricultural cycles used in your operations. The list page displays all cycles with the Cycles Name column. You can Edit existing cycles or Delete cycles that are no longer applicable.
- To create a new Season Type, click the “Create” button on the season type page. Enter the Season Type Name to define different seasonal periods for agricultural activities. The list page shows all season types with the Season Type Name column. Available actions are Edit to modify season types and Delete to remove unused season types.
- To add a new Contract Type, click the “Create” button on the Contract Type page. Enter the Contract Type Name to categorize different types of contracts used in agricultural operations. The list page displays all contract types with the Contract Type Name column. You can edit existing contract types or delete contract types that are no longer needed.
- To create a new Loan Type, click the “Create” button on the loan type page. Enter the Loan Type Name to define different categories of agricultural loans. The list page shows all loan types with the Loan Type Name column. Available actions include Edit to modify loan types and Delete to remove loan types that are no longer used.
- To create a new Category, click the “Create” button on the category page. Enter the Category Name to define various classifications used within the system. The list page displays all categories with the Category Name column. Available actions include Edit to modify existing categories and Delete to remove categories that are no longer required.
- To add a new Nutrient Content, click the “Create” button on the nutrient content page. Enter the Nutrient Content Name to represent different nutrient compositions used in agricultural practices. The list page shows all nutrient contents with the Nutrient Content Name column. You can edit existing nutrient contents or delete those that are no longer needed.
- To create a new Pest Type, click the “Create” button on the Pest Type page. Enter the Pest Type Name to categorize different types of pests affecting crops. The list page displays all pest types with the Pest Type Name column. Available actions are Edit to update existing pest types and Delete to remove unused ones.
- To add a new Irrigation Systems Type, click the “Create” button on the Irrigation Systems Type page. Enter the Irrigation Systems Type Name to define different irrigation methods used in farming operations. The list page shows all irrigation system types with the Irrigation Systems Type Name column. You can edit existing irrigation system types or delete those that are no longer applicable.
Fleet Management
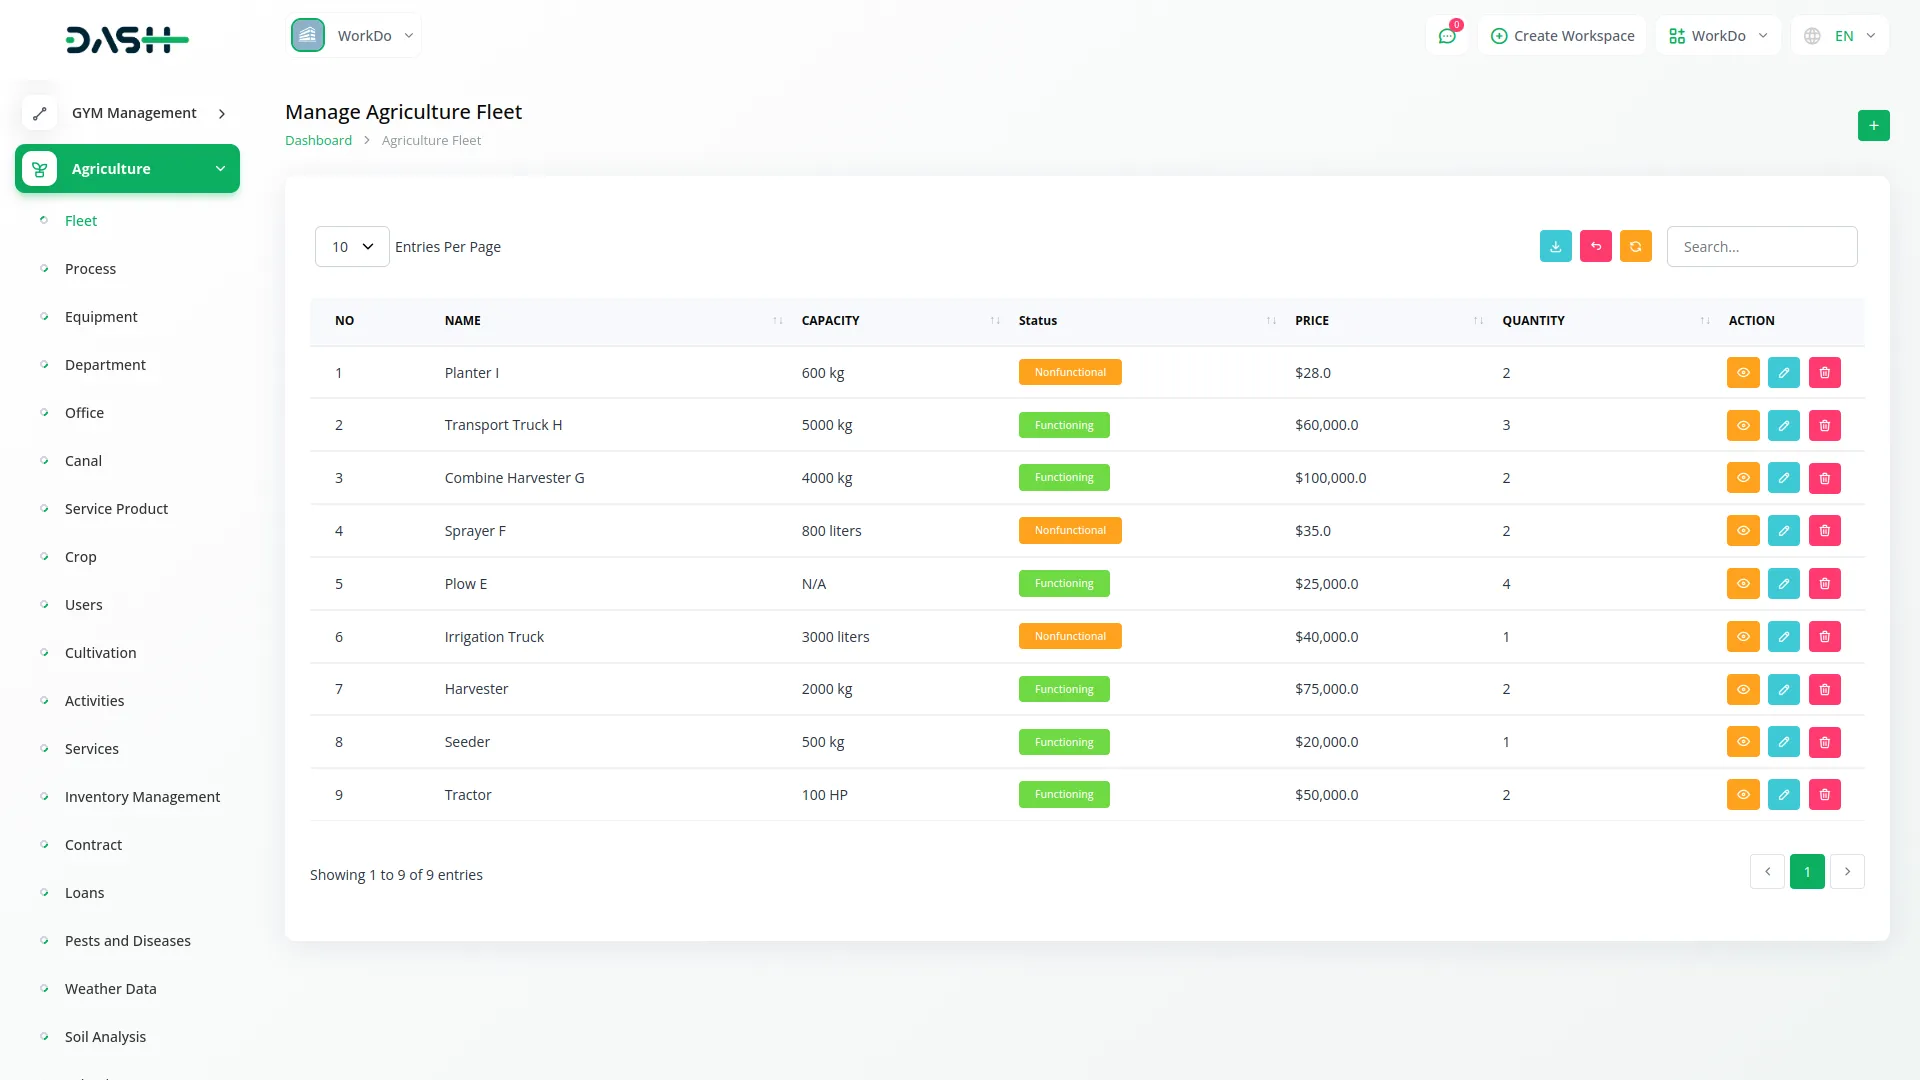
- To create a new fleet entry, click the “Create” button at the top of the fleet page. Enter the Fleet Name to identify the specific vehicle or machinery.
- Fill in the Capacity to specify the operational capacity of the fleet item. Select the Status from the available options: Functioning or Nonfunctional to indicate the current operational state. Enter the Price for the fleet item and specify the Quantity of items available.
- The list page shows all fleet items with columns for No, Name, Capacity, Status, Price, and Quantity. Use the Search button to find specific fleet items and the Export button to download fleet data. Available actions include Show to view detailed fleet information, Edit to modify fleet details, and Delete to remove fleet items from the system.
Process Management
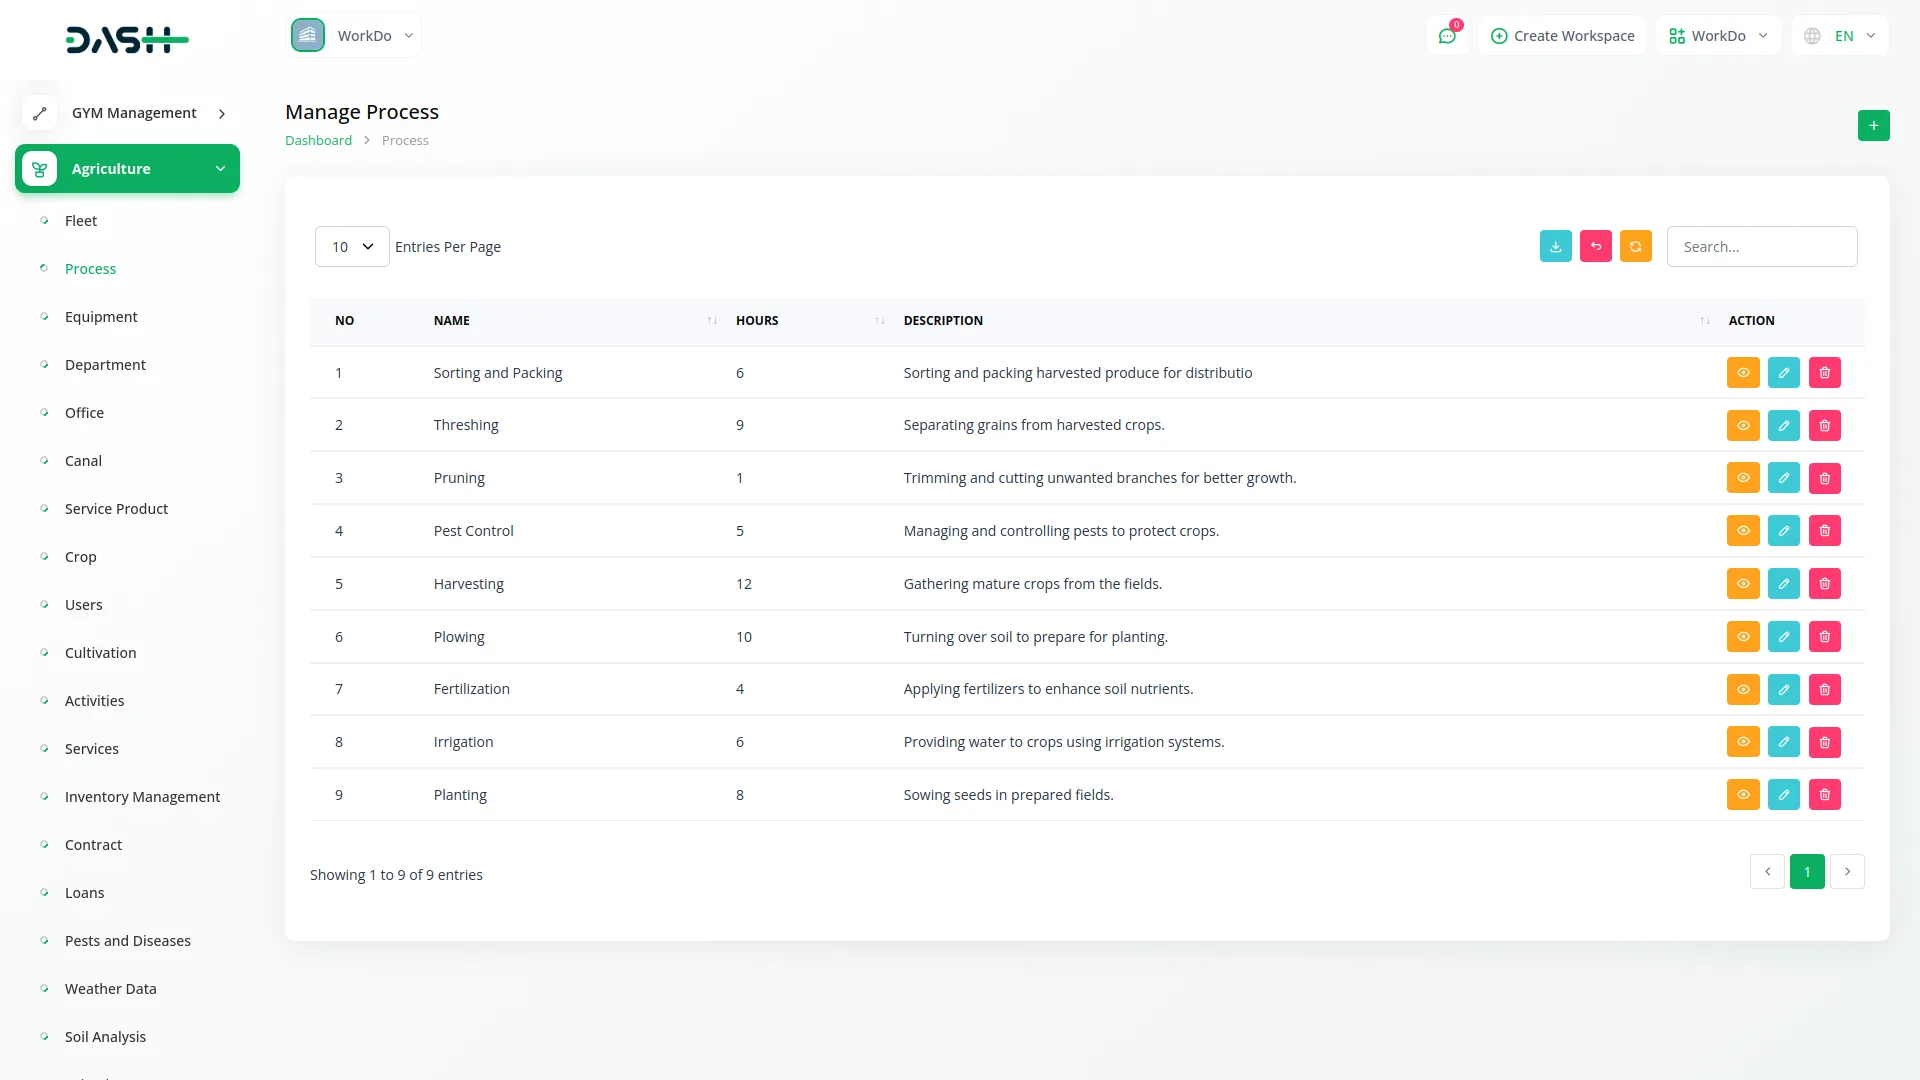
- To add a new process, click the “Create” button on the process page. Enter the Name of the agricultural process you want to define. Fill in the Hours required to complete this process. Add a Description that explains the details and steps involved in this process.
- The list page displays all processes with columns for No, Name, Hours, and Description. Use the Search button to locate specific processes and the Export button to download process information.
- Available actions include View to see complete process details, Edit to modify process information, and Delete to remove processes that are no longer used.
Equipment Management
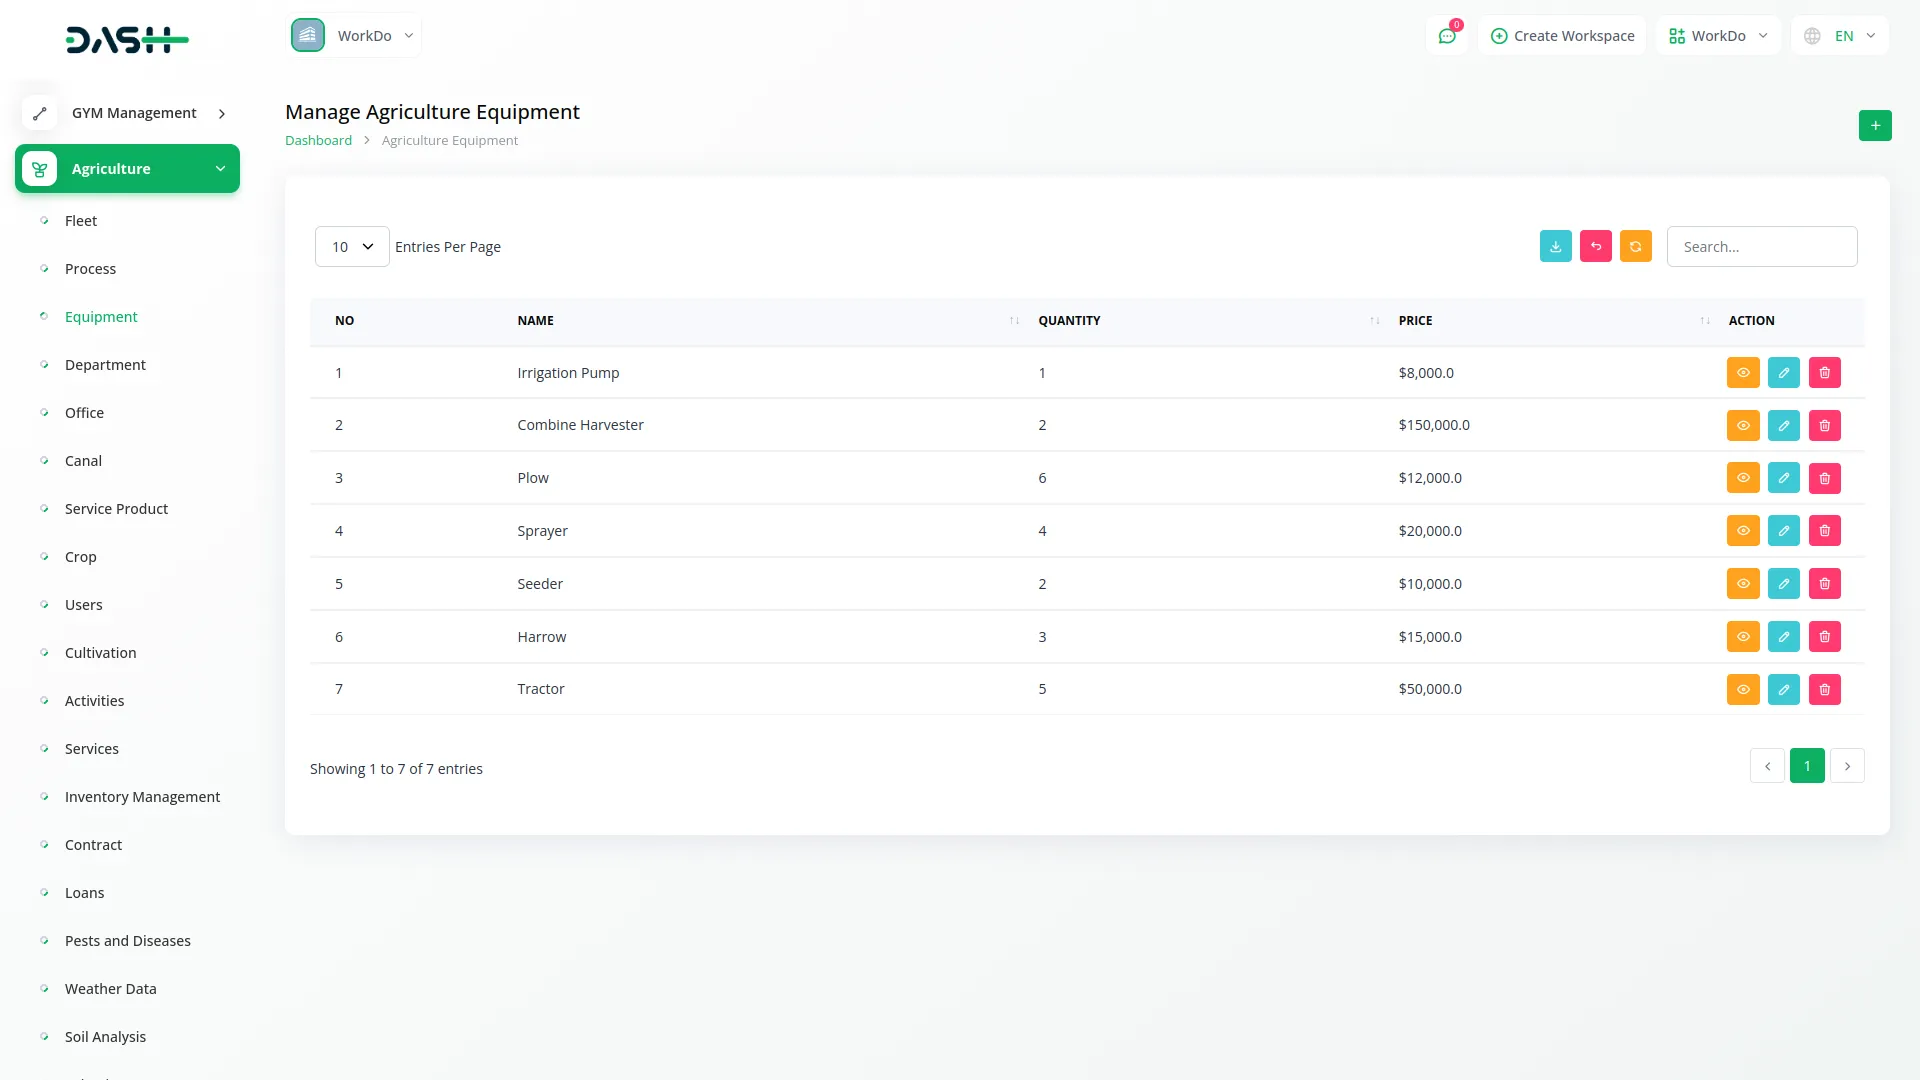
- To create a new equipment entry, click the “Create” button at the top of the equipment page. Enter the Name of the equipment to clearly identify the item. Specify the Quantity of equipment units available. Enter the Price for the equipment.
- The list page shows all equipment with columns for No, Name, Quantity, and Price. Use the Search button to find specific equipment and the Export button to download equipment data. Available actions include View to see detailed equipment information, Edit to modify equipment details, and Delete to remove equipment entries from the system.
Department Management
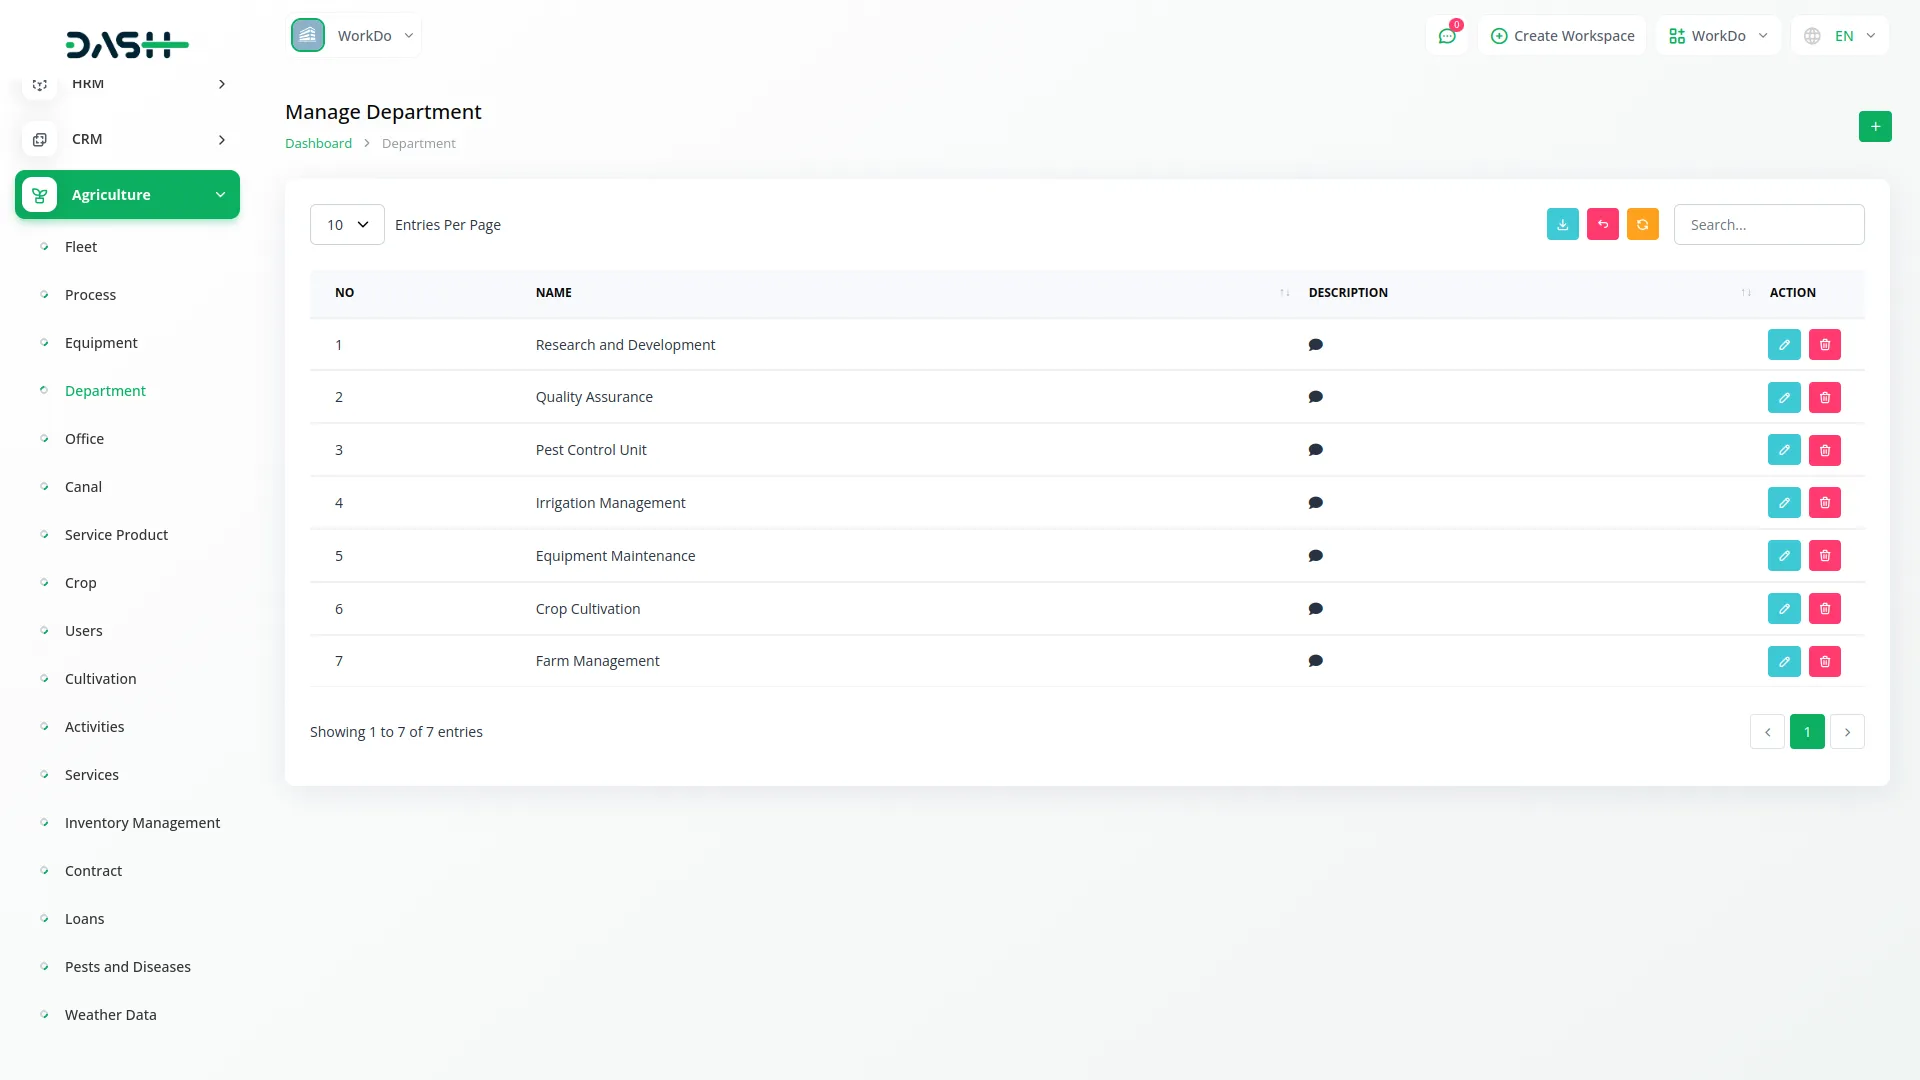
- To add a new department, click the “Create” button on the department page. Enter the Name of the department to identify the organizational unit. Add a Description that explains the department’s role and responsibilities within the agricultural organization.
- The list page displays all departments with columns for No, Name, and Description. Use the Search button to locate specific departments and the Export button to download department information. Available actions include Edit to modify department details and Delete to remove departments that are no longer needed.
Office Management
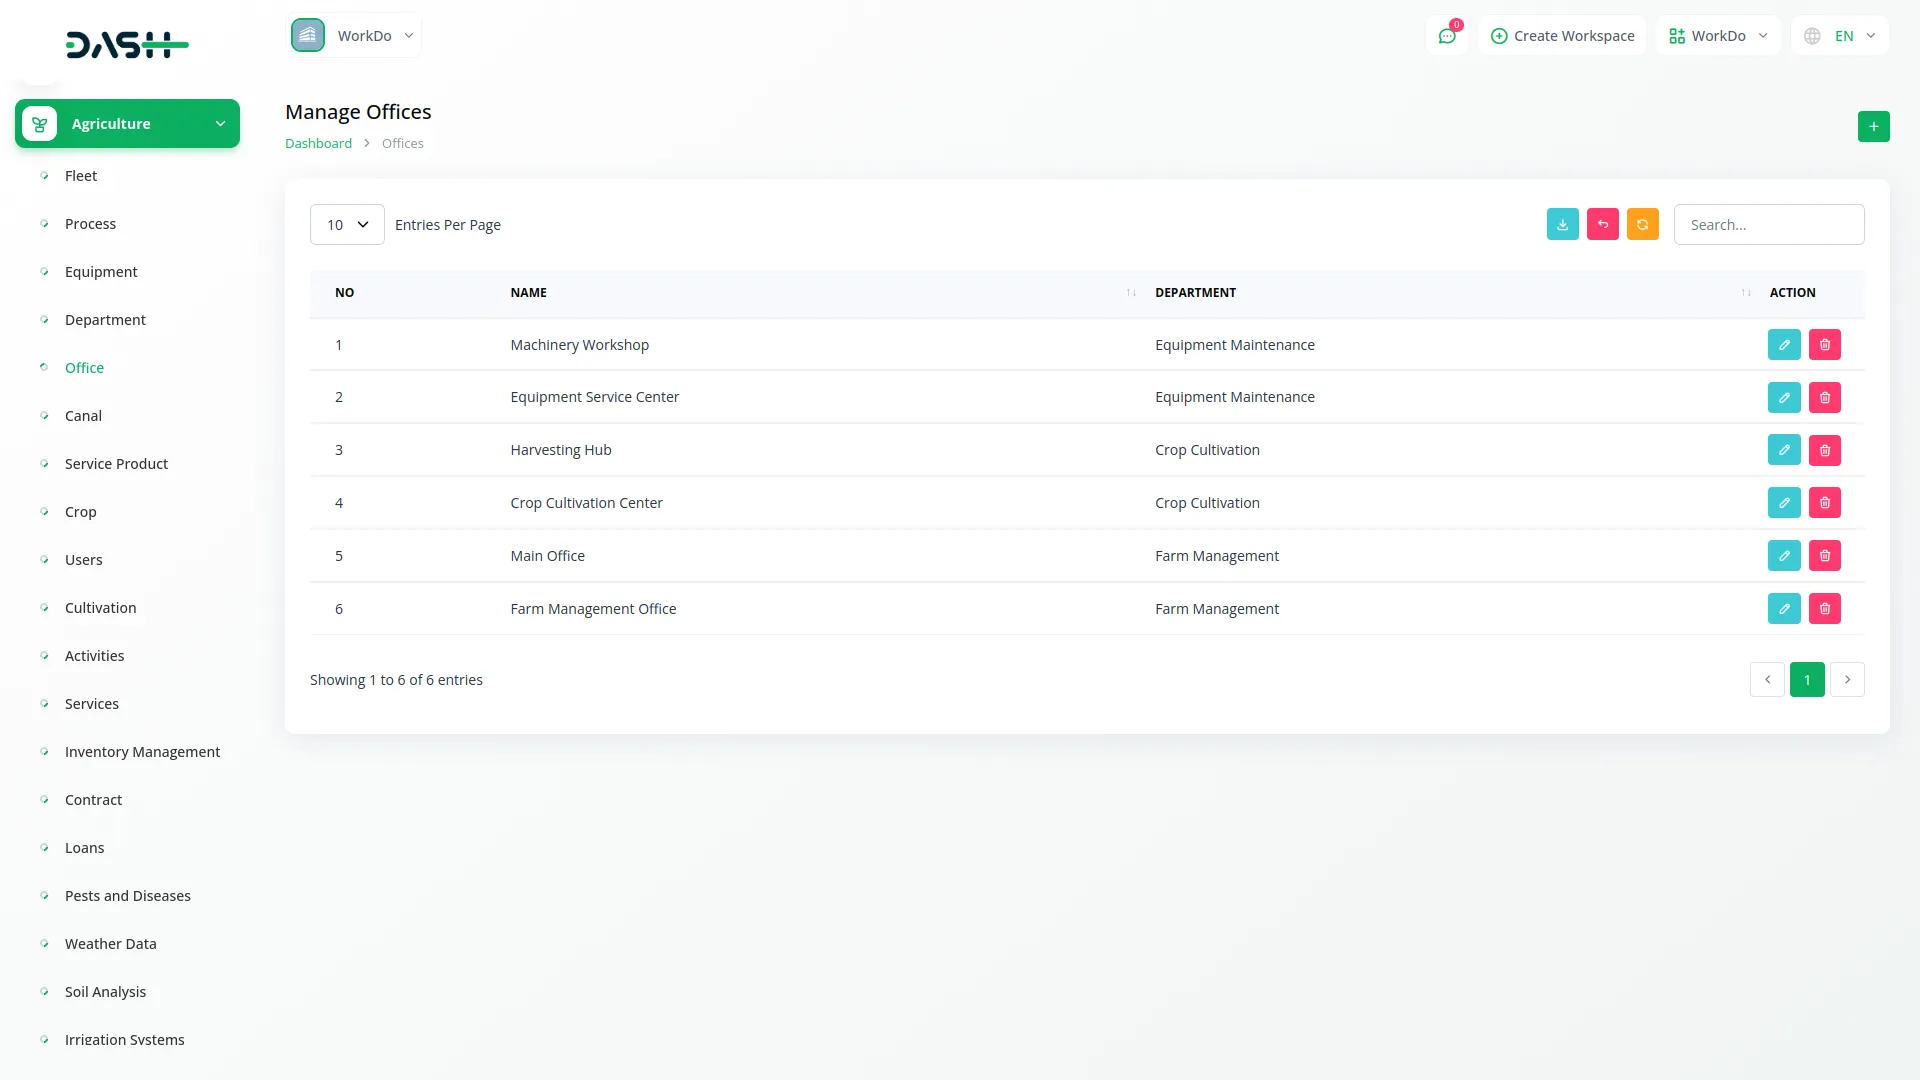
- To create a new office, click the “Create” button at the top of the office page. Enter the Name of the office to identify the specific location or branch. Select the Department from the dropdown menu that connects to the Department menu you set up previously. This connection ensures that each office is properly assigned to an organizational department.
- The list page displays all offices with columns for No, Name, and Department. Use the Search button to locate specific offices and the Export button to download office information. Available actions include Edit to modify office details and Delete to remove offices that are no longer needed.
Canal Management
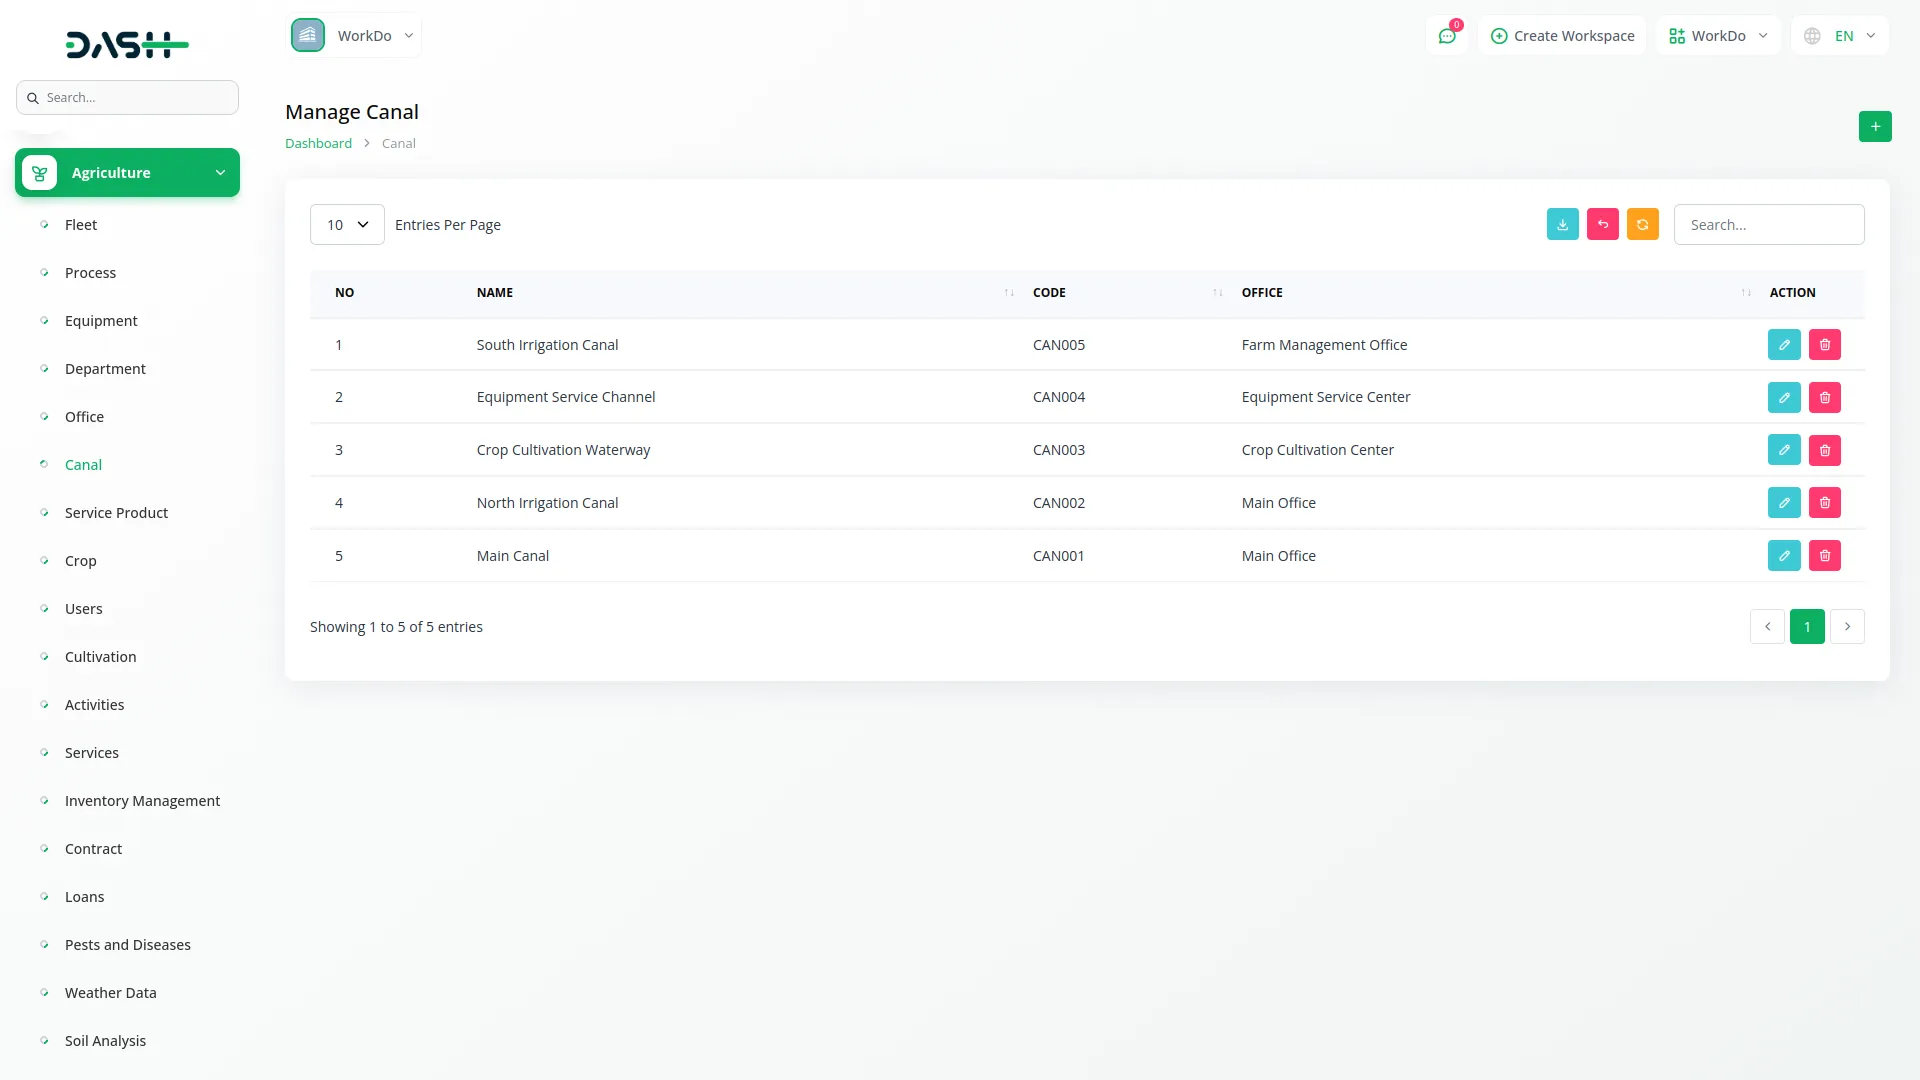
- To add a new canal, click the “Create” button on the canal page. Enter the Name of the canal for identification purposes. Fill in the Code that represents the canal’s unique identifier or reference number. Select the Office from the dropdown menu that connects to the Office menu, linking each canal to a specific office location.
- The list page shows all canals with columns for No, Name, Code, and Office Name. Use the Search button to find specific canals and the Export button to download canal data. Available actions include Edit to modify canal information and Delete to remove canals from the system.
Service Product Management
- To create a new service product, click the “Create” button at the top of the service product page. Enter the Name of the service product to clearly identify what service or product is being offered.
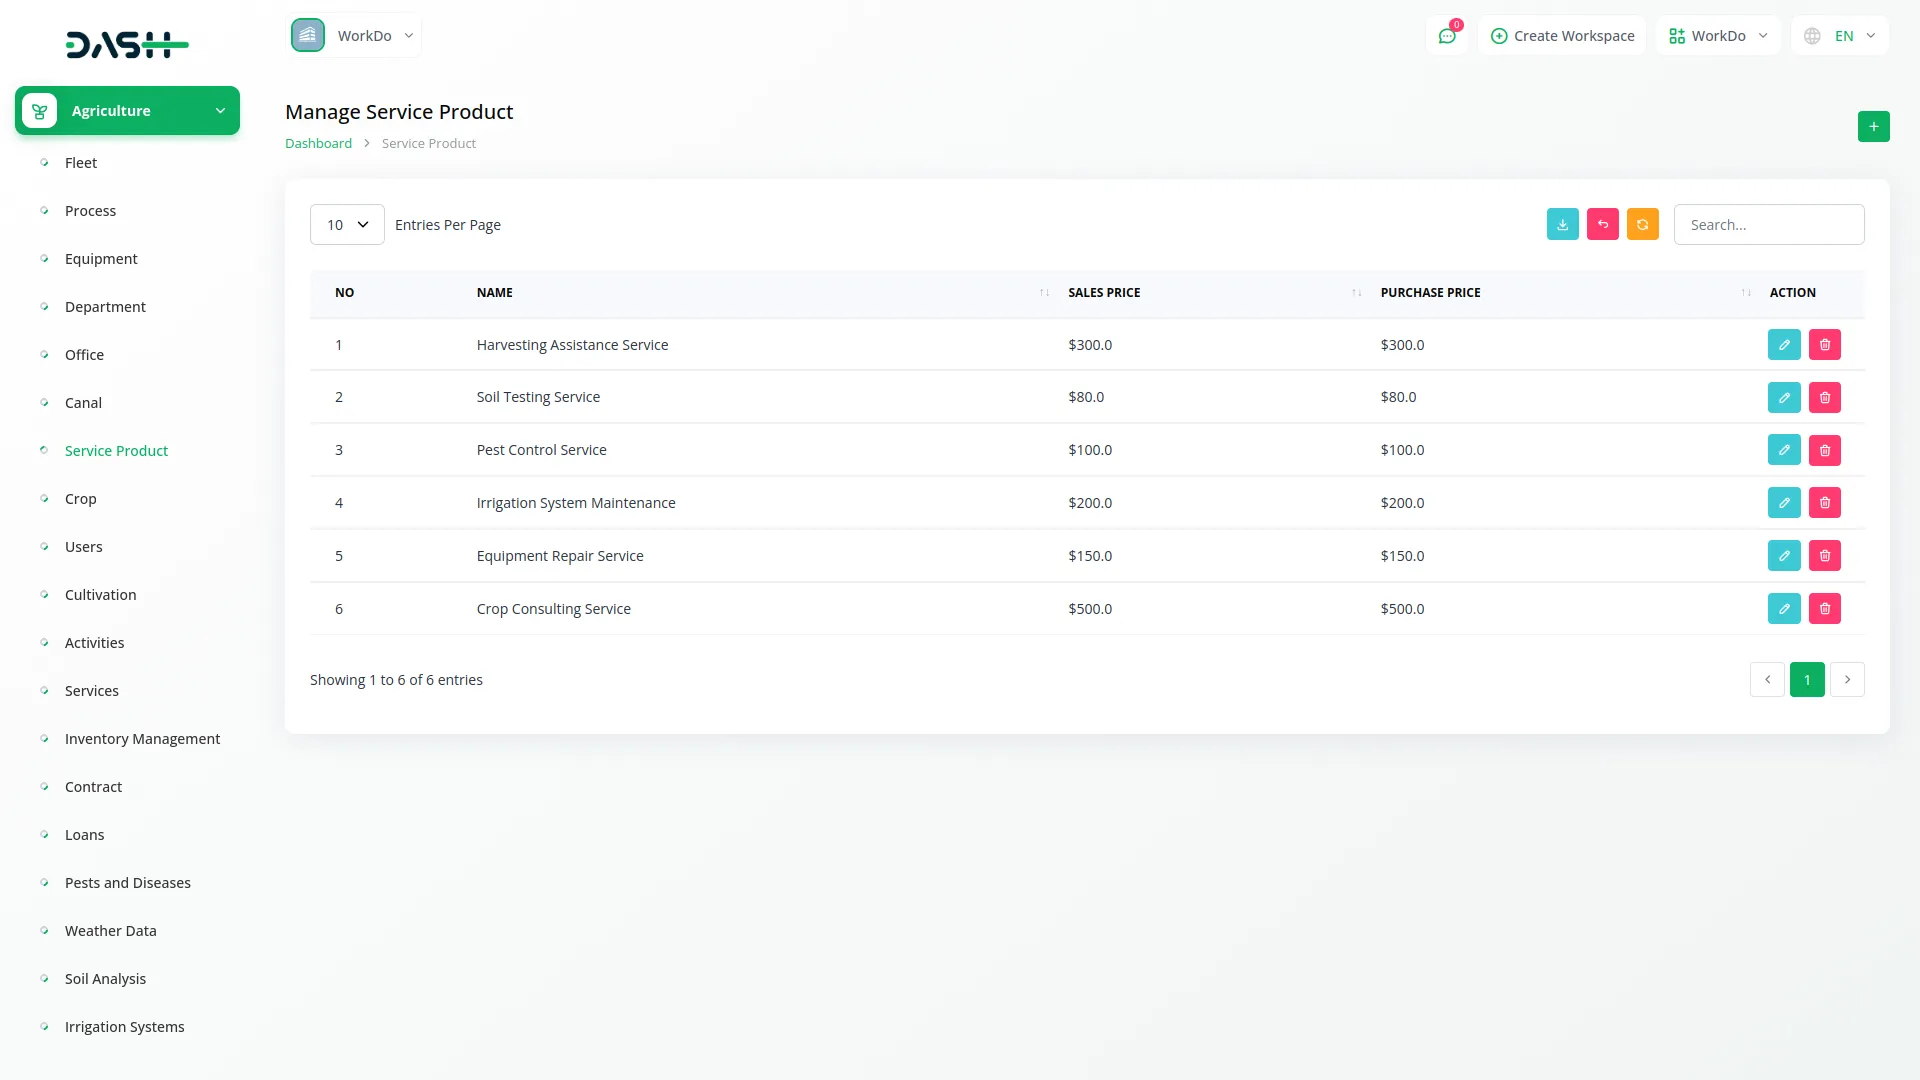
- Fill in the Sales Price which represents the price at which the product or service is sold to customers. Enter the Purchase Price which is the cost at which the product or service is acquired.
- The list page displays all service products with columns for No, Name, Sales Price, and Purchase Price. Use the Search button to locate specific service products and the Export button to download service product information. Available actions include Edit to modify service product details and Delete to remove service products that are no longer offered.
Crop Management
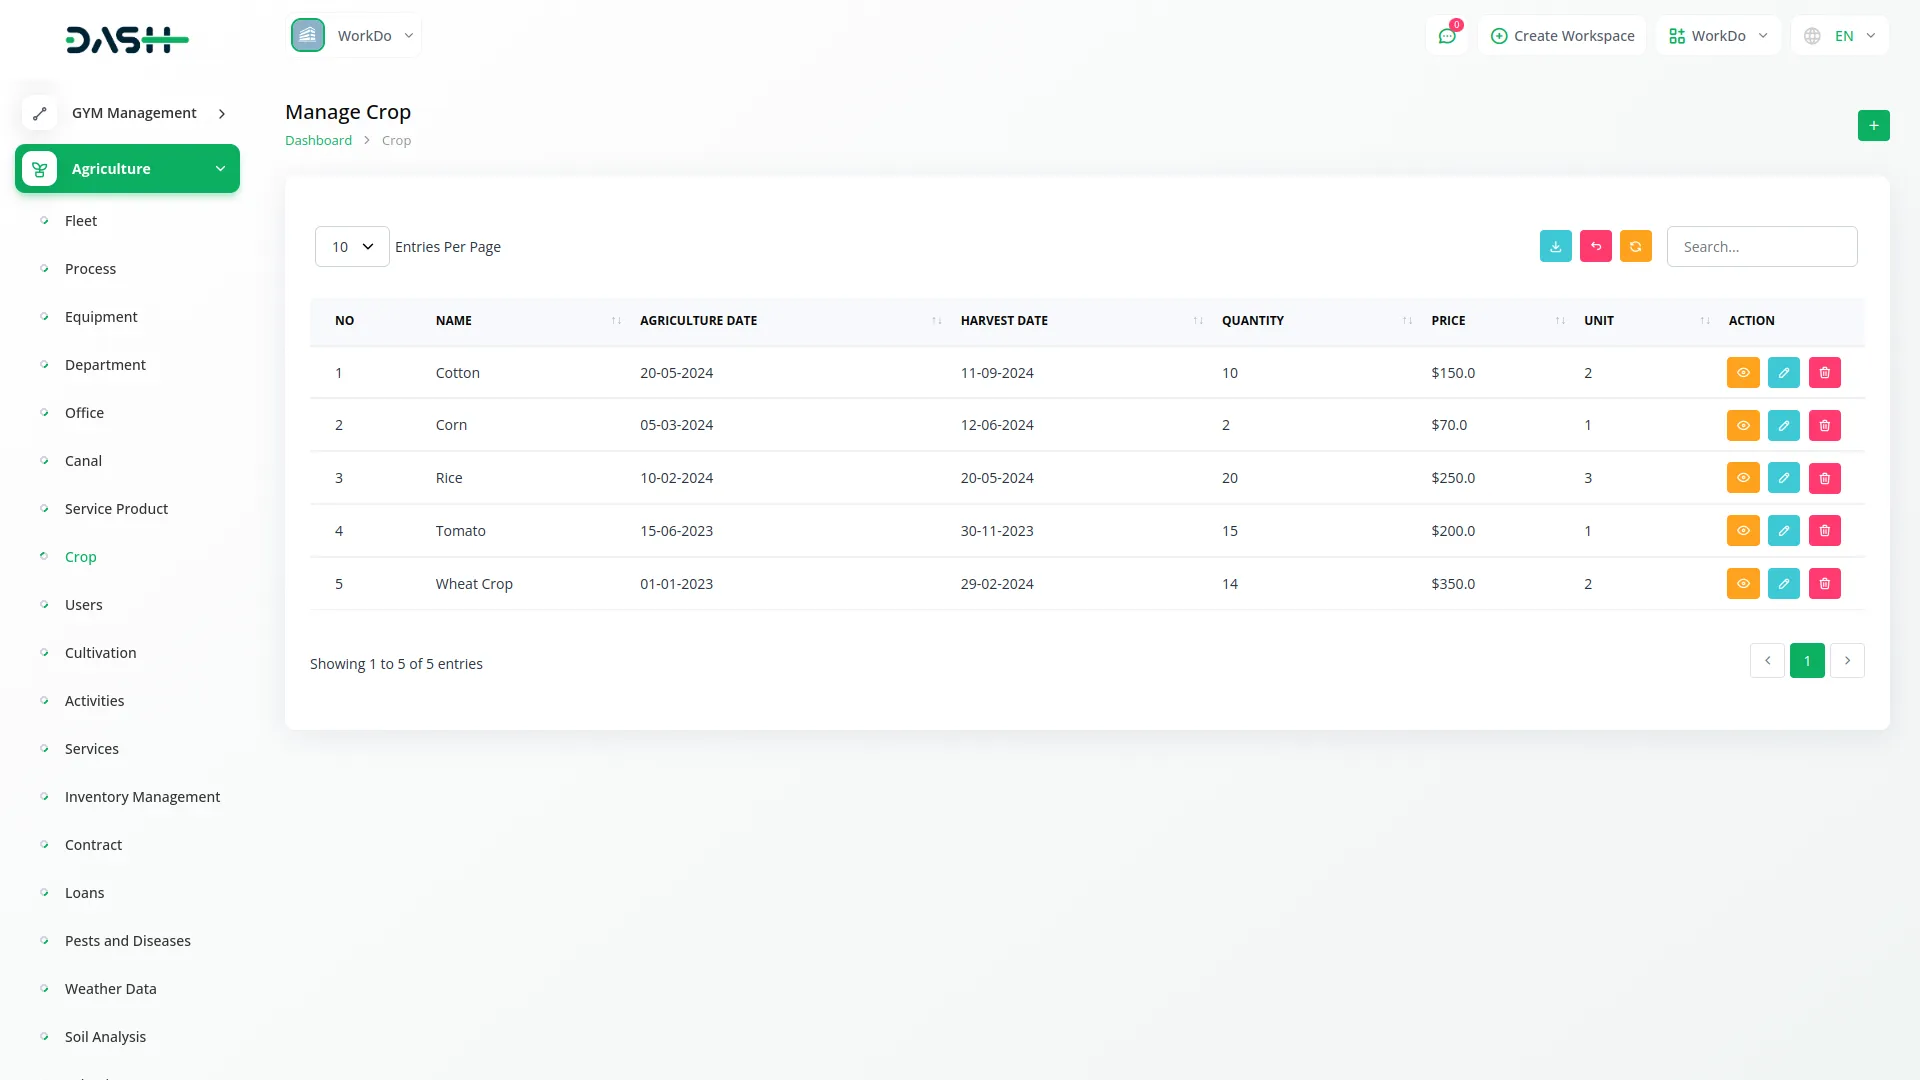
- To add a new crop, click the “Create” button on the crop page. Enter the Name of the crop you want to manage. Specify the Quantity of the crop and enter the Price per unit. Fill in the Unit of measurement for the crop. Set the Agriculture Date when the crop was planted and the Harvest Date when it was or will be harvested.
- Select the Season from the dropdown menu which connects to the Season Type menu from System Setup. Choose the Cycles from the dropdown that connects to the Cycles menu from System Setup.
- Select the Fleets from the dropdown connecting to the Fleet menu to assign machinery or vehicles to this crop. Choose Equipment from the dropdown connecting to the Equipment menu to assign the necessary tools. Select Processes from the dropdown connecting to the Process menu to define the agricultural processes involved.
- The list page shows all crops with columns for No, Name, Agriculture Date, Harvest Date, Quantity, Price, and Unit. Use the Search button to find specific crops and the Export button to download crop data. Available actions include View to see complete crop details, Edit to modify crop information, and Delete to remove crops from the system.
User Management
- To create a new user, click the “Create” button at the top of the user page. Enter the Name of the user and their Email address. Set a Password for the user account and fill in their Phone number.
- Select the Department from the dropdown menu that connects to the Department menu. Choose the Office from the dropdown connecting to the Office menu to assign the user to a specific location.
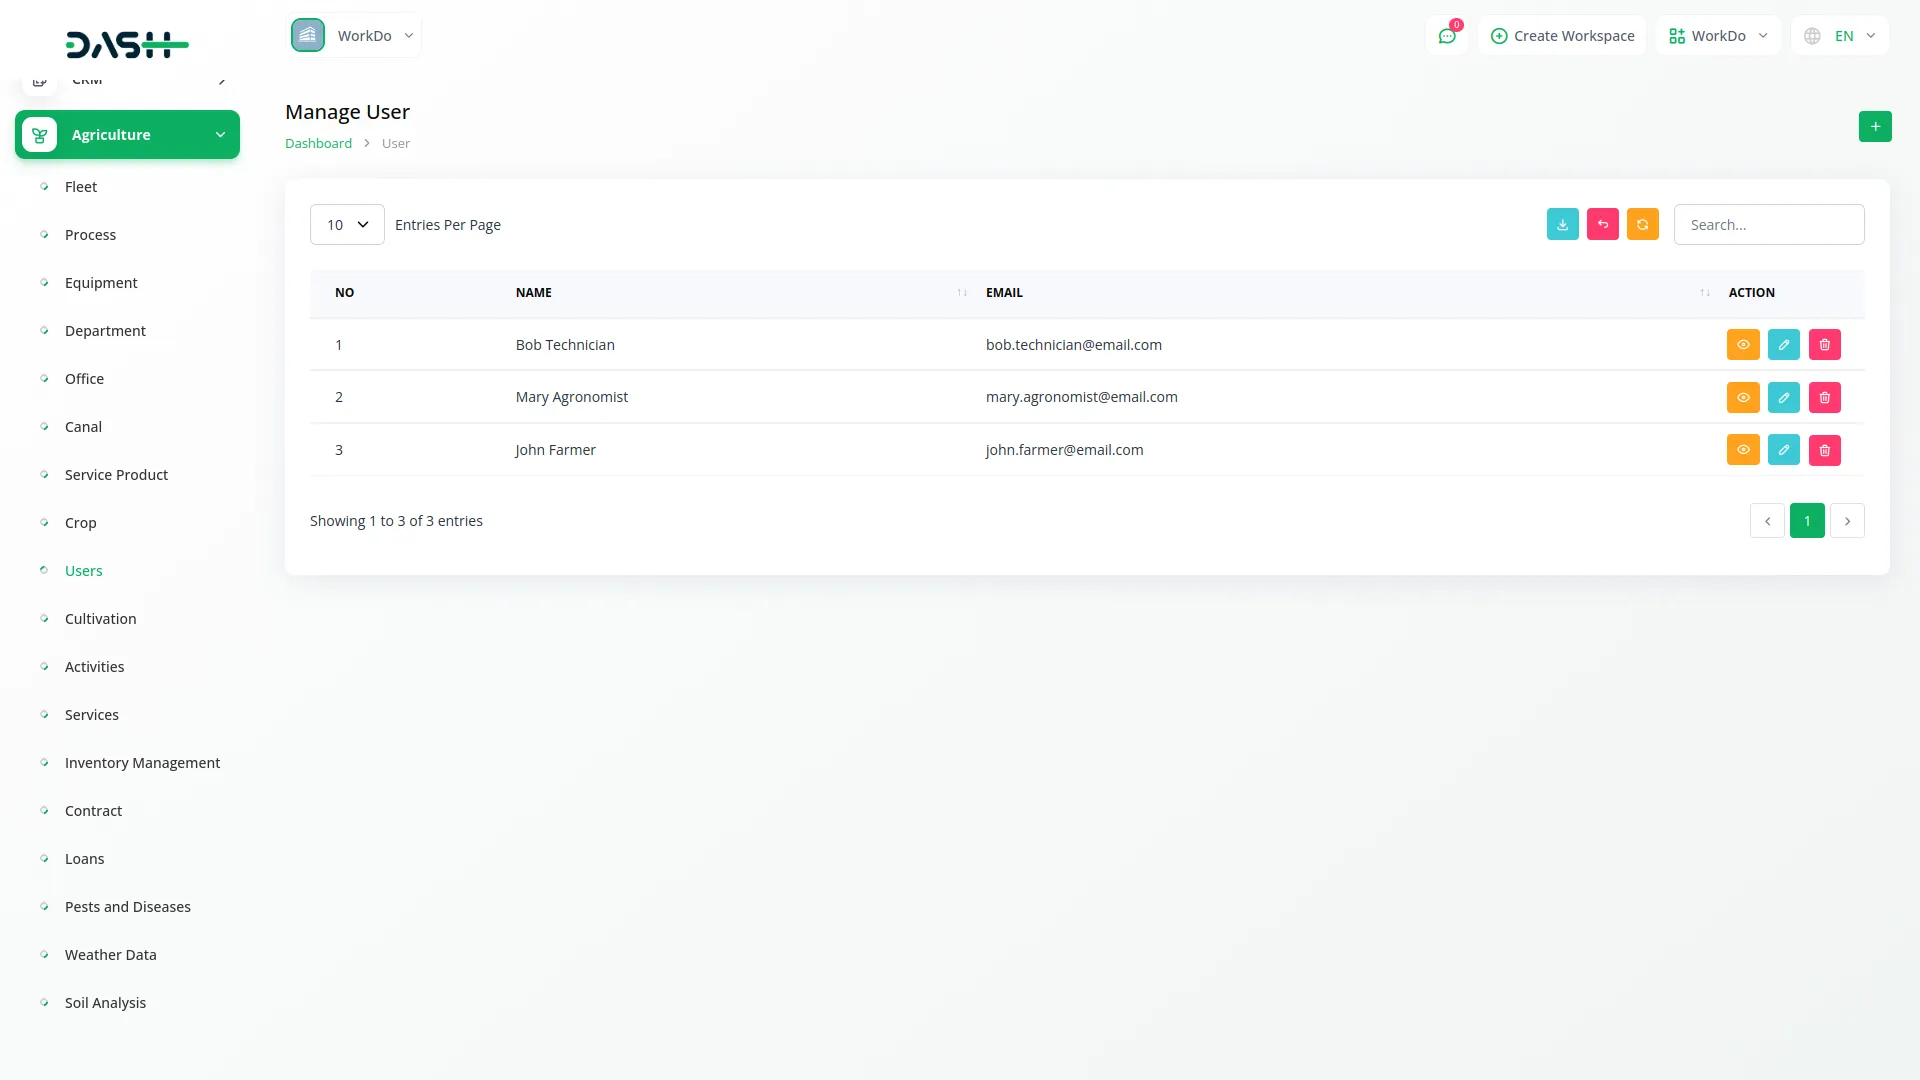
- Enter the Total Area that the user is responsible for managing and specify the Cultivate Area that represents the area currently under cultivation. Note that this menu displays all users where the user type is “farmer”, focusing specifically on agricultural users within the system.
- The list page displays all farmer users with columns for No, Name, and Email. Use the Search button to locate specific users and the Export button to download user information.
- Available actions include View to see complete user details, Edit to modify user information, and Delete to remove users from the system.
Cultivation Management
- To create a new cultivation record, click the “Create” button at the top of the cultivation page. Enter the Name of the cultivation project to identify the specific farming activity. Select the Farmer from the dropdown menu which connects to the User menu and shows only users where the user type is “farmer”. Choose the Agriculture Cycle from the dropdown connecting to the Cycles menu from System Setup.
- Select the Department from the dropdown which connects to the Department menu and choose the Office from the dropdown connecting to the Office menu to specify the organizational structure. Enter the Area measurement for the cultivation project.
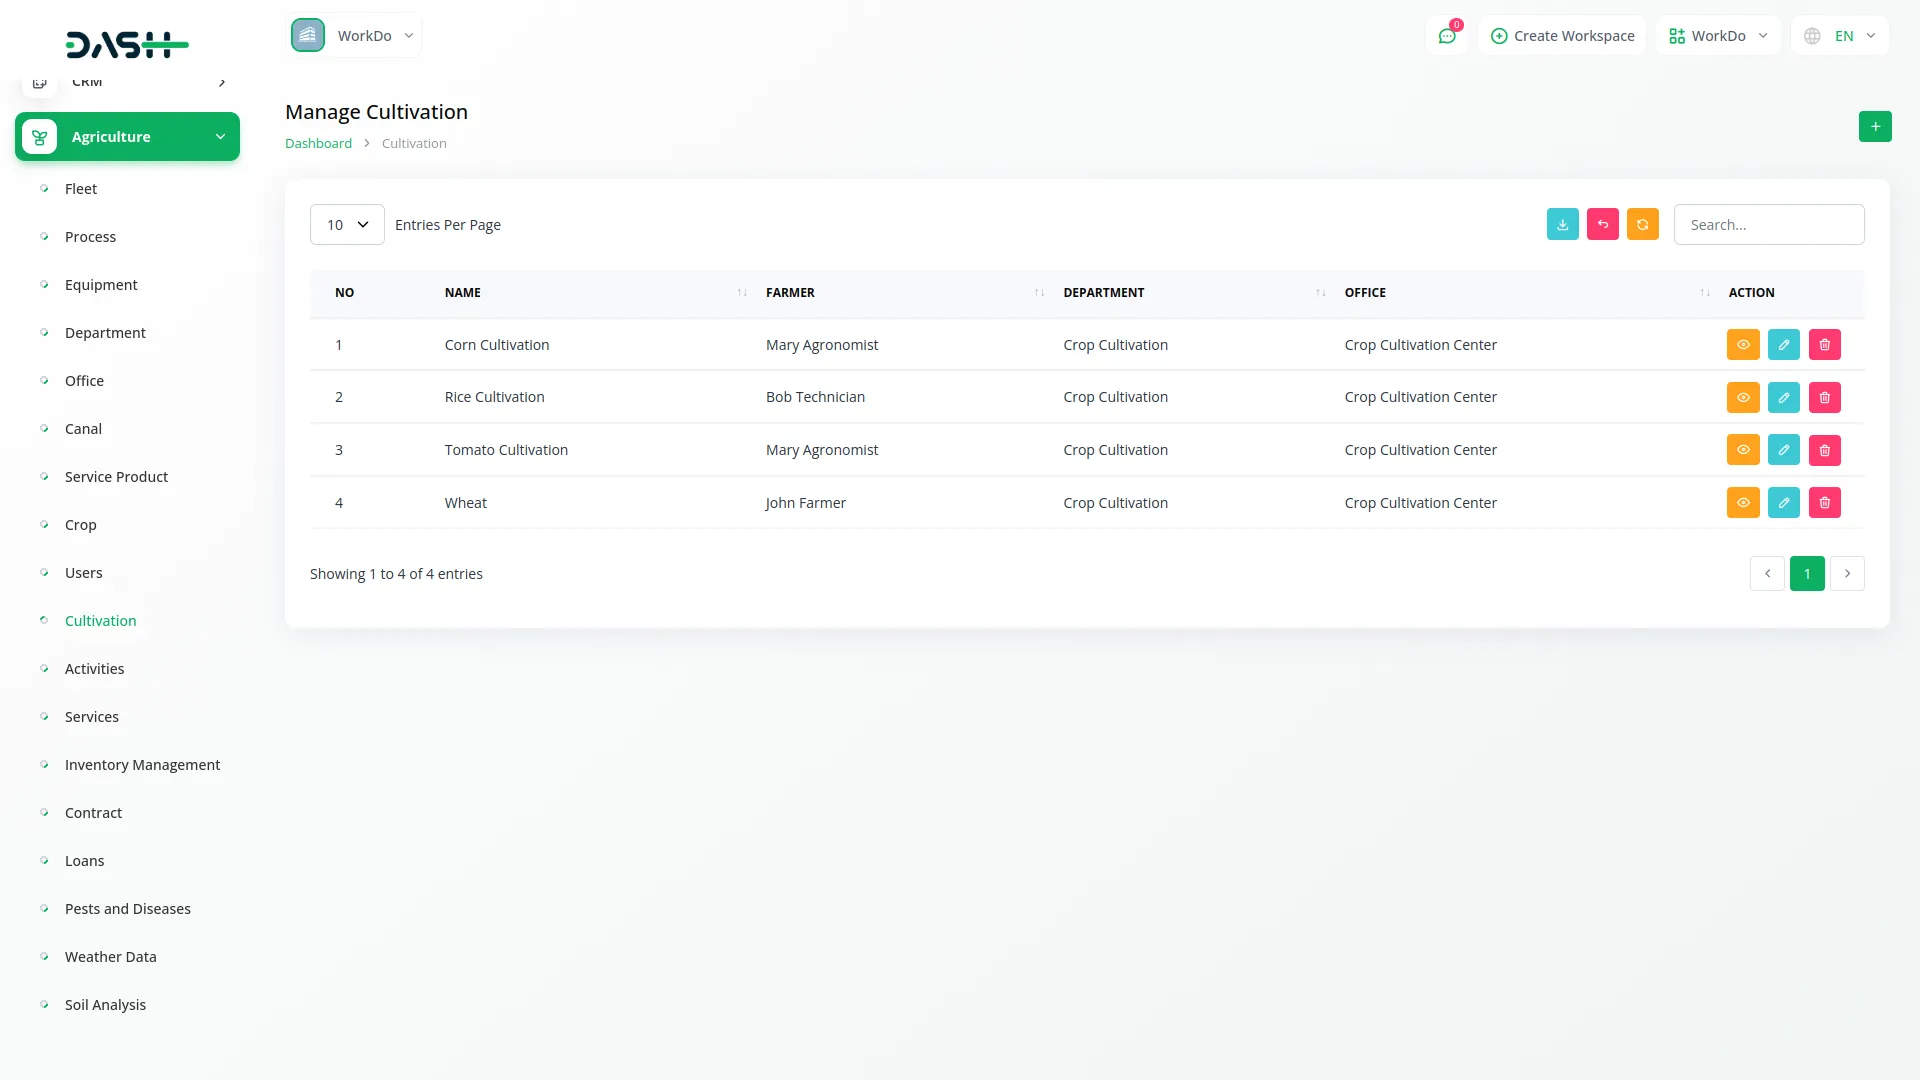
- The list page displays all cultivation records with columns for No, Name, Farmer Name, Department, and Office. Use the Search button to find specific cultivation projects and the Export button to download cultivation data.
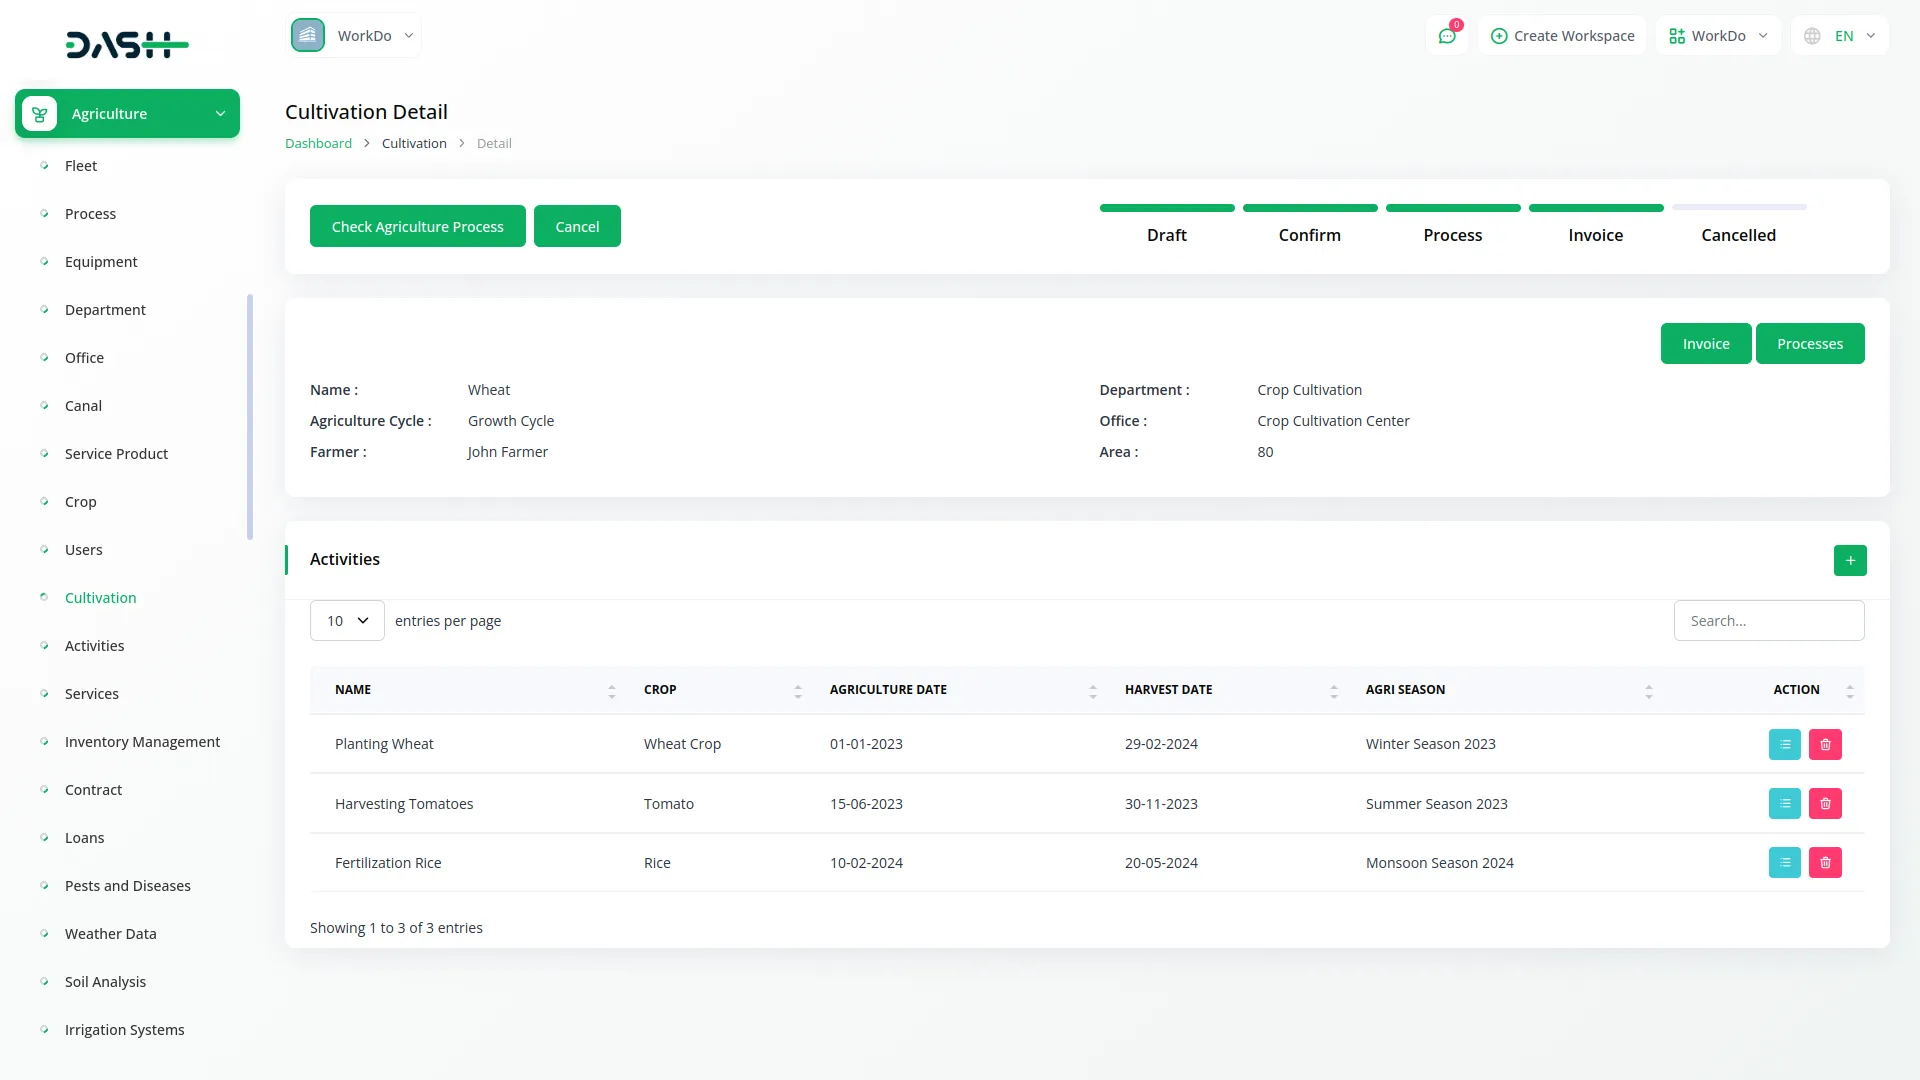
- Available actions include Edit to modify cultivation information, and Delete to remove cultivation records from the system, View which opens the Cultivation Detail page where you can manage status options like Draft, Confirm, Process, Invoice, and Cancelled, and also shows an Activities list table, View to see Activity Service information, and Delete to remove records from the system.
Activities Management
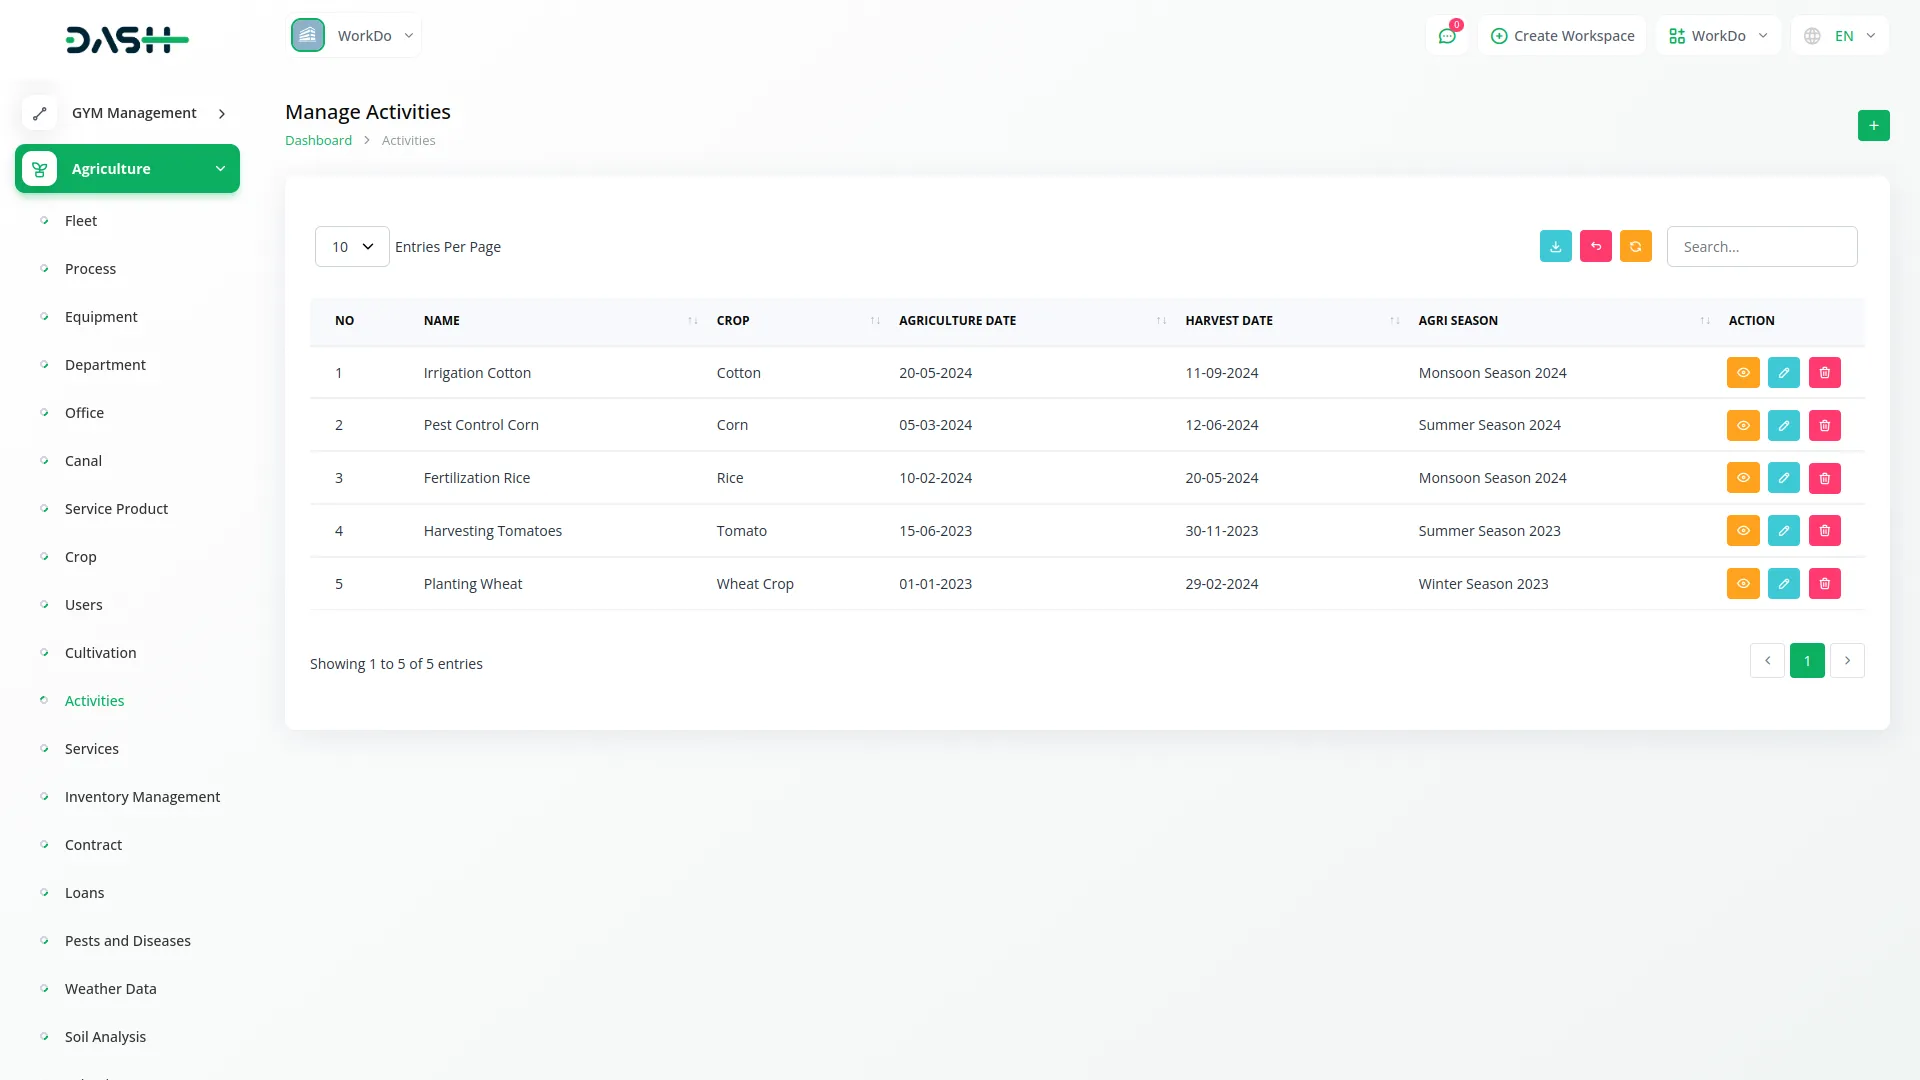
- To add a new activity, click the “Create” button on the activities page. Enter the Name of the agricultural activity you want to track. Select the Crop from the dropdown menu which connects to the Crop menu to link the activity to a specific crop. Enter the Agri Season in the text field to specify the seasonal timing for the activity.
- The list page shows all activities with columns for No, Name, Crop, Agriculture Date, Harvest Date, and Agri Season Name. Use the Search button to locate specific activities and the Export button to download activity information.
- Available actions include View which opens the Activities Detail page where you can see a Services list table. This table includes an Add button to add new services related to the activity and a delete button to remove services from the list. Other available actions are Edit to modify activity details and Delete to remove activities from the system.
Services Management
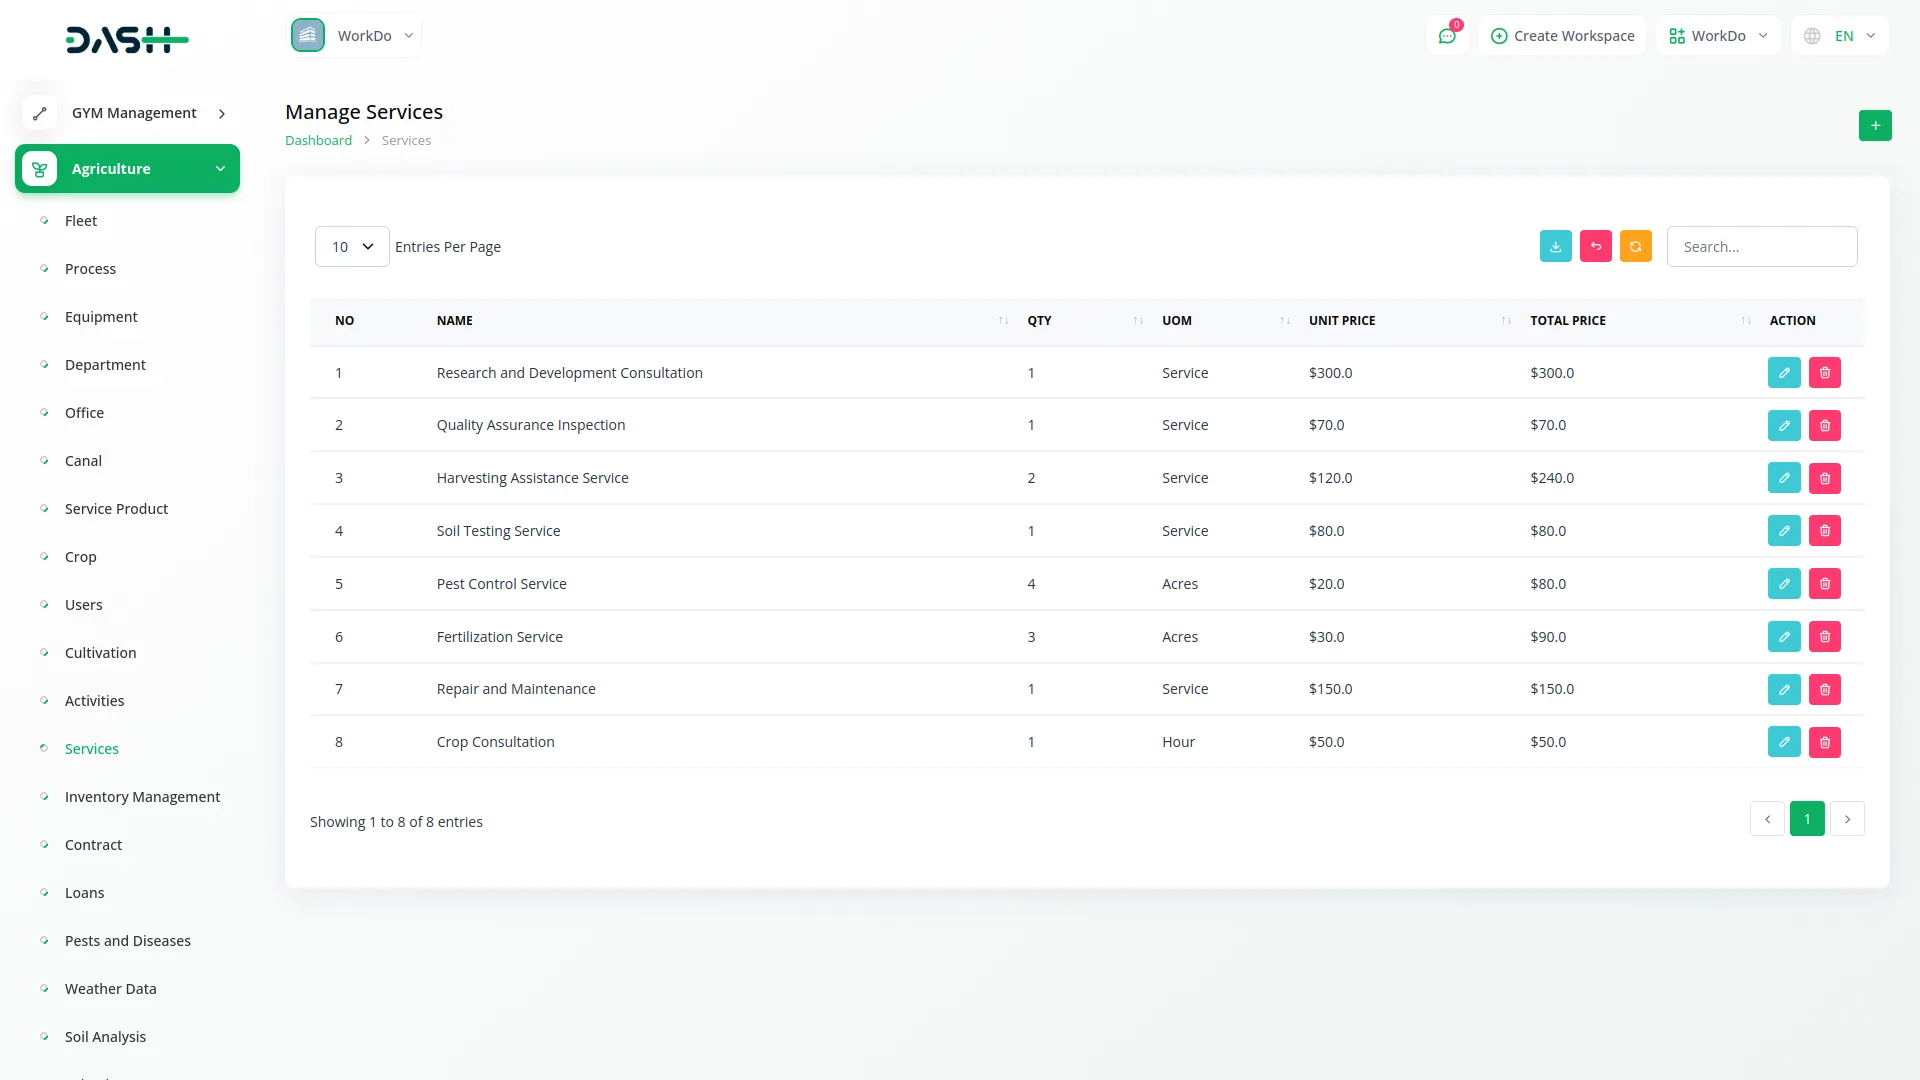
- To create a new service, click the “Create” button at the top of the services page. Enter the Name of the service being provided. Select the Activity from the dropdown menu that connects to the Activities menu to link the service to a specific agricultural activity. Fill in the QTY (quantity) of the service and specify the UOM (Unit of Measure).
- Enter the Unit Price for the service and the Total Price which represents the complete cost for the service quantity provided.
- The list page displays all services with columns for No, Name, QTY, UOM, Unit Price, and Total Price. Use the Search button to find specific services and the Export button to download service data. Available actions include Edit to modify service information and Delete to remove services from the system.
Inventory Management
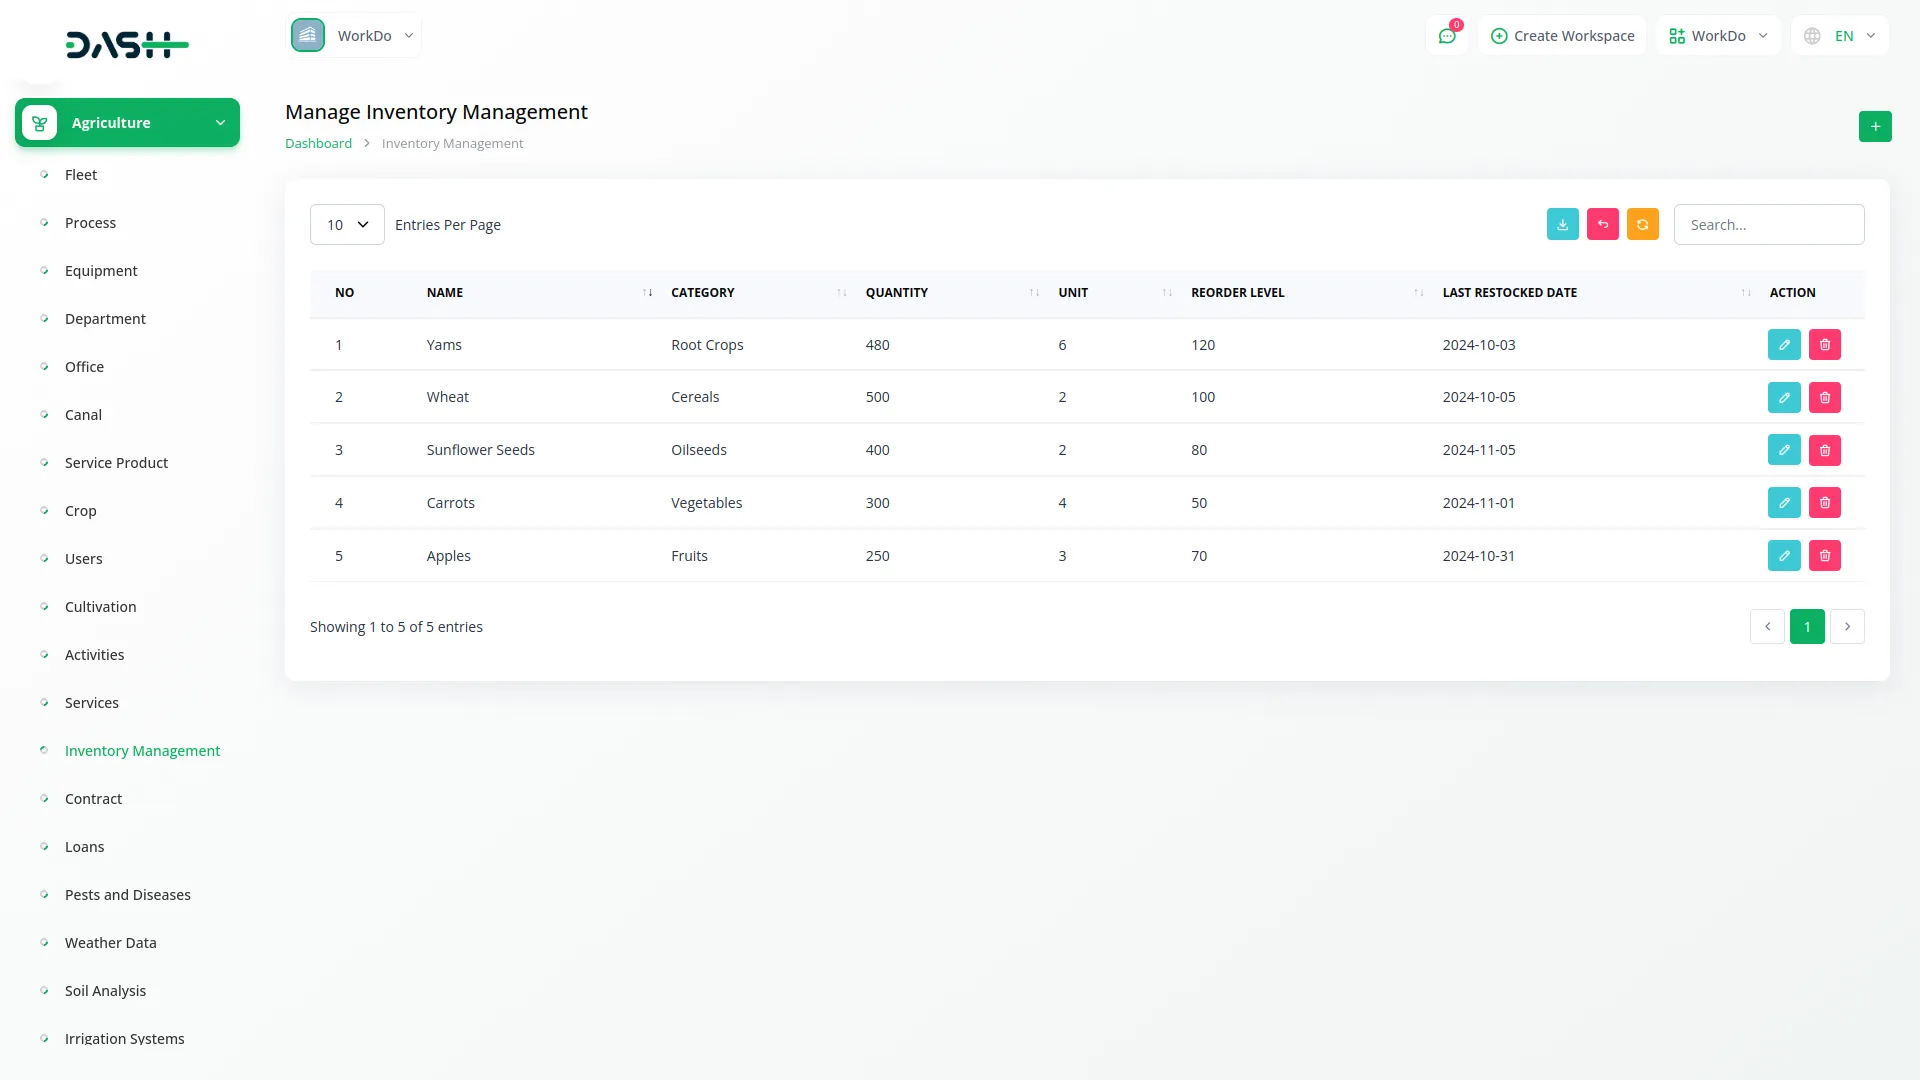
- To add a new inventory item, click the “Create” button on the inventory management page. Enter the Name of the inventory item to clearly identify what is being tracked. Select the Category from the dropdown menu that connects to the Category menu from System Setup to properly categorize the inventory item.
- Fill in the Quantity currently available in inventory and specify the Unit of measurement. Enter the Reorder Level which indicates when new stock should be ordered. Set the Last Restocked Date to track when inventory was last replenished.
- The list page shows all inventory items with columns for No, Name, Category, Quantity, Unit, Reorder Level, and Last Restocked Date.
- Use the Search button to locate specific inventory items and the Export button to download inventory information. Available actions include Edit to modify inventory details and Delete to remove inventory items from the system.
Contract Management
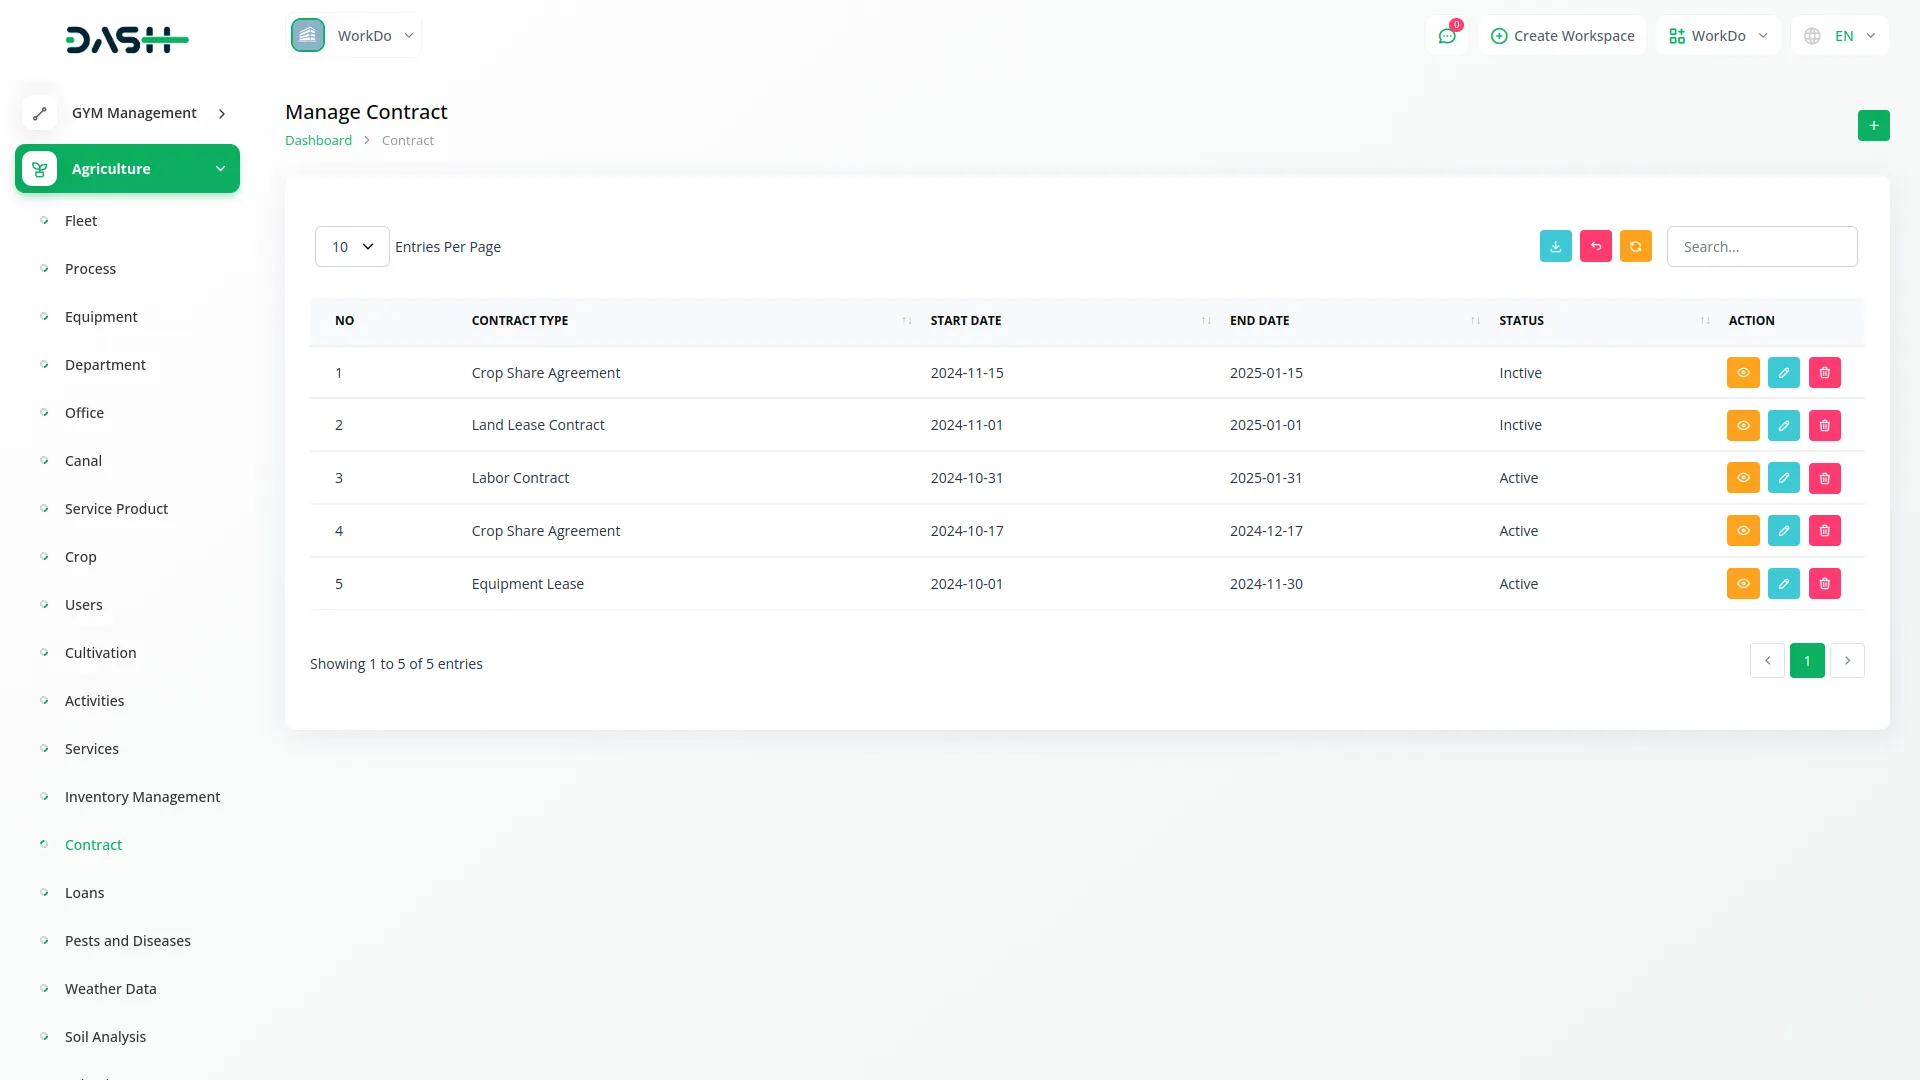
- To create a new contract, click the “Create” button at the top of the contract page. Select the Contract Type from the dropdown menu which connects to the Contract Type menu from System Setup to categorize the agreement. Set the Start Date when the contract begins and the End Date when it expires.
- Choose the Status from the available options: Active or Inactive to indicate the current state of the contract. Fill in the Parties Involved to identify who is participating in the contract. Add the Terms that outline the specific conditions and agreements of the contract.
- The list page displays all contracts with columns for No, Contract Type, Start Date, End Date, and Status. Use the Search button to find specific contracts and the Export button to download contract data.
- Available actions include Show to view complete contract details, Edit to modify contract information, and Delete to remove contracts from the system.
Loan Management
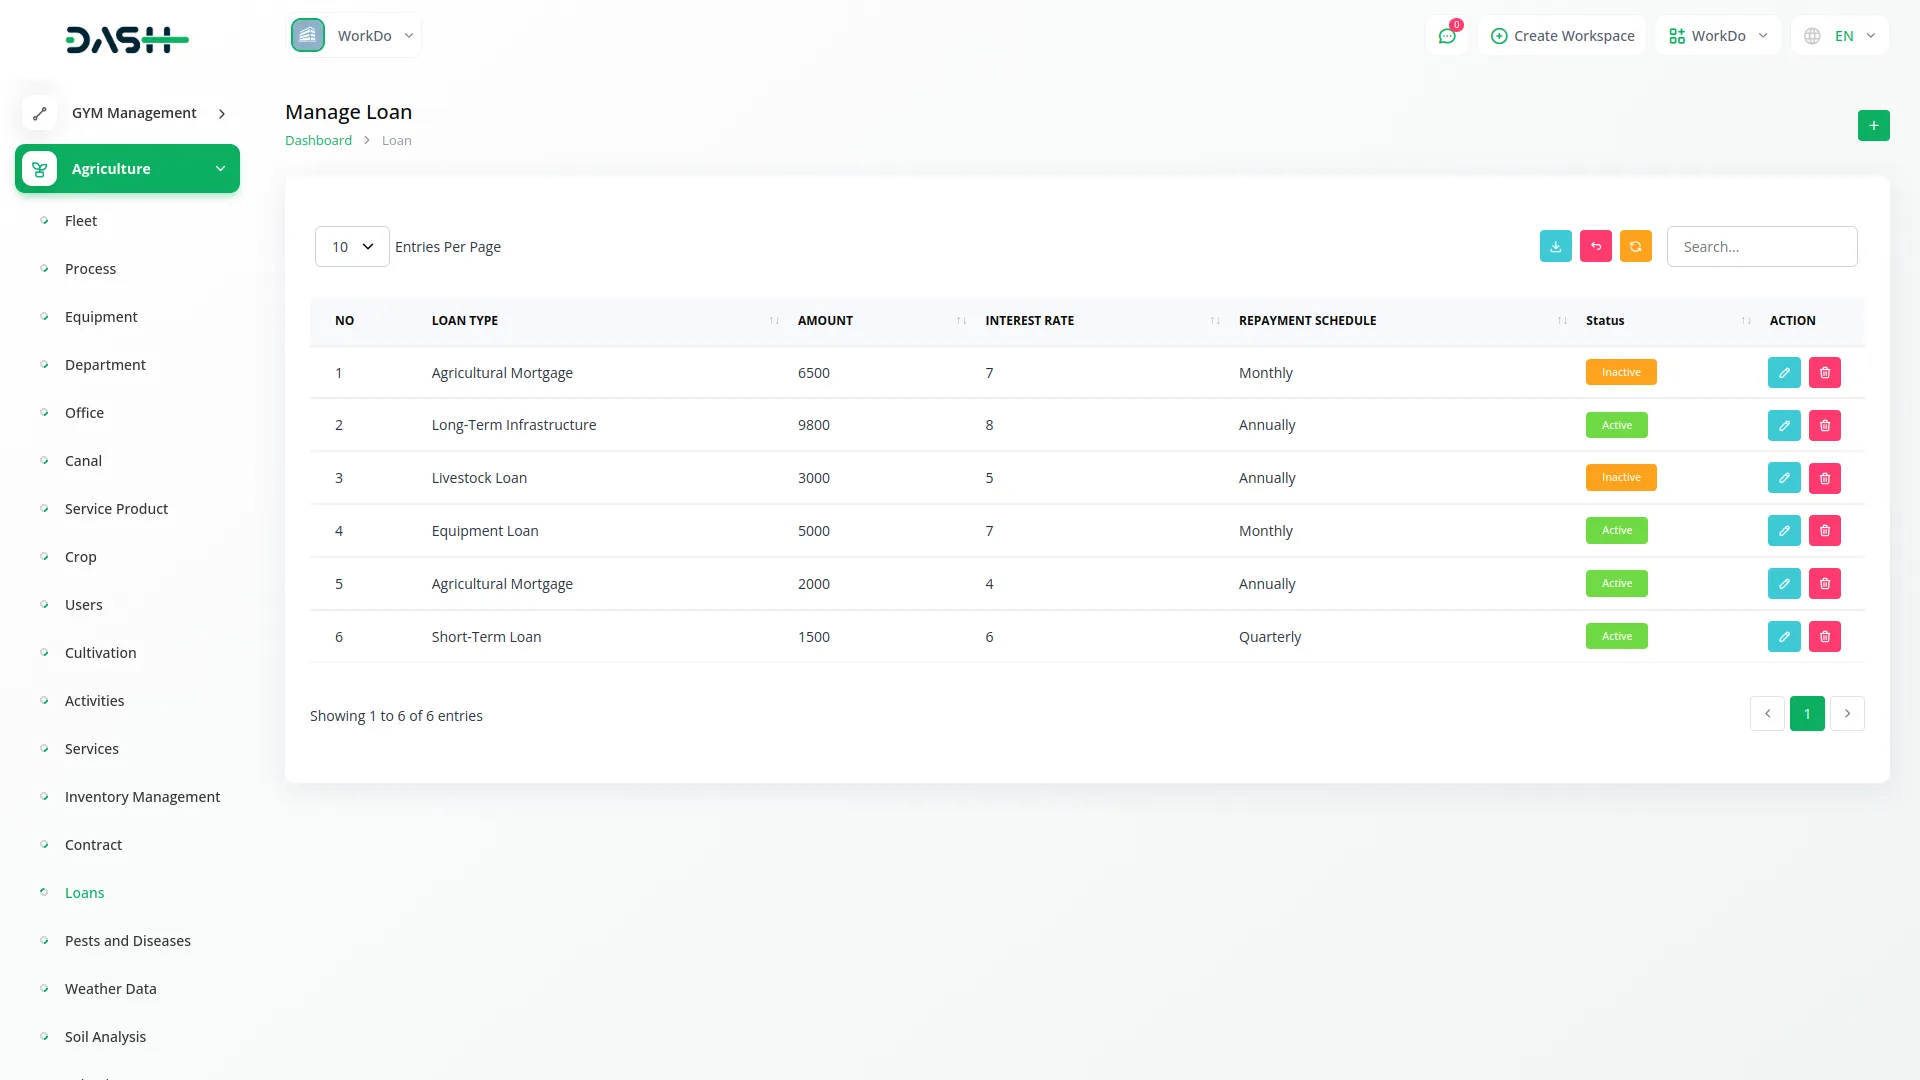
- To create a new loan record, click the “Create” button at the top of the loan page. Select the Loan Type from the dropdown menu, which connects to the Loan Type menu from System Setup to categorize the loan appropriately.
- Enter the Amount of the loan being processed and fill in the Interest Rate that applies to this loan.
- Add the Repayment Schedule details that outline how the loan will be repaid. Select the Status from the available options: Active or Inactive to indicate the current state of the loan.
- The list page displays all loans with columns for No, Loan Type, Amount, Interest Rate, Repayment Schedule, and Status.
- Use the Search button to find specific loans and the Export button to download loan information. Available actions include Edit to modify loan details and Delete to remove loan records from the system.
Pests and Diseases Management
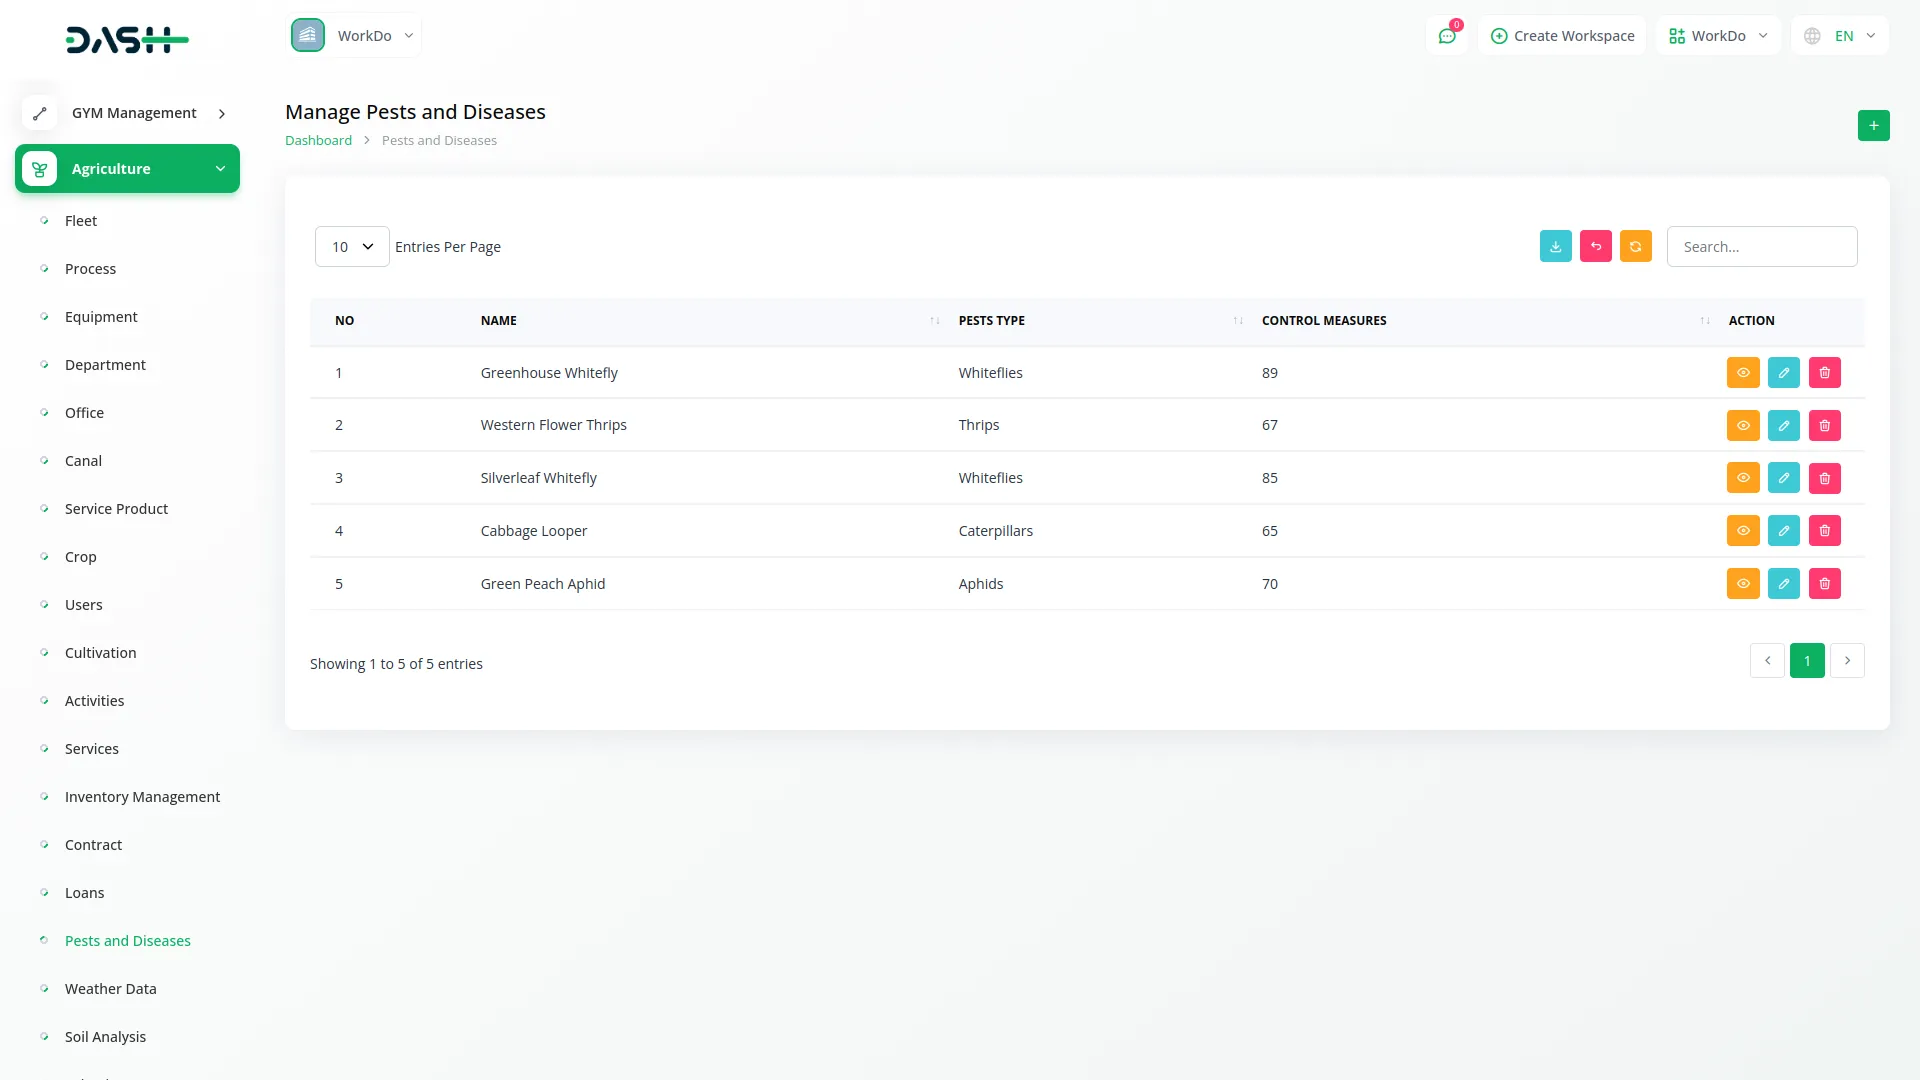
- To add a new pest or disease record, click the “Create” button on the pests and diseases page. Enter the Name of the pest or disease to clearly identify the threat.
- Select the Pest Type from the dropdown menu which connects to the Pests Type menu from System Setup to categorize the pest or disease properly.
- Fill in the Affected Crops to specify which crops are impacted by this pest or disease. Add the Symptoms that help identify the presence of this pest or disease. Enter the Control Measures that describe how to treat or prevent this pest or disease.
- The list page shows all pest and disease records with columns for No, Name, Pest Type, and Control Measures. Use the Search button to locate specific pests or diseases and the Export button to download pest and disease information.
- Available actions include Show to view complete pest or disease details, Edit to modify the information, and Delete to remove records from the system.
Weather Data Management
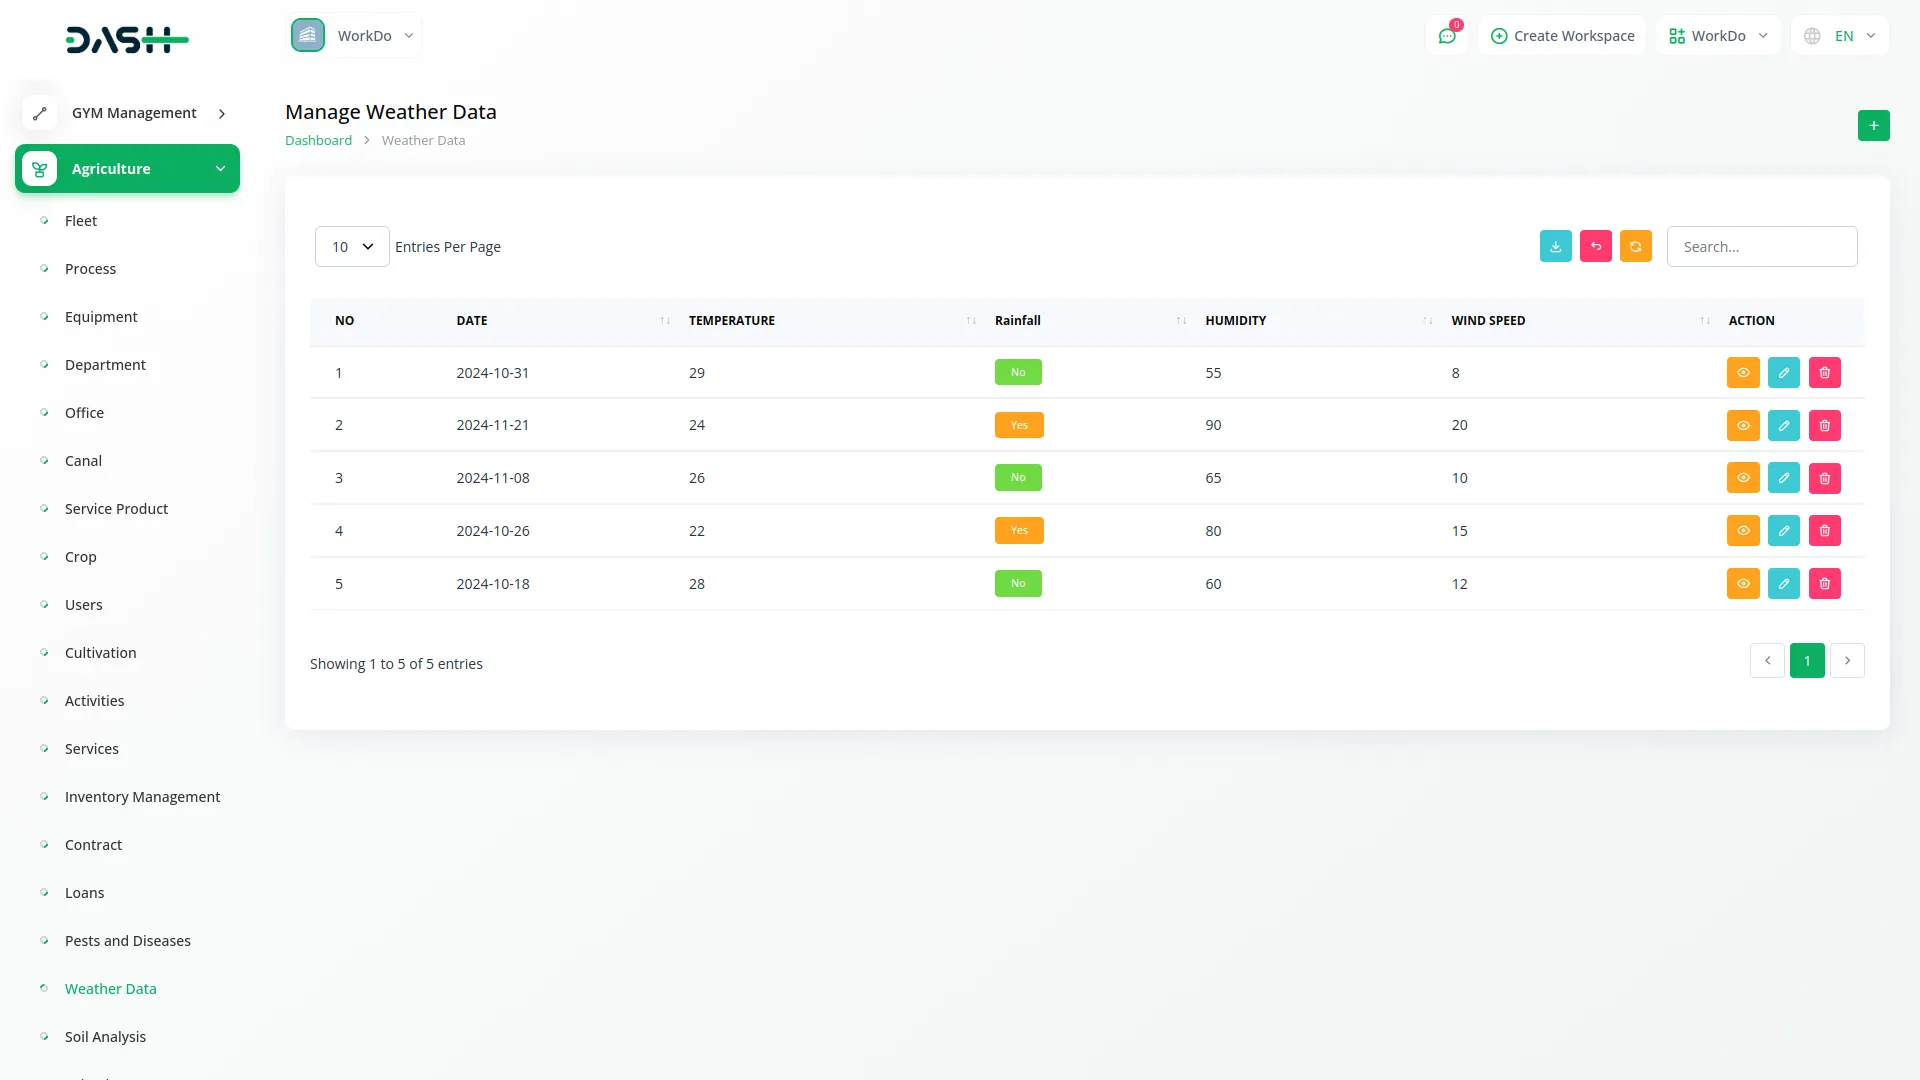
- To create a new weather data entry, click the “Create” button at the top of the weather data page. Set the Date for the weather record you want to add. Enter the Temperature in degrees Celsius to record the daily temperature. Select Rainfall from the Yes or No options to indicate whether there was precipitation.
- Fill in the Humidity percentage to record the moisture level in the air. Enter the Wind Speed measurement and add the Forecast information that provides weather predictions or additional observations.
- The list page displays all weather data with columns for No, Date, Temperature, Rainfall, Humidity, and Wind Speed. Use the Search button to find specific weather records and the Export button to download weather information.
- Available actions include Show to view complete weather details, Edit to modify weather data, and Delete to remove weather records from the system.
Soil Analysis Management
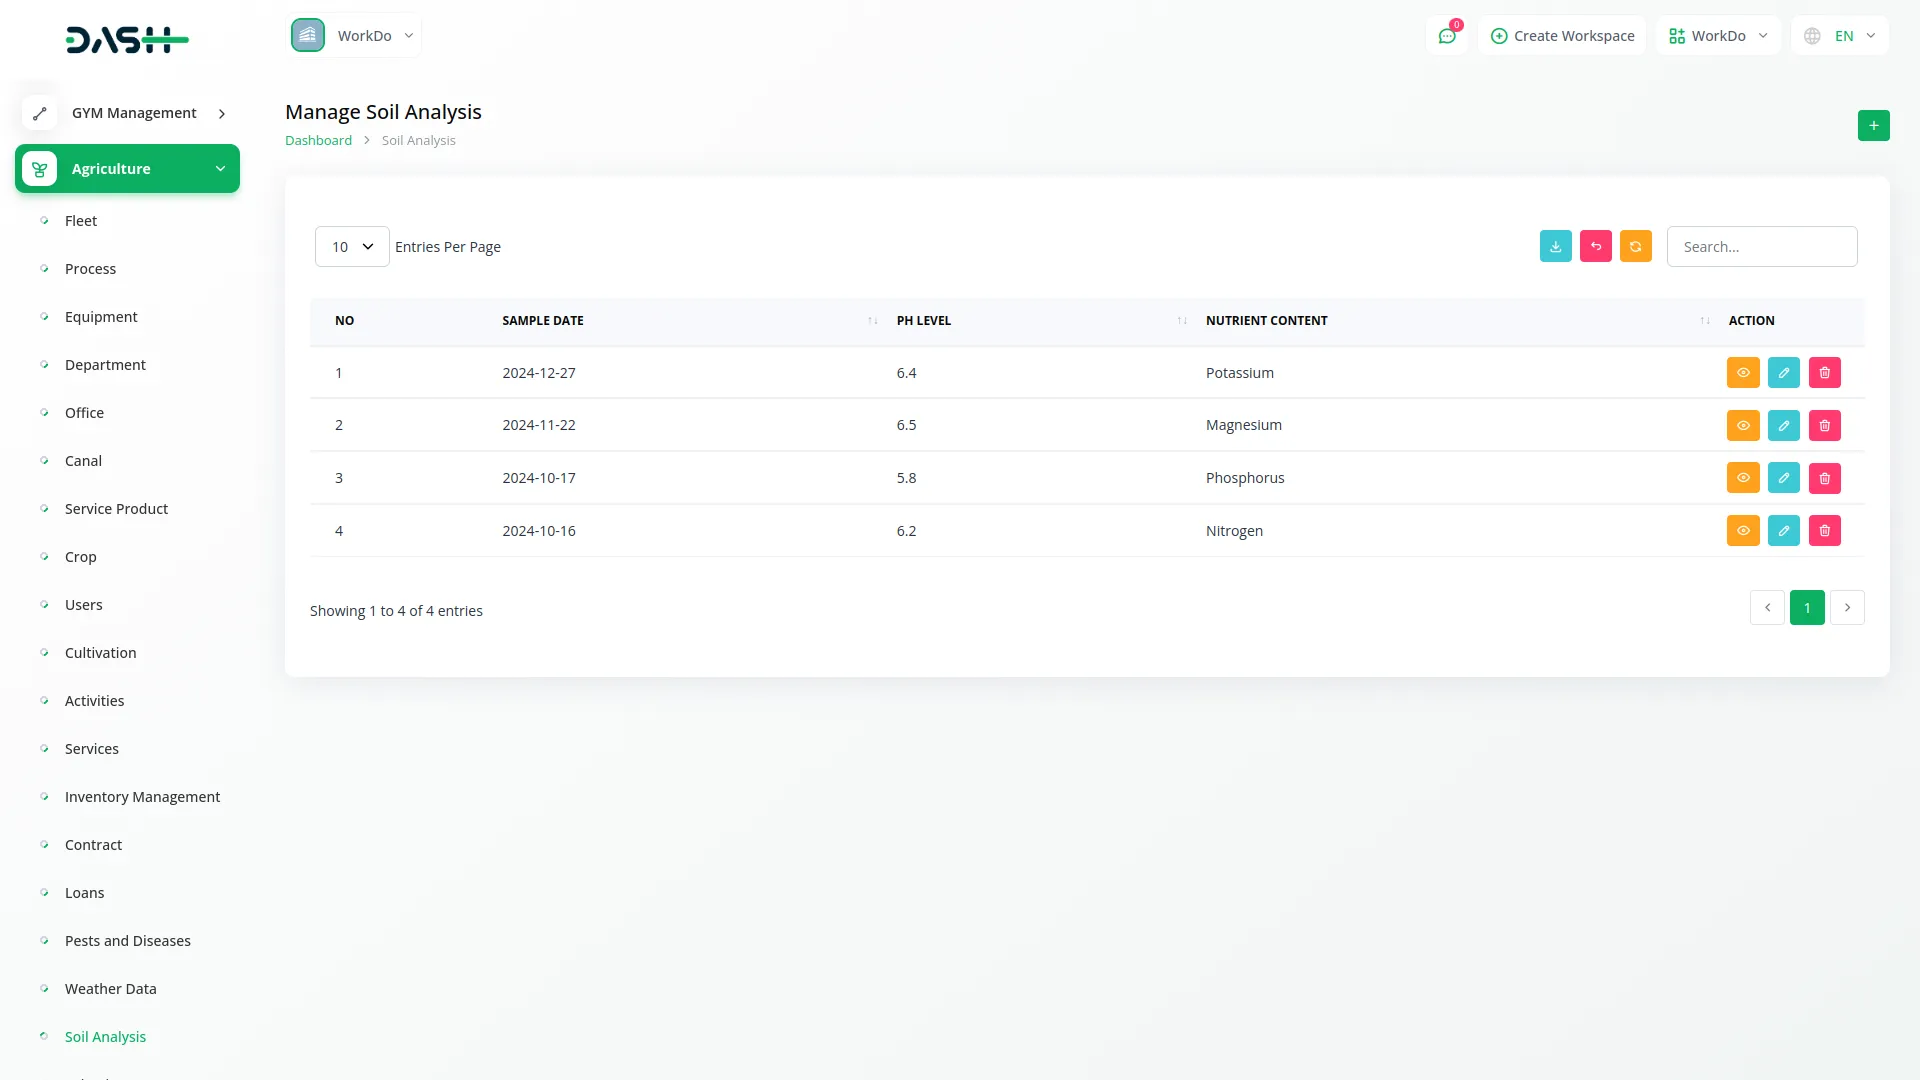
- To add a new soil analysis record, click the “Create” button on the soil analysis page. Set the Sample Date when the soil sample was taken for analysis. Enter the PH Level measurement that indicates the acidity or alkalinity of the soil.
- Select the Nutrient Content from the dropdown menu which connects to the Nutrient Content menu from System Setup to specify the nutrients found in the soil.
- Fill in the Location where the soil sample was collected. Add the Recommendations that provide guidance based on the soil analysis results for improving soil quality or crop production.
- The list page shows all soil analysis records with columns for No, Sample Date, PH Level, and Nutrient Content. Use the Search button to locate specific soil analysis records and the Export button to download soil analysis information.
- Available actions include Show to view complete soil analysis details, Edit to modify the analysis data, and Delete to remove soil analysis records from the system.
Irrigation Systems Management
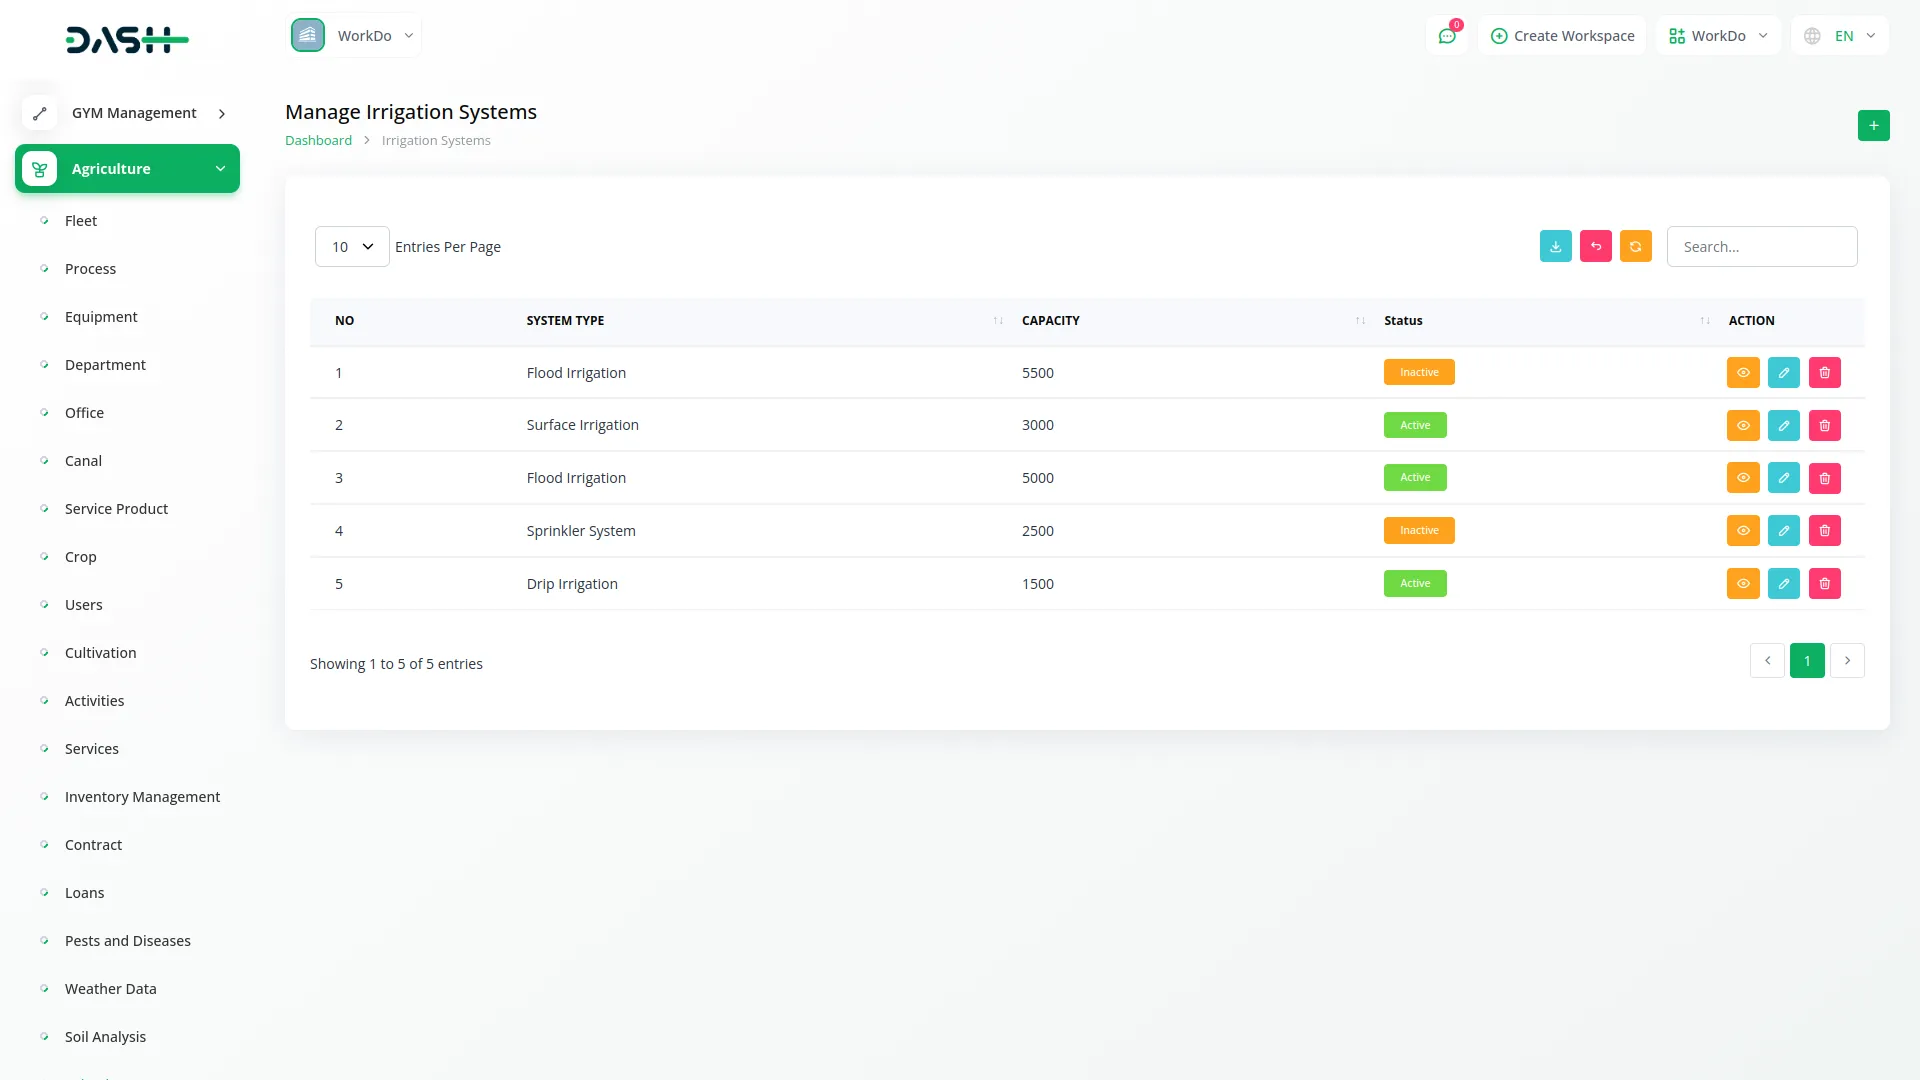
- To create a new irrigation system record, click the “Create” button at the top of the irrigation systems page. Select the System Type from the dropdown menu which connects to the Irrigation Systems Type menu from System Setup to categorize the irrigation system properly. Enter the Capacity of the irrigation system to specify its operational capability.
- Choose the Status from the available options: Active or Inactive to indicate whether the irrigation system is currently operational. Fill in the Water Source that supplies water to the irrigation system. Add the Location where the irrigation system is installed or operates.
- The list page displays all irrigation systems with columns for No, System Type, Capacity, and Status. Use the Search button to find specific irrigation systems and the Export button to download irrigation system information.
- Available actions include Show to view complete irrigation system details, Edit to modify system information, and Delete to remove irrigation system records from the system.
Research and Development Management
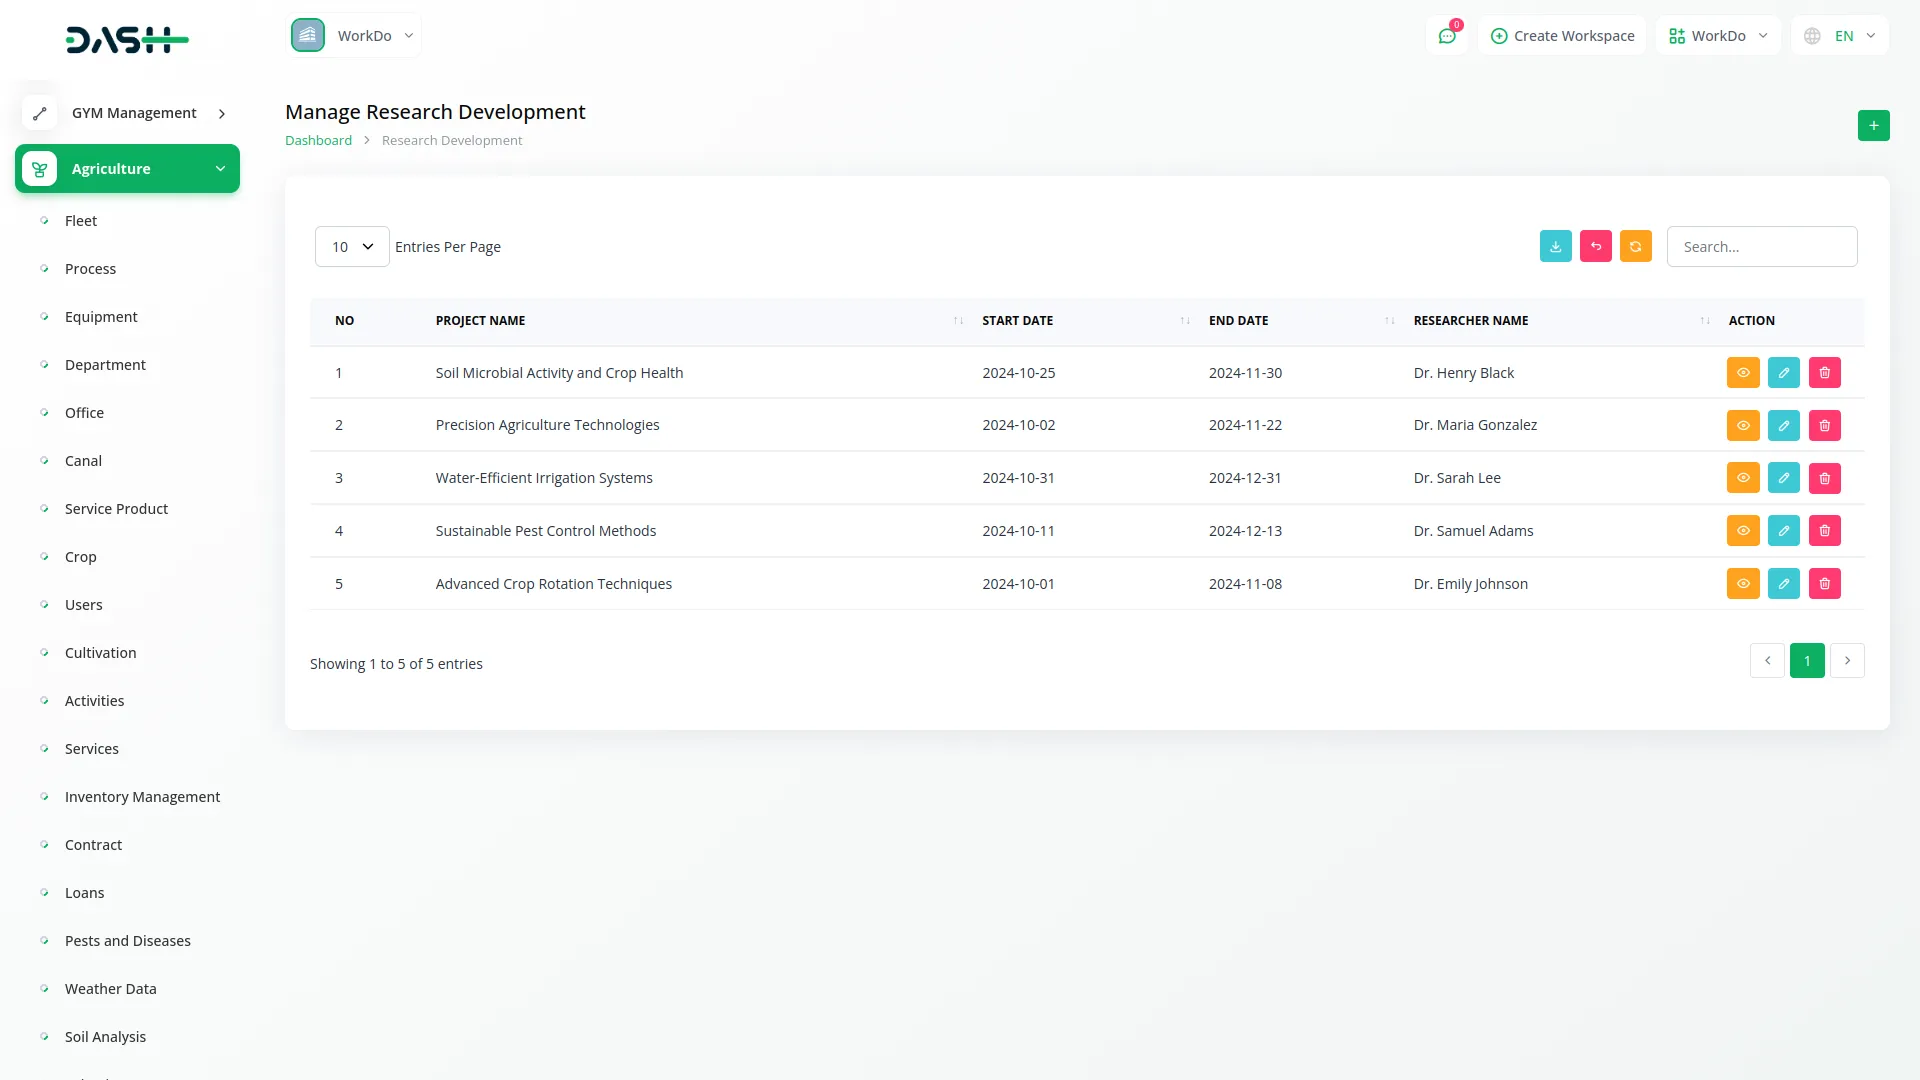
- To create a new research and development project, click the “Create” button at the top of the research and development page. Enter the Project Name to clearly identify the research initiative. Set the Start Date when the research project begins and the End Date when it is scheduled to be completed.
- Fill in the researcher’s Name to identify who is conducting or leading the research project. Add the Results section to document the findings, outcomes, or conclusions of the research. Include a Description that provides detailed information about the research project, its objectives, methodology, and scope.
- The list page displays all research and development projects with columns for No, Project Name, Start Date, End Date, and Researcher Name.
- Use the Search button to find specific research projects and the Export button to download research and development information. Available actions include Show to view complete project details, Edit to modify project information, and Delete to remove research projects from the system.
Compliance and Reporting Management
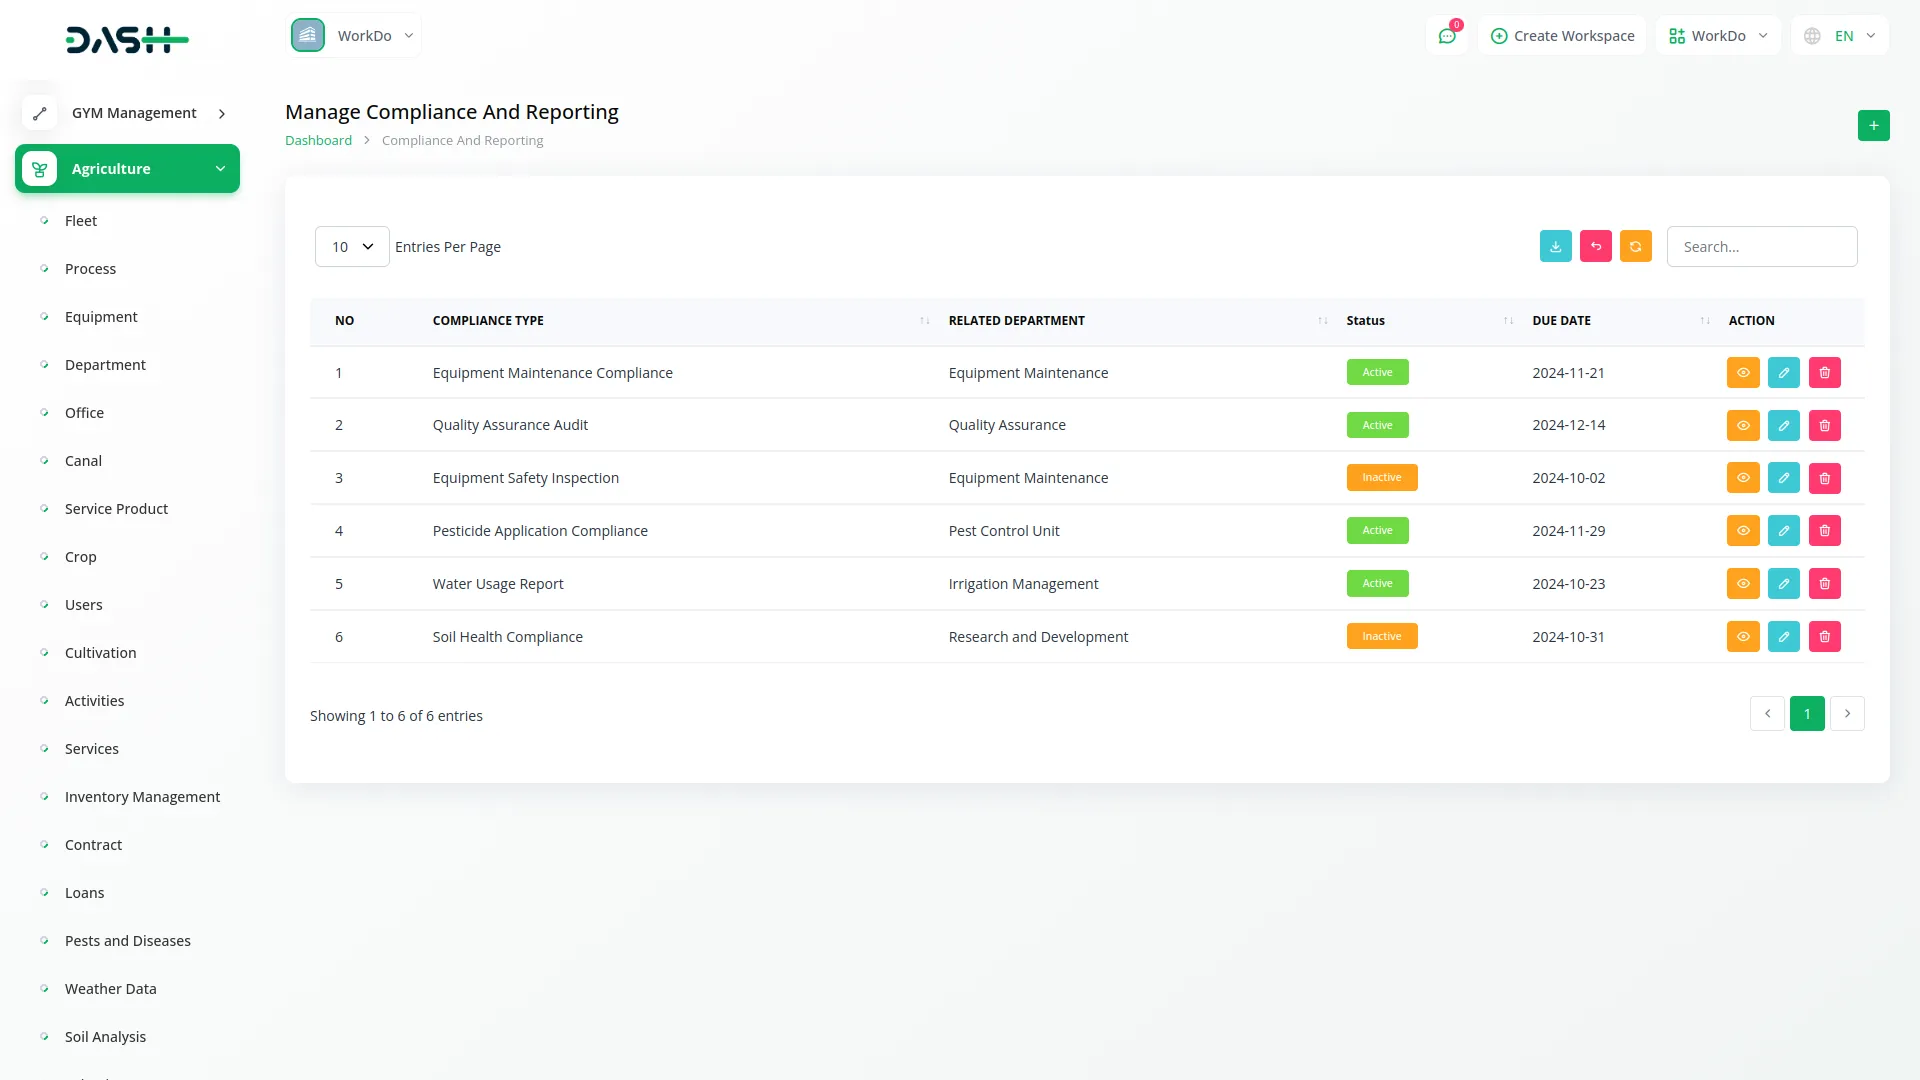
- To add a new compliance record, click the “Create” button on the compliance and reporting page. Enter the Compliance Type to specify what type of regulatory or compliance requirement is being tracked. Set the Due Date when the compliance requirement must be completed or reviewed.
- Select the Related Department from the dropdown menu which connects to the Department menu to assign responsibility for the compliance activity.
- Choose the Status from the available options: Active or Inactive to indicate the current state of the compliance requirement. Add a Description that provides detailed information about the compliance requirement, its purpose, and any specific instructions or guidelines.
- The list page shows all compliance and reporting records with columns for No, Compliance Type, Related Department, Status, and Due Date.
- Use the Search button to locate specific compliance records and the Export button to download compliance and reporting information. Available actions include Show to view complete compliance details, Edit to modify compliance information, and Delete to remove compliance records from the system.
Categories
Related articles
- Quotation Integration in Dash SaaS
- Google Wallet Integration in Dash SaaS
- Square Payment Gateway in Dash SaaS
- Document Template Integration in Dash SaaS
- Requests Integration in Dash SaaS
- Support Ticket Integration in Dash SaaS
- Porter’s Five Model Integration in Dash SaaS
- Newspaper Distribution Management Integration in Dash SaaS
- Shopify Sync Integration in Dash SaaS
- Boutique and Design Add-On Detailed Documentation
- Sage Integration in Dash SaaS
- Make Integration Detailed Documentation
Reach Out to Us
Have questions or need assistance? We're here to help! Reach out to our team for support, inquiries, or feedback. Your needs are important to us, and we’re ready to assist you!


Need more help?
If you’re still uncertain or need professional guidance, don’t hesitate to contact us. You can contact us via email or submit a ticket with a description of your issue. Our team of experts is always available to help you with any questions. Rest assured that we’ll respond to your inquiry promptly.
Love what you see?
Do you like the quality of our products, themes, and applications, or perhaps the design of our website caught your eye? You can have similarly outstanding designs for your website or apps. Contact us, and we’ll bring your ideas to life.
