Property Management Integration in Dash SaaS
Transform property management into a seamless process with the Property Management Add-On, designed to handle every aspect of property ownership effortlessly.
Introduction
Transform property management into a seamless process with the Property Management Add-On, designed to handle every aspect of property ownership effortlessly. From managing properties, leases, and tenants to handling maintenance tasks, our robust section offers a centralized solution for property owners. Easily create tenant profiles, track key information, and manage lease agreements with just a few clicks. Plus, streamline the lease renewal process and control invoices efficiently, enhancing property oversight and maximizing efficiency.
How To Install the Property Management Add-On?
To Set Up the Property Management Add-On, you can follow this link: Setup Add-On.
How to Use the Property Management Add-On?
Dashboard
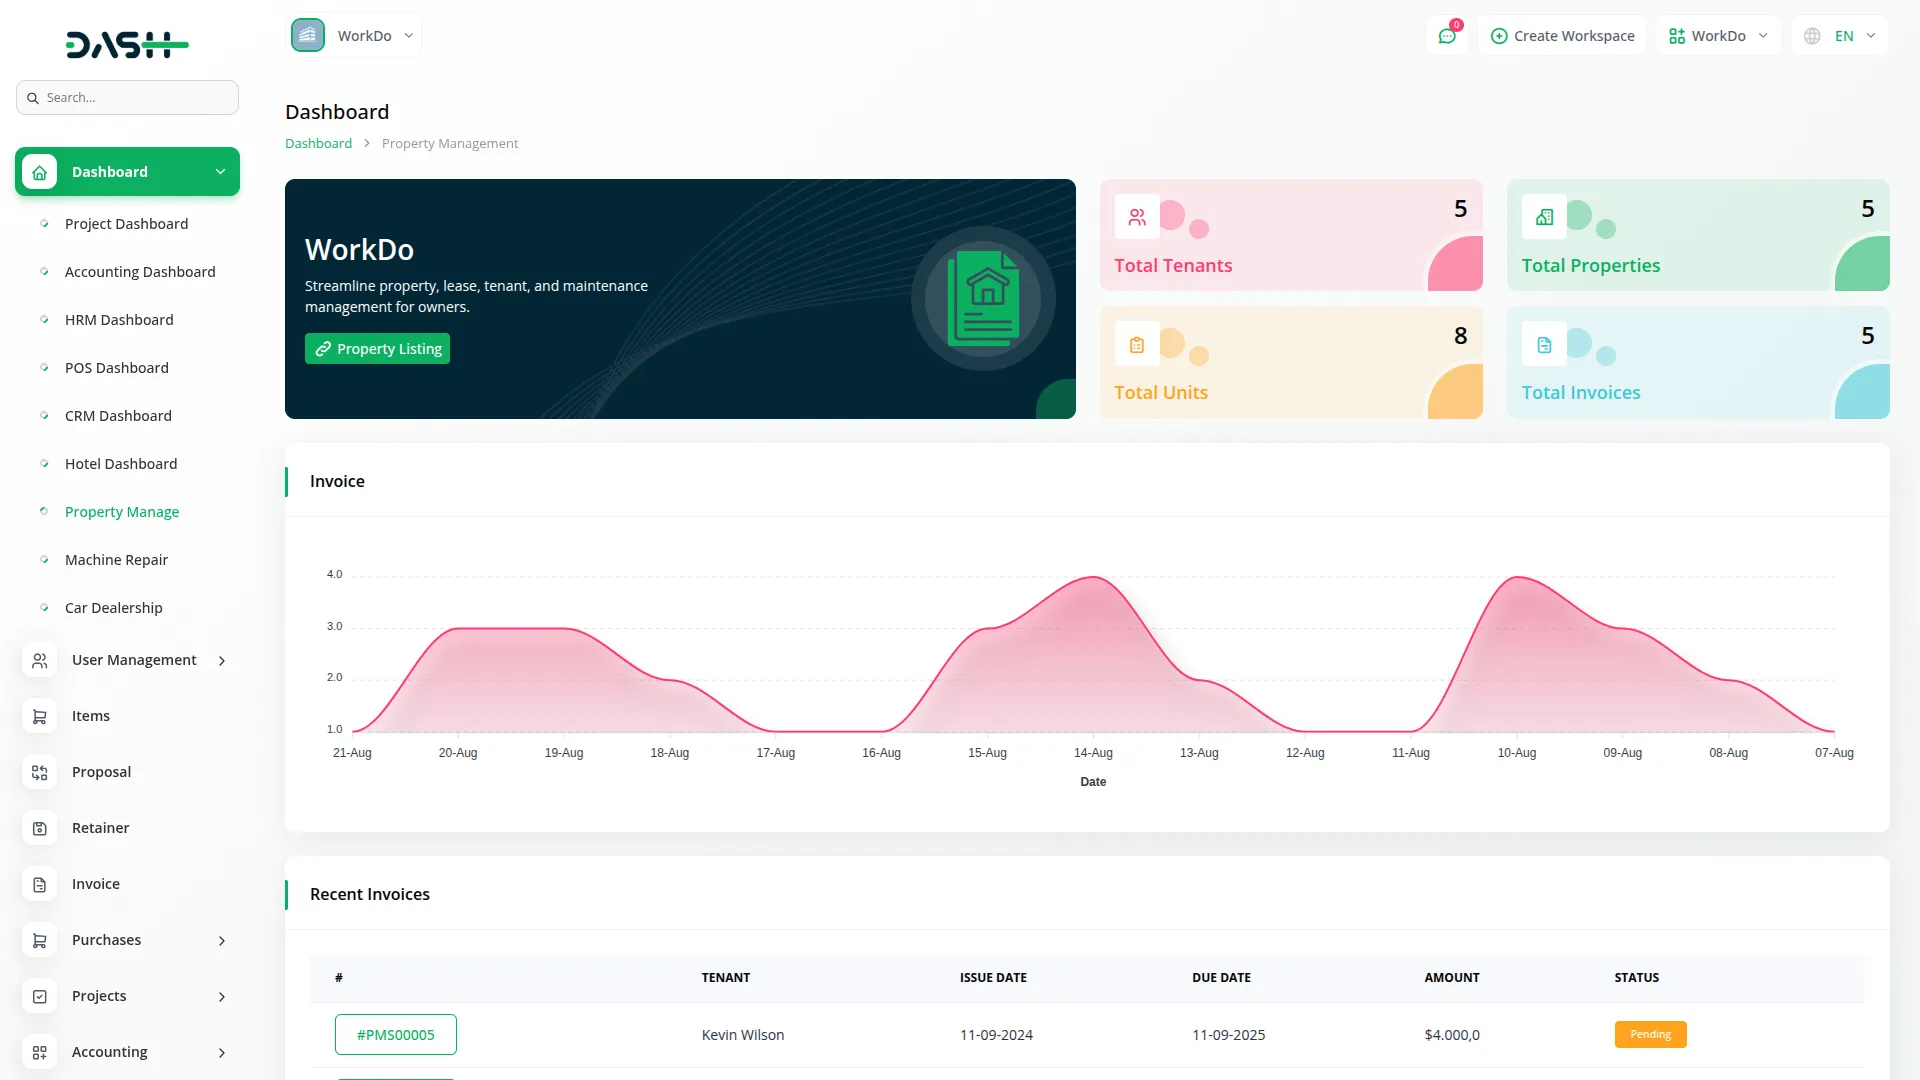
- The dashboard serves as your main control center, providing quick access to key information and statistics about your property management business.
- On the dashboard, you will find several important cards displaying statistics, including Total Tenants, Total Properties, Total Units, and Total Invoices. These cards give you an instant overview of your business metrics.
- The Property Listing Link Card offers copy link functionality for public property listings, enabling you to easily share your listings with others.
- An Invoice Area Chart shows invoice trends over the last 15 days, helping you track your billing patterns and revenue flow.
- The Recent Invoices Table displays the last 5 invoices with columns for Invoice Number, Name, Issue Date, Due Date, Amount, and Status. You can click on any Invoice Number to open the detailed invoice information.
Property Management
- Property management is the core of your system, where you create and manage all your rental properties.
- To create a new Property, click the “Create” button. Enter the Property Name, Address, City, State, Country, and Zip Code. Add Location details, including Latitude and Longitude for mapping purposes. Fill in Financial information such as Security Deposit and Maintenance Charge. Add a Description and upload Multiple Property Images.
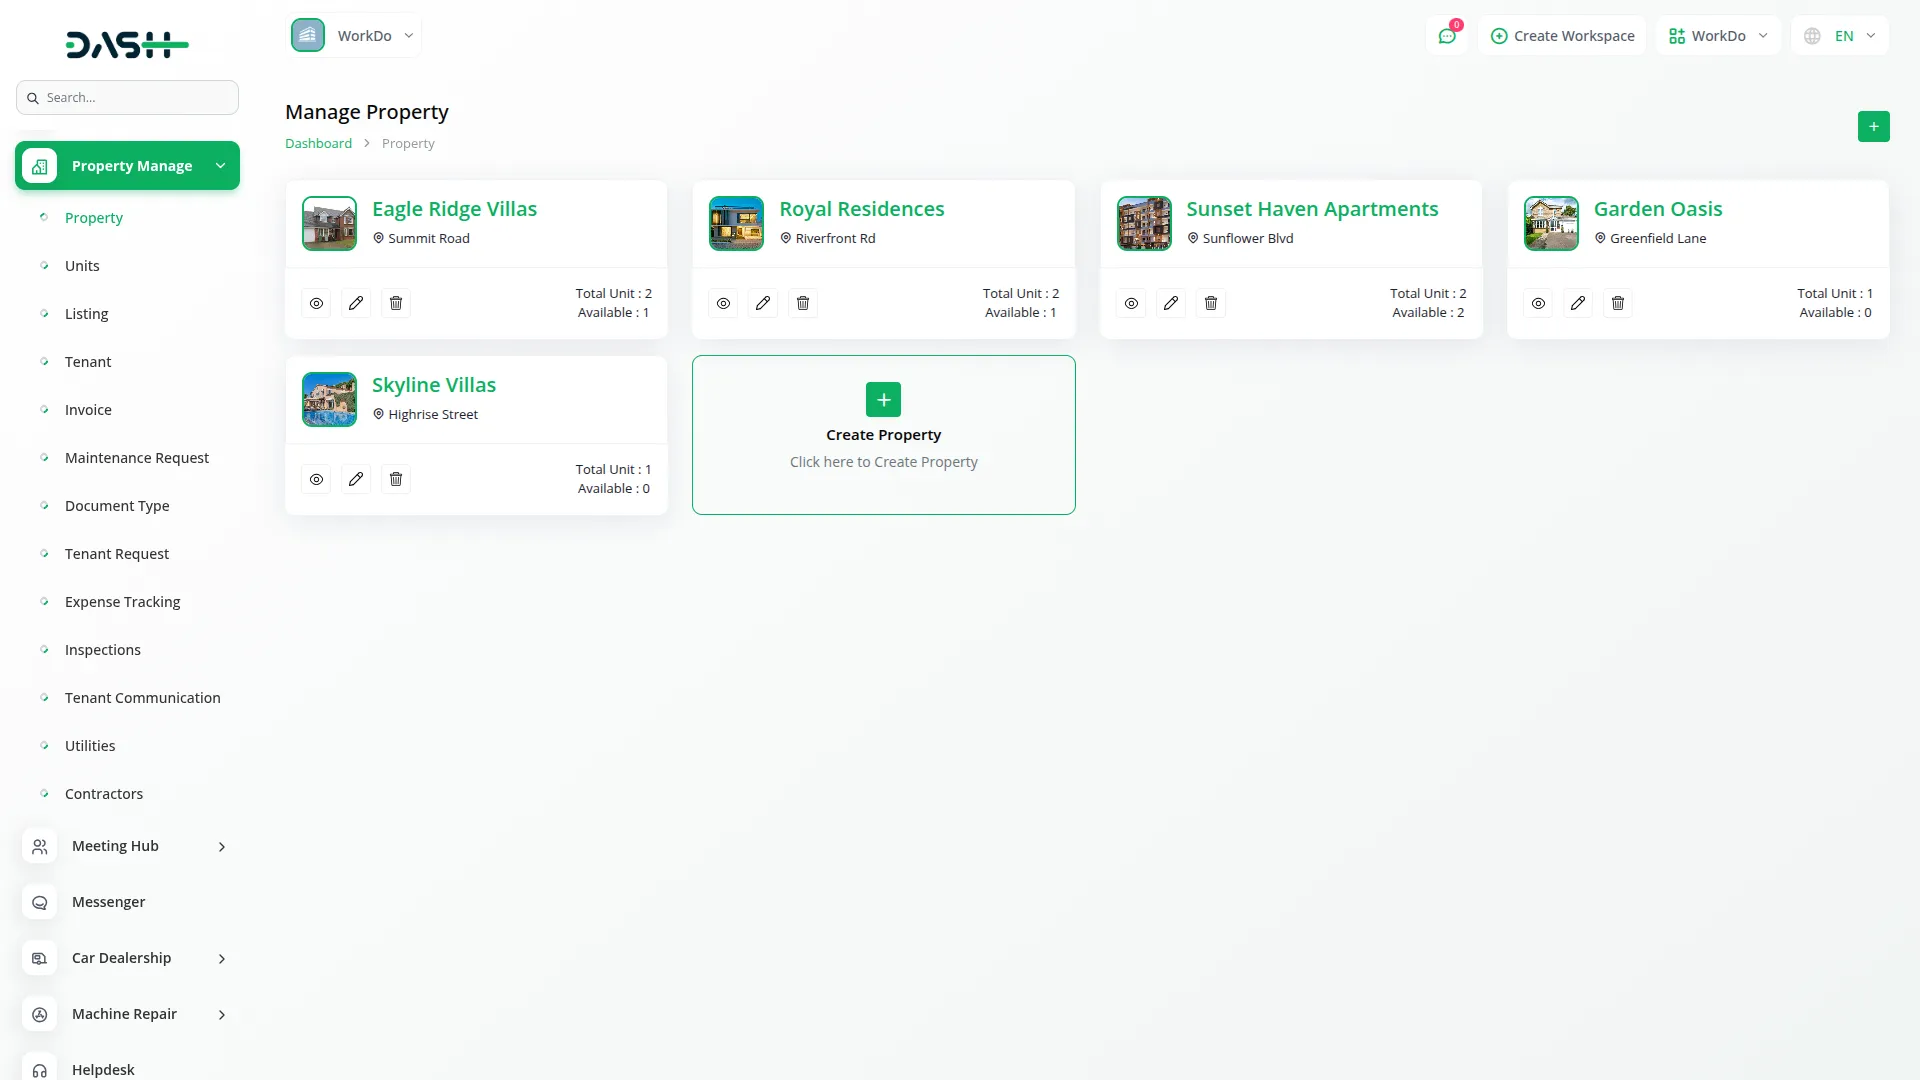
- The grid page features an “Create” button and displays property cards with images, name, address, unit count, and available units. The table shows columns for No, Property Image, Property Name, Address, Total Units, Available Units, and Action. Available actions include View, Edit, and Delete.
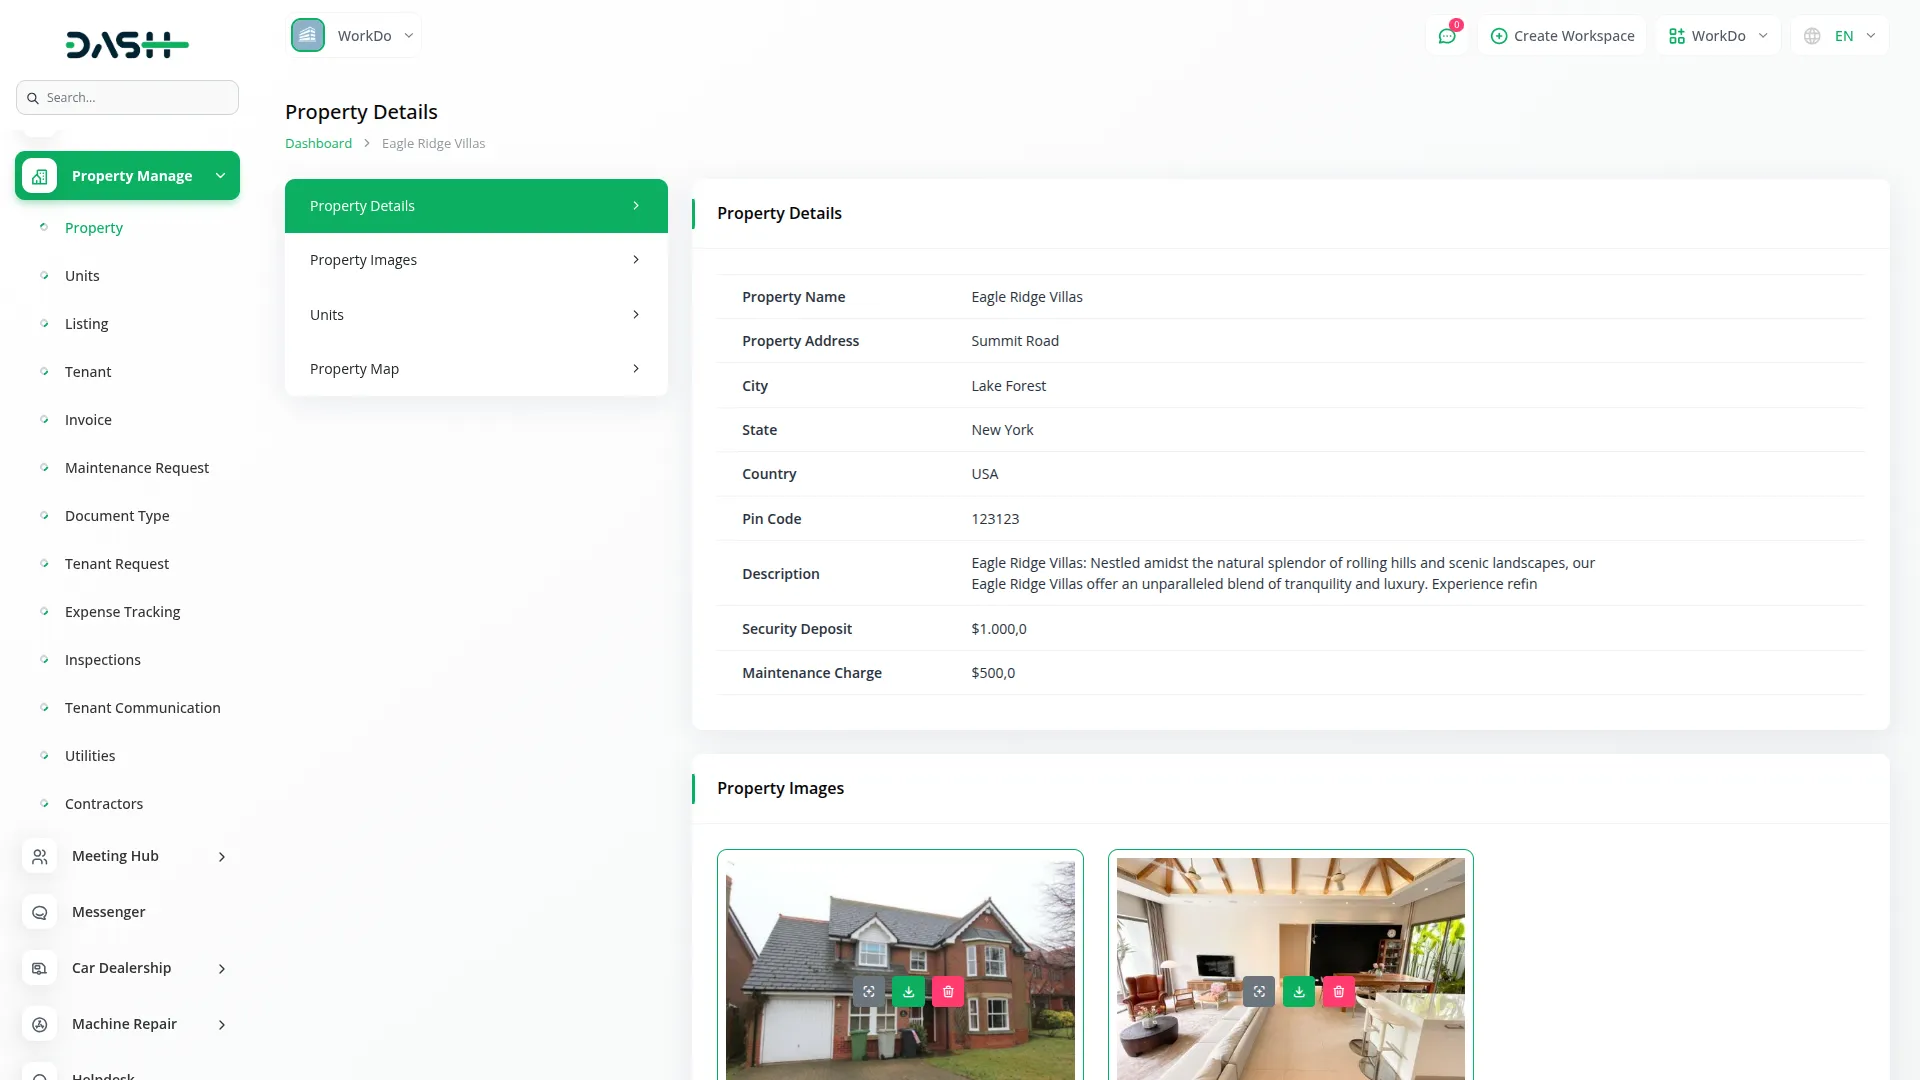
- When you click the “View” button, you can view complete property details, including Property Name, Address, City, State, Country, Pin Code, Description, Security Deposit, and Maintenance Charge. The property images section shows all uploaded images with Preview, Download, and Delete buttons.
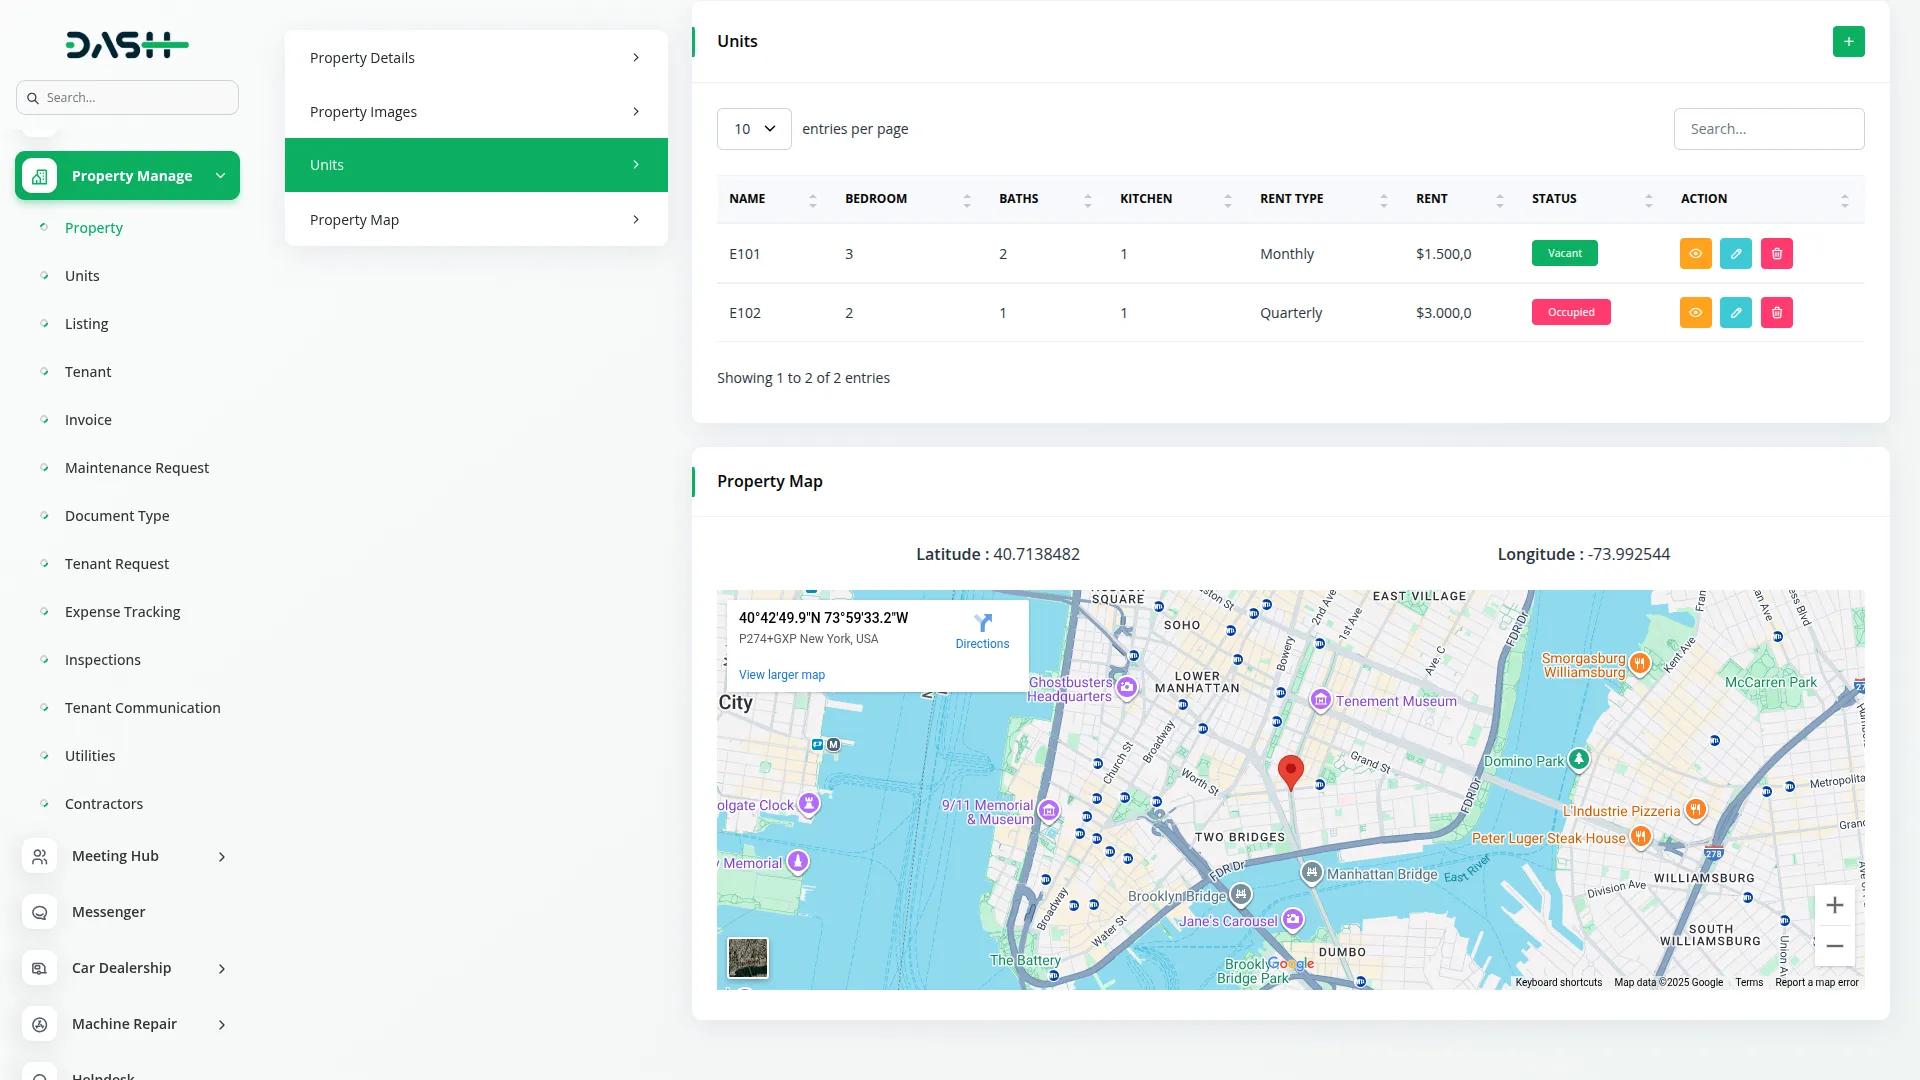
- In the Units section within the property view, you can create new units by filling out the Unit Name, Bedroom count, Baths, Kitchen details, Amenities (multi-selection), Rent Type (Monthly/Yearly/Quarterly), Rent amount, Utilities Included, and Description. The units list shows Name, Bedroom, Baths, Kitchen, Rent Type, Rent, Status (Vacant or Occupied), and Action columns with View, Edit, and Delete options.
- The Property Map section displays location information using the Latitude and Longitude coordinates with an interactive map view.
- When you click the “Edit” button, you can modify property information and upload additional images. The image management system allows you to download and delete individual images.
Unit Management
- The Units page allows you to manage individual rental units within your properties, with automatic status tracking based on tenant assignments.
- To create a new Unit, click the “Create” button. Select the Property from the dropdown (dynamically loaded from the Property page), then enter the Unit Name, number of Bedrooms, Baths, Kitchen details, and Amenities using multi-selection. Choose the Rent Type (Monthly/Yearly/Quarterly), enter the Rent amount, specify Utilities Included, and add a Description.
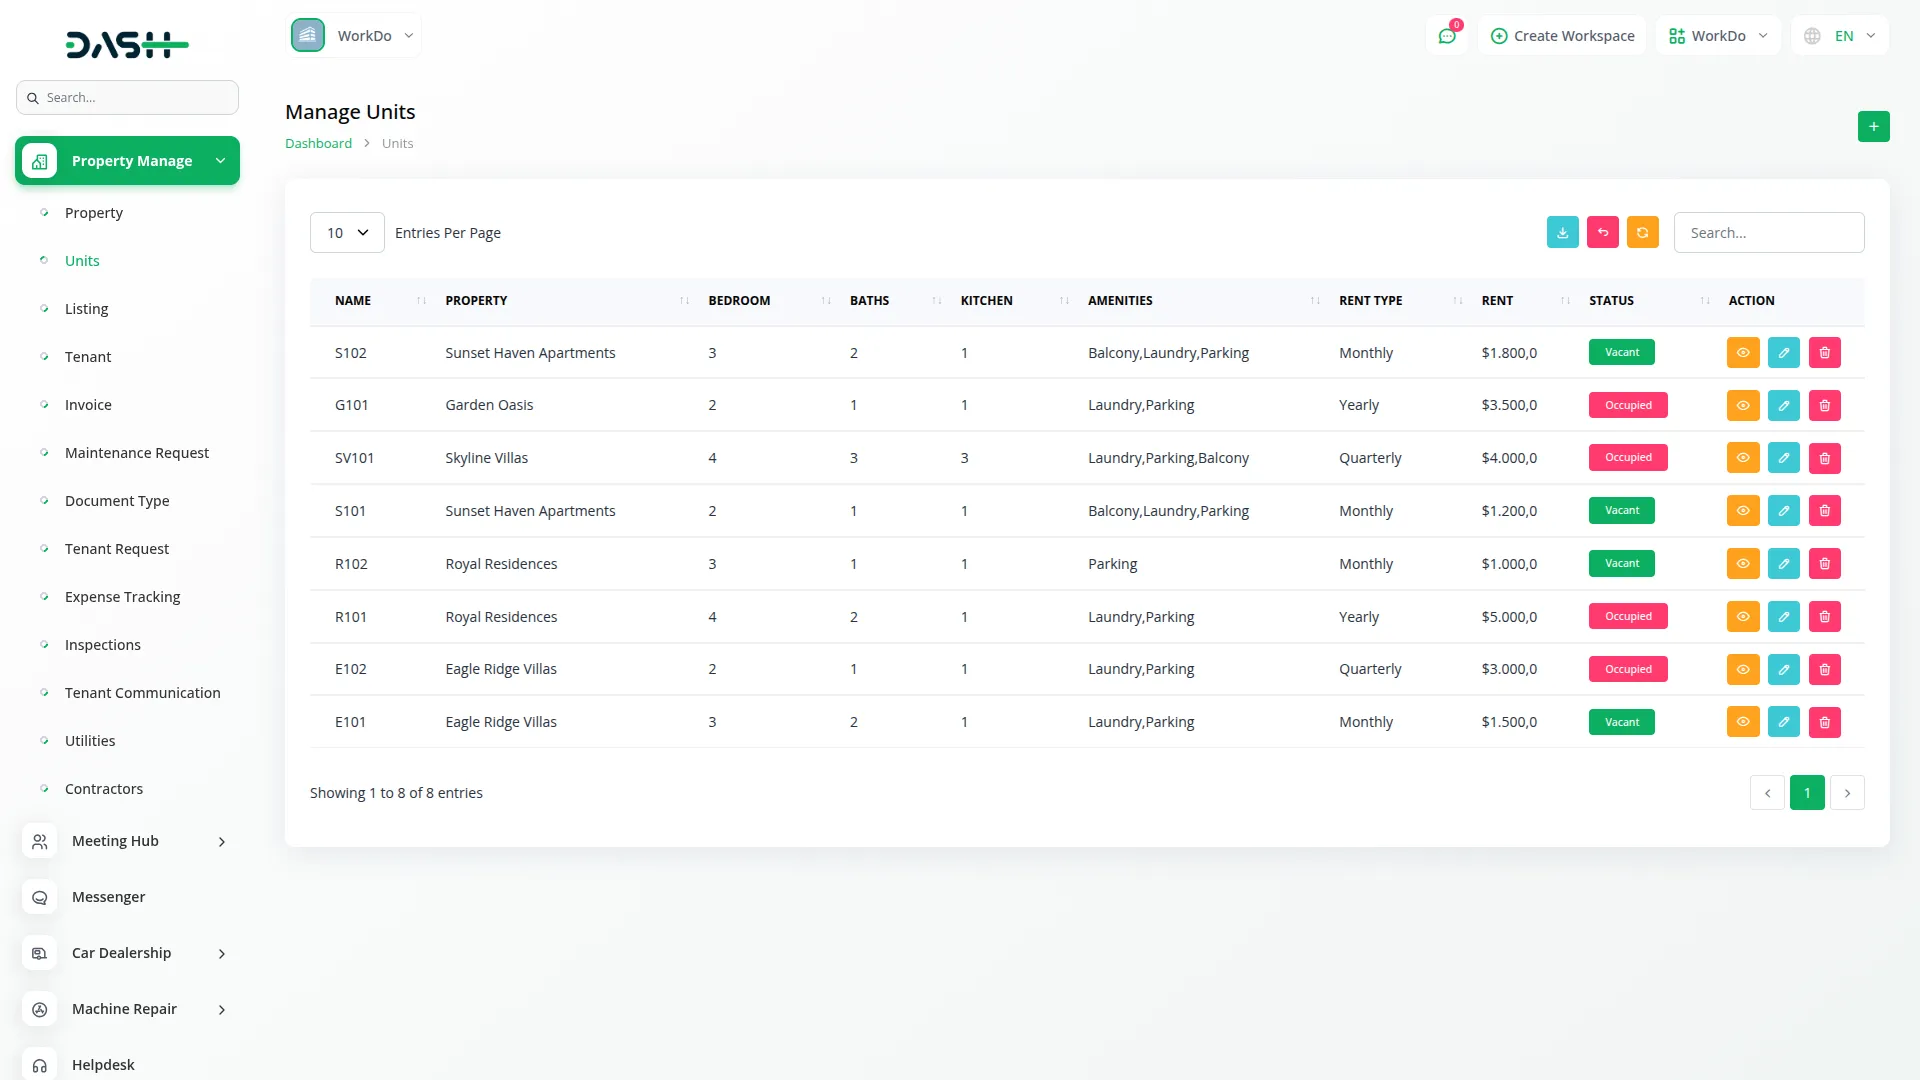
- The list page includes buttons for Search, Reset, Reload, and Export. The table displays columns for Name, Property, Bedroom, Baths, Kitchen, Amenities, Rent Type, Rent, Status (Vacant or Occupied), and Action. Available actions are View, Edit, and Delete.
- The system automatically manages Unit Status with Rentable Status showing either Vacant or Occupied. The status updates automatically when tenants are assigned or when lease renewals occur, ensuring accurate availability tracking across your property portfolio.
Listing Management
- The Listing page allows you to create public listings for your available properties that will appear on the frontend website for potential tenants to view.
- To create a new Listing, click the “Create” button. In the Listing Details section, select the Property from the dropdown (dynamically loaded from Properties) and set the Status to either “Visible” or “Not Visible”. Based on your property selection, the system will automatically fill in the Address, Country, State, City, Pincode, and Description fields.
- In the Media Details section, upload Multiple Property Images that will be displayed on the frontend side for visitors to see.
- For Unit Information Details, select the Unit from the dropdown (dynamically loaded based on your selected Property from the Units page). Enter the List Type, Tax amount, number of En-suites, Lounge details, Garage/Parking information, Dining details, and Total Square footage.
- Based on your unit selection, the system automatically fills in the Rent Type, Security Amount, Rental Amount, Maintenance Charge, Bedroom count, Bathrooms, Kitchen details, Amenities, and Utilities included.
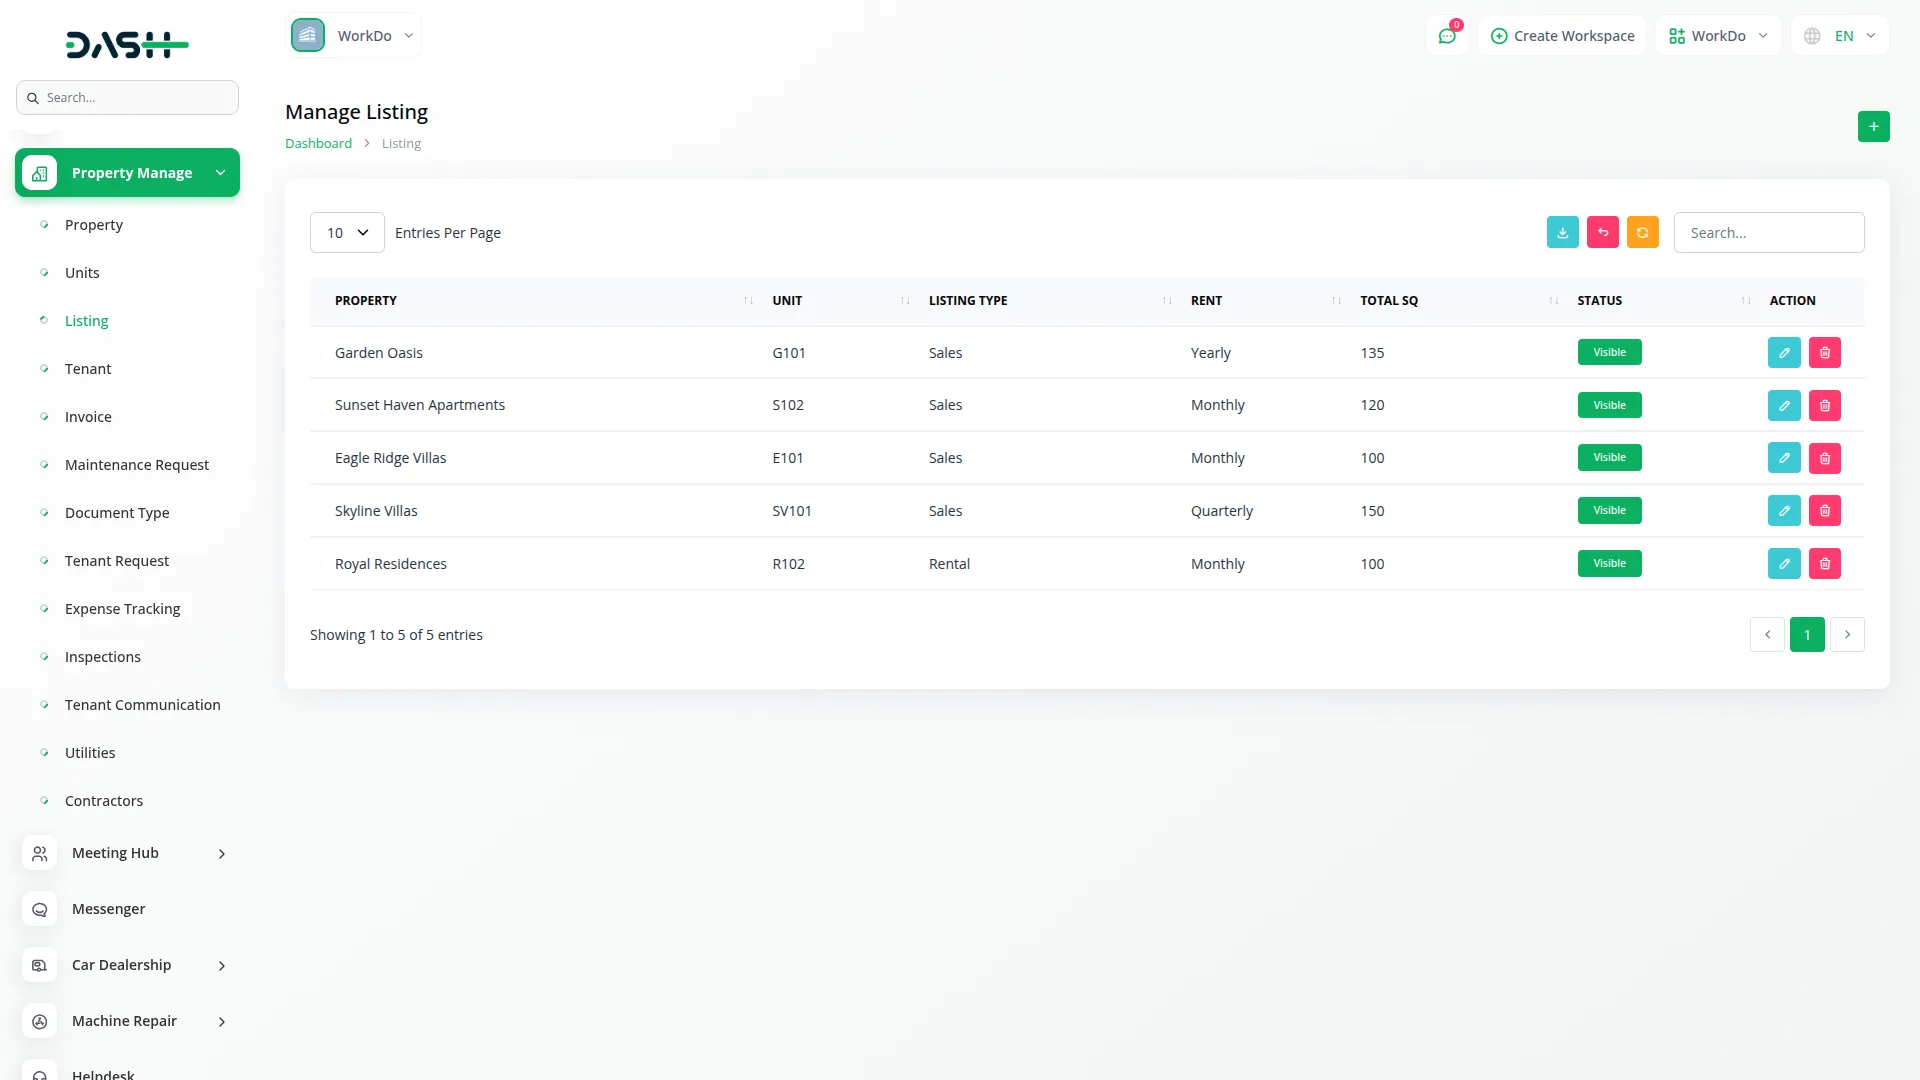
- The list page provides buttons for Search, Export, Reset, Reload, and Add. The table shows columns for Property, Unit, Listing Type, Total Sq, Status, and Action. Available actions include Edit and Delete.
- This section gives you control over which properties appear on your public website and allows you to upload specific images for each listing while managing their visibility status.
Tenant Page
- To create a new Tenant, click the “Create” button. Fill in the Basic Info section with Name, Email, Password, Contact number, Total Family Members, Address, City, State, Country, and Zip Code.
- In the Property Details section, select the Property from the dropdown (dynamically loaded from Properties), then choose the Unit from the dropdown (dynamically loaded based on your selected Property from the Units page). The system will automatically fill in Total Rent, Rent Type, Security Deposit, and Maintenance Charge based on your unit selection.
- For Document Details, upload the required documents based on the Document Types you have configured in your system.
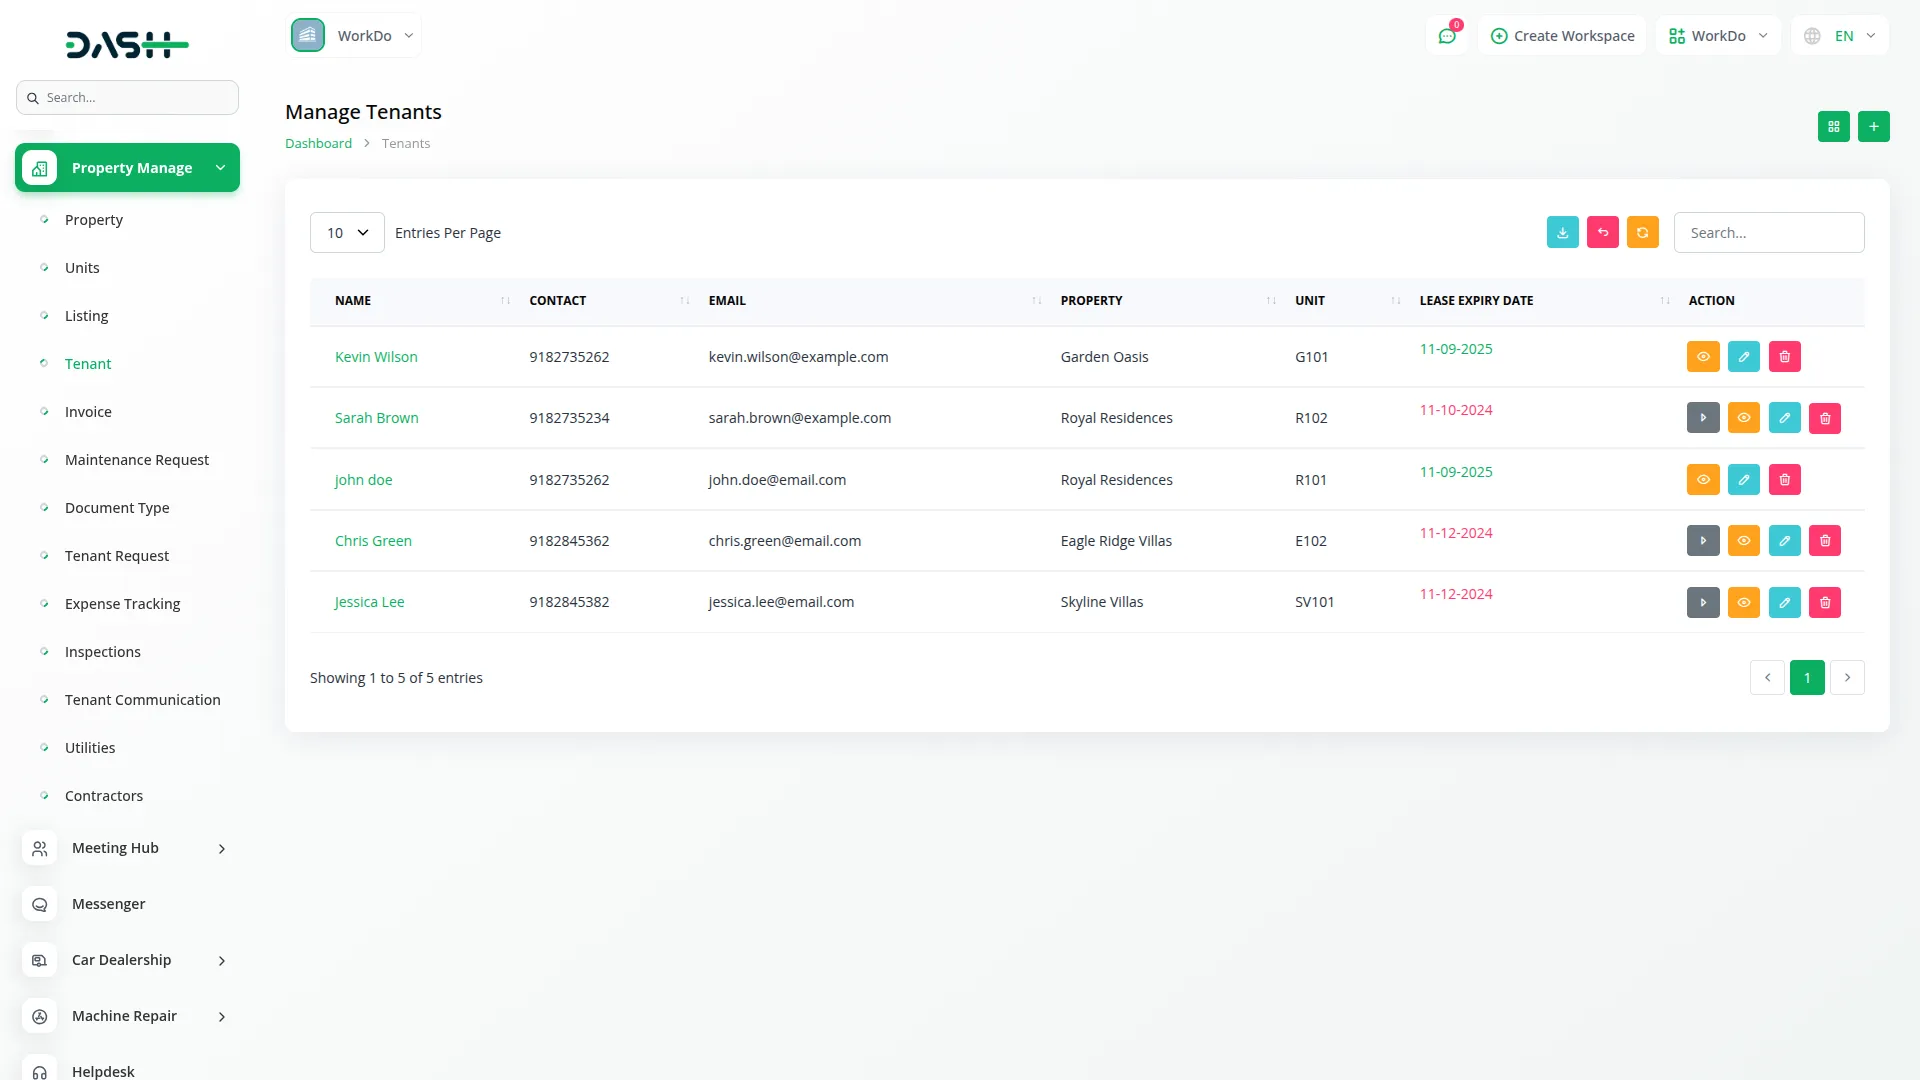
- The list page offers buttons for Search, Export, Reset, Reload, Add, and Grid View. The table displays columns for Name, Contact, Email, Property, Unit, Lease Expiry Date, Status, and Action. Available actions include View, Edit, Delete, and Status.
- In Grid View, you can switch between the Add and List View buttons. Tenant information appears as cards showing profile image, name, and email, with actions for View, Edit, Delete, and Status.
- When you click the “View” button, you can view Tenant Info, including Name, Email, Contact, Address, City, State, Country, and Zip Code. The Property Info section shows Property Name, Unit Name, and Address. The Document Info displays a table with columns for No, Document Type, and Document Images.
- The “Status” button appears when a tenant’s lease expires. Clicking it shows Basic Info (Name, Email, Phone Number), Property Details (Property Name, Unit Name, Address), and action options to Cancel or Renew the lease.
- The system automatically creates user accounts with tenant role assignment, manages document uploads, updates unit status between Vacant and Occupied, and generates invoices when tenants are created or leases are renewed.
Invoice Management
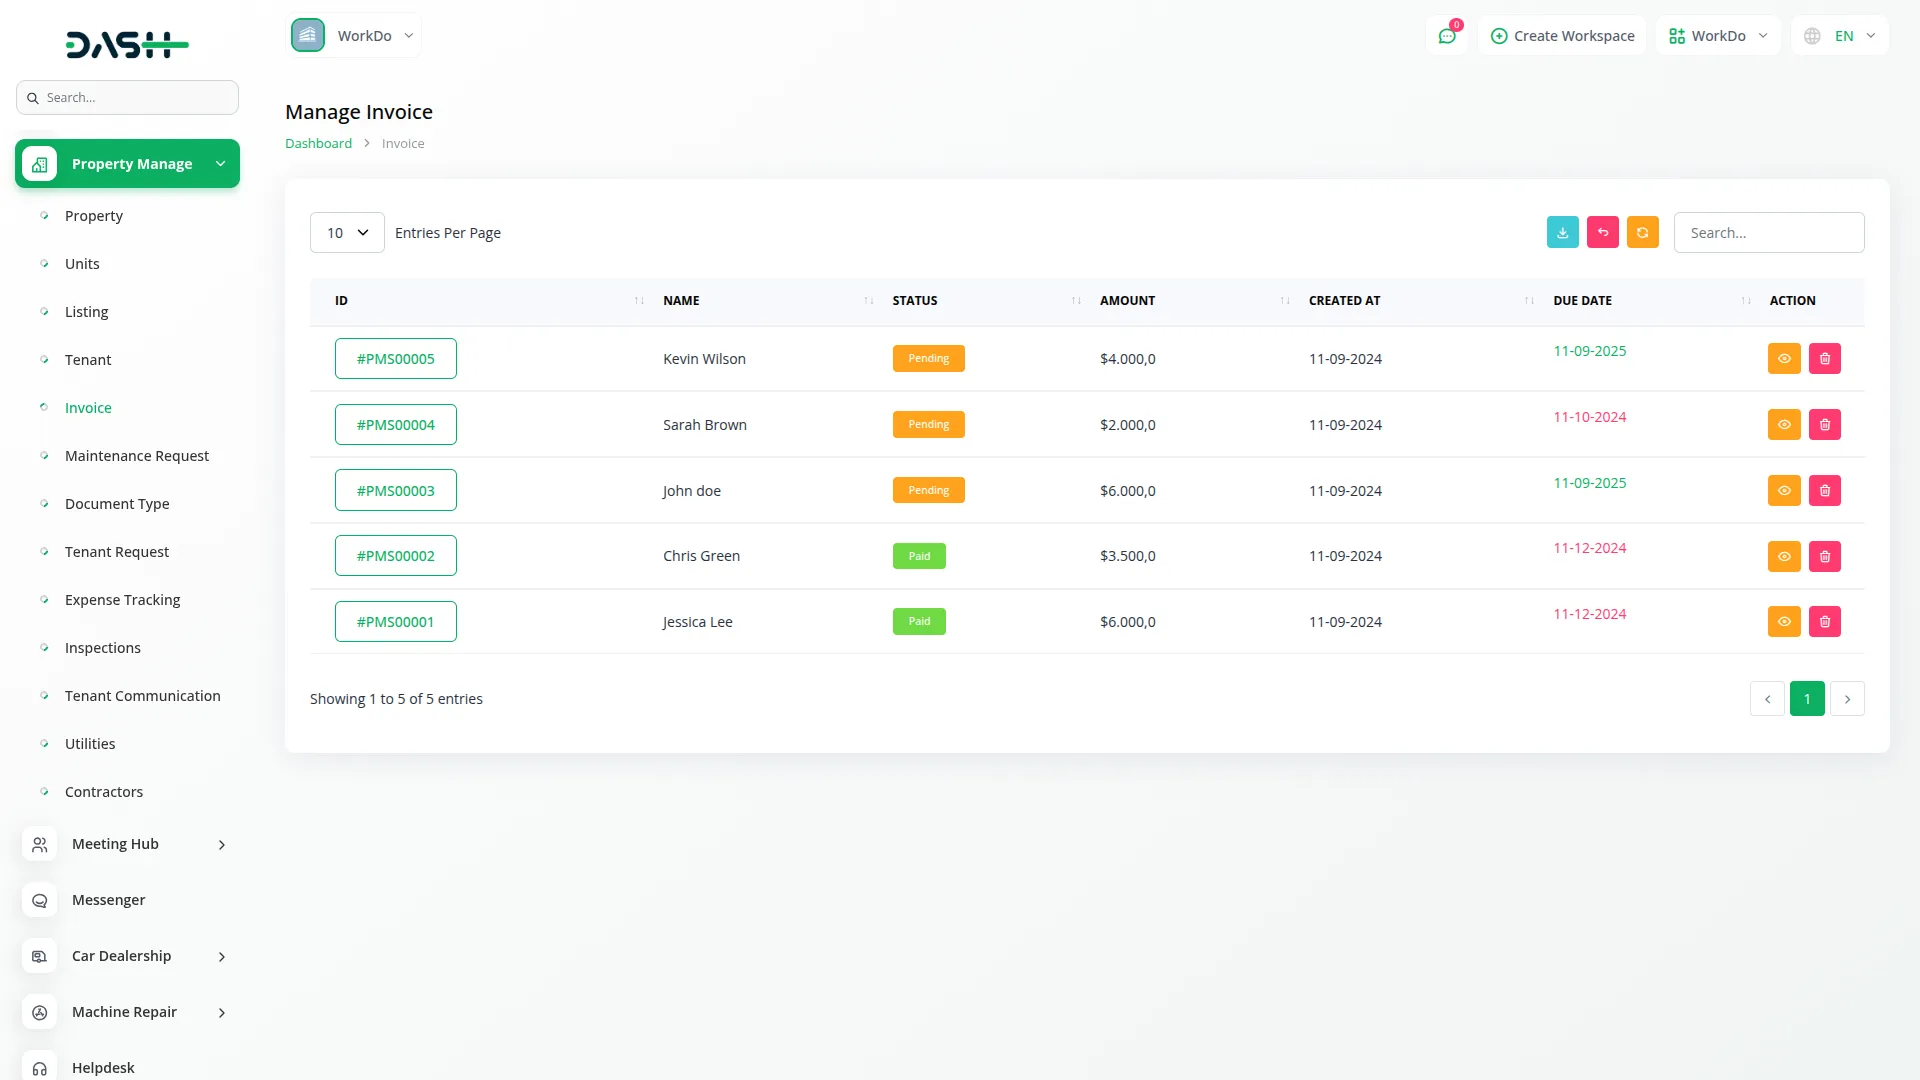
- The system automatically creates invoices when new tenants are added and generates additional invoices during lease renewals, eliminating manual invoice creation.
- The list page provides buttons for Search, Reset, Reload, and Export. The table shows columns for ID, Tenant Name, Created At, Due Date, Amount, Status, and Action. The available actions are View and Delete.
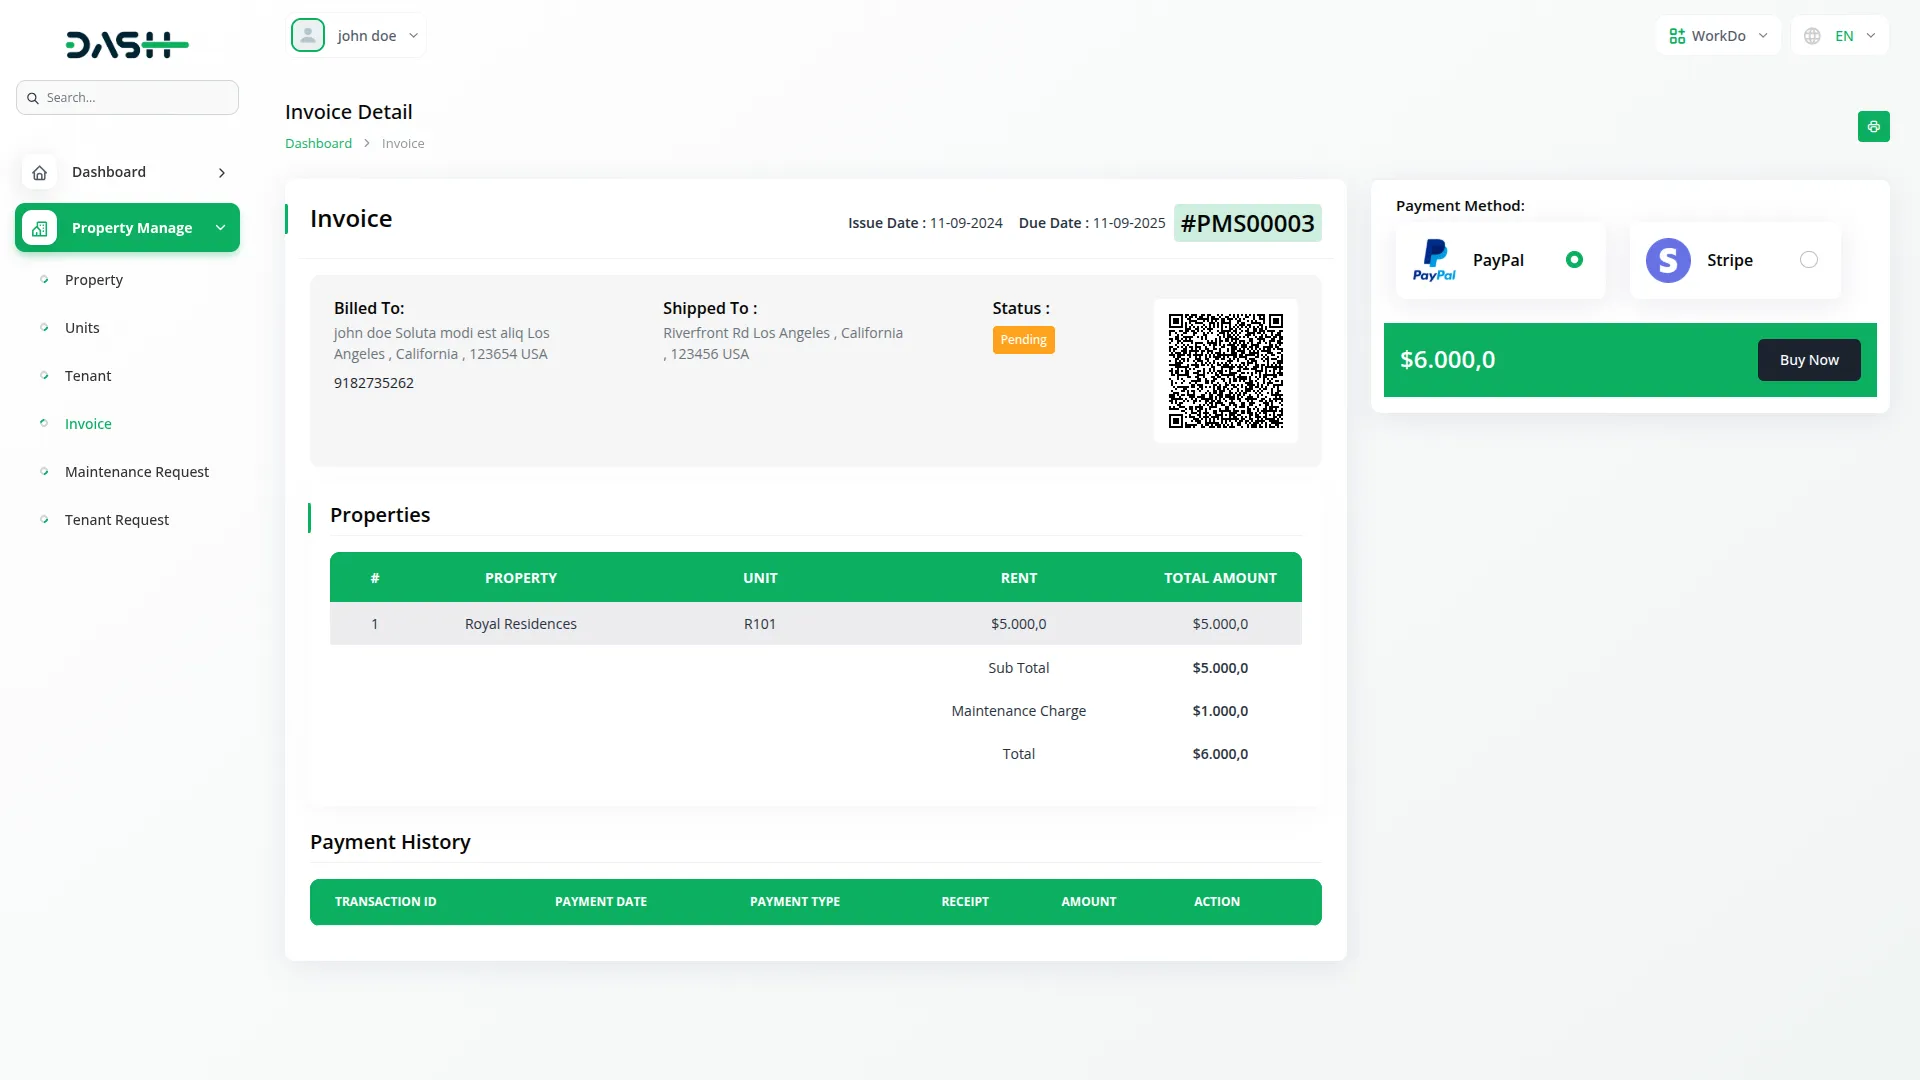
- When you click the “View” button, you can view complete invoice details, including tenant and property information, payment history, and status tracking. The system provides PDF download functionality and allows you to change the Status between “Paid” and “Not Paid”.
- Tenants can log into their accounts and make online payments using integrated payment systems like Stripe, PayPal, etc. to pay their invoices directly through the platform.
- This page includes comprehensive PDF generation and download capabilities, along with complete payment tracking and status update features.
- Back on the main invoice list page, you will see convenient management options including reset, reload, and export functionalities that allow you to refresh the invoice list, export invoice data for accounting purposes, and reset any applied filters. You can also use the search functionality to quickly locate specific invoices by tenant name, invoice ID, or other relevant criteria.
Maintenance Request Management
- Maintenance Request management allows you to track and manage repair and maintenance issues reported by tenants.
- To create a new Maintenance Request, click the “Create” button. Select the Tenant from the dropdown, and the system will automatically fill in the Property and Unit information based on your tenant selection.
- Set the Status to Pending, In Progress, or Completed. Enter the Issue type and provide a detailed Description of the Issue. You can also attach files related to the maintenance request.
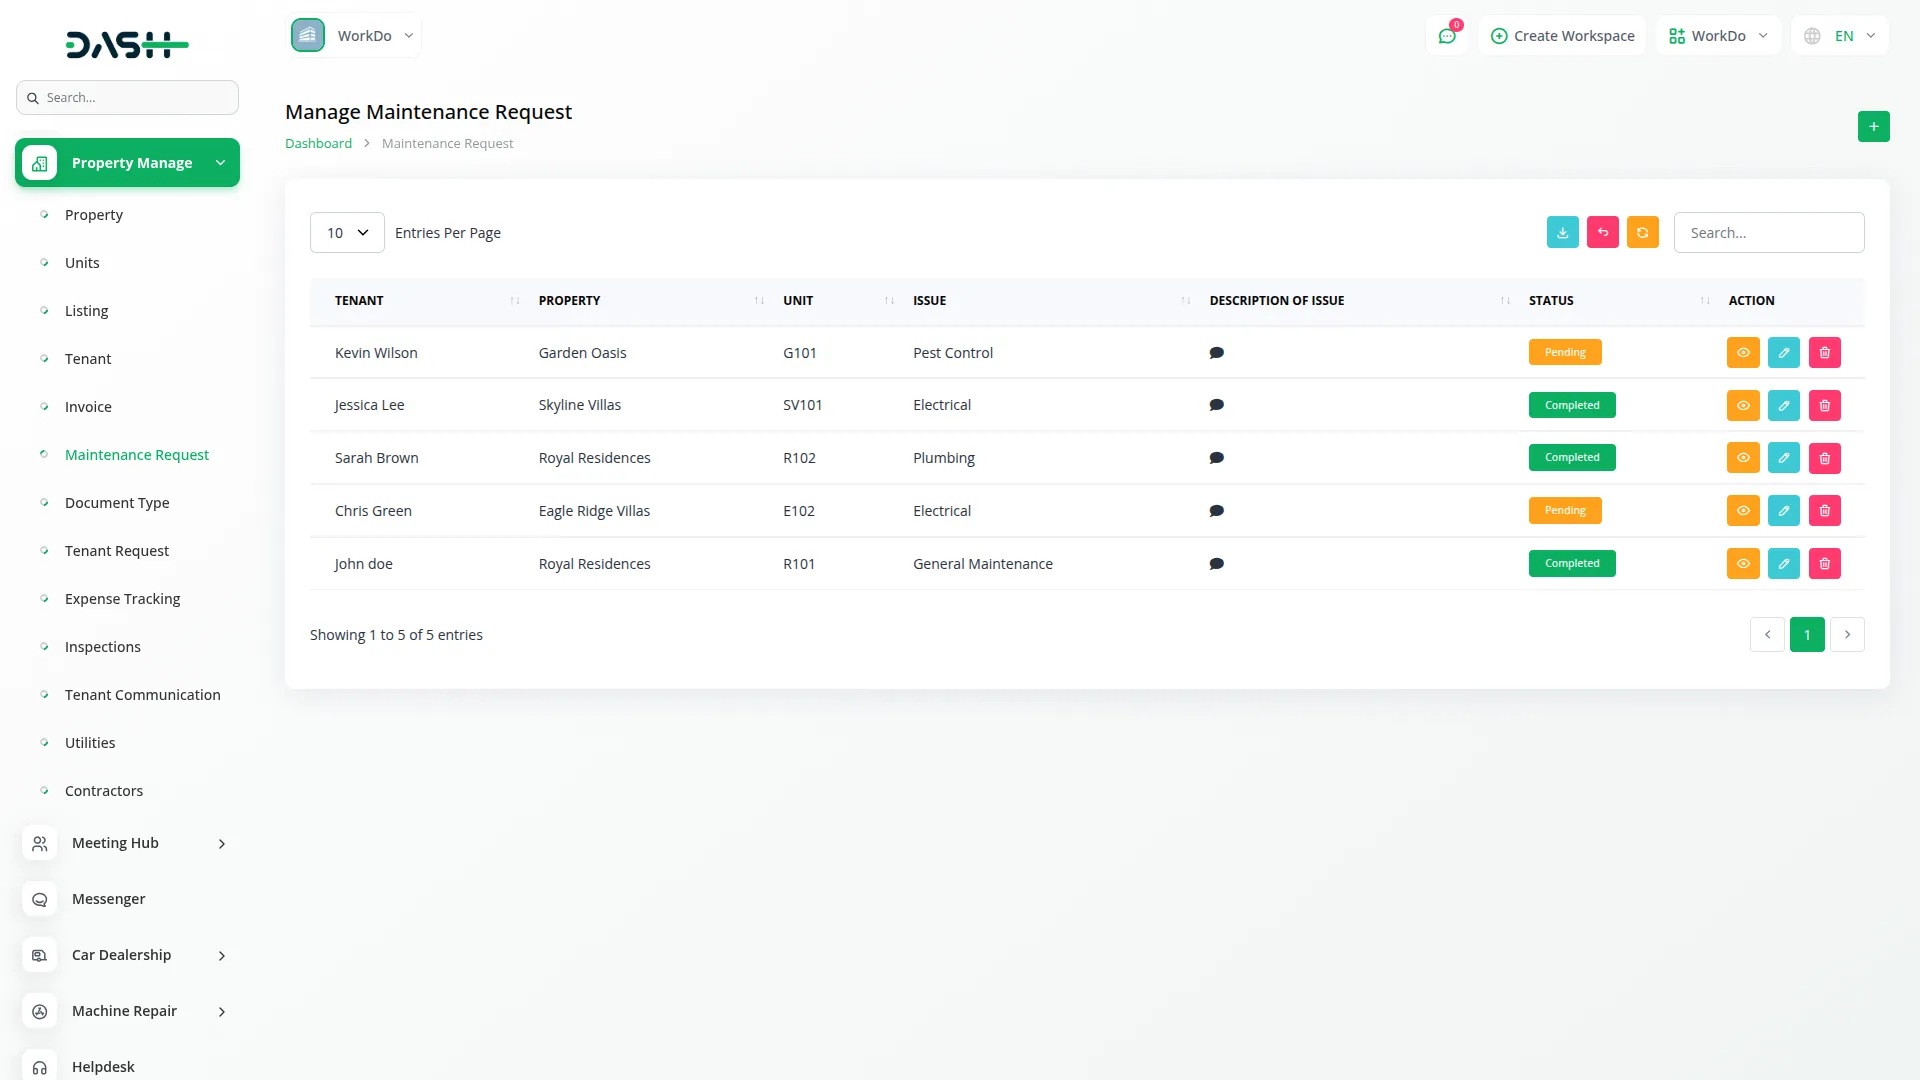
- The list page includes buttons for Search, Export, Reset, Reload, and Add. The table displays columns for Tenant, Property, Unit, Issue, Description of Issue, Status, and Action. Available actions are View, Edit, and Delete.
Document Type Management
- Document Type management allows you to define which documents are required or optional for tenants during the application process.
- To create a new Document Type, click the “Create” button. Fill in the Name field and select whether it’s a Required Field by choosing “Is Required” or “Not Required”.
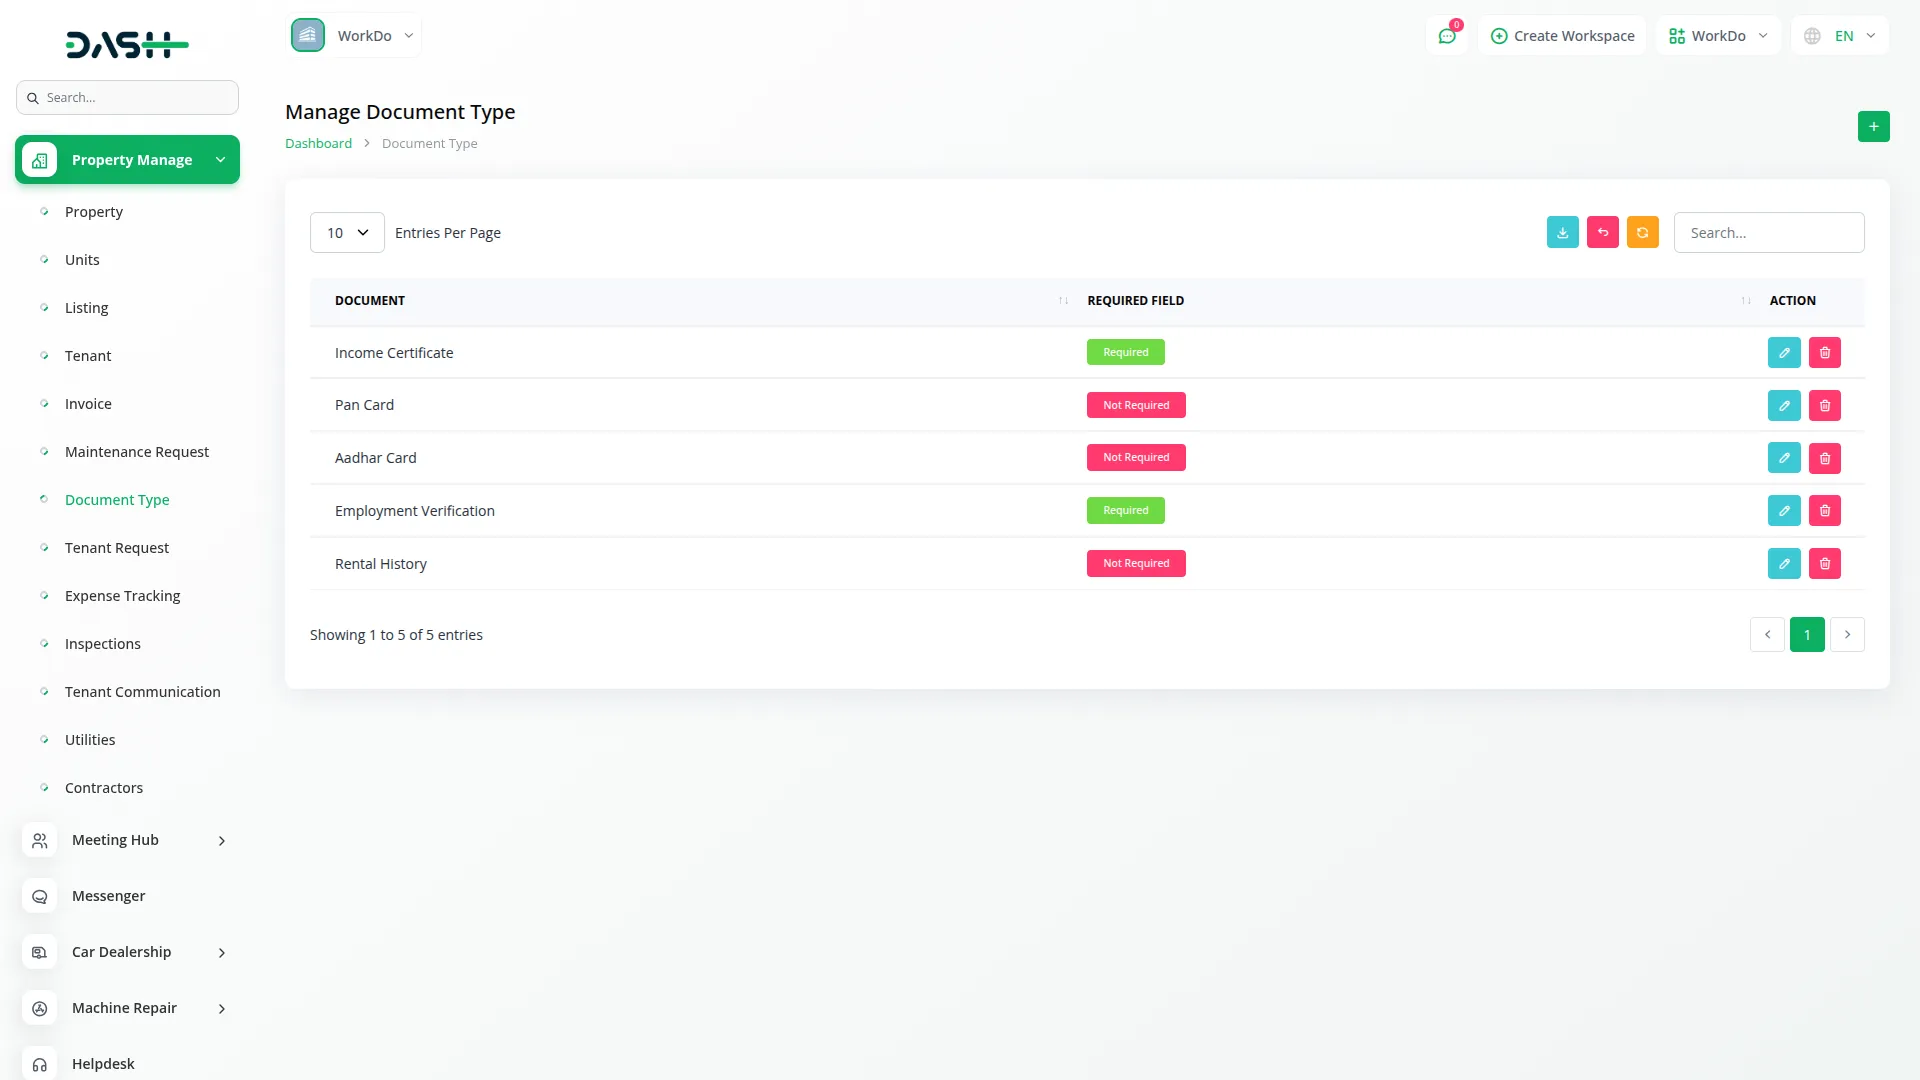
- The list page shows all document types with buttons for Search, Export, Reset, Reload, and Add. The table displays columns for Document Name, Required Field, and Action. Available actions include Edit and Delete.
- This section helps you standardize the documentation process by defining document types such as ID, Lease Agreement, or any other documents you need from tenants.
Tenant Request Management
- Tenant Request management handles booking requests that come from visitors to your public property listing website, allowing you to convert interested prospects into actual tenants.
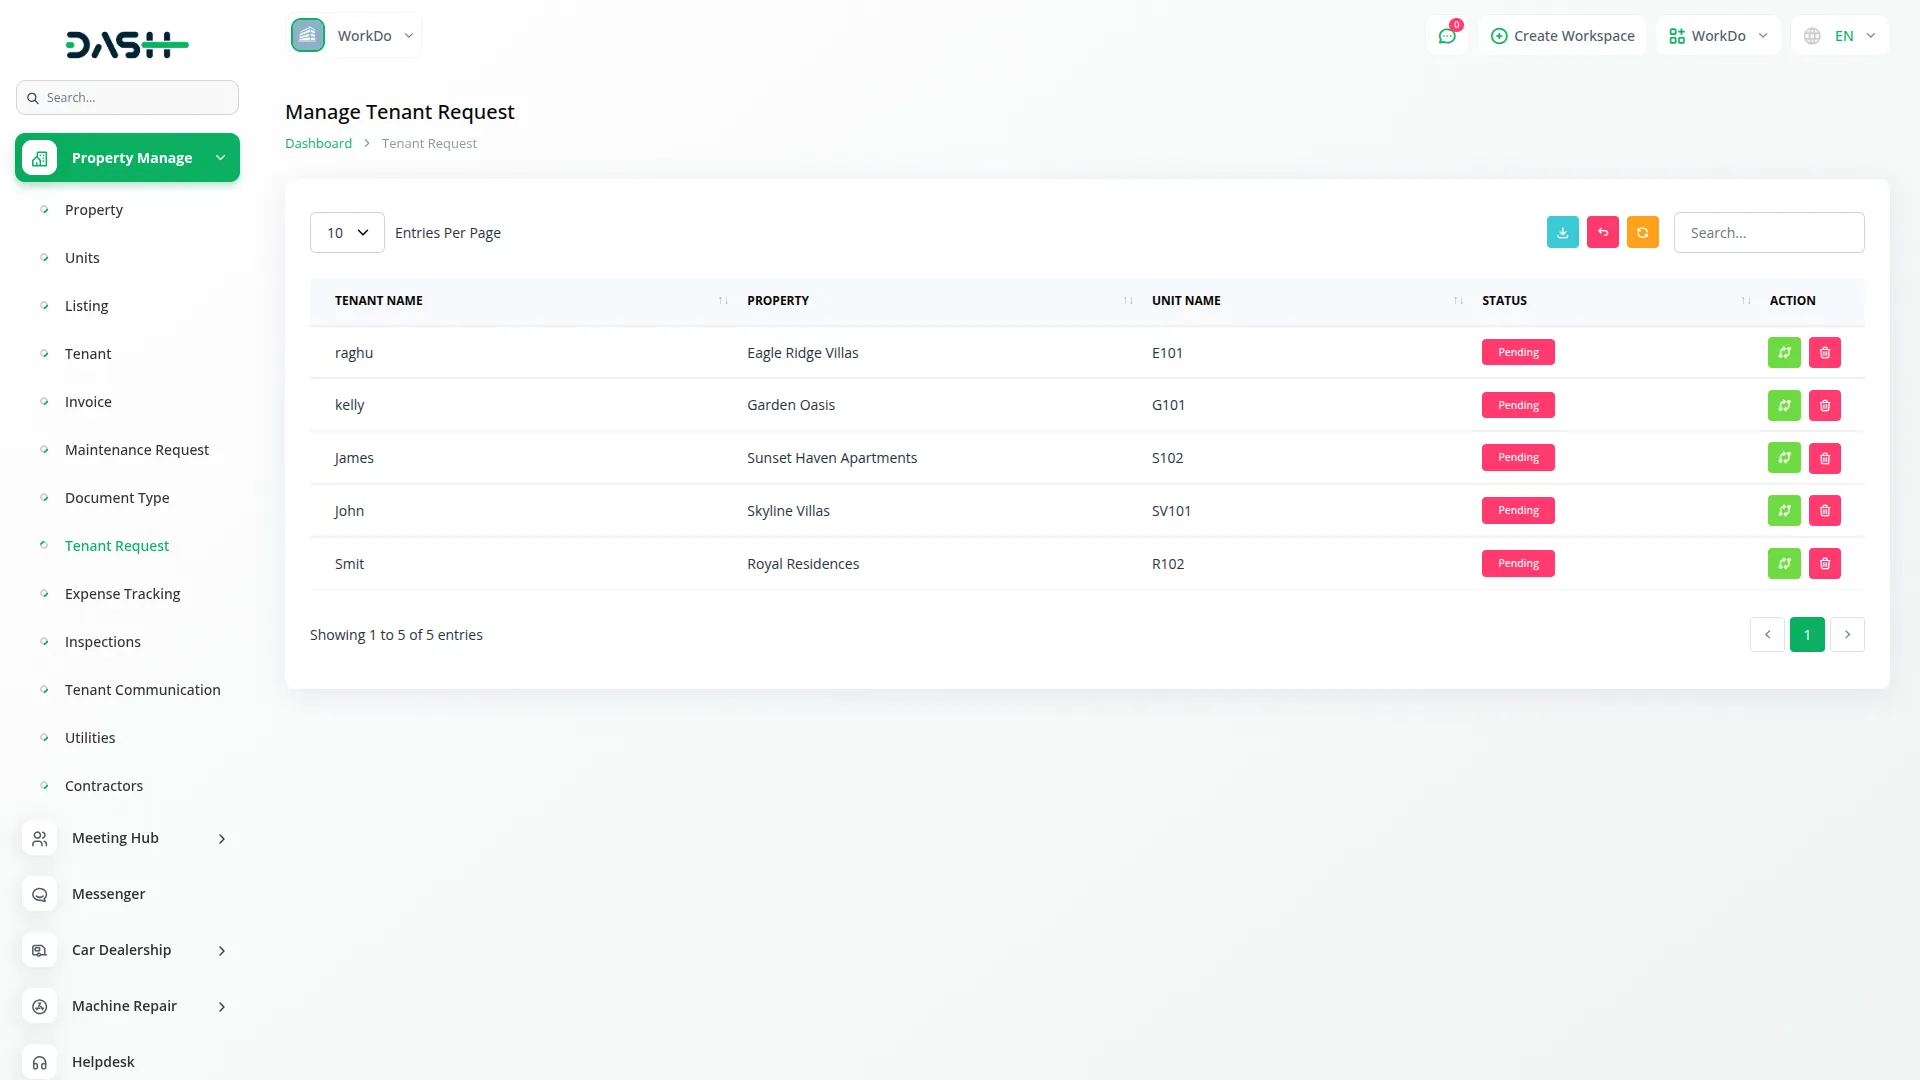
- The list page provides buttons for Search, Reset, Reload, and Export. The table shows columns for Tenant Name, Property, Unit Name, Status, and Action. Available actions include “Convert to Tenant” and Delete.
- When you click “Convert to Tenant”, the system transforms the booking request into an actual tenant record. This process creates a user account and tenant record, generates the initial lease and invoice, and updates the unit status to occupied.
- During conversion, you fill out the same tenant creation form with Basic Info, including Name, Email, Password, Contact, Total Family Members, Address, City, State, Country, and Zip Code.
- The Property Details section shows the Property dropdown (dynamically loaded from Properties) and Unit dropdown (dynamically loaded based on selected Property from Units page), with automatic filling of Total Rent, Rent Type, Security Deposit, and Maintenance Charge. In Document Details, you upload the required documents based on your configured Document Types.
Expense Tracking Management
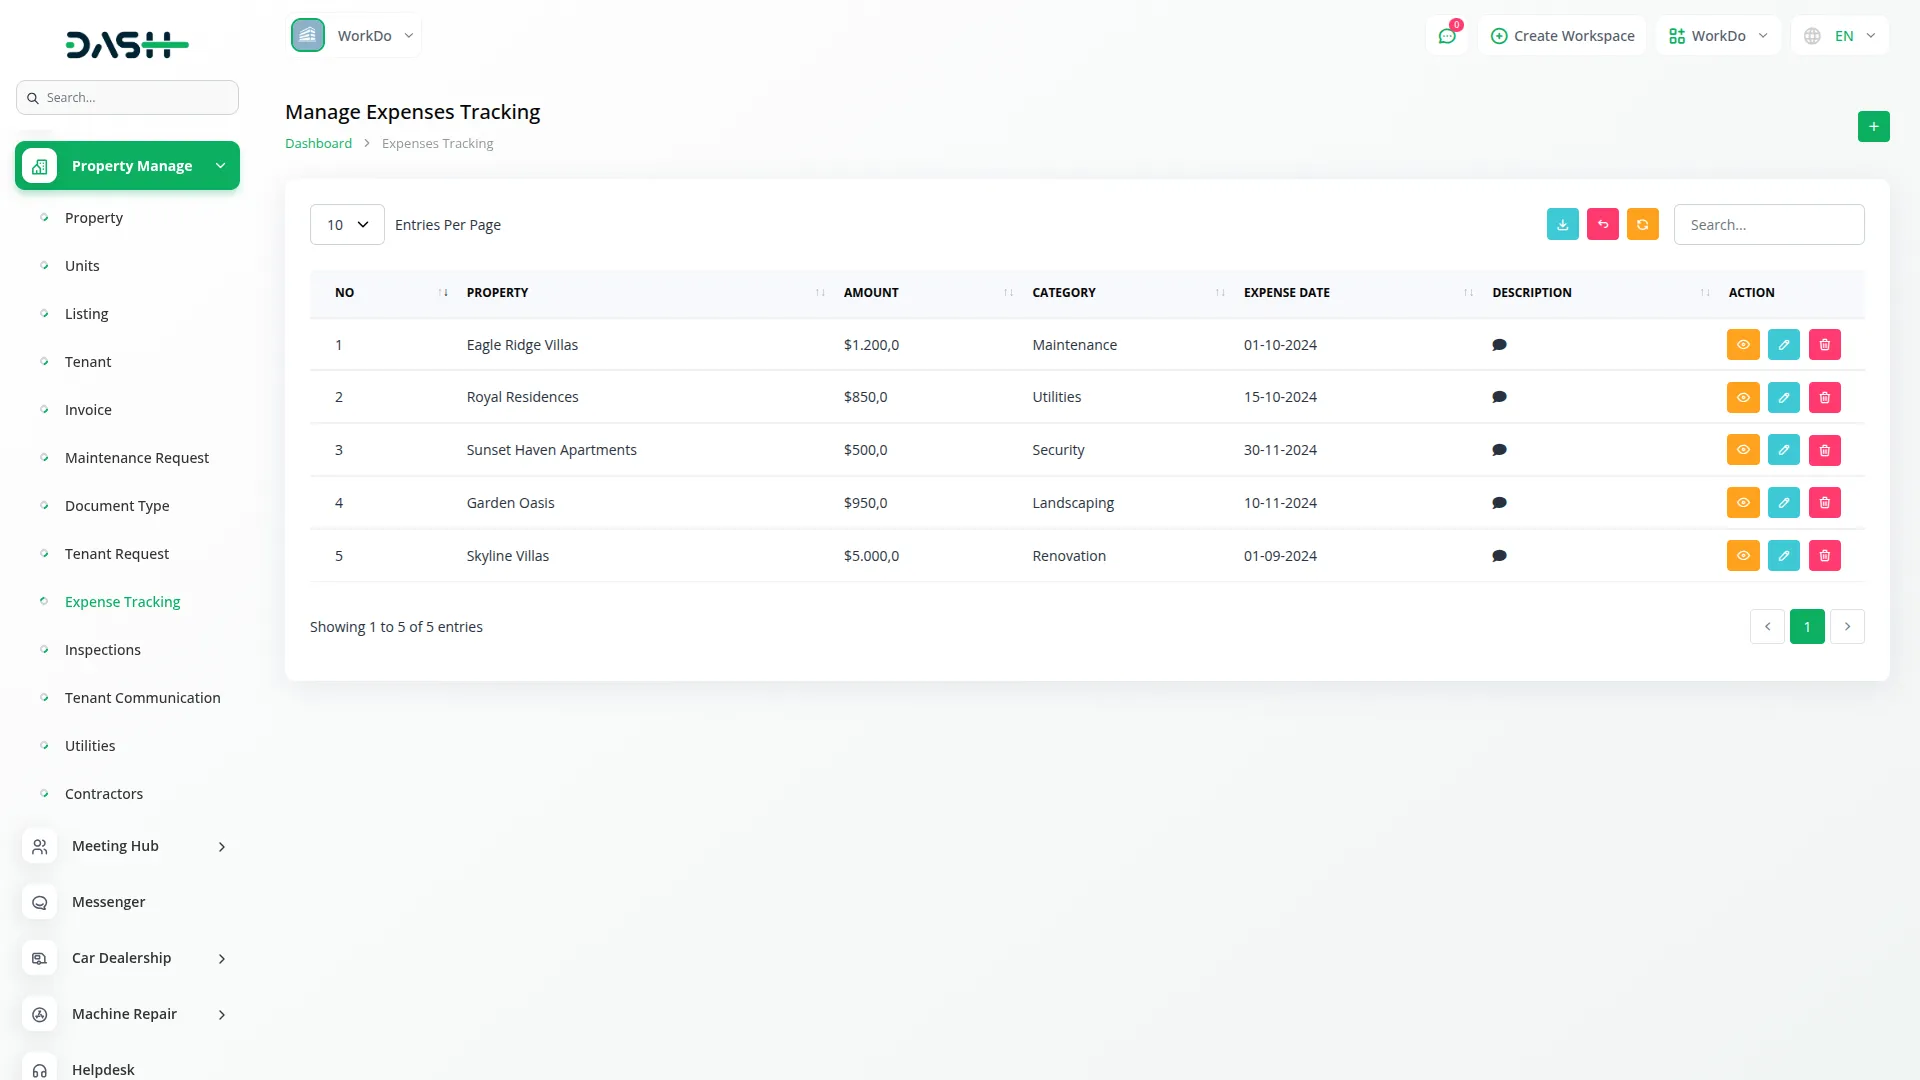
- Expense Tracking allows you to monitor and record all costs associated with your properties, helping you maintain accurate financial records for each property.
- To create a new Expense record, click the “Create” button. Select the Property from the dropdown (dynamically loaded from Properties), enter the Amount spent, specify the Category of expense, set the Expense Date, and provide a Description of what the expense was for.
- The list page includes buttons for Search, Export, Reset, and Reload. The table displays columns for Property, Amount, Category, Expense Date, Description, and Action. Available actions are View, Edit, and Delete.
Inspections Management
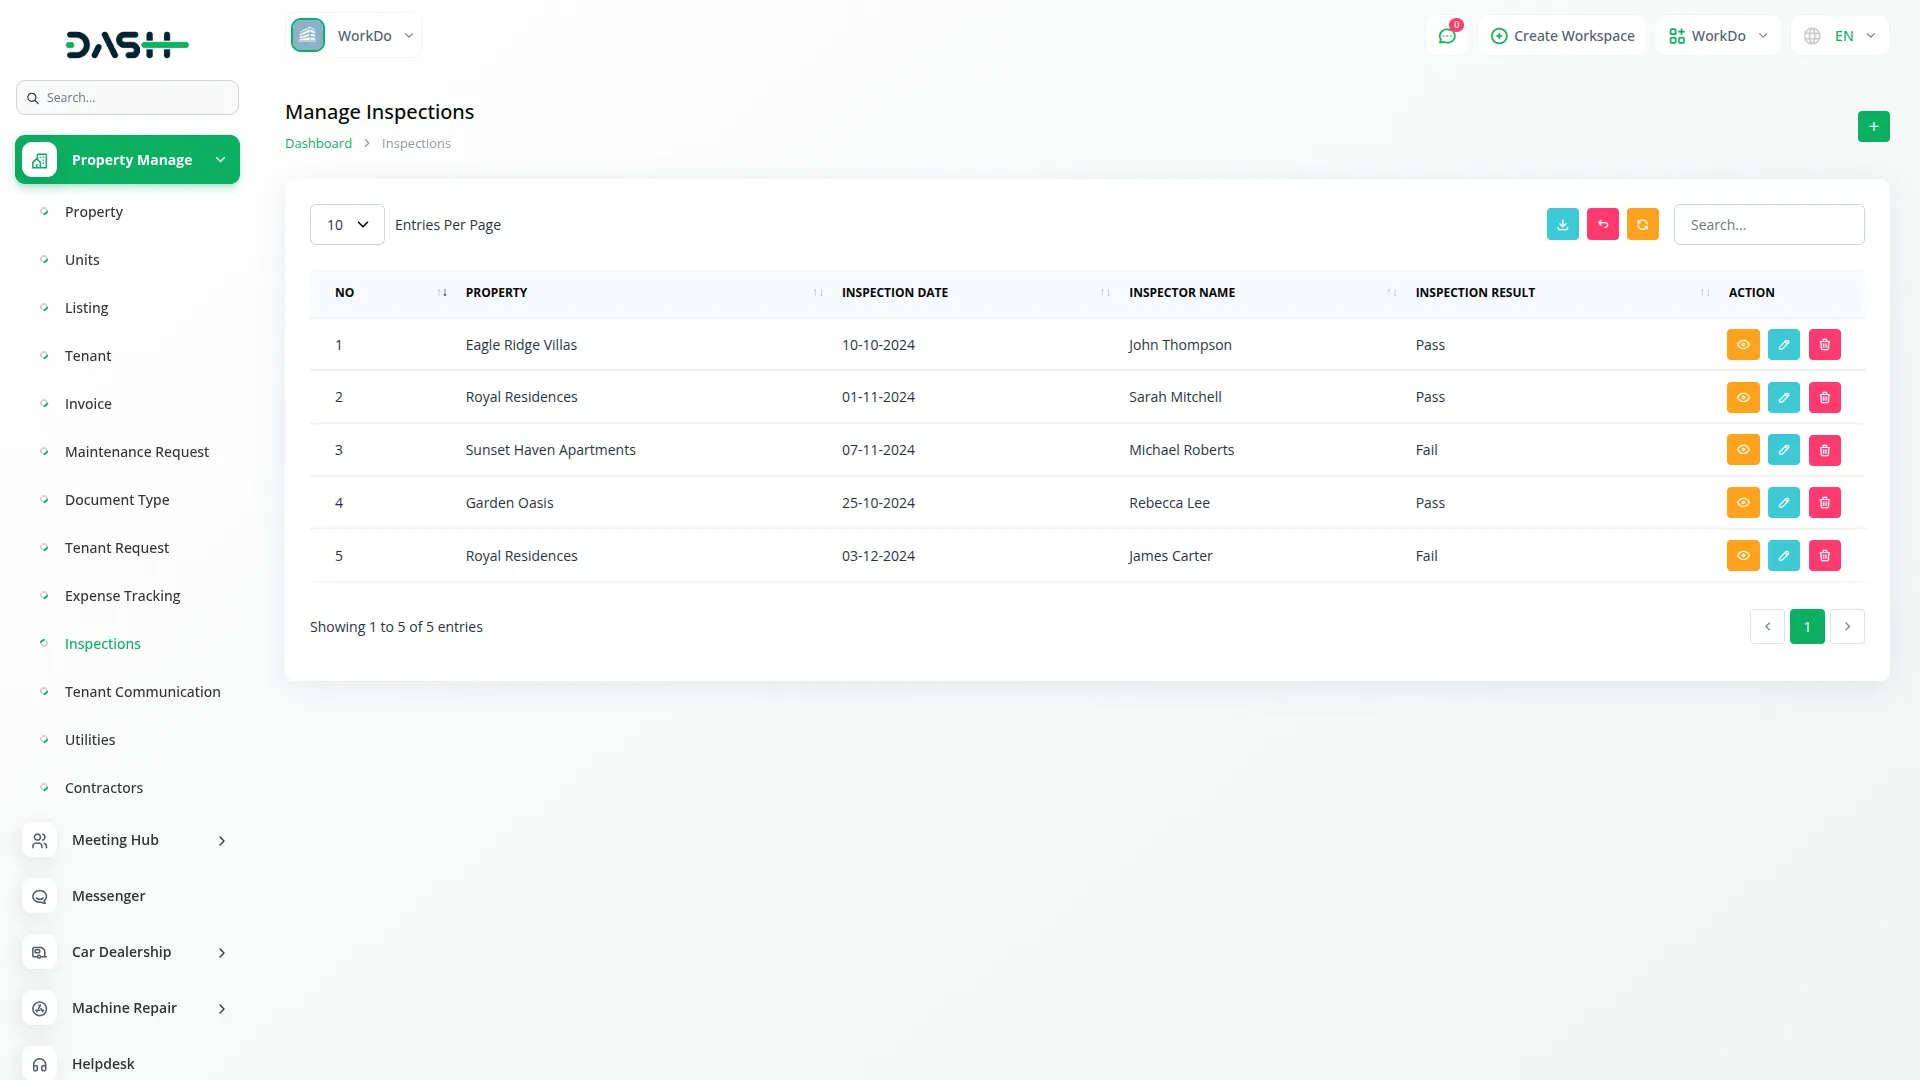
- The Inspections page helps you maintain records of property inspections, ensuring your properties meet safety and quality standards.
- To create a new Inspection record, click the “Create” button. Select the Property from the dropdown (dynamically loaded from Properties), set the Inspection Date, enter the Inspector Name, record the Inspection Result, and add any relevant Comments about the inspection findings.
- The list page provides buttons for Search, Reset, Reload, and Export. The table shows columns for Property, Inspection Date, Inspector Name, Inspection Result, and Action. Available actions include View, Edit, and Delete.
Tenant Communication Management
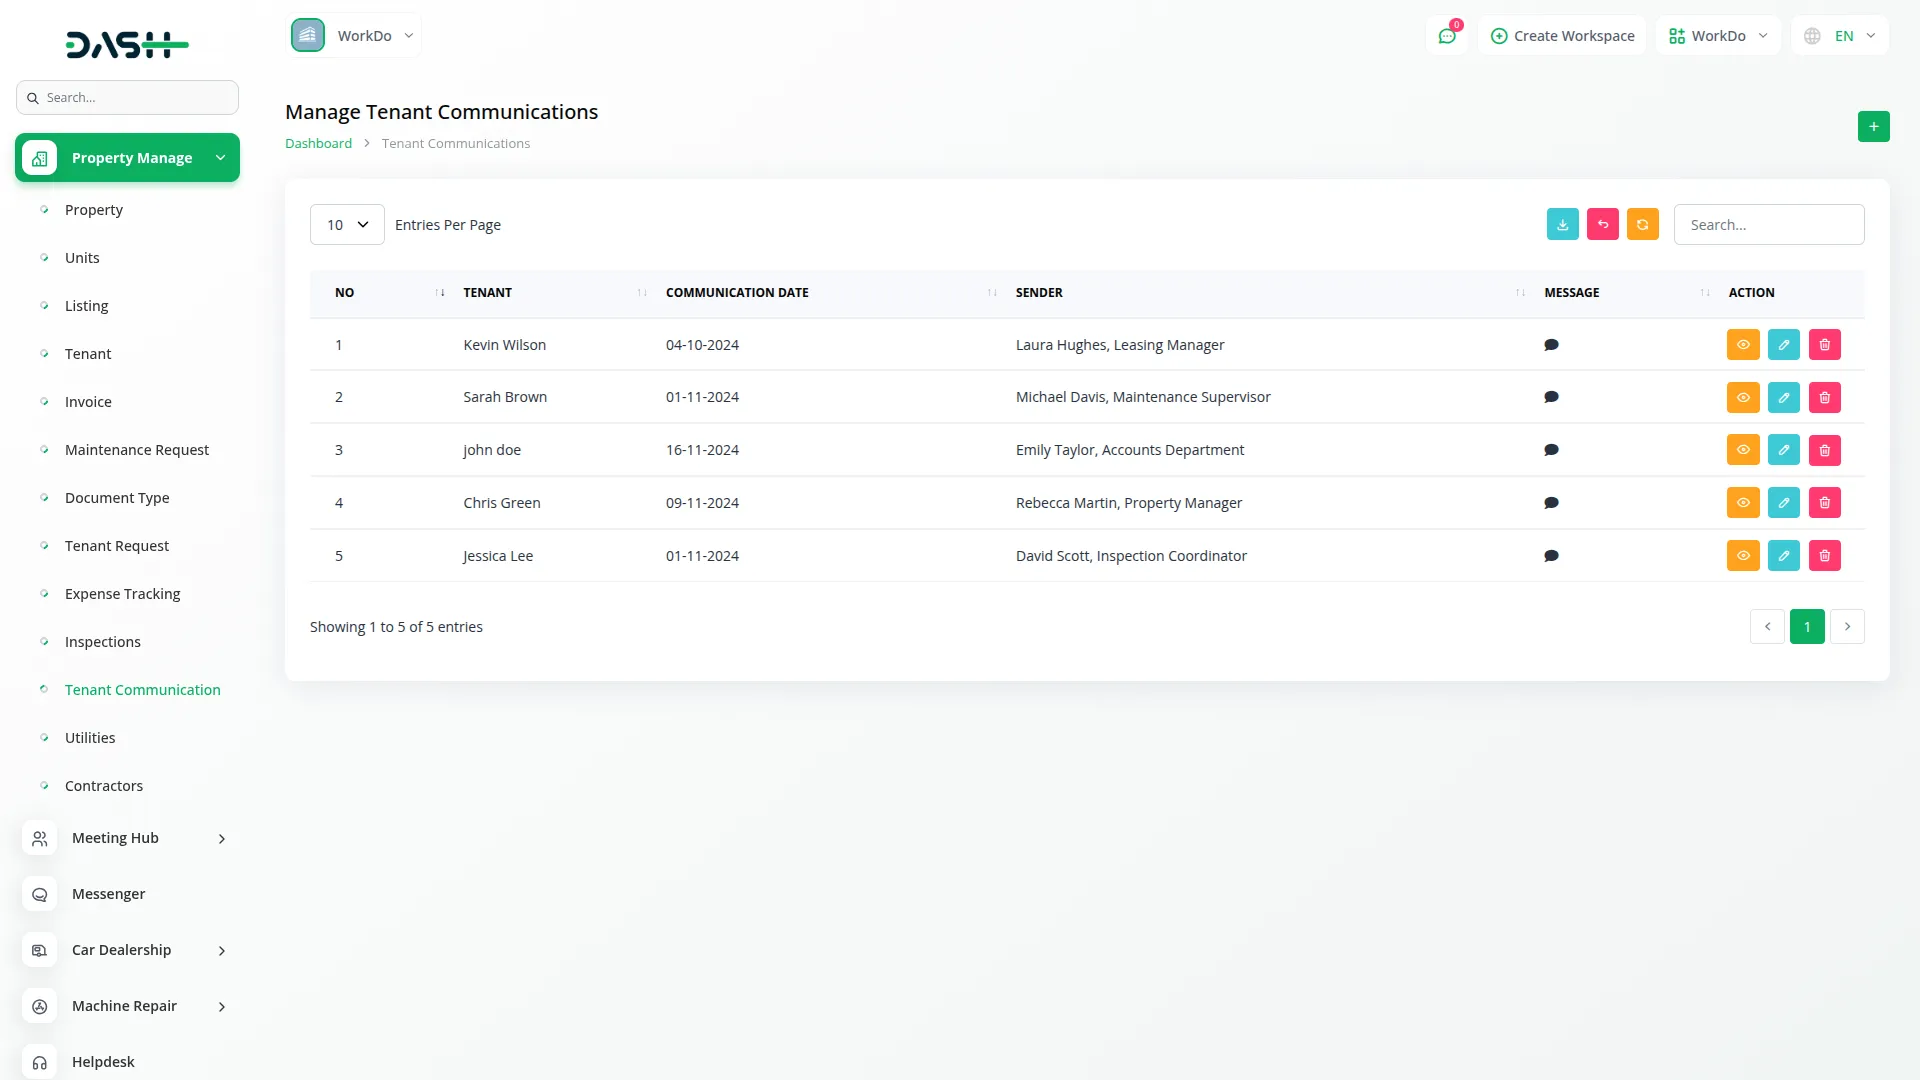
- Tenant Communication allows you to maintain a record of all communications with your tenants, creating a comprehensive communication history.
- To create a new Communication record, click the “Create” button. Select the Tenant from the dropdown (dynamically loaded from Tenant), set the Communication Date, specify the Sender, and enter the Message content.
- The list page includes buttons for Search, Export, Reset, Reload, and Add. The table displays columns for No, Tenant, Communication Date, Sender, Message, and Action. Available actions are View, Edit, and Delete.
Utilities
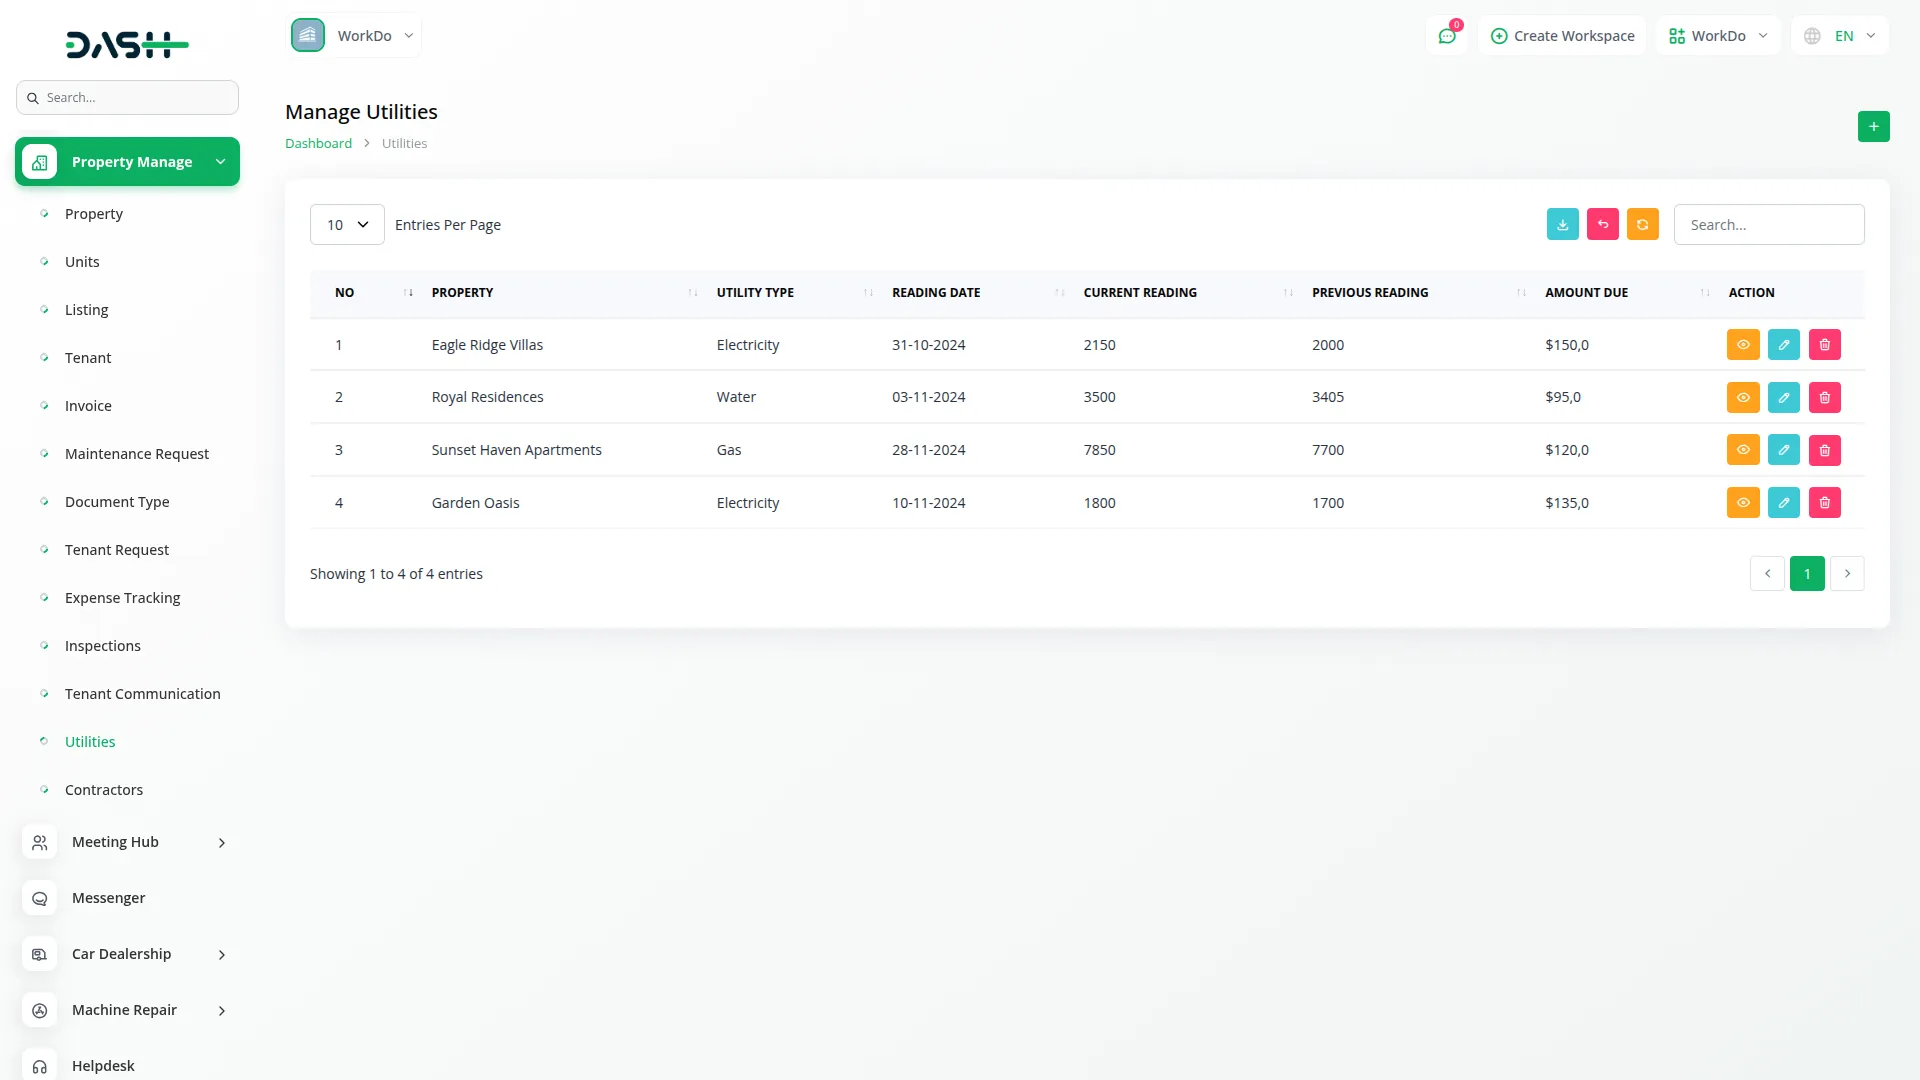
- The Utilities page manages utility readings and billing for your properties, tracking consumption and costs for various utility services.
- To create a new Utility record, click the “Create” button. Select the Property from the dropdown (dynamically loaded from Properties), choose the Utility Type (such as Electricity, Water, Gas, Internet, etc.), set the Reading Date, enter the Amount Due, record the Current Reading, and input the Previous Reading.
- The list page provides buttons for Search, Export, Reset, Reload, and Add. The table shows columns for No, Property, Utility Type, Reading Date, Current Reading, Previous Reading, Amount Due, and Action. Available actions include View, Edit, and Delete.
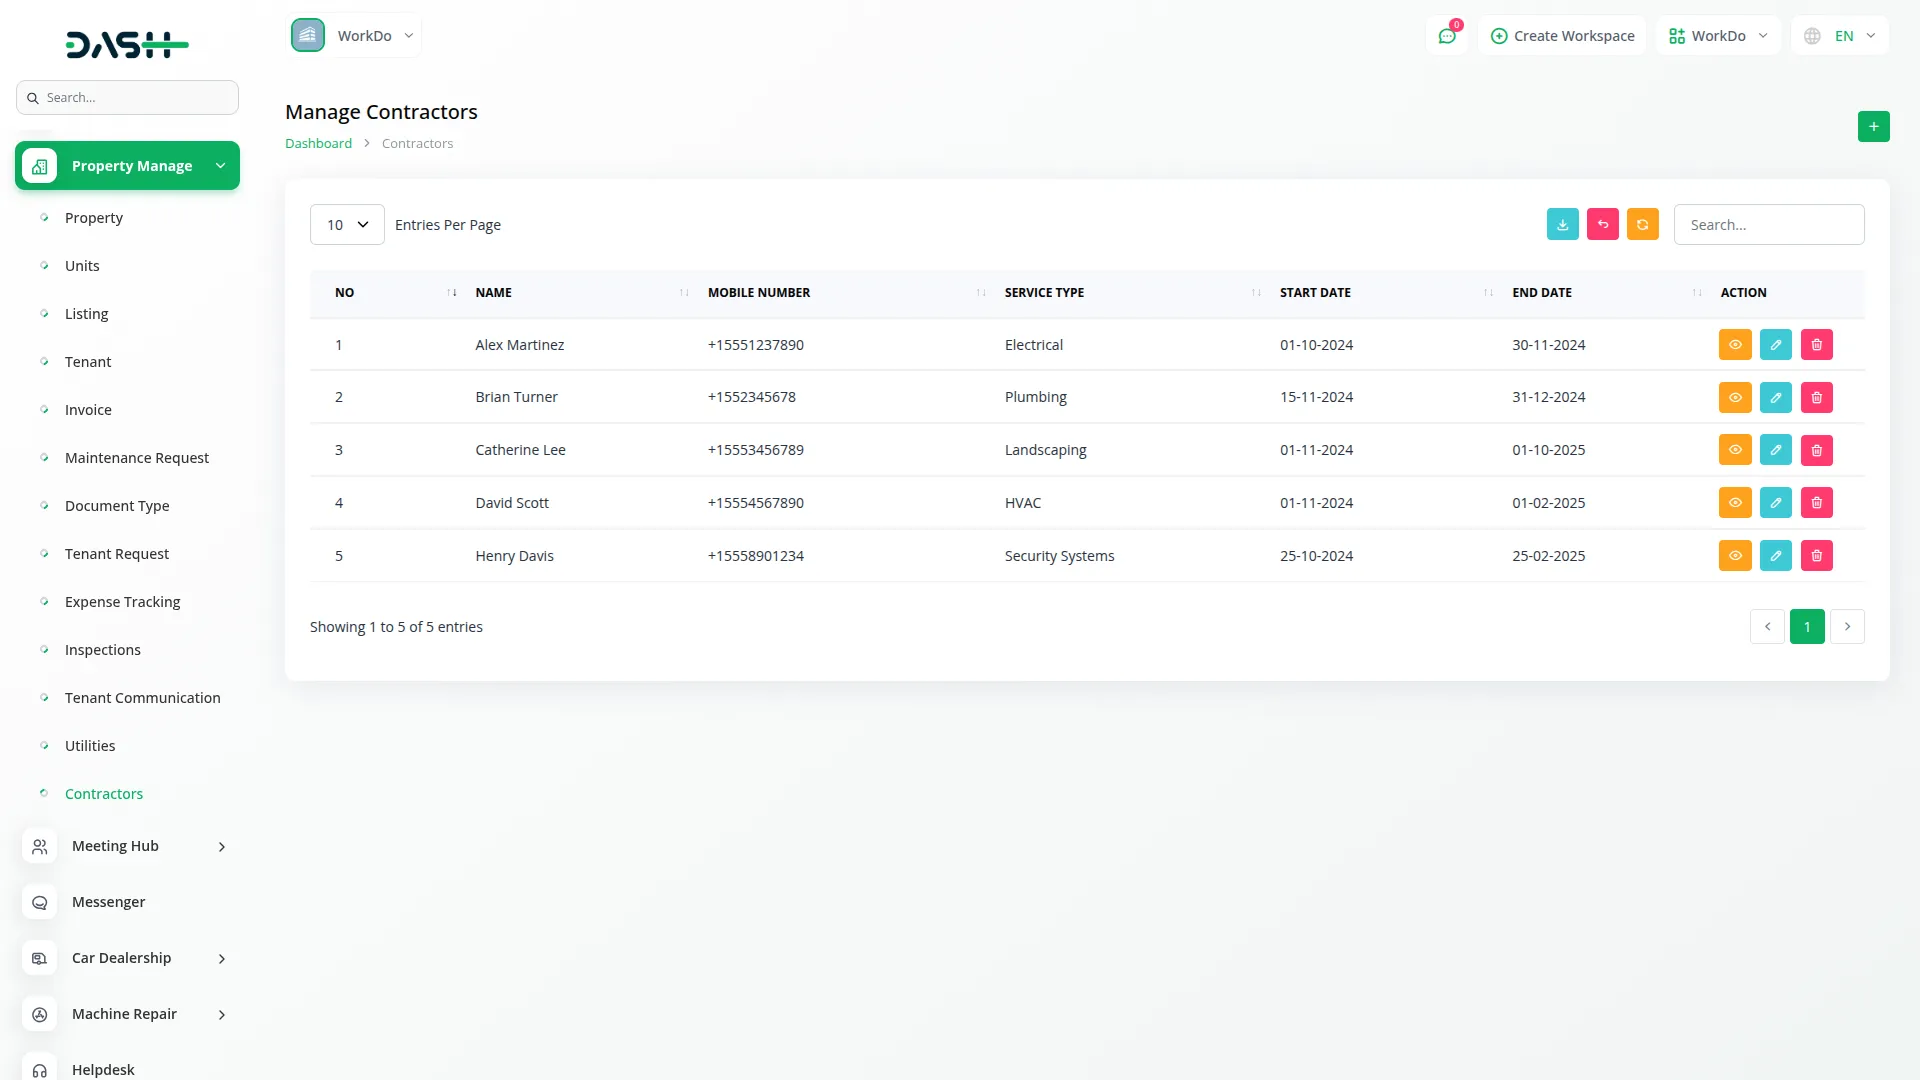
Contractors
- The Contractors page manages information about service providers and contractors who work on your properties.
- To create a new Contractor record, click the “Create” button. Enter the contractor’s Name, Mobile Number, Start Date, End Date, and Service Type they provide.
- The list page includes buttons for Search, Export, Reset, Reload, and Add. The table displays columns for No, Name, Mobile Number, Service Type, Start Date, End Date, and Action. Available actions are View, Edit, and Delete.
Public Property Listing Frontend
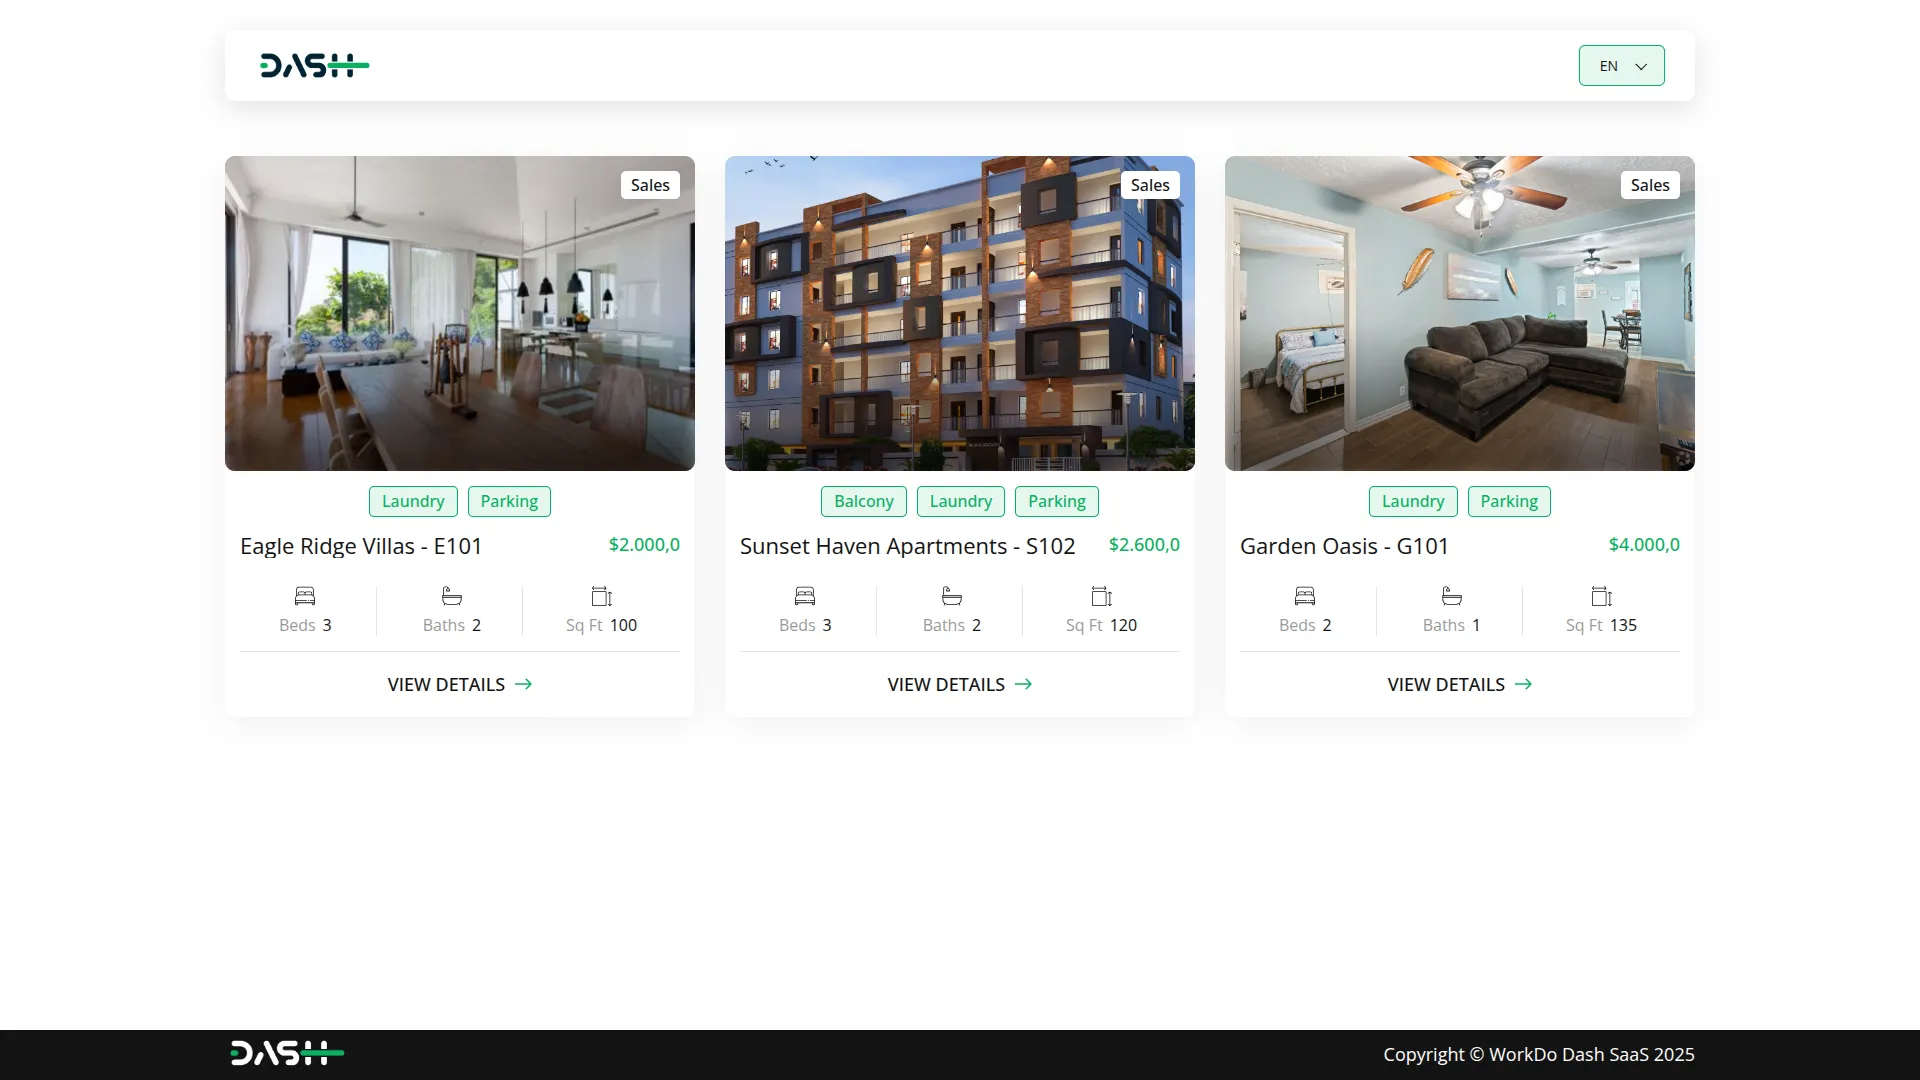
- The public property listing website is accessible via your workspace slug URL at /property/listing/{slug}. This frontend allows potential tenants to browse available properties and submit booking requests.
- The header section displays your logo, which is clickable and redirects visitors to the home page. A language selection functionality is also available in the header for international visitors.
- The main page shows a property grid display featuring images and basic information for each available property. Properties are dynamically loaded from the Property Listing page. This grid layout makes it easy for potential tenants to browse through your rental offerings quickly.
- The footer section contains your logo (also clickable to redirect to the home page) and copyright text information.
Property Detail Page
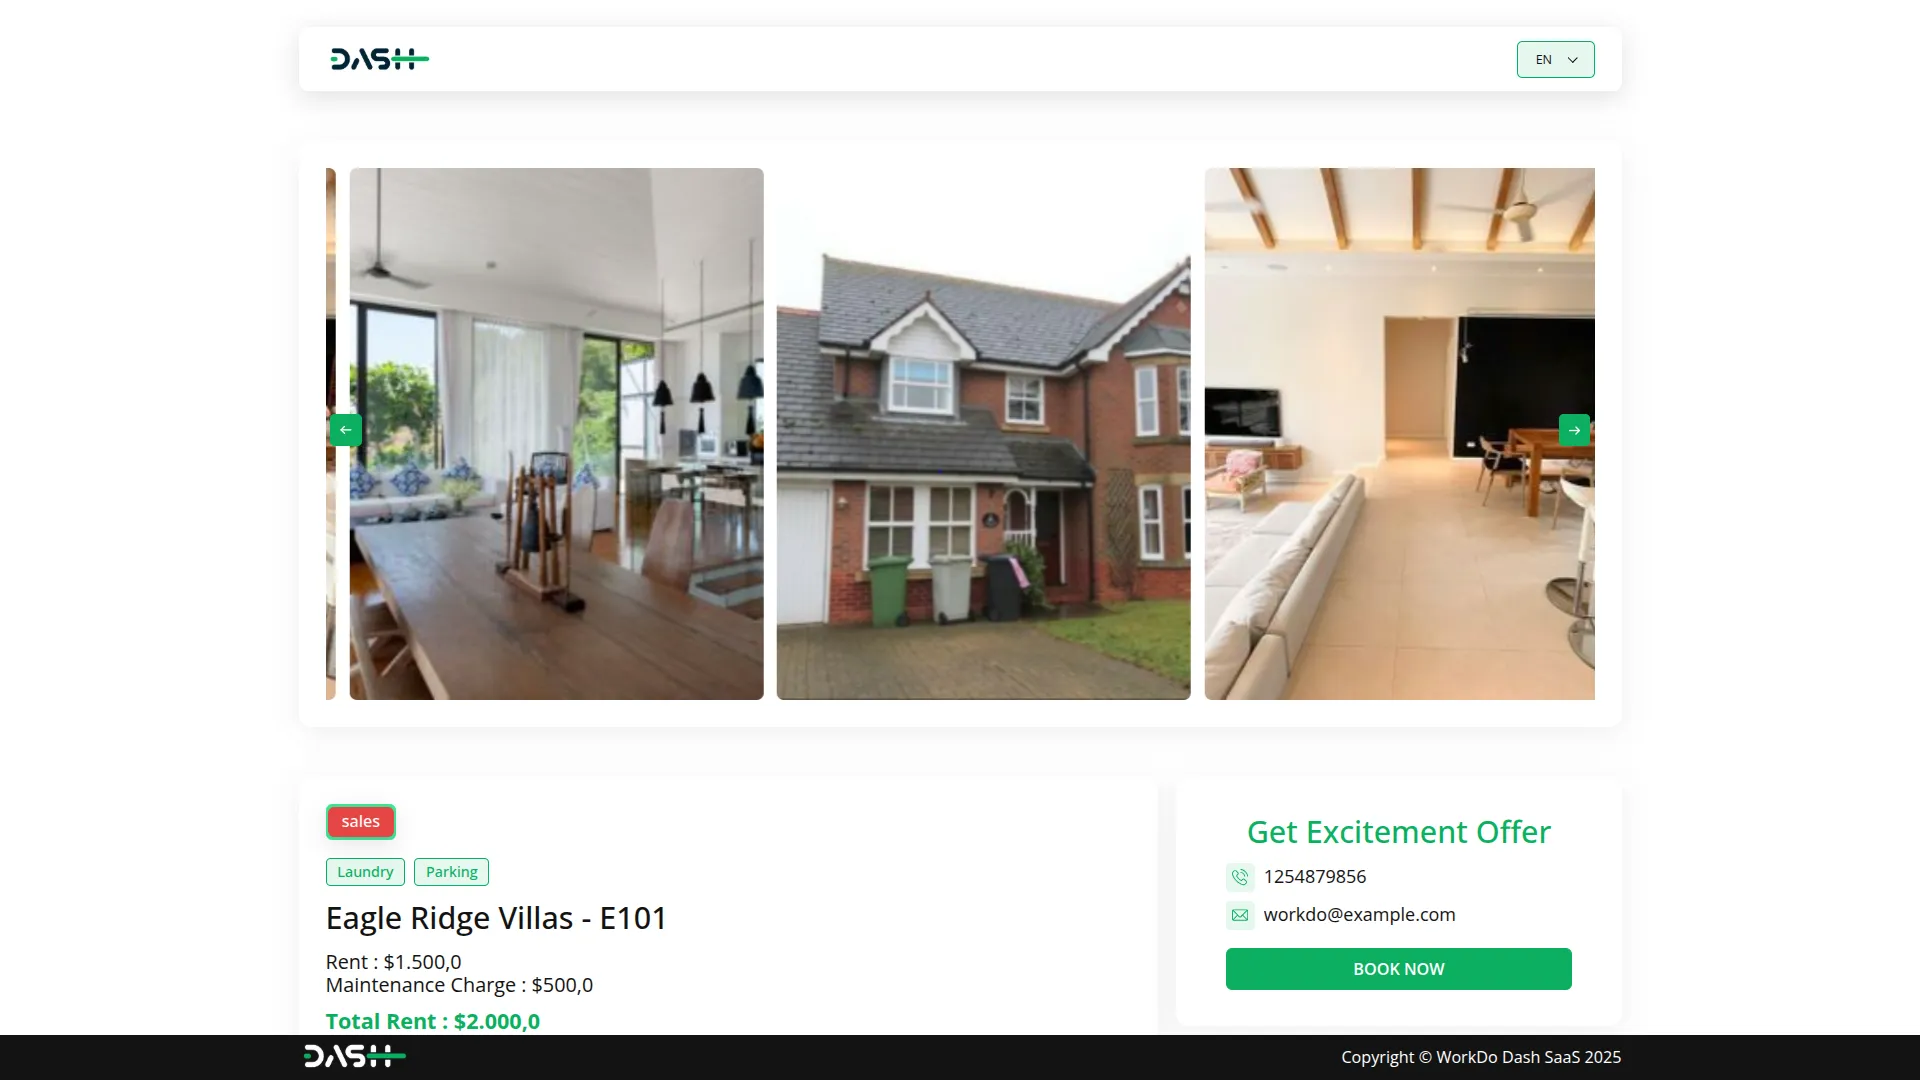
- When visitors click on any property from the grid display, they are taken to a comprehensive Property Detail Page that provides complete information about the rental unit.
- The page features a property images gallery showcasing multiple photos of the property to give potential tenants a clear view of the space.
- Unit specifications are displayed, including the number of bedrooms, bathrooms, kitchen details, and available amenities. This helps tenants understand exactly what the property offers.
- Rent information and pricing are prominently shown, including the rent amount and any maintenance charges that apply to the property.
- A detailed property description provides additional context about the rental, neighborhood, and any special features or policies.
- The page includes a booking request form specifically designed for interested tenants who want to inquire about renting the property.
Booking Process
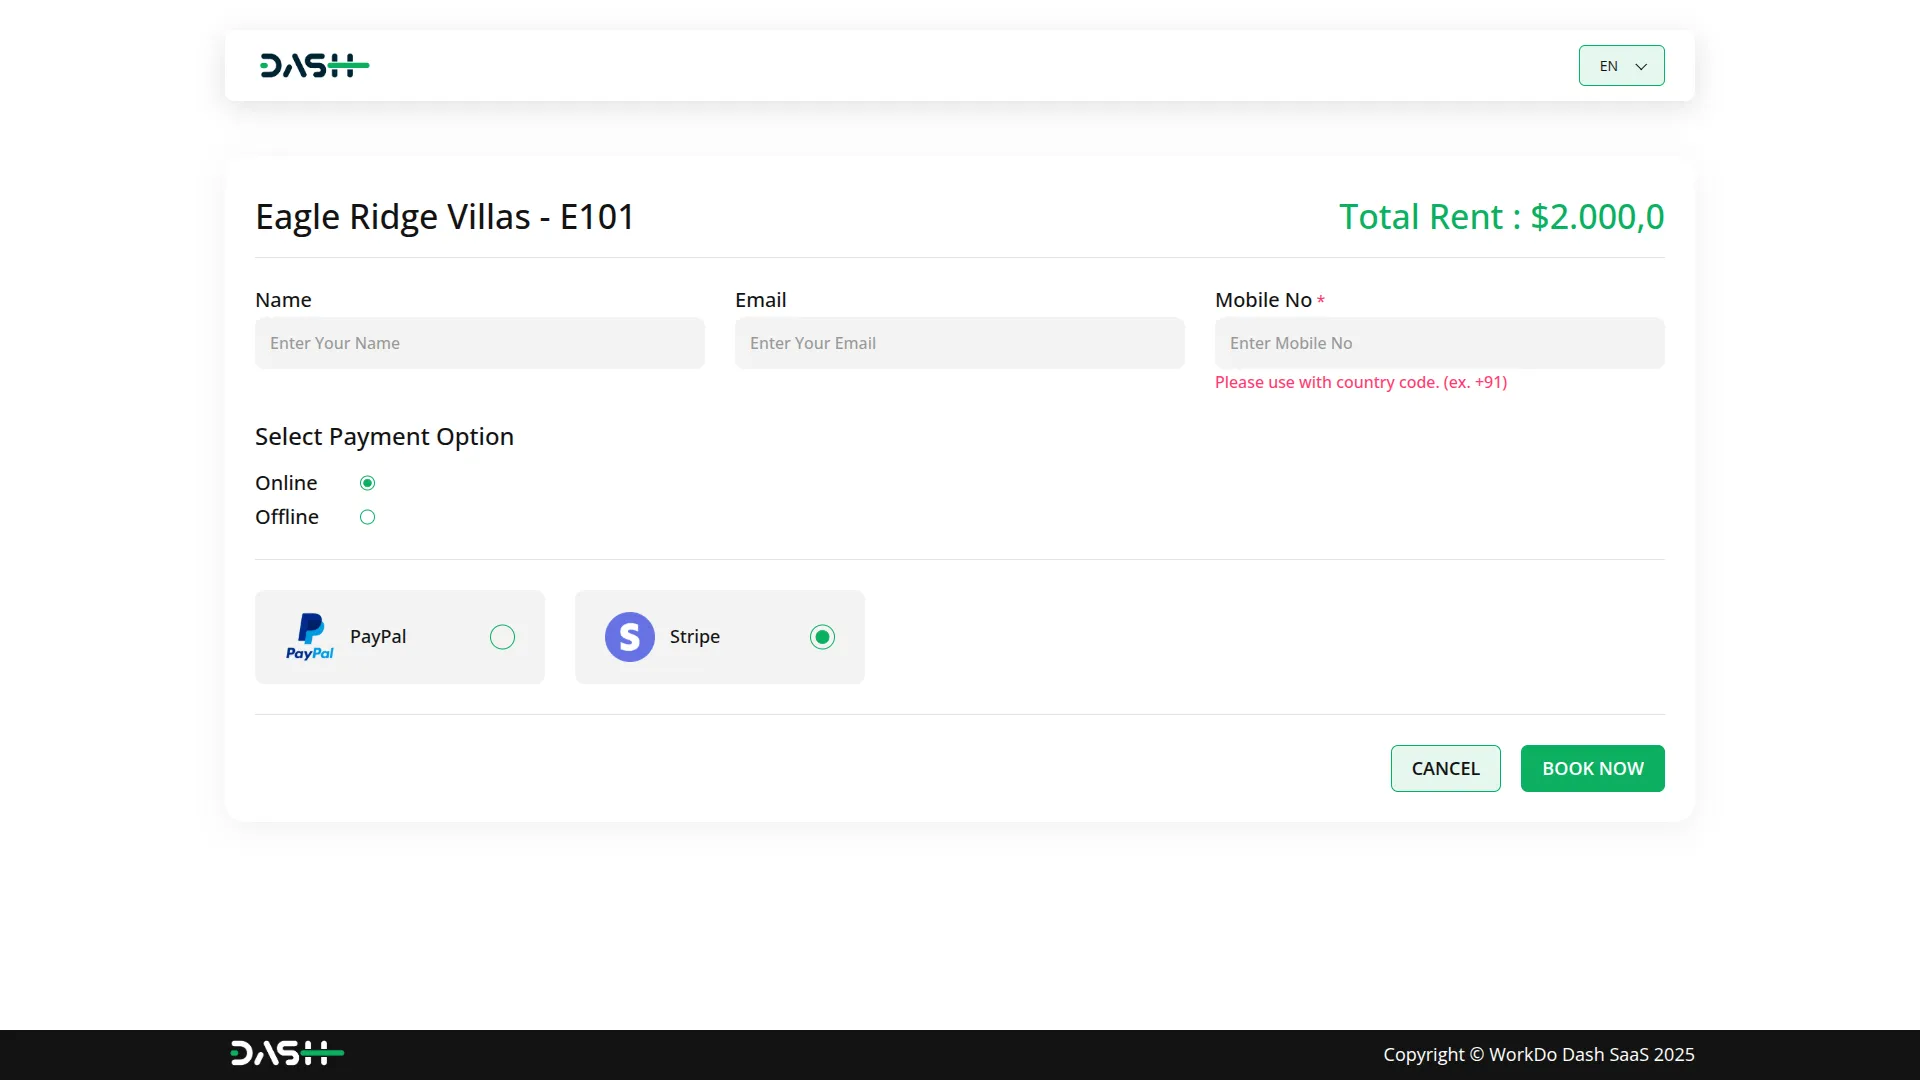
- The booking process begins when potential tenants click the “Book Now” button located on the Property Detail Page.
- This opens a customer information form where interested tenants must enter their Name, Email, and Mobile Number. This information is essential for processing their rental request.
- Tenants can then select their preferred payment option, choosing between Online and Offline payment methods based on their preference and convenience.
- After completing the form and selecting payment preferences, tenants can submit their booking request for confirmation.
Admin Management System
- Once a booking request is submitted through the website, it automatically appears in the admin side Tenant Request section.
- Property managers and administrators can view all incoming booking requests in this centralized location.
- From the admin panel, administrators have two options for each booking request: they can either convert the request into an actual tenant record or reject the request if it doesn’t meet their criteria.
Categories
Related articles
- Google Captcha Integration in Dash SaaS
- Blog & Article Integration in Dash SaaS
- Plaid Integration in Dash SaaS
- Garage/Workshop Management Integration in Dash SaaS
- Telegram Integration in Dash SaaS
- Performance Indicator Integration in Dash SaaS
- Jitsi Meet Detailed Documentation
- Video Hub Integration in Dash SaaS
- Google Authentication Integration in BookingGo SaaS
- Catering Management Integration in Dash SaaS
- LMS Integration in Dash SaaS
- Franchise Management Integration in Dash SaaS
Reach Out to Us
Have questions or need assistance? We're here to help! Reach out to our team for support, inquiries, or feedback. Your needs are important to us, and we’re ready to assist you!


Need more help?
If you’re still uncertain or need professional guidance, don’t hesitate to contact us. You can contact us via email or submit a ticket with a description of your issue. Our team of experts is always available to help you with any questions. Rest assured that we’ll respond to your inquiry promptly.
Love what you see?
Do you like the quality of our products, themes, and applications, or perhaps the design of our website caught your eye? You can have similarly outstanding designs for your website or apps. Contact us, and we’ll bring your ideas to life.
