Performance Indicator Integration in Dash SaaS
The Performance Indicator is a comprehensive gamification platform designed to enhance employee engagement and productivity through structured challenges, team management, and achievement tracking.
Introduction
The Performance Indicator is a comprehensive gamification platform designed to enhance employee engagement and productivity through structured challenges, team management, and achievement tracking. This system allows organizations to create teams, assign challenges, track progress through XP and points systems, and recognize achievements. The platform provides both administrative tools for company management and user-focused dashboards for team leaders and individual members to monitor their performance and contributions.
How To Install Performance Indicator Add-On?
To Set Up the Performance Indicator Add-On, you can follow this link Setup Add-On.
How To Use Performance Indicator Add-On?
Performance Indicator Dashboard
- The main dashboard provides a complete overview of your organization’s performance metrics through various cards and charts. You can view cards displaying Total Challenges, Total Members, Total Teams, and Total Achievements for quick insights into overall system activity. The Teams Overview bar chart shows points for the top 5 performing teams, while the Individual Overview bar chart displays XP scores for the top 5 members.
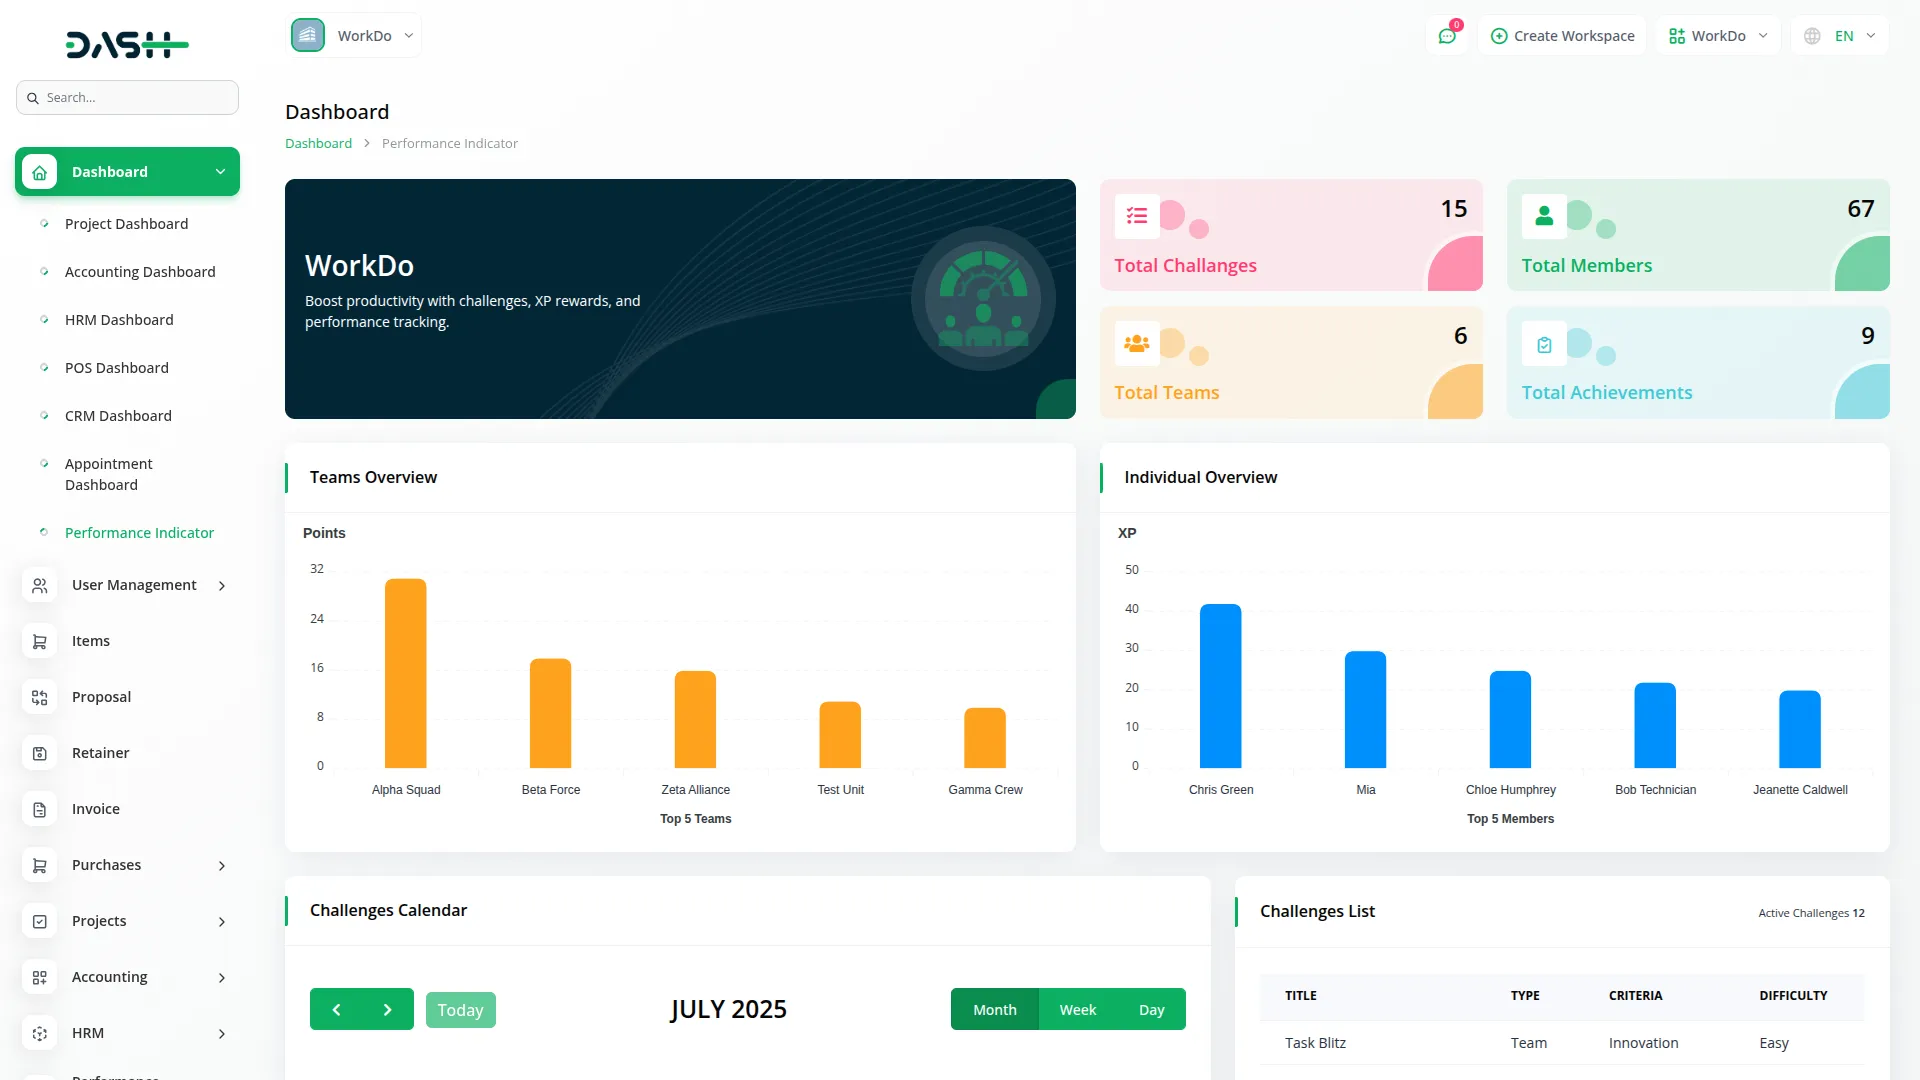
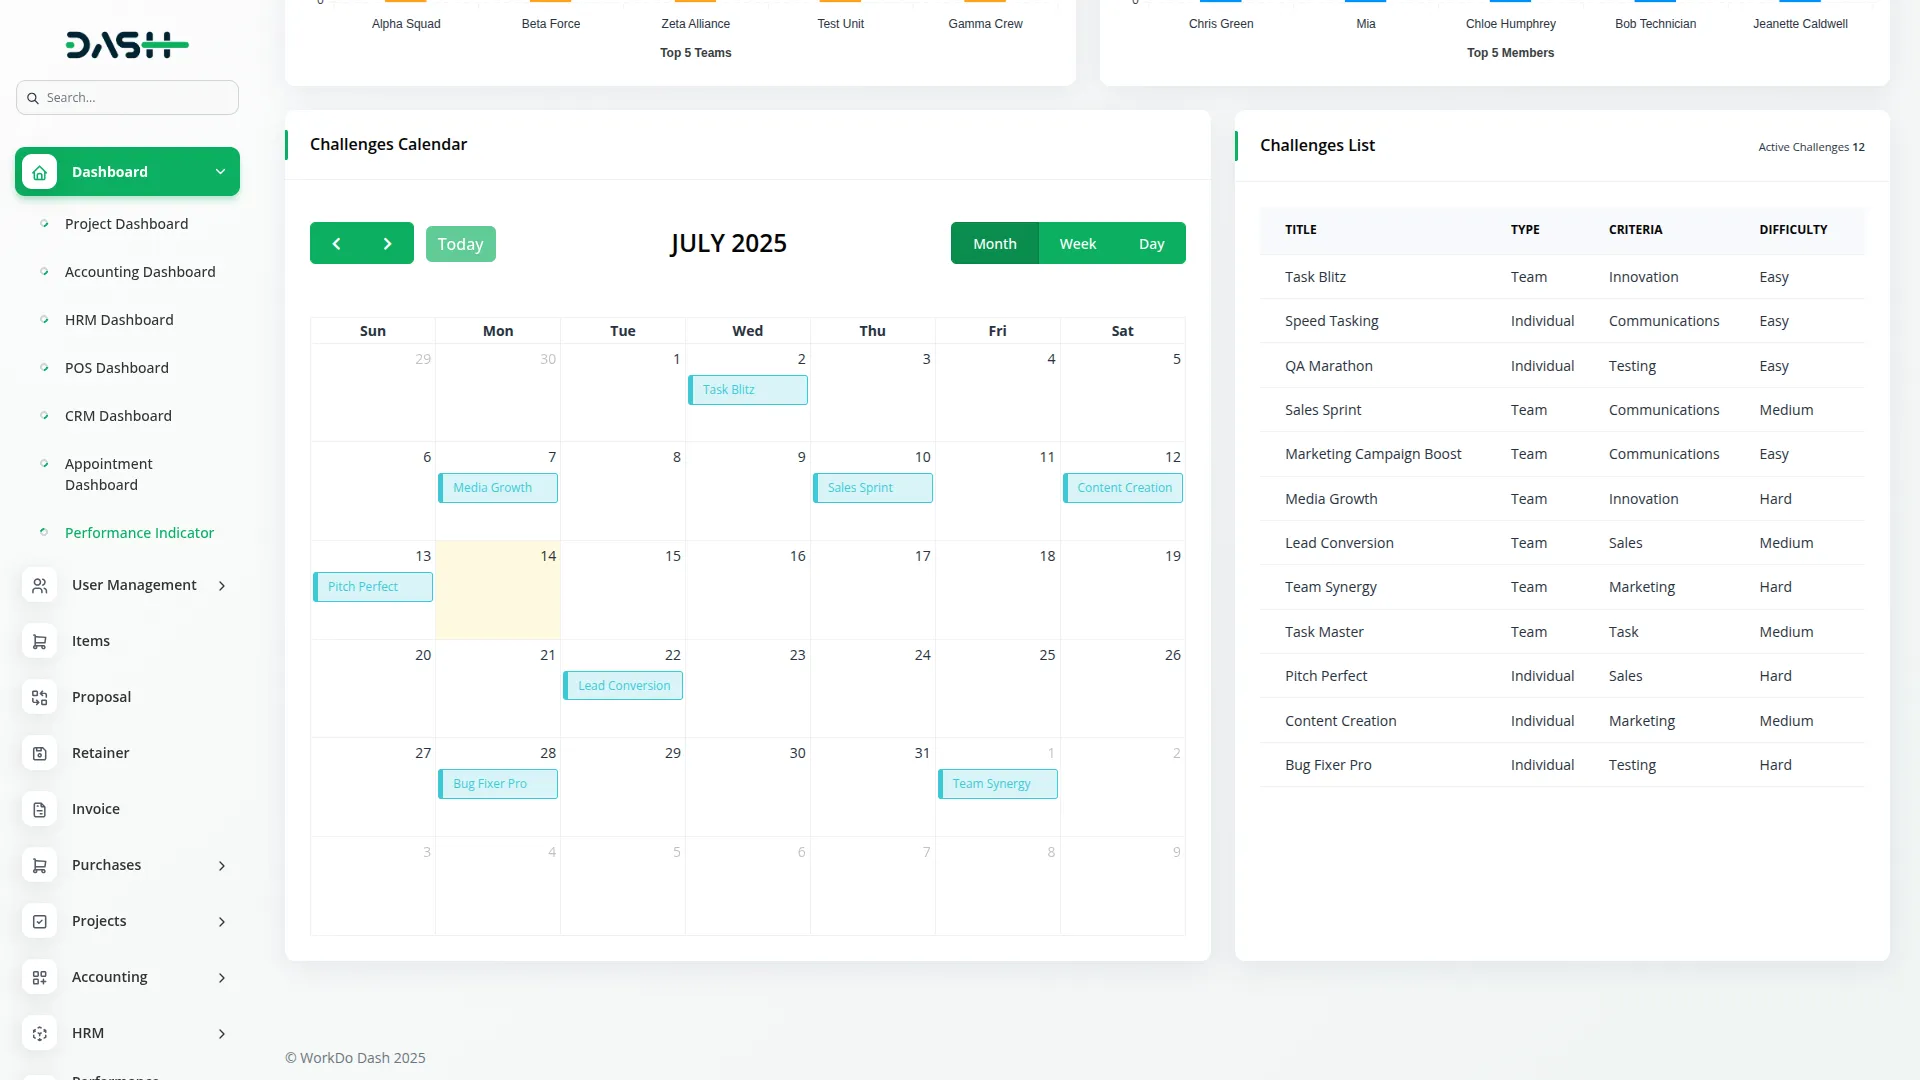
- The Challenges Calendar View shows challenge names on their respective dates for easy scheduling reference. Additionally, a comprehensive challenges list displays all active and upcoming challenges with their detailed information.
System Setup
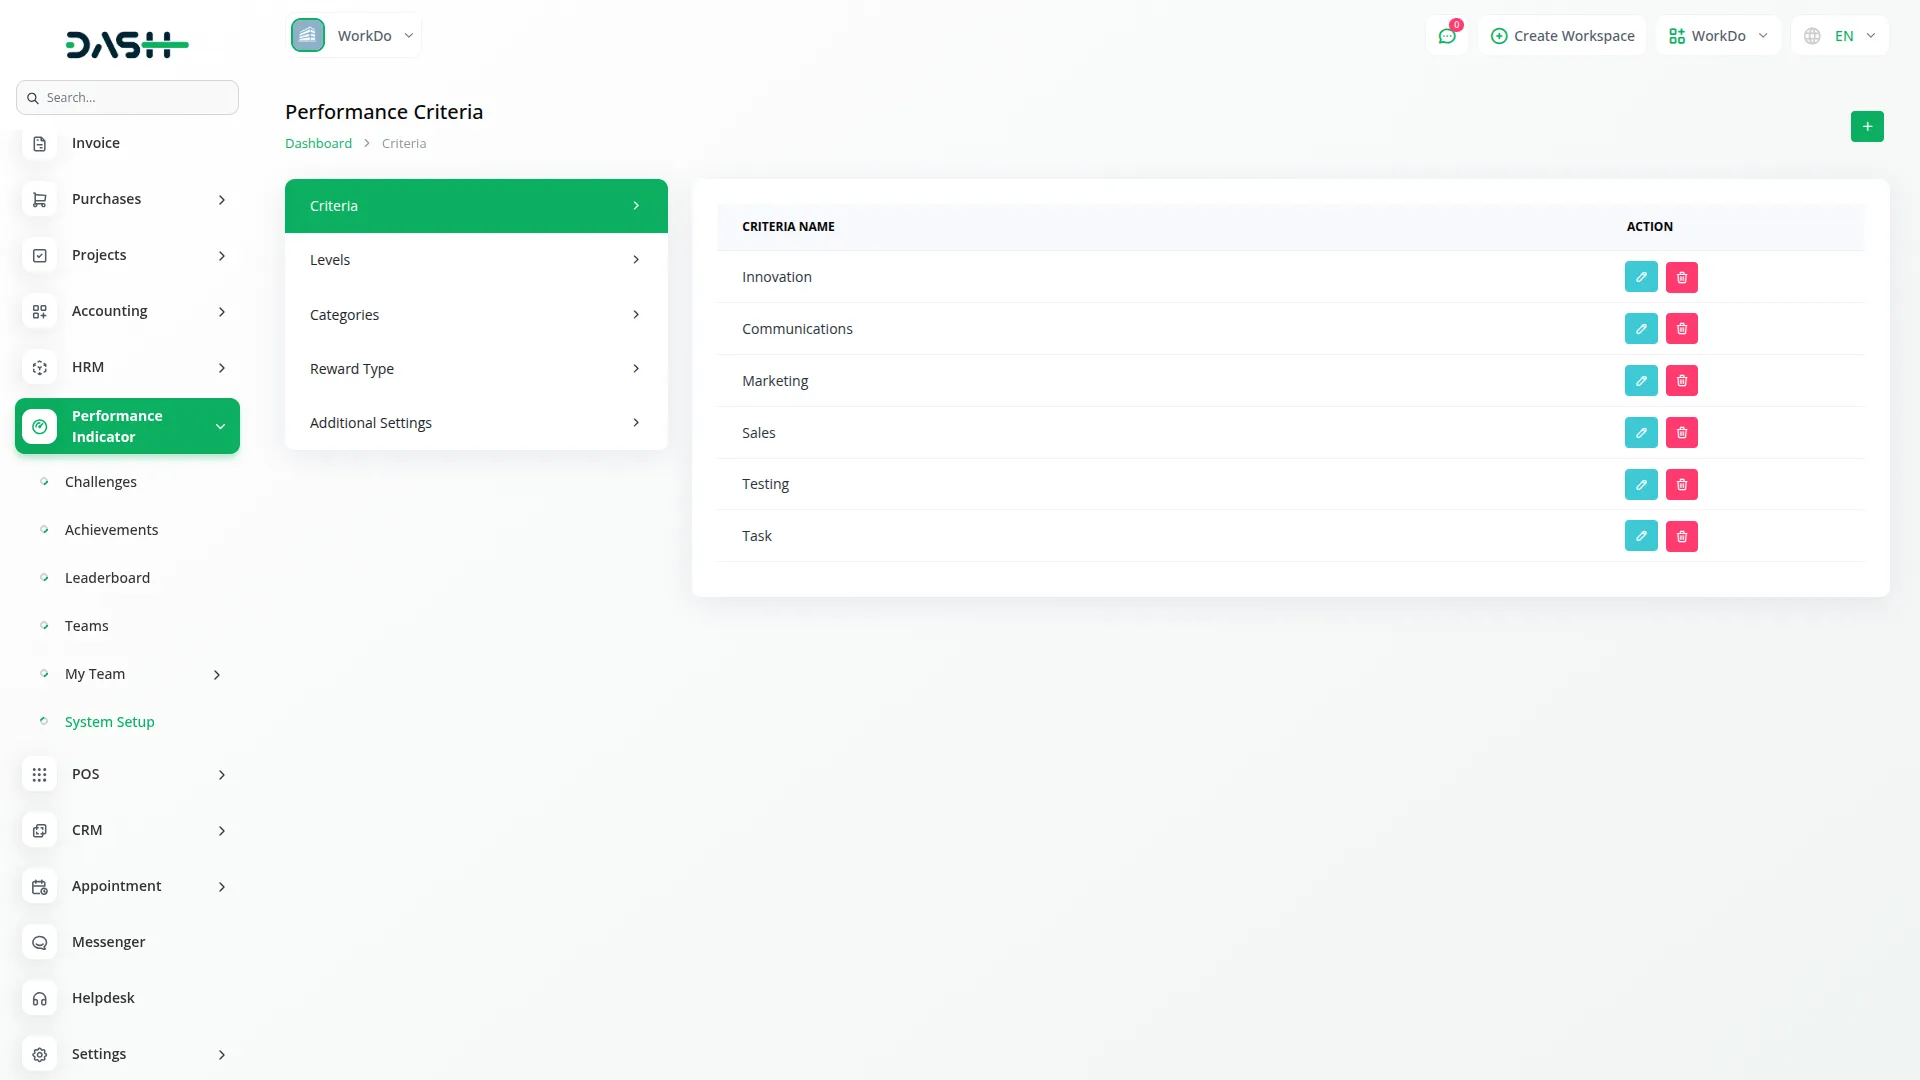
- The System Setup section allows you to configure essential elements for your performance tracking system. This section is connected to other sections like Teams, Challenges, and Achievements, as the settings you configure here will be used throughout the system.
- To create a new Criteria, click the Create button and enter the Criteria Name. The list page shows all criteria with options to Edit or Delete existing entries.
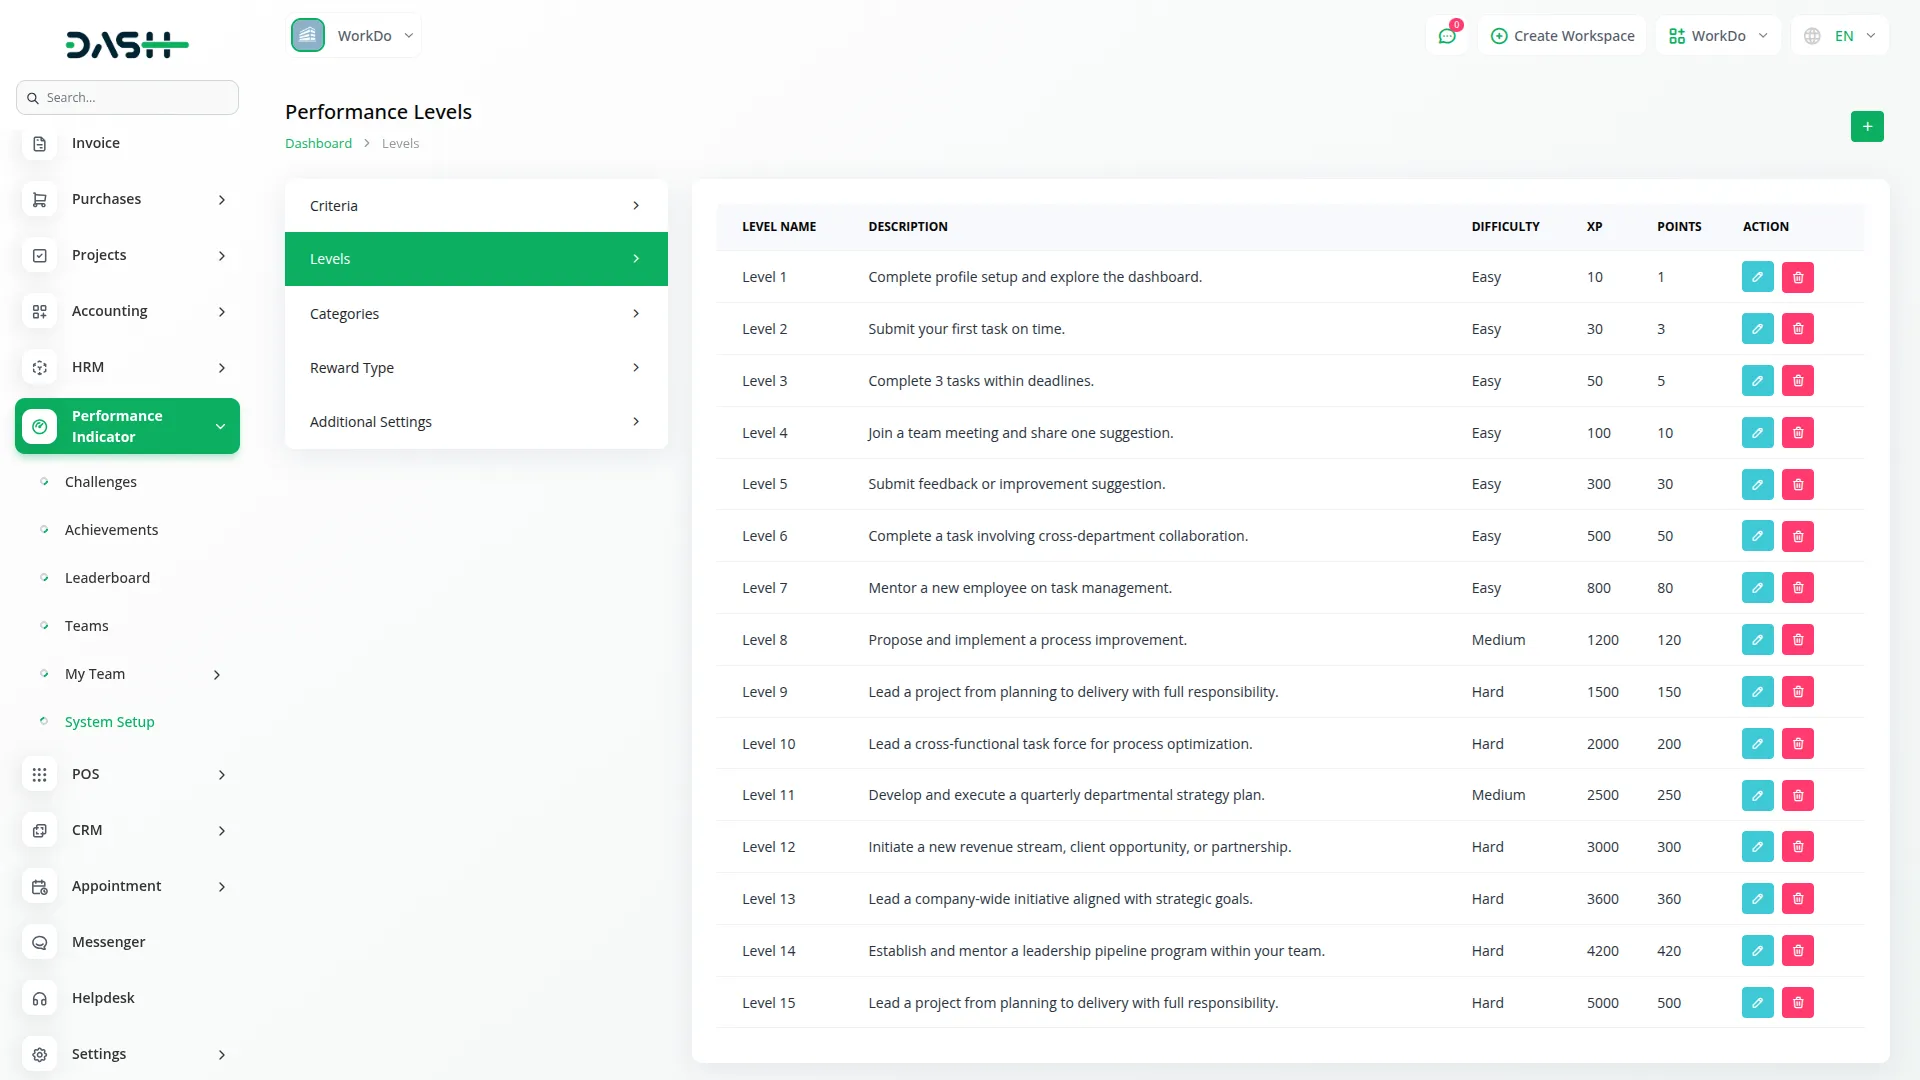
- For Levels configuration, click Create and fill in the Name, select Difficulty Level from Easy, Medium, or Hard options, enter XP and Points values, and add a Description. The list displays all levels with their difficulty, XP, points, and descriptions, with Edit and Delete options available.
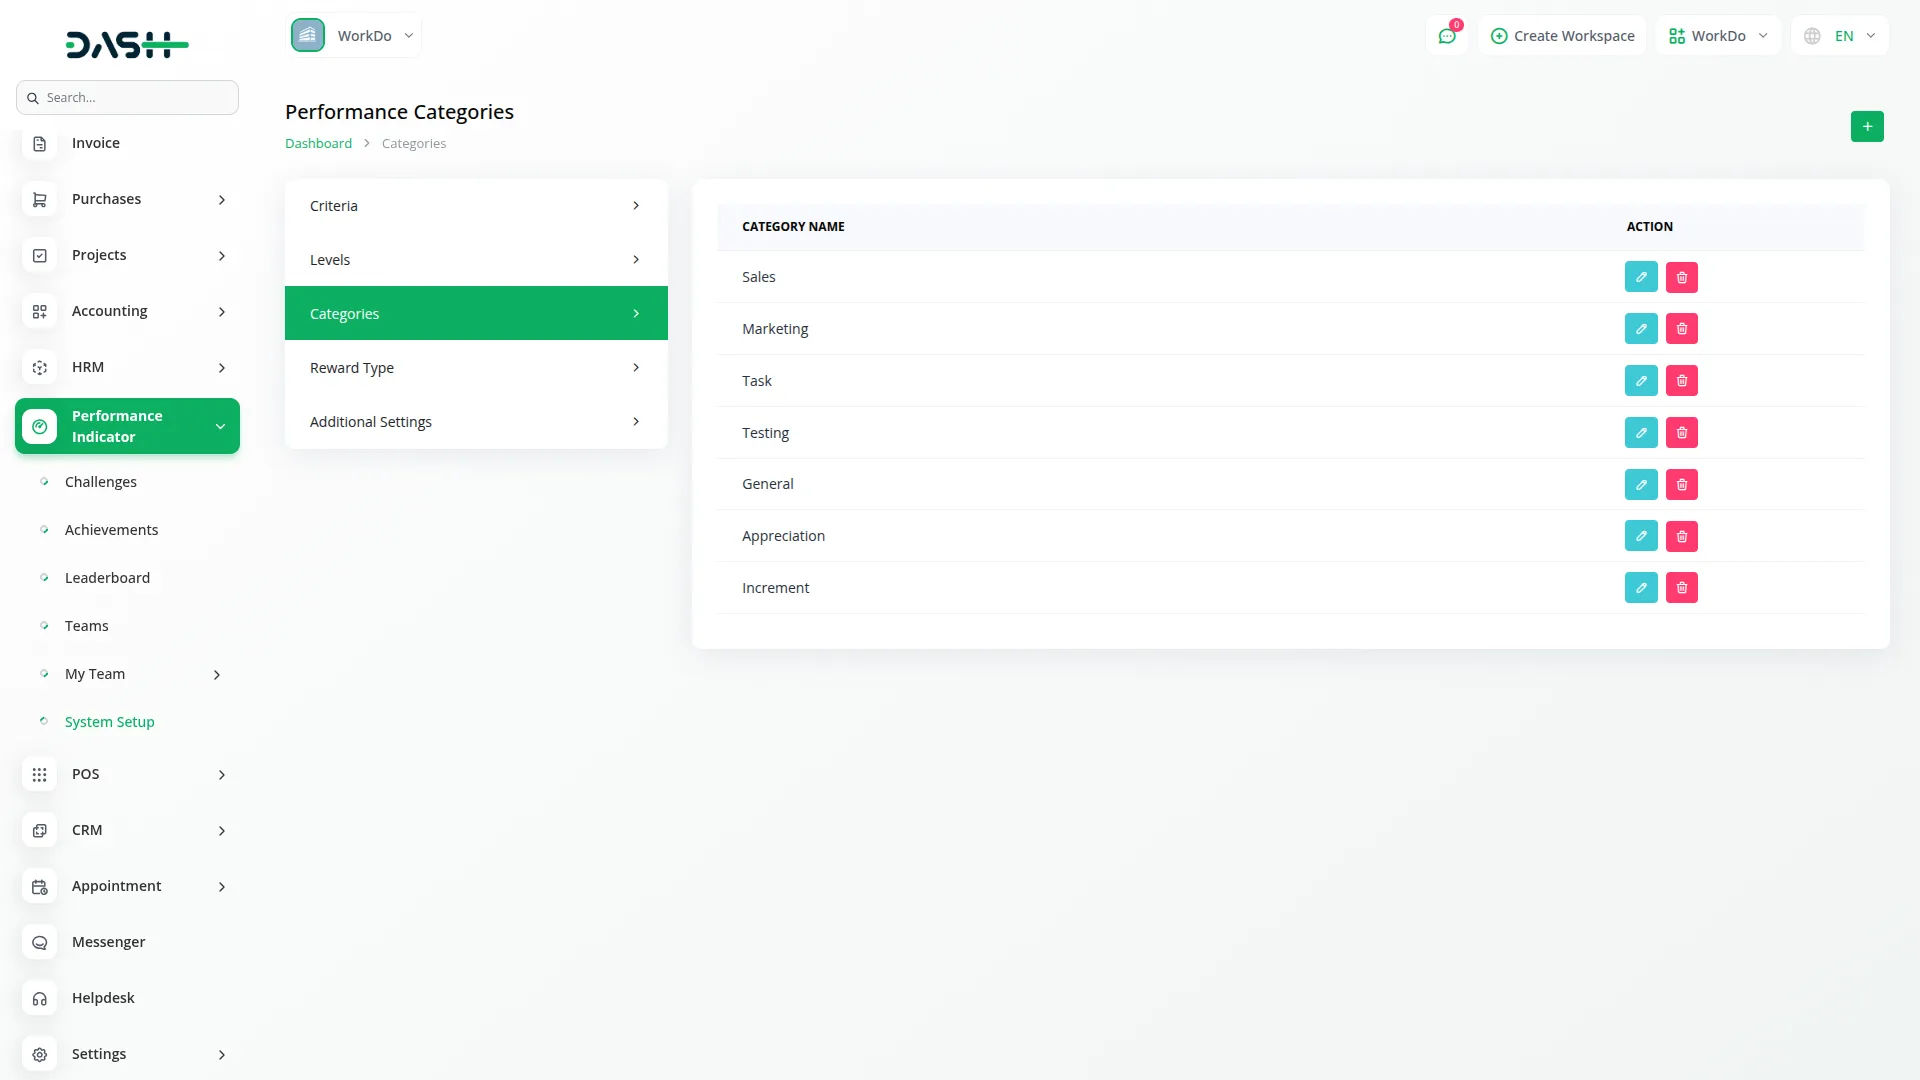
- To create Categories, click Create and enter the Category Name. The list page shows all categories with Edit and Delete actions.
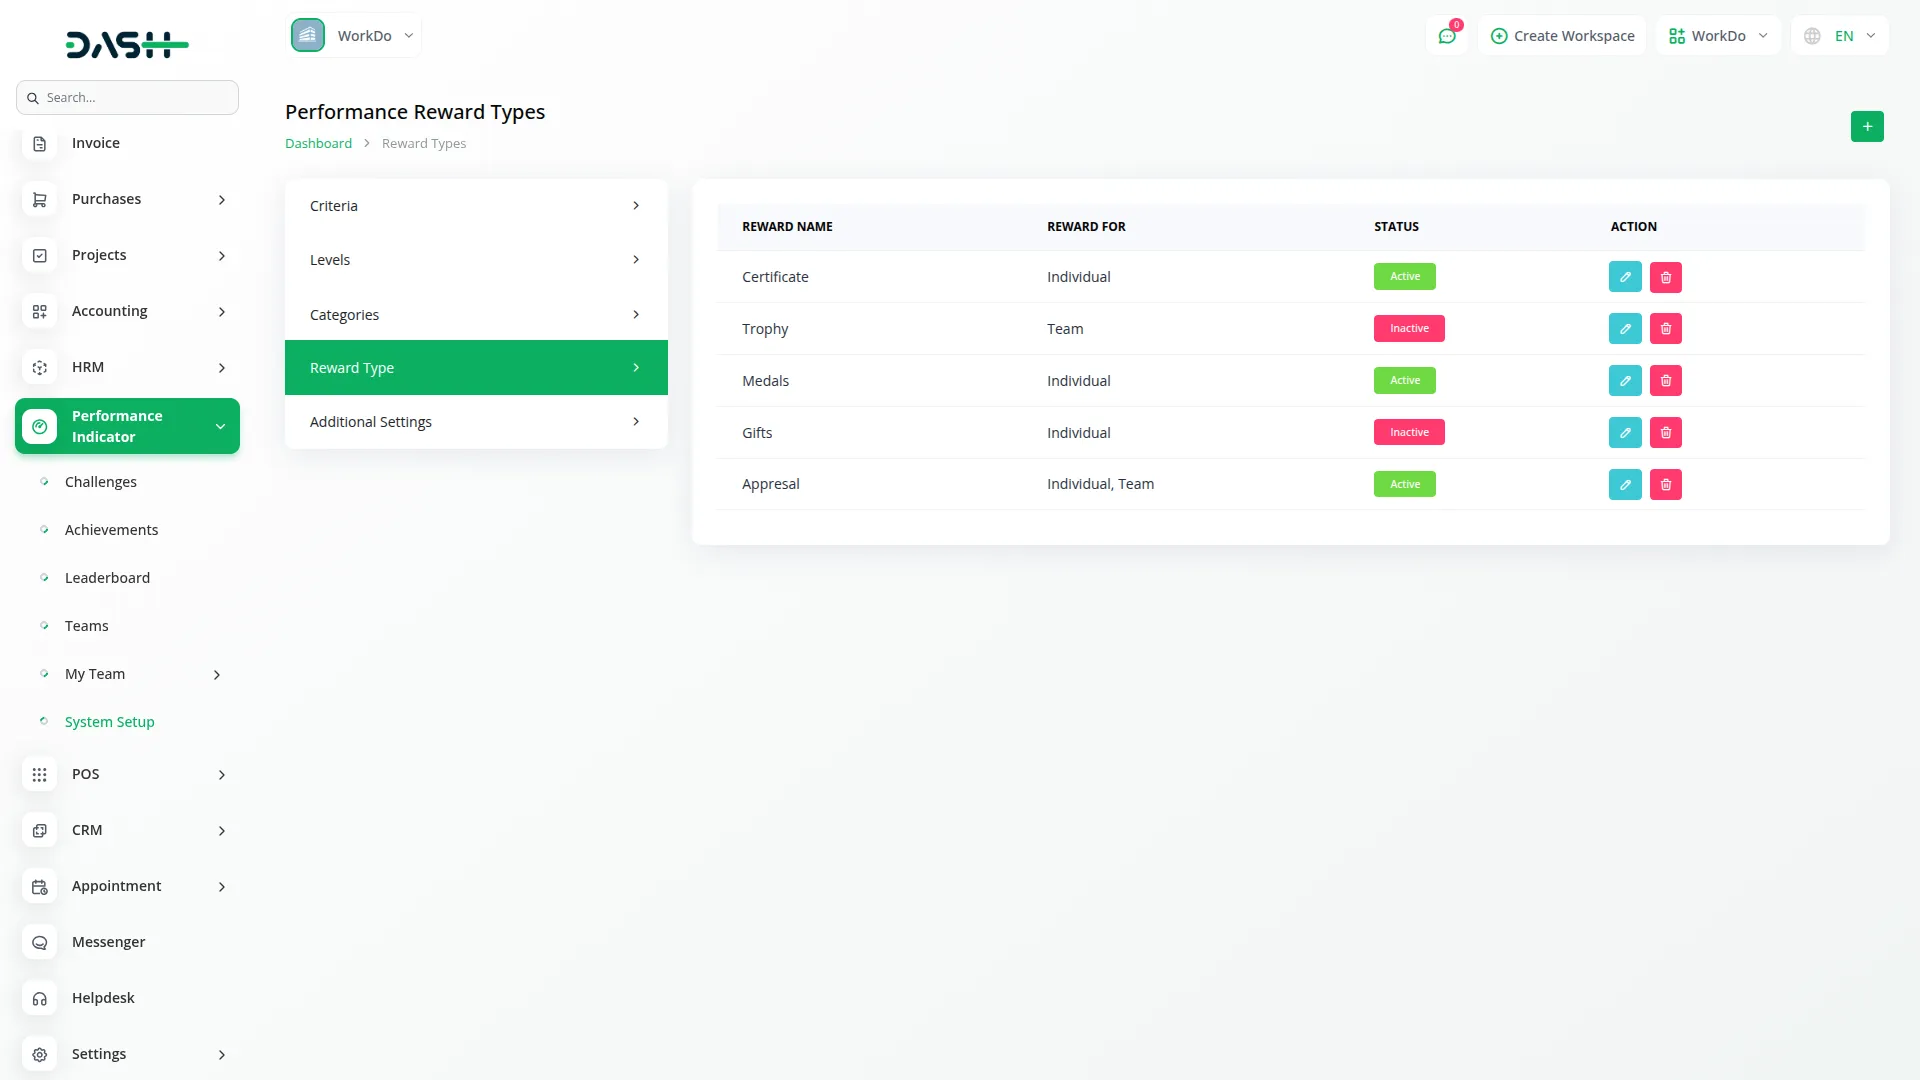
- For Reward Types, click Create and enter the Reward Type name, toggle the Reward Status on or off, and select Type as Team, Individual, or both using multi-select. The list shows reward types with their status and type, offering Edit and Delete options.
- In Additional Settings, configure display options by toggling Profile Image Display, Criteria Display, Category Display, Reward Type Display, and Projects Display on or off. Set up Points to XP Conversion by defining how many XP are equal to one point.
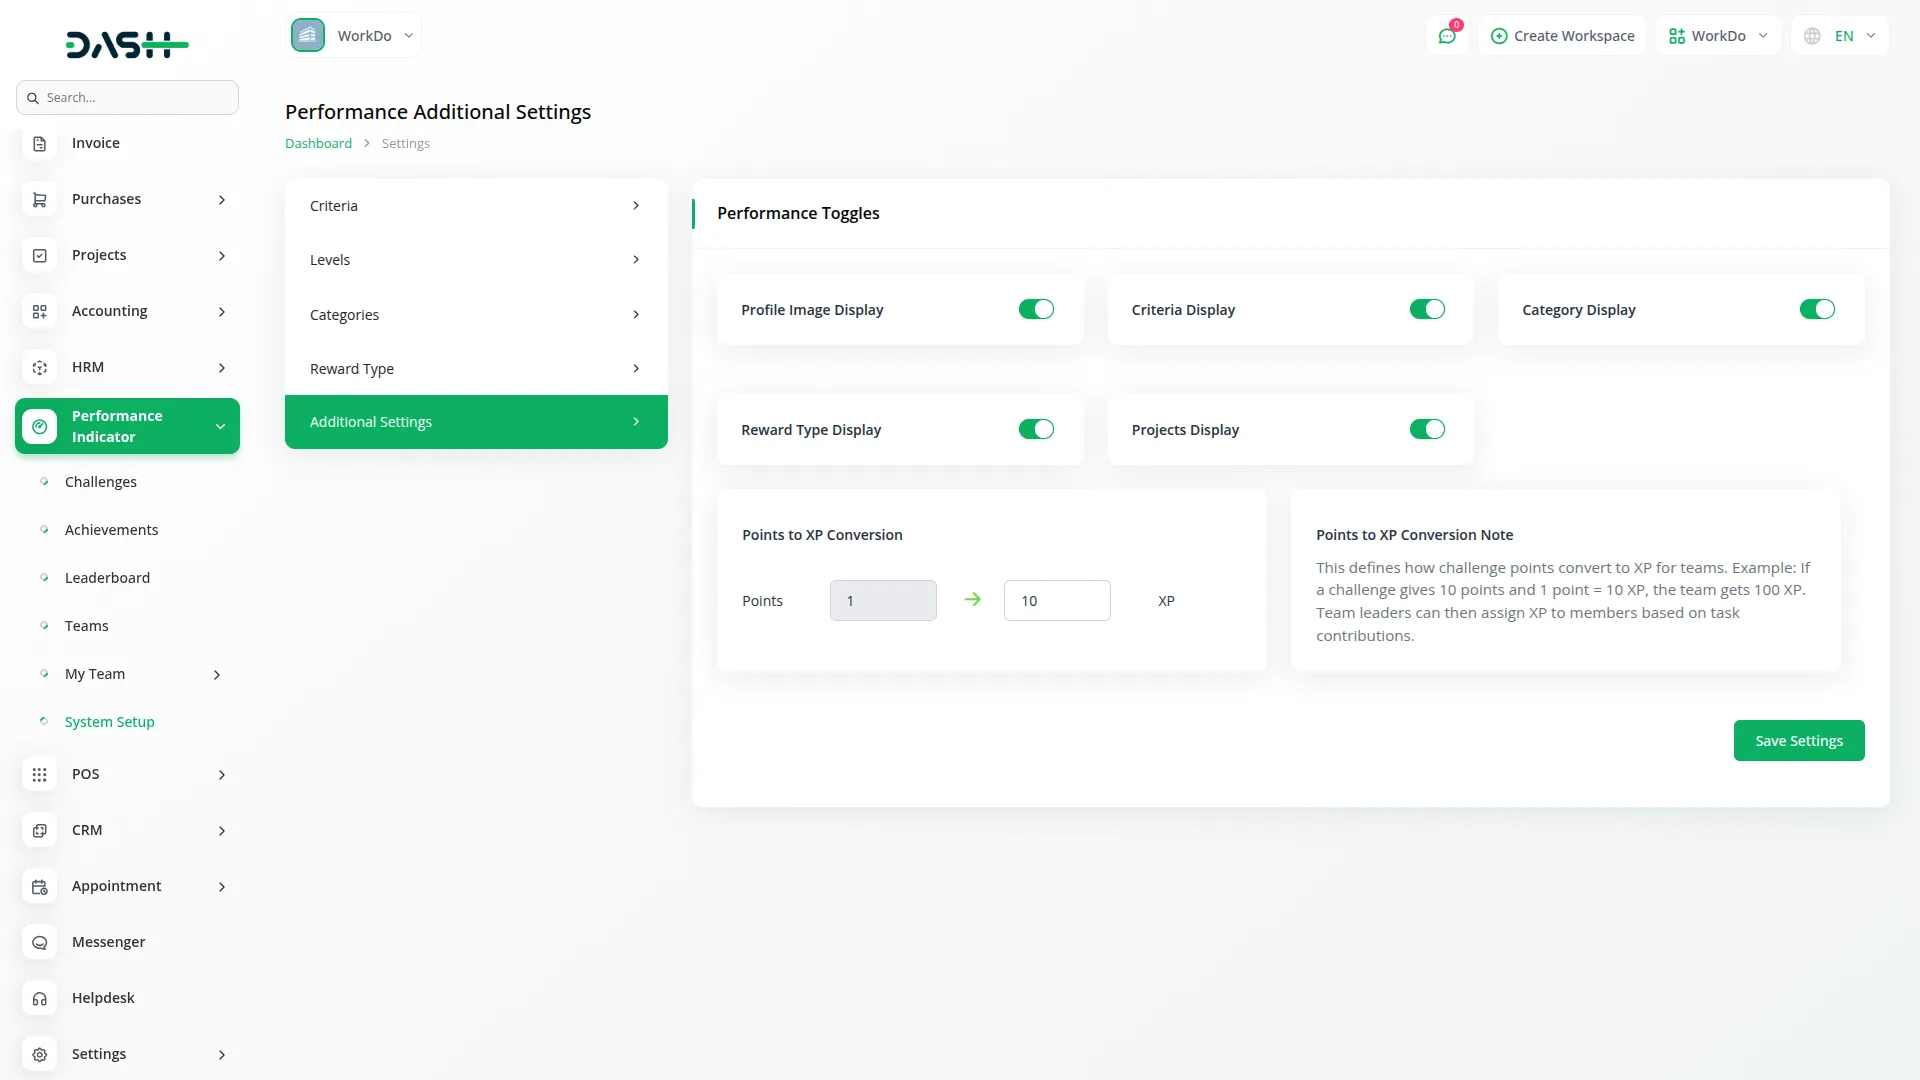
- This setting allows companies to allocate points to teams, and team leaders can then distribute the converted XP to team members based on their task contributions.This feature helps explain the conversion process to users.
Important Notes:
- When changing XP conversion rates from additional settings, new challenges will use the updated score calculations, while existing challenges will retain their original score count.
Team Management
- To create a new team, click the Create button and enter the Team Name, toggle Activation Status on or off, add a Description, upload a Team Badge and Team Profile Image, select a Team Leader from Staff Members, and choose Team Members using multi-select from Staff Members.
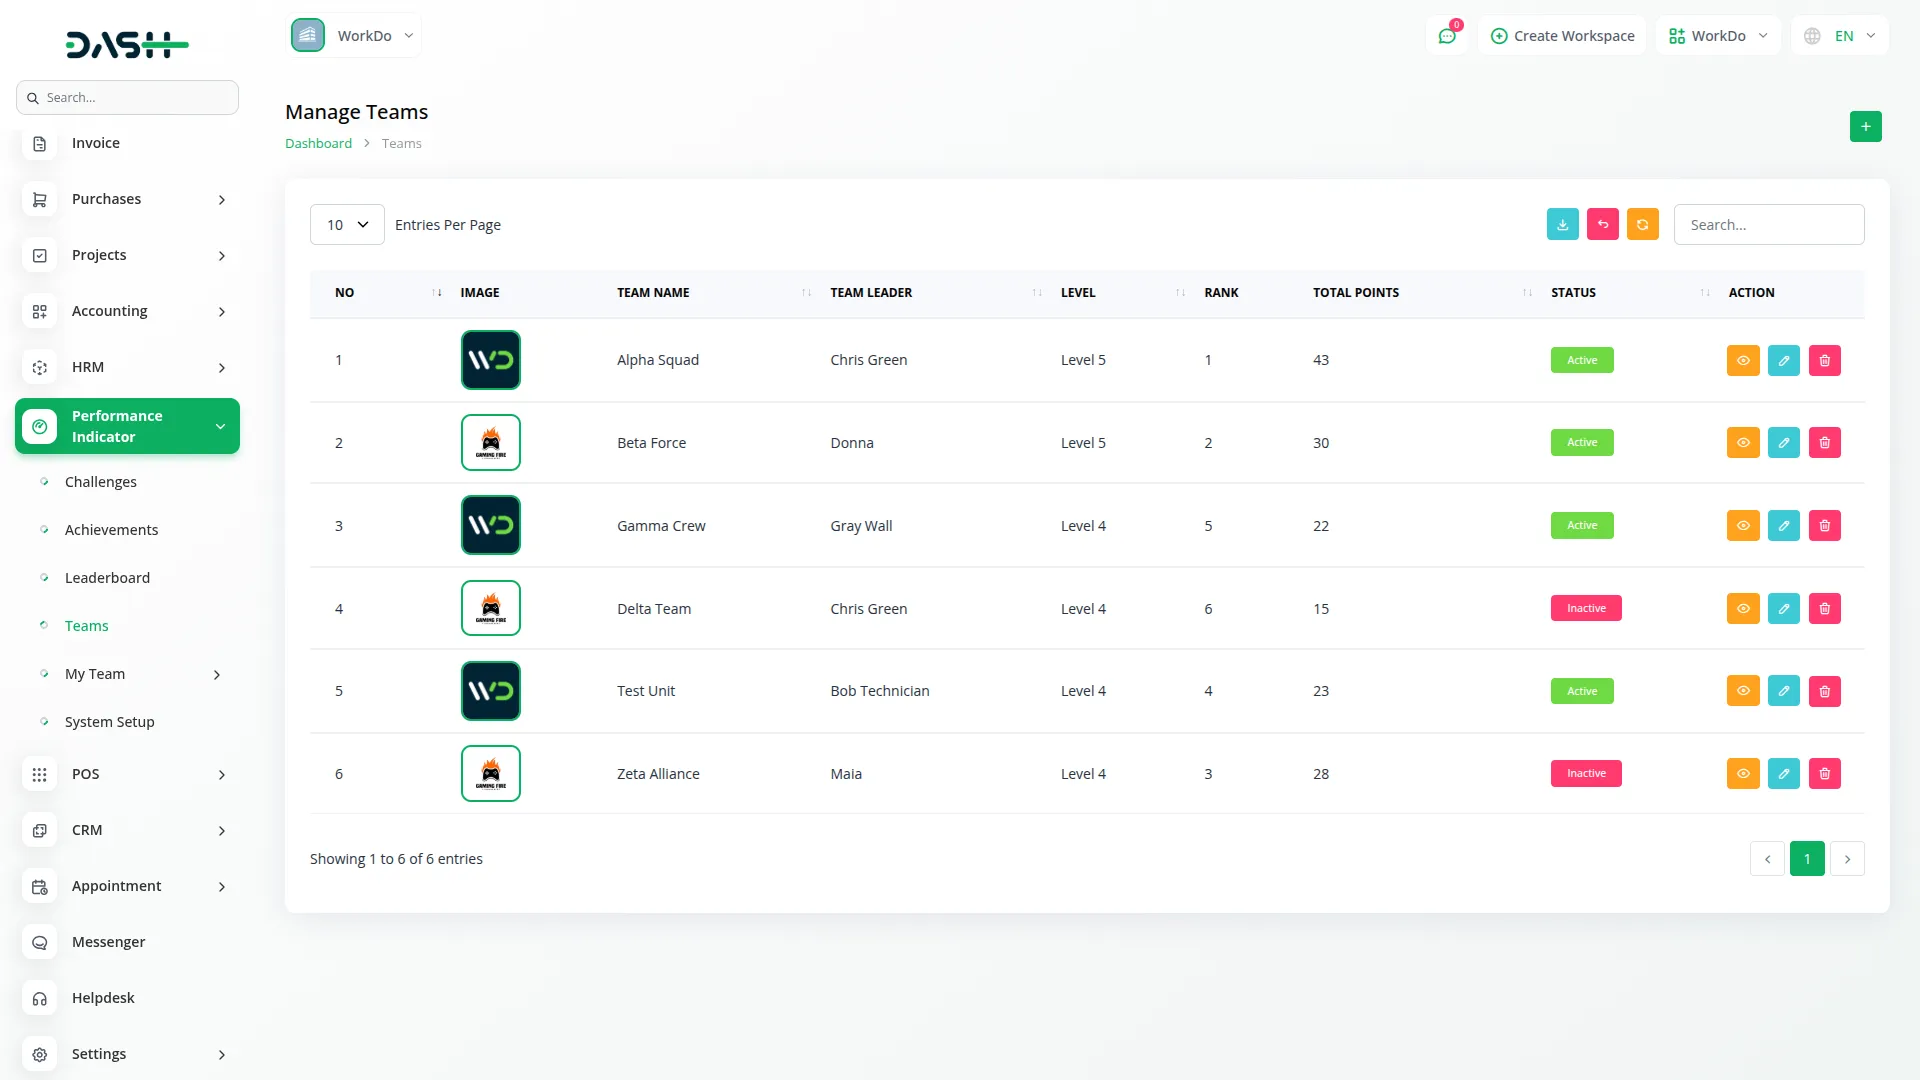
- The list page displays teams with Search, Export buttons at the top. The table shows Number, Image, Team Name, Team Leader, Level, Rank, Total Points, and Status columns.
- Action provides options to manage your team. If you can view all team details by clicking the view button will redirect you to that team’s detailed page. You can also edit existing team information or delete a team record if it’s no longer needed.
Important Notes:
- The Team Profile Image field appears only if the profile image display toggle is on in System Setup under Additional Settings.
Challenge Management
- To create a new challenge, click the Create button and enter the Challenge Name, toggle Activation Status on or off, add a Description, set Start Date and End Date, select Challenge Status from Upcoming, Ongoing, On Hold, or Finished, choose Difficulty Level from Easy, Medium, or Hard.
- Project Selection: Select a Project from the Projects section. Before selecting a project, ensure that the Project module is enabled and active in your system.
- Choose Criteria from the System Setup options, and select Type as Team or Individual.
- If you select Team type, enter Points for total points assigned for challenge completion, and select Teams using multi-select. If you select Individual type, enter XP for total XP assigned for challenge completion, and select Members using multi-select from Staff Members.
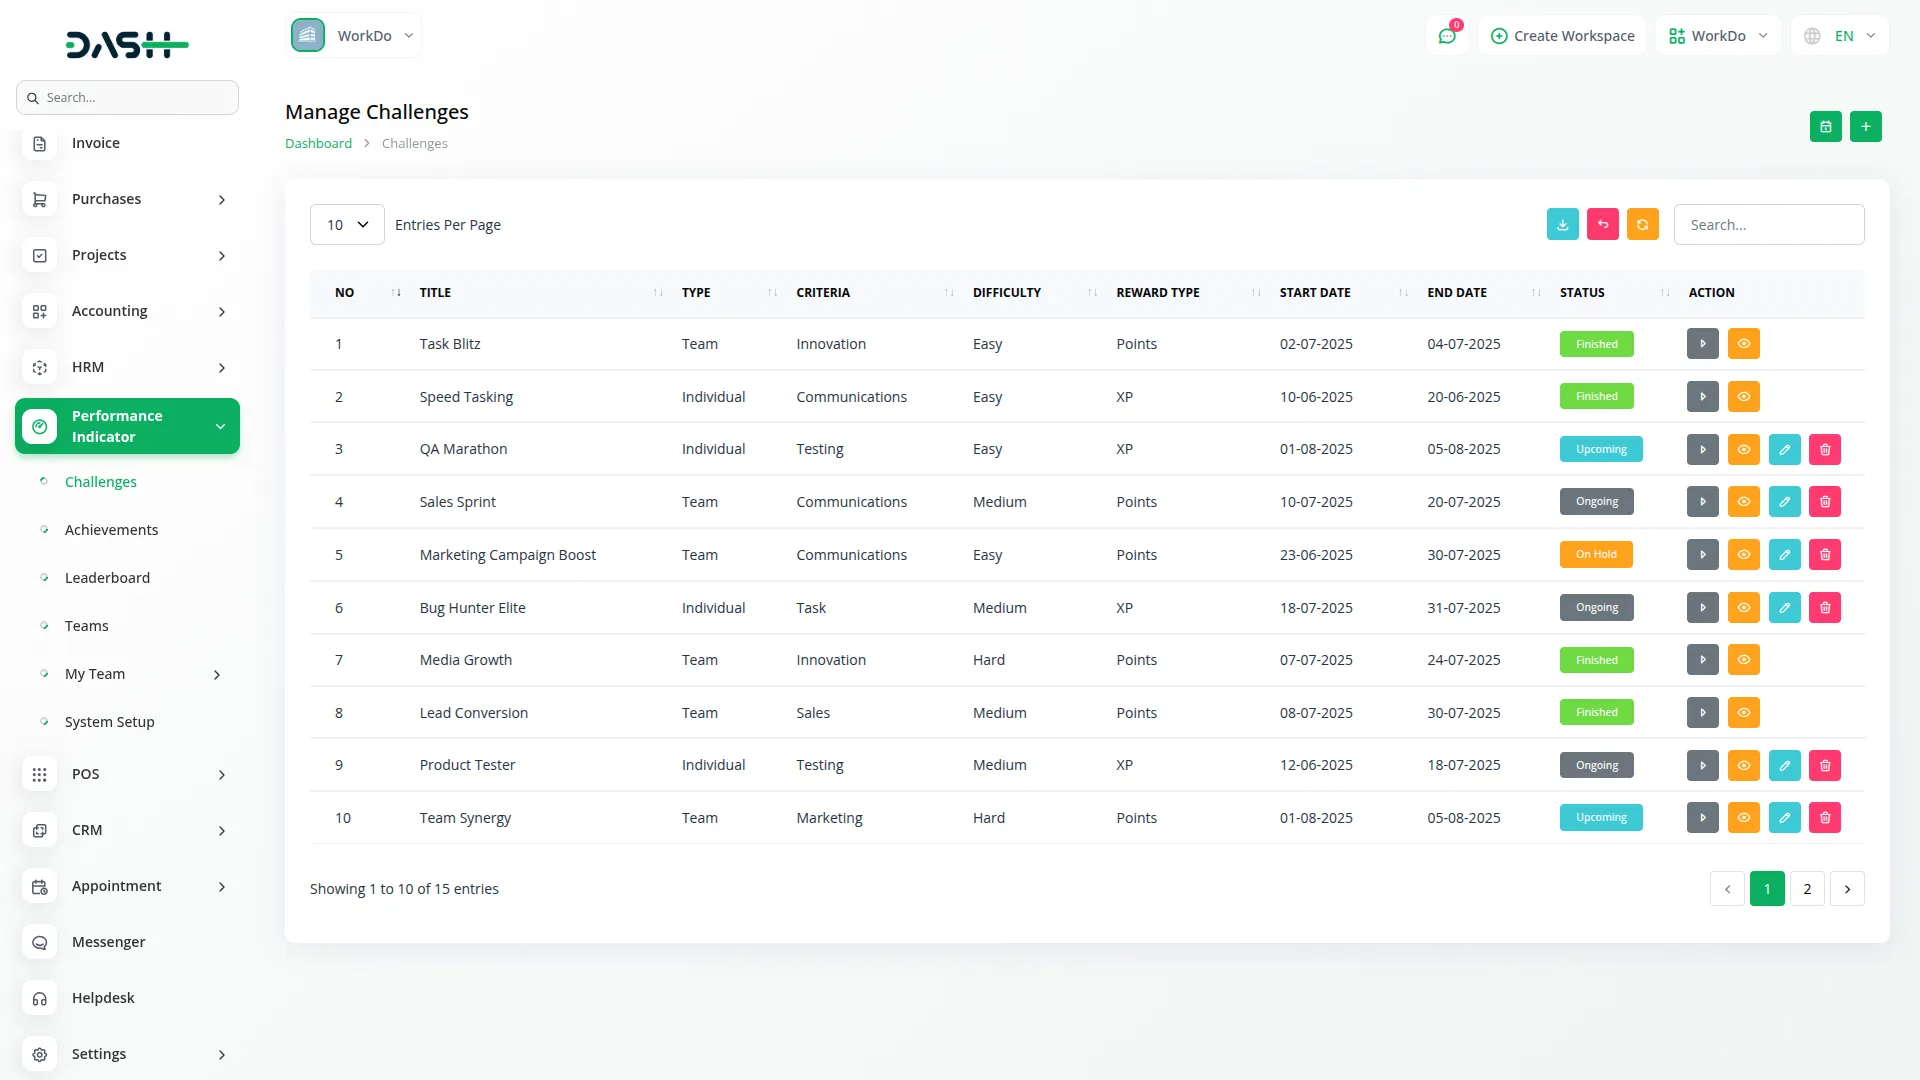
- The list page features Calendar View, Action, View, Edit, and Delete buttons. The table displays Number, Title, Type, Criteria, Difficulty, Reward Type, Start Date, End Date, and Status columns.
- Actions provide various options to manage challenges effectively. You can view all the details of a specific challenge and edit its information, including status updates.If a challenge is no longer needed, you can delete its record. Additionally, the Action button allows you to directly assign scores to teams and individuals from the list view, streamlining the evaluation process.
Important Notes:
- Challenge Status automatically updates to “Finished” once all XP or Points scores are fully assigned, and Edit/Delete buttons become invisible when all required fields and scores are completed.
- The project section will only be visible when the toggle button is enabled from the system setup under Additional Settings.
- The Criteria will only be visible when you enable the toggle button from the system setup under Additional Settings.
- You cannot edit the challenge’s Type after creation.
- The score field is disabled when the challenge status is “Upcoming”, “Finished” or Inactive.
Achievement Setup
- To create a new achievement, click the Create button and enter the Achievement Title, toggle Activation Status on or off, add a Description, and select Type as Team or Individual.
- Reward types are configured in the System Setup. During achievement creation, the reward type field is dynamically filtered based on the selected type : displaying only those rewards specifically assigned to teams or individuals.
- The Assign Fields allow you to set condition-based requirements with specific XP/Points and Level needed to unlock the achievement. These fields change automatically based on whether the achievement is for a team or individuals.
- When Team is selected, Points and Level checkboxes are displayed. Select the required checkboxes to open corresponding fields for setting required Points or Level values.
- When Individual is selected, XP and Level checkboxes are displayed. Select the required checkboxes to open corresponding fields for setting required XP or Level values.
- Then select Category from System Setup options, choose Assign Mode as Auto or Manual, and select Award Type as Top Performer or All Performers.
- For Assign Mode, Auto means the achievement unlocks automatically when conditions are met, while Manual requires admin approval using the “Manual Complete” button. For Award Type, Top Performer gives the award only to the highest-performing team or individual, while All Performers gives awards to everyone who meets the criteria.
- Top Performer Selection: When Top Performer is selected, you can use the action button to view eligible candidates. Clicking the action button opens a modal window displaying the winner team or user names, allowing the company to manually select the winner.
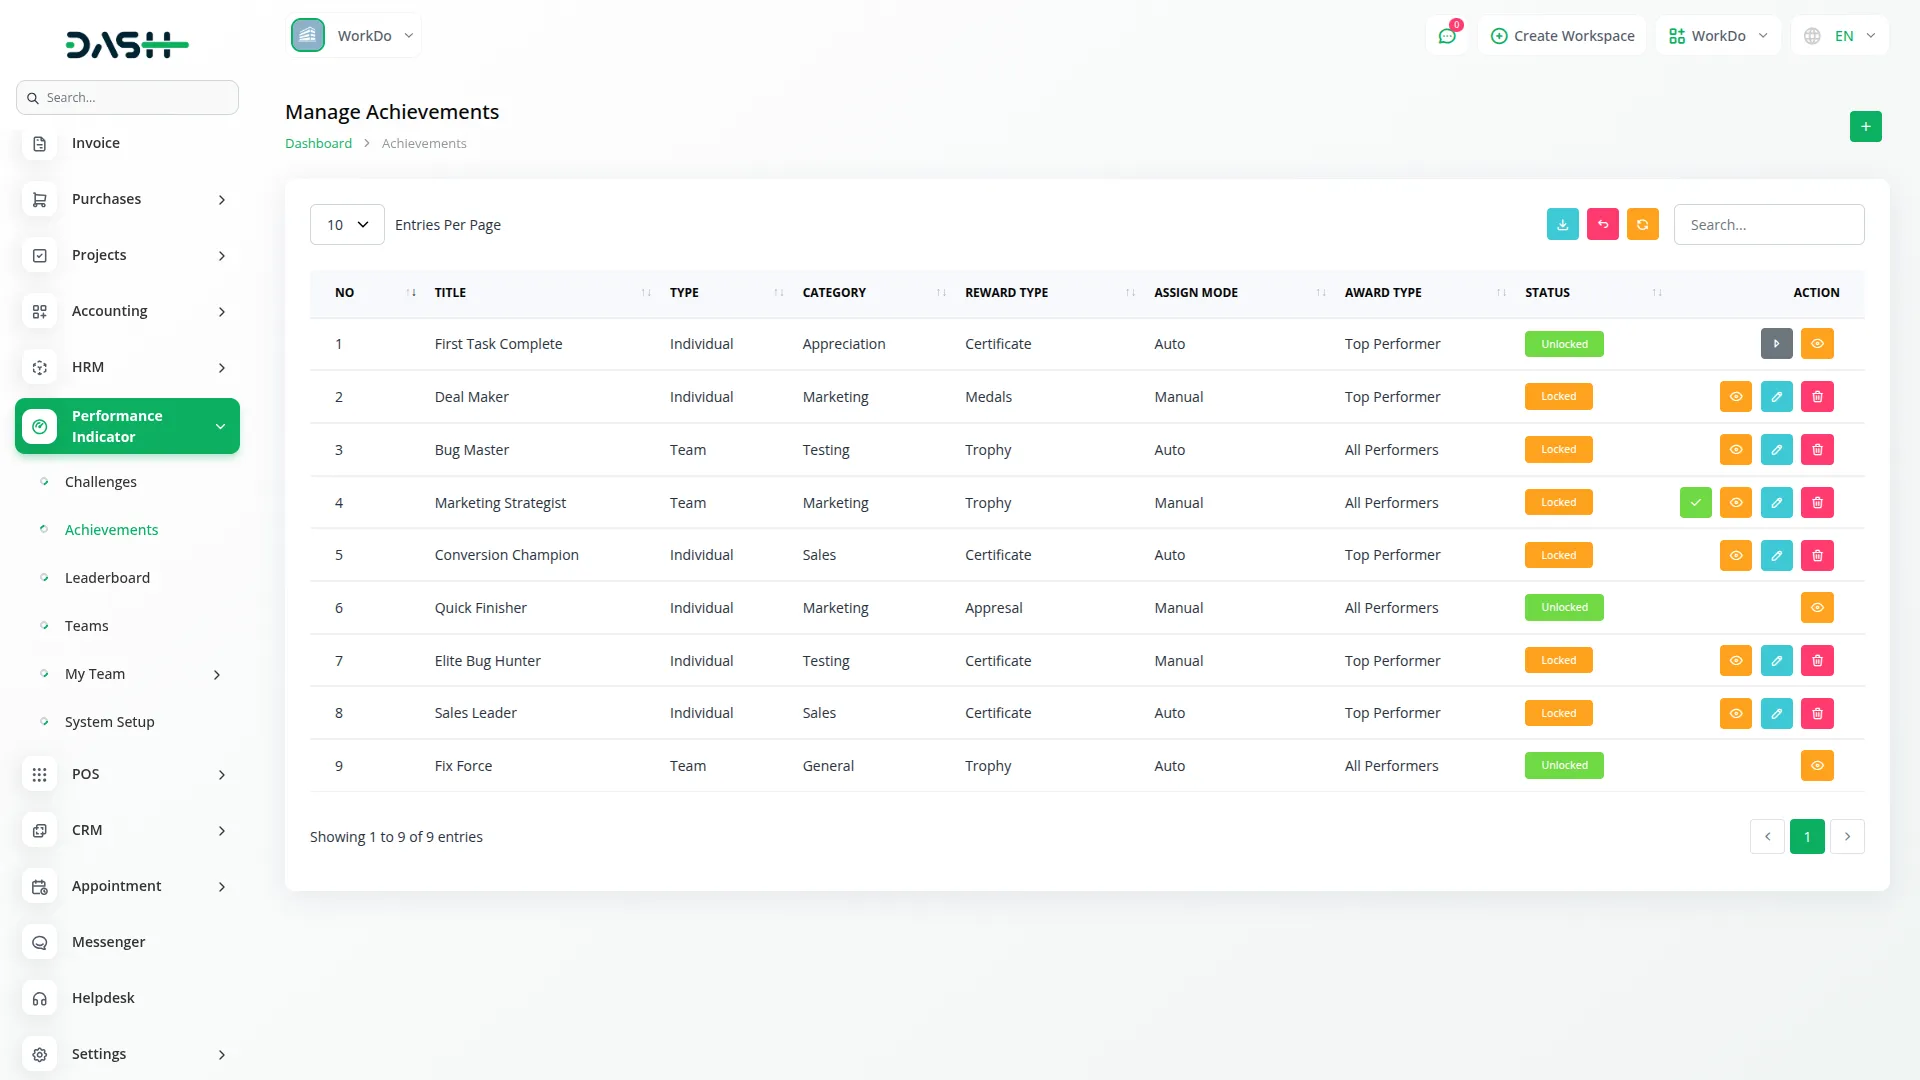
- The list page shows Search, Export buttons with a table displaying Number, Title, Type, Category, Reward Type, Assign Mode, Award Type, and Status columns.
- You can view all the details of a specific achievement and edit its information if needed. If an achievement is no longer relevant, you can delete its record. The Action button appears when the achievement is unlocked and the Award Type is set to Top Performer. Using this button, you can view a list of users who completed the achievement and announce the winner. The Manual Complete button is used to manually assign an unlocked achievement. It becomes visible only when certain predefined conditions are successfully met.
Important Notes
- The Category section and Reward Type will only be visible when the toggle button is enabled from the system setup under Additional Settings.
- The Manual button will only be visible when the “Manual” radio button is selected for Assign Mode while creating or editing an Achievement. The Top Performer button will be hidden if the Award Type is set to “All Performers”.
Leaderboard Overview
- The Leaderboard section displays performance rankings in two separate views without any creation functionality. You can view Team Leaderboard and Individual Leaderboard to track performance across your organization.
- The Team Leaderboard shows comprehensive team performance metrics including Team Name, Team Leader, Leader Email, Rank, Level, Top Contributor, Top Contributor XP, Total Team Members, and Total Points. The table displays all teams ranked by their performance with detailed information.
- The Individual Leaderboard displays comprehensive individual performance metrics including Name, Email, Rank, Level, and Total XP for each member. The table shows individual rankings with complete performance data.

My Team – Task
- The My Team section is used by Team Leaders to assign and manage tasks for their team members. This section is connected to the Teams and Challenges sections as you must select existing teams and challenges when creating tasks.
- To create a new task, click the Create button and enter the Task Name, select Task Status, add a Description.
- Select the Team from available teams. If a team leader is assigned to multiple teams, those teams will appear in the Select Team dropdown, and the team leader can select a team to assign tasks to its members accordingly.
- You can select challenges according to the selected team and can see the challenge’s score calculation in the Earned XP field’s note.
- Select a Team Member according to the selected team.
- Enter Estimation Time, set Start Date that must fall within the selected challenge’s timeline, set End Date that must fall within the selected challenge’s timeline.
- Earned XP: Here, the team leader declares how much XP will be awarded to the team member/user upon task completion. Below this field, a note is displayed showing used XP, total XP, and remaining XP, which helps the team leader distribute scores to team members effectively and enter a Badge for the task.
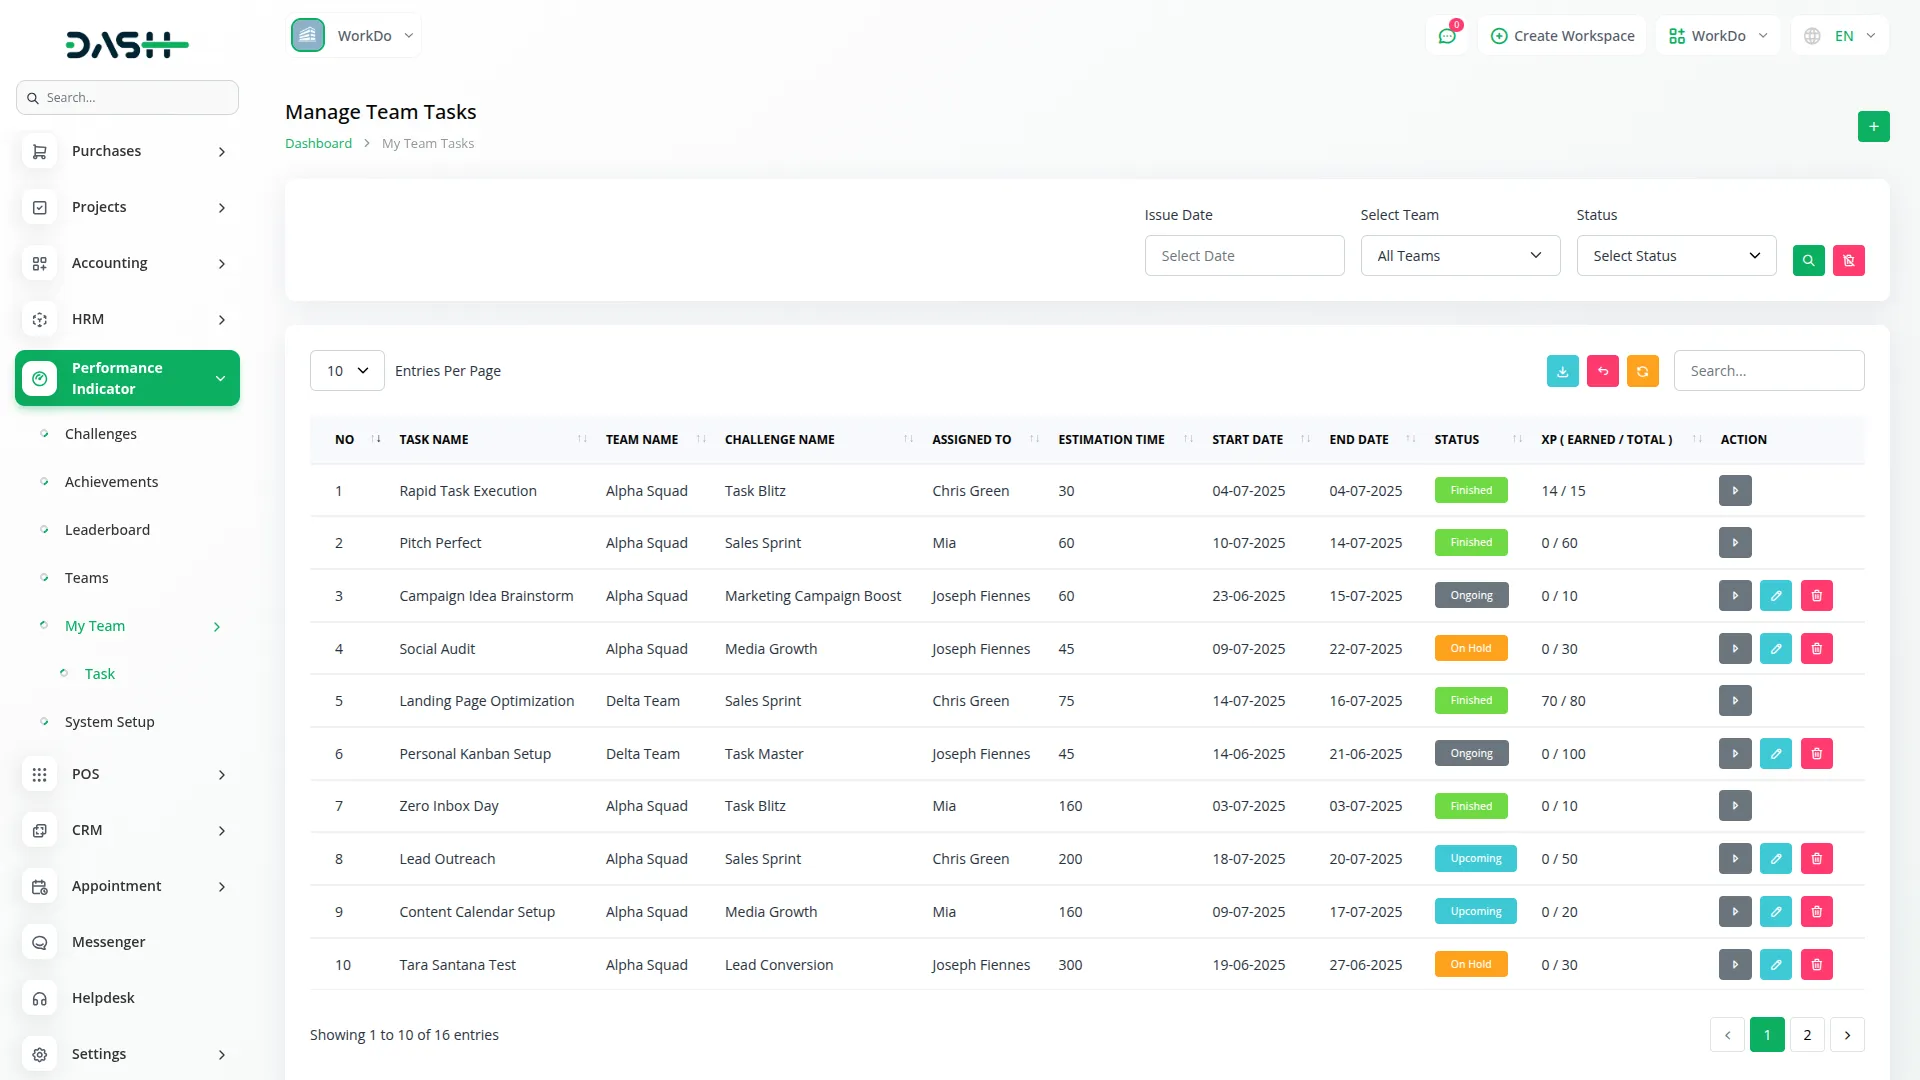
- The list page features Apply, Reset buttons with filtering options including Issue Date to filter tasks by start-end date range, Select Team to filter tasks by team name, and Status to filter tasks by task status.
- The table displays Number, Task Name, Team Name, Challenge Name, Assigned To, Estimation Time, Start Date, End Date, Status, and XP with Total/Earned columns.
- Assign XP: Actions include an Action button that shows task details and allows entering XP Score for the member. The Enter XP Score field is only displayed when the challenge is finished and the task status is not upcoming.
- Edit and Delete options are available for modifying or removing a task. However, these buttons will be disabled once a score has been assigned to the respective team member.
User Dashboard – Team Leader
- The Team Leader Dashboard provides a comprehensive view for managing team performance and is displayed when users have team leadership roles. This dashboard connects to the Teams, Challenges, and Achievements sections to display relevant team data.
- The dashboard includes a Select Team dropdown to filter dashboard data by team name, which appears when the Team Leader is selected as a leader in multiple teams. Dashboard Tab Buttons allow switching between personal and team dashboards for flexible viewing. Performance cards display Team Challenges, Team Members, Assign Tasks, and Team Level for quick insights into team status.
- The Challenges Calendar View shows assigned team challenge names on their respective dates for easy scheduling reference.
- The dashboard displays a Team Challenges List with Title, Criteria, Start Date, and End Date for all challenges assigned to the selected team. Additionally, a Team Achievements List shows Title, Category, and Reward Type.
Important Notes
- In the dashboard, Criteria will only be visible when the toggle button is enabled from the system setup under Additional Settings.
- The Category and Reward Type will only be visible when the toggle button is enabled from the system setup under Additional Settings.
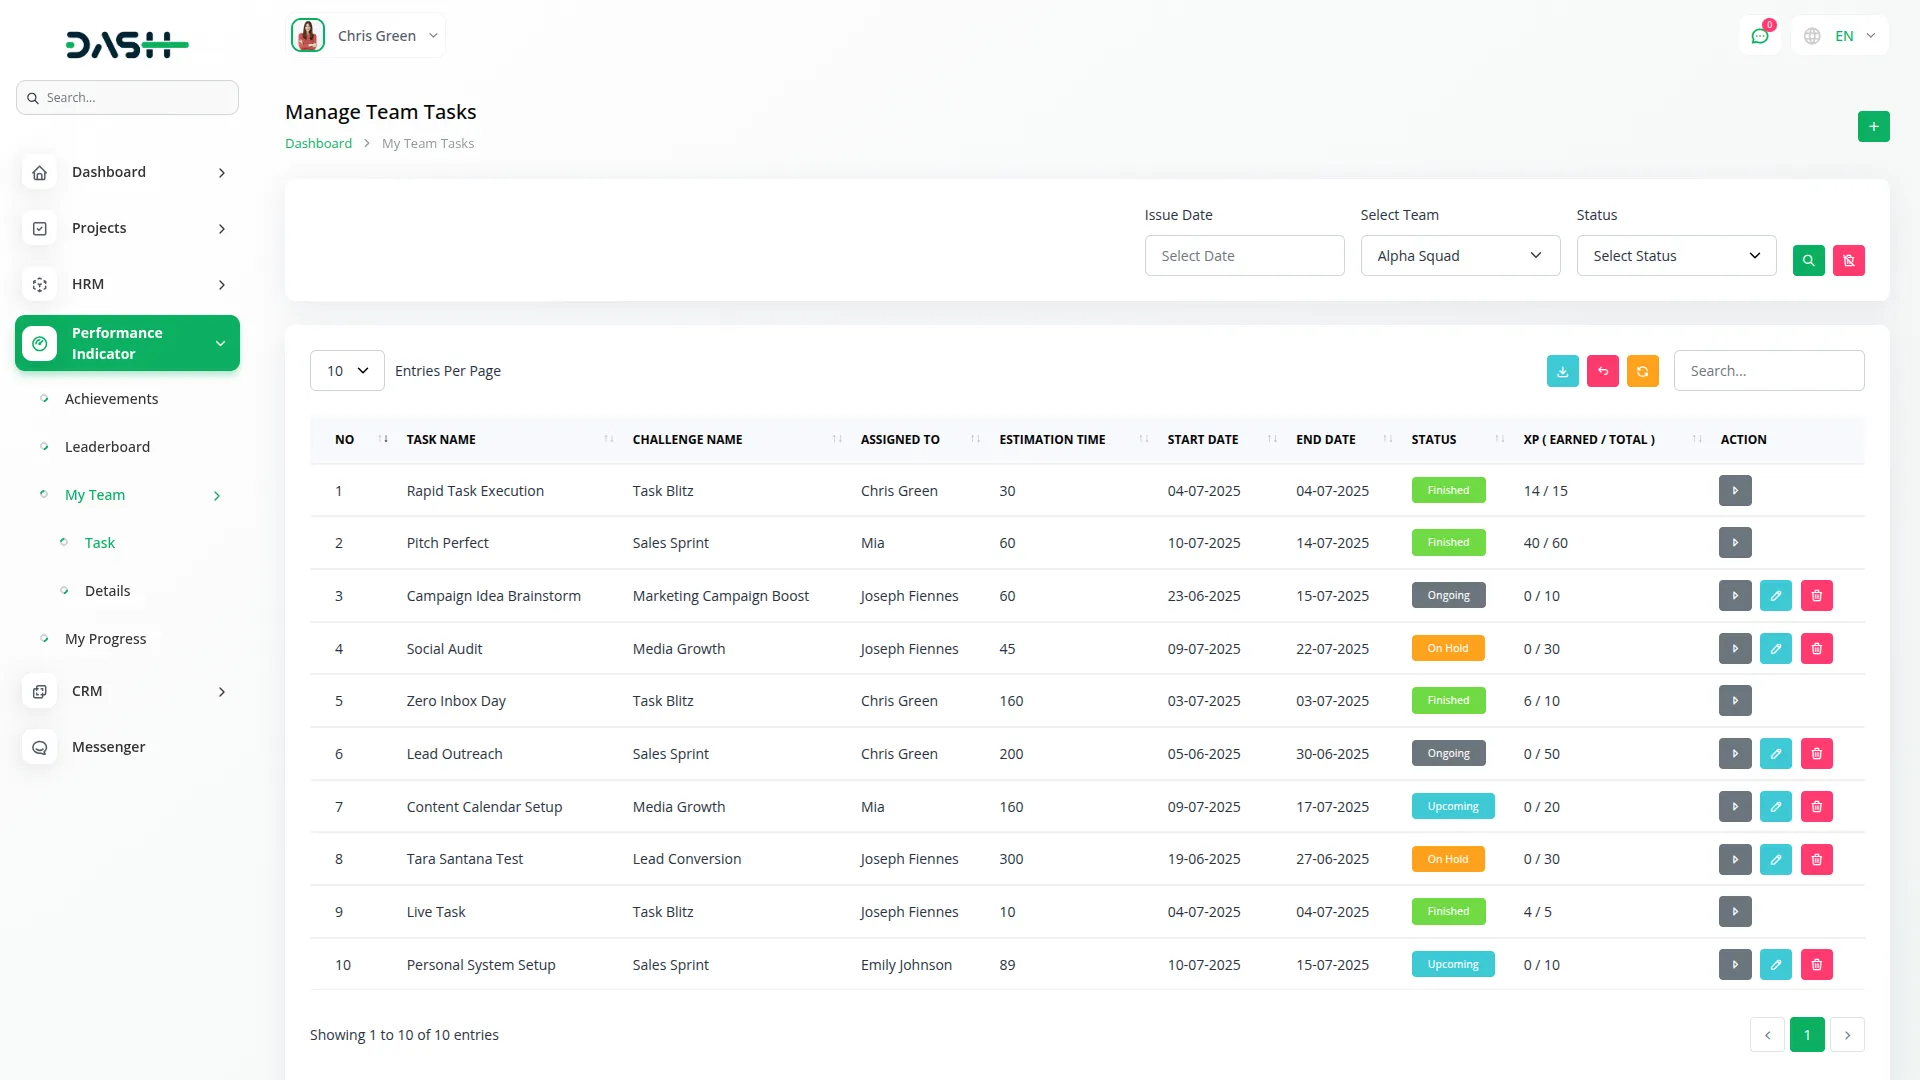
My Team – Task
- The My Team section is used by Team Leaders to assign and manage tasks for their team members. This section is connected to the Teams and Challenges sections as you must select existing teams and challenges when creating tasks.
- To create a new task, click the Create button and enter the Task Name, select Task Status, and add a Description.
- Select the Team from available teams. If a team leader is assigned to multiple teams, those teams will appear in the Select Team dropdown, and the team leader can select a team to assign tasks to its members accordingly.
- You can select challenges according to the selected team and can see the challenge’s score calculation in the Earned XP field’s note.
- Select a Team Member according to the selected team.
- Enter Estimation Time, set Start Date that must fall within the selected challenge’s timeline, and set End Date that must fall within the selected challenge’s timeline.
- Earned XP: Here, the team leader declares how much XP will be awarded to the team member/user upon task completion. Below this field, a note is displayed showing used XP, total XP, and remaining XP, which helps the team leader distribute scores to team members effectively and enter a Badge for the task.
- The list page features Apply and Reset buttons with filtering options including Issue Date to filter tasks by start-end date range, Select Team to filter tasks by team name, and Status to filter tasks by task status.
- The table displays Number, Task Name, Team Name, Challenge Name, Assigned To, Estimation Time, Start Date, End Date, Status, and XP with Total/Earned columns.
- Assign XP: Actions include an Action button that shows task details and allows entering XP Score for the member. The Enter XP Score field is only displayed when the challenge is finished and the task status is not upcoming.
- Edit and Delete options are available for modifying or removing a task. However, these buttons will be disabled once a score has been assigned to the respective team member.
My Team – Details
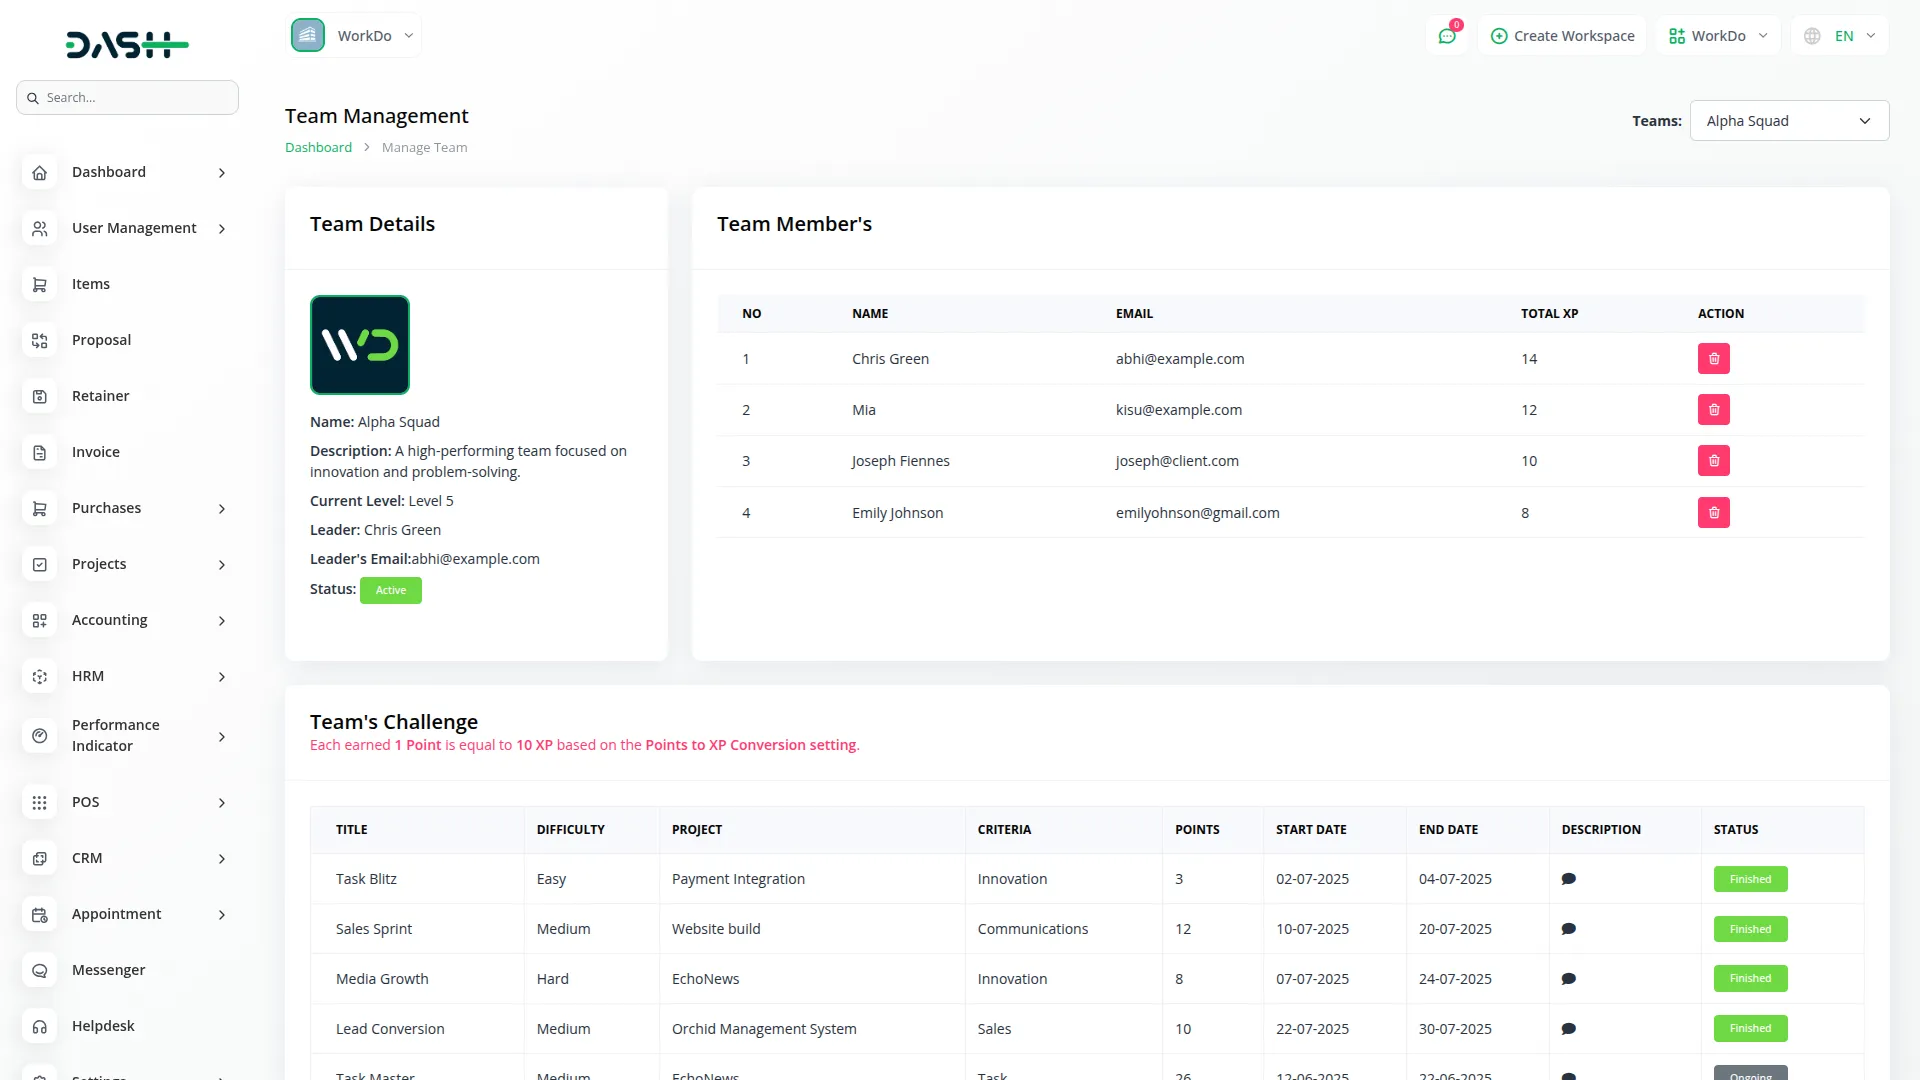
- The My Team Details section provides Team Leaders with comprehensive team management capabilities beyond basic task creation. This section connects to the Teams, Challenges, and My Team sections to provide detailed team information and management options.
- Team Leaders can use the Select Team Dropdown to switch between multiple teams if they lead more than one team. The Team Details section displays comprehensive team information including Name, Description, Current Level, Leader, Leader Email, and Status for the selected team. The Team Members section lists all team members with their name, email, and total XP, and includes a Delete action to remove team members from the team.
- The Team’s Challenges section shows a detailed list of challenges assigned to the selected team including title, difficulty, project, criteria, points, start date, end date, description, and status which can be Upcoming, Ongoing, On Hold, or Finished.
- The Team’s Tasks section displays a comprehensive list of tasks including task name, challenge name, assigned team member name, estimation time, XP, start date, end date, description, and status which can be Upcoming, Ongoing, On Hold, or Finished.
User Dashboard – Individual Member
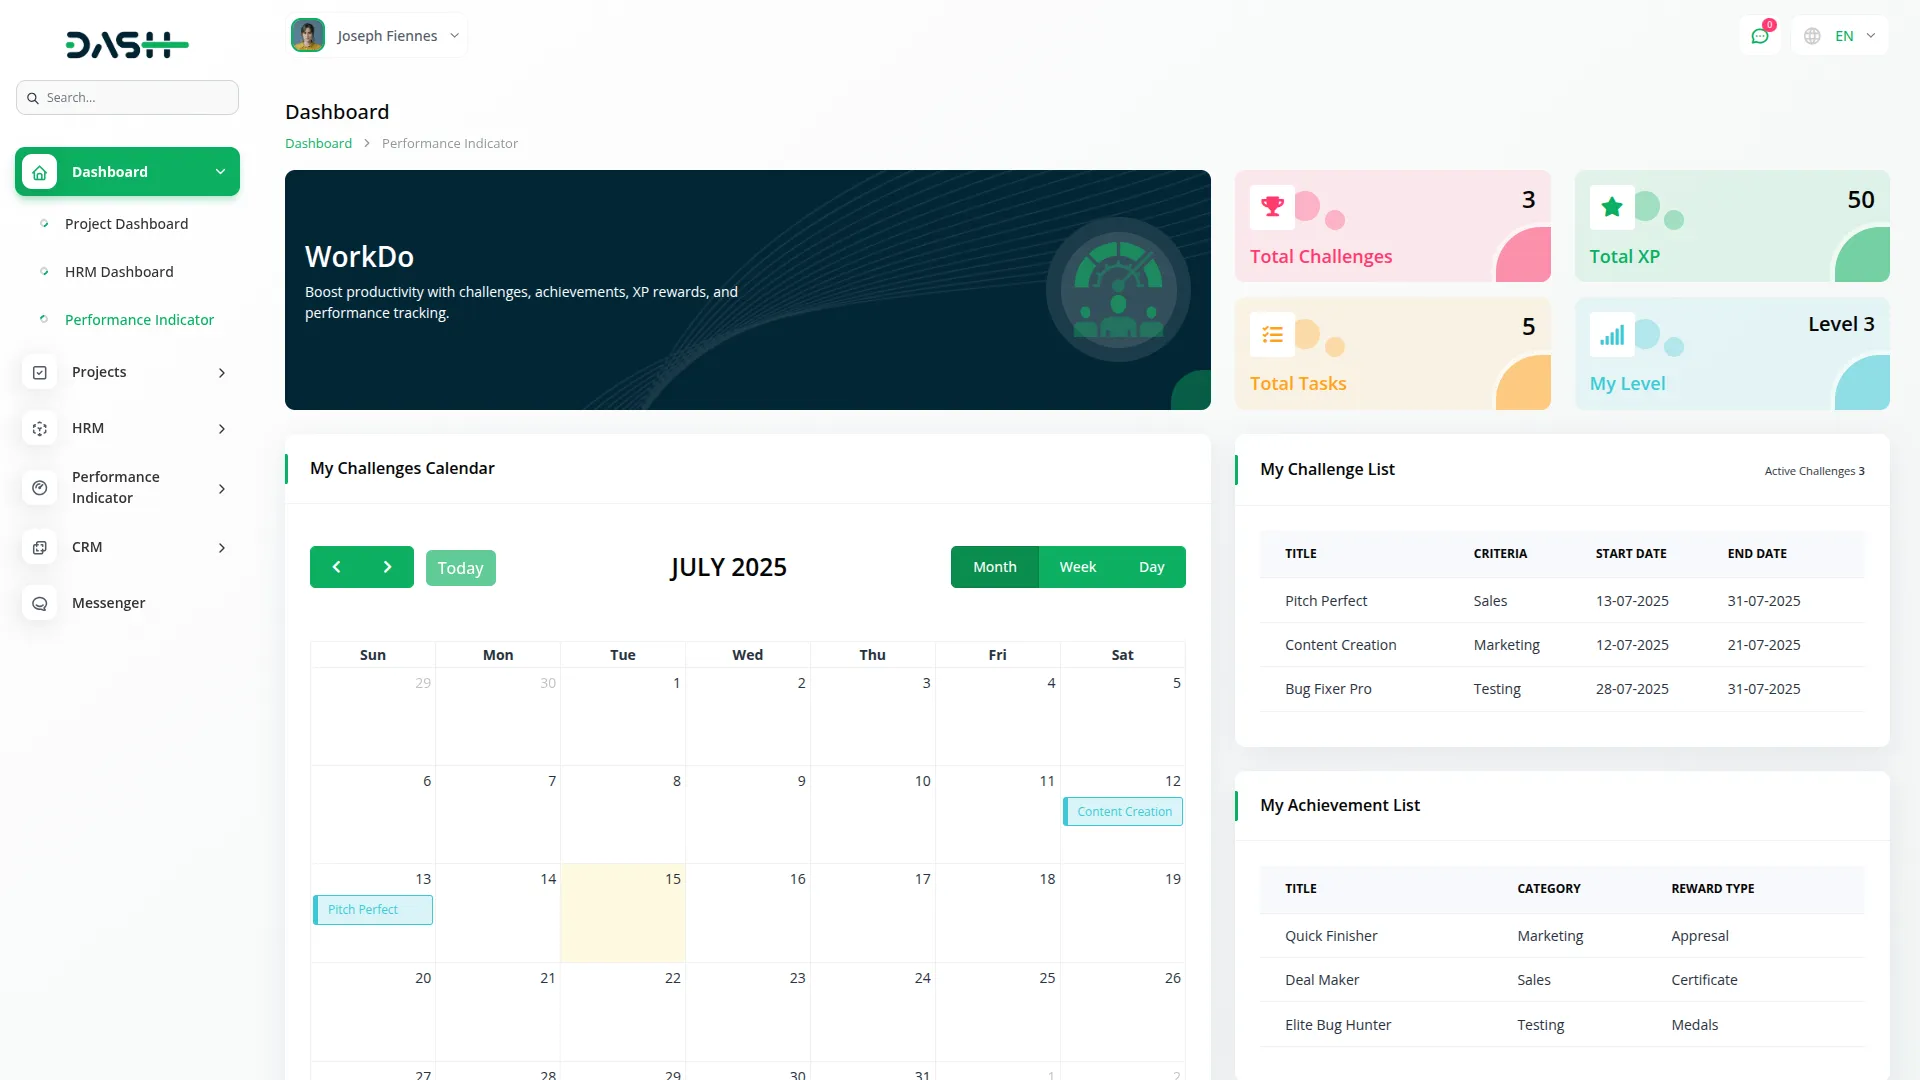
- The Individual Member Dashboard provides a personalized view for individual users to track their own performance and progress. This dashboard connects to the Challenges and Achievements sections to display user-specific data.
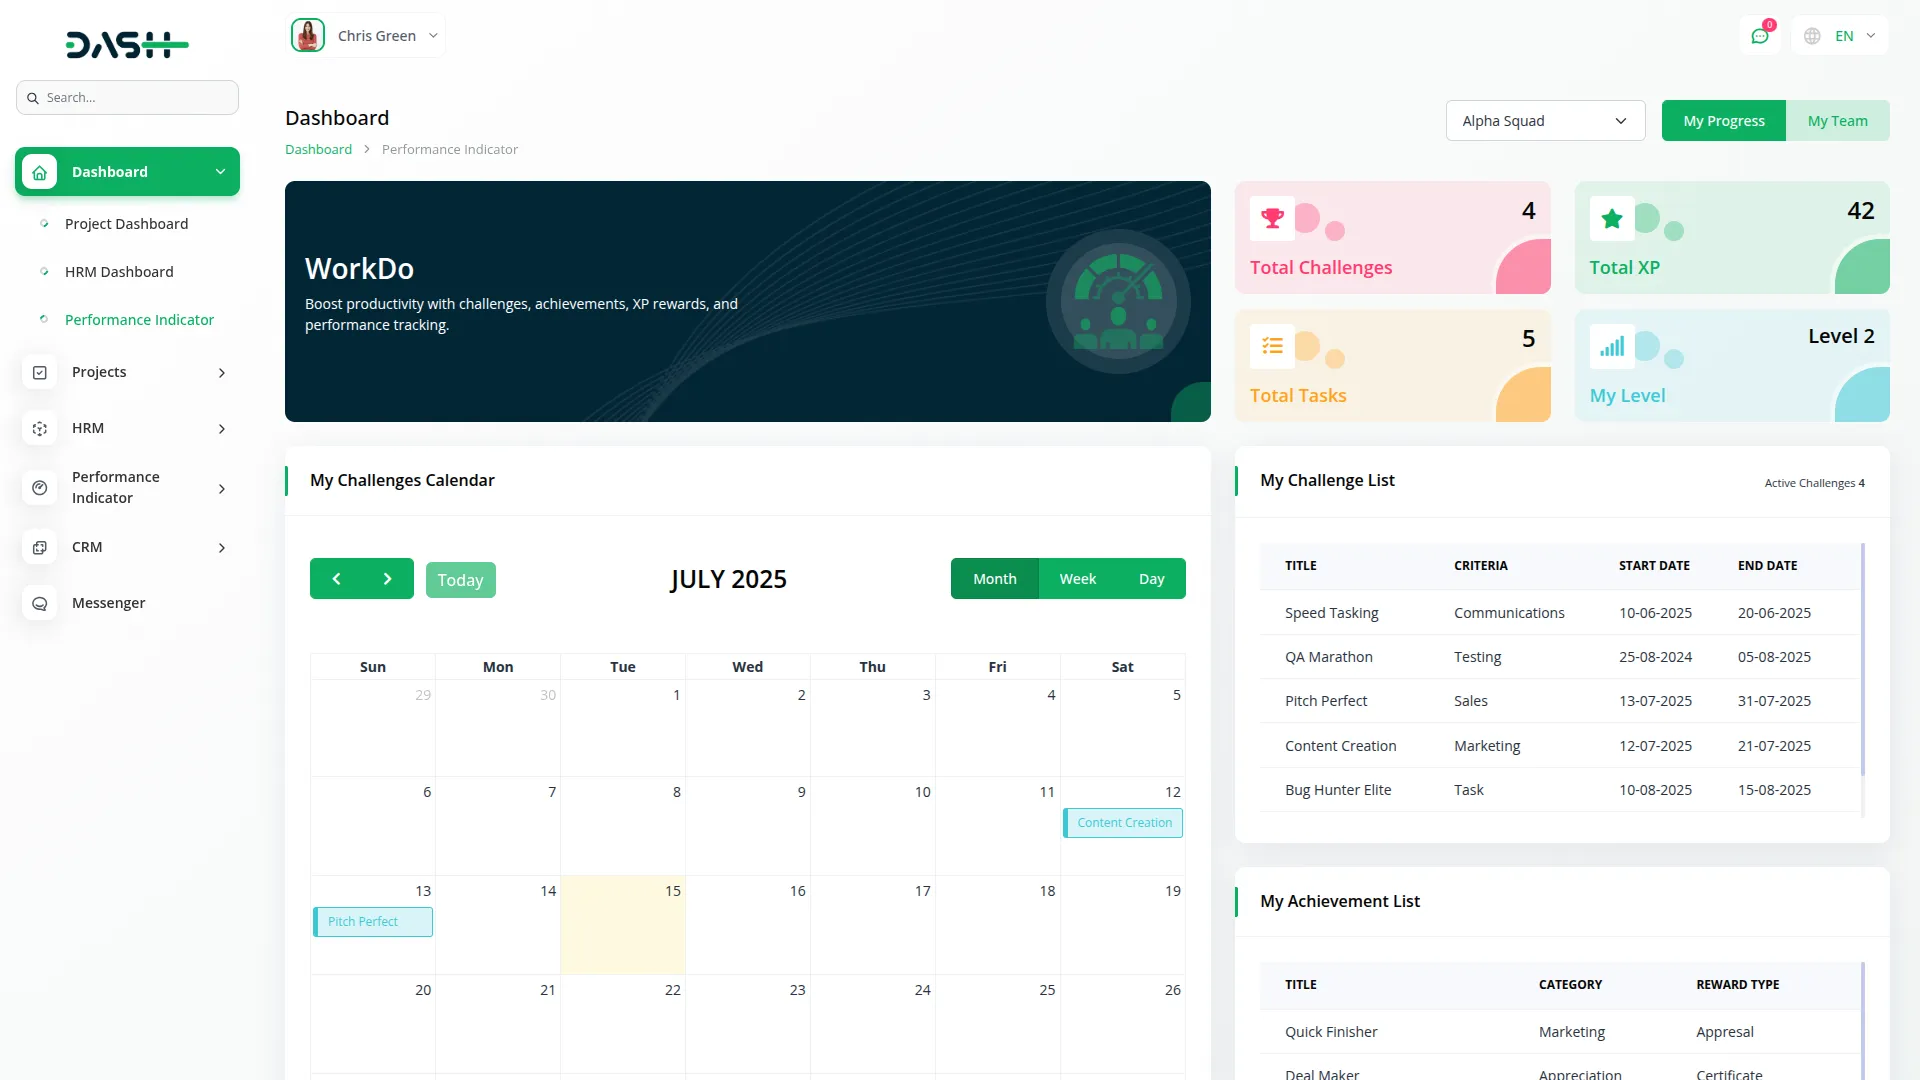
- Performance cards display Total Challenges, Total XP, Total Tasks, and My Level for quick insights into individual progress. The Challenges Calendar View shows assigned individual challenge names on their respective dates for personal scheduling reference.
- The dashboard displays My Challenges List with Title, Criteria, Start Date, and End Date for all challenges assigned to the individual user. Additionally, my Achievements List shows Title, Category, and Reward Type for all achievements unlocked by the user. This dashboard focuses entirely on individual performance without team management capabilities.
Important Notes
- In the dashboard, Criteria will only be visible when the toggle button is enabled from the system setup under Additional Settings.
- The Category and Reward Type will only be visible when the toggle button is enabled from the system setup under Additional Settings.
My Progress
- The My Progress section gives each user a personal page to see how they are performing on the platform. It brings together information from different areas like Teams, Challenges, Tasks, and Achievements so that users can easily understand their overall progress.
- At the top, there is a progress bar that shows how much XP (Experience Points) the user has earned and how much more is needed to reach the next level. It also shows the total XP score and percentage completed. This helps users see how close they are to leveling up.
- The My Badges section shows a list of all the badges the user has earned. Badges are rewards given for completing certain tasks, reaching goals, or performing well. This section helps users see their achievements at a glance.
- The Level Details section shows the user’s current level and a short note about it. It also shows the next level and what is needed to reach it. This helps users understand what to focus on next and gives them a clear goal to work toward.
- The Unlocked Achievements section lists all the achievements the user has earned. Each achievement shows its name, the type of reward (like a certificate or trophy), the title given, and the category it belongs to (like sales or marketing). This helps users know what they’ve accomplished and where they’ve been recognized.
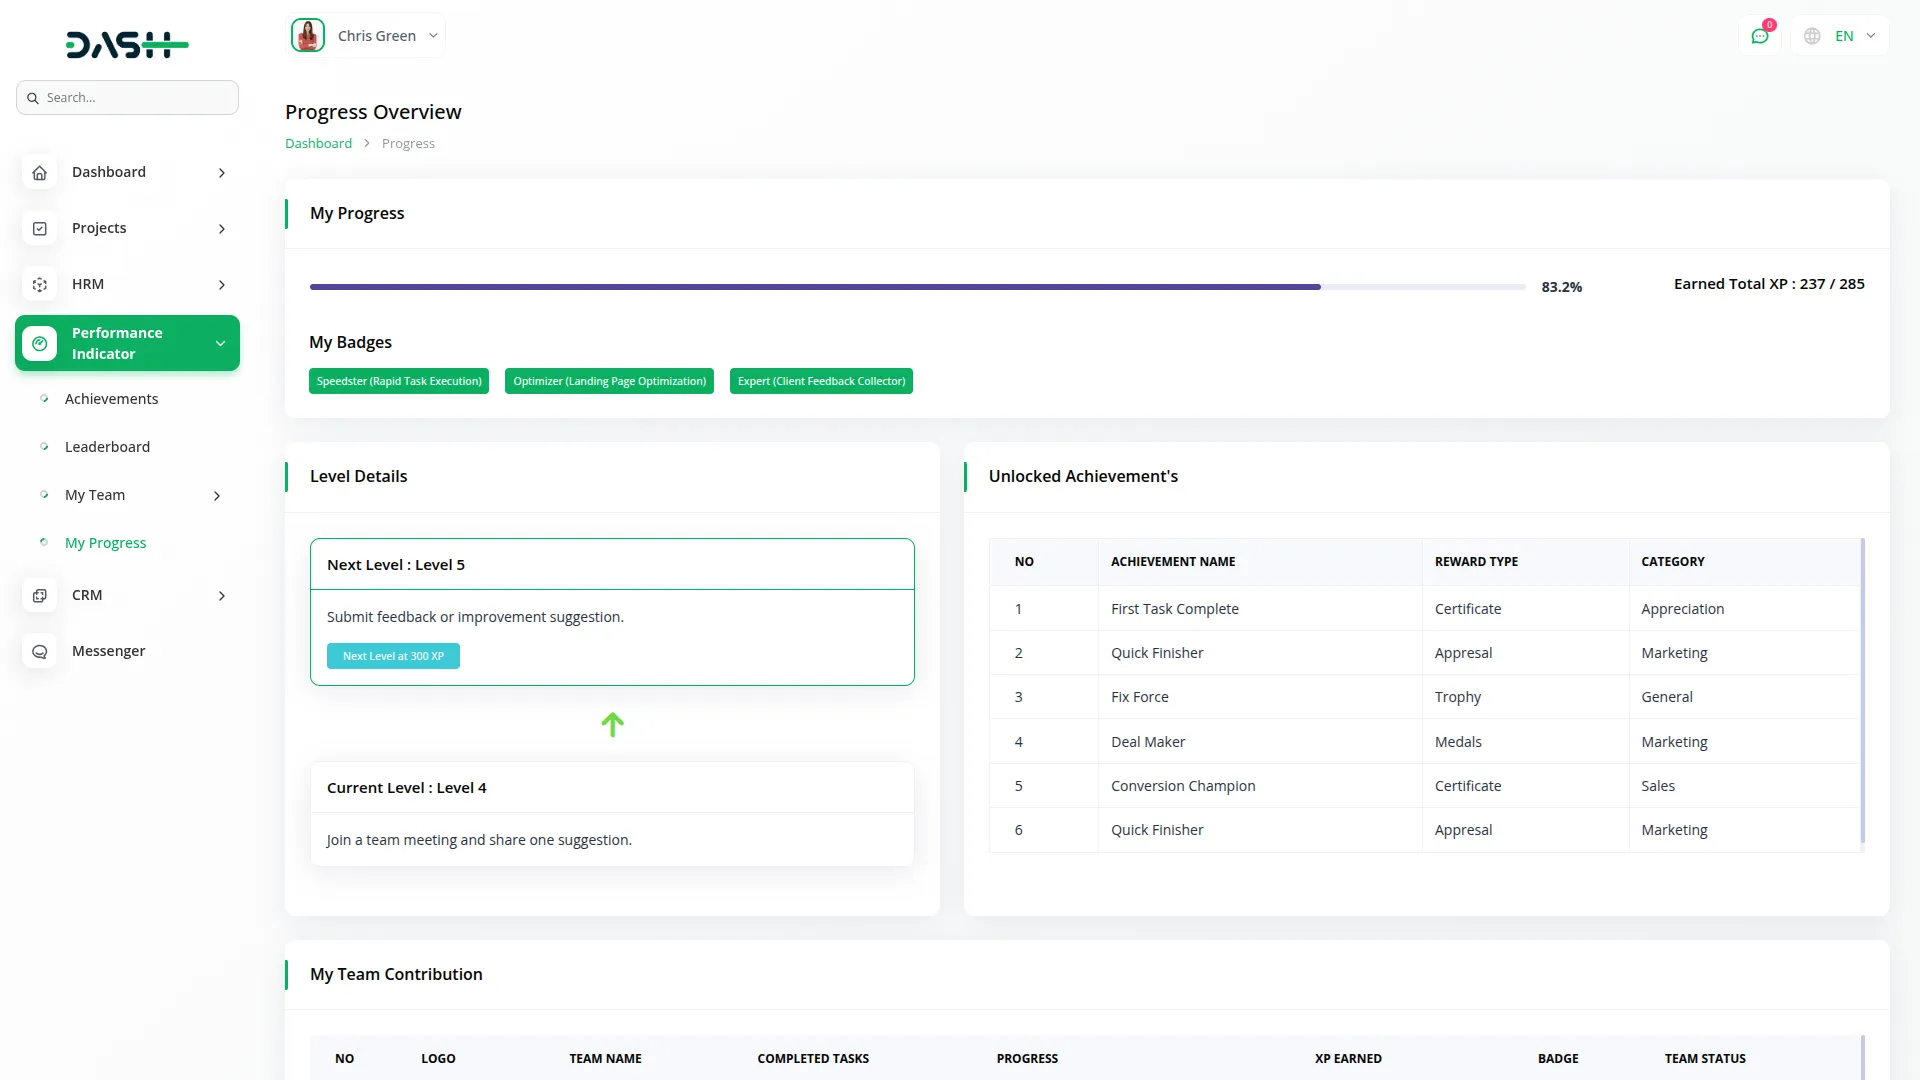
- The My Team Contribution section shows how the user has helped in different teams. It includes the team name, number of tasks completed, progress bar, XP earned, and team status. This helps users see their role in team success and how active their teams are.
- The My Tasks section lists all the tasks assigned to the user. Each task shows the name, team, linked challenge, XP points, start and end dates, description, and status (like ongoing or finished). This section helps users keep track of their work and deadlines.
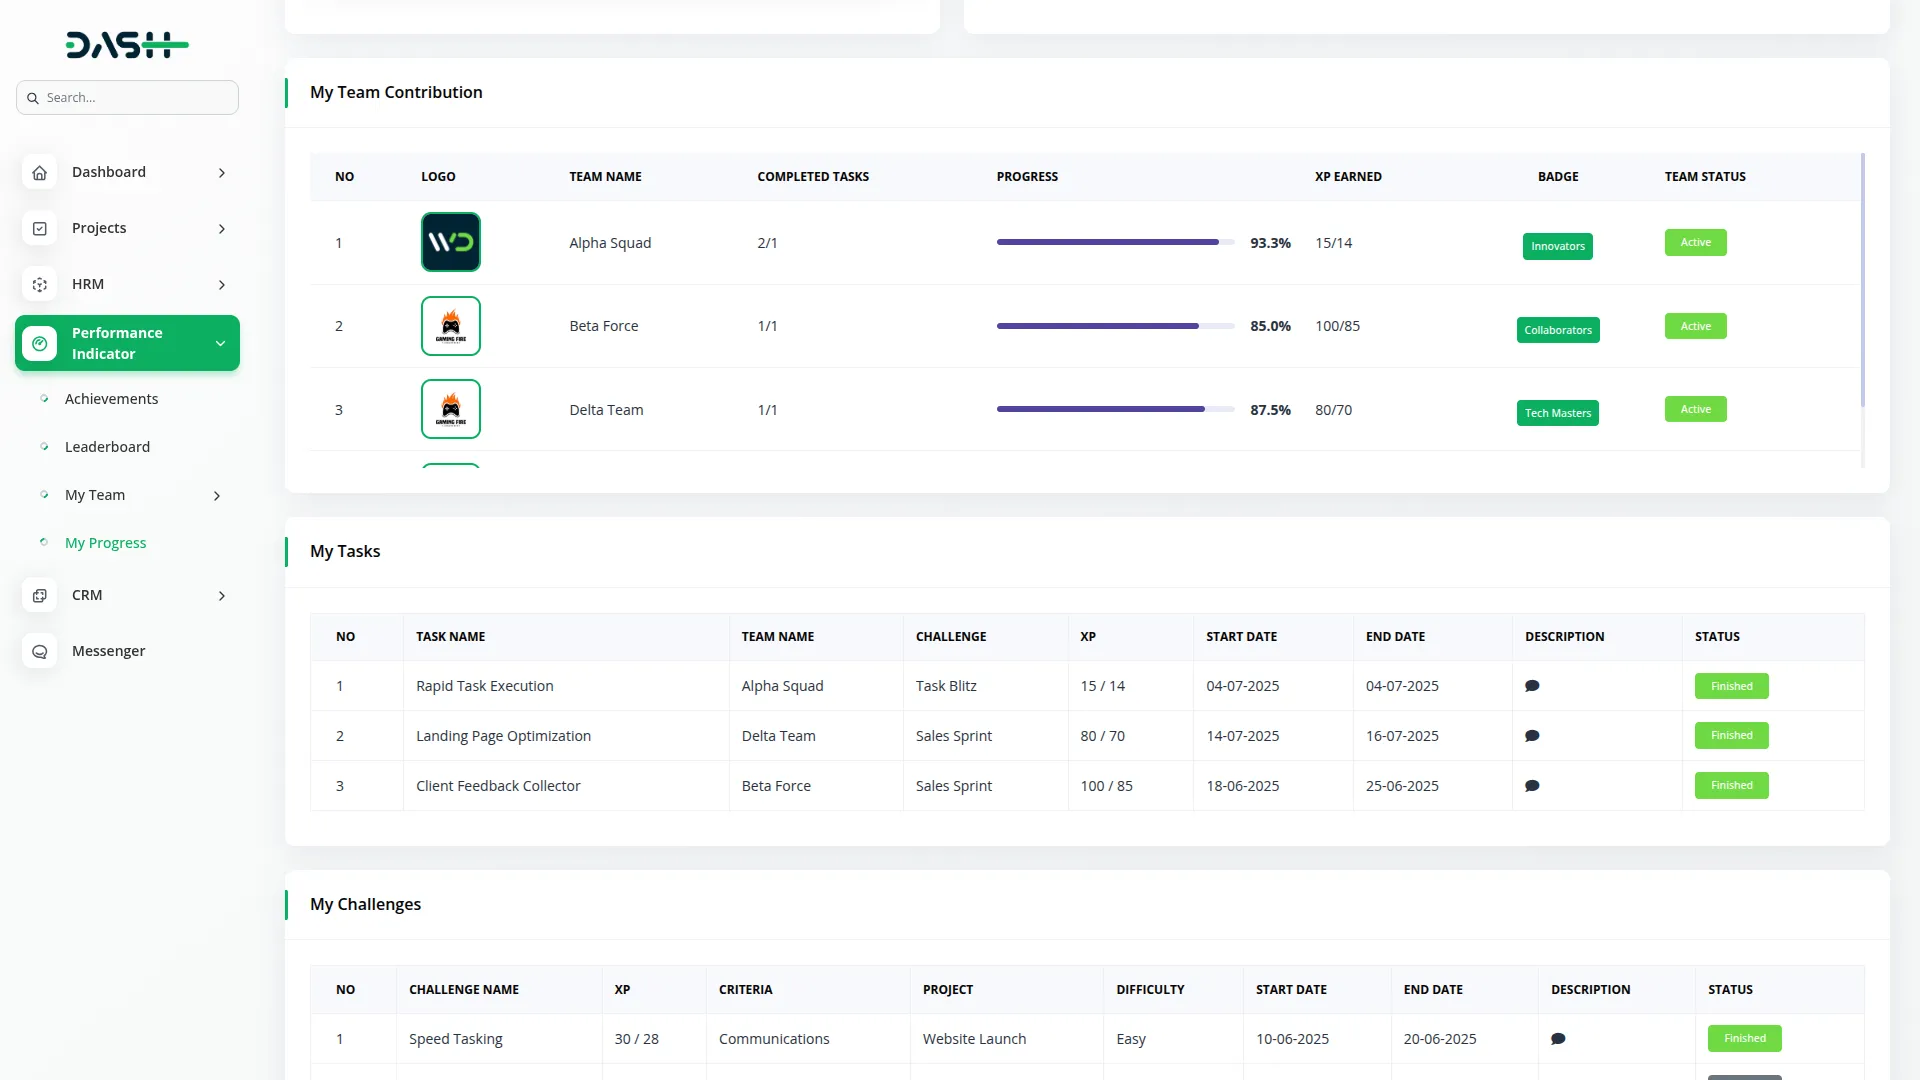
- The My Challenges section shows the challenges assigned to the user. It includes the challenge name, XP reward, completion rules, project name, difficulty level, start and end dates, and status. Users can use this to see which challenges they are working on and what rewards they can earn.
- The Overdue Tasks section shows tasks that were not finished by their deadline. The Overdue Challenges section lists challenges that are still incomplete even after their end date. These sections help users understand which items are late and need attention.
- The Upcoming Tasks and Upcoming Challenges sections show tasks and challenges that are going to start soon. This helps users plan their work ahead of time.
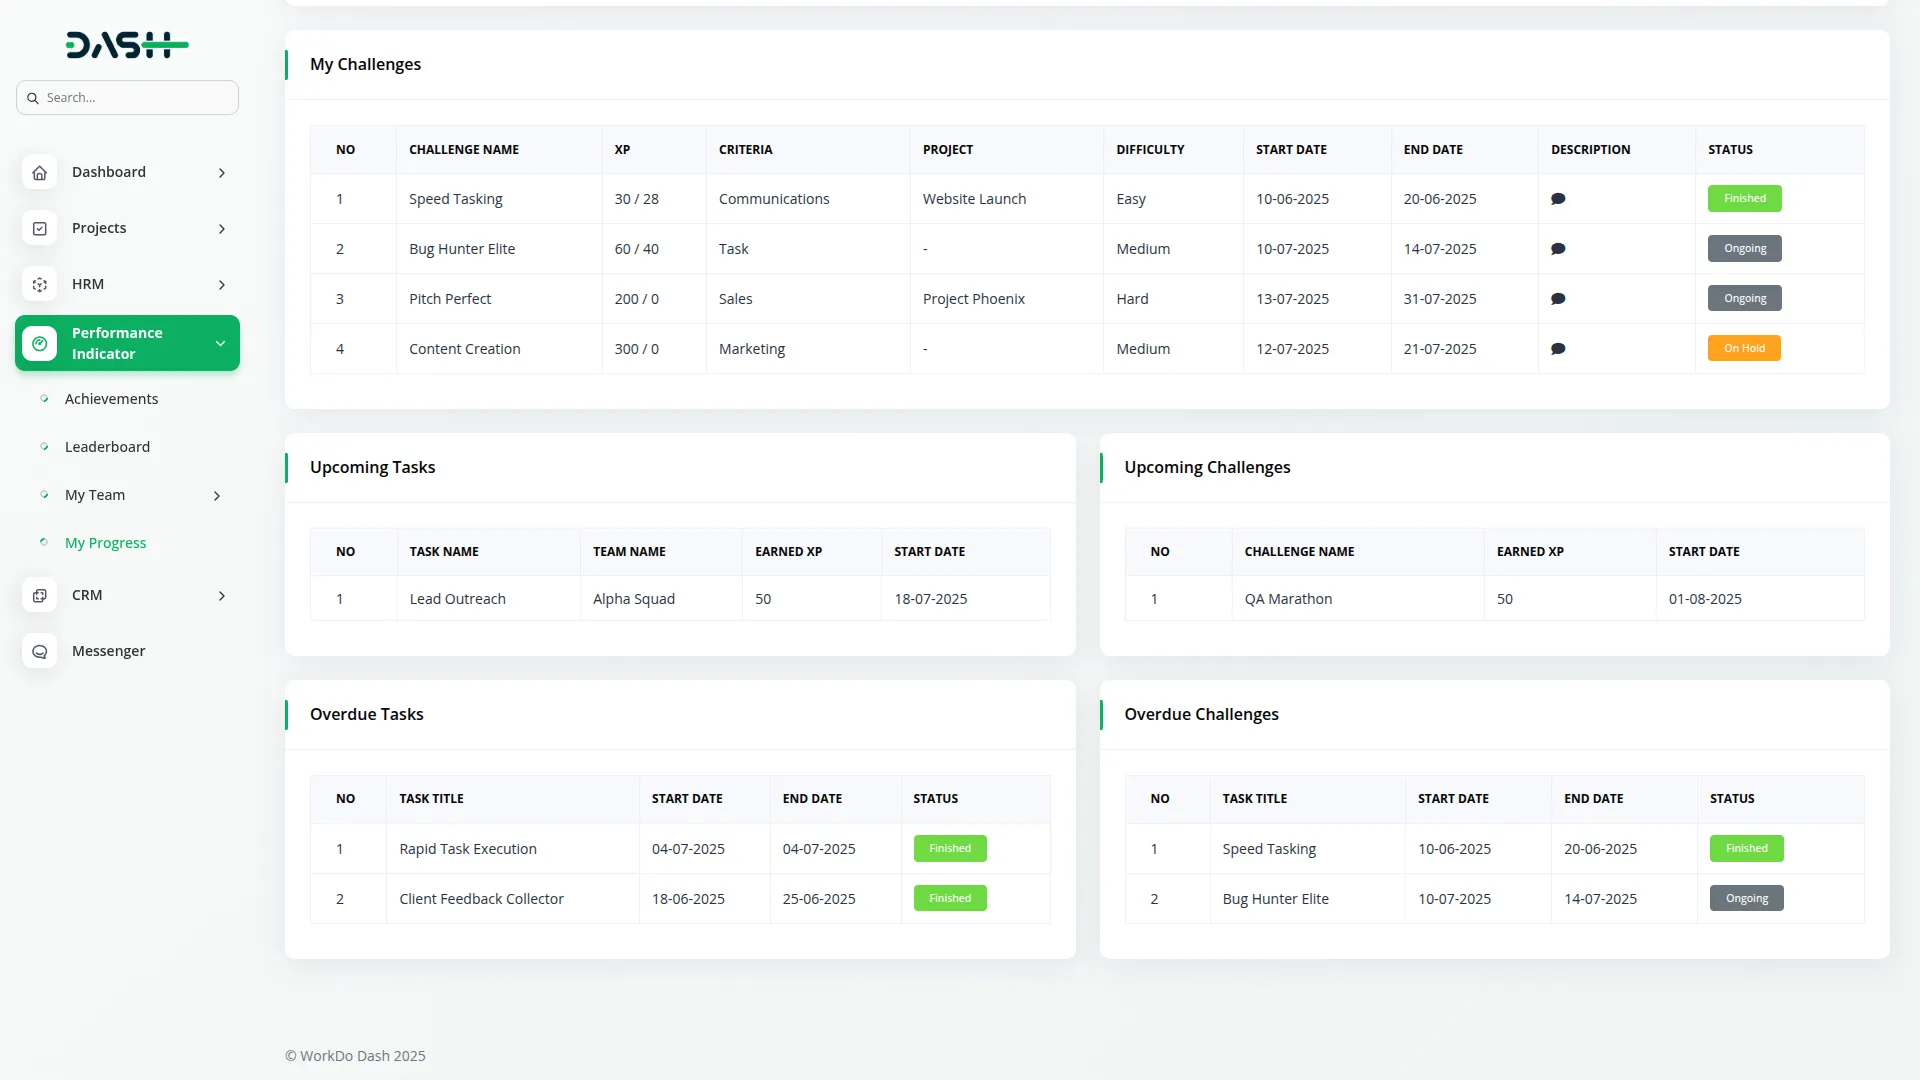
- This section is read-only, which means users can see their data but can’t make any changes here. It uses progress bars and tables to show all information clearly. The goal of this section is to help users track their progress, stay motivated, and keep improving.
Important Notes
- In the Unlocked Achievements section Category and Reward Type will only be visible when the toggle button is enabled from the system setup under Additional Settings.
- In the My Challenges section Criteria and Project Type will only be visible when the toggle button is enabled from the system setup under Additional Settings.
System Workflow
Summary
The Performance Indicator system operates through a structured workflow where companies manage teams and individual members through challenges and achievements:
- Teams and Individual Members: Companies create teams with designated leaders and assign both team-based and individual challenges
- Challenge Assignment: Challenges are assigned to teams (earning points) and individuals (earning XP directly)
- Points to XP Conversion: When teams complete challenges and earn points, these are converted to XP using system settings (e.g., 1 point = 10 XP)
- Task Distribution: Team Leaders receive converted XP and create tasks for team members, distributing XP as rewards upon task completion
- Achievement System: Achievements are unlocked when teams or individuals reach specific XP, Point or Level thresholds
- Personal Progress: Individual XP from both tasks and individual challenges contributes to personal achievements and level progression
Example Workflow
Step 1: Challenge Assignment:
- The company assigns a “Marketing Campaign” challenge to Team Alpha.
- If Team Alpha completes this task on time, the company gives 10 points as a reward.
Step 2: Points-to-XP Conversion
The company gives Team Alpha 10 points upon completing the challenge. As per the Points-to-XP Conversion setting:
- Reward Score: 10 Points
- System Conversion Rate: 1 Point = 10 XP
- Total XP Generated: 10 Points × 10 = 100 XP
- Note: This XP is handed over to the Team Leader for distribution.
Step 3: XP Distribution Setup by Team Leader
- Team Leader Alex decides in advance how the 100 XP (which the team will get after completing the challenge) will be shared among team members, based on how difficult each task is or how much each member is contributing.
- Task 1 (Content Writing) → Riya: 40 XP
- Task 2 (Design Work) → Raj: 60 XP
- The team leader creates tasks, assigns members, and plans the XP distribution in advance for the team challenge.
Step 4: Overdue Challenge Scenario (Optional Variation)
- If the team completes the challenge after the deadline, the company can reduce the reward points as a penalty.
- In this case, Team Alpha finished the challenge 2 days late, so instead of giving 10 Points, the company awarded only 8 Points.
- XP Becomes: 8 Points × 10 = 80 XP
- Team Leader Alex then distributed the reduced XP as follows:
- Riya: 30 XP
- Raj: 50 XP
- This kind of penalty system encourages team members to complete tasks on time by linking performance with rewards.
Step 5: Task Completion by Members
- Once team members complete their assigned tasks:
- They instantly receive the corresponding XP.
- Riya completes her task → gains 30 of 40 XP
- Raj completes his task → gains 50 of 60 XP
- These XP values are added to their personal profile.
Step 6: Individual Challenge Participation
- Apart from team-based challenges, individuals may also take on Personal Challenges.
- Raj completes an individual challenge and earns 50 XP.
- This is awarded directly by the company, separate from the team’s XP flow.
Step 7: XP Calculation Final XP totals:
- Raj’s Total XP = XP from Team Task (50 XP) + Individual Challenge (50 XP) = 100XP
- Riya’s Total XP = XP from Team Task (30 XP) = 30XP
Step 8: Achievement Unlocking & Level-Up
- Achievements are tied to reaching certain XP milestones Suppose “Creative Achiever” requires 100 XP.
- Raj unlocks this achievement and levels up, while Riya continues working toward the threshold.
- This workflow demonstrates how the Performance Indicator system creates a comprehensive gamification experience that motivates both team collaboration and individual excellence through structured challenges, task management, and achievement recognition.
Categories
Related articles
- Purchase Notification – eCommerceGo Addon
- McKinsey 7-S Model Integration in Dash SaaS
- Queue Management Integration in Dash SaaS
- Art Showcase Integration in Dash SaaS
- Adyen Detailed Documentation
- Quickbooks Integration in Dash SaaS
- Google Meet Integration in BookingGo SaaS
- Feedback Integration in Dash SaaS
- Additional Field in Checkout – eCommerceGo Addon
- Launching Your Own SaaS Business with BookingGo SaaS
- File Sharing Integration in Dash SaaS
- Google Login – eCommerceGo Addon
Reach Out to Us
Have questions or need assistance? We're here to help! Reach out to our team for support, inquiries, or feedback. Your needs are important to us, and we’re ready to assist you!


Need more help?
If you’re still uncertain or need professional guidance, don’t hesitate to contact us. You can contact us via email or submit a ticket with a description of your issue. Our team of experts is always available to help you with any questions. Rest assured that we’ll respond to your inquiry promptly.
Love what you see?
Do you like the quality of our products, themes, and applications, or perhaps the design of our website caught your eye? You can have similarly outstanding designs for your website or apps. Contact us, and we’ll bring your ideas to life.
