
Freelancing Platform – WorkDo Dash SaaS Add-On Guide
Learn how to manage freelancing projects and client workflows in WorkDo Dash SaaS.
Introduction
The Freelancing Platform Add-On transforms your platform into a complete two-sided freelancing marketplace where clients post jobs and skilled freelancers apply, get hired, and deliver work. With secure escrow payments, built-in dispute resolution, profile verification, reviews, and a fully customizable website, it gives you everything needed to connect talent with opportunity and manage your entire freelancing ecosystem from one powerful admin dashboard.
How to Install the Add-On?
To Set Up the Freelancing Platform Add-On, you can follow this link: Setup Add-On.
How To Use The Freelancing Platform Add-On?
Freelancing Platform Dashboard
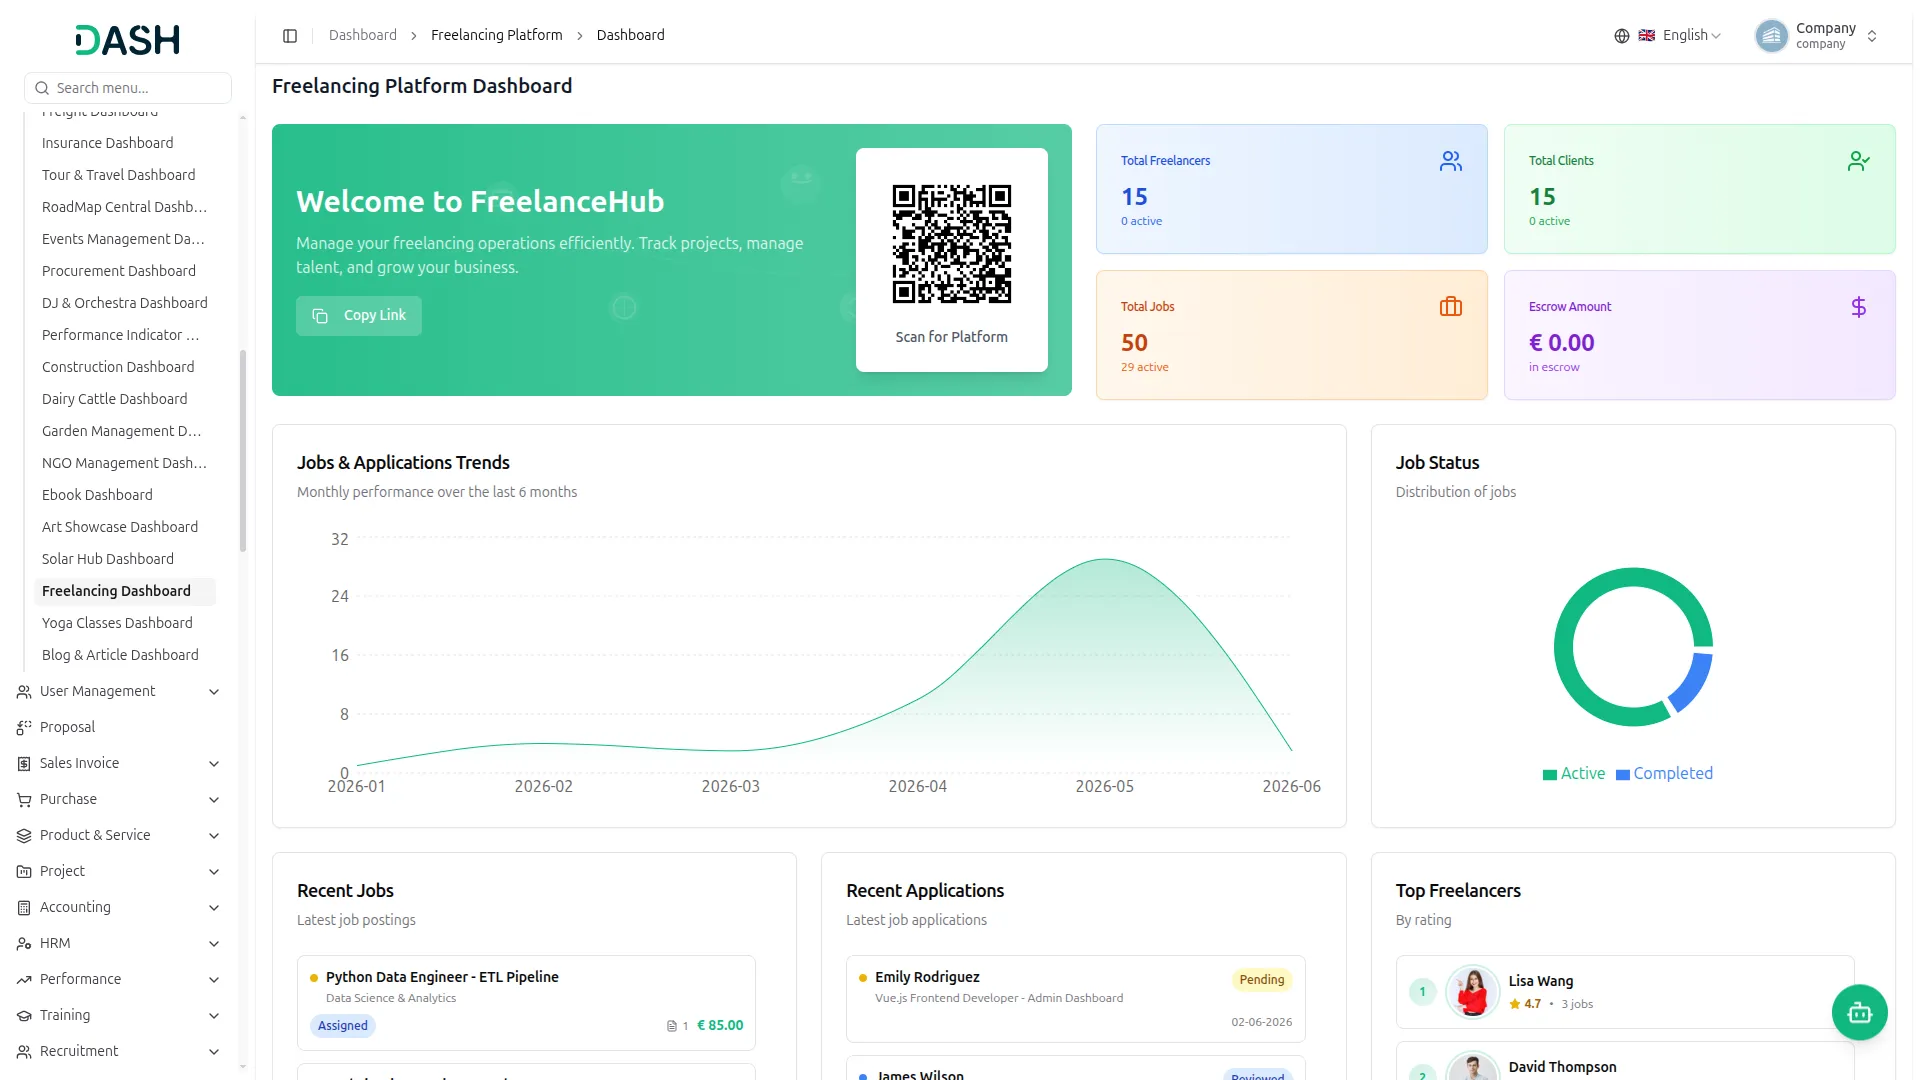
- The dashboard provides a complete overview of your freelancing platform’s performance through various summary cards, content insights, and quick access features.
- At the top, you’ll find a Welcome Card displaying your dashboard title and description, along with a QR Code that visitors can scan to directly access your platform and a Copy Link button to quickly share your website link.
- The dashboard displays important summary cards showing Total Freelancers, Total Clients, Total Jobs, and Escrow Amount, with each card noting the active count or amount in escrow, giving you instant insights into your platform’s users, jobs, and held funds at a glance.
- The Jobs & Applications Trends chart displays your platform’s monthly performance over the last six months, allowing you to track how job and application activity has grown over time, while the Job Status chart shows the distribution of jobs split between Active and Completed.
- The Recent Jobs section displays your latest job postings, with each entry showing the job title, category, status (such as Active, Completed, In Progress, or Assigned), proposal count, and salary, giving you a quick view of newly posted work on the platform.
- The Recent Applications section displays the latest job applications, with each entry showing the freelancer’s name, the job applied for, the application status (such as Pending, Reviewed, Accepted, or Rejected), and the date, letting you keep track of incoming proposals.
- The Top Freelancers section ranks freelancers by rating, showing each freelancer’s photo, name, star rating, and number of jobs, allowing you to quickly identify your best-performing talent.
- The Recent Reviews section displays the latest platform reviews, showing the reviewer and reviewee with their roles, the related job, the review text, the star rating, and the date, giving you a quick view of recent feedback between clients and freelancers.
- The Recent Disputes section displays the latest dispute cases with a count of open disputes, and each case shows the dispute title, the related job and category; who raised it; a short excerpt of the reason; the priority; how long ago it was raised; the amount; and the status (such as ‘Open’, ‘Resolved’ or ‘Closed’), helping you stay on top of issues that need resolution.
- The Pending Verifications section displays verification requests awaiting review, showing each user’s name, email, submission date, and type (Freelancer or Client), so you can quickly act on accounts waiting to be verified.
- The Recent Transactions section displays the latest wallet activity, showing each transaction’s user with their role, the payment description, the credit or debit type, the amount, and the date and time, giving you a full picture of money movement across the platform.
System Setup
Brand Settings
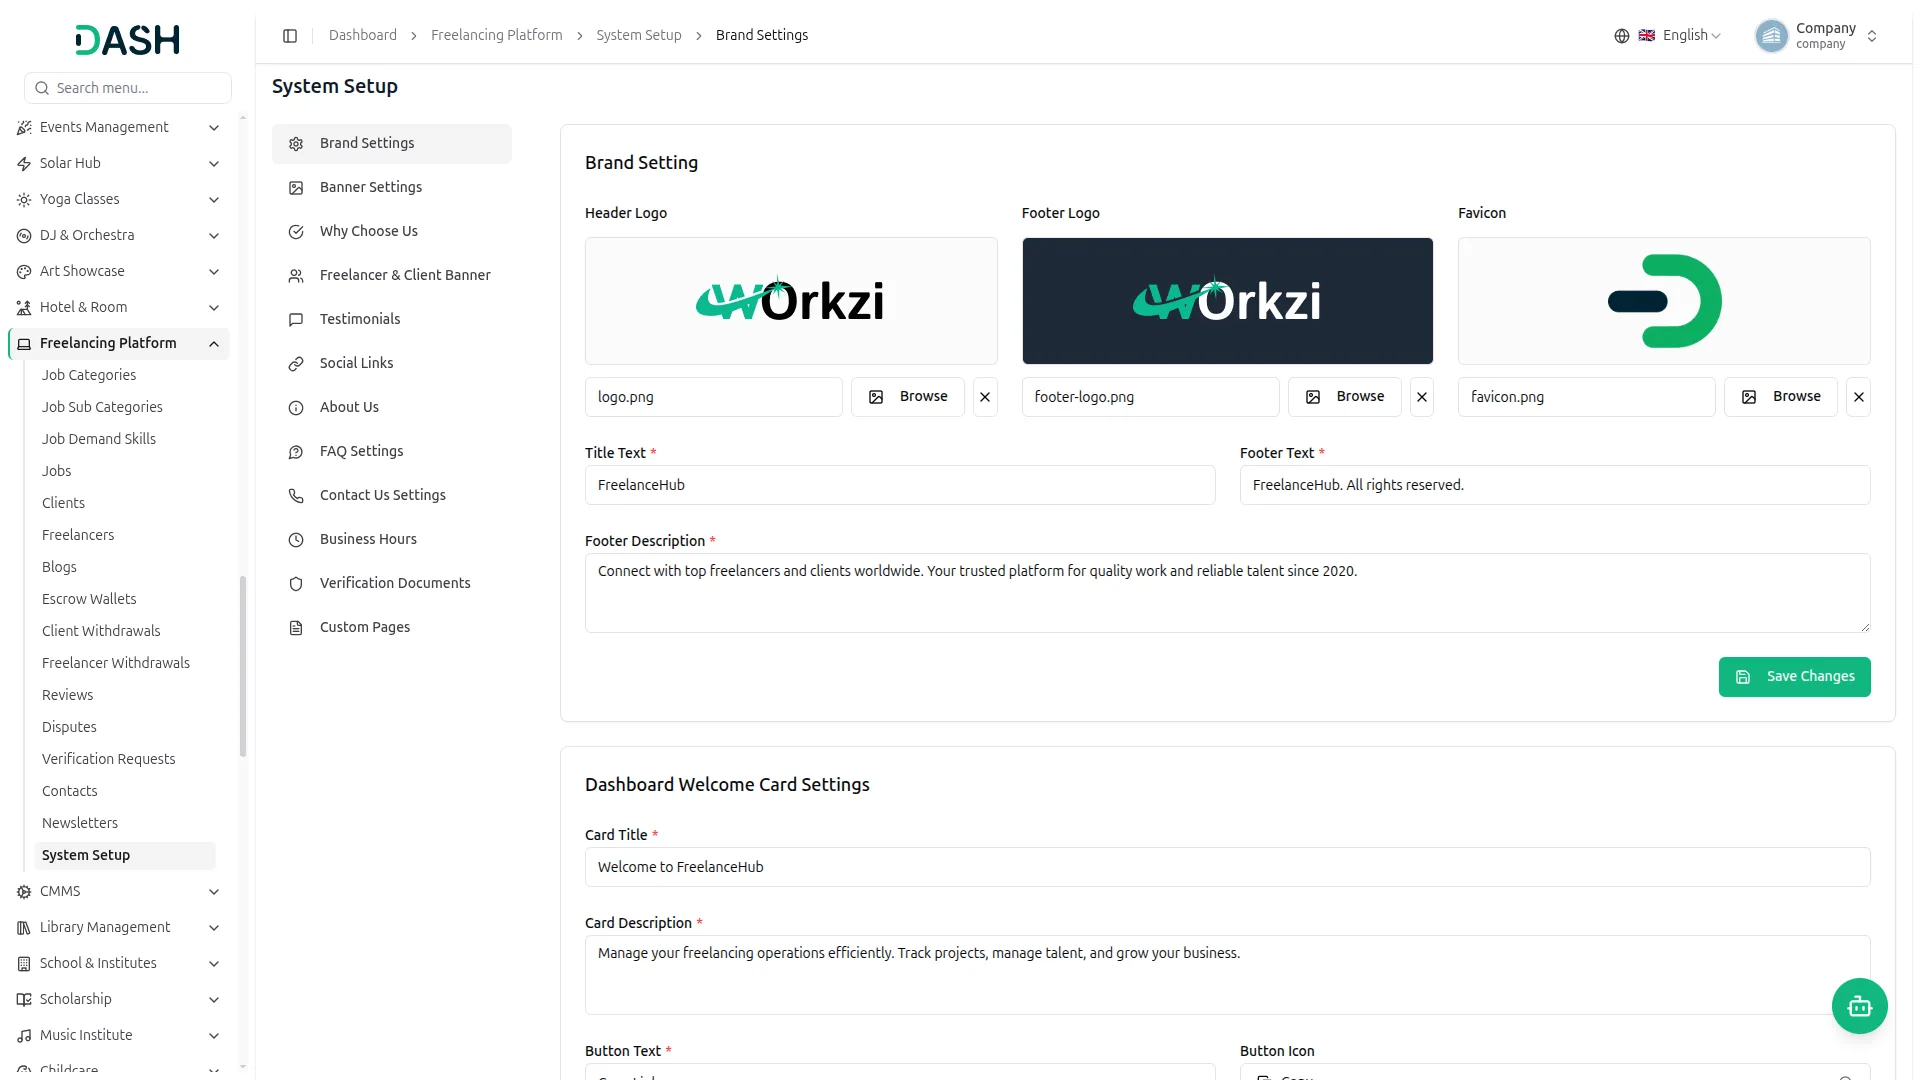
- In the Brand Settings section, click the Browse button to upload your Header Logo. Click the next ‘Browse’ button to upload your Footer Logo. Click the third Browse button to upload your Favicon. Enter your Title Text, your website’s name, or your brand name. Enter your Footer Text, the copyright line shown at the bottom of every page. Enter your Footer Description, a short line describing your platform.
- In the Dashboard Welcome Card Settings section, enter the Card Title and Card Description, the welcome message shown inside your admin dashboard. Enter the Button Text and select the Button Icon for the dashboard button. Click Save Changes.
- The website displays the Header Logo in the top navigation bar on every page. The Footer Logo and Footer Description are shown in the footer section at the bottom of every page, and the Footer Text appears as the copyright line at the very bottom of the footer. The Favicon is displayed on the browser tab. The Card Title, Card Description, and Button are displayed inside the admin dashboard welcome area.
Banner Settings
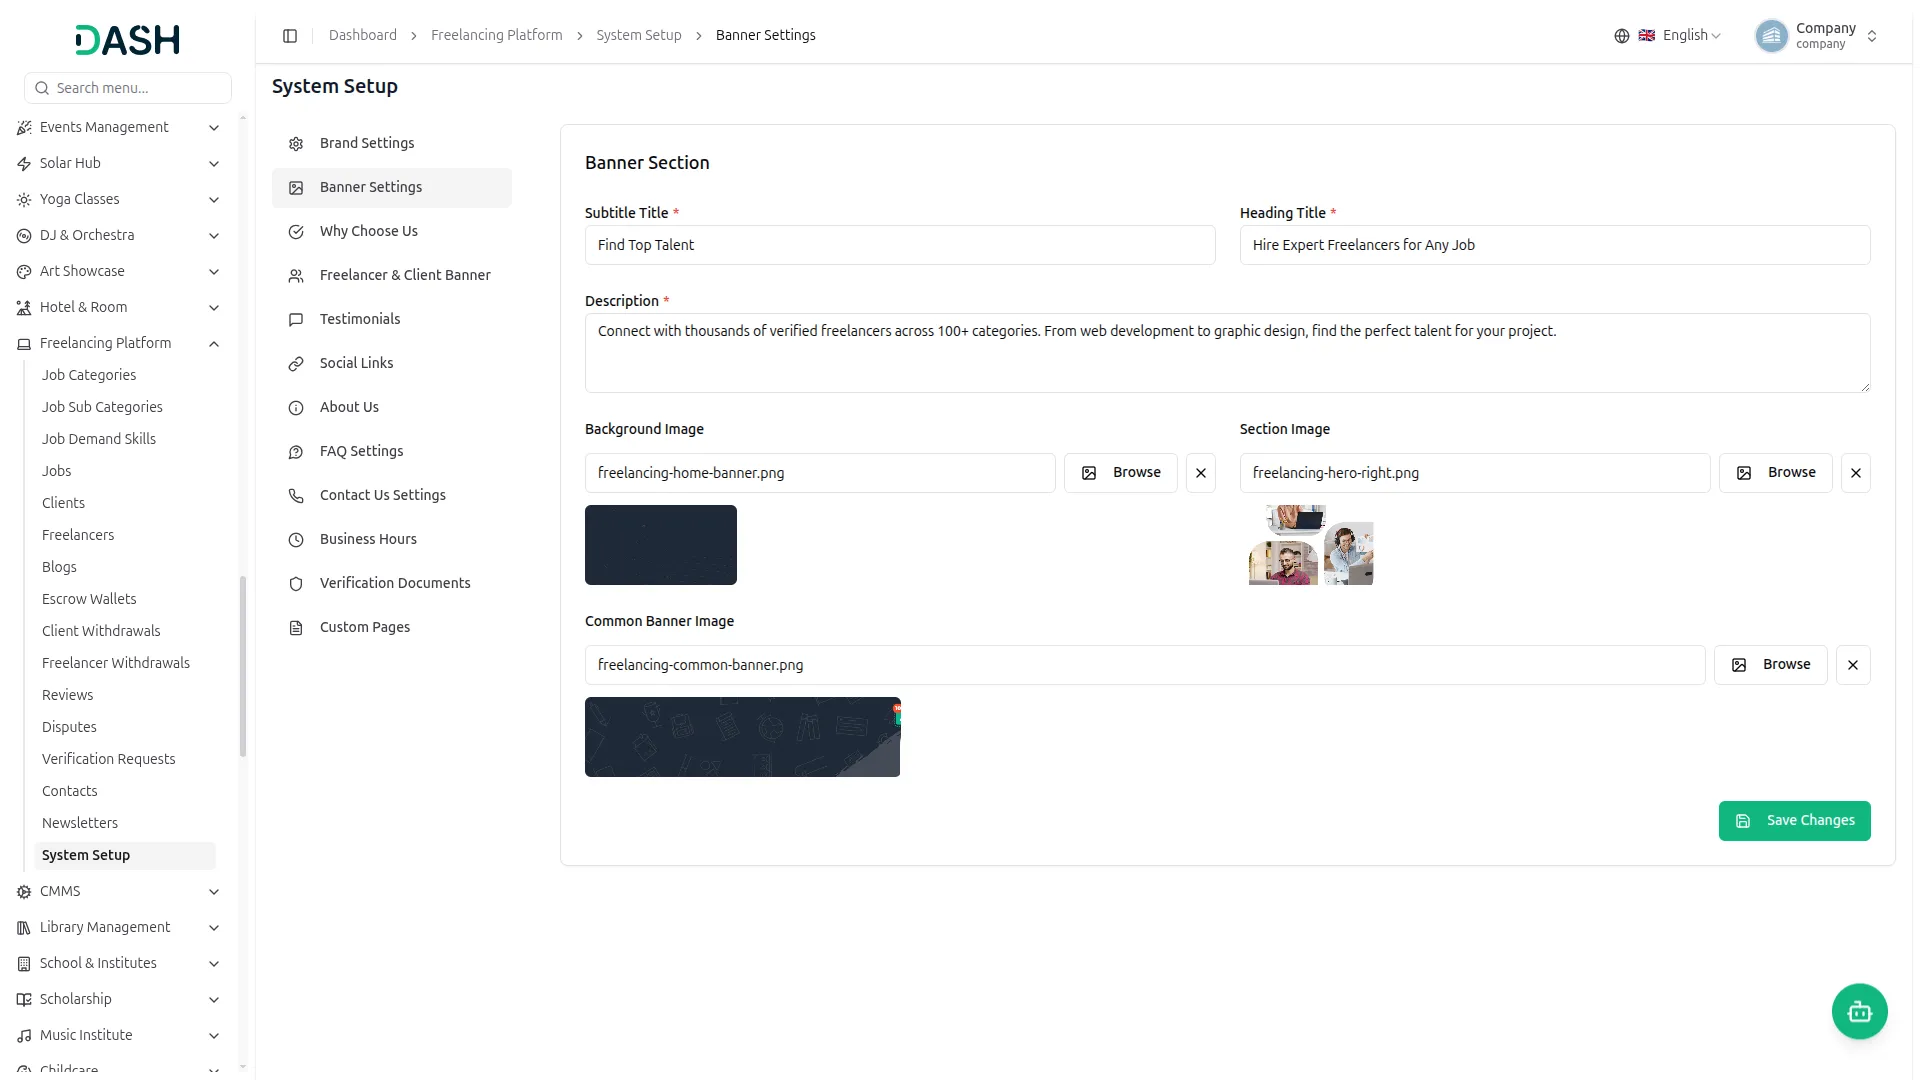
- In the Banner Section, enter the Subtitle Title and the Heading Title for your homepage banner. Enter the Description shown below the heading. Click Browse to upload the Background Image (the banner background) and the Section Image (the visual shown beside the heading). Click ‘Browse’ to upload the Common Banner Image, the background used on inner page headers. Click Save Changes.
- The website displays this banner as the main hero section at the top of the homepage. The Subtitle Title appears as the small label above the heading, the Heading Title appears as the large main heading, and the Description appears as the supporting text below it. The Background Image sits behind the hero section, and the Section Image is shown on the right side. The Common Banner Image is used as the header background on inner pages such as Jobs, Categories, Freelancers, About Us, Blog, FAQ, and Contact.

Why Choose Us
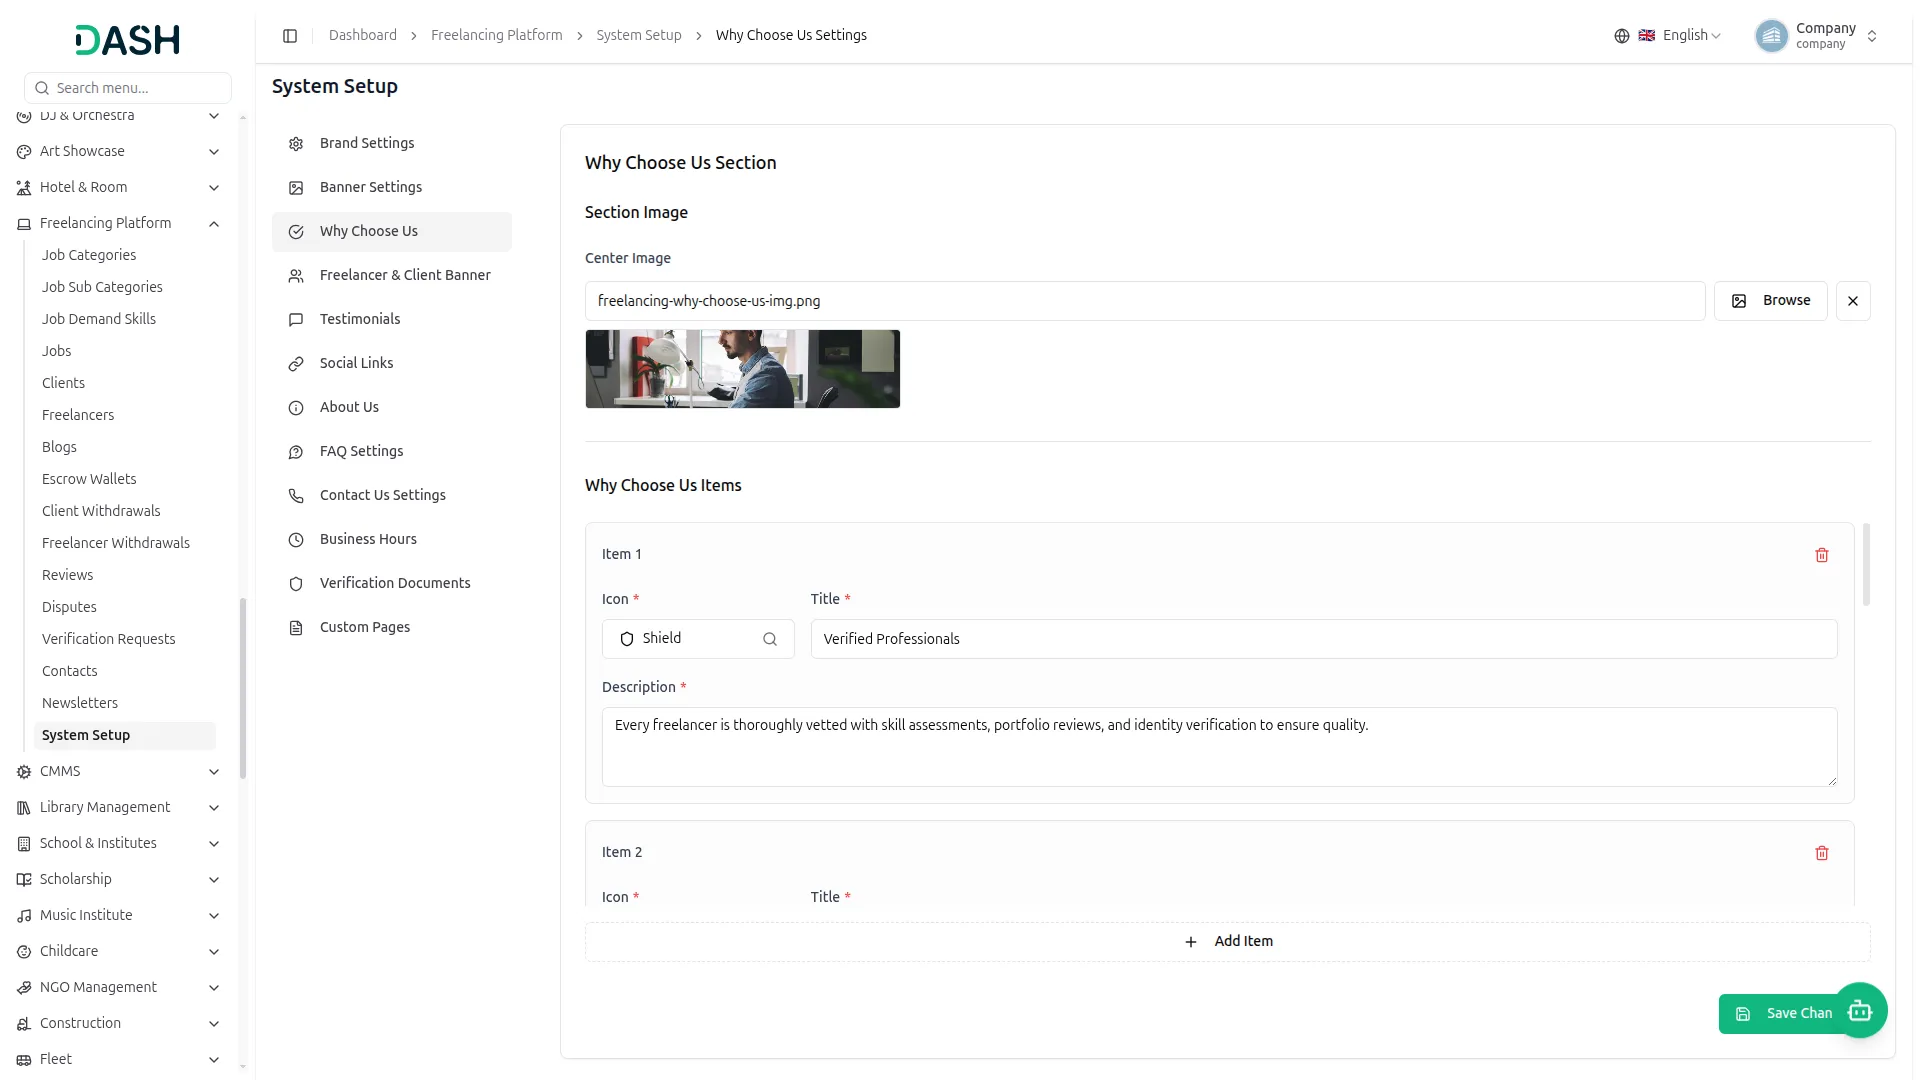
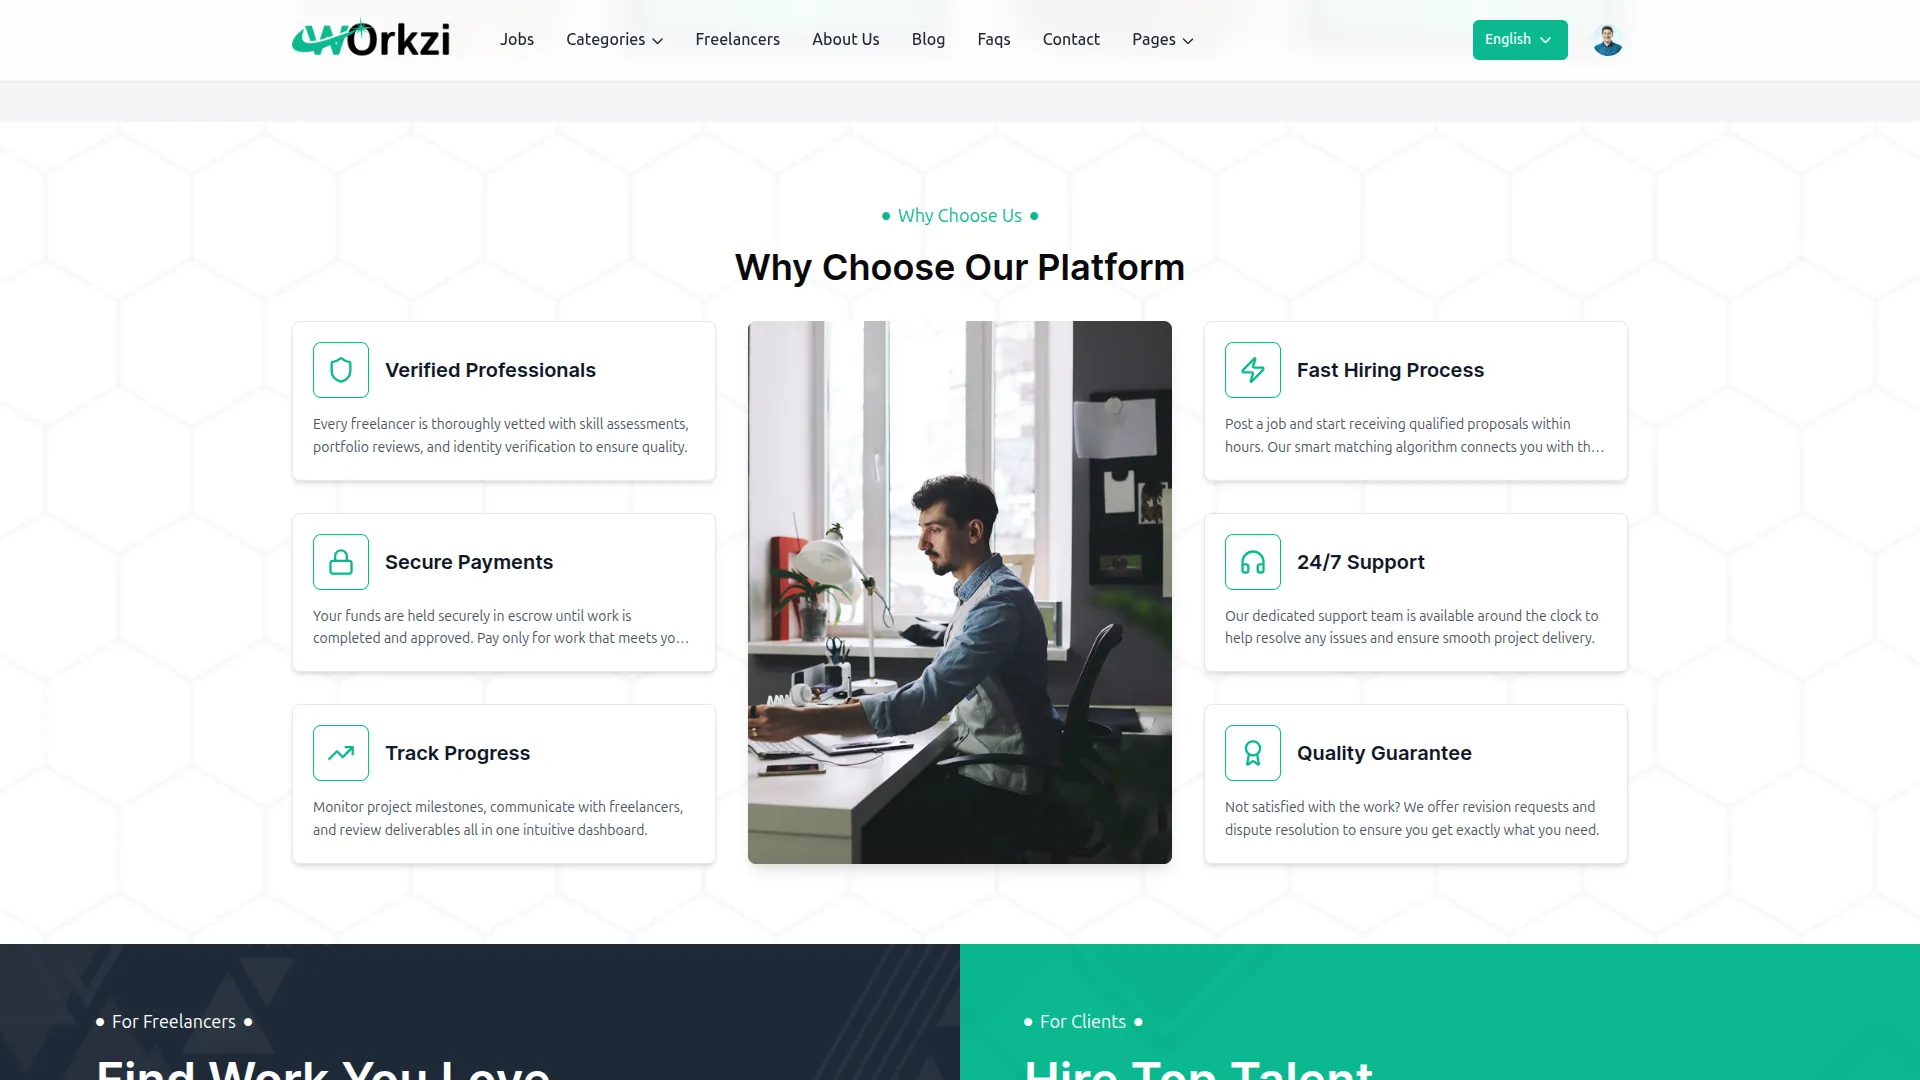
- In the Why Choose Us section, click Browse to upload the Center Image. Under ‘Why Choose Us Items, for each item, select an Icon, enter a Title, and enter a Description. Click Add Item to add more items, and use the delete icon to remove any. Click Save Changes.
- The website displays this content in the “Why Choose Our Platform” section on the homepage. The Center Image appears in the middle of the section, and each item is shown around it with its selected Icon, Title, and Description, highlighting the platform’s key strengths to visitors.
Freelancer & Client Banner
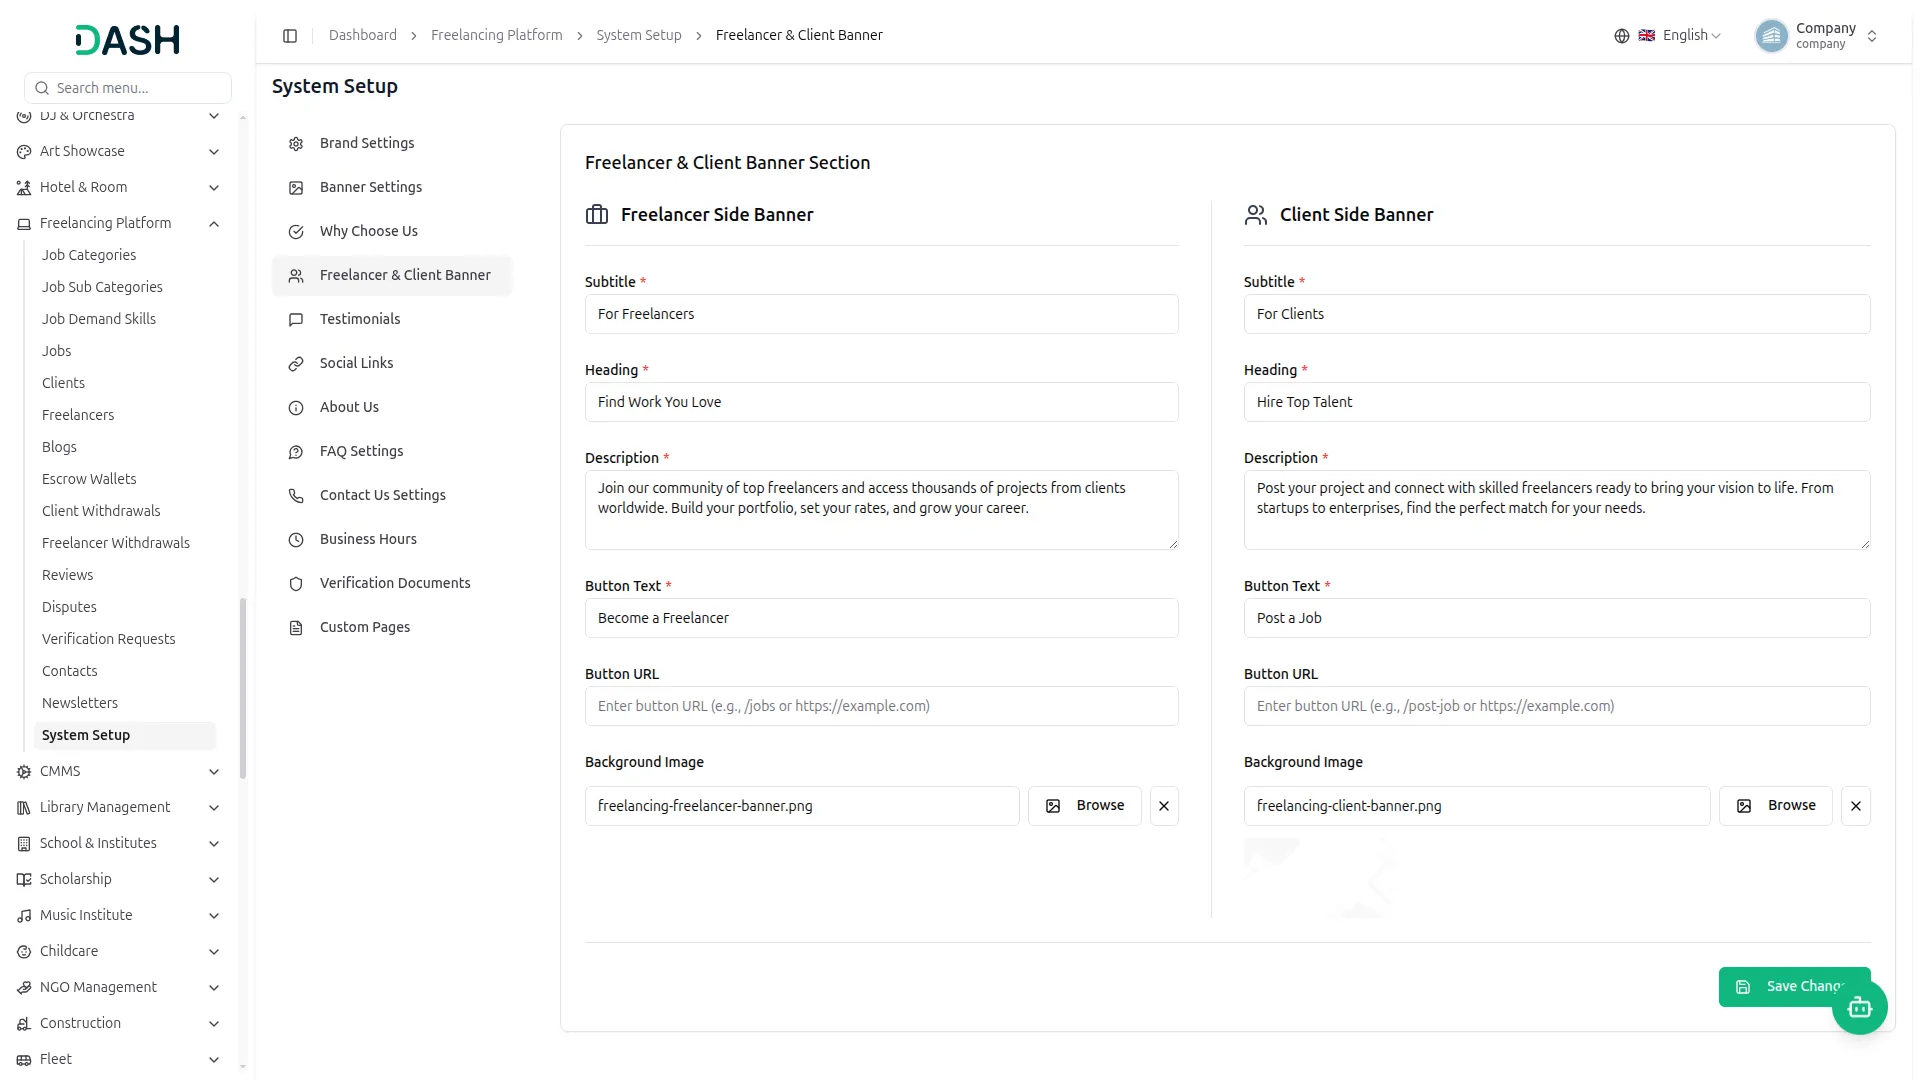
- This section has two sides. Under the Freelancer Side Banner, enter the Subtitle, Heading, Description, and Button Text, enter the Button URL the button should link to, and click Browse to upload the Background Image.
- Under the Client Side Banner, enter the same fields, the Subtitle, Heading, Description, Button Text, and Button URL, and click Browse to upload the Background Image. Click Save Changes.
- The website displays both banners side by side in the call-to-action section on the homepage. The Freelancer Side Banner appears as the “For Freelancers” block with its subtitle, heading, description, and button, and the Client Side Banner appears as the “For Clients” block. Each button uses its Button Text and links to the Button URL, sending freelancers and clients to the right starting point.
Testimonials
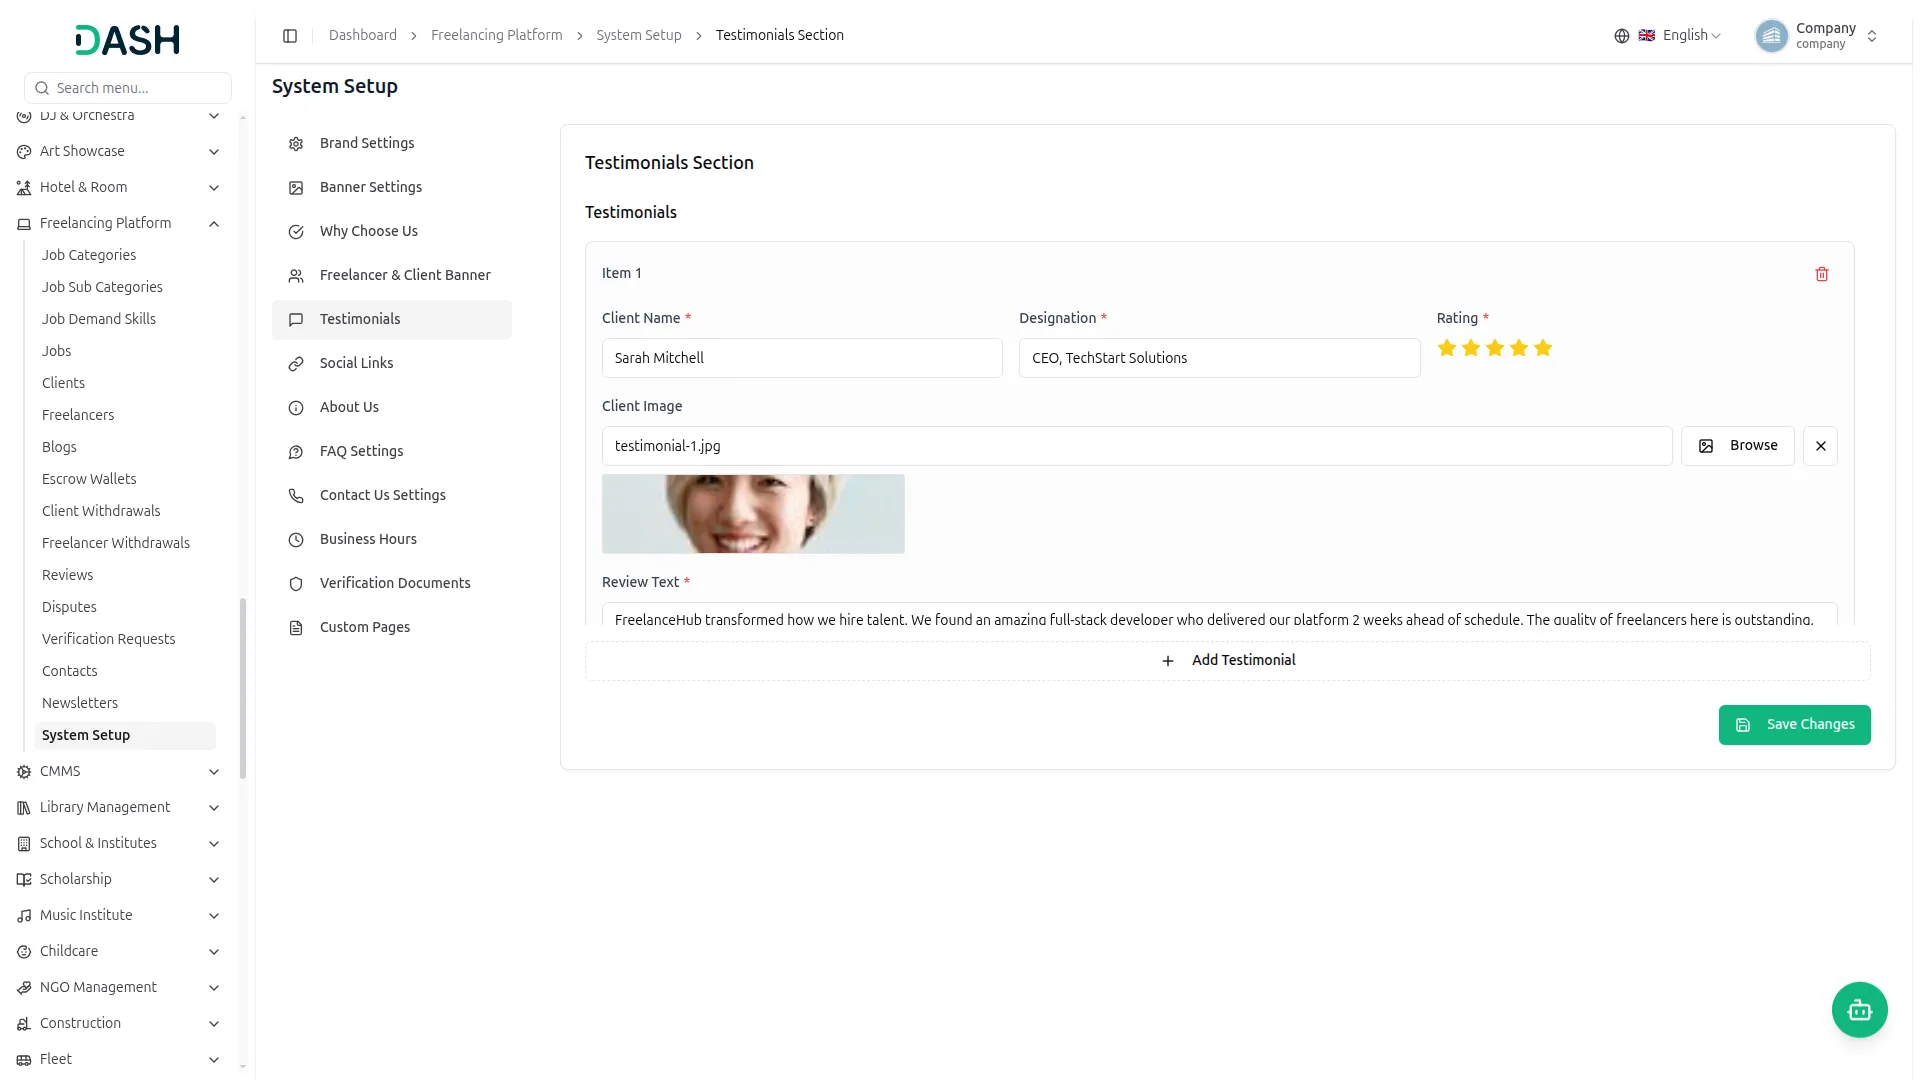
- In the Testimonials section, for each item, enter the Client Name and Designation, select the Rating by clicking the stars, click Browse to upload the Client Image, and enter the Review Text. Click Add Testimonial to add more, and use the delete icon to remove any. Click Save Changes.
- The website displays these testimonials in the “Shared Experiences” section on the homepage. Each card shows the Client Image, Client Name, Designation, star Rating, and Review Text, giving visitors social proof from past clients.

Social Links
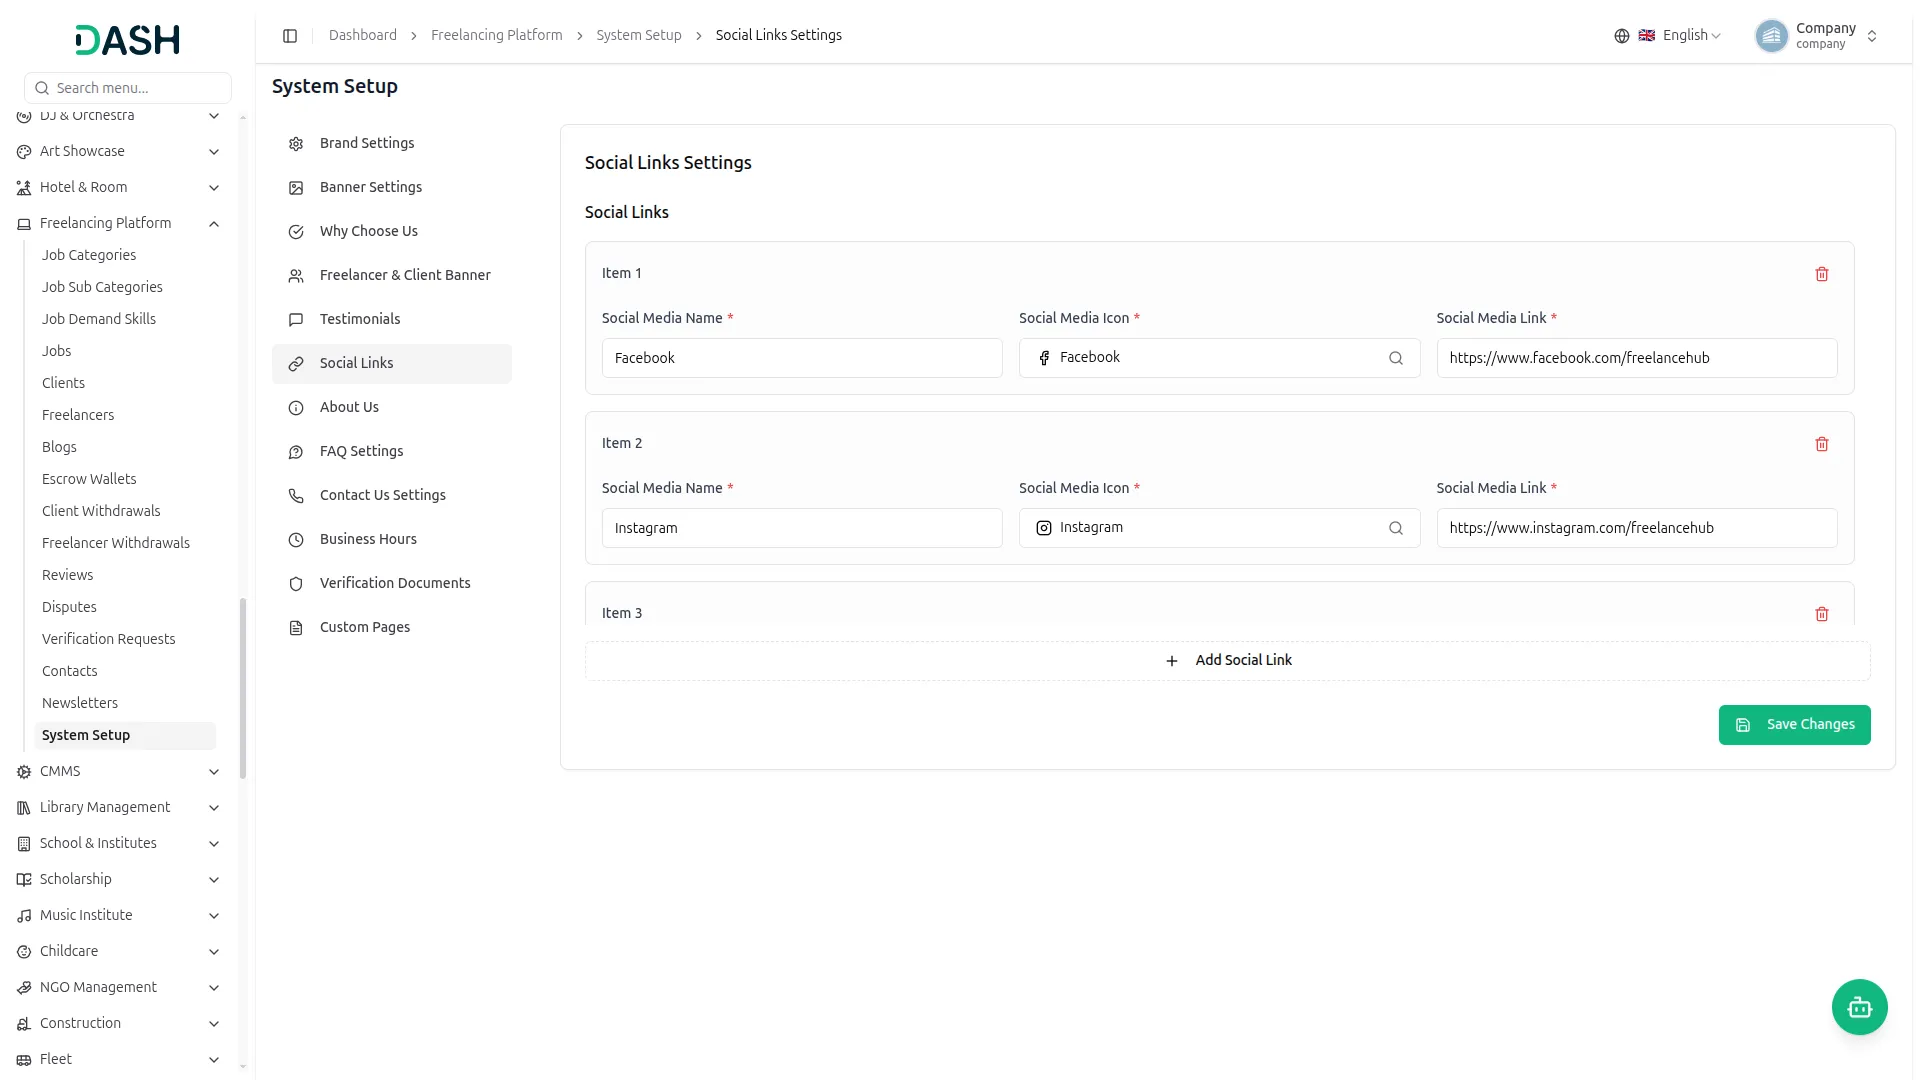
- In the Social Links section, for each item select the Social Media Icon from the icon search field, enter the Social Media Name, and enter the Social Media Link. Click Add Social Link to add more platforms, and use the delete icon to remove any. Click Save Changes.
- The website displays your social media icons as clickable buttons in the footer on every page and on the Contact page. Each icon links to its Social Media Link, letting visitors reach your social profiles directly from the website.
About Us
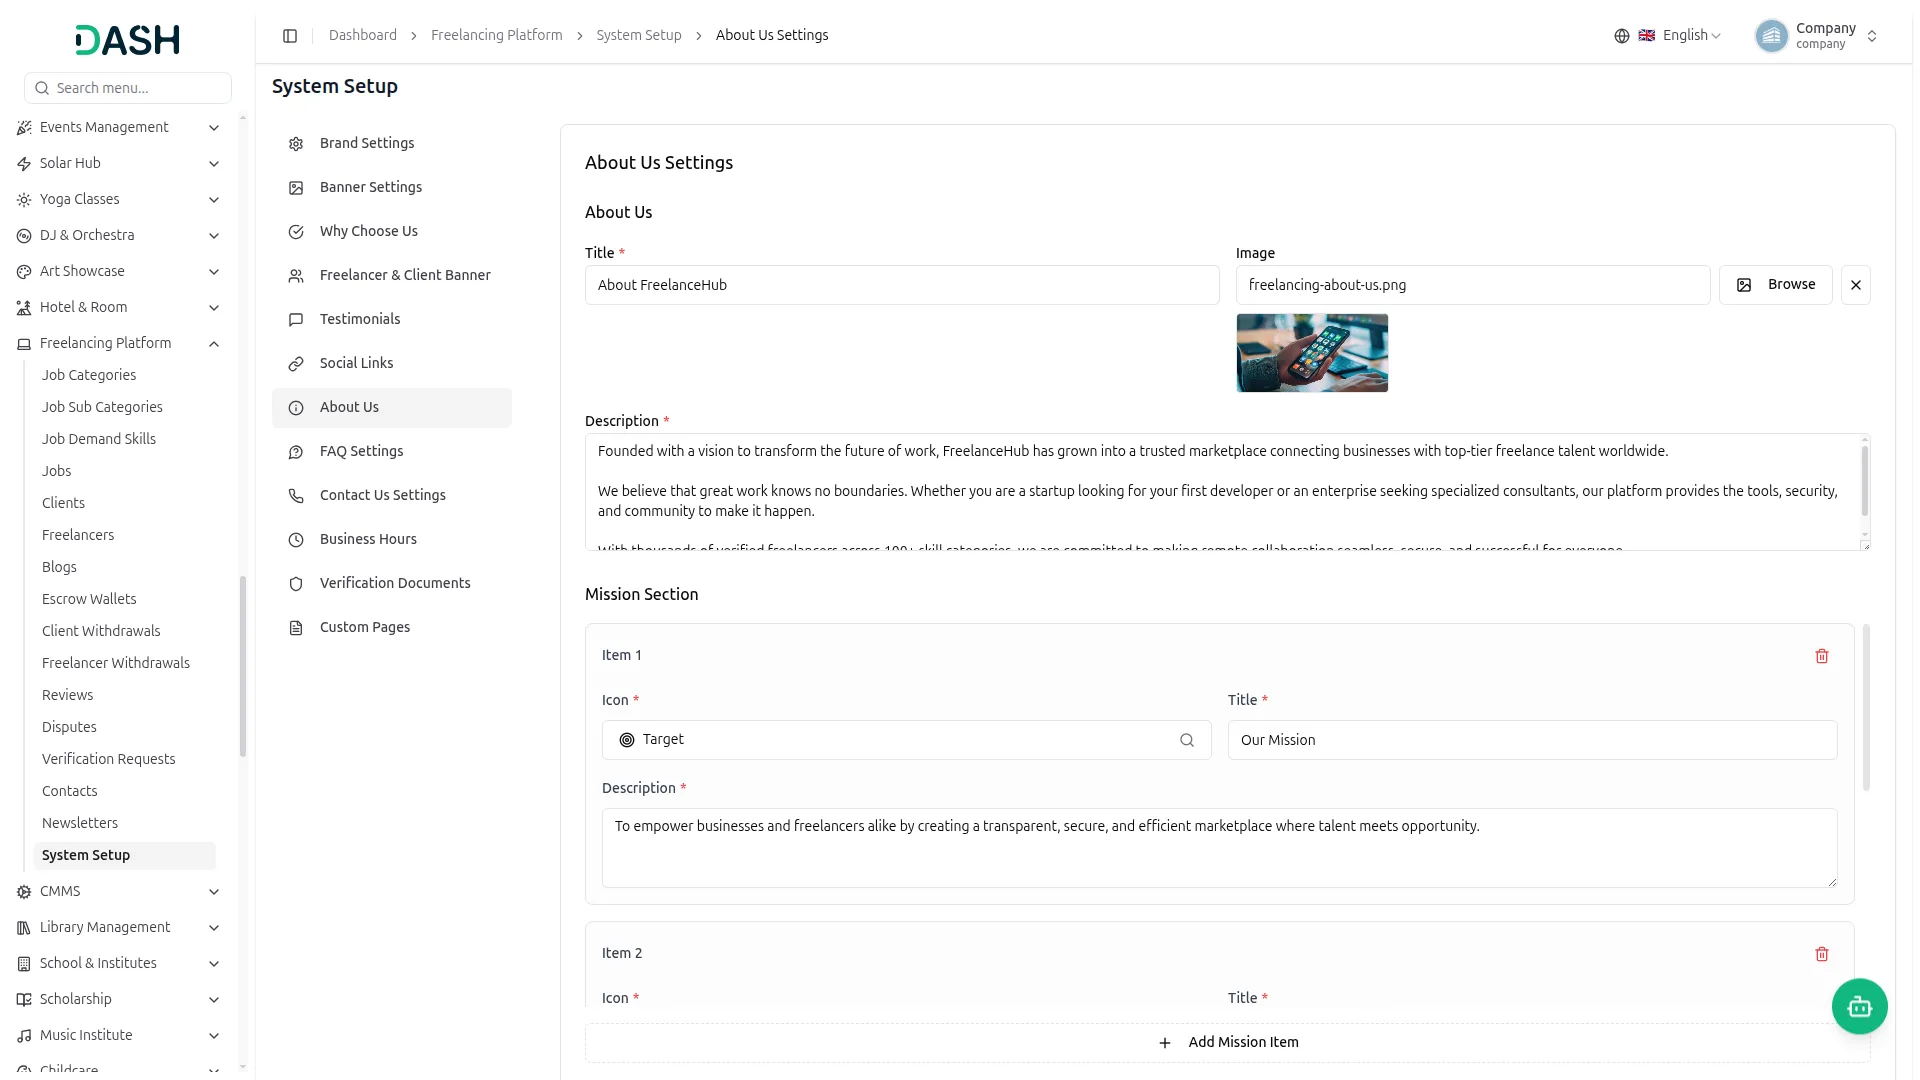
- In the About Us section, enter the Title and Description, and click Browse to upload the About Us Image. Under the Mission Section, enter the section Description, and for each item select an Icon, enter a Title, and enter a Description; click Add Mission Item to add more (for example, Mission, Vision, and Values).
- Under Our Team, for each member, enter their Name, Designation, and Description; click Browse to upload their Image; add their Social Icon and Social URL; click Add Team Member to add more. Click Save Changes.
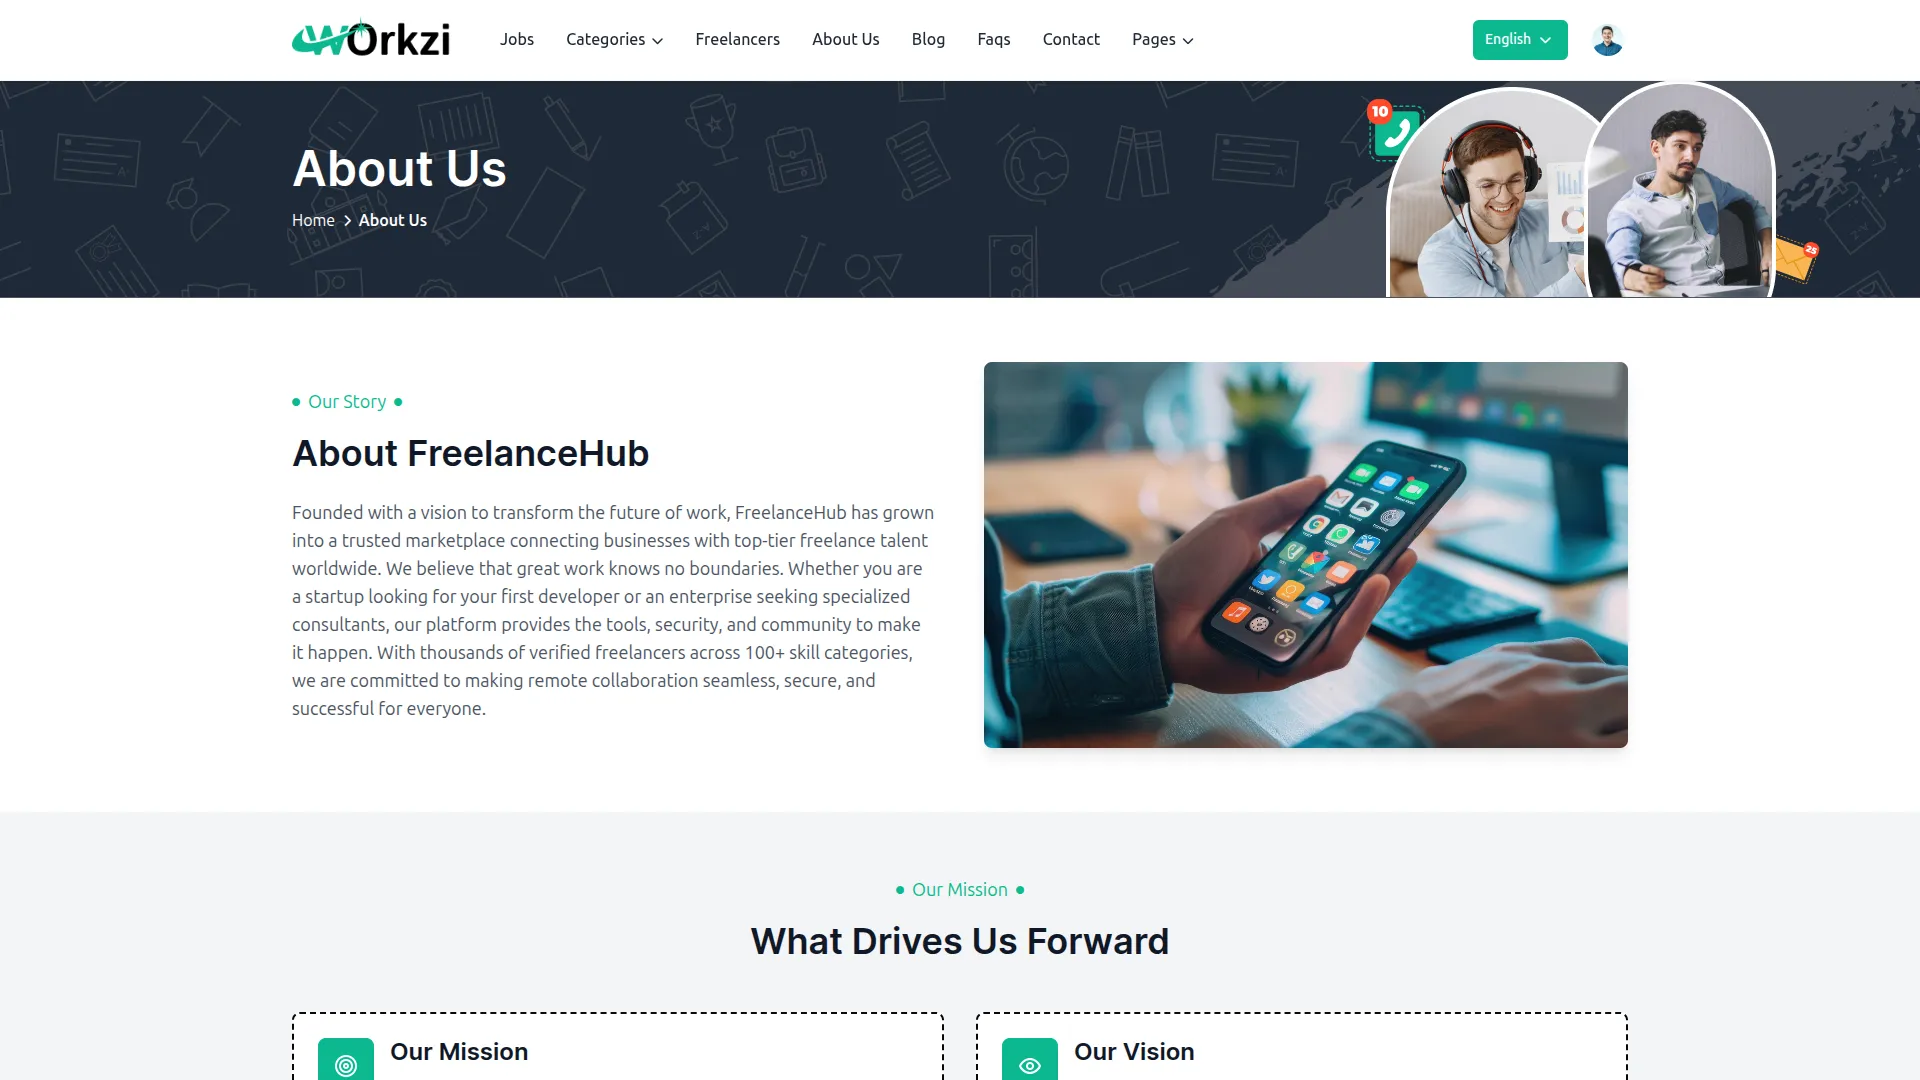
- The website displays this content on the About Us page. The Title, Description, and Image appear in the story section at the top. The Mission items appear in the “What Drives Us Forward” block as Our Mission, Our Vision, and Our Values. The team members appear in the “Meet Our Amazing Team” section, each shown with their photo, name, designation, description, and social links.
FAQ Settings
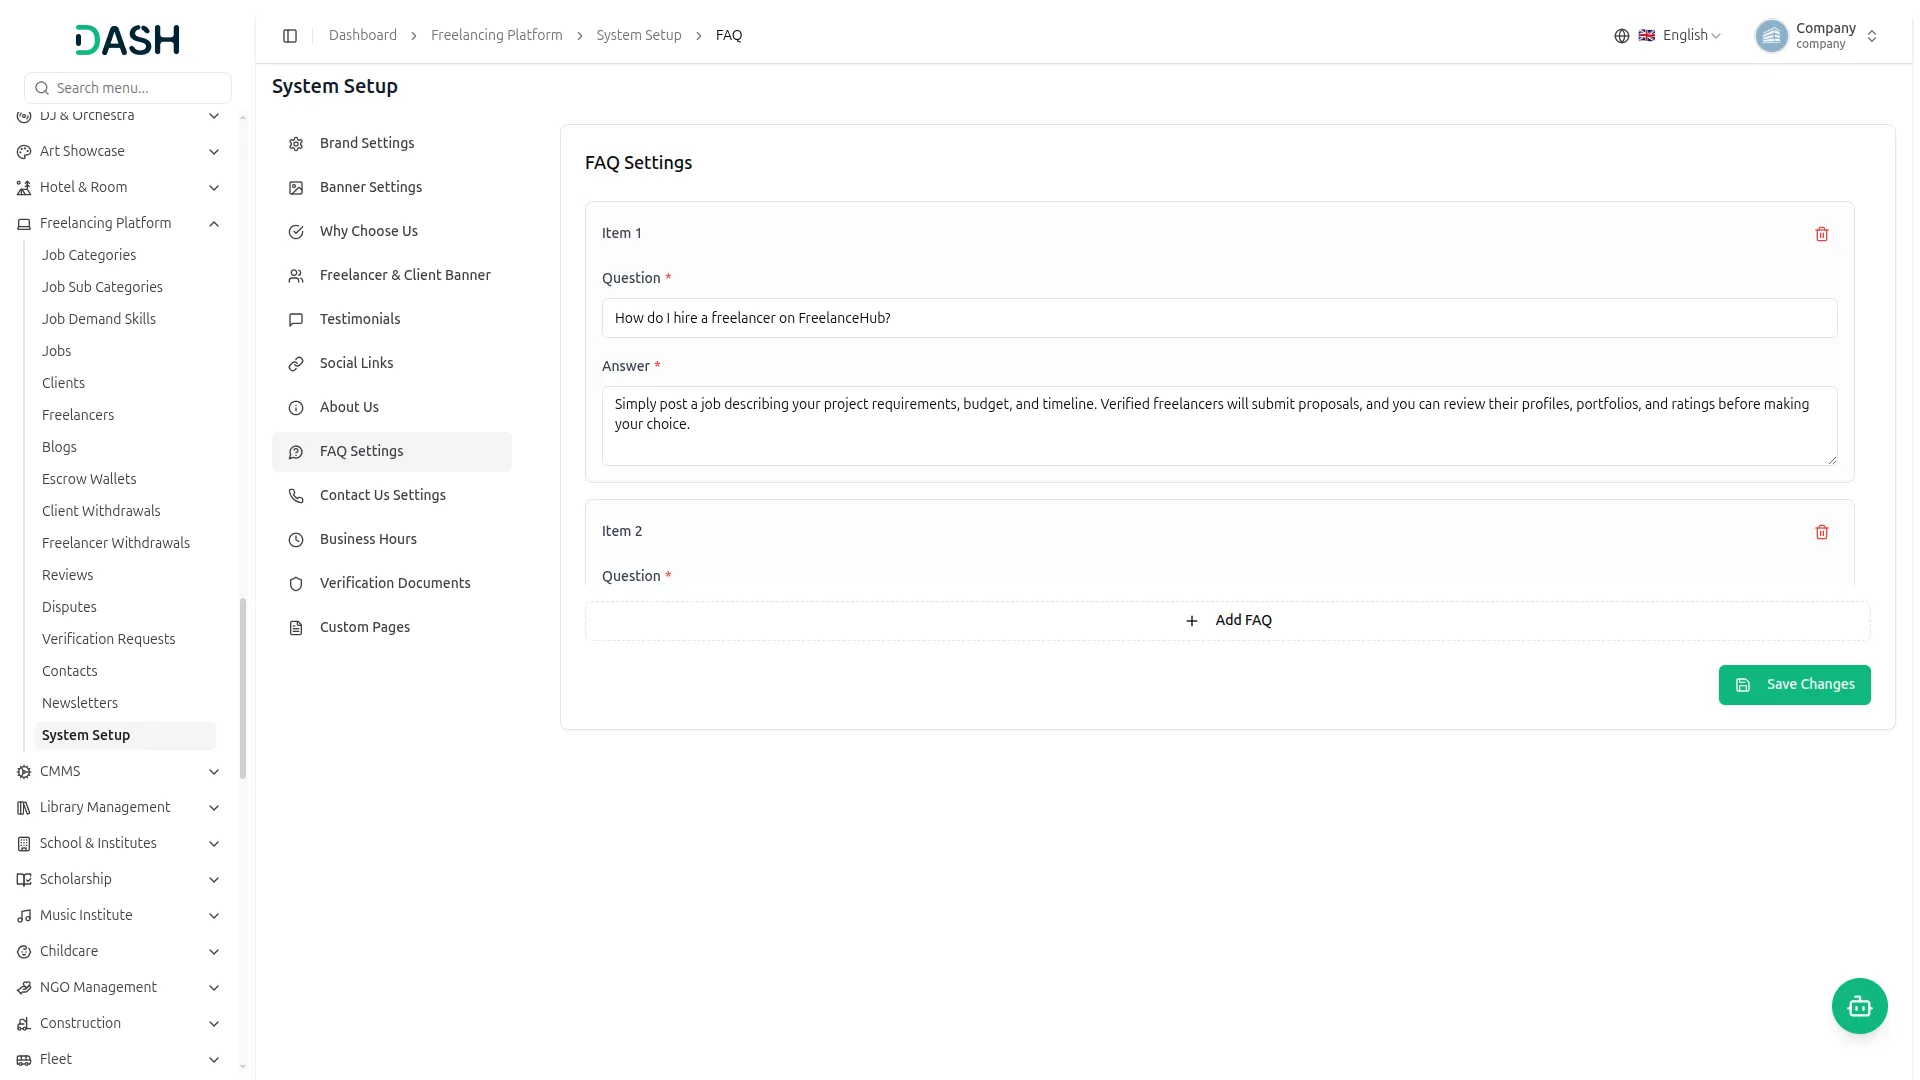
- In the FAQ Settings section, for each item, enter the Question and the Answer. Click Add FAQ to add more, and use the delete icon to remove any. Click Save Changes.
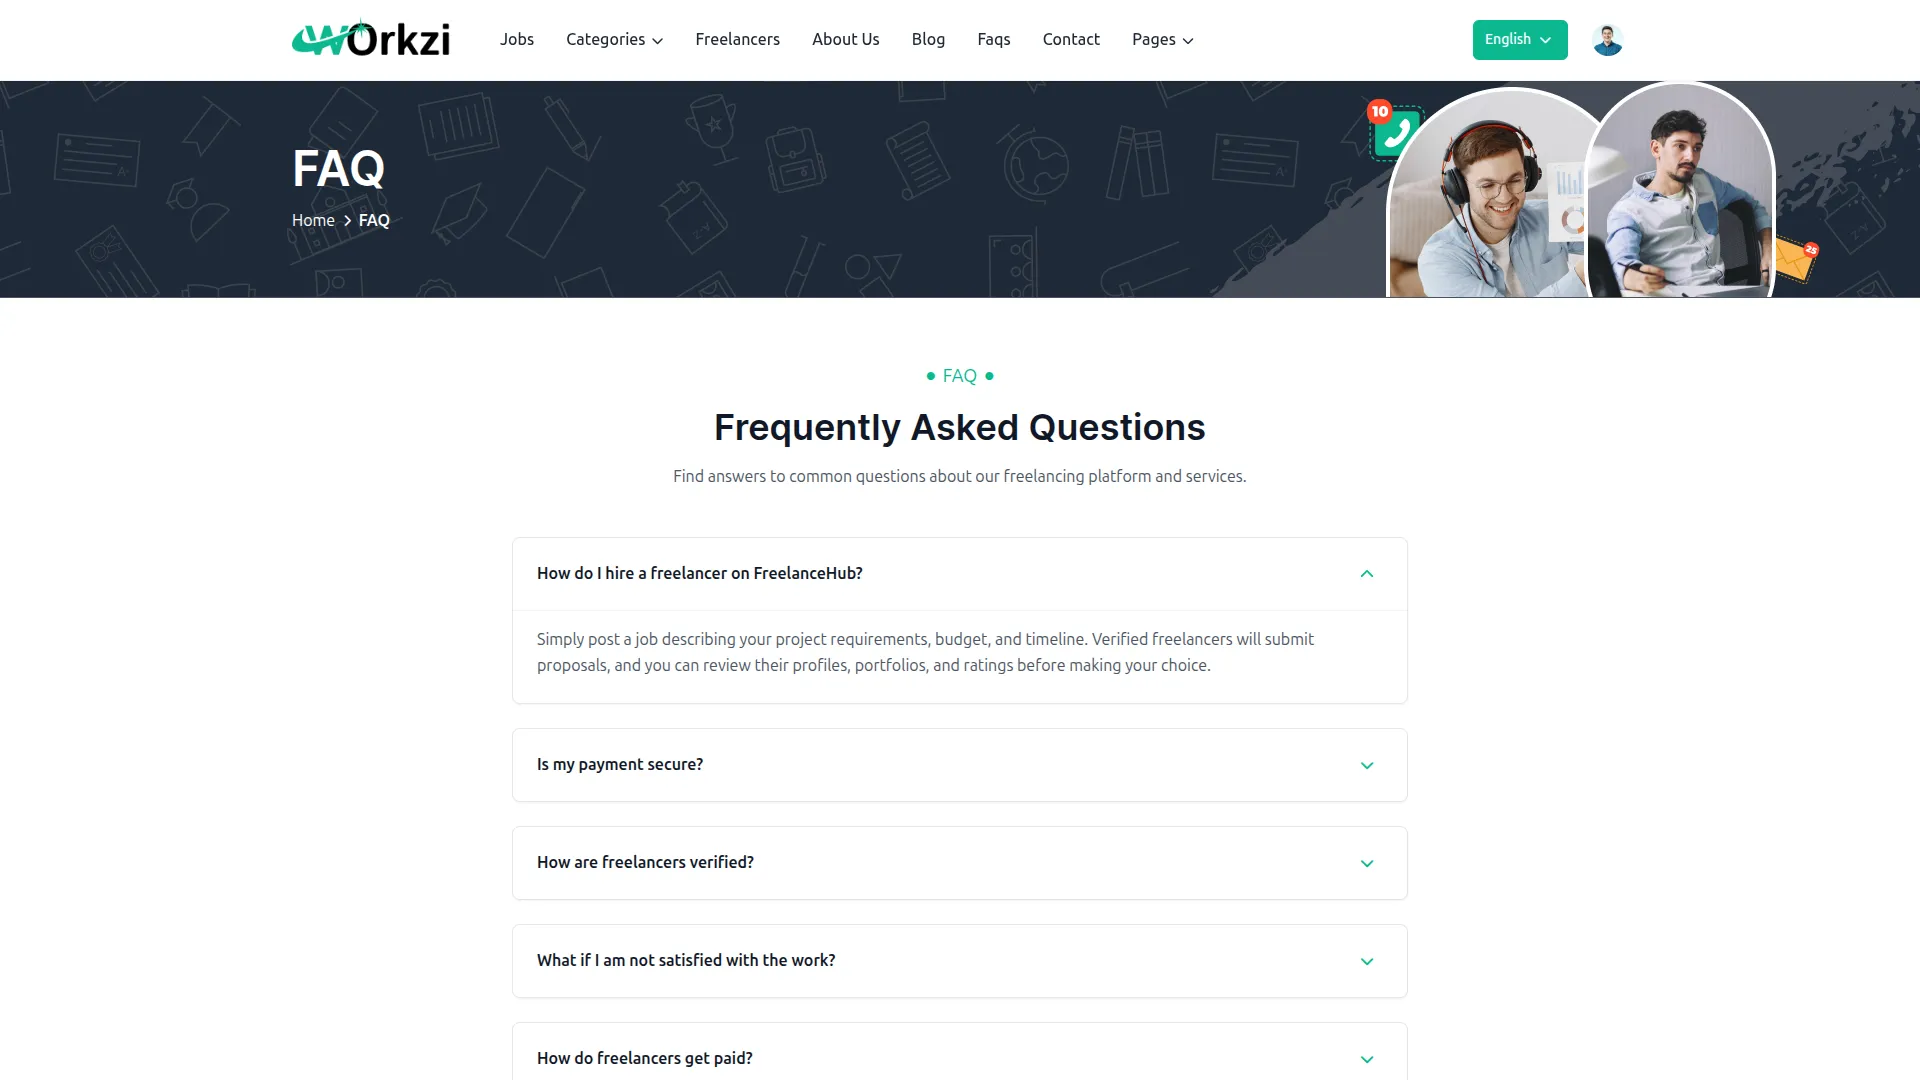
- The website displays these on the FAQ page as an expandable list. Each Question appears as a clickable row, and clicking it reveals its Answer below, helping visitors find common information quickly.
Contact Us Settings
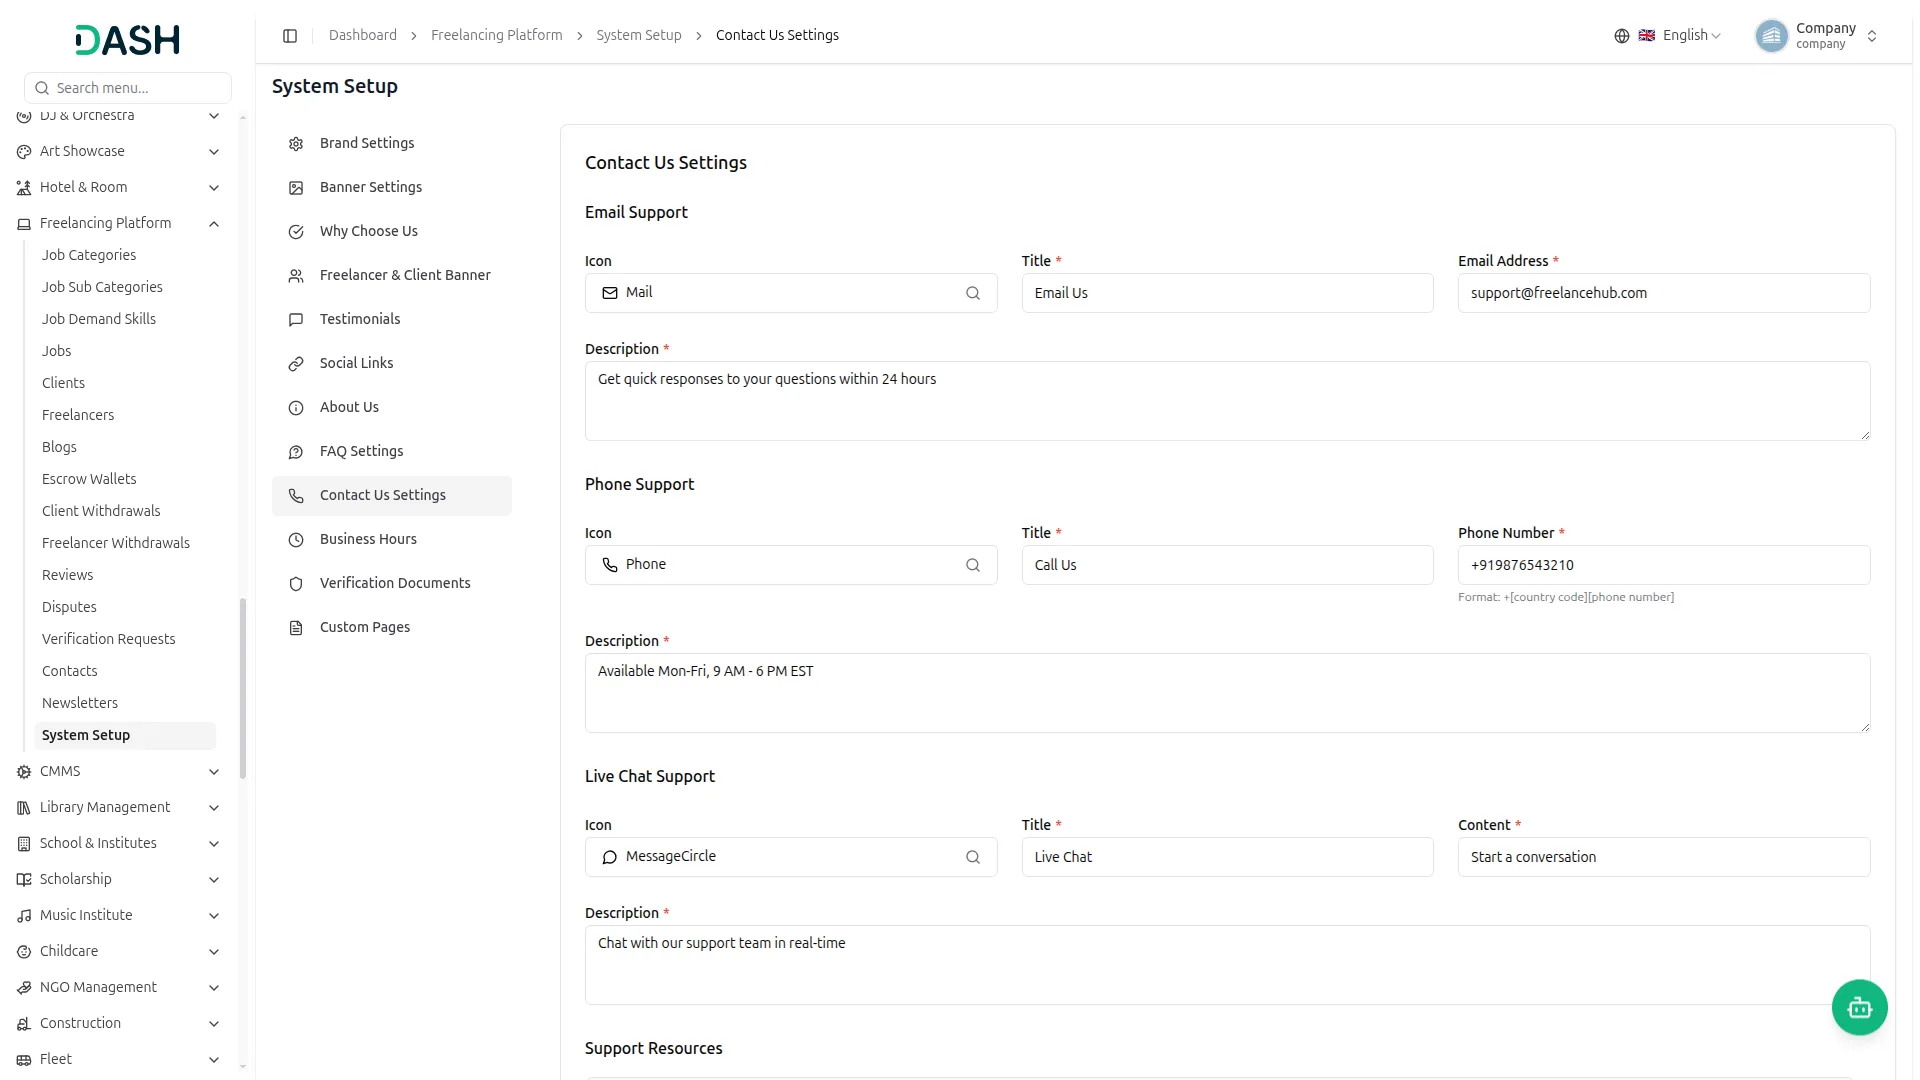
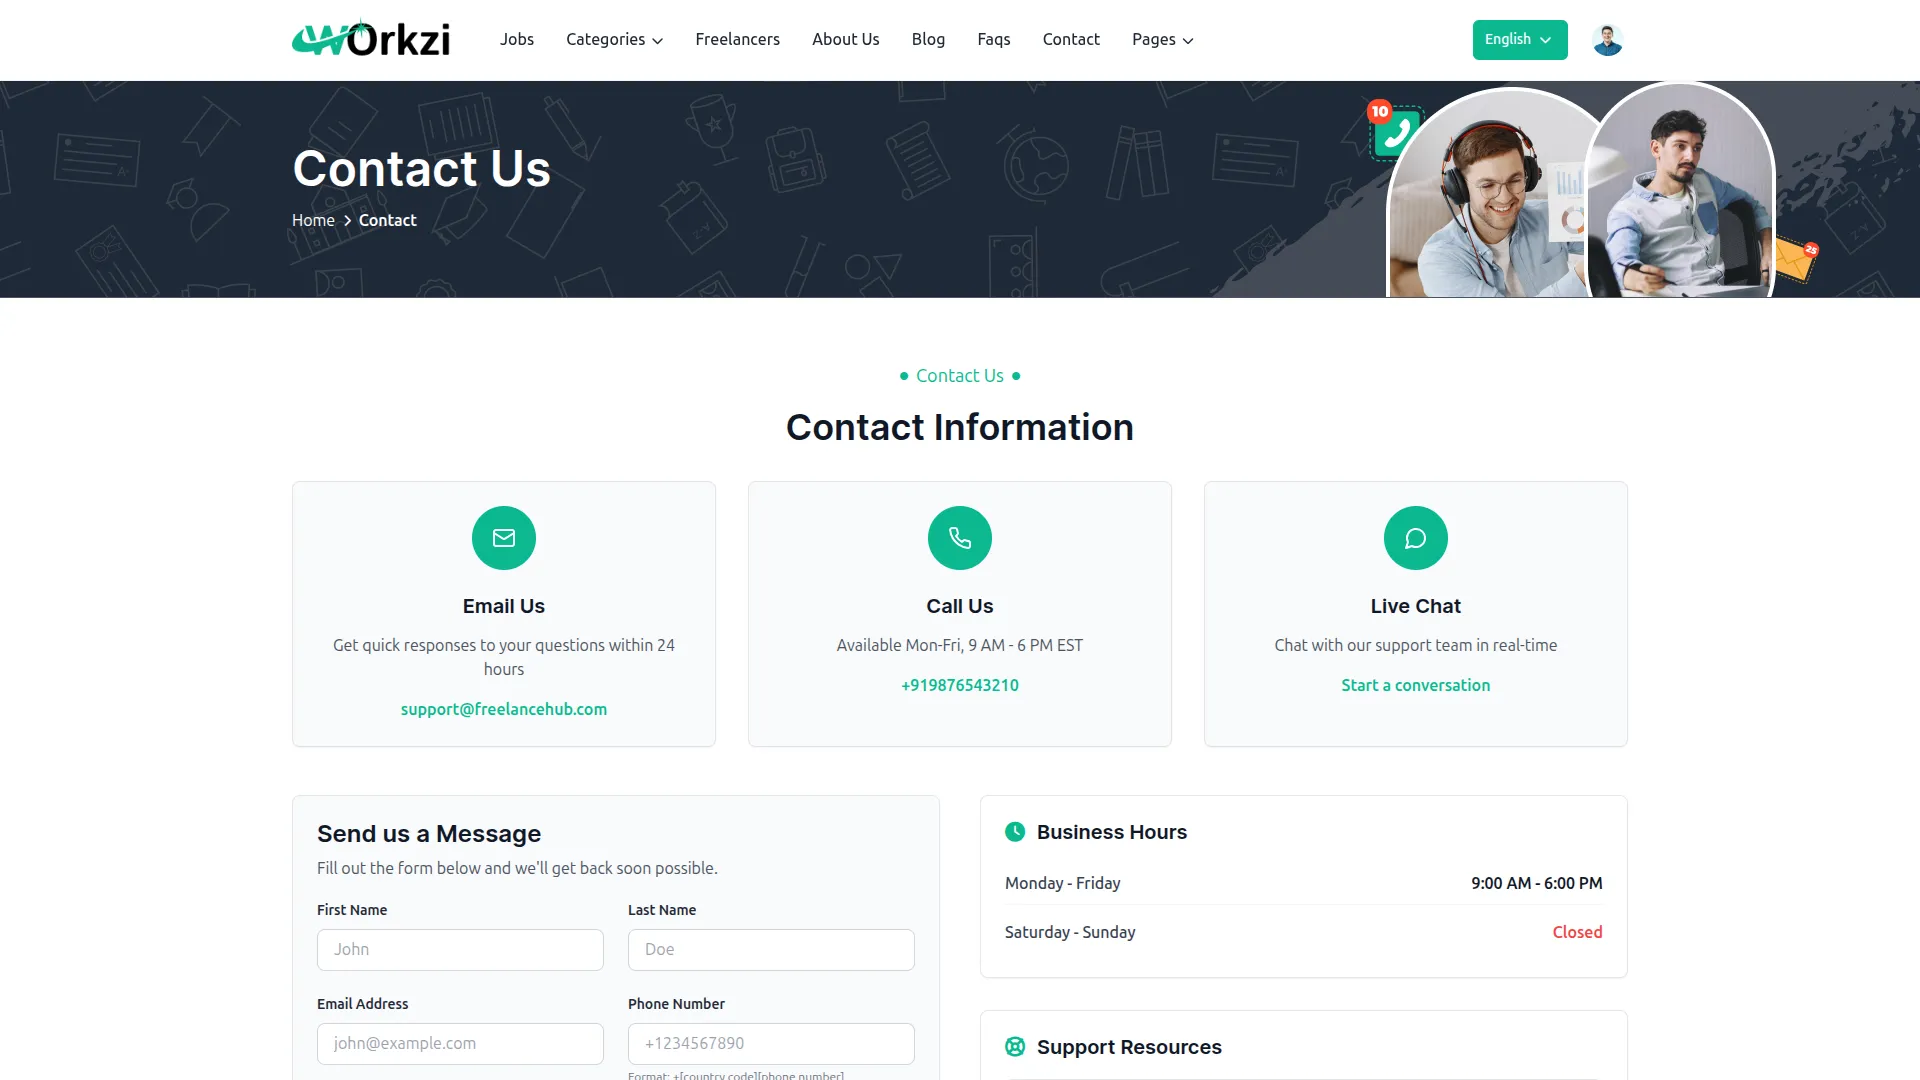
- In the Contact Us Settings section, configure three support blocks. Under Email Support, select an Icon, enter the Title, the Email Address, and a Description. Under Phone Support, select an Icon, enter the Title, the Phone Number, and a Description.
- Under Live Chat Support, select an Icon, enter the Title, the Content, and a Description. Under Support Resources, for each item, select an Icon and enter the Content; click ‘Add Support Resource’ to add more, and use the delete icon to remove any. Click Save Changes.
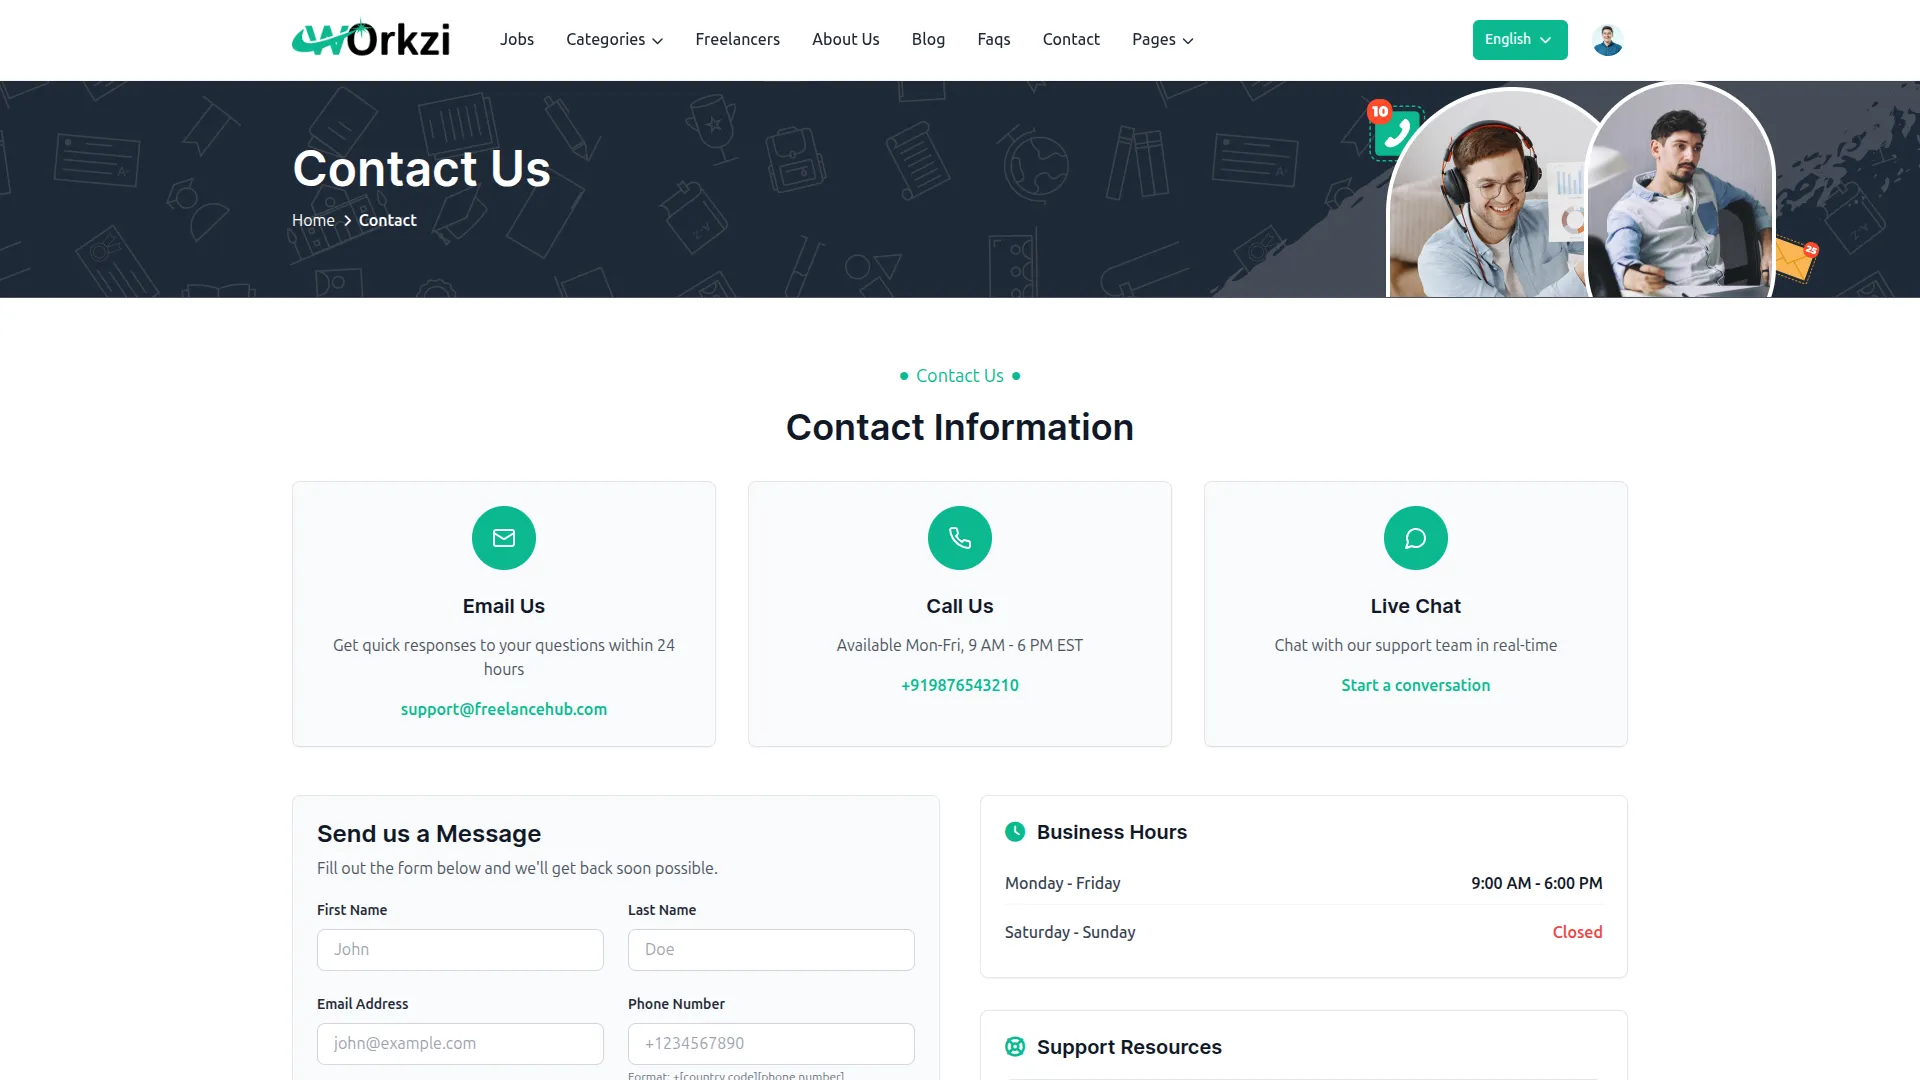
- The website displays this content on the Contact page. The Email Support, Phone Support, and Live Chat Support blocks appear as the three contact cards at the top, each showing its icon, title, description, and contact details. The Support Resources appear as a linked list in the “Support Resources” panel on the same page.
Business Hours
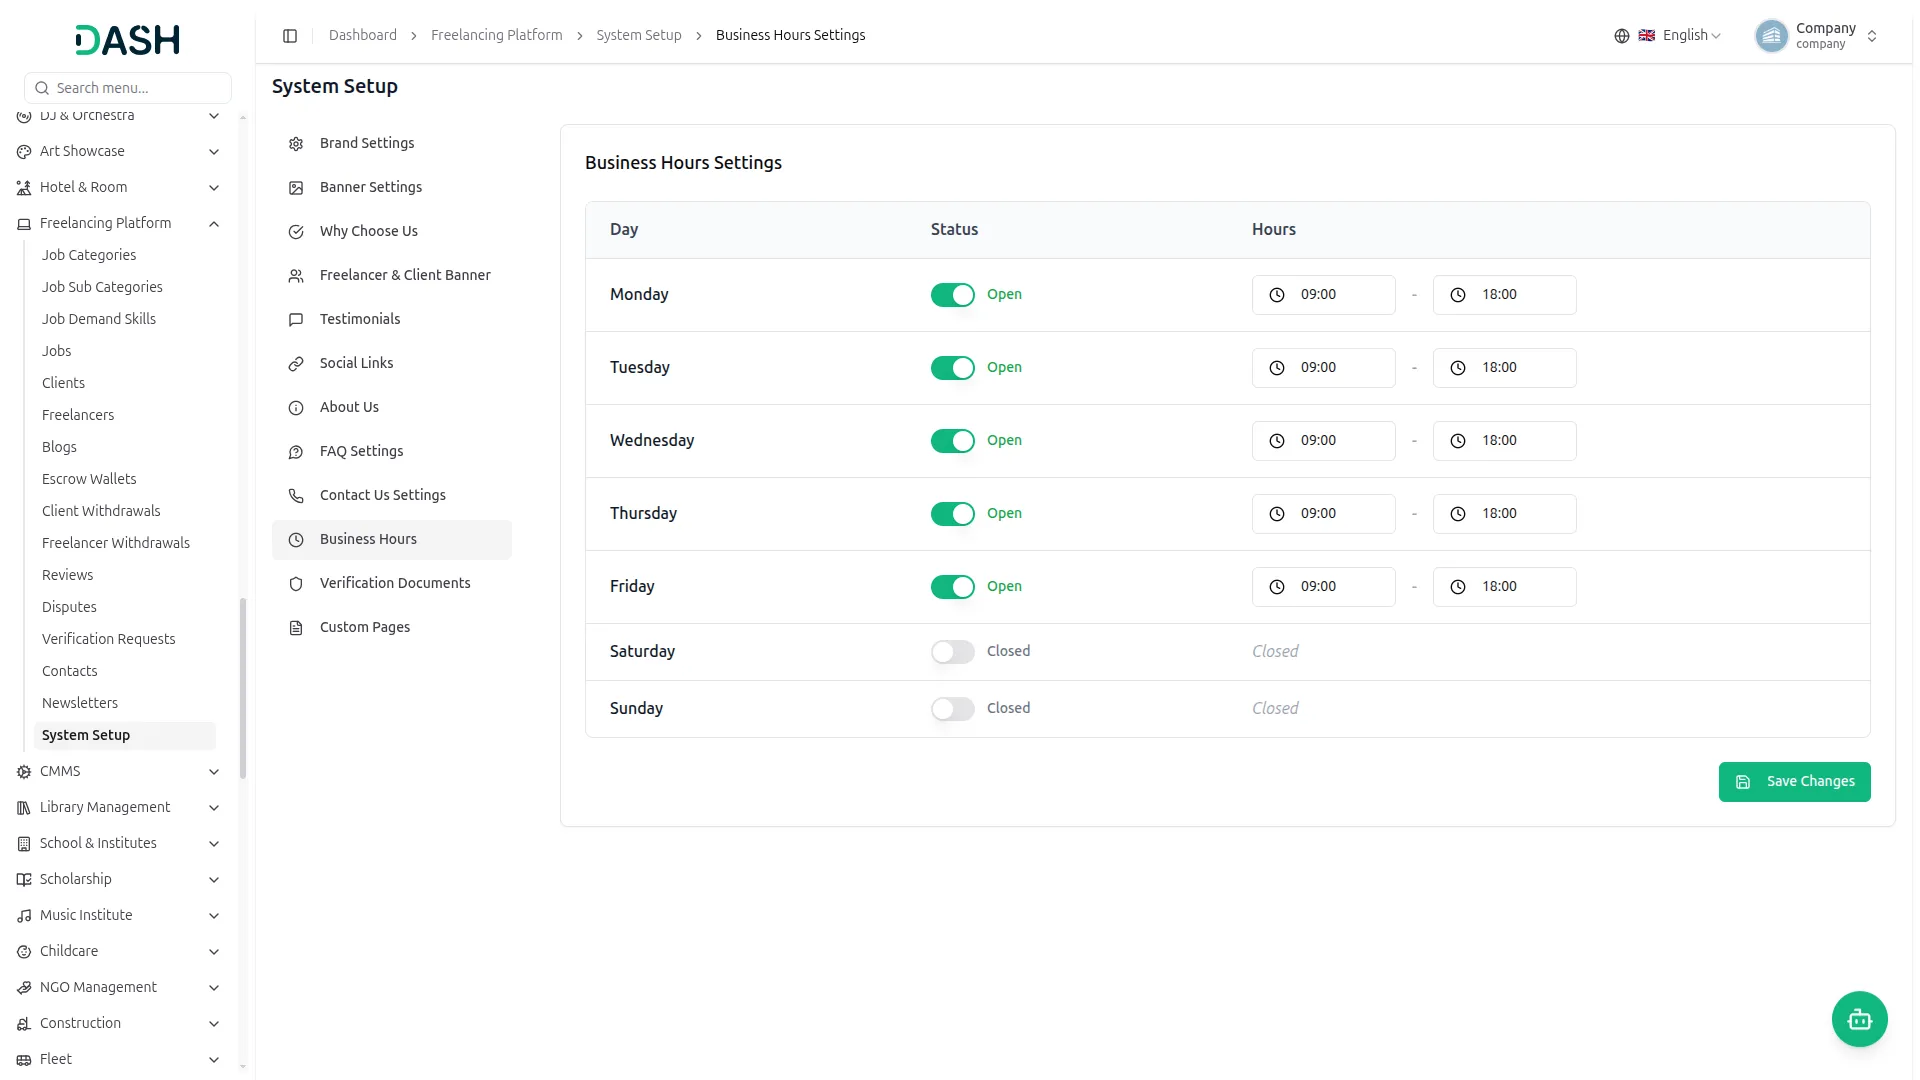
- In the Business Hours Settings section, for each day, toggle the Status to Open or Closed. For open days, set the opening and closing times in the Hours fields. Closed days will display as Closed. Click Save Changes.
- The website displays these hours in the “Business Hours” panel on the Contact page. Each day shows its open and close times, and any day toggled off is shown as Closed, so visitors know when your support team is available.
Verification Documents
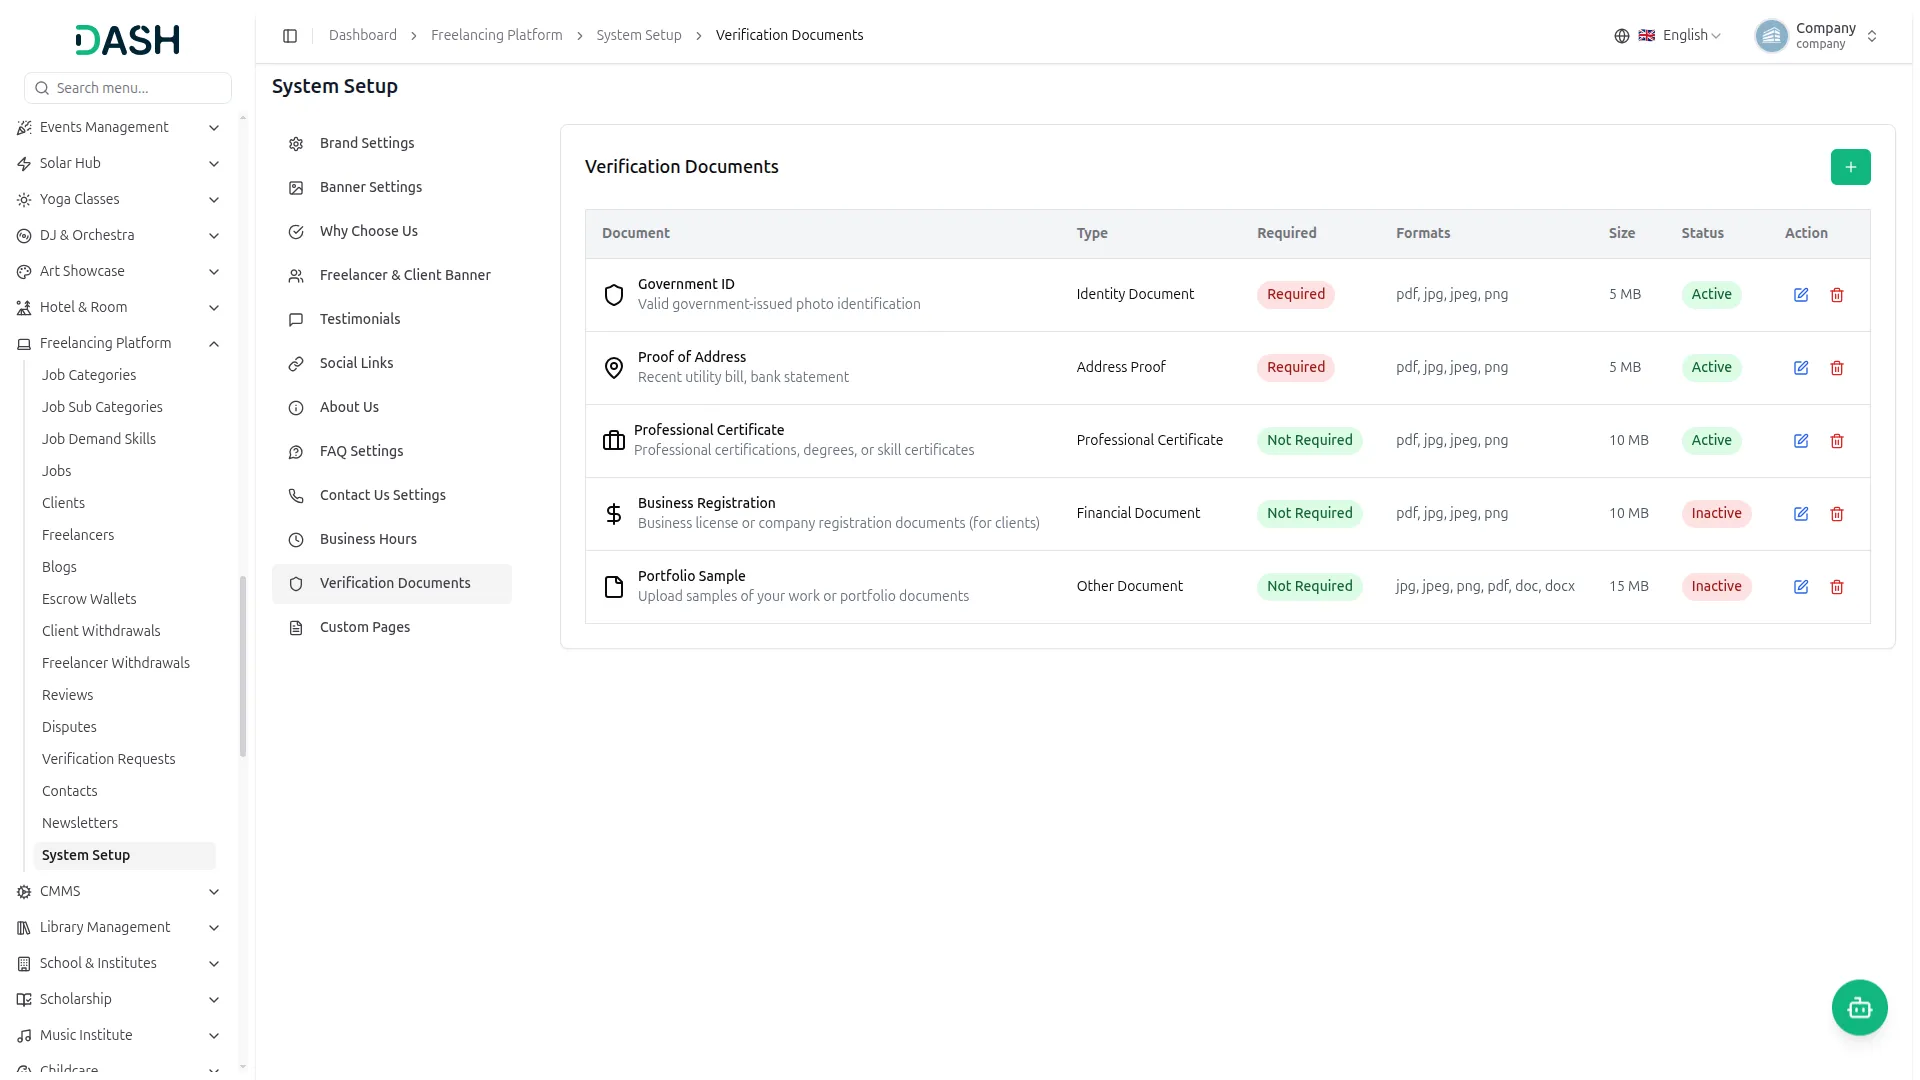
- In the Verification Documents section, click the “Create” button to add a new document type. In the Create Verification Document window, enter the Document Name, select the Document Type, and enter a Description. Under Accepted File Formats, tick the allowed formats (PDF, JPG, JPEG, PNG, DOC, DOCX). Enter the Maximum File Size (MB). Toggle Required Document on if users must submit it, and toggle ‘Active’ on to make it available. Click Create.
- In the list page, you can see a table of all document types with their Type, Required status, accepted Formats, maximum Size, and Status. Use the edit and delete icons in the table to update or remove existing document types.
- These settings control the Document Verification step shown inside both the Client and Freelancer profiles. Each Active document appears as an upload slot on the user’s Verification page with its name, description, and allowed file rules. Documents marked ‘Required’ must be uploaded before a profile can be verified, while ‘Inactive’ documents are hidden from users.
Custom Pages
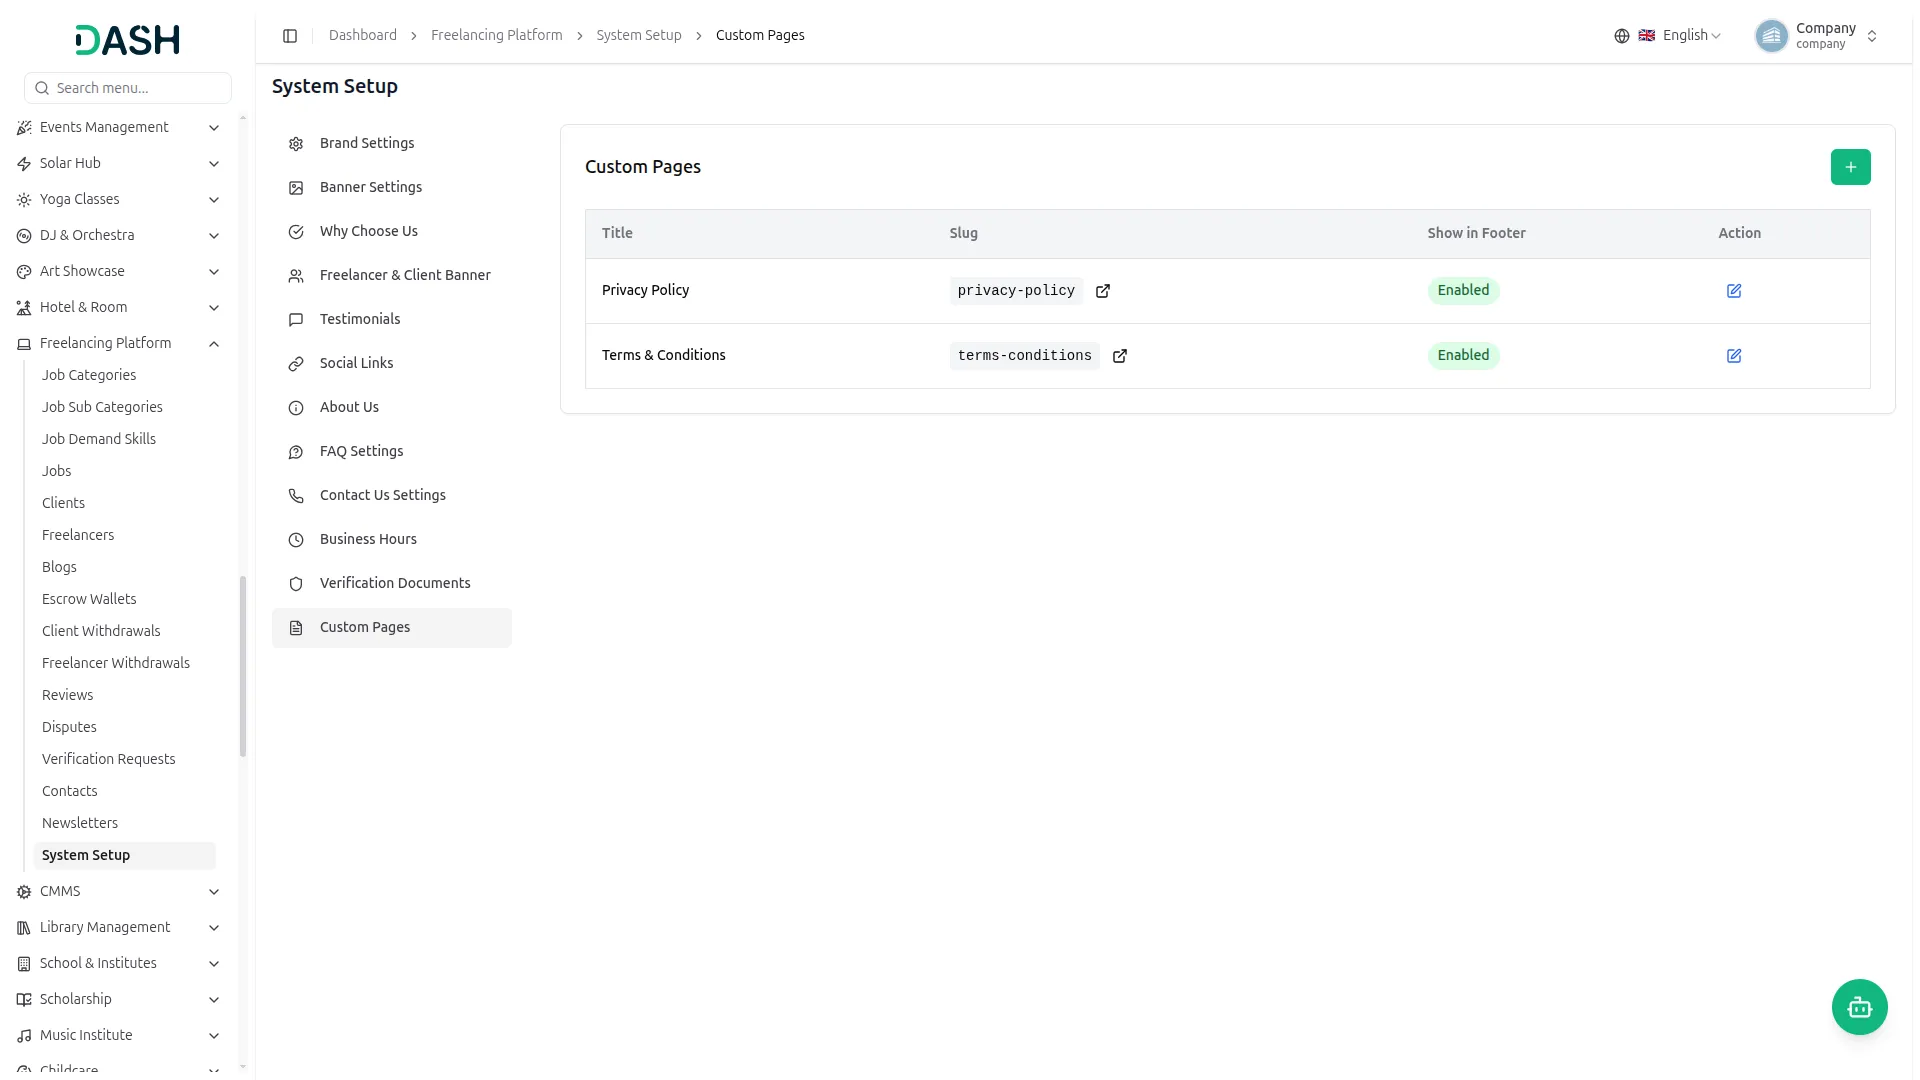
- In the Custom Pages section, click the “Create” button to add a new page. In the Create Custom Page window, enter the Title and the URL Slug (lowercase letters and hyphens only), enter a Description, and write the page Contents using the editor. Toggle ‘Enable Page Footer’ on to show the page link in the footer. Click Create.
- In the list page, you can see a table of your custom pages with their Title, Slug, Show in Footer status, and actions. Use the edit icon to update an existing page.
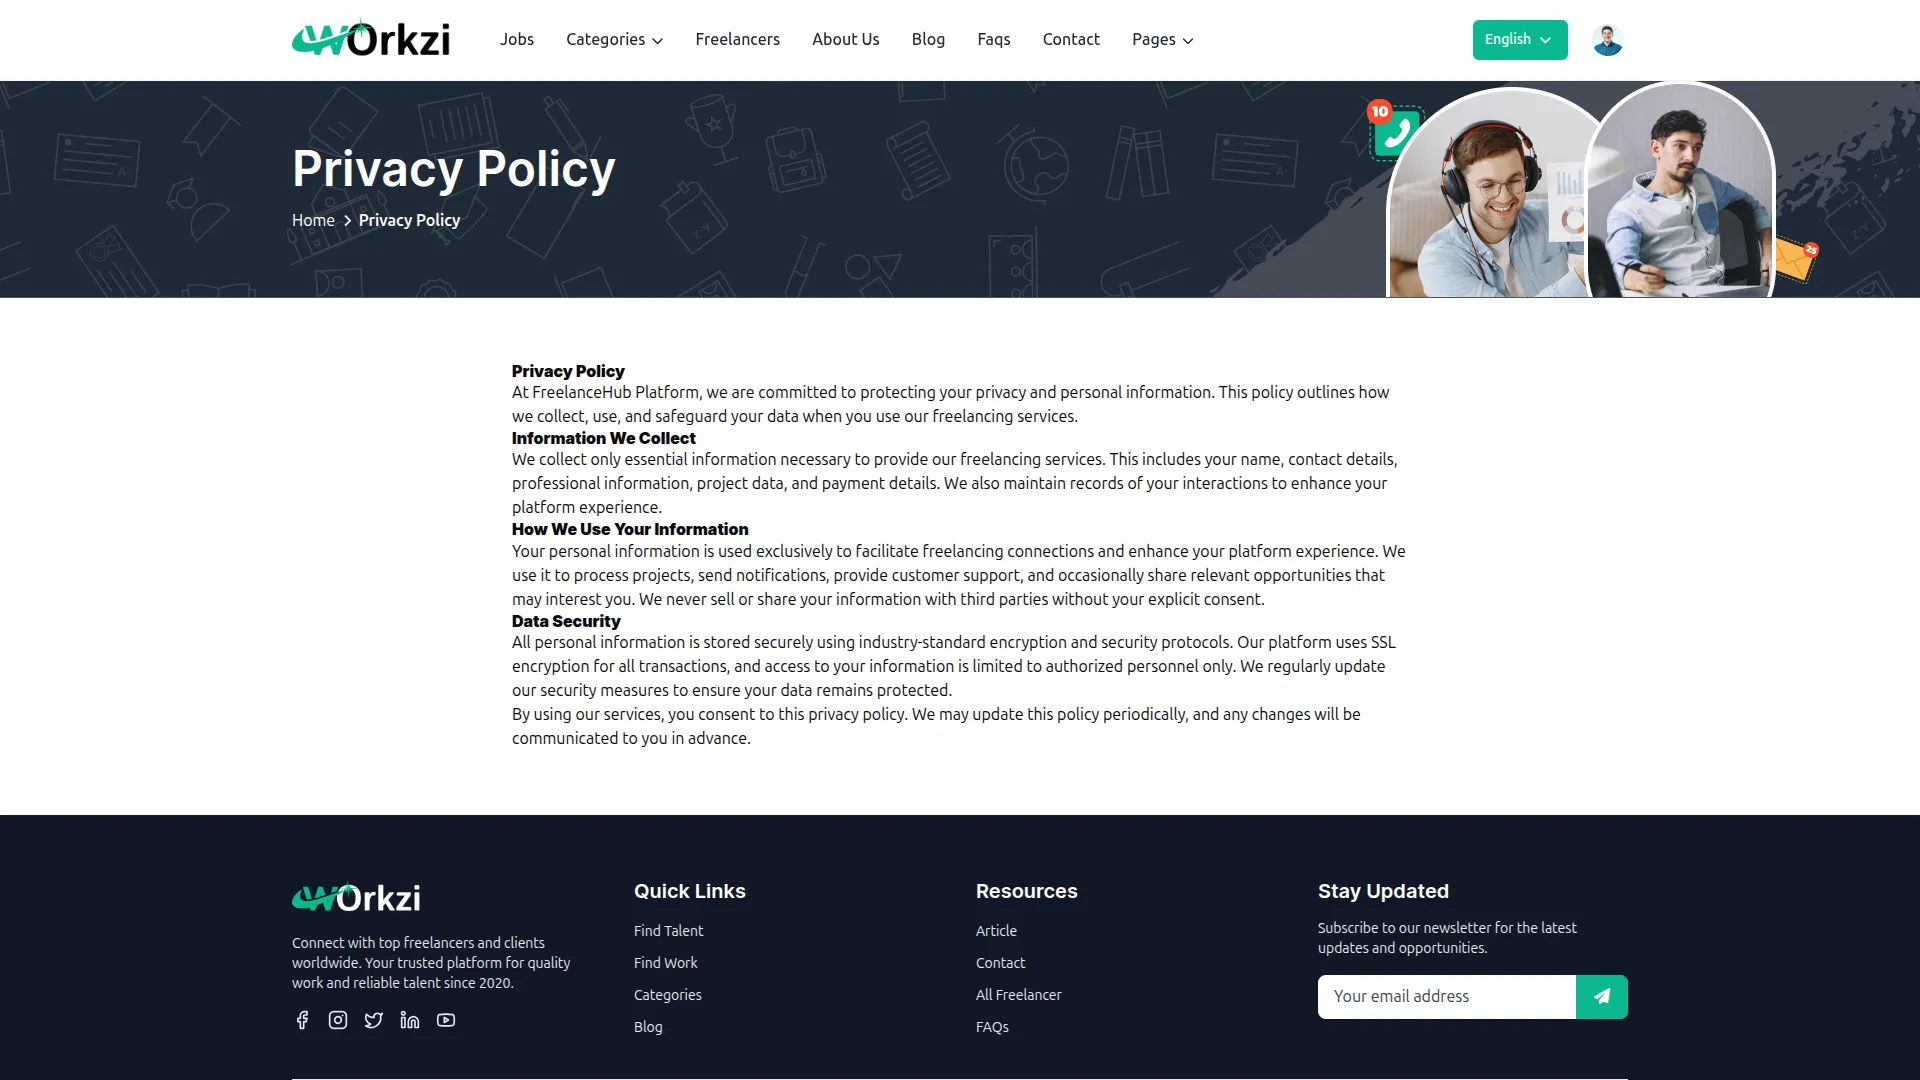
- The website displays each custom page at its own URL using the Slug (for example, /privacy-policy or /terms-conditions). Pages with Show in Footer enabled appear as links in the website footer, and the page Contents are shown on the page itself, letting you publish pages like Privacy Policy and Terms & Conditions without coding.
Job Categories
- To create a new job category, click the “Create” button on the Manage Job Categories page. Select the Category Icon from the icon search field. Enter the Name, Client Fixed Charge, and the Client Percentage Charge, the freelancer Fixed Charge, and the freelancer Percentage Charge.
- Enter the Entry Level Salary, Mid Level Salary, and Senior Level Salary, and the typical pay rates will be shown for this category. In the Skills/Tags field, type each skill and add it to attach the relevant skills to this category. Set the Status to Active or Inactive from the dropdown. Enter the Description (up to 1000 characters).
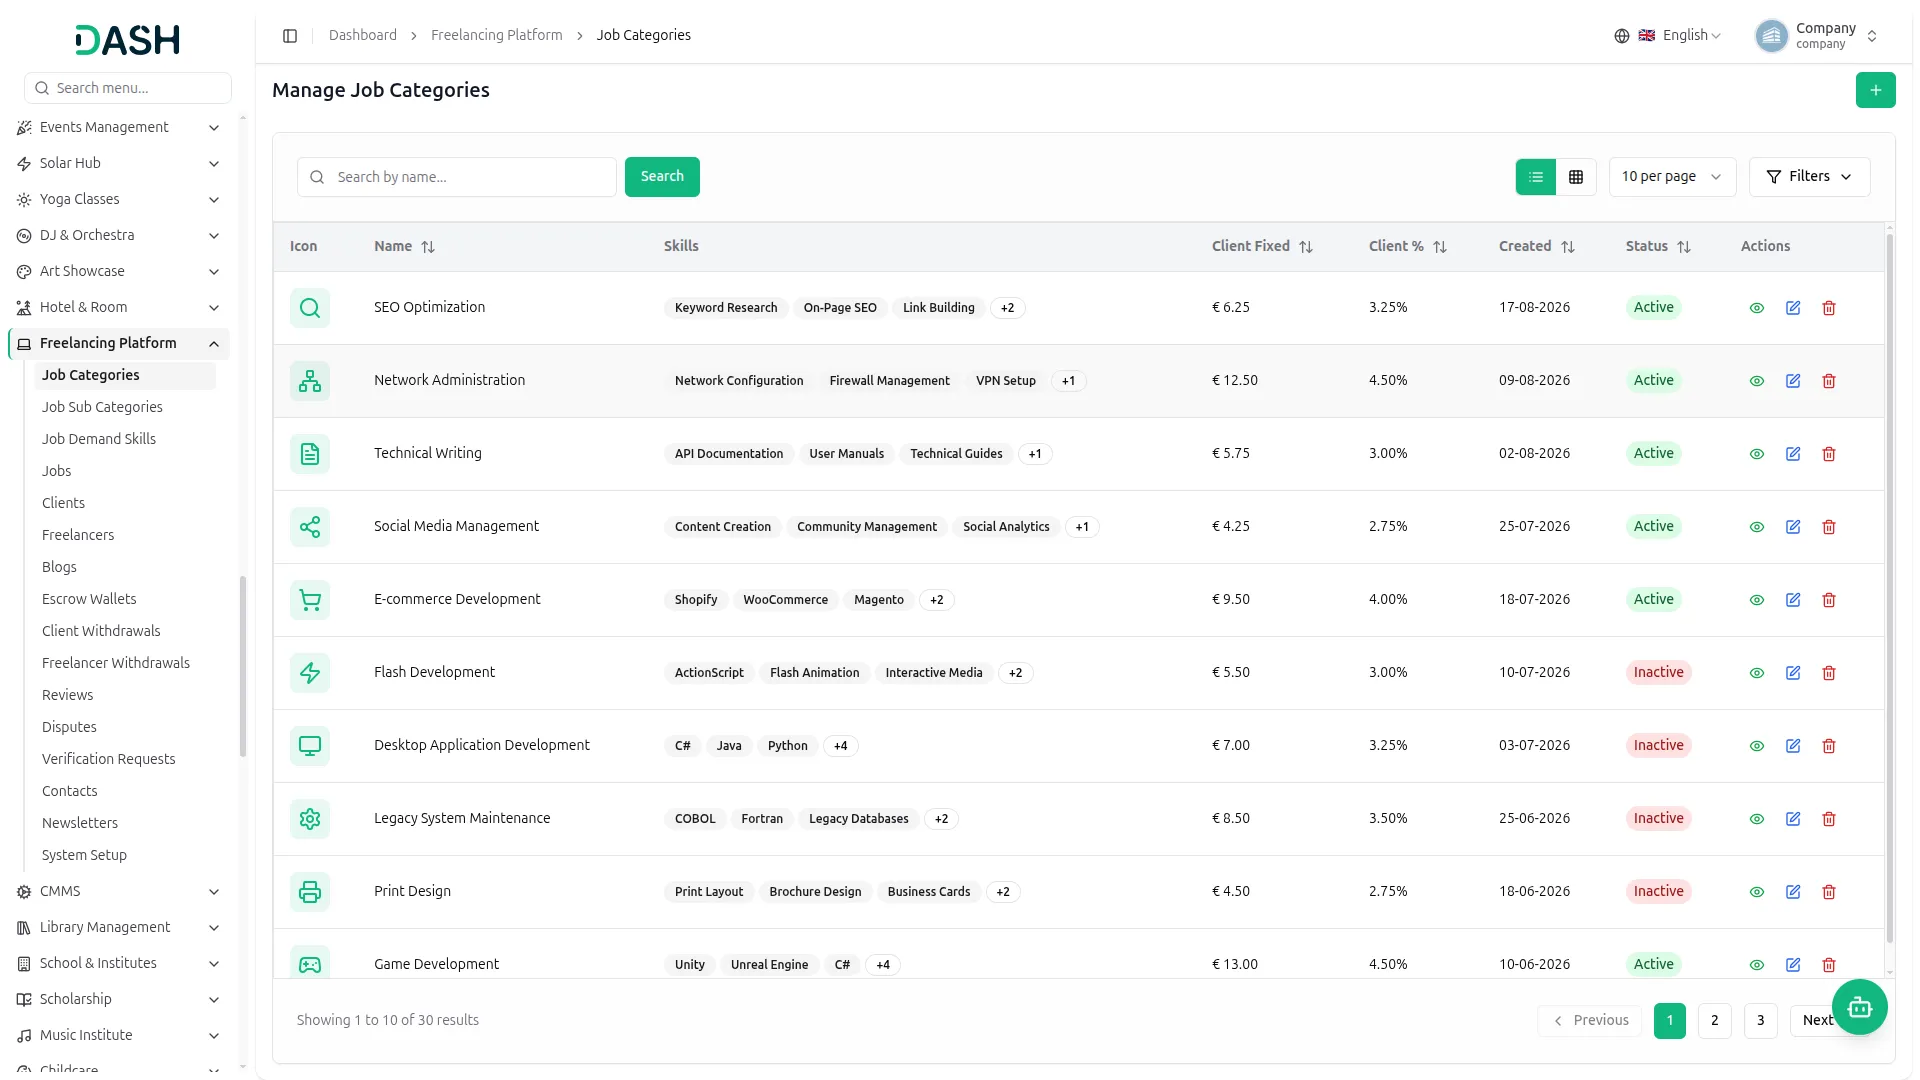
- The list page displays a table with columns for Icon, Name, Skills, Client Fixed, Client %, Created date, Status, and Actions. You can search for a category using the search bar, switch between list view and grid view using the view toggle buttons. Click the Filters button to filter by Status, then click Apply to filter the data or Clear to reset it.
- In the Actions column, click View to see the full category details. Click Edit to modify the category. Click Delete to permanently remove it.
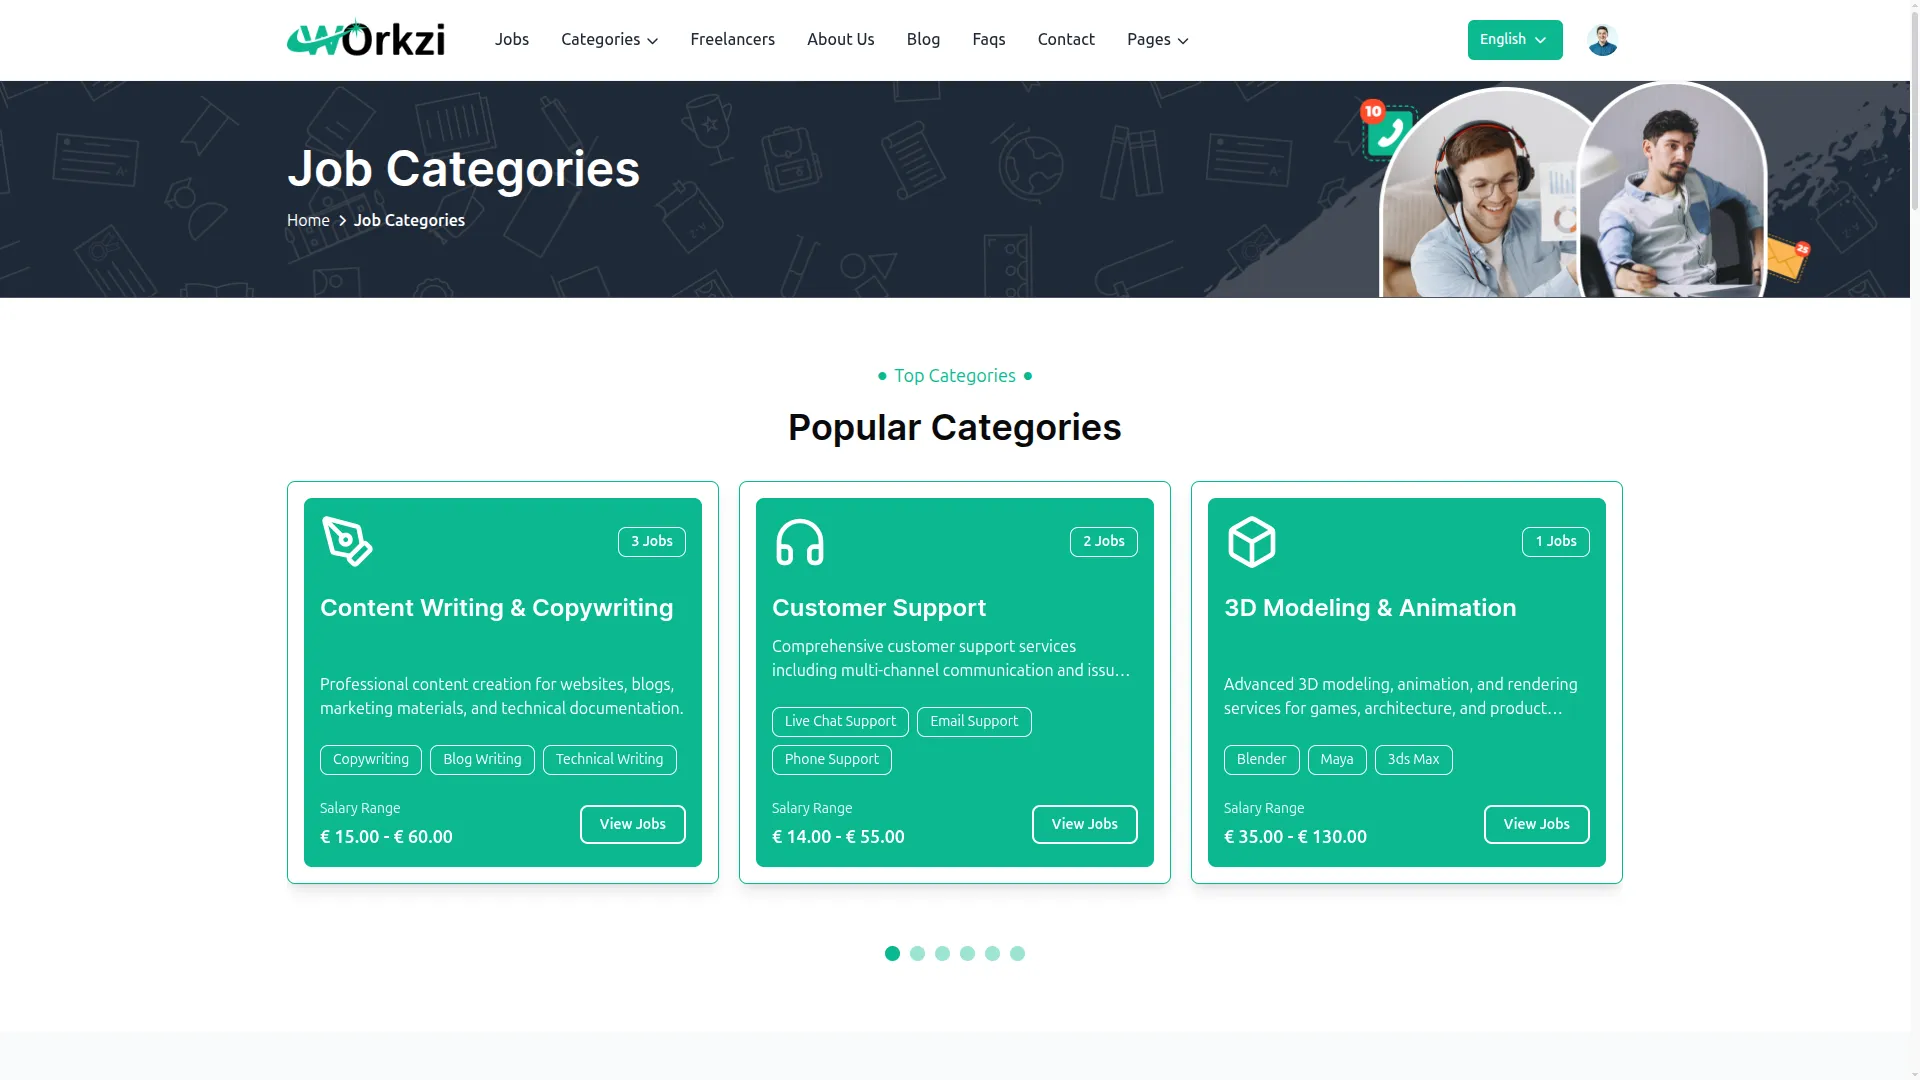
- The website displays each Active category across the public site. Active categories appear in the “Browse by Category” section on the homepage, in the Categories navigation menu, and on the Job Categories page with their Icon, Name, and live job count. The category Skills/Tags appears as the associated skill tags on Job Details pages, and the Entry, Mid, and Senior Level Salary values are shown in the “Salary Insights by Category” section. When a client posts a job or a freelancer earns from one, the Client and Freelancer Fixed and Percentage Charges set here are applied as the platform’s fees. Inactive categories are hidden from the website and cannot be selected when posting a job.
Job Sub Categories
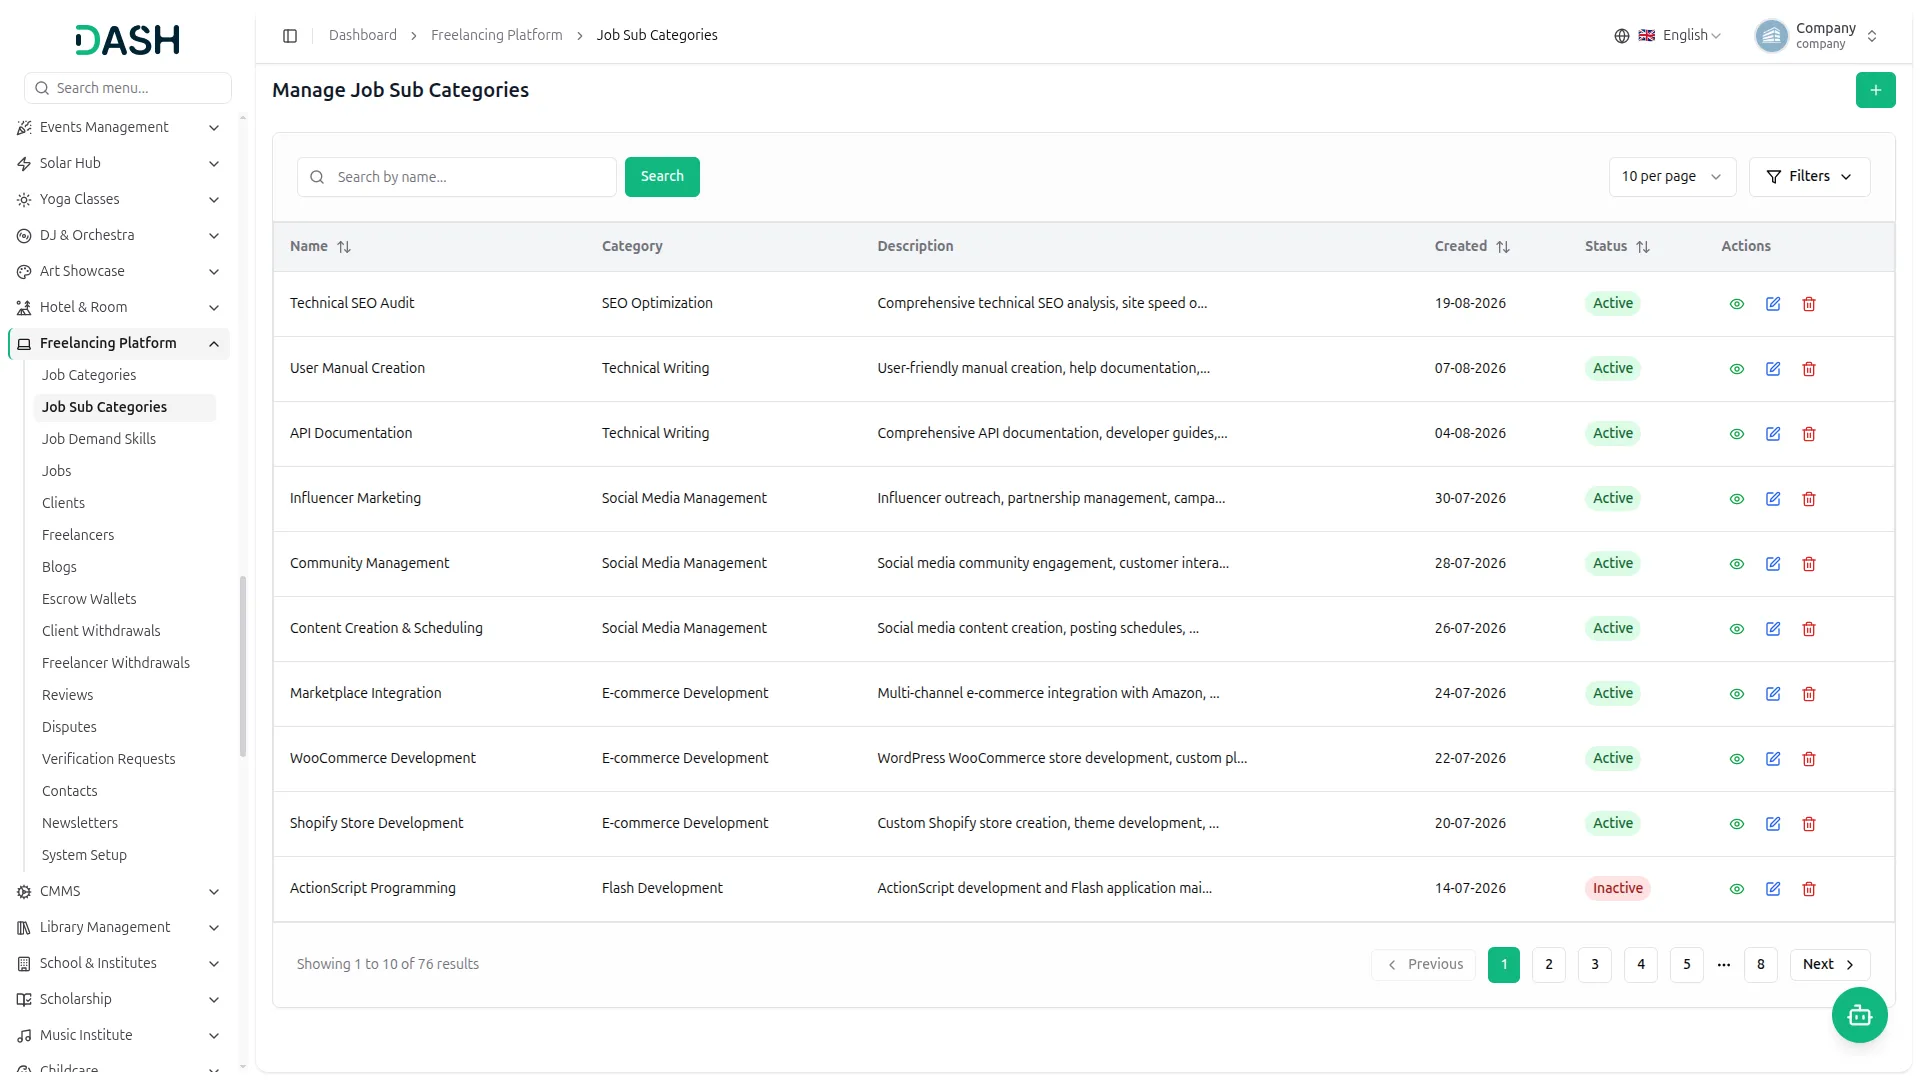
- To create a new job sub category, click the “Create” button on the Manage Job Sub categories page. Select the parent Category from the dropdown (which configure from the category module). Enter the Name of the sub category. Enter the Description. Set the Status to Active or Inactive from the dropdown.
- The list page displays a table with columns for Name, Category, Description, Created date, Status, and Actions. You can search for a sub category using the search bar. Click the Filters button to filter by Category and Status, then click Apply to filter the data or Clear to reset it.
- In the Actions column, click View to see the full sub category details. Click Edit to modify the sub category. Click Delete to permanently remove it.
- The website uses these sub categories to organize jobs more precisely within each parent category. Active sub categories are available under their respective categories when a client posts a job. They help clients classify jobs more accurately and help freelancers discover more relevant opportunities within a category. Inactive sub categories are hidden from the website and cannot be selected when posting a job.
Job Demand Skills
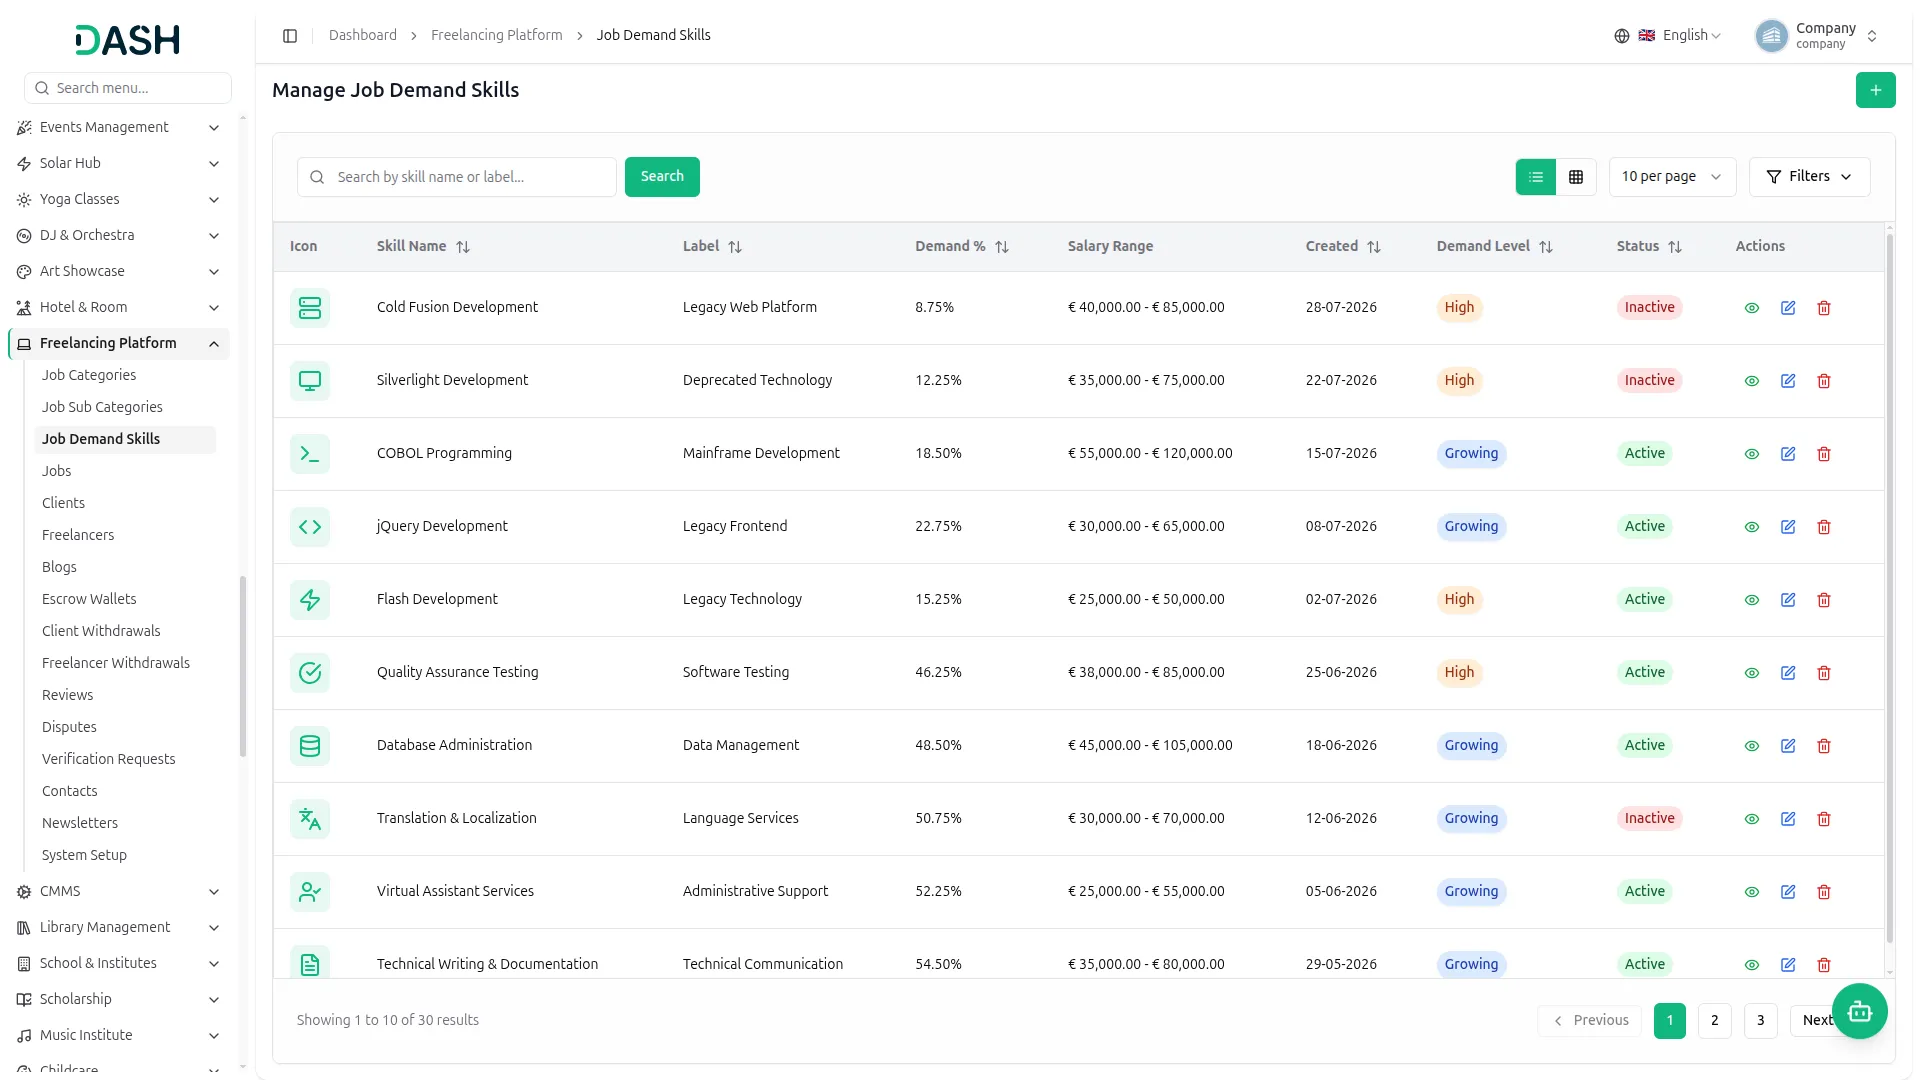
- To create a new demand skill, click the “Create” button on the Manage Job Demand Skills page. Enter the Skill Name and select the Skill Icon from the icon search field. Set the Status to Active or Inactive from the dropdown.
- Enter the Label, a short tag used to describe the skill. Select the Demand Level from the dropdown. Enter the Demand Percentage. Enter the Min Salary Range and Max Salary Range for the skill. Enter the Description.
- The list page displays a table with columns for Icon, Skill Name, Label, Demand %, Salary Range, Created, Demand Level, Status, and Actions. You can search for a skill using the search bar and switch between list view and grid view using the view toggle buttons.
- Click the Filters button to filter by Demand Level, Demand Percentage, and Status, then click Apply to filter the data or Clear to reset it.
- In the Actions column, click View to see the full skill details. Click Edit to modify the skill. Click Delete to permanently remove it.
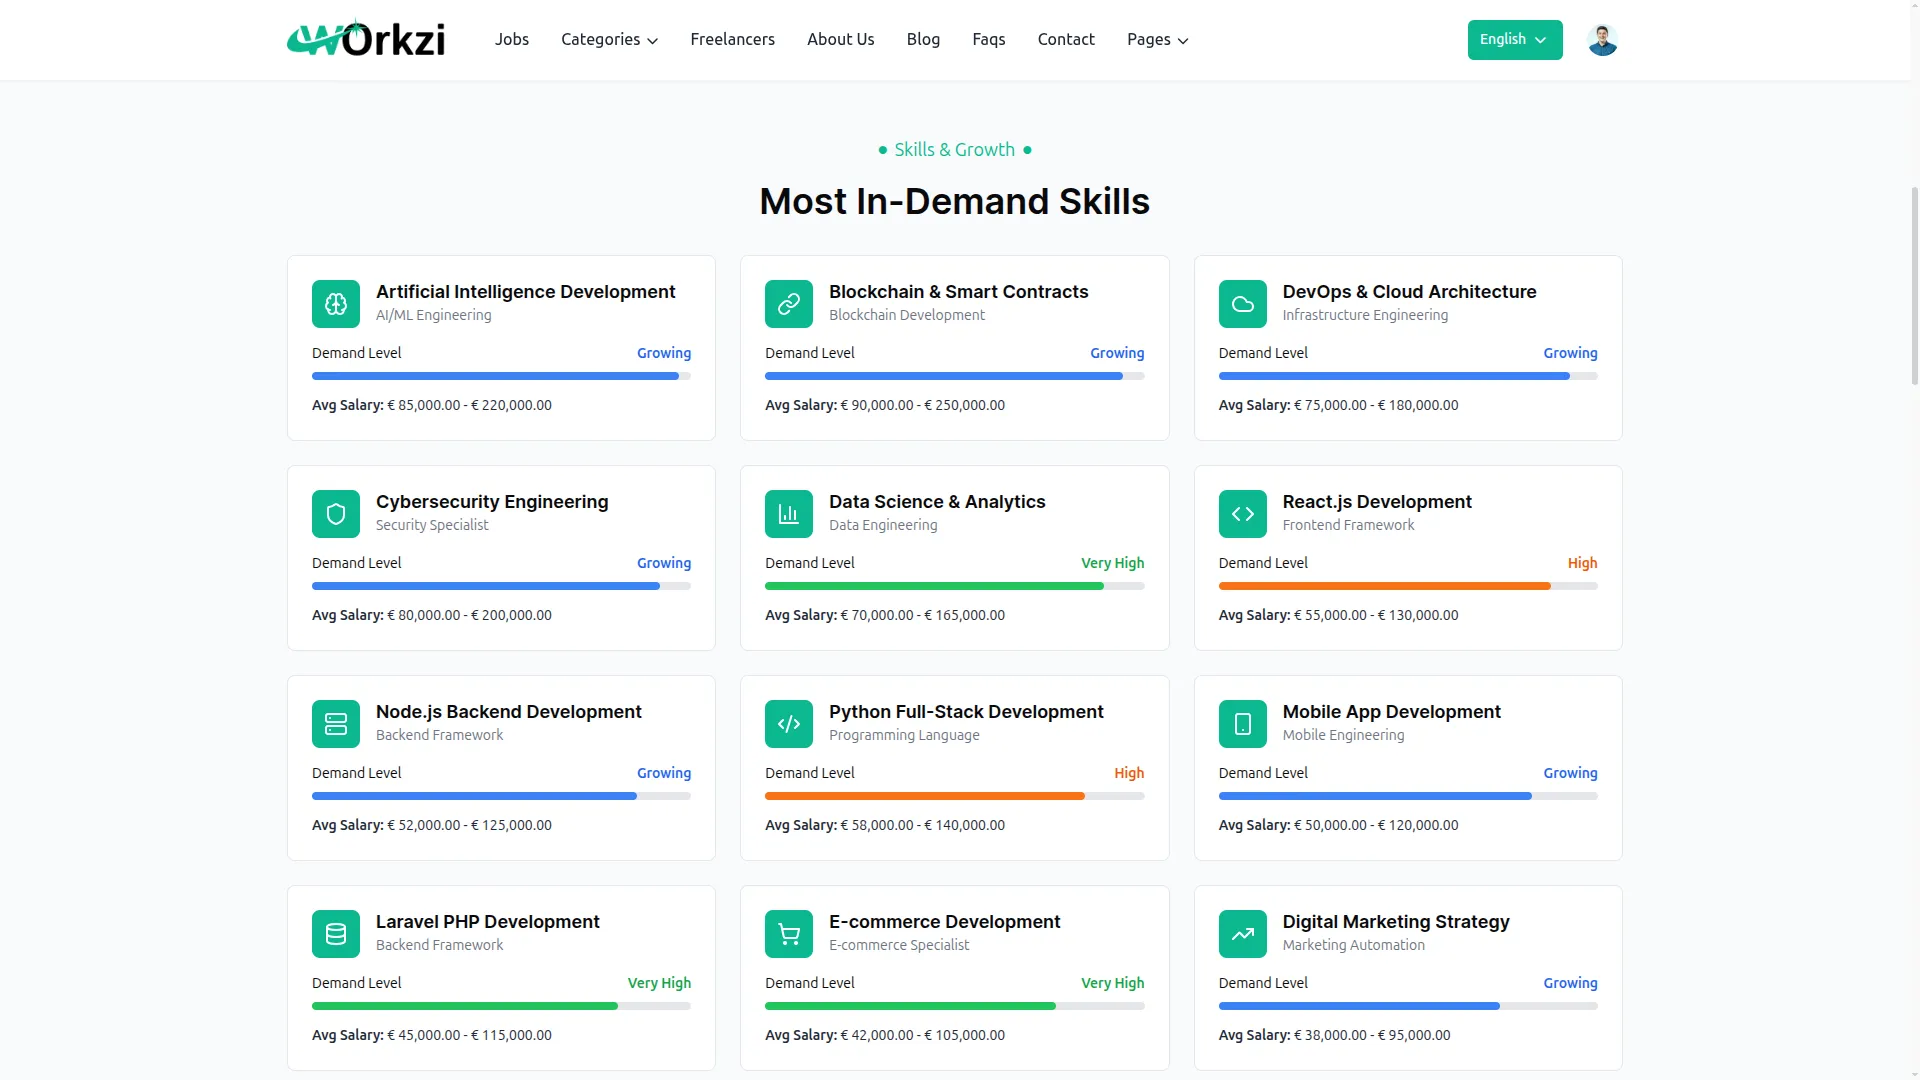
- The website displays each Active demand skill in the “Most In-Demand Skills” section on the Job Categories page. Active skills appear with their Icon, Skill Name, Label, Demand Level, Demand Percentage, and Salary Range, helping clients and freelancers identify trending skills and understand their typical market value. Inactive skills are hidden from the website.
Manage Jobs
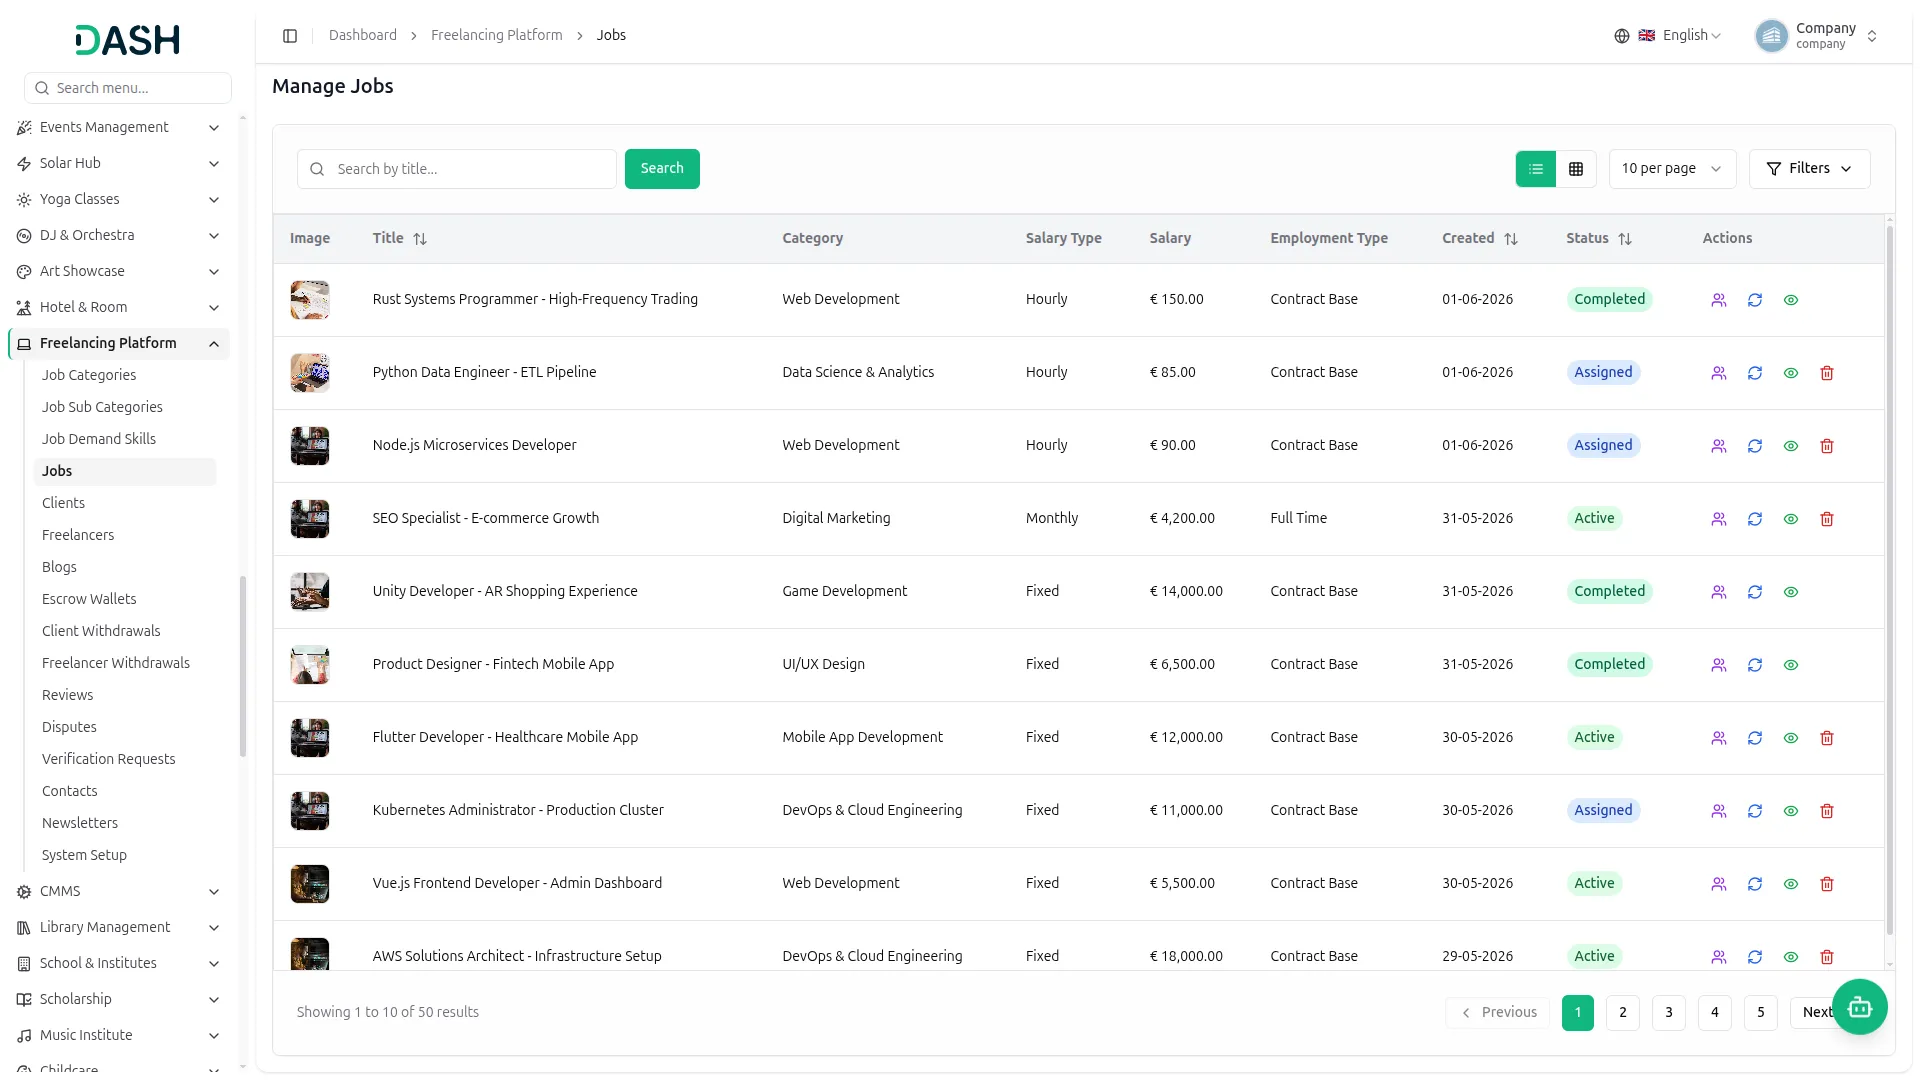
- The Manage Jobs page displays all jobs posted on the platform. The list page displays a table with columns for Image, Title, Category, Salary Type, Salary, Employment Type, Created, Status, and Actions. You can search for a job using the search bar and switch between list view and grid view using the view toggle buttons.
- Click the Filters button to filter by Category, Status, Job Type, Salary Type, and Employment Type, then click Apply to filter the data or Clear to reset it.
- In the Actions column, click View Applications to see all applications submitted for the job. Click Update Status to change the job status. Click View to see the full job details. Click Delete to permanently remove the job.
- When updating a job status, select the New Status from the dropdown. Available statuses include Active, Inactive, Closed, Assigned, In Progress, Completed, and Cancelled.
- When viewing applications, the page displays all applications submitted for the selected job along with the Total Applications count. The table includes Freelancer Name, Email, Status, Applied Date, and Actions. You can search for an application using the search bar, filter by Status, and choose how many records to show per page. In the Actions column, click View to see the application details. Click Delete to permanently remove the application. Click Back to Job to return to the job list.
- The status set here controls how each job appears and functions on the website. Active jobs are displayed on the Jobs page and are available for freelancers to apply. Assigned jobs are removed from public listings and no longer accept new applications. In Progress, Completed, Closed, and Cancelled jobs reflect their respective stages in the job lifecycle and are not shown as open opportunities.
- Inactive jobs are hidden from the website. The applications managed here are the same applications shown in the client and freelancer dashboards, ensuring that all users see consistent and up-to-date job information.
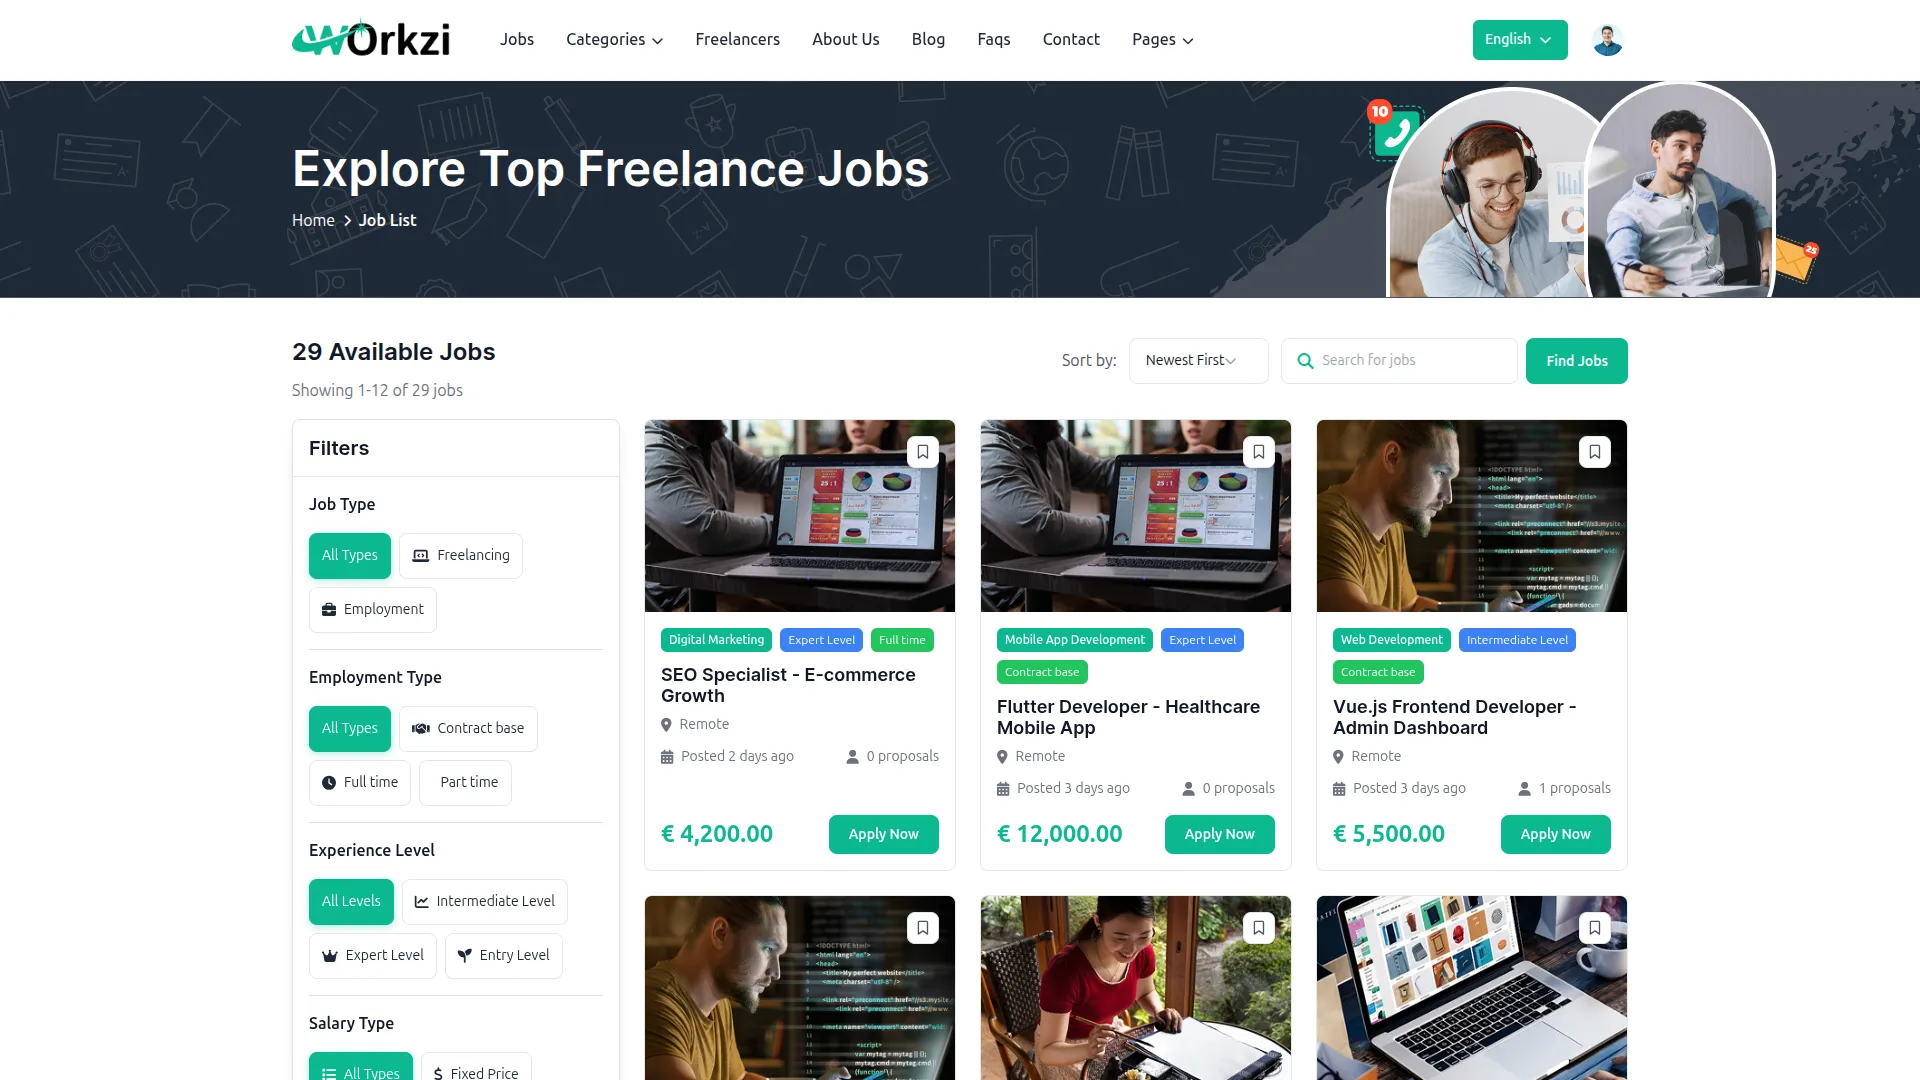
Manage Clients
- The Manage Clients page displays all clients registered on the platform. The list page displays a table with columns for Image, Name, Email, Phone, Total Spent, Created, Status, and Actions. You can search for a client using the search bar and switch between list view and grid view using the view toggle buttons.
- Click the Filters button to filter by Status, then click Apply to filter the data or Clear to reset it. In the Actions column, click Suspend to suspend the client’s account. Click View to see the full client details. Click Delete to permanently remove the client.
- When you click the view button, you can see that the Client Details page displays the client’s profile photo, Name, Verification Status, Email, Phone, Joined Date, Location, and Full Address. The Wallet Overview section shows Total Deposited, Total Spent, Total Withdrawn, Current Balance, and Held in Escrow. The Job Statistics section shows Total Jobs, Completed Jobs, Ongoing Jobs, Rating, and Success Rate.
- Below the overview sections, Posted Jobs displays all jobs created by the client. Assigned Jobs displays the client’s active job engagements along with their payment status. Transaction History displays all wallet-related transactions. Reviews Received displays the feedback submitted by freelancers for the client.
- The verification status set here controls how the client appears across the website. Verified clients display a verification badge on their public profile, while unverified clients are displayed without it. Suspended clients cannot access their accounts or use platform features, including posting jobs. The wallet, job, transaction, and review information shown on this page reflects the same data available in the client’s dashboard, allowing administrators to monitor and review client activity from a single location.
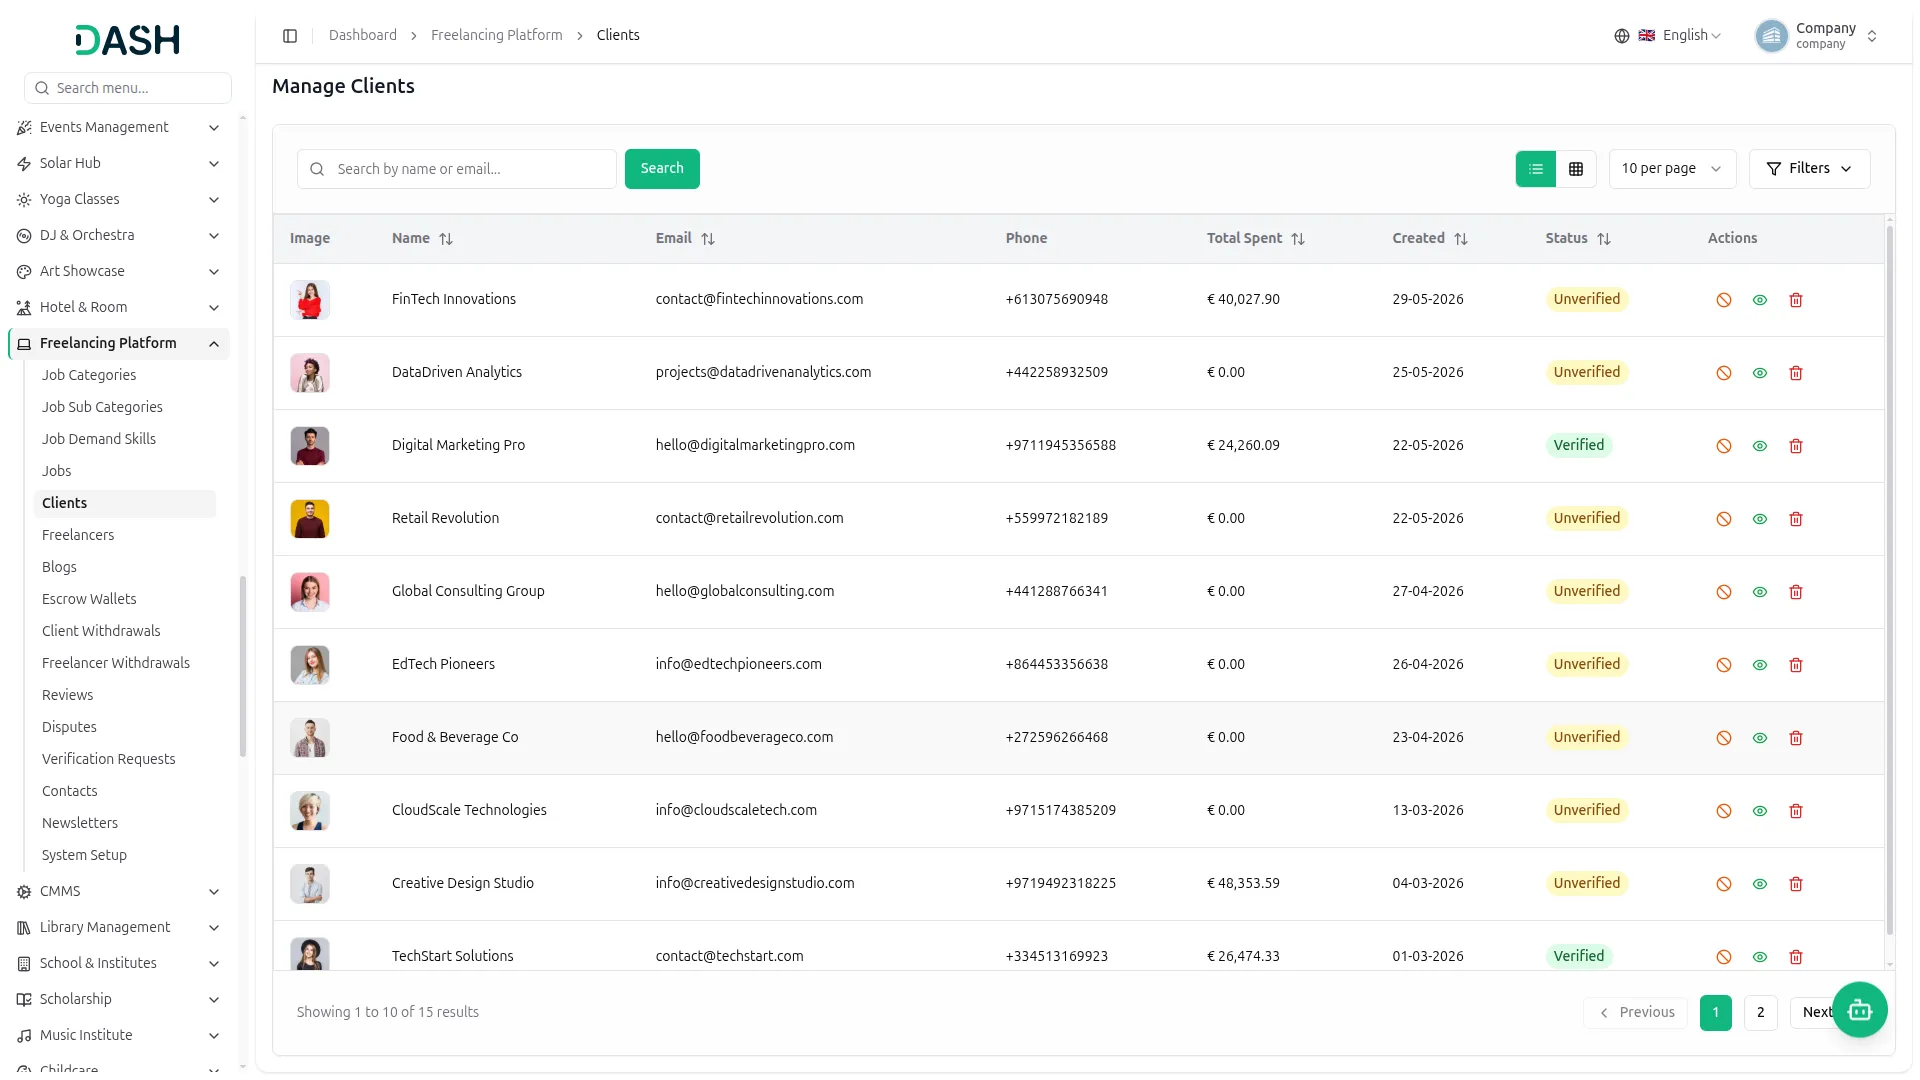
Manage Freelancers
- The Manage Freelancers page displays all freelancers registered on the platform. The list page displays a table with columns for Image, Name, Email, Experience, Rate/Hour, Gender, Status, and Actions. You can search for a freelancer using the search bar and switch between list view and grid view using the view toggle buttons.
- Click the Filters button to filter by Status and Gender, then click Apply to filter the data or Clear to reset it. In the Actions column, click Suspend to suspend the freelancer’s account. Click View to see the full freelancer details. Click Delete to permanently remove the freelancer.
- When you click the view button, you can see that the Freelancer Details page displays the freelancer’s profile photo, Name, Verification Status, Professional Role, Email, Phone, Joined Date, Rate/Hour, Address, Skills, and Languages Spoken. The Wallet Overview section shows Total Earned, Total Withdrawn, Current Balance, Held in Escrow, and Net Earnings. The Job Statistics section shows Total Applications, Completed Jobs, Ongoing Jobs, Rating, and Success Rate.
- Below the overview sections, Job Applications displays all jobs the freelancer has applied to. Assigned Jobs displays the freelancer’s active job engagements along with their payment status. Transaction History displays all wallet-related transactions. Reviews Received displays the feedback submitted by clients for the freelancer.
- The verification status set here controls how the freelancer appears across the website. Verified freelancers display a verification badge on their public profile, while unverified freelancers are displayed without it.
- Suspended freelancers cannot access their accounts or use platform features. The wallet, application, job, transaction, and review information shown on this page reflects the same data available in the freelancer’s dashboard, allowing administrators to monitor and review freelancer activity from a single location.
Manage Blogs
- To create a new blog post, click the “Create” button on the Manage Blogs page. Enter the Title and URL Slug. Enter the Excerpt and add the relevant Tags. Enter the Meta Title and Meta Description for search engine optimization.
- Enter the Content using the rich-text editor, which provides formatting options including bold, italic, underline, strikethrough, text alignment, bulleted and numbered lists, blockquotes, links, text colors, and undo and redo controls. Upload the Featured Image. Set the Status to Active or Inactive and choose whether the post should be Featured.
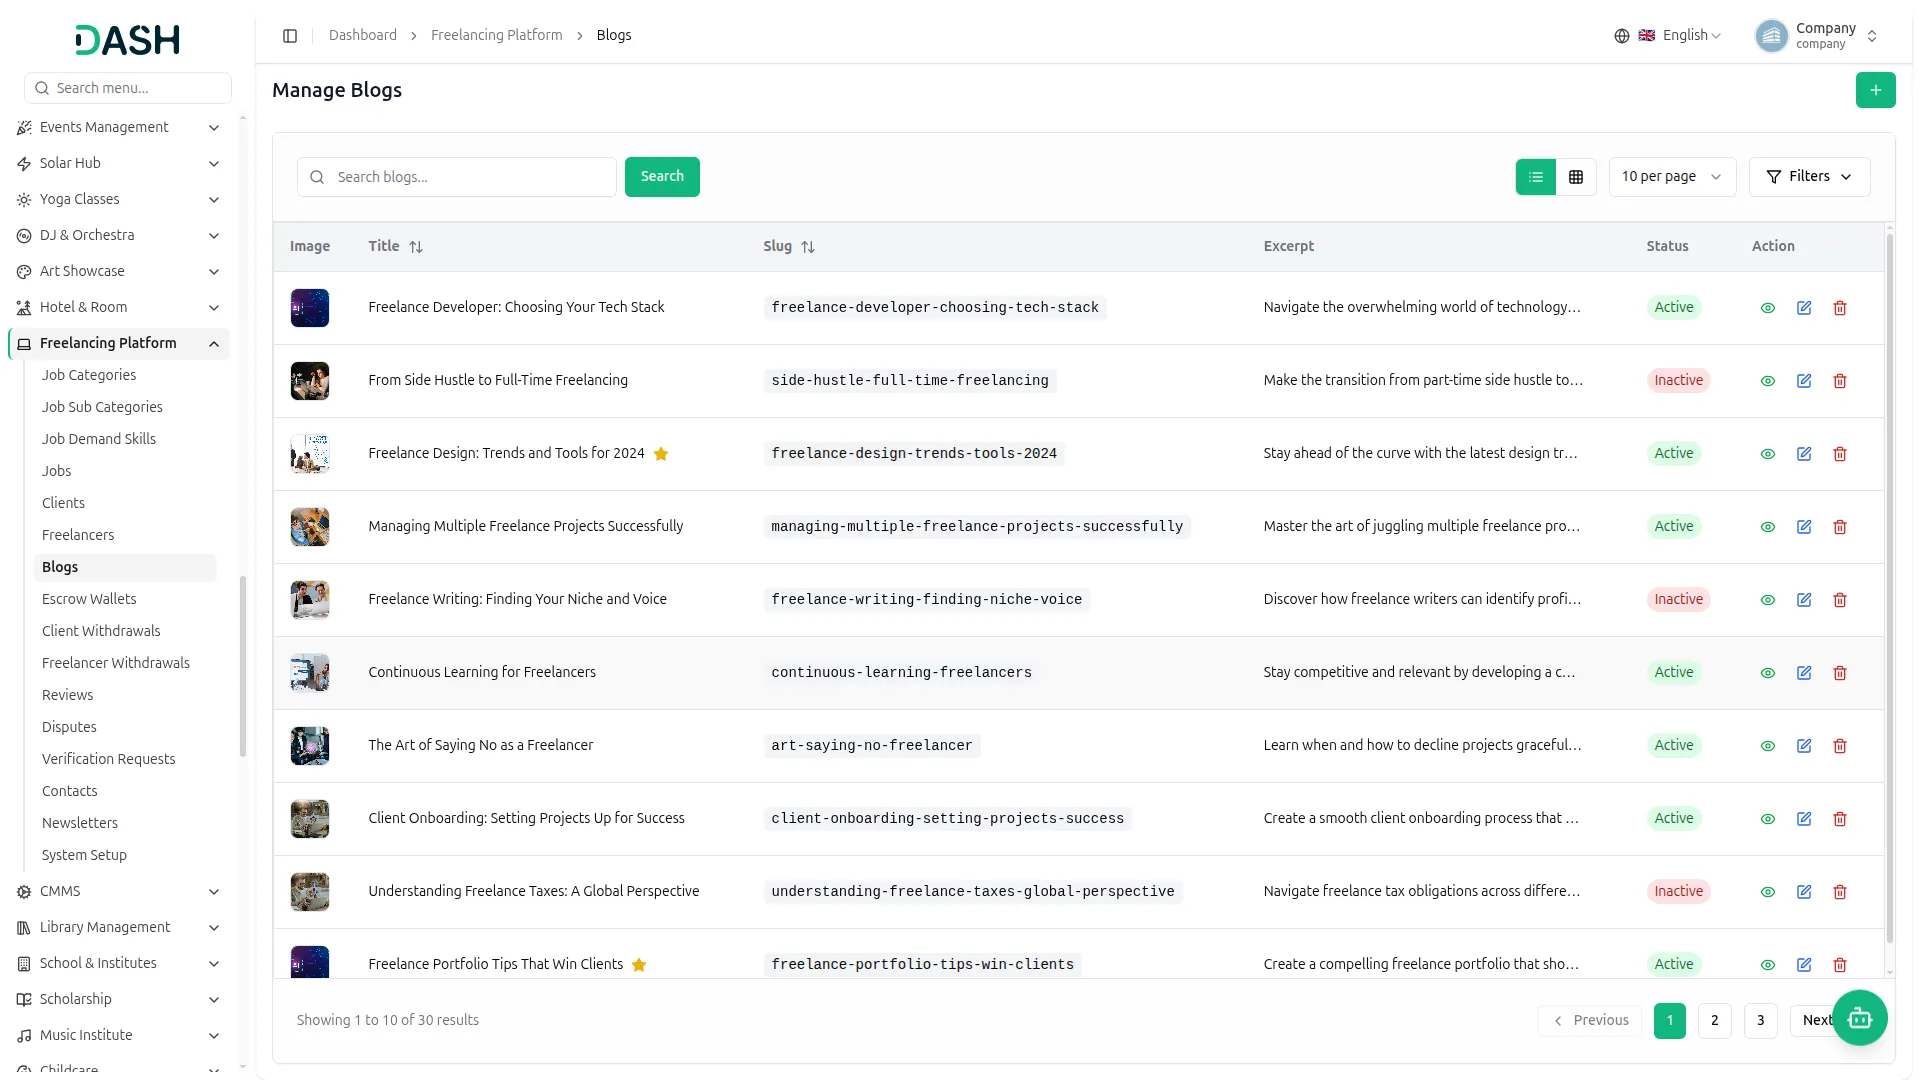
- The list page displays a table with columns for Image, Title, Slug, Excerpt, Status, and Actions. You can search for a blog post using the search bar and switch between list view and grid view using the view toggle buttons.
- Click the Filters button to filter by Status and Featured, then click Apply to filter the data or Clear to reset it. In the Actions column, click View to see the full blog details. Click Edit to modify the blog post. Click Delete to permanently remove it. Blog posts marked as Featured display a star indicator in the list.
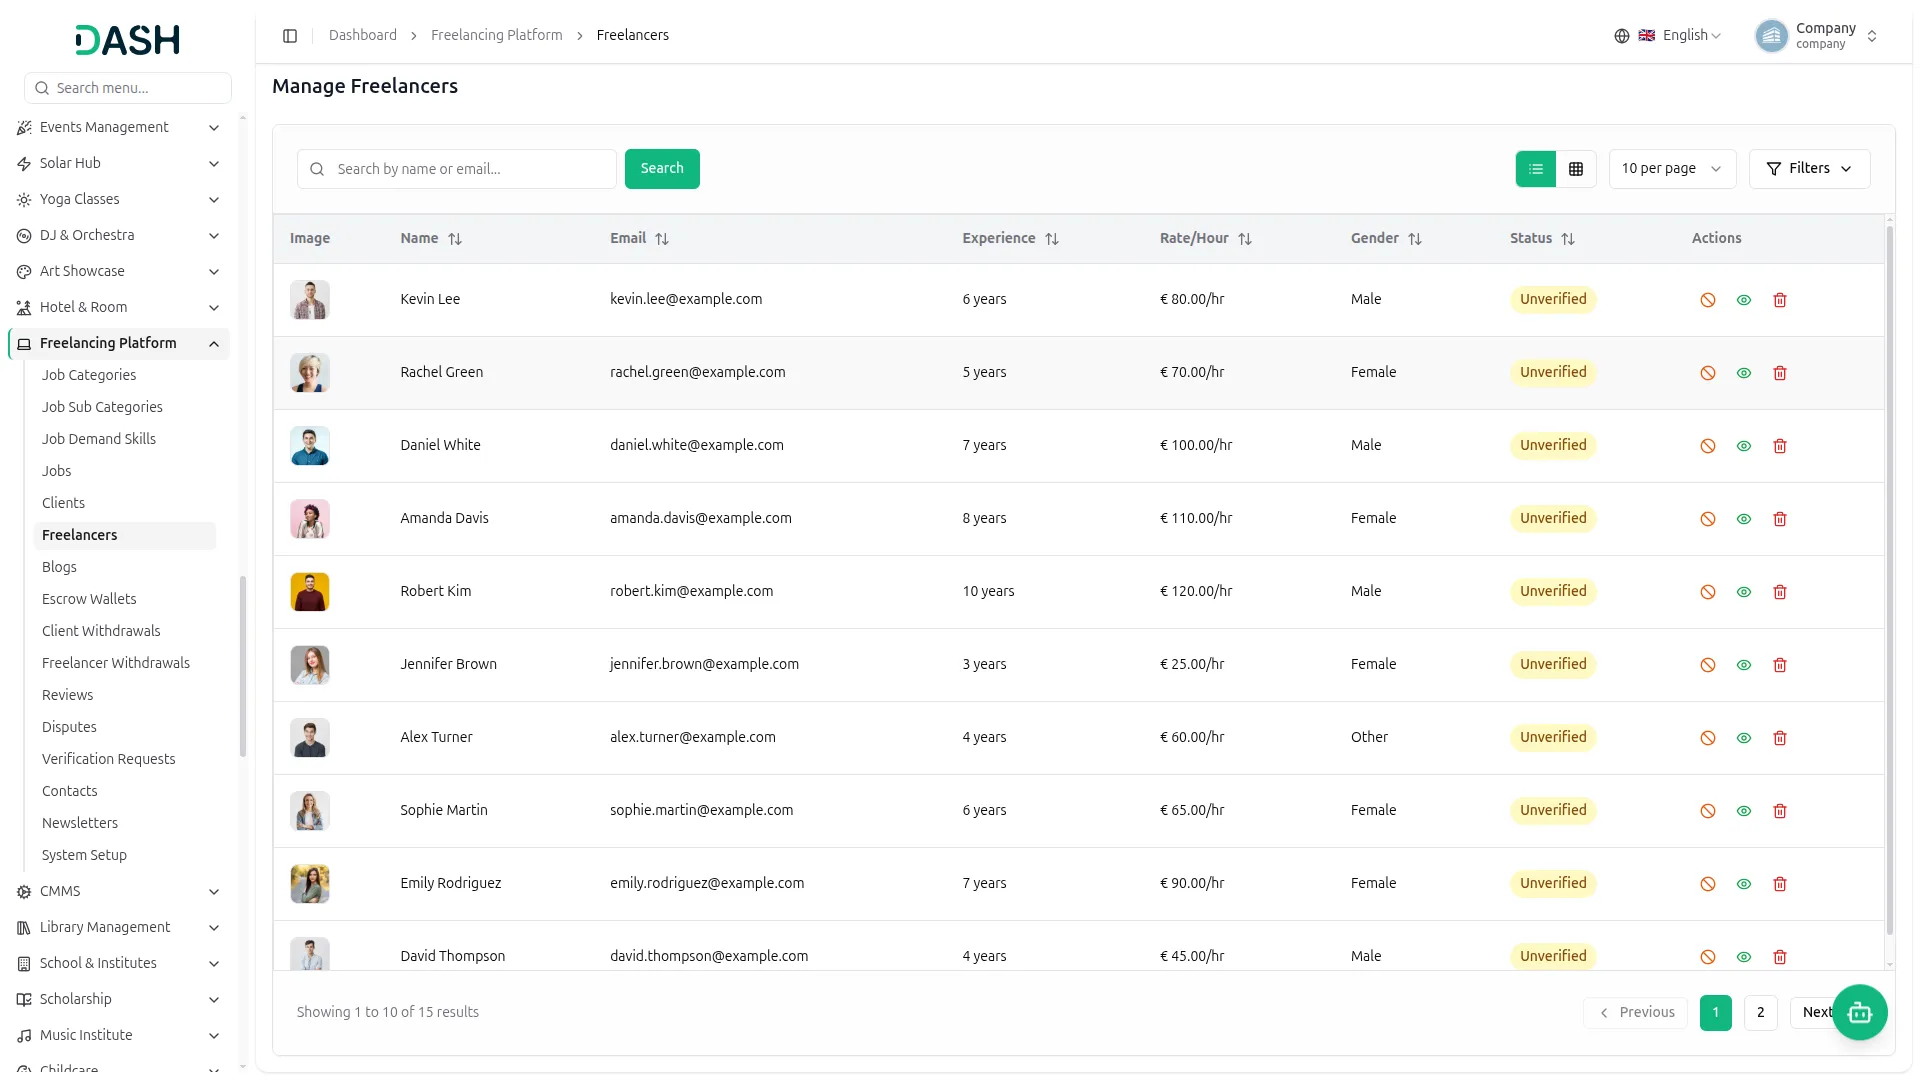
- The website displays each Active blog post in the “Our Latest Blog Articles” section on the homepage and on the Blog page. Active posts appear with their Featured Image, Title, Excerpt, and a ‘Read More’ link. Posts marked as Featured display a Featured tag. Each blog post is published on its own page using the URL Slug, where the full Content is displayed. The Meta Title and Meta Description are used as the page’s SEO metadata. Inactive blog posts are hidden from the website.

Manage Escrow Wallets
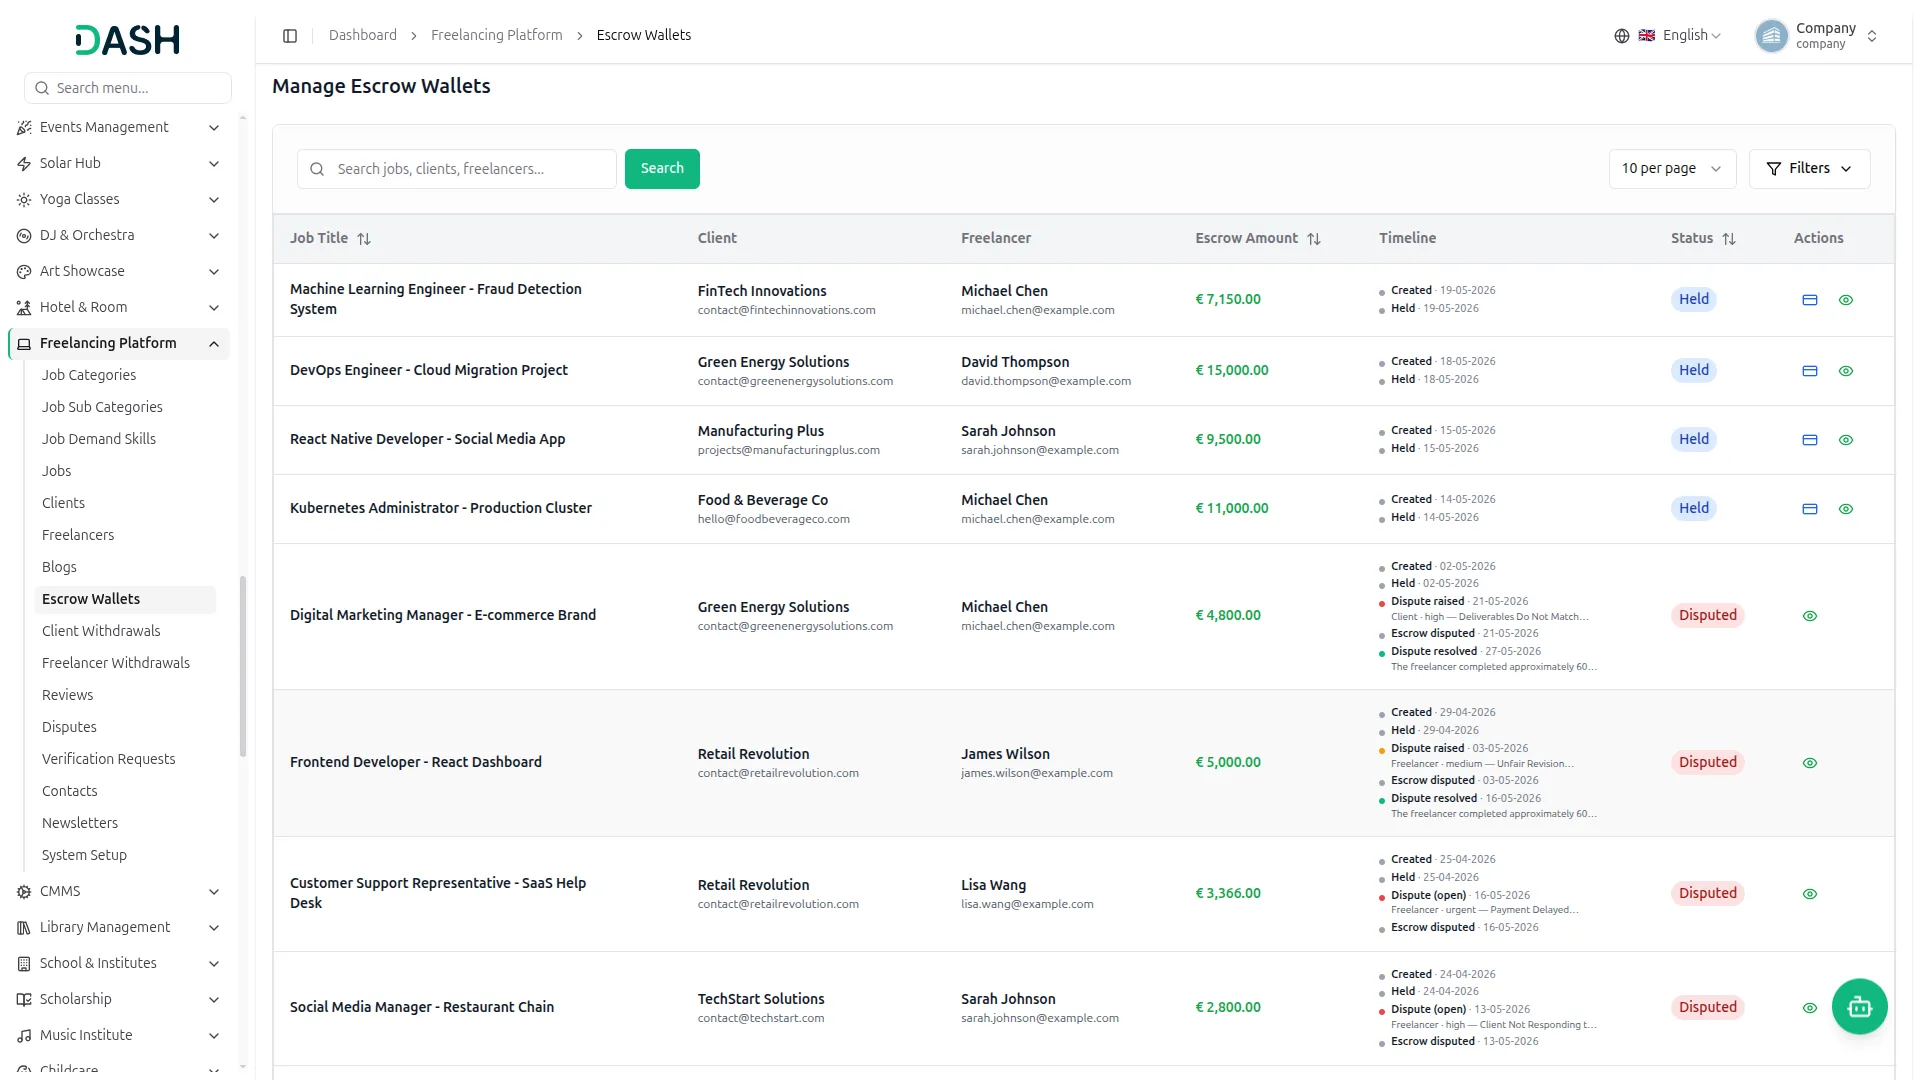
- The Manage Escrow Wallets page displays all escrow records on the platform. The list page displays a table with columns for Job Title, Client, Freelancer, Escrow Amount, Timeline, Status, and Actions. Each record shows the client details, freelancer details, escrow amount, and the escrow timeline. You can search for an escrow record using the search bar.
- Click the Filters button to filter by Status, then click Apply to filter the data or Clear to reset it. In the Actions column, click View to see the full escrow details. For records with a Held status, click Release Payment to release the escrow amount to the freelancer. A confirmation window appears before the payment is released.
- The Timeline displays the history of the escrow record, including events such as Created, Held, Dispute Raised, Escrow Disputed, Dispute Resolved, and Settled. Disputed records also display the related notes and resolution details.
- The escrow information shown here is reflected in both the client and freelancer wallets. Escrow amounts remain in a held state and are displayed as frozen funds until they are released. When a payment is released, the escrow amount is transferred to the freelancer and recorded in their earnings and transaction history. The associated job then progresses toward completion.
- Records with disputes display a ‘Disputed’ status until the dispute is resolved. Once settled, the escrow amount may be released to the freelancer, refunded to the client, or divided between both parties based on the resolution outcome. All escrow transactions and status updates are reflected in the wallet histories of both the client and freelancer.
Manage Client Withdrawals
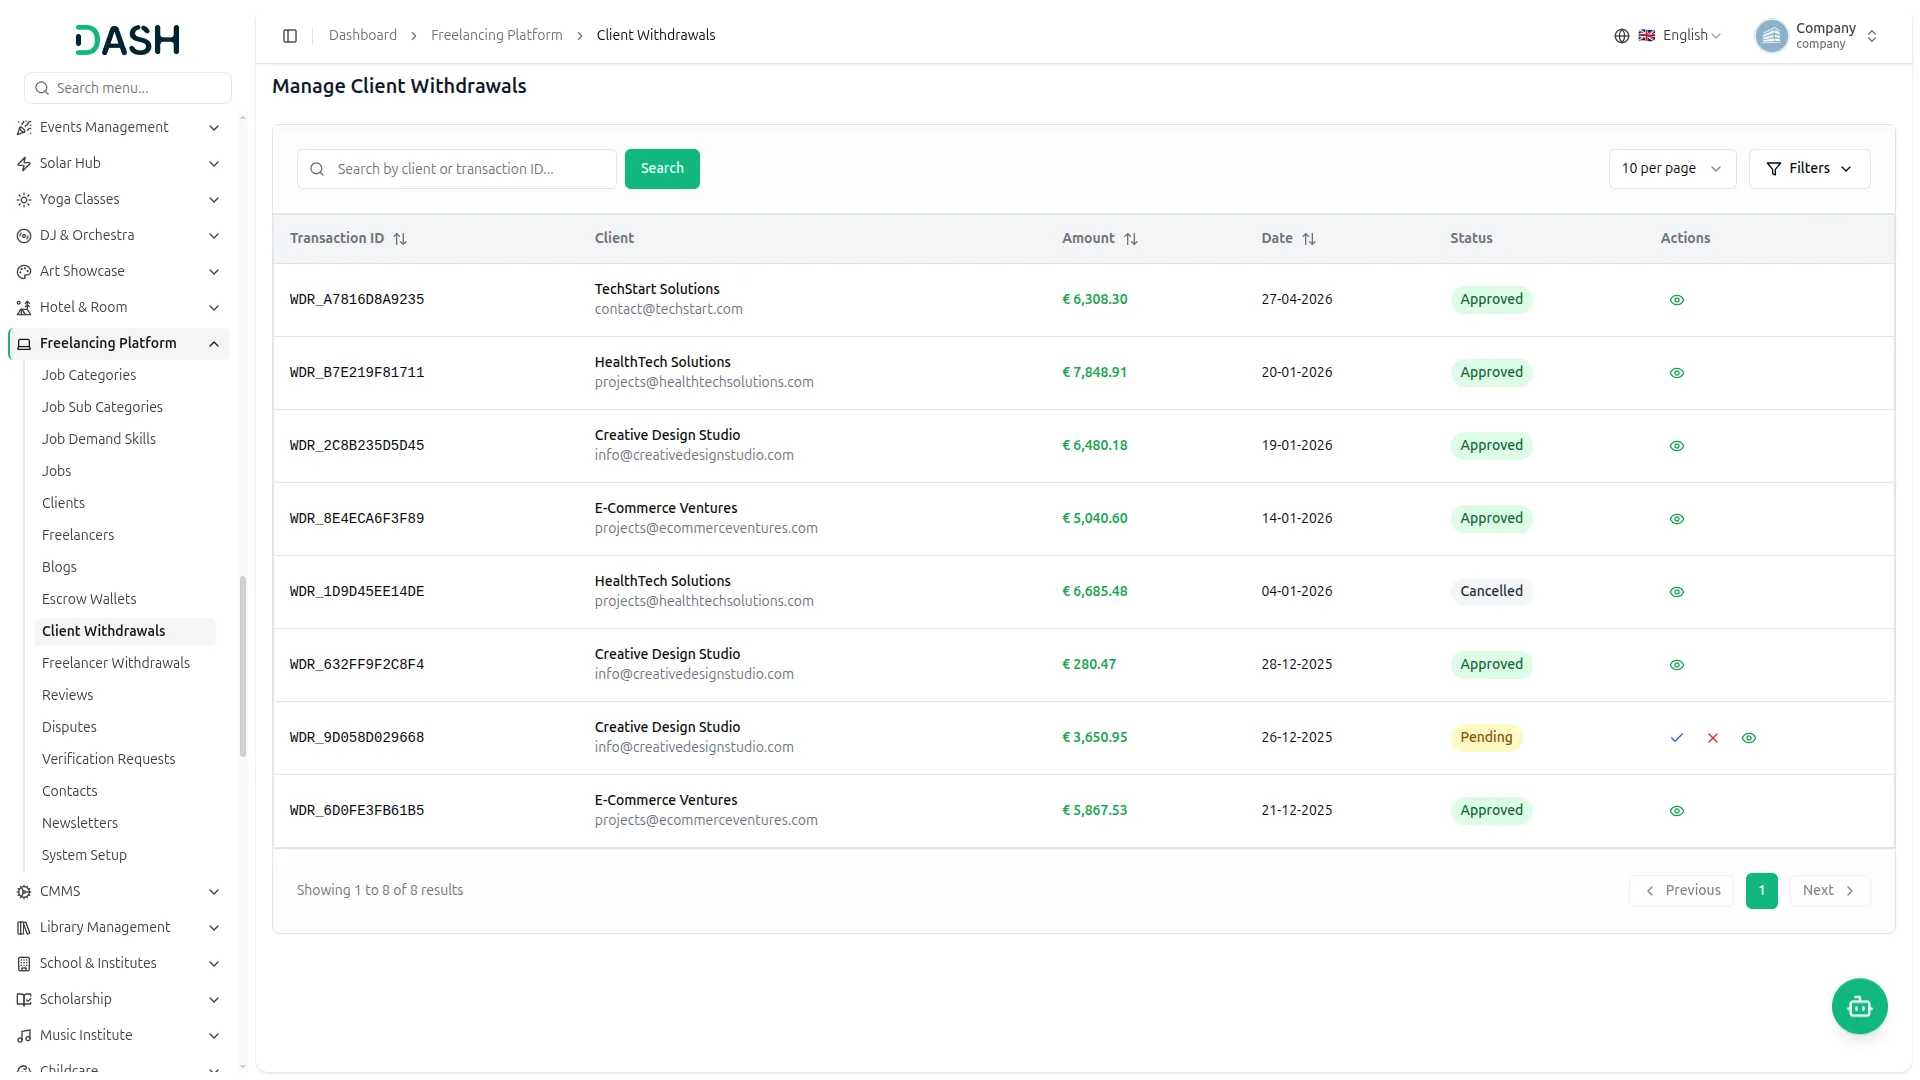
- The Manage Client Withdrawals page displays all client withdrawal requests on the platform. The list page displays a table with columns for Transaction ID, Client, Amount, Date, Status, and Actions.
- Each record shows the transaction ID, client details, withdrawal amount, request date, and current status. You can search for a withdrawal request using the search bar. Click the Filters button to filter by Status and Date Range, then click Apply to filter the data or Clear to reset it.
- In the Actions column, click View to see the full withdrawal request details. For requests with a ‘Pending’ status, click ‘Approve’ to approve the withdrawal request or click ‘Reject’ to reject it.
- When approving a withdrawal request, you can enter optional Admin Notes before confirming the approval. When rejecting a withdrawal request, enter the Rejection Reason before confirming the rejection.
- The withdrawal requests shown here are submitted by clients through the Withdraw Funds feature in their wallet. Pending withdrawal amounts are temporarily held until an administrator reviews the request. When a withdrawal request is approved, the amount is deducted from the client’s wallet and recorded in the client’s transaction history. When a withdrawal request is rejected, the held amount is returned to the client’s available wallet balance, and the rejection details are reflected in the client’s wallet records.
Manage Freelancer Withdrawals
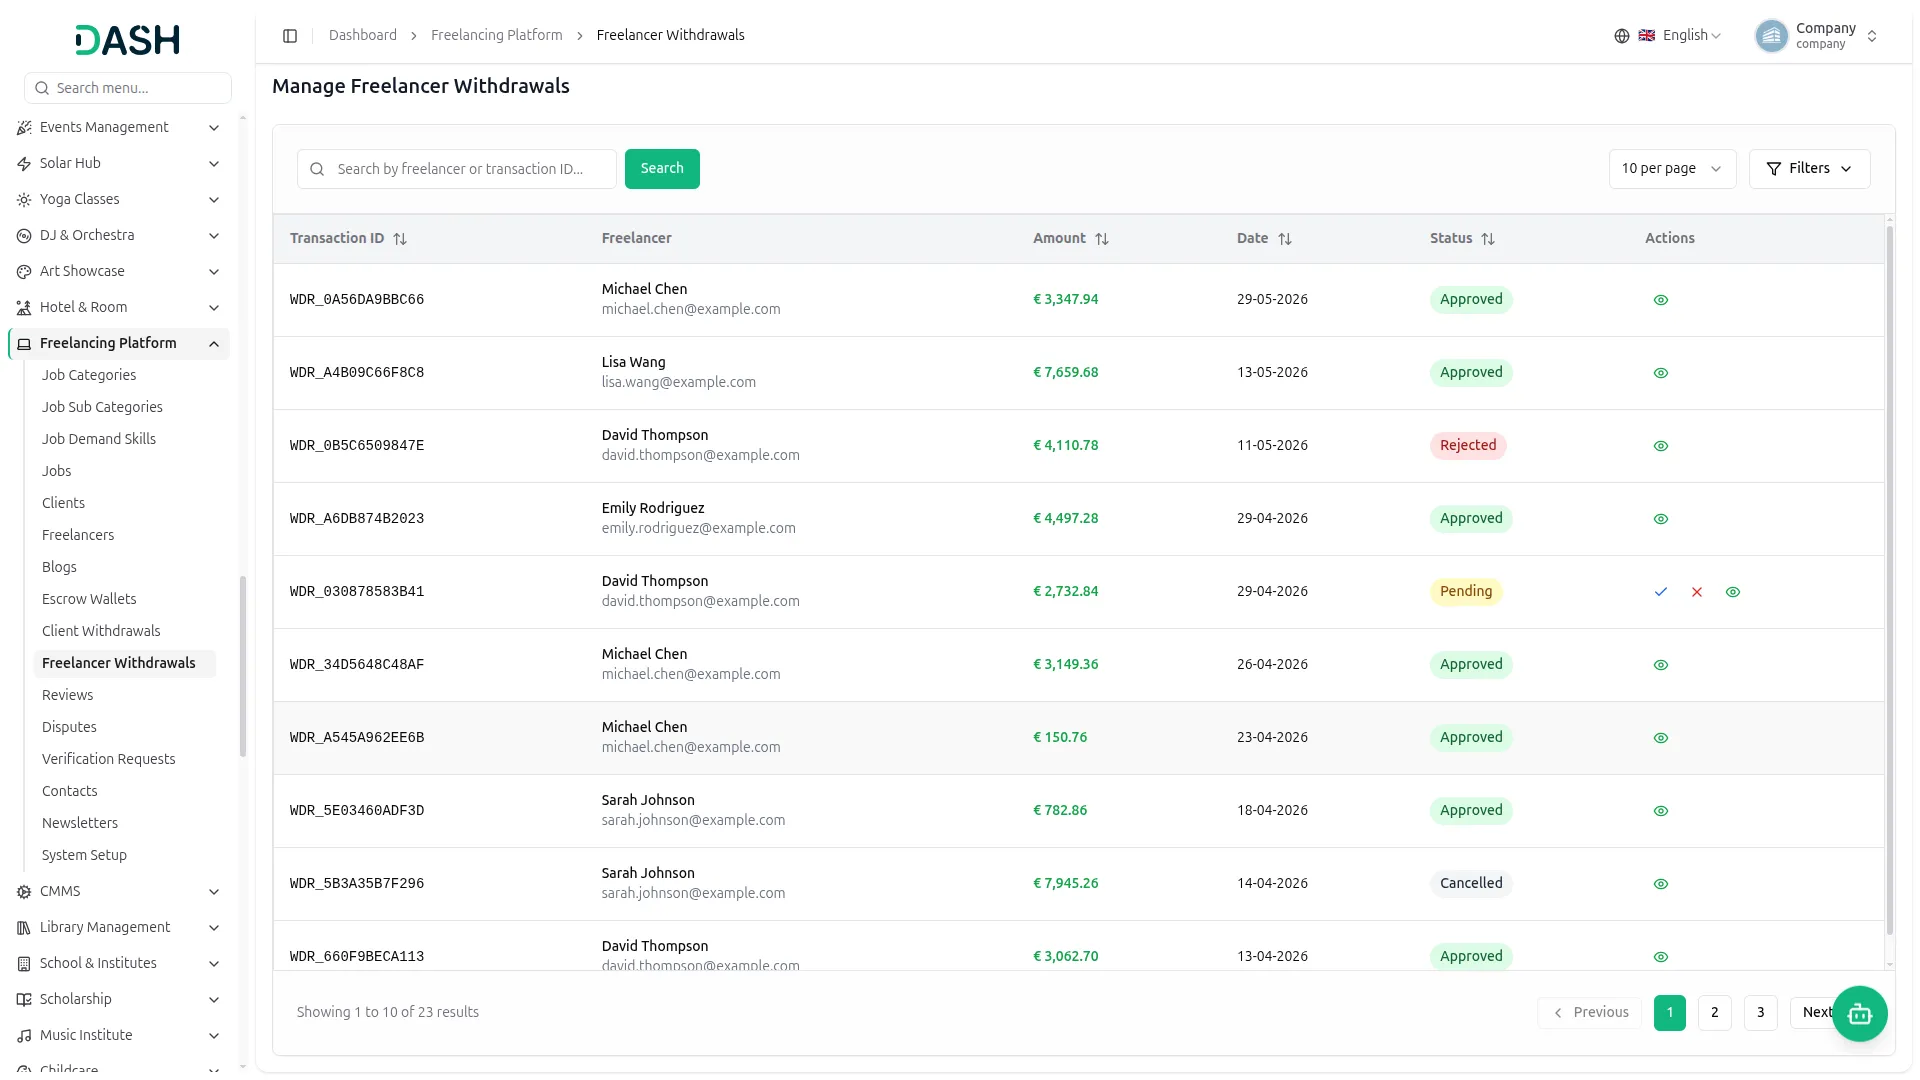
- The Manage Freelancer Withdrawals page displays all freelancer withdrawal requests on the platform. The list page displays a table with columns for Transaction ID, Freelancer, Amount, Date, Status, and Actions.
- Each record shows the transaction ID, freelancer details, withdrawal amount, request date, and current status. You can search for a withdrawal request using the search bar. Click the Filters button to filter by Status and Date Range, then click Apply to filter the data or Clear to reset it.
- In the Actions column, click View to see the full withdrawal request details. For requests with a ‘Pending’ status, click ‘Approve’ to approve the withdrawal request or click ‘Reject’ to reject it.
- When approving a withdrawal request, you can enter optional Admin Notes before confirming the approval. When rejecting a withdrawal request, enter the Rejection Reason before confirming the rejection.
- The withdrawal requests shown here are submitted by freelancers through the Request Withdrawal feature in their My Earnings section. Withdrawal requests remain pending until they are reviewed by an administrator. When a withdrawal request is approved, the amount is deducted from the freelancer’s wallet and recorded in the freelancer’s transaction history. When a withdrawal request is rejected, the amount is returned to the freelancer’s available wallet balance, and the rejection details are reflected in the freelancer’s wallet records.
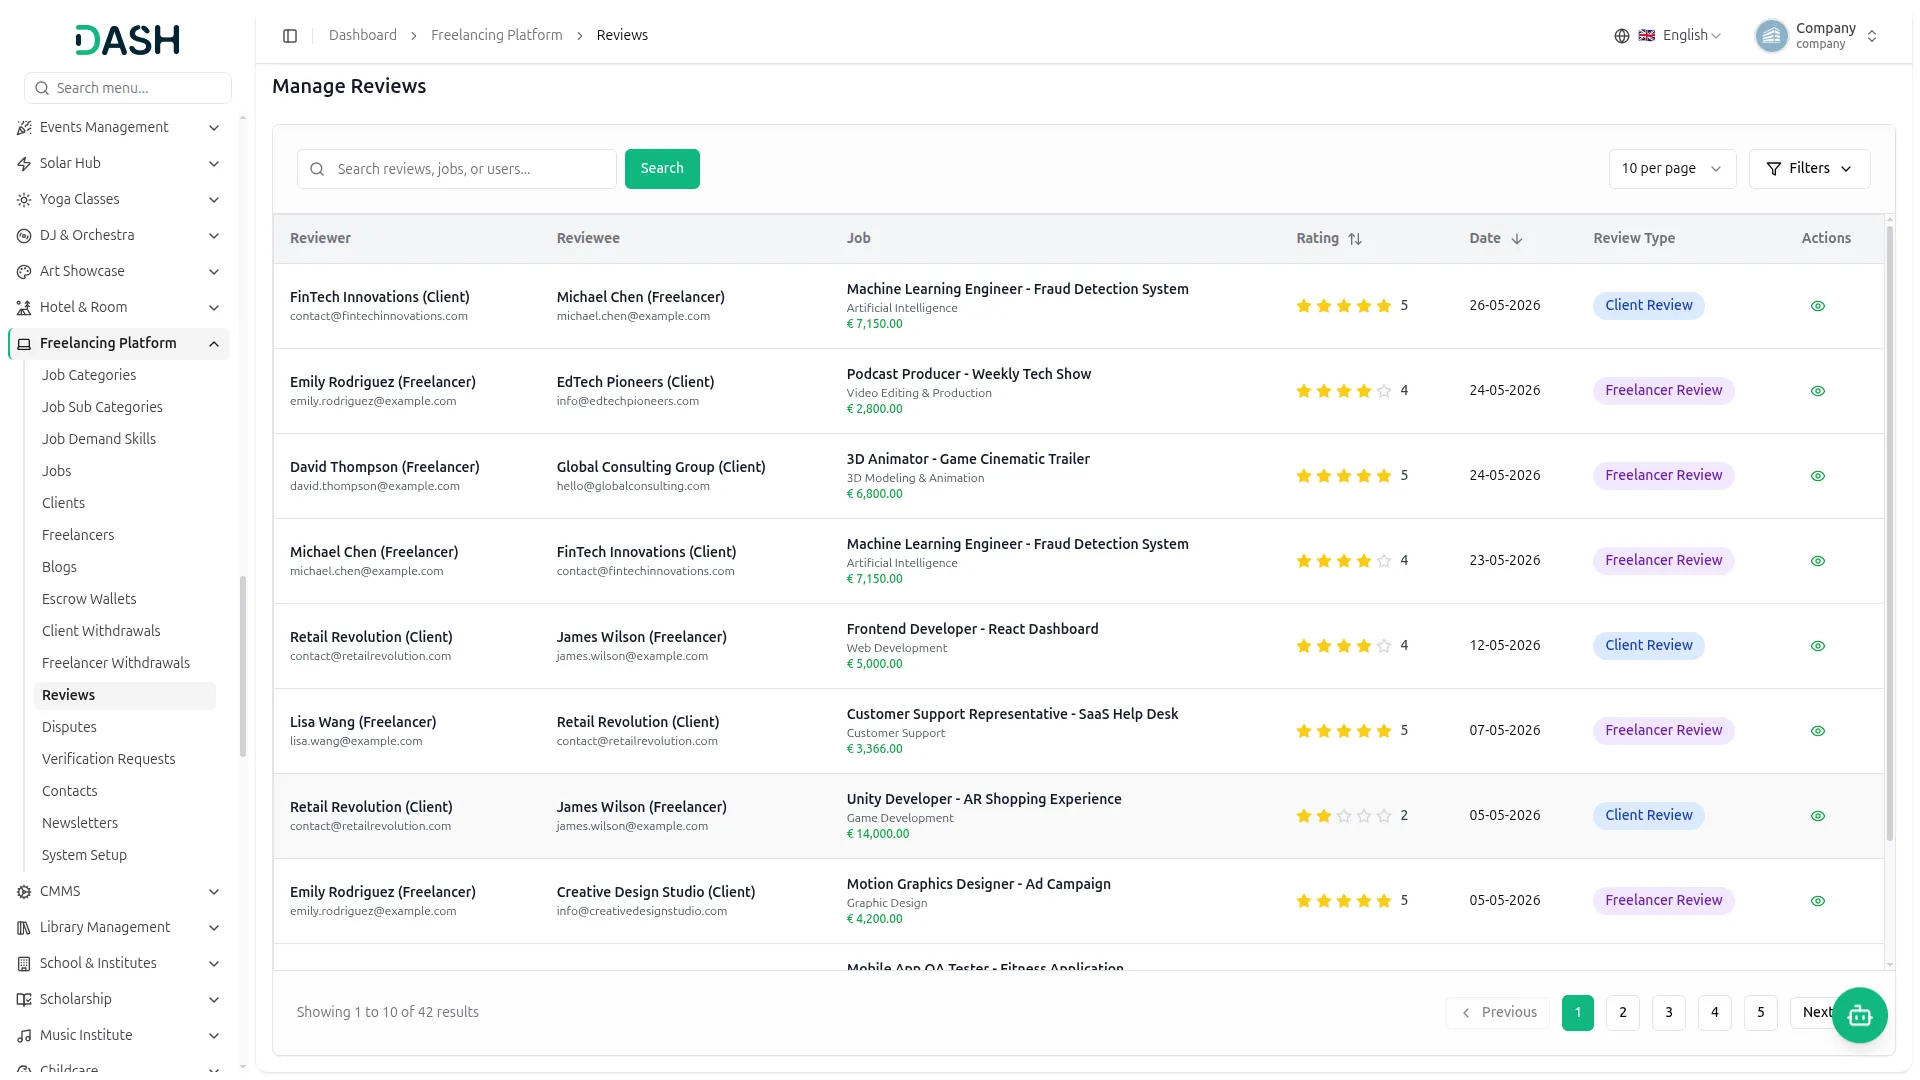
Manage Reviews
- The Manage Reviews page displays all reviews submitted on the platform. The list page displays a table with columns for Reviewer, Reviewee, Job, Rating, Date, Review Type, and Actions.
- Each record shows reviewer details, reviewee details, the related job information, rating, date, and review type. You can search for reviews, jobs, or users using the search bar. Click the Filters button to filter by Reviewer Type and Rating, then click Apply to filter the data or Clear to reset it.
- In the Actions column, click the view icon to open the review’s details.
- On the live website, these reviews appear on the public profiles of the people they concern. A client’s review of a freelancer shows in the “Reviews About Freelancer” section of that freelancer’s public profile, while a freelancer’s review of a client shows in the “Reviews About Client” section of that client’s public profile. The ratings collected here also feed the ratings shown on profile headers and on the freelancer and client cards across the site.
Manage Disputes
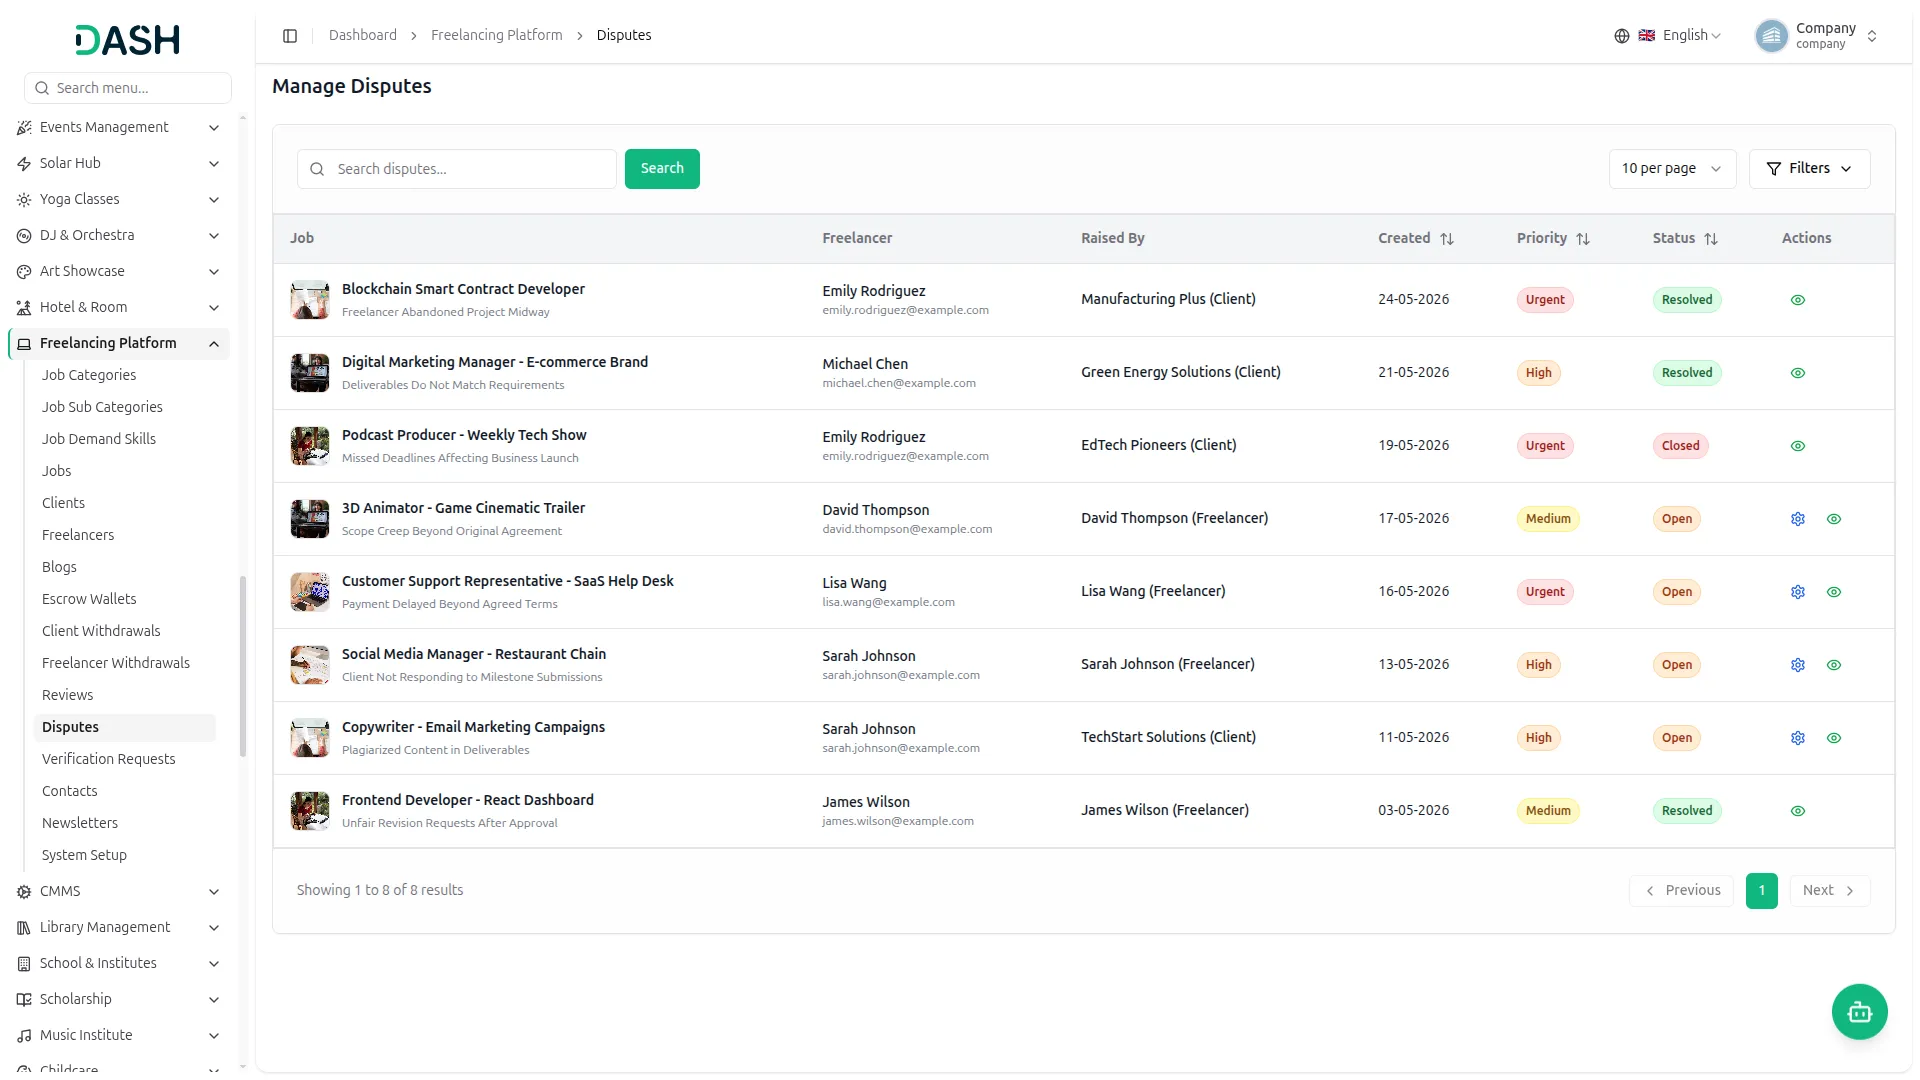
- The Manage Disputes page displays a table with columns for Job, Freelancer, Raised By, Created, Priority, Status, and Actions. Each row shows the job with its dispute reason beneath the title, the freelancer’s name and email, the party who raised the dispute along with their role, the created date, a priority label such as Low, Medium, High, or Urgent, and a status such as Open, Resolved, or Closed. You can search disputes using the search bar.
- Click Filters to filter by Status, Priority, Type, and Date Range, then click Apply or Clear. In the Actions column, click the view icon to open the dispute’s details. For a dispute whose status is ‘Open’, a ‘Resolve Dispute’ control also appears.
- When you click the “Resolve Dispute” button on the dispute details page and review the Dispute Details section, which includes the Title and Escrow Amount. Select the appropriate Resolution Type from the dropdown menu, enter the Settled Amount ($), and provide a clear Resolution Summary describing the outcome. Set the Status to Resolved once the dispute is finalized. Enter a detailed explanation in the Resolution Details field covering the agreement, scope, or decision made, and then click the “Resolve” button to complete the process.
- When you click the view icon, the dispute details page opens, headed by the dispute title and its ID along with status, priority, and the disputing party’s role, plus a line noting the dispute is open and awaiting admin review.
- The Messages panel shows the full conversation thread between the client, the freelancer, and the Company, with each entry timestamped, and a message box with an attachment control lets you type and send a reply.
- A Dispute Reason panel sets out the full reason the dispute was raised. Alongside, the Disputed Job Details panel lists the Job Title, Author, Freelancer, Job Budget, Disputant, Disputed On date, Escrow Amount, Escrow Status, Held At date, and Dispute Status.
- A Job Details panel shows the job with its category, type, budget, and status; a Client panel shows the client’s name and email address, and a Freelancer panel shows the freelancer’s name, email address, and phone number.
- On the live website, disputes shown here are the same ones raised by either party from their Assigned Job through the Raise Dispute action, and they appear in the My Disputes area of both the client and freelancer dashboards. When you resolve a dispute, the chosen resolution type determines how the escrow is settled, with funds released to the freelancer, refunded to the client, or split as a partial settlement, and the outcome is reflected in the Escrow Status on the dispute, in the Manage Escrow Wallets record, and in both parties’ wallet transaction histories. Messages you send as the Company appear in the dispute thread that both the client and freelancer see.
Manage Verification Requests
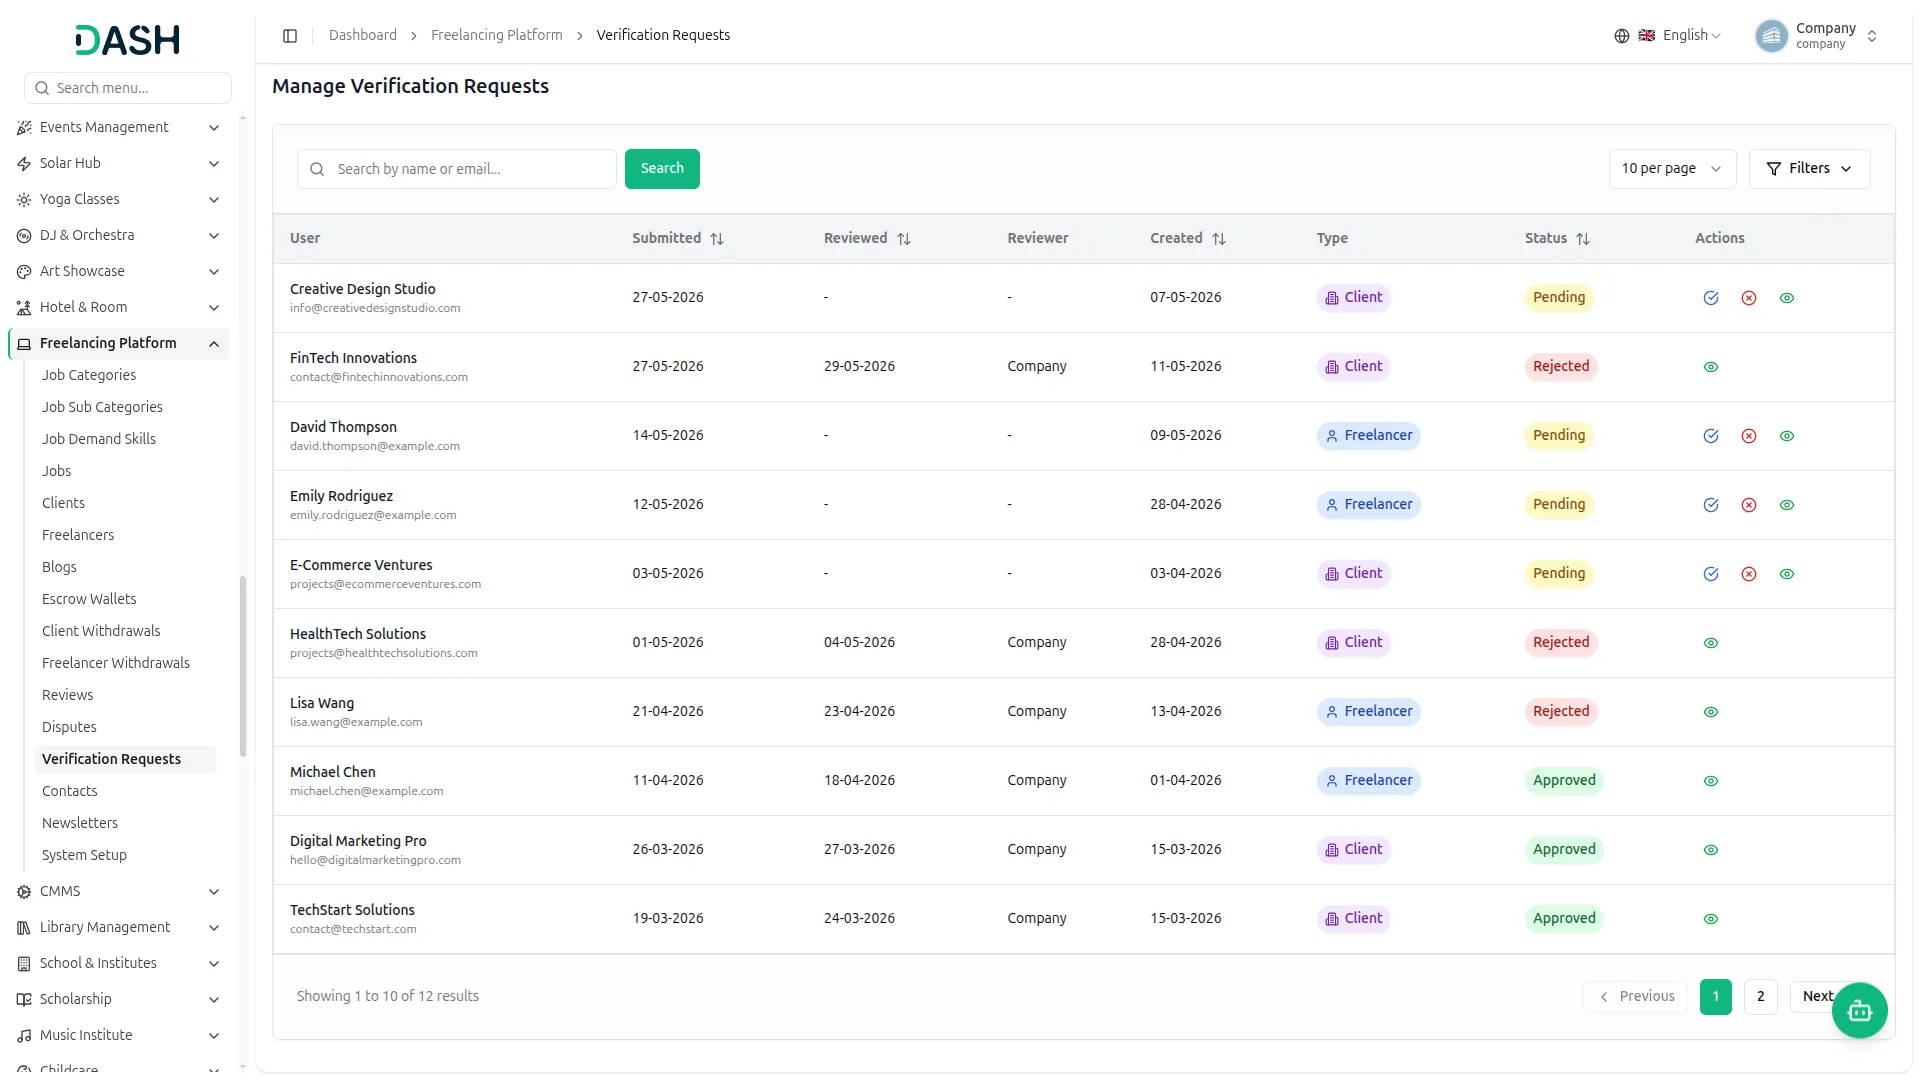
- The Manage Verification Requests page displays a table with columns for User, Submitted, Reviewed, Reviewer, Created, Type, Status, and Actions. Each row shows the user’s name and email; the submitted and reviewed dates; the reviewer shown as ‘Company’, the created date, a Type label of ‘Freelancer’ or ‘Client’; and a status such as ‘Pending’, ‘Approved’, or ‘Rejected’.
- You can search by name or email using the search bar and then click Search. Click Filters to filter by Status and by Type, then click Apply or Clear. In the Actions column, click the view icon to open the request’s details. For a request whose status is Pending, an approve and a reject control also appear.
- Clicking the approve control opens the Approve Verification Request form, which shows the user’s Name, Email, Phone, Type, Submitted At date, and Status, along with an optional Admin Notes field. Click Approve to approve the request or Cancel to dismiss. Clicking the reject control opens the Reject Verification Request form, which shows the same user details plus a required Rejection Reason field and an optional Admin Notes field. Click Reject to reject the request or Cancel to dismiss.
- When you click the view icon opens the Verification Request Details page, headed by the user’s name, type, and status, with Approve and Reject buttons. A User Information panel lists the Full Name, Email Address, and Phone Number; a Request Timeline panel traces the Request Created and Submitted for Review dates; and a Document Stats panel shows the Total number of documents and how many are required. An Uploaded Documents section lists each submitted document with its name and category label, the file name, the upload date, file size, and format; a Required marker where applicable; a description of what the document should be; and controls to download or open the file.
- On the live website, these requests originate from the Document Verification area within the client’s and freelancer’s My Profile, where each user uploads the documents configured under Verification Documents in System Setup and submits them for review. When you approve a request, the user is marked as verified, and a verified badge appears on their public profile; the verification status is also reflected in Manage Clients or Manage Freelancers. When you reject a request, the user sees a “Verification Needs Attention” banner in their profile prompting them to address the issue and resubmit.
Manage Contacts
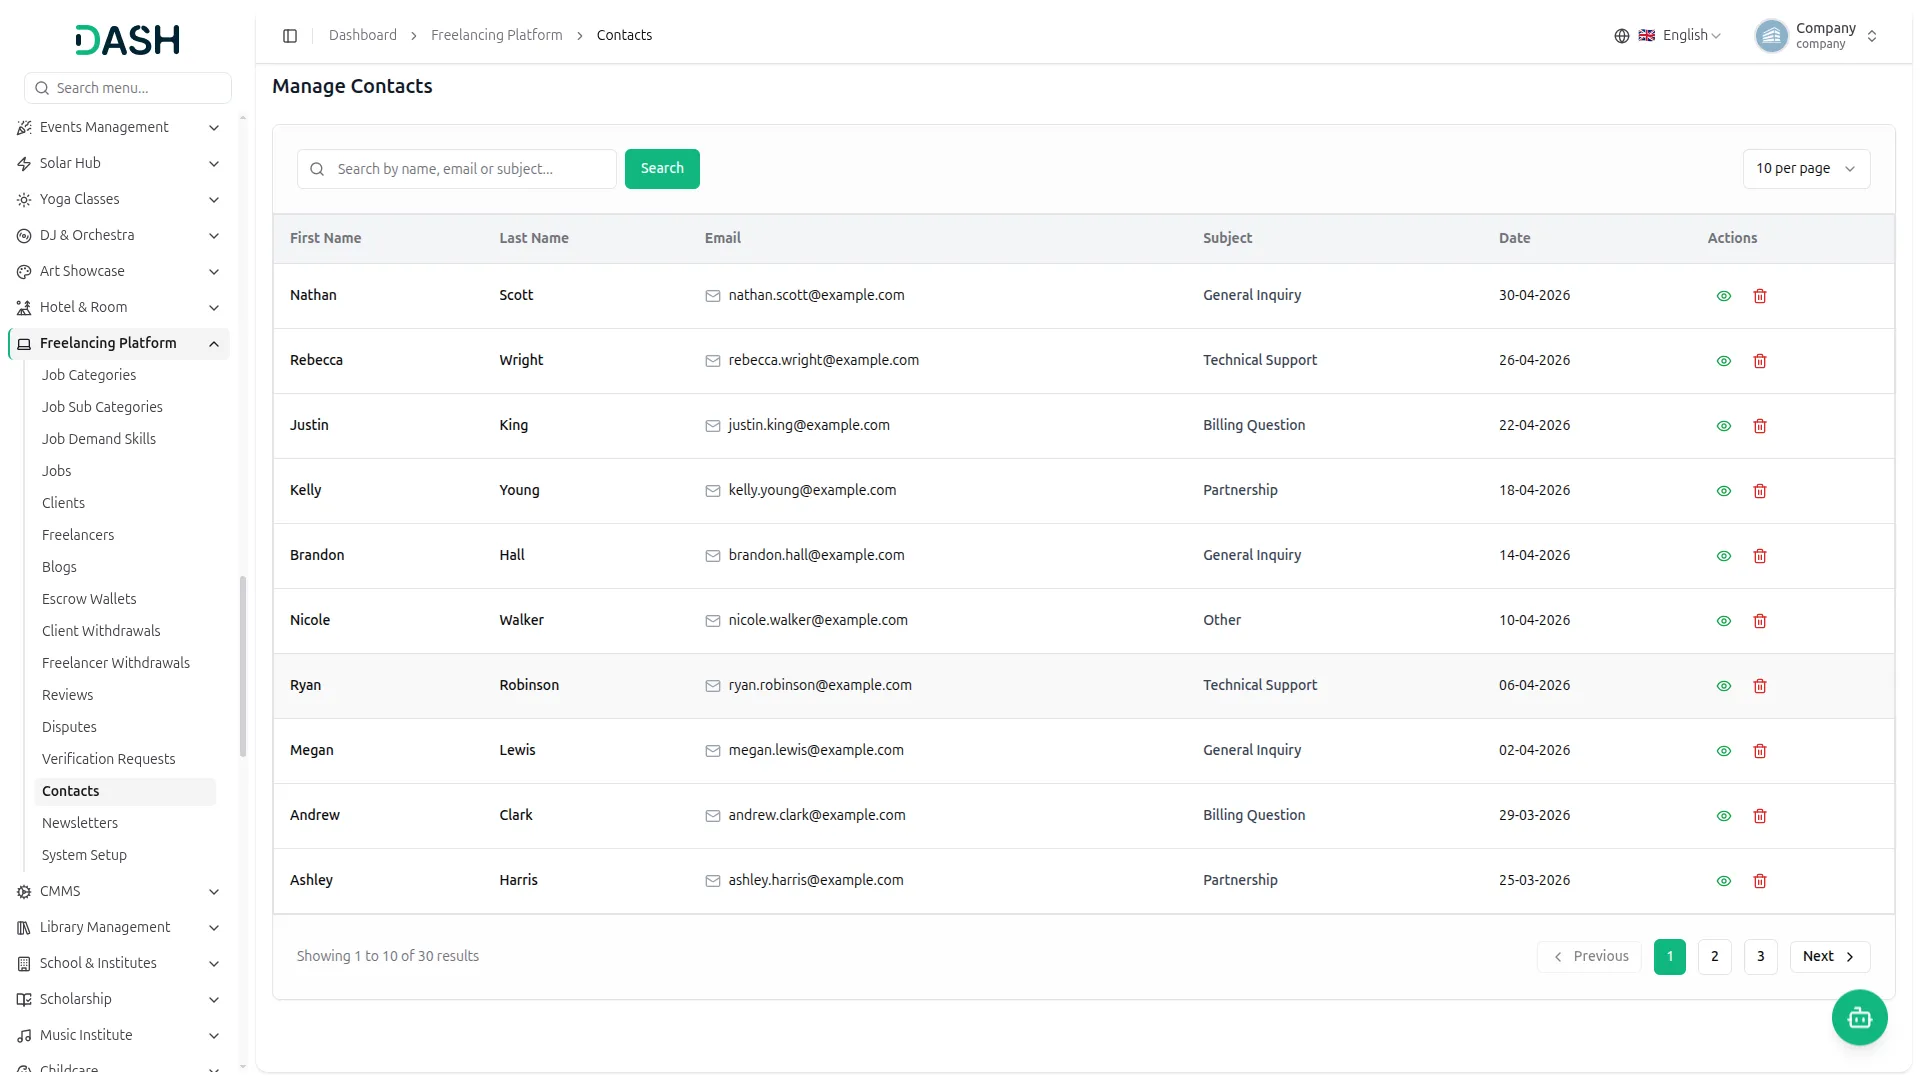
- The Manage Contacts page displays a table with columns for First Name, Last Name, Email, Subject, Date, and Actions. Each row shows the sender’s first and last name; their email address; the subject of their message, such as General Inquiry, Technical Support, Billing Question, Partnership, or Other; and the date the message was submitted.
- You can search by name, email, or subject using the search bar. In the Actions column, click the view icon to open the full message, or click the delete icon to remove it.
- On the live website, these entries are the messages submitted by visitors through the “Send us a Message” form on the Contact Us page, where each visitor enters their first and last name, email, phone, a subject chosen from the dropdown, and their message. Every submission received through that form is collected here for the admin to read and manage.
Manage Newsletters
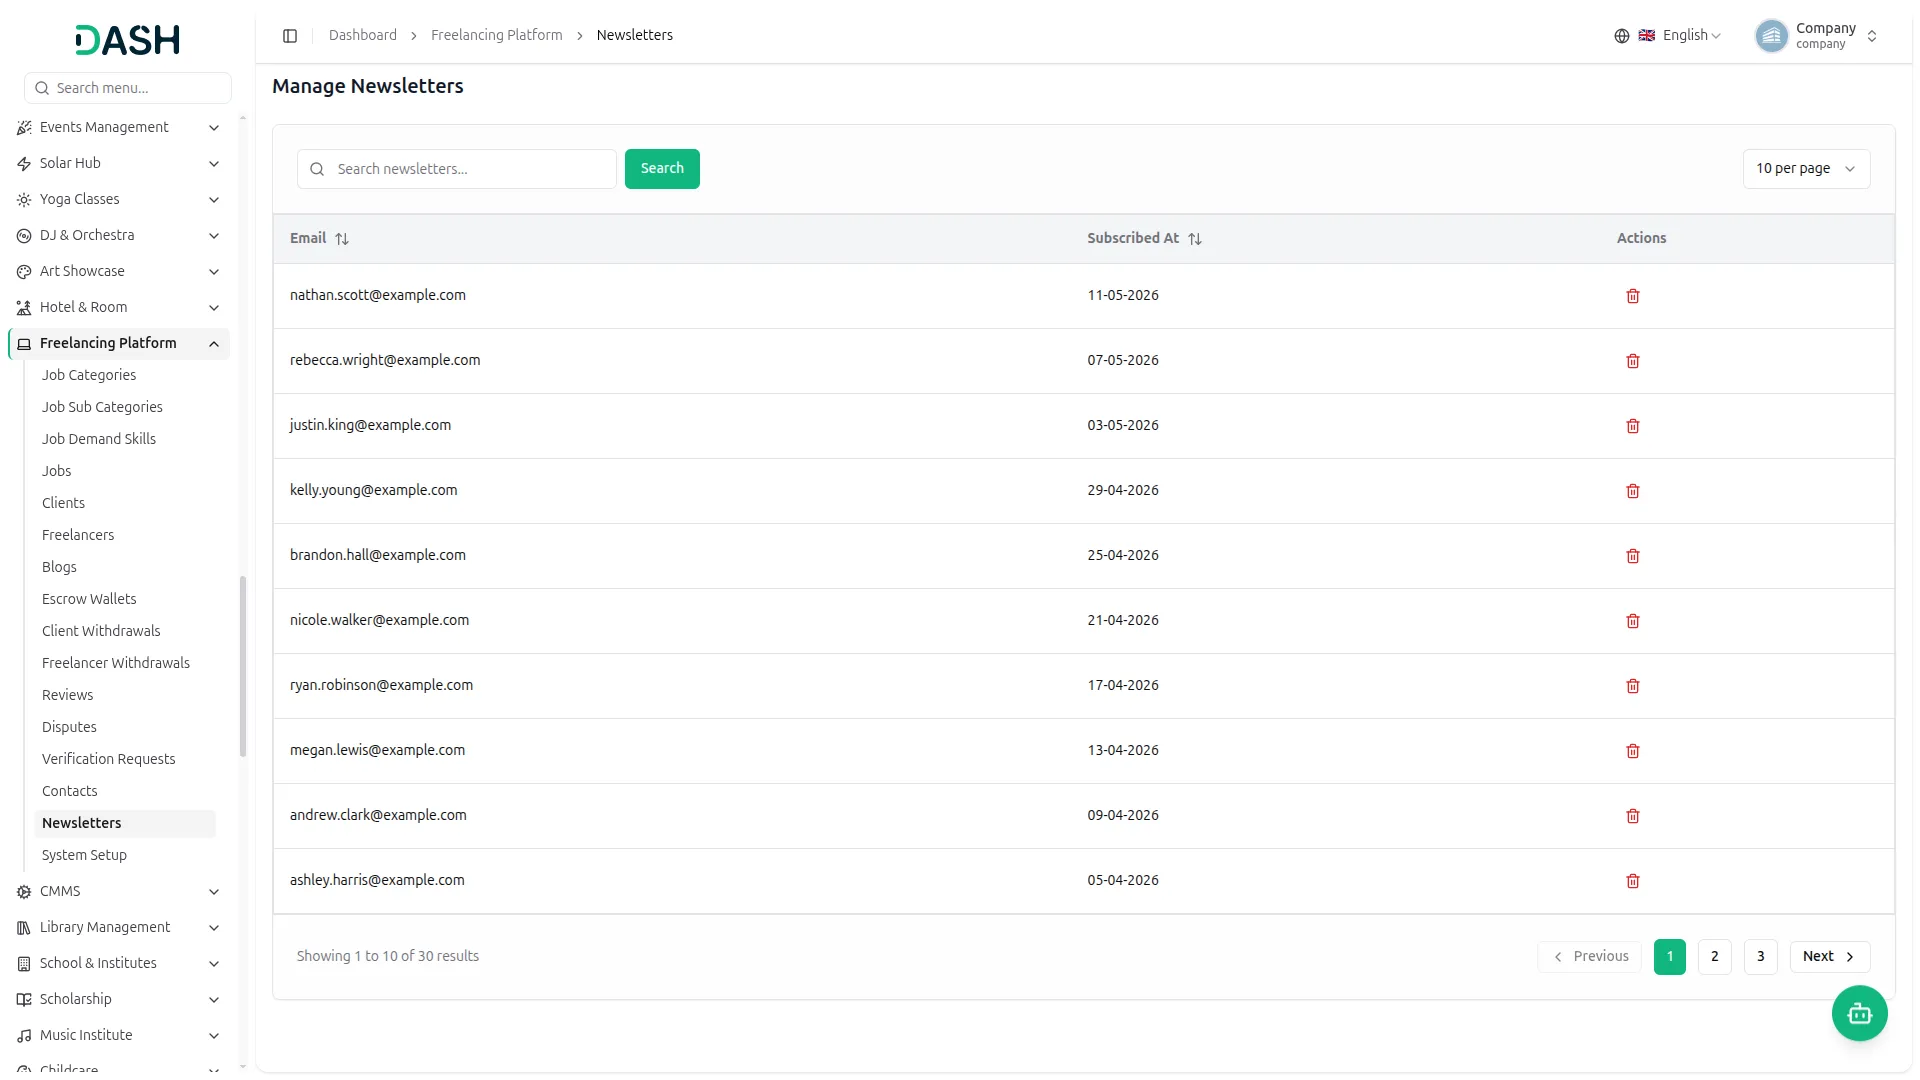
- The Manage Newsletters page displays a table with columns for Email, Subscribed At, and Actions. Each row shows a subscriber’s email address and the date they subscribed. You can search newsletters using the search bar and then click the Search button. In the Actions column, click the delete icon to remove a subscriber from the list.
- On the live website, these entries are the email addresses collected through the newsletter subscription on the website, where visitors enter their email to subscribe. Every email submitted there is gathered here for the admin to view and manage.
Profile Management
Client Profile
My Profile
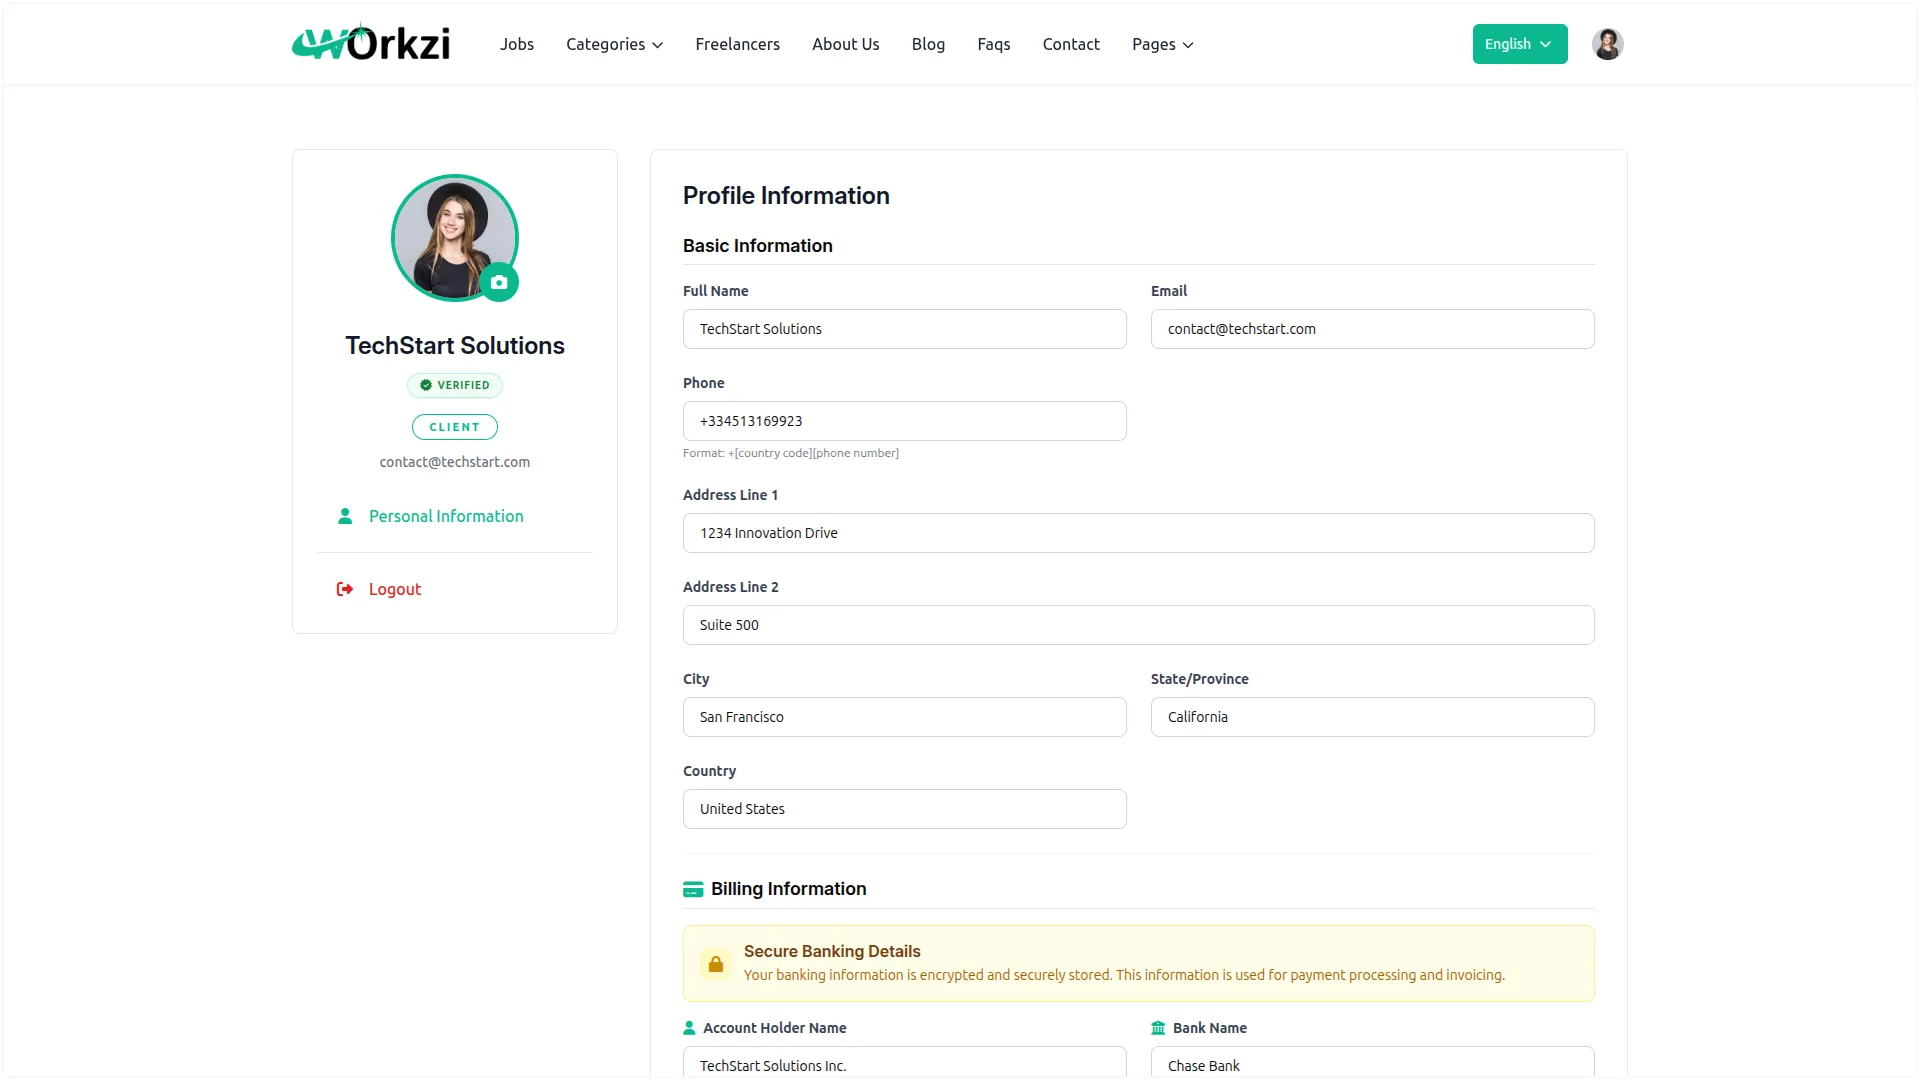
- This is where the client manages their account details. Under Basic Information, the client enters their Full Name, Email, Phone, Address Line 1, Address Line 2, City, State/Province, and Country.
- Under Billing Information, the client enters their secure banking details used for payment processing and invoicing, including Account Holder Name, Bank Name, Bank Branch, Account Type, Account Number, and IFSC Code. After updating the details, the client clicks Save Changes to store the information.
- The Verification page appears below Personal Information and is where the client uploads the documents required to verify their account, such as Government ID, Proof of Address, and Professional Certificate.
- Each document shows its name, description, allowed file rules, and current status, along with options to download, view, or replace the file. After uploading the required documents, the client clicks Submit to send the request for review.
- The document slots shown here are controlled by the Verification Documents settings in System Setup. Once approved by the admin, a verified badge appears on the client’s public profile; if rejected, a “Verification Needs Attention” banner prompts the client to resubmit.
View Public Profile
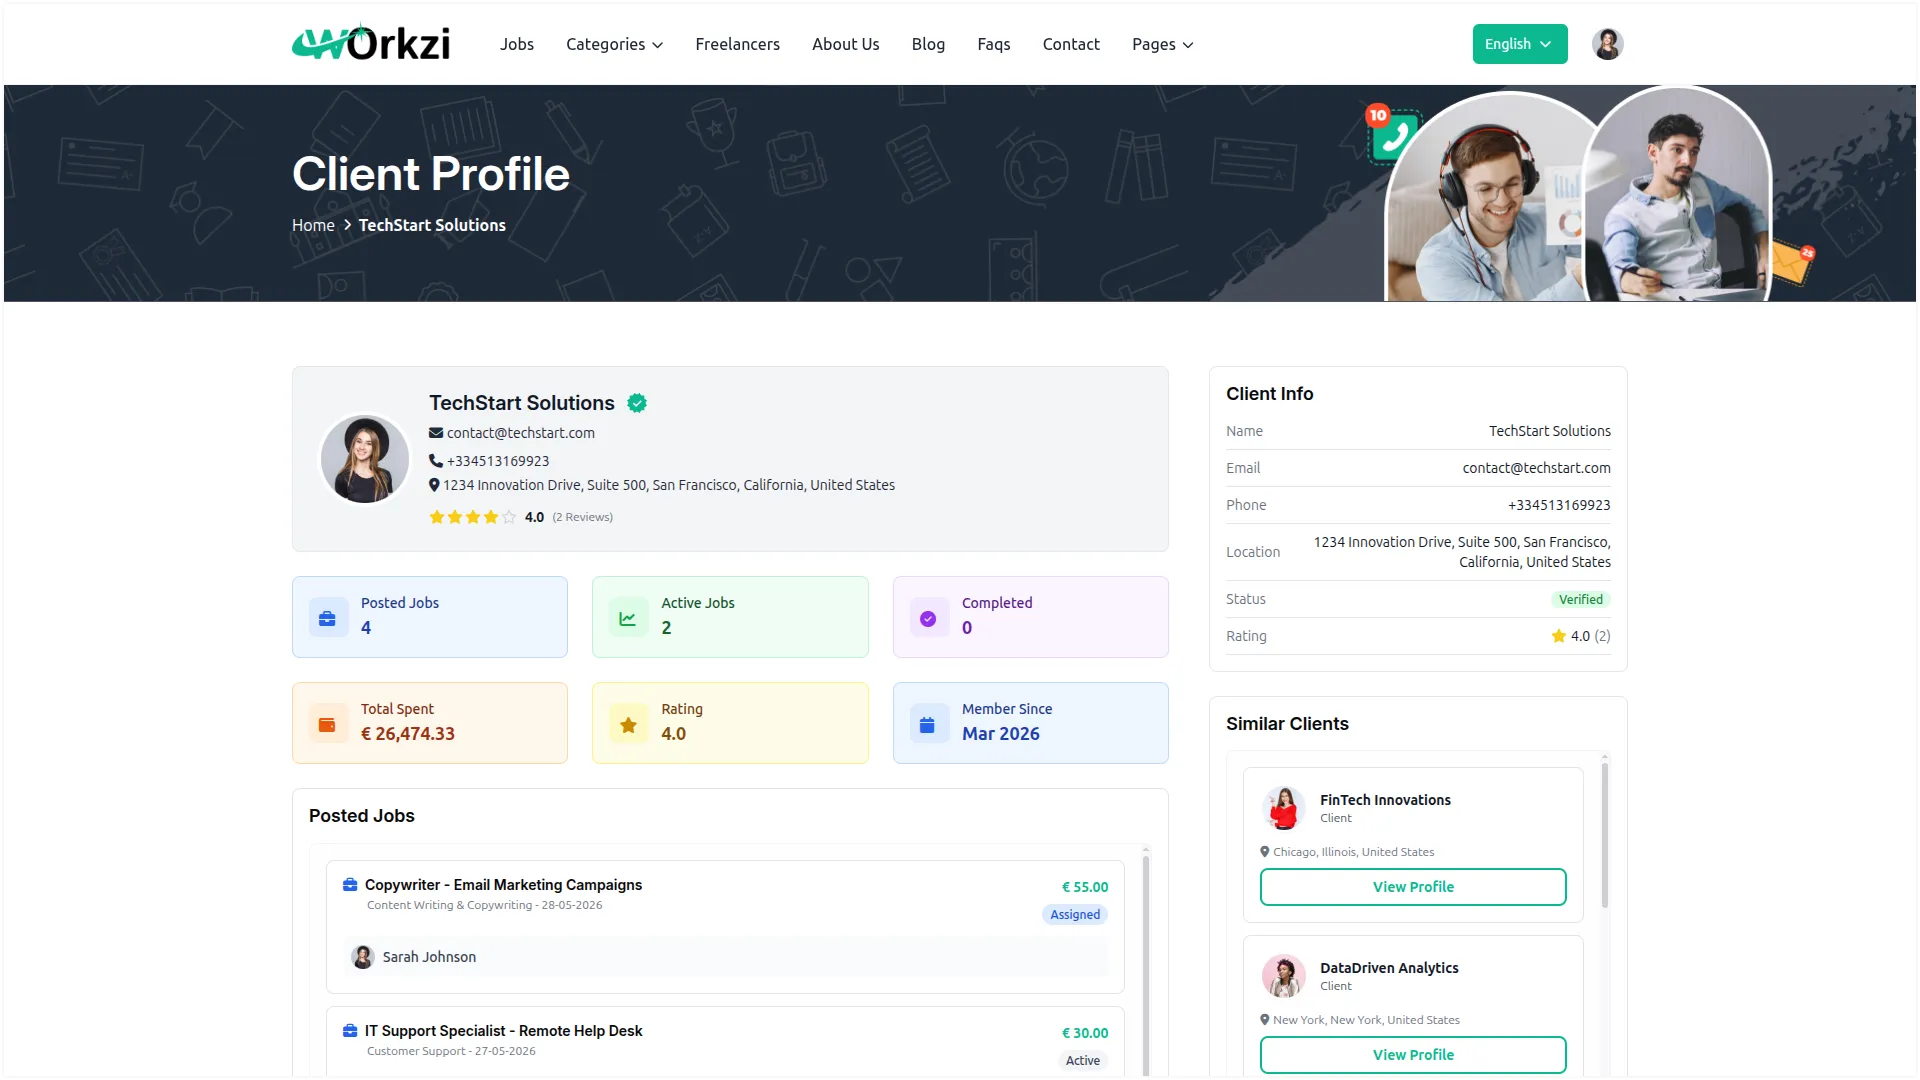
- This opens the client’s public-facing profile as visitors see it. It displays the client’s photo, name, contact details, location, and rating, along with stat cards for Posted Jobs, Active Jobs, Completed, Total Spent, Rating, and Member Since.
- Below that, Posted Jobs lists the client’s jobs with the assigned freelancer and status, Current Projects shows ongoing engagements with budget and assigned date, Completed Projects lists finished work, and Reviews About Client shows the feedback freelancers left for the client. A sidebar shows Client Info and Similar Clients.
My Jobs
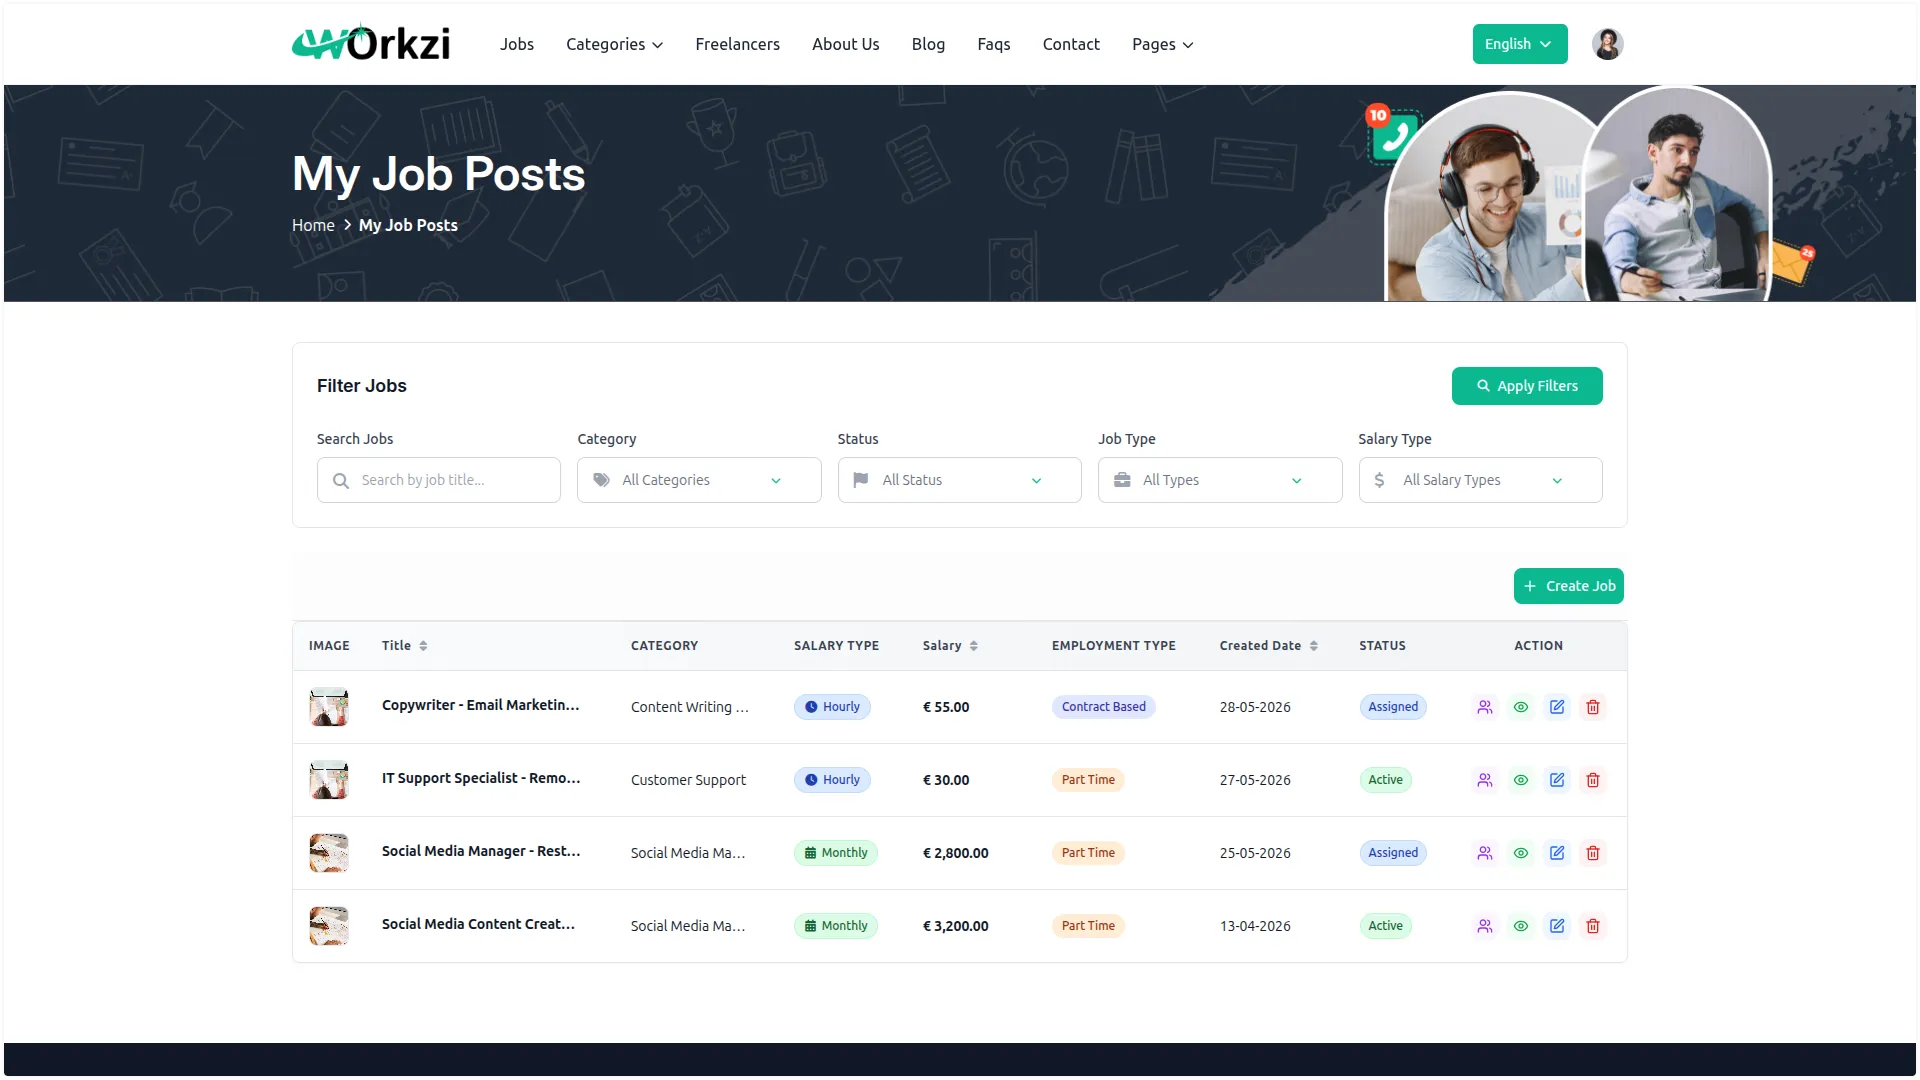
- Clients can create and manage job postings from the Jobs section. Clicking Create Job opens a form where the client can enter job details, including the job title, category, subcategory, salary type, salary amount, total budget, employment type, experience level, job type, work period, work location, availability date, and status.
- Clients can also upload a job image and supporting attachments, add a detailed job description, and include benefits and perks before publishing the job. Once submitted, the job becomes available for freelancers to view and apply for based on its status and visibility settings.
- The page displays a table with columns for Image, Title, Category, Salary Type, Salary, Employment Type, Created Date, Status (Active, Assigned, or In Progress), and Action. The client can search by job title and filter by Category, Status, Job Type, and Salary Type.
- From the Action column, the client can view applications, view the job, edit it, or delete it. Once a job is Assigned, it is removed from public listings and no longer accepts new applications.
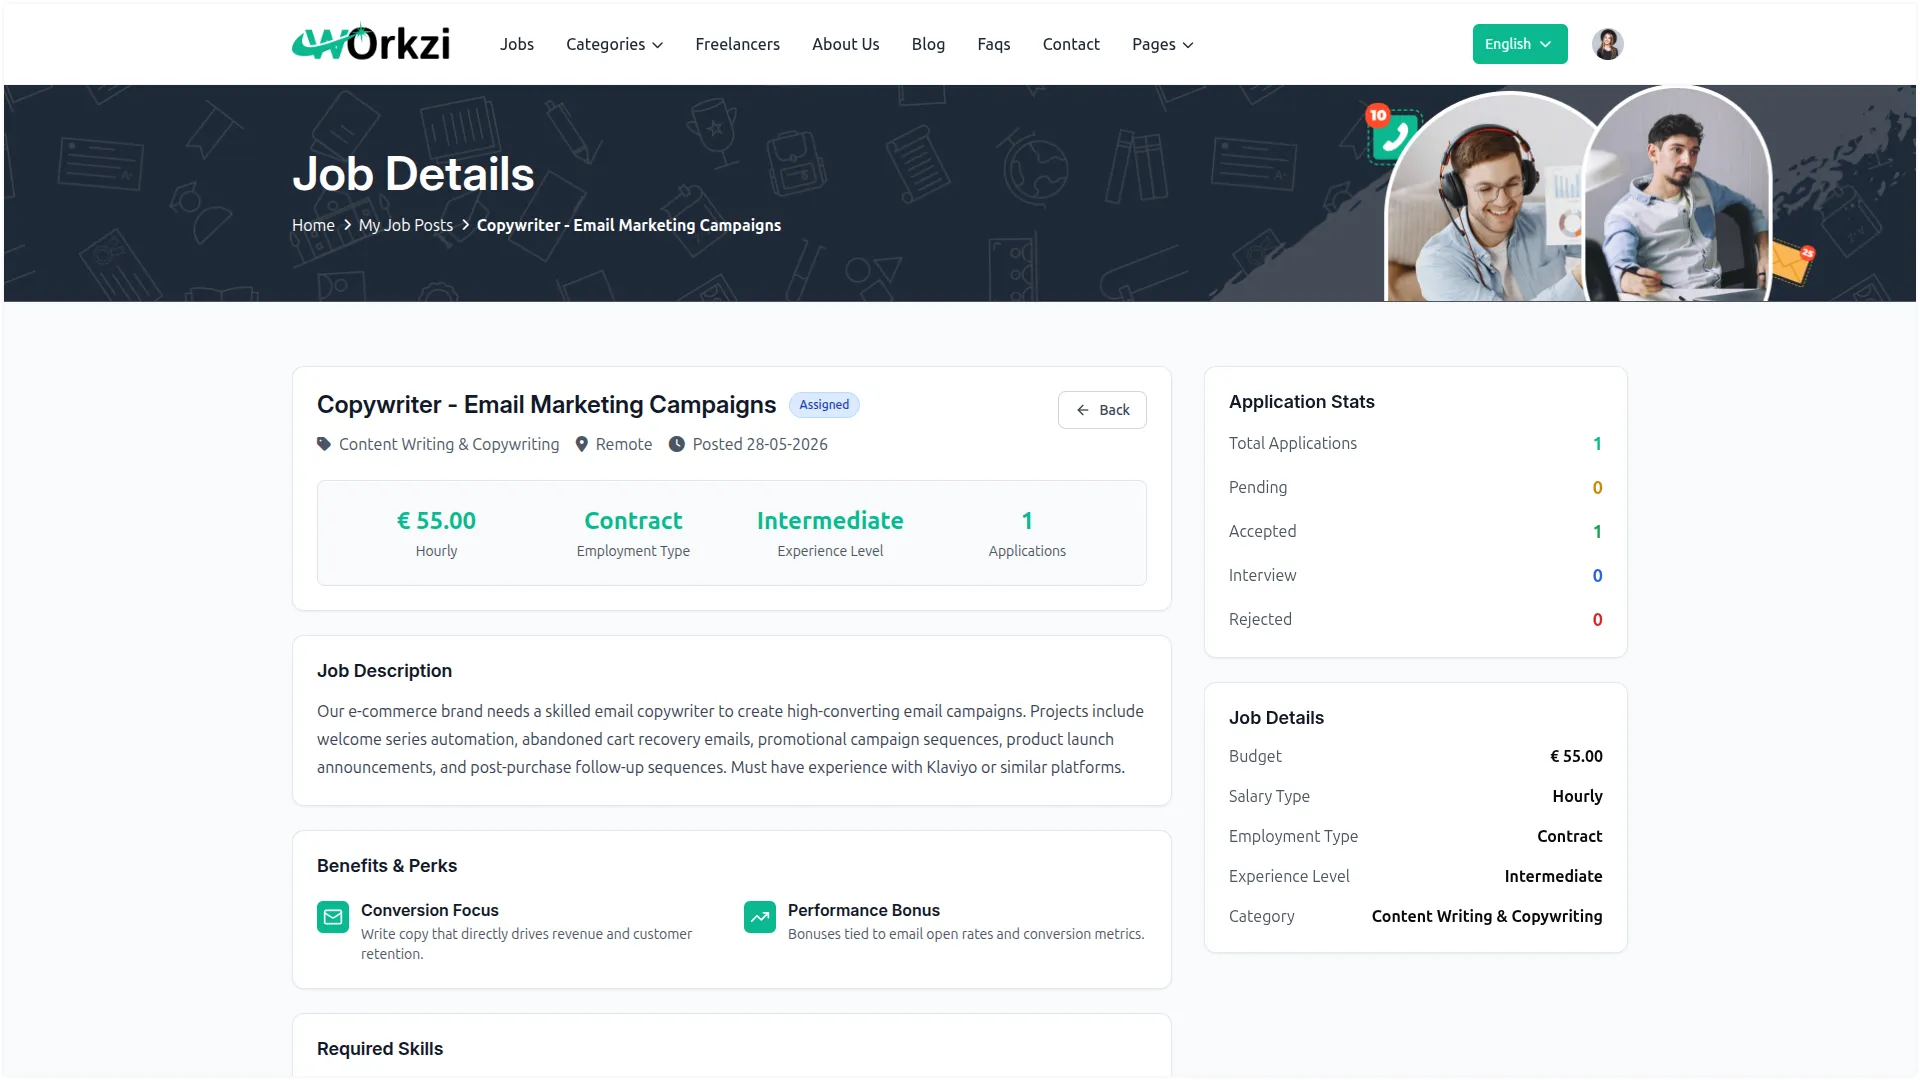
Job Details
- Opening a posted job shows its full details. The Application Stats panel shows Total Applications, Pending, Accepted, Interview, and Rejected counts. The page also displays the Job Description, Benefits & Perks, Required Skills, and Additional Information (Available From and Work Period), with a sidebar showing Budget, Salary Type, Employment Type, Experience Level, and Category.
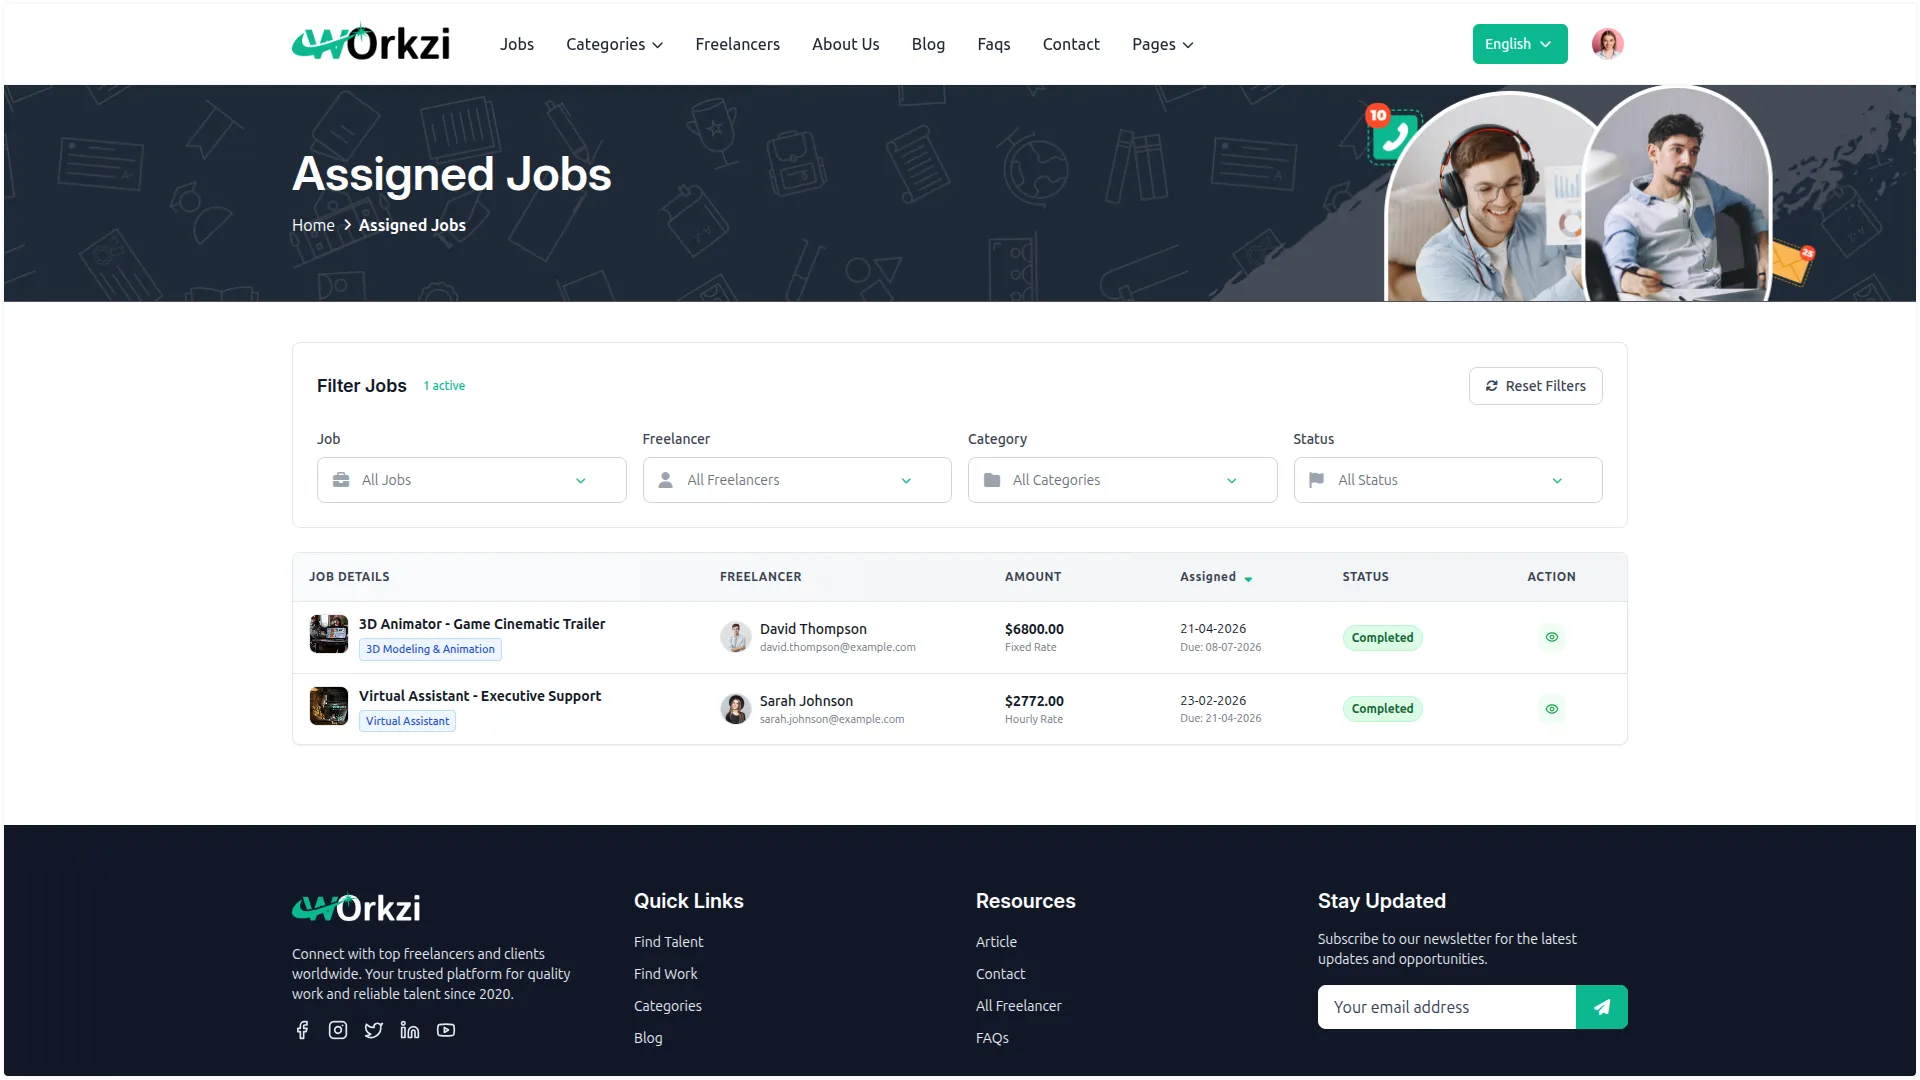
Assigned Jobs
- This page lists the jobs the client has assigned to freelancers. The table shows Job Details, Freelancer, Amount, Assigned/Due dates, and Status (Assigned or Disputed), and the client can filter by Job, Freelancer, Category, and Status. In the action column, Clicking the view button opens the assigned job, where the client can communicate directly with the freelancer.
- Client clicks the star icon to open the Submit Review modal, where they select a Rating (required) and add an optional Review before clicking Submit Review to rate the freelancer for that job. The eye icon opens the job’s detail view.
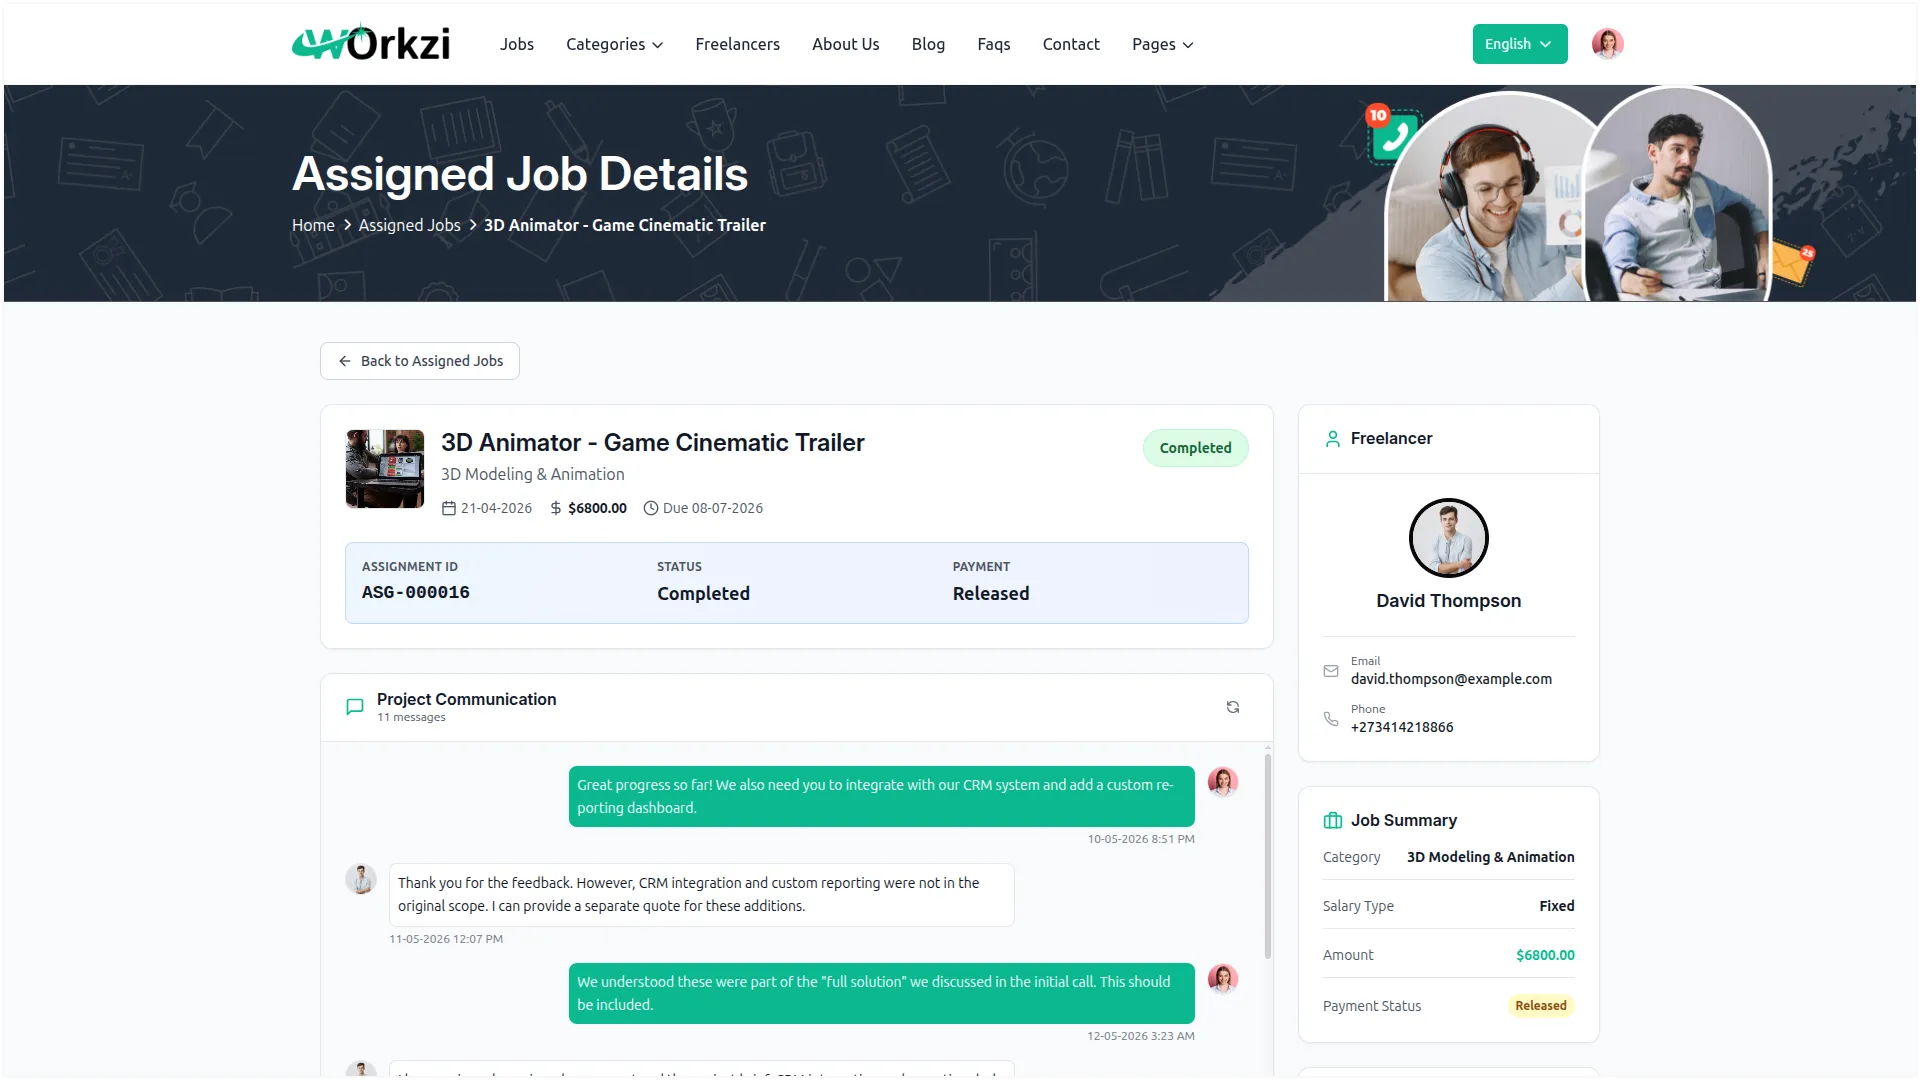
Assigned Job Details
- This page shows the full details of one assigned job. The header displays the title, category, date, amount, and due date, followed by the Assignment ID, Status, and Payment status (such as Escrowed or Refunded). The Project Communication panel lets the client message the freelancer, and Assignment Notes show any notes for the engagement.
- The sidebar shows the Freelancer’s information, a Job Summary (Category, Salary Type, Amount, Payment Status), and a Project Timeline tracking events such as Job Assigned and Work Started.
My Disputes
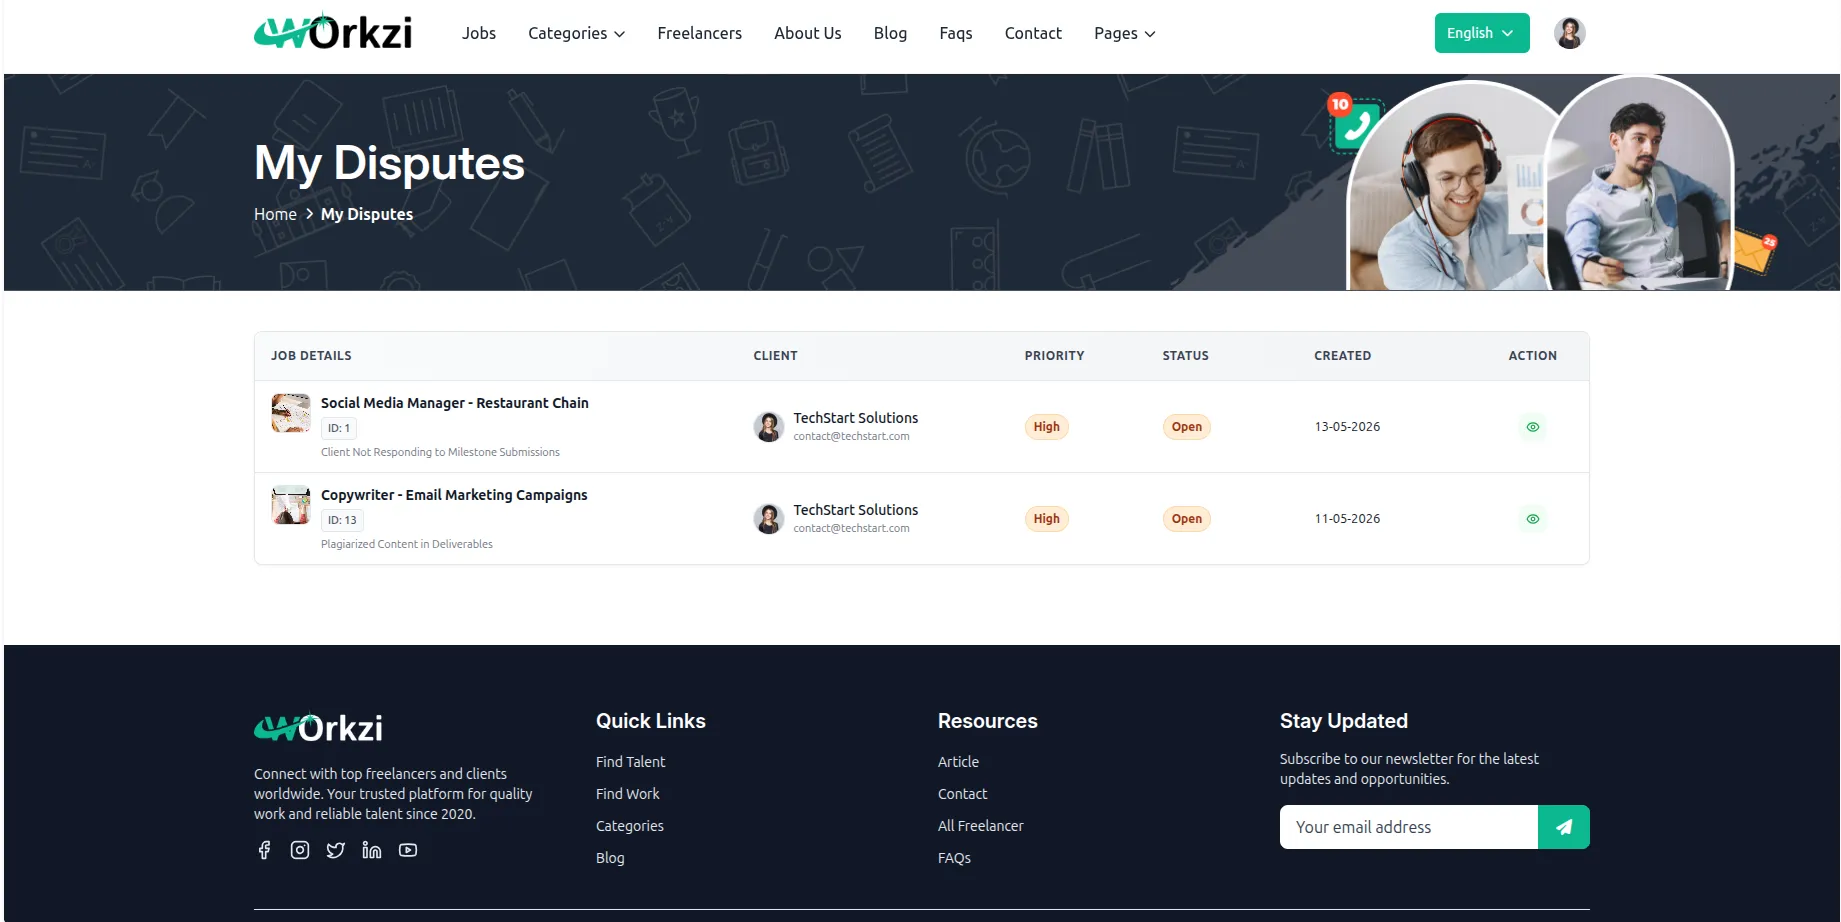
- This page lists the disputes connected to the client’s jobs. The table shows the Job, Freelancer, Priority, Status, and Created date, with a view button to open each dispute.
Dispute Details
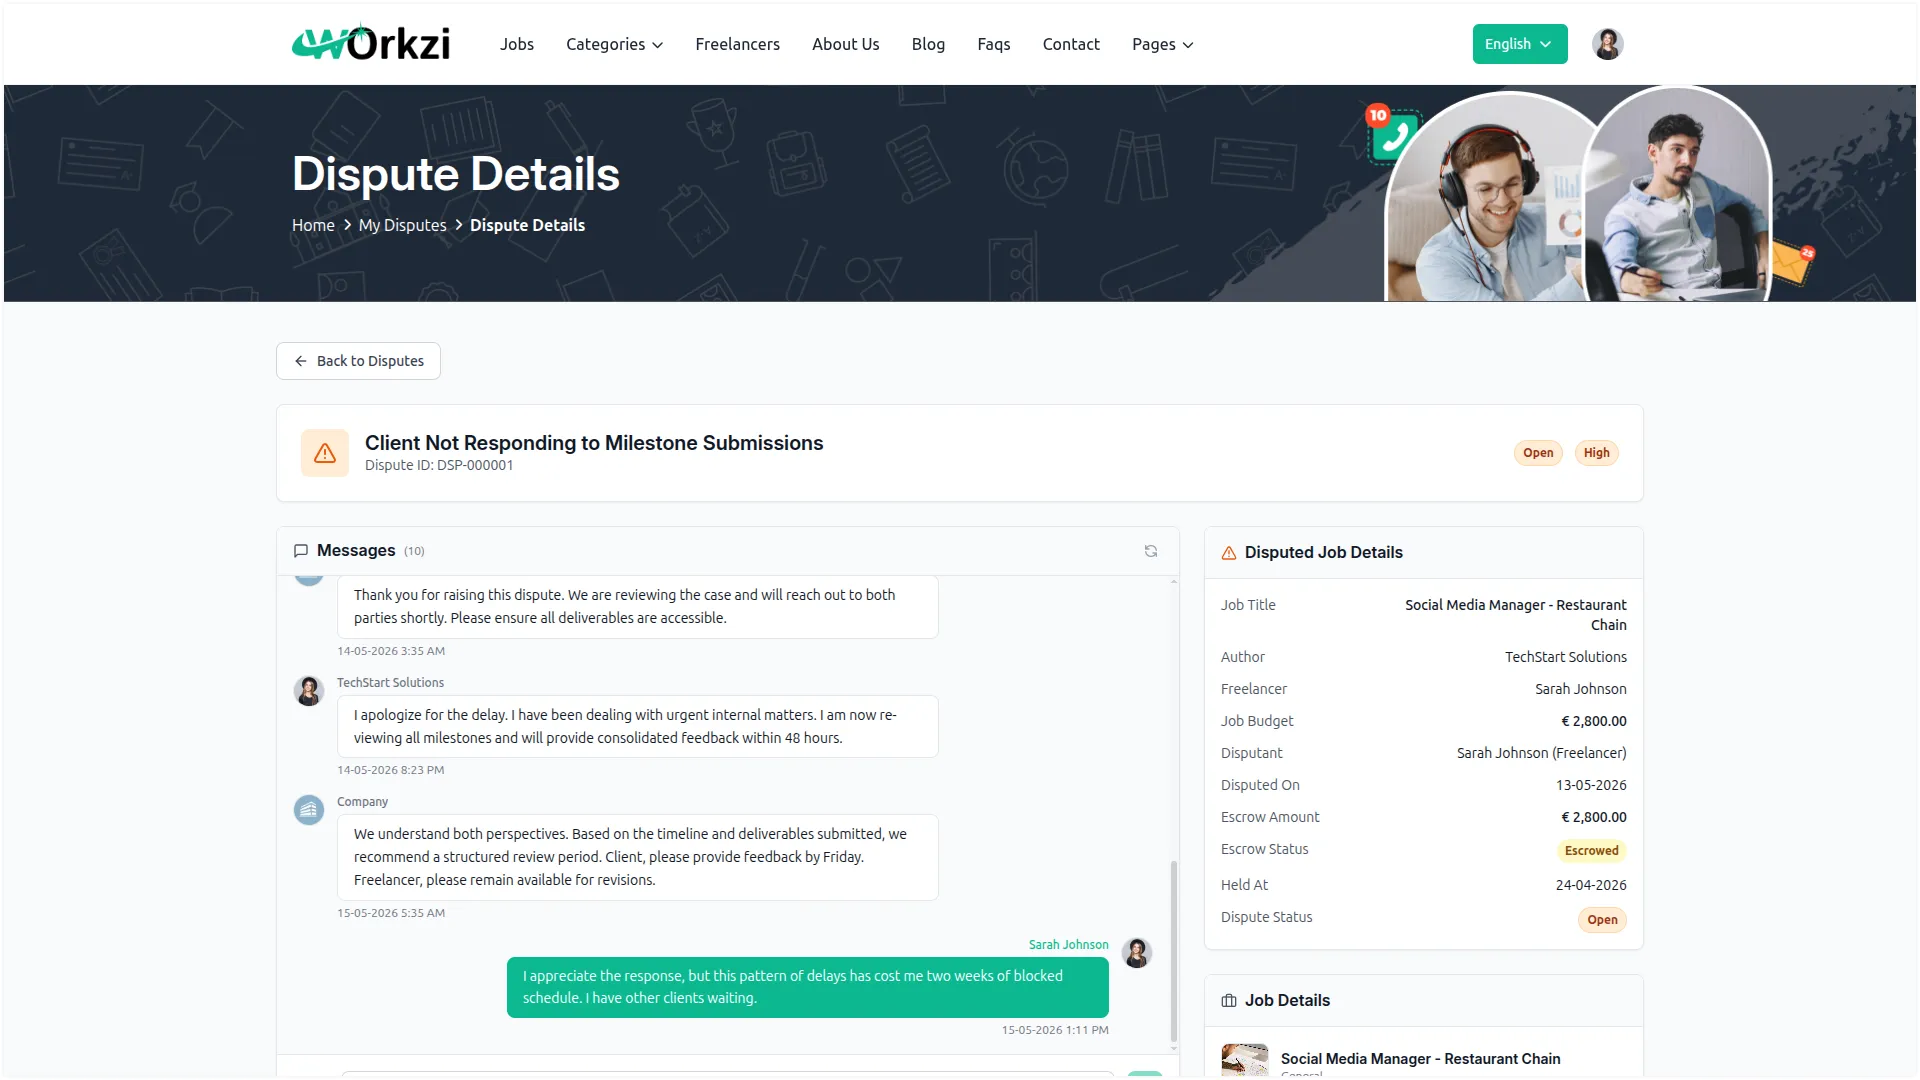
- This page shows the full details of a dispute. It displays the dispute title and Dispute ID along with its status and priority; a Messages thread between the client, freelancer, and the Company (the admin); and a Disputed Job Details panel listing the Job Title, Author, Freelancer, Job Budget, Disputant, Disputed On date, Escrow Amount, Escrow Status, Held At date, and Dispute Status.
- Below the Messages thread, the Dispute Reason section shows the disputant’s full statement. The right sidebar also includes a Job Details card listing the Job Title, category, Type, and Amount, and a Freelancer card showing the freelancer’s name, Email, and Phone.
- The Company resolves the dispute, and the outcome is reflected in the escrow status and both wallets.
My Wallet
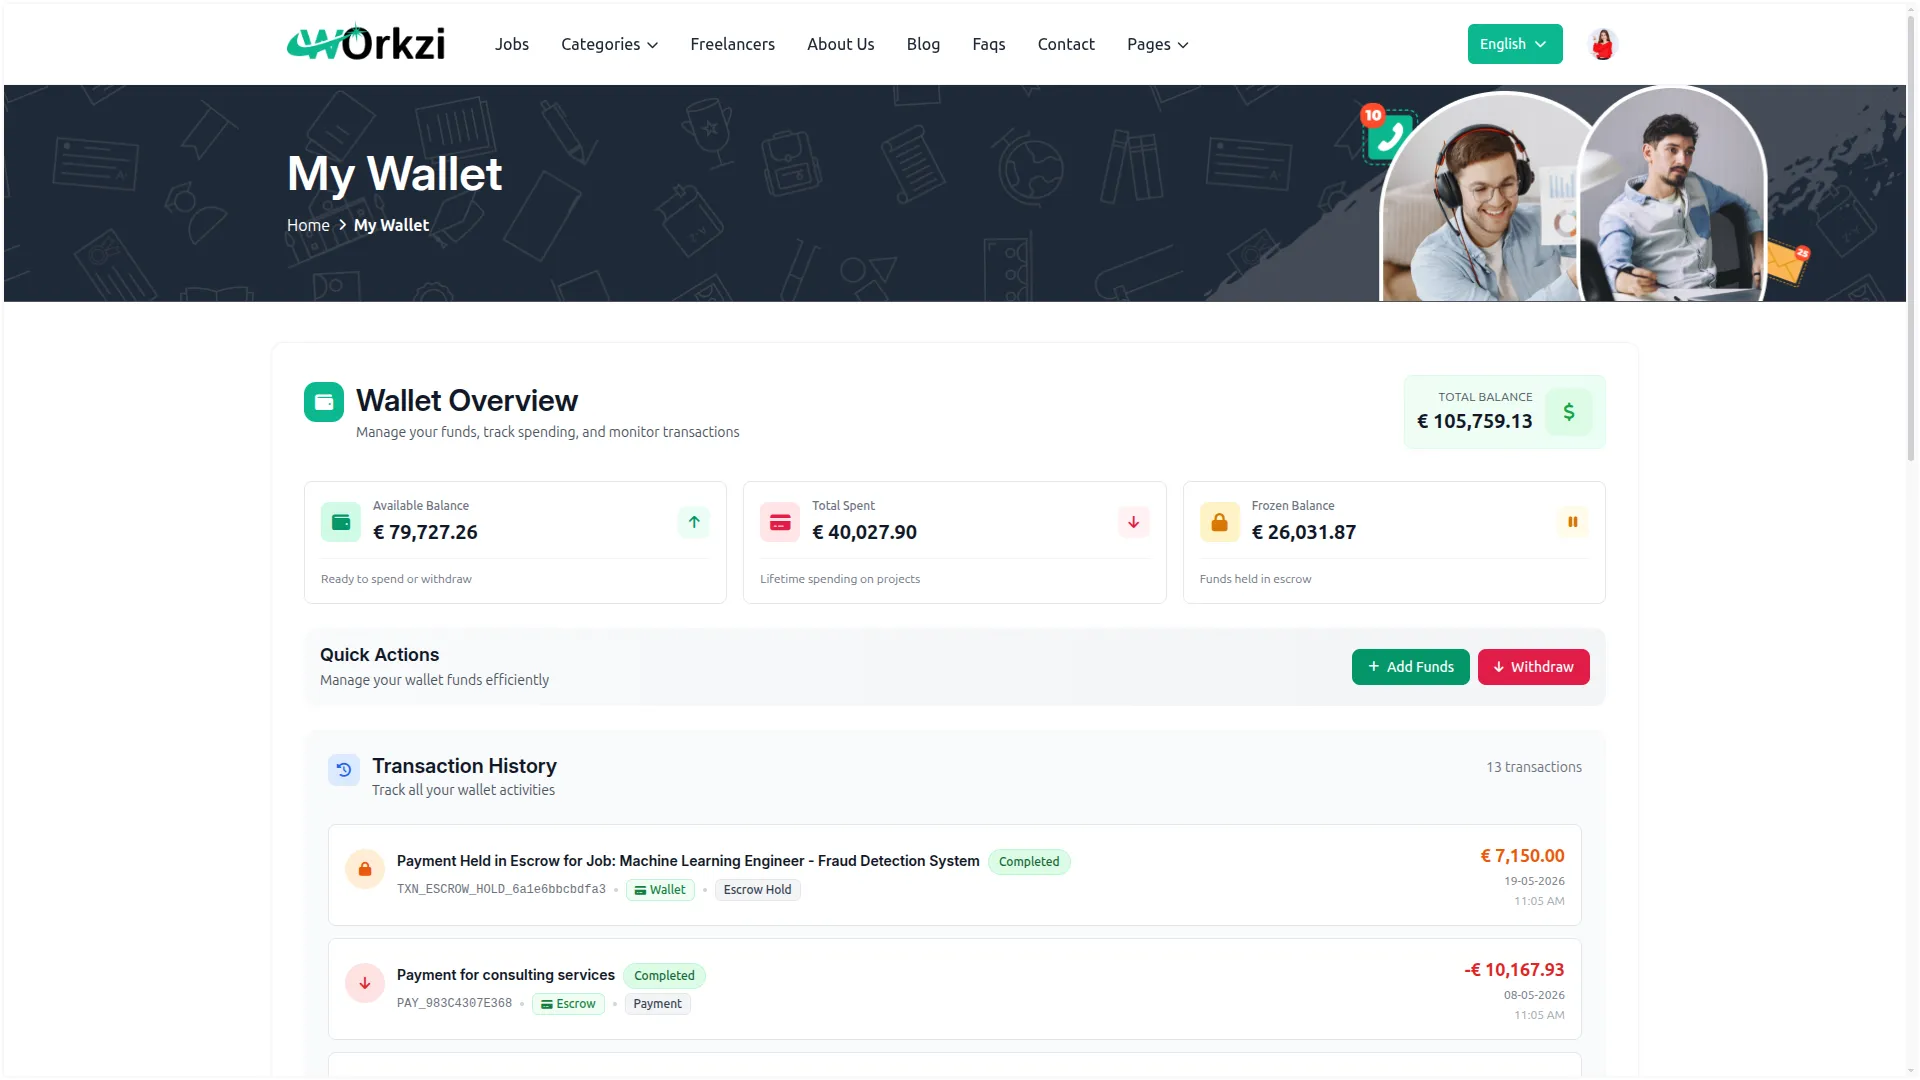
- This is where the client manages their funds. The Wallet Overview shows the Total Balance, along with cards for Available Balance, Total Spent, and Frozen Balance (funds held in escrow).
- The Quick Actions area provides Add Funds and Withdraw buttons, and the Transaction History lists all wallet activity such as deposits, escrow releases, and dispute refunds. Clicking Add Funds opens a window where the client enters a Deposit Amount, selects a payment method (Stripe or PayPal), and confirms; the funds are added immediately.
- Clicking Withdraw opens a window where the client enters a Withdrawal Amount (minimum $1.00) and optional Comments, then submits the request; withdrawal requests require admin approval and the amount is temporarily frozen until processed.
Freelancer Profile
My Profile
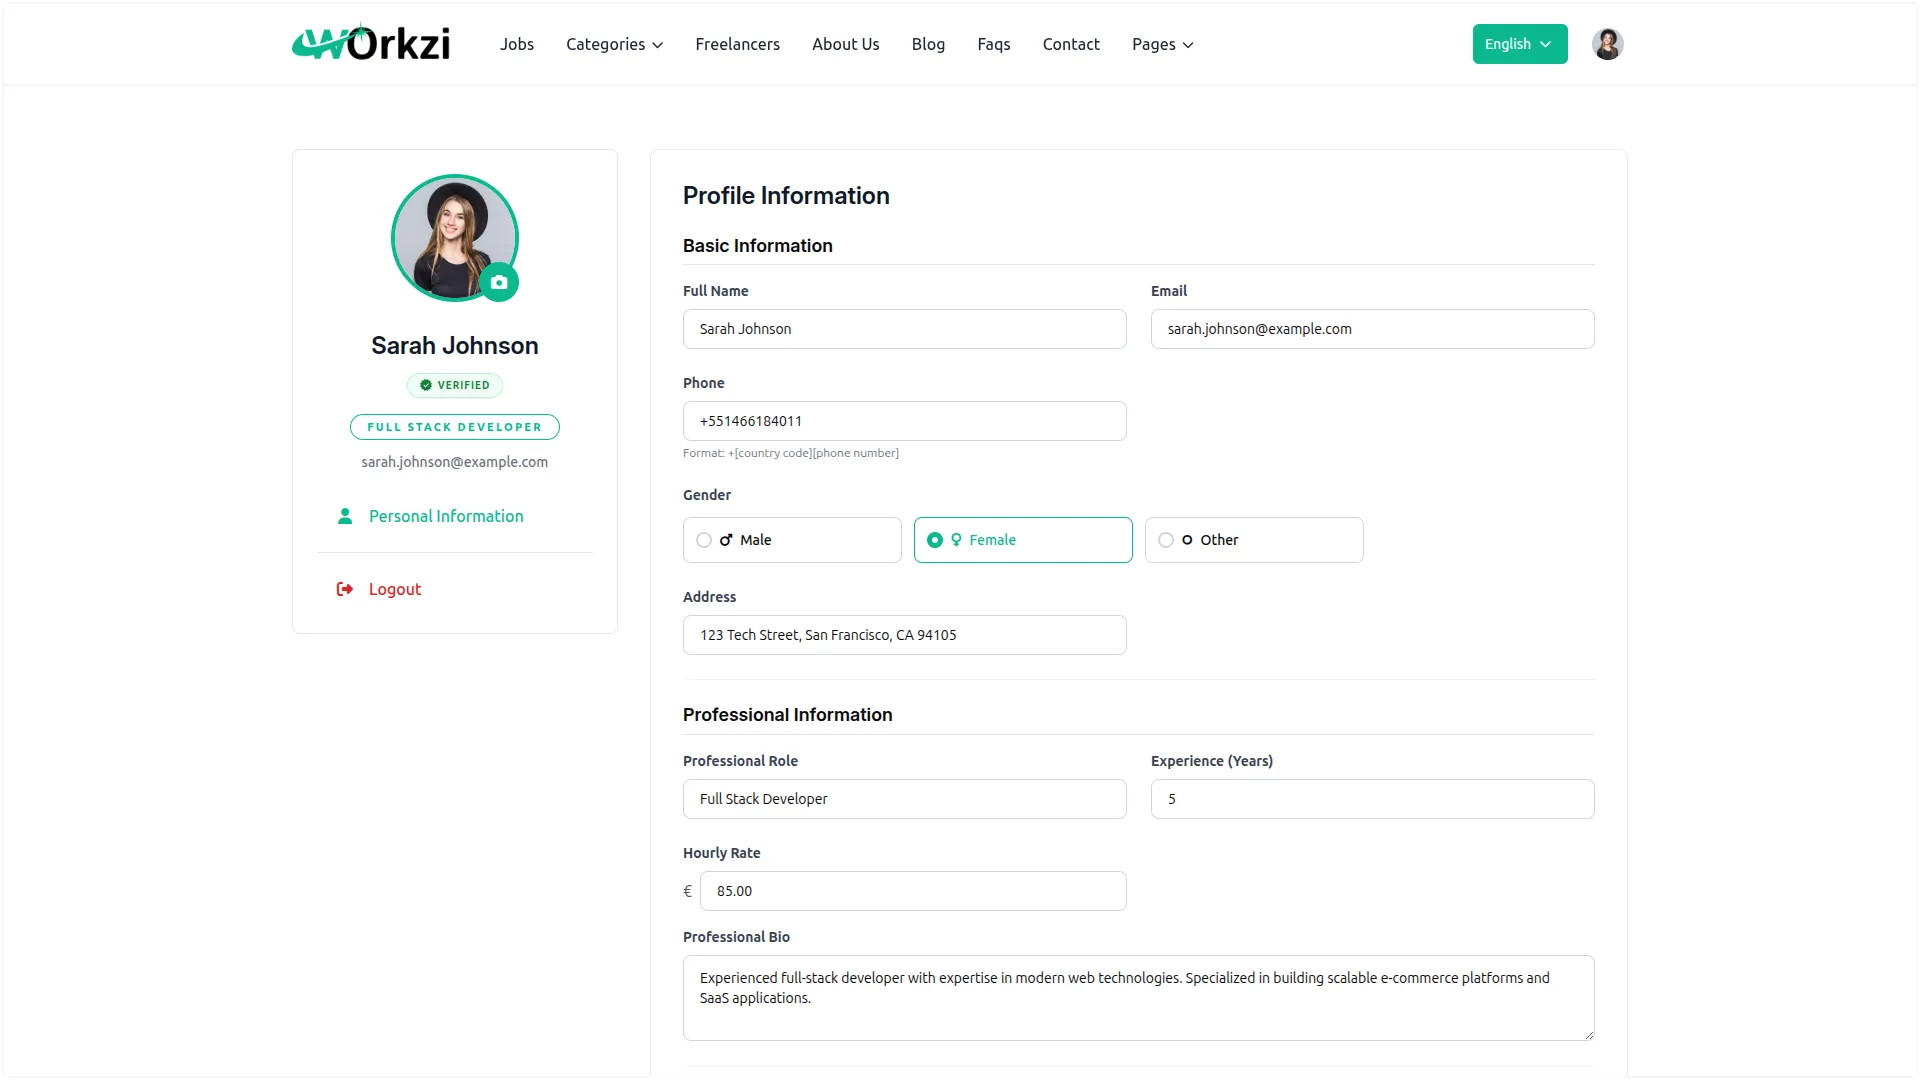
- This is where the freelancer builds their account, and it is more detailed than the client profile. Under ‘Basic Information’, the freelancer enters their Full Name, Email, Phone, Gender, and Address.
- Under Professional Information, they enter their Professional Role, Experience (Years), Hourly Rate, and Professional Bio.
- In the Skills section, the freelancer adds relevant skills by choosing from the added, Popular, and Trending skills. In Languages Spoken, they add the languages they speak.
- In the Qualifications section, they enter each qualification with its Degree/Certificate, Year, Institution, and Grade/Marks, click Add Qualification to add more, and use the delete icon to remove any.
- In the Bank Details section, they enter their secure banking details, including Account Holder Name, Bank Name, Bank Branch, Account Type, Account Number, and IFSC Code, used for payment processing and withdrawals. After updating the details, the freelancer clicks Save Changes.
- The Verification page is where the freelancer uploads the documents required to verify their account, such as Government ID, Proof of Address, and Professional Certificate. Each document shows its name, description, allowed file rules, and current status, with options to download, view, or replace the file.
- After uploading the required documents, the freelancer clicks Submit to send the request for review. The document slots shown here are controlled by the Verification Documents settings in System Setup.
- Once approved by the admin, a verified badge appears on the freelancer’s public profile; if rejected, a “Verification Needs Attention” banner prompts them to resubmit.
View Public Profile
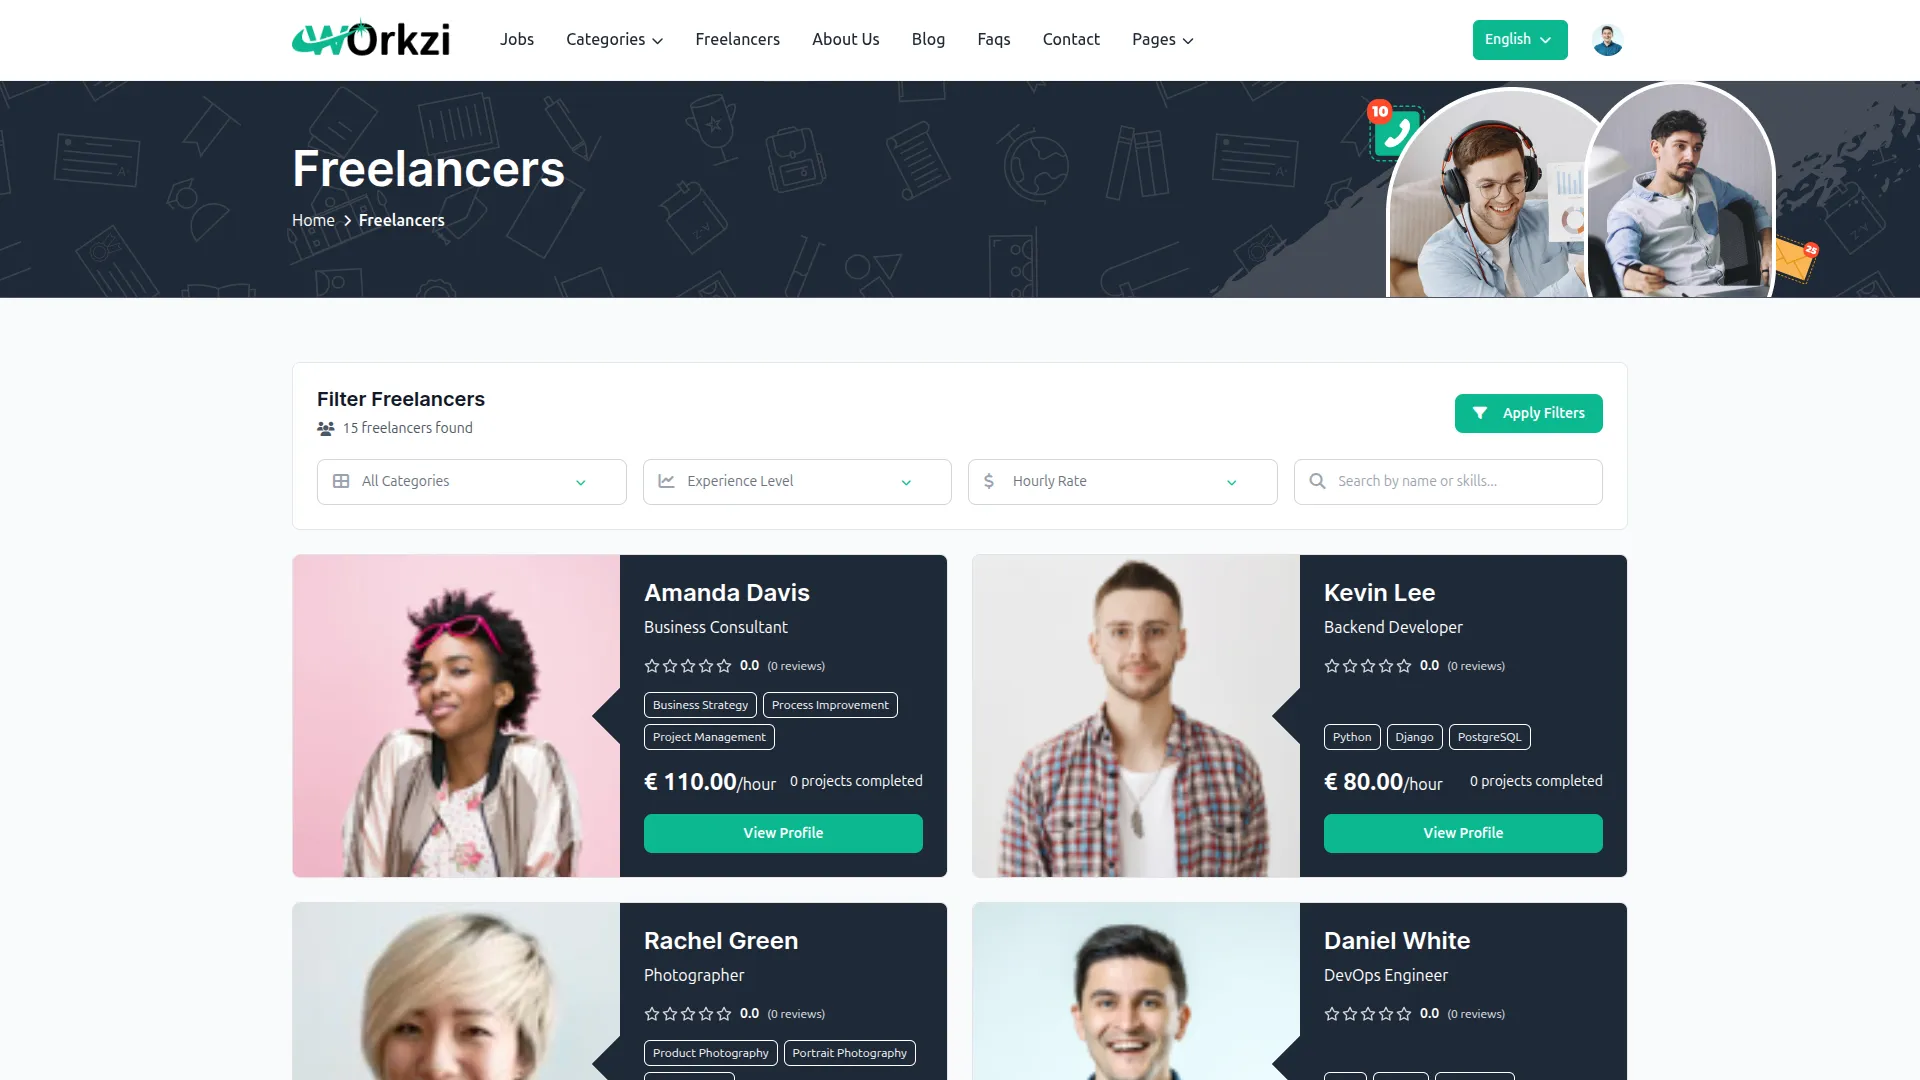
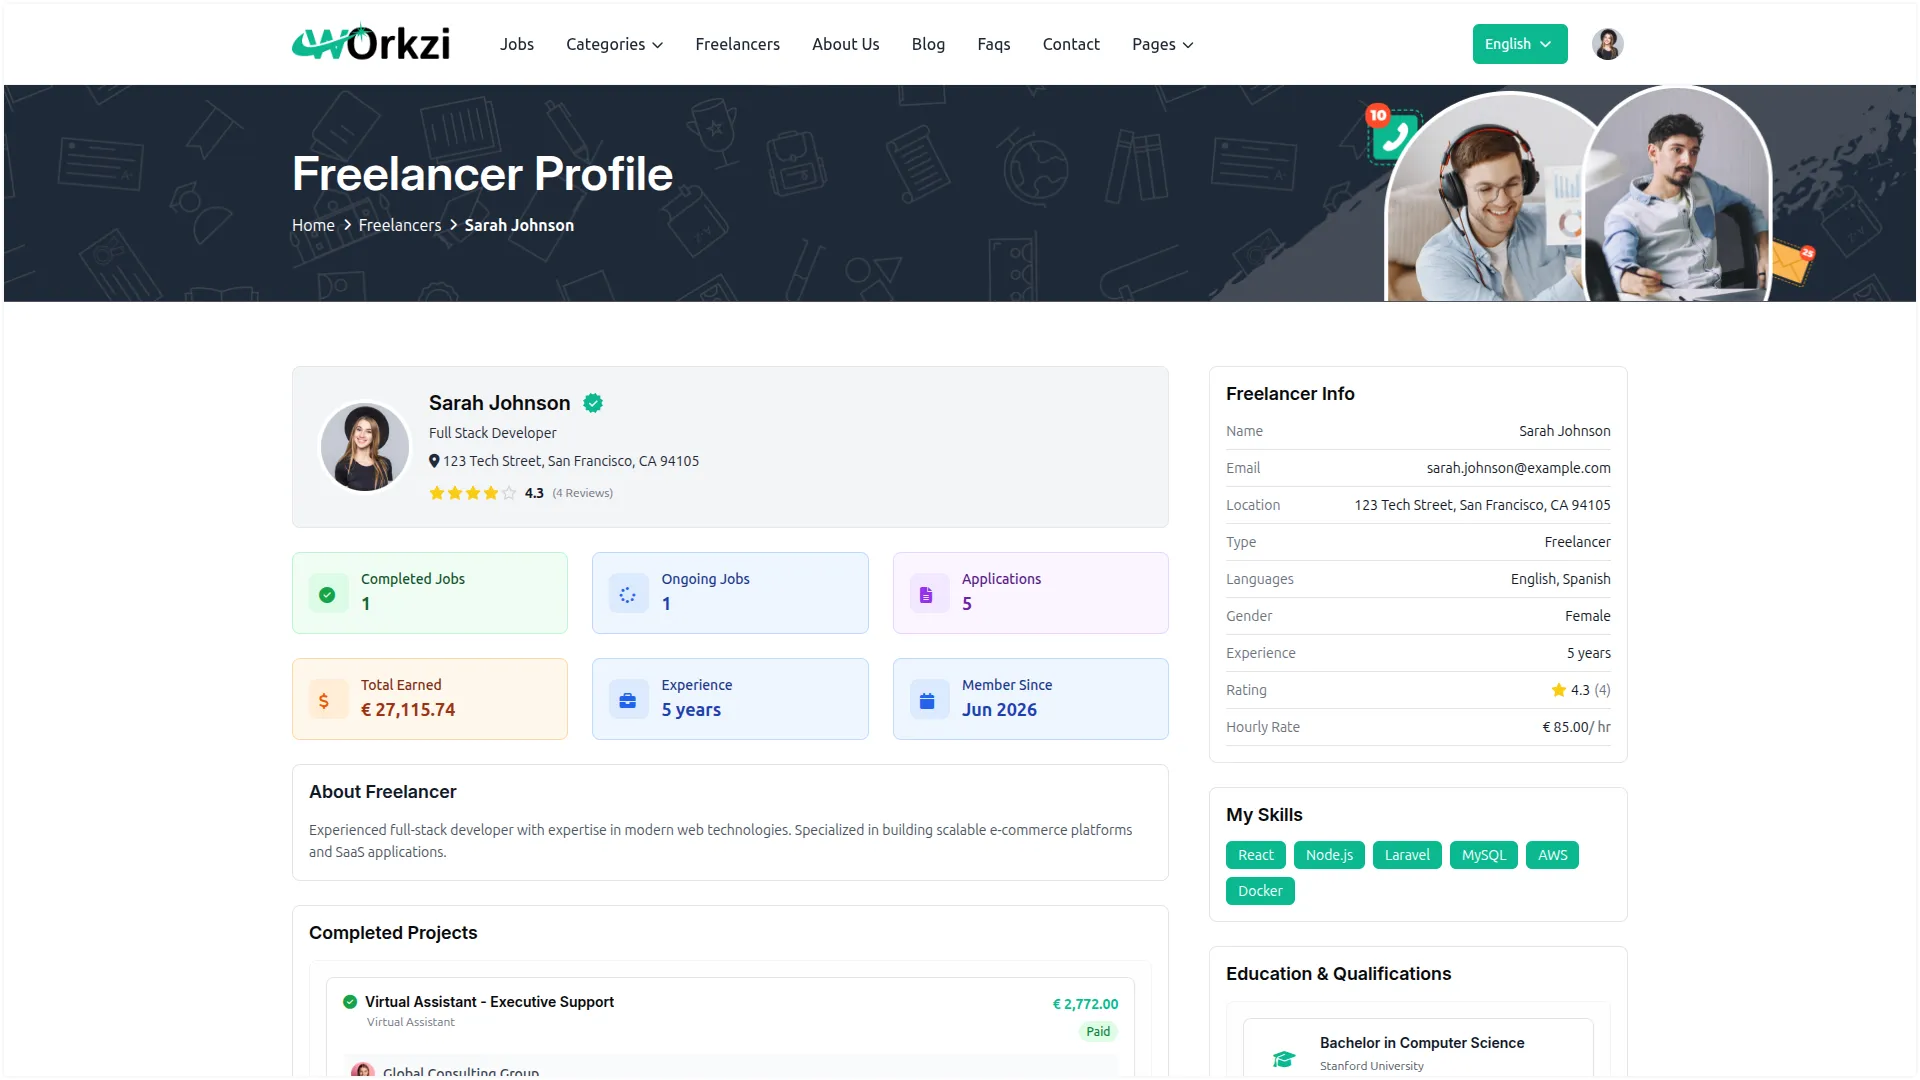
- This opens the freelancer’s public-facing profile as clients see it. It displays the freelancer’s photo, name, role, location, and rating, along with stat cards for Completed Jobs, Ongoing Jobs, Applications, Total Earned, Experience, and Member Since.
- Below that, About Freelancer shows the bio, Completed Projects lists finished work, Current Projects shows ongoing work with a progress percentage, and Reviews About Freelancer shows client feedback. A sidebar displays Freelancer Info, My Skills, Education & Qualifications, and Recent Applications with their status.
My Applications
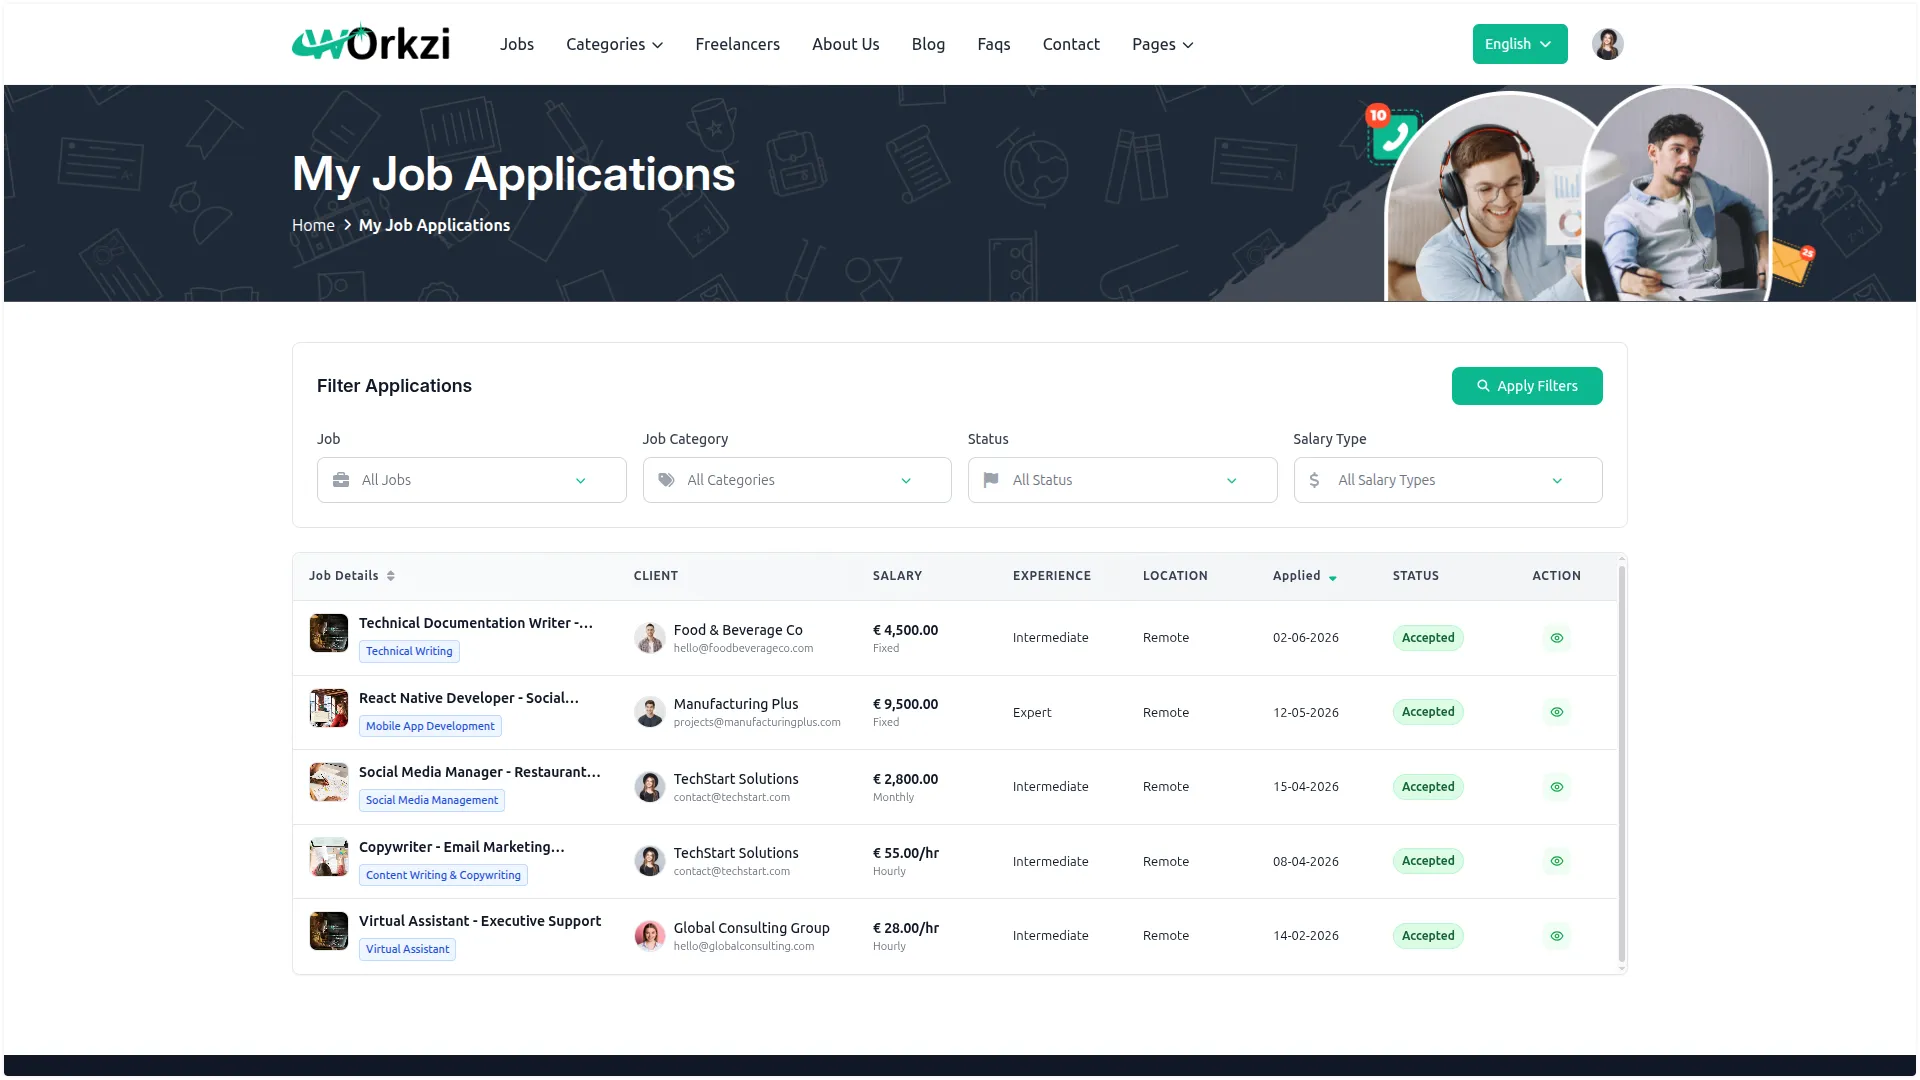
- This page lists the jobs the freelancer has applied to. The table shows Job Details, Client, Salary, Experience, Location, Applied date, and Status (Pending or Accepted), and the freelancer can filter by Job, Job Category, Status, and Salary Type.
- From the Action column, the freelancer can view an application, and Pending applications can be edited or deleted while Accepted applications are view-only.
Saved Jobs
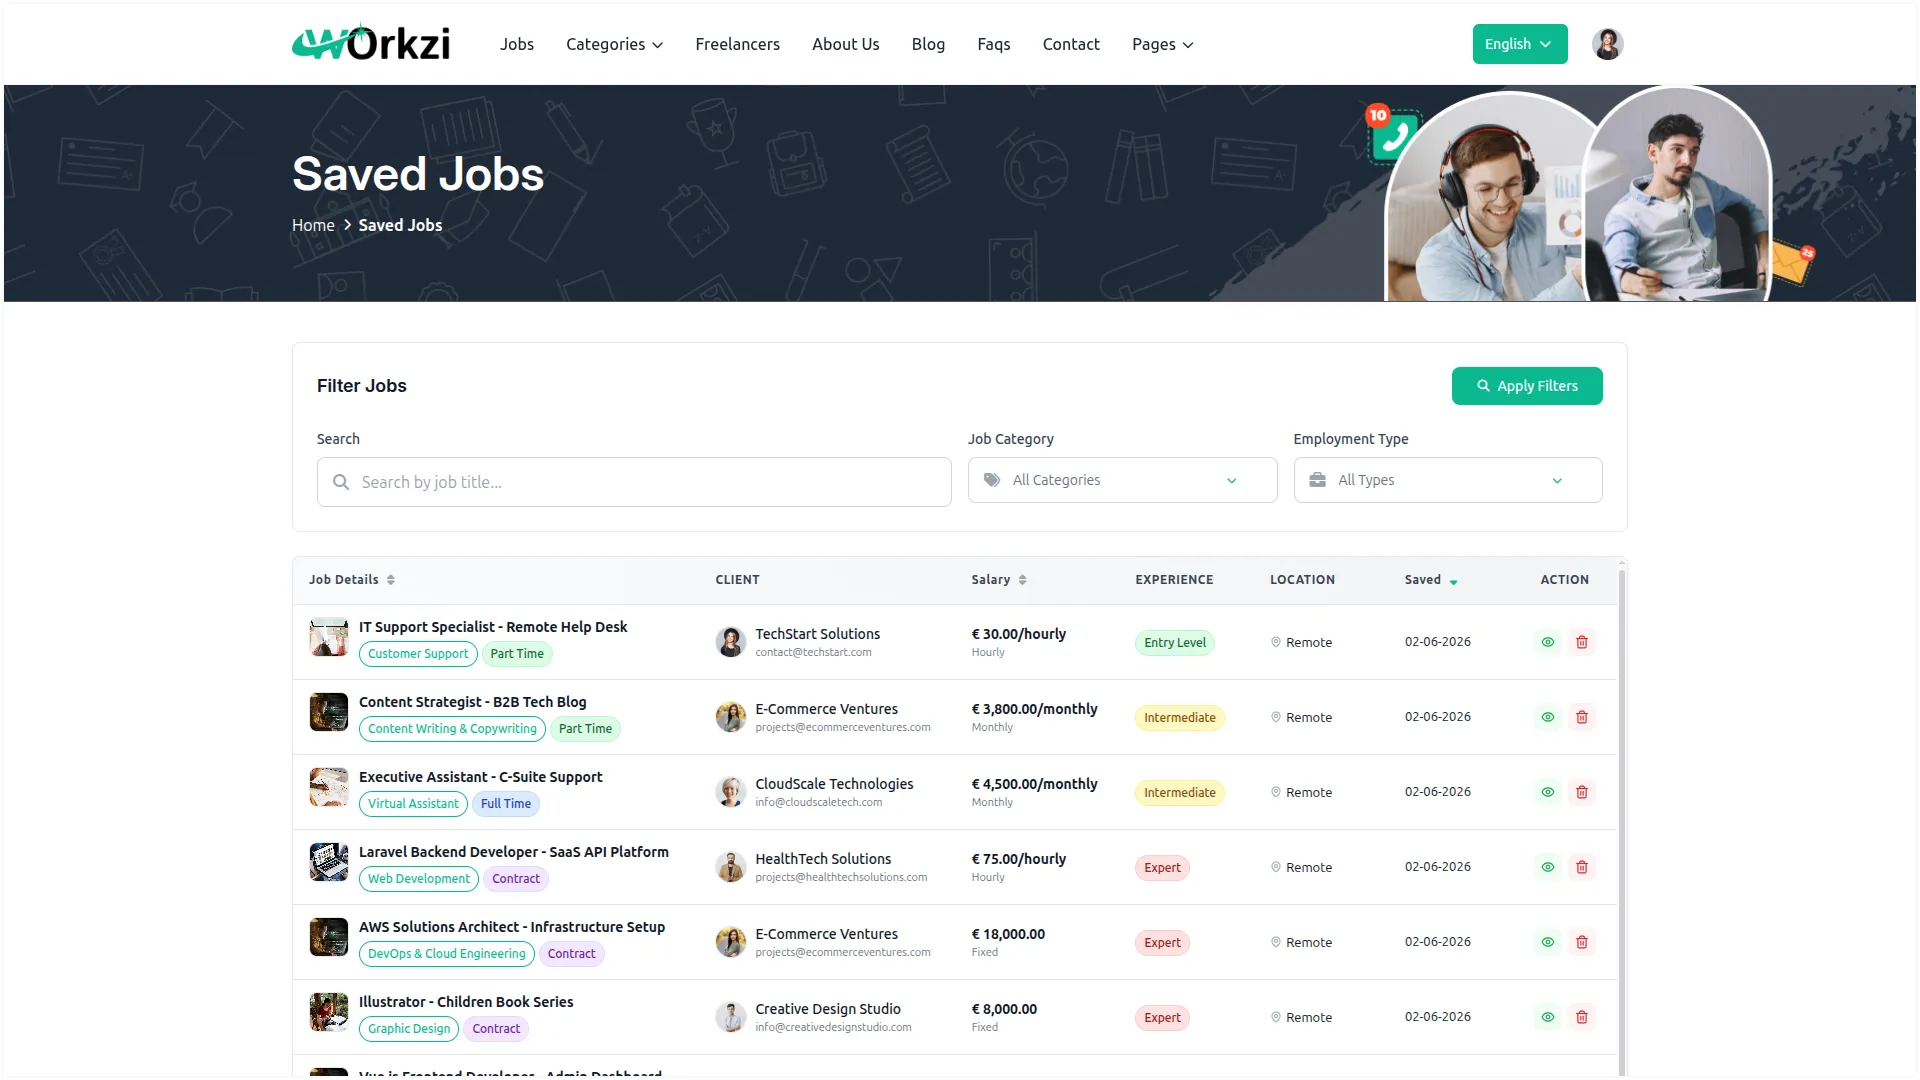
- This page lists the jobs the freelancer has bookmarked for later. The table shows Job Details, Client, Salary, Experience, Location, and the Saved date, and the freelancer can search and filter by Job Category and Employment Type. From the Action column, the freelancer can view the job or remove it from saved jobs.
Job Details
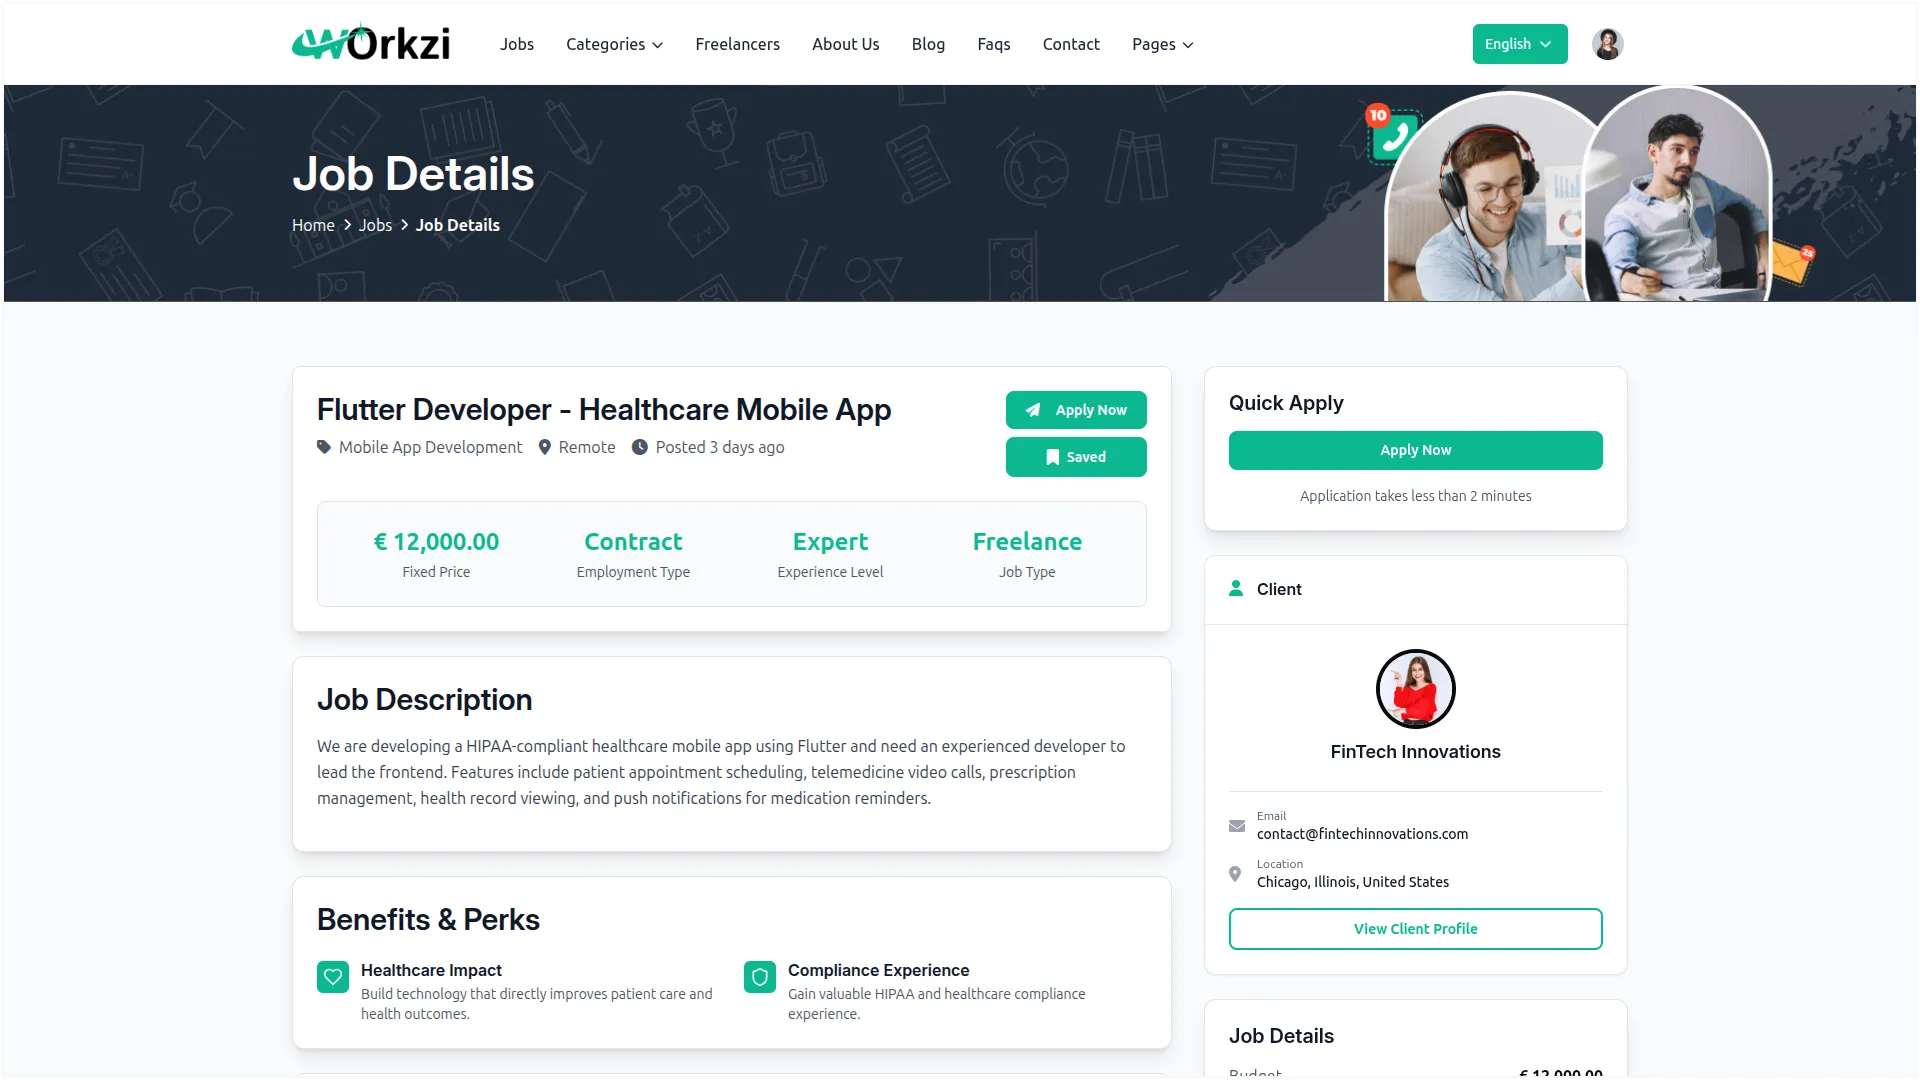
- When browsing a job, the freelancer sees its full details with an Apply Now button and a Save button. The page shows the salary, employment type, experience level, and job type, followed by the Job Description, Benefits & Perks, Skills & Technologies, and Additional Information.
- The sidebar shows the Client card with a View Client Profile link, the Job Details summary, and Related Jobs. Clicking Apply Now opens the Apply for Job window, where the freelancer’s Personal Information is auto-filled from their profile, and they write a Cover Letter in the rich-text editor, attach a Resume/CV (PDF, DOC, or DOCX), add any Additional Notes, and click Submit Application.
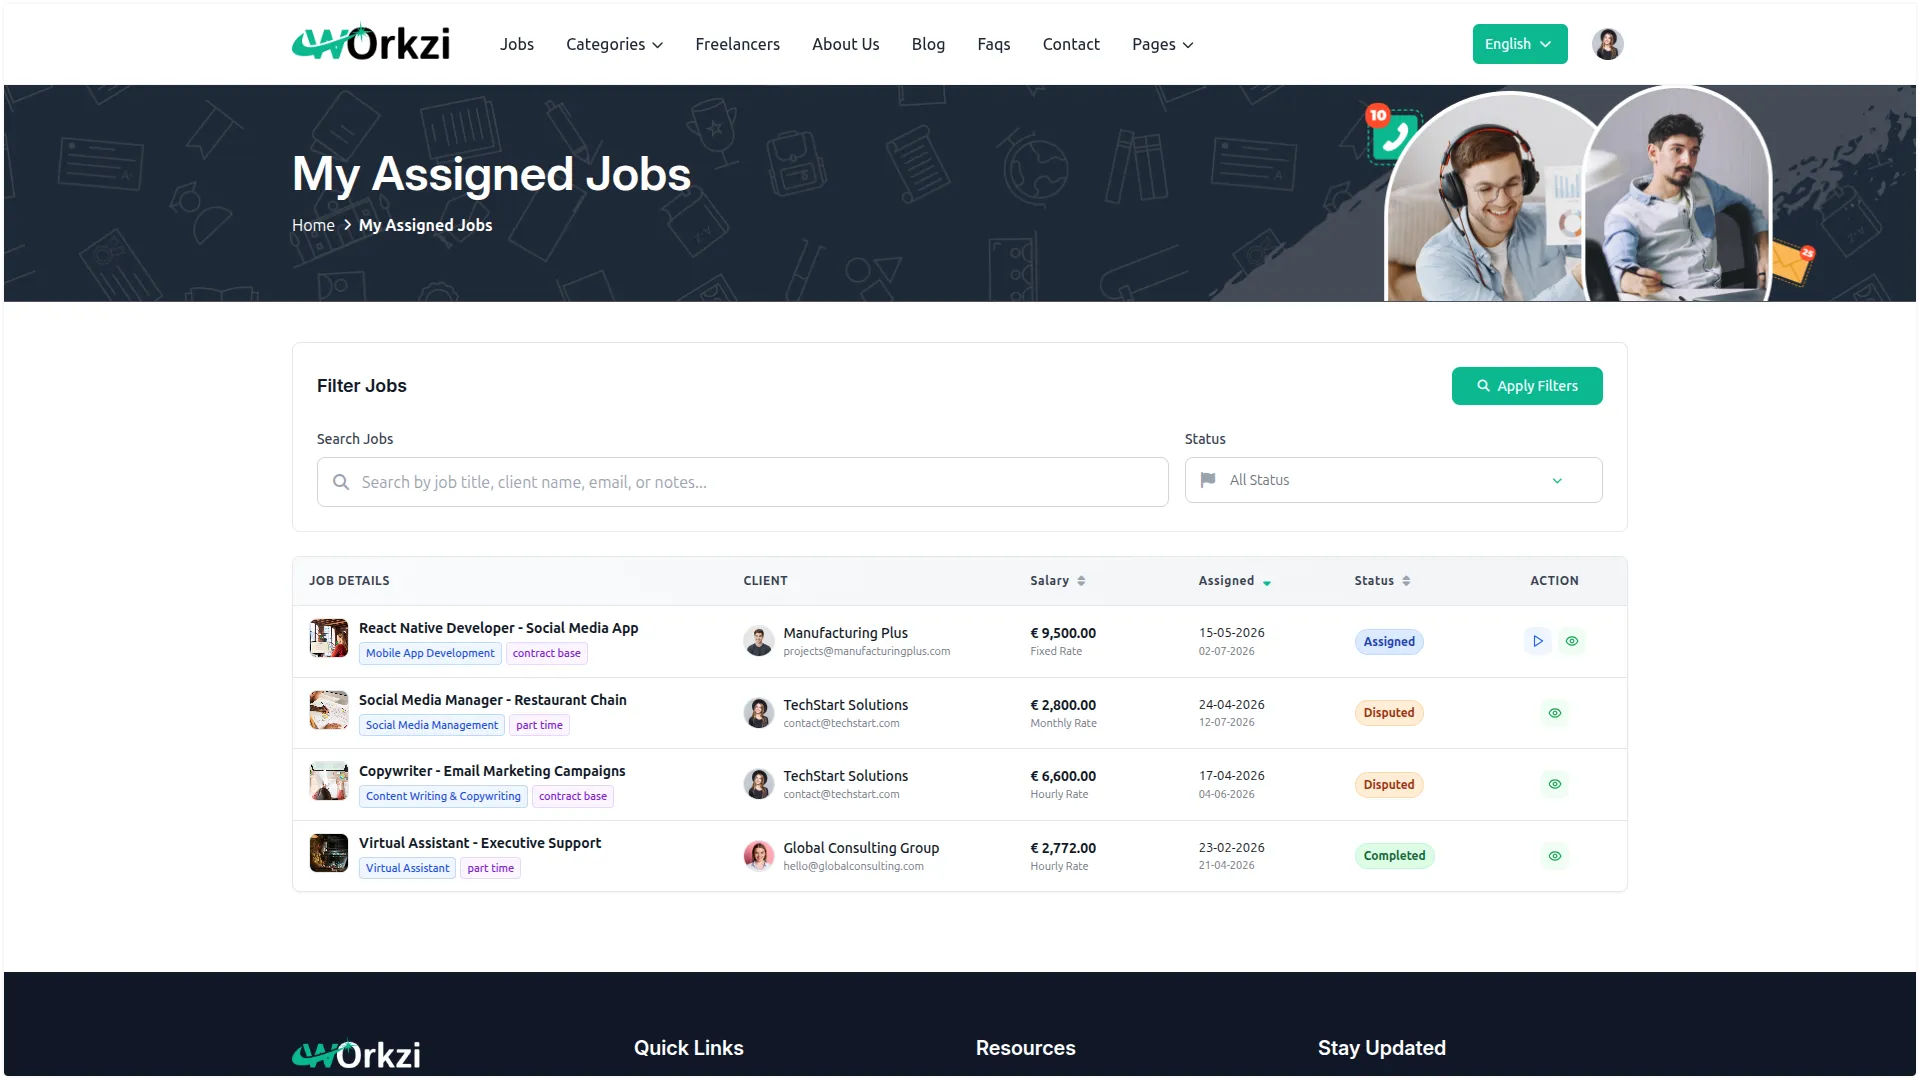
My Assigned Jobs
- This page lists the jobs assigned to the freelancer. The table shows Job Details, Client, Salary, Assigned/Due dates, Status, and Action, and the freelancer can search and filter by Status.
- The available action depends on the status: for an Assigned job, the freelancer clicks Start Work and confirms, which changes the status to In Progress and notifies the client; for an In Progress job, the freelancer can click Submit Work and confirm, which notifies the client to review the submission, or click Raise Dispute; Disputed and Completed jobs are view-only.
- The freelancer clicks the star icon to open the Submit Review modal, which asks about their experience working with the client on the listed job. They select a Rating (required), add an optional Review (up to 1000 characters), and click Submit Review to rate the client. The Cancel button closes the modal without submitting.
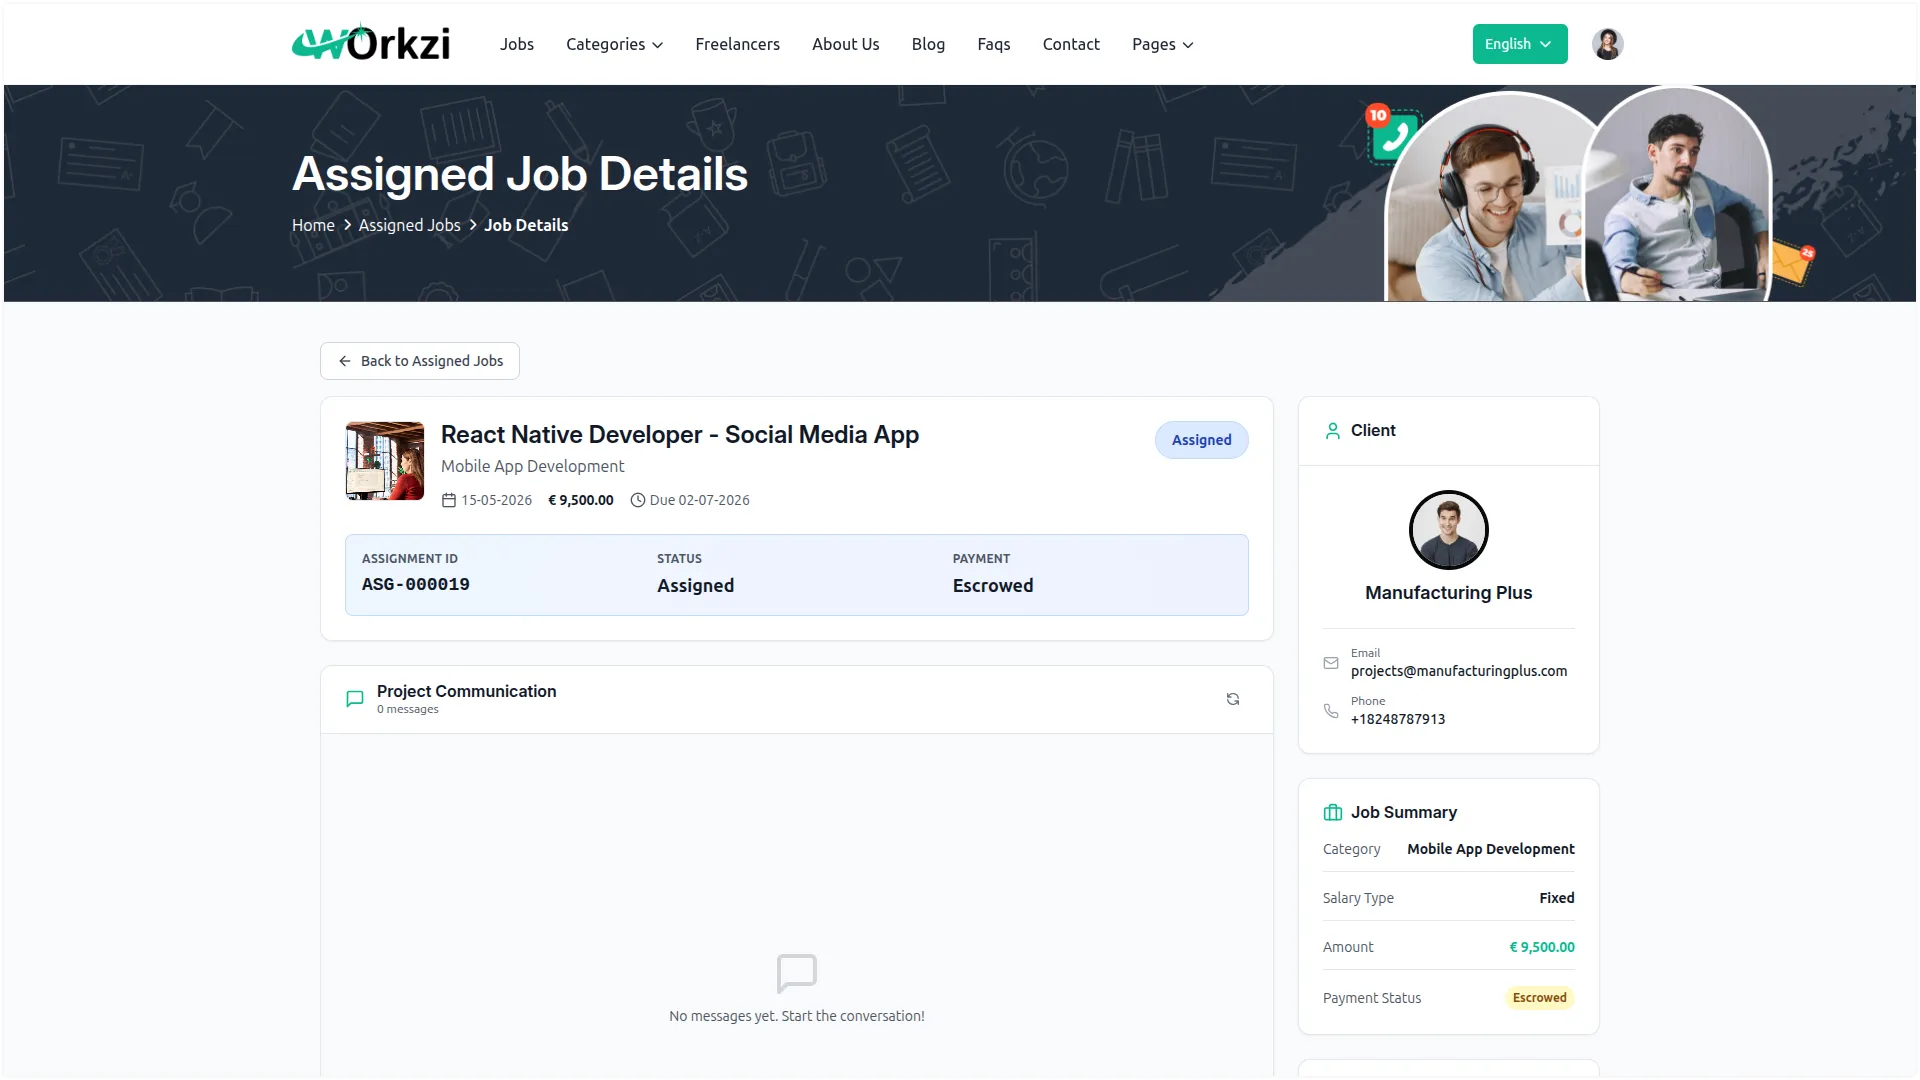
Assigned Job Details
- This page shows the full detail of one assigned job. The header displays the title, category, date, amount, and due date, followed by the Assignment ID, Status, and Payment status (such as Escrowed).
- The Project Communication panel lets the freelancer message the client, and Assignment Notes shows any notes. The Actions panel provides Submit Work and Raise Dispute buttons, and the sidebar shows the Client’s information, a Job Summary, and a Project Timeline.
- Clicking ‘Raise Dispute’ opens a window where the freelancer enters a Dispute Title, selects a Priority (Low, Medium, High, or Urgent), writes a Reason for Dispute (minimum 20 characters), optionally attaches a Supporting Document, and clicks ‘Raise Dispute’.
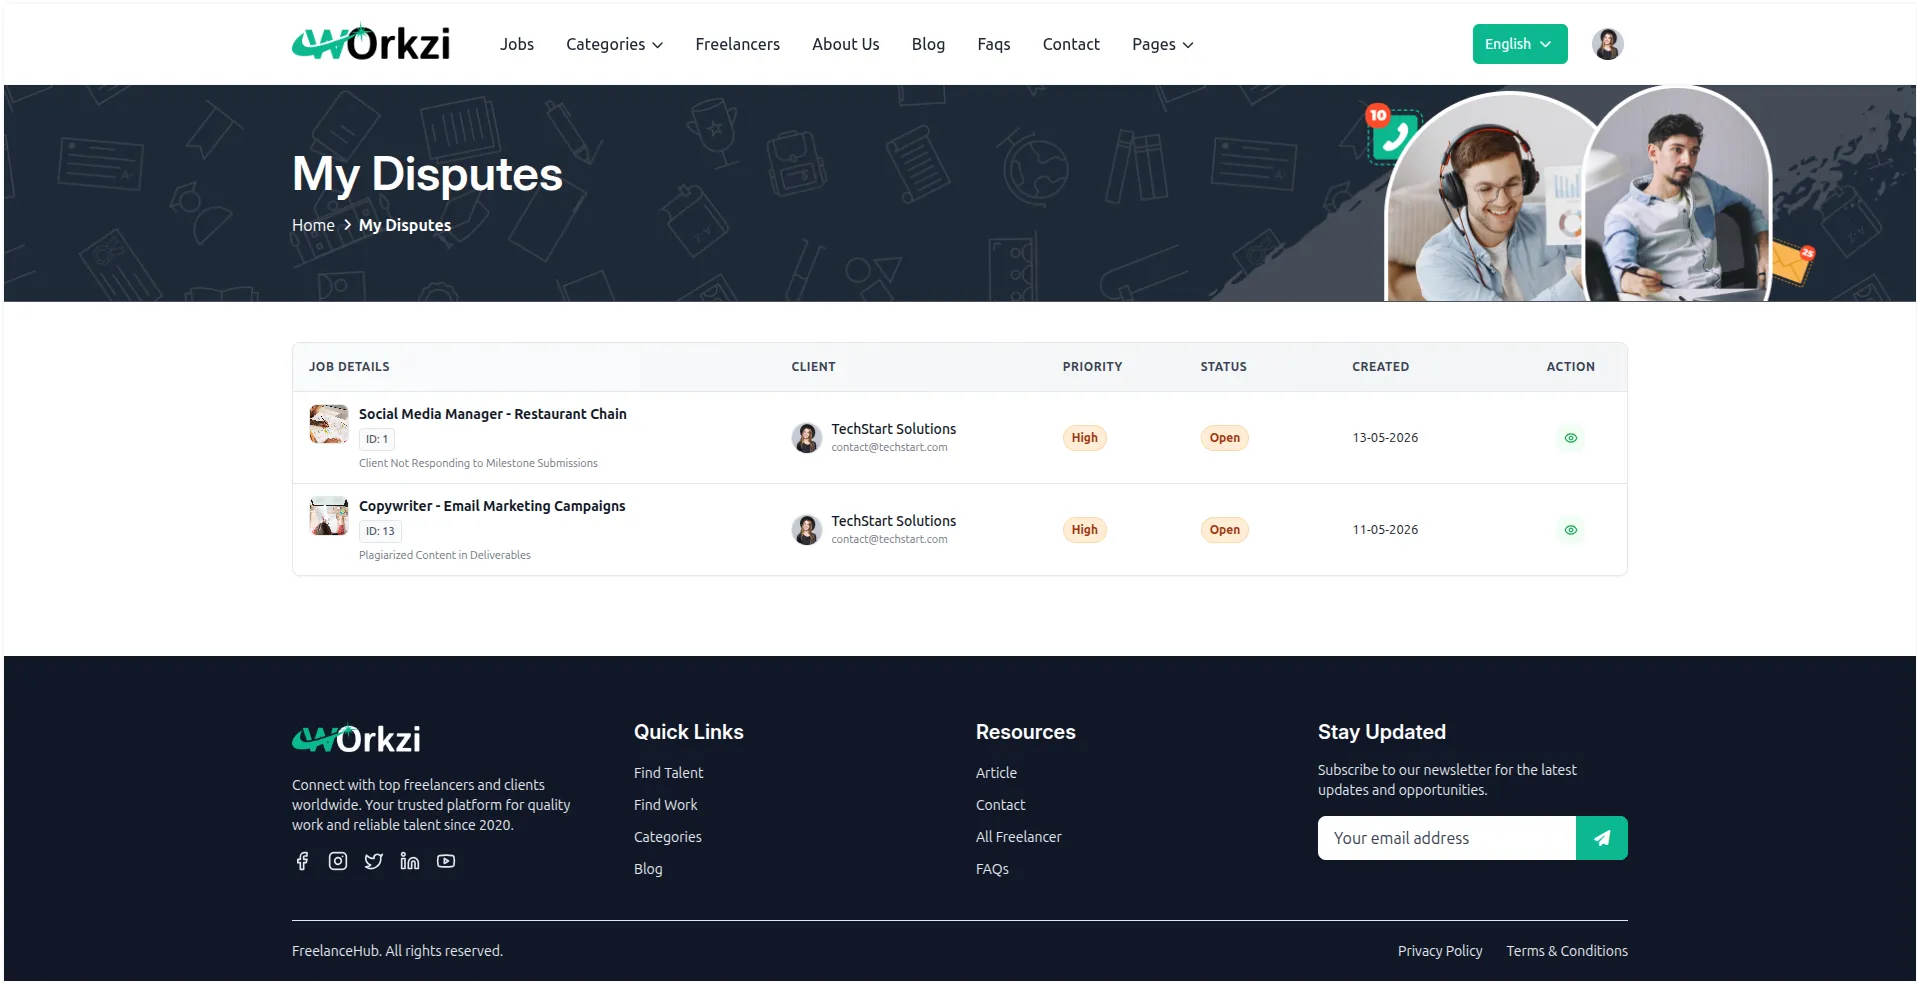
My Disputes
- This page lists the disputes the freelancer is involved in. The table shows Job Details, Client, Priority, Status, and Created date, with a view button to open each dispute.
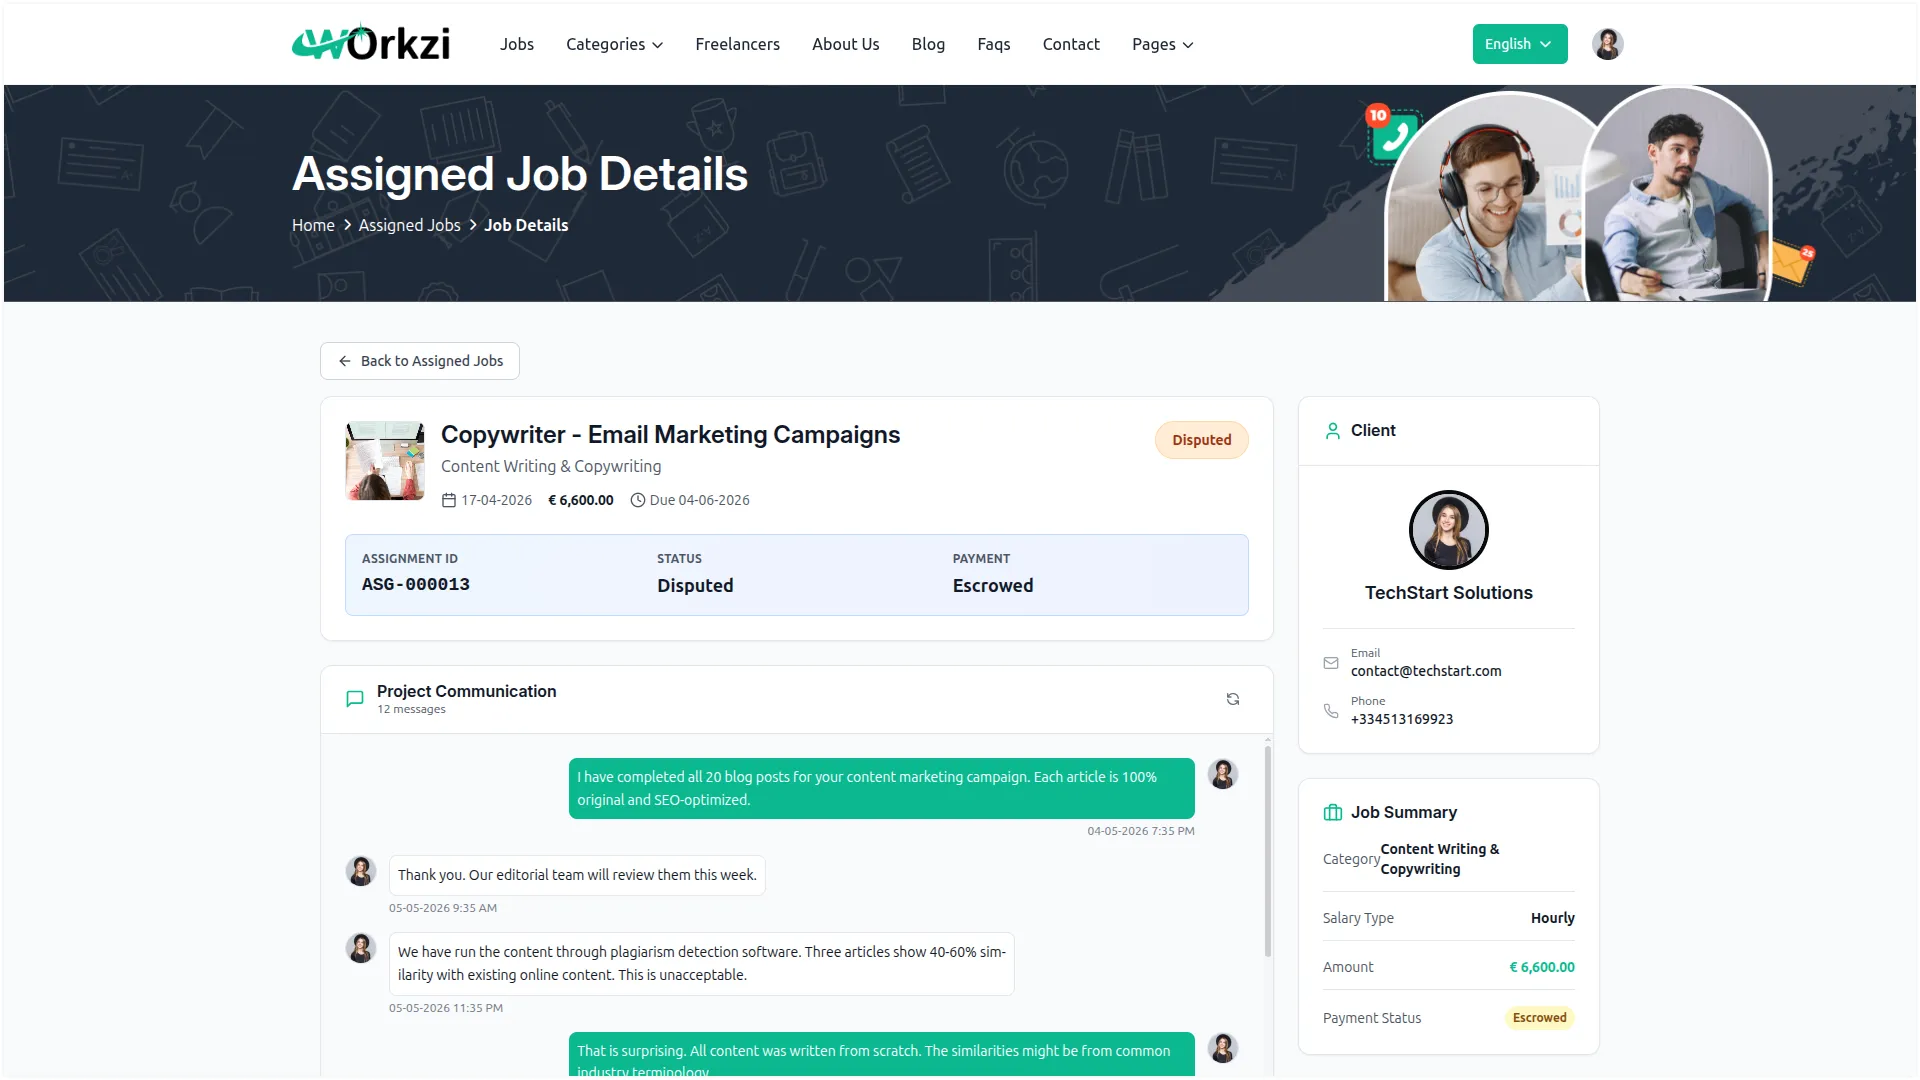
Dispute Details
- This page shows the full details of a dispute. It displays the dispute title and Dispute ID with its status and priority, a Messages thread between the freelancer, client, and the Company, a Dispute Reason block, and a Disputed Job Details panel listing the Job Title, Author, Freelancer, Job Budget, Disputant, Disputed On date, Escrow Amount, Escrow Status, Held At date, and Dispute Status.
- Below the Messages thread, the Dispute Reason section shows the disputant’s full statement. The right sidebar also includes a Job Details card listing the Job Title, category, Type, and Amount, and a Client card showing the Client’s name, Email, and Phone.
- The Company resolves the dispute, and the outcome is reflected in the escrow status and both wallets.
My Wallet
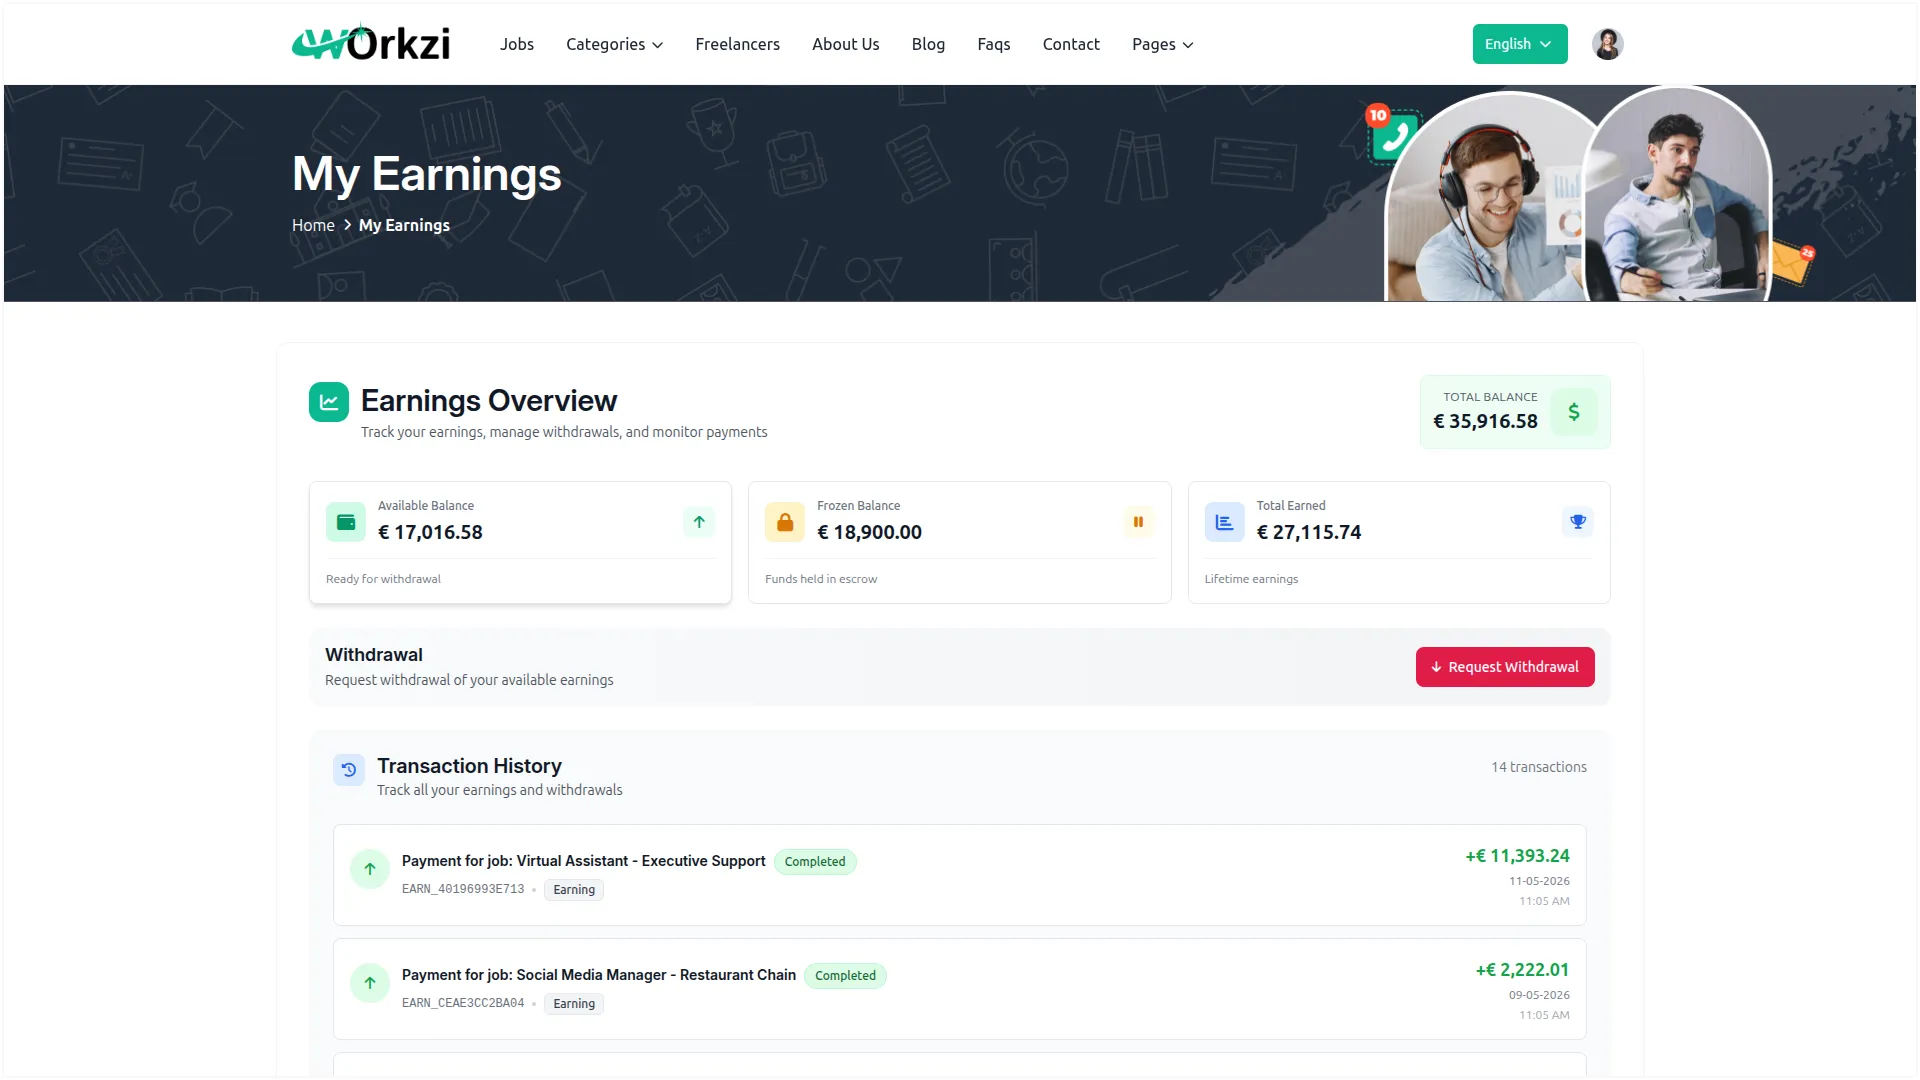
- This is where the freelancer tracks their earnings. The Earnings Overview shows the Total Balance, along with cards for Available Balance, Frozen Balance (funds held in escrow), and Total Earned (lifetime earnings).
- The Transaction History lists all activity, such as escrow holds, payments for completed jobs, dispute adjustments, and withdrawals. Clicking Request Withdrawal opens a window where the freelancer enters a Withdrawal Amount (minimum $5.00) and optional Account Details, then submits the request; withdrawal requests require admin approval and are typically processed within 1–3 business days, with large withdrawals sometimes requiring account verification.
Categories
Related articles
- Catering Management – WorkDo Dash SaaS Add-On Guide
- User Manual – vCard SaaS
- Workflow – WorkDo Dash SaaS Add-On Guide
- Xero – WorkDo Dash SaaS Add-On Guide
- WorkDo Dash SaaS Setup Guide
- NGO Management – WorkDo Dash SaaS Add-On Guide
- Paytm – WorkDo Dash SaaS Add-On Guide
- Instagram Post – WorkDo Dash SaaS Add-On Guide
- Tracking Pixel – BookingGo SaaS Add-On Guide
- PayU – BookingGo SaaS Add-On Guide
- Trello – WorkDo Dash SaaS Add-On Guide
- Braintree – WorkDo Dash SaaS Add-On Guide
We're Here to Help - Let's Talk
Have questions about our solutions, customization services, or business tools? Our team is here to help you. let's talk.