File Sharing Integration in Dash SaaS
The File Sharing software is a comprehensive platform designed to help businesses and individuals securely share files with controlled access and detailed tracking.
Introduction
The File Sharing software is a comprehensive platform designed to help businesses and individuals securely share files with controlled access and detailed tracking. This software provides secure file upload and distribution capabilities with multiple sharing methods including email assignment and shared links. The system includes advanced security features such as password protection, auto-destroy functionality, and comprehensive download tracking. Users can monitor all file-sharing activities, manage deleted files through a trash system, and handle verification processes for file access requests. Whether you’re sharing documents with team members, distributing files to clients, or managing secure file transfers, this software provides all the tools needed to maintain control over your shared content while ensuring security and accountability
How to Install the Add-On?
To Set Up the File Sharing Add-On, you can follow this link: Setup Add-On
How to Use The File Sharing Add-On?
Verification Flow Explanation
- When you first access the File Sharing page, you will see a verification notice indicating that you need to complete verification before you can create or manage files. Under that note if you click on the verification, you will be navigated to the verification page. On the verification page you will see a create button, if you click on the button, the verification form will open.
- Here you need to upload your required file. Once you submit your verification request, it will show an “Applied Date” “Particular Attachment”and have a “Pending” status.
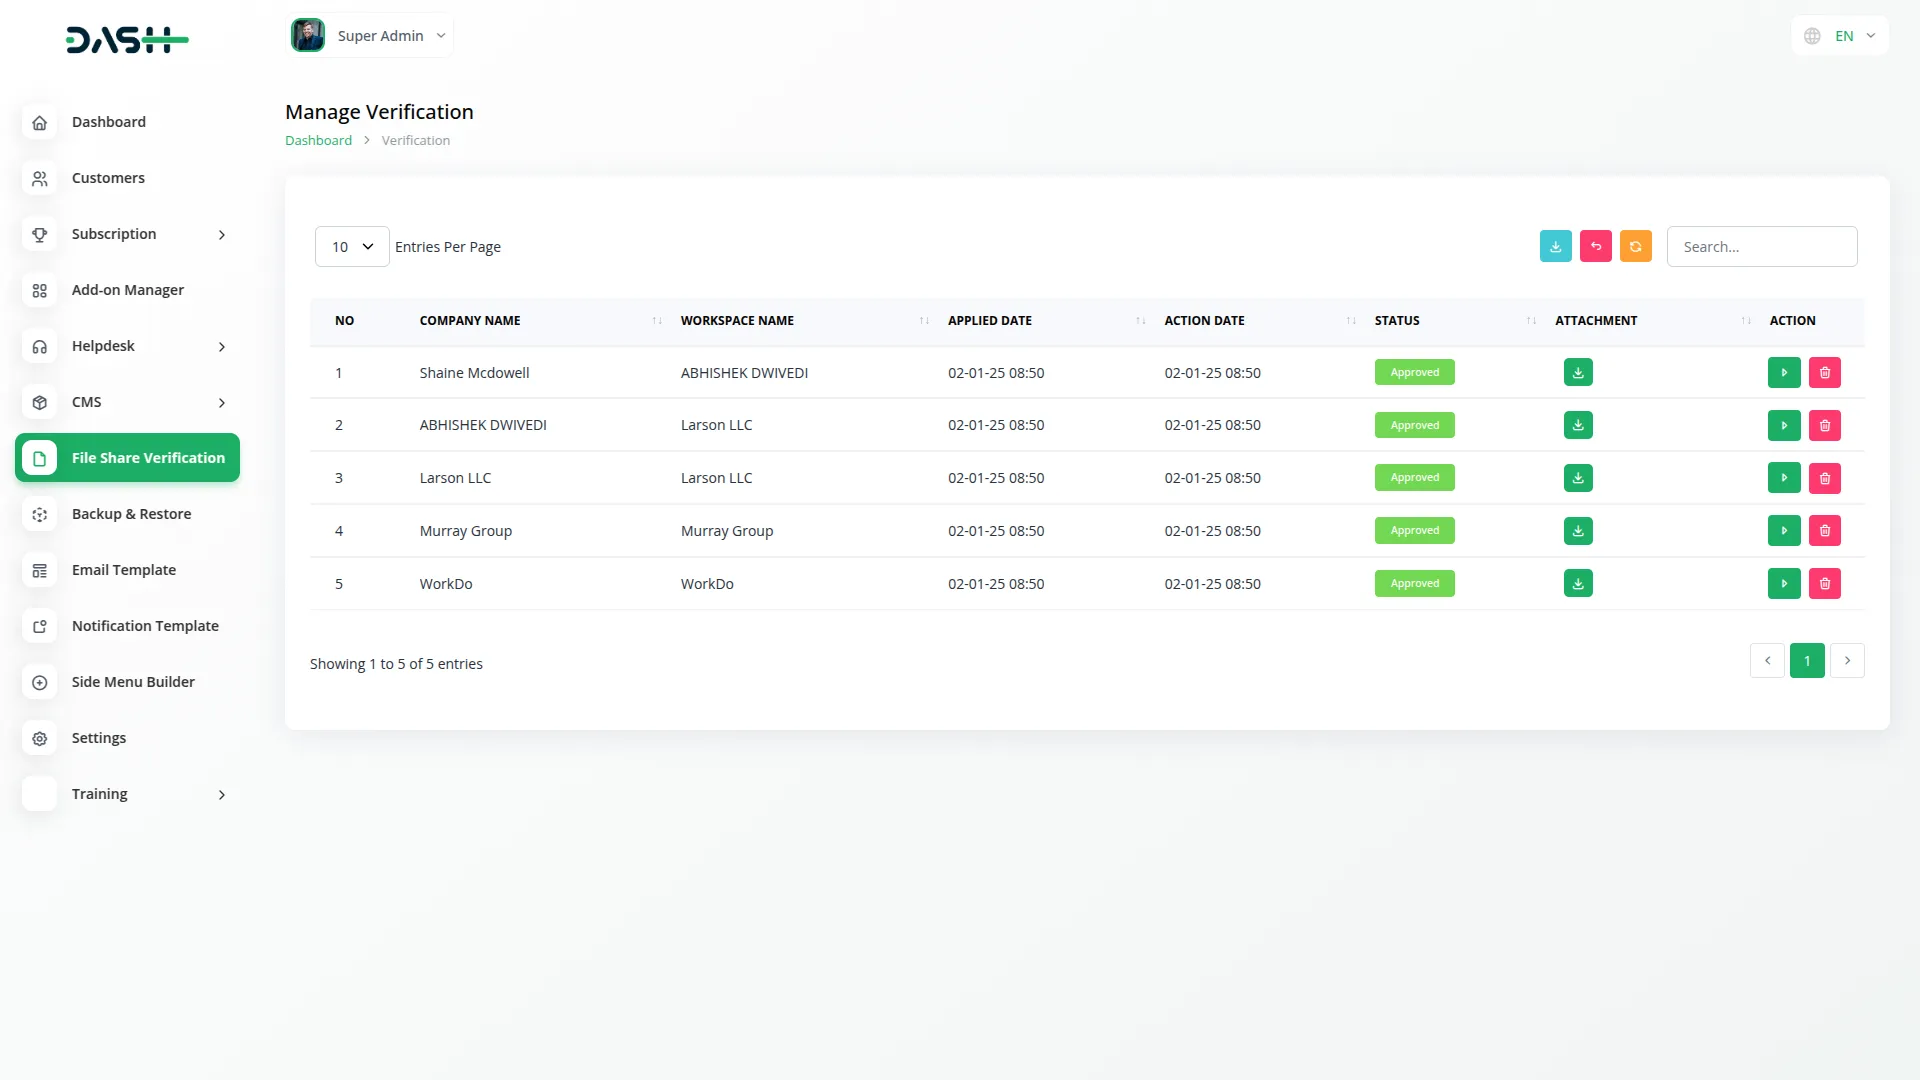
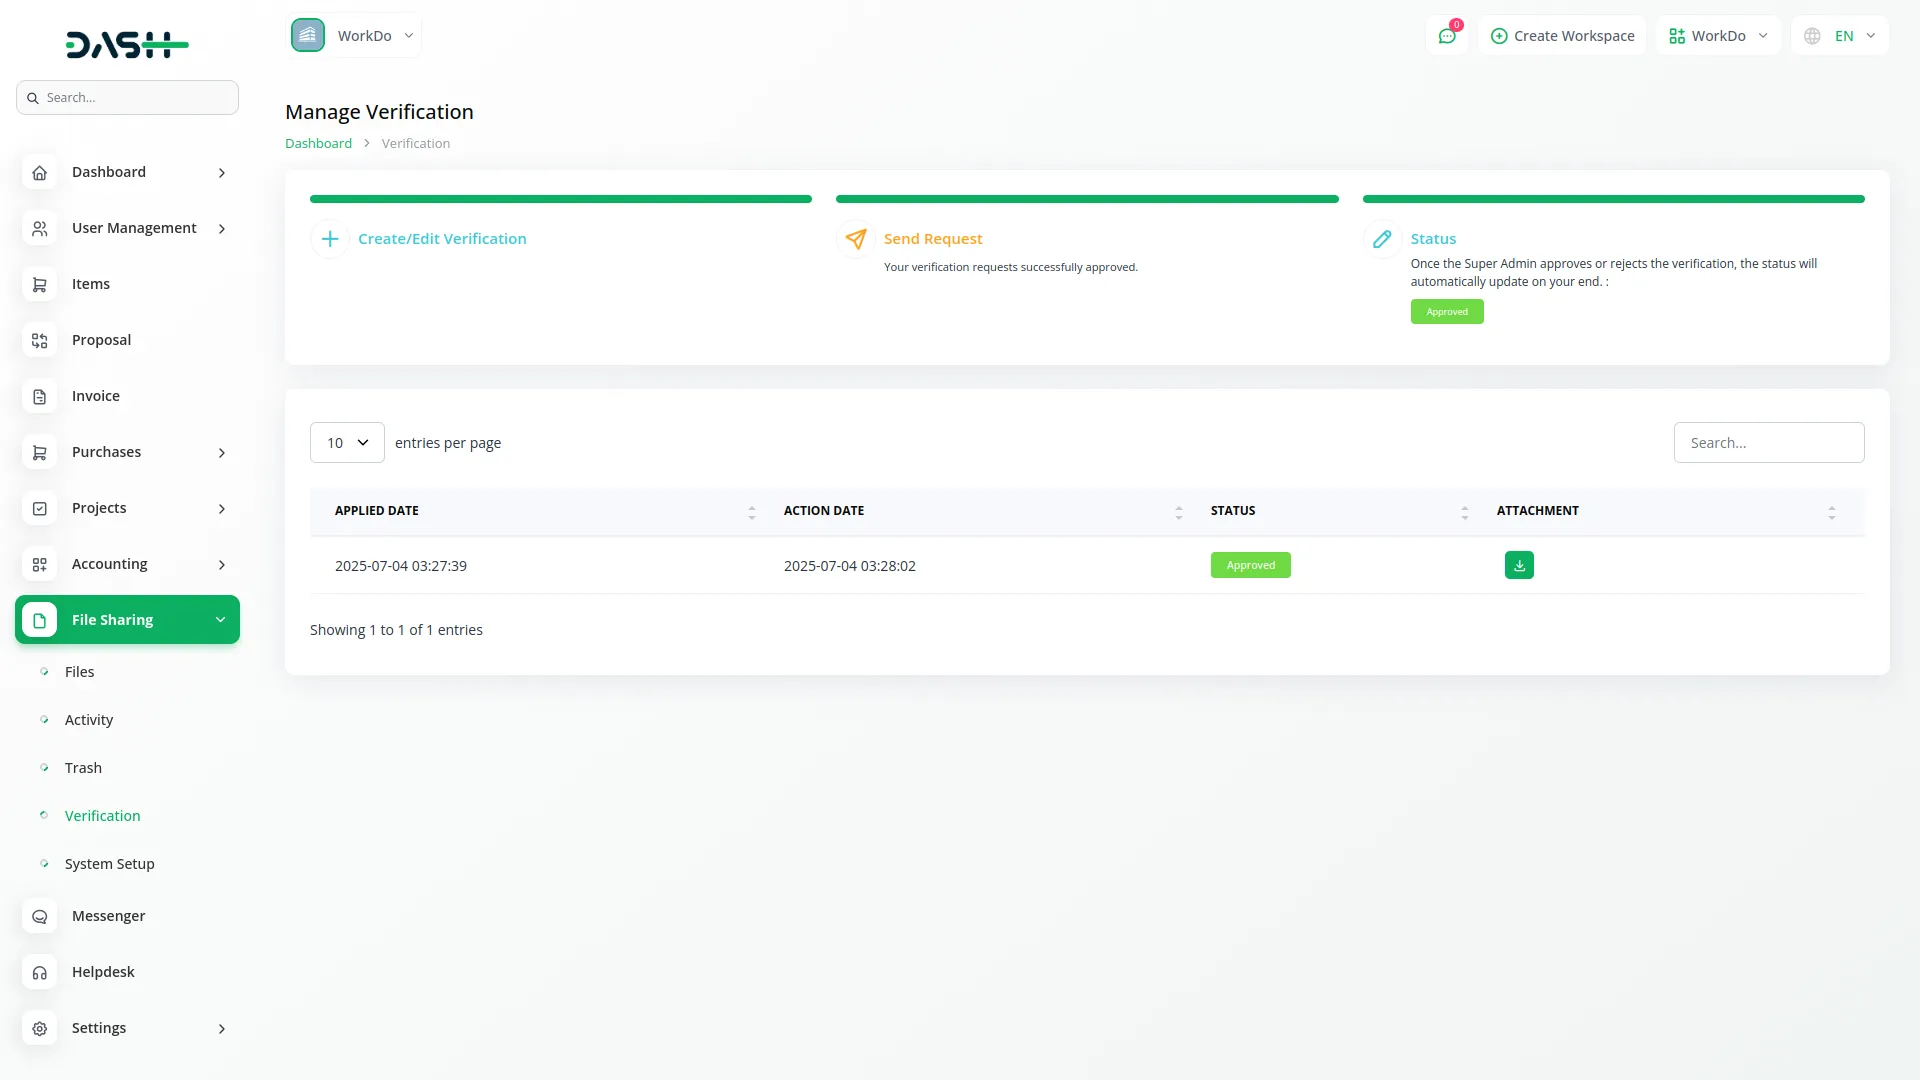
- The super administrator will review your submitted documents and either approve or reject your verification request. You can check the status of your verification in the File Share Verification section. Once the super admin approves your request, you will receive an “Action Date” and your status will change to “Approved.”
- Only after your verification is approved can you access the Files section and start creating, uploading, and sharing files. Until then, the file creation features will remain blocked with the verification notice displayed. You can also delete request if you want, but if you delete it all the data related to that file will be removed, you can also regain the file if you want.
Files Management
- To upload and share a new file, click the “create” button located at the top of the files page. This will open the file upload form where you need to complete several sections.
- Start with the Attachment field by clicking “Browse” or “Choose File” to select the file you want to upload from your computer. Once selected, you’ll see the file name and size displayed.
- Next, choose your sharing method from the “Select a method for sharing the file” options. You can either select “Assign Email” which allows you to add specific email addresses where the file will be sent directly, or choose “Shared Link” which generates a downloadable link that you can share with anyone.
- If you want the file to be automatically deleted after a certain period, enable the “Auto Destroy” option and set your preferred time frame. This is useful for temporary files or sensitive documents that shouldn’t remain accessible indefinitely.
- For additional security, you can use the “Secure the upload with a password” option. When enabled, recipients will need to enter the password you set before they can download the file. This field is optional but recommended for confidential documents.
- In the Users field, you can select multiple users who should have access to the file. This connects to your User management system, allowing you to choose from your existing contacts or user database.
- Finally, add a Description to explain what the file contains or provide instructions for recipients. This helps users understand the file’s purpose before downloading.
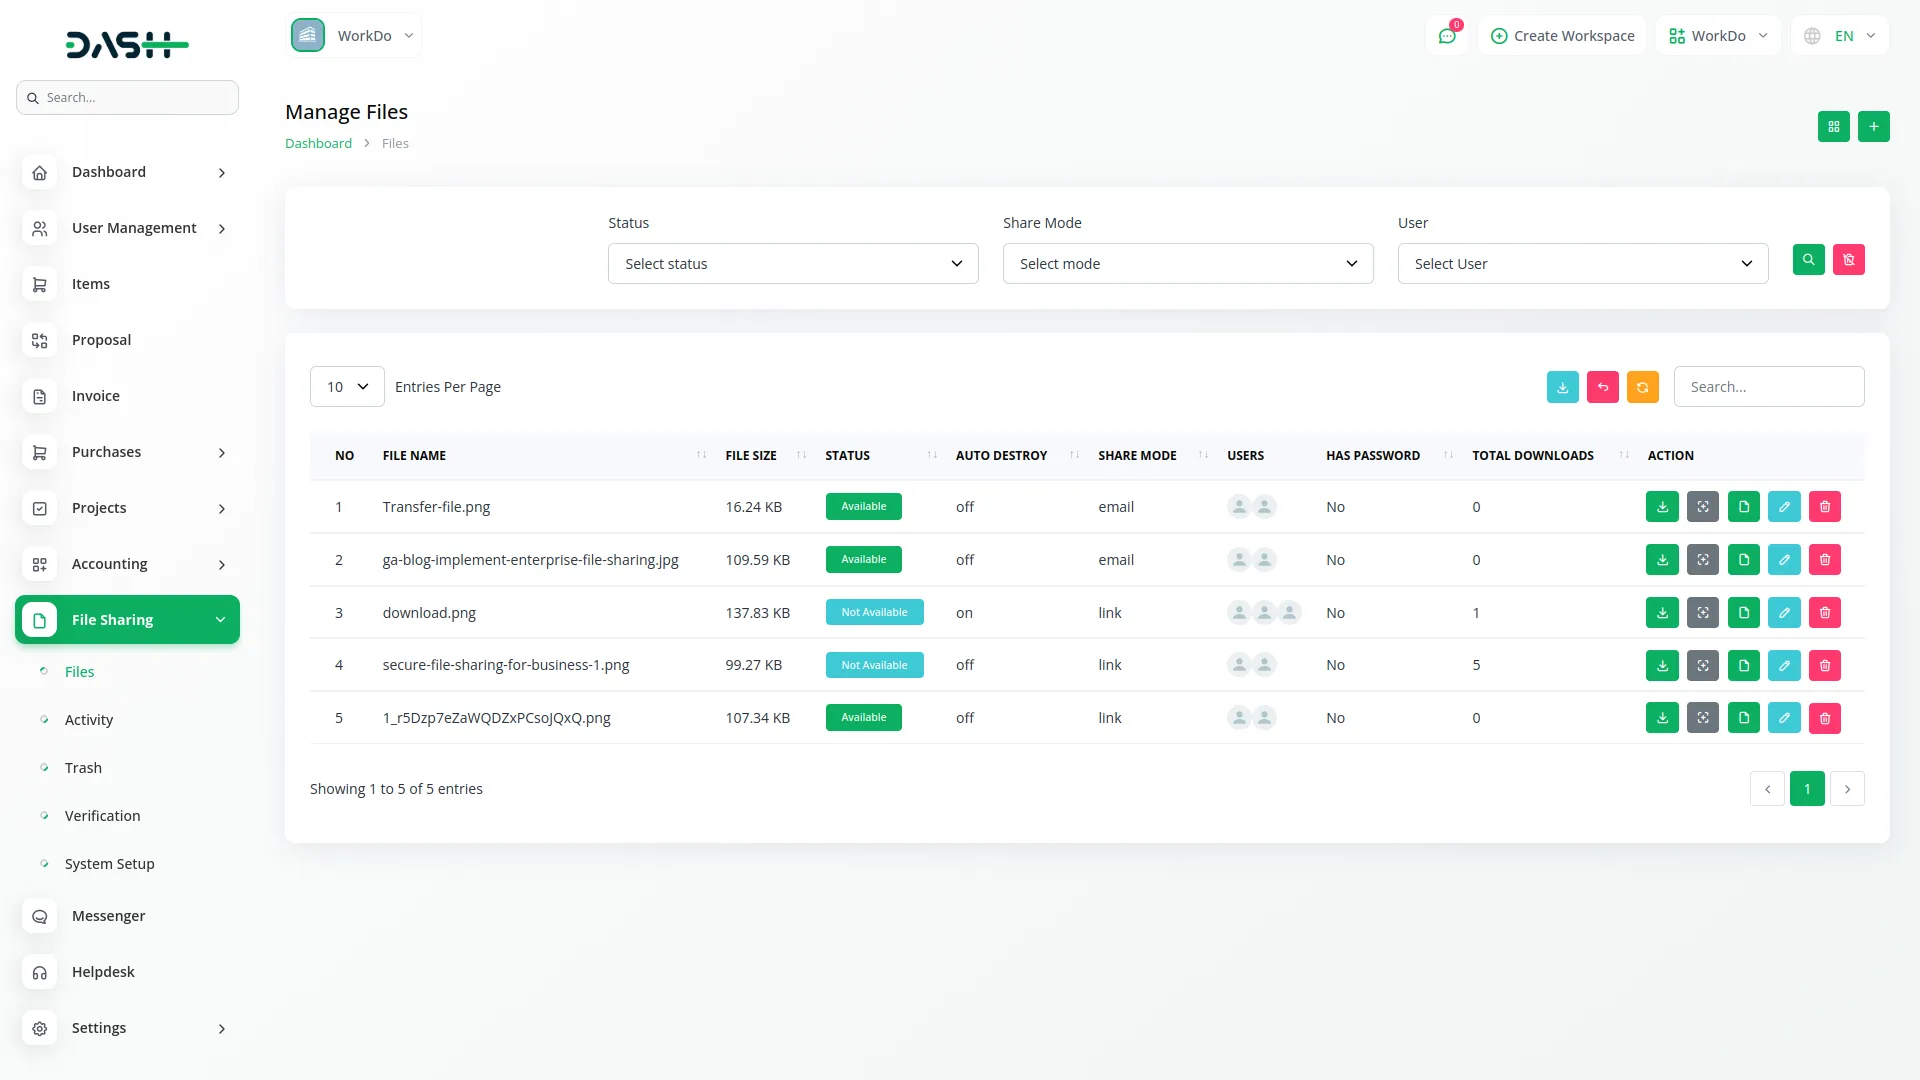
- The list page shows all your uploaded files in a table format. The columns display No (sequential number), File Name, File Size, Status (Available or Not Available), Auto Destroy settings, Share Mode (Email or Link), Users who have access, Has password indicator, and Total Downloads count.
- Use the Search button to find specific files by name or other criteria. The Export button allows you to download a report of all your files. The Grid button switches the view from table format to a visual grid layout showing file thumbnails and key information.
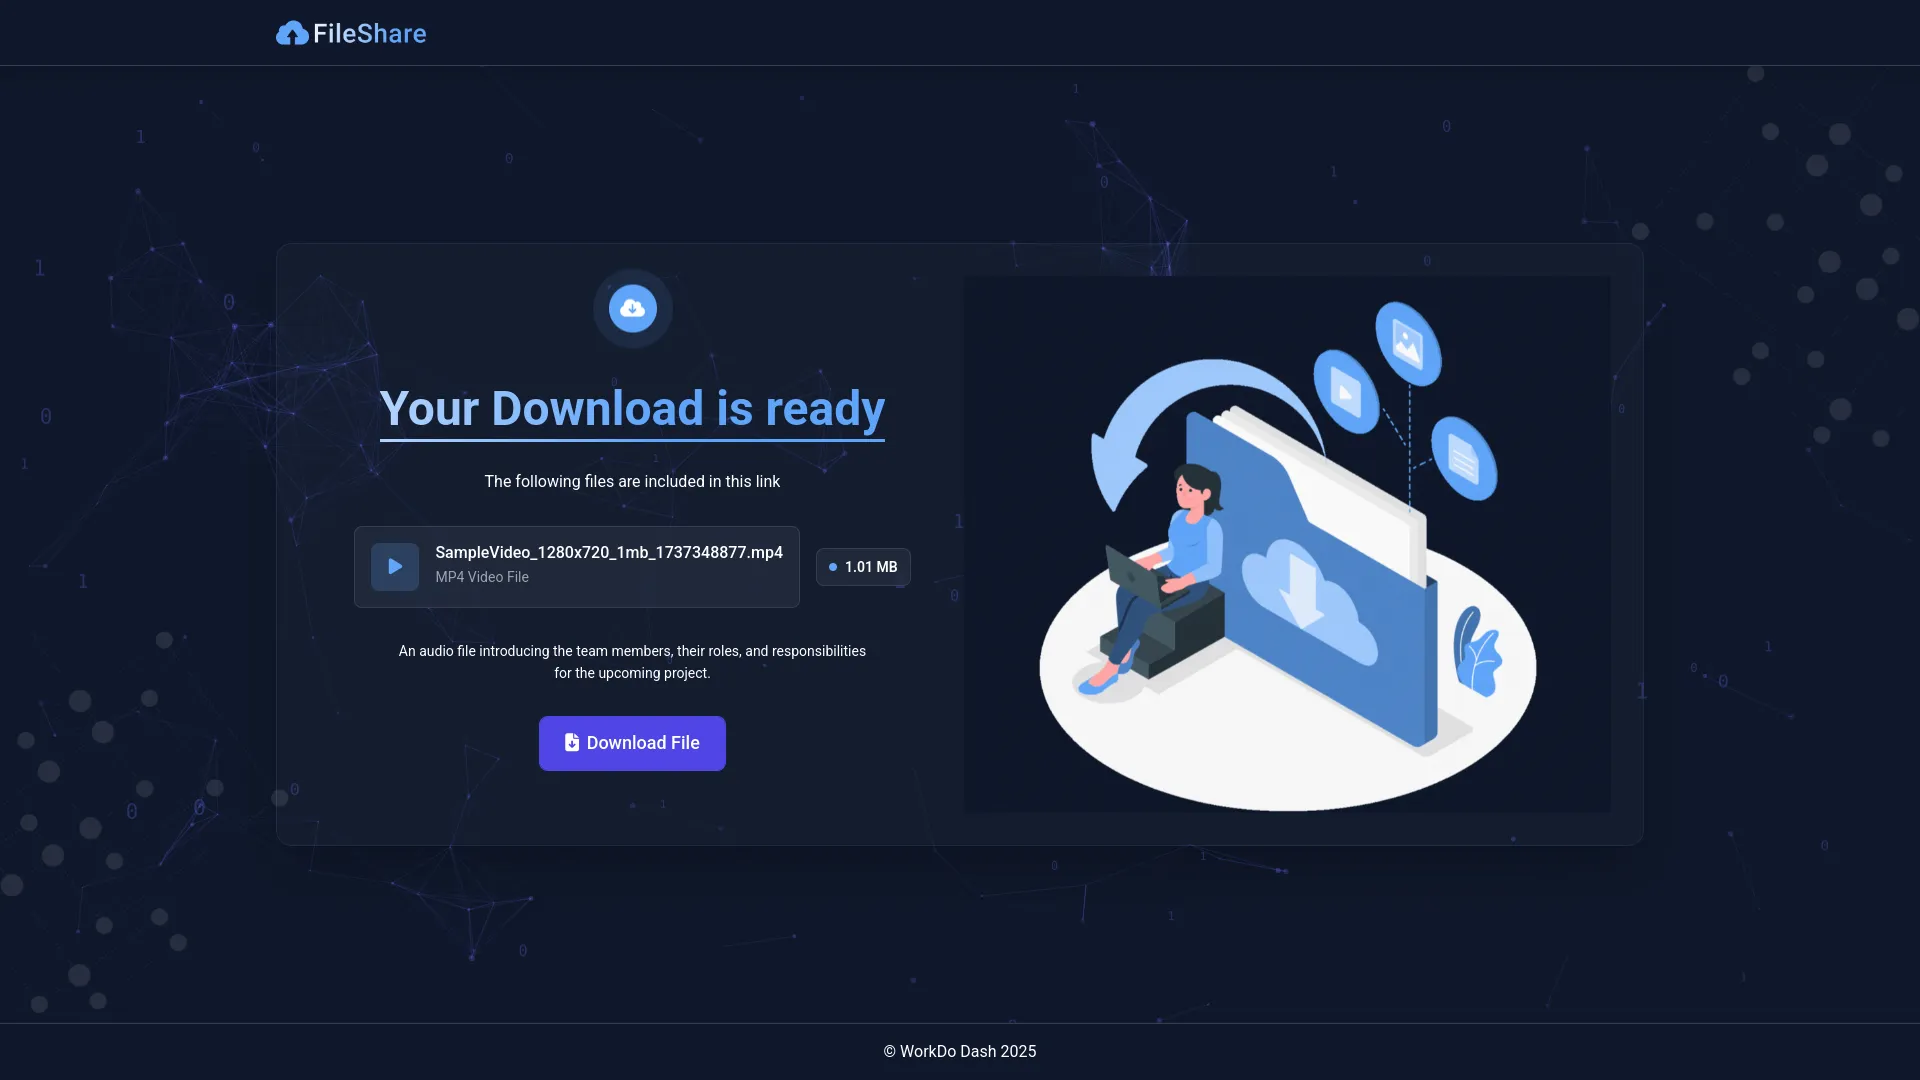
- Available actions in the Actions column include Download to get the original file, Preview to view images or videos directly in the browser, Copy Link to get a ready-to-download link with file name and size information when users access this link, they will see a download page displaying “Your Download is ready” with the file name, size, and a download button as shown in the interface, Edit button to modify file settings, and Delete to remove files.
- or filtering your files, use the Status filter to show only Available or Not Available files, Share Mode filter to display only Email or Link shared files, and User filter which connects to your User management system to show files shared with specific users.
Activity Management
- The Activity section provides comprehensive tracking of all download activities for your shared files. This helps you monitor who is accessing your files and when.
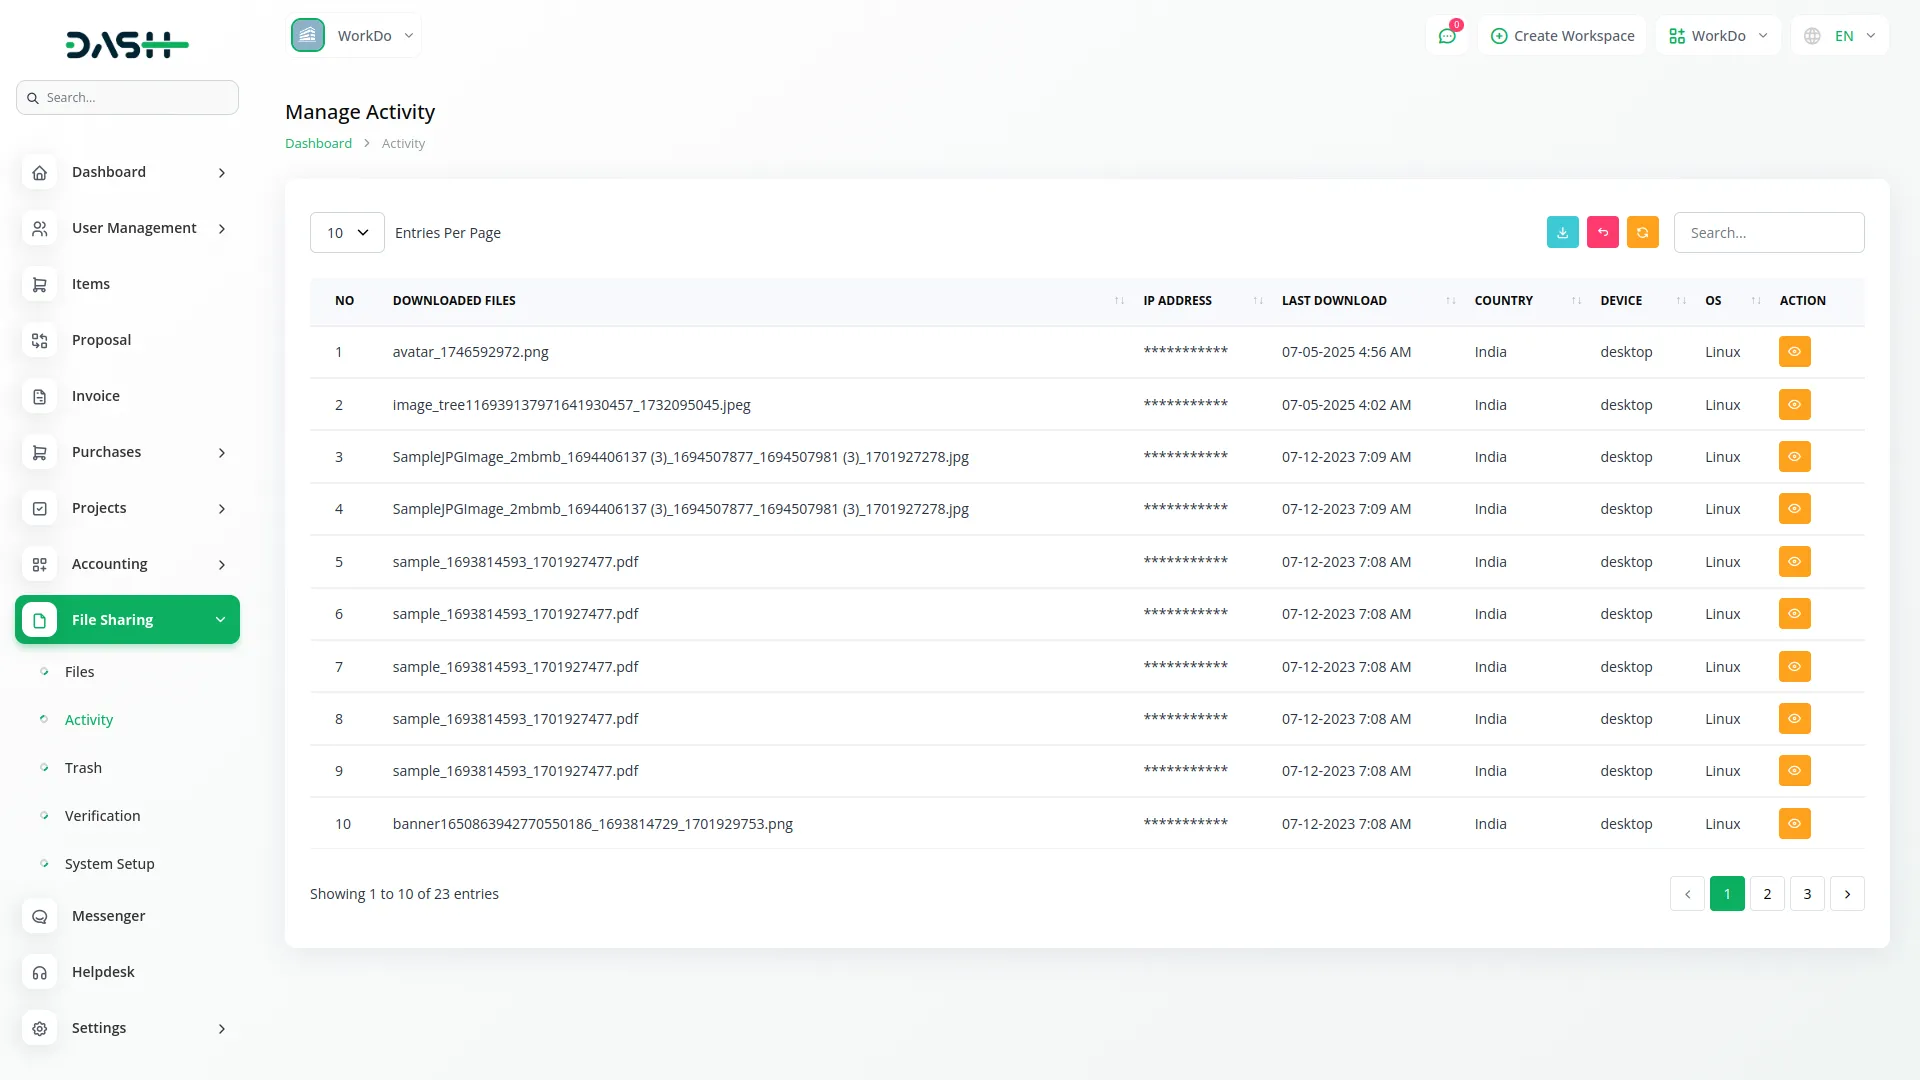
- The list page displays detailed download information with columns showing No (sequential number), Downloaded Files (which specific files were accessed), IP Address of the downloader, Last Download timestamp, Country where the download occurred, Device type used, and Operating System information.
- Use the Search button to find specific download activities by file name, IP address, or date. The Export button lets you download detailed activity reports for record-keeping or analysis.
- Click the “View” button to view detailed information about specific download activities. This detailed view provides comprehensive tracking data including download history, user patterns, and access logs for security monitoring and usage analysis.
Trash Management
- When you delete files, they don’t disappear immediately but move to the Trash section, giving you a chance to recover them if needed.
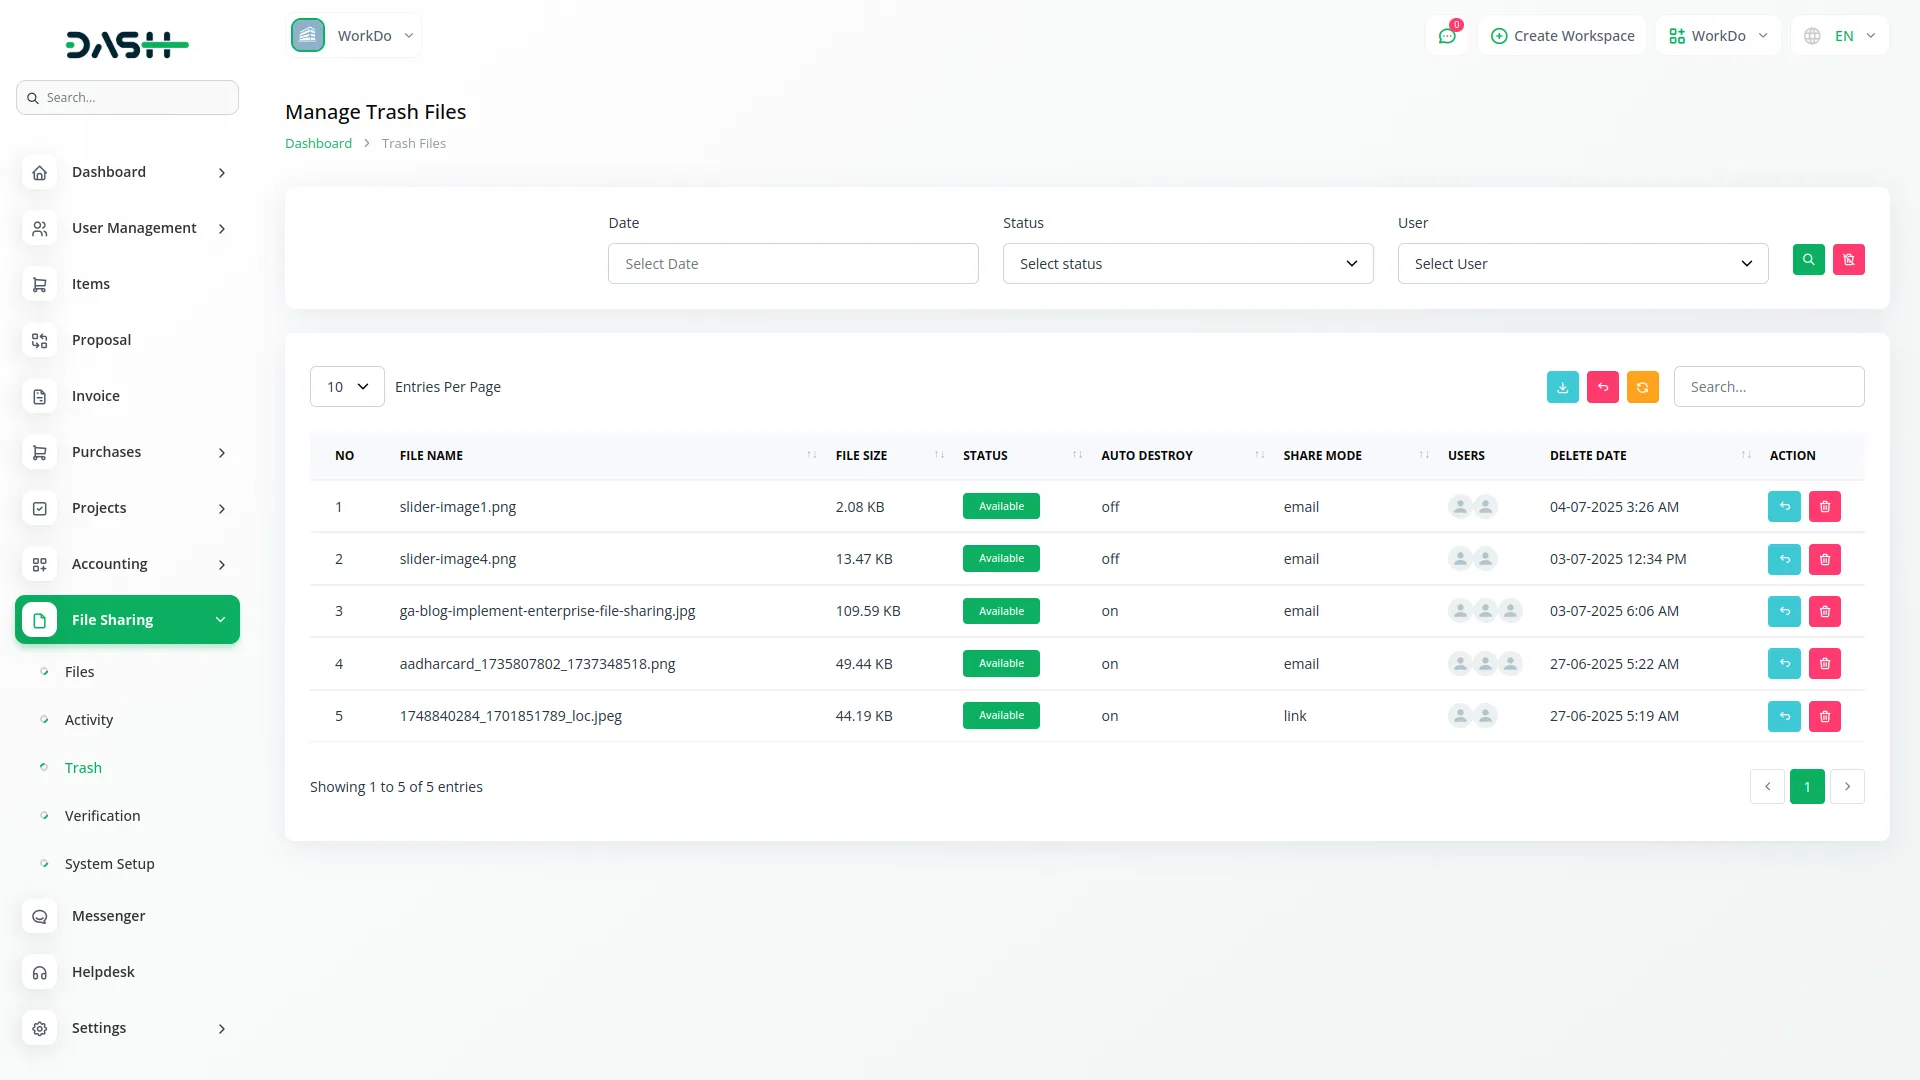
- The trash list page displays all deleted files with columns showing No, File Name, File Size, Status, Auto Destroy settings, Share Mode, Users who had access, and Delete Date when the file was removed.
- Use the Search button to find specific deleted files and the Export button to download reports of deleted files for your records.
- Available actions include Restore to bring files back to active status (they will reappear in your main Files list), and Delete to permanently remove files from the system (this action cannot be undone).
- For filtering deleted files, use Date range filtering to show files deleted between specific Start and End dates, Status filter for Available or Not Available files, and User filter connecting to your User management system to show files that were shared with specific users.
Verification Management
- You can manage your own verification requests and track their progress. The list page shows your verification submissions with columns for Applied Date (when you submitted), Action Date (when it was reviewed), Status (Pending, Approved, or Rejected), and Attachment column where you can download the documents you previously uploaded. Use the Search and Export functions to manage your verification history and download records of your submissions.
- For super administrators, this section displays all verification requests from users and companies. The super admin list page shows columns for No, Company Name, Workspace Name, Applied Date, Action Date, Status, and Attachment (where admins can download submitted documents for review).
- Super administrators can use the Action button to review verification requests and either approve or reject them. When clicked, this opens a detailed review interface where admins can examine submitted documents and make approval decisions.
- The Delete button allows removal of verification records when necessary. Use the Search and Export functions to efficiently manage the verification workflow and maintain records of all verification decisions.
System Setup
The System Setup section allows administrators to configure the overall appearance and functionality of the file sharing system, including branding elements and default file sharing settings.
Brand Setting
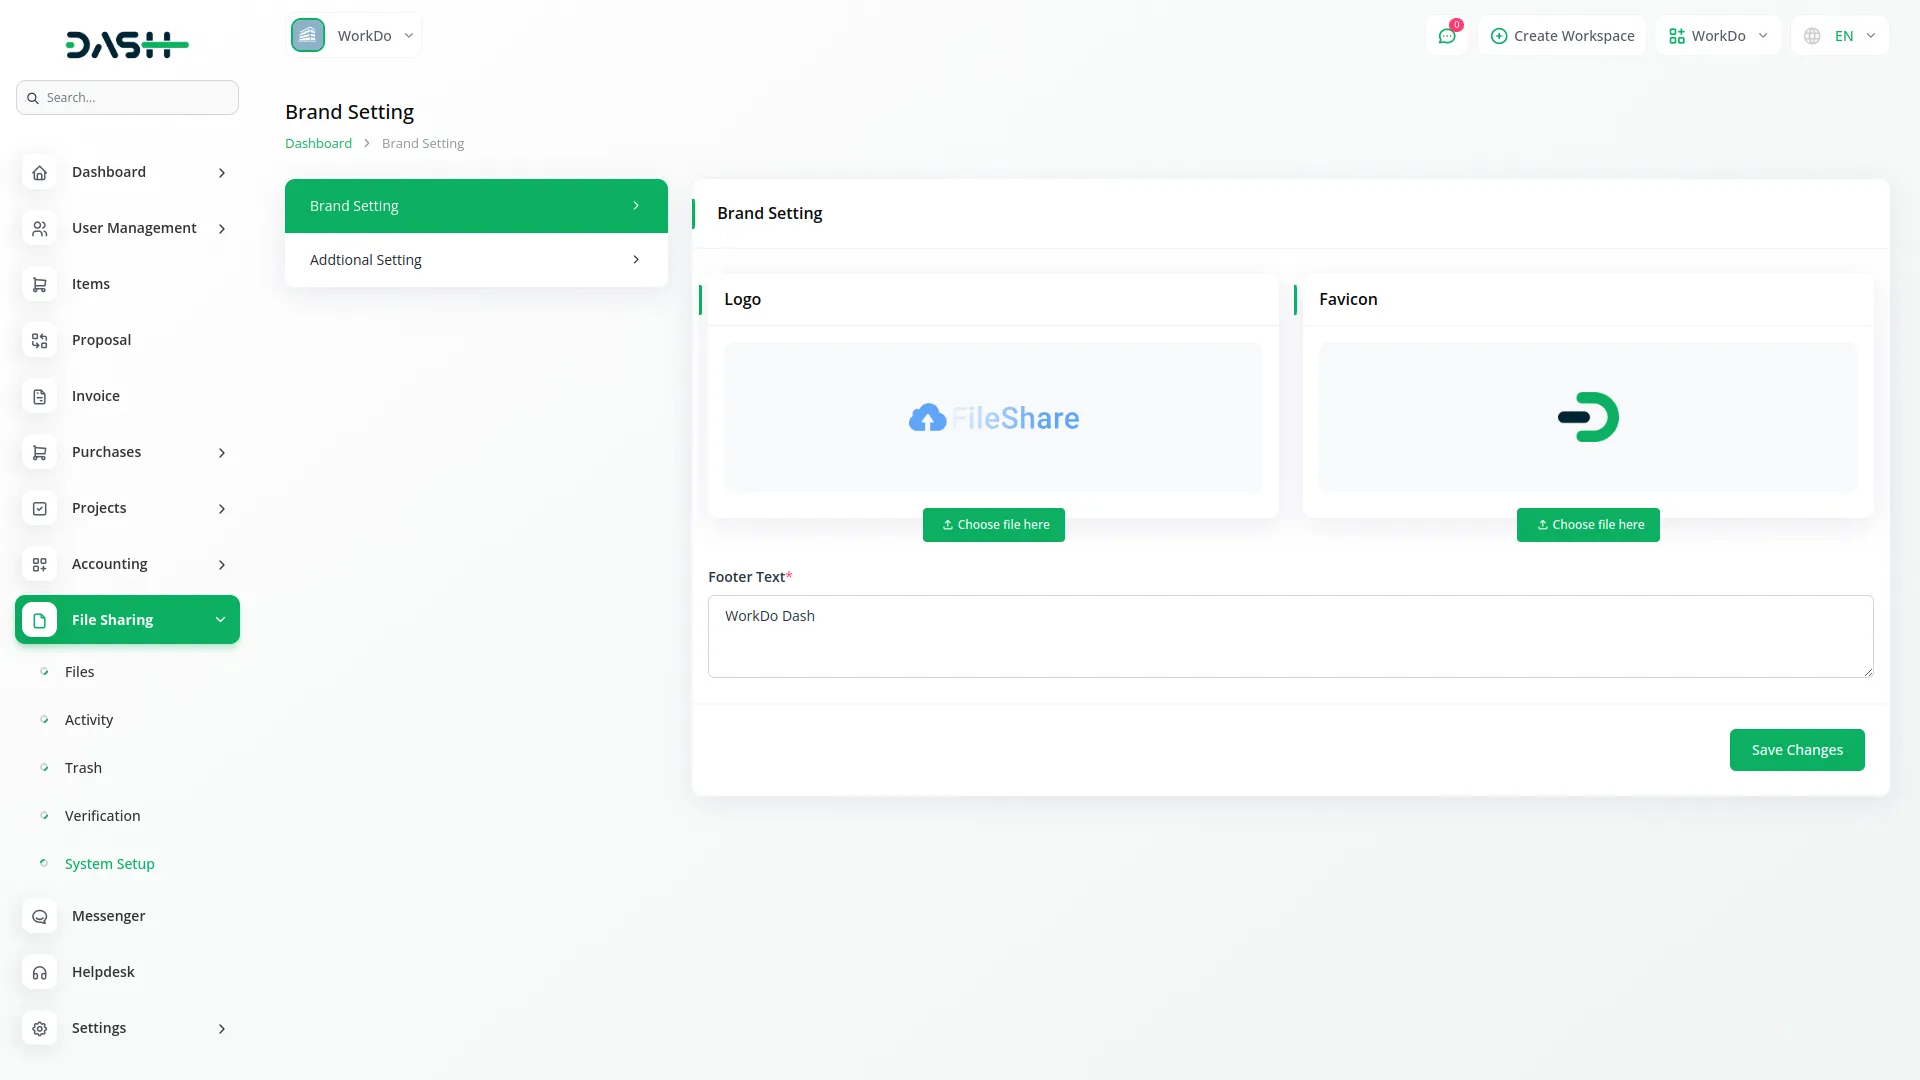
- To configure your organization’s branding, access the Brand Setting section where you can upload and preview your company logo, which will appear throughout the file sharing interface. Upload and preview your favicon, which displays in browser tabs and bookmarks. Enter your footer text in the designated input field, which appears as a short text at the bottom of all pages.
Additional Setting
- Configure the default file sharing presentation by entering the File Title, which serves as the default title shown on file share pages. Set the File Button Text that appears on download or share buttons throughout the system. Add a File Description in the textarea field to provide a short description about files that appear on sharing pages. Upload and preview a File Image that serves as a thumbnail or banner for your file sharing interface.
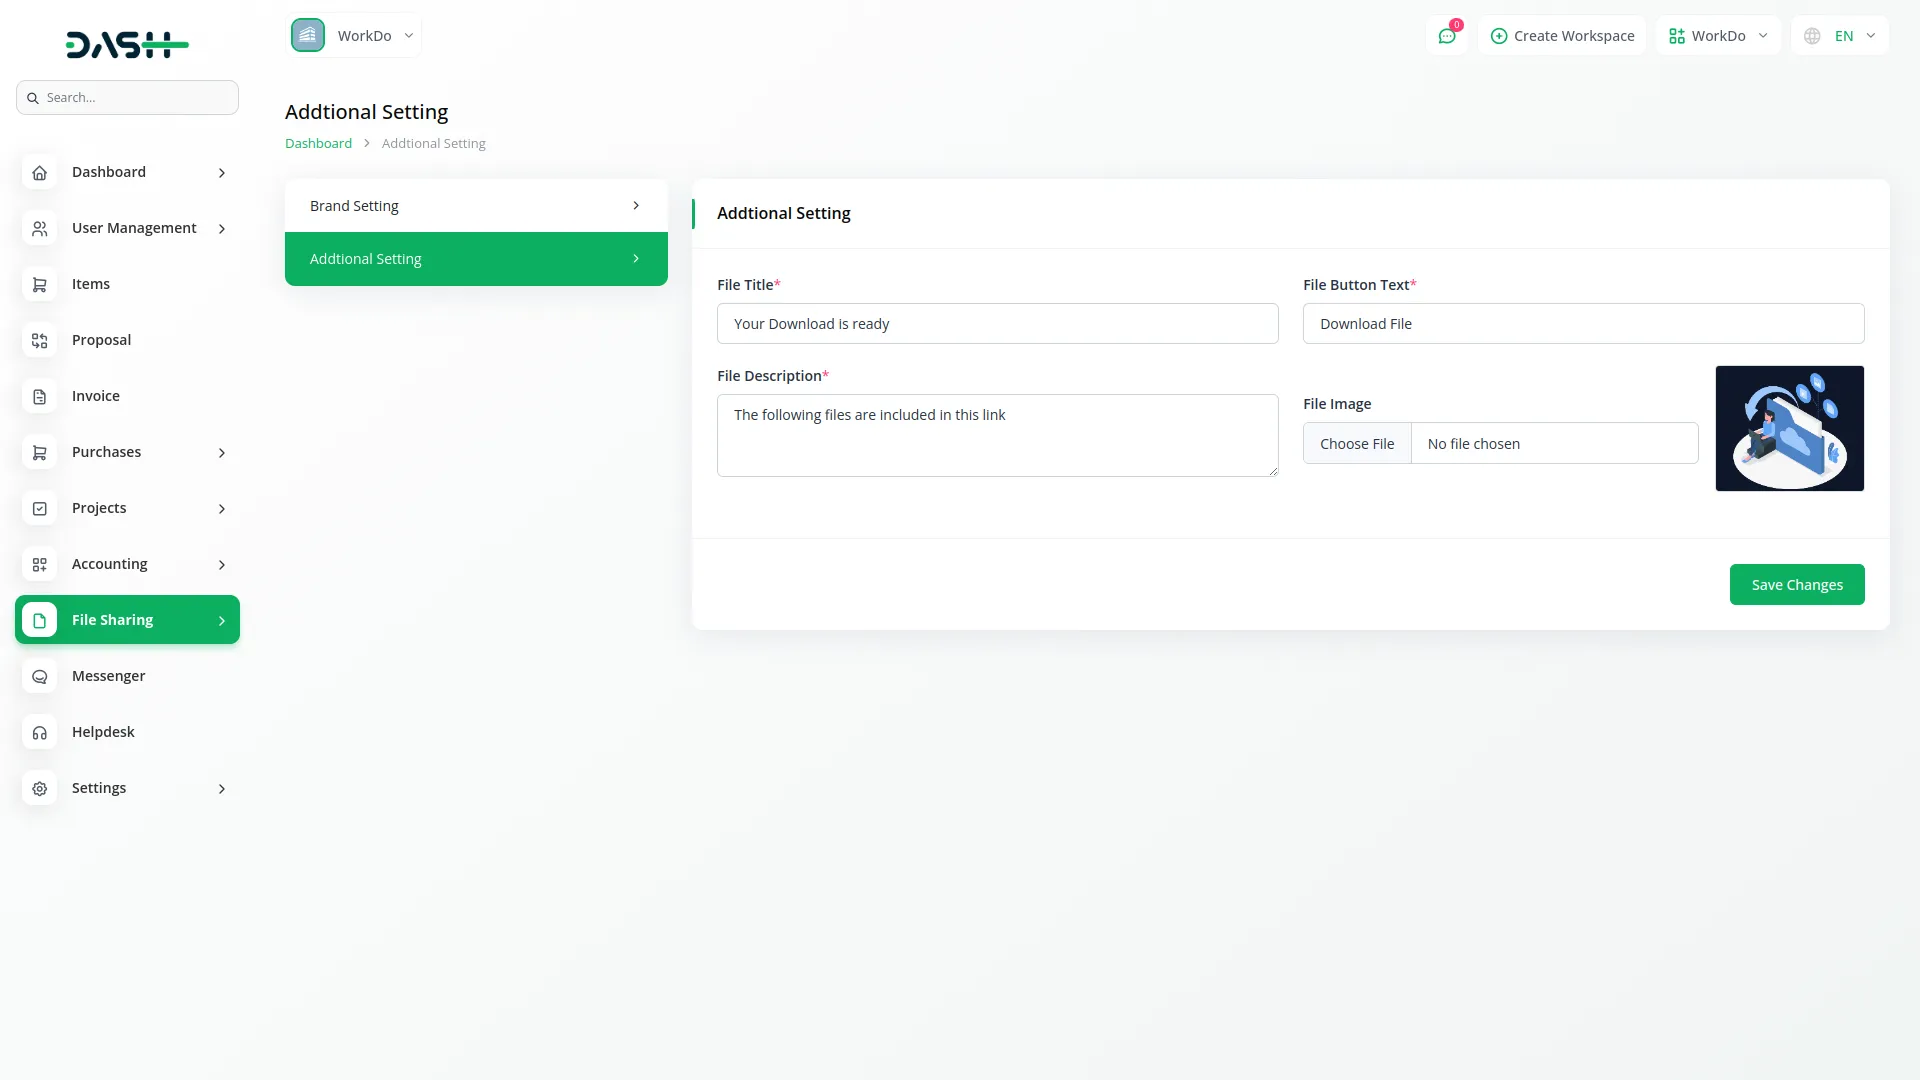
All settings are automatically applied across the entire system once saved, ensuring consistent branding and user experience throughout the file sharing platform.
Categories
Related articles
- RoadMap Central Integration in Dash SaaS
- Shopify Sync Integration in Dash SaaS
- Dance Academy Integration in Dash SaaS
- Laundry Management Integration in Dash SaaS
- HubSpot Integration in Dash SaaS
- Documents Integration in Dash SaaS
- Equipment Rental Detailed Documentation
- Finding Email Credentials for the EMailbox Module in Dash SaaS
- Internal Knowledge Integration in Dash SaaS
- Feedback Integration in Dash SaaS
- Marketing Plan Integration in Dash SaaS
- Google Calendar Credentials Generate
Reach Out to Us
Have questions or need assistance? We're here to help! Reach out to our team for support, inquiries, or feedback. Your needs are important to us, and we’re ready to assist you!


Need more help?
If you’re still uncertain or need professional guidance, don’t hesitate to contact us. You can contact us via email or submit a ticket with a description of your issue. Our team of experts is always available to help you with any questions. Rest assured that we’ll respond to your inquiry promptly.
Love what you see?
Do you like the quality of our products, themes, and applications, or perhaps the design of our website caught your eye? You can have similarly outstanding designs for your website or apps. Contact us, and we’ll bring your ideas to life.
