
Workflow – WorkDo Dash SaaS Add-On Guide
Learn how to automate tasks and streamline business processes in WorkDo Dash SaaS.
Introduction
Workflow Automation is a powerful system designed to help organizations automate routine tasks and notifications across multiple business modules. It enables you to define rule-based workflows that automatically trigger actions when specific conditions are met during business events.
With Workflow Automation, you can eliminate manual follow-ups and ensure timely communication by sending automated notifications through multiple channels such as Email, Slack, Telegram, Twilio, WhatsApp API, and more. The system reacts to events like invoice creation, project updates, lead generation, POS orders, HR activities, and other operational processes—keeping your team informed and responsive at all times.
How To Install The Add-On?
To Set Up the WorkFlow Add-On, you can follow this link: Setup Add-On.
How To Use The Workflow Add-On?
Workflow Management
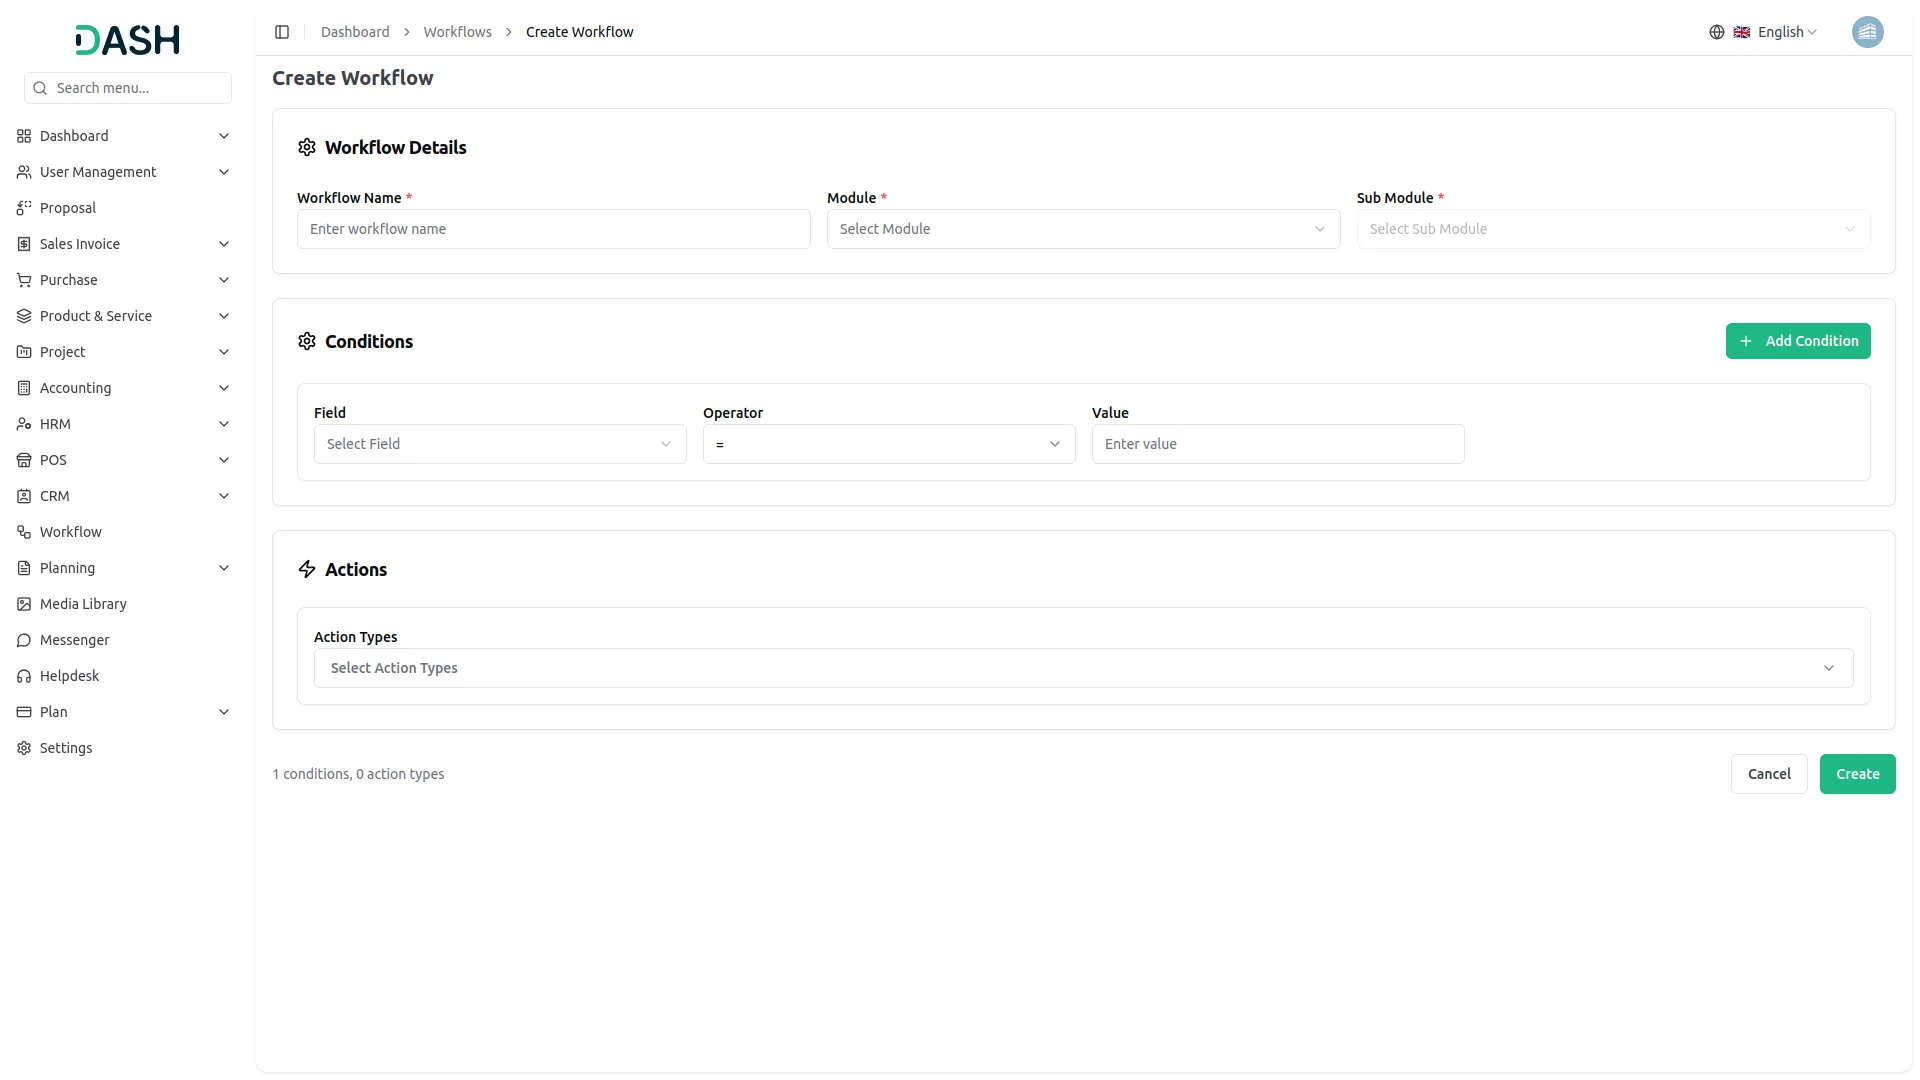
- To add a new workflow, click the “Create” button at the top of the workflow page. Enter a meaningful name in the Name field. This name helps you easily identify the purpose of the workflow, such as “High Value Invoice Notification” or “New Lead Alert”.
- select the Module from the dropdown which includes options like General, Project, Accounting, Lead, HRM, POS.
- Then choose the Event from the dropdown which changes based on your selected module, such as Sales Invoice, Purchase Invoice, Project, Lead, Deal, POS, The available fields and conditions will dynamically update according to the selected sub module.
-
The Condition section allows you to define rules that must be met before actions are executed. For each condition:
- Field: Select a field related to the chosen sub module (e.g., Total Amount, Tax, Customer, Status).
- Condition Operator: Choose from =, !=, >, <,>=, <=< /li>
- Value: Enter the value to compare against. Or you can select the the value from dropdown
- You can click the “Add Condition” button to add multiple conditions for the same sub module. All conditions are evaluated using AND logic, meaning every condition must be true.
- In the Action section, select the Action Types one or more actions from the multi-select dropdown: Email, Slack, Telegram, Twilio, WhatsApp API Below the action selector, enter a Message in the textarea. This message will be used across all selected notification channels.
- Email Configuration: Select Recipient Type as Custom to manually enter an Email address, or Staff to notify a selected staff member. Then enter the Message to be sent.
- Twilio Configuration: Select Recipient Type as Custom to manually enter a Mobile Number, or Staff to notify a selected staff member. Then enter the Message to be sent.
- Telegram Configuration: Enter the Telegram Access Token and Telegram ChatID, then enter the Message to be sent.
- Slack Configuration: Enter the Slack Webhook URL, then enter the Message to be sent.
- WhatsApp API Configuration: Select Recipient Type as Custom to manually enter a Mobile Number, or Staff to notify a selected staff member. Also enter the WhatsApp Access Token and Phone Number ID, then enter the Message to be sent.
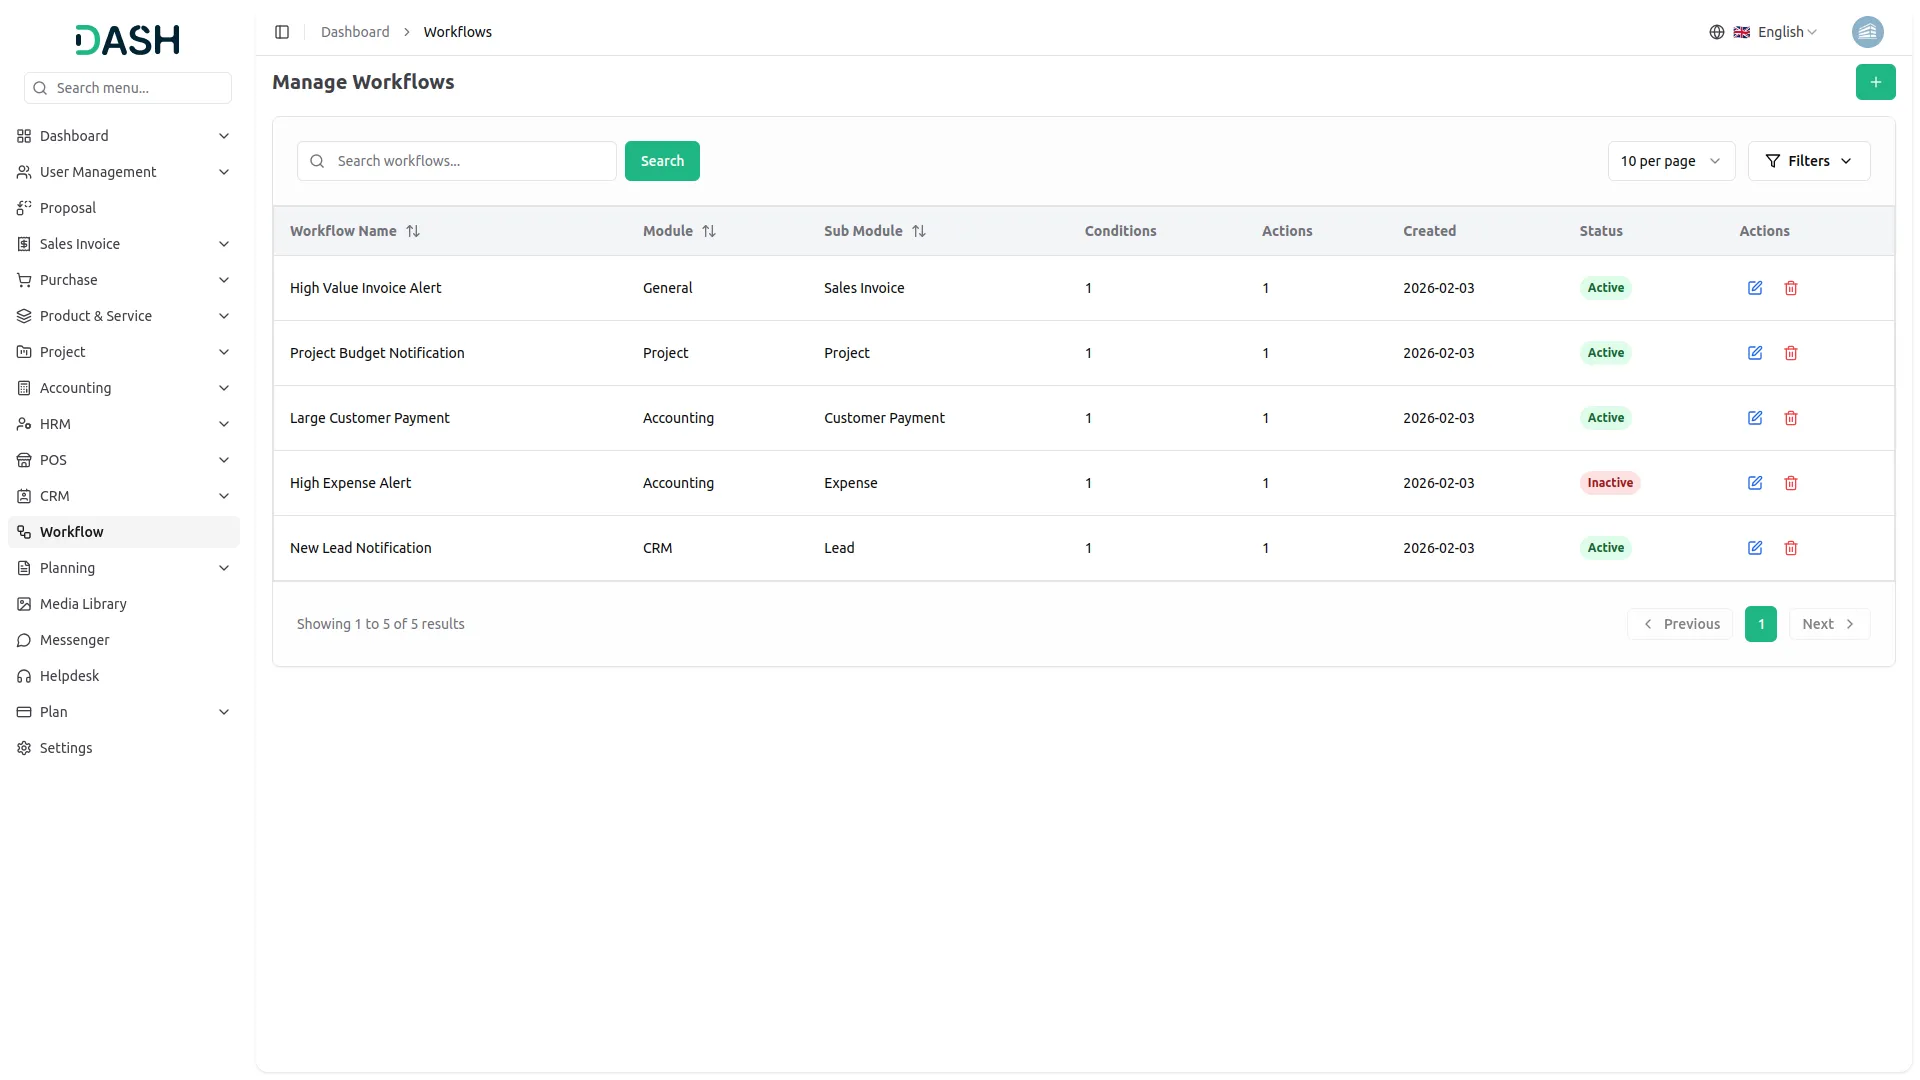
- The list page features Search, and Filters buttons at the top. The table displays columns for Workflow Name, Module, Sub Module, Conditions, Actions, Status, Created and Action showing all your created workflows. You can use the Edit action to modify existing workflows or Delete action to remove workflows that are no longer needed.
Example Workflow Setup
- Scenario: High-Value Sales Invoice Notification
- Module: General
- Sub Module: Sales Invoice
Conditions:
-
1. Field: Total Amount
Operator: >
Value: 500
-
2. Field: Tax
Operator: =
Value: GST
Selected Actions:
-
Send Email Notification
- Type: Staff
- Staff: John Doe
-
Send Slack Notification
- Webhook URL: https://hooks.slack.com/…
-
Send Telegram Notification
- Access Token: 123456:ABC-DEF1234ghIkl-zyx57W2v1u123ew11
- Chat ID: @channel_name
-
Send Twilio Notification
- Type: Custom
- Number: +1234567890
-
Send WhatsApp API Notification
- Type: Custom
- Number: +1234567890
Result:
When a Sales Invoice is created under the General module, the system checks:
- If Total Amount > 500
- And Tax = GST
If both conditions are met, all configured notifications (Email, Slack, Telegram, Twilio, WhatsApp API) are automatically triggered.
Available Modules & Sub Modules
For example, if you enable the create user setting from General, then the notification via Workflow Automation will be sent to that particular user when the user is created.
General
- New User
- New Sales Invoice
- Sales Invoice Status Updated
- New Sales Proposal
- Proposal Status Updated
- New Purchase
- New Warehouse
Accounting
- New Customer
- New Revenue
- New Vendor
HRM
- New Monthly Payslip
- New Award
- New Event
- Leave Approve/Reject
- New Announcement
- New Holidays
CRM
- New Lead
- Lead to Deal Conversion
- New Deal
- Lead Moved
- Deal Moved
Taskly
- Project
Account
- Customer Payment
- Vendor Payment
- Revenue
- Expense
Lead
- Lead
- Deal
So, this is how you can use Workflow Automation Add-On very easily.
Categories
Related articles
- Whereby Meeting – WorkDo Dash SaaS Add-On Guide
- Video Hub – WorkDo Dash SaaS Add-On Guide
- Sales Agent – WorkDo Dash SaaS Add-On Guide
- Water Park Management – WorkDo Dash SaaS Add-On Guide
- Google Meet – WorkDo Dash SaaS Add-On Guide
- Sign in with GitHub – eCommerceGo SaaS Add-On Guide
- Slack – BookingGo SaaS Add-On Guide
- Make Credentials Generation Guide
- Payfort – WorkDo Dash SaaS Add-On Guide
- Tour & Travel Management – WorkDo Dash SaaS Add-On Guide
- User Manual – Taskly
- CoinGate – BookingGo SaaS Add-On Guide
We're Here to Help - Let's Talk
Have questions about our solutions, customization services, or business tools? Our team is here to help you. let's talk.