Restaurant Menu Integration in Dash SaaS
Streamline your restaurant’s menu presentation and management with Dash SaaS, the comprehensive tool for seamless integration.
Introduction
The Restaurant Menu Add-On is a comprehensive tool designed to streamline the management and presentation of your restaurant’s menu. This Add-On enables you to easily create, update, and organize your menu items, ensuring your offerings are always current and appealing to your customers. With features such as customizable categories, detailed item descriptions, pricing options, and visual enhancements, the Restaurant Menu Add-On helps you provide a seamless and engaging dining experience. This documentation will guide you through the setup, configuration, and utilization of the Add-On, ensuring you can fully harness its capabilities to enhance your restaurant’s operations and customer satisfaction.
How to Install the Restaurant Menu Add-On?
To Set Up the Restaurant Menu Add-On, you can follow this link: Setup Add-On
How to Use the Restaurant Menu Add-On?
Restaurant Menu Dashboard
- The Restaurant Menu dashboard is your main control center that provides an overview of your restaurant’s current status and performance.
- When you access the dashboard, you will see several key components displayed prominently. At the top, there is a “Copy Link” button that allows you to copy your restaurant’s website link for sharing with customers or on social media platforms. When you go to the frontend, you cannot book the items from there; you can just see them. To book the items or the dining table, you need to scan the QR Code.
- Below this, you will find three important information cards showing Total Orders, Total Customers, and Total Dining Tables. These cards give you instant insight into your business metrics at a glance.
- The dashboard also displays an Order Chart that shows order trends for the last 7 days, helping you track your daily performance and identify patterns in customer ordering behaviour.
- In the bottom section, you can view your Dining Tables data, which shows the current status and information about all your restaurant tables.
System Setup
The System Setup section is the foundation of your restaurant management system, where you configure all the basic settings and information that will appear on your website and throughout the system.
Restaurant Category
- To create a new restaurant category, click the “Create” button at the top of the page. Fill in the Category Name field with the name you want to display, select a Category Color that represents this category, and upload an Image that will be associated with this category.
- The list page displays all your categories in a table format with columns showing the Image, Category Name, and Category Color. You can search through categories and perform actions like Edit or Delete on existing categories.
Brand Setting
- In the Brand Setting section, you configure your restaurant’s basic branding elements. Upload your Logo for both header and footer sections of your website, add a Favicon that will appear in browser tabs, and enter your Footer Text, which typically includes copyright information.
- You also need to set your Header Text, Restaurant Email, Restaurant Address, and Phone Number. These details will be displayed throughout your website and used for customer communications.
Banner Section
- To customize your website’s banner area, enter a compelling Tagline and Heading Title that will grab visitors’ attention. Upload a Banner Background Image that sets the visual tone for your site.
- In the Banner Images section, you can add multiple images using the repeater function. This allows you to create a rotating banner with several appealing photos of your restaurant or food items.
Reservation Settings
- Set up your reservation system by entering a Reservation Title and uploading a Background Video that will play in the reservation section. Add a Reservation Description that explains your reservation process to customers.
- Configure your restaurant’s operating hours by setting the Start Day and End Day of your weekly schedule, along with Open Time and Close Time for each day.
- For special occasions, click “Create” to add new occasions. Enter the Name of each occasion in the form. The list page shows all occasions with options to search, and you can edit or delete existing occasions as needed.
Gallery
- Set up your gallery section by entering the Title and Description for display on the website. Use the Gallery Images repeater to add multiple images for the gallery section of your website.
About Us
- Configure the About Us page by entering Tagline, Heading Title, About Us Description, and Long Description. Upload an About Us Image and add Hours Note and Hours Description for complete information display.
Testimonials
- Set up testimonials by entering the Title and Description. Use the Testimonials Details repeater to add multiple testimonials, including Client Name, Rating, Message, and Client Image for the testimonial section of your website.
Social Link
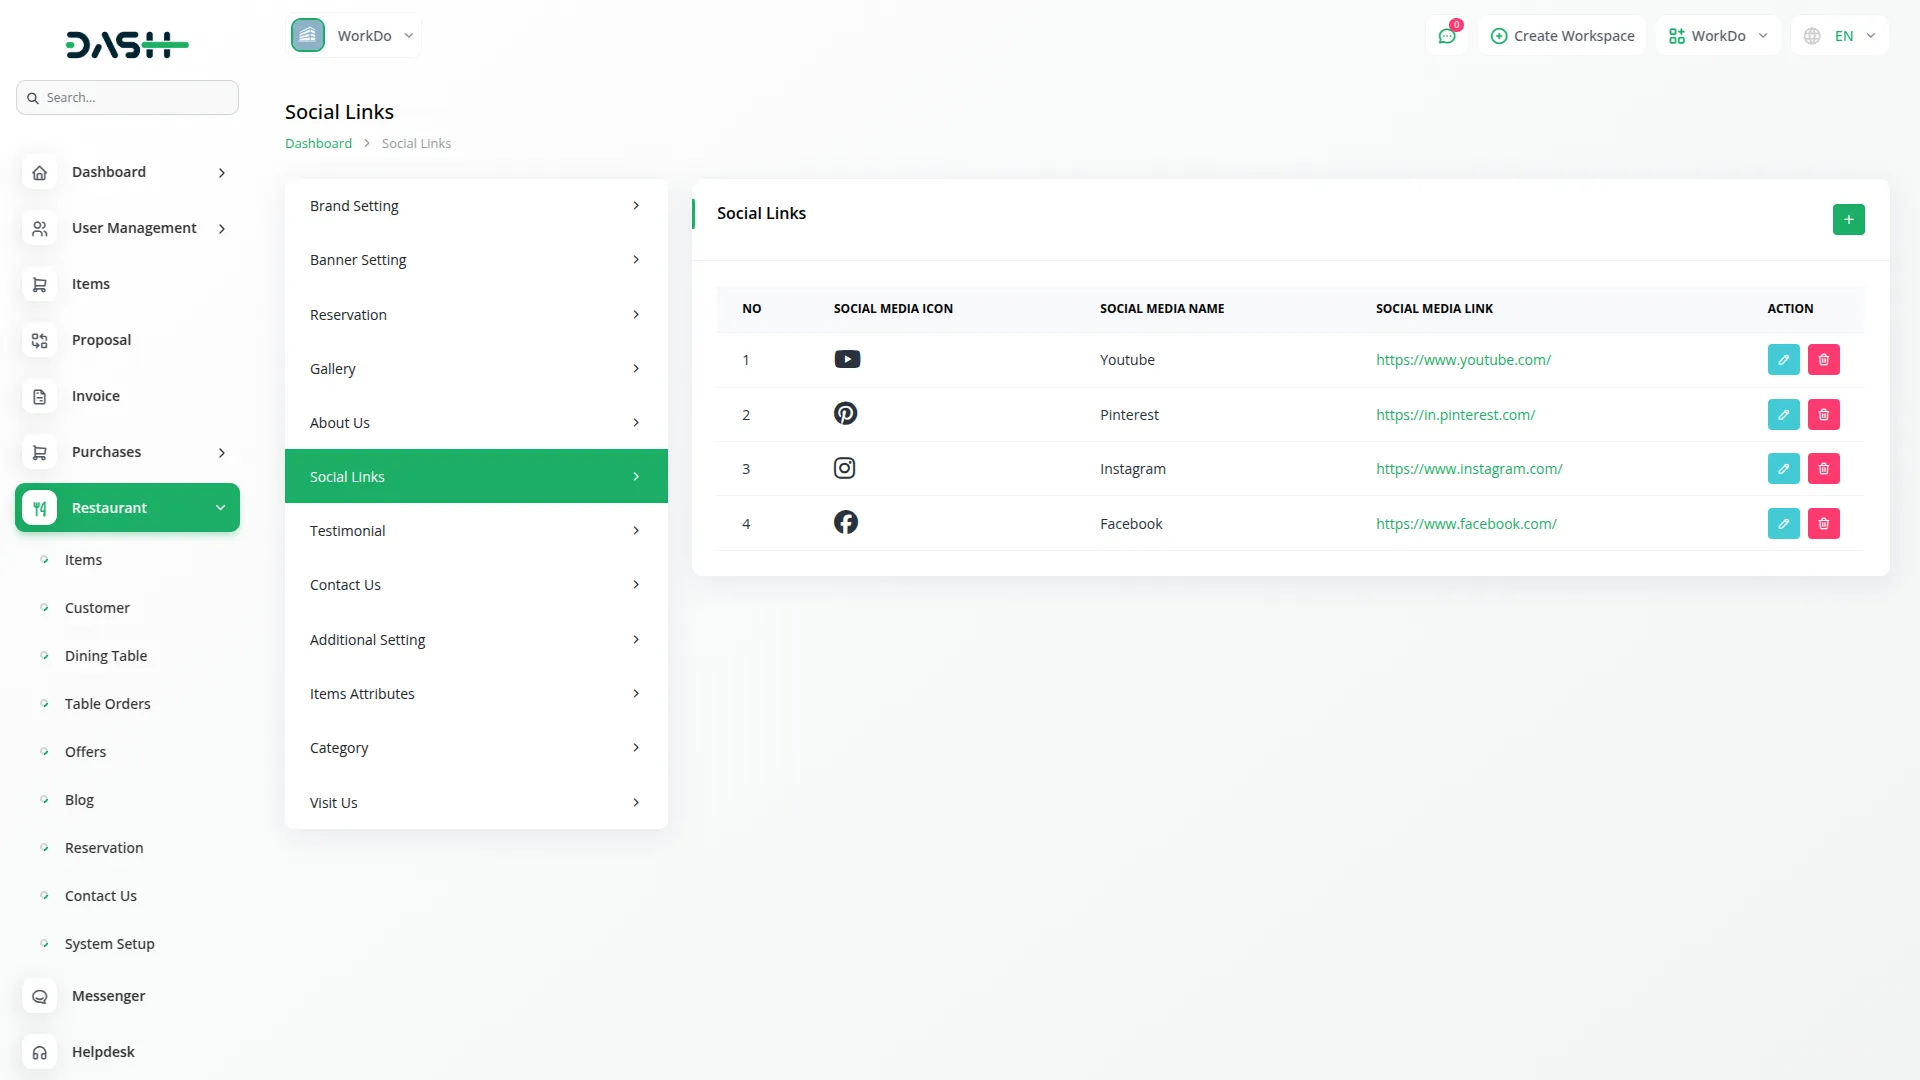
- To add social media links, click the “Create” button. Select Social Media Icon, enter Social Media Name, and add the Social Media Link.
- The list page displays all social links with Social Media Icon, Social Media Name, and Social Media Link columns. You can edit or delete social links using the available actions.
Contact Us
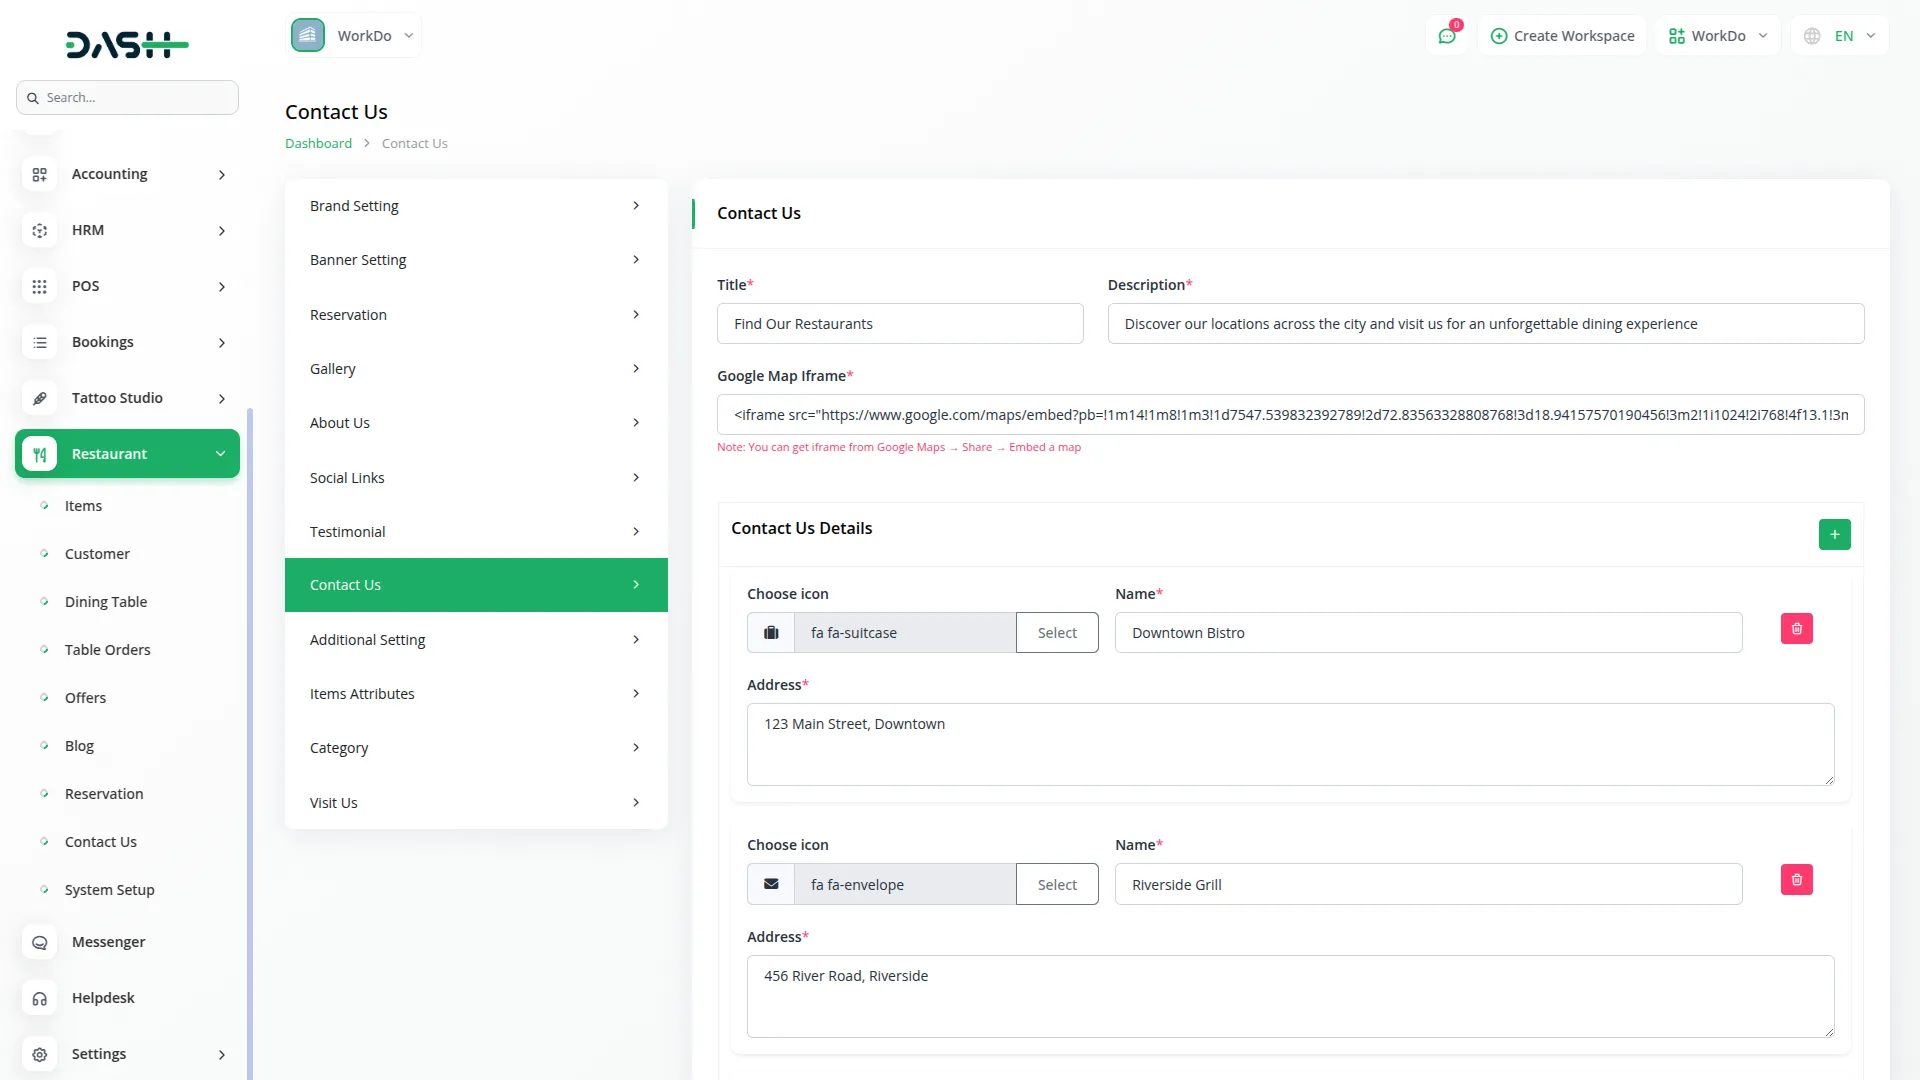
- Configure the contact section by entering Title, Description, and Google Map Iframe. Use the Contact Us Details repeater to add multiple contacts by choosing an icon, entering Name and Address for display in the Contact Us section of the website.
Additional Setting
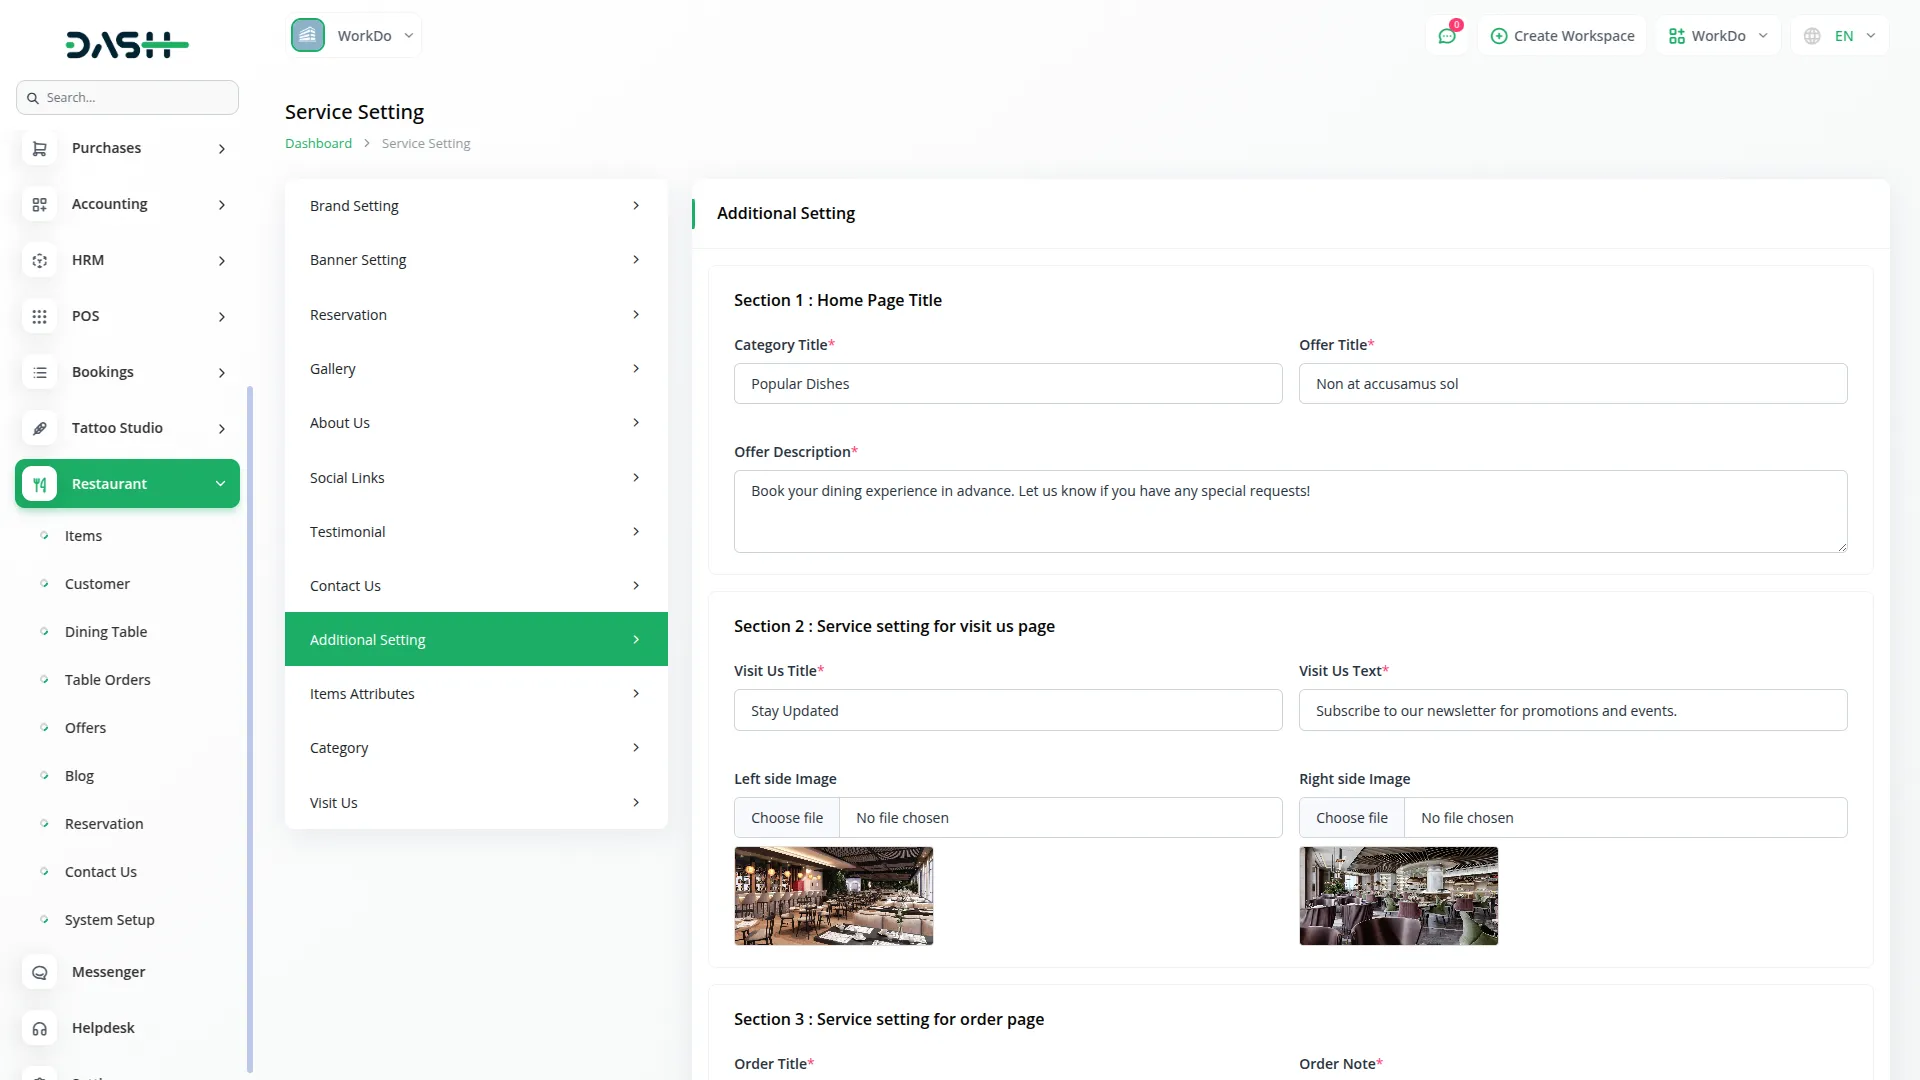
- Configure various page sections through five different sections:
- Section 1, Home Page Title: Enter Category Title, Offer Title, and Offer Description for home page display.
- Section 2 Service setting for visit us page: Add Visit Us Title, Visit Us Text, Left side Image, and Right side Image.
- Section 3 Service setting for order page: Enter Order Title and Order Note.
- Section 4 Contact Us page: Add Contact Us Title, Contact Us Note, and Contact Us Description.
- Section 5 Blog page: Enter Blog Title twice for blog page configuration.
Items Attributes
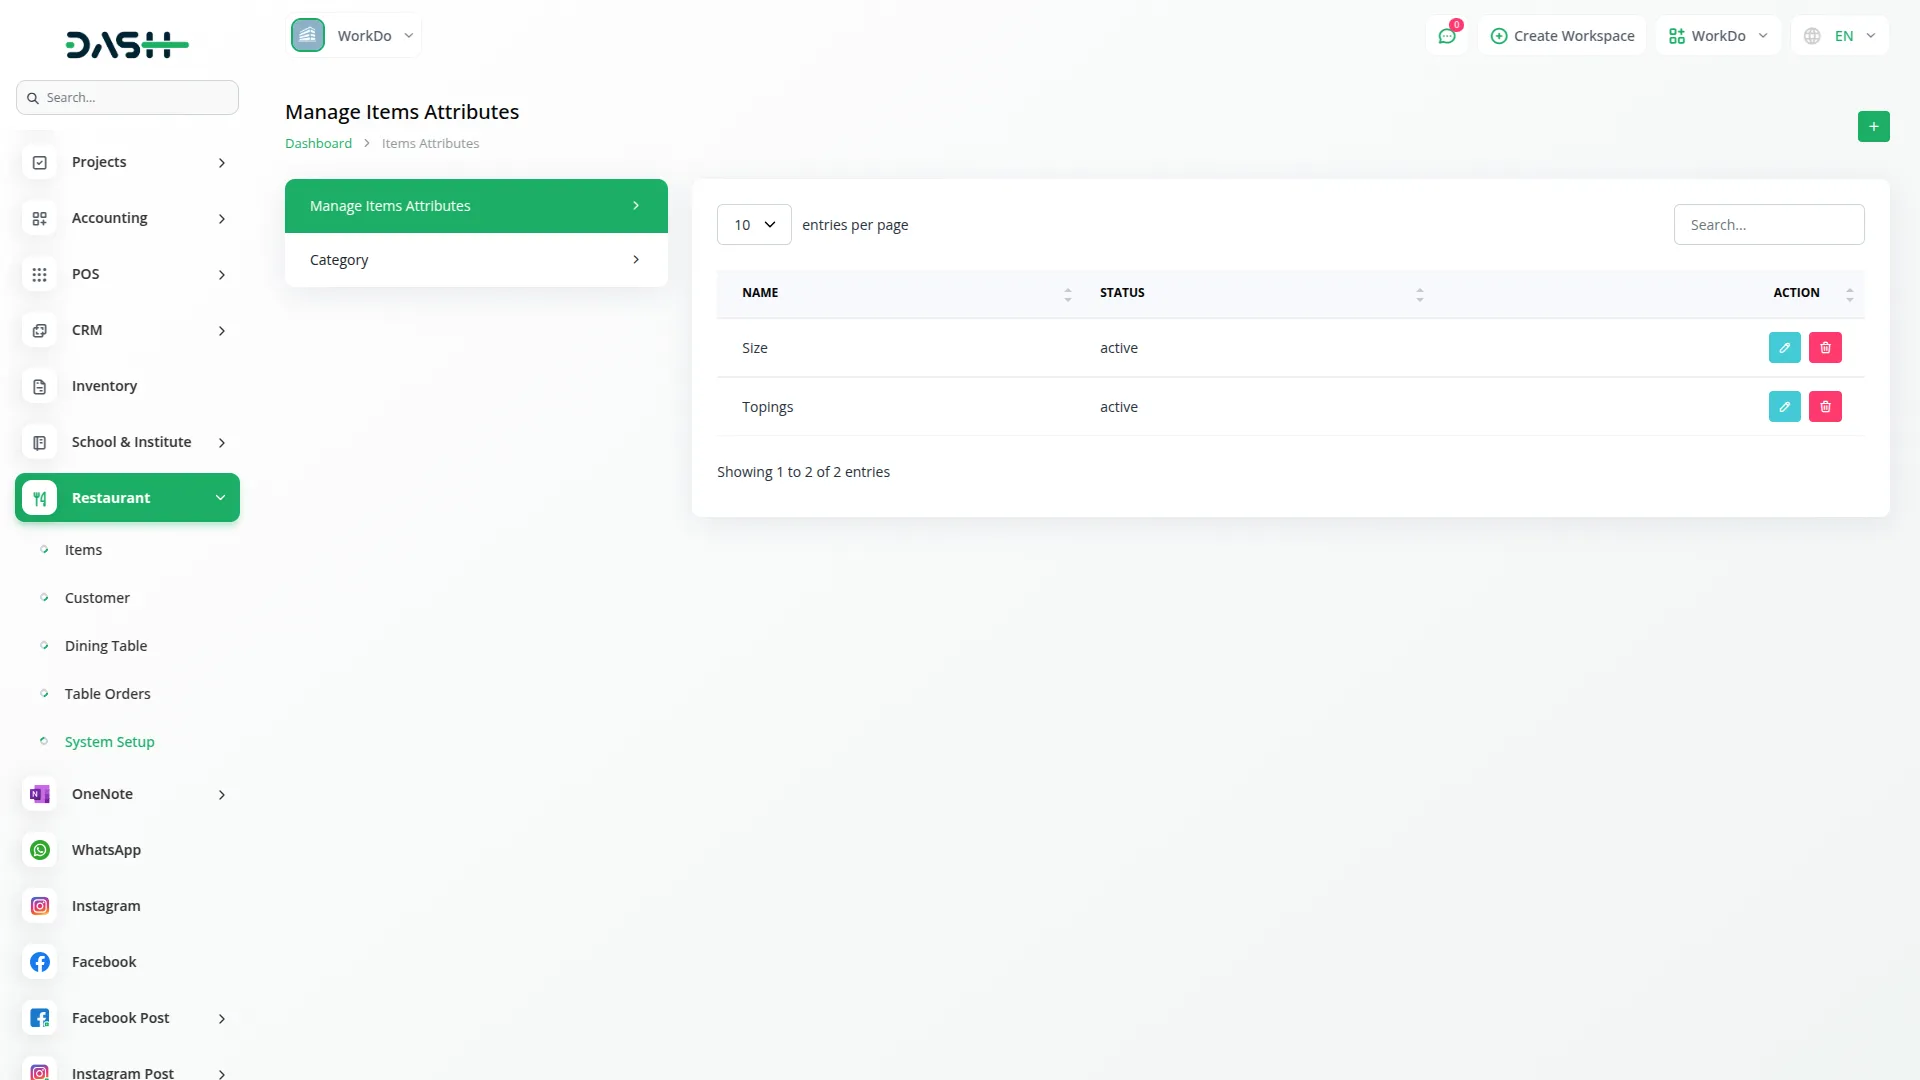
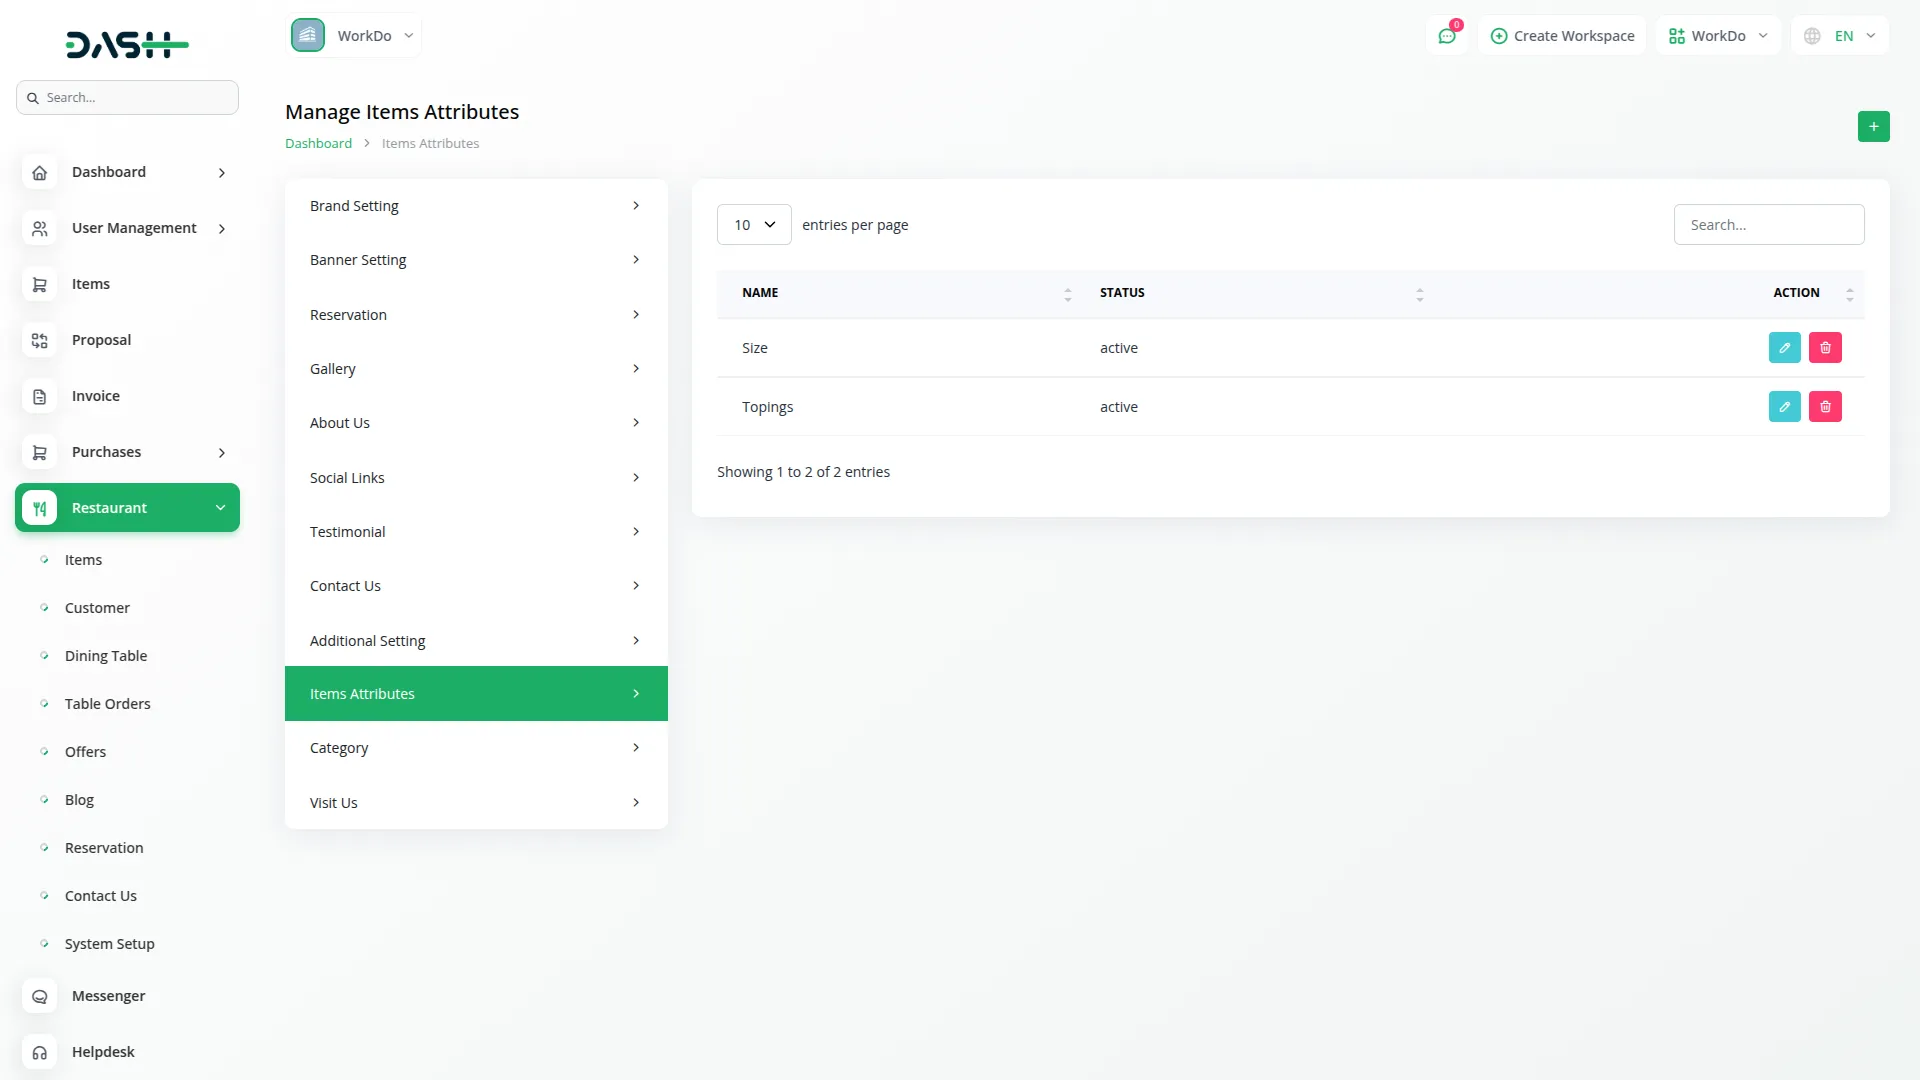
- To create item attributes, click the “Create” button. Enter the Name and select Status as Active or Inactive. The list page shows all attributes with Name and Status columns. You can edit or delete attributes using the available actions.
Visit Us
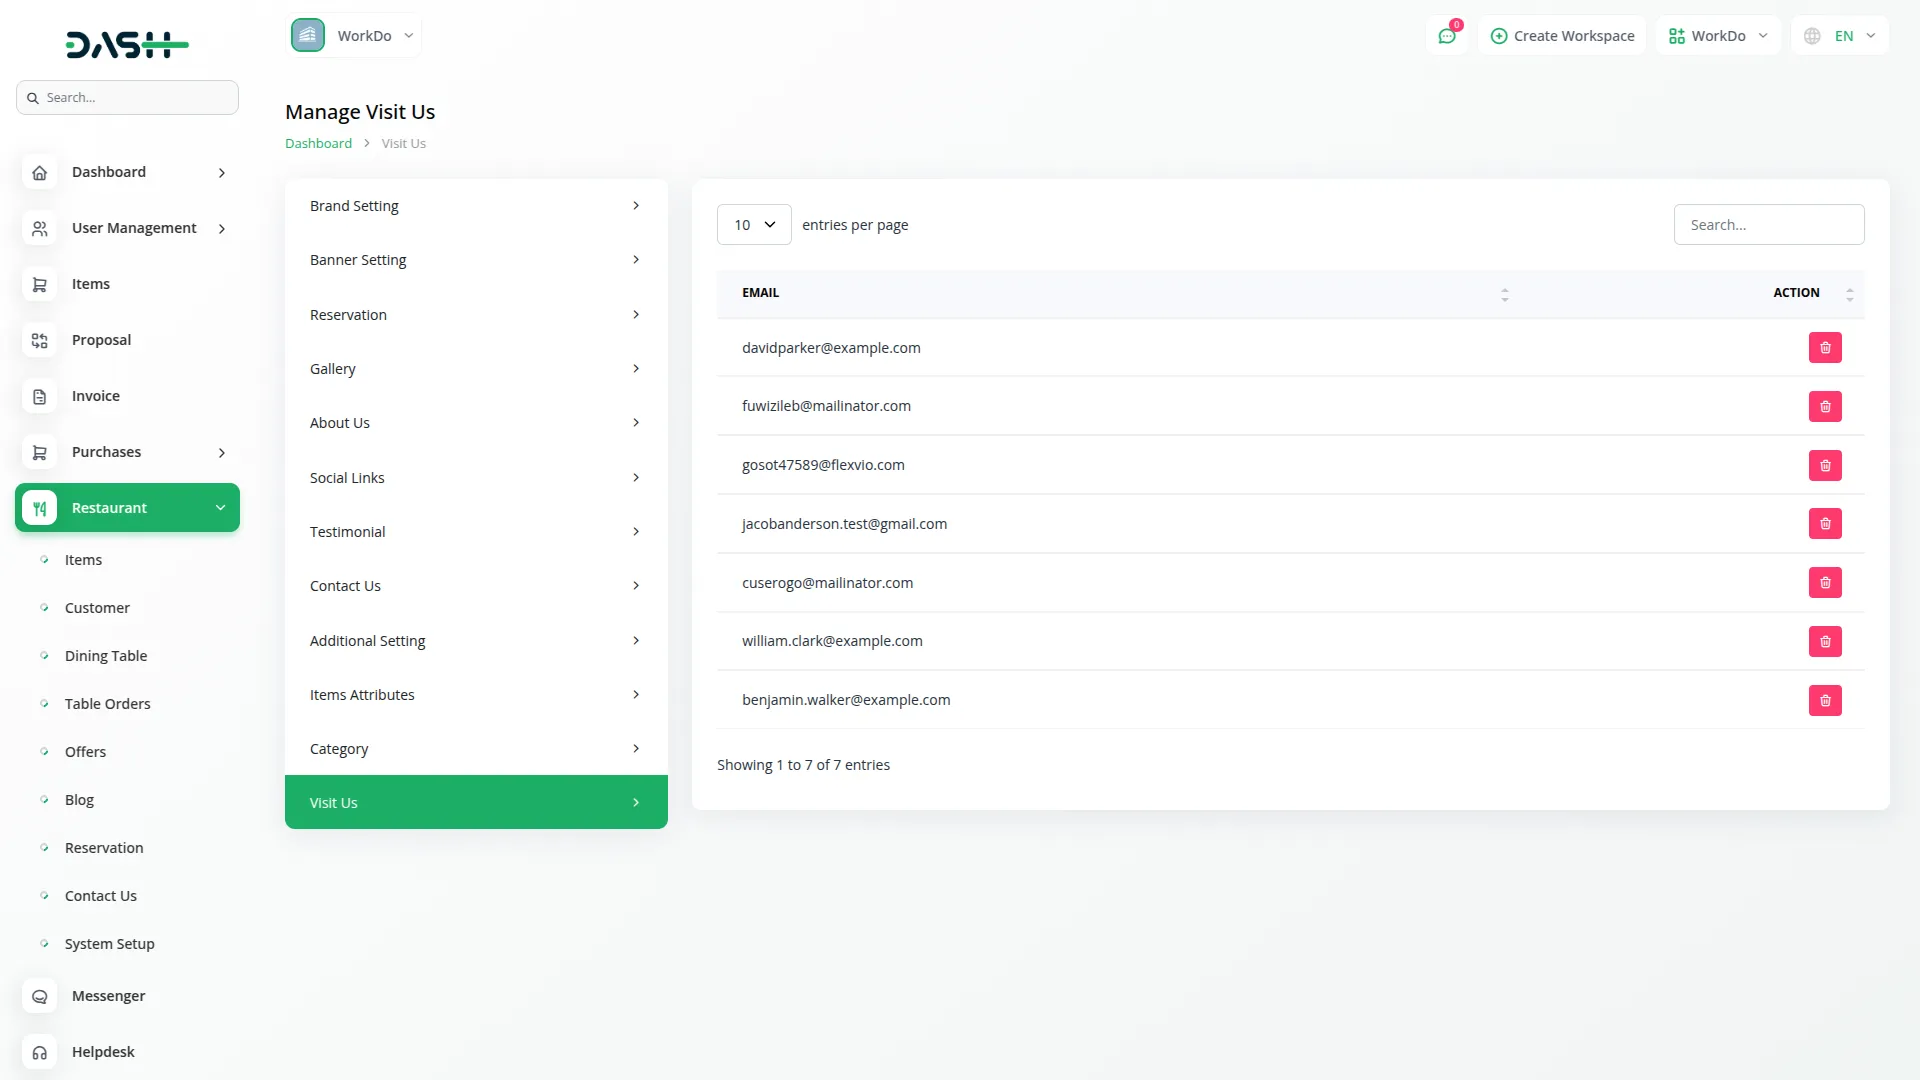
- This section displays emails submitted from the footer section on the frontend. The list page shows the Email column with the Delete action available for managing submissions.
Manage Items
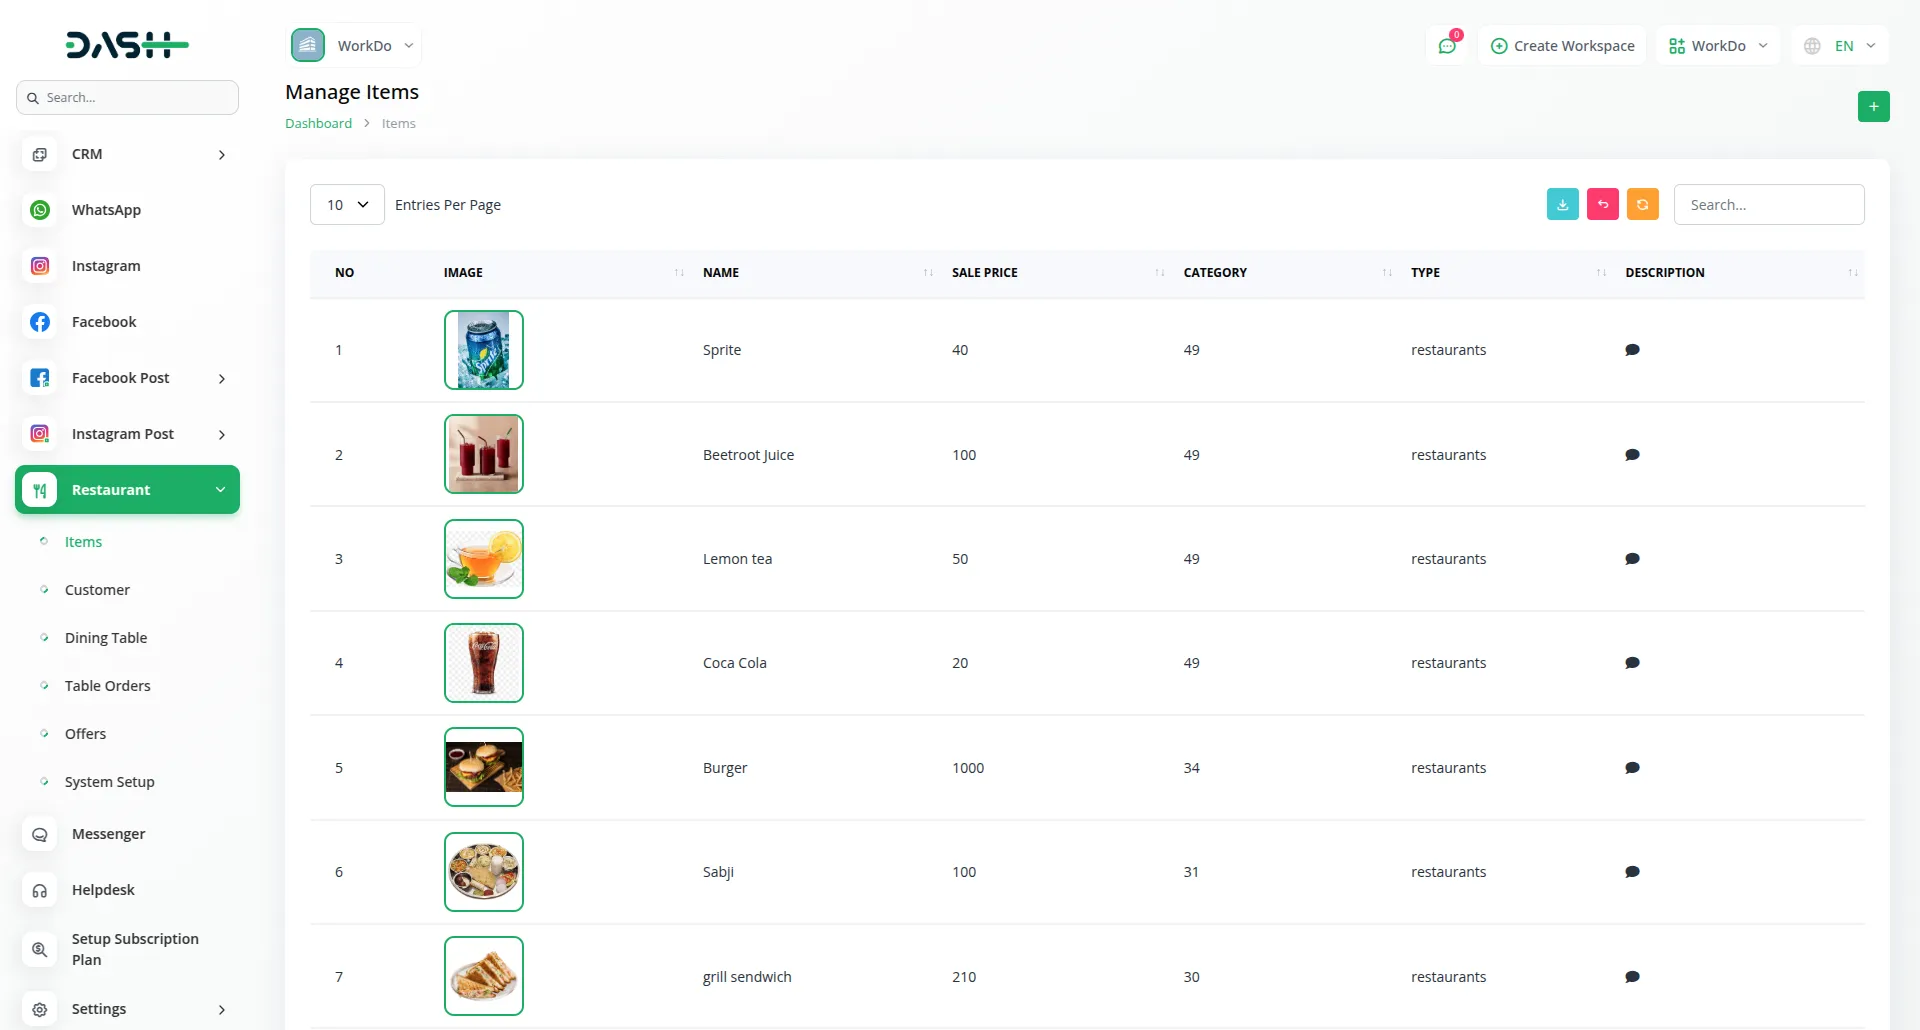
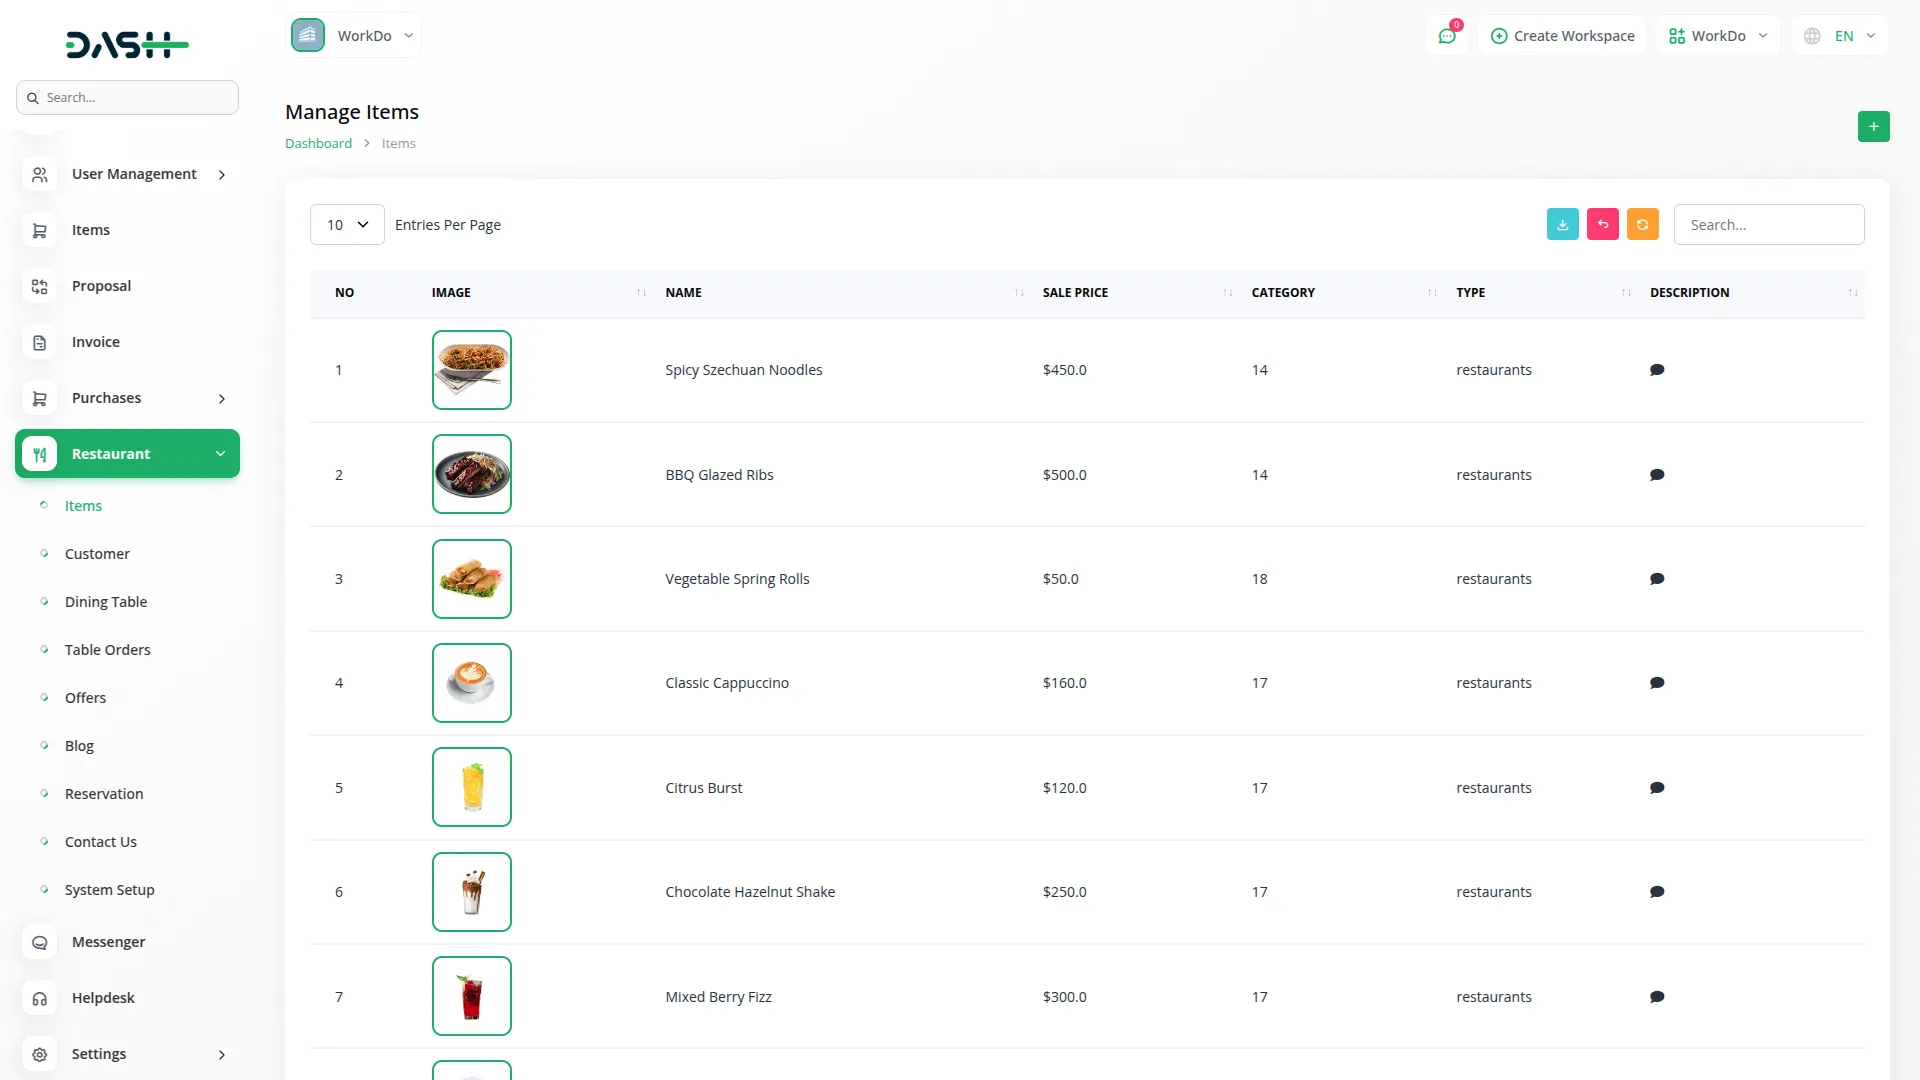
- The Items section is where you manage your complete restaurant menu and all food items available to customers.
- To add a new menu item, click the “Create” button. Fill in the Item Name and SKU (Stock Keeping Unit) for accurate inventory tracking. Set the Tax rate that applies to this item and select the appropriate Category from your previously created Restaurant Categories.
- Enter a detailed Description of the item that will help customers understand what they’re ordering. Set both the Sale Price (what customers pay) and Purchase Price (your cost) for profit tracking. Choose the appropriate Income Account and Expense Account for your accounting system.
- Specify the Unit of measurement and the Quantity available. Upload an appealing Image of the item that will be displayed to customers. If the item has variants, enter the Variant Name and any Additional Price for that variant.
- Select relevant Item Attributes from those you’ve set up in System Setup, and set the Status to either Active or Inactive depending on current availability.
- The list page displays all items in a table with columns for No, Image, Item Name, Category, Sale Price, Type, and Description. You can search through items, export the list, and perform Edit or Delete actions on individual items. Note that editing and deleting can only be performed on base items.
Customer
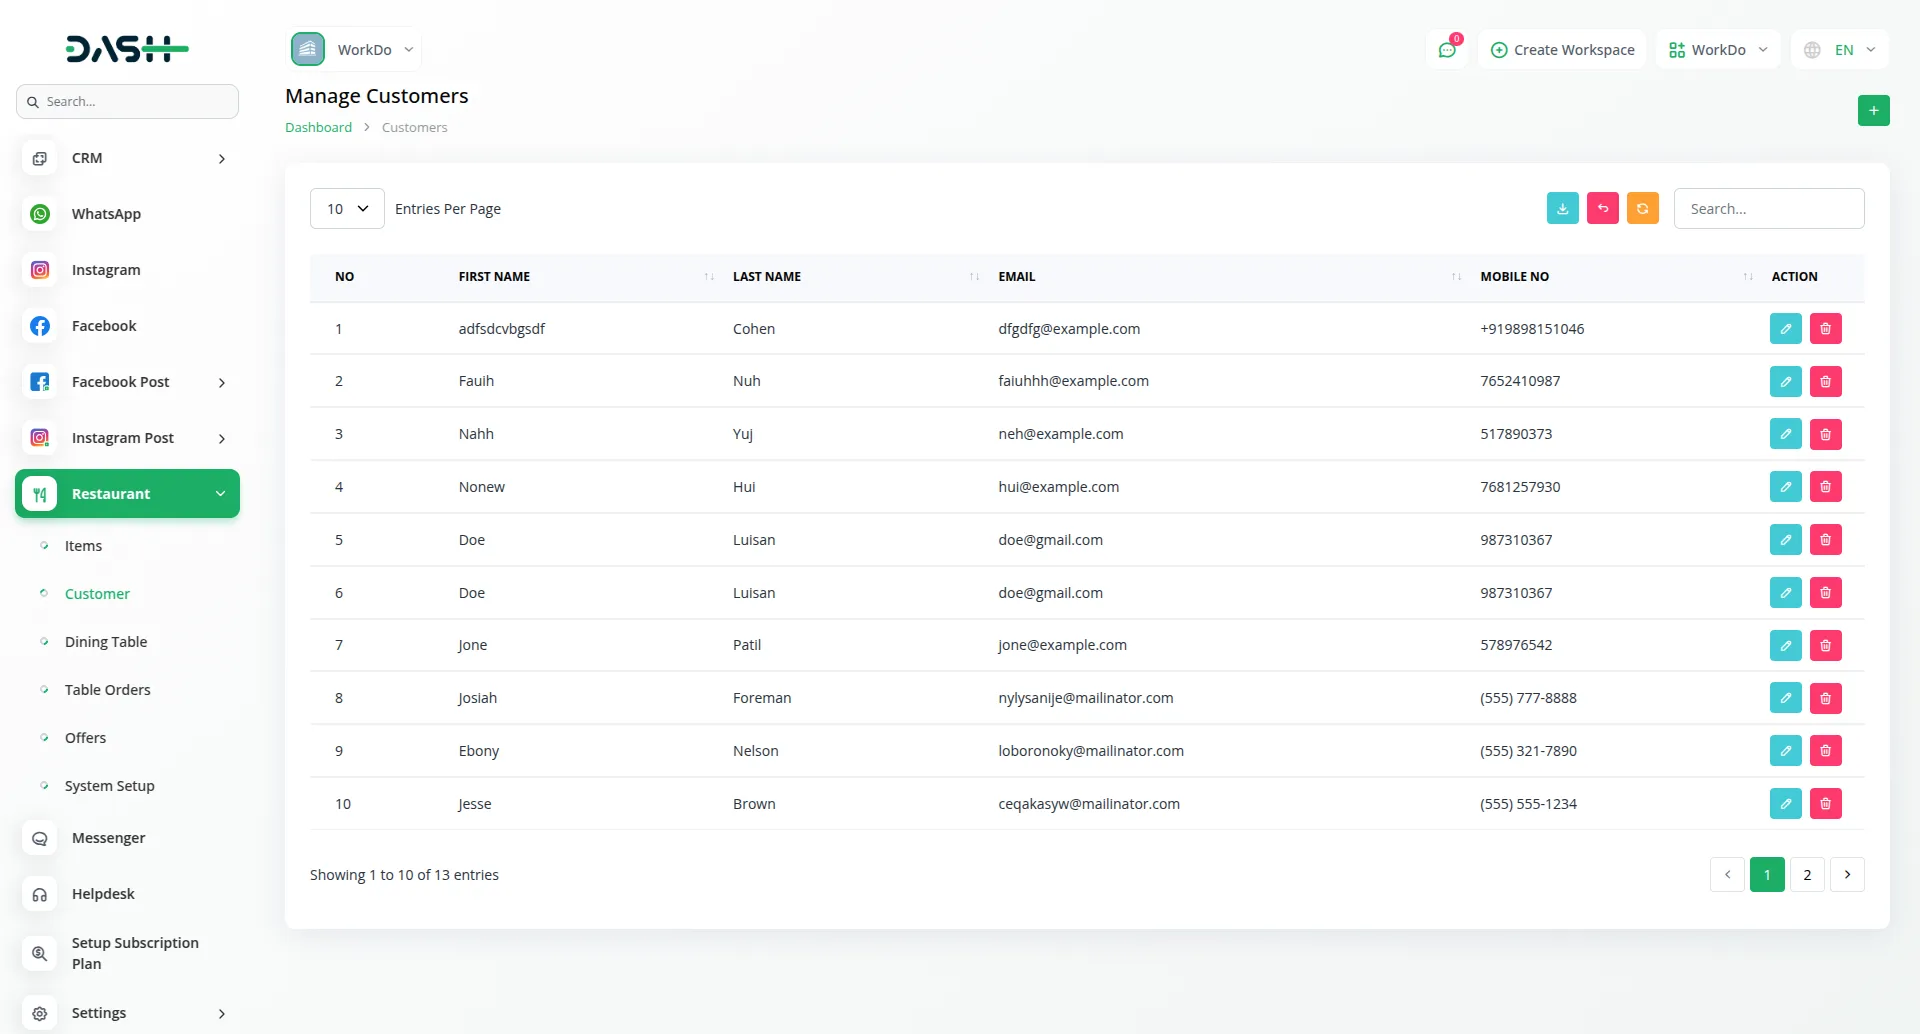
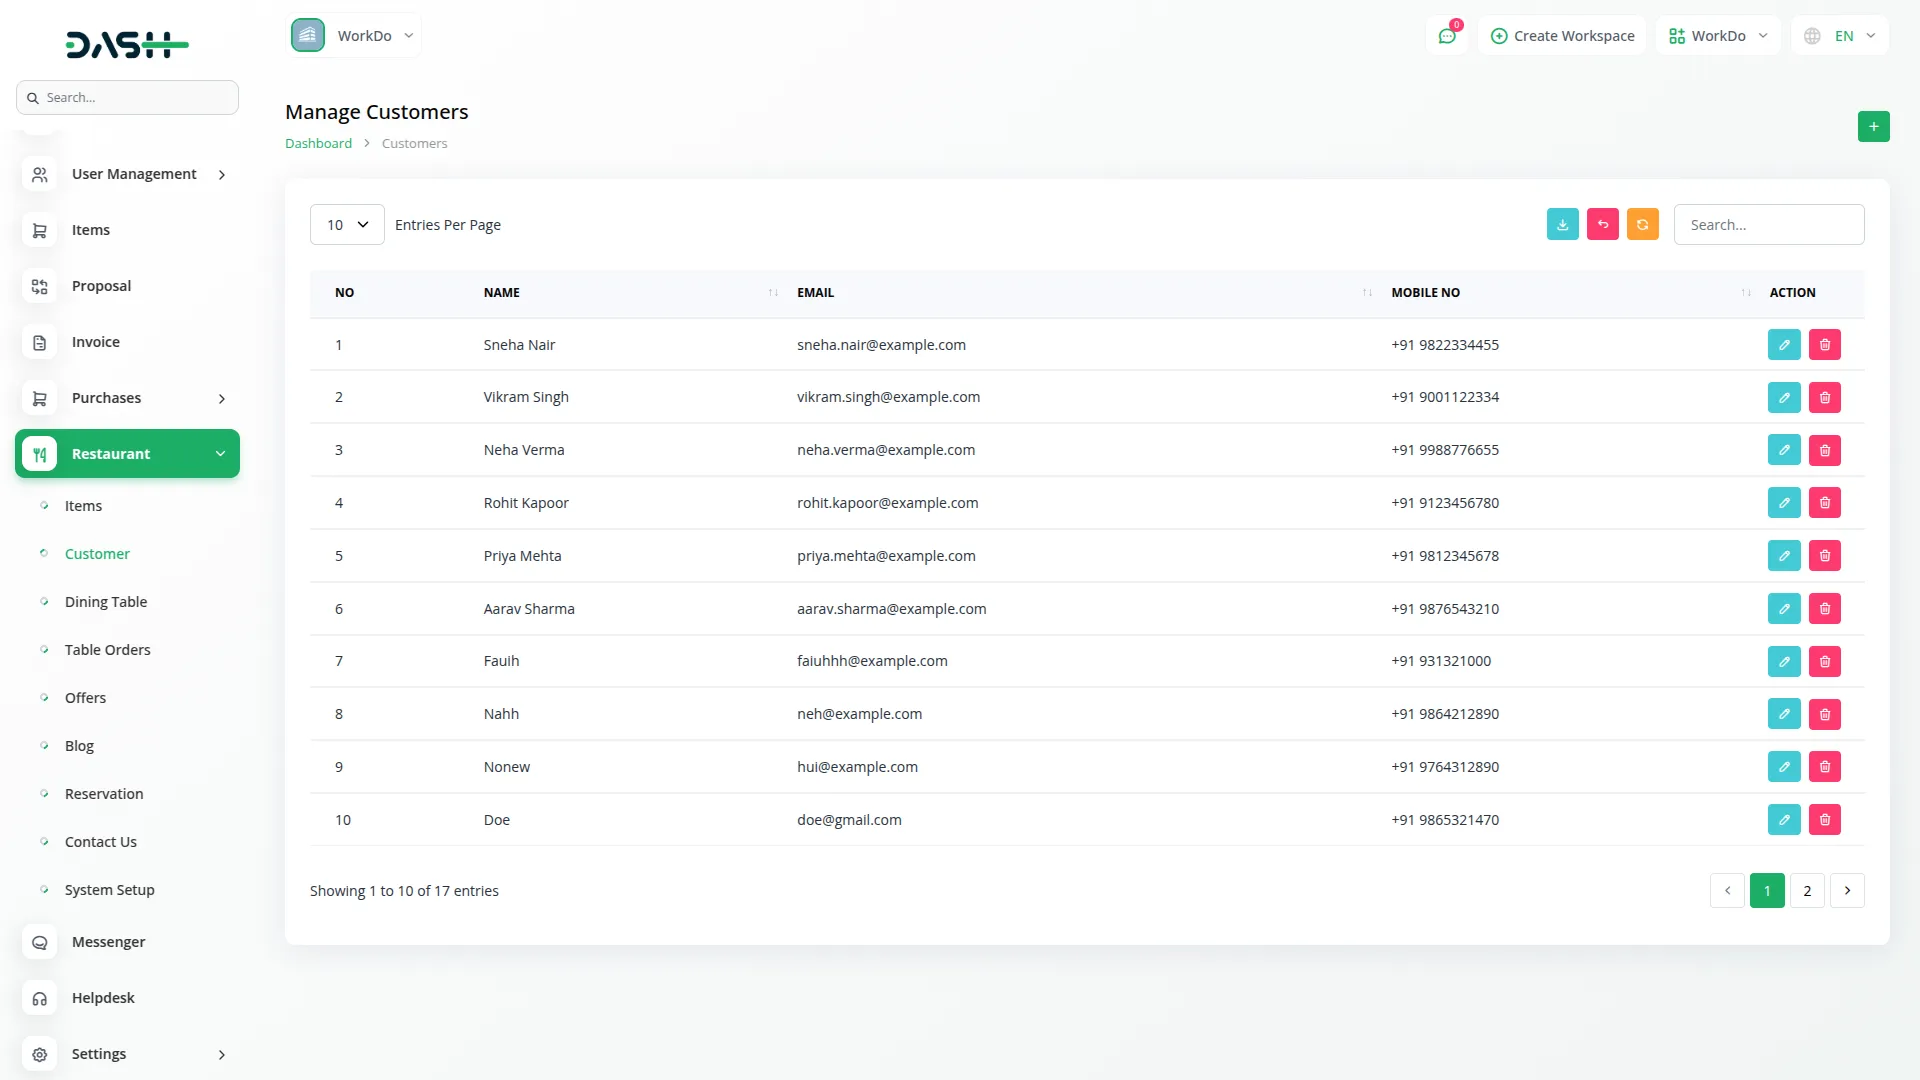
- The Customer section helps you maintain a database of all your restaurant customers, whether they order through your website or are added manually from the backend.
- To create a new customer record, click the “Create” button. Enter the customer’s Name, Email, and Mobile Number as primary contact information. Fill in their Address details, including City, State, and ZIP Code, for delivery or contact purposes.
- You can also add any special Instructions related to the customer, such as dietary preferences or delivery notes that will help your staff provide better service.
- The list page shows all customers in a table format with columns for No, Name, Email, and Mobile Number. You can search through customer records, export the customer list for external use, and perform Edit or delete actions on customer profiles.
- This section automatically captures customer information when they place orders through your website checkout process, ensuring you build a comprehensive customer database over time.
Dining Tables
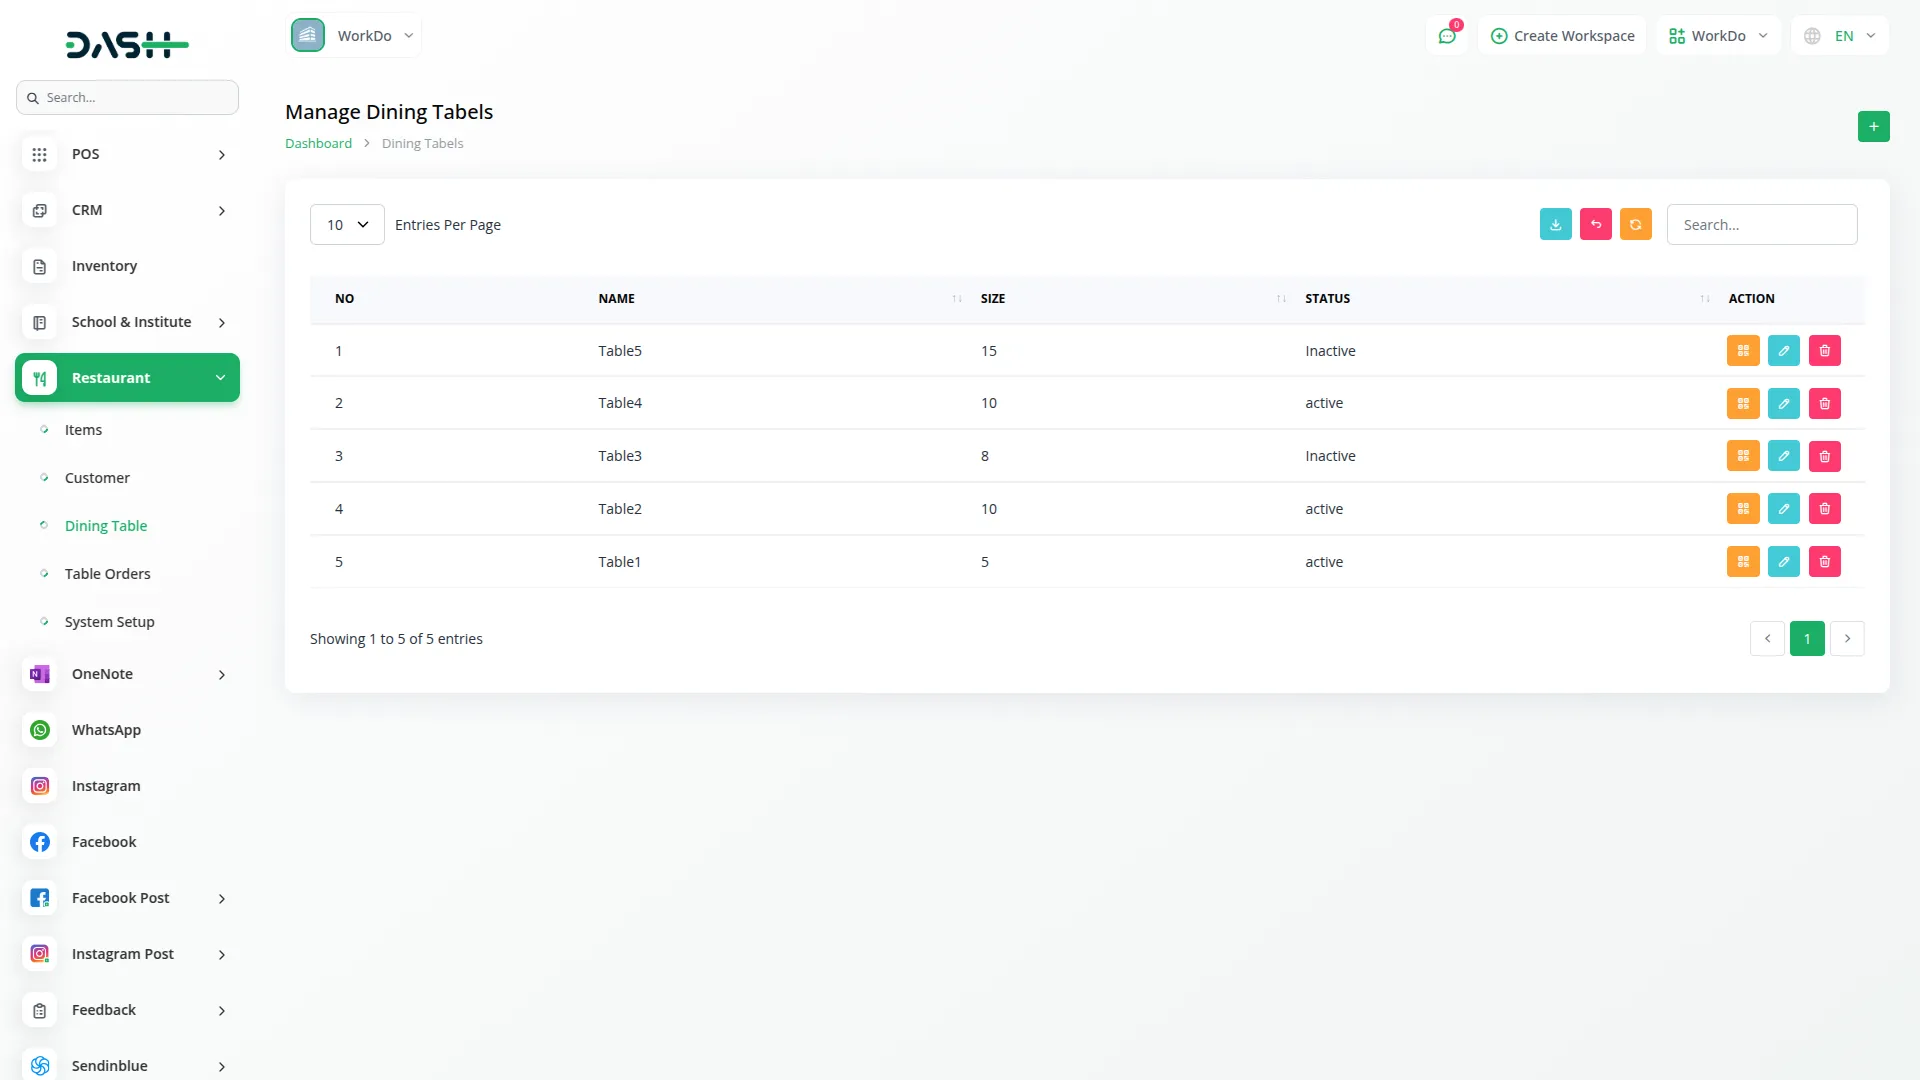
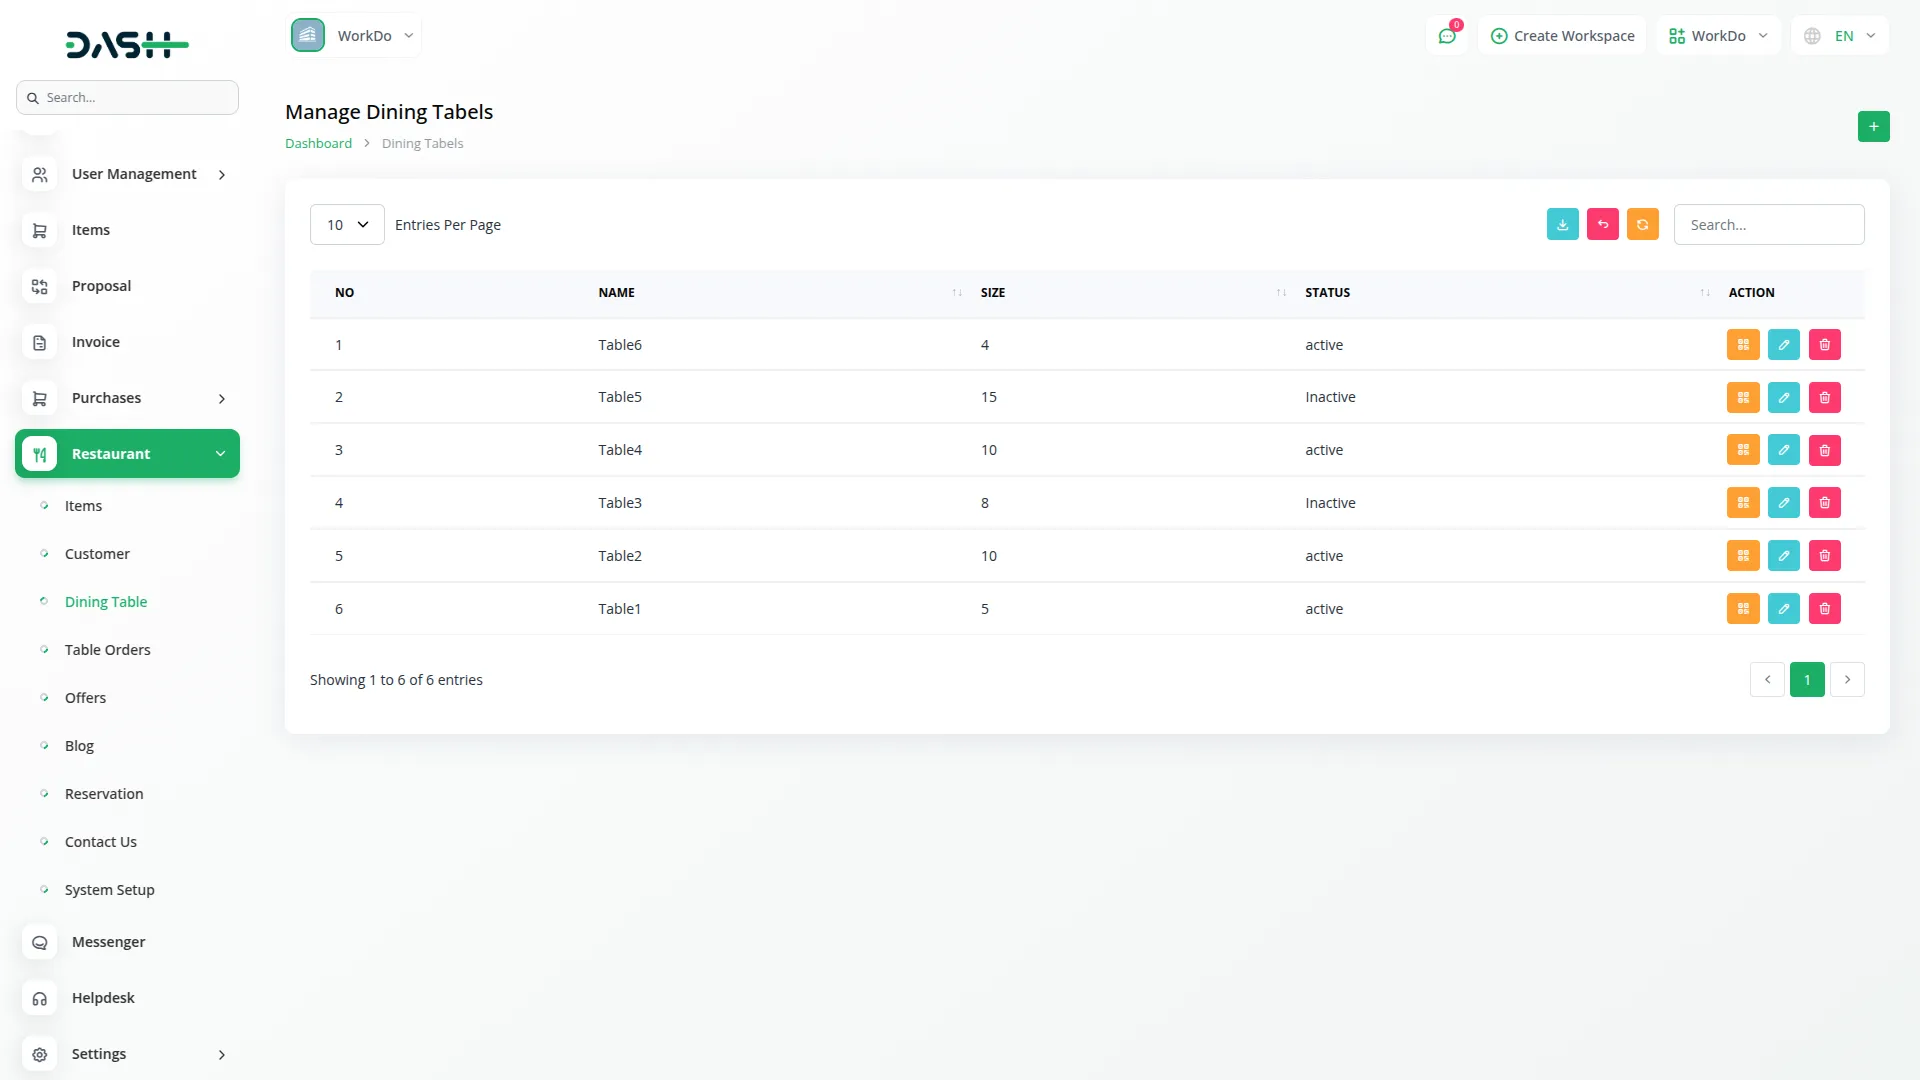
- The Dining Tables section allows you to set up and manage all the physical tables in your restaurant, complete with QR code functionality for contactless ordering.
- To add a new dining table, click the “Create” button. Enter a unique Table Name that helps staff identify the table (such as “Table 1” or “Window Booth”). Specify the Size of the table, indicating how many people it can accommodate.
- Set the Status to either Active or Inactive depending on whether the table is currently available for use.
- The list page displays all tables with columns for No, Table Name, Size, and Status. You can search through tables, export the table list, and perform various actions, including QR Code, Edit, or Delete.
- When you click the QR Code action, the system generates a scannable QR code for that specific table. Customers can scan this code to access your menu directly and place orders from their table. You can also copy the link associated with the QR code and download a printable QR code banner to place on the physical table.
- This feature enables contactless ordering where customers can browse your menu and place orders directly from their smartphones without needing to interact with staff for menu viewing or initial ordering.
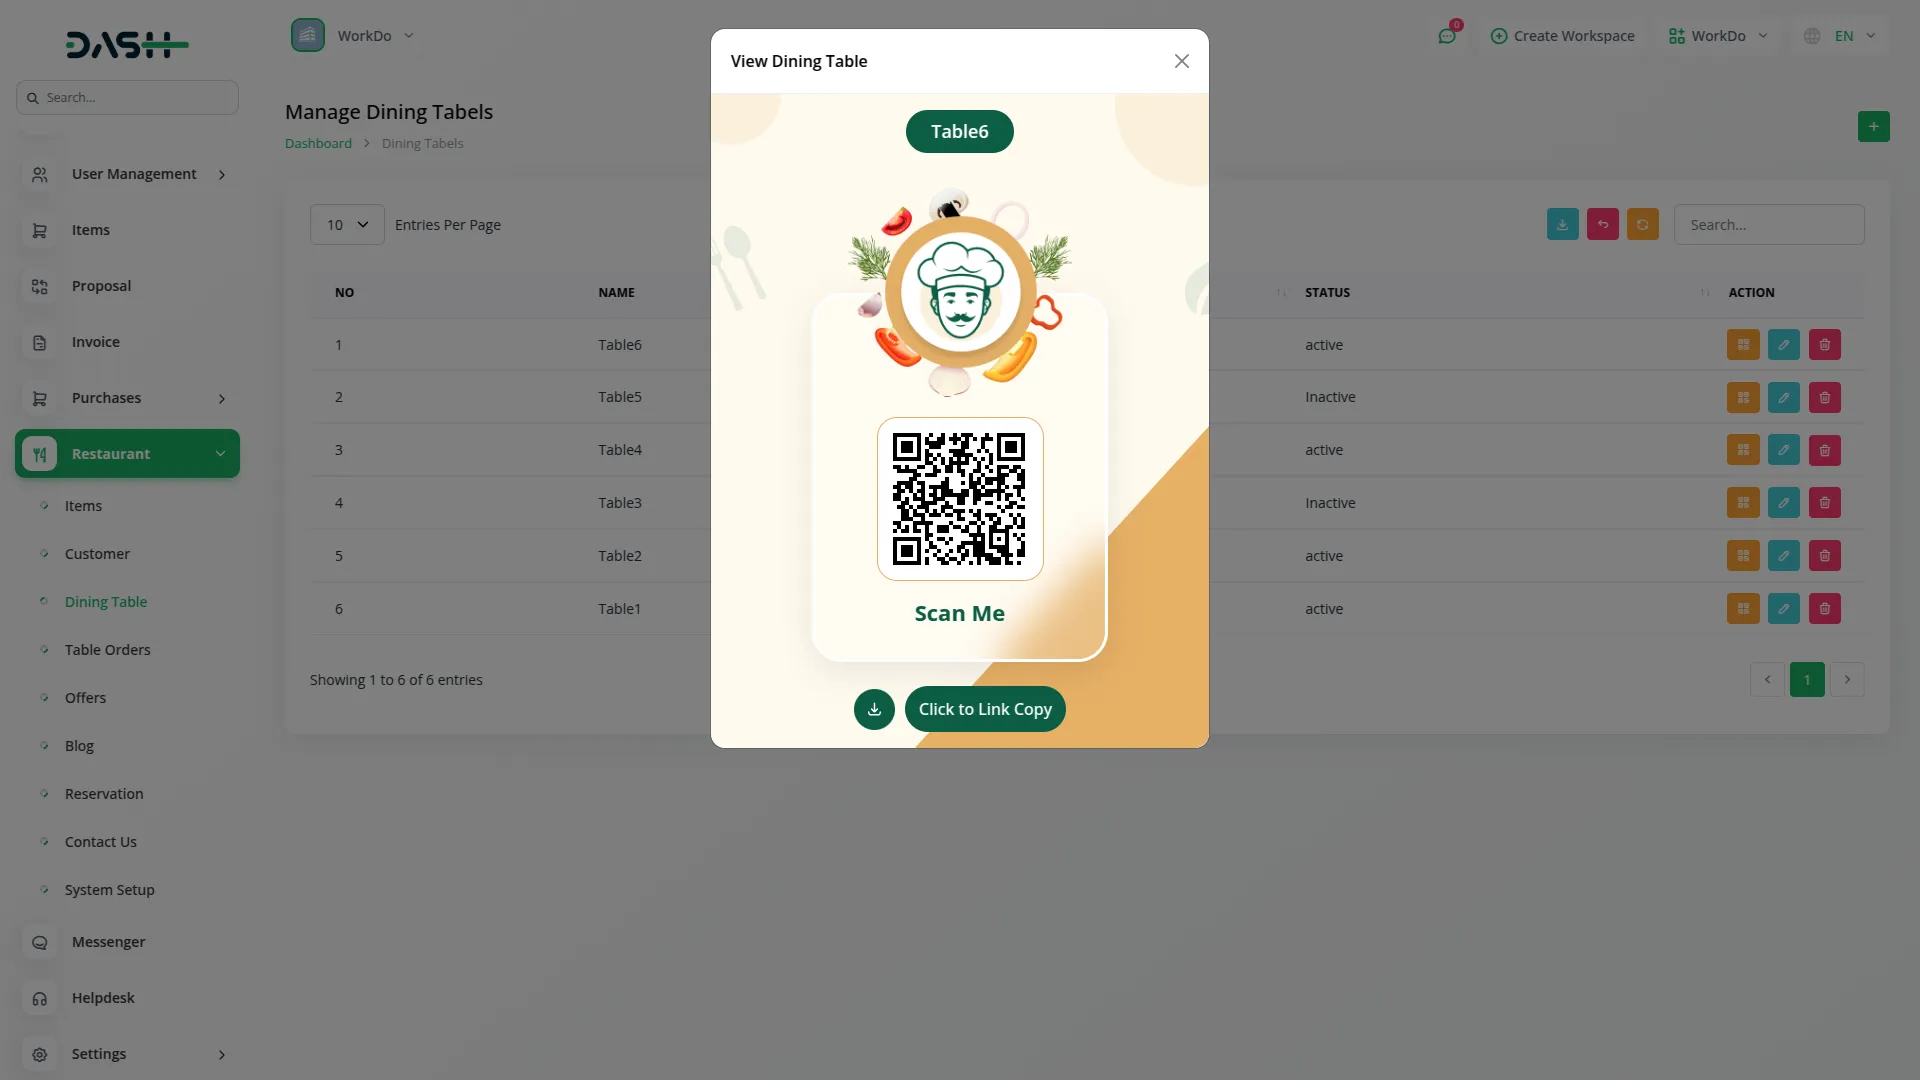
Table Orders
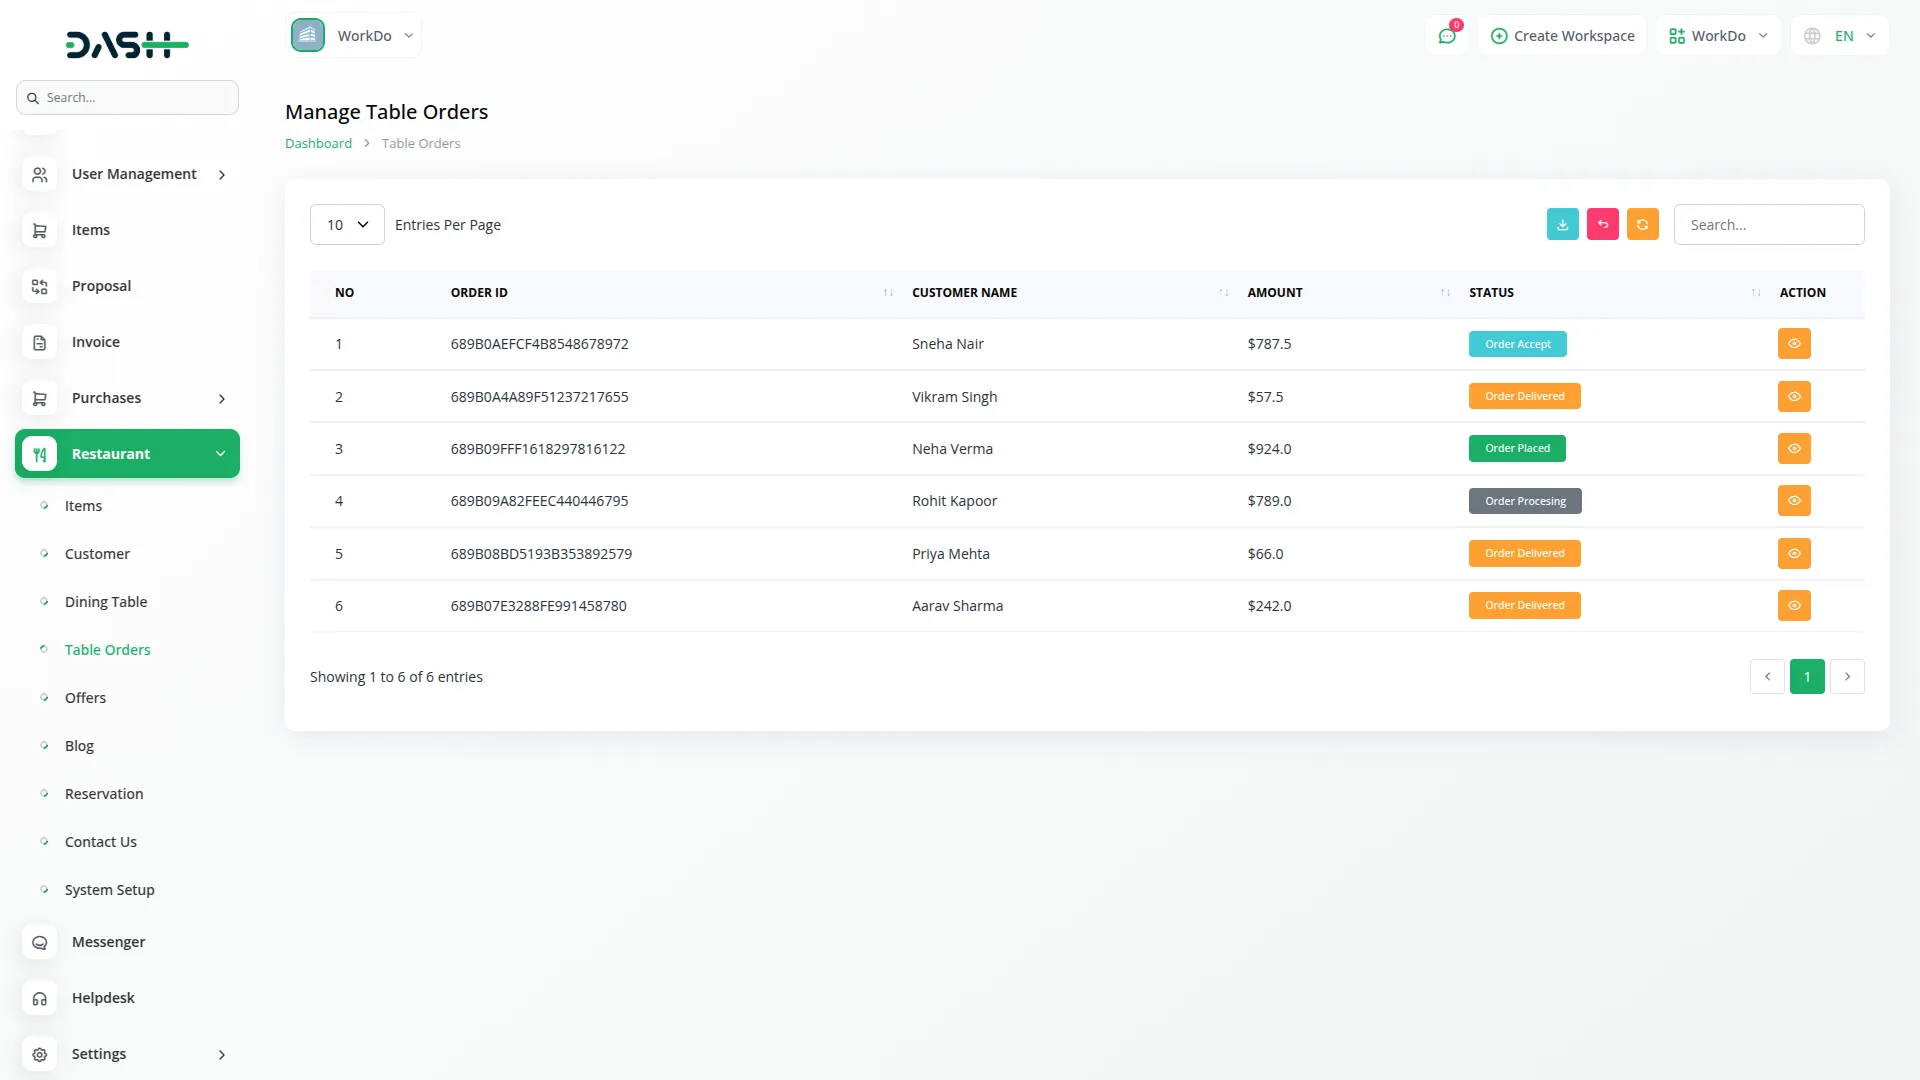
- The Table Orders section displays all orders that customers have submitted through your restaurant website, allowing you to track and manage the entire order fulfilment process.
- This section does not have a create function since orders are automatically generated when customers place them through your website. All orders appear on the list page for you to manage.
- The list page shows all customer orders in a table format with columns for No, Order ID, Customer Name, Amount, and Status. The Status column displays the current stage of each order: Placed, Accepted, Processing, or Delivered. You can search through orders and export the order list for record-keeping.
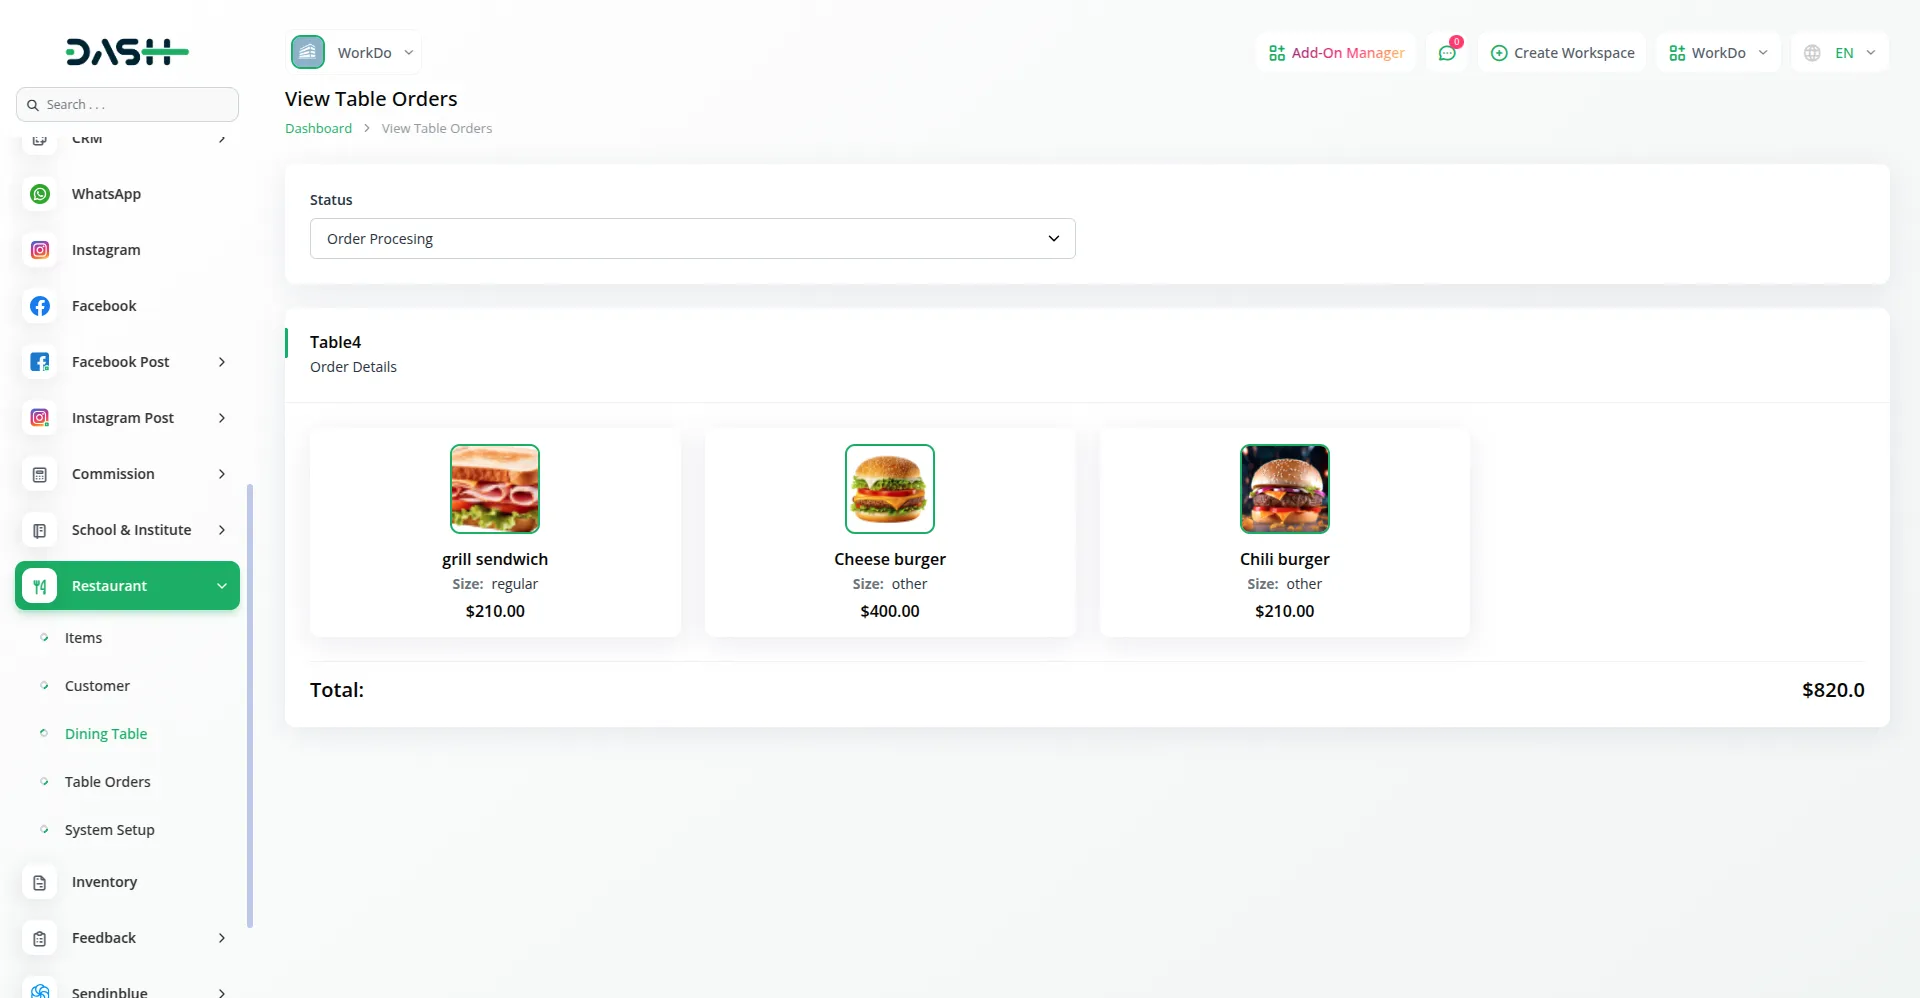
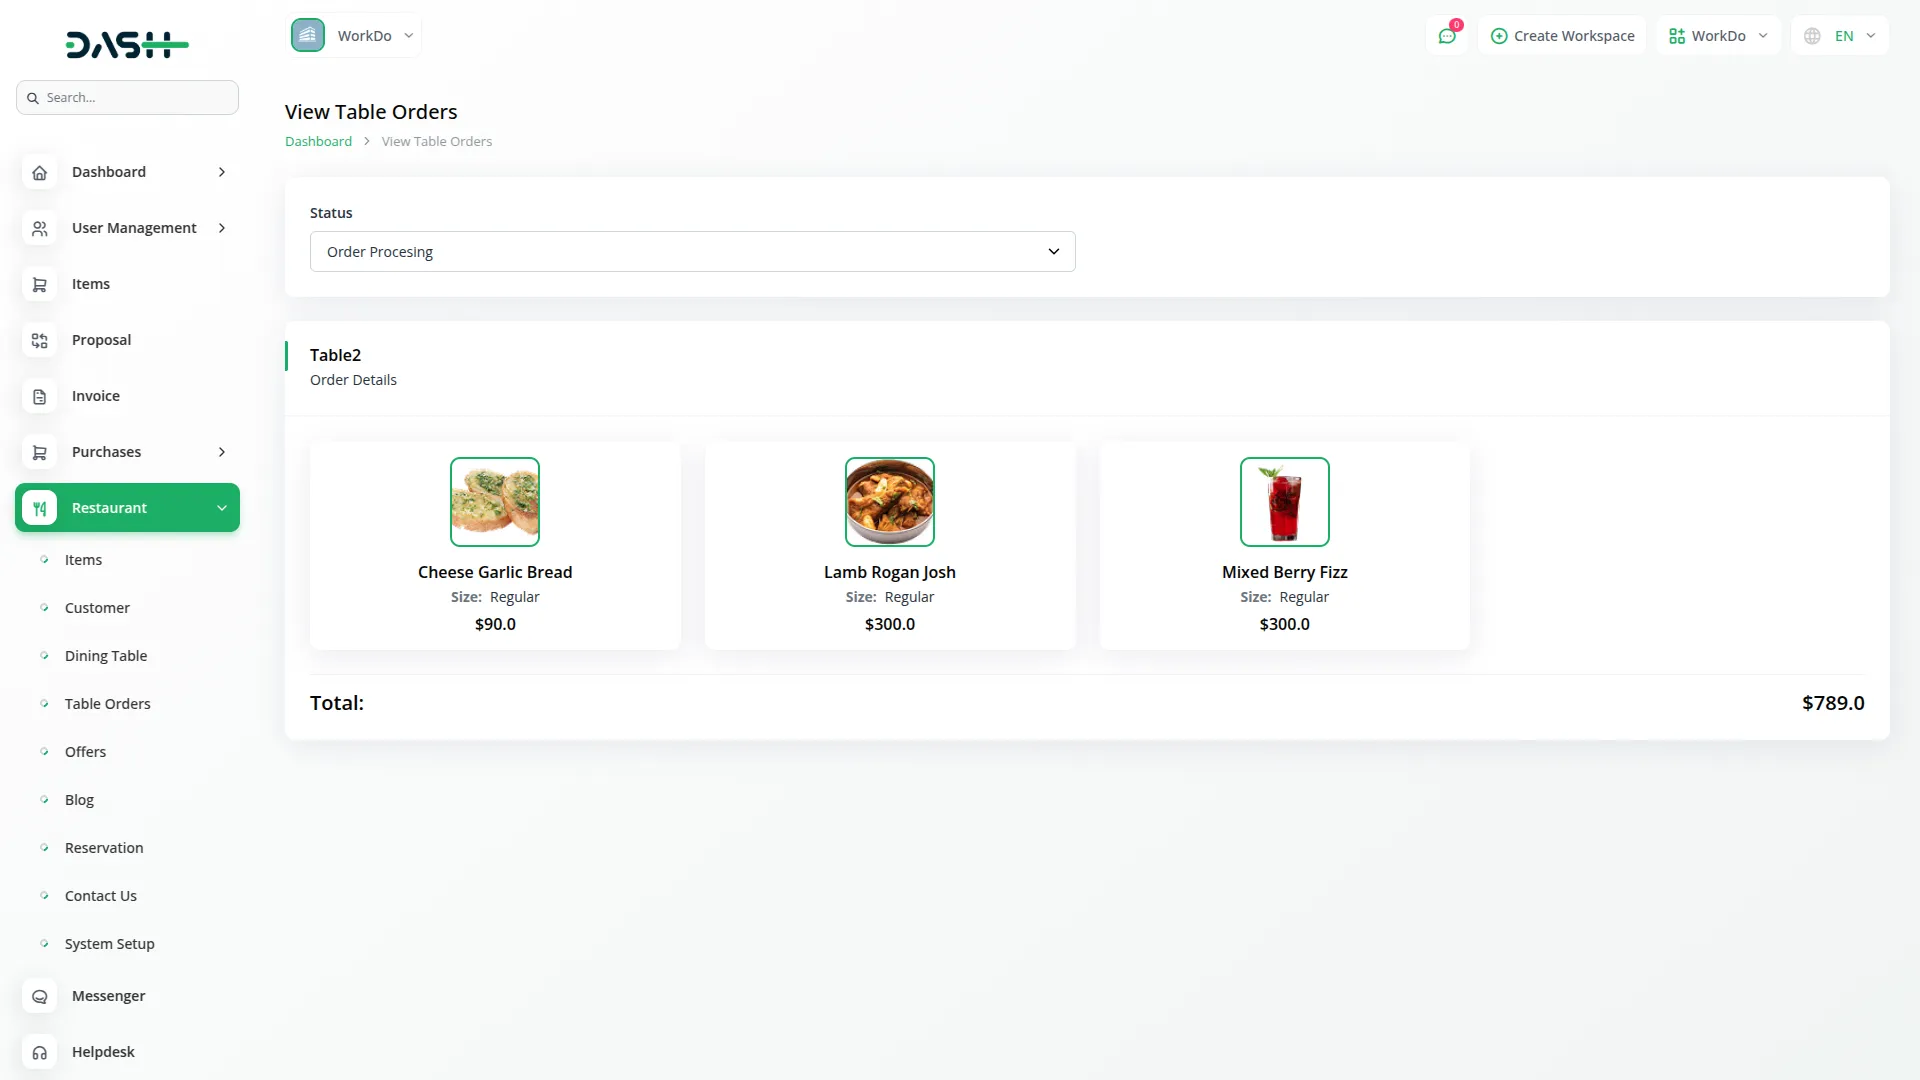
- When you click the “View” button for any order, a detailed view opens, displaying the order status in a drop-down menu where you can update the current status. This view also shows all ordered items and their total cost.
- When you change the status in this backend system, customers can see the updated status on the frontend, allowing them to track their order progress in real-time.
Offers
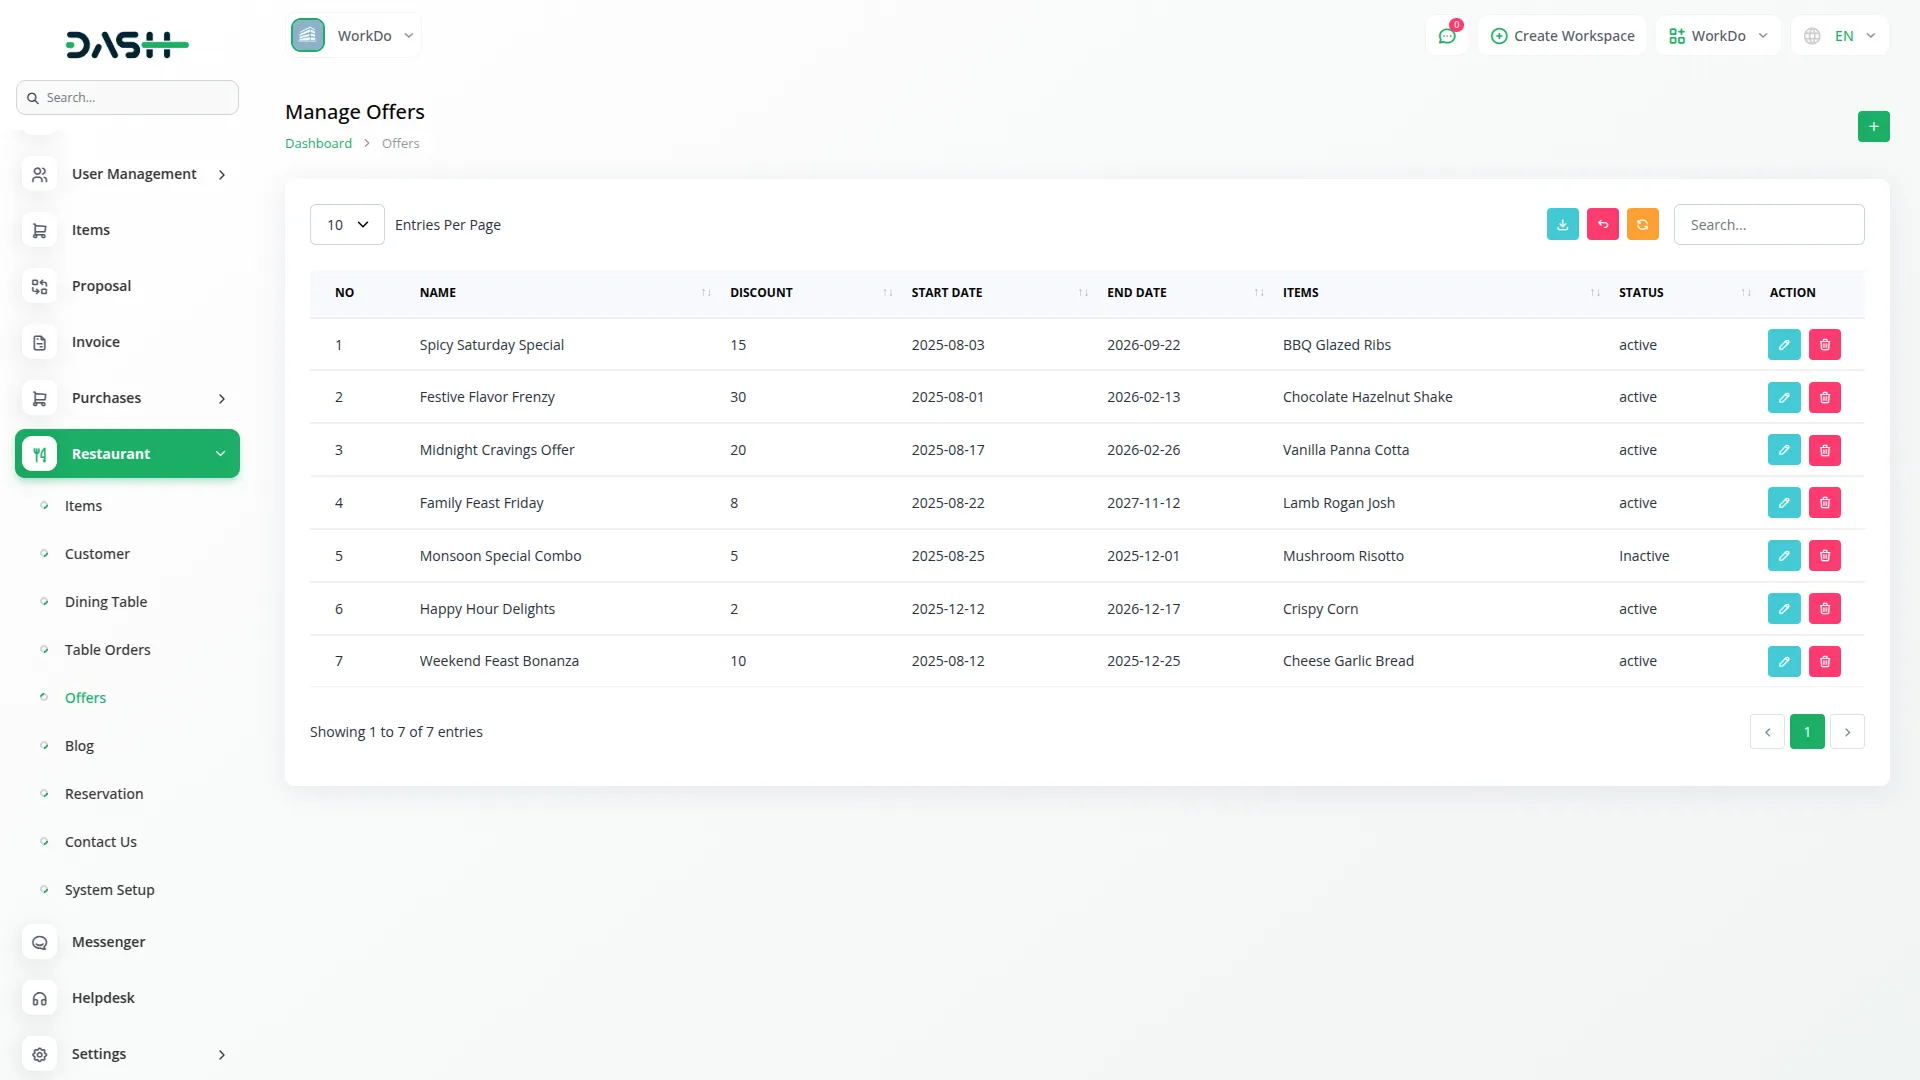
- The Offers section allows you to create and manage promotional discounts that can be applied to specific menu items, helping you boost sales and attract customers.
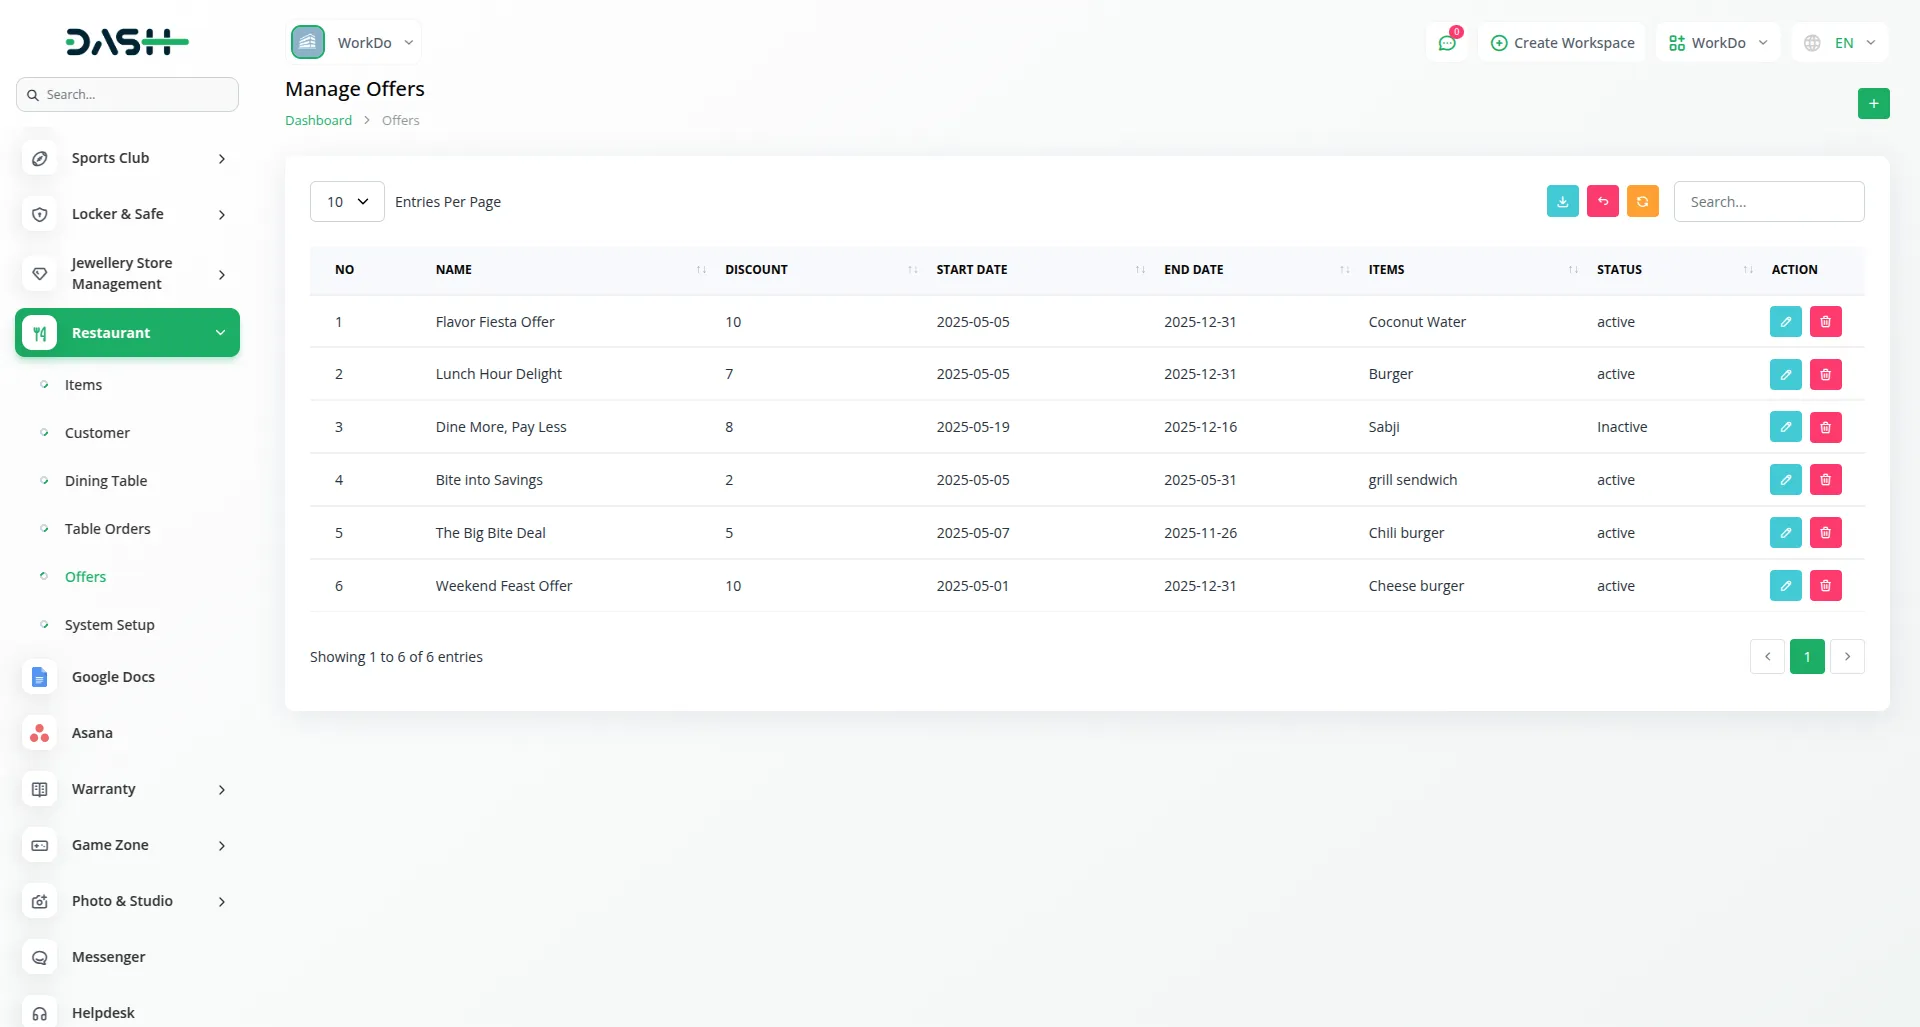
- To create a new offer, click the “Create” button. Enter an attractive Offer Name that customers will see, and set the Discount Percentage you want to apply. Define the promotion period by selecting Start Date and End Date for when the offer will be active.
- Set the Status to either Active or Inactive depending on whether you want the offer to be currently available to customers. Select the specific Items from your menu that this offer will apply to, giving you control over which products are discounted.
- The list page displays all your offers in a table with columns for No, Offer Name, Discount, Start Date, End Date, Status, and Items. You can Search through offers, Export the offers list, and perform Edit or Delete actions on existing promotions.
- The system automatically handles offer management by defining validity periods, applying discounts to specific menu items, and performing automatic price calculations with discounts applied when customers add eligible items to their cart.
Blog
- The Blog section enables you to create engaging content for your restaurant website, sharing recipes, cooking tips, restaurant news, and other interesting articles that keep customers engaged with your brand.
- To create a new blog post, click the “Create” button. Enter a compelling Blog Title that will attract readers, write a brief Description that summarizes the blog content, and upload an appealing Image that represents the blog topic.
- The list page shows all your blog posts in a table format with columns for No, Image, Blog Title, and Message. You can search through blog posts, export the blog list, and perform actions, including Article, Edit, or Delete.
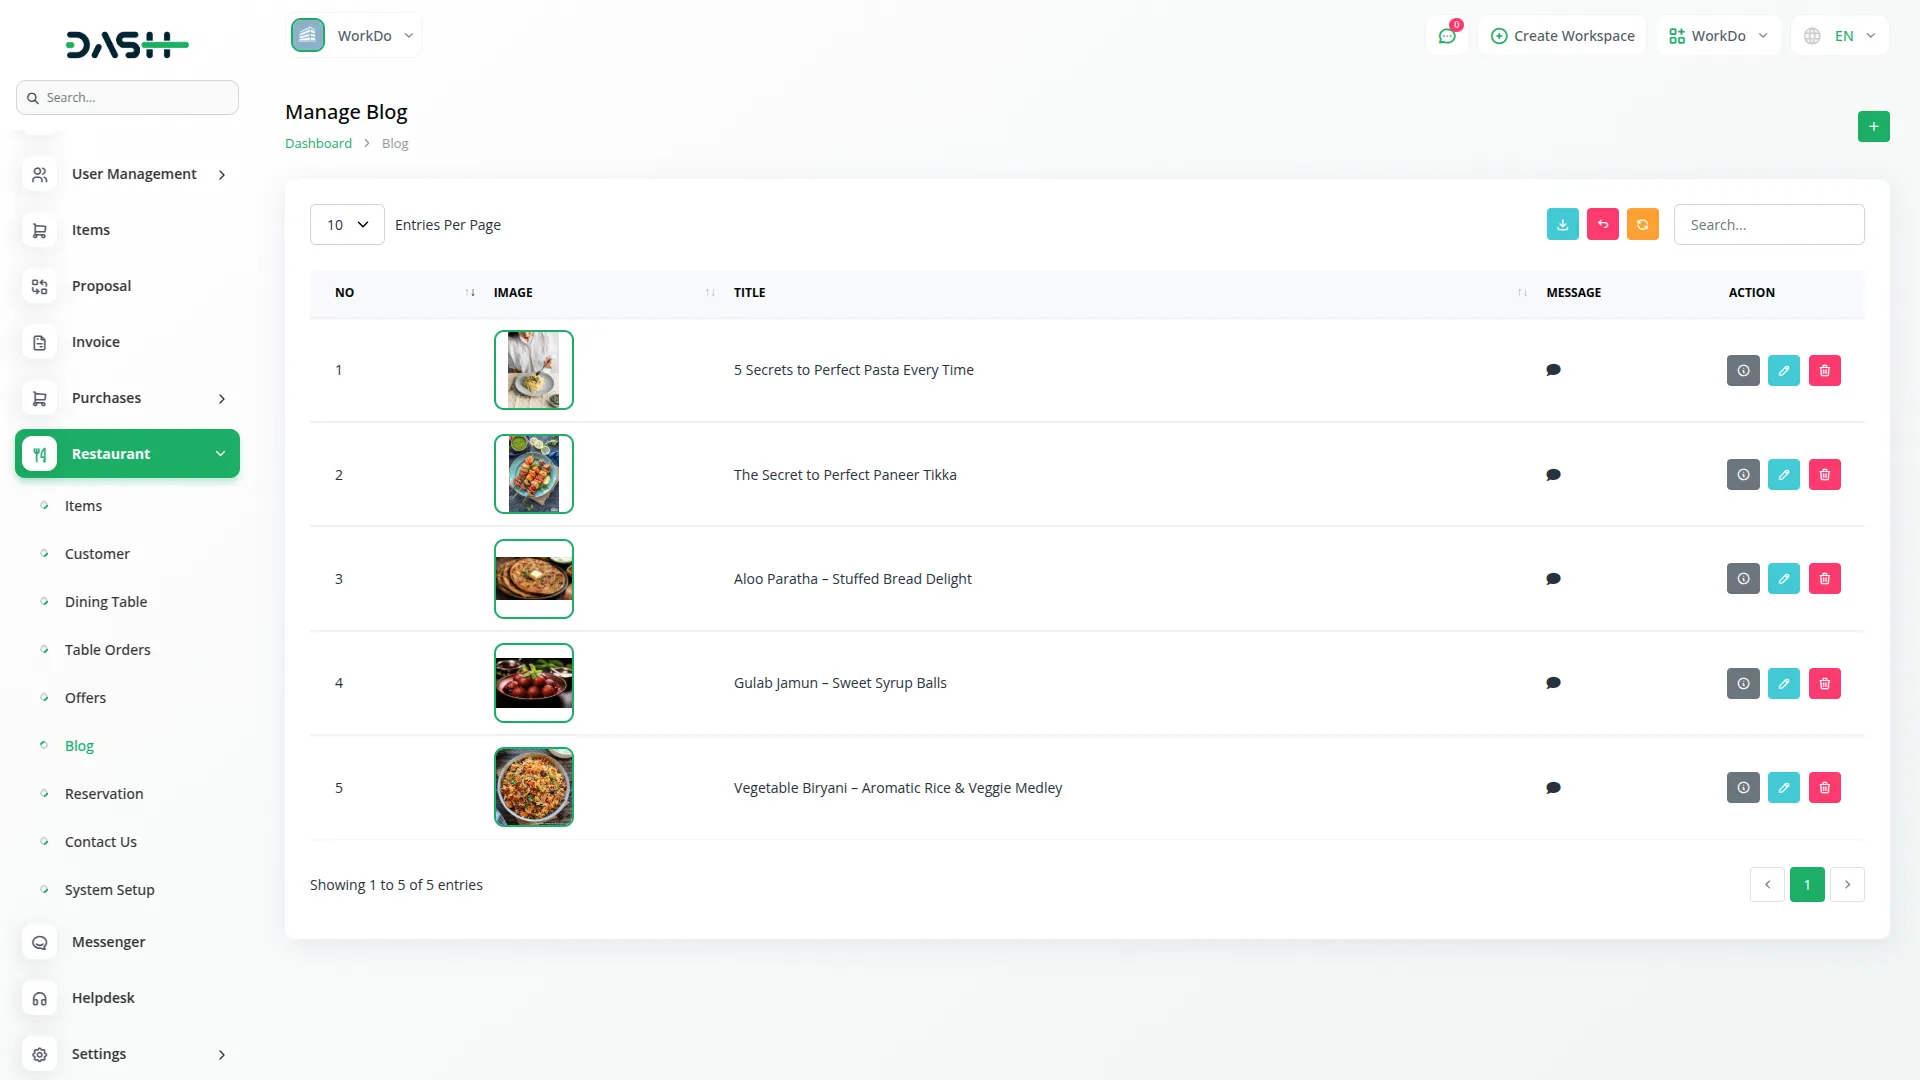
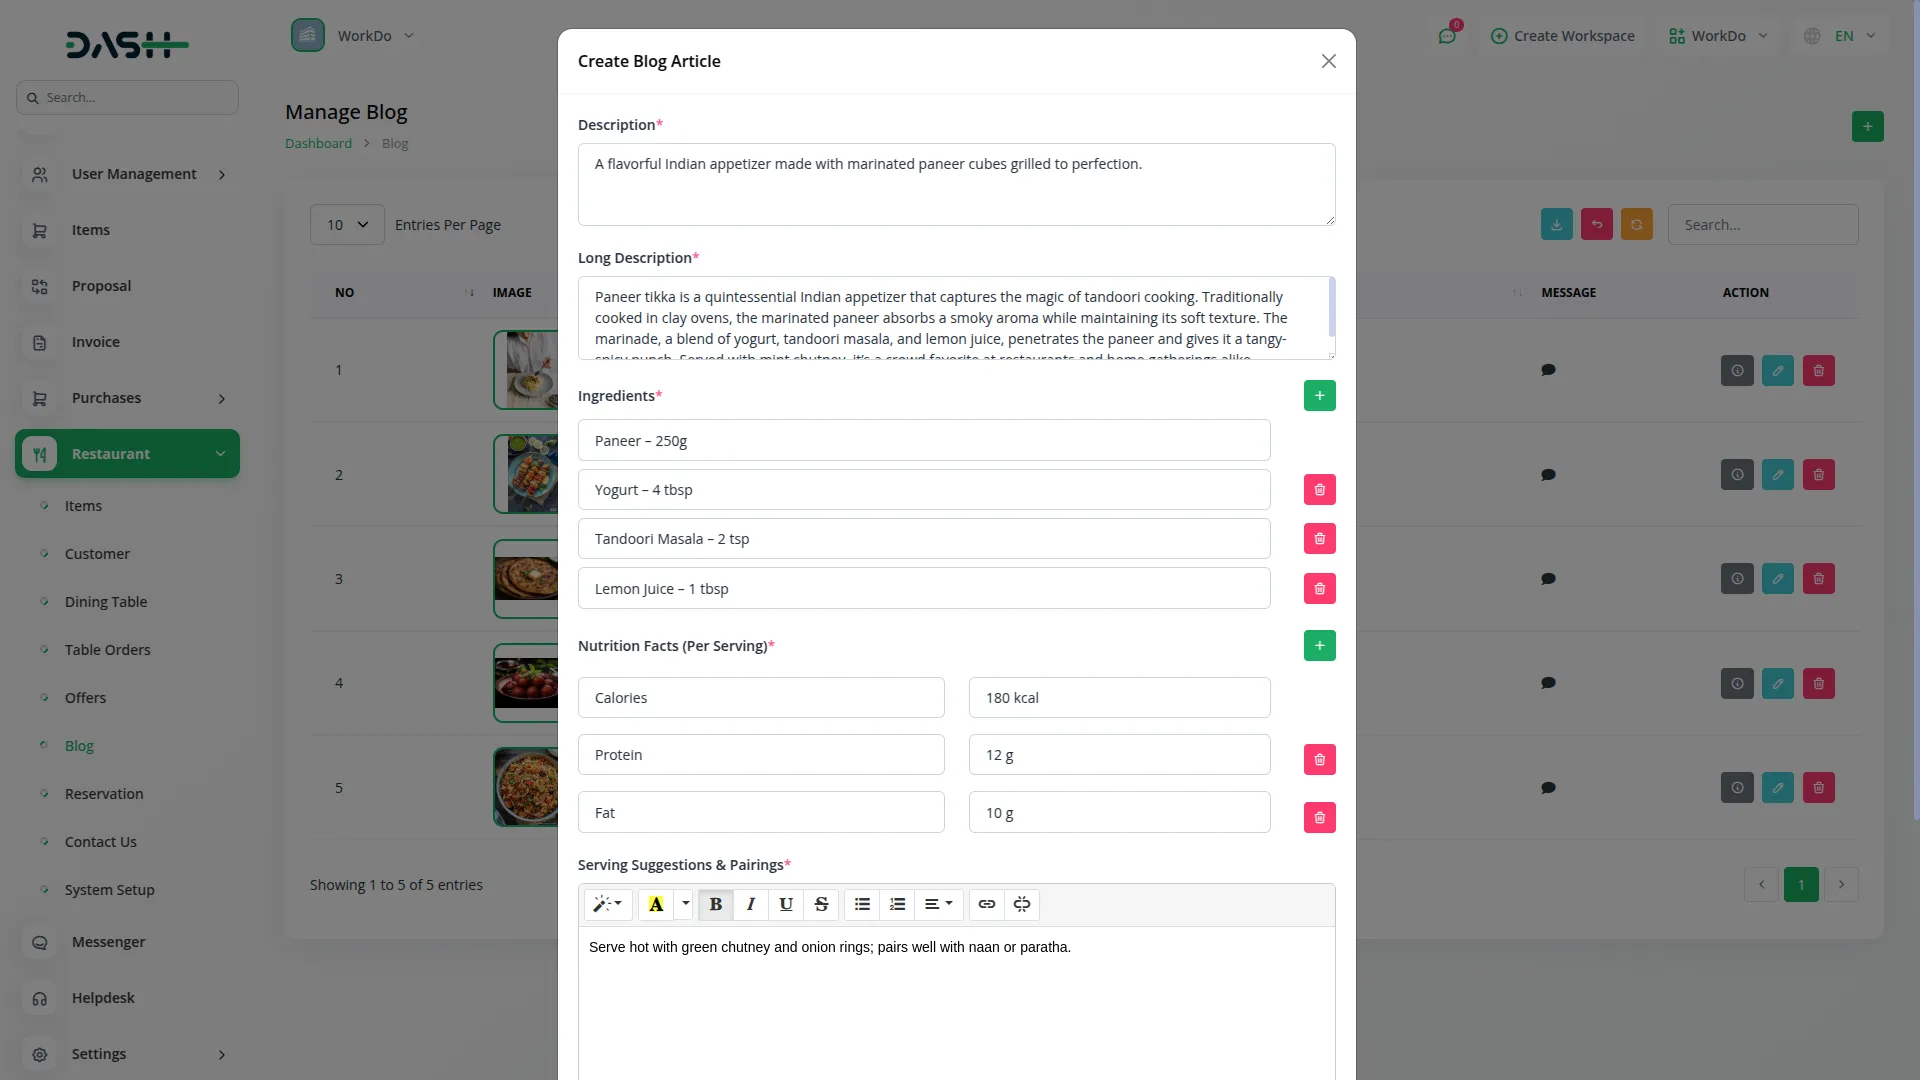
- When you click the “Article” button for any blog post, you can add detailed content, including a full Description and Long Description for comprehensive article content. Use the Ingredients repeater to list ingredients if writing about recipes, and add Nutrition Facts Per Serving using the nutrition repeater for detailed nutritional information.
- You can also include Serving Suggestions and Pairings to help readers enjoy the food better, and add interesting trivia in the “Did You Know?” text section to make your articles more engaging and informative.
Reservations
- The Reservations section displays all table reservation requests that customers have submitted through your restaurant website, allowing you to manage your seating and plan for busy periods.
- This section does not have a create function since reservations are automatically generated when customers book tables through your website reservation system. All reservation requests appear here for your review and management.
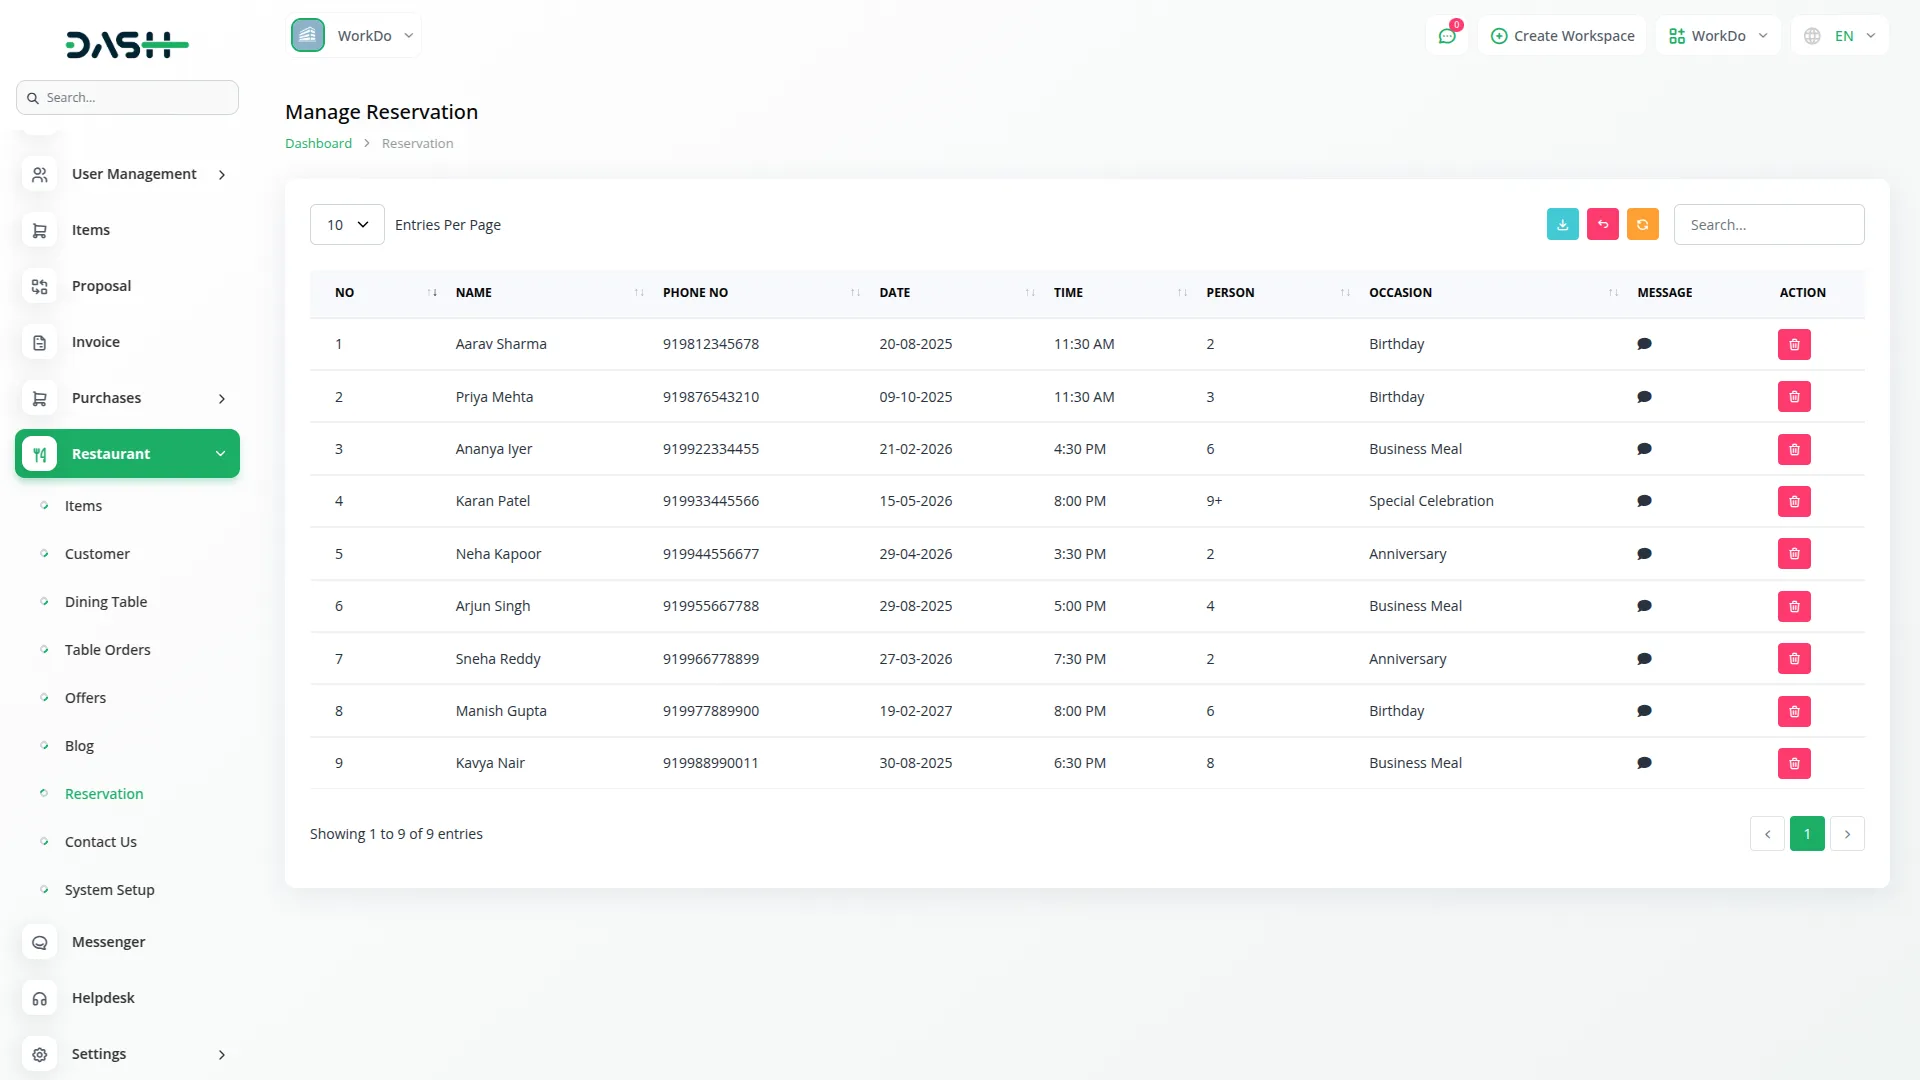
- The list page shows all customer reservations in a table format with columns for No, Customer Name, Phone Number, Date, Time, Number of Persons, Occasion, and Message. You can search through reservations and export the reservations list for planning purposes.
- The only available action is Delete, which allows you to remove reservations that are no longer valid or have been canceled. Customers submit their reservation details through the frontend website, and you can use this information to prepare tables and plan staffing accordingly.
Contact Us
- The Contact Us section displays all inquiries and messages that customers have sent through the contact forms on your restaurant website, helping you maintain good customer communication and address their questions or concerns.
- This section does not have a create function since contact submissions are automatically generated when customers fill out contact forms on your website. All customer inquiries appear here for your response and follow-up.
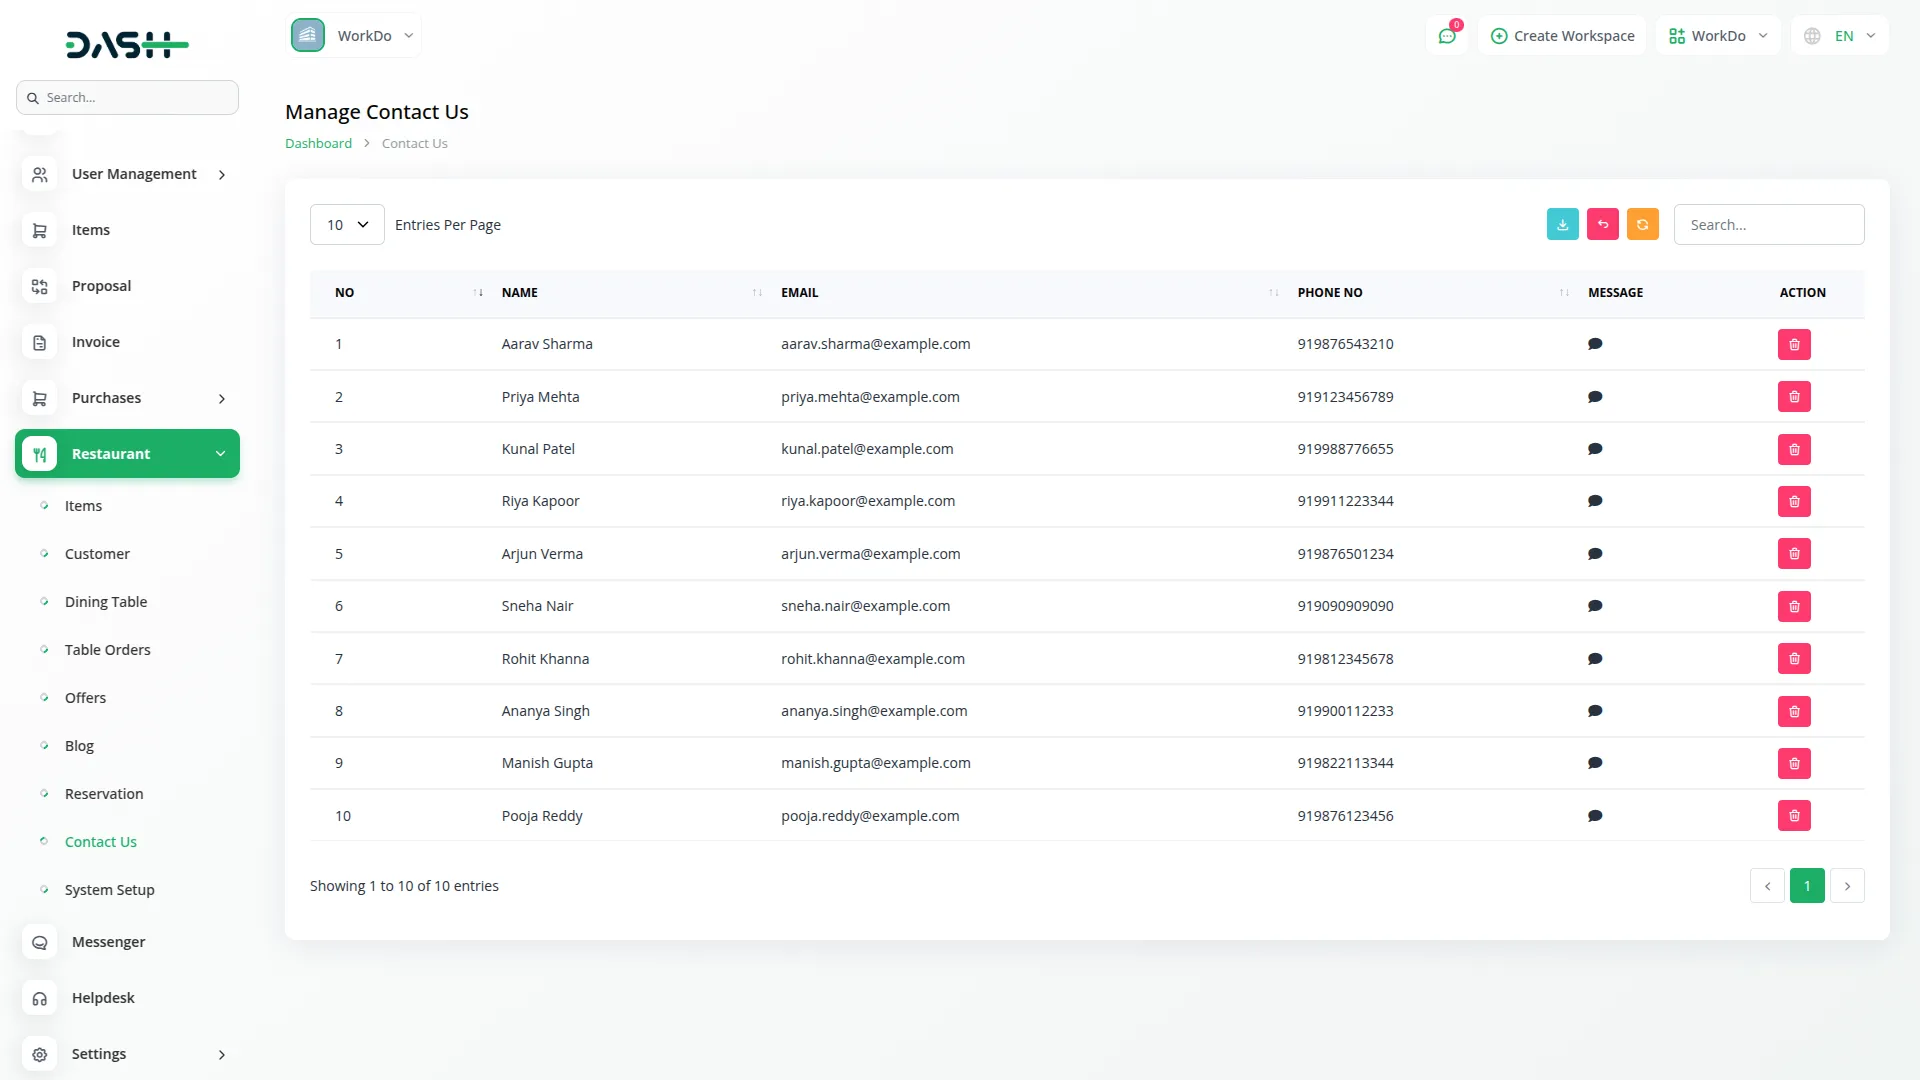
- The list page shows all contact submissions in a table format with columns for No, Name, Email, Phone No, and Message. You can search through contact submissions and export the contact list for customer service management.
- The only available action is Delete, which allows you to remove contact submissions that have been resolved or are no longer relevant. Use the displayed contact information to reach out to customers and address their questions, complaints, or feedback promptly to maintain good customer relationships.
Restaurant Menu Website Management Guide
Important Note: Only the sections set through System Setup will be displayed on the website. Please ensure the desired sections are properly configured.
Favicon & Header
This section includes the small icon shown on the browser tab (favicon) and the main navigation header seen at the top of every page. The header displays the restaurant logo and a menu linking to key sections like Home, Menu, Gallery, Testimonials, About Us, Contact, and Reservation.
- Go to System Setup → Brand Setting to upload the favicon and restaurant logo.
- The menu items are auto-linked to their respective page sections. No manual configuration is needed for these links.
- The logo file is retrieved dynamically and shown across all pages.
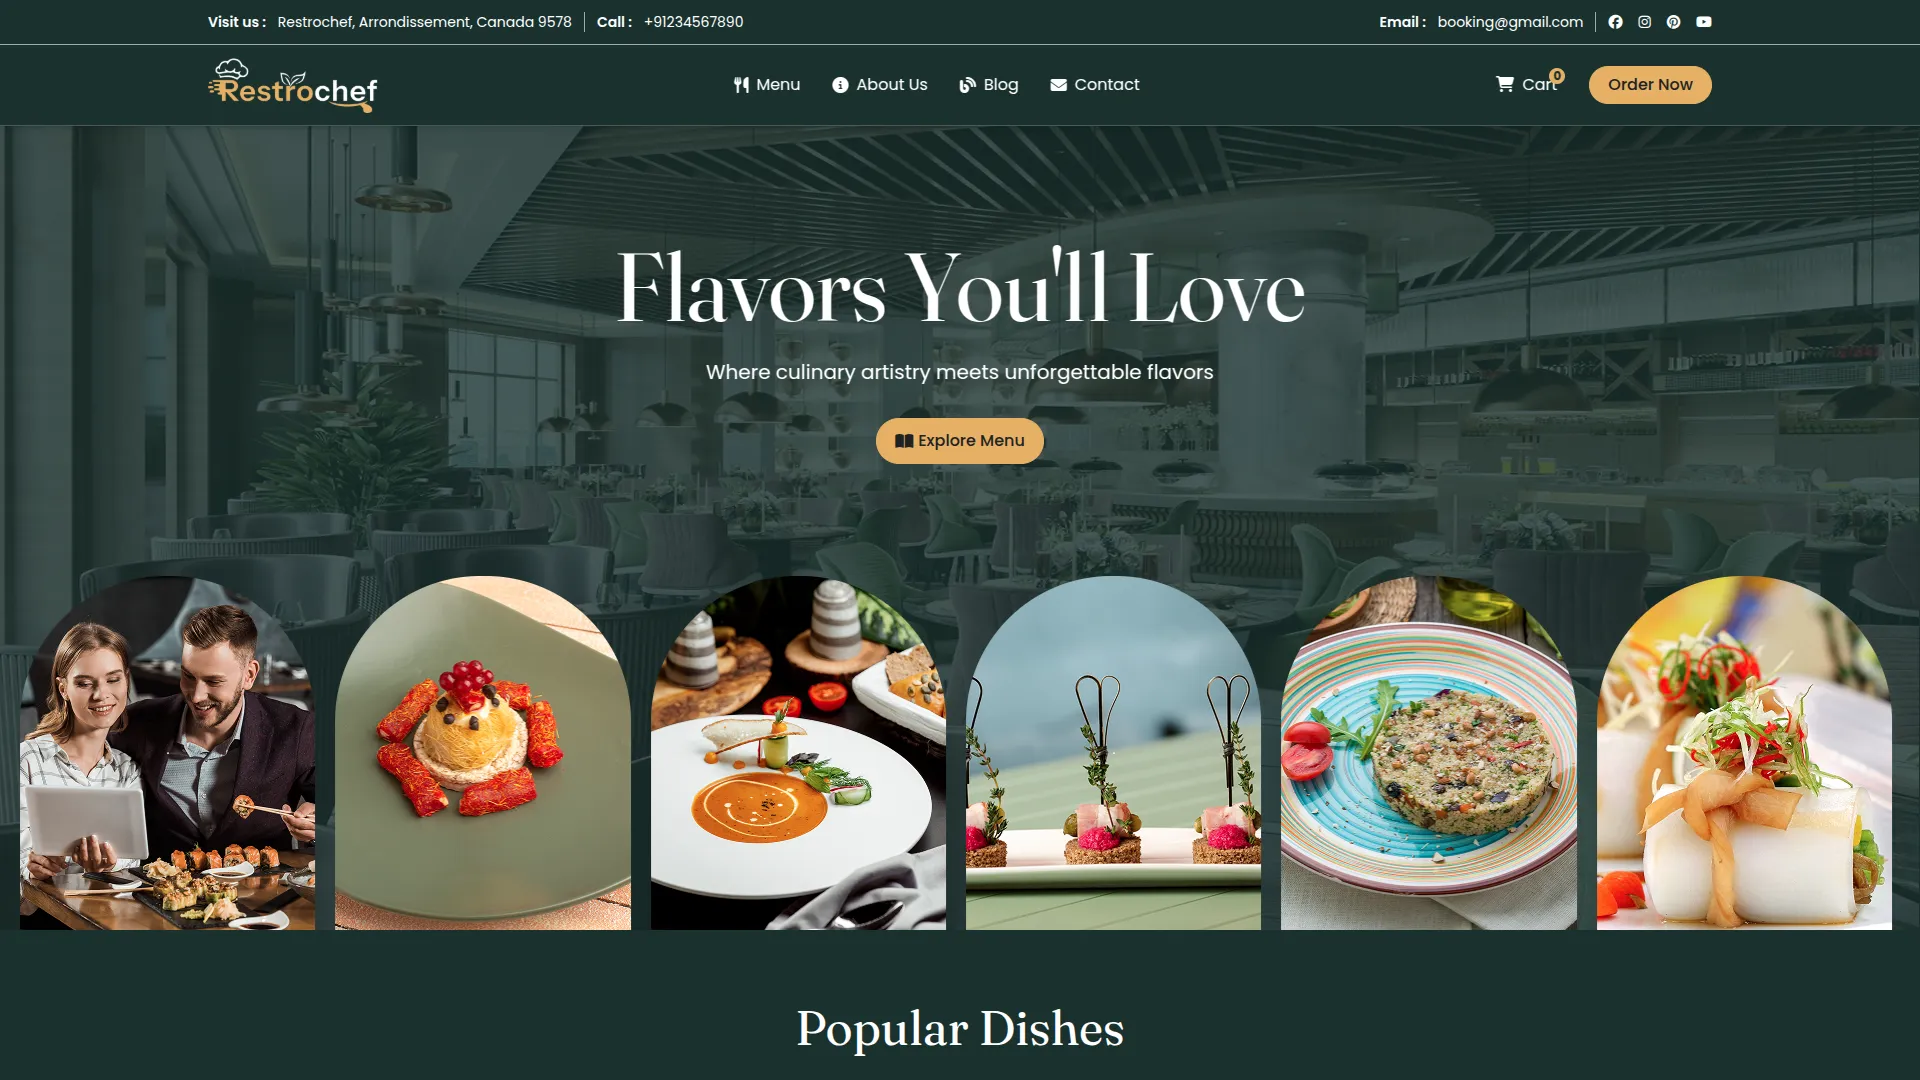
Banner Section
This is the top visual section of the homepage, usually showing a large image or background with a title, subtitle, and a call-to-action button. It introduces visitors to the restaurant and encourages interaction.
- Go to System Setup → Banner Section.
- You can set the following values: Banner Title, Subtitle / Tagline, Banner Button Text, Background Image.
- These fields are dynamically displayed on the homepage banner.
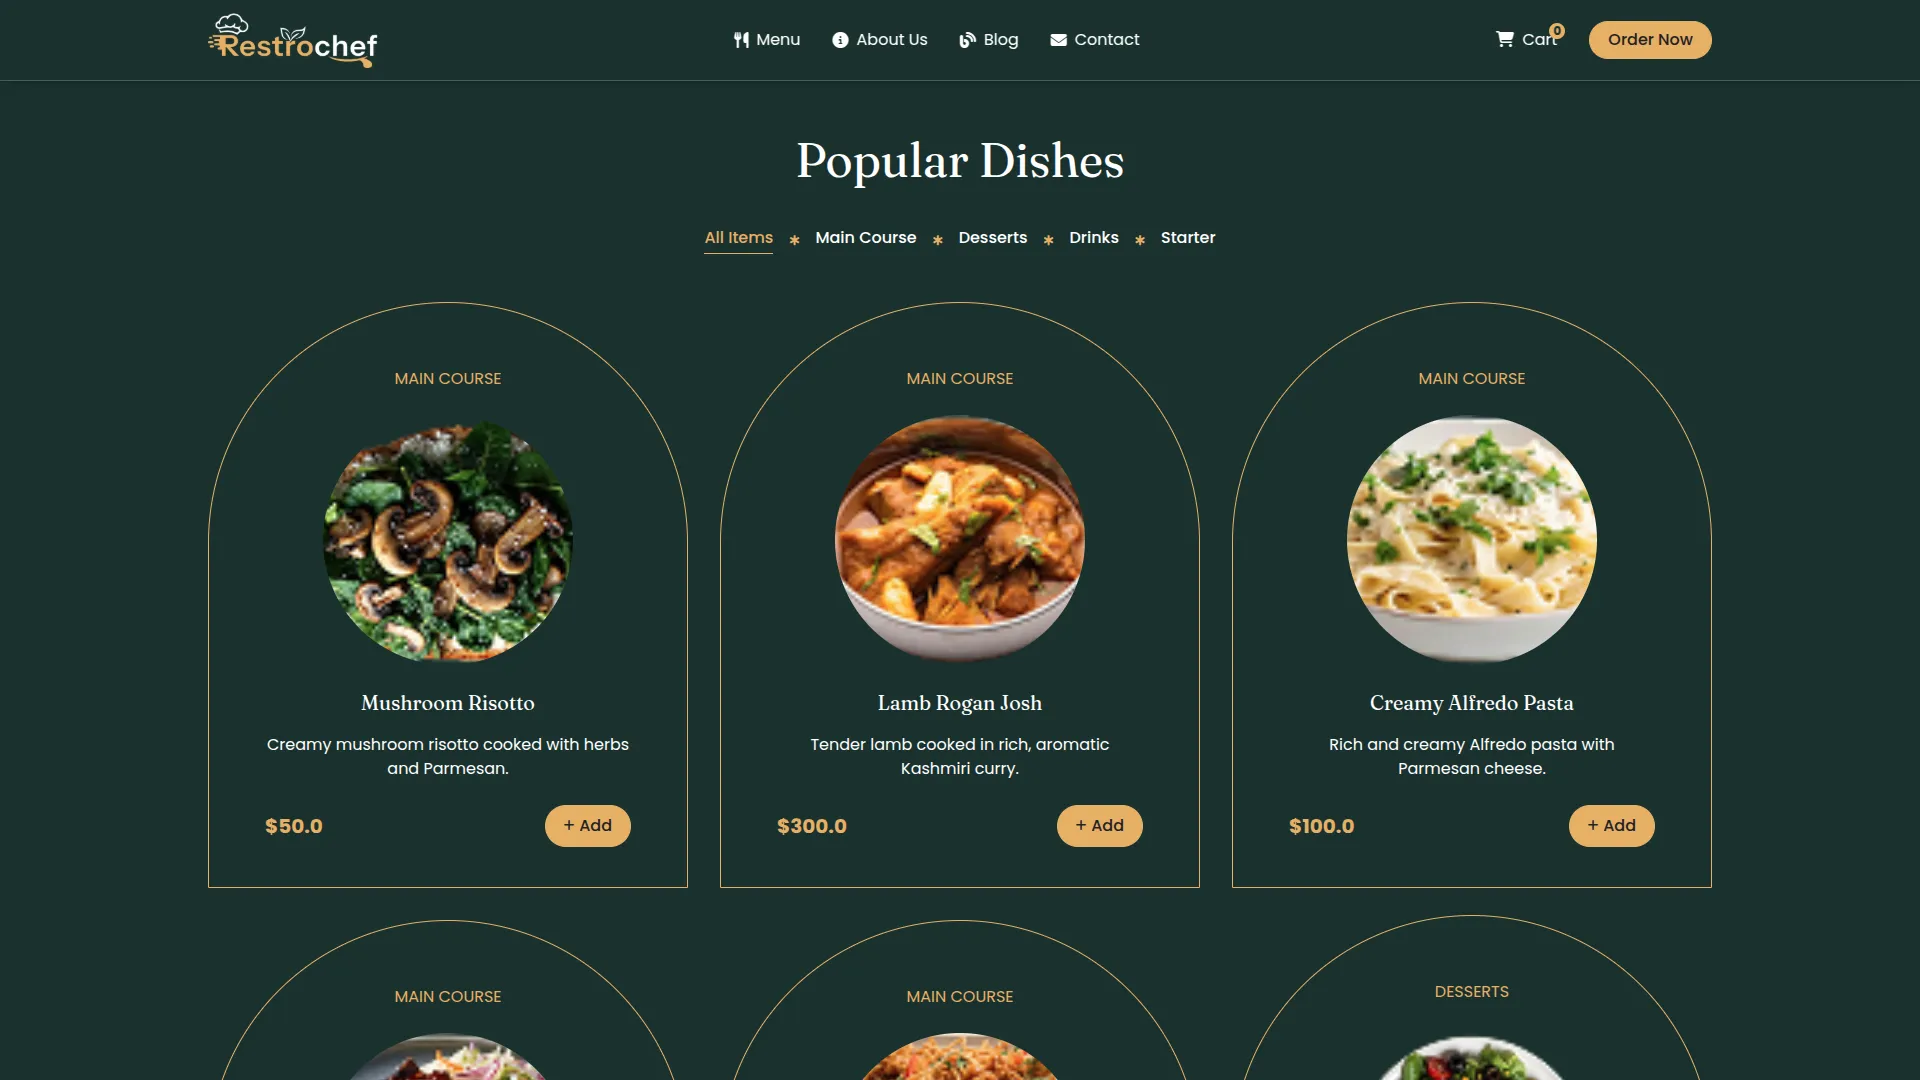
Menu Categories Section
This section showcases the types of food categories your restaurant offers. Each category is shown as a card or block with an icon, title, and description. It helps users understand what menu categories are available at a glance.
- Go to System Setup → Restaurant Category.
- You can add or edit: Category Title, Icon (visual identifier), Description.
- The frontend dynamically loops through all category records and displays them on the homepage.
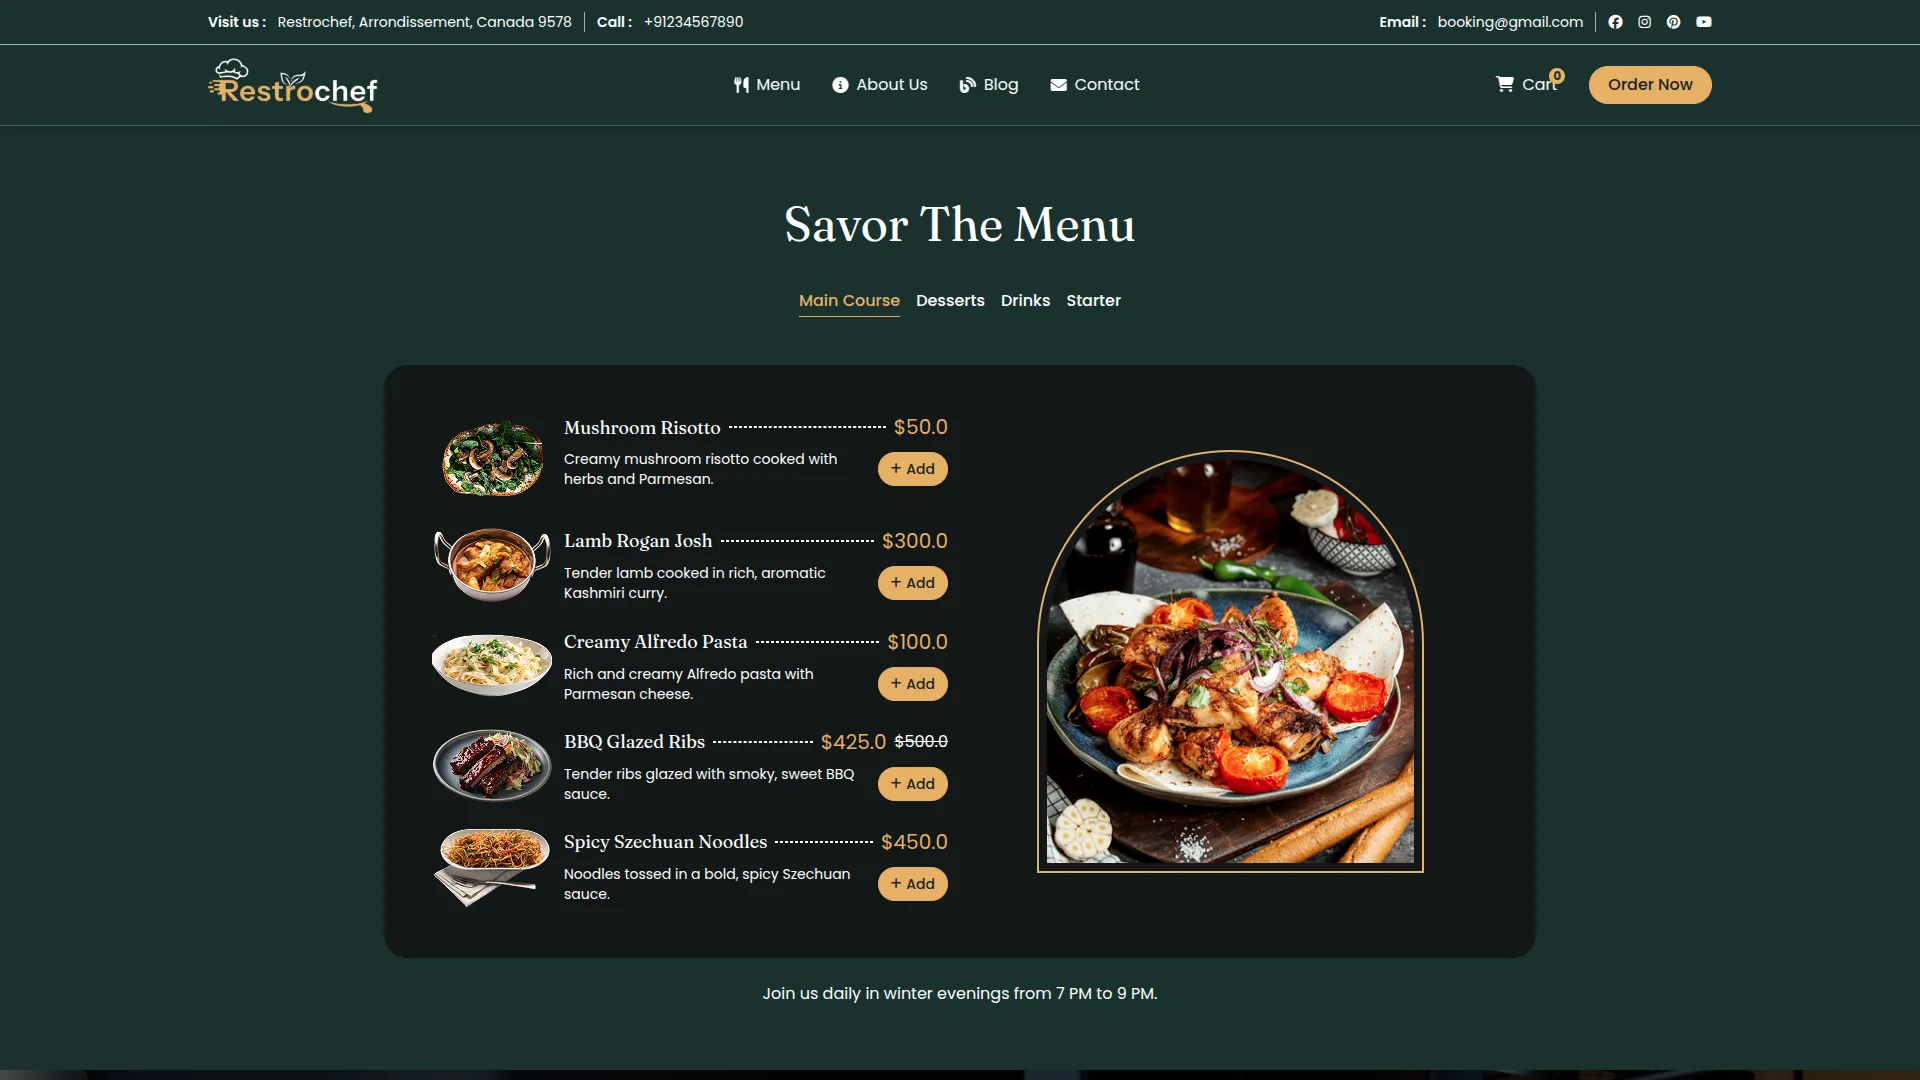
Items Showcase Section
This section features a short introduction to your menu items and a visual preview of your dishes. It includes a title, description, and button (e.g., “View Menu”) and showcases menu items pulled from the Items module.
- Menu item images and descriptions are pulled dynamically from the Items module.
- Ensure menu items are added in the Items module for this section to populate correctly.
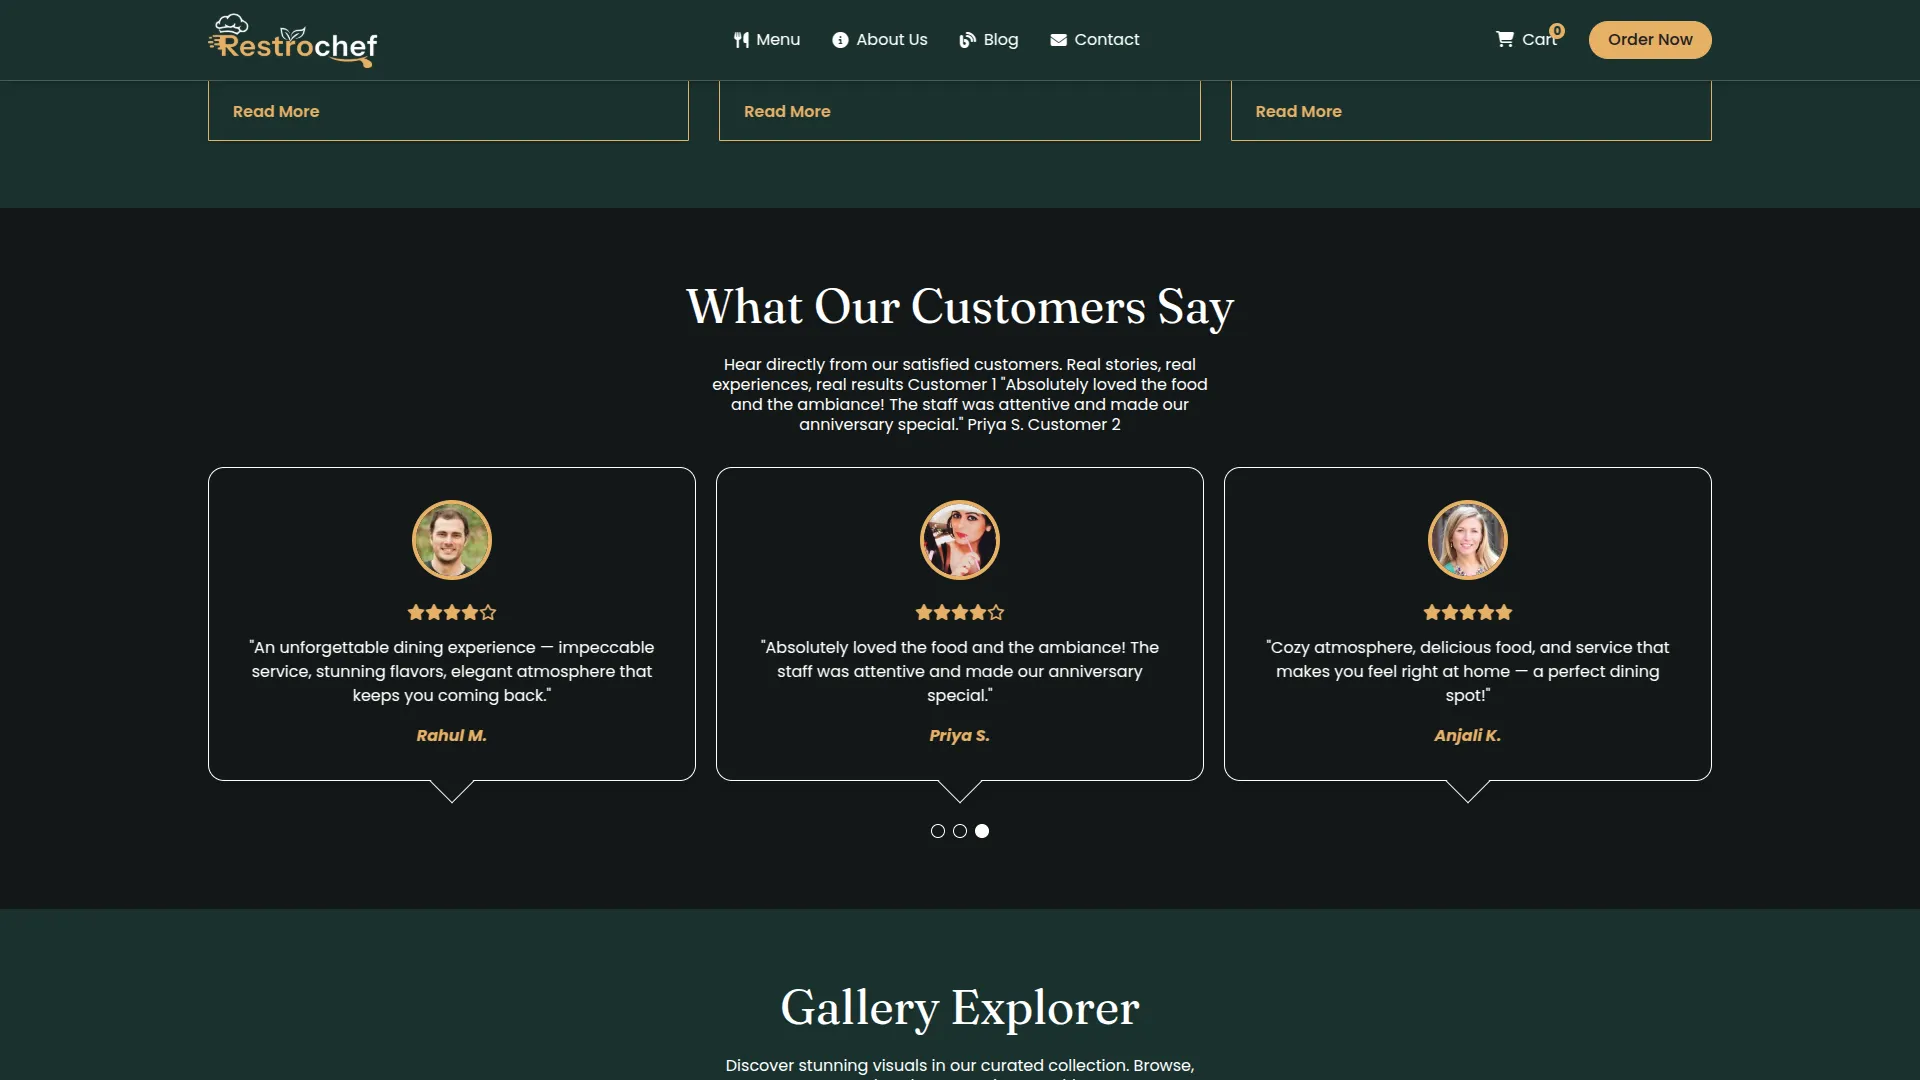
Testimonial Section
This section displays customer reviews and feedback about your restaurant experience. It features testimonials with customer names, reviews, and ratings that demonstrate your restaurant’s quality and service excellence.
- Customer testimonials are managed through System Setup → Testimonials.
- These values will render dynamically within the homepage testimonial block.
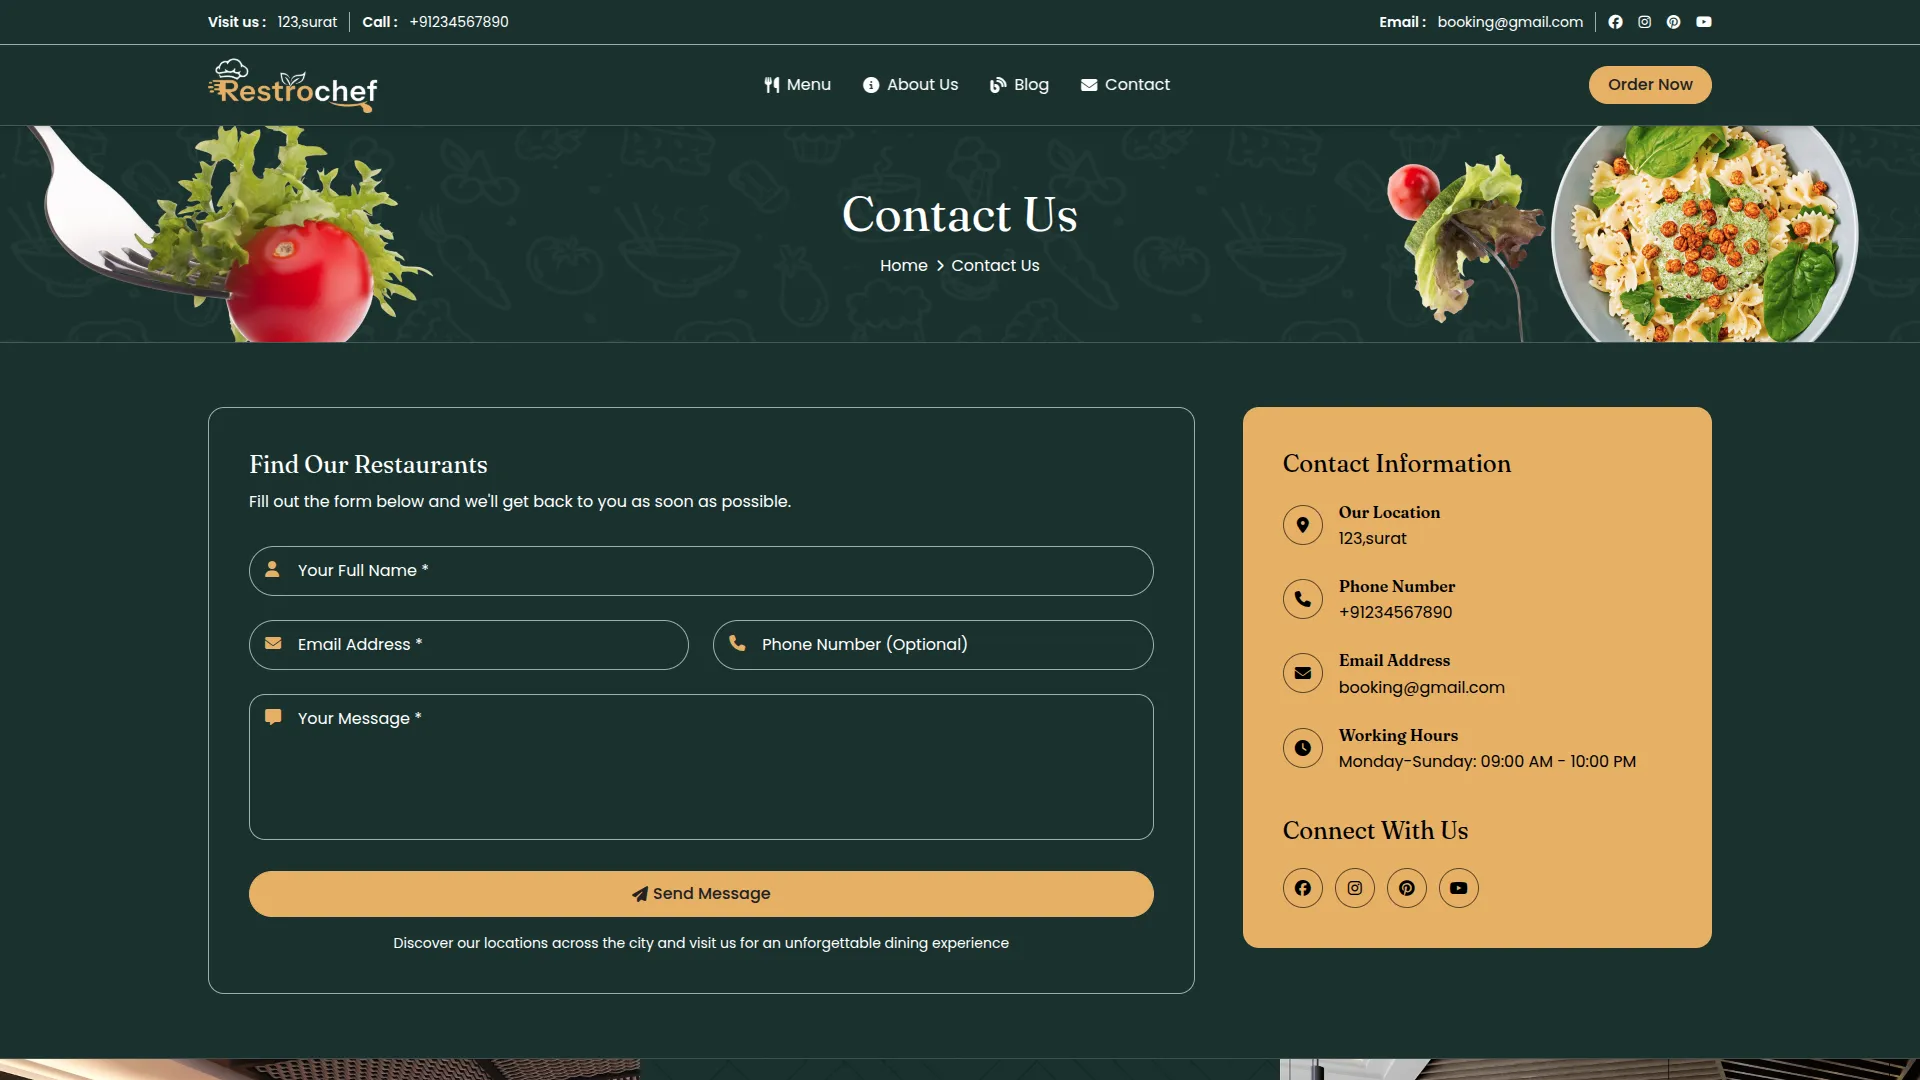
Contact Section
This section allows users to send inquiries and see your restaurant’s contact information. It includes a form (Name, Email, Subject, Message) and displays restaurant contact details and social media icons.
- Contact Info (Phone, Address, Email) is managed in System Setup → Brand Setting.
- Social media links (Facebook, Instagram, etc.) are pulled from System Setup → Social Links.
- The form sends messages that are stored and managed under the Contacts module.
CTA Section (Call to Action)
This is a dedicated area on the homepage to encourage users to take action, such as making a reservation or viewing the menu. It usually contains a short message and a button.
- Go to System Setup → Additional Settings → Section 1: CTA Section for Home Page.
- You can update: CTA Title, CTA Description, CTA Button Text
- These values will render dynamically within the homepage CTA block.
Menu Page
This full-page view displays categorized menu items to showcase your restaurant’s offerings. Visitors can browse dishes by category, with filters and item previews.
- Title & Description: System Setup → Additional Settings → Section 2: Setting for Menu Page
- Restaurant Categories: System Setup → Restaurant Category
- Menu Items & Info: Automatically pulled from the Items module
- Each menu item is displayed along with its assigned category, pricing, and details.
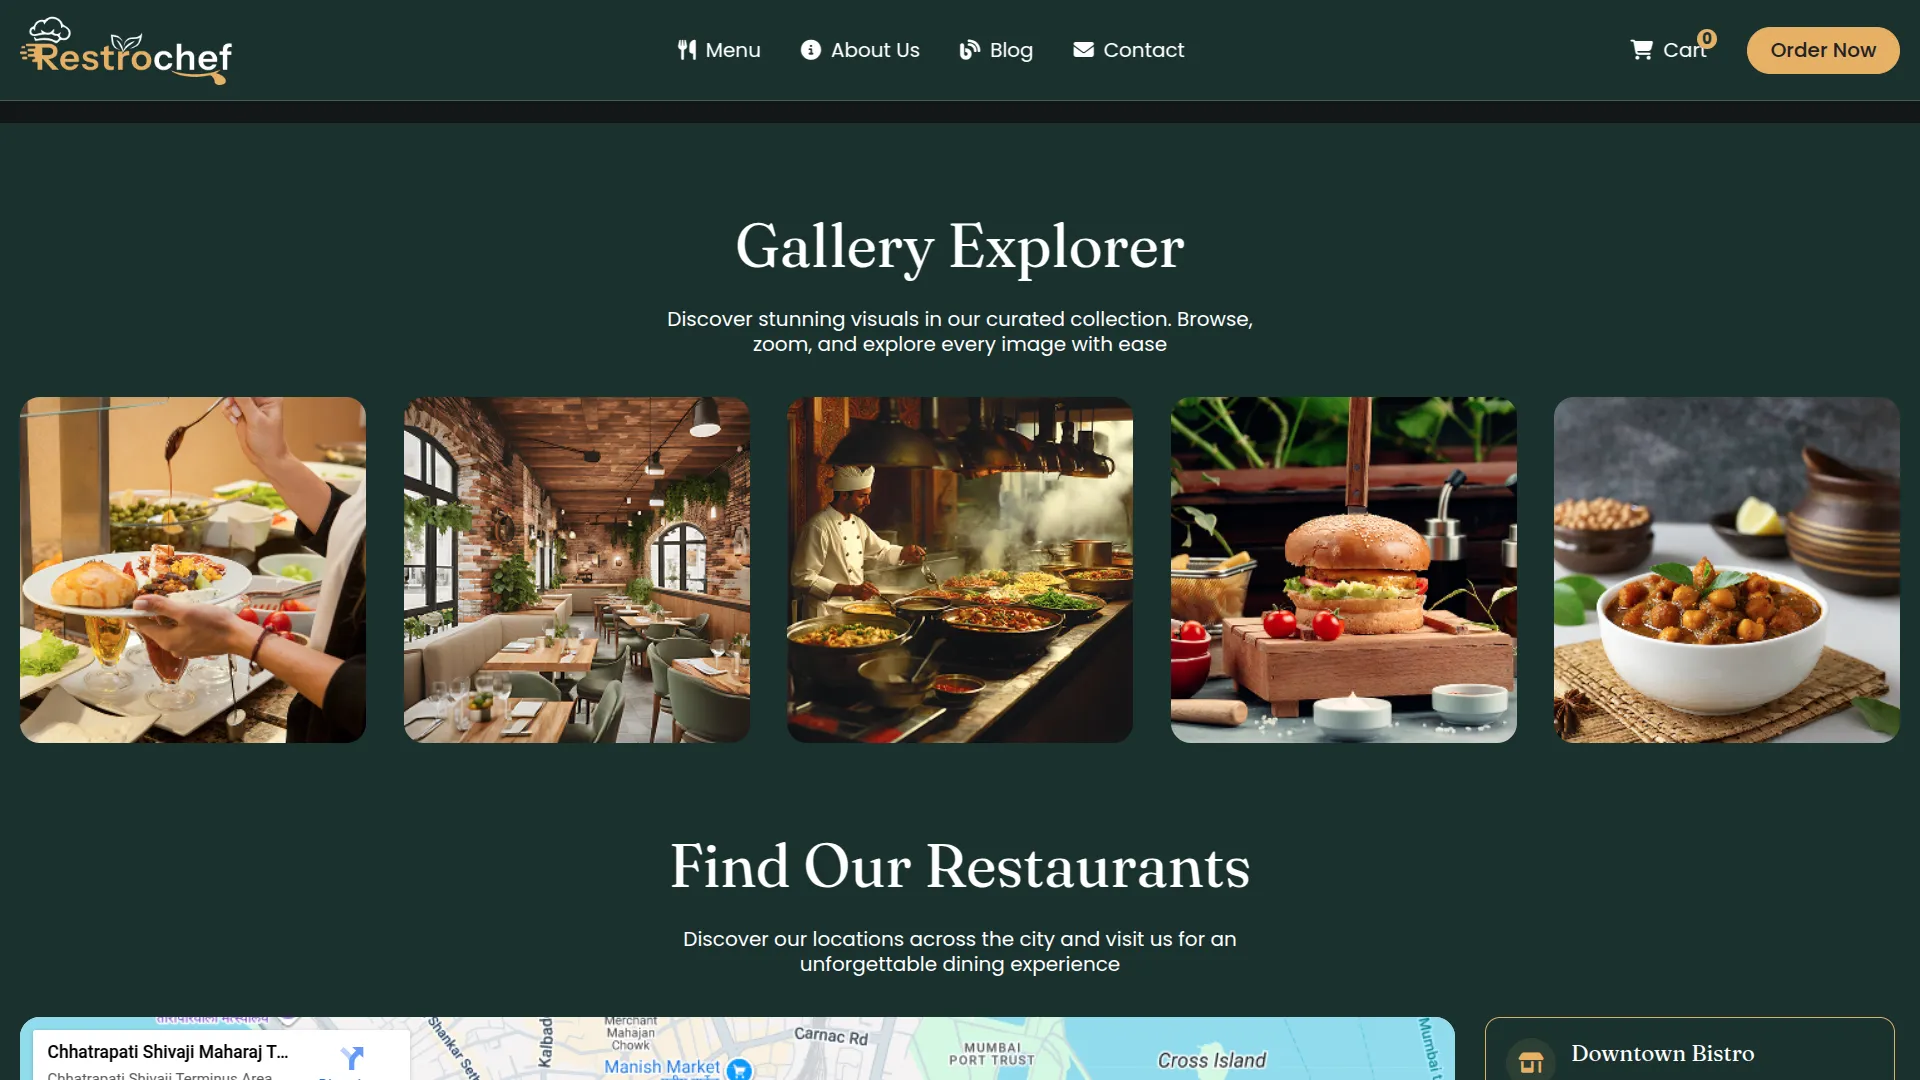
Gallery Page
This page showcases your restaurant’s ambiance, dishes, and events through images organized in a visually appealing layout.
- Title & Description: System Setup → Gallery Page
- Gallery Images: System Setup → Gallery
- Images are displayed with titles and descriptions configured in the gallery settings.
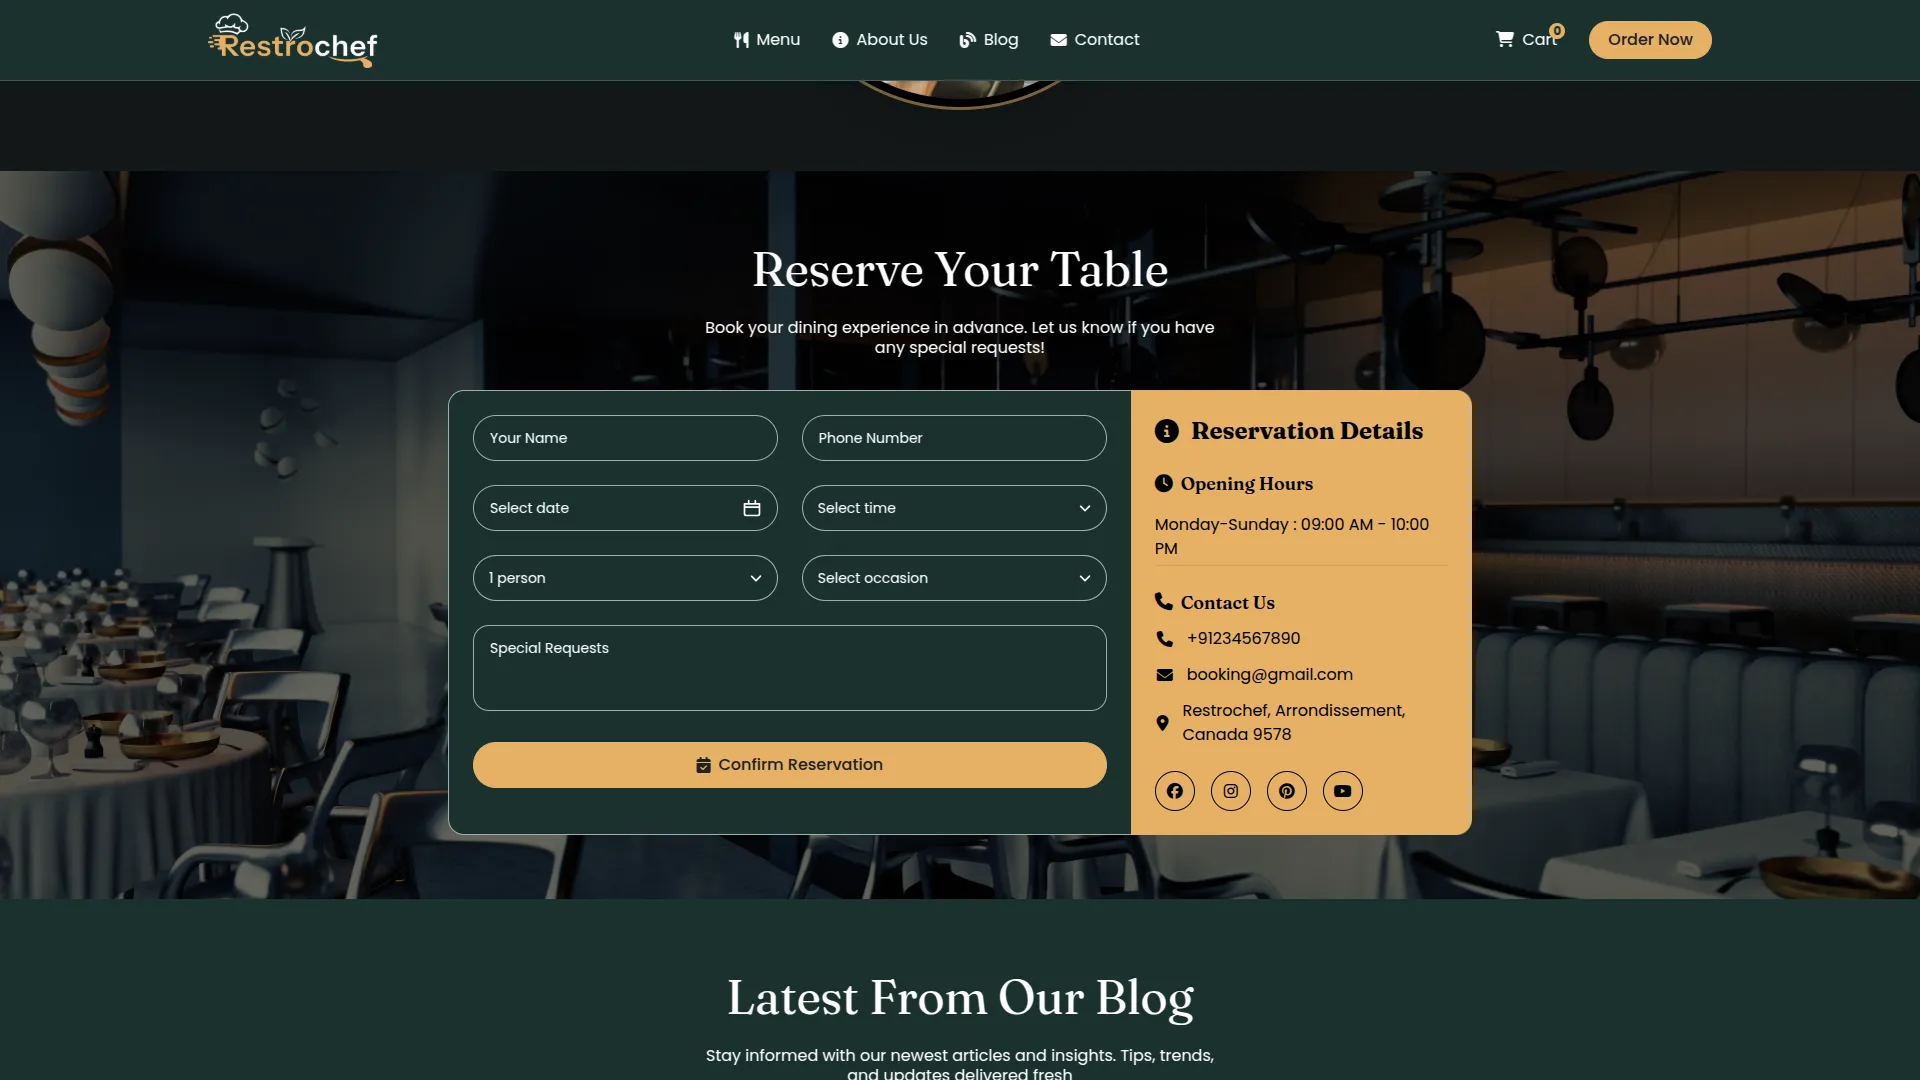
Reservation Page (Booking Form)
This page contains a detailed reservation booking form. Visitors can submit their preferences for date, time, party size, occasion, and special requests.
- Page Title & Description: System Setup → Additional Settings → Section 4: Setting for Reservation Page
- Time slots depend on: System Setup → Contact Info → Open & Close Time
- Available tables shown in the booking form come from the Dining Tables module
- Occasion options are configured in system setup
- Fields like Table Selection auto-populate based on availability
After form submission, the success message footer shows:
- Contact info (from Section 4 of Reservation Page settings)
- Phone Number (from Contact Info)
- Social Media links (from Social Links)
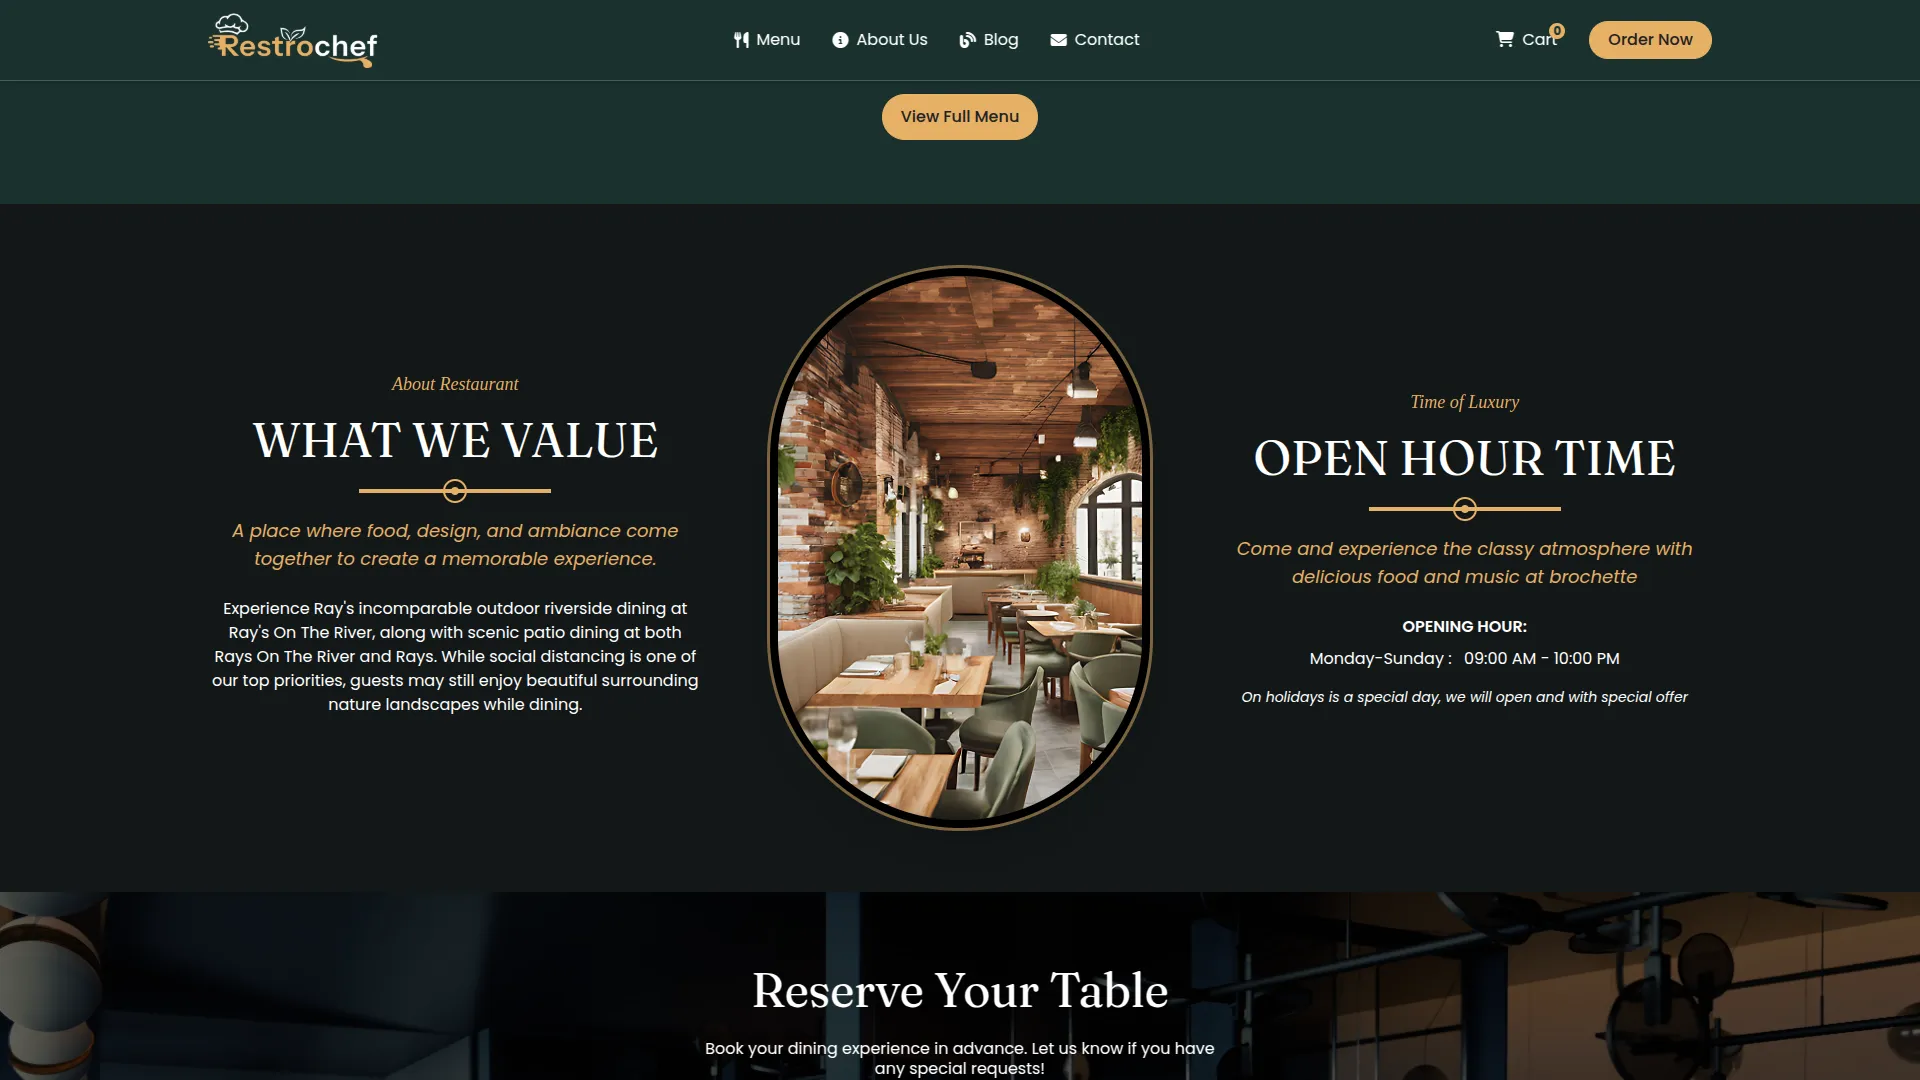
About Us Page
This page provides detailed information about your restaurant’s story, mission, and values. It helps customers understand your restaurant’s background and philosophy.
- Title & Description: System Setup → About Us Settings
- Restaurant Information: Including history, mission, and values
- Operating Hours: From System Setup → Reservation Setting
- Content is dynamically pulled from your About Us configuration.
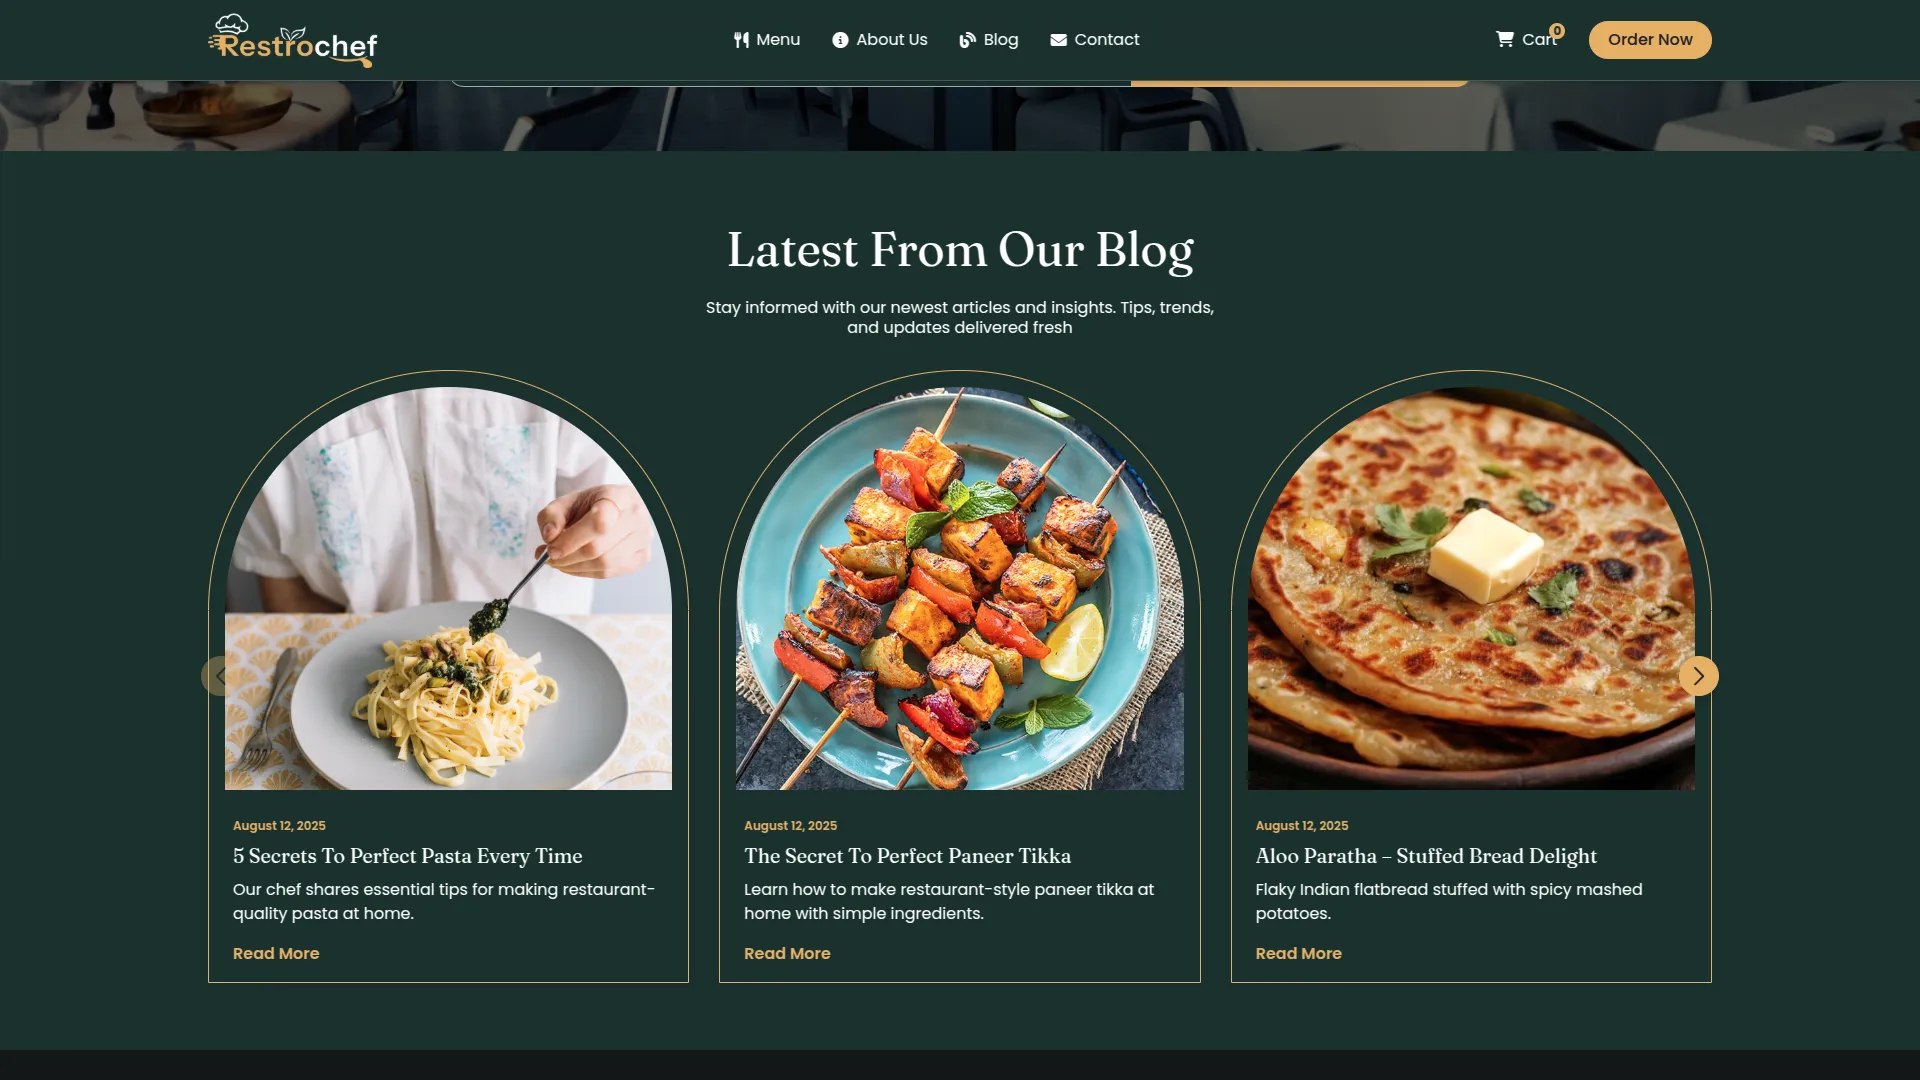
Blog Page
This section displays restaurant-related articles, news, and updates. Visitors can read about new menu items, events, and restaurant stories.
- Blog Articles: System Setup → Blog Section
- Article Titles and Descriptions: Automatically displayed from blog entries
- When visitors click “read more,” they access the full article page with complete content.
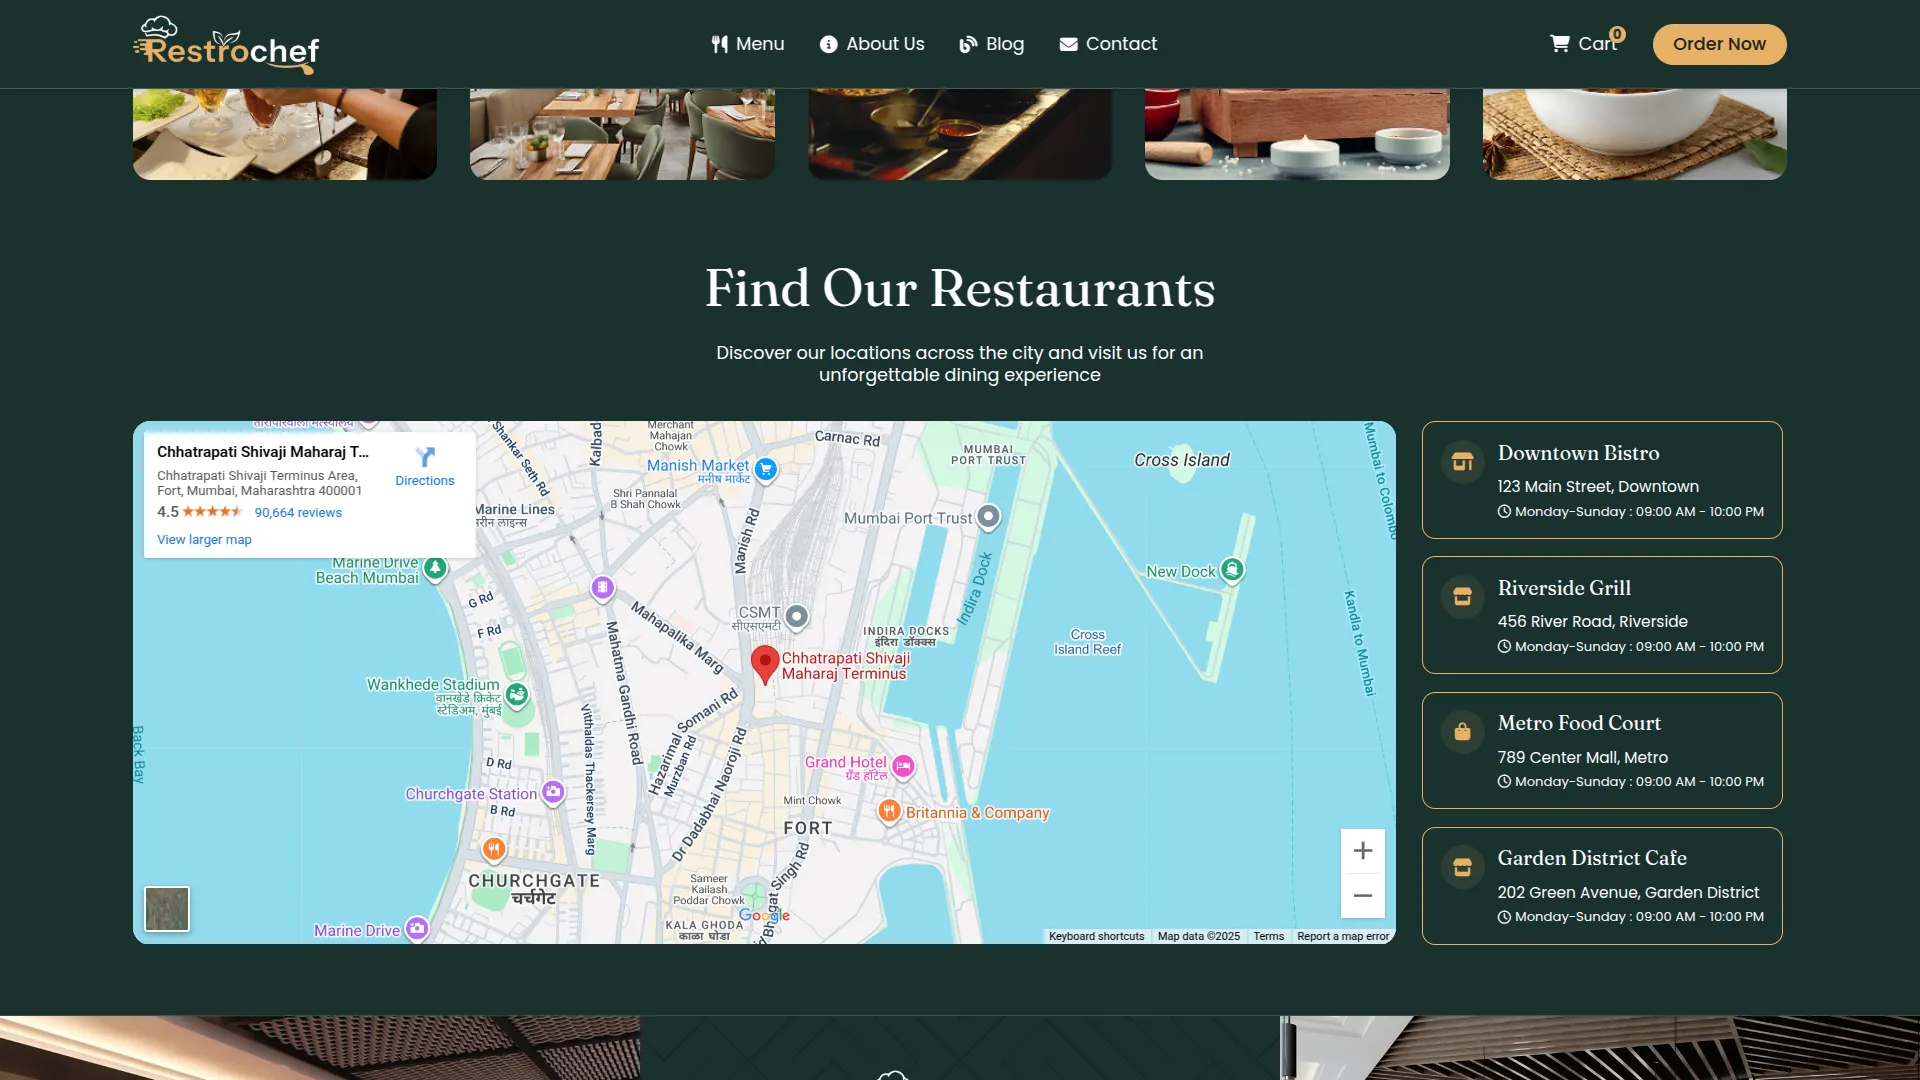
Map Section
This section shows your restaurant location using an interactive map and displays branch information for multiple locations.
- Google Map: System Setup → Contact Us → Google Map iframe
- Branch Information: Contact details and addresses for different locations
- Location details are pulled from your contact and branch settings.
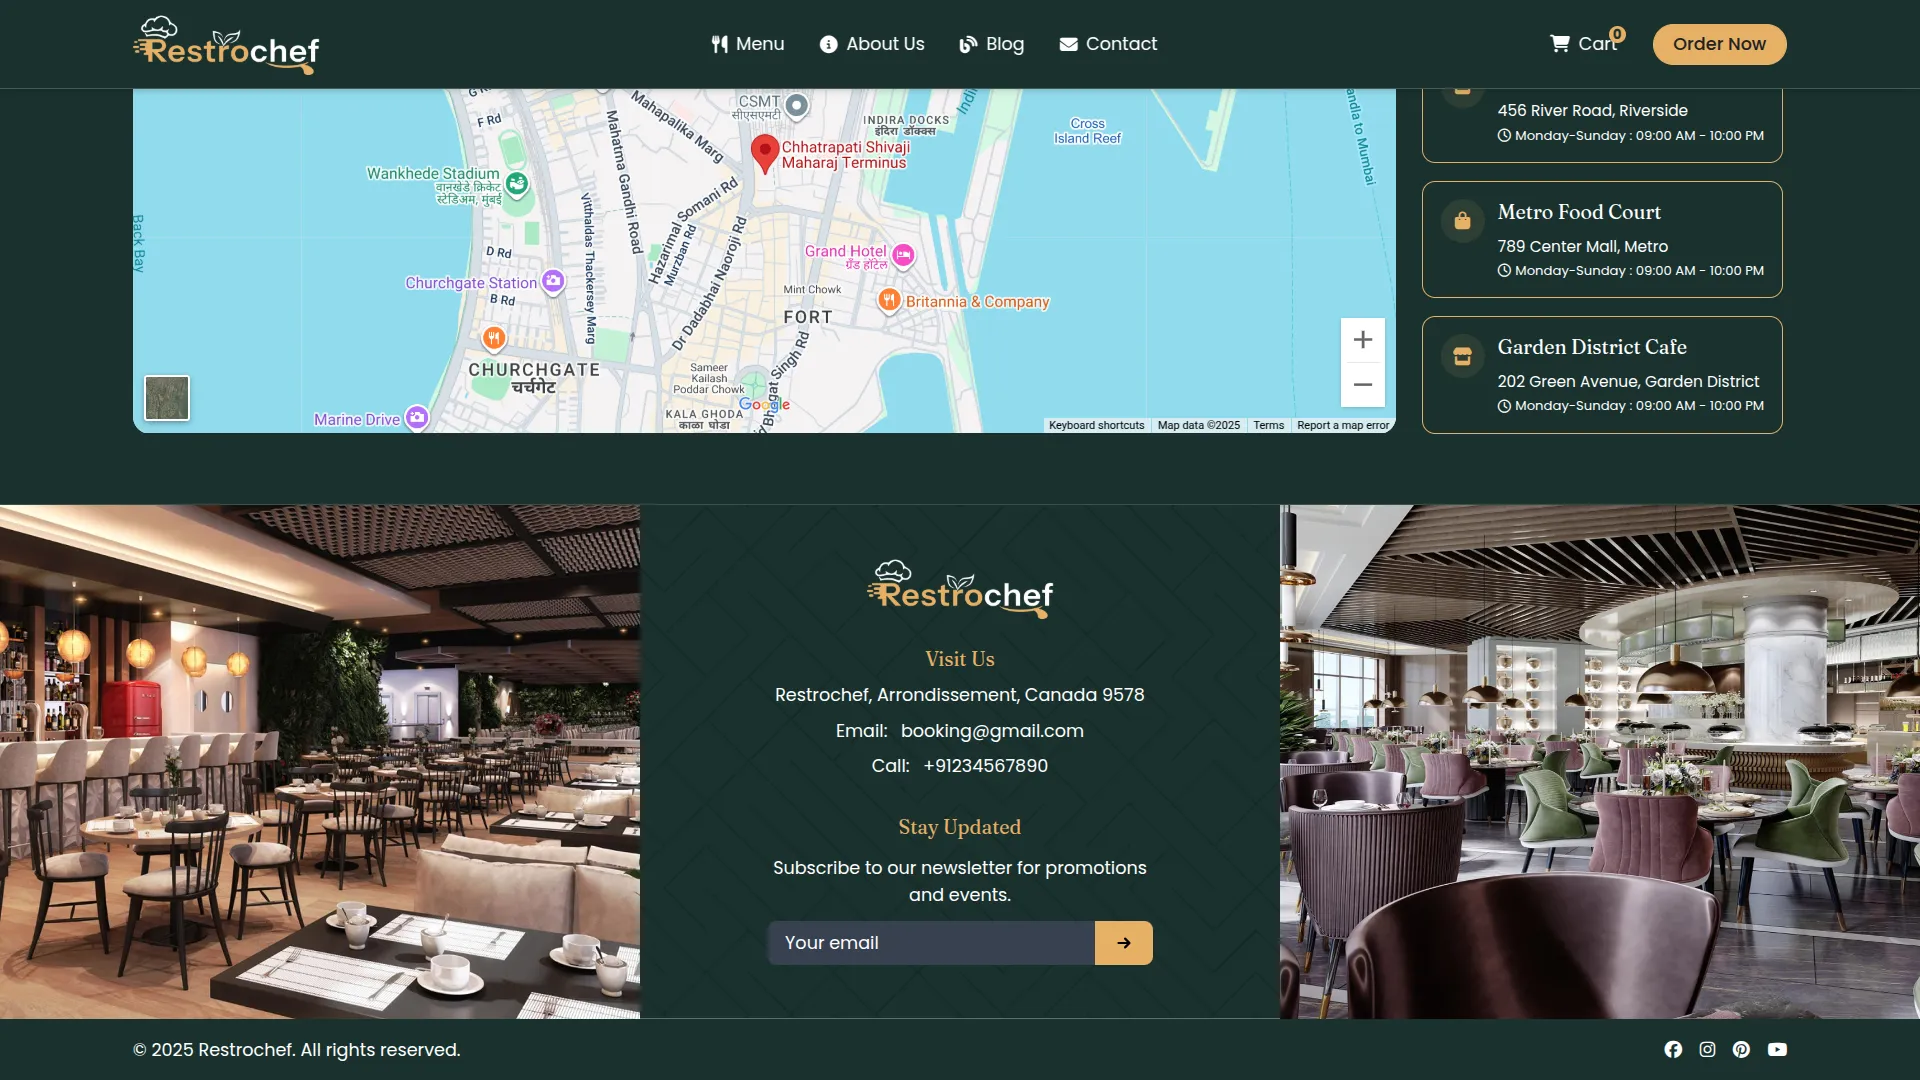
Footer
This is the bottom section of all pages, displaying your logo, contact info, quick navigation links, and copyright notice.
- Logo: System Setup → Brand Setting
- Contact Info: System Setup → Contact Info
- Social Links: System Setup → Social Links
- Copyright Text: System Setup → Brand Setting
Cart Management
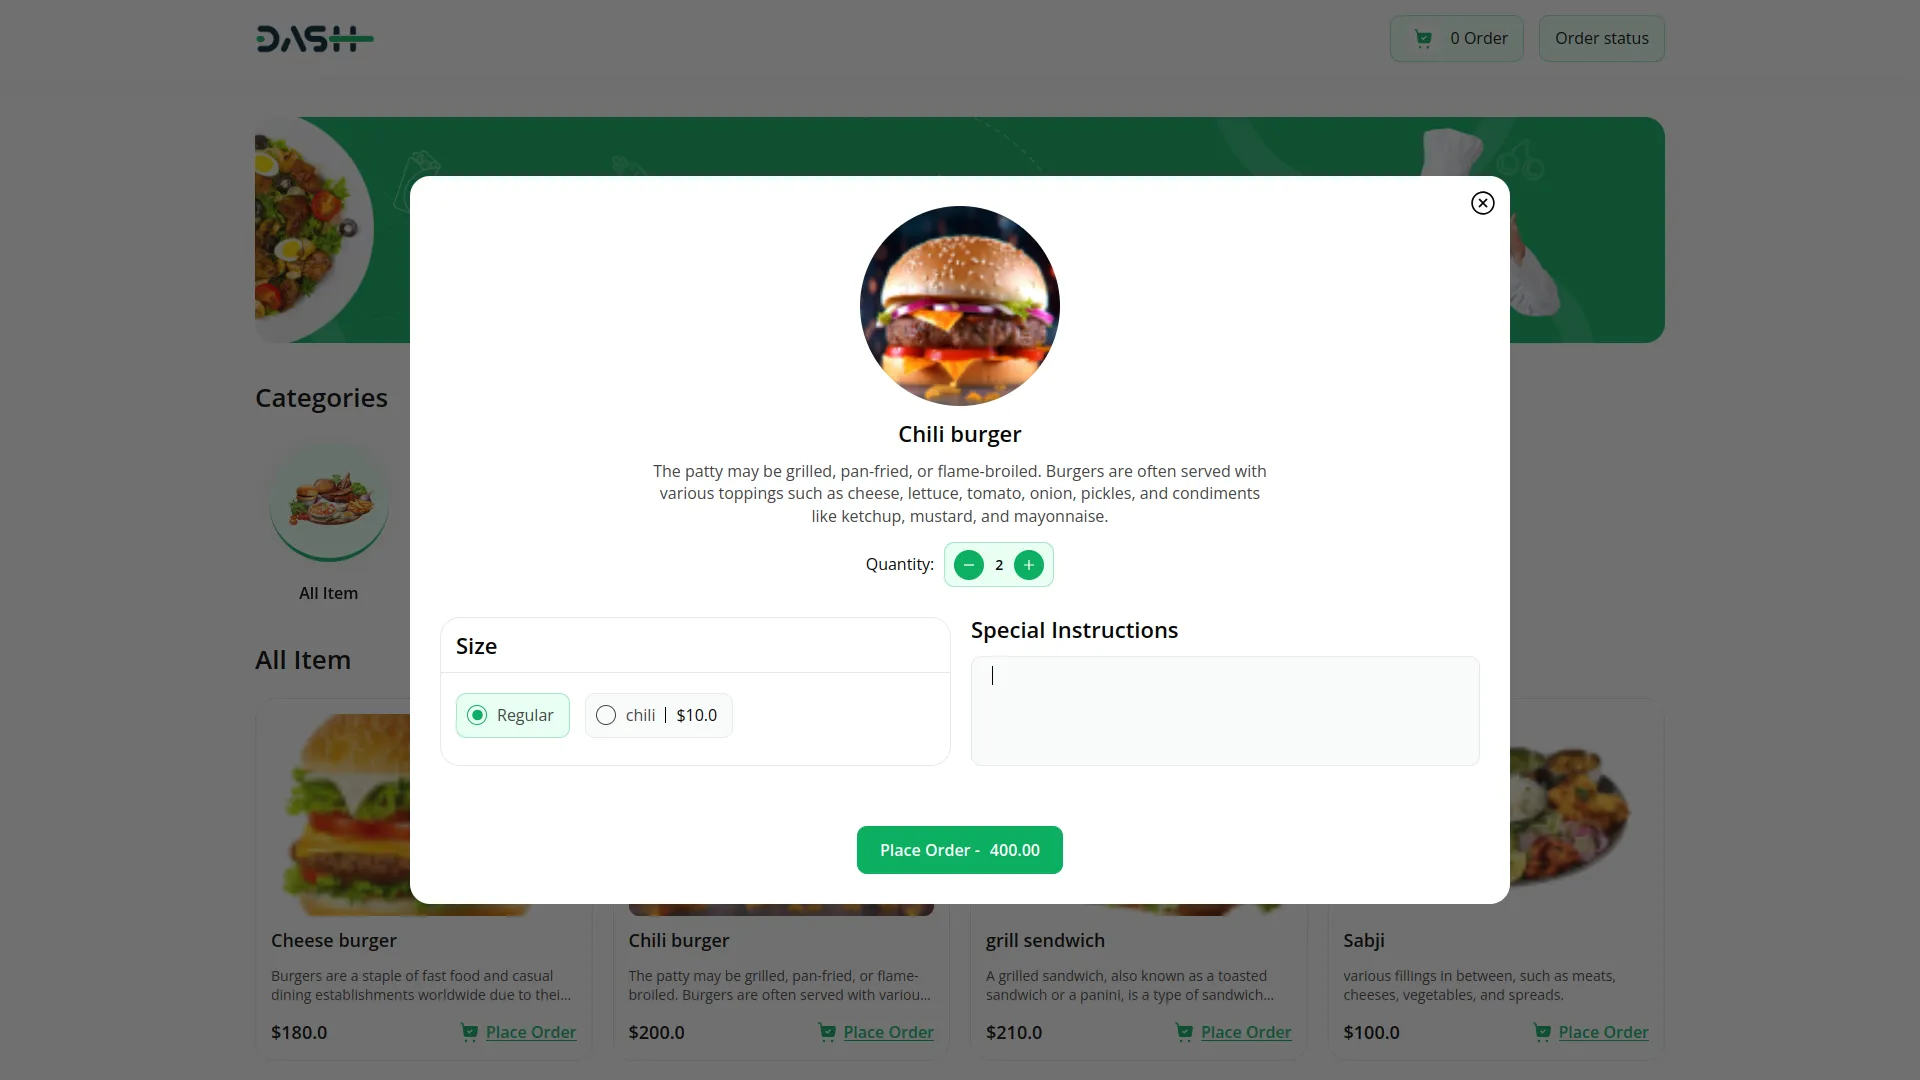
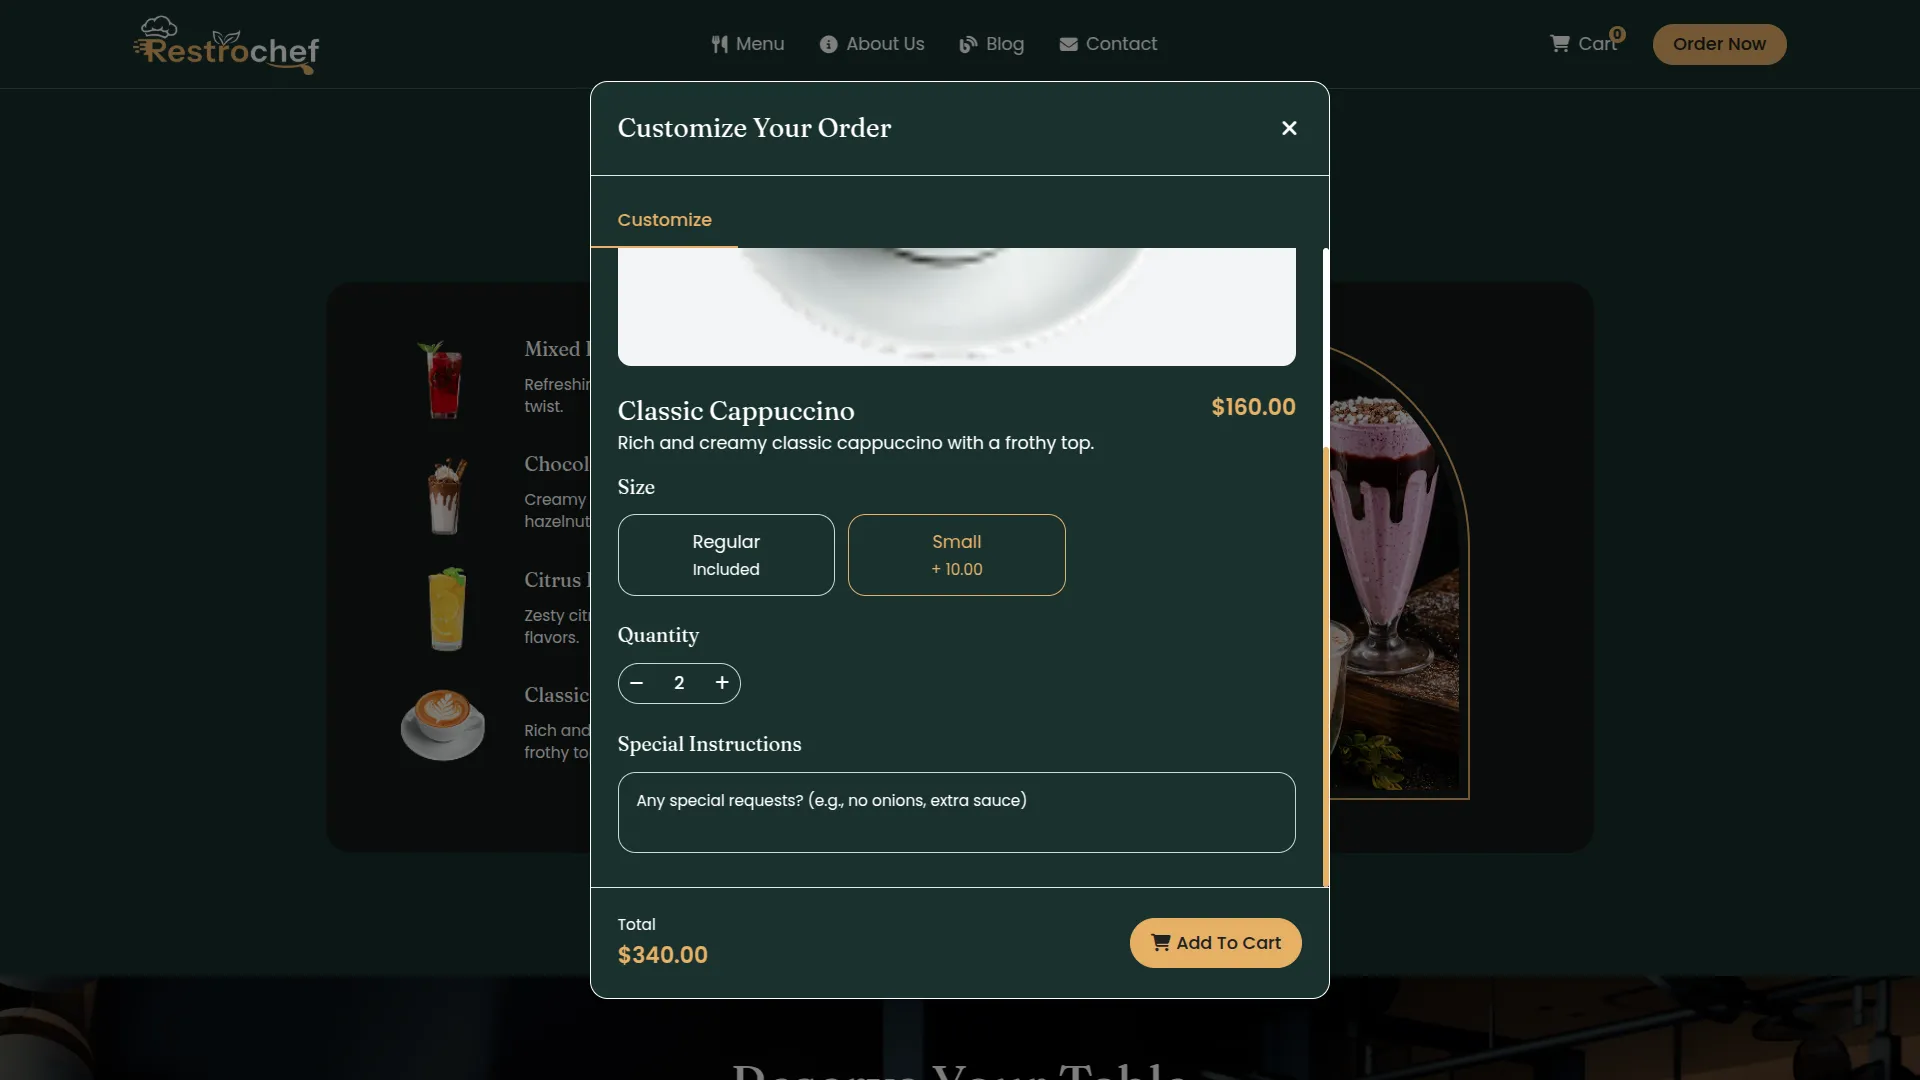
- When customers browse the menu and find items they want to order, they click the “Add” button on any menu item. This action opens a detailed item page where customers can view the complete item information, including description, price, and available options.
- On the item detail page, customers can select from available variants such as size options (small, medium, large), spice levels, or other customizations configured for that specific item. They can also adjust the quantity using the plus and minus buttons to select how many portions they want to order.
- After making their selections for variants and quantity, customers click the “Add to Cart” button. This action immediately opens the cart page, where customers can see all their selected items displayed in an organized list format.
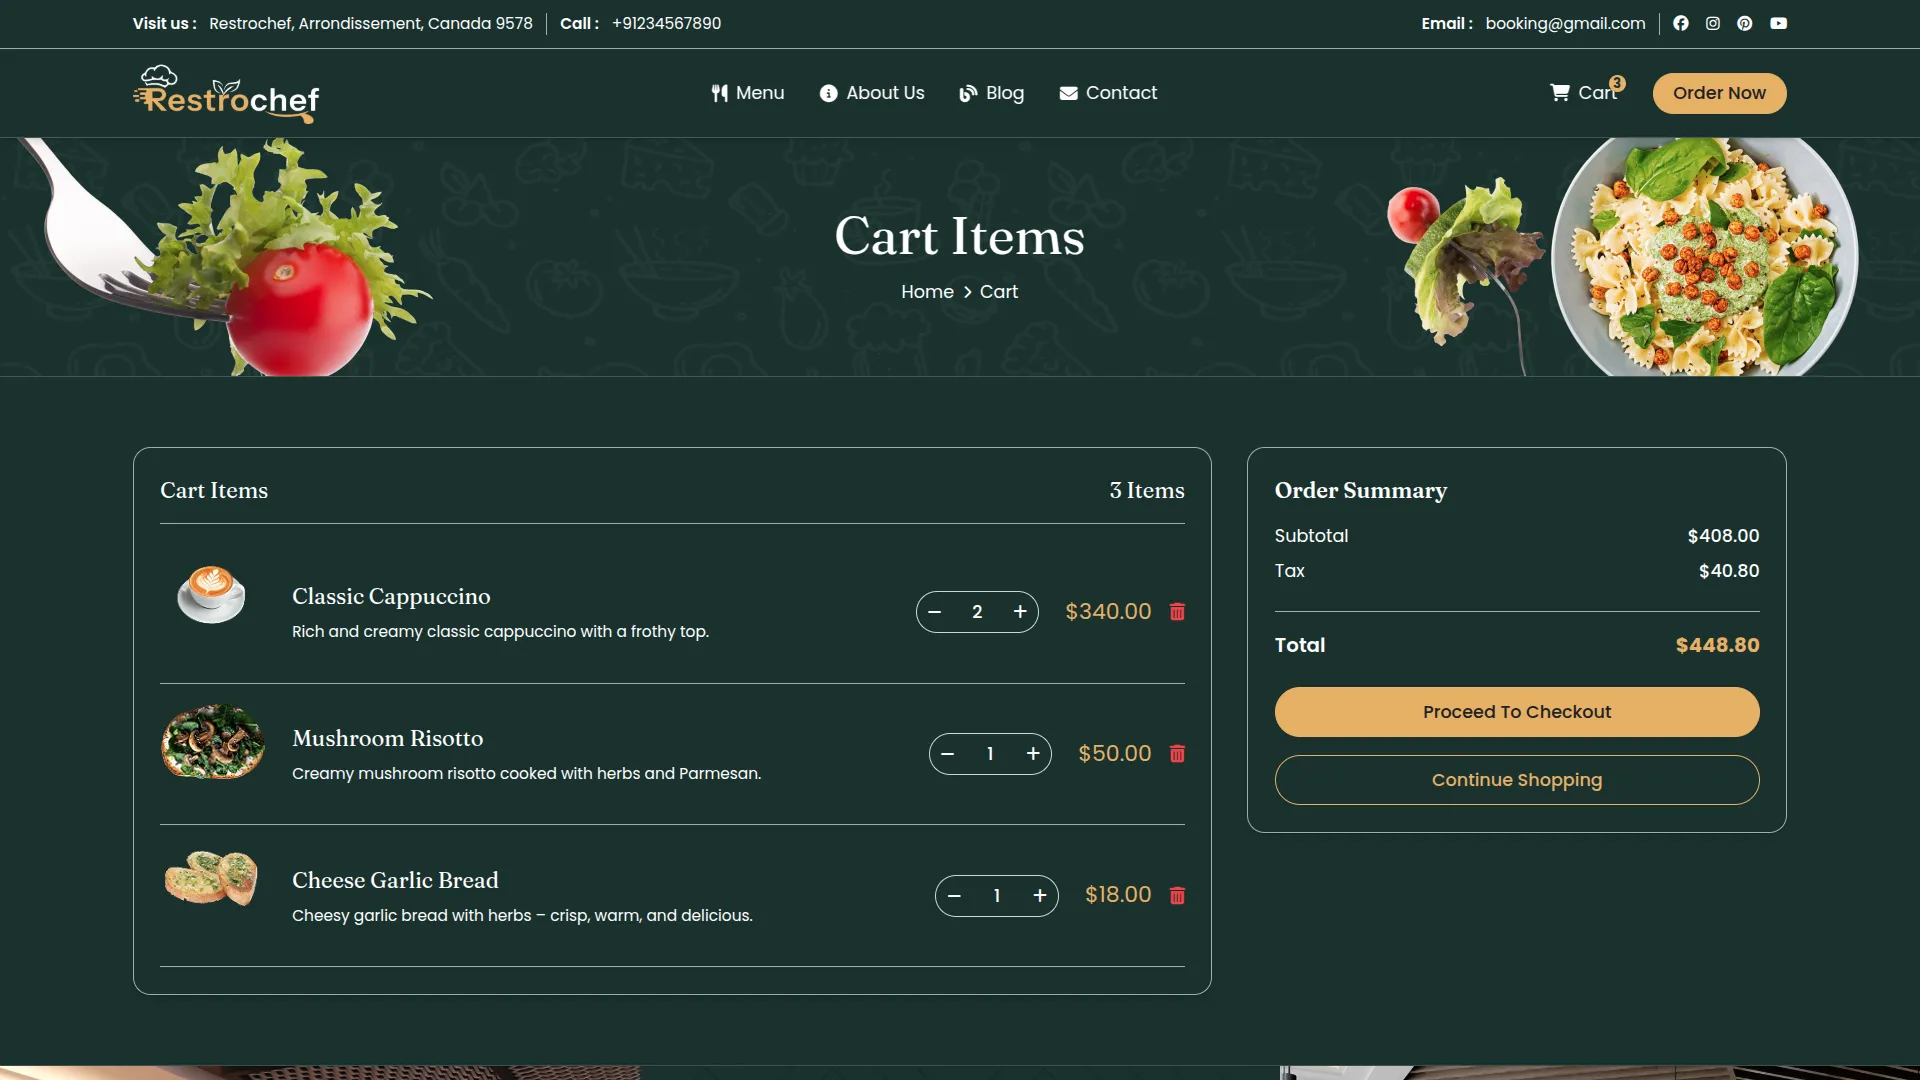
- The cart page shows each added item with its name, selected variant details, individual price, chosen quantity, and line total. Customers can modify quantities directly from the cart page using quantity controls, remove unwanted items by clicking the remove buttons, and see real-time calculation updates.
- The cart displays the subtotal for all items, applicable taxes, any discounts from active offers, and the final total amount. Customers can continue shopping by going back to the menu or proceed when ready to place their order.
- Cart features include session-based storage that maintains items even if customers navigate away, full variant support for all item customizations, automatic offer and discount application based on eligible items, precise tax calculation according to configured rates, and comprehensive quantity management for a smooth customer experience.
Checkout Process
- From the cart page, after reviewing all selected items and confirming their order details, customers click the “Proceed to Checkout” button. This action redirects them to the checkout page, where they must provide their personal and delivery information to complete the order.
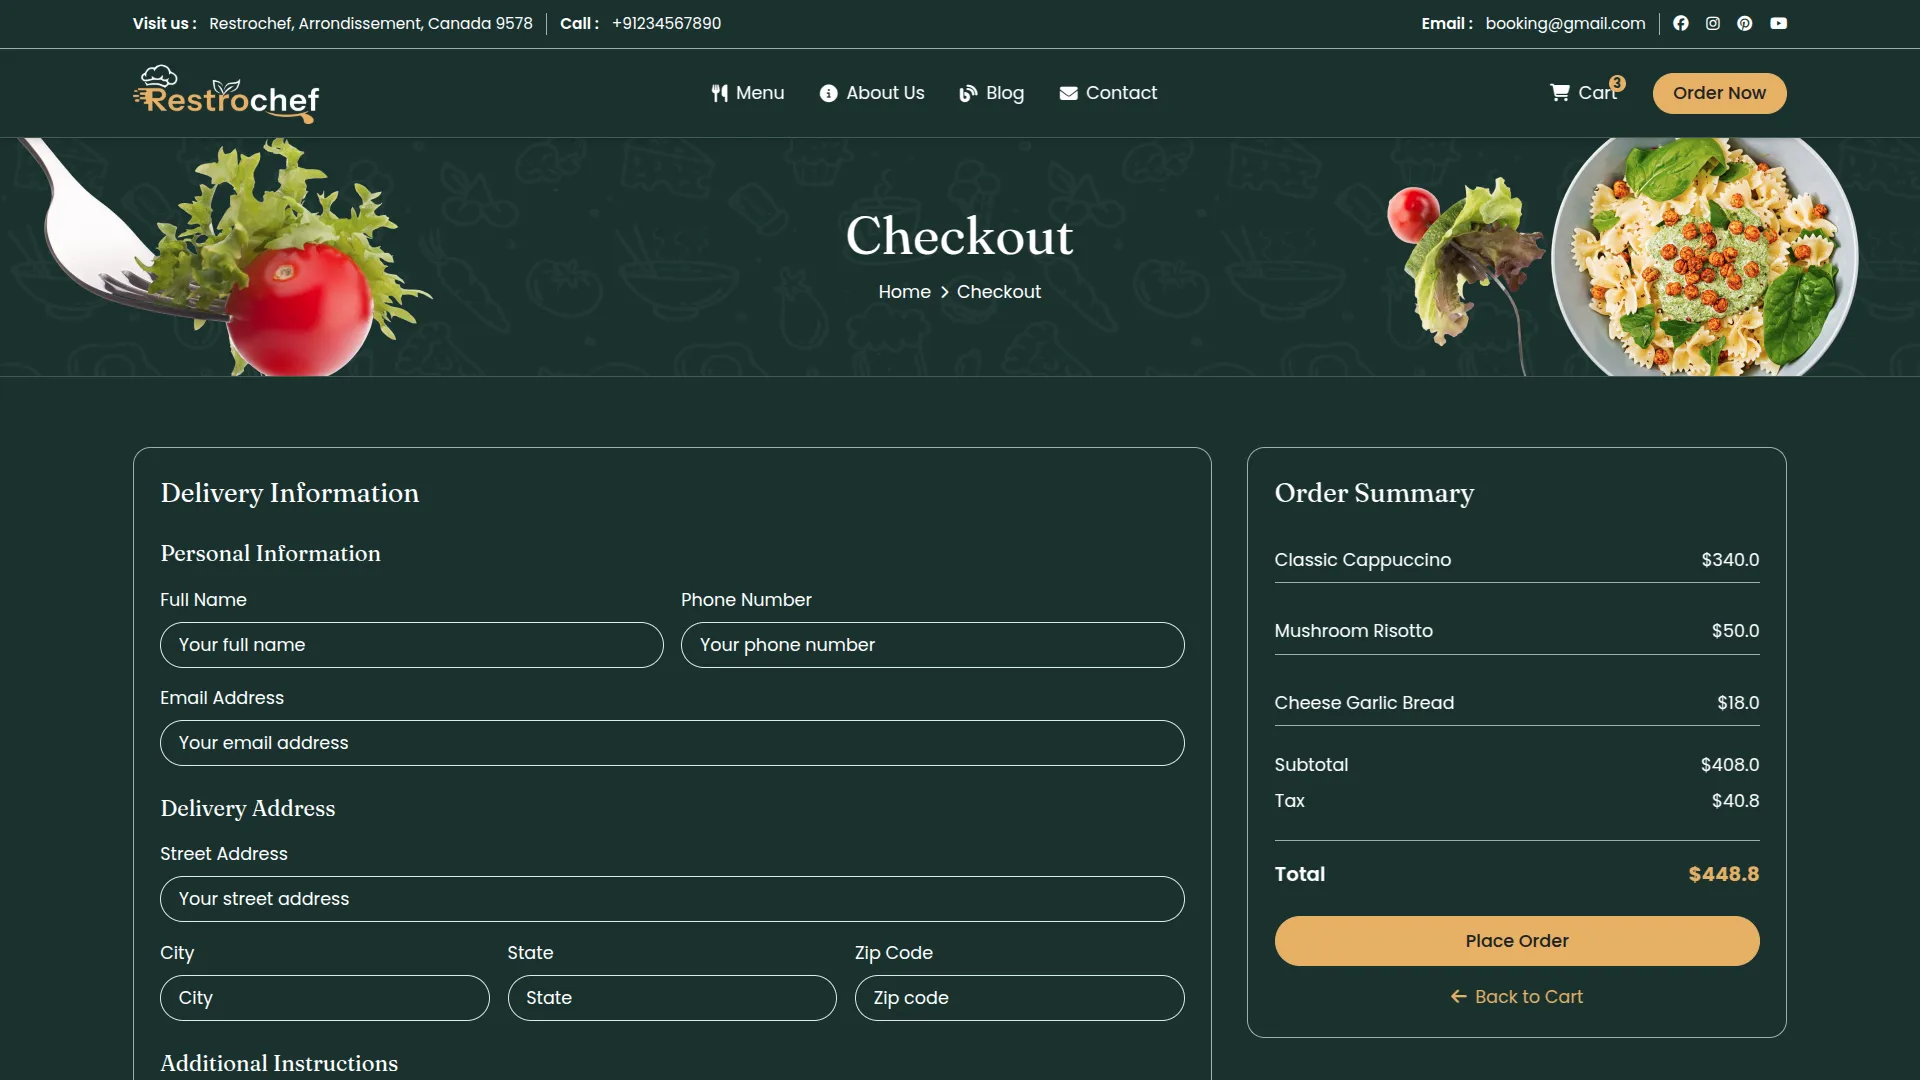
- On the checkout page, customers see an order summary section displaying all cart items with quantities and prices for final review. Below this, they find a comprehensive customer information form that requires essential details for order processing.
- The customer information form includes mandatory fields such as full name for order identification, mobile phone number for order updates and delivery coordination, email address for order confirmation and receipts, and complete delivery address including street address, city, state, and ZIP code. Additional optional fields may include special delivery instructions or dietary preferences.
- Customers must fill in all required fields with accurate information before proceeding. The system validates each field in real-time, showing error messages for incorrect formats like invalid phone numbers or email addresses. Once all information is correctly entered and validated, the “Checkout” button becomes active.
- When customers click the “Place Order” button, the system processes their order through multiple steps, including order validation, inventory checking, and order confirmation generation. The entire process typically takes a few seconds with a loading indicator showing progress.
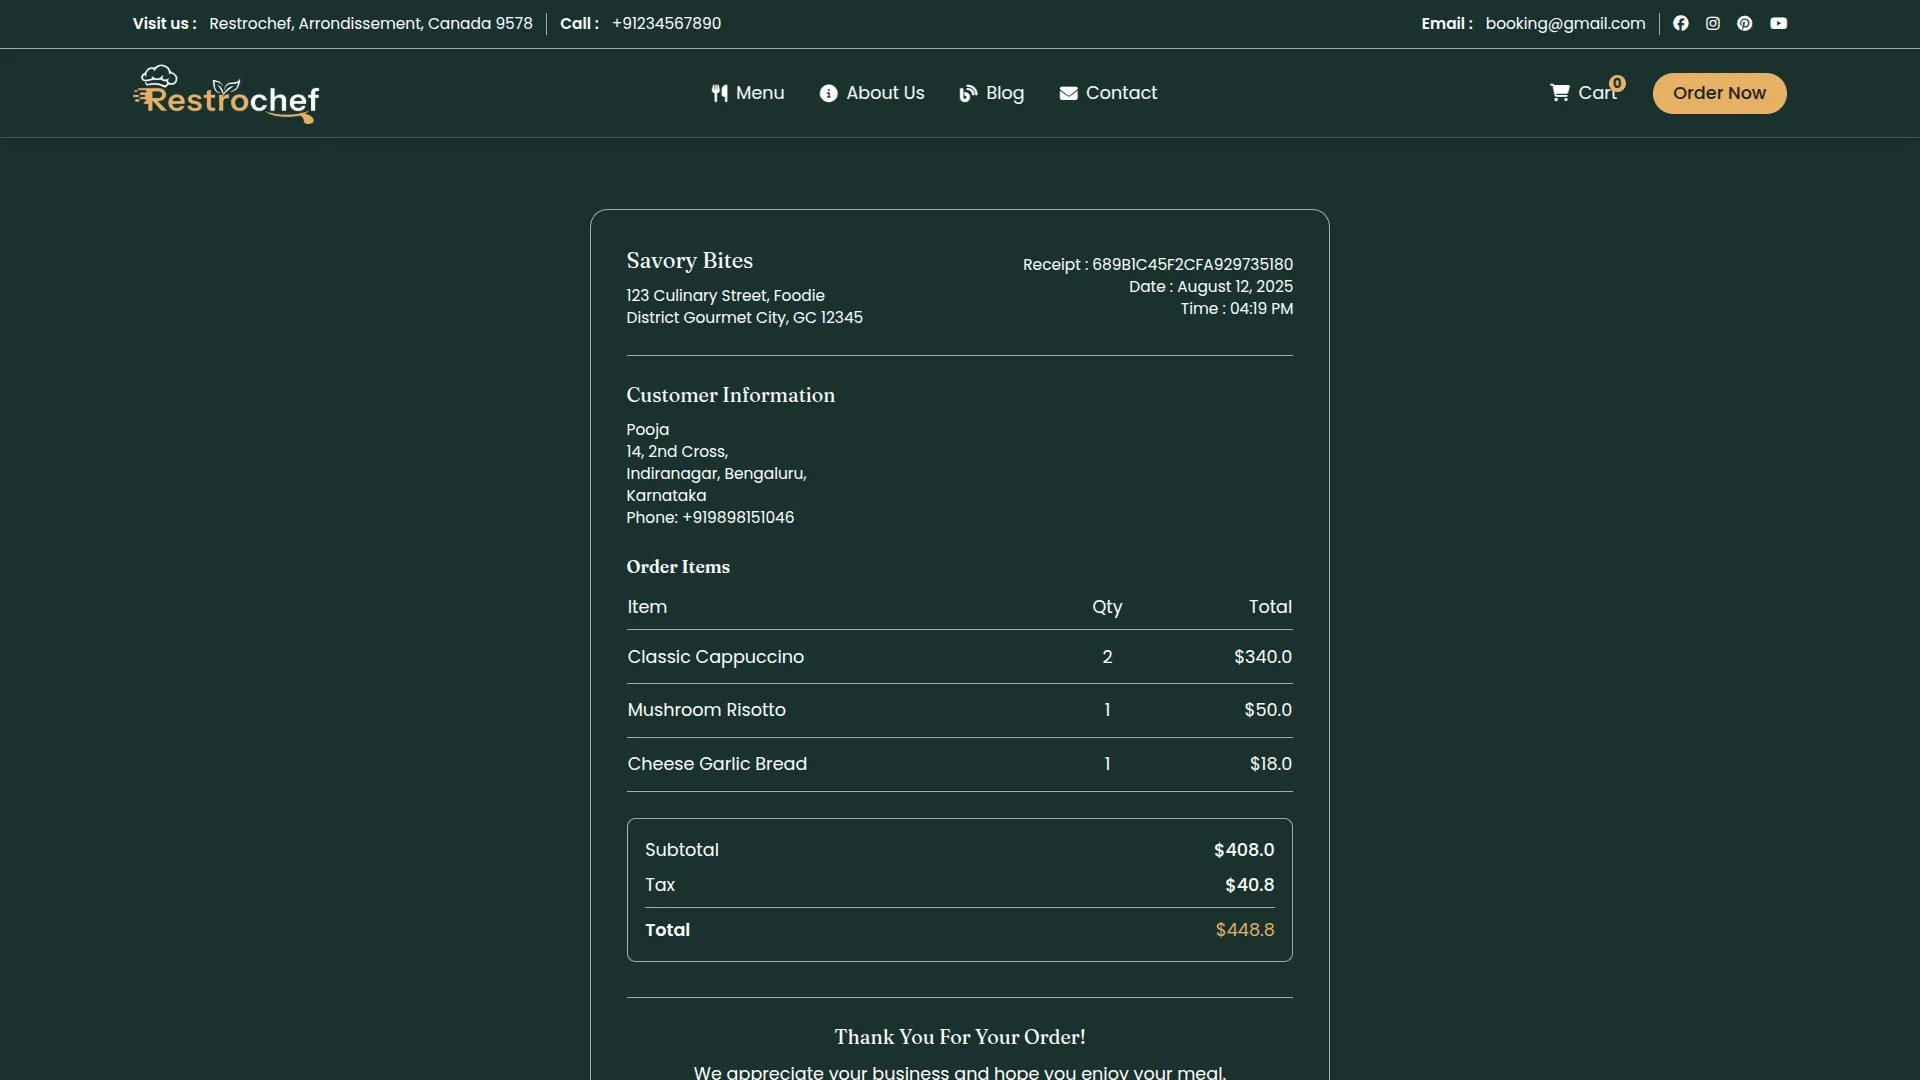
- Upon successful order completion, the system automatically generates a detailed receipt containing complete order information, including order number, date and time, customer details, itemized list with quantities and prices, applicable taxes and discounts, and final total amount. This receipt appears on screen and is also automatically available for download as a PDF file.
- The generated receipt includes restaurant branding, order tracking number, estimated delivery time, and contact information for customer support. Customers can immediately download this receipt by clicking the “Download Receipt” button, and they also receive a copy via email to the address provided during checkout.
- After successful checkout, customers see an order confirmation page with their order number prominently displayed. On this page, they find an “Order Tracking” button that allows them to monitor their order status in real-time.
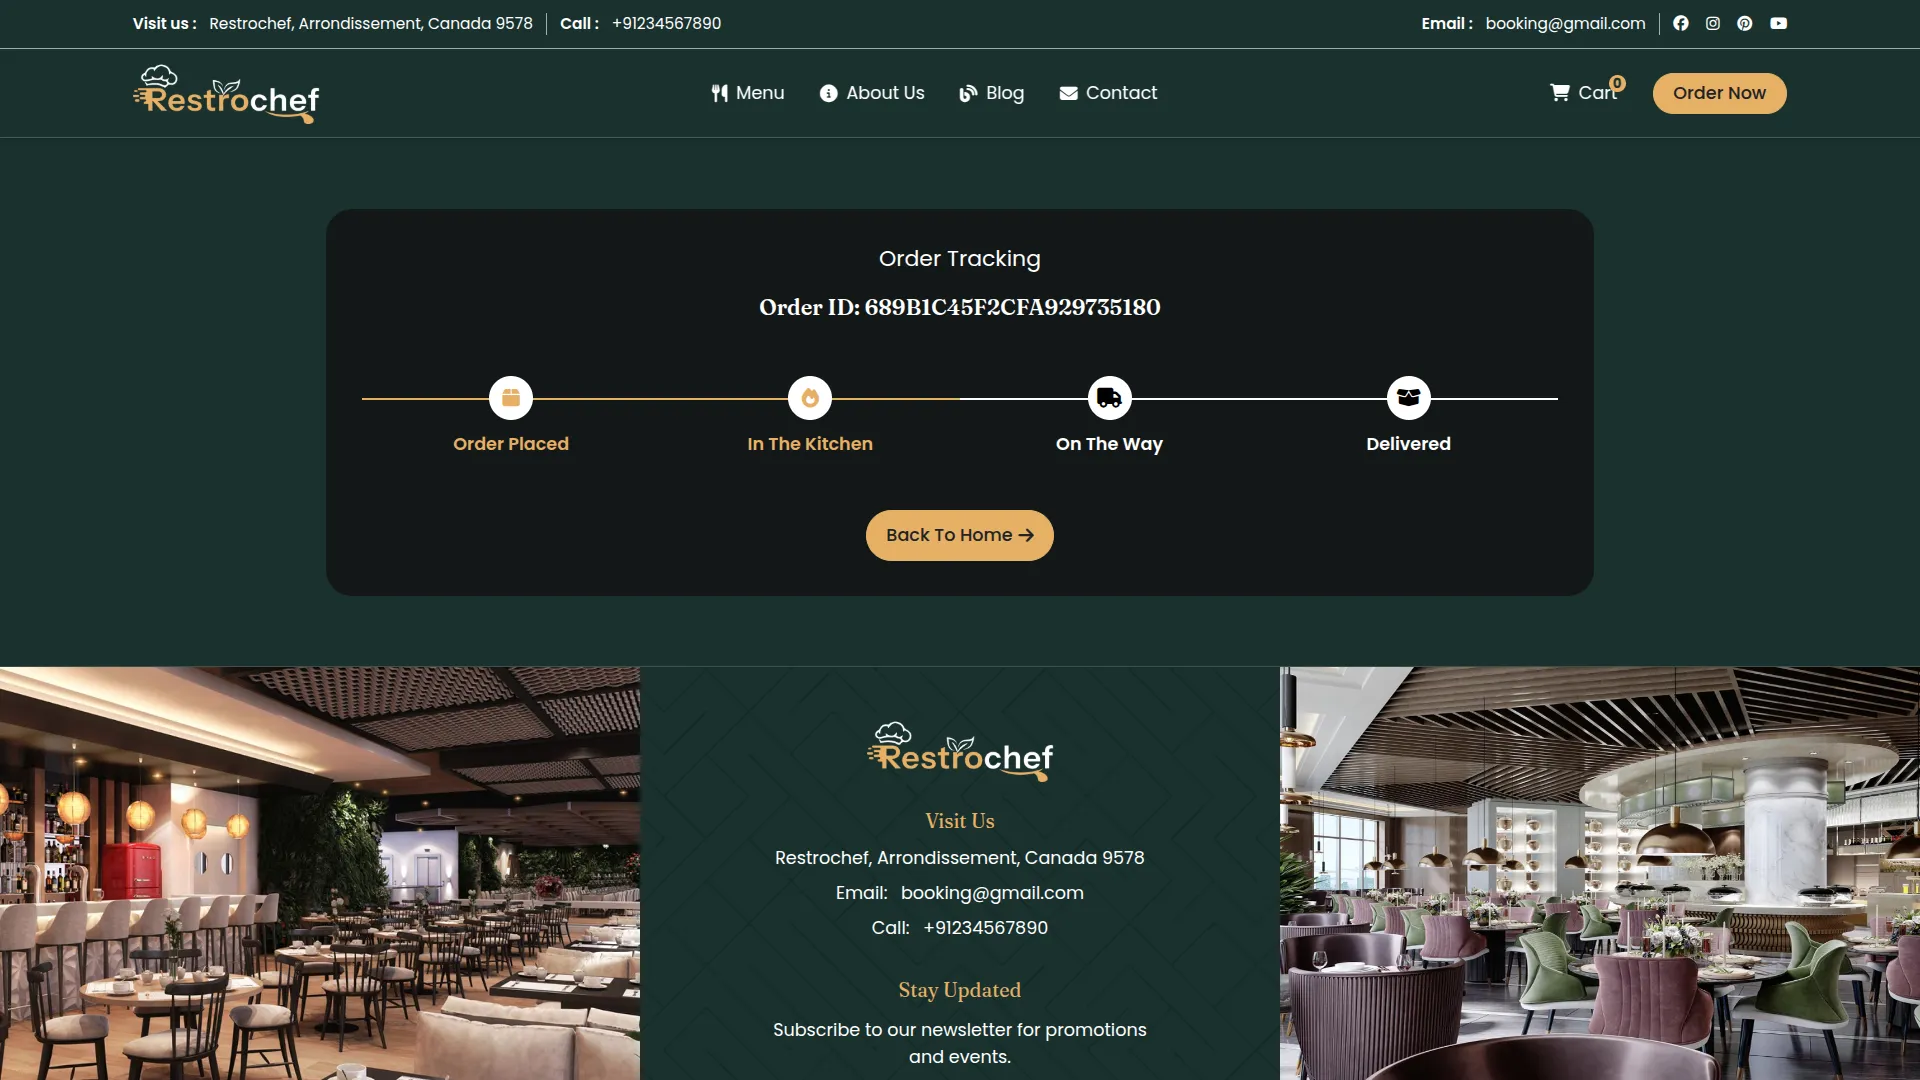
- When customers click “Order Tracking,” they access a dedicated tracking page showing their order progress through different stages such as Order Placed, Accepted by Restaurant, Food Preparation Started, Ready for Pickup/Delivery, and Completed. Each status update includes a timestamp and relevant details.
- The tracking system provides live updates, so customers can refresh the page or receive notifications when their order status changes. This keeps customers informed throughout the entire fulfillment process, from order placement to final delivery or pickup completion.
- Checkout features include comprehensive customer data validation with real-time error checking, secure information collection for address and contact details, detailed order summary display with item breakdown, precise final price calculation including taxes and discounts, professional receipt generation with download capability, automated email confirmation sending, and complete order tracking functionality that keeps customers informed throughout the entire order fulfillment process.
Categories
Related articles
- Hair And Care Studio Integration in Dash SaaS
- Nepalste Integration in Dash SaaS
- Jitsi Meet Detailed Documentation
- n8n Detailed Documentation
- Photo & Studio management Integration in Dash SaaS
- 2checkout Integration in Dash SaaS
- Sign-In With Facebook – eCommerceGo Addon
- Newsletter Integration in Dash SaaS
- Budget Planner Integration in Dash SaaS
- Appointment Review Integration in BookingGo SaaS
- Performance Indicator Integration in Dash SaaS
- CountDown Timer Integration in eCommerceGo SaaS
Reach Out to Us
Have questions or need assistance? We're here to help! Reach out to our team for support, inquiries, or feedback. Your needs are important to us, and we’re ready to assist you!


Need more help?
If you’re still uncertain or need professional guidance, don’t hesitate to contact us. You can contact us via email or submit a ticket with a description of your issue. Our team of experts is always available to help you with any questions. Rest assured that we’ll respond to your inquiry promptly.
Love what you see?
Do you like the quality of our products, themes, and applications, or perhaps the design of our website caught your eye? You can have similarly outstanding designs for your website or apps. Contact us, and we’ll bring your ideas to life.
