Medical Lab Management Integration in Dash SaaS
The Medical Lab Management System is a comprehensive software solution designed to streamline and manage all aspects of medical laboratory operations.
Introduction
The Medical Lab Management System is a comprehensive software solution designed to streamline and manage all aspects of medical laboratory operations. This system helps healthcare facilities efficiently handle patient information, appointments, lab tests, billing, inventory management, and result reporting. The software provides an integrated dashboard for quick overview of key metrics and maintains complete patient history records. With its user-friendly interface, the system enables lab staff to manage daily operations, track test results, handle billing processes, and maintain accurate records of all laboratory activities.
How To Install the Medical Lab Management Add-On?
To Set Up the Medical Lab Management Add-On, you can follow this link: Setup Add-On
How to Use the Medical Lab Management Add-On?
Dashboard
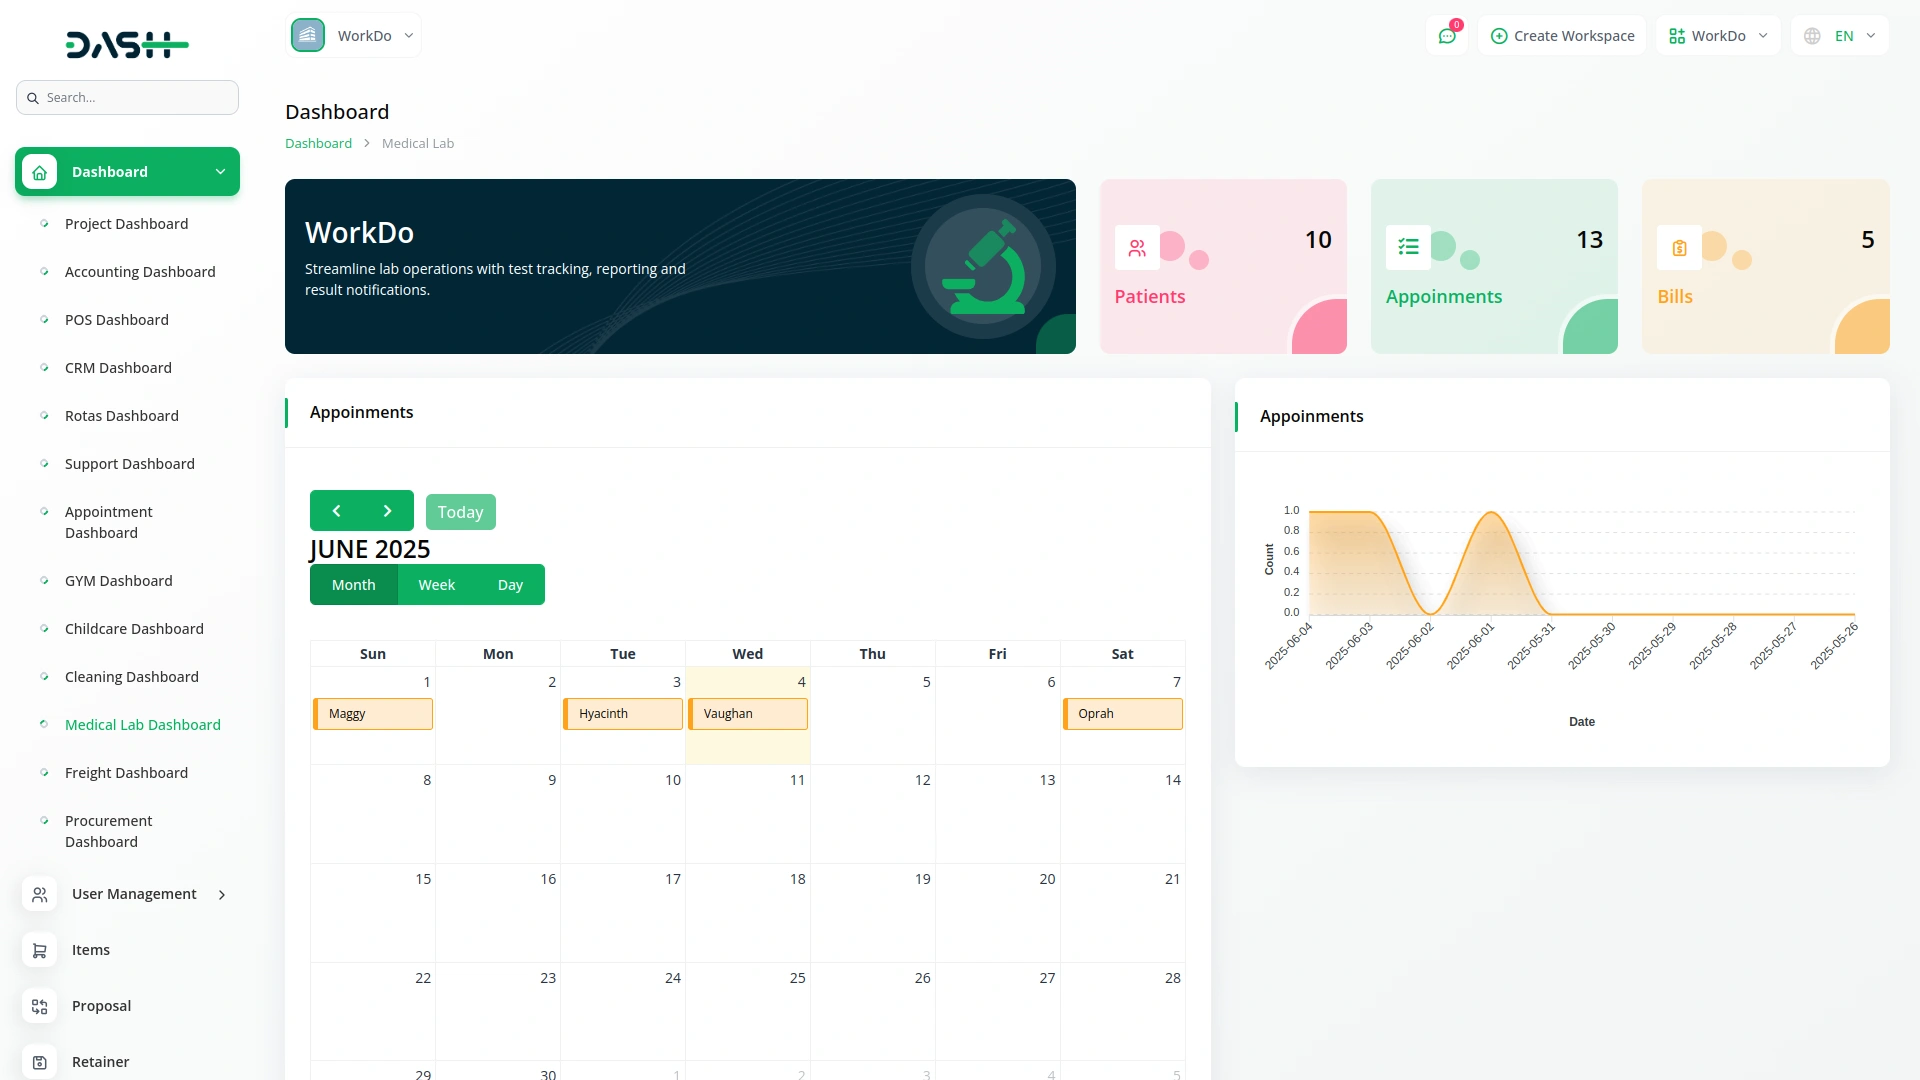
- The “Patients” section displays the total number of registered patients.
- The “Appointments” section displays the total number of scheduled appointments.
- The “Bills” section displays the total number of generated bills.
- All appointments are shown on a calendar based on their scheduled dates, showing the patient’s name for each appointment.
- The appointment graph displays the total count of appointments for each scheduled date, providing a visual overview of daily appointment volumes.
Manage Patients
- To add a new patient, click the “Create” button at the top of the patients page. Fill out the patient information form by entering First Name, Last Name, Date Of Birth, Gender from dropdown (Male or Female), Contact, Address, Blood Group, Email, and Insurance information.
- After entering all required information, click “Submit” to create the patient record.
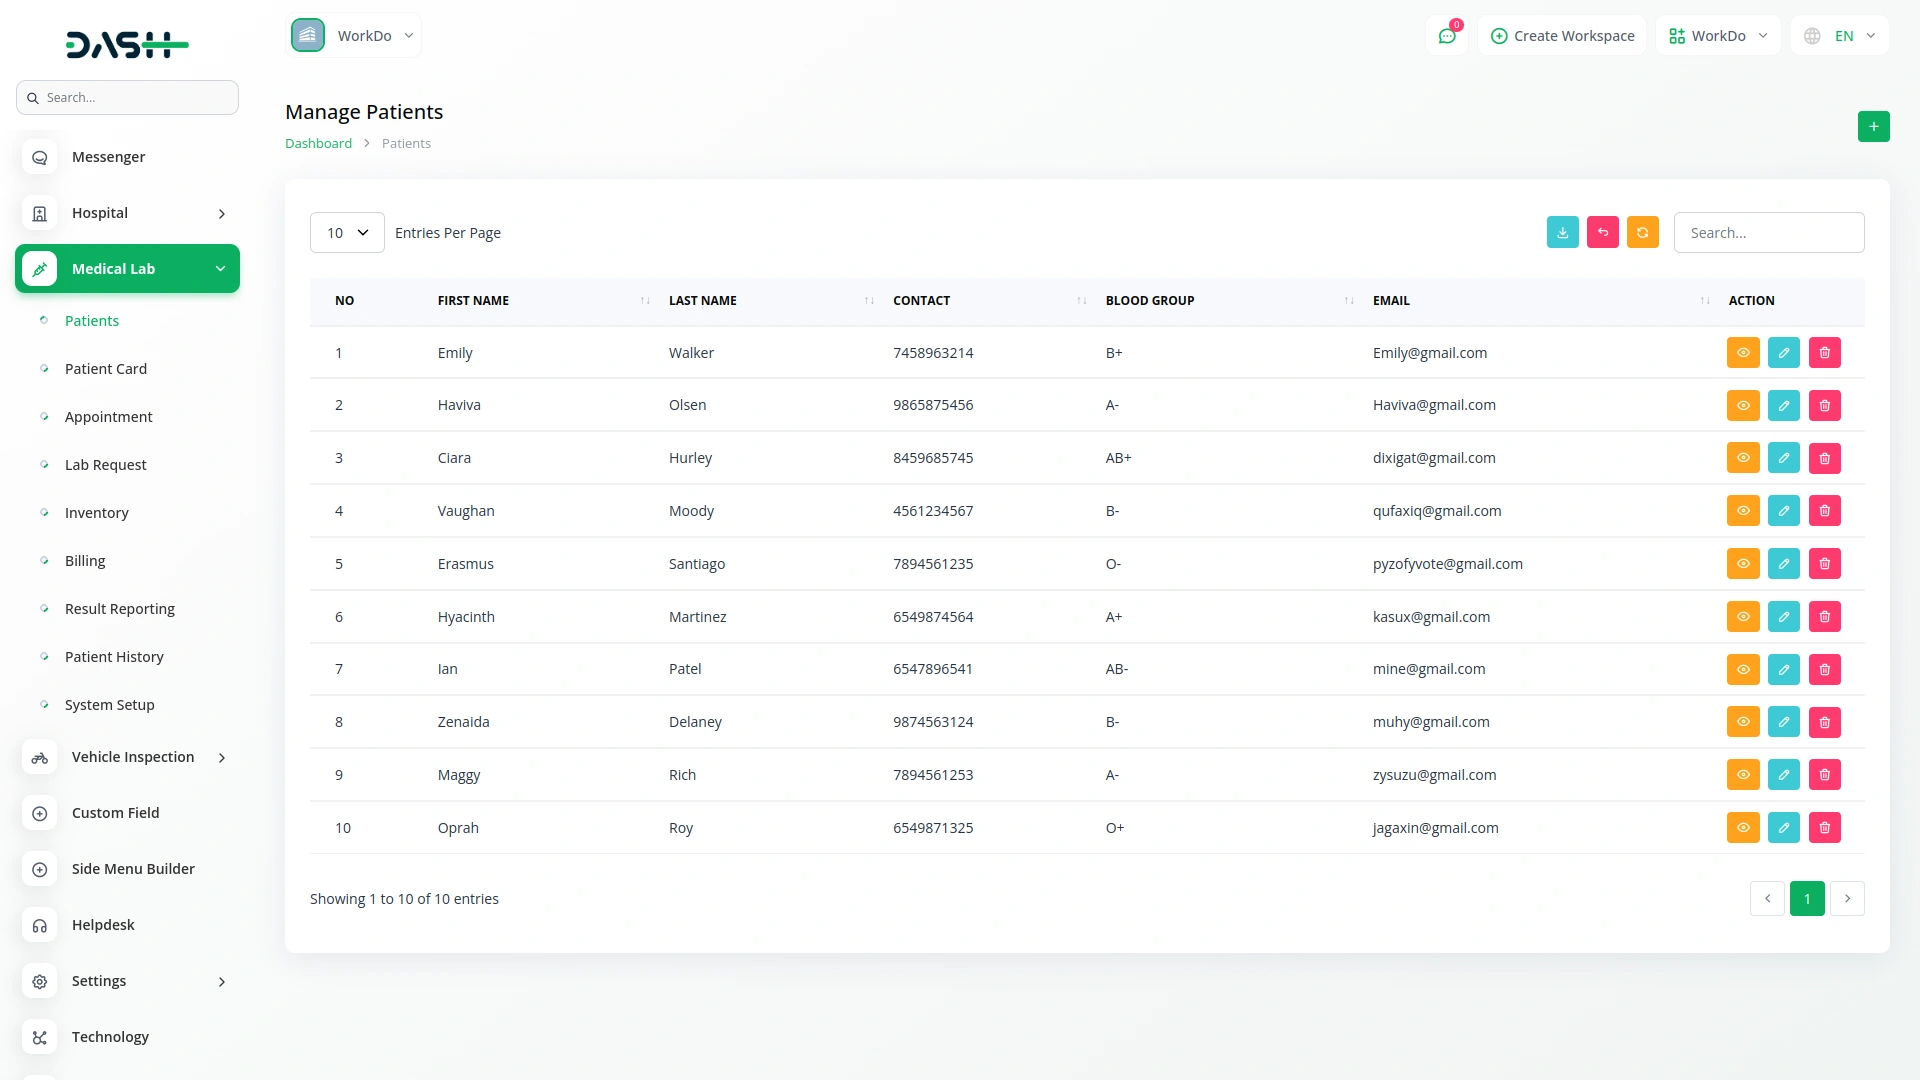
- The list page shows all patients with Search button, and Export button. Table columns include No, First Name, Last Name, Contact, Blood Group, and Email.
- Actions include View button which shows complete patient details, Edit Button to modify patient information, and Delete Button to remove patient records.
Manage Patient Card
- To create a new patient card, click the “Create” button on the patient card page. Select the Patient from the dropdown (Comes from registered Patients), enter Issue Date, Expiry Date, and Add Notes.
- Once all information is completed, click “Submit” to create the patient card.
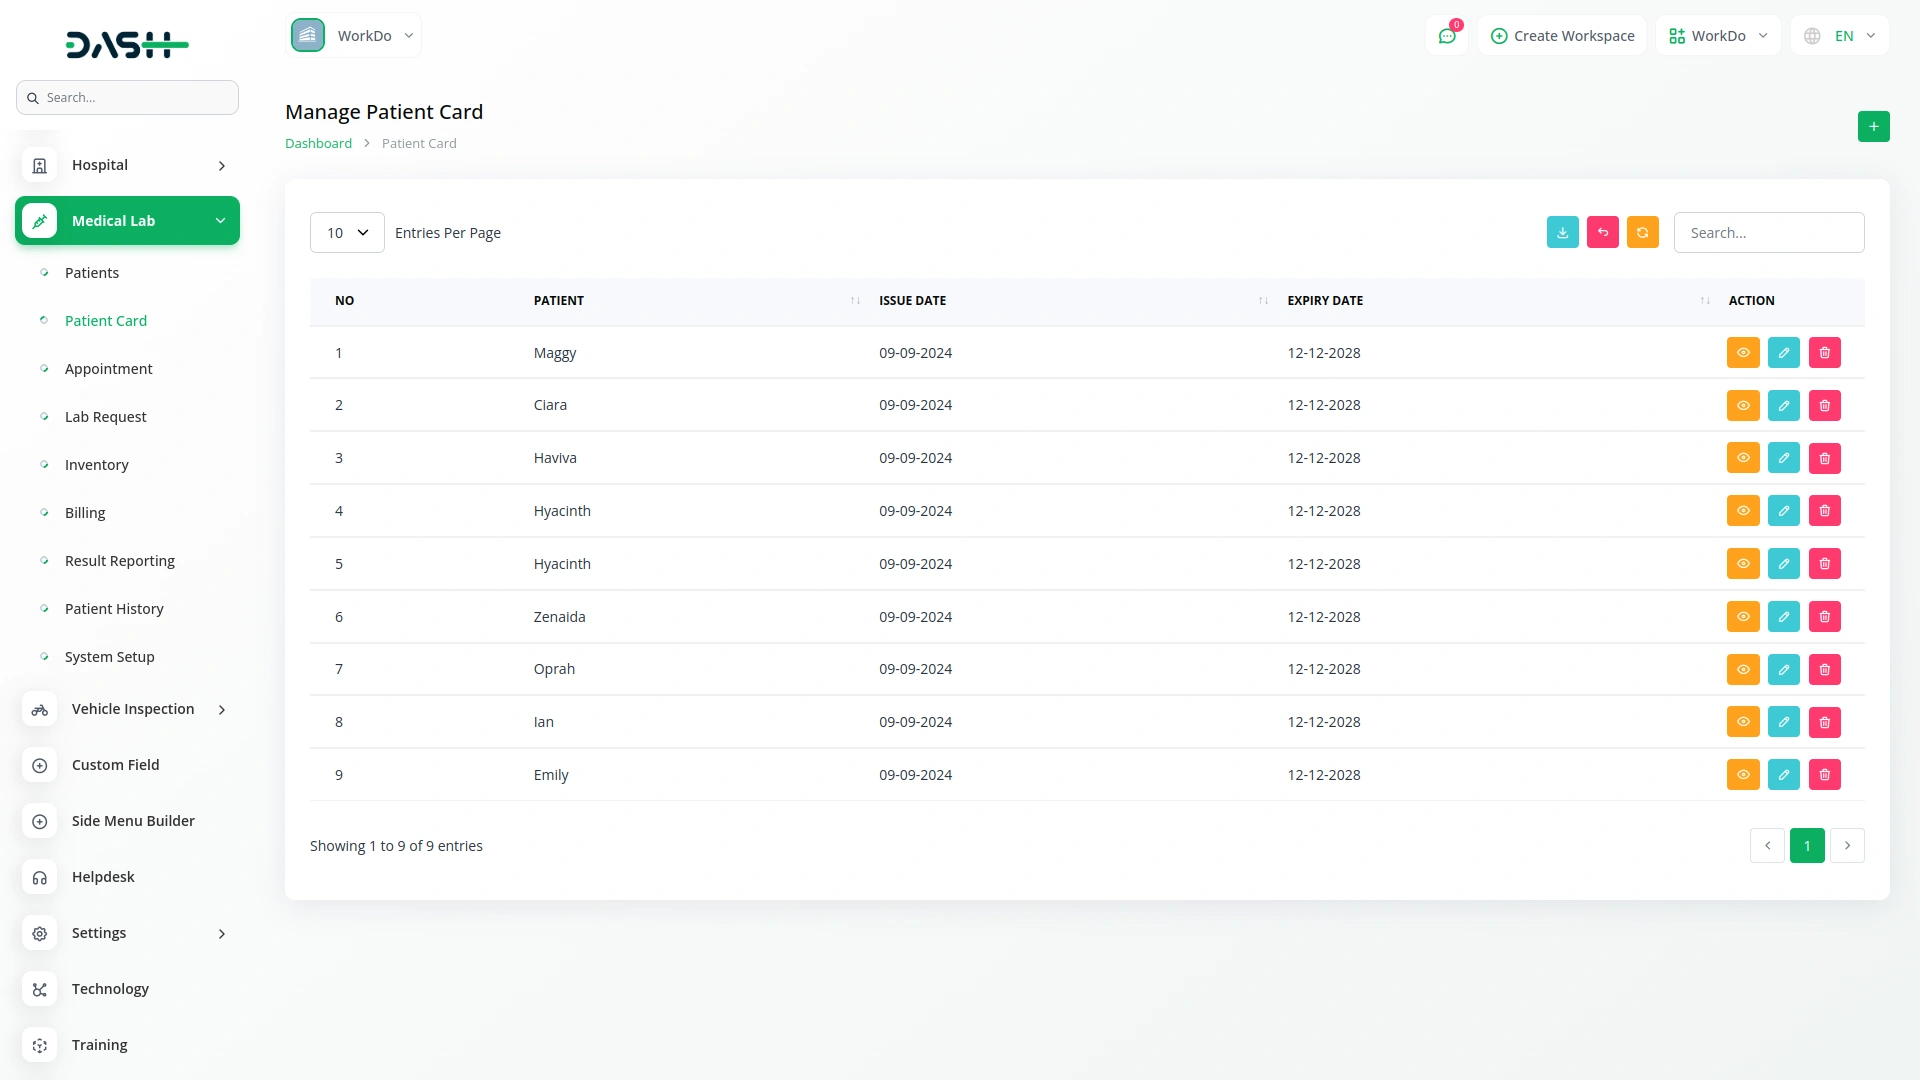
- The list page shows all patient cards with Search button, and Export button. Table columns include No, Patient, Issue Date, and Expiry Date.
- Actions include View button which shows complete Patient Card Details, Edit Button to modify card information, and Delete Button to remove Patient Card records.
Manage Appointment
- To schedule a new appointment, click the “Create” button on the appointments page. Select Patient from dropdown (Comes from registered Patients), choose Date, Time, and select Purpose/Type from dropdown (Comes from System Setup Lab Test).
- The Doctor field will be displayed only if the Hospital Management Add-On is enabled or purchased.
- After filling in all required details, click “Submit” to schedule the appointment.
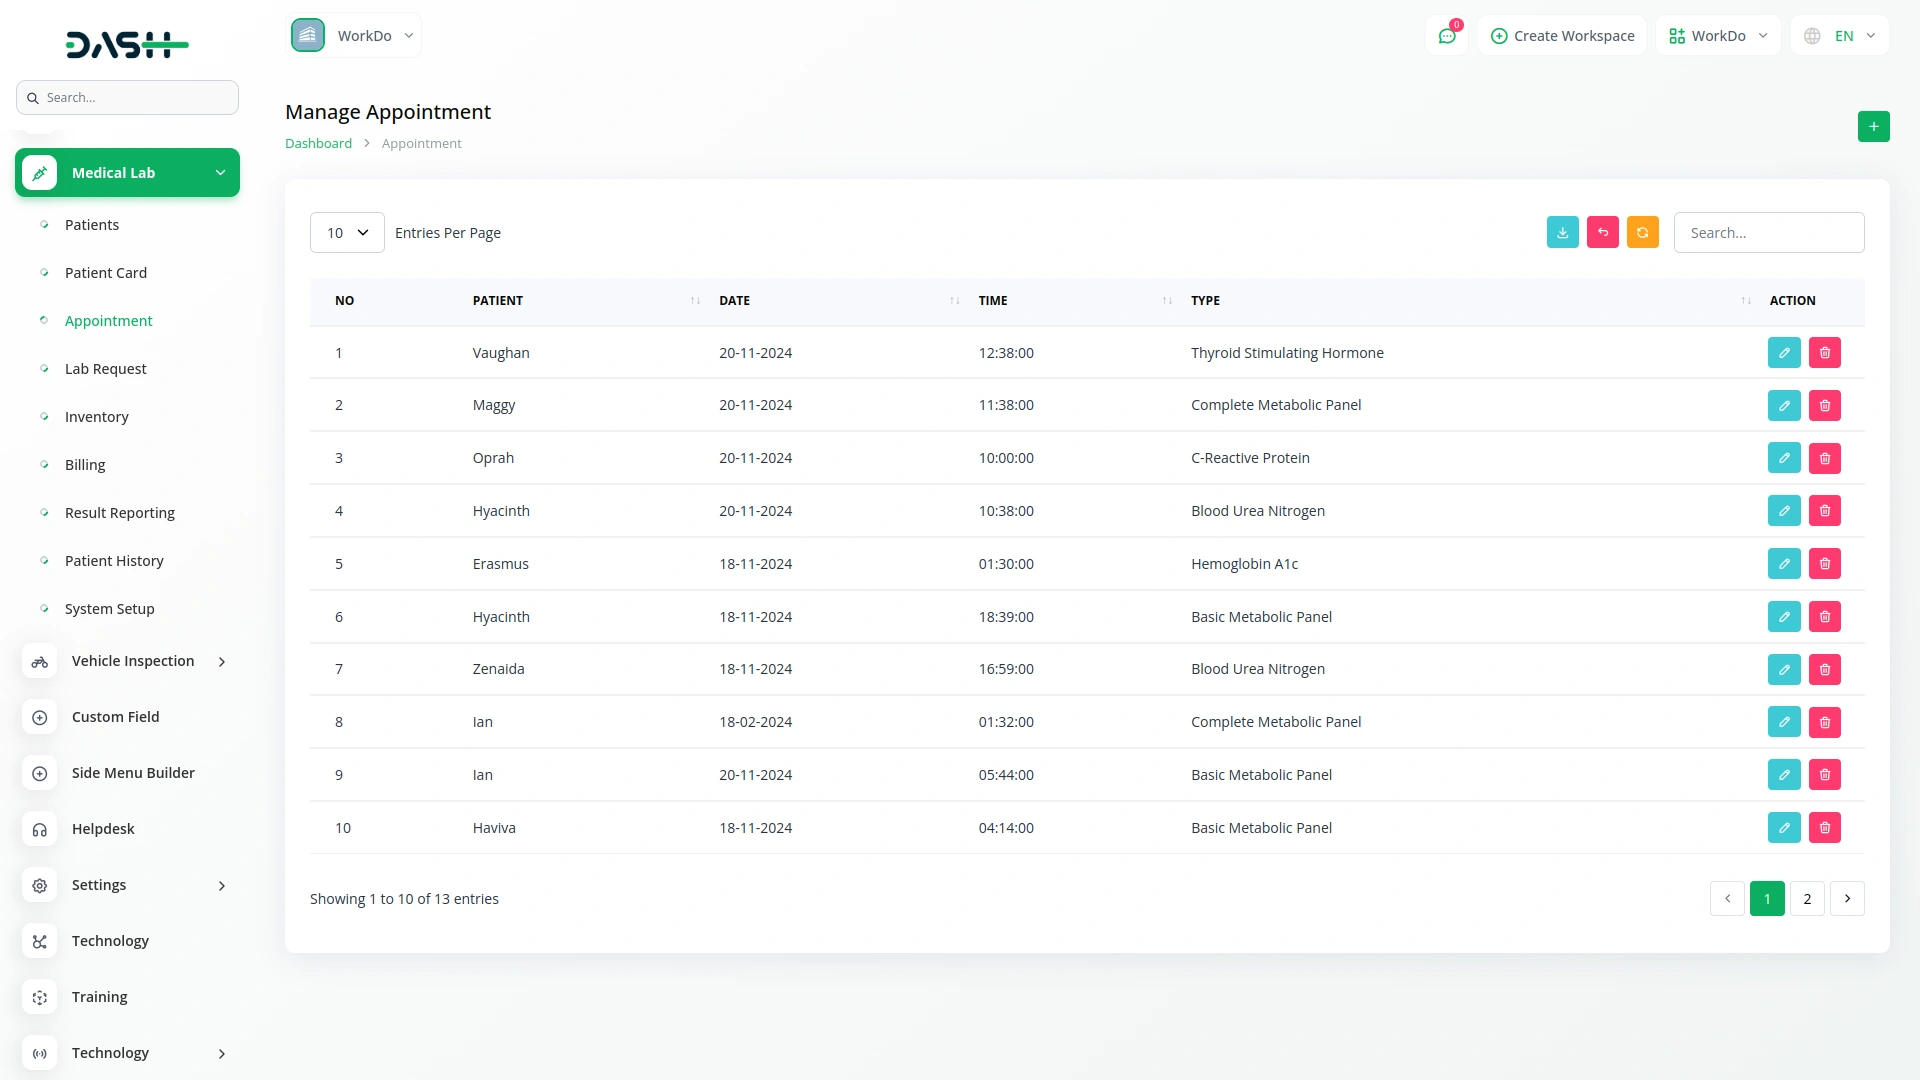
- The list page shows all Appointments with Search button, and Export button.
- Table columns include No, Patient, Date, Time, and Type. Actions include the Edit button to modify appointment details and Delete button to cancel appointments.
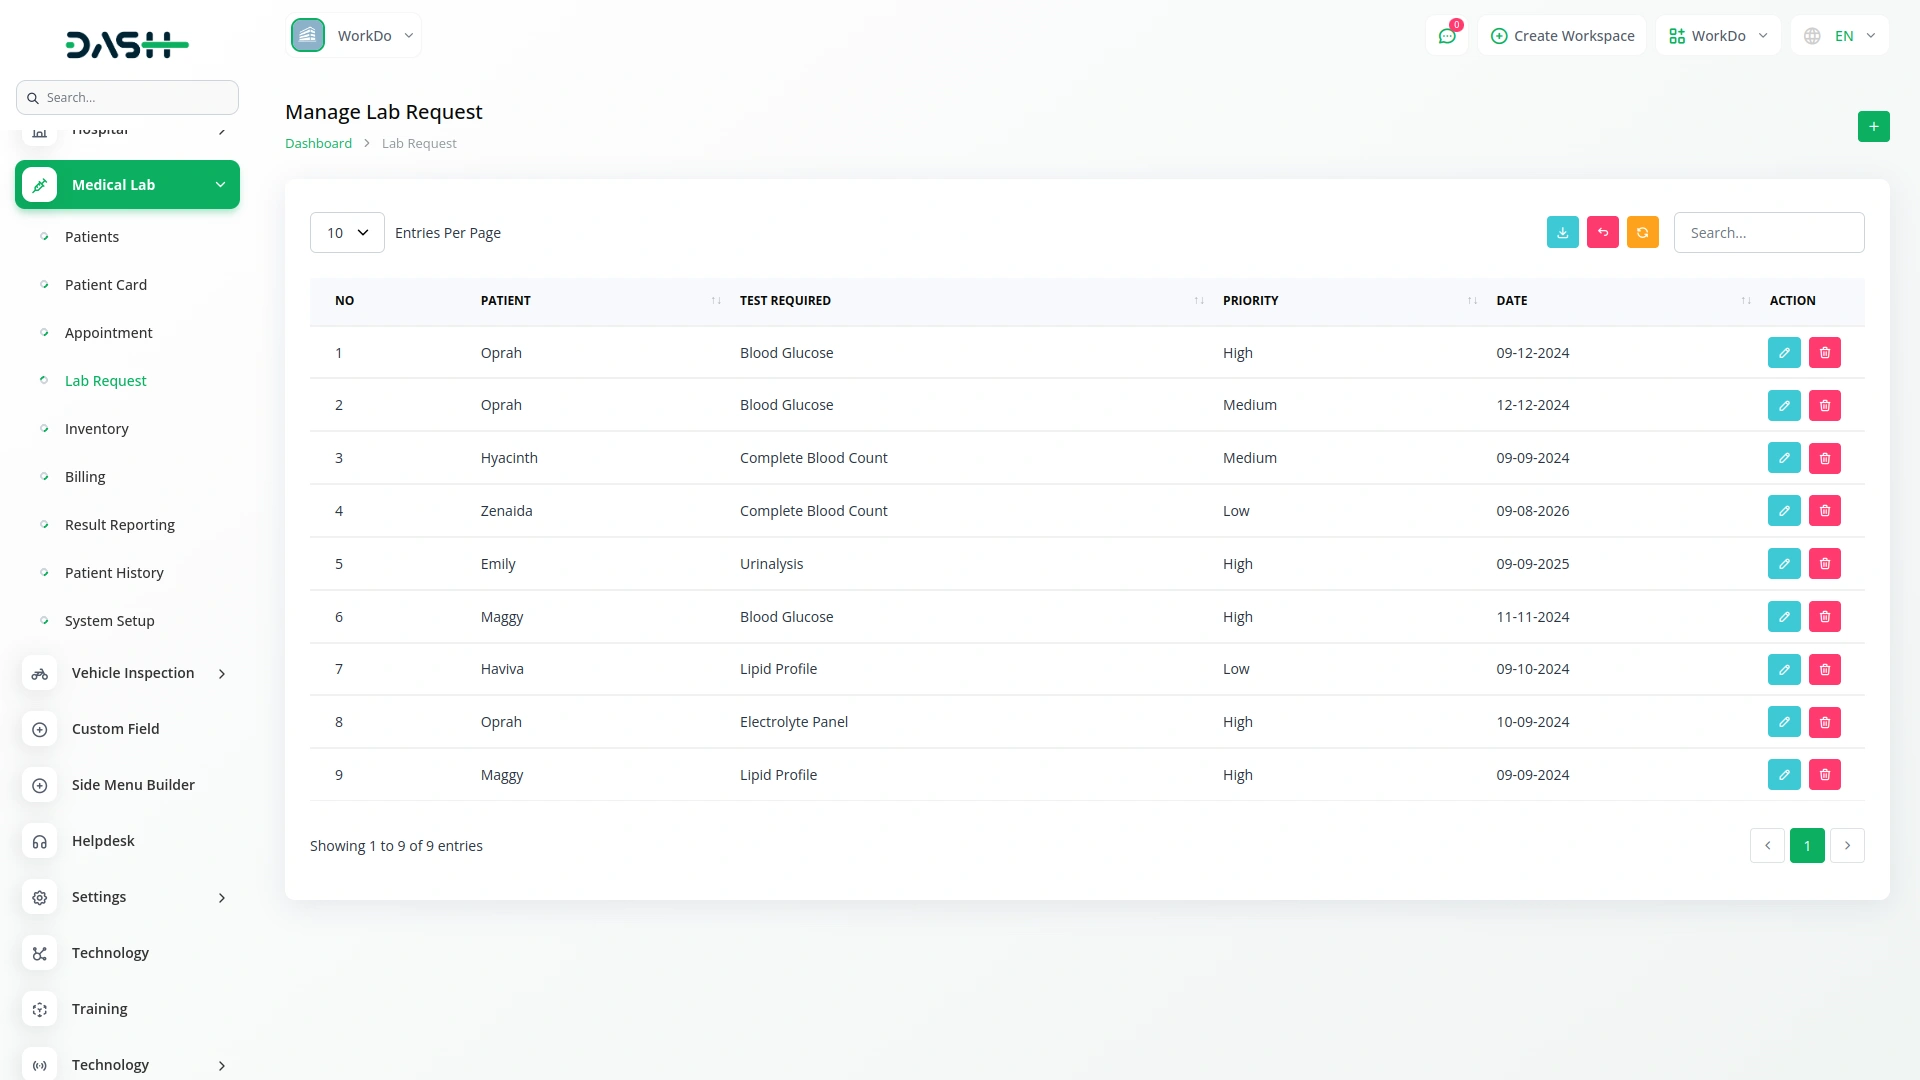
Manage Lab Request
- To create a new lab request, click the “Create” button on the lab request page. Select Patient from dropdown (Comes from registered Patients), choose test required from dropdown (Comes from System Setup Test Content), set priority level (Low, Medium, High), and enter Date.
- The Doctor field will be displayed only if the Hospital Management Add-On is enabled or purchased.
- Once all information is entered, click “Submit” to create the Lab request.
- The list page shows all lab requests with Search button, and Export button. Table columns include No, Patient, Test Required, Priority, and Date.
- Actions include Edit button to modify request details and Delete button to remove lab requests.
Manage Inventory
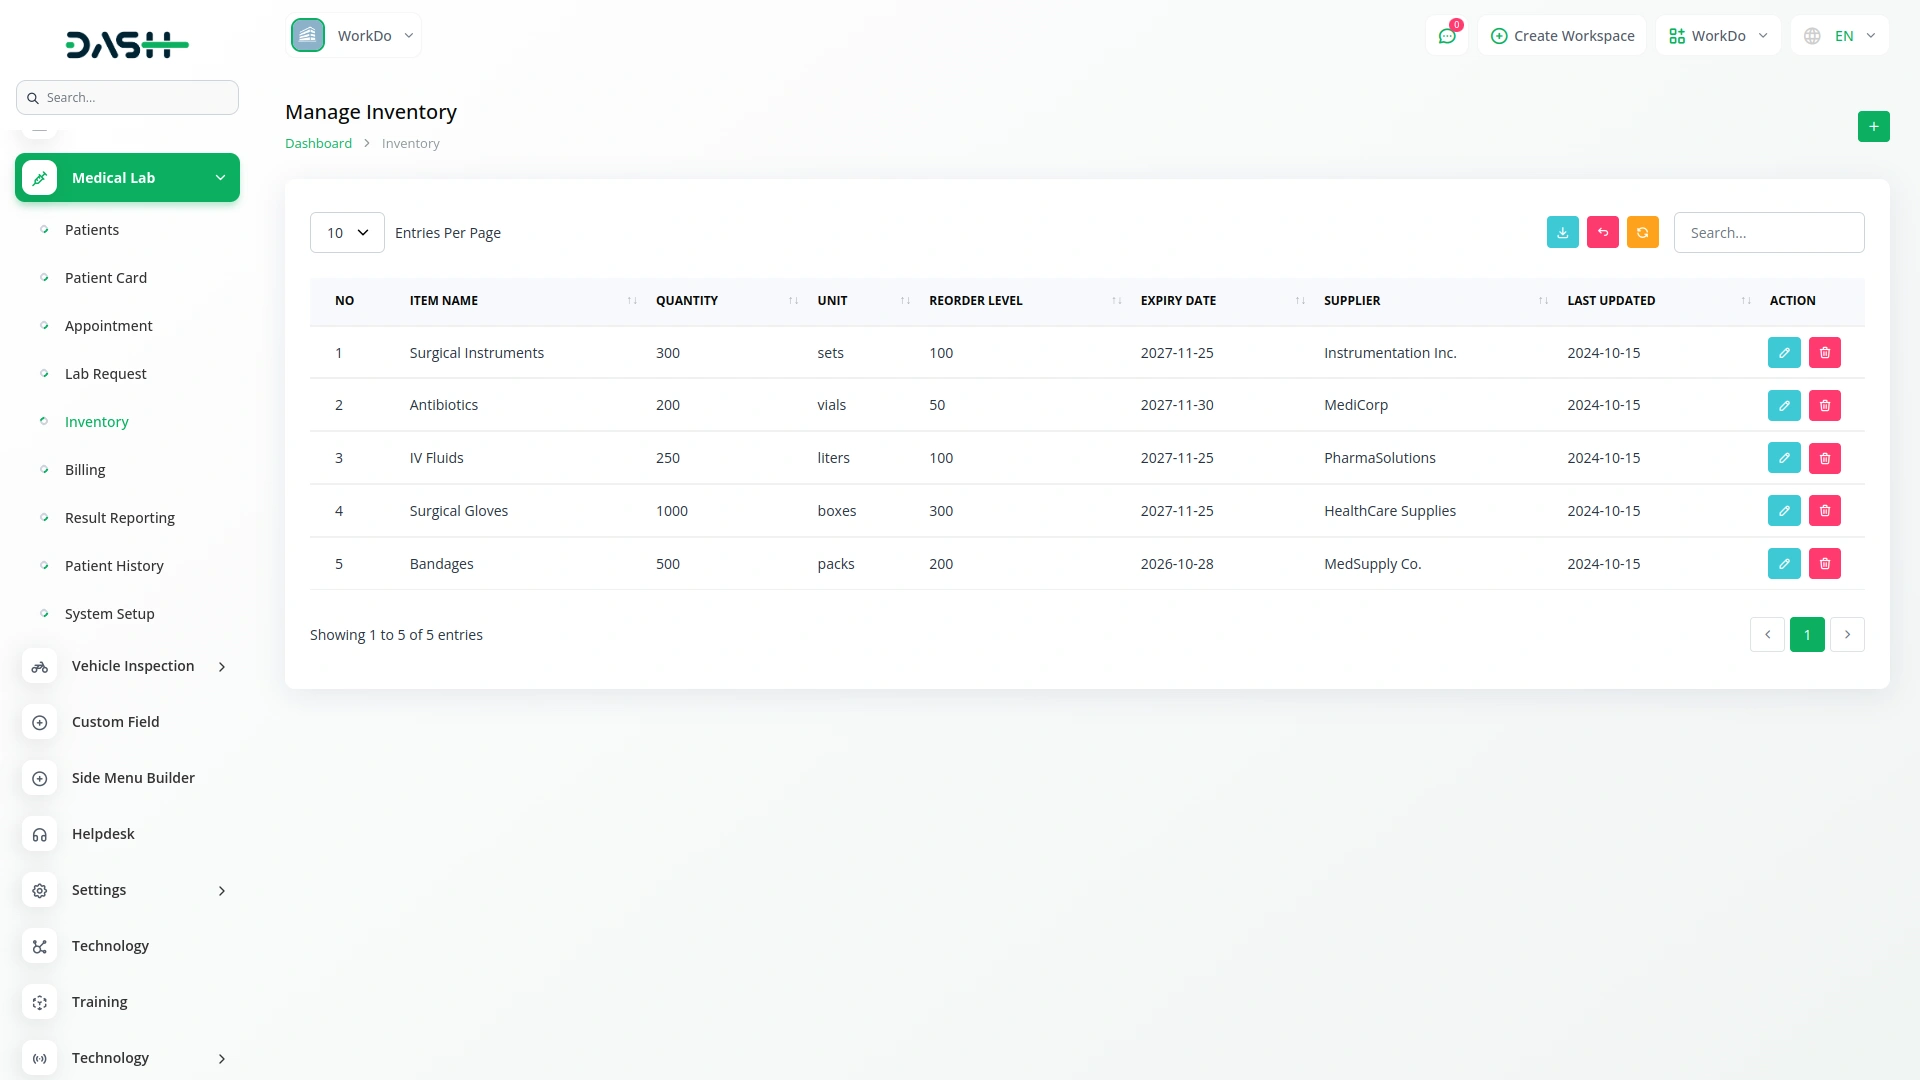
- To add a new inventory item, click the “Create” button at the top of the inventory page. Fill out the Inventory form by entering Item Name, Quantity, Unit, Reorder Level, Expiry Date, Supplier, and Last Updated Date.
- After entering all required information, click “Submit” to create the Inventory record.
- The list page shows all Inventory Items with Search button, and Export button.Table columns include No, Item Name, Quantity, Unit, Reorder Level, Expiry Date, Supplier, and Last Updated.
- Actions include Edit button to modify inventory information and Delete button to remove Inventory records.
Manage Billing
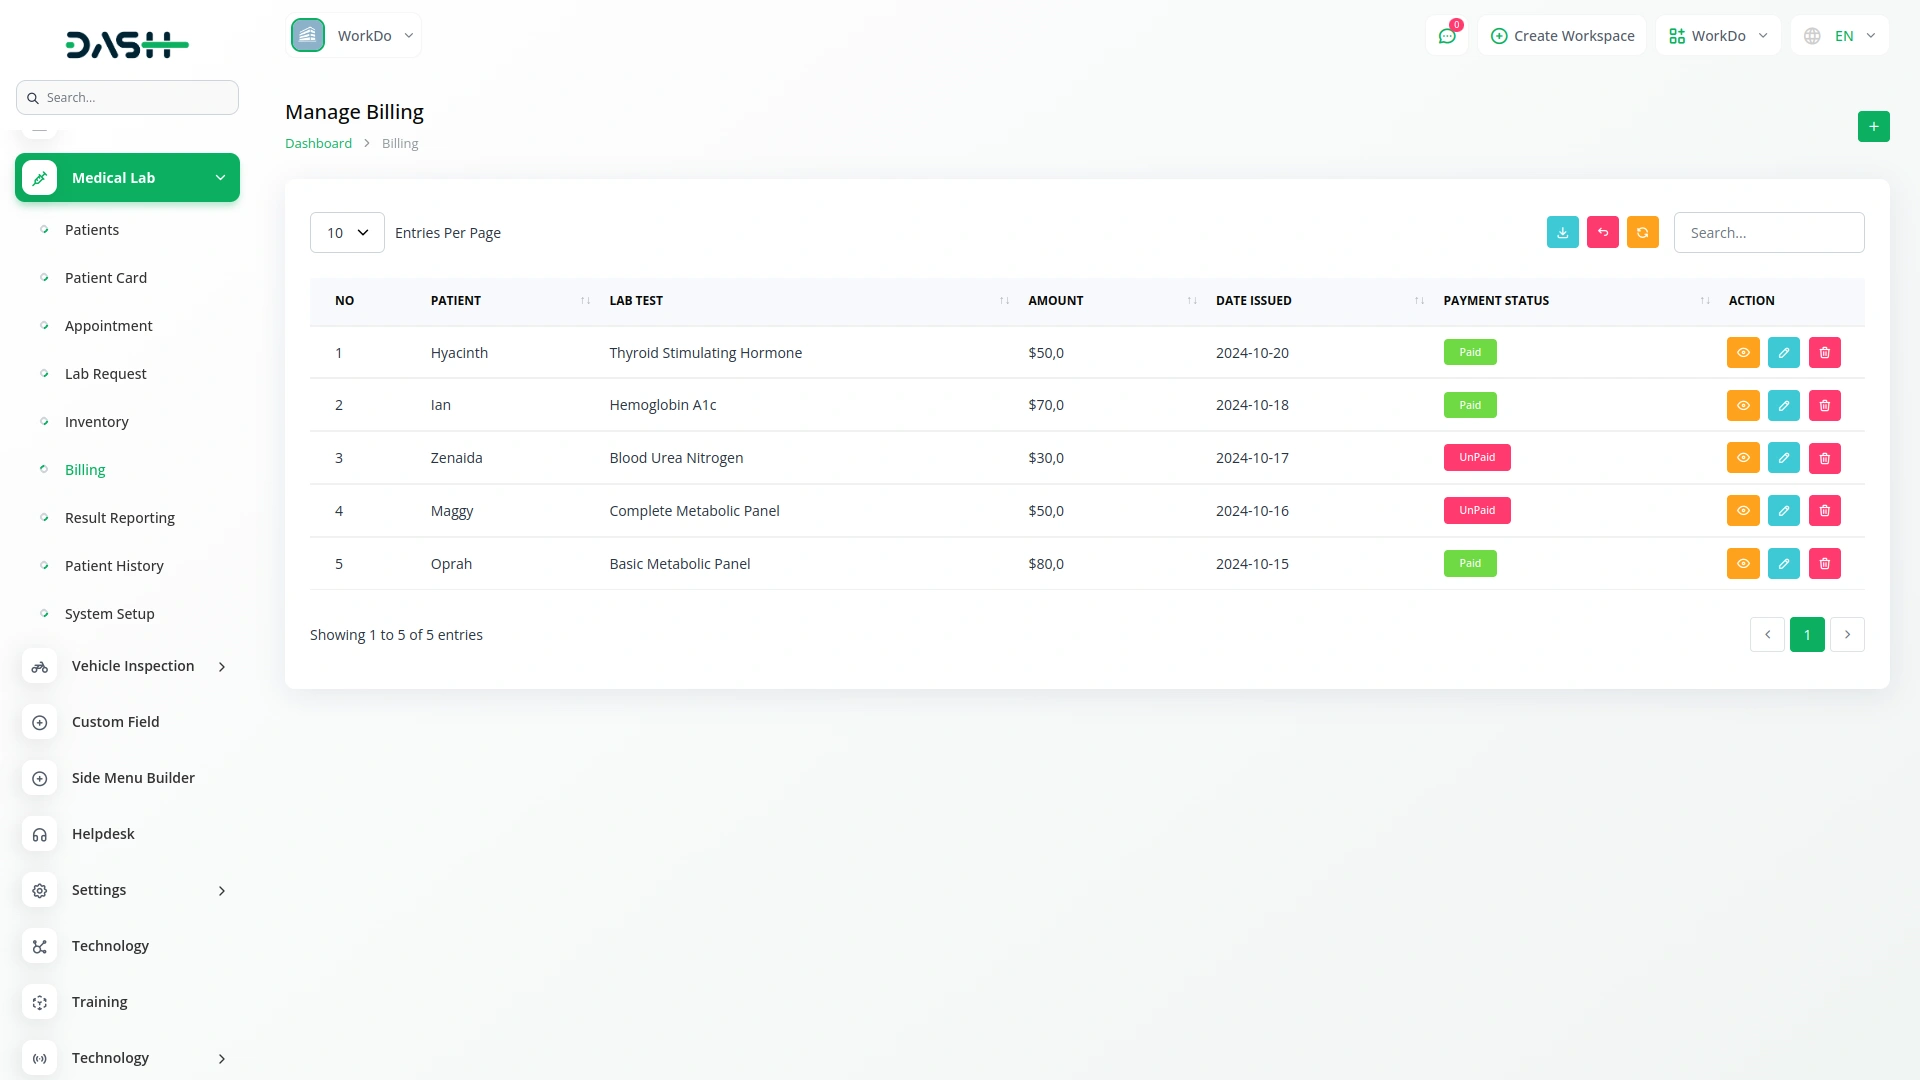
- To create a new bill, click the “Create” button at the top of the Billing page. Select the Patient from dropdown (Comes from registered Patients) and choose Lab Test from dropdown (Comes from System Setup Lab Test).
- The amount will be displayed after selecting both the Patient and the Lab Test. Enter Date Issued and select payment status (Paid or Unpaid).
- After filling in all required details, click “Submit” to create the billing record.
- The list page shows all Bills with Search button, and Export button.. Table columns include No, Patient, Lab Test, Amount, Date Issued, and Payment Status.
- Actions include View button which shows Billing details and allows downloading Billing, Edit button to modify billing information, and Delete button to remove Billing records. .
Manage Result Reporting
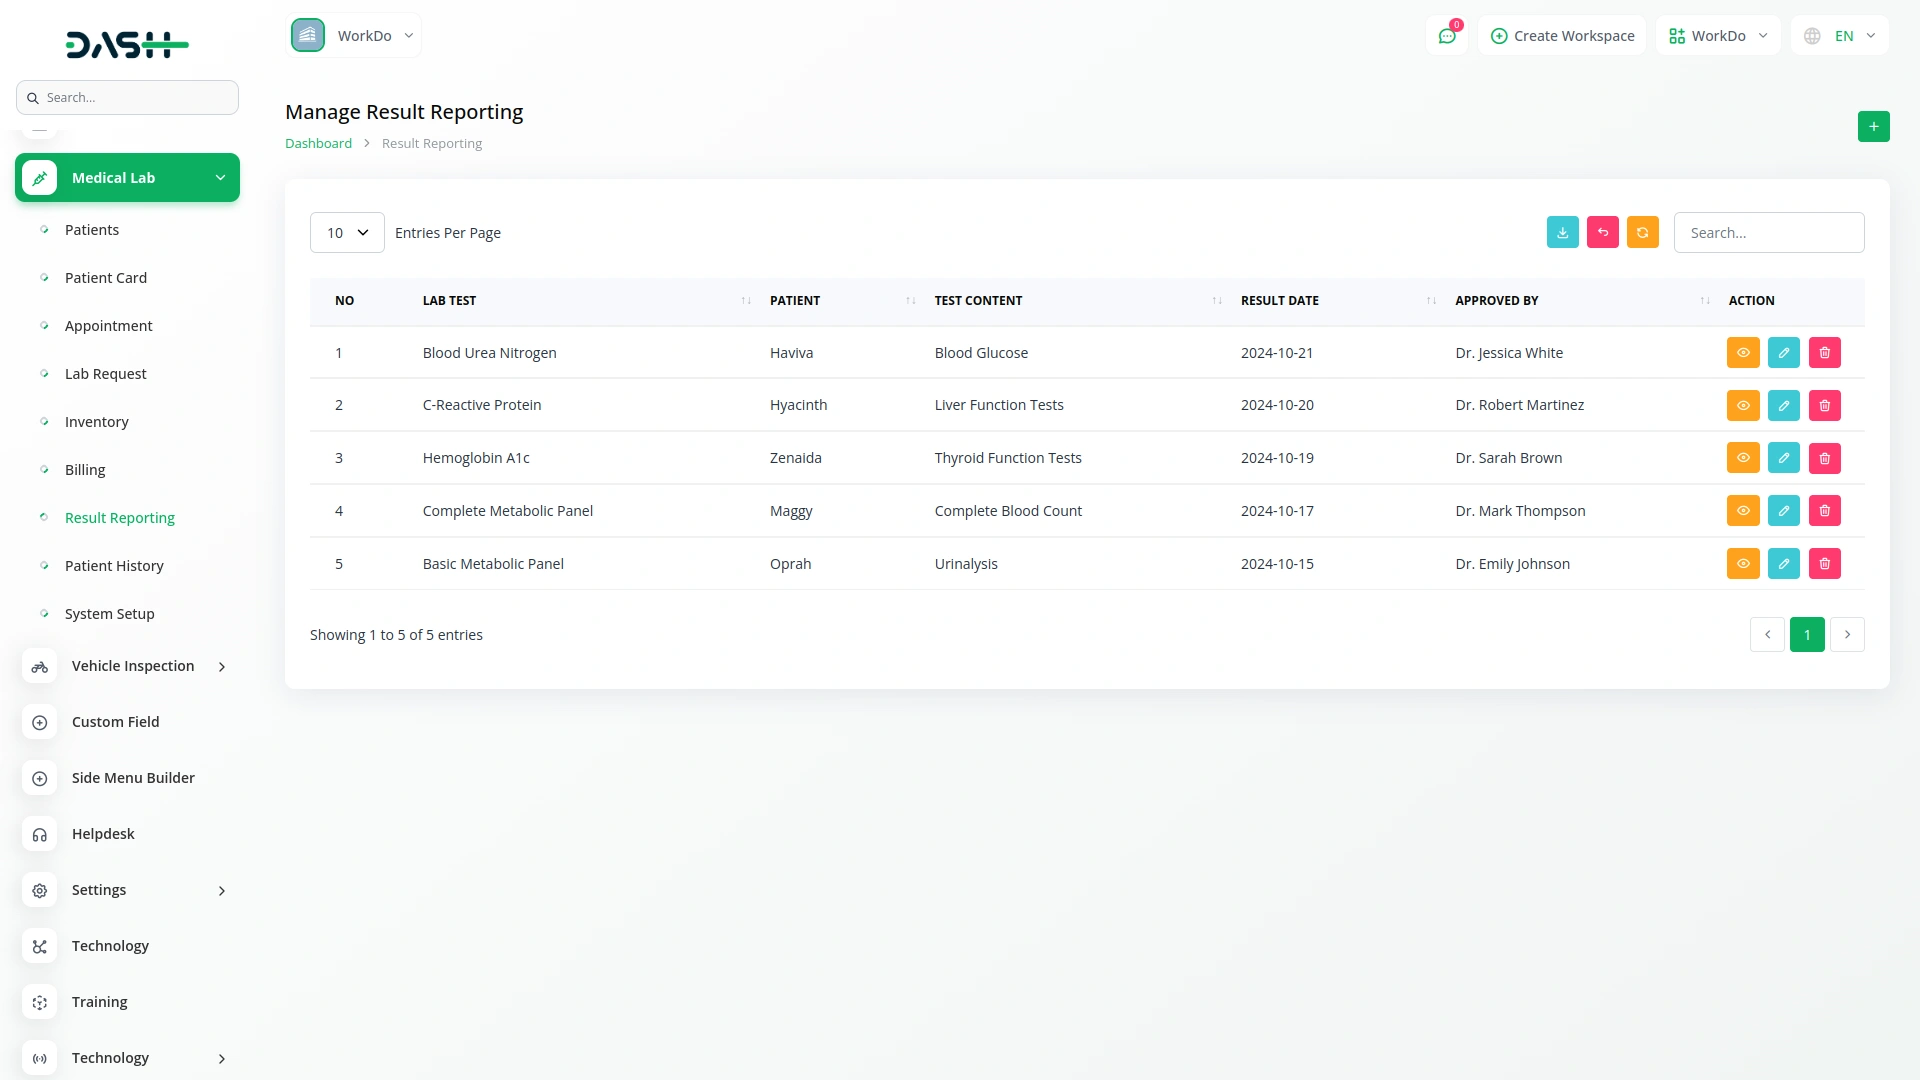
- To create a new result report, click the “Create” button at the top of the result reporting page. Select Lab Test from dropdown (Comes from System Setup Lab Test), choose Patient from dropdown (Comes from registered Patients), and select Test Content from dropdown (Comes from System Setup Test Content).
- Enter Result Value, Result Unit, Result Date, select approved by from dropdown (Only users who have been assigned the Doctor role will appear in the Approved By dropdown list), and Add Comments.
- After entering all required information, click “Submit” to create the Result Report.
- The list page shows all Result Reports with Search button, and Export button. Table columns include No, Leb Test, Patient, Test Content, Result Date, and Approved By.
- Actions include View button which shows Result Reporting Details, Edit button to modify result information, and Delete button to remove Result Records.
Manage Patient History
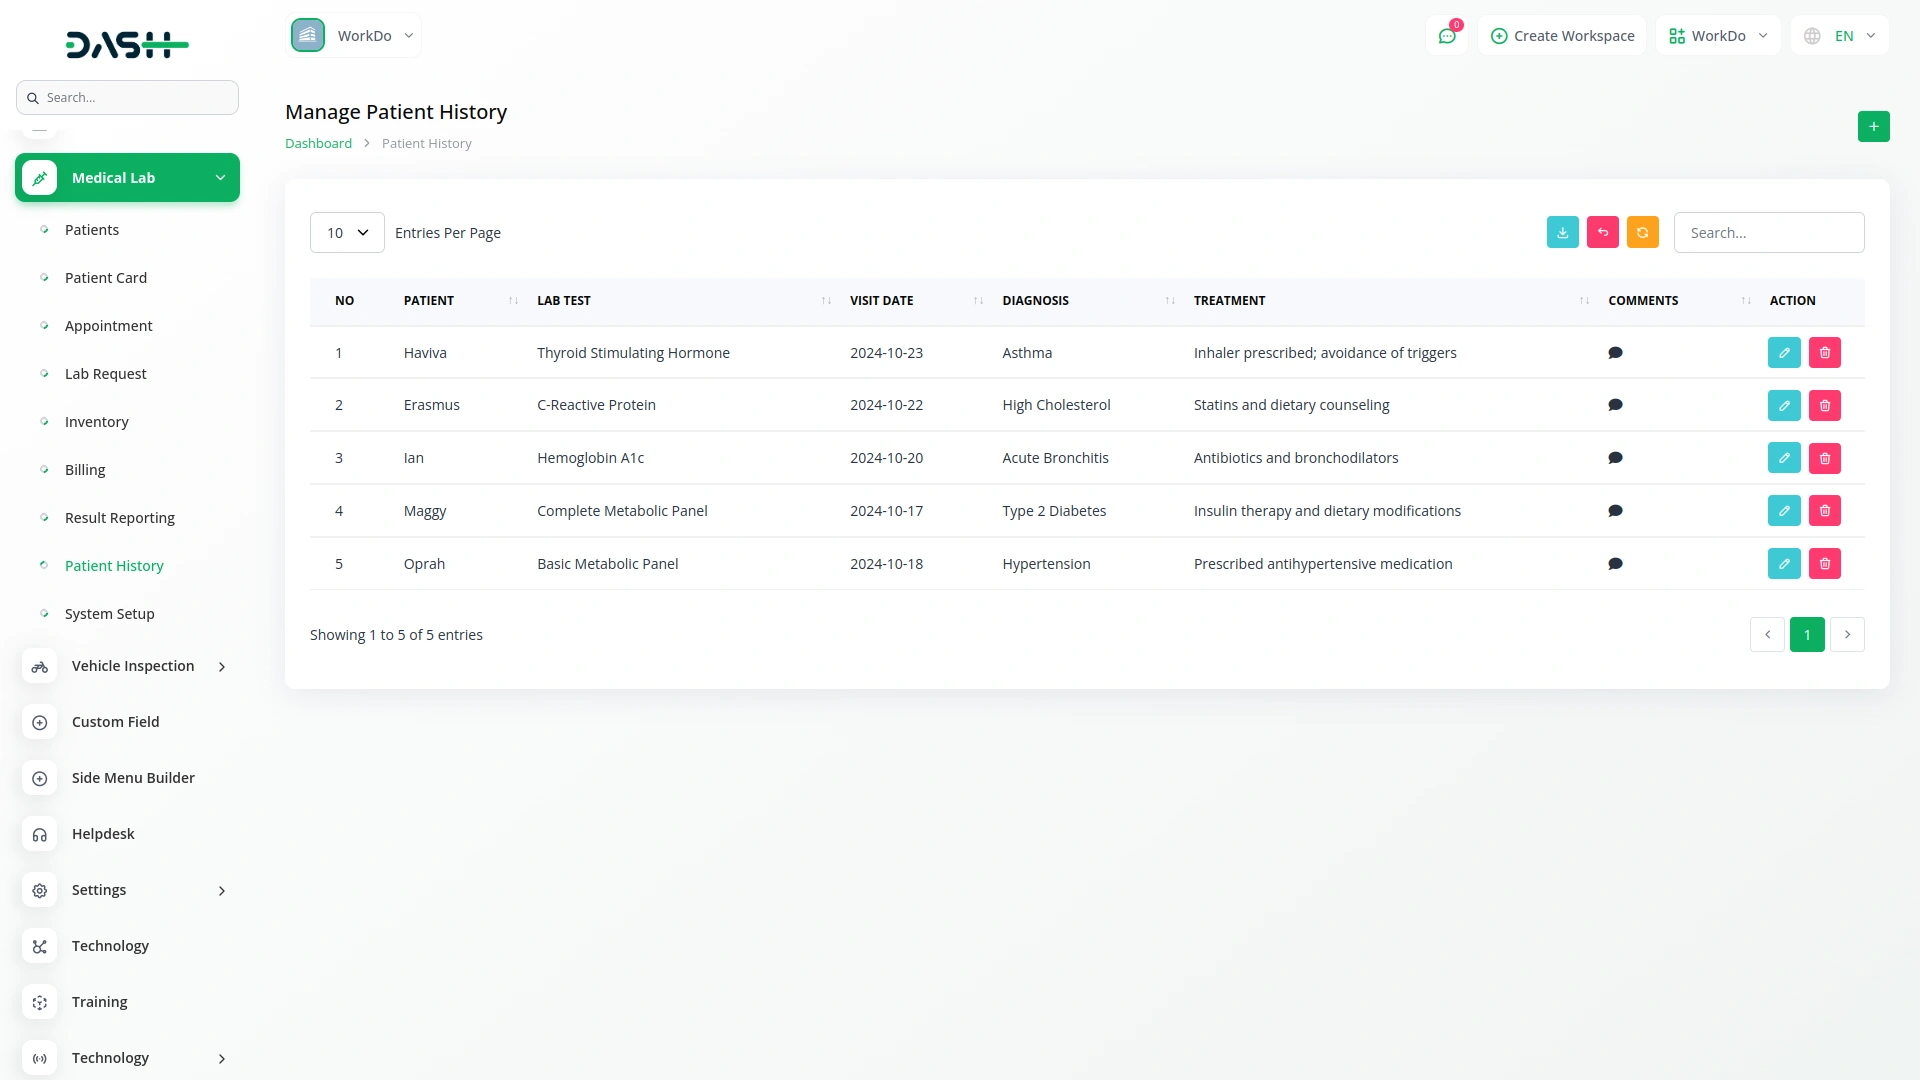
- To add a new Patient history record, click the “Create” button at the top of the Patient history page. Select Patient from dropdown (Comes from registered Patients), choose Lab Test from dropdown (Comes from System Setup Lab Test), enter Visit Date, Diagnosis, Treatment, and Comments.
- After filling in all required details, click “Submit” to create the Patient History Record.
- The list page shows all Patient History Records with Search button, and Export button.
- Table columns include No, Patient, Lab Test, Visit Date, Diagnosis, Treatment, and Comments (when the comments icon is clicked, a popup opens displaying all the related comments).
- Actions include Edit button to modify Patient History Information and Delete button to remove Patient History Records.
System Setup
Manage Test Unit
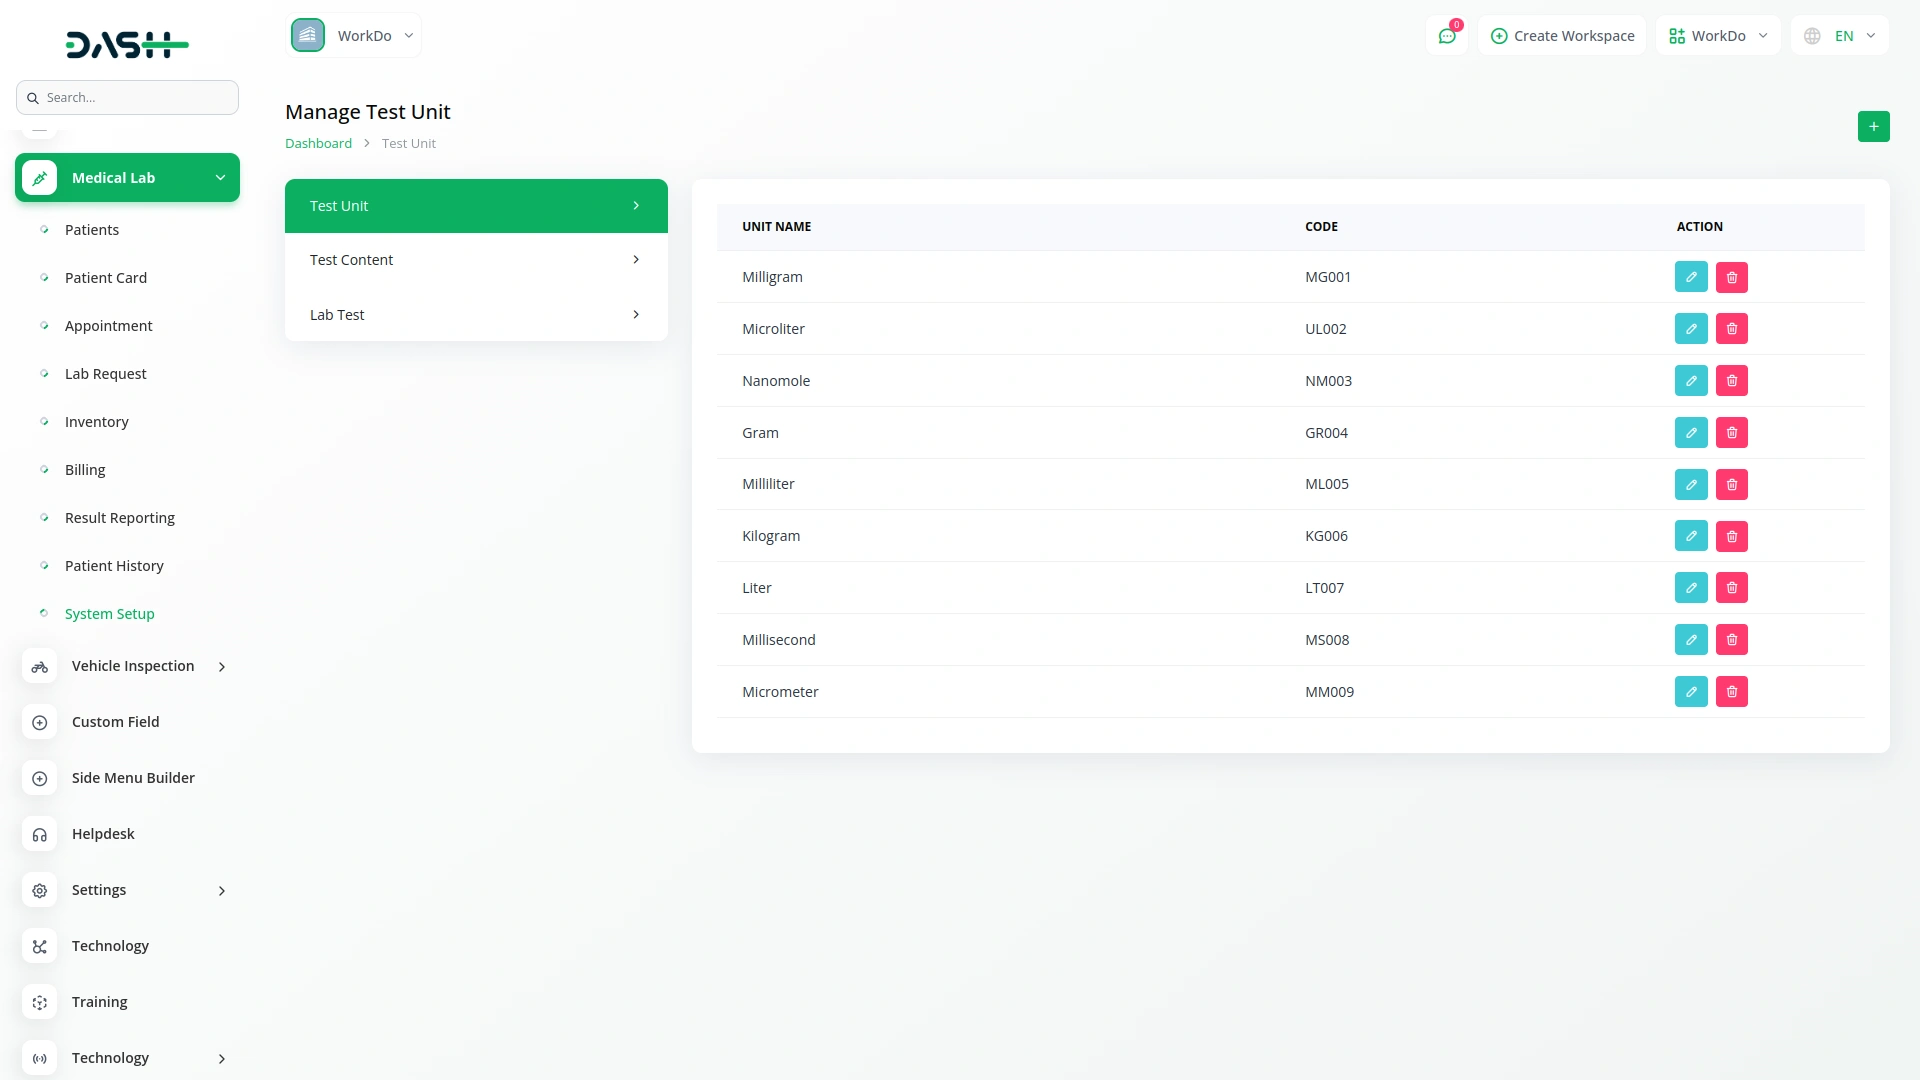
- To add a new Test Unit, click the “Create” button at the top of the Test Unit Page. Fill out the form by entering the Test Unit name and code.
- After entering the required information, click “Submit” to create the test unit.
- The list page shows all Test Units with the create button. Table columns include Unit Name and Code.
- Actions include Edit button to modify test unit information and Delete button to remove Test Unit records.
Manage Test Content
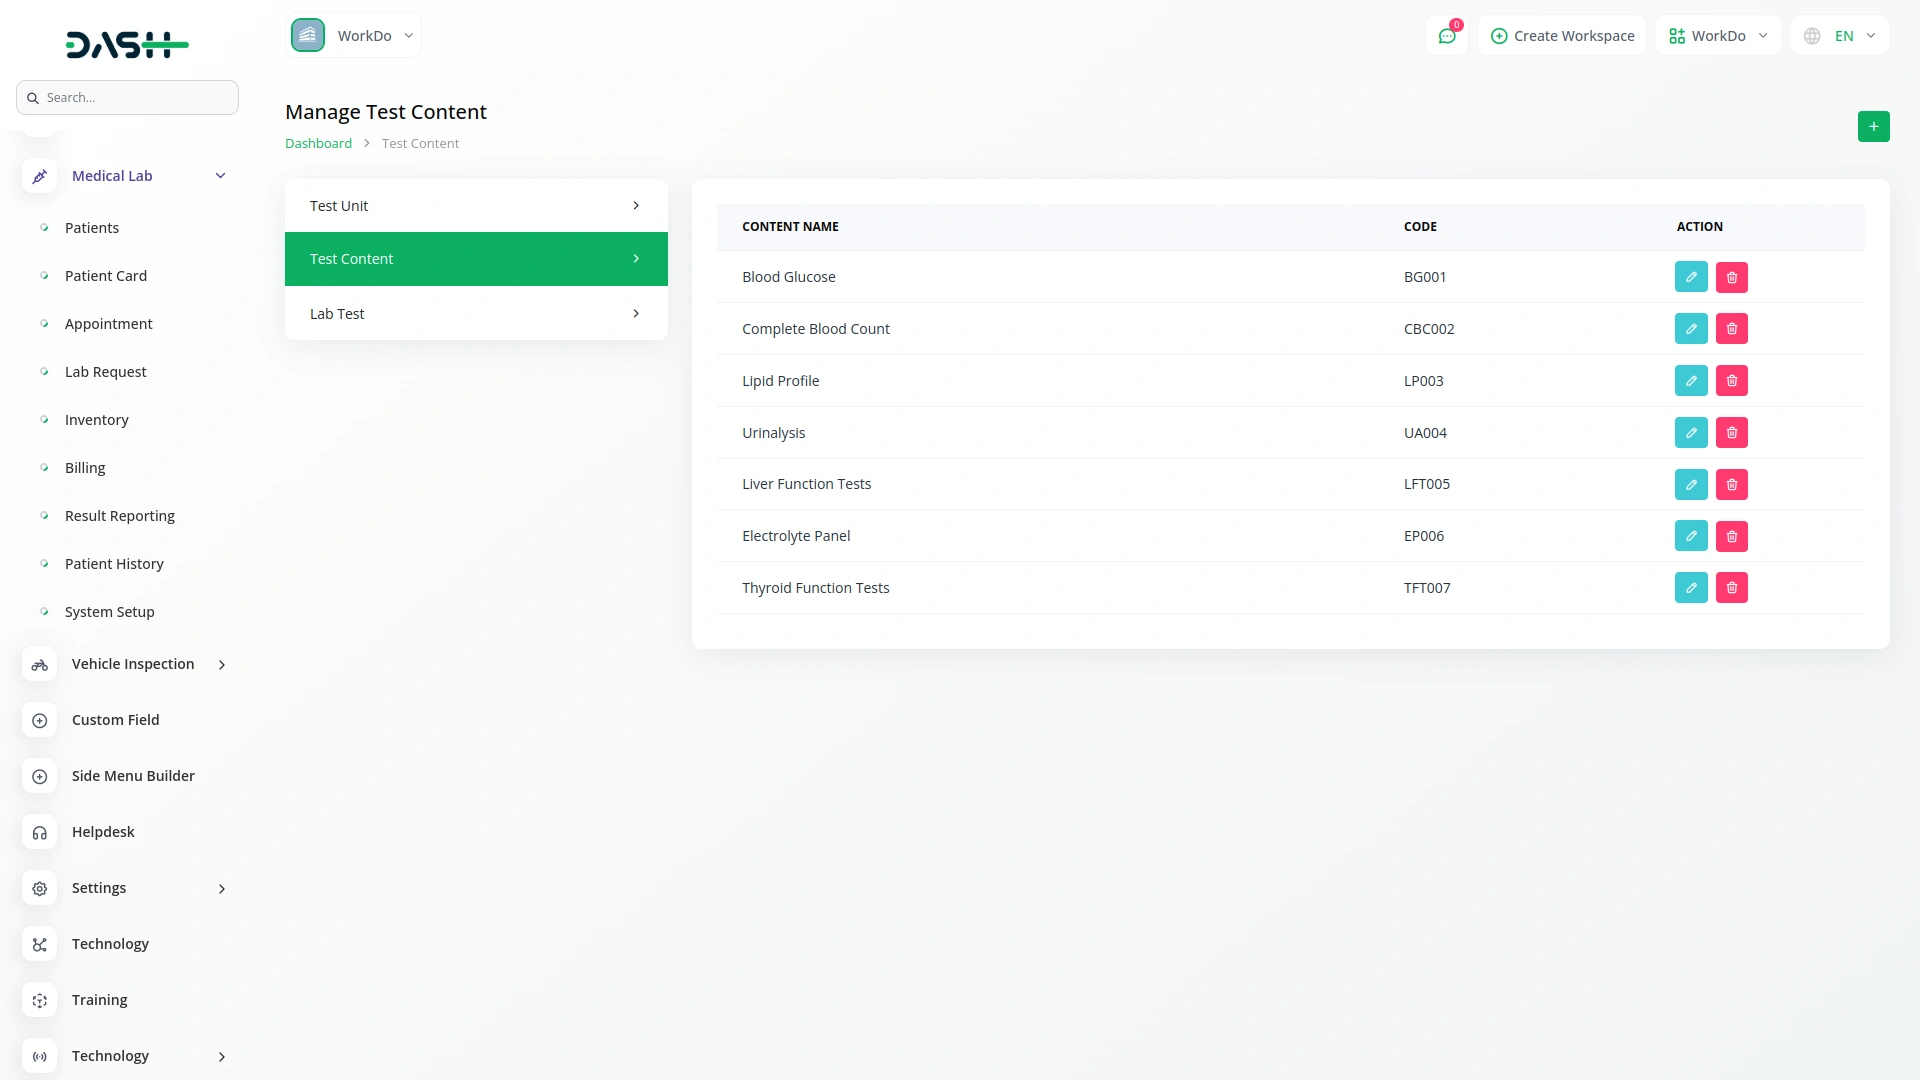
- To add new Test Content, click the “Create” button at the top of the Test Content page. Fill out the form by entering Test Content name and code.
- After entering the required information, click “Submit” to create the Test Content.
- The list page shows all Test Content.
- Table columns include Content Name and Code. Actions include Edit button to modify test content information and Delete button to remove Test Content records.
Manage Lab Test
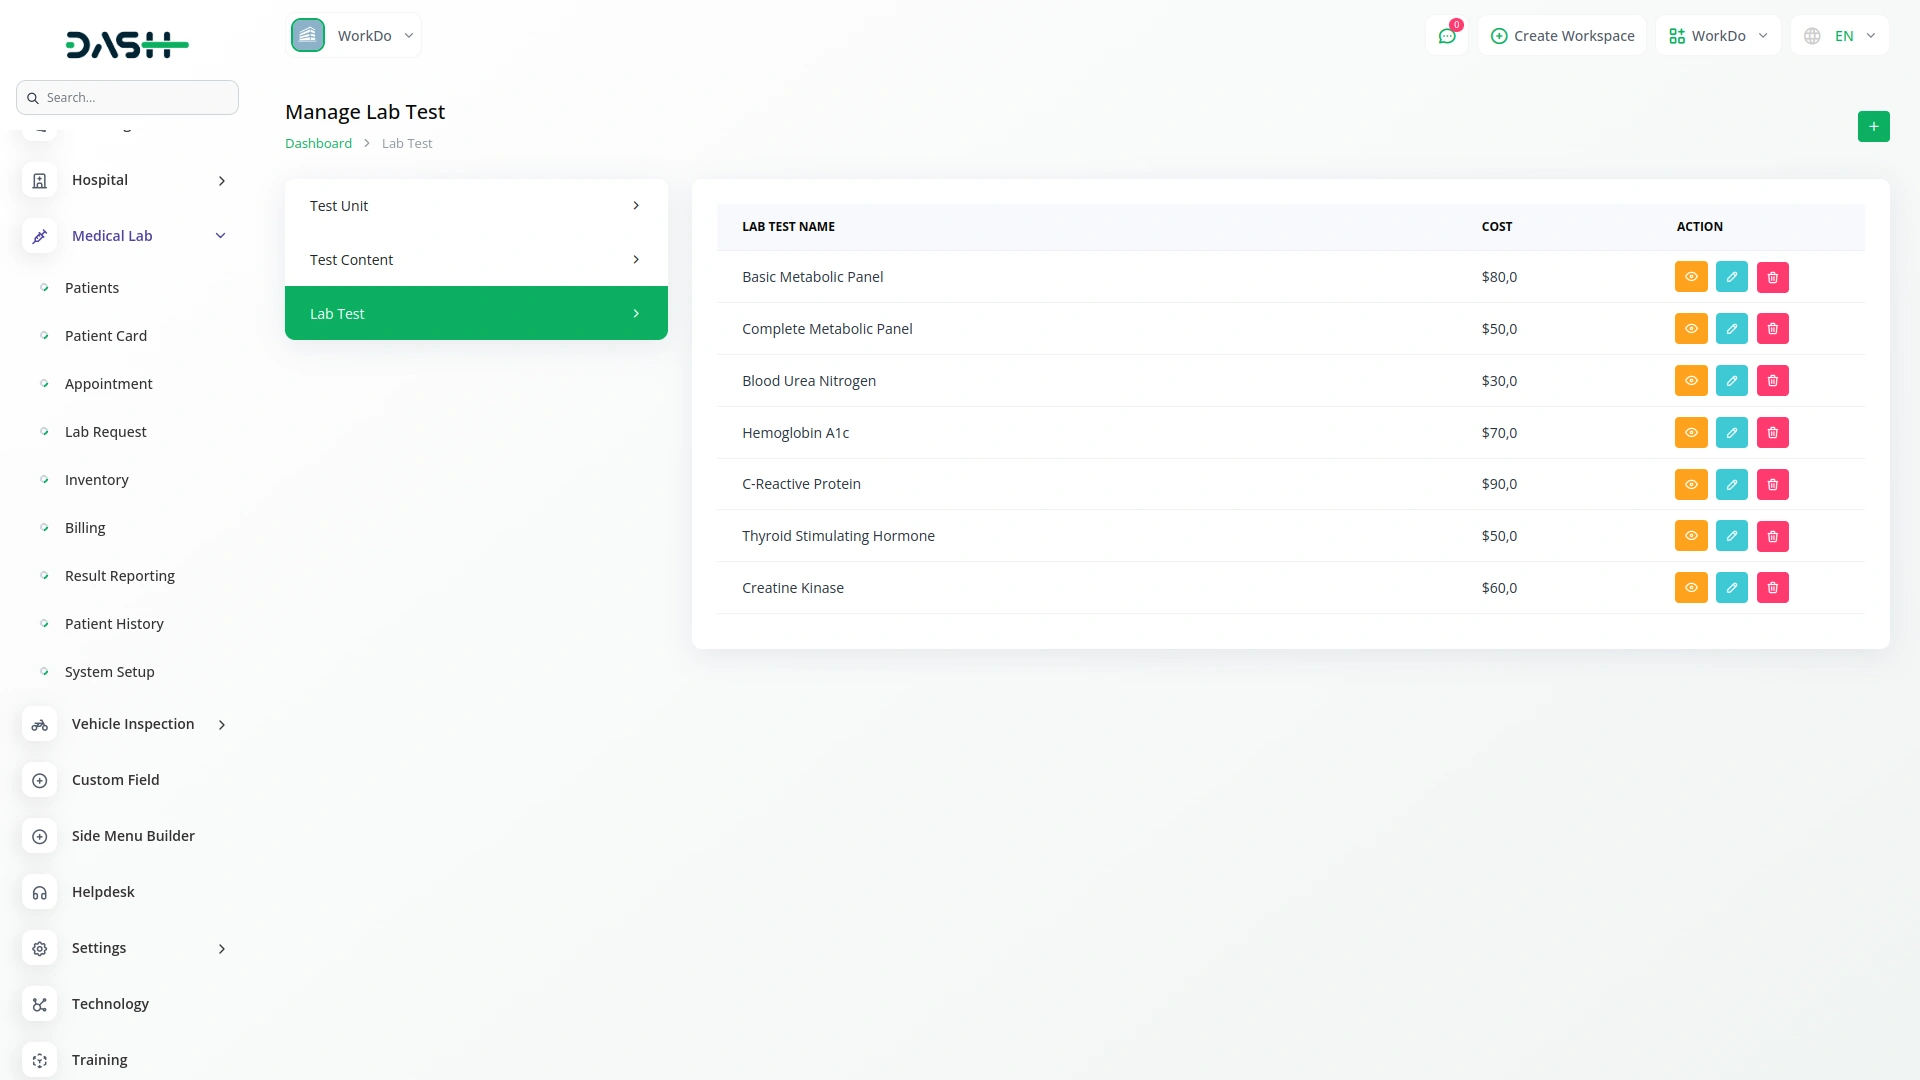
- To add a new Lab Test, click the “Create” button at the top of the Lab Test page. Enter Lab Test name, Cost, then click “Add Item” button to add content from dropdown (Comes from System Setup Test Content) and Unit from dropdown (Comes from System Setup Test Unit).
- After entering all required information, click “Submit” to create the Lab Test.
- The list page shows all Lab Tests with the Create button. Table columns include Lab Test Name and Cost. Actions include View button which shows complete lab test details, Edit button to modify Lab Test Information, and Delete button to remove Lab Test records.
Categories
Related articles
- Team Workload Integration in Dash SaaS
- Sofort Integration in Dash SaaS
- OneNote Integration in Dash SaaS
- Porter’s Five Model Integration in Dash SaaS
- Reminder Module Integration in Dash SaaS
- McKinsey 7-S Model Integration in Dash SaaS
- Internal Knowledge Integration in Dash SaaS
- Asset Borrow And Rent Integration in Dash SaaS
- Contract Template Integration in Dash SaaS
- WhatSender Add-On Integration in Dash SaaS
- e-Invoice Integration in Dash SaaS
- Job Search Detailed Documentation
Reach Out to Us
Have questions or need assistance? We're here to help! Reach out to our team for support, inquiries, or feedback. Your needs are important to us, and we’re ready to assist you!


Need more help?
If you’re still uncertain or need professional guidance, don’t hesitate to contact us. You can contact us via email or submit a ticket with a description of your issue. Our team of experts is always available to help you with any questions. Rest assured that we’ll respond to your inquiry promptly.
Love what you see?
Do you like the quality of our products, themes, and applications, or perhaps the design of our website caught your eye? You can have similarly outstanding designs for your website or apps. Contact us, and we’ll bring your ideas to life.
