Insurance Management Integration in Dash SaaS
The Insurance Management software is a comprehensive platform designed to help insurance companies, agents, and brokers manage their entire insurance operations efficiently.
Introduction
The Insurance Management software is a comprehensive platform designed to help insurance companies, agents, and brokers manage their entire insurance operations efficiently. This system provides complete control over insurance policies, client management, claims processing, risk assessment, regulatory compliance, and financial tracking. The software supports policy creation and management, client and agent coordination, premium calculations, claim processing, invoice generation, risk evaluation, reinsurance agreements, underwriting requests, compliance monitoring, regulatory document management, customer support, marketing campaigns, and fraud detection. Whether you’re managing a small insurance agency or a large insurance corporation, this software provides all the tools needed to streamline operations, track policies and claims, manage client relationships, ensure regulatory compliance, assess risks, process payments, and maintain detailed records of all insurance activities while providing comprehensive reporting and analytics capabilities.
How to Install the Add-On?
To Set Up the Insurance Management Add-On, you can follow this link Setup Add-On
How To Use the Insurance Management Add-On?
Insurance Management Dashboard
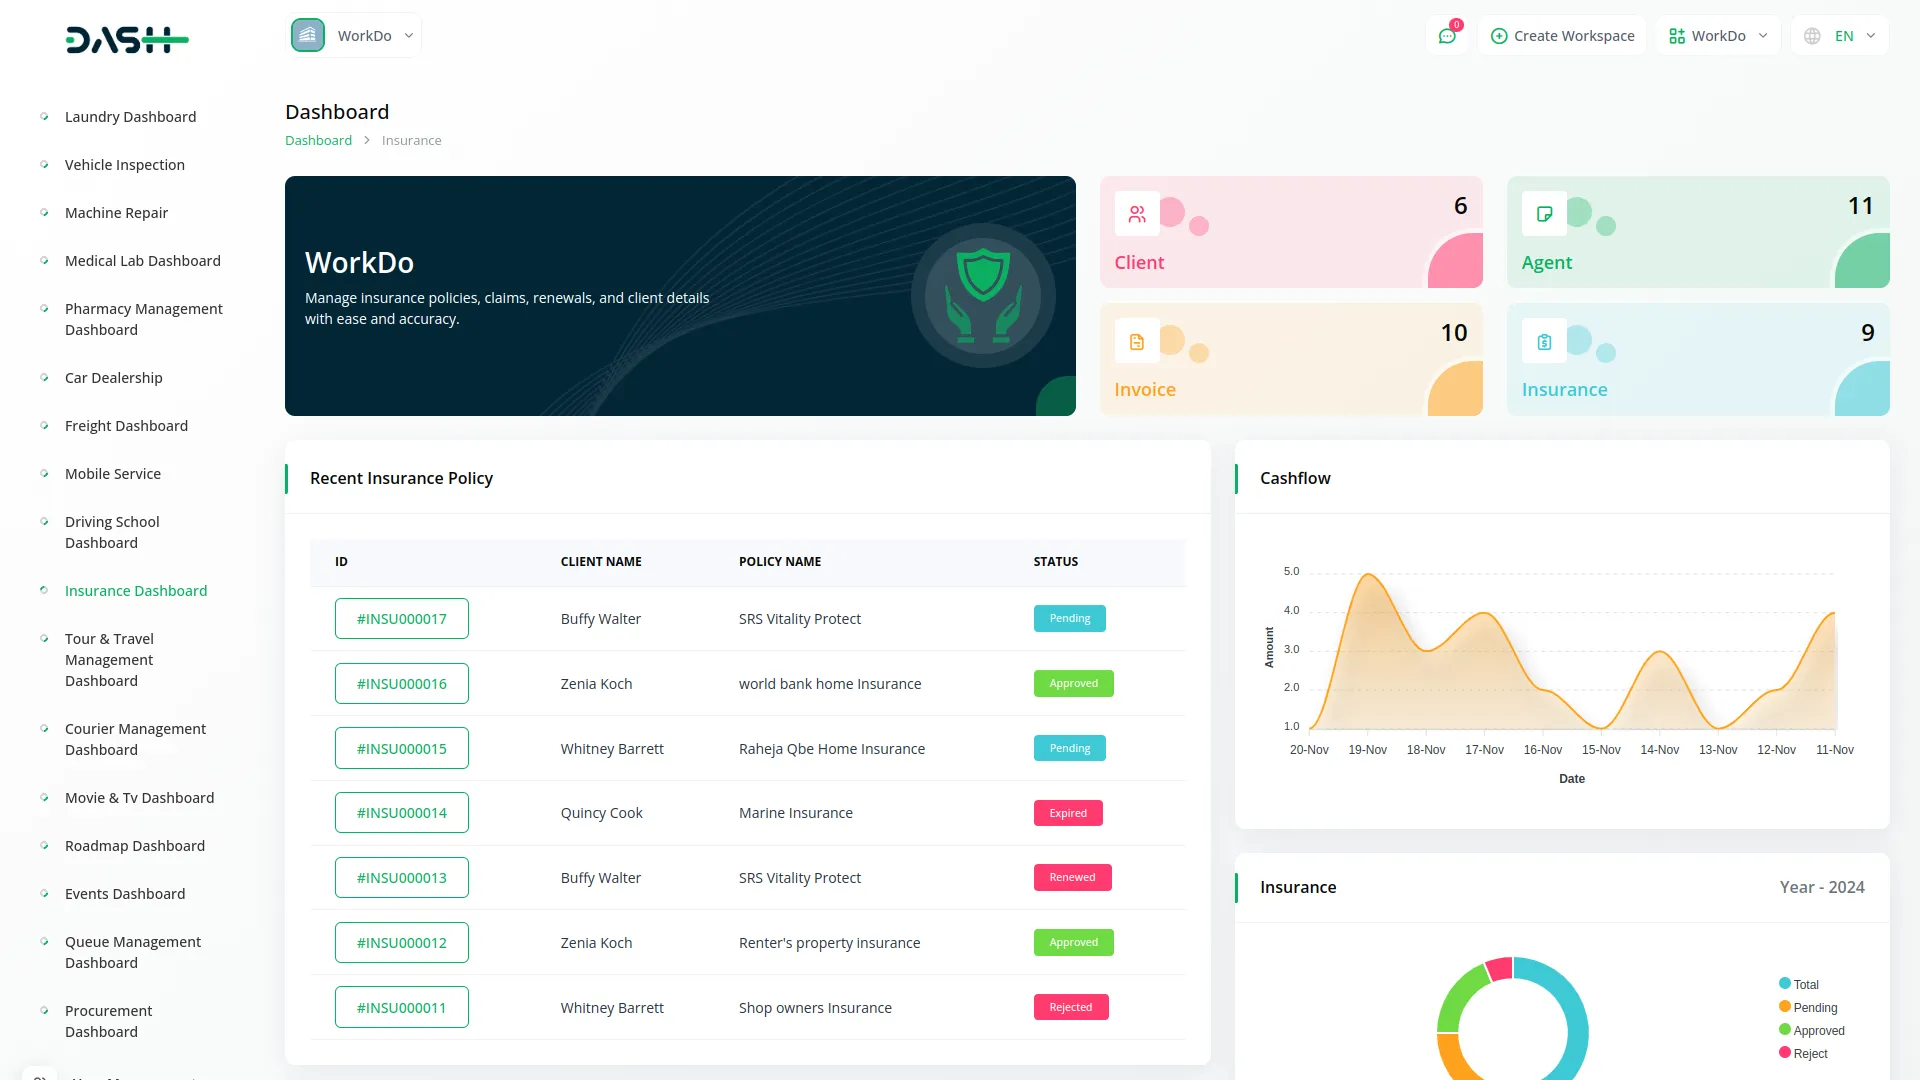
- The dashboard provides a comprehensive overview of your insurance operations with several key metrics, recent activity tables, and analytical charts.
- Four main cards display important statistics: Total Client showing the number of clients in your system, Total Agent displaying the number of insurance agents, Total Invoice showing the total number of invoices generated, and Total Insurance indicating the overall number of insurance policies managed.
- The dashboard includes a Recent Insurance Policy table that displays the latest 7 insurance details with columns for ID, Client Name, Policy Name, and Status, providing quick access to the most recent policy activities.
- A Recent Invoices table shows the latest 5 invoices with columns for ID, Client Name, Create Date, Amount, and Status, helping you monitor recent financial transactions.
- The dashboard features a Cash Flow chart that visualizes financial data for the last 15 days, helping you track revenue trends and cash flow patterns. An Insurance Status pie chart displays the distribution of insurance policies across different statuses, including Total, Pending, Approved, and Reject categories.
- An Invoice Status pie chart shows the breakdown of invoice payment statuses, including Total, Paid, and Unpaid categories, providing insight into your billing and collection performance.
System Setup
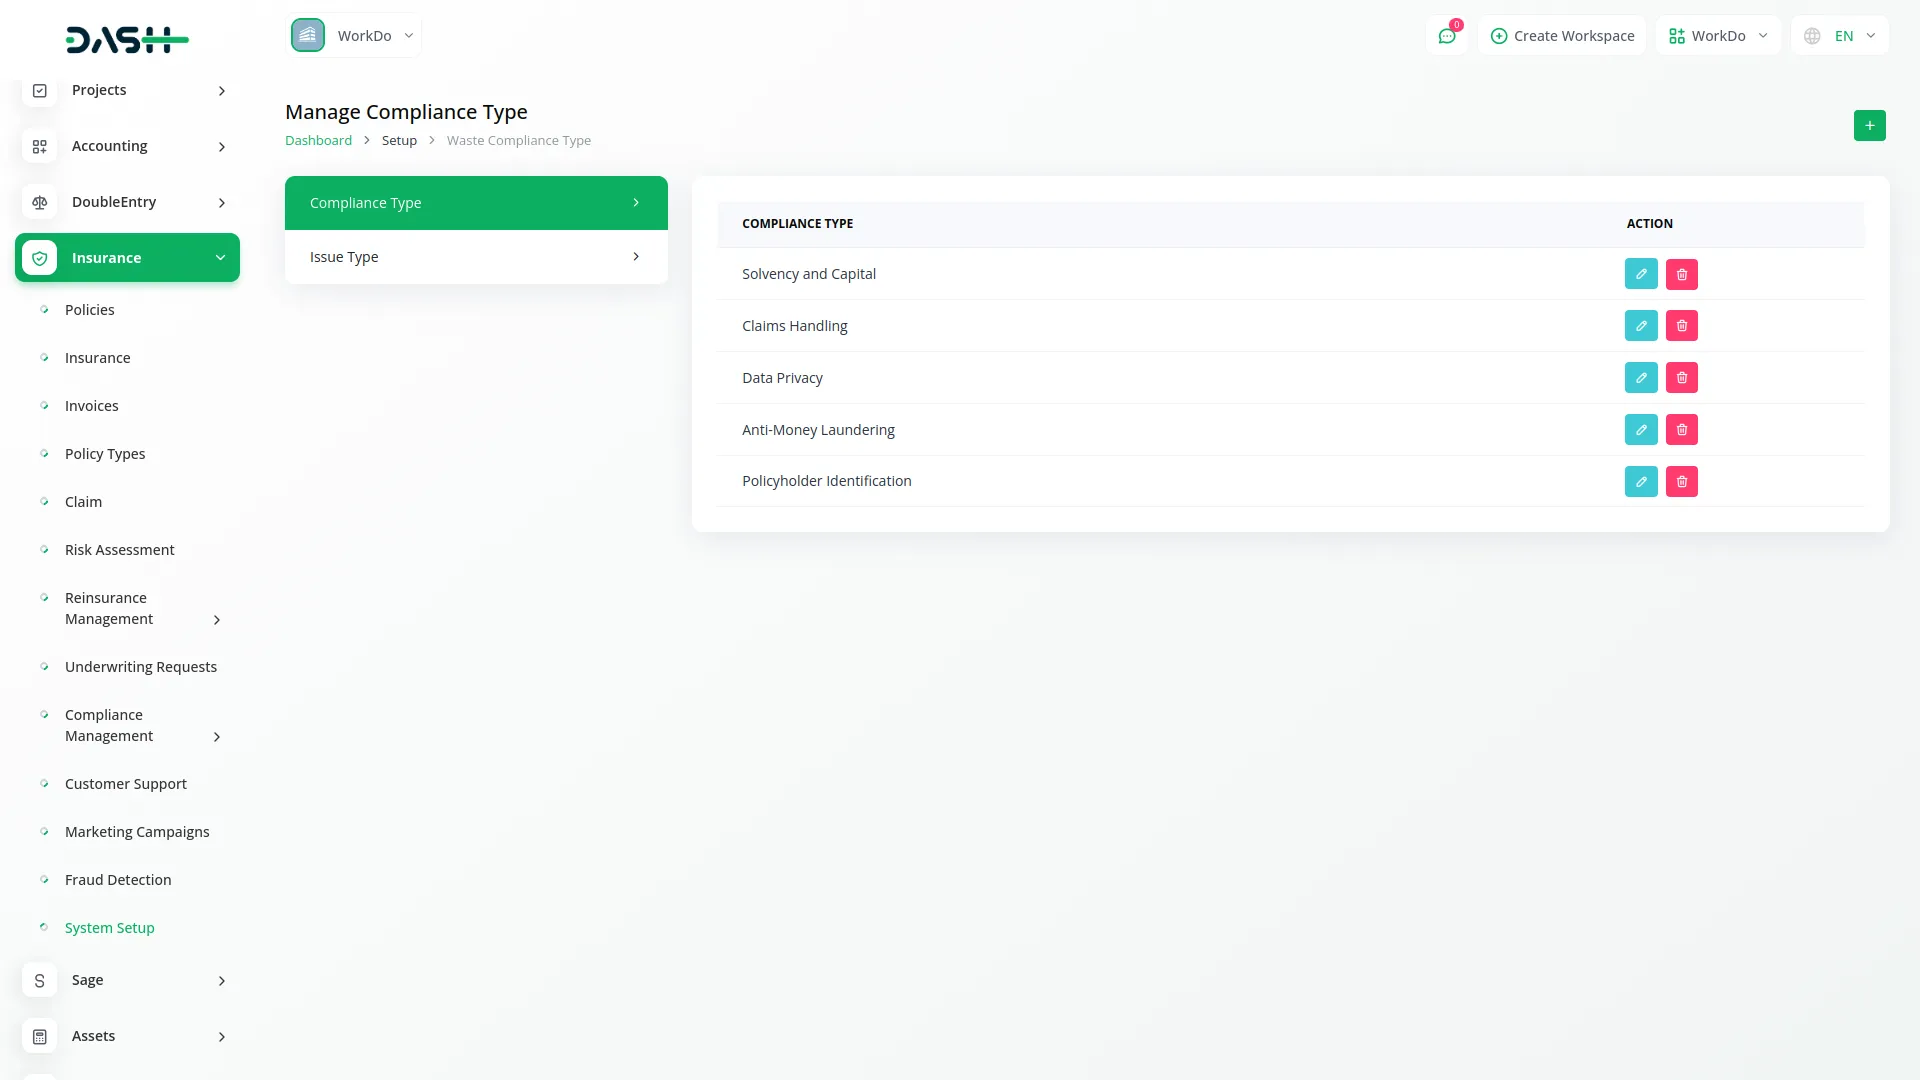
- The System Setup section contains two foundational configuration menus that must be established before using other parts of the insurance management system. These setup menus provide the basic data categories and types that will be used throughout the system.
- To create a new Compliance Type, click the “Create” button at the top of the Compliance Type page. Enter the Compliance Type Name that will be used to categorize different types of regulatory compliance requirements throughout the system.
- The list page shows all compliance types in a table with the Compliance Type column. Available actions include Edit to modify existing compliance types and Delete to remove compliance types that are no longer needed.
- To add a new Issue Type, click the “Create” button on the issue type page. Enter the Issue Type Name that represents different categories of customer support issues or problems. The list page displays all issue types in the Issue Type column. You can edit existing issue types or delete issue types that are no longer applicable.
Policy Type Management
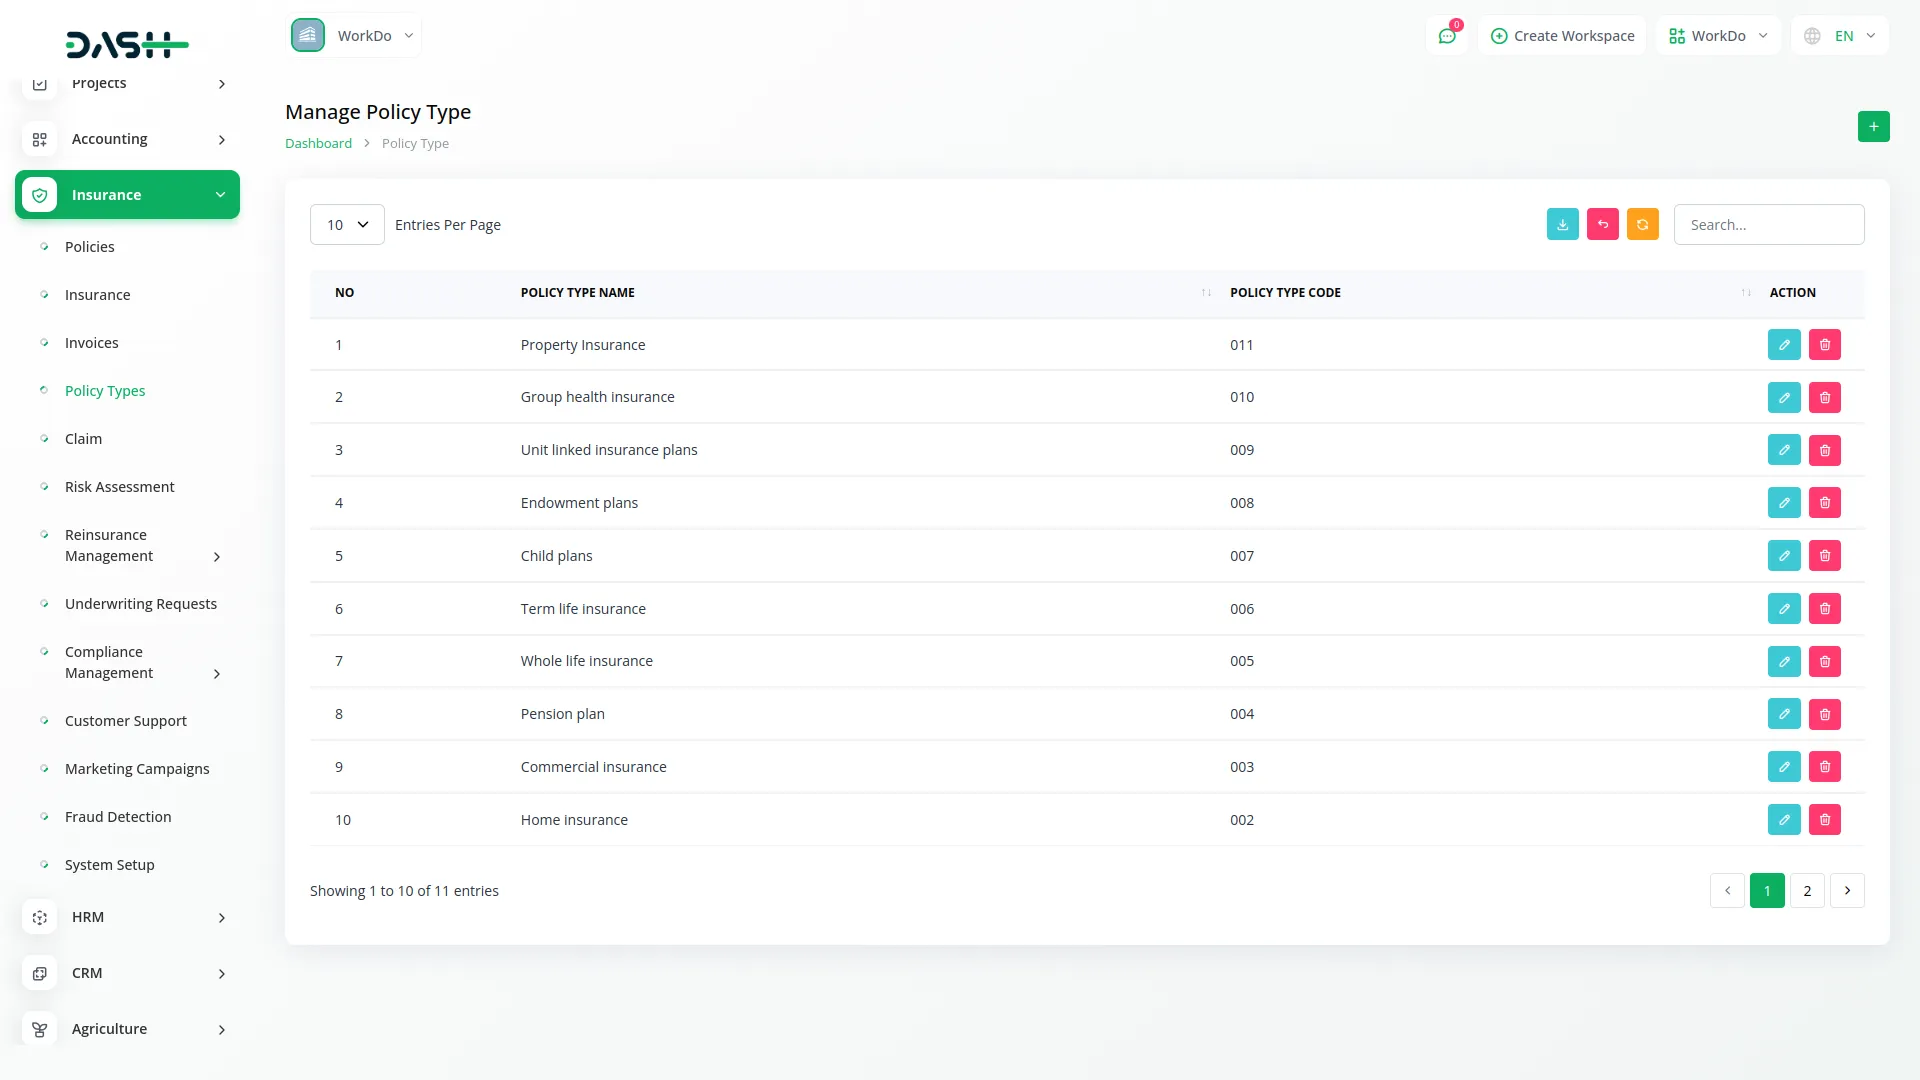
- To create a new policy type, click the “Create” button at the top of the policy type page. Enter the Policy Type Name to identify the specific category of insurance policy you want to define. Fill in the Policy Type Code, which serves as a unique identifier or reference code for this policy type.
- The list page shows all policy types with columns for No, Policy Type Name, and Policy Type Code. Use the Search button to find specific policy types and the Export button to download policy type data. Available actions include Edit to modify policy type information and Delete to remove policy types from the system.
Policy Management
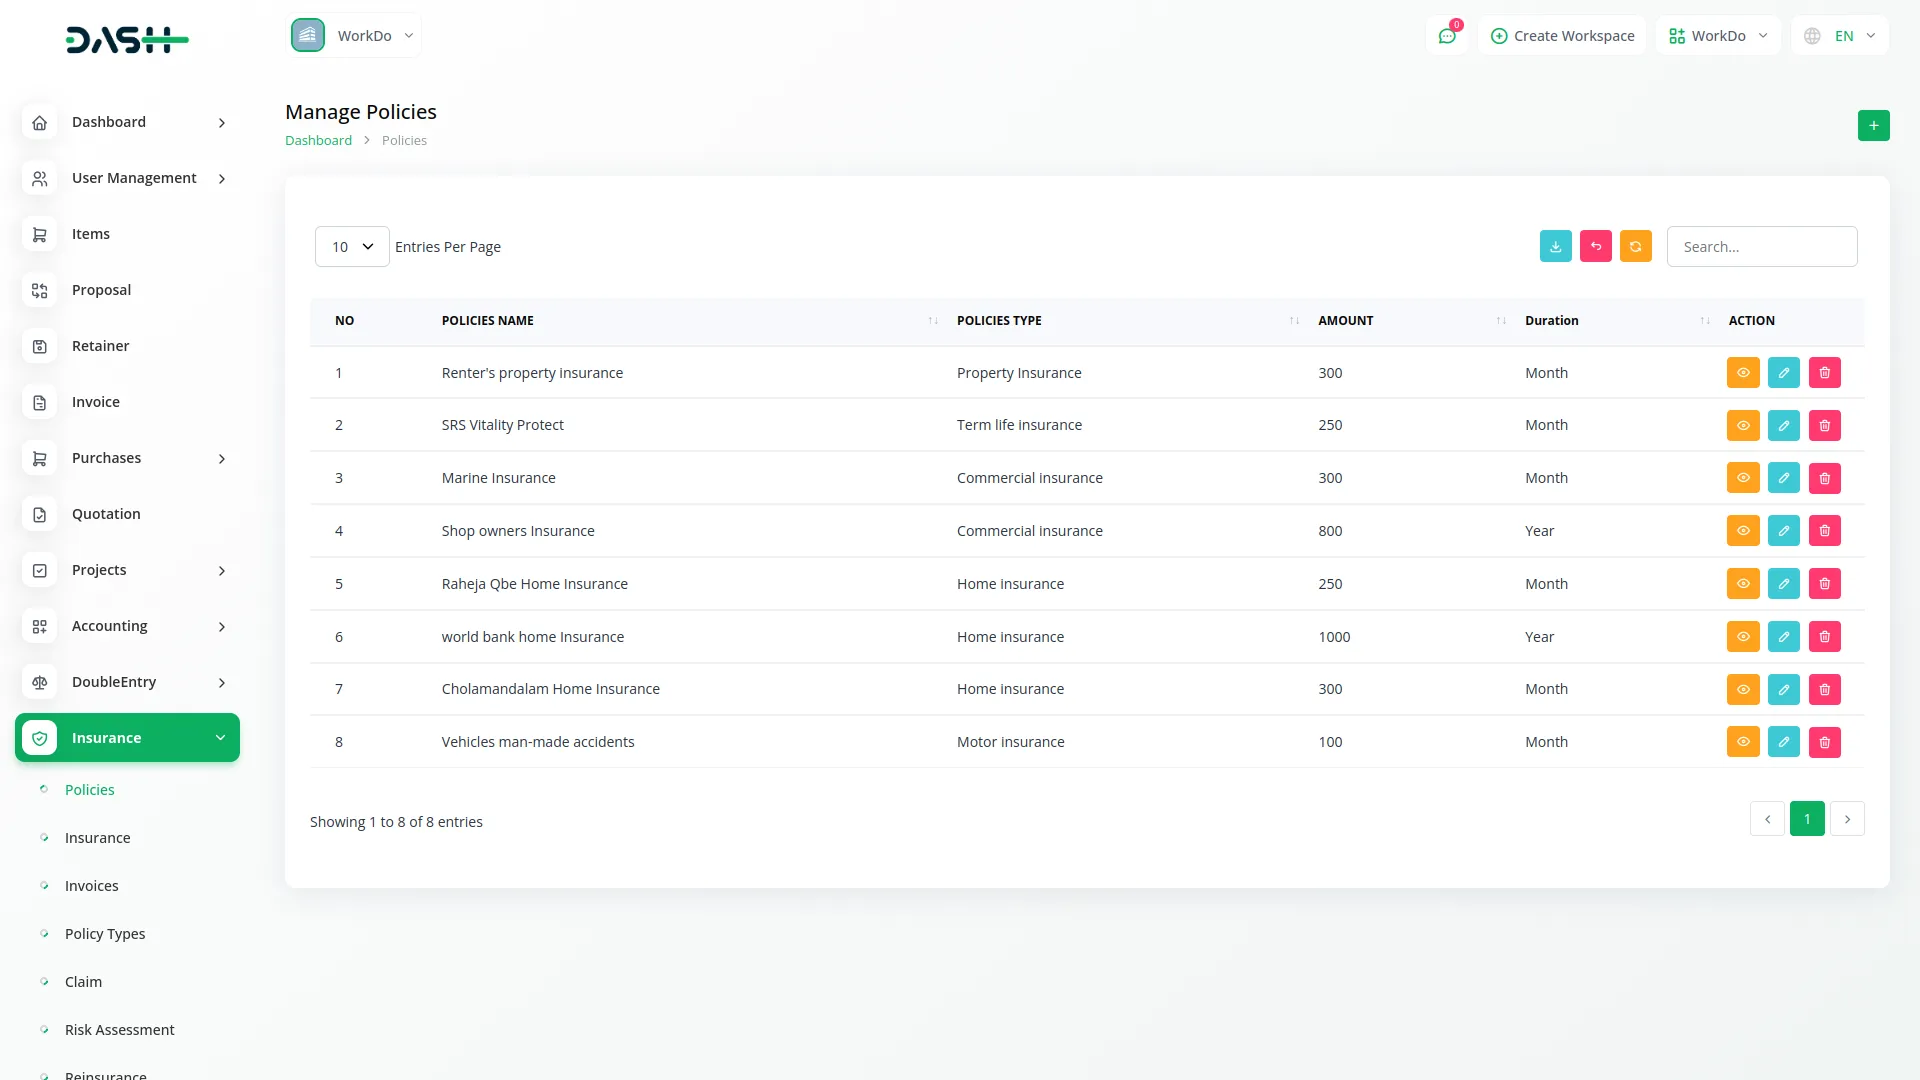
- To add a new policy, click the “Create” button on the policies page. Enter the Policy Name to identify the specific insurance policy. Select the Policy Type from the dropdown menu, which connects to the Policy Type menu to categorize the policy properly. Choose the Duration from the available options: Monthly or Yearly to specify the policy term frequency.
- Set the Minimum Duration and Maximum Duration to define the policy term limits. Enter the Policy Amount that represents the coverage value or premium amount.
- Select the Commission Type from Fixed or Percentage options and enter the Commission value accordingly. Choose the Tax from the dropdown connecting to the ProductService Setup for tax calculations. Fill in the Claim Percentage that defines the claim settlement ratio and add a Description with detailed policy information.
- The list page displays all policies with columns for No, Policy Name, Policy Type, Amount, and Duration. Use the Search button to locate specific policies and the Export button to download policy information. Available actions include View to see complete policy details, Edit to modify policy information, and Delete to remove policies from the system.
Insurance Management
- To create a new insurance record, click the “Create” button at the top of the insurance page. Select the Client from users where the user type is Client to assign the insurance to a specific customer.
- Choose the Policy Type from the dropdown connecting to the Policy Type menu and select the Policy from the dropdown connecting to the Policies menu. Select the Agent from users where the user type is Staff to assign an agent to this insurance. Enter the Duration for the insurance coverage period.
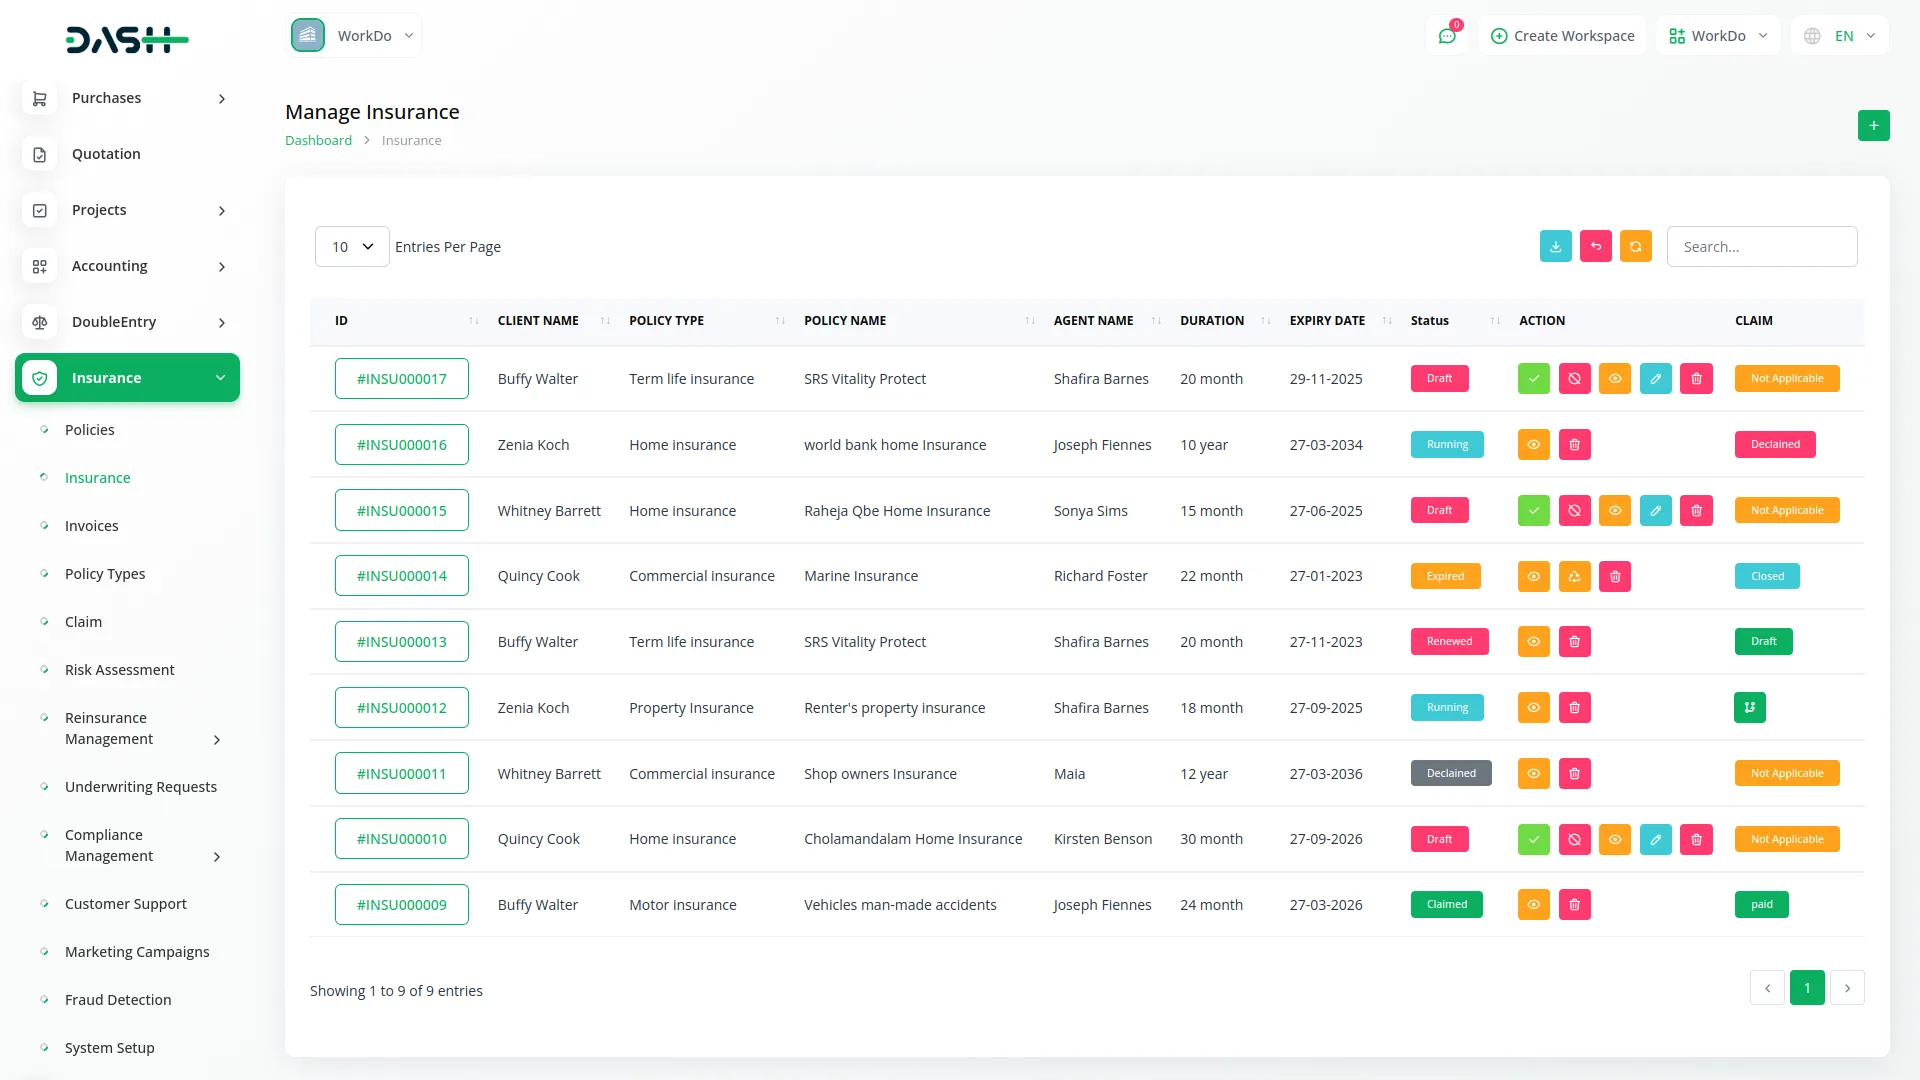
- The list page shows all insurance records with columns for ID, Client Name, Policy Type, Policy Name, Agent Name, Duration, Expiry Date, Insurance Status, and Claim Status.
- When you click on the ID, it opens the Insurance Details page, and if the Claim Status indicates that you are eligible to apply, you can click the Claim Insurance button. This will open a form where you can enter your Claim Reason and submit the claim for processing.
- Use the Search button to find specific insurance records and the Export button to download insurance data. Available actions include Accept to approve the insurance application, Reject to decline the application, Show to open the Insurance Details page which contains Client Info, Agent Info, Policy Info, Insurance Policy Info, and Instalment Information, where you can convert instalments into invoices or view existing invoices. Edit to modify insurance details, and Delete to remove insurance records from the system.
Invoice Management
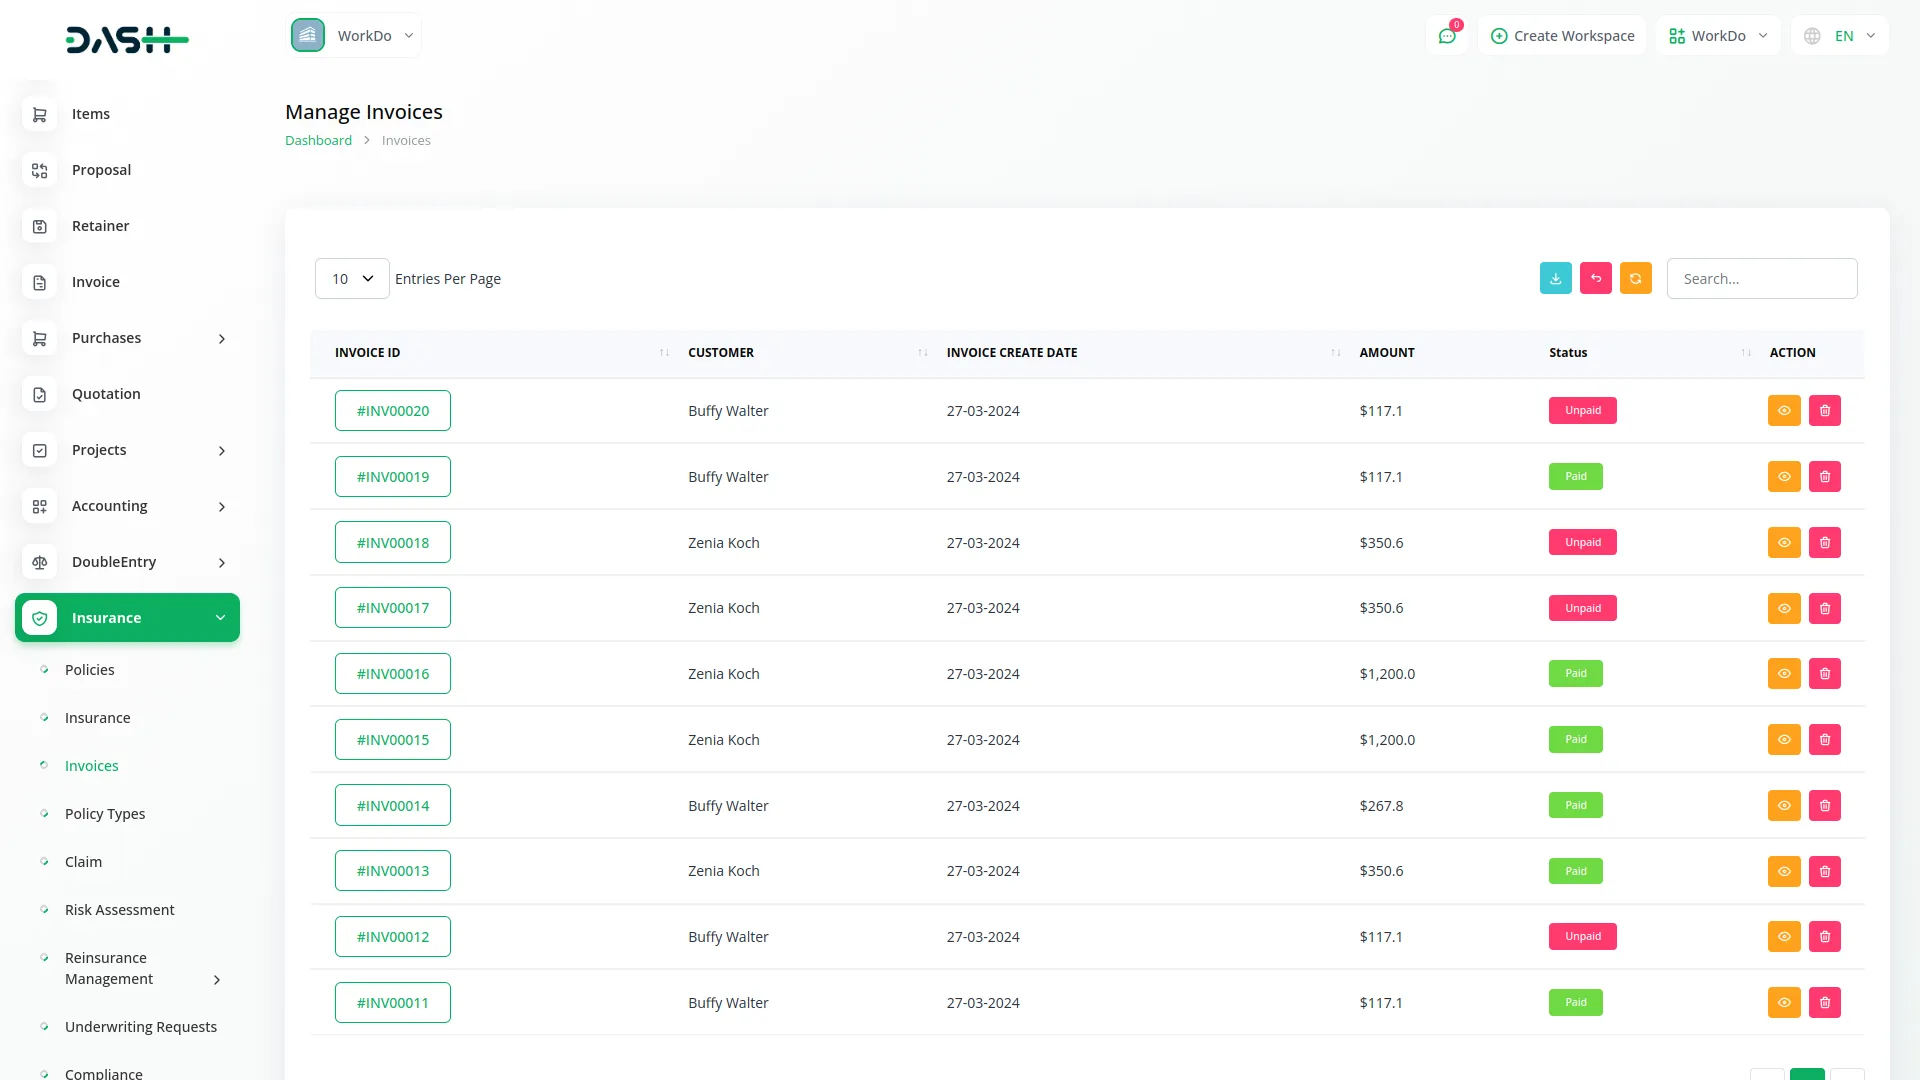
- The Invoice menu displays all instalment invoices that have been converted from instalments into invoice format. This section automatically manages billing for insurance premiums and payments.
- The list page shows all invoices with columns for Invoice ID, Customer, displaying the client name, Invoice Create Date, Amount, and Status, which can be Paid or Unpaid. Clicking on the Invoice ID opens the Invoice Details page, where you can review the invoice and add a payment if the status is Unpaid.
- Use the Search button to locate specific invoices and the Export button to download invoice data for accounting and financial reporting purposes. Available actions include Delete to remove invoices from the system, Show to view the Invoice Details page, where you can review the invoice and add a payment if the status is Unpaid.
- When you click on Add Payment, a payment pop-up opens. In this pop-up, you can view the amount, select the payment date, and choose a bank account from the dropdown, which connects with the Accounting Add-on. You must also fill in the Reference field, optionally add a description, and upload the Payment Receipt. Then, click the Create button to add the payment.
Insurance Claim Management
- The Insurance Claim menu displays all insurance policies for which claims have been applied. This section manages the entire claims processing workflow from submission to resolution.
- The list page shows all insurance claims with columns for No, Claim ID, Insurance ID, Client Name, Amount, Action Date, Status, and Payment Status. Use the Search button to find specific claims and the Export button to download claim data for analysis and reporting purposes.
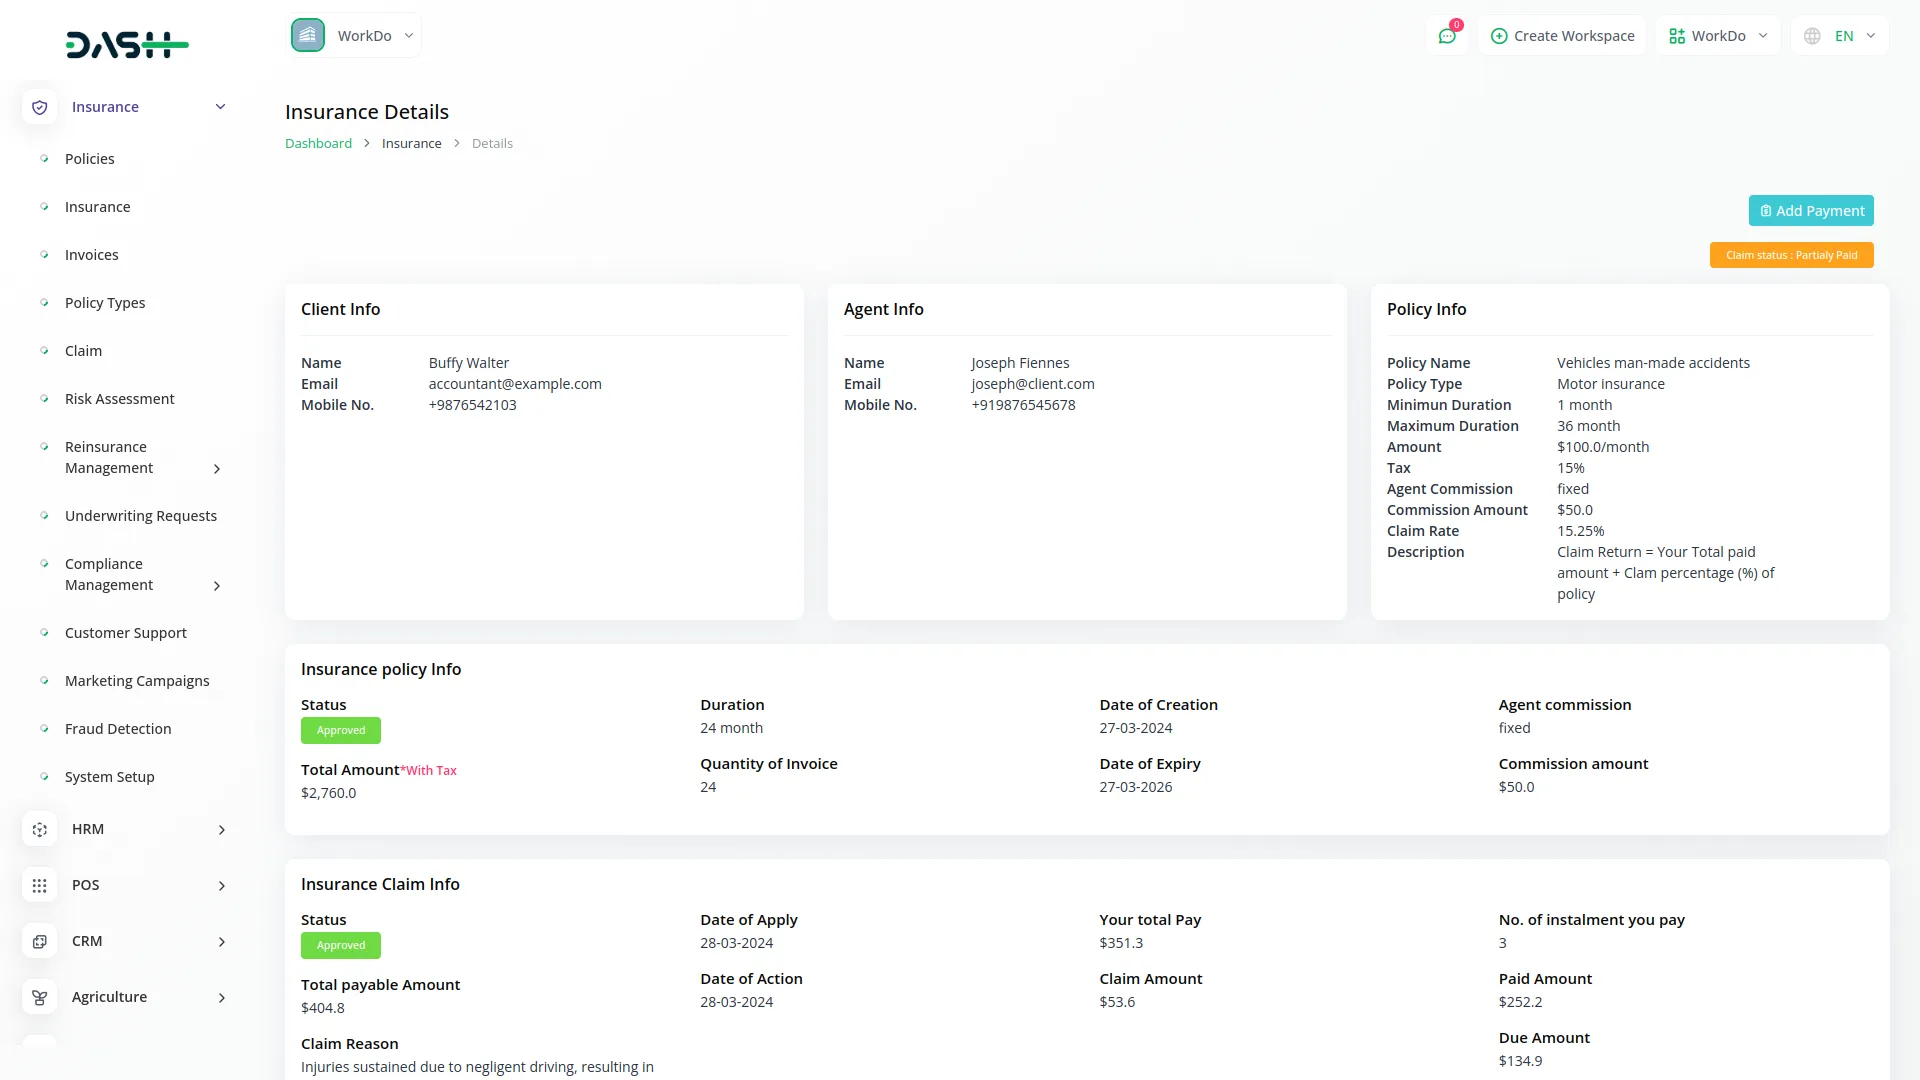
- Clicking on the Insurance ID opens the Insurance Details page, where you can view Client Info, Agent Info, Policy Info, Insurance Policy Info, and Instalment Information. From this page, you can convert instalments into invoices or view existing invoices. This page also includes Claim Information, and if the claim has been approved, you will have the option to add claim payment for the respective insurance.
- When you click on Add Payment, a payment pop-up opens. In this pop-up, you can edit the prefilled amount, select the payment date, and choose a bank account from the dropdown, which connects with the Accounting Add-on. You must also fill in the Reference field, optionally add a description, and upload the Payment Receipt. Then, click the Create button to add the payment.
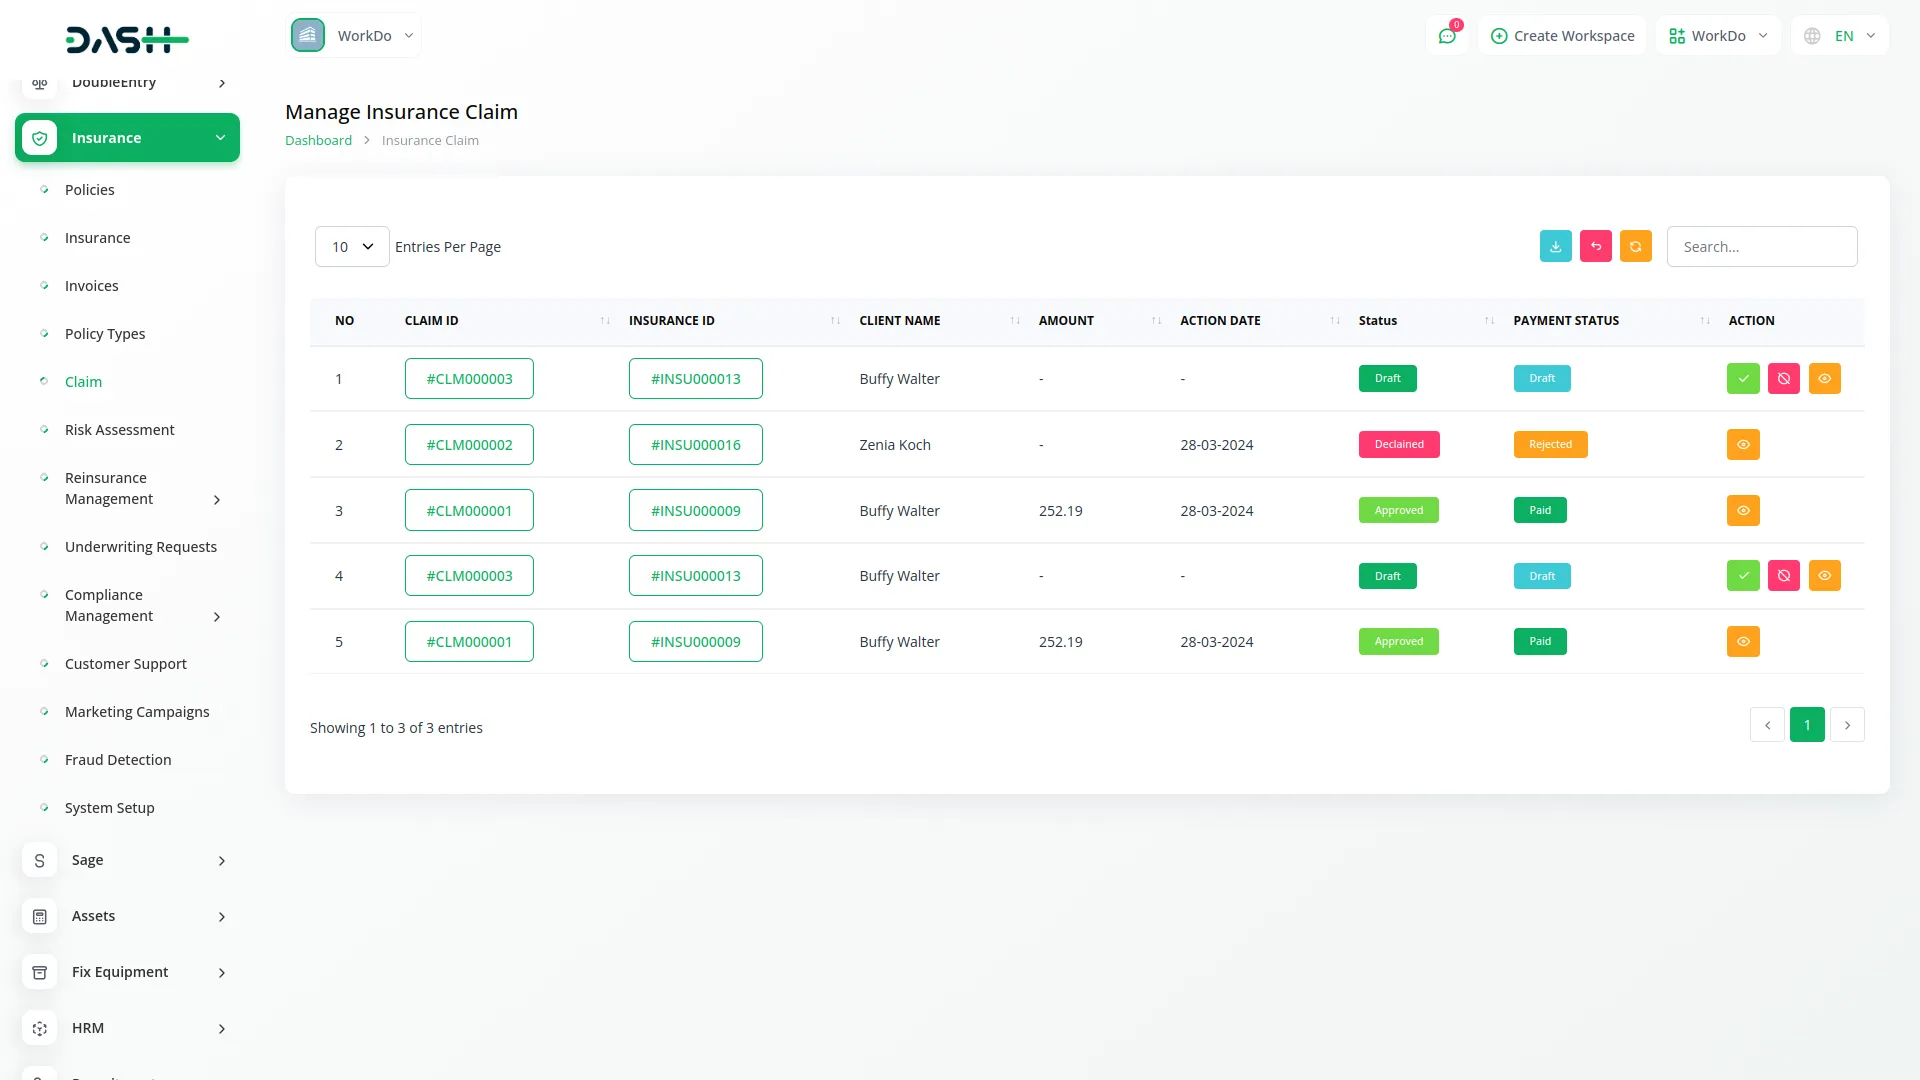
- Available actions include Accept to approve the claim, Reject to decline the claim, and Show to open a detailed page that contains Client Info, Agent Info, Policy Info, Insurance Policy Info, and Instalment Information, where you can convert instalments into invoices or view existing invoices. This page also includes Claim Information, and if the claim has been approved, you will have the option to add claim payment for the respective insurance.
Risk Assessment Management
- To create a new risk assessment, click the “Create” button at the top of the risk assessment page. Select the Policy from the dropdown menu that connects to the Policies menu to specify which policy is being assessed.
- Choose the Risk Level from the available options: High, Low, or Medium to categorize the risk level. Set the Assessment Date when the risk evaluation was conducted and add a Description that provides detailed information about the risk factors and assessment findings.
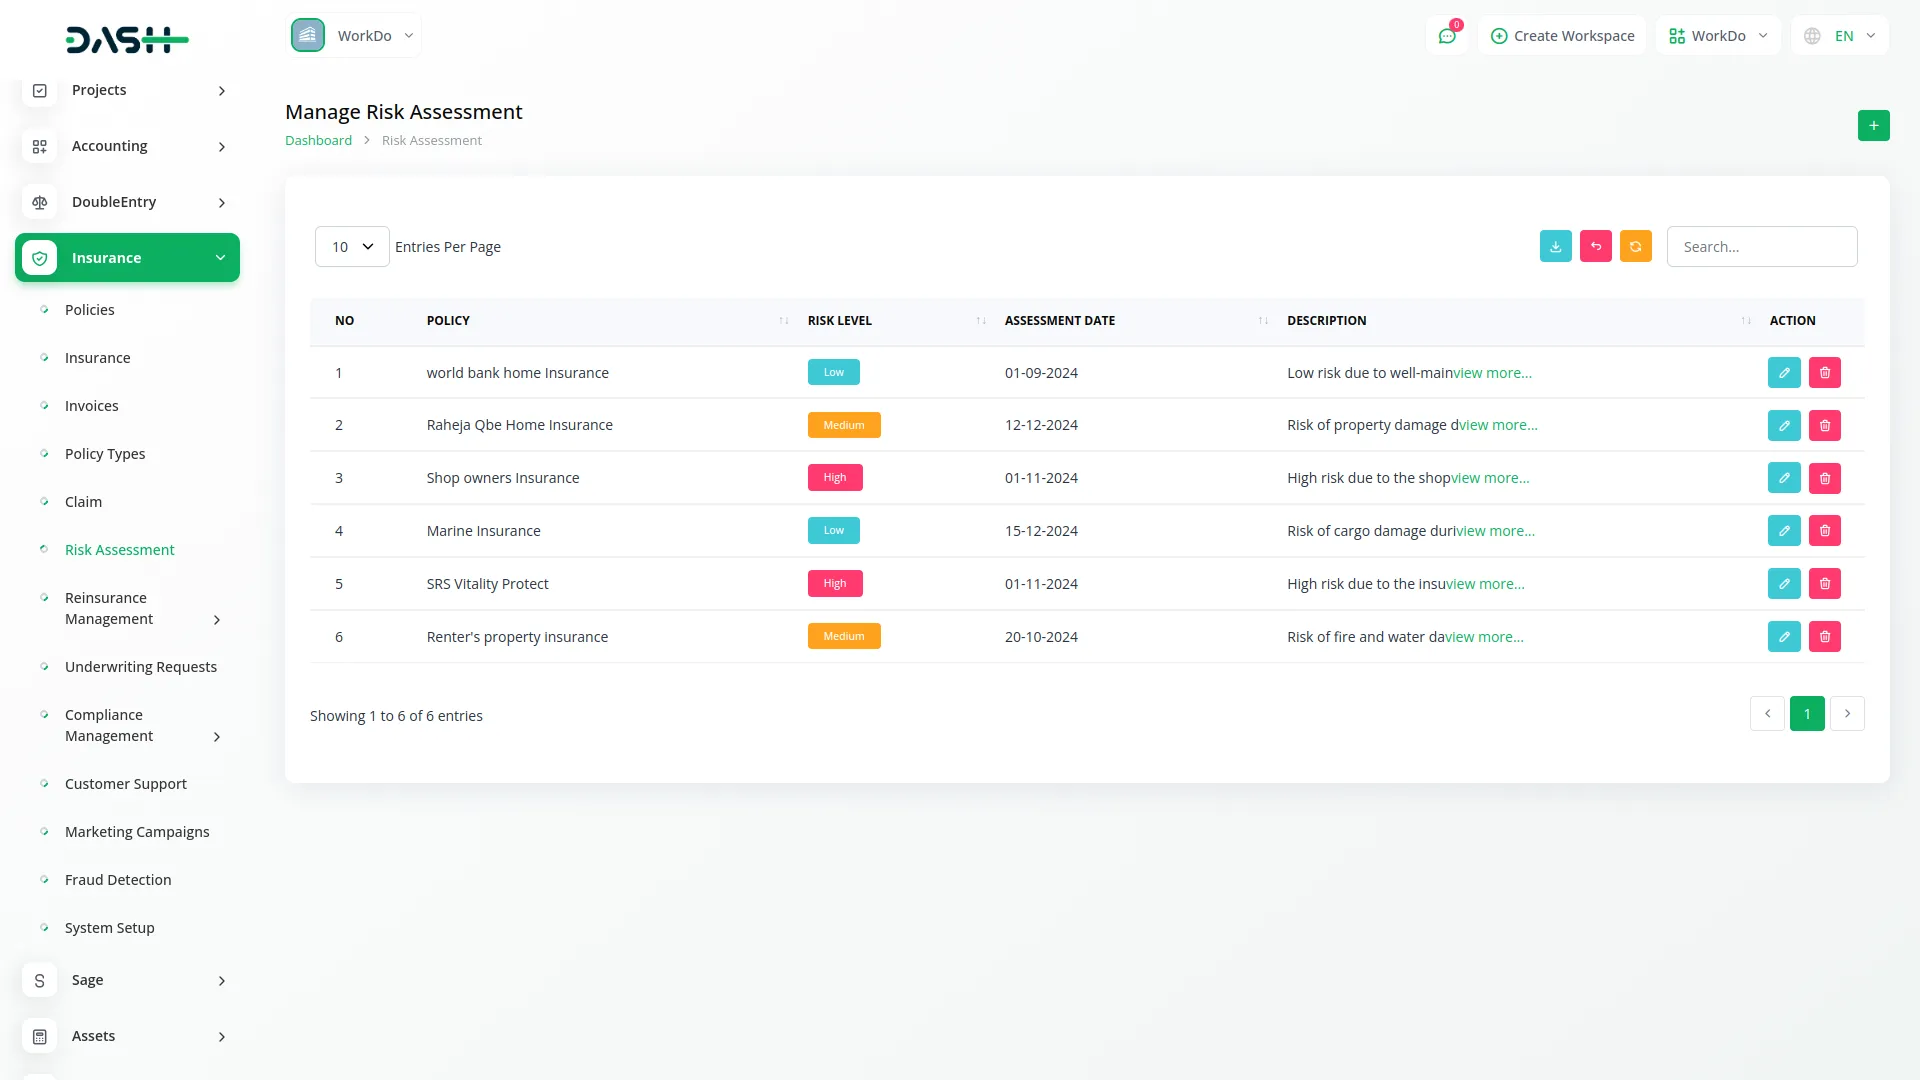
- The list page displays all risk assessments with columns for No, Policy, Risk Level, Assessment Date, and Description.
- Use the Search button to locate specific risk assessments and the Export button to download risk assessment data for analysis and reporting. Available actions include Edit to modify risk assessment details and Delete to remove risk assessments from the system.
Reinsurance Agreement Management
- To add a new reinsurance agreement, click the “Create” button on the reinsurance agreement page. Select the Policy from the dropdown menu that connects to the Policies menu to specify which policy is covered by the reinsurance agreement.
- Enter the Reinsurer Name that identifies the reinsurance company. Set the Agreement Date when the reinsurance agreement was established.
- Fill in the Coverage Percentage in percentage format to specify what portion of the risk is covered by the reinsurer.
- Enter the Premium Share in percentage format to indicate the reinsurer’s share of the premium. Select the Status from the available options: Active or Expired to indicate the current state of the agreement.
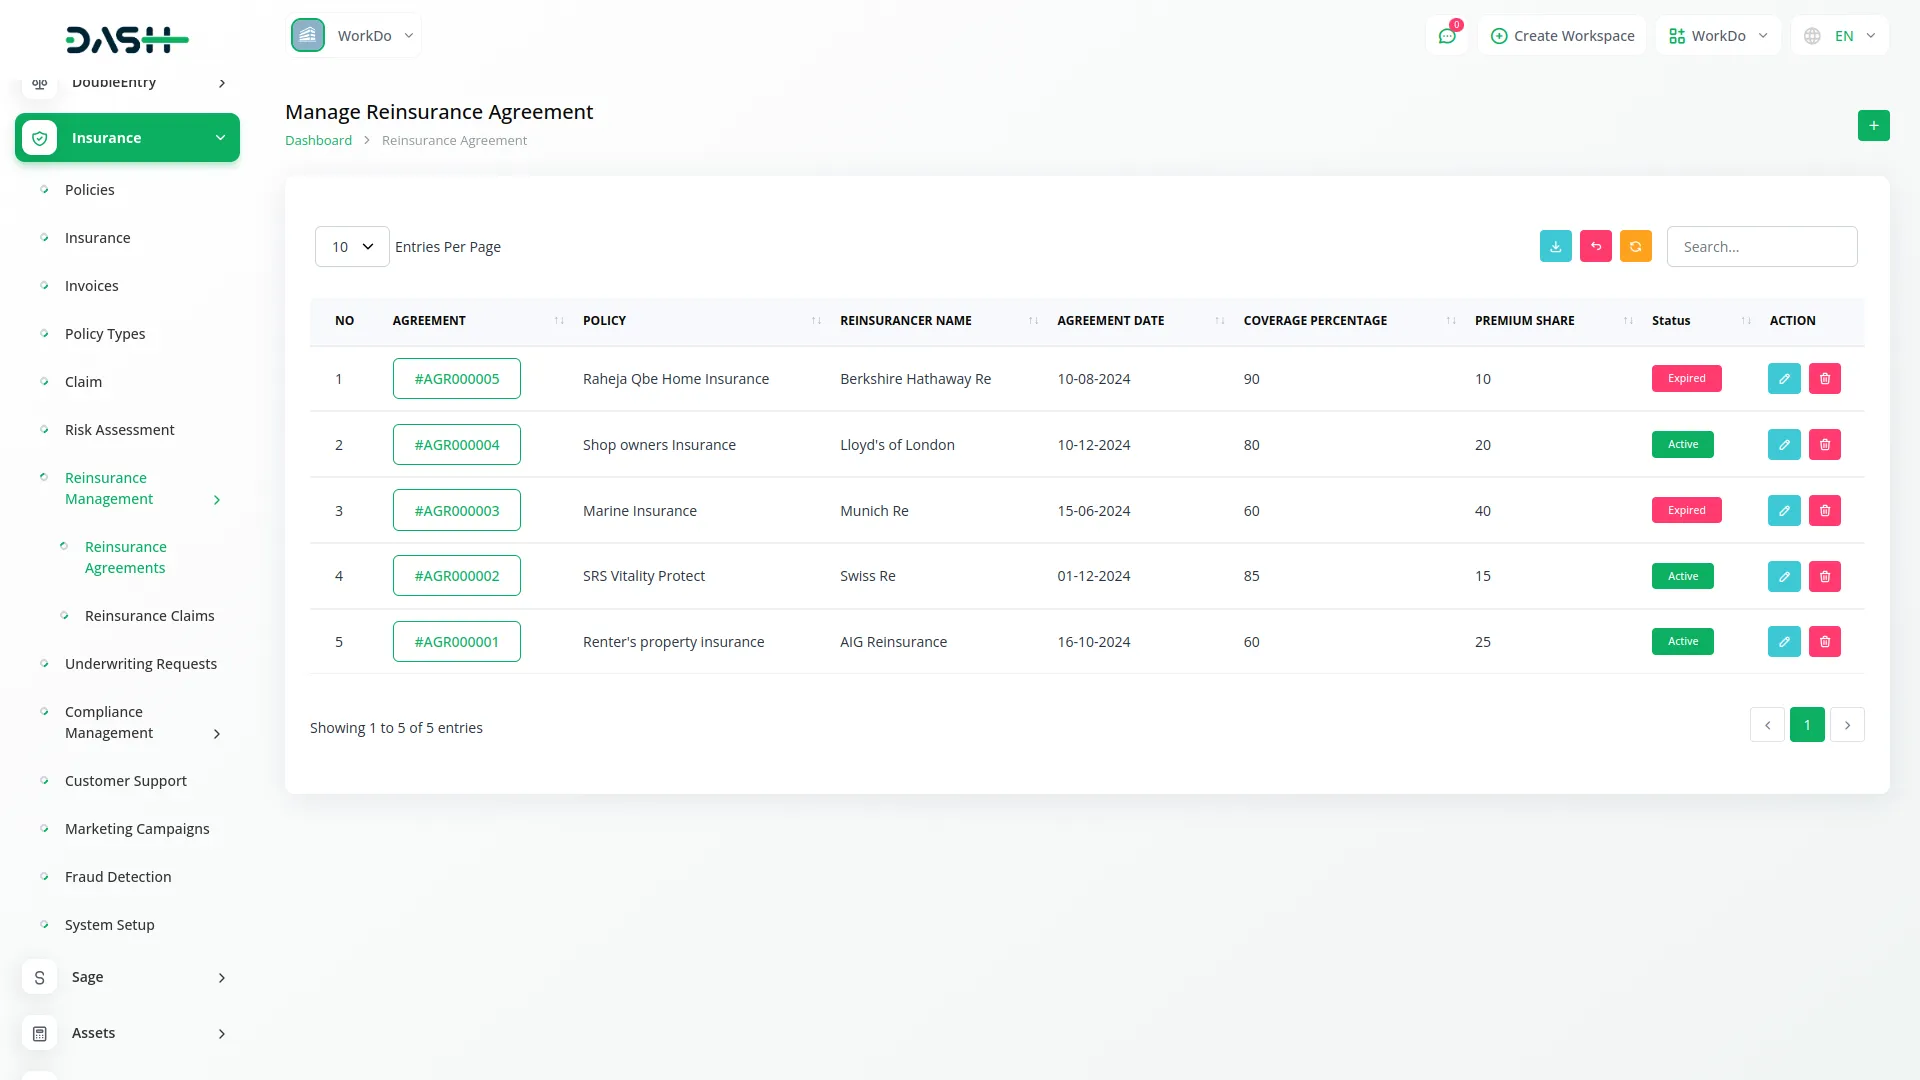
- The list page shows all reinsurance agreements with columns for No, Agreement No, Policy, Reinsurer Name, Agreement Date, Coverage Percentage, Premium Share, and Status. Use the Search button to find specific agreements and the Export button to download reinsurance agreement information. Available actions include Edit to modify agreement details and Delete to remove agreements from the system.
Reinsurance Claim Management
- To create a new reinsurance claim, click the “Create” button at the top of the reinsurance claim page. Select the Claim from the dropdown menu that connects to the Insurance Claim menu to link the reinsurance claim to an existing insurance claim. Choose the Agreement from the dropdown connecting to the Reinsurance Agreement menu to specify which reinsurance agreement applies.
- Enter the Claim Amount representing the total claim value and fill in the Reimbursement Amount showing how much the reinsurer will pay. Select the Claim Status from the available options: Pending or Settled to indicate the current processing state. Set the Claim Date when the reinsurance claim was filed.
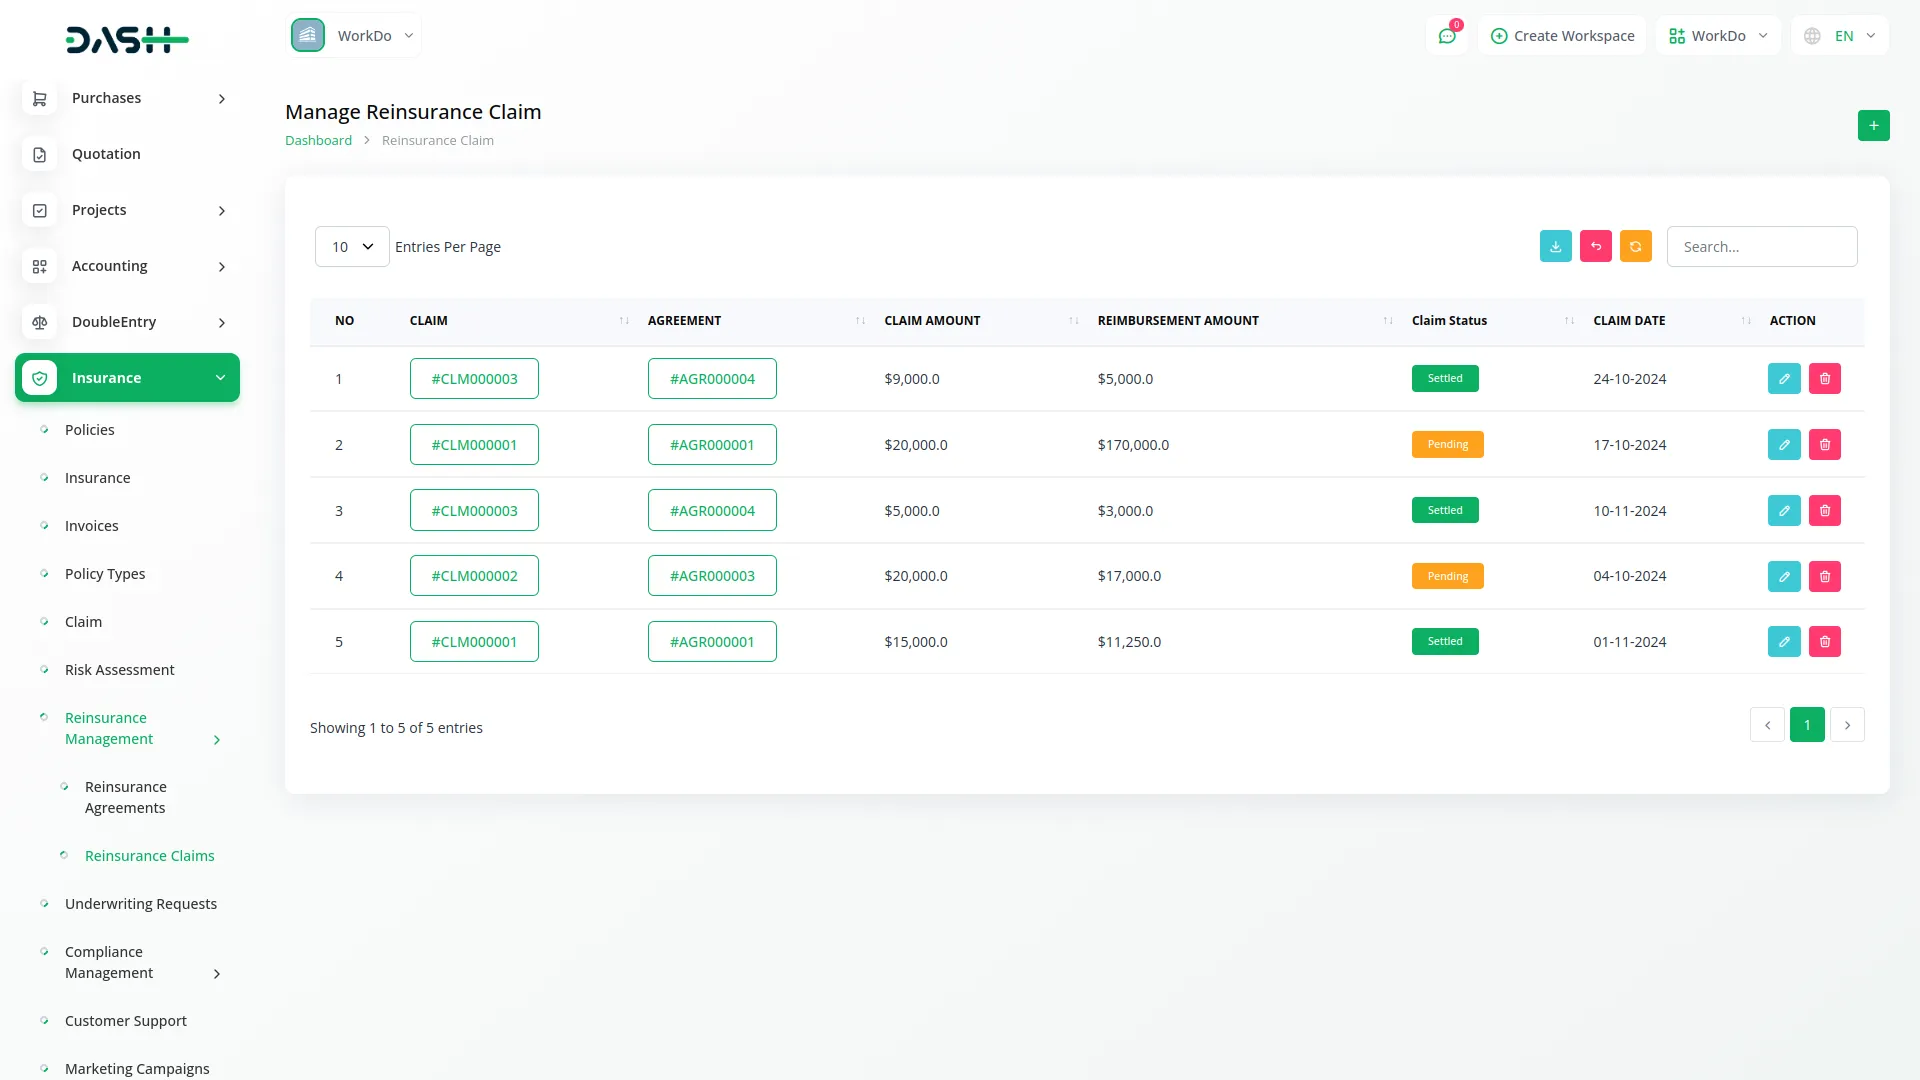
- The list page displays all reinsurance claims with columns for No, Claim, Agreement, Claim Amount, Reimbursement Amount, Claim Status, and Claim Date. Use the Search button to locate specific reinsurance claims and the Export button to download reinsurance claim data. Available actions include Edit to modify reinsurance claim information and Delete to remove reinsurance claims from the system.
Underwriting Request Management
- To create a new underwriting request, click the “Create” button at the top of the underwriting request page. Select the Policy from the dropdown menu that connects to the Policies menu to specify which policy requires an underwriting assessment. Choose the Customer from users where the user type is Client to identify the applicant requiring underwriting evaluation.
- Enter the Underwriter’s Name who will be responsible for conducting the assessment. Set the Assessment Date when the underwriting evaluation was performed.
- Select the Risk Level from the available options: High, Medium, or Low to categorize the risk assessment outcome. Choose the Decision from Approved or Rejected options to indicate the underwriting conclusion. Add Notes that provide detailed information about the underwriting process, findings, and decision rationale.
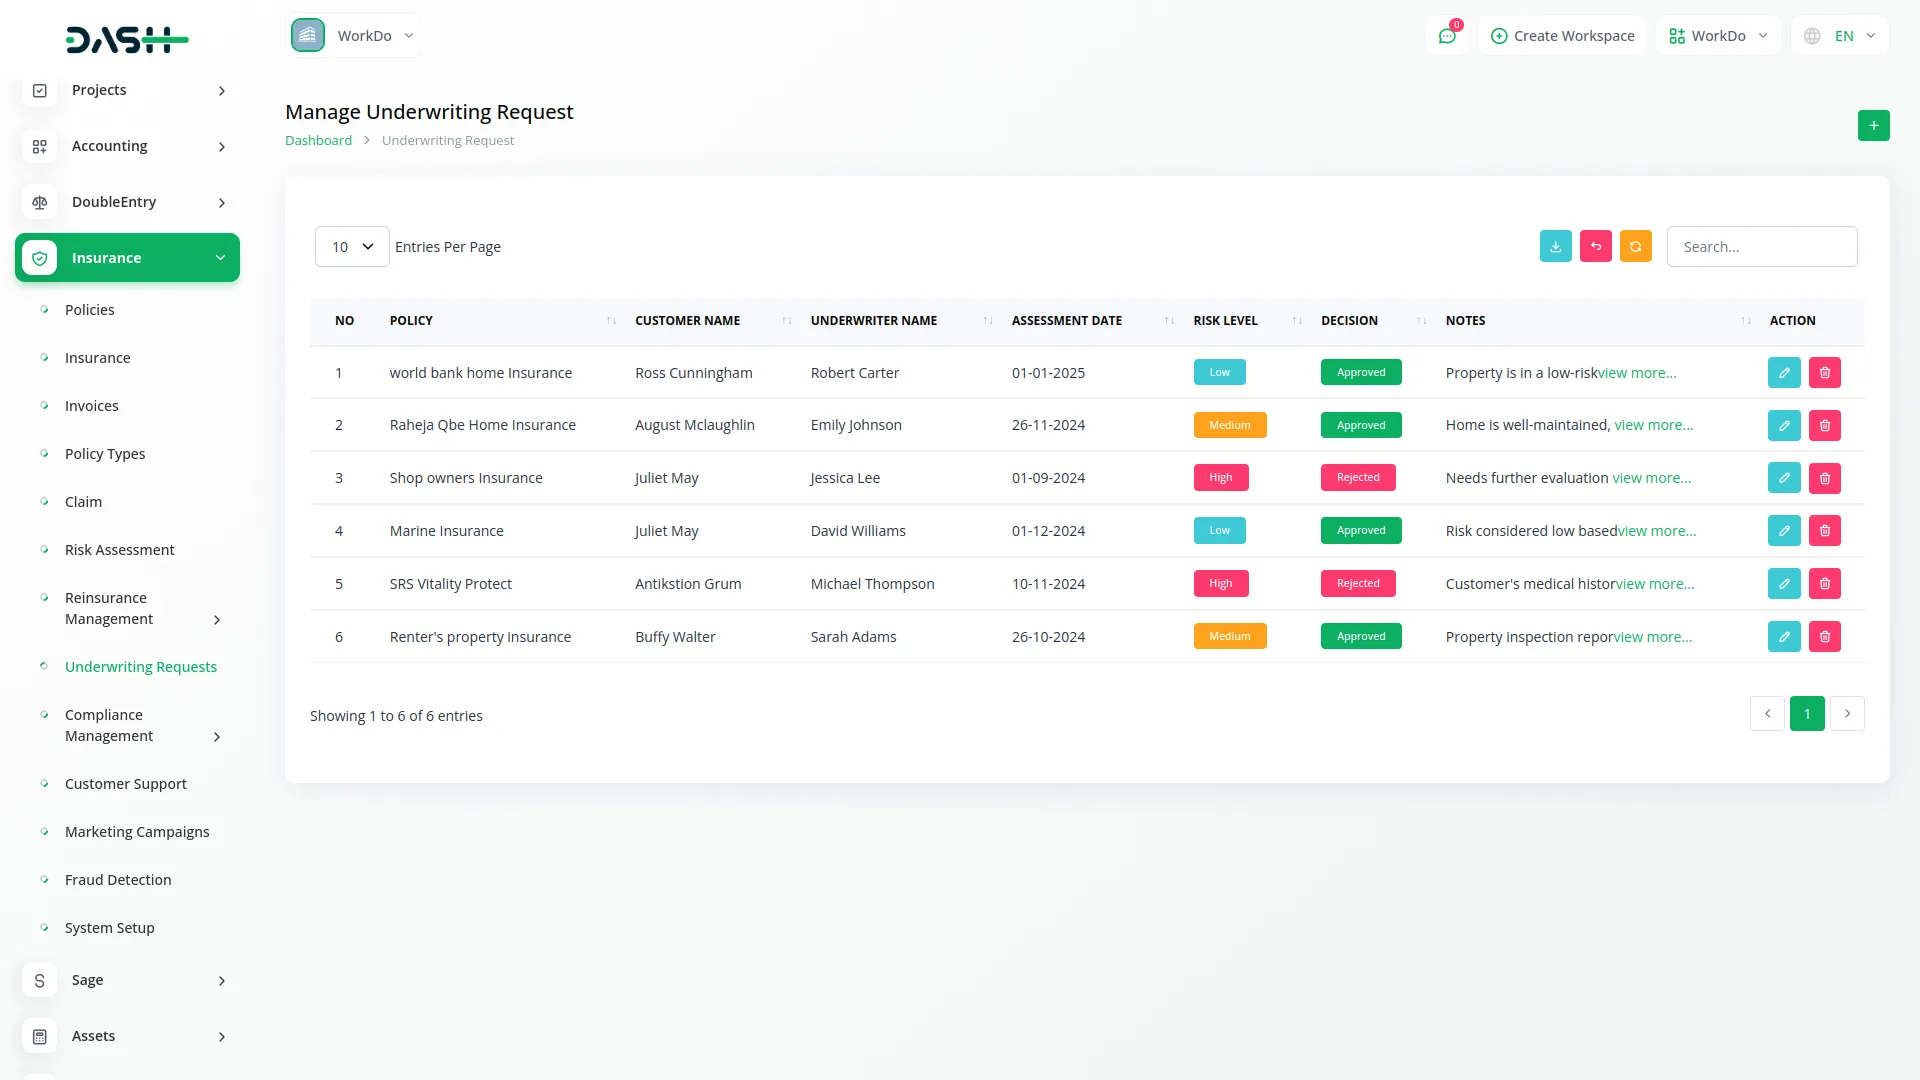
- The list page displays all underwriting requests with columns for No, Policy, Customer Name, Underwriter Name, Assessment Date, Risk Level, Decision, and Notes. Use the Search button to locate specific underwriting requests and the Export button to download underwriting data for analysis and reporting purposes.
- Available actions include Edit to modify underwriting request details and Delete to remove underwriting requests from the system.
Compliance Record Management
- To add a new compliance record, click the “Create” button on the compliance record page. Select the Policy from the dropdown menu that connects to the Policies menu to specify which policy the compliance record applies to.
- Choose the Compliance Type from the dropdown connecting to the Compliance Type menu from System Setup to categorize the compliance requirement properly.
- Upload the Document that contains the compliance-related information or evidence. Select the Compliance Status from the available options: Completed or Pending to indicate the current state of compliance. Set the Assessment Date when the compliance evaluation was conducted.
- Add Notes that provide additional details about the compliance requirements, findings, or follow-up actions needed.
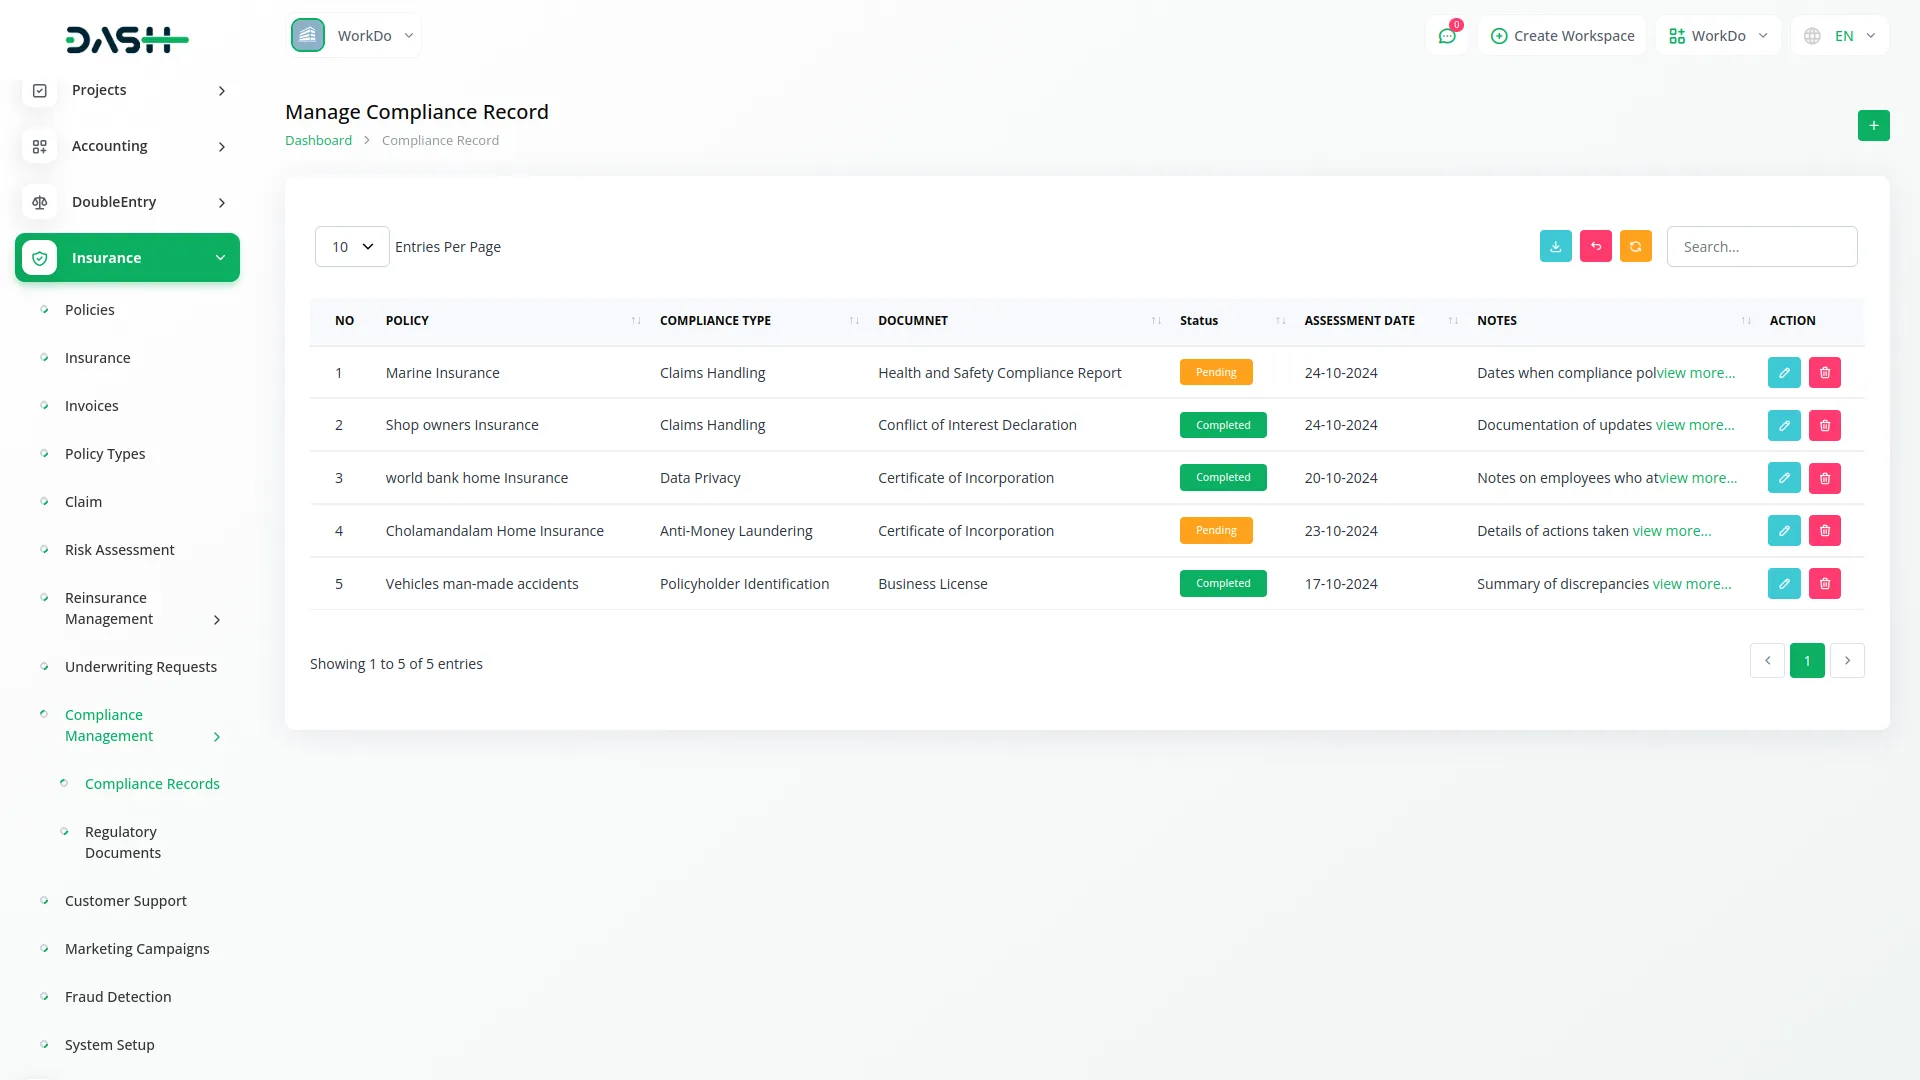
- The list page shows all compliance records with columns for No, Policy, Compliance Type, Document, Status, Assessment Date, and Notes.
- Use the Search button to find specific compliance records and the Export button to download compliance information for regulatory reporting and audit purposes. Available actions include Edit to modify compliance record details and Delete to remove compliance records from the system.
Regulatory Document Management
- To create a new regulatory document, click the “Create” button at the top of the regulatory document page. Enter the Document Name to identify the specific regulatory document. Fill in the Document Type that categorizes the kind of regulatory documentation being managed. Set the Upload Date when the document was added to the system.
- Enter the Expiry Date to track when the document will expire and need renewal or updating. Select the Status from the available options: Valid or Expired to indicate the current validity of the document.
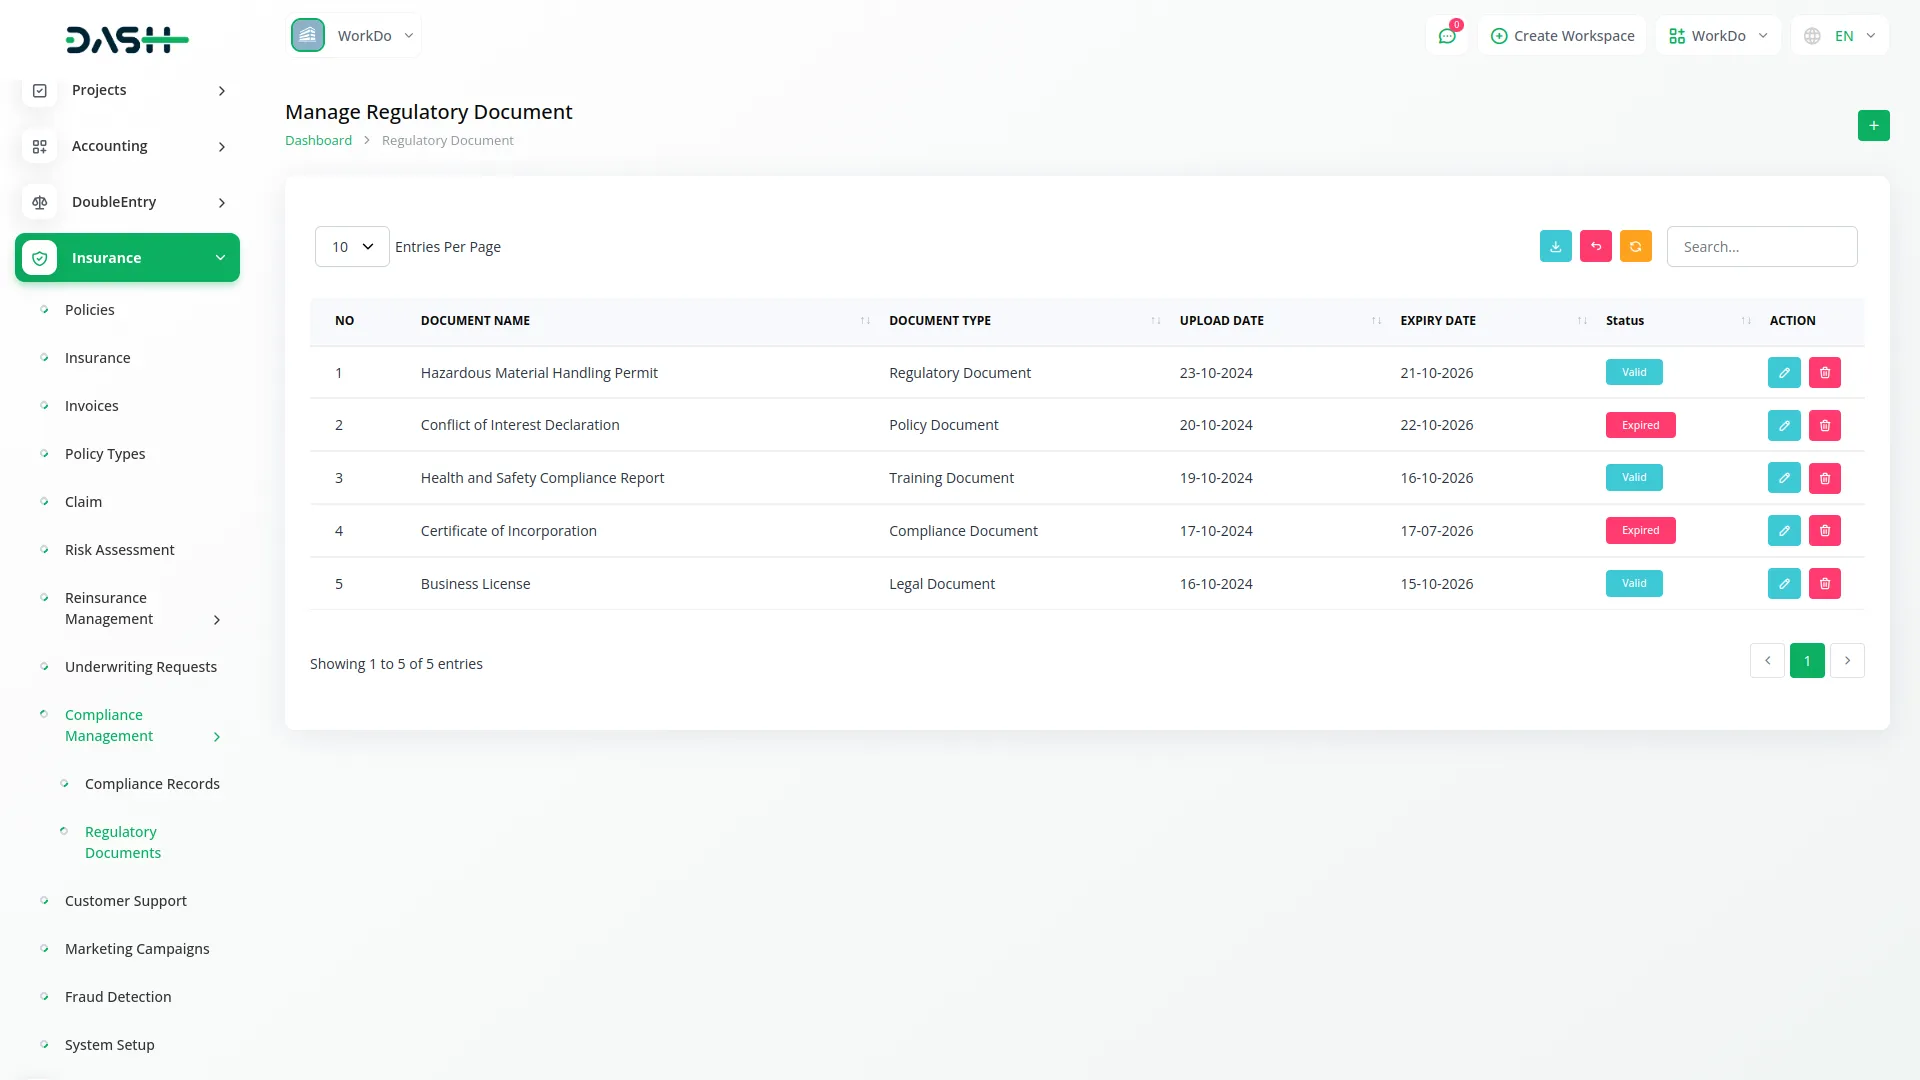
- The list page displays all regulatory documents with columns for No, Document Name, Document Type, Upload Date, Expiry Date, and Status. Use the Search button to locate specific regulatory documents and the Export button to download document information for compliance tracking and regulatory reporting. Available actions include Edit to modify document details and Delete to remove documents from the system.
Customer Support Management
- To add a new customer support case, click the “Create” button on the customer support page. Select the Policy from the dropdown menu that connects to the Policies menu to link the support request to a specific policy. Choose the Customer from users where the user type is Client to identify who is requesting support.
- Select the Issue Type from the dropdown connecting to the Issue Type menu from System Setup to categorize the support request properly. Choose the Status from the available options: Open, Closed, or In Progress to indicate the current state of the support case. Select Assign To from users where the user type is Staff to designate which team member will handle the support request.
- Set the Created Date when the support case was opened and enter the Resolved Date when the issue was resolved, if applicable. Add a Description that provides detailed information about the customer’s issue, problem description, and any relevant context or background information.
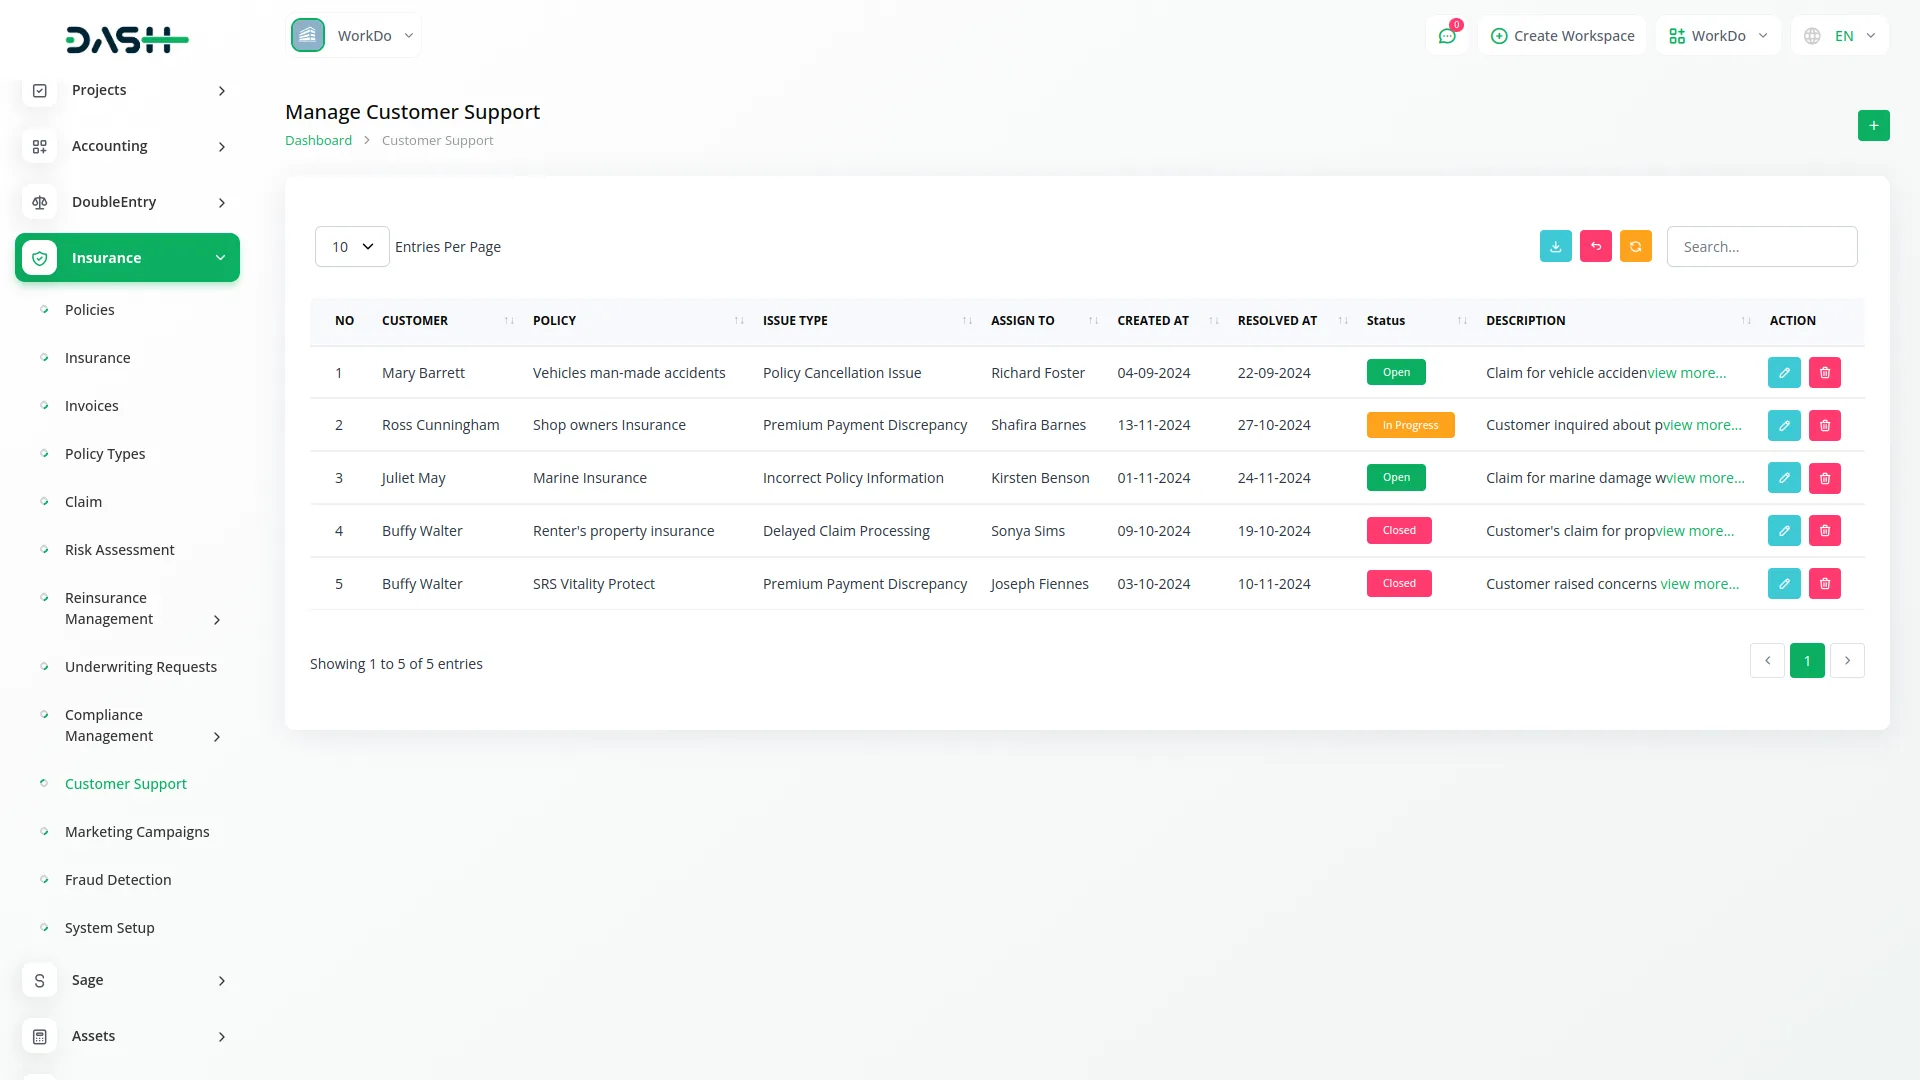
- The list page shows all customer support cases with columns for No, Customer, Policy, Issue Type, Assign To, Created Date, Resolved Date, Status, and Description. Use the Search button to find specific support cases and the Export button to download support data for performance analysis and reporting. Available actions include Edit to modify support case details and Delete to remove support cases from the system.
Marketing Campaign Management
- To create a new marketing campaign, click the “Create” button at the top of the marketing campaigns page. Enter the Campaign Name to identify the specific marketing initiative. Set the Start Date when the campaign will begin and the End Date when it will conclude.
- Fill in the Target Audience information that describes who the campaign is designed to reach. Enter the Budget allocated for the campaign activities and expenses. Select the Status from the available options: Active, Complete, or Cancelled to indicate the current state of the marketing campaign.
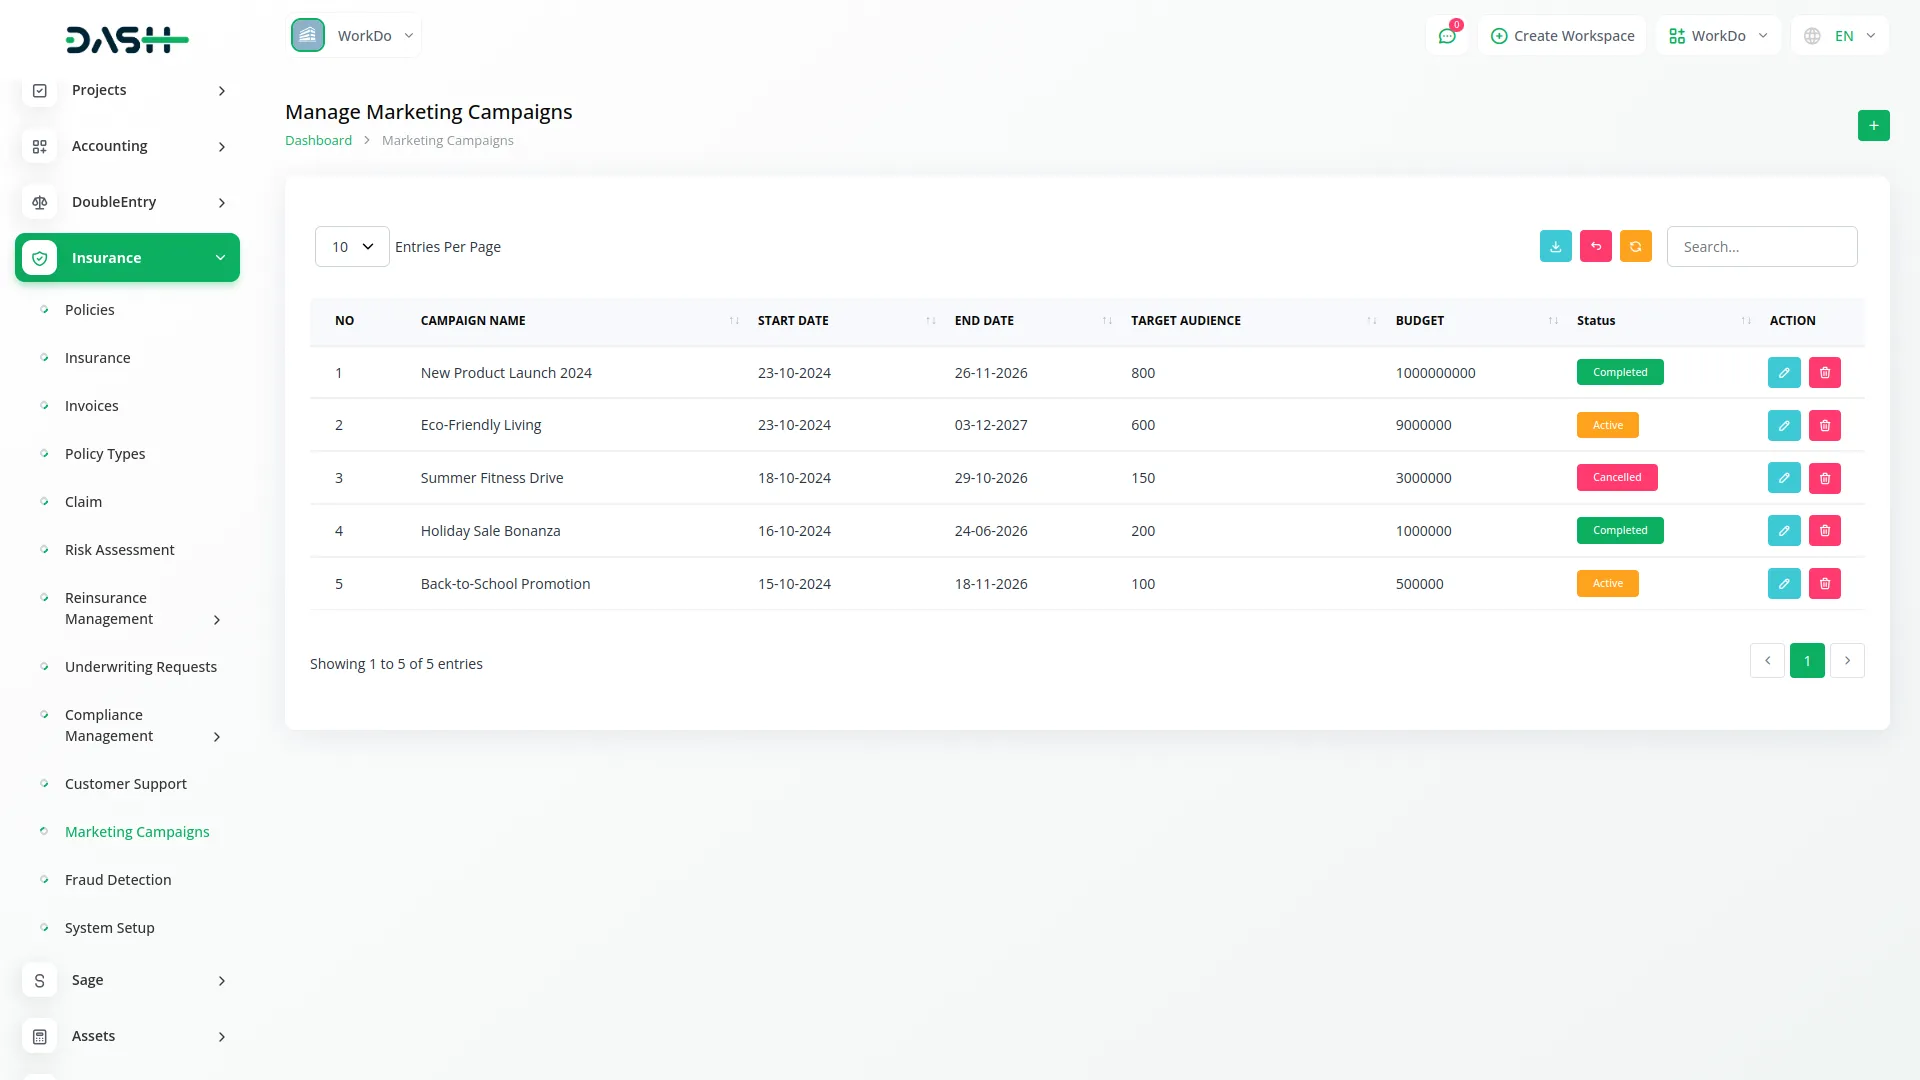
- The list page displays all marketing campaigns with columns for No, Campaign Name, Start Date, End Date, Target Audience, Budget, and Status. Use the Search button to locate specific campaigns and the Export button to download campaign information for marketing analysis and performance tracking. Available actions include Edit to modify campaign details and Delete to remove campaigns from the system.
Fraud Detection Management
- To create a new fraud detection record, click the “Create” button at the top of the fraud detection page. Select the Policy from the dropdown menu that connects to the Policies menu to specify which policy is associated with the potential fraud case. Choose the Claim from the dropdown connecting to the Insurance Claim menu to link the fraud alert to a specific insurance claim.
- Set the Alert Date when the fraud detection system flagged the potential issue or when the suspicious activity was identified. Select the Alert Level from the available options: High, Low, or Medium to categorize the severity and priority of the fraud alert. Choose the Status from Open, Investigated, or Resolved options to indicate the current state of the fraud investigation.
- Select Resolved By from users where the user type is Staff to identify which team member handled the fraud investigation if the case has been resolved. Enter the Resolution Date when the fraud case was closed or resolved. Add a Description that provides detailed information about the suspicious activity, investigation findings, evidence collected, and resolution details.
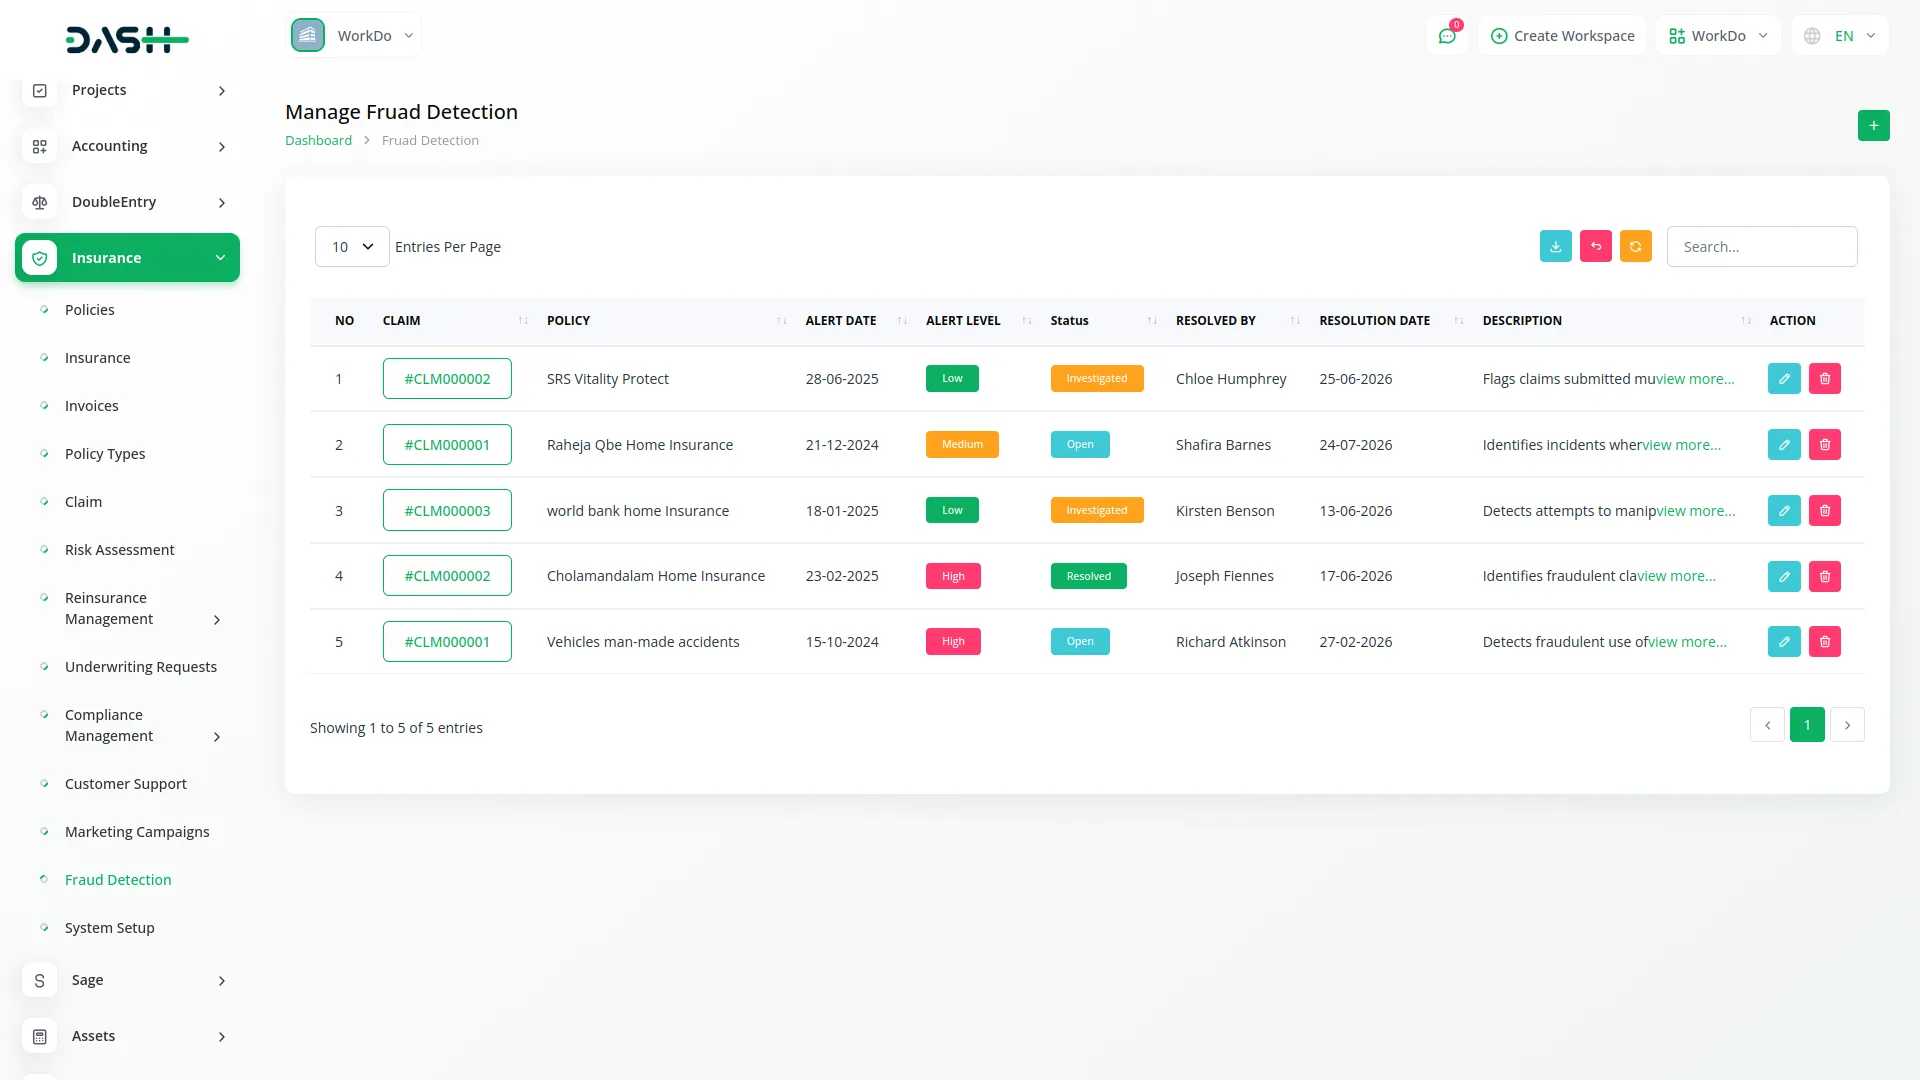
- The list page displays all fraud detection records with columns for No, Claim ID, Policy Name, Alert Date, Alert Level, Status, Resolved By, Resolution Date, and Description. Use the Search button to locate specific fraud cases and the Export button to download fraud detection data for analysis, reporting, and compliance purposes. Available actions include Edit to modify fraud detection details and Delete to remove fraud detection records from the system.
Categories
Related articles
- Plivo SMS Integration in Dash SaaS
- Recruitment Integration in Dash SaaS
- Zulip Chat Add-On Detailed Documentation
- Agriculture Managemet Integration in Dash SaaS
- Tailoring and Fashion Design Detailed Documentation
- Custom Alert Detailed Documentation
- WhatsApp Twilio Integration Dash SaaS
- SalesForce Integration in Dash SaaS
- Box.com Integration in Dash SaaS
- Pharmacy Management Integration in Dash SaaS
- How To Generate The YouTube Credentials
- DJ & Orchestra Add-On Detailed Documentation
Reach Out to Us
Have questions or need assistance? We're here to help! Reach out to our team for support, inquiries, or feedback. Your needs are important to us, and we’re ready to assist you!


Need more help?
If you’re still uncertain or need professional guidance, don’t hesitate to contact us. You can contact us via email or submit a ticket with a description of your issue. Our team of experts is always available to help you with any questions. Rest assured that we’ll respond to your inquiry promptly.
Love what you see?
Do you like the quality of our products, themes, and applications, or perhaps the design of our website caught your eye? You can have similarly outstanding designs for your website or apps. Contact us, and we’ll bring your ideas to life.
