Retainer Integration in Dash SaaS
The Retainer software is a comprehensive financial management system designed to help businesses create, manage, and track retainer agreements with their customers.
Introduction
The Retainer software is a comprehensive financial management system designed to help businesses create, manage, and track retainer agreements with their customers. This software handles the complete retainer lifecycle from initial setup and creation to payment collection and conversion to invoices. The system integrates with accounting and project modules to provide flexible billing options, supports multiple payment methods, and includes customizable templates and tax configurations. Whether you’re managing design services, consulting retainers, or project-based agreements, this software provides all the tools needed to streamline your retainer management process and maintain professional client relationships.
How to Install the Add-On?
To Set Up the Retainer Add-On, you can follow this link: Setup Add-On
How to Use The Retainer Add-On?
Setup & Configuration
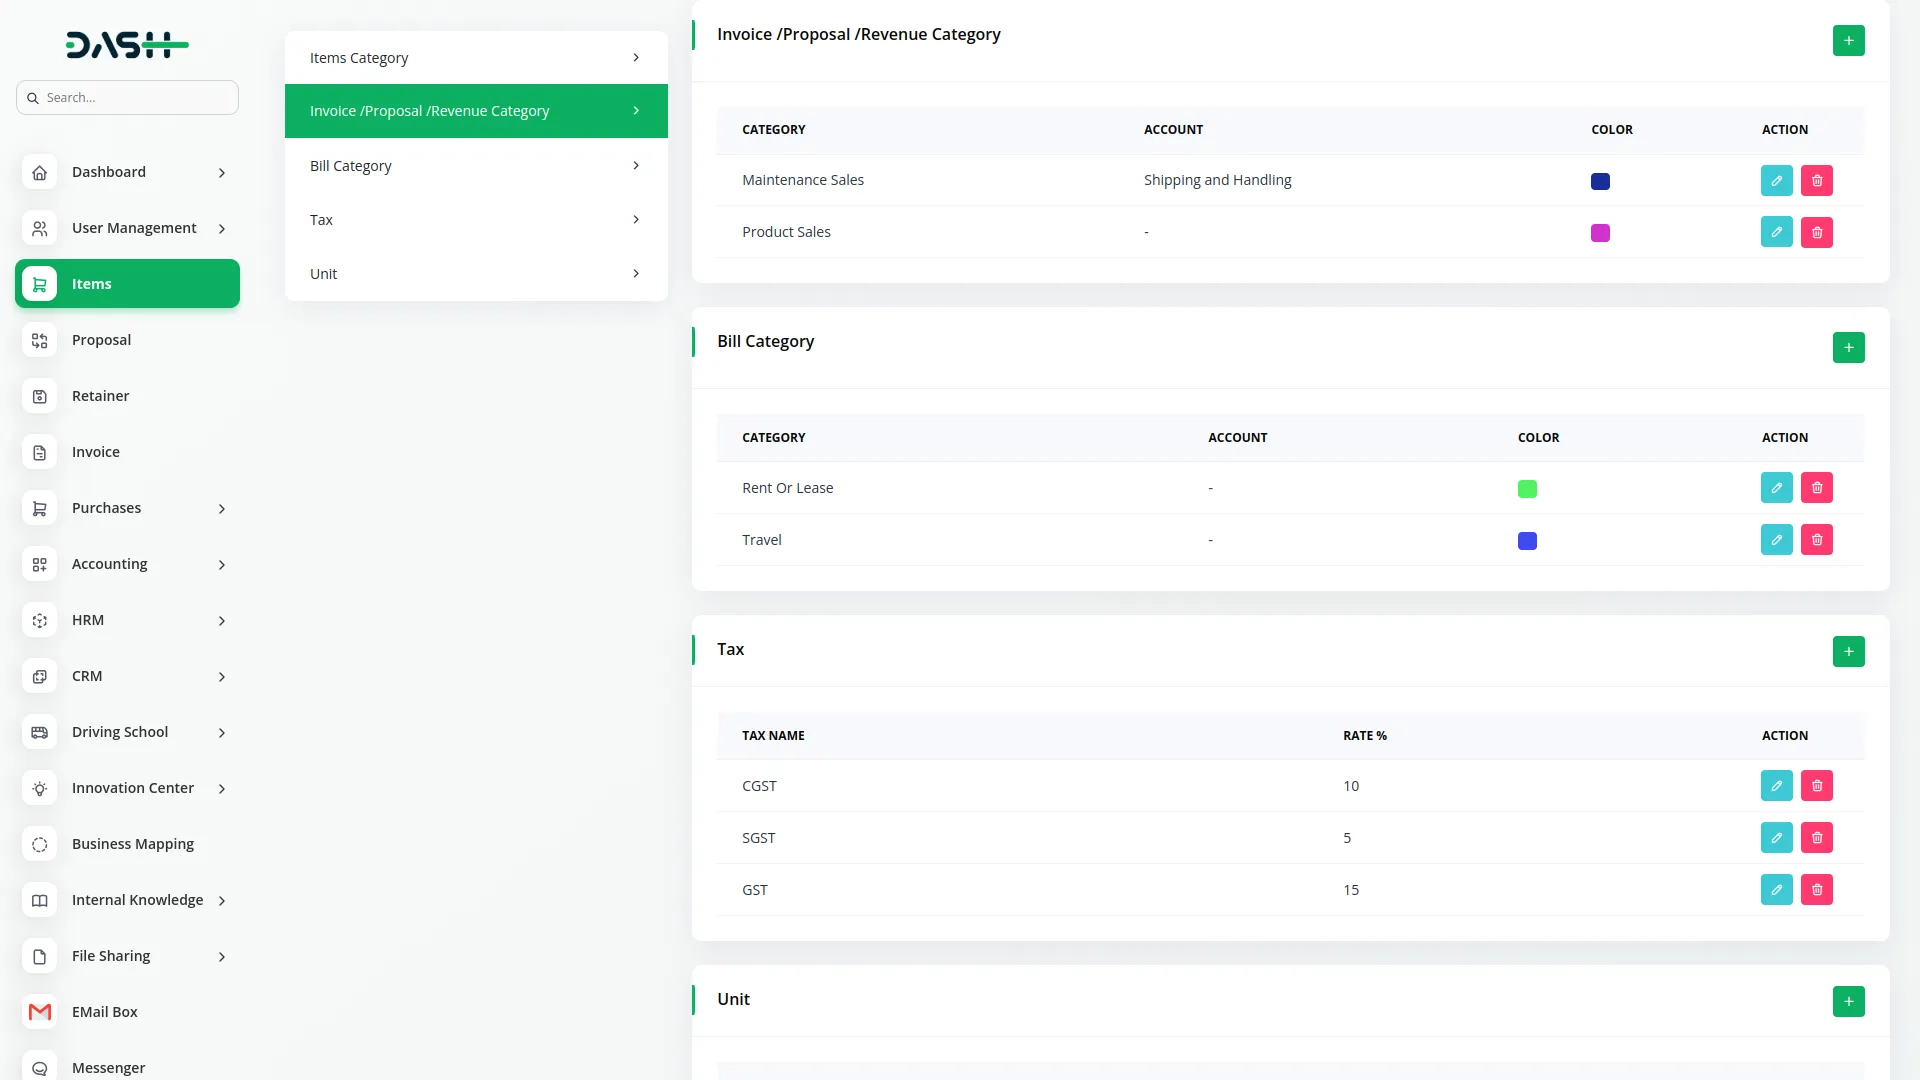
Configure Retainer Categories
- To set up retainer categories, navigate to Setup and then select Invoice / Proposal / Revenue Category. Click on the “Create” button to add a new category. Enter the category name such as “Design Services” or “Consulting Services”.
- Choose an account from the Chart of Accounts dropdown which only appears if the Accounting module is active in your system. Select a category color that will be used for UI representation to help you visually organize different types of retainers.
- You can enable image functionality by toggling the “Enable Image?” option to ON. If you enable this feature, you’ll need to upload a category image that represents this retainer category. This helps in visual identification and professional presentation of your retainer categories. You can also edit and delete the categories from the action column.
Create Tax Rates
- To create tax rates, navigate to Setup and then select Tax and click on the “Create” button. Enter the tax rate name such as “VAT”, “Sales Tax”, or “Service Tax”.
- Specify the tax rate percentage, for example, enter 18% for an 18 percent tax rate. These tax rates will be available for selection when creating retainers, ensuring accurate tax calculations on all your retainer agreements. You can edit or delete the tax rates whenever you want.
Create Unit
- To create a unit, navigate to Setup and then add the unit name and click on the “Create” button. This allows you to define measurement units for items in your retainer agreements.
Retainer Creation
Account Type Selection
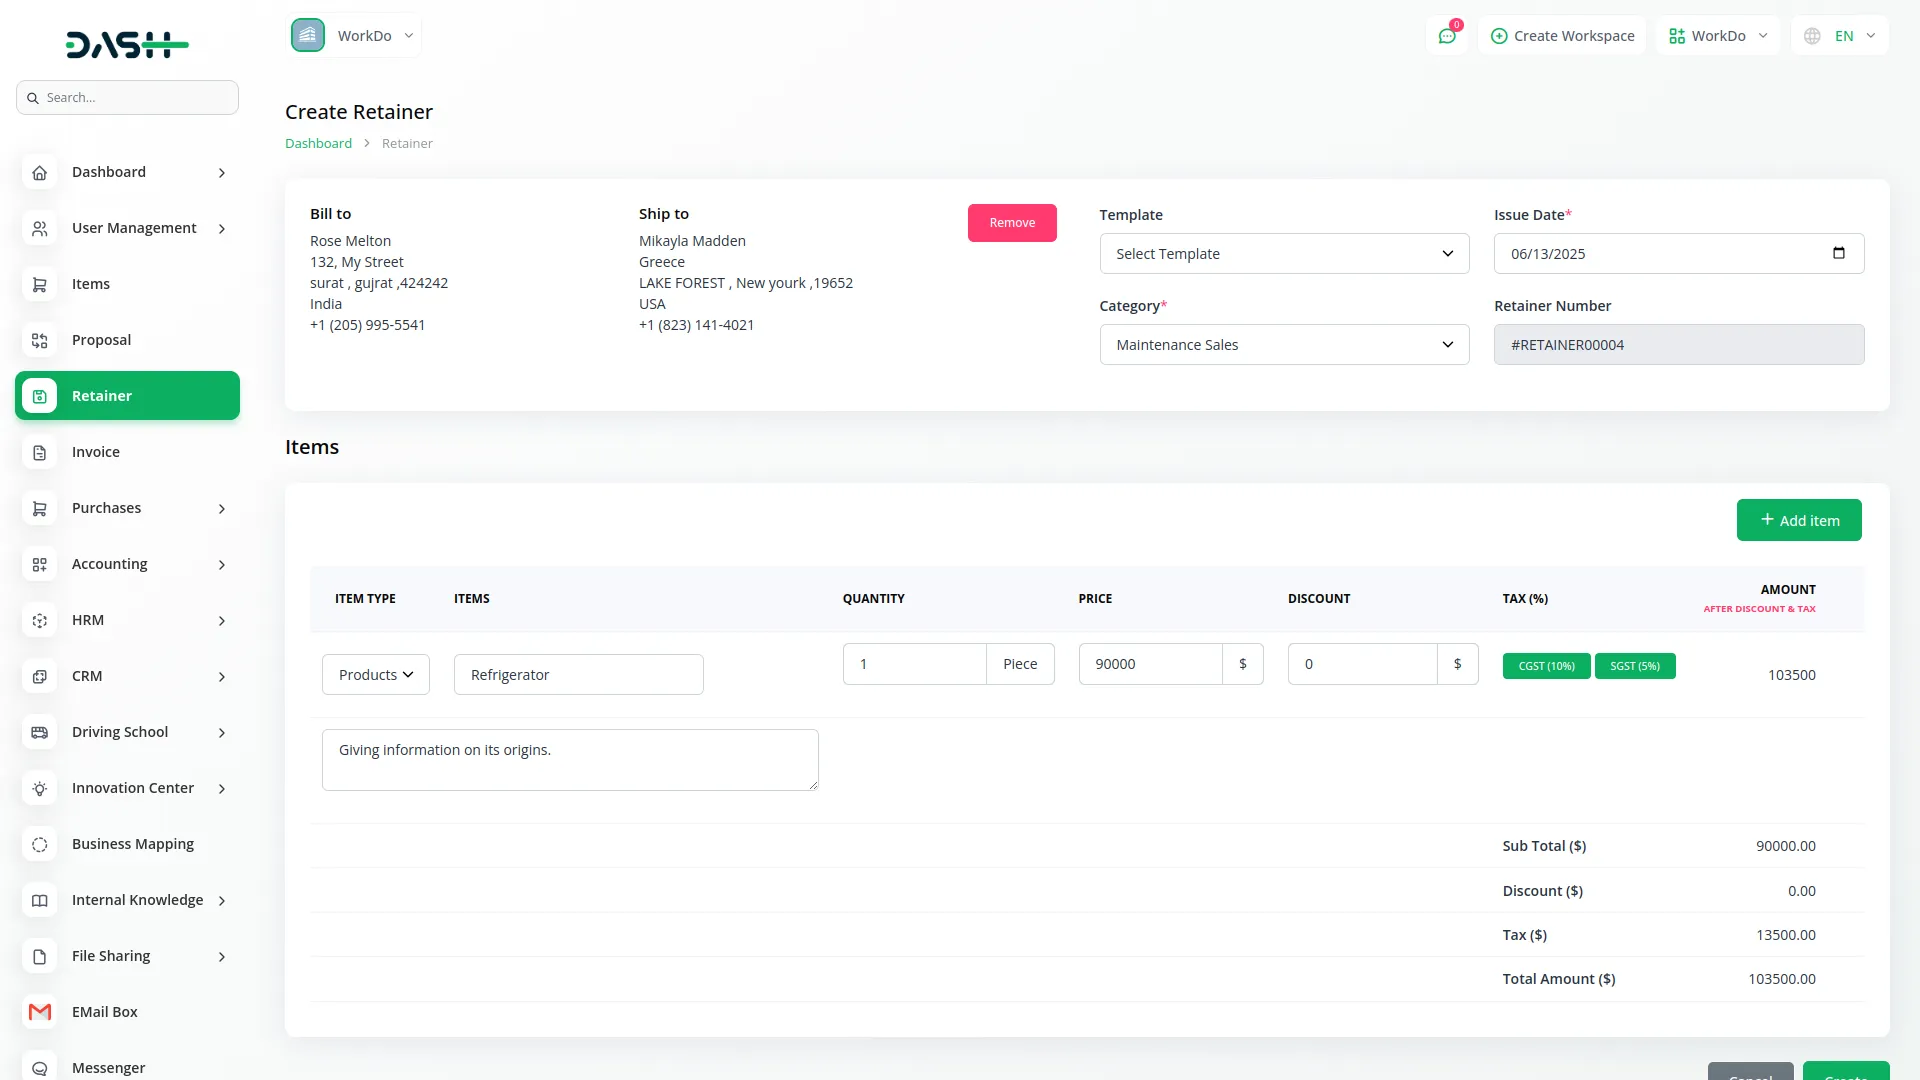
- When creating a new retainer, you’ll first need to select the account type. The available options are Accounting and Projects, but these options only appear if both the Accounting and Project modules are active in your system.
- This selection determines how the retainer will be structured and what additional fields become available.
Accounting Type Retainers
- If you select Account Type as Accounting, choose the customer from your Accounting section under Customers list. Set the billing type to “Item-wise” which allows you to add multiple items or services to the retainer.
- Select a template from your available Retainer Templates to maintain consistent formatting. Choose the issue date using the date picker and select the appropriate category from your configured Invoice/Proposal/Revenue categories. The retainer number will be automatically generated.
- In the Item Section for item-wise billing, select the item type from Products, Services, or Parts. Based on your selection, the system will load the respective item list for you to choose from. For each item, enter the quantity, price, discount amount, and tax percentage. You can add multiple items to a single retainer by using the “Add Item” button to build comprehensive retainer agreements.
Project Type Retainers
- If you select Account Type as Projects, choose the customer from your Accounting section under Customers list. Set the billing type to “Project-wise” which links the retainer to a specific project. Select a template from your Retainer Templates and choose the issue date.
- Select the project from your Projects section under the Project list that this retainer relates to. Choose the category from your configured categories and the system will automatically generate the retainer number. Select the appropriate tax rate from your configured Setup under Tax options.
Retainer Management
List Page Features
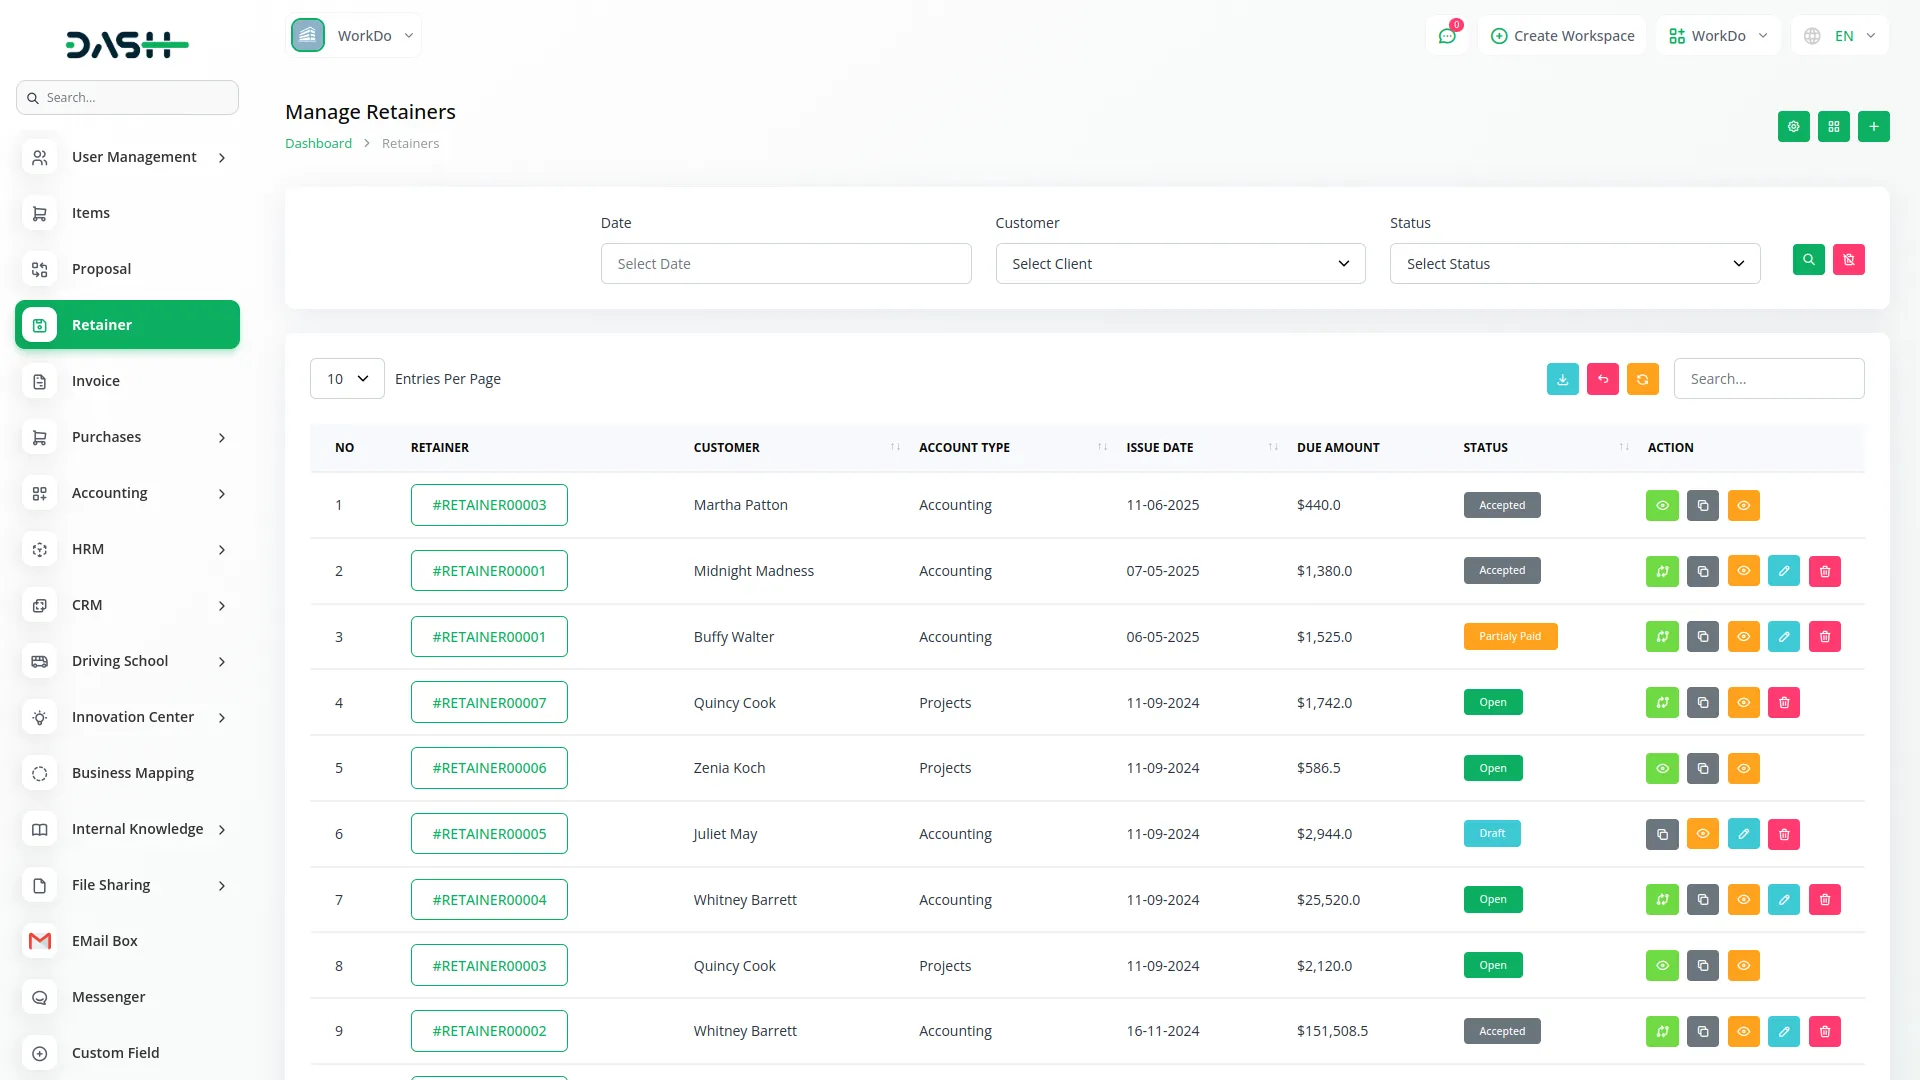
- The retainer list page provides comprehensive management tools with Search functionality to find specific retainers, Export options to download retainer data, and an “Create” button to create new agreements. You can access Setup options directly from this page and switch to Grid View for different visual presentations of your retainers.
- The main table displays columns for number, Retainer ID, customer name, account type, issue date, due amount, and current status.
- Clicking on the Retainer ID opens the full Retainer Detail page where you can view all information and perform additional actions.
Retainer Actions
- For each retainer in the list, several actions are available. You can “Convert to Invoice” to transform the retainer into a billable invoice. If a retainer has already been converted, the action becomes “Already Converted to Invoice” which redirects you to the Invoice Detail Page.
- Use “Duplicate” to create a copy of an existing retainer for similar agreements. The “View” action opens the detailed Retainer Detail Page, while “Edit” and “Delete” allow you to modify or remove retainer records.
Filter Options
The retainer list includes advanced filtering capabilities to help you find specific retainers quickly:
- Date-wise Filter: Filter retainers by creation date, issue date, or due date ranges
- Customer Filter: Filter by customer name (customers come from Accounting -> Customer section)
- Status Filter: Filter by retainer status including all available retainer statuses (Draft, Sent, Accepted, Paid, Converted, etc.)
Retainer Detail Management
Header Actions
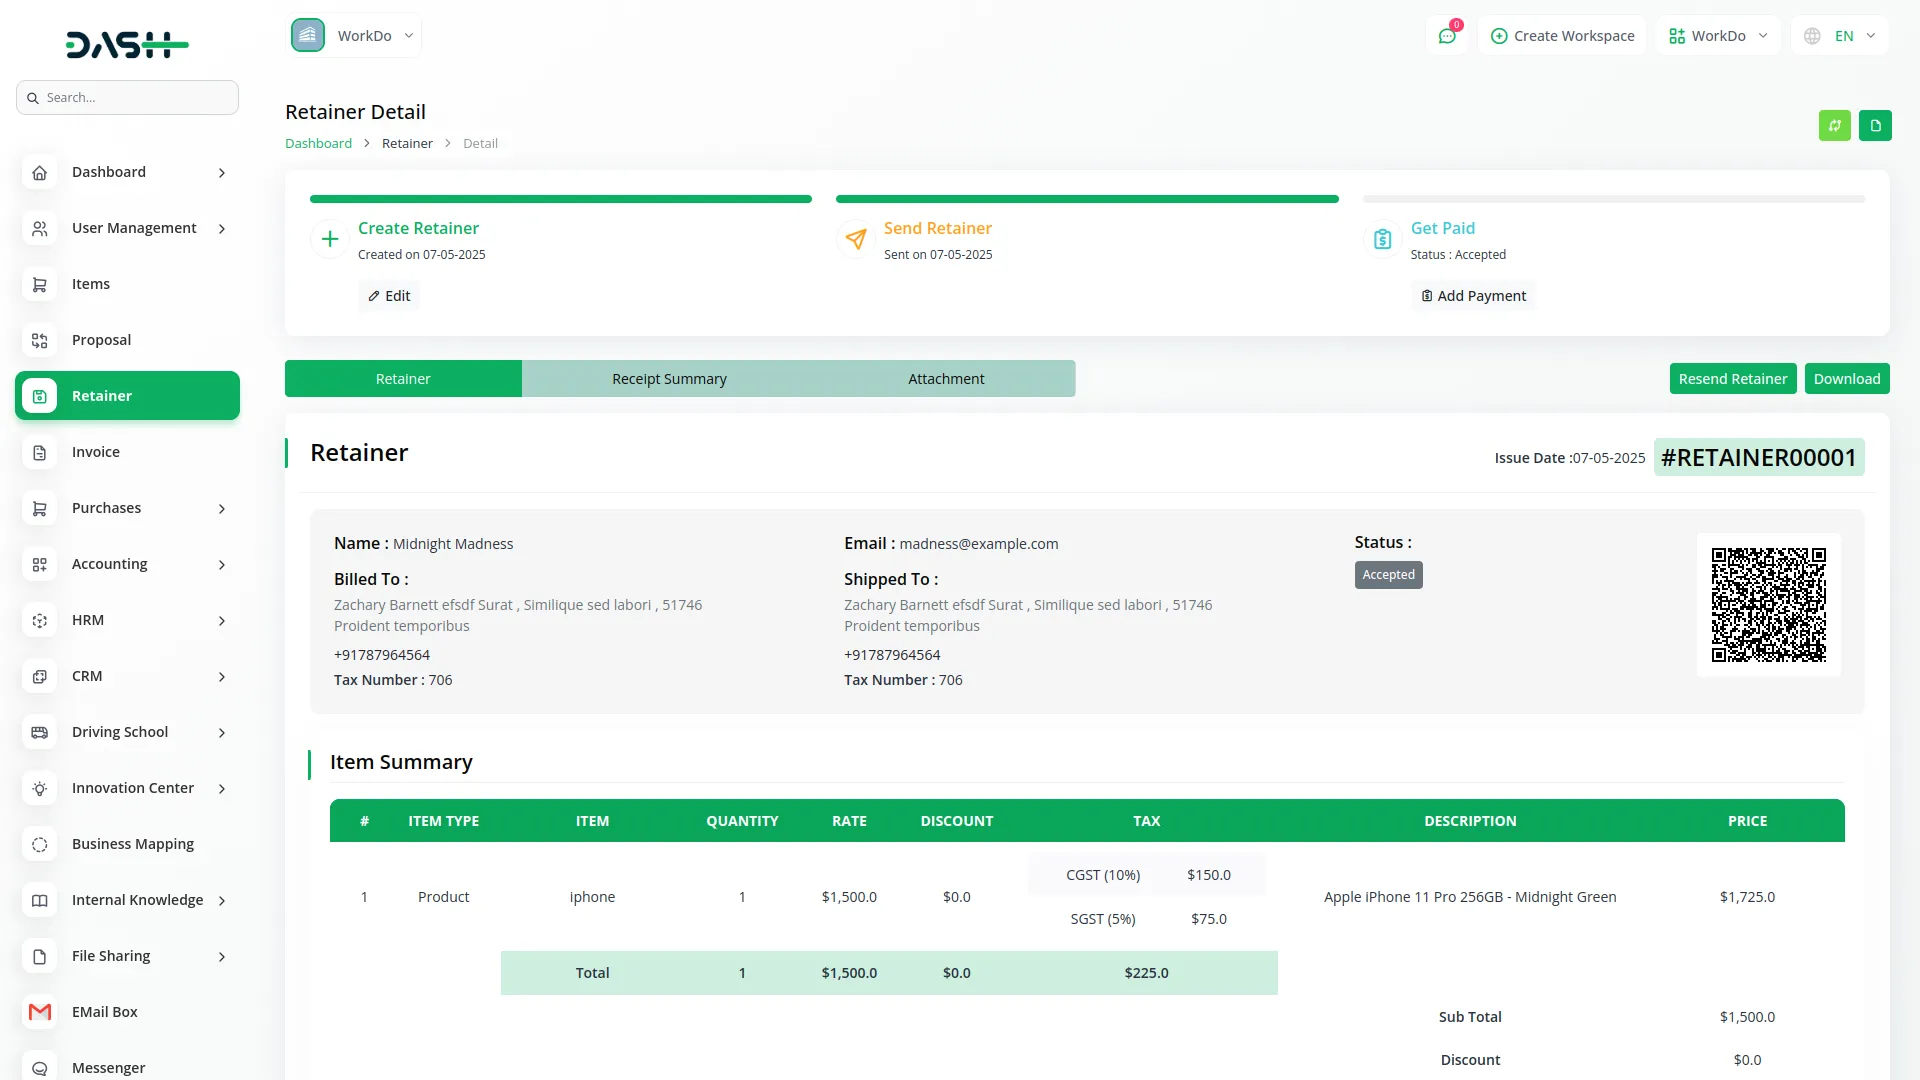
- On the Retainer Detail page, you’ll find several important actions in the header. The “Convert to Invoice” button transforms the retainer into an invoice for billing purposes.
- Use “Copy Link” to get the public retainer payment link that you can share with customers for online viewing and payment. The “Download Retainer PDF” option generates a professional PDF document reflecting your current template, logo, and color settings.
- When you send a retainer to a customer, they can view it on their dashboard through the public link. The customer has the ability to change the status to “Accepted” once they agree to the terms.
- After the customer accepts the retainer, the “Add Payment” option becomes available on your company side, allowing you to record and track payments against the retainer agreement.
-
Payment Management
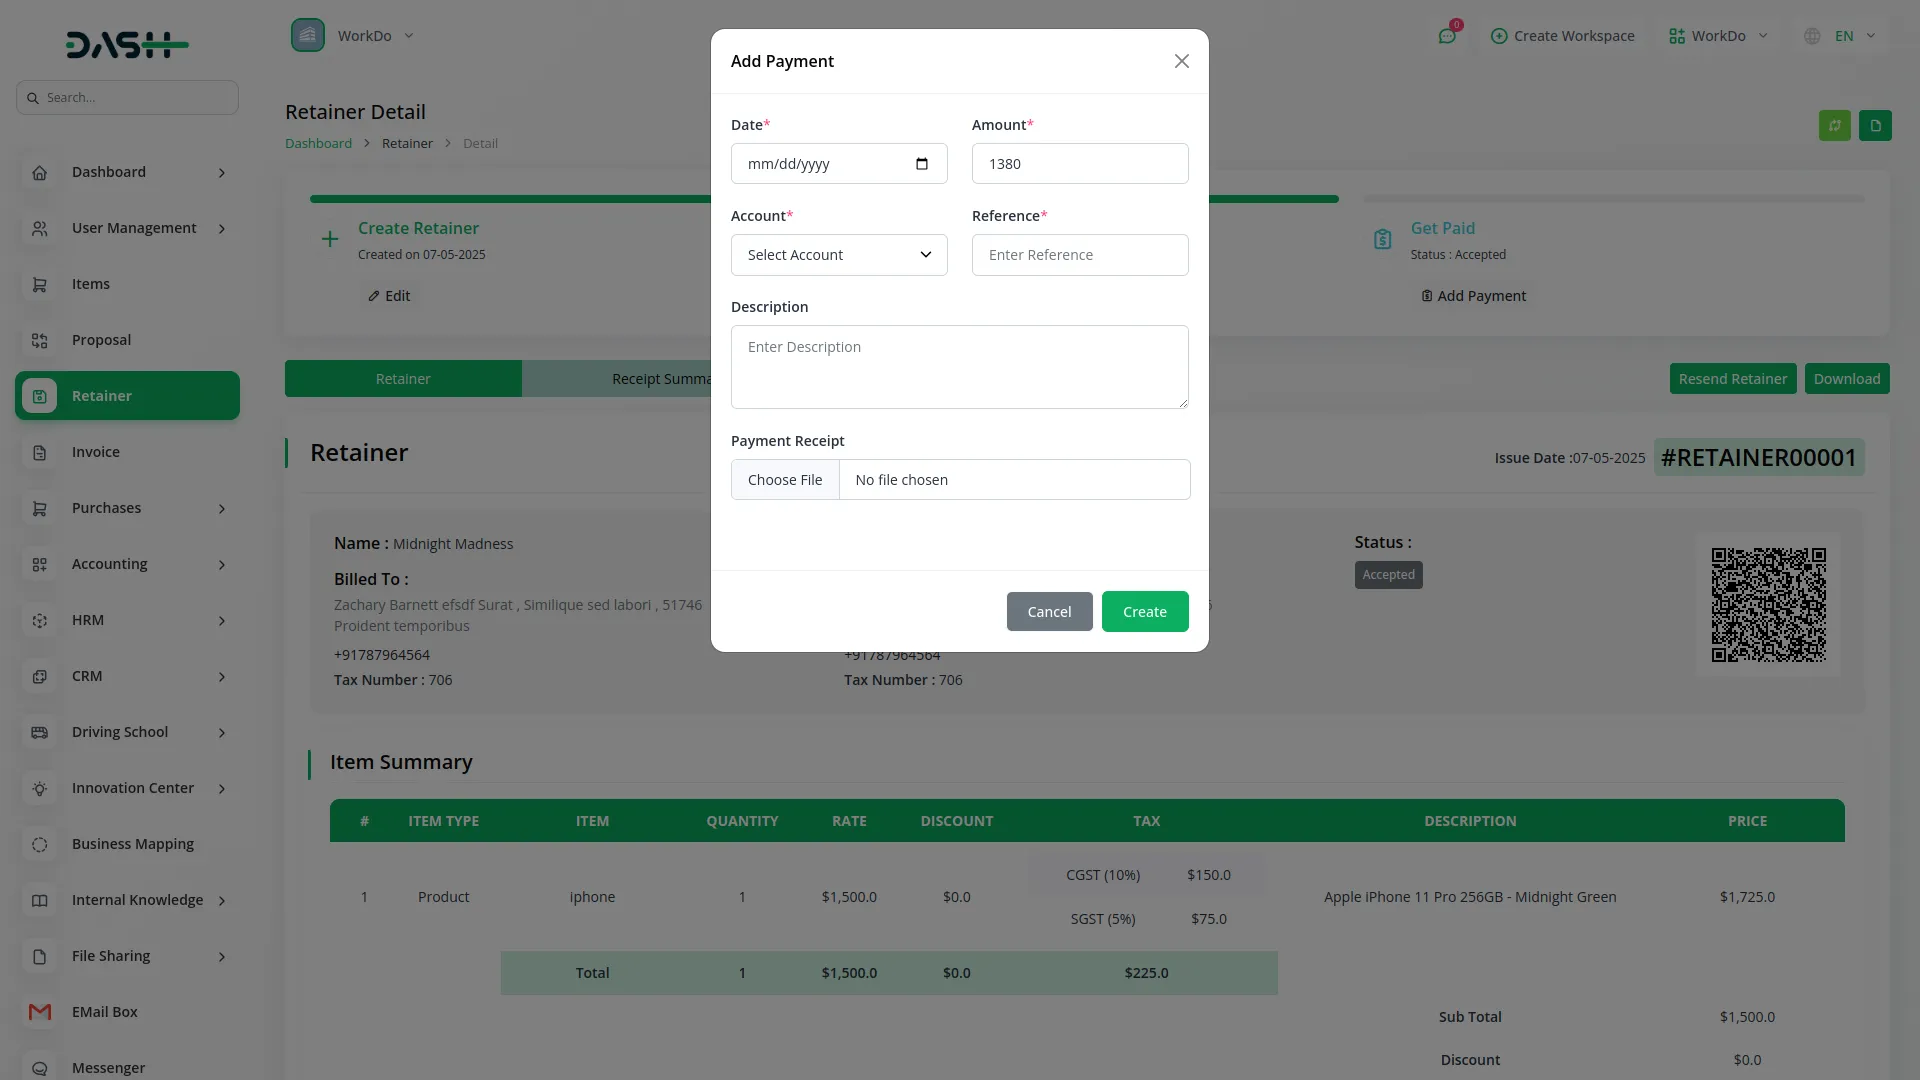
- To add a payment, navigate from the Retainer Detail page and click “Create”. Enter the payment date and amount received. If Accounting is enabled, select the account from Accounting under Banking and then Account where the payment was received.
- Add a reference number for tracking purposes and include a description of the payment. You can upload a receipt image as proof of payment. After saving, the payment information will appear in the Receipt Summary section for complete payment tracking.
-
Attachments and Communication
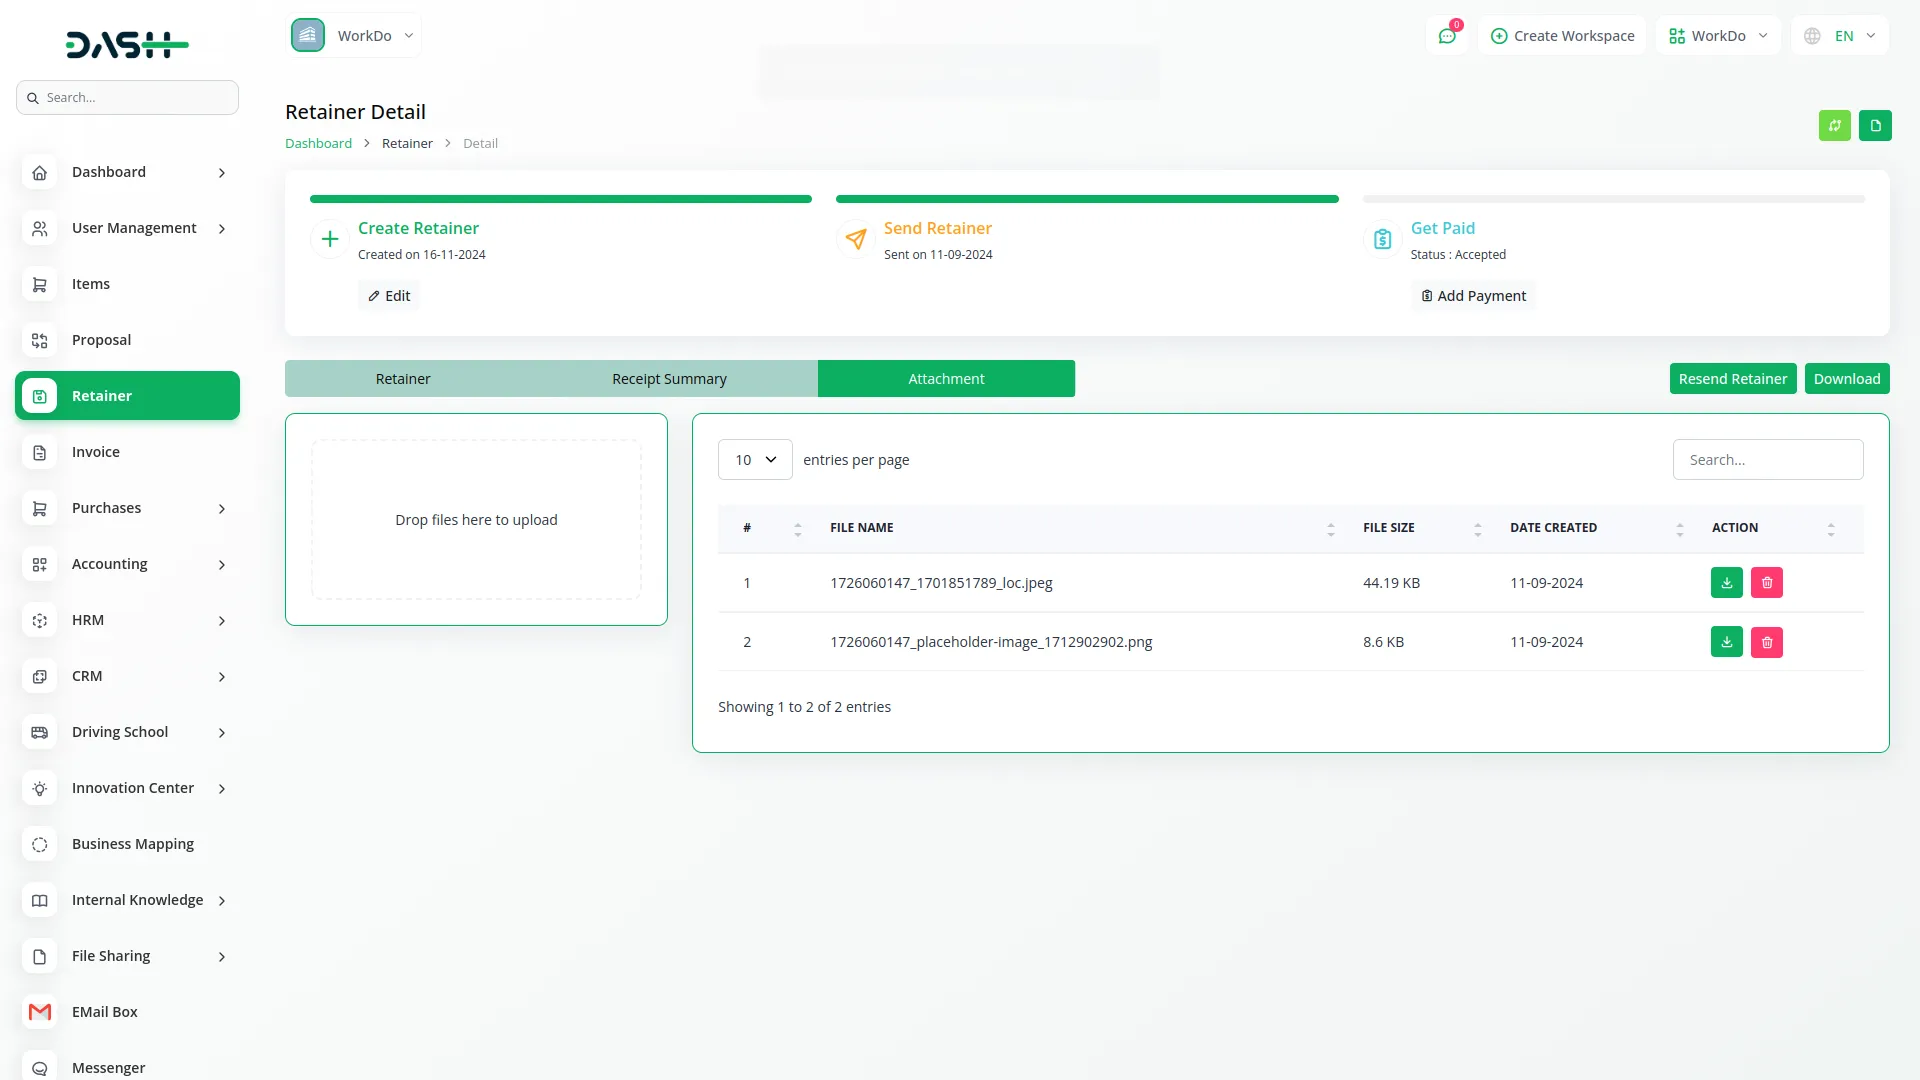
- You can add attachments to retainers by clicking “Add Attachment” and uploading relevant files such as contracts, specifications, or supporting documents. Use “Resend Retainer” to send the retainer details to the customer again if needed.
- The “Download PDF” option creates a current version of the retainer that reflects your latest template, logo, and color settings.
-
Public Payment Page
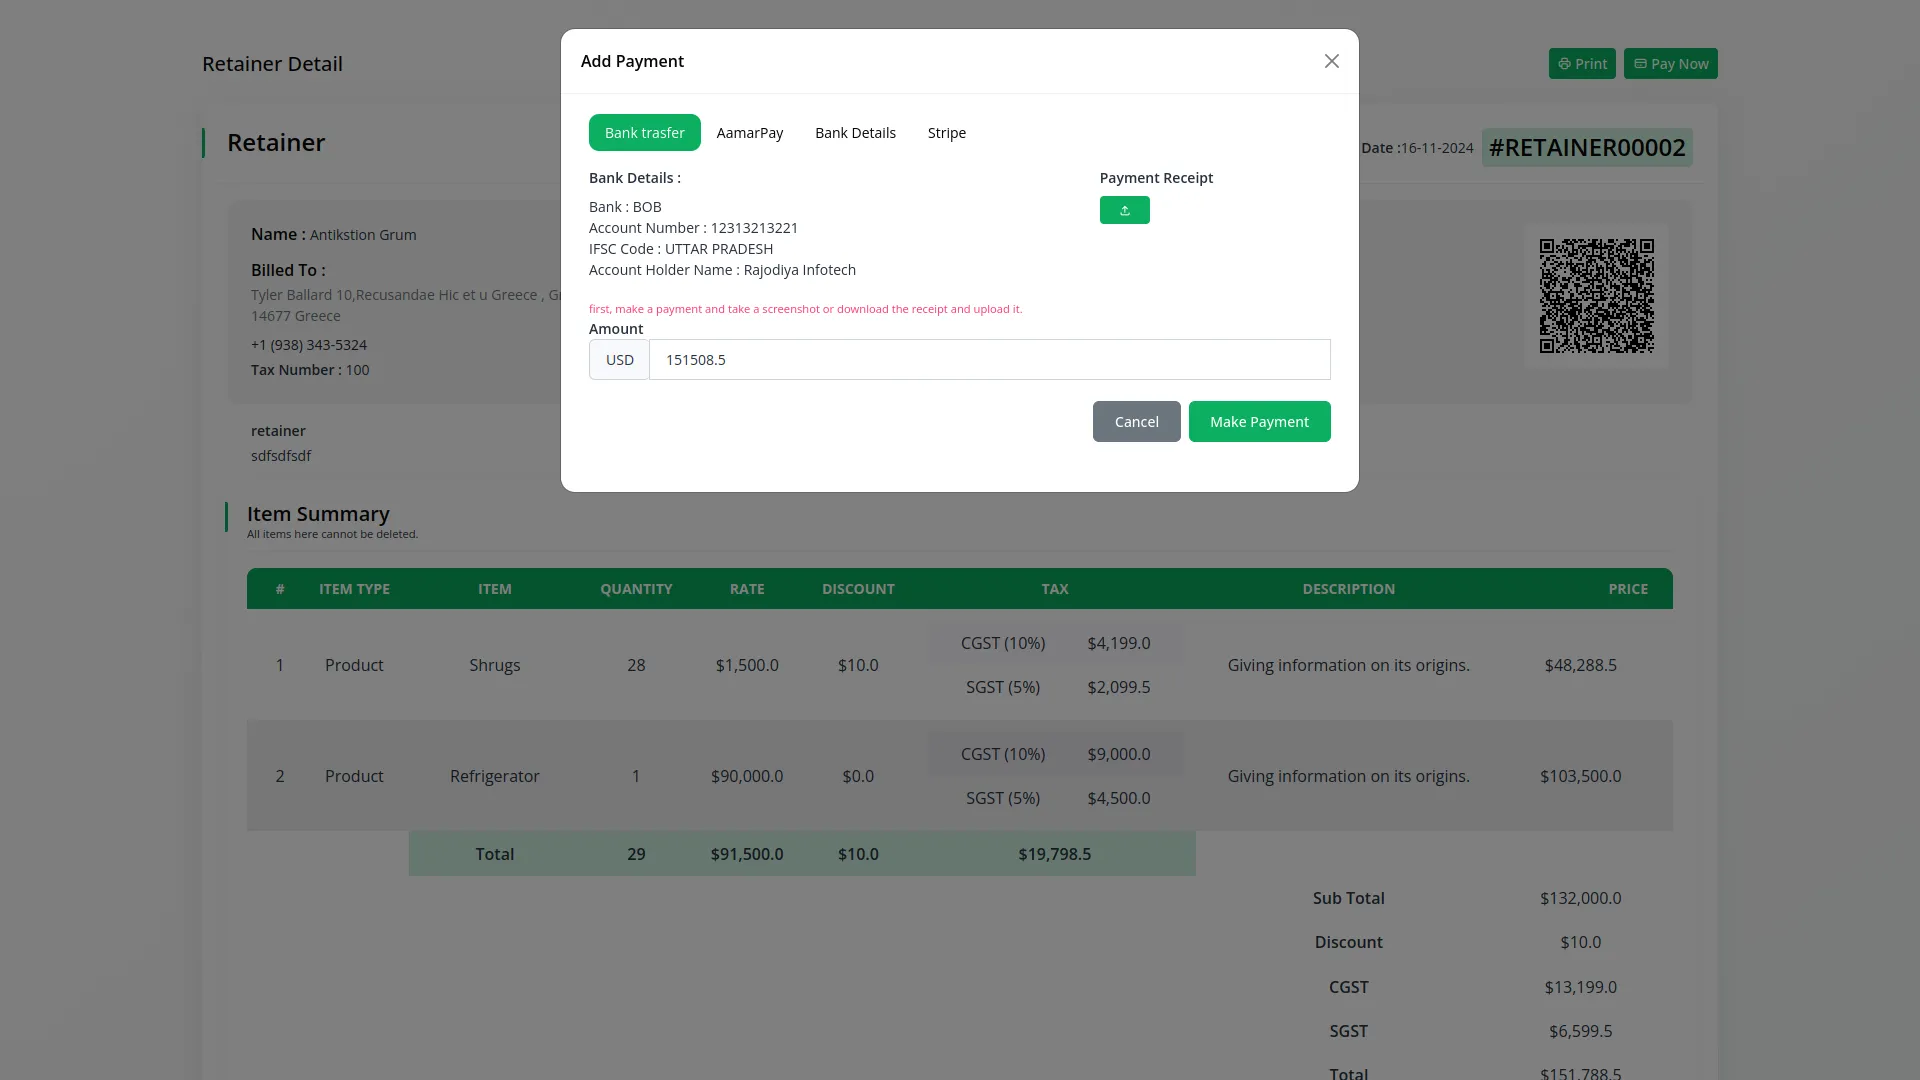
- The public retainer payment page opens when customers use the copied public link. This page displays a complete retainer summary with professional formatting.
- Customers can use the “Print PDF” button to download their copy or click “Pay Now” to access the online payment form if a payment gateway is enabled in your system. Note: Online payment functionality is available if you enable Account Add-On and connect your bank account with a Payment Gateway. After successful payment, the transaction automatically appears under the Receipt Summary in your system.
-
Print Settings Configuration
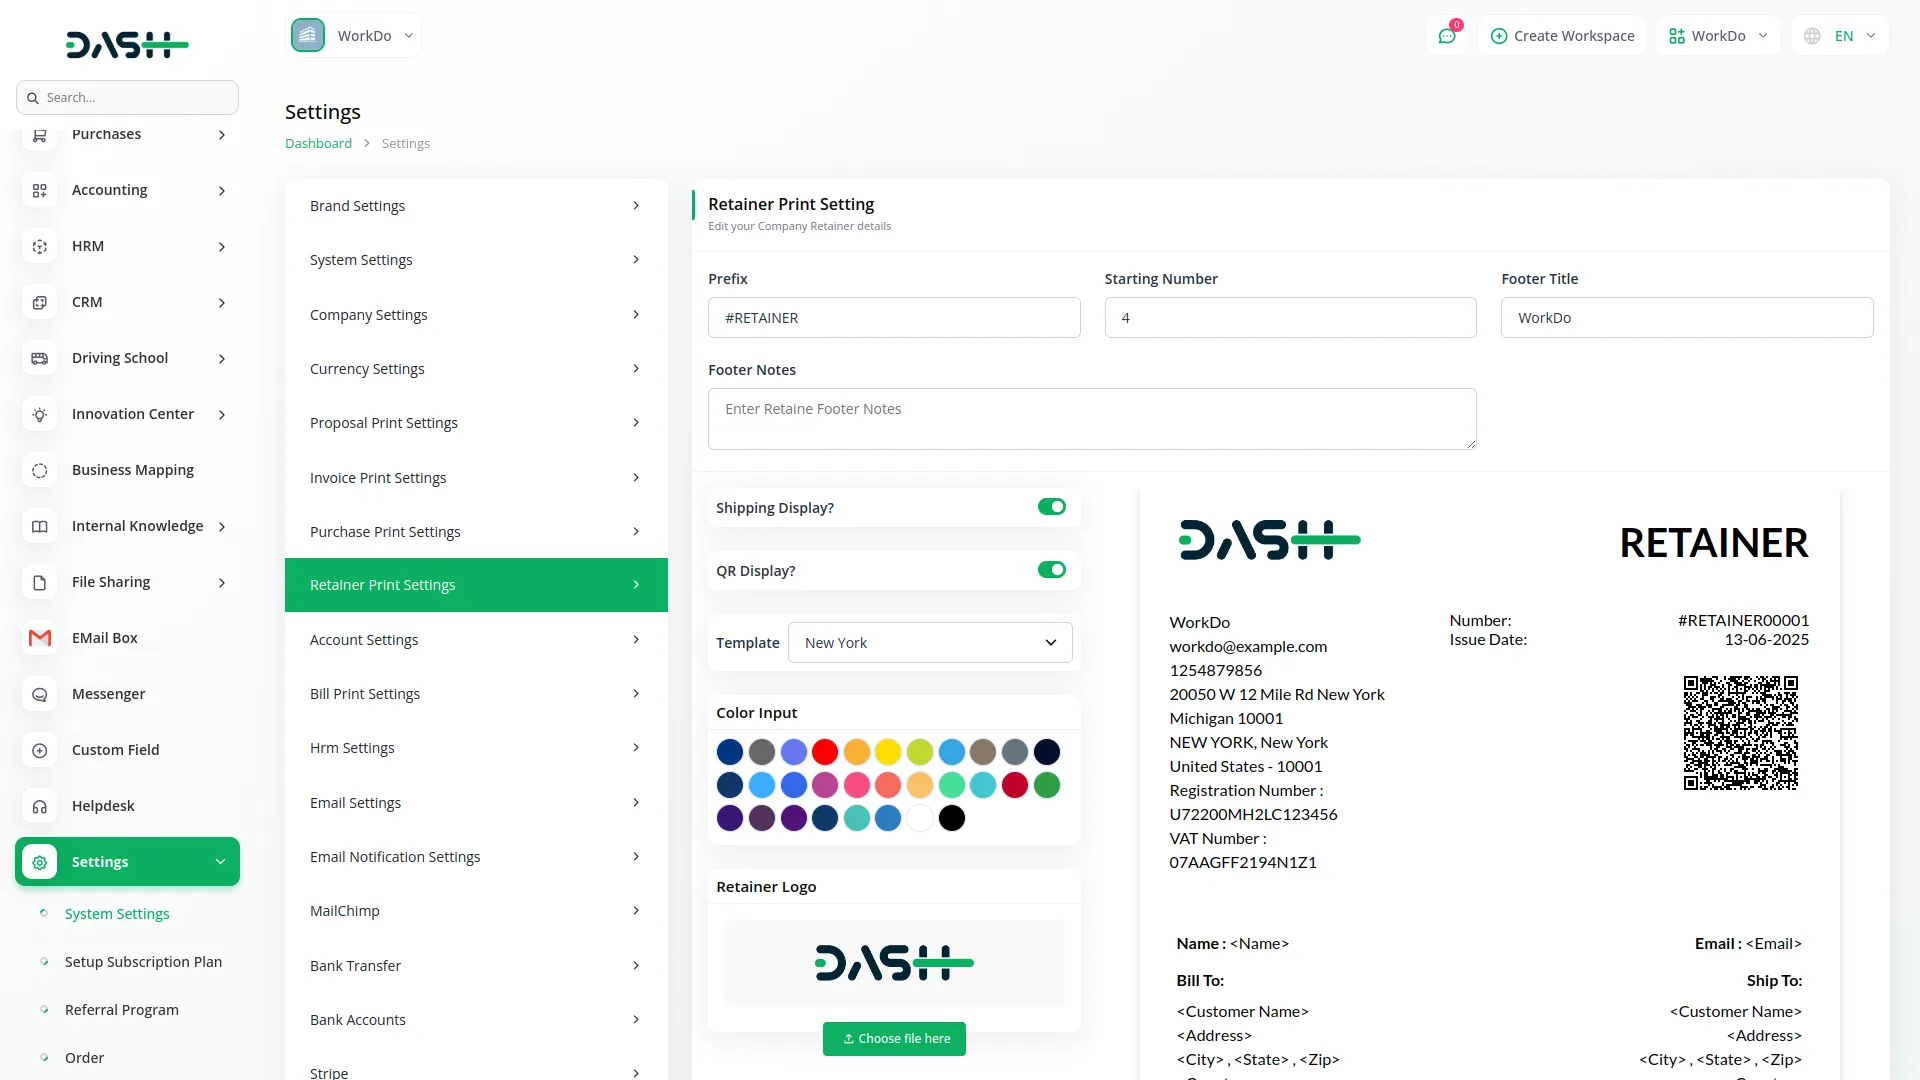
- To customize retainer appearance, navigate to System Settings and select Retainer Print Setting. Configure the prefix such as “RET” for retainer numbering and set the starting number for your sequence.
- Add a footer title and footer notes that will appear on all retainer documents. Toggle “Shipping Display” ON or OFF based on whether you want shipping information shown. Enable or disable “QR Display” for QR code inclusion on retainers.
- Select your preferred template layout from available options and choose a color scheme using the color input feature. Upload your retainer logo that will appear on all documents. Click “Save” to apply all changes, and these settings will immediately reflect in all downloaded PDFs and public retainer pages.
-
Categories
Related articles
- Franchise Management Integration in Dash SaaS
- Portfolio Integration in Dash SaaS
- Facebook Post Integration in Dash SaaS
- LiveStorm Meeting Detailed Documentation
- Sendinblue Integration in Dash SaaS
- PayNow Payment Gateway Integration in Dash SaaS
- Google Drive Integration in Dash SaaS
- Locker & Safe Deposit Integration in Dash SaaS
- Project Template Integration in Dash SaaS
- Google Slides Detailed Documentation
- Webhook – WorkDo Dash SaaS Add-on
- Blood Bank Integration in Dash SaaS
Reach Out to Us
Have questions or need assistance? We're here to help! Reach out to our team for support, inquiries, or feedback. Your needs are important to us, and we’re ready to assist you!


Need more help?
If you’re still uncertain or need professional guidance, don’t hesitate to contact us. You can contact us via email or submit a ticket with a description of your issue. Our team of experts is always available to help you with any questions. Rest assured that we’ll respond to your inquiry promptly.
Love what you see?
Do you like the quality of our products, themes, and applications, or perhaps the design of our website caught your eye? You can have similarly outstanding designs for your website or apps. Contact us, and we’ll bring your ideas to life.
