Driving School Integration in Dash SaaS
The Driving School Add-On is a comprehensive management system designed to help driving schools efficiently operate and track all aspects of their business.
Introduction
The Driving School Add-On is a comprehensive management system designed to help driving schools efficiently operate and track all aspects of their business. This software manages the complete student journey from enrollment to license acquisition, including student registration, vehicle fleet management, class scheduling, lesson tracking, progress monitoring, and invoice generation. The system provides detailed analytics through dashboards, handles instructor assignments, tracks vehicle usage, manages driving tests, and maintains progress reports for regulatory compliance. Whether you’re running a small driving school or a large training institute, this software provides all the tools needed to streamline operations, ensure proper documentation, maintain student records, and deliver professional driving education services while meeting licensing requirements and business objectives.
How to Install the Add-On?
To Set Up the Driving School Add-On, you can follow this link: Setup Add-On
How to Use The Driving School Add-On?
Driving School Dashboard
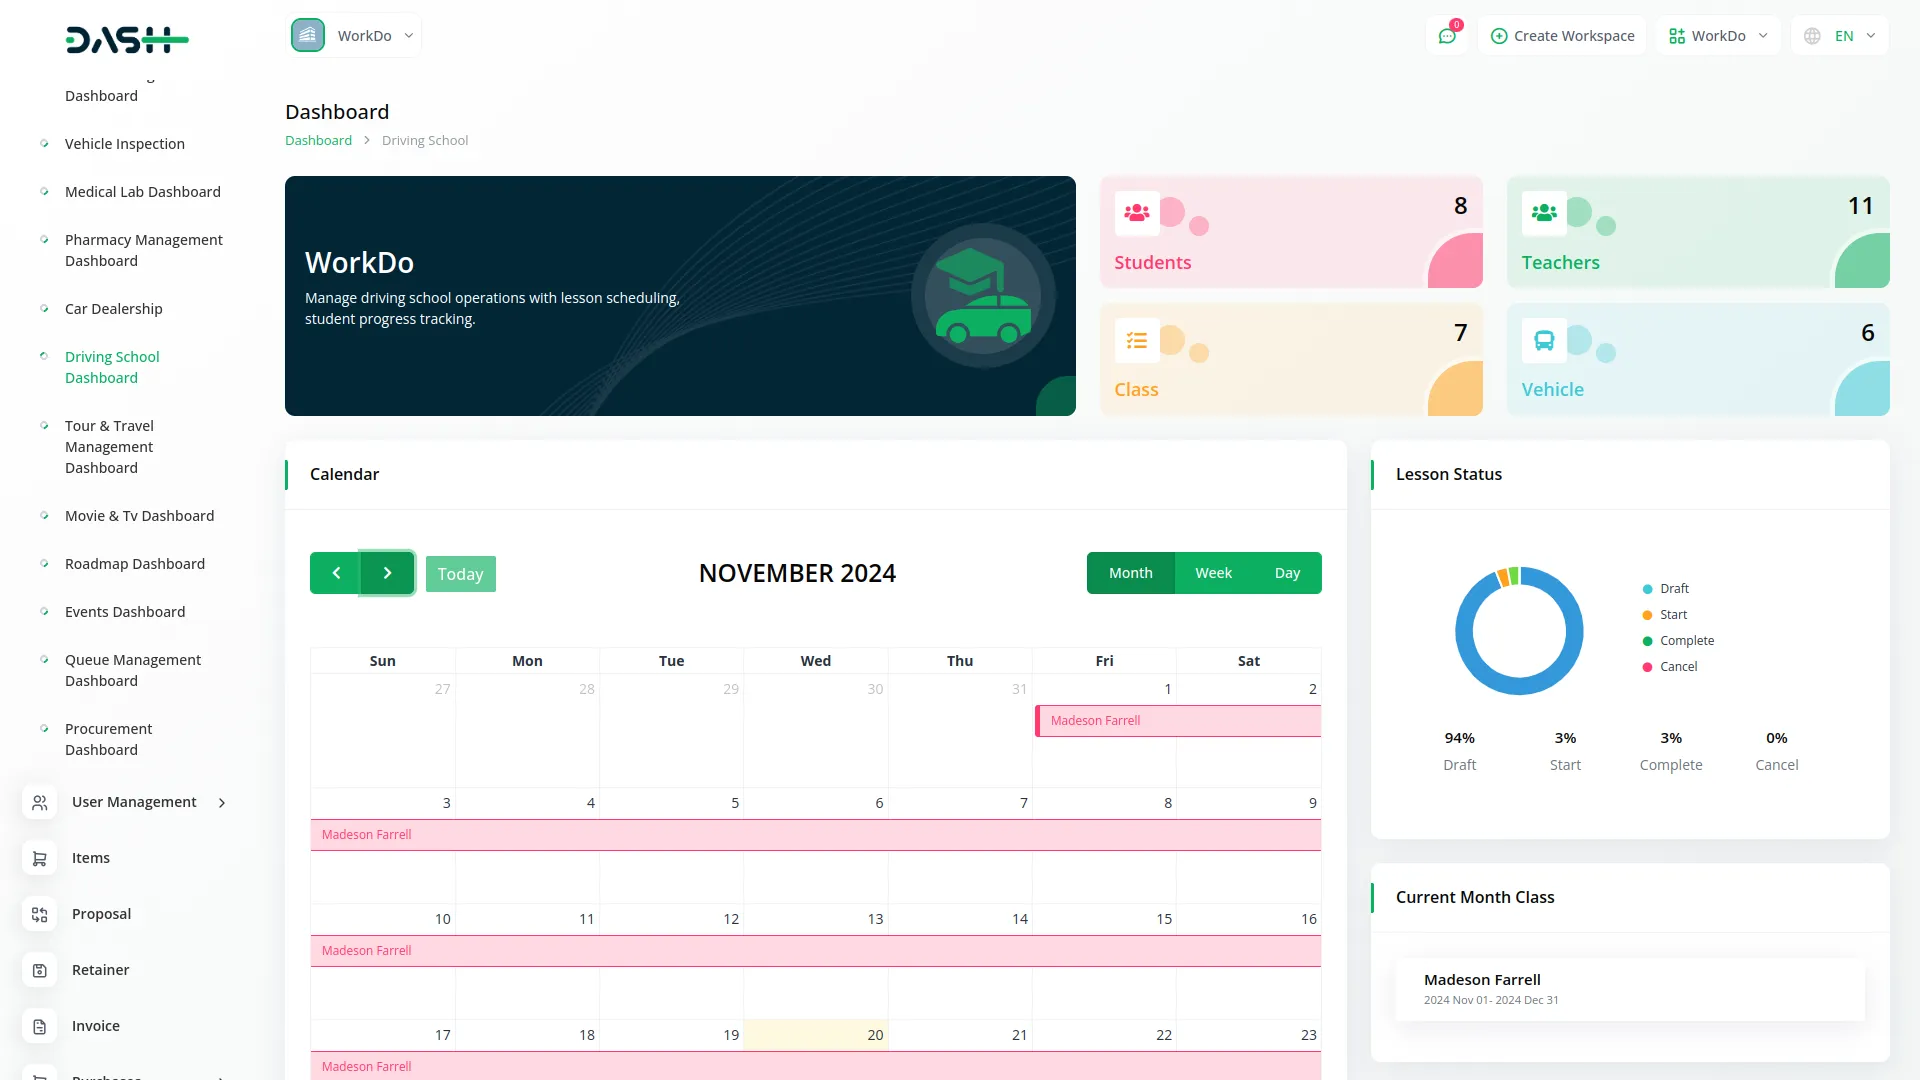
- The dashboard is your main control center that shows important information at a glance. When you open the software, you will see four cards displaying total numbers for Students, Teachers, Classes, and Vehicles currently in your system.
- Below the cards, there is a calendar that shows class data organized by date. You can click on any date to see which classes are scheduled for that day.
- The dashboard also includes a pie chart showing Lesson Status with different categories: Draft, Start, Complete, and Cancel. This helps you quickly see the status of all lessons.
- At the bottom, you will find the Current Month Class section that displays class names and class dates for the current month, giving you a quick overview of your monthly schedule.
-
Student Management
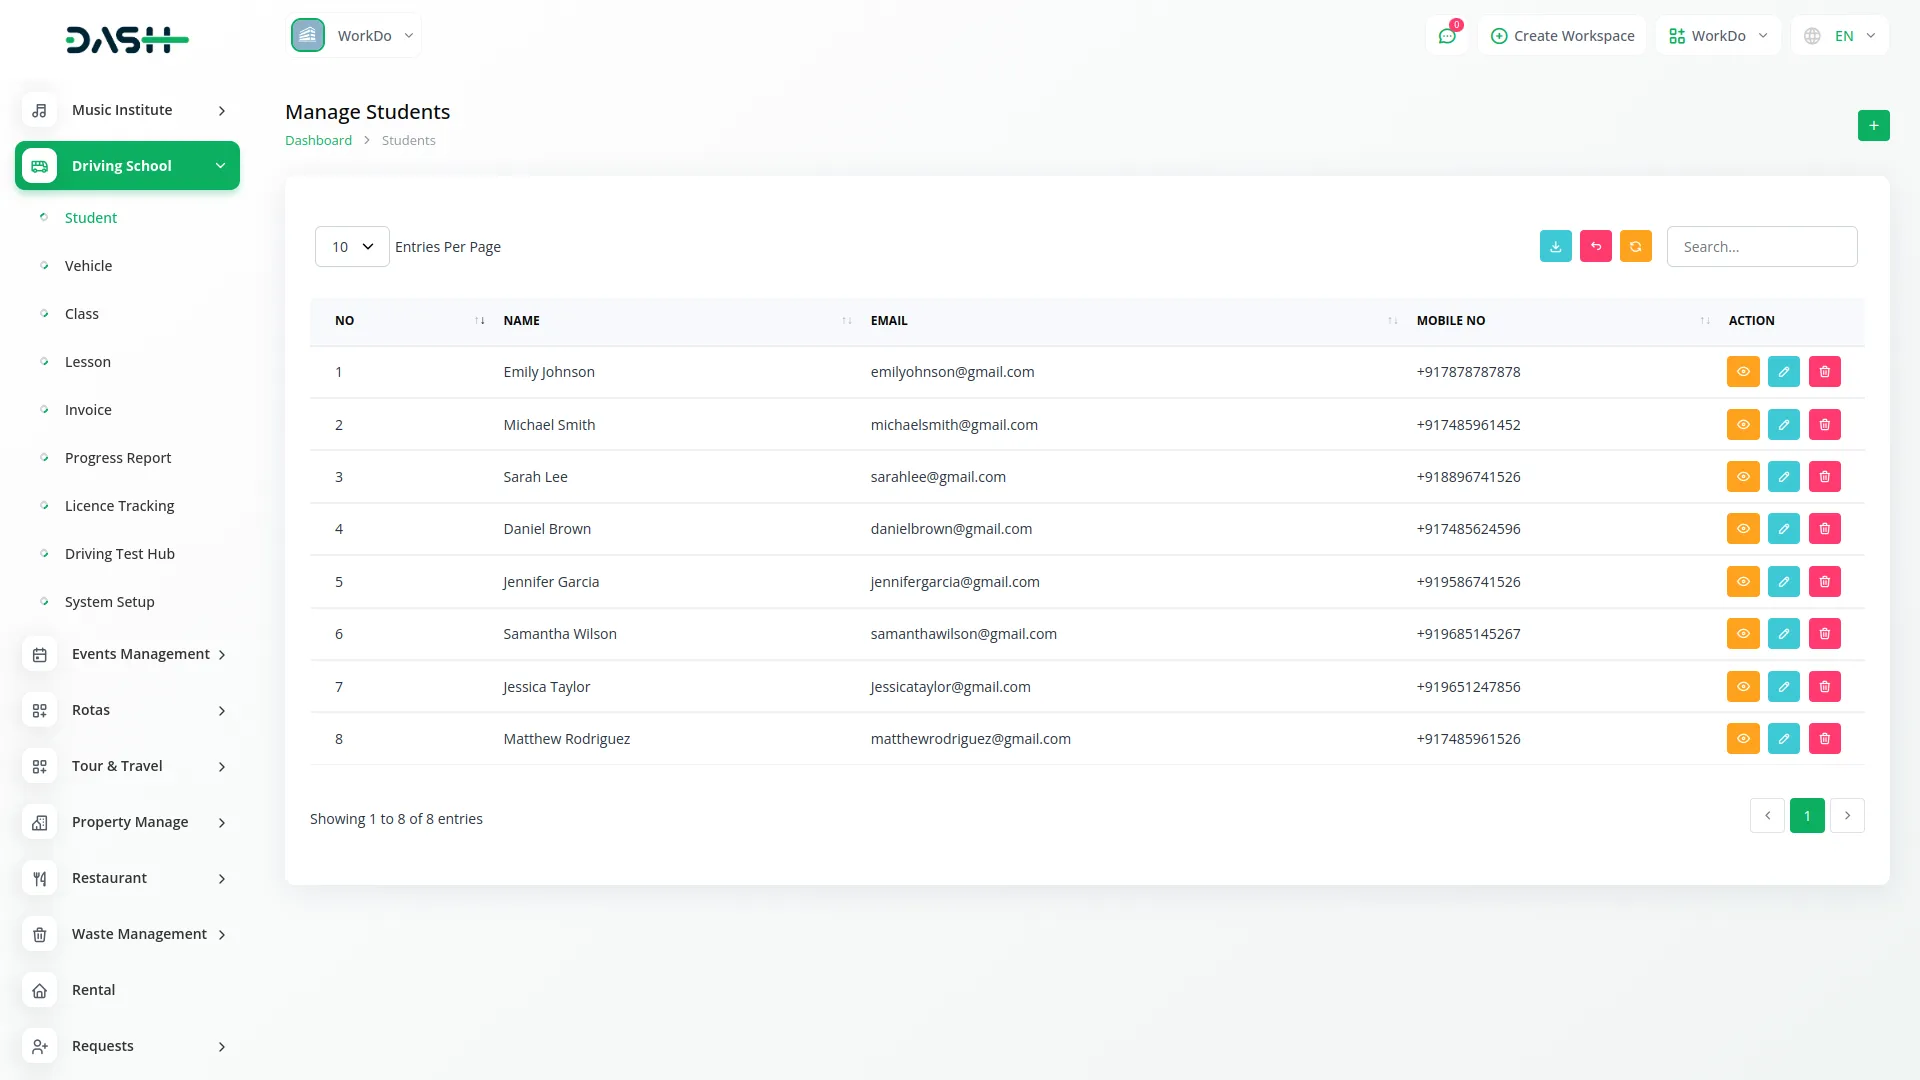
- To create a new student, click the “Create” button at the top of the student page. Fill out the form by entering the student’s name, email, password, and select their gender from the dropdown (Male or Female). Enter their date of birth, mobile number, city, state, country, and pin code.
- Next, select their preferred language from the select box and enter their complete address.
- The list page shows all students in a table with columns for No, Name, Email, and Mobile No. You can use the Search button to find specific students or Export button to download the student list. In the Actions column, you can click the view button to view complete student details, Edit to modify student information, or Delete to remove a student from the system.
-
Vehicle Management
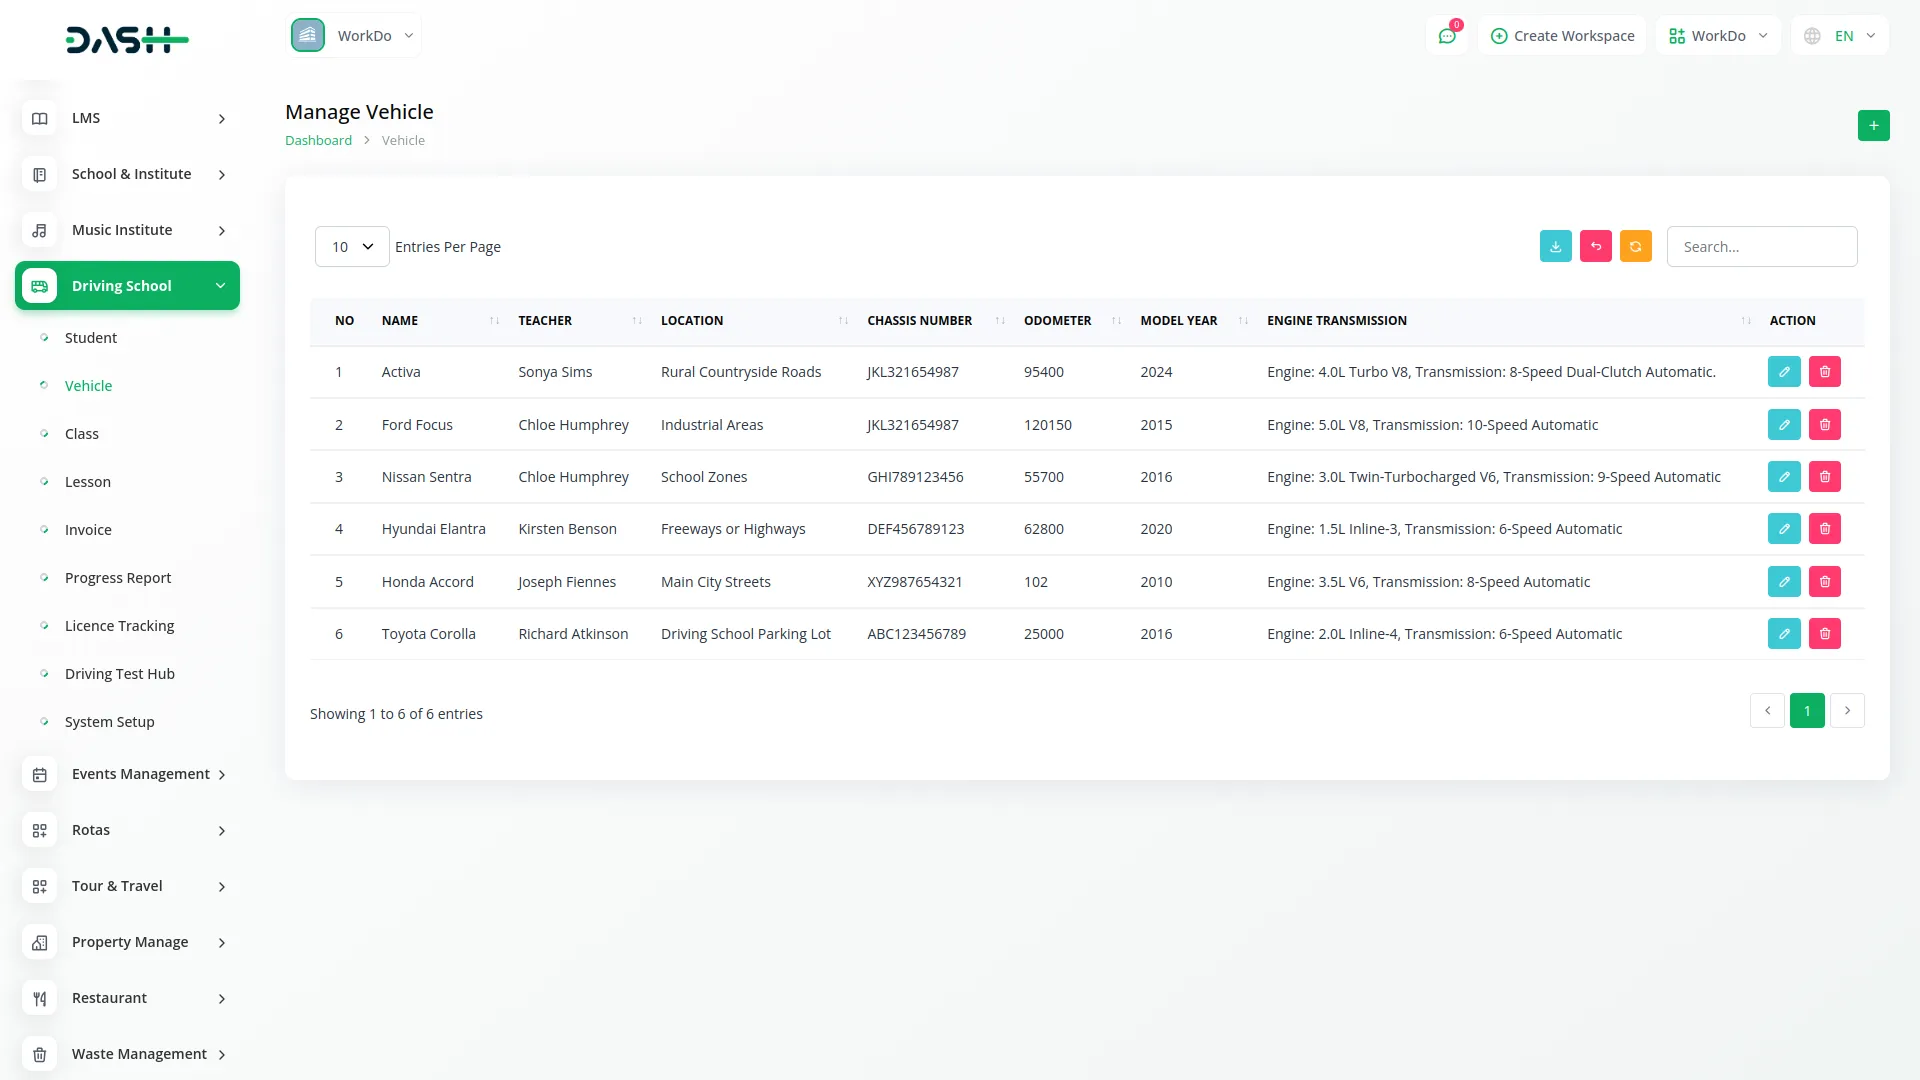
- To create a new vehicle, click the “Create” button on the vehicle page. Enter the vehicle name and select a teacher from the dropdown (this list comes from your staff records). Fill in the chassis number, current odometer reading, model year, and vehicle location.
- The list page displays all vehicles in a table with columns for No, Name, Teacher, Location, Chassis Number, Odometer, Model Year, and Engine Transmission.
- Use the Search button to find specific vehicles or Export to download the vehicle list. In the Actions column, you can click Edit to modify vehicle information or Delete to remove a vehicle from the system.
-
Class Management
- To create a new class, click the “Create” button on the class page. Enter the class name, start date and time, and end date and time. Select the vehicle name from the dropdown (this list comes from your vehicle records) and choose a teacher from the staff dropdown.
- Next, select the student from the driving student list, enter the location where the class will take place, set the fees amount, and specify the schedule details.
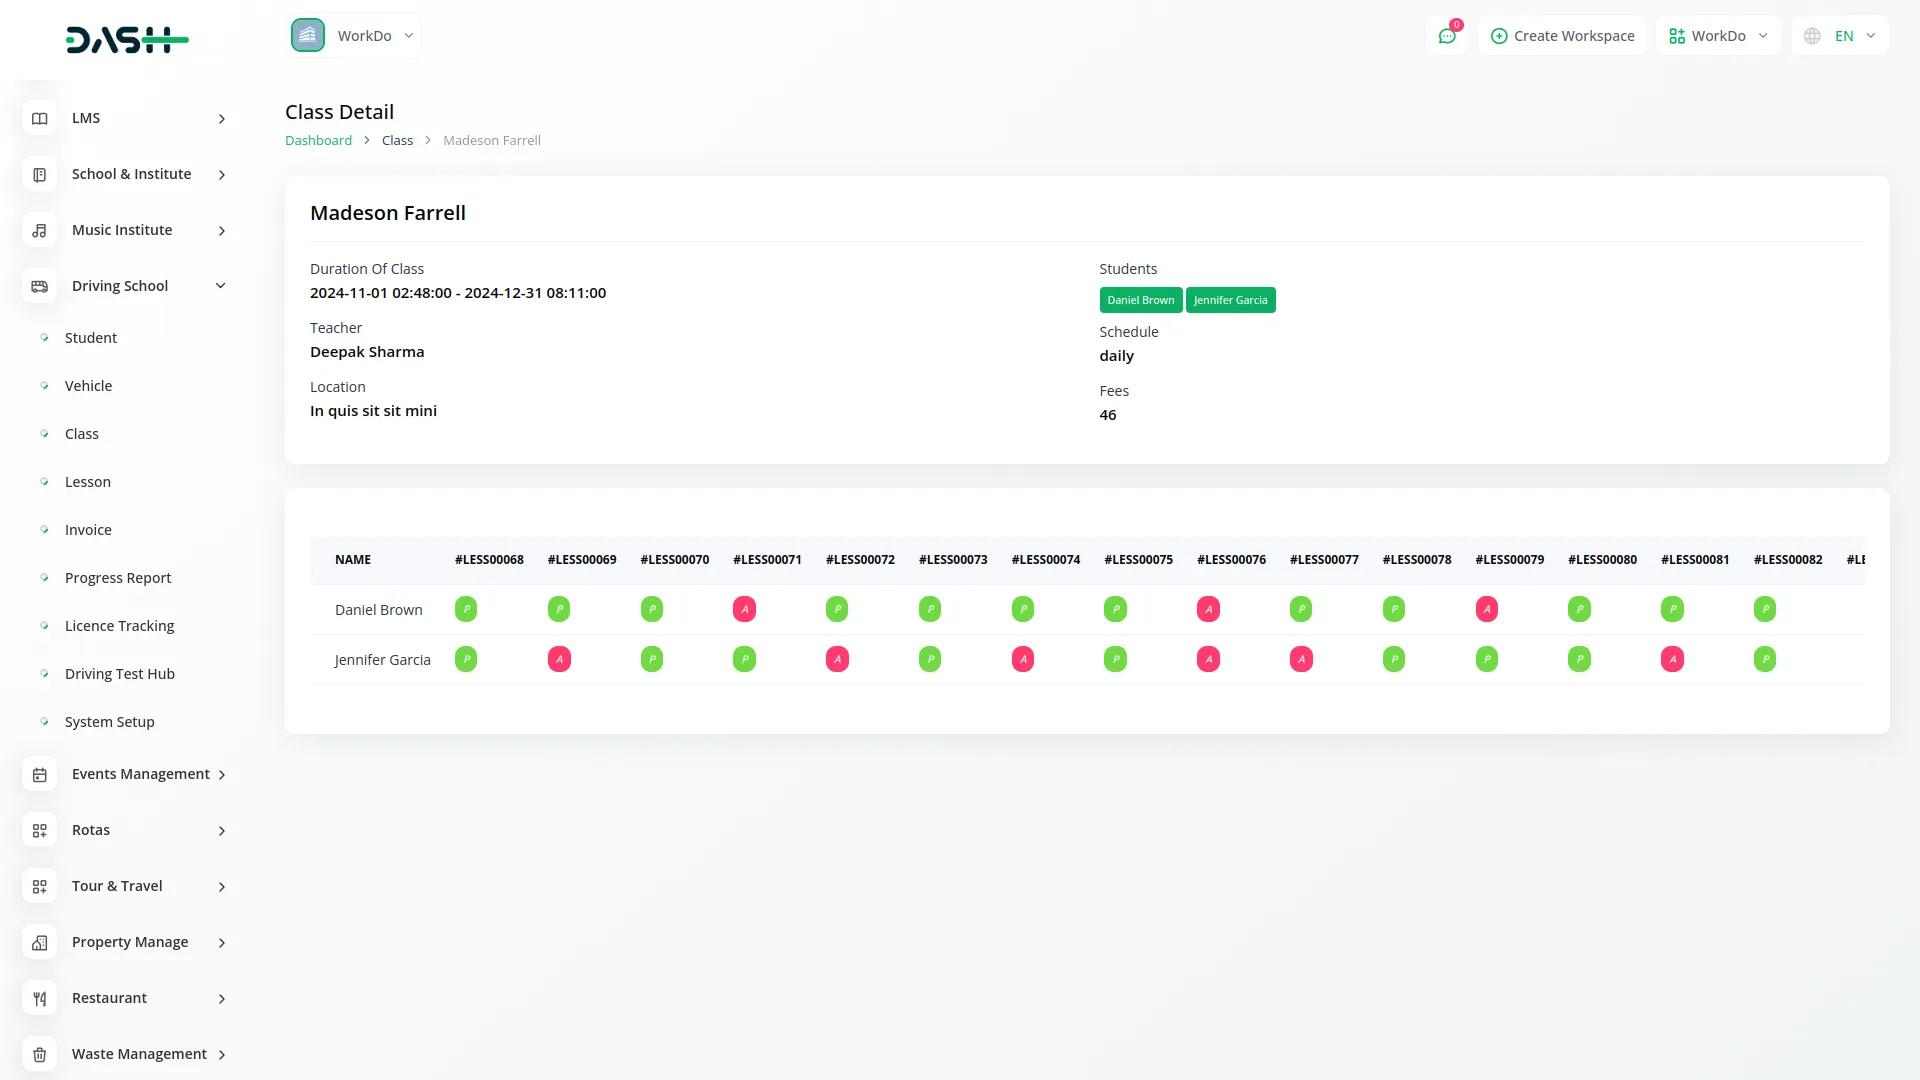
- The list page shows all classes with columns for No, Class Id, Name, Start Date & Time, End Date & Time, Location, and Schedule. The Class Id, when you click on this ID, opens a new page showing the particular student name and lesson ID.
-
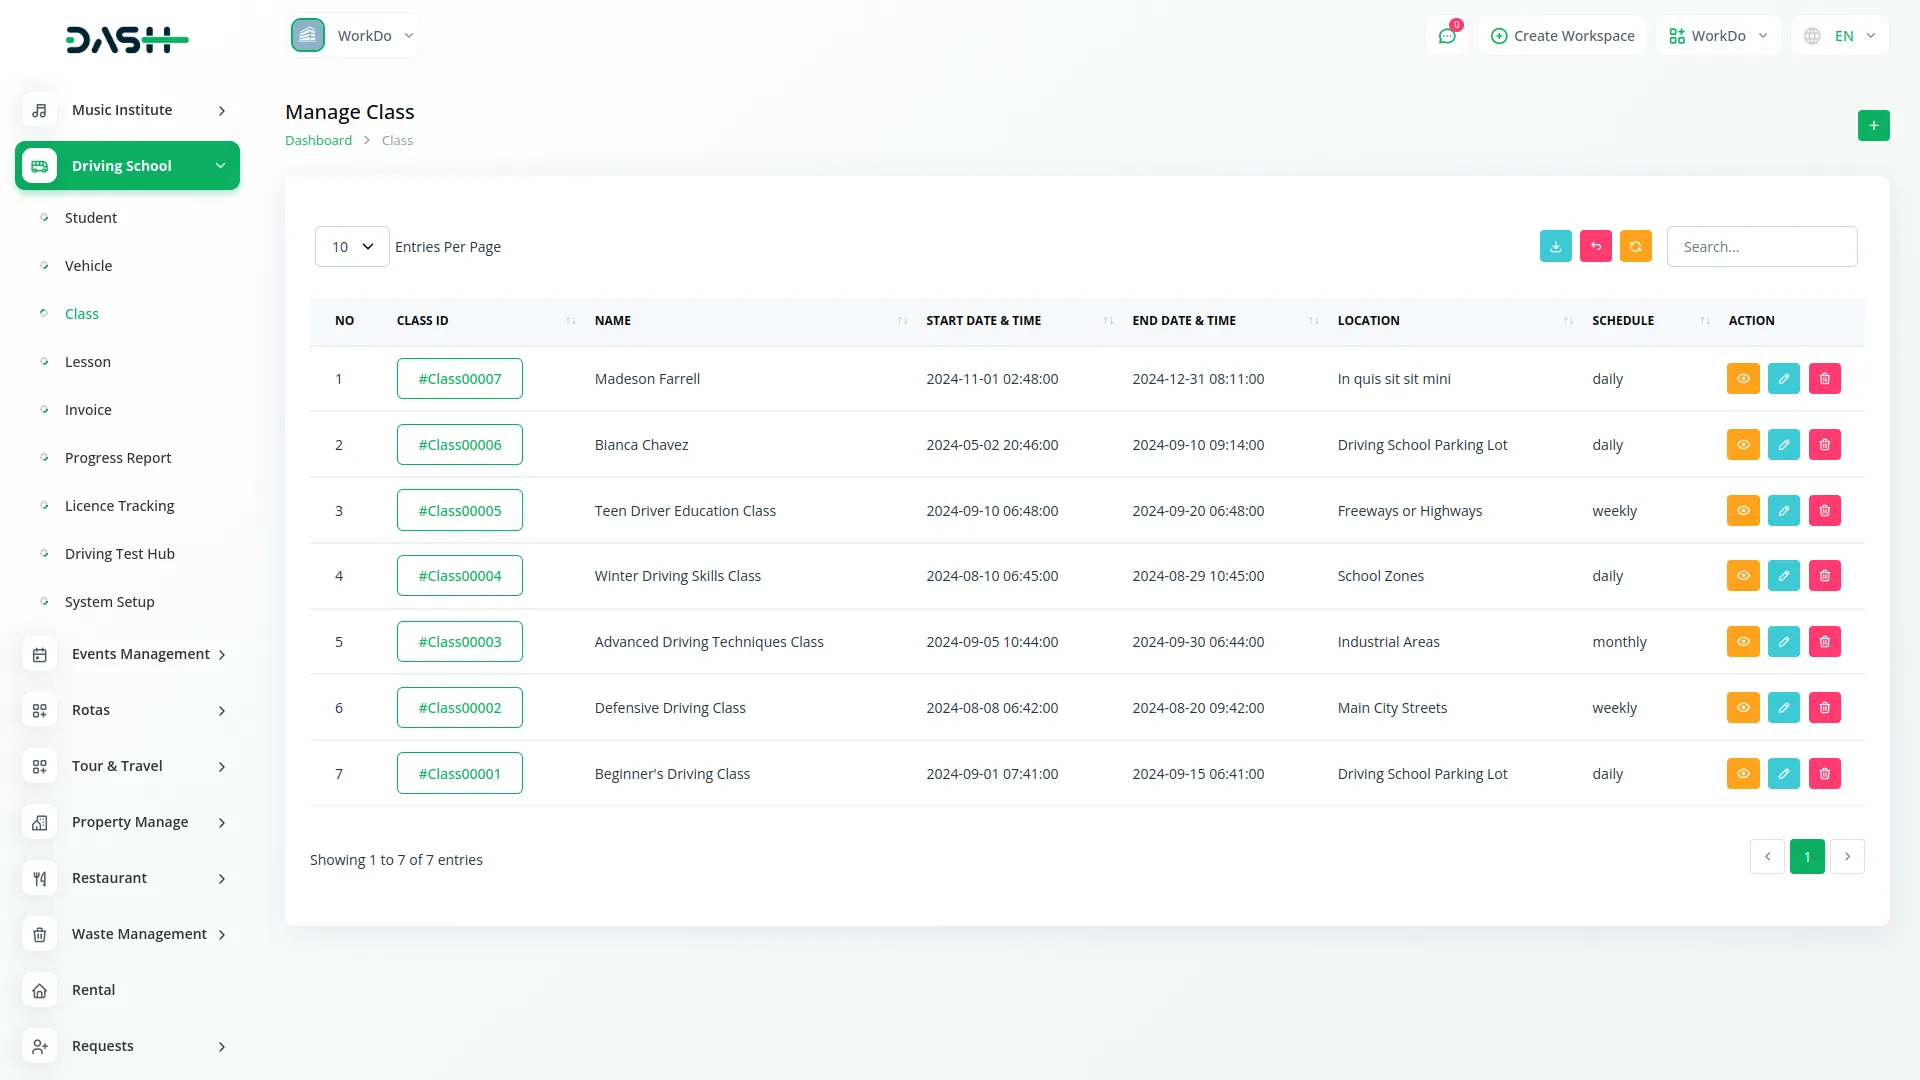
- Use Search to find classes or Export to download the class list. In the Actions column, you can click the view button to view class details, Edit to modify class information, or Delete to remove a class.
- If you click on the view button, you will see the necessary details like name of the class, duration of the class, students, teacher, schedule, location, fees, and number of lessons, and the attendance of students.
-
Lesson Management
- The lesson page shows all lessons in your system. You cannot create lessons directly from this page as they are generated from your classes.
- The list page displays lessons with columns for No, Lessons, Lesson Name, Start Date & Time, End Date & Time, and Status. The Lessons column shows IDs when you click on this ID, it opens a new page displaying the particular student name with present and absent functionality to mark attendance.
-
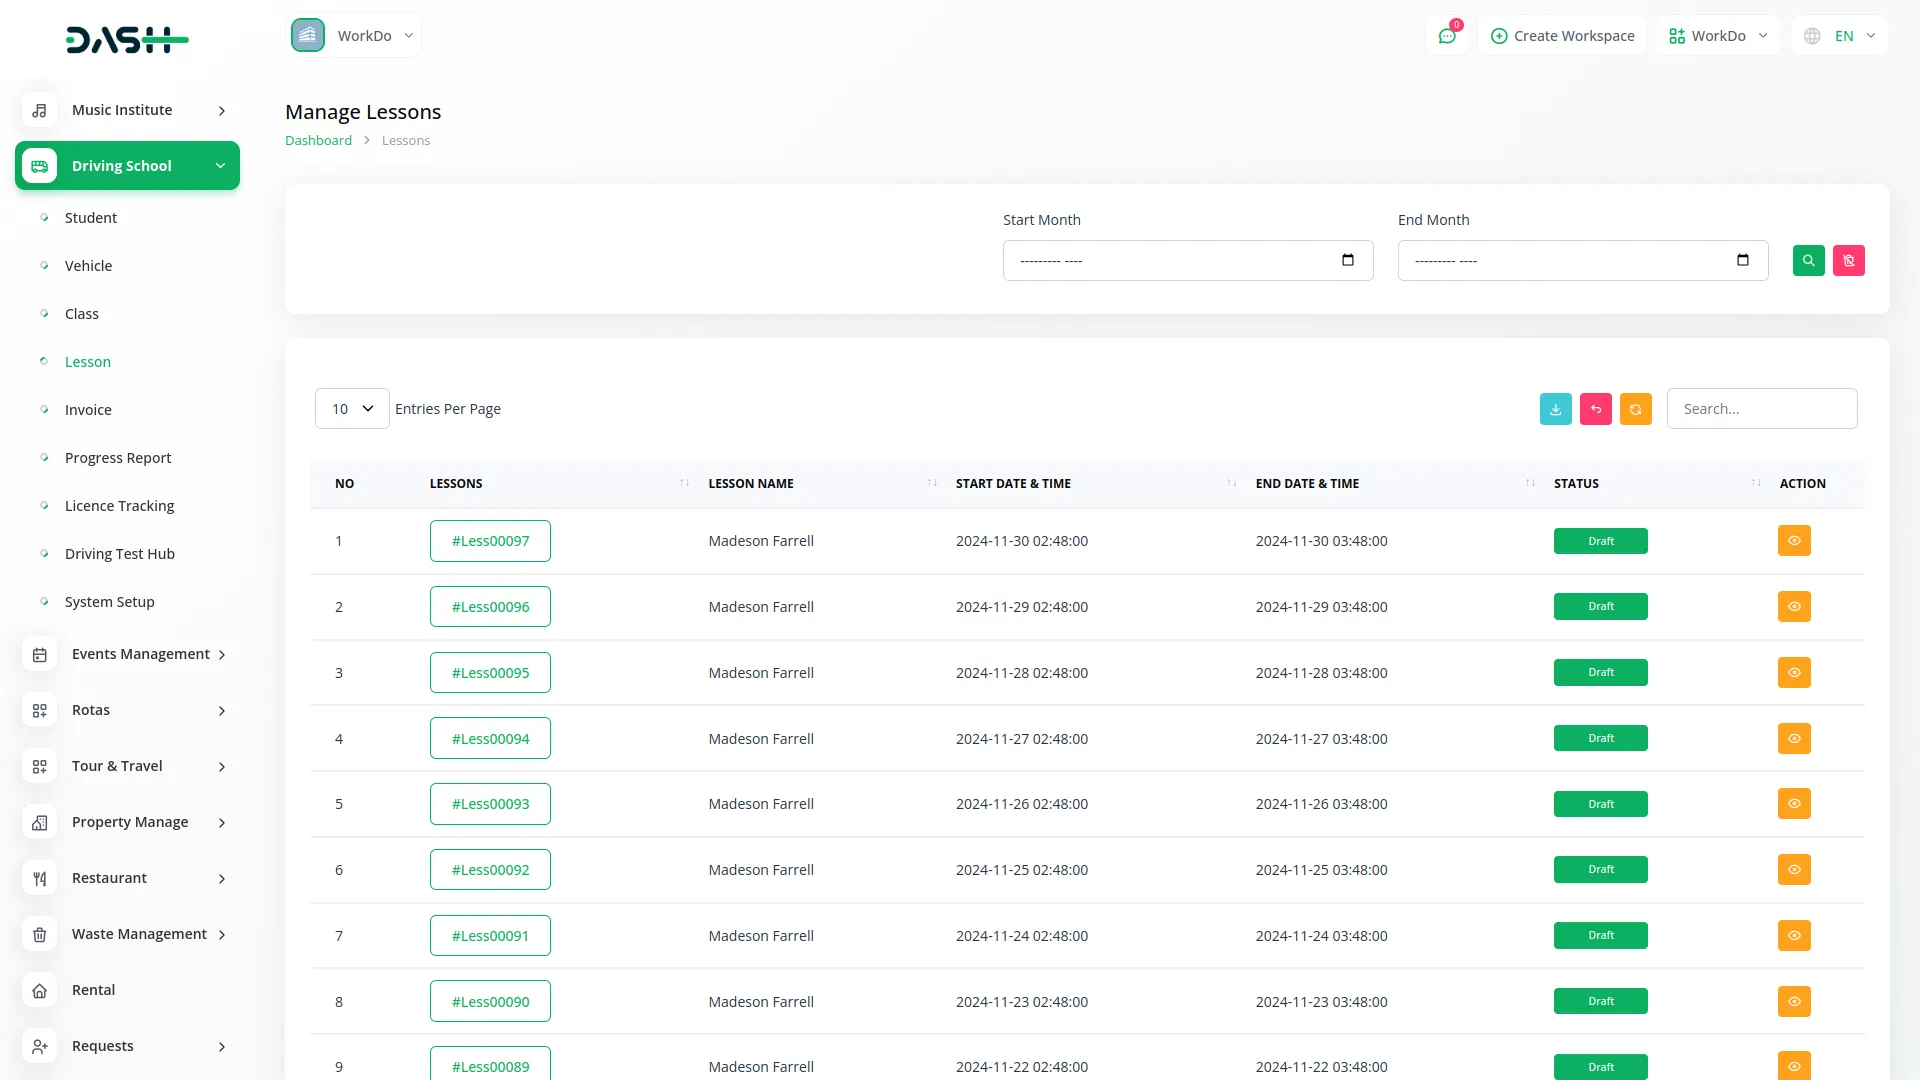
- Use the Search button to find specific lessons or Export to download the lesson list. In the Actions column, you can only click the view button to view lesson details and manage student attendance for that particular lesson. You can also filter specific lessons by adding start month and end month in the filter section given at the top of the page.
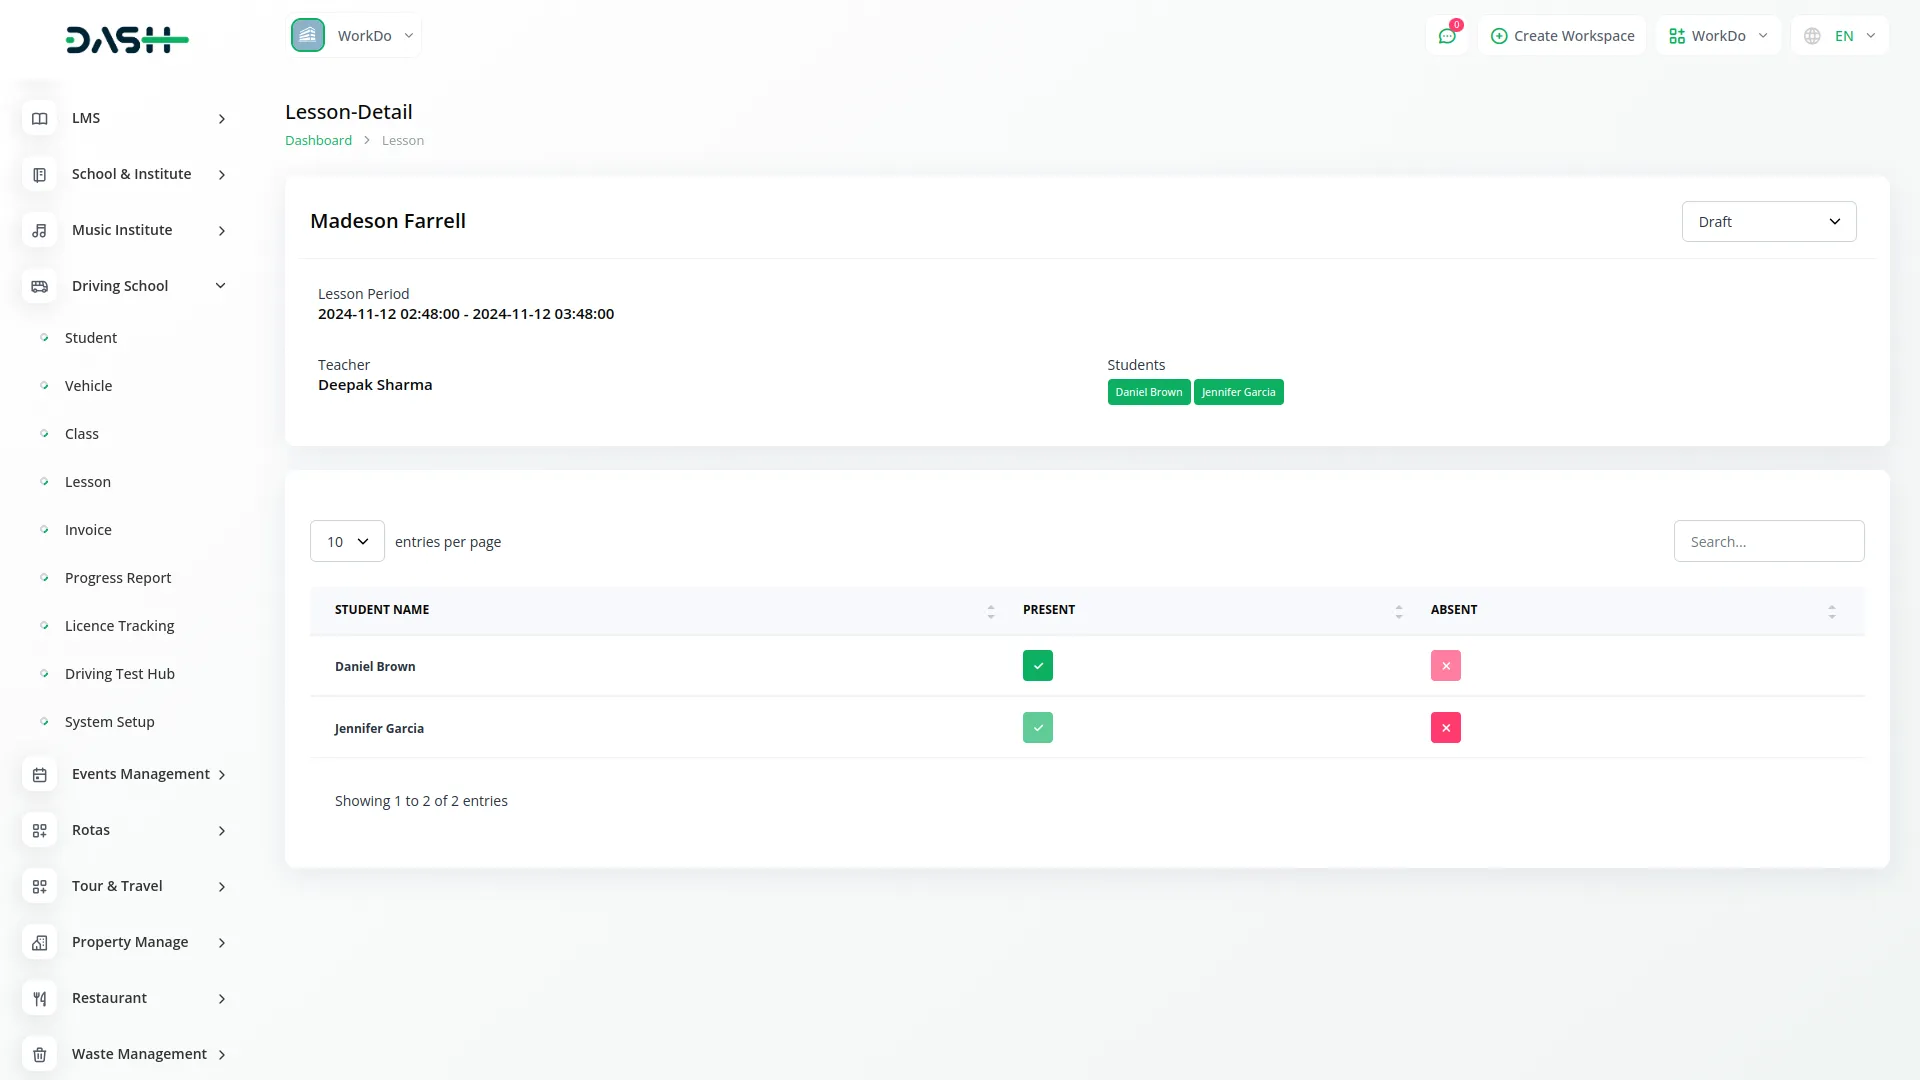
- If you click on the view button, you can update the status of the lesson from the status dropdown given at the top of the page, after which you can see the period of the lesson, name of the teacher, and the name of the students.
- Below this, you will see the list of students, you can mark their attendance from there whether they are absent or present. You can also search for the students from the search bar available at the top of the list of students.
-
Invoice Management
- To create a new invoice, click the “Create” button on the invoice page. First, select the student from the dropdown, then select the class from the available classes (this list comes from your class records). The system will create a class-wise invoice for the selected student and class.
- The list page shows all invoices with columns for No, Invoice, Student, Issue Date, Due Date, Due Amount, and Status. The Invoice column displays IDs, when you click on this ID, it opens a new page showing invoice details where you can also add manual payments and download the invoice.
-
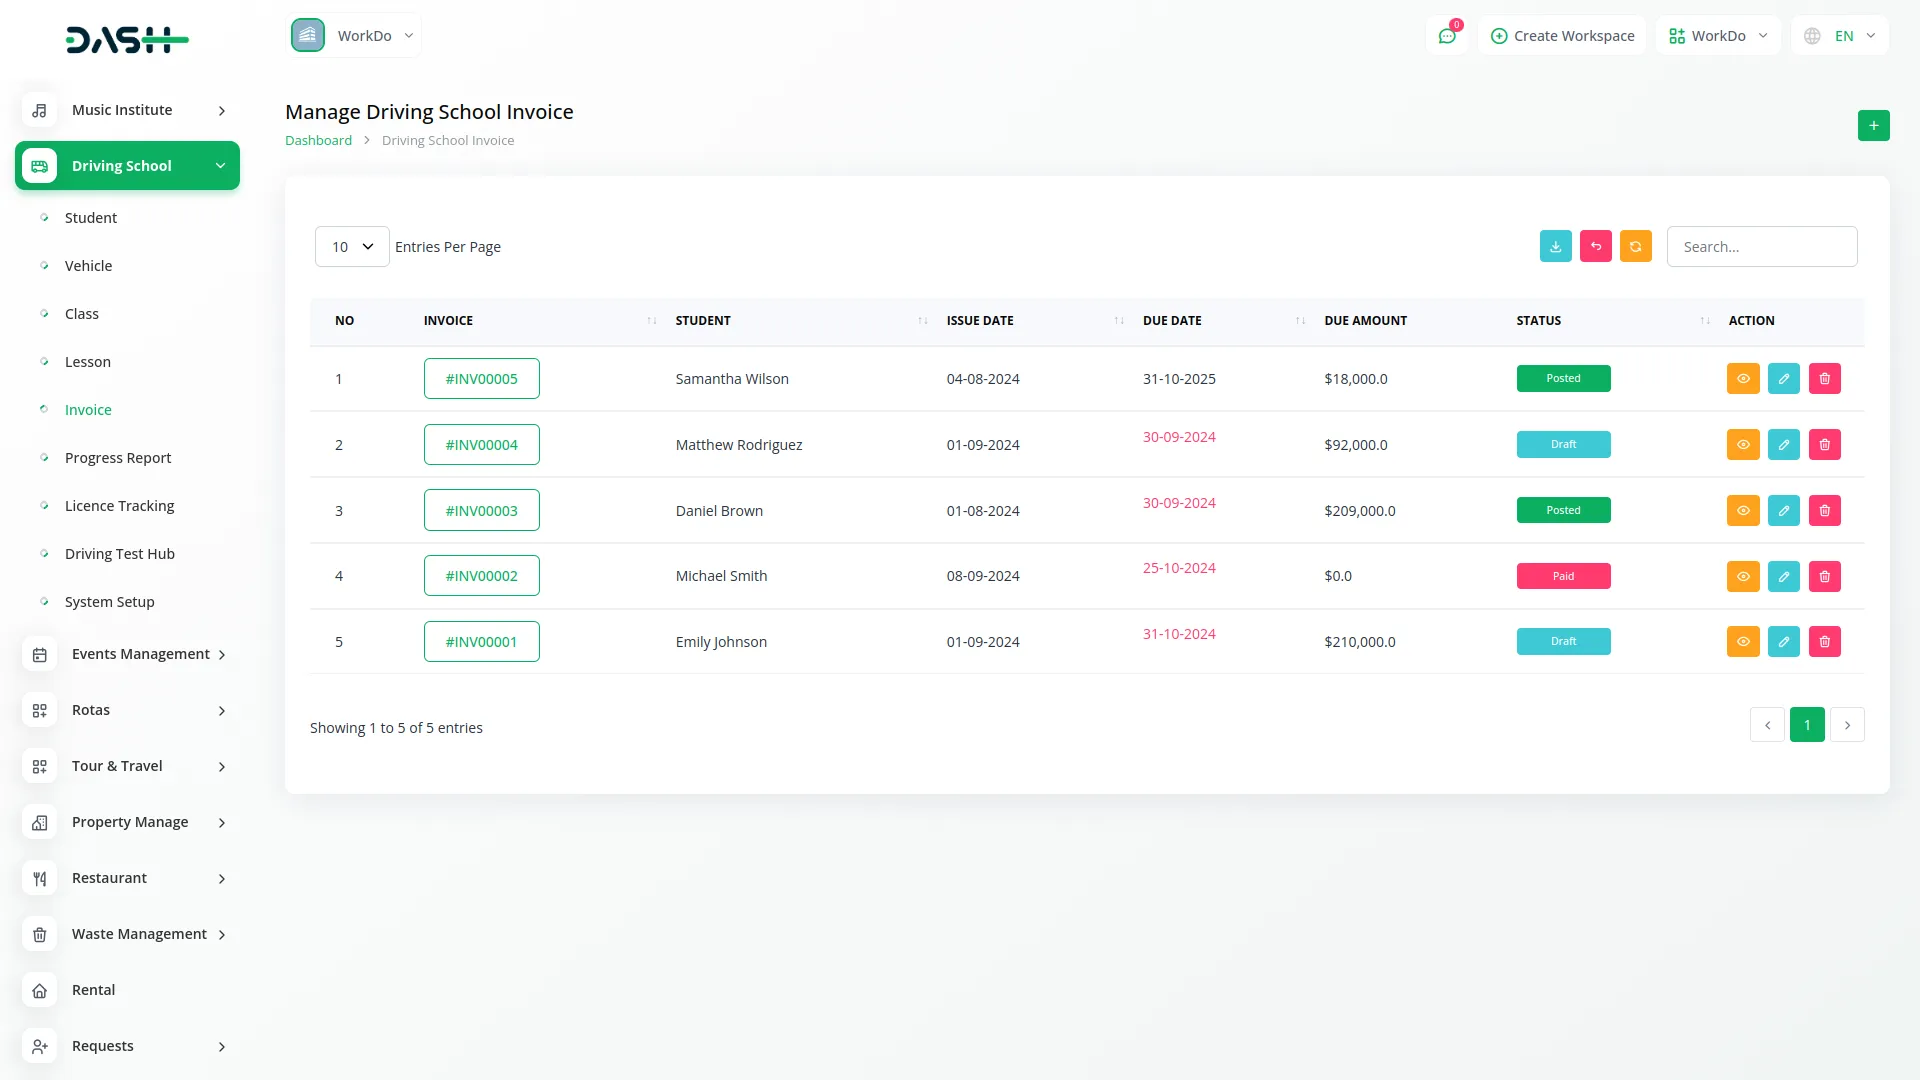
- Use Search to find specific invoices or Export to download the invoice list. In the Actions column, you can click the view button to view invoice details and add manual payments, Edit to modify invoice information, or Delete to remove an invoice.
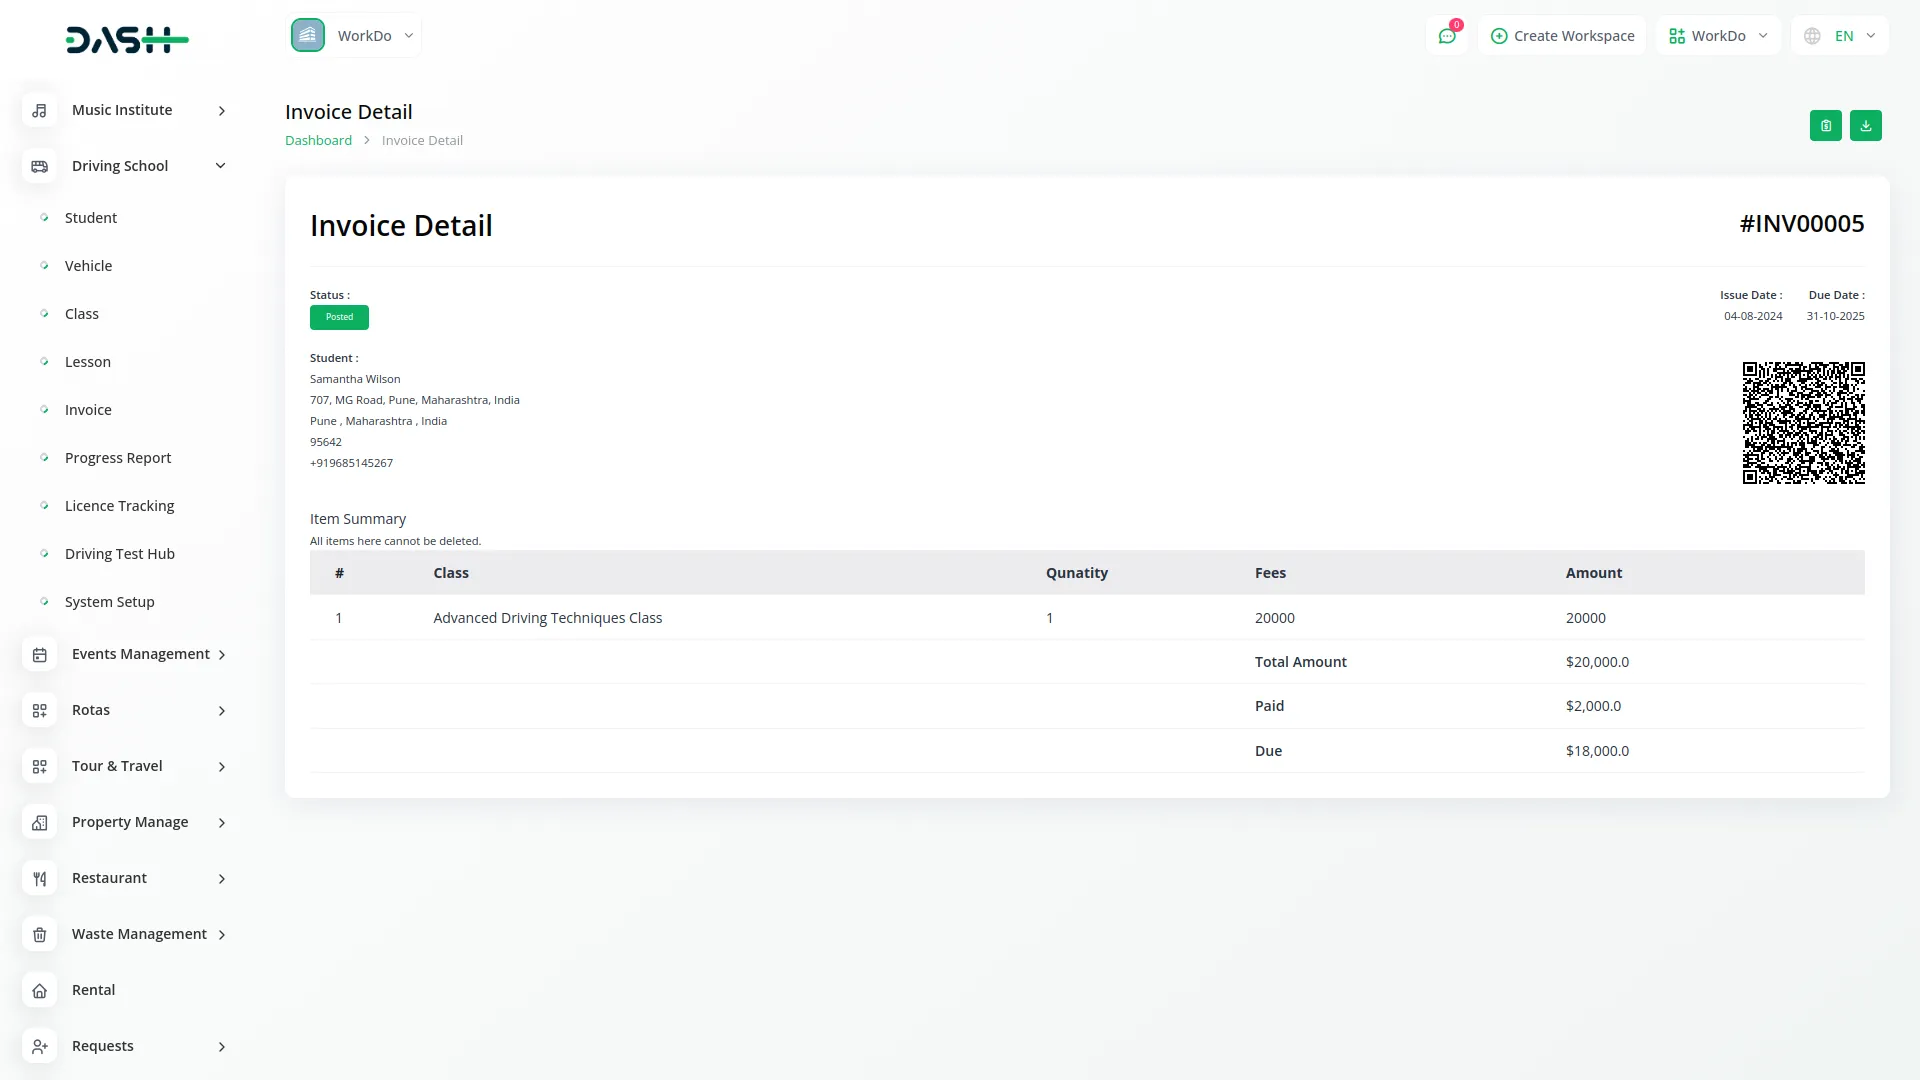
- If you click on the view button, you will see two buttons given at the top, first button is for “Add Payment”, with the help of which you can manually add the payment, beside which there is a button for download with the help of which you can download the invoice easily.
- After that, you will see the name of the student and other necessary details, status whether it is posted or not, and a QR Code from where you can add the payment manually, you can also see the item summary easily if you want.
-
Progress Report Management
- To create a new progress report, click the “Create” button on the progress report page. Select the student from the driving student dropdown, then choose the class from the student’s available classes. Select the teacher from the staff dropdown and enter the progress date.
- Next, fill in the skills assessed field, provide a rating for the student’s performance, and optionally add remarks.
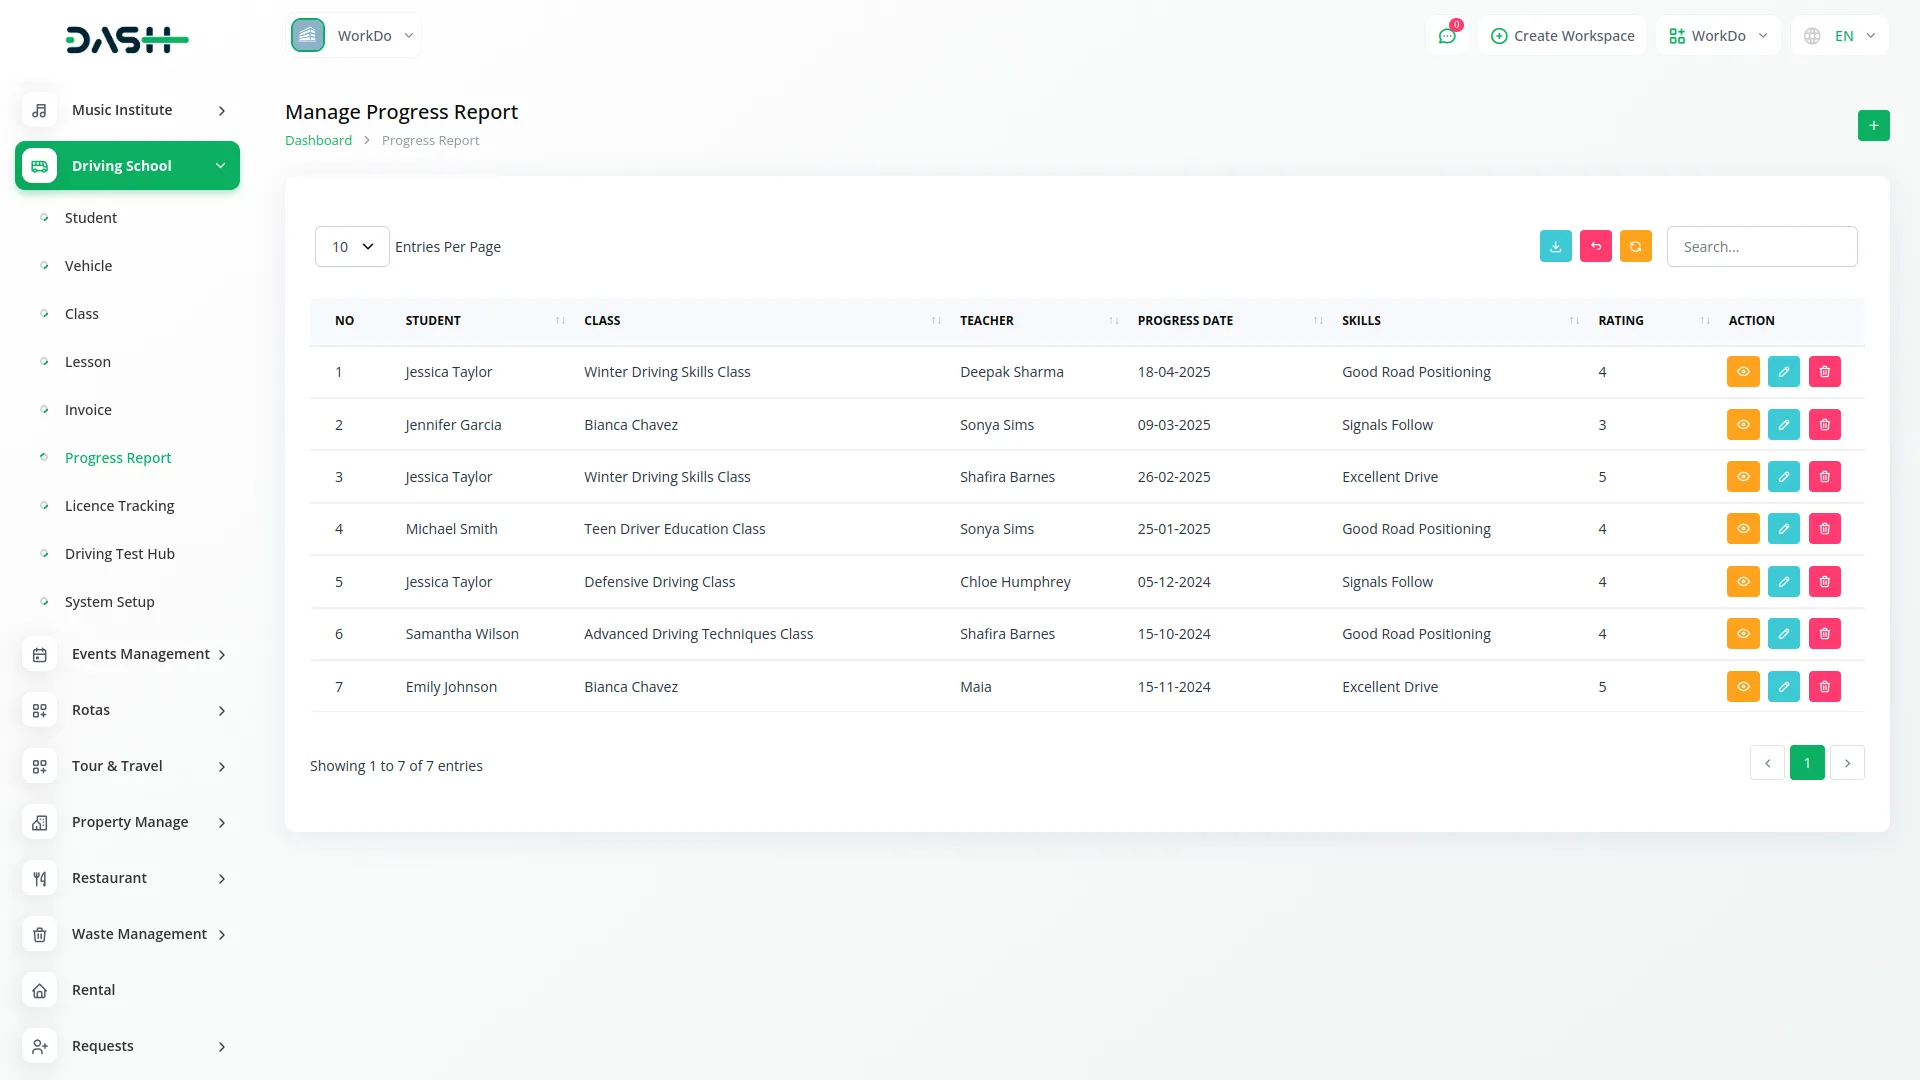
- The list page displays all progress reports with columns for No, Student, Class, Teacher, Progress Date, Skills, and Rating.
- Use the Search button to find specific reports or Export to download the progress report list. In the Actions column, you can click the view button to view complete report details, Edit to modify the progress report, or Delete to remove a report.
-
System Setup
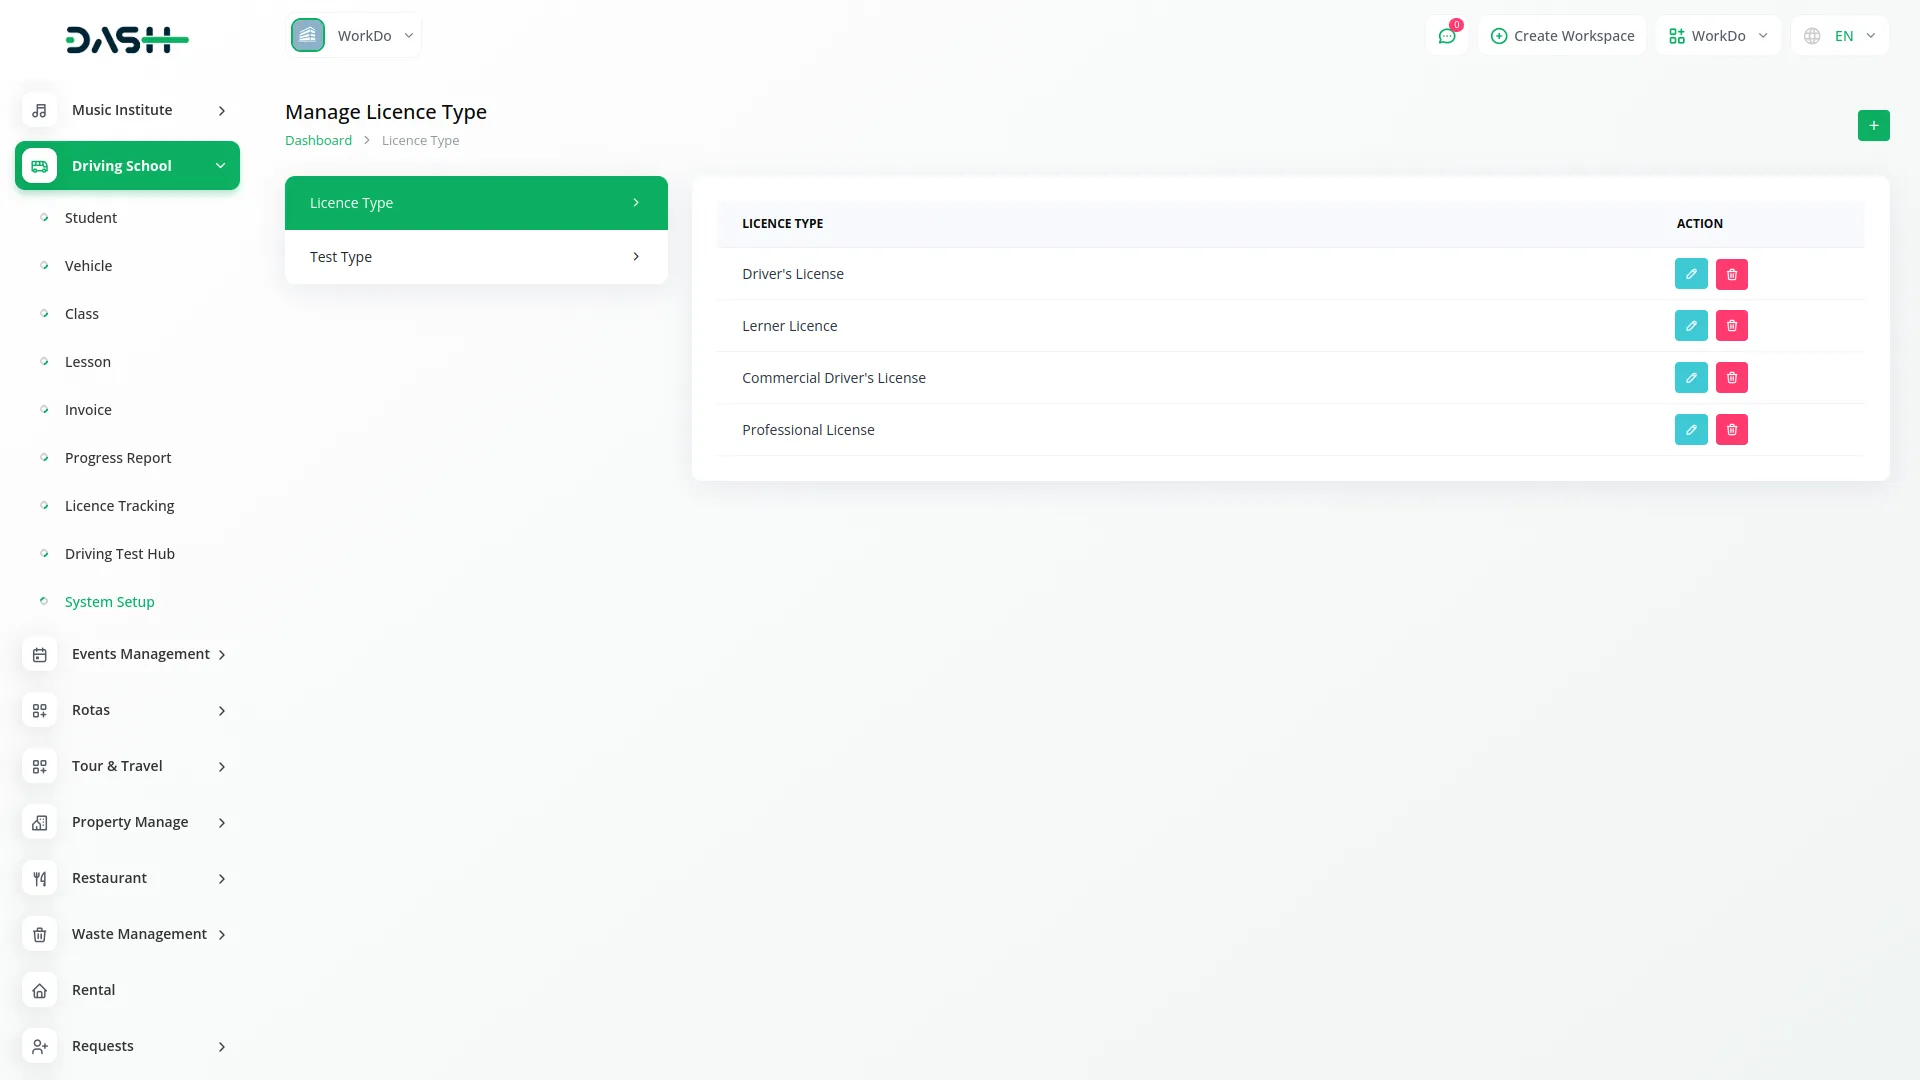
- The system setup section contains two main configuration areas that help you set up standard data for your driving school.
- In the Licence Type section, you can manage different types of licenses offered by your driving school. Click the “Create” button to add a new licence type and enter the licence type name.You can also edit or delete the data through the action column whenever you want.
- In the Test Type section, you can manage different types of tests conducted at your school. Click the “Create” button to add a new test type and enter the test type name.
- These setup options help standardize the data used throughout the system in other modules like licence management and driving test management. You can also edit or delete the data through the action column whenever you want.
-
Licence Management
- To create a new licence record, click the “Create” button on the licence page. Select the student from the driving student dropdown and choose the licence type from the system setup options. Enter the application date and test date.
- Next, select the test result from the dropdown (Pass or Fail). If the test result is Pass, enter the licence number, licence issue date, and licence expiry date.
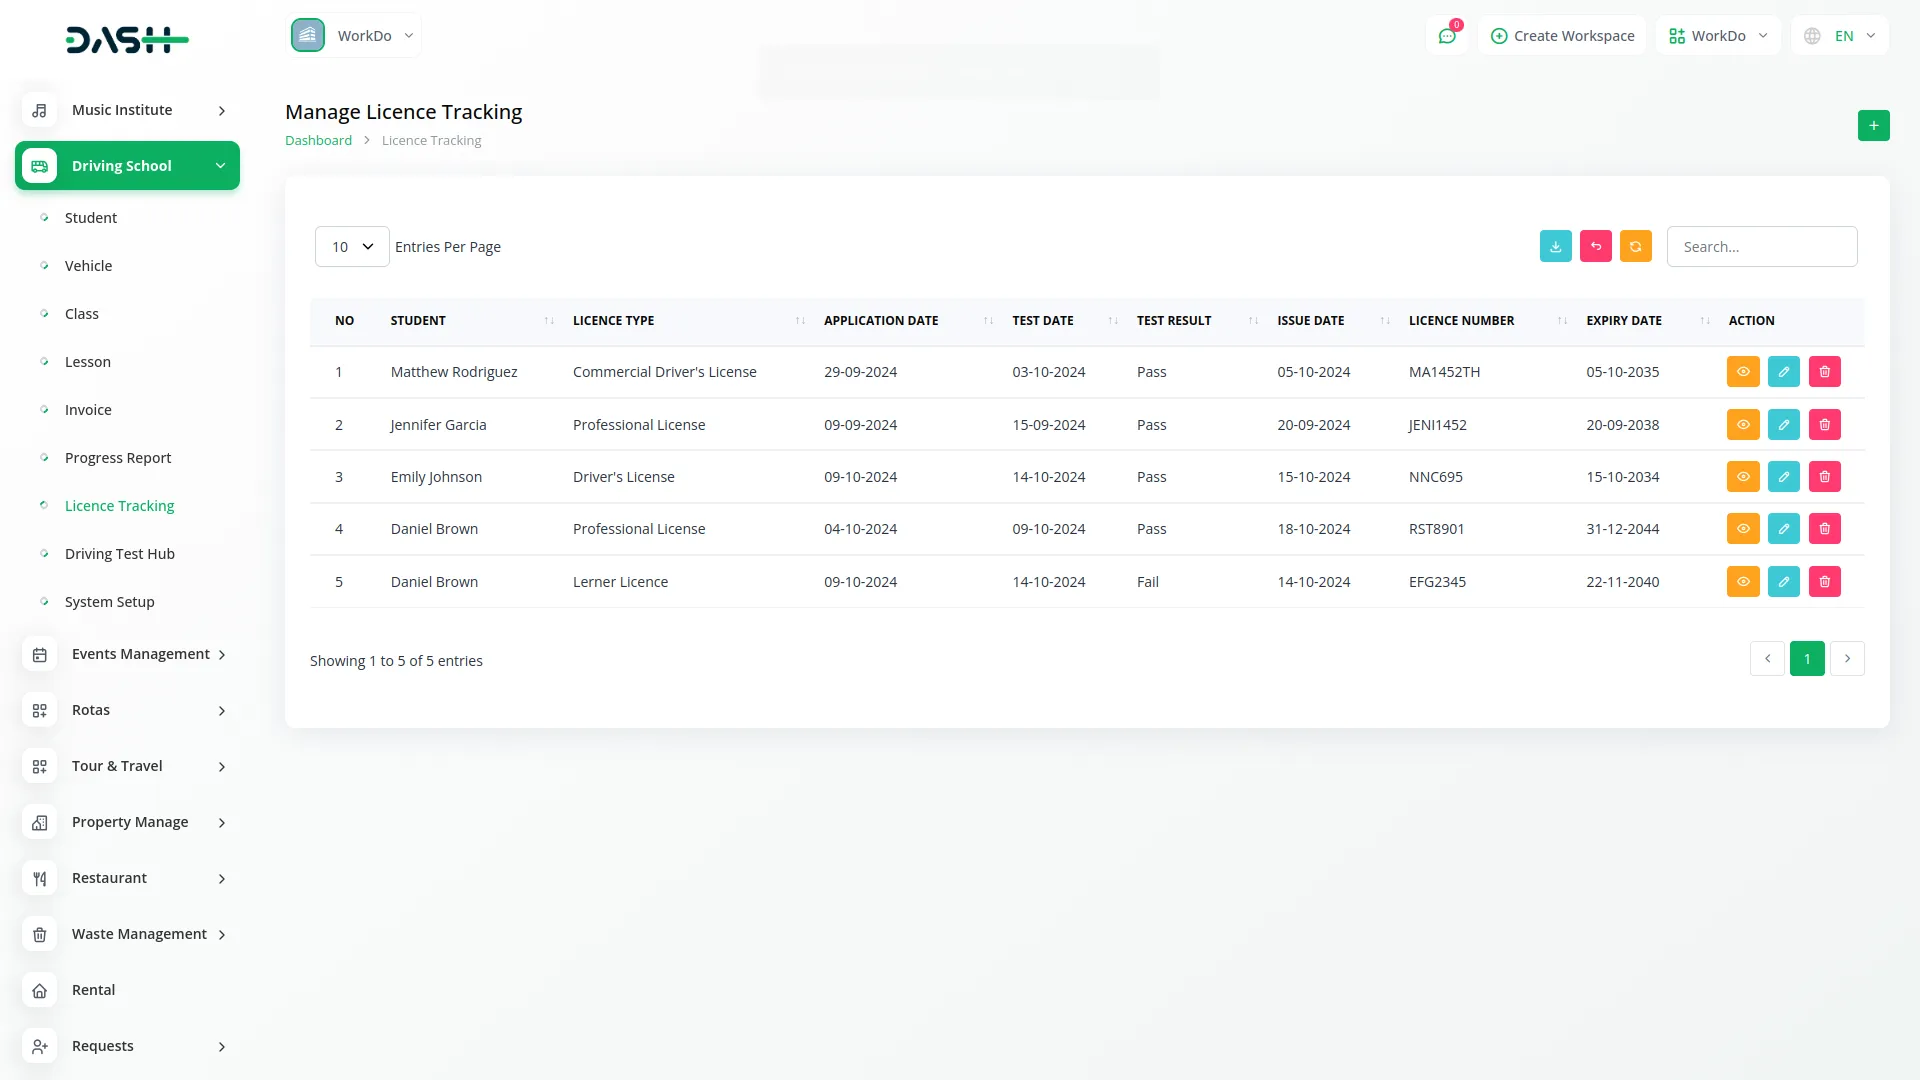
- The list page shows all licence records with columns for No, Student, Licence Type, Application Date, Test Date, Test Result, Issue Date, Licence Number, and Expiry Date.
- Use Search to find specific records or Export to download the licence list. In the Actions column, you can click the view button to view complete licence details, Edit to modify licence information, or Delete to remove a licence record.
-
Driving Test Hub
- To create a new driving test record, click the “Create” button on the driving test page. Select the student from the driving student dropdown and choose the teacher from the staff dropdown. Select the test type from the system setup options and enter the test date.
- Next, enter the test score achieved by the student and select the test result from the dropdown (Pass or Fail). Optionally, you can add remarks about the test performance.
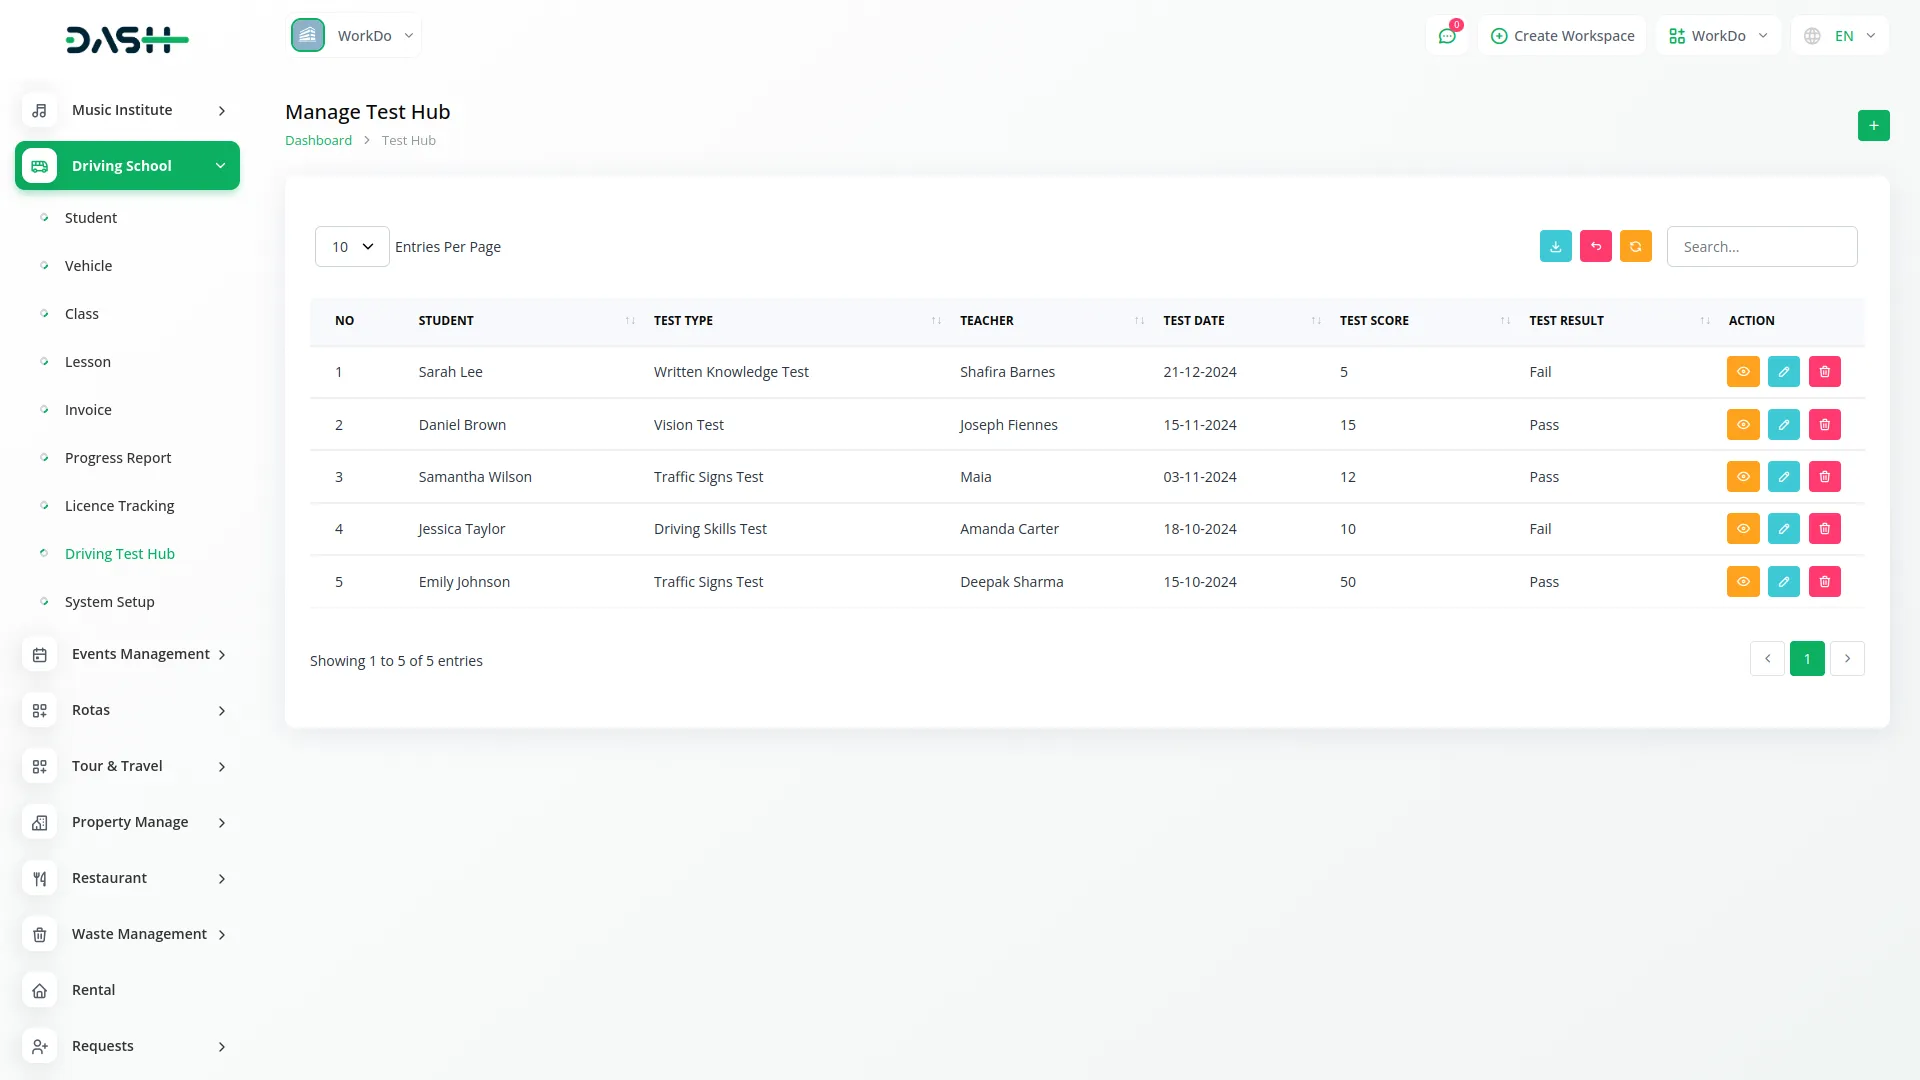
- The list page displays all driving test records with columns for No, Student, Test Type, Teacher, Test Date, Test Score, and Test Result. Use the Search button to find specific test records or Export to download the test list. In the Actions column, you can click the view button to view complete test details, Edit to modify test information, or Delete to remove a test record.
-
Categories
Related articles
- Performance Indicator Integration in Dash SaaS
- Vehicle Inspection Management Integration in Dash SaaS
- Moyasar Detailed Documentation
- CMMS Integration in Dash SaaS
- Tattoo Studio Management Detailed Documentation
- Twilio Integration in Dash SaaS
- Launching Your Own SaaS Business With WorkDo Dash
- School/Institute Management Integration in Dash SaaS
- WhatsApp API Integration Dash SaaS
- Job Search Detailed Documentation
- Office Equipment Management Detailed Documentation
- McKinsey 7-S Model Integration in Dash SaaS
Reach Out to Us
Have questions or need assistance? We're here to help! Reach out to our team for support, inquiries, or feedback. Your needs are important to us, and we’re ready to assist you!


Need more help?
If you’re still uncertain or need professional guidance, don’t hesitate to contact us. You can contact us via email or submit a ticket with a description of your issue. Our team of experts is always available to help you with any questions. Rest assured that we’ll respond to your inquiry promptly.
Love what you see?
Do you like the quality of our products, themes, and applications, or perhaps the design of our website caught your eye? You can have similarly outstanding designs for your website or apps. Contact us, and we’ll bring your ideas to life.
