Freight Management System Integration in Dash SaaS
The Freight Management System is a comprehensive software solution designed to streamline freight and logistics operations for shipping companies and freight forwarders.
Introduction
The Freight Management System is a comprehensive software solution designed to streamline freight and logistics operations for shipping companies and freight forwarders. This system manages the complete freight lifecycle from initial booking requests to final invoicing and payment. The system handles customer management, booking requests with multiple transport modes (Air, Ocean, Land) and directions (Import, Export), shipping operations with detailed container and route tracking, invoice generation, and payment processing. It includes essential setup modules for pricing, containers, and services, along with integrated accounting features for vendor management.
How To Install the Freight Management Add-On?
To Set Up the Freight Management Add-On, you can follow this link: Setup Add-On
How to Use the Freight Management System Add-On?
Frontend
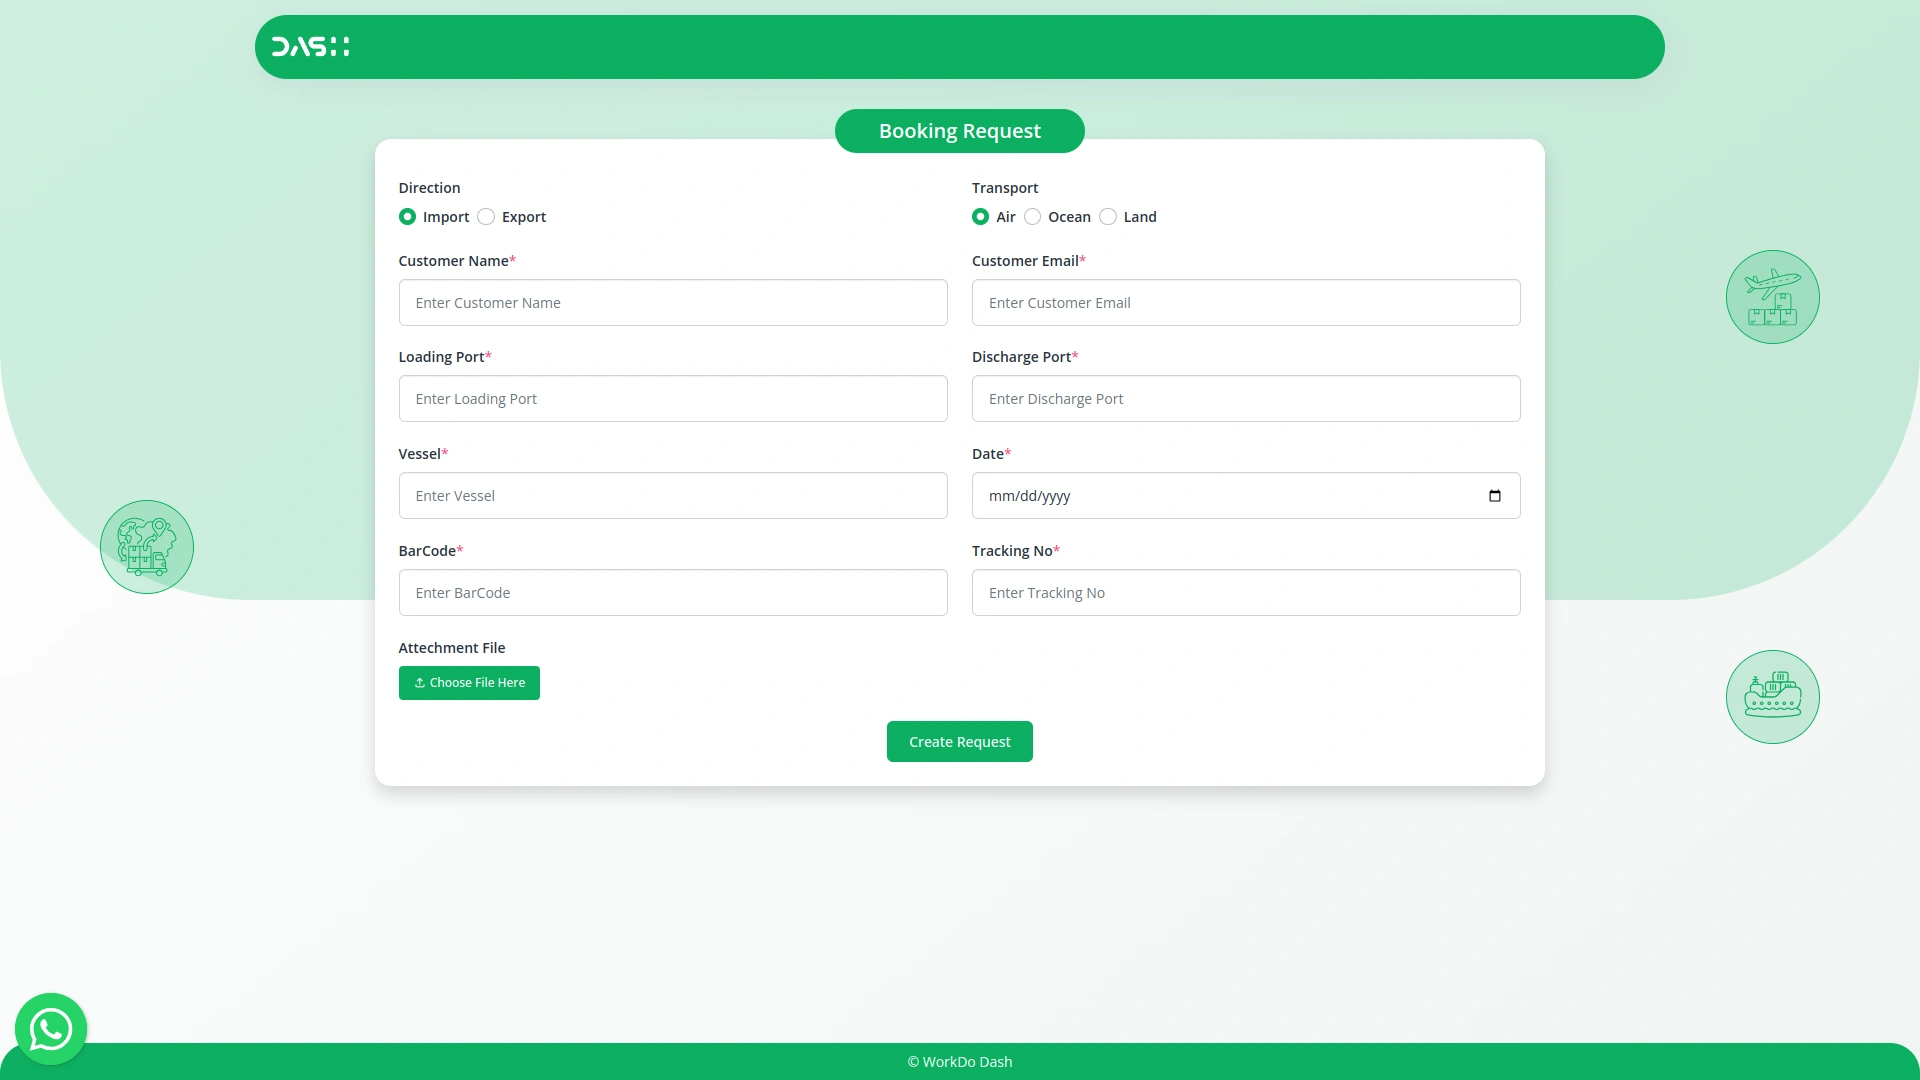
- The Copy Link button is located in the top section of the dashboard. Clicking this button opens the frontend Booking Request, where users can directly interact with the system.
- From this frontend interface, they can submit new Booking requests, provide details, and access other public-facing features related to Freight Management Services.
- This helps simplify the communication process between users and the Freight Administration.
Dashboard
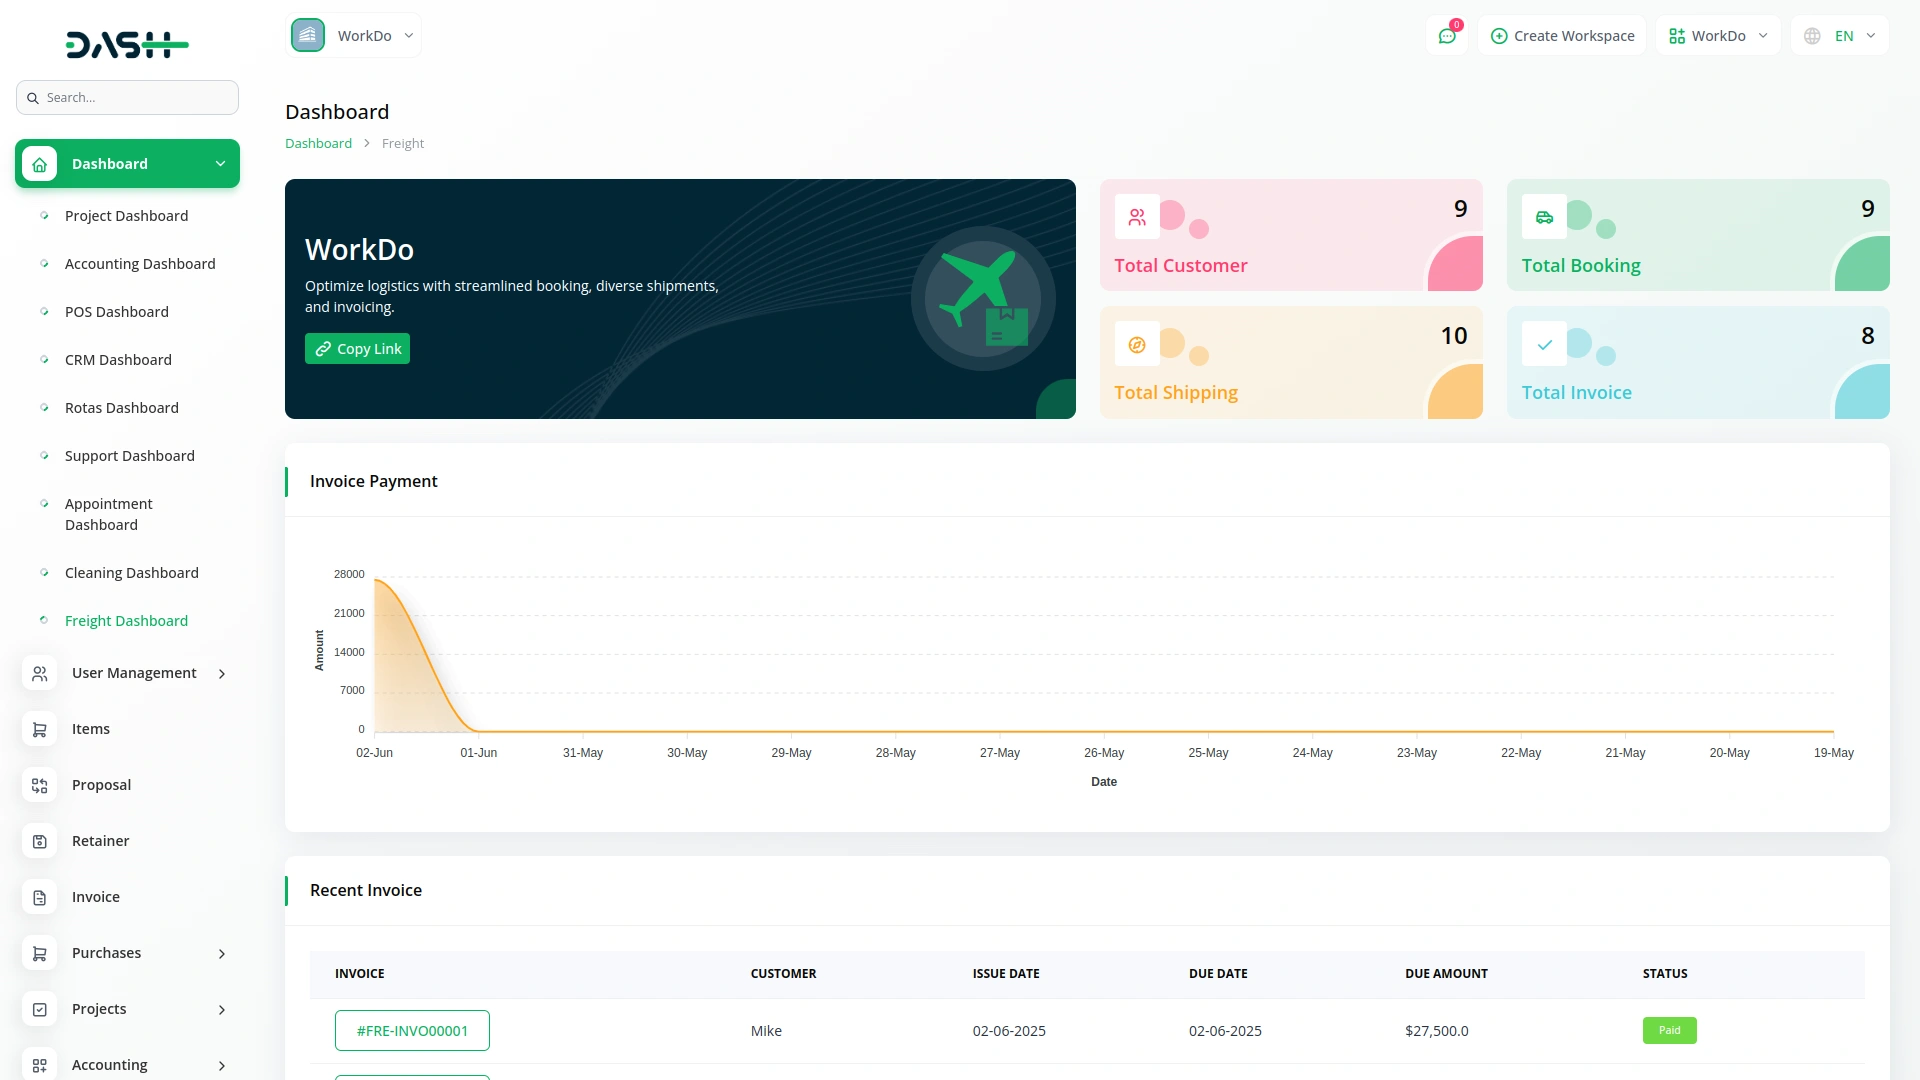
- The Dashboard provides a central overview of your freight operations and key business metrics. It includes a Copy Link button that allows you to copy the link used for creating a frontend Booking Request, making it easy to share with customers for direct booking submissions.
- The dashboard displays four main statistics: Total Customers, showing the number of registered customers; Total Bookings, displaying all booking requests; Total Shipments, showing active shipments; and Total Invoices, indicating the total number of invoices generated.
- The Invoice Payment graph displays the date each invoice was created, along with the corresponding payment amount, allowing you to track payment trends over time.
- The Recent Invoices section displays the most recently created invoices for quick access, while the Recent Shipments section shows the most recently created shipments for immediate tracking.
Manage Customer
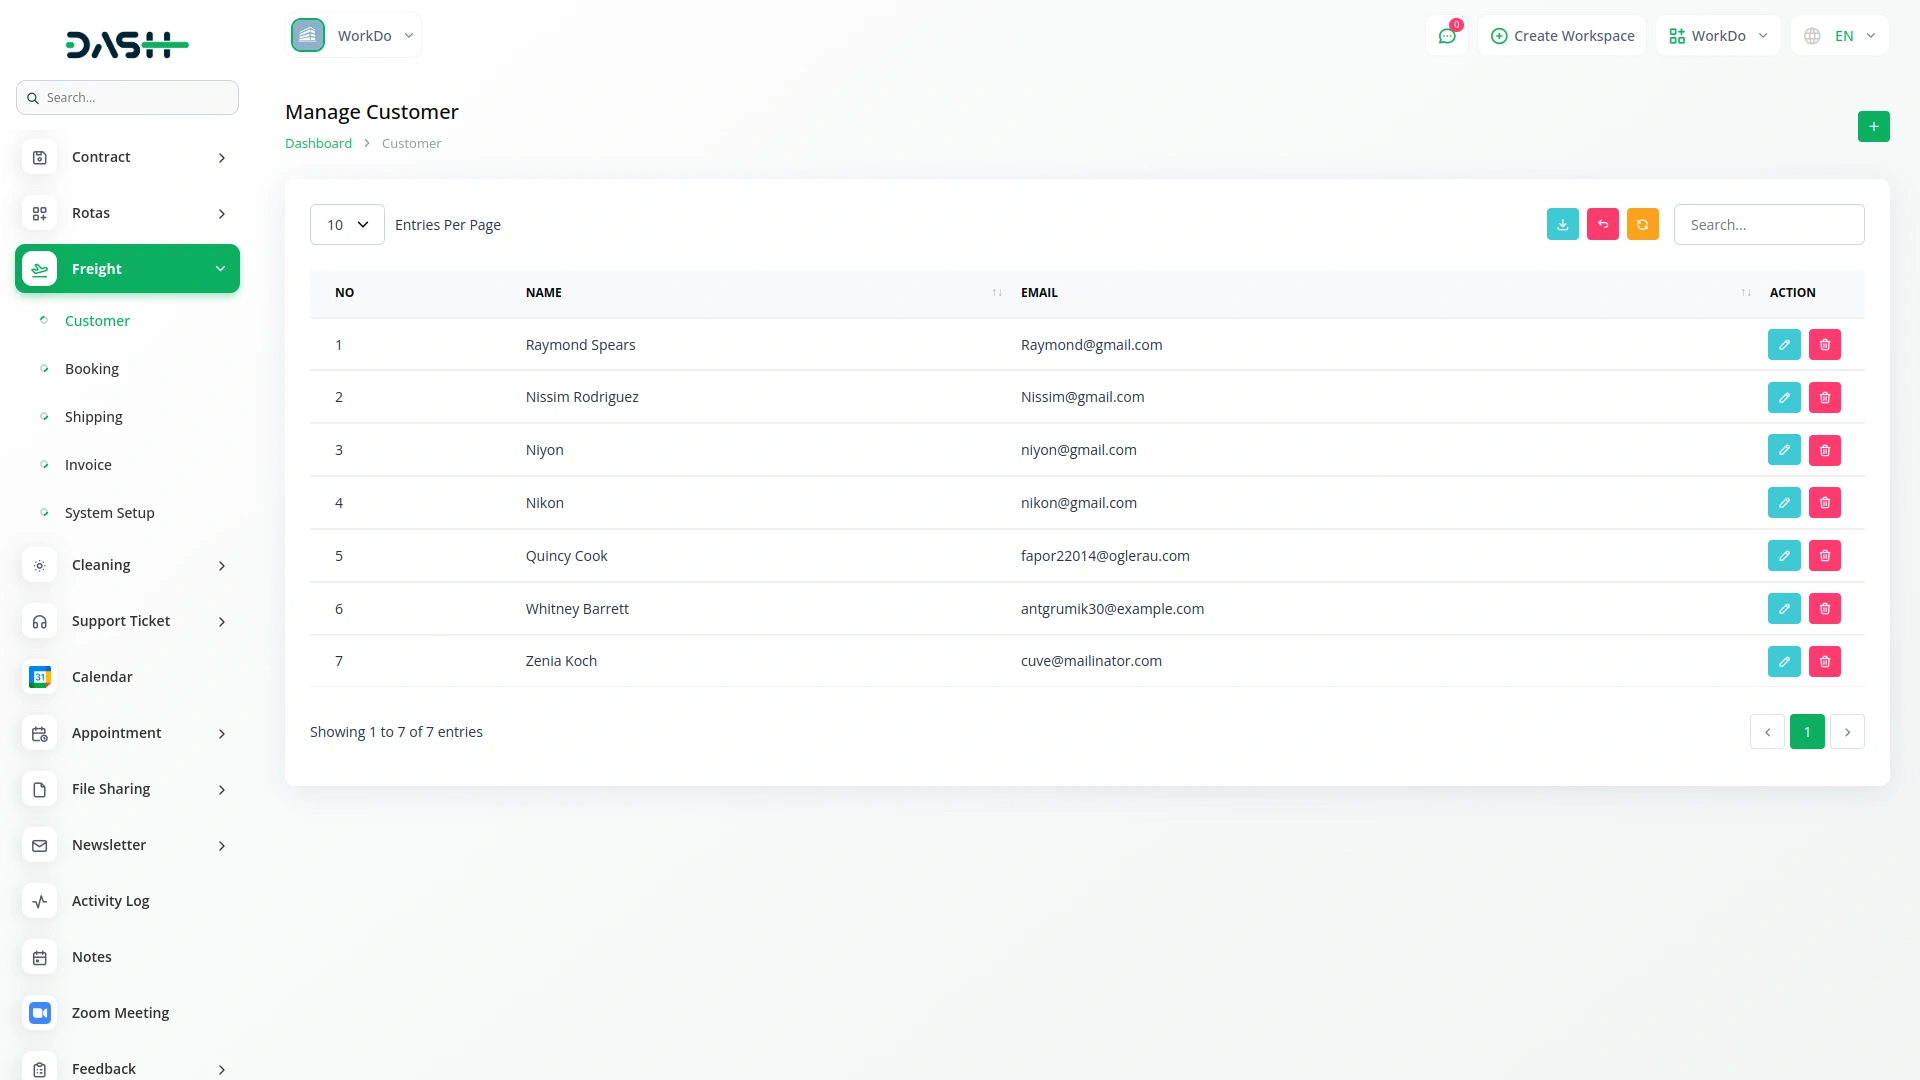
- To create a new customer, click the “Create” button on the customer page. Enter the customer’s name, email, and password for their account access. Fill in their complete address information, including city, state, country, zip code, and detailed address. Click “Submit” to create the customer profile.
- The list page shows all customers in a table with columns for serial number, customer name, and email address. You can use the Search button to find specific customers or the Export button to download customer data.
- In the Actions column, click the “Edit” button to modify customer information or the “Delete” button to remove a customer from the system.
Manage Booking
- To create a new booking request, click the “Create” button on the booking page. Select the direction by checking either the Import or Export radio button. Choose the transport method by checking the Air, Ocean, or Land radio button options.
- Enter the customer name and customer email address. Fill in the loading port and discharge port information.
- Specify the vessel details and select the booking date using the date picker. Enter the BarCode and Tracking Number, then upload any attachment files if required. Click “Submit” to create the booking request.
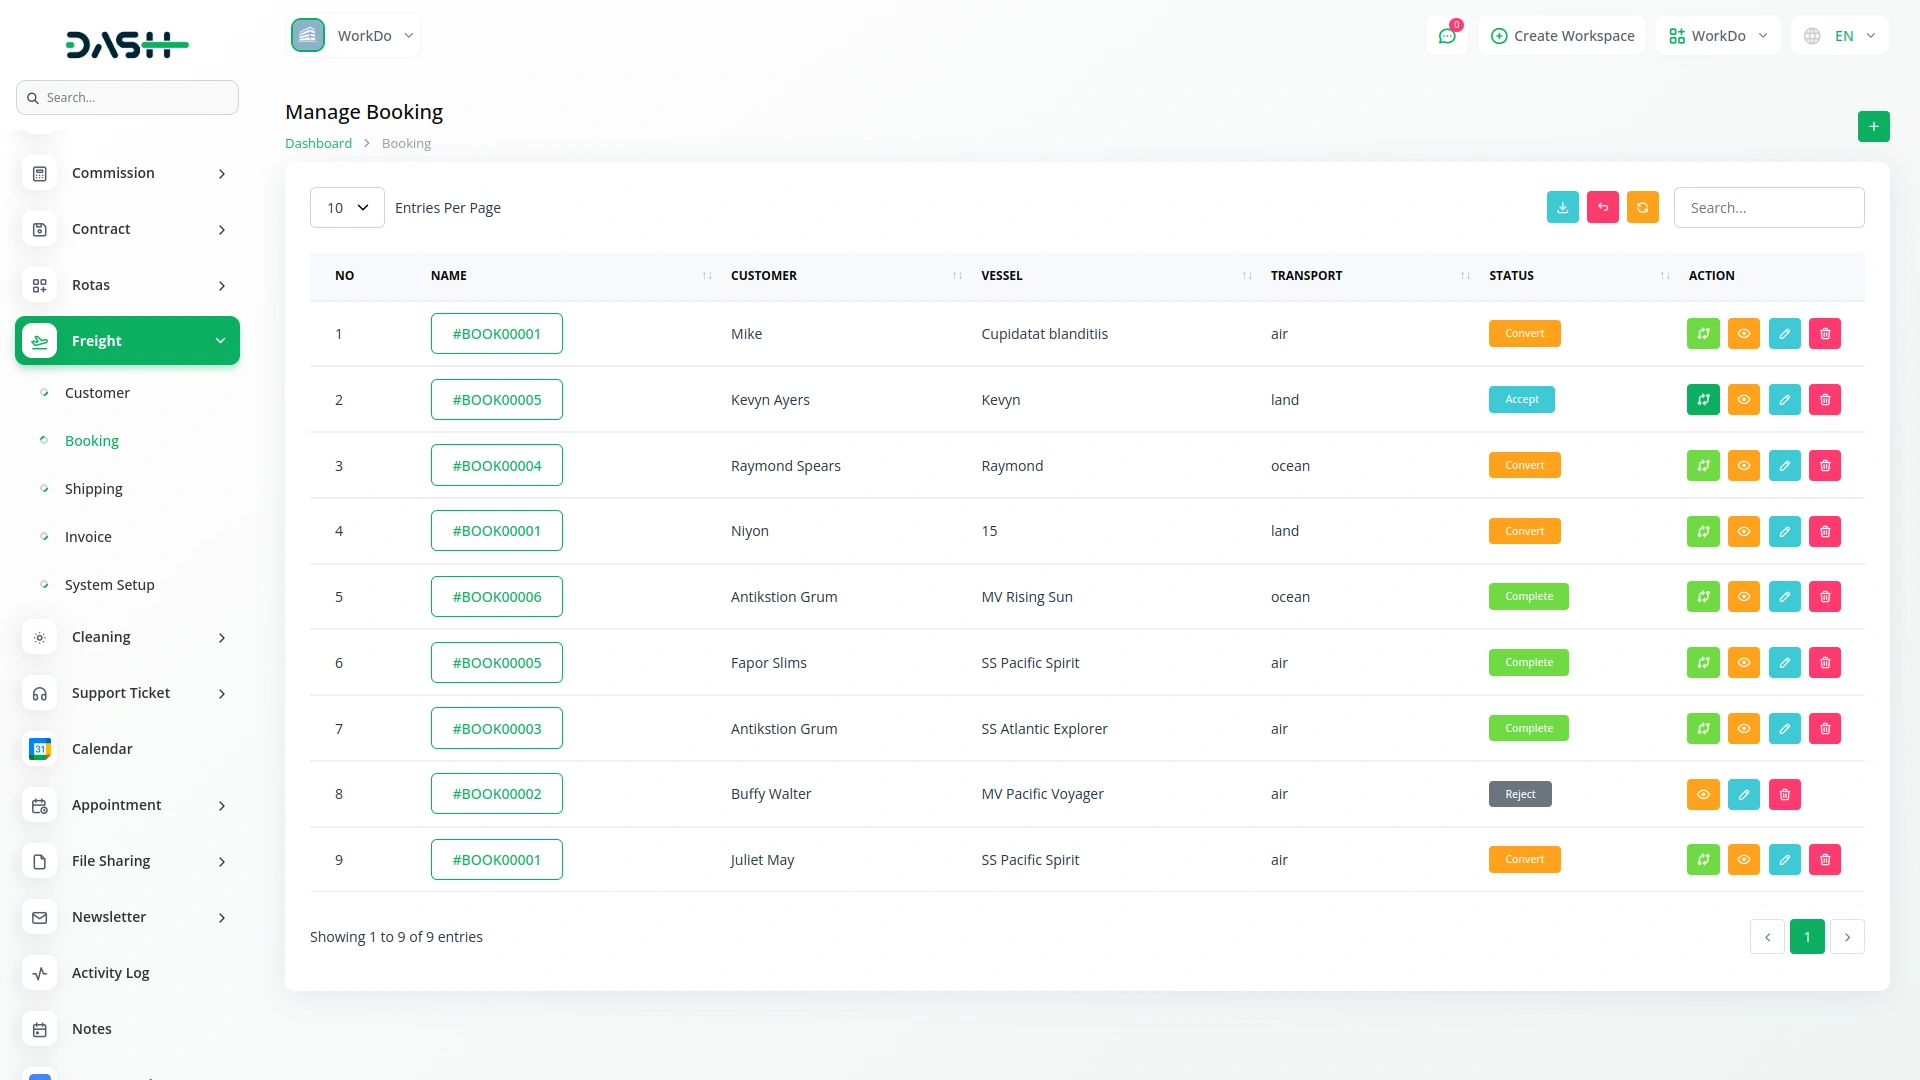
- The list page displays all booking requests with columns showing serial number, booking name (which shows booking request details when clicked), customer, vessel, transport method, and status (Draft, Accept, Convert, Complete, Reject). You can use Search and Export buttons to manage booking data.
- The Actions column provides several options: “Accept” opens a popup to create a customer, and once the customer is created, the Accept button changes to Convert to Ship.
- “Reject” shows a confirmation popup, and upon clicking Yes, both Accept and Reject buttons are removed. “Convert to ship” displays a confirmation popup, and upon clicking Yes, the button changes to Already Converted to Shipping.
- “Already Converted to Shipping” displays the associated shipping details when clicked. Additional actions include the “View” button to show booking request details, the “Edit” button to modify bookings, and the “Delete” button to remove booking requests.
Manage Shipping
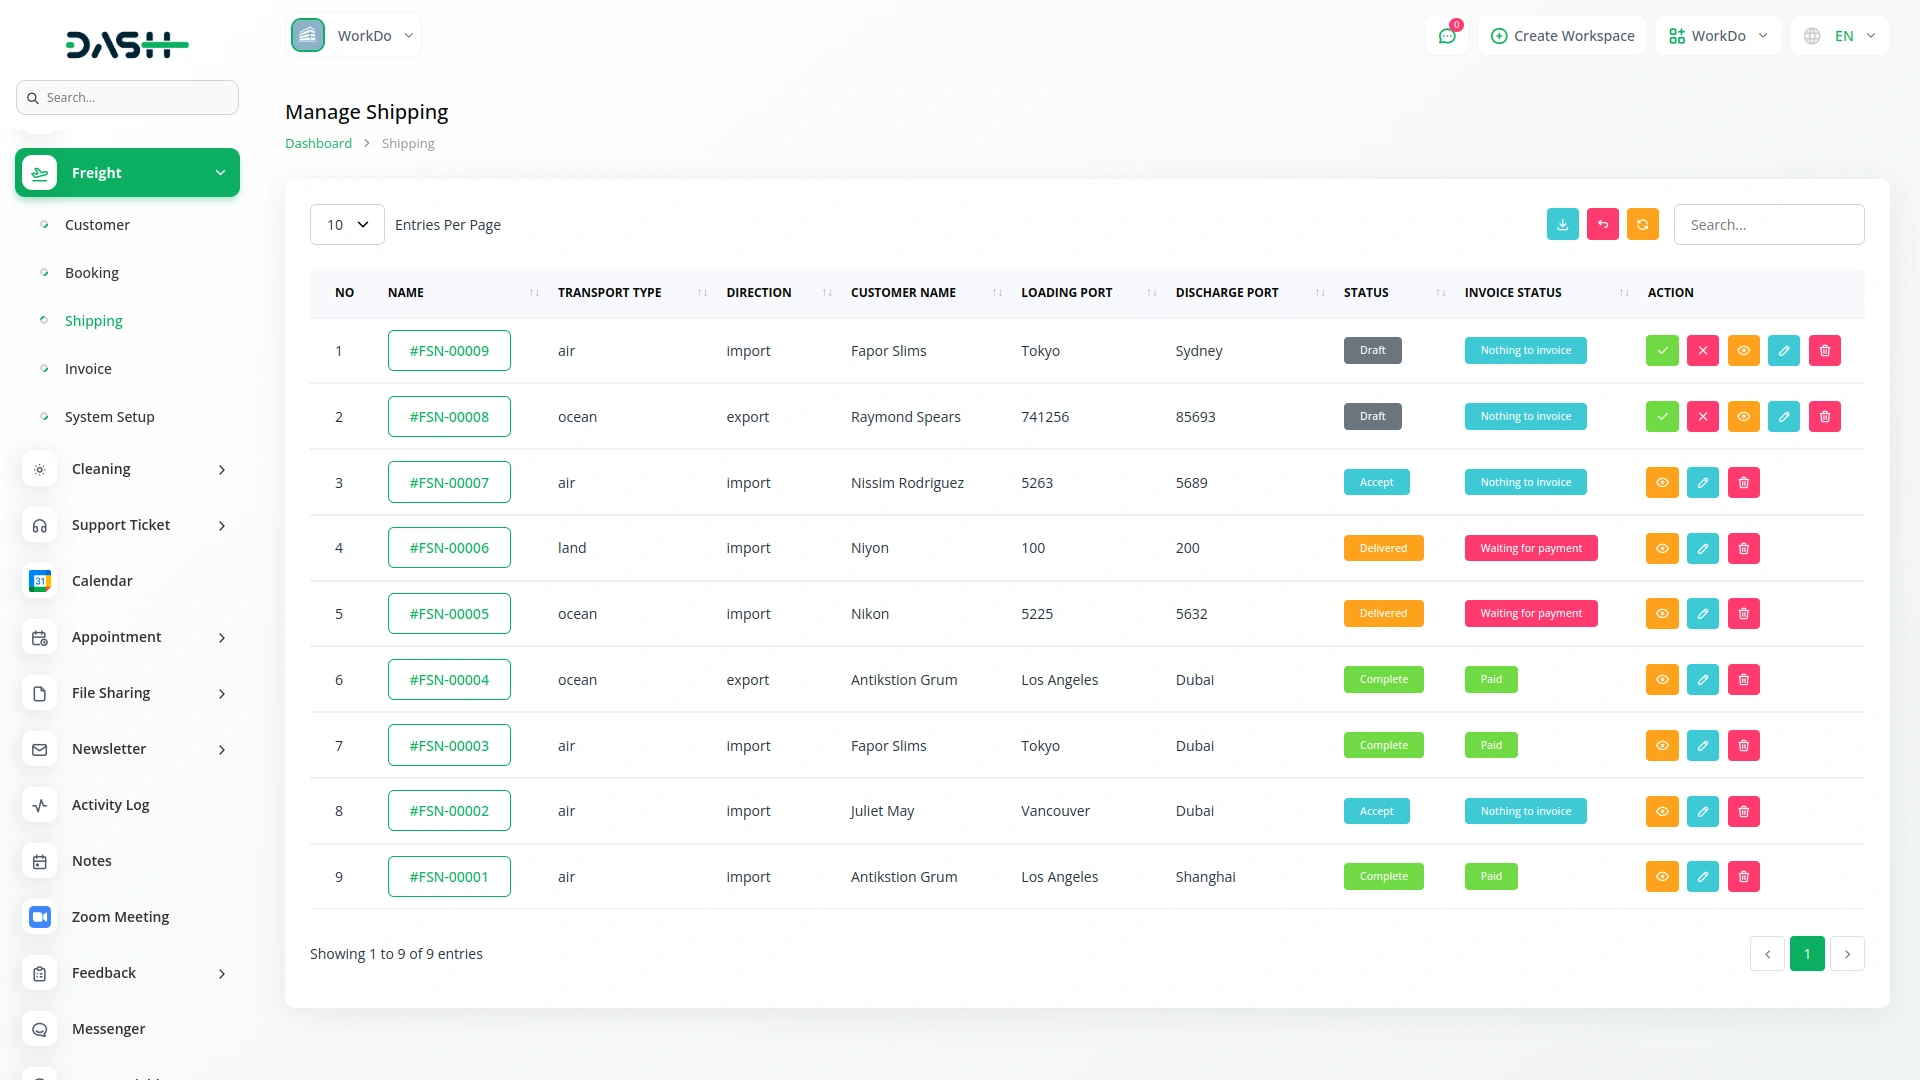
- The shipping module manages all active shipments in your system. The list page displays all shipments without a form creation section, as shipments are created through the booking conversion process.
- The list page shows shipments with columns for serial number, shipping name (which shows shipping details when clicked), transport type, direction, customer name, loading port, discharge port, status (Draft, Accept, Reject, Delivered, Complete), and invoice status (Nothing to invoice, Waiting for payment, Partially Paid, Paid). Use Search and Export buttons to manage shipping data.
- In the Actions column, “Accept” shows a confirmation pop-up, and after clicking Yes, both Accept and Reject buttons are removed. “View” opens the shipping details with five tabs: Main Carriage displays details related to the main carriage. Container tab shows table columns for Container (dropdown from System Setup), Quantity, and Volume, where selecting a container automatically fills the quantity and volume fields.
- Order tab displays Description, Container (from System Setup), Pricing (from System Setup), Billing On (Weight, Volume, Service options), Weight, Volume, Price, and Sale Price, with automatic price updates based on selections and a Create Invoice button appearing after updates.
- Services tab shows Vendor (from Accounting), Service (from System Setup), Quantity, Sales Price, and Total Sales with automatic calculations and repeater functionality. Route tab includes Route Operation, Transport, From, To, Send Date, and Received Date fields with repeater functionality, displaying Route Operations, Source Location, Destination Location, Transport, Cost, and Sale columns with Edit and Delete actions. Additional actions include “Edit” and “Delete” buttons for shipping management.
Manage Invoices
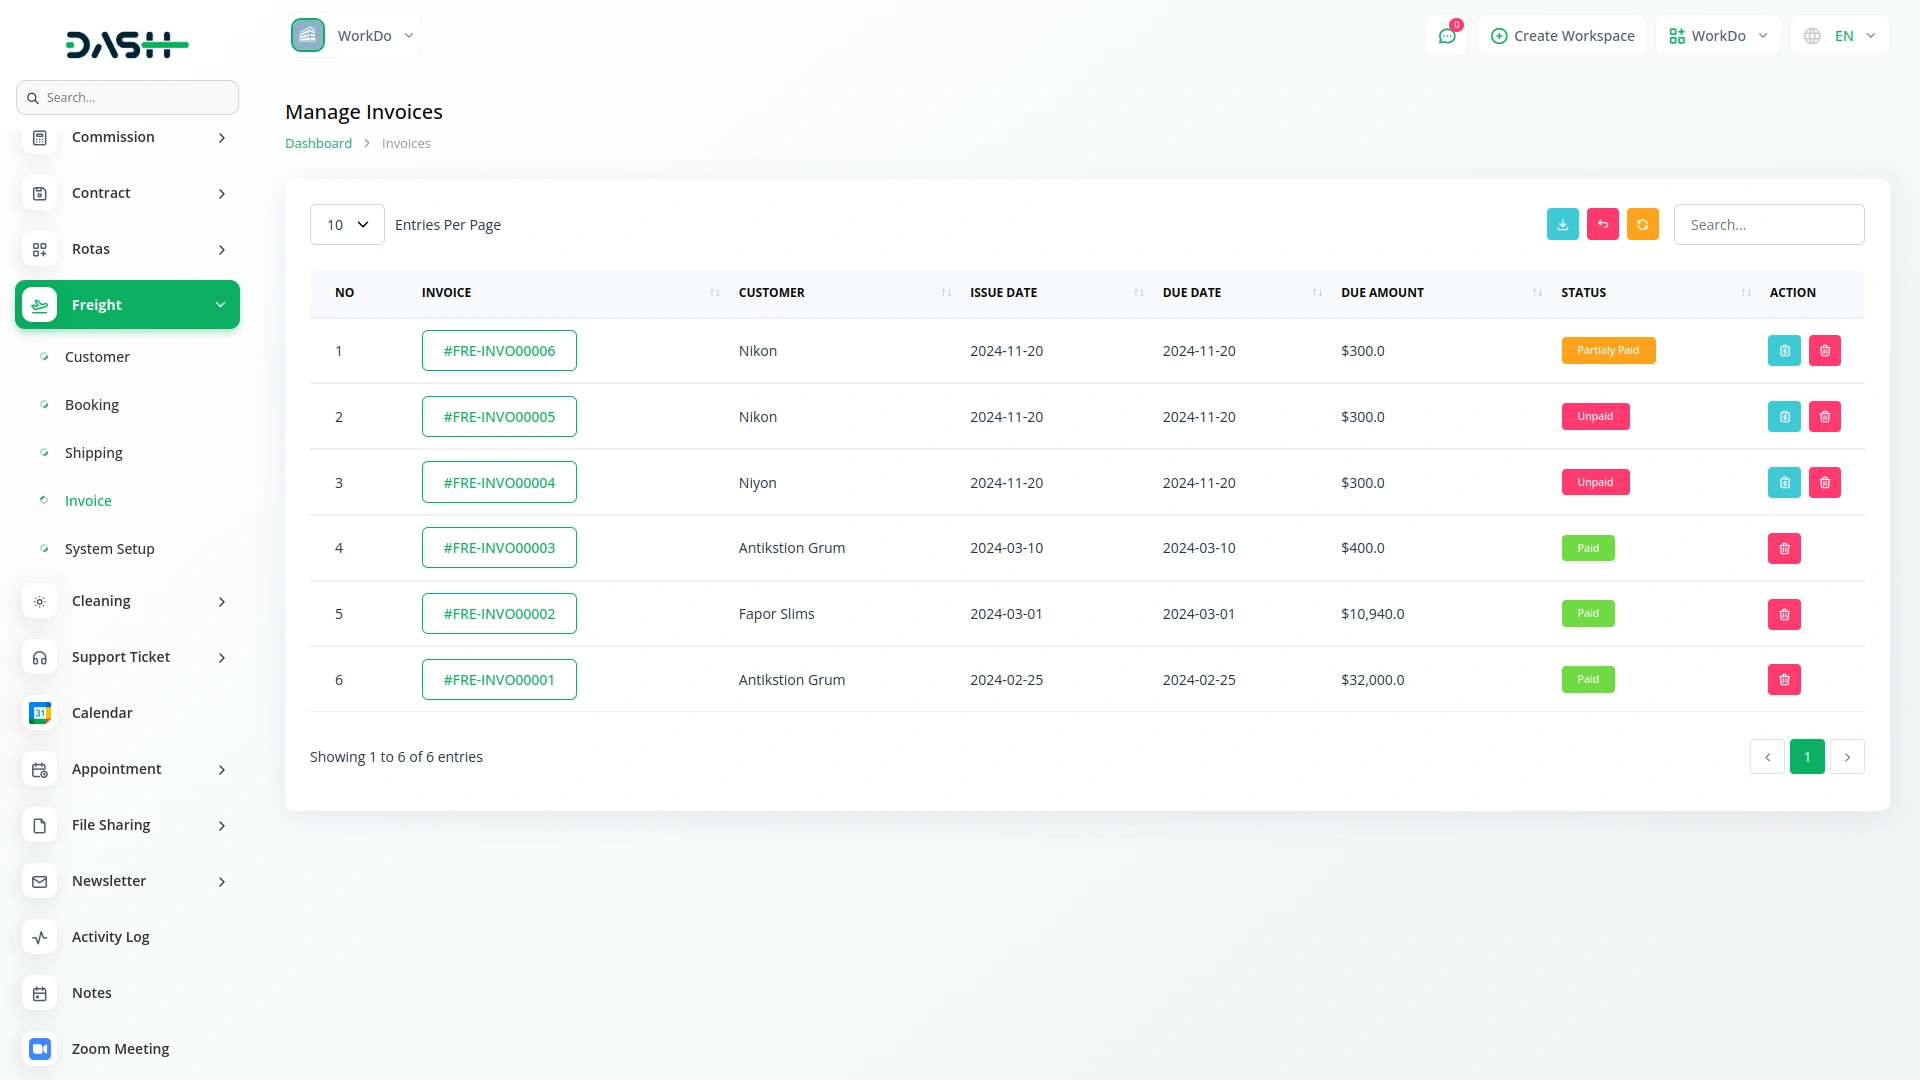
- The invoice module displays all generated invoices without a direct form creation section, as invoices are created through the shipping order process.
- The list page shows all invoices with columns for serial number, invoice number (which shows invoice details when clicked), customer, issue date, due date, due amount, and status (Paid, Unpaid, Partially Paid). Use the Search and Export buttons to manage invoice data.
- In the Actions column, “Add Payment” opens a pop-up allowing you to make a payment for the invoice, and “Delete” removes the invoice from the system.
System Setup
Manage Price
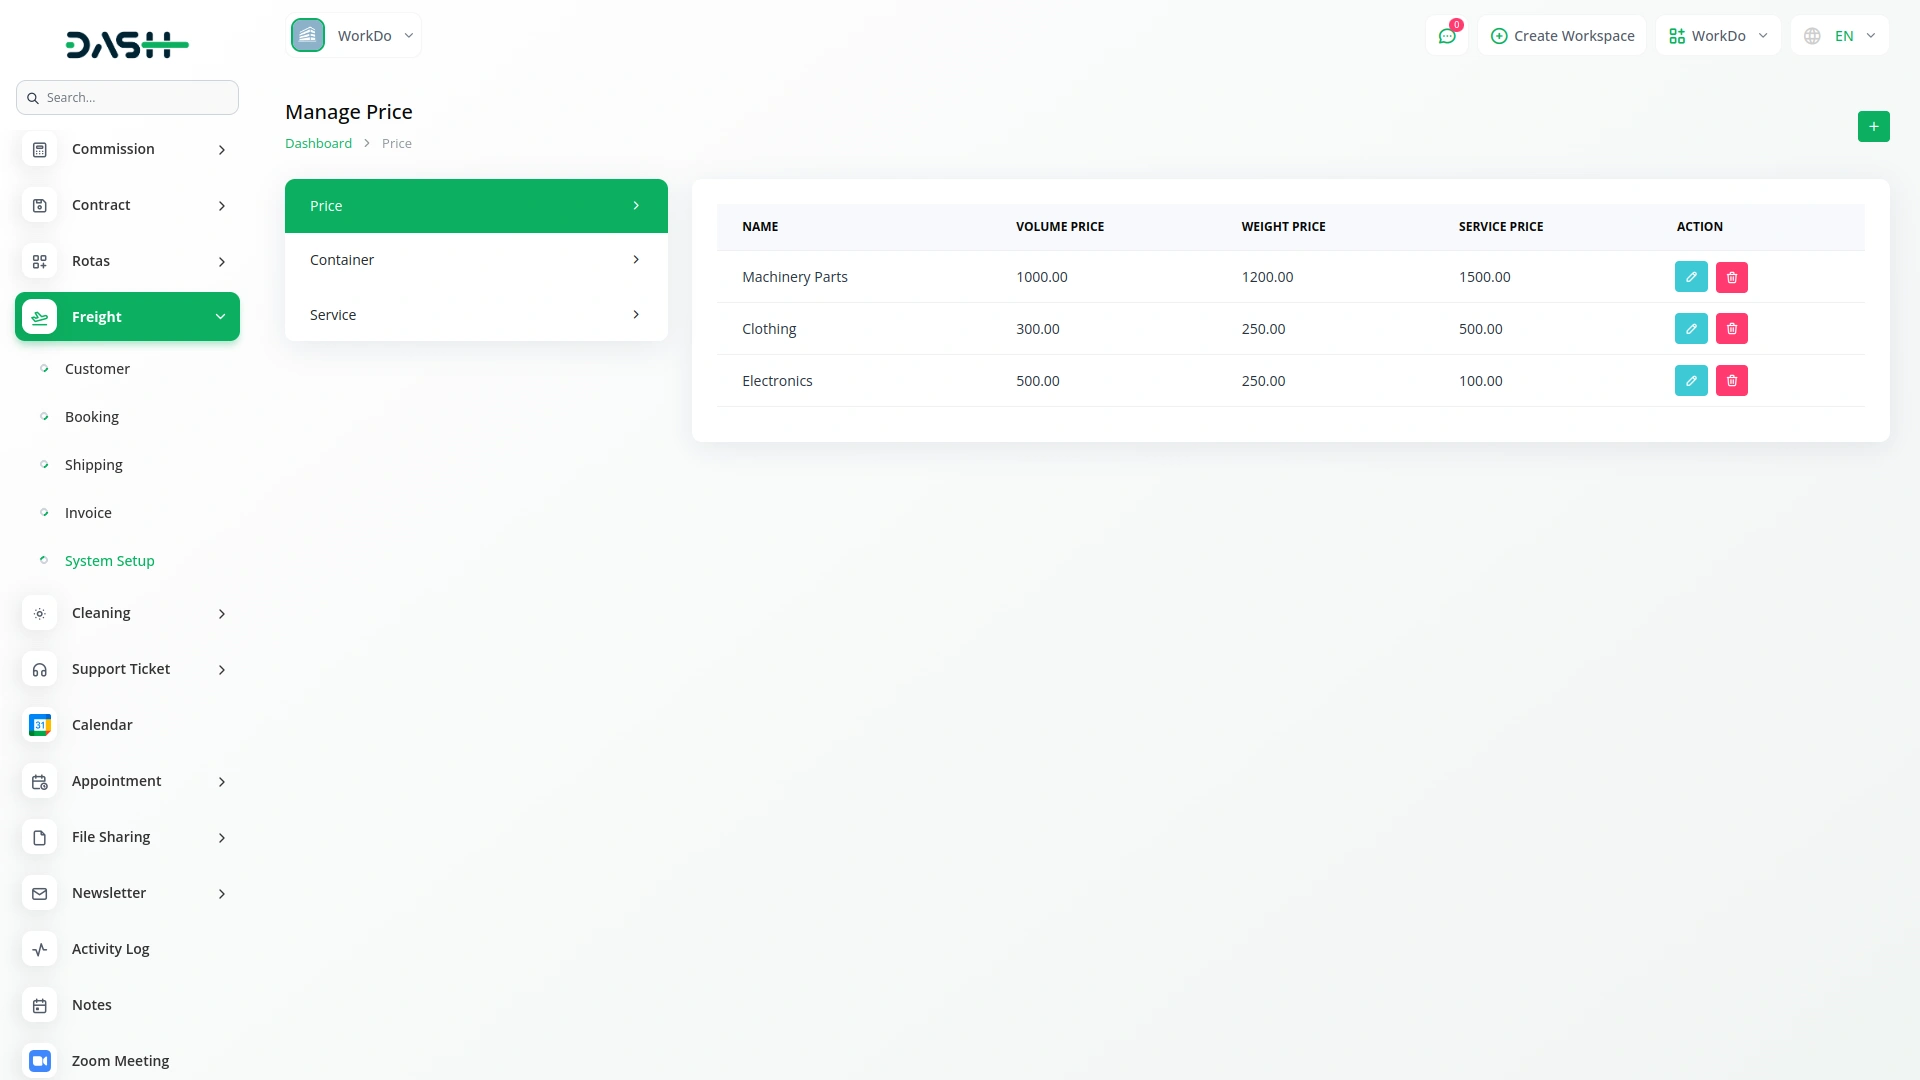
- To create a new price entry, click the “Create” button on the price management page. Enter the price name to identify this pricing structure.
- Set the volume price for volume-based calculations, the weight price for weight-based calculations, and the service price for service-based pricing. Click “Submit” to create the price entry.
- The list page displays all price entries with columns showing the price name, volume price, weight price, and service price.
- The Actions column provides an “Edit” button to modify existing price entries and a “Delete” button to remove price entries from the system.
Manage Container
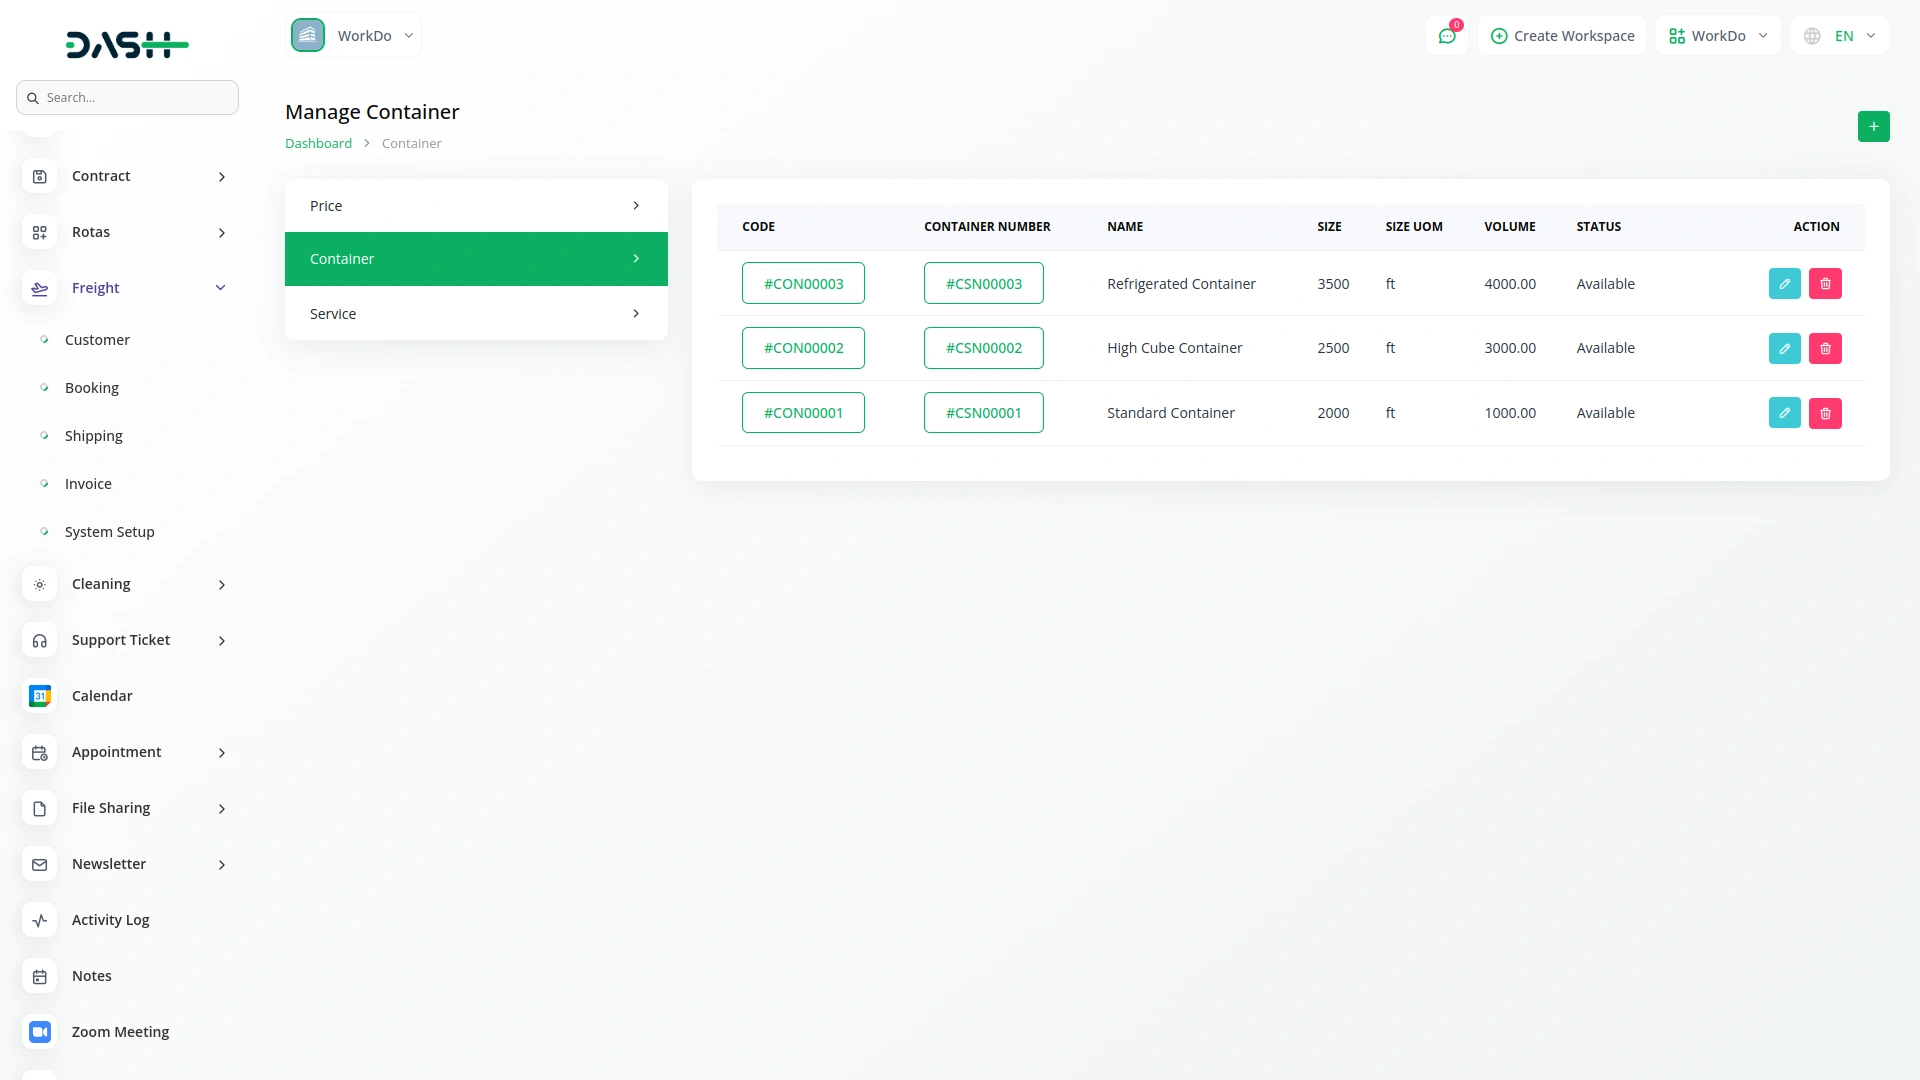
- To add a new container, click the “Create” button on the container management page. Enter the container code and container number for identification.
- Set the status using the toggle button to mark the container as Available or Unavailable. Fill in the container name, size, and size unit of measurement (UOM). Enter the volume price for this container type. Click “Submit” to create the container entry.
- The list page shows all containers with columns displaying the container code, container number, name, size, size UOM, volume, and current status. The Actions column provides “Edit” to modify existing container information and “Delete” to remove containers from the system.
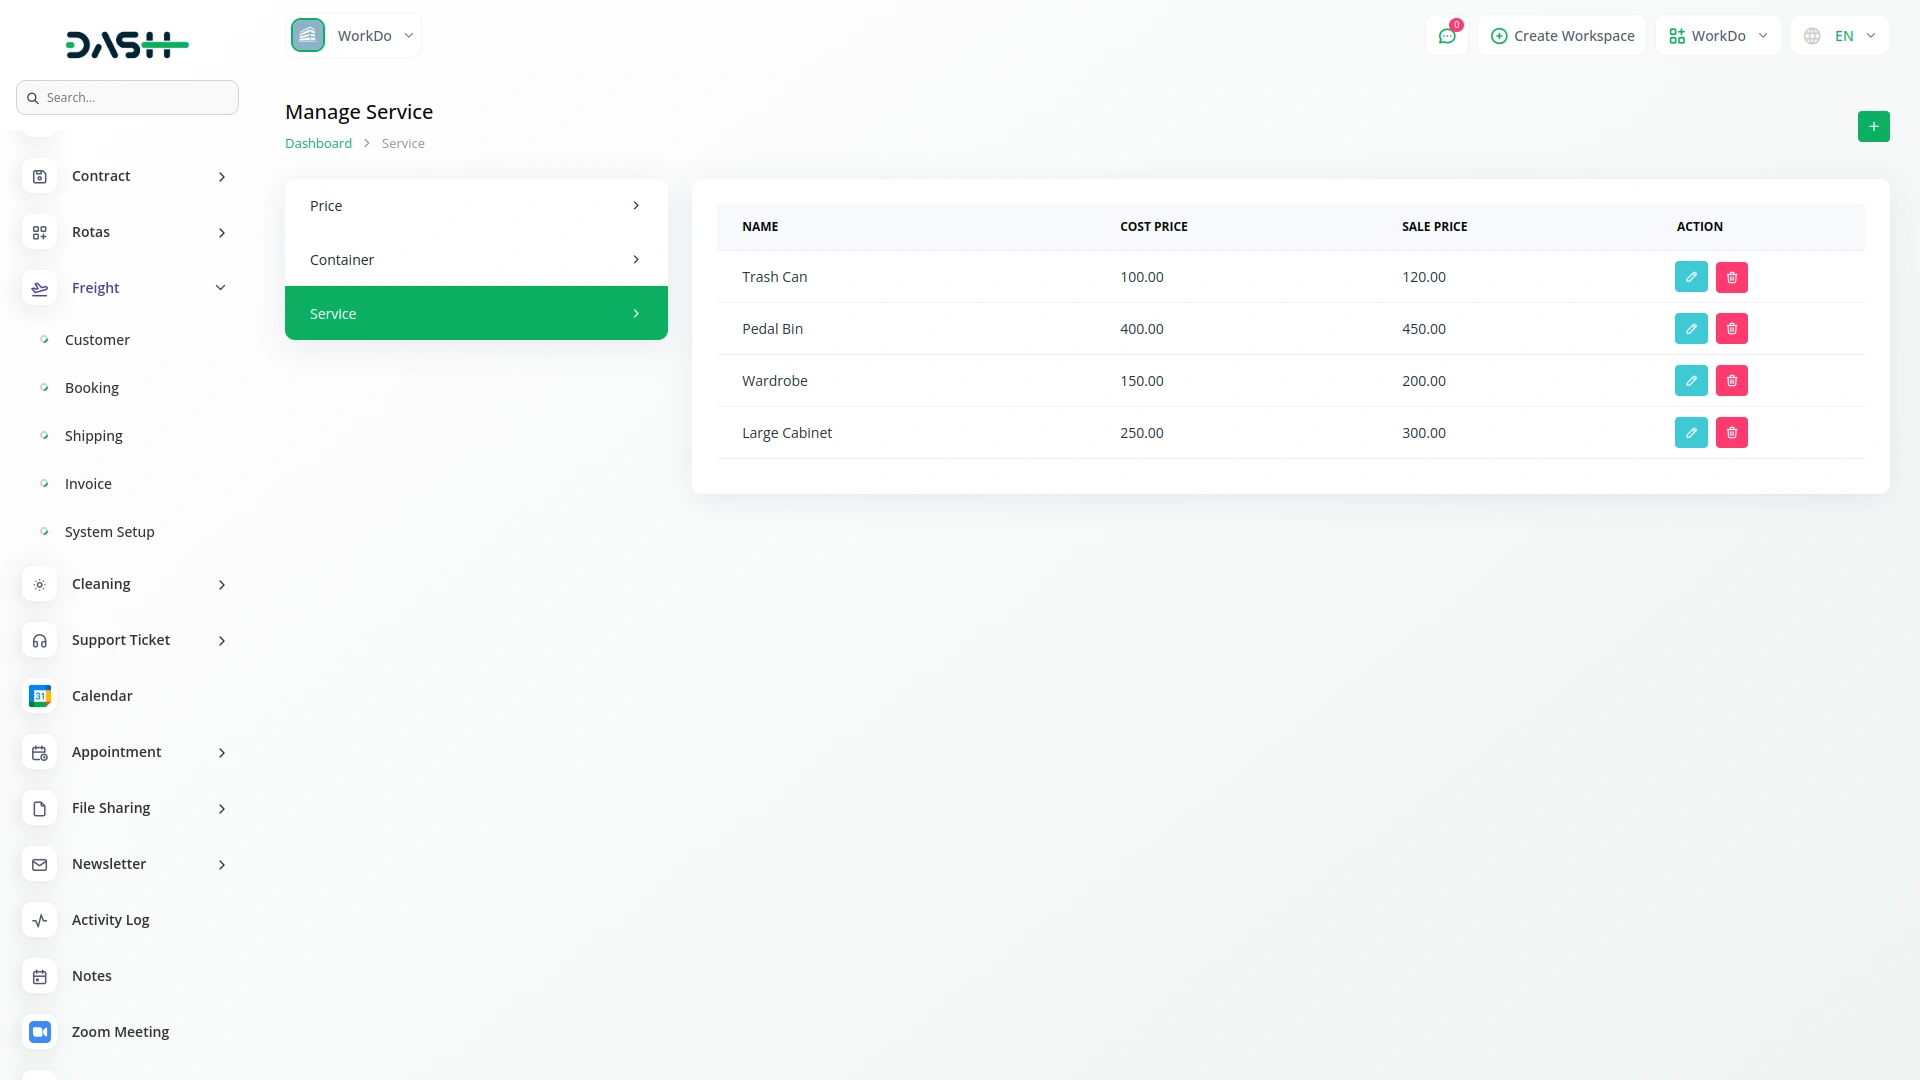
Manage Service
- To create a new service, click the “Create” button on the service management page. Enter the service name to identify the type of service offered.
- Set the cost price for your internal costing and the sale price for customer billing. Click “Submit” to create the service entry.
- The list page displays all services with columns showing the service name, cost price, and sale price.
- The Actions column provides an “Edit” button to modify existing service information and a “Delete” button to remove services from the system.
Categories
Related articles
- Google Slides Detailed Documentation
- Sales Agent Integration in Dash SaaS
- Dairy & Cattle Management Integration in Dash SaaS
- Portfolio Integration in Dash SaaS
- EaseBuzz Payment Gateway Detailed Documentation
- Find Google Leads Integration in Dash SaaS
- Facilities Integration in Dash SaaS
- Braintree Payment Gateway Detailed Documentation
- Plaid Integration in Dash SaaS
- Email Box Integration in Dash SaaS
- vCard Integration in Dash SaaS
- Bookings Integration in Dash SaaS
Reach Out to Us
Have questions or need assistance? We're here to help! Reach out to our team for support, inquiries, or feedback. Your needs are important to us, and we’re ready to assist you!


Need more help?
If you’re still uncertain or need professional guidance, don’t hesitate to contact us. You can contact us via email or submit a ticket with a description of your issue. Our team of experts is always available to help you with any questions. Rest assured that we’ll respond to your inquiry promptly.
Love what you see?
Do you like the quality of our products, themes, and applications, or perhaps the design of our website caught your eye? You can have similarly outstanding designs for your website or apps. Contact us, and we’ll bring your ideas to life.
