Mobile Service Management Integration in Dash SaaS
Mobile Service Management is a comprehensive software solution designed to help mobile repair businesses manage their service operations efficiently.
Introduction
Mobile Service Management is a comprehensive Add-On solution designed to streamline mobile device repair and service operations. The system enables businesses to manage service requests, track repairs, handle invoices, and provide customers with a complete online booking and tracking experience. The Add-On includes both backend management tools for staff and a customer-facing website where clients can book services, track repair progress, and make payments. Key features include request management, technician assignment, status tracking, invoice generation, and a fully customizable frontend website.
How to Install the Add-On?
To Set Up the Mobile Service Management Add-On, you can follow this link: Setup Add-On.
How to Use The Mobile Service Management Add-On?
Dashboard overview
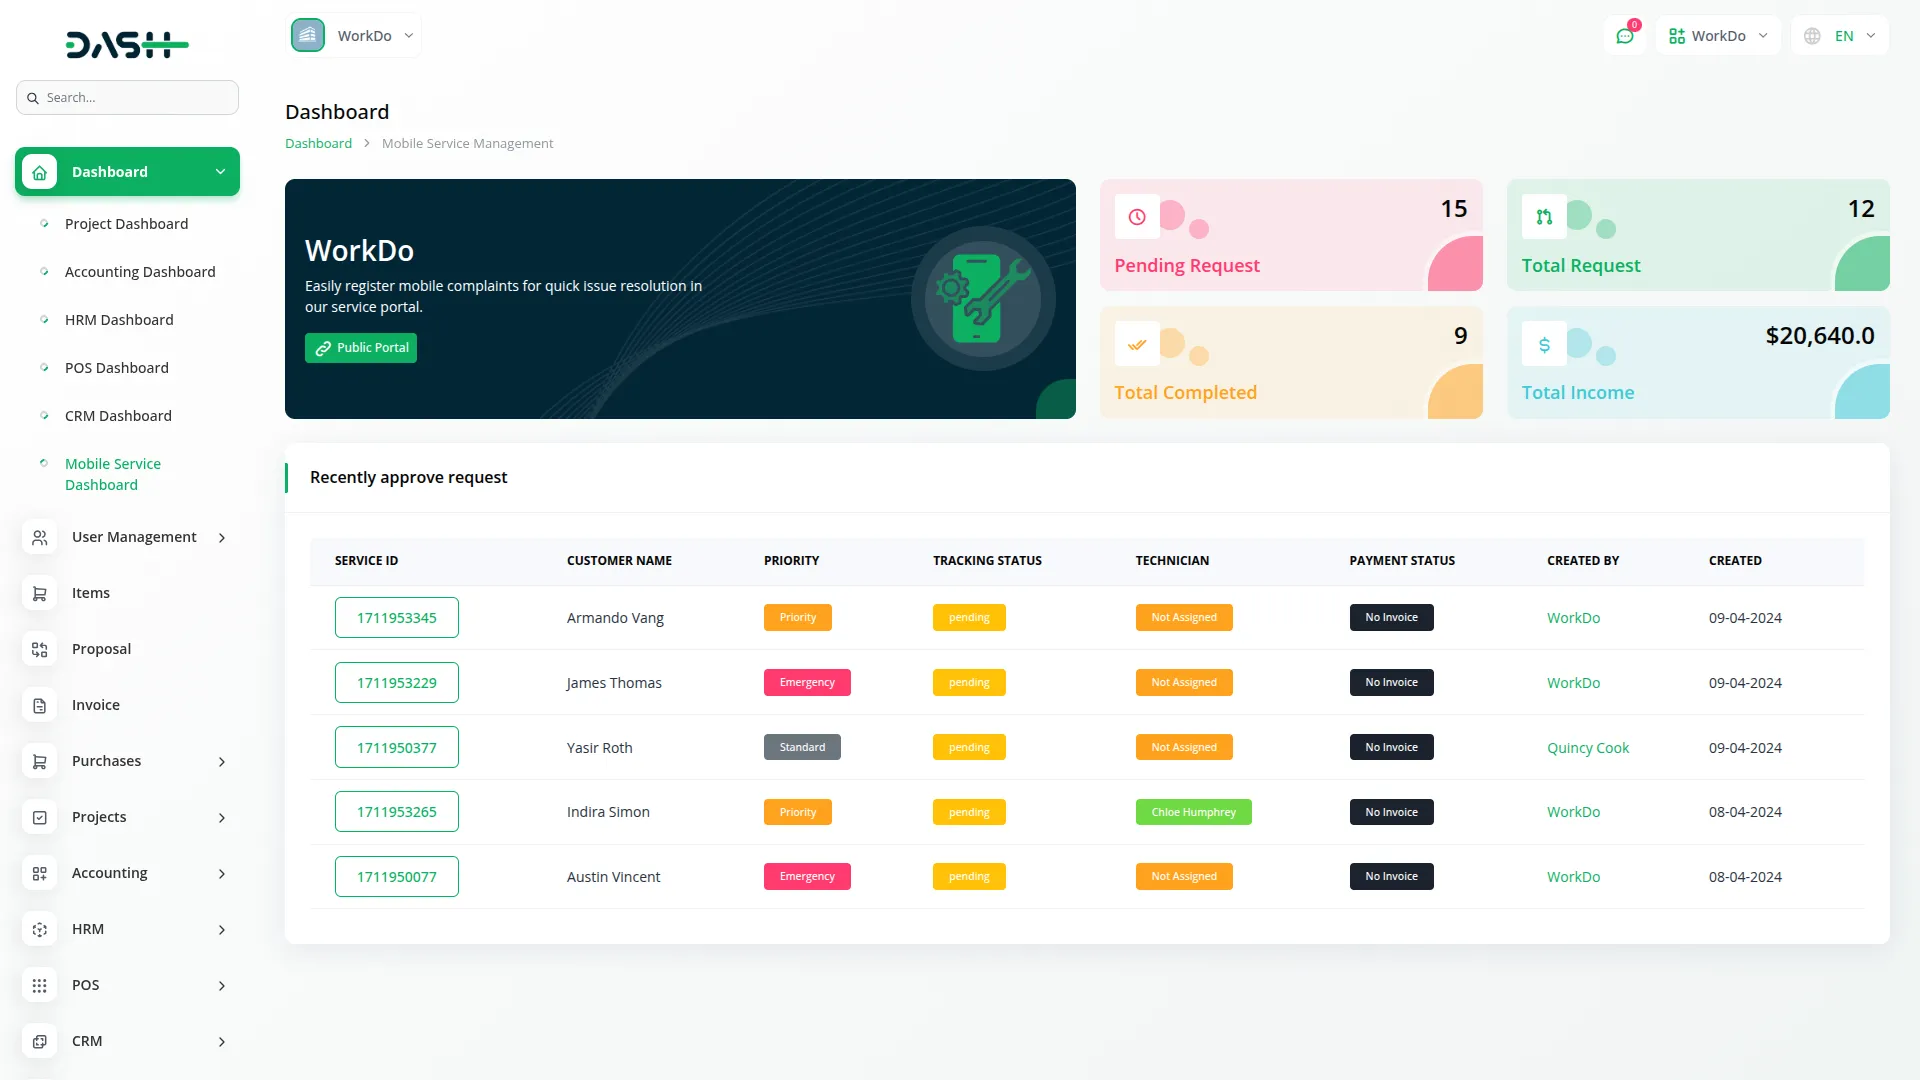
- The Dashboard provides a complete overview of your mobile service business operations and quick access to important information.
- When you access the Dashboard, you will see Statistics Cards displaying Total Pending Requests (awaiting approval), Total Active Requests (approved and in progress), Total Completed Requests (repair ended), and Total Income (from mobile service invoices). These cards give you instant insight into your business performance.
- Below the statistics, you’ll find a Recent Requests Table showing the latest 5 approved service requests. Each row displays the Service ID (clickable for details), Customer Name, Priority level (Standard, Priority, Emergency), assigned Technician (if any), Payment Status (if invoice is available), Created Date, and Created By information.
- The Dashboard also includes a frontend link copy feature that allows you to send the booking website link directly to clients for service requests. This makes it easy for customers to book and track their mobile service needs online.
Theme Setup
- The Theme Setup section allows you to configure how your frontend website appears to customers. This comprehensive customization system is organized into several sub-sections, each with individual toggle switches that control visibility on the frontend.
Site Settings
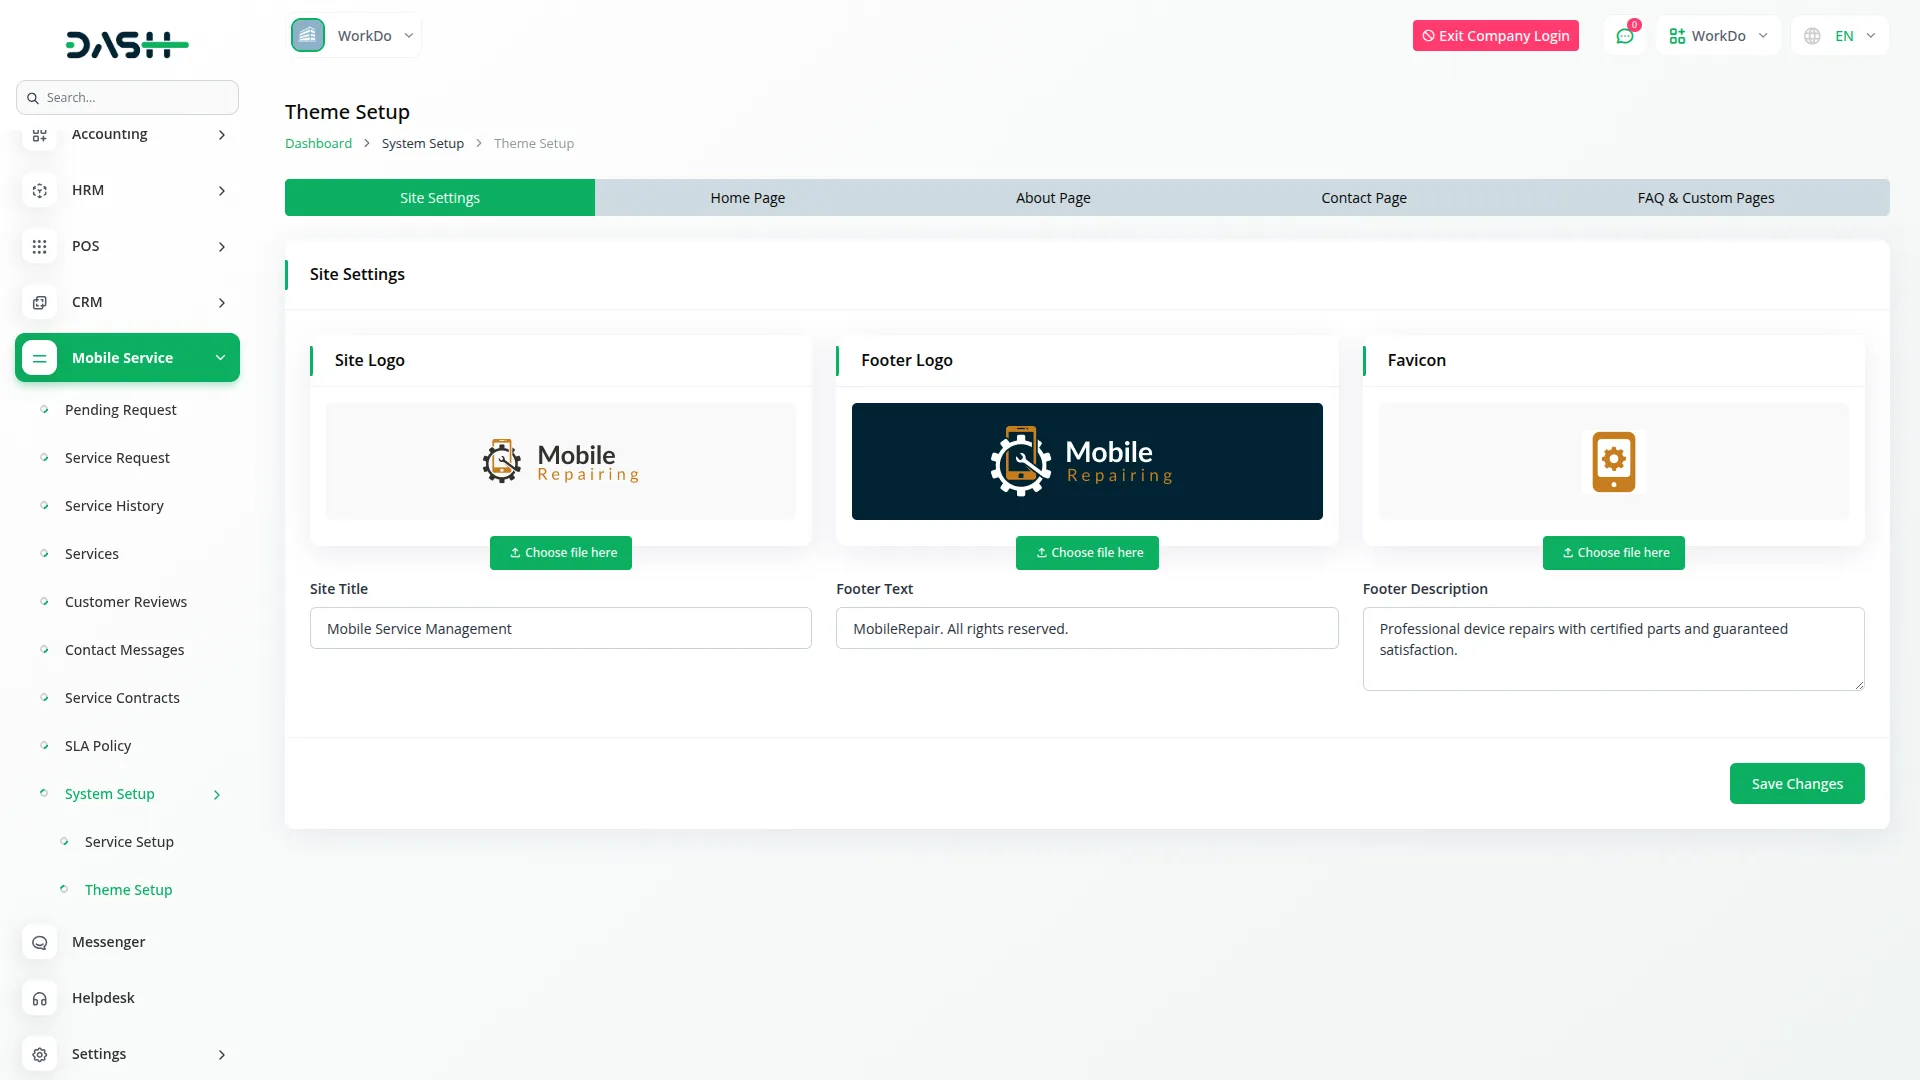
- In the Site Settings section, you can configure your basic website identity elements. Enter your Site Title, Footer Text, and Footer Description to establish your brand presence. Upload your Site Logo, Footer Logo, and Favicon to ensure consistent branding across your website.
- Once saved, these elements will appear throughout your frontend booking website, creating a professional and cohesive brand experience. The Site Logo and Title display in the website header section along with the navigation menu containing Home, Services, FAQ (if enabled), About (if enabled), and Contact (if enabled) pages. The header also includes a Language Translate Dropdown and a Service Request Button. The Footer Logo, Text, and Description appear in the website footer section along with social media links and contact details.
Home Page Setup
- The Home Page Setup controls the main sections that customers see when they visit your website.
Banner Section
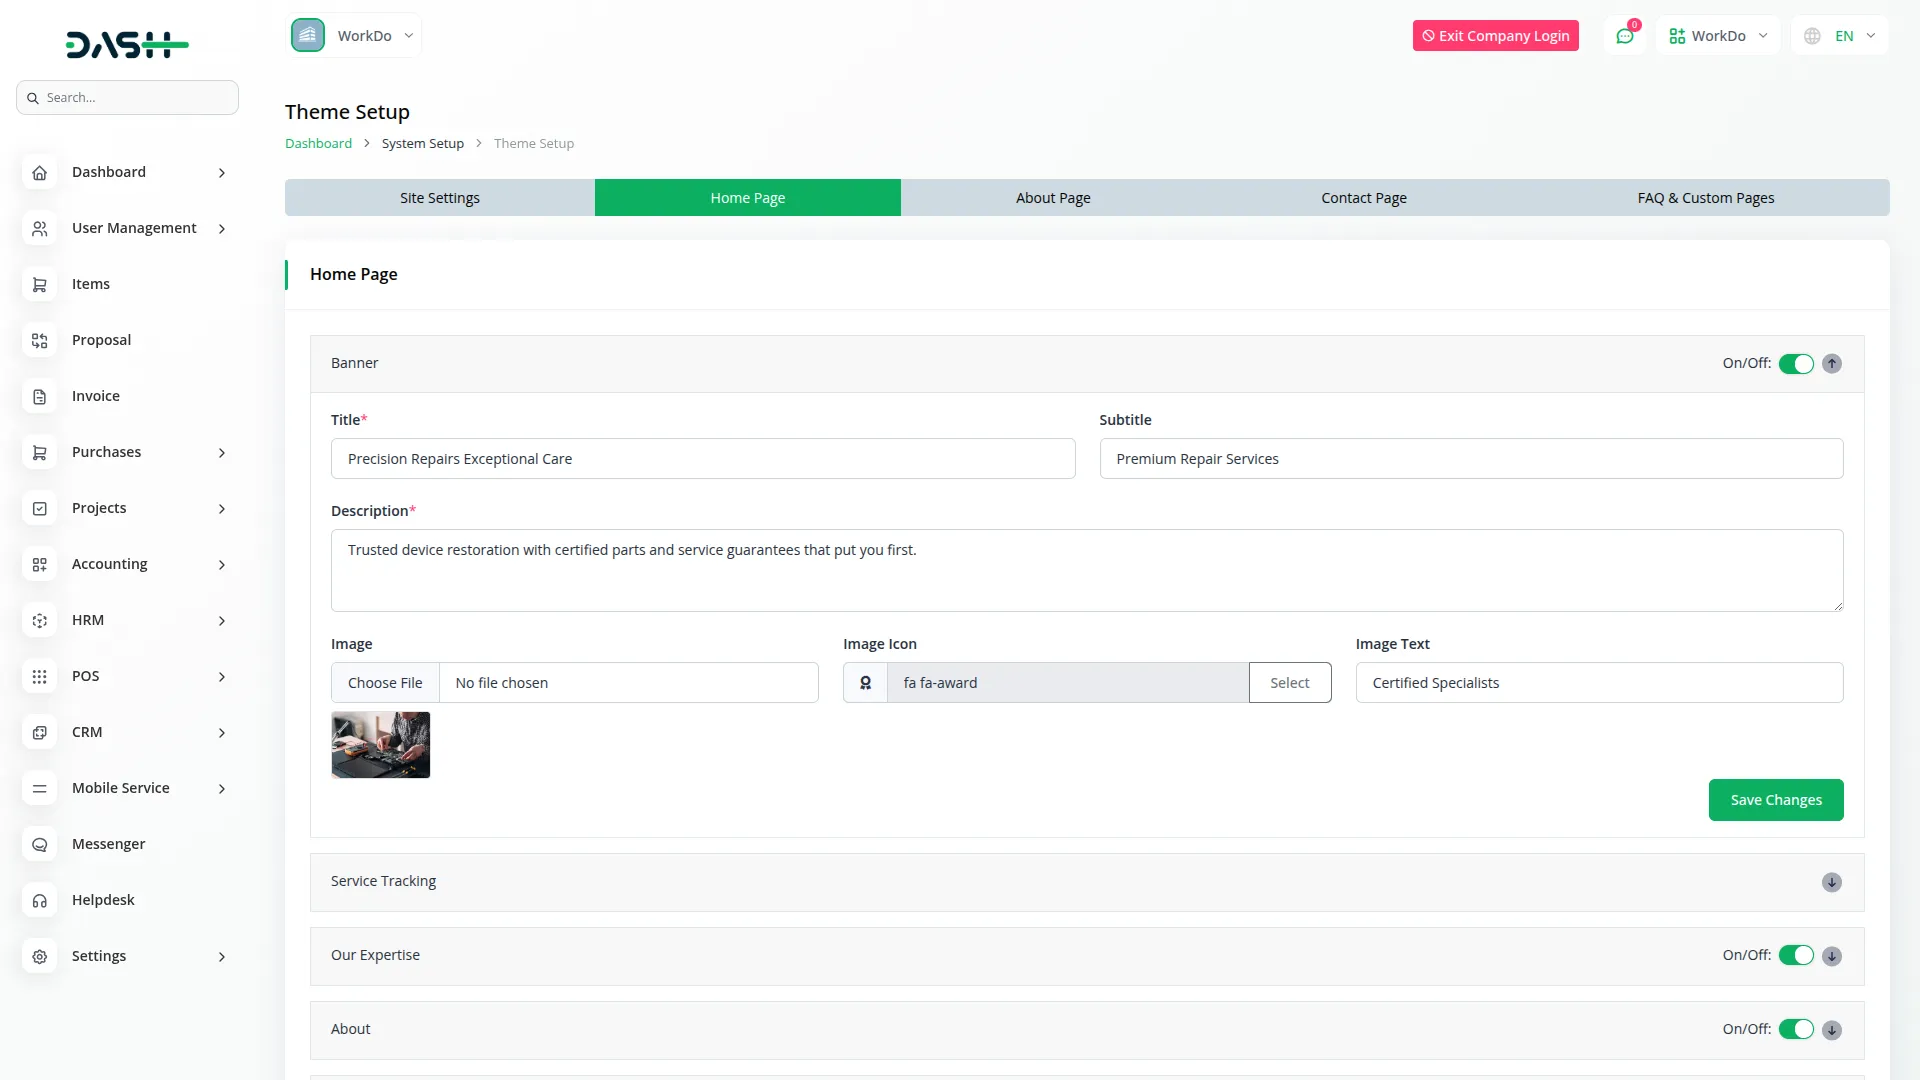
- Enter your main Title, Description, and Subtitle along with a compelling Banner Image. You can also add an Image Icon and Image Text to enhance the visual appeal.
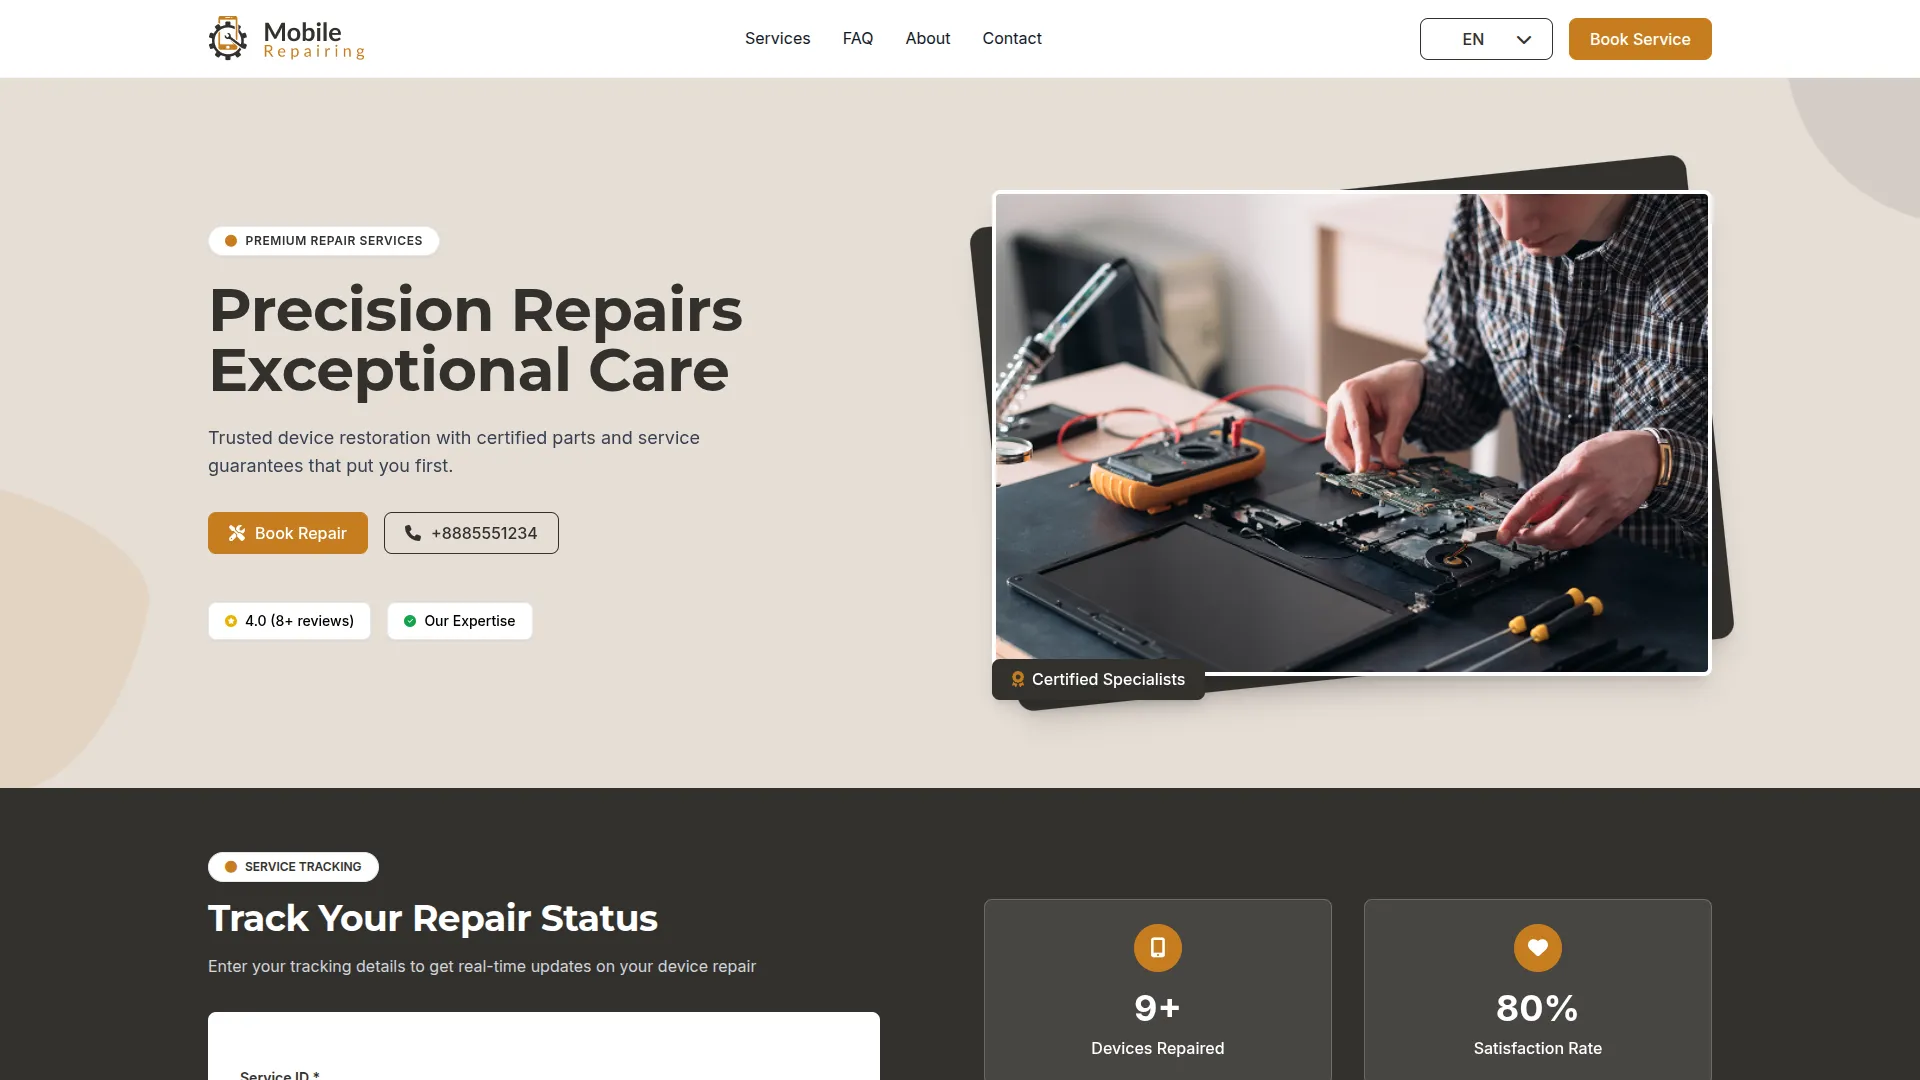
- When the toggle is ON and all required fields are completed, this banner will prominently display at the top of your homepage, creating an impactful first impression for visitors.
Tracking Section
- Configure the Title and Description for your service tracking area. This section cannot be turned OFF and always displays on the homepage, allowing customers to easily track their service status using their Service ID and email address.
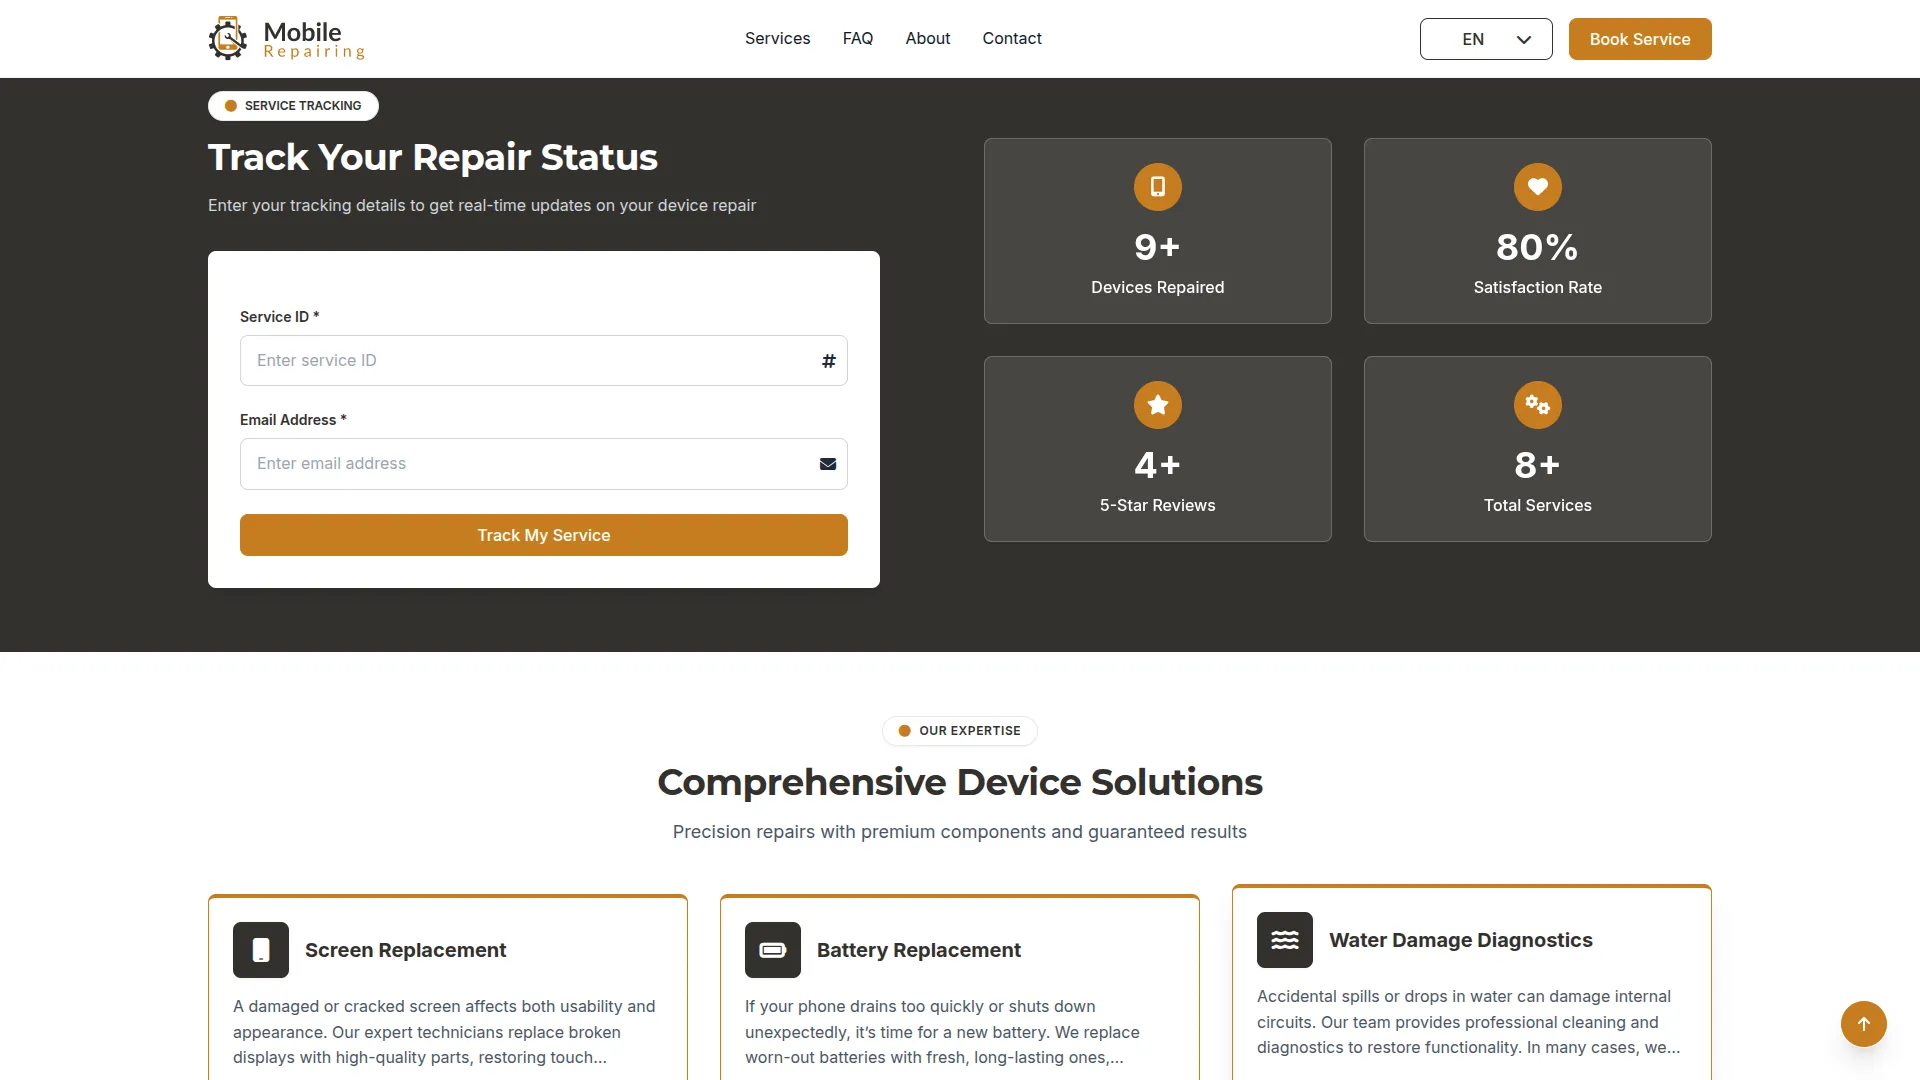
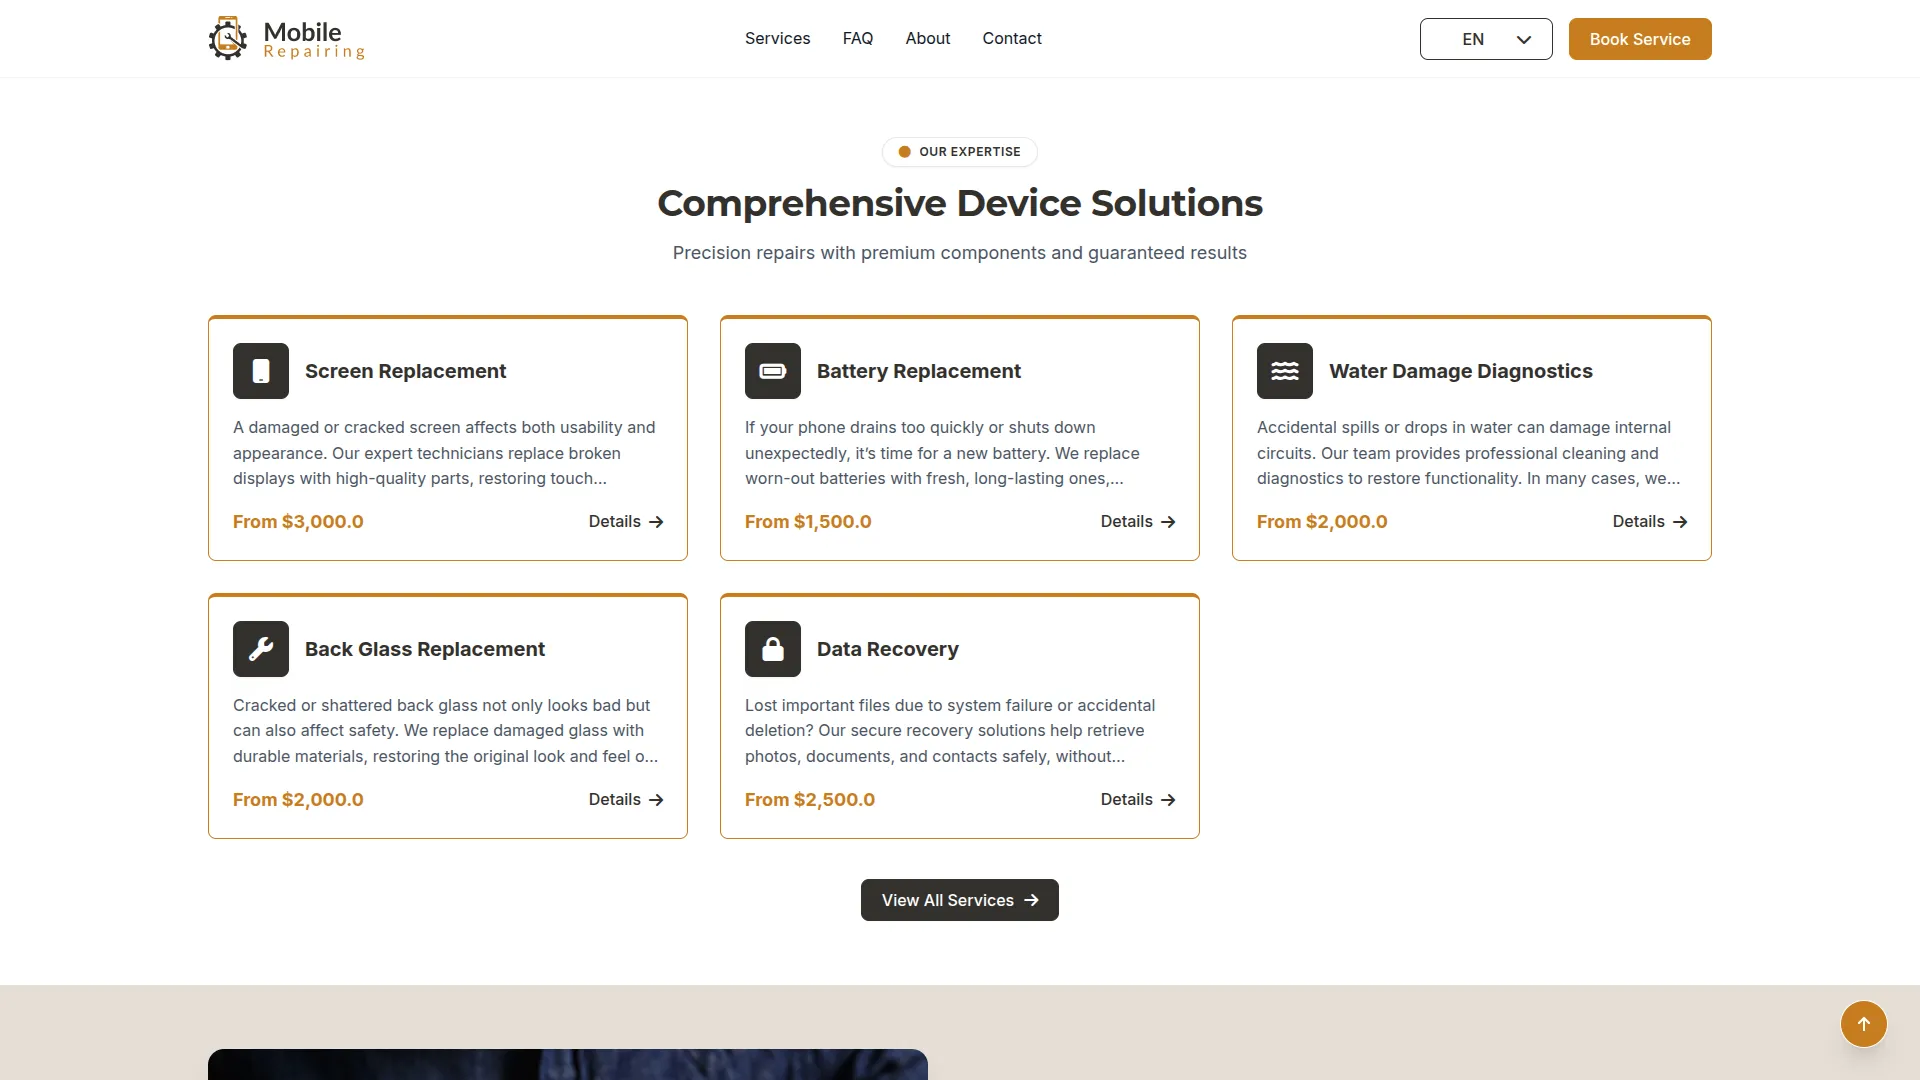
Expertise Section
- Set up the Title and Description for showcasing your service expertise. This section will automatically display services that are marked as “Show in Expertise” in the Services section. If you have services configured to show in expertise, this section will appear on your homepage; otherwise, it remains hidden.
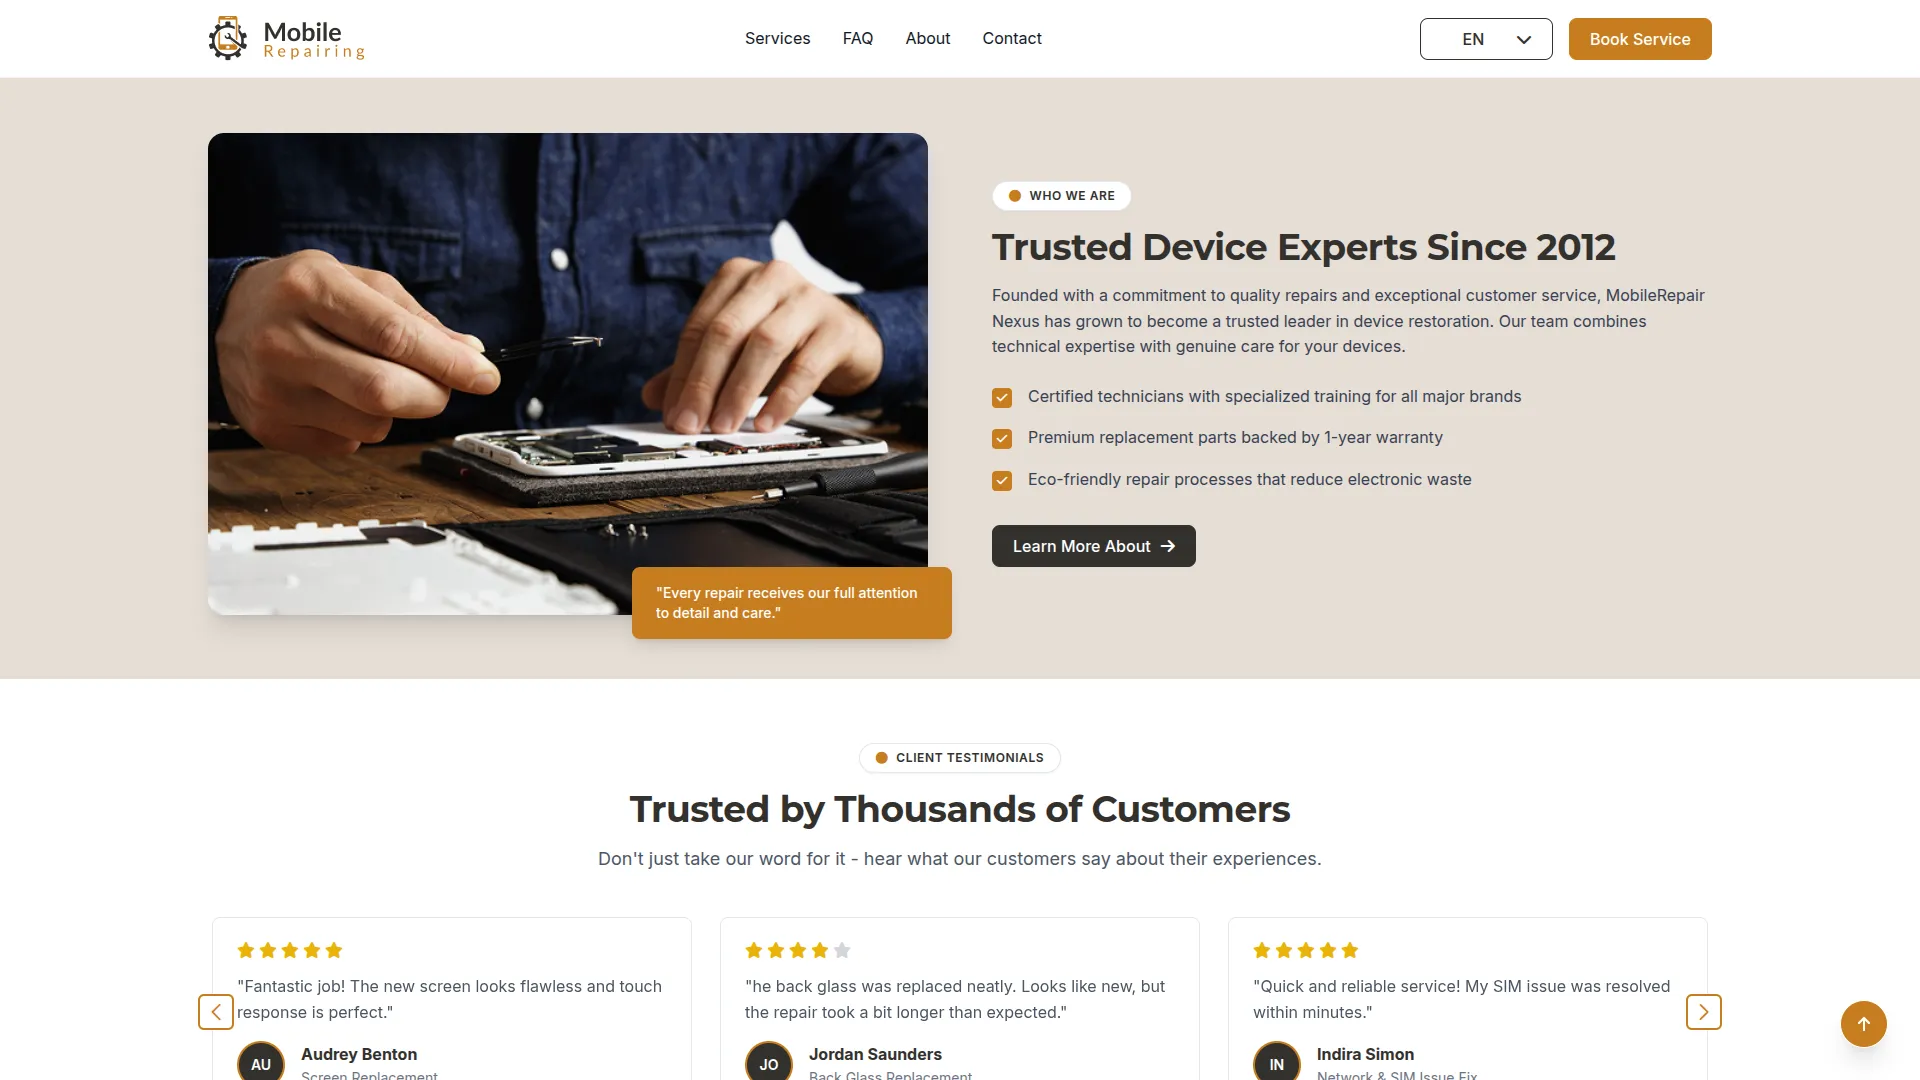
About Section
- Create your company story by entering a Title, Description, and uploading an About Image. You can add multiple Facility & Features entries, each with its own title, to highlight what makes your service special.
- When the toggle is ON and content is provided, this section helps build trust with potential customers.
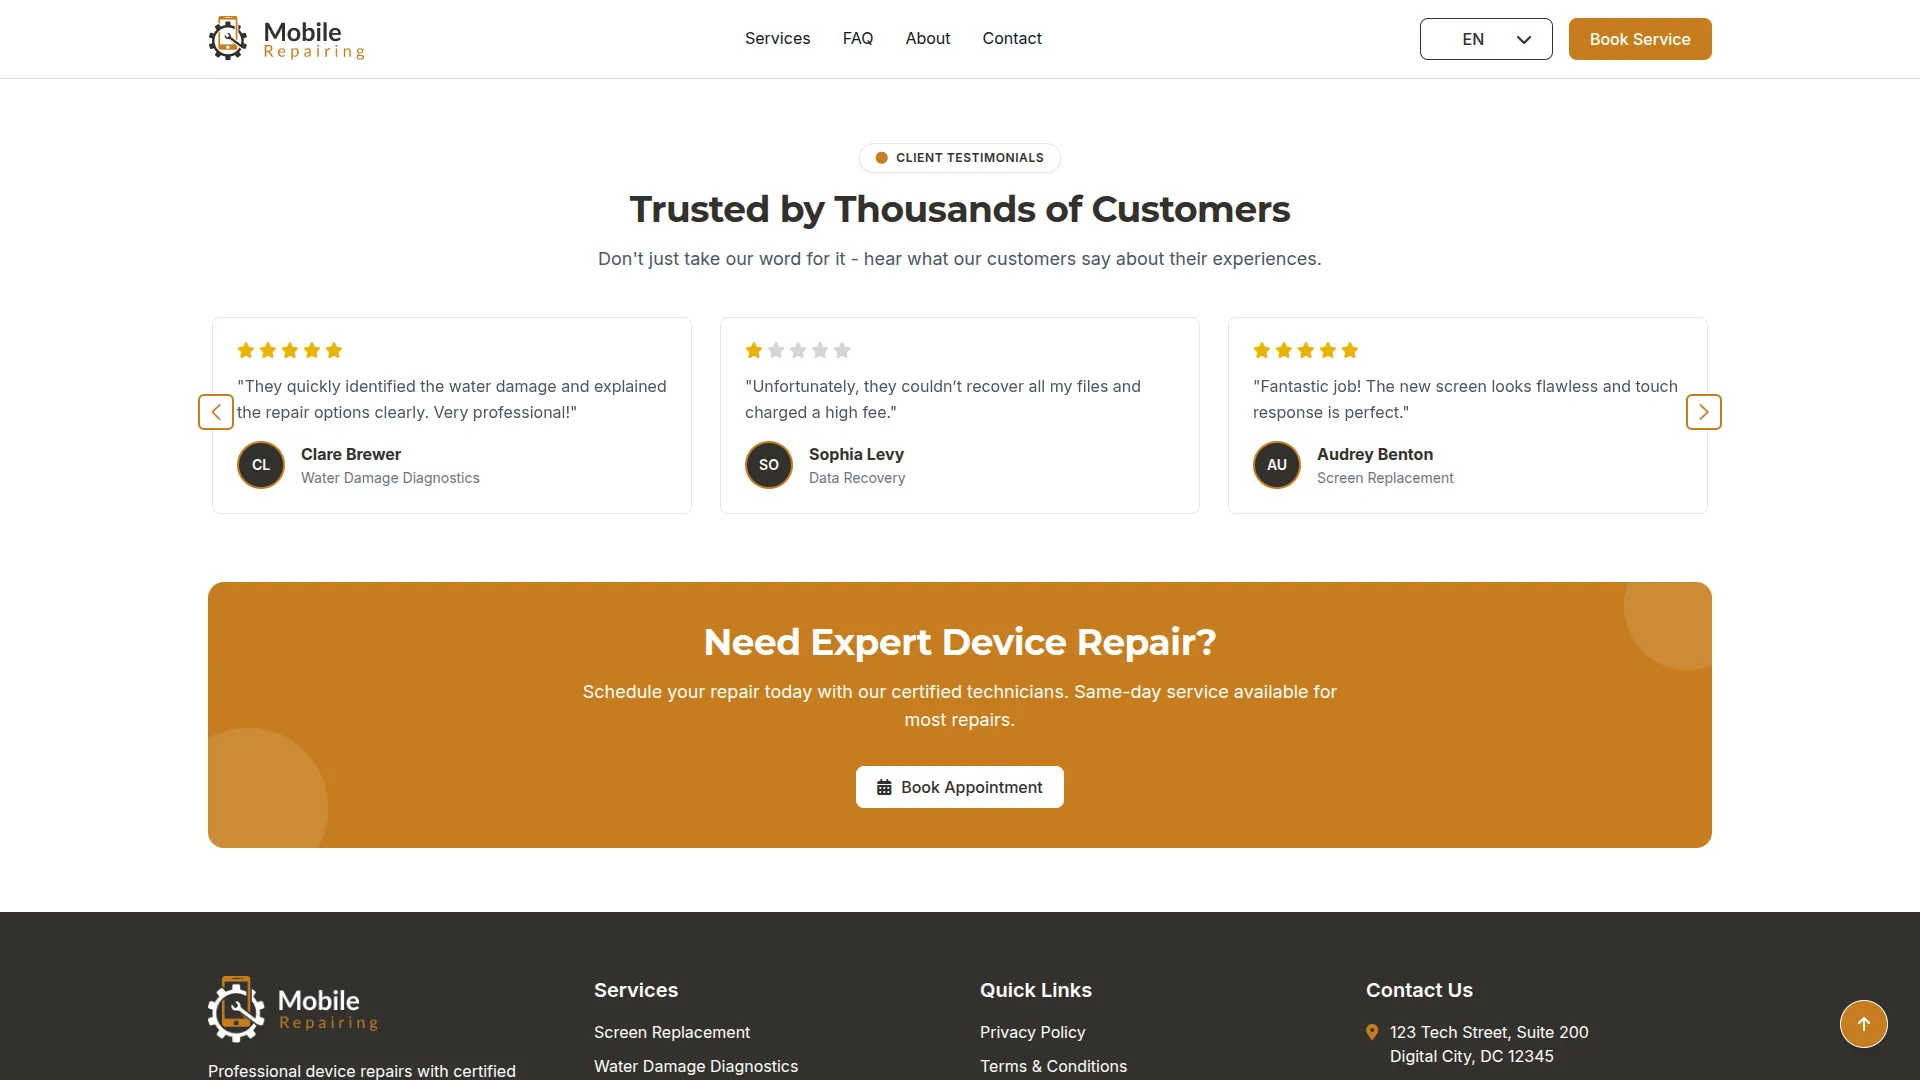
Testimonials Section
- Configure the Title and Description for the customer reviews display. This section automatically shows reviews from the Customer Reviews section. If you have customer reviews available, this section will display on your homepage to build credibility; otherwise, it stays hidden.
CTA Section
- Set up your call-to-action area with a compelling Title and Description to encourage customer engagement and service bookings.
About Page Setup
- When the About page toggle is ON, a dedicated About page appears in your navigation bar, and the About section button becomes active.
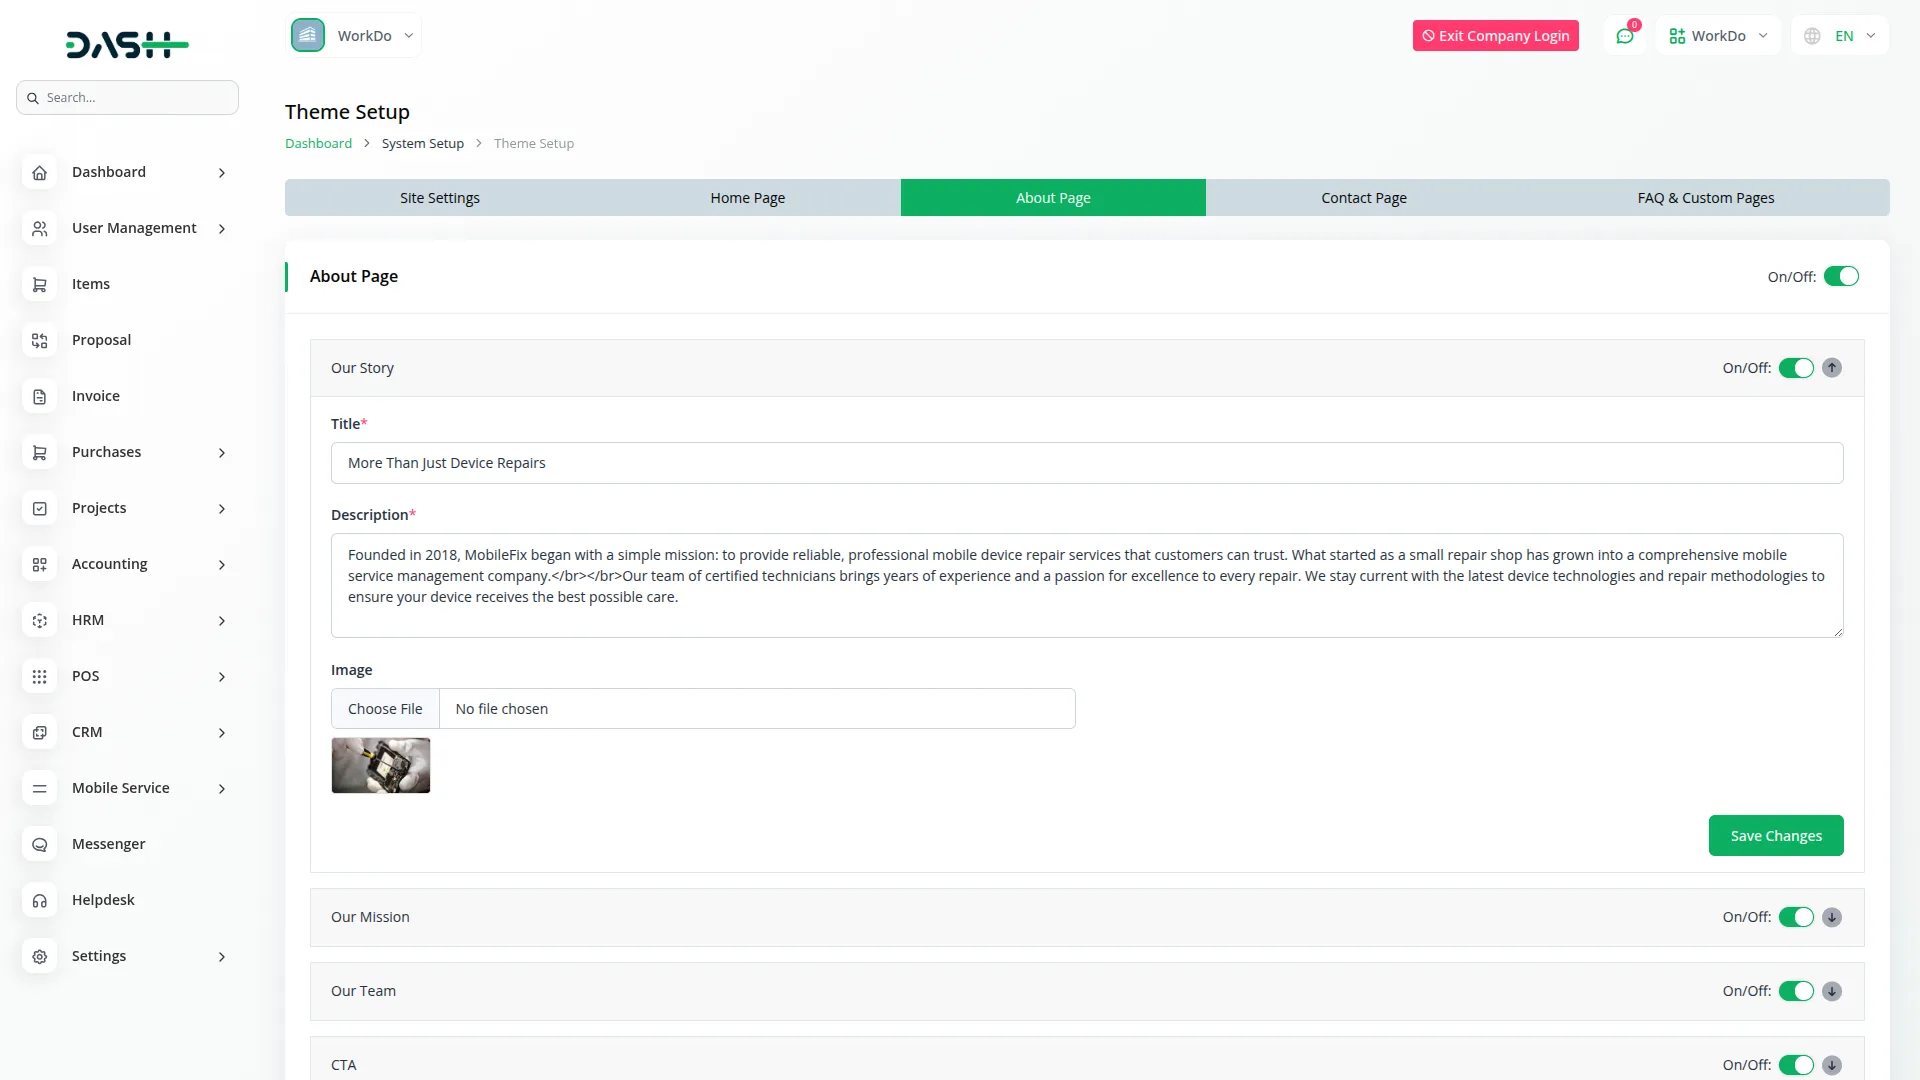
Story Section
- Tell your company’s story by entering a Title, Description, and uploading a Story Image that represents your business journey and values.
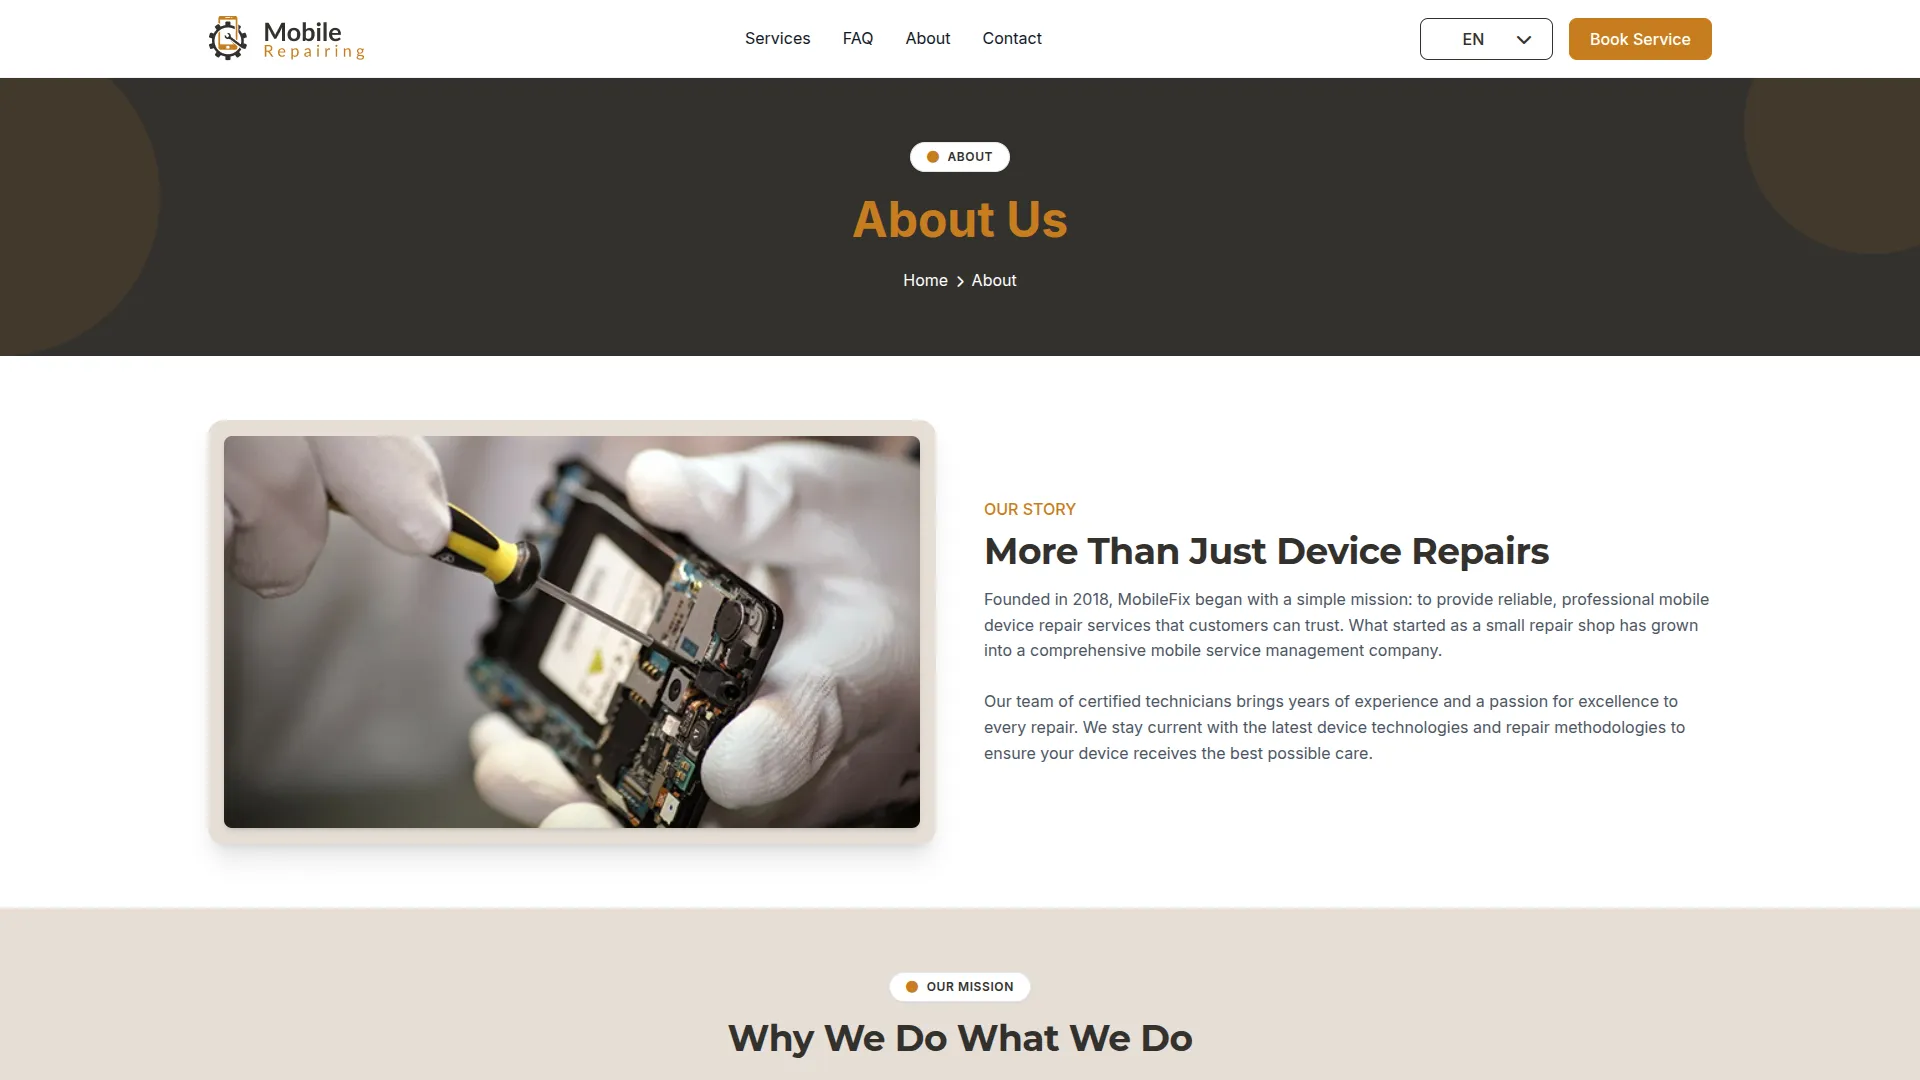
Mission Section
- Define your company’s mission with a Title and Description. You can create up to 3 Mission Cards, each containing an icon, title, and description to highlight your core values and objectives.
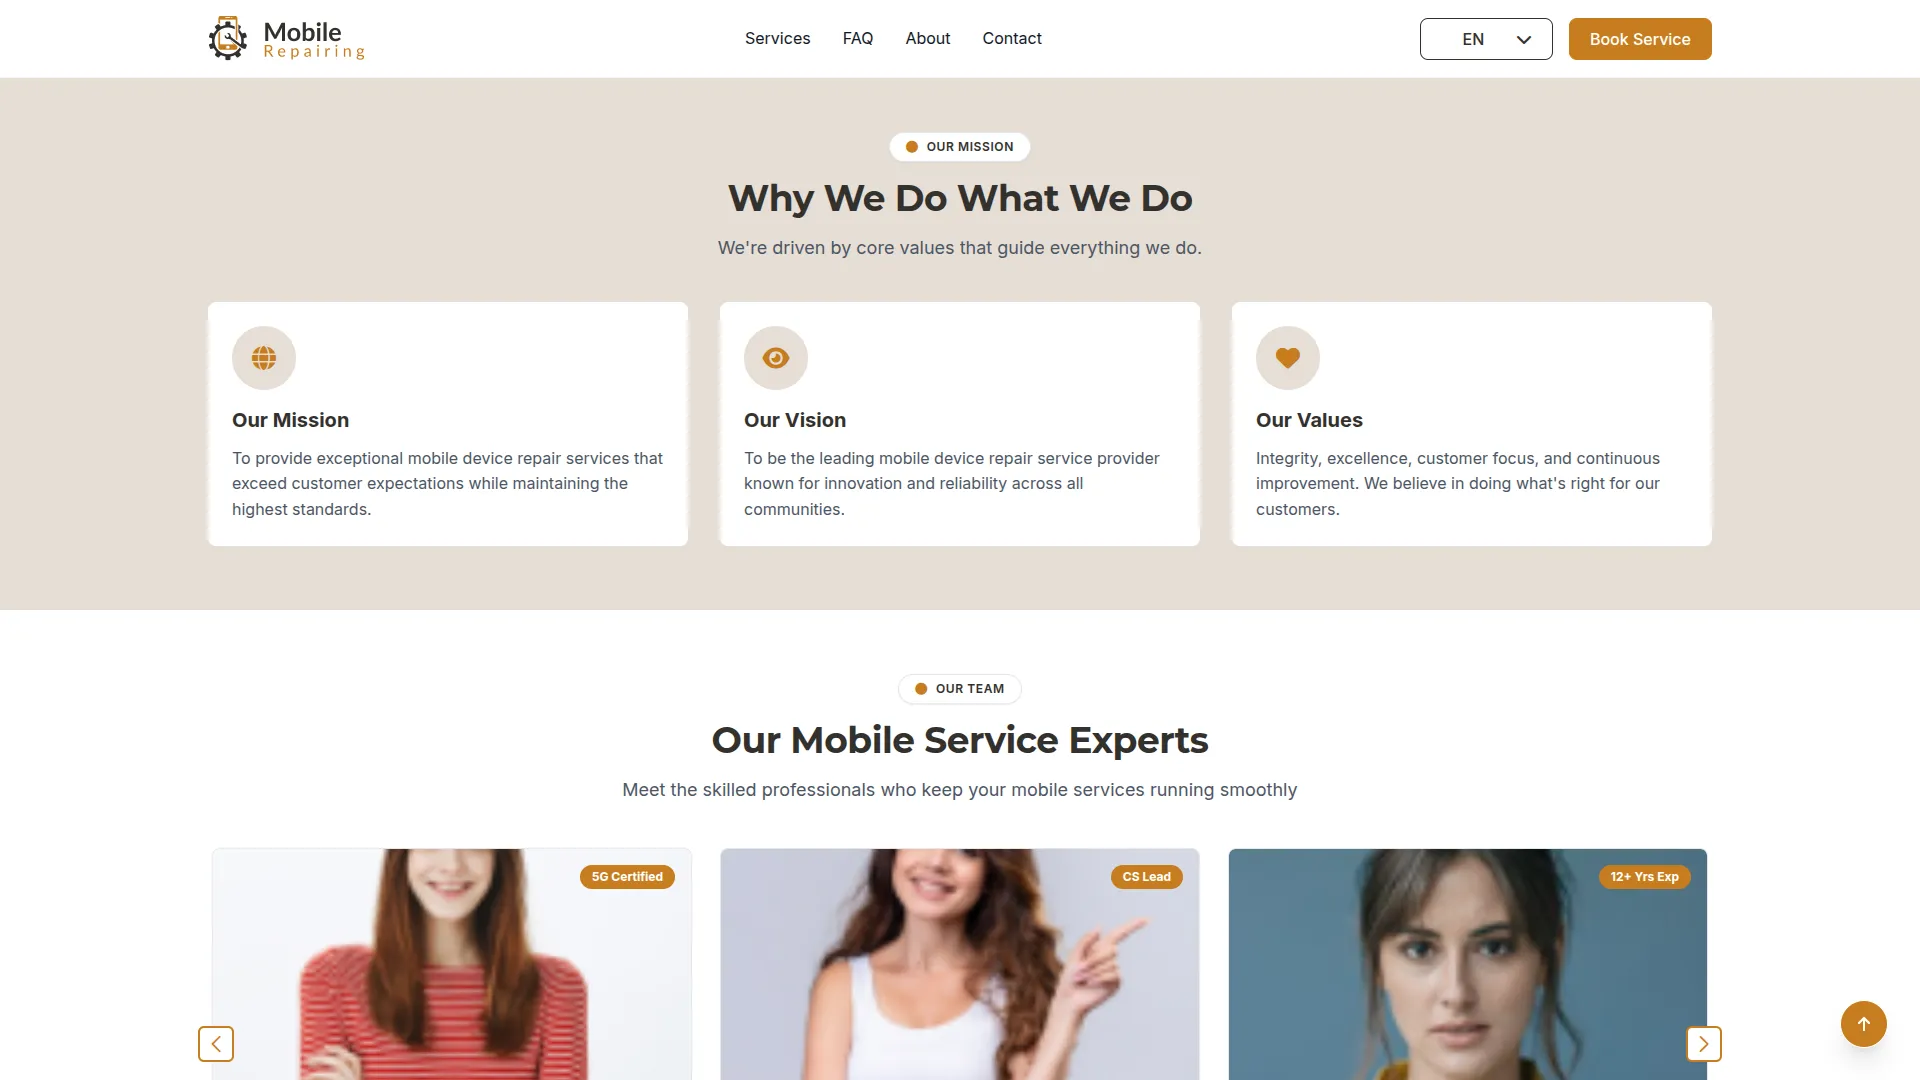
Team Section
- Showcase your team by entering a Title and Description for the section. Add Team Members by selecting staff from your user database, then enter their Experience, Position, and Description. You can add multiple team members to build trust and a personal connection with customers.
About the CTA Section
- Create a compelling call-to-action specific to your About page with a relevant Title and Description.
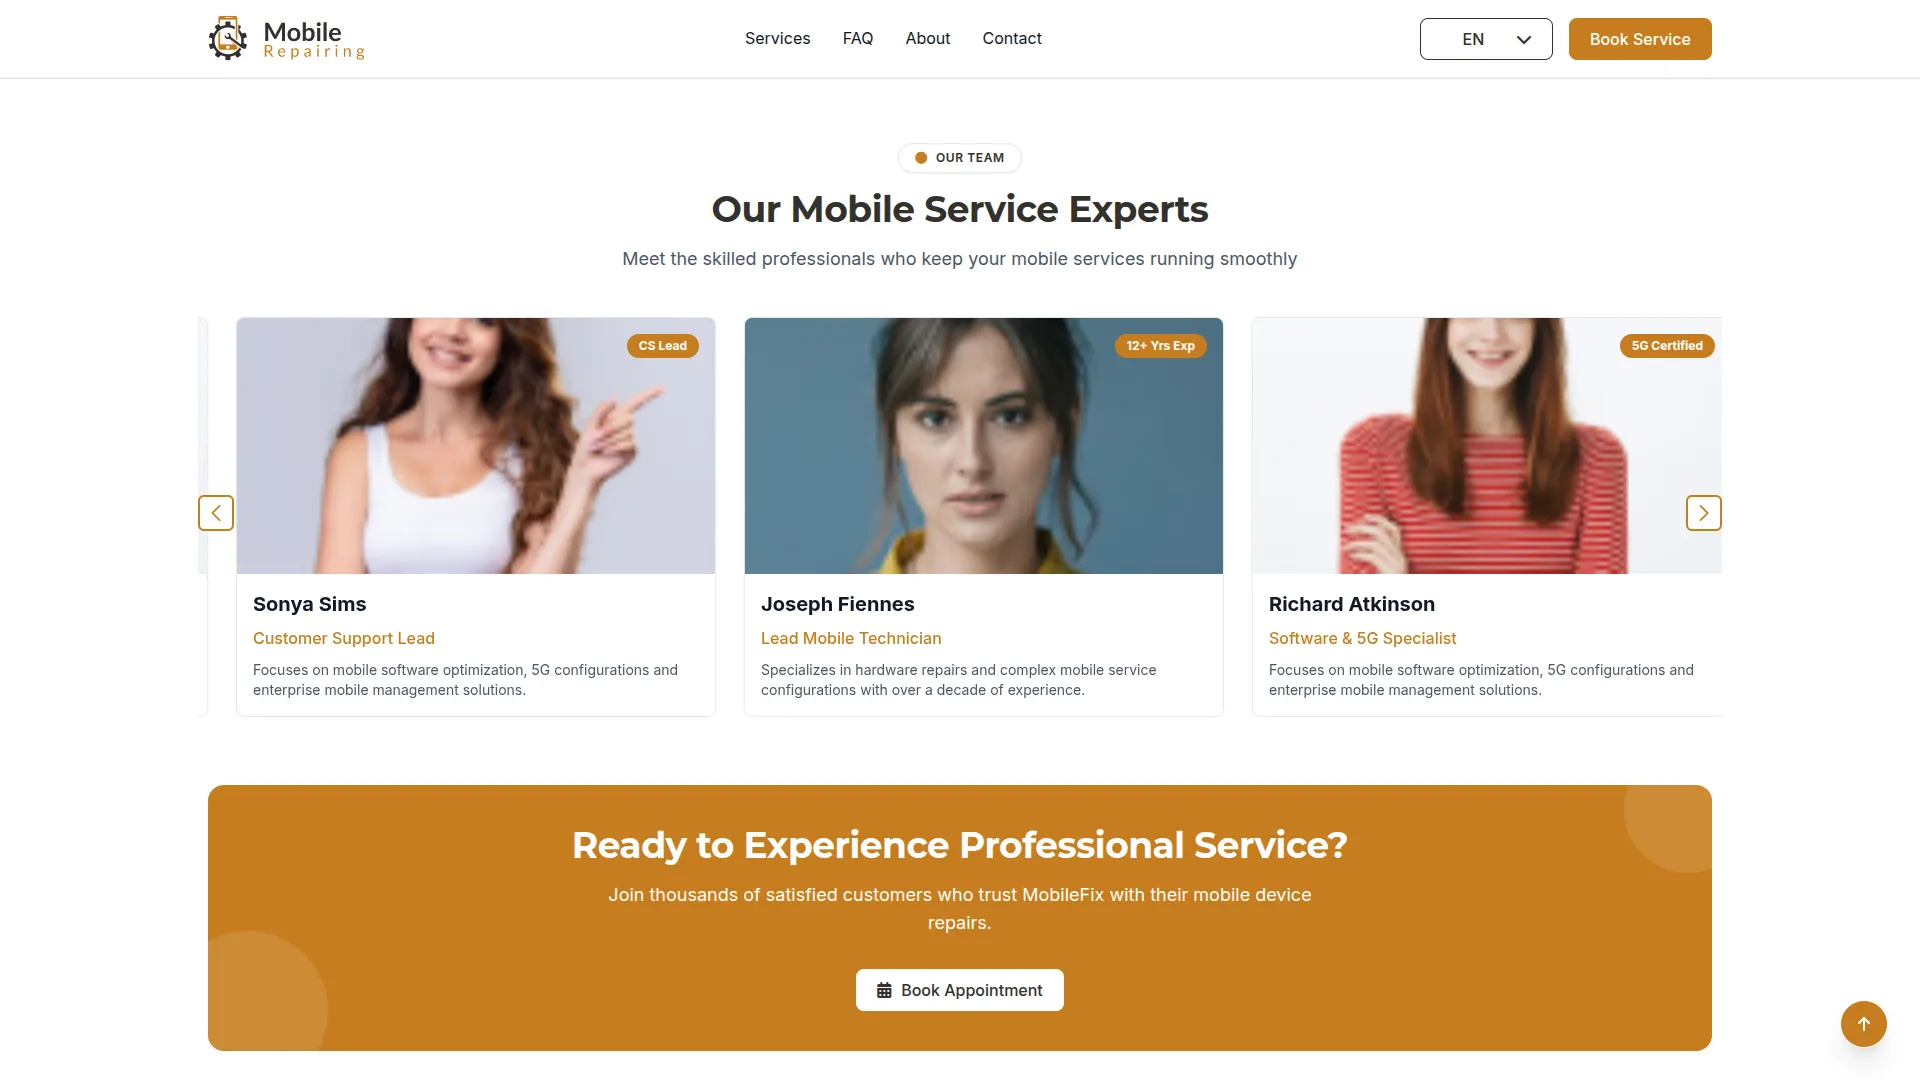
When the About page toggle is ON, this complete About page appears in your website navigation, displaying the Story Section with company background, Mission Section with up to 3 mission cards, Team Section showcasing selected staff members, and About CTA Section for engagement.
If About page sections aren’t configured properly, the frontend displays the “Page is not configured yet. Please check back later.” message.
Contact Page Setup
- When the Contact page toggle is ON, a Contact page appears in your navigation bar for easy customer access.
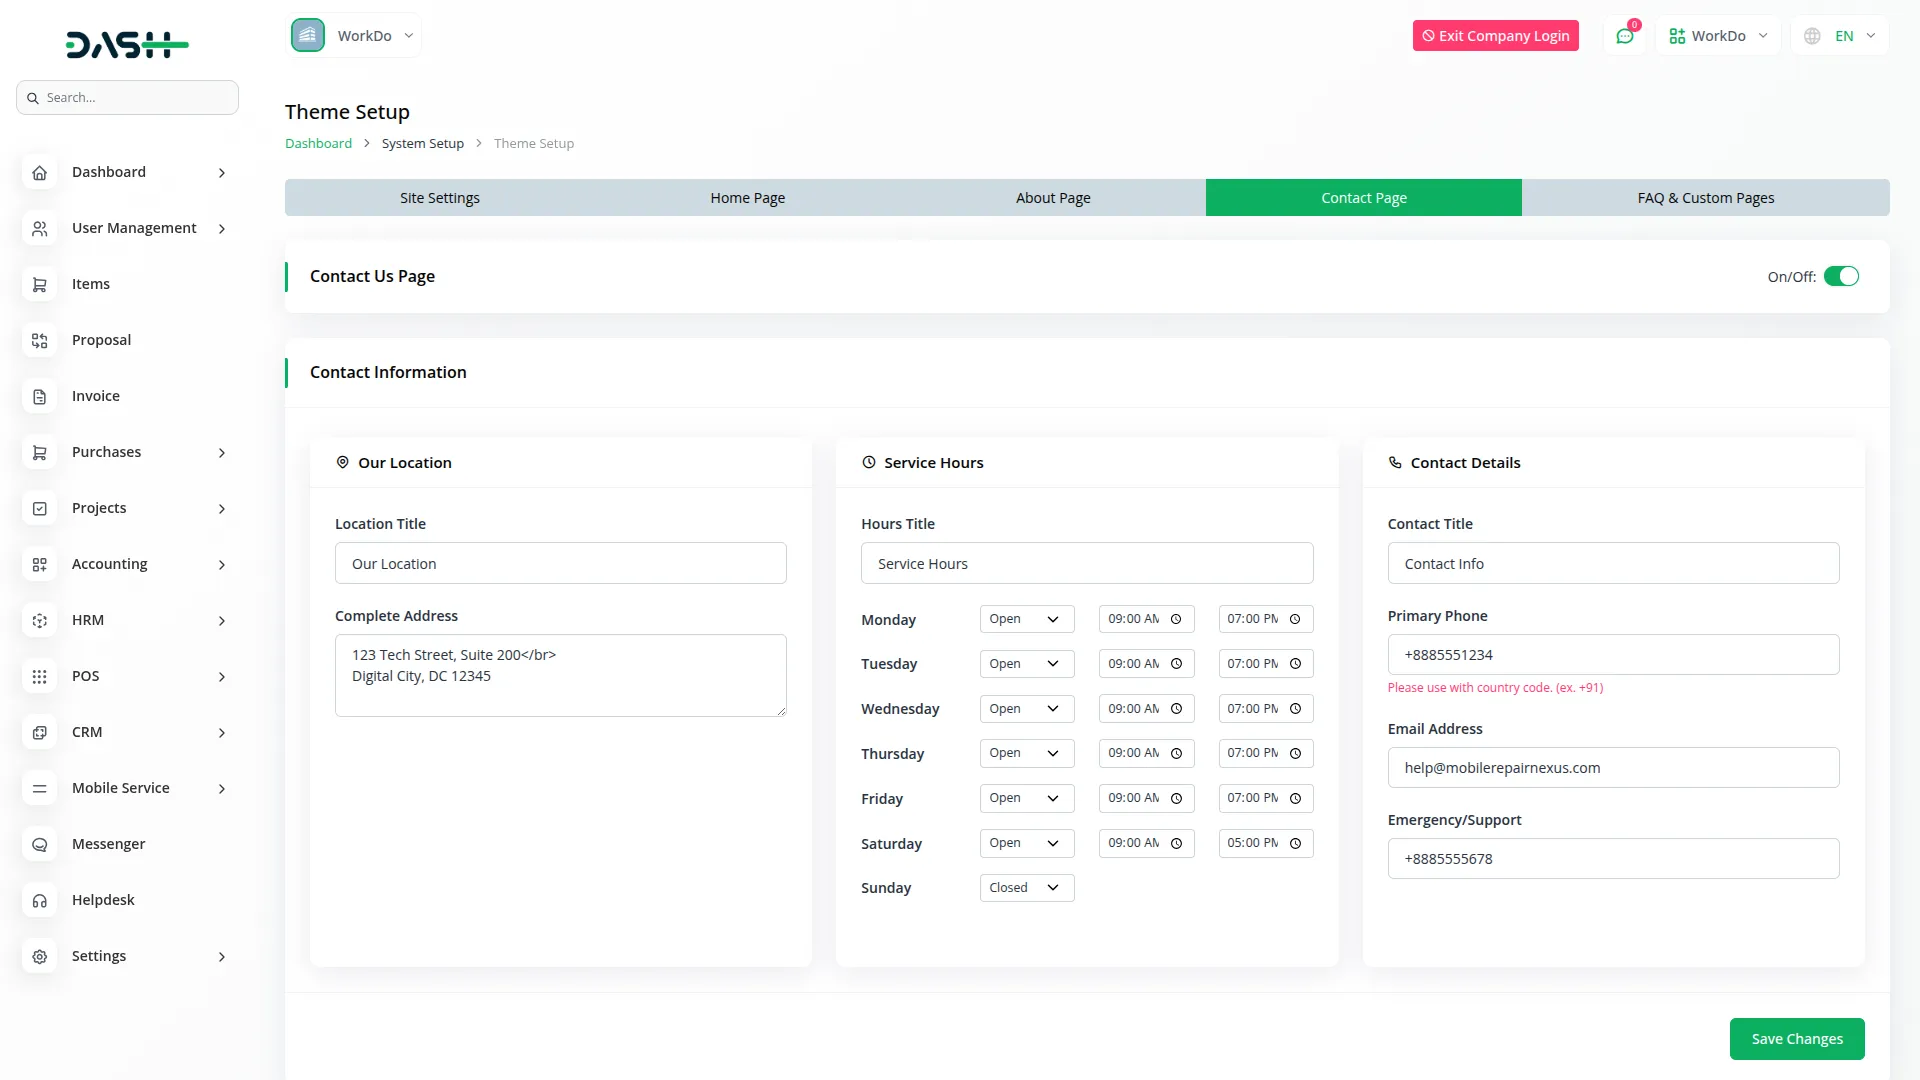
Contact Info
This information is reflected throughout your website and footer for consistency.
Our Location
- Enter a Location Title and Complete Address to help customers find your repair center.
Service Hours
- Set up your Hours Title, then select which weekdays you’re open or closed and enter specific start and end times for each day.
Contact Details
- Configure your Contact Title, Primary Phone, Email Address, and Emergency/Support contact information. This contact information displays throughout your website header, footer, and contact page.
Follow Us
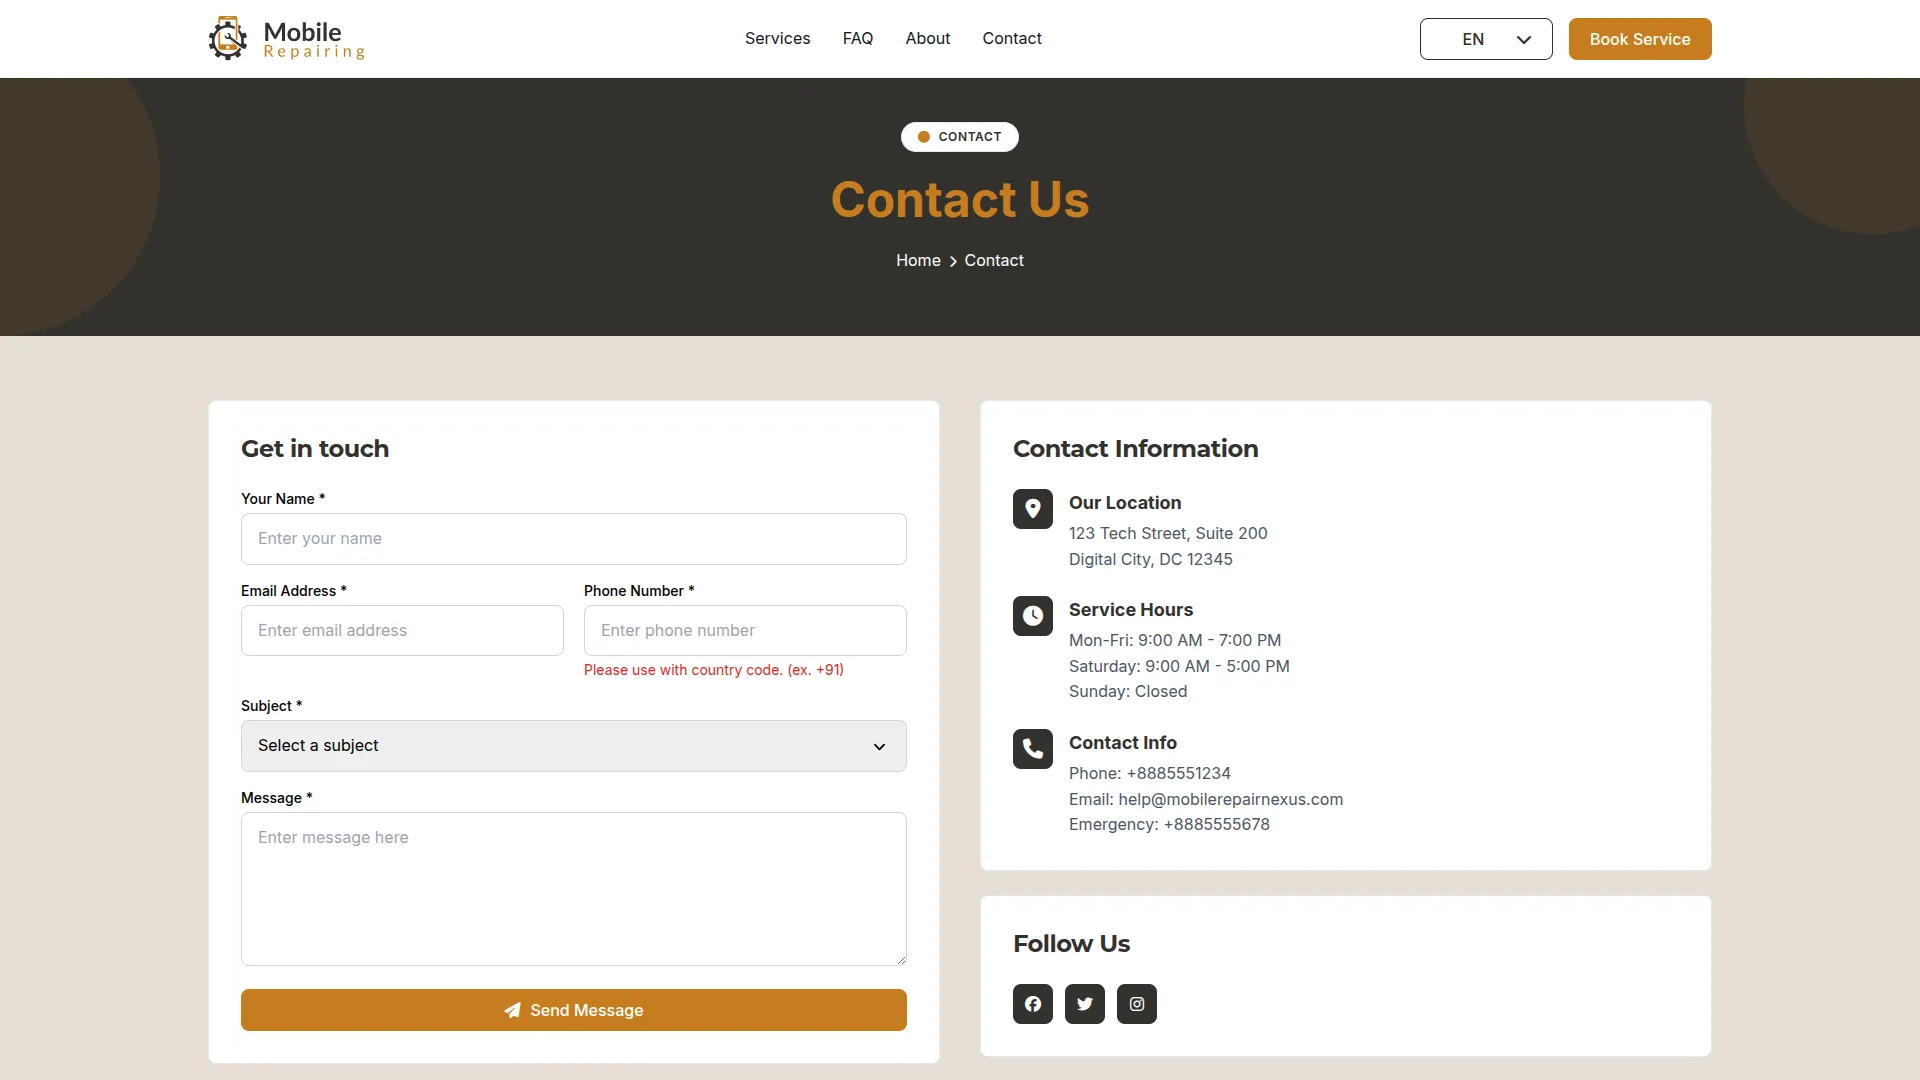
- This social media data also appears in your website footer. Add Social Media Icons and URLs for multiple platforms to connect with customers across different channels. These social links display in both the Contact page and the footer section of your website.
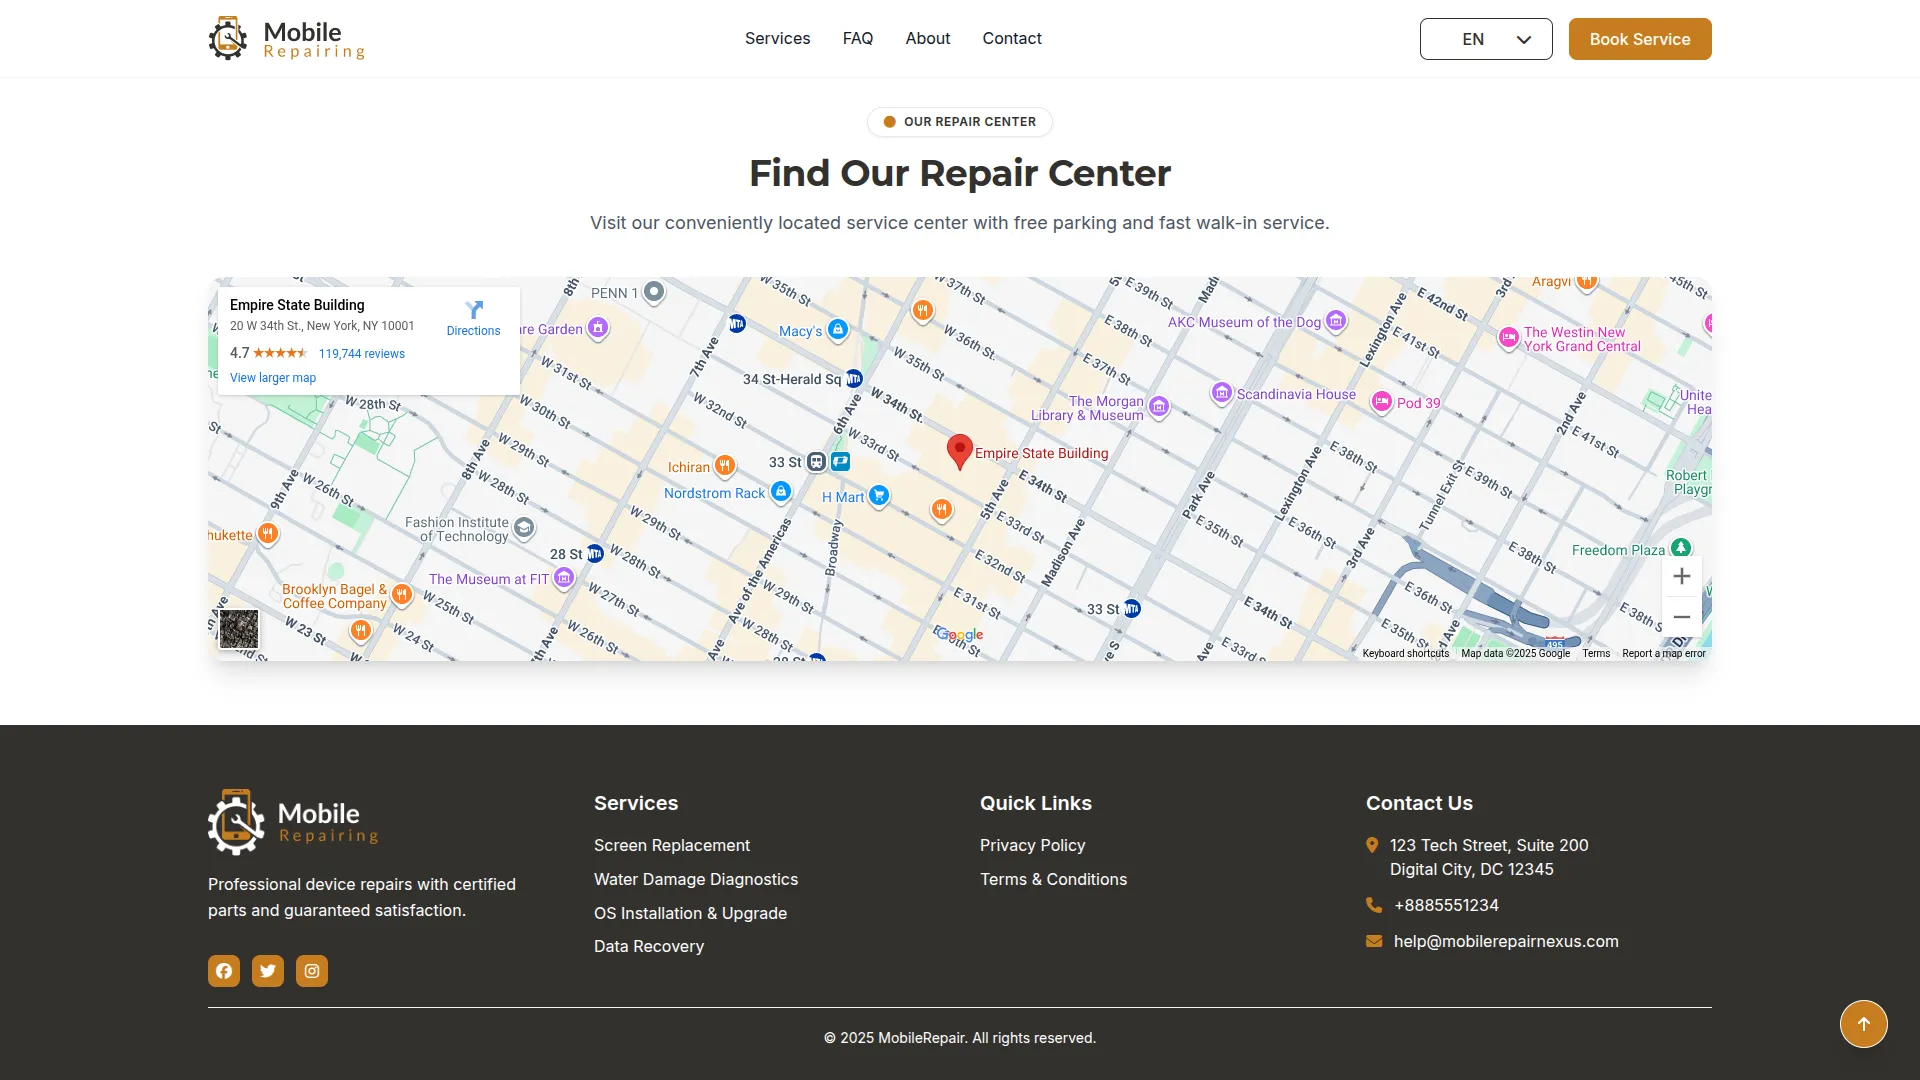
Our Repair Center
- Create a welcoming description with a Title and Description, then add Google Maps iframe code to help customers locate your physical repair center. This information appears on the Contact page when customers need directions to your location.
FAQ & Custom Pages
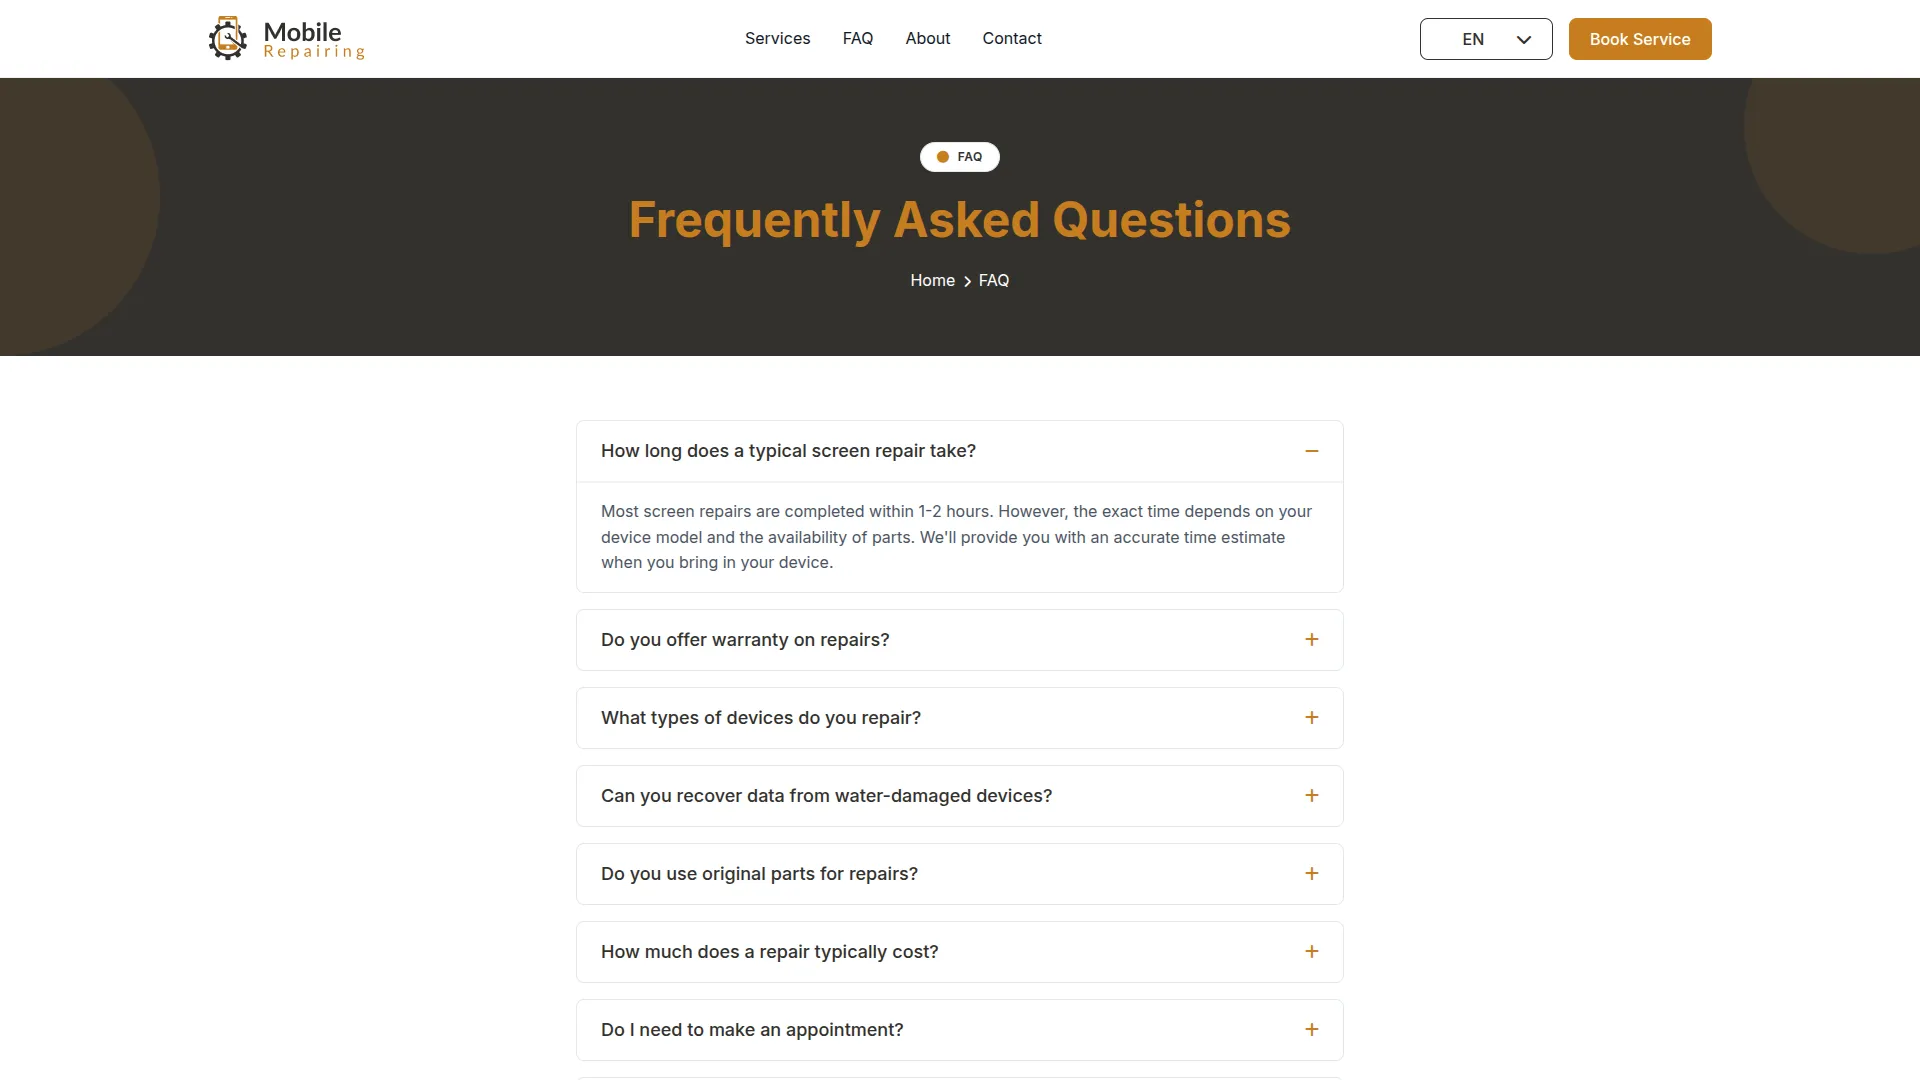
- When the page toggle is ON, the FAQ appears in your navigation bar.
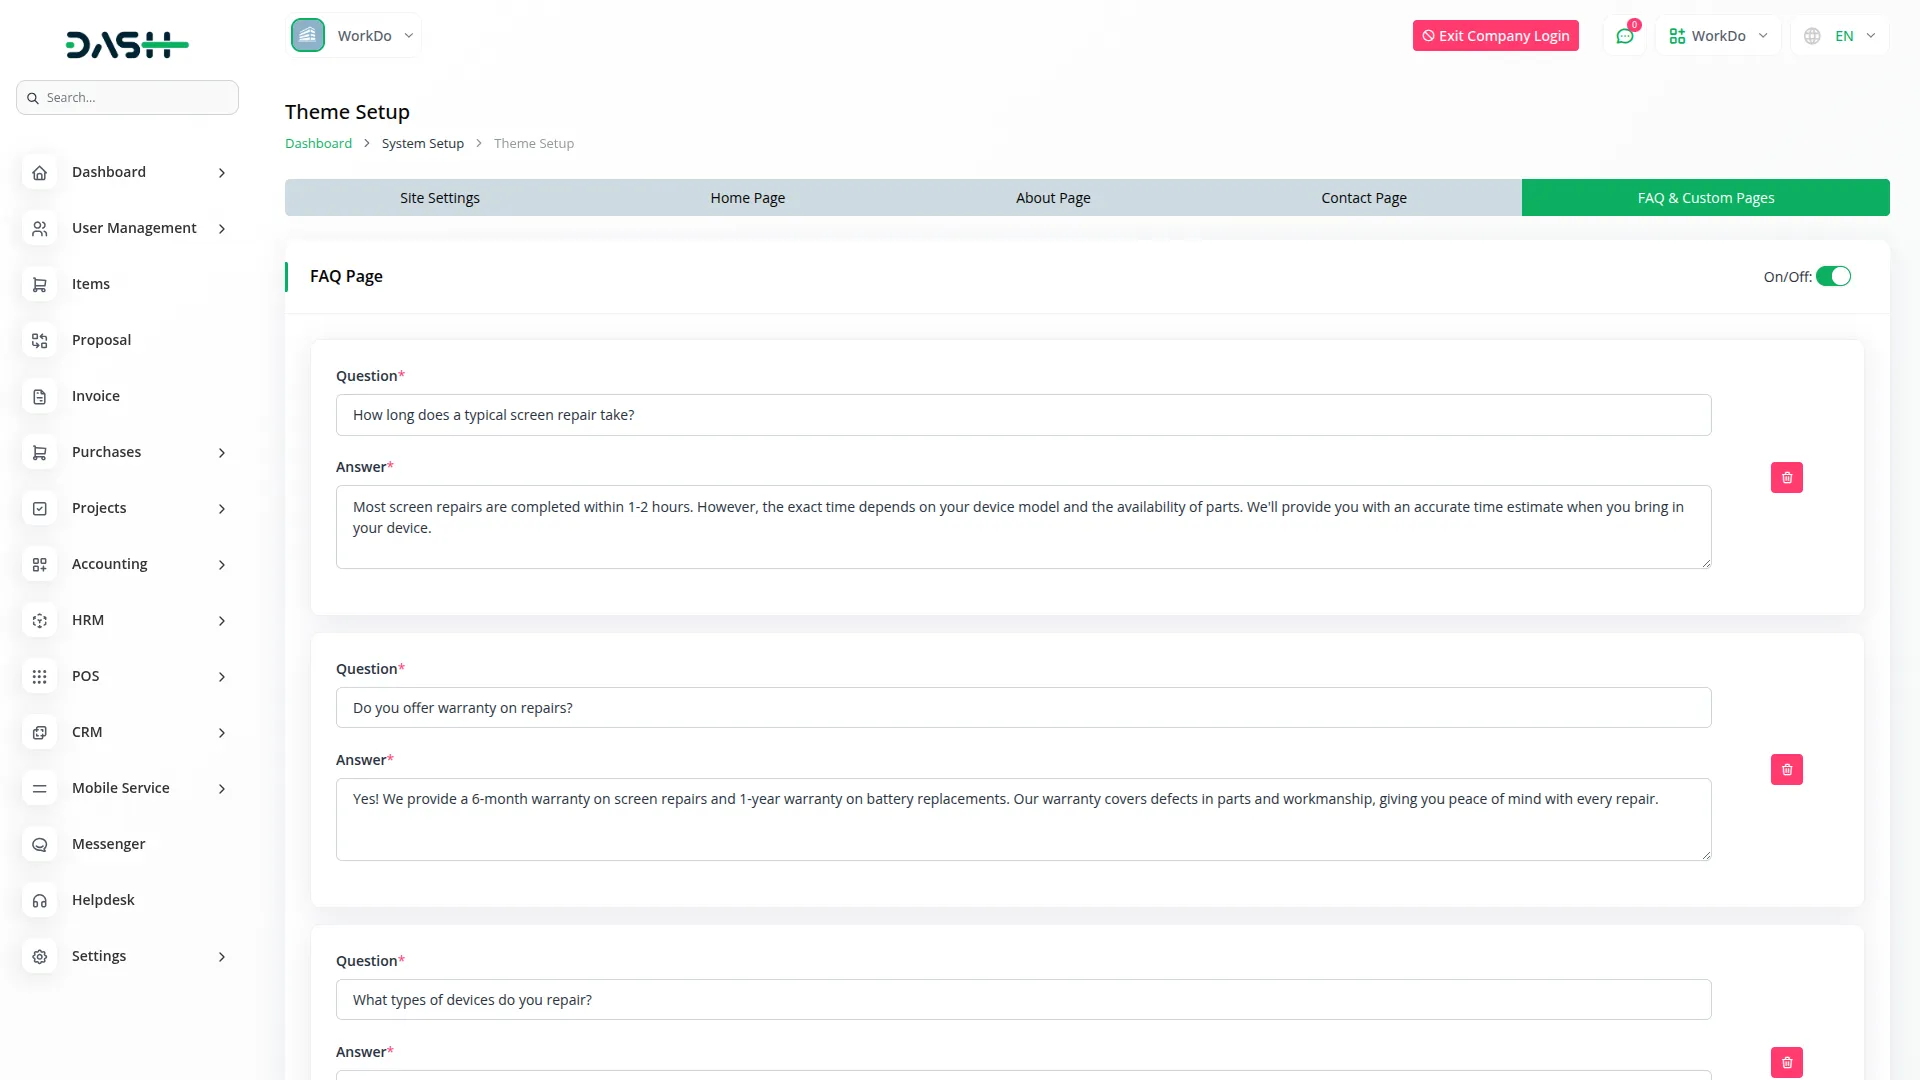
FAQ Section
- Add frequently asked Questions and Answers using the repeater function to address common customer concerns and reduce support inquiries.
- When the FAQ page toggle is ON, this page appears in your website navigation. If FAQ items are not added, the frontend displays the “FAQ is not configured yet. Please check back later.” message.
Custom Pages
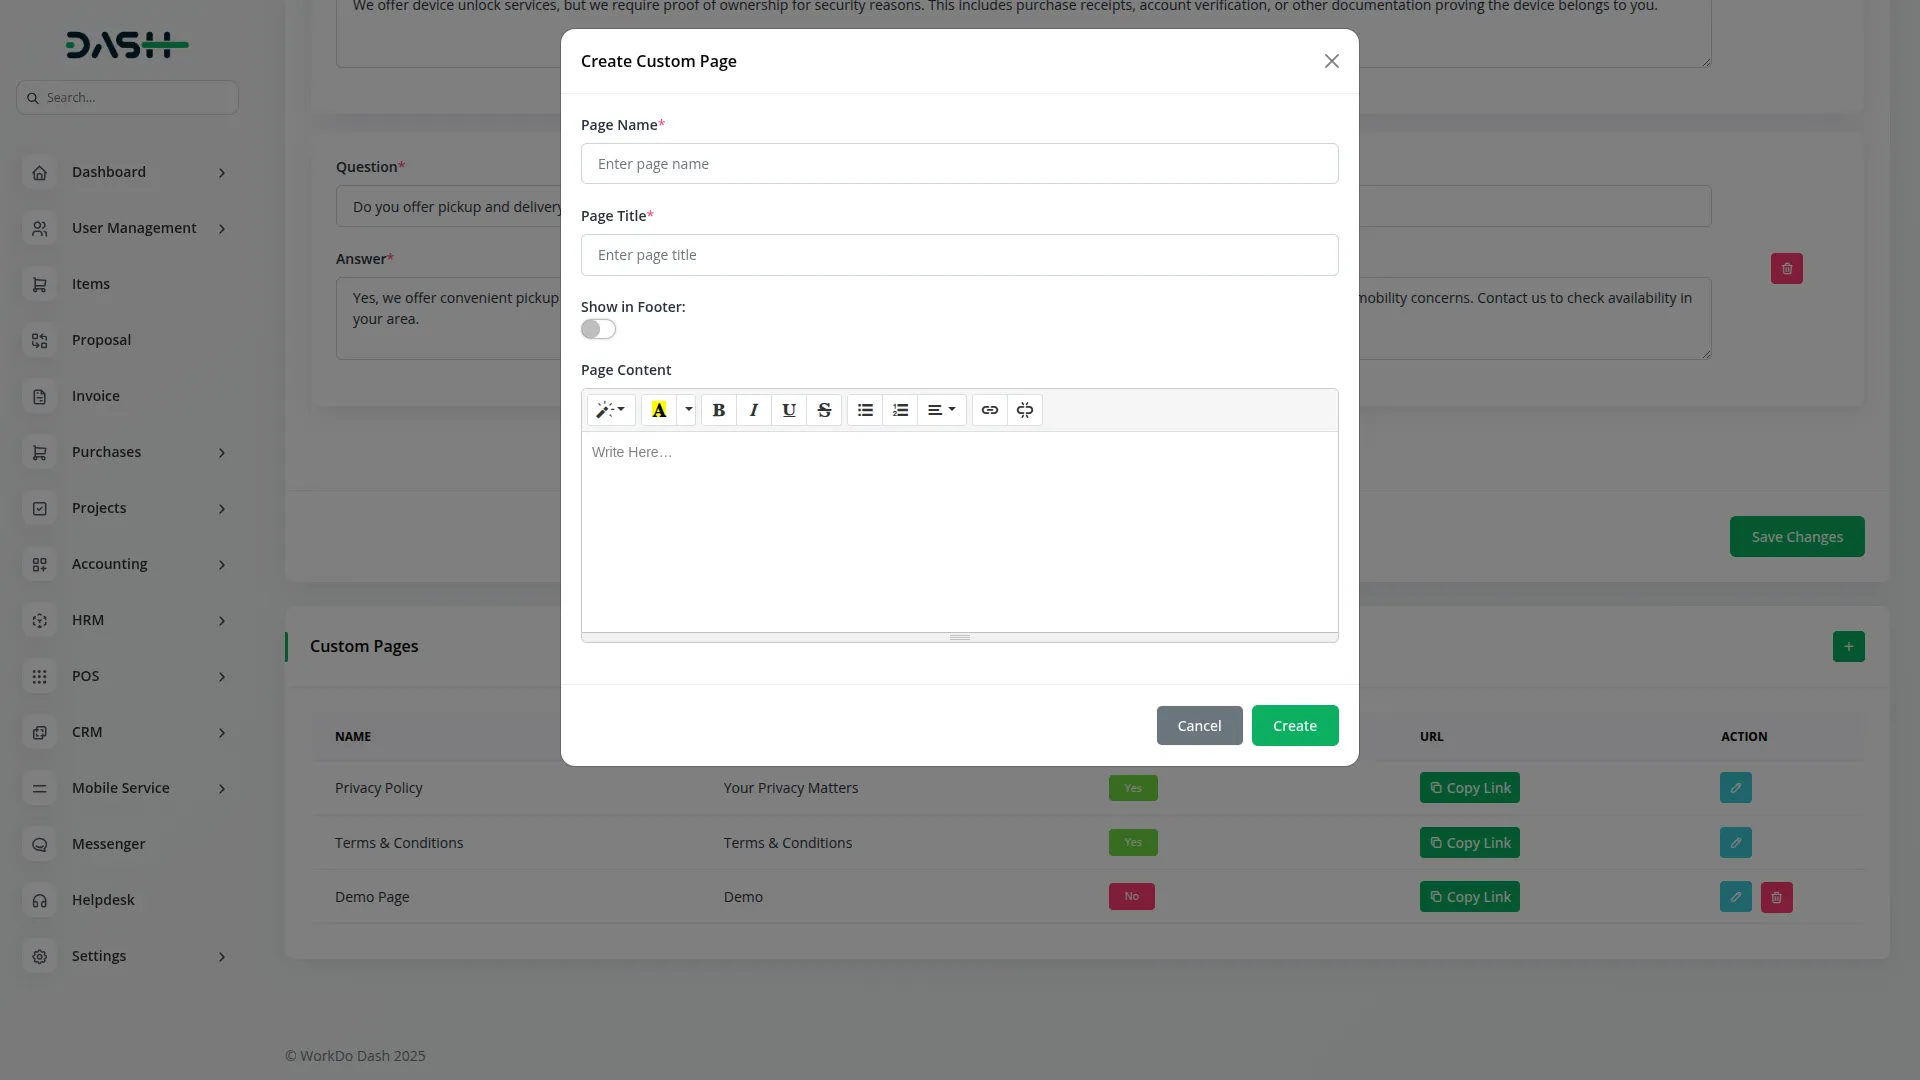
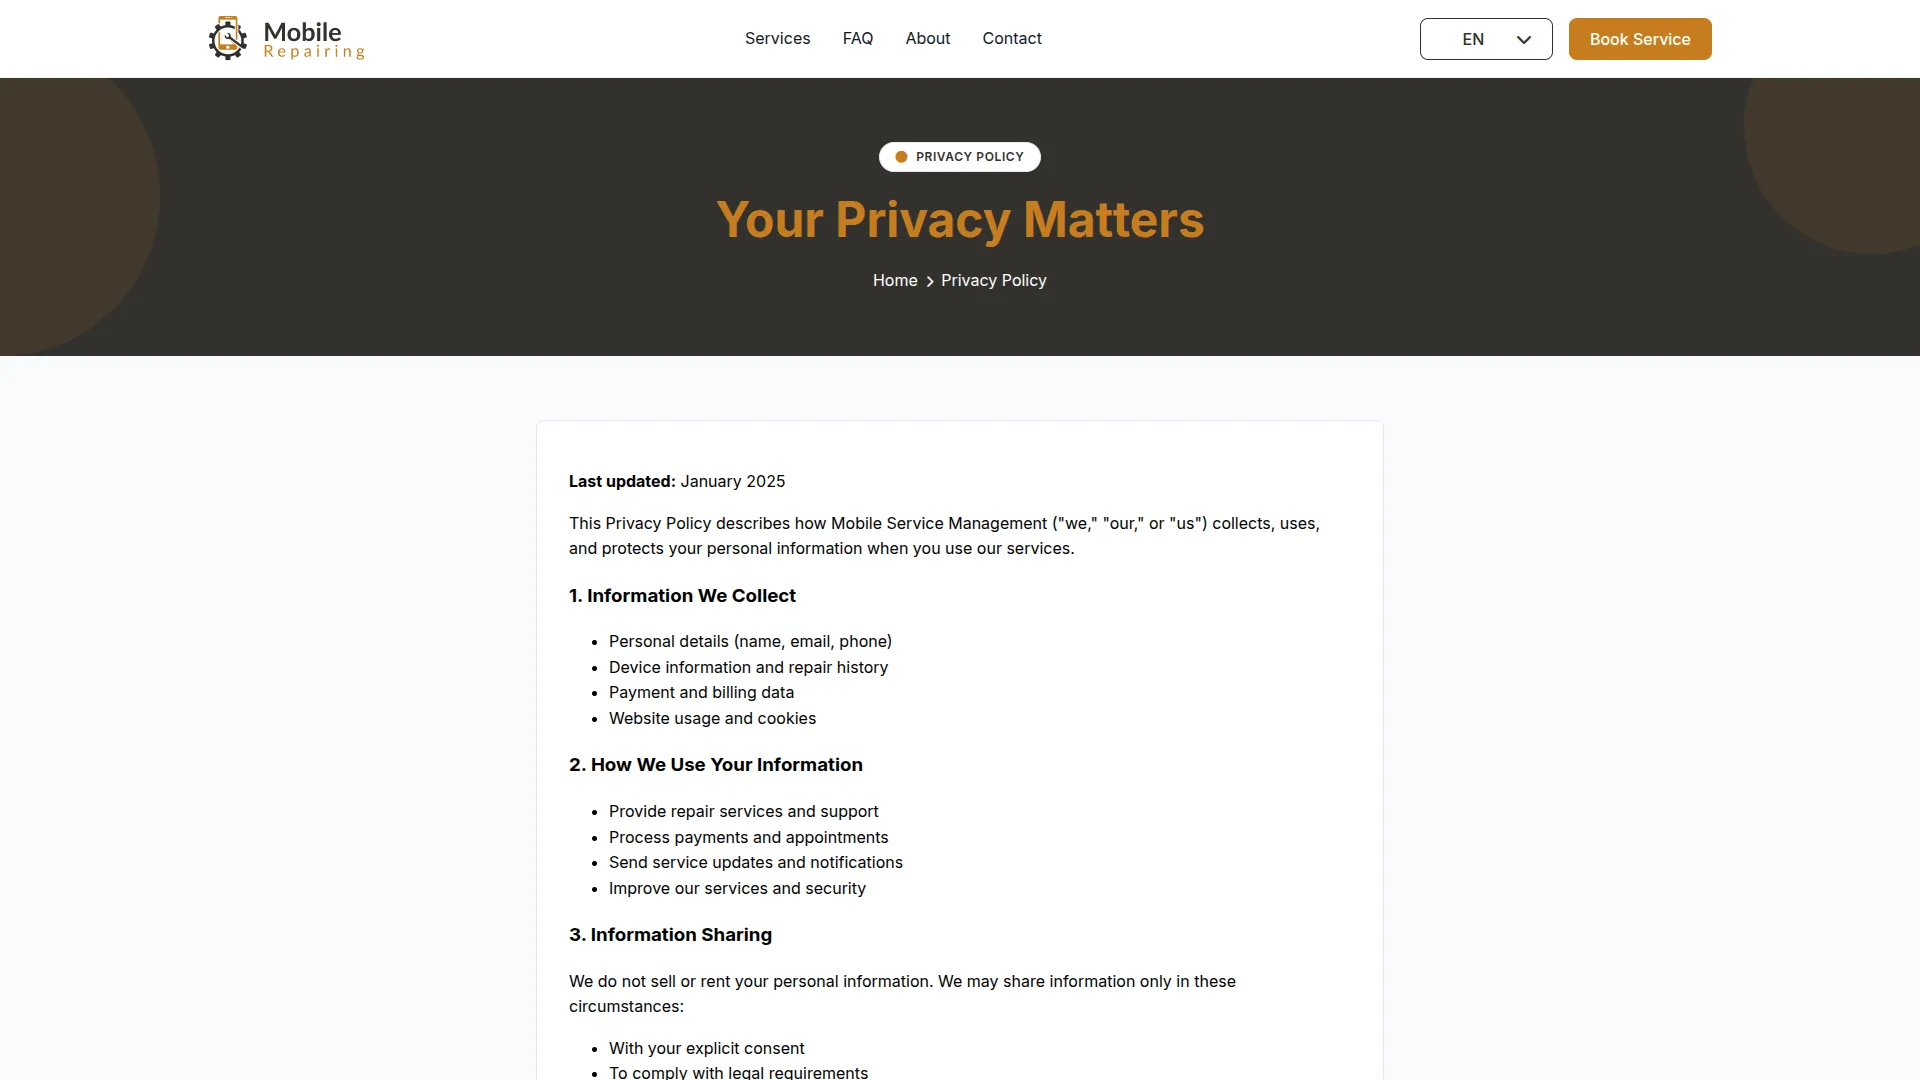
- Create additional pages by entering the page Name, Title, and Content. When “Show in Footer” is ON, the page menu appears in the footer quick links for easy access.
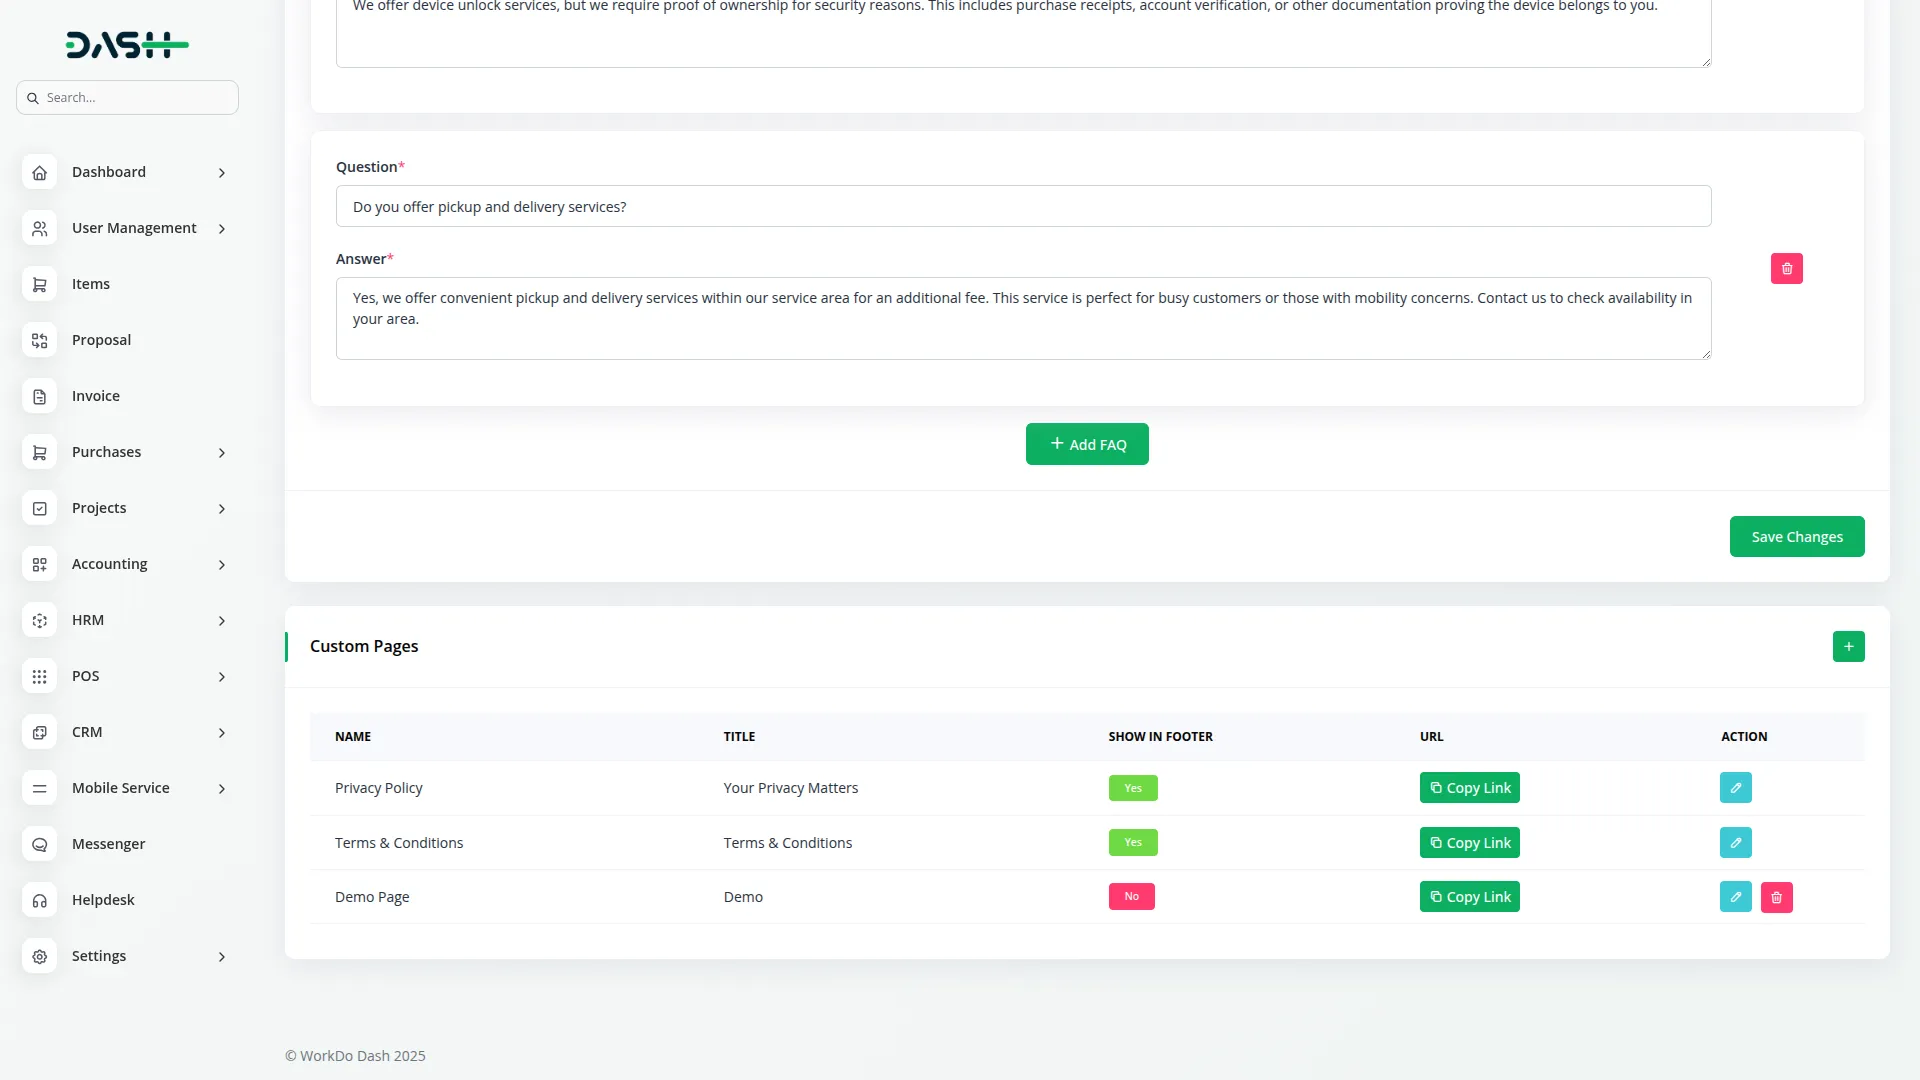
- The list page displays all custom pages with Create button functionality, showing Name, Title, Show in Footer status, and a copyable URL. You can edit or delete custom pages as needed, though default pages cannot be removed.
Service Setup
- The Service Setup section provides the foundational configuration for your mobile service operations, organizing services into categories, device brands, and tracking statuses.
Service Categories
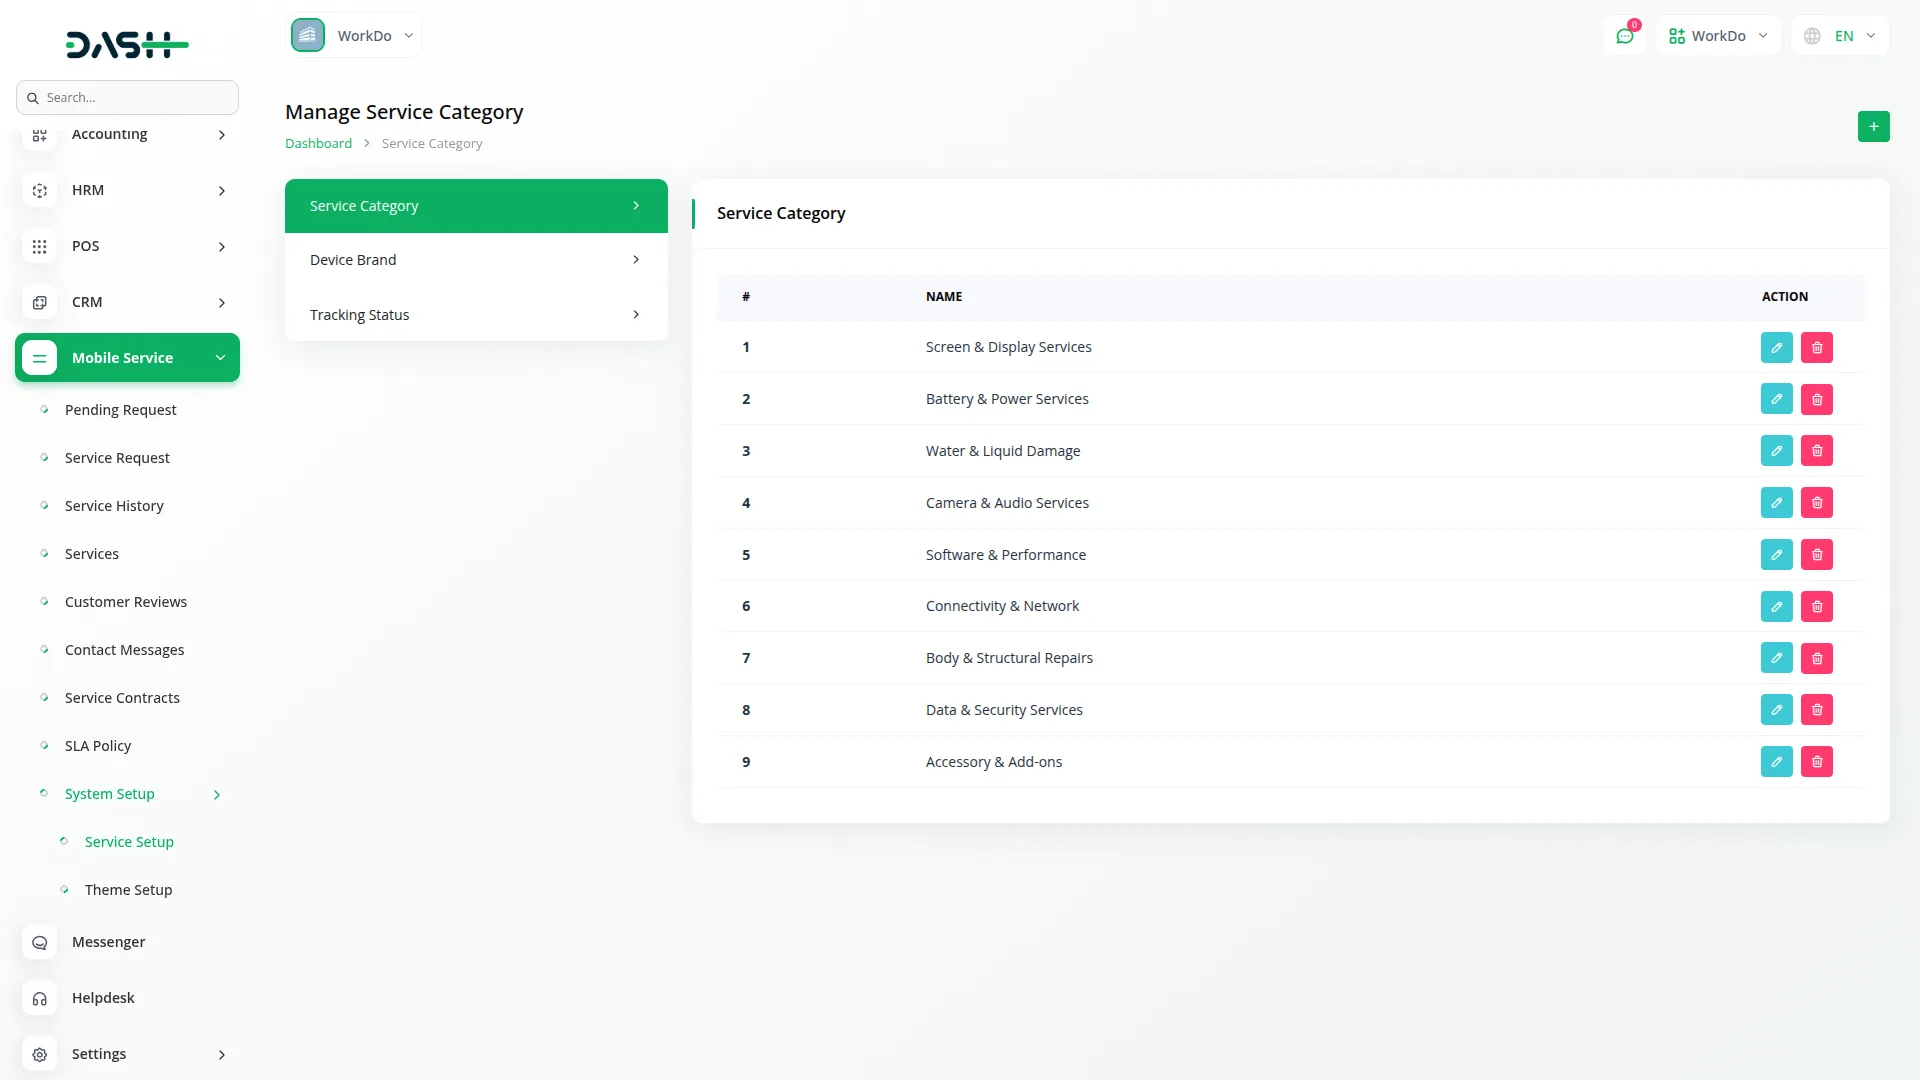
- To create a new service category, click the “Create” button and enter the category Name. This helps organize your services into logical groups like Screen Repair, Battery Replacement, or Water Damage.
- The list page displays all categories in a simple table with the Name column, and you can edit or delete existing categories as your service offerings evolve.
Device Brands
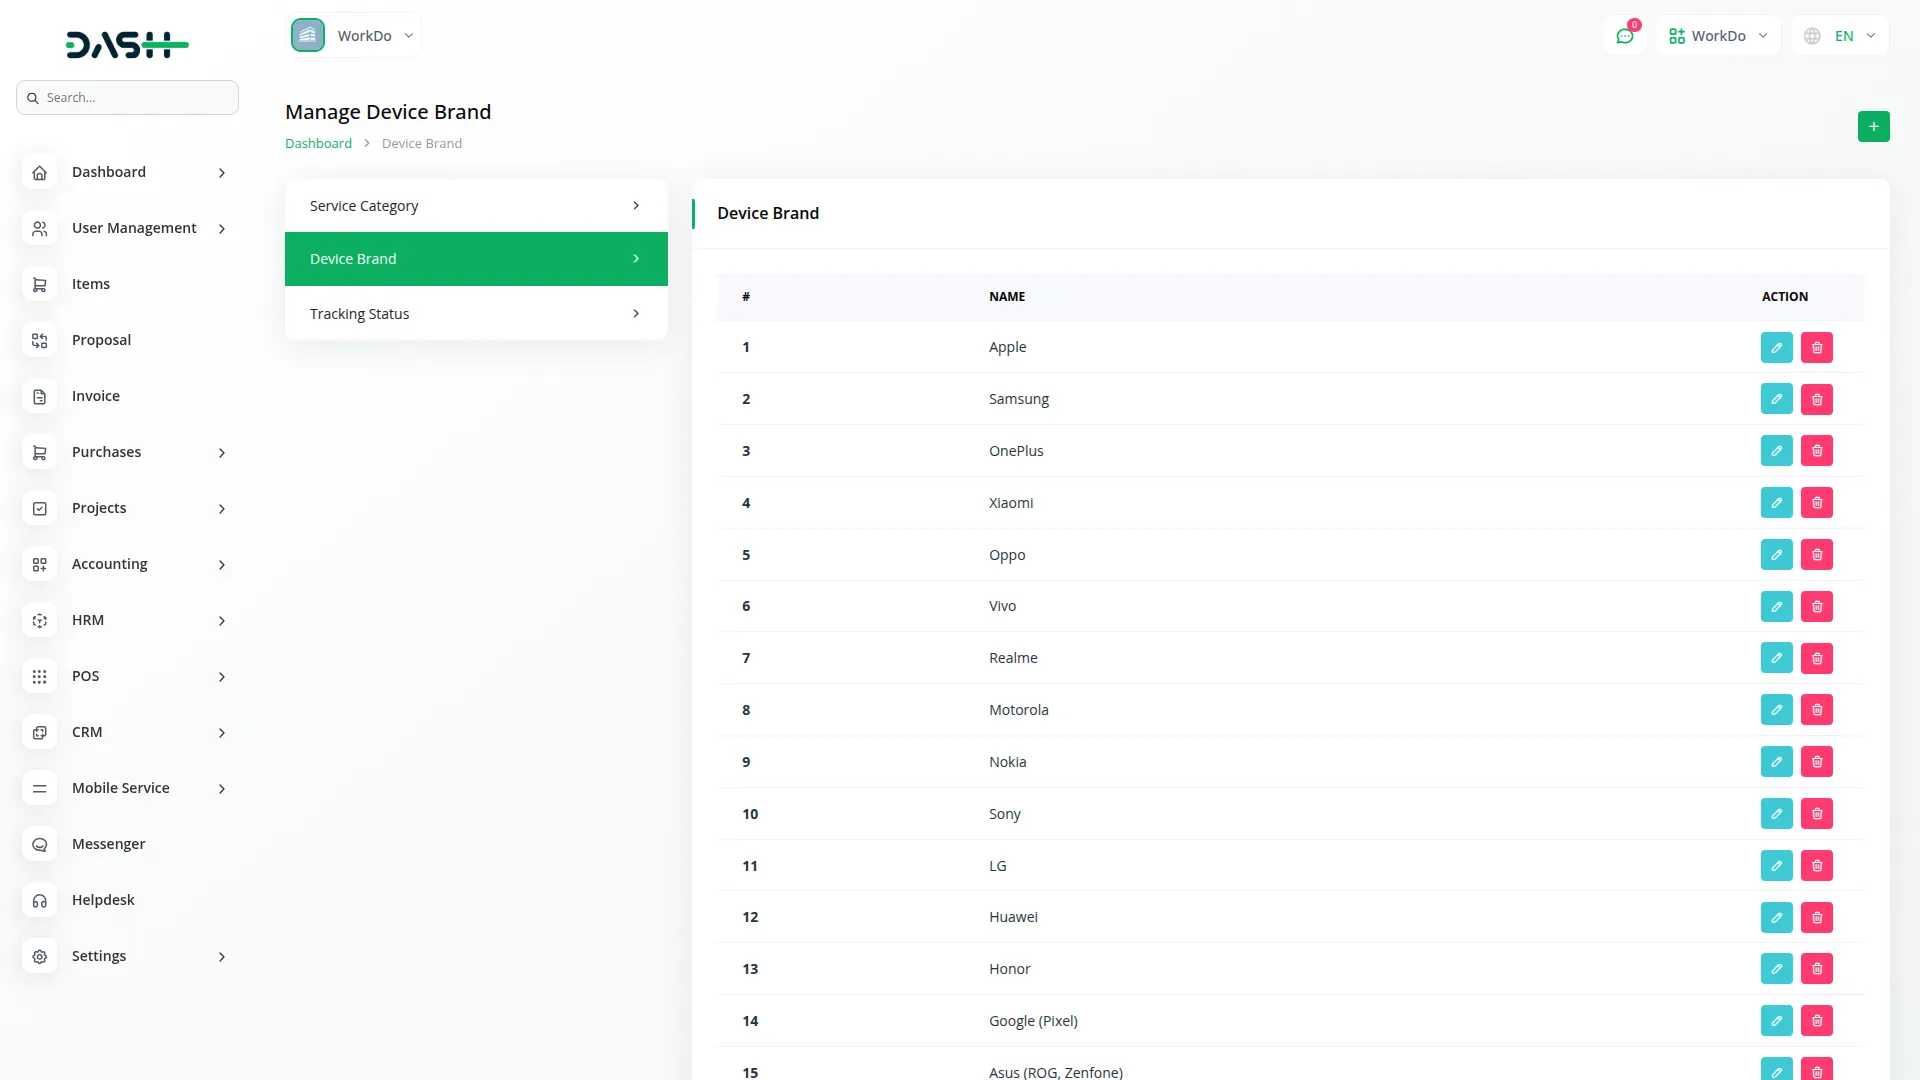
- To add a new device brand, click the “Create” button and enter the brand Name. This allows customers to specify their device manufacturer when booking services, such as Apple, Samsung, or Google.
- The list page shows all brands with the Name column, and you can edit or delete brands to keep your options current with market trends.
Tracking Status
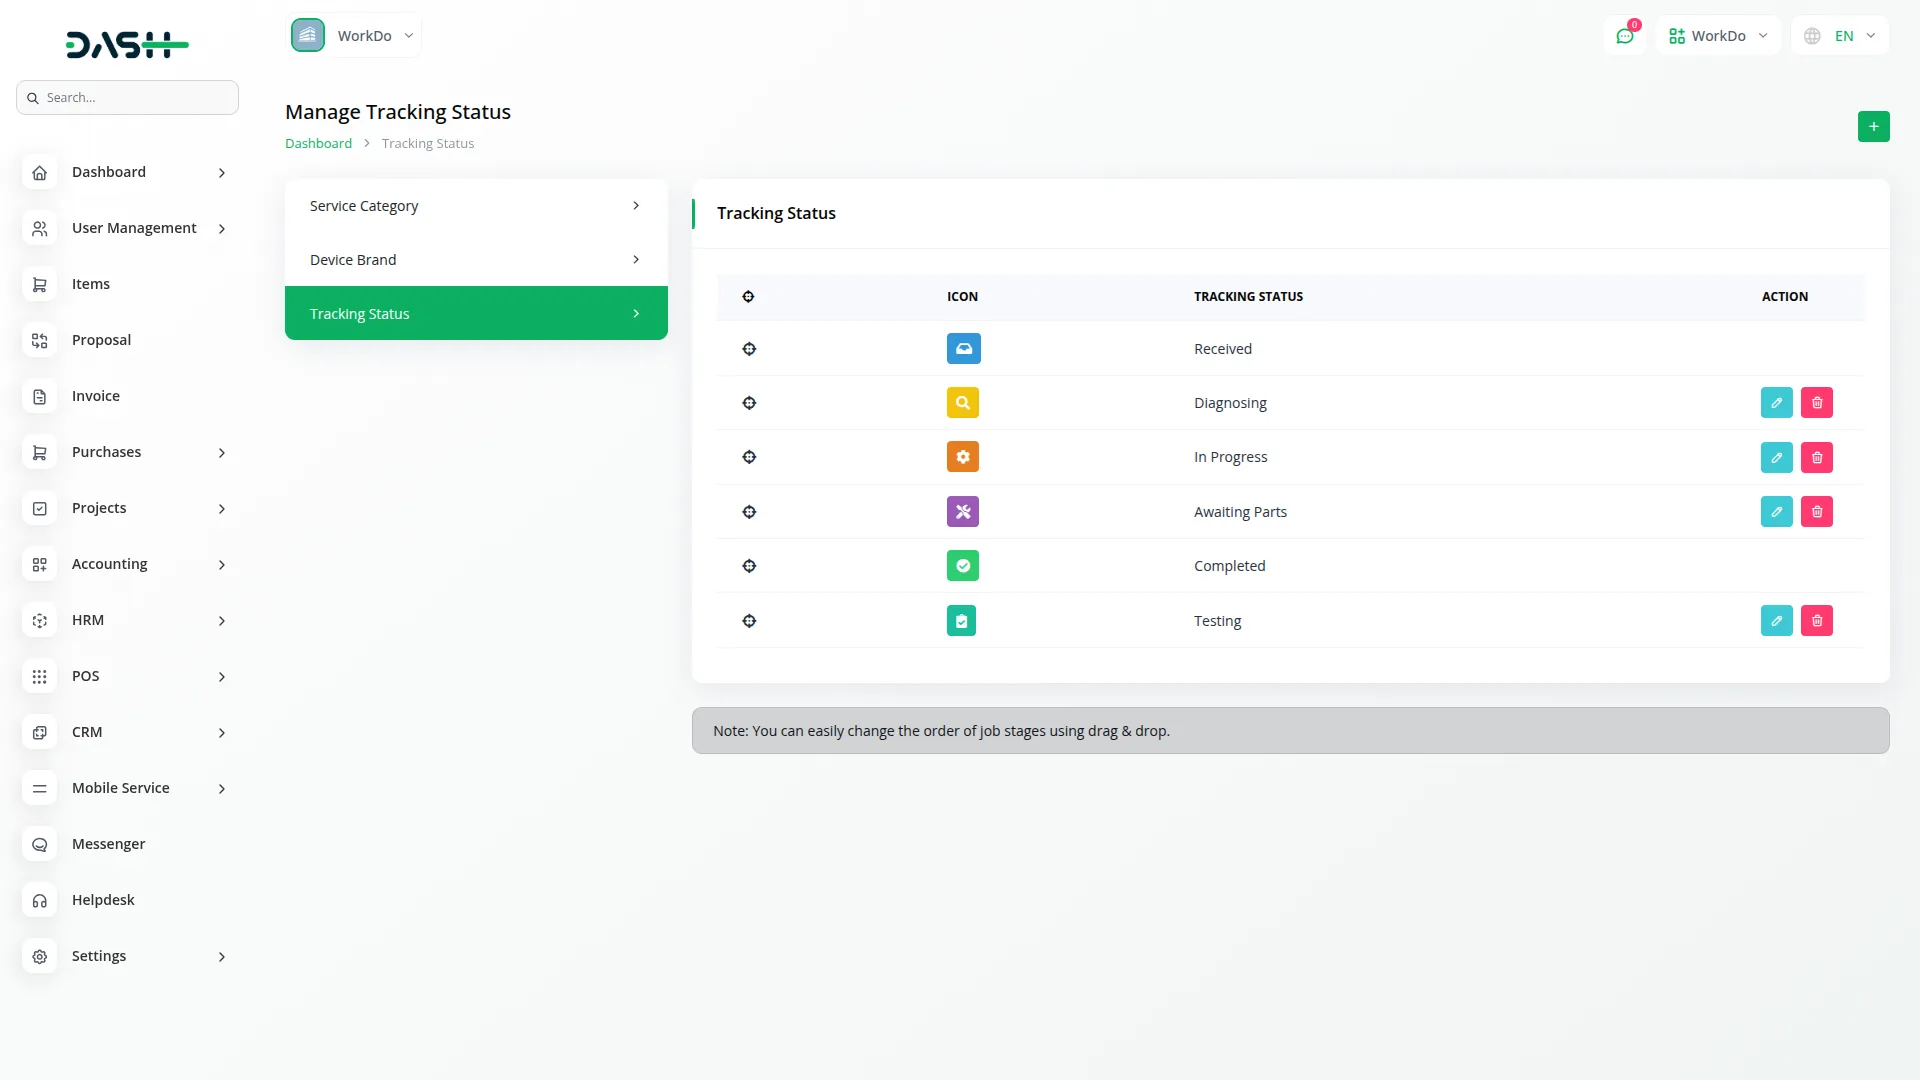
- To create a tracking status, click the “Create” button and configure the Icon, Tracking Status name, and Status Color. These statuses help customers understand their repair progress, such as “Received,” “Diagnosing,” “Parts Ordered,” or “Ready for Pickup.”
- The list page displays the Icon with Status Color and Tracking Status name. Only Company administrators can drag and drop statuses to reorder and align them according to your repair workflow process.
Services
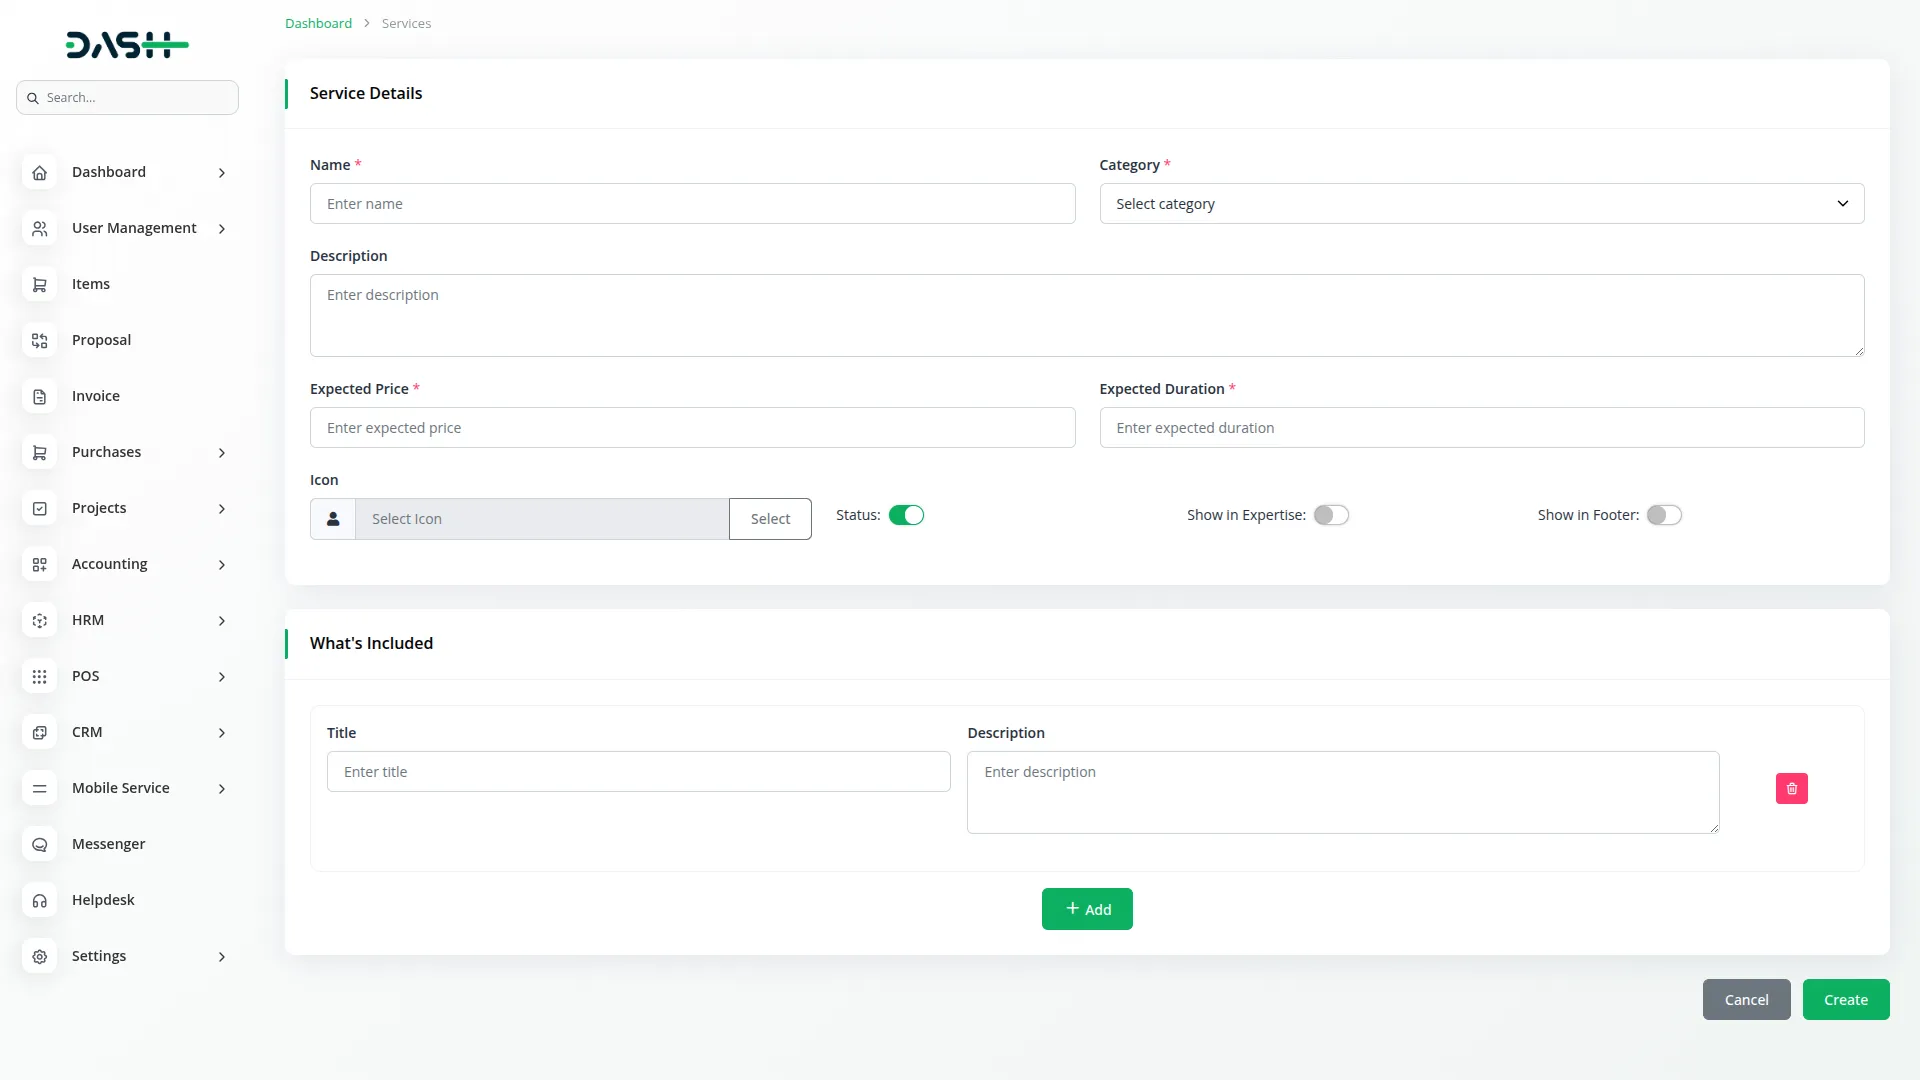
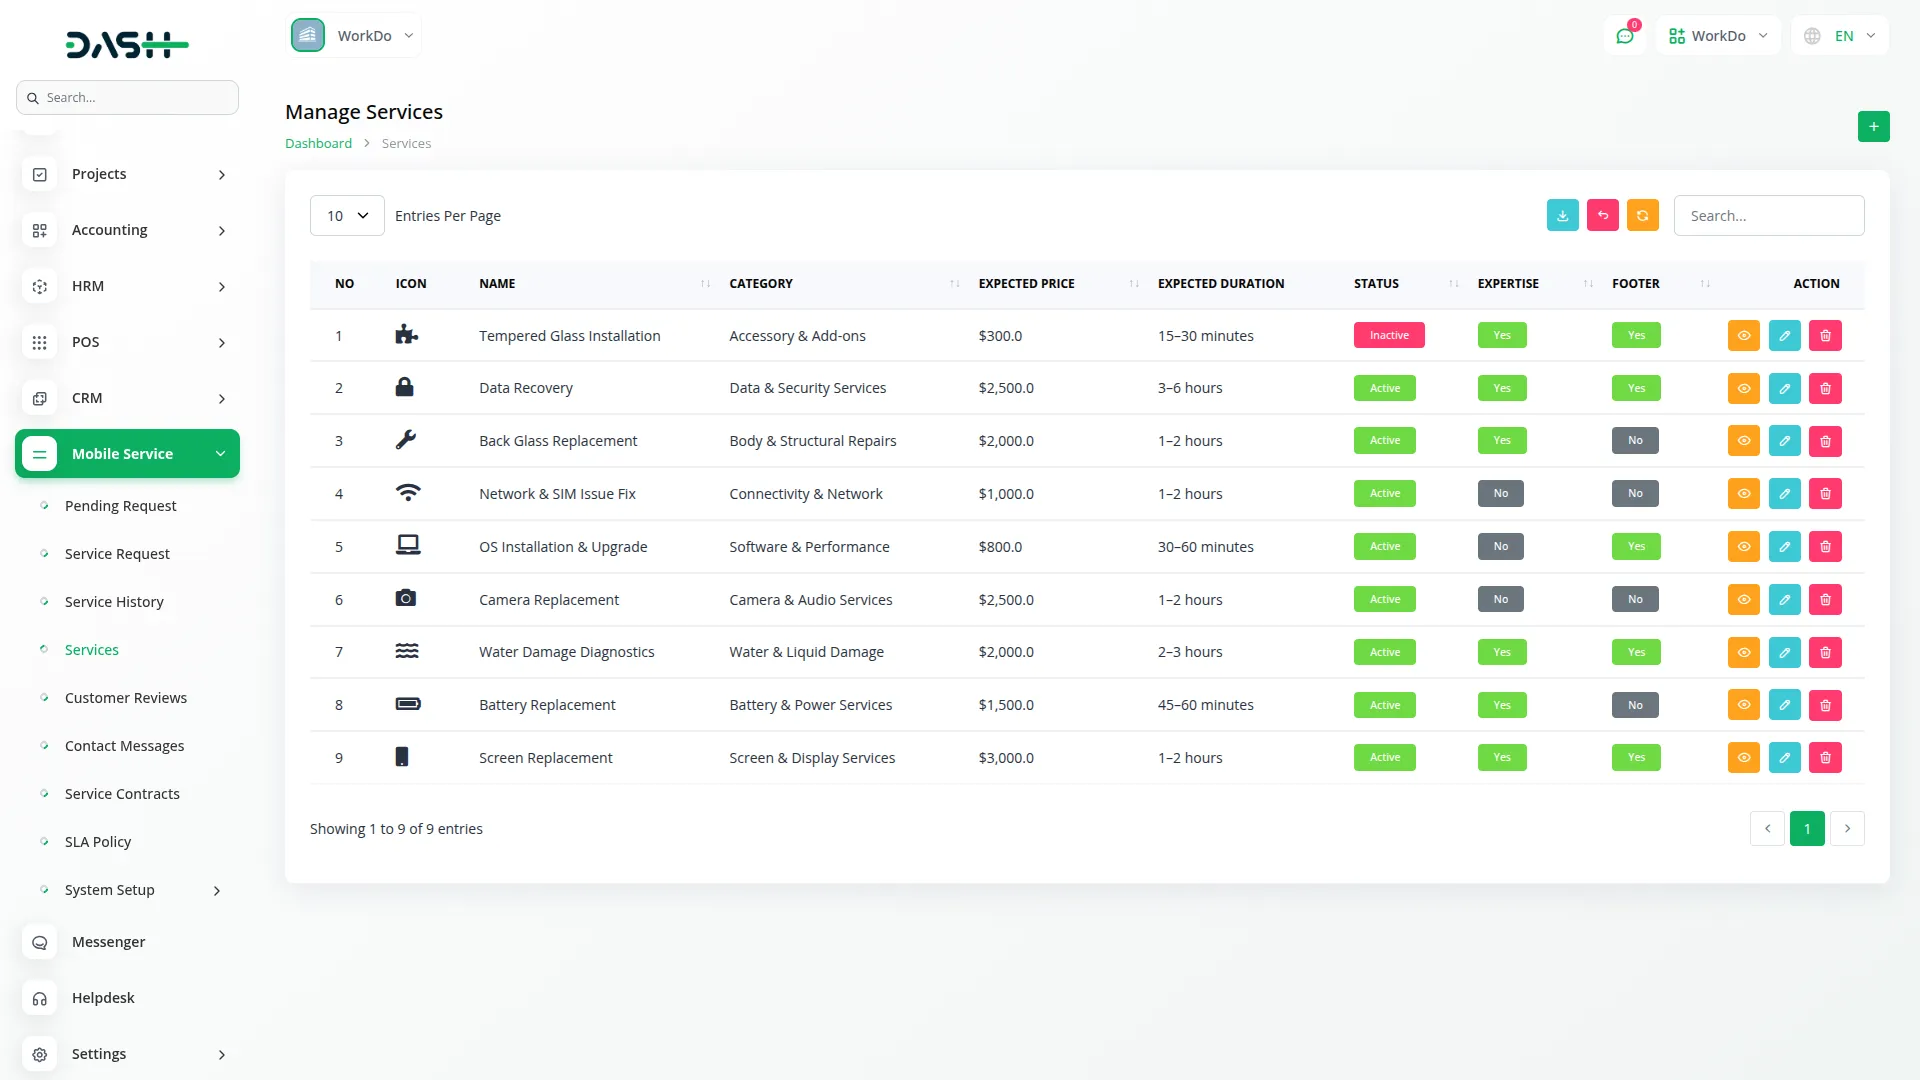
- To create a new service, click the “Create” button at the top of the services page. Enter essential details, including the service Name, select the appropriate Category from your Service Categories section, and write a clear Description of what the service includes. Set the Expected Price and Expected Duration to help customers understand costs and timeframes.
- Upload an Icon to visually represent the service and use the Status toggle to make the service active or inactive. The “Show in Expertise” toggle controls whether this service appears in the Homepage Expertise section, while “Show in Footer” determines if it displays under Footer Services. In the “What’s Included” section, you can add multiple items with a Title and Description to detail exactly what customers receive with this service.
- The list page shows all services with comprehensive information, including Icon, Name, Category, Expected Price, Expected Duration, Status (Active/Inactive), Expertise (Yes/No), and Footer (Yes/No) columns. You can search services, export the list, or use actions like Show to view full details, Edit to modify service information, or Delete to remove services.
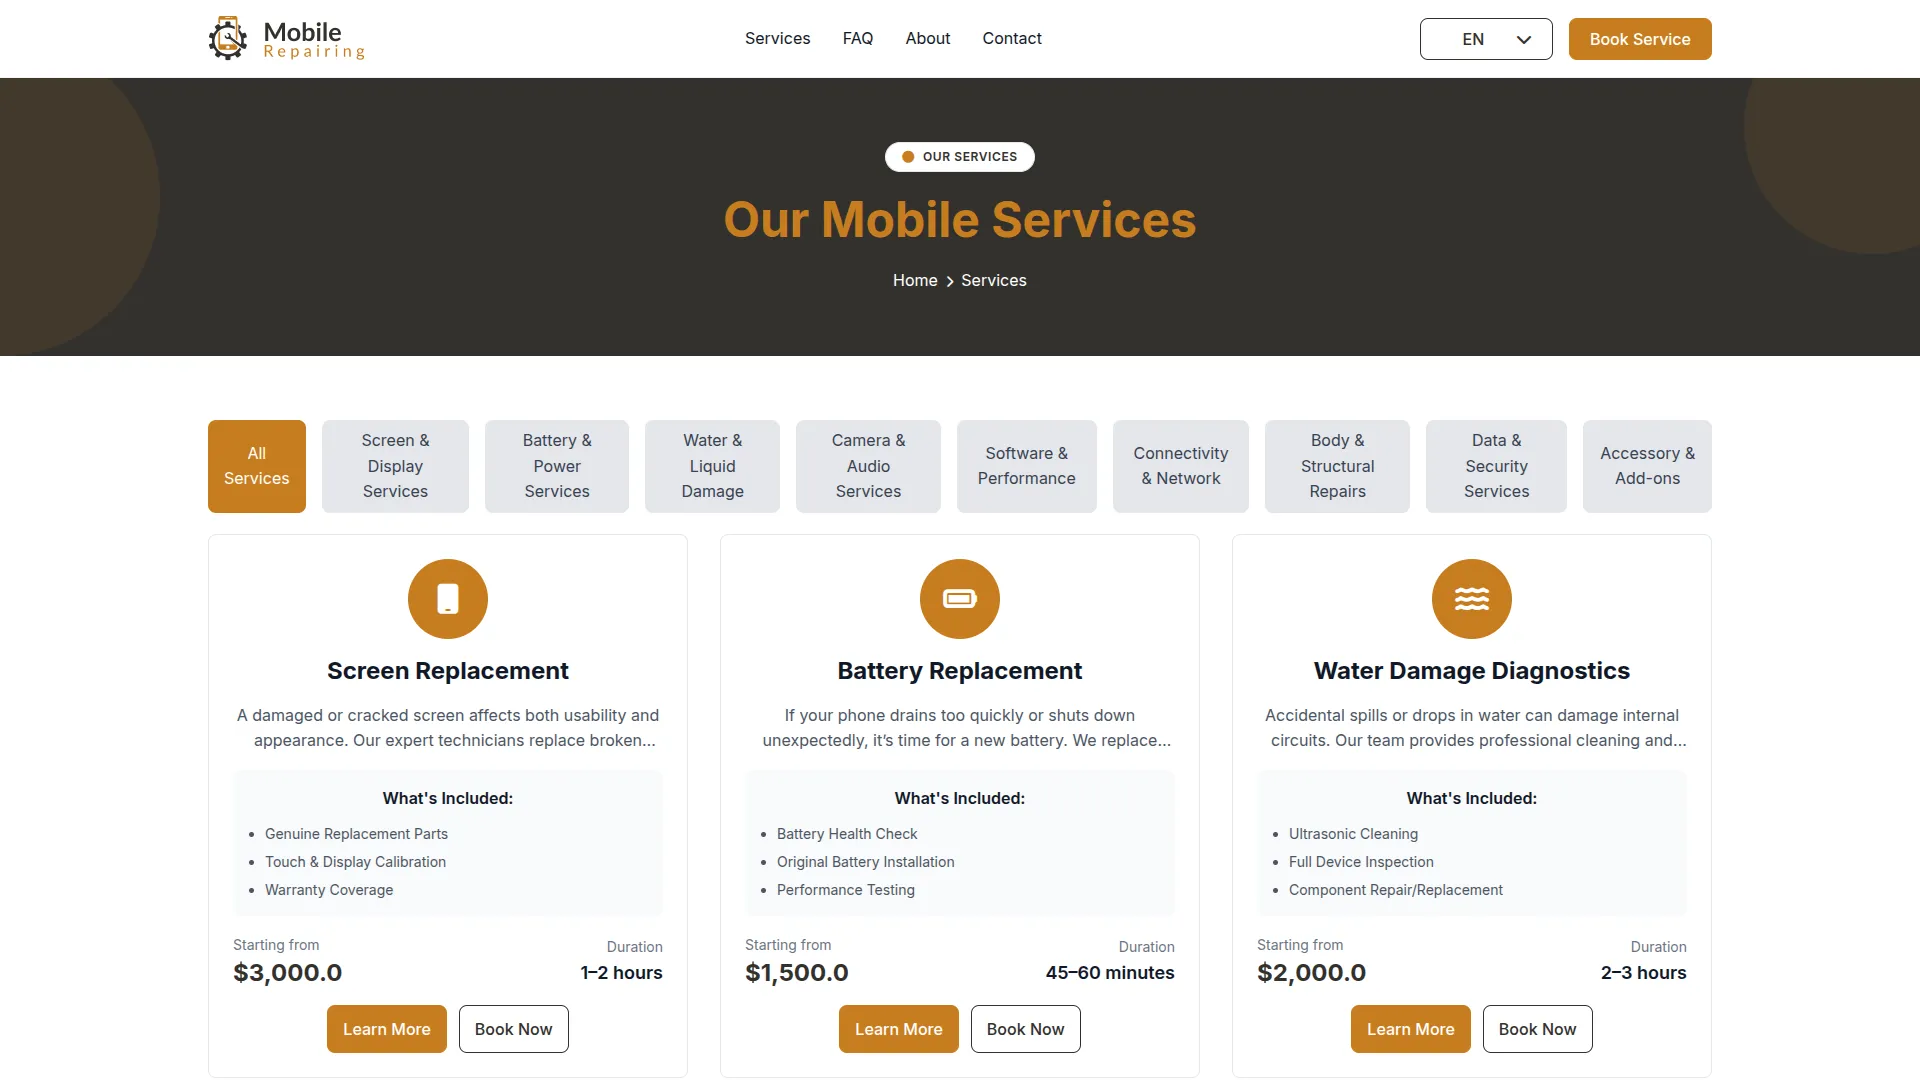
- This data connects directly to the frontend, where active services display on the Services page with category-wise filtering options, showing service details, expected pricing, and duration. Services marked as “Show in Footer” appear in the website footer under the Services section.
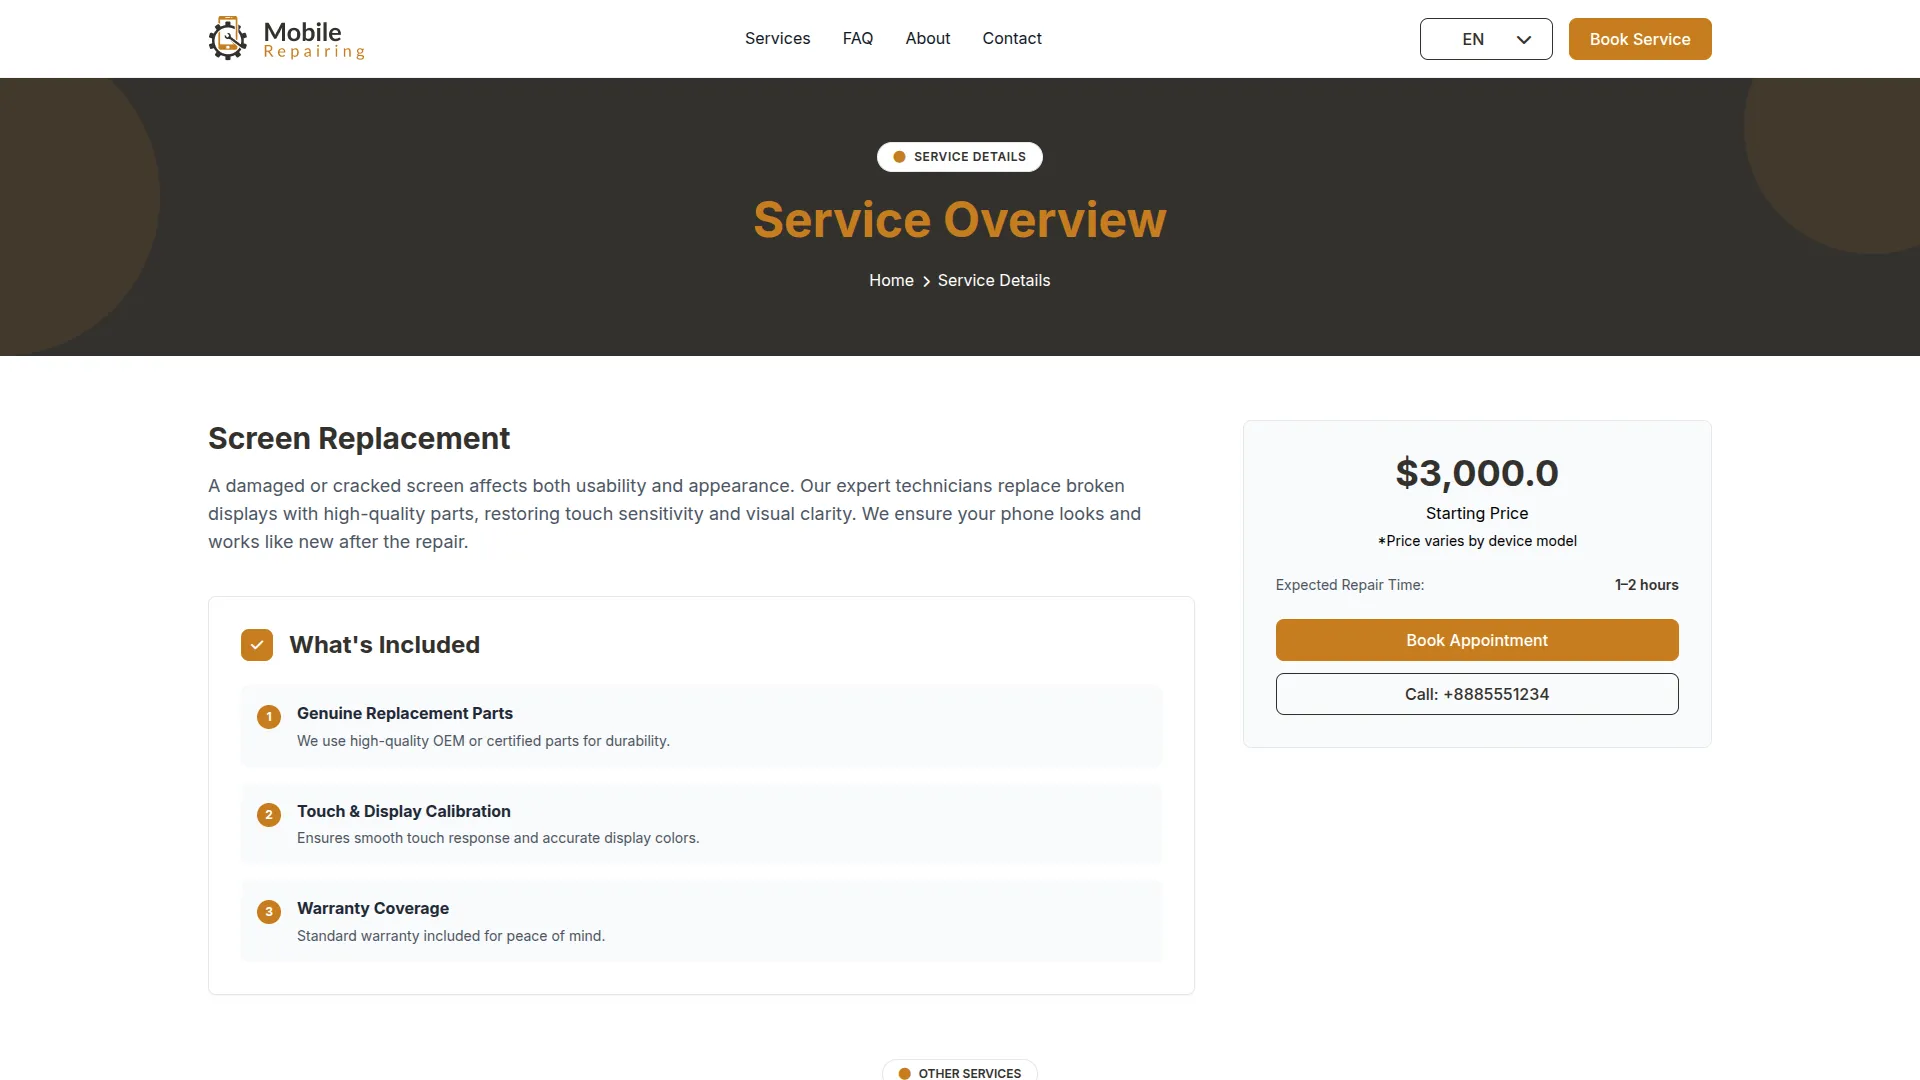
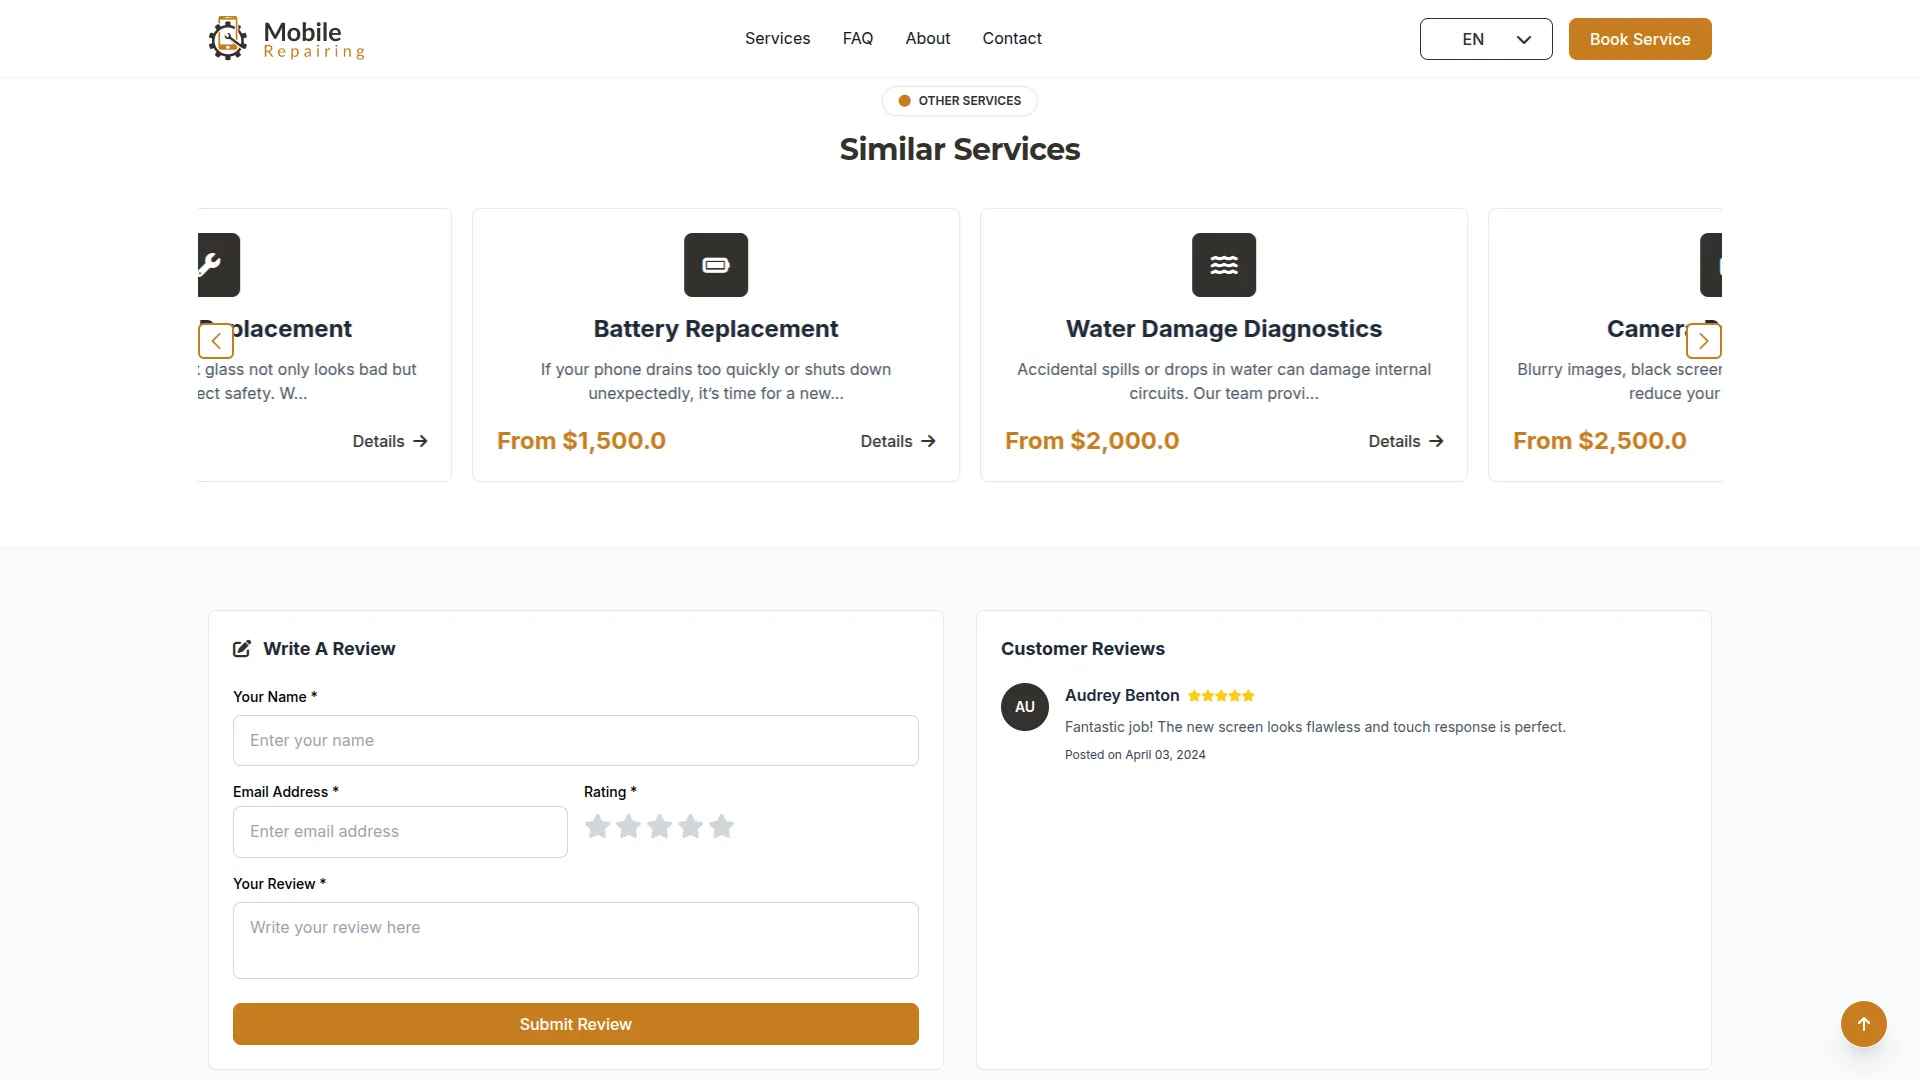
- Each service has a dedicated Service Details page displaying comprehensive information, similar services, and a Customer Reviews Form where completed customers can submit feedback with Name, Email Address, Rating, and Reviews fields. Each customer can submit only one review per completed service.
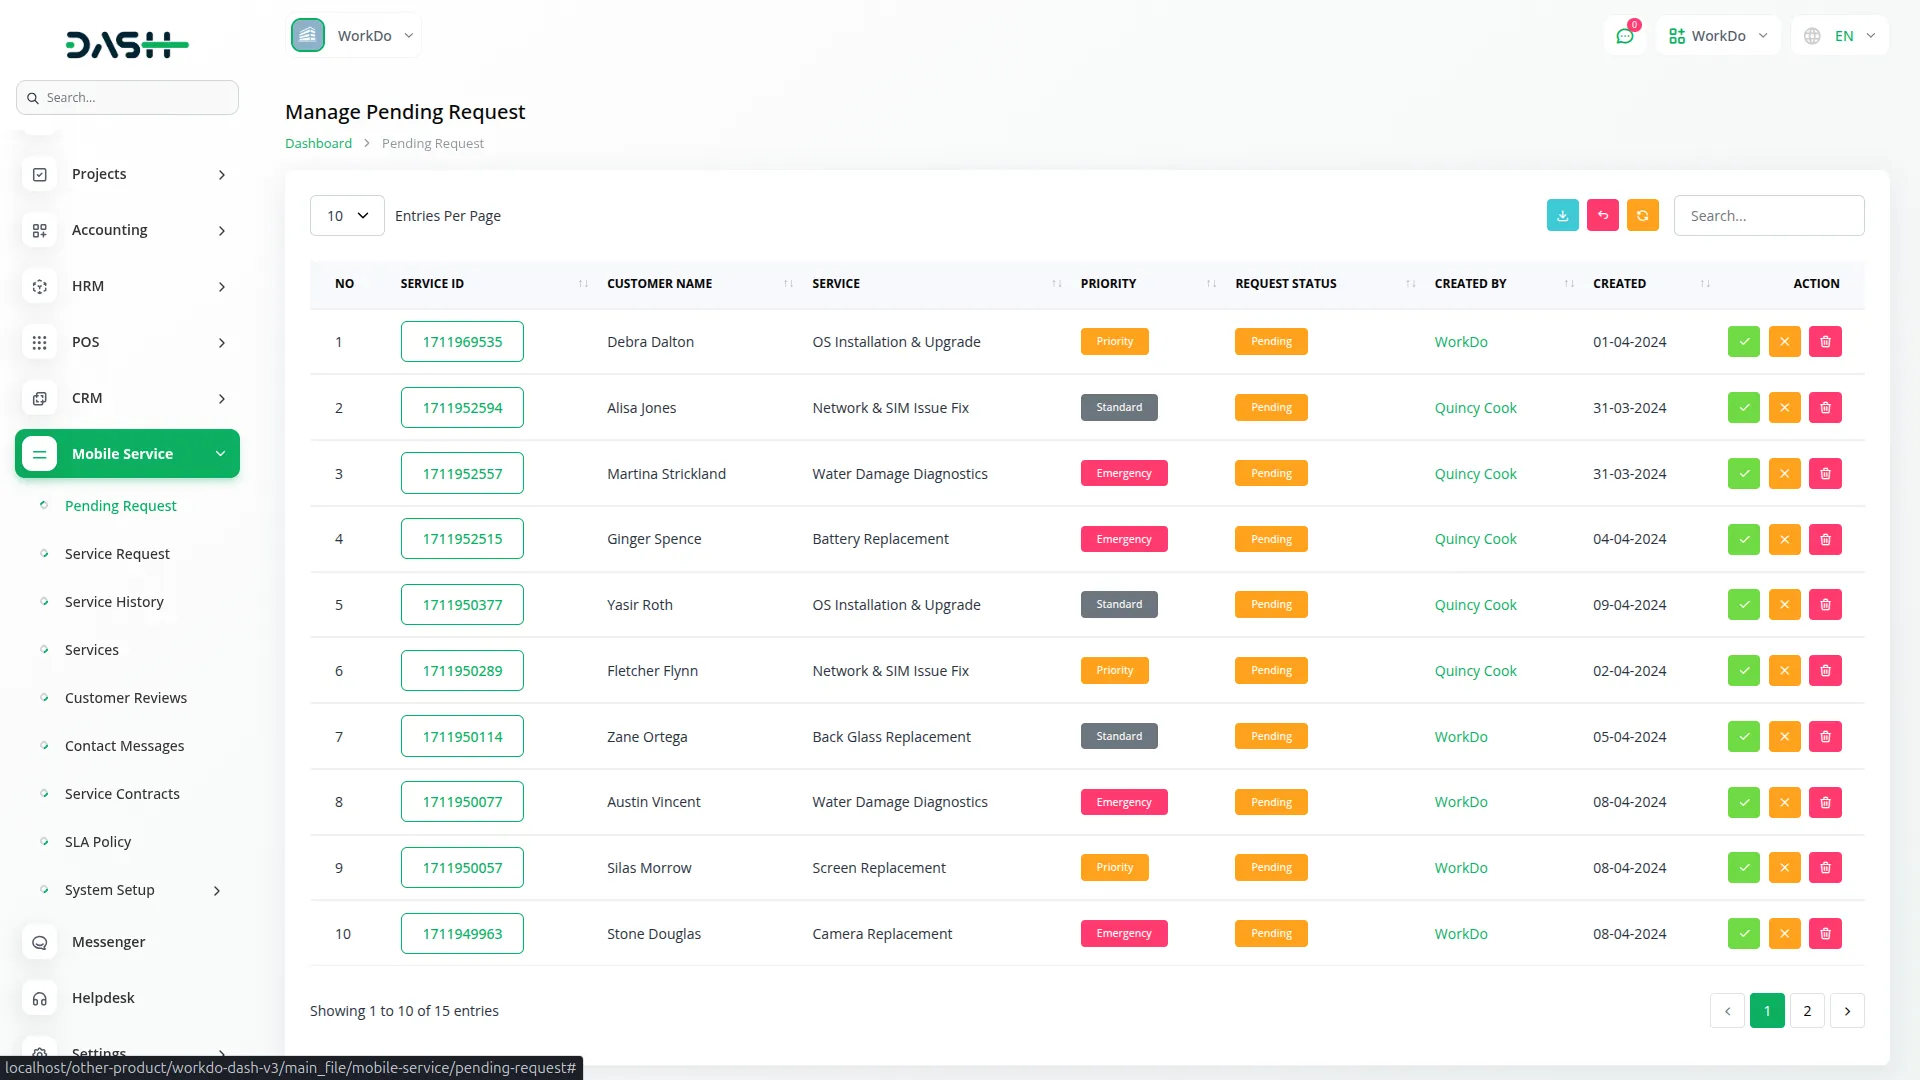
Pending Requests
- The Pending Requests section displays all service requests that have been submitted but are awaiting approval, including both frontend customer submissions and staff-created requests, as well as any rejected requests.
- The list page provides a complete view with Search and Export functionality. The table displays Request Number, Service ID (clickable to show complete details), Customer Name, Service Type (pulled from the Services section), Priority level (Standard, Priority, or Emergency), current Request Status, Created By (comes from the User section), Created Date, and available Actions.
- In the Actions column, you can click Approve to move the request to the Service Requests section, where it becomes an active repair job. Click Reject to decline the request, which keeps it in this section but changes the status to rejected. Use Delete to permanently remove requests that are no longer needed.
- Once you approve a request, it automatically moves from Pending Requests to Service Requests, and customers receive email notifications about the status change.
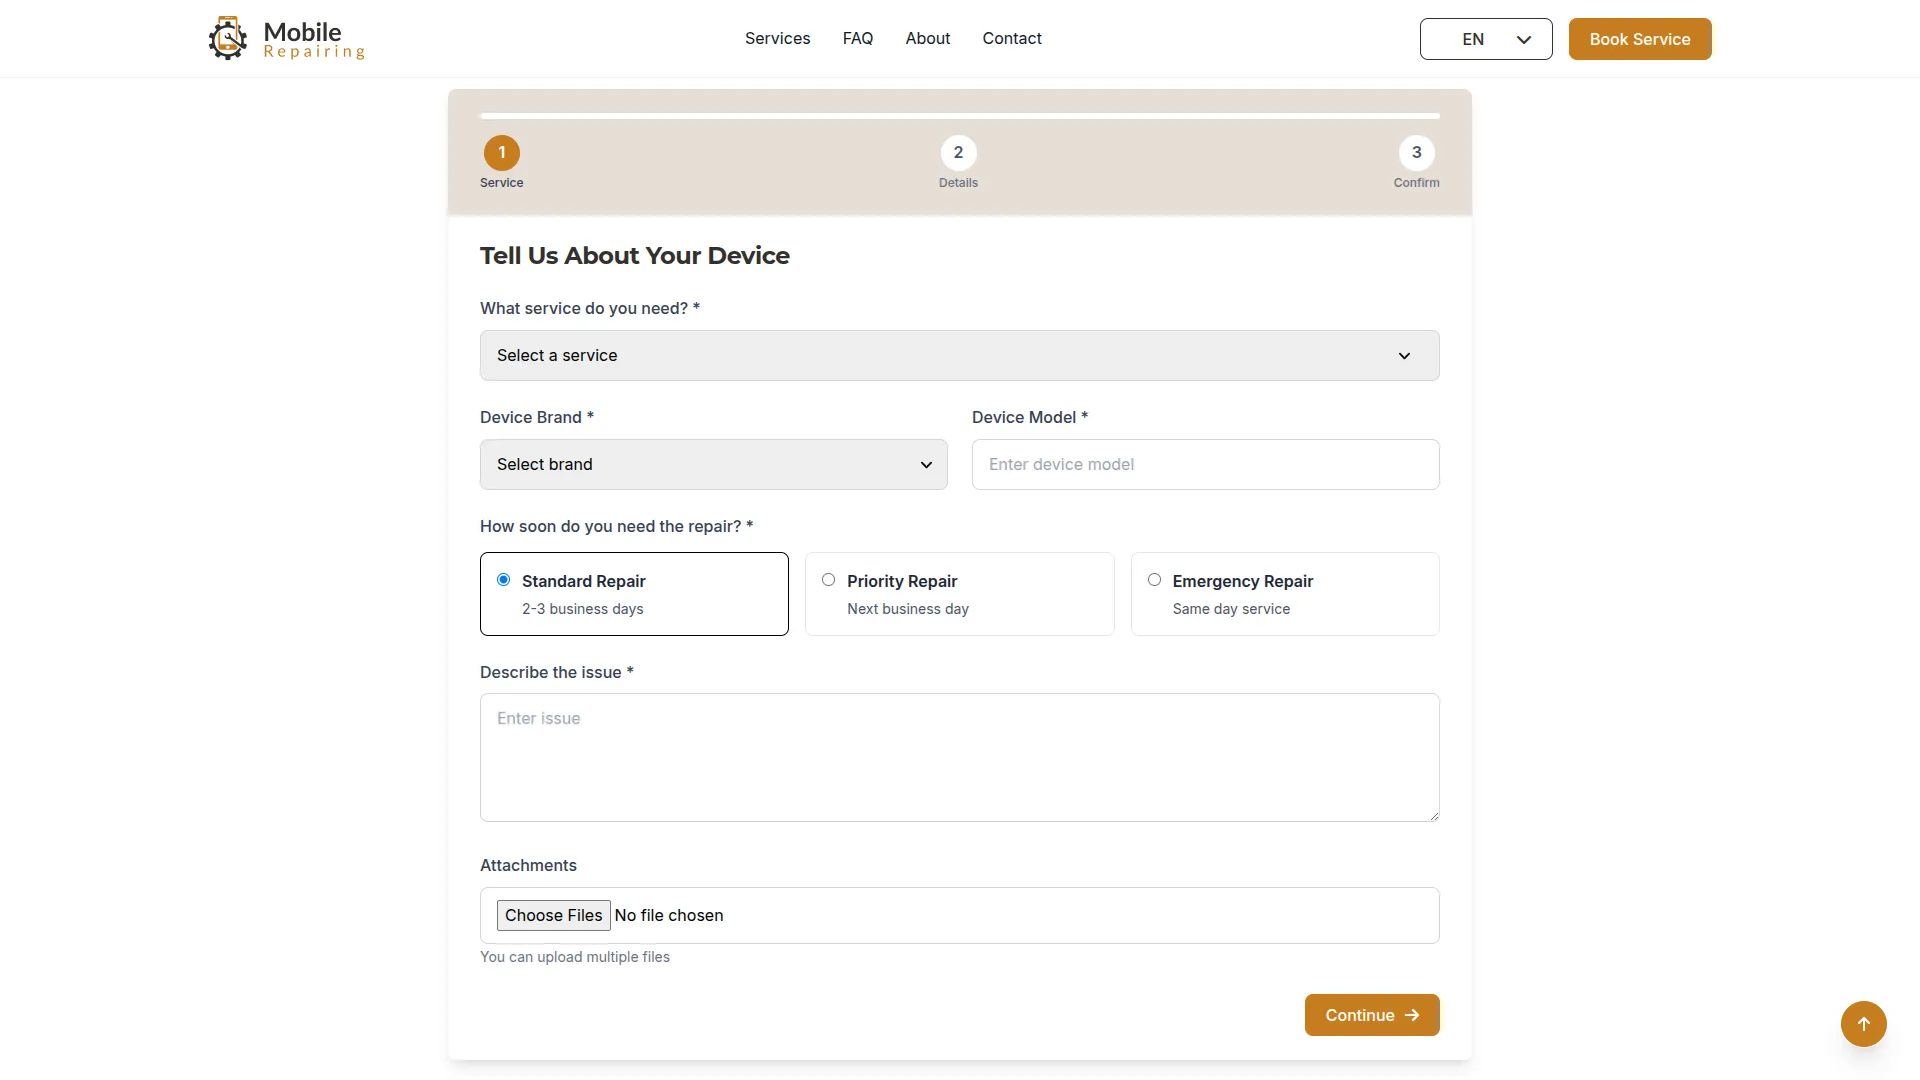
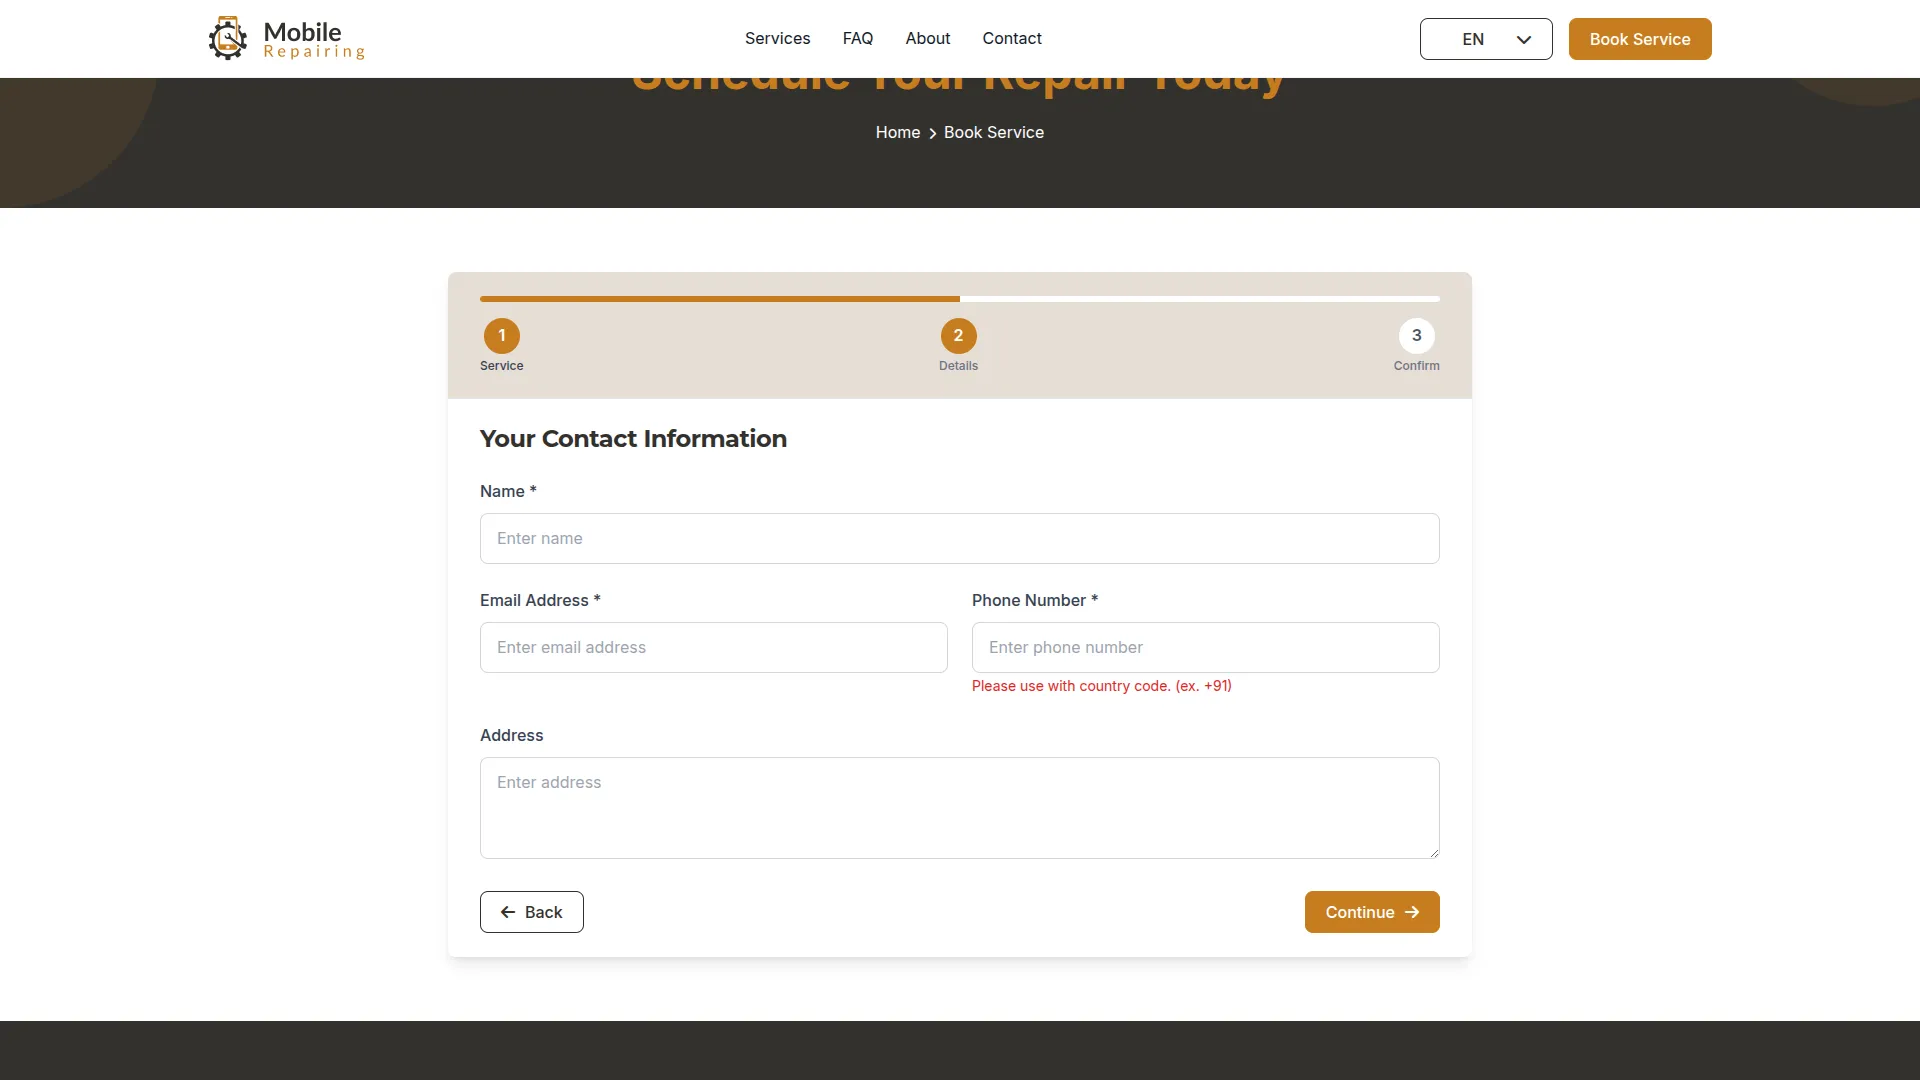
- Frontend customers can submit service requests through the Book Service Request form by entering their Name, Email Address, Phone Number, Address, selecting a Service, choosing Priority level (Standard, Priority, Emergency), selecting Device Brand, entering Device Model, describing the issue, adding Special Requests, and uploading multiple Attachments.
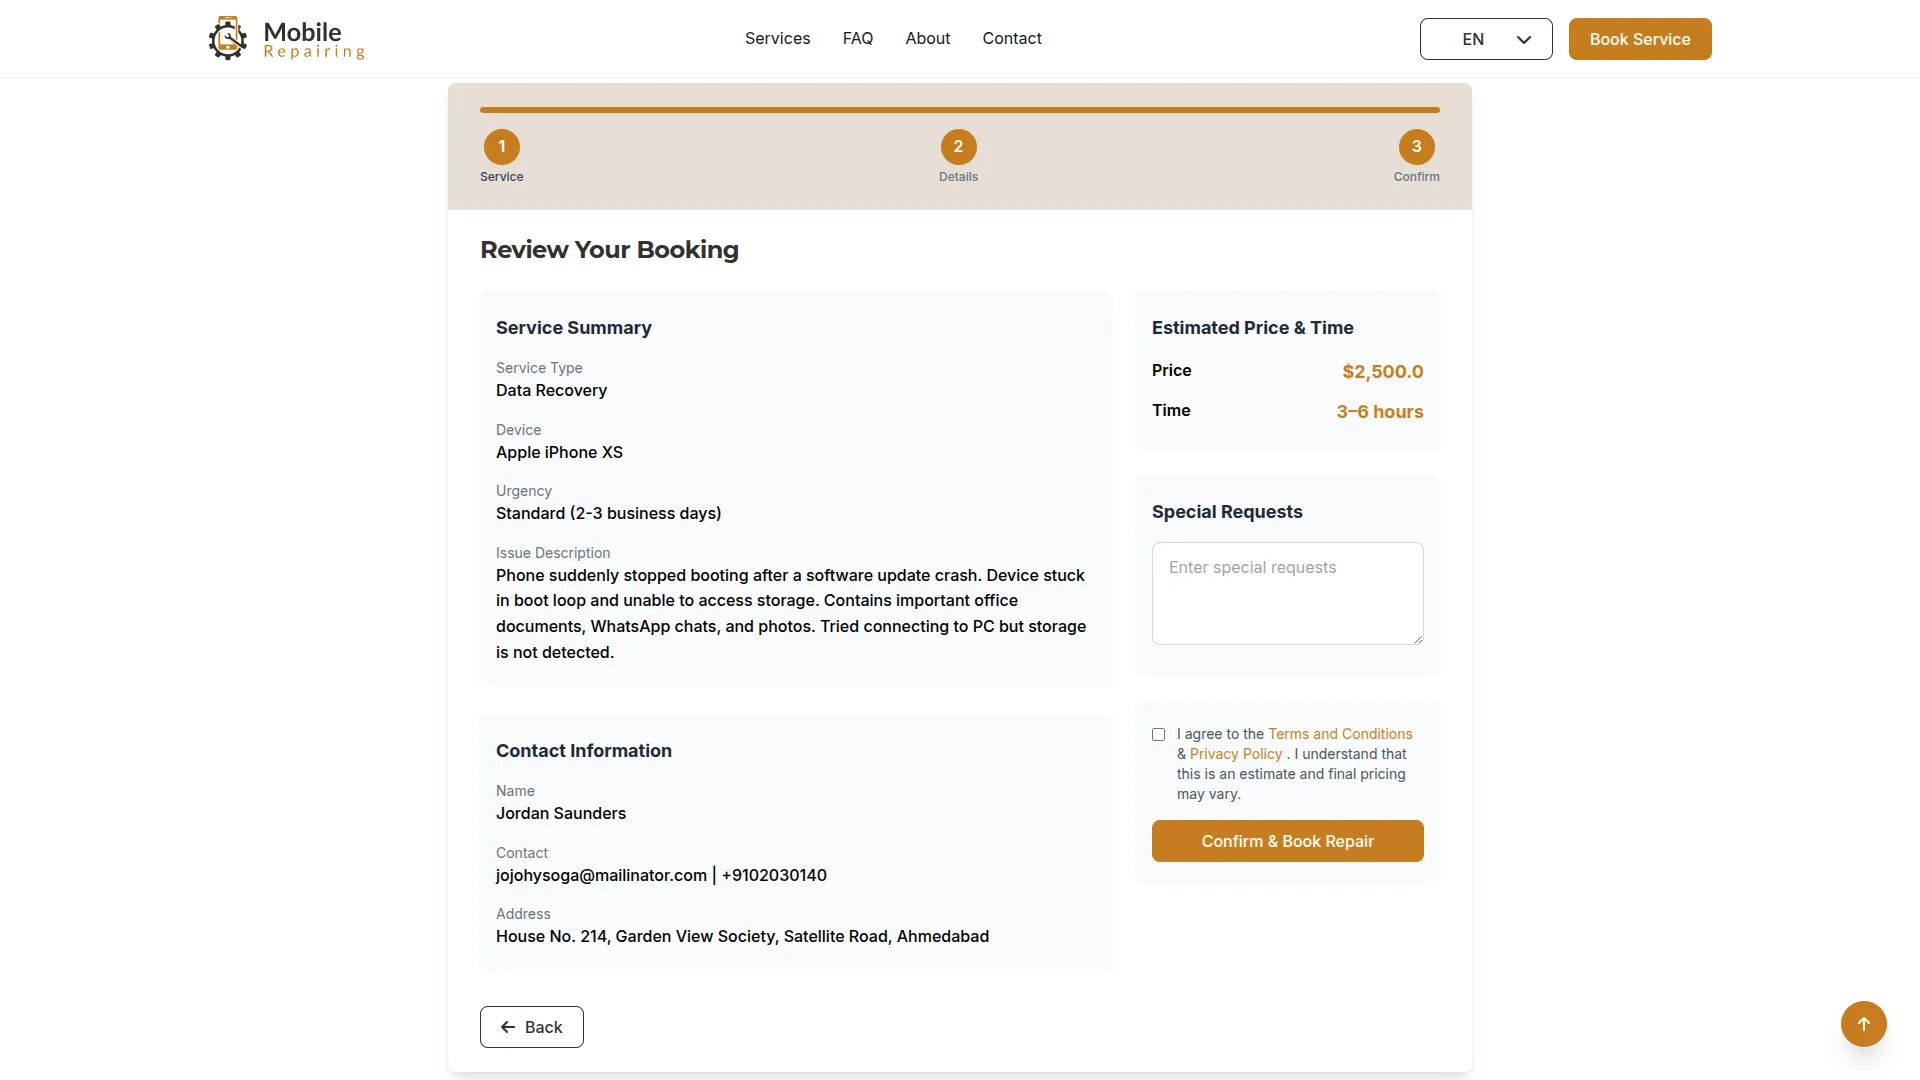
- Once submitted, requests appear in this Pending Requests section awaiting your approval, and customers receive email confirmation.
Service Requests
- The Service Requests section manages all approved service requests that are currently active and have not yet been completed. This is where you handle ongoing repair work and track progress.
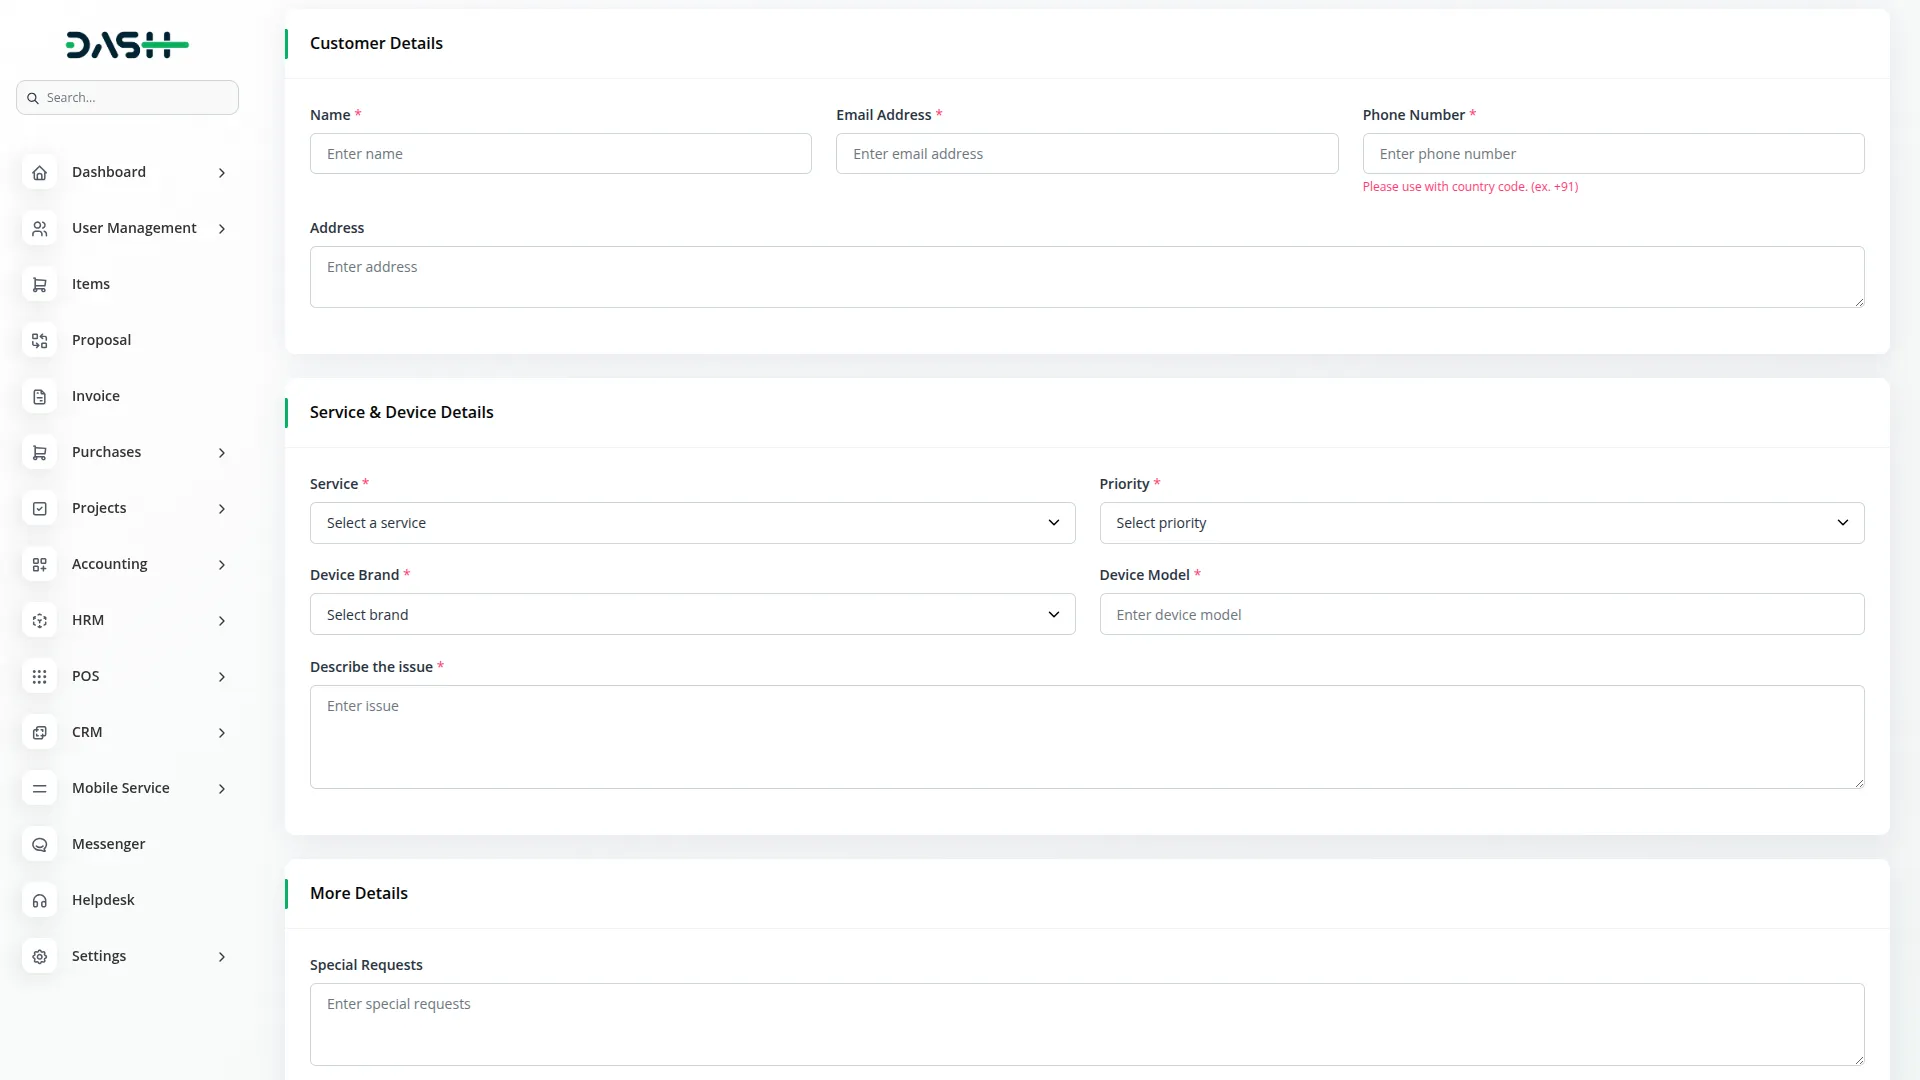
- To create a new service request directly, click the “Create” button and fill in the customer details, including Name, Email Address, Phone Number, and Address. Select the appropriate Service from your Services section, set the Priority level (Standard, Priority, or Emergency), choose the Device Brand from your Device Brands section, and enter the specific Device Model. Add a description in the “Describe the issue” field, include any Special Requests, and upload multiple Attachments if needed.
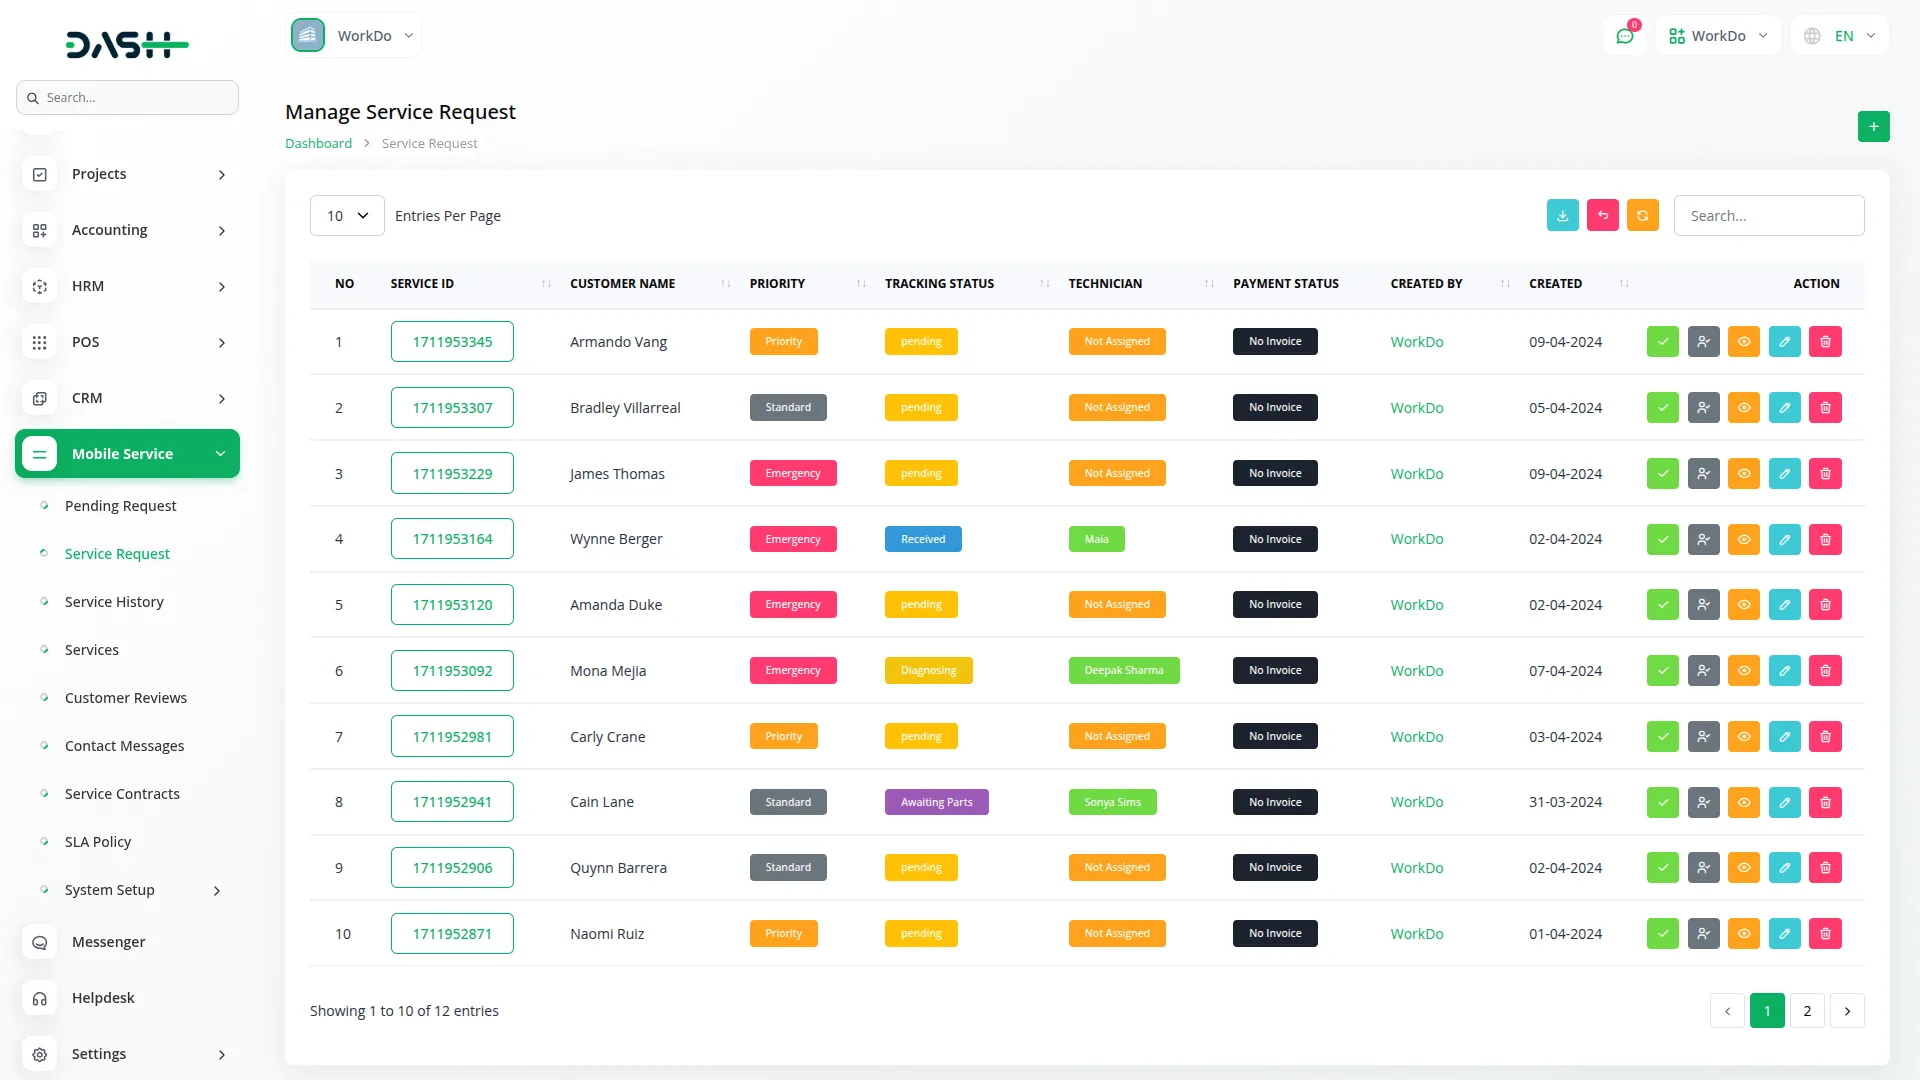
- The list page displays all active requests with Search and Export options. The table shows Request Number, Service ID (clickable for complete details), Customer Name, Priority level, current Tracking Status (comes from the Tracking Status section), assigned Technician (comes from the User section), Payment Status (comes from the Invoice section), Created By (comes from the User section), and Created Date.
- In the Actions column, you have several options. Use “End Repair” to mark the service as completed, which moves it from Service Requests to Service History. Click “Assign Technician” to open a pop-up where you can select from available staff users. The “Show” action displays the complete service timeline and live tracking information that customers can also see. Use “Edit” to modify any service details, and “Delete” to remove the request entirely.
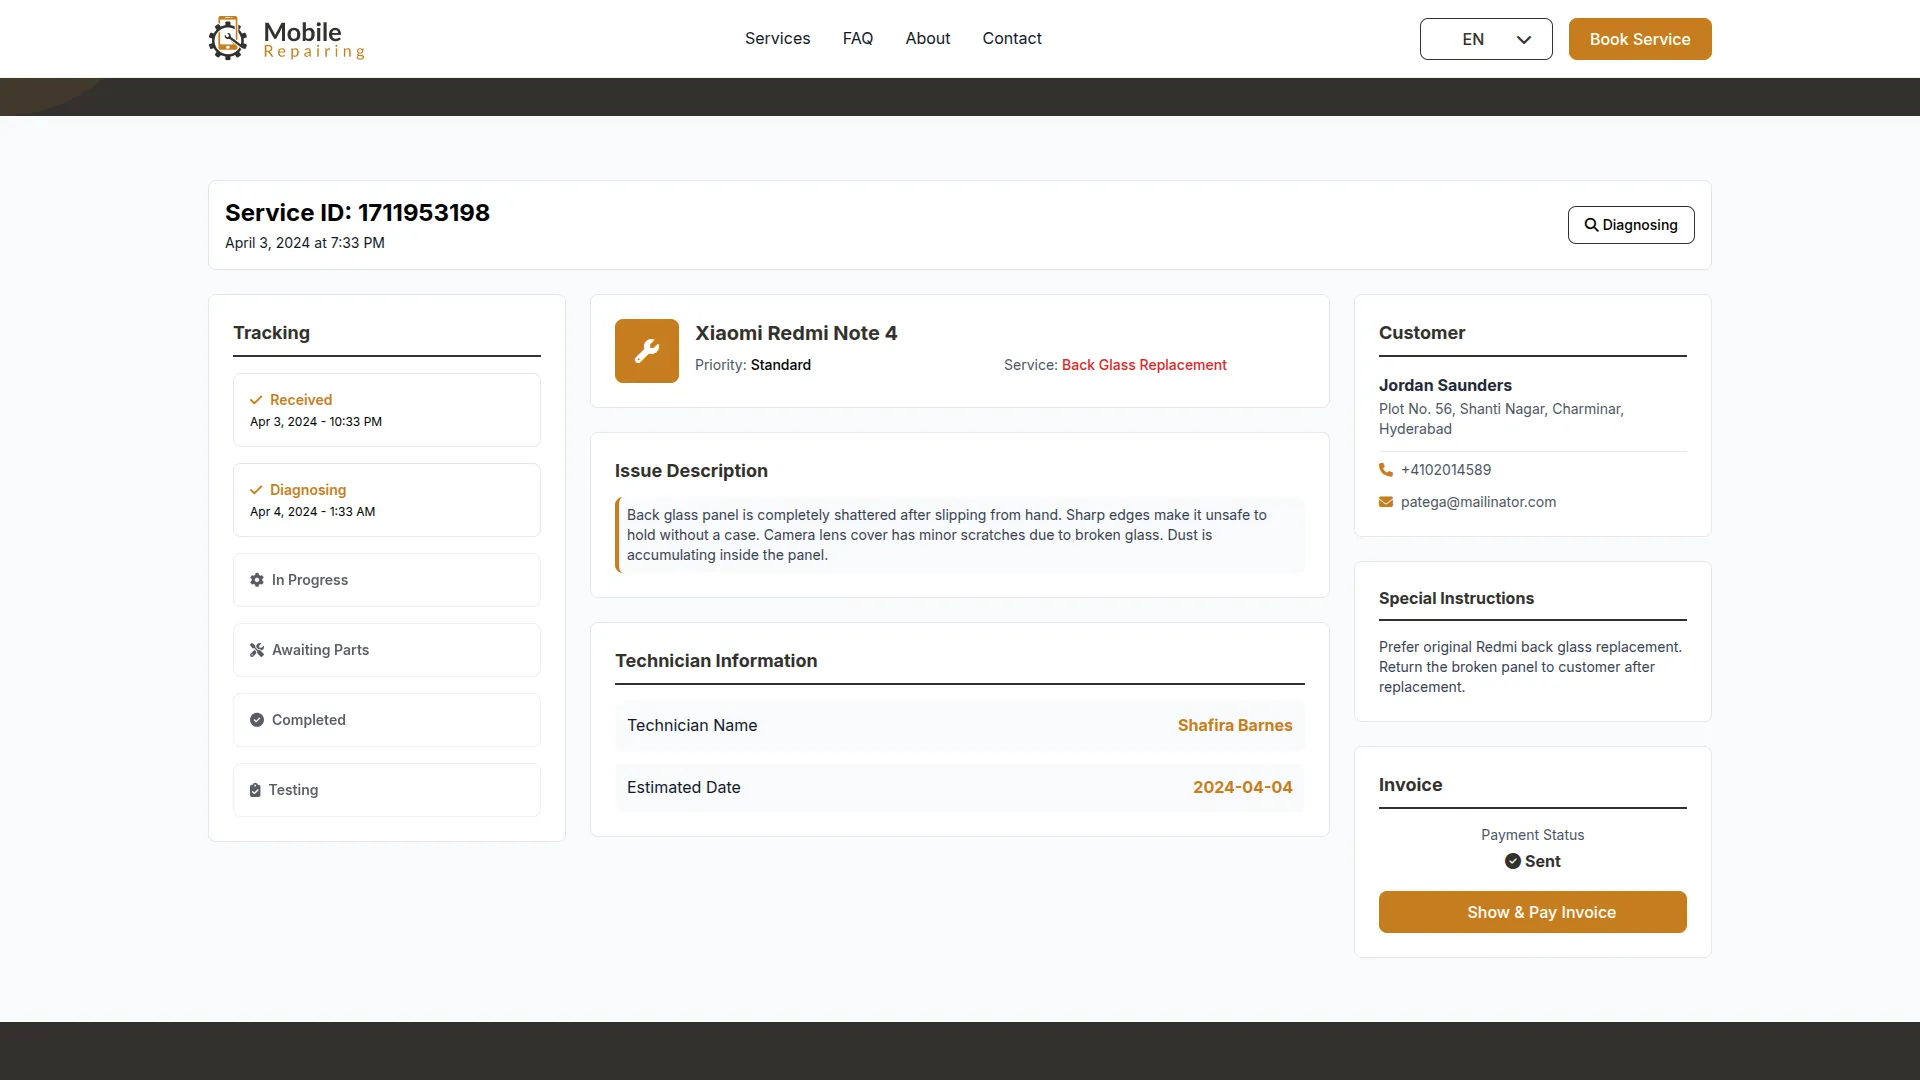
- This section connects directly to the frontend Service Tracking system, where customers can monitor their repair progress using their Service ID and Email Address. The tracking page shows current status and timeline, complete service details, technician and customer information, and, if available, an Invoice card with payment status and an Invoice show button. Note that service tracking is only available for approved requests.
Service History
- The Service History section contains all service requests that have been approved and completed. This serves as your archive of finished repair work and helps track business performance over time.
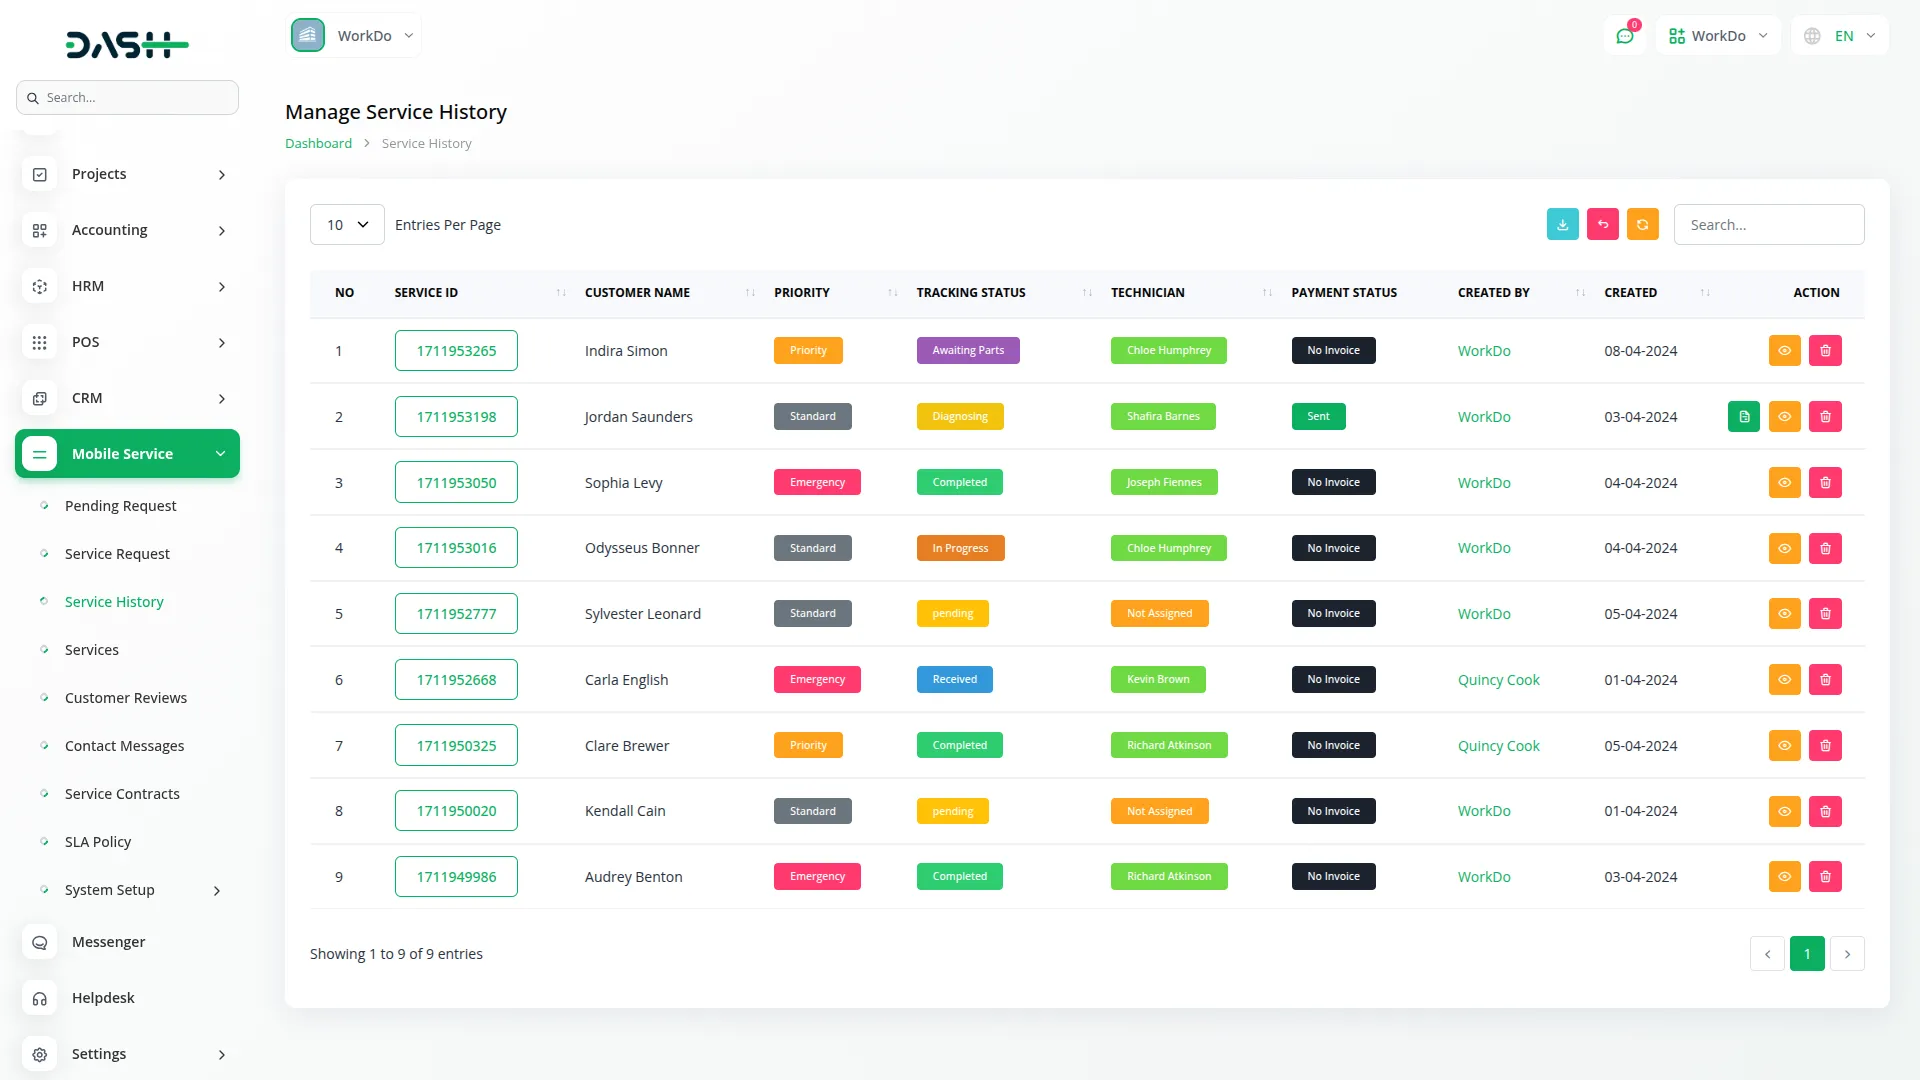
- The list page provides Search and Export functionality to help you manage completed services. The table displays Request Number, Service ID (clickable to show complete details), Customer Name, Priority level, final Tracking Status (from Tracking Status section), assigned Technician (from User section), Payment Status (from Invoice section), Created By (from User section), and Created Date.
- In the Actions column, you can click “Invoice show” to view invoice details and payment status if an invoice was created for the completed service. Use “Show” to review the complete service timeline and all tracking information.
- The “Delete” action allows you to remove completed requests from your history if needed. This historical data helps you analyze technician performance, service completion times, and customer satisfaction patterns.
Invoice
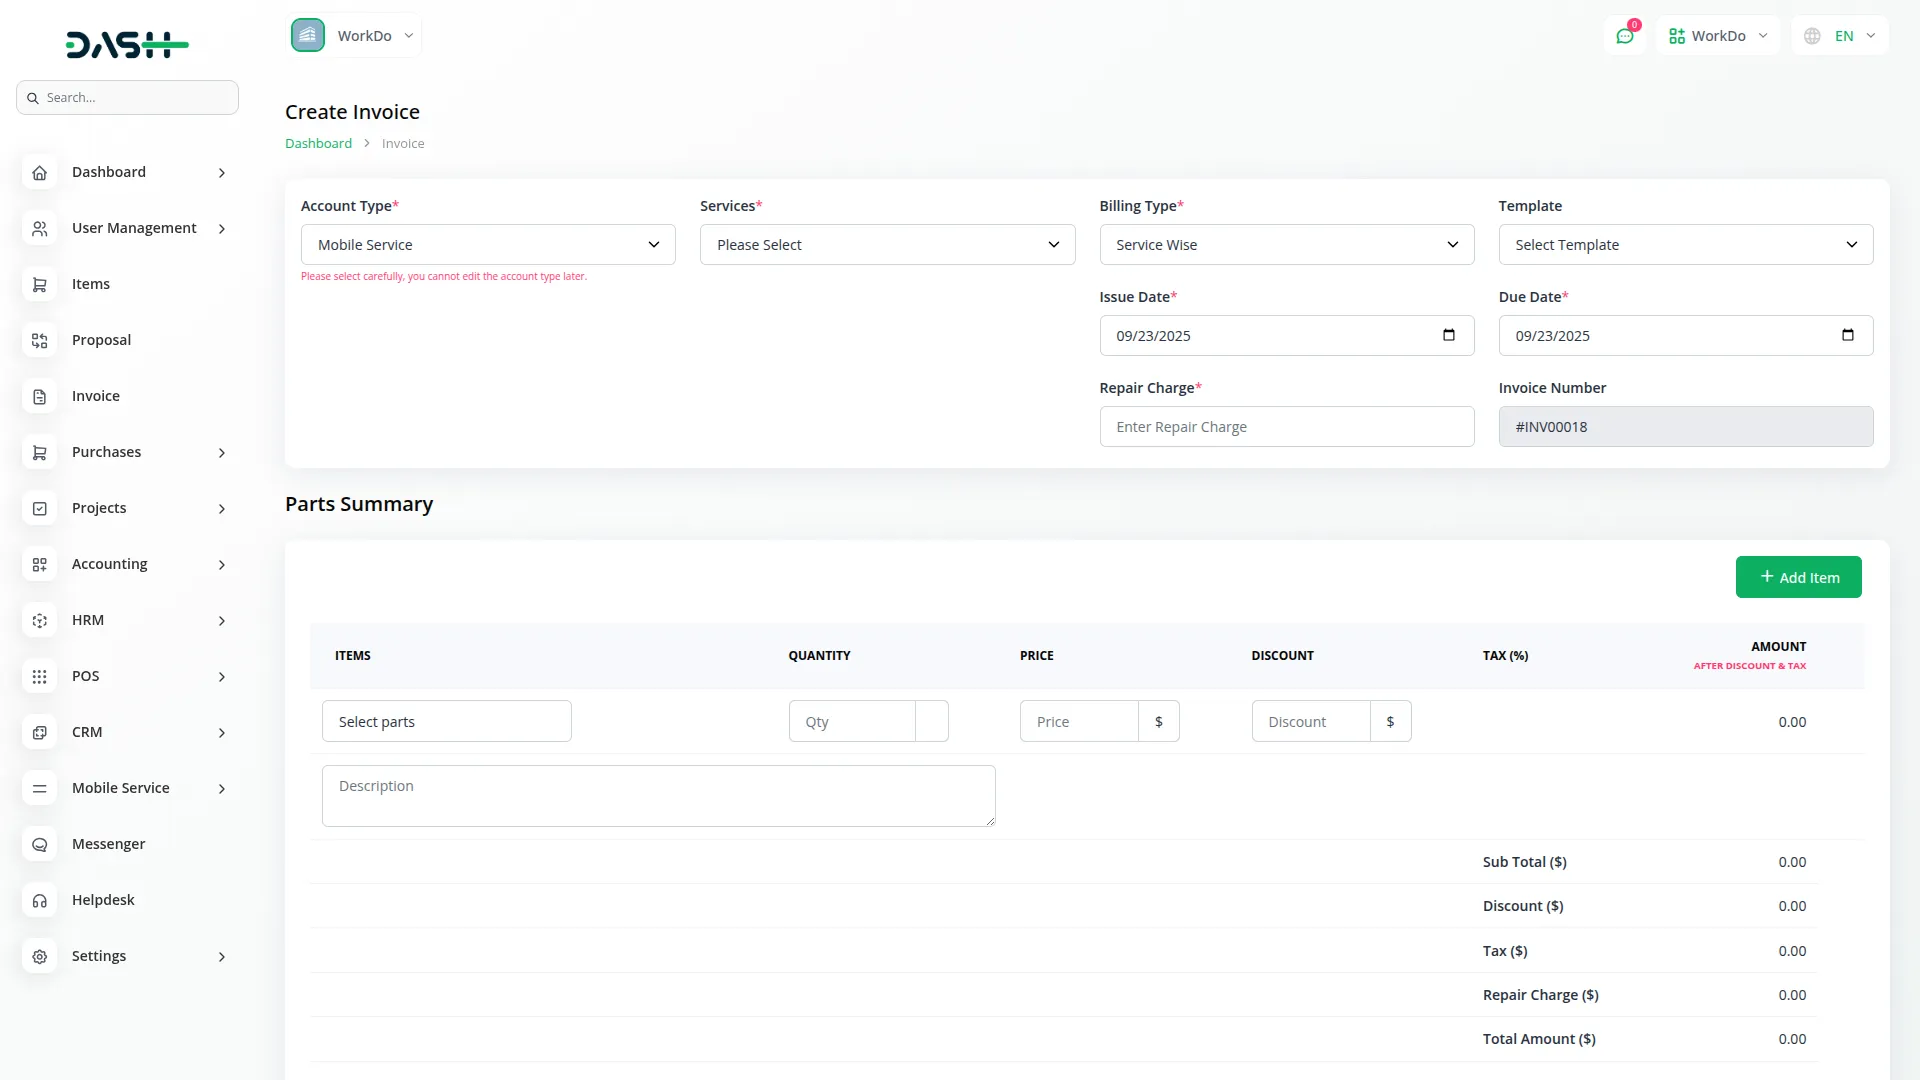
- To create a new invoice, click the “Create” button at the top of the invoice page. Select “Mobile Service” as the Account Type, then choose from approved Service IDs in the Services dropdown. Configure your Billing Type and select the appropriate Template for invoice formatting. Set the Issue Date and Due Date for payment terms.
- Enter the Repair Charge for labor costs, then use “Add Parts” to include any replacement components. For each part, select items from your Items section, specify quantity, set price, apply discounts if applicable, configure tax rates, and the system will calculate the total amount. Add a description for each part and repeat this process for multiple parts as needed.
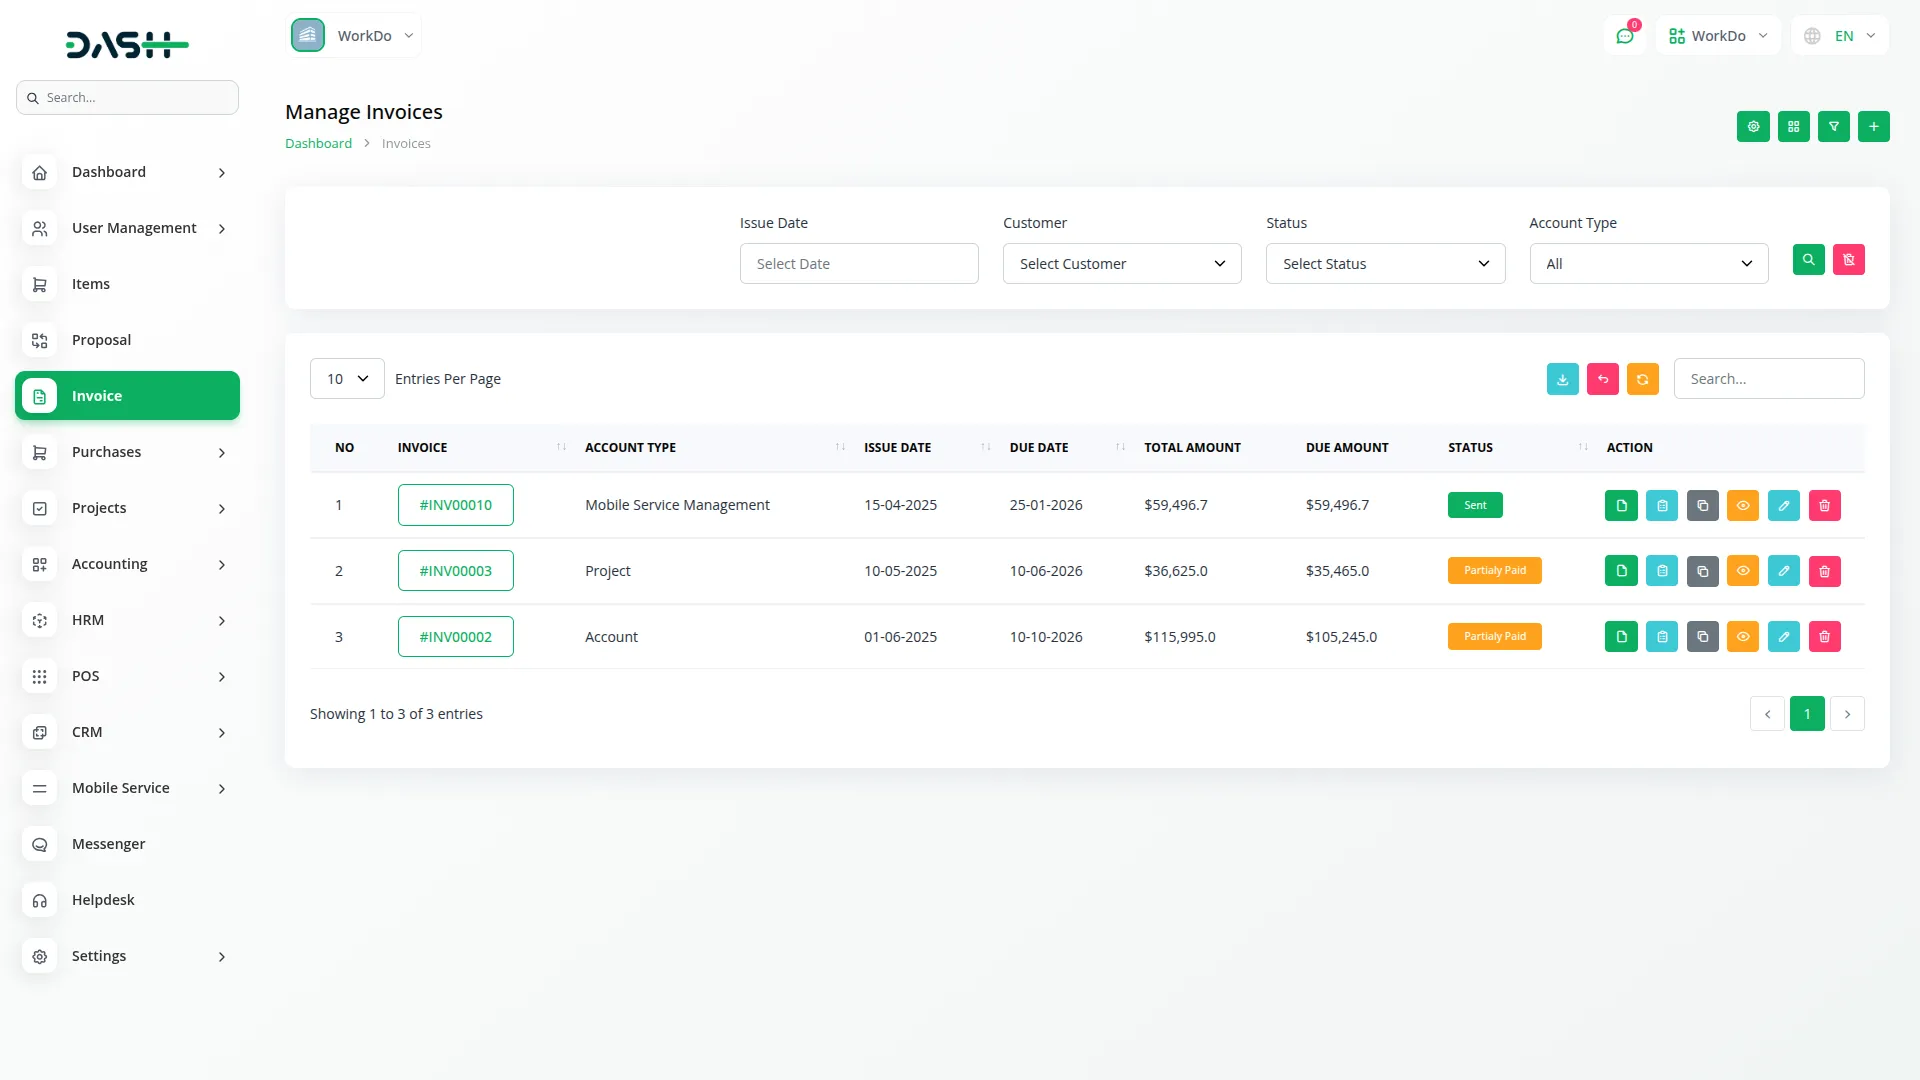
- The list page shows all invoices with Search, Export, and Filters options for better organization. The table displays Invoice Number, Account Type, Issue Date, Due Date, Total Amount, Due Amount, and current Status.
- In the Actions column, you have multiple options. Click “Copy” to copy the invoice link that you can send to clients for online payment processing. Use “Invoice Delivery Form” to access the print-ready form for physical delivery.
- “Duplicate Form” creates a copy of the existing invoice for similar services. The “Show” action displays complete invoice details, “Edit” allows modifications, and “Delete” removes the invoice. The Payment Status from invoices connects back to Service Requests and Service History sections, providing complete financial tracking throughout the service lifecycle.
Service Contracts
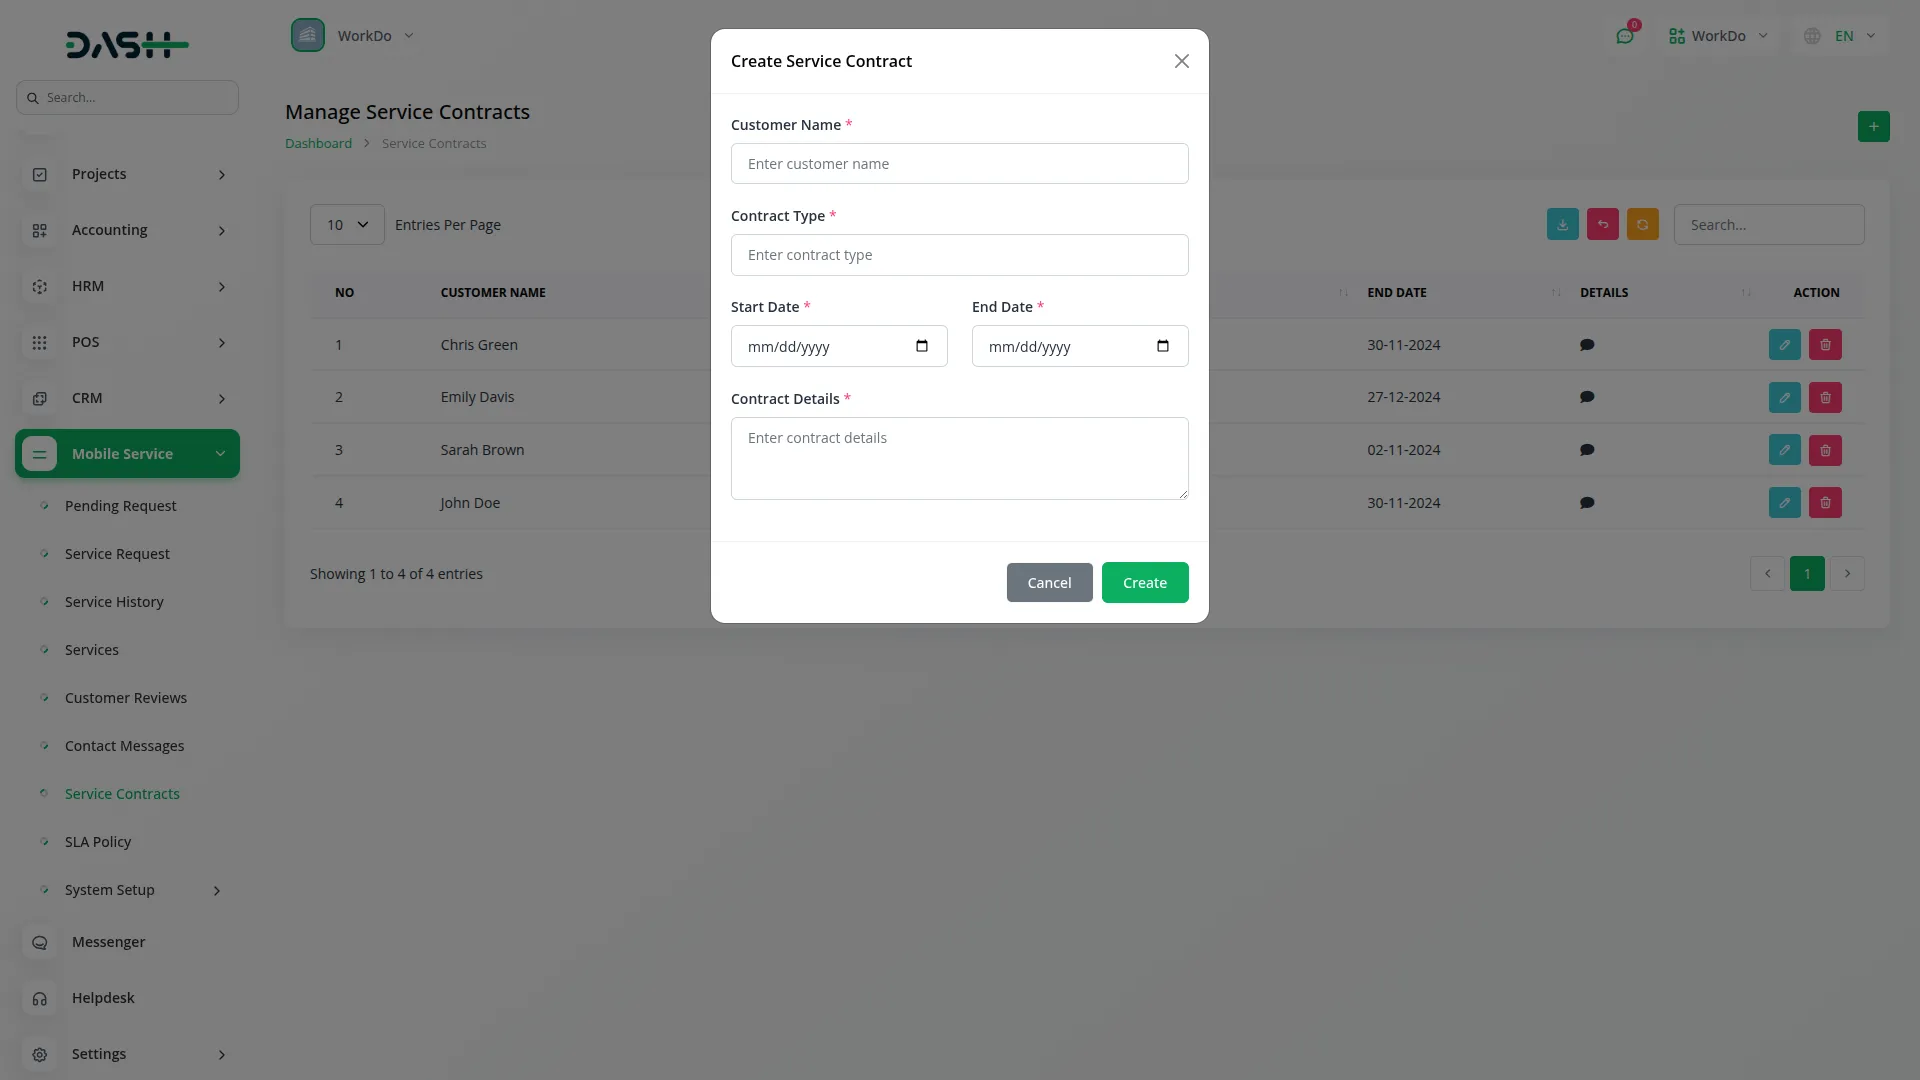
- To create a new service contract, click the “Create” button at the top of the contracts page. You need to enter the Customer Name who will be covered under this agreement, select the Contract Type that defines the service level, and set the Start Date and End Date to establish the contract duration. In the Contract Details field, specify the terms, conditions, and services covered under this agreement.
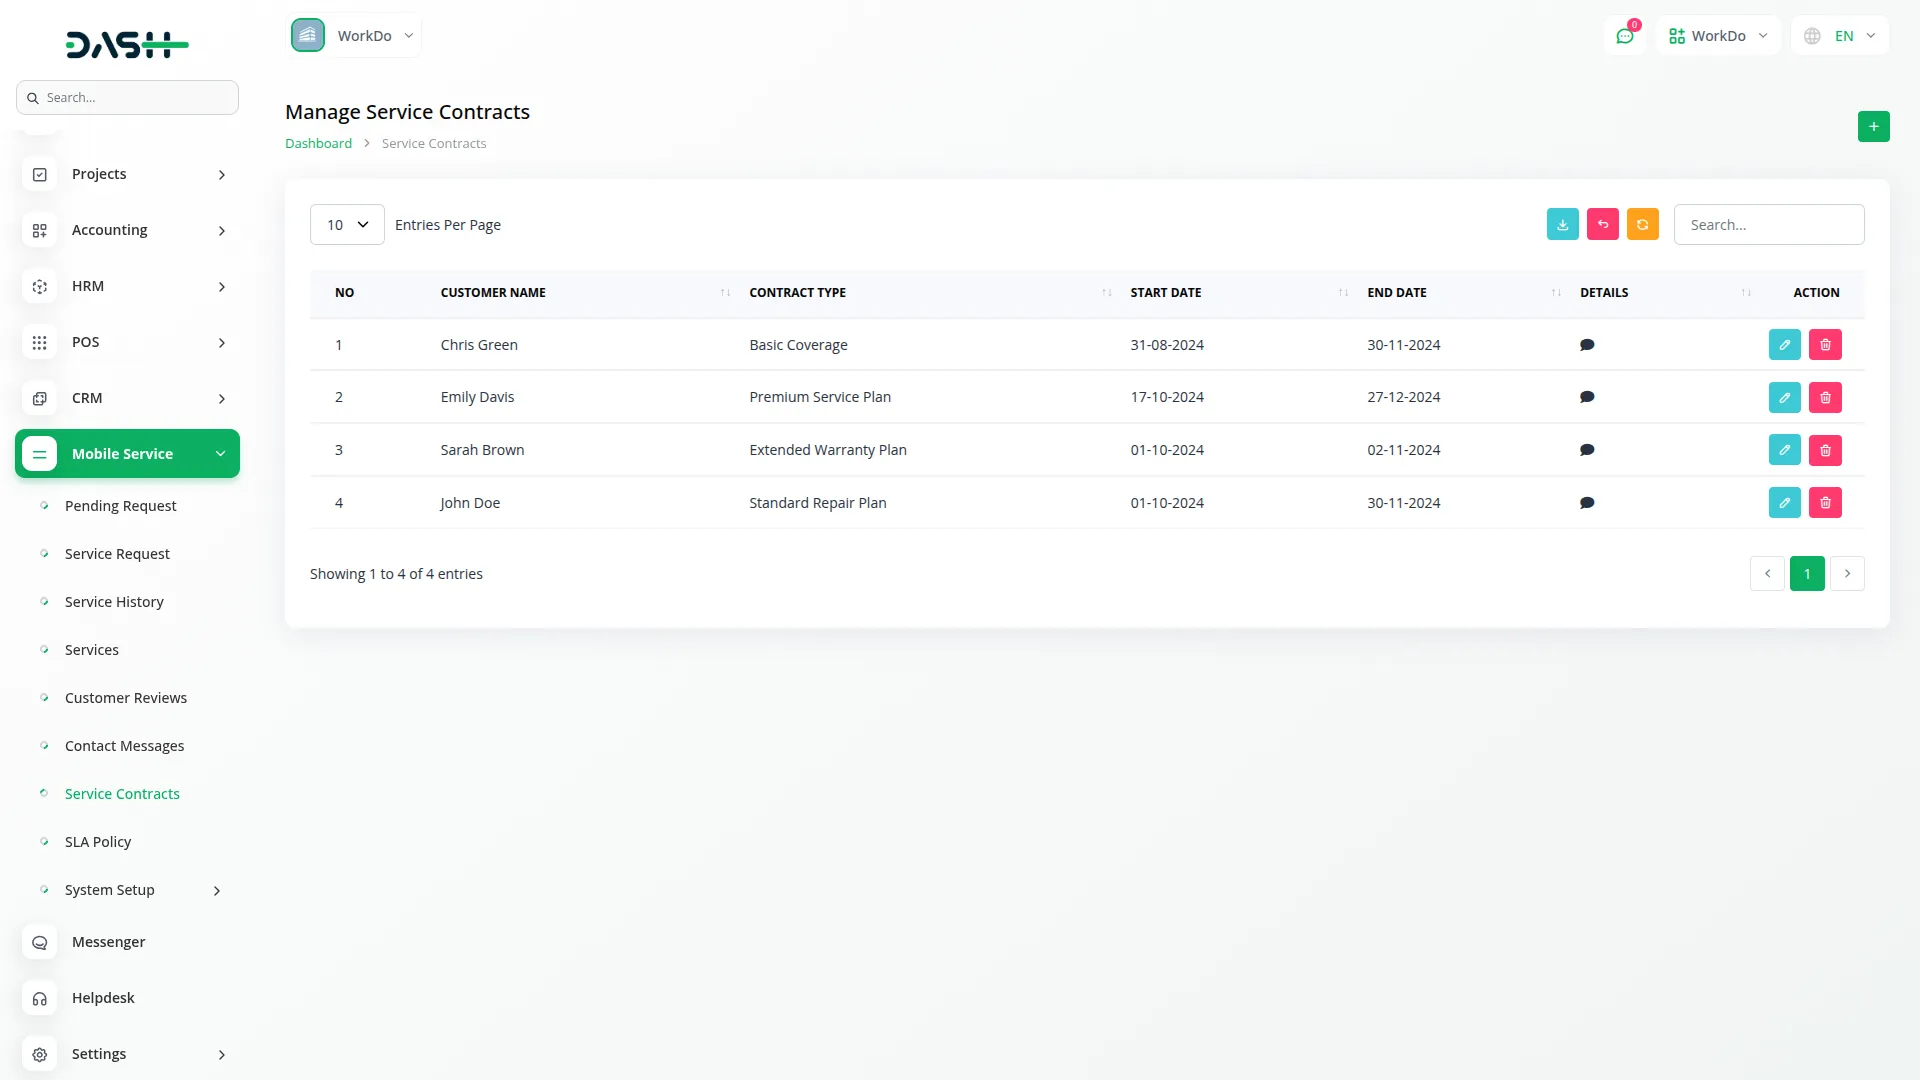
- The list page provides Search and Export functionality to manage all your service agreements. The table displays Customer Name, Contract Type, Start Date, End Date, Contract Details summary, and available Actions.
- In the Actions column, you can click “Edit” to modify any contract terms, dates, or details as business needs change. Use “Delete” to remove contracts that are no longer active or needed. Service contracts help establish ongoing relationships with customers and provide predictable service arrangements for regular maintenance or priority support services.
SLA Policies
- To create a new SLA Policy, click the “Create” button at the top of the policies page. Enter a descriptive Policy Name that identifies the service level agreement, set the Response Time indicating how quickly you’ll acknowledge service requests, and define the Resolution Time showing your commitment to complete repairs. Add a detailed Description explaining what this policy covers and any specific terms or conditions.
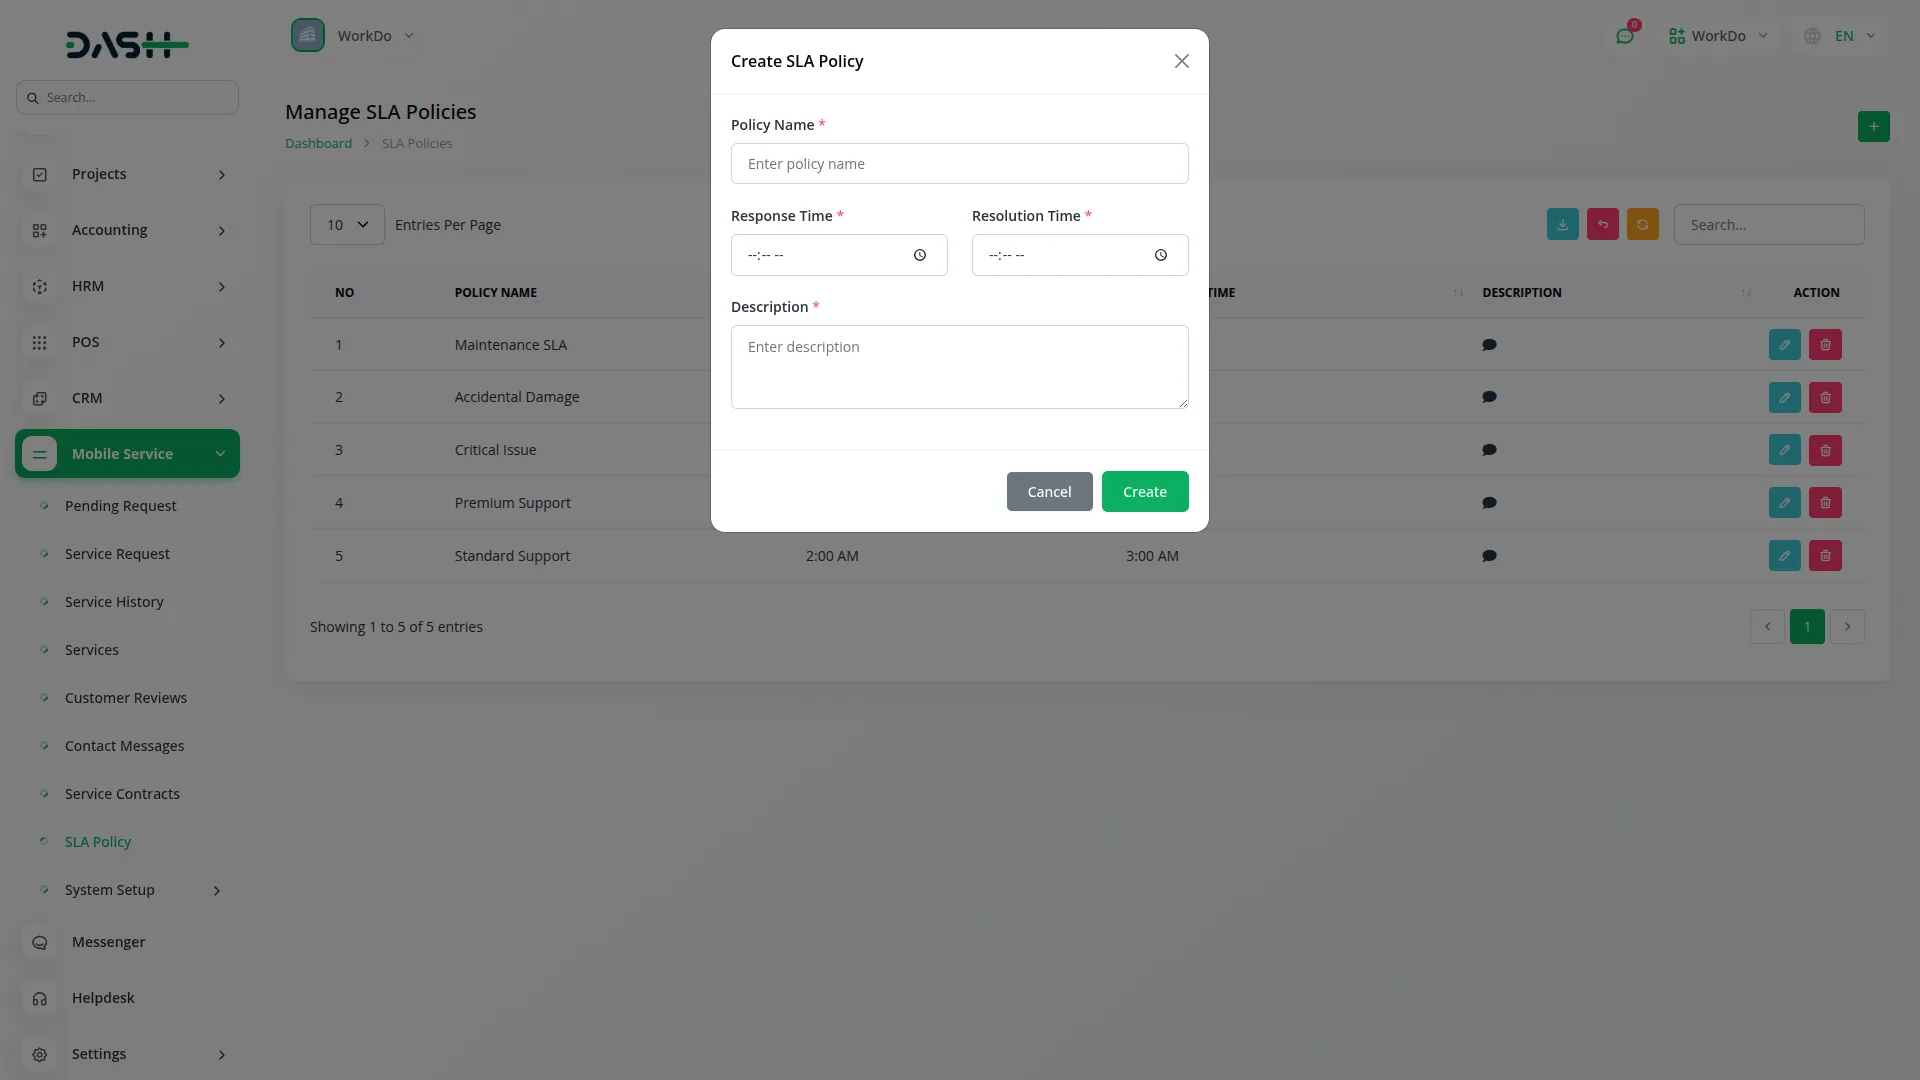
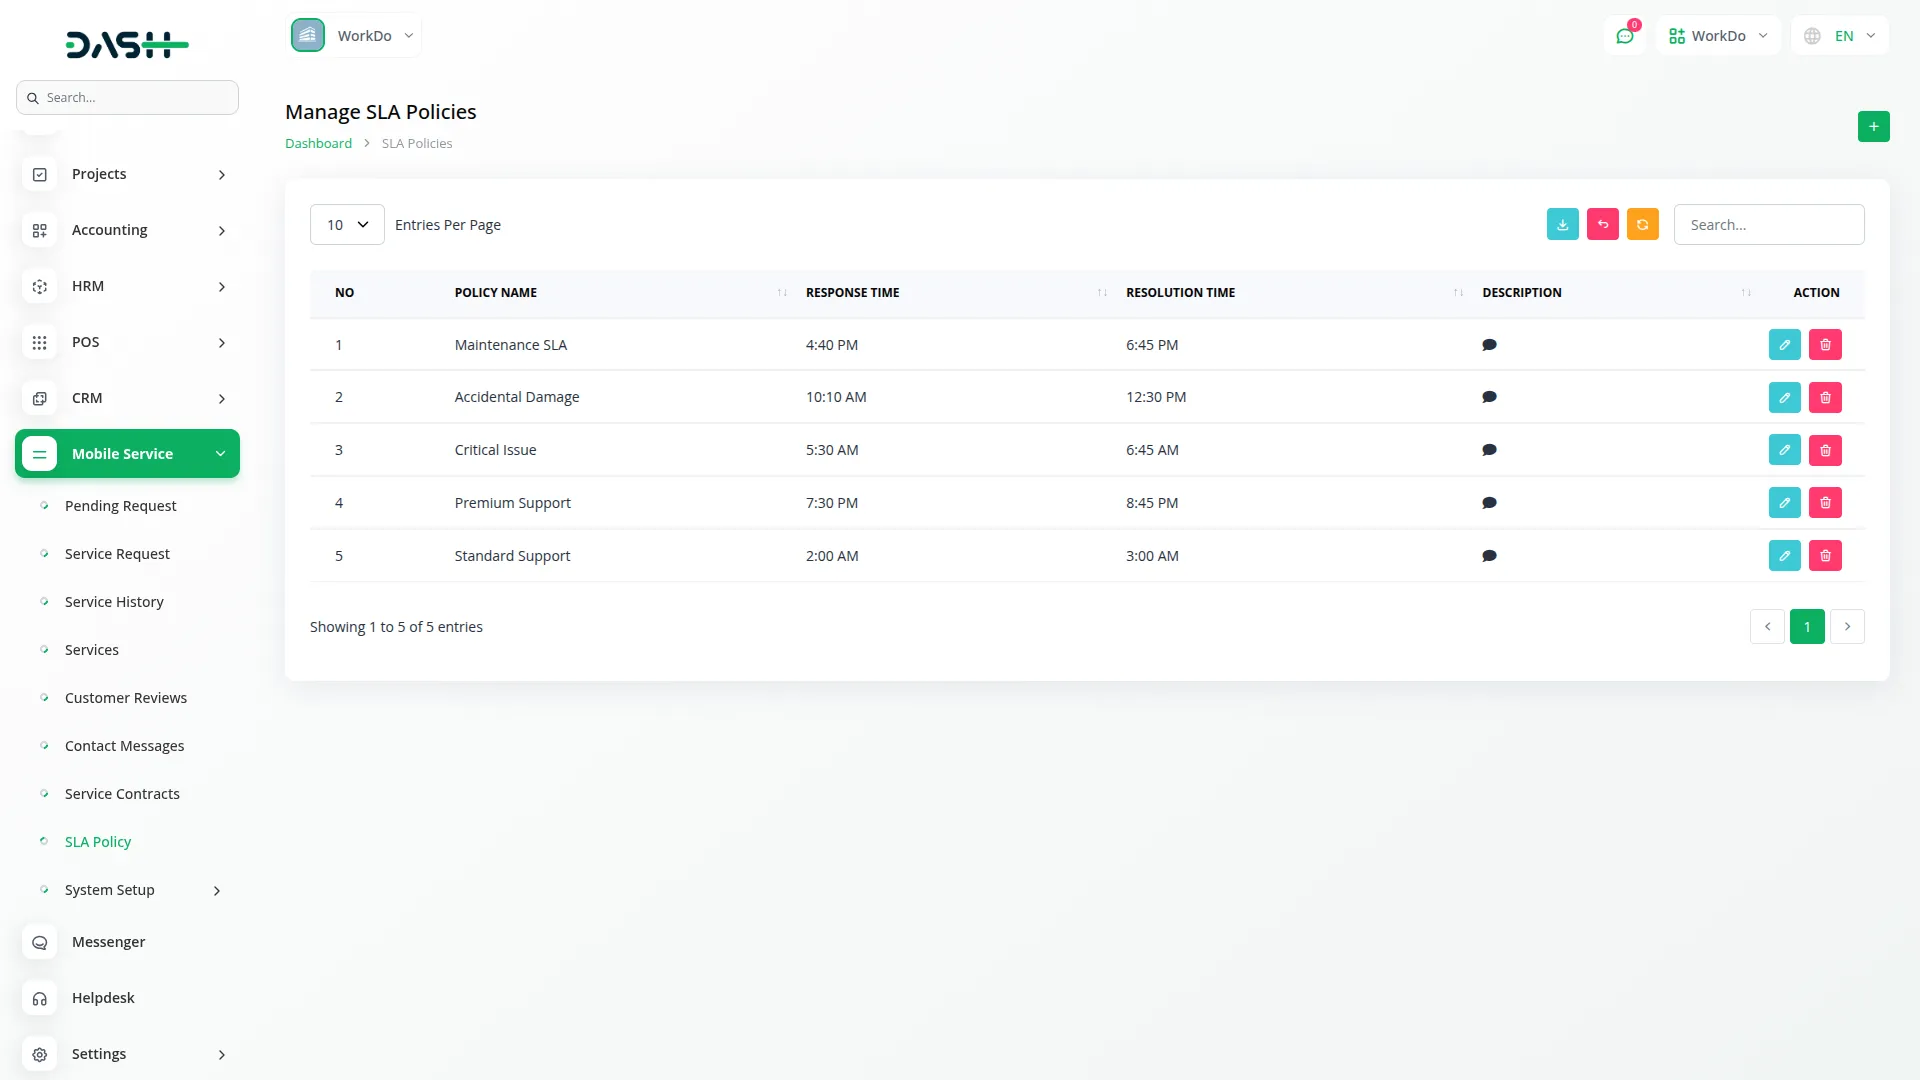
- The list page provides Search and Export functionality to manage all your service level agreements. The table displays Policy Name, Response Time, Resolution Time, Description summary, and available Actions.
- In the Actions column, you can click “Edit” to modify policy details, timeframes, or descriptions as your service capabilities evolve. Use “Delete” to remove policies that are no longer applicable. SLA Policies help set clear customer expectations and ensure consistent service delivery standards across your repair operations.
Customer Reviews
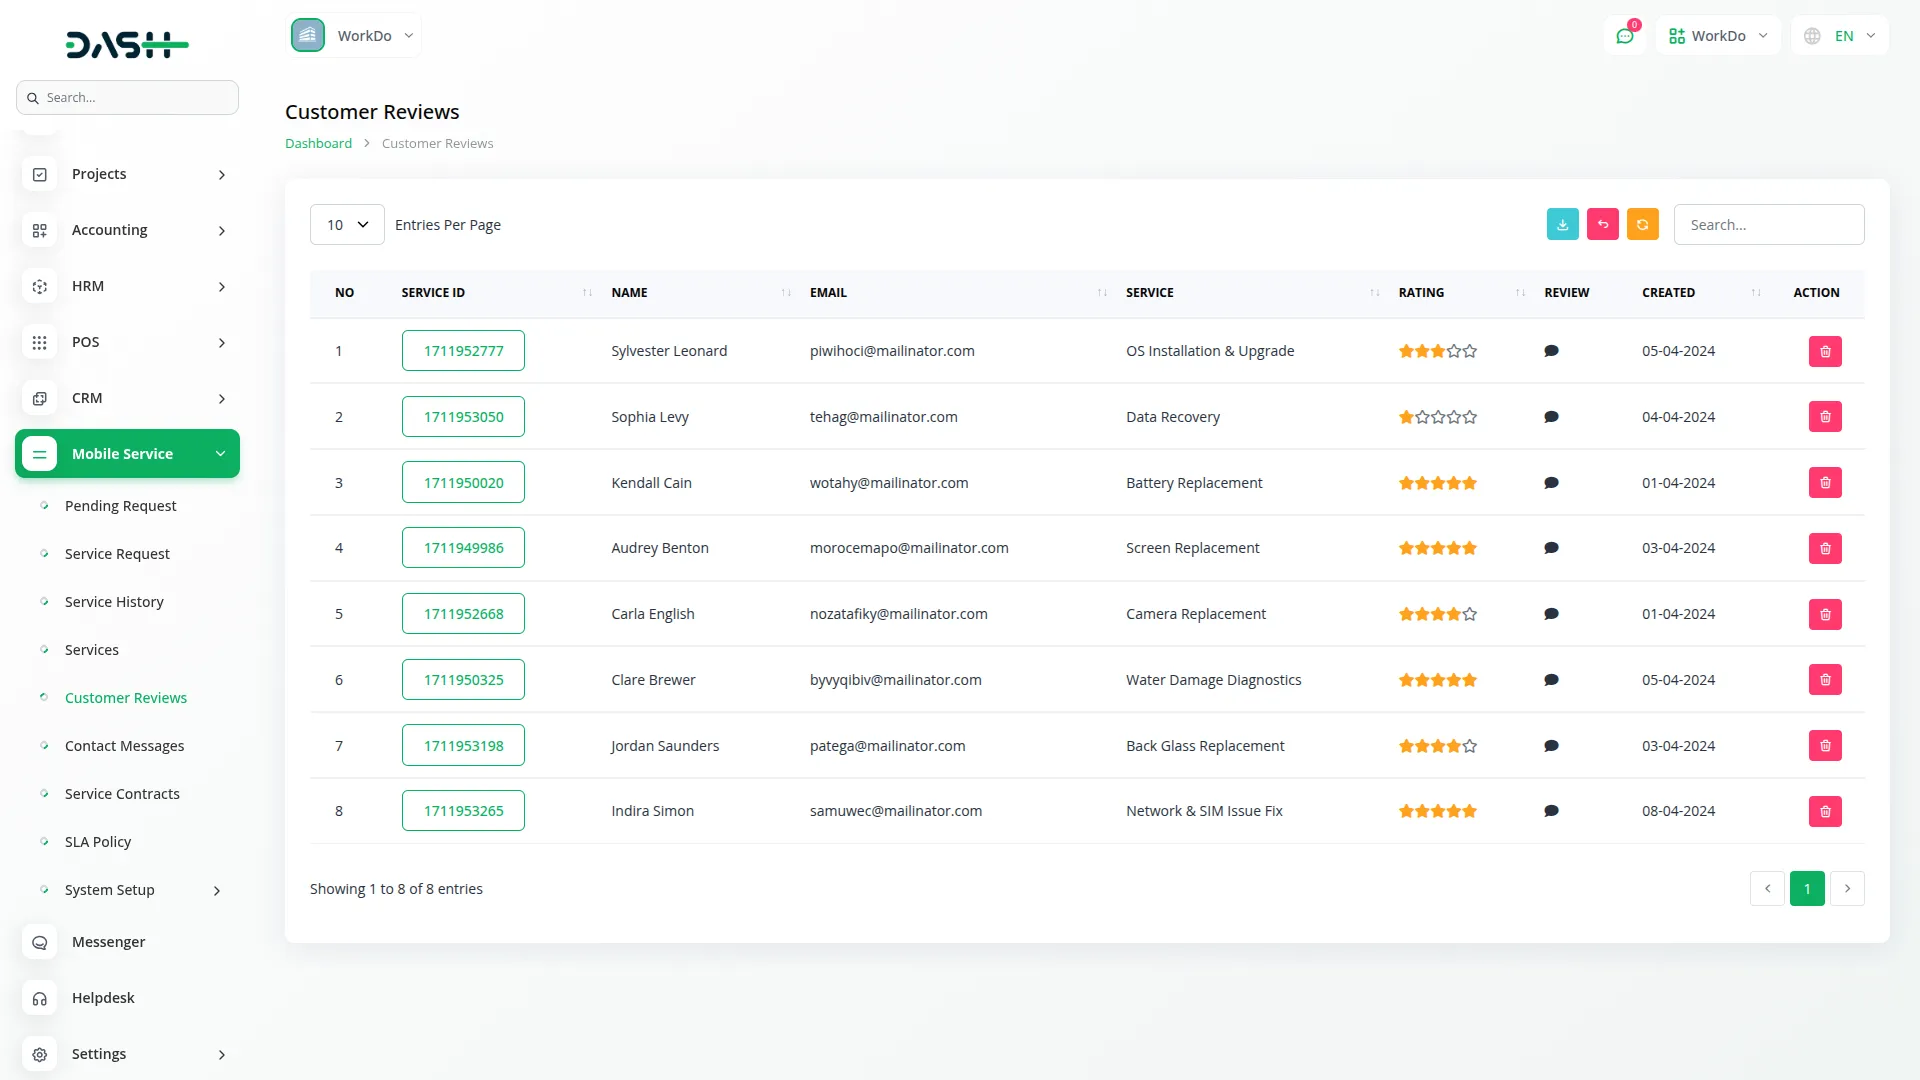
- The Customer Reviews section displays all reviews submitted by customers through the frontend website after their service completion. This section is view-only, as reviews are created by customers on the frontend.
- The list page provides Search and Export functionality to analyze customer feedback. The table shows review Number, Service ID (clickable to view complete service details), customer Name, Service Type (from the Services section), star Rating, Review Message content, and Created Date when the review was submitted.
- In the Actions column, you can click “Delete” to remove inappropriate or outdated reviews if necessary. These customer reviews automatically appear in the frontend Testimonials section on your homepage when the section is enabled in Home Page Setup, helping build credibility and trust with potential customers.
- Reviews can only be submitted by customers who have completed a service through the Service Details page review form, and each customer can submit only one review per completed service. Reviews display on the frontend only when available; otherwise, the Testimonials section remains hidden.
Contact Messages
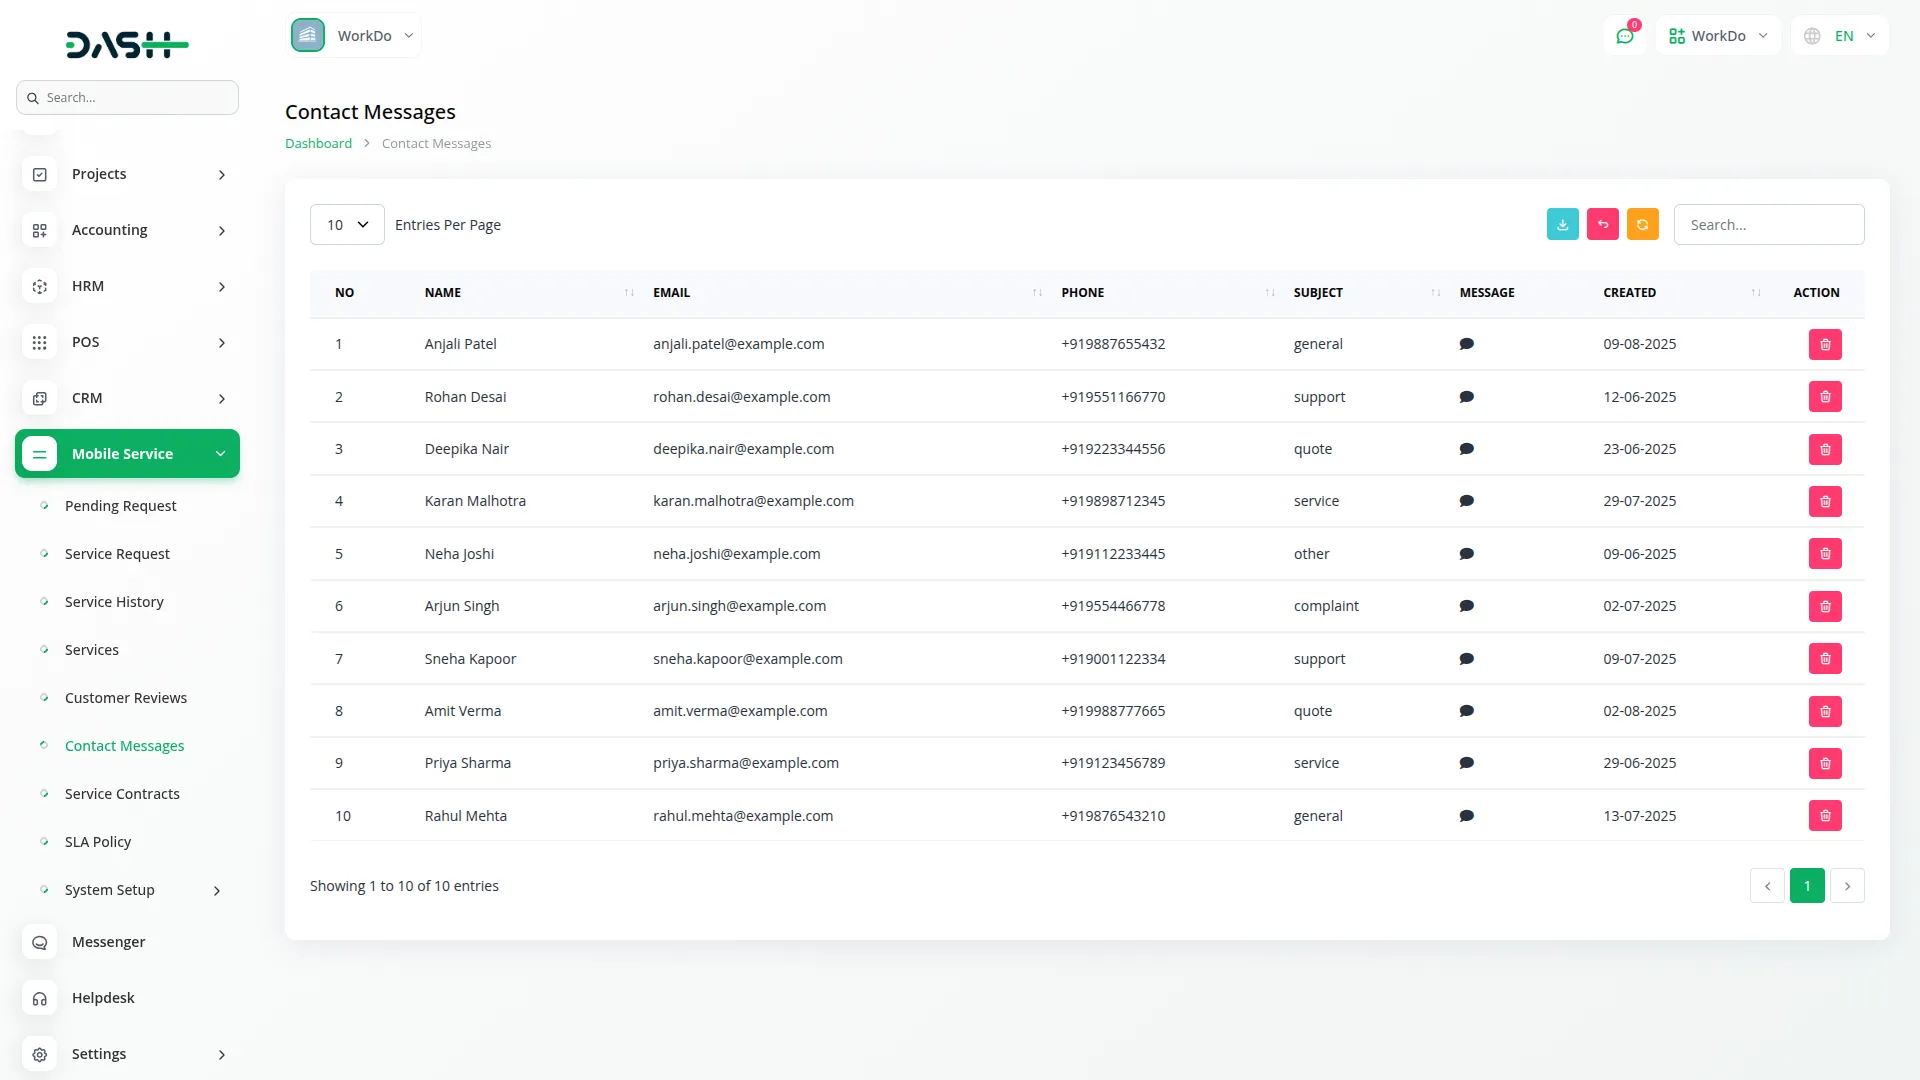
- The Contact Messages section displays all inquiries submitted through the contact form on your frontend website. This section helps you track and respond to customer communications and potential service requests.
- The list page provides Search and Export functionality to manage customer inquiries efficiently. The table displays message Number, customer Name, Email address, Phone number, Subject line, complete Message content, and Created Date when the inquiry was submitted.
- In the Actions column, you can click “Delete” to remove messages after you’ve responded or if they’re no longer relevant.
- These messages come directly from the Contact page form on your frontend website, where customers can submit inquiries with Name, Email Address, Phone Number, Subject, and Message fields.
- The Contact page also displays your contact information, including Location, Service Hours, Contact Details, Follow Us social media section, and Our Repair Center information when properly configured through Contact Page Setup. If Contact page sections aren’t configured, the frontend shows the “Page is not configured yet. Please check back later.” message.
Categories
Related articles
- Vehicle Inspection Management Integration in Dash SaaS
- Zoho Meeting Integration in Dash SaaS
- OneNote Integration in Dash SaaS
- Form Builder Integration in Dash SaaS
- SinchSMS Integration in Detailed Documentation
- Sendinblue Integration in Dash SaaS
- Business Model Integration in Dash SaaS
- Tailoring and Fashion Design Detailed Documentation
- Pesapal Integration in Dash SaaS
- Dance Academy Integration in Dash SaaS
- User Manual – WorkDo Dash SaaS
- Elderly Care Detailed Documentation
Reach Out to Us
Have questions or need assistance? We're here to help! Reach out to our team for support, inquiries, or feedback. Your needs are important to us, and we’re ready to assist you!


Need more help?
If you’re still uncertain or need professional guidance, don’t hesitate to contact us. You can contact us via email or submit a ticket with a description of your issue. Our team of experts is always available to help you with any questions. Rest assured that we’ll respond to your inquiry promptly.
Love what you see?
Do you like the quality of our products, themes, and applications, or perhaps the design of our website caught your eye? You can have similarly outstanding designs for your website or apps. Contact us, and we’ll bring your ideas to life.
