LMS Integration in Dash SaaS
The LMS (Learning Management System) is a comprehensive educational platform designed to help organizations create, manage, and deliver online courses.
Introduction
The LMS (Learning Management System) is a comprehensive educational platform designed to help organizations create, manage, and deliver online courses. This software enables administrators to build complete learning experiences with course management, student enrollment, payment processing, and detailed analytics. The system includes both an administrative backend for content management and a user-friendly website where students can browse, purchase, and complete courses. Key features include course creation with multimedia content, student management, payment integration, customizable themes, and comprehensive reporting tools.
How To Install the LMS Add-On?
To Set Up the LMS Add-On, you can follow this link: Setup Add-On
How to Use the LMS Add-On?
LMS Dashboard
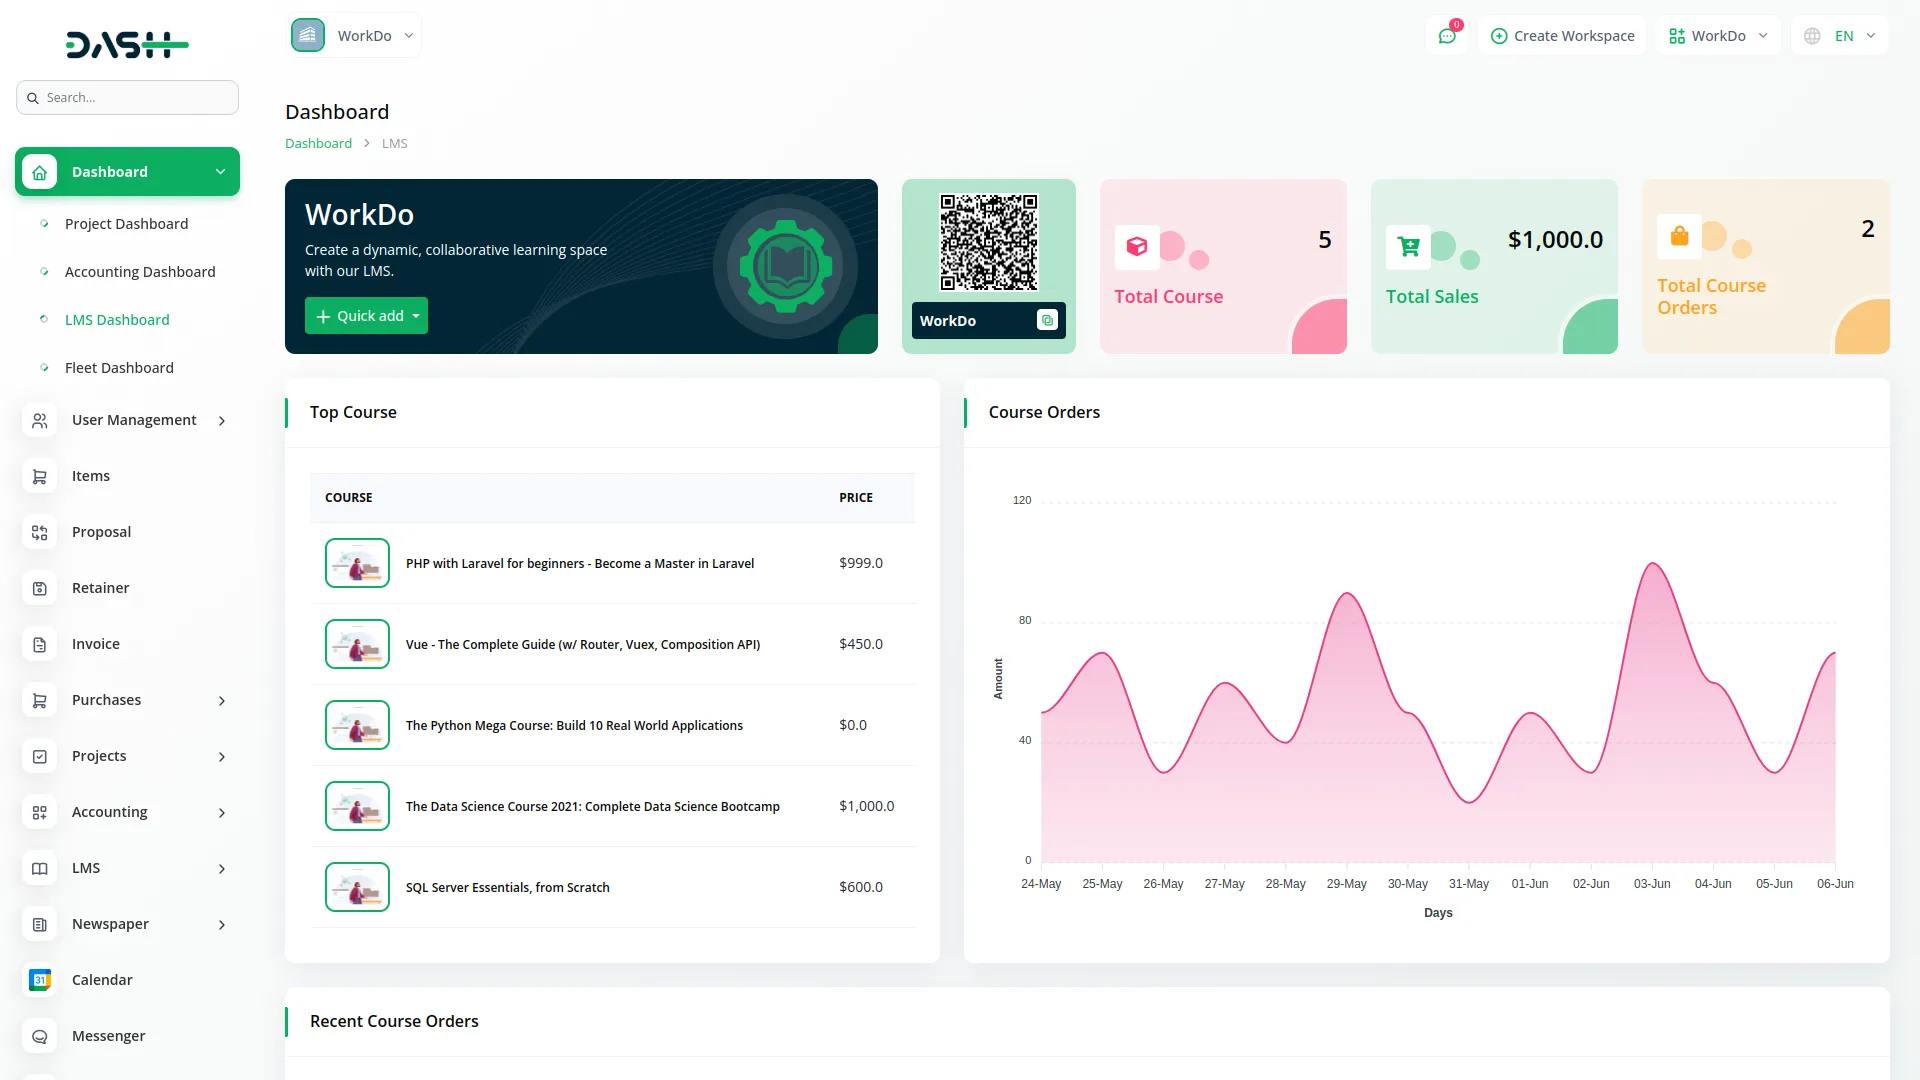
- The LMS Dashboard provides a central overview of your learning platform’s key metrics and quick access to important functions. To access the dashboard, log into your admin panel and navigate to the main dashboard page.
- The dashboard displays quick action buttons at the top, including Add New Course, Add New Category, and Add New SubCategory for immediate access to core functions.
- You can scan the QR code with the help of which the store link will be opened easily. There is also a link, which can be copied, through which the site will open easily.
- Key performance cards show Total Course count, Total Sales figures, and Total Course Orders to give you an instant view of your platform’s performance.
- The Top Course section displays your 5 best-performing courses with the course name, course image, and price information.
- A Course Orders area chart visualizes your sales data over the last 2 weeks, helping you track recent performance trends.
- The Recent Course Orders section shows the latest 5 orders in a table format with columns for Date, Name, Price, Payment Type, Payment Status, and Action. Click the “View” action to view detailed order information.
LMS Website Preview
- The LMS Website provides a complete learning platform for students to discover and access courses. The header section contains your clickable logo linking to the homepage, along with a navigation menu including Home, Blog, and Custom Page sections that are dynamically populated from your Custom Page section.
- The right side features a search bar, a wishlist icon with a badge showing the number of items added to the wishlist, an add-to-cart icon with a badge displaying the total count of items added to the cart, and a language selection dropdown.
- Authentication displays either a “Sign In” button for logged-out users or a “My Account” dropdown for logged-in users showing student name and email, profile link, My Courses section, and logout option.
- Separate forms handle login and student registration, with protected actions like purchasing courses or adding reviews requiring login and automatically redirecting users when needed.
- Theme configuration is accessible via System Settings, LMS Theme Settings, and controls the display of detail sections, blog section appearance, homepage sections, featured courses, category display, and best seller courses throughout the website.
- The Featured Courses section displays courses in a Product card view with course image, course name, star rating, student enrollment count, total chapters, difficulty level, price, and an Add to Cart button.
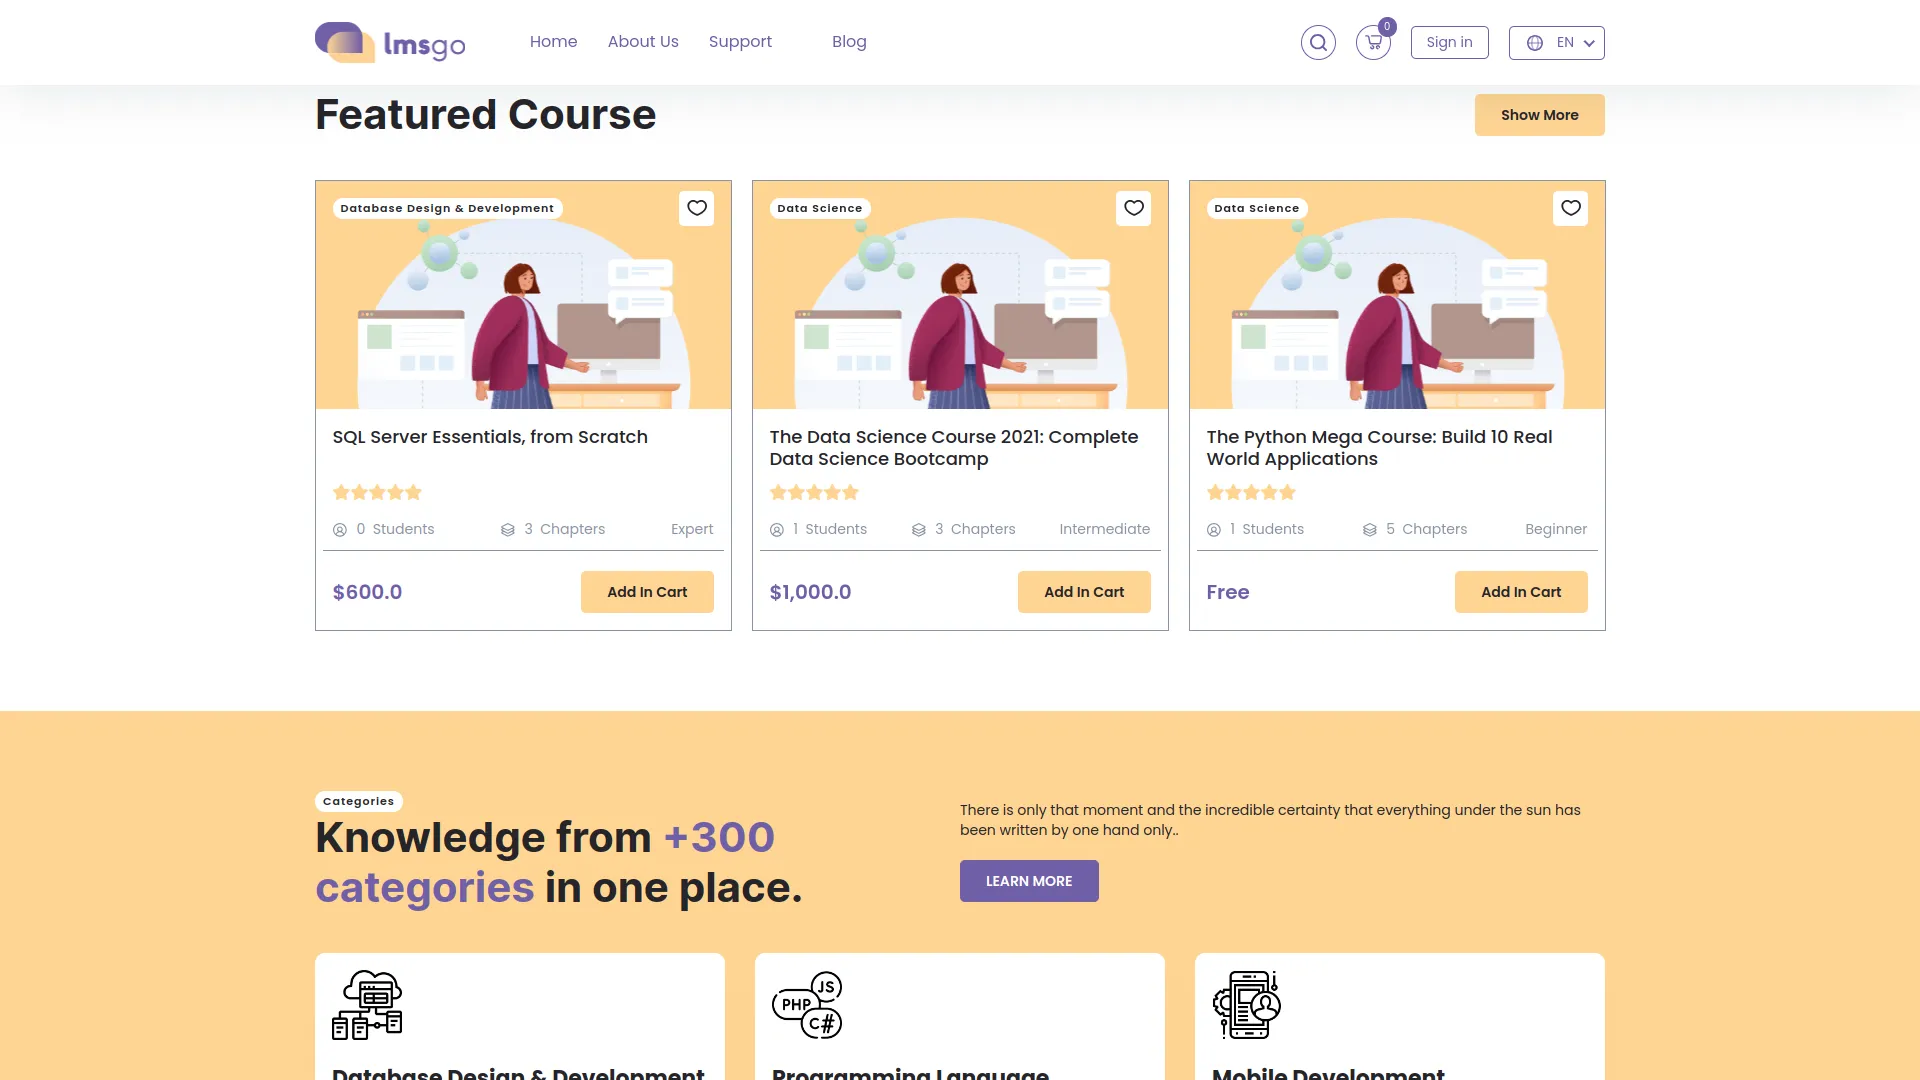
- Clicking the image or name opens the Course Detail page with tabs for Course Overview showing detailed descriptions and key information, Syllabus displaying video content and documentation, Tutor information with instructor profiles and metrics, Course Reviews where authenticated students can add feedback, and FAQs dynamically pulled from the Course section.
- The left side Course Card shows category, course name, duration, level, enrolled students, chapters, language, Add to Cart button, and wishlist button.
- The Best Seller section on the home page automatically displays courses where the admin has enabled the discount toggle.
- Category cards in the home page section contain category image, name, brief description, and a “Find More Courses” button leading to filtered listings.
- The Search Page provides sidebar filters for category checkboxes, level selection, and price options for paid or free courses, with main content showing filtered course cards and a top search bar for keyword searches.
- Students can save courses to their wishlist using heart icons and access the wishlist page via the header icon showing the saved count.
- The checkout process begins when users click “Add to Cart”, updating the cart with adjustable quantities, then proceeding to checkout with order summary, coupon code field for discounts, and payment options, including online payments and bank transfer with manual verification.
- After successful payment, users reach a confirmation page with a downloadable course access link, a printable invoice, and course details.
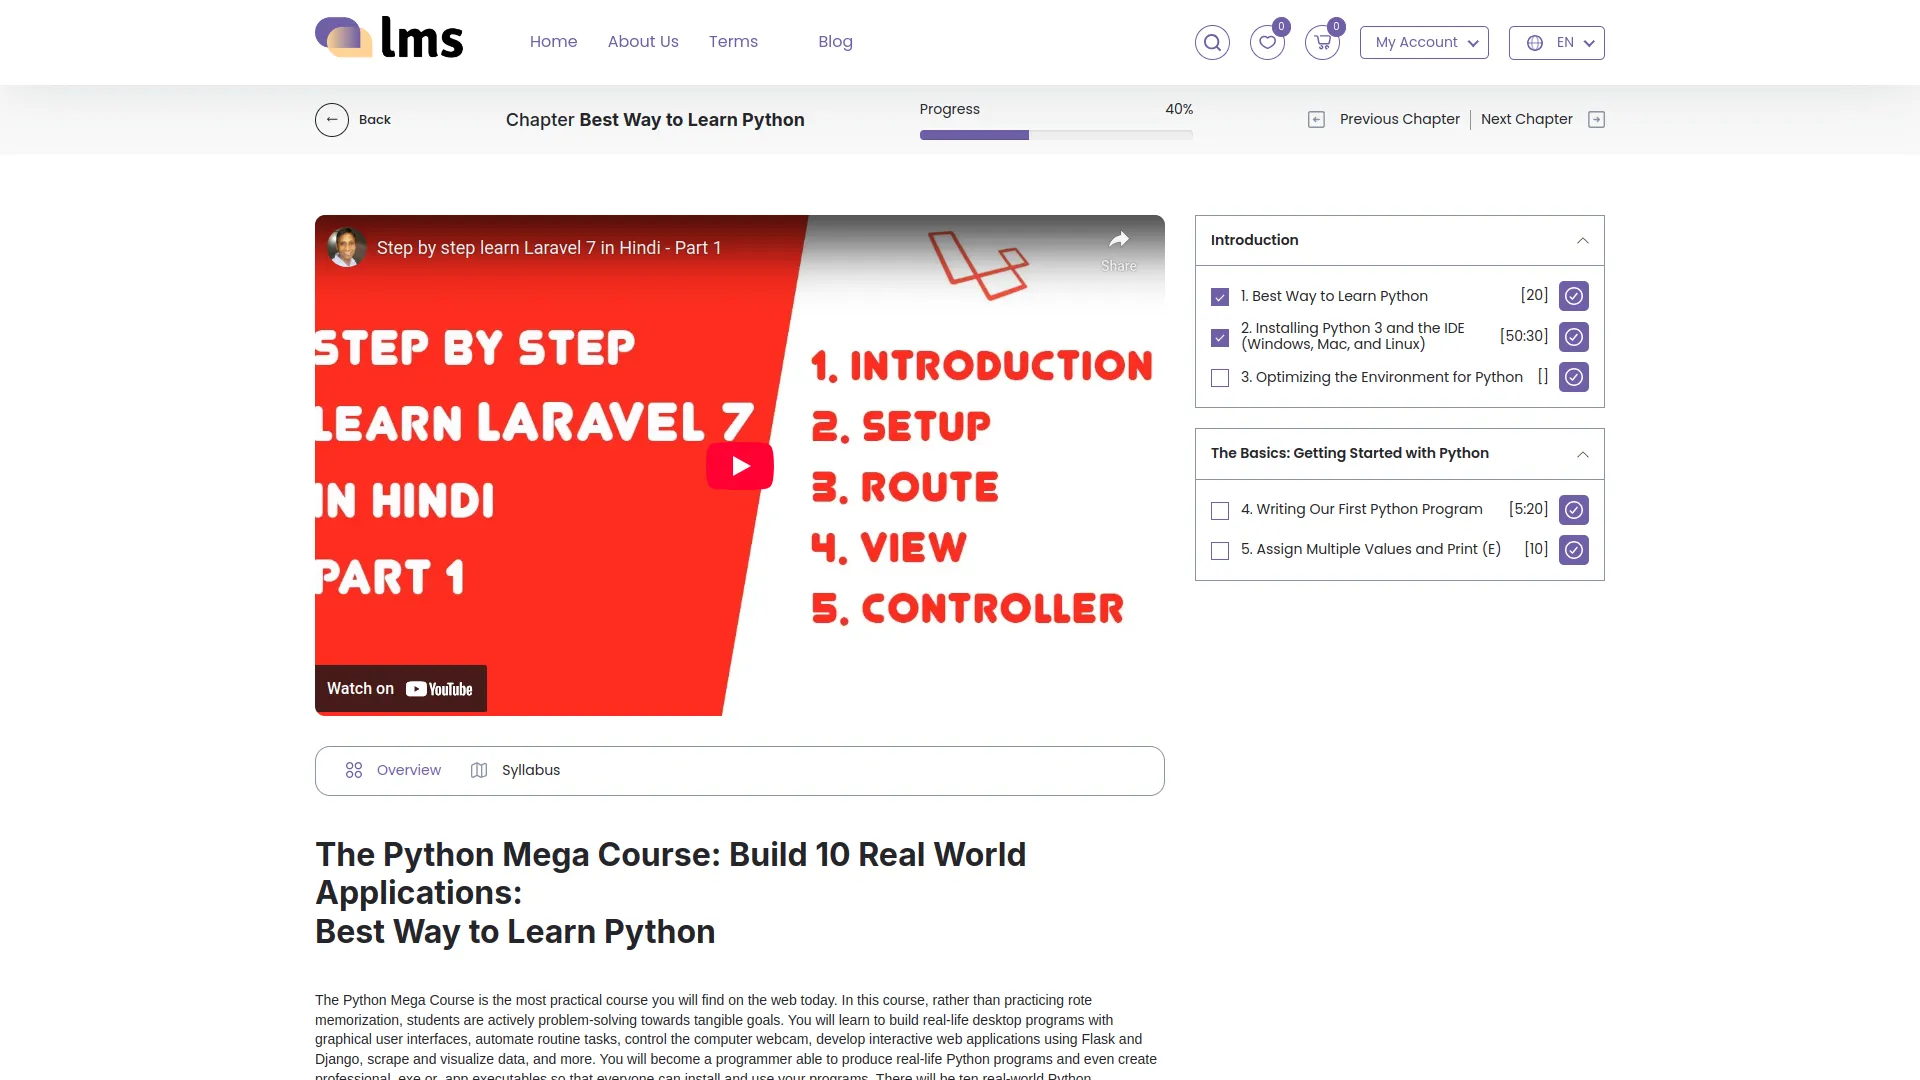
- The My Account button given on the header, under which there is a section of “My Courses”, displays purchased courses with “Start Watching” buttons leading to the course player.
- The player shows chapter-wise content with mark-as-complete options, and upon 100% completion, displays a “Get Certificate” button, generating PDF certificates with the student’s name, Course name, Course Time, and Store Name.
- My Account button is given on the header, under which there is a section of “My Profile”, offering edit forms for User Name, Email, Profile Image, Current Password, New Password, and Retype New Password confirmation for secure account updates.
System Settings
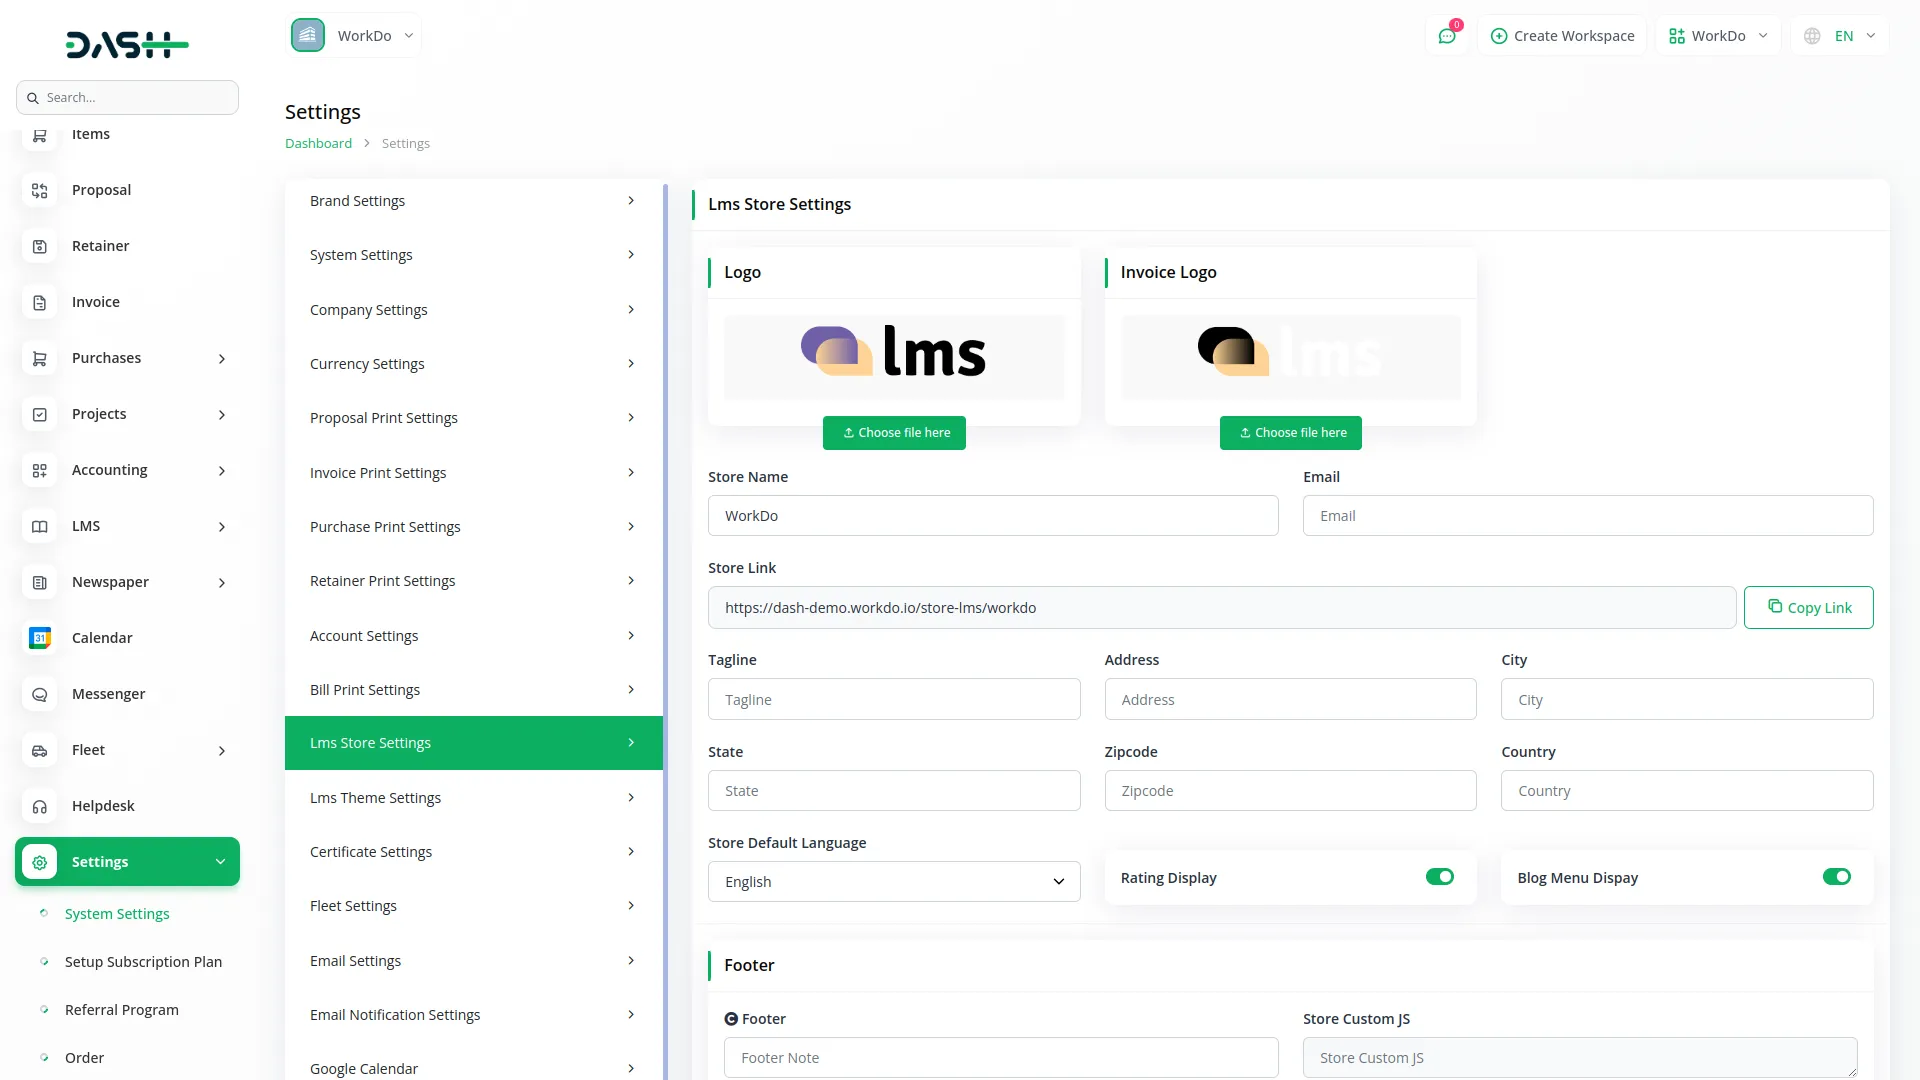
- The LMS Theme Settings allow you to customize your learning website’s appearance and functionality. You can choose from 4 different themes, each with 3 color variants, giving you 12 total design combinations.
- To start customizing, select one of the 4 LMS themes and pick a color variant. Once you’ve made your selection, click “Edit Theme” to open the theme editor panel. The editor has a left-side menu with 5 sections: Detail, Change Blogs, SEO, PWA, and QR Code.
- Customize your website by managing different sections like Detail, Home-Header, Home-Featured Course, Home-Categories, Home-On Sale, Home-Email Subscriber, Home-Footer, and Home-Brand-Logo. Each section includes a toggle button that can be enabled or disabled to control whether the section is visible on the website.
- The Change Blogs section lets you drag and drop to reorder these website sections: Header, Banner, Category, Feature Course, BestSeller, and Email Subscriber. Simply drag sections up or down to change their display order.
- The SEO section has two tabs. The SEO tab includes Meta Keywords, Google Analytics code, Meta Description, Facebook Pixel code, and Meta Image upload. The Info tab allows you to create tracking pixels by selecting a platform and entering the Pixel ID. View all created pixels in a table with delete functionality.
- In the PWA section, enable Progressive Web App functionality by entering App Title, App Name, App Background Color, and App Theme Color. Use the PWA toggle to turn this feature on or off, allowing your website to work.
- The QR Code section lets you customize your website’s QR code with Foreground Color, Background Color, and Corner Radius settings. Choose between Normal for standard styling, Text to add custom text with color and size options, or Image to upload and display an image on the QR code.
- The top page menu provides three tools: Store Analysis displays visitor charts for the last 15 days, platform usage, device types, and browser statistics. QR Code generates a scannable code for your website URL. Preview opens a live preview of your website with current settings.
- The Certificate Settings manage automatic certificate generation for students who complete all course chapters. When students finish a course, they can download their personalized certificate from the website.
- To set up certificates, select a Certificate Template from available designs, choose a Color Input for the primary certificate color, and configure Certificate Variables which are placeholder fields that automatically populate with student and course information when certificates are generated.
-
System Setup
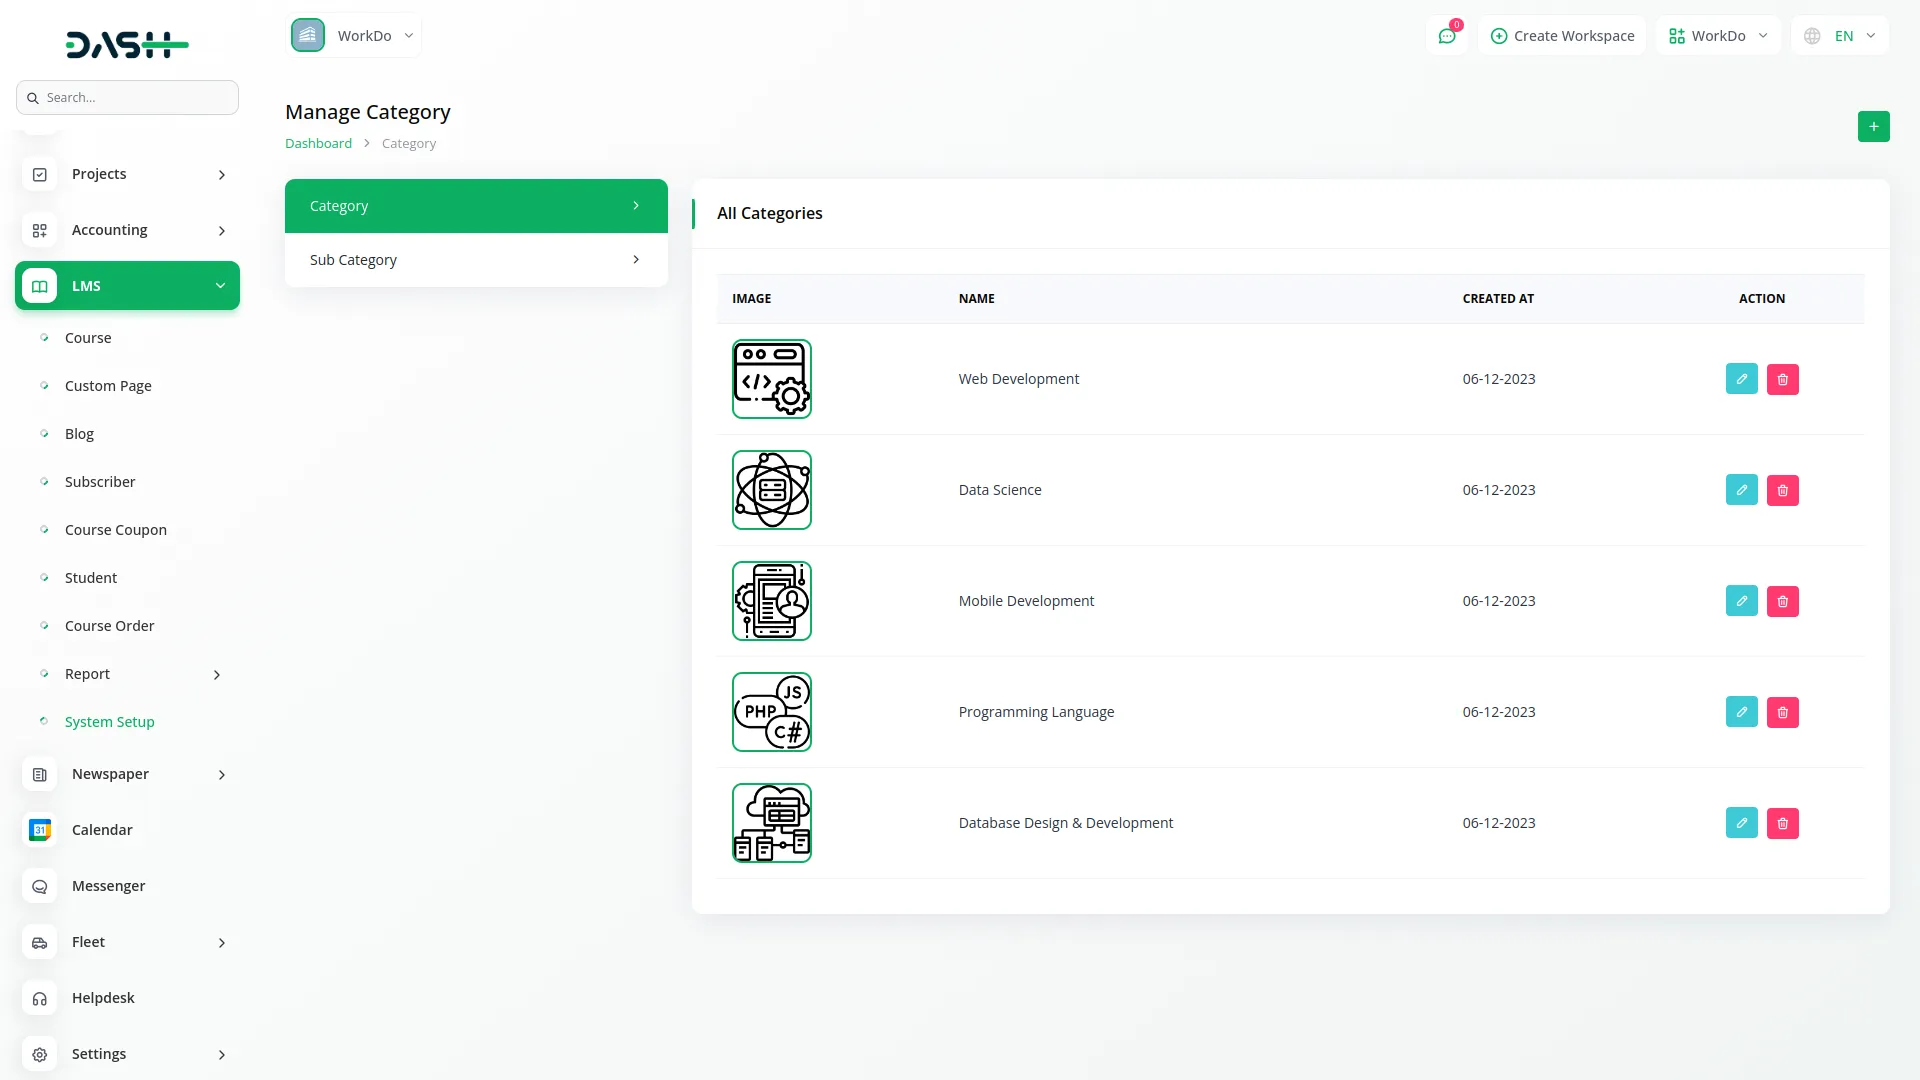
- System Setup manages the foundational categories and subcategories that organize your courses. This section connects directly to the Course section by providing the category structure for course classification.
- To create a new Category, click the “Create” button and enter the category Name, upload a Category Image, and add a Description explaining the category’s purpose. The category list page displays all categories in a table with Image, Name, Created At columns, and Edit or Delete actions for each entry.
- For Sub Category management, click “Create” to create new subcategories. Select the parent Category from the dropdown menu populated from your Category section, then enter the subcategory Name. The subcategory list shows Name, Category, and Created At columns with Edit and Delete actions available.
- These categories and subcategories will automatically appear in dropdown menus when creating courses, ensuring proper organization and making it easier for students to find relevant content on your website.
Course Management
- To create a new course, click the “Create” button on the Course List page and fill in the Topic Title, Course Requirements, Course Description, select a Category from the dropdown (loaded from the Category section in System Setup), and then choose a Subcategory which is dynamically loaded based on the selected Category.
- Choose the appropriate Level (Beginner, Intermediate, or Expert), select the course Language, enter the Duration, and upload a Thumbnail image to visually represent the course.
- If the course is free, toggle “This is Free” ON which will hide the Price and Cut Price fields and ignore the Discount toggle; if “This is Free” is OFF, the Discount toggle becomes active — turning it ON displays both Price and Cut Price fields, while turning it OFF shows only the Price and hides the Cut Price.
- Use the “Featured Content” toggle to decide whether the course should appear in the Featured section (if ON) or the Sale section (if OFF), and toggle “Preview” ON to display the Preview Type dropdown where you can select either Video File, Image, or iFrame and then provide the corresponding input — video upload, image upload, or iFrame URL accordingly.
- Fill in the Content Description, Price, and Cut Price (if applicable), then click Save to successfully add the course to the system.
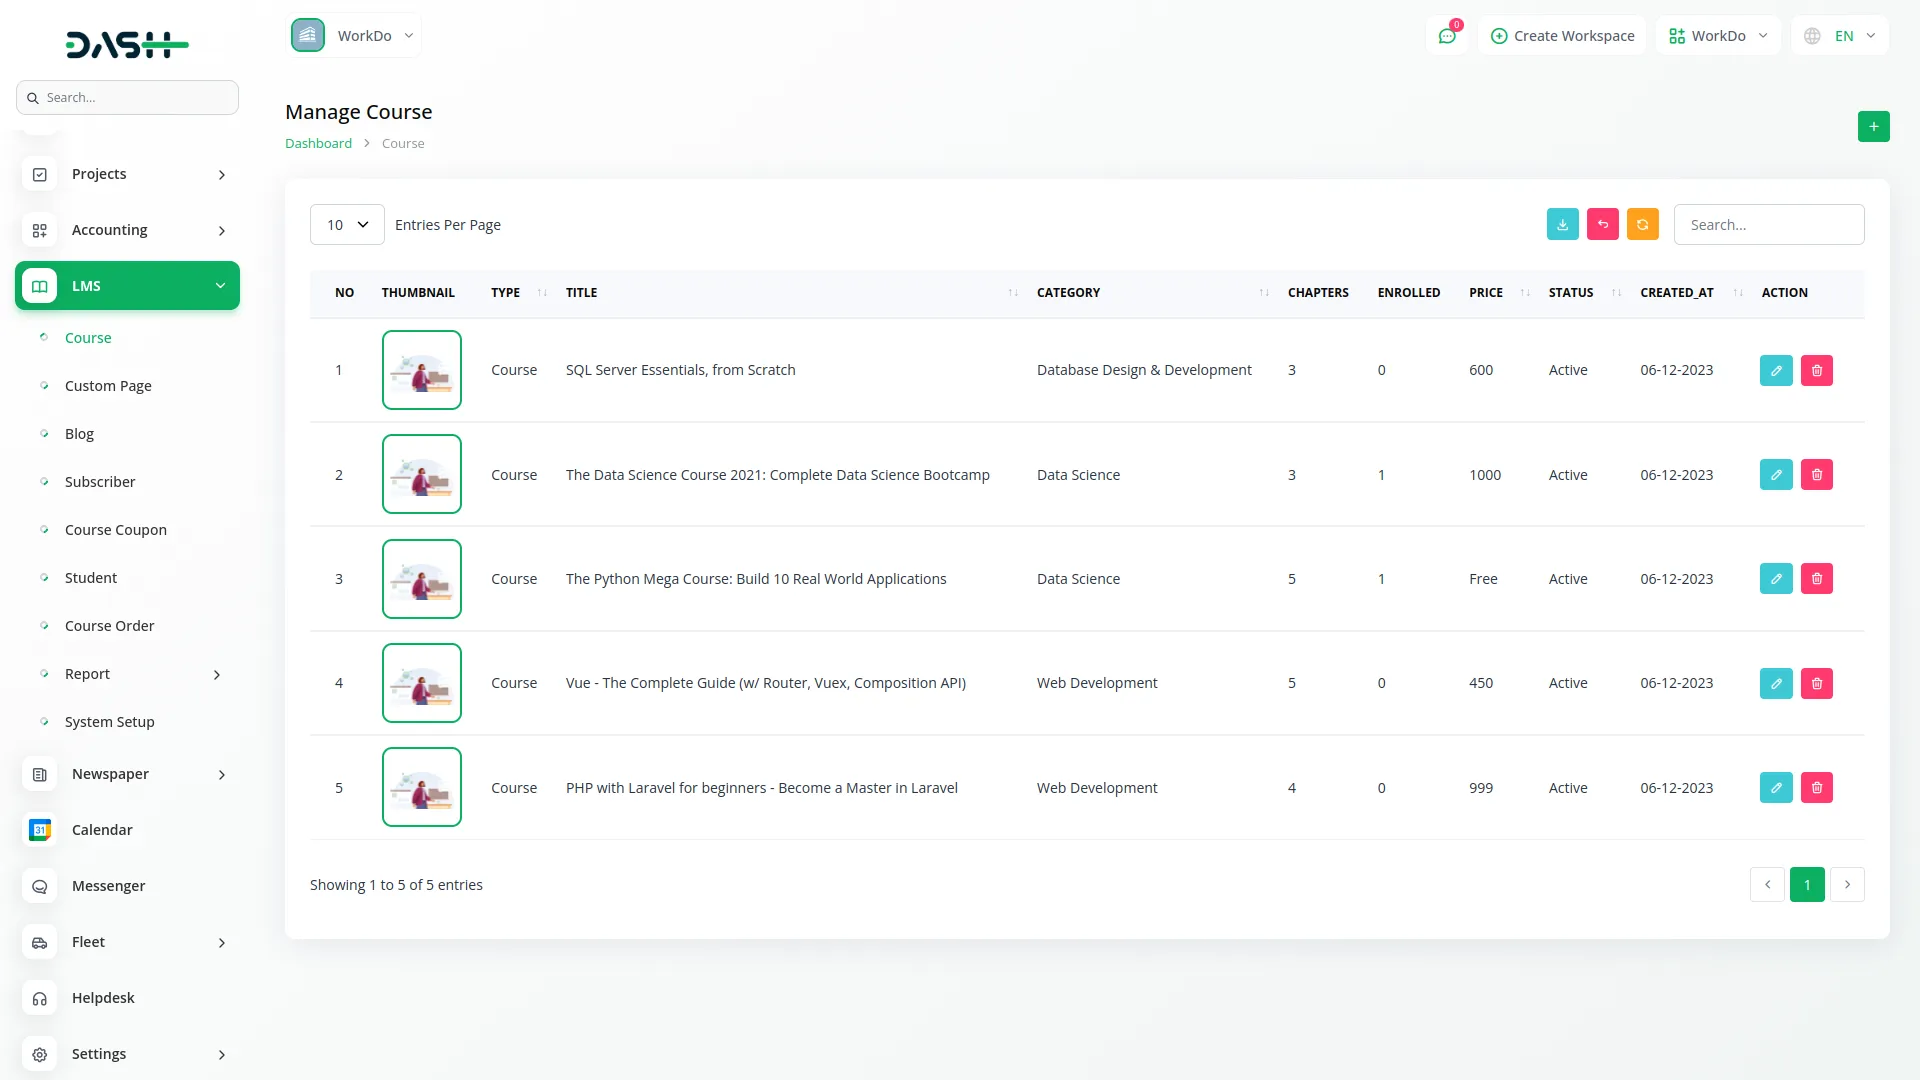
- On the Course List page, you will see options like Search, Export, and Add, and the table will show information such as No, Thumbnail, Title, Category, Chapter count, Enrolled student count, Price, Status, Created At, and an Action column from which you can Edit or Delete the course.
-
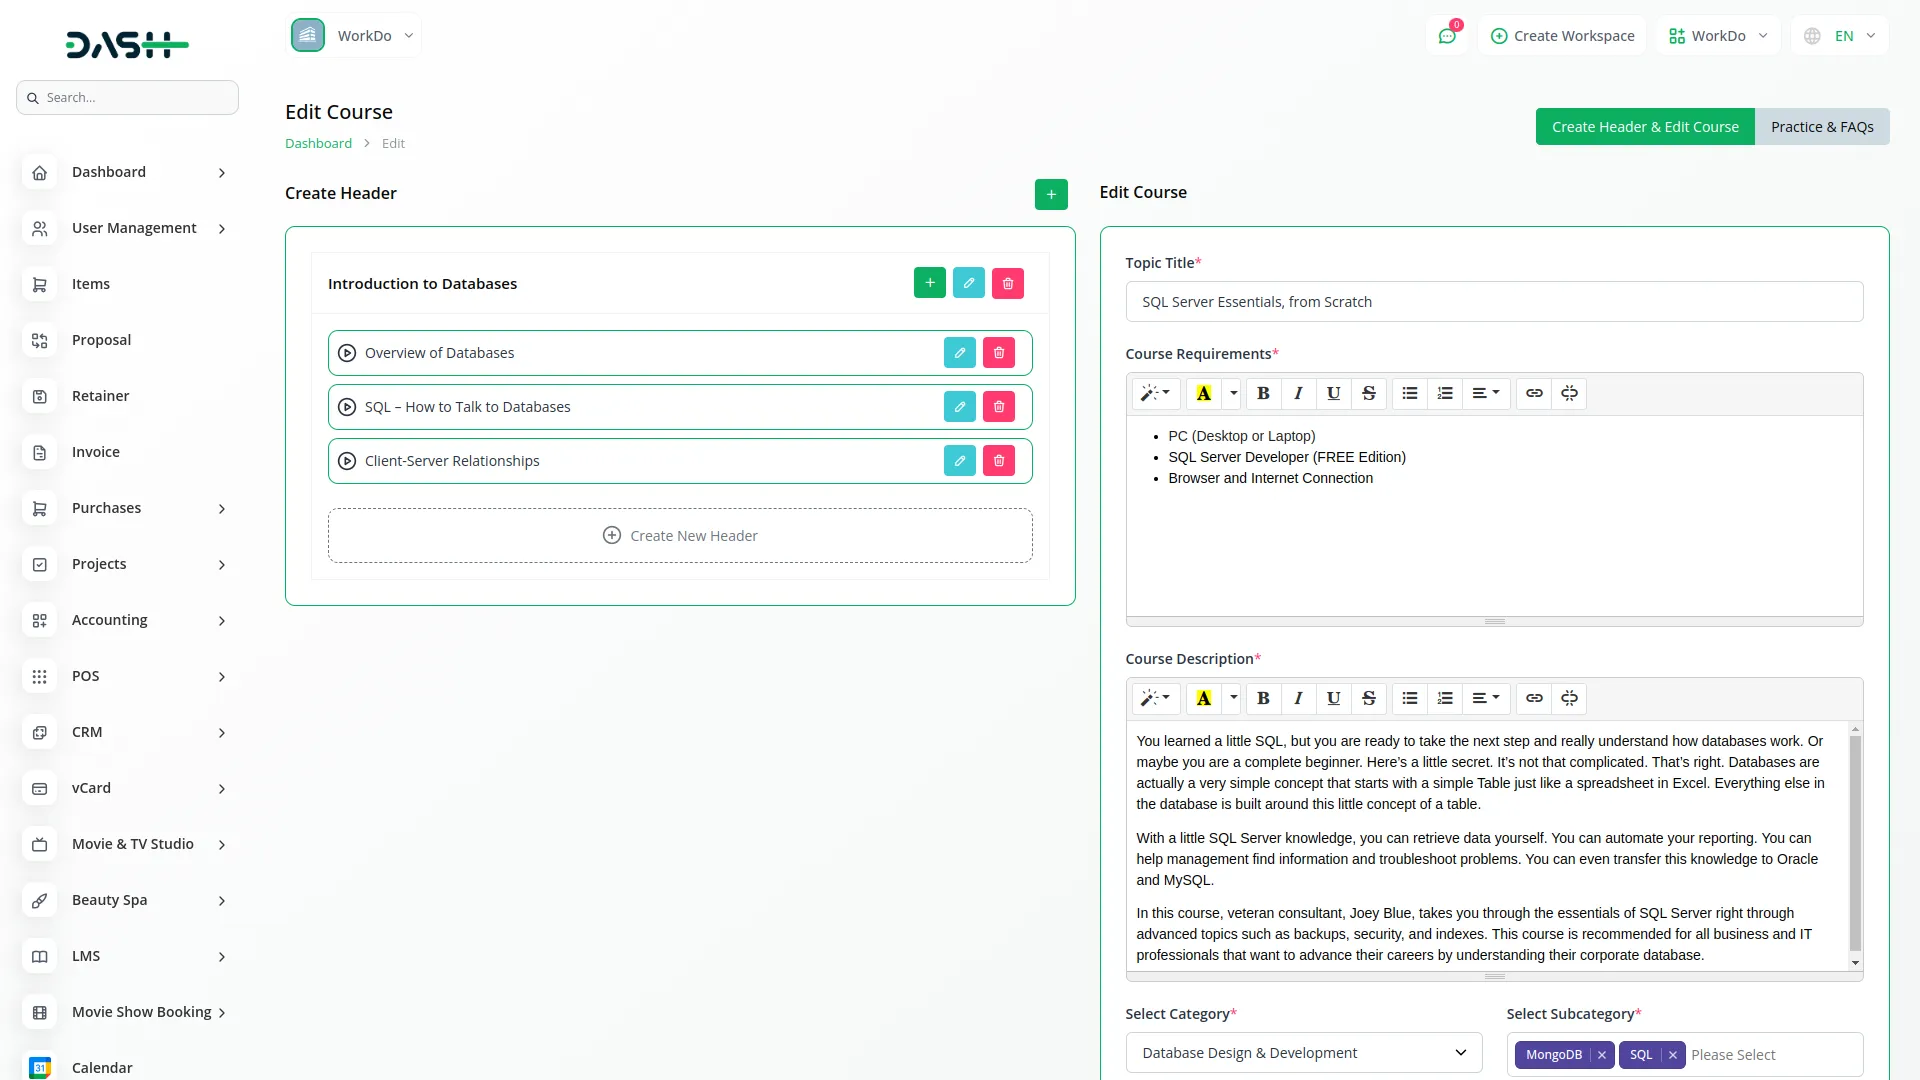
- Clicking Edit opens the same form with existing course data and also allows managing the course structure by adding Headers and Chapters, where each Header has a Header Name and comes with Create, Edit, and Delete options to manage its content.
- Click Create under a Header to add a Chapter by entering the Chapter Name, selecting the Chapter Type (Video URL, Video File, iFrame, or Text Content), and filling in the related fields like URL, Duration, file upload, or text input; you can also upload multiple External Files as part of chapter resources.
- All chapters are listed under their respective headers, and each chapter entry includes Edit and Delete options for content management.
- You can add multiple headers, and under each header, you can add multiple chapters.
- In the edit section, users can also handle Practice materials and FAQs. In the Practice section, users can upload multiple files and images using the provided upload field in the form. The Practice List page displays individual uploaded items, and provides actions to download, edit, or delete each file.
- The FAQs section allows users to create frequently asked questions by entering a question and its corresponding answer. Each FAQ entry can be edited or deleted using the available actions.
Custom Page Management
- Custom Page allows you to create additional static pages for your LMS website. These pages can be displayed in the website header navigation and contain custom content for policies, about pages, or other informational content.
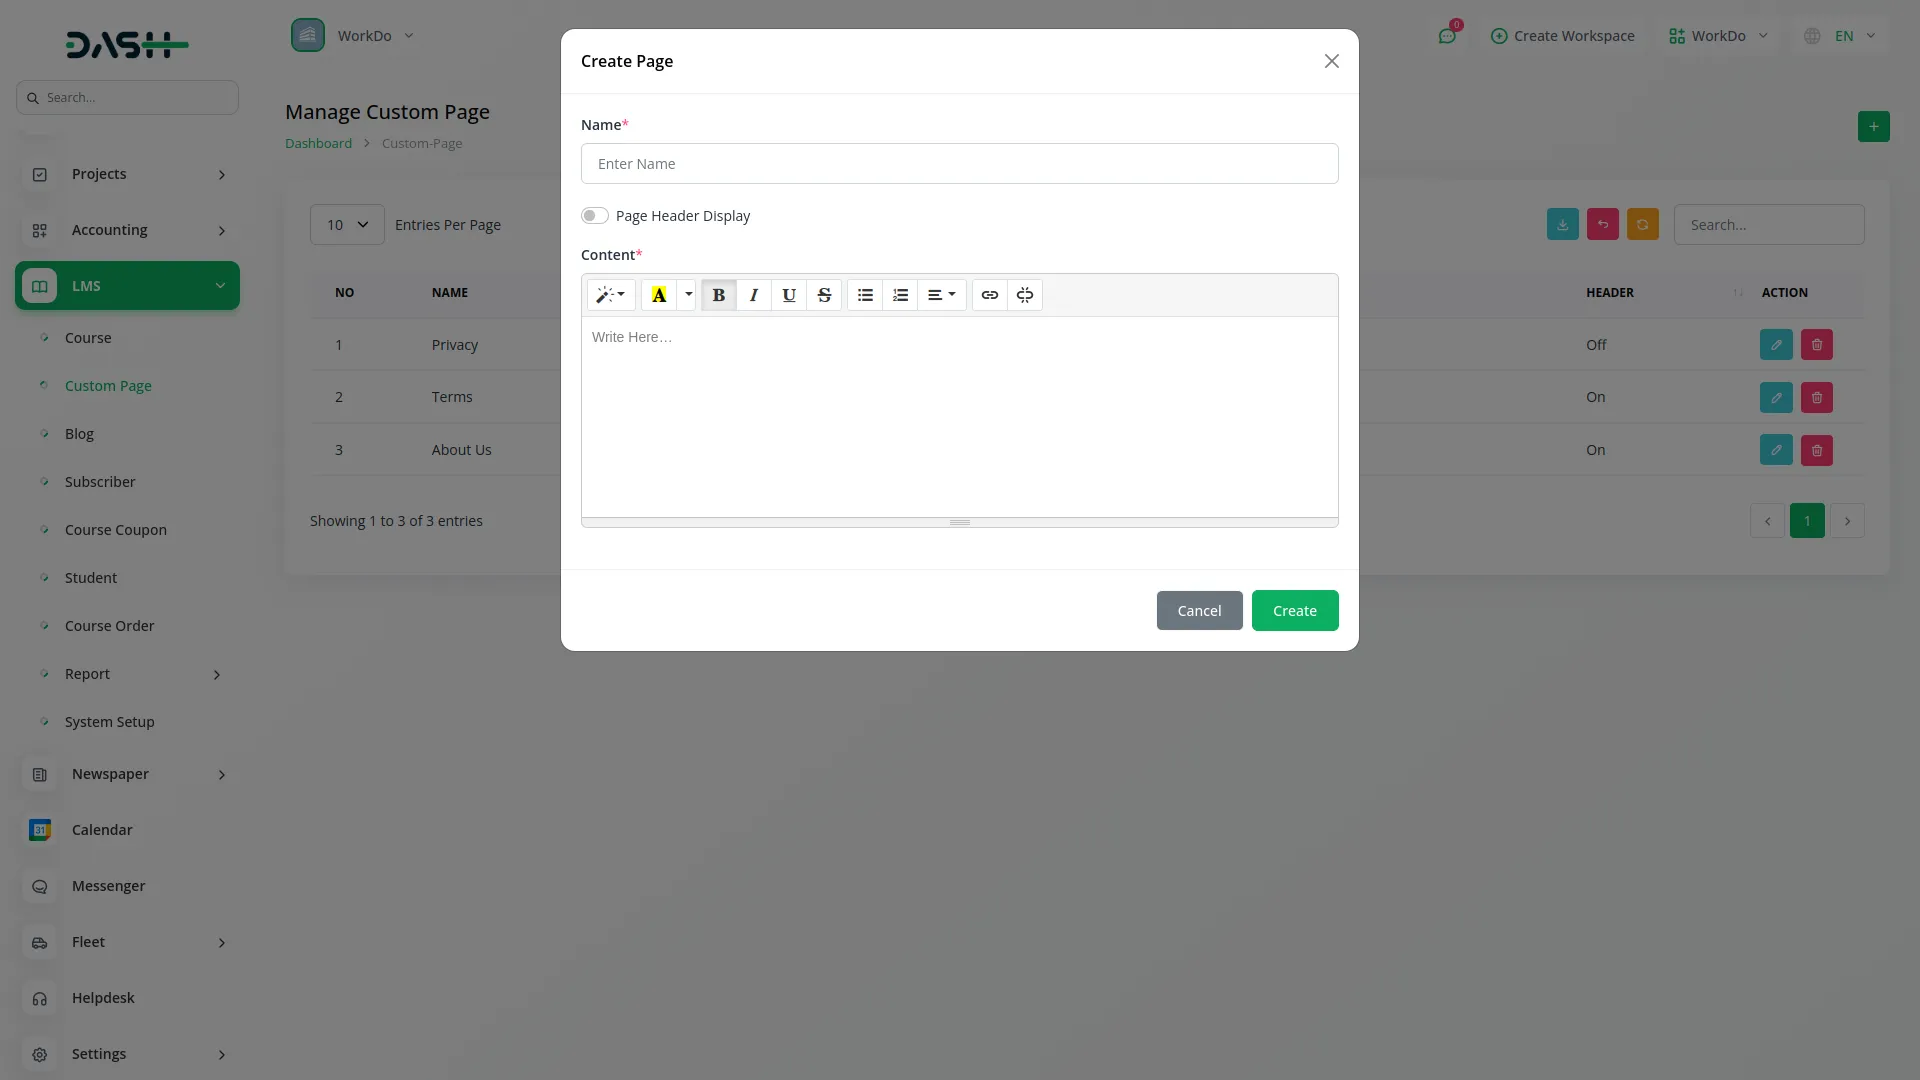
- To create a new Custom Page, click “Create” and enter the page Name and your custom Content. Use the Page Header Display toggle to control whether this page appears in your website’s top header navigation menu. >
- When enabled, visitors can click the page name in the header to view the dynamic content you’ve created.
- The custom page list displays all pages with columns for Name, Page Slug showing the page link, Header status indicating whether it appears in navigation, and Action options. Use Edit to modify page content or Delete to remove pages you no longer need.
- These custom pages integrate directly with your LMS Website header navigation, providing seamless access to additional information for your students and visitors.
Manage Blogs
- Blog management enables you to create and publish blog content that appears on your LMS website. The blog section connects to your website header menu and provides social sharing capabilities for increased engagement.
- Access the Blog section through two main sections: Social Media settings and blog creation. In Social Media configuration, use toggle buttons to Enable Blog Social Button functionality and control individual platforms including Enable Whatsapp, Enable Facebook, Enable LinkedIn, Enable Google, Enable Email, Enable Twitter, Enable Pinterest, and Enable Stumbleupon. These settings determine which social sharing options appear on your published blog posts.
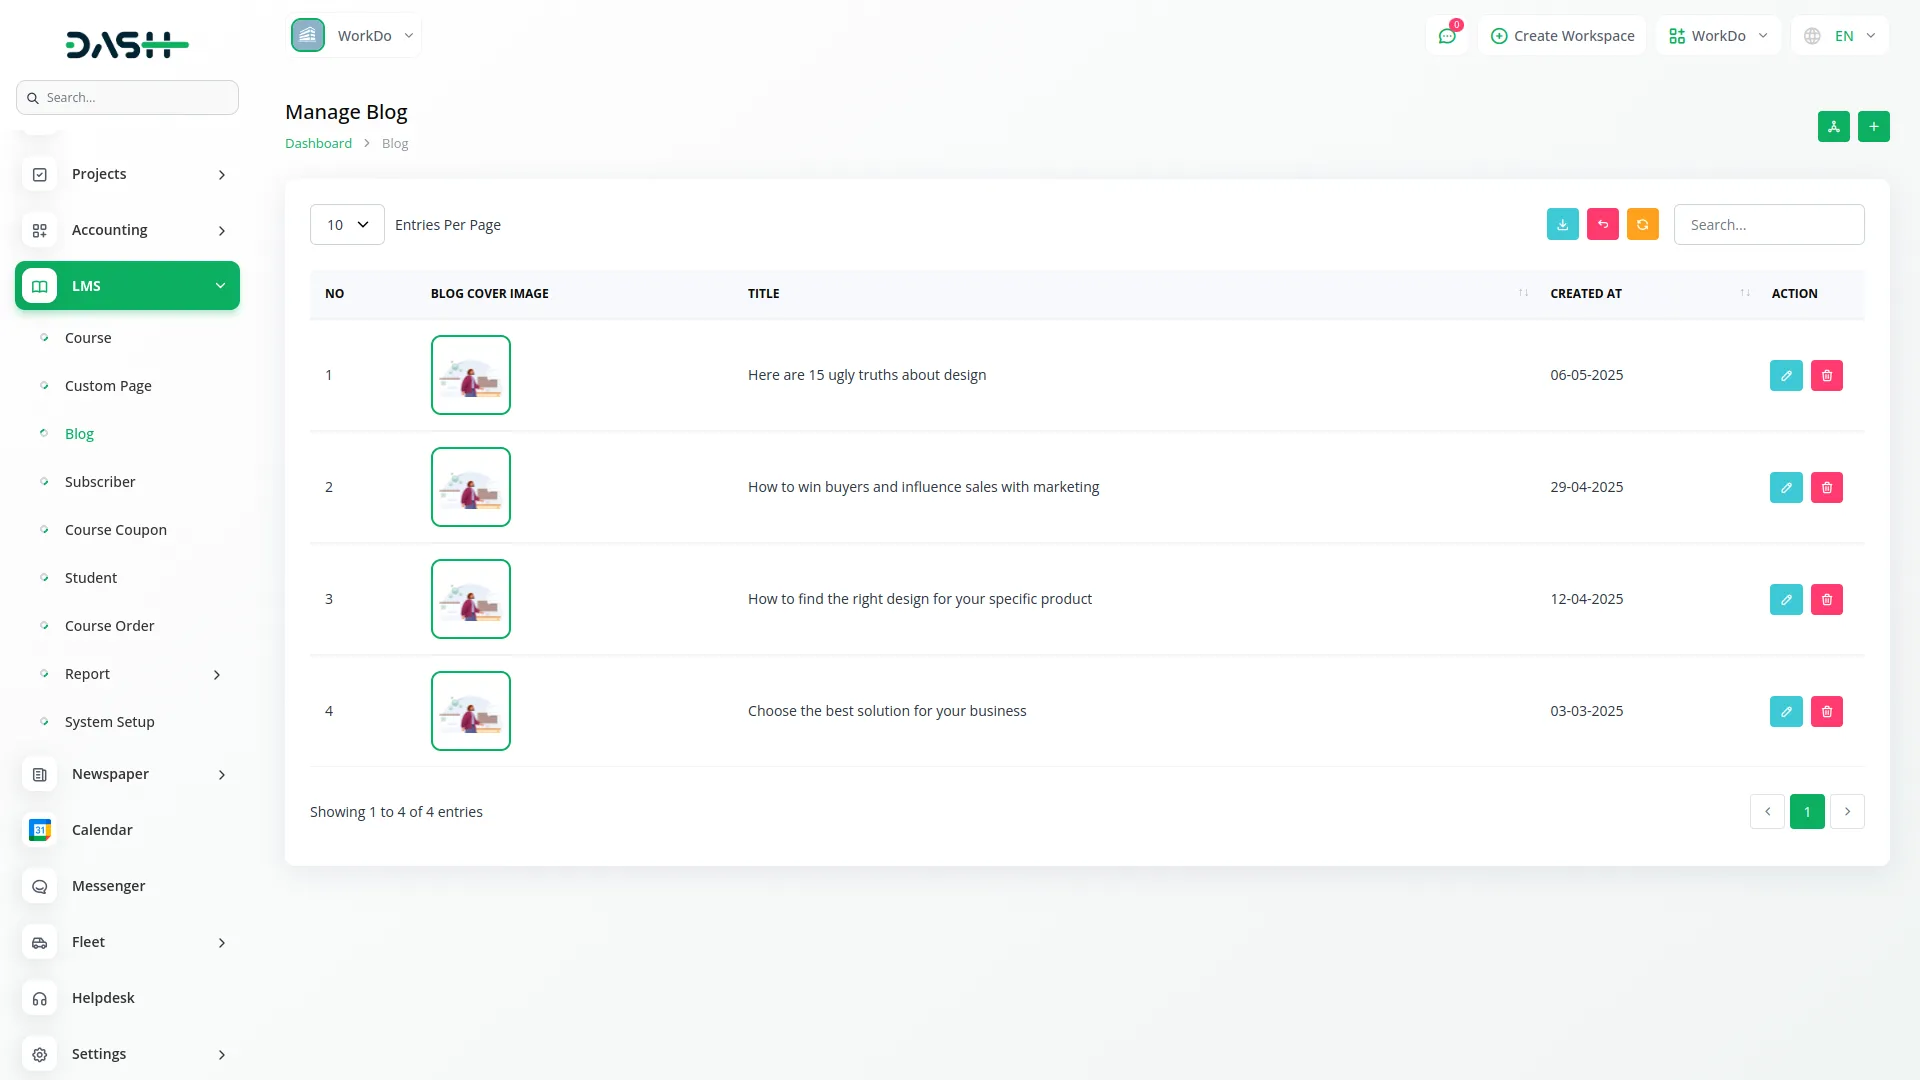
- To create a new blog post, click “Create” and enter the blog Title, upload a Blog cover image, and add your detailed content in the Detail field. Your blog posts will automatically appear on the blog listing page accessible through your website header.
- The blog list page shows all posts with columns for Blog cover image, Title, Created At date, and Action options. Use Edit to modify existing posts or Delete to remove content. Published blogs enhance your website’s content value and can help with search engine optimization.
Subscribers Management
- Subscriber management handles email subscriptions from website visitors who want to receive updates about your courses and platform. This section connects to the email subscription field displayed on course pages throughout your website.
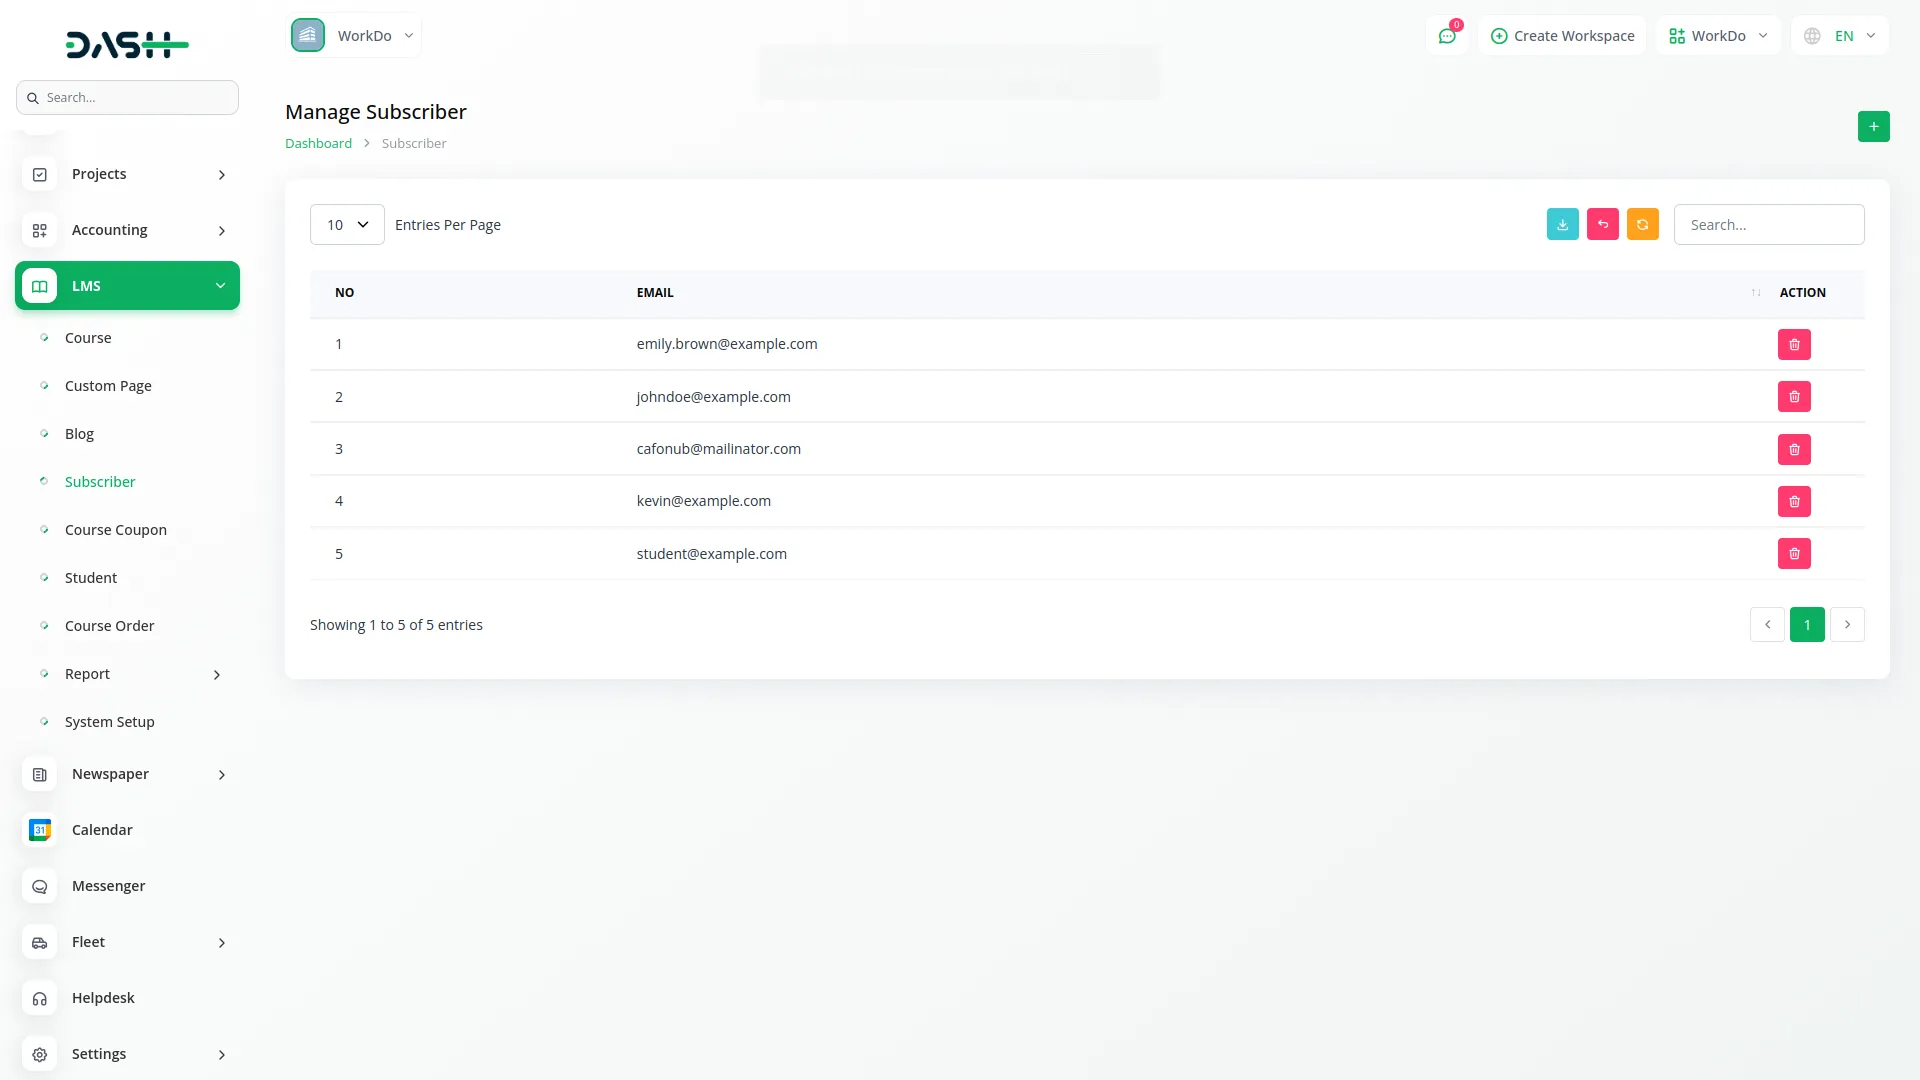
- Website visitors can subscribe by entering their email in the subscription field found on course pages. Additionally, you can manually add subscribers through the admin panel by clicking “Create” and entering the subscriber’s email address.
- The subscriber list displays all email subscriptions with columns for Number, Email address, and Action options. Use the Delete action to remove subscribers who no longer wish to receive updates or have requested removal.
- This subscriber database can be used for email marketing campaigns to promote new courses, special offers, or platform updates to engaged users who have expressed interest in your content.
Create Course Coupons
- Course Coupons allows you to create discount codes that students can apply during the course checkout process. These coupons integrate with the website’s payment system to provide flexible pricing options.
- To create a new coupon, click “Create” and enter the coupon Name and set usage Limit for how many times it can be used. In the Code field, either manually enter a coupon code or click “Generate” to automatically create one.
- Configure the discount using the Flat Discount toggle – when enabled, enter a flat discount amount, or when disabled, enter a percentage-based Discount value.
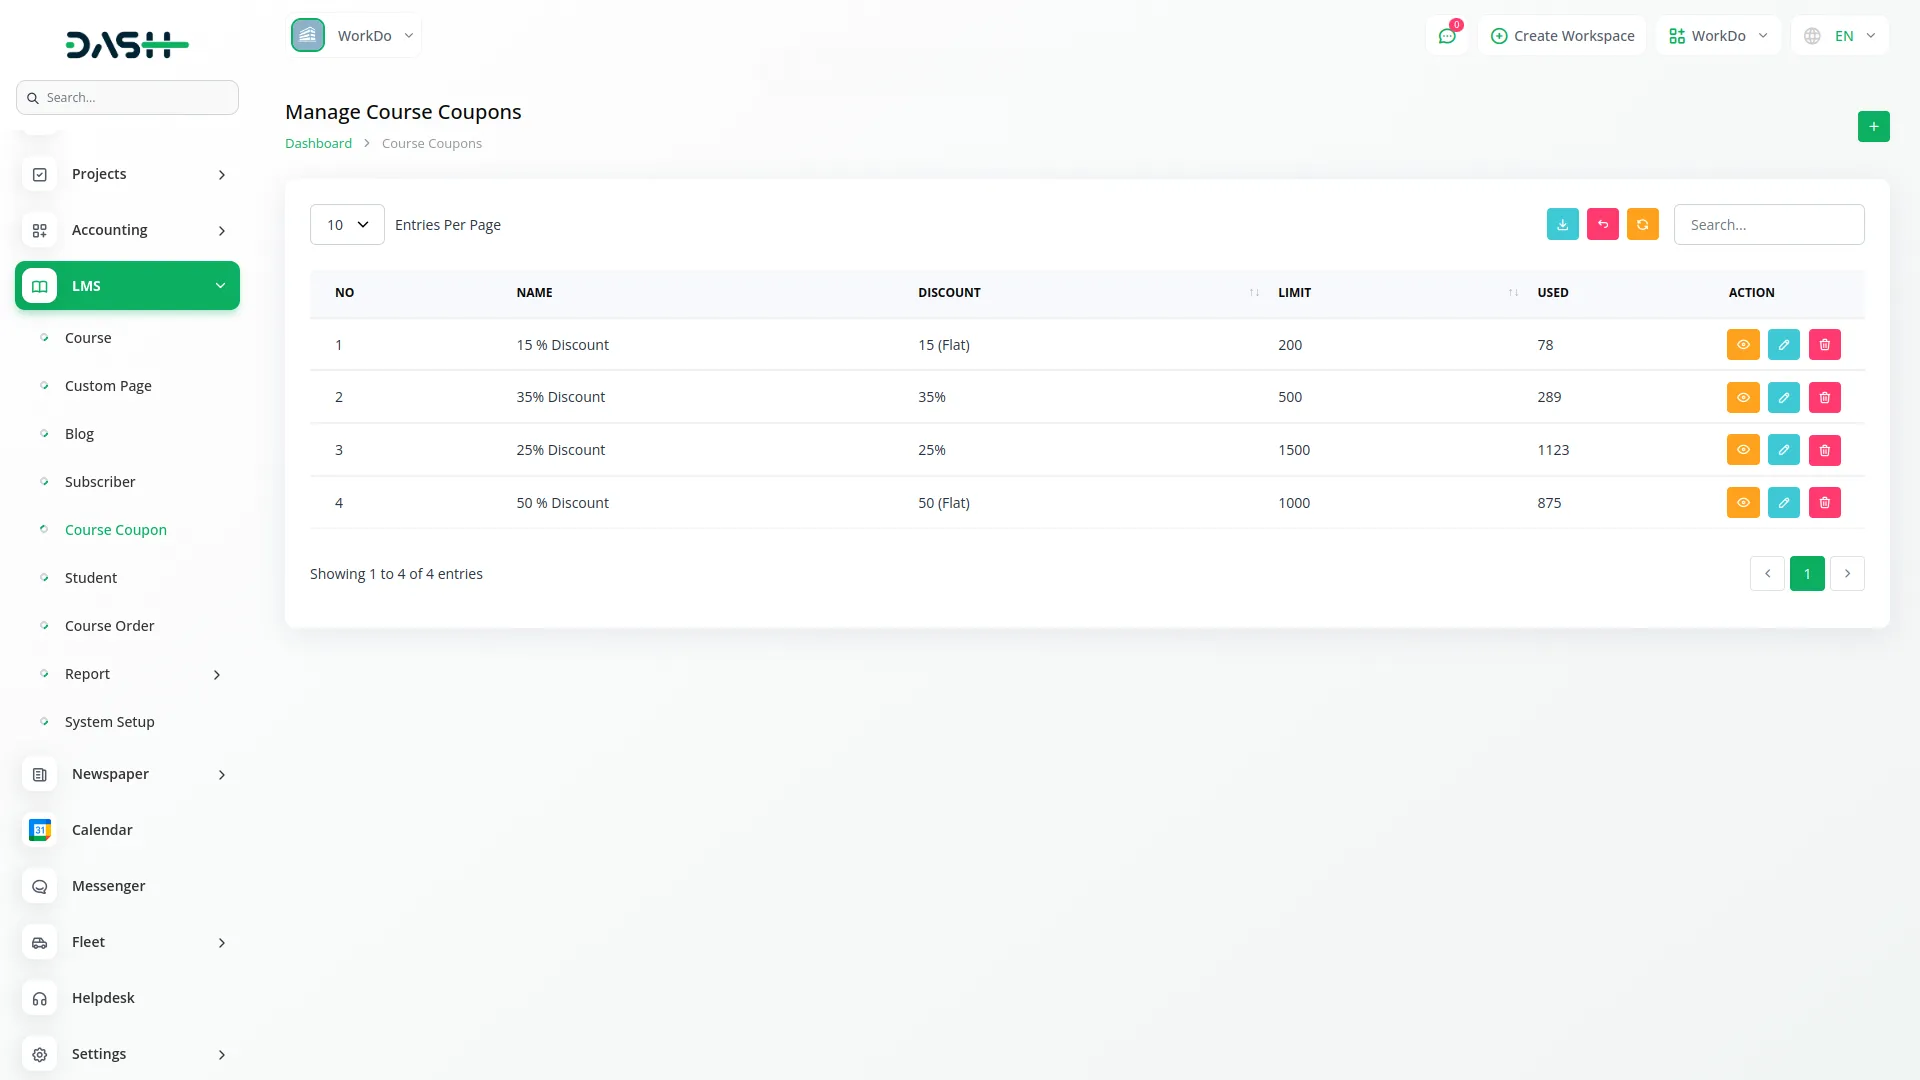
- The coupon list page displays all coupons with columns for Name, Code, Discount amount, Limit, Used count showing how many times each coupon has been redeemed, and Action options. Use Show to view detailed usage statistics, Edit to modify coupon settings, or Delete to remove expired coupons.
- Click the “Show” action to open a detailed usage page displaying which users have used the coupon, with columns for Number, Coupon code, User information, and Date of usage. This helps track coupon performance and user engagement.
Student Management
- Student management handles all registered users who can purchase and access courses on your platform. This section connects to the authentication system and course enrollment tracking throughout your LMS.
- To manually create a student account, click “Create” and enter the student’s Name, Email, Password, and Phone Number. Students can also register themselves through the website’s registration form, which automatically adds them to this section.
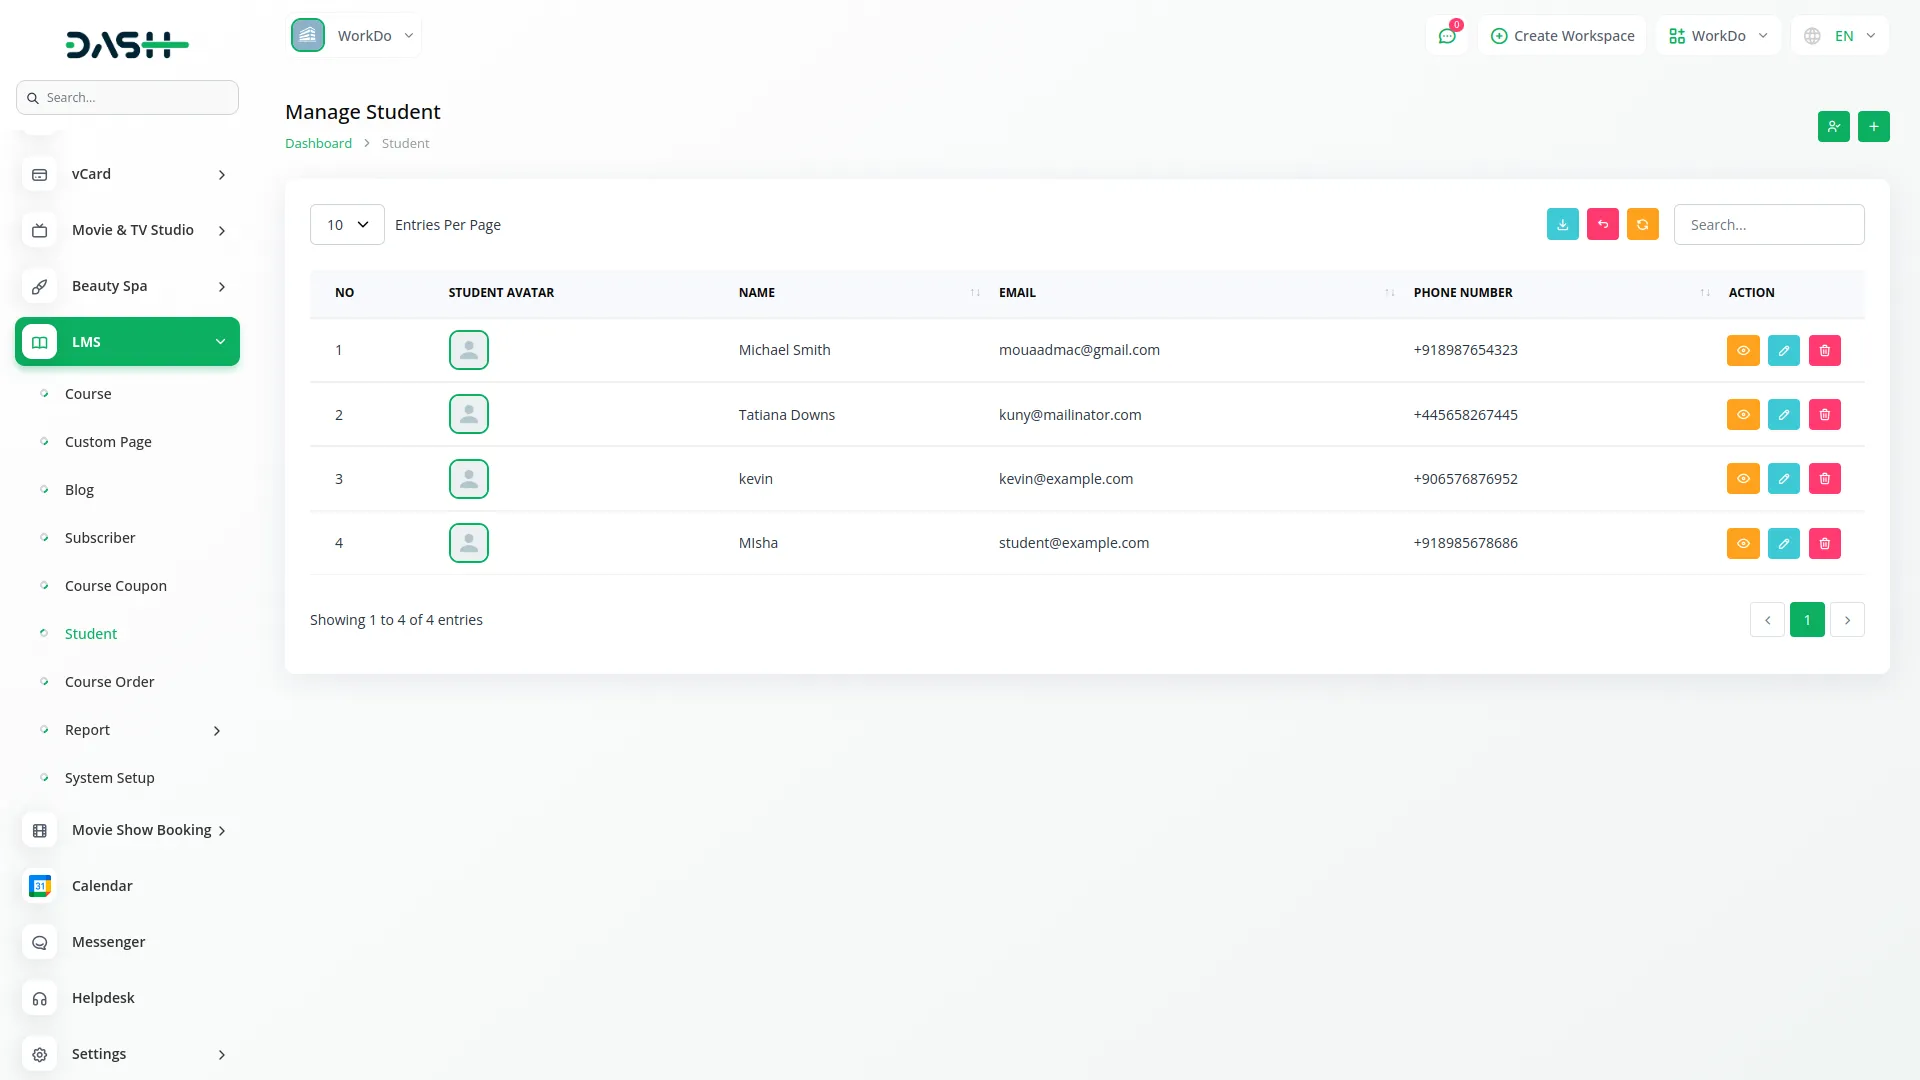
- The student list displays all registered users with columns for Number, Student Avatar image, Name, Email, Phone Number, and Action options. Use View to see detailed student information and course progress, Edit to modify student details, or Delete to remove inactive accounts.
- Click the “View” action to access a student’s course dashboard showing their enrollment status with columns for Number, Course name, Category, total Chapters, Chapters completed, and Status indicating whether they’re “Still Watching” or have “Completed” each course.
- Access Student Log through the dedicated button to view login activity and security information. Filter logs by Month and Student, then view detailed login data including Student Name, Email, Last Login time, IP address, Country, Device type, Operating System, and available actions for monitoring platform security.
Course Order Management
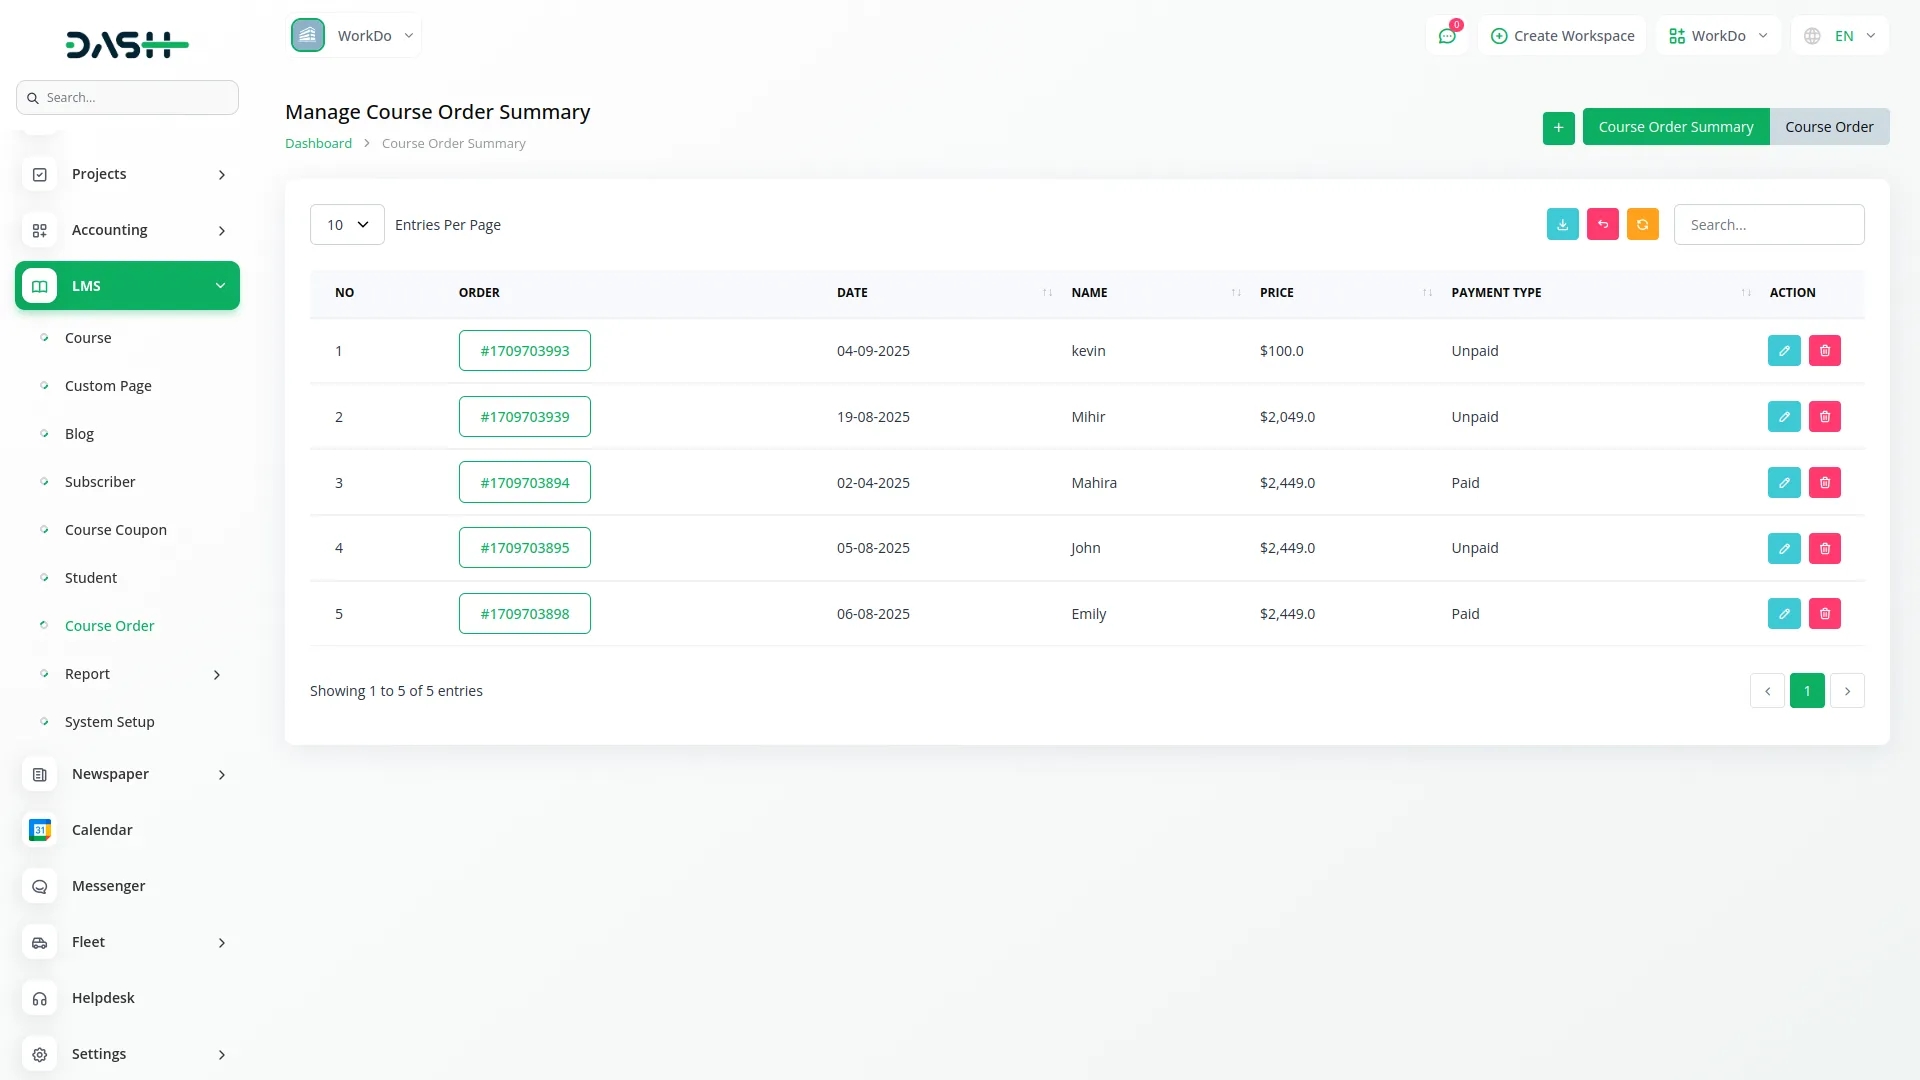
- Course Order management handles both manual order creation and automatic order processing from website purchases. This section operates in two sections: Course Order Summary for manual admin orders and Course Order for website-generated orders.
- In the Course Order Summary, manually create orders by clicking “Create” and filling the Order Information section with Student selection from the dropdown, Issue Date, Course Number, Phone Number, and Payment_type status as unpaid or paid.
- The Course Summary section supports multiple course items using repeatable rows. For each row, select the Course from the dropdown which auto-fills the Price, set the Discount percentage, and view calculated amounts for Sub Total, Discount amount, and Total Amount. Use Add Row and Delete Row buttons to manage multiple courses in a single order.
- The Course Order Summary list displays manual orders with columns for Number, Order ID, Date, Name, Price, Payment type showing unpaid or paid status, and Action options including Edit and Delete.
- The Course Order section automatically records all orders placed through your website including online payments and bank transfers. The list shows columns for Number, Order ID that redirects to detailed view, Date, Name, Price, Payment Type indicating Online Payment with provider names or Bank Transfer, Receipt information, and Action options.
- Use the Status action for Bank Transfer orders to update payment verification, Show to view complete order details with customer information and copy link functionality, or Delete to remove orders.
- The View action opens detailed customer order information with a Copy Link icon for sharing and browser viewing options, plus Download PDF capability for printing order summaries.
- Invoices can be generated from the Invoice section using the Order ID for financial tracking and reporting.
Report and Store Analytics
- Store Analytics provides comprehensive data analysis of your LMS website performance and user engagement. This reporting section connects to your website traffic and helps you understand user behavior patterns.
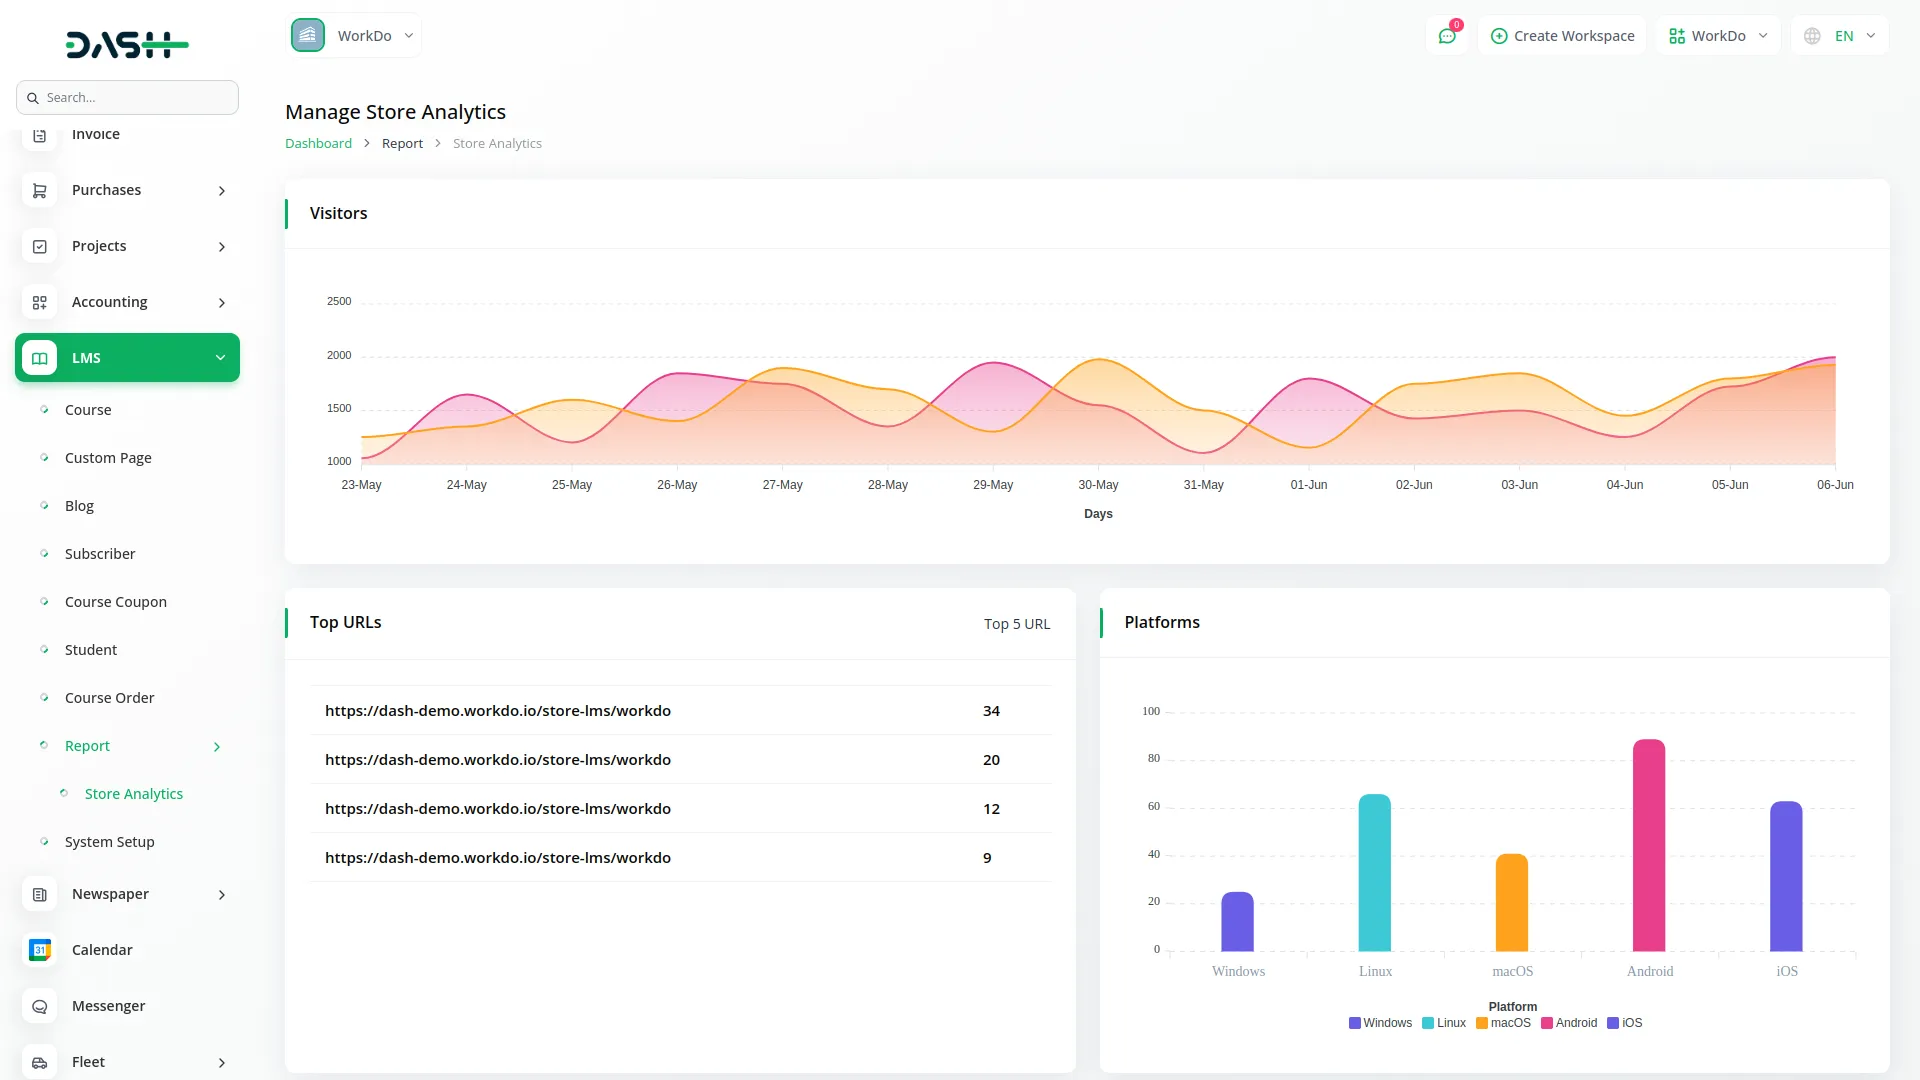
- The Store Analysis section displays four key analytics charts to track your platform’s performance. The Visitors Chart shows an area chart displaying visitor counts over the last 15 days, helping you identify traffic trends and peak usage periods.
- The Platforms Chart presents a bar chart showing which operating systems your visitors use, such as Linux and Windows distributions.
- The Devices Chart displays a pie chart illustrating the breakdown of device types accessing your platform, showing the split between Desktop and Mobile users.
- The Browsers Chart shows another pie chart representing browser usage statistics, indicating popular browsers like Chrome and Firefox among your users.
- The Top URLs section provides insight into your most popular content by displaying the Top 5 Course URLs that receive the most student visits.
- This information appears in a simple table format with columns for Course Link and Course Views, helping you identify which courses generate the most interest and engagement from your students.
- Use these analytics to make informed decisions about course development, marketing strategies, and platform optimization based on real user data and behavior patterns.
Categories
Related articles
- Instagram Post Integration in Dash SaaS
- PayFort Add-On Integration in Dash SaaS
- Business Process Mapping Integration in Dash SaaS
- PowerTranz Payment Gateway in Dash SaaS
- Elderly Care Detailed Documentation
- Locker & Safe Deposit Integration in Dash SaaS
- Vehicle Wash Detailed Documentation
- Marketing Plan Integration in Dash SaaS
- Bookings Integration in Dash SaaS
- Radiology Management Detailed Documentation
- Email Box Integration in Dash SaaS
- Support Ticket Integration in Dash SaaS
Reach Out to Us
Have questions or need assistance? We're here to help! Reach out to our team for support, inquiries, or feedback. Your needs are important to us, and we’re ready to assist you!


Need more help?
If you’re still uncertain or need professional guidance, don’t hesitate to contact us. You can contact us via email or submit a ticket with a description of your issue. Our team of experts is always available to help you with any questions. Rest assured that we’ll respond to your inquiry promptly.
Love what you see?
Do you like the quality of our products, themes, and applications, or perhaps the design of our website caught your eye? You can have similarly outstanding designs for your website or apps. Contact us, and we’ll bring your ideas to life.
