

Project – WorkDo Dash SaaS Add-On Guide
Plan projects, assign tasks, track milestones, manage budgets, and collaborate with teams efficiently.
Introduction
The Project Add-On is a complete project management tool that helps your company plan, track, and deliver work all in one place. You can create projects, break them down into milestones and tasks, log bugs, and assign work to your team members and clients. It gives you flexible ways to view your work, including a Kanban board, a Calendar, and a Gantt Chart, so you can follow progress in whatever way suits you best. You can also manage project payments, record milestone costs, and keep an eye on budgets and collected amounts. With clear dashboards and detailed reports, the Project Add-On gives you a full picture of how every project is moving from start to finish.
How to Use The Project Add-On?
Dashboard
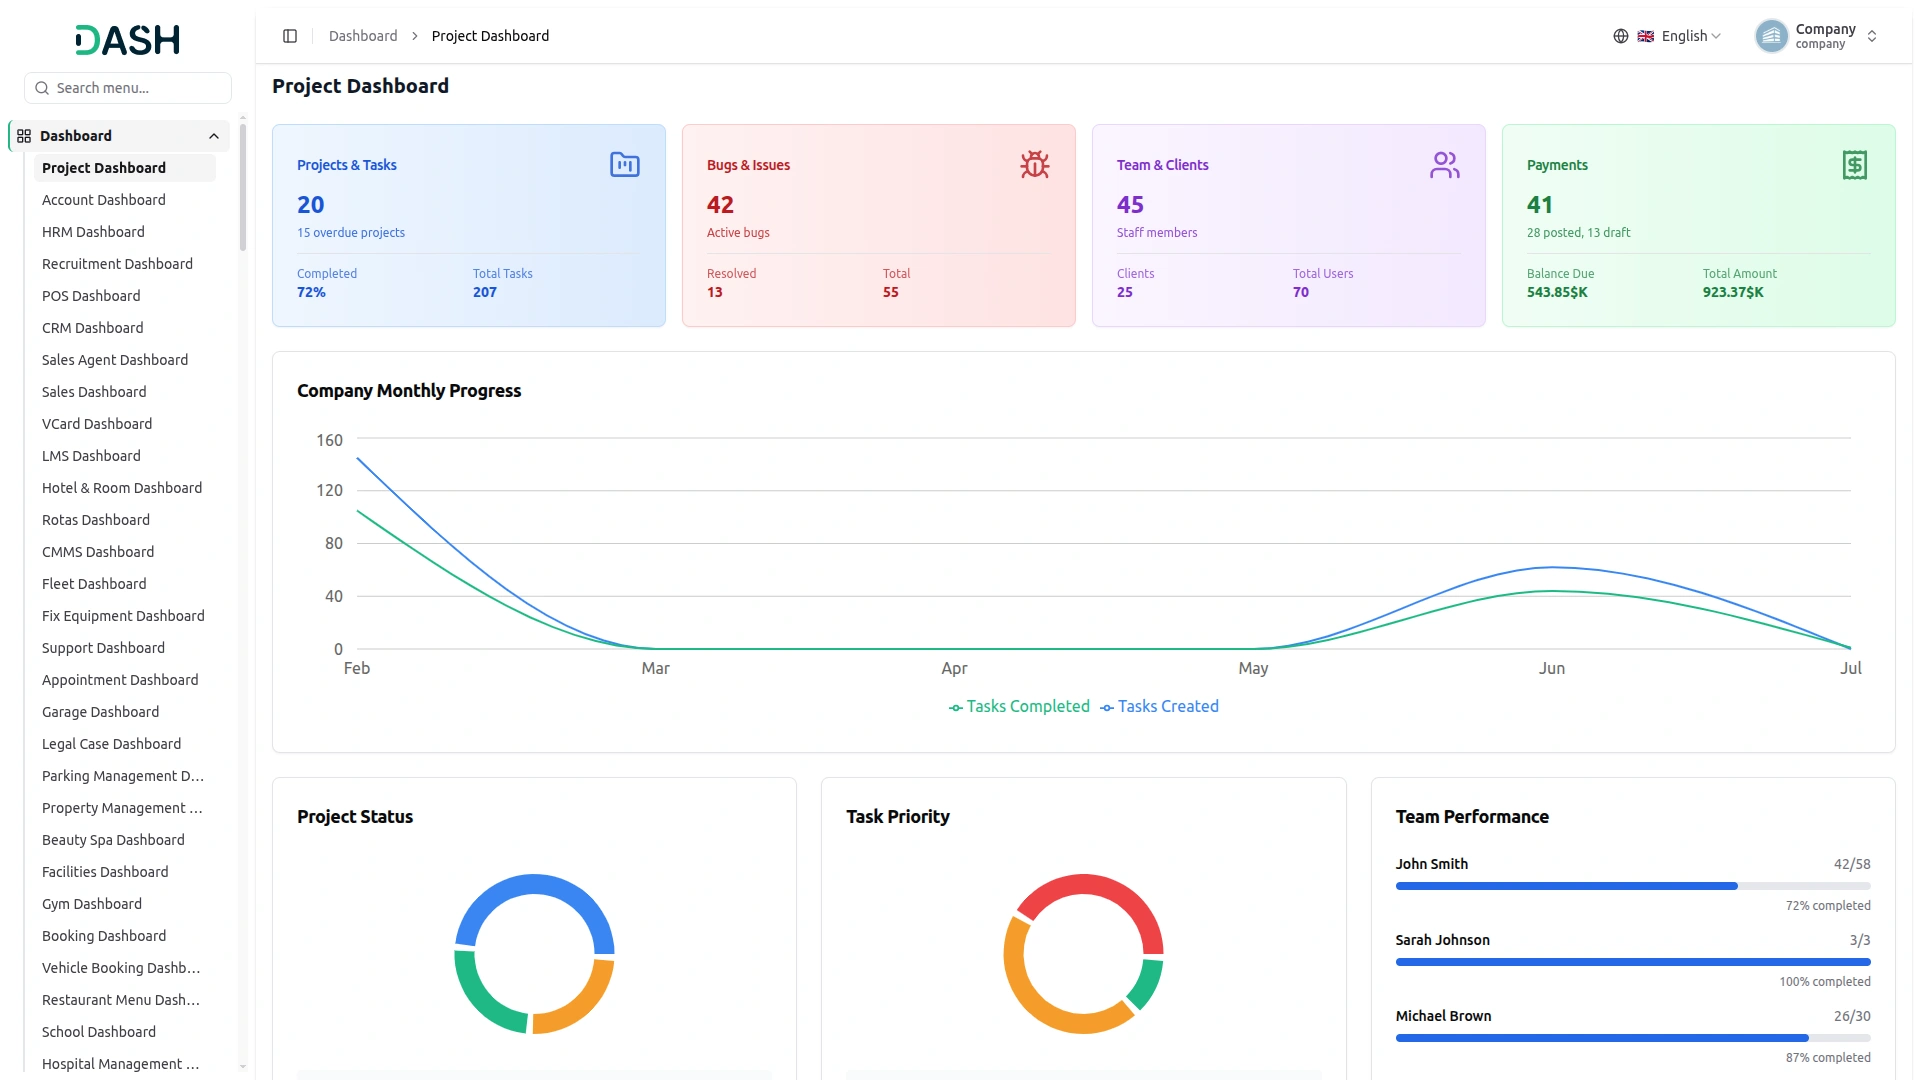
- The Project Dashboard gives a company-wide overview of your projects, tasks, and financials through a set of summary cards, panels, and charts.
- Four cards across the top summarize key metrics, and each card is clickable, taking you straight to its related page for a closer look. Projects & Tasks shows the total number of projects along with any overdue count, plus the percentage of completed tasks and Total Tasks, and opens the Projects page. Bugs & Issues shows the count of Active bugs, along with Resolved and Total counts, and opens the Bugs & Issues page.
- Team & Clients shows the number of Staff members, along with the count of Clients and Total Users, and opens the Team & Clients page. Payments shows the Total number of payments along with how many are Posted versus Draft, plus the Balance Due and Total Amount, and opens the Payments page.
- The Company Monthly Progress chart plots two trend lines across the months (Feb through Jul) tracking overall company activity over time.
- The Project Status panel shows a donut chart breaking down projects into Ongoing, Finished, and On Hold, with a count for each category listed below.
- The Task Priority panel shows a donut chart breaking down tasks into High, Medium, and Low priority, with a count for each listed below.
- The Team Performance panel lists each team member with a progress bar showing their completed versus total tasks and the completion percentage.
- The Recent Company Tasks section shows a summary line of tasks completed across all projects, followed by cards for individual tasks. Each card shows the Priority (High, Medium, Low), Stage (Todo, In Progress, Review), Assignee(s), and the Project it belongs to.
- The Recent Payments table lists payments with columns for Payment (as a link), Project, Customer, Total, Balance, Status (Posted or Draft), and Date.
System Setup
Task Stage
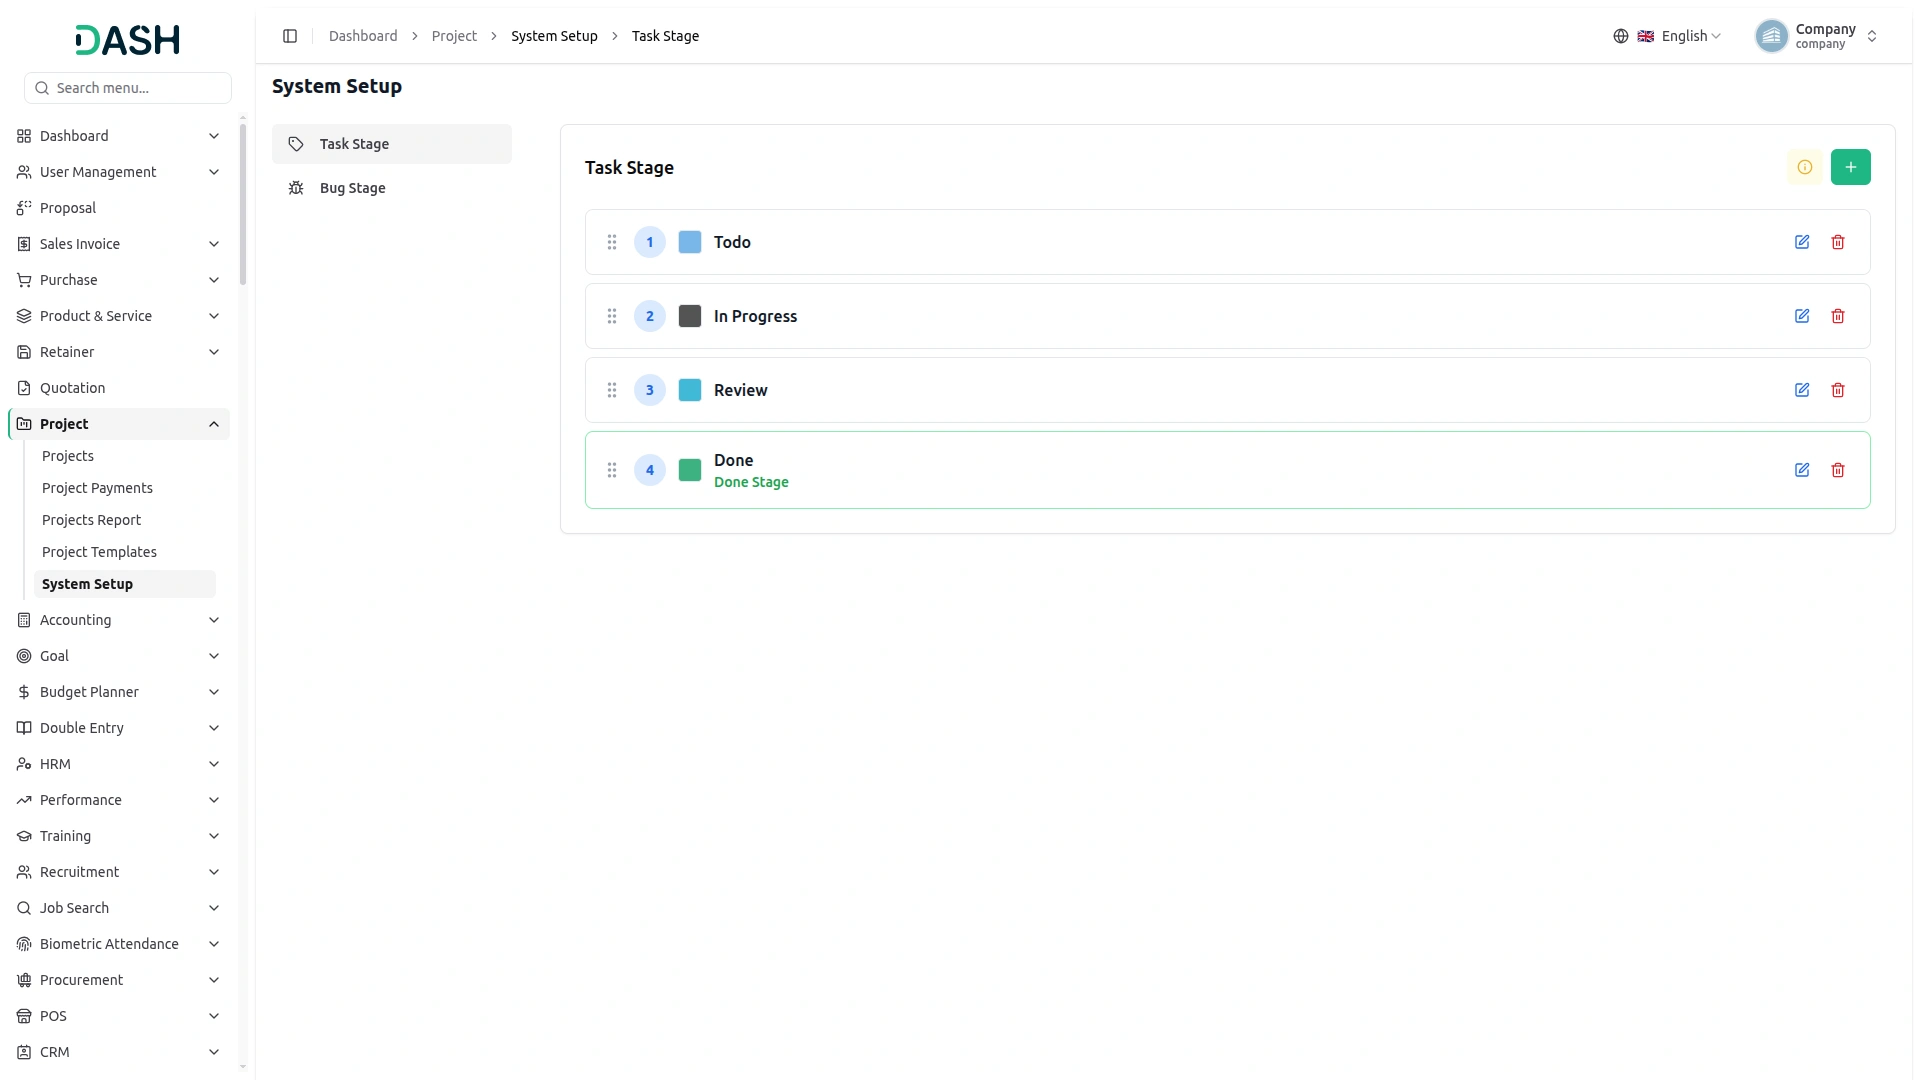
- To create a new Task Stage, click the “Create” button. Enter the stage Name, select a Colour, and then click Create to save the new task stage.
- The Task Stages section displays all configured stages in the workflow. Use the Edit button to modify an existing stage or the Delete button to remove it. Stages can also be reordered by dragging and dropping them into the desired sequence. The last stage is always considered “Done”.
- When you click the View button in the Project section, a Kanban View button appears in the top-right corner. Clicking it opens the Kanban board, where the background Colours of all tabs (task stages) are dynamically applied from the Colours configured in the Task Stage settings.
Bug Stage
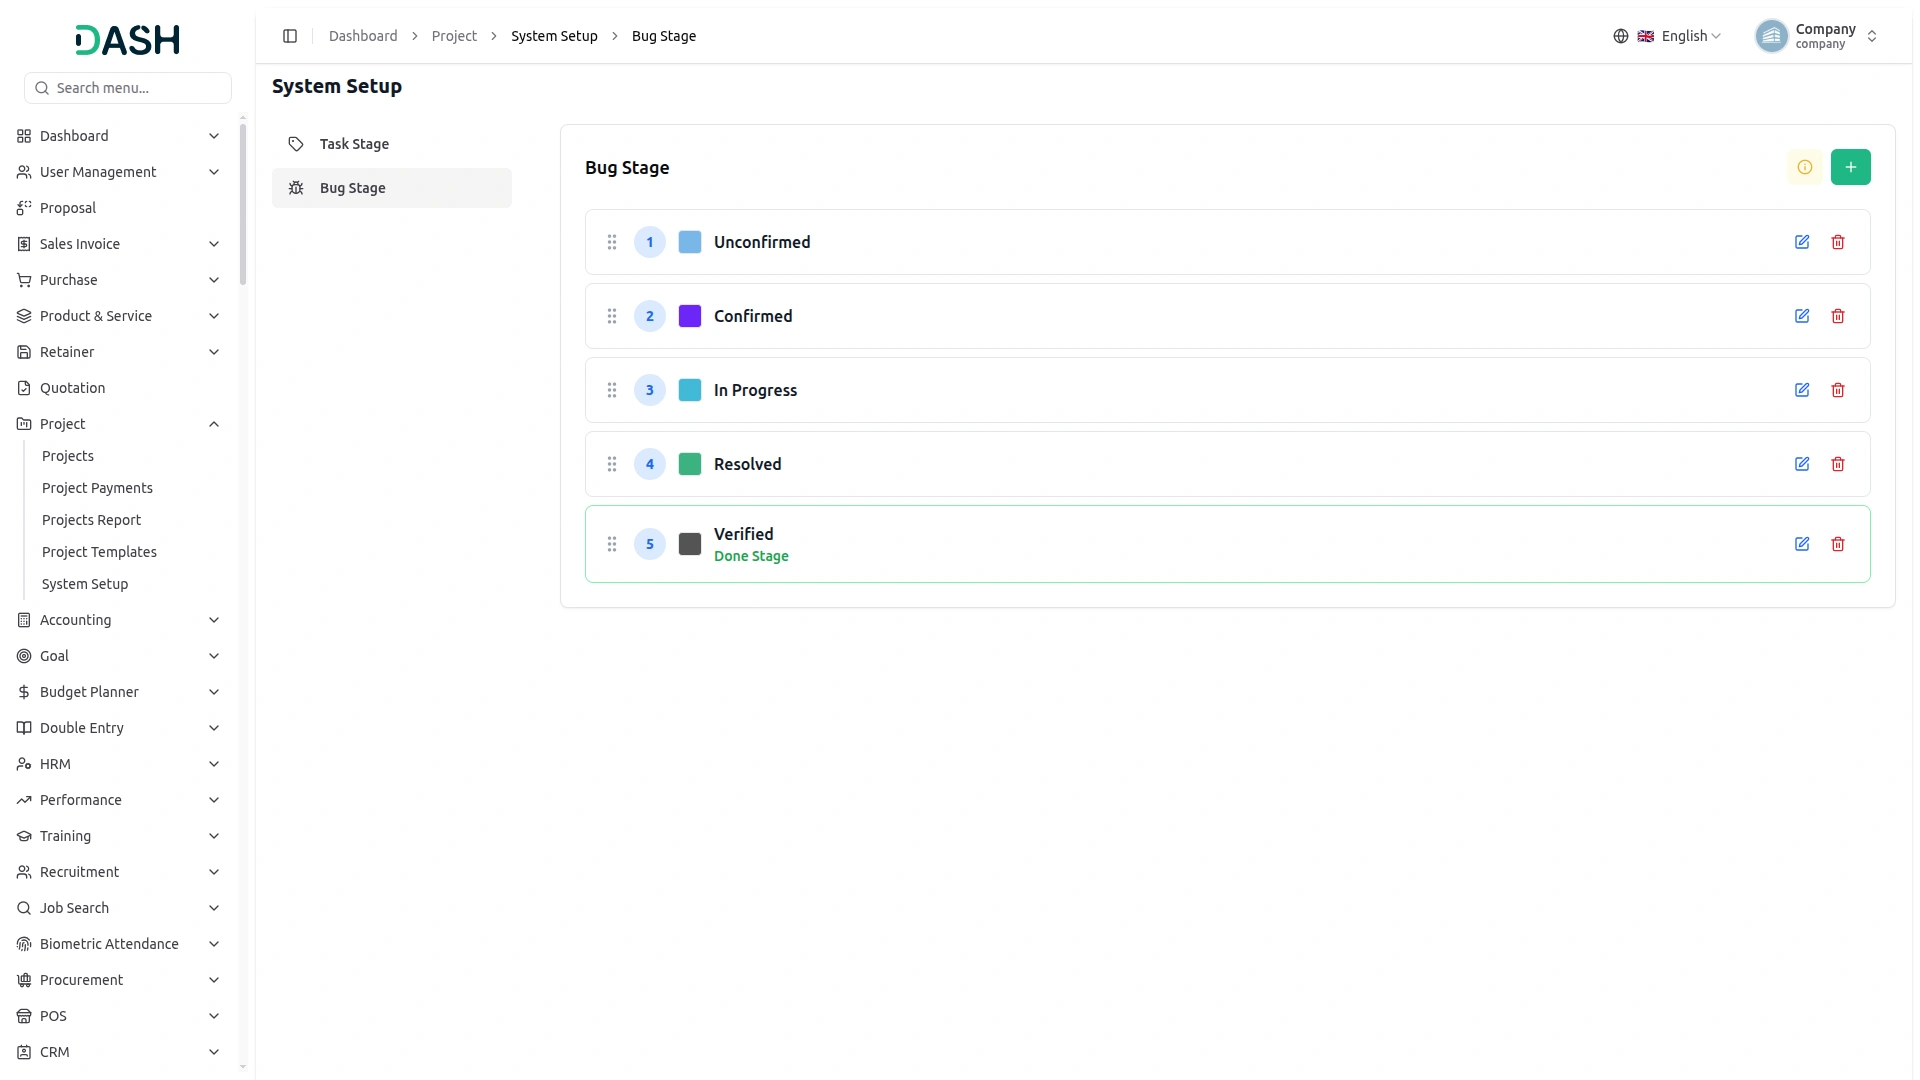
- To create a new Bug Stage, click the “Create” button. Enter the stage Name, select a Colour, and then click Create to save the new Bug Stage.
- The Bug Stages section displays all configured stages in the workflow. Use the Edit button to modify an existing stage or the Delete button to remove it. Stages can also be reordered by dragging and dropping them into the desired sequence. The last stage is always considered “Done”.
- When you click the View button in the Project section, a Bug button appears in the top-right corner. Clicking it opens the Bug board, where the background Colours of all tabs (Bug stages) are dynamically applied from the Colours configured in the Task Stage settings.
Manage Project
- To create a new Project, click the “Create” button at the top of the Project page. Enter the Name, set the Start Date or End Date, select the Users from the dropdown (which is configured from the user management), add a Budget, and add a Description.
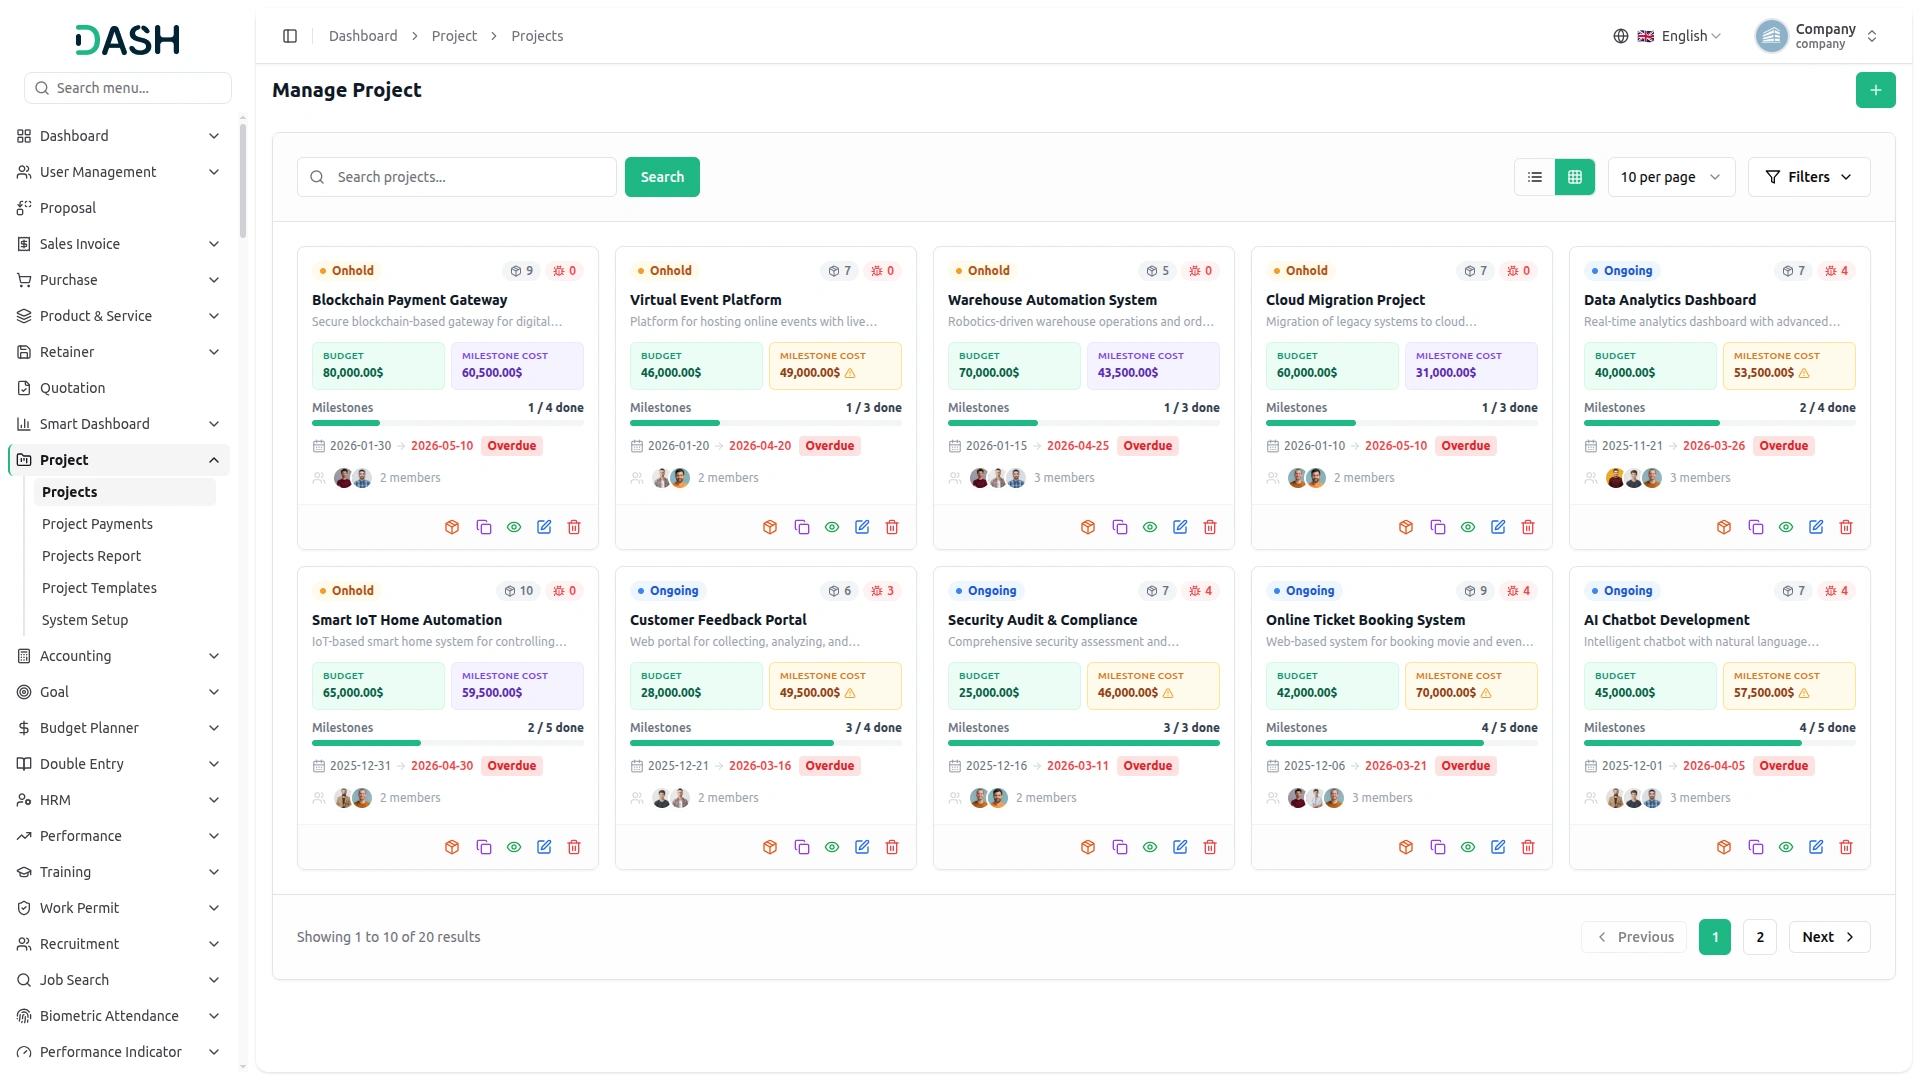
- In Grid view, each card displays the project’s Status (Onhold, Ongoing, Finished), Task count and Bug count icons, Name, Description, Budget, Milestone Cost, Milestone progress (completed / total with a progress bar), Start Date, End Date, assigned Users (with member count), and Action icons.
- Each project appears as a card showing two cost boxes: Budget and Milestone Cost. If the milestone spend goes over the project Budget, the Milestone Cost box turns yellow; if the spend is within or under the Budget, it stays purple. When a project’s due date has passed, its date is shown in red to indicate that it is overdue.
- The index page displays all projects with options for List View or Grid View at the top. Use the Search button to find a specific Project or apply Filter Dropdowns (Status, Date Range) to narrow results. Then click ‘Apply’ to activate filters or ‘Clear’ to reset them.
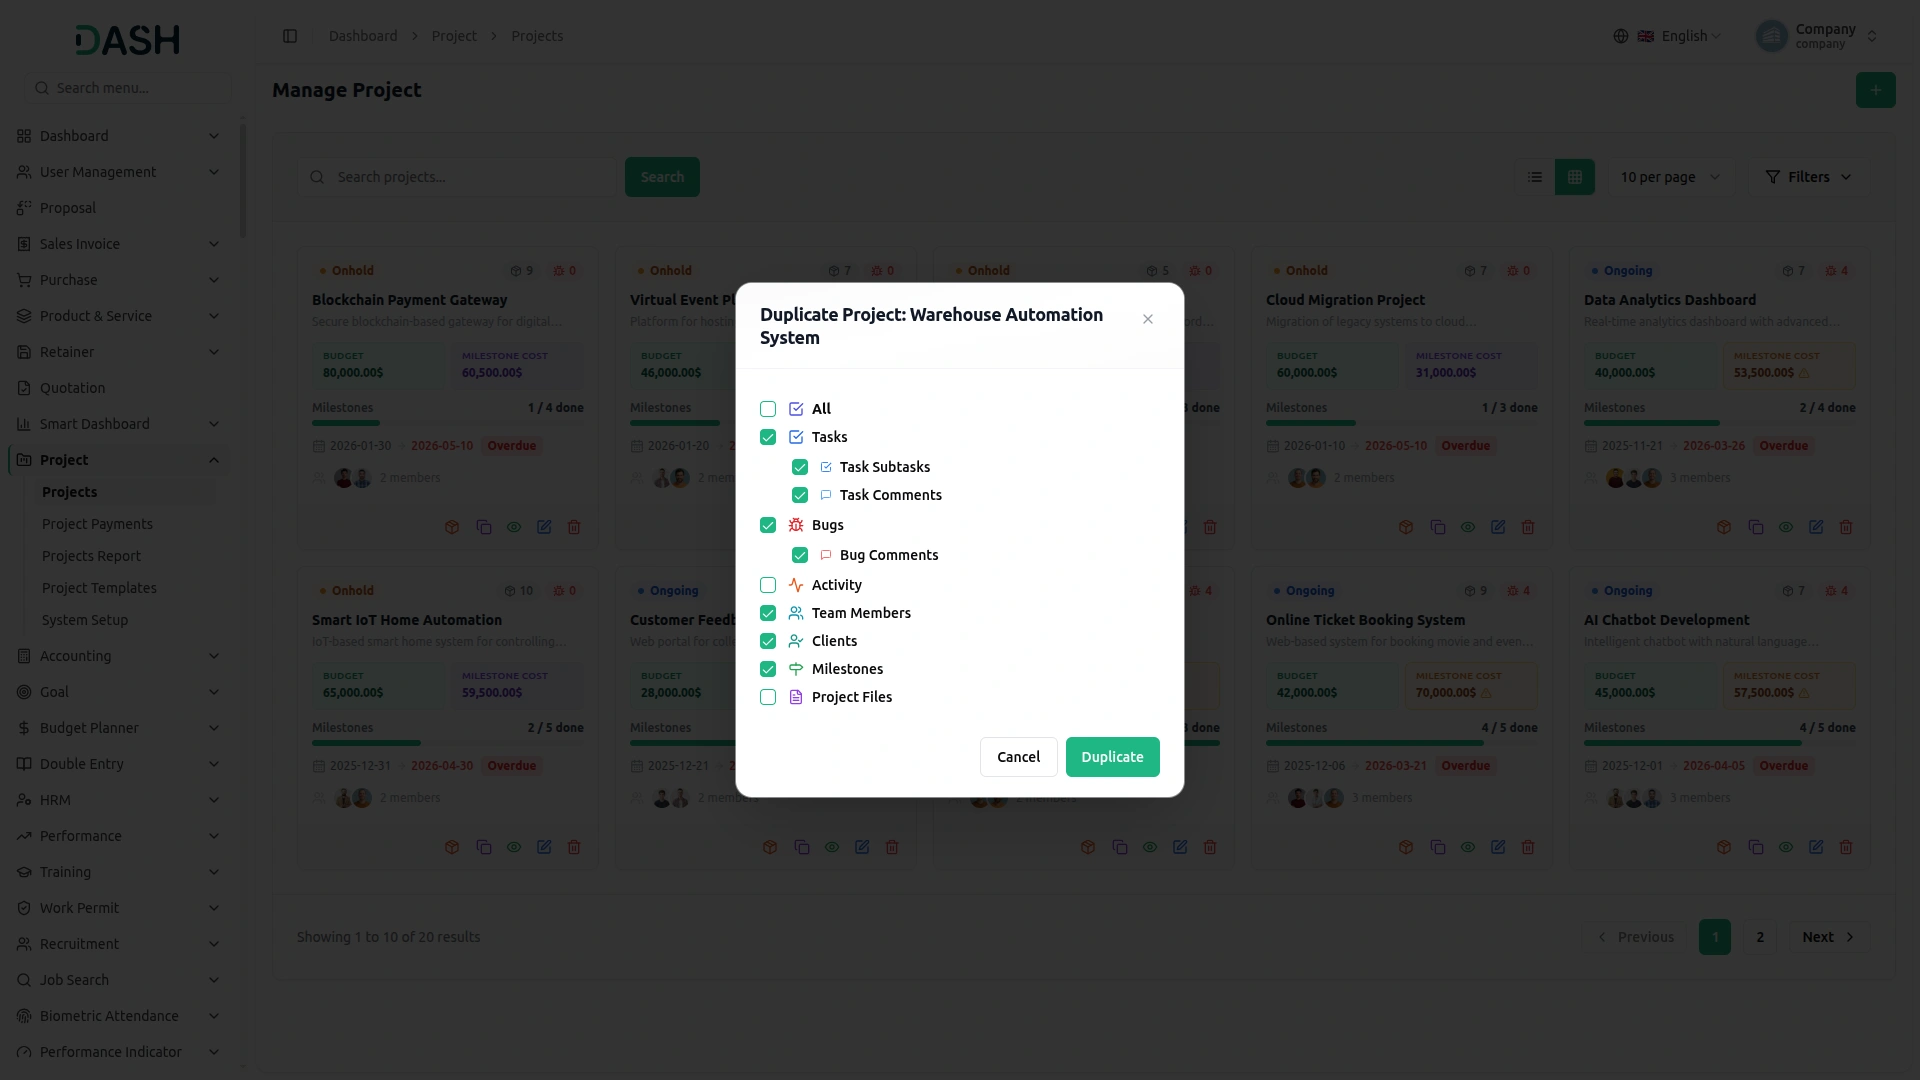
- You can use the Action option on each row: the Duplicate button to copy the project, the View button to open the project details, the Edit button to modify the project, or the Delete button to remove the project record.
- When you click the Duplicate button, the Duplicate Project window opens for that project. Select the components you want to copy into the new project: All, Tasks (with Task Subtasks and Task Comments), Bugs (with Bug Comments), Activity, Team Members, Clients, Milestones, and Project Files.
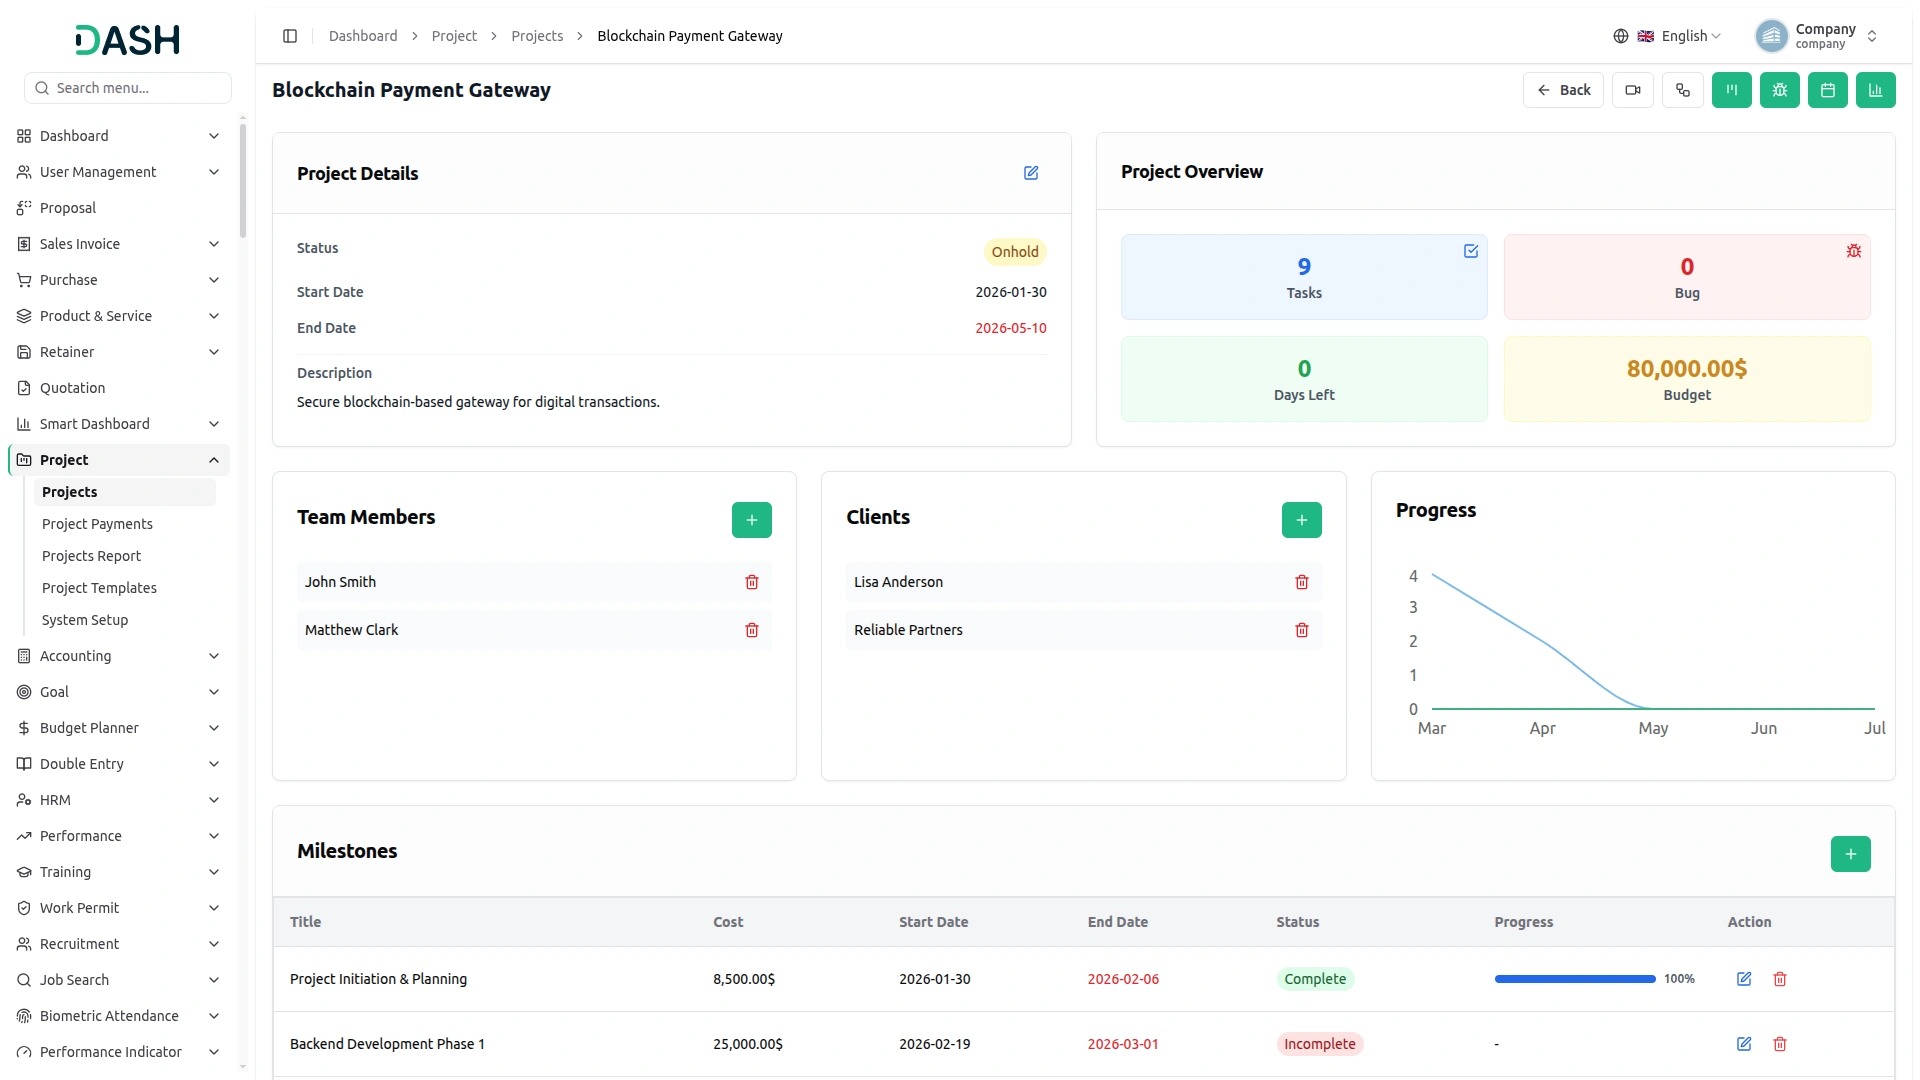
- When you click the View button, it opens the project details page. The Project Details card shows the Status, Start Date, End Date, and Description, and the Edit option lets you modify these details.
- The Project Overview card displays a quick summary of the project, including the number of Tasks, the number of Bugs, the Days Left, and the total Budget.
- The Progress section shows a chart of the project’s progress over time, and the Recent Activity section lists the latest actions taken on the project, such as ‘done’, ‘review’, ‘in progress’, and ‘todo’.
- Click the “Create” button at the top right of the card to open the Team Member window. Select the team members you want to add from the dropdown.
- The Team Members card lists everyone assigned to the project. Each entry shows the member’s name with a delete option to remove them. At login, a team member will only see the data allowed by their assigned permissions.
- Click the “Create” button at the top right of the card to open the Share To Client window. Select the clients you want to share the project with from the dropdown.
- The client’s card lists every client the project is shared with. Each entry shows the client name with a delete icon to remove access. At login, a client will only be able to see the data that matches the permissions assigned to their role.
- Click the “Create” button at the top right to open the Create Milestone window. Enter the Milestone Title, set the Milestone Cost, choose the Start Date and End Date, and enter a Summary.
- The Milestones table displays every milestone in the project, with columns for Title, Cost, Start Date, End Date, Status, Progress, and Action. The Status column shows whether each milestone is Complete or Ongoing, and the Progress column shows a completion bar with its percentage. Use the option in the Action column to edit or delete a milestone.
- The Recent Activity card displays a running log of actions across the project. Each entry shows who performed the action, what they did, such as creating a bug, moving a task between stages, creating a timesheet, or creating a milestone, and the date it happened.
- The Files card lists every file attached to the project, with the file name and type shown for each entry. Use the ‘Select files’ field or the ‘Browse’ button to choose a file to upload. Hover over a file to reveal the option at the right: view the file, download it, or delete it.
Task Kanban
- To create a new task, click the “Create Task” button at the top-right corner. In the Create Task window, the Project is pre-filled. Then select the Milestone from the dropdown, enter the Title, choose the Priority (High, Medium, or Low) from the dropdown, select a Stage from the dropdown, select the members in Assign To, set the Duration, add a Description, and click Create to save the task.
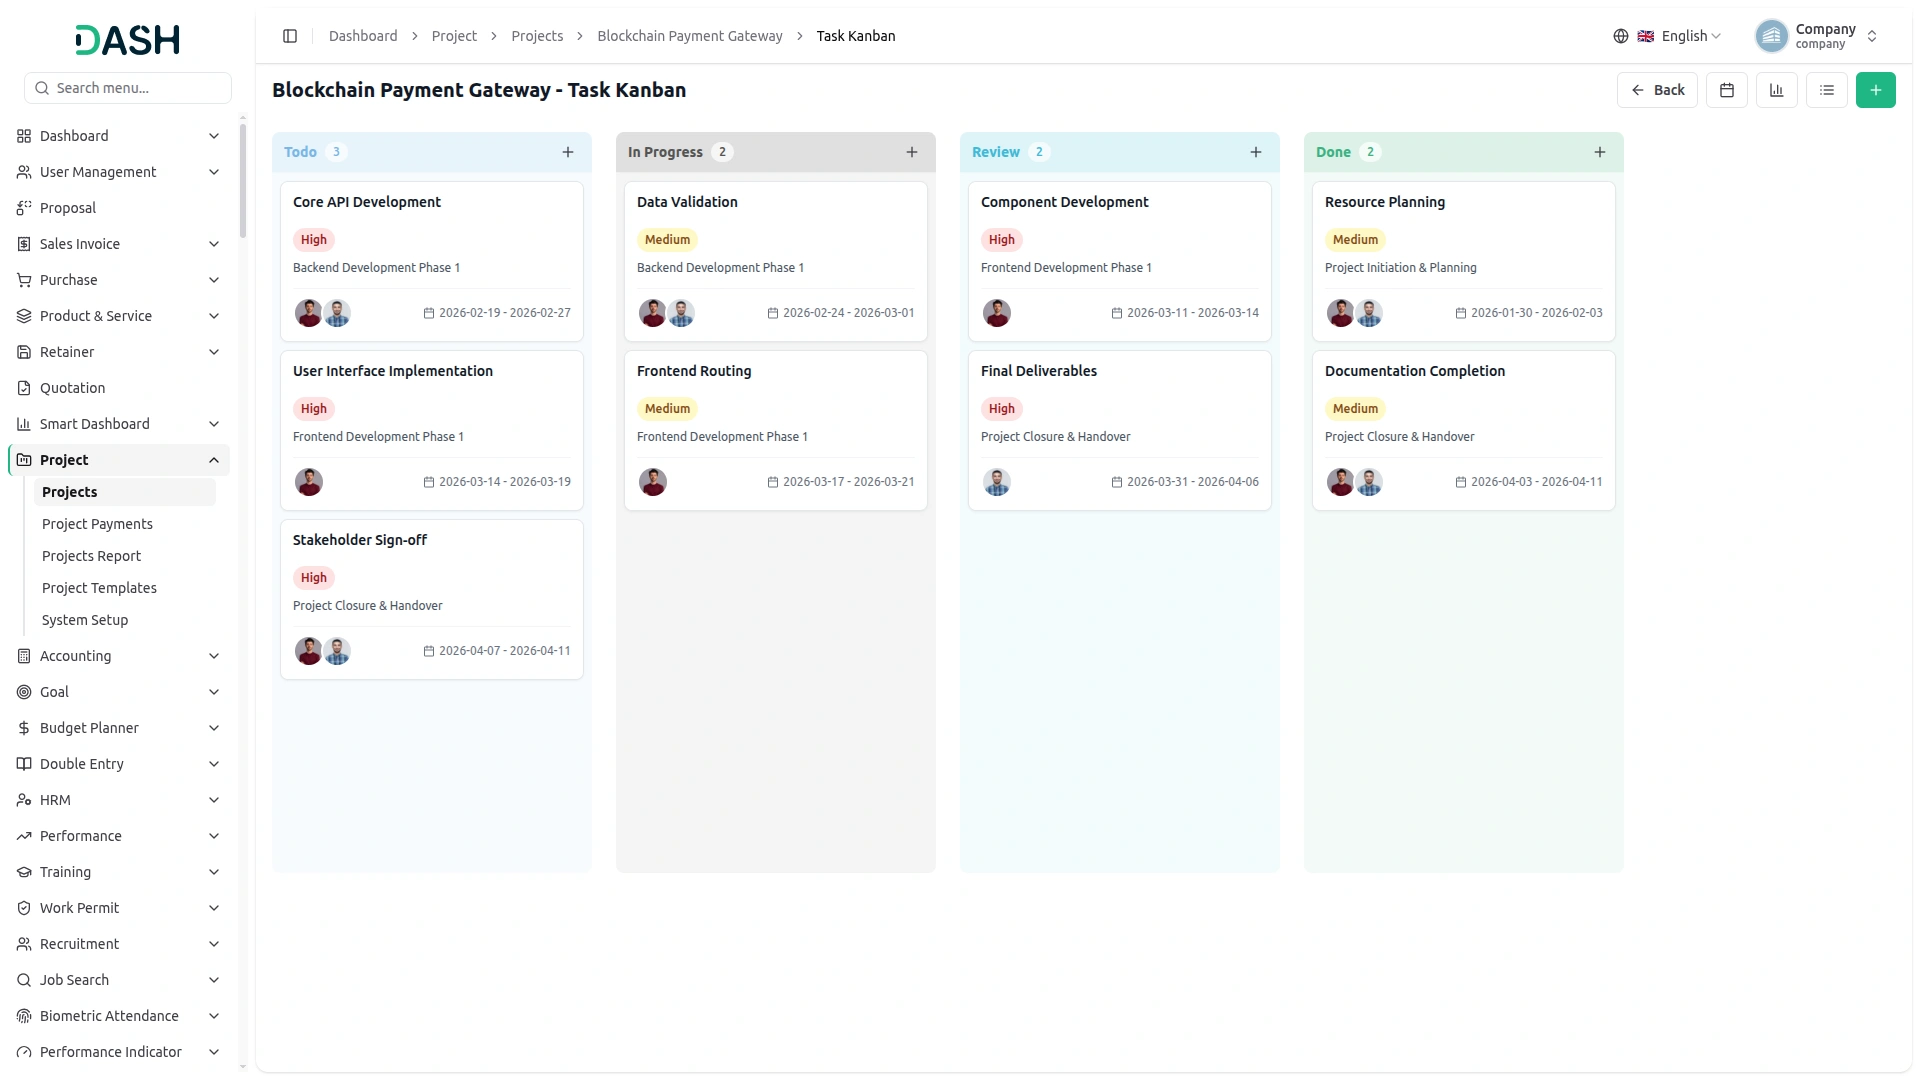
- The Task Kanban board displays all tasks arranged in columns by their Task Stage. Each column shows the stage name with a task count badge, and the background colour of each column is applied from the colours configured in the Task Stage settings. You can use the List View button to view your data in a list format.
- Each task card displays the task Title, Priority badge (Low, Medium, High), the linked Milestone name, the assigned member(s), and the task Duration (start and end date). Tasks can be moved between stages by dragging and dropping a card from one column to another. Tasks by dragging and dropping a card from one column to another.
- Hover over a task card to reveal its action menu: use the View button to open the task details, the Edit button to modify the task, or the Delete button to remove it.
- Clicking the View button opens the Task Details window, which displays the task Description, Project, Milestone, Stage, Duration, Assigned To member(s), and Priority. This window also contains three tabs: Comments, Subtasks, and Files. Use the Comments tab to add a comment and view existing comments; the Subtasks tab to add subtasks with a Subtask Name and Due Date and mark them complete using the checkbox; and the Files tab to attach files using the ‘Select files’ field or the ‘Browse’ button.
Bug
- Click the Bug button at the top right of the project page to open the bug board. To add a bug, open the “Create” Bug button. Enter the Title, set the Priority (High, Medium, Low), choose the team members in Assign To, set the Status, and enter the Description.
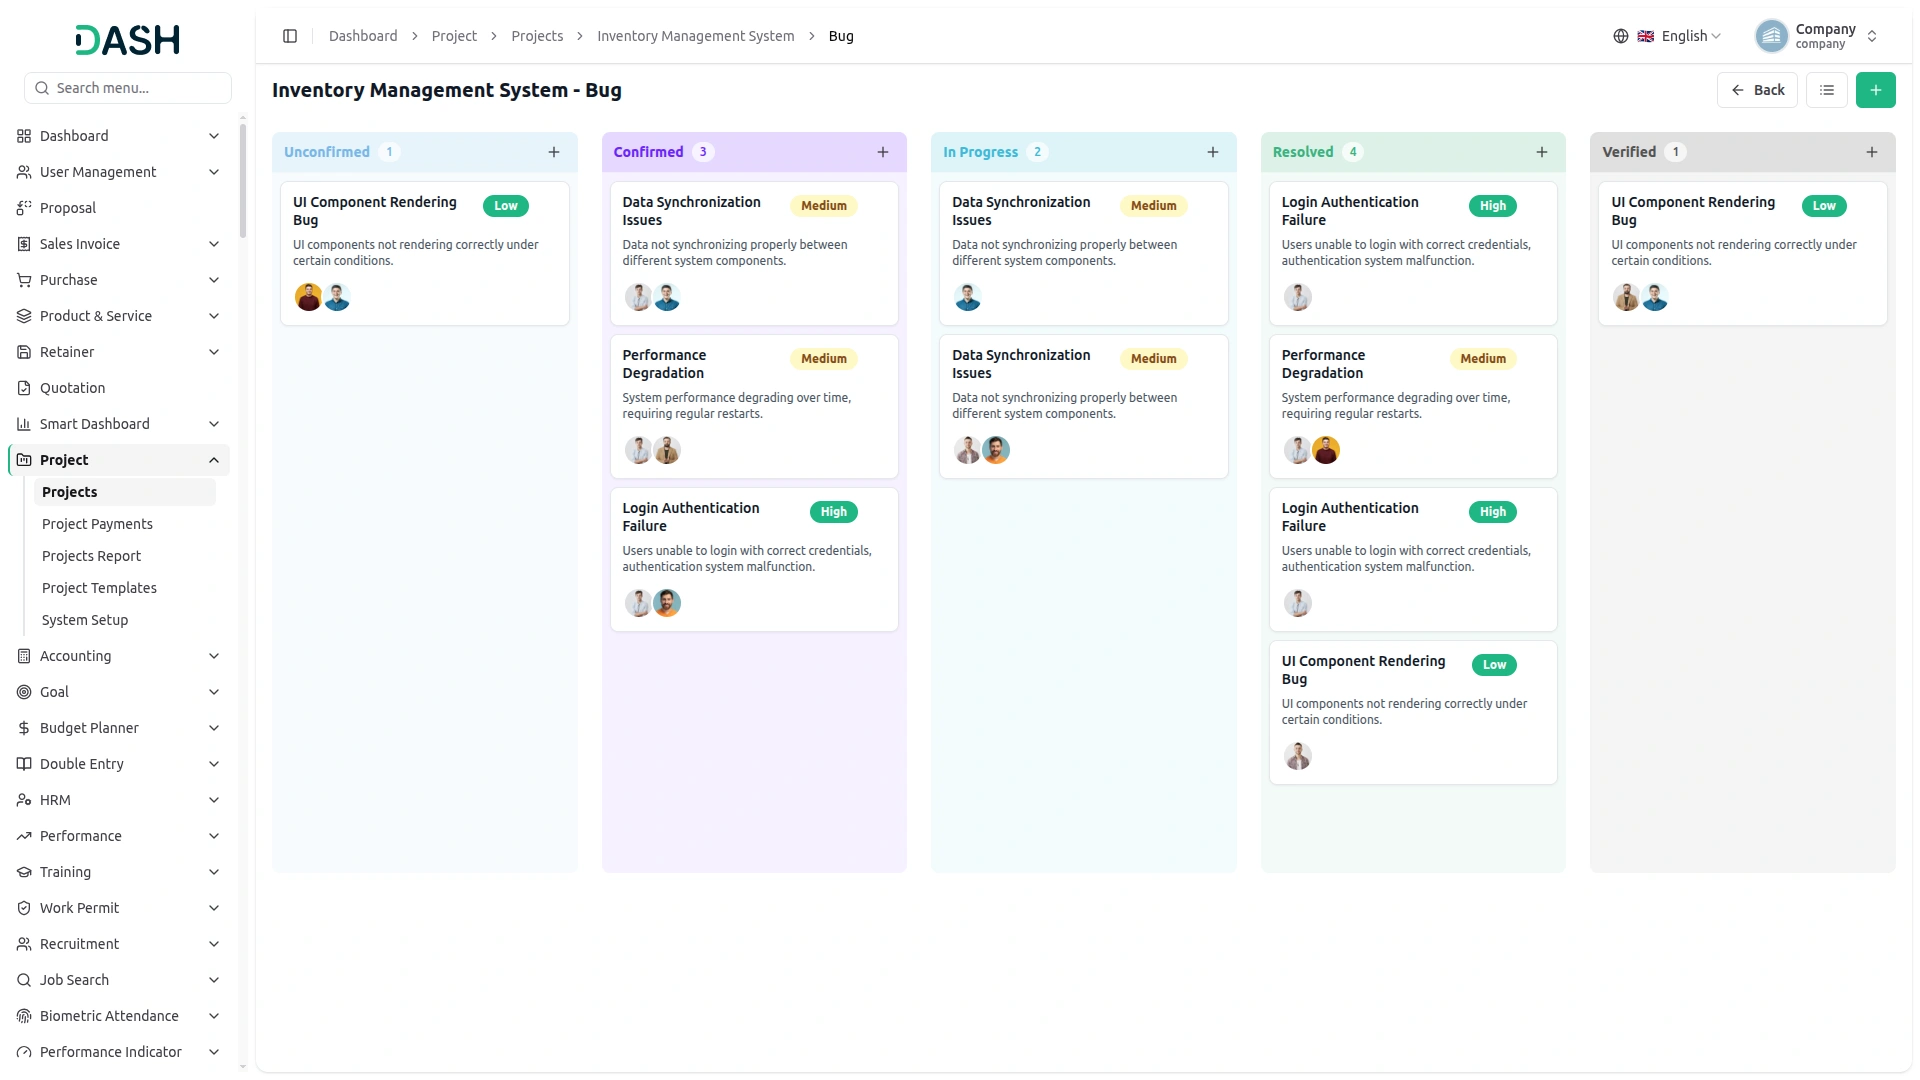
- The Bug Kanban board displays all bugs arranged in columns by their status. Each column shows the status name with a bug count badge. You can use the List View button at the top-right to view your data in a list format. Bugs by dragging and dropping a card from one column to another.
- Each bug card displays the bug Title, Priority badge (Low, Medium, High), a short description, and the assigned member(s). Bugs can be moved between statuses by dragging and dropping a card from one column to another.
- Hover over a bug card to reveal its action menu: use the View button to open the bug details, the Edit button to modify the bug, or the Delete button to remove it.
- Clicking the View button opens the Bug Details window, which displays the bug Description, Project, Status, Assigned To member(s), and Priority. This window also contains two tabs: Comments and Files. Use the Comments tab to add a comment and view existing comments (each comment shows the author, date, and a delete option) and the Files tab to attach files using the ‘Select files’ field or the ‘Browse’ button.
Calendar View
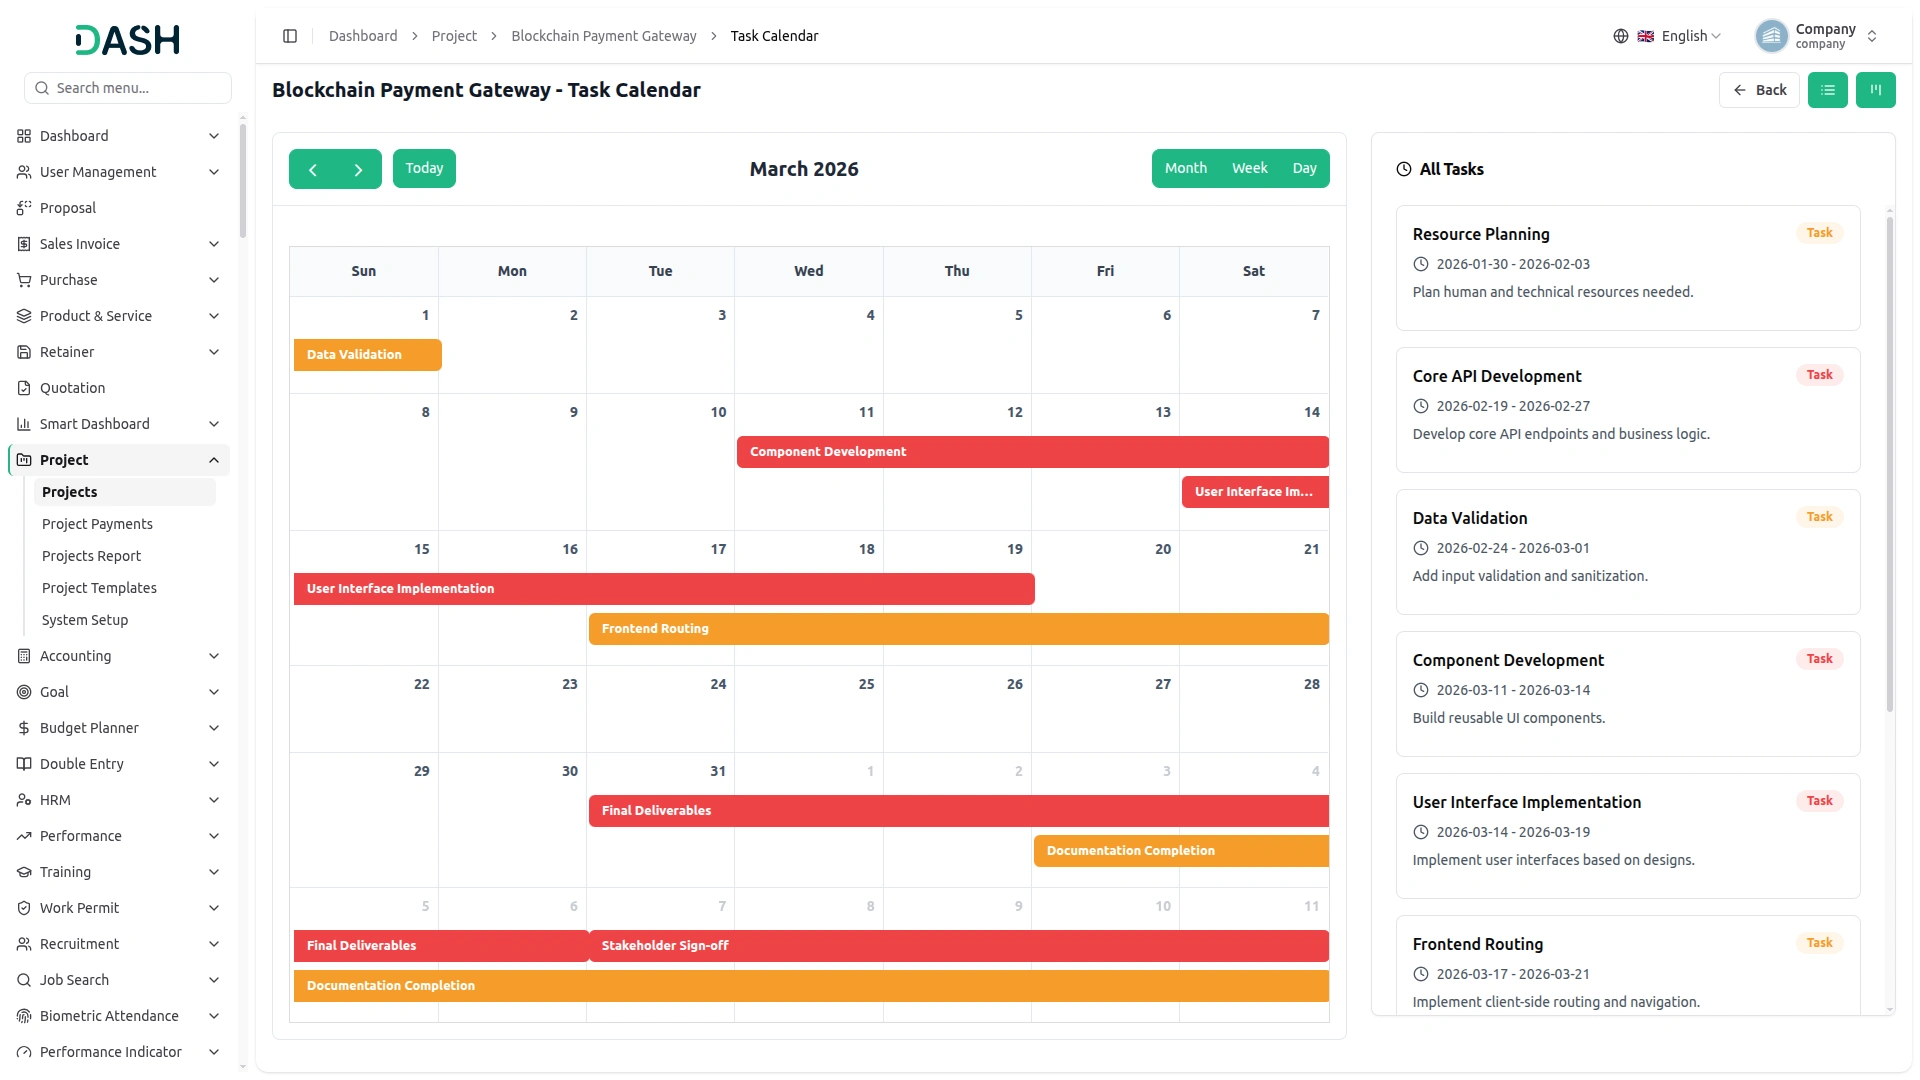
- Click the Calendar View button at the top right of the project page to open the Task Calendar. The calendar displays all project tasks by date, and you can switch between Month, Week, and Day views or use the navigation arrows and Today button to move between dates.
- The All Tasks panel on the right lists every task with its date range and description. Use the icons at the top right to toggle between the List and Kanban views.
Gantt Chart
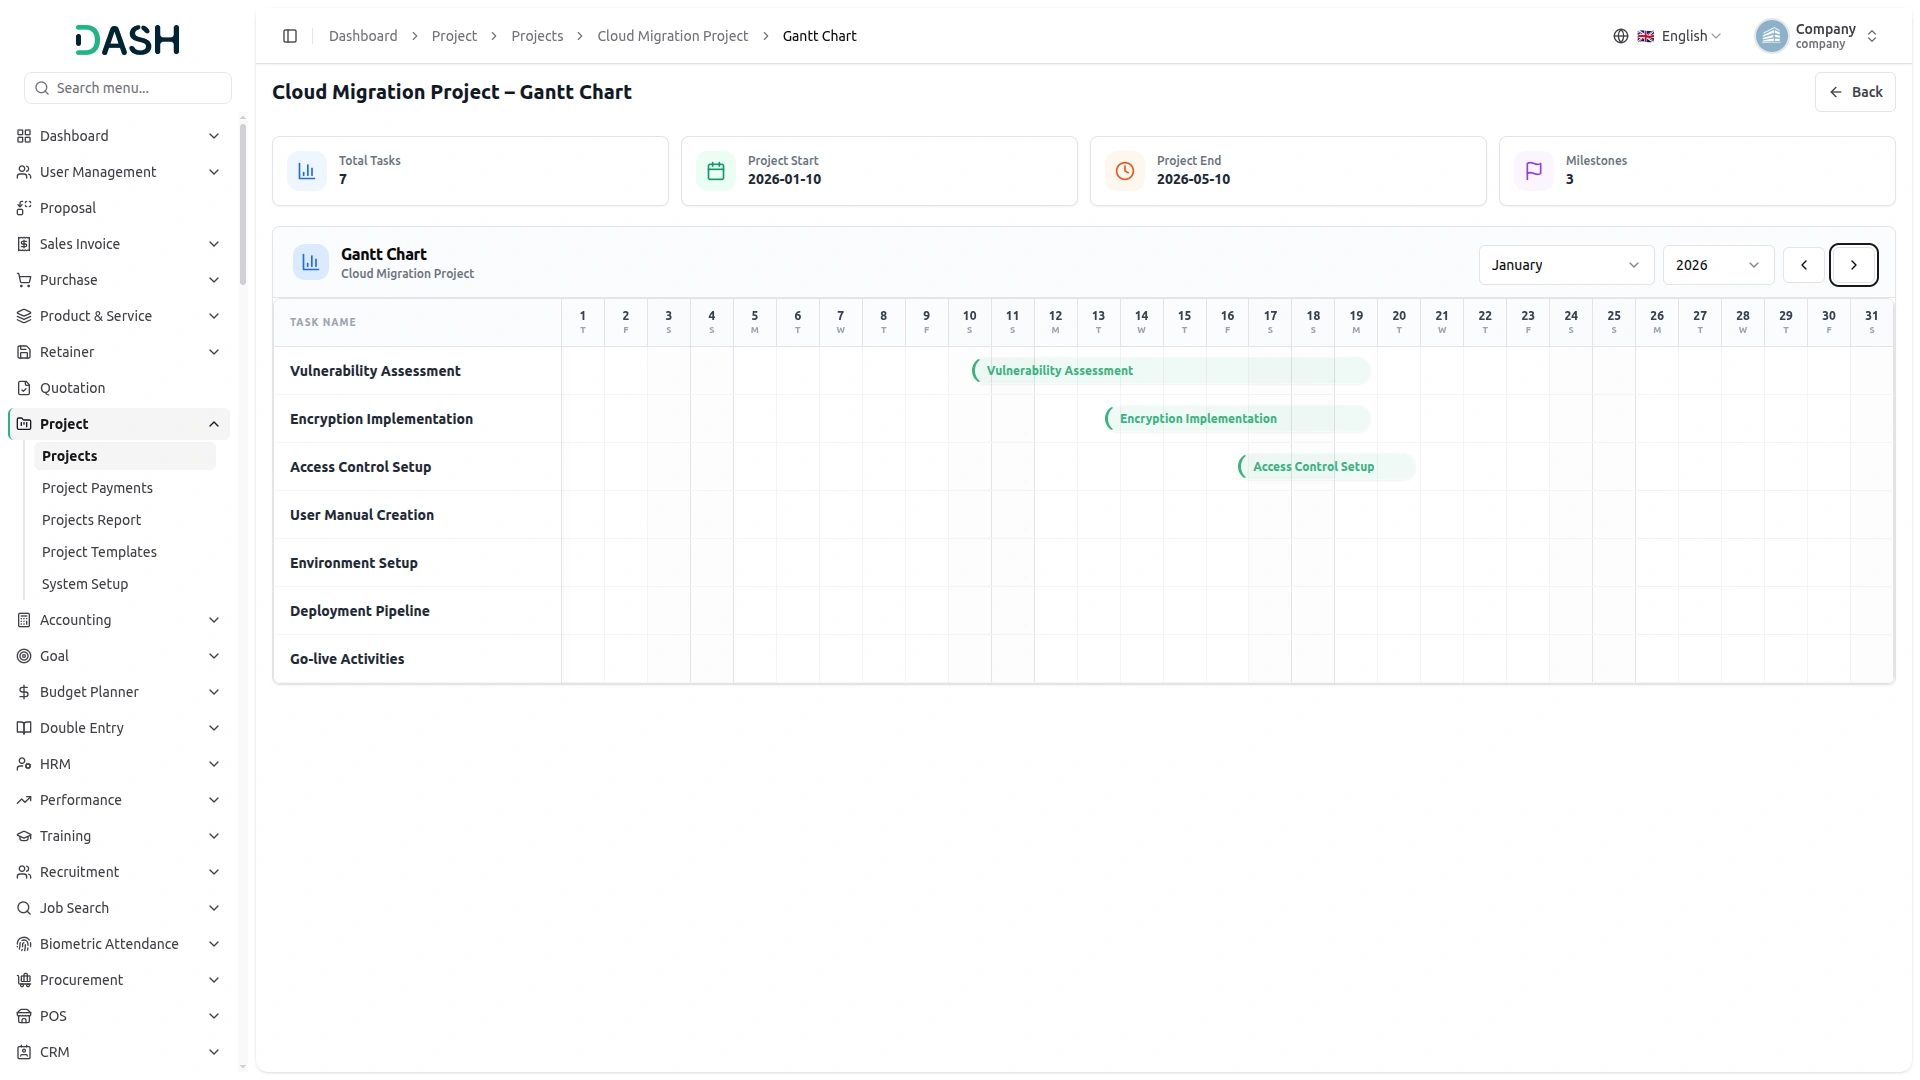
- The top of the page displays four summary cards: Total Tasks (the total number of tasks in the project), Project Start (the project start date), Project End (the project end date), and Milestones (the total number of milestones).
- The Gantt Chart panel shows all tasks plotted along a timeline grid. The left column lists each Task Name, and the timeline across the top displays the days of the selected month with their day-of-week labels. Use the Month and Year dropdowns at the top-right to choose the period.
- Each task is shown as a horizontal bar on the timeline, positioned according to the date range (Duration) set for that task in its Edit window. The bar spans from the task’s start date to its end date, so changing a task’s duration updates where its bar appears on the chart.
- The current date is marked on the timeline by a red Today indicator with a vertical dashed line, making it easy to see which tasks are due, in progress, or upcoming relative to today.
Project Payments
- To add a new payment, click the “Create” button at the top of the Project Payments page.
- Under ‘Payment Details’, set the Payment Date and Due Date; select the Project from the dropdown (which comes from the project section); and choose the Customer from the dropdown (the customer is selected after a project is chosen). Then select the Bank Account from the dropdown, enter the Payment Terms, and add optional Notes.
- Under Payment Items, click “+ Add Item” to add a row. Select the Milestone, enter the Price, and set the Discount % for each item. The Total for each row is calculated automatically, and the Delete Action lets you remove a row. The Payment Summary on the right shows the Subtotal, Discount, and Total.
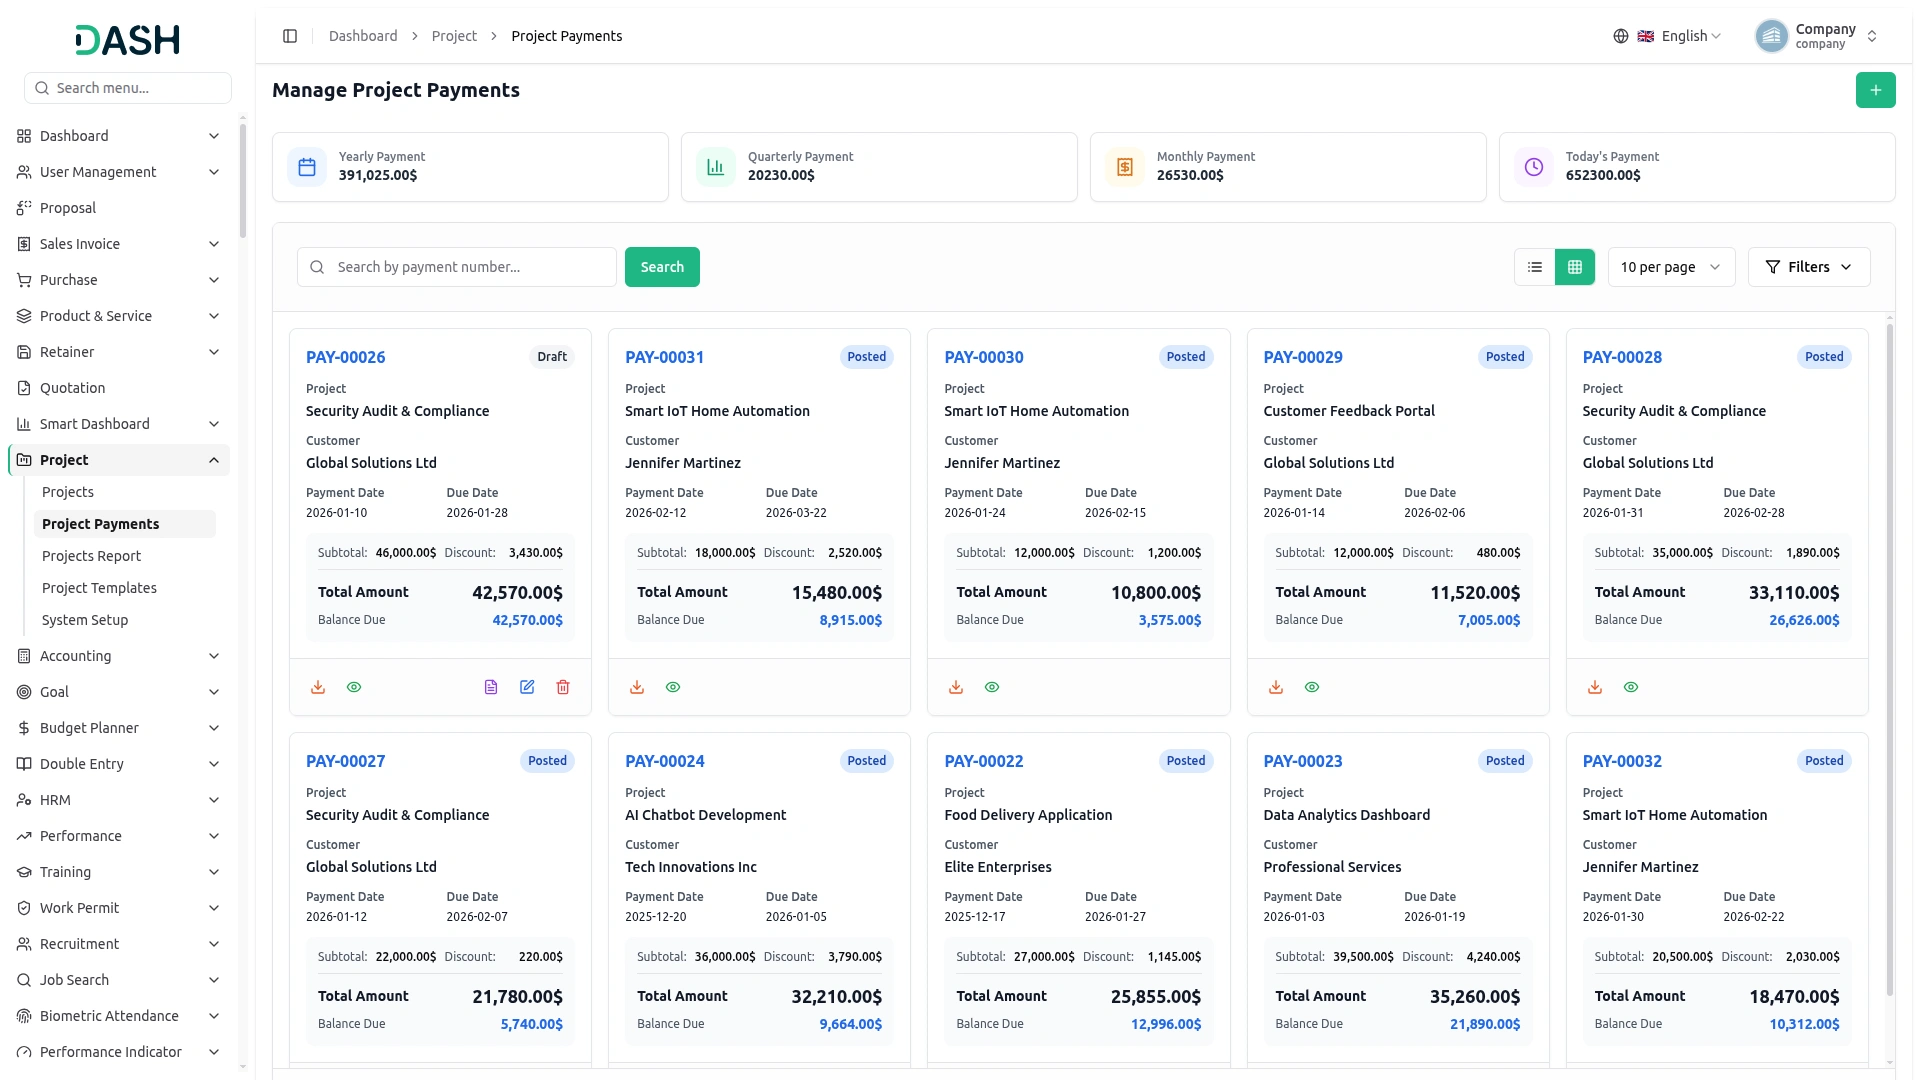
- The Manage Project Payments page opens with a row of summary cards at the top: Yearly Payment, Quarterly Payment, Monthly Payment, and Today’s Payment, showing the total payment amounts for each period.
- Use the Search by payment number field with the Search button to find a specific payment. The toggle at the top-right switches between List View and Grid View, and the Filters button reveals a filter panel to filter by Project, Customer, Status, and Date Range. Click Apply to run the filter or Clear to reset it.
- Each payment is shown as a card displaying the payment Number, a status badge (Posted or Draft), the Project, Customer, Payment Date, Due Date, Subtotal, Discount, Total Amount, and Balance Due.
- Each card has an action row at the bottom: use the download option to download the payment PDF, the View option to open the payment details, and for Draft payments the additional Post payment to finalize, Edit, and Delete option to post, modify, or remove the payment.
- When clicking the View option opens the Project Payment detail page. The header shows the payment number, status badge, Total Amount, the Project, Customer (with email), and Details (Payment Date, Due Date, Terms), along with Download PDF and Post Payment buttons, the Balance Due, and any Notes. Below this, the Payment Items table lists each Milestone with its Price, Discount (percentage and amount), and Total, followed by the Subtotal, Discount, Total Amount, and Balance Due.
Project Reports
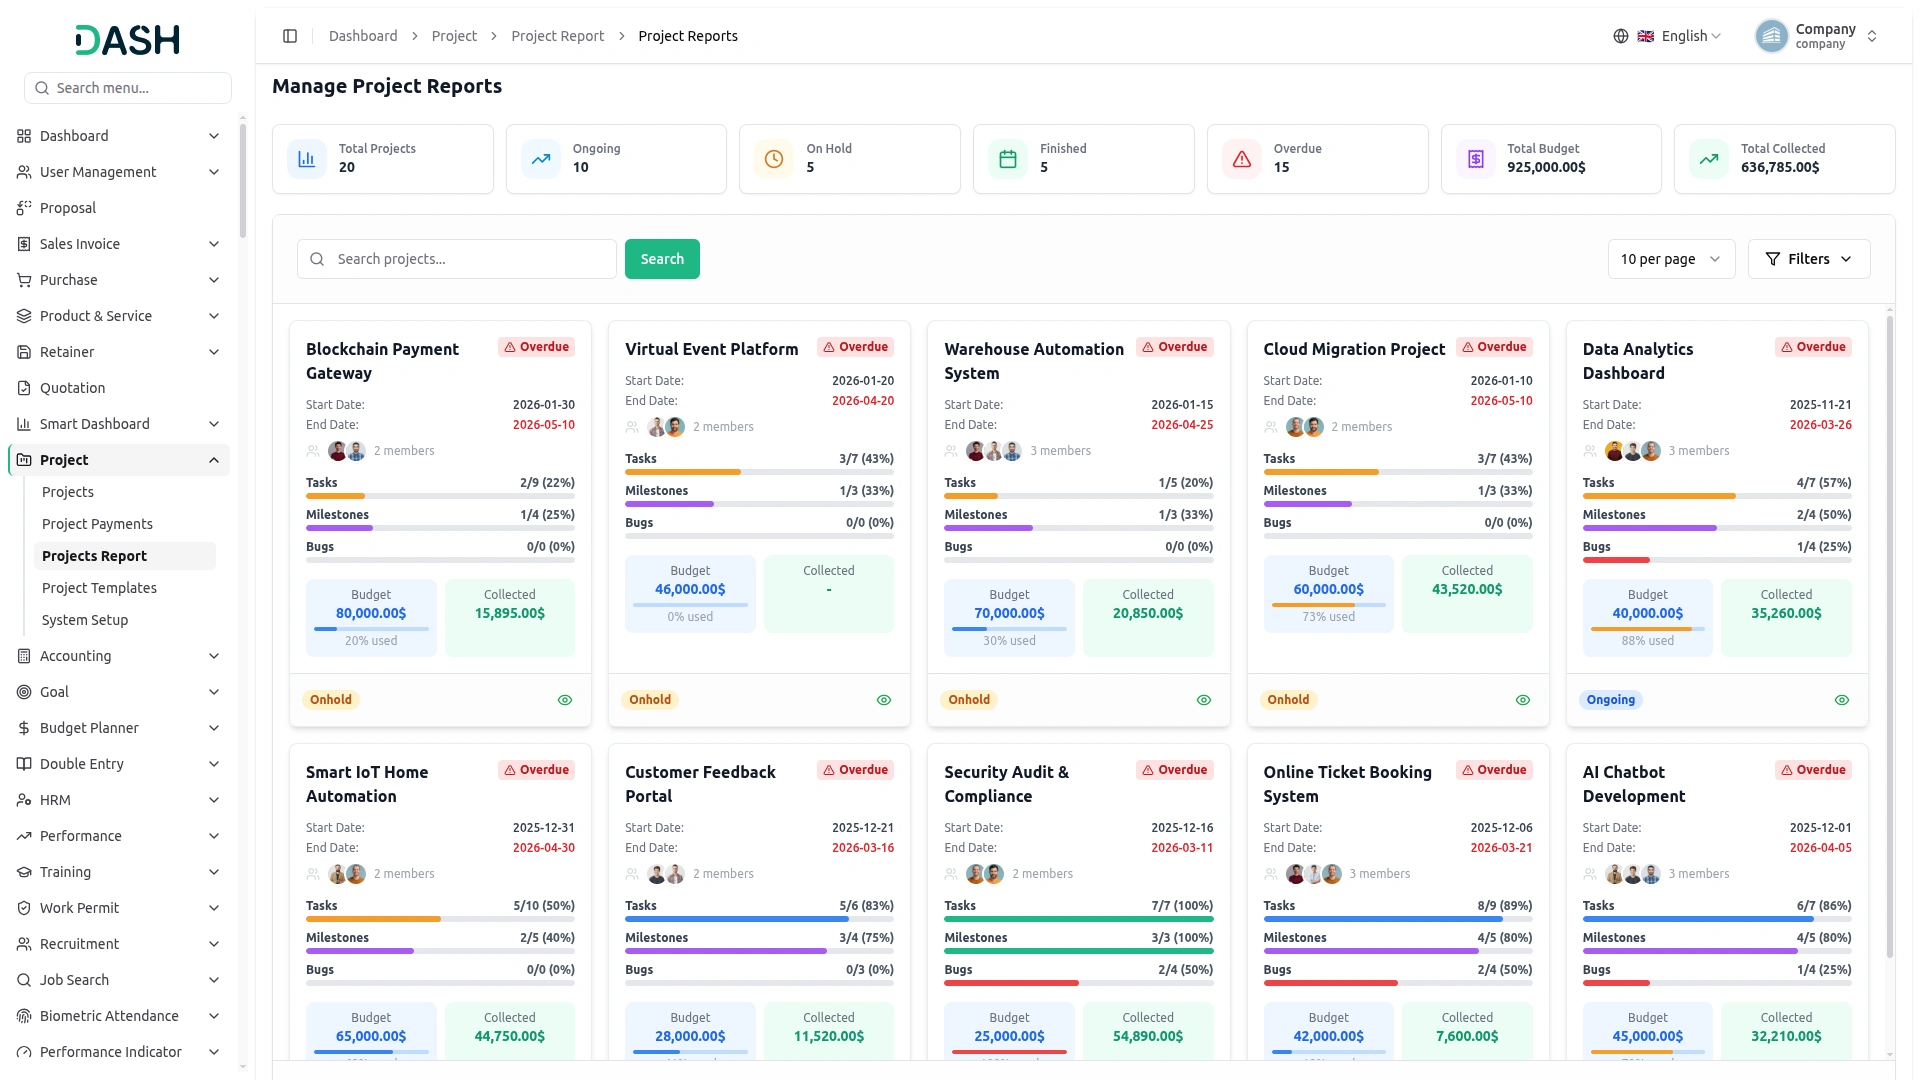
- The Manage Project Reports page opens with a row of summary cards at the top: Total Projects, Ongoing, On Hold, Finished, Overdue, Total Budget, and Total Collected, giving an at-a-glance overview across all projects.
- Use the Search button to find a specific project. The Filters button reveals a filter panel where you can filter by Status using the dropdown and by a Date Range using the date picker. Click Apply to run the filter or Clear to reset it.
- Each project is shown as a report card displaying the project name, Start Date and End Date, the assigned member(s), and progress bars for Tasks, Milestones, and Bugs (each with a completed/total count and percentage). The card also shows the Budget and Collected amounts with the percentage of budget used, and a status badge (such as Onhold). Click the View option on a card to open its full report.
- When you click the view button, the Project Report page opens with a header showing the project name, its status badge, the description, the project date range, and the budget. Below this is a row of summary cards: Tasks Done, Bugs Resolved, Milestones, Overdue Tasks, Team Members, and Timeline (days left).
- This page contains five tabs: Overview, Tasks, Bugs, Financial, and Team & Milestones (the Tasks and Bugs tabs show a count badge).
- The Overview tab displays a Task Status Distribution pie char with a legend showing each count and a Task Priority Distribution bar chart (Medium, High, and Low).
- The Tasks tab shows a Task List with a completed/overdue summary in the top-right. Each row lists the task Title, Priority badge, Stage (with a coloured status dot), Assigned To member(s), Start Date, End Date (overdue dates appear in red), and a Subtasks progress bar with its completed/total count and percentage.
- The Bugs tab shows a Bug Status Distribution chart, a Bug Priority Distribution chart, and a Bug List with a resolved summary. When the project has no bugs, each section displays an empty state such as “No bug data available” or “No bugs found for this project.”
- The Financial tab displays four summary cards: Total Budget, Milestone Costs, Total Invoiced, and Collected (Posted). Below these is a Budget Utilisation section with progress bars for Milestone Costs vs Budget, Total Invoiced vs Budget, and Amount Collected vs Budget (each with an amount and percentage), followed by a Payment List table showing the payment Number, Payment Date, Due Date, Amount, and Status badge.
- The Team & Milestones tab shows a Team Productivity table listing each member’s Name, Tasks Assigned, Tasks Done, Task Rate (with a progress bar), Bugs Assigned, and Bugs Resolved. Below it, a Milestones table lists each milestone’s name, Progress bar, Cost, Billed amount, Status badge (Complete, Ongoing, Incomplete), Start Date, and End Date, with a complete/total summary in the top-right.
Categories
Related articles
- Tap – WorkDo Dash SaaS Add-On Guide
- vCard – WorkDo Dash SaaS Add-On Guide
- Cleaning Management – WorkDo Dash SaaS Add-On Guide
- Save Reply – TicketGo Add-On Guide
- User Manual – HRM SaaS
- Requests – WorkDo Dash SaaS Add-On Guide
- PetCare – WorkDo Dash SaaS Add-On Guide
- Payfort – BookingGo SaaS Add-On Guide
- ZATCA – WorkDo Dash SaaS Add-On Guide
- Google Wallet – WorkDo Dash SaaS Add-On Guide
- Tags – TicketGo Add-On Guide
- User Manual – Taskly SaaS
We're Here to Help - Let's Talk
Have questions about our solutions, customization services, or business tools? Our team is here to help you. let's talk.