User Manual – BookingGo SaaS
Optimize business management with BookingGo SaaS user manual. Effortlessly handle appointments and add-ons with this comprehensive solution.
- 1.Introduction
- 2. Registration Process
- 3. Super Admin Login Process
- 4. Super Admin Access and Capabilities
- 5. Subscription Module
- 6. Admin Login Process
- 7. Our Complimentary Add-Ons
- 8. Our Premium Add-ons
- 9. Dashboard
- 10. User Management System
- 11. Business Module
- 12. Customer Management Module
- 13. Custom Status Module
- 14. Appointment Module
- 15. Appointment Calendar
- 16. Promo Codes
- 17. Service Tax
- 18. Contacts
- 19. Subscribers
- 20. Settings
- 21. Conclusion
1.Introduction
BookingGo SaaS revolutionizes business management by offering a comprehensive solution to handle every aspect of your operation. From seamlessly managing business hours, appointments, and break hours to overseeing users, customers, appointment calendars, and system settings, BookingGo SaaS provides an intuitive and efficient platform. With customizable features and automated processes, businesses can enhance time efficiency, improve customer experiences, and maintain superior organization. BookingGo SaaS adapts to diverse industries, offering scalability and flexibility to meet unique business needs. Elevate your business operations, simplify complex tasks, and unlock success with BookingGo’s user-friendly interface and powerful features.
2. Registration Process
The registration process in BookingGo SaaS enables admins to create accounts and access the platform seamlessly. This documentation outlines the step-by-step procedure for administrators to register and gain entry into the system.
2.1 Introduction to the Registration Process
The registration process is designed to allow administrators to create their accounts within the BookingGo SaaS platform, granting them access to its functionalities and features.
2.2 Accessing the Login Page
Admins navigate to the designated login page of the BookingGo SaaS platform.
2.3 Initiating Registration
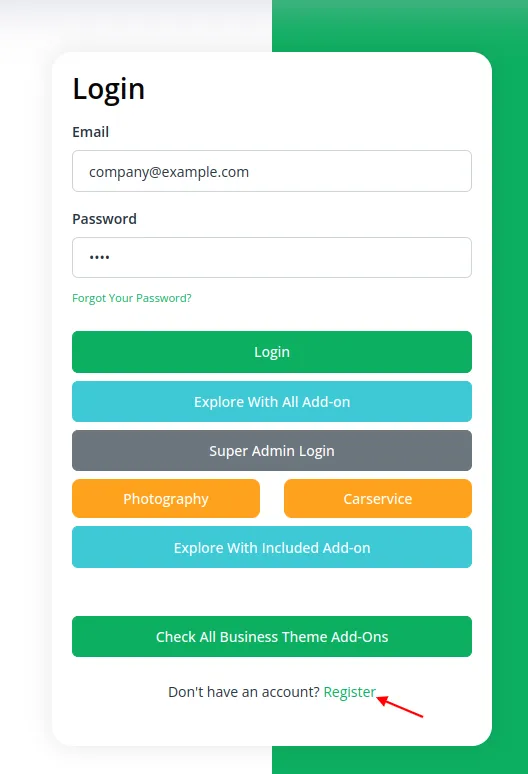
Upon reaching the login page, admins can “Register” alongside the login form.
2.4 Providing Credentials
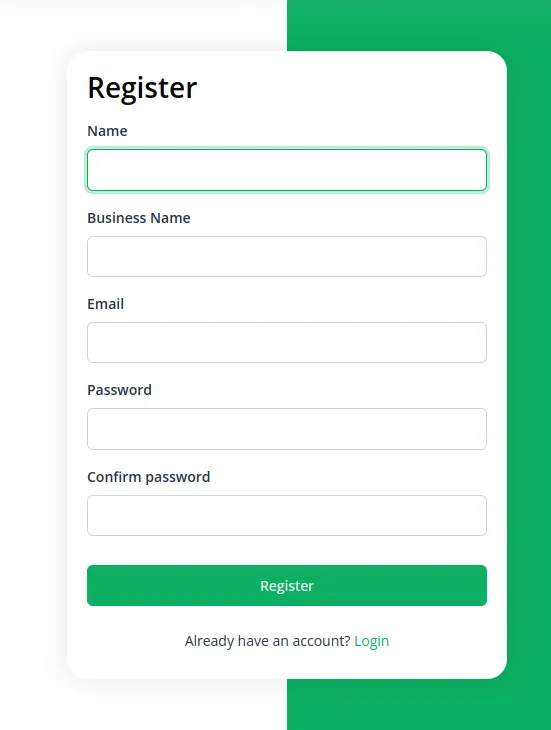
To begin the registration, admins are prompted to input the necessary credentials, including email addresses, passwords, and any other required information.
2.5 Successful Registration
Once the verification process is completed, the registration is successfully processed. Admins now have their account credentials to log in to the platform.
2.6 Exploring Platform Features
With the registered account, admins can explore and access the diverse features and functionalities BookingGo SaaS offers.
2.7 Seamless Access
- Subsequent logins can be initiated using the registered email and password on the login page.
Admins can seamlessly register themselves on the BookingGo SaaS platform by following these steps.
3. Super Admin Login Process
The Super Admin login process in BookingGo SaaS provides access to the platform’s high-level administrative controls. Follow these steps to log in:
3.1 Access the Login Page
Open your web browser and navigate to the BookingGo SaaS login page.
3.2 Enter Credentials
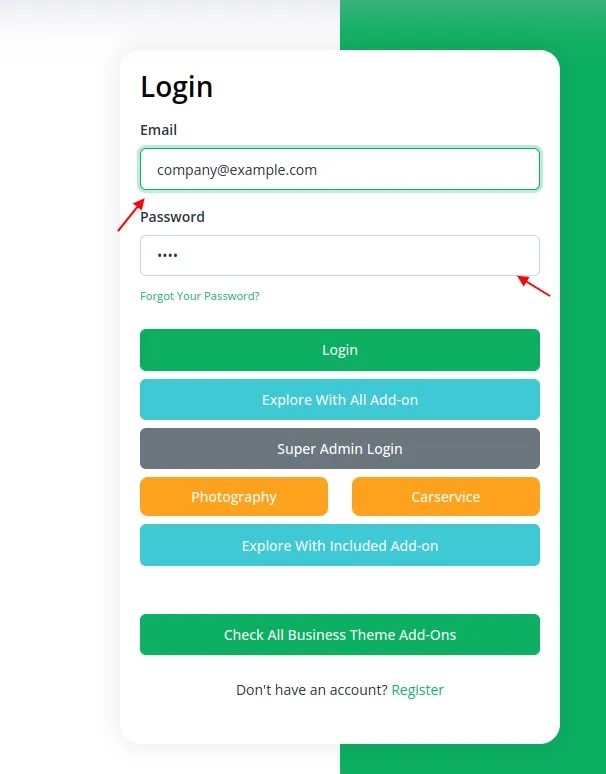
Provide the Super Admin’s registered email address and password.
3.3 Super Admin Login
Click the “Super Admin Login” button to authenticate.

3.4 Dashboard Access
After successful authentication, access the Super Admin dashboard.

3.5 Manage Admin Functions
Use the dashboard to manage users, modules, settings, and more.
Following these steps, you can log in as the Super Admin and manage the essential aspects of the BookingGo SaaS platform.
4. Super Admin Access and Capabilities in BookingGo SaaS
As a Super Admin in BookingGo SaaS, you have comprehensive control over the platform, allowing you to manage users, subscriptions, orders, settings, and more. Here’s a detailed breakdown of your access and capabilities:
4.1 Dashboard
Upon logging in, the Dashboard presents a high-level overview of the platform’s activity and key metrics, including:
- Total Users : The total number of users registered on the platform.
- Paid Users :The number of users with active paid subscriptions.
- Total Orders : The total number of orders placed.
- Order Amount : The cumulative amount of revenue generated from orders.
- Total Plans : The total number of subscription plans available.
- Popular Plans : The most popular subscription plans based on user adoption.
- Site Link : A direct link to the main site.
- Chart of Recent Orders : A visual representation of recent order trends.
4.2 Subscribers
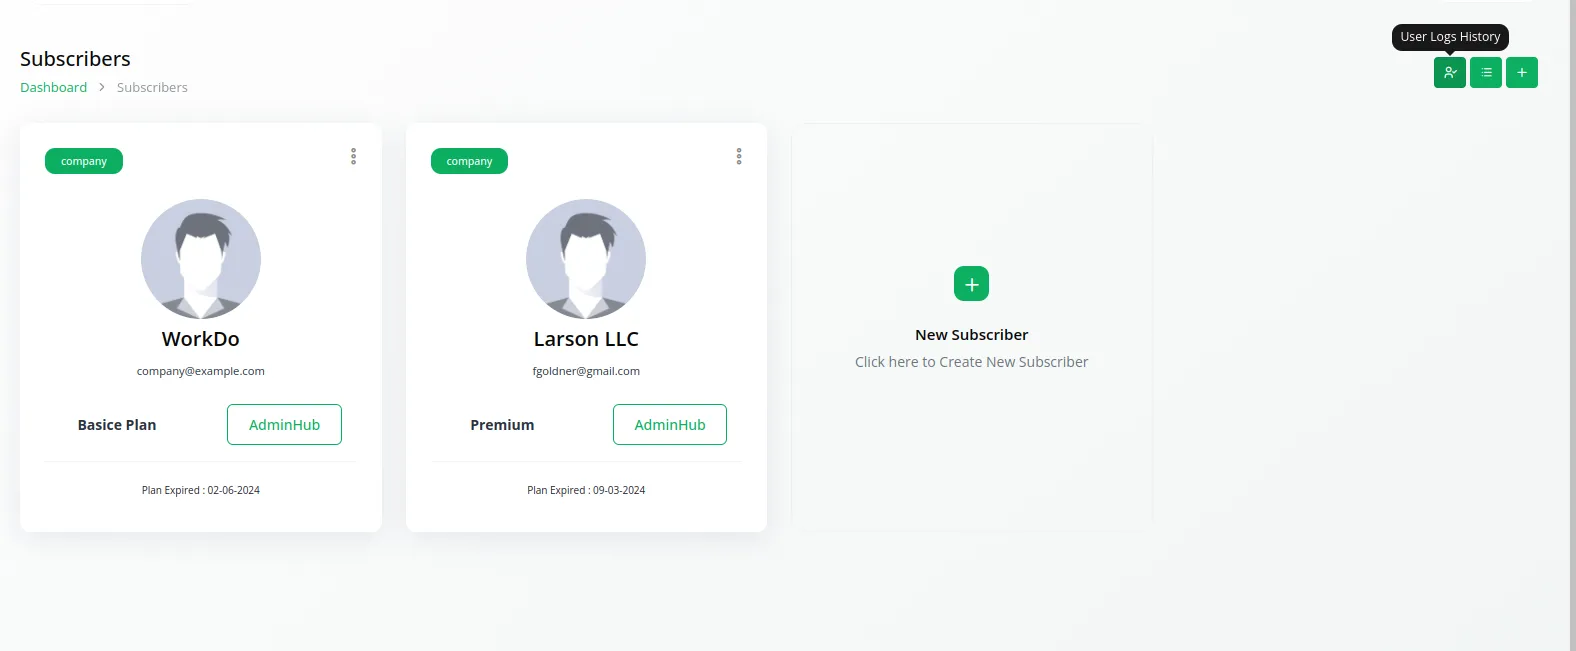
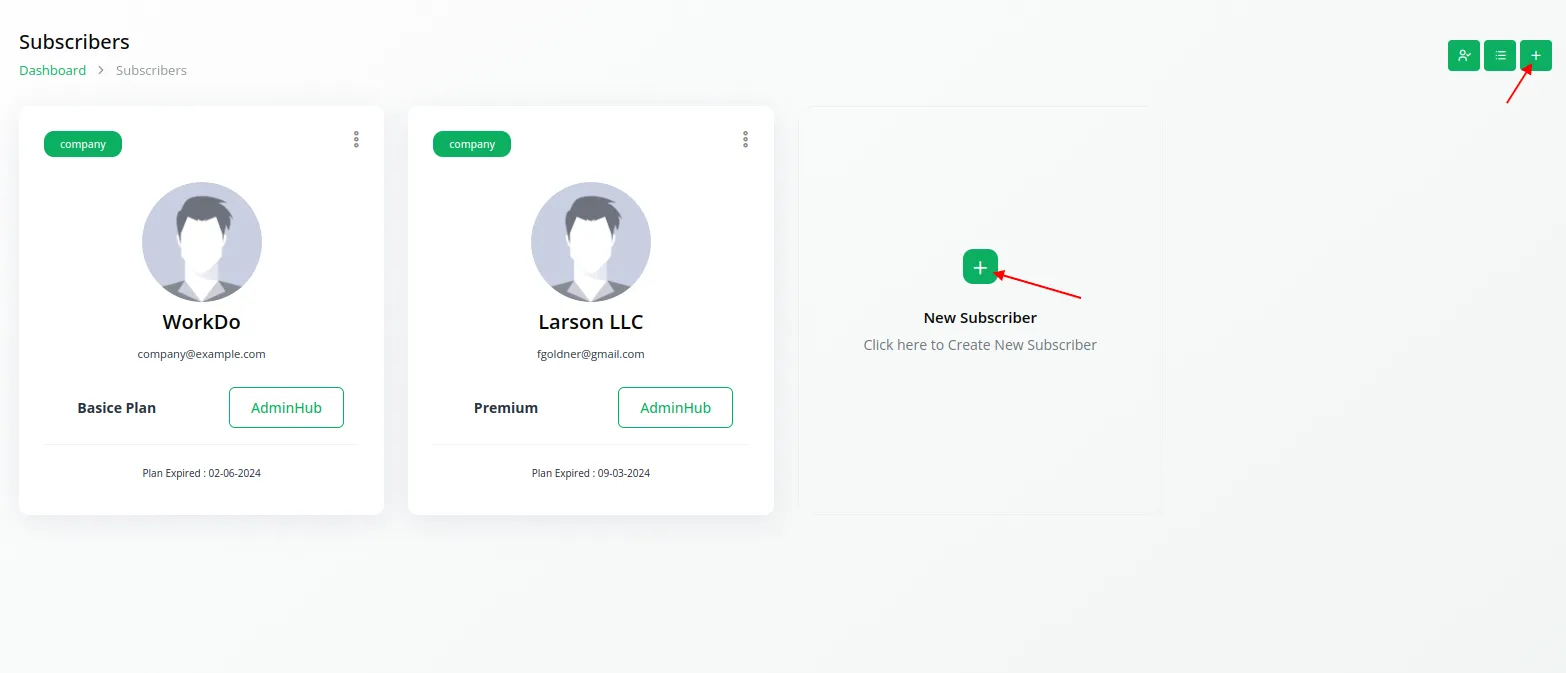
The Subscribers page allows you to manage the user base effectively:
-
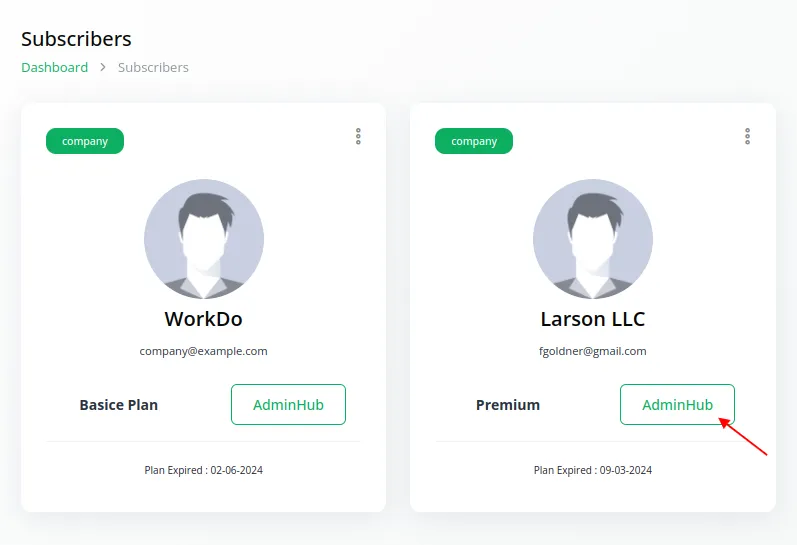
List of Subscribers : View all subscribers along with their subscription plans.
-
Admin Hub Button : Access detailed company information for each subscriber.
-
User Log History : Monitor and review the activity logs of users.
-
Create New Subscribers : Add new subscribers manually.
5. Subscription Module
This module is divided into four key pages:
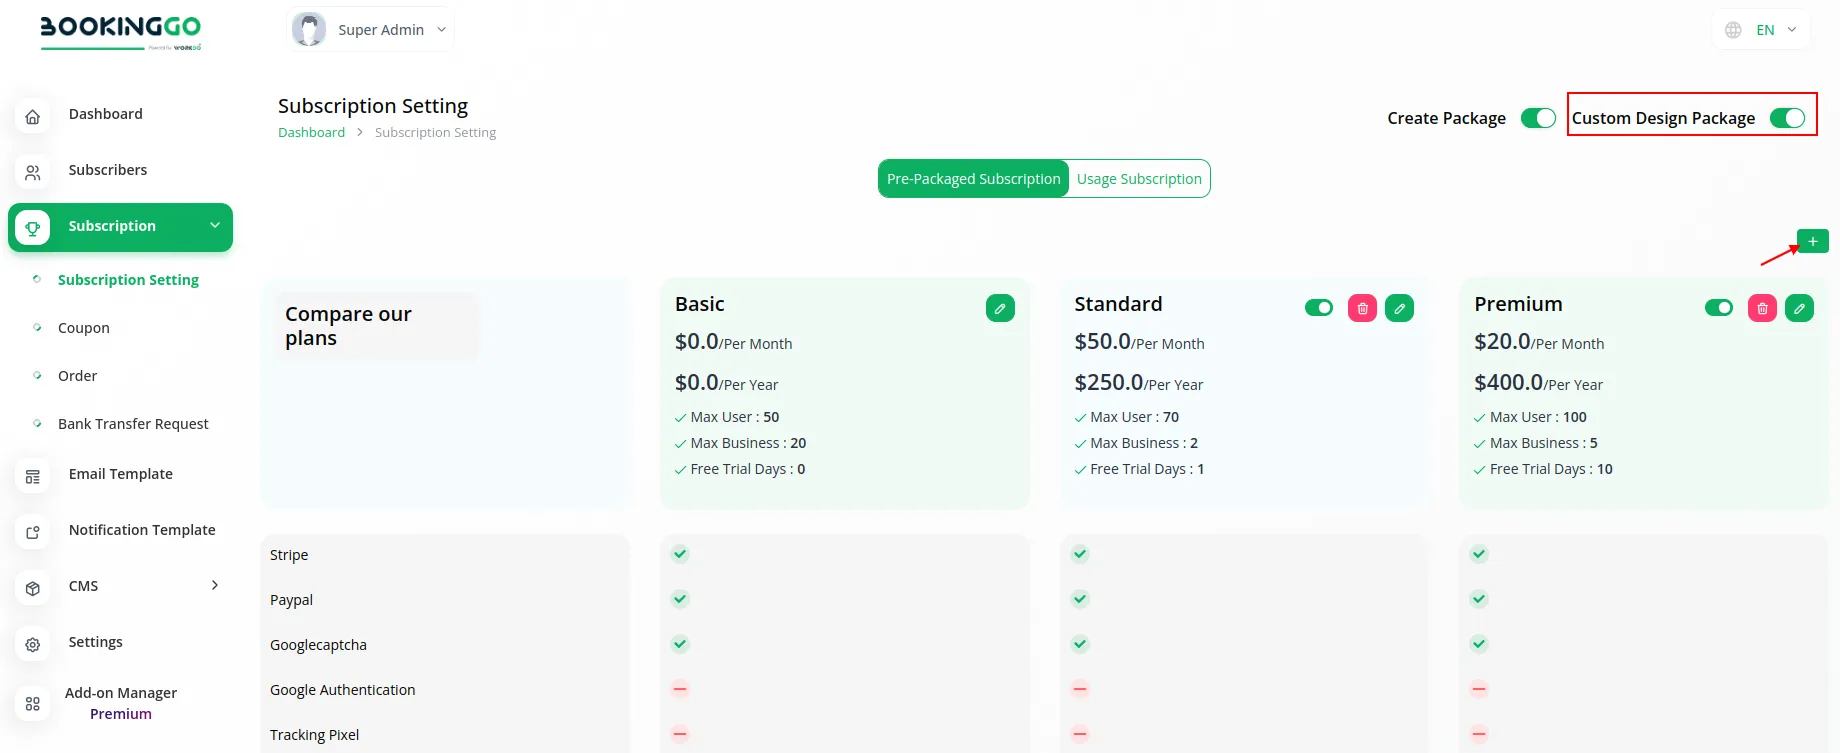
5.1 Subscription Plan
- Create Subscription Plans : Design new subscription plans.
- Manage Modules and Functions : Add or delete features from existing plans.
- Custom Design Packages : Create tailor-made subscription packages.
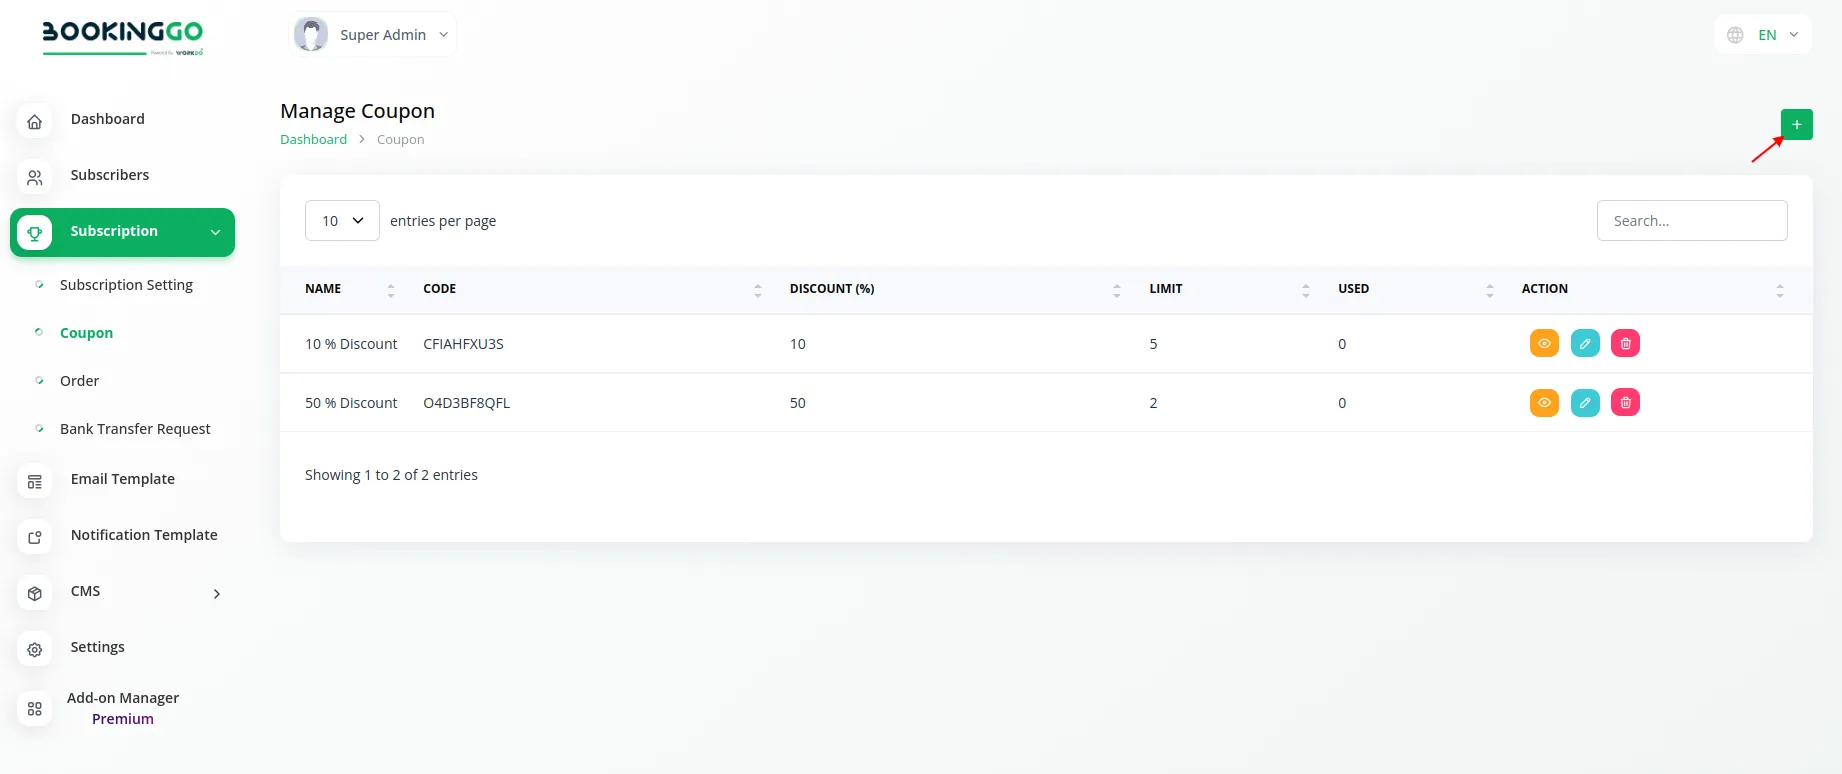
5.2 Coupons
- Create Coupons : Generate new discount coupons.
- Manage Coupons : View, edit, and delete existing coupons.
5.3 Orders
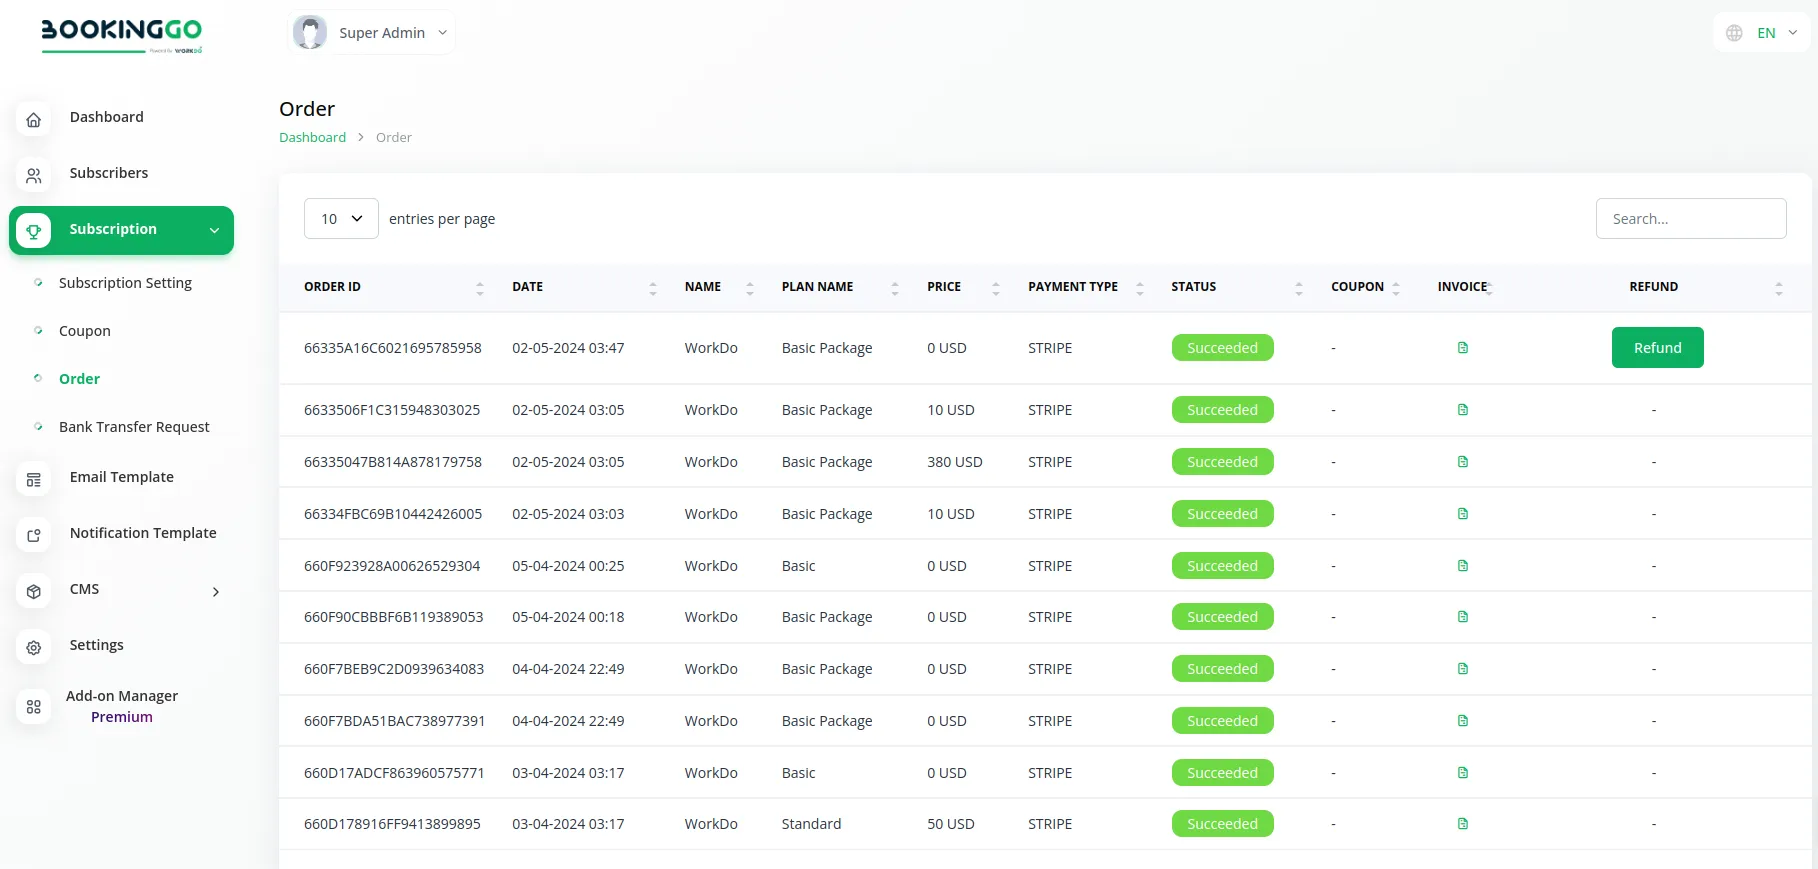
- Order List : View all orders with details such as order ID, date, customer name, plan name, price, payment type, status, applied coupon, invoice, and refund options.
- Refund Management : Handle refund requests directly.
5.4 Bank Transfer Request
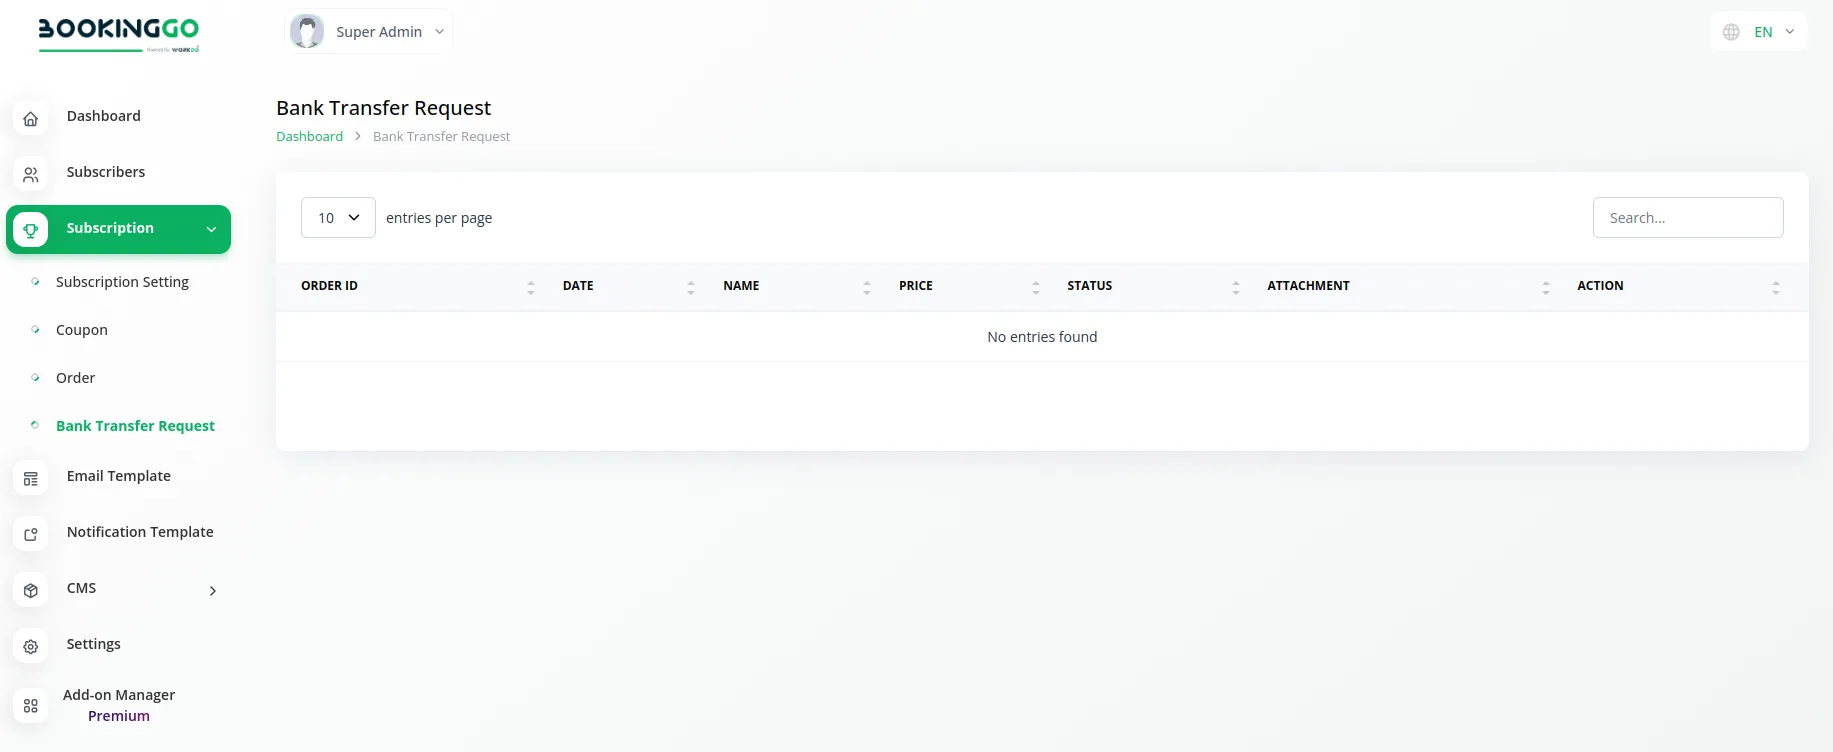
- Manage Requests : View and process bank transfer requests.
5.5 Email Templates
Manage communication templates efficiently:
- List of Email Templates : Access and manage pre-designed email templates.

5.6 Notification Templates
Create and manage notification templates for various platforms:
- Platforms Supported : Twilio, Slack, Telegram, WhatsApp, and WhatsApp API.

5.7 CMS (Content Management System)
Manage the content of your site with ease:
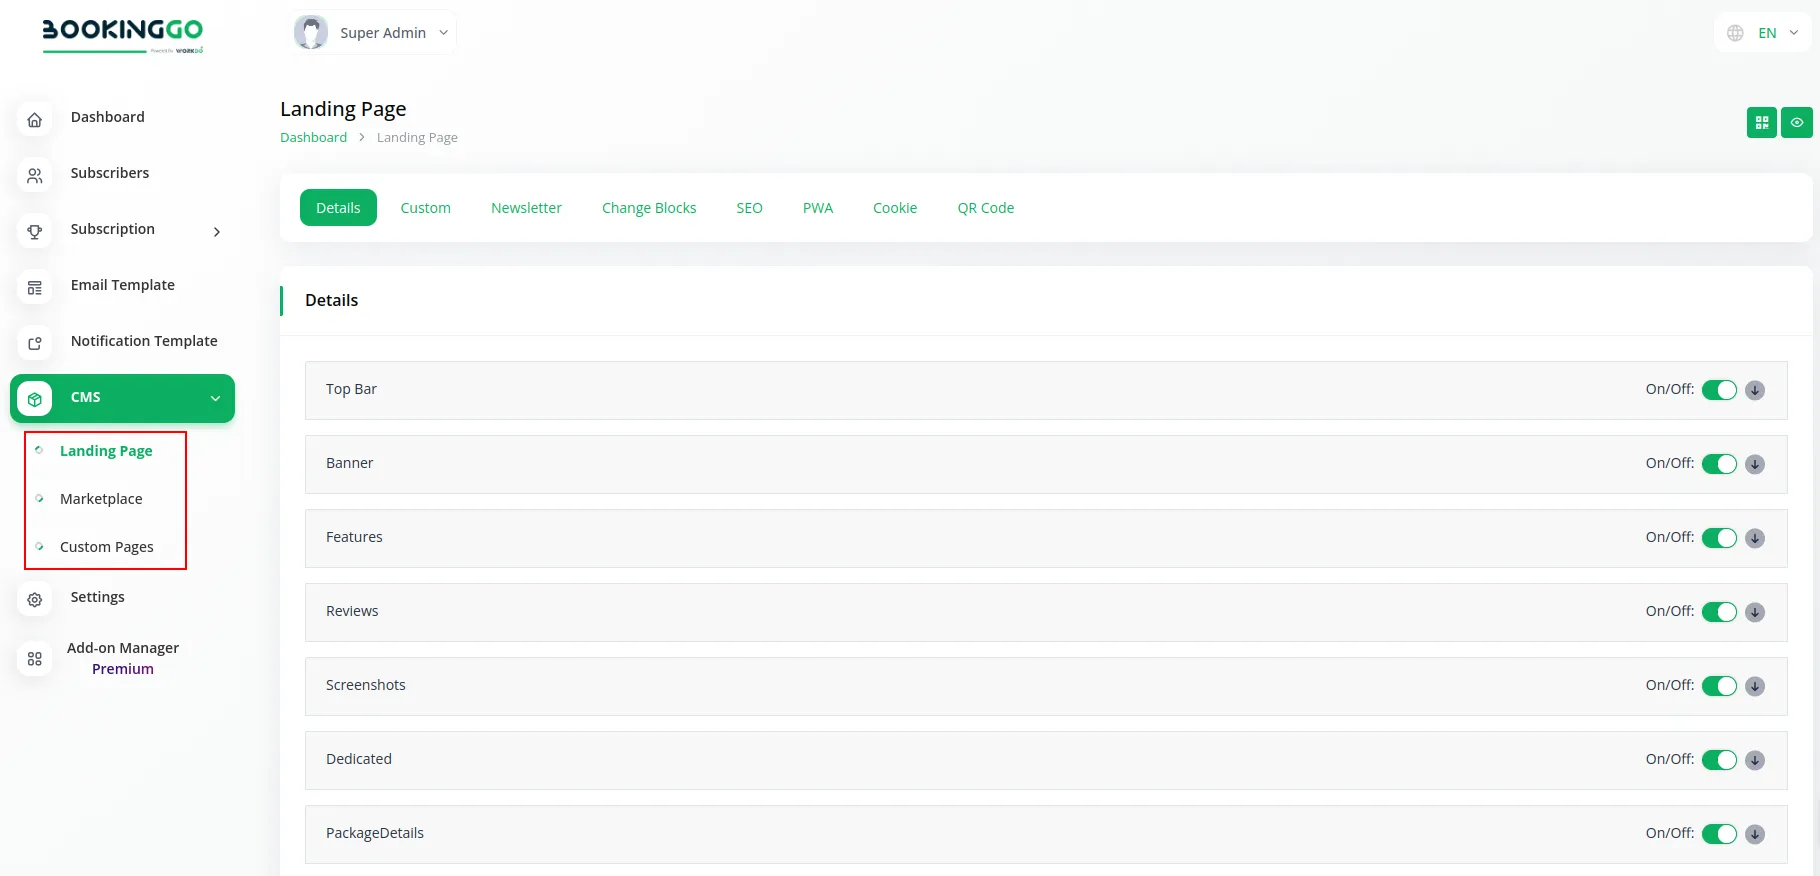
- Create Pages : Develop landing pages, marketplace pages, and custom pages.
- Landing pages : You can create landing pages for the various categories mentioned over there. You can also enable or disable these pages whenever you want, and also have the live preview of those pages.
- MarketPlace Page : Create MarketPlace Content for the available modules, and also attach the banner images to it
- Custom Pages : Create various custom pages and view them whenever you want.
5.8 Settings
Configure various aspects of the platform to suit your needs:
- Brand Settings : Customize branding elements.
- System Settings : Adjust core system configurations.
- Cookie Settings : Manage cookie consent and policies.
- Storage Settings : Configure data storage options.
- SEO Settings : Optimize the platform for search engines.
- Cache Settings : Manage caching for improved performance.
- Custom JS/CSS : Add custom JavaScript and CSS for advanced customization.
- Email Settings : Configure email server and sending options.
- Email Notification Settings : Manage settings for email notifications.
- ReCaptcha Settings : Enable and configure ReCaptcha for security.
- Webhook Settings : Set up webhooks for real-time notifications.
- Zapier Settings : Integrate with Zapier for automated workflows.
- Pabbly Connect Settings : Integrate with Pabbly Connect for automation.
- Bank Transfer Settings : Manage bank transfer options.
- Payment Gateway Settings : Configure payment gateways for processing transactions.

With these extensive capabilities, the Super Admin role in BookingGo SaaS ensures that you can oversee and fine-tune every aspect of the platform, facilitating smooth operations and optimal performance for all users and businesses.
6. Admin Login Process
The admin login process in BookingGo SaaS allows authorized personnel to access and manage specific functionalities within the platform. Here’s a step-by-step explanation of how to log in as an admin:
6.1 Access the Login Page
- Open your web browser and navigate to the BookingGo SaaS login page.
6.2 Enter Credentials
- Provide your registered email address and password associated with your admin account.
6.3 Login
- Click the “Login” button to initiate the authentication process.

6.4 Dashboard Access
- Once your credentials are verified, you’ll be directed to the admin dashboard.
6.5 Creating New Stores
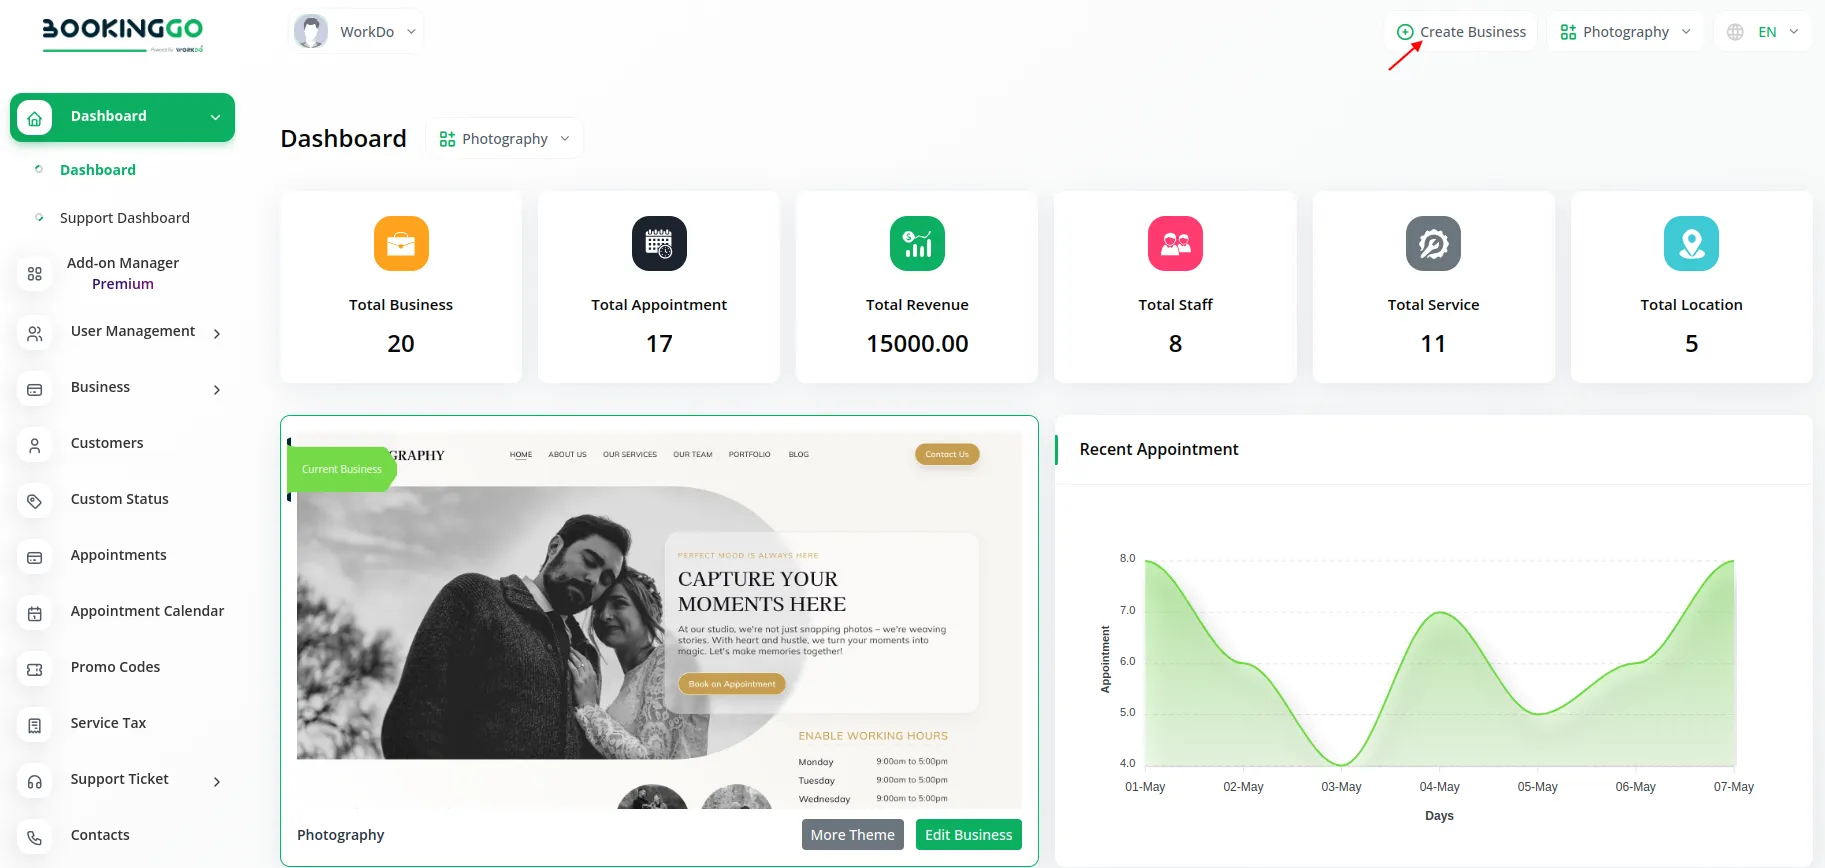
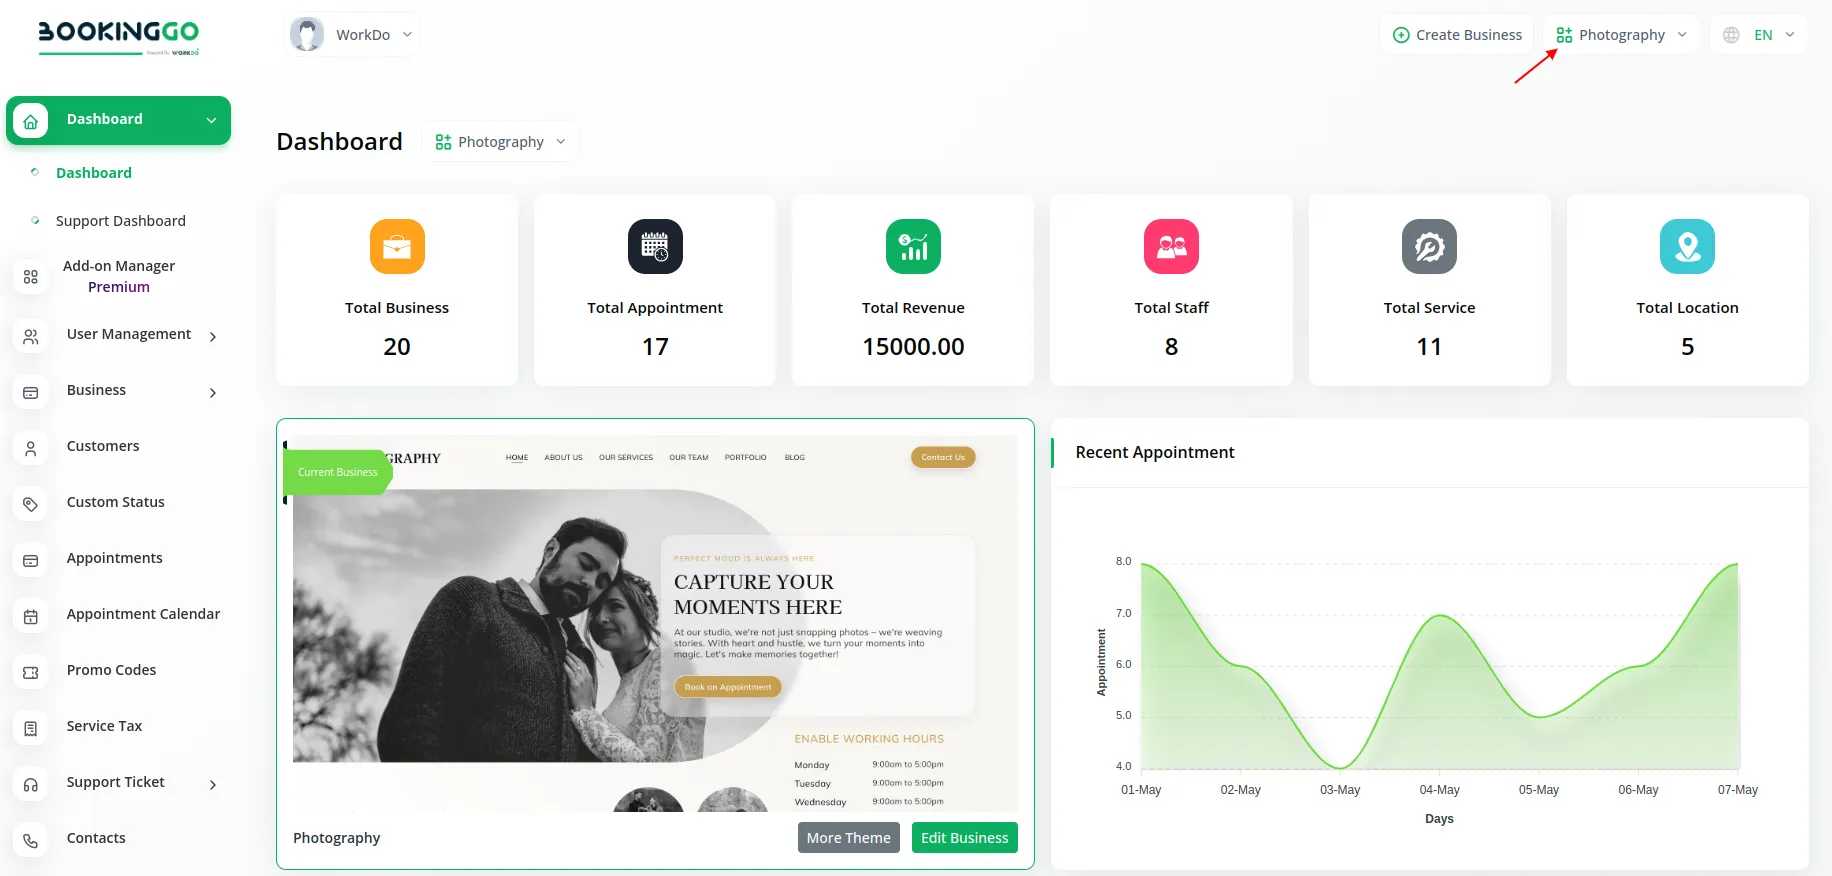
- Admins can establish new stores by clicking the “Create New Store” button on the dashboard’s right side.
6.6 Selecting New Themes
- The “Select New Themes” button enables admins to choose and implement new themes to enhance the store’s visual appearance.
6.7 Language Preferences
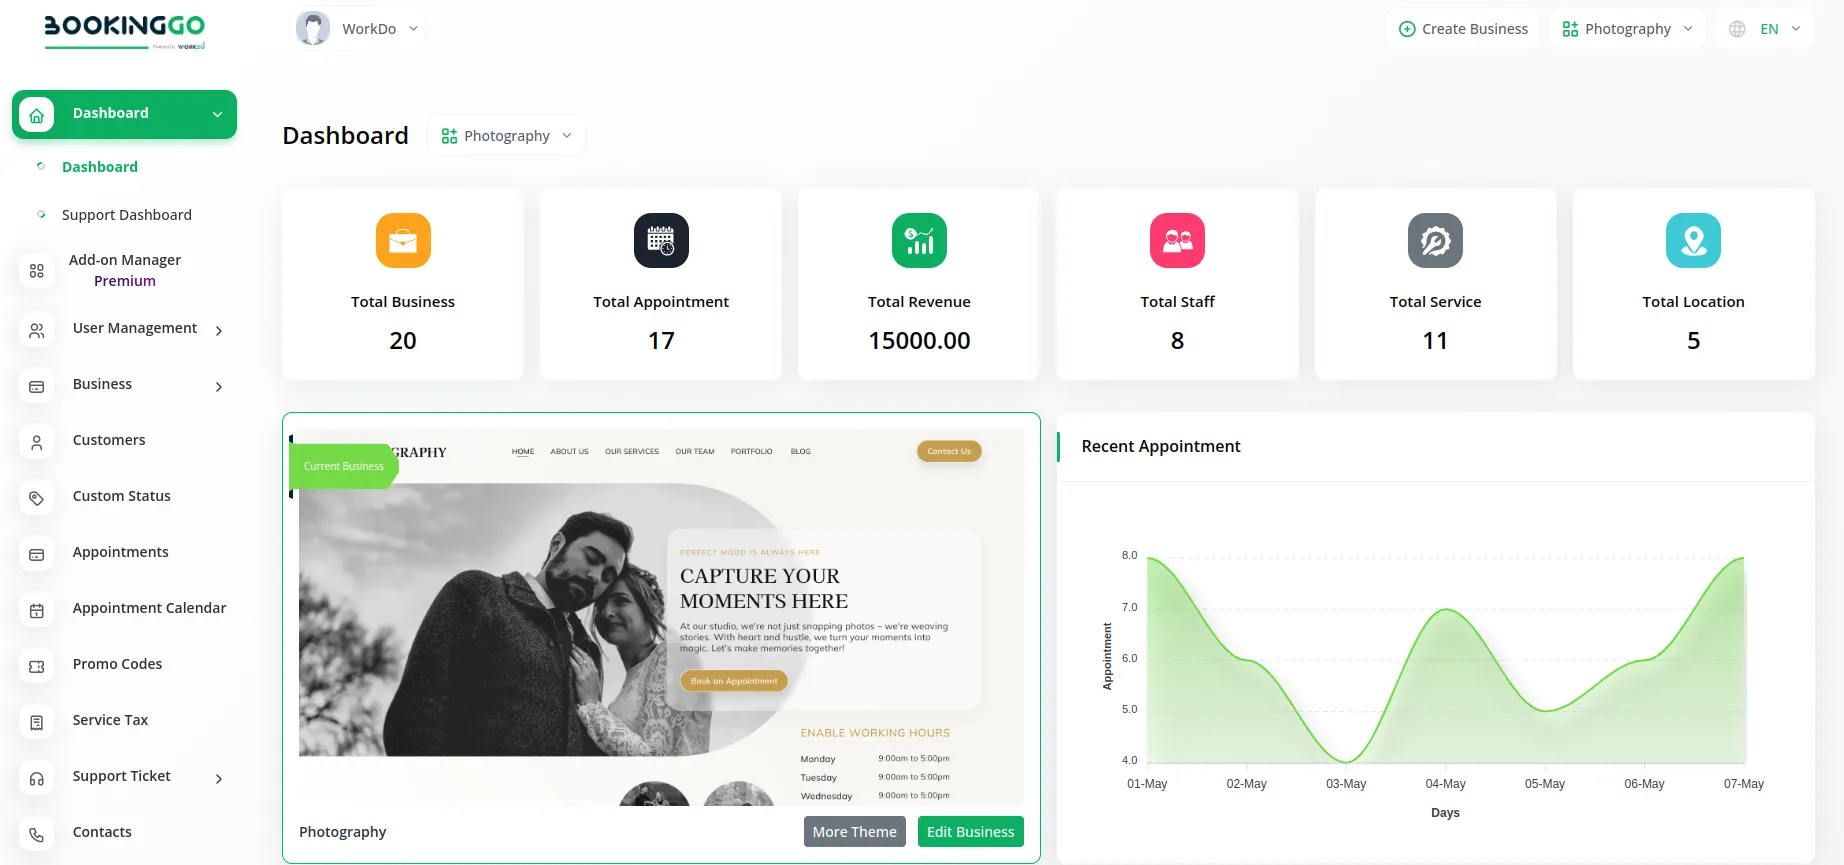
- The “EN” button facilitates the selection of preferred languages and enables admins to enable or disable them as needed.
6.8 Admin Functions
- Use the dashboard to access and manage functionalities assigned to your admin role. This may include product management, order processing, customer interactions, etc.
By following these steps, you can log in as an admin and efficiently manage specific tasks and responsibilities within the BookingGo SaaS platform.
7. Our Complimentary Add-Ons
| Landing Page | Google Recaptcha | Stripe |
| Paypal | Photography | Car Service |
8. Our Premium Add-ons
9. Dashboard
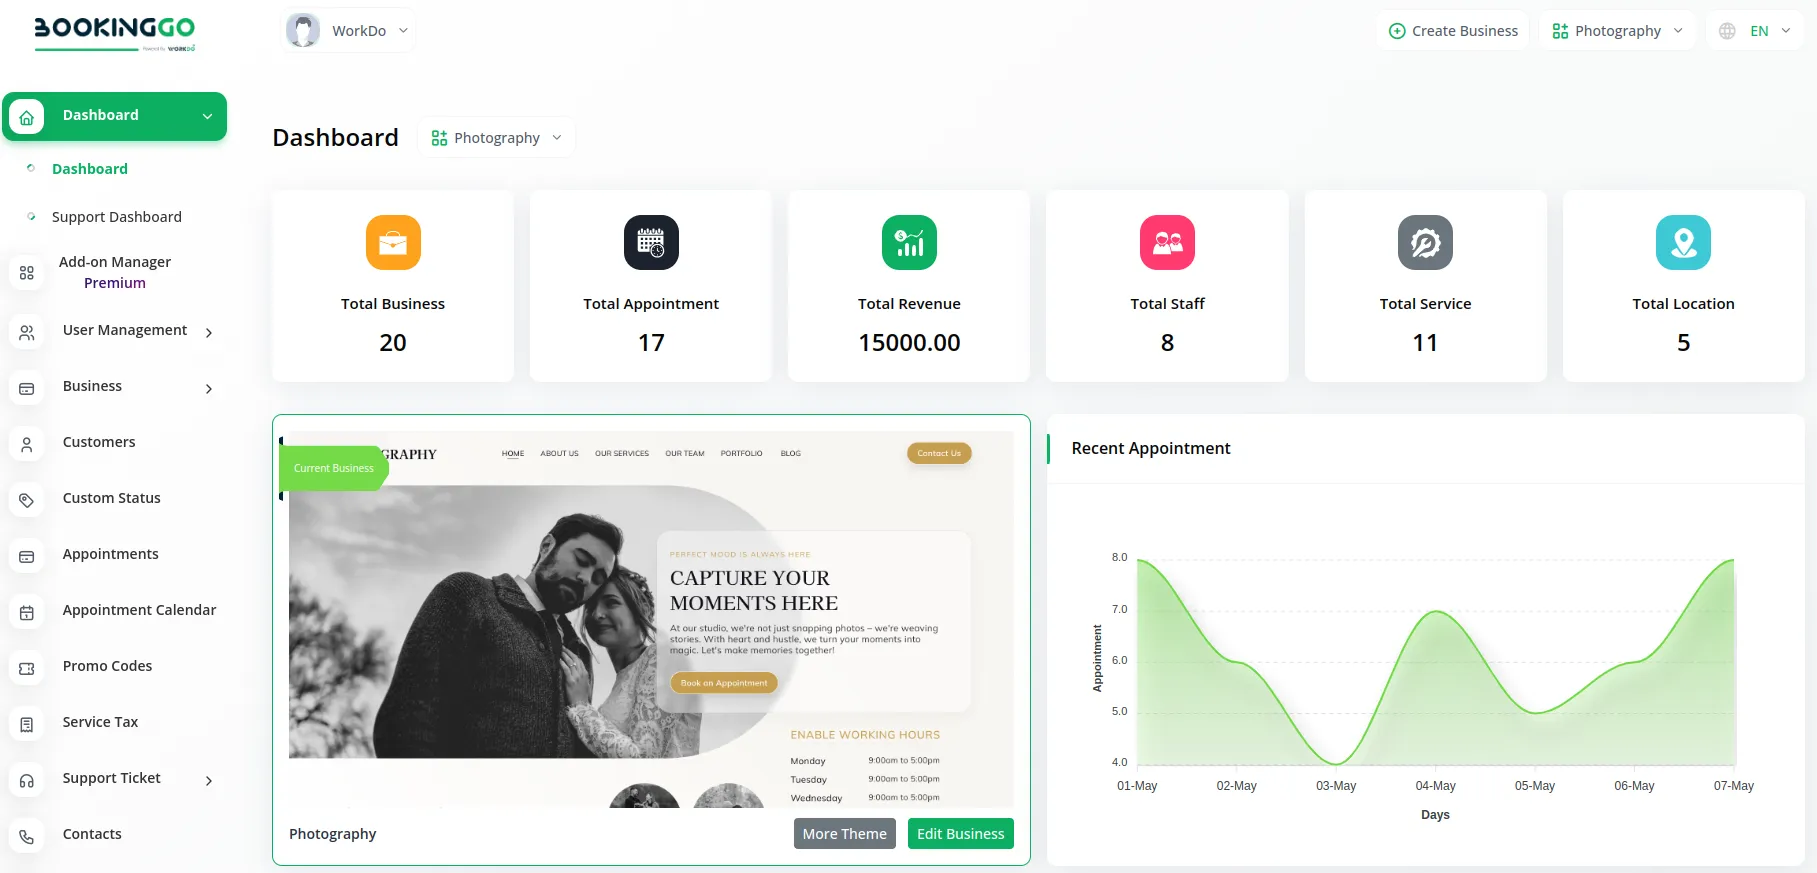
Welcome to the Dashboard of BookingGo SaaS, your central hub for monitoring and managing the key metrics and activities across the platform. Here, you have access to a comprehensive overview of your business operations, enabling you to make informed decisions and maintain optimal performance. Below is a detailed explanation of the information and tools available on the Dashboard:
9.1 Key Metrics
- Total Businesses : View the total number of businesses registered on the platform. This metric gives you an insight into the platform’s reach and the number of entities leveraging BookingGo for their operations.
- Total Appointments : See the cumulative number of appointments scheduled across all businesses. This figure helps you gauge overall engagement and activity on the platform.
- Total Revenue : Monitor the total revenue generated through the platform. This metric provides a snapshot of the financial performance and success of the businesses using BookingGo.
- Total Staff : Keep track of the total number of staff members registered across all businesses. This helps you understand the workforce size utilizing the platform.
- Total Services : View the total number of different services offered by all businesses. This number reflects the diversity and range of services available on the platform.
- Total Locations : See the total number of distinct business locations registered. This provides a geographical perspective on the platform’s utilization.
- Current Business : Get detailed information about the currently selected business, including specific performance metrics and statistics.
9.2 Visual and Interactive Elements
- Chart of Recent Appointments : A dynamic chart that visualizes recent appointment trends. This helps you quickly assess activity patterns and identify peak times or areas needing attention.
- List of Latest Services : Stay updated with a list of the most recently added services. This feature keeps you informed about new offerings and innovations across the platform.
- Business Link : Access direct links to specific business profiles. This allows for quick navigation and management of individual businesses.
- Embedded Code : Retrieve the embedded code necessary for integrating BookingGo functionalities into external websites. This facilitates seamless integration and enhances accessibility for end-users.
- List of Latest Appointments : Review a detailed list of the most recent appointments scheduled. This list helps you stay on top of current activities and provides insights into recent user engagement.

The Dashboard is designed to provide a holistic view of your platform’s performance, helping you maintain superior organization, drive operational efficiency, and support the success of all businesses using BookingGo. Utilize these tools and insights to manage your operations effectively and enhance your overall business management experience.
10. User Management System
10.1 Users
-
10.1.1 Users List :
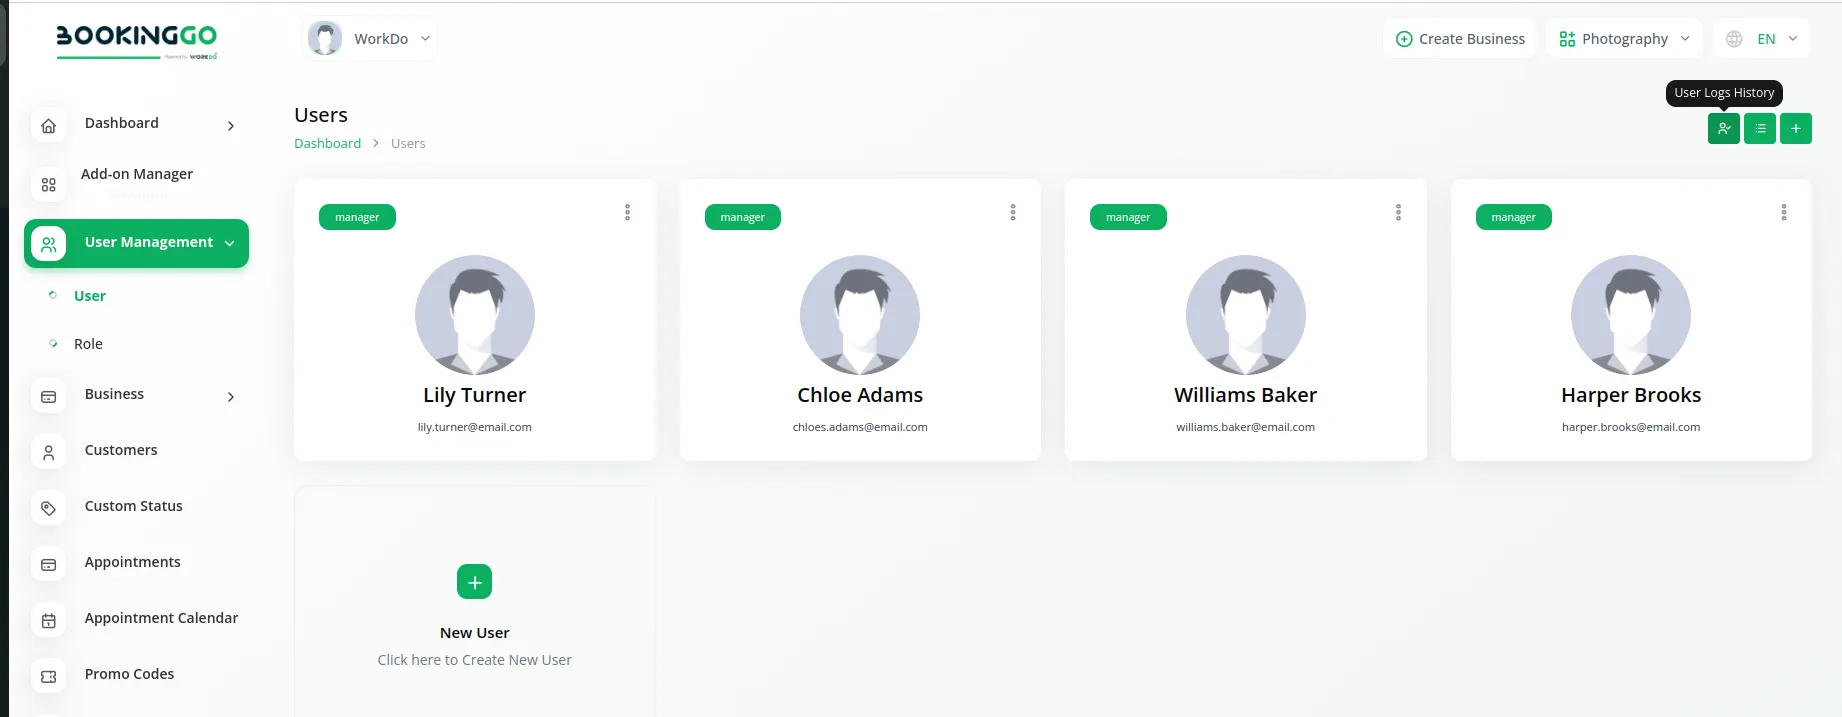
In the Users section of the User Management System, users can access a comprehensive list of all registered users. This list provides a quick overview of the individuals involved in the system.
-
10.1.2 Add New Users :
Facilitating seamless user management, this page allows administrators to add new users effortlessly. This feature ensures that the system stays up-to-date with the latest additions to the user base.
-
10.1.3 User Log History :
For enhanced security and accountability, the User Management System includes a feature to view the log history of users. This log offers insights into user activities, aiding in system monitoring and troubleshooting.
11. Business Module
11.1 Create Business
Your one-stop solution for creating and managing your business effortlessly. On this page, you can kickstart your journey by creating a new business tailored to your niche. Here’s how:
-
11.1.1 Choose Your Layout :
- Form Layout : Select this option if you prefer a clean, structured form to set up your business details.
- Website Templates : Opt for a professionally designed template from our collection to give your business a polished online presence.
-
11.1.2 Customize Your Colors :
- Pick from a range of color options to match your brand’s identity and make your business stand out.
-
11.1.3 Complete Your Business Profile :
- Fill in essential details such as business name, contact information, and industry to get started.

11.2 Edit Business
Fine-tuning your business settings is crucial for ensuring it meets all your operational needs. This page allows you to customize and manage various aspects of your business:
-
11.2.1 Customize Themes :
Click the Customize button to personalize different sections of your website, including:
- Header
- Home Banner
- About Us Page
- Service Section
- Extra Info
- Staff Section
- Testimonial Section
- Portfolio Section
- Brand Section
- Blog Sections
- Contact Section
- Mapping Section
- Gallery Section
- Footer
-
11.2.2 Location Settings :
- View a list of your business locations or create new ones as needed.
-
11.2.3 Category Settings :
- Create, edit, or delete business categories to keep your offerings organized.
-
11.2.4 Service Settings :
Add new services and manage existing ones with options to:
- Enable team bookings
- Edit service details
- Delete services
-
11.2.5 Staff Settings :
Add new staff members and manage current ones. Actions include:
- Team booking management
- Editing staff details
- Deleting staff members
- Setting flexible hours
- Setting flexible days
-
11.2.6 Business Hours Settings :
- Define your business hours to ensure clients know when you’re available.
-
11.2.7 Business Holiday Settings :
- Specify holidays to keep your availability up-to-date.
-
11.2.8 Custom Settings :
- Add business links, domains, and sub-domains, then save the changes.
-
11.2.9 Appointment Settings :
- Configure appointment slot capacities and set reminders to keep everything on track.
-
11.2.10 Custom Fields Settings :
- Add custom labels and fields to gather the specific information you need from clients.
-
11.2.11 PWA Settings :
- Configure Progressive Web App (PWA) settings for an enhanced user experience.

11.3 Business Overview
This page provides an overview of all the businesses you’ve created. You can easily manage each business with the following actions:
11.3.1 Copy Link :
- Quickly copy the link to your business for sharing purposes.
11.3.2 Appointments :
- View and manage all appointments associated with your business.
11.3.3 Subscribers :
- See a list of subscribers to keep track of your customer base.
11.3.4 Contacts :
- Manage contact details for seamless communication.
11.3.5 Delete Business :
- Remove businesses that are no longer needed.

Stay organized and efficient with BookingGo’s comprehensive business module, designed to cater to all your business management needs.
12. Customer Management Module
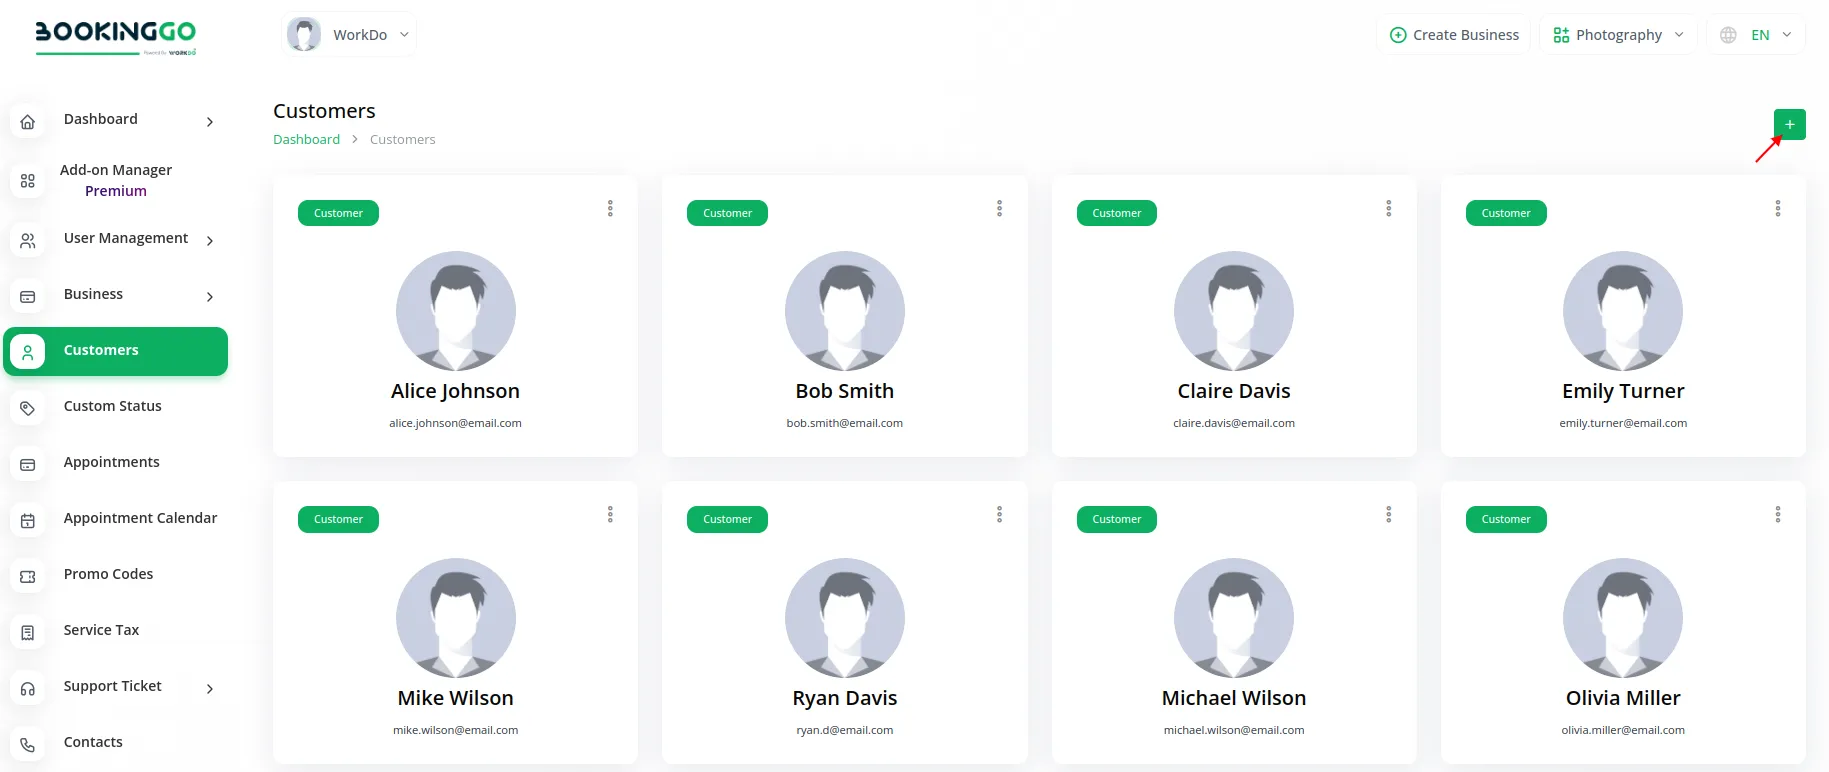
The Customer Management Module in BookingGo SaaS allows you to efficiently manage your customer database. Here’s how to use the various features:
12.1 Viewing the Customer List
You can view a comprehensive list of all your customers, providing quick access to important customer information. This organized view helps you keep track of your clientele and streamline customer management.
12.2 Creating a New Customer
To add a new customer :
- Click the “+” button located at the top of the page.
- Fill in the necessary details in the provided form.
- Save the new customer profile.
This feature ensures that you can easily expand your customer database with accurate and up-to-date information.
12.3 Editing Customer Details
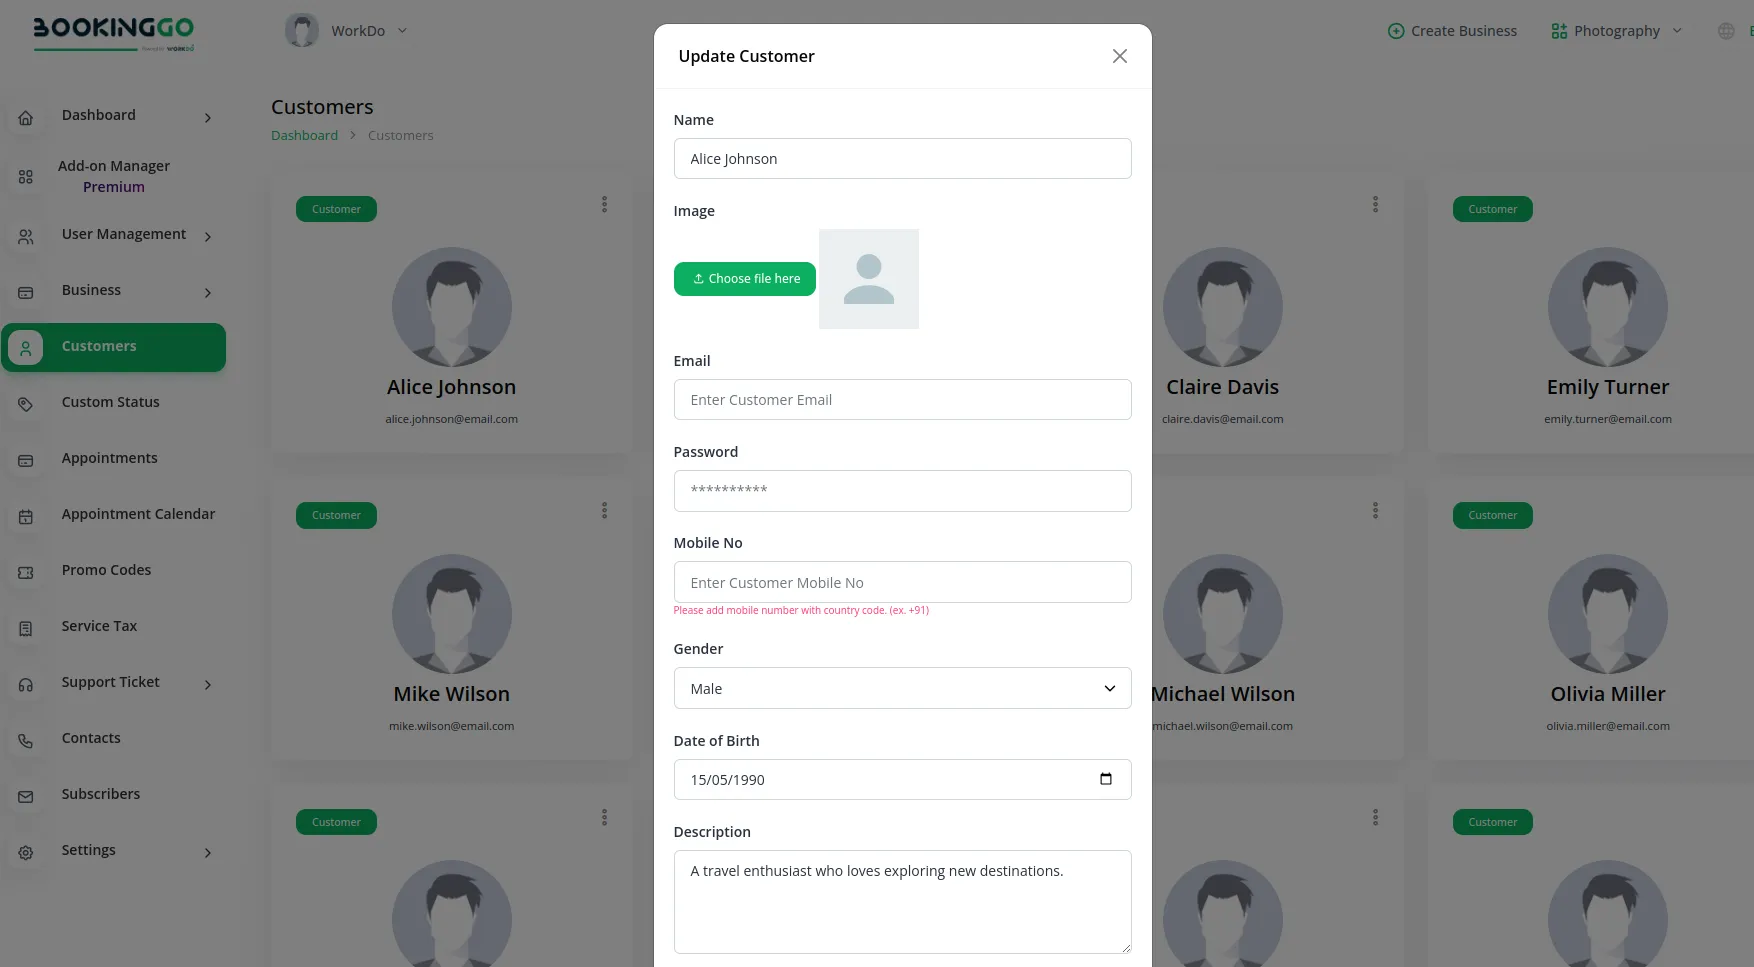
To edit an existing customer’s details :
- Select the customer from your list.
- Click on the “Edit” button.
- Update the necessary information in the form.
- Save the changes.
This allows you to keep your customer information current and correct any discrepancies quickly.
12.4 Deleting a Customer
To delete a customer :
- Select the customer from your list.
- Click on the “Delete” button.
- Confirm the deletion when prompted.
This feature helps you maintain a clean and relevant customer database by removing outdated or irrelevant profiles.
By using these features, you can effectively manage your customer information, ensuring that your customer service remains top-notch and your records are always accurate.
13. Custom Status Module
The Custom Status Module in BookingGo SaaS allows you to create and manage custom statuses for your bookings, providing enhanced flexibility and organization. Here’s how to use this module effectively:
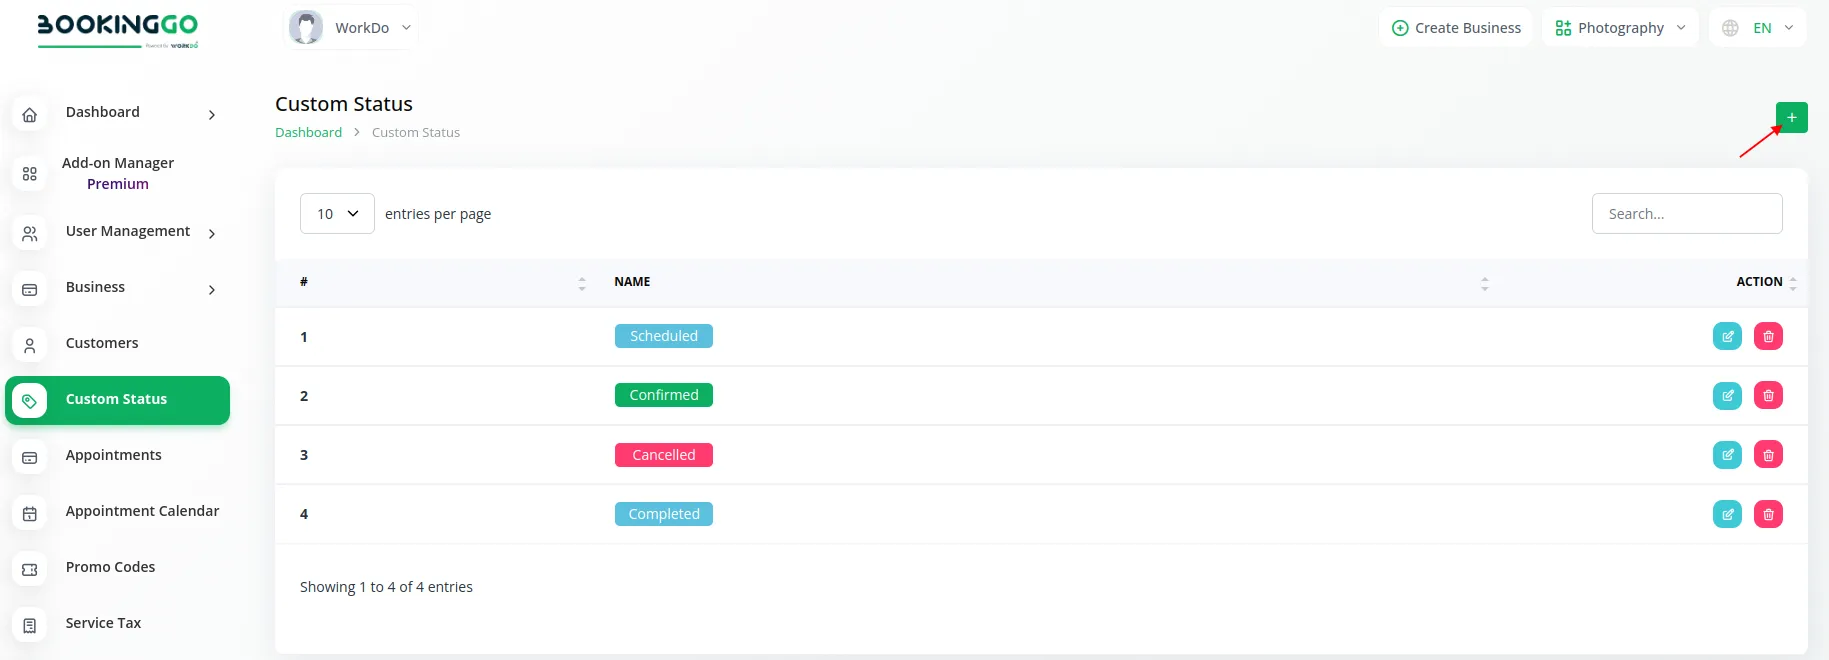
13.1 Viewing the Custom Status List
You can view a comprehensive list of all your custom statuses. This organized list ensures that you can easily see and manage the various statuses you have created, helping you keep track of the different stages and conditions of your bookings.
13.2 Adding a Custom Status
To add a new custom status
- Click the “Add Custom Status” button.
- Enter the name of the custom status in the provided field.
- Choose a color for the custom status from the color picker to help visually differentiate it from other statuses.
- Save the new custom status.
This feature allows you to tailor the status options to fit your specific business needs, making it easier to categorize and manage bookings.
13.3 Choosing Custom Status Colors
When adding or editing a custom status, you can select a color that best represents that status. The color-coding helps in quickly identifying the status of a booking at a glance, improving efficiency and organization.
Using the Custom Status Module, you can create a more personalized and efficient booking management system that aligns with your unique business requirements.
14. Appointment Module
The Appointment Module in BookingGo SaaS allows you to efficiently manage your appointments. Here’s how to use it:
14.1 Creating Appointments
- Click the “Create Appointment” button.
- Enter customer, staff, service, location, date, and duration details.
- Save the appointment.
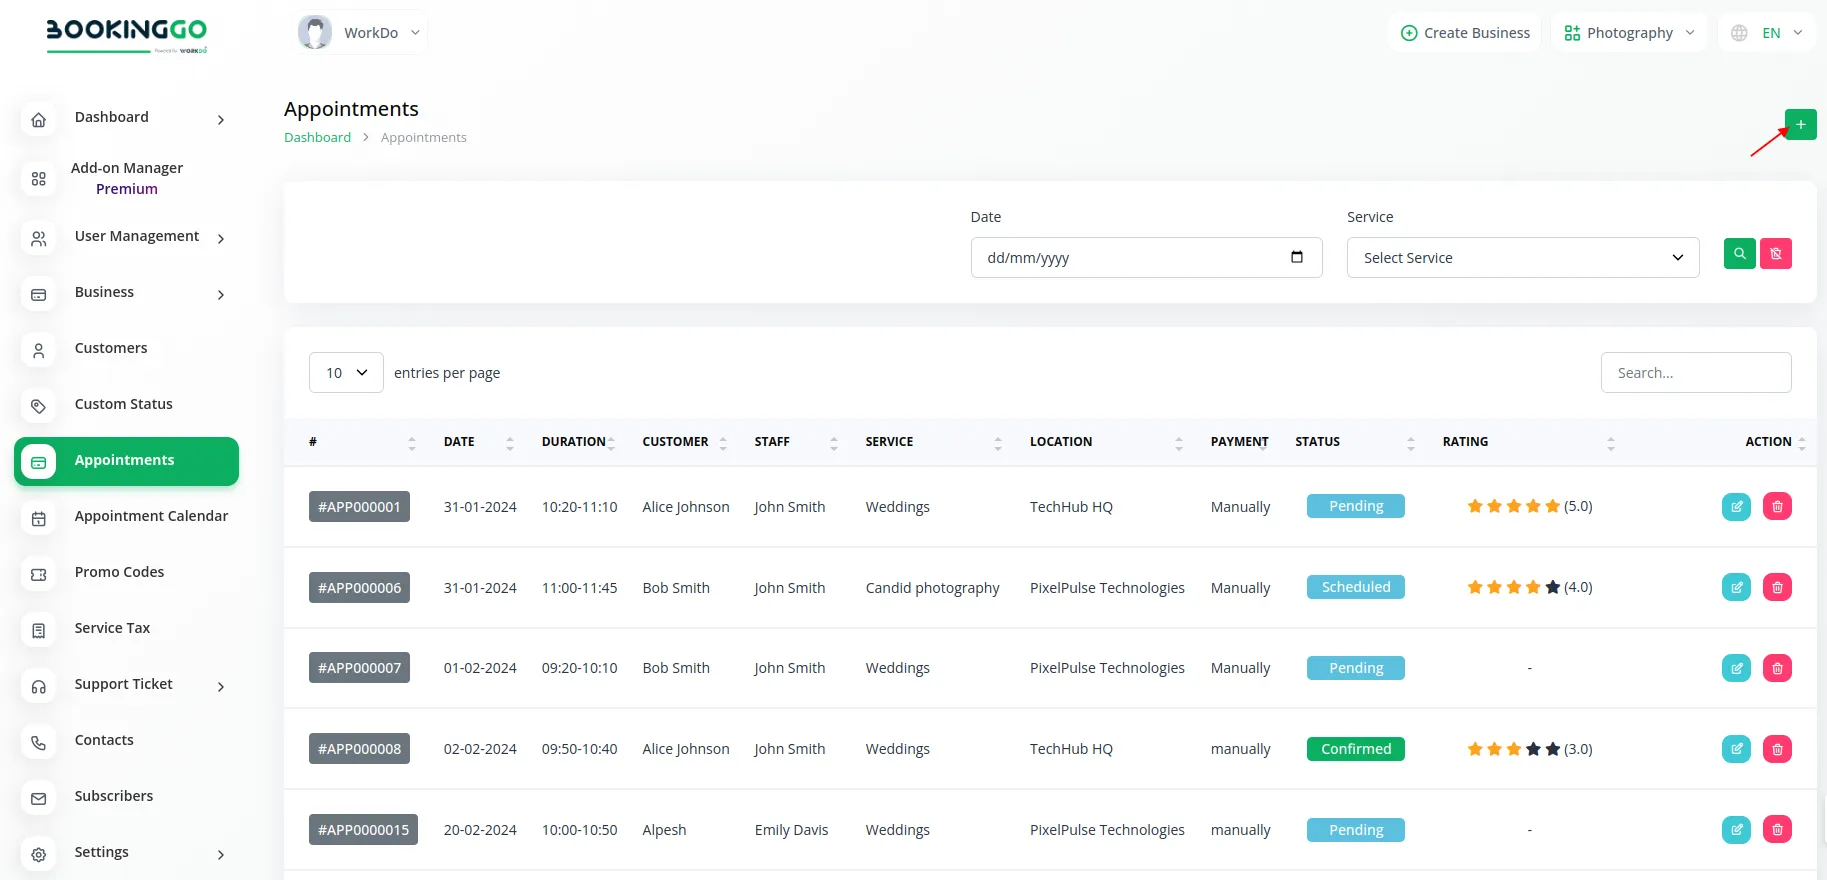
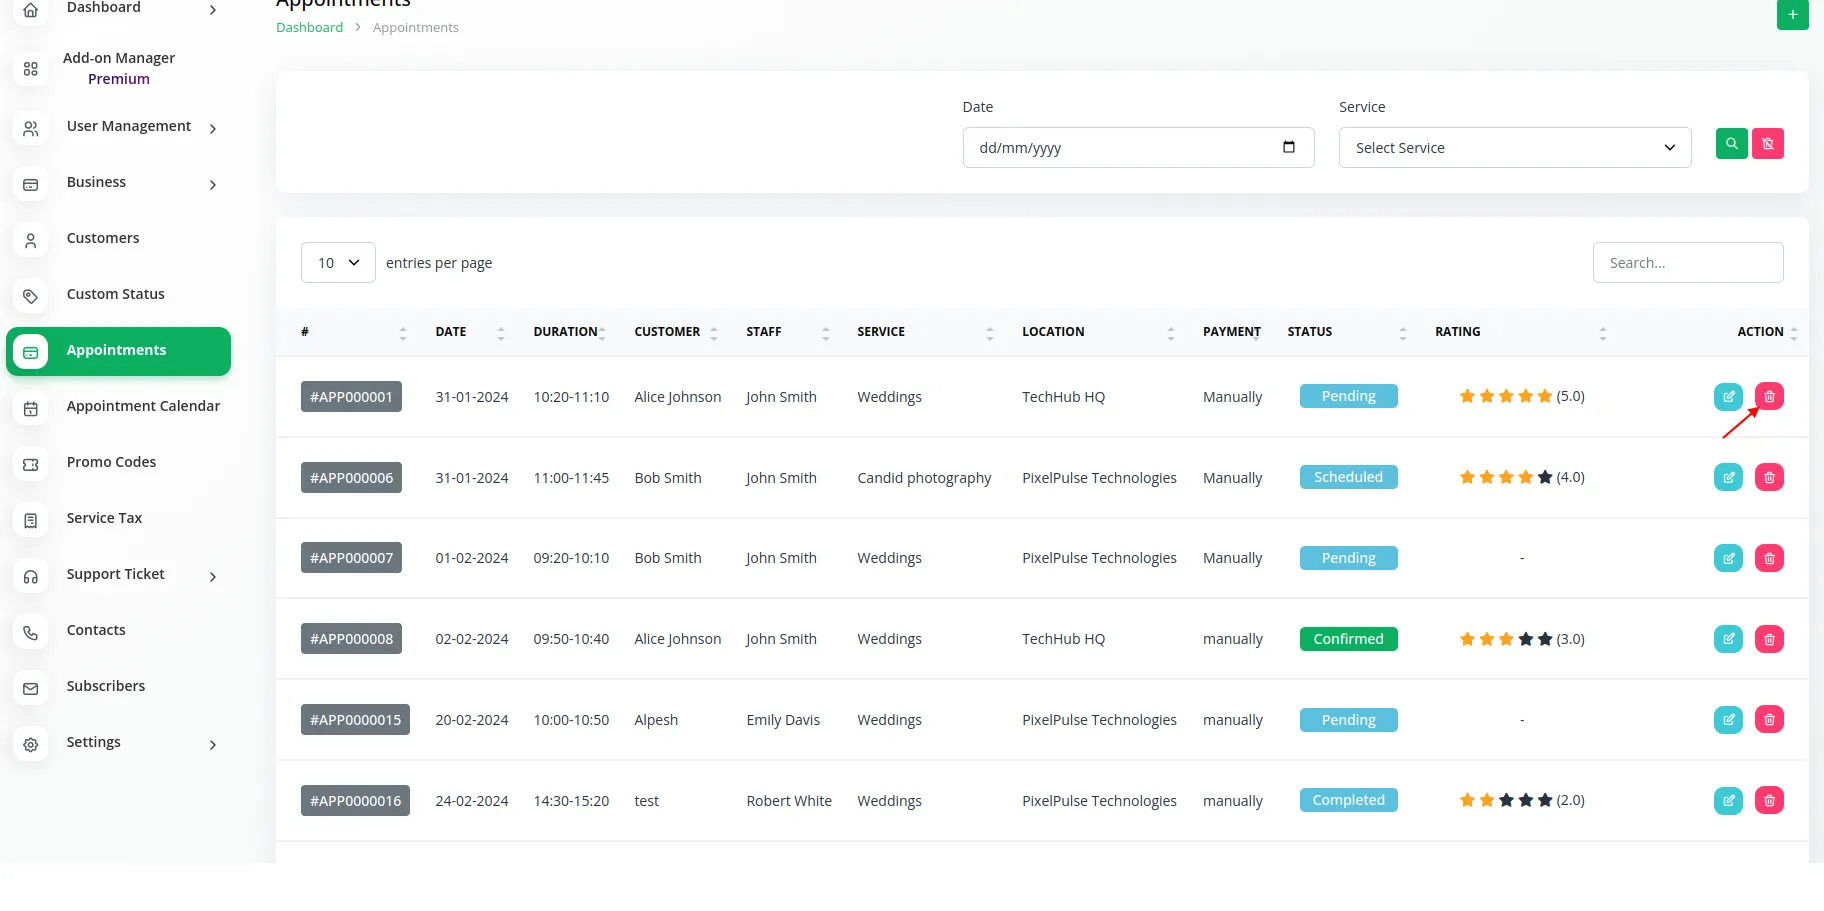
14.2 Viewing the Appointment List
See a detailed overview of all appointments, including:
- Appointment ID
- Date and Duration
- Customer
- Staff
- Service
- Location
- Payment Status
- Appointment Status
- Payment Source
- Rating
- Action Column
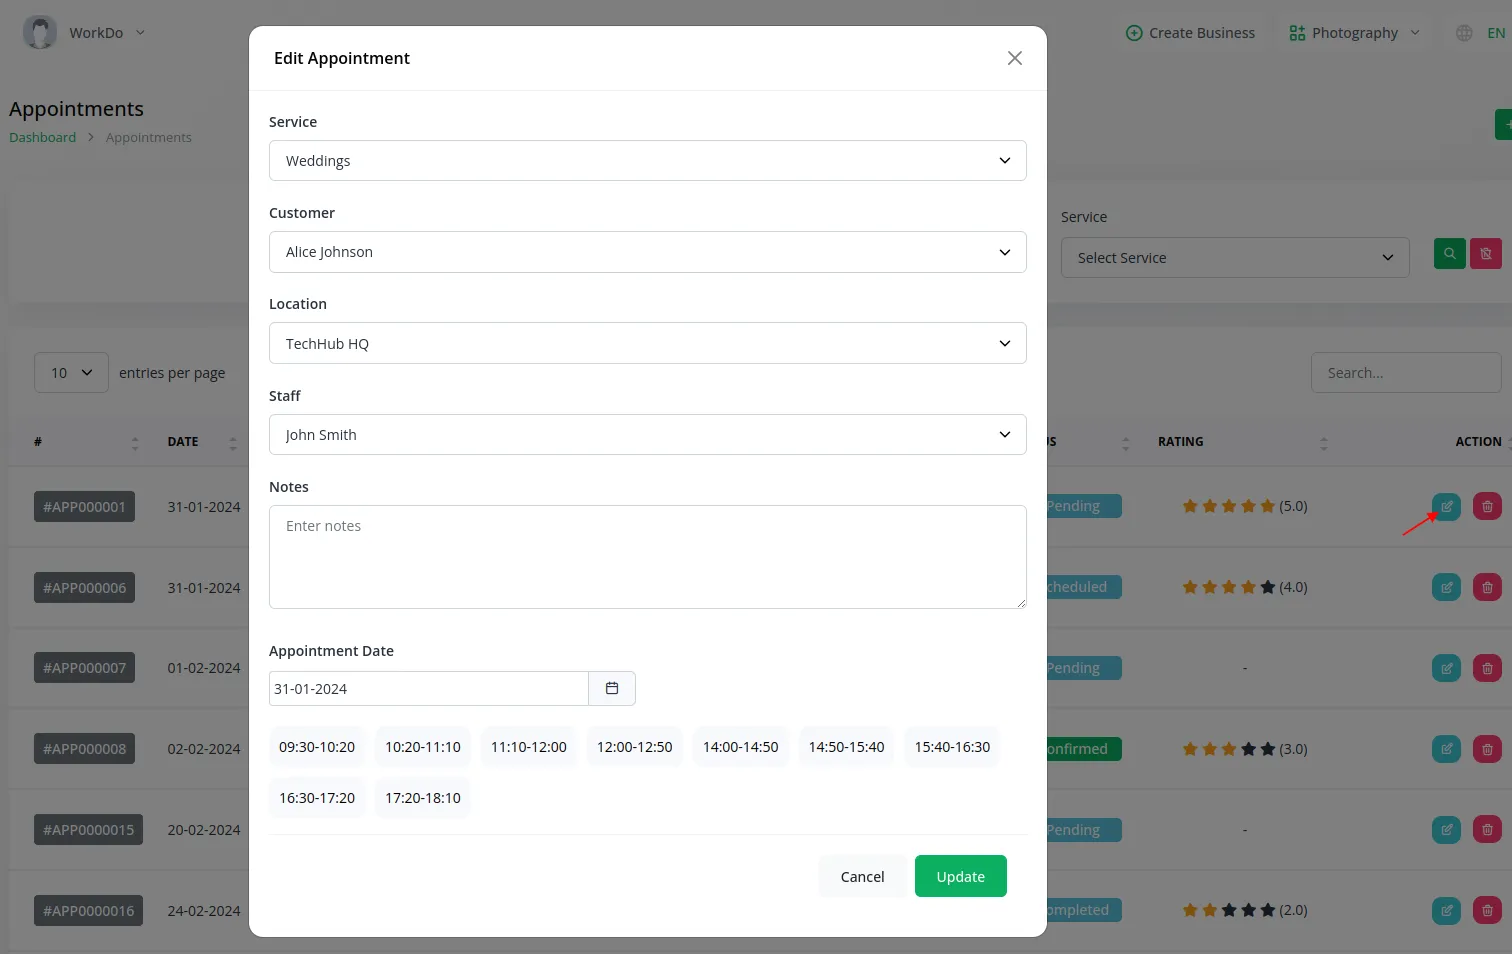
14.3 Editing Appointments
- Click “Edit” in the action column.
- Update the necessary details.
- Save the changes.
14.4 Deleting Appointments
- Click “Delete” in the action column.
- Confirm the deletion.
The Appointment Module in BookingGo SaaS provides all the tools you need to manage your bookings efficiently, ensuring smooth operations and excellent customer service.
15. Appointment Calendar
The Appointment Calendar module in BookingGo SaaS provides a visual overview of all your scheduled appointments. Each appointment date is clearly marked on the calendar, allowing you to easily track and manage your bookings. You can also add new appointments directly to the calendar, ensuring seamless scheduling. Additionally, you can view a list of dates with fixed appointments, offering a quick reference to your busy days and helping you stay organized.

16. Promo Codes
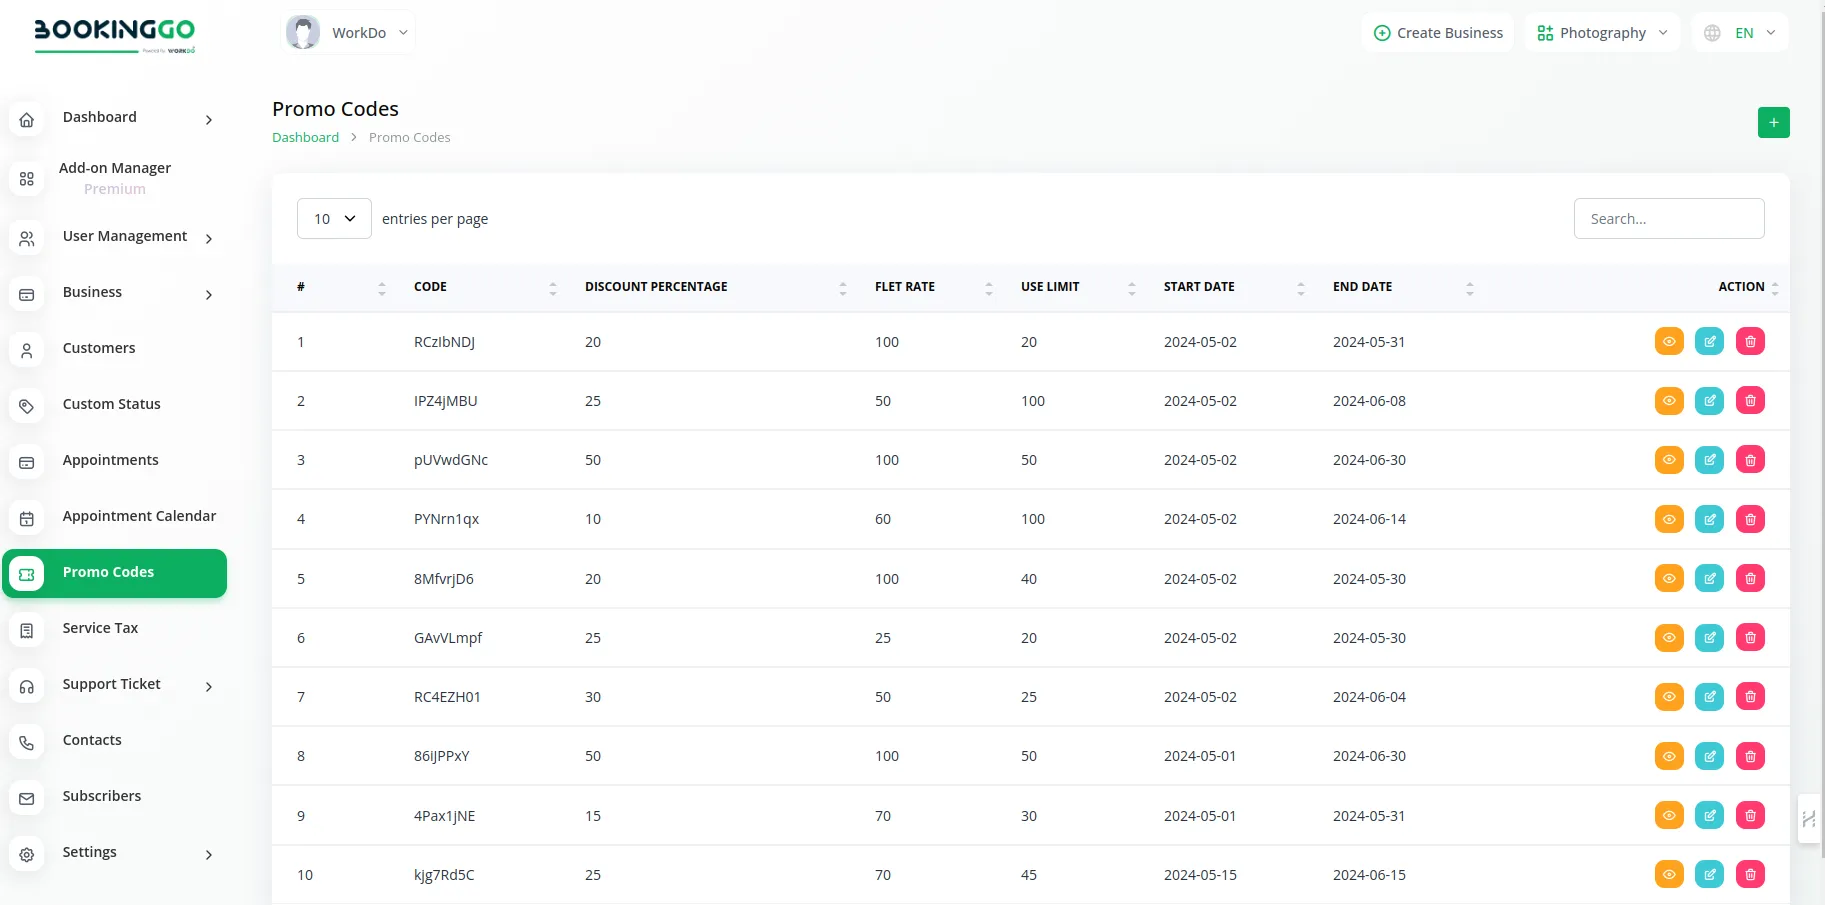
The Promo Codes module enables you to manage promotional offers effortlessly. Here, you can see a comprehensive list of all your current promo codes. You have the flexibility to create new promo codes to attract customers, edit existing ones to update the offers, and delete those that are no longer needed. This module helps you efficiently manage your promotional strategies, boosting customer engagement and sales.
17. Service Tax
The Service Tax module allows you to manage service taxes applied to your offerings. You can easily add new service tax rates as required by your business or regulatory changes. This module also provides a list of all your service taxes, ensuring you have a clear view of all applicable taxes. Managing service taxes within this module helps you maintain compliance and ensures accurate billing for your services.

18. Contacts
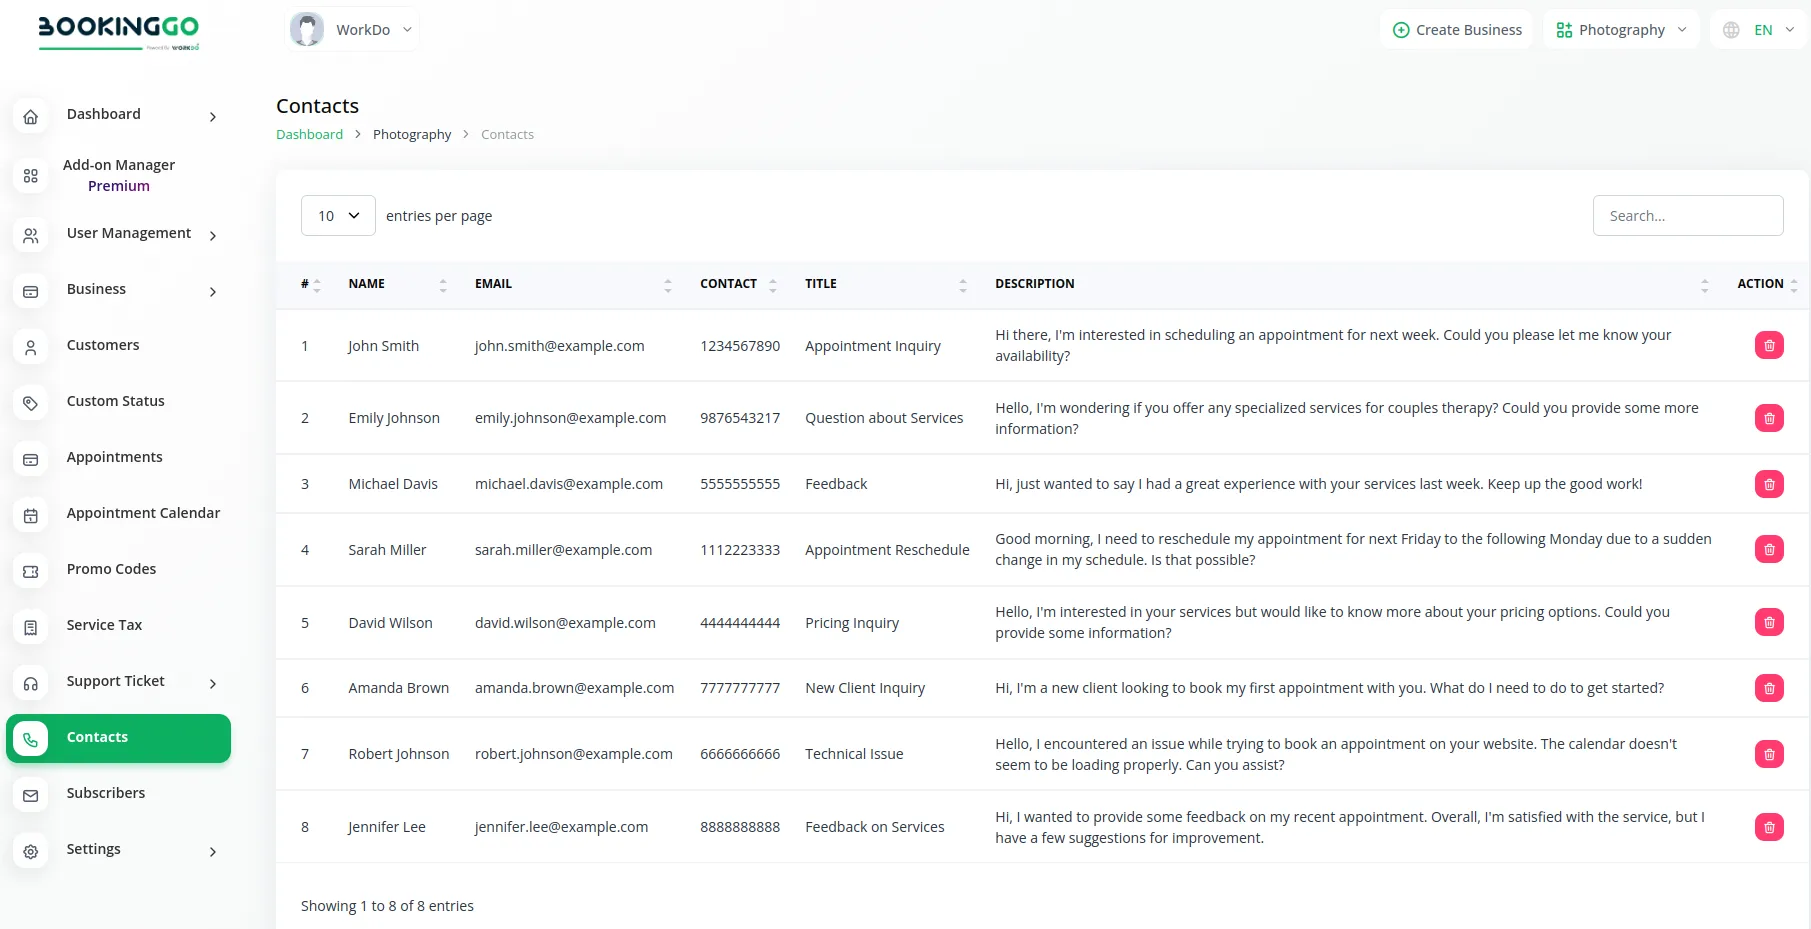
The Contacts module in BookingGo SaaS provides an organized list of all your contacts, offering a centralized location for managing your business relationships. You can easily view and access contact information, ensuring smooth communication and follow-ups. Additionally, if a contact is no longer relevant or needed, you have the option to delete them at any time, helping you maintain an up-to-date and clutter-free contact list.
19. Subscribers
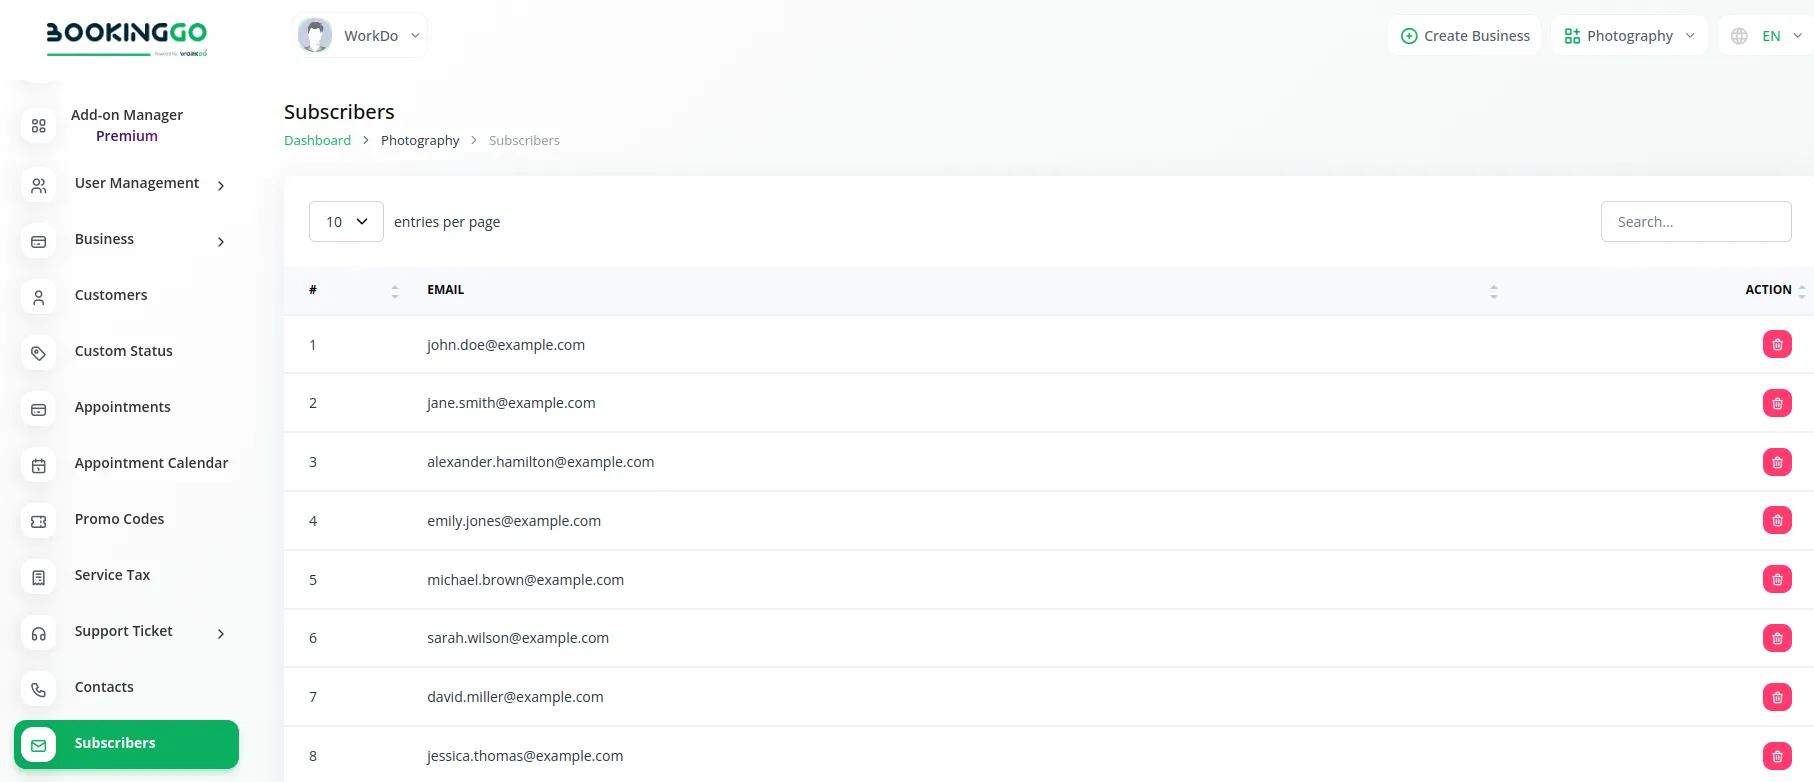
The Subscribers module allows you to manage your subscription base efficiently. Here, you can see a detailed list of all your subscribers, giving you insights into your customer base and engagement levels. If necessary, you can delete subscribers who are no longer active or relevant, ensuring your subscriber list remains current and manageable. This module helps you stay connected with your audience and streamline your communication efforts.
20. Settings
20.1 System Settings
- Brand Settings : Customize your brand identity, including logos, colors, and branding elements.
- System Settings : Configure system-wide settings such as language preferences, time zones, and currency formats.
- Week Start At : Define the start day of the week according to your regional or business requirements.
- Embedded Code : Embed custom code snippets for advanced functionality or integration with third-party services.
- Custom JS/CSS : Add custom JavaScript or CSS code to tailor the appearance and functionality of your platform.
- Messenger Settings : Configure messaging integrations like Tawk.to and WhatsApp to facilitate customer communication.
- Appointment Review Settings : Manage settings related to appointment reviews, including review status and display options.
- Email Settings : Configure email settings for outgoing communications, including SMTP configuration and email notification settings.
- Payment Gateway Settings : Set up and manage payment gateway options for accepting payments from customers.crmgosaas

20.2 Set up Subscription Plan
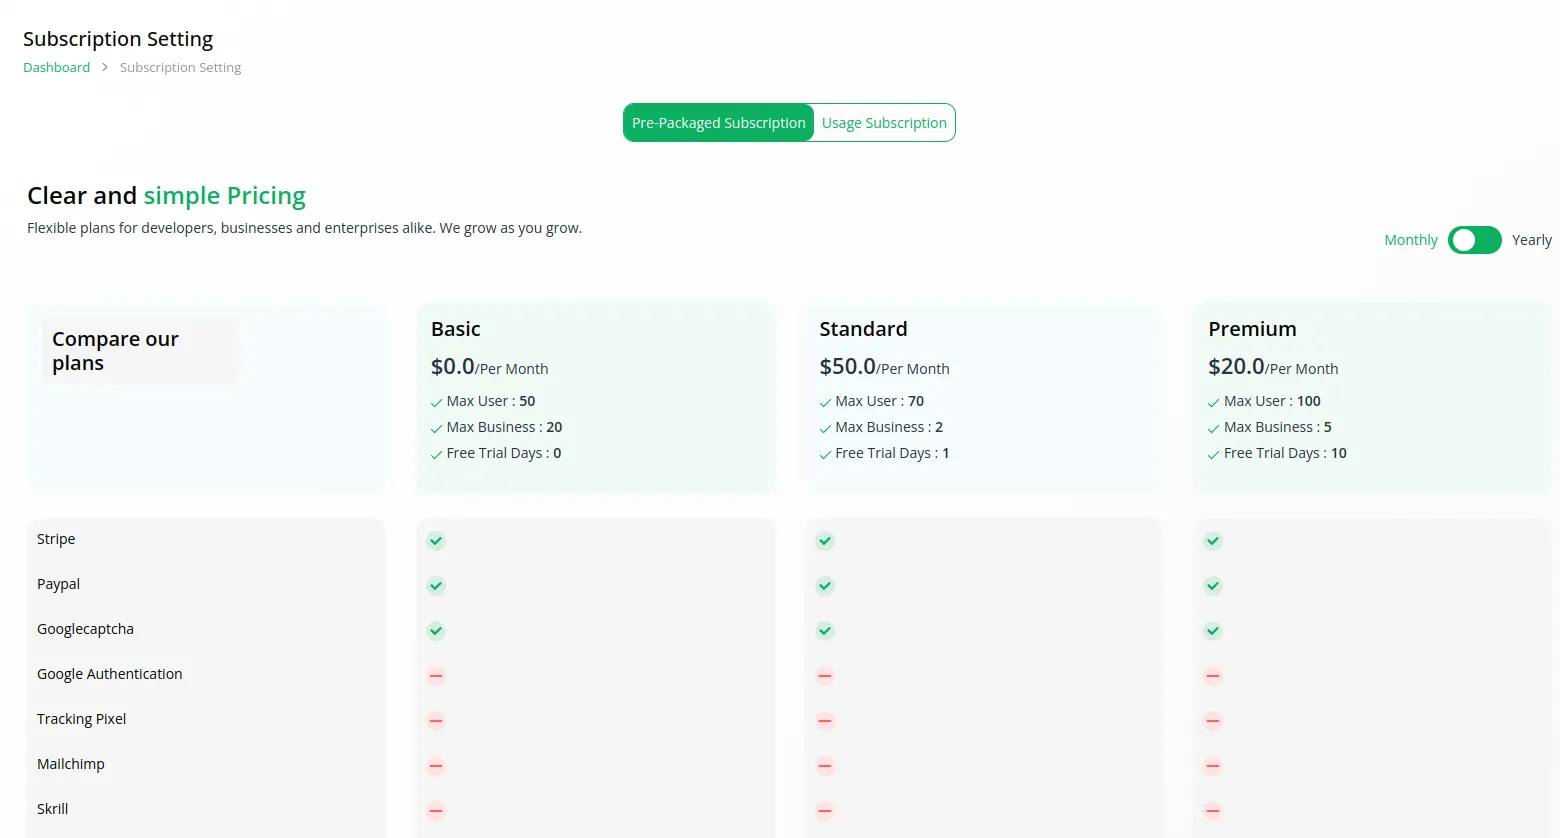
On this page, you can subscribe to various plans according to your business needs. Choose from a range of subscription options tailored to your requirements, whether you’re a small business or a growing enterprise. Select the plan that best suits your needs and budget, and proceed with the subscription process seamlessly.
20.3 Orders
In the Orders page, you can view a list of all orders placed by customers for subscription plans. This provides a comprehensive overview of your revenue stream and allows you to track and manage customer subscriptions effectively. Keep track of orders, monitor payment statuses, and ensure a smooth customer experience with easy access to order details and management tools.

21. Conclusion
In conclusion, the BookingGo SaaS user manual serves as a comprehensive guide to empower users in maximizing the potential of our booking management platform. With intuitive features and customizable settings, BookingGo offers a seamless experience for businesses looking to streamline their appointment scheduling, customer management, and subscription services. From creating appointments and managing contacts to setting up subscription plans and configuring system settings, our user manual provides step-by-step instructions for leveraging the full range of functionalities available within the platform. Users can customize their branding, integrate messaging services, manage taxes and payments, and much more, all within a user-friendly interface designed for efficiency and ease of use. Whether you’re a small business owner or a large enterprise, BookingGo SaaS offers the flexibility and scalability to meet your unique needs. With our user manual as your guide, you’ll have the knowledge and tools to optimize your booking processes, enhance customer satisfaction, and drive business growth.
Reach Out to Us
Have questions or need assistance? We're here to help! Reach out to our team for support, inquiries, or feedback. Your needs are important to us, and we’re ready to assist you!


Related document
We give a helping hand to make sure you start with the right foot.
CyberSource Integration in Dash SaaS
Enhance your business in Bahrain with secure Cybersource Integration in Dash SaaS. Accept debit card payments effortlessly. Visit WorkDo.io now.
Launching Your Own SaaS Business with BookingGo SaaS
Learn the process of launching your own SaaS business with BookingGo SaaS, a comprehensive platform equipped with powerful tools for success.
Product Compare Integration in eCommerceGo SaaS
Learn how to enhance your online store with the Product Compare eCommerceGo Add-On. Get the competitive edge with this powerful integration.
Spin To Win Reward – eCommerceGo Addon
Enhance customer interaction and drive sales with the dynamic Spin To Win Reward feature offered by eCommerceGo SAAS.
Performance Indicator Integration in Dash SaaS
The Performance Indicator is a comprehensive gamification platform designed to enhance employee engagement and productivity through structured challenges, team management, and achievement tracking.
Reward-Club Point – eCommerceGo Addon
Increase customer engagement and loyalty with the Reward-Club Point Module for eCommerceGo SaaS. Learn more now!
Webhook Integration in BookingGo SaaS
Streamline your booking process with seamless webhook integration add-on for WorkDo.io. Improve efficiency and stay up-to-date in real-time.
Business Model Integration in Dash SaaS
The Business Model Add-On is a strategic business design tool that helps organizations create and visualize their business models using the Business Model Canvas framework.
Review Reminder – eCommerceGo Addon
Enhance credibility and increase customer engagement with the Review Reminder Addon on the EcommerceGO SaaS platform.
WhatsApp Messenger Integration in Dash SaaS
The WhatsApp Messenger Add-On is a communication integration tool designed to connect your business platform with WhatsApp messaging services.
Team Booking Integration in BookingGo SaaS
Discover the power of seamless team booking integration in BookingGo SaaS. Improve productivity and streamline your team’s scheduling process.
Influence Marketing Detailed Documentation
The Influencer Marketing System is a comprehensive platform designed to connect brands with influencers for effective marketing campaigns
Need more help?
If you’re still uncertain or need professional guidance, don’t hesitate to contact us. You can contact us via email or submit a ticket with a description of your issue. Our team of experts is always available to help you with any questions. Rest assured that we’ll respond to your inquiry promptly.
Love what you see?
Do you like the quality of our products, themes, and applications, or perhaps the design of our website caught your eye? You can have similarly outstanding designs for your website or apps. Contact us, and we’ll bring your ideas to life.
