POSGo – WooCommerce Point Of Sale
1. Getting Started
1.1 Welcome
This Documentation describes the installation and configuration steps of script. While the installation process is rather simple, some of the instructions presented here will require minimum understanding in working with databases and managing files on a server. If you’re not familiar with the procedures presented, We can help you via support desk.
1.2 License
- Regular License : Use, by you or one client, in a single end product which end users are ot charged for. The total price includes the item price and a buyer fee.
- Extended License : Use, by you or one client, in a single end product which end users can be charged for. The total price includes the item price and a buyer fee.
Please purchase Extended License if you are going to sell as a service. Envato License Policy
2. Installation
The user will get a zip file which he has to upload in the “Add New” menu option in the WordPress admin panel.
For this login to WordPress Admin Panel and Under the Dashboard hover your mouse over the “Plugins” menu option. This brings out a Sub-Menu and then selects the “Add New” option.

After this, you will see an option on the top of your page that is “Upload Plugin”, click the option to upload the zip file.

Then click on the “Upload Plugin” option, below that you will see a button “Choose File” click on the button to browse for the zip file as per the snapshot below.

Post browsing the file, click the “Install Now” button to install the plugin as per the snapshot.

Click on “Activate Plugin” to activate the installed plugin.

3. Flush Rewrite Rules
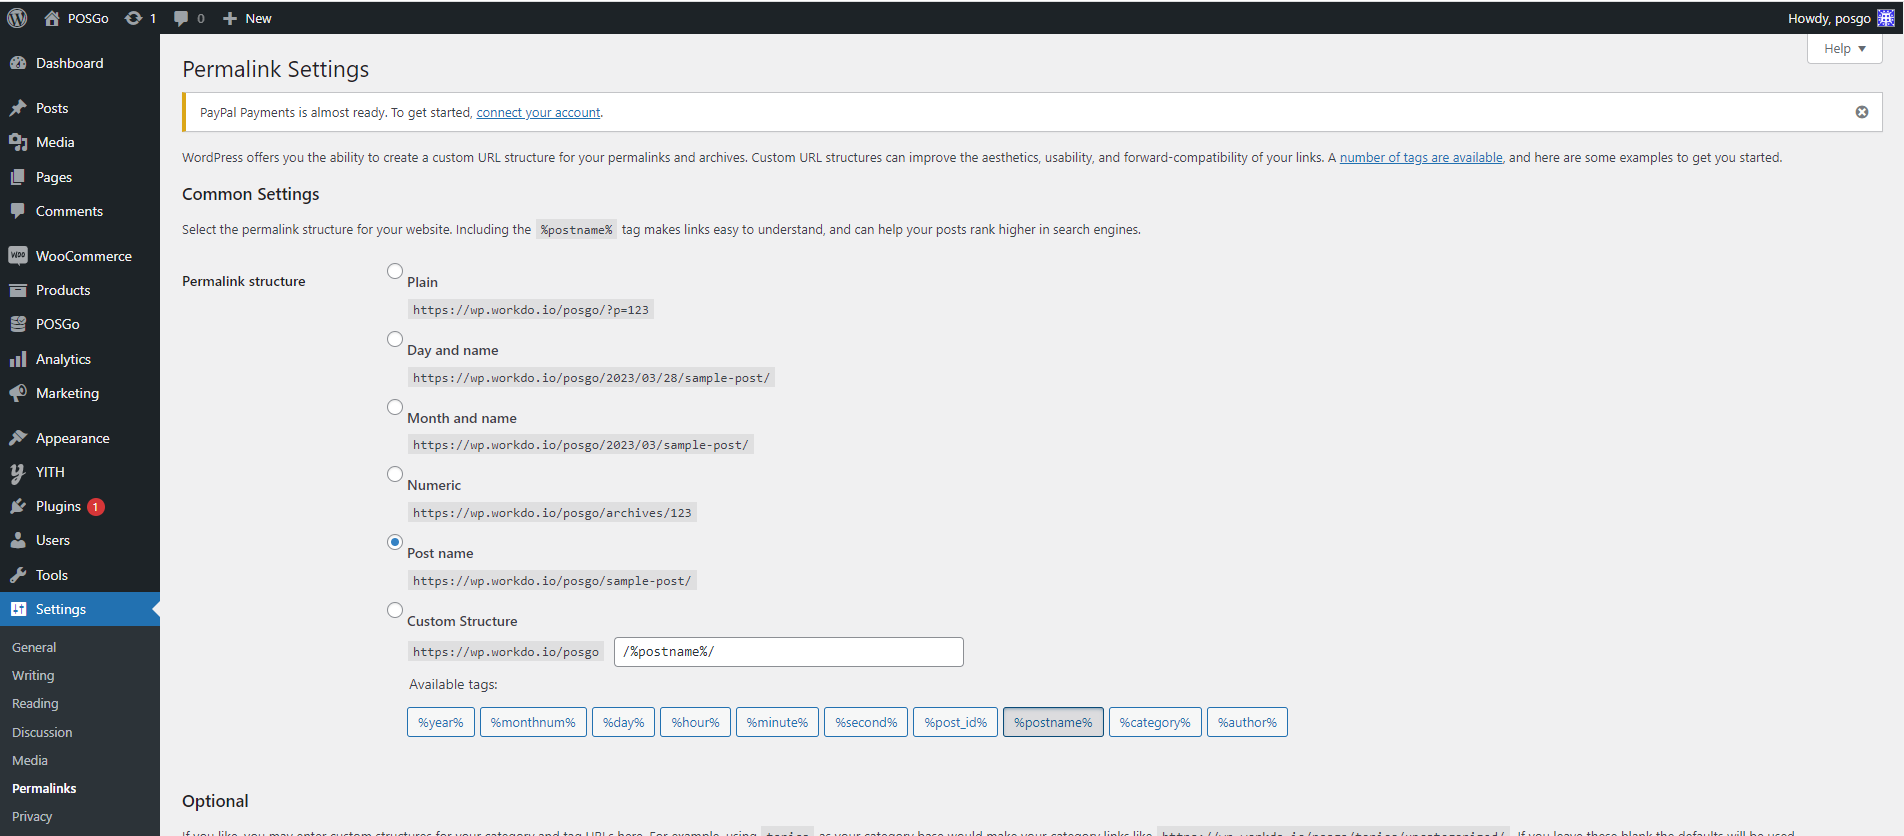
The admin has to flush the permalink by navigating to Settings > Permalinks so that the links to the POSGo store work correctly.
3.1 Dashboard
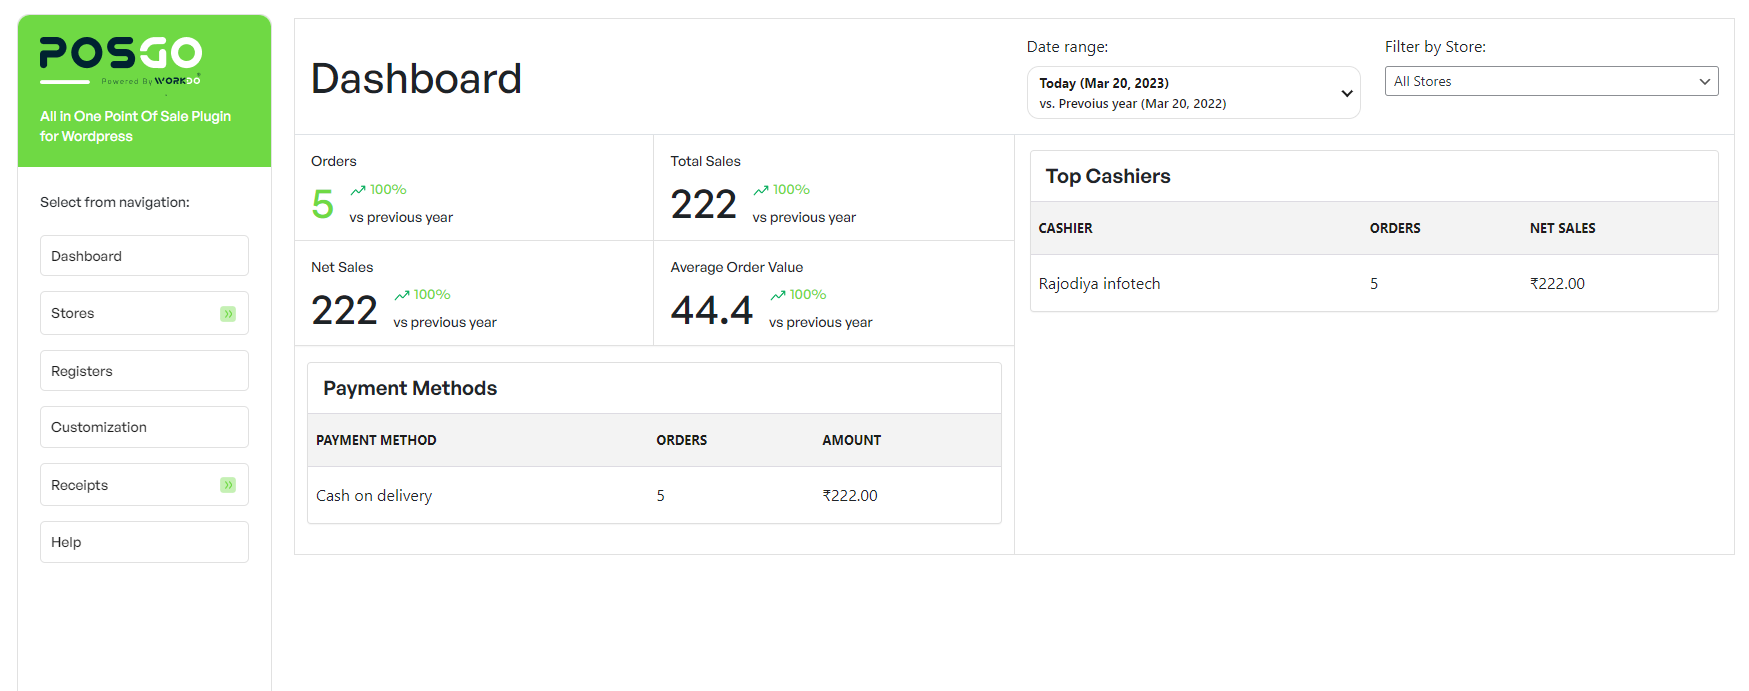
As soon as you activate the plugin and go to POSGo , you will see the Dashboard.
Here, you will find a dedicated report of all orders and sales made through your POSGo terminals.
Filter by date
These stats can be filtered by date: you can choose one of the preset time ranges or select a custom one.
Here, you will find a dedicated report of all orders and sales made through your POSGo terminals.

4. Stores
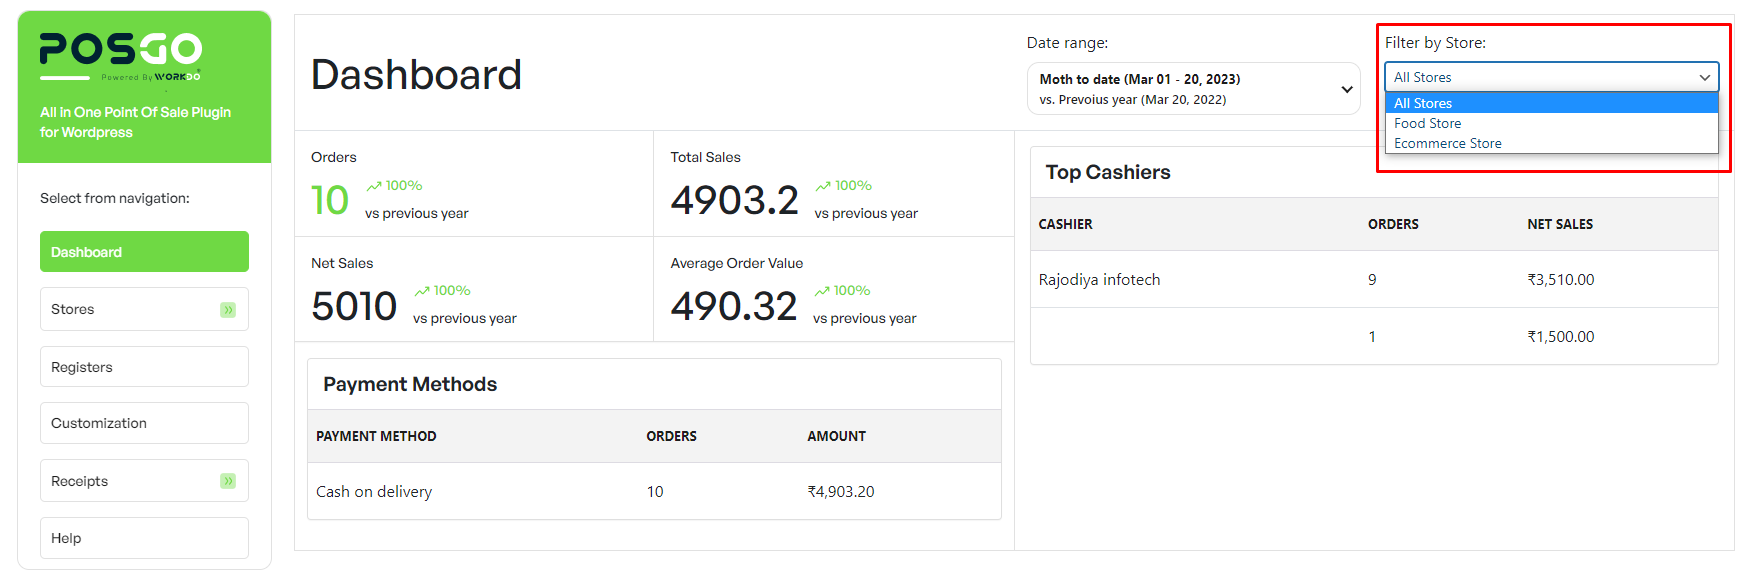
Filter by store
You can also filter these stats by store :
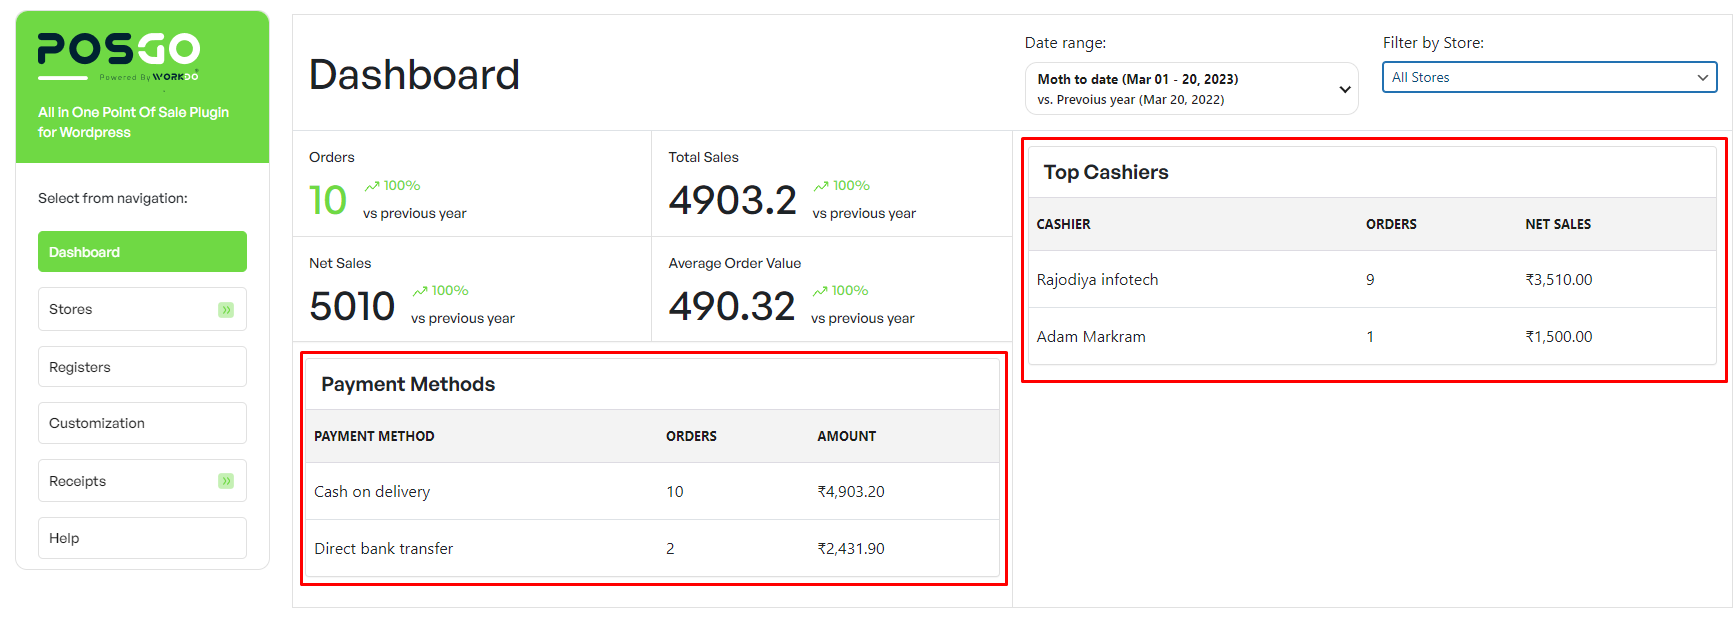
Finally, in the last section of the Dashboard, you’ll see a quick summary of sales by payment method and a box with Top cashiers listed by the net amount of sales they have processed through your POSGo system.
4.1 Store Information
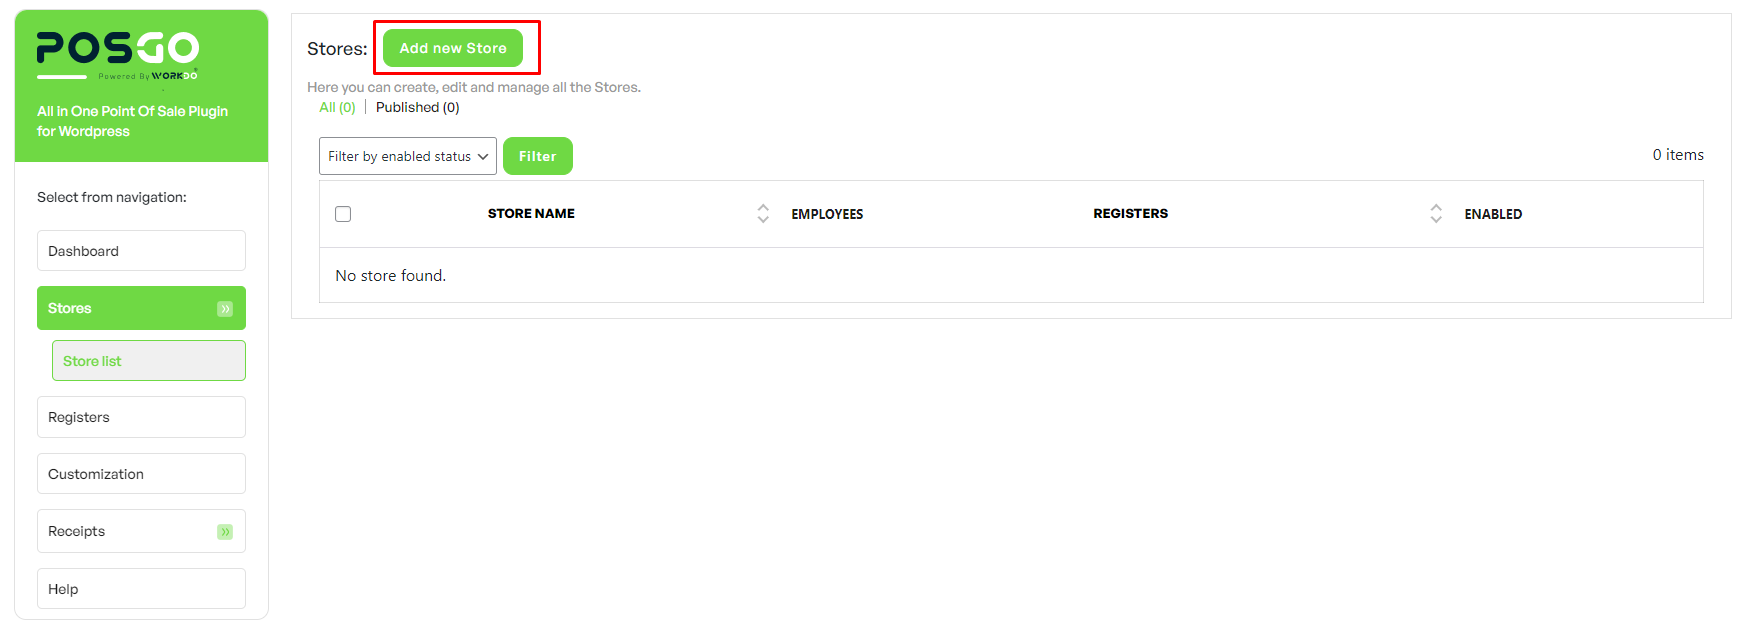
To start configuring your Points of Sale, go to POSGo > Stores: here you can set up one or more stores where you will use the POS system.
Click on Create your first store to add a new one, and you will be guided step by step to the full configuration.
Step 1 – Store information
In this step, you can enter the store information and contact details, social networks included. Below, you find the details you can enter.
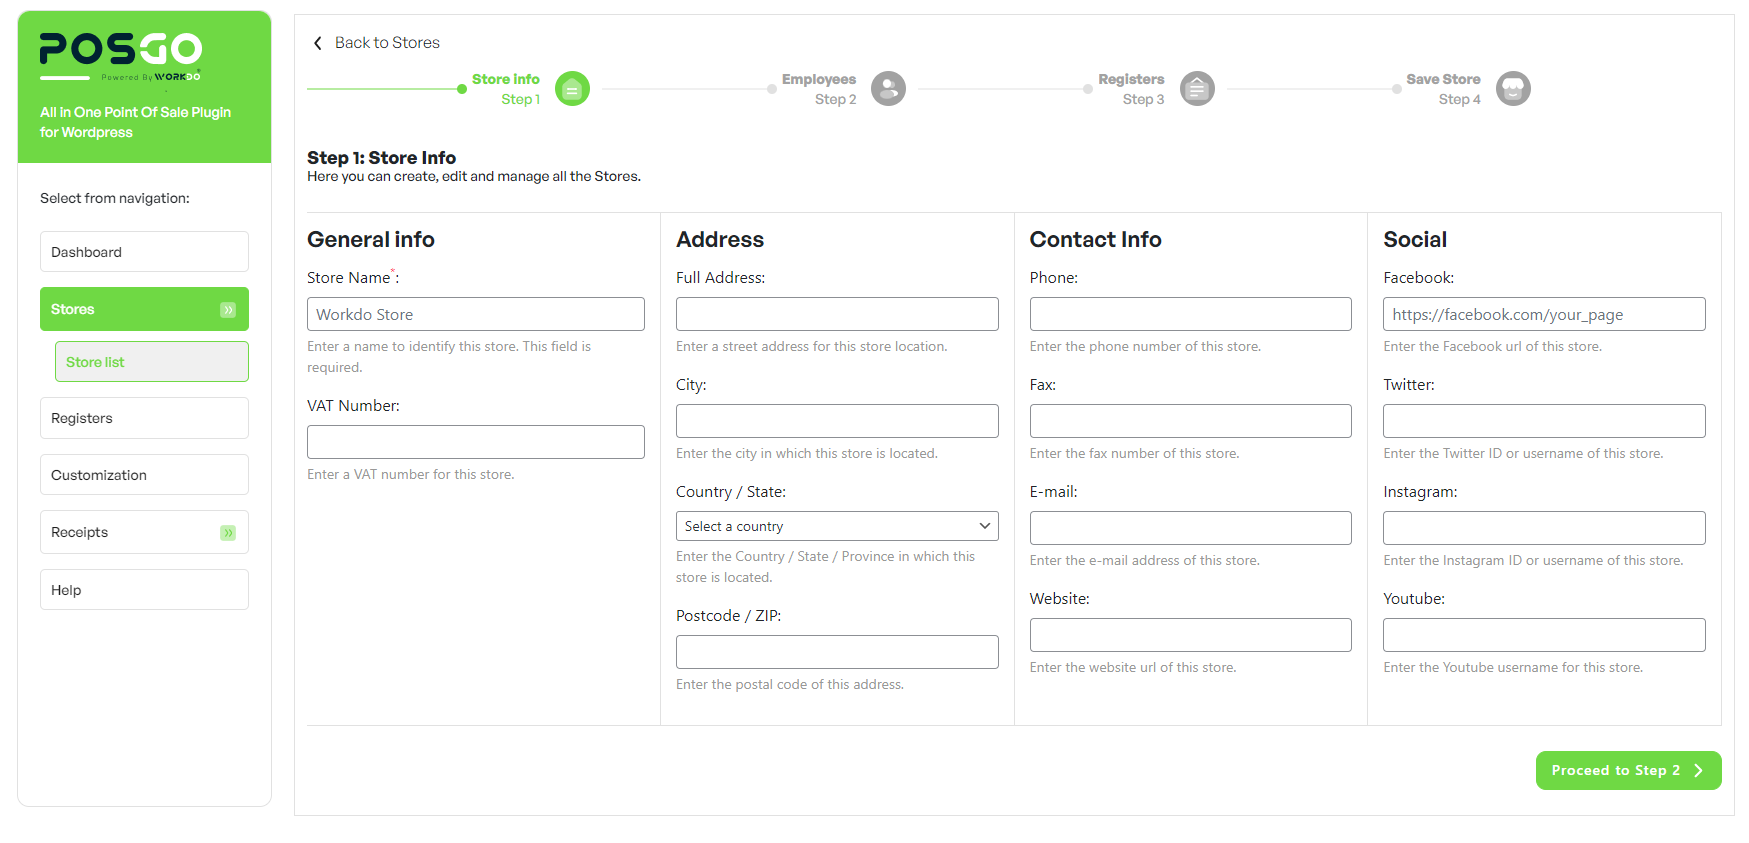
- Store Name (required field)
- VAT number
- Full address
- city
- Country/State
- Postcode/ZIP
- Phone
- fax
- Website
- Youtube
Step 2 – Store employees
Here, you can set up the employees of your store. You can add users with two different capabilities :
- Managers, who have full access to all registers and functionalities of the store. Please note that you have to assign at least one manager for each store.
- Cashiers, who might have limited access to the store registers (e.g. being allowed to use only Register 1, but not Register 2). You can set these limits in the next step about Register settings.
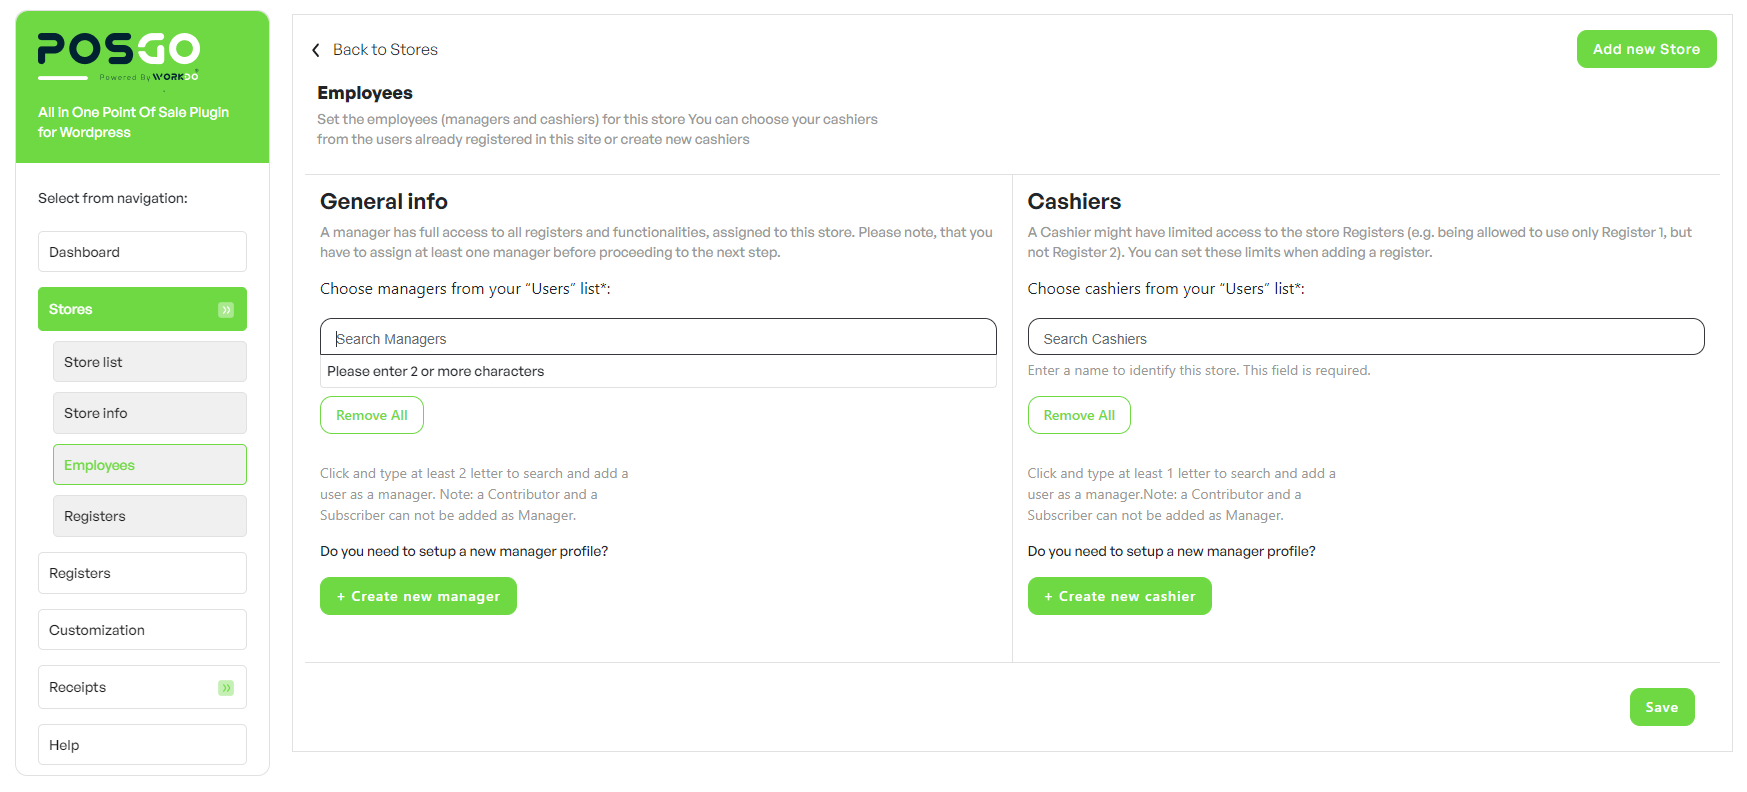
You can either pick an existing user or add a new user profile from this screen :
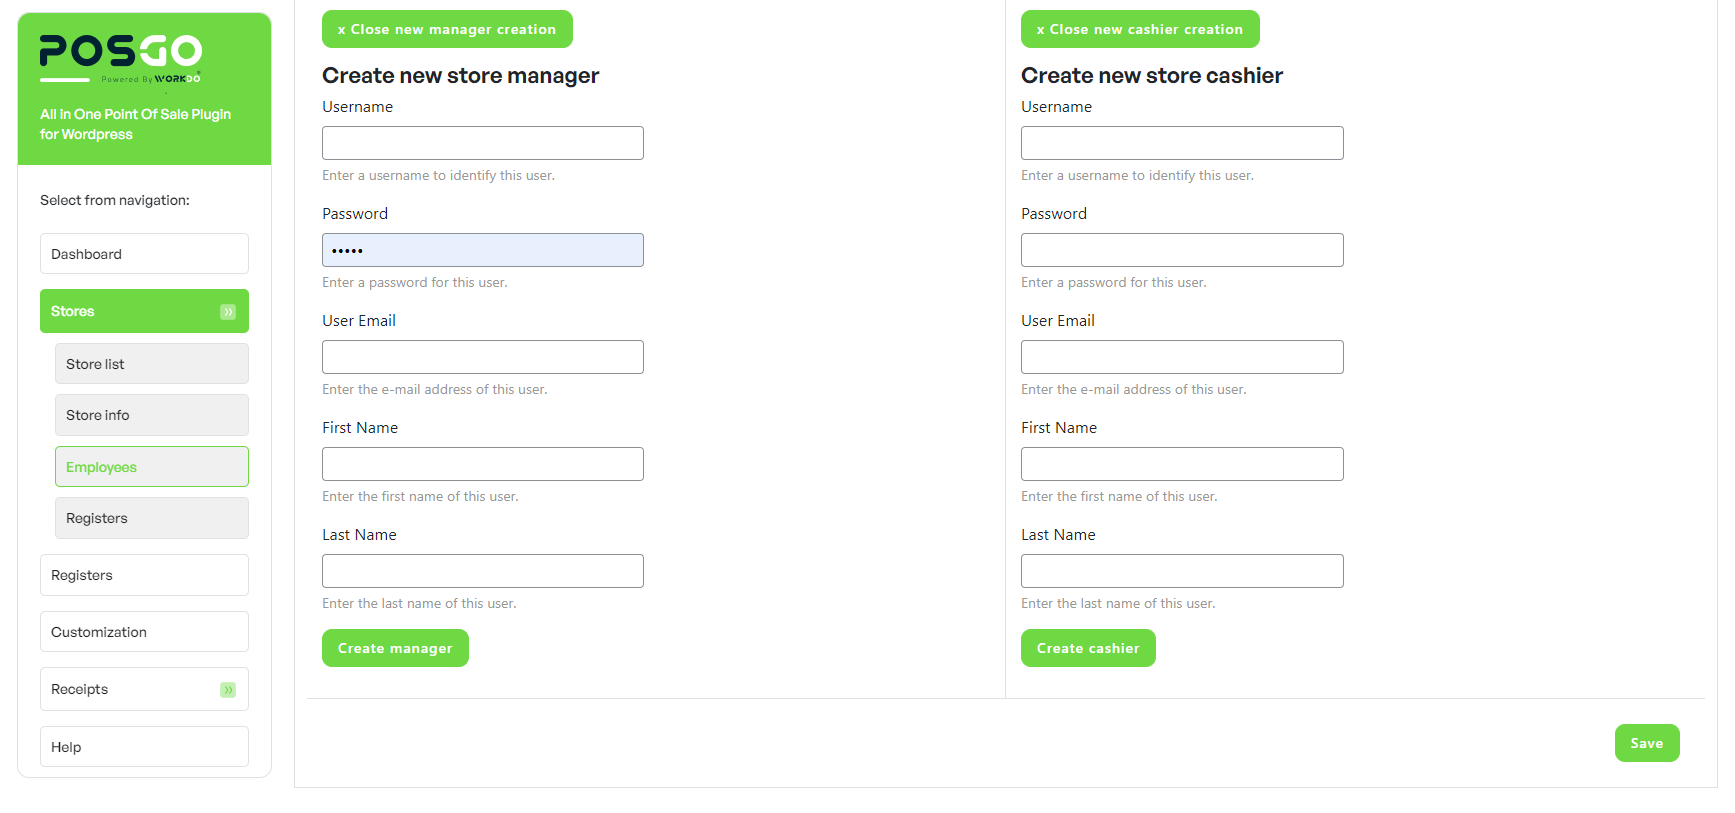
Go to POSGo > Store > Employees whenever you want to edit one or more of the above details for an existing store.

Step 3 – Registers
In this step, you can set up all the Registers available for the Store. Every Register might have different settings, regardless of other Registers of the same store. Please, see all the available options below:
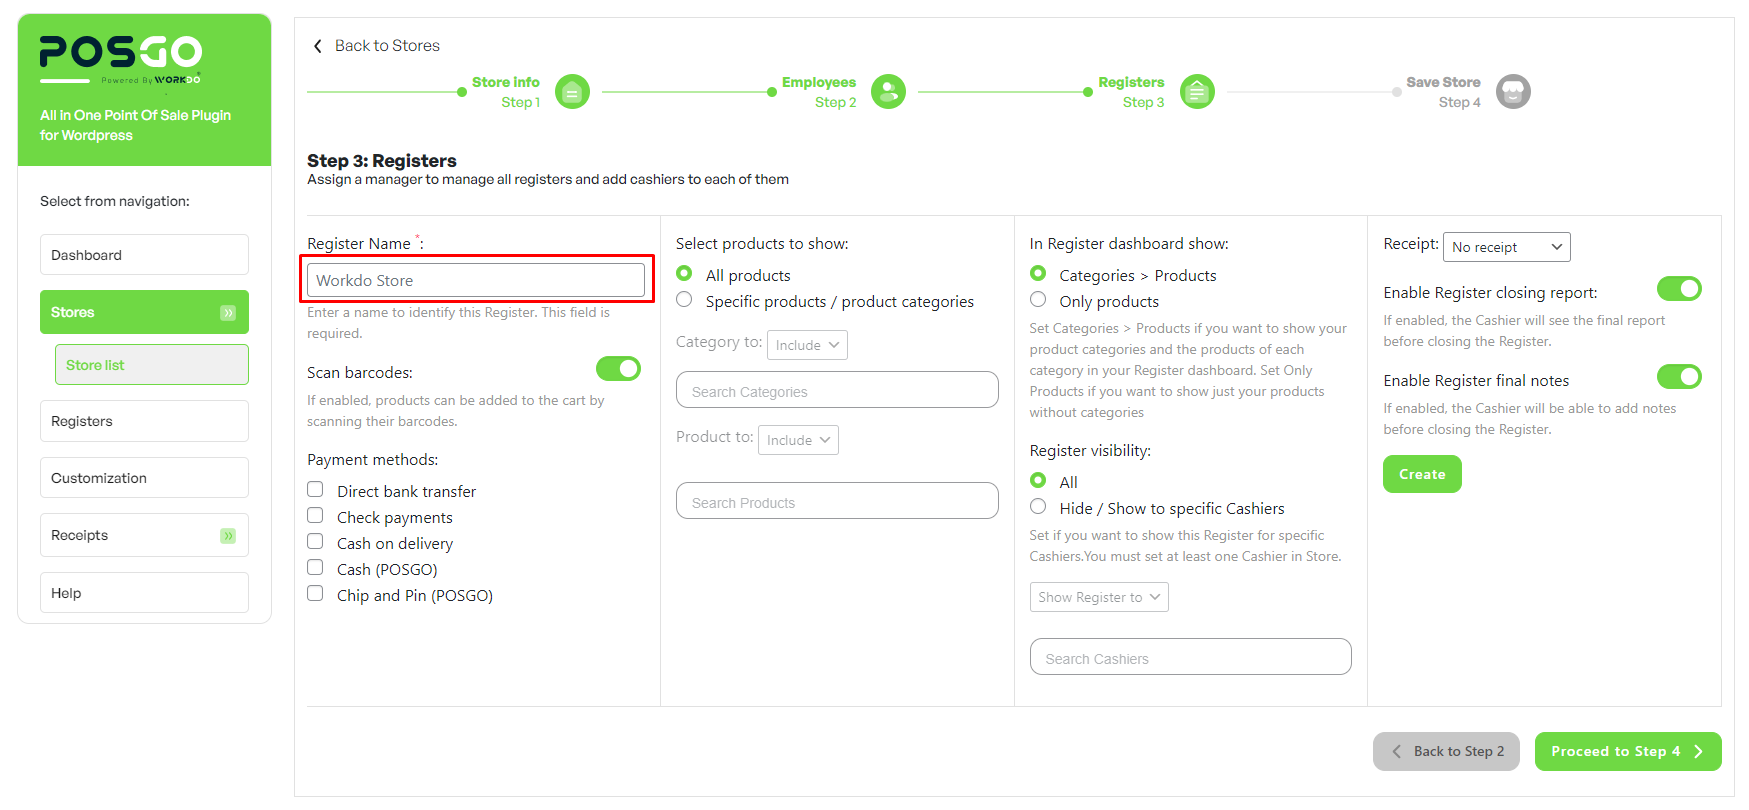
- Register name : this is a required field that will help you identify Registers.
- Payment methods : choose which payment gateways will be available for this specific Register.
- Select products to show : limit the products that are purchasable from this specific Register. This option can be useful if you want to sell some products only in your WooCommerce online and make them unavailable in your physical points of sale, or if you have distinct departments.
In the example below, from this Register, you can only purchase products in the categories Accessories, Electonic, Mobile.
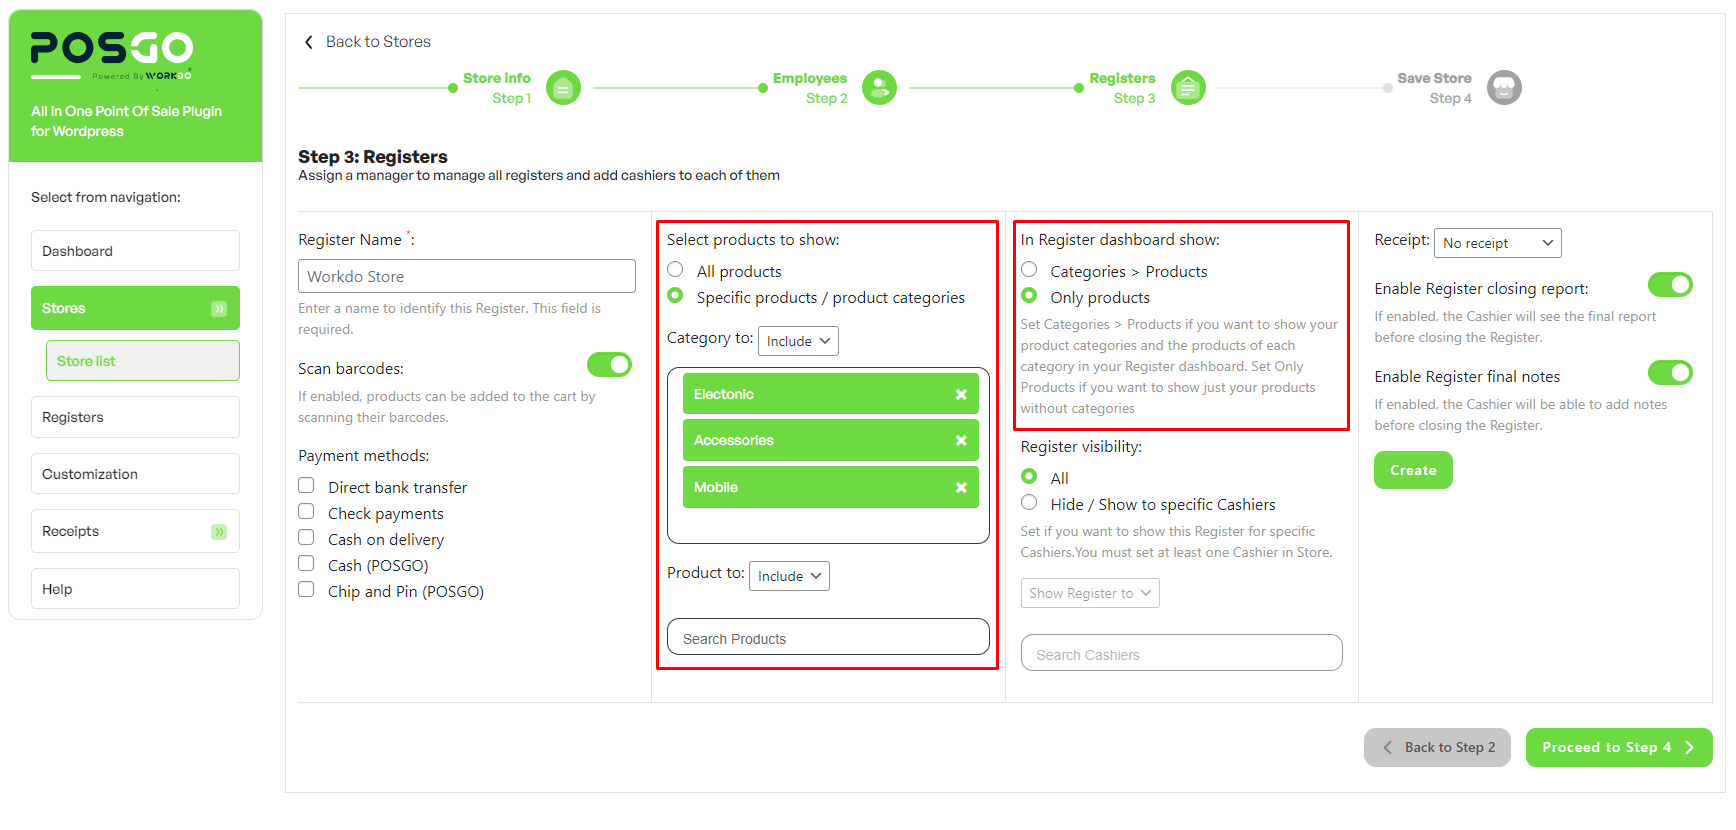
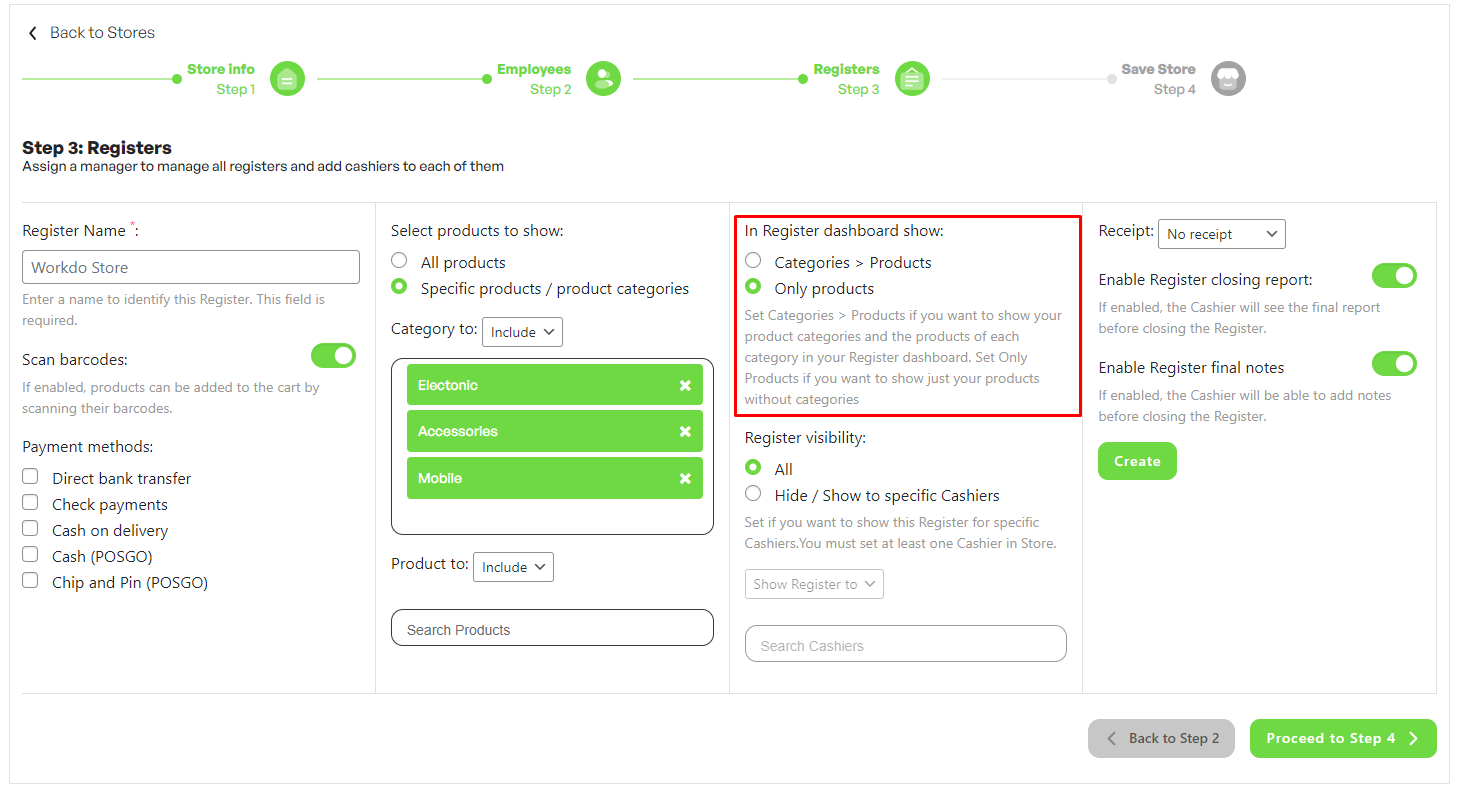
- In Register dashboard show : choose here how you want to display products on the POSGo screen. You can show the category list, so the Cashier has to pick a category first and then find the product, or you can show all products in one view.
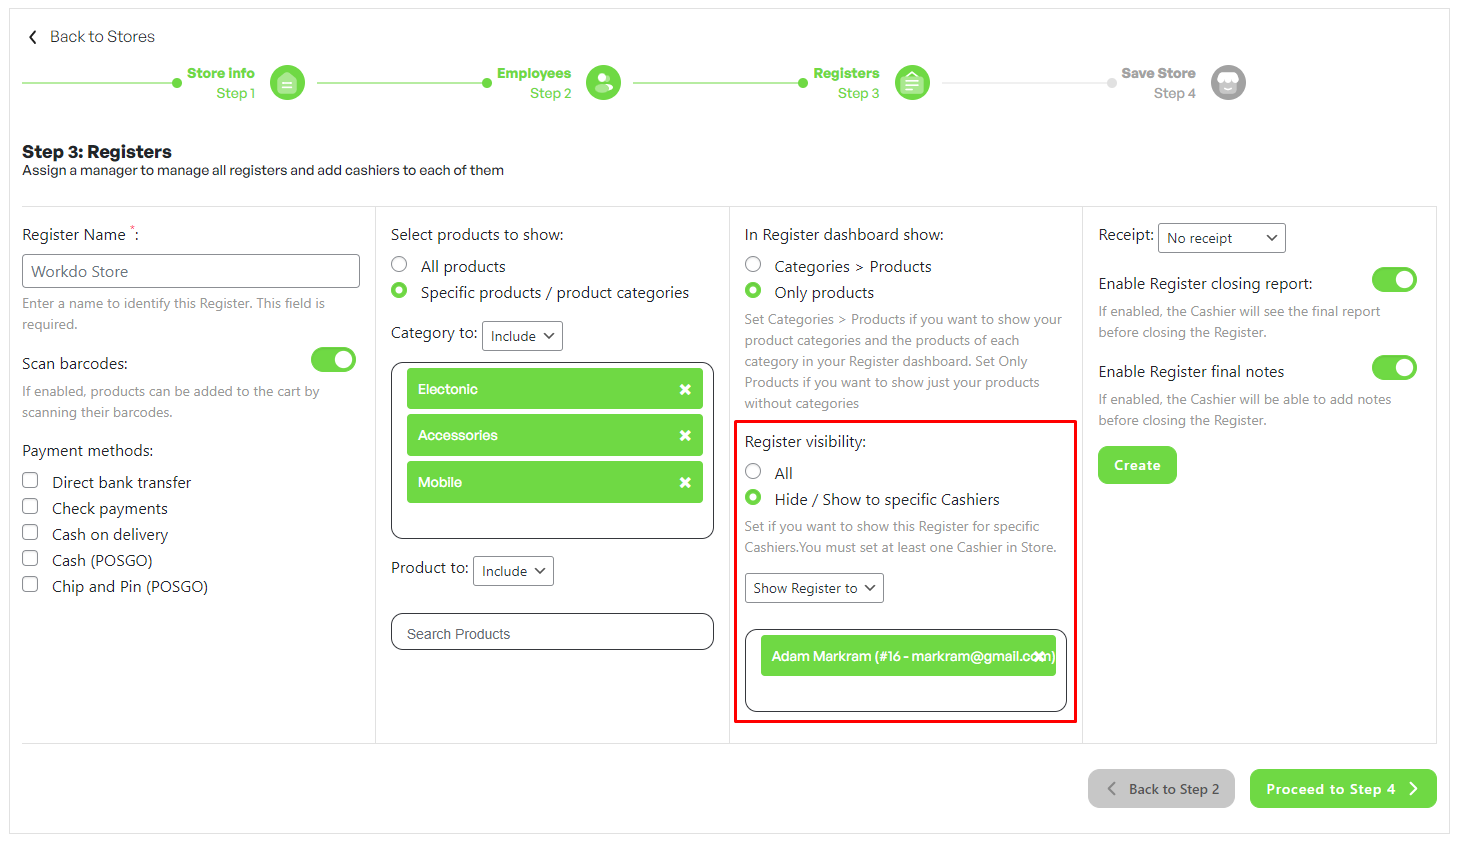
- Register visibility : select the cashiers among those set for the current store that will be able to view the register or not.
- Receipt : choose the receipt template to use for this store. You can create your receipt templates as described
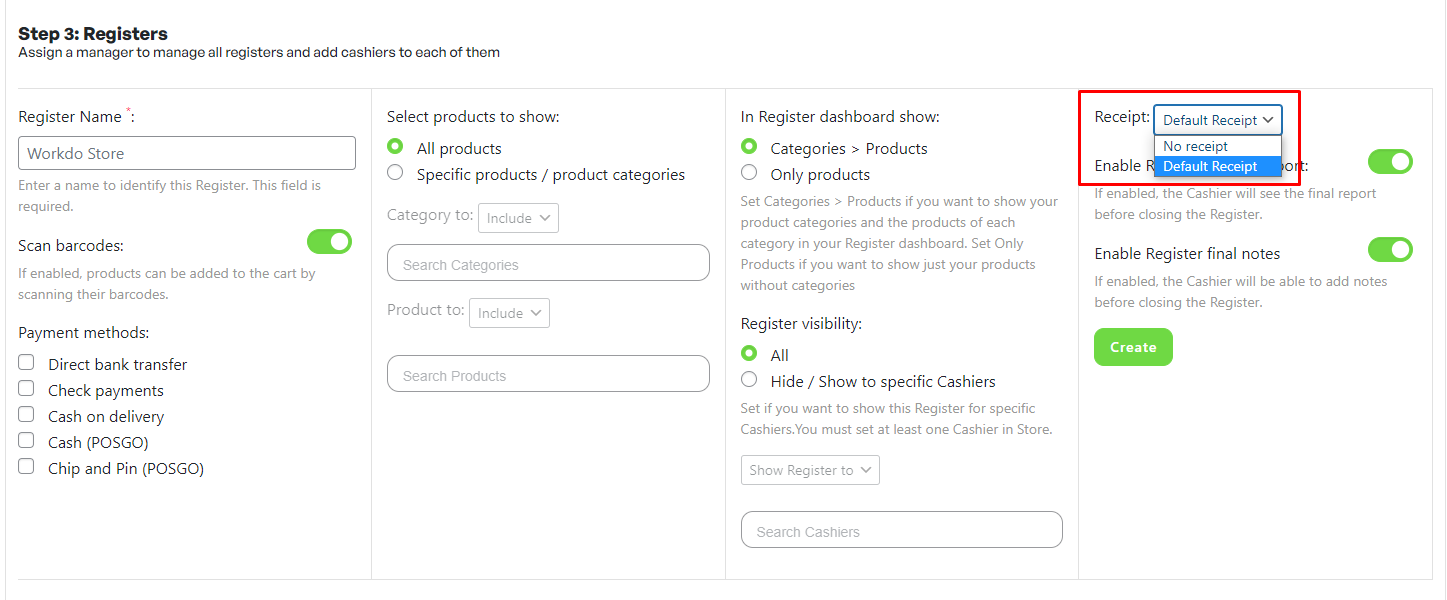
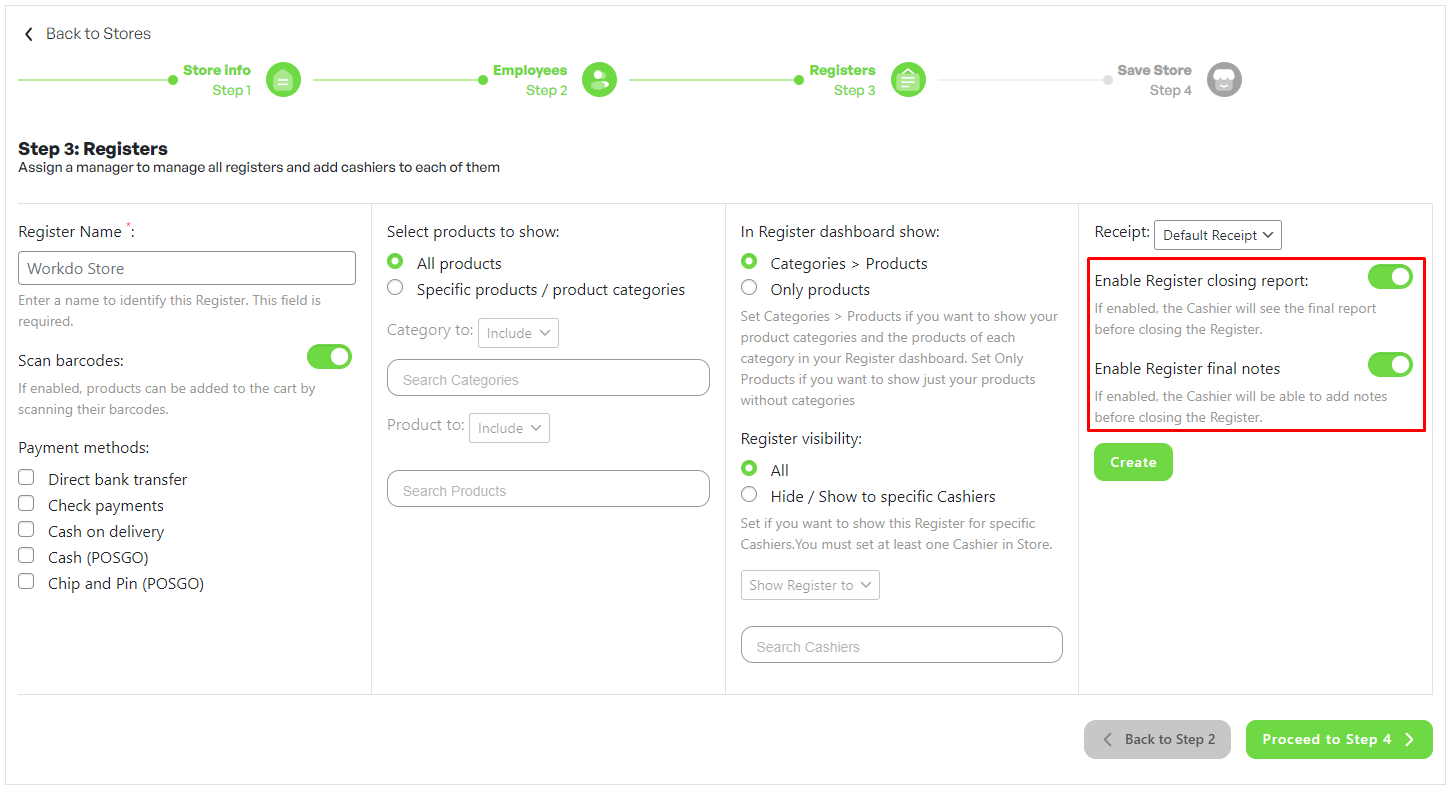
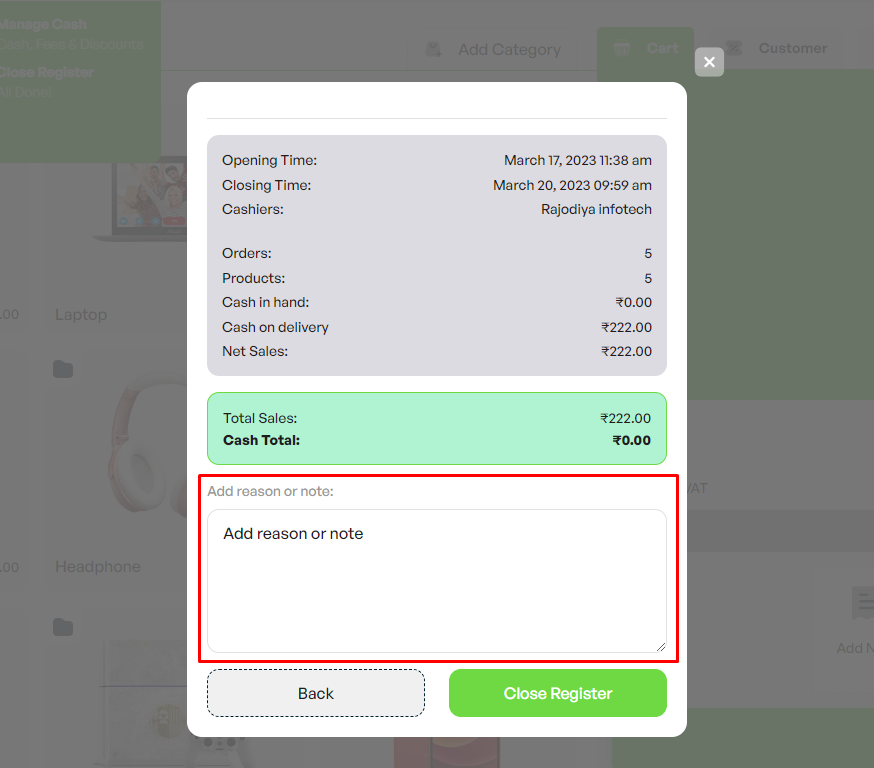
- Enable Register closing report : this enables a dedicated box in the Register closure view, where you can add notes.
- Enable Register final notes : this enables a dedicated box in the Register closure view, where you can add notes.
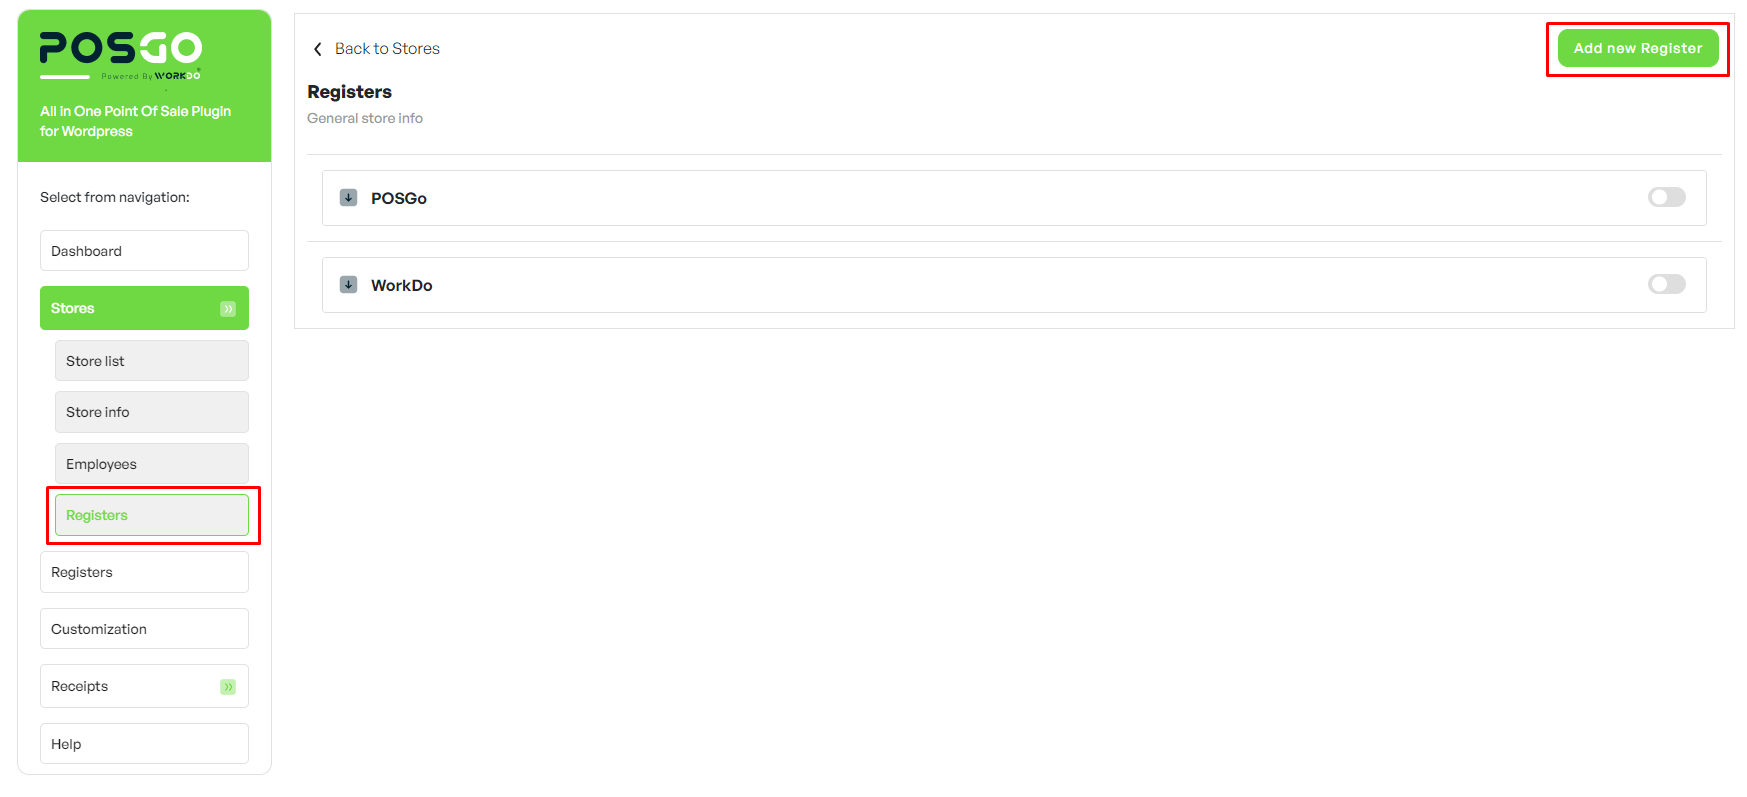
Go to POSGo > Store > Registers whenever you want to edit one or more of the above details for an existing store.
4.4 Receipt
Go to POSGo > Receipts to configure your sales receipt templates. Every Register can use a custom template. Click on Add new receipt to create a new one.
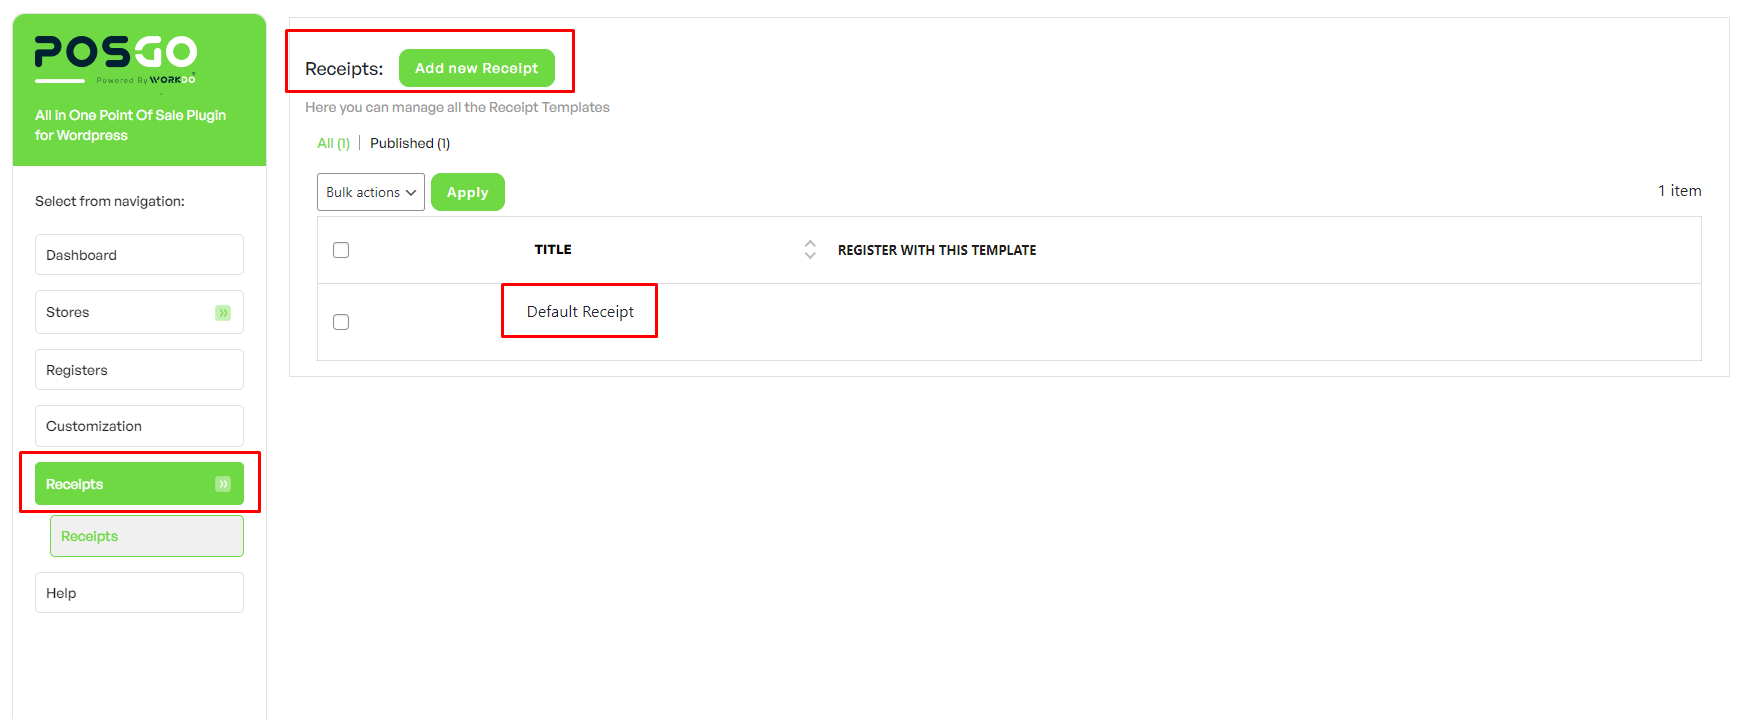
The new receipt template is divided into sections and on the right side, you’ll see a preview of the changes that you are currently doing.
General settings
In the General settings section, you can edit the Receipt name : this is the name of the template, the one that you will see in the Register picker tool in the Register settings.
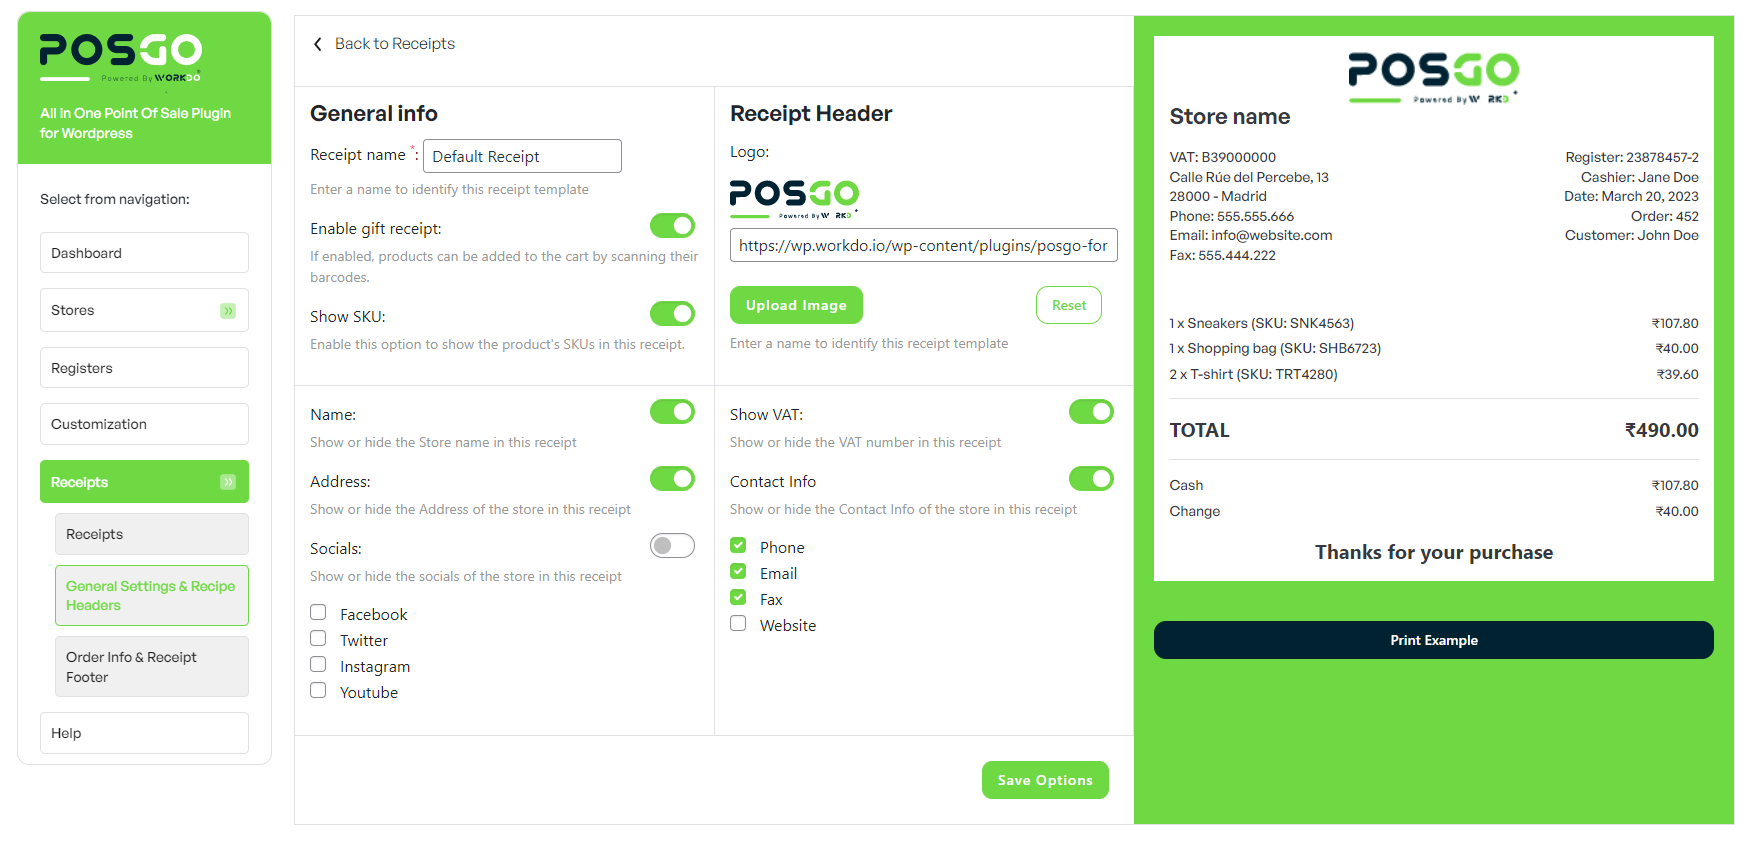
- Show SKU : enable if you want to show the product SKU in the receipt
- SKU label: enter the label that will define the SKU field.
- SShow prices including tax : enable to show prices tax included.
- Show tax details : enable if you want to force the tax row to be shown in the receipt.
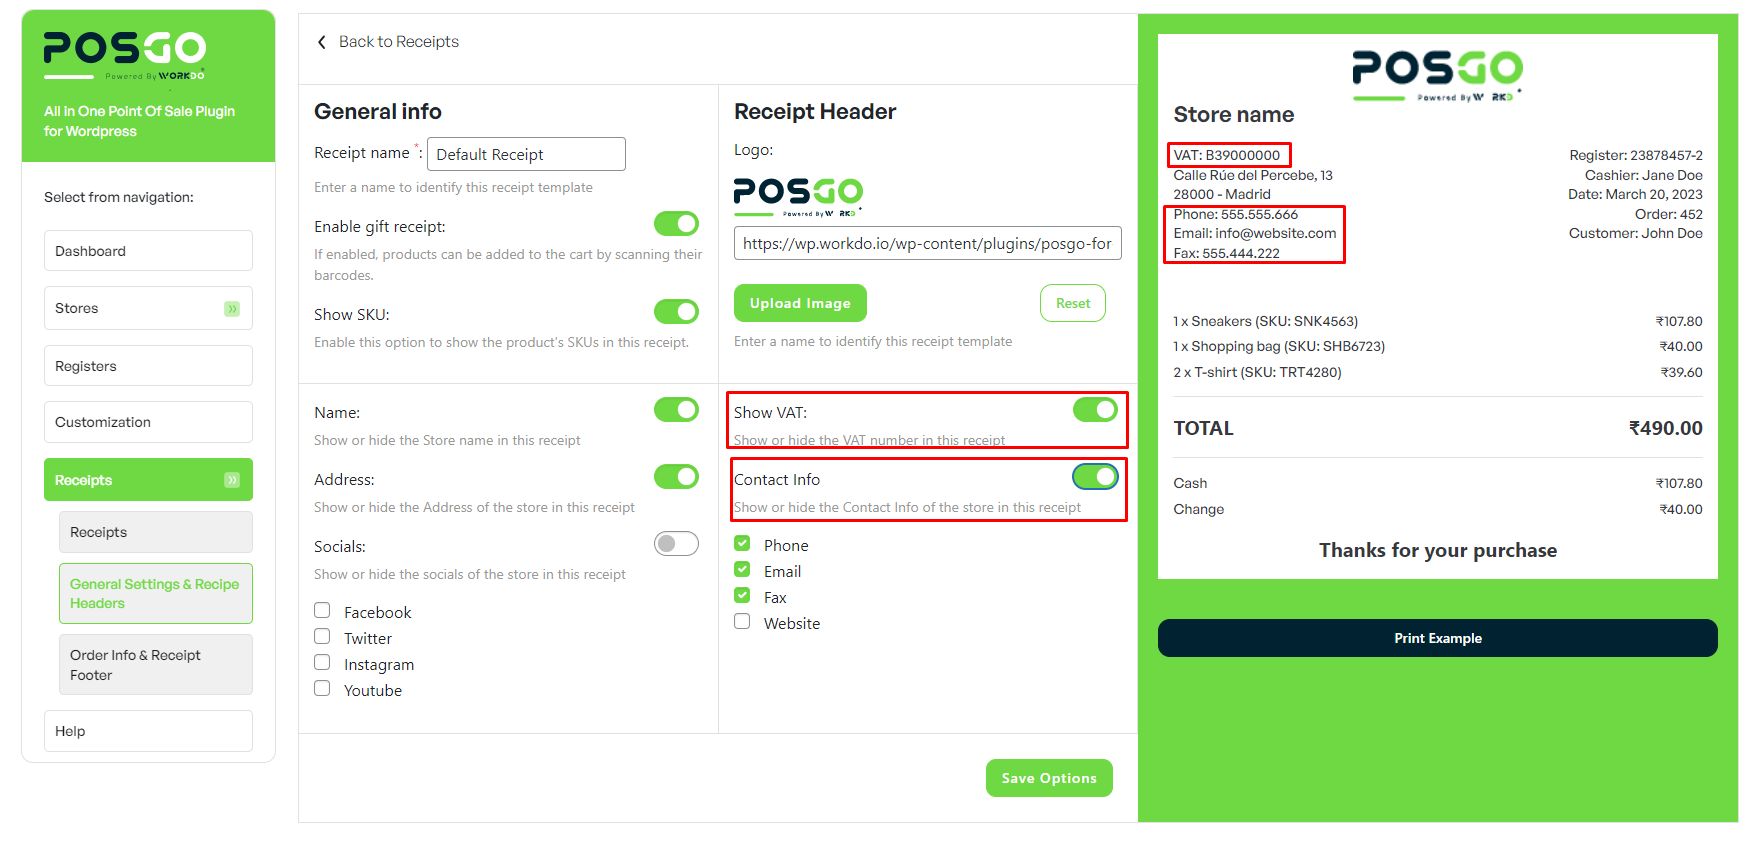
Receipt header
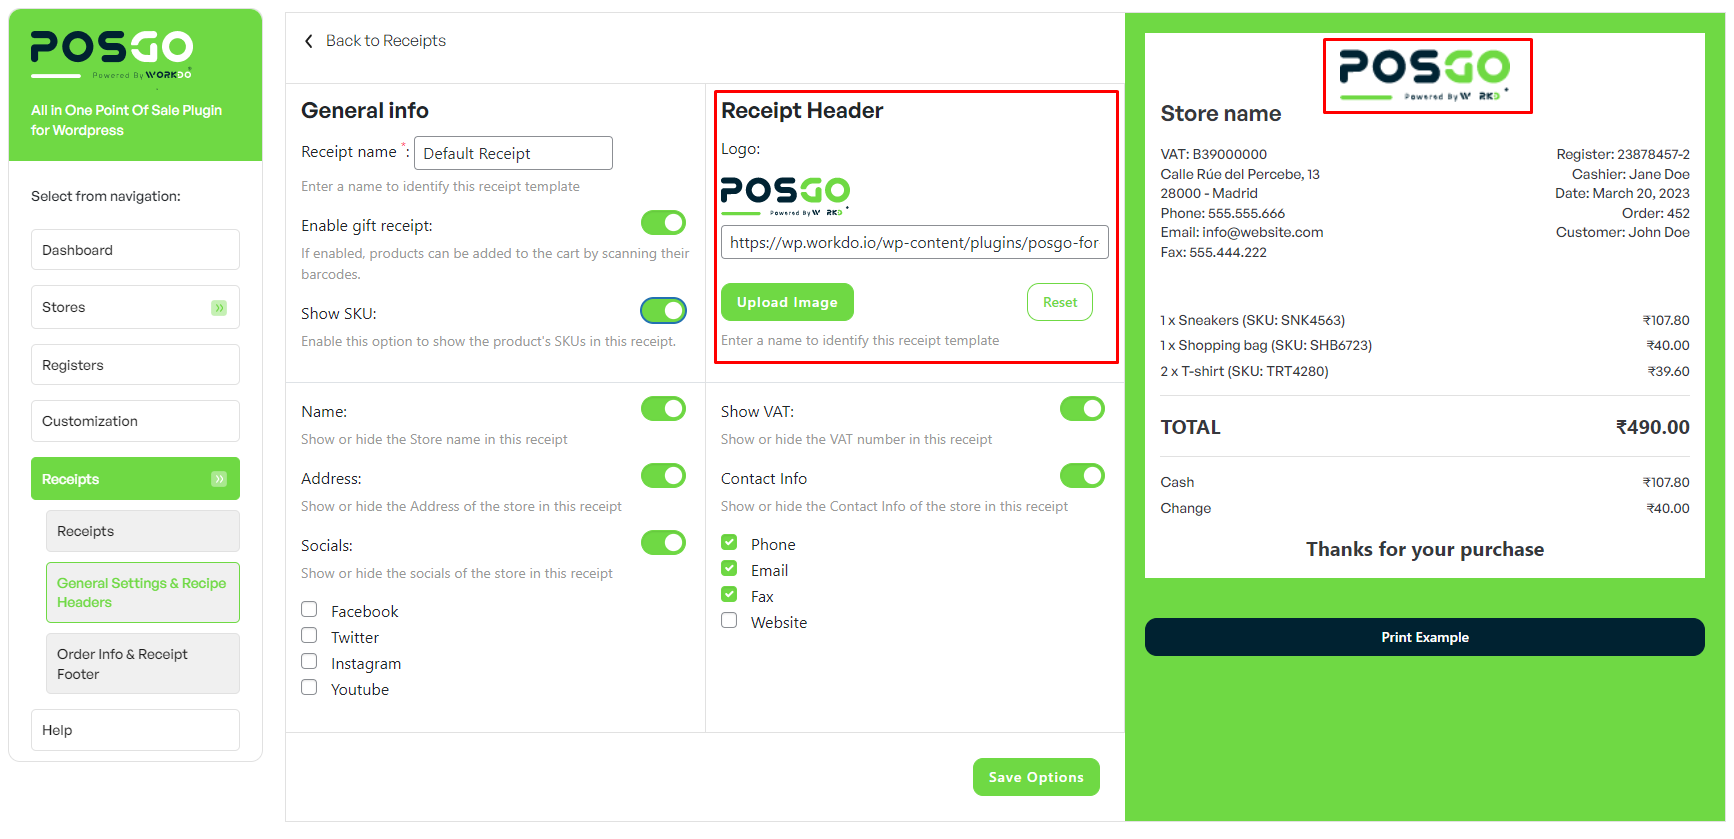
- Logo: upload here your custom logo to show at the top of the receipt.
- Name: enable if you want to show the shop name on the receipt.
- Show VAT: enable this option if you want to show the VAT number that you’ve set in the Store settings.
- VAT label : edit here the text that will identify the VAT in the receipt. Default to ‘VAT:’
- Address : enable this option if you want to show the store address as specified in the Store settings.
- Contact info : enable if you want to show the Store contact info as specified in the Store settings. You can choose whether to display all or just a few of the available ones.
- Socials : enable this option to select the socials you want to show in the receipt.
Order info
Here you can edit all the information related to the order as it will appear in the receipt :
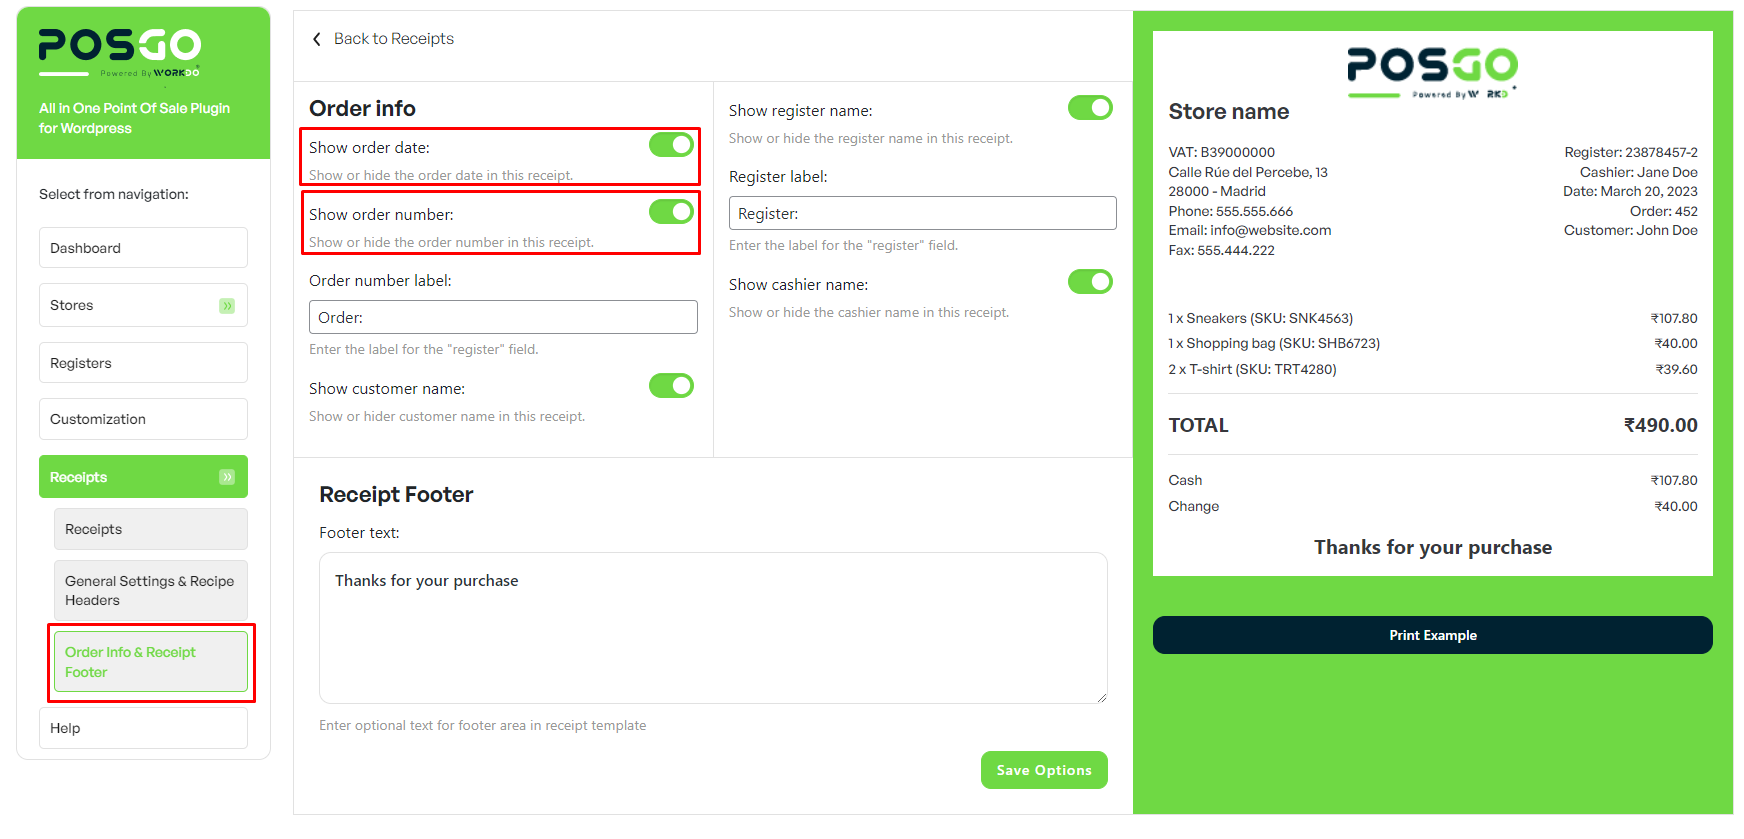
- Show order date : include the date of the order.
- Order date label : change here the text that identifies the order date. Default to ‘Date’.
- Show order number : this will print the order number.
- Order number label : change here the text that identifies the order number. Default to ‘Order’.
- Show customer name : this shows the customer name (if available).
- Customer label : change here the text to identify the customer. Default to ‘Customer’.
- Show shipping details :this shows shipping info.
- Shipping label : change here the text that identifies shipping details.
- Show register name : this allows showing the Register through which the order was placed in the receipt.
- Register label : change here the text to identify the Register. Default to ‘Register’.
- Show cashier name : this allows showing the name of the Cashier who placed the order.
- Cashier label : change here the text to identify the Cashier who placed the order. Default to ‘Cashier’.
Footer
In this last section, you can add a custom text that will be shown in the receipt footer :

Click on Save receipt to save your settings. From now on, you will be able to find this receipt template as one of the available choices in the Store settings .
Example
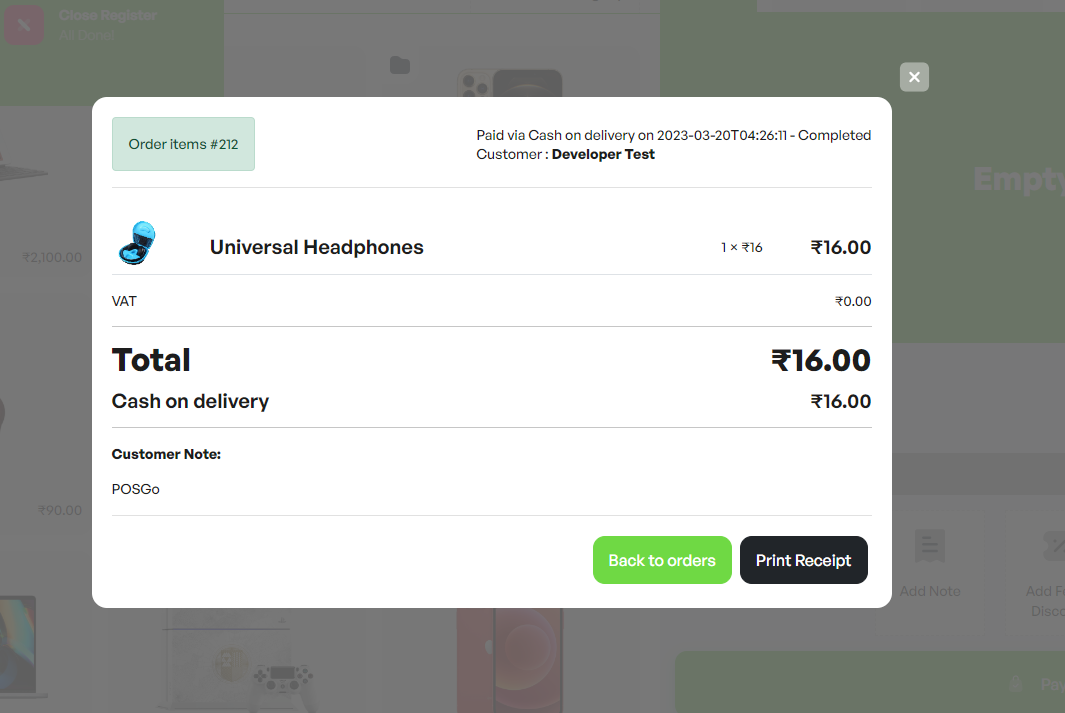
If the receipt option is enabled, whenever a new order is placed, on the POSGo screen, you will be able to see a Print receipt button that allows you to either print the receipt through the connected printer or save a PDF copy of it.
4.5 Customization
Go to POSGo > Customization to customize the settings of your POSGo screen.

General settings
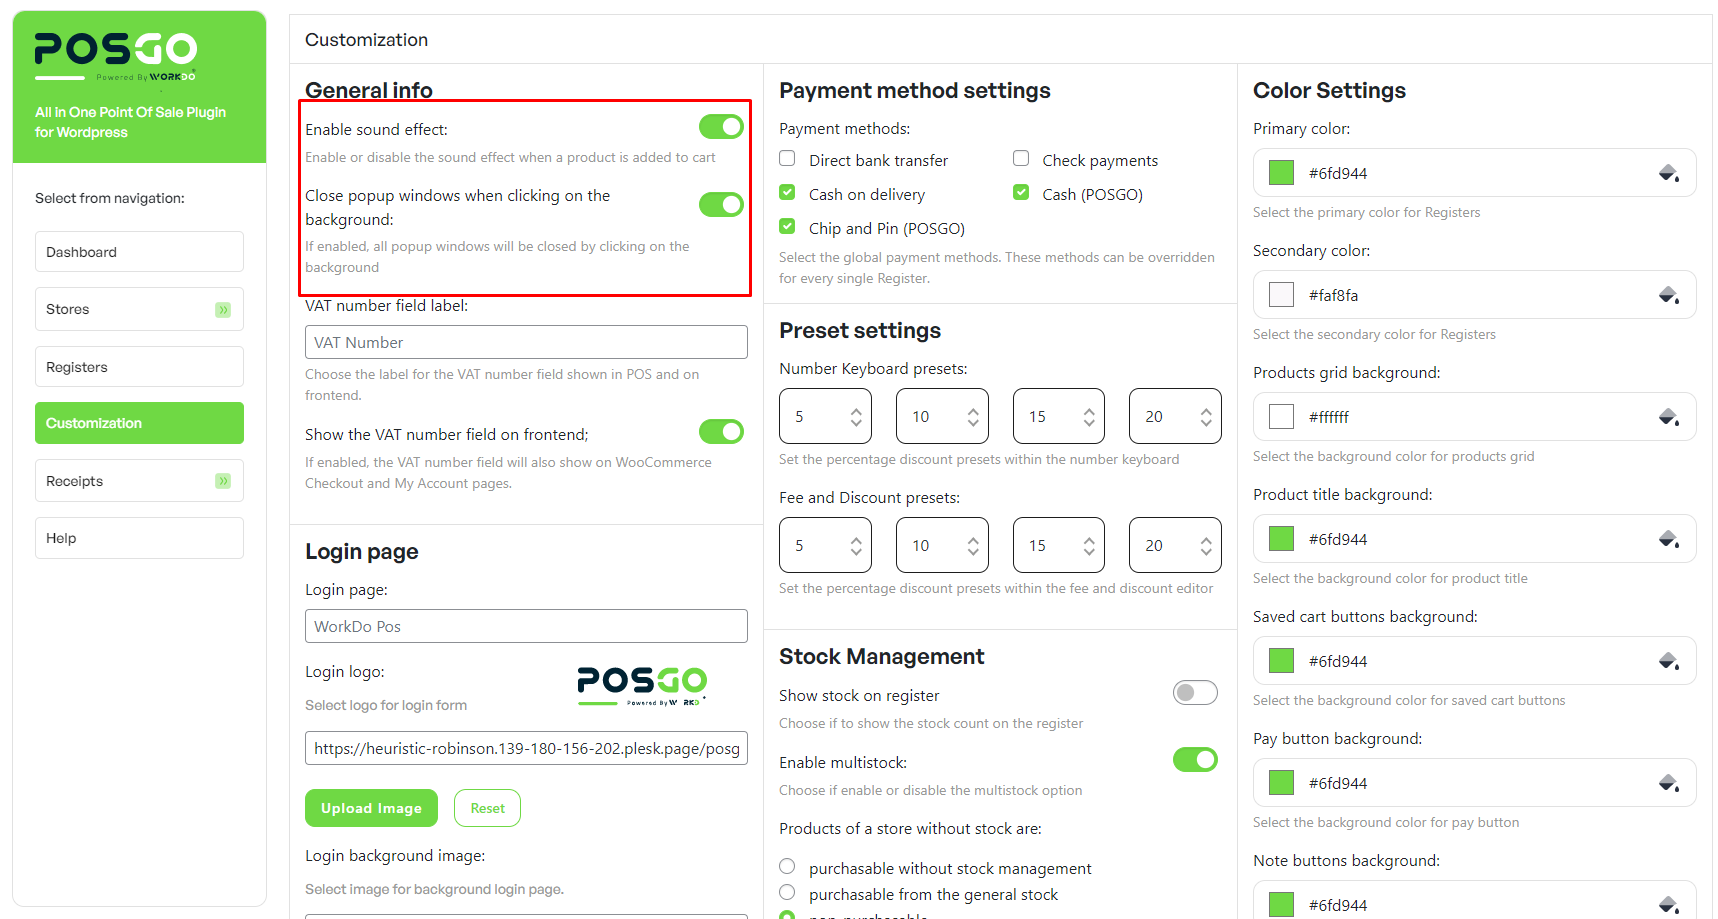
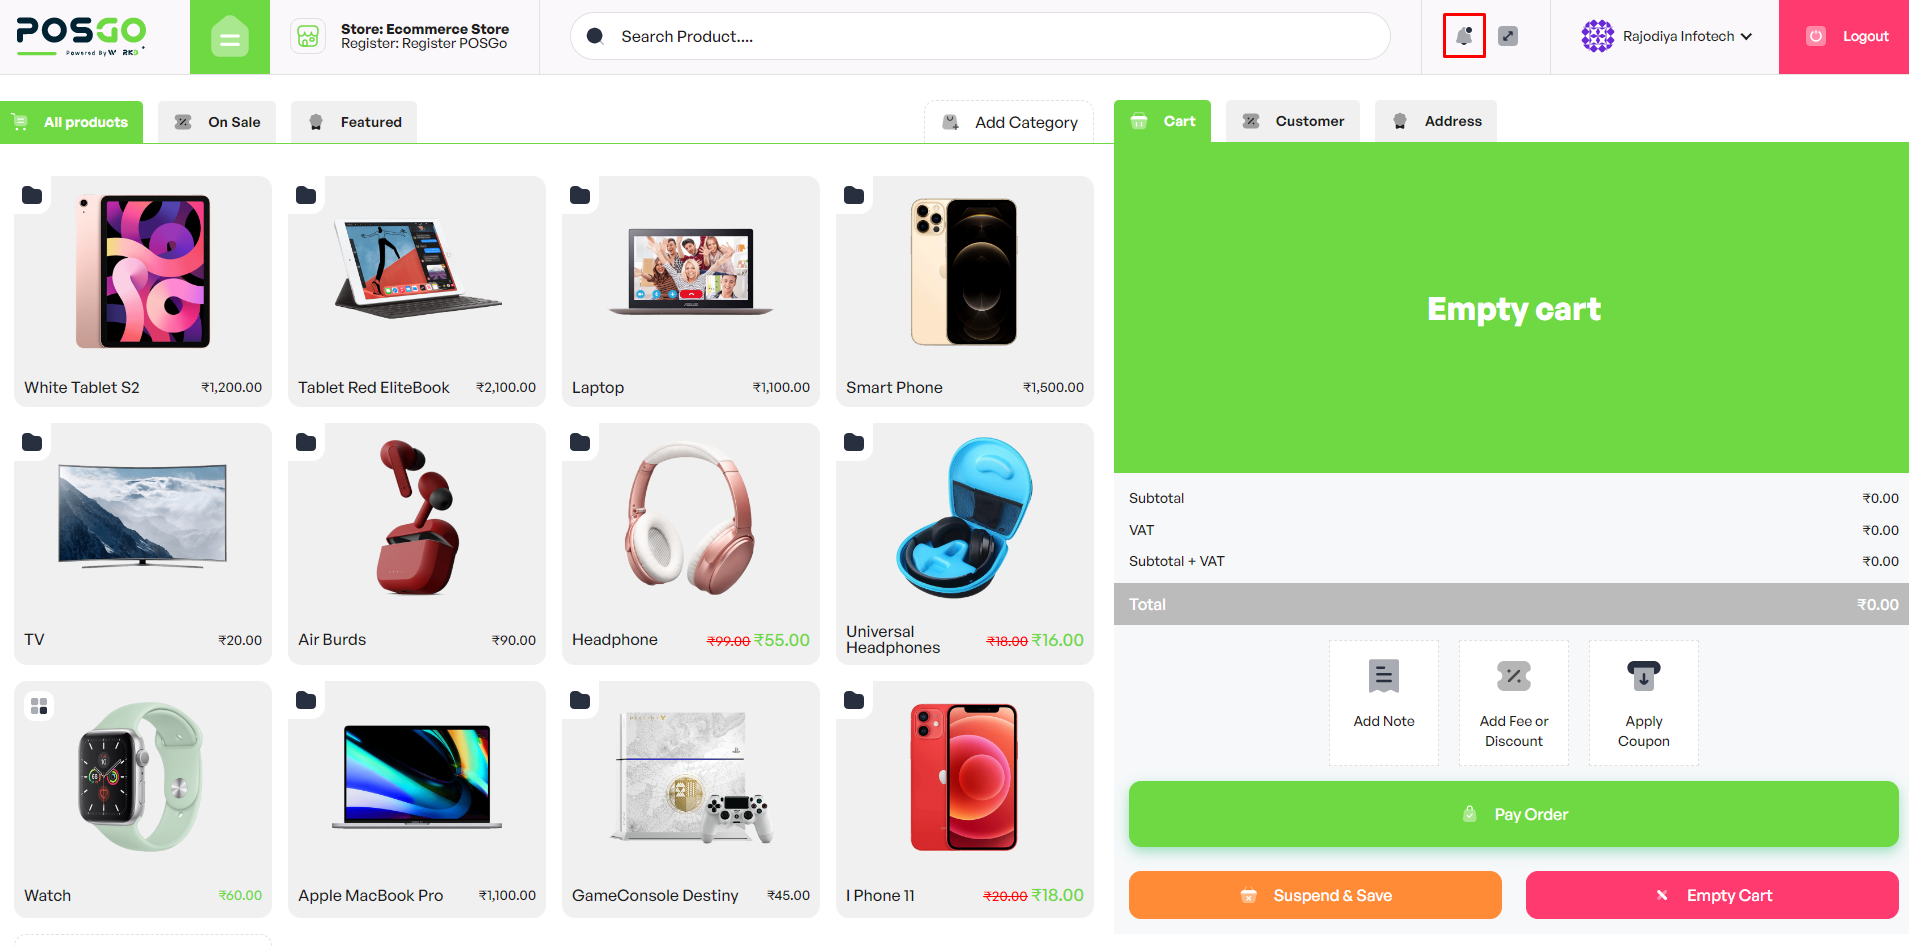
- Enable sound effect : this option enables the sound played every time a product is added to the cart from the POSGo screen. Every Cashier can disable the sound effect from the POSGo terminal by clicking on the bell icon:
- Close popup windows when clicking on the background : enable this option if you want to close every kind of popup window appearing on the POSGo screen when you click out of it. Make sure you keep this option disabled if you want to close the window only when clicking on the X icon in it.
- VAT number field label : enter the label that will define the VAT number field in POSGo and on frontend.
- Show the VAT number field on frontend : enable this option if you want to show the VAT number field added by the plugin on WooCommerce Checkout and My Account pages too.
Login page
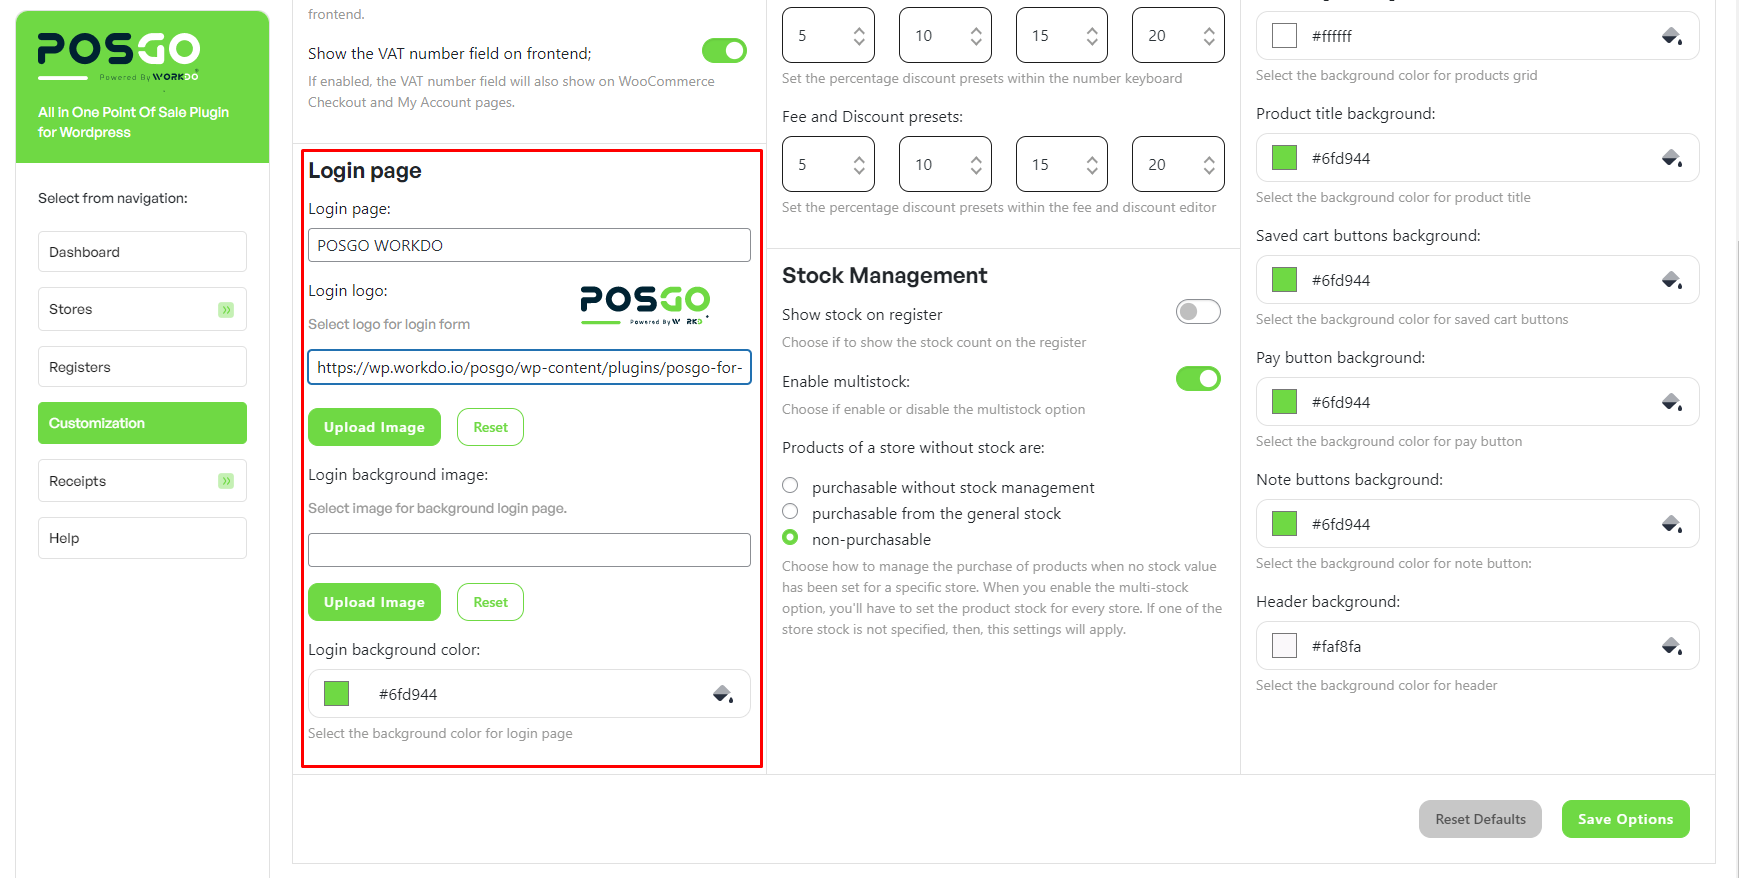
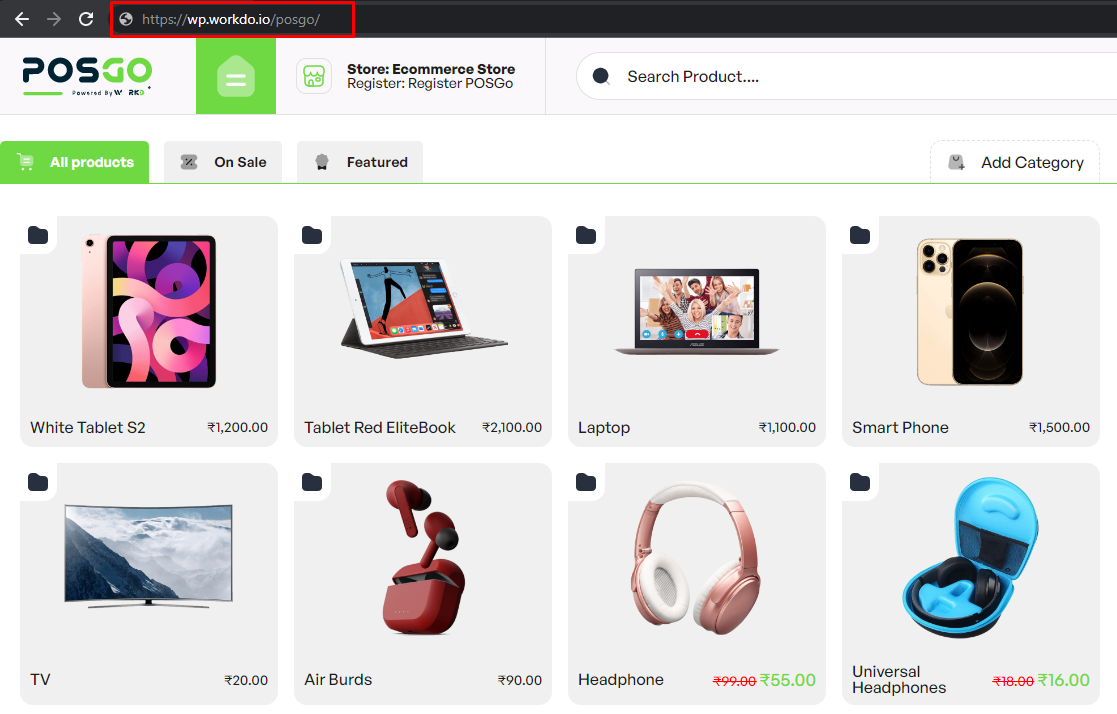
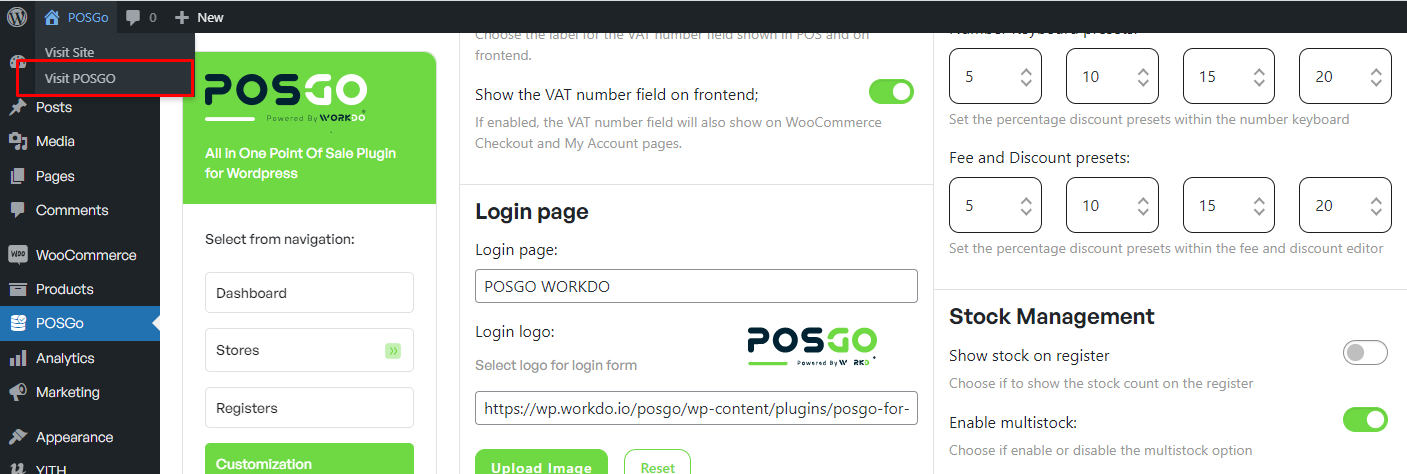
- Login page : pick here the page that opens the POSGo screen view. This is the page that Cashiers have to visit whenever they want to open and use a POSGo Register. By default, the plugin creates a page called ‘POSGo WORKDO‘, which slug is /posgo . This is also the page that can be opened from the backend from the top left menu dropdown.
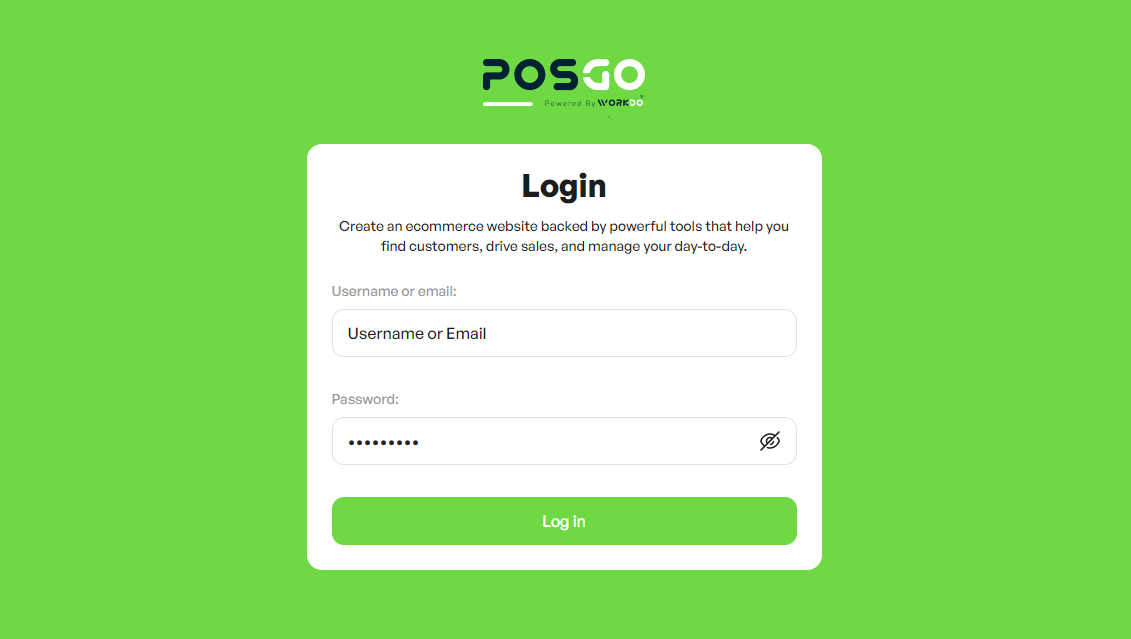
- Login logo : here you can set up the logo that your Managers and Cashiers will see on the login page whenever they visit the POSGo screen page and near the search bar in the Register screen.
- Login background image : pick or upload here an image for the login screen.
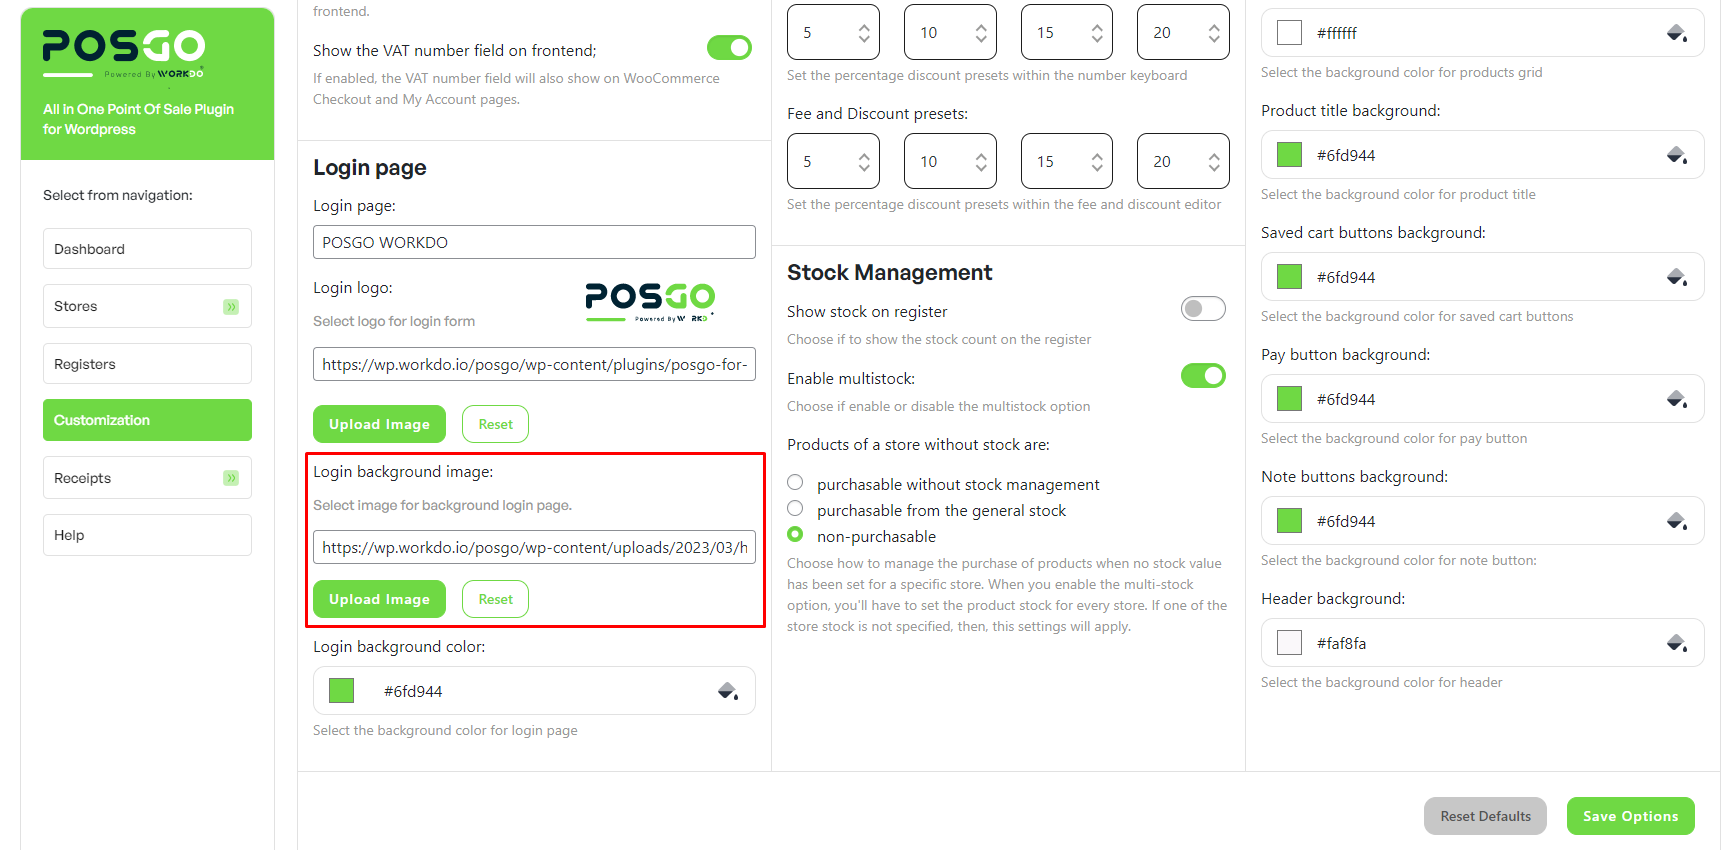
- Login background color : pick here a color for the background of the login screen. This will be replaced by the image if there are any selected.
Payment method settings
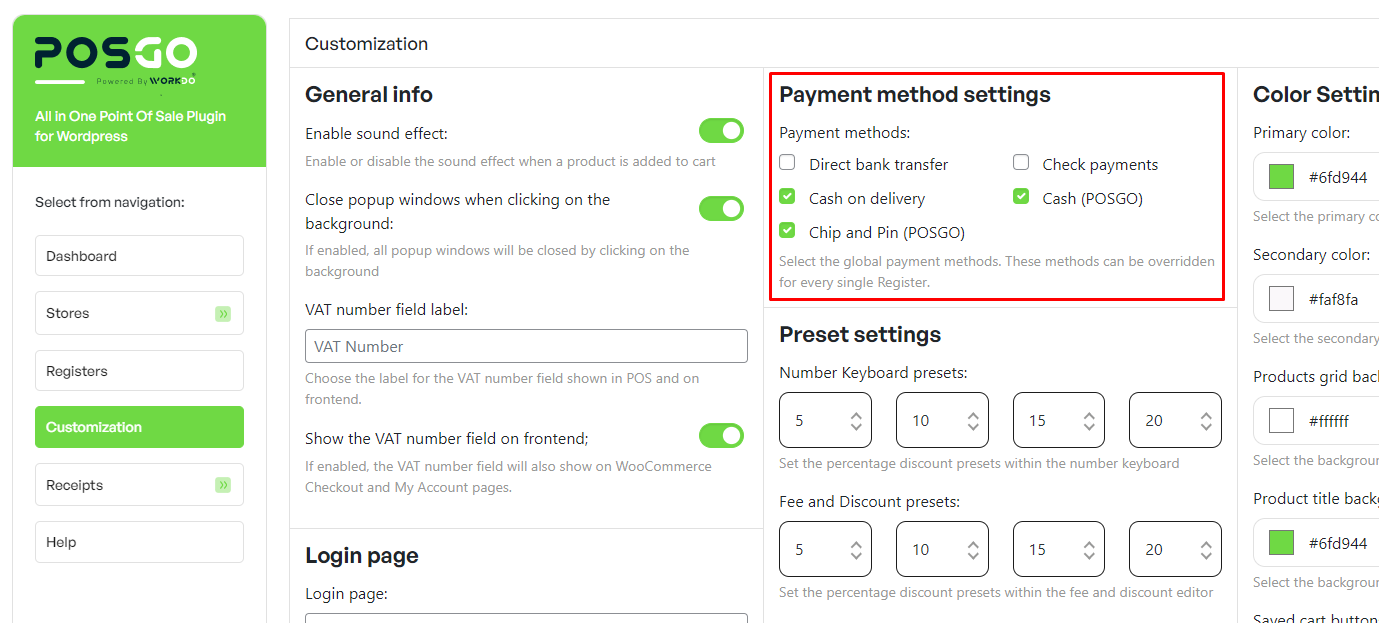
- Payment methods : select the payment methods that will be globally used. It is possible to override this setting for each register.
Preset settings
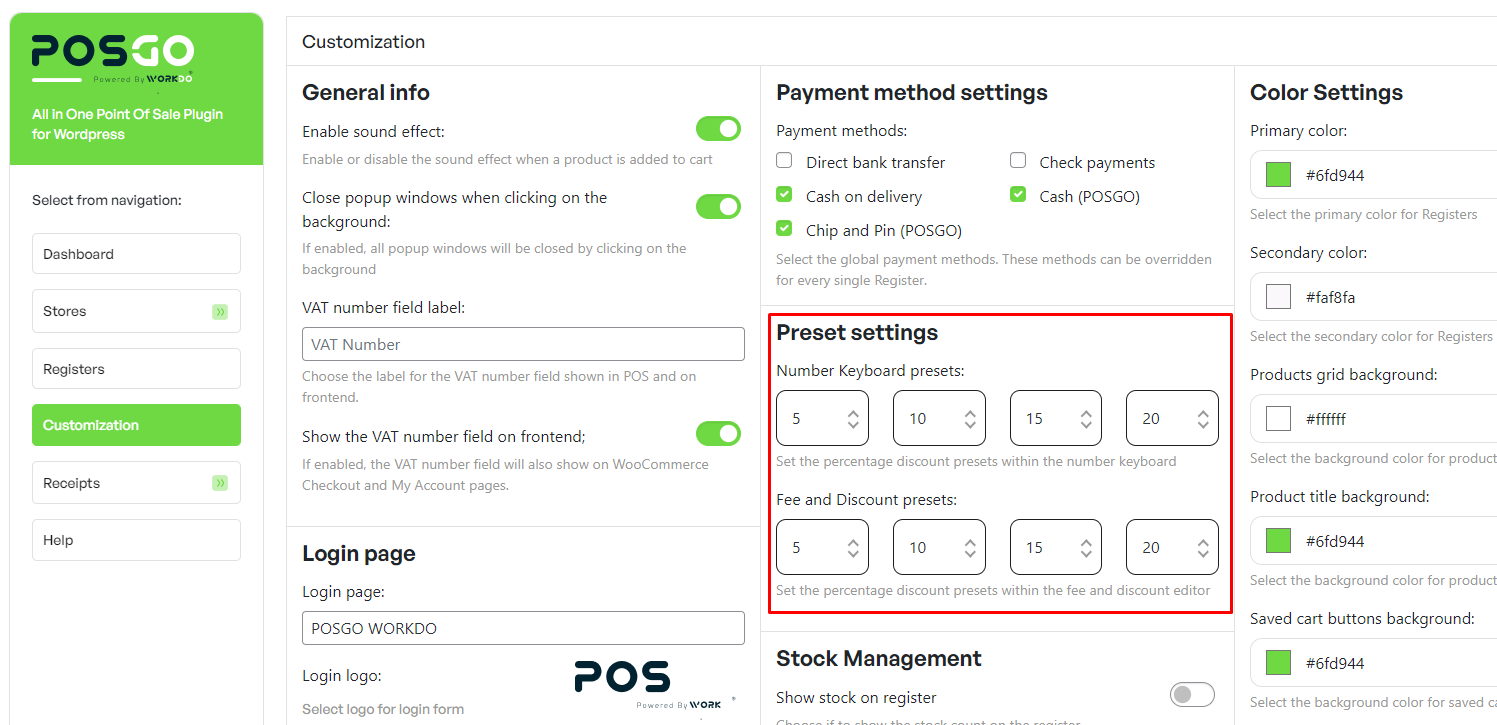
- Fee and Discount presets : here you can set up the preset amounts for the buttons that will appear when you click on the Add Fee or Discount button from the POSGo screen. They will be listed as ‘Popular fees’.
Stock management
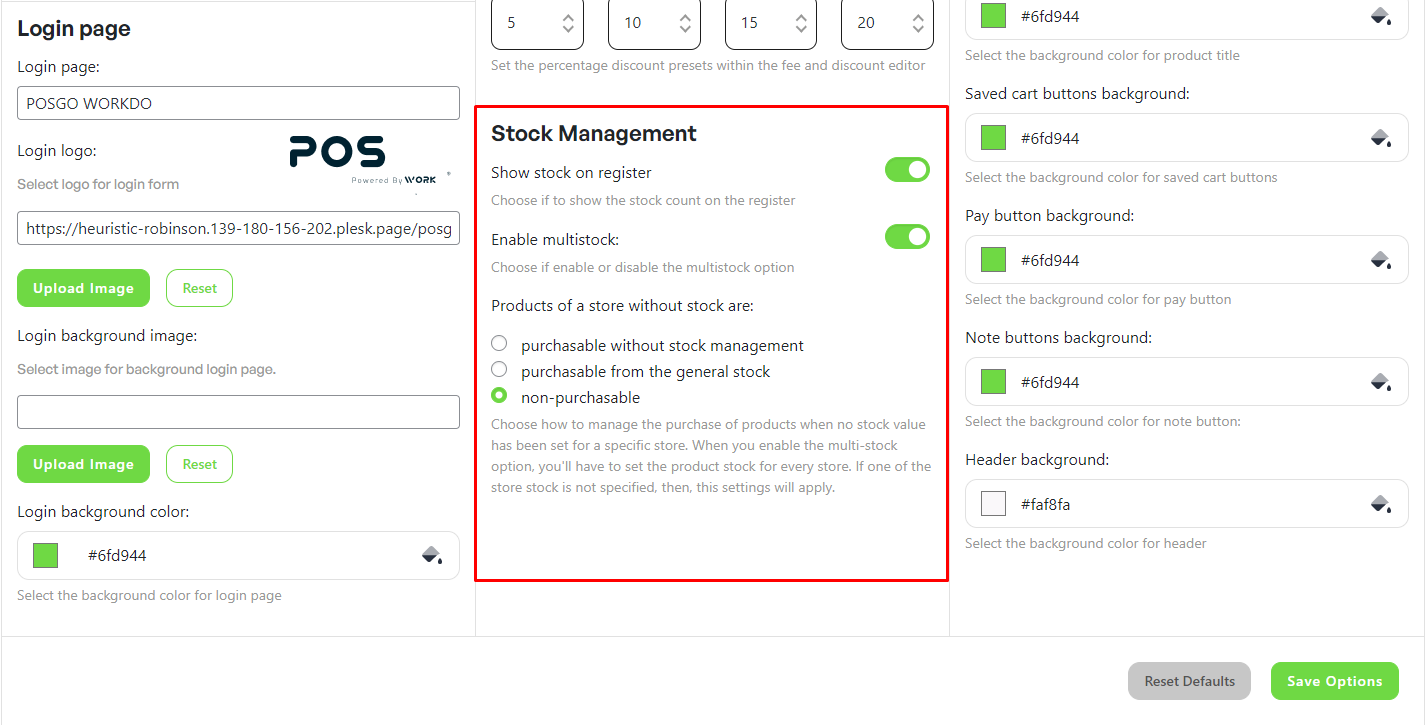
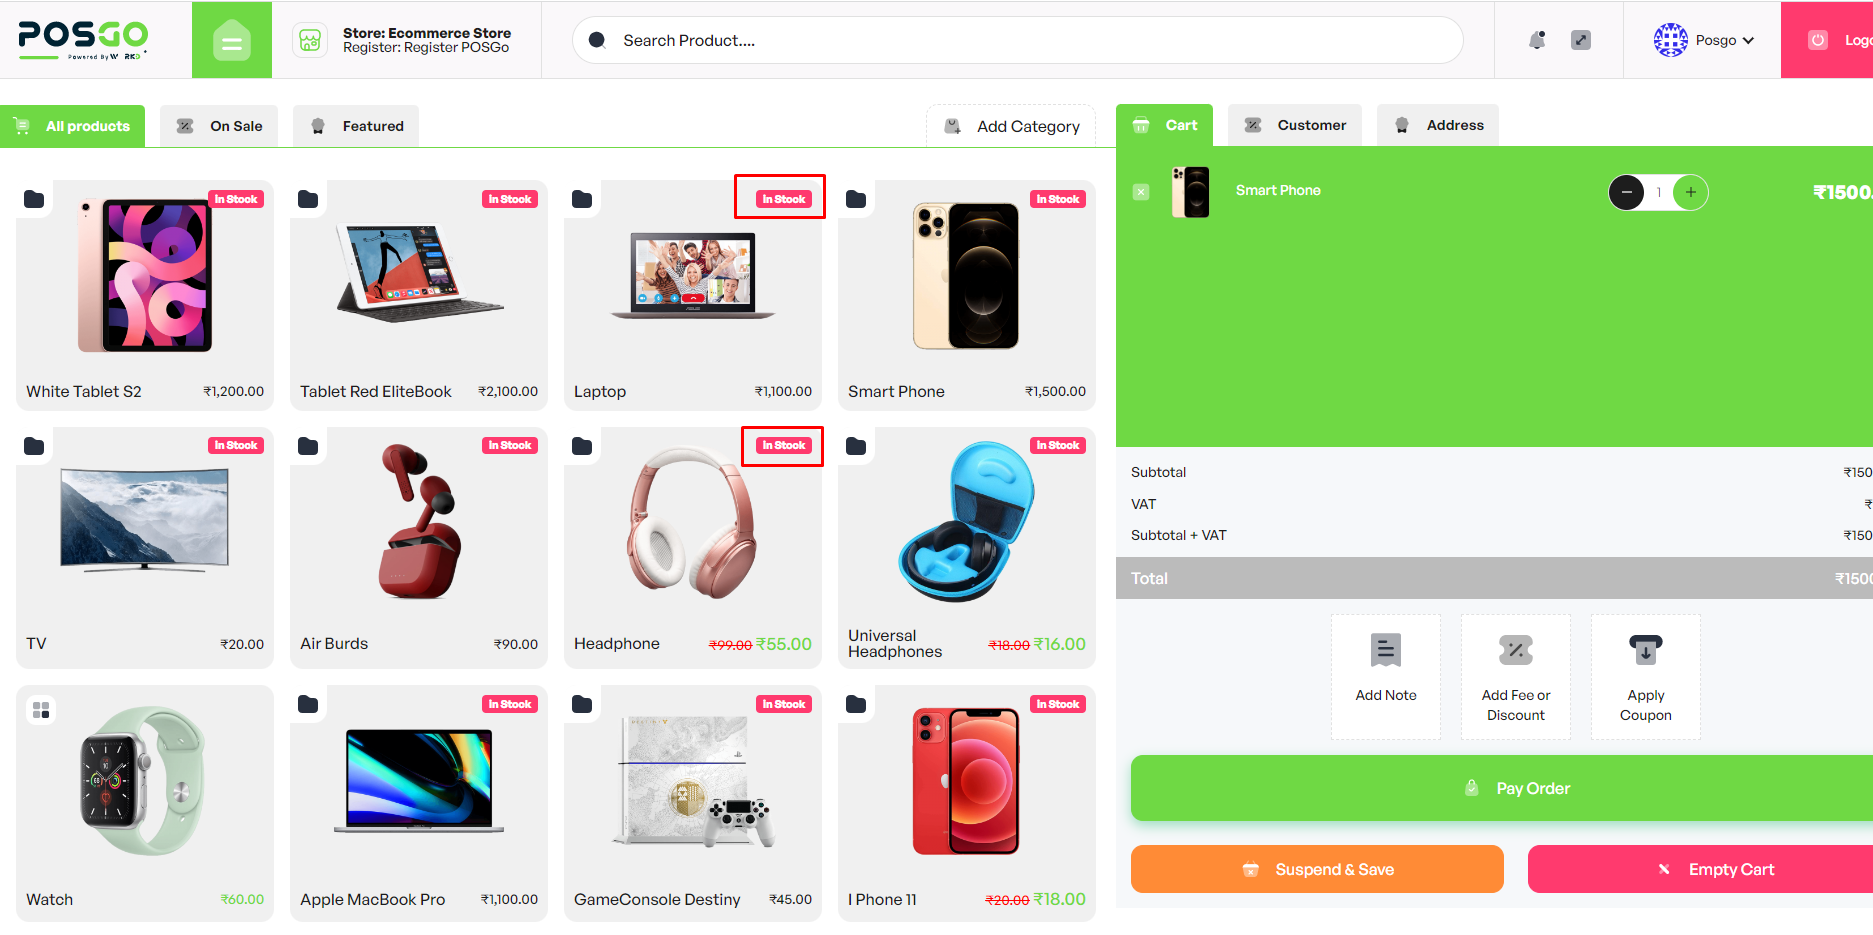
1. Show stock on Register
- Show stock on Register : enable if you want to show the number of available units of in-stock products, and highlight out-of-stock and on-backorder items on the POSGo screen.
For in-stock products, the stock will automatically update after completing the order.
2. Multi-stock
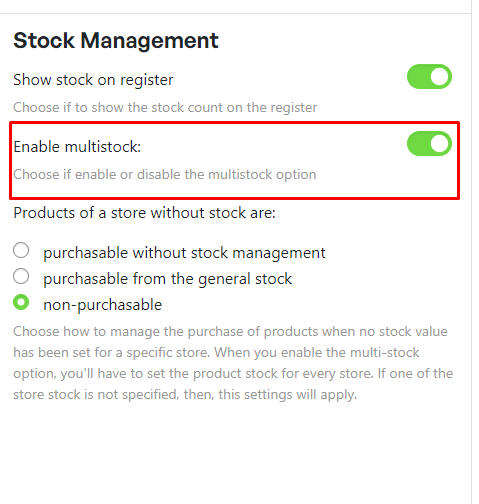
- Enable multistock : enable this option to manage multiple stocks for your products and sync the stocks of all your stores (both the online store and the points of sale).
Stock and refunds
Whenever you refund an order placed through the POSGo system, the items are restocked automatically only if you are using WooCommerce version 4.1 or higher.
4.6 Additional Payment Methods
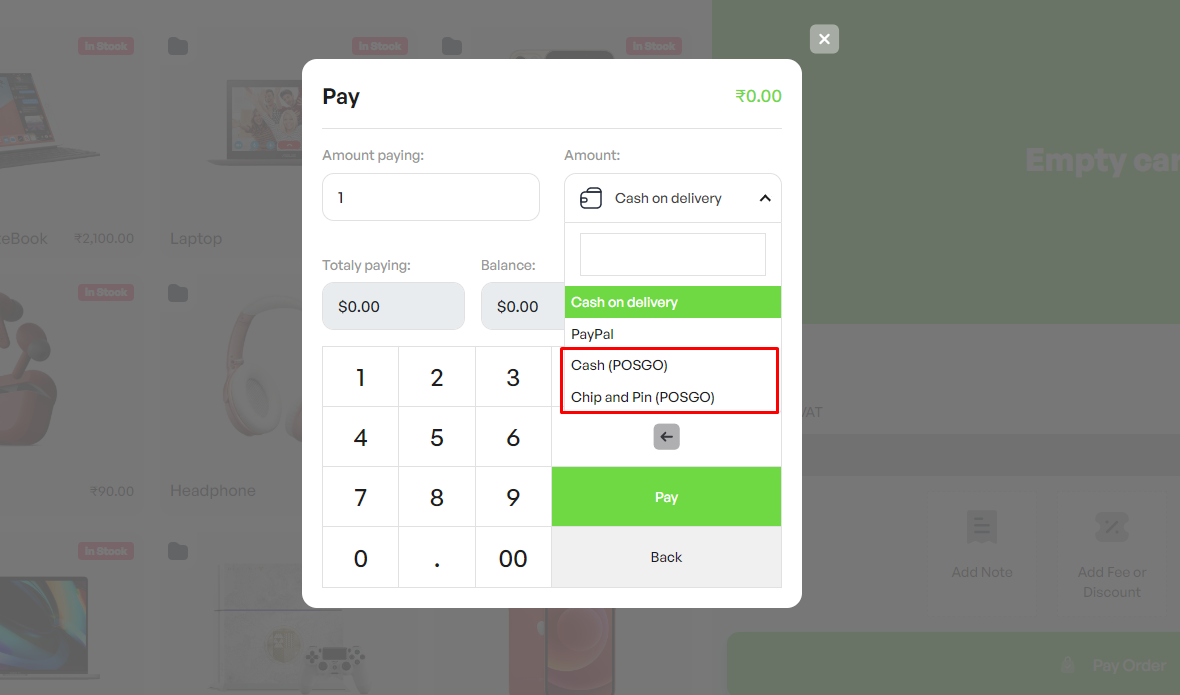
POSGo Point Of Sale adds more payment methods to your WooCommerce store.
Go to WooCommerce > Settings > Payment to see what is available.

- Cash
- Chip and Pin
Both gateways are added by our POSGo plugin and can either be used for orders on the online shop or from the POSGo interface.

5. POSGo Screen
5.1 Login
First of all, you’ll have to log in.
The login page will appear whenever you visit the POSGo page. By default, the plugin creates a page with the /posgo slug. So, if your site name is mystore.com, the access link will be wordpress.com/posgo.
When you visit the POSGo page, if you are not logged in, you will see a login screen like this.

Once you’ve added the correct login info, you will be able to pick the Store and Register you want to access.
Remember that Managers and Cashiers might have limited access to specific Stores and Registers, so on the login screen, they will only see those Stores and Registers they have been enabled to.
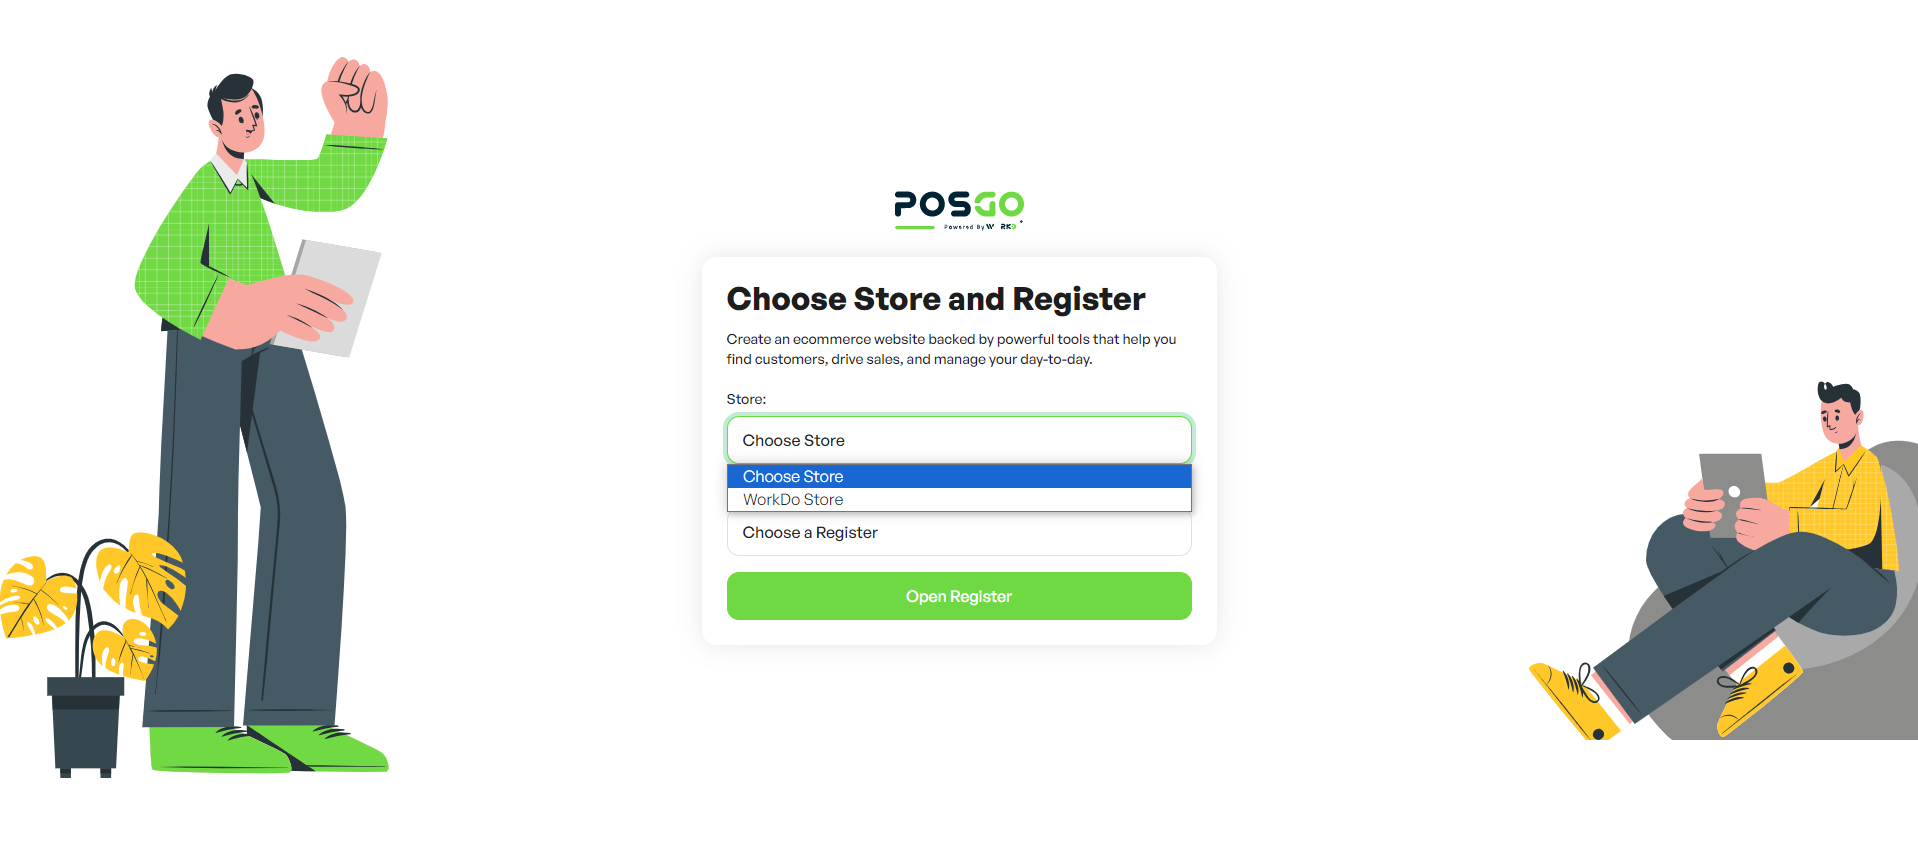
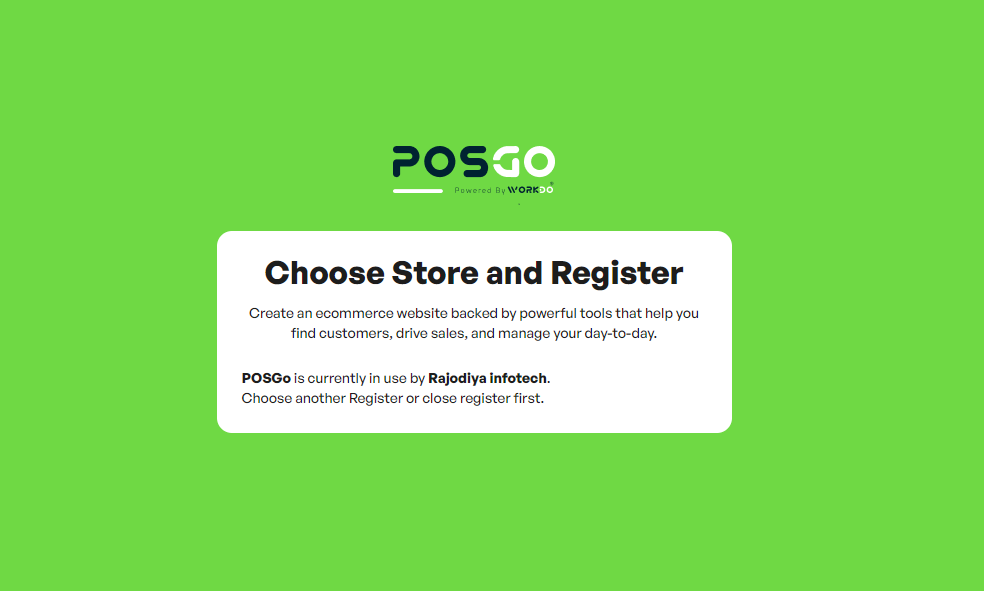
If some other Manager or Cashier has already opened the selected Register, you will see a message that asks you whether you want to choose another Register or Take over. Only one Cashier at a time can be logged into the same Register, so, please, be careful and use the take-over function only if you know that you can freeze the other Cashier out of the Register.
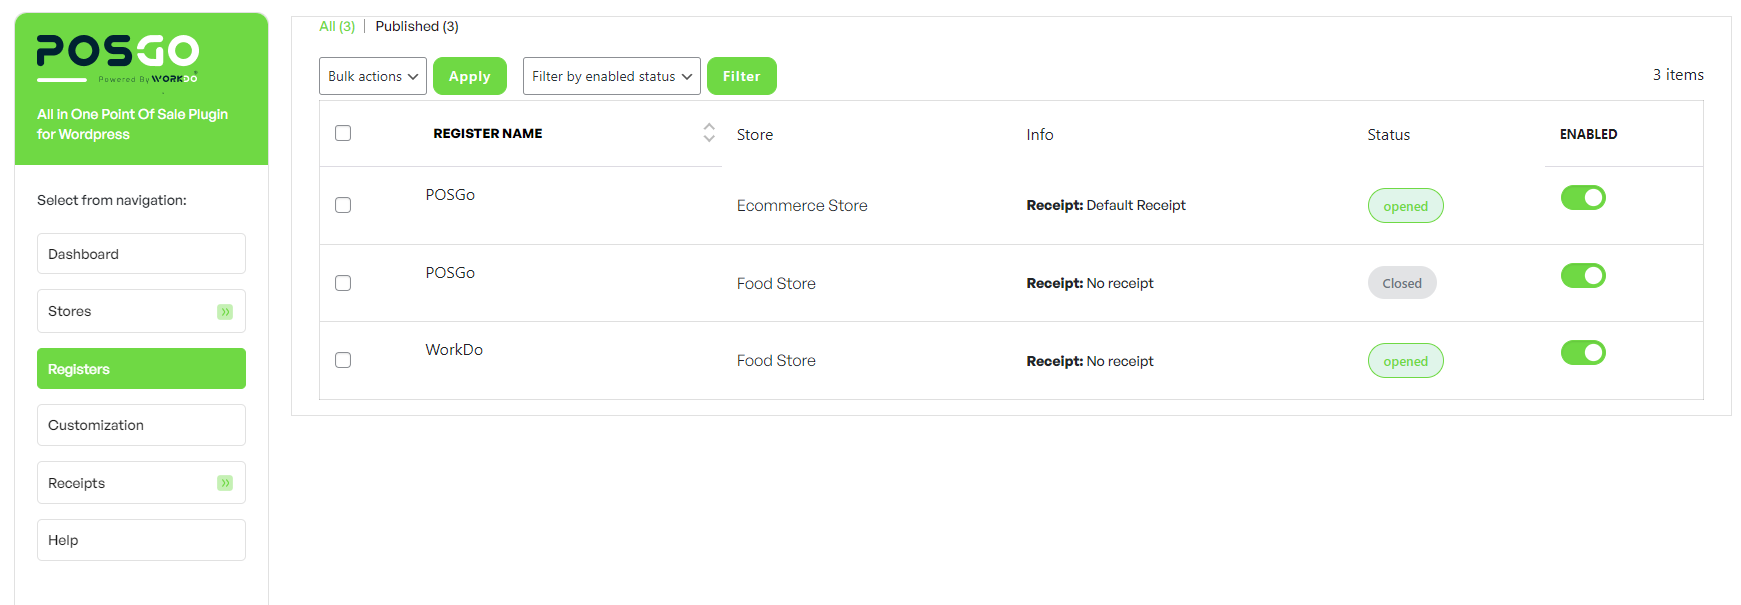
You will be able to see open Registers and users logged in from POSGo > Registers.
5.2 User menus
Right side menu
This is the screen that Managers and Cashiers will see.
On the top right of the screen, you will see:
- a bell icon that lets the Cashier turn off the Register sound effect (please, visit this page if you want to enable/disable the sound effect for everyone)
- a full-screen icon that will let the Cashier see the POSGo view in full screen (available only on the desktop version)
- the name of the logged-in user. If you hover over it, you will be able to see a quick recap with the following information :

Left side menu
- the Store and the Register you’re logged in
- the Manage Store button to log into the backend of your website (only available for Store Managers and website admins )
- the Switch Register button to switch from a Store/Register to another one (only available for Store Managers and website admins )
- a menu button that opens the following views :

5.3 Products
Product listing : search, add and Manage
On the left side of the screen, you will see the products. They are displayed either by category or all together, based on the settings that you’ve selected in POSGo > Registers > In Register dashboard show (see details here).
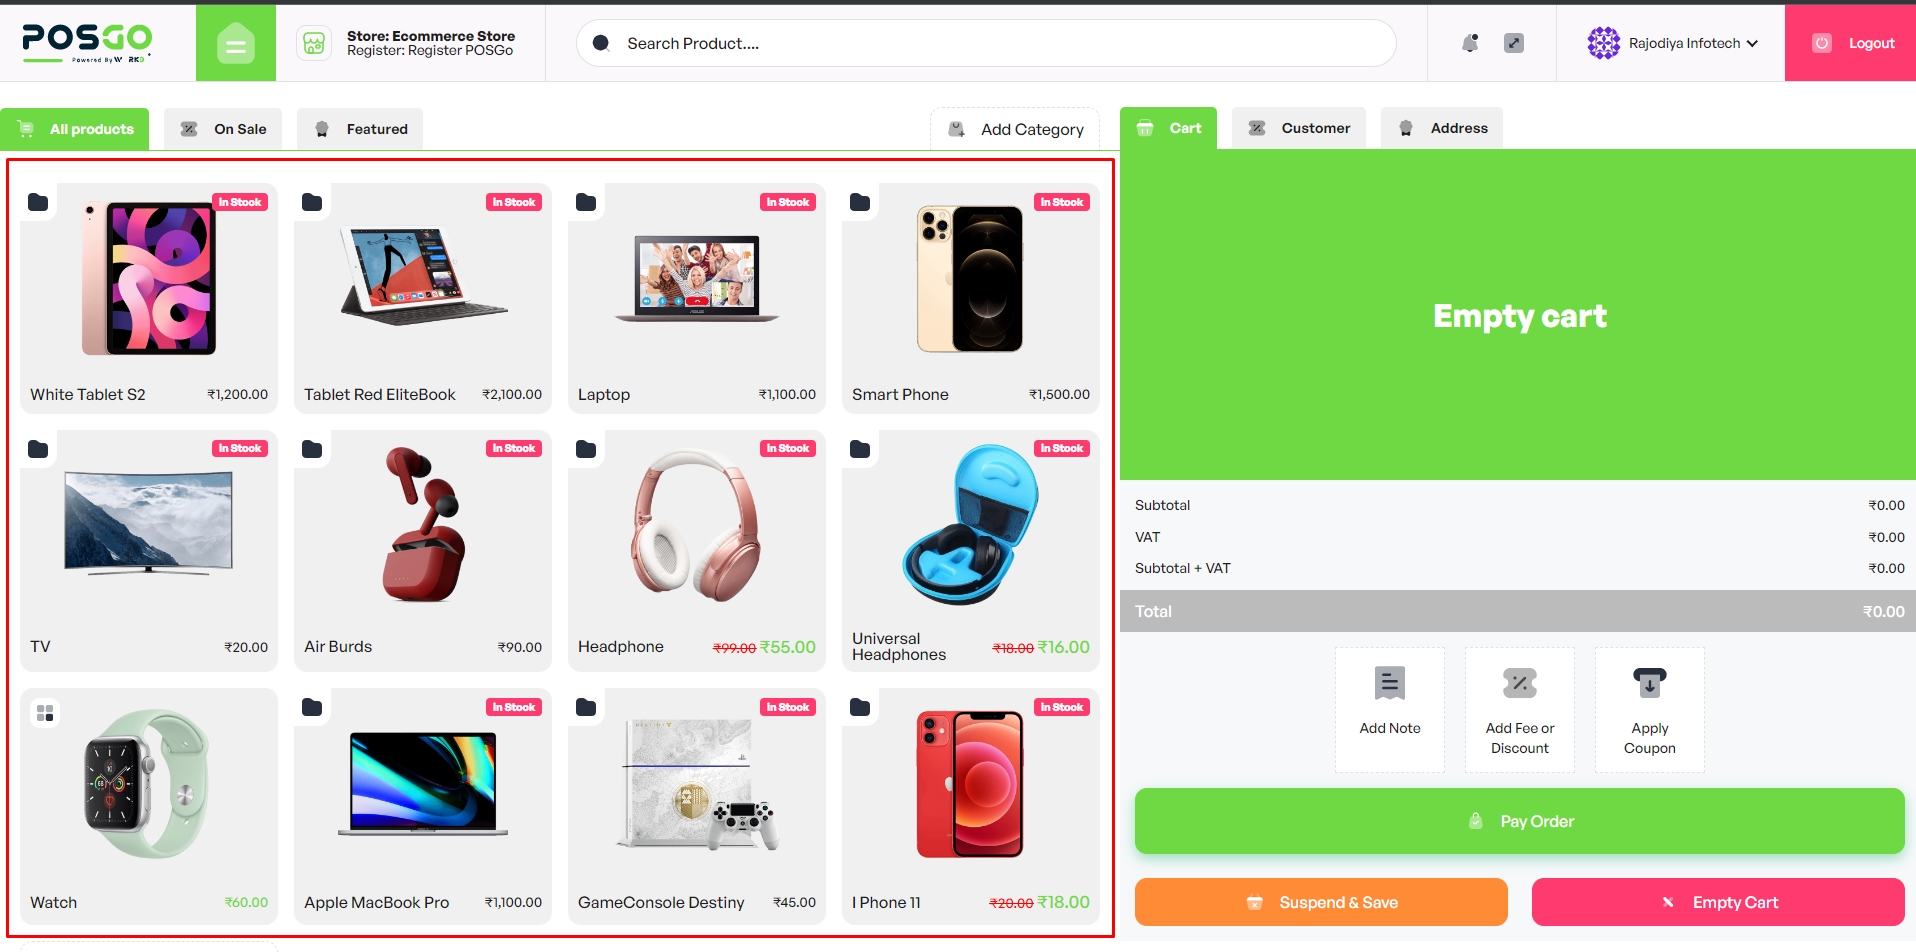
Just click on them to add them to the cart. If it’s a variable product, you will be able to pick the right variation :
Clicking on one product more than once will update the product quantity.
Add a new product
Finally, from this section, you can also add a product on the stor by clicking on the Add product tab.
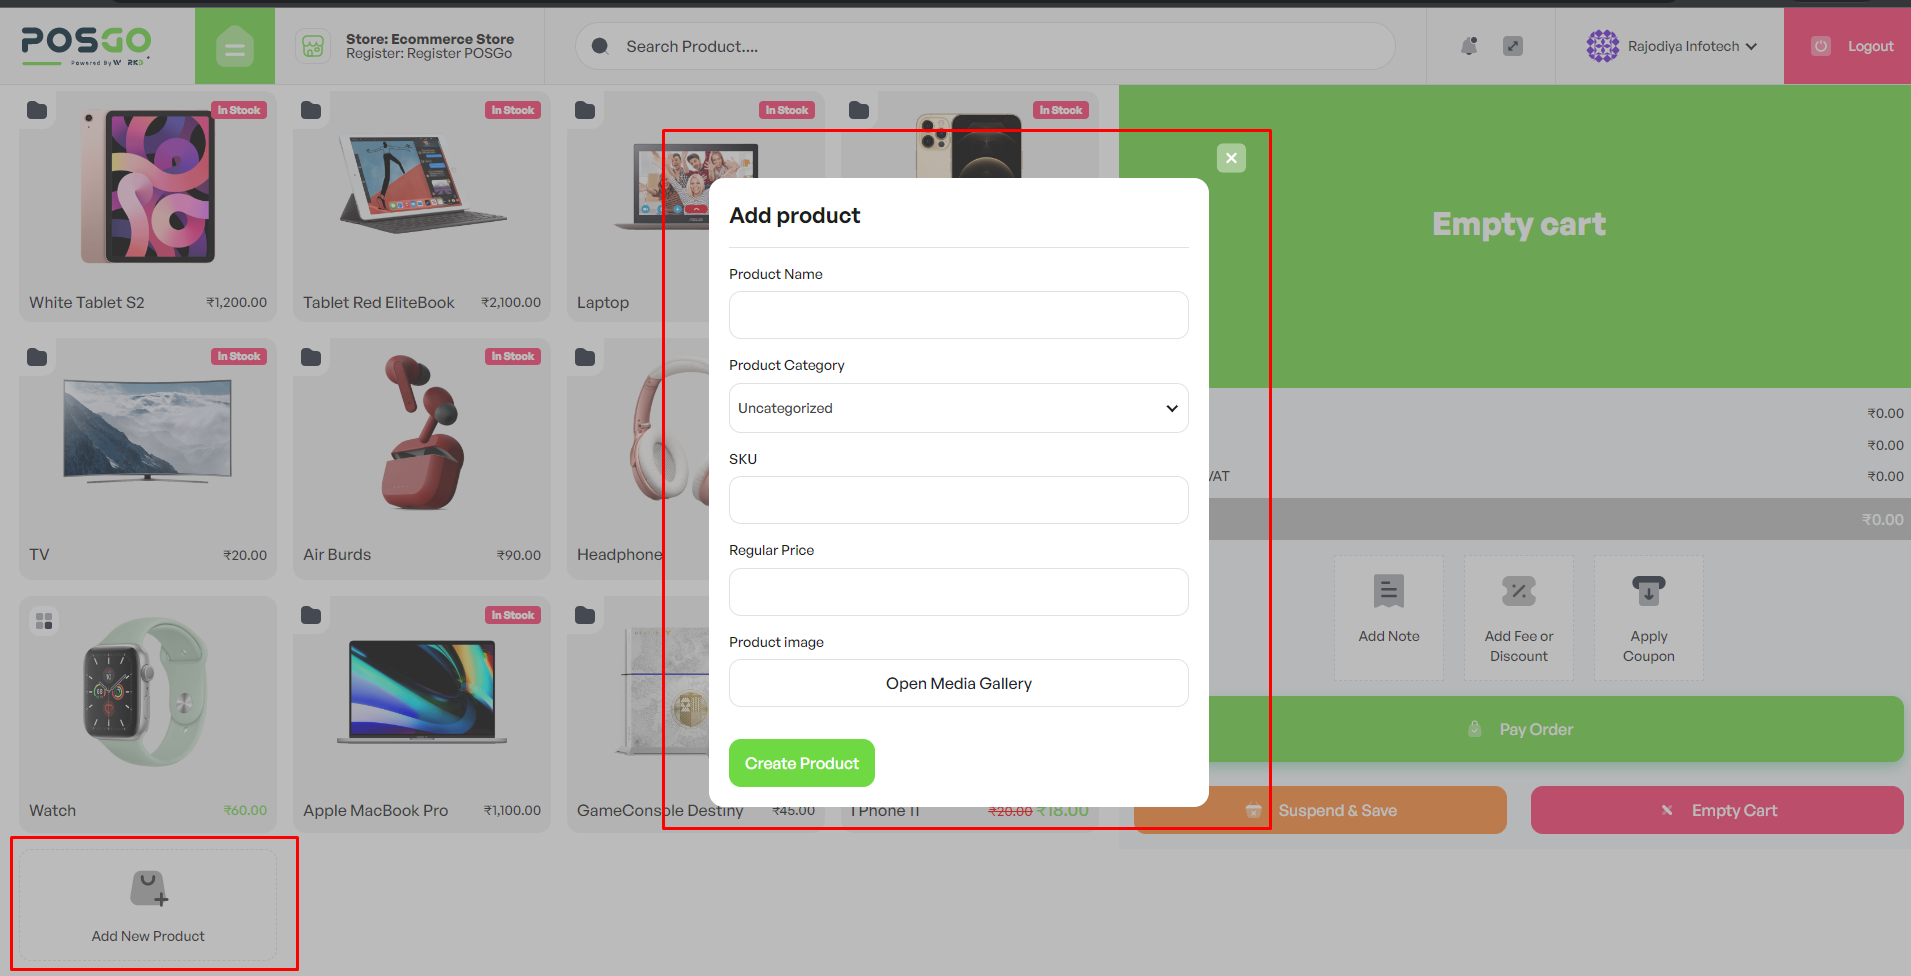
You will be able to fill in the following information for the new product :
- Product name :
- Product category : start typing to search among your shop categories
- SKU : enter the product SKU here.
- Regular price : enter here the product price.
- Product Image : Upload here the product image.
Cart buttons
At the bottom of this screen, you will also see more buttons.
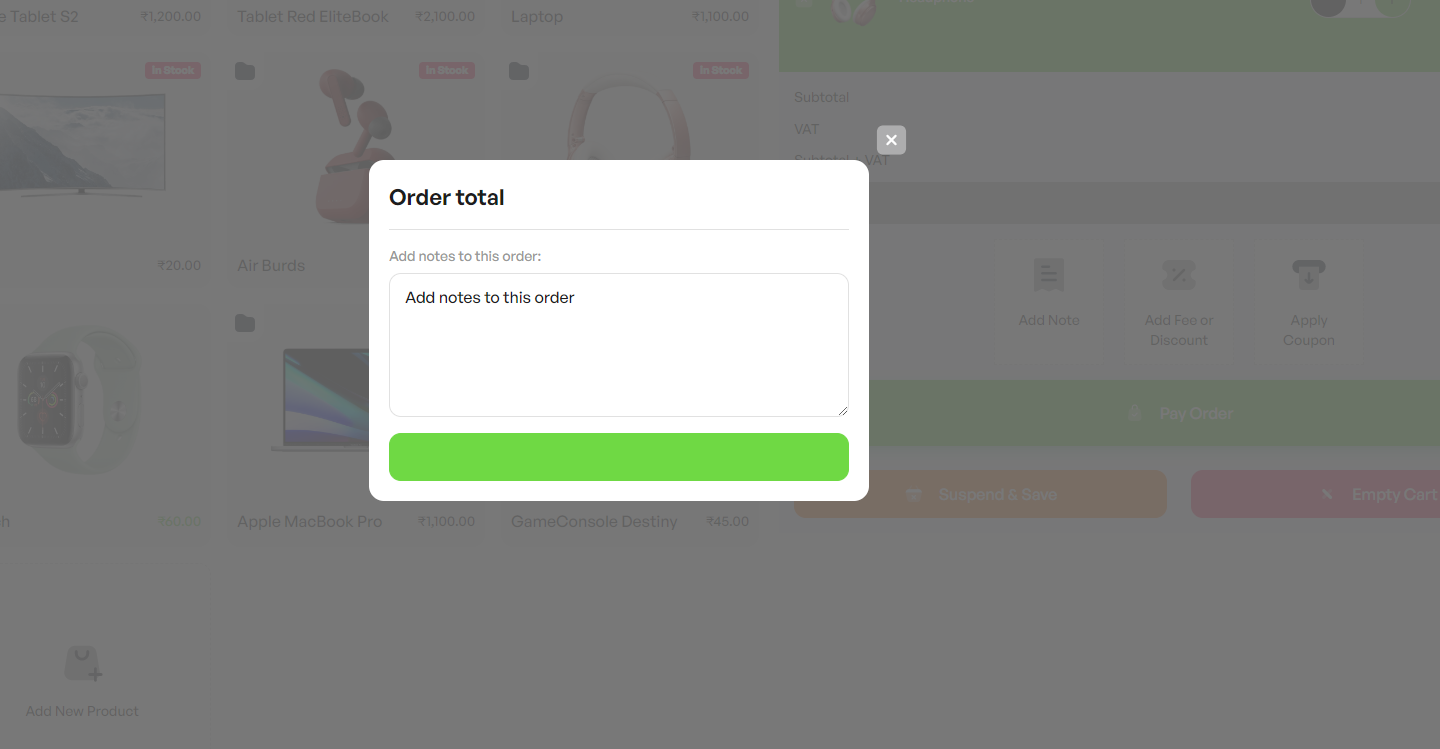
1. Add note.
This allows you to add a note to the entire order.
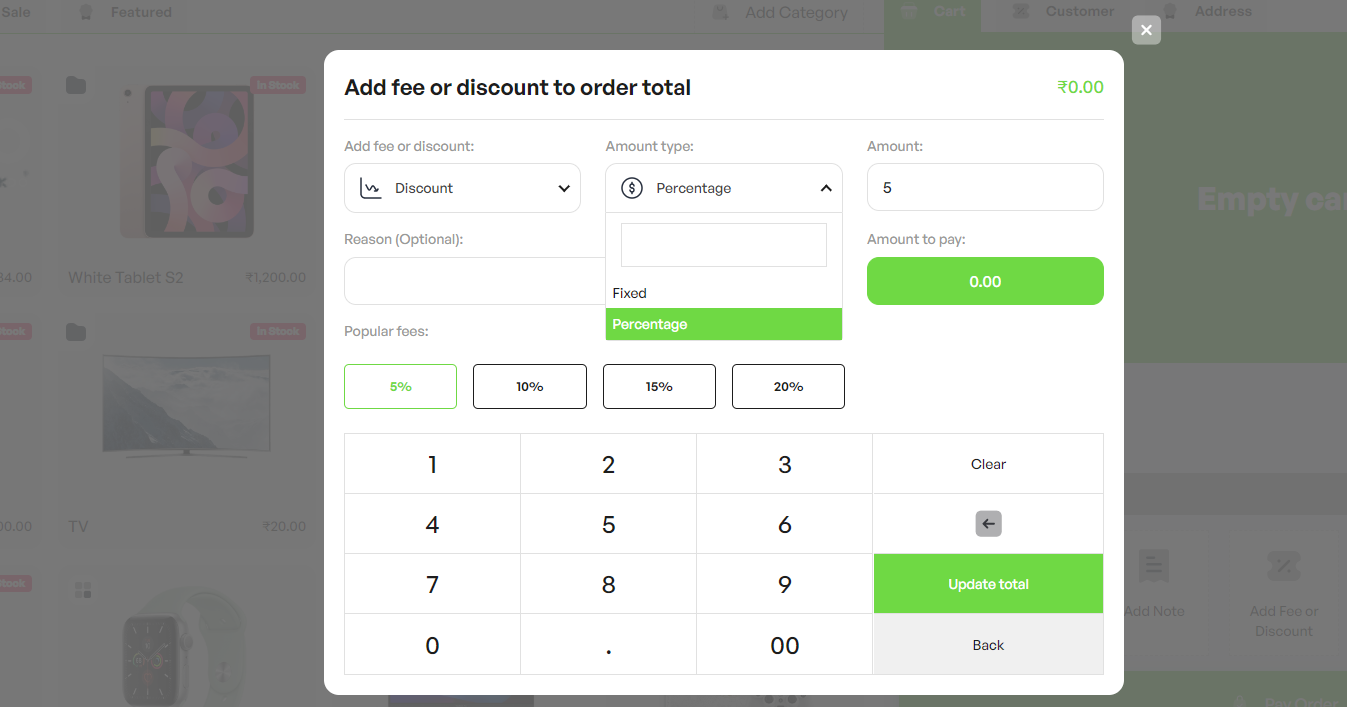
2. Add fee or discount
This allows you to add either a fee or a discount on the order
total.
You can either choose fee or
discount : and select whether it has to be
fixed : or : percent.
You can take advantage of the preset keys for a quick selection
(Popular fees). You can set up these keys with
custom values from POSGo > Customization as
explained here.
Additionally, you can add a Reason text to take
note of why the fee/discount has been applied.
When applying a discount, this will be automatically converted into a coupon that will be added to the order details, like in the image below.
3. Apply coupon
Click on this button to apply a coupon code that has been previously created in WooCommerce > Coupons. Copy and paste the code and click on ‘Apply coupon’ to confirm.

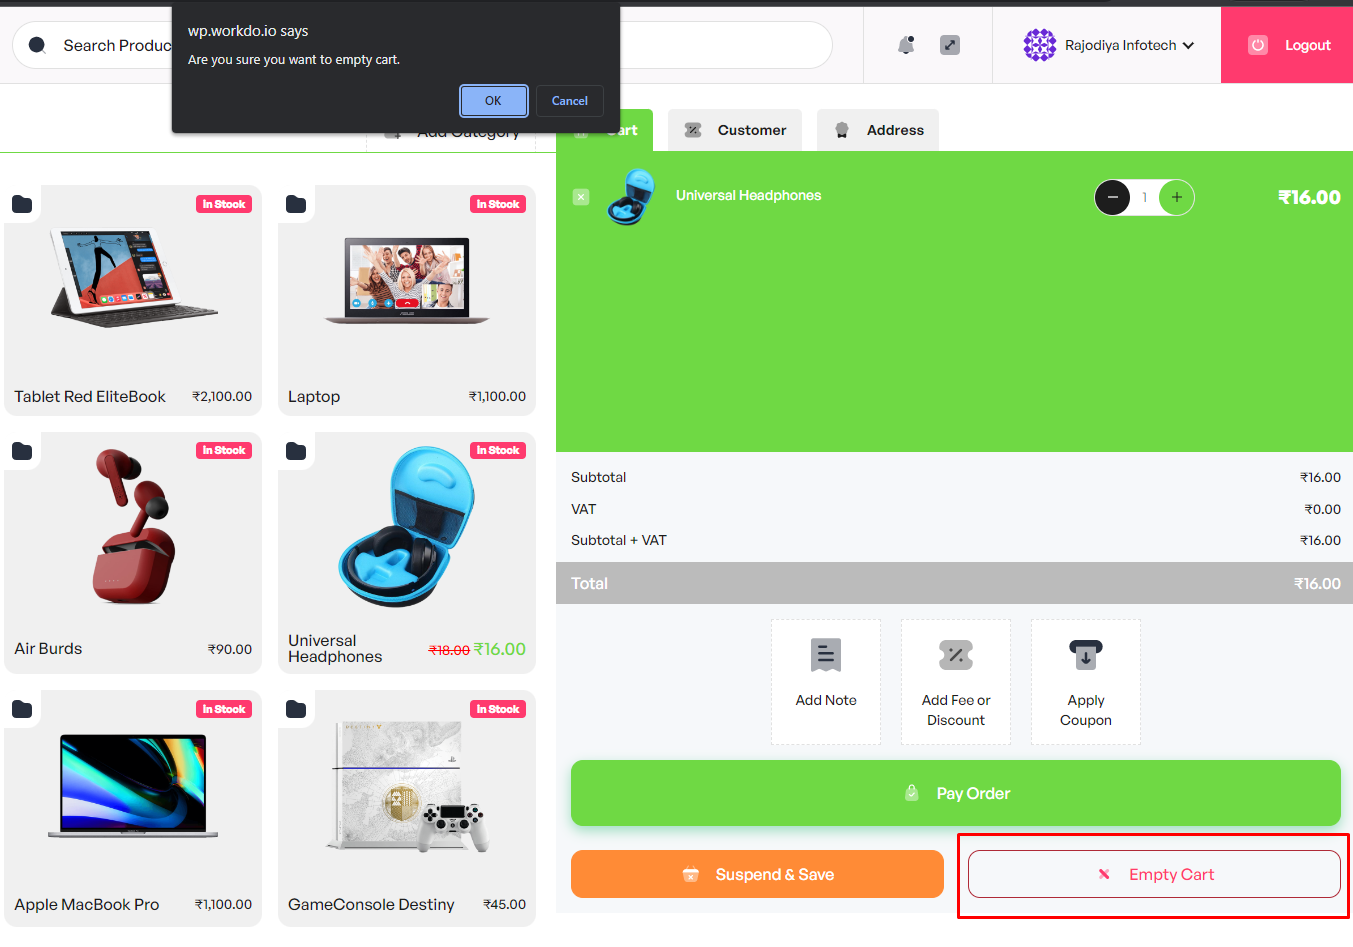
4. Empty Cart
You can also empty the cart in one move, and start adding products again.
5. Pay
When everything is set, you can click on the Pay button which will open a popup window with all available payment options.

- Total due : this is the total amount that the customer has to pay.
- Total paying : this is the total amount that the customer is actually paying. It includes amounts from all the payment methods selected.
- Balance : this is how much is still left to pay.
- Change : this is the change that the cashier has to give to the customer.
- Payment option : select here the payment method used.
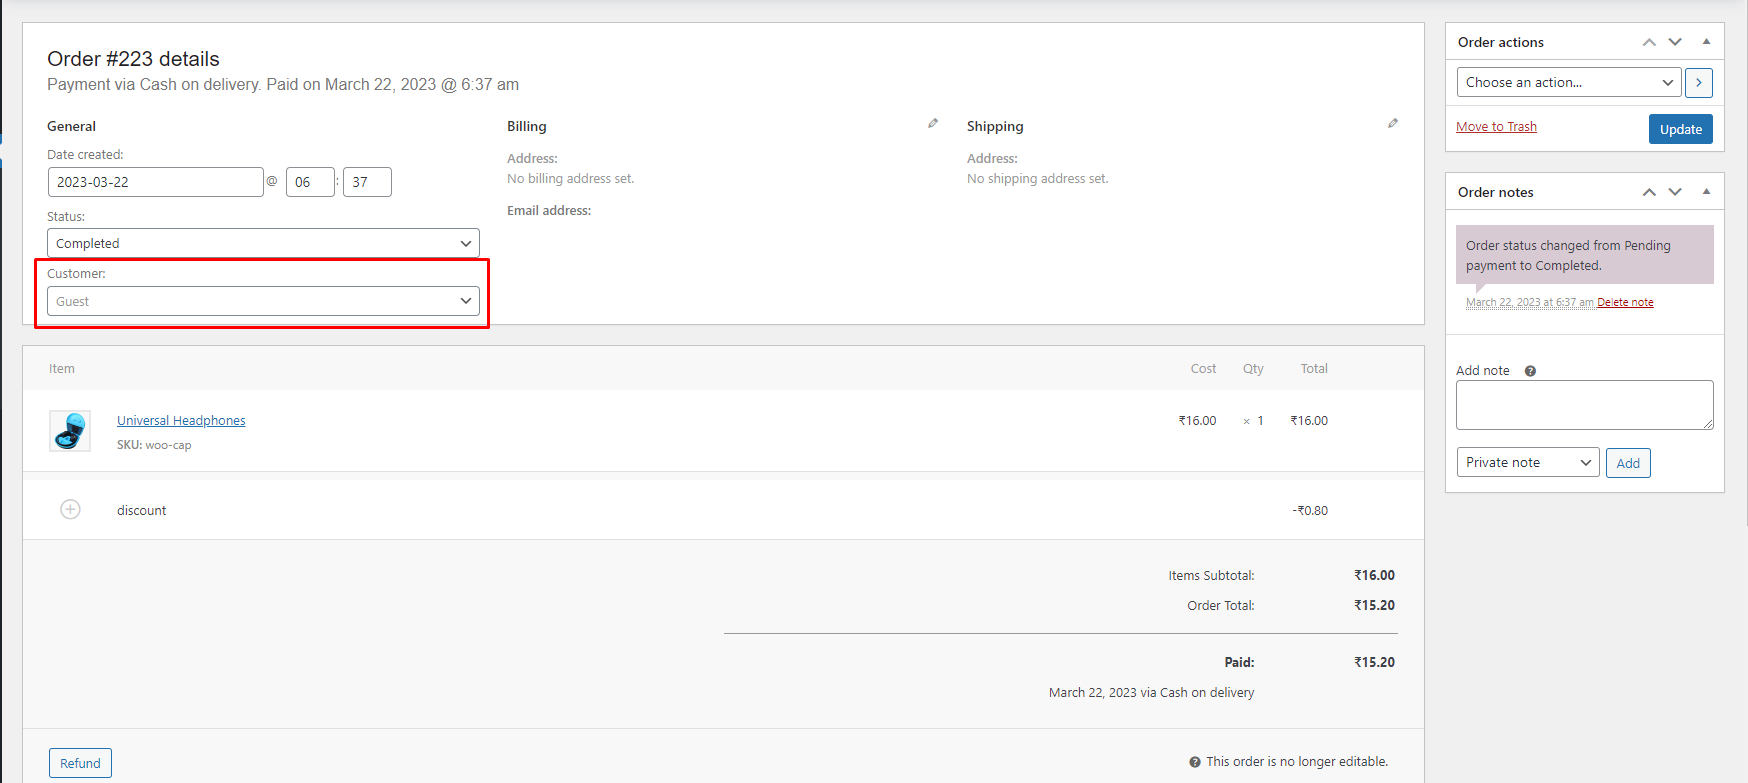
Finally, click on Pay and an order will be created with Completed status. If you add also Shipping information, the order will be created with Processing status.
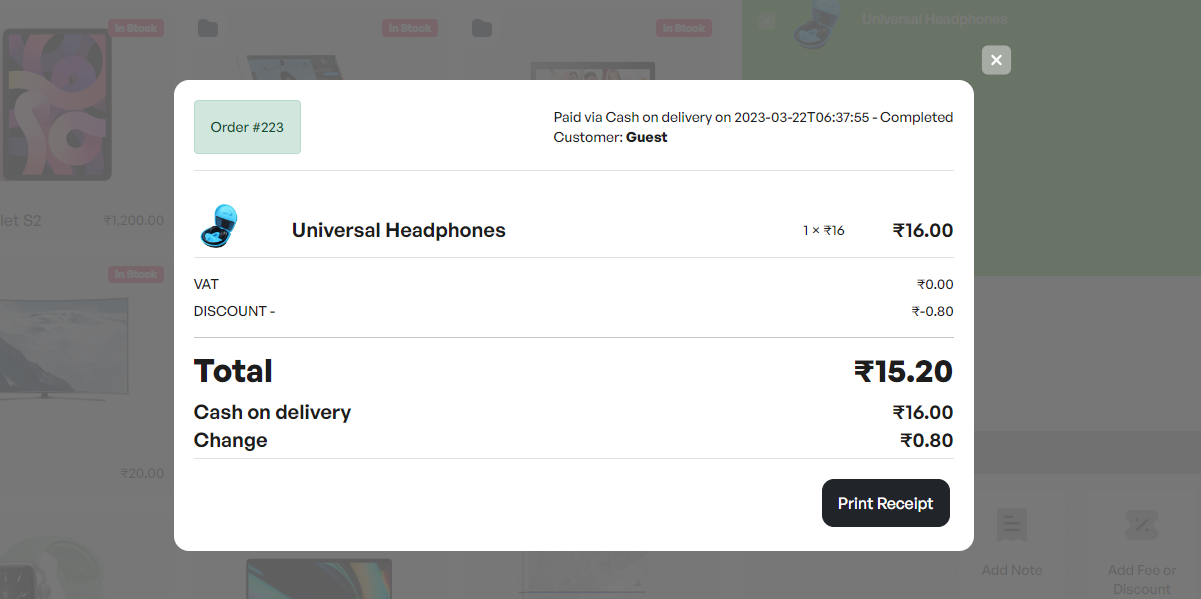
This is what the admin will see on the backend in the order details :
5.4 Customer
When you place an order from the POSGo screen, you can either process the order for guest users, or you can associate an existing or a new user to it. This can be useful if you need to save customers’ details like the billing and shipping information (for example for home delivery) or if you have special coupons for returning customers only and so on.
At any time, you can open the Customer tab that’s on the right side of your Register screen.

In the popup, will be able to choose from three different options:
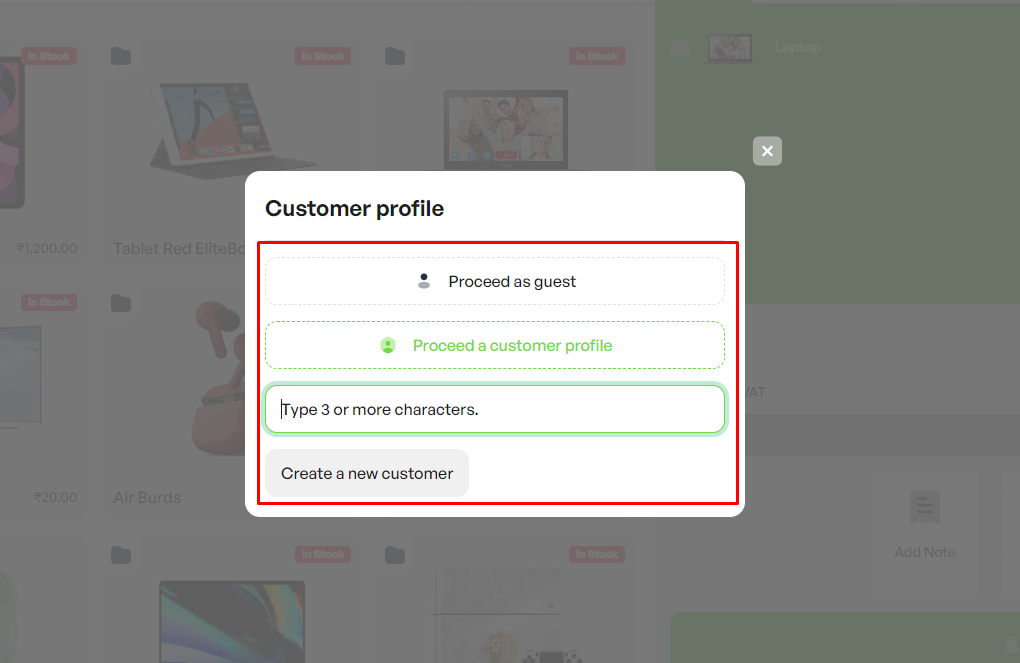
- Proceed as guest: click on this option to continue creating the order as a guest.
- Load a customer profile: click on this option to create the order for an existing user; start typing the customer’s username or email address to select the user.
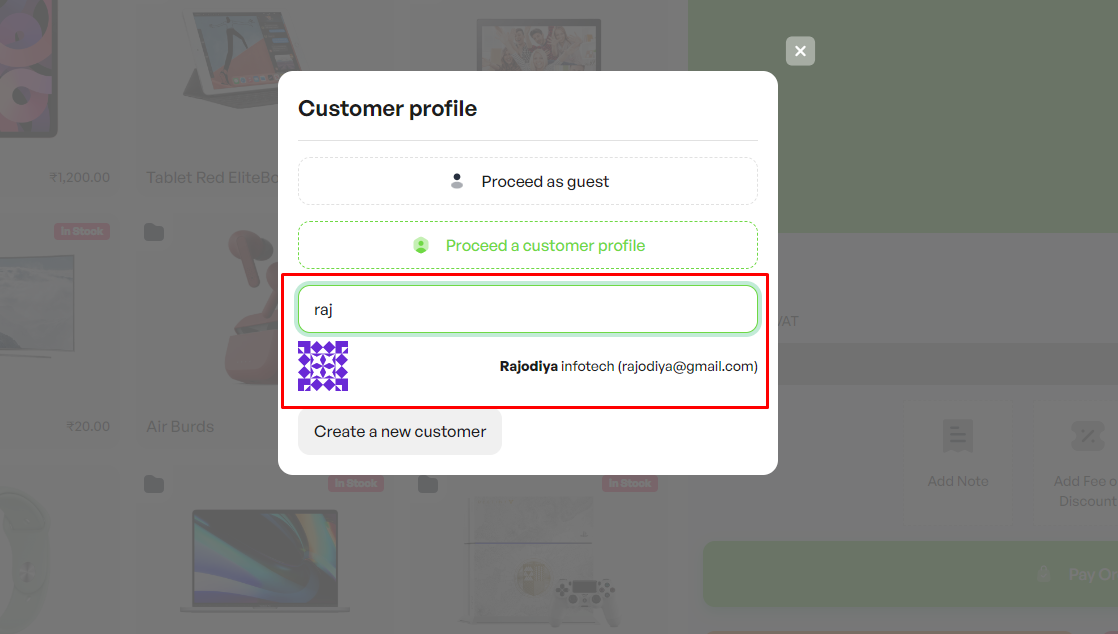
After loading the customer, you will be able to edit the user info, remove the selected user and decide whether to use that profile to complete the order, create a new user profile or proceed as a guest.
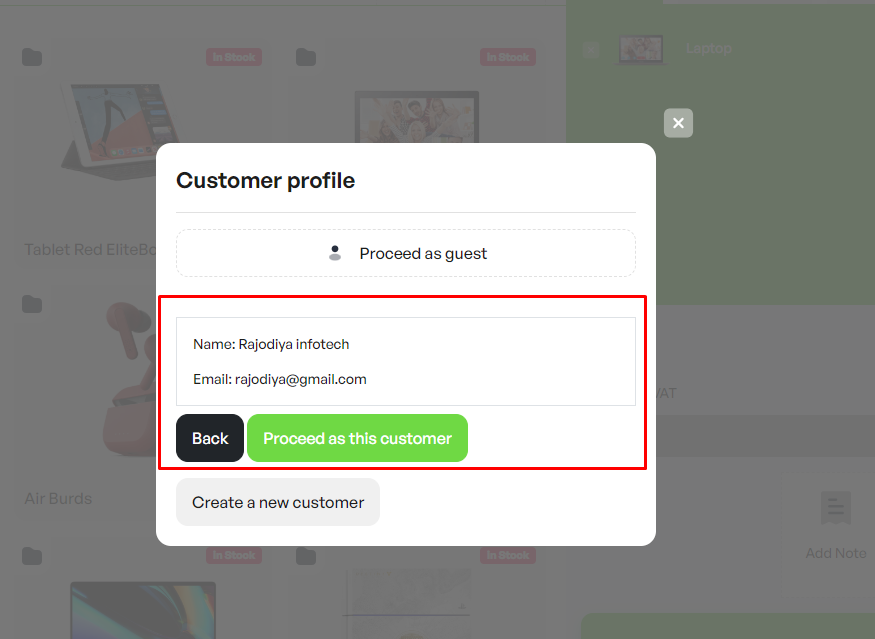
- Create new customer profile: click on this option to create the order for a new customer; complete the fields to create the profile with the customer billing details.
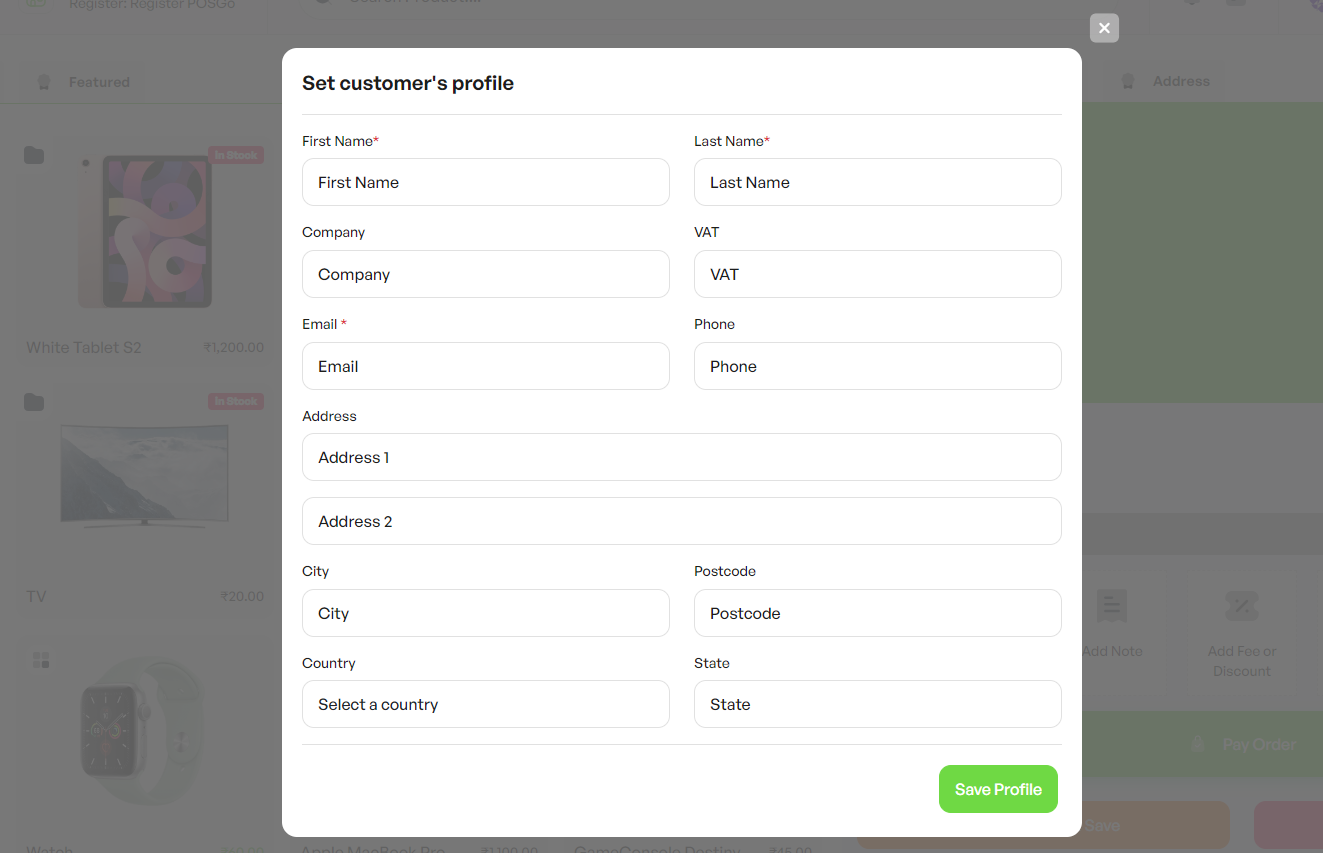
The new user will be then available in the Users tab on the backend, as well as their billing details.
These are all the available fields for new and existing customers :
- First name * (required field)
- Last name * (required field)
- Company
- VAT / CIF / ID
- Email * (required field)
- Phone
- Address
- City
- Post Code
- Country
- State
Please, make sure you fill out at least all required fields (First name, Last name and Email), otherwise, you will not be able to complete the order.
5.5 Address
For guest users, you can set up the customer’s shipping address before proceeding with the payment. To do that, just open the Address tab on the right side of your Register screen and fill out the fields.

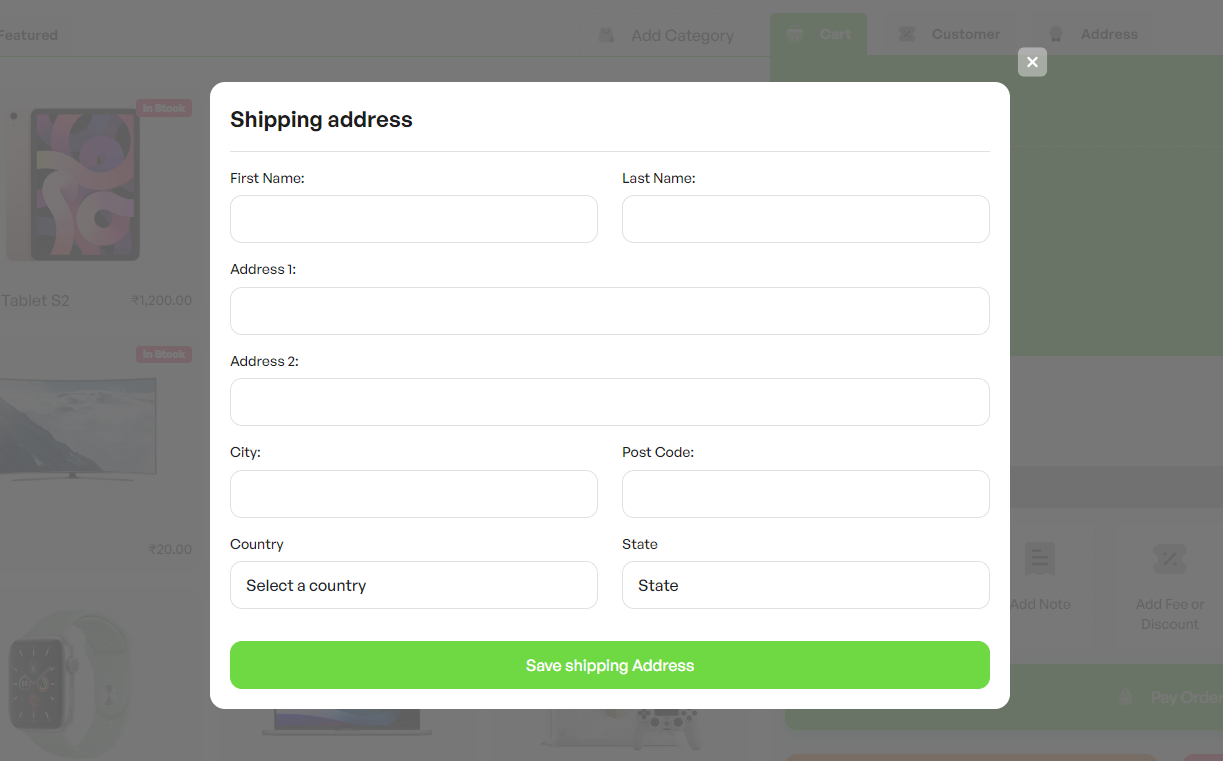
You will find these shipping fields :
- First name * (required field)
- Last name * (required field)
- Phone
- Address
- City
- Post Code
- Country
- State
Please, make sure you fill out at least all required fields (First and Last name), otherwise, you will not be able to complete the order.
5.6 Order History
In the Order history, you will be able to find a list of all orders placed in the current store through the POSGo system.
Go to the left menu on top of the screen and click on Order History
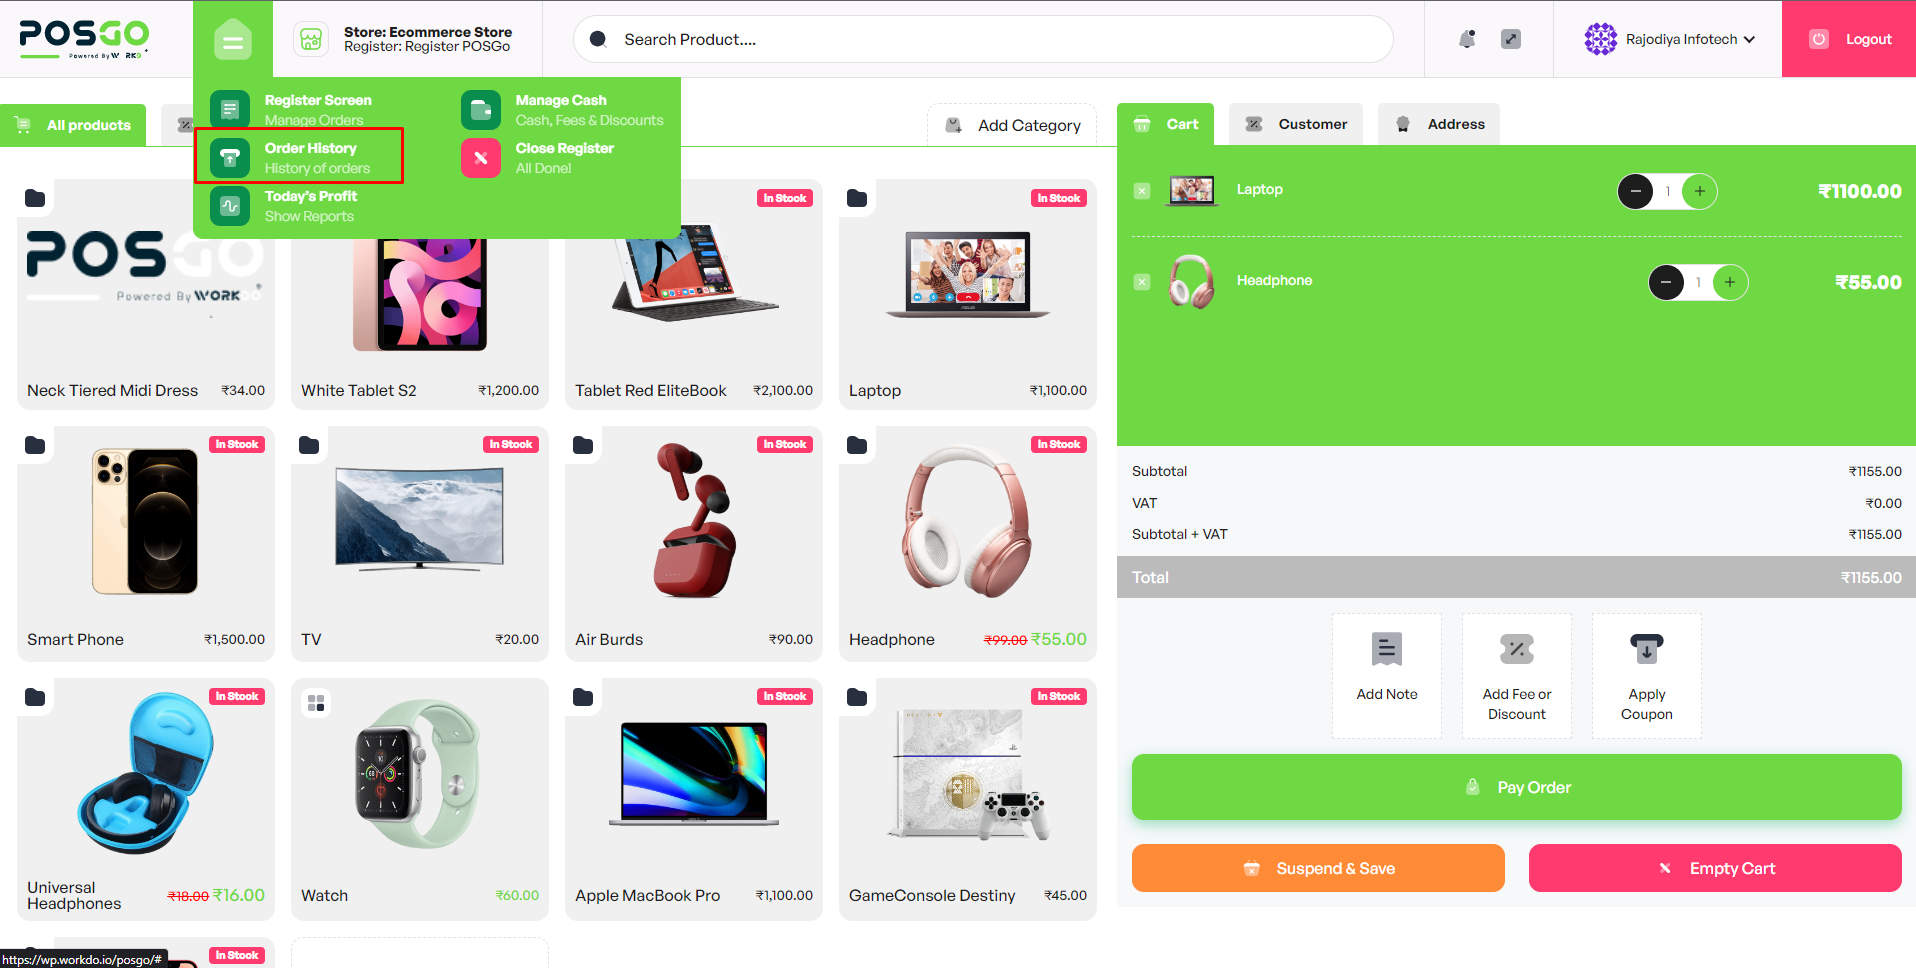
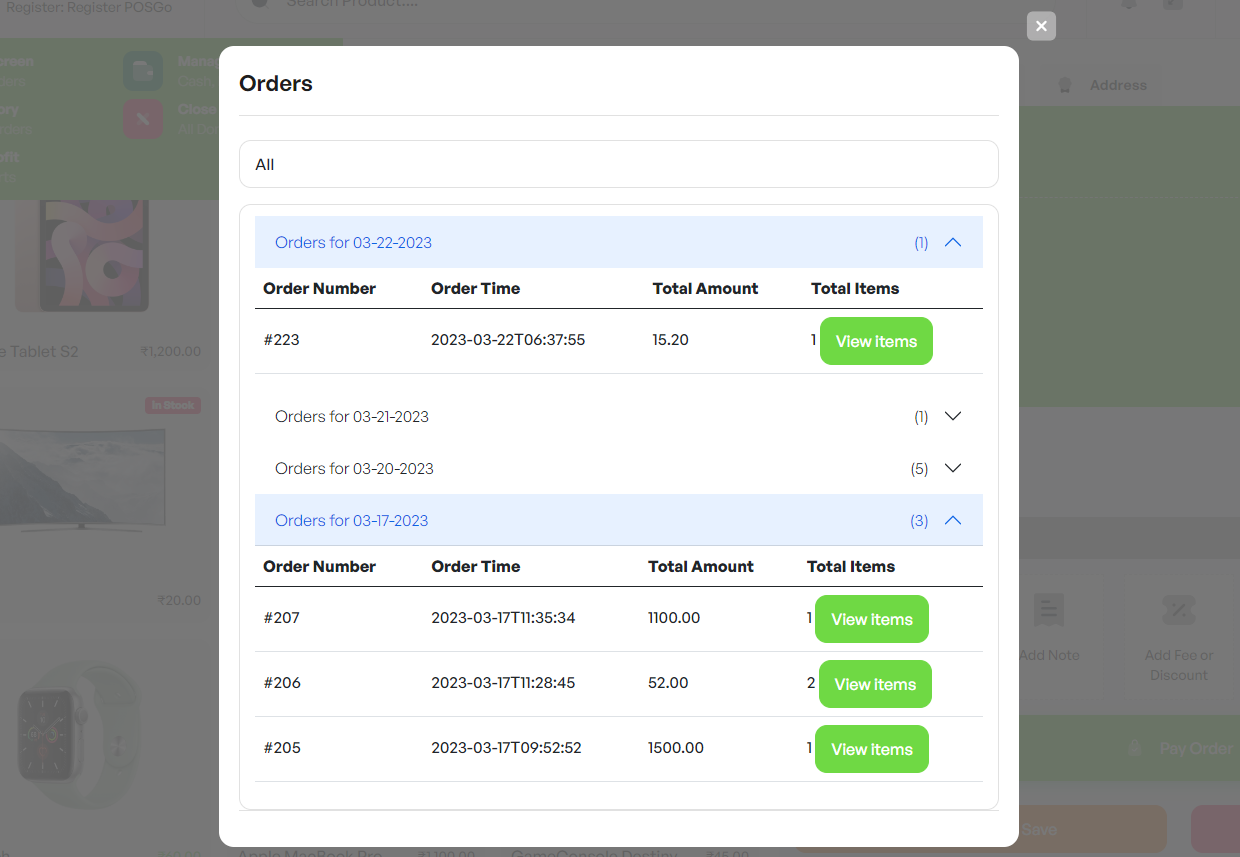
You will see a list of all orders grouped by day from the most recent to the oldest ones.
You can also filter orders by Register by simply selecting it from the dropdown menu on the Top.
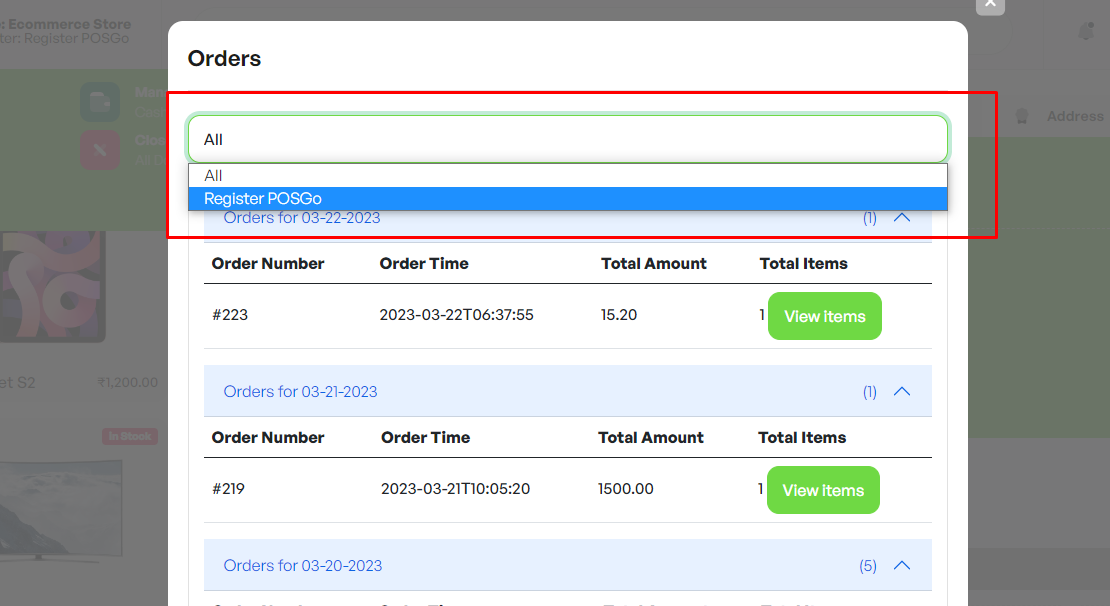
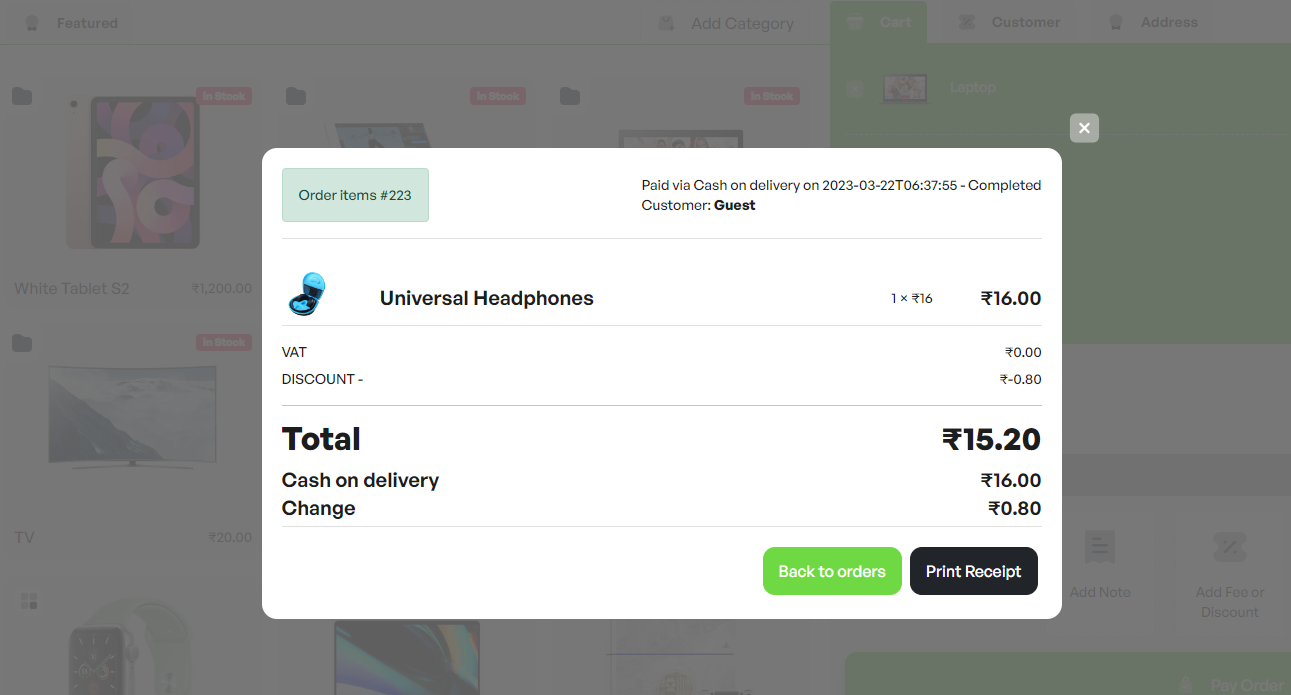
Click on a specific day, then click view item button
5.7 Today’s profit
Select Today’s profit from the menu on the left, and you will be able to see a recap of all sales made since the Register opening.
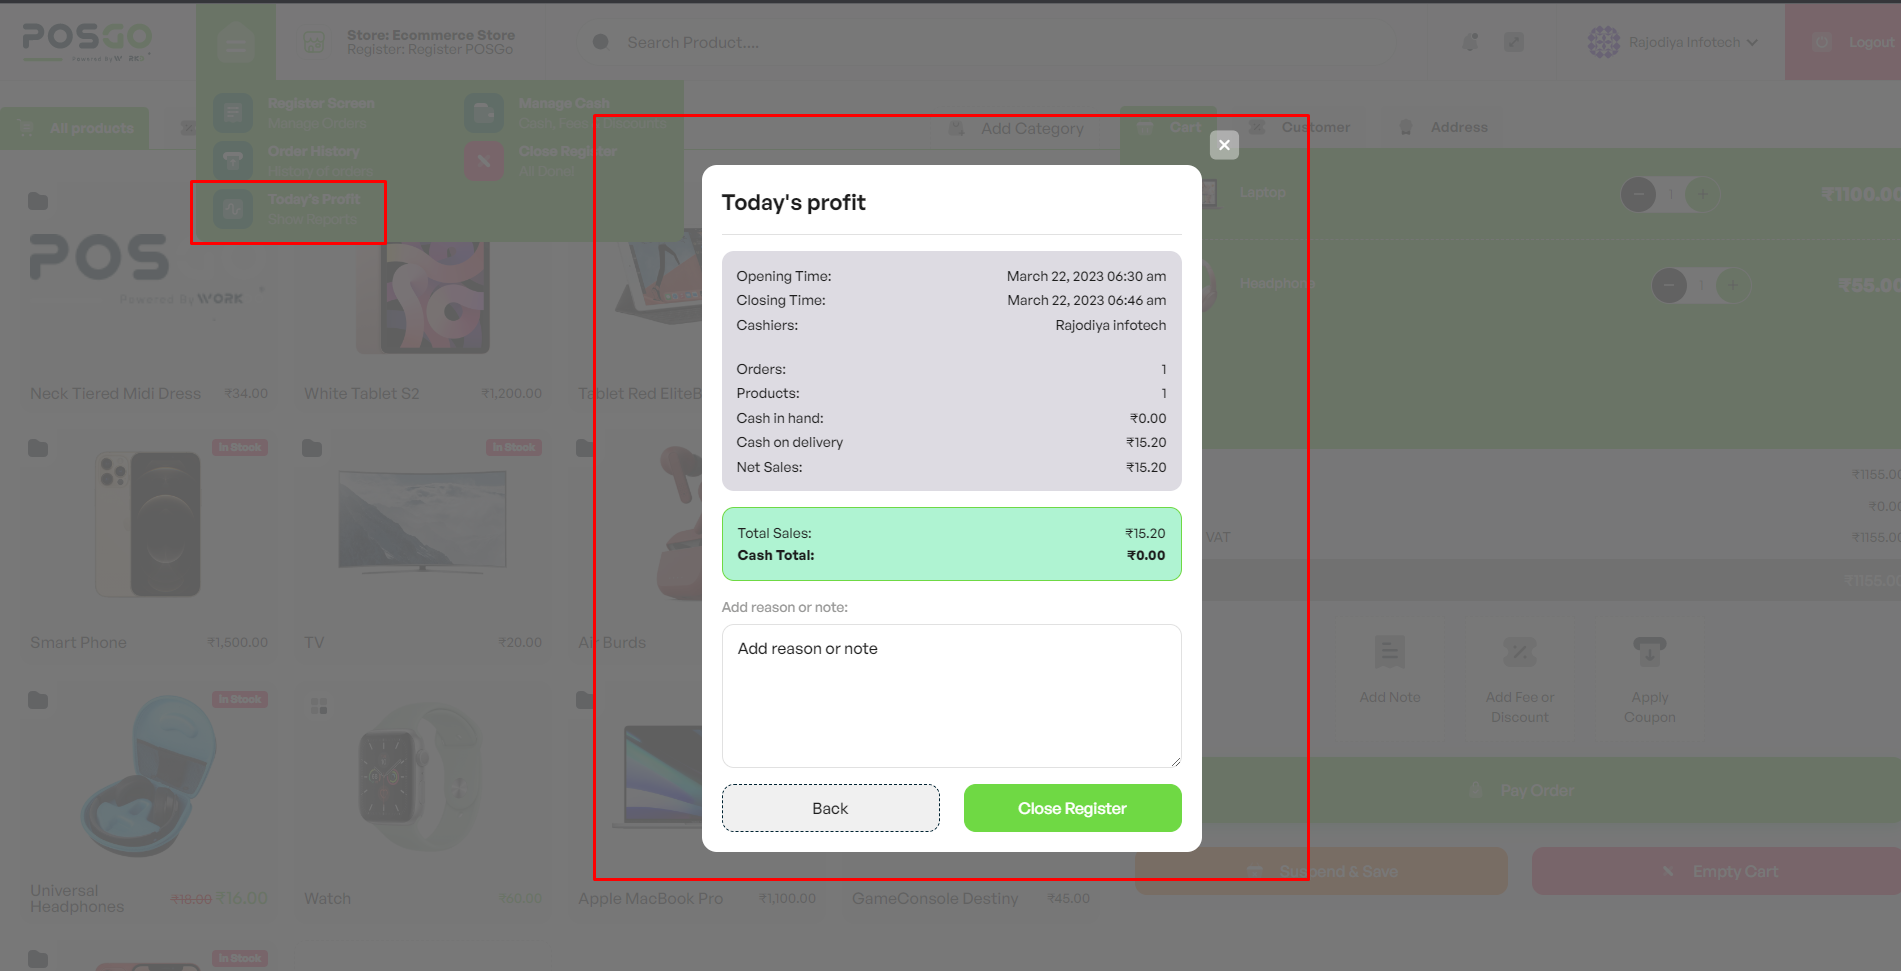
- Opening time
- Cashiers logged in during the session
- Total number of orders
- Total number of products sold
- Cash in hand
- Sales by payment methods
- Net Sales
- Shipping
- VAT
- Cash Total in the register
5.8 Manage Cash
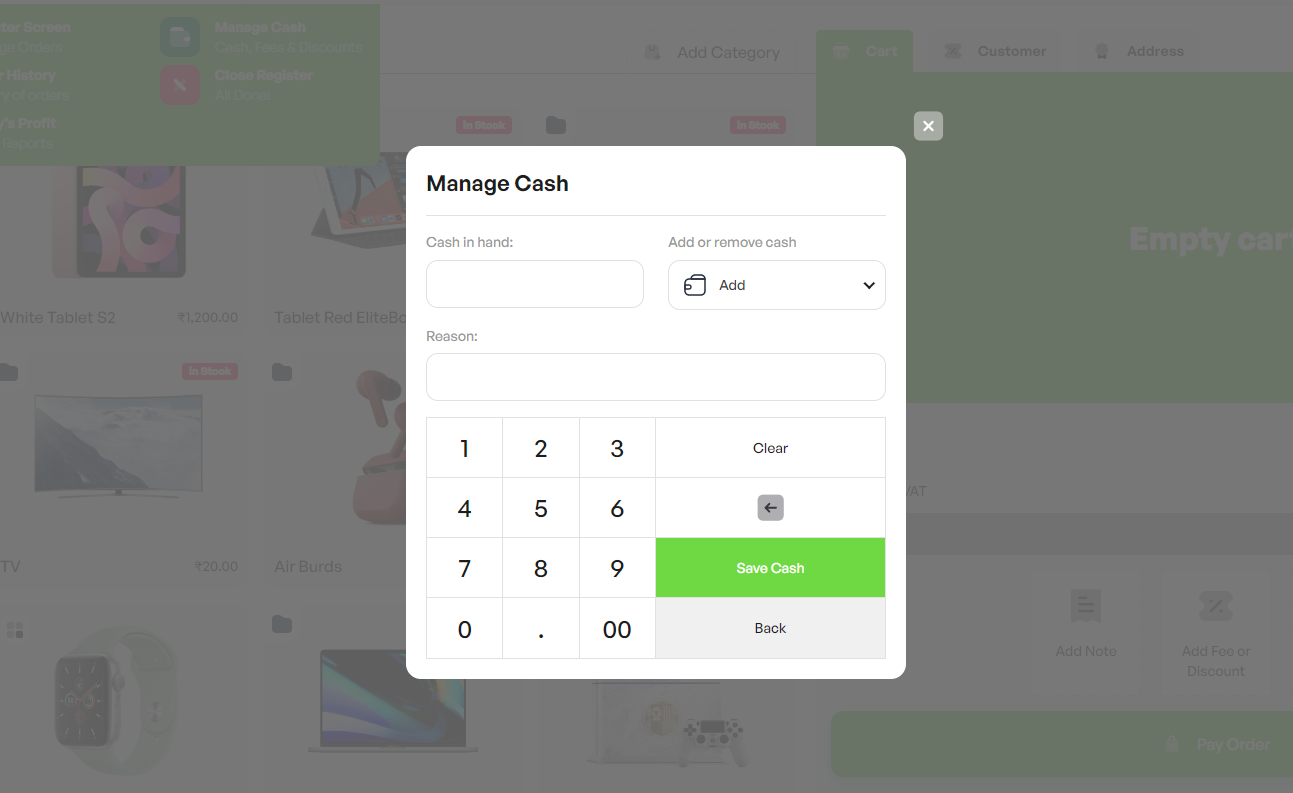
At any time during the Register session, you may need to add or remove Cash from the register and save this information. To do that, just go to the menu on the right side of your screen and select Manage Cash
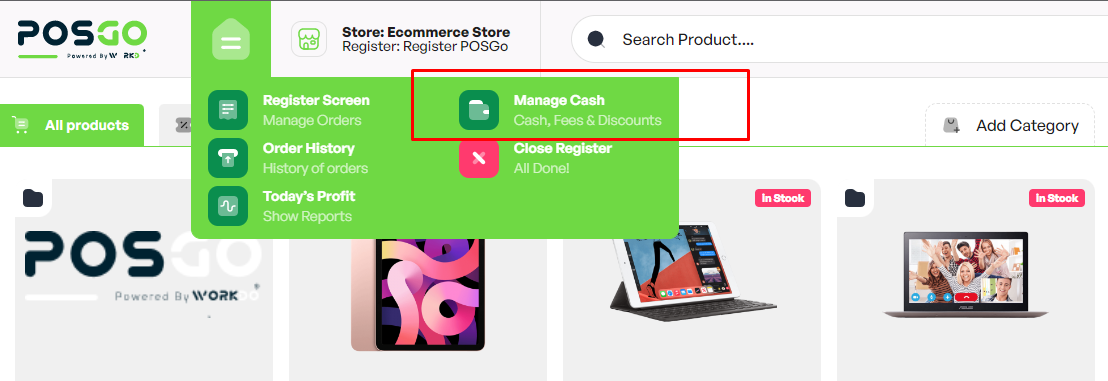
You can either select Add or Remove, enter the amount and add a Reason to add a note about why cash has been added or removed.
5.9 Close Register
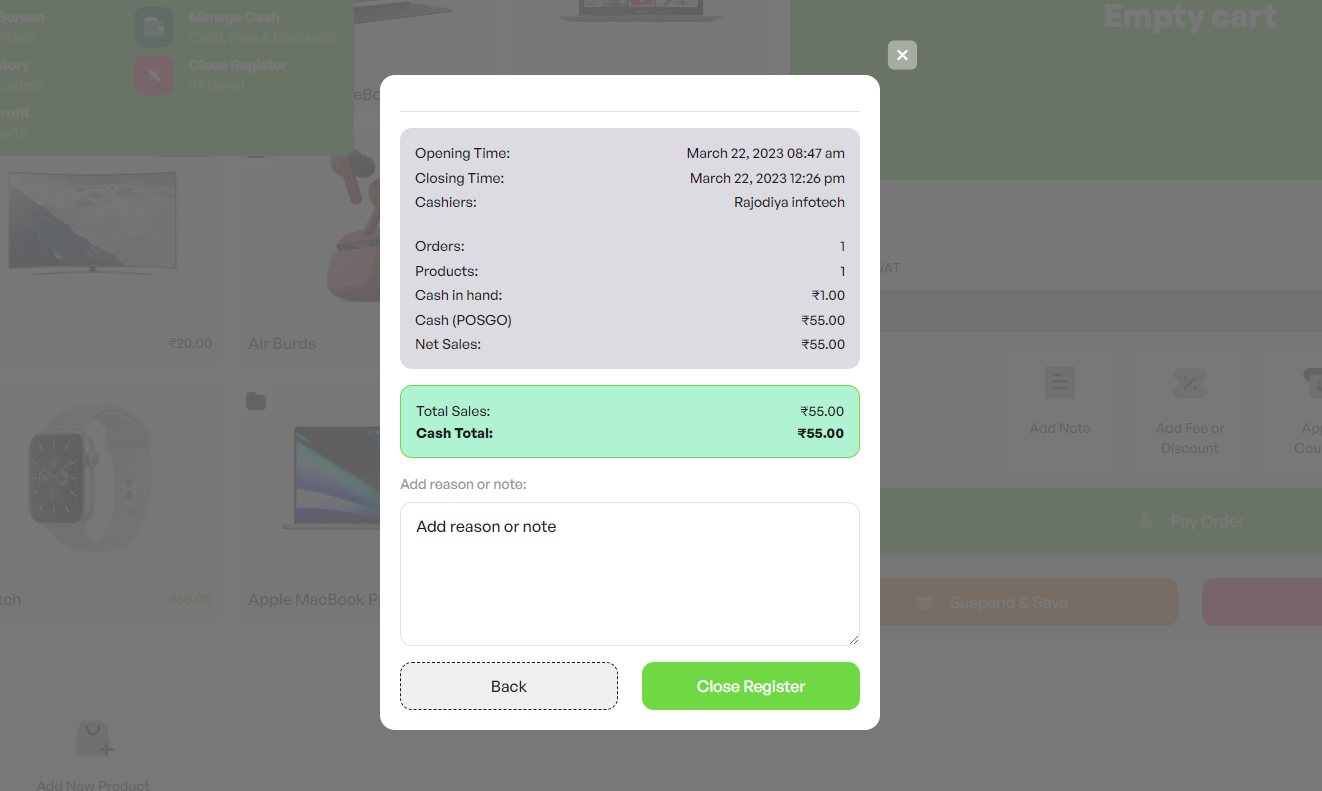
The Register closure is a very important step. When it’s time to close the Register at the end of the day, you can go to the menu on the left side of your screen and select Close Register.

You can either select Add or Remove, enter the amount and add a Reason to add a note about why cash has been added or removed.

5.10 Changelog
- 1.0 – Released on 05 march 2023
- 2.0 – 25 January 2024
Play sound when changing product quantity
- 2.1 – 16 May 2024
New: Support for WordPress 6.5 Or newer
New: Barcode
- Fix: issue with admin capabilities
- Fix: Improved search
- Fix: Improved receipt print
3.0 – 16 Oct 2024
- Fix: Addressed deprecated function issue
- New: Added default API call for WooCommerce
- Fix: Corrected default AJAX call
3.1 – 9 Jan 2025
- New: support for WooCommerce 9.5
- Update: Frontend Css file
Reach Out to Us
Have questions or need assistance? We're here to help! Reach out to our team for support, inquiries, or feedback. Your needs are important to us, and we’re ready to assist you!

Related document
We give a helping hand to make sure you start with the right foot.
Wizzchat – eCommerceGo Addon
Discover WizzChat, the advanced AI-powered chat solution. Enhance communication with WizzChat eCommerceGo Addon. Detailed at WorkDo.io.
Read moreCyberSource Integration in Dash SaaS
Enhance your business in Bahrain with secure Cybersource Integration in Dash SaaS. Accept debit card payments effortlessly. Visit WorkDo.io now.
Read moreAppointment Review Integration in BookingGo SaaS
Gather valuable feedback on appointment booking and improve customer satisfaction with the Appointment Review Module in BookingGo SaaS.
Read moreRestaurant Menu Integration in Dash SaaS
Streamline your restaurant’s menu presentation and management with Dash SaaS, the comprehensive tool for seamless integration.
Read moreMailchimp Integration in BookingGo SaaS
Seamlessly sync your booking data and elevate your marketing strategies with the new Mailchimp integration in BookingGo SaaS.
Read morePurchase Notification – eCommerceGo Addon
Enhance user experience with real-time purchase notifications. Integrate eCommerceGo SaaS & improve your eCommerce business. Check Now!
Read moreService Tax Integration in BookingGo SaaS
Explore our comprehensive guide to seamlessly integrate and optimize service tax functionalities on the BookingGo SaaS platform.
Read moreCollaborative Services Integration in BookingGo SaaS
Enhance booking management with the Collaborative Services module integration in BookingGo SaaS, revolutionizing efficiency.
Read moreZapier Add-On in BookingGo SaaS
Boost efficiency with our Zapier add-on. Learn how to grant super admin access in a few simple steps. Increase productivity today!
Read moreAutomatic Order Printing Integration in eCommerceGo SaaS
Introduction In the fast-paced world of eCommerce, efficiency and speed are paramount. The Automatic Order […]
Read morePromo Codes Integration in BookingGo SaaS
Learn how to maximize savings with BookingGo SaaS’s promo code module. Dive deep into functionalities and strategic applications. Boost your bookings now!
Read moreOutlook Calendar Integration in Dash SaaS
Welcome to the comprehensive guide for integrating Outlook Calendar with the Dash SaaS add-on. This documentation is crafted to provide a thorough walkthrough of the integration process, ensuring you can effortlessly synchronize your Outlook Calendar with Dash.
Read moreWizzchat – eCommerceGo Addon
Discover WizzChat, the advanced AI-powered chat solution. Enhance communication with WizzChat eCommerceGo Addon. Detailed at WorkDo.io.
Read moreCyberSource Integration in Dash SaaS
Enhance your business in Bahrain with secure Cybersource Integration in Dash SaaS. Accept debit card payments effortlessly. Visit WorkDo.io now.
Read moreAppointment Review Integration in BookingGo SaaS
Gather valuable feedback on appointment booking and improve customer satisfaction with the Appointment Review Module in BookingGo SaaS.
Read moreRestaurant Menu Integration in Dash SaaS
Streamline your restaurant’s menu presentation and management with Dash SaaS, the comprehensive tool for seamless integration.
Read moreNeed more help?
If you’re still uncertain or need professional guidance, don’t hesitate to contact us. You can contact us via email or submit a ticket with a description of your issue. Our team of experts is always available to help you with any questions. Rest assured that we’ll respond to your inquiry promptly.
Love what you see?
Do you like the quality of our products, themes, and applications, or perhaps the design of our website caught your eye? You can have similarly outstanding designs for your website or apps. Contact us, and we’ll bring your ideas to life.
