
Pipedrive – WorkDo Dash SaaS Add-On Guide
Learn how to configure and manage Pipedrive integration in WorkDo Dash SaaS.
Introduction
The Pipedrive Add-On allows you to pull your existing Pipedrive data directly into the Pipedrive module. Once connected, you can manage Pipelines, Stages, Lead Labels, Leads, Deals, and Products all within the system. The Sync feature imports your Pipedrive records into the CRM so everything stays in one place. Goals from Pipedrive are also visible with live status tracking.
How to Install the Add-On?
To Set Up the Pipedrive Add-On, you can follow this link: Setup Add-On.
How to use the Pipedrive Add-On?
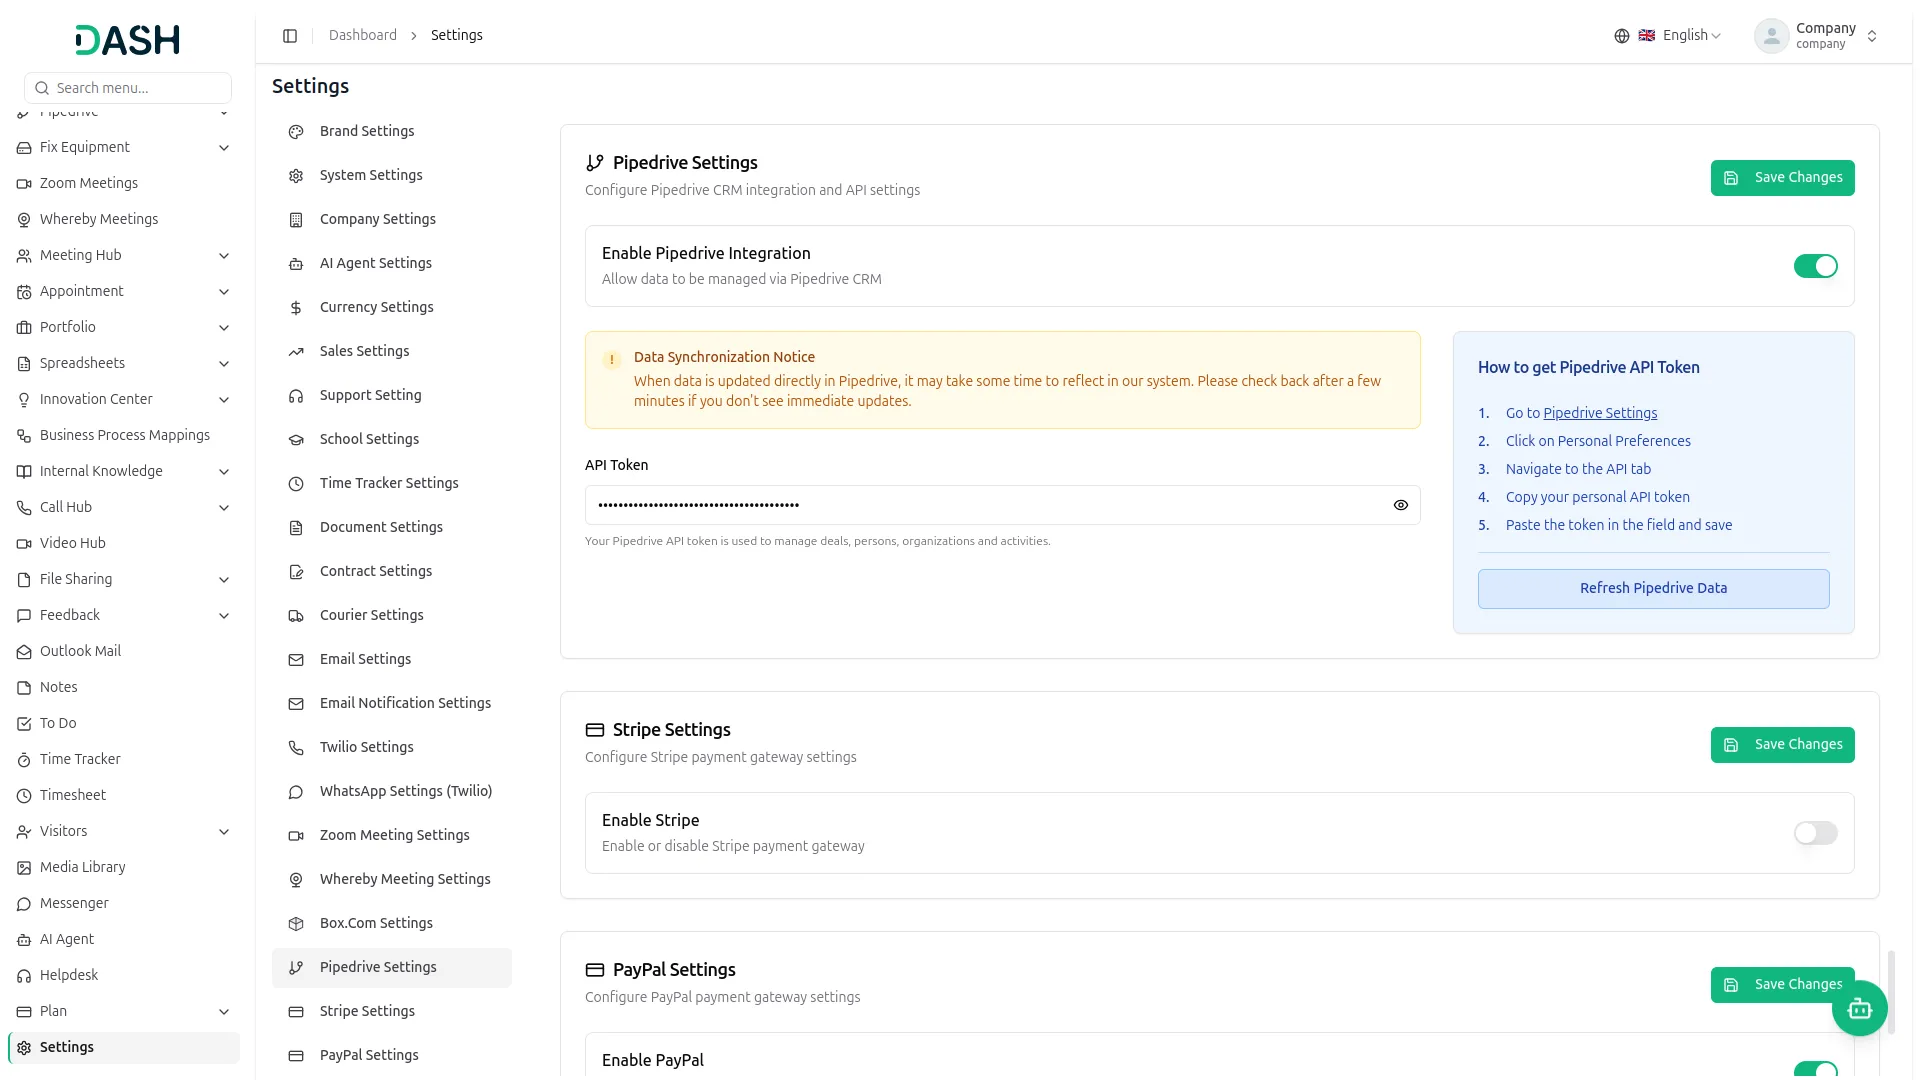
Pipedrive Settings Configuration
- Go to System Settings and locate the Pipedrive section. Toggle on the Enable Pipedrive Integration option to allow your data to be managed via Pipedrive CRM. Enter your API Token in the provided field to connect your Pipedrive account.
- This will sync your Pipedrive data with the system. Once configured, click Save Changes to apply your settings.
- To generate your API token, follow the steps below:
- Go to Pipedrive Settings
- Click on Personal Preferences
- Navigate to the API tab
- Copy your personal API token
- Paste the token in the field and save
- To manually trigger a data sync at any time, click the Refresh Pipedrive Data button available on the settings page.
- Note: When data is updated directly in Pipedrive, it may take a few minutes to reflect in the system. If you don’t see immediate updates, please check back after a short while. Your Pipedrive API token is used to manage deals, persons, organizations, and activities across the platform.
System Setup
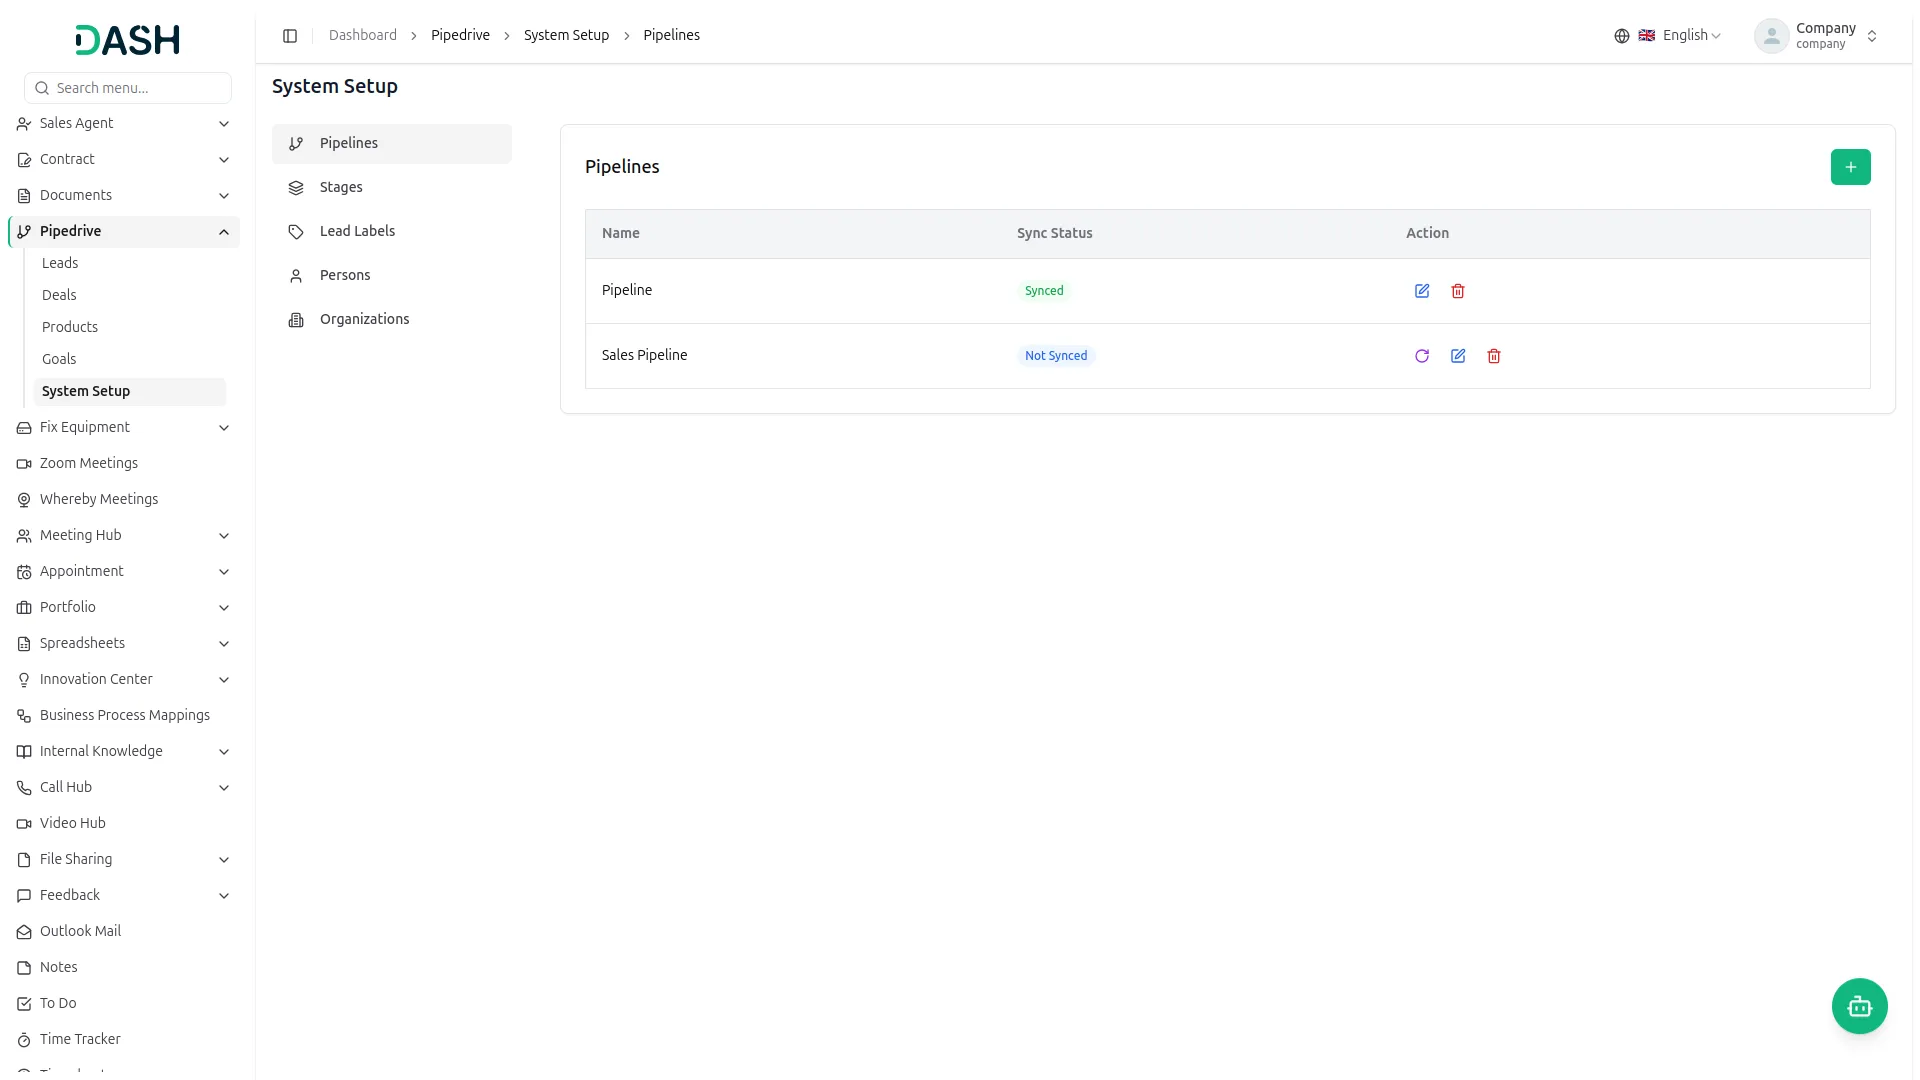
- The System Setup section allows administrators to configure foundational data used across the Pipedrive integration. It includes Pipelines, Stages, Lead Labels, Persons, and Organizations, all of which are referenced when managing leads and deals throughout the platform.
Pipelines
- To add a new pipeline, click the “Create” button, enter the pipeline name in the form that opens, and click Create. The Pipelines page shows all your pipelines in a list with their name and sync status. For each pipeline, you can click Sync to pull an existing Pipedrive pipeline into the CRM pipeline, Edit to update its name, or Delete it if it’s no longer needed.
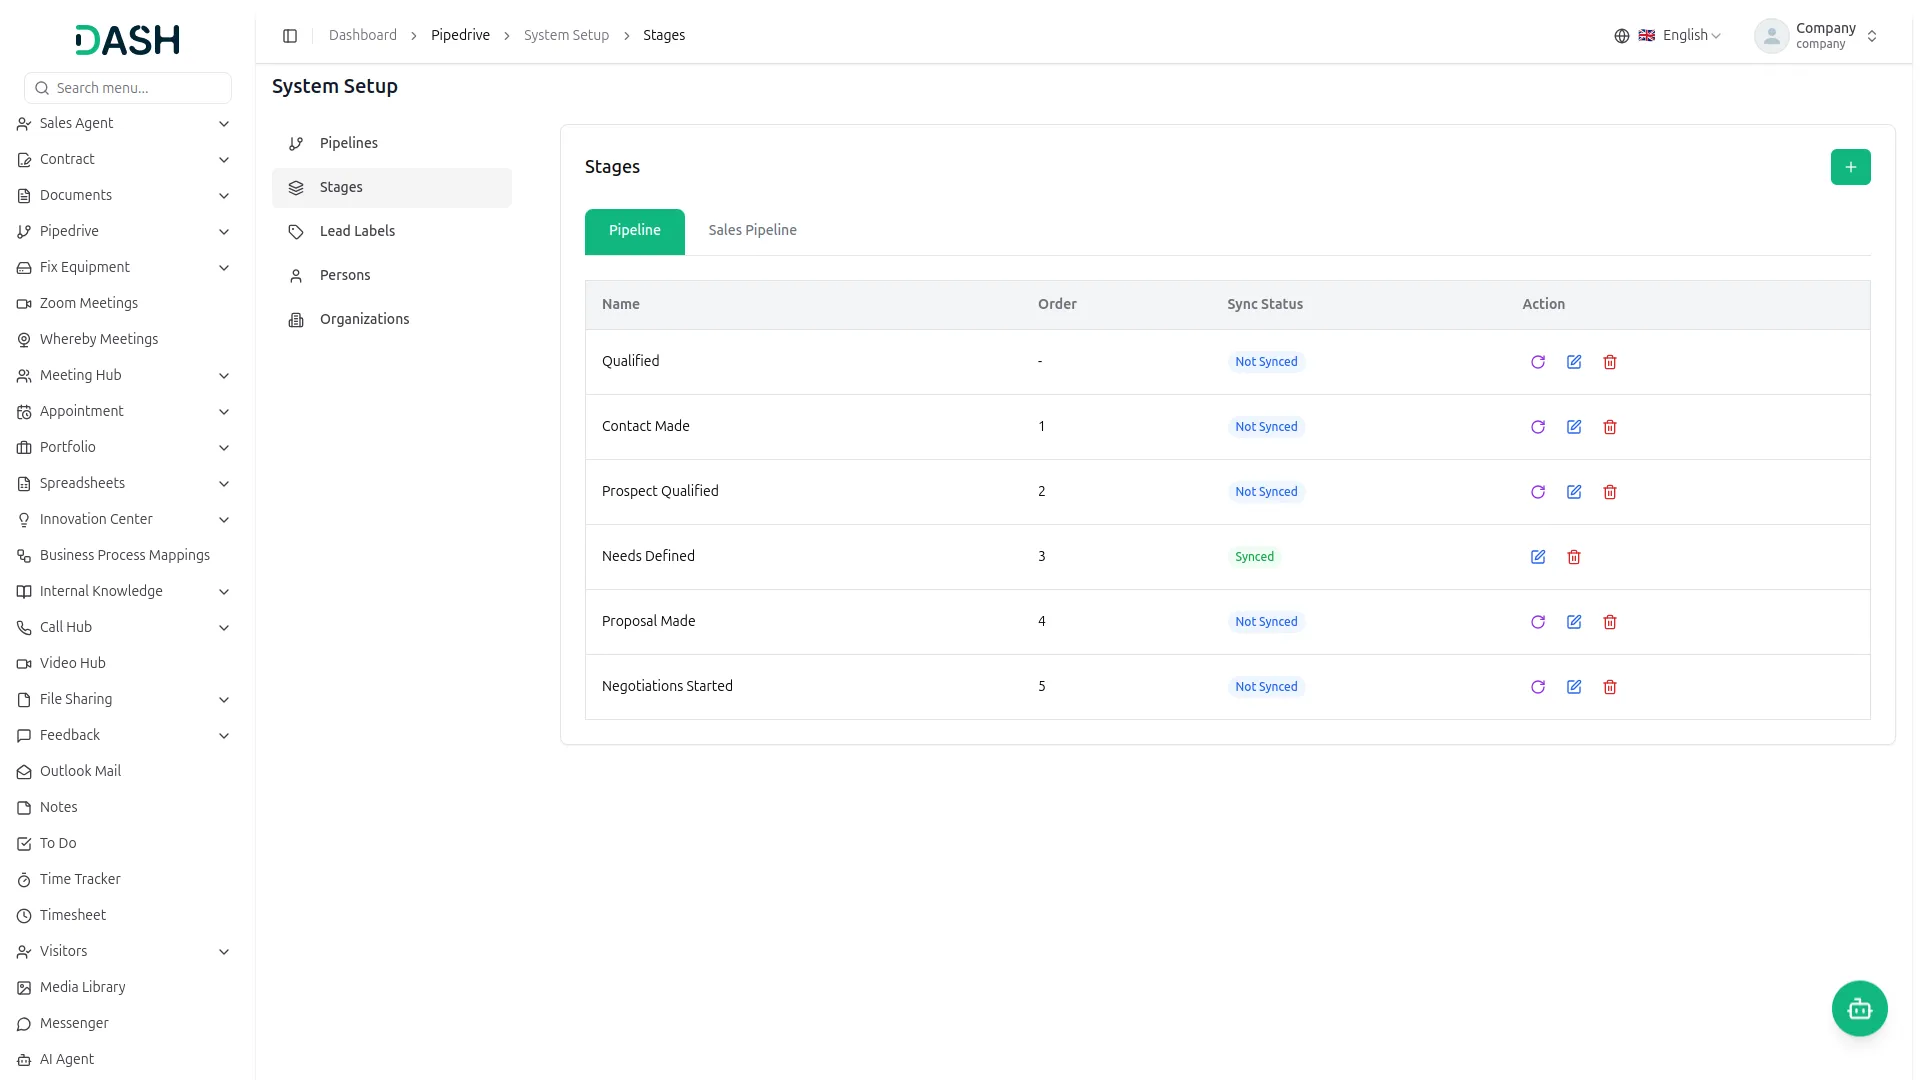
Stages
- To add a new stage, click the “create” button, enter the stage name, select the pipeline it belongs to from the dropdown, and click Create. The Stages page shows all deal stages grouped by pipeline. You can switch between pipelines using the tabs at the top. Each stage displays its name, order, and sync status. For each stage, you can click Sync to pull an existing Pipedrive deal stage into the CRM deal stage, Edit to update its details, or Delete it if it’s no longer needed.
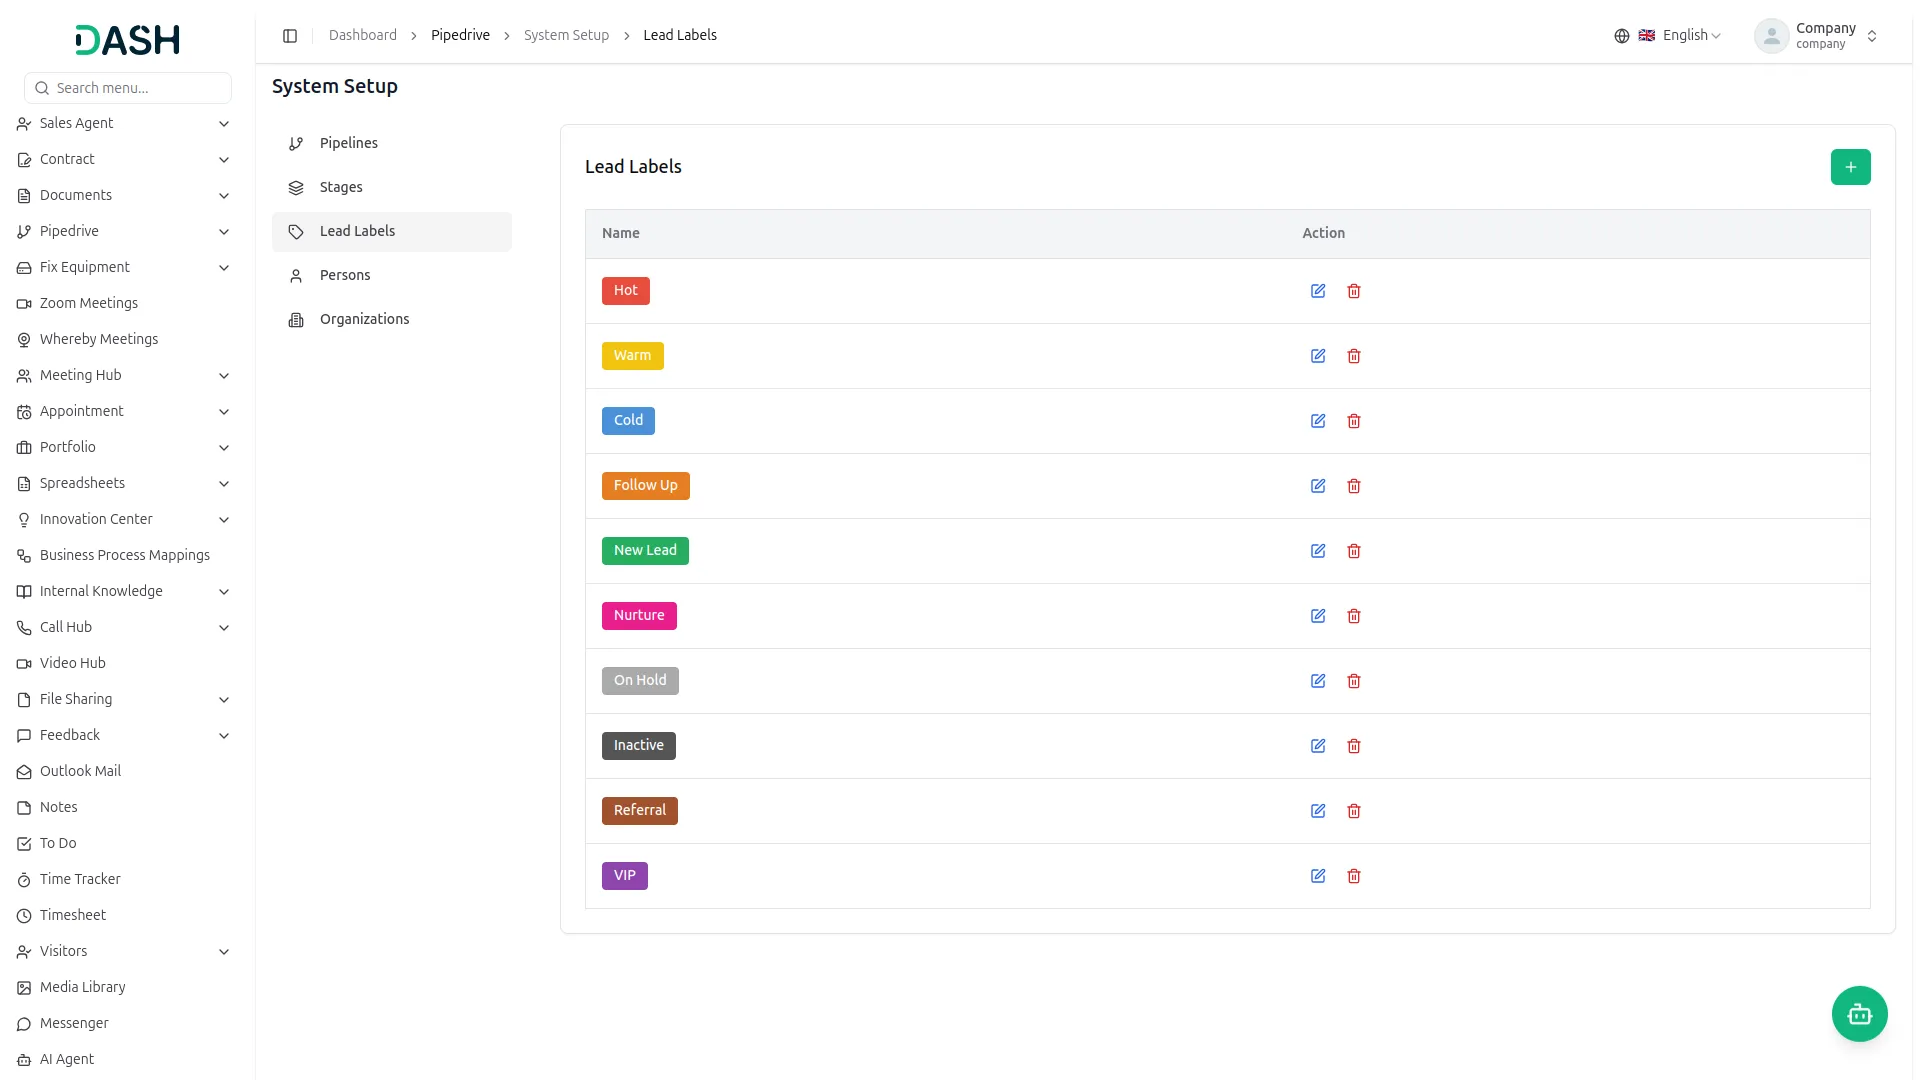
Lead Labels
- To add a new label, click the “Create” button, enter the label name, choose a color from the dropdown, and click Create. The Lead Labels page shows all labels that can be assigned to leads, displayed as colored tags. For each label, you can Edit it to update its name or color, or Delete it if it’s no longer needed.
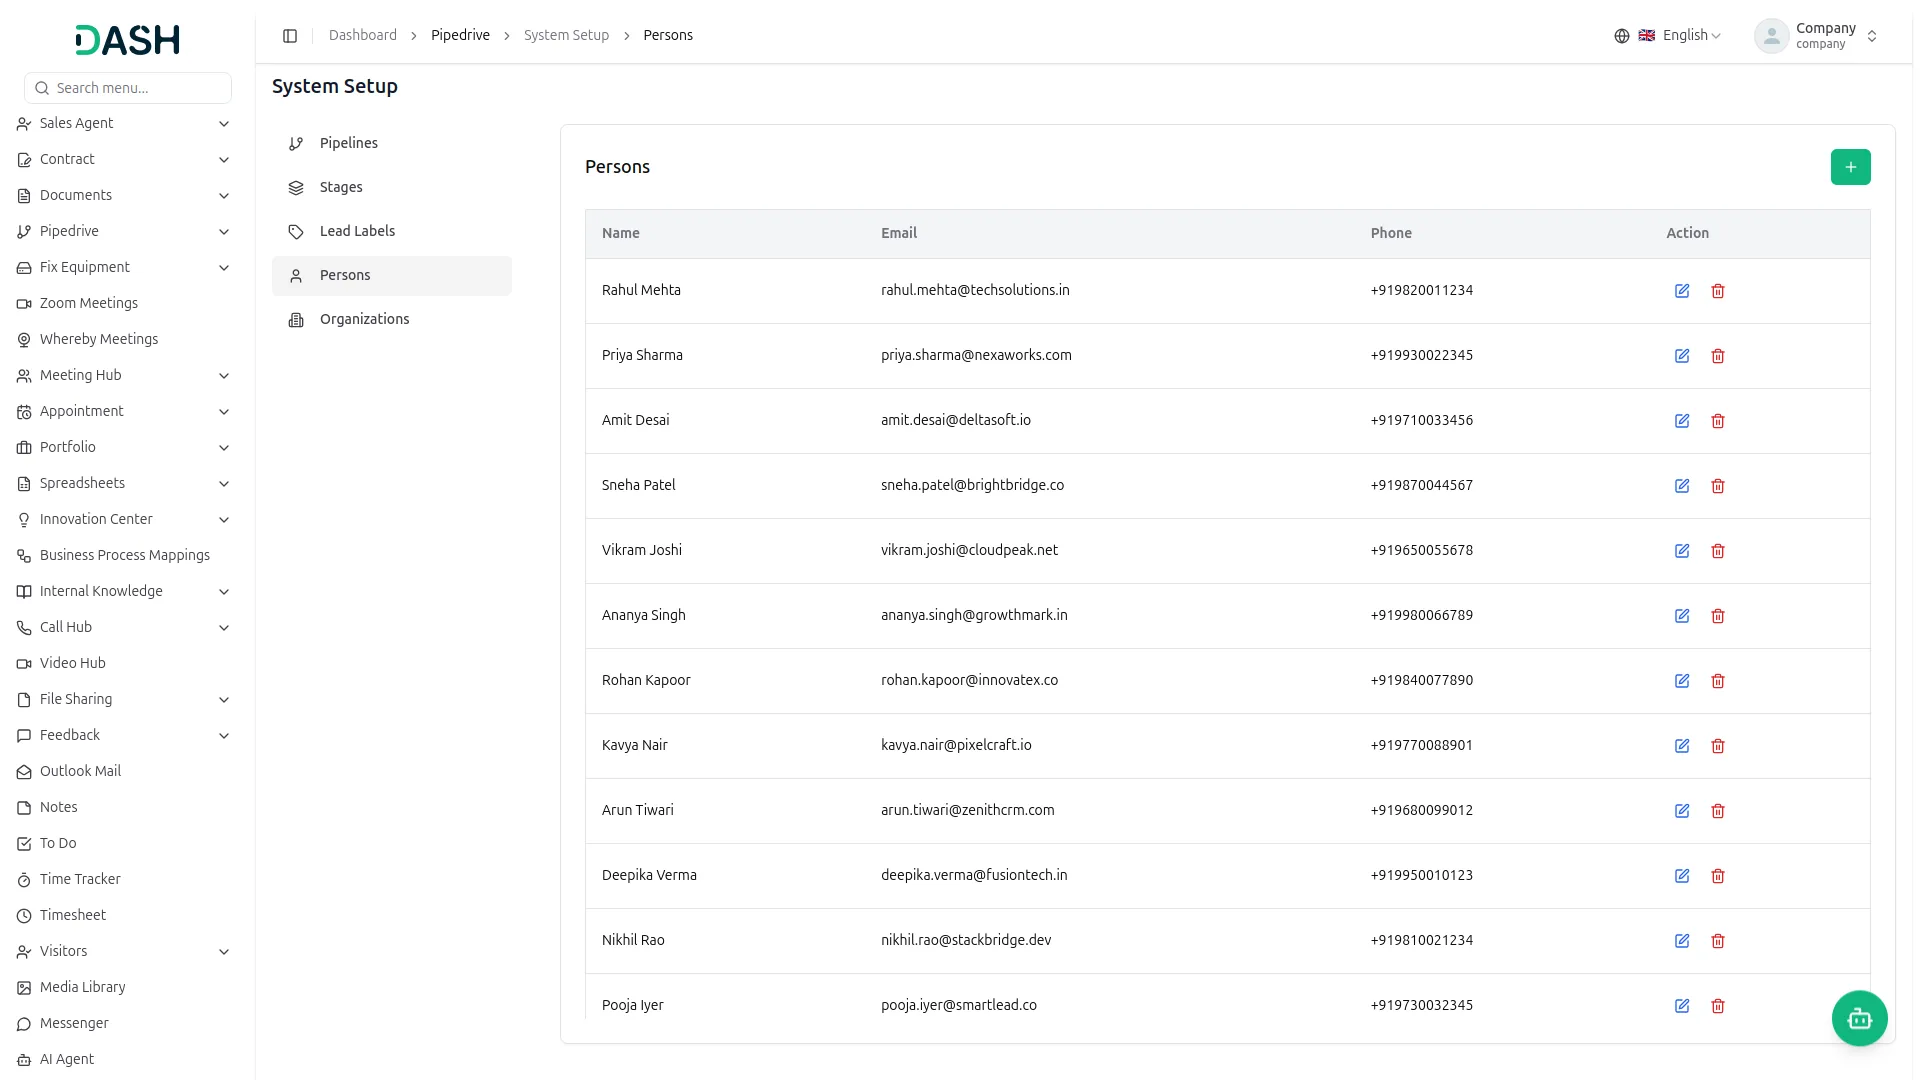
Persons
- To add a new person, click the “Create” button, enter the person’s name, email, and phone number, and click Create. The Persons page shows all contacts in a list with their name, email, and phone number. For each person, you can Edit their details or Delete them if they’re no longer needed.
Organizations
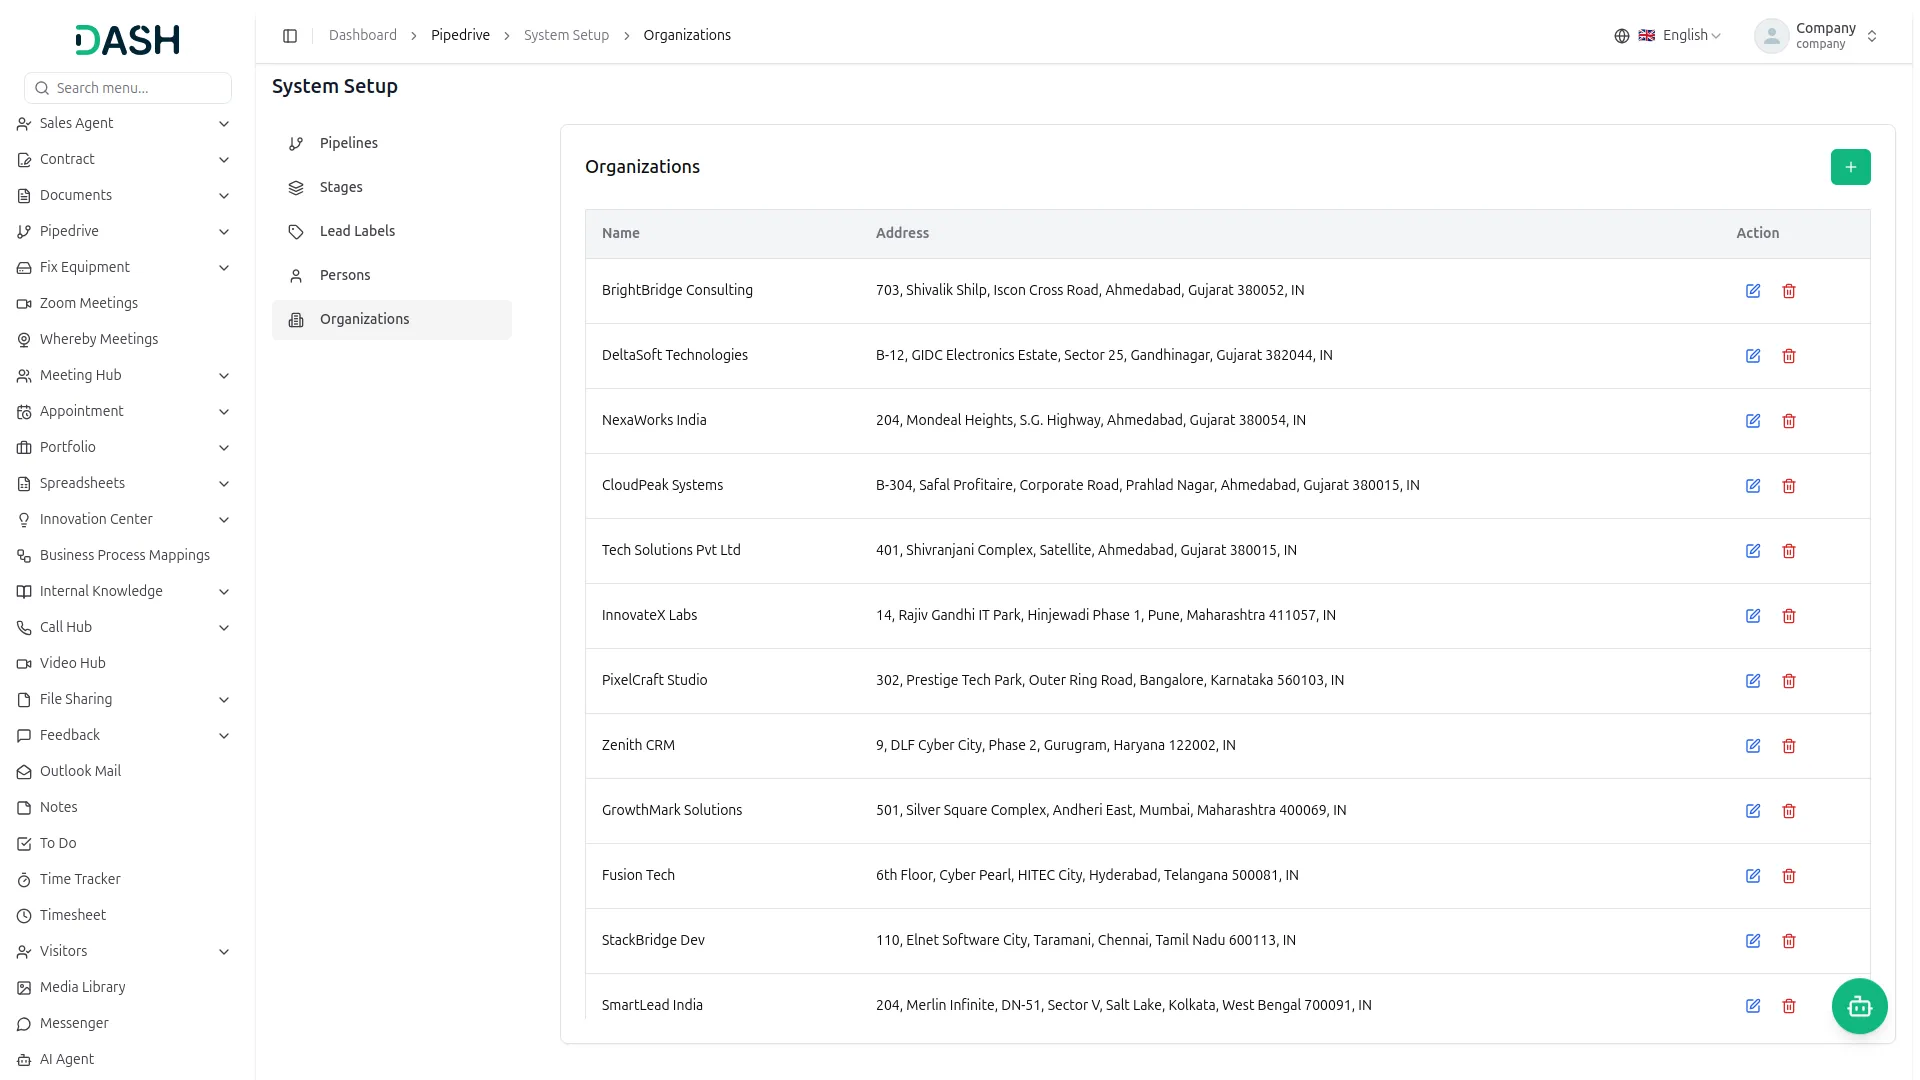
- To add a new organization, click the “Create” button, enter the organization’s name and address in the form that opens, and click Create. The Organizations page shows all organizations in a list with their name and address. For each organization, you can Edit its details or Delete it if it’s no longer needed.
Manage Leads
- To add a new lead, click the “Create” button on the manage lead page. Fill in the lead’s enter the Title, select the Person or Organization from the dropdown, choose the Labels from the dropdown, set a Value and Currency, and choose an Expected Close Date.
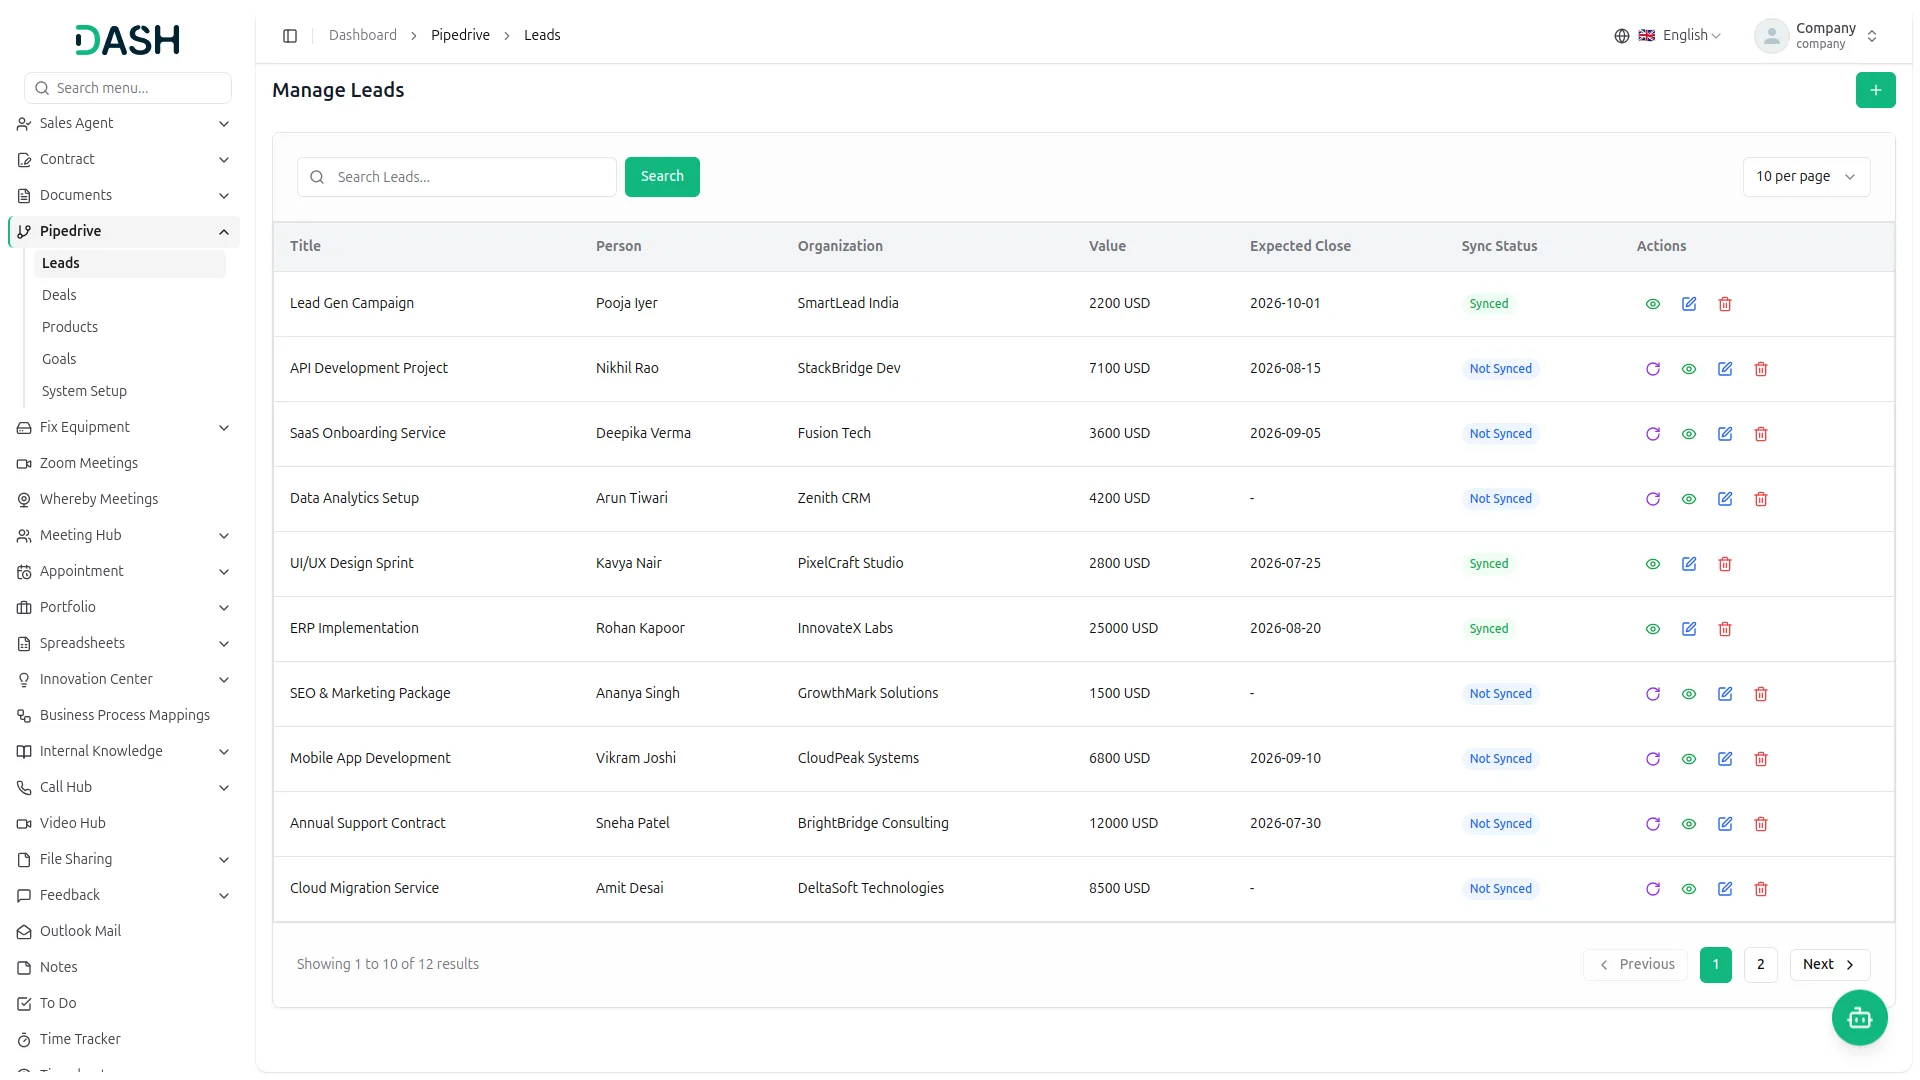
- The list page shows all lead in a table with columns for Title, Person, Organization, Value, Expected Close, Sync Status, and Actions. Use the Search bar at the top to quickly find a specific lead.
- For each lead in the list, you have a set of quick action options in the Actions column. Click the Sync to pull an existing Pipedrive lead into the CRM lead. A form will appear where you enter the lead’s Name, Email, Subject, User, Phone Number, Follow Up Date, and select a Pipeline, then click Sync.
- Once successfully synced, the Sync Status column will update to Synced, and the Sync will no longer appear. Click the View to open the full details of that lead. You can also Edit a lead to update its information, or Delete it if it’s no longer needed.
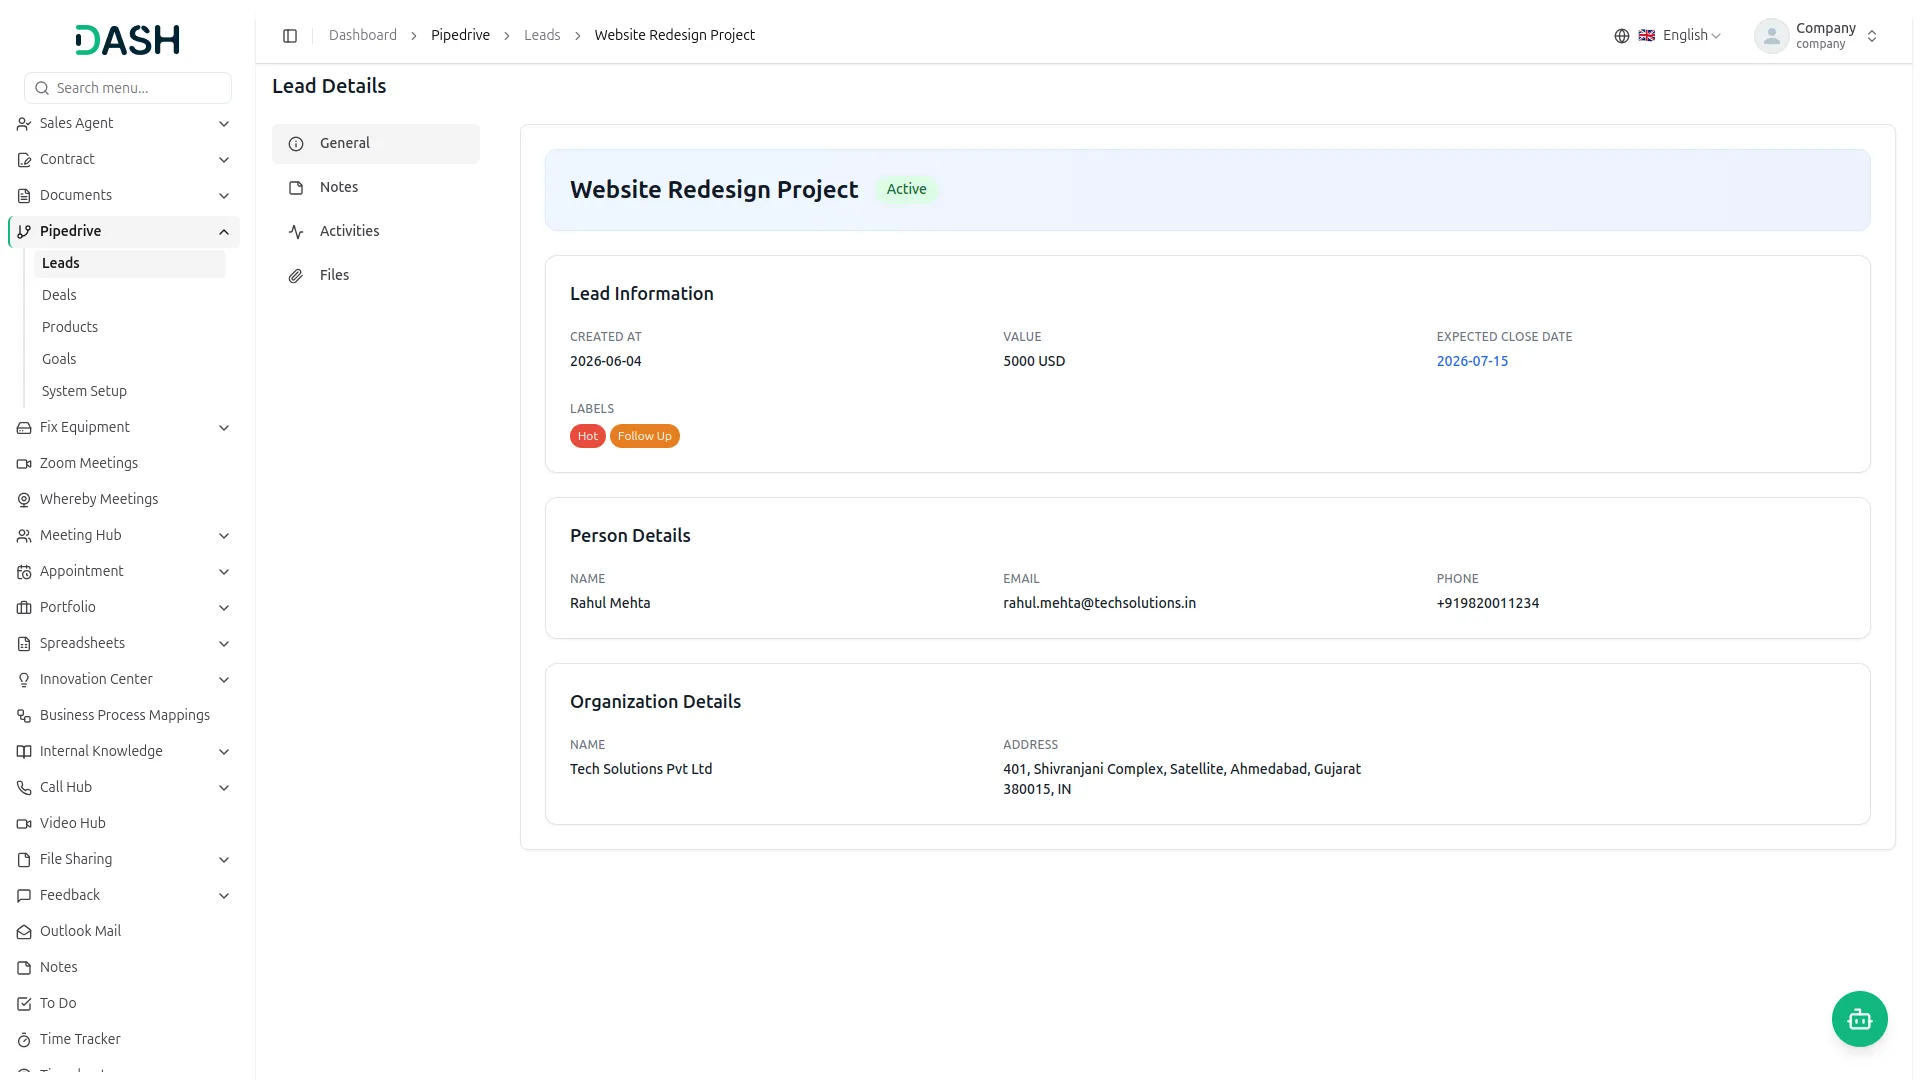
- When you click View, the Lead Details page opens. On this page, you can access four tabs: General, Notes, Activities, and Files.
- The General tab displays the lead’s core information, including its creation date, value, expected close date, labels, and any linked person or organization details.
- The Notes tab allows you to add internal notes to the lead. Click the “Create” button to open a note input field, write your note, and click Save. Notes are useful for tracking conversations, observations, or any context related to the lead.
- The Activities tab lets you log and track tasks associated with the lead. Click the “Create” button to add a new activity. Fill in the Subject, select an activity Type from the dropdown, set a Due Date and Due Time, add an optional Note, and toggle Mark as Done if the activity is already completed. Click Save to log it.
- The Files tab allows you to upload and manage documents or files related to the lead. Click the upload at the top right to attach files. All uploaded files are displayed with their name, size, and upload date.
Manage Deals
- To add a new deal, click the “Create” button on the Manage Deals page. Fill in the deal’s title, select the person or organization from the dropdown, select the Pipeline from the dropdown, and choose Stage from the dropdown.
- Set a value and currency, and choose status from the dropdown. Add Expected Close Date.
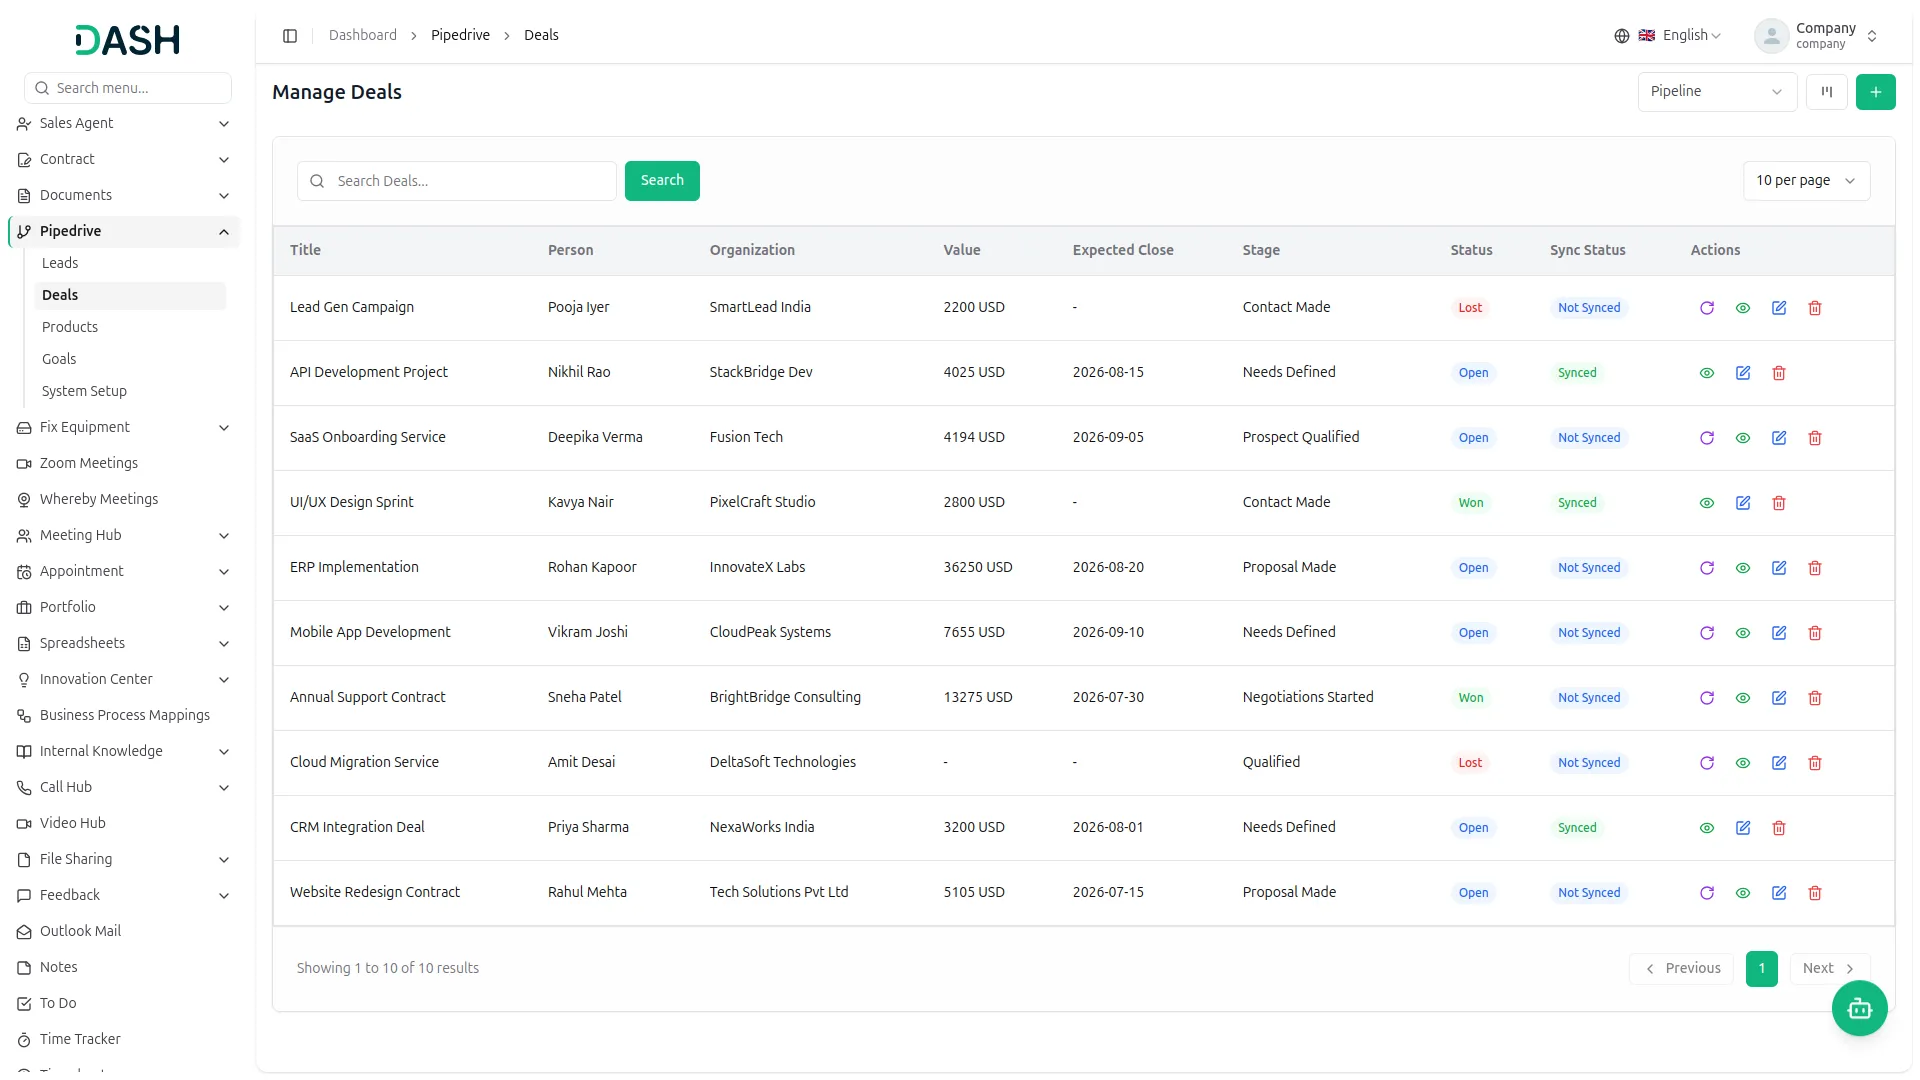
- The Manage Deals page shows all your deals in a list with key details like the deal title, person, organization, value, expected close date, deal stage, status, Sync status, and Action.
- You can search for a specific deal using the search bar at the top. If you prefer a visual overview, click the Kanban View option at the top right to see your deals grouped by stage as cards on a board.
- For each deal in the list, you have a set of quick action options in the Actions column. Click Sync to pull an existing Pipedrive deal into the CRM deal. A form will appear where you enter the deal’s name, email, subject, assigned user, phone number, follow-up date, and select a pipeline, then click Sync.
- Once successfully synced, the Sync Status column will update to Synced, and the Sync will no longer appear. Click View to open the full details of that deal. You can also Edit a deal to update its information, or Delete it if it’s no longer needed.
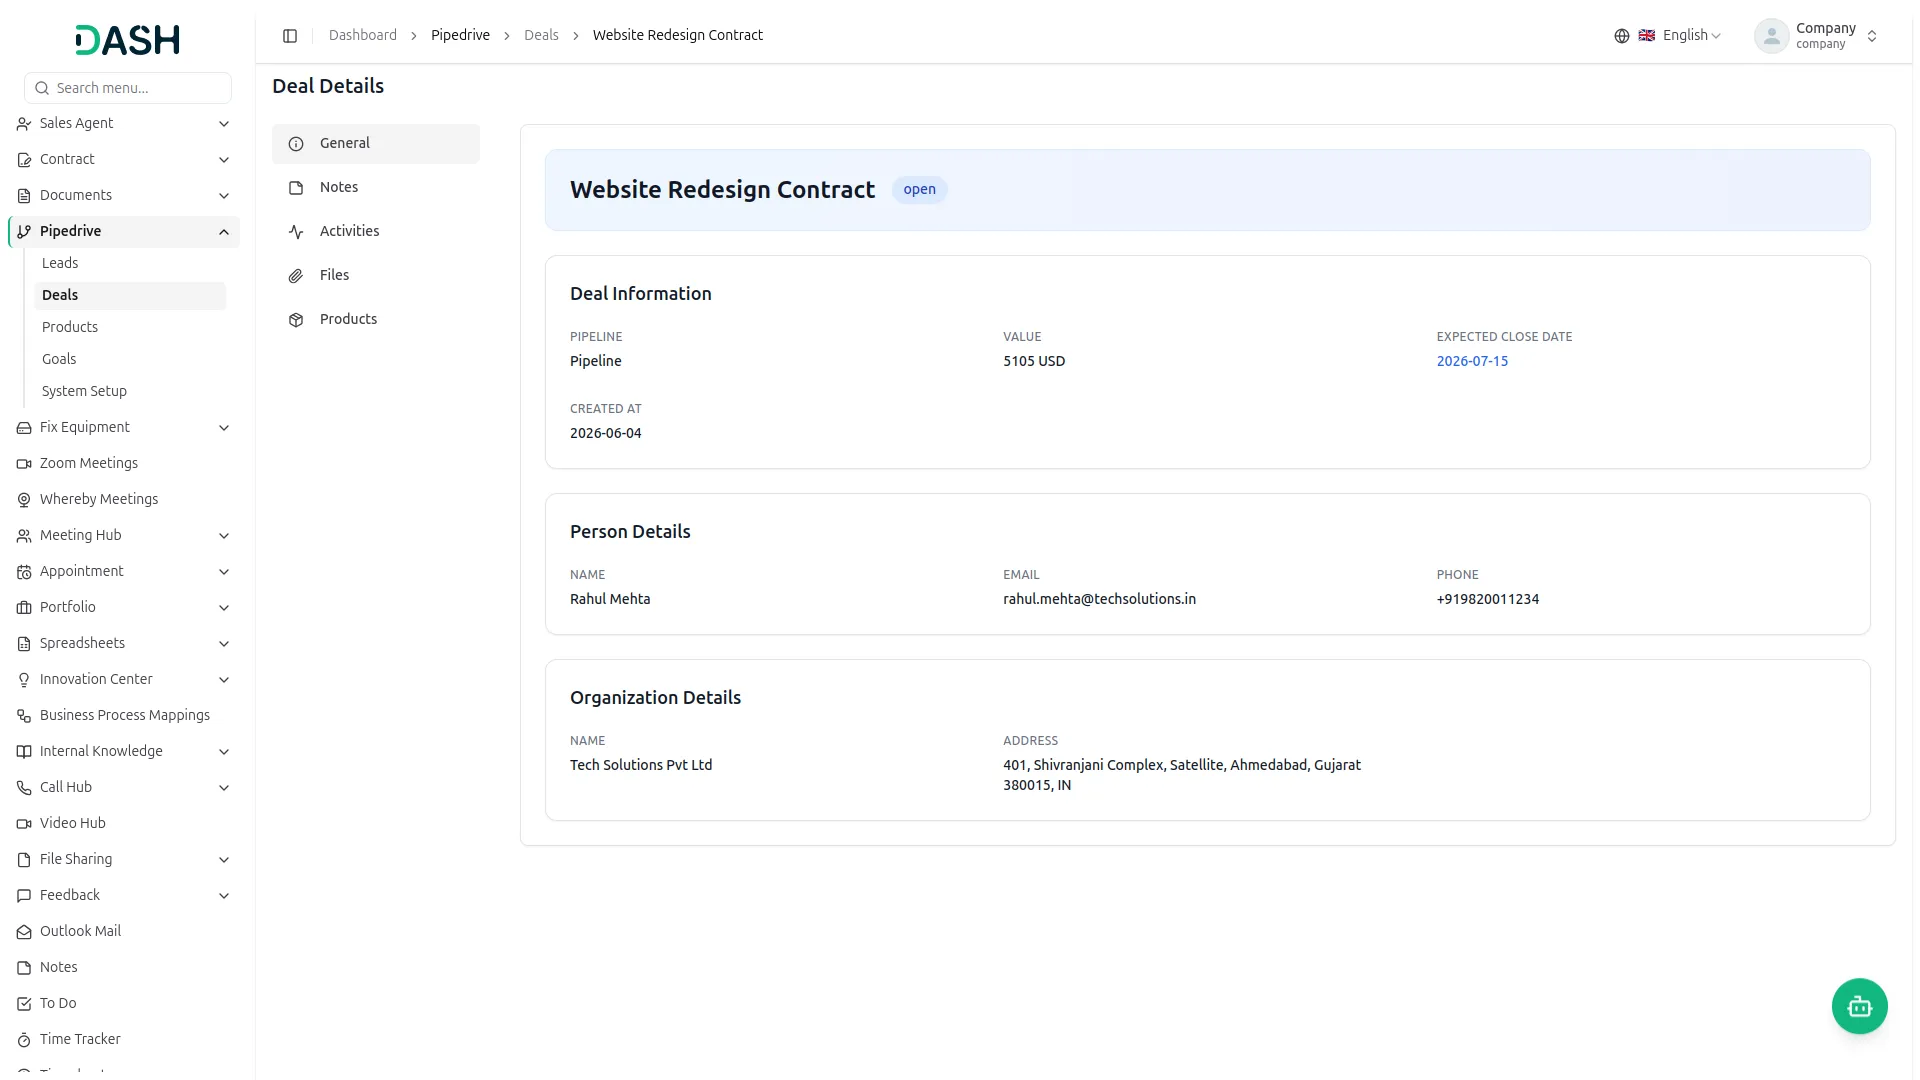
- When you click View to open a deal, the Deal Details page opens with a sidebar containing five tabs: General, Notes, Activities, Files, and Products.
- The General tab shows the deal’s core information like its pipeline, value, expected close date, creation date, and any linked person or organization details, including their name, email, phone, and address.
- The Notes tab is where you can add internal notes to keep track of conversations or important context related to the deal. Click the “Create” button, write your note, and click Save. All saved notes are displayed below the input field with their date.
- The Activities tab lets you log tasks linked to the deal. Click the “Create” button to add a new activity, fill in the subject, pick an activity type, set a due date and time, add an optional note, and toggle Mark as Done if it’s already completed. Click Save to log it. All activities appear in a list showing their subject, type, due date, due time, and current status.
- The Files tab is where you can upload and manage any documents or files related to the deal. Click the upload at the top right to attach a file. All uploaded files are shown with their name, size, and upload date.
- The Products tab lets you link products to the deal. Click the “Create” button to add a product, select the product from the dropdown, set the quantity, choose a product price, adjust the unit price, apply a discount percentage if needed, and set the tax handling method. A calculation summary shows the subtotal, net amount, tax, and total amount. Click Save to add the product. All added products are listed with their name, quantity, unit price, and total.
Manage Products
- To add a new product, click the “Create” button on the Manage Products page. Fill in the product’s name, enter a product code, specify the unit, set a tax percentage, and add pricing details, including the price, currency, and cost. You can also click “Add Price” to include additional pricing items.
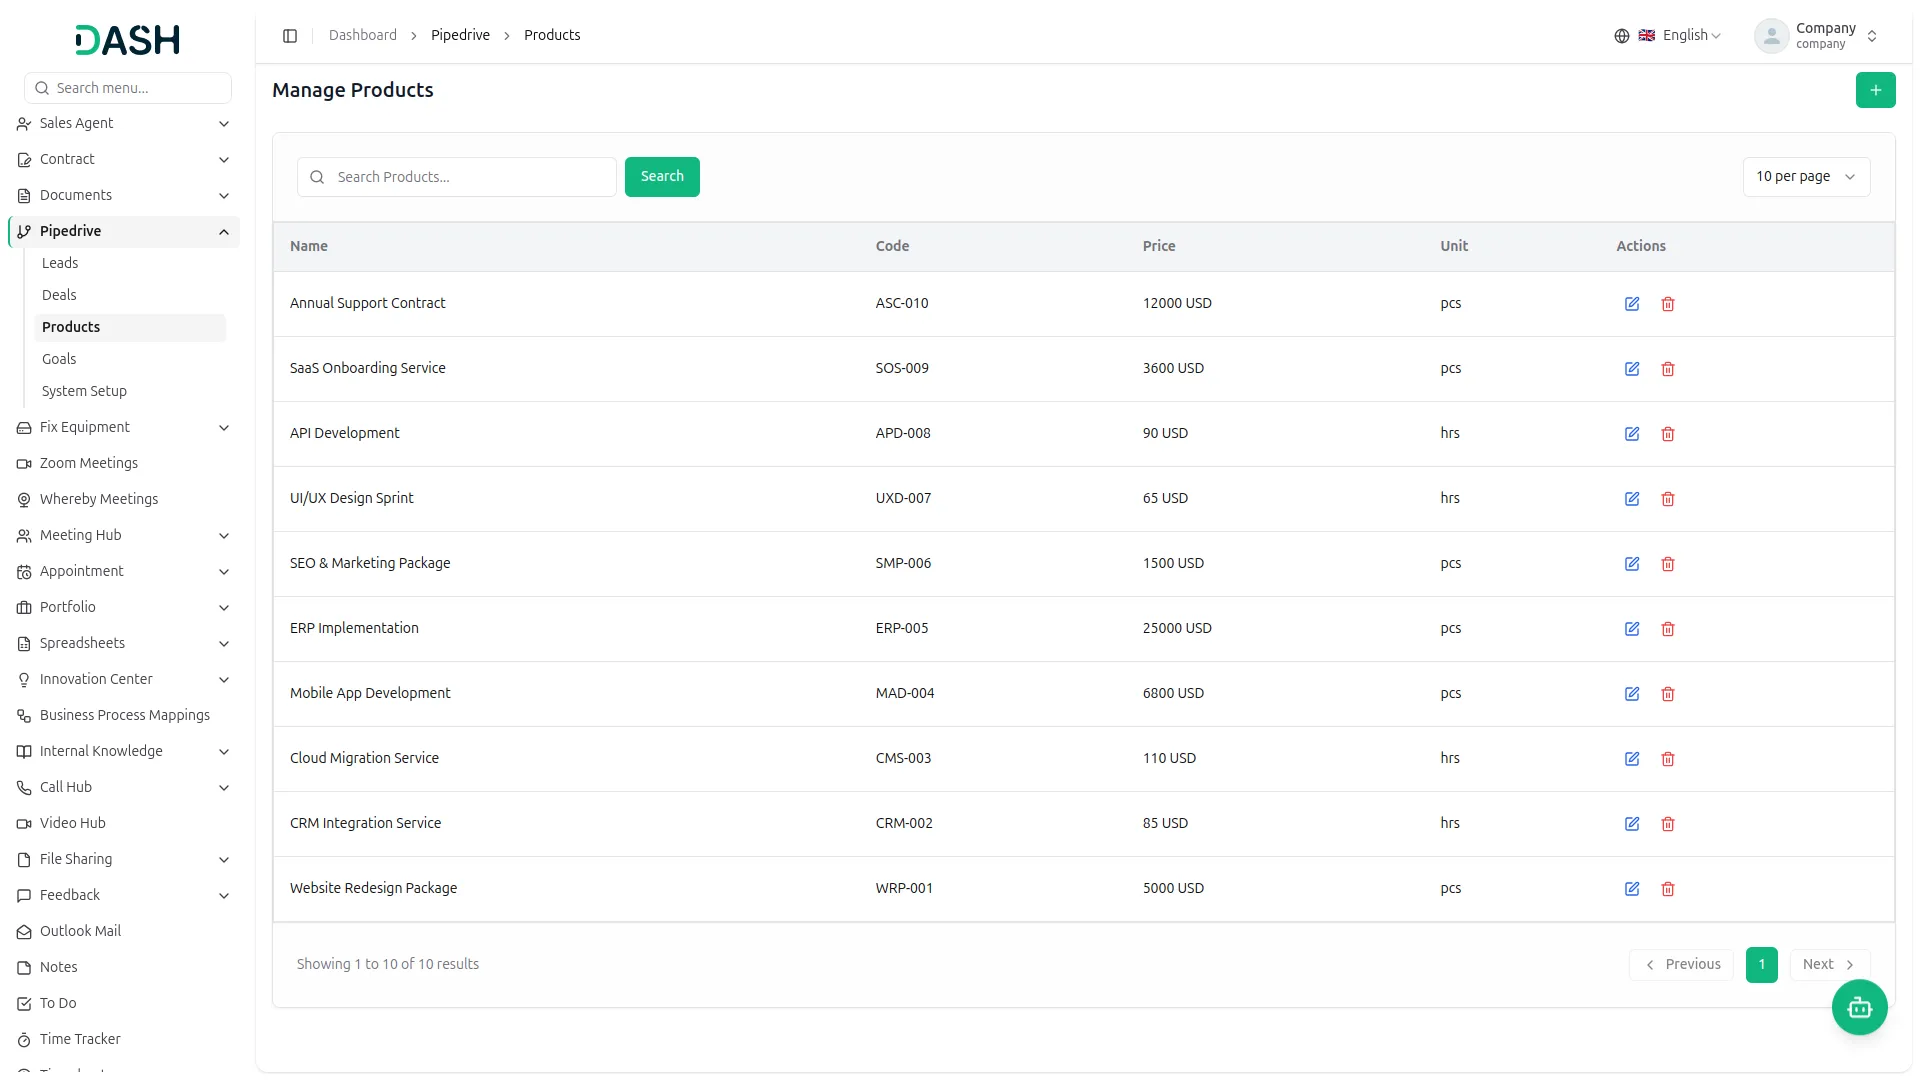
- The Manage Products page shows all your products in a list with key details like the product name, code, price, unit, and action. You can search for a specific product using the search bar button.
- For each product in the list, you have a set of quick action options in the Actions column. Click Edit to update the product’s information, or Delete it if it’s no longer needed.
Manage Goals
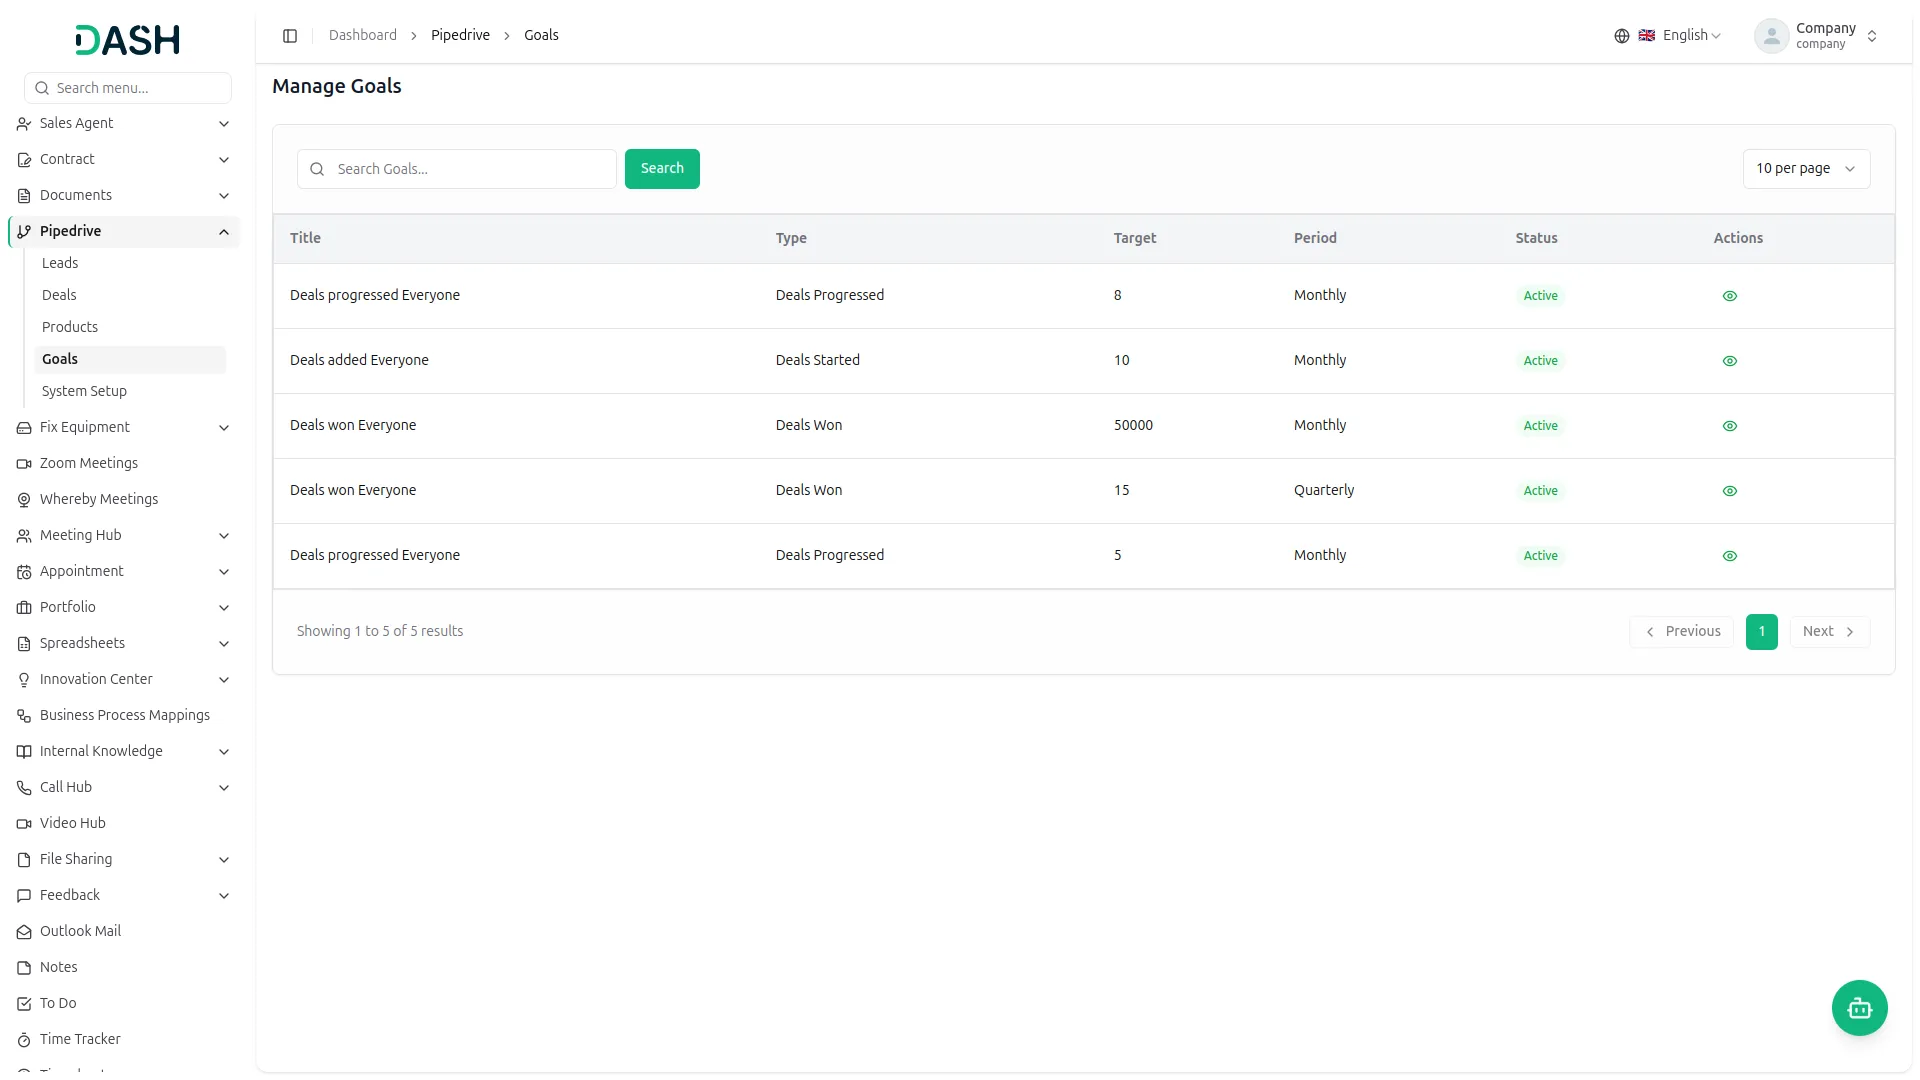
- The Manage Goals page shows all your goals in a list with key details like the goal title, type, target, period, current status, and action. You can search for a specific goal using the search bar.
- For each goal in the list, you have a quick action option in the Actions column. Click View to open the full details of that goal and track its progress.
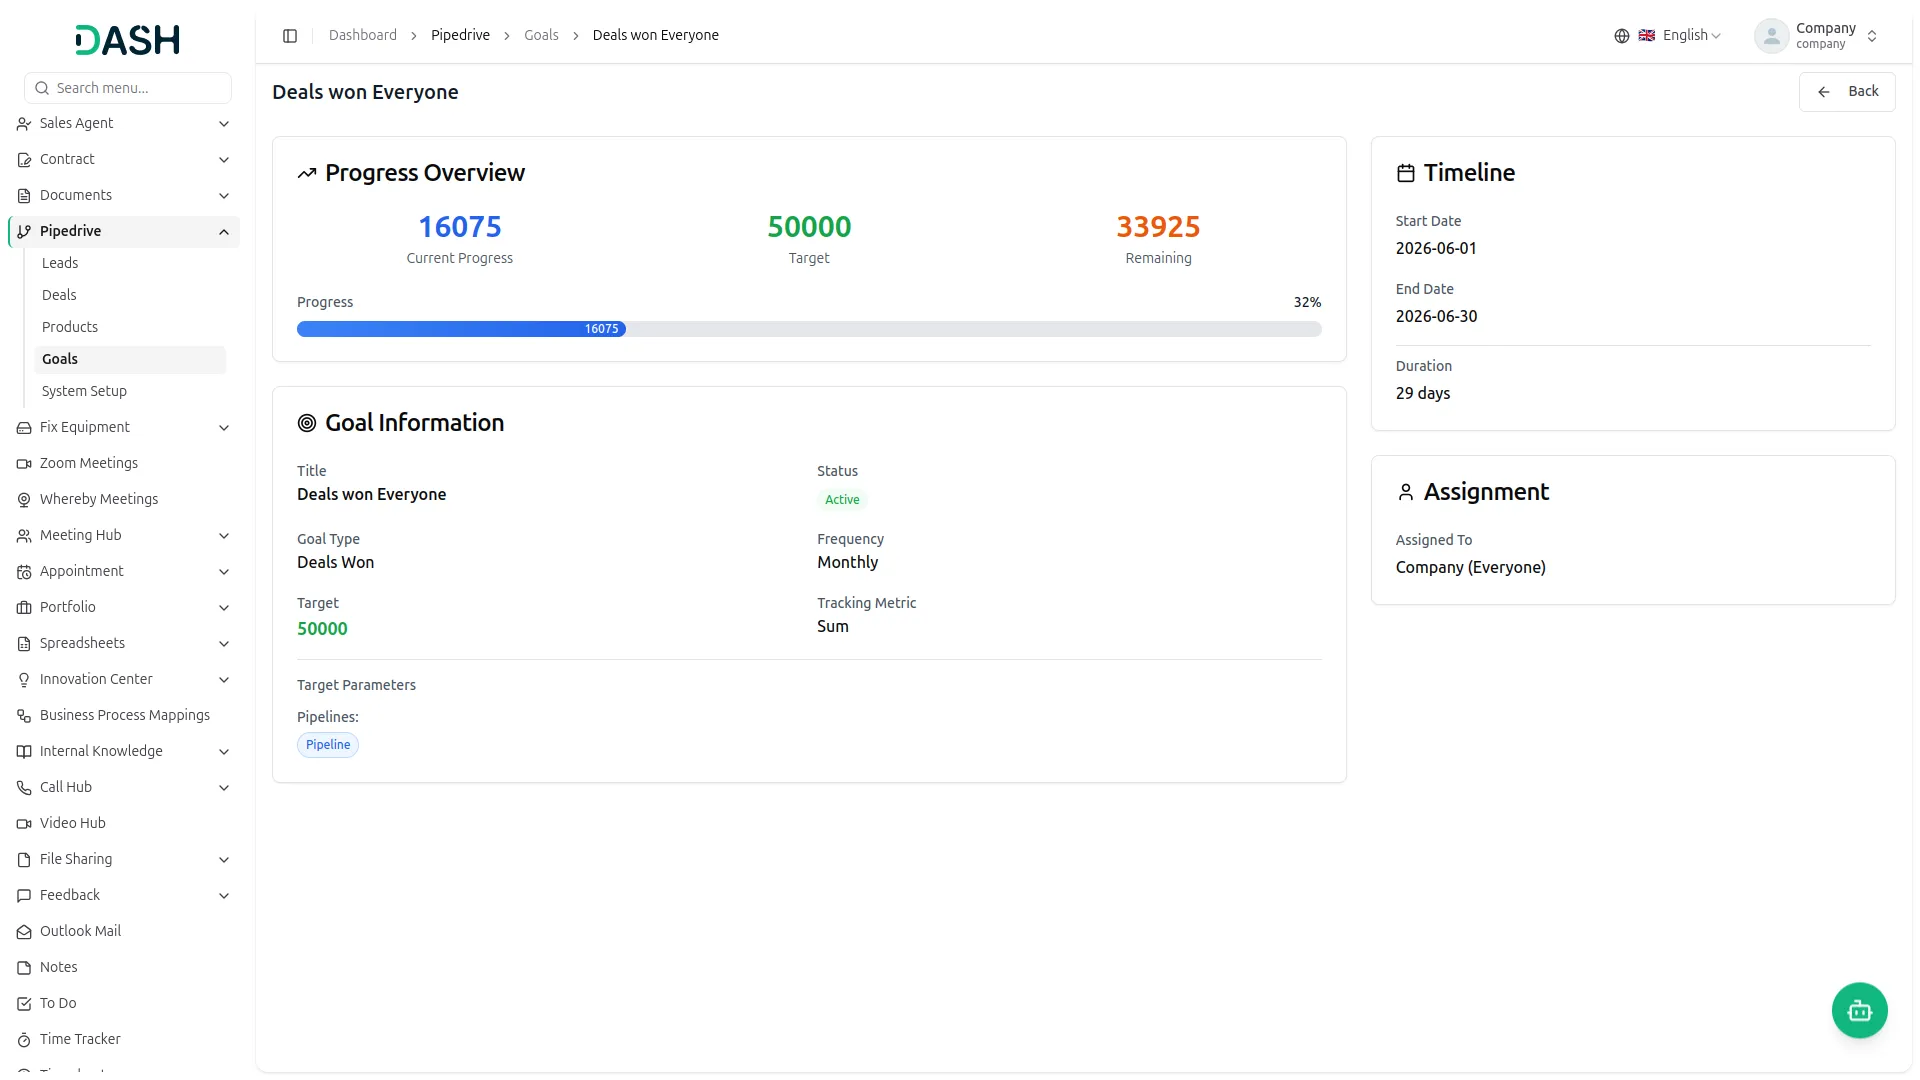
- When you click View, the goal details page opens, showing a Progress Overview at the top with the current progress, target, remaining count, and a progress bar indicating the completion percentage.
- Below that, the Goal Information section displays the goal’s title, status, goal type, frequency, target, tracking metric, and target parameters, such as the pipelines and activity types the goal is tracking.
- On the right side, the Timeline section shows the start date, end date, and duration of the goal. The Assignment section shows who the goal is assigned to, such as an individual user or a team.
Note: The Sync column and Sync action for Pipelines, Stages, Leads, and Deals are only visible when the CRM Module subscription is active. If the CRM Module is not subscribed, these options will not appear.
Categories
Related articles
- ZitaSMS – TicketGo Add-On Guide
- Easebuzz – WorkDo Dash SaaS Add-On Guide
- PayNow – BookingGo SaaS Add-On Guide
- Export Conversations – TicketGo Add-On Guide
- Sign in with Bitbucket – eCommerceGo SaaS Add-On Guide
- Monnify – WorkDo Dash SaaS Add-On Guide
- BlueSnap – WorkDo Dash SaaS Add-On Guide
- Free Shipping Pop-Up – eCommerceGo SaaS Add-On Guide
- Marketing Module – eCommerceGo SaaS Add-On Guide
- YouTube Content Management – WorkDo Dash SaaS Add-On Guide
- Razorpay – BookingGo SaaS Add-On Guide
- OneNote – WorkDo Dash SaaS Add-On Guide
We're Here to Help - Let's Talk
Have questions about our solutions, customization services, or business tools? Our team is here to help you. let's talk.