
Jewellery Store Management – WorkDo Dash SaaS Add-On Guide
Learn how to manage jewellery inventory, sales, and customer records in WorkDo Dash SaaS.
Introduction
The Jewellery Store Management Add-On is a complete solution that transforms your platform into a fully functional online jewellery store. From a single backend, you can manage jewellery items, inquiries, bookings, repairs and custom orders, blogs, reviews, subscribers, and contact messages, while everything you add appears instantly on a professionally designed shopfront. With built-in System Setup and Theme Setup tools, you also get full control over your store’s core data and your website’s branding, layout, and content.
How to Install the Add-On?
To Set Up the Jewellery Store Management Add-On, you can follow this link: Setup Add-On.
How To Use the Jewellery Store Management Add-On?
Dashboard
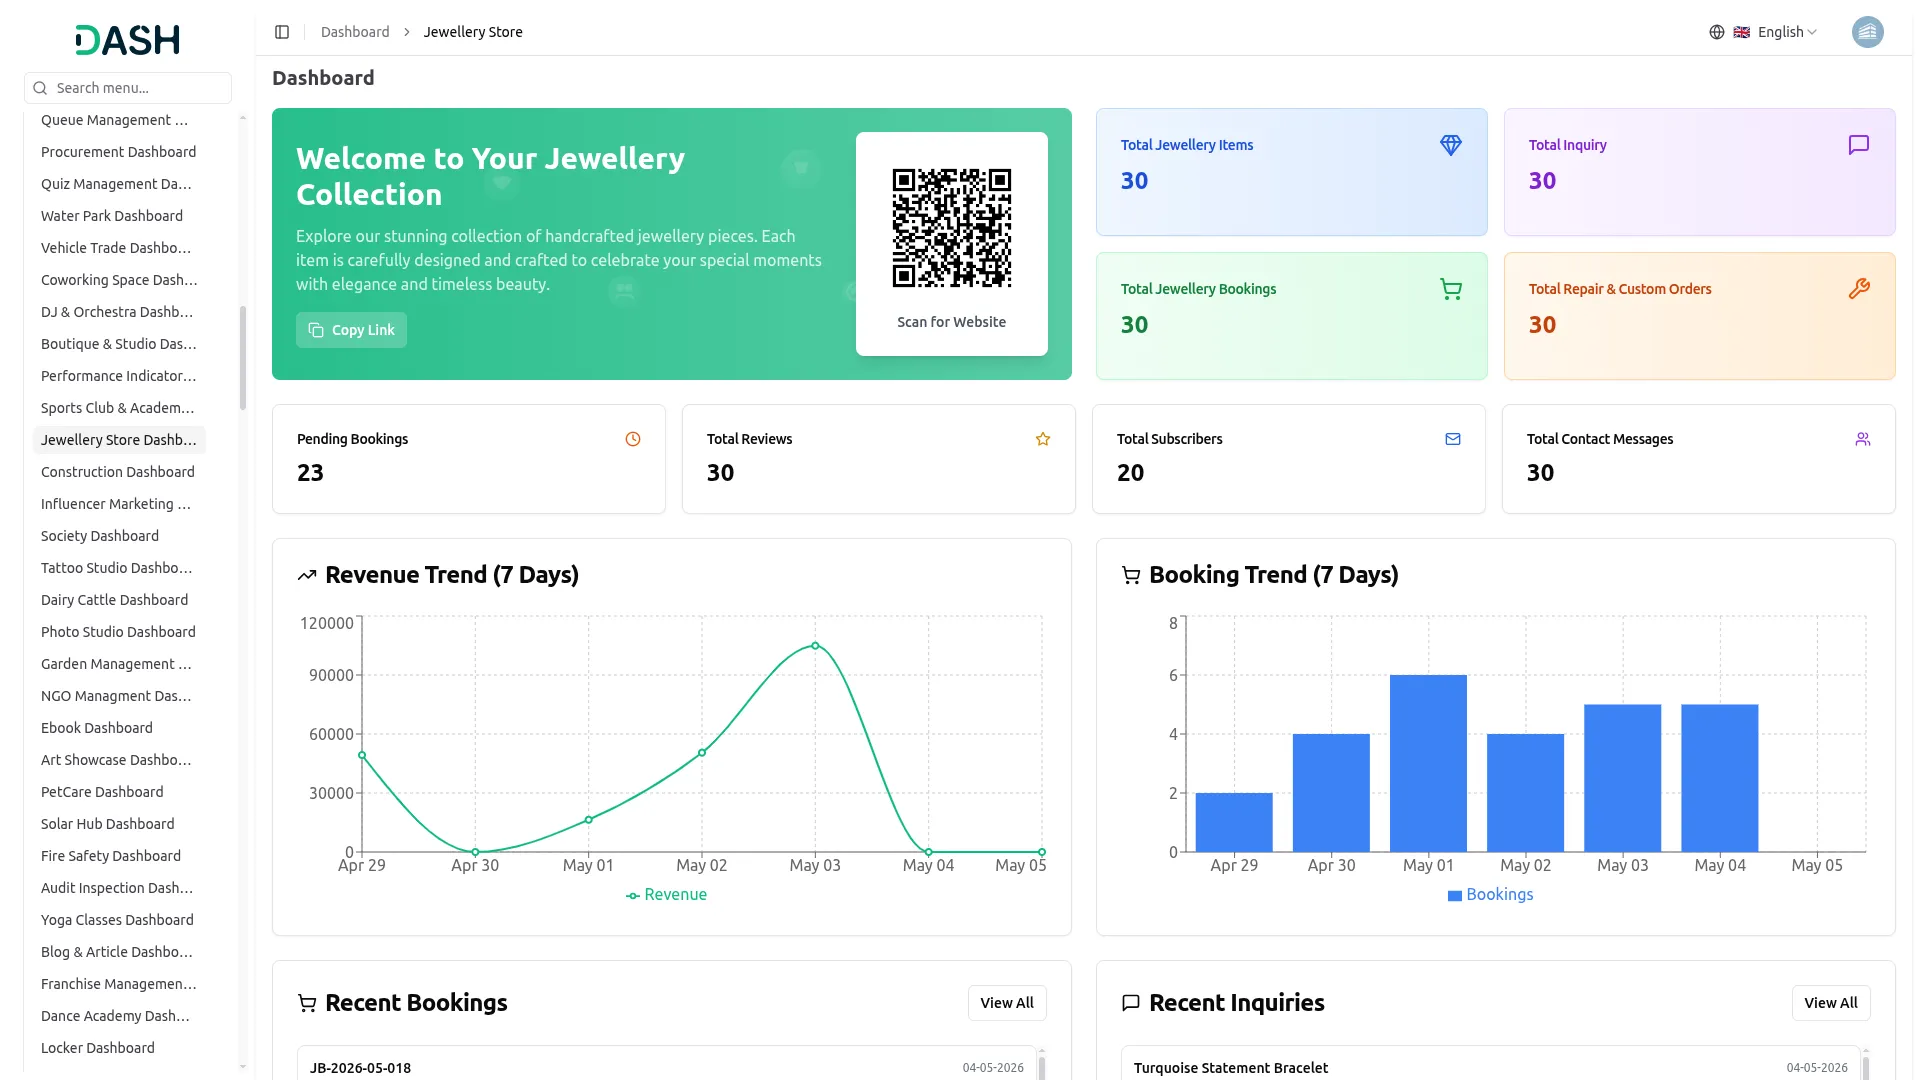
- The dashboard provides a complete overview of your jewellery store’s operations and performance through various visual elements and quick access features.
- At the top, you will find a QR Code that customers can scan to directly access your store website, along with a Copy Link button to share the store website link easily.
- The dashboard displays important summary cards showing Total Jewellery Items, Total Inquiry, Total Jewellery Bookings, and Total Repair & Custom Orders, giving you instant insights into your store’s key metrics at a glance.
- A second row of summary cards shows Pending Bookings, Total Reviews, Total Subscribers, and Total Contact Messages, allowing you to quickly track items that need attention and overall customer engagement.
- The Revenue Trend (7 Days) chart displays a line graph showing the revenue generated over the last seven days, allowing you to monitor your store’s short-term sales performance at a glance.
- The Booking Trend (7 Days) chart displays a line graph showing the number of bookings received over the last seven days, giving you a quick snapshot of recent booking activity.
- The Recent Bookings section displays the latest bookings with details such as Booking Number, Customer Name, Jewellery Item, Amount, Date, and Status (Paid, Draft, or Cancelled), allowing you to monitor recent bookings directly from the dashboard.
- The Recent Inquiries section displays the latest customer inquiries with details such as Jewellery Item, Customer Name, Email, Date, and Status (New, In Progress, or Closed), helping you track incoming inquiries quickly.
- The Top Products section displays your best products with details such as Product Image, Name, Category, Price, Stock Count, and Stock Status, giving you a quick view of your top-performing jewellery items.
- The Recent Reviews section displays the latest customer reviews with details such as Reviewer Name, Review Text, Date, and Star Rating (out of 5), allowing you to monitor customer feedback directly from the dashboard.
-
System Setup
- The System Setup section lets you manage the core master data used across your jewellery store. It is divided into five tabs: Inquiry Type, Blog Category, Jewellery Category, Material Preferences, and Stone Type.
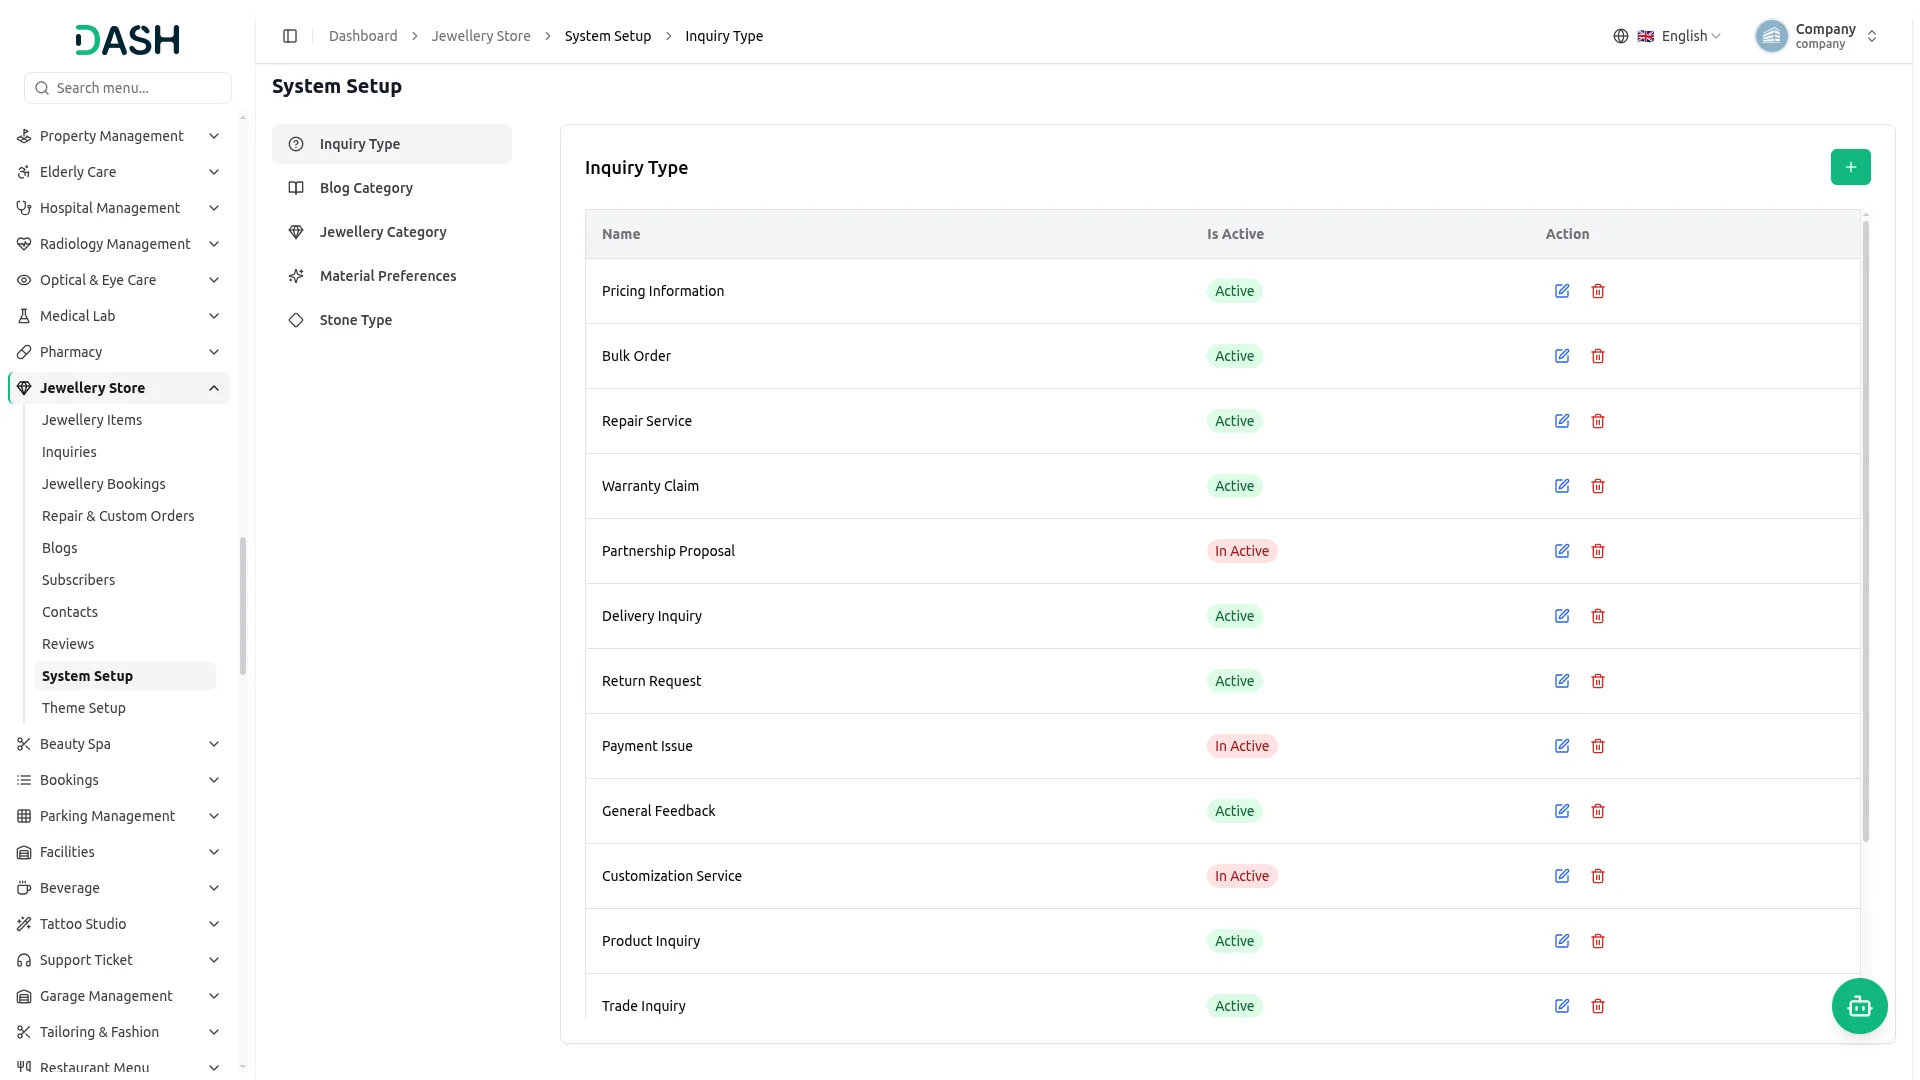
Inquiry Type
- In the Inquiry Type tab, click the “Create” button to open the Create Inquiry Type form. Enter the Name and use the Is Active toggle to set whether it is available for use, then click Create.
- Once saved, each active inquiry type appears in the Inquiry Type dropdown on the website’s Send Inquiry form, allowing customers to select the reason for their inquiry (such as Pricing Information, Repair Service, or General Feedback).
-
Blog Category
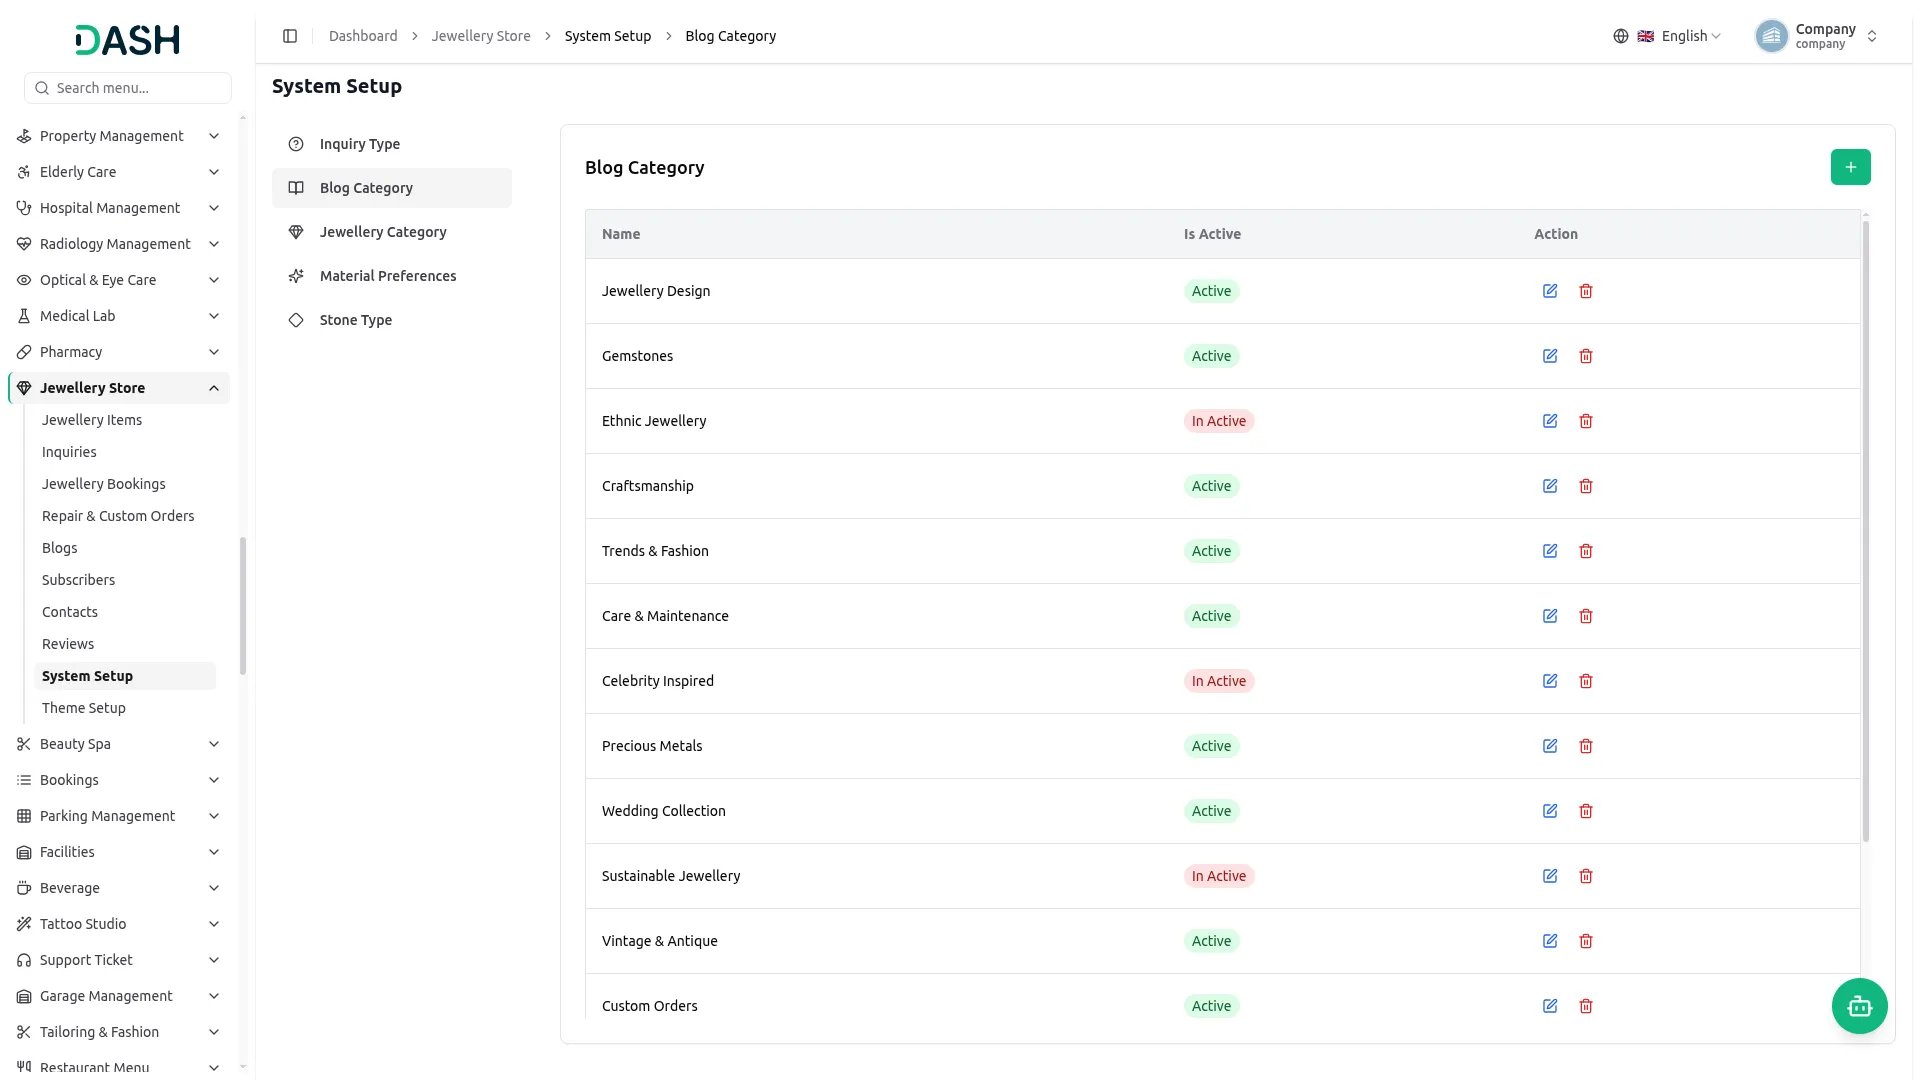
- In the Blog Category tab, click the “Create” button to open the Create Blog Category form. Enter the Name and use the Is Active toggle to set its availability, then click Create.
- Once saved, each active blog category becomes available when creating a blog and appears in the Categories list on the website’s Blog page, allowing visitors to browse posts by category.
-
Jewellery Category
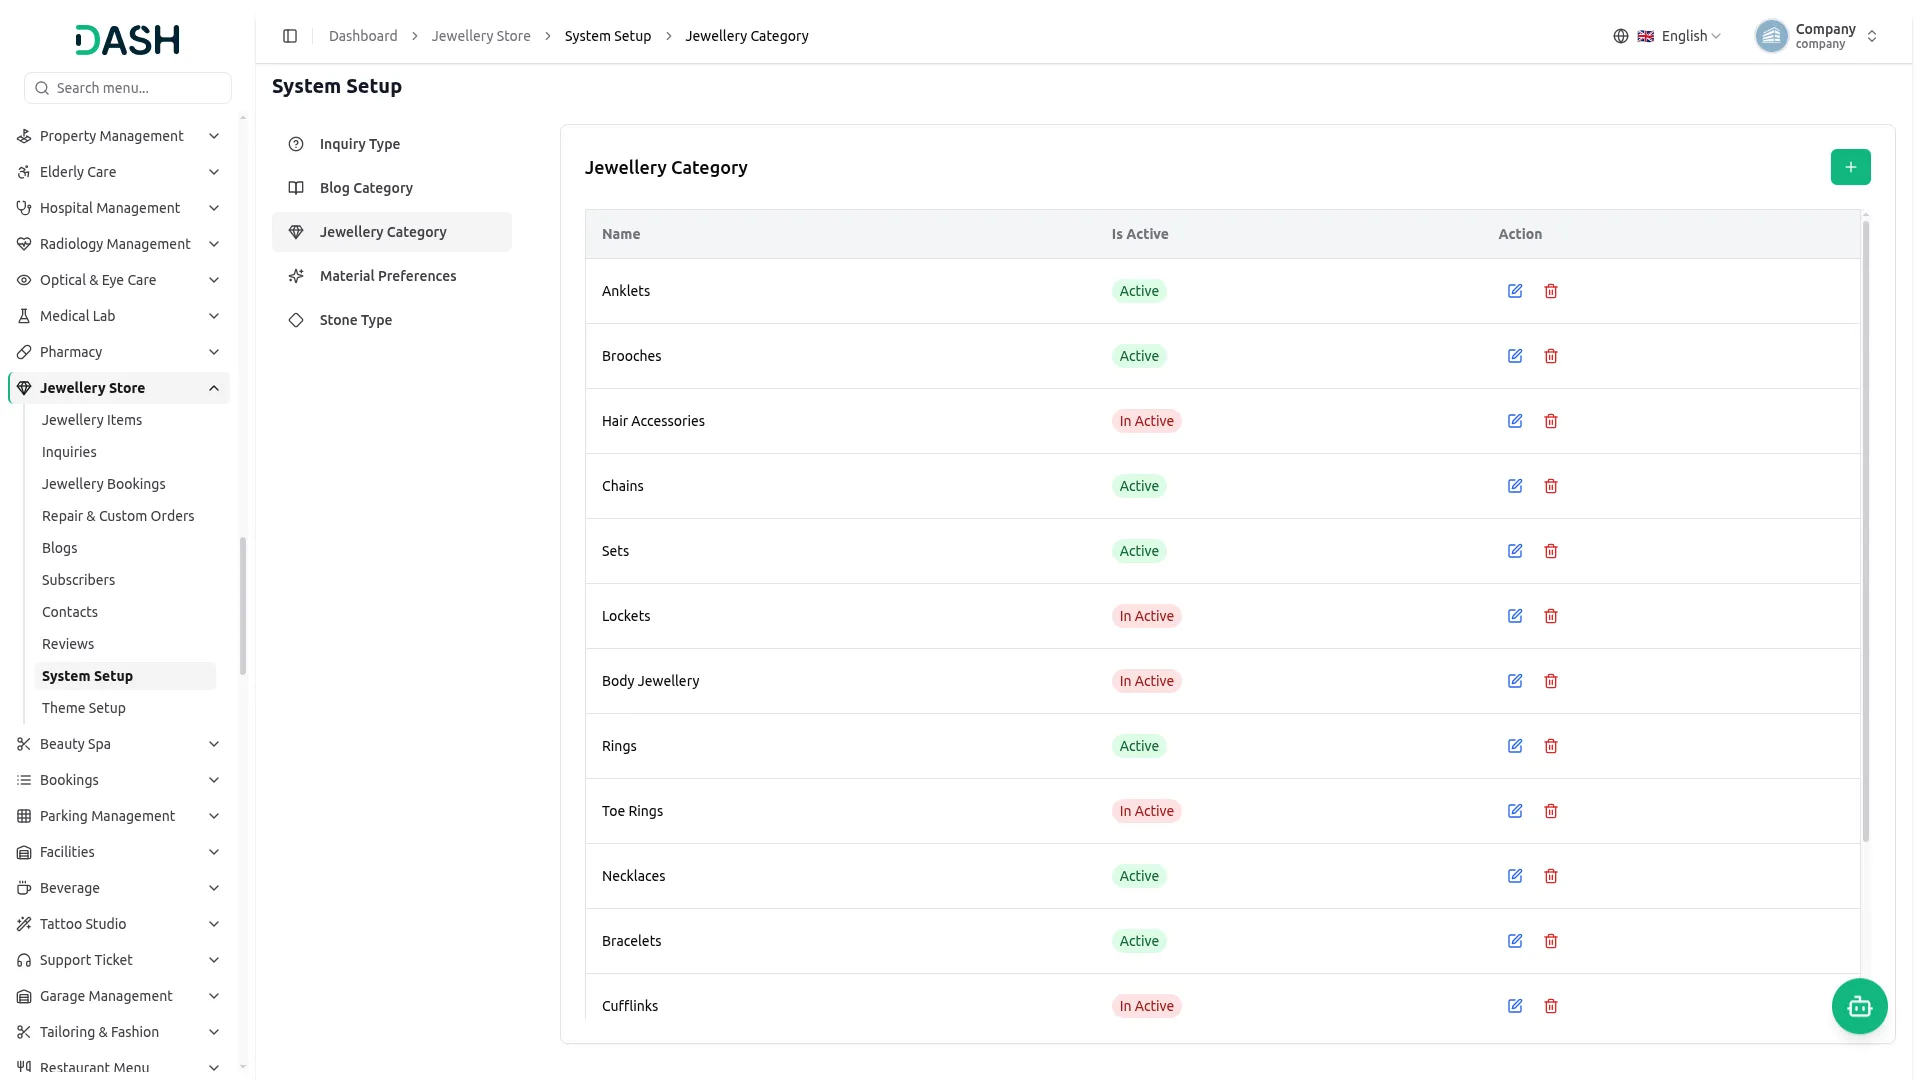
- In the Jewellery Category tab, click the “Create” button to open the Create Jewellery Category form. Enter the Name and use the Is Active toggle to set its availability, then click Create.
- Once saved, each active jewellery category becomes available when creating a jewellery item and appears in the Category filter on the website’s Jewellery Collection page, allowing visitors to filter products by category (such as Rings, Necklaces, or Earrings).
-
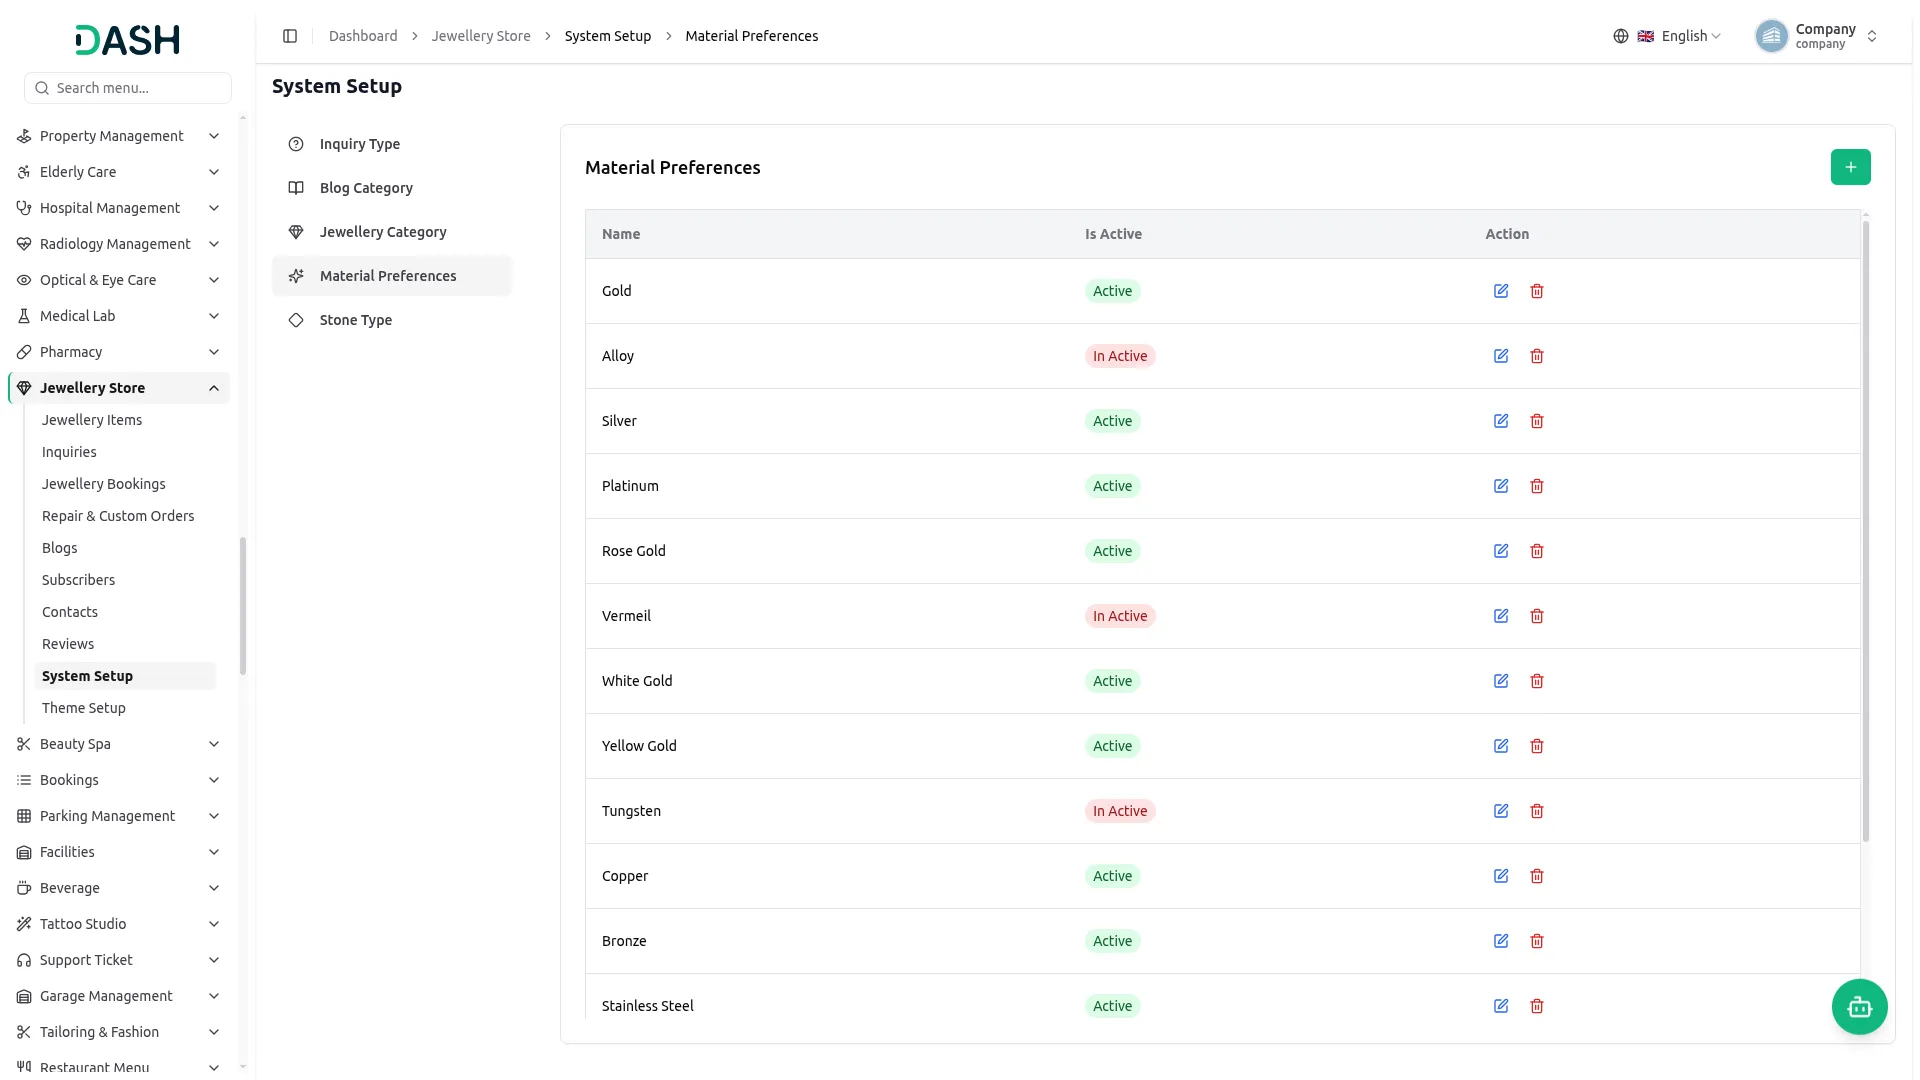
Material Preferences
- In the Material Preferences tab, click the “Create” button to open the Create Material Preference form. Enter the Name and use the Is Active toggle to set its availability, then click Create.
- Once saved, each active material becomes available when creating a jewellery item and appears in the Material filter on the website’s Jewellery Collection page, as well as in the Material Preference options on the inquiry form (such as Gold, Silver, or Platinum).
-
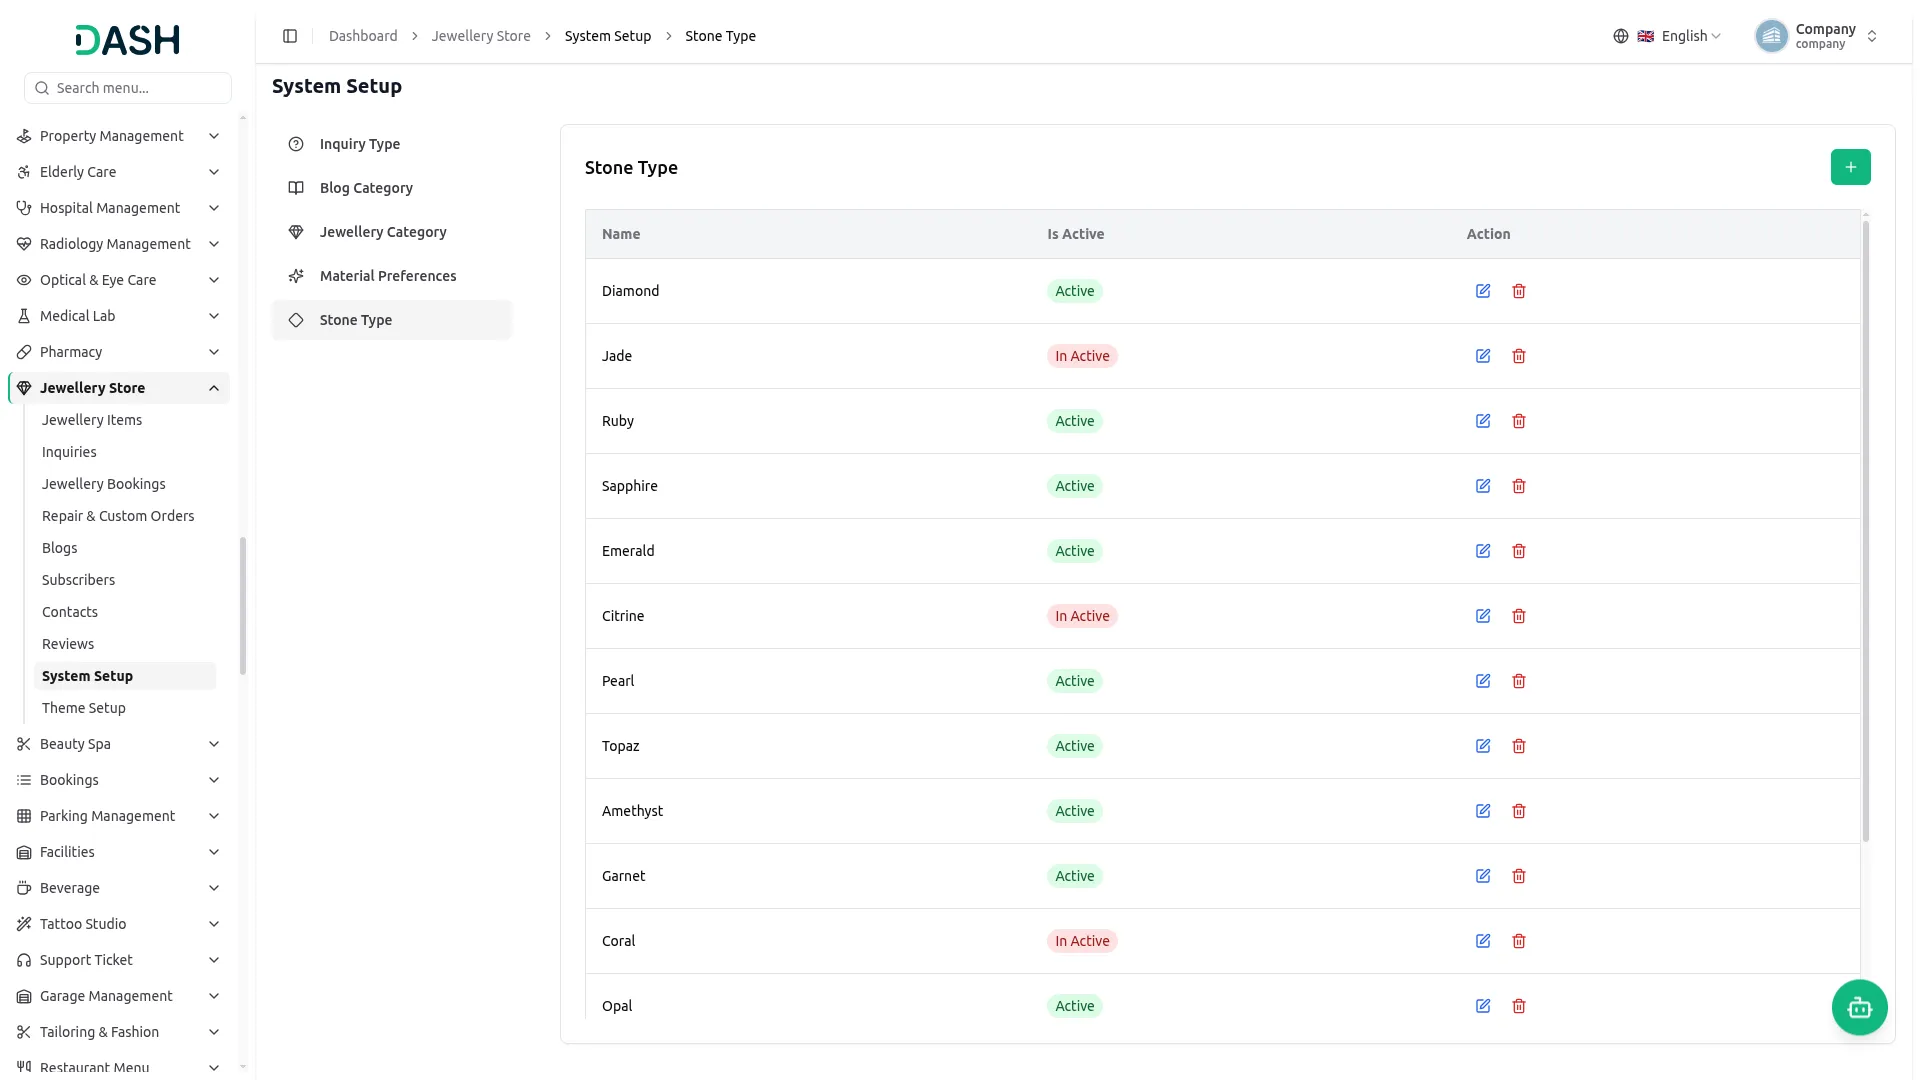
Stone Type
- In the Stone Type tab, click the “Create” button to open the Create Stone Type form. Enter the Name and use the Is Active toggle to set its availability, then click Create.
- Once saved, each active stone type becomes available when adding stone details to jewellery items and appears in the Stone Type options on the website’s Send Inquiry form (such as Diamond, Ruby, or Emerald).
-
Theme Setup
- The Theme Setup section lets you customize the appearance and content of your storefront website through multiple tabs: Brand Settings, Banner Section, Gallery Section, FAQ Section, Limited Time Section, Testimonial Section, Contact Us Section, About Us Section, Social Link Section, Quick Link Section, and Custom Pages.
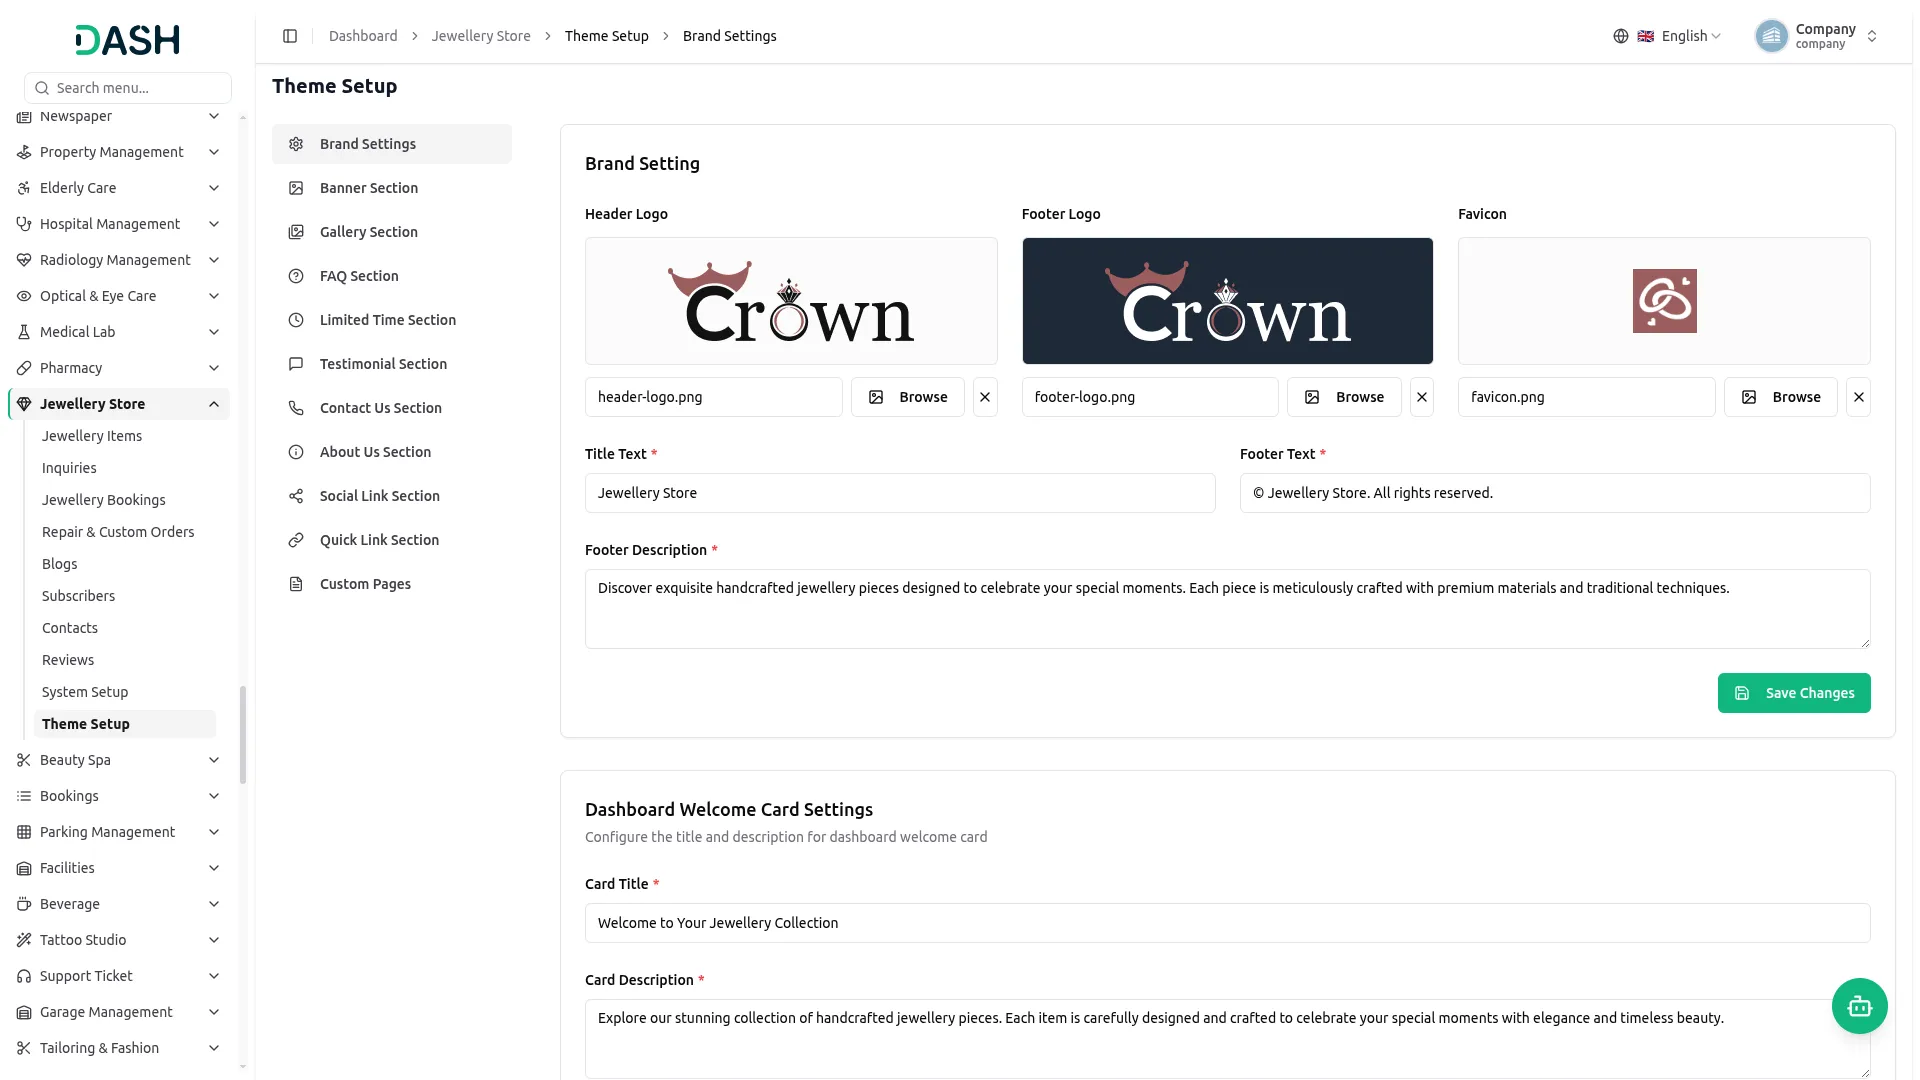
Brand Settings
- In the Brand Setting section, you will find fields for Header Logo, Footer Logo, Favicon, Title Text, Footer Text, and Footer Description. You can upload your header logo, footer logo, and favicon using the Browse button. Enter all the required details and click Save Changes.
- In the Dashboard Welcome Card Settings, you will find fields for Card Title, Card Description, Button Text, and Button Icon. Enter all the details and click Save Changes.
- Once saved, the Header Logo will appear in the header, and the Footer Logo will appear in the footer of your website, while the Favicon will display as the small icon in the browser tab. The Title Text will represent your store’s name across the site. The Footer Text will display as the copyright tagline in the footer, and the Footer Description will appear as the short introductory text below the logo in the footer section.
- The Card Title, Card Description, Button Text, and Button Icon will appear on the Welcome card shown at the top of your admin Dashboard.
-
Banner Section
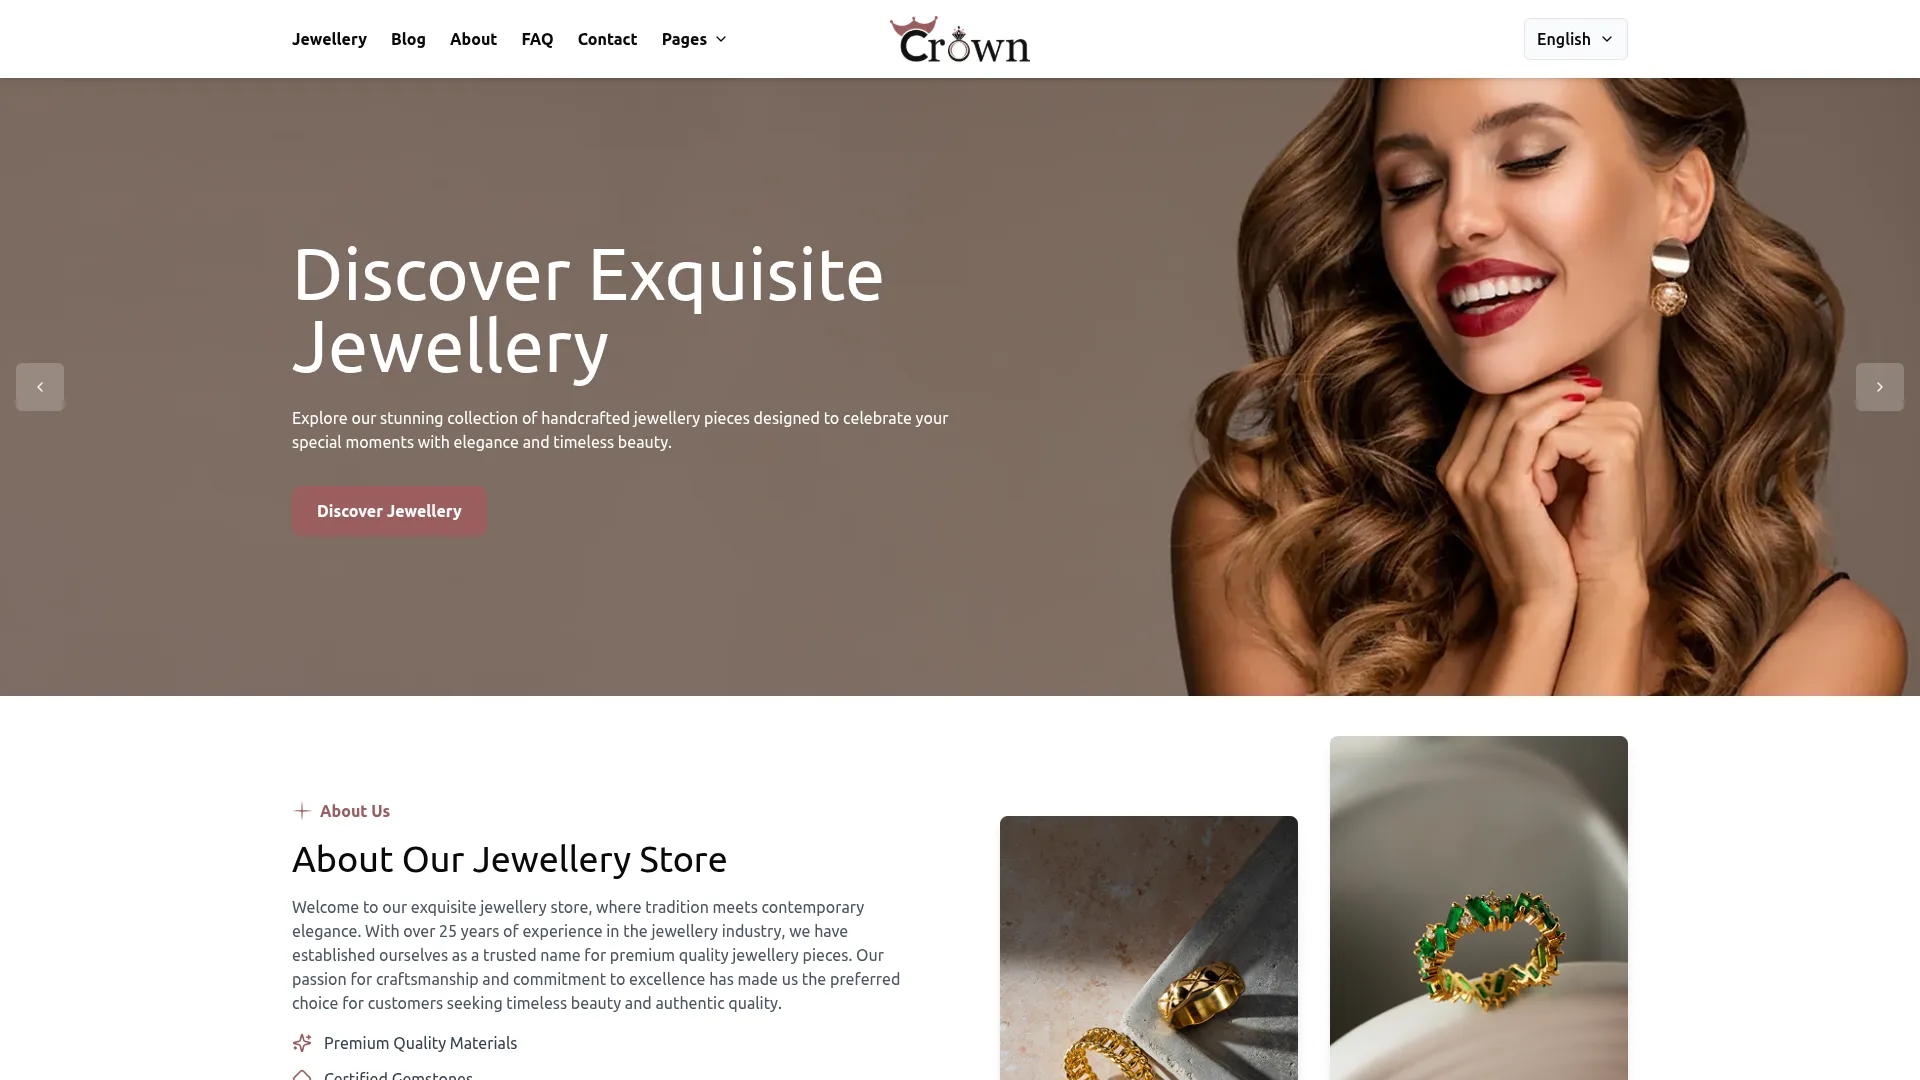
- In the Banner Section, you will find fields for Title, Description, and Image for each banner item. Upload your banner image using the Browse button and enter all the required details. To add more banner slides, click the Add Banner button and use the delete icon to remove a banner item. Click Save Changes.
-
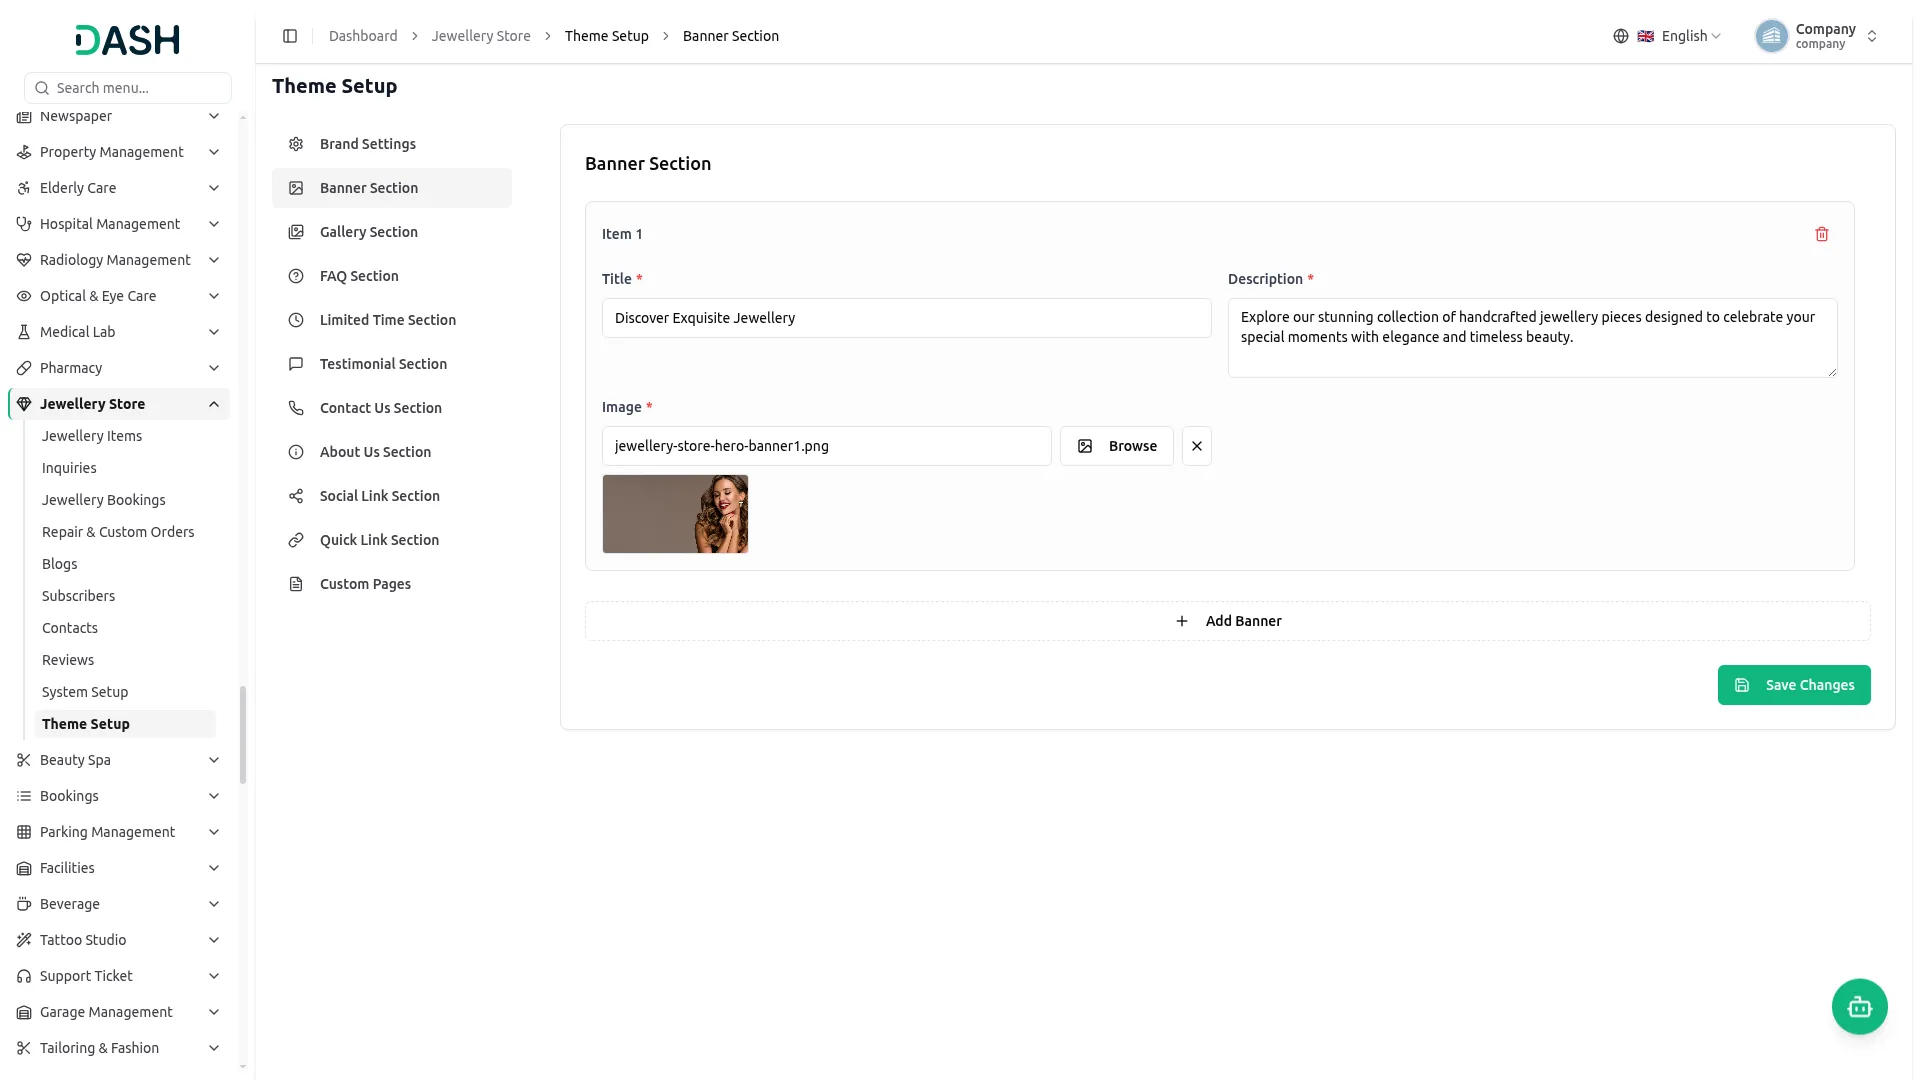
- Once saved, the Title and Description will appear as the main heading and supporting text in the hero section on your homepage, and the Banner Image will display as the background of the hero slider. When multiple banners are added, they will rotate as slides in the homepage hero section, giving visitors an engaging introduction to your store.
-
Gallery Section
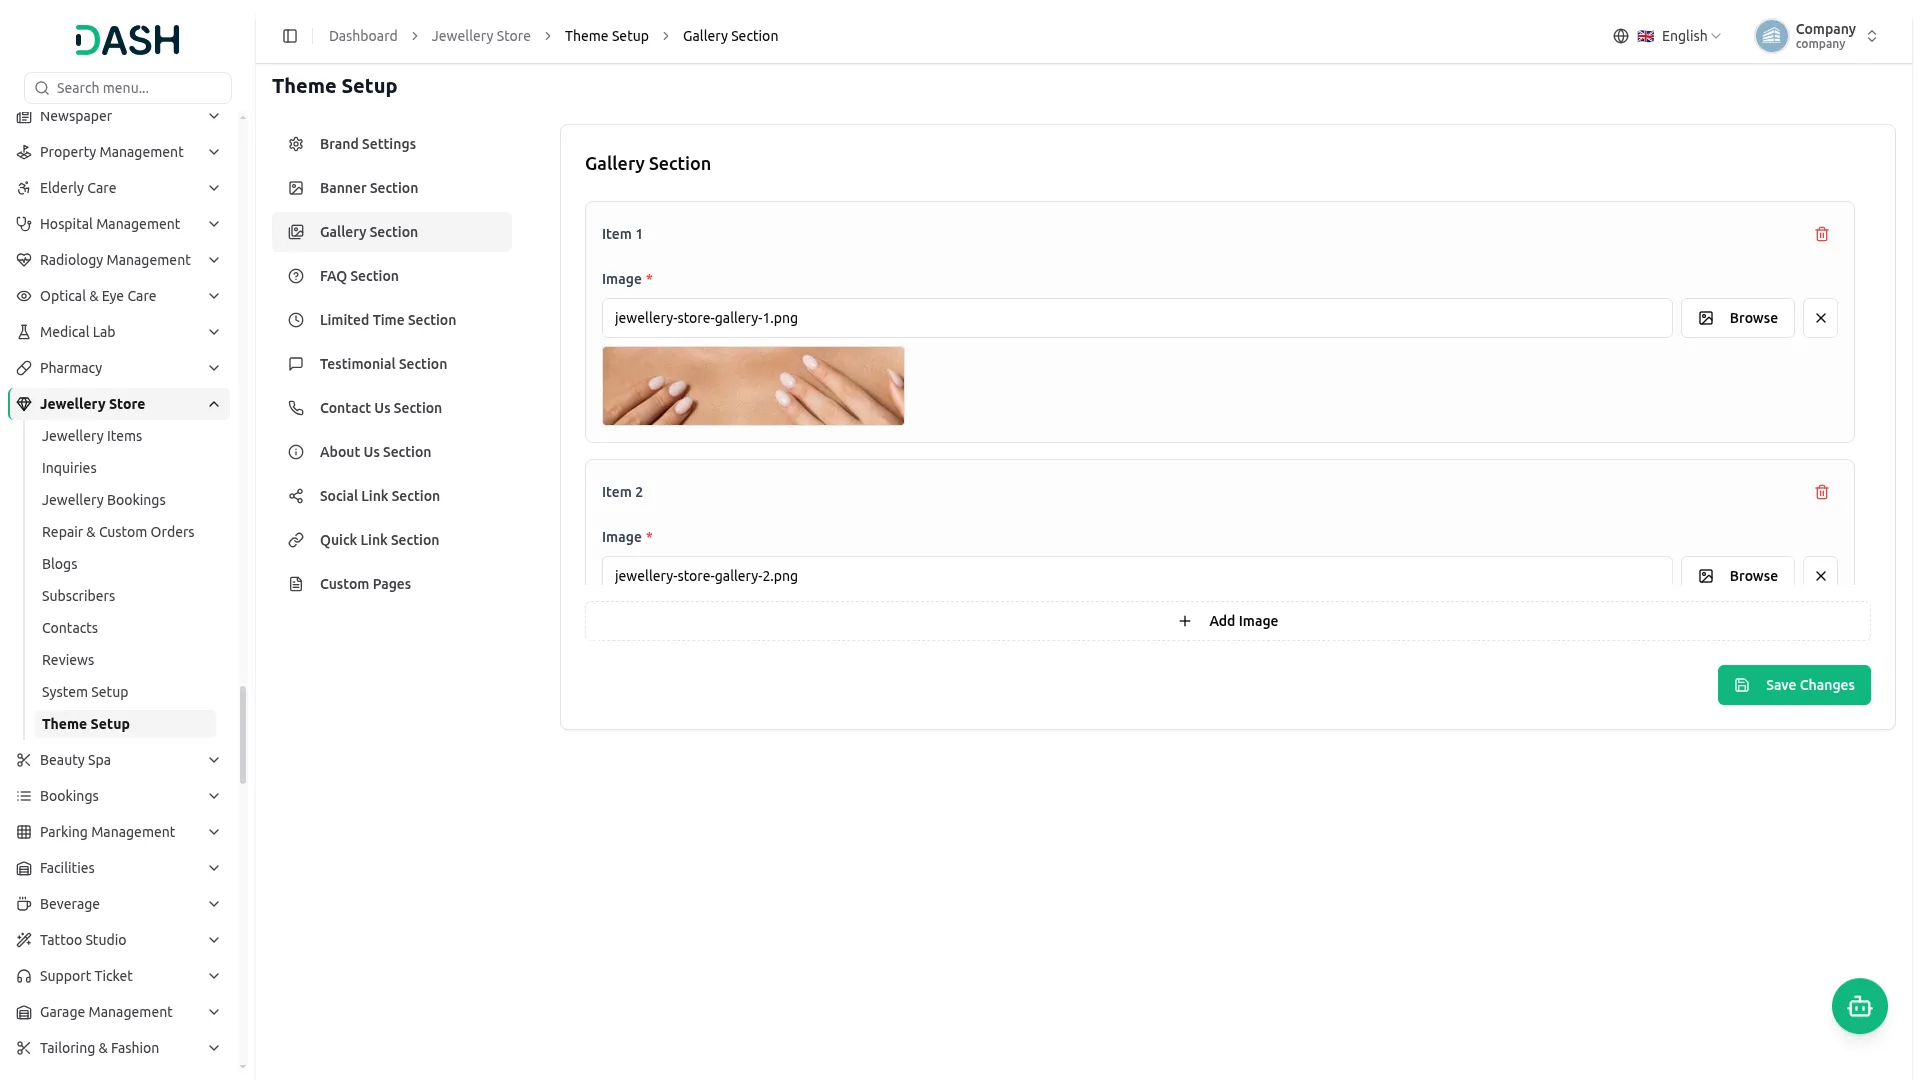
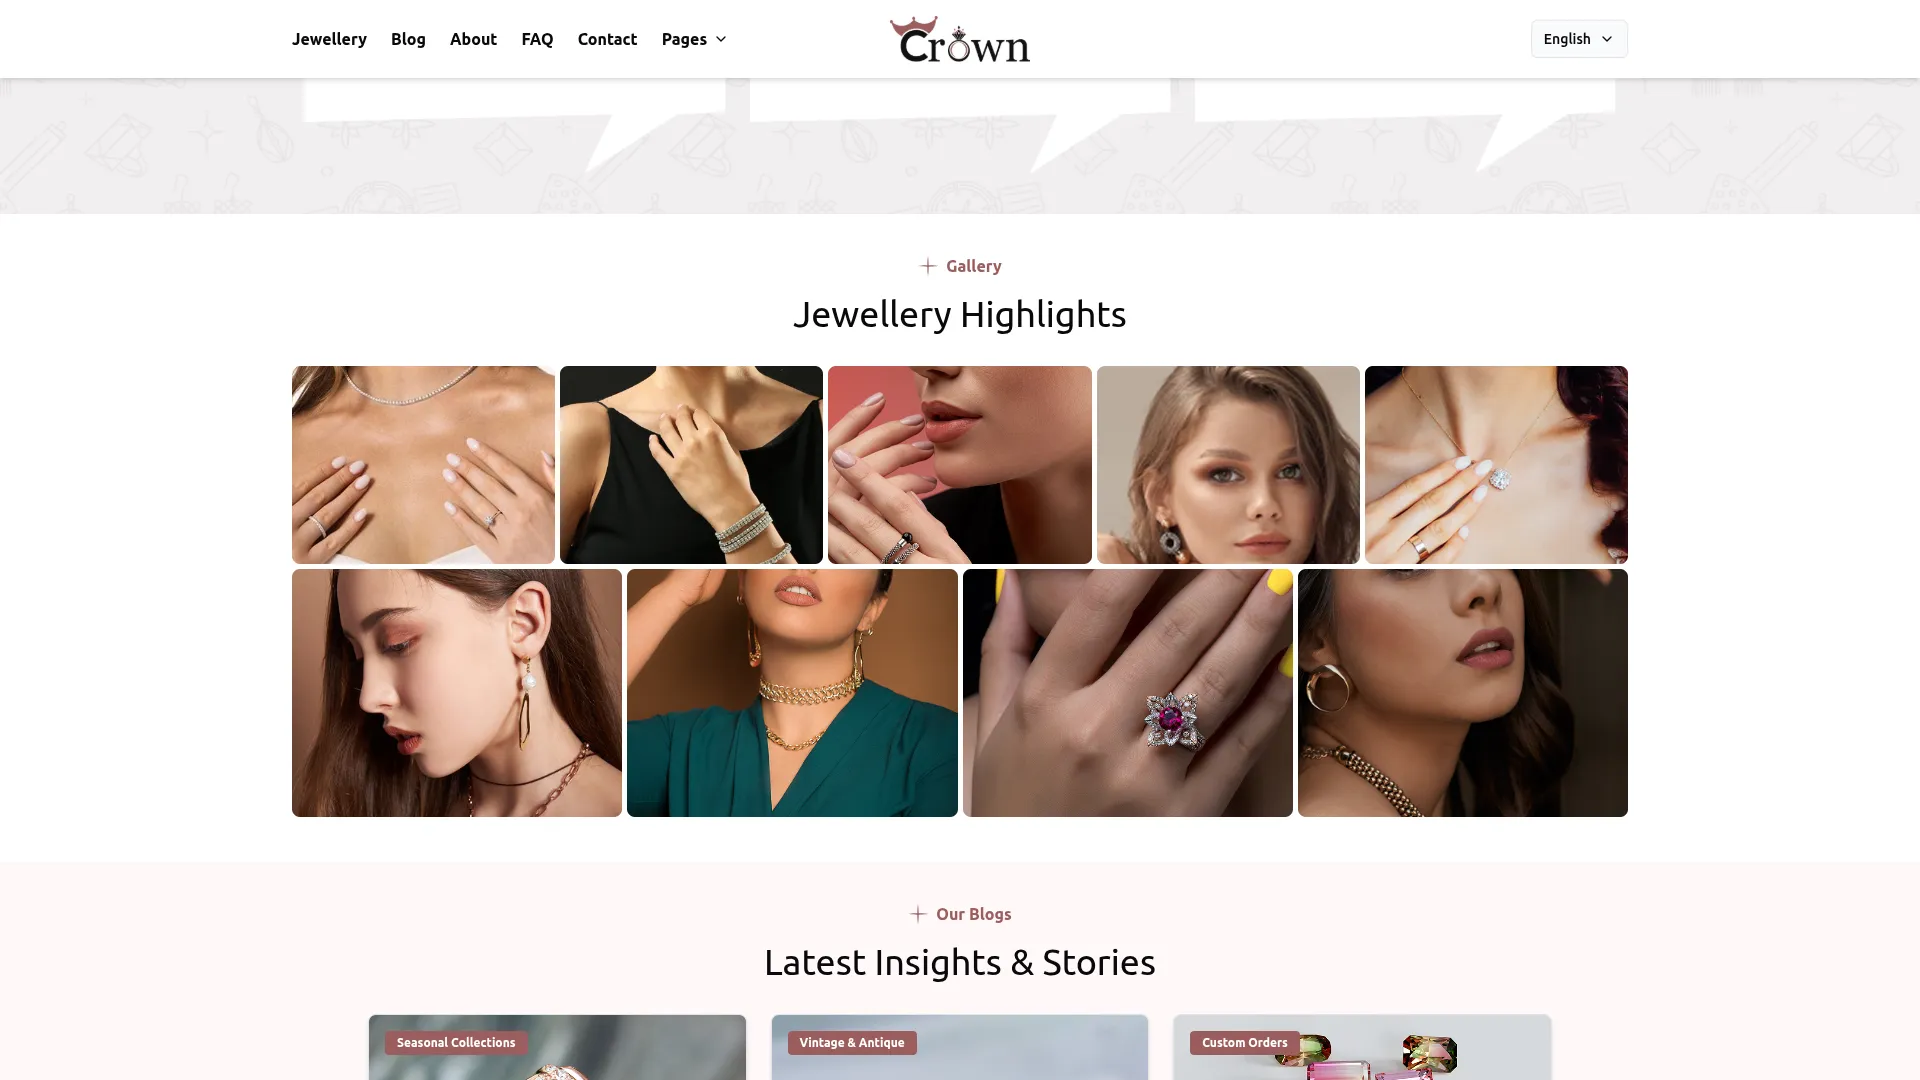
- In the Gallery Section, you will find an Image field for each gallery item. Upload your gallery image using the Browse button, click the Add Image button to add more images, and use the delete icon to remove an item. Click Save Changes.
- Once saved, all gallery images appear in the Jewellery Highlights gallery section on your homepage, showcasing a grid of your jewellery pieces to visitors.
-
-
FAQ Section
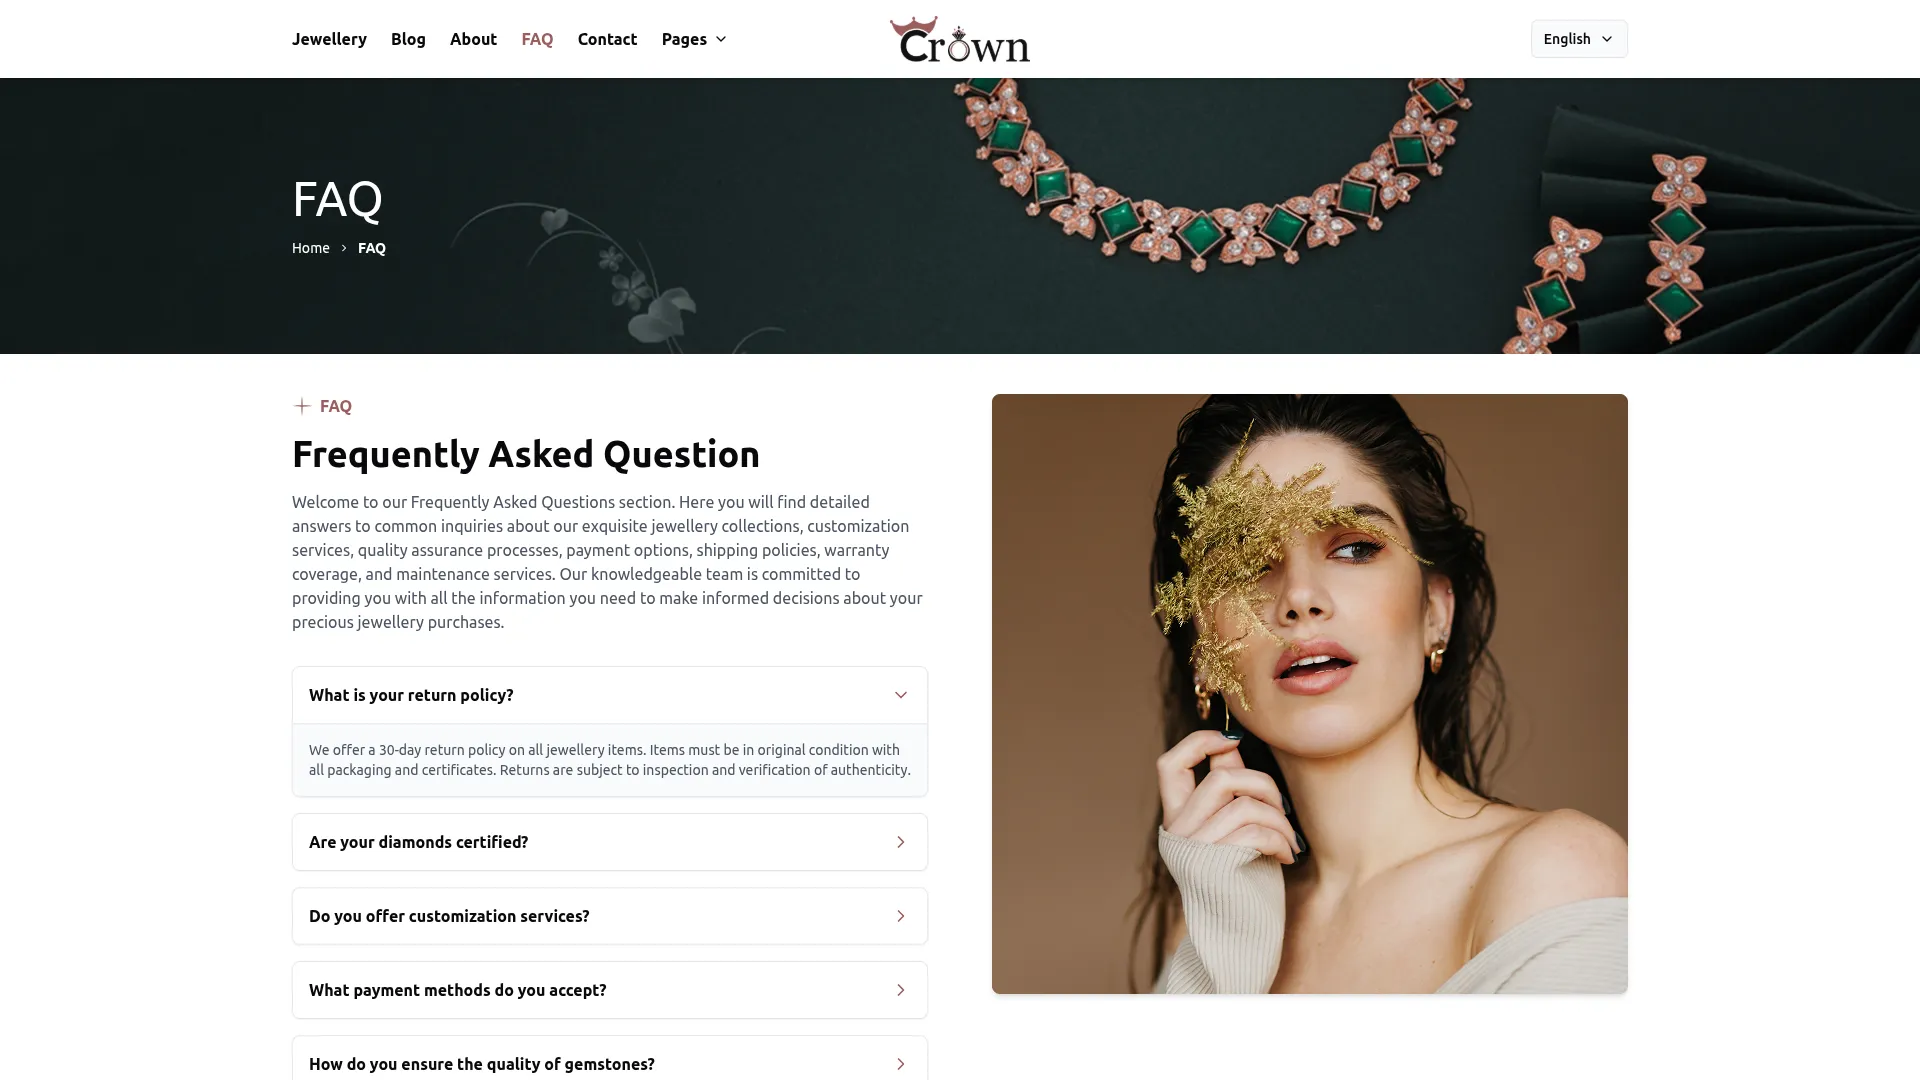
- In the FAQ Section, you will find an Image field, a Description field, and a list of FAQs, each with a Question and Answer. Upload the section image using the Browse button, enter the description, and add each question with its answer. Click the Add FAQ button to add more questions, and use the delete icon to remove an item. Click Save Changes.
-
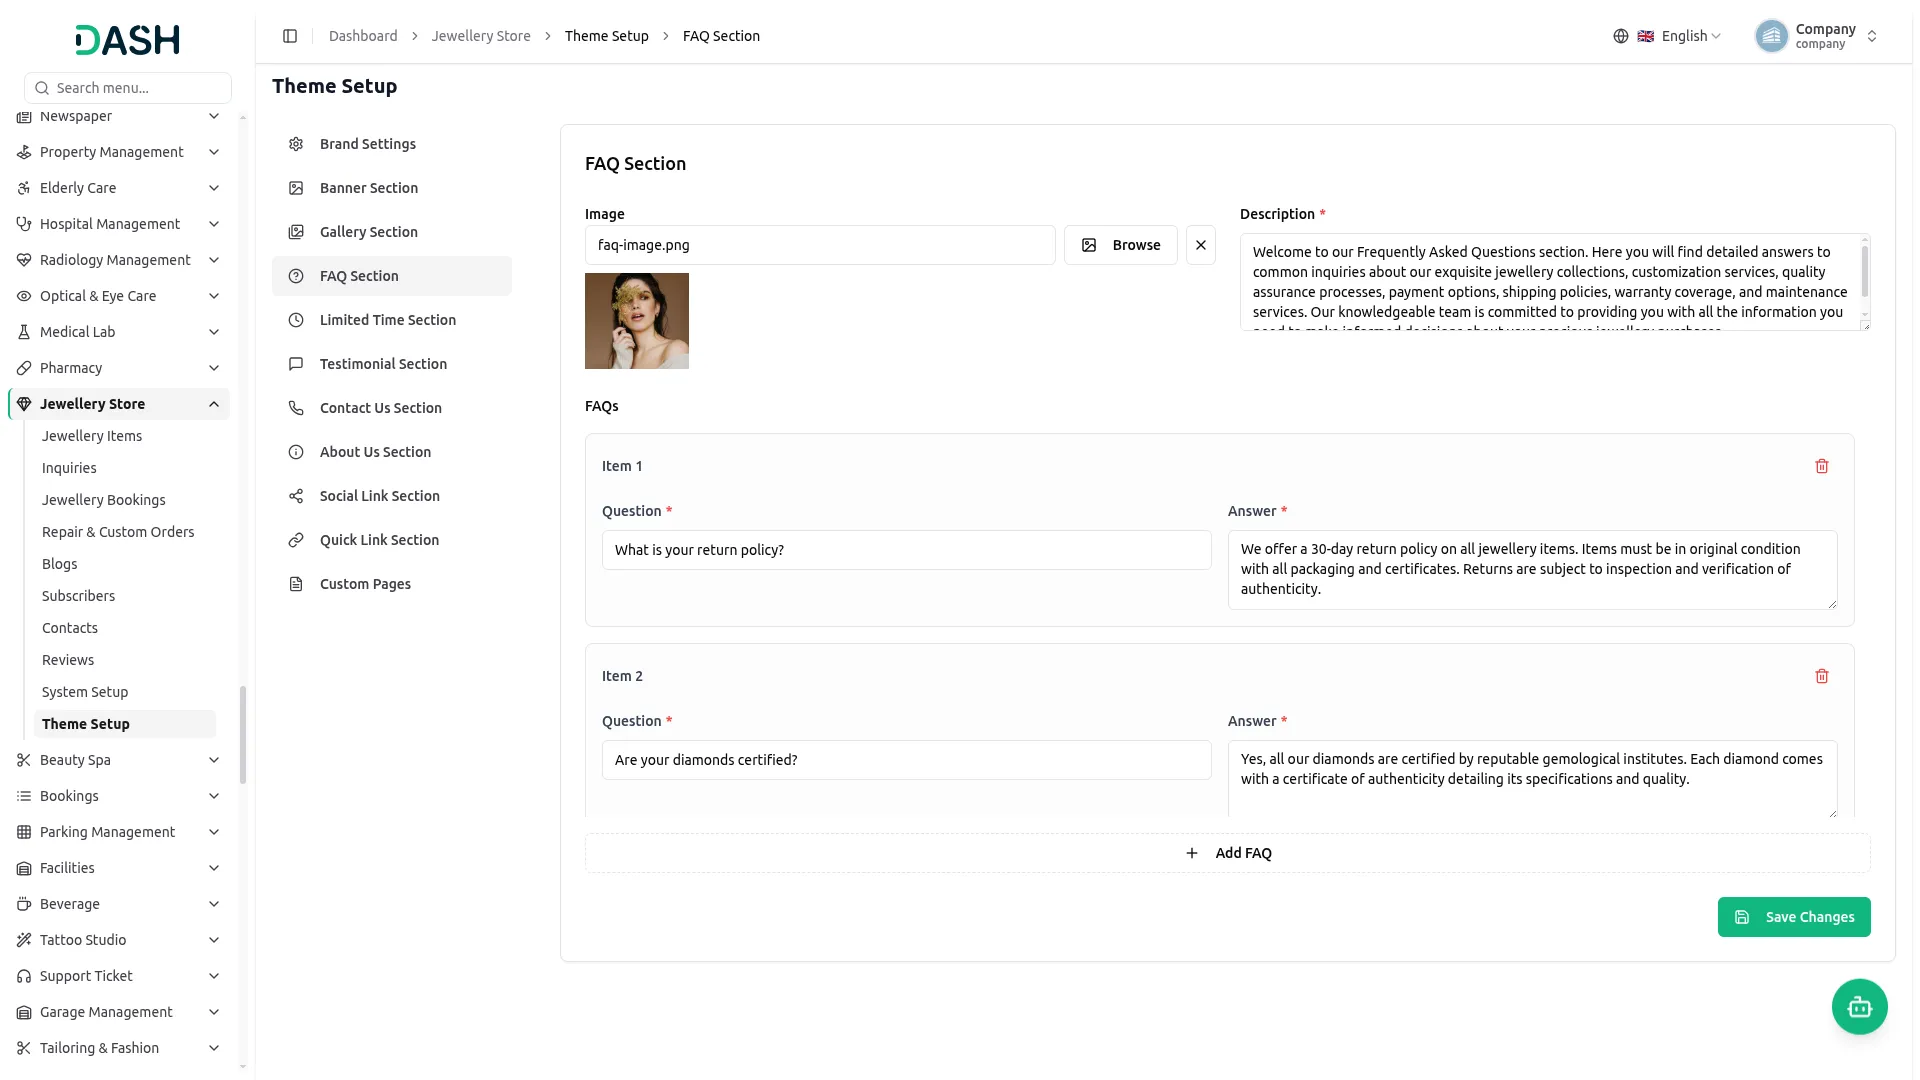
- Once saved, the Image and Description appear at the top of the website’s FAQ page, and each Question and Answer appears as an expandable accordion item, allowing visitors to find answers to common queries.
-
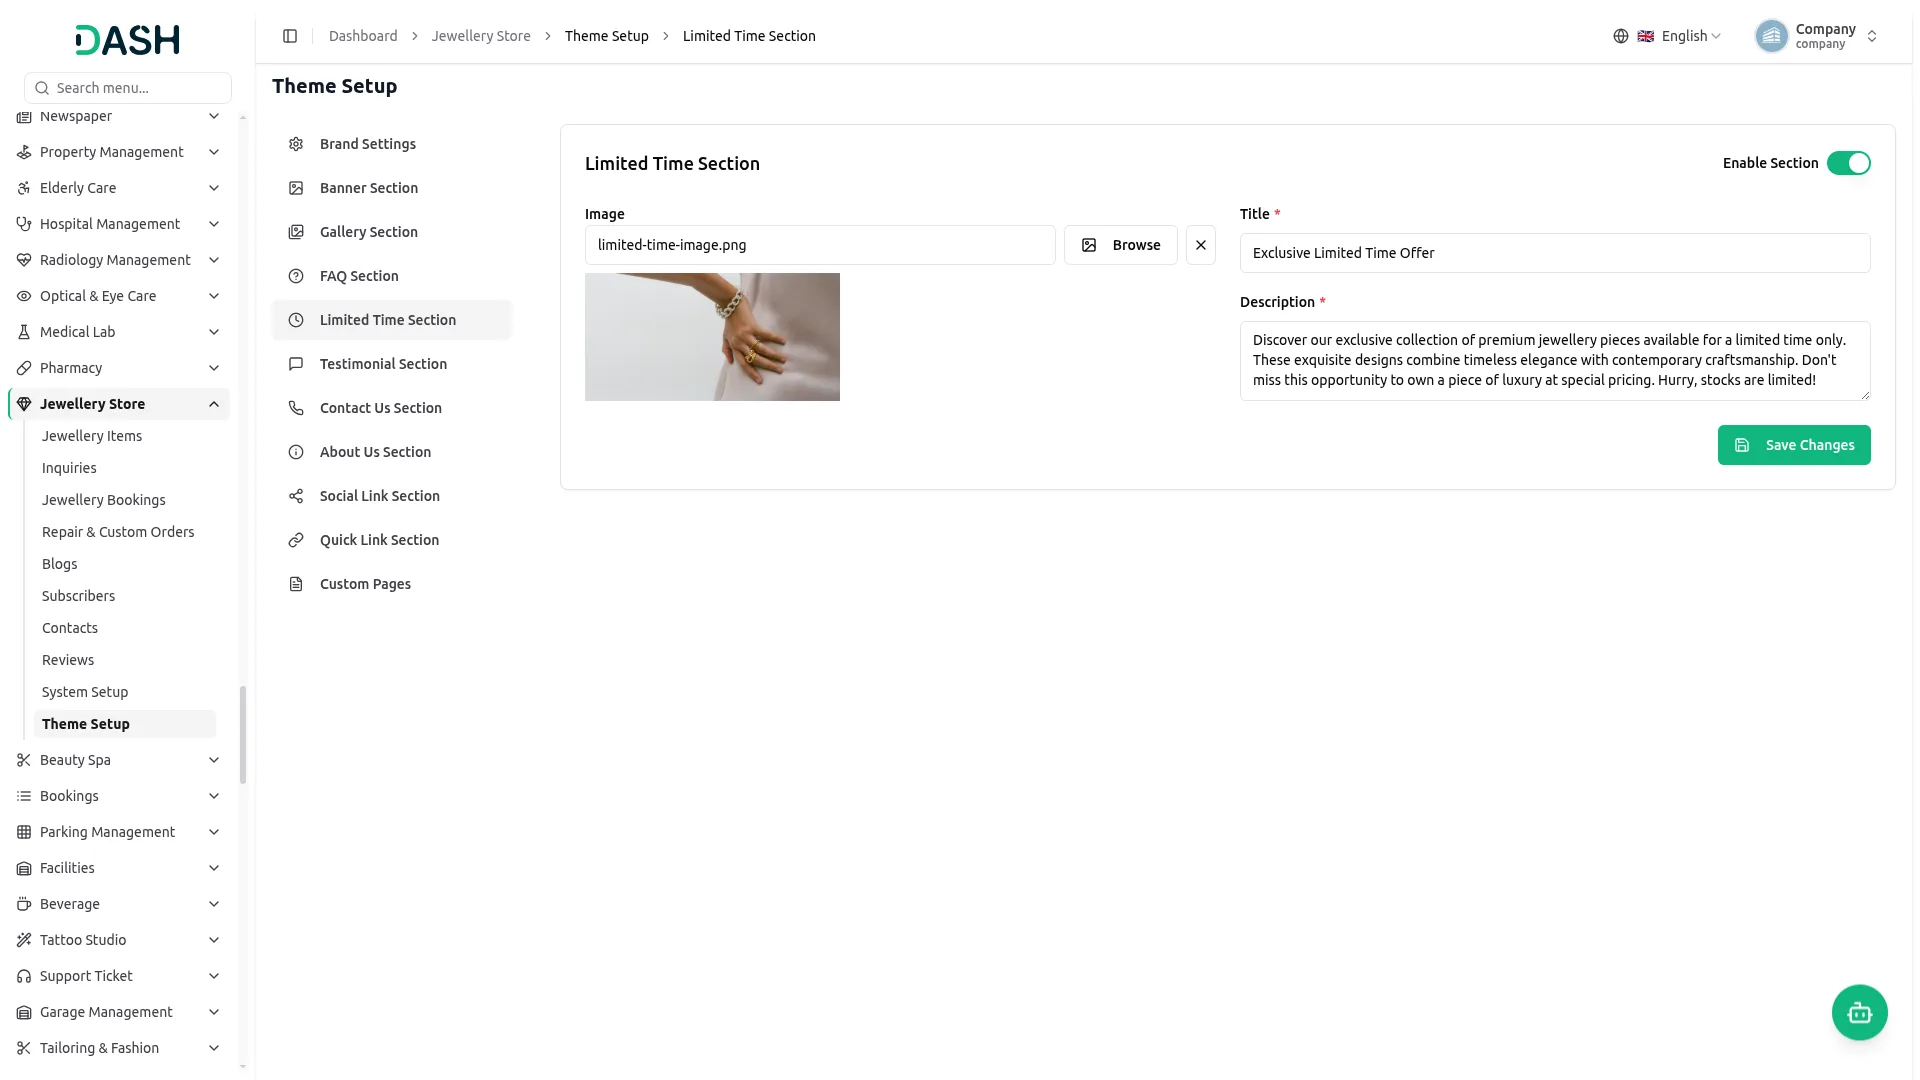
Limited Time Section
- In the Limited Time Section, you will find an Enable Section toggle along with fields for Image, Title, and Description. Use the Enable Section toggle to turn the section on or off, upload the image using the Browse button, enter the title and description, and click Save Changes.
-
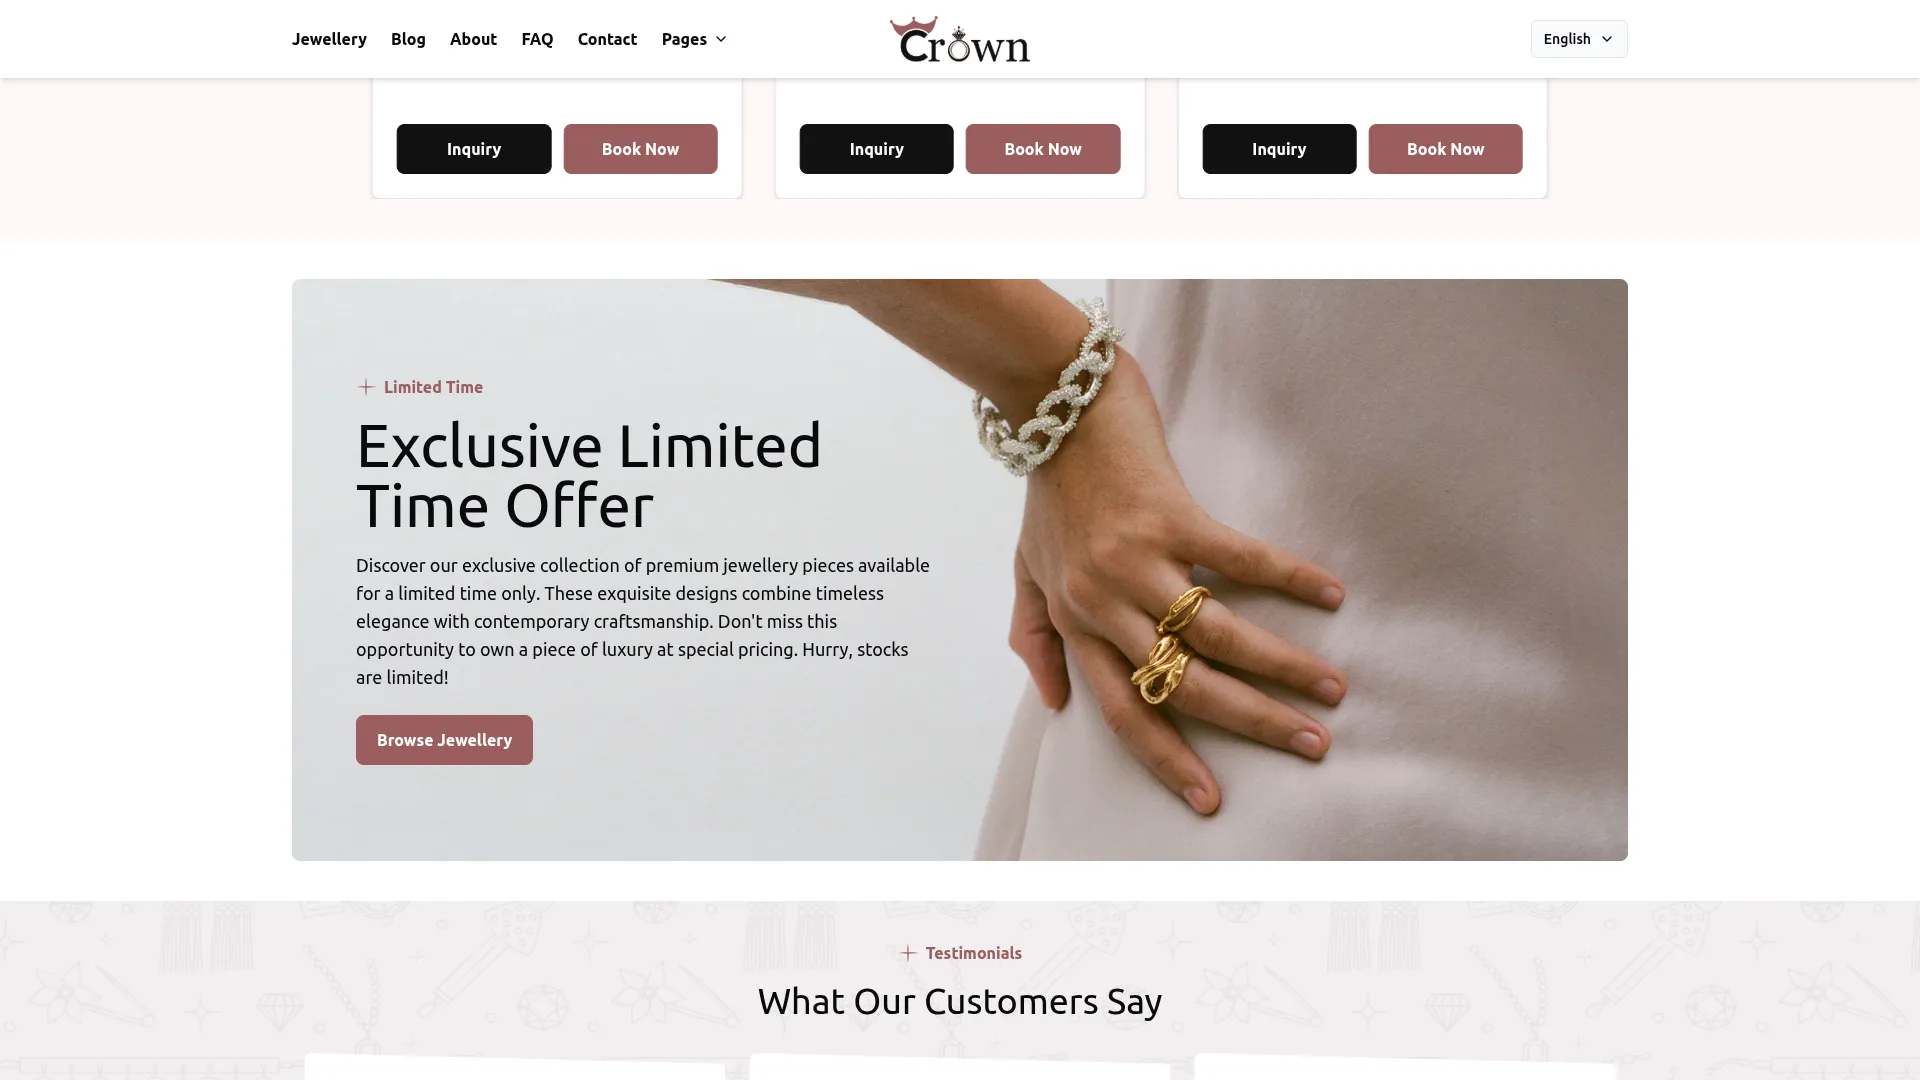
- Once saved and enabled, the Title, Description, and Image appear in the Exclusive Limited Time Offer banner on your homepage, promoting your limited-time collection to visitors. When the section is disabled, it is hidden from the homepage.
-
Testimonial Section
- In the Testimonial Section, you will find fields for each testimonial item, including Name, Type, Rating, and Description. Enter the customer’s name, select the type (such as Customer), set the star rating, and write the testimonial text. Click the Add Testimonial button to add more testimonials, and use the delete icon to remove an item. Click Save Changes.
-
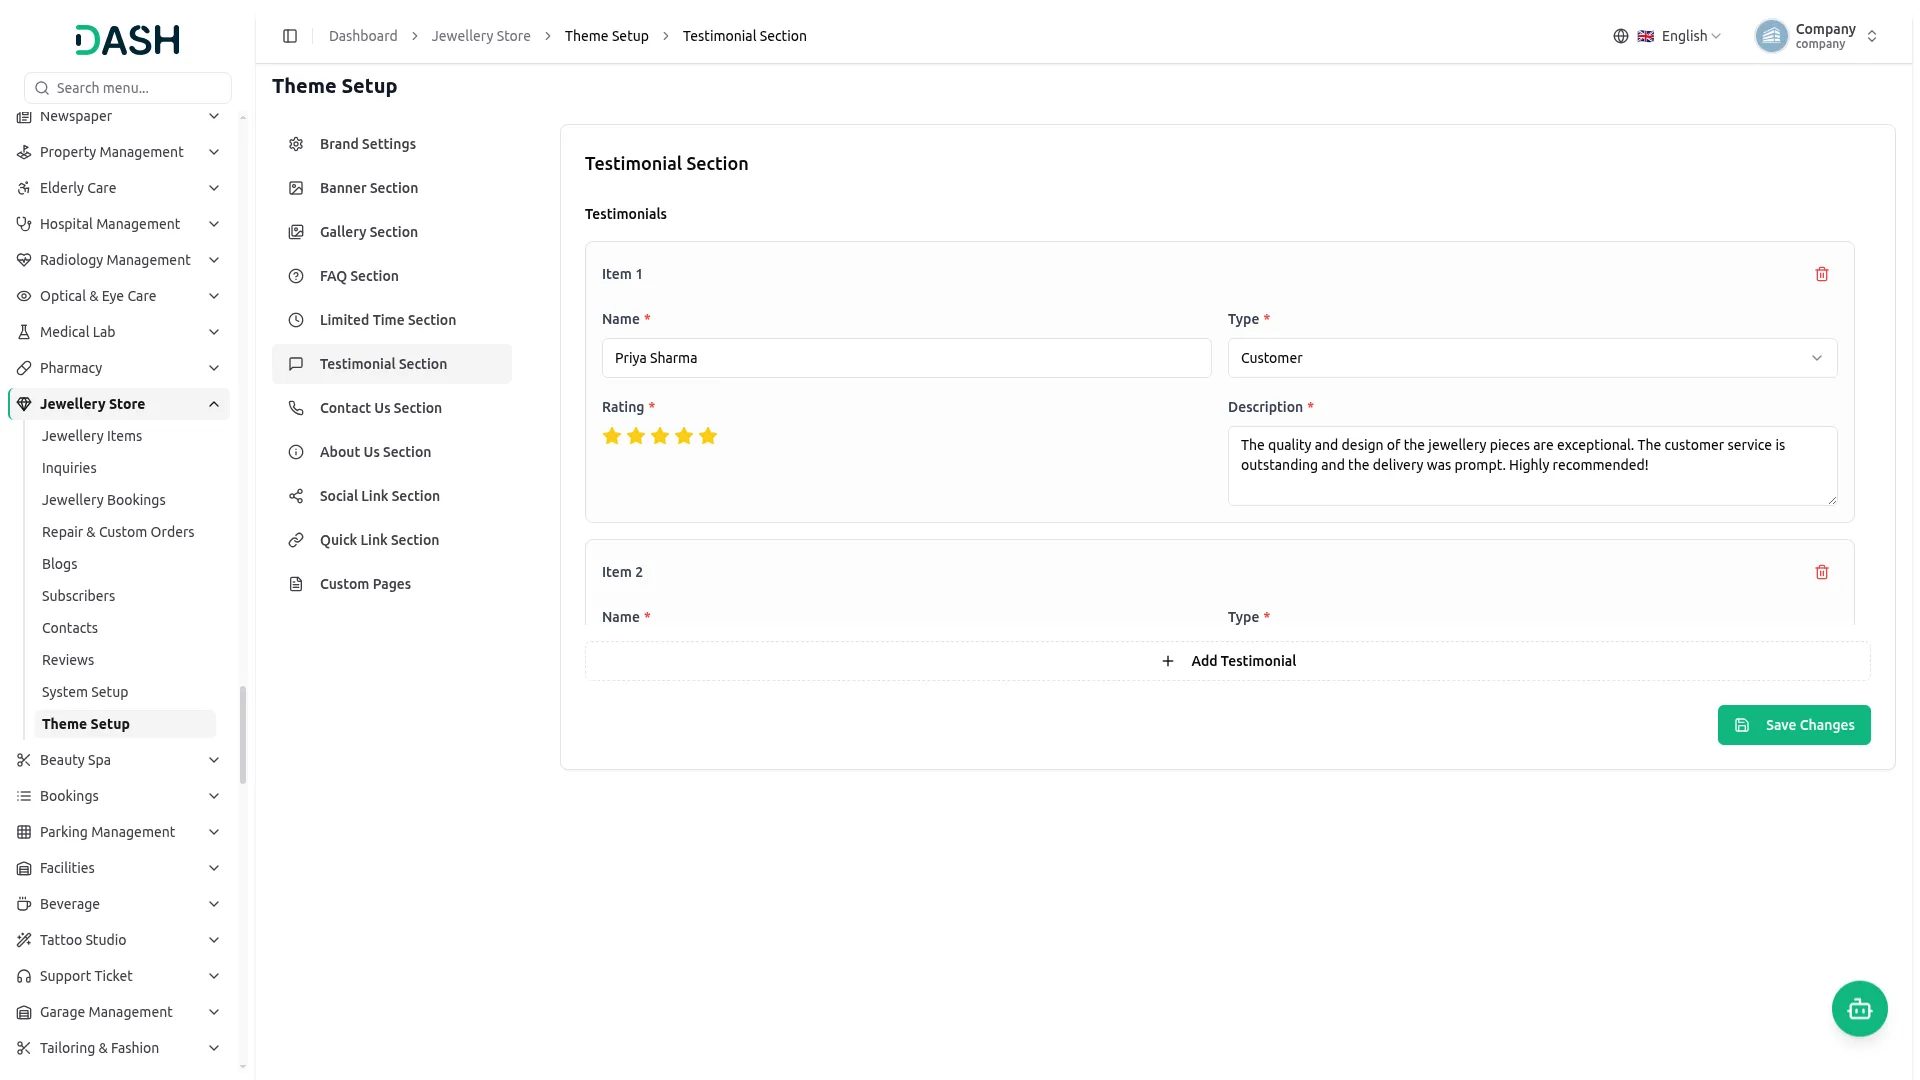
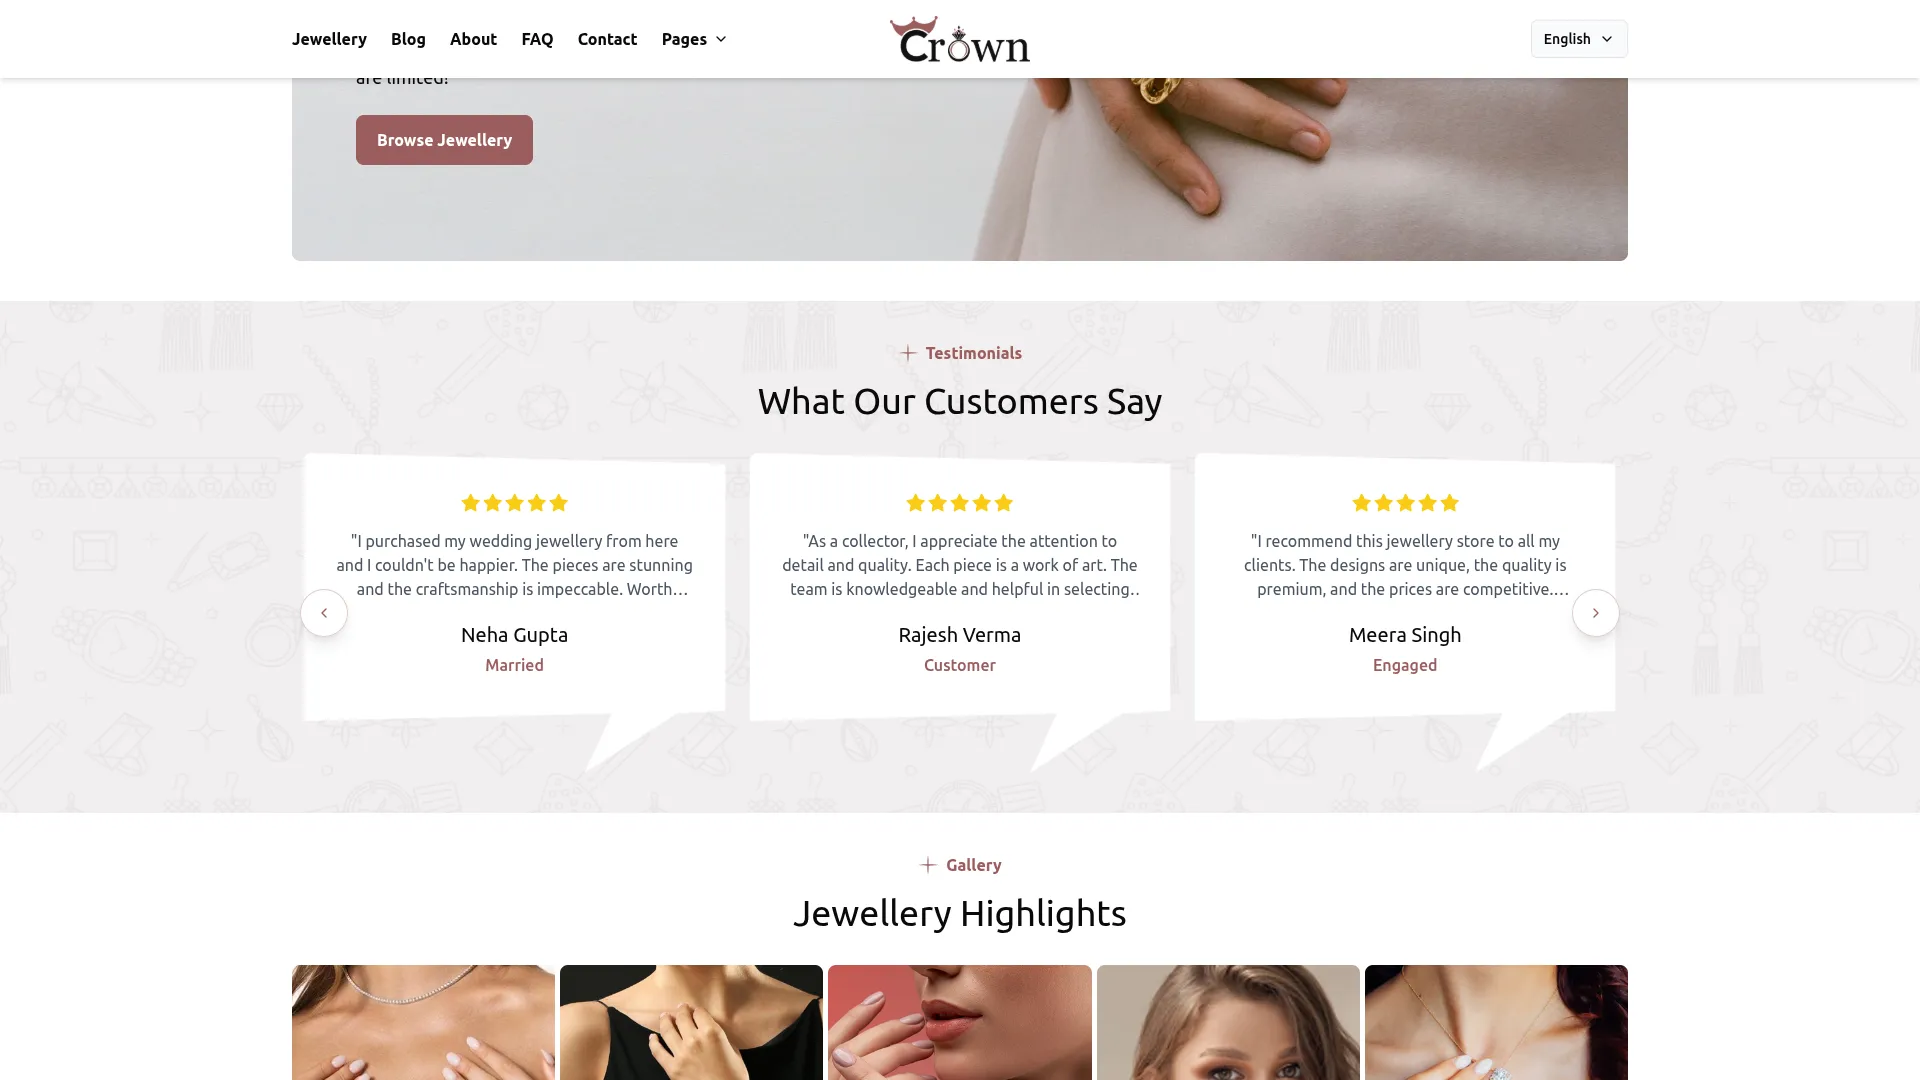
- Once saved, all testimonials appear in the What Our Customers Say section on your homepage, displaying each reviewer’s name, type, rating, and feedback to build trust with visitors.
-
Contact Us Section
- In the Contact Us Section, you will find Phone Information (Title, Icon, Phone Number), Email Information (Title, Icon, Email Address), and Address Information (Title, Icon, Street Address, City, Country, Pincode), along with a Map field where you paste the Map Iframe embed code. Enter all the required details and click Save Changes.
- In the Why Choose Crown Jewellery? section, you will find fields for each feature item, including Icon, Title, and Description. Add each feature; use the Add Item button to include more and the delete icon to remove an item. Click Save Changes.
- In the Business Hours section, use the toggles to set your working days of the week and enter the Opening Time and Closing Time. Click Save Changes.
-
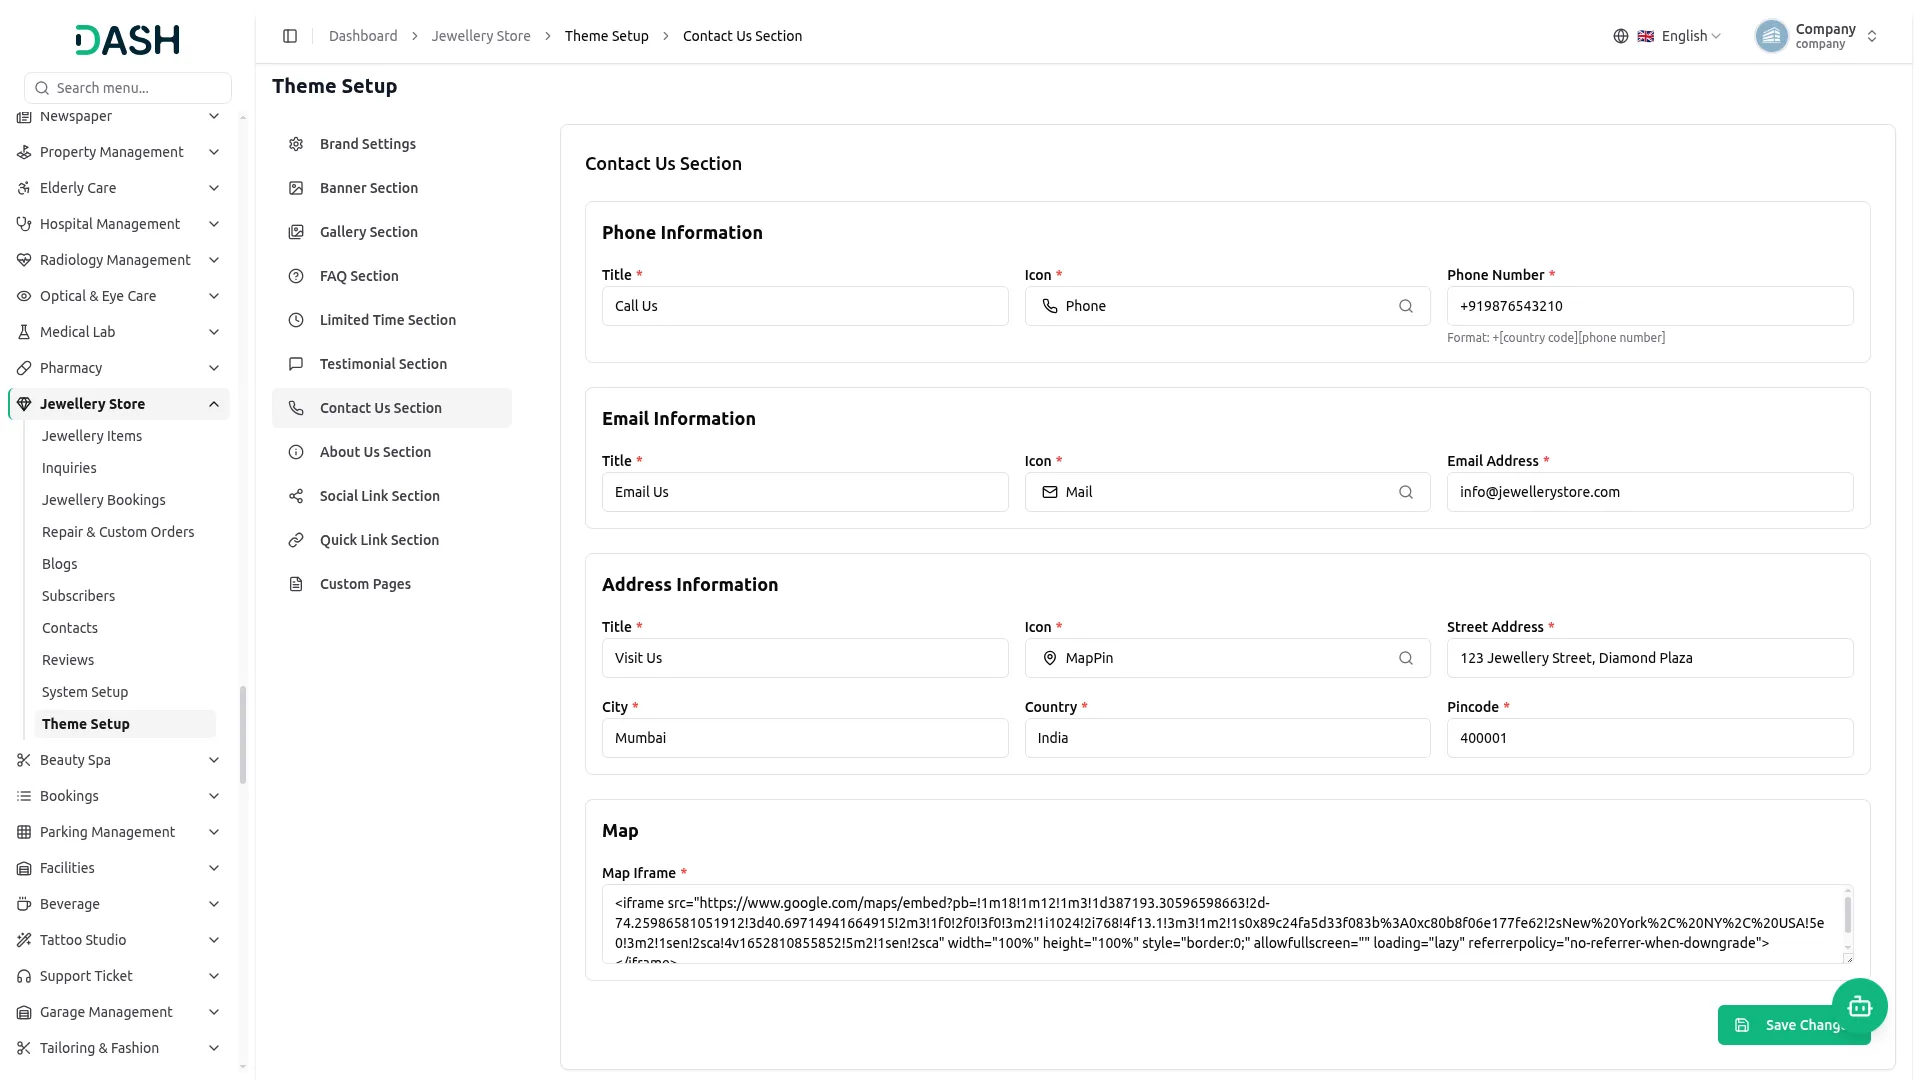
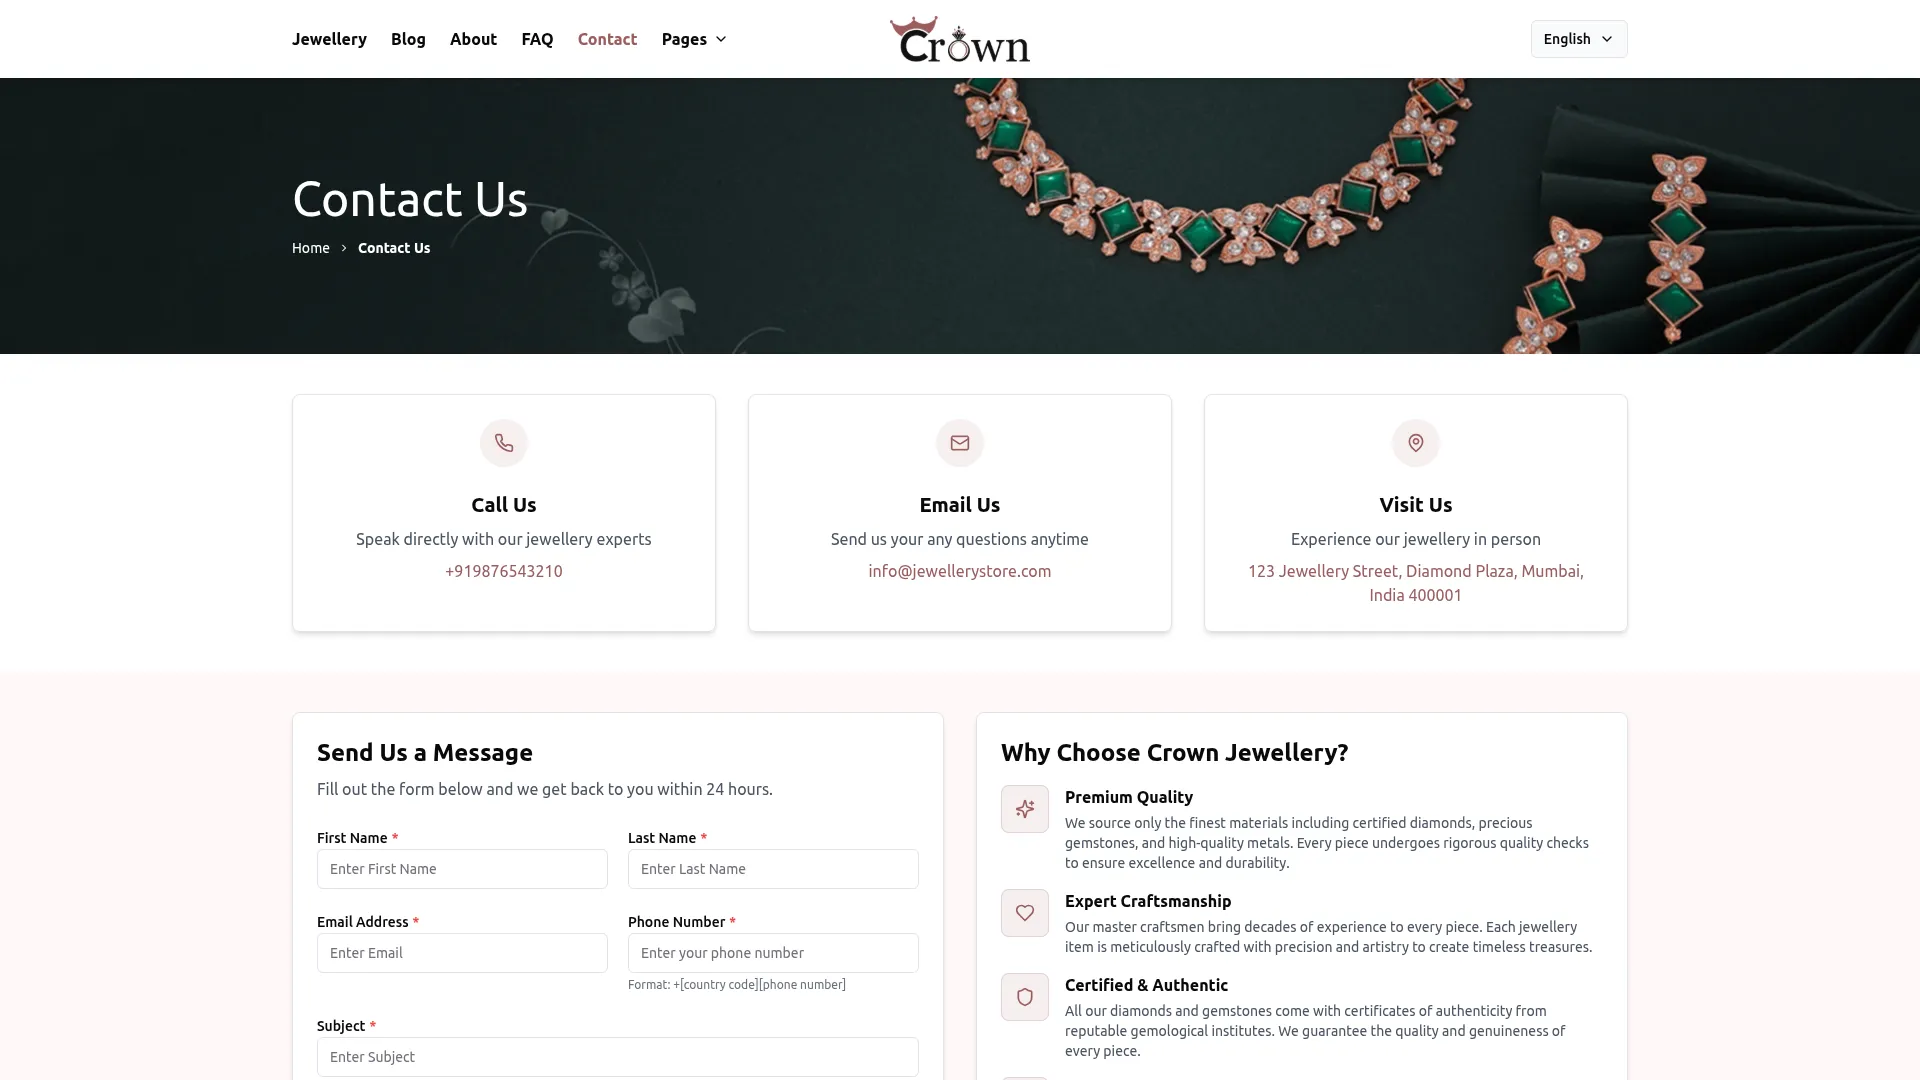
- Once saved, the Phone, Email, and Address details appear in the Call Us, Email Us, and Visit Us cards on the website’s Contact Us page, and the Map Iframe displays as the store location map. The ‘Why Choose Crown Jewellery?’ features appear alongside the contact form, and the Business Hours appear in the Business Hours panel on the same page.
-
About Us Section
- In the About Us Section, you will find fields for Title, Description, Image 1, and Image 2, along with About Us Items (each with an Icon and Title). Upload the images using the Browse button, enter the details, add items using the Add Item button, and use the delete icon to remove an item.
- In the Mission & Vision Section, you will find an Image field, a Mission Description, and a Vision Description. Upload the image and enter both descriptions.
- In the Features Section, you will find fields for each feature item, including Icon, Title, and Description. Add features using the Add Feature button, and use the delete icon to remove an item.
- In the Team Section, you will find fields for each team member, including Name, Position, and Social Links (Social Icon and Social URL). Add members using the Add Team Member button, and use the delete icon to remove an item. Click Save Changes.
-
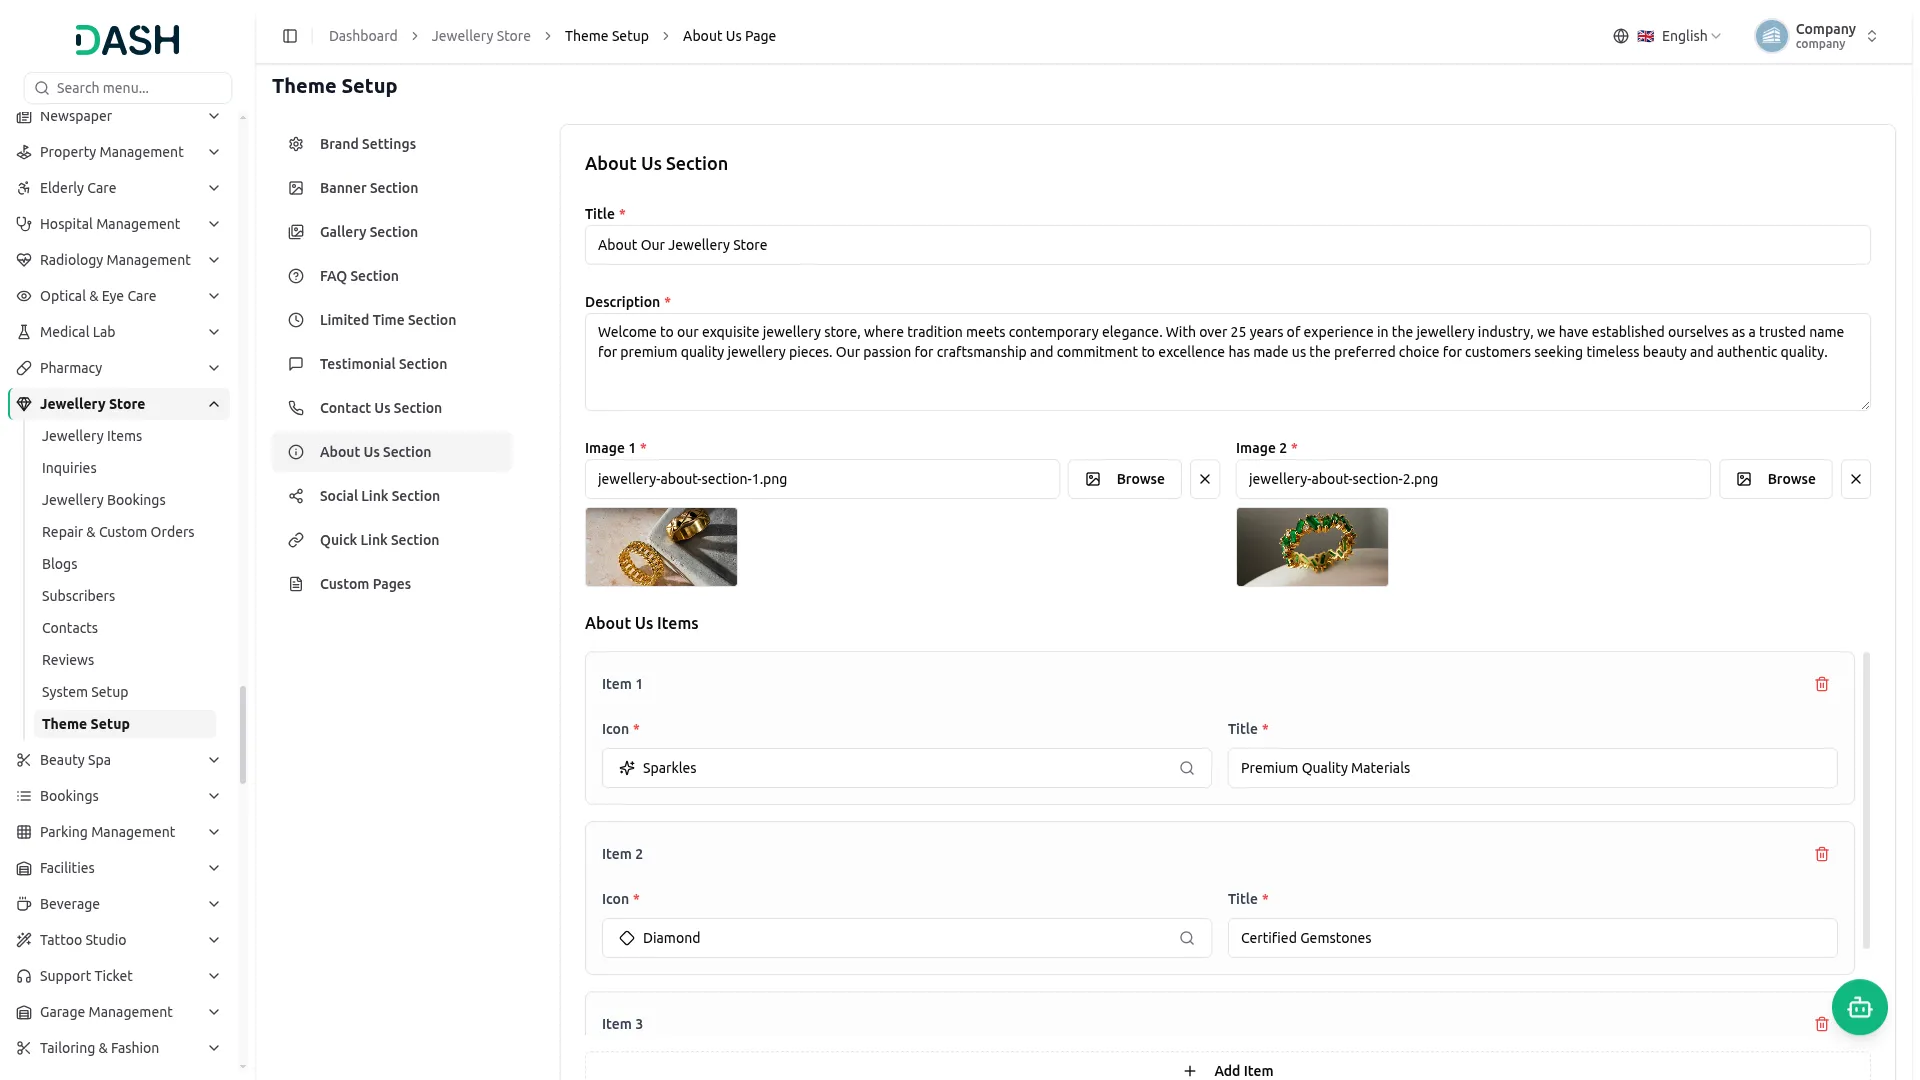
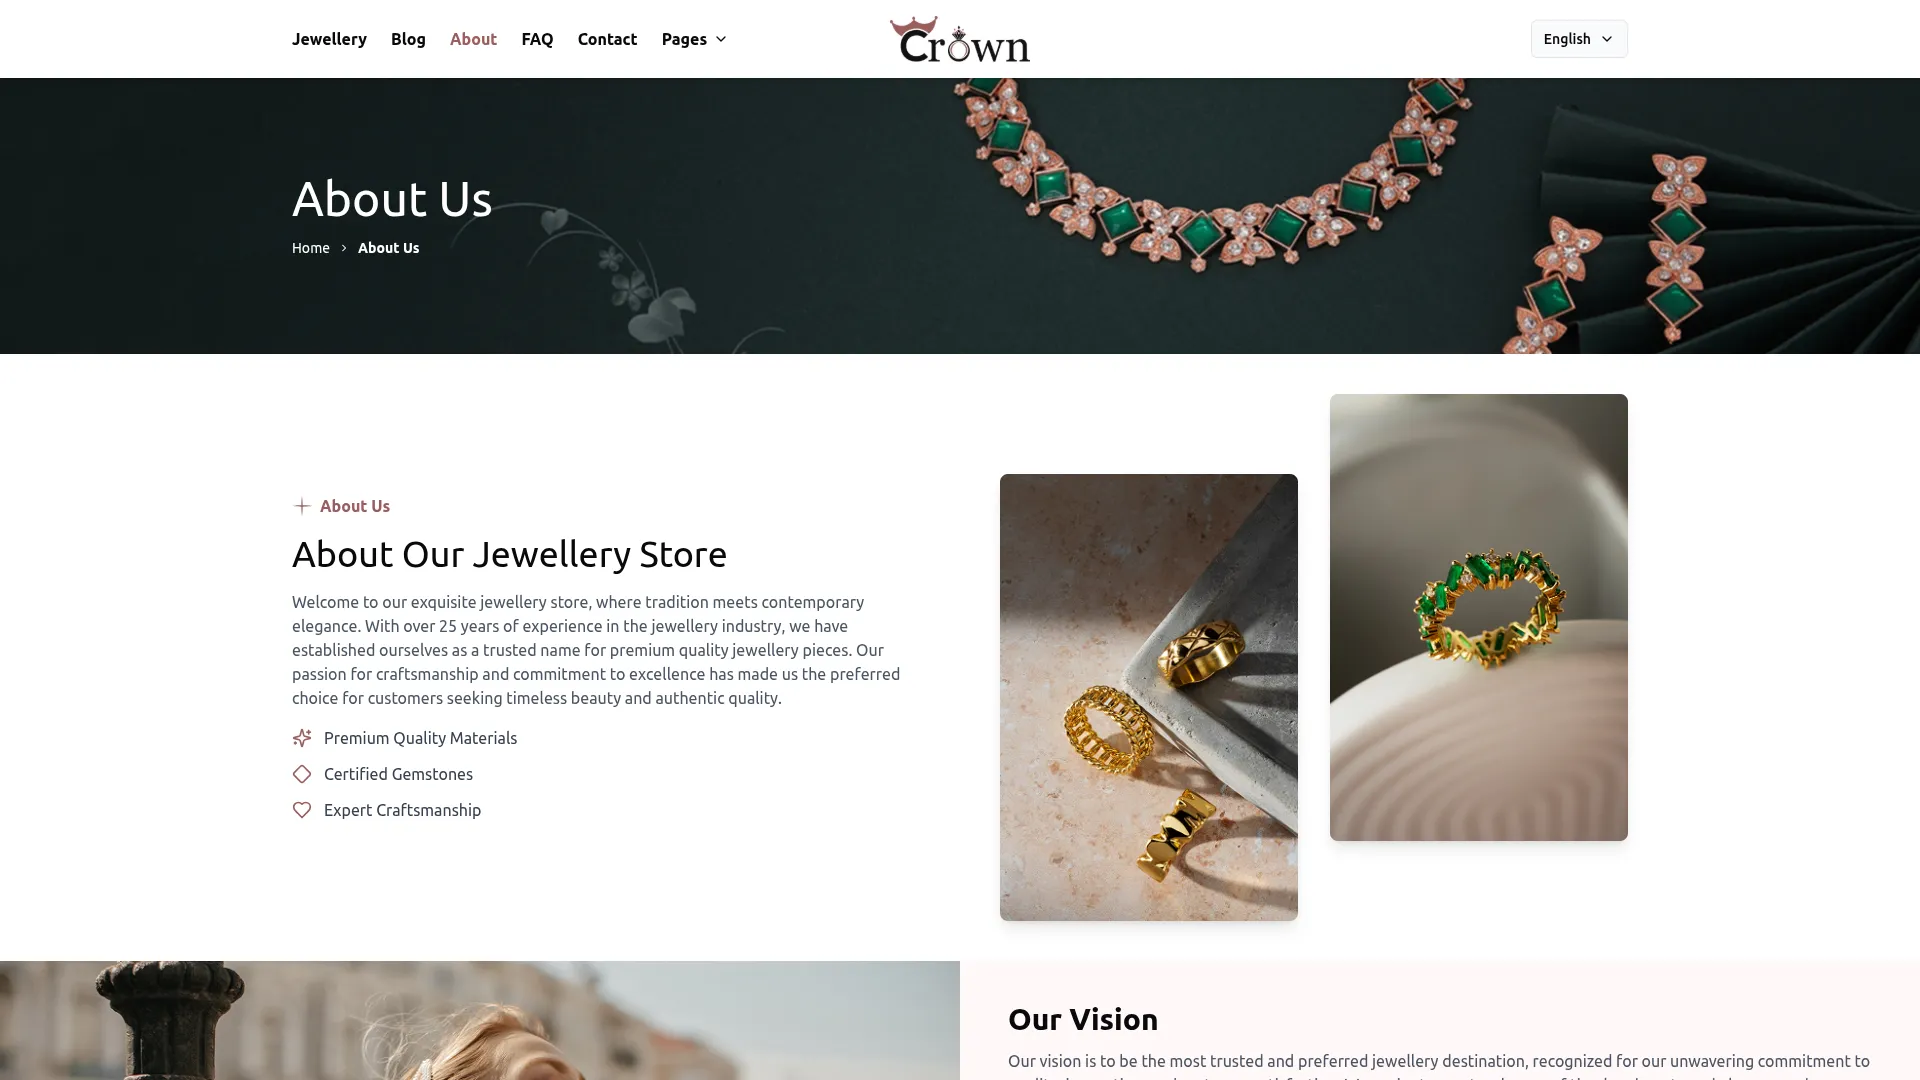
- Once saved, the Title, Description, and images appear in the About Our Jewellery Store block on the website’s About Us page; the Mission and Vision descriptions appear in the Our Vision and Our Mission section; the Features appear in the Why Choose Our Jewellery section, and the team members appear in the Meet Our Team section.
-
Social Link Section
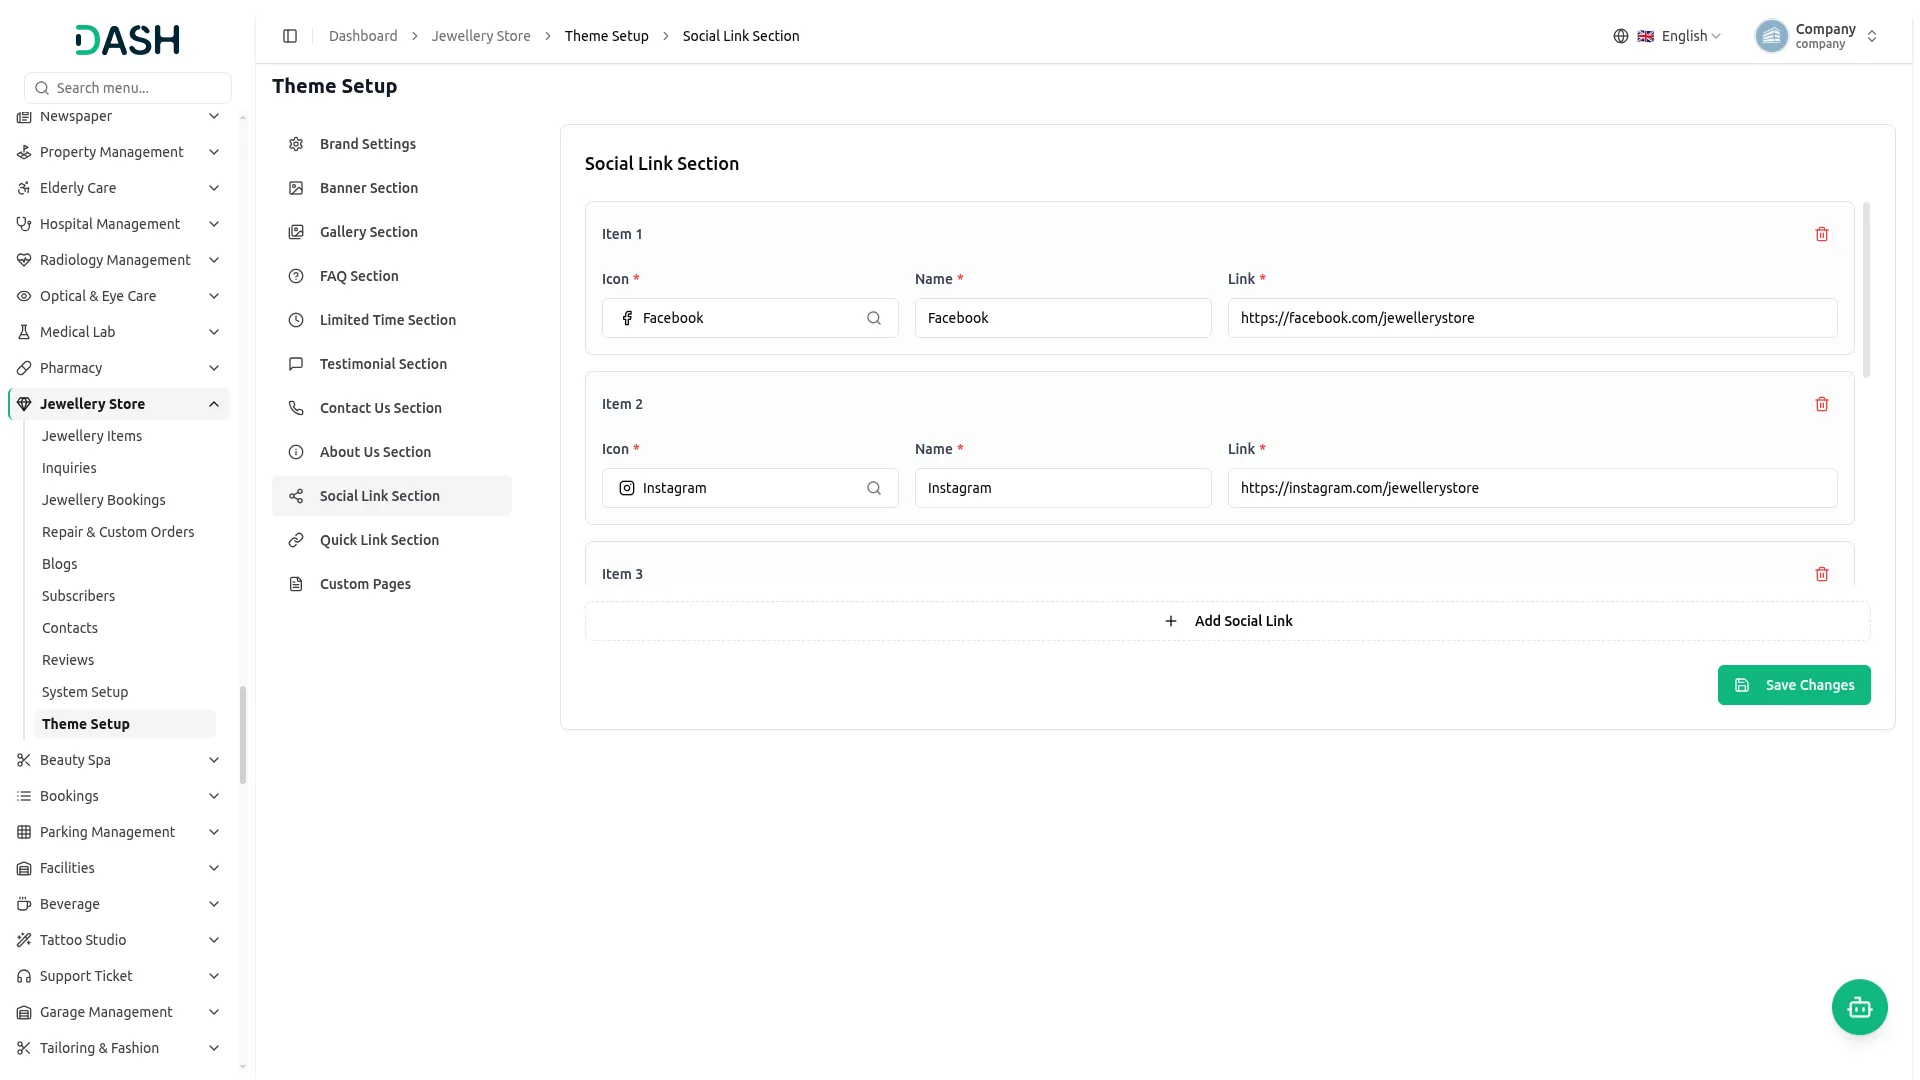
- In the Social Link Section, you will find fields for each social link item, including Icon, Name, and Link. Select the icon, enter the name and the URL, click the Add Social Link button to add more, and use the delete icon to remove an item. Click Save Changes.
- Once saved, all social links appear as clickable social media icons in the footer of your website, directing visitors to your social media pages.
-
Quick Link Section
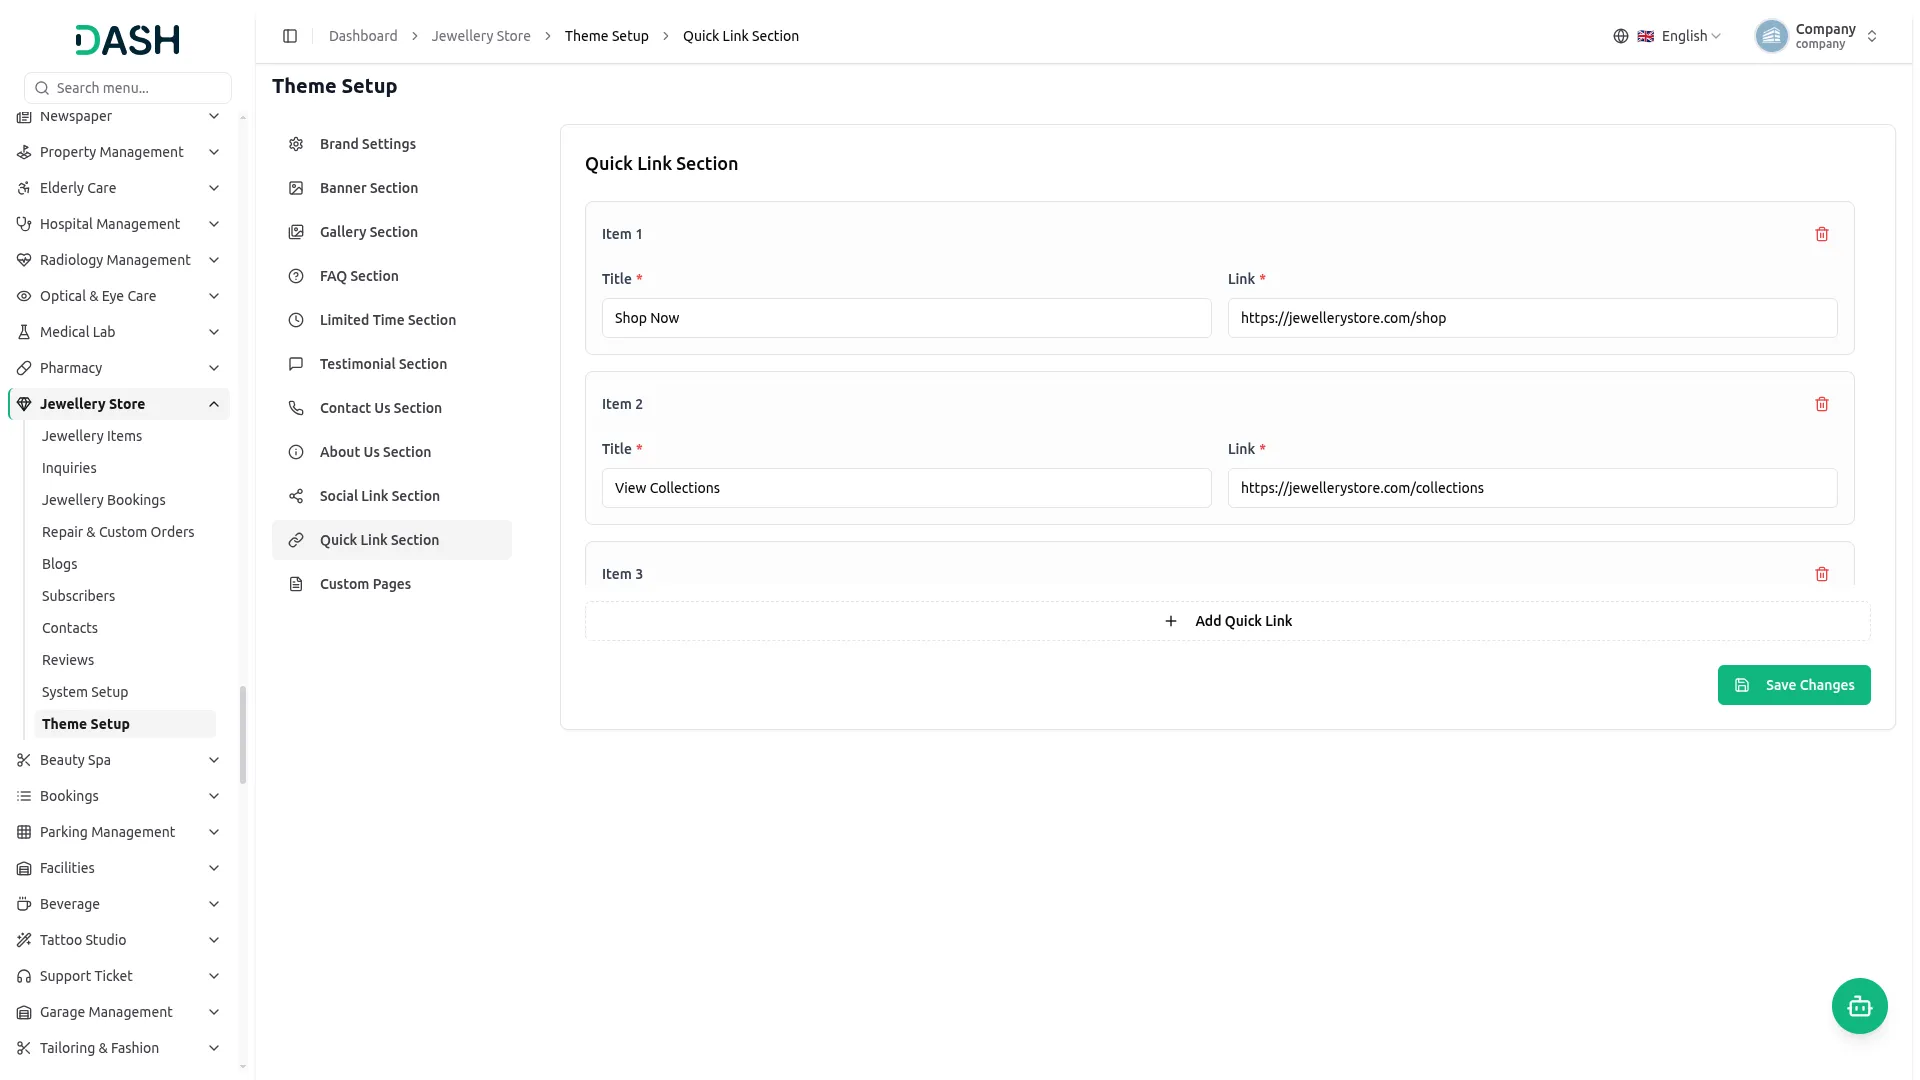
- In the Quick Link Section, you will find fields for each quick link item, including Title and Link. Enter the title and the URL, click the Add Quick Link button to add more, and use the delete icon to remove an item. Click Save Changes.
- Once saved, all quick links appear in the Quick Links list in the footer of your website, giving visitors fast access to important pages.
-
Custom Pages
- To add a new page, click the “Create” button in the Custom Pages tab. In the Create Custom Page form, enter the Title and URL Slug (only lowercase letters and hyphens allowed), add an optional Description, write the page Contents using the rich text editor, and use the Enable Page Footer toggle to set whether the page link appears in the footer. Click Create to save the page.
- The list page displays a table of columns including the page’s Title, Slug, Show in Footer status, and Action. Use the edit in the Action column to update a page and the open icon next to the slug to preview the page on the website.
-
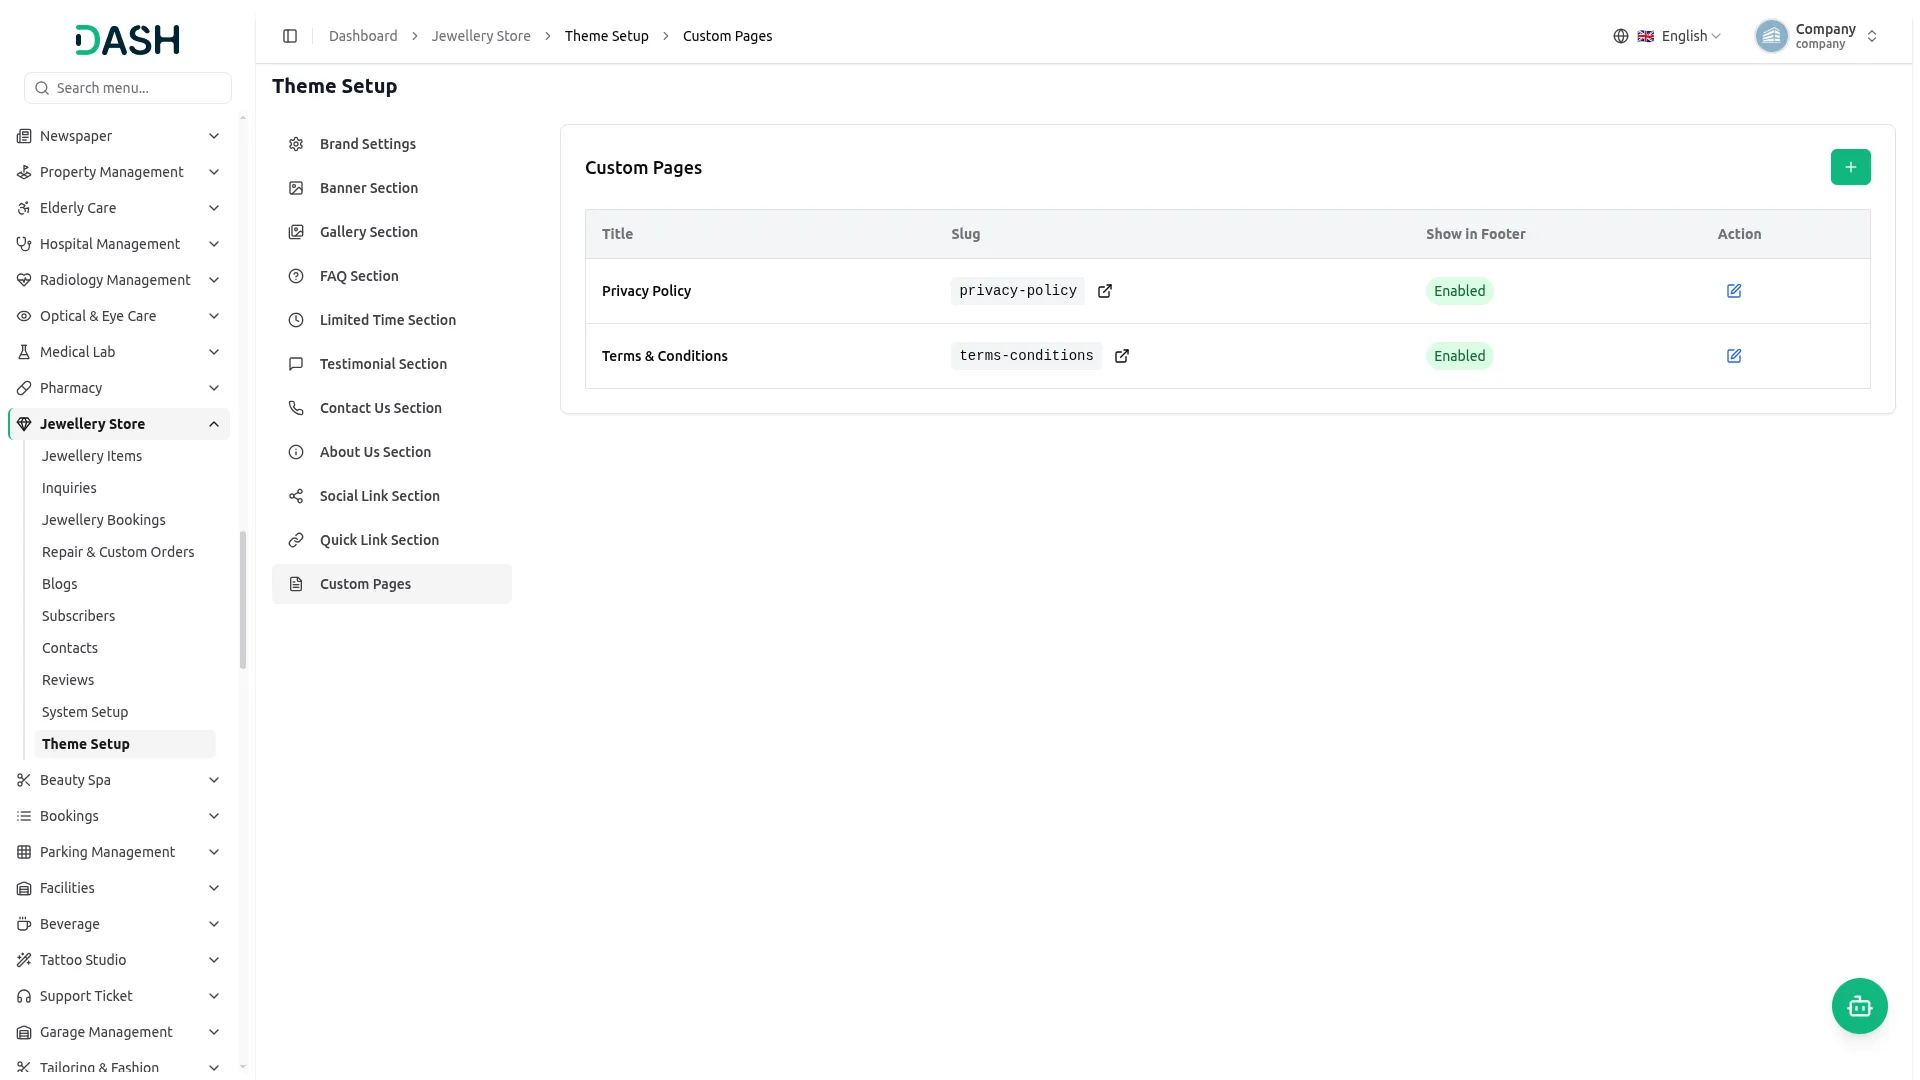
- Once saved, each custom page becomes a live page on your website (such as Privacy Policy and Terms & Conditions), and pages with Show in Footer enabled also appear as links in the website’s footer.
-
Jewellery Items
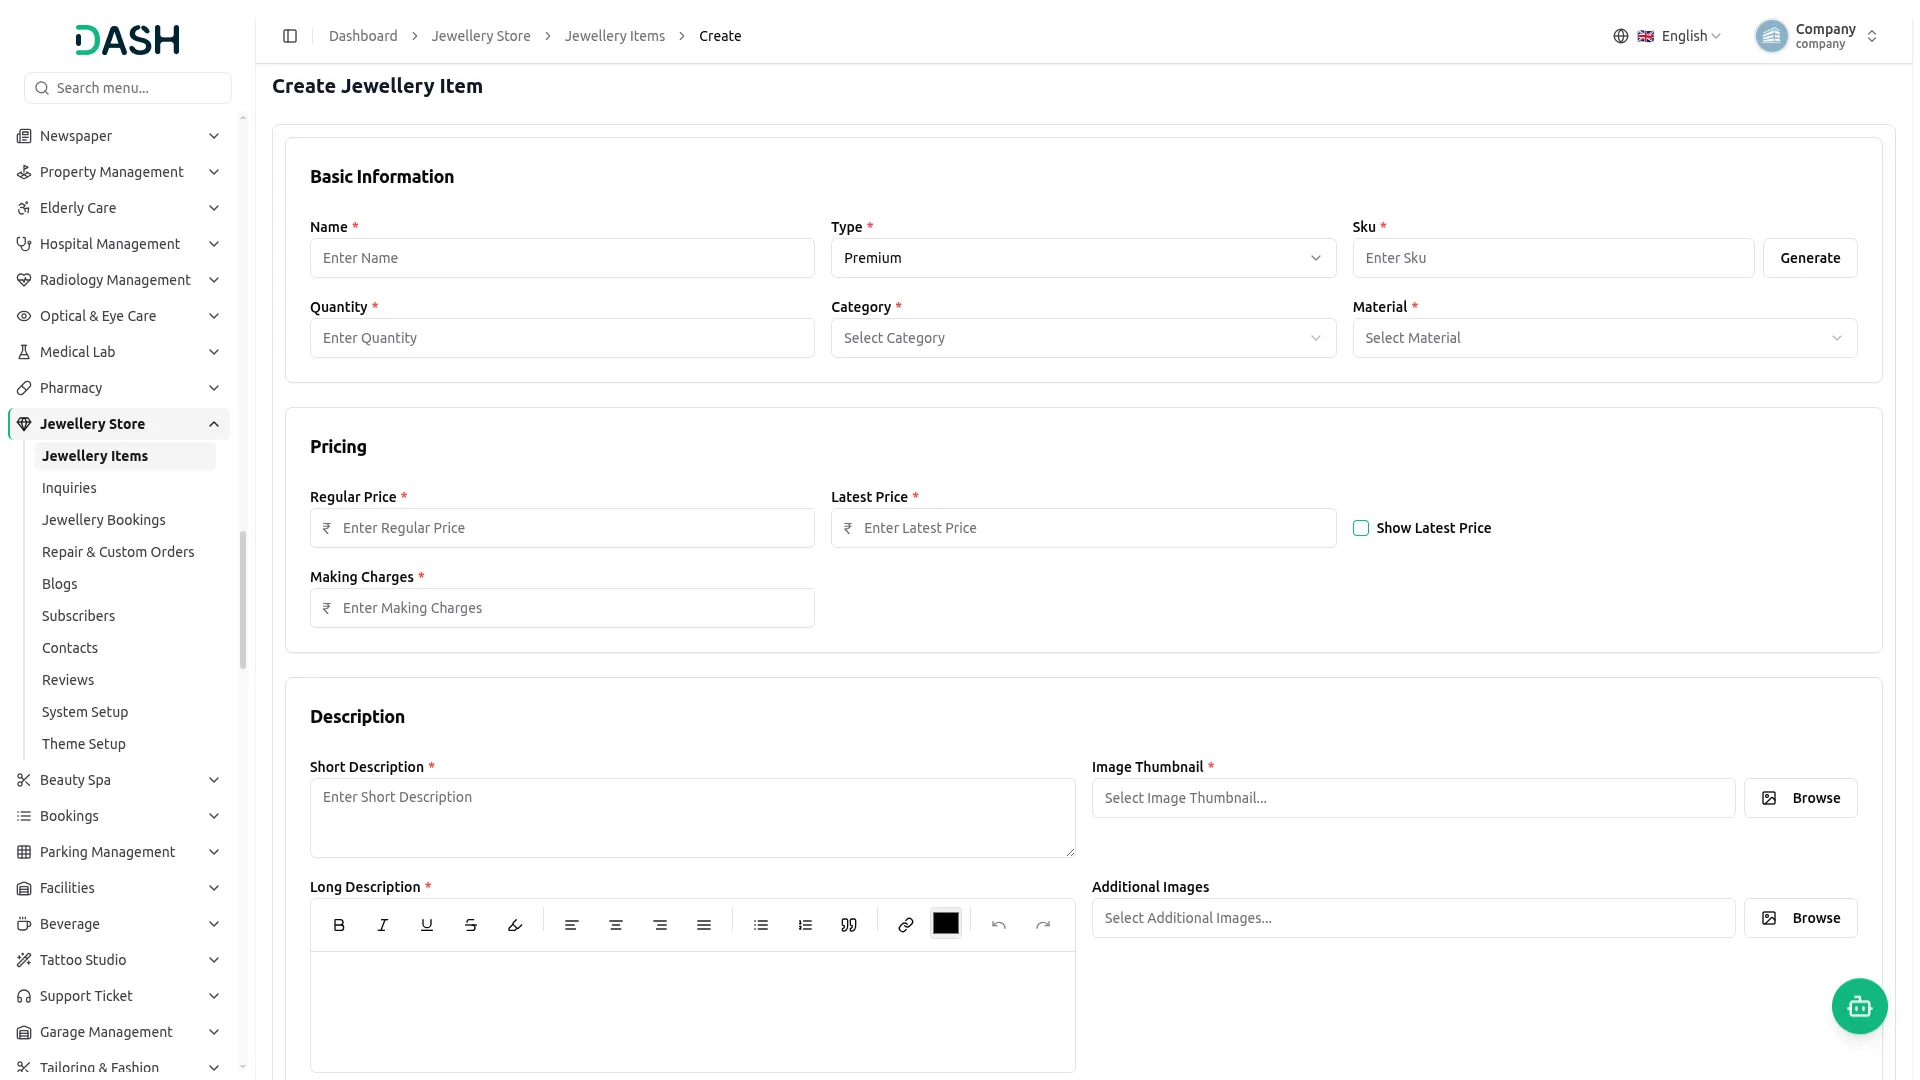
- To add a new jewellery item, click the “Create” button, which is located on the Manage Jewellery Items page. In the Create Jewellery Item form, under Basic Information, enter the item’s Name, select the Type, enter the SKU, and enter the Quantity, Category, and Material.
- Under Pricing, enter the Regular Price, Latest Price, and Making Charges, and enable the Show Latest Price option if you want the discounted price displayed. Under Description, enter the Short Description, upload the Image Thumbnail and Additional Images using the Browse button, and write the Long Description using the rich text editor.
- Under Weight & Details, enter the Gross Weight, Net Weight, Stone Details, and Karat. Under Additional Information, add What’s Included items by selecting an Icon and entering a Title, and add Care Instructions such as Daily Care and Cleaning, using the Add Item / Add buttons to include multiple entries. Click Create to save the item.
-
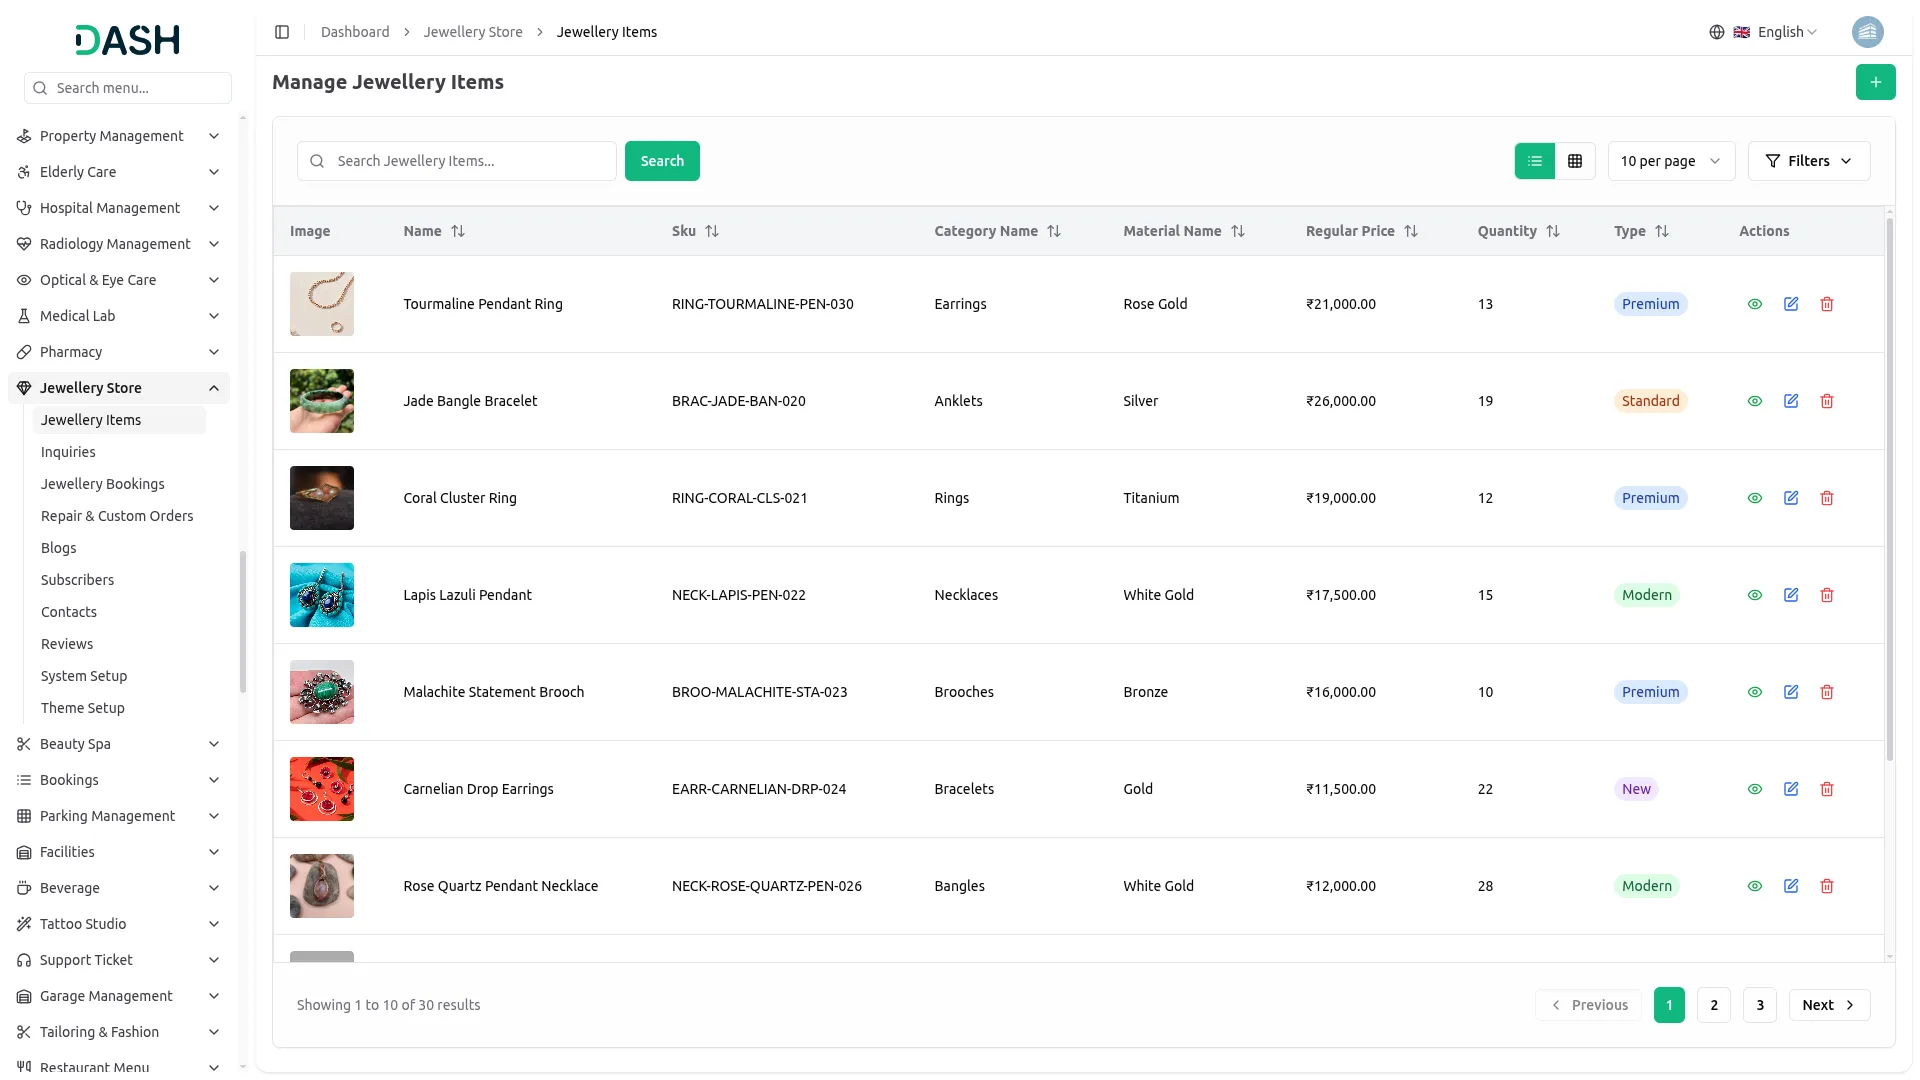
- The list page displays a table of columns including the item’s Image, Name, SKU, Category Name, Material Name, Regular Price, Quantity, and Type. Use the search bar to find a specific jewellery item by name or details, and switch between list view and grid view, or change how many items appear per page.
- Click the Filters button to apply filtering options, including filtering by Type, Category, and Material. Click Apply to filter the data or Clear to reset it.
- In the Actions column, you can use the view to see the full item details, the edit to update the item, or the delete to permanently remove it from the system.
-
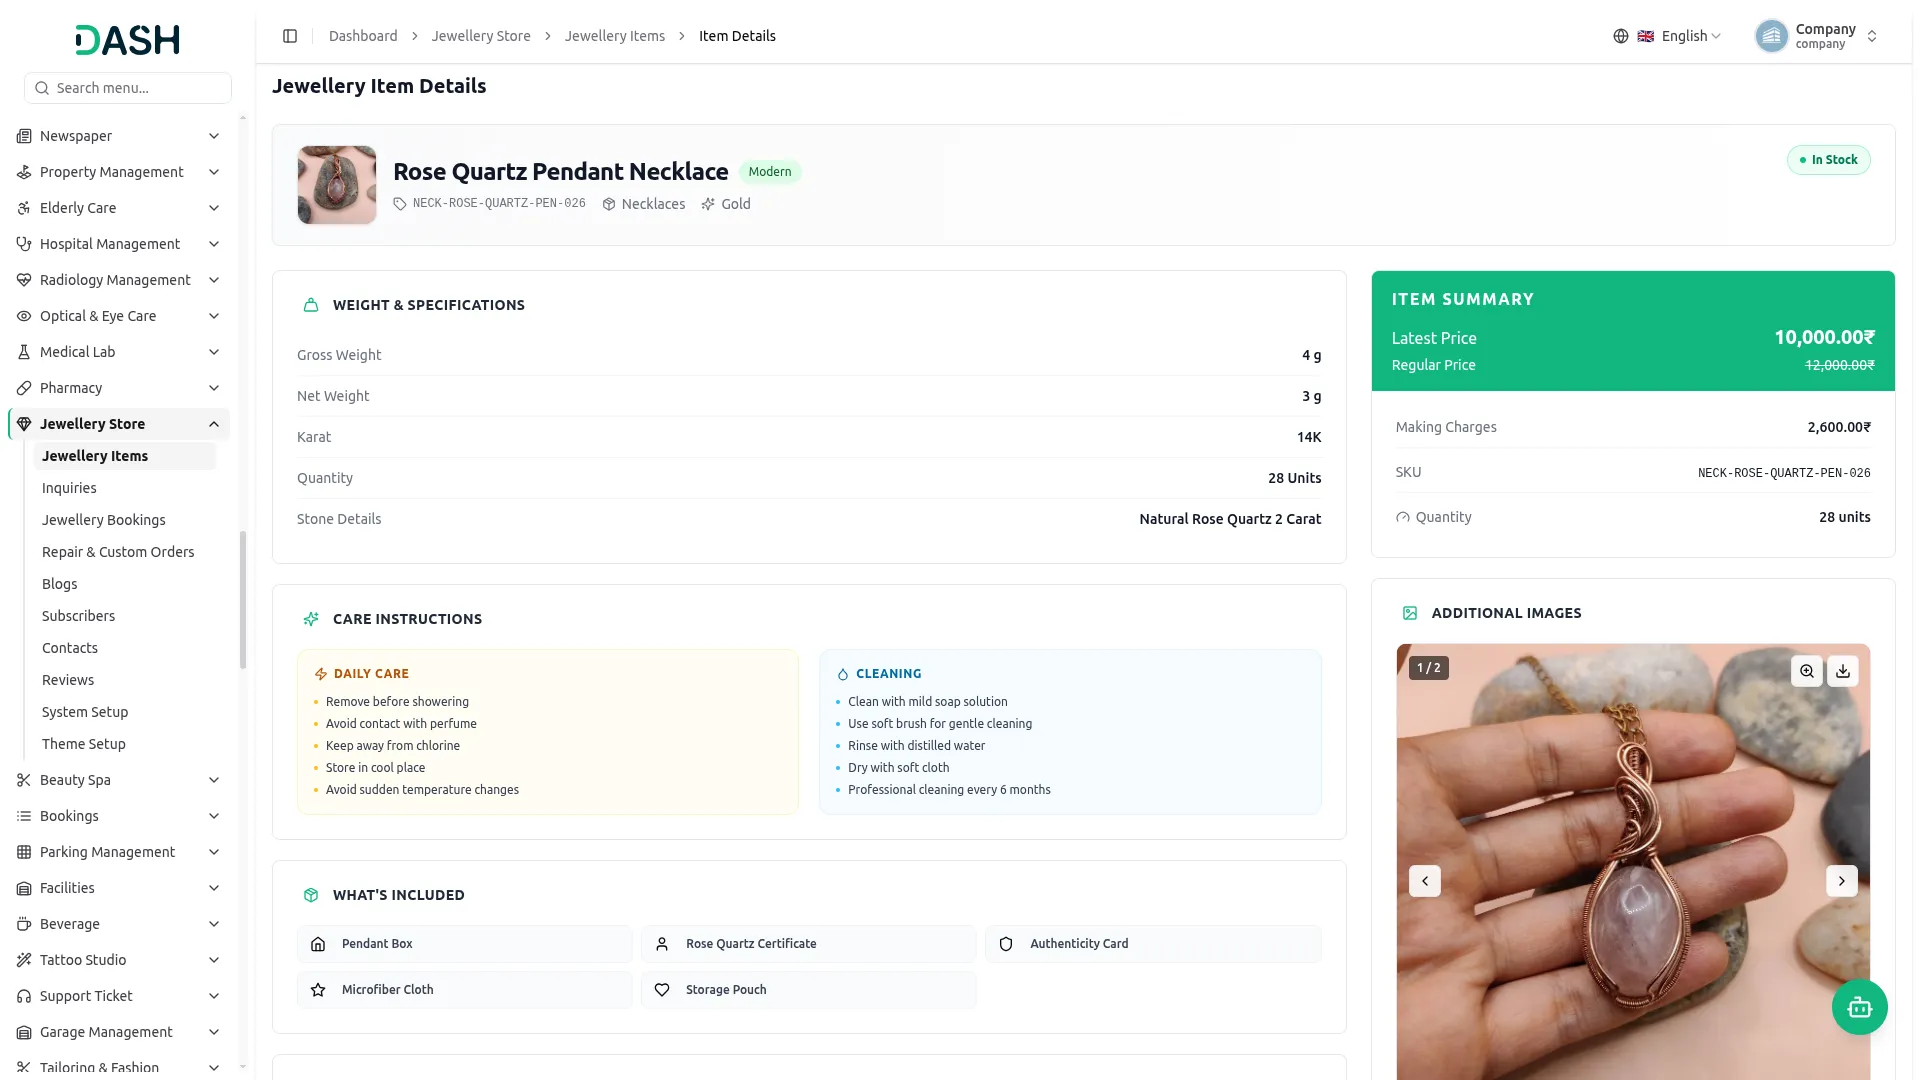
- Clicking the view opens the Jewellery Item Details page, which displays the item’s image, name, type, SKU, category, material, and stock status, along with Weight & Specifications (Gross Weight, Net Weight, Karat, Quantity, Stone Details), an Item Summary card (Latest Price, Regular Price, Making Charges, SKU, Quantity), Care Instructions (Daily Care and Cleaning), What’s Included, and the item’s Overview and Description.
-
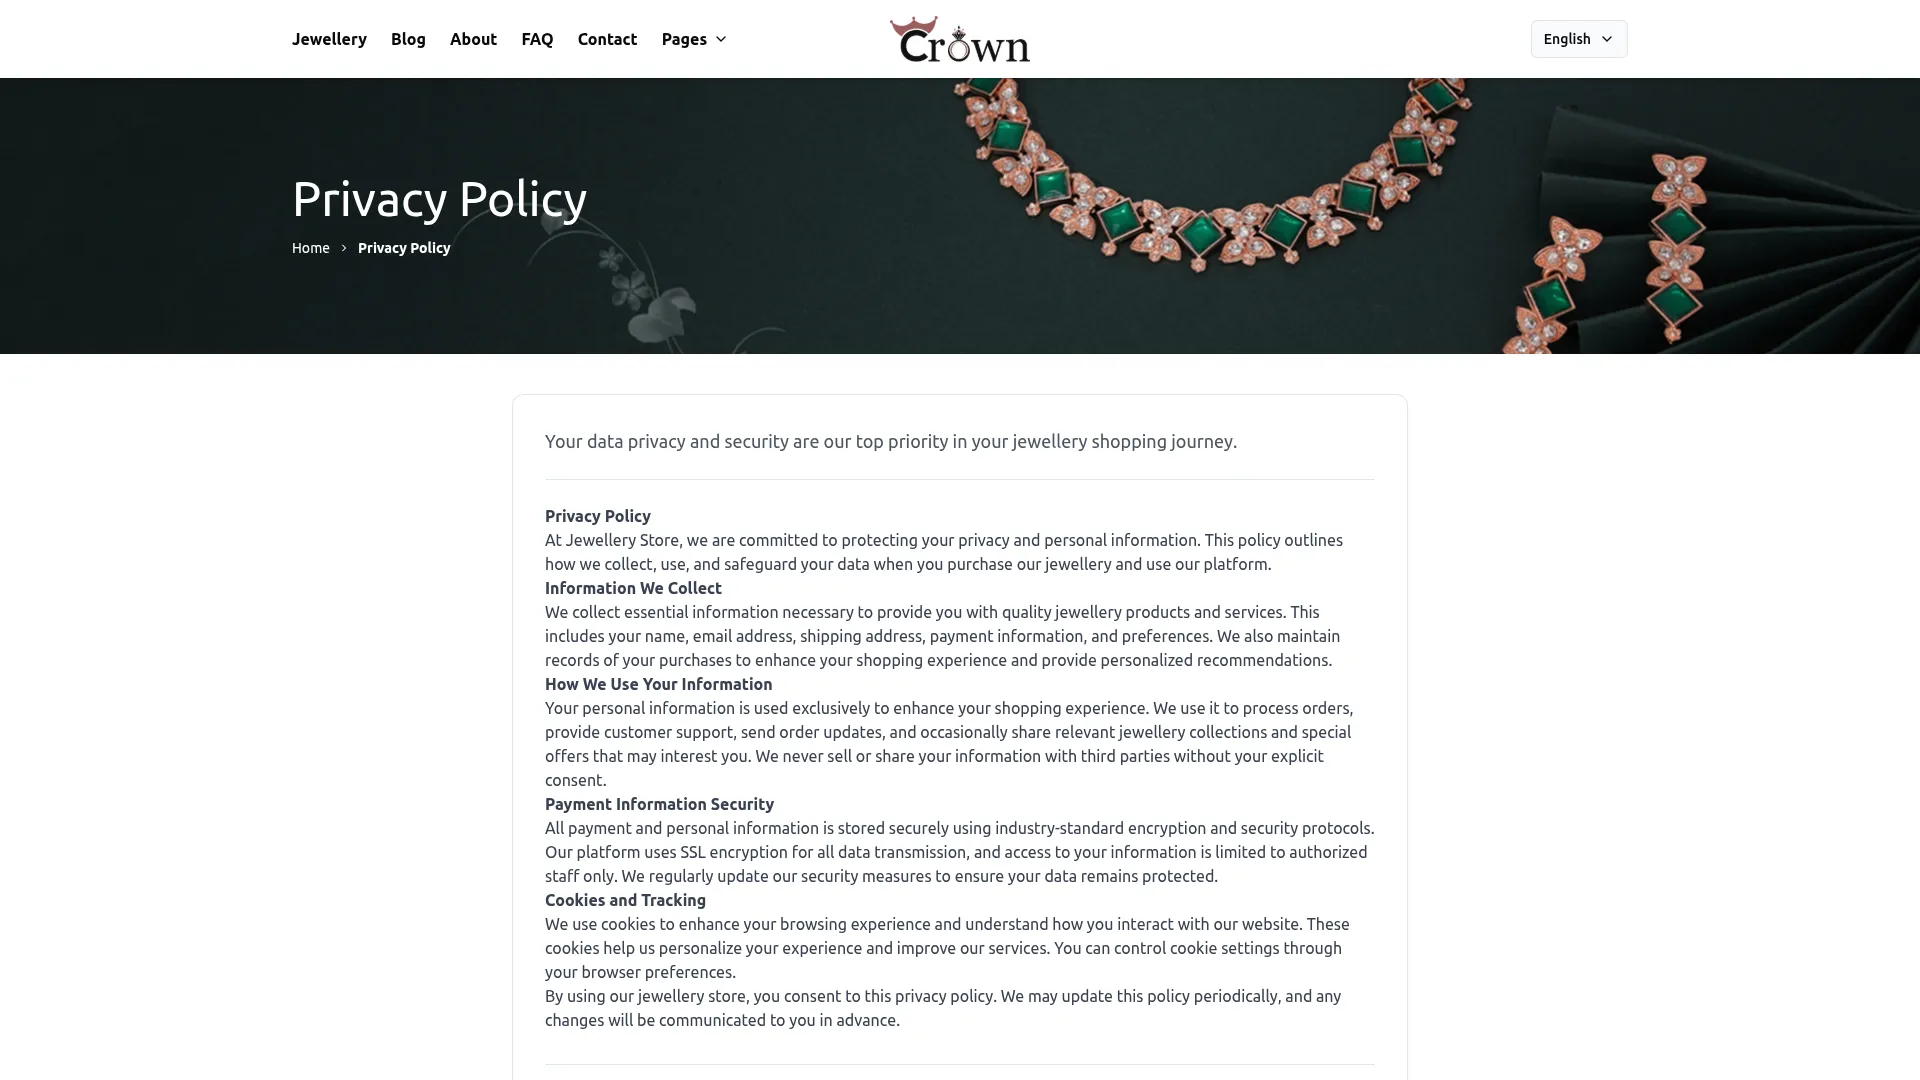
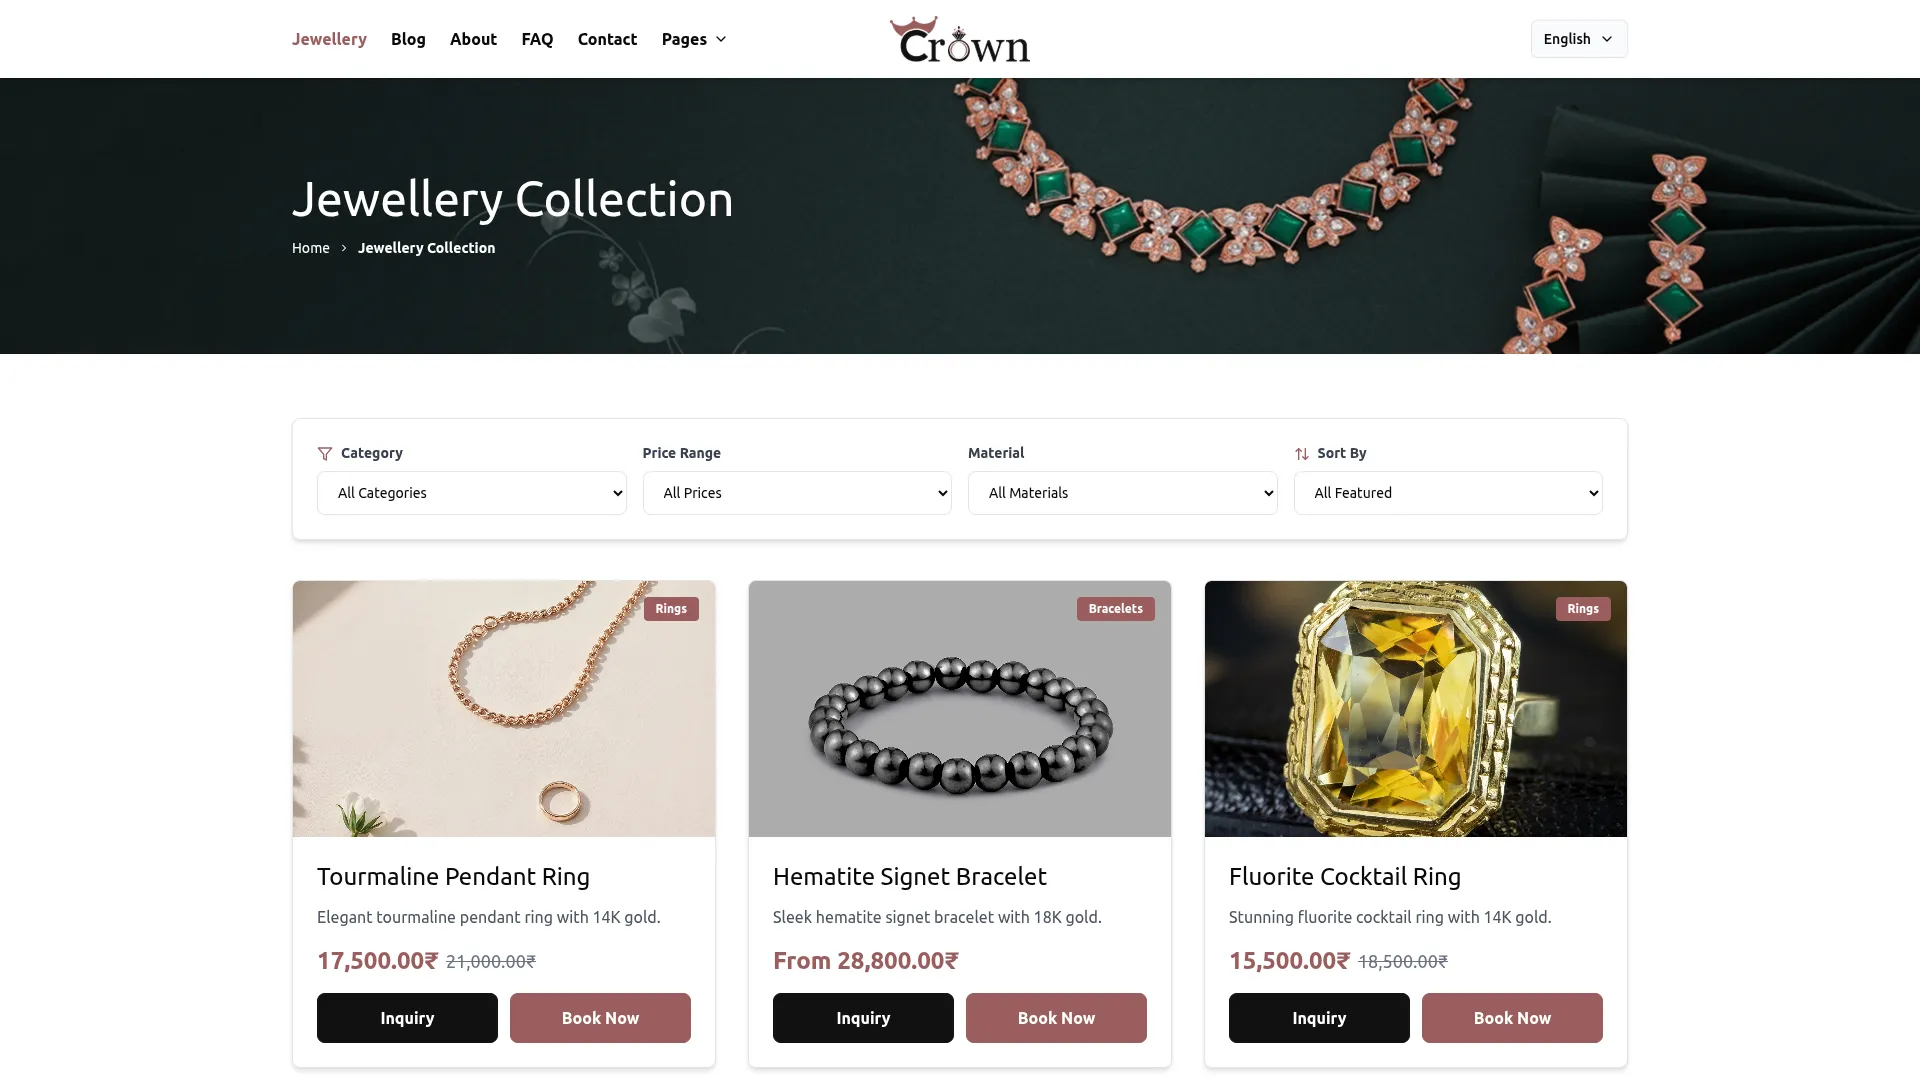
- On the website, every jewellery item created here automatically appears on the Jewellery Collection page, where visitors can browse items by Category, Price Range, and Material. Each item displays its image, name, short description, and price, along with Inquiry and Book Now buttons, allowing customers to view full item details, send an inquiry, or place a booking directly from the shopfront.
-
Manage Inquiries
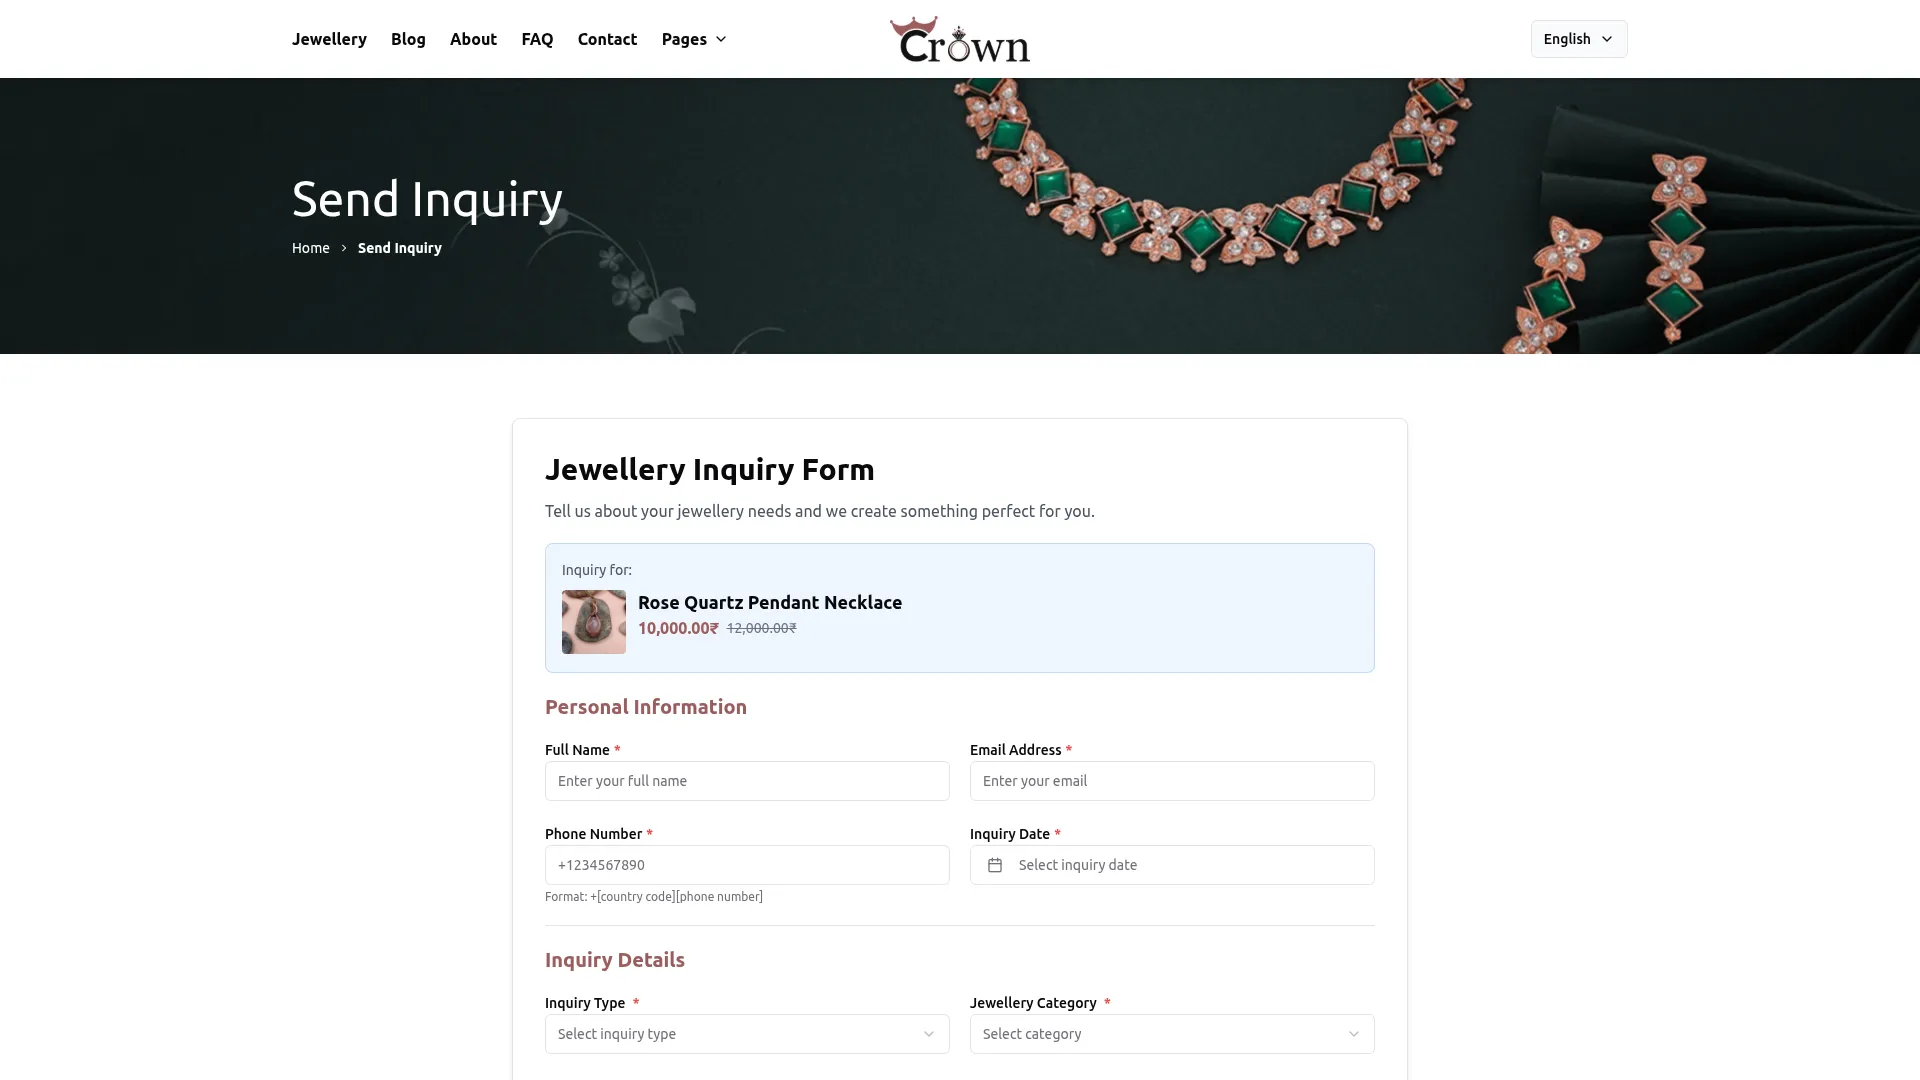
- The Manage Inquiries page displays all the jewellery inquiries submitted by customers through the website. The list page displays a table of columns including the inquiry’s Image, Full Name, Email Address, Phone Number, Inquiry Type, Jewellery Category, Budget Range, Inquiry Date, and Inquiry Status. Use the search bar to find a specific inquiry by name or details, and switch between list view and grid view, or change how many items appear per page.
- Click the Filters button to apply filtering options, including filtering by Inquiry Type, Jewellery Category, Inquiry Date, and Inquiry Status. Click Apply to filter the data or Clear to reset it.
- In the Inquiry Status column, click the dropdown on any inquiry to update its status to New, Responded, In Progress, or Closed, allowing you to track the progress of each inquiry directly from the list.
- In the Actions column, you can use the view to see the full inquiry details, the edit to update the inquiry, or the delete to permanently remove it from the system.
-
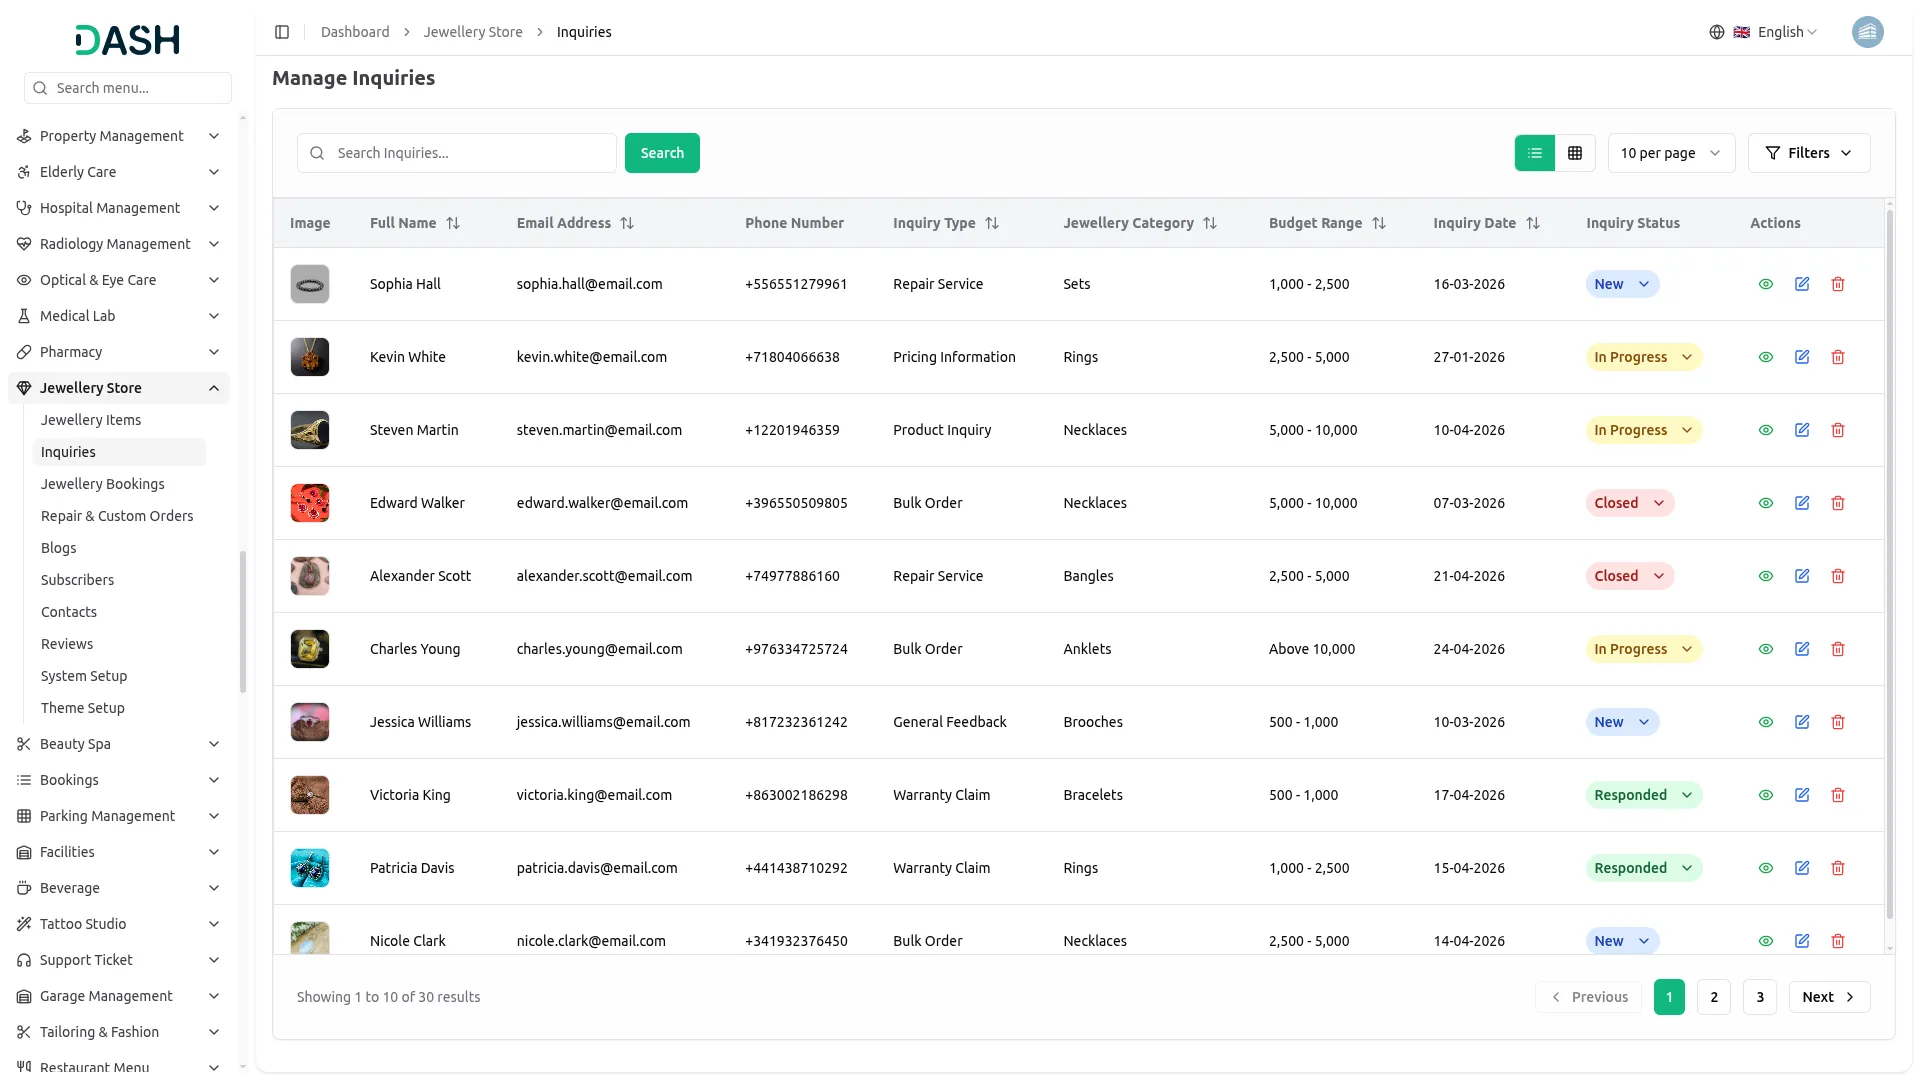
- On the website, customers submit inquiries through the Send Inquiry page, where they fill in their Personal Information, Inquiry Details (Inquiry Type, Jewellery Category, Preferred Budget Range), Material & Specifications, Stone Details, a Reference Image, Timeline/Deadline, and Additional Notes. Every inquiry submitted through this form is automatically recorded and appears in the Manage Inquiries section in the backend for the store to review, respond to, and manage.
-
Jewellery Bookings
- To add a new booking, click the “Create” button, which is located on the Manage Jewellery Bookings page. In the Create Jewellery Booking form, enter the customer’s Customer Name, Email, Contact, and Reservation Date, then select the Bank Account and enter the Shipping Address.
- Select the Item from the dropdown and enter the Quantity. Once an item is selected, the Gross Weight, Net Weight, Stone Weight, Making Charges, and Metal details are filled in automatically, and the Subtotal, Discount, Taxes, and Grand Amount are calculated accordingly. Enter any Special Requirements, then click Create to save the booking.
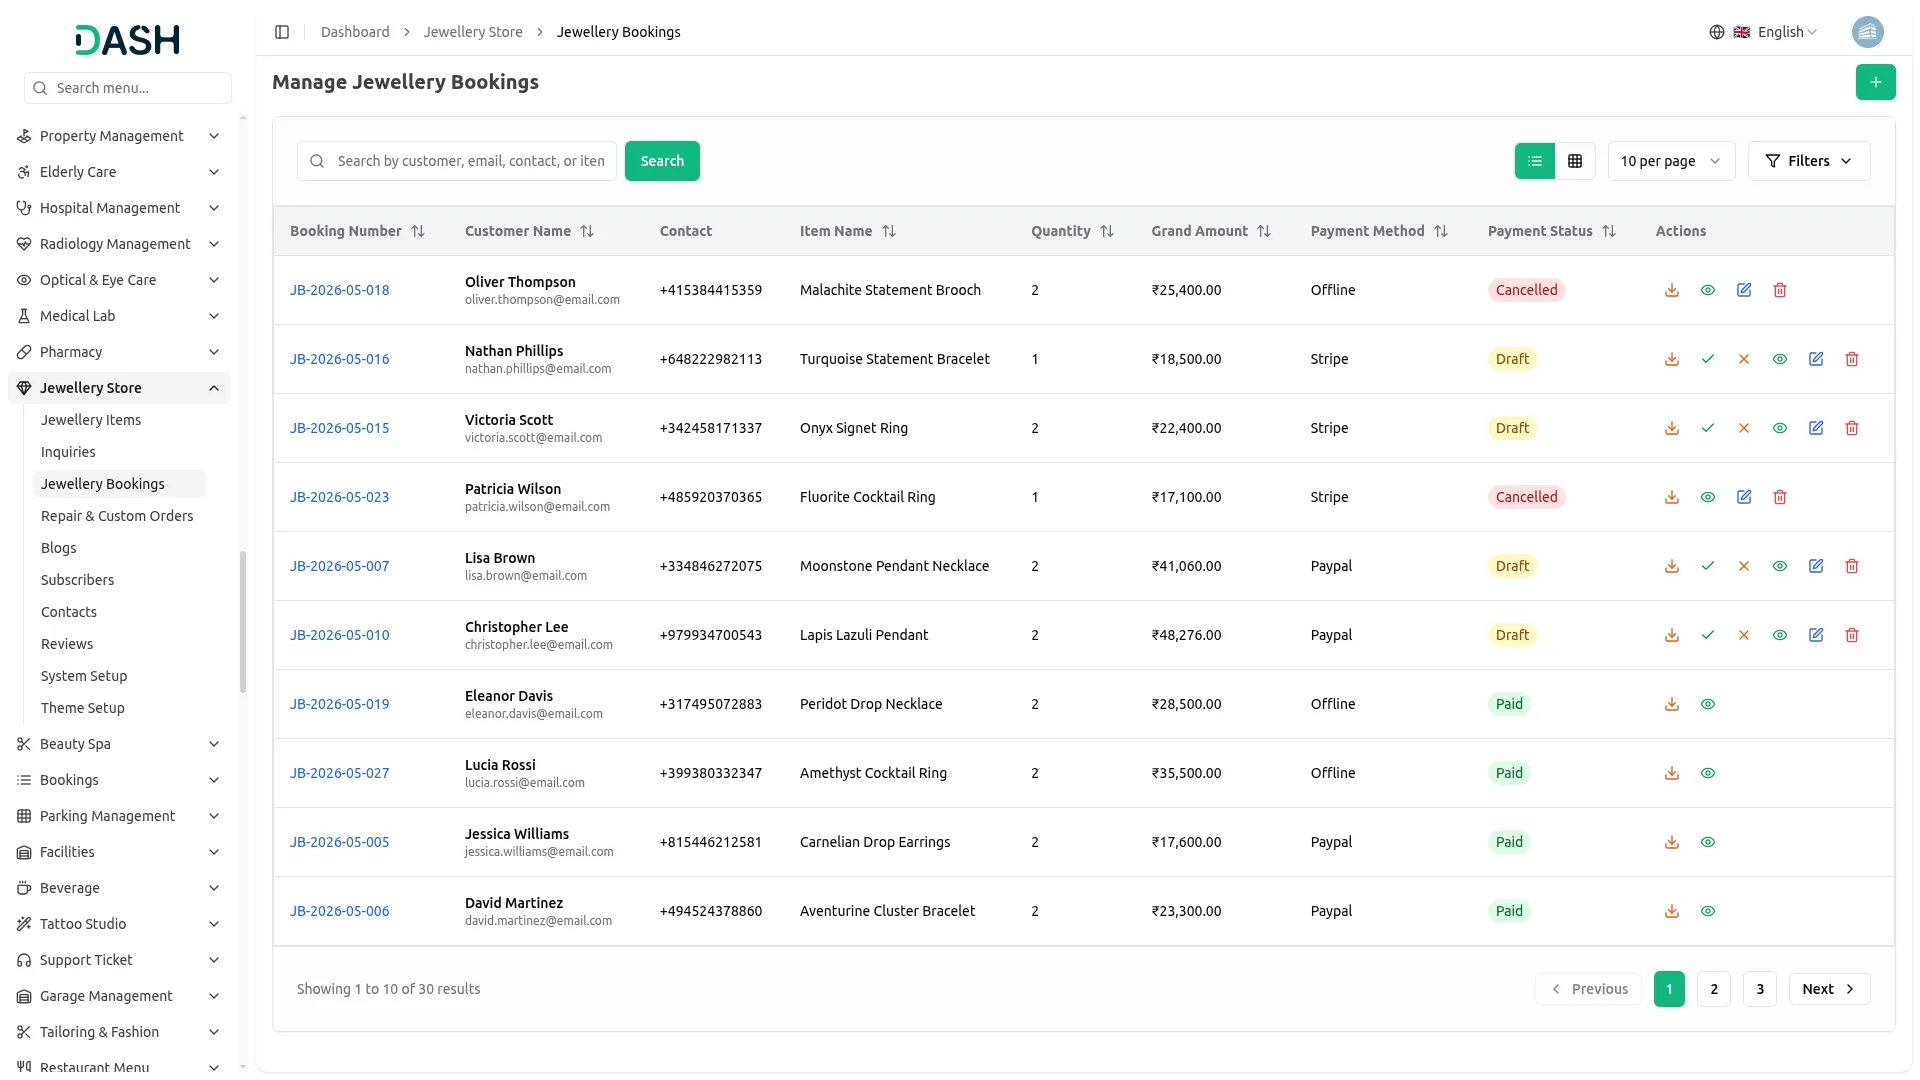
- The list page displays a table of columns, including the booking’s Booking Number, Customer Name, Contact, Item Name, Quantity, Grand Amount, Payment Method, and Payment Status. Use the search bar to find a specific booking by customer, email, contact, or item, and switch between list view and grid view, or change how many items appear per page.
- Click the Filters button to apply filtering options, including filtering by Item and Payment Status. Click Apply to filter the data or Clear to reset it.
- In the Actions column, you can use the download to save the booking invoice, the view to see the full booking details, the edit to update the booking, or the delete to permanently remove it from the system.
- For bookings with a Draft status, Approve and Reject will also appear in the Actions column. Click Approve to confirm the booking or Reject to decline it, allowing you to manage pending bookings directly from the list.
-
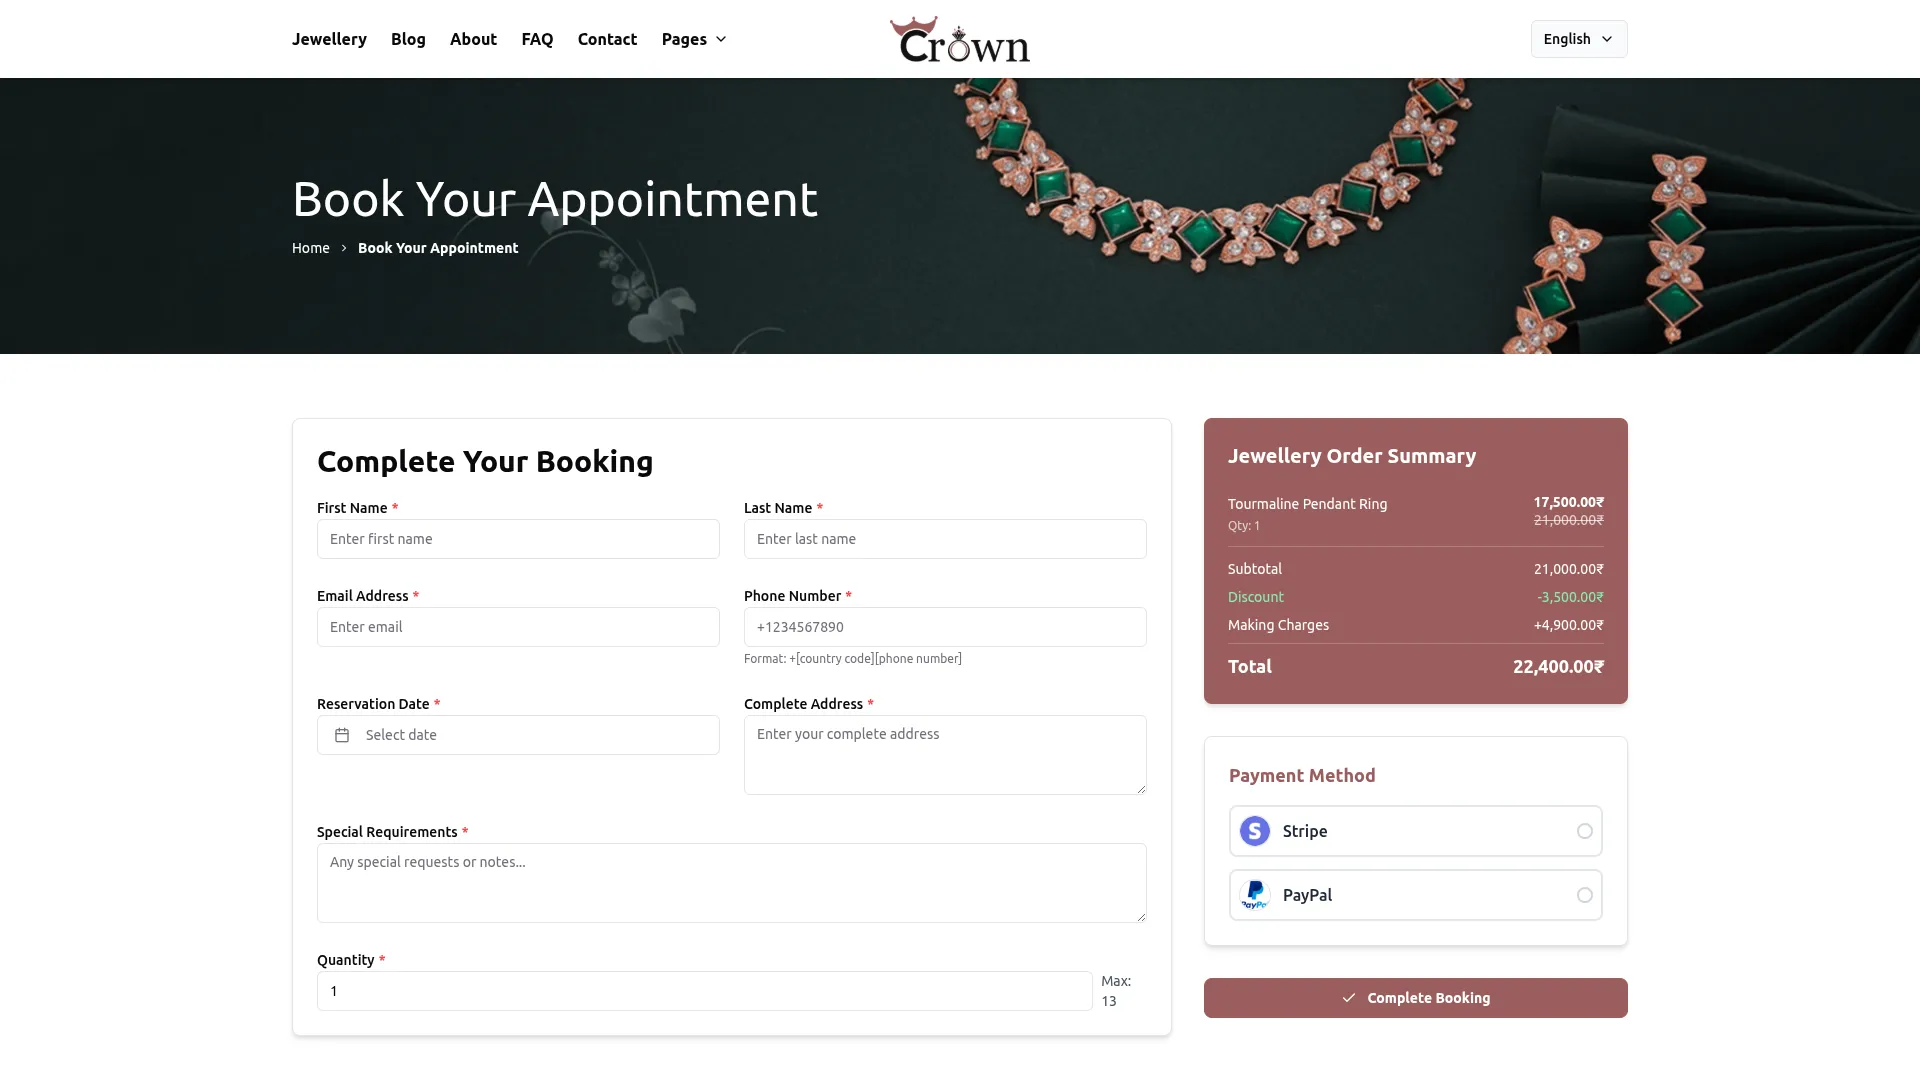
- On the website, customers place bookings through the Book Your Appointment page, where they fill in their personal details, Reservation Date, Complete Address, Special Requirements, and Quantity, and review the Jewellery Order Summary (Subtotal, Tax, Making Charges, and Total) before selecting a Payment Method to complete the booking. Every booking submitted through this form is automatically recorded and appears in the Manage Jewellery Bookings section in the backend for the store to review, approve, and manage.
-
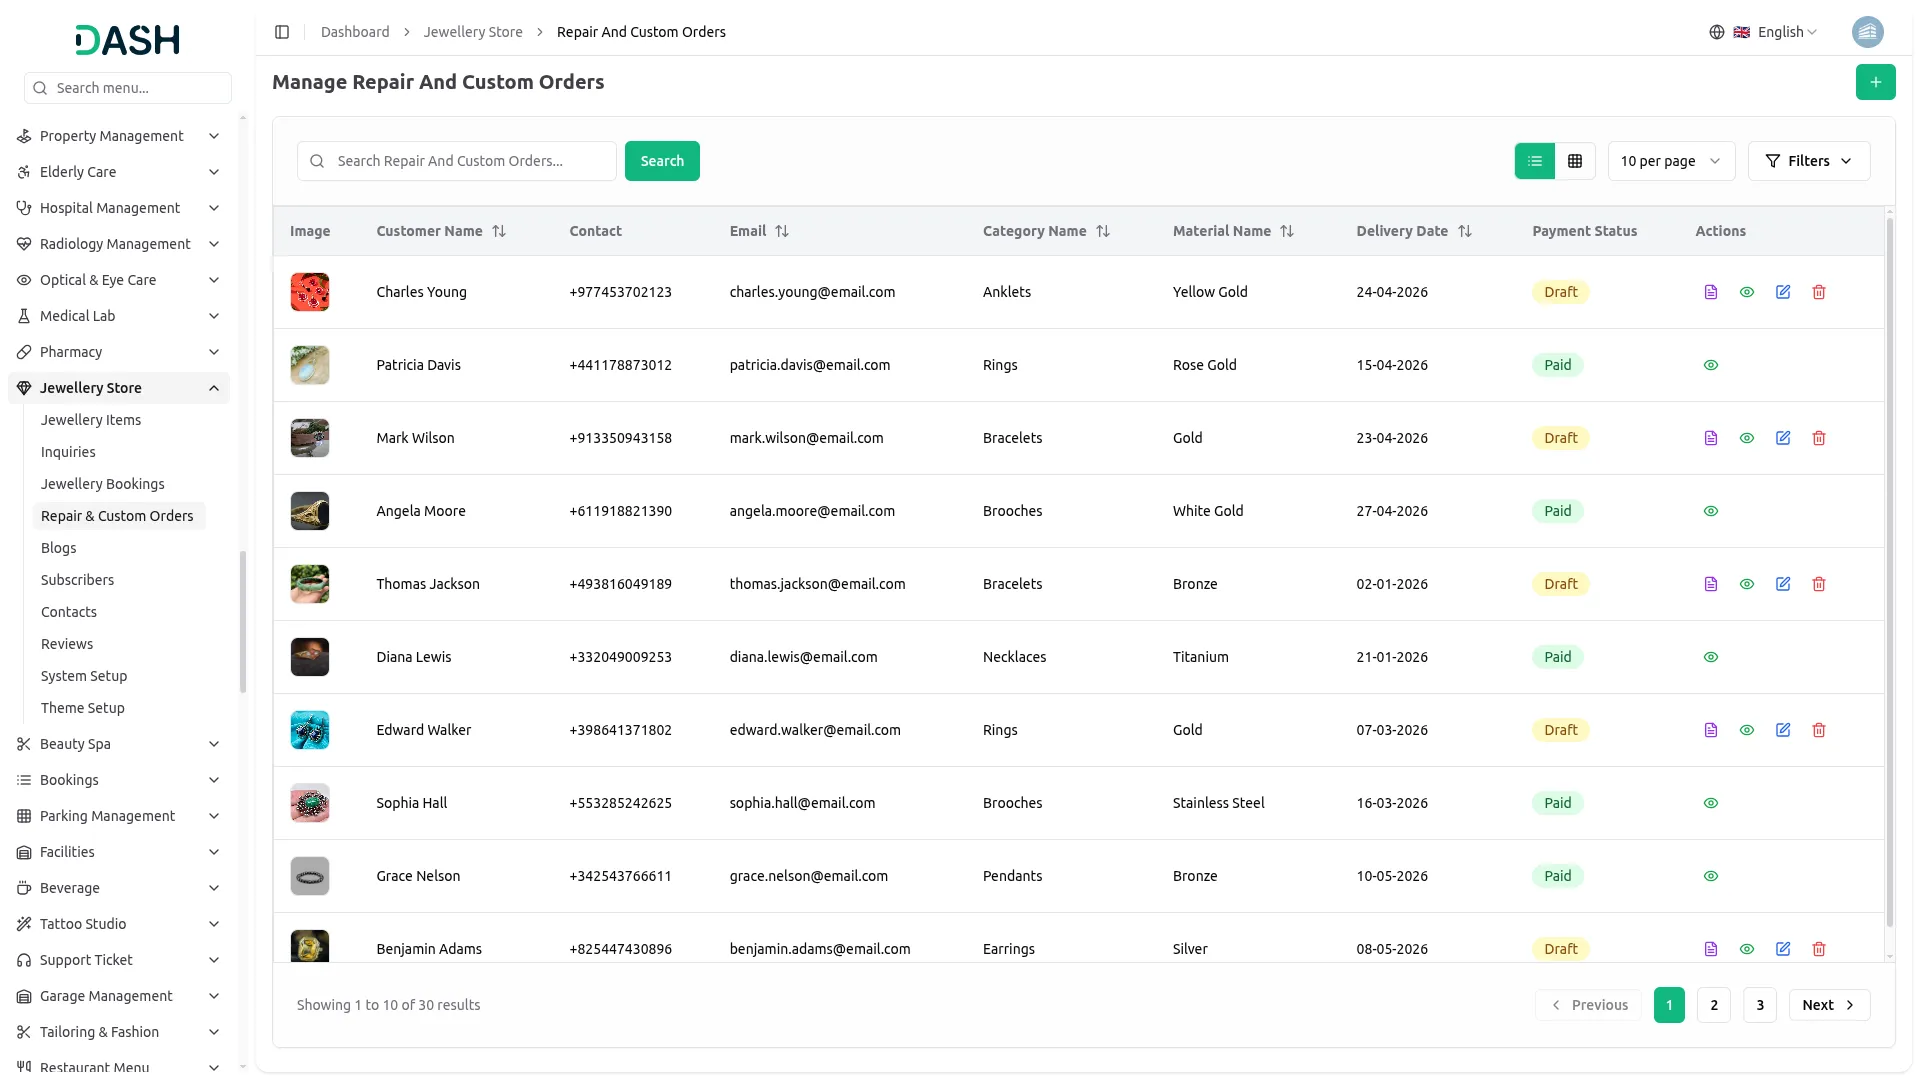
Repair And Custom Orders
- To add a new order, click the “Create” button, which is located on the Manage Repair and Custom Orders page. In the Create Repair and Custom Orders form, enter the customer’s Customer Name, Contact, and Email, then select the Bank Account, Category, and Material.
- Enter the Karat, Weight, Estimated Cost, and Delivery Date; upload an Image using the Browse button; and enter the Work Required along with any optional Additional Instructions. Click Create to save the order.
- The list page displays a table of columns including the order’s Image, Customer Name, Contact, Email, Category Name, Material Name, Delivery Date, and Payment Status. Use the search bar to find a specific order by name or details, and switch between list view and grid view, or change how many items appear per page.
- Click the Filters button to apply filtering options, including filtering by Payment Status, Category, Material, and Delivery Date. Click Apply to filter the data or Clear to reset it.
- In the Actions column, you can use the view to see the full order details, the edit to update the order, or the delete to permanently remove it from the system.
- For orders with a ‘Draft’ status, a Post Order will also appear in the Actions column. Click ‘Post Order’ to confirm and process the order, after which the Payment Status updates to ‘Paid’, allowing you to manage pending orders directly from the list.
-
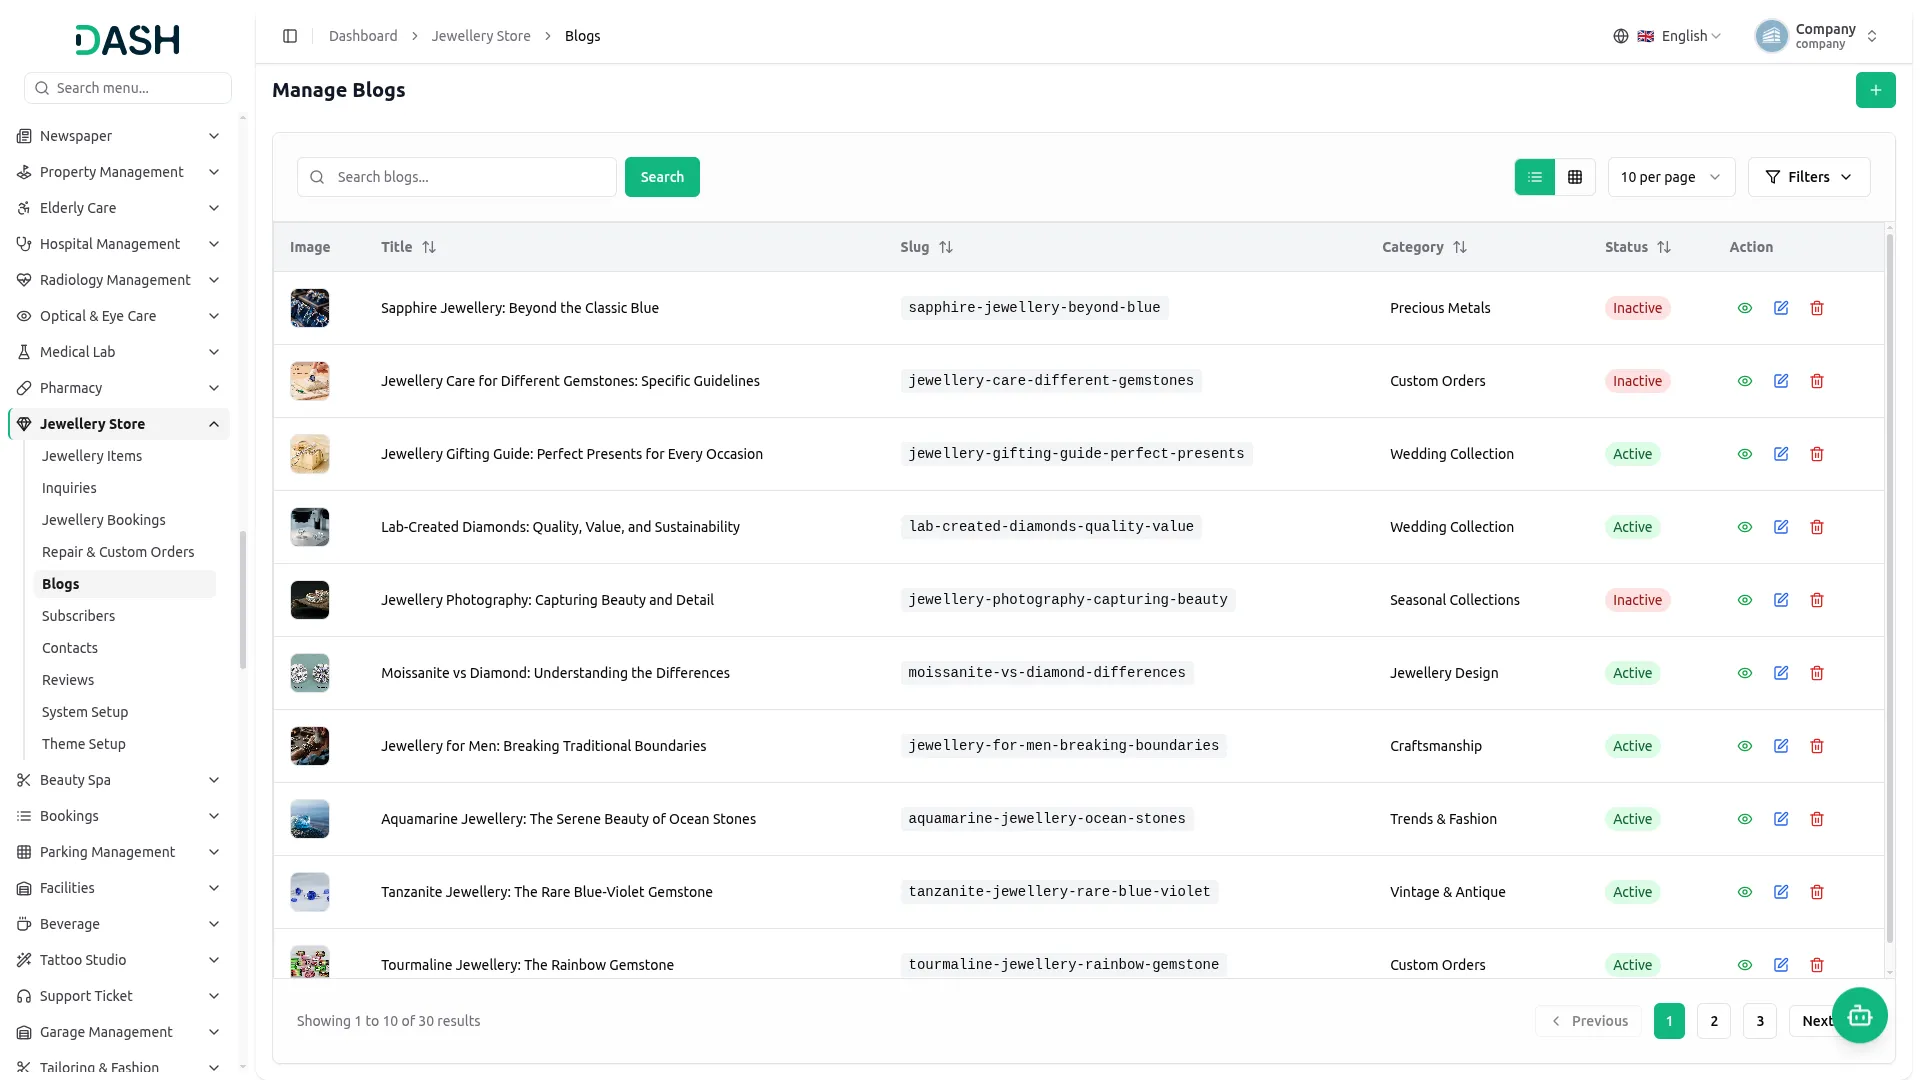
Manage Blogs
- To add a new blog, click the “Create” button, which is located on the Manage Blogs page. In the Create Blog form, enter the blog Title and URL Slug (only lowercase letters and hyphens allowed), then write a Short Description and select the Category.
- Add Tags for better categorization, write the main Description using the rich text editor, and upload a Featured Image using the Browse button. Use the Active toggle to set whether the blog is published on the website, then click Create to save the blog.
- The list page displays a table of columns including the blog’s Image, Title, Slug, Category, and Status. Use the search bar to find a specific blog by title or details, and switch between list view and grid view, or change how many items appear per page.
- Click the Filters button to apply filtering options, including filtering by Status and Category. Click Apply to filter the data or Clear to reset it.
- In the Action column, you can use the view to see the full blog details, the edit to update the blog, or the delete to permanently remove it from the system.
-
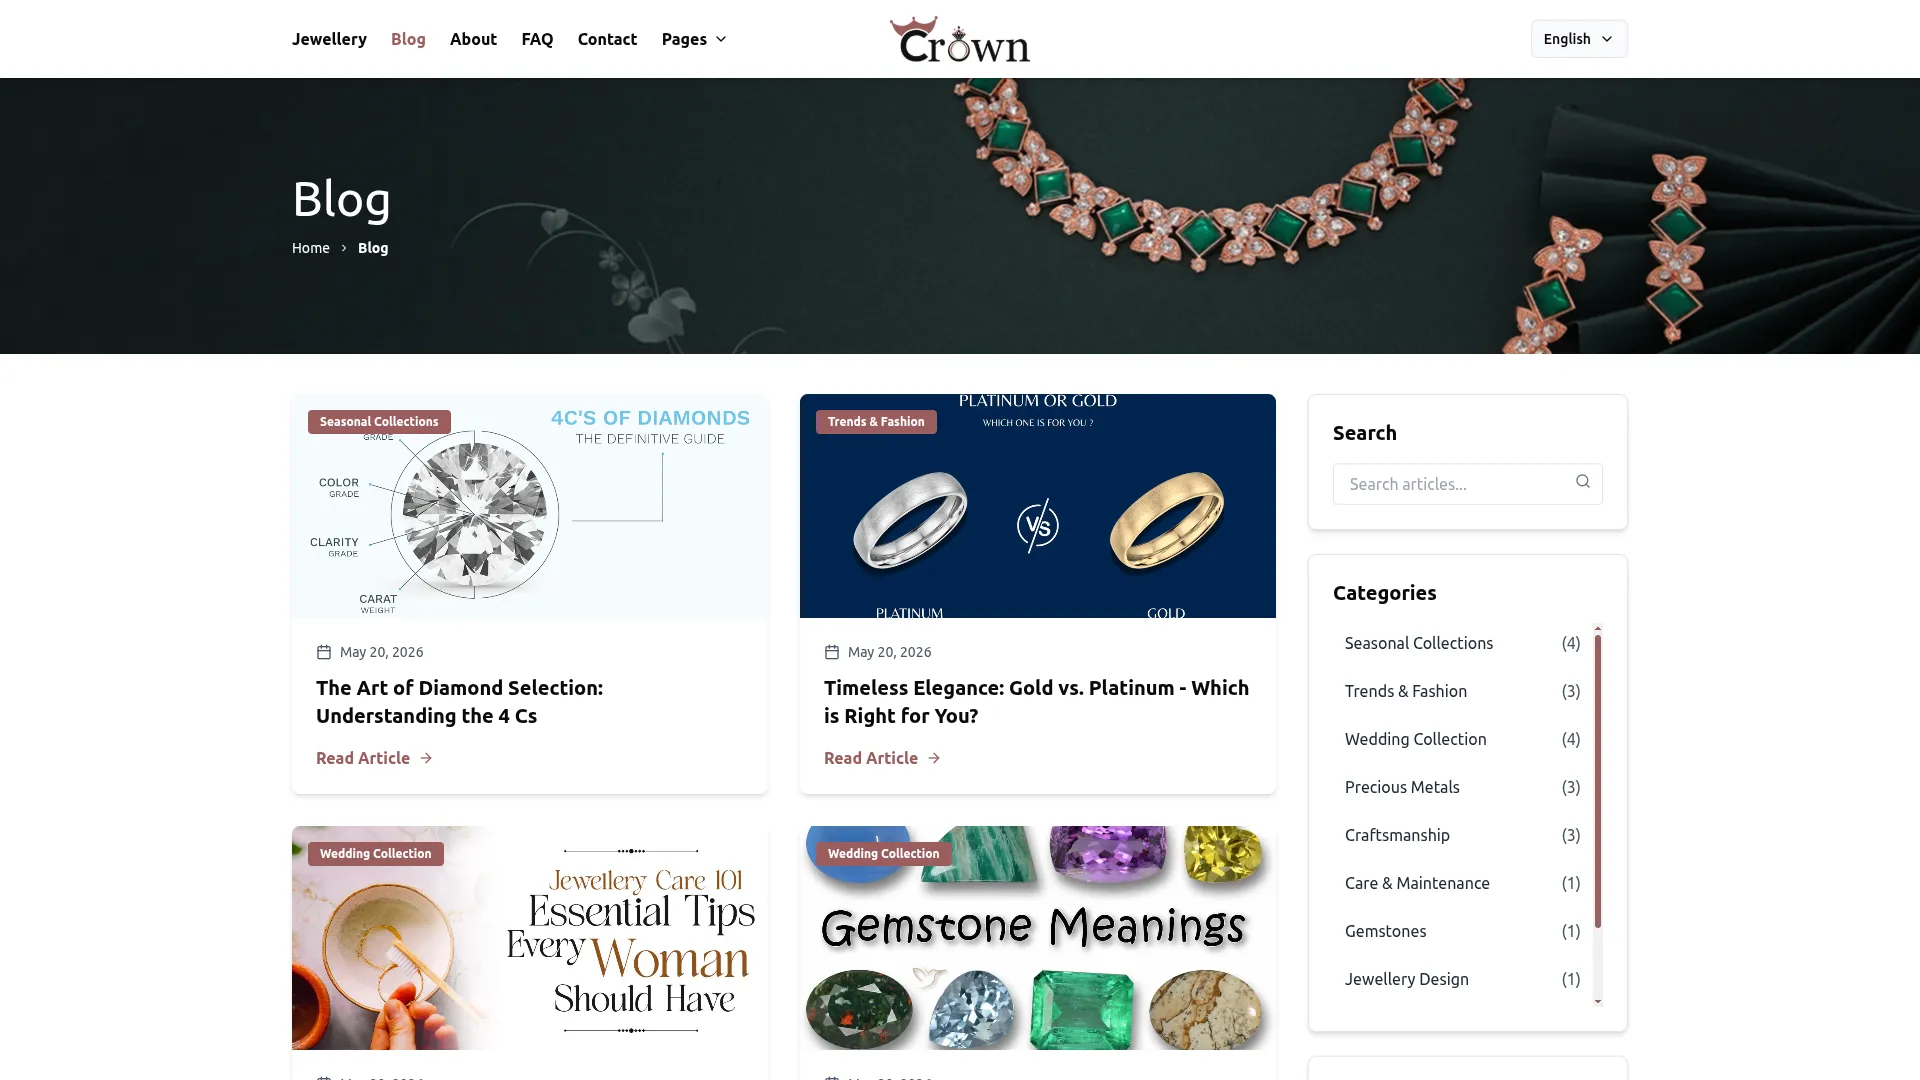
- On the website, every blog with an Active status appears on the Blog page, where visitors can browse posts by category, search for articles, and view Recent Posts. Each blog displays its featured image, title, category, and date, and clicking a post opens the full blog detail page showing the complete content along with its Category, Tags, and Recent Posts. Blogs set to Inactive are not shown on the storefront.
-
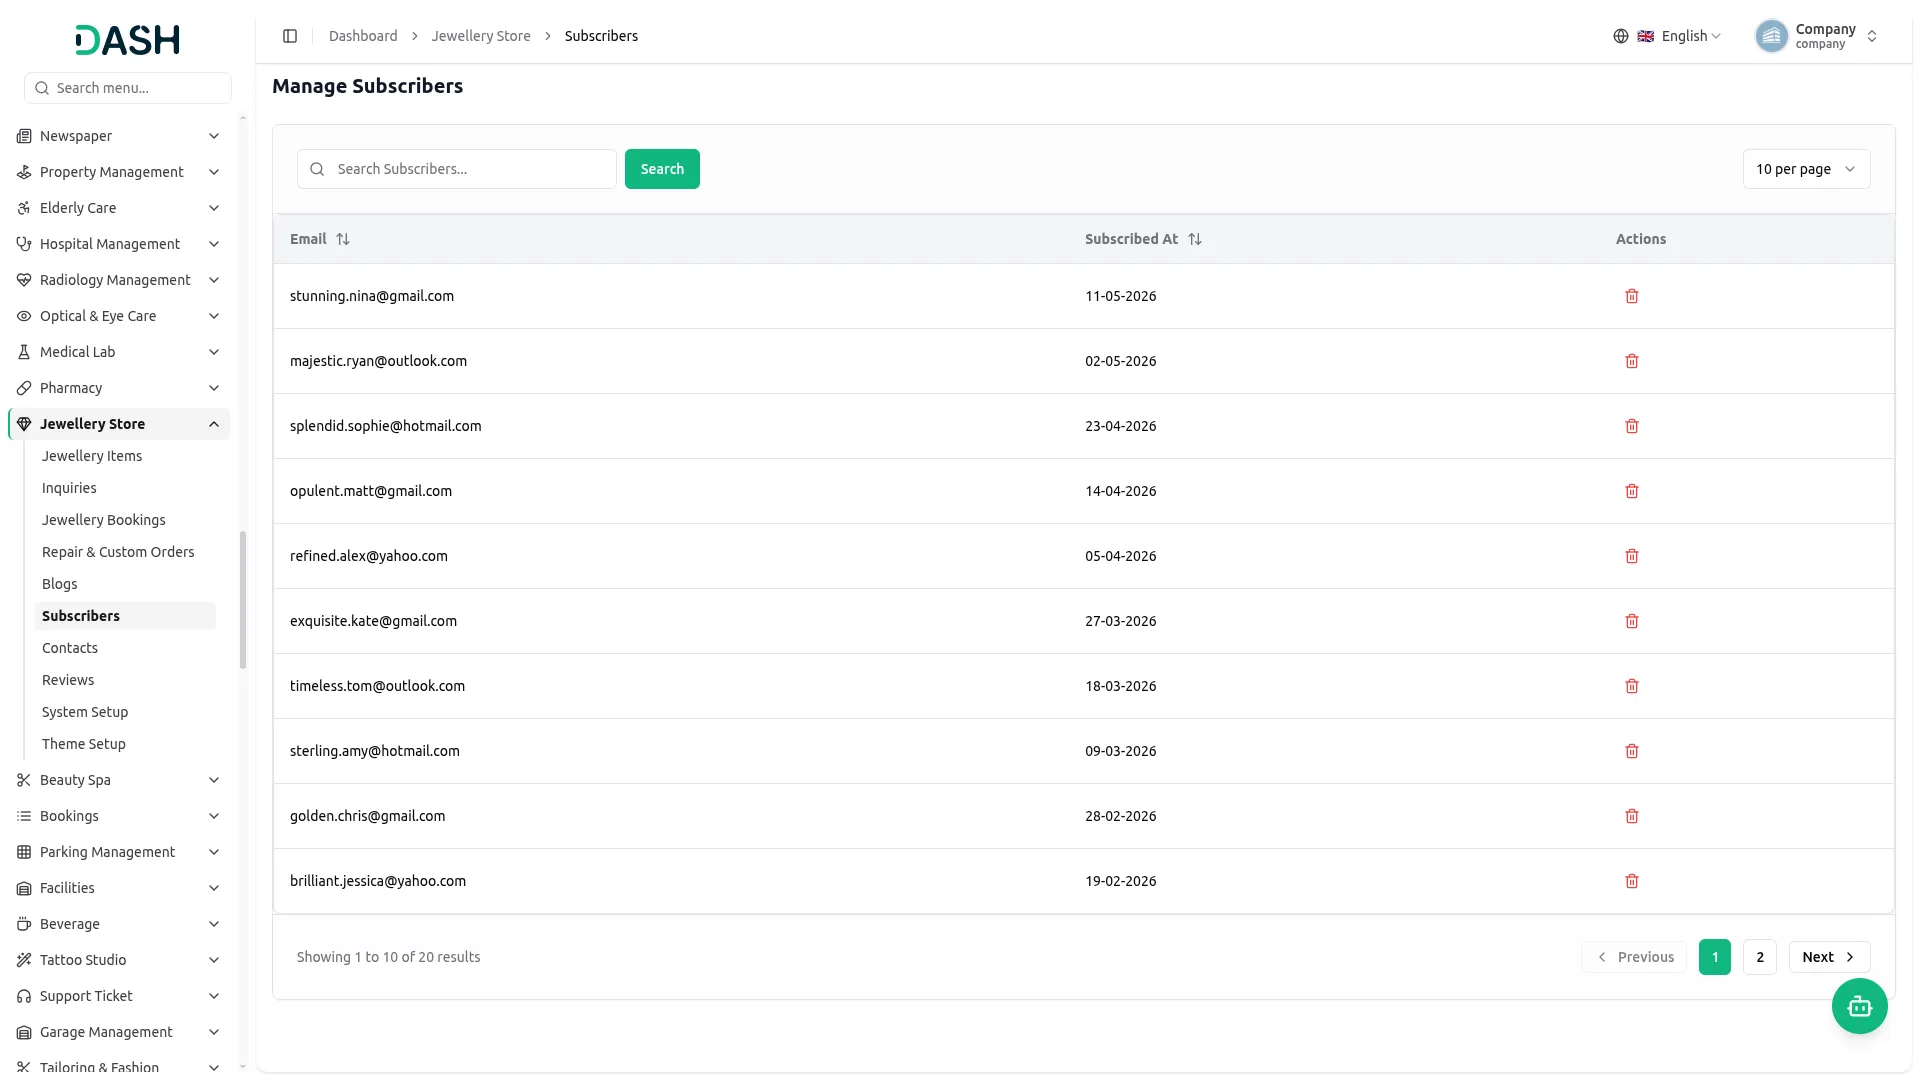
Manage Subscribers
- The Manage Subscribers page displays all the email addresses collected through the newsletter subscription form on your website. The list page displays a table of columns including the subscriber’s Email and Subscribed At date. Use the search bar to find a specific subscriber by email, or change how many items appear per page.
- In the Actions column, you can use the delete to permanently remove a subscriber from the system.
- On the website, visitors subscribe through the Subscribe Newsletter section, where they enter their email address and click Subscribe Free. Every email submitted through this form is automatically recorded and appears in the Manage Subscribers section in the backend, allowing the store to maintain its newsletter audience for exclusive offers, new collection updates, and jewellery care tips.
-
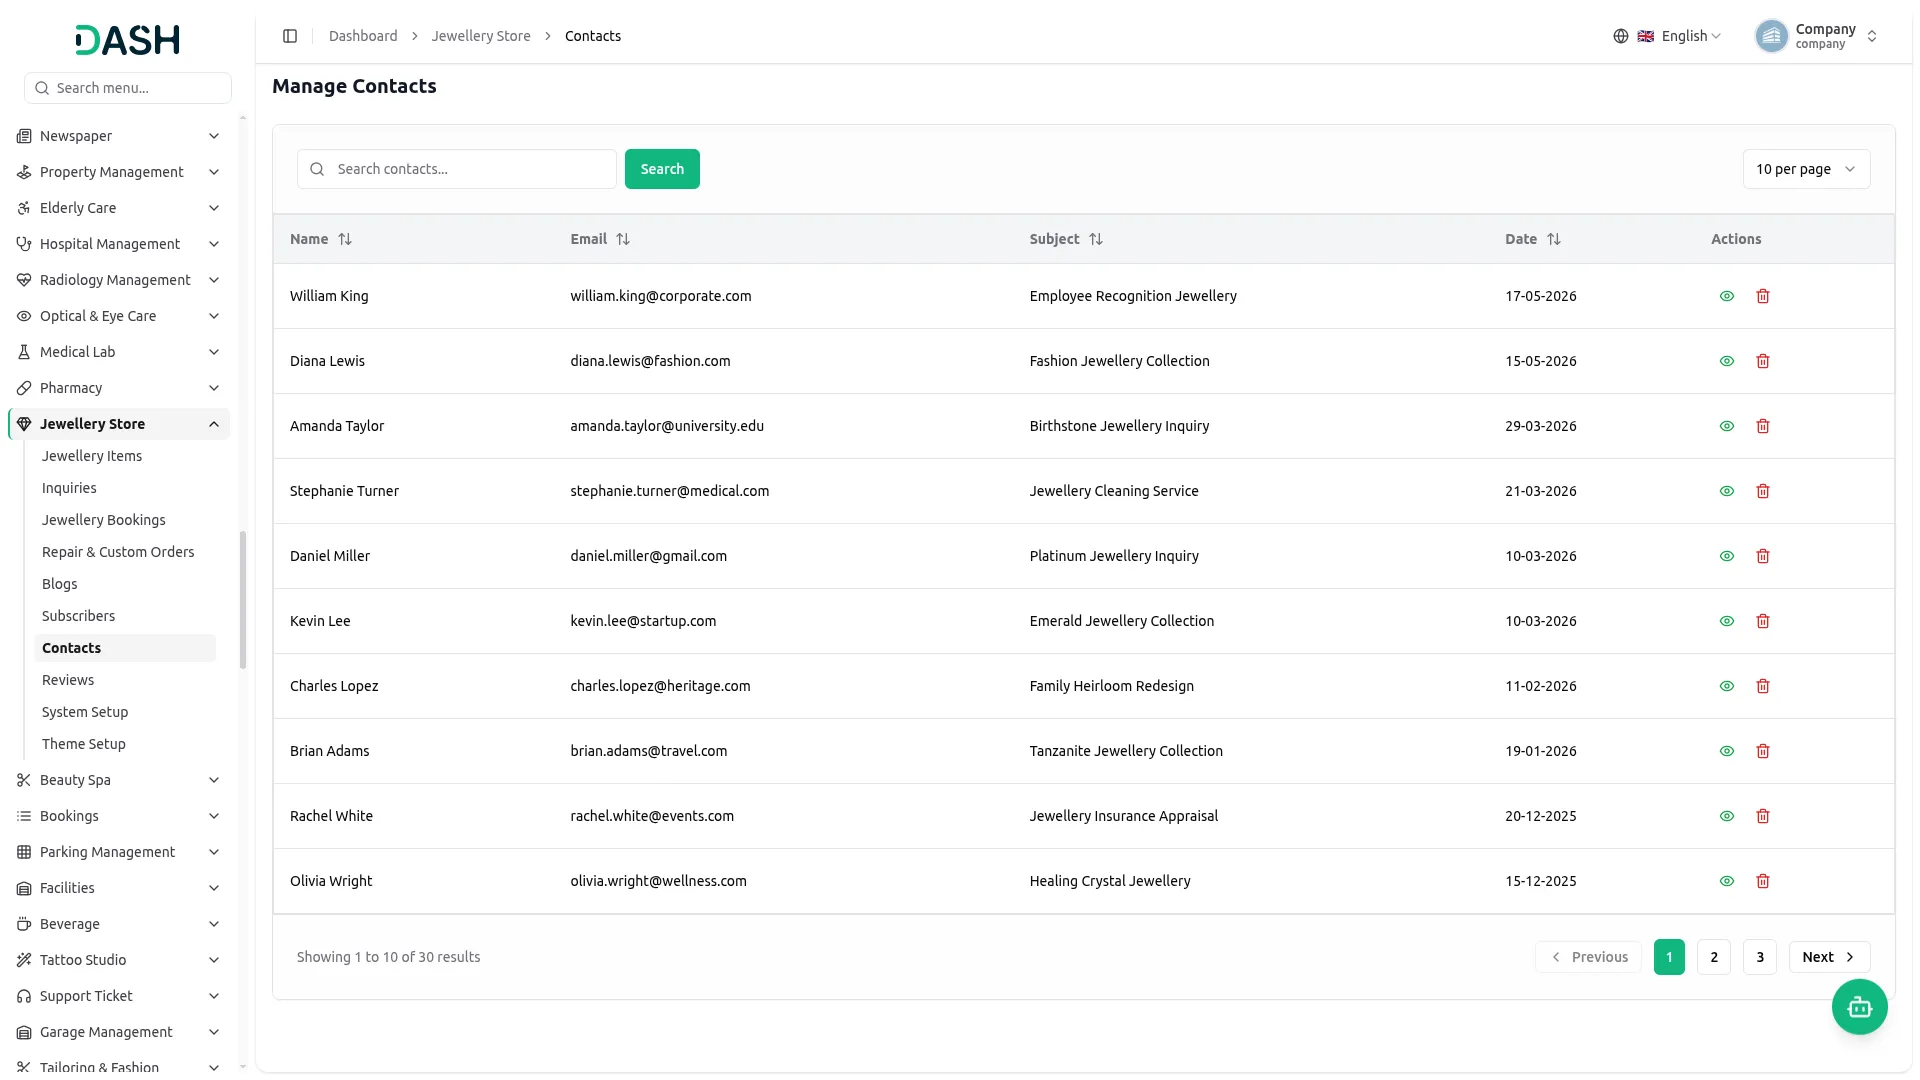
Manage Contacts
- The Manage Contacts page displays all the messages submitted by visitors through the contact form on your website. The list page displays a table of columns including the contact’s Name, Email, Subject, and Date. Use the search bar to find a specific contact by name or details, or change how many items appear per page.
- In the Actions column, you can use the view to see the full contact message details or the delete to permanently remove it from the system.
- On the website, visitors send messages through the Send Us a Message form on the Contact Us page, where they fill in their First Name, Last Name, Email Address, Phone Number, Subject, and Message. Every message submitted through this form is automatically recorded and appears in the Manage Contacts section in the backend for the store to review and respond to.
-
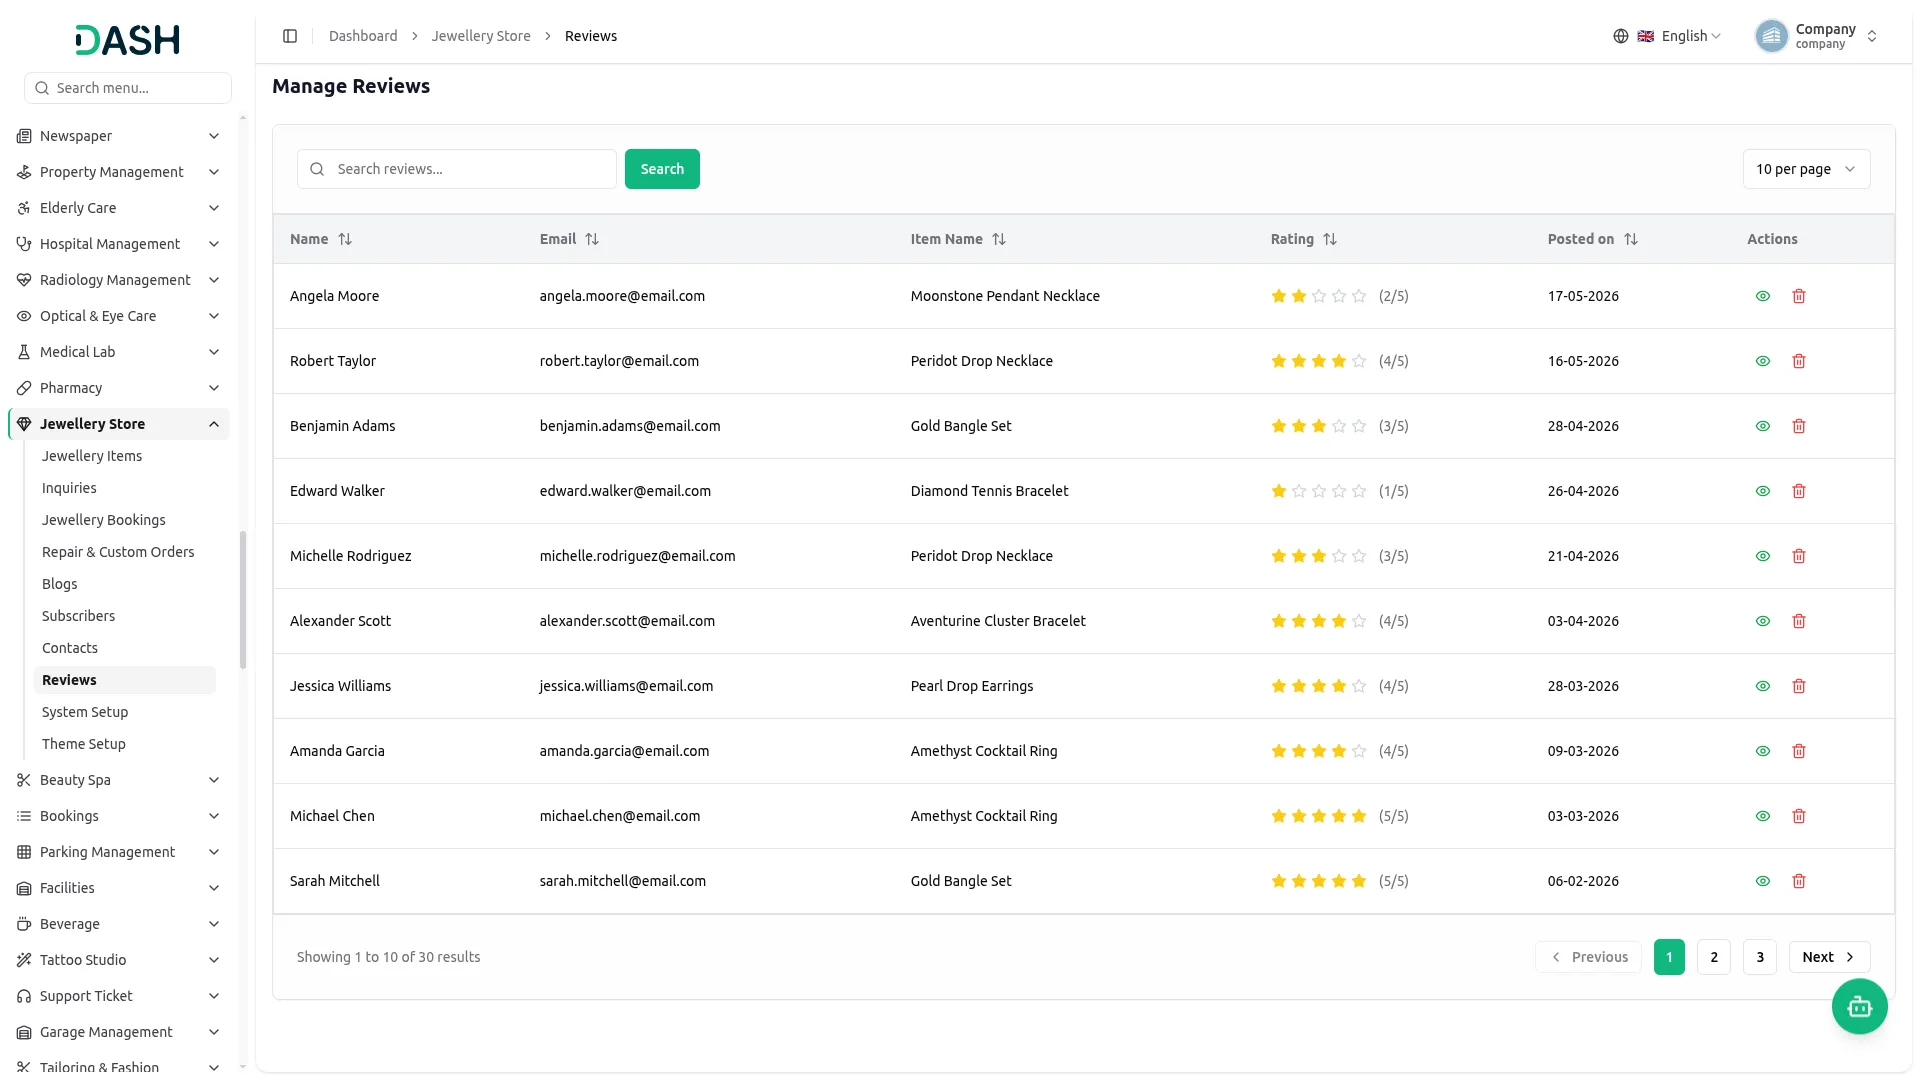
Manage Reviews
- The Manage Reviews page displays all the reviews submitted by customers for your jewellery items. The list page displays a table of columns including the reviewer’s Name, Email, Item Name, Rating (out of 5 stars), and Posted on date. Use the search bar to find a specific review by name or details, or change how many items appear per page.
- In the Actions column, you can use the view to see the full review details or the delete to permanently remove it from the system.
- On the website, customers leave reviews for the jewellery items they have purchased or viewed, providing their name, rating, and feedback. Every review submitted is recorded and appears in the Manage Reviews section in the backend, where the store can monitor customer feedback and manage which reviews are displayed.
-
Categories
Related articles
- Cleaning Management – WorkDo Dash SaaS Add-On Guide
- NMI – BookingGo SaaS Add-On Guide
- Radiology Management – WorkDo Dash SaaS Add-On Guide
- PowerTranz – WorkDo Dash SaaS Add-On Guide
- Flash Sale Guide – eCommerceGo SaaS
- Livestorm Meeting Credentials Generation Guide
- Visitor Management – WorkDo Dash SaaS Add-On Guide
- Meta Token Generation Guide
- Procurement – WorkDo Dash SaaS Add-On Guide
- Twilio – TicketGo Add-On Guide
- Flutter App Setup & Installation Guide
- DJ Orchestra – WorkDo Dash SaaS Add-On Guide
We're Here to Help - Let's Talk
Have questions about our solutions, customization services, or business tools? Our team is here to help you. let's talk.