
Payroll Management in WorkDo HRM
Learn to process payroll runs, salary components, and payslips easily.
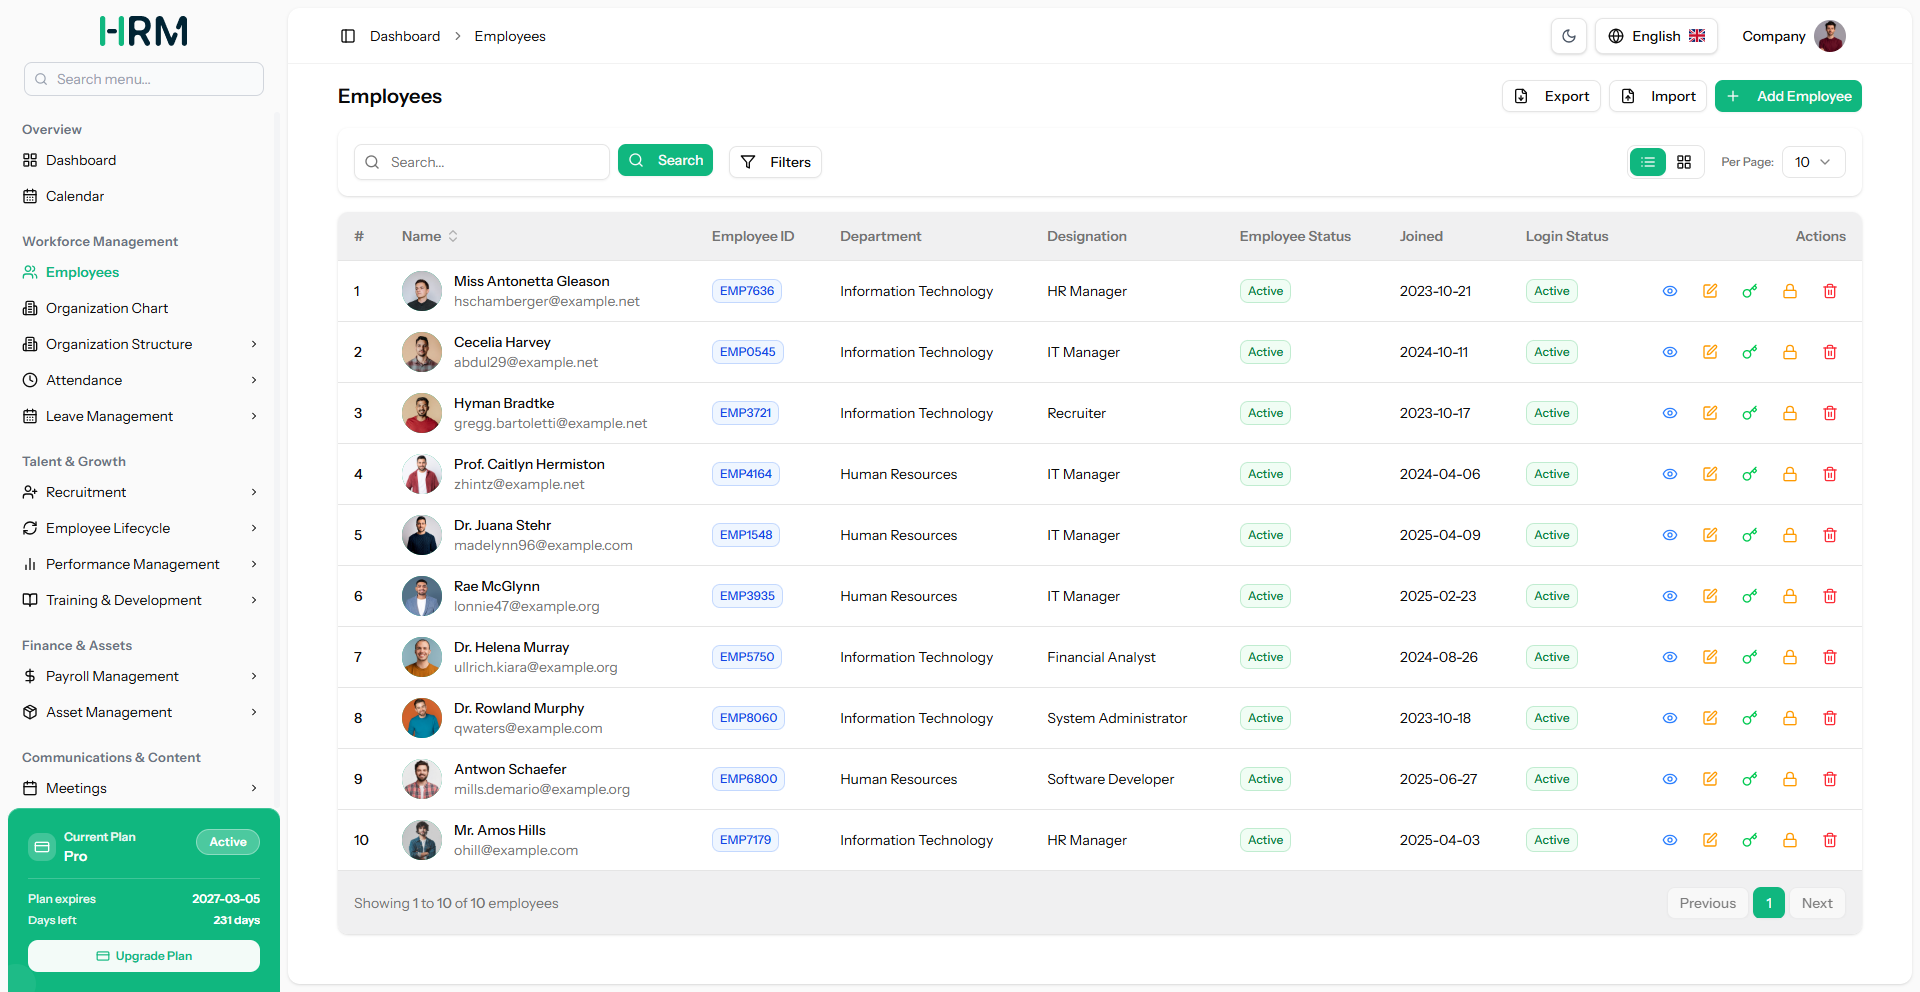
Step 1: To get started, you’ll first need to create an employee by entering the required details. Go to the Employees page in the left-hand navigation bar and click the “Add Employee” button at the top right of the screen. On the next page, fill in the necessary information and click “Create”.
Once created, you’ll be able to see the employee listed in the Employees page.
Step 2: Once your employees are set up, the next step is to manage their attendance. From the Attendance Records page under the Attendance menu, you can access and manage all attendance-related activities. Here’s what you can do:
Step 3: To view and manage attendance, navigate to the Attendance Records page from the Attendance menu. This page displays a comprehensive calendar-style view of all employees’ attendance for the selected month and year.
Each day in the calendar will be marked with a specific symbol based on the employee’s attendance status. If the employee came to work, the day will show Present. If an employee does not come to work without approval, they will be marked as Absent. Also, if an employee leaves before half days they will still be marked as Absent. If the employee worked only half the day, it will show Half Day.
If the employee is on an approved paid or unpaid leave, the day will be marked as On Leave. If that day is a declared public or company holiday, it will show Holiday. If it is the employee’s scheduled weekly off, like Saturday or Sunday, it will show Day Off (This option is available in the settings).
For dates that have not yet arrived, the day will simply show as Future. If an employee has not added attendance for the day, it will show as Attendance Not Added.
If the employee arrived after the Late Arrival Grace, the day will show Late. If the employee left before the Early Departure Grace, it will show Early Departure. And if the employee worked beyond their shift hours, the day will show Overtime.
You can manually add it by clicking the “Add Record” button located at the top-right corner of the screen and entering the required details.
Step 4: Once your attendance setup is complete, the next step is to manage employee leave. From the Leave Application page under the Leave Management menu, you can access and handle all leave-related tasks. Here’s what you can do:
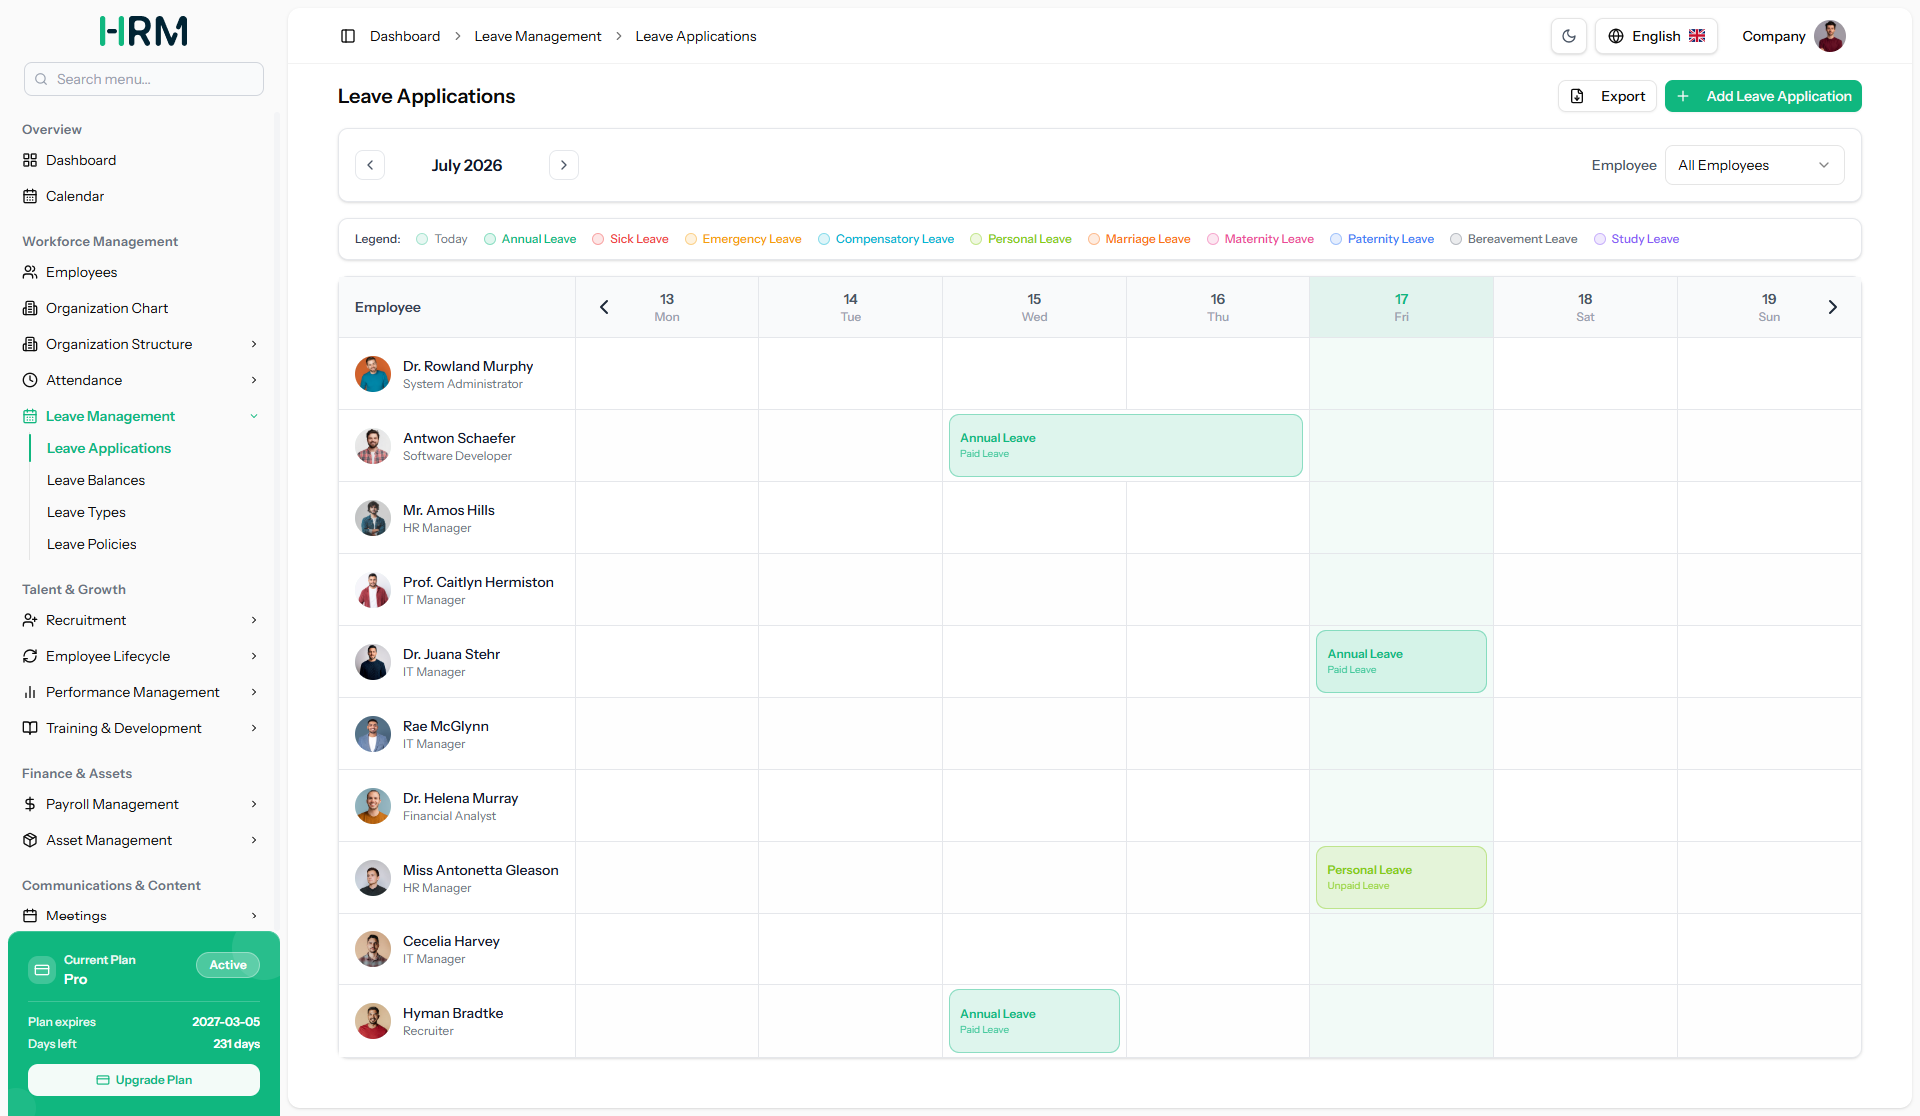
Step 5: Leave Applications helps you keep a complete record of all leave requests raised by employees in one place, so you can easily track who is on leave, for how many days, and what type of leave they have taken, and you can approve or reject requests directly from this screen without any back-and-forth communication.
To add a new leave application manually, click the “Add Leave Application” button at the top right corner, fill in the required details, and click Save.
Step 6: The Payroll Management module allows you to handle all salary related activities for your employees from one place. You’ll find all payroll-related options under the Payroll Management menu on the left navigation bar.
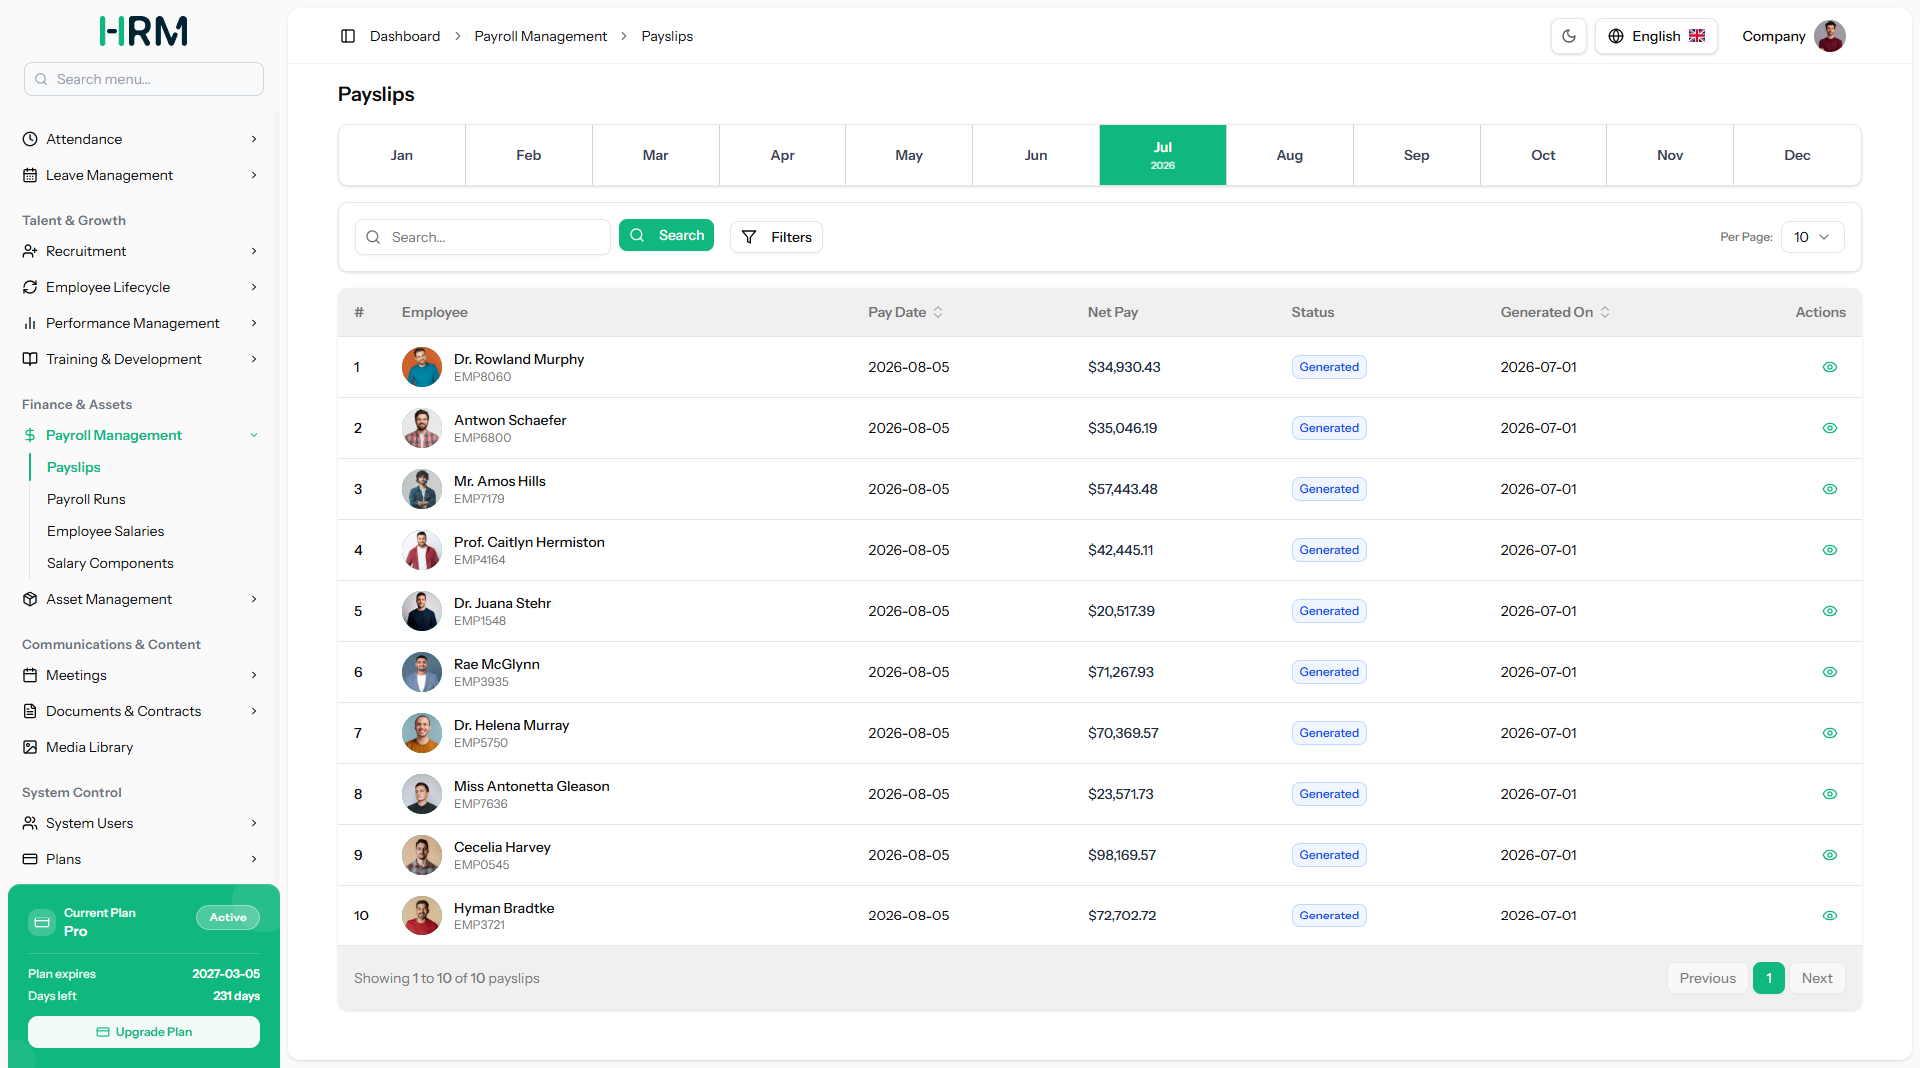
Step 7: Payslips helps you keep a complete and organized record of every employee’s salary slip in one place, so you can download any payslip for any month without having to calculate or prepare it manually, saving you time and ensuring every employee has a proper salary record at all times.
You can filter payslips by Employee, Status, or a specific Date Range using the filters availab le at the top of the screen and download any payslip directly from the actions column.
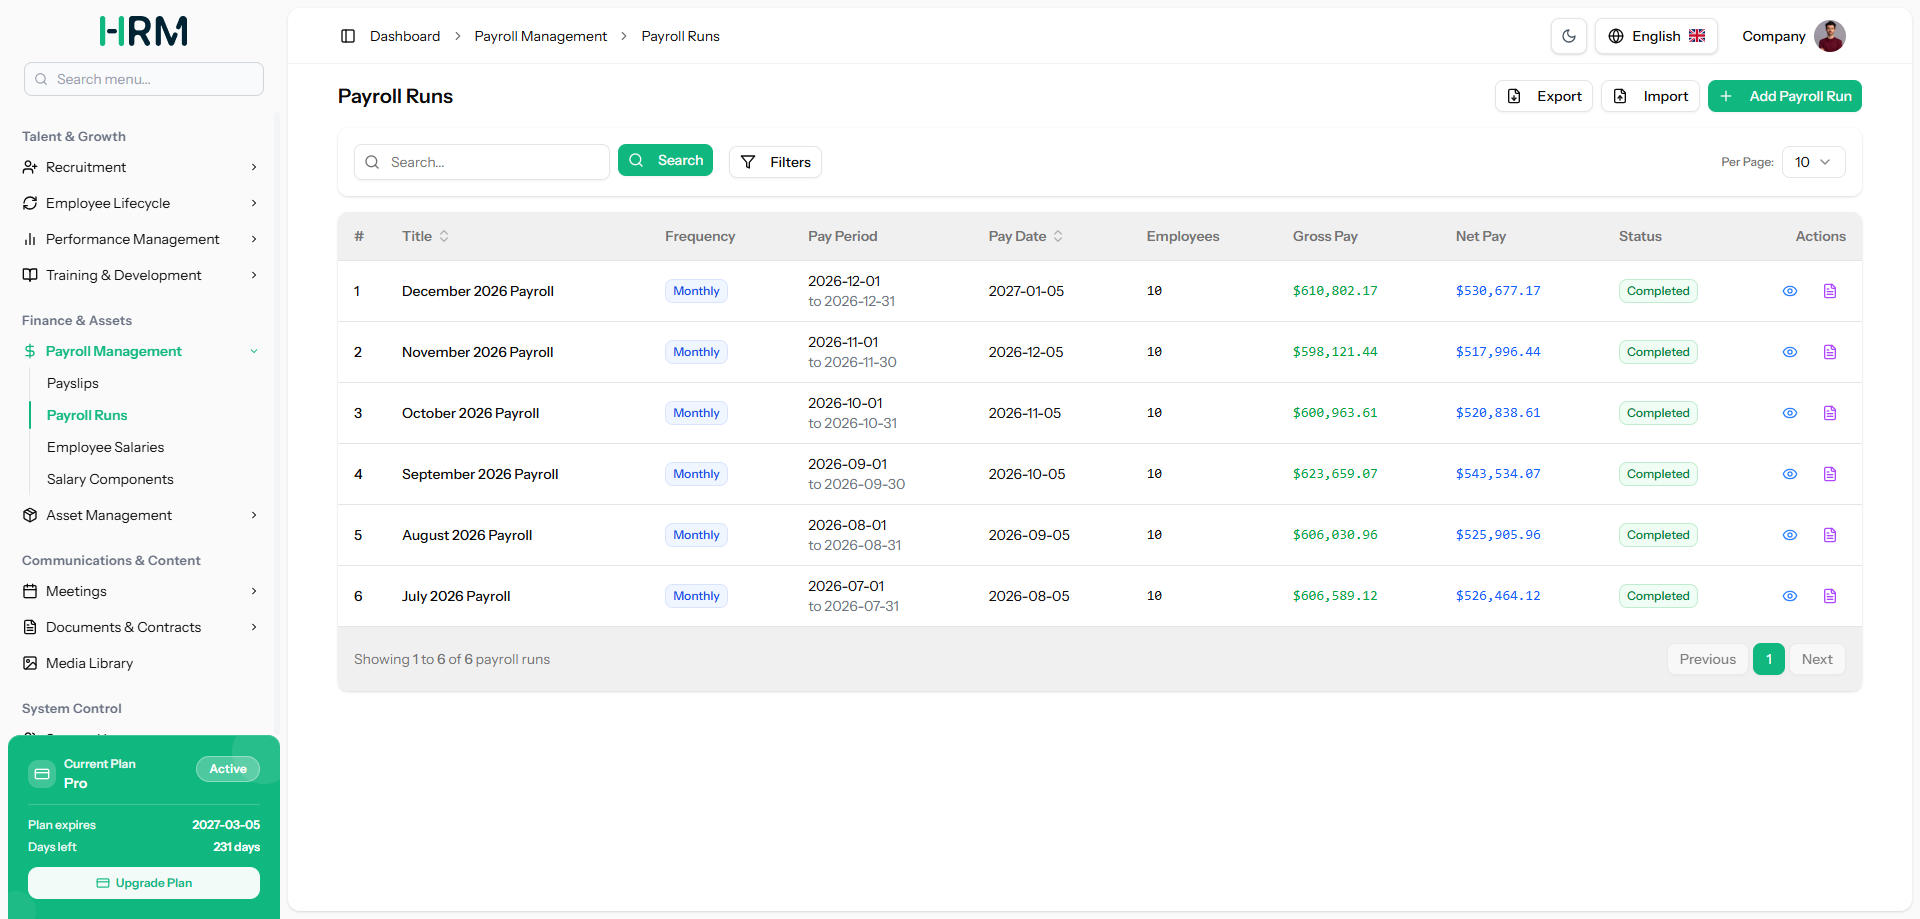
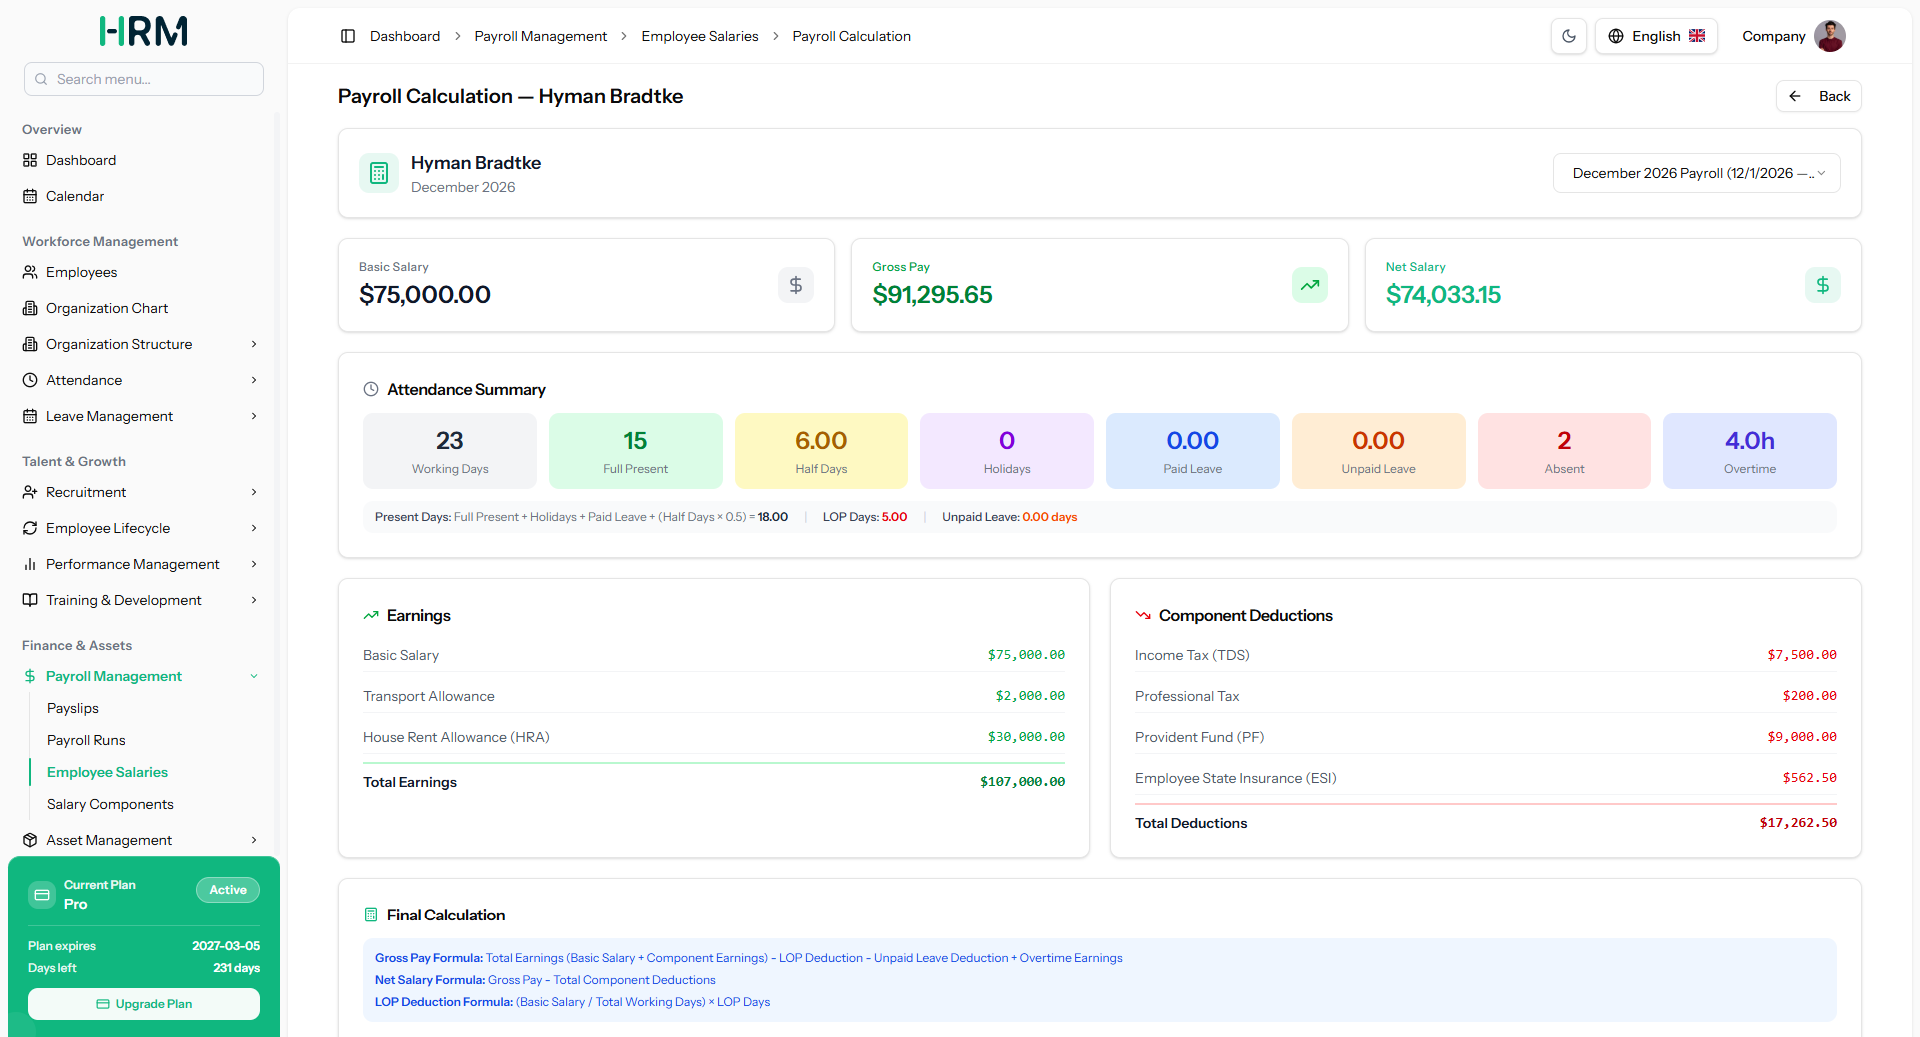
Step 8: Payroll Runs allows you to process salaries for all employees in a single action. To get started, click the “Add Payroll Run” button, fill in the required details, and save it.
Once created, the payroll will appear in the list with a Draft status. To process it, click the Process button; this will calculate all employee salaries and update the payroll status to Completed.
After processing, you can click the View button to access detailed payroll information, including a summary at the top, Payroll Run Details, and a complete breakdown of Employee Payroll Entries for all employees included in that run.
Once a payroll is created, clicking the Process button will trigger the payroll run. After the payroll is successfully processed and its status is marked as Completed, it can no longer be edited or deleted.
However, if there are any discrepancies or errors in an individual employee’s payslip, you can delete that specific payslip and rerun it for the concerned employee without affecting the rest of the payroll. This option is available under the View action.
Once the payroll is completed, click the Generate Payslips button to publish the payslips. They will automatically be added to the Payslips page, where employees can view their salary details. Employees can also download their payslips directly from there.
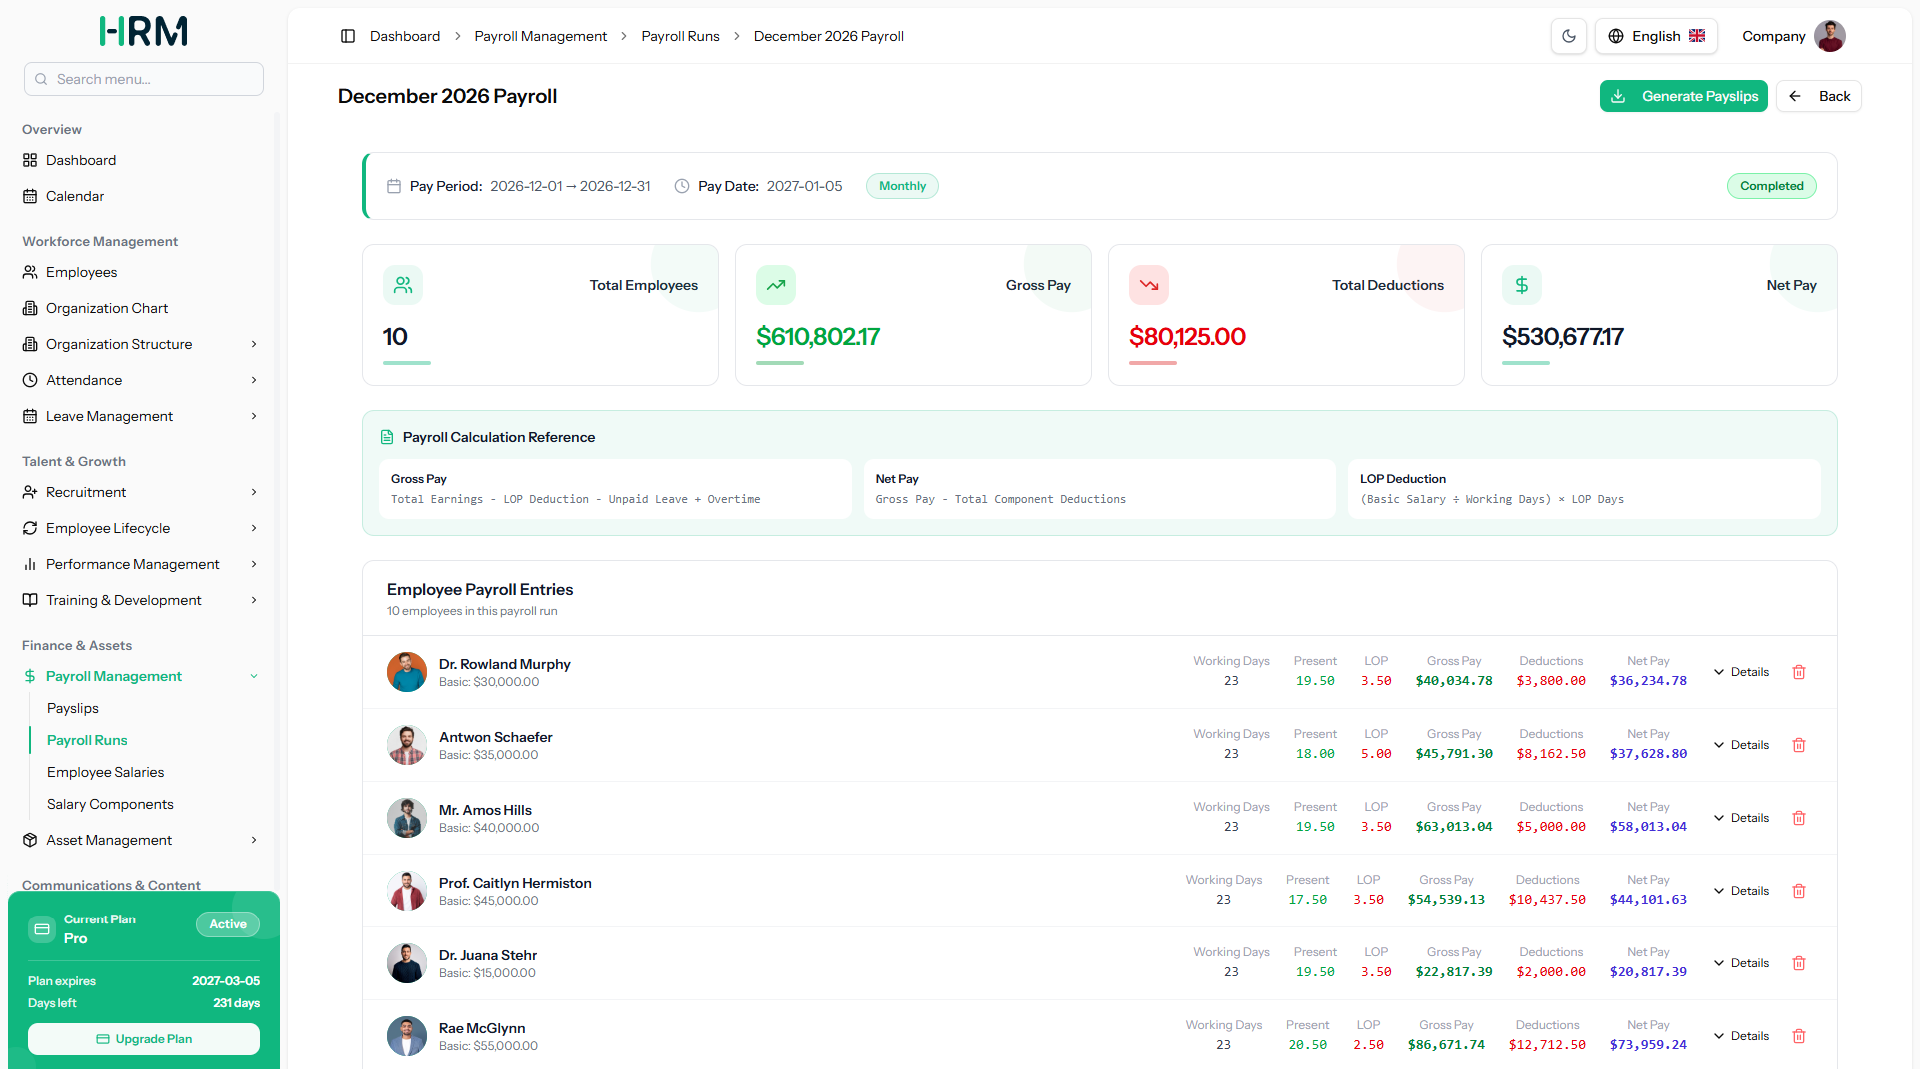
Step 9: Salary Components helps you define and customize all the individual building blocks of an employee’s salary such as allowances, benefits, taxes, and deductions, so that when payroll is processed, the system automatically applies the correct earnings and deductions for each employee based on the components assigned to them, ensuring that every payslip is calculated consistently and accurately according to your company’s salary structure.
The components created here will be available as dropdown options in the Edit action on the Employee Salaries page.
To add a new component, fill in the Component Name, Description, Type, Calculation Type, Fixed Amount, and set the Status to Active, then click Add Component.
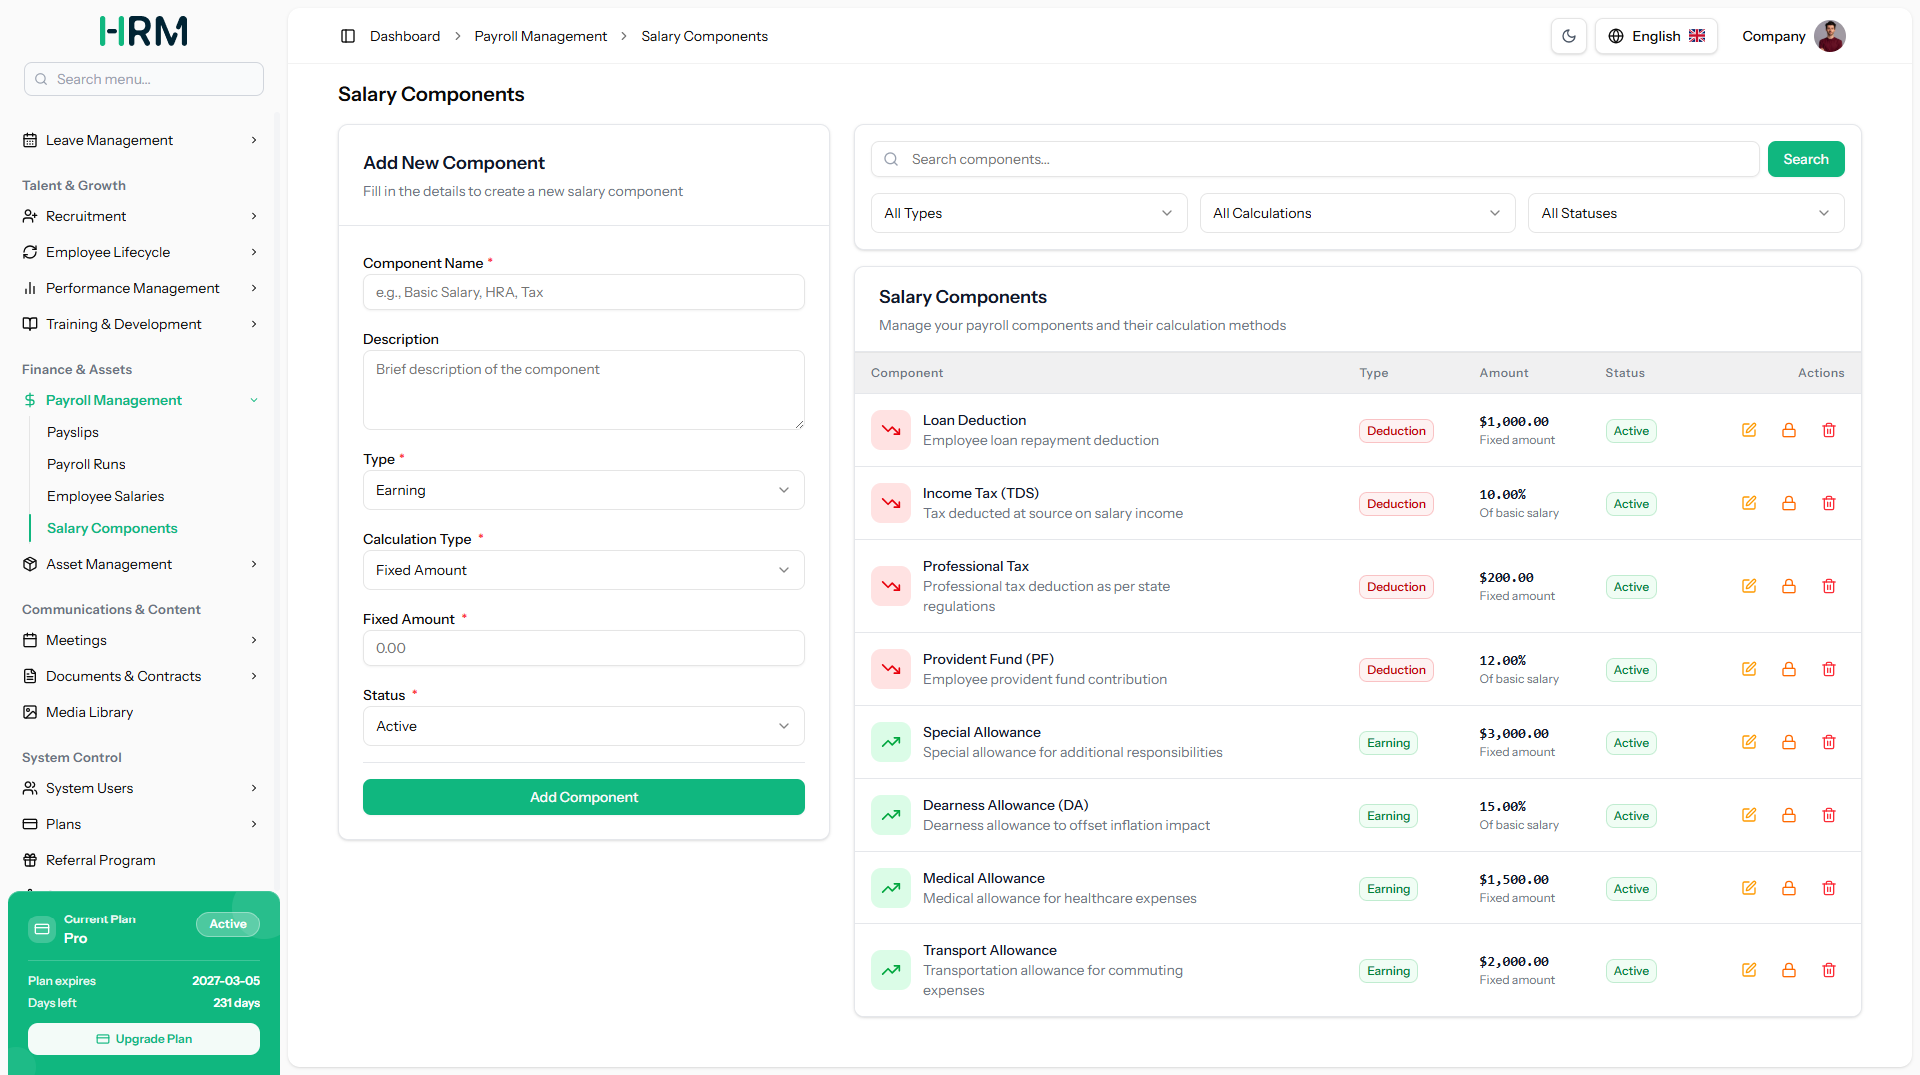
Step 10: Employee Salaries help you maintain a clear and detailed salary structure for every employee. You can click the Edit button to update an employee’s salary details, where you can select multiple Salary Components from the dropdown; these selected components will then be displayed on the list page. All salary components are created and managed from the Salary Components page.
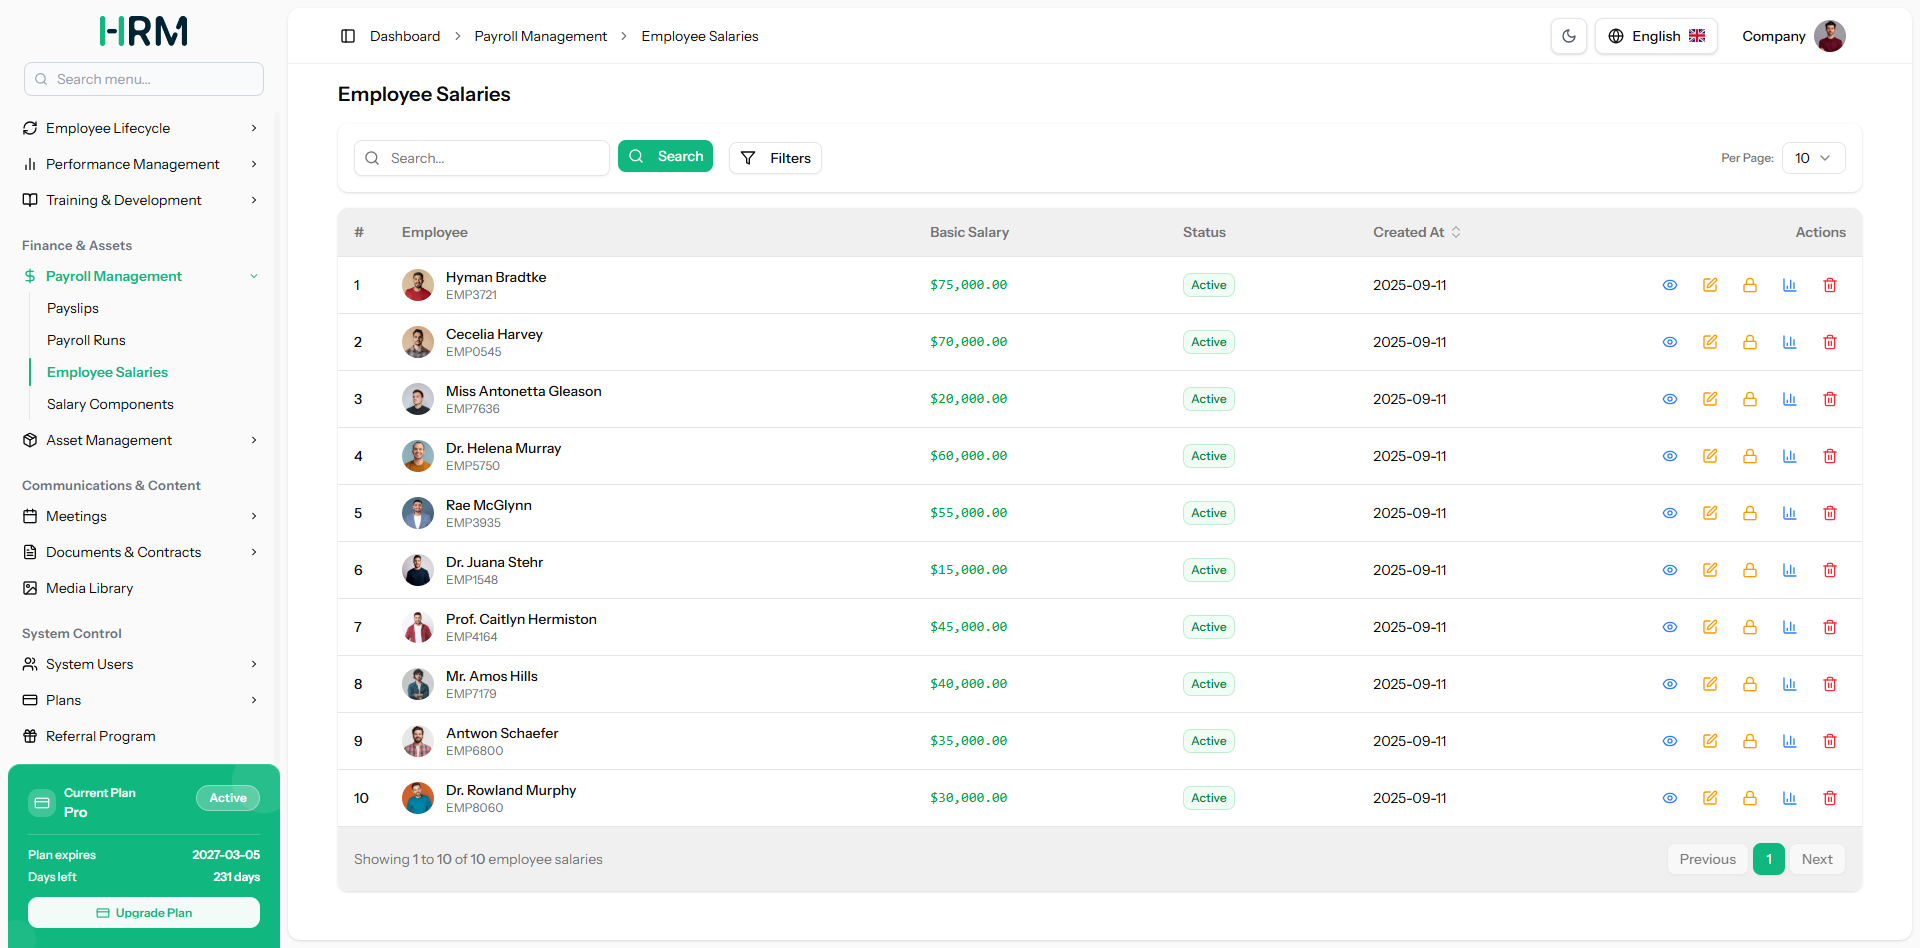
You can click the Show Payroll button to view the detailed payroll calculation for any employee. This page includes an Attendance Summary showing working days, full present days, half days, holidays, paid leave, unpaid leave, absent days, and overtime hours, along with a complete breakdown of Earnings and Component Deductions such as Basic Salary, allowances, Tax, PF, and ESI.
The Final Calculation section displays the step-by-step salary breakdown, including Total Earnings, LOP Deduction, Unpaid Leave Deduction, Overtime Amount, Gross Pay, and the final Net Salary (Take Home). At the bottom of the page, you can also view the Daily Attendance Records showing a day-by-day log of Clock In, Clock Out, Total Hours, Overtime, and Status for the entire pay period.
Categories
Related articles
- Braintree – WorkDo Dash SaaS Add-On Guide
- CoinGate – WorkDo Dash SaaS Add-On Guide
- Zulip Chat – WorkDo Dash SaaS Add-On Guide
- Beverages Production System – WorkDo Dash SaaS Add-On Guide
- PayNow – BookingGo SaaS Add-On Guide
- Moyasar – BookingGo SaaS Add-On Guide
- Pabbly Connect – WorkDo Dash SaaS Add-On Guide
- PEST Analysis – WorkDo Dash SaaS Add-On Guide
- Instamojo – BookingGo SaaS Add-On Guide
- Skrill – WorkDo Dash SaaS Add-On Guide
- Sequential Appointment – BookingGo SaaS Add-On Guide
- QuickBooks – WorkDo Dash SaaS Add-On Guide
We're Here to Help - Let's Talk
Have questions about our solutions, customization services, or business tools? Our team is here to help you. let's talk.