Flutter App Setup Handbook: A Step-by-Step Installation Guide
Flutter Installation Guide:-
Step1:
Download flutter sdk flutter website -: https://docs.flutter.dev/get-started/install/windows
Step 2:
Unzip the downloaded folder and copy the folder path to the bin folder.
Step 3:
Open the Start menu, search for “Environment Variables,” and select “Edit” the system environment variables.
Step 4:
In the “System variables” section, scroll down and select the “Path” variable, then click “Edit”, Click “New” and add
Step 5:
The path to the bin directory inside the Flutter directory (e.g. C:\flutter\bin).
Step 6:
Open a new command prompt or terminal window.
- Run the command flutter –version to check if Flutter is installed properly.
- Run the command flutter doctor to check for any dependencies you may still need to install. Follow the instructions provided by the flutter doctor command to resolve any issues.
Step 7:
- You can use any text editor for Flutter development, but using an integrated development environment (IDE) like Visual Studio Code (VS Code) or Android Studio is recommended.
- Download and install Visual Studio Code or Android Studio.
Change the App icon in Android & iOS
The app launch icon is the icon that appears on our device’s home screen when we launch our app. It is a great way to brand and make our app stand out.
Implementation
We can follow the instructions given below to change the application launch icon.
Prepare the custom app icons
To generate different-sized icons for both Android and iOS simultaneously, we can follow these steps.
- Visit the website App Icon.
- Upload our icon image by clicking the “Upload your app icon” button.
- Tick the iPhone and Android options checkboxes to generate icons for both platforms.
- Click on the Generate button, and this website will automatically create different-sized icons for Android and iOS.
- It will generate a zip folder named AppIcons with Android, Assets. xcassets named folders, app store, and Play Store icons.
Adding icons in Android
To update the app icon on the Android platform of our Flutter project, we can follow these steps.
- We can open our Flutter project in our preferred code editor or IDE.
- Locate the android/app/src/main/res directory within our project.
- Inside the res directory, we will find multiple mipmap-* folders.
- Replace these mipmap-* folders with the corresponding mipmap-* folders from the downloaded AppIcons zip file.
- Once we have replaced the folders, the new app icon resources will be in place for the Android platform.
Adding icons in iOS
To update the app icon in the iOS platform of our Flutter project, follow these steps.
- Navigate to the ios/Runner/ directory in our Flutter project.
- Locate the Assets. xcassets folder within the Runner directory.
- Delete the existing Assets. xcassets folder.
- Now, open the folder where we have downloaded the new app icon assets (let’s assume it’s named AppIcon).
- Copy the Assets. xcassets folder from the AppIcon folder.
- Paste the copied Assets. xcassets folder into the ios/Runner/ directory of our Flutter project.
Change the App name in Android & iOS
Implementation
We can follow the instructions given below to change the application name.
Change the app name in the Android
To update the app name on the Android platform of our Flutter project, we can follow these steps.
- We can open our Flutter project in our preferred code editor or IDE.
- Locate the android/app/src/main/AndroidManifest.xml directory within our project.
- Inside the AndroidManifest.xml file, we will find the android: label and replace its value with the new app name.
- Run the flutter clean command in the terminal.
- Run flutter pub get command in the terminal.
- Completely stop and run your app.
Change the app name in iOS
To update the app icon in the iOS platform of our Flutter project, follow these steps.
- Navigate to iOS>Runner and open the info.plist file.
- Find the key named CFBundleName and replace the string value (below it) to reflect the new app name.
- Run the flutter clean command in the terminal.
- Run flutter pub get command in the terminal.
- Completely stop and run your app.
Change App package name in Android & iOS
Implementation
We can follow the instructions given below to change the application name.
Change app name in Android
To update the app name on the Android platform of our Flutter project, we can follow these steps.
- We can open our Flutter project in our preferred code editor or IDE.
- Locate the android/app/build.gradle directory within our project.
- Inside the build.gradle file, we will find applicationId and copy its value.
- Go to menu bar, select edit option, and go to Find>Replace in file, in this pop-up, first field paste value and second field add new package name.
- Then click the Replace All button.
- Run flutter clean command in the terminal.
- Run flutter pub get command in the terminal.
- Completely stop and run your app.
Change app name in iOS
To update the app icon in the iOS platform of our Flutter project, follow these steps.
- Navigate to ios folder and open in finder.
- In ios folder, open Runner.xcworkspace in Xcode.
- Go to Runner/Signing & Capability, and we will find Bundle Identifier and replace its value with the new package name.
- Run flutter clean command in the terminal.
- Run flutter pub get command in the terminal.
- Completely stop and run your app.
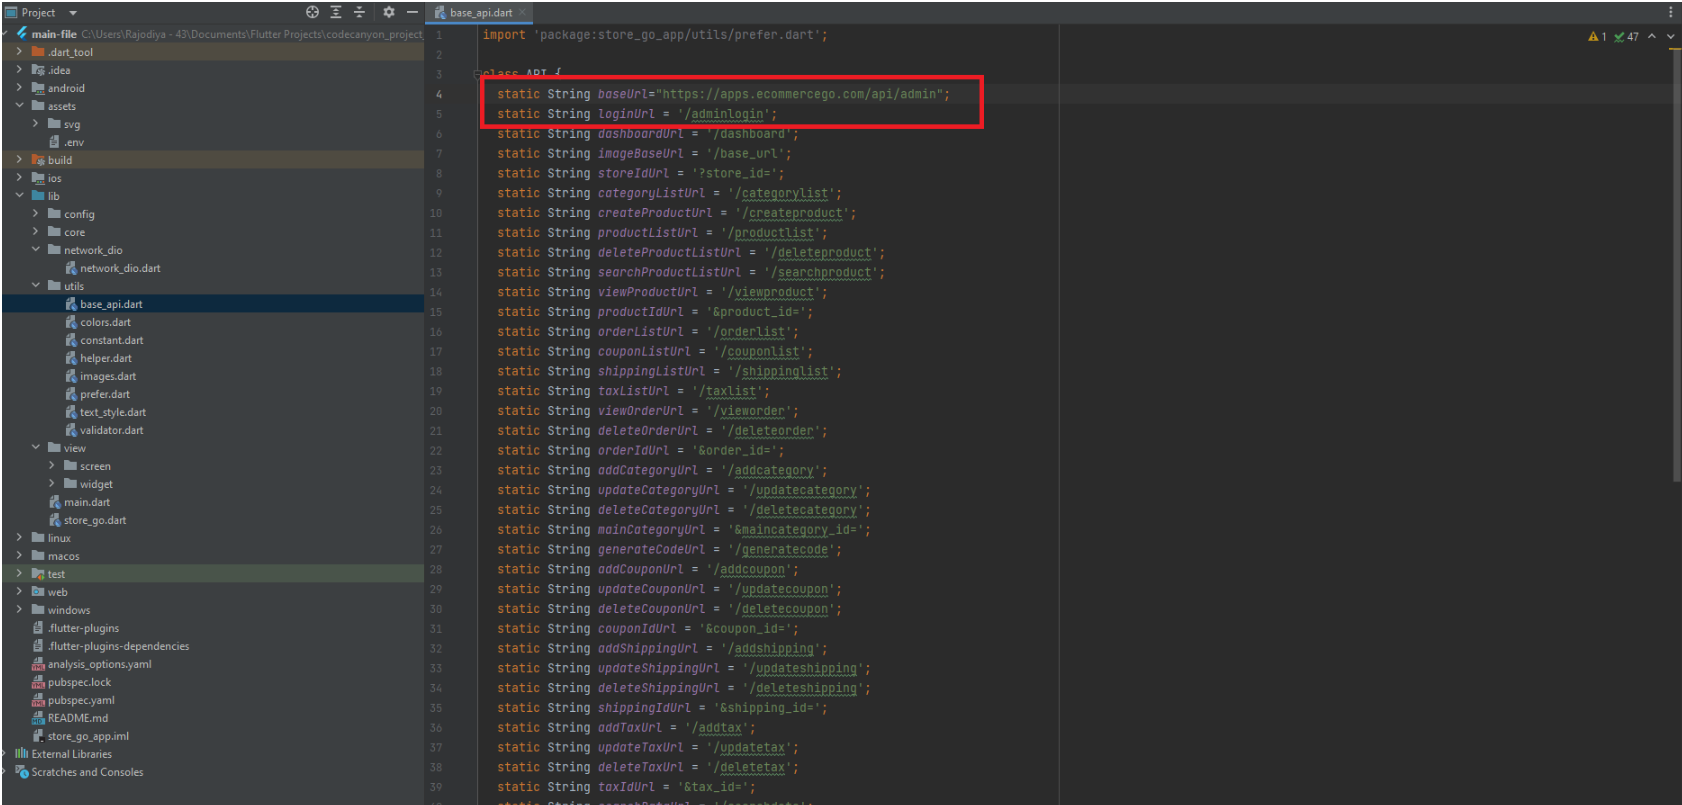
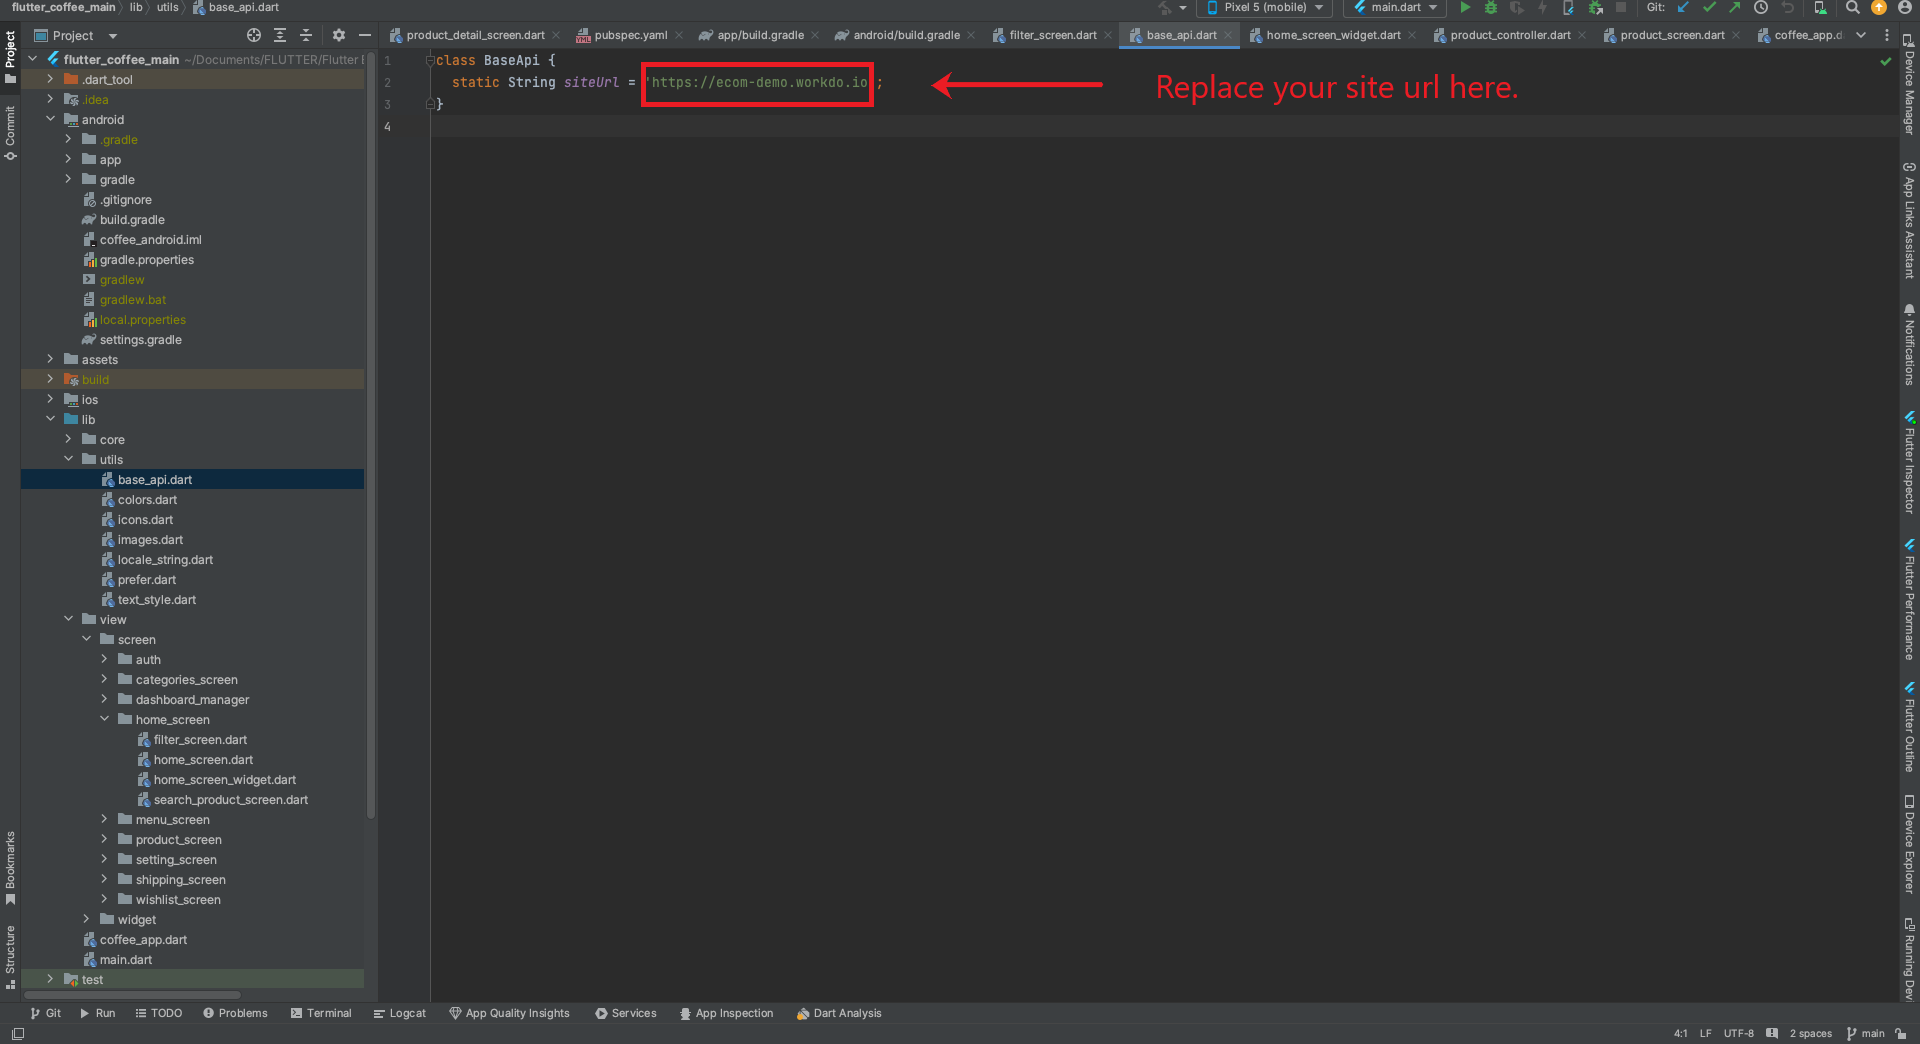
Change BaseUrl in Project
- We can open our Flutter project in our preferred code editor or IDE.
- Locate the lib/utils/base_api/ file within our project.
- Replace your web url with the baseUrl variable value.
- If you have purchased the EcommerceGo Saas product, you can skip the video and follow the screenshots below for base URL replacement.
eCommerceGo SaaS admin product base url reference

eCommerceGo SaaS addon product base url reference

Categories
Related articles
- Google Meet Intgration in BookingGo SaaS
- Payment Gateway Ozow
- Sign in With OutLook Module Integration in eCommerceGo SaaS
- Product Enquiry Integration in eCommerceGo SaaS
- Google Calendar Integration in BookingGo SaaS
- SMS Integration in Dash SaaS
- Duo 2FA Integration in eCommerceGo SaaS
- CyberSource Integration in Dash SaaS
- Subscribe – eCommerceGo Addon
- Promo Codes Integration in BookingGo SaaS
- Planning Module Detailed Integration in Dash SaaS
- Size Guideline – eCommerceGo Addon
Reach Out to Us
Have questions or need assistance? We're here to help! Reach out to our team for support, inquiries, or feedback. Your needs are important to us, and we’re ready to assist you!


Need more help?
If you’re still uncertain or need professional guidance, don’t hesitate to contact us. You can contact us via email or submit a ticket with a description of your issue. Our team of experts is always available to help you with any questions. Rest assured that we’ll respond to your inquiry promptly.
Love what you see?
Do you like the quality of our products, themes, and applications, or perhaps the design of our website caught your eye? You can have similarly outstanding designs for your website or apps. Contact us, and we’ll bring your ideas to life.

