Fleet Integration in Dash SaaS
The Fleet Management System is a comprehensive software solution designed to help businesses manage their vehicle operations efficiently.
Introduction
The Fleet Management System is a comprehensive software solution designed to help businesses manage their vehicle operations efficiently. This system allows you to track vehicles, manage drivers and customers, schedule bookings, monitor maintenance activities, handle fuel consumption, manage insurance policies, and generate detailed reports. The system also includes invoicing capabilities and provides real-time dashboard insights to help you make informed decisions about your fleet operations.
How To Install The Add-On?
To Set Up the Fleet Add-On, you can follow this link: Setup Add-On
How To Use The Fleet Add-On?
Fleet Dashboard
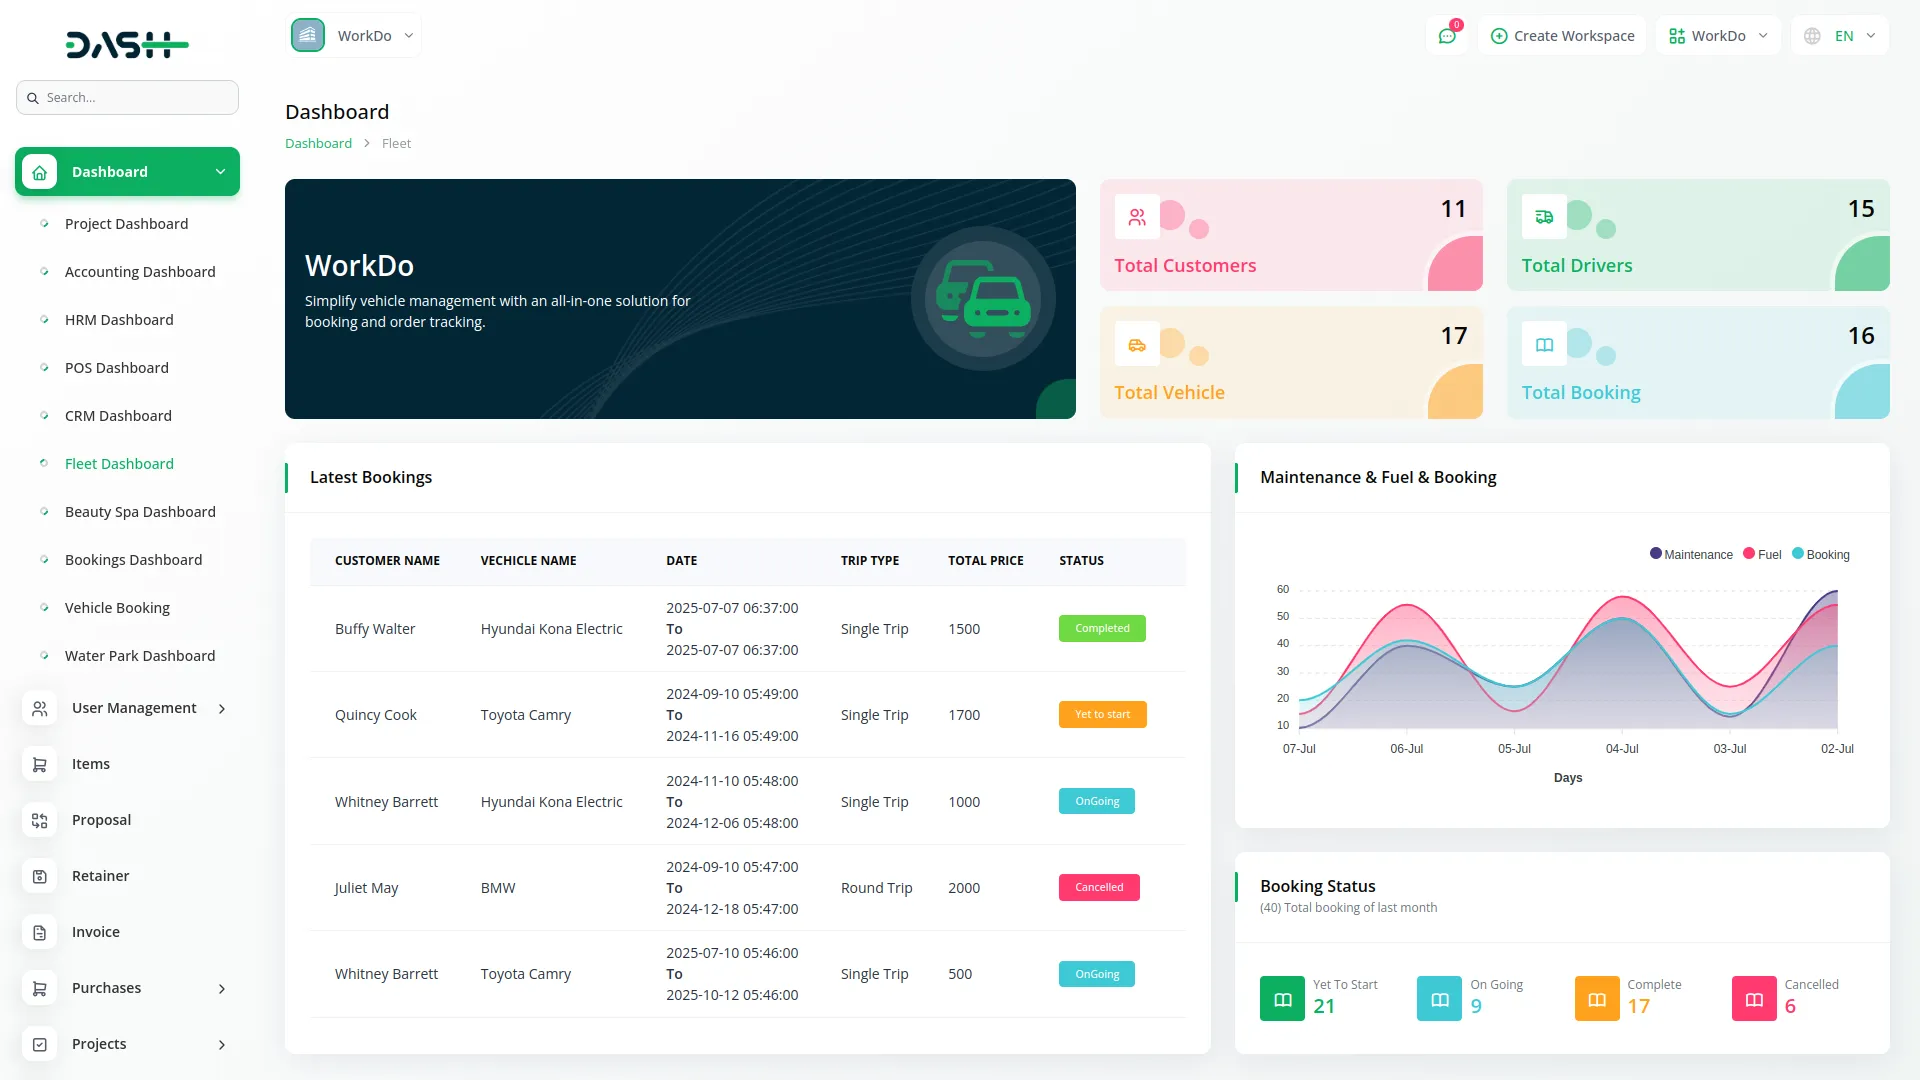
- The Fleet Dashboard is your main control center that displays key information about your fleet operations. When you access the dashboard, you will see four important cards showing Total Customers, Total Drivers, Total Vehicles, and Total Bookings.
- The dashboard includes a calendar where you can view current month bookings. You can change the view to monthly, yearly, or day-wise data as needed. The Latest Bookings section shows the last 5 bookings on your dashboard for quick reference.
- You will also see charts displaying Maintenance, Fuel, and Booking data for the last six days. The Booking Status section shows total bookings from last month, categorized as Yet To Start, On Going, Complete, and Cancelled.
System Settings
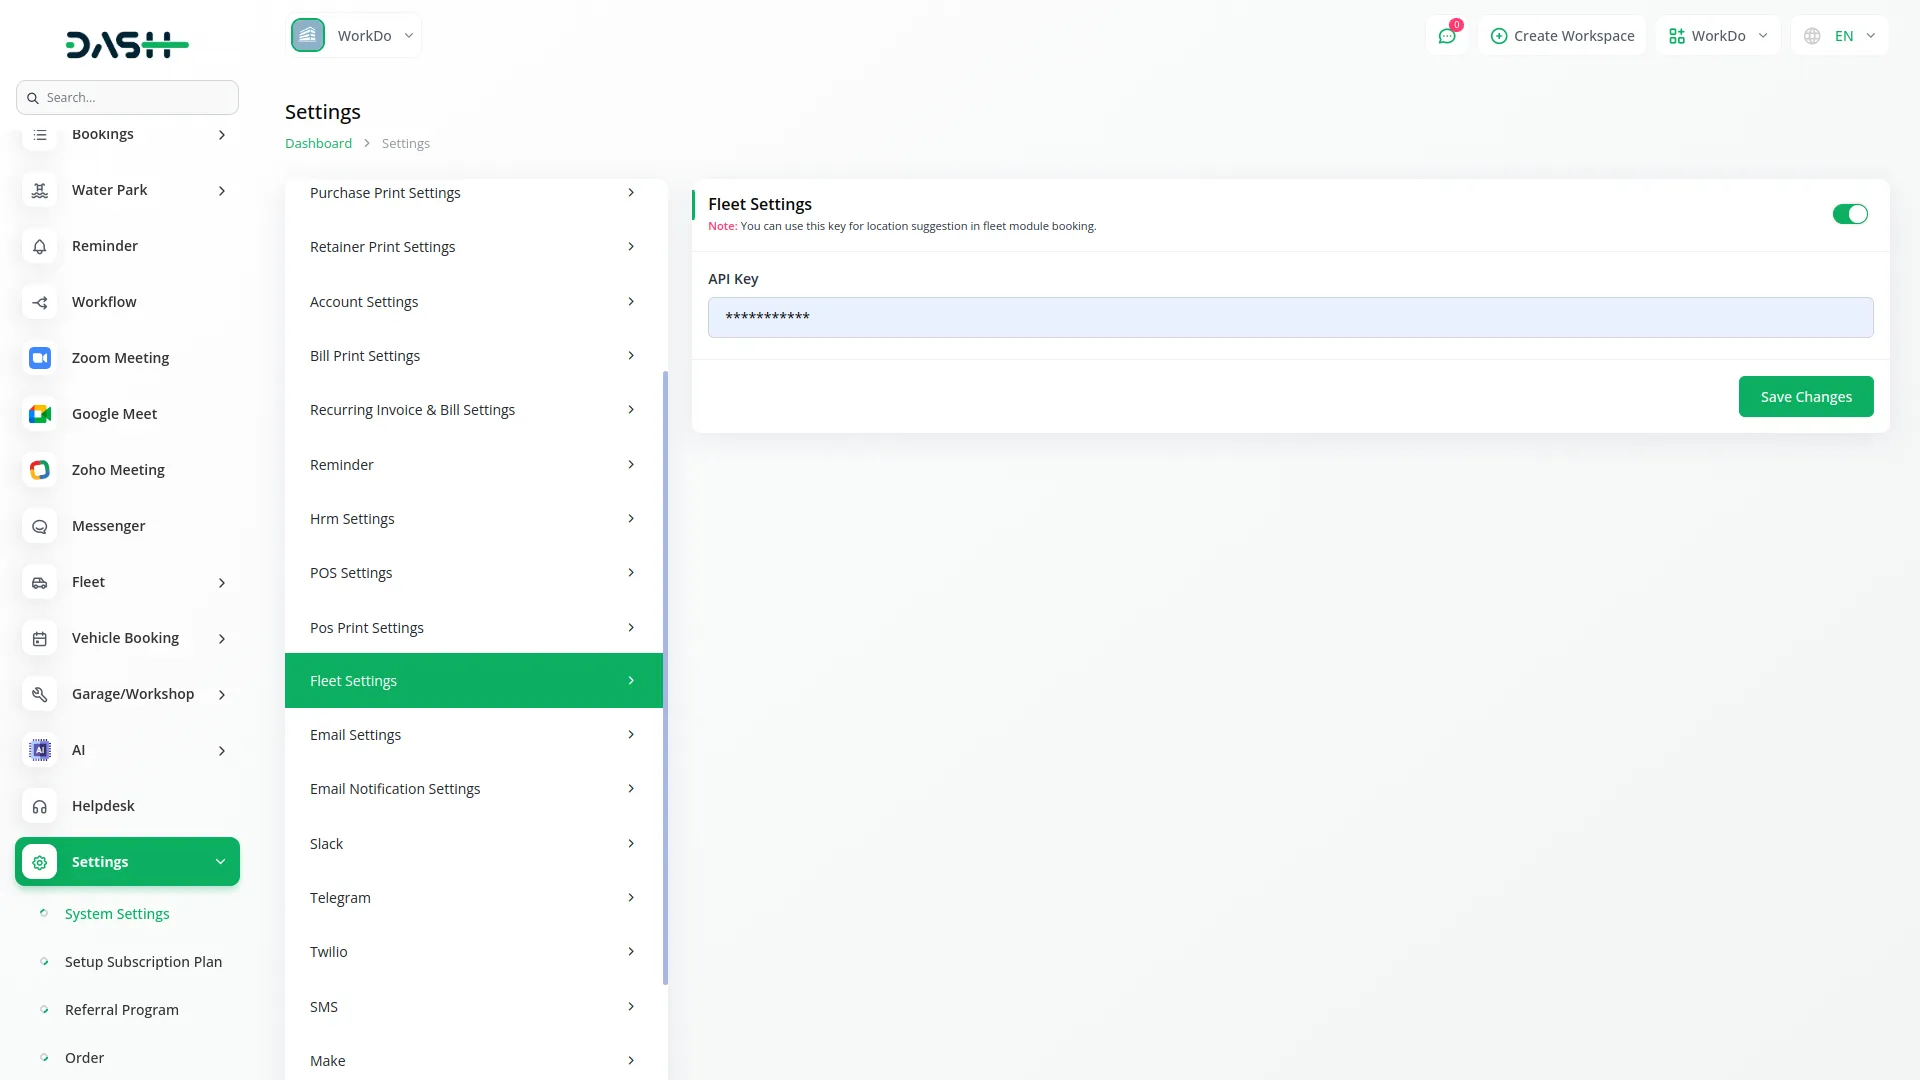
- To configure Fleet Settings, locate the Enable/Disable toggle. When the toggle is disabled, you will not be able to add an API key, and location suggestions will not appear when adding locations.
- When you enable the toggle, you can enter an API key in the provided field. After entering the API key, click “Save Changes” to activate location suggestions when adding locations.
- The API Key field is where you enter your location service API key for automatic address suggestions.
System Setup
- License Type
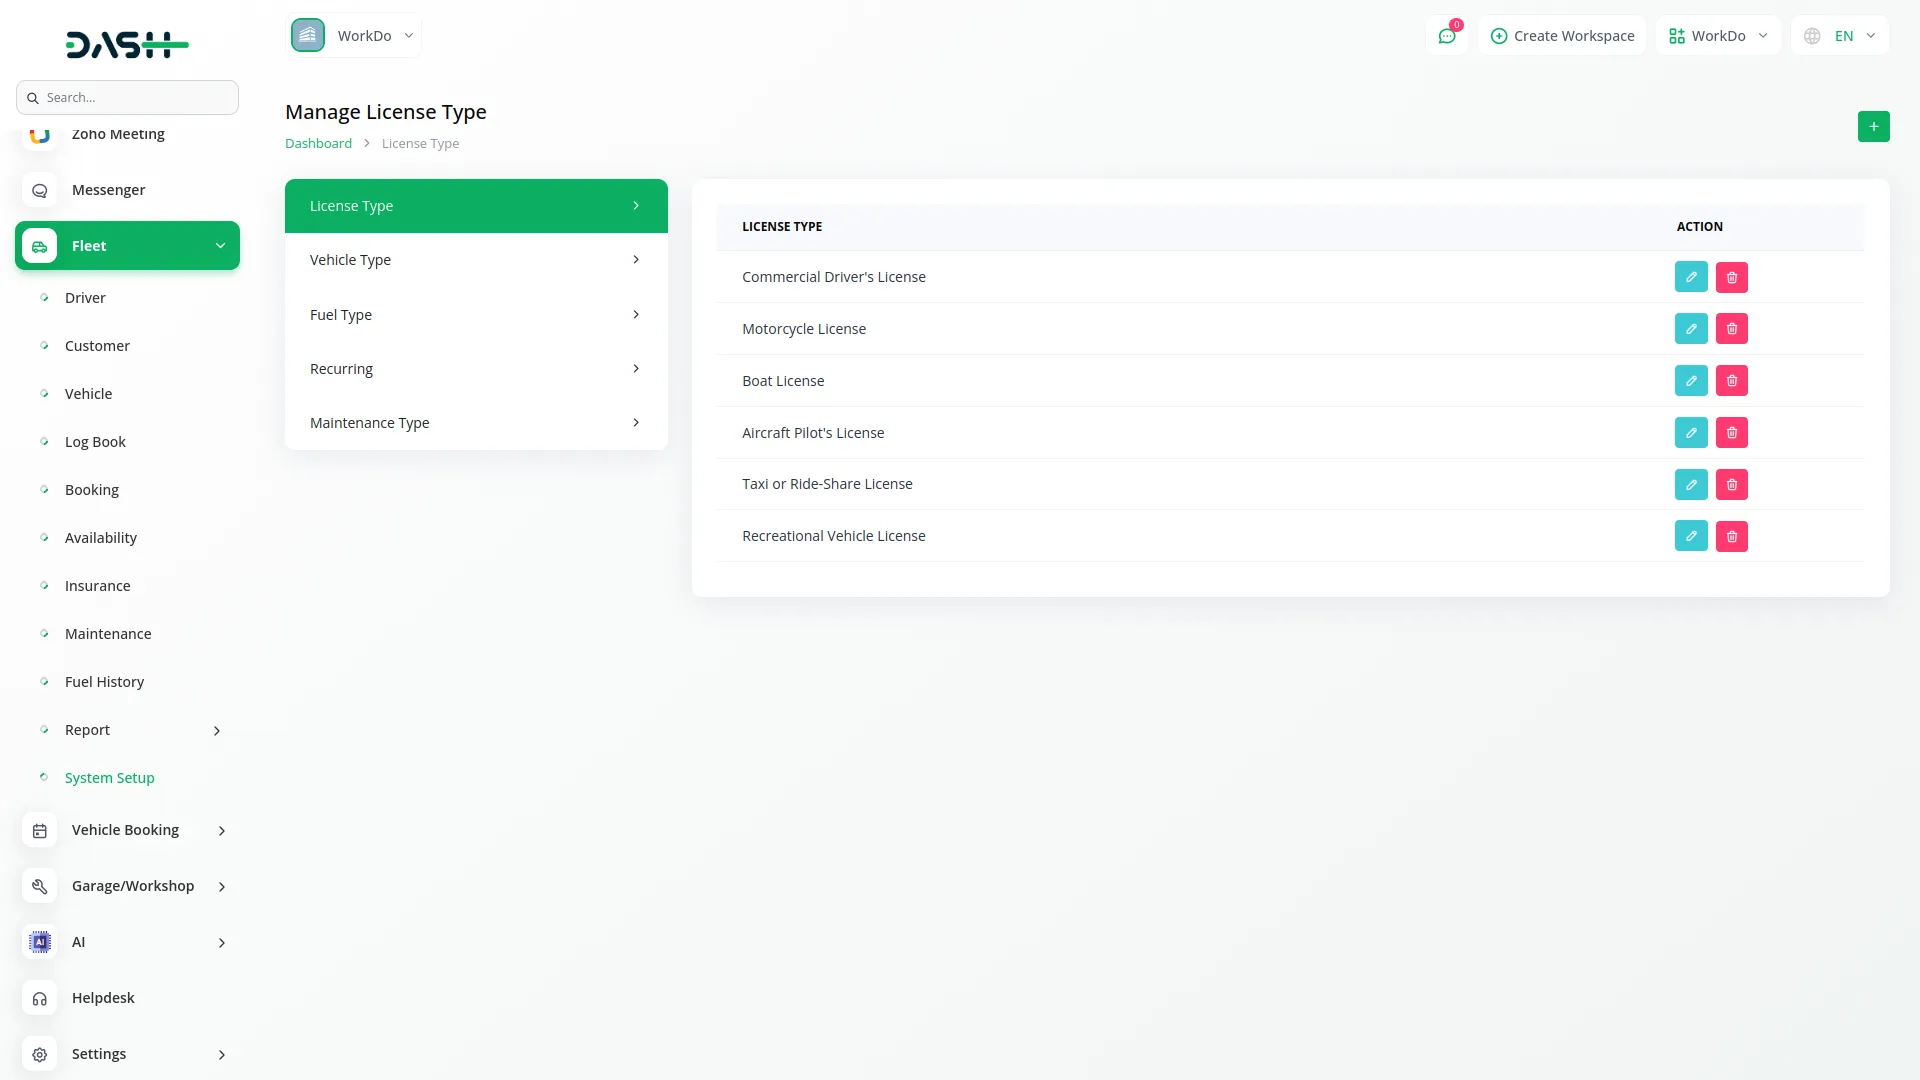
- To create a new License Type, click the “Create” button. Enter the License Type name in the form field and save. The list page displays all license types in a table with License Type column. You can Edit or Delete existing license types using the action buttons
- Vehicle Type
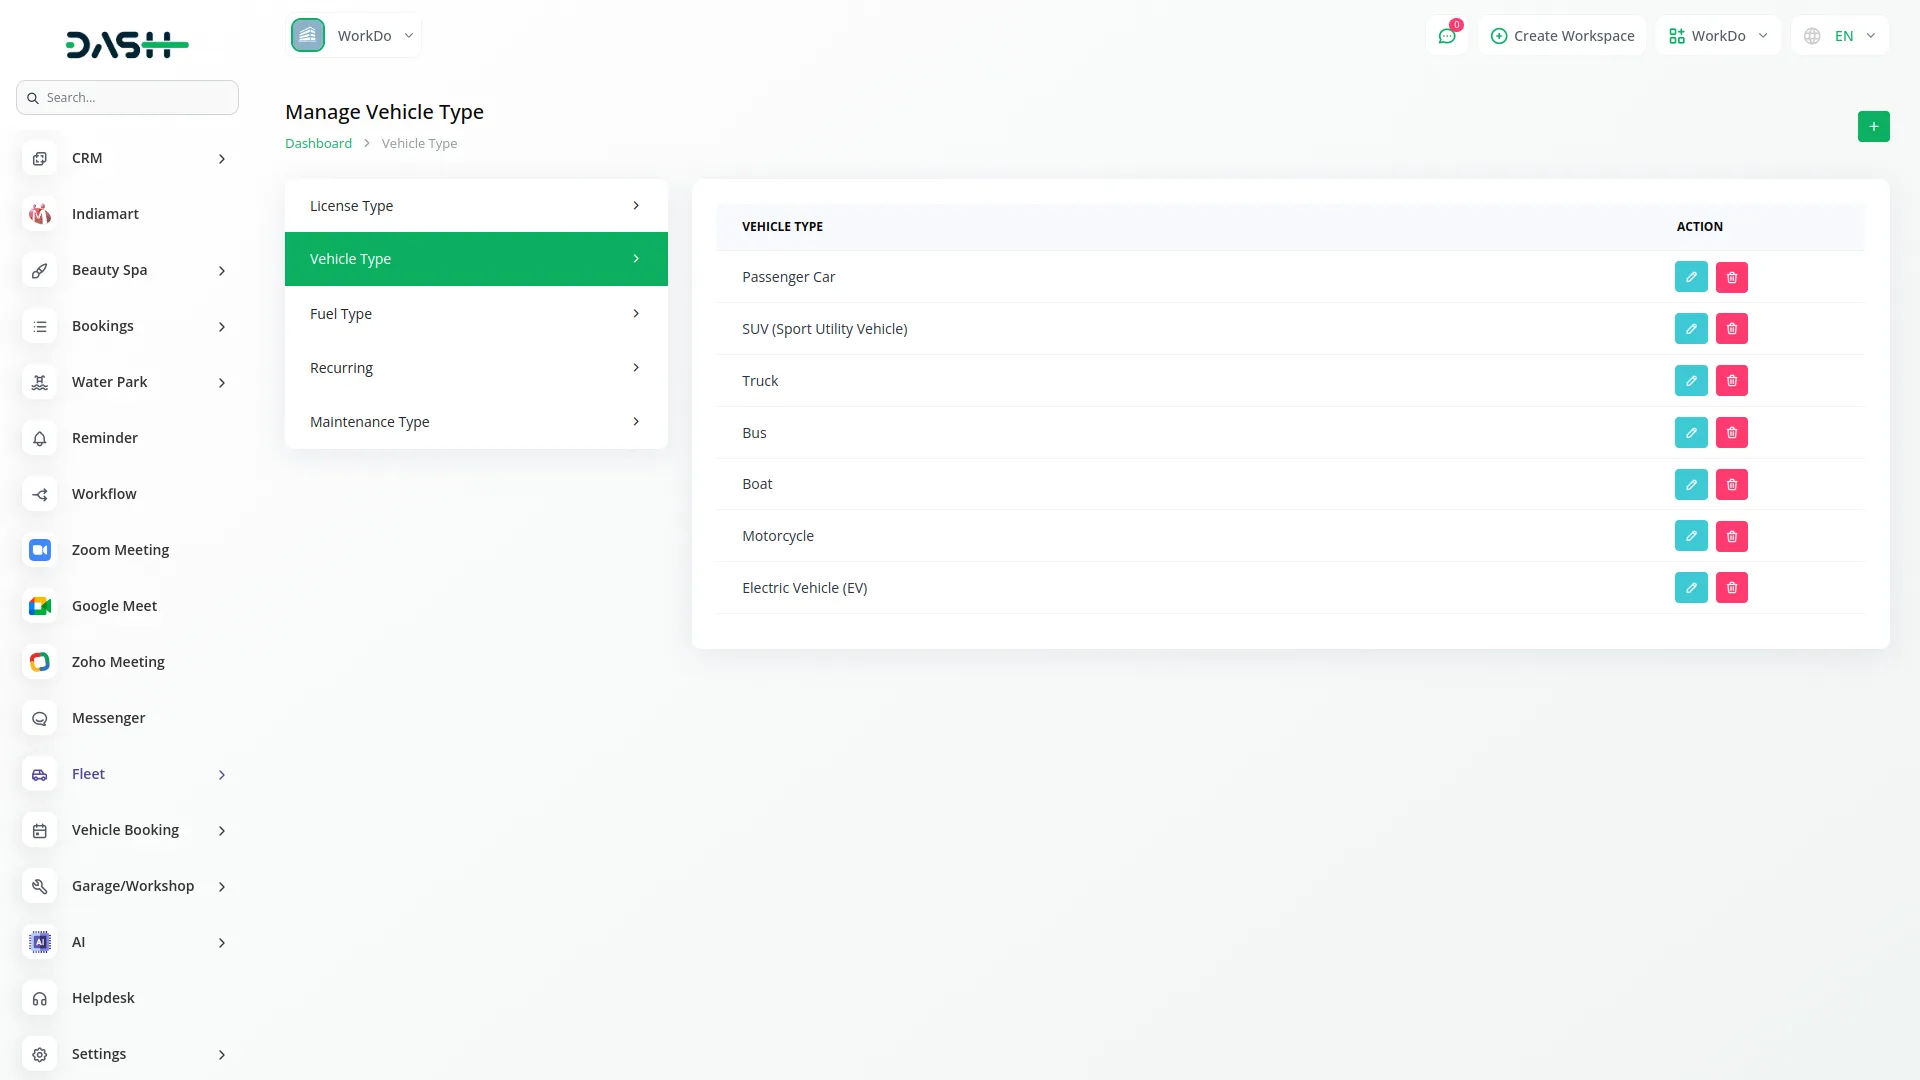
- To add a new Vehicle Type, click the “Create” button. Fill in the Vehicle Type Name field and submit the form. The list page shows all vehicle types with Vehicle Type column. Available actions include Edit and Delete.
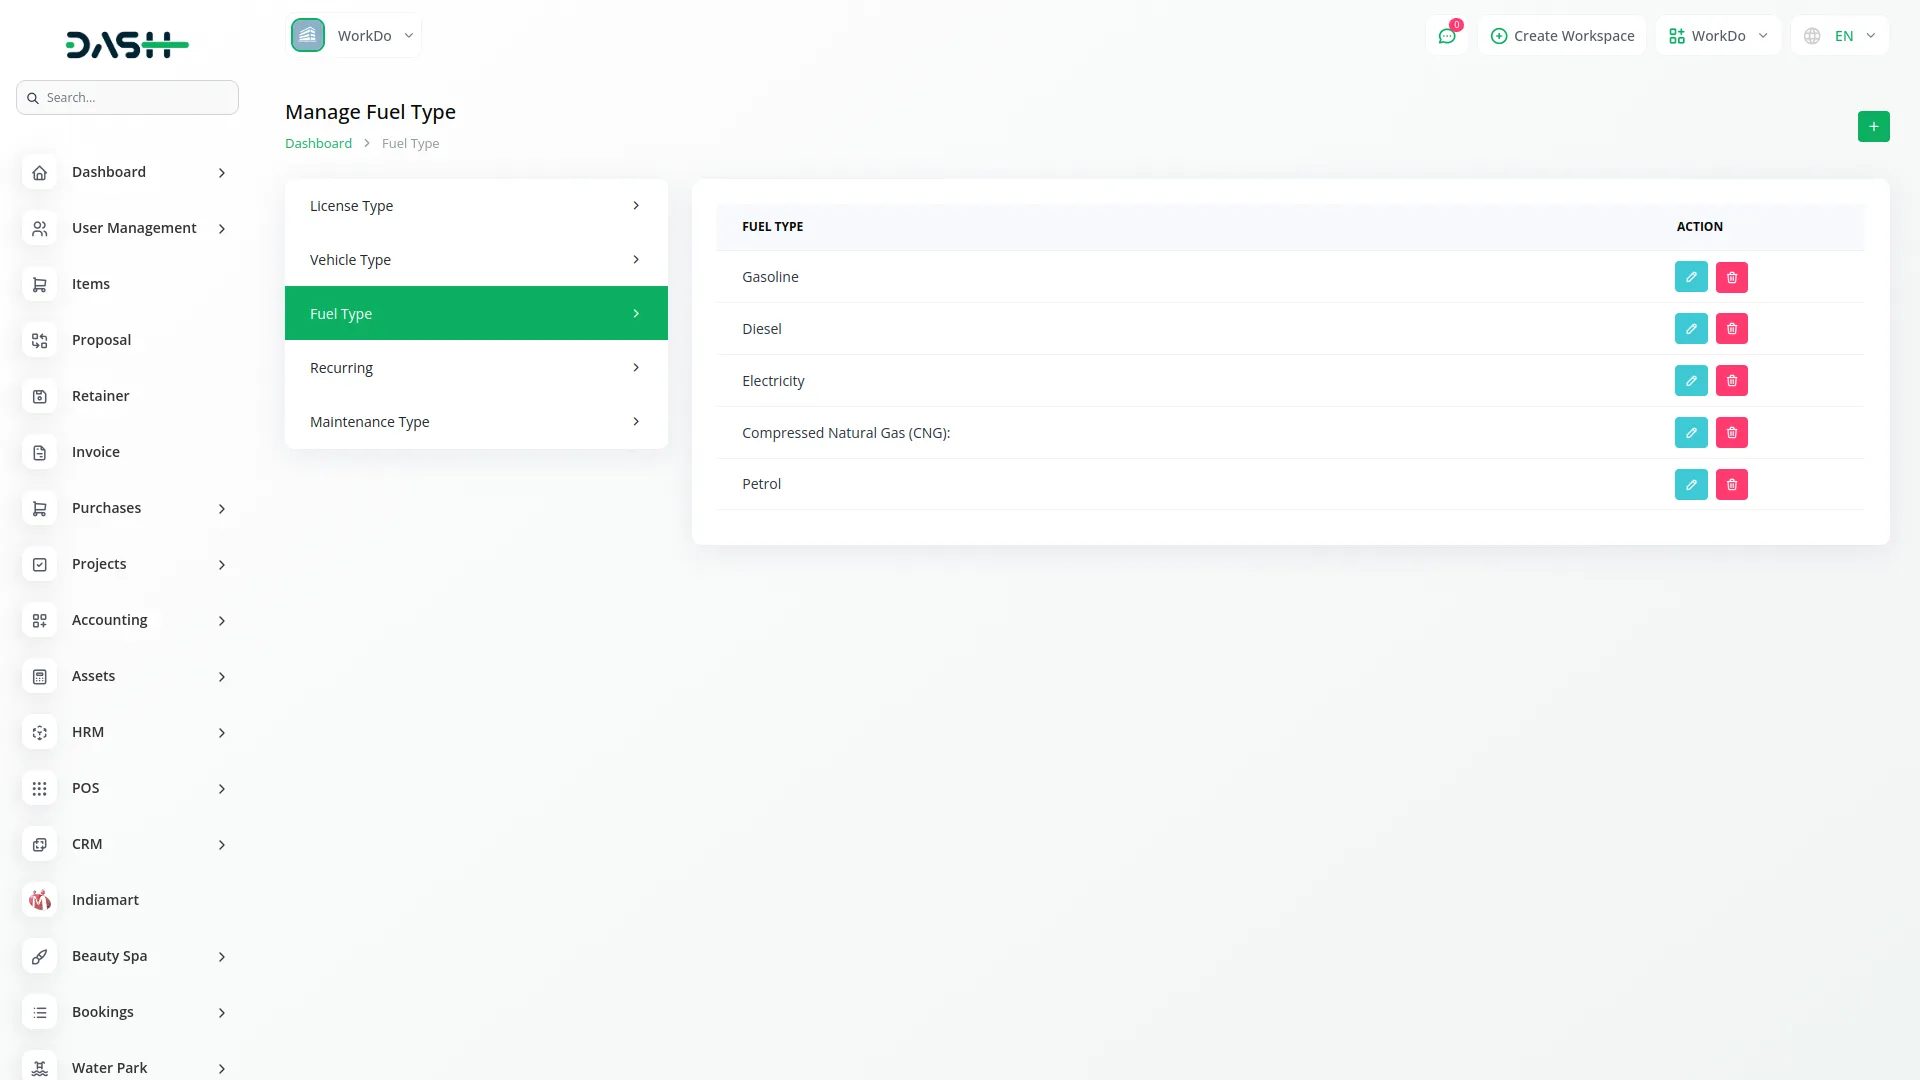
- Fuel Type
- To create a new Fuel Type, click the “Create” button. Enter the Fuel Type Name and save the record. The list page displays all fuel types in a table with a Fuel Type column. You can Edit or Delete fuel types as needed.
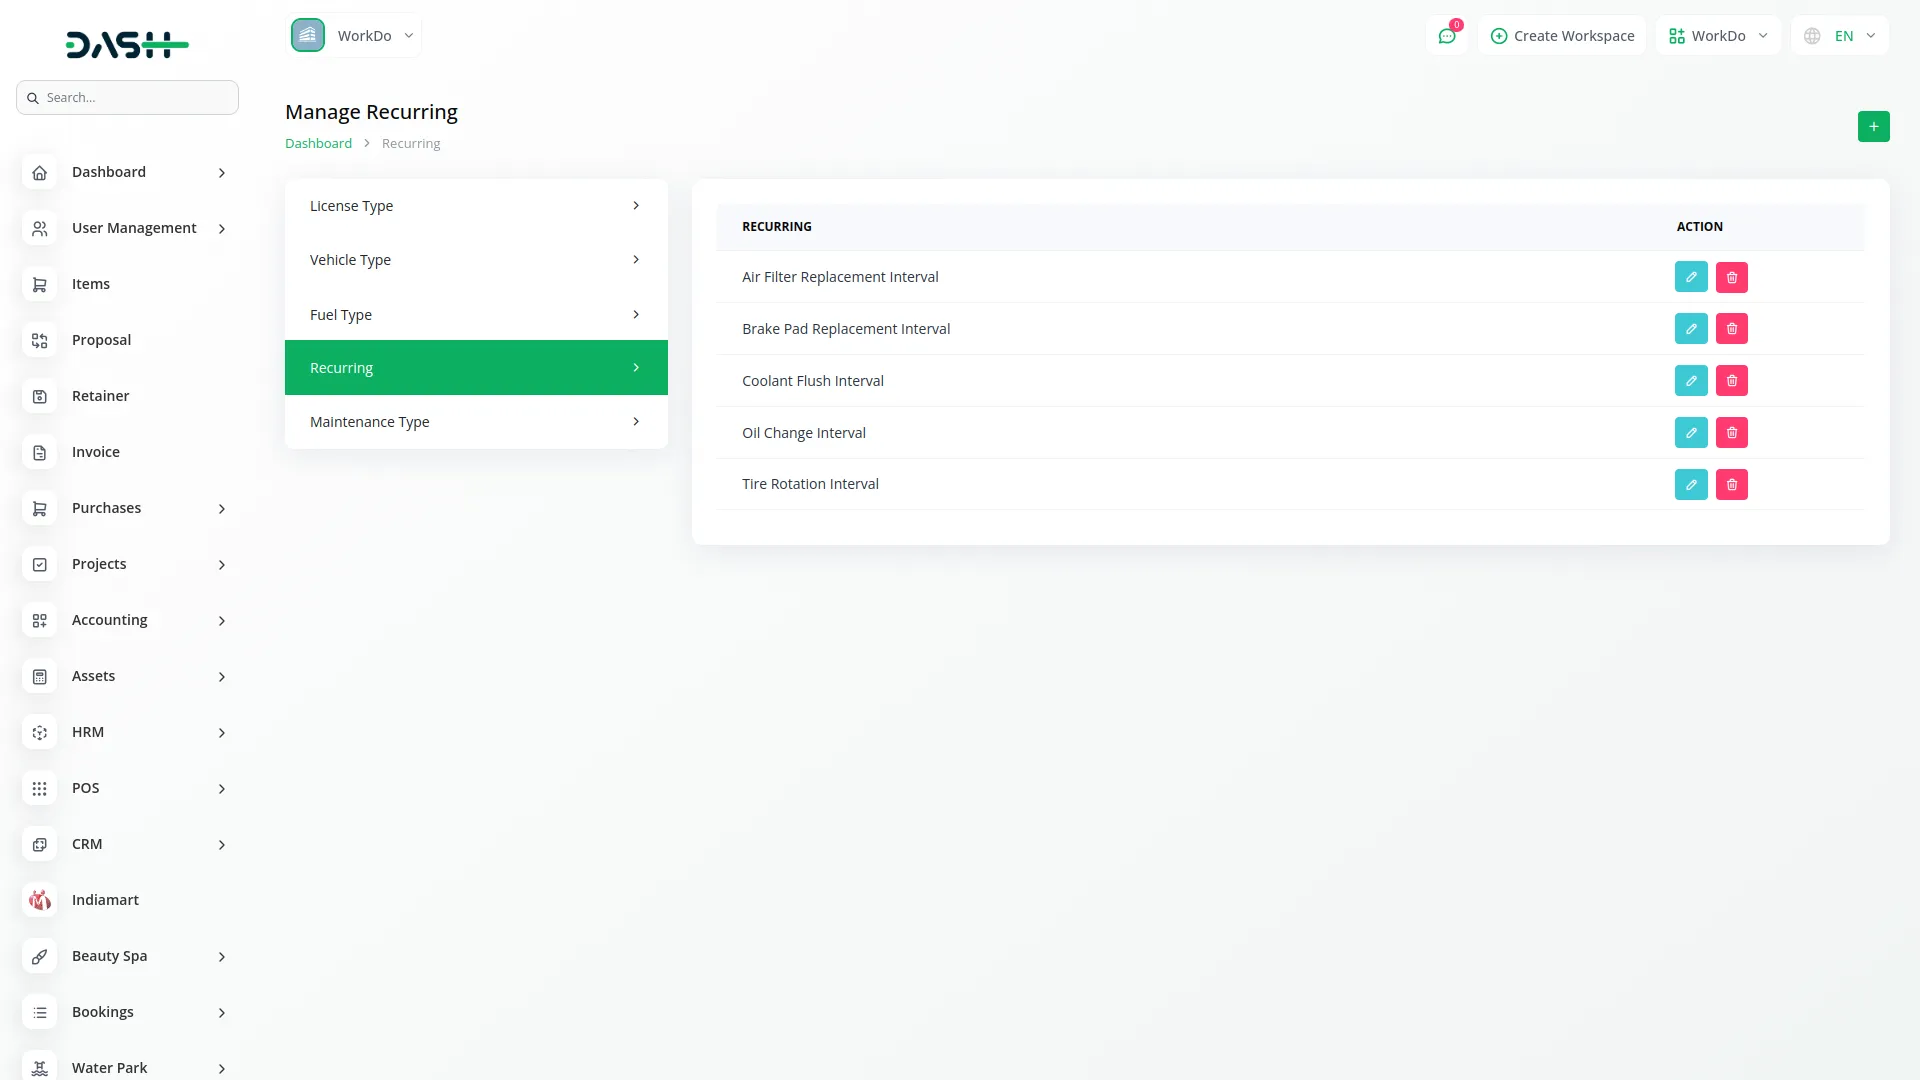
- Recurring
- To set up Recurring periods, click the “Create” button. Enter the Recurring Period Name in the form and save. The list page shows all recurring periods with Recurring columns. Available actions are Edit and Delete.
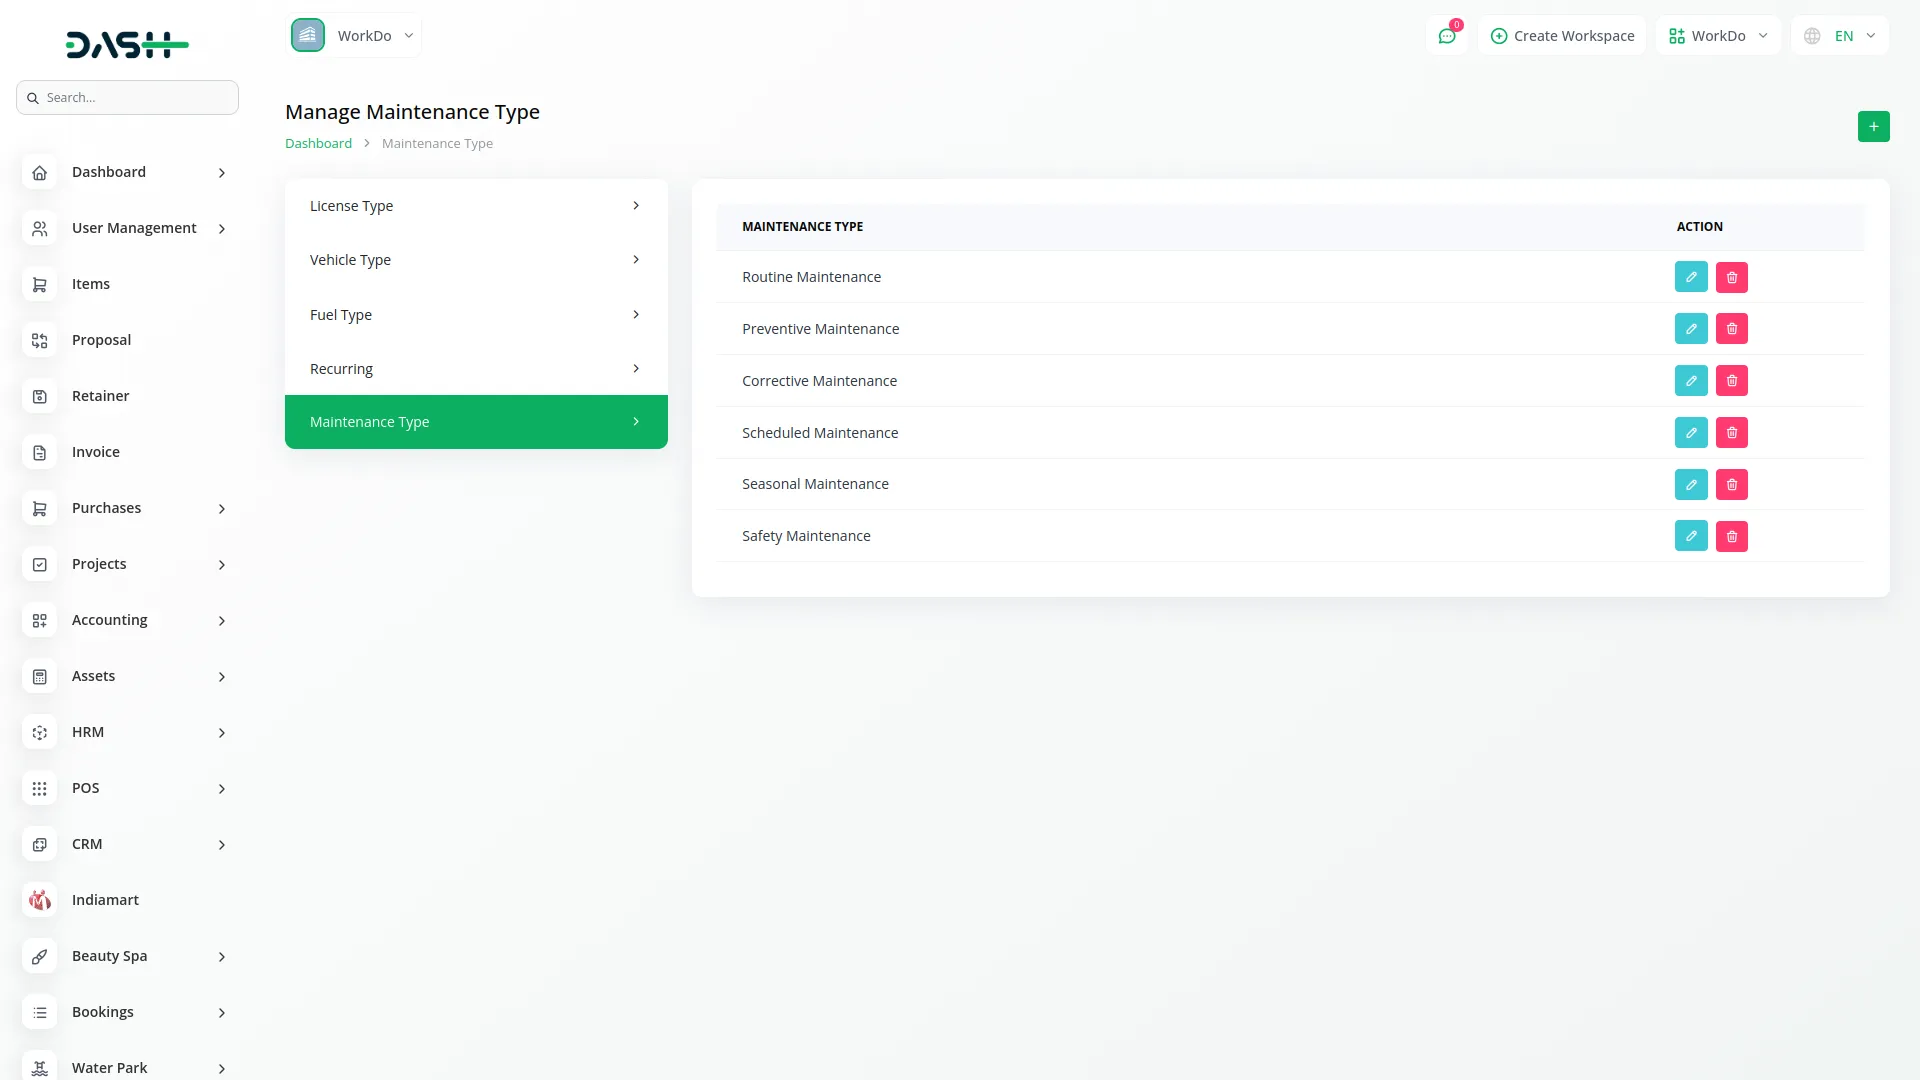
- Maintenance Type
- To add a new Maintenance Type, click the “Create” button. Fill in the Maintenance Type Name field and submit. The list page displays all maintenance types with the Maintenance Type column. You can Edit or Delete maintenance types using the action buttons.
Manage Driver
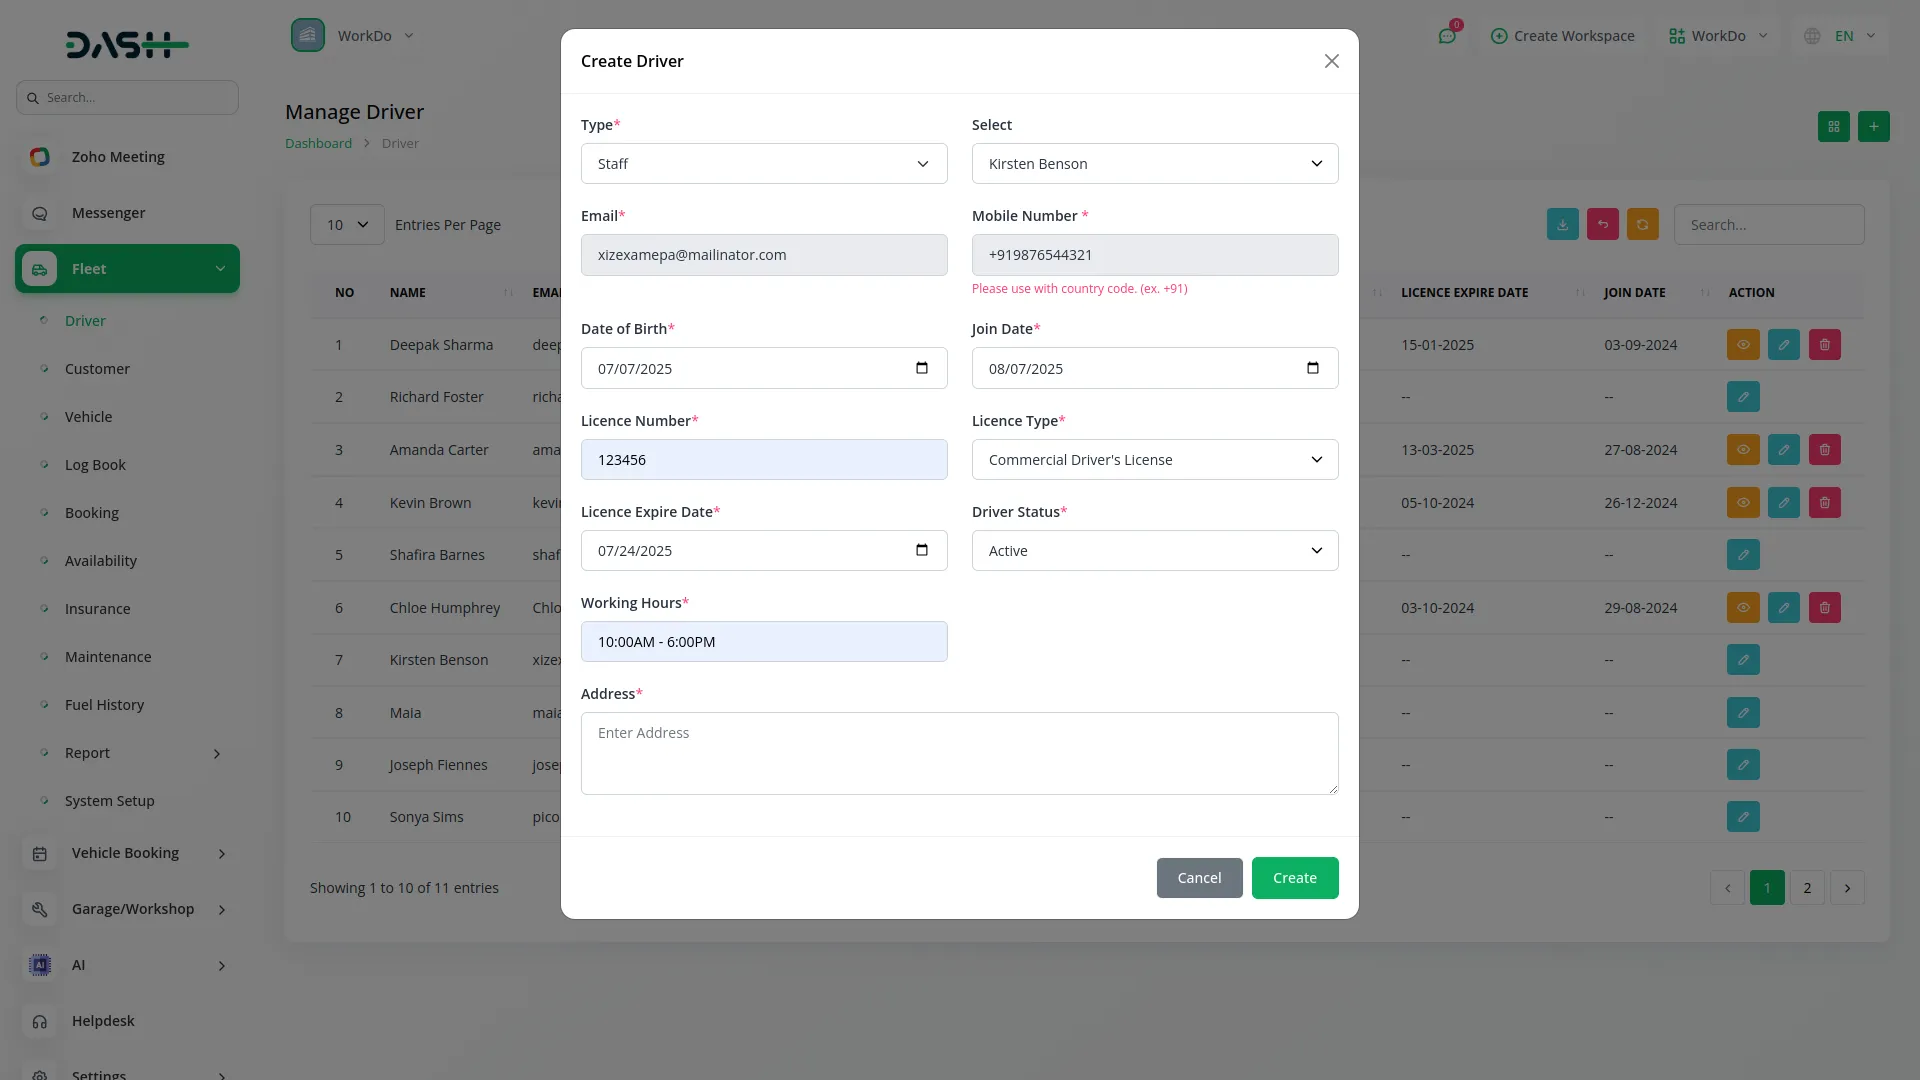
- To create a new Driver, click the “Create” button at the top of the driver page. First, select the Type – either Contractor or Staff. If you select Contractor, you need to manually add Name, Email, Mobile Number, and Password.
- If you select Staff, a Staff dropdown will appear and Name and Email will be auto-filled when you select a staff member. Then enter Date of Birth, Join Date, License Number, and select License Type from the dropdown (this comes from System Setup).
- Add License Expire Date, select Driver Status (Active or Inactive), enter Working Hours, and fill in the Address. The list page shows all drivers with columns for No, Name, Email, License Number, License Type, Working Hours, License Expire Date, and Join Date.
- Available buttons include Search, Export, Reload, Reset, and Grid View. Available actions are View, Edit, and Delete.
- When you click View, driver details are displayed including Name, Mobile number, Date of Birth, Join Date, etc., and you can add multiple attachments. In Grid View, driver cards show the driver’s name and email with three buttons (View, Edit, Delete).
Manage Customer
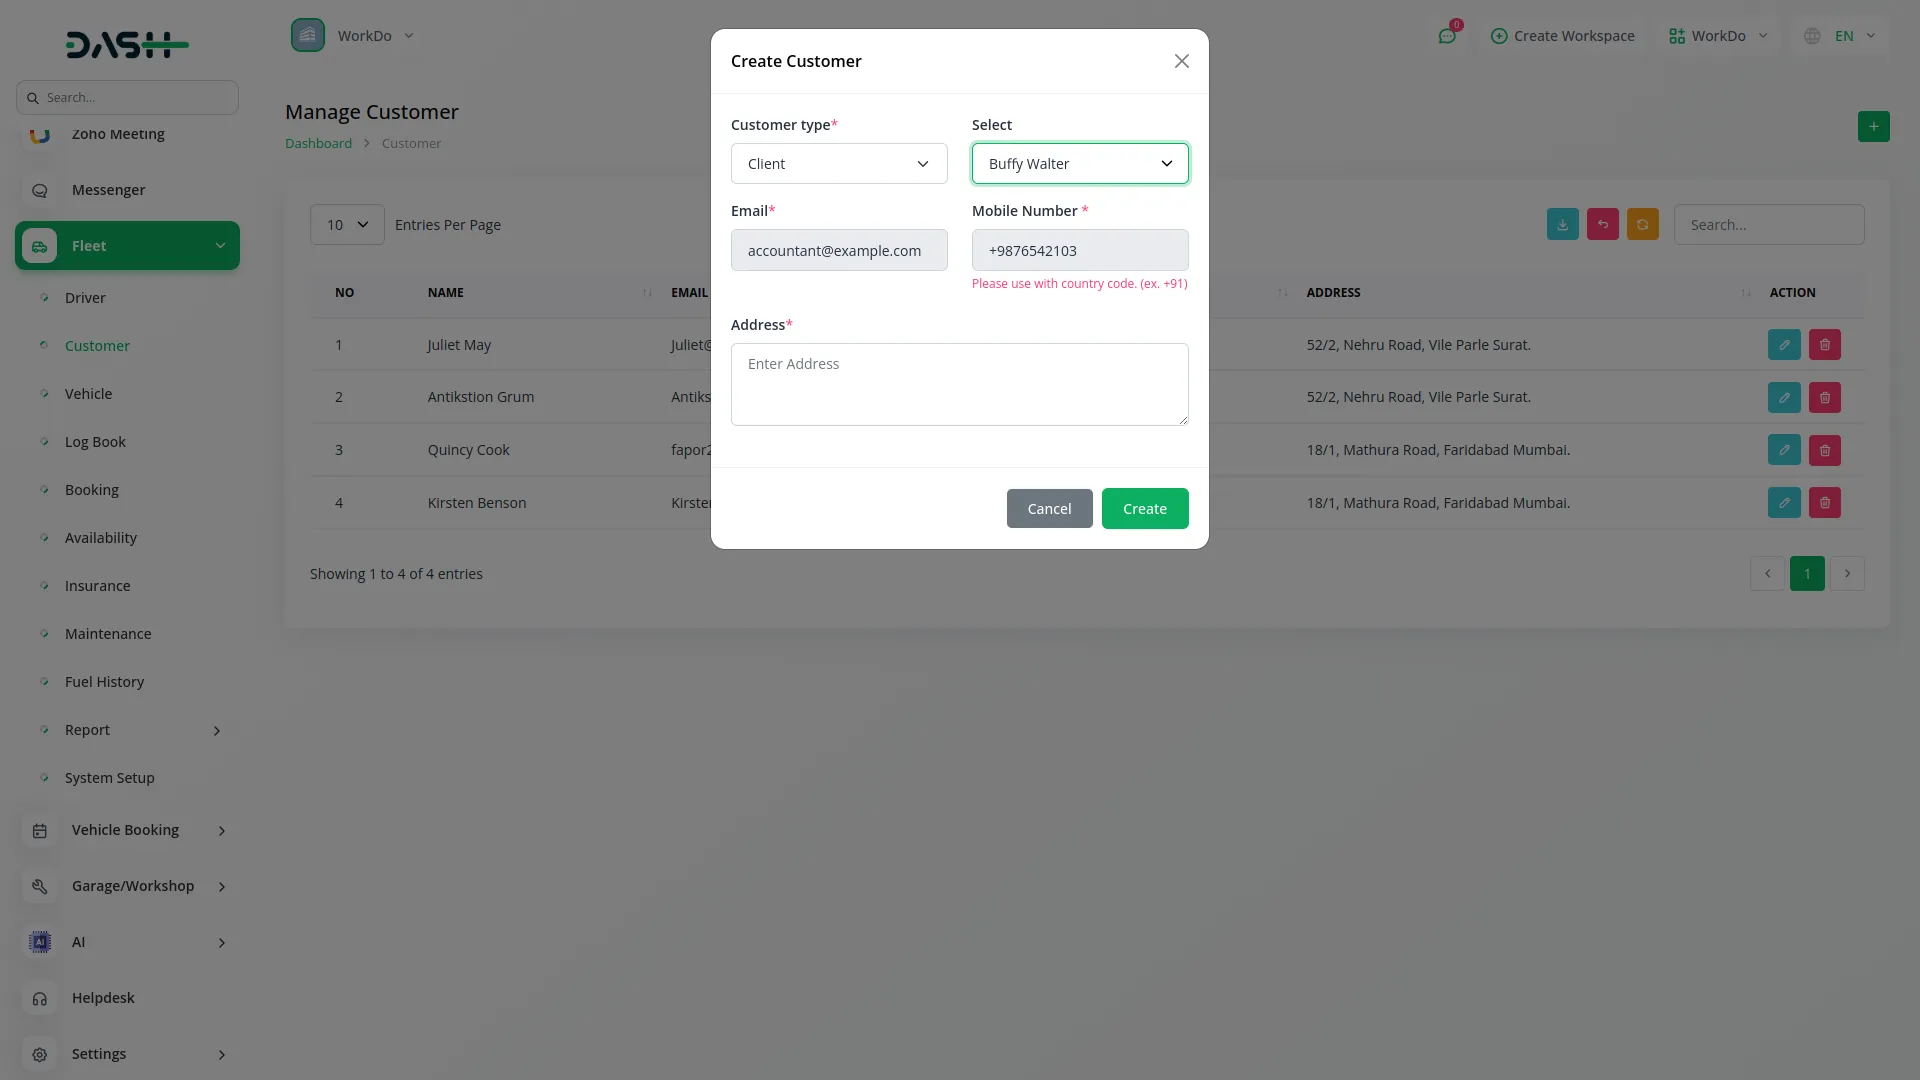
- To add a new Customer, click the “Create” button. Select Customer Type – either Walk-in or Client. If you select Walk-in, manually add Name, Email, and Mobile Number. If you select Client, a Client dropdown will appear and Email and Mobile Number will be auto-filled when you select a client. Then enter the Address information and save the customer record.
- The list page displays all customers with columns for No, Name, Email, Mobile Number, and Address. Available buttons include Search, Export, Reload, and Reset. Available actions are Edit and Delete for customer records.
Vehicle Management
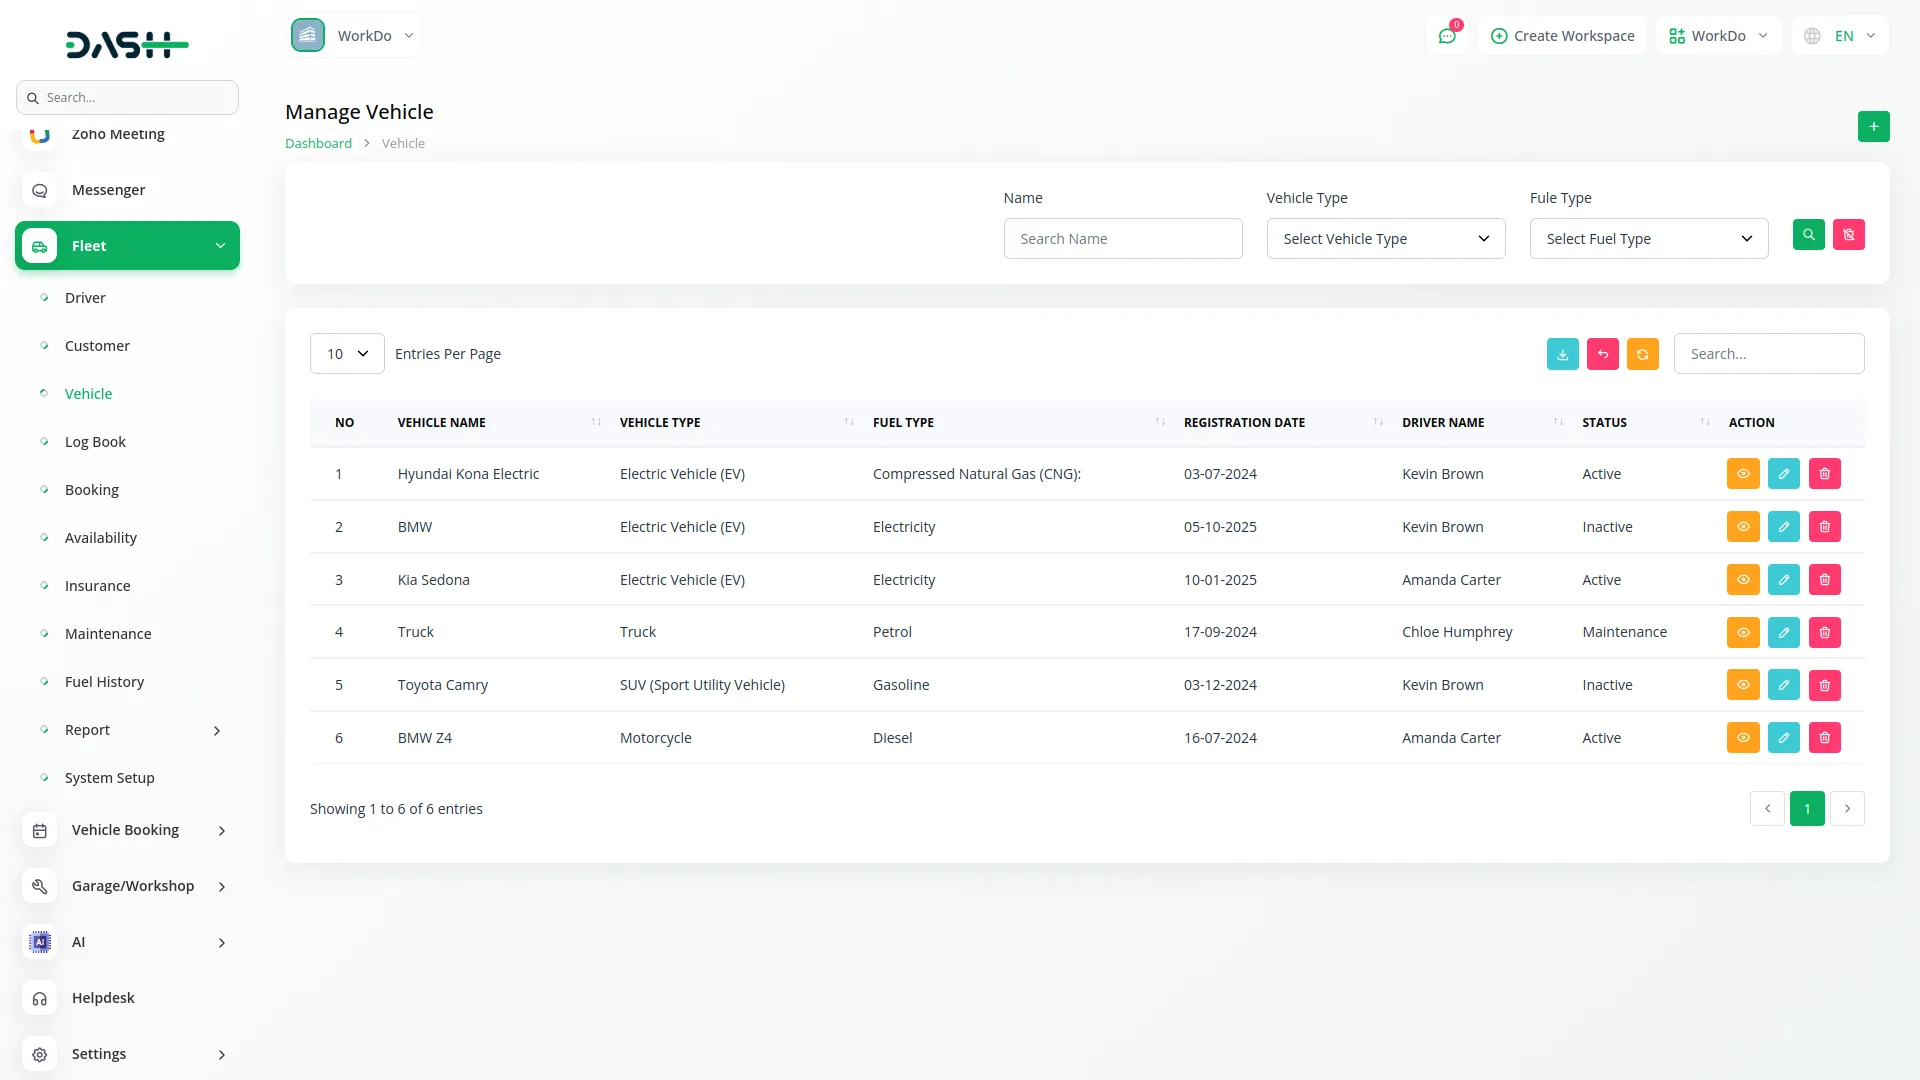
- Before viewing the vehicle list, you can use the Vehicle filter to search for specific vehicles. Enter Name, select Vehicle Type from the dropdown (this comes from System Setup), select Fuel Type from the dropdown (this also comes from System Setup), then click “Apply” to search vehicle data or “Reset” to clear the filters. To create a new Vehicle, click the “Create” button.
- Enter Vehicle Name and select Vehicle Type from the dropdown (from System Setup). Add Registration Date, Register Expiry Date, and select Fuel Type from the dropdown (from System Setup). Choose Driver Name from the dropdown (from Driver module), then enter License Plate Number, Vehicle Identification Number, Model Year, and select Status (Active, Inactive, or Maintenance). Finally, add Seat Capacity and Rate.
- The list page shows all vehicles with columns for No, Vehicle Name, Vehicle Type, Fuel Type, Registration Date, Driver Name, and Status. Available buttons include Search, Export, Reload, and Reset.
- Available actions are View, Edit, and Delete. When you click View, multiple tabs appear showing Details, Insurance, Bookings, Maintenance, and Fuel History. The Details tab shows vehicle information and allows adding multiple attachments.
- The Insurance tab displays insurance information including Insurance Provider Name, Recurring date, and Recurring Period. The Bookings tab shows booking details including Start Date, End date, and Amount. The Maintenance tab displays maintenance records including Service type, Maintenance Type, and Service Name. The Fuel History tab shows fuel records including Driver name, Fueling date and time, Fuel type, and Total Cost.
Manage Log Books
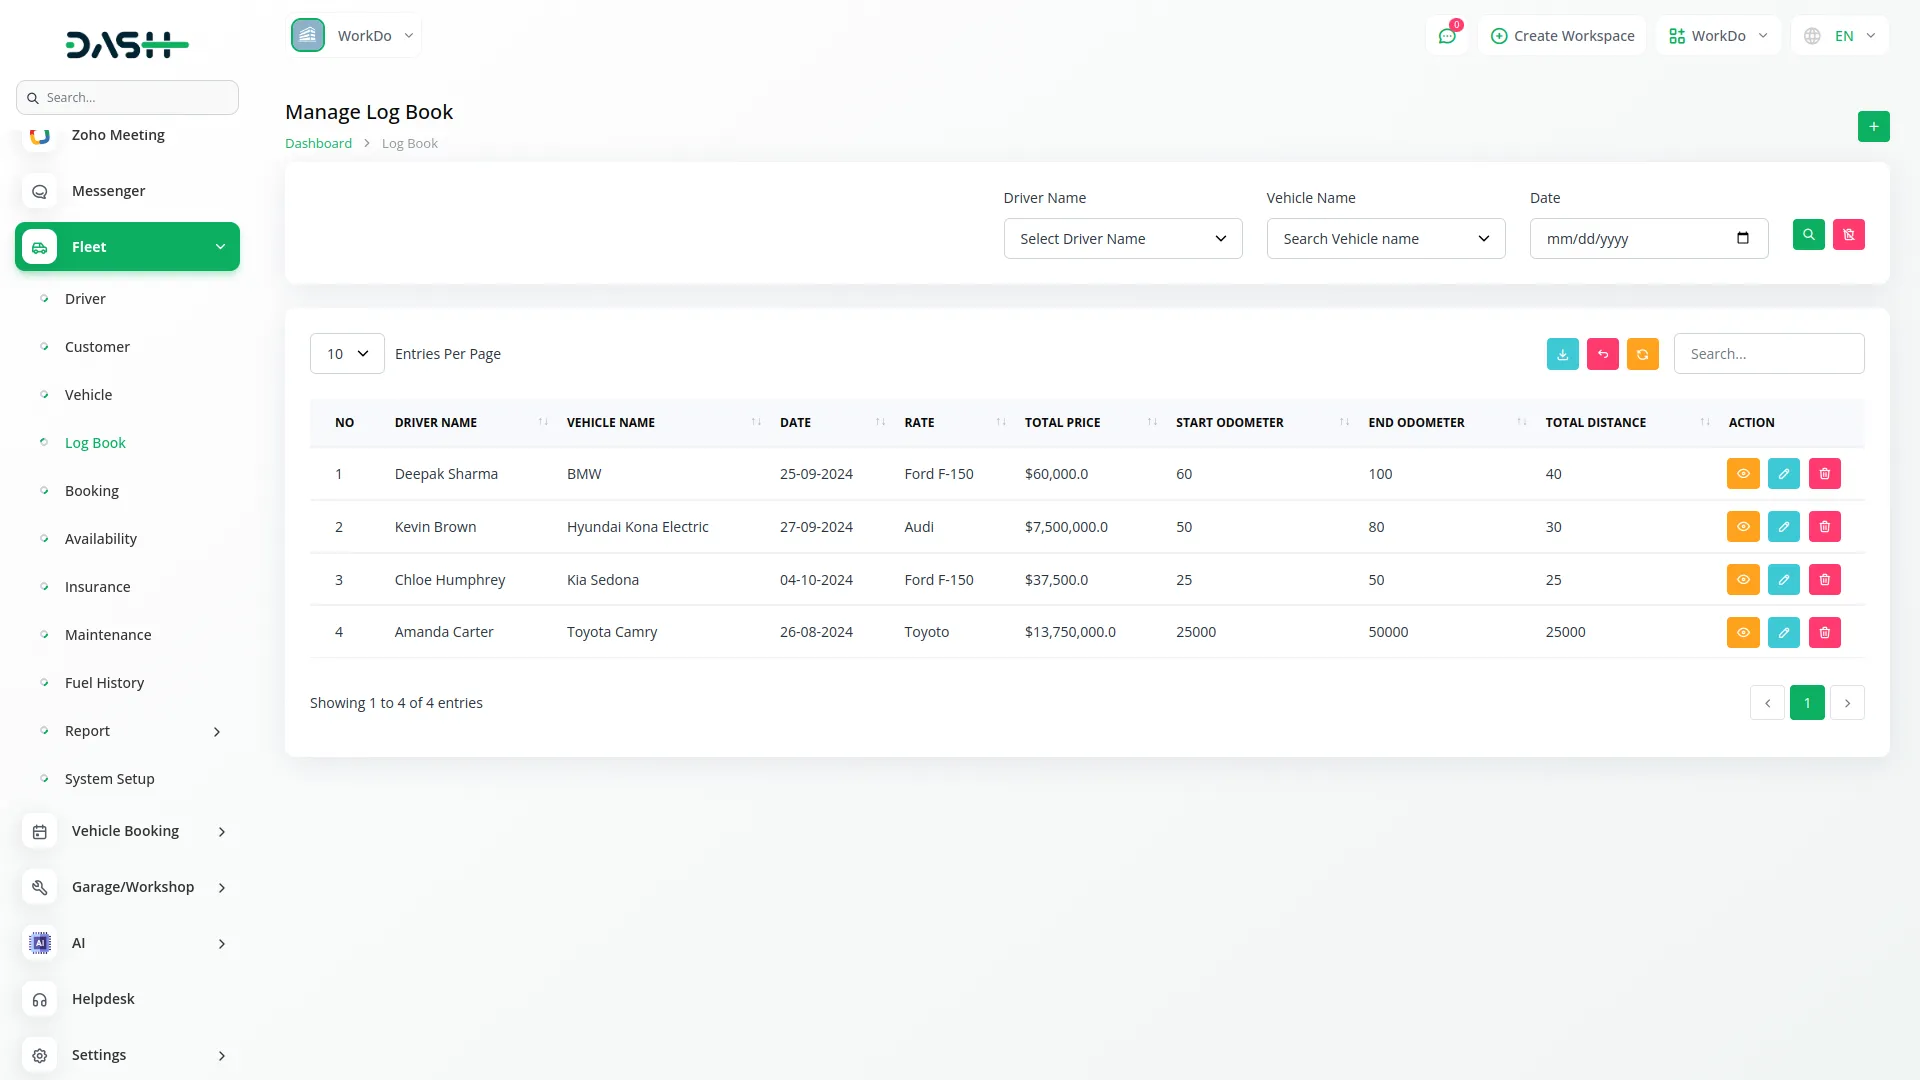
- You can filter Log Book records using Driver Name dropdown (from Driver module), Vehicle Name dropdown (from Vehicle module), and Date. Click “Apply” to search Log Book data or “Reset” to clear filters. To create a new Log Book entry, click the “Create” button.
- Select Driver Name from the dropdown (from Driver module) and Vehicle Name from the dropdown (from Vehicle module). Enter Start Date, End Date, Start Odometer, and End Odometer readings.
- Select Rate from the dropdown (Fleet type item), and the Total Distance and Total Price will be automatically calculated (Rate price × Total Distance). Add any Notes and save the record. The list page displays all log book entries with columns for No, Driver Name, Vehicle Name, Date, Rate, Total Price, Start Odometer, and End Odometer. Available buttons include Search, Export, Reload, and Reset. Available actions are View, Edit, and Delete for log book entries.
Manage Bookings
- To create a new Booking, click the “Create” button. Select Customer Name from the dropdown (from Customer module) and Vehicle Name from the dropdown (from Vehicle module). Enter Start Date/Time and End Date/Time for the trip.
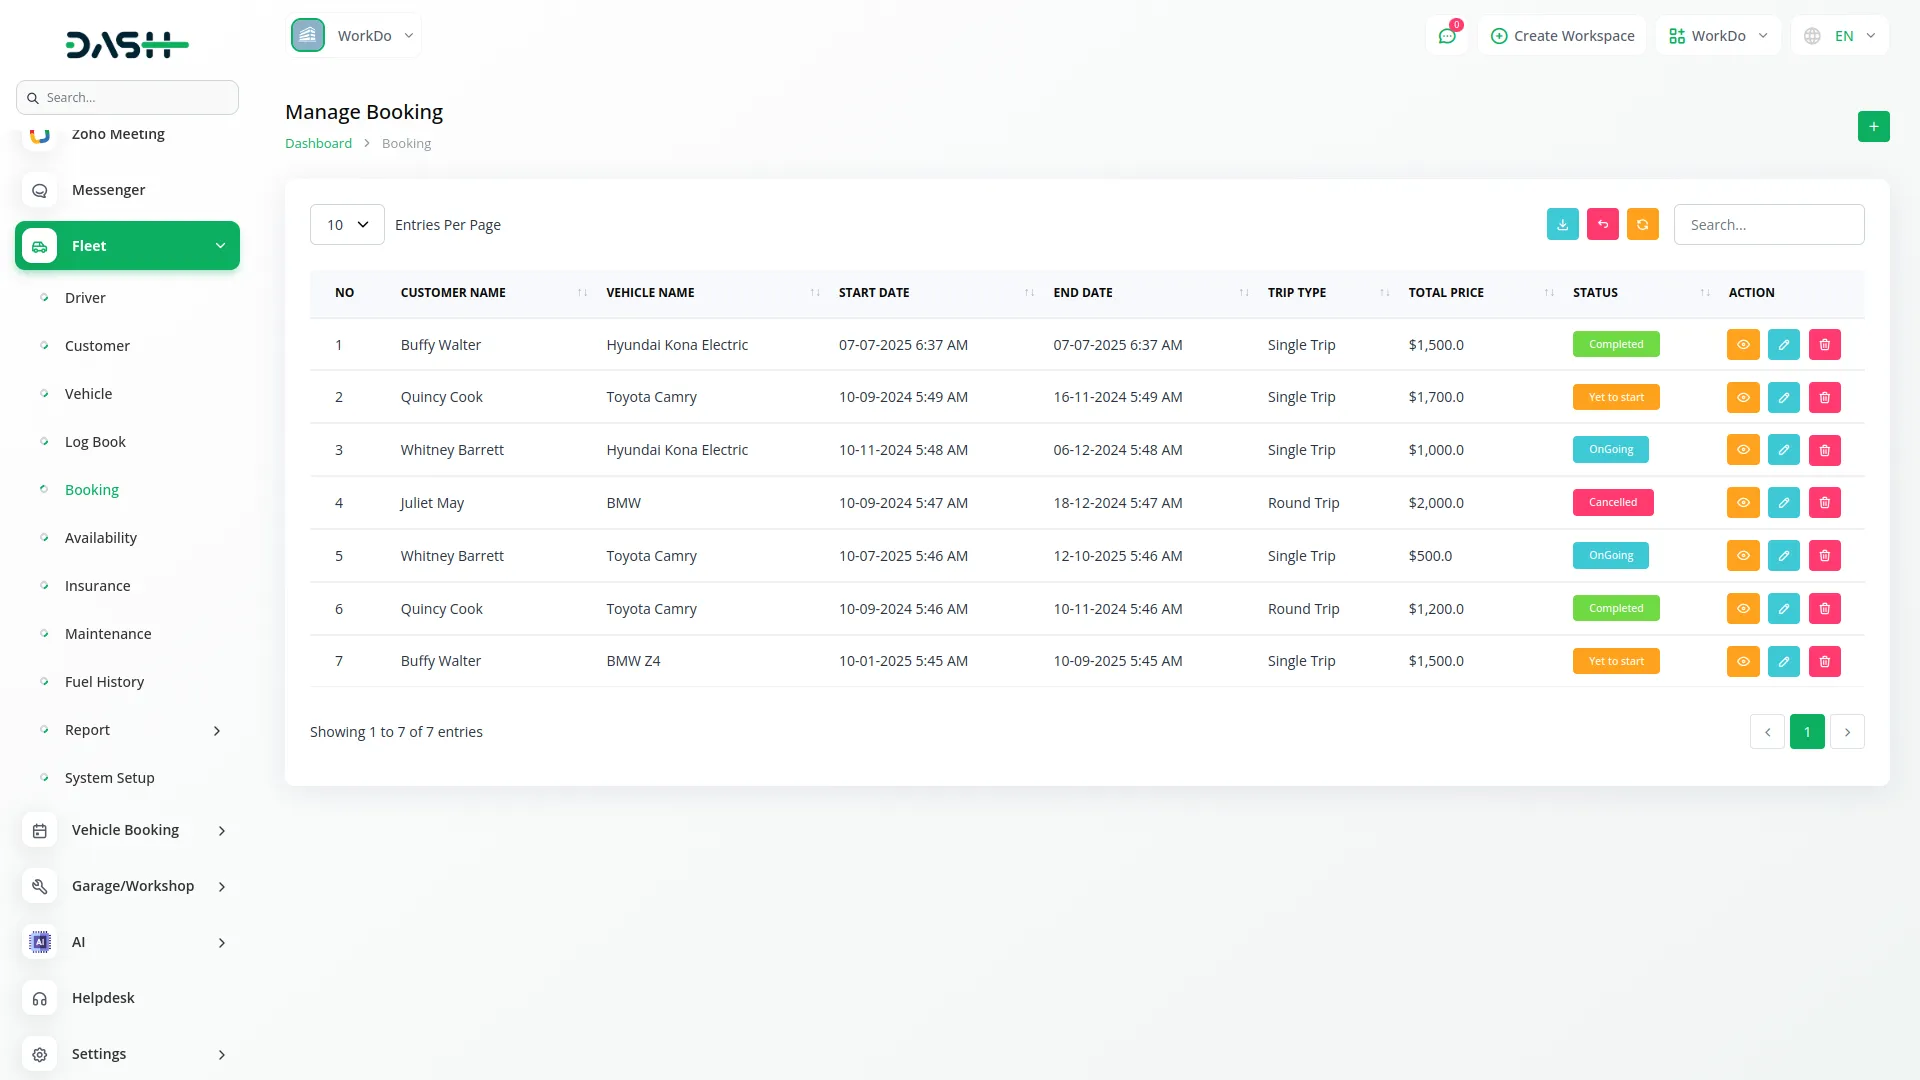
- Add Start Location and End Location, select Trip Type, and enter Total Price. Set the Status and add any Notes for the booking. The list page shows all bookings with columns for No, Customer Name, Vehicle Name, Start Date, End Date, Trip Type, Total Price, and Status.
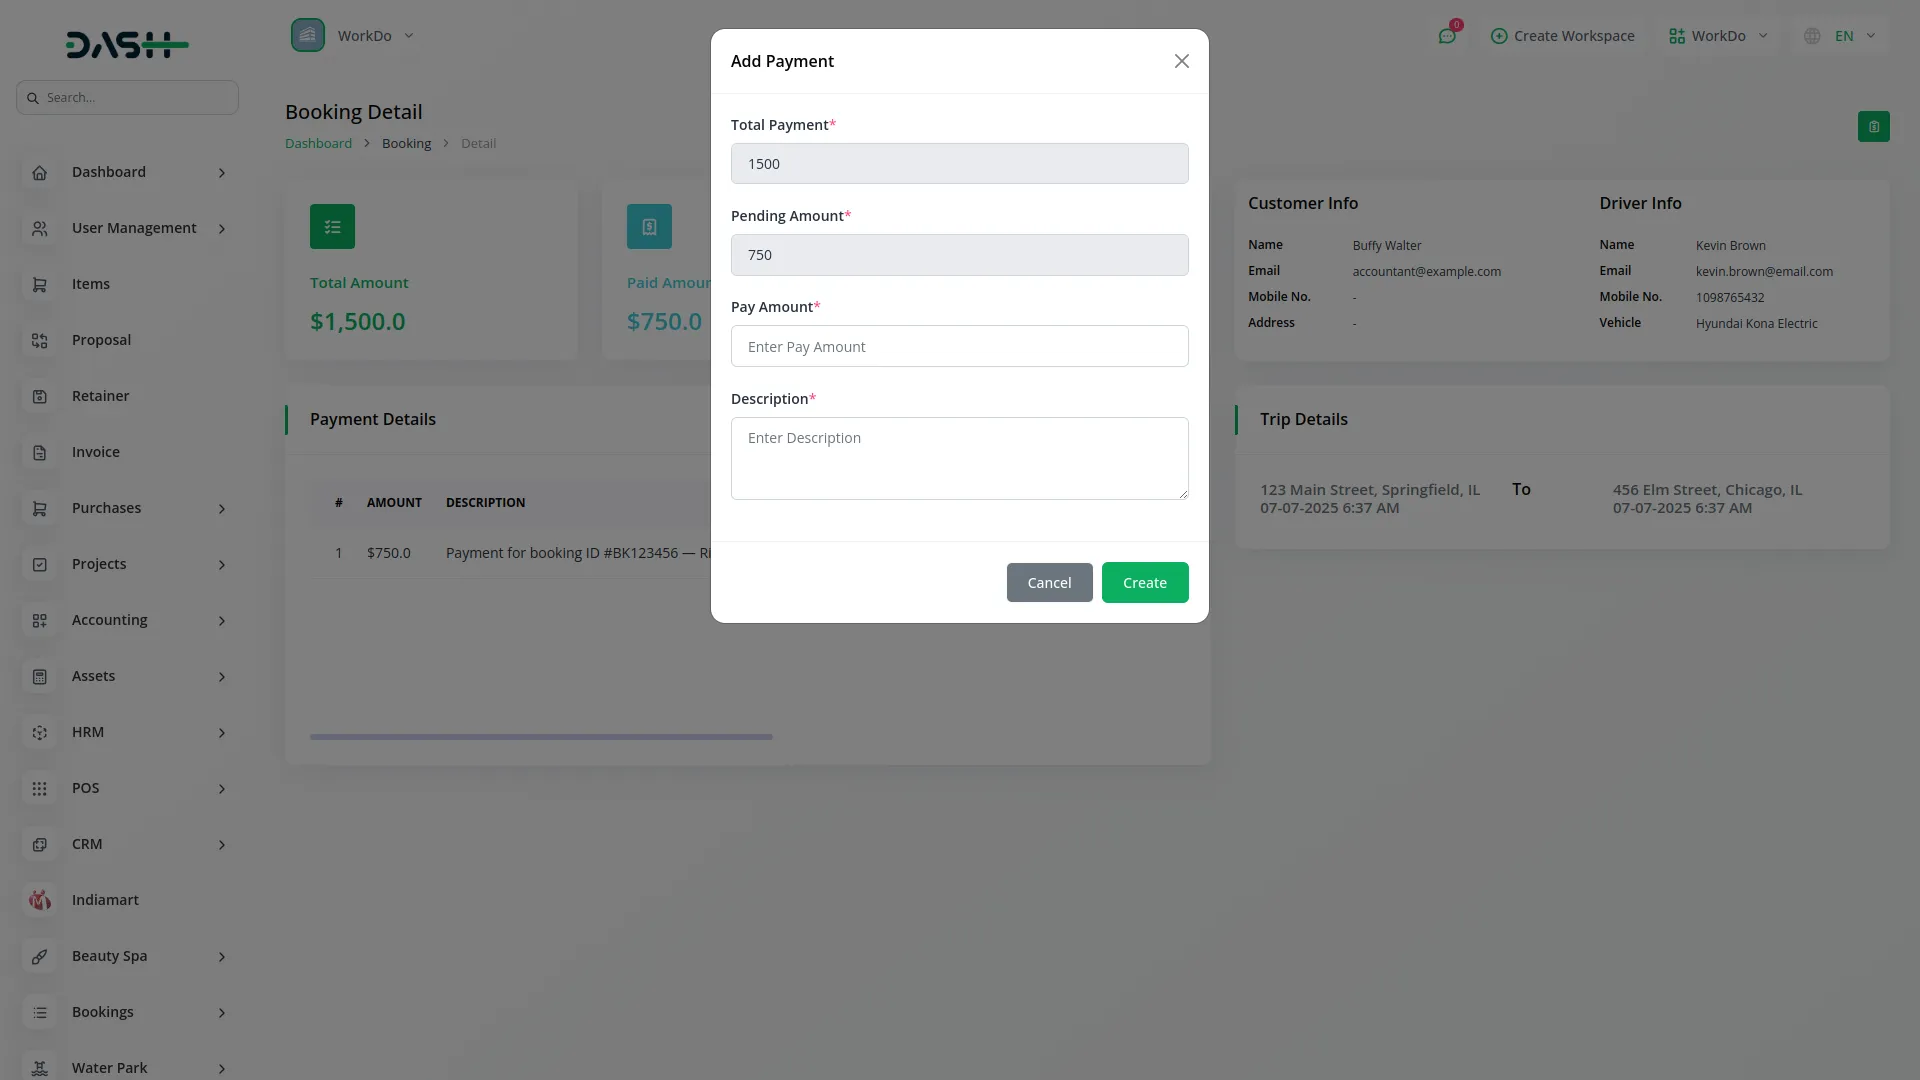
- Available buttons include Search, Export, Reload, and Reset. Available actions are View, Edit, and Delete. When you click View, you will see three cards showing Total Amount, Paid Amount, and Pending Amount.
- There is also an “Add Payment” button where you can enter Pay Amount and Description (Total Payment and Pending Amount are auto-filled). The view shows Customer Info (Name, Email, Mobile No, Address) and Driver Info (Name, Email, Mobile No, Vehicle).
- The Payment Details section displays a table with columns for No, Amount, Description, Paid Time, and Delete action. The Trip Details section shows the complete journey from Start location and start date/time to End location and end date/time.
Manage Availability
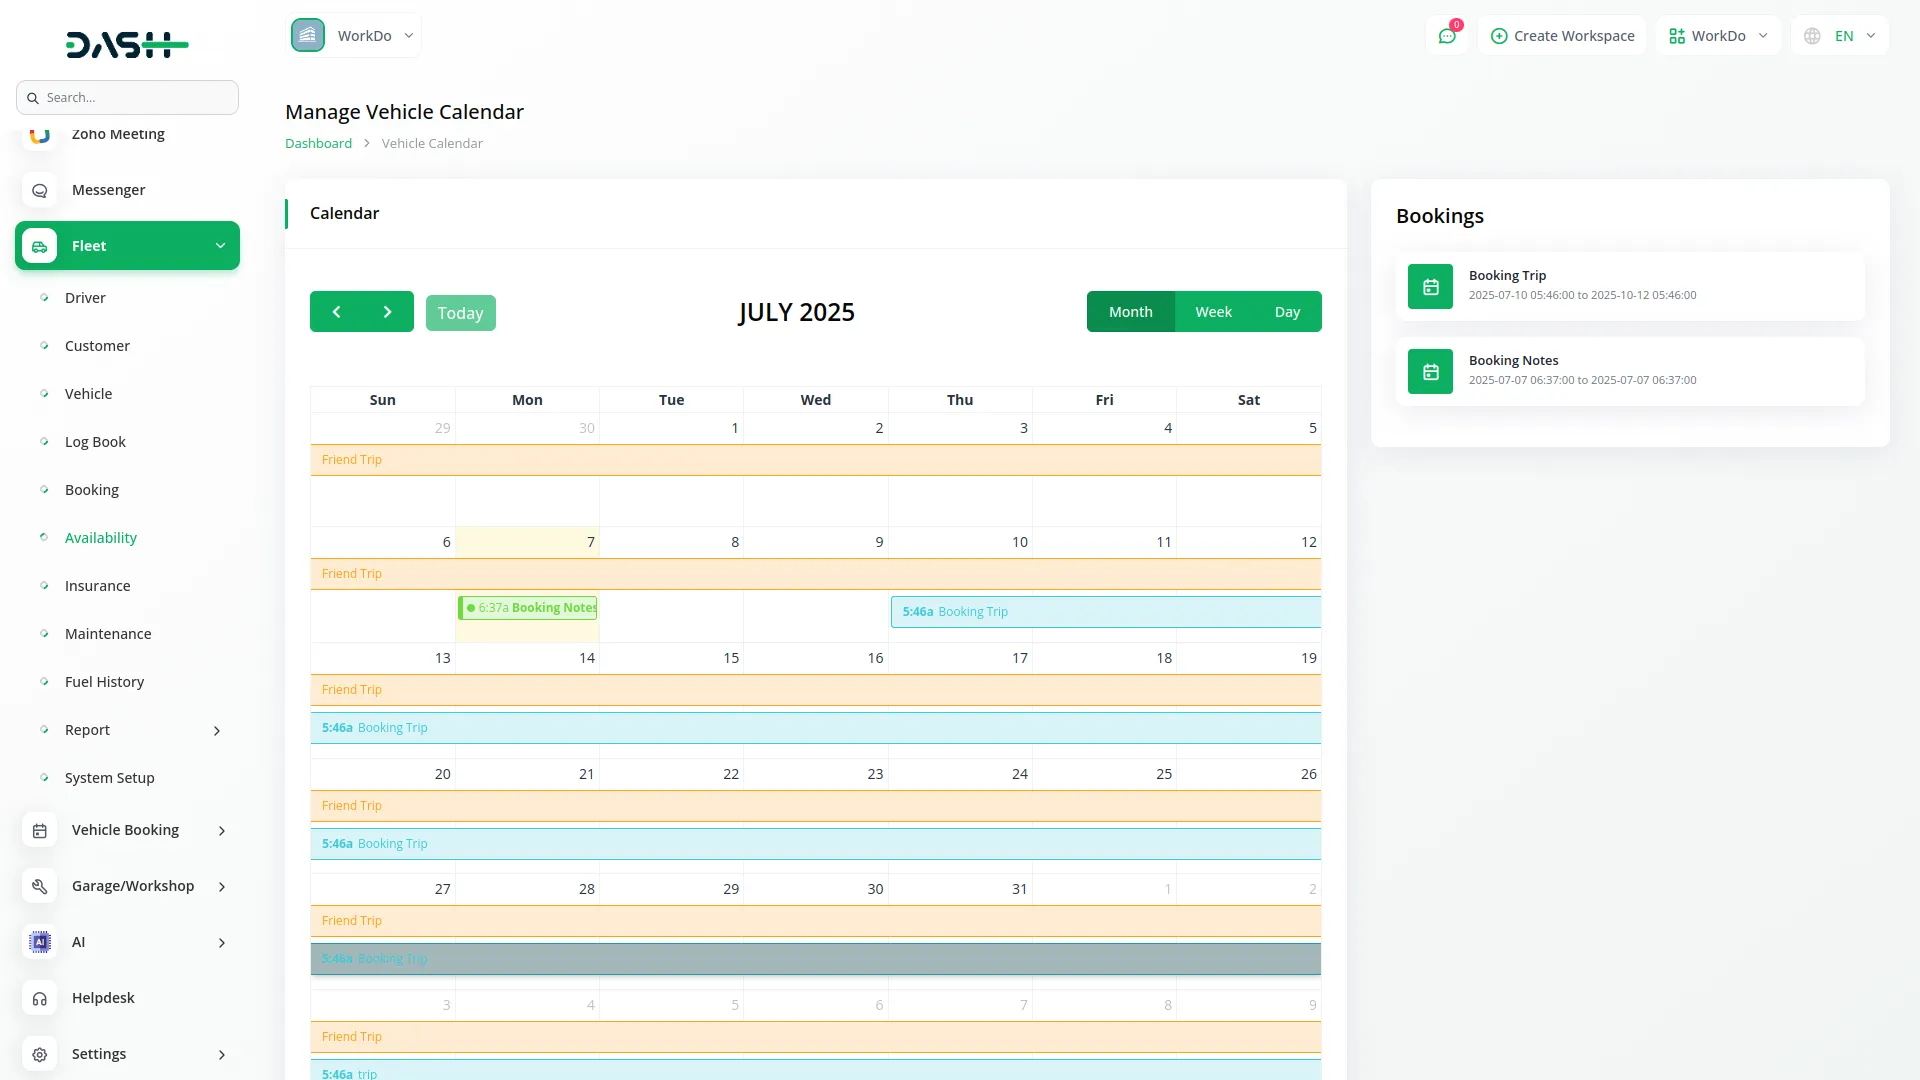
The Availability module displays a calendar view where you can see current month bookings. You can change the view to monthly, yearly, or day-wise data to check vehicle and booking availability for different time periods.
Manage Insurance
- You can filter Insurance records using Insurance Provider Name, Policy Number, and Vehicle Name dropdown (from Vehicle module). Click “Apply” to search Insurance data or “Reset” to clear filters. To create a new Insurance record, click the “Create” button.
- Enter Insurance Provider Name and select Vehicle Name from the dropdown (from Vehicle module). Add Start Date, End Date, Recurring Date, and select Recurring Period from the dropdown (from Recurring in System Setup).
- Enter Insurance Deductible, Charge Payable, Policy Number, upload Policy Document, and add any Notes. The list page displays all insurance records with columns for No, Policy Number, Insurance Provider Name, Vehicle Name, Recurring Date, Recurring Period, and Charge Payable. Available buttons include Search, Export, Reload, and Reset.
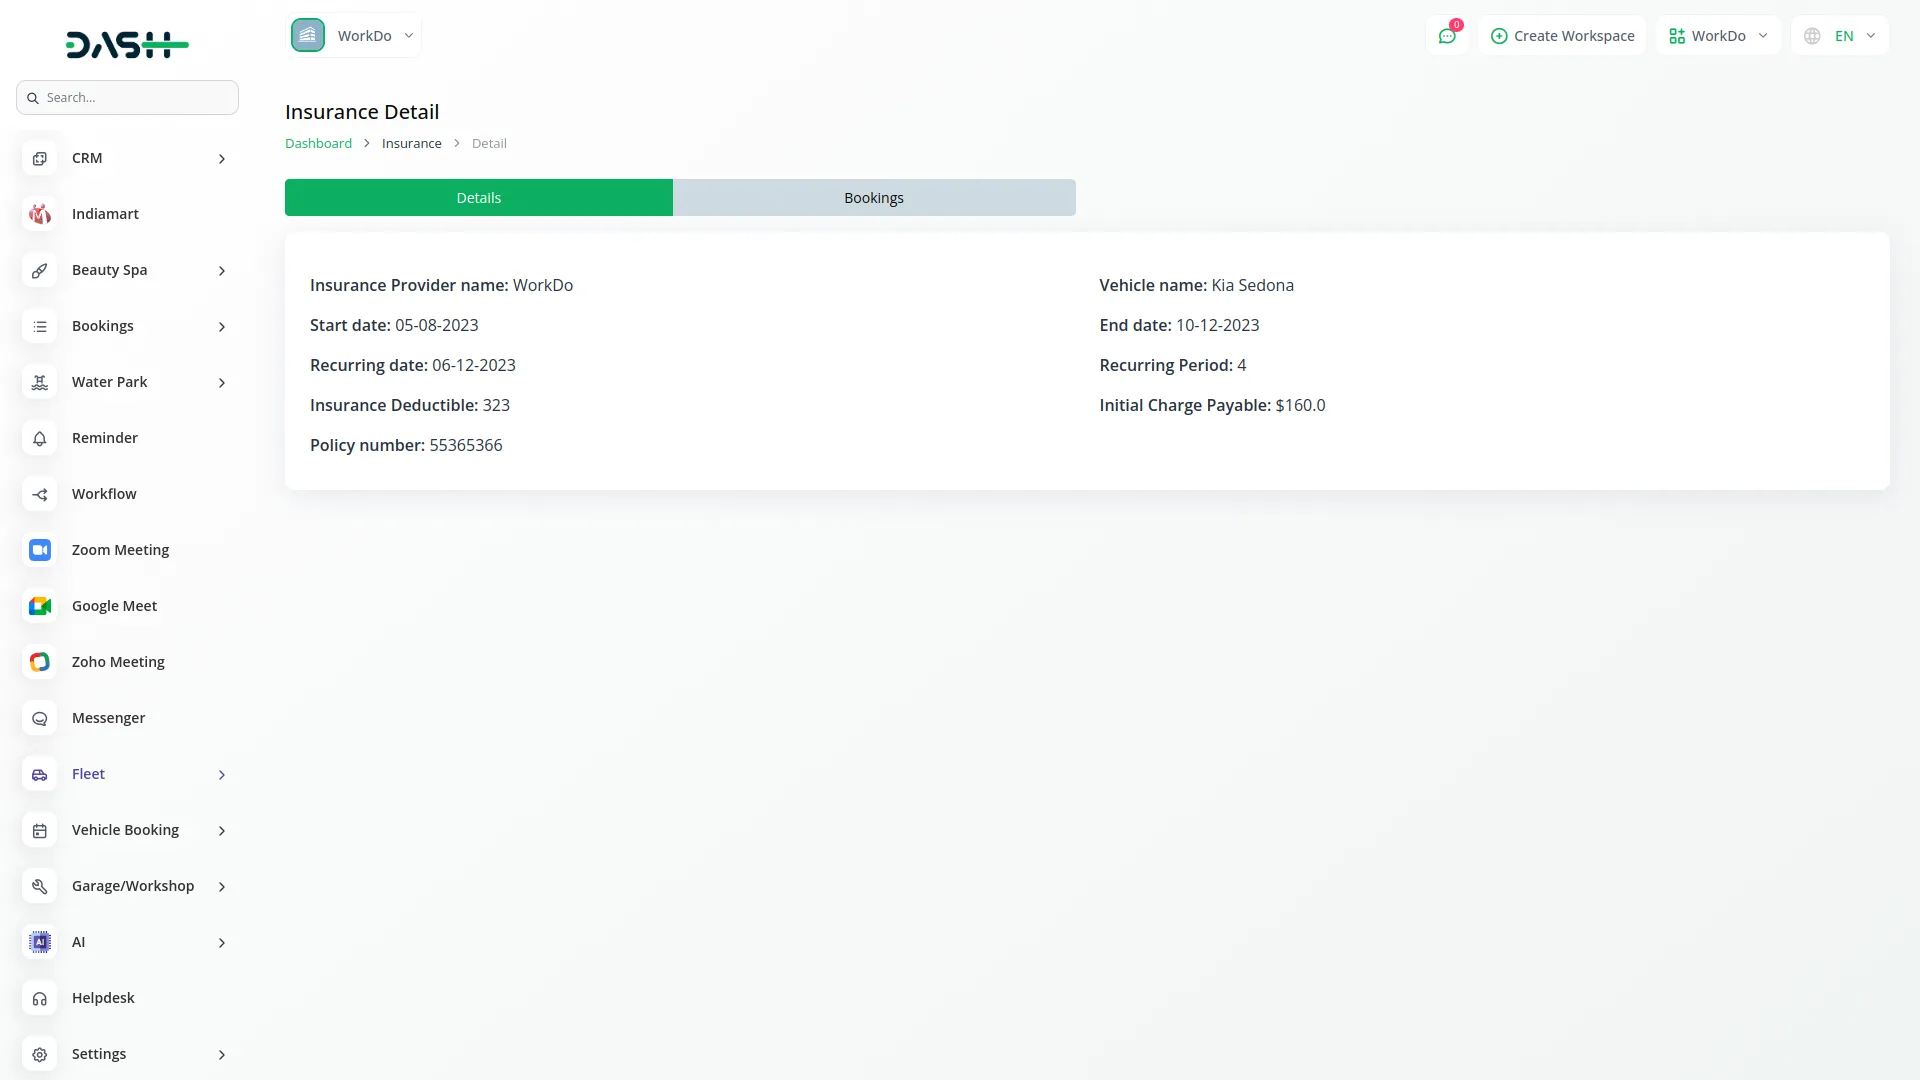
- Available actions are View, Edit, and Delete. When you click View, two tabs appear: Details and Bookings. The Details tab shows insurance information including Insurance Provider name, Vehicle name, Start date, End date, and Policy number.
- The Bookings tab allows you to add booking details with Start Date, End date, and Amount fields, and displays a table with Start Date, End date, and Amount columns with Edit and Delete actions.
Maintenance
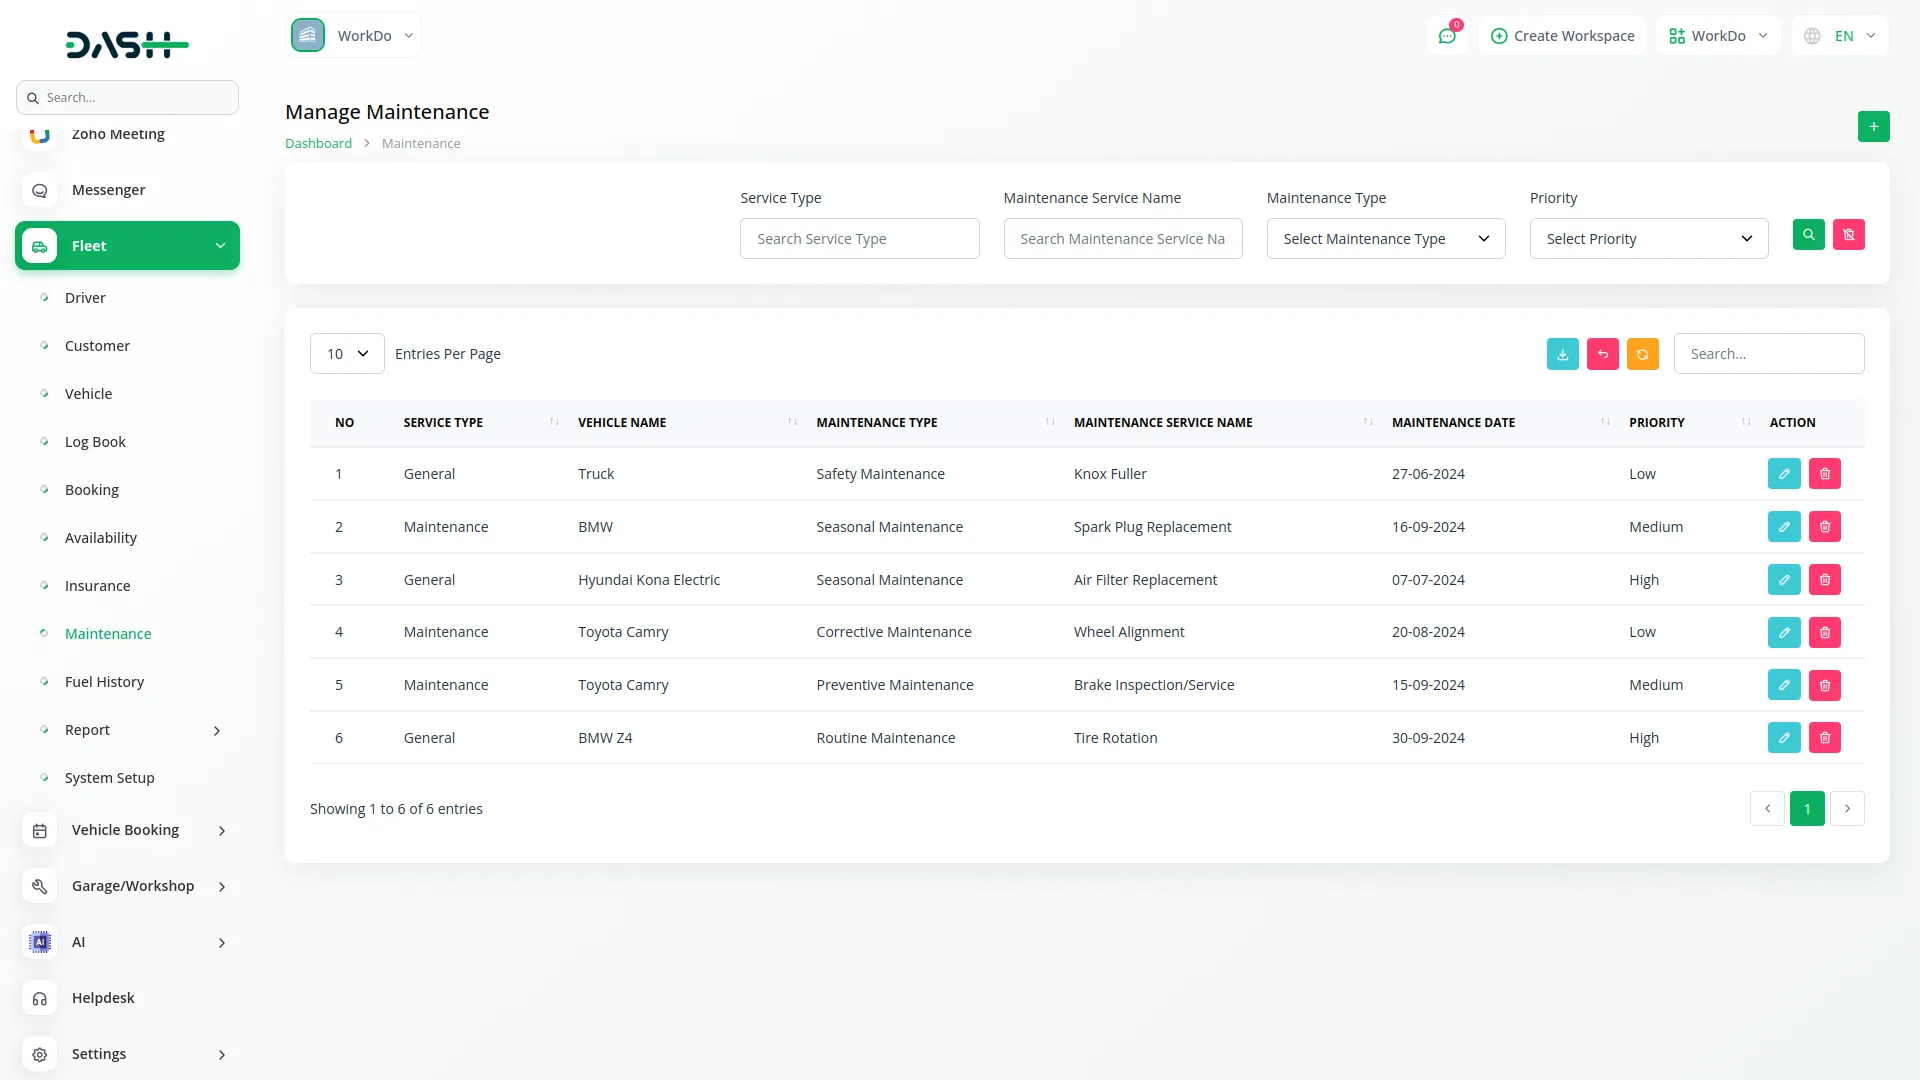
- You can filter Maintenance records using Service Type, Maintenance Service Name, Maintenance Type dropdown (from System Setup), and Priority dropdown (high, medium, low). Click “Apply” to search Maintenance data or “Reset” to clear filters. To create a new Maintenance record, click the “Create” button.
- Select Service Type using radio buttons (Maintenance or General) and choose Service For from the dropdown (from Users). Select Vehicle Name from the dropdown (from Vehicle module) and Maintenance Type from the dropdown (from System Setup).
- Enter Maintenance Service Name, Cost, Charge Bear By, Maintenance Date, and select Priority (high, medium, low). Add Total Cost and any Notes for the maintenance record. The list page displays all maintenance records with columns for No, Service Type, Vehicle Name, Maintenance Type, Maintenance Service Name, Maintenance Date, and Priority. Available buttons include Search, Export, Reload, and Reset. Available actions are View, Edit, and Delete for maintenance records.
Fuel History
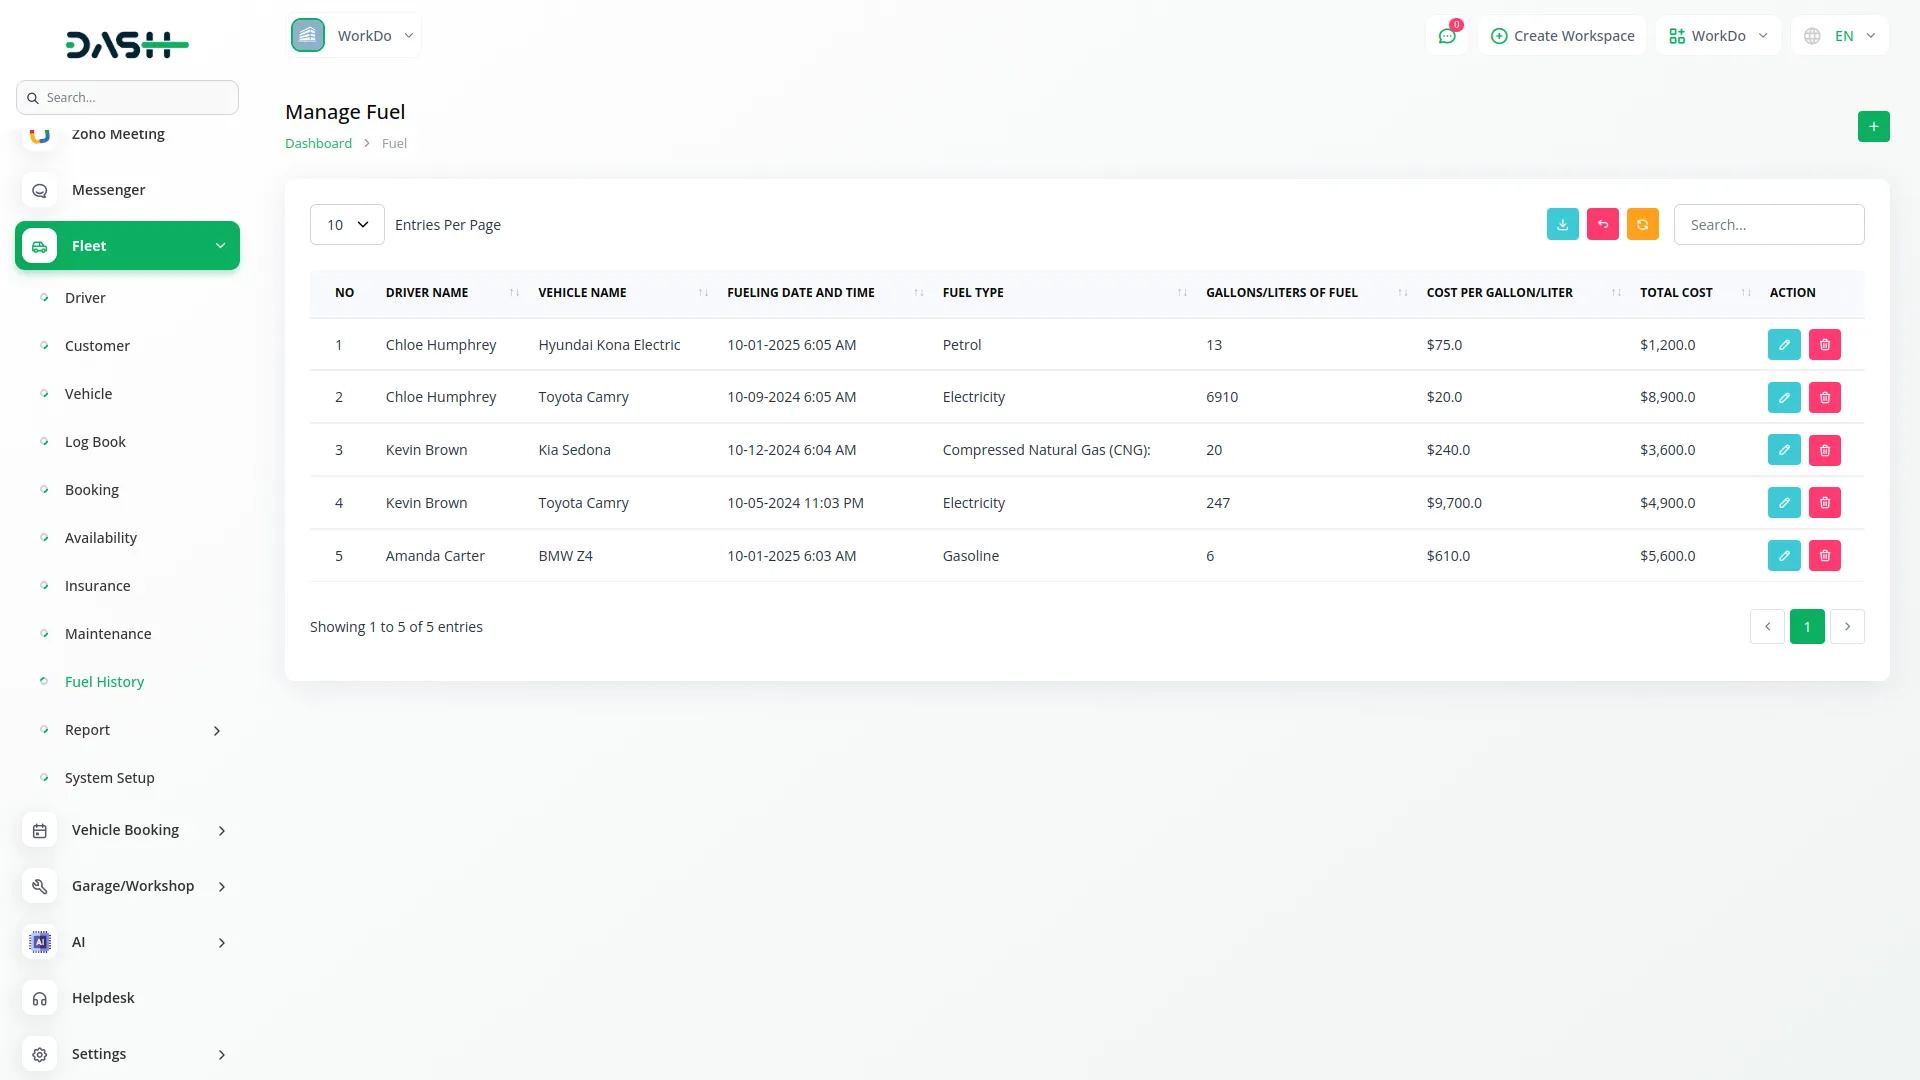
- To create a new Fuel History record, click the “Create” button. Select Driver Name from the dropdown (from Driver module), Vehicle Name from the dropdown (from Vehicle module), and Fuel Type from the dropdown (from System Setup). To create a new Fuel History record, click the “Create” button. Select Driver Name from the dropdown (from Driver module), Vehicle Name from the dropdown (from Vehicle module), and Fuel Type from the dropdown (from System Setup). To create a new Fuel History record, click the “Create” button. Select Driver Name from the dropdown (from Driver module), Vehicle Name from the dropdown (from Vehicle module), and Fuel Type from the dropdown (from System Setup).
- Enter Fueling Date and Time, Gallons/Liters of Fuel, Cost per Gallon/Liter, Total Cost, Odometer Reading, and any Notes. The list page shows all fuel history records with columns for No, Driver Name, Vehicle Name, Fueling Date and Time, Fuel Type, Gallons/Liters of Fuel, Cost per Gallon/Liter, and Total Cost.
- Available buttons include Search, Export, Reload, Reset, and Create. Available actions are View, Edit, and Delete for fuel history records.
Manage Reports
The Report module provides two main report types: Maintenance Report and Fuel History Report.
Maintenance Report
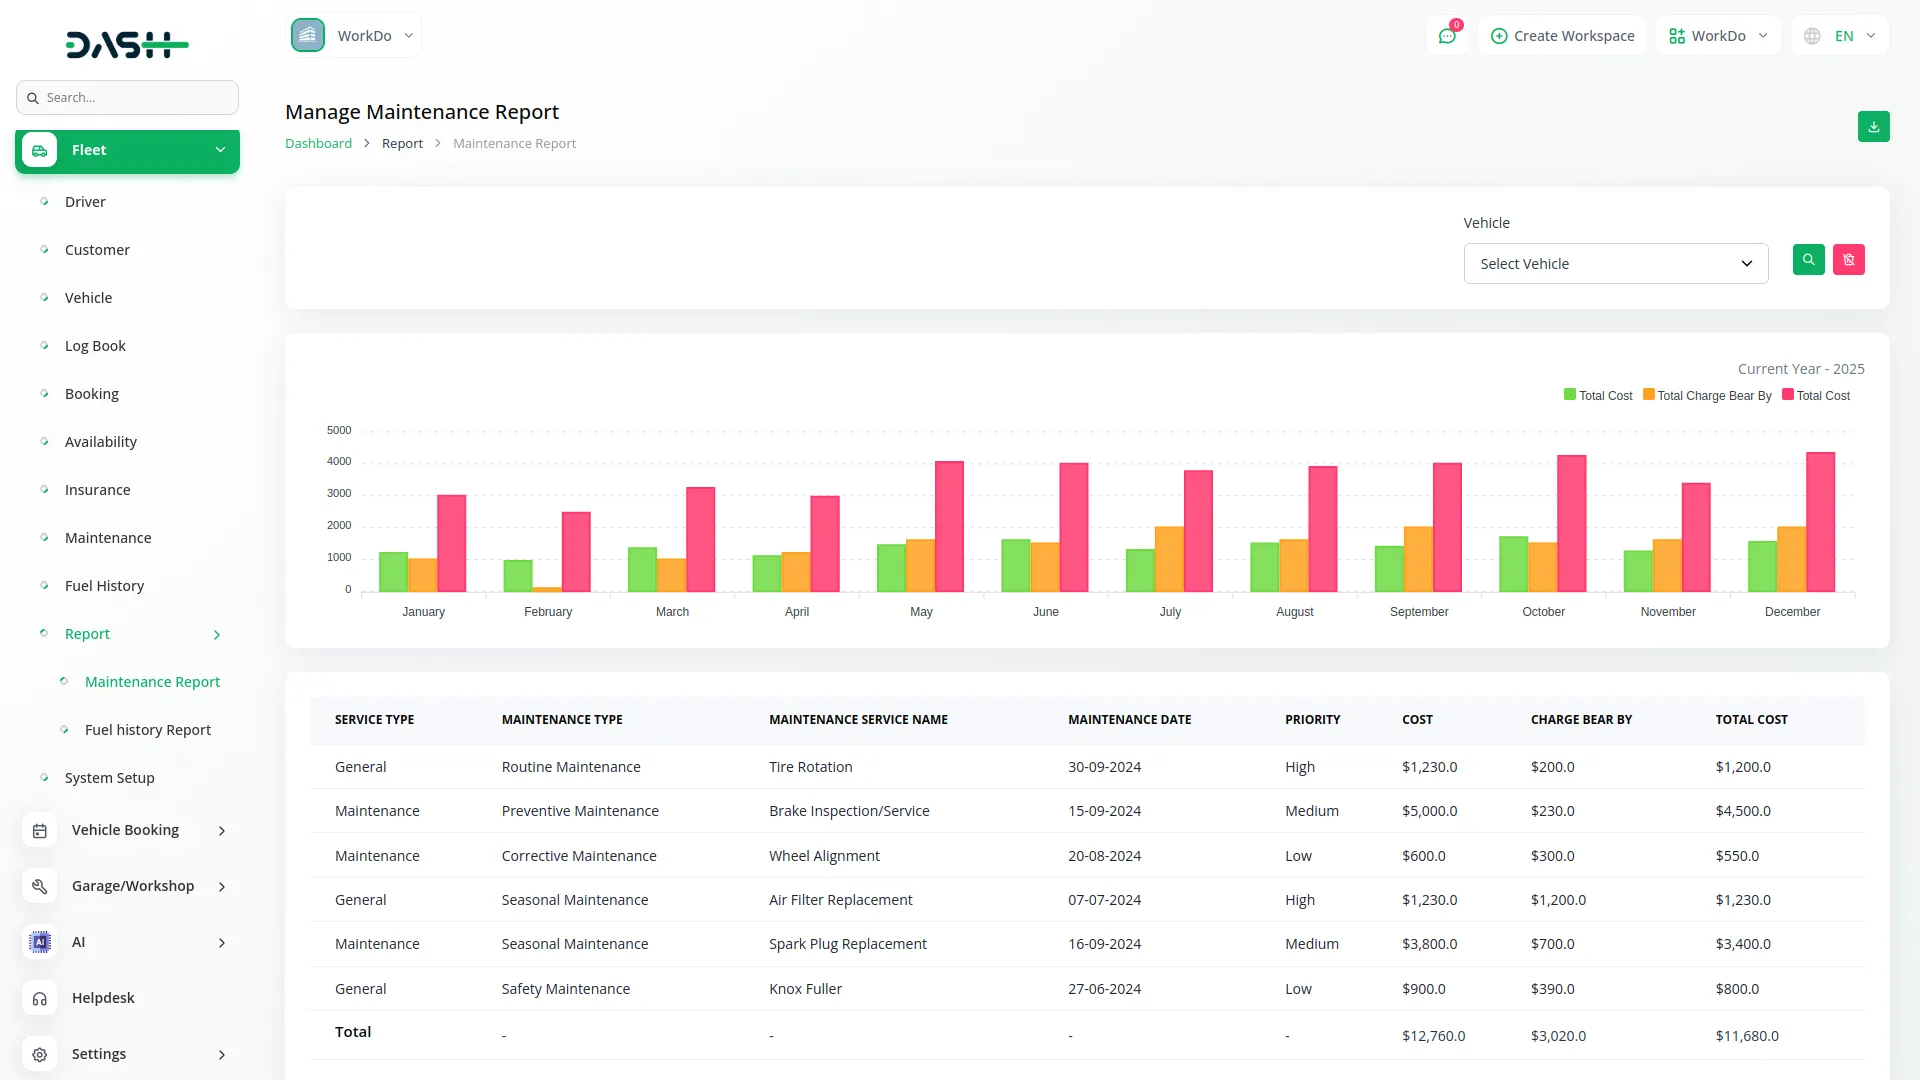
- You can filter the Maintenance Report using Vehicle dropdown (from Vehicle module). Click “Apply” to search vehicle maintenance report data or “Reset” to clear filters.
- The report displays a current year chart showing Cost, Total Charge Bear By, and Total Cost. Below the chart, all maintenance history is shown with details including Service type, Maintenance Type, Maintenance Service Name, Maintenance Date, Priority, Cost, Charge bear by, and Total Cost. Click the “Download” button to download the maintenance history report.
Fuel History Report
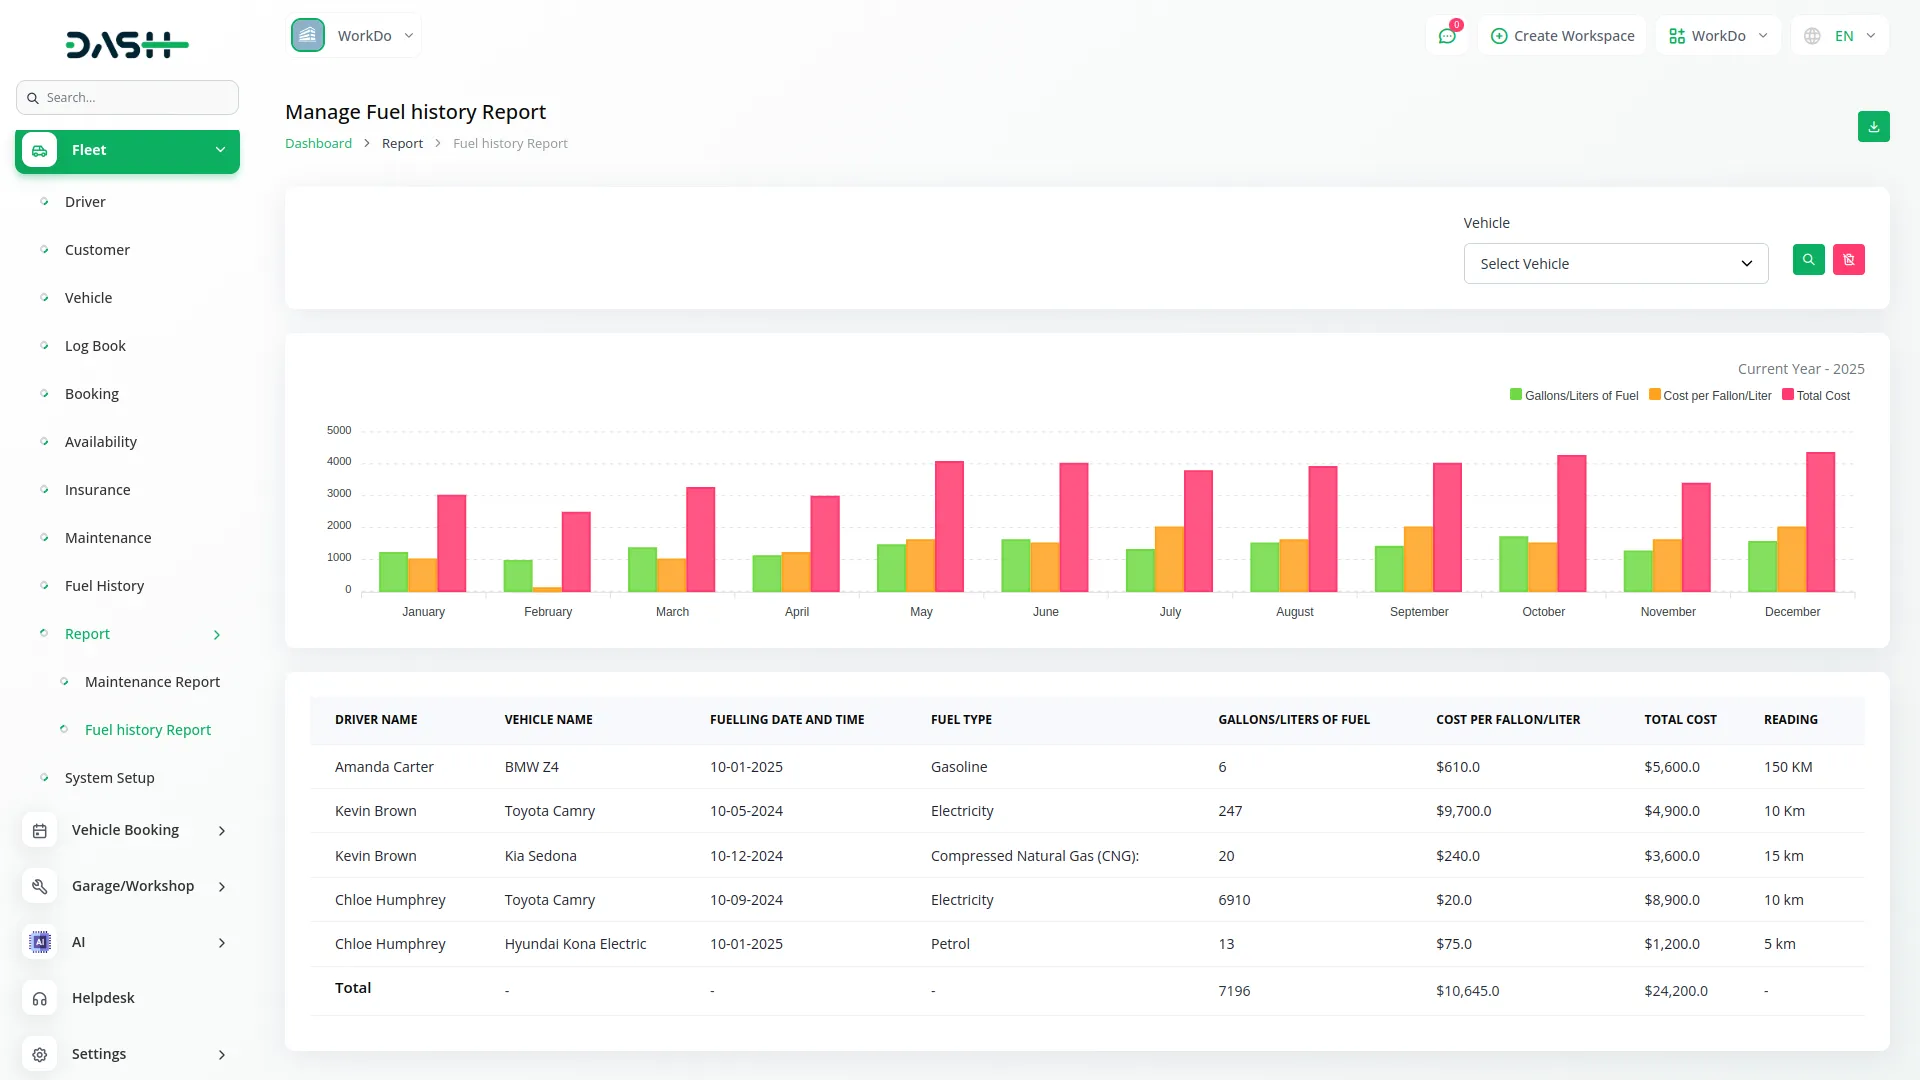
- You can filter the Fuel History Report using Vehicle dropdown (from Vehicle module). Click “Apply” to search vehicle fuel history report data or “Reset” to clear filters.
- The report shows a current year chart displaying Gallons/Liters of Fuel, Cost per Gallon/Liter, and Total Cost. The detailed fuel history includes Driver name, Vehicle Name, Fueling date and time, Fuel type, Gallons/Liters of Fuel, Cost per Gallon/Liter, Total Cost, and Reading.
- Click the “Download” button to download the fuel history report.
Invoice
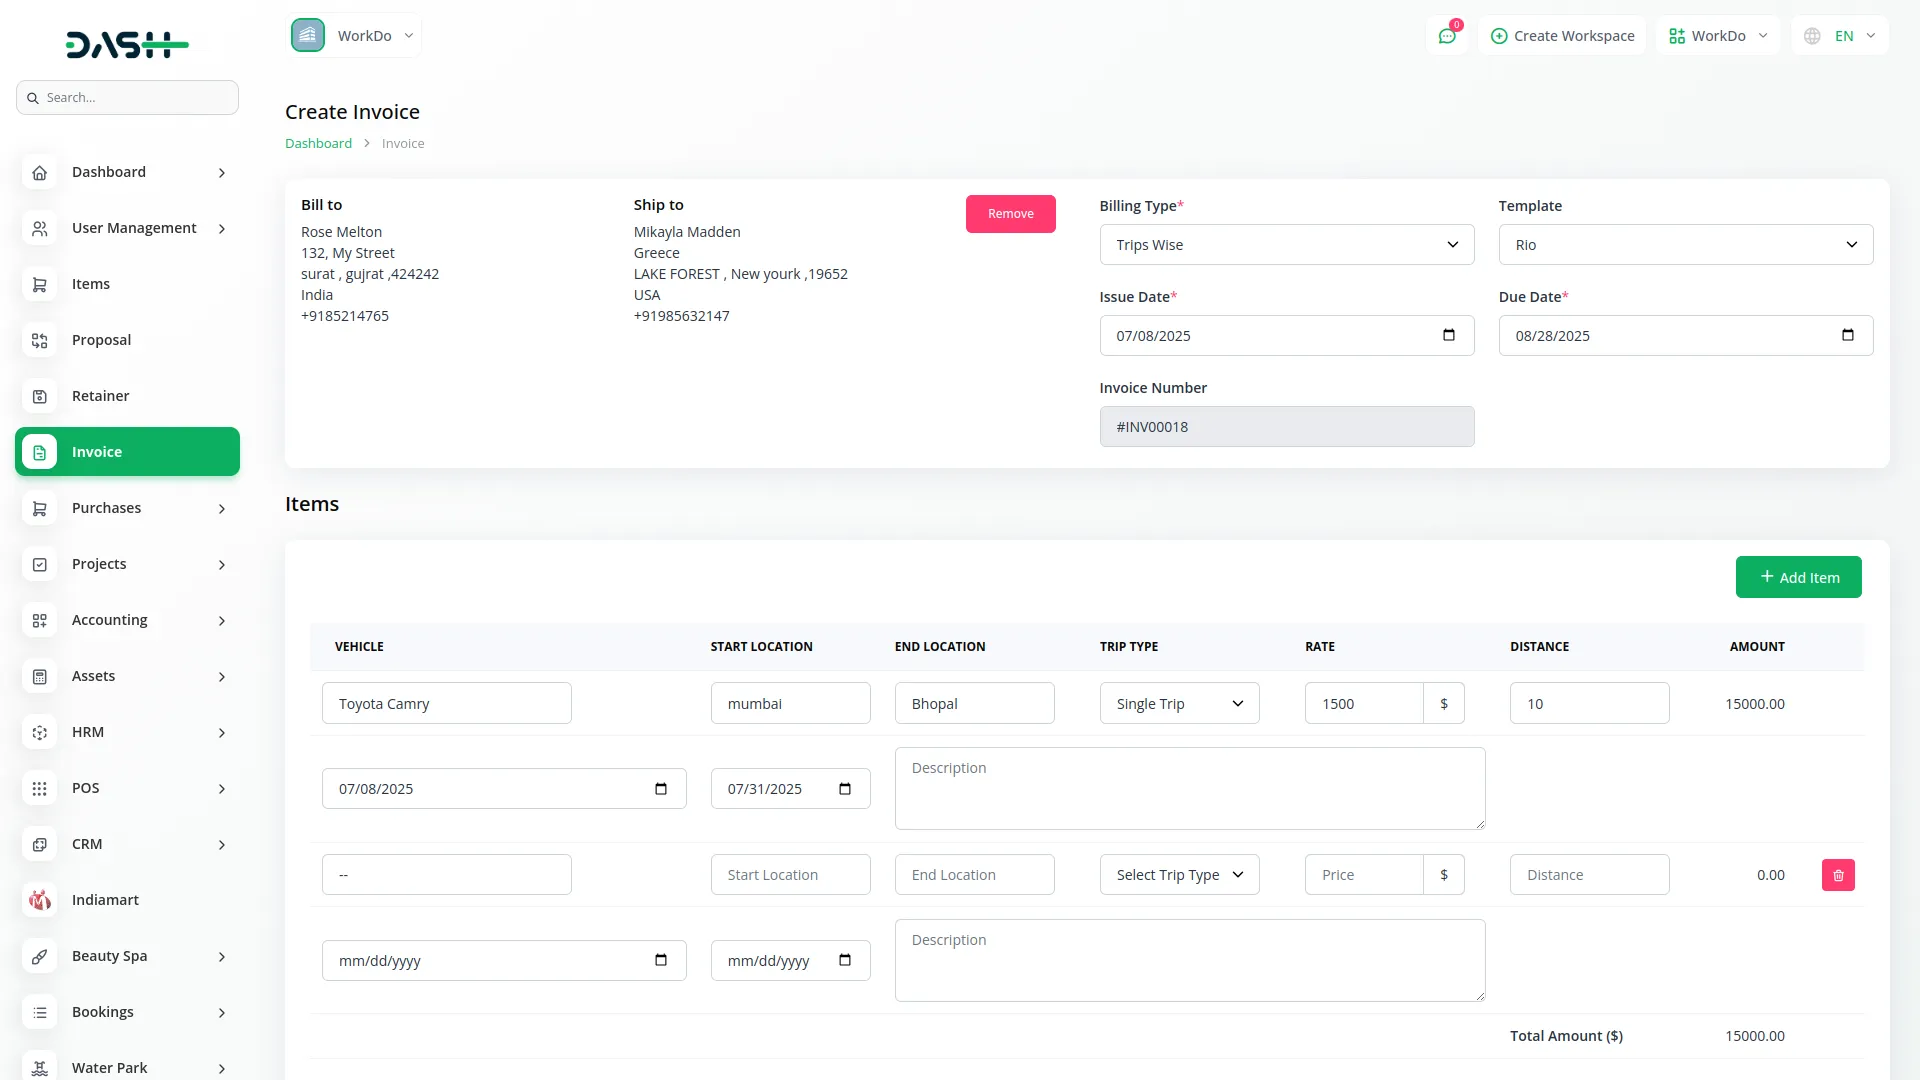
- To create a new Invoice, click the “Create” button. In the Information section, select Account Type from the dropdown (default selection is “Fleet”) and choose Customer from the dropdown (from Customer module filtered by Fleet Customers).
- Select Billing Type from the dropdown (Trip Wise is pre-selected) and choose Template from the available invoice template styles. Enter Issue Date and Due Date using the date picker, and the Invoice Number will be pre-filled or auto-generated.
- Select Income Account from the dropdown (from Chart of Accounts from Account Add-on). In the Items section, click the “Add Item” button in the top-right to add new item entries. For each item, select Vehicle from the dropdown (from Vehicle module), enter Start Location and End Location as text.
- Choose Trip Type from the dropdown (Single Trip or Round Trip), enter Rate as a number and Distance as a number. Select Start Date and End Date using date pickers, add Description in the text area.
- The Amount will be automatically calculated as Rate × Distance and displayed as read-only. You can add multiple items using the repeater functionality.
- The Total Amount in the Summary section will automatically calculate as the sum of all item-level amounts and display as read-only. Use the “Cancel” button to cancel form creation or “Create” button to submit and create the invoice.
Categories
Related articles
- YouTube Content Management
- To Do Integration in Dash SaaS
- File Sharing Integration in Dash SaaS
- Fix Equipment Integration in Dash SaaS
- Pesapal Integration in Dash SaaS
- Medical Lab Management Integration in Dash SaaS
- Project Template Integration in Dash SaaS
- Procurement Integration in Dash SaaS
- Sign-in With Bitbucket Detailed Documentation
- Sign-In with LinkedIn Add-On Integration in Dash SaaS
- Laundry Management Integration in Dash SaaS
- Influence Marketing Detailed Documentation
Reach Out to Us
Have questions or need assistance? We're here to help! Reach out to our team for support, inquiries, or feedback. Your needs are important to us, and we’re ready to assist you!


Need more help?
If you’re still uncertain or need professional guidance, don’t hesitate to contact us. You can contact us via email or submit a ticket with a description of your issue. Our team of experts is always available to help you with any questions. Rest assured that we’ll respond to your inquiry promptly.
Love what you see?
Do you like the quality of our products, themes, and applications, or perhaps the design of our website caught your eye? You can have similarly outstanding designs for your website or apps. Contact us, and we’ll bring your ideas to life.
