

HRM – WorkDo Dash SaaS Add-On Guide
Handle employees, attendance, payroll, leave, recruitment, and daily HR operations from one place.
Introduction
The HRM Add-On helps you manage your entire team in one place, from the day someone joins to the day they leave. It covers everyday HR tasks like keeping employee records, tracking attendance, managing leave, running payroll, and organizing shifts. It also lets you recognize good work through awards and promotions, and handle issues like complaints and warnings when they come up. You can customize things like branches, departments, and job titles to match how your company is set up. Simple dashboards and calendars make it easy to see what’s happening and manage your team without hassle.
How to Use The HRM Add-On?
HRM Dashboard
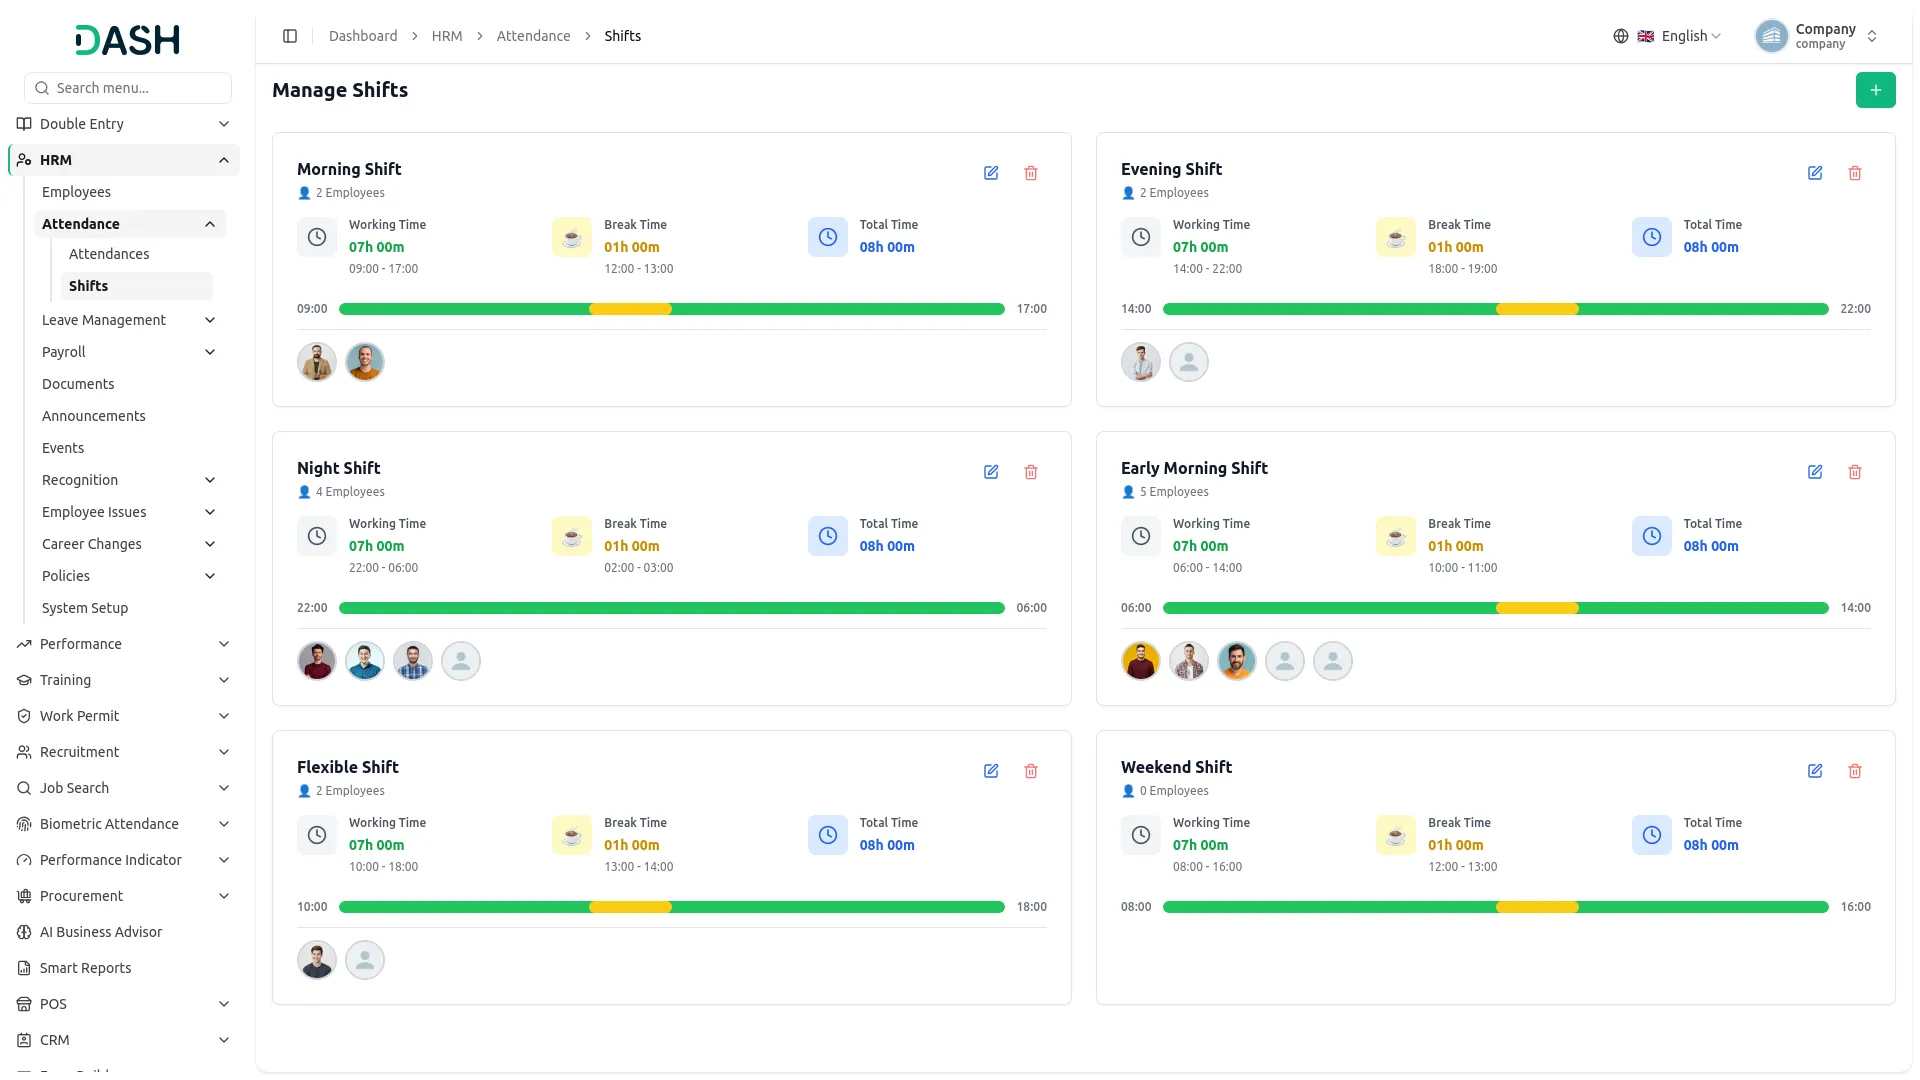
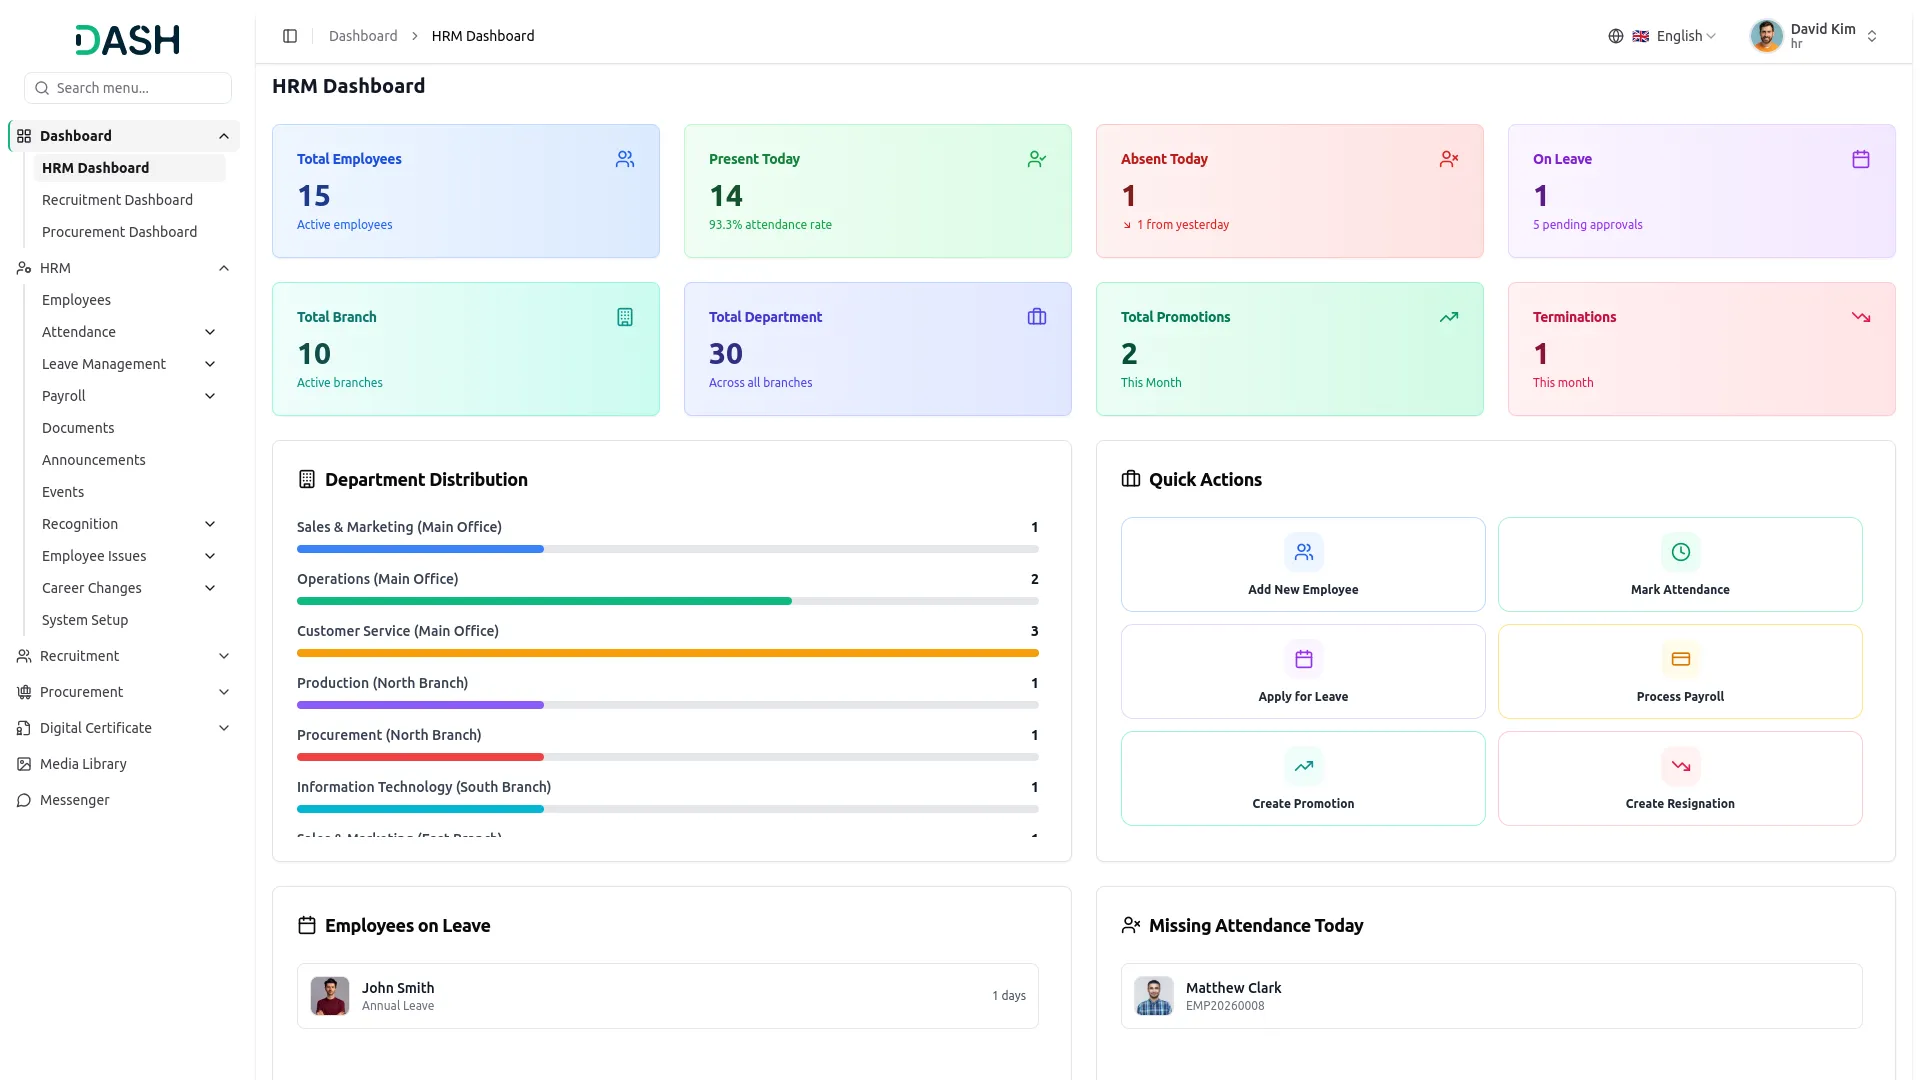
- The HRM Dashboard gives a company-wide overview of your attendance and HR activity through a set of summary cards, panels, and a calendar. Each summary card is clickable and takes you straight to its related page for a closer look.
- Eight cards across the top summarize key metrics. Total Employees shows the number of active employees and opens the Employees page, and Present Today shows how many are present, along with the day’s attendance rate, and opens the Attendance page.
- Absent Today shows how many are absent with the change from the previous day and opens the Attendance page, and On Leave shows how many are on leave along with the number of pending approvals and opens the Leave page. The second row covers Total Branch and Total Department across all branches, Total Promotions for the current month, and Terminations for the current month, each opening its respective page when clicked.
- The Department Distribution panel lists each department with its branch and shows the number of employees in it, with a bar indicating the relative size of each department.
- The Quick Actions panel provides shortcuts to common tasks: Add New Employee, Mark Attendance, Apply for Leave, Process Payroll, Create Promotion, and Create Resignation, each taking you straight to the relevant page.
- The Employees on Leave panel shows the list of employees on leave today or displays a “No employees on leave today” message if there are none. The Missing Attendance Today panel highlights employees who have not yet marked attendance or confirms when all employees have done so.
- The Events & Holidays Calendar displays upcoming events and holidays as colored bars on a calendar. You can move between periods using the arrows and the “Today” button or switch between Month, Week, and Day views.
- The Recent Leave Applications panel lists the latest leave requests, each showing the employee name, leave type, date range, and status (Pending, Approved, or Rejected). The Announcements panel lists recent announcements, each showing the title, a short description, and the date.
Manage Employees
- To add a new employee, click the “Create” button on the Employee page. The form is divided into three tabs, Basic Info, Contact & Banking, and Hours & Docs; that you fill in one after another using the “Next” button.
- The Basic Info tab covers Personal Information and Employment Information. The Employee ID is auto-generated, so select the Date of Birth and choose the Gender as Male, Female, or Other using the radio buttons.
- Then select the User (only company users are applicable here, and you can add one using the “Create user” link), choose the Shift (or add one with the “Create shift” link), set a Date of Joining, and pick the Employment Type.
- Once a user is selected, the Branch dropdown becomes available. Choose the branch from it (branches are populated from system setup), or click the “Create branch” link below the field if the branch you need doesn’t exist yet.
- Once a branch is selected, choose the Department from the Department dropdown, which becomes available only after a branch is picked (departments are populated from system setup).
- Once a department is selected, choose the Designation from the Designation dropdown, which becomes available only after a department is picked (designations are populated from system setup).
- The Contact & Banking tab covers Contact Information, Emergency Contact, and Banking Information. Fill in Address Line 1, Address Line 2, City, State, Country, and Postal Code, along with the Emergency Contact Name, Relationship, and Phone Number.
- Then enter the Bank Name, Account Holder Name, Account Number, Bank Identifier Code, Bank Branch, and the optional Tax Payer Id.
- The Hours & Docs tab covers Hours & Rates and Employee Documents. Enter the Basic Salary, Hours Per Day, Days Per Week, and Rate Per Hour. Under Employee Documents.
- Select the Document Type and upload the Document File using “Choose File” (add a type first with the “Create document type” link if needed). Click “Add Document” to attach more items, then click “Create” to save the employee.
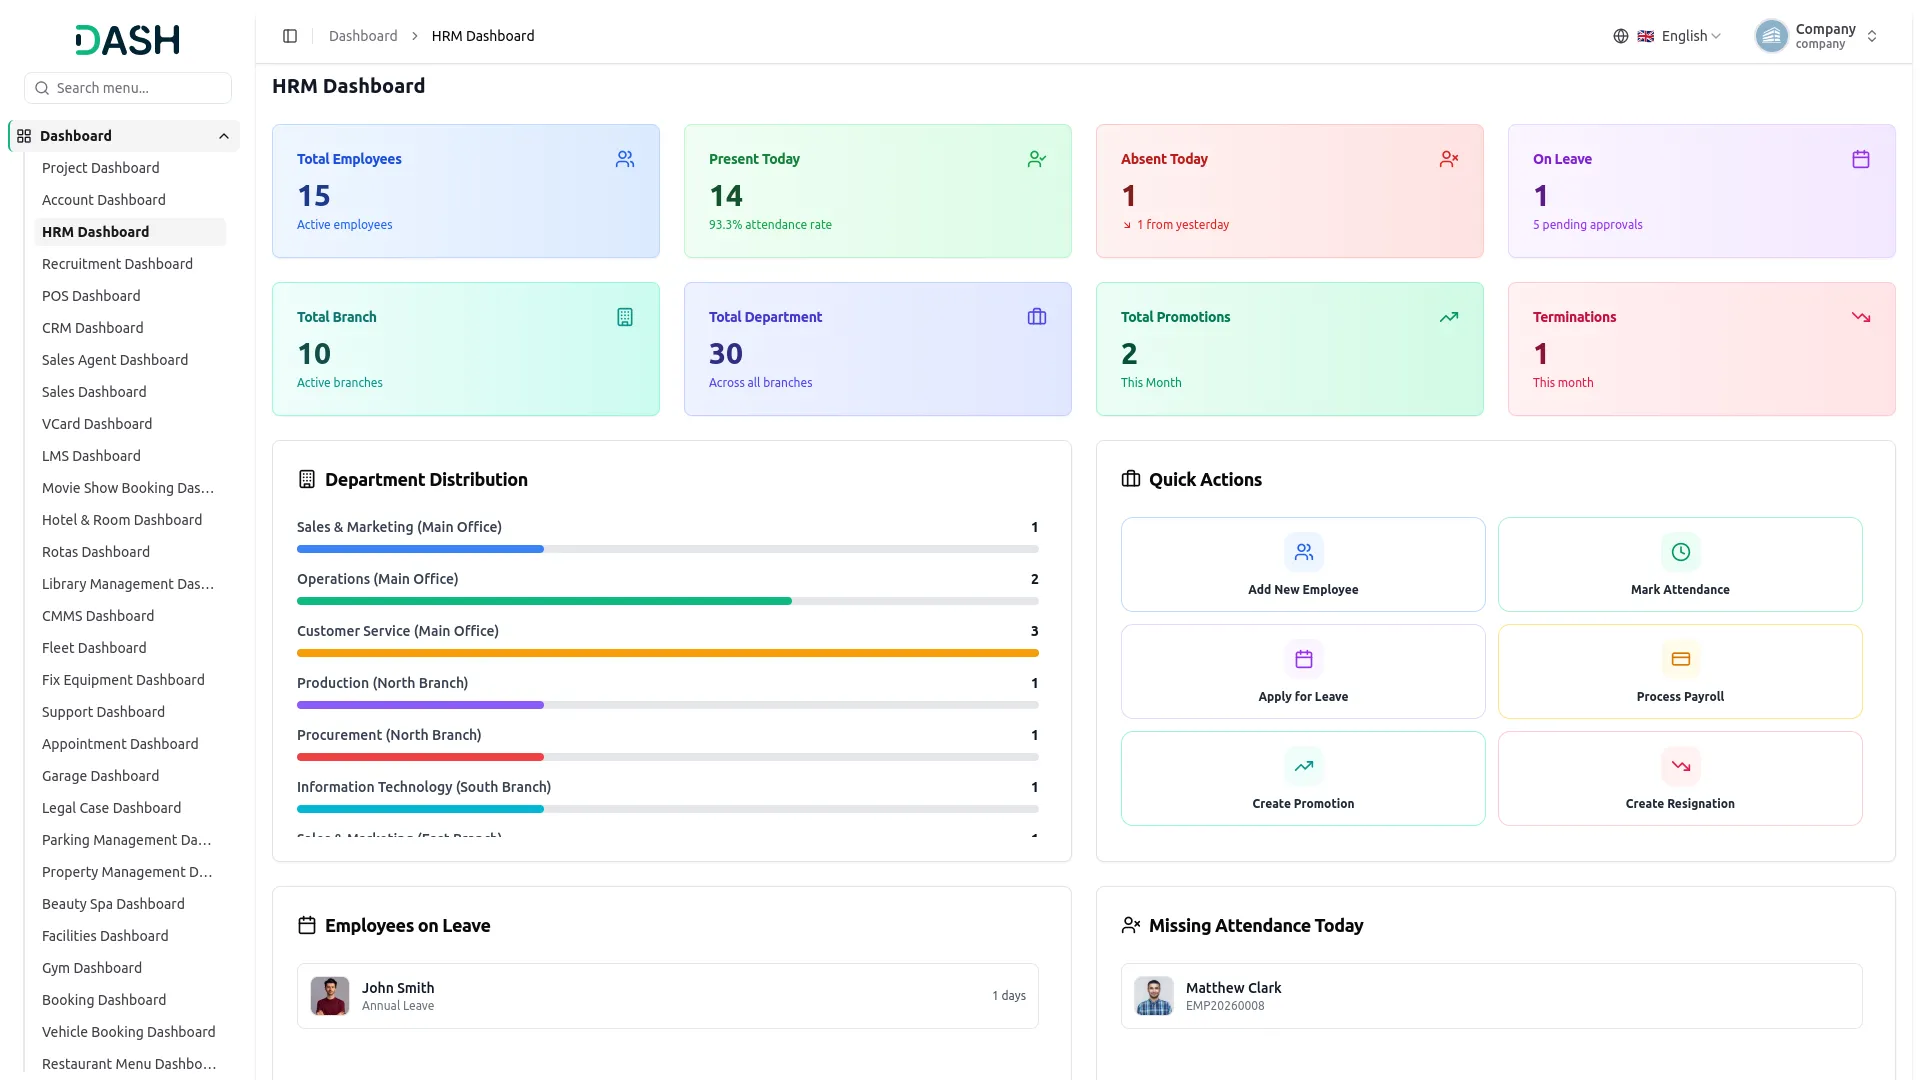
- In Grid view, each card displays the employee’s Employment Type badge (Contract, Full Time, Part Time, Temporary), Avatar, Name, Employee Id (as a link), Branch, Department, Designation, DOB, Date Of Joining, and Action icons for View, Edit, and Delete.
- When a user account is disabled, the Actions are replaced by a lock icon with a “User is disabled” note, and these options stay unavailable until the account is enabled again.
- Use the Search option to locate specific employees, with options for List View or Grid View at the top, or open the Filters panel to refine results by Branch, Department, Employment Type, and Gender. Click “Apply” to apply the selected filters or “Clear” to reset them.
- When you click the View button, it opens the full employee profile across five tabs: Employee Details (employment and contact information), Banking Information, Payslip (displays payslips for all months since the employee’s joining month), Attendance (a log of Date, Clock In, Clock Out, and Overtime Hours), and Documents.
- A Quick Actions panel on the right links to the employee’s history, Awards, Warnings, Transfers, Promotions, and Complaints. Clicking any of these takes you to that section’s page, showing only the records for that particular employee.
- A “This Month” panel summarizes attendance stats such as Working Days, Present, Absent, Late Arrivals, Early Exits, Overtime, and Unpaid Leave.
Attendance
Attendances
- To add a new Attendance entry, click the “Create” button on the Manage Attendances page. Select the Employee (use the “Create employee here” link if the employee doesn’t exist yet) and the Date, then set the Clock In Time and Clock Out Time. You can add any extra details in the Notes.
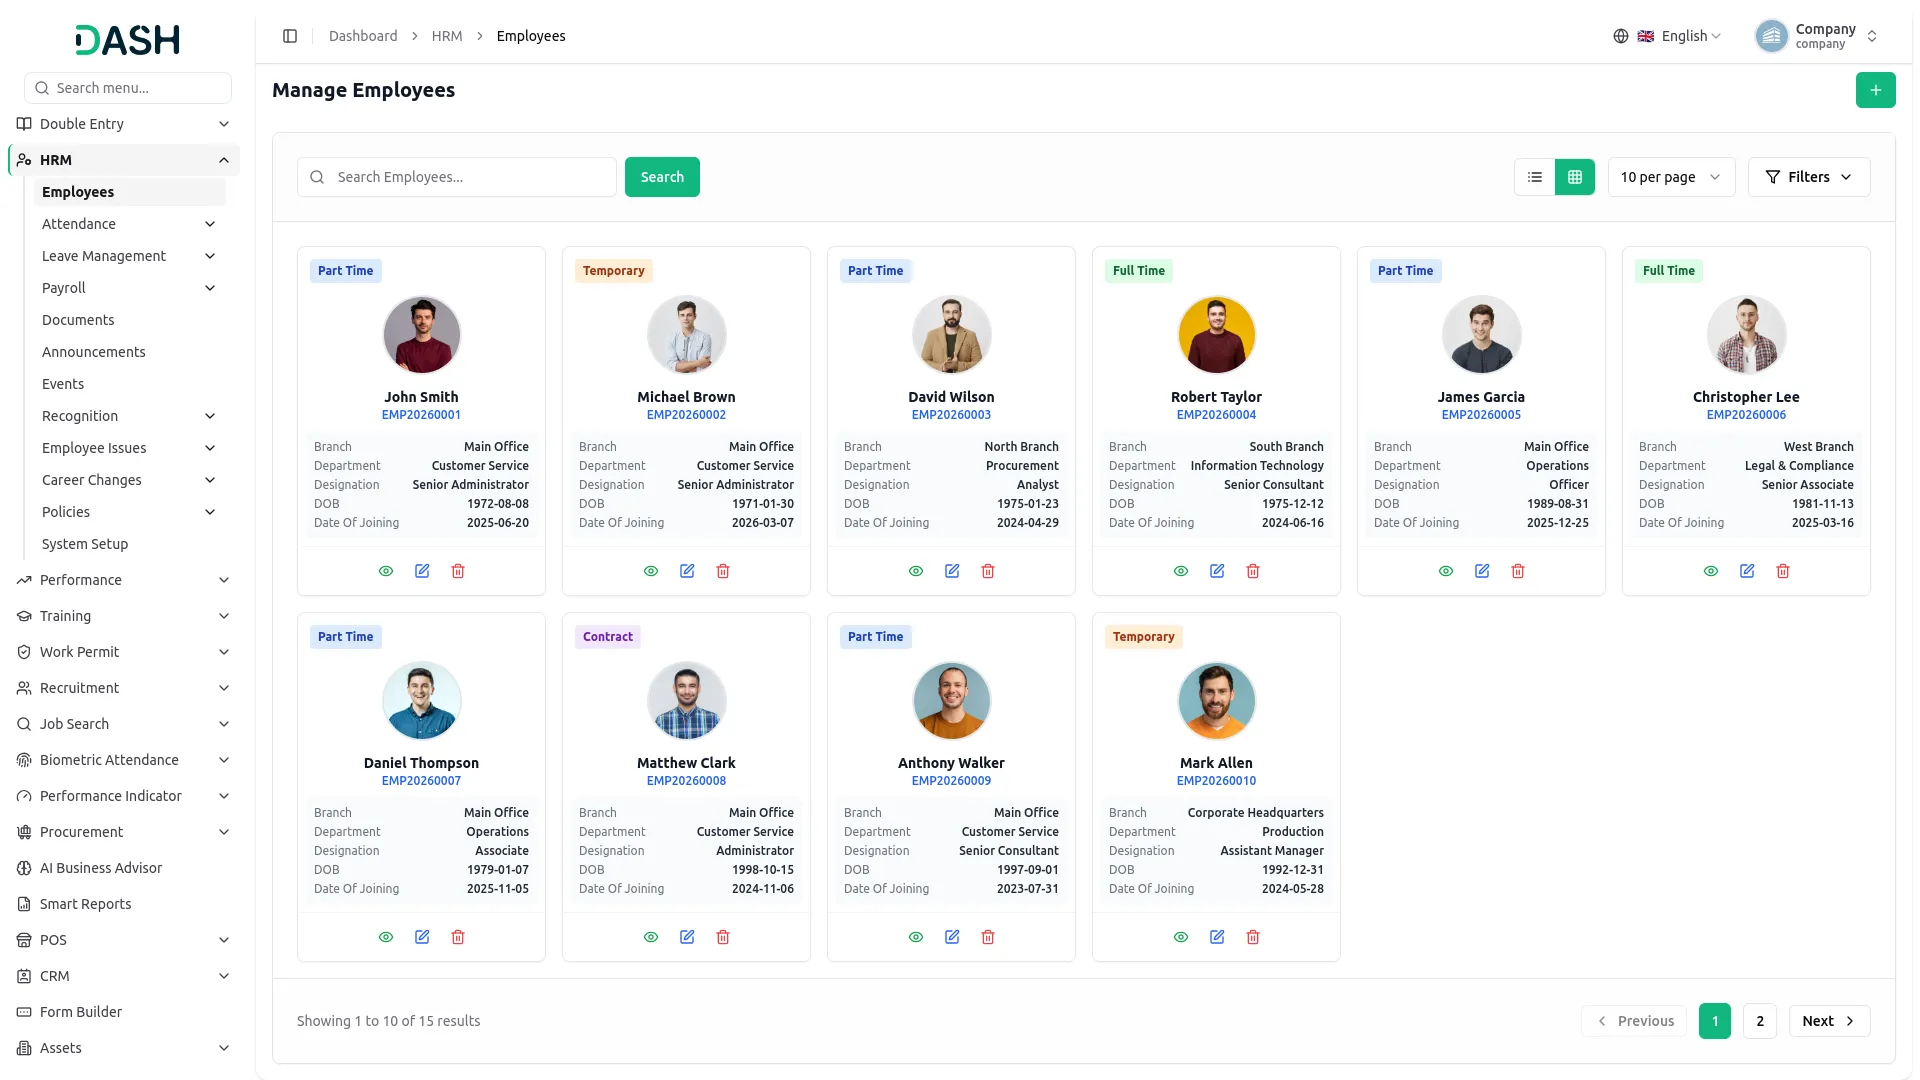
- The page displays a monthly Attendance Report in a grid format. The first column lists each employee with their avatar, name, and designation, followed by a column for every day of the selected month and a Total column that summarizes each employee’s hours for the month.
- Each day cell shows a marker indicating the employee’s attendance status for the day, which is automatically determined based on the Clock In and Clock Out times entered. A legend at the top explains every marker: Present, Absent, Half Day, On Leave, Holiday, Day Off, Future, Pending, Late, Early, and Overtime. Hovering over a Day Off marker shows a tooltip labelling it as a non-working day.
- Clicking on a day cell opens a popup with that day’s details: Date, Status, entry type (e.g., Late entry), Clock In, Clock Out, and Total Hours, along with a “Click to edit” option to update the entry.
- Use the Search option to locate a specific employee and the Month and Year dropdowns at the top right to choose the period you want to view. You can also use the previous and next arrows to move between months.
Shifts
- To add a new Shift, click the “Create” button on the Manage Shifts page. Enter the Shift Name, then set the Start Time and End Time along with the Break Start Time and Break End Time. Check “Is Night Shift” if the shift spans overnight.
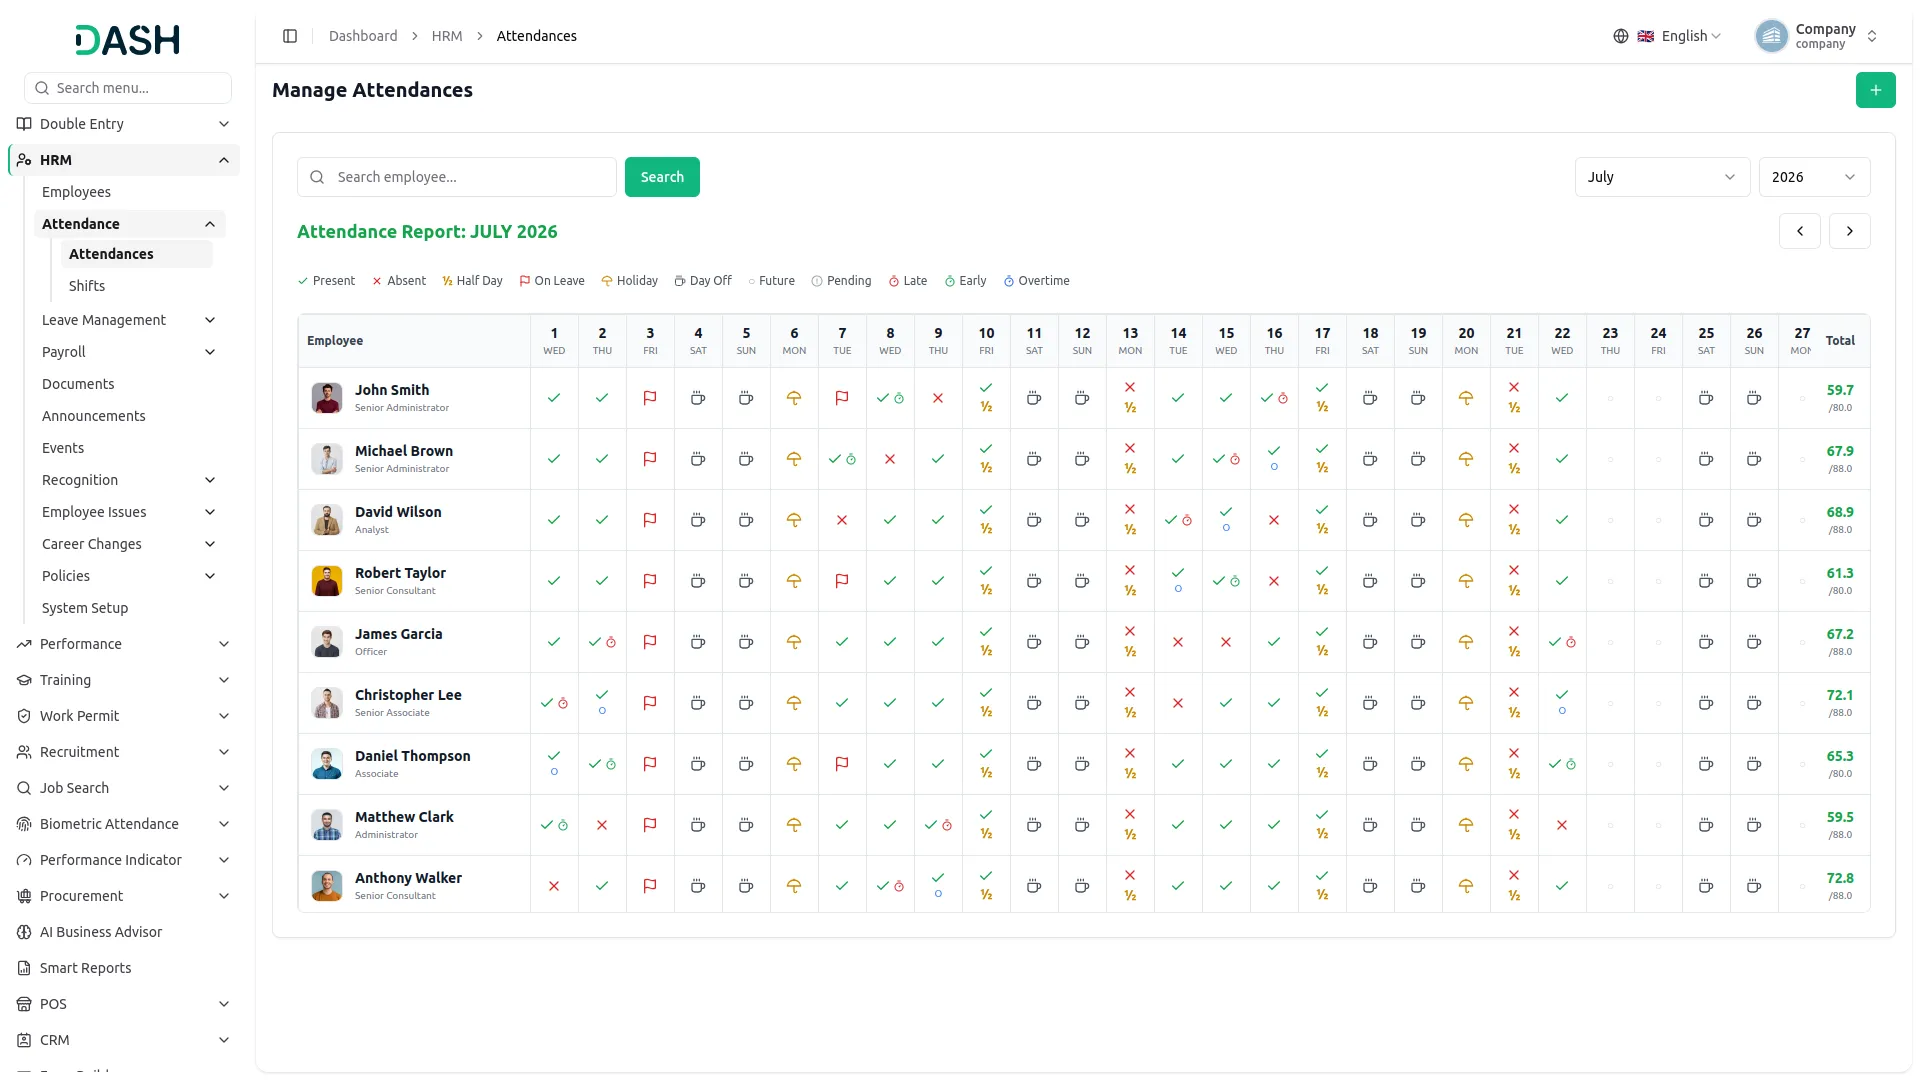
- The page displays all shifts as cards, each showing the Shift Name, the number of Employees assigned, and Edit and Delete icons.
- Each card shows three time boxes: Working Time, Break Time, and Total Time, along with the corresponding start and end times. A progress bar below visualizes the full shift span, with the break portion highlighted in yellow within the working time shown in green.
- Below the progress bar, the avatars of employees assigned to that shift are listed.
Leave Management
Leave Applications
- To create a new Leave Application, click the “Create” button on either the Leave Calendar or the Manage Leave Applications page. Select the Employee (use the “Create employee here” link if the employee doesn’t exist yet).
- Select the Leave Type (use the “Create leave type here” link if it doesn’t exist yet). Check “Half Day Leave” if applicable; this reveals a Half Day Type dropdown to choose “Before” or “After”. If left unchecked, an End Date field is displayed instead, allowing you to select a date range. Then enter a Reason, and optionally attach a supporting file.
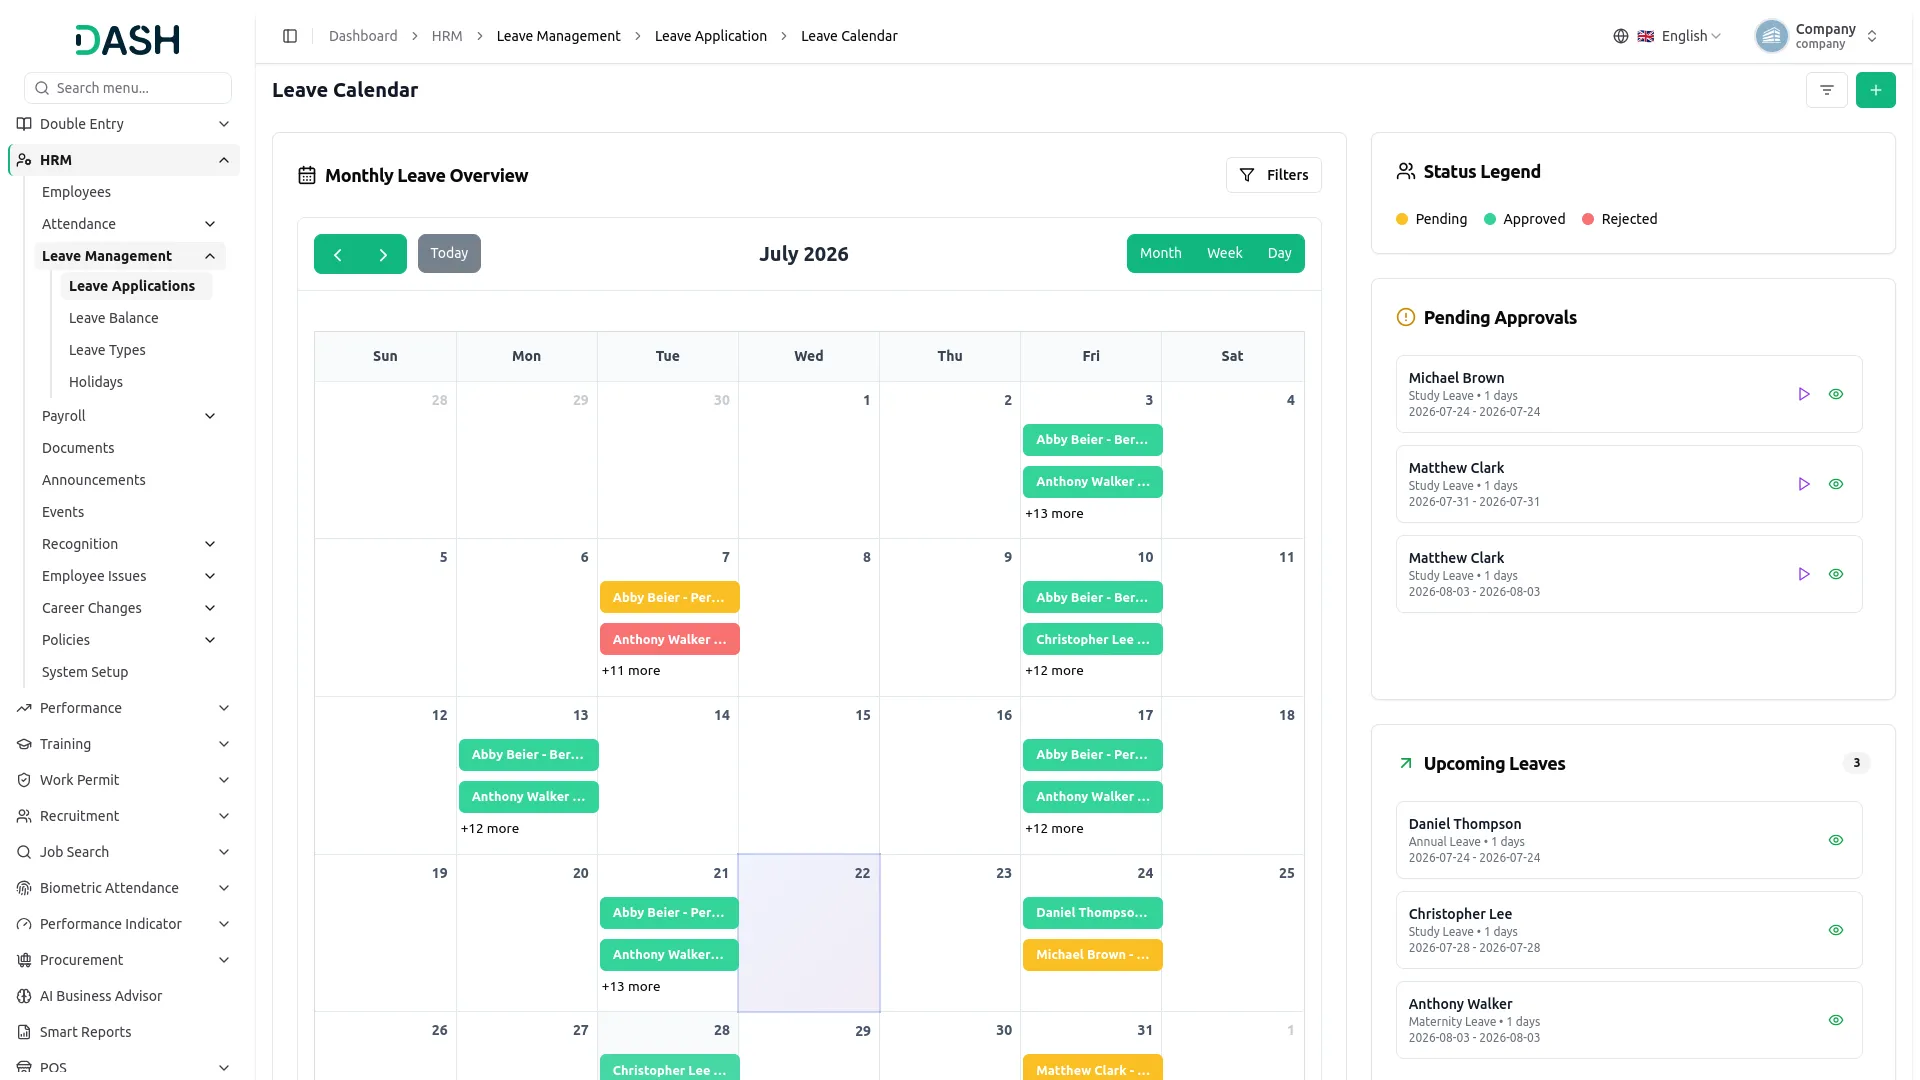
- The Leave Calendar view opens by default, displaying a Monthly Leave Overview in a calendar grid, with each day cell showing the employees on leave that day as colored bars (color-coded by status per the Status Legend: Pending, Approved, Rejected).
- If more than two leaves fall on the same day, a “+ more” link shows the rest. Use the arrows or the “Today” button to navigate and toggle between Month, Week, and Day views.
- Use the Filters panel on the Leave Calendar to narrow results by Employee, Status, and Leave Type, then click “Apply” to apply the filters or “Clear” to reset them.
- On the right, the Pending Approvals panel lists leave requests awaiting action, each showing the Employee name, Leave Type and duration, and date range, with icons to Manage Status ( to open a popup where you can Approve or Reject the request with an optional Comment) or View (see the Leave Application Details) the request. An Upcoming Leaves panel below it lists approved leaves that haven’t started yet.
- The Manage Leave Applications page lists all applications in a table with columns for Employee, Leave Type, Start Date, End Date, Days, Applied On, Is Paid, Status, and Actions. Use the Search option to locate a specific leave type. Alternatively, click the Calendar View button to display leave records in a calendar view.
- Use the Filters panel to refine results by Employee, Status, Date Range, and Is Paid, then click “Apply” to apply the filters or “Clear” to reset them.
- Available actions depend on the application’s status. Pending requests display four icons: Manage Status, which opens a popup to approve or reject the request with an optional Comment; View, to see the full application details; Edit, to update the request; and Delete, to remove the application. For Approved and other finalized requests, only View and Delete are available.
Leave Balance
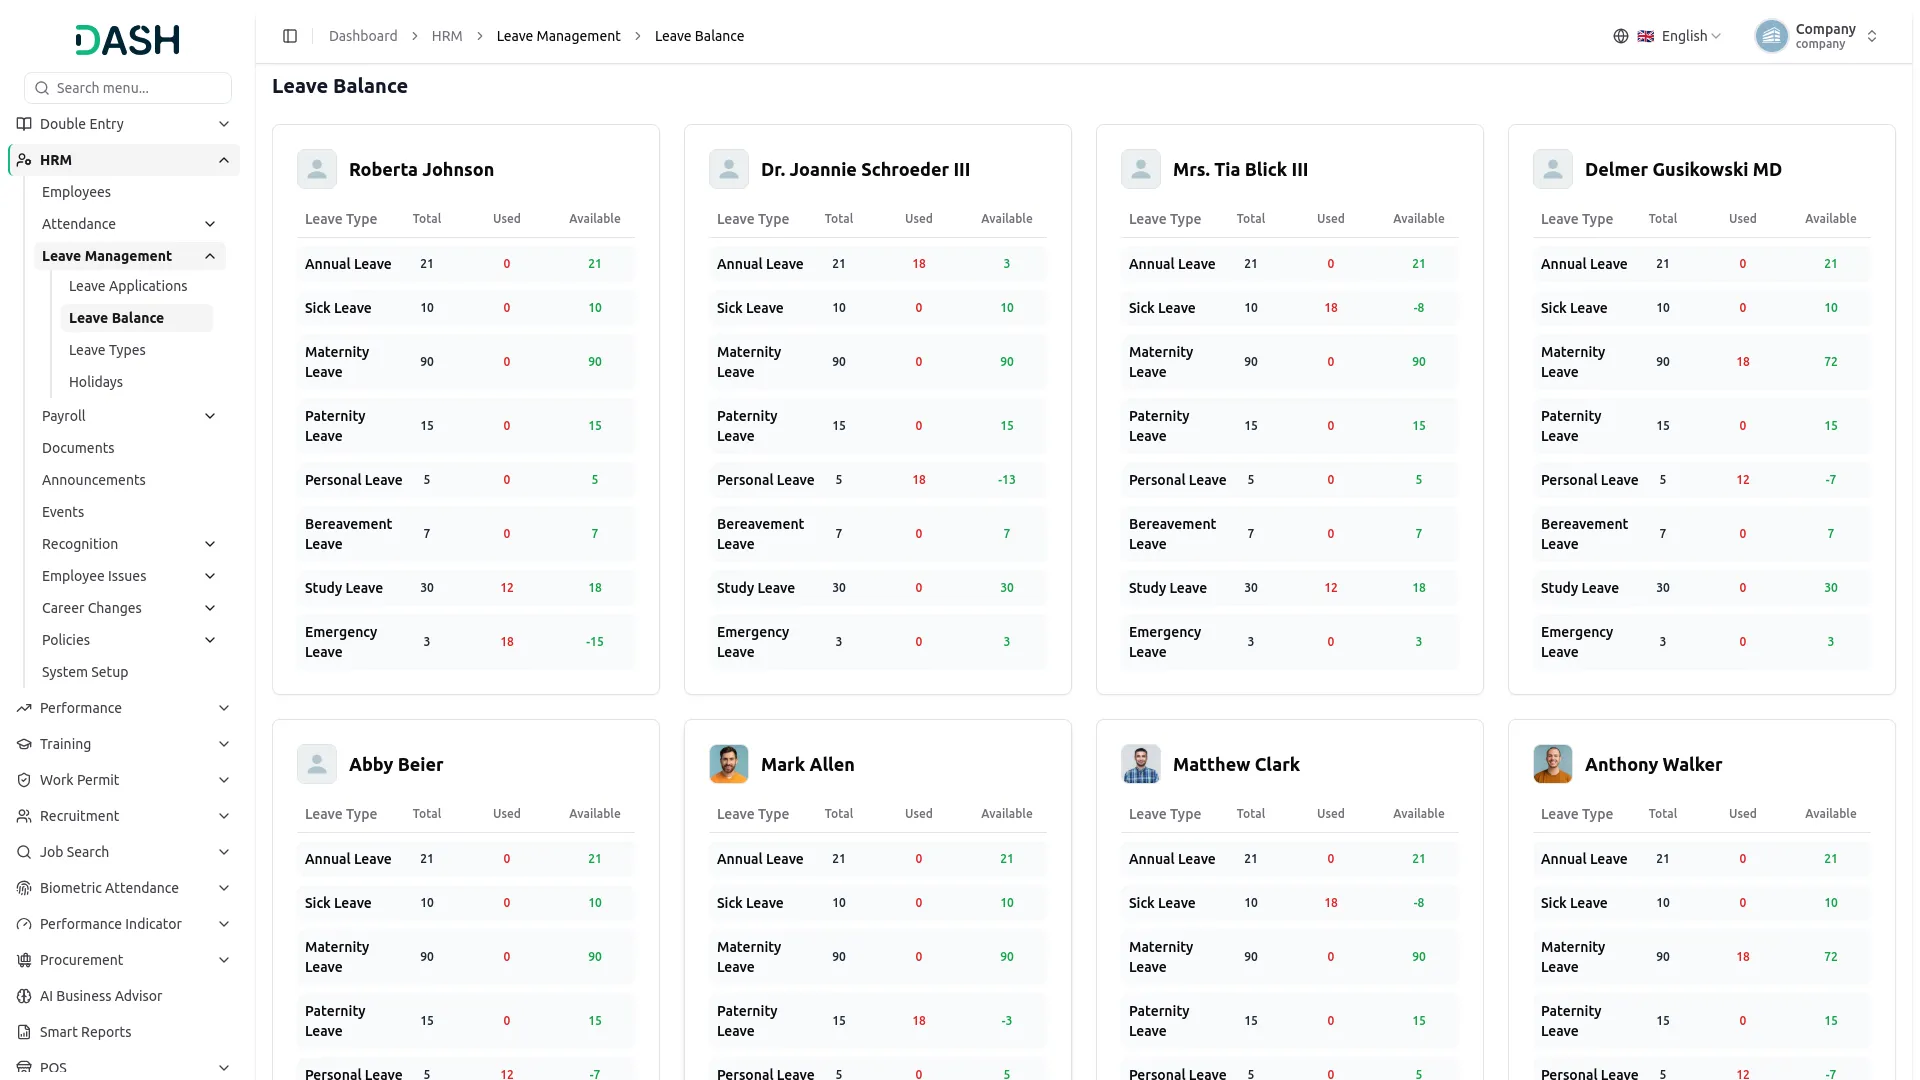
- The Leave Balance page gives a read-only overview of each employee’s leave entitlements. Every employee appears as a separate card showing their avatar and name.
- Within each card, a table shows the available leave types, with their Total, Used, and Available values.
- The Total column shows the leave allocated for the year, the Used column shows how much has already been taken, and the Available column shows the remaining balance for that leave type.
Leave Types
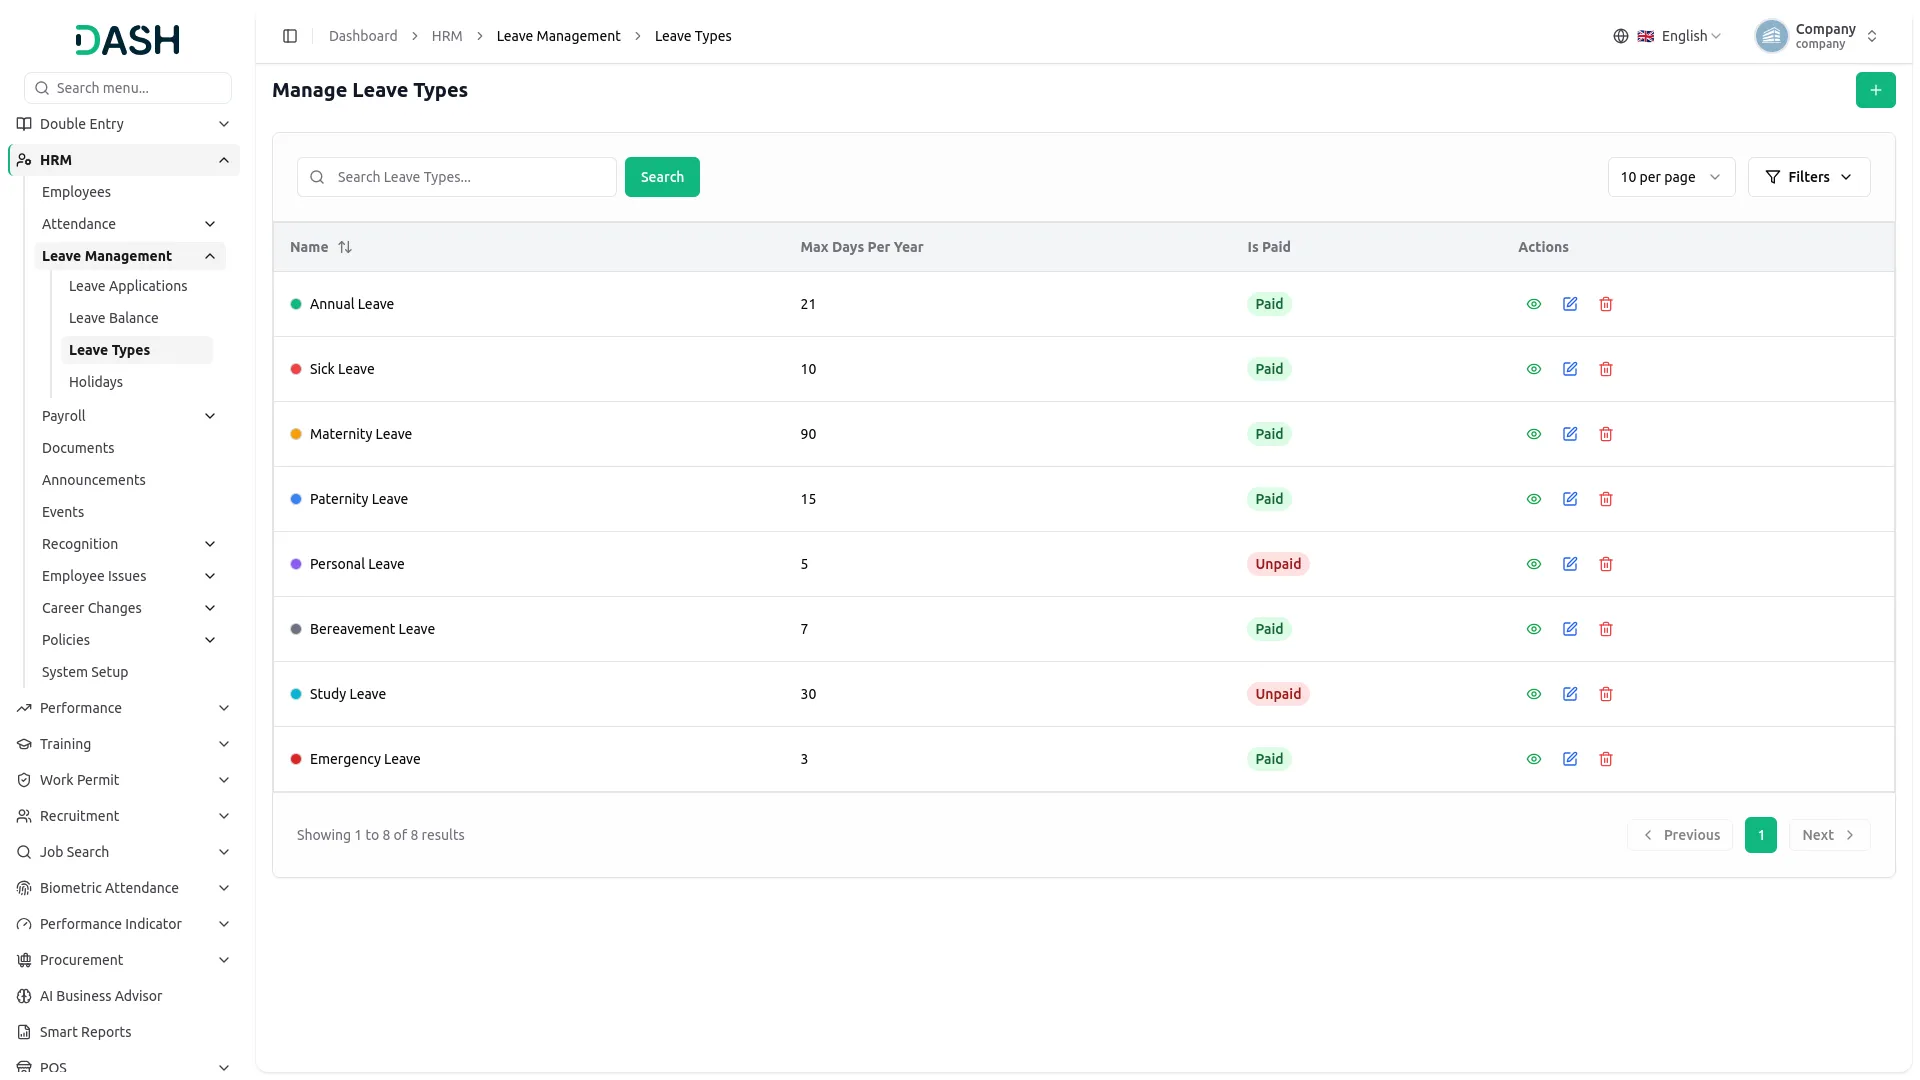
- To add a new Leave Type, click the “Create” button on the Manage Leave Types page. Enter the Name and set the Max Days Per Year, then pick a Color to identify the leave type.
- This selected color is used to display the leave type wherever it appears, such as the Leave Calendar and Manage Leave Applications page. You can add an optional Description and turn on the “Is Paid” toggle if the leave is paid.
- The list page displays all leave types with columns for Name, Max Days Per Year, Is Paid, and Actions.
- Use the Search option to locate a specific leave type and the Filters panel to refine results by payment status under “Is Paid”. Click “Apply” to apply the selected filter or “Clear” to reset it.
- Available Actions you can use: View to see the complete leave type details, Edit to update any information, and Delete to remove a leave type that is no longer needed.
Manage Holidays
- To create a new Holiday, click the “Create” button on either the Holidays Calendar or Manage Holidays page. Enter the Name, set the Start Date and End Date, then select the Holiday Type (use the “Create holiday type here” link if it doesn’t exist yet), which comes from the system setup. Add a Description and turn on the “Is Paid” toggle if the holiday is paid.
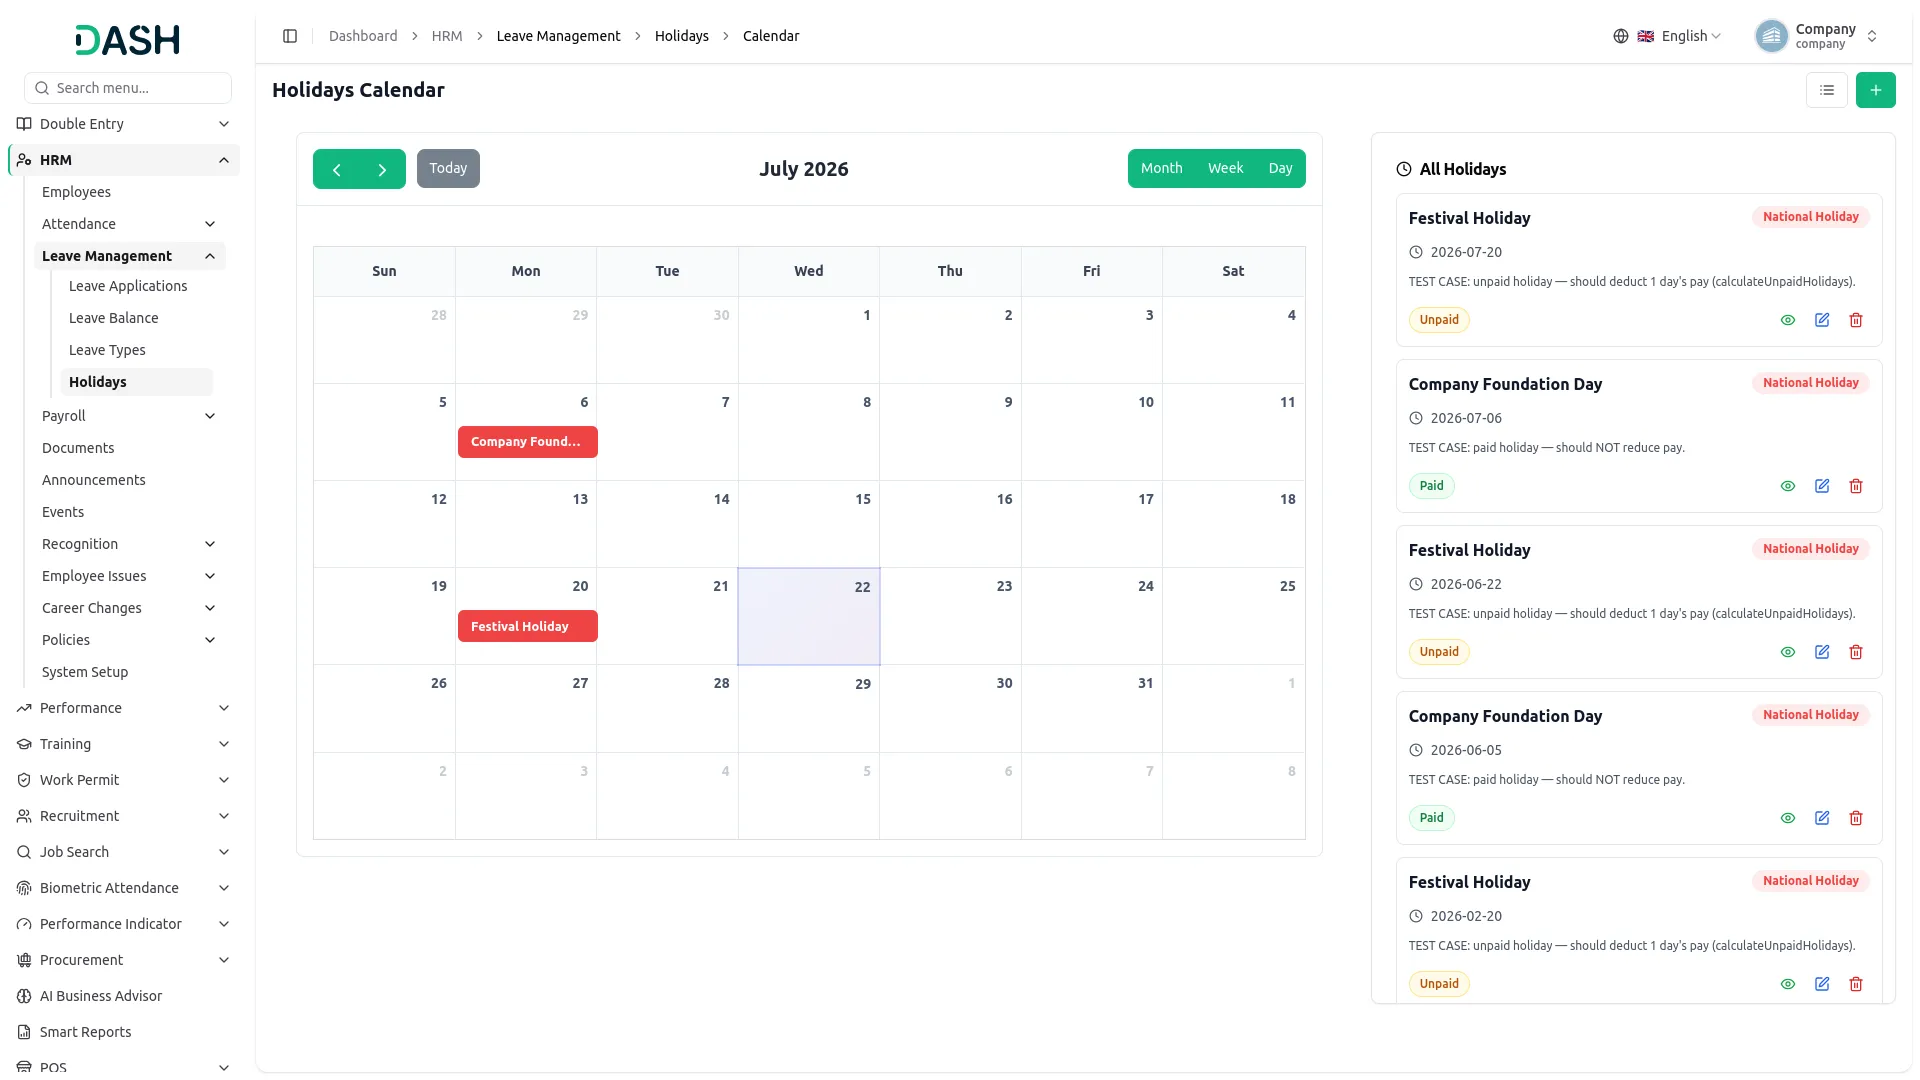
- The Holidays Calendar view opens by default, displaying a monthly calendar grid on the left. Use the “Today” button to navigate and toggle between Month, Week, and Day views.
- On the right, the All Holidays panel lists every holiday as a card showing the Name, Holiday Type badge, date range, Description, and a Paid/Unpaid tag, along with View, Edit, and Delete icons.
- To switch to the table format, click the List View button next to the calendar icon at the top. This opens the Manage Holidays page, listing all holidays in a table with columns for Name, Holiday Type, Start Date, End Date, Paid, and Actions (View, Edit, Delete). Use the Search option to locate a specific holiday.
- Use the Filters panel to refine results by Holiday Type, Start Date, End Date, and Paid, then click “Apply” to apply the filters or “Clear” to reset them.
Payrolls
Manage Payslip
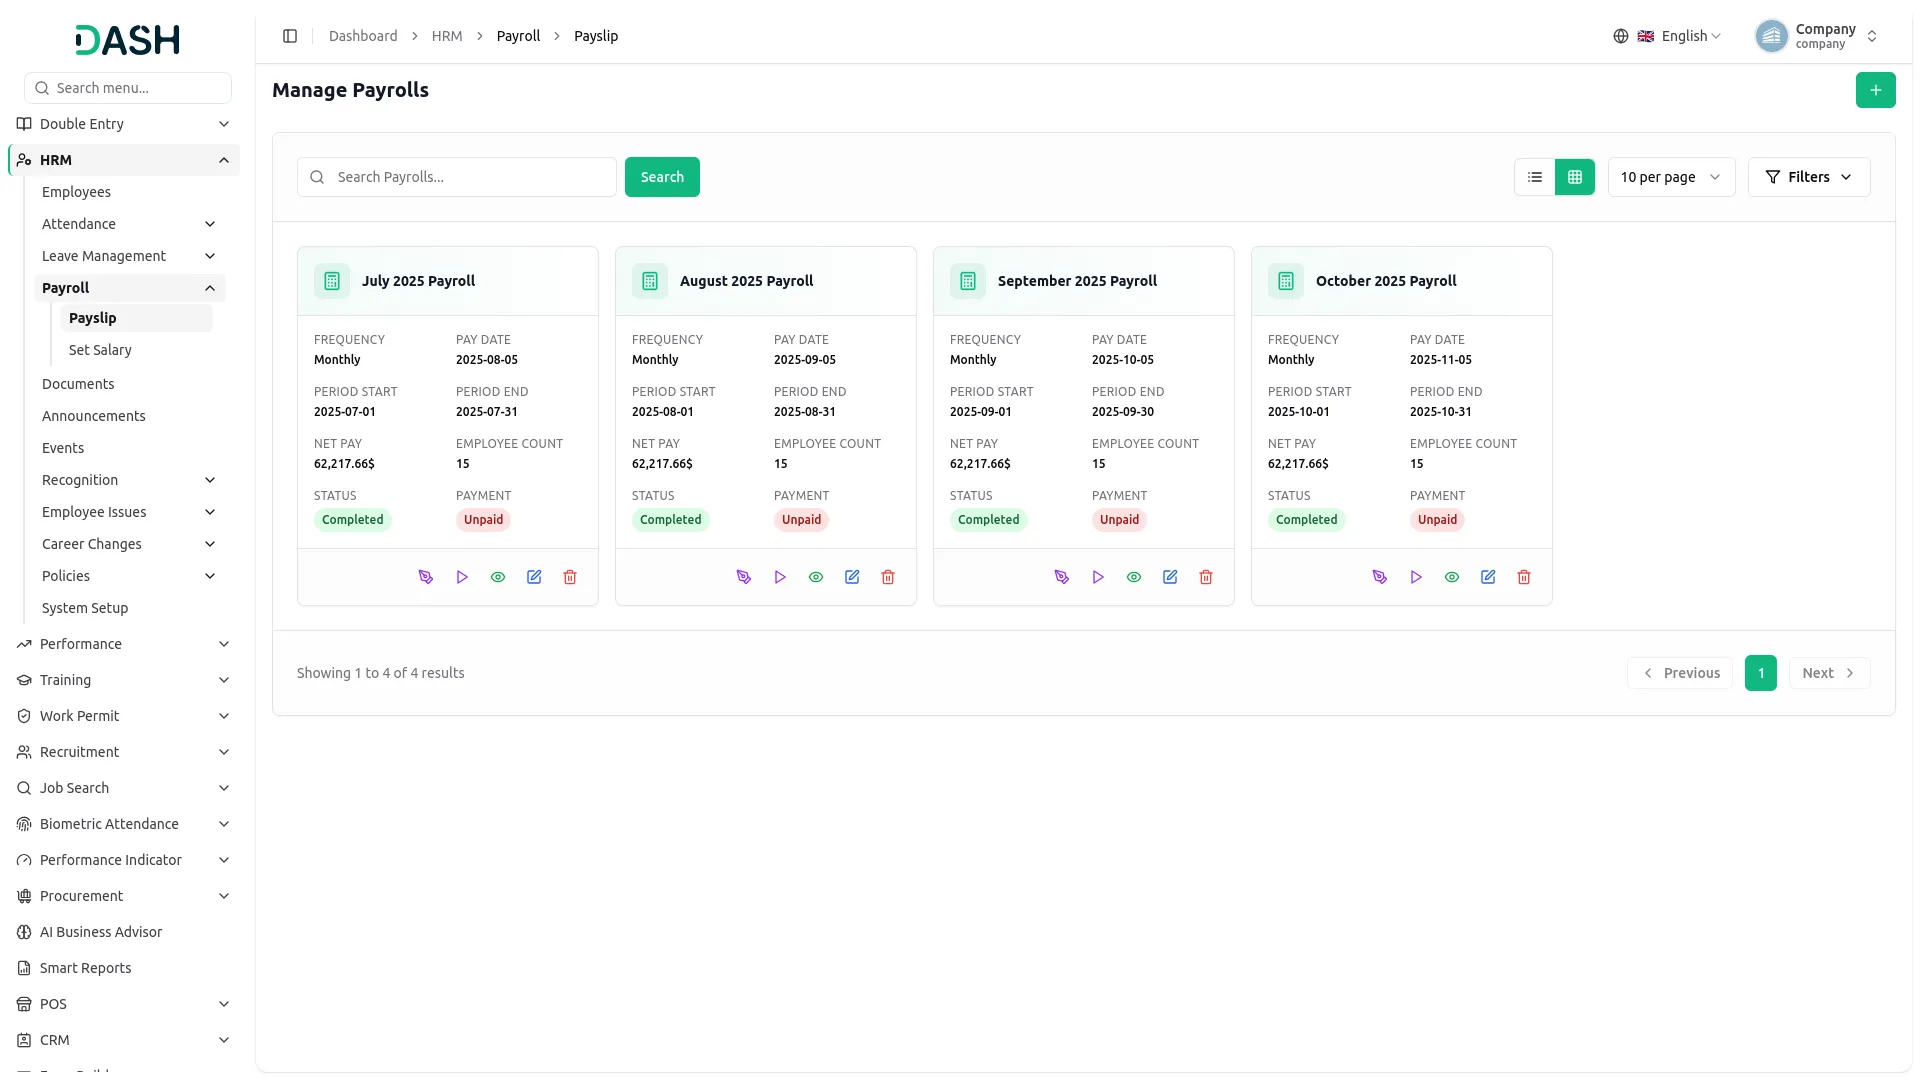
- To create a new payroll, click the “Create” button at the top of the Manage Payrolls page. Enter the title and select the payroll frequency from the dropdown (weekly, bi-weekly, monthly). Then set the pay period start date, pay period end date, and pay date, and choose the bank account from which salaries will be paid. You can add any extra details in the Notes.
- The list page displays all payrolls in a table with the Title, Payroll Frequency, Pay Period Start, Pay Period End, Pay Date, Total Net Pay, Employee Count, Status, Payment Status, and Actions columns.
- The Status column shows the payroll stage, such as Draft, and the Payment Status column shows whether it is Paid or Unpaid.
- Use the search bar at the top to find a payroll by title and the Filters section to narrow the list by Payroll Frequency or Status; select your filter values and click “Apply”, or click “Clear” to reset. You can also switch between list and grid views.
- From the Actions column, you can run the payroll (draft status converted into the complete) view to see the details, edit to modify the details, or delete to remove them.
- Opening a payroll’s details takes you to the Payroll Details page. The top section summarizes the payroll, its title, pay period, pay date, frequency, and overall status, along with quick-view cards for the total number of Employees, Gross Pay, Deductions, and Net Pay.
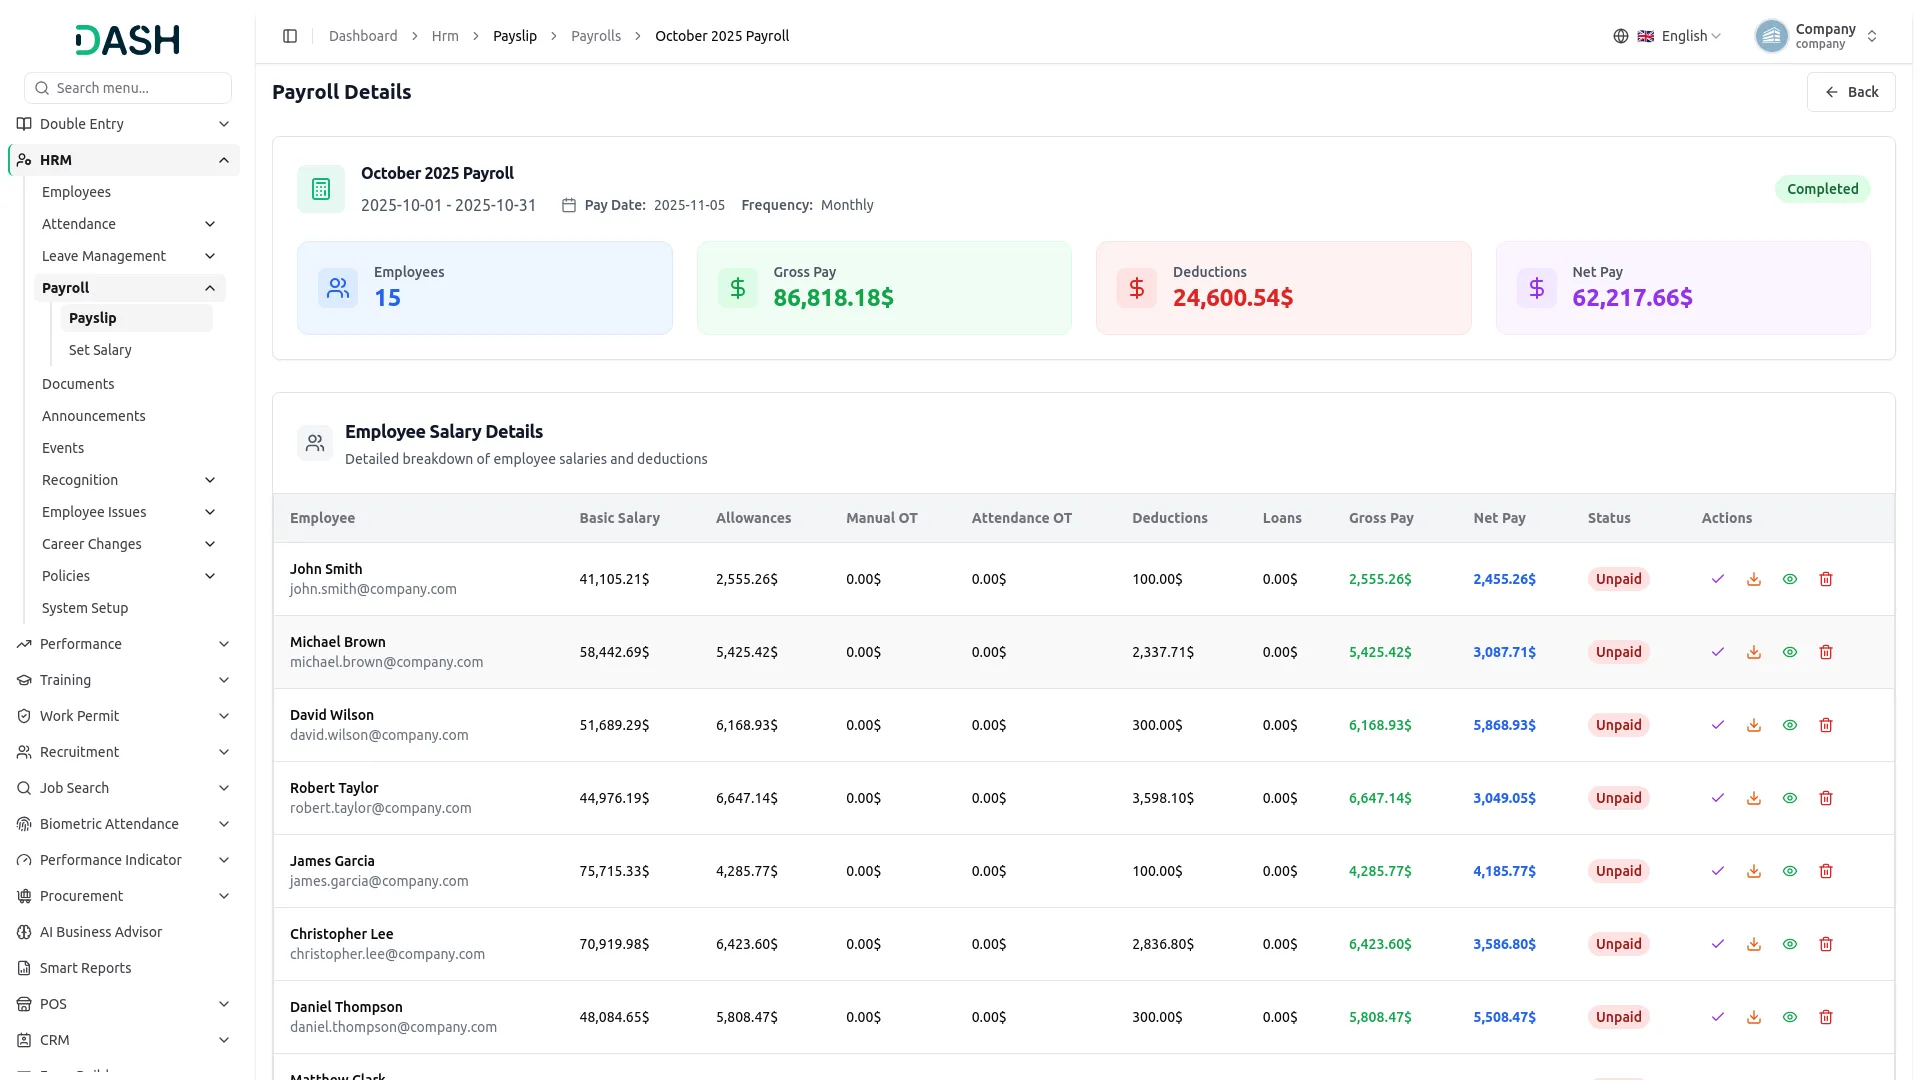
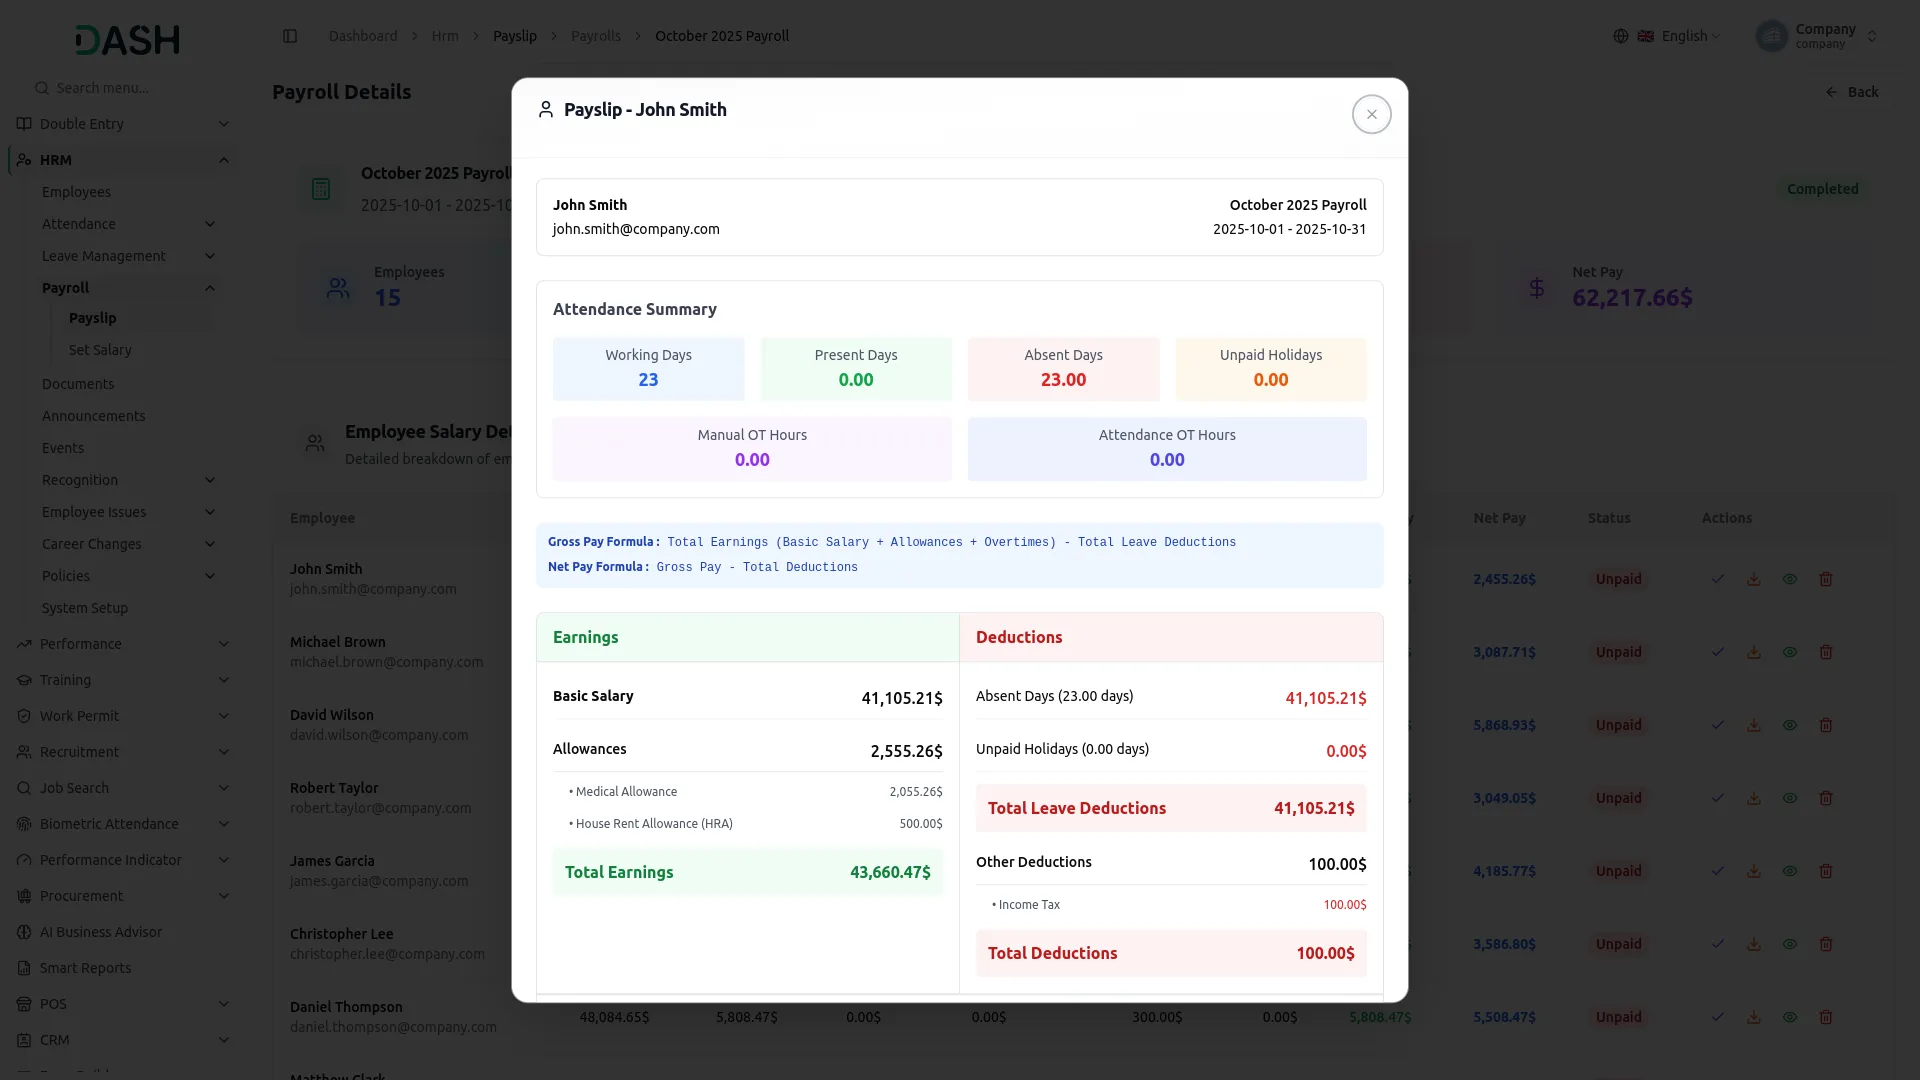
- Below that, the Employee Salary Details section lists every employee included in the payroll. Each row shows the employee’s name and email along with their Basic Salary, Allowances, Manual OT, Attendance OT, Deductions, Loans, Gross Pay, Net Pay, and Status. From the Actions column on each row, you can pay the employee’s salary, download the payslip, view the details, or delete the record.
Set Salary
- The list page displays all employees with columns for Employee ID, Employee Name, Branch, Department, Designation, Basic Salary, and Actions. Use the Search button to find a specific employee by name or ID, and switch between List View and Grid View for a different layout. You can also use the Filters panel to narrow the list by Employee, then click “Apply” to run the filter or “Clear” to reset it.
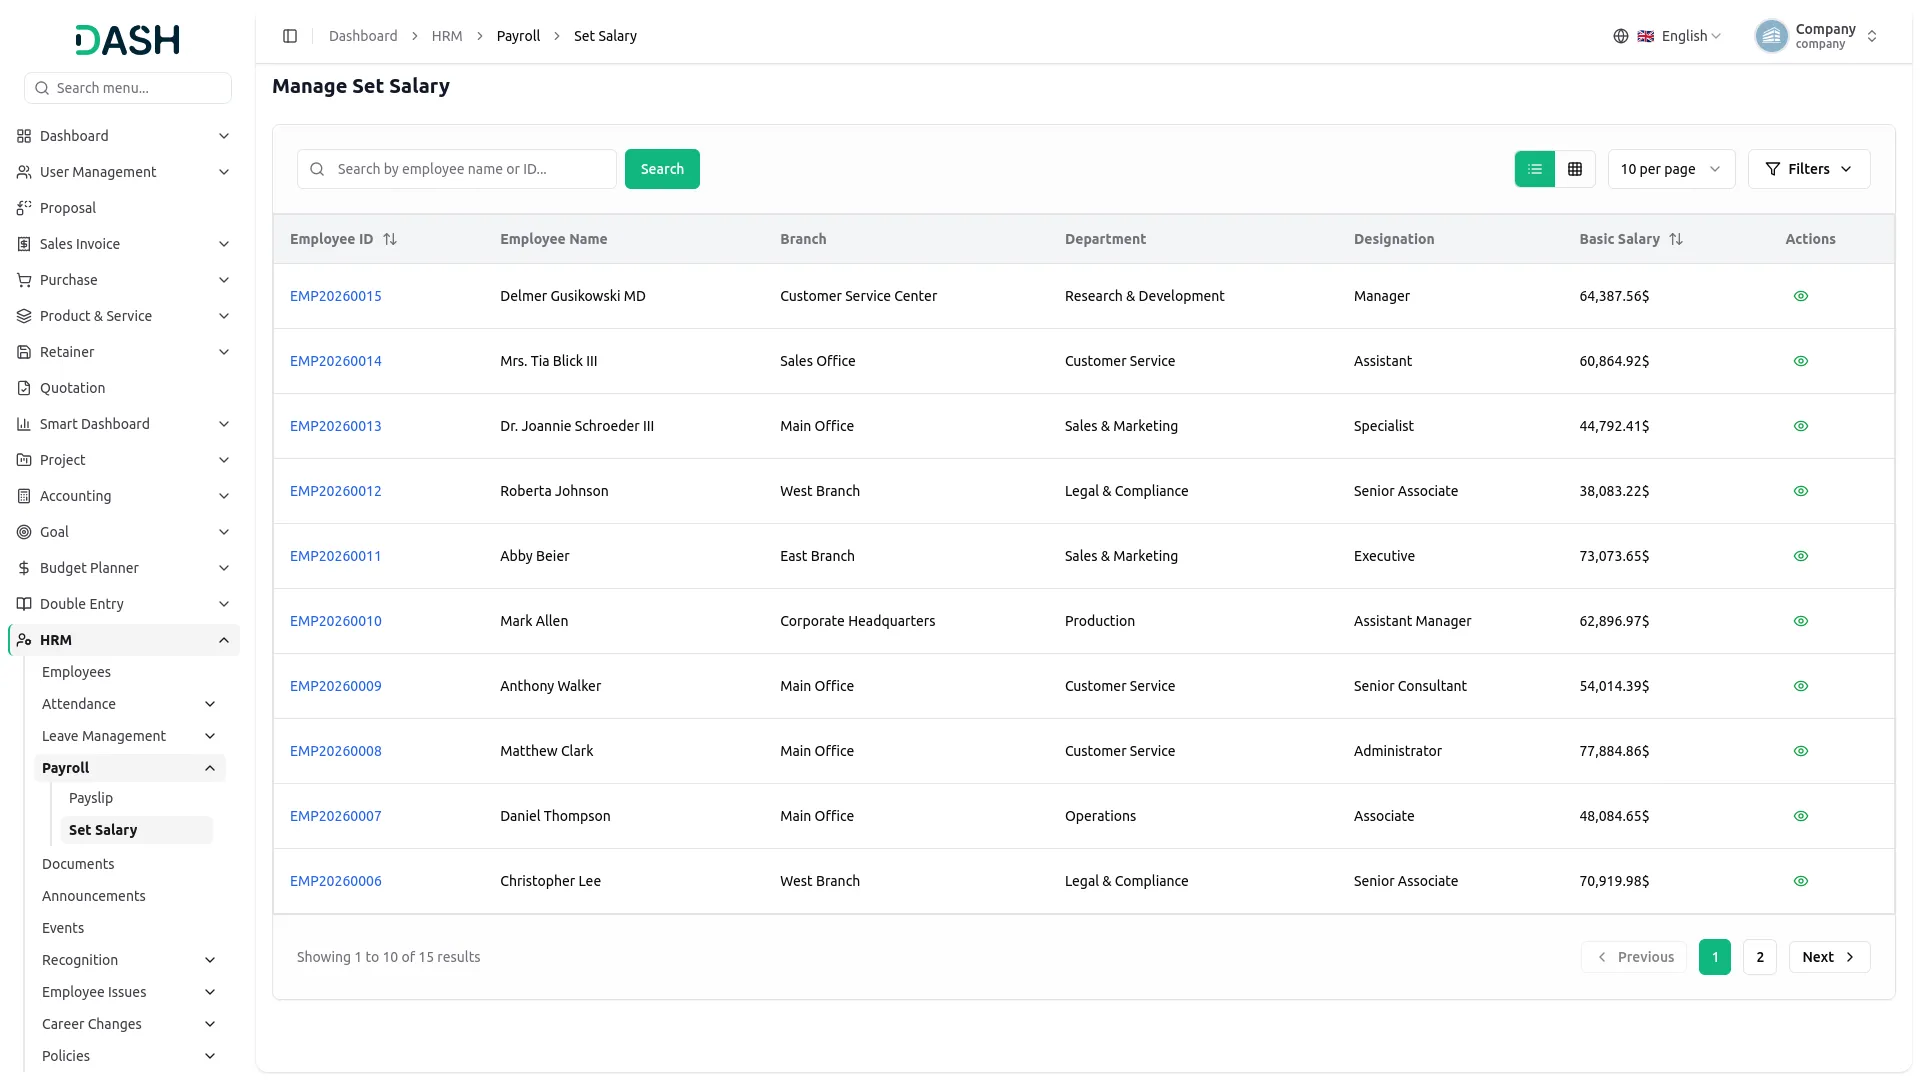
- Available Actions you can use: View to open the complete Employee Salary Details and manage that employee’s salary setup.
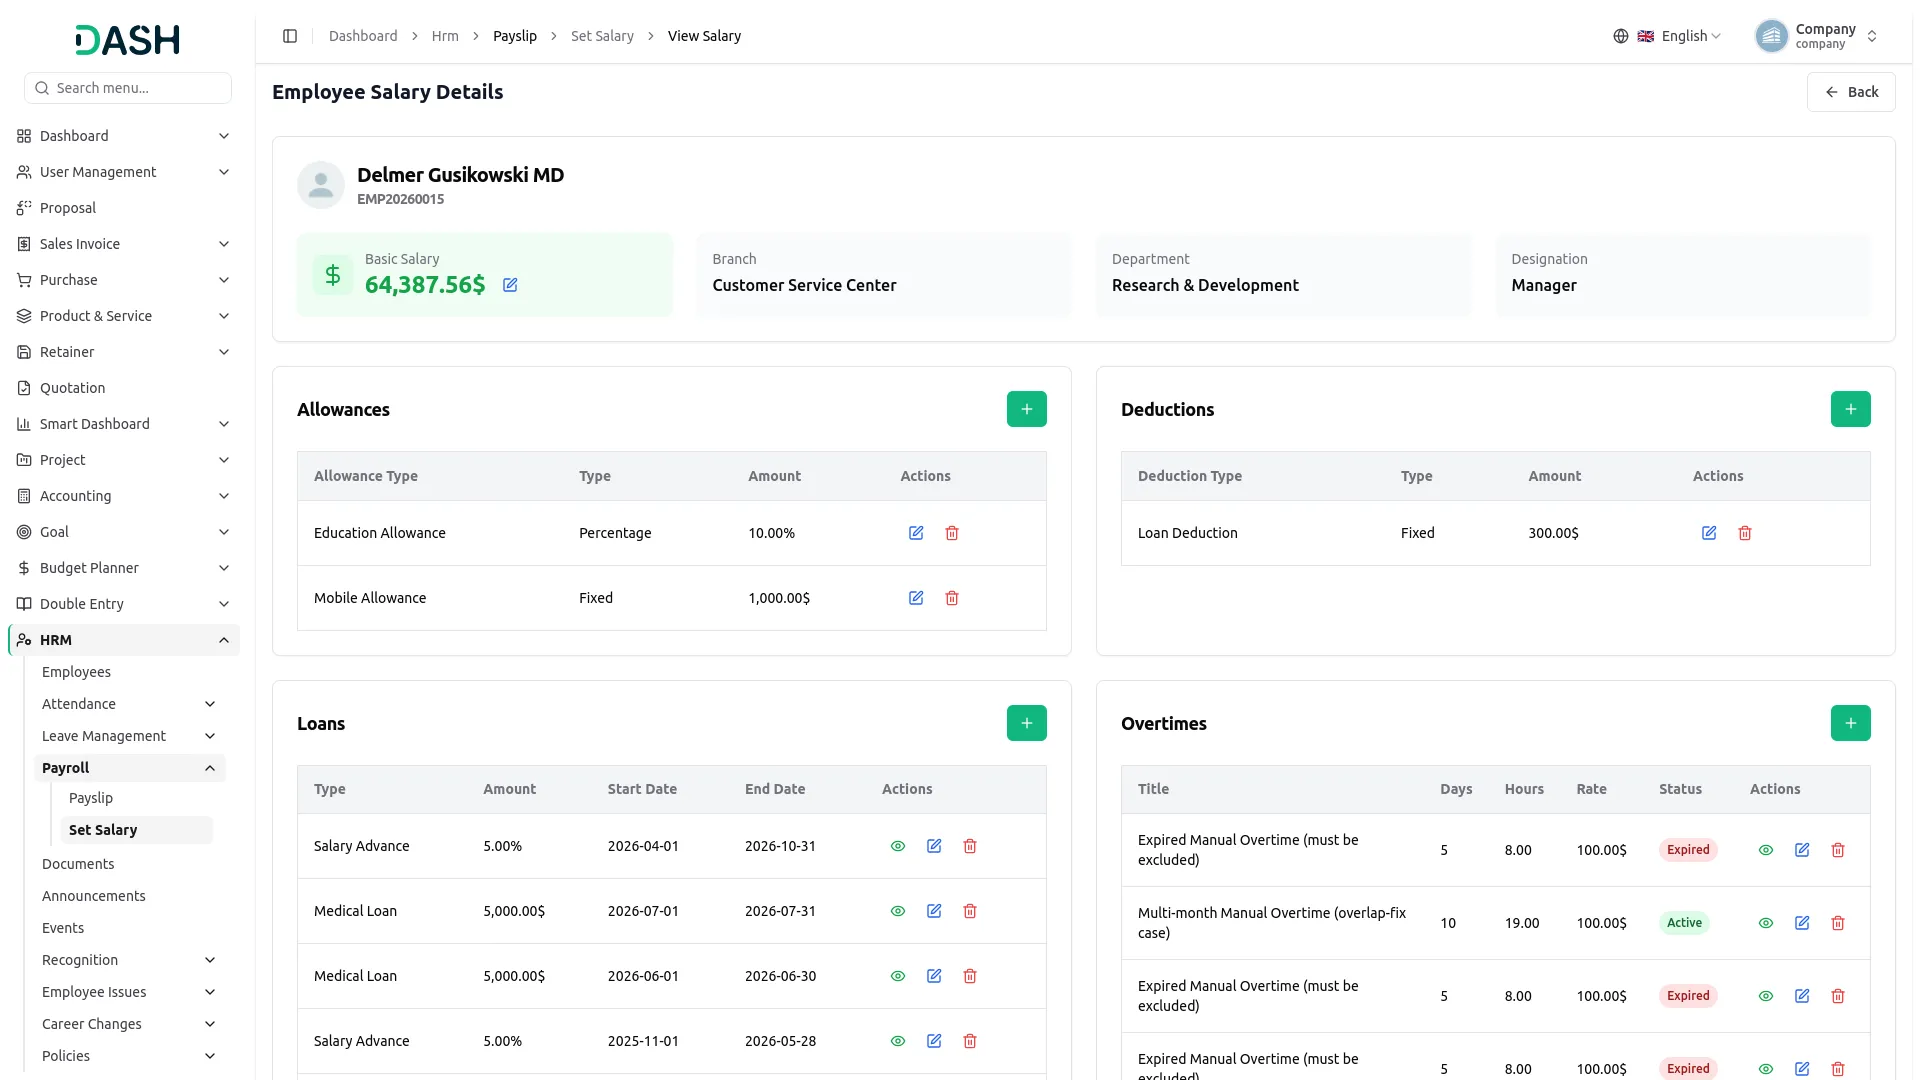
- The Employee Salary Details page shows the employee’s profile at the top along with their Basic Salary, Branch, Department, and Designation. You can update the Basic Salary directly by clicking the edit icon next to the amount.
- The rest of the page is divided into four sections: Allowances, Deductions, Loans, and Overtime, each with its own table and a “Create” button to add a new entry.
- To add an Allowance, click the “Create” button in the Allowances section. Select the Allowance Type, choose the Type as Fixed or Percentage, enter the Amount, and click “Create”.
- The Allowances table lists each entry with columns for Allowance Type, Type, Amount, and Actions. Available action options you can use are ‘edit’ or ‘delete’.
- To add a Deduction, click the “Create” button in the Deductions section. Select the Deduction Type, choose the Type as Fixed or Percentage, enter the Amount, and click “Create”.
- The Deductions table lists each entry with columns for Deduction Type, Type, Amount, and Actions. Available action options you can use are ‘edit’ or ‘delete’.
- To add a Loan, click the “Create” button in the Loans section. Enter the Title, select the Loan Type and the Type as Fixed or Percentage, enter the Amount, set the Start Date and End Date, add an optional Reason, and click “Create”.
- The Loans table lists each entry with columns for Type, Amount, Start Date, End Date, and Actions. Available actions include view full details, as well as edit or delete the record.
- To add an Overtime, click the “Create” button in the Overtimes section. Enter the Title, Total Days, Hours, and Rate; set the Start Date and End Date; select the Status as Active or Expired; add optional Notes; and click “Create”.
- The Overtime table lists each entry with columns for Title, Days, Hours, Rate, Status, and Actions. Available actions include view full details, as well as edit or delete the record.
Manage Documents
- To create a new Document, click the “Create” button on the Manage Documents page. Enter the Title and select the Document Category (populated from system setup, use the “Create document category here” link if it doesn’t exist yet), which comes from the system setup, and then add a Description. Click “Browse” to select the Document file to upload.
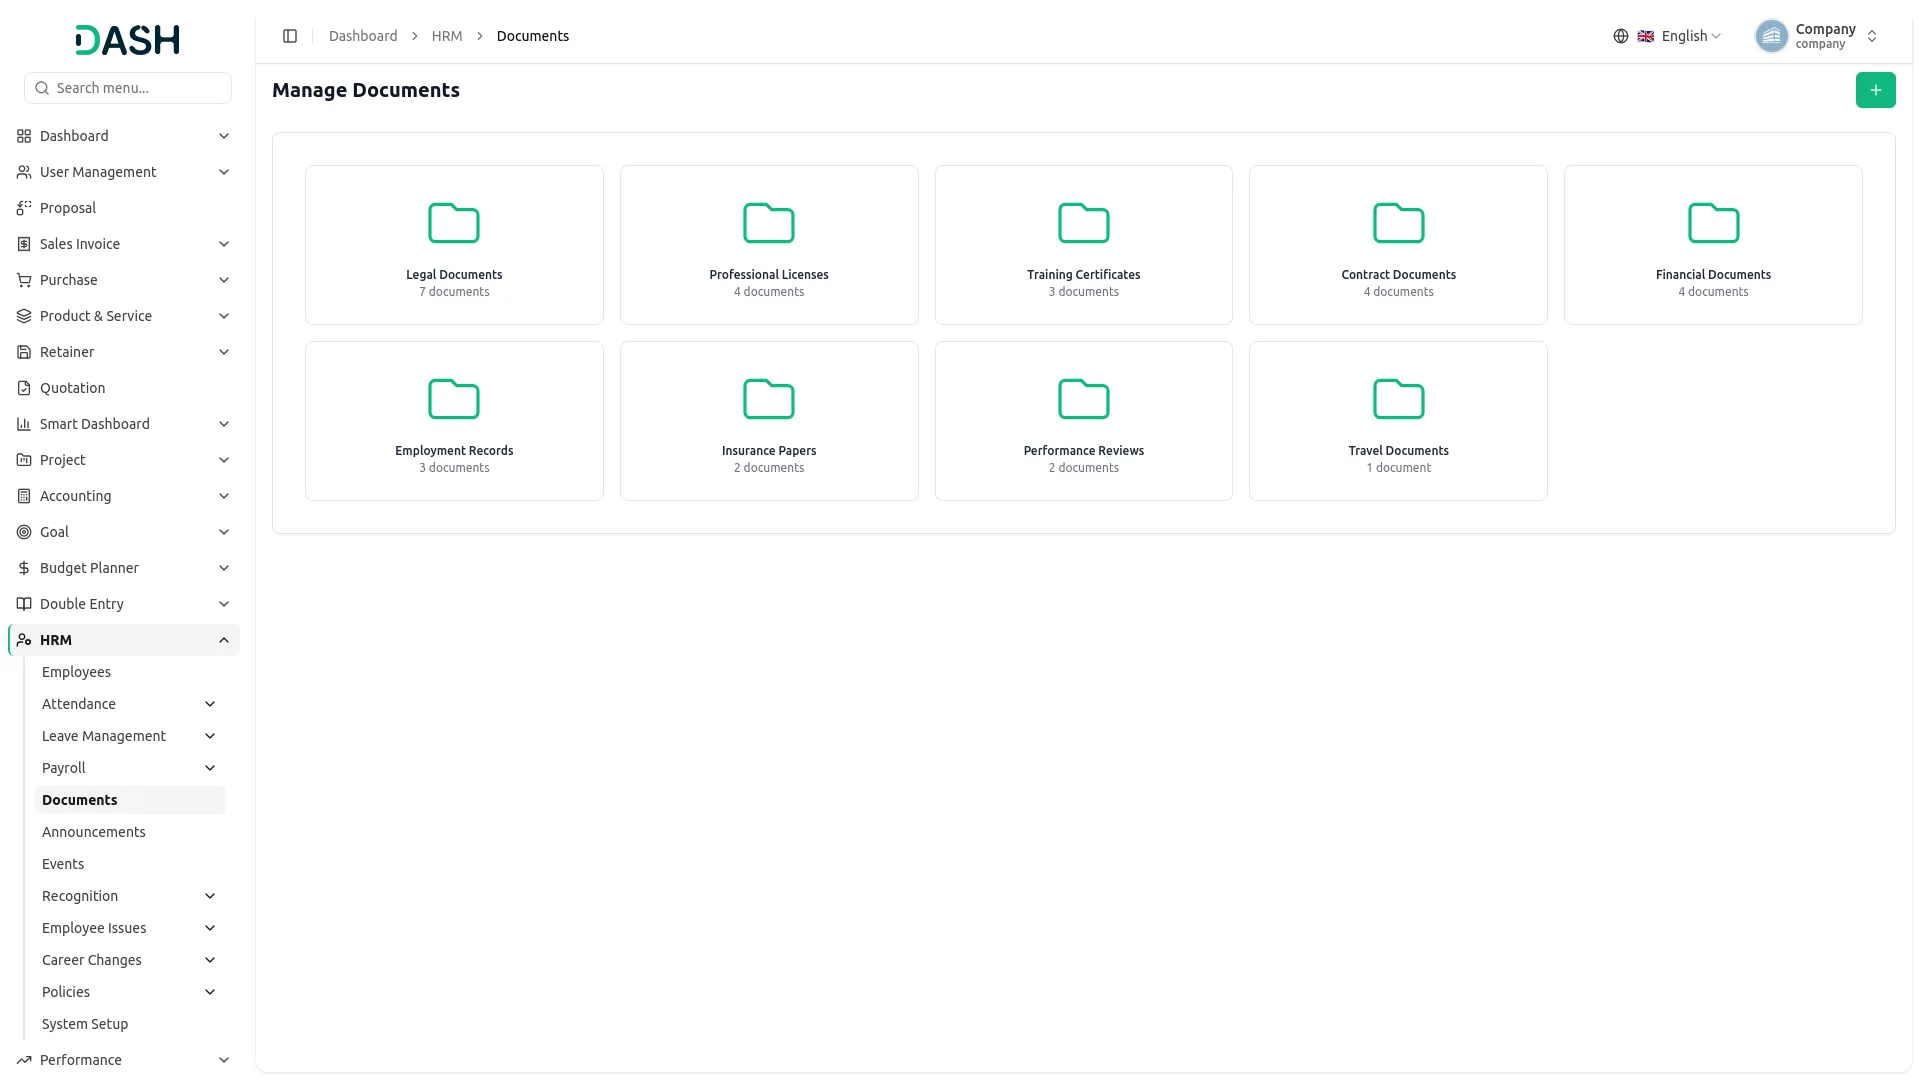
- The Manage Documents page displays all Document Categories as folder cards, each showing the Category Name and the number of documents inside it.
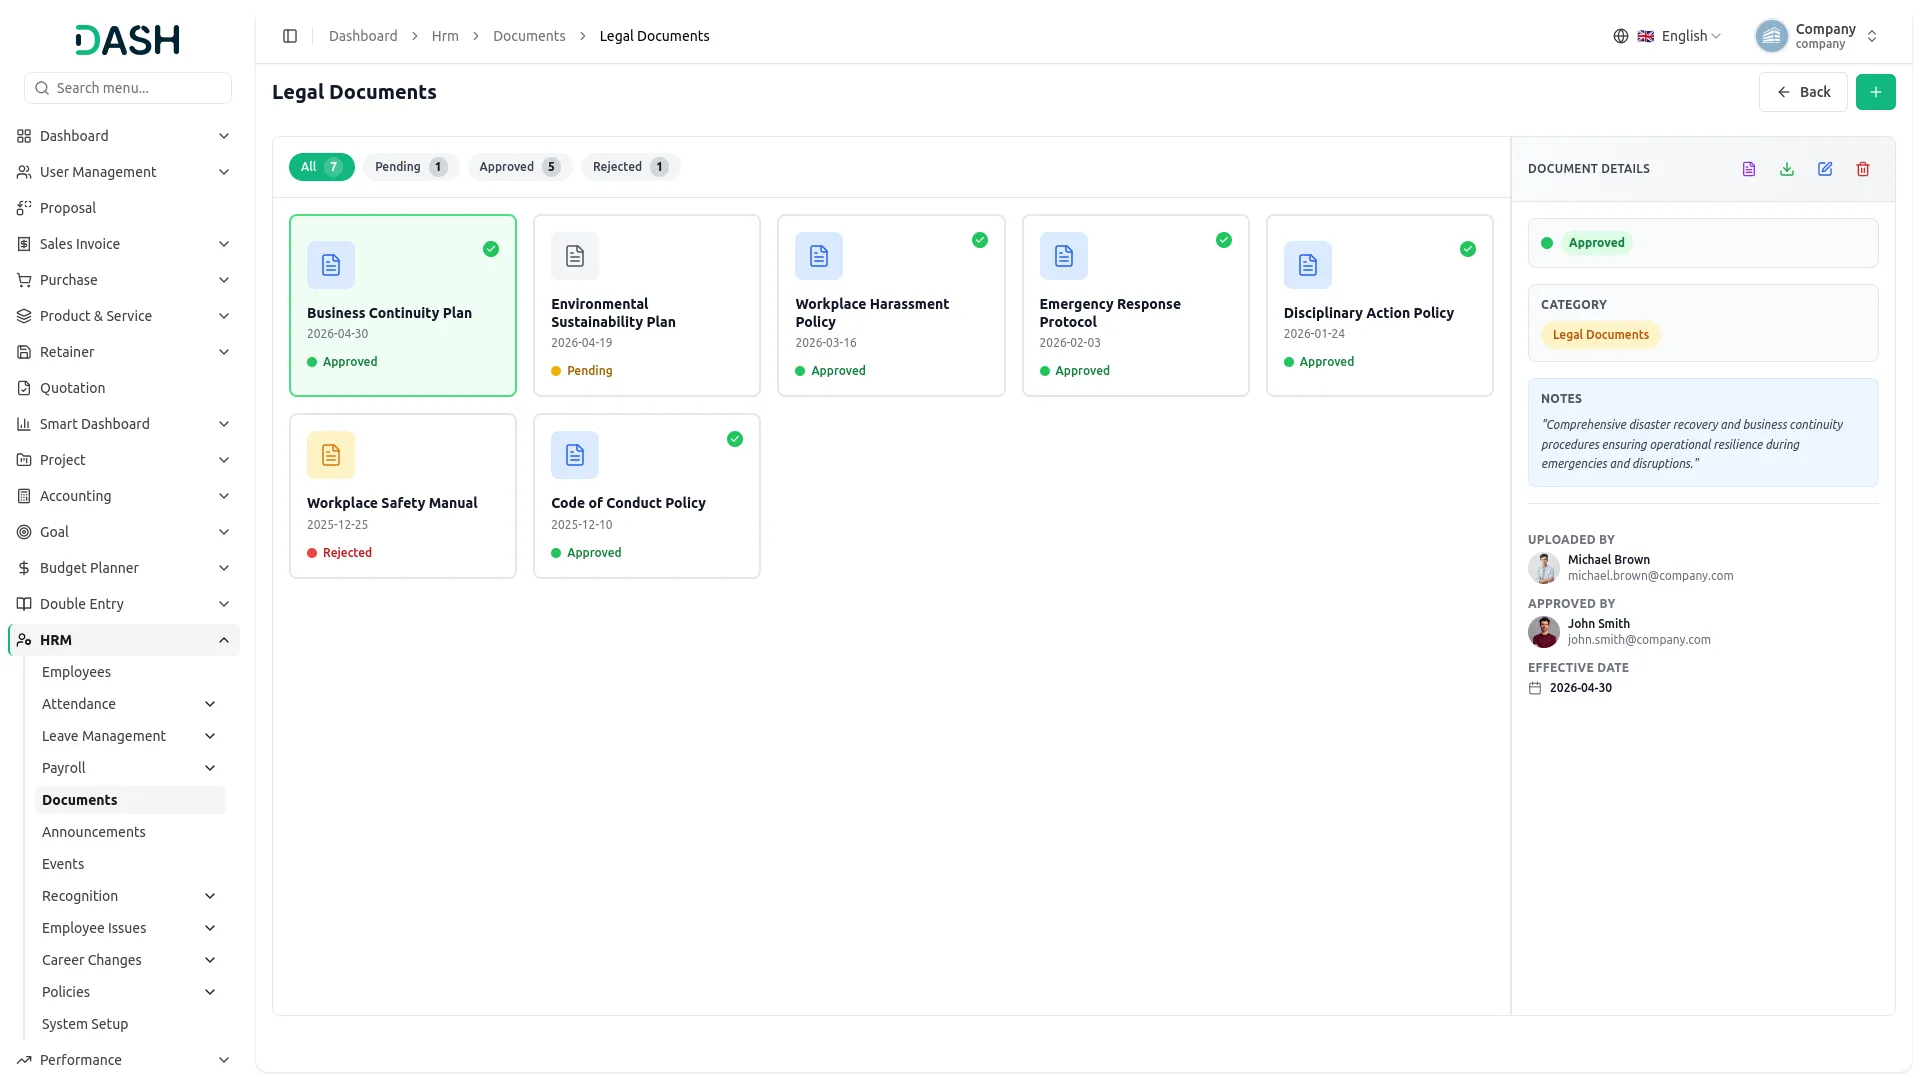
- Clicking a folder opens that Category’s page, showing all documents within it as cards. Tabs at the top – All, Pending, Approved, Rejected – let you filter documents by status, with a count badge on each tab. Each document card shows an icon, Title, upload date, and a Status indicator (Pending, Approved, or Rejected).
- Clicking a document card selects it (highlighted with a green border and checkmark) and opens its details in the Document Details panel on the right, showing the Status, Category, Notes, Uploaded By (with avatar and email), Approved By (with avatar and email), and Effective Date.
- From the Document Details panel, use the Open icon to view the document, Download to save it, Edit to update its details, and Delete to remove it.
Manage Announcements
- To create a new Announcement, click the “Create” button on the Manage Announcements page. Enter the Title and select the Announcement Category (populated from system setup; use the “Create announcement category here” link if it doesn’t exist yet).
- Select the Department (populated from system setup; use the “Create department here” link if it doesn’t exist yet) and choose a Priority from the dropdown (Low, Medium, High, Urgent). Set the Start Date and End Date, then add a Description.
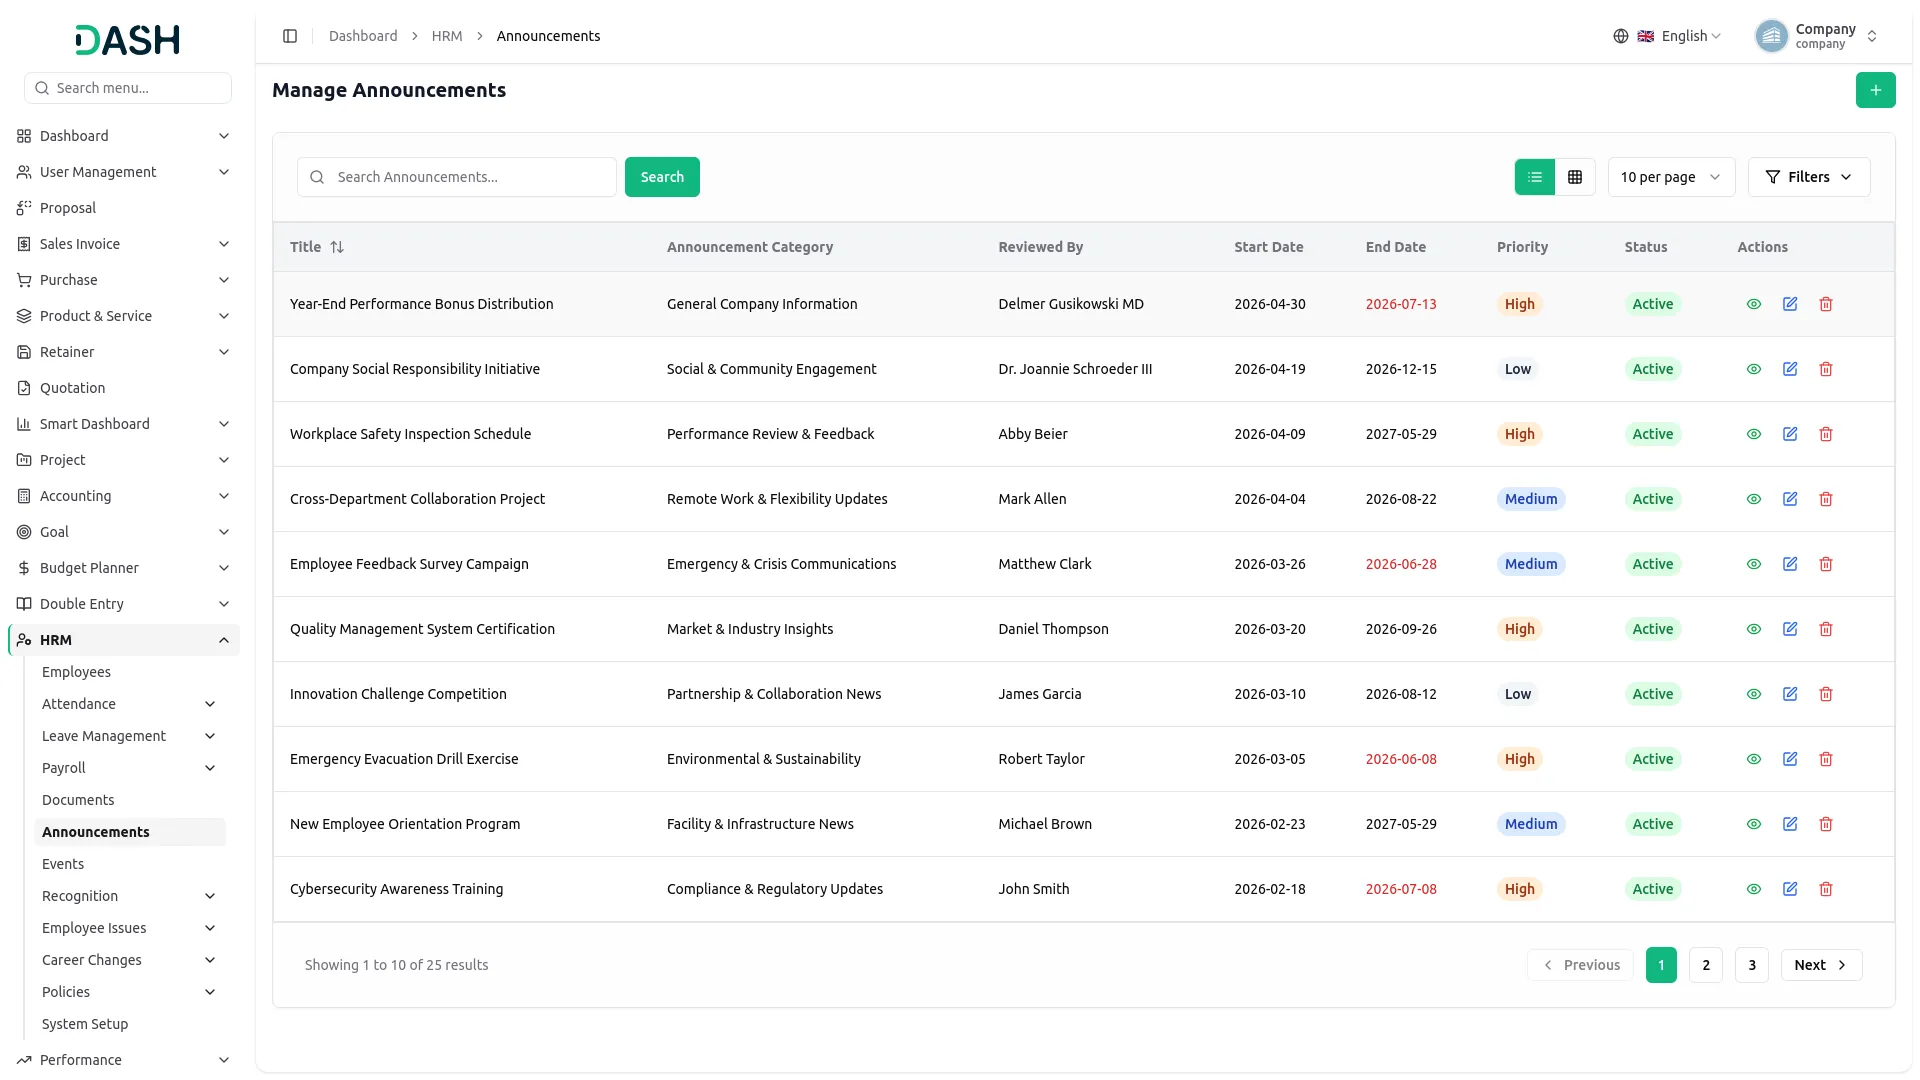
- The Manage Announcements page displays all announcements in a table with columns for Title, Announcement Category, Reviewed By, Start Date, End Date, Priority (Low, Medium, High, Urgent), Status (Draft, Active, or Inactive), and Actions. When the End Date has passed, it’s shown in red to indicate it’s overdue.
- Use the Search option to locate a specific announcement, or toggle between List View and Grid View. Use the Filters panel to refine results by Category, Priority, and Status, then click “Apply” to apply the filters or “Clear” to reset them.
- Available Actions include: an Active and Inactive option (shown only for Draft announcements) to activate or inactivate the announcement; View to see the full details; Edit to update it; and Delete to remove it.
Manage Events
- To create a new Event, click the “Create” button on either the Events Calendar or Manage Events page. Enter the Title and select the Event Type (populated from system setup; use the “Create event type here” link if it doesn’t exist yet), then select the Departments (populated from system setup; use the “Create department here” link if it doesn’t exist yet).
- Set the Start Date, End Date, Start Time, and End Time, then enter a Location and pick a Color to identify the event. This selected color is used to display the event wherever it appears, such as in the Events Calendar. You can add an optional Description.
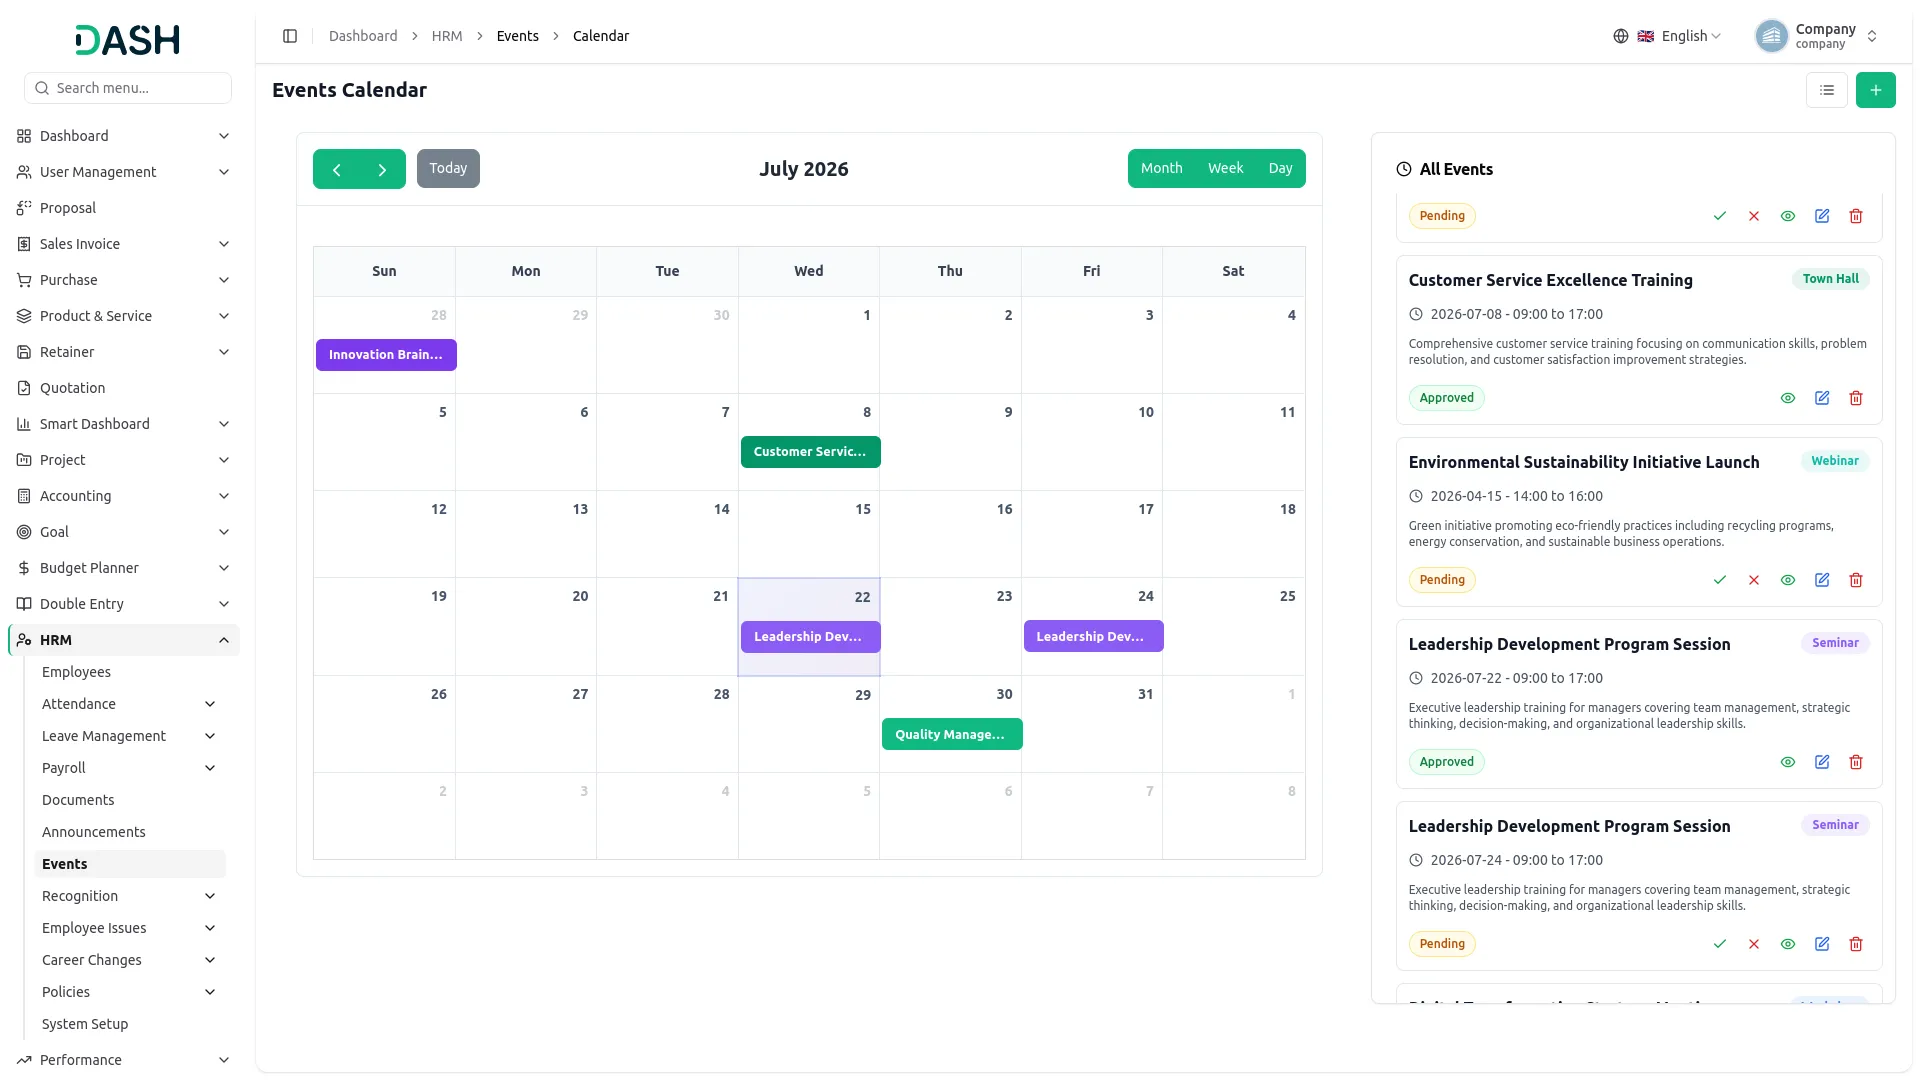
- The Events Calendar view opens by default, displaying a monthly calendar grid on the left, with each event shown as a colored bar on its date (matching the Color chosen when creating it). Use the “Today” button to navigate and toggle between Month, Week, and Day views.
- On the right, the All Events panel lists every event as a card showing the Title, Event Type badge, date and time range, Description, and a Status tag (Pending or Approved).
- Available Actions on each card include: Approve and Reject options (shown only for Pending events) to approve or reject the event. View to see the full details; Edit to update it, and Delete to remove it.
- To switch to the table format, click the List View button next to the calendar icon at the top. This opens the Manage Events page, listing all events in a table with columns for Title, Event Type, Start Date, End Date, Start Time, End Time, Reviewed By, Status, and Actions.
- Use the Search option to locate a specific event, or toggle between List View and Grid View. Use the Filters panel to refine results by Status and Event Type, then click “Apply” to apply the filters or “Clear” to reset them.
Recognition
Manage Awards
- To create a new Award, click the “Create” button on the Manage Awards page. Select the Employee (populated from the Employee section; use the “Create employee here” link if the employee doesn’t exist yet).
- The Award Type (populated from system setup; use the “Create award type here” link if it doesn’t exist yet), and then set the Award Date. You can add an optional Description and attach a Certificate file.
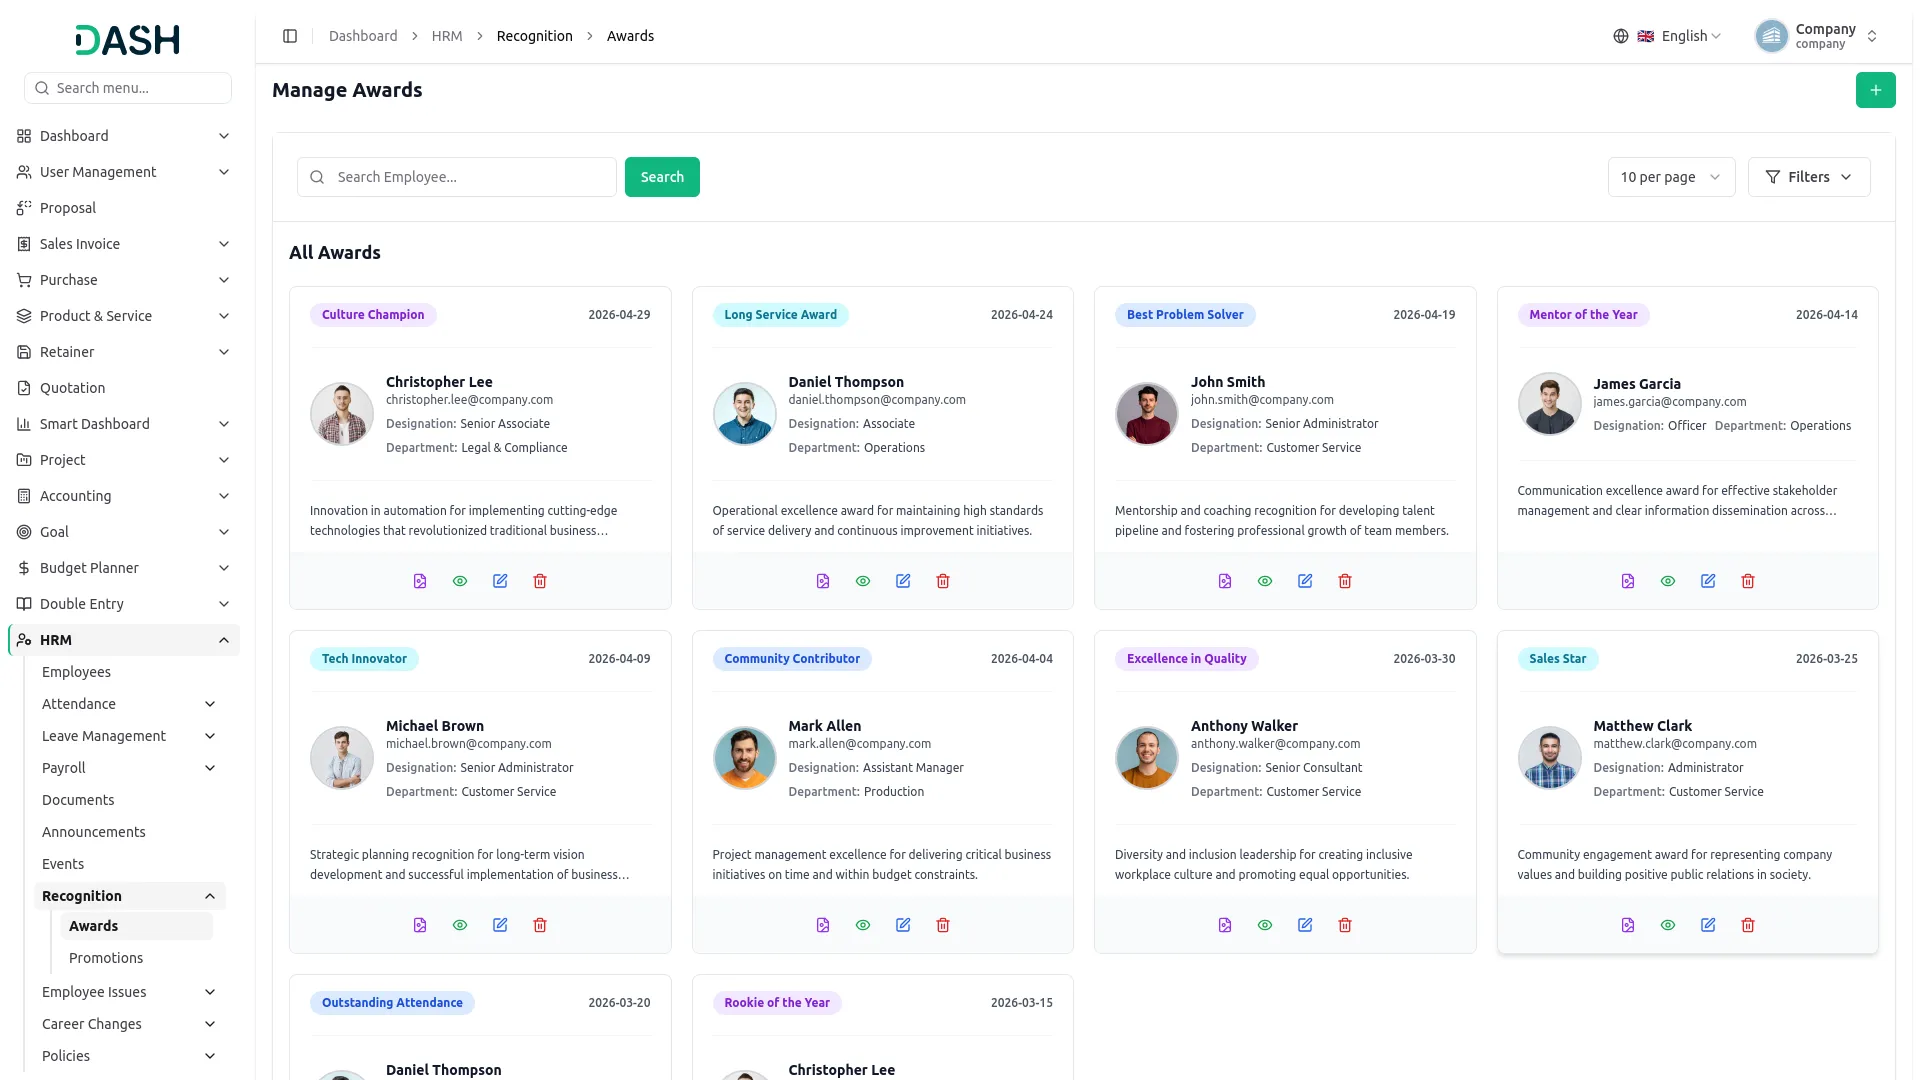
- The Manage Awards page displays awards as cards. If any awards were given during the current month, they appear under a “This Month Spotlight” heading; otherwise, all awards are displayed under an “All Awards” heading.
- Each card shows the Award Type badge, Award Date, the employee’s Avatar, Name, Email, Designation, and Department, along with a Description.
- Available Actions on each card include the following: Certificate to view the attached file, View to see the full award details, Edit to update it, and Delete to remove it.
- Use the Search option to locate a specific employee. Use the Filters panel to refine results by Employee and Award Type, then click “Apply” to apply the filters or “Clear” to reset them.
Manage Promotions
- To create a new Promotion, click the “Create” button on the Manage Promotions page. Select the Employee (populated from the Employee section; use the “Create employee here” link if the employee doesn’t exist yet); once selected, a panel displays their Current Branch, Current Department, and Current Designation for reference.
- Select the Branch dropdown; choose the branch from it (branches are populated from system setup), or click the “Create branch” link below the field if the branch you need doesn’t exist yet.
- Once a branch is selected, the To Department dropdown becomes available, and once a department is selected, the To Designation dropdown becomes available. Set the Effective Date, then add an optional Reason and attach a supporting Document.
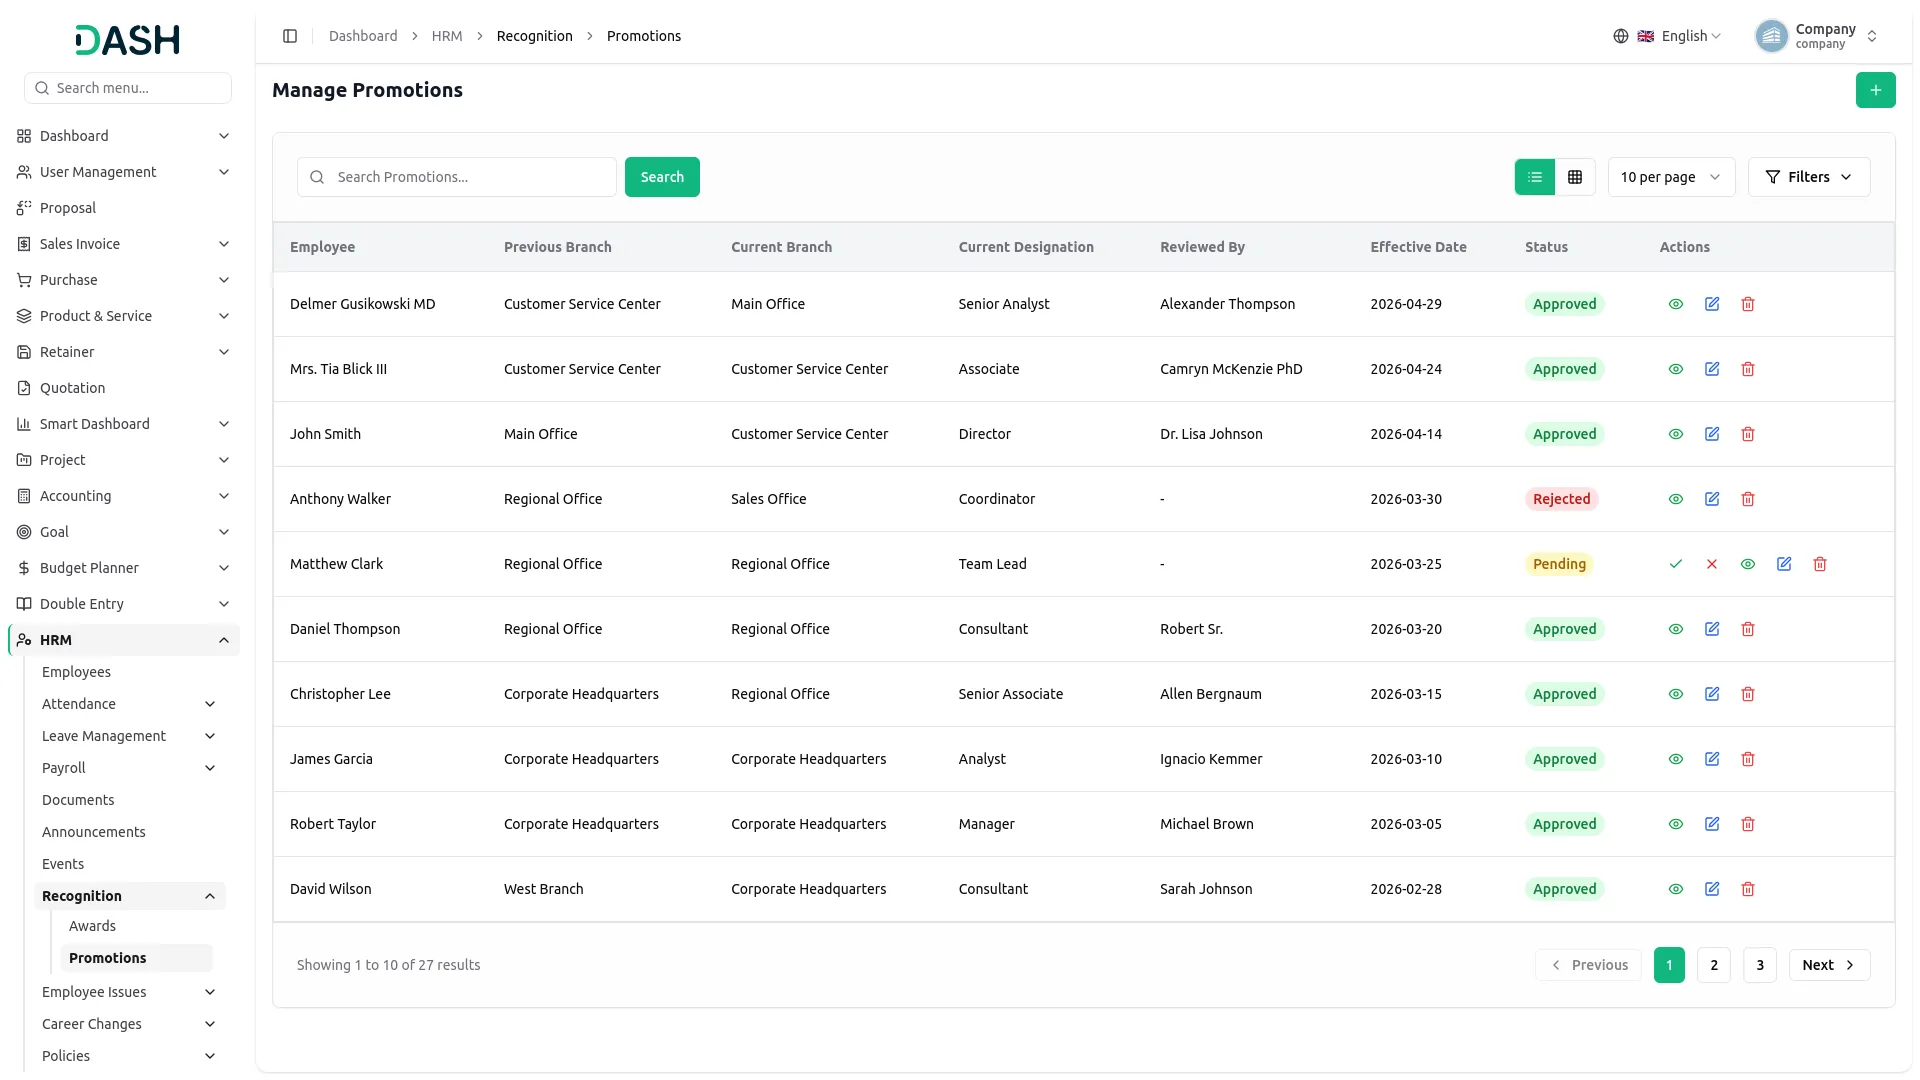
- The Manage Promotions page displays all promotions in a table with columns for Employee, Previous Branch, Current Branch, Current Designation, Reviewed By, Effective Date, Status, and Actions. Use the Search option to locate a specific promotion, or toggle between List View and Grid View.
- Use the Filters panel to refine results by Employee, Previous Branch, Current Branch, and Status, then click “Apply” to apply the filters or “Clear” to reset them.
- Available Actions include: Approve and Reject options (shown only for Pending promotions) to approve or reject the promotion; View to see the full details; Edit to update it; and Delete to remove it.
Employee Issues
Manage Complaints
- To create a new Complaint, click the “Create” button on the Manage Complaints page. Select the Employee (populated from the Employee section; use the “Create employee here” link if the employee doesn’t exist yet).
- Optionally select the Against Employee, then select the Complaint Type (populated from the system setup; use the “Create complaint type here” link if it doesn’t exist yet). Enter a Subject and Description, set the Complaint Date, and optionally attach a supporting Document.
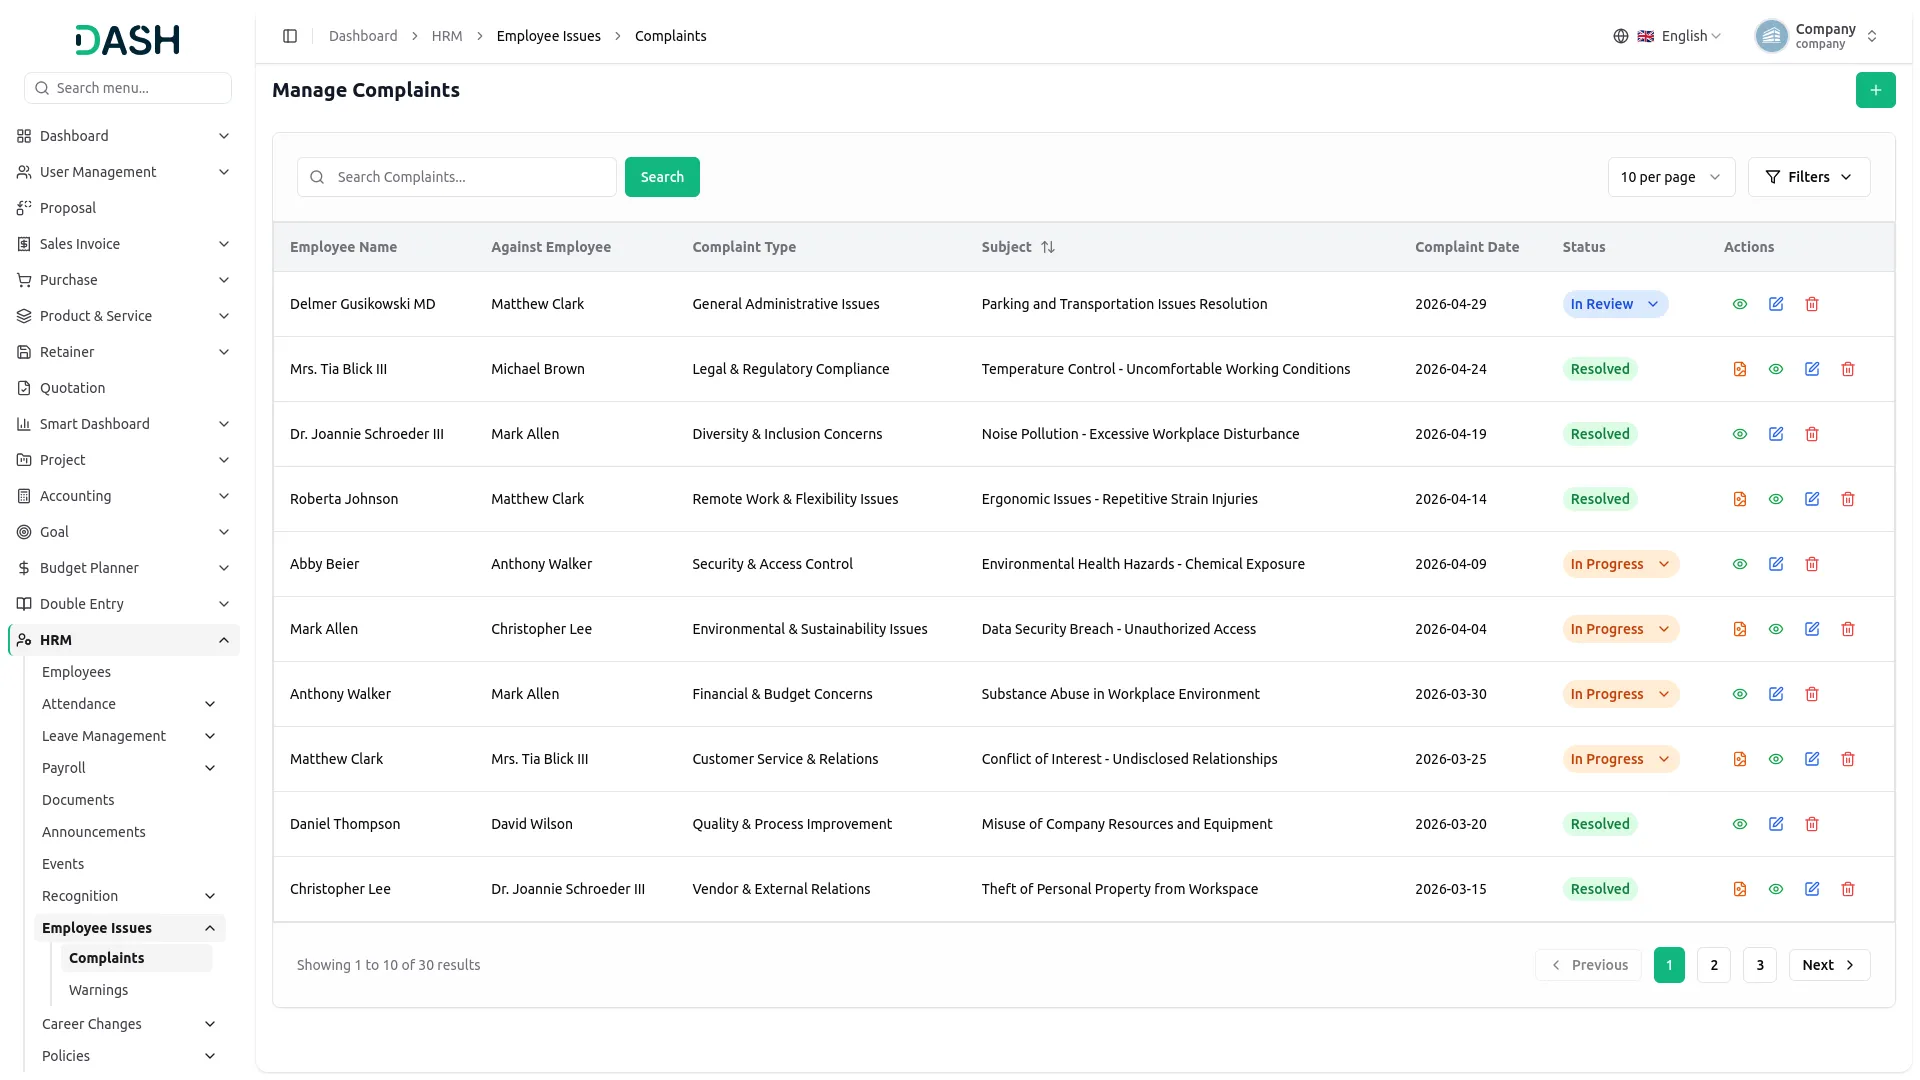
- The Manage Complaints page displays all complaints in a table with columns for Employee Name, Against Employee, Complaint Type, Subject, Complaint Date, Status, and Actions.
- Use the Search option to locate a specific complaint. Use the Filters panel to refine results by Employee, Complaint Type, and Status, then click “Apply” to apply the filters or “Clear” to reset them.
- The Status column shows a dropdown (except when Resolved), letting you update the complaint’s progress: Pending, In Review, Assigned, In Progress, or Resolved.
- Available Actions include: Document to view the attached file (shown only when a document was attached), Re-Complaint (shown only for Resolved complaints) to reopen the complaint, View to see the full details, Edit to update it, and Delete to remove it.
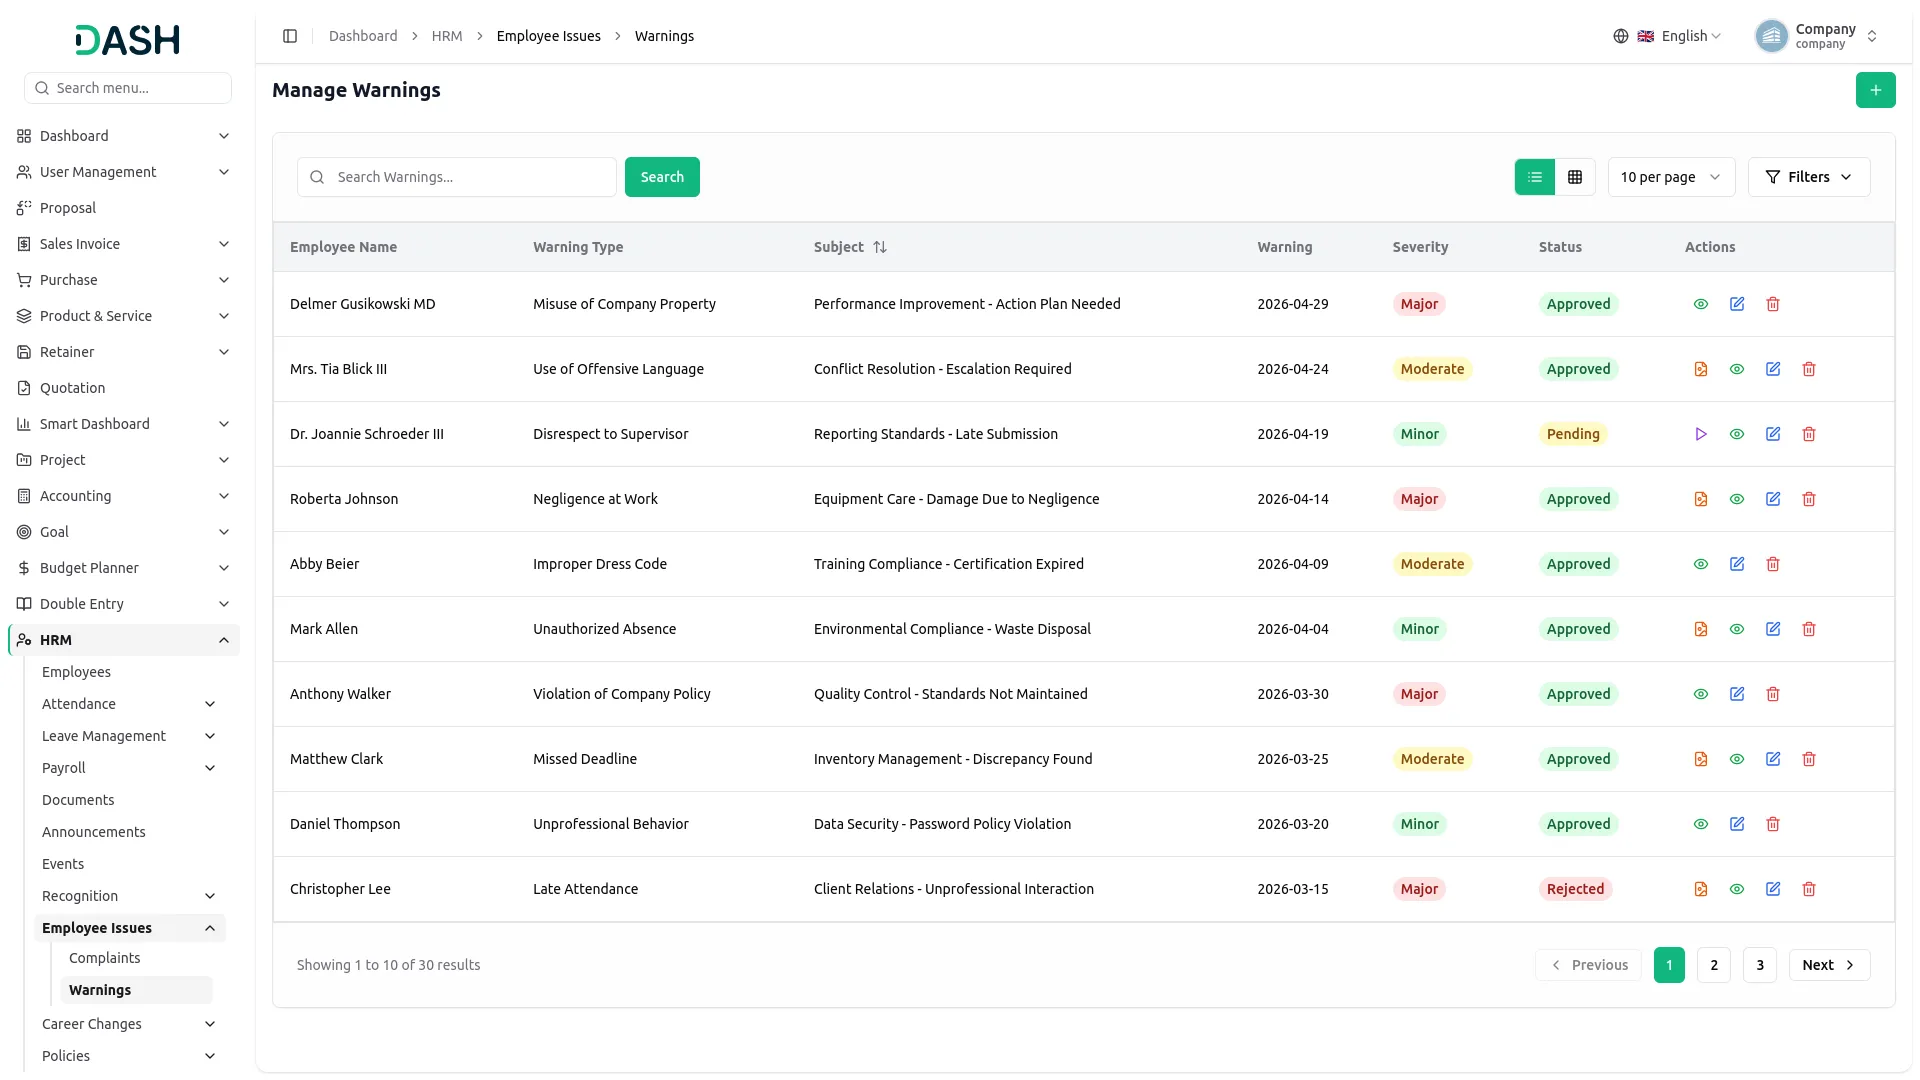
Manage Warnings
- To create a new Warning, click the “Create” button on the Manage Warnings page. Select the Employee (populated from the Employee section; use the “Create employee here” link if the employee doesn’t exist yet).
- The Warning Type (populated from the system setup; use the “Create warning type here” link if it doesn’t exist yet). Enter a Subject, choose the Severity (Minor, Moderate, Major), and set the Warning Date. Add an optional Description and attach a supporting Document.
- The list page displays all warnings with columns for Employee Name, Warning By, Warning Type, Subject, Warning (date), Severity, Status, and Actions. The Severity column shows the warning level, Minor, Moderate, or Major, and the Status column shows whether the warning is Pending or Approved.
- Use the Search option to locate a specific warning, or toggle between List View and Grid View to change how the data is displayed. Use the Filters panel to refine results by Employee, then click “Apply” to apply the filter or “Clear” to reset it.
- Available Actions you can use: View to see the complete warning details, Edit to update any information, and Delete to remove a warning that is no longer needed. When a warning is still pending, a Response action also appears. This opens a window where you can update the Warning Status and enter a Response, then click “Save”. If a document was attached to the warning, a Document action also appears, letting you open the uploaded file.
Career Changes
Employee Transfers
- To create a new Employee Transfer, click the “Create” button on the Manage Employee Transfers page. Select the Employee (populated from the Employee section; use the “Create employee here” link if the employee doesn’t exist yet).
- Select the To Branch (branches are populated from system setup; use the “Create branch here” link if it doesn’t exist yet);Once a branch is selected, choose the Department from the Department dropdown, which becomes available only after a branch is picked (departments are populated from system setup).
- Once a department is selected, choose the Designation from the Designation dropdown, which becomes available only after a department is picked (designations are populated from system setup). Set the Effective Date, enter a Reason, and optionally attach a supporting Document.
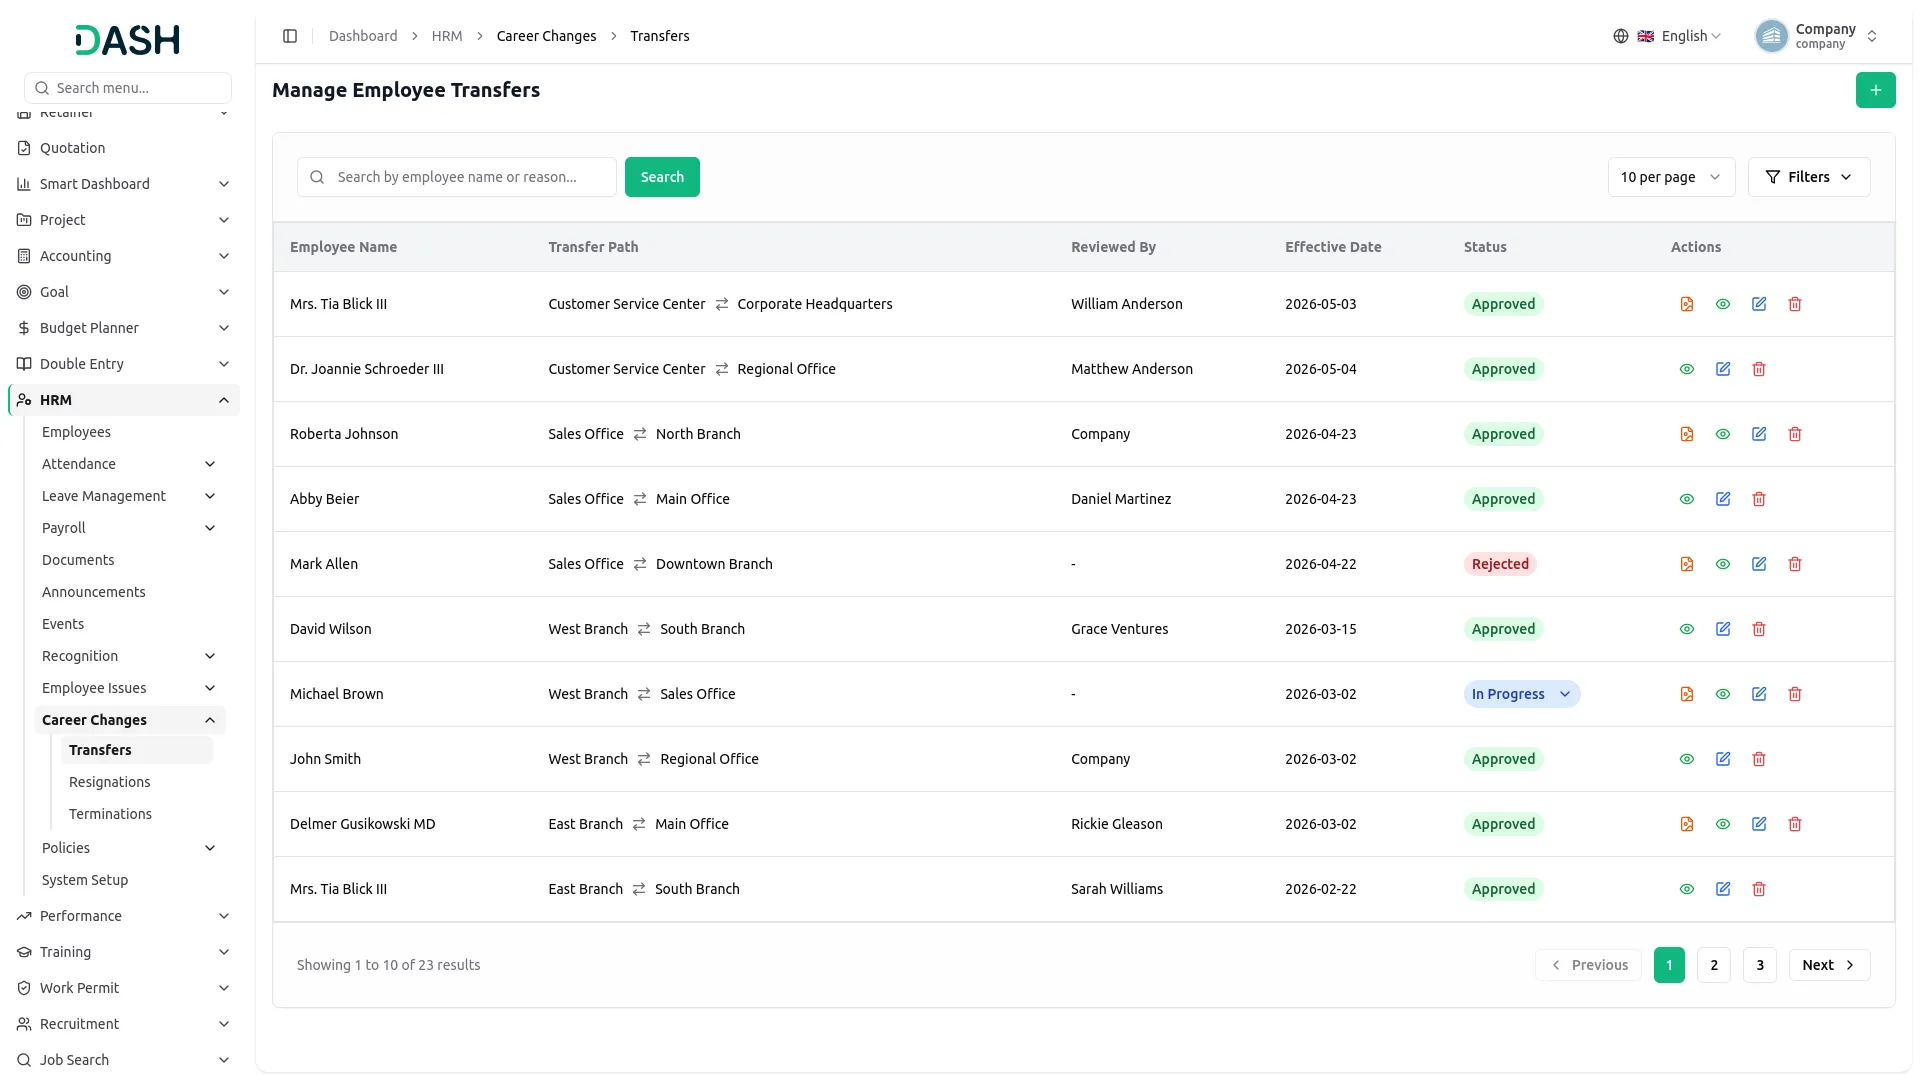
- The Manage Employee Transfers page displays all transfers in a table with columns for Employee Name, Transfer Path (showing the previous branch and new branch with an arrow between them), Reviewed By, Effective Date, Status, and Actions.
- Use the Search option to locate a specific employee or reason. Use the Filters panel to refine results by Employee and Status, then click “Apply” to apply the filters or “Clear” to reset them.
- The Status column shows a dropdown letting you update the transfer’s progress, Pending, Approved, In Progress, Rejected, or Cancelled.
- Available Actions include: Document to view the attached file (shown only when a document was attached), View to see the full details, Edit to update it, and Delete to remove it.
Manage Resignations
- To create a new Resignation, click the “Create” button on the Manage Resignations page. Select the Employee (populated from the Employee section; use the “Create employee here” link if the employee doesn’t exist yet; note that the employee cannot be changed once the resignation is approved). Set the Last Working Date, enter a Reason, and add an optional Description and supporting Document.
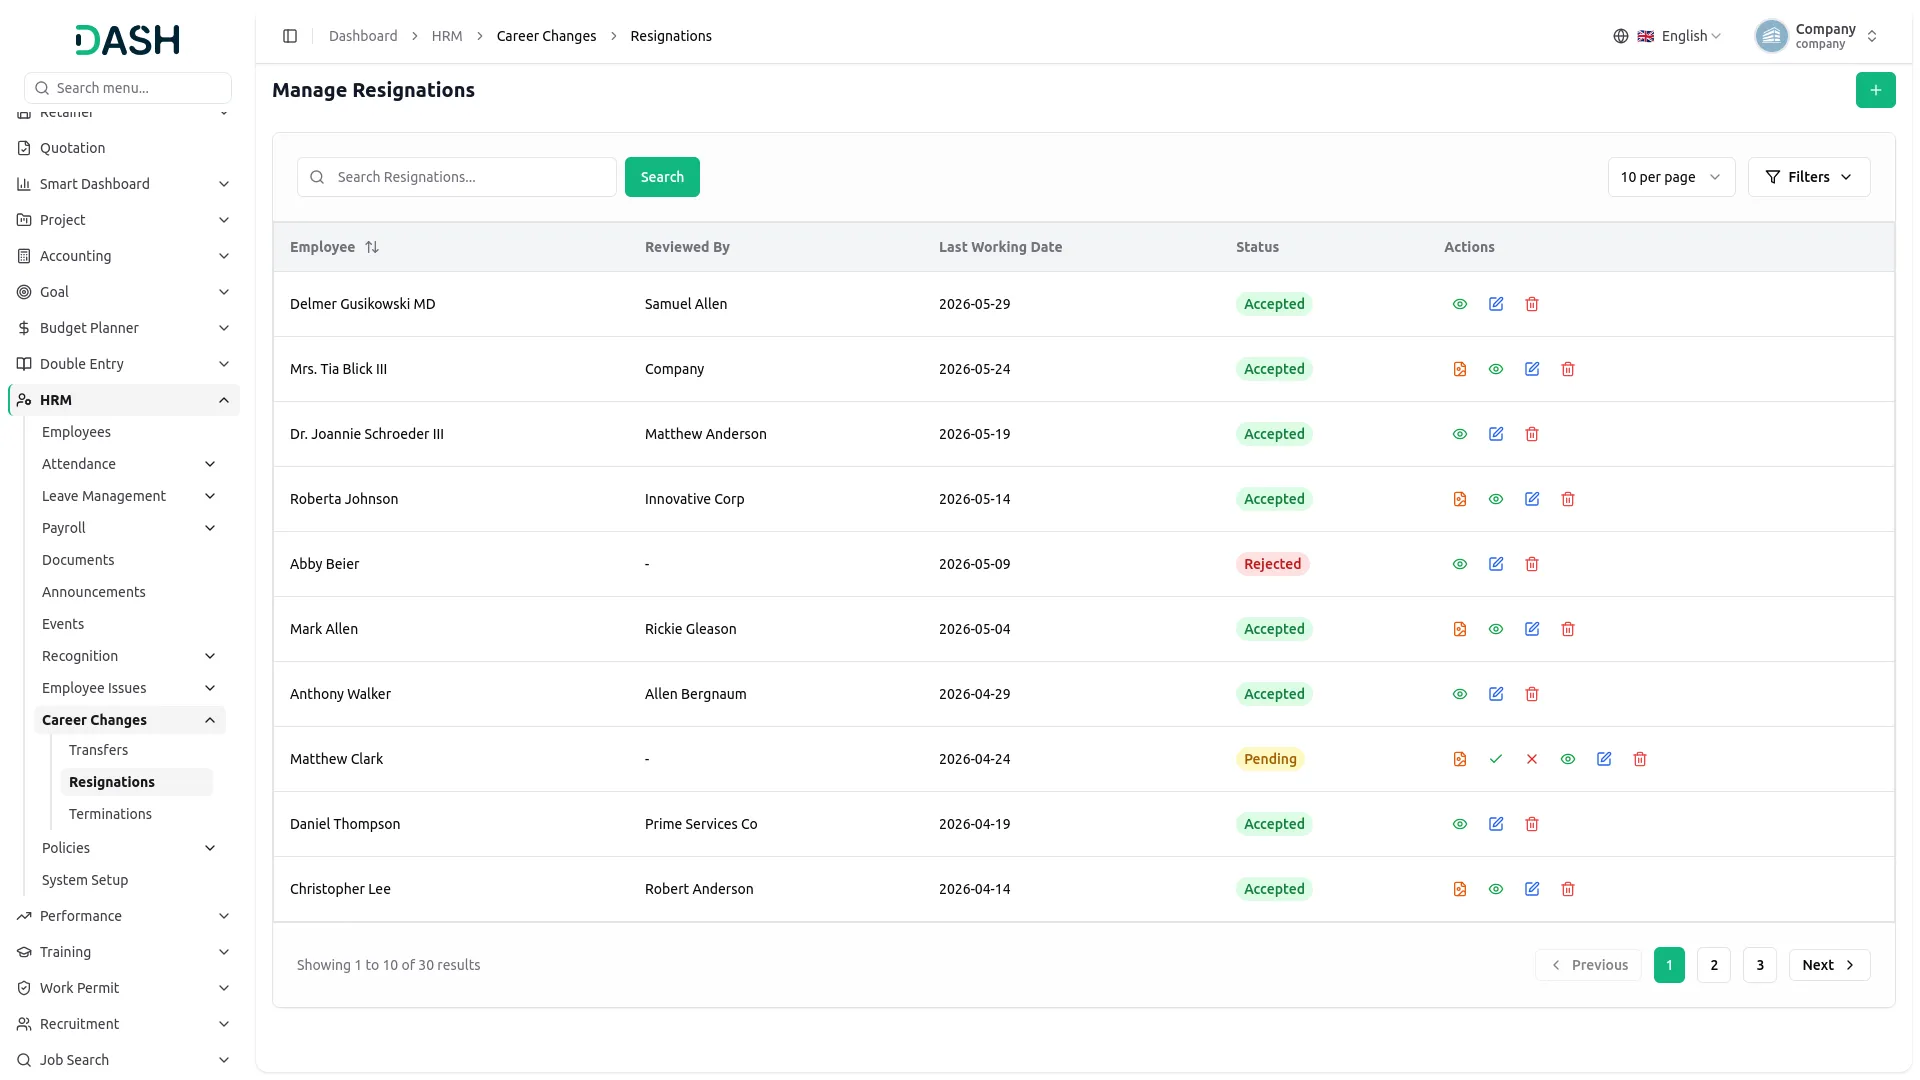
- The Manage Resignations page displays all resignations in a table with columns for Employee, Reviewed By, Last Working Date, Status, and Actions.
- Use the Search option to locate a specific resignation. Use the Filters panel to refine results by Employee and Status, then click “Apply” to apply the filters or “Clear” to reset them.
- Available Actions include: Document to view the attached file (shown only when a document was attached); Approve and Reject options (shown only for Pending resignations) to approve or reject the resignation; View to see the full details; Edit to update it; and Delete to remove it.
Manage Terminations
- To create a new Termination, click the “Create” button on the Manage Terminations page. Select the Employee (populated from the Employee section; use the “Create employee here” link if the employee doesn’t exist yet, note that the employee cannot be changed once the termination is approved).
- The Termination Type (populated from the system setup; use the “Create termination type here” link if it doesn’t exist yet). Set the Notice Date and Termination Date, enter a Reason, and add an optional Description and supporting Document.
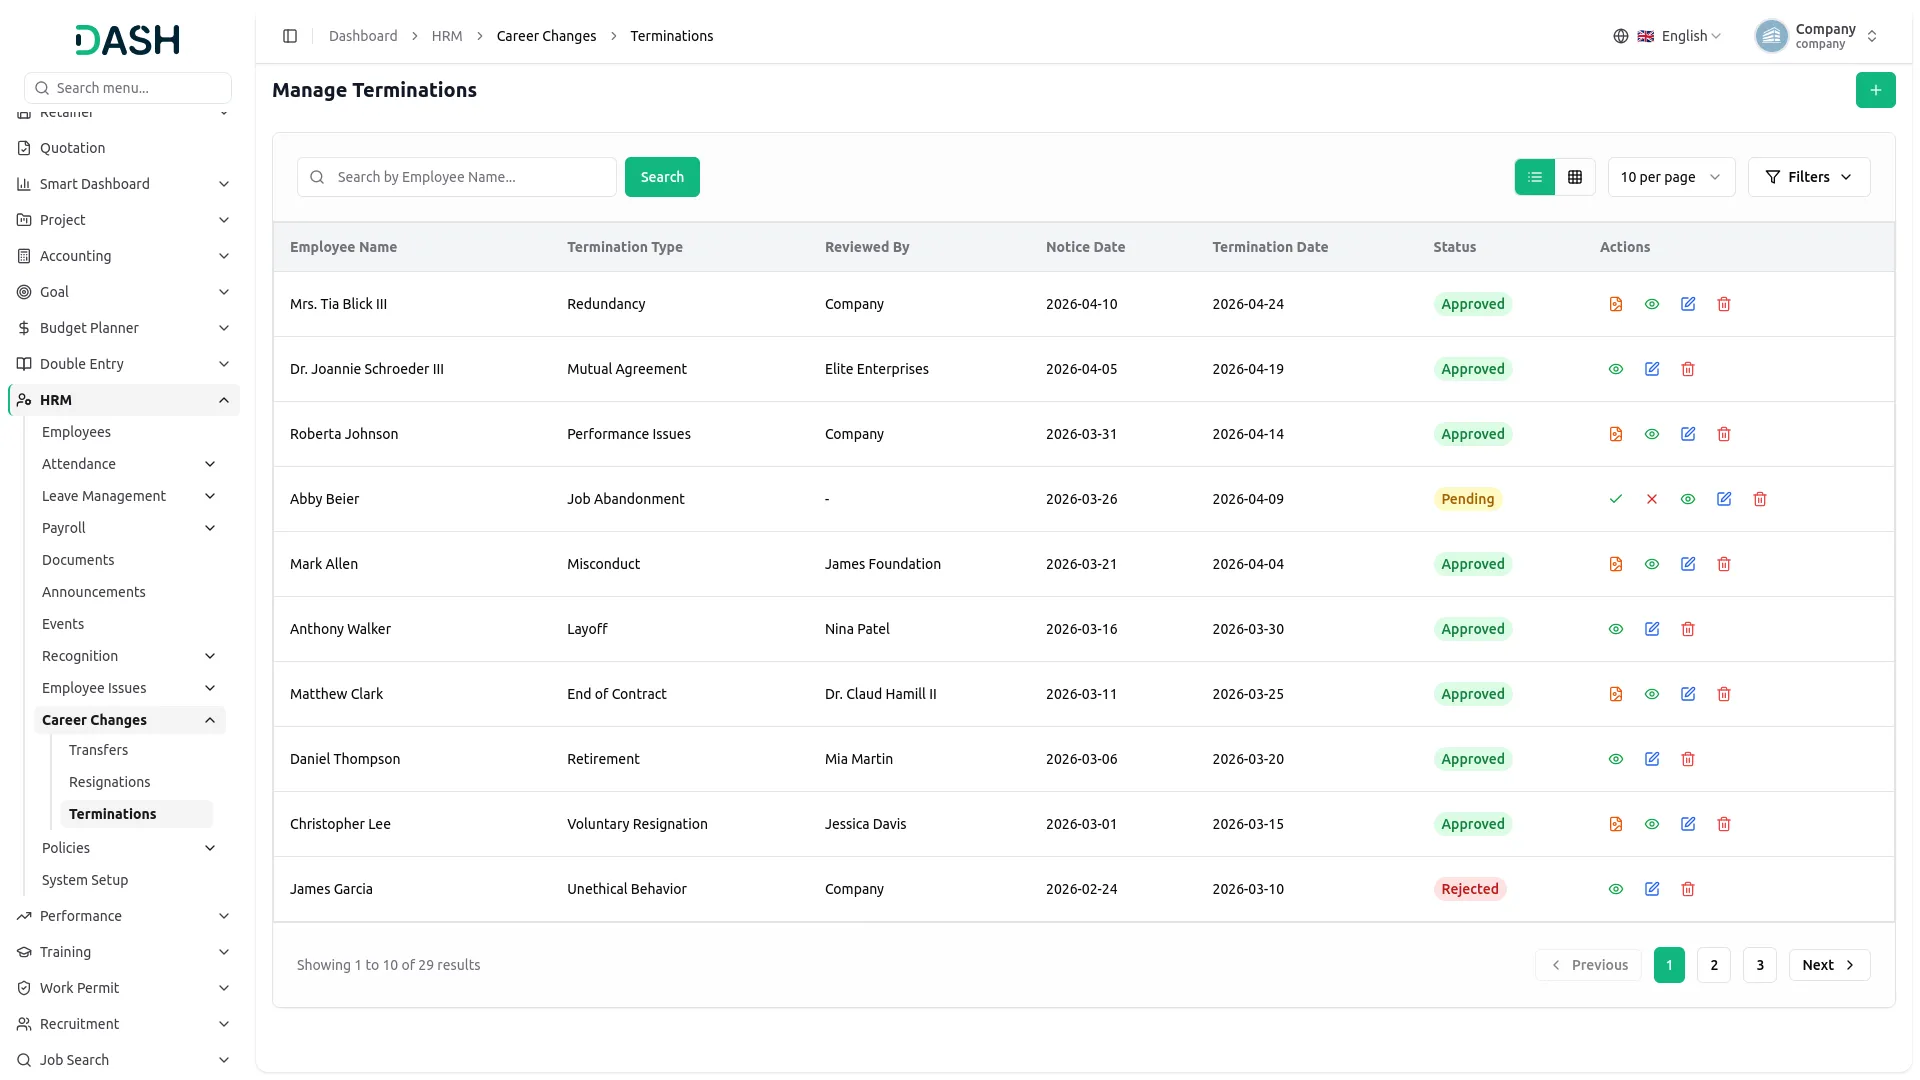
- The Manage Terminations page displays all terminations in a table with columns for Employee Name, Termination Type, Reviewed By, Notice Date, Termination Date, Status, and Actions.
- Use the Search option to locate a specific employee, or toggle between List View and Grid View. Use the Filters panel to refine results by Employee and Status, then click “Apply” to apply the filters or “Clear” to reset them.
- Available Actions include: Document to view the attached file (shown only when a document was attached), View to see the full details, Edit to update it, and Delete to remove it.
Policies
Company Policies
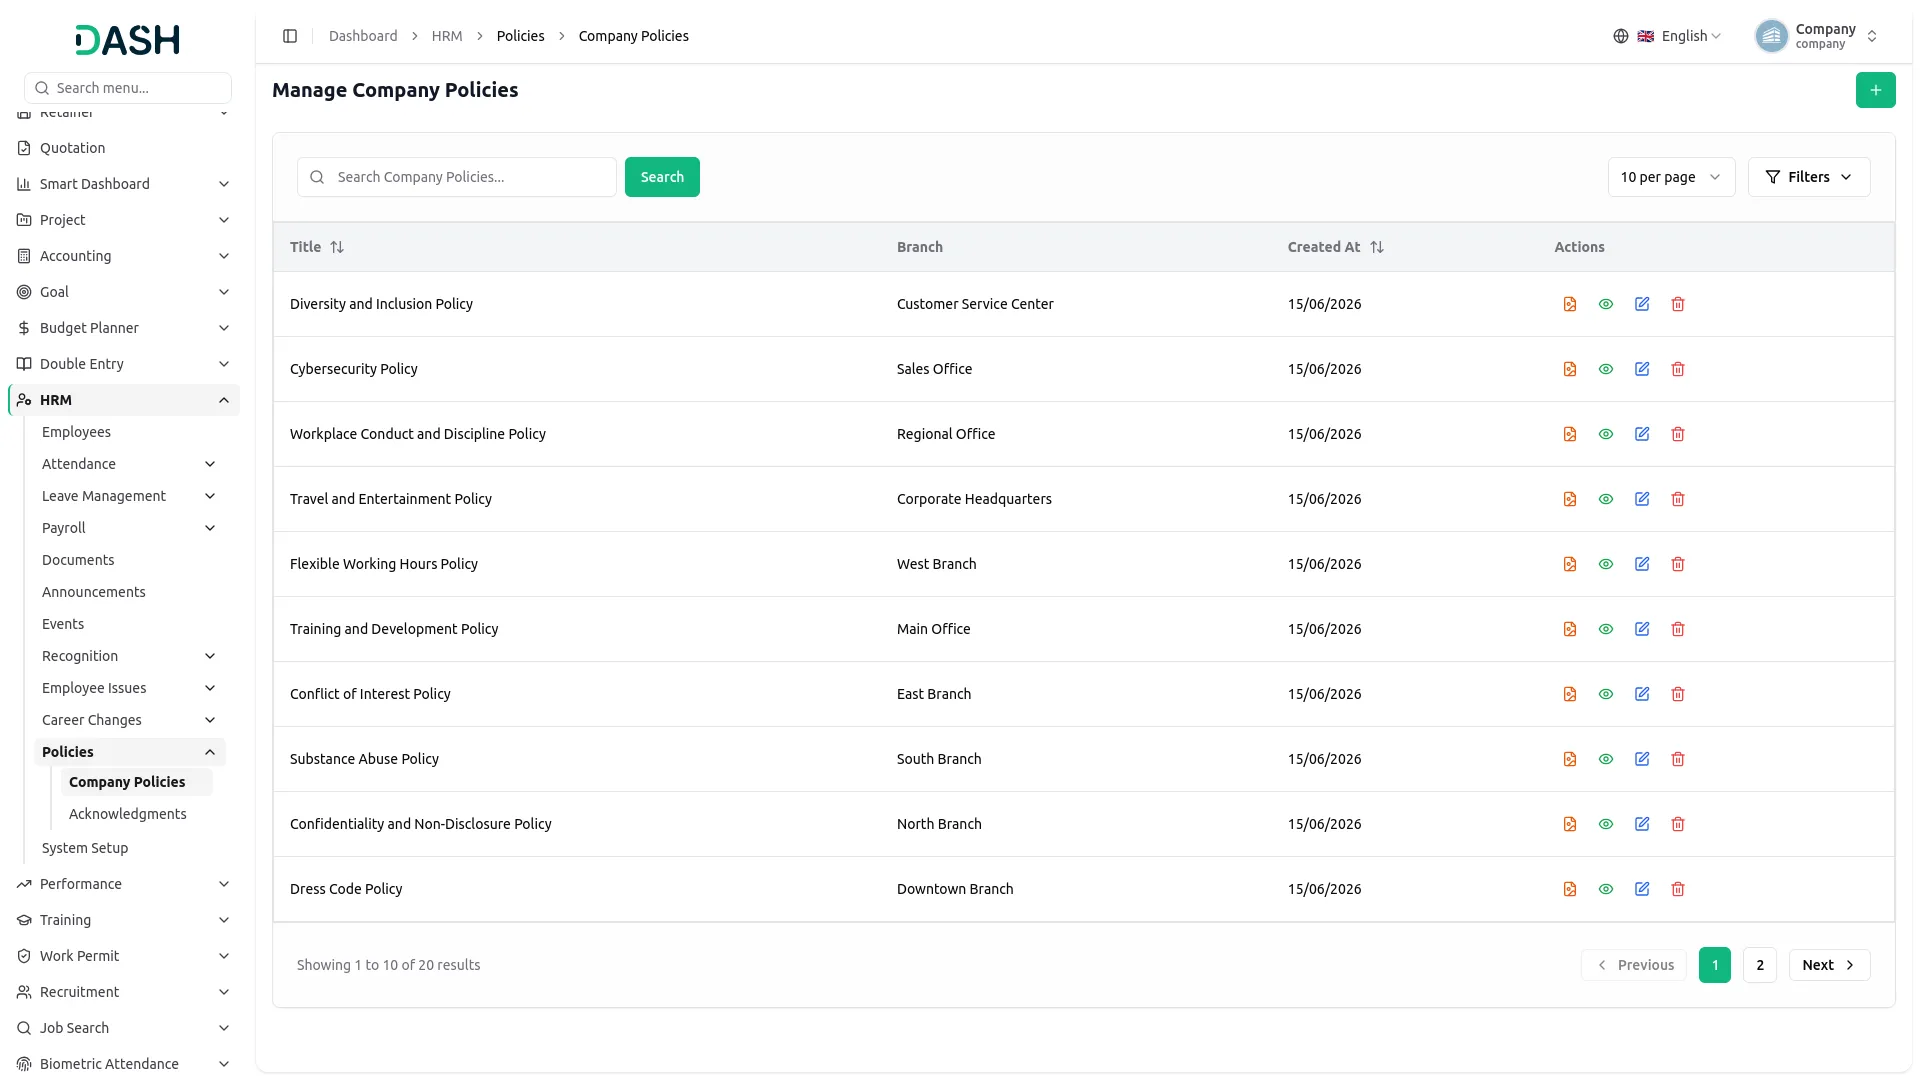
- To create a new Company Policy, click the “Create” button on the Manage Company Policies page. Optionally select the Branch (populated from the system setup; use the “Create branch here” link if it doesn’t exist yet), then enter the Title and an optional Description, and attach an optional Attachment file.
- The Manage Company Policies page displays all policies in a table with columns for Title, Branch, Created At, and Actions. Use the Search option to locate a specific policy.
- Use the Filters panel to refine results by Branch, then click “Apply” to apply the filters or “Clear” to reset them.
- Available Actions include: Document to view the attached file (shown only when a document was attached), View to see the full details, Edit to update it, and Delete to remove it.
Manage Acknowledgments
- To create a new Acknowledgment, click the “Create” button on the Manage Acknowledgments page. Select the Employee ( populated from the Employee section; use the “Create employee here” link if the employee doesn’t exist yet).
- The Document (populated from the document section; use the “Create document here” link if it doesn’t exist yet), then enter an Acknowledgment Note.
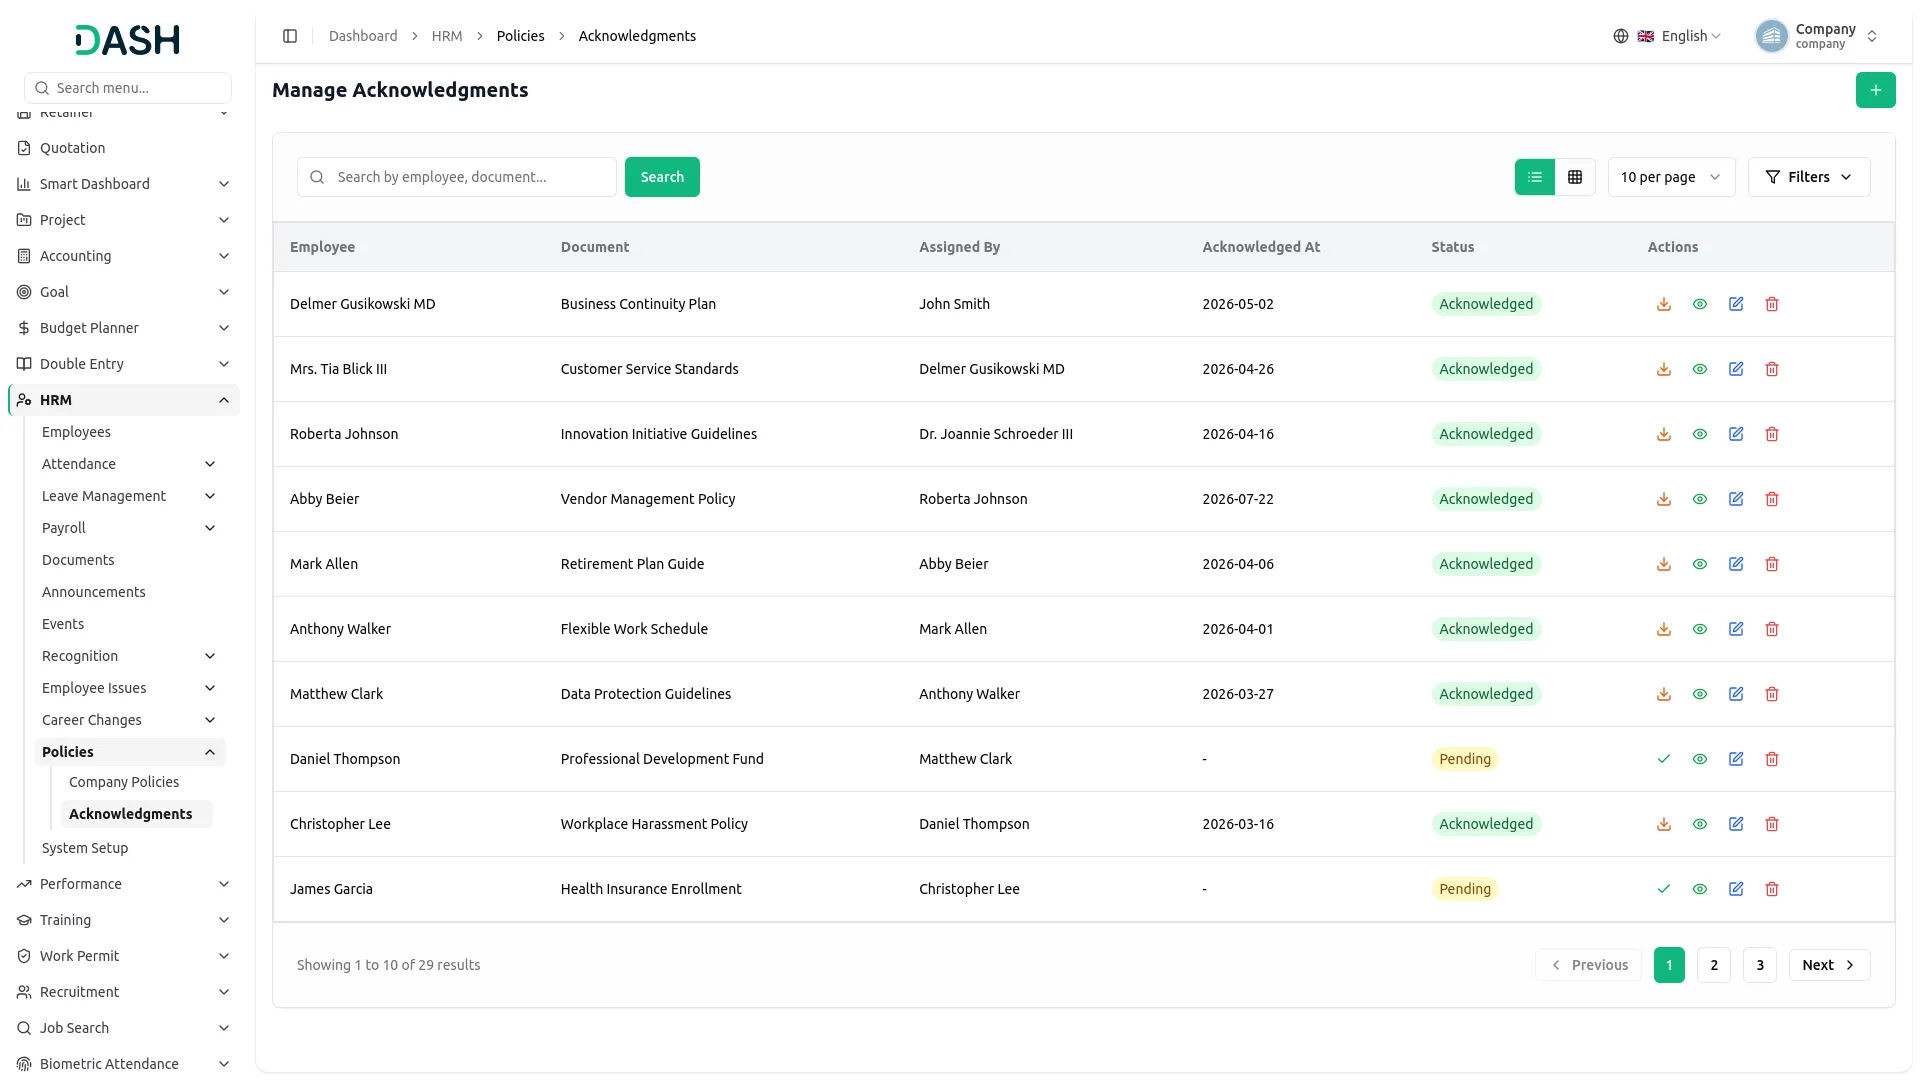
- The Manage Acknowledgments page displays all acknowledgments in a table with columns for Employee, Document, Assigned By, Acknowledged At, Status, and Actions.
- Use the Search option to locate a specific employee or document, or toggle between List View and Grid View. Use the Filters panel to refine results by Employee, Document, and Status, then click “Apply” to apply the filters or “Clear” to reset them.
- Available Actions include: Download to save the document, a checkmark icon (shown only for Pending acknowledgments) to mark it Acknowledged, View to see the full details, Edit to update it, and Delete to remove it.
System Setup
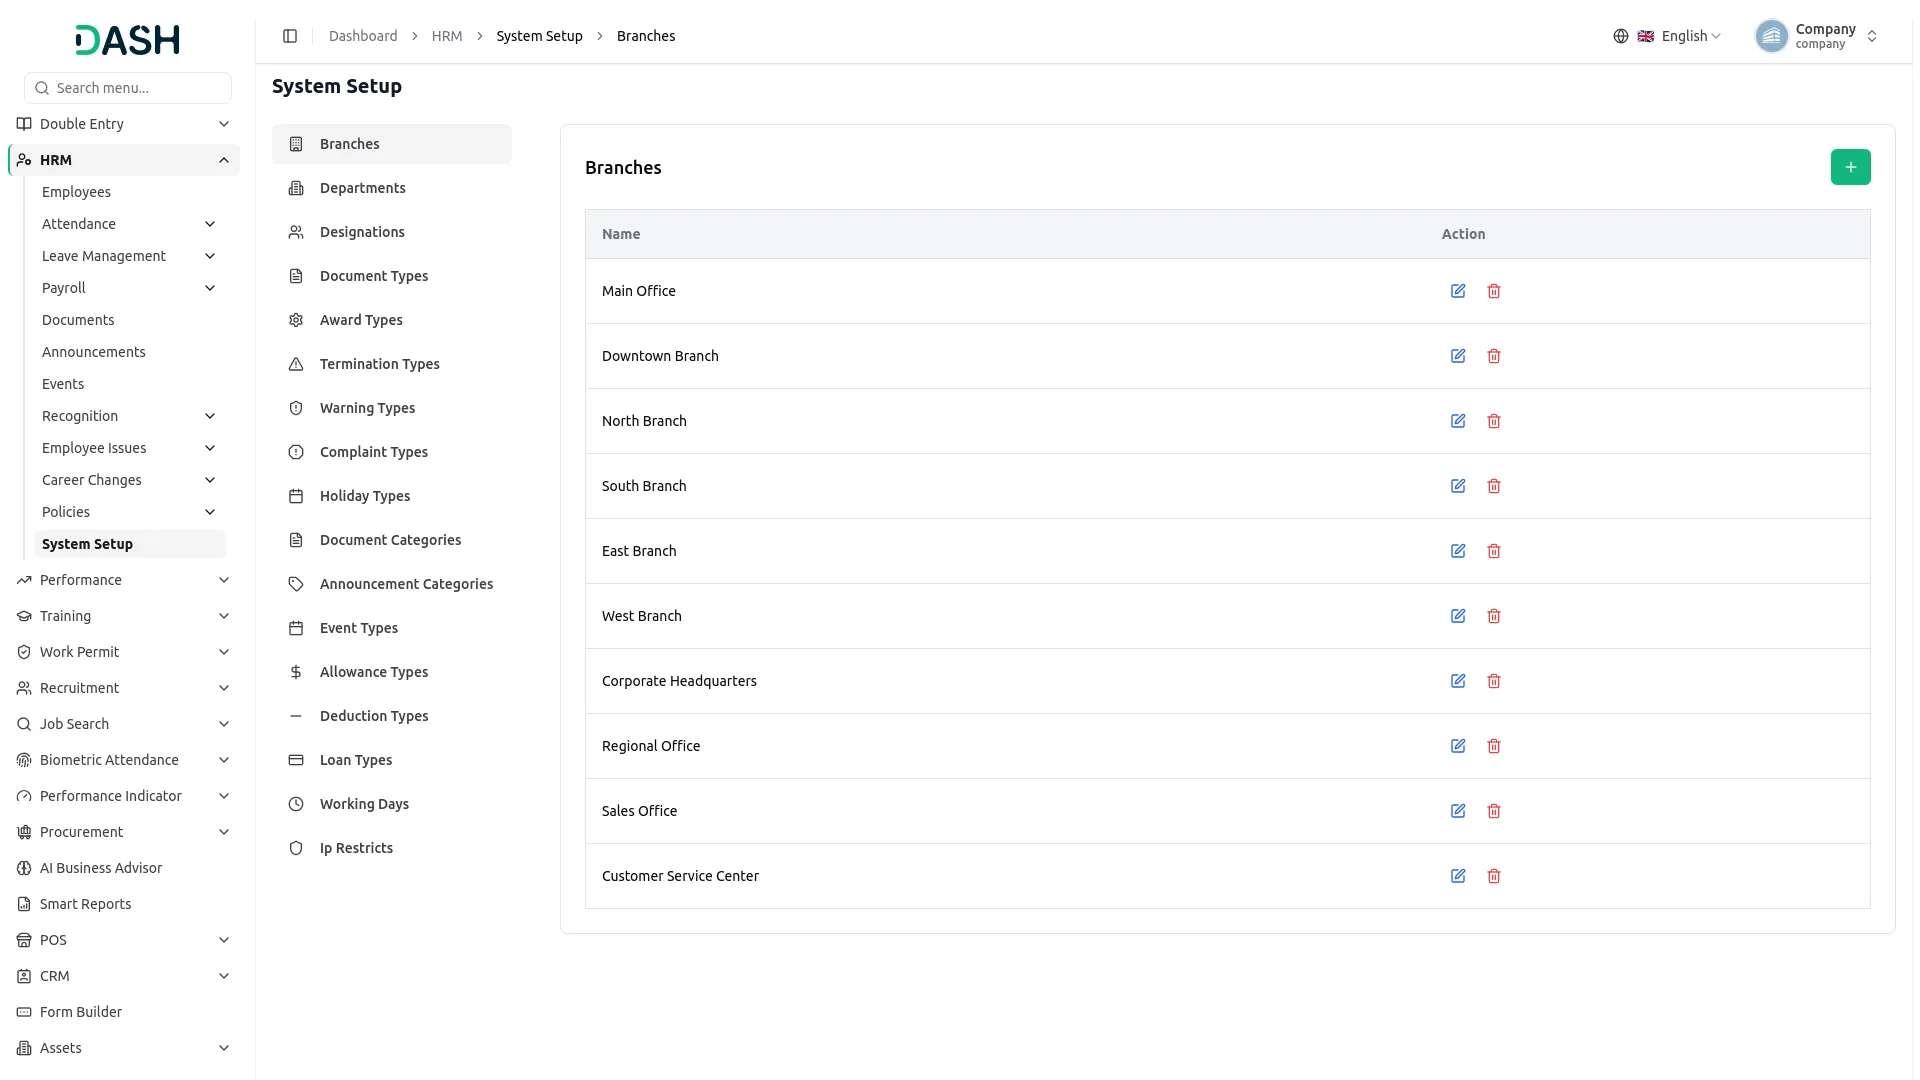
Branches
- To create a new branch, click the “Create” button at the top of the Branches page. Enter the branch name in the Name field, then click “Create”.
- The list page displays all branches in a table with Name and Action columns. From the Action column, you can edit or delete any branch.
Departments
- To add a new department, click the “Create” button on the Departments page. Enter the department name, then select the branch from the dropdown. If the branch you need doesn’t exist yet, click the “Create branch” link below the dropdown to add one. Click “Create” to save.
- The list page shows each department with Name, Branch, and Action columns. Use the Action column to edit or delete a department.
Designations
- To create a designation, click the “Create” button on the Designations page. Enter the designation name, then select the branch. If the branch you need doesn’t exist yet, click the “Create branch” link below the dropdown to add one.
- Once a branch is selected, choose the department from the Department dropdown, which becomes available only after a branch is picked. Click “Create” to save.
- The list page lists all designations with Name, Branch, Department, and Action columns, where you can edit or delete each entry.
Document Types
- To add a document type, click the “Create” button on the Document Types page. Enter the document name and, if needed, a description. Turn on the “Is Required” toggle if the document must be submitted, then click “Create”.
- The list page displays the Document Name, Description, Is Required, and Action columns. The Is Required column shows whether each document is marked as Required or Not Required, and the Action column lets you edit or delete the document type.
Award Types
- To create an award type, click the “Create” button on the Award Types page. Enter the award name and a description, then click “Create”.
- The list page shows all award types with Name, Description, and Action columns. You can edit or delete any award type from the Action column.
Termination Types
- To add a termination type, click the “Create” button on the Termination Types page. Enter the termination type name, then click “Create”.
- The list page displays the Name and Action columns, with options to edit or delete each termination type.
Warning Types
- To create a warning type, click the “Create” button on the Warning Types page. Enter the warning type name, then click “Create”.
- The list page shows all warning types with Name and Action columns, where you can edit or delete each entry.
Complaint Types
- To add a complaint type, click the “Create” button on the Complaint Types page. Enter the complaint type name, then click “Create”.
- The list page lists each complaint type with Name and Action columns. Use the Action column to edit or delete a complaint type.
Holiday Types
- To create a holiday type, click the “Create” button on the Holiday Types page. Enter the holiday type name, then click “Create”.
- The list page displays the Name and Action columns, allowing you to edit or delete each holiday type.
Document Categories
- To add a document category, click the “Create” button on the Document Categories page. Enter the category name and turn on the Enable/Disable toggle to activate it, then click “Create”.
- The list page shows each category with Name, Status, and Action columns. The Status column indicates whether the category is Enabled or Disabled, and the Action column lets you edit or delete it.
Announcement Categories
- To create an announcement category, click the “Create” button on the Announcement Categories page. Enter the category name in the Name field, then click “Create”.
- The list page displays all announcement categories with Name and Action columns, where you can edit or delete each entry.
Event Types
- To add an event type, click the “Create” button on the Event Types page. Enter the event type name, then click “Create”.
- The list page shows all event types with Name and Action columns. Use the Action column to edit or delete an event type.
Allowance Types
- To create an allowance type, click the “Create” button on the Allowance Types page. Enter the allowance name and a description, then click “Create”.
- The list page displays each allowance type with Name, Description, and Action columns. You can edit or delete any allowance type from the Action column.
Deduction Types
- To add a deduction type, click the “Create” button on the Deduction Types page. Enter the deduction name and a description, then click “Create”.
- The list page shows all deduction types with Name, Description, and Action columns, where you can edit or delete each entry.
Loan Types
- To create a loan type, click the “Create” button on the Loan Types page. Enter the loan name and a description, then click “Create”.
- The list page displays each loan type with Name, Description, and Action columns. Use the Action column to edit or delete a loan type.
Working Days
- The Working Days page lets you define which days of the week are treated as working days for your organization. Tick the checkbox next to each day you want to mark as a working day; Monday through Sunday are all available, and then click “Save” to apply your selection.
Ip Restricts
- To add an allowed IP address, click the “Create” button on the IP Restrictions page. Enter the IP address in the Ip field, then click “Create”.
- The list page displays all restricted IP addresses with Ip and Action columns, where you can edit or delete each entry. The “IP Restrict Off” toggle at the top right enables or disables IP restriction for the system; when turned on, access is limited to the IP addresses listed here.
Note: Any data created in the System Setup modules can be used across other modules in the other hrm module.
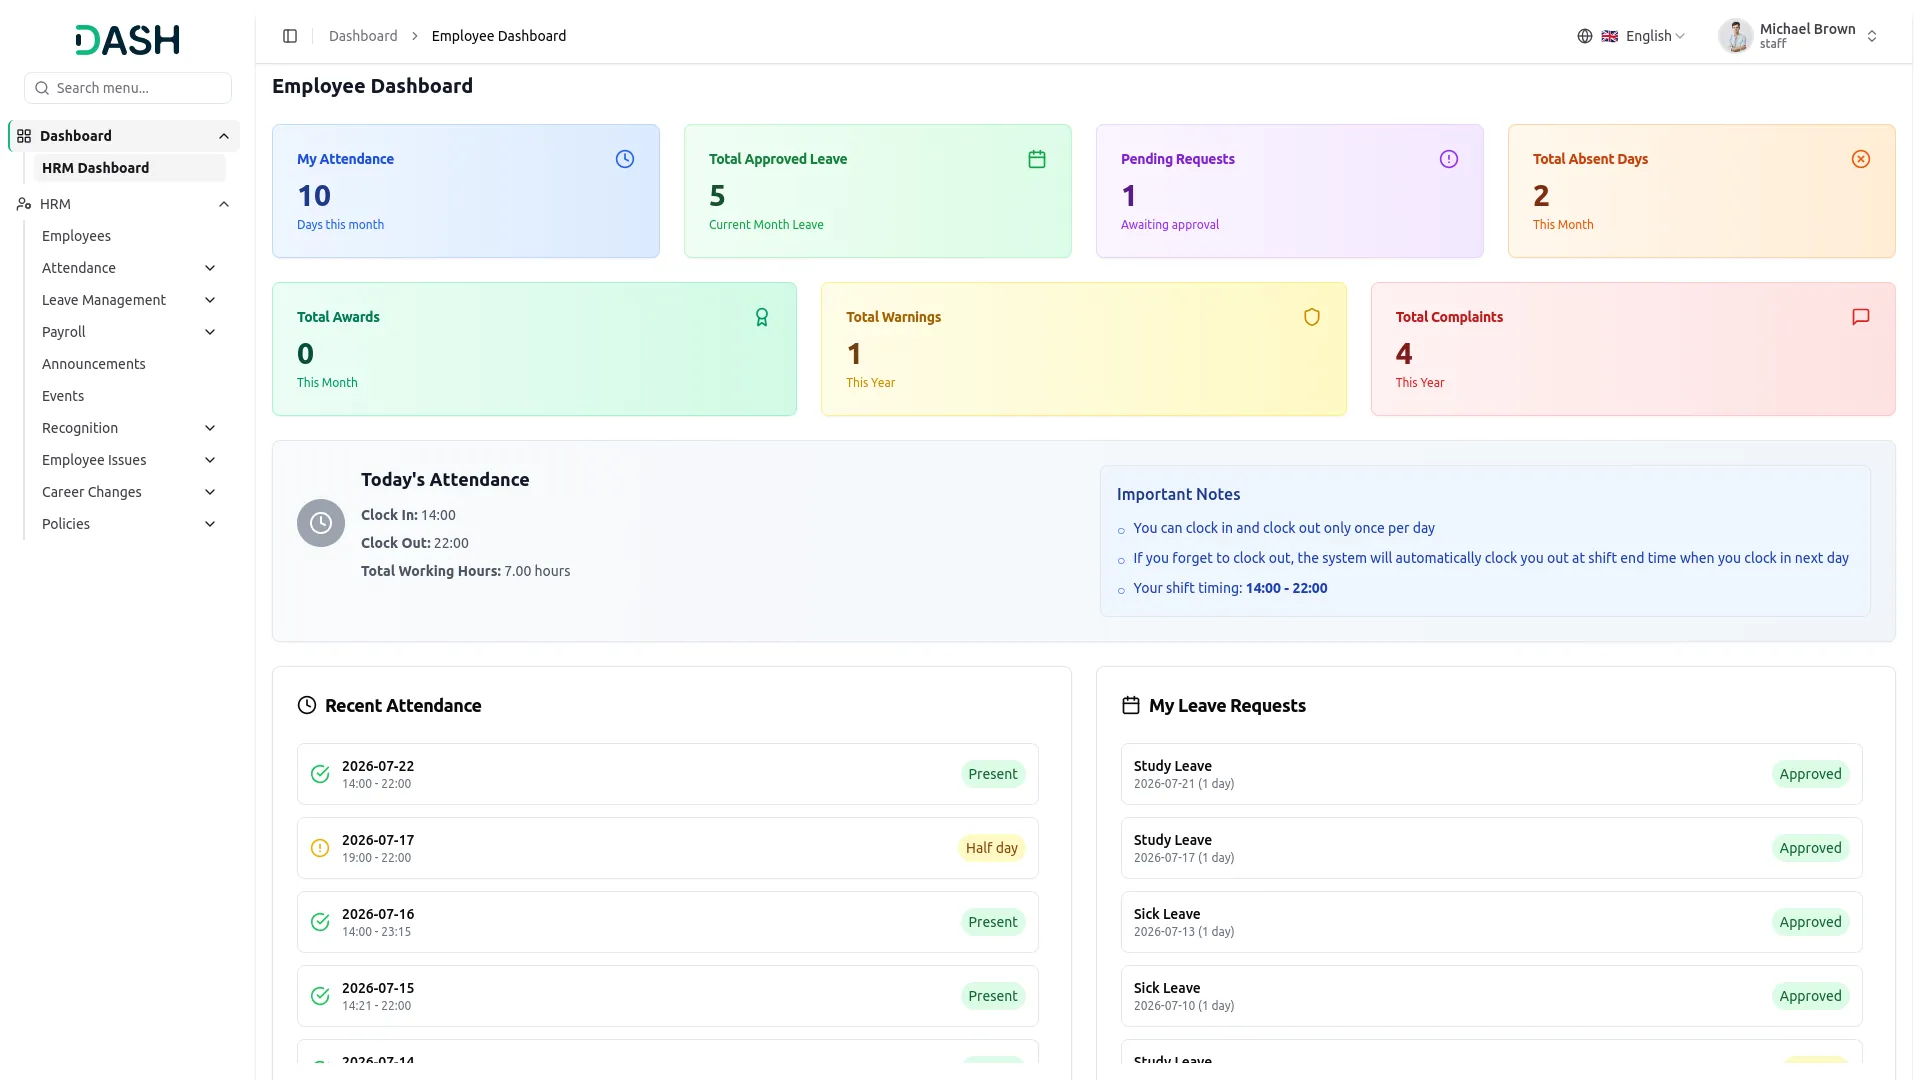
HR and Employee login
- The system supports two types of user login: HR and Employee.
- Each user can access and view only their own data and is restricted from viewing or modifying other users’ information. Access to menus, modules, and system features is controlled through role-based permissions, ensuring that users can see only the specific menus they are authorized to access and perform only the actions assigned to them, such as viewing, creating, editing, or deleting records. This permission-based access control enhances data security, privacy, and overall system integrity.
Categories
Related articles
- Meta Token Generation Guide
- Twilio – WorkDo Dash SaaS Add-On Guide
- Twilio – BookingGo SaaS Add-On Guide
- ZATCA – WorkDo Dash SaaS Add-On Guide
- 2Checkout – BookingGo SaaS Add-On Guide
- Mercado Pago – WorkDo Dash SaaS Add-On Guide
- Out of Office – TicketGo Add-On Guide
- CoinGate – BookingGo SaaS Add-On Guide
- User Manual – WorkDo Dash SaaS
- MSG91 – TicketGo Add-On Guide
- Discount – BookingGo SaaS Add-On Guide
- AamarPay – BookingGo SaaS Add-On Guide
We're Here to Help - Let's Talk
Have questions about our solutions, customization services, or business tools? Our team is here to help you. let's talk.