
Notice Board – WorkDo Dash SaaS Add-On Guide
Manage announcements, acknowledgements, comments, and employee updates in one place.
Introduction
The Notice Board Add-On in Dash SaaS is a digital bulletin system where administrators and managers share important updates with employees. Employees can read announcements, leave comments when allowed, and confirm acknowledgement on critical notices. Messages are shown only to the intended audience and are available for a specific time period once the expiry date passes, the notice automatically stops appearing on the Board. Critical notices trigger real-time pop-up alerts to targeted users and can require formal acknowledgement to confirm the message has been read and understood.
How To Install The Add-On?
To Set Up the Notice Board Add-On, you can follow this link: Setup Add-On.
How To Use The Notice Board Add-On?
Notice Board
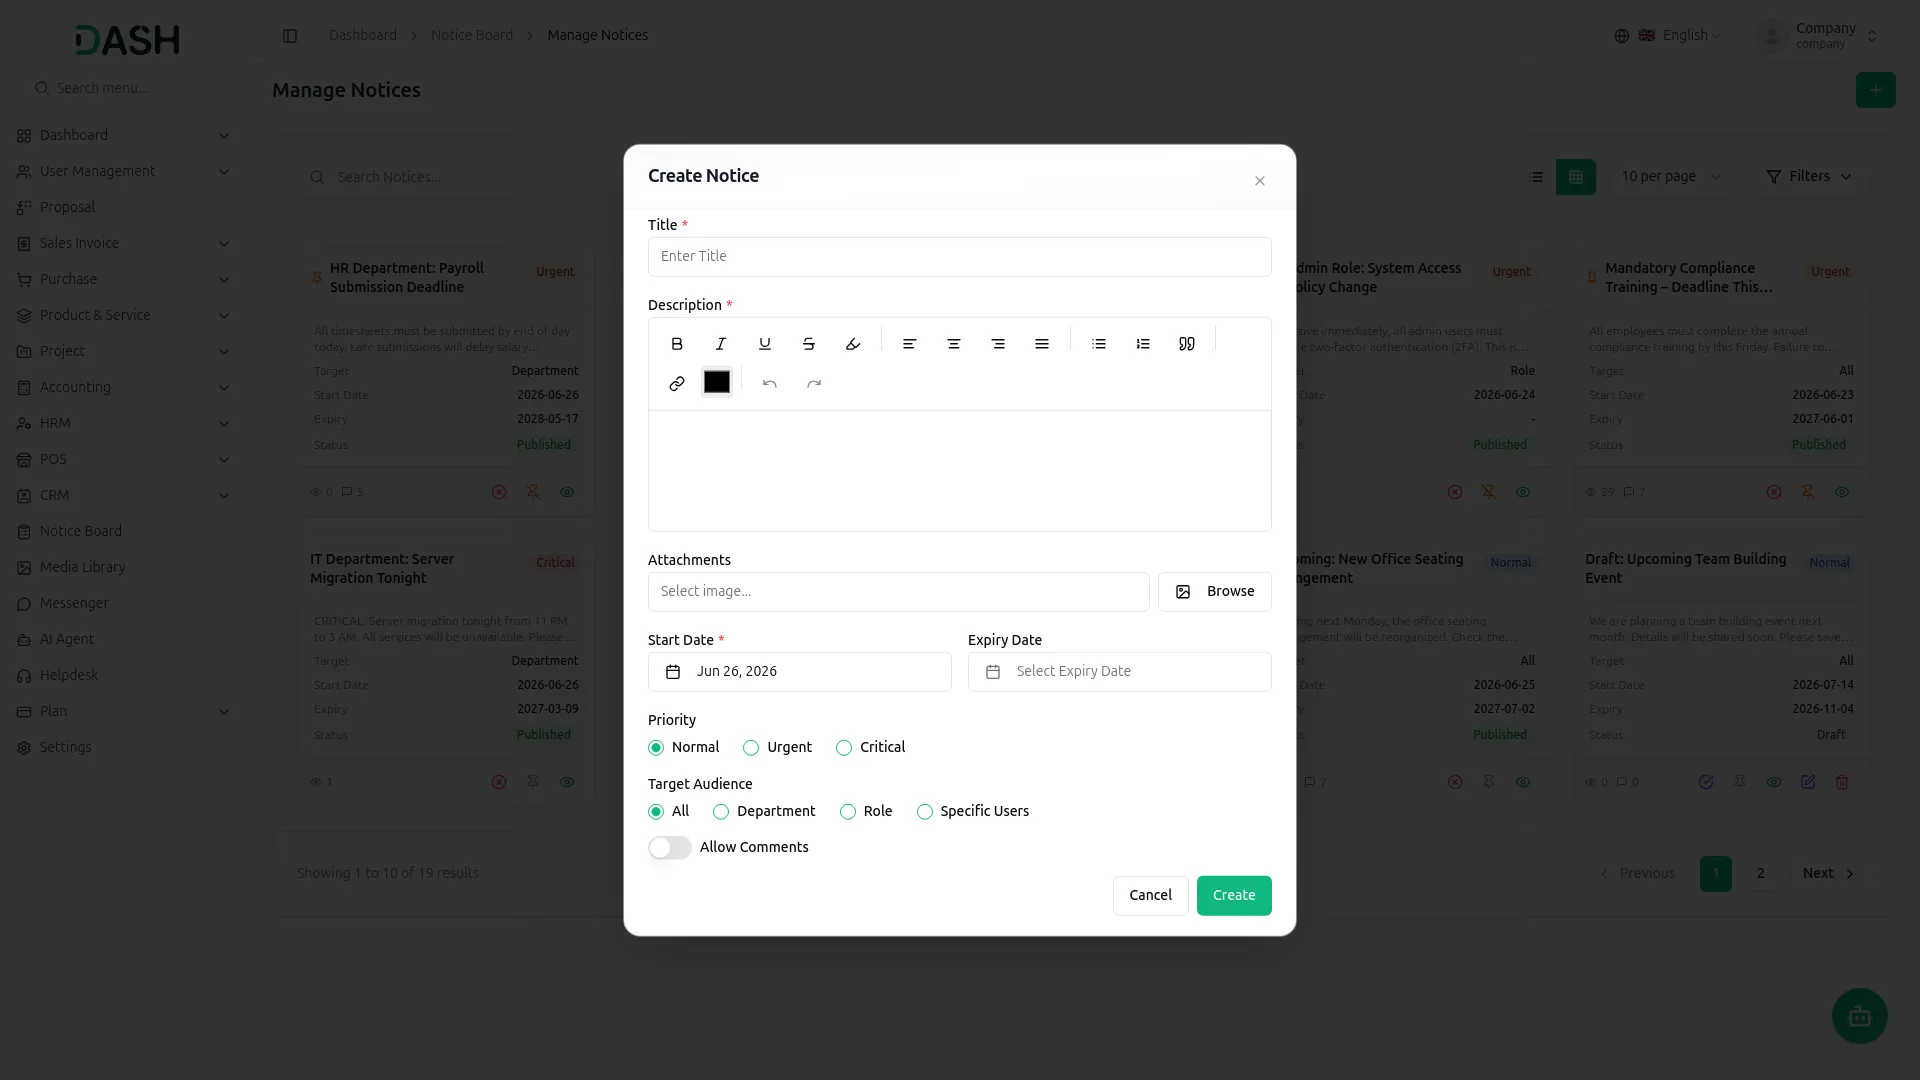
- To add a new notice, click the “Create” button on the Notices Board page. A Create Notice form opens. Enter the Title and the Description, which is the full notice content and supports rich text such as bold, lists, and links.
- Use the Attachments field and the Browse button to optionally attach files or images. Set the Start Date and optionally an Expiry Date. Choose the Priority: Normal, Urgent, or Critical. Critical notices send real-time alerts to users.
- Choose the Target Audience: All, Department, Role, or Specific Users. Selecting All sends the notice to every user and requires no further selection. Selecting Department, Role, or Specific Users reveals an additional selector below where you choose the exact recipients; for example, choosing Role displays a Select Roles dropdown where you pick the role the notice is for. Turn the Allow Comments toggle ON to let users comment on this notice.
- The Require Acknowledgement toggle is only available for Critical notices. When ON, users must click “I Acknowledge” to confirm they have read the notice.
- Click ‘Create’ to save the notice or ‘Cancel’ to discard it. A newly created notice is saved as a Draft, which means it is saved but not visible to anyone yet; only the creator and managers can see it.
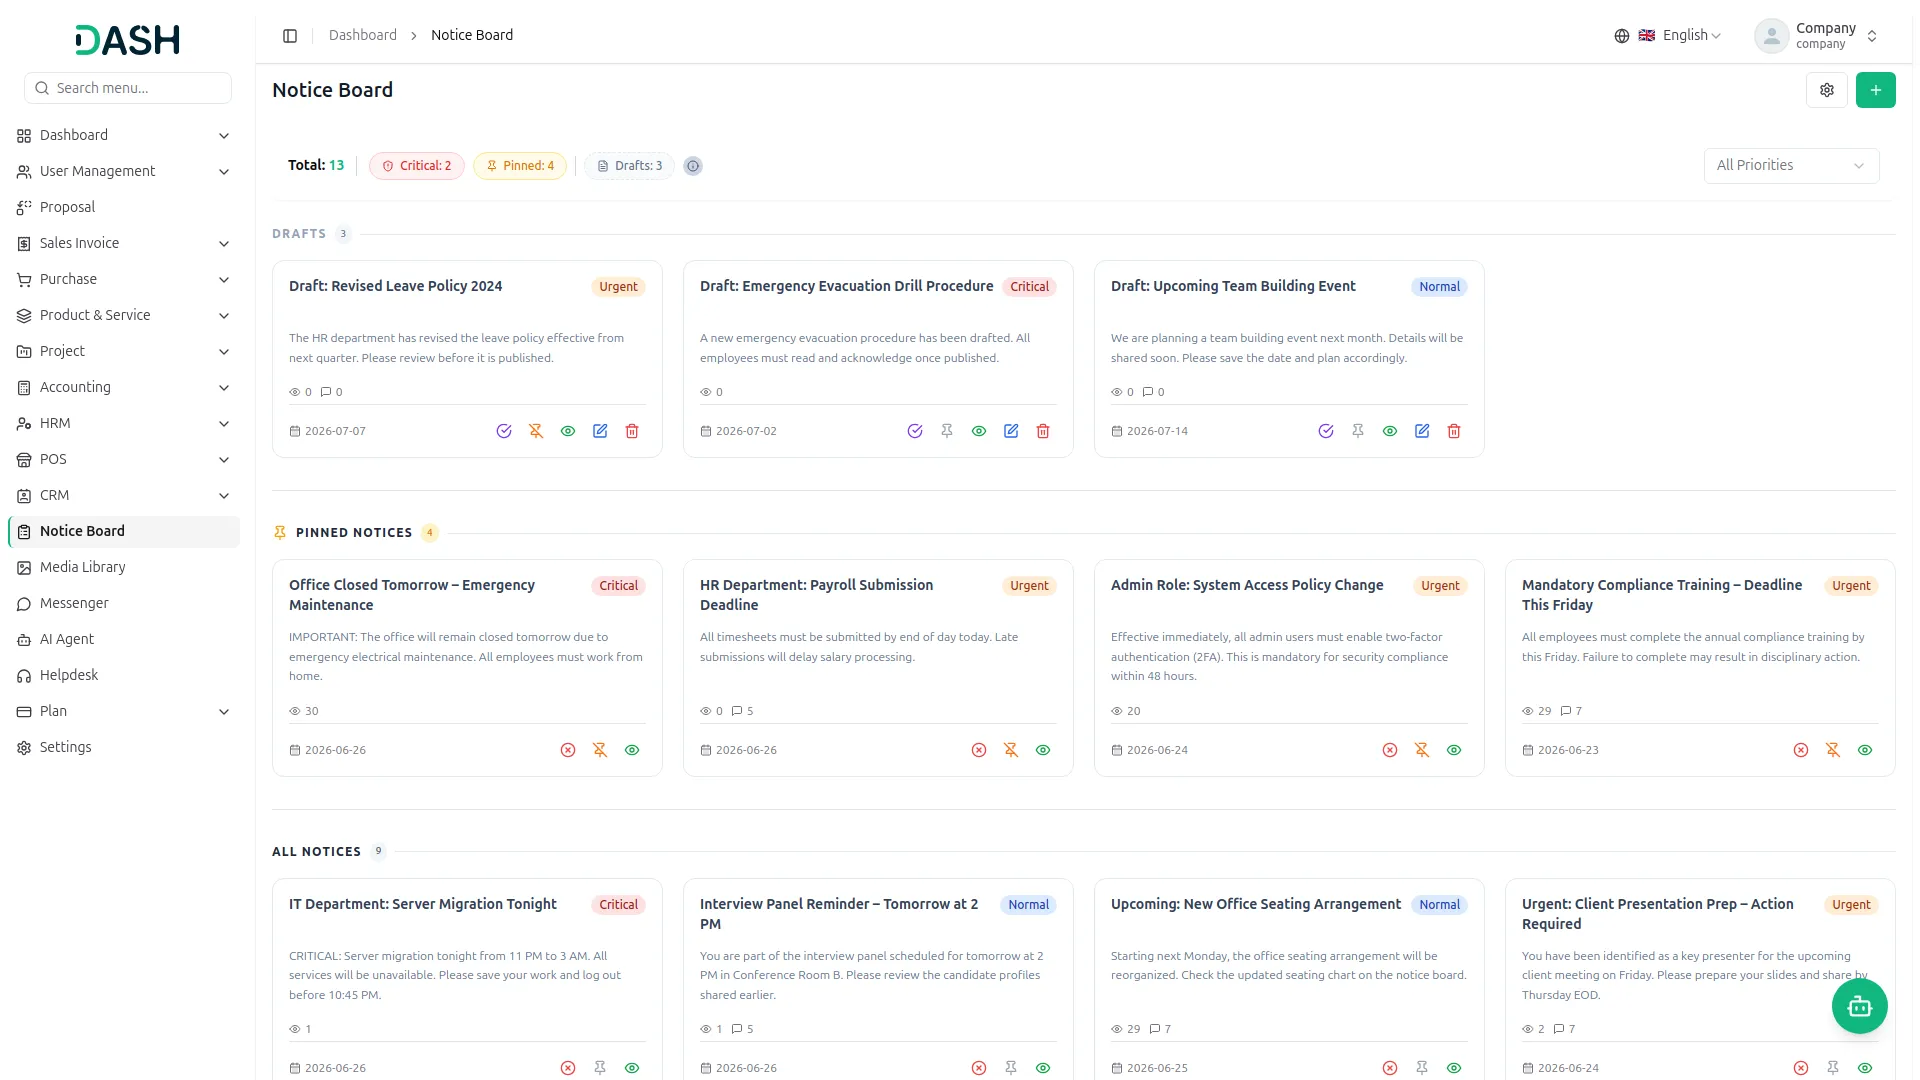
- To open the Notice Board, go to the Notice Board section from the main menu. You land on the Board page, which shows all published notices that are visible to you. At the top of the page, you can see quick stats: Total, Critical, Pinned, and Drafts counts.
- The Board groups notices into sections: Drafts (visible only to the creator and managers), Pinned Notices, and All Notices. Use the All Priorities dropdown on the top right to filter notices by Priority (Normal, Urgent, or Critical).
- When you open the Board, notices you have not read yet show a green “New” badge. Click Read More on any notice card to open the full notice. Simply opening the full notice automatically marks it as read; no button is needed.
- If a notice does not require acknowledgement, you can also click the Mark as Read checkmark button directly on the card.
Manage Notices
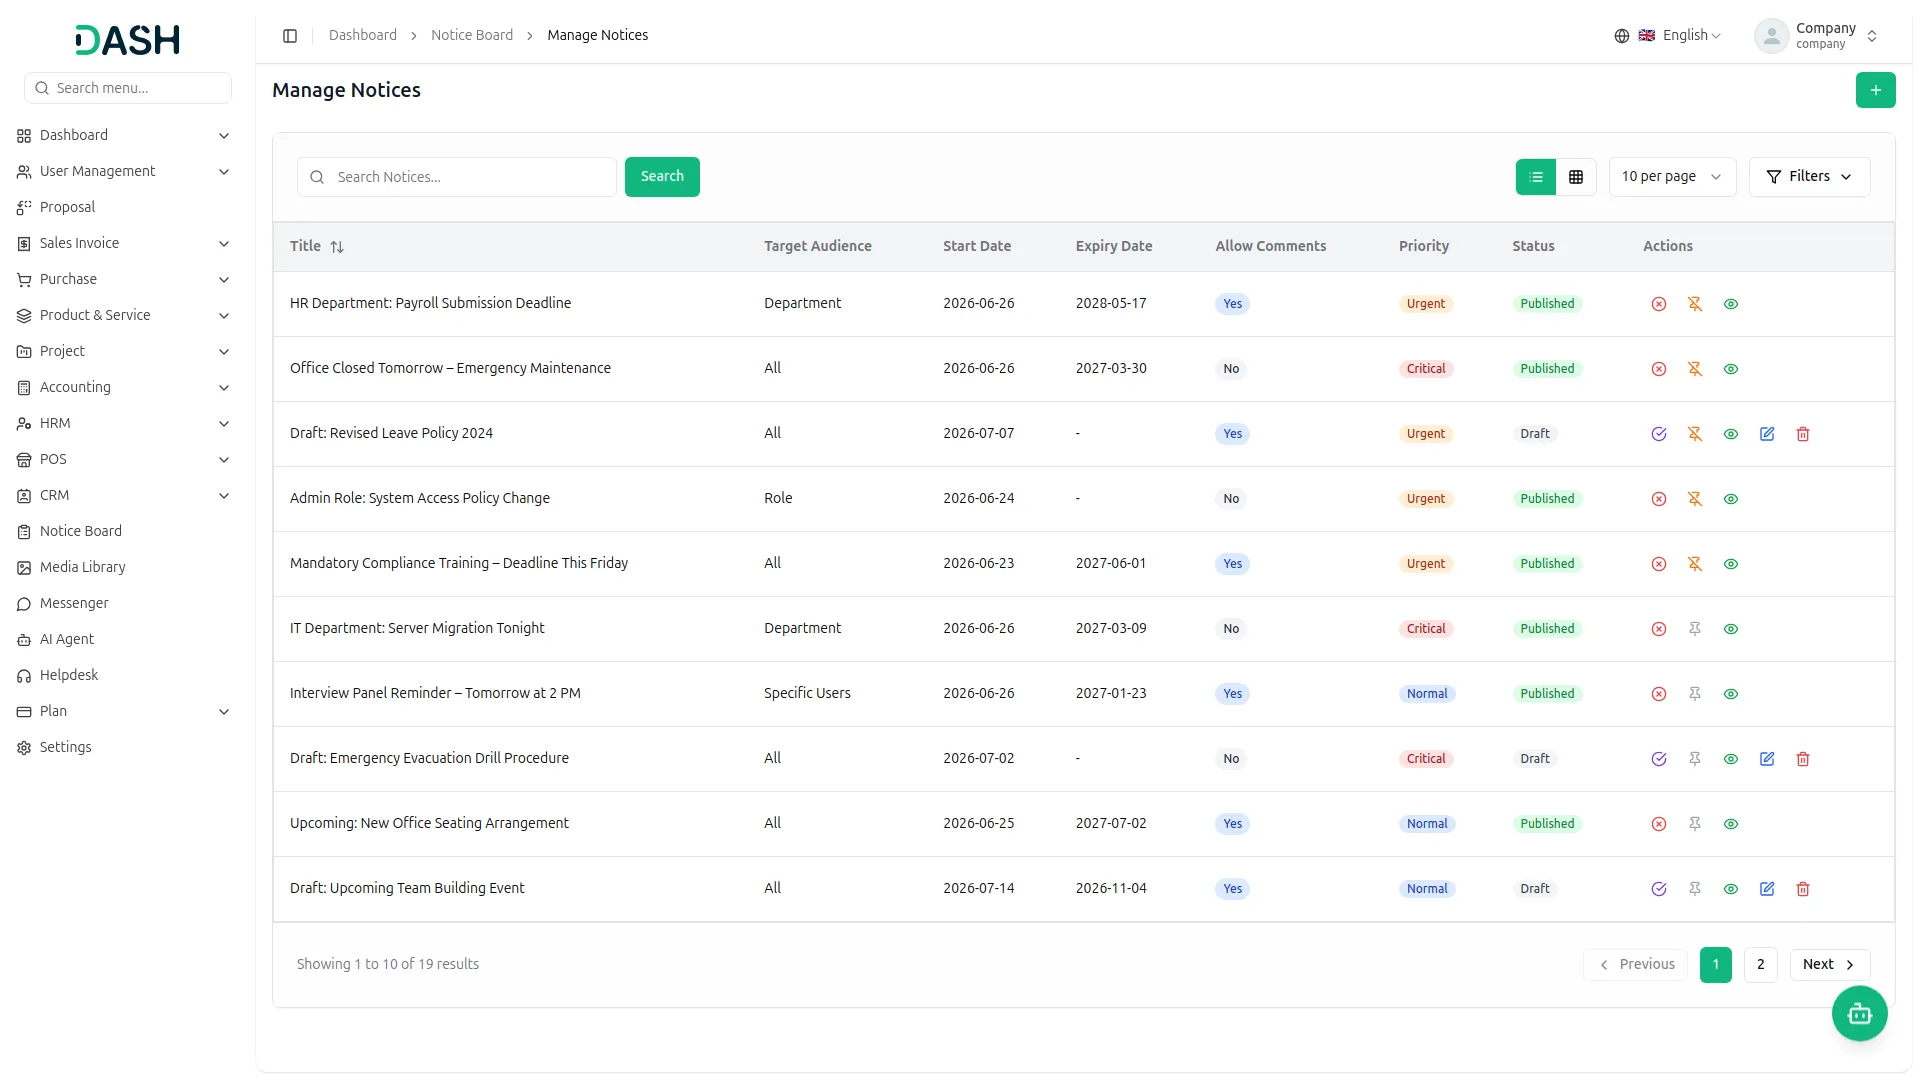
- When you click the “Manage Notice” button, you’ll navigate to the manage notice page, which shows a full list or grid of all notices you manage.
- The Manage Notice page displays all lists with column details such as Title, Target Audience, Start Date, Expiry Date, Allow Comment, Priority, Status, and Action.
- Use the Search bar to find notices by title. Apply Filter Dropdowns (Priority, Target Audience, Status, and Date Range) to narrow results. Then click ‘Apply’ to activate filters or ‘Clear’ to reset them. Use the List or Grid view toggle to change the layout.
- The actions available per notice depend on its status: Publish (Draft only), Deactivate (Published only), Pin/Unpin (any status), View (any status), Edit (Draft only), and Delete (Draft only).
- Pinned notices always appear at the top of the Board, above all others. Click the Pin option on any notice to pin it, and click the same option (it turns orange when pinned) to unpin it.
- Only Draft notices can be deleted. Published notices must be Deactivated first, and even then they stay in the system for records. Click Delete, then confirm; the notice is permanently removed.
Notice Detail Page
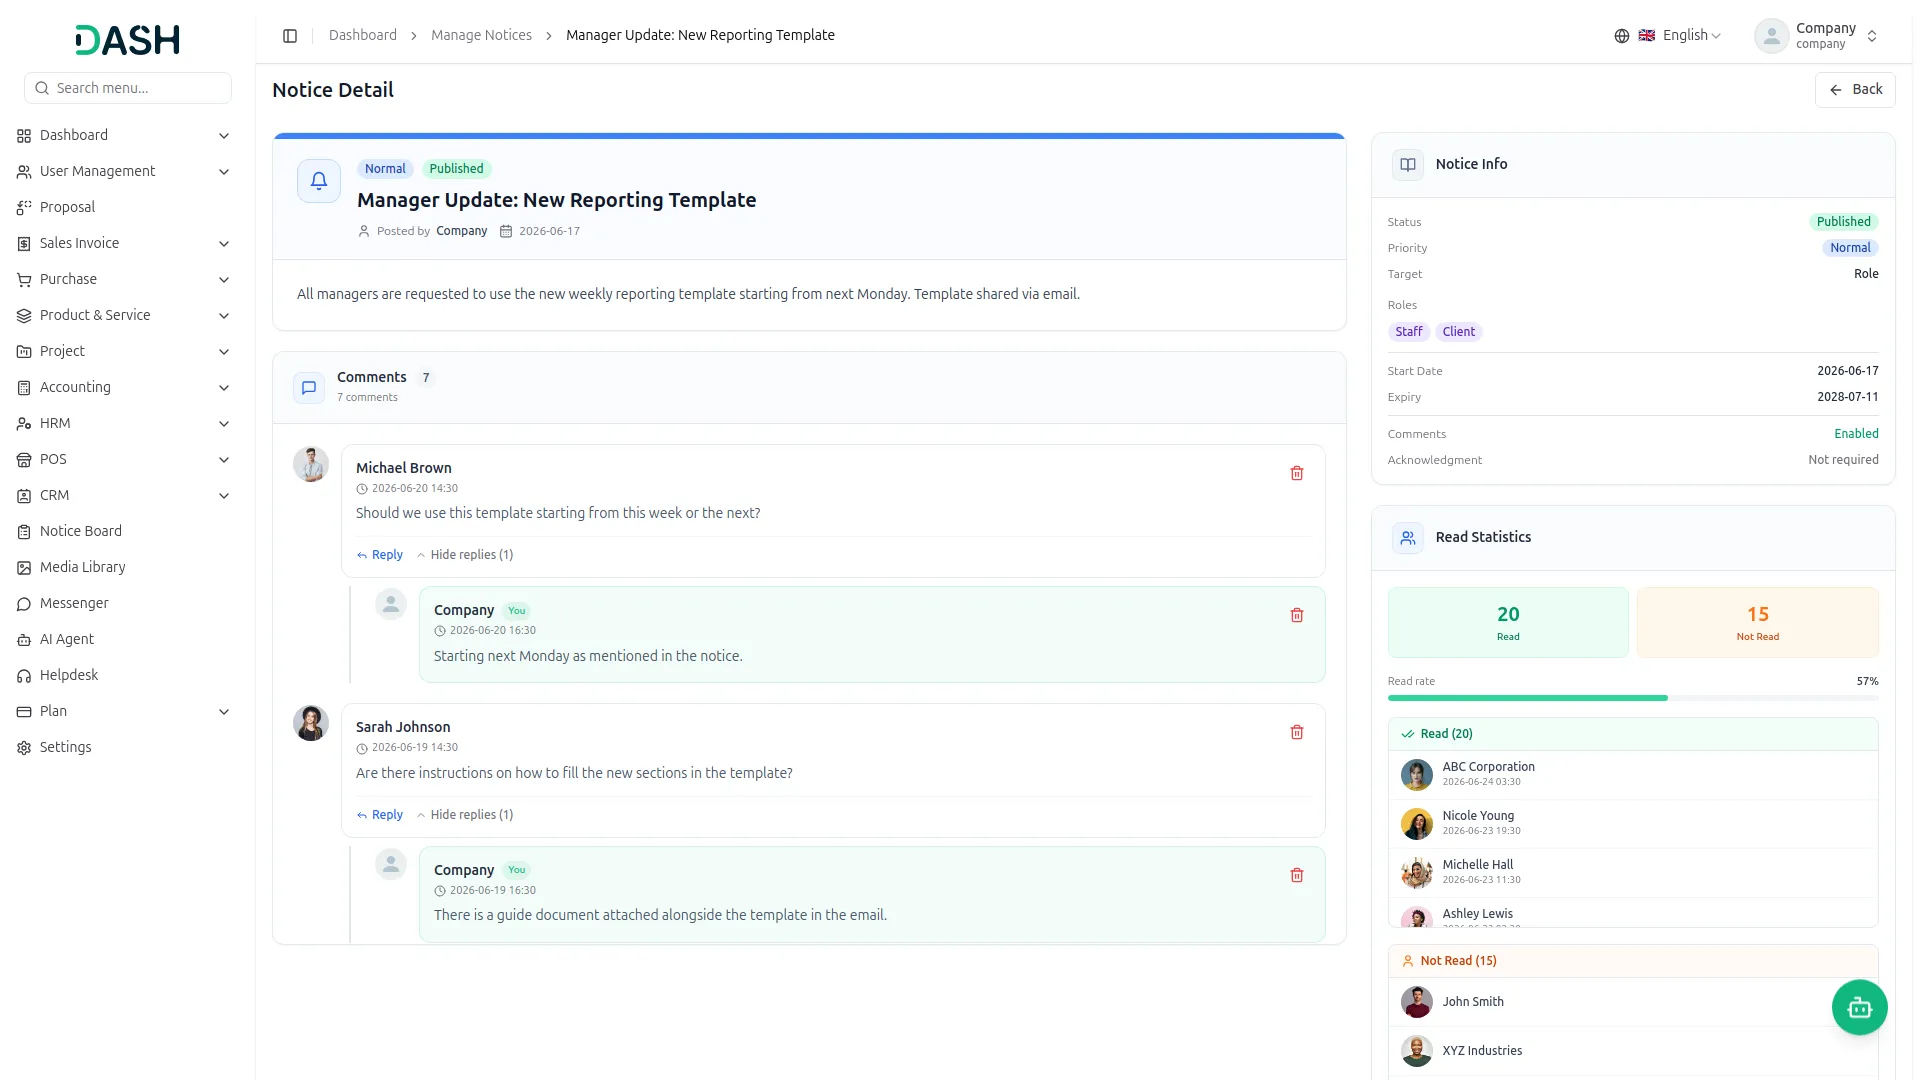
- Clicking View on any notice opens the full detail page. The page has a back arrow at the top right to return to the previous page.
- The main area shows: A priority colour strip across the top of the notice card. The notice badges (such as Pinned, Urgent, and Published), the notice title, the “Posted by” name, and the posted date.
- The acknowledgement banner is shown only when acknowledgement is required and you have not yet acknowledged. The full notice description. Attachments to view or download.
- The Comments section, shown when comments are enabled, with a comment count. Each comment shows the author’s name, timestamp, and message, along with Reply and Hide replies links. Your own comments and replies are marked with a “You” tag so you can easily identify them. A delete icon appears on comments that can be removed.
- If the notice creator enabled Allow Comments, open the full notice and scroll down to the Comments section. Type your comment in the text box and click Post Comment. Managers can Reply to a comment (one level deep).
- You can delete your own comment, and managers can delete any comment. You cannot comment on your own notices, and you cannot reply to your own comments.
- The right sidebar is visible to managers only and contains two panels: Notice Info – shows Status, Priority, Target, Start Date, Expiry, Comments (Enabled or disabled), Acknowledgement (Required or Not required), and Pinned (Yes or No).
- Read Statistics section; managers with the right permission can see: The Read count (how many targeted users have opened it) and the Not Read count (how many have not opened it yet). The Acknowledged count (how many have clicked “I Acknowledge”, for critical notices).
- Read Rate % and Acknowledgement Rate % progress bars. A list of users who have read it, each with a timestamp, and a list of users who have not read it yet.
Publishing a Notice
- A notice in Draft status is invisible to everyone except the creator and managers. To make it live, go to ‘Notice Board’ or ‘Manage Notices’ using the gear icon on the Board page.
- Find the draft notice and click the green checkmark Publish button, then confirm in the pop-up. The notice is now Published.
- Before publishing, the Start Date must be today or earlier; you cannot publish a notice whose start date is in the future. The Expiry Date, if set, must not have already passed; an already-expired notice cannot be published.
- Once published, the notice appears on the Board for all targeted users. If it is a Critical notice, a real-time pop-up alert is sent to targeted users instantly (this requires Pusher to be configured at the Super Admin site).
- A published notice can no longer be edited or deleted; it can only be Deactivated or Pinned/Unpinned.
Deactivating a Notice
- To manually stop showing a published notice before its Expiry Date, click the Deactivate button on the notice and confirm the popup.
- The notice moves to Deactivated status and disappears from the Board immediately.
- Deactivated notices are not deleted; they remain in the Manage Notices list for record-keeping.
- The difference between Expiry Date and Deactivate: the Expiry Date is automatic (the system hides the notice when the date passes and it still shows as “Published” ), while Deactivate is manual (you click the button to stop it early or immediately, and the status changes to “Deactivated” ).
Acknowledging a Notice (When Required)
- Some Critical notices require you to formally confirm that you have read and understood them.
- On the notice card you will see “Acknowledgment required” with an Acknowledge button. When you open the full notice, an orange banner appears at the top.
- Click “I Acknowledge”; the banner turns green and shows “You have acknowledged this notice.” Once acknowledged, it cannot be undone.
Critical Notice
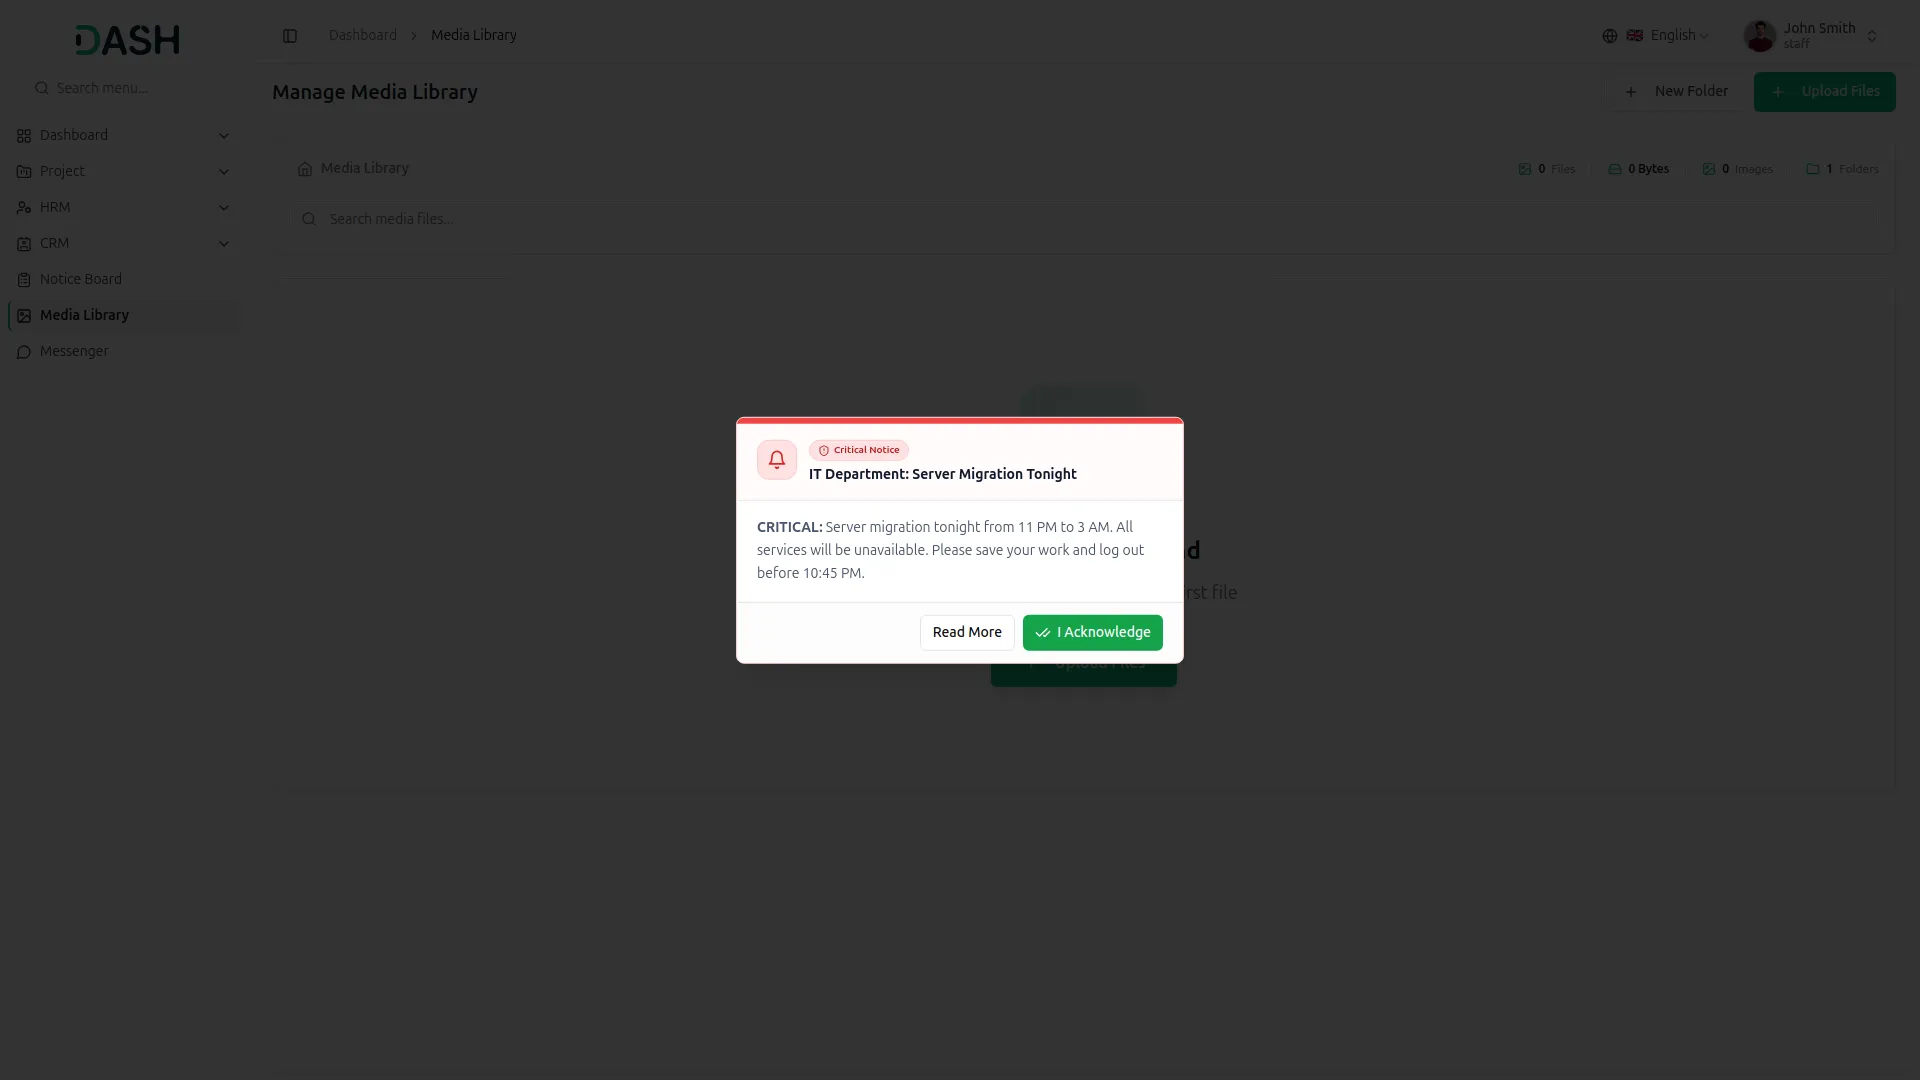
- When a Critical priority notice is published, a pop-up alert automatically appears on screen for all targeted users who have not read it yet.
- The alert shows the notice title and a short description, with a Read More button and an I Acknowledge button.
- Users can dismiss it or click through to read the full notice. The pop-up only appears once per session per unread critical notice.
Categories
Related articles
- Flexible Duration – BookingGo SaaS Add-On Guide
- Send and Close – TicketGo Add-On Guide
- Recent Orders – eCommerceGo SaaS Add-On Guide
- Franchise Management – WorkDo Dash SaaS Add-On Guide
- Appointment – WorkDo Dash SaaS Add-On Guide
- Bundle Products – eCommerceGo SaaS Add-On Guide
- User Manual – POS SaaS
- Google Map URL – vCard SaaS Add-On Guide
- WorkDo Dash SaaS Setup Guide
- Zoho Credentials Generation Guide
- Facebook Link Page – vCard SaaS Add-On Guide
- Zendesk – TicketGo Add-On Guide
We're Here to Help - Let's Talk
Have questions about our solutions, customization services, or business tools? Our team is here to help you. let's talk.