
Hair & Care Studio – WorkDo Dash SaaS Add-On Guide
Learn how to manage salon bookings, staff, services, and customers in WorkDo Dash SaaS.
Introduction
The Hair Care Studio Management Add-On is a complete solution for managing your salon’s online presence and daily operations from one easy-to-use backend. From customizing your website’s branding, gallery, and working hours through System Setup, to managing Services, Stylists, Offers, and Appointments, everything is handled in one place. Clients can book directly through the website, while you process payments, publish blog posts, and review contact inquiries, all with a real-time Dashboard giving you an instant overview of your studio’s performance.
How to Install the Add-On?
To Set Up the Hair & Care Studio Management Add-On, you can follow this link: Setup Add-On.
How to use the Hair & Care Studio Management Add-On?
Hair Care Studio Dashboard
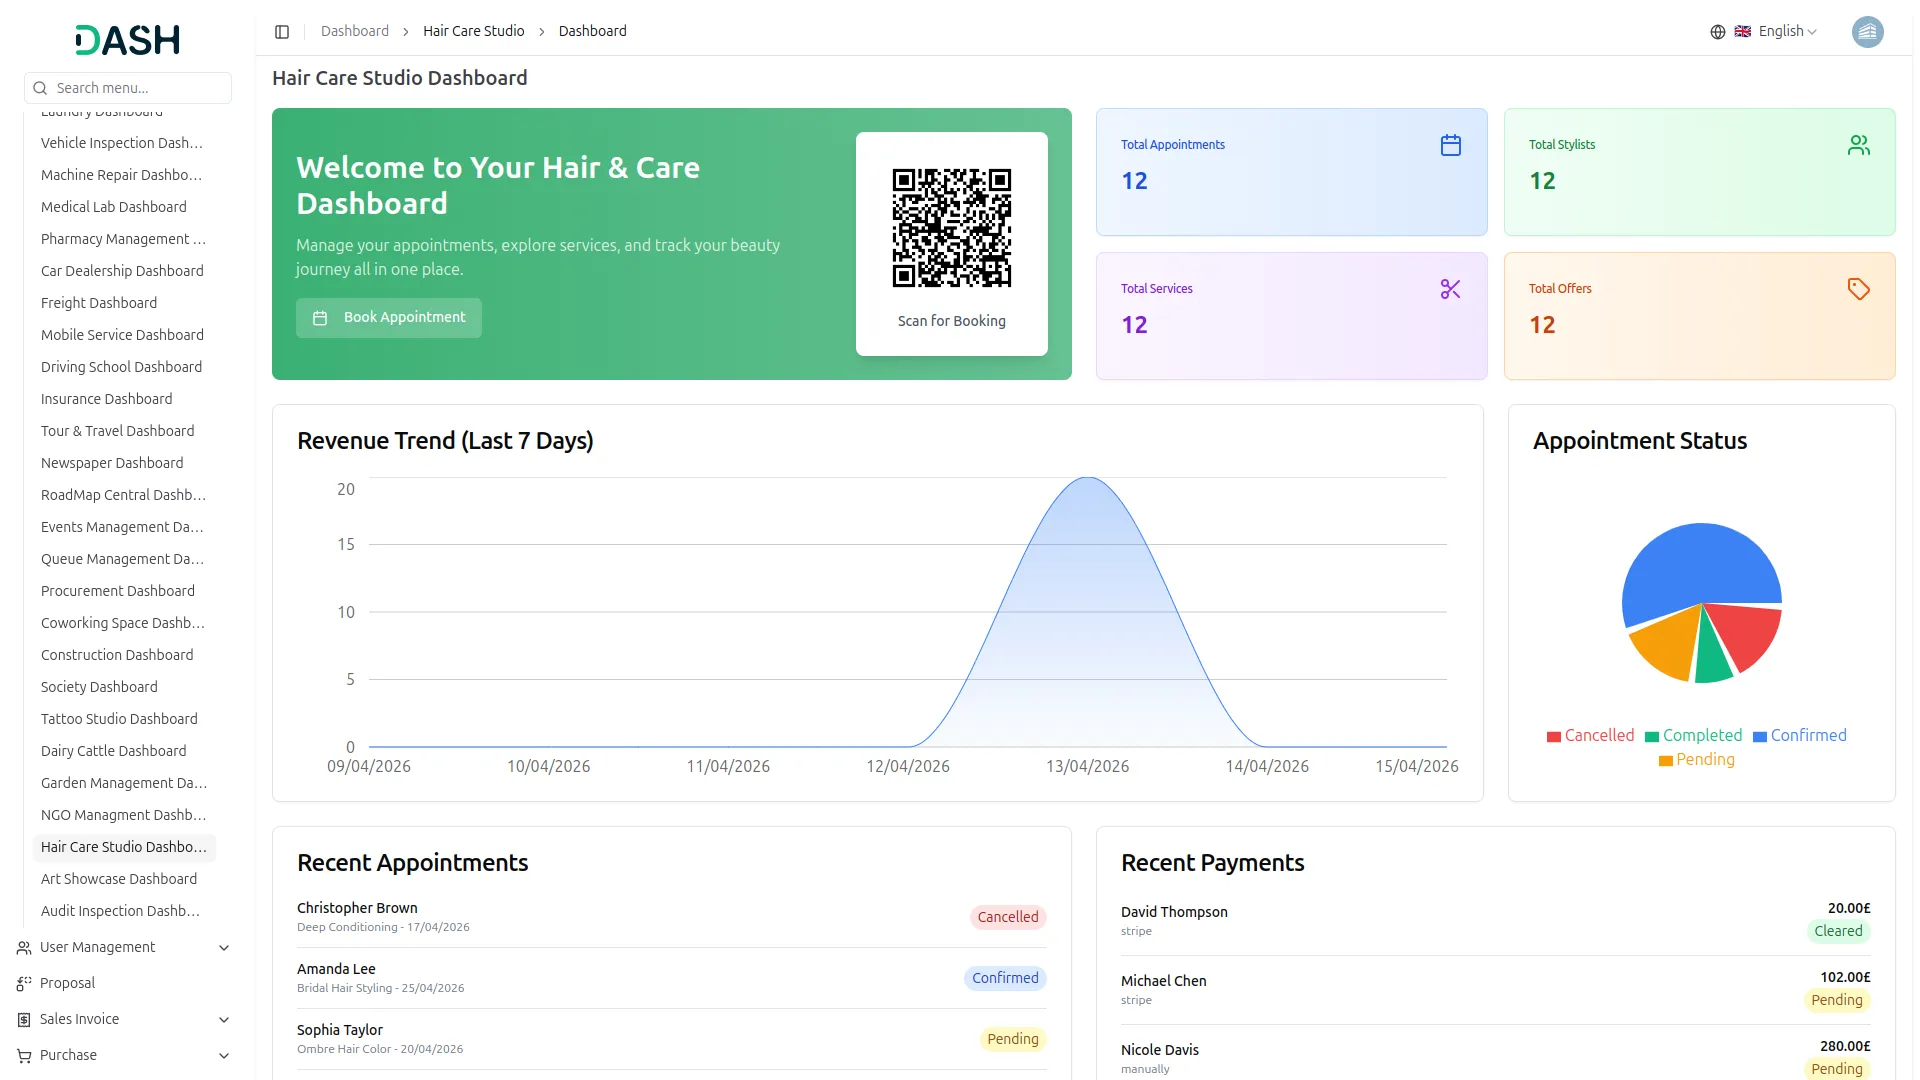
- The dashboard provides a complete overview of your Hair Care Studio’s operations and performance through various visual elements and quick access features.
- At the top, you will find a QR Code that customers can scan to directly access the booking page, along with a Book Appointment button to quickly navigate to the appointment booking section.
- The dashboard displays important summary cards showing Total Appointments, Total Stylists, Total Services, and Total Offers, giving you instant insights into your studio’s key metrics at a glance.
- The Revenue Trend (Last 7 Days) line chart displays a visual representation of your studio’s revenue performance over the past seven days, allowing you to track earning patterns and identify your busiest periods at a glance.
- The Appointment Status pie chart displays a breakdown of all appointments by their current status (Confirmed, Completed, Pending, and Cancelled), allowing you to quickly monitor the overall health of your appointment pipeline.
- The Recent Appointments section at the bottom displays the latest bookings with details such as client name, selected service, appointment date, and current status, allowing you to monitor and track the most recent client bookings directly from the dashboard.
- The Recent Payments section displays the latest transactions with details including client name, payment method (Stripe, PayPal, or Manually), amount charged, and payment status (Cleared or Pending), giving you a real-time snapshot of your studio’s financial activity.
Staff Dashboard
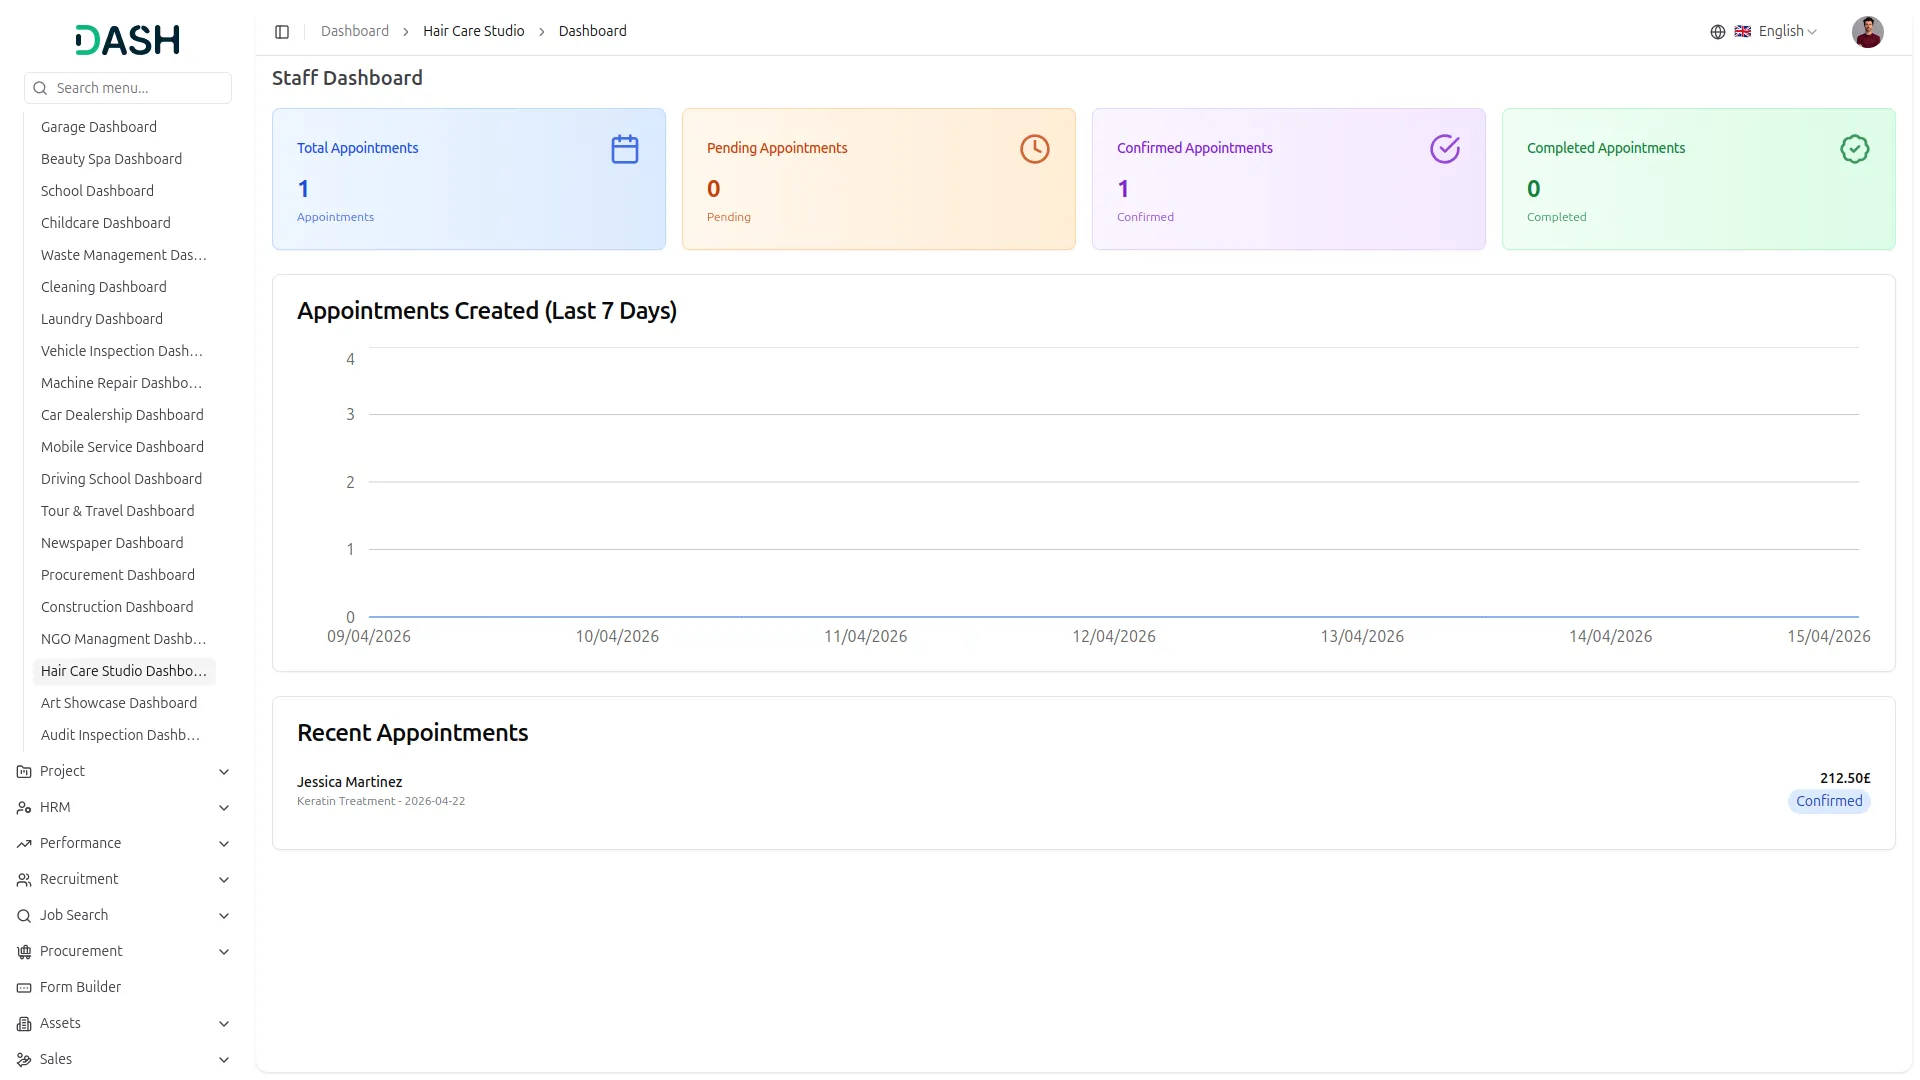
- The Staff Dashboard provides a focused overview of your assigned appointments and their current progress at a glance.
- You can view summary cards displaying Total Appointments, Pending Appointments, Confirmed Appointments, and Completed Appointments, giving you an instant count of where each booking currently stands in the workflow.
- The Appointments Created (Last 7 Days) line chart visualizes the volume of appointments logged over the past week, making it easy to spot busy periods and track day-to-day booking activity.
- The Recent Appointments section at the bottom lists the latest bookings assigned to you, so you can stay on top of upcoming client sessions without navigating away from the dashboard.
System Setup
Brand Settings
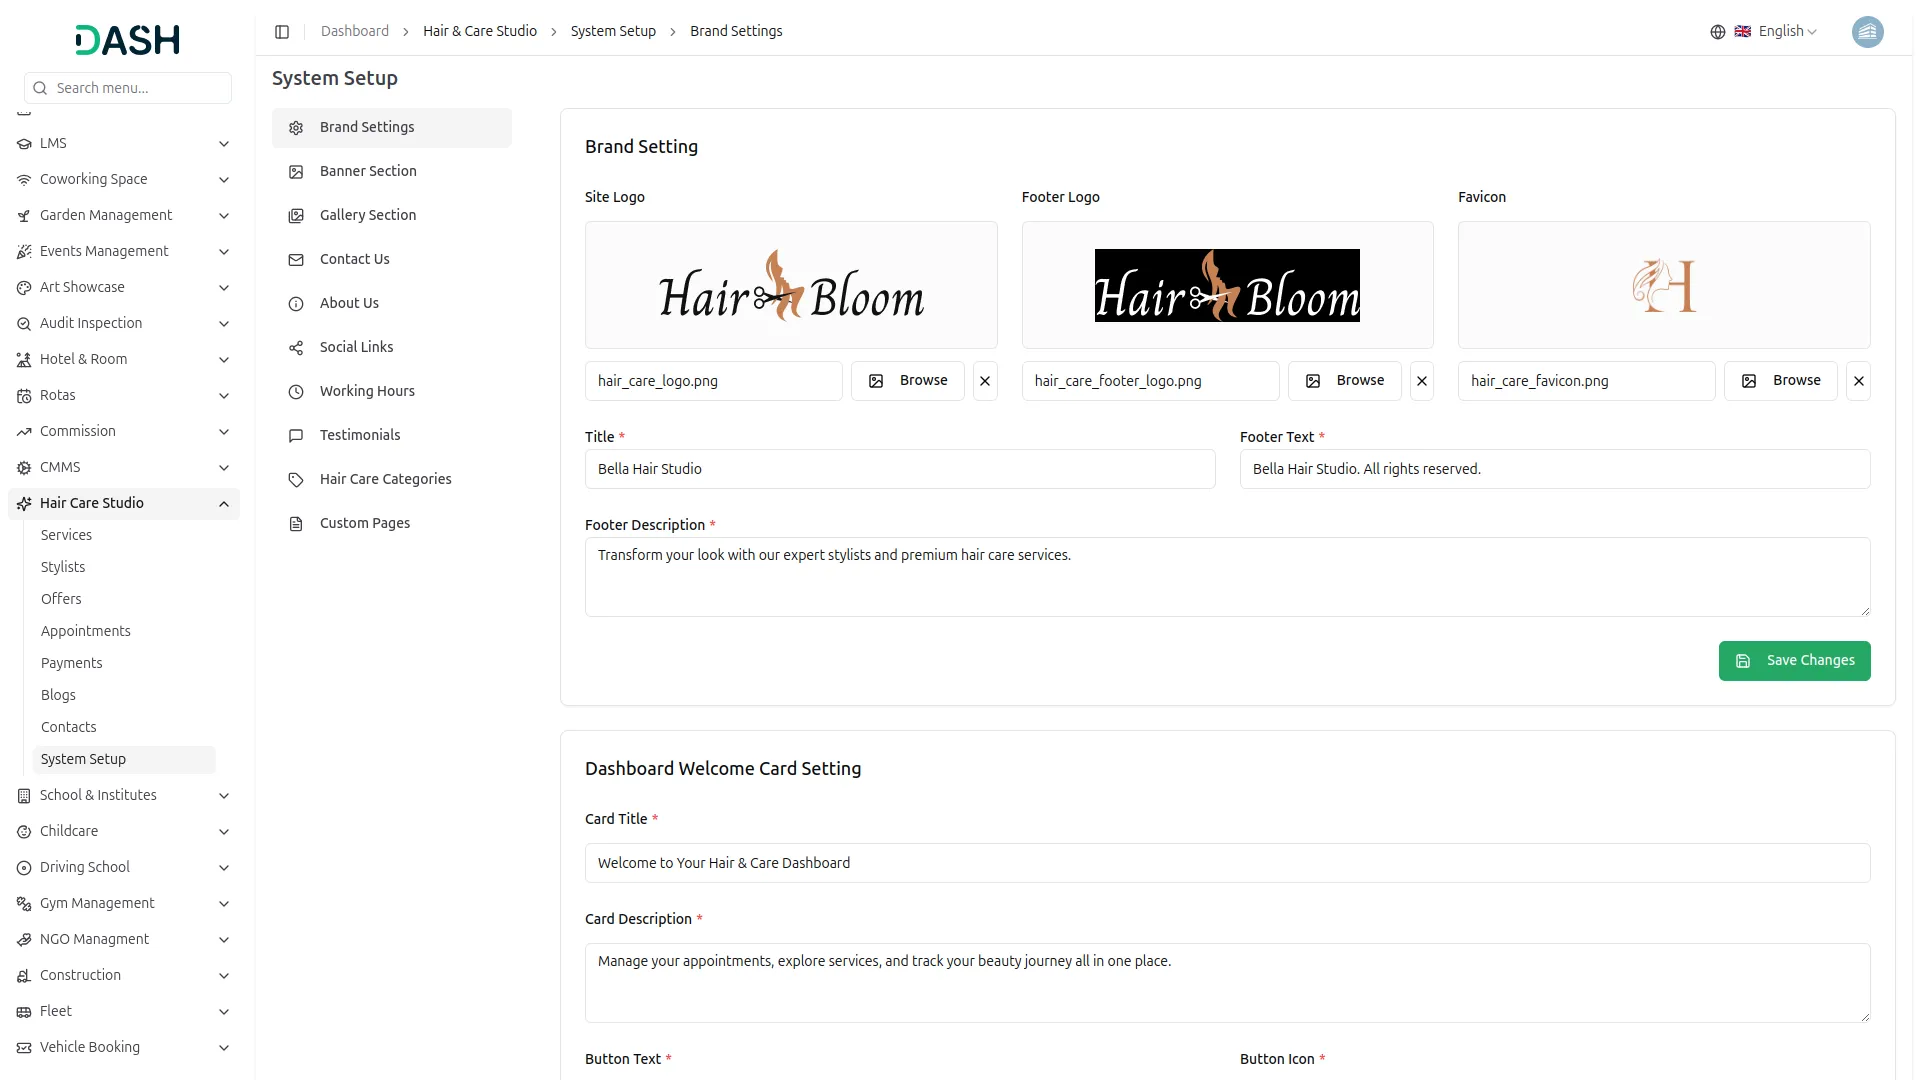
- In the Brand Settings section, you will find fields for Site Logo, Footer Logo, Favicon, Title, Footer Text, and Footer Description. You can upload your logos and favicon using the Browse button. Enter all the required details and click Save Changes.
- In the Dashboard Welcome Card Settings, you will find fields for Card Title, Card Description, Button Text, and Button Icon. Enter all the details and click Save Changes.
- Once saved, the Site Logo will appear in the header of your website, while the Footer Logo will display in the footer section. The Favicon will appear as the small icon in the browser tab. The Title will represent your studio’s name across the site. The Footer Text will display as the copyright tagline at the bottom of the footer, and the Footer Description will appear as the short introductory text below the logo in the footer section.
Banner Section
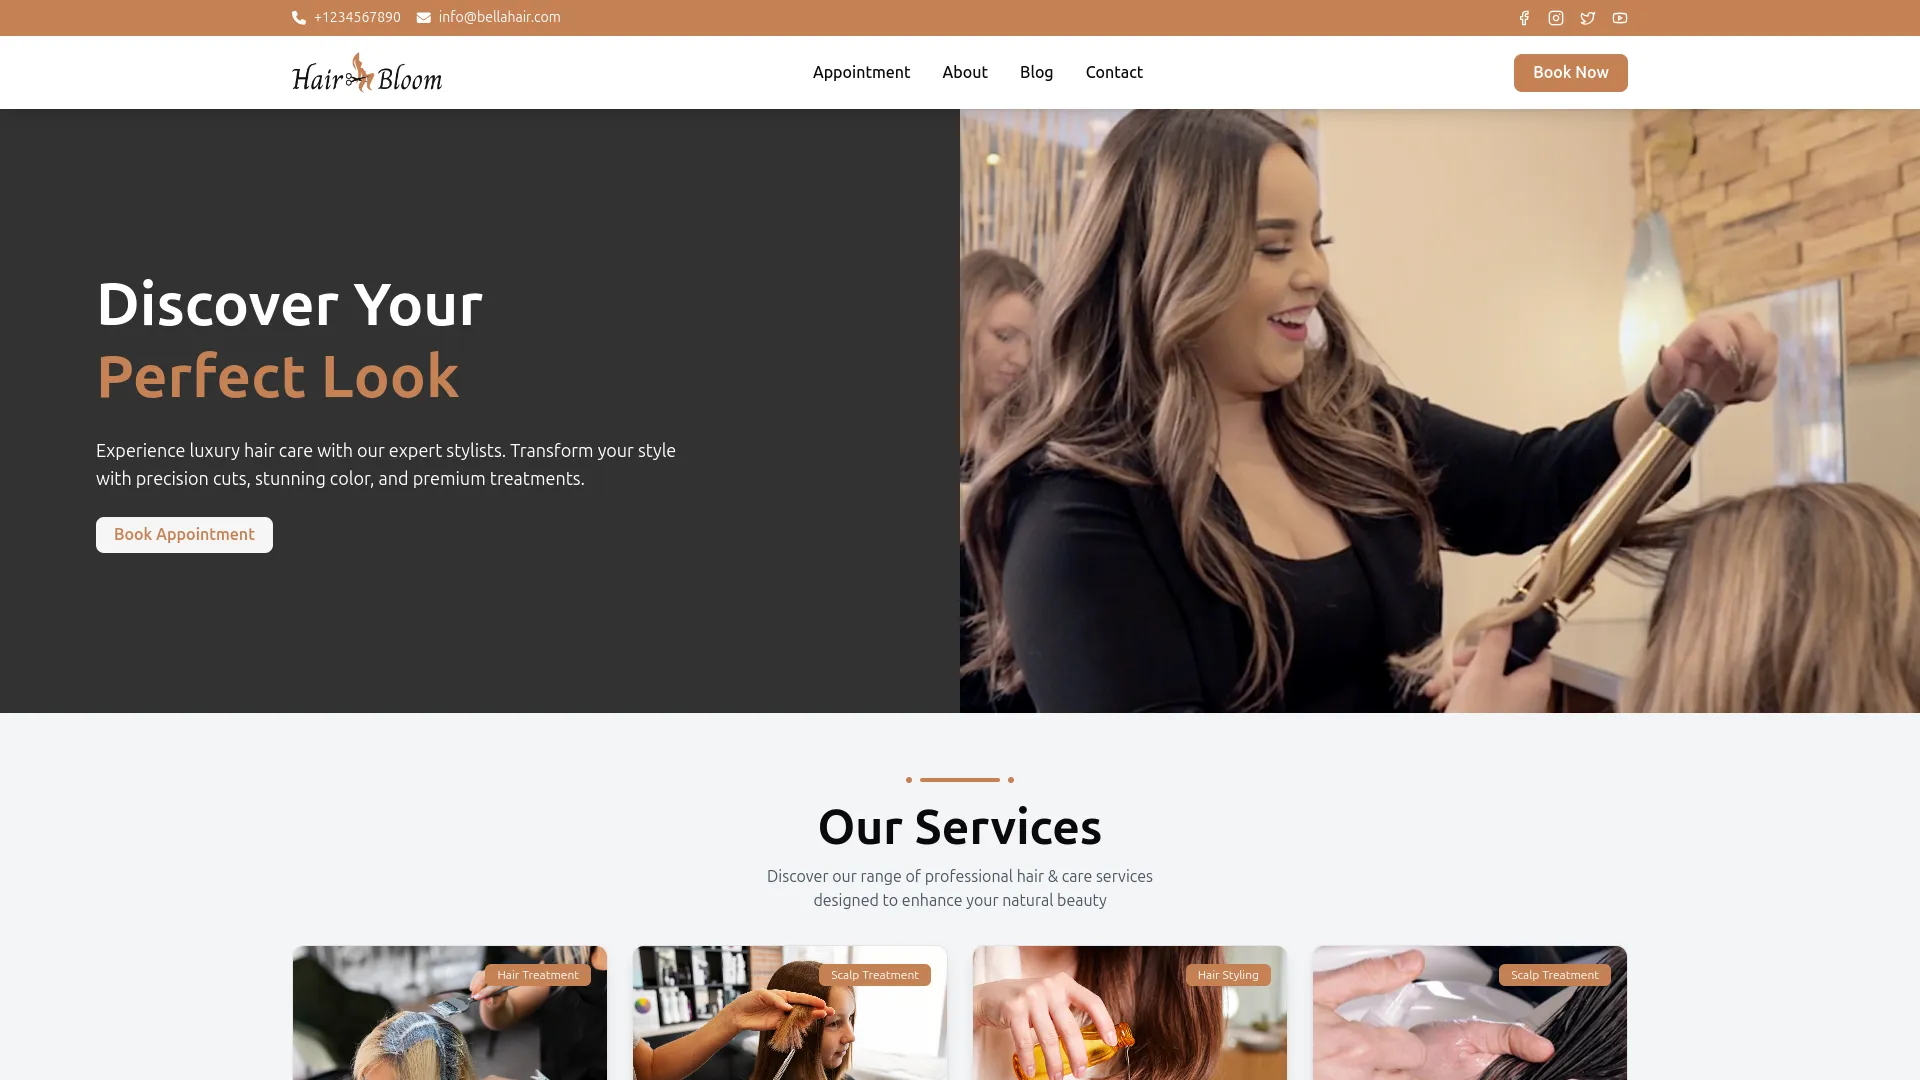
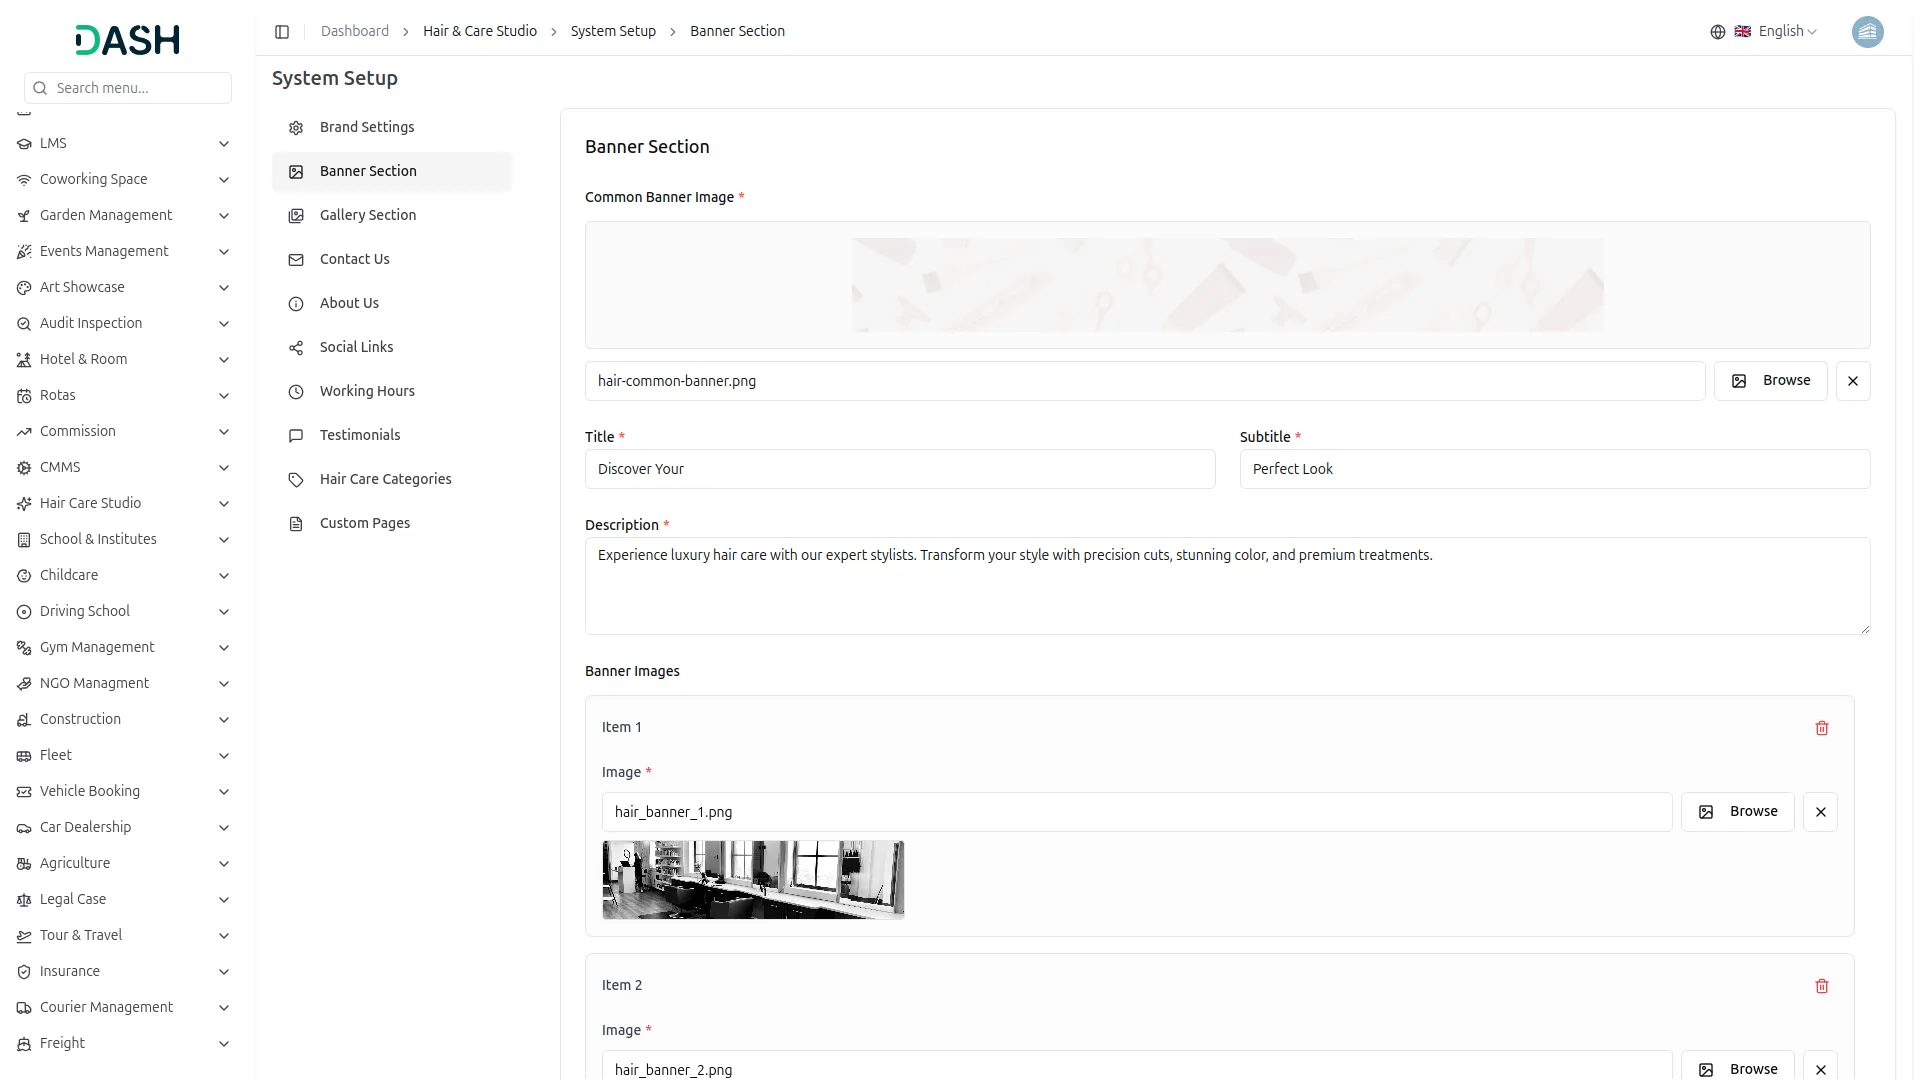
- In the Banner Section, you will find a Common Banner Image field that serves as the background image for the inner pages, such as Appointment, About, Blog, and Contact. Upload it using the Browse button. Below that, enter the Title, Subtitle, and Description for the homepage hero section. In the Banner Images area, you can upload multiple banner images by clicking the “Add Banner” button. Click Save Changes when done.
- Once saved, the Common Banner Image will appear as the background across all inner page headers. The Title and Subtitle will display as the two-line main heading in the hero section on the homepage, with the Description appearing as the supporting text beneath it. The uploaded Banner Images will display as the visual background slides in the homepage hero section.
Gallery Section
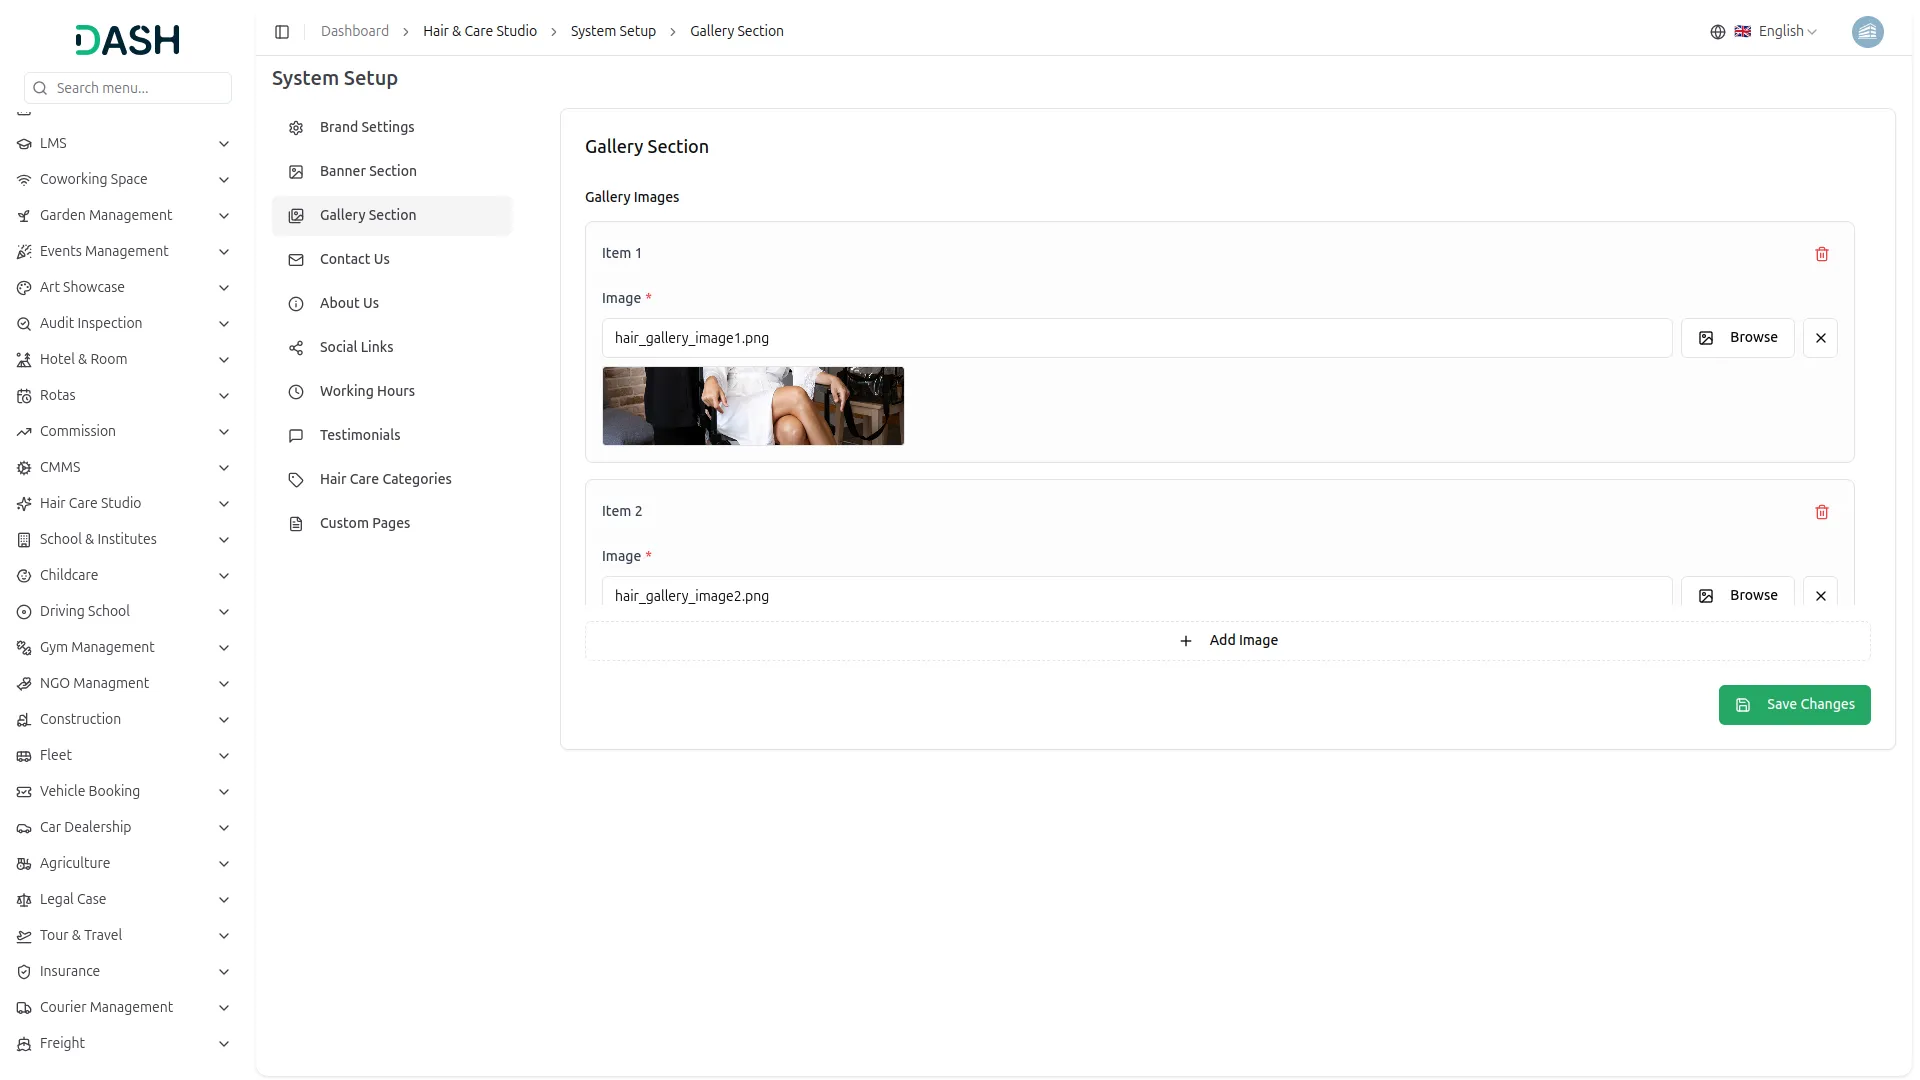
- In the Gallery Section, you will find individual gallery image items, each with an Image upload field. Upload your salon work photos using the Browse button for each item. To add more images, click the “Add Image” button. Click Save Changes when done.
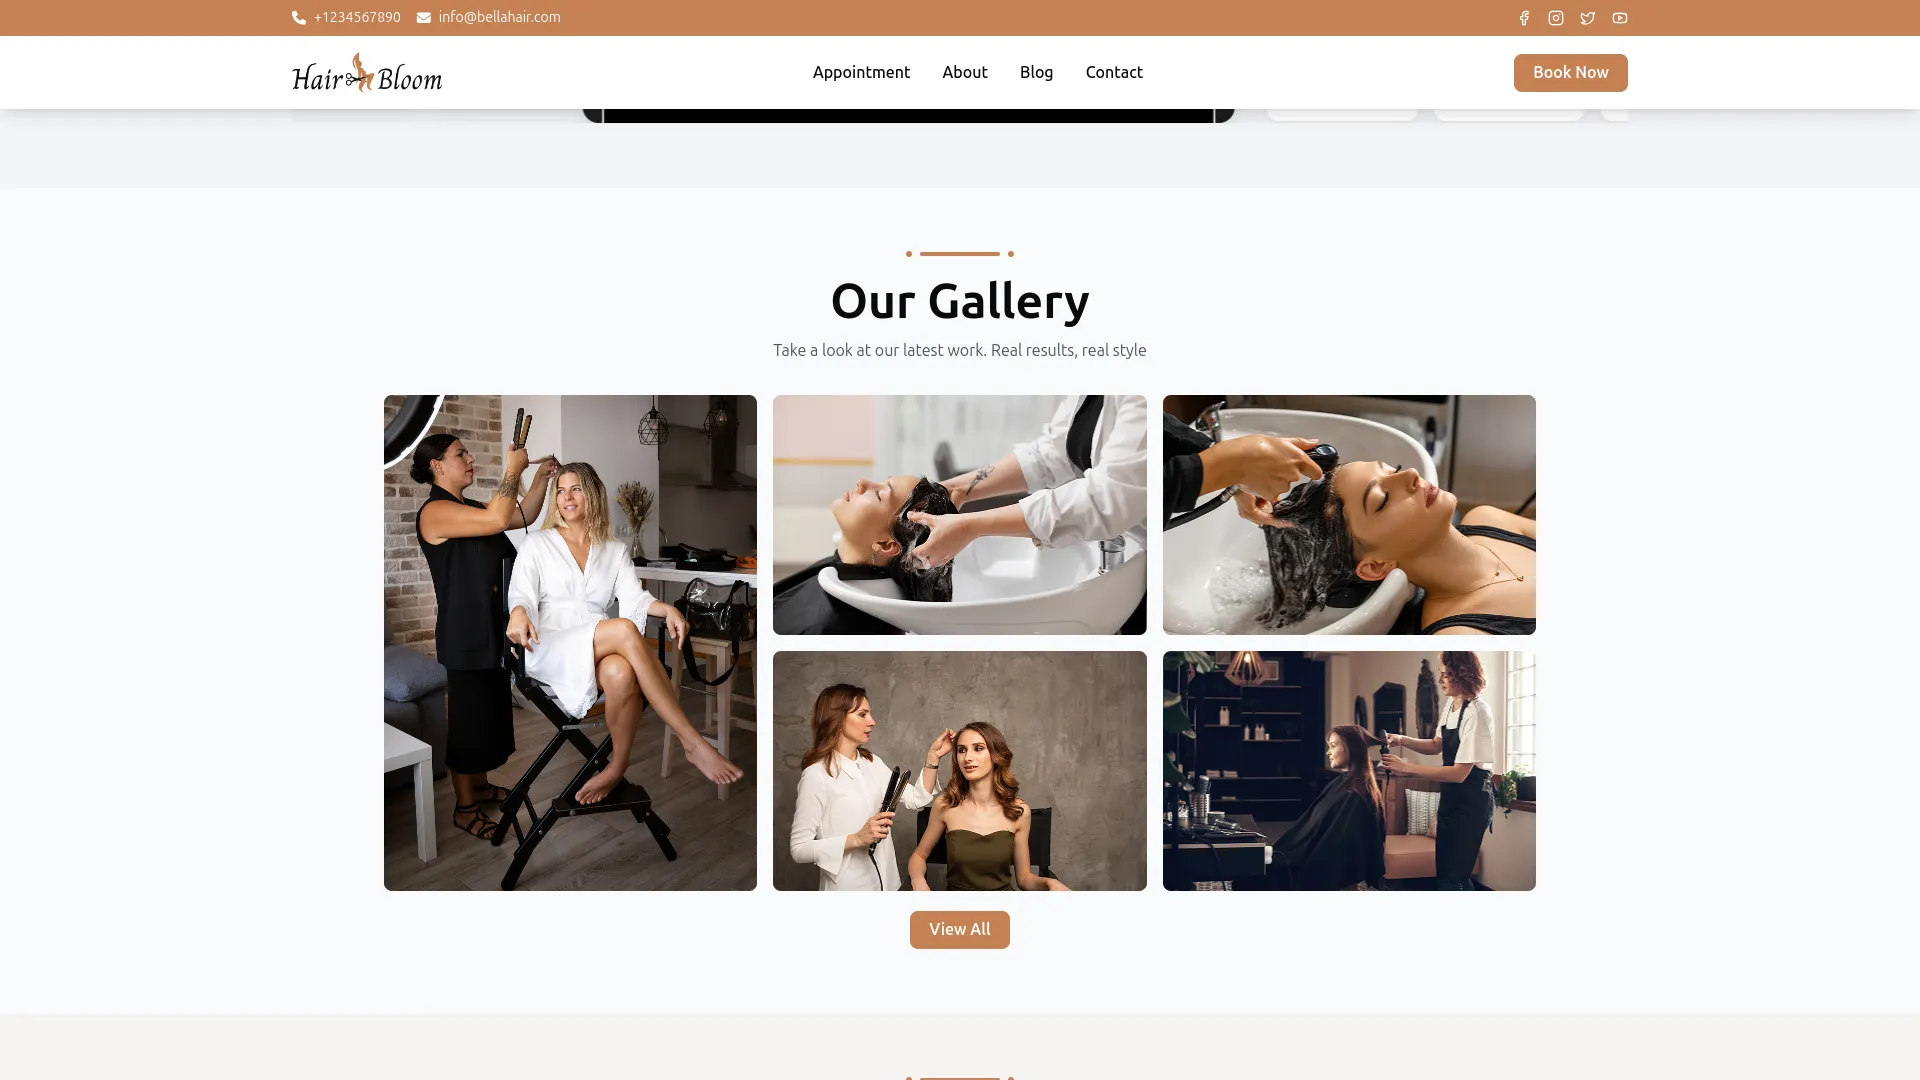
- Once saved, all uploaded images will appear in the Our Gallery section on the homepage, showcasing your studio’s latest work to visitors. They will also be accessible via the View All button, which leads to the full gallery display.
Contact Us
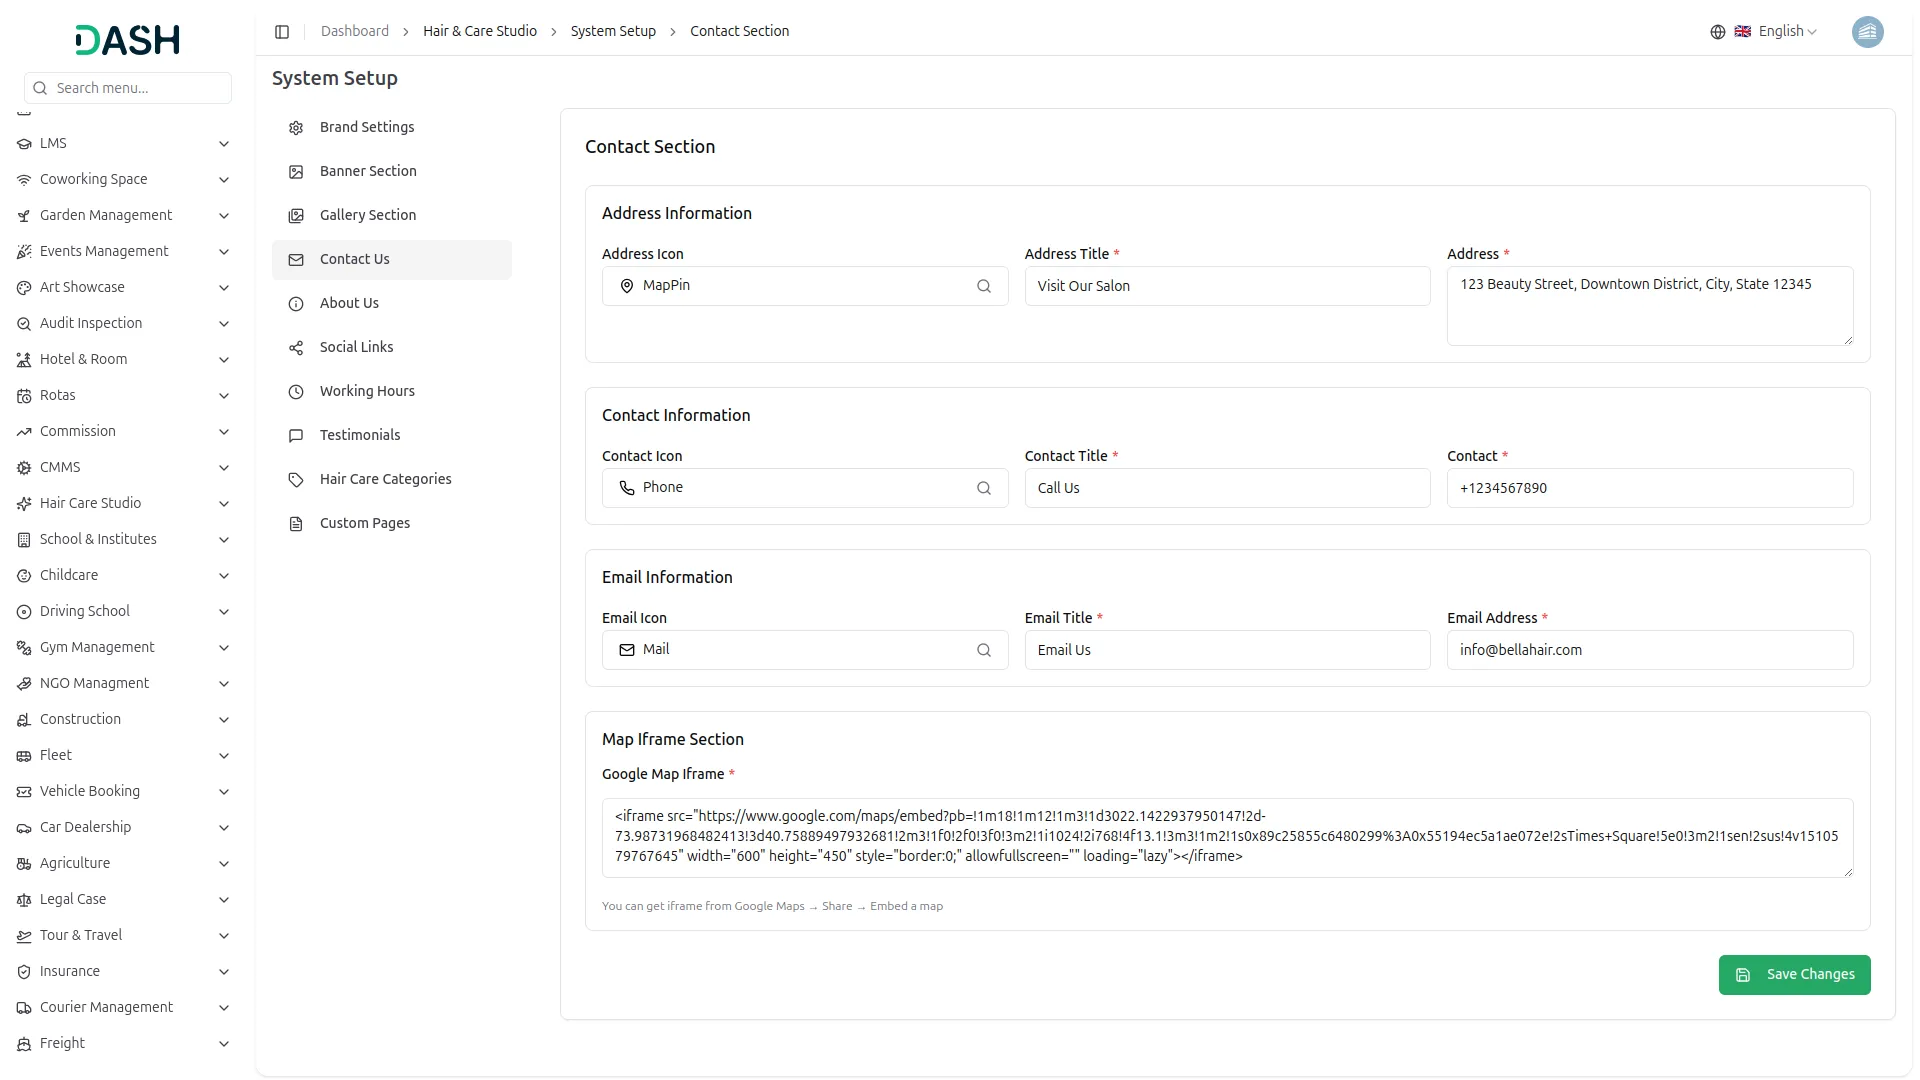
- In the Contact Section, you will find three information blocks. Under Address Information, enter the Address Icon, Address Title, and full Address. Under Contact Information, enter the Contact Icon, Contact Title, and Phone Number. Under Email Information, enter the Email Icon, Email Title, and Email Address.
- In the Map Iframe Section, paste your Google Map Iframe embed code to display your salon’s location on the map. You can get the iframe code from Google Maps by going to Share → Embed a map. Click Save Changes when done.
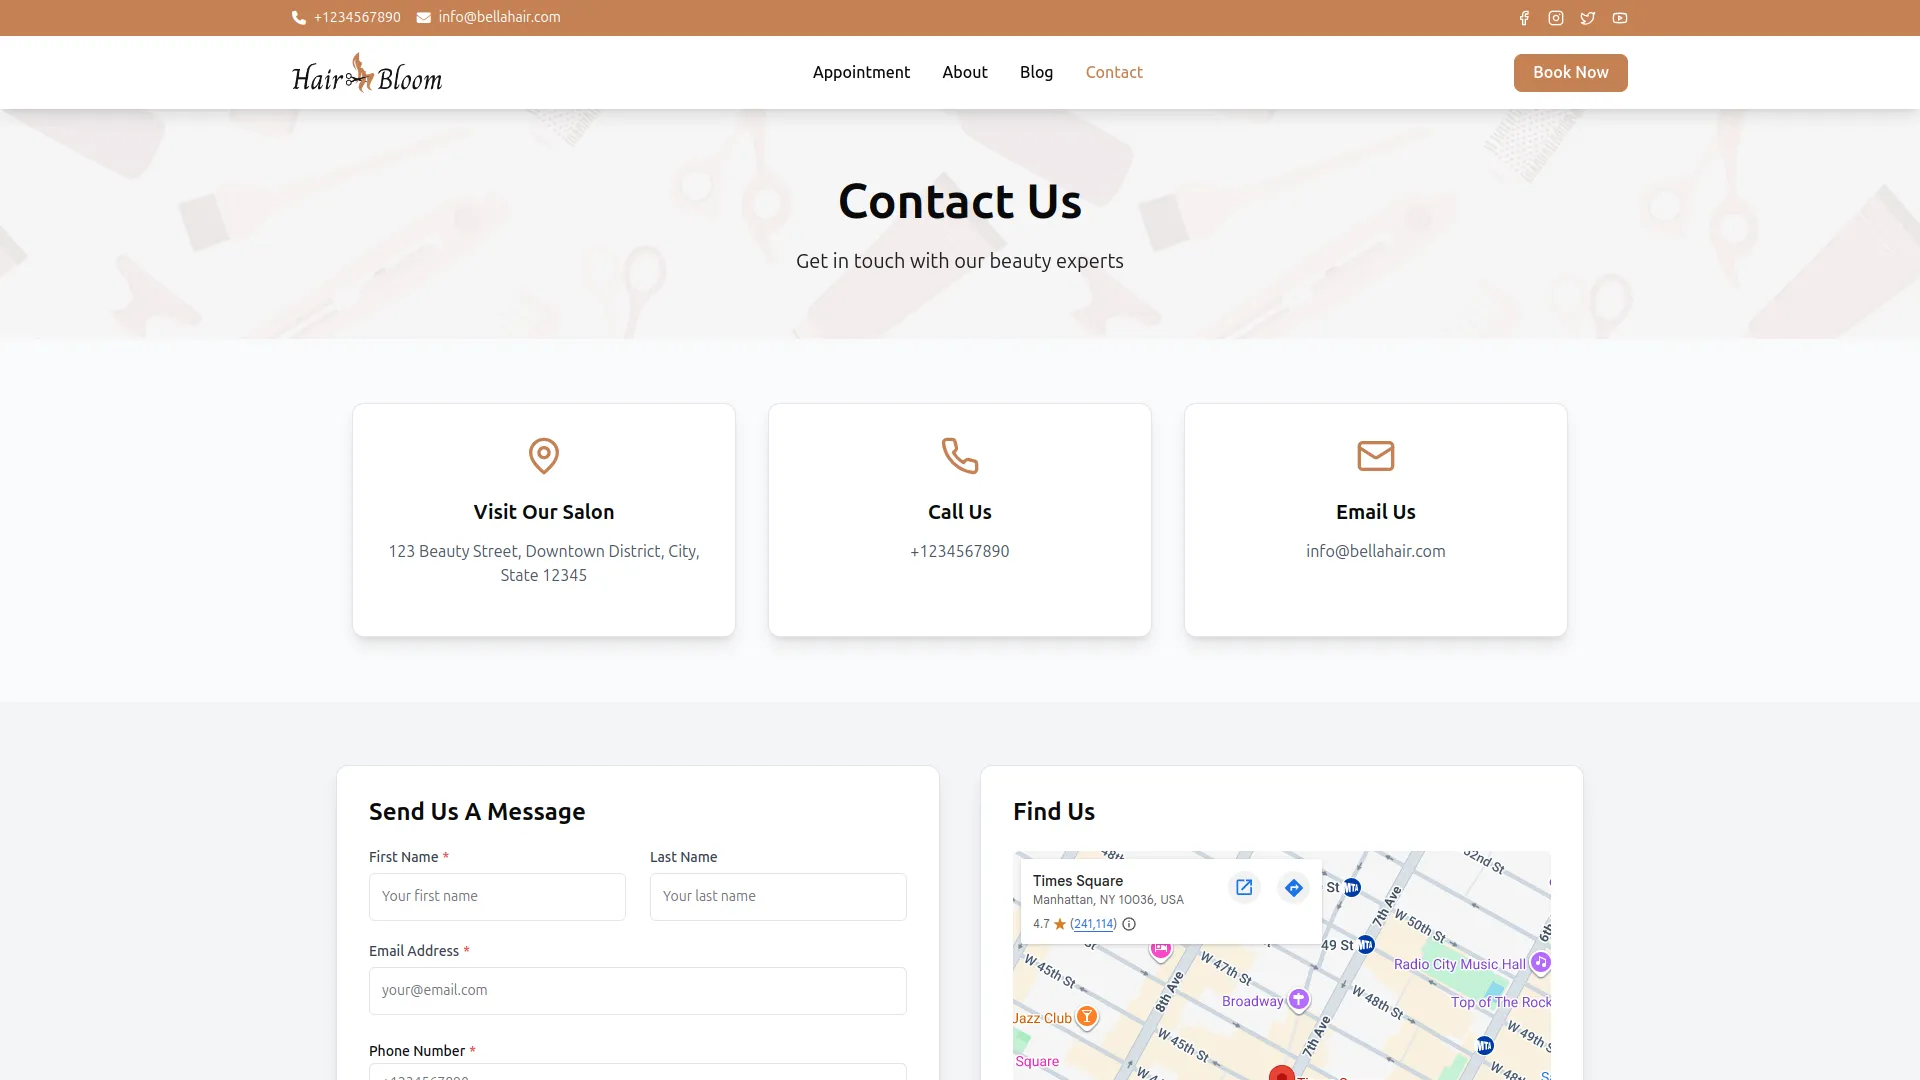
- Once saved, the three contact cards, Visit Our Salon, Call Us, and Email Us, will appear at the top of the Contact page, each displaying their respective icon, title, and details. The embedded Google Map will display your studio’s exact location in the Find Us section on the Contact page, making it easy for clients to locate you.
About Us
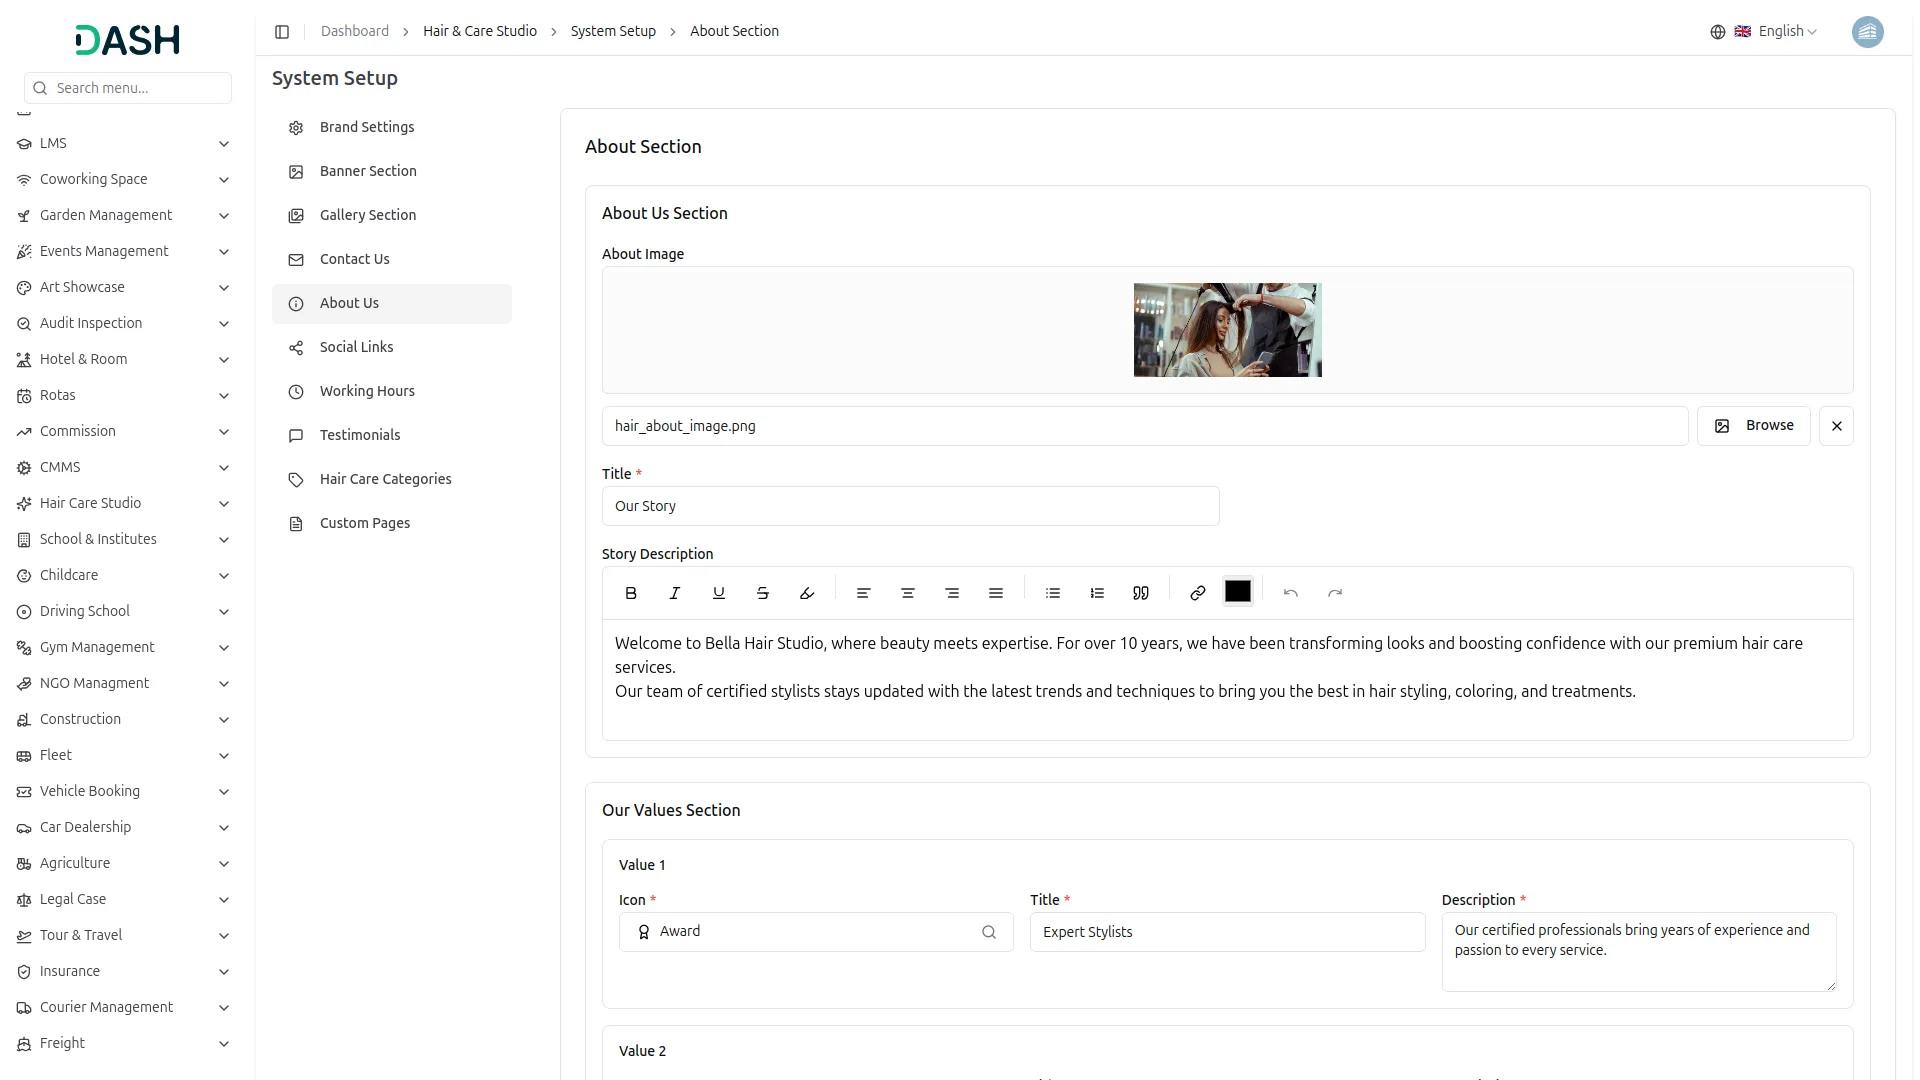
- In the About Us Section, you will find an About Image upload field, a Title field, and a Story Description rich text editor. Upload your salon image using the Browse button and write your studio’s story using the text editor.
- Below that, in the Our Values Section, you will find three value items, Value 1, Value 2, and Value 3, each with an Icon, Title, and Description field. Enter the relevant details for each value. Click Save Changes when done.
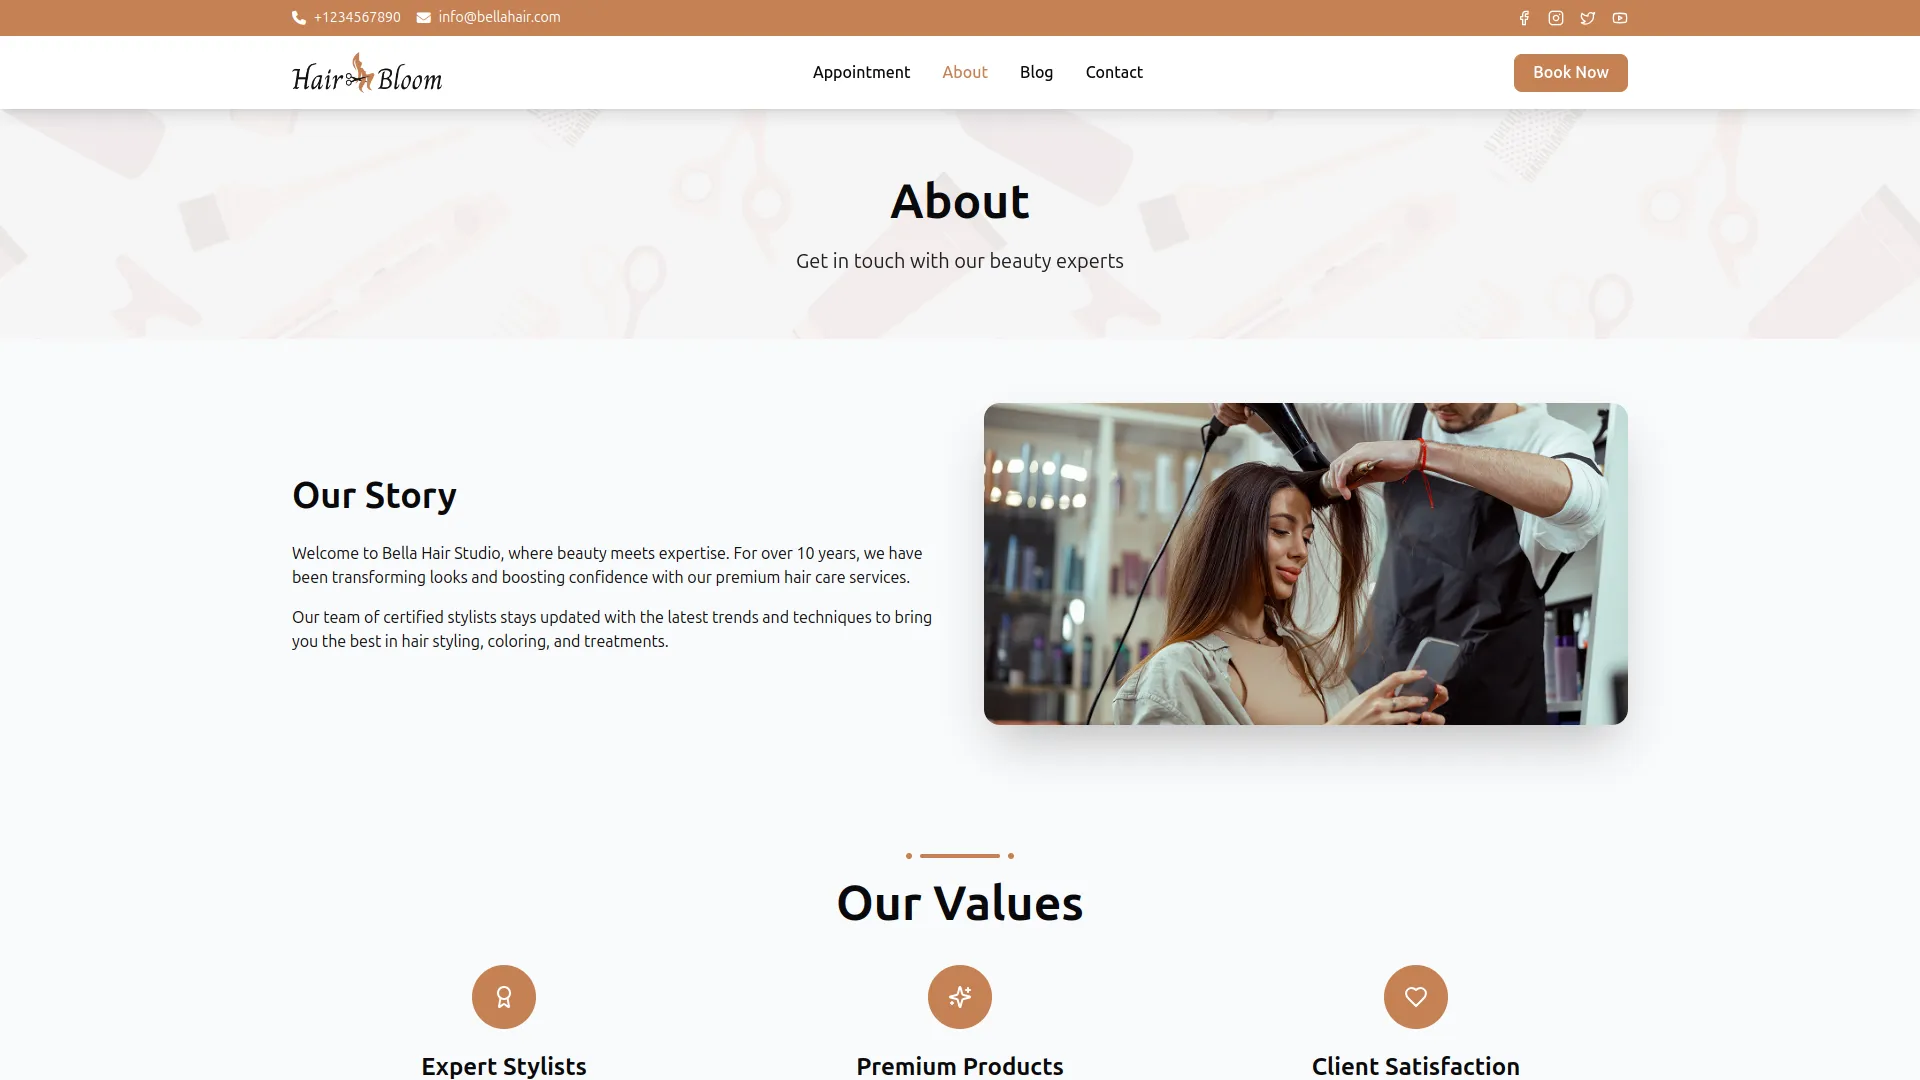
- Once saved, the About Image will appear alongside the Our Story section on the About page. The Title and Story Description will display as the heading and narrative text next to the image. The three value items will appear as the Our Values cards on the About page, each showing their icon, title, and supporting description.
Social Links
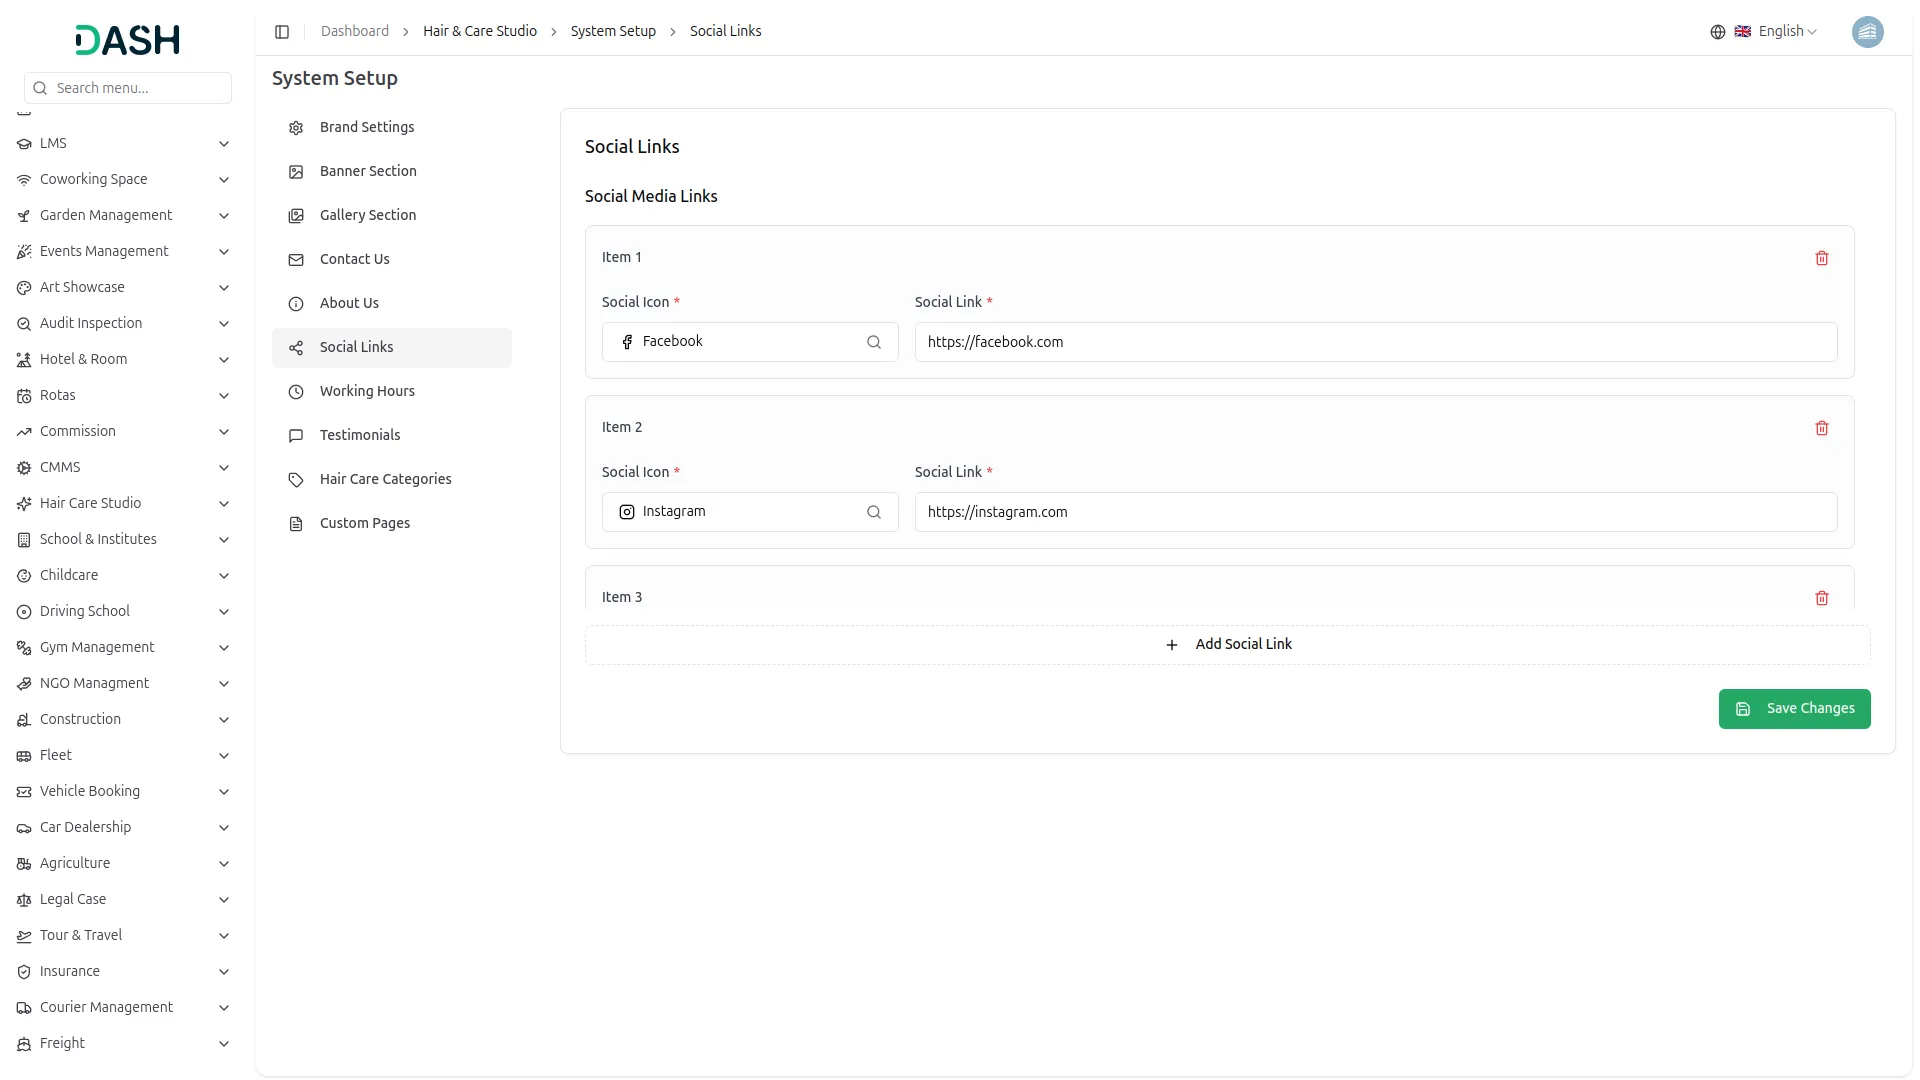
- In the Social Links section, you will find individual items, each containing a Social Icon and a Social Link URL field. Select the platform icon from the dropdown and enter the full URL of your social media profile. To add more platforms, click the “Add Social Link” button. Click Save Changes when done.
- Once saved, the social media icons will appear in the footer of your website across all pages, as well as in the Follow Us section on the Contact page, allowing visitors to connect with your studio on social media directly.
Working Hours
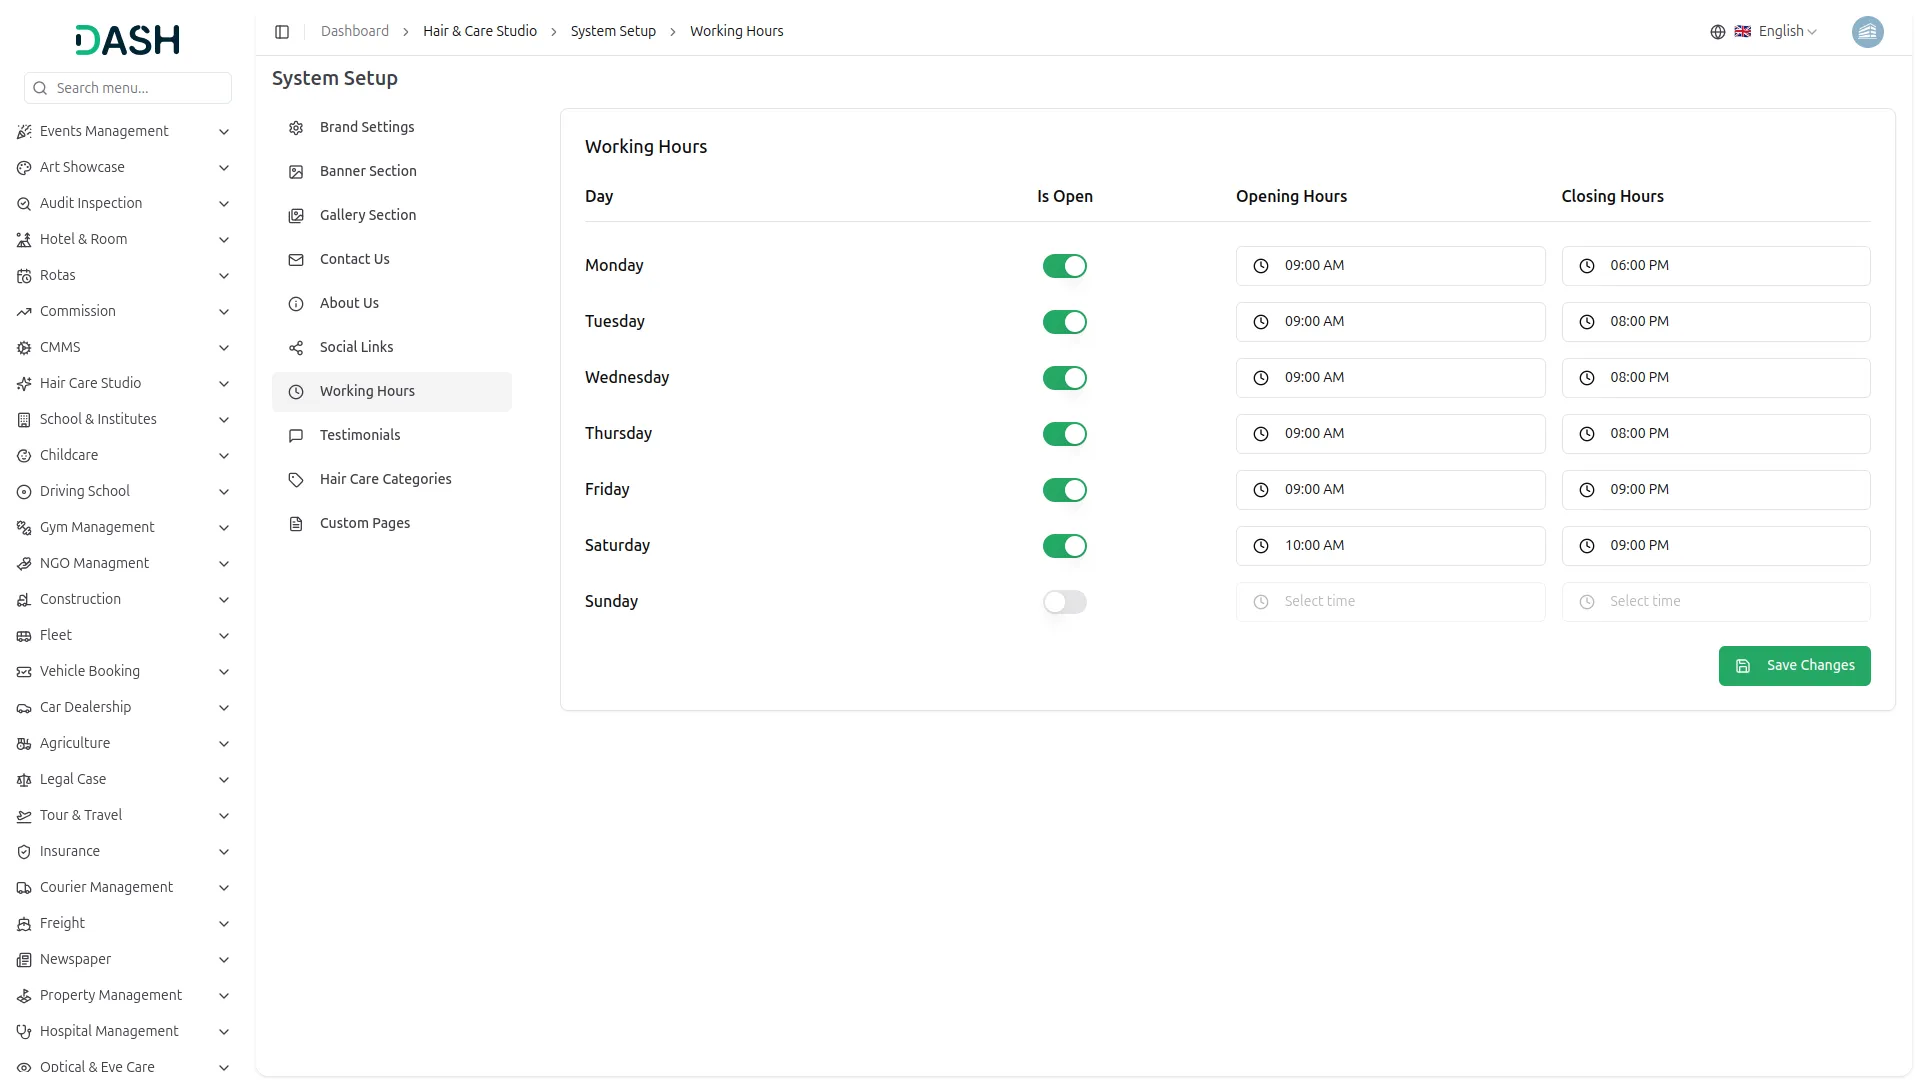
- In the Working Hours section, you will find a table listing all seven days of the week, Monday through Sunday, each with an Is Open toggle, an Opening Hours field, and a Closing Hours field. Toggle a day on to mark it as open and set the opening and closing times. If a day is toggled off, such as Sunday, it will be marked as a holiday, and the time fields will be disabled. Click Save Changes when done.
- Once saved, the working hours will appear in the Opening Hours section in the footer across all pages of the website, as well as on the Contact page, showing clients exactly when your studio is open and when it is closed.
Testimonials
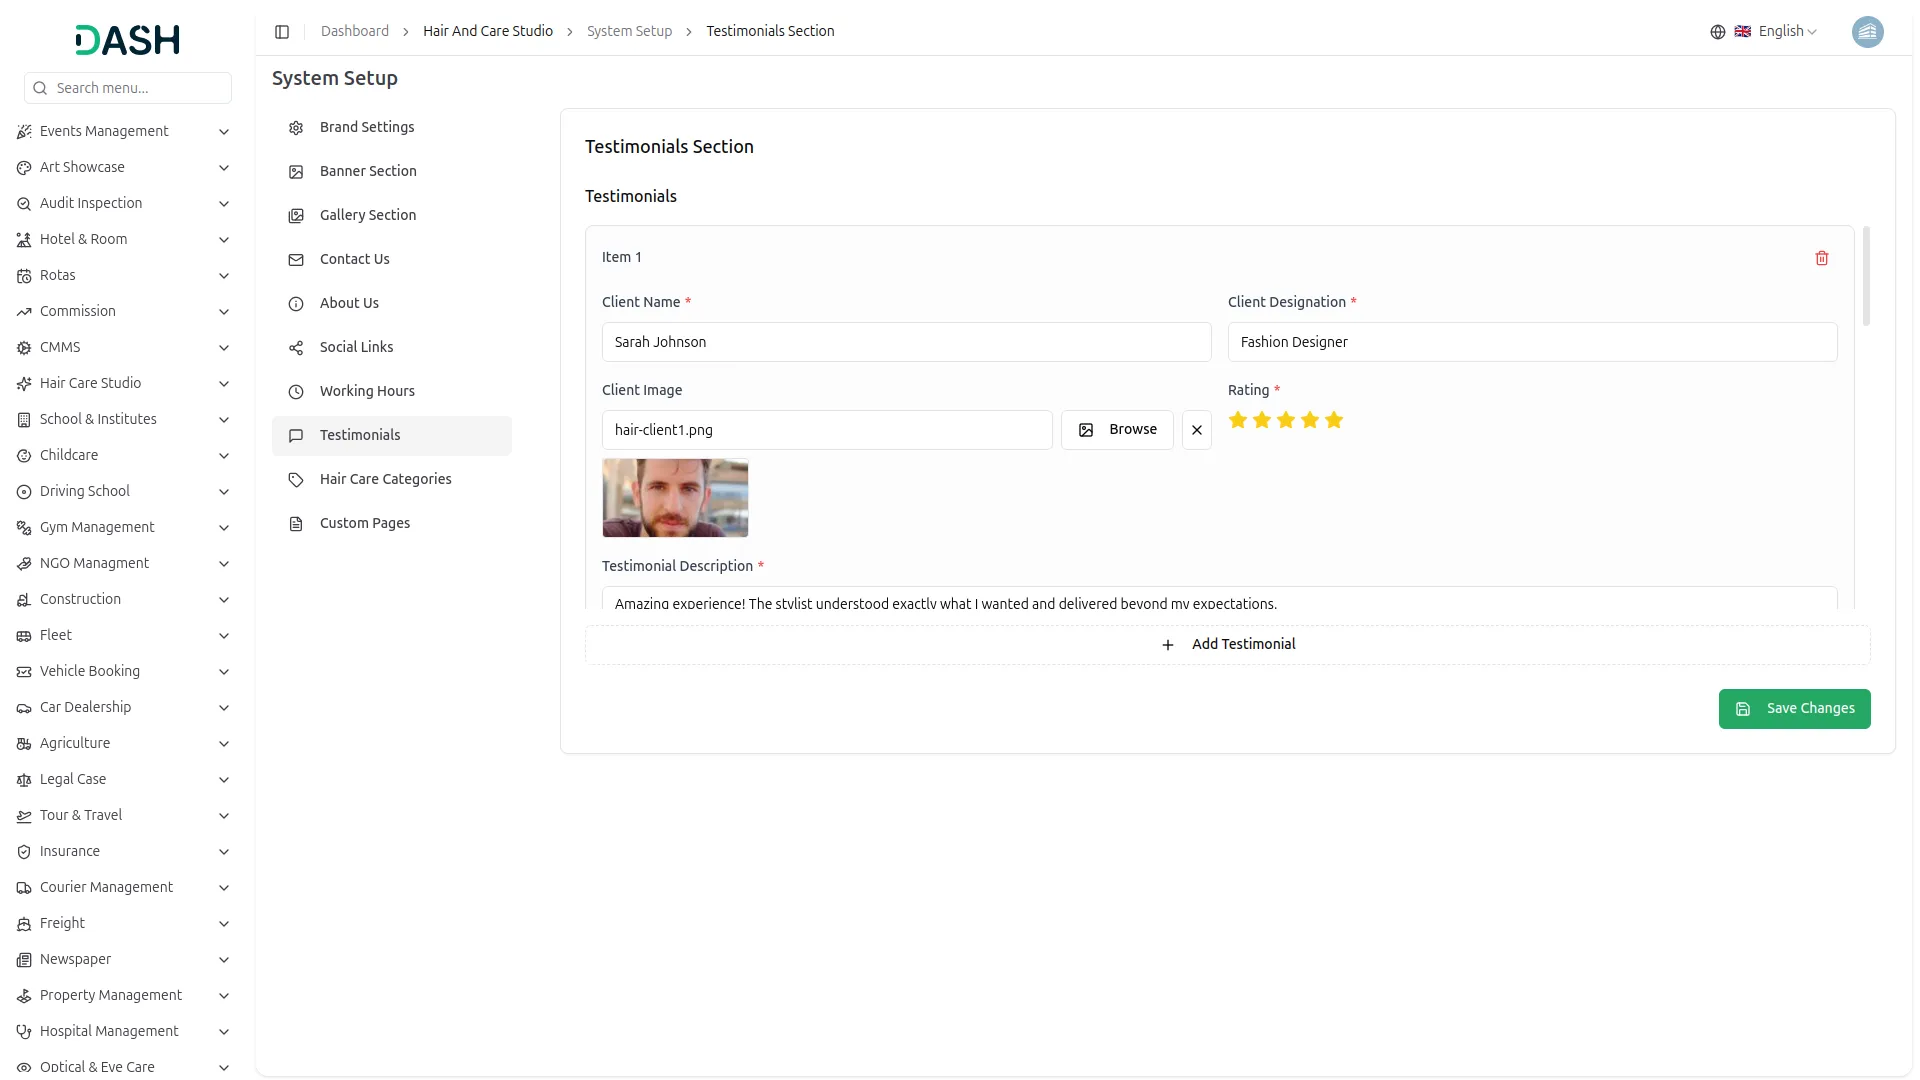
- In the Testimonials Section, you will find individual testimonial items, each with a Client Name, Client Designation, Client Image, Rating, and Testimonial Description field. Upload the client’s photo using the Browse button and select the star rating. To add more testimonials, click the “Add Testimonial” button. Click Save Changes when done.
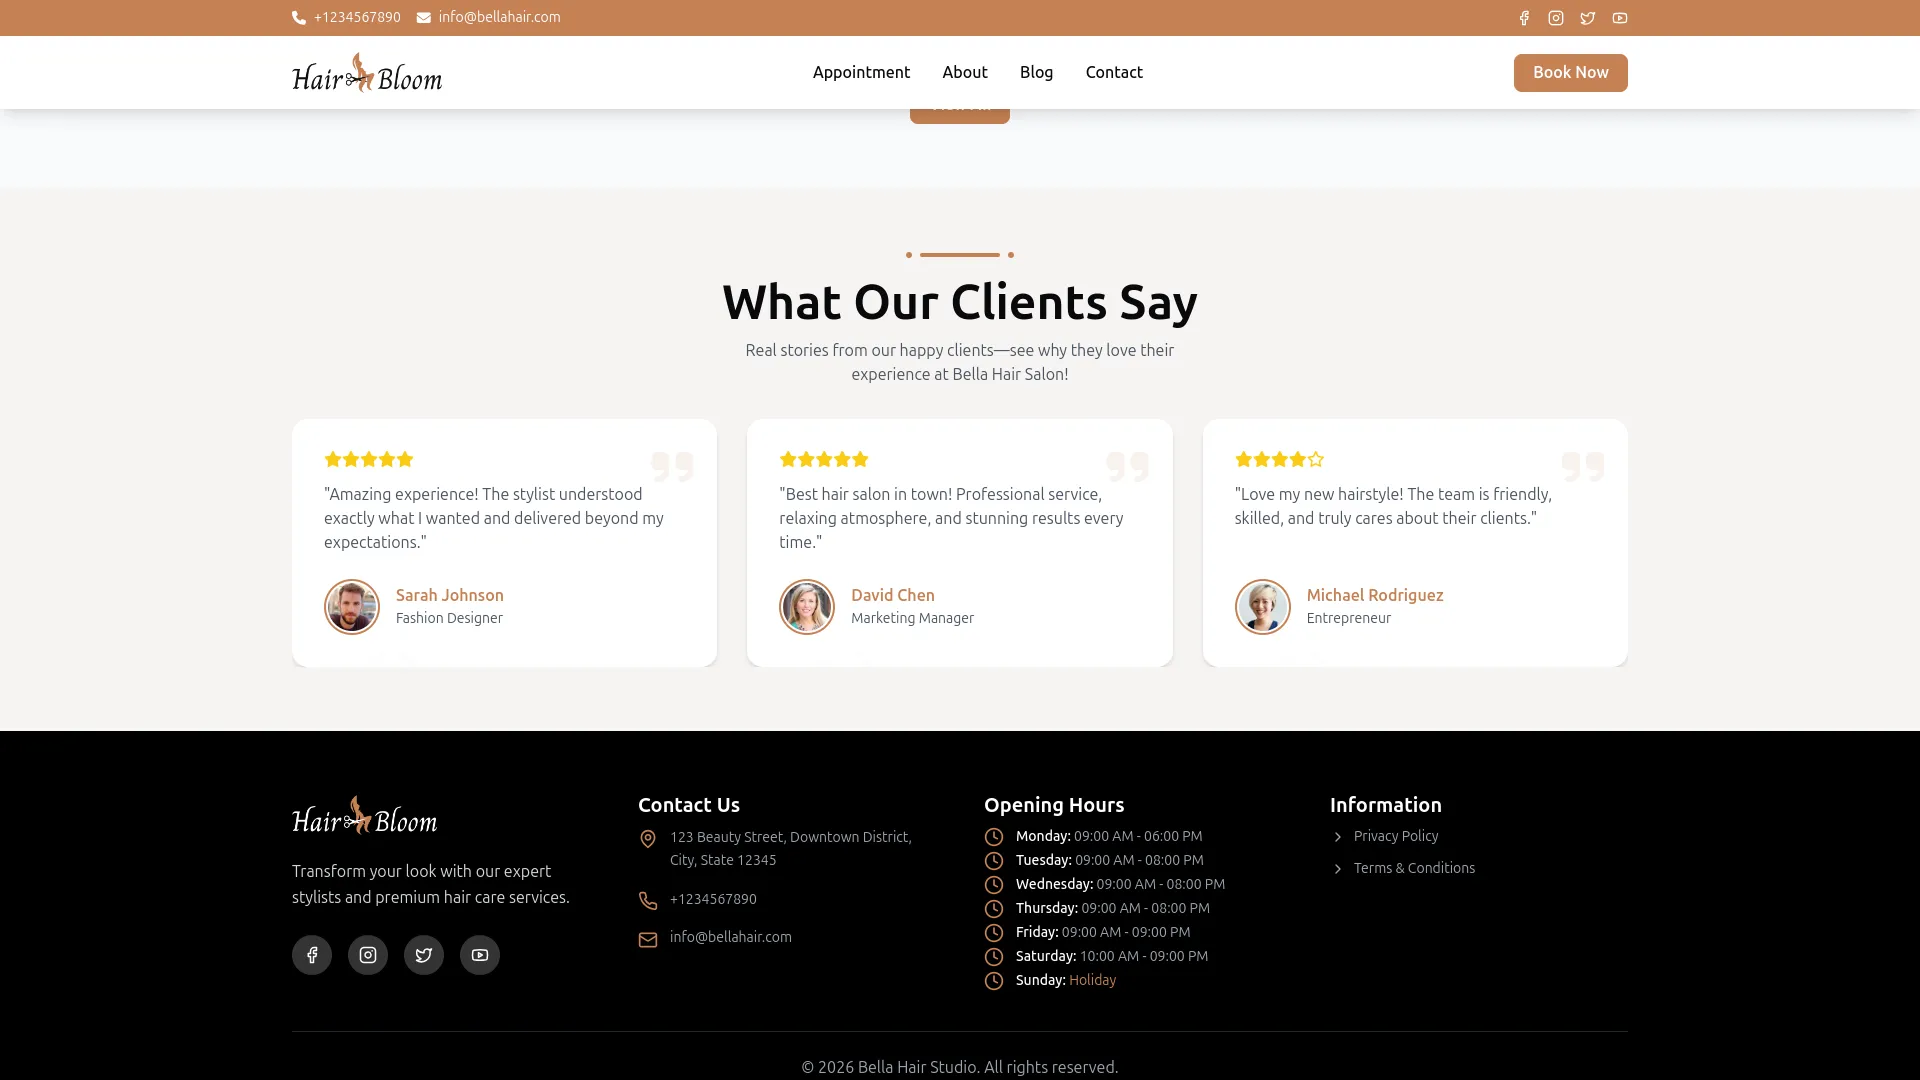
- Once saved, each testimonial will display as a review card in the What Our Clients Say section on the homepage, showing the client’s photo, name, designation, star rating, and their feedback, helping build trust with potential clients visiting your website.
Hair Care Categories
- To add a new category, click the “Create” button at the top right. In the Create Hair Care Category form, enter the Name and Description.
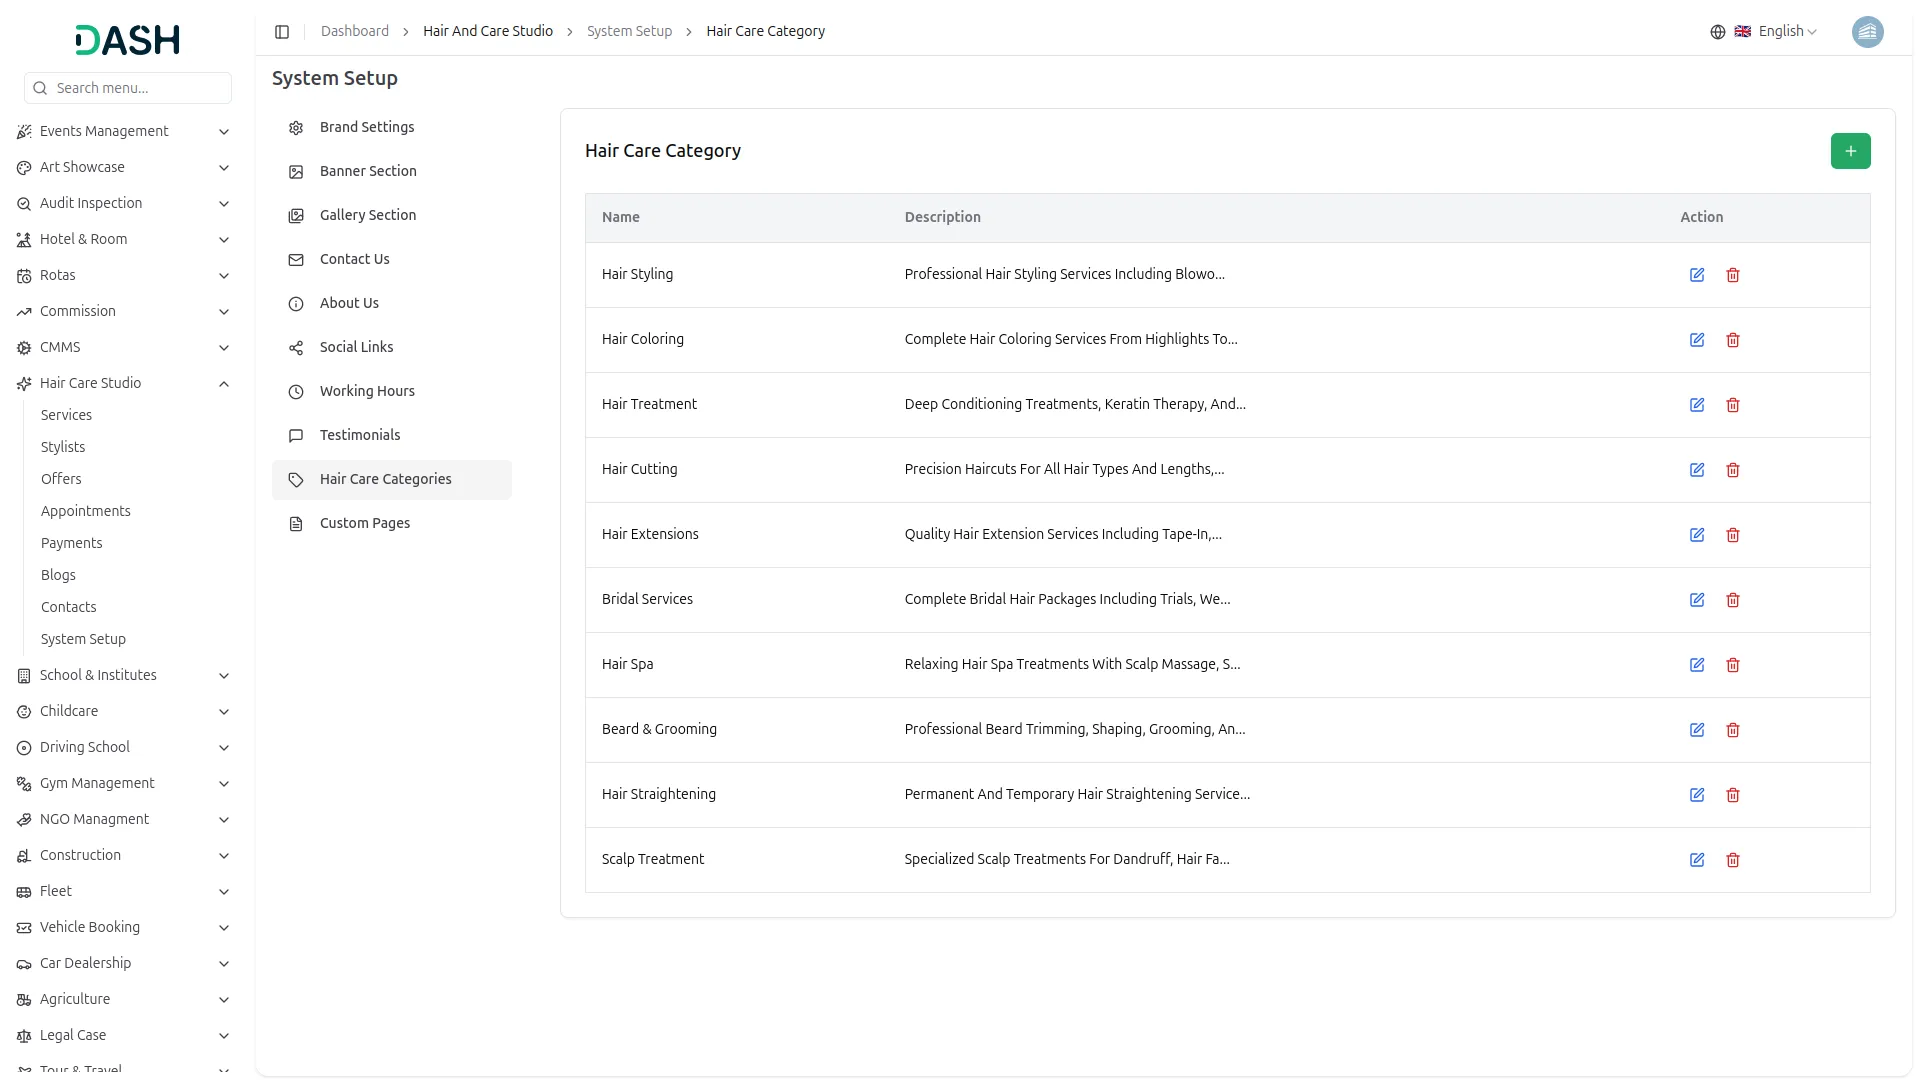
- In the Hair Care Categories section, you will find a list of all existing categories, each displaying the category Name, Description, and an Action column with edit and delete options for modifying the data.
- Once saved, hair care categories will be used to organize your services and blog posts throughout the website. They appear as category labels on blog post cards in the Blog page and are used in the appointment booking flow to help clients filter and select the appropriate service type.
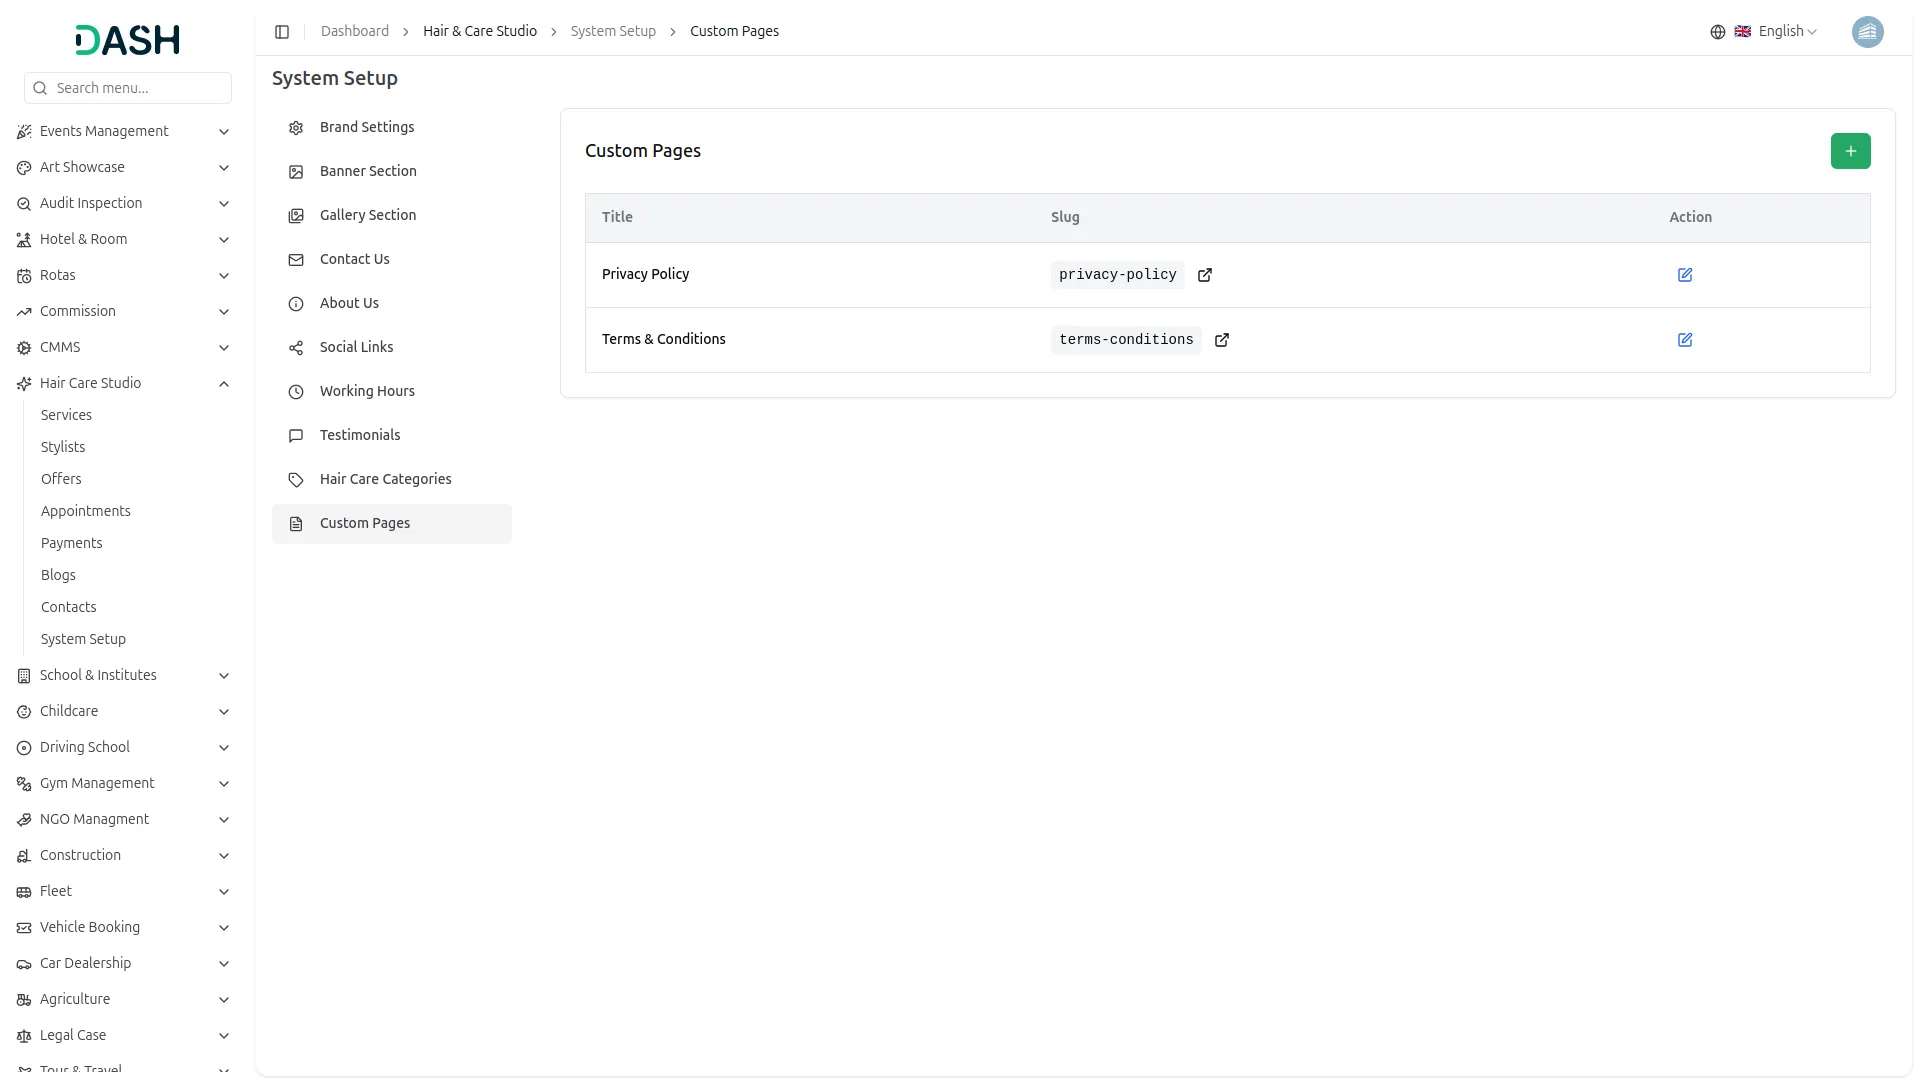
Custom Pages
- To create a new page, click the “Create” button at the top right. In the Create Custom Page form, enter the Title, URL Slug (lowercase letters and hyphens only), Description, and write the full page content using the rich text editor.
- In the Custom Pages section, you will see a list of all existing pages, including their Page Title, URL Slug, and available Actions. The primary action provided is Edit, which allows you to modify the page details.
- Once saved, each custom page will be accessible on your website via its unique URL slug. These pages are linked in the Information section of the footer, allowing visitors to read important pages such as Privacy Policy and Terms & Conditions directly from the website.
Manage Services
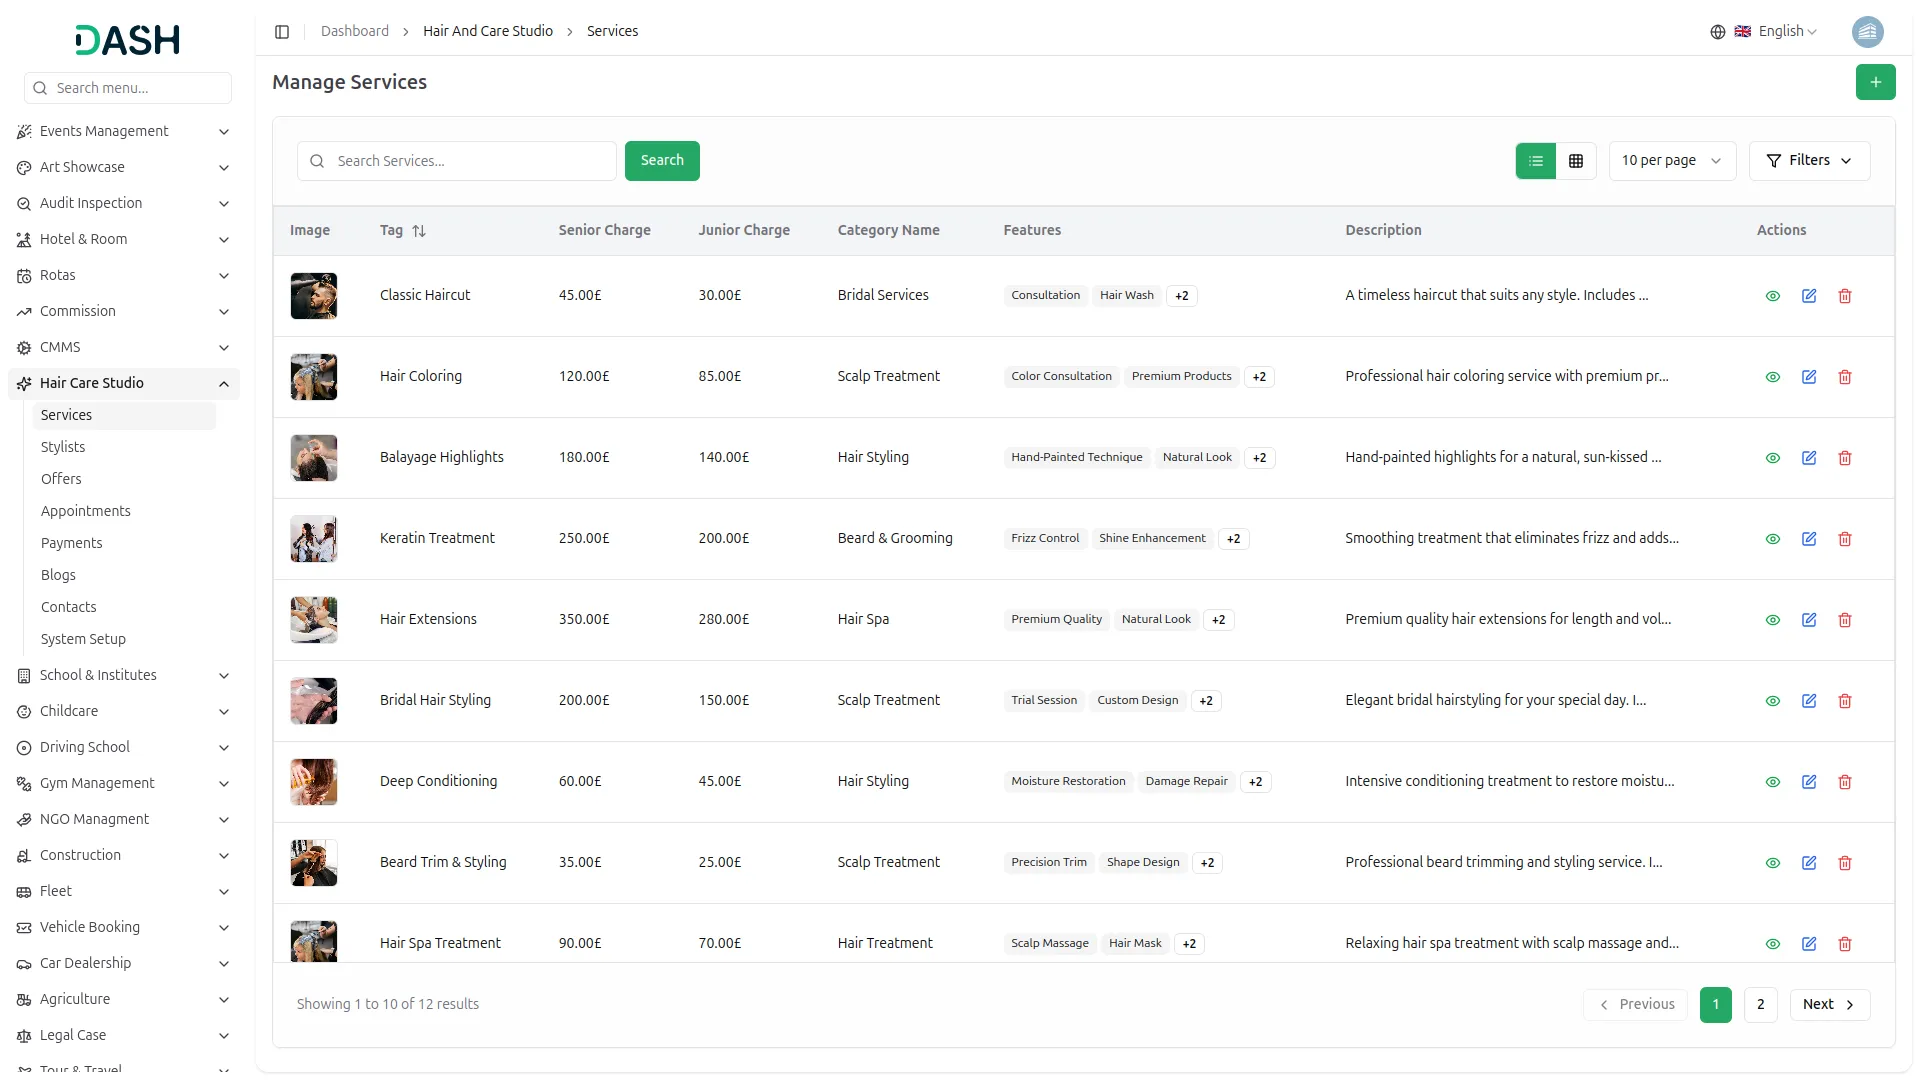
- To add a new service, click the “Create” button located on the Manage Services page. In the Create Service form, enter the service Tag (name), select the Category from the dropdown (configuration from the System setup).
- set the Senior Charge and Junior Charge pricing. Upload a service Image using the Browse button. In the Features field, type each feature and press Enter to add it as a tag. Finally, enter the Description for the service.
- The list page displays a table of columns including the service Image, Tag, Senior Charge, Junior Charge, Category Name, Features, and Description. Use the search bar to find a specific service by name.
- Click the Filters button to filter services by Category. Click Apply to filter the results or Clear to reset them. You can also toggle between list view and grid view using the view options.
- In the Actions column, you can use the view to see the full service details, the edit to update the service information, or the delete to permanently remove it from the system.
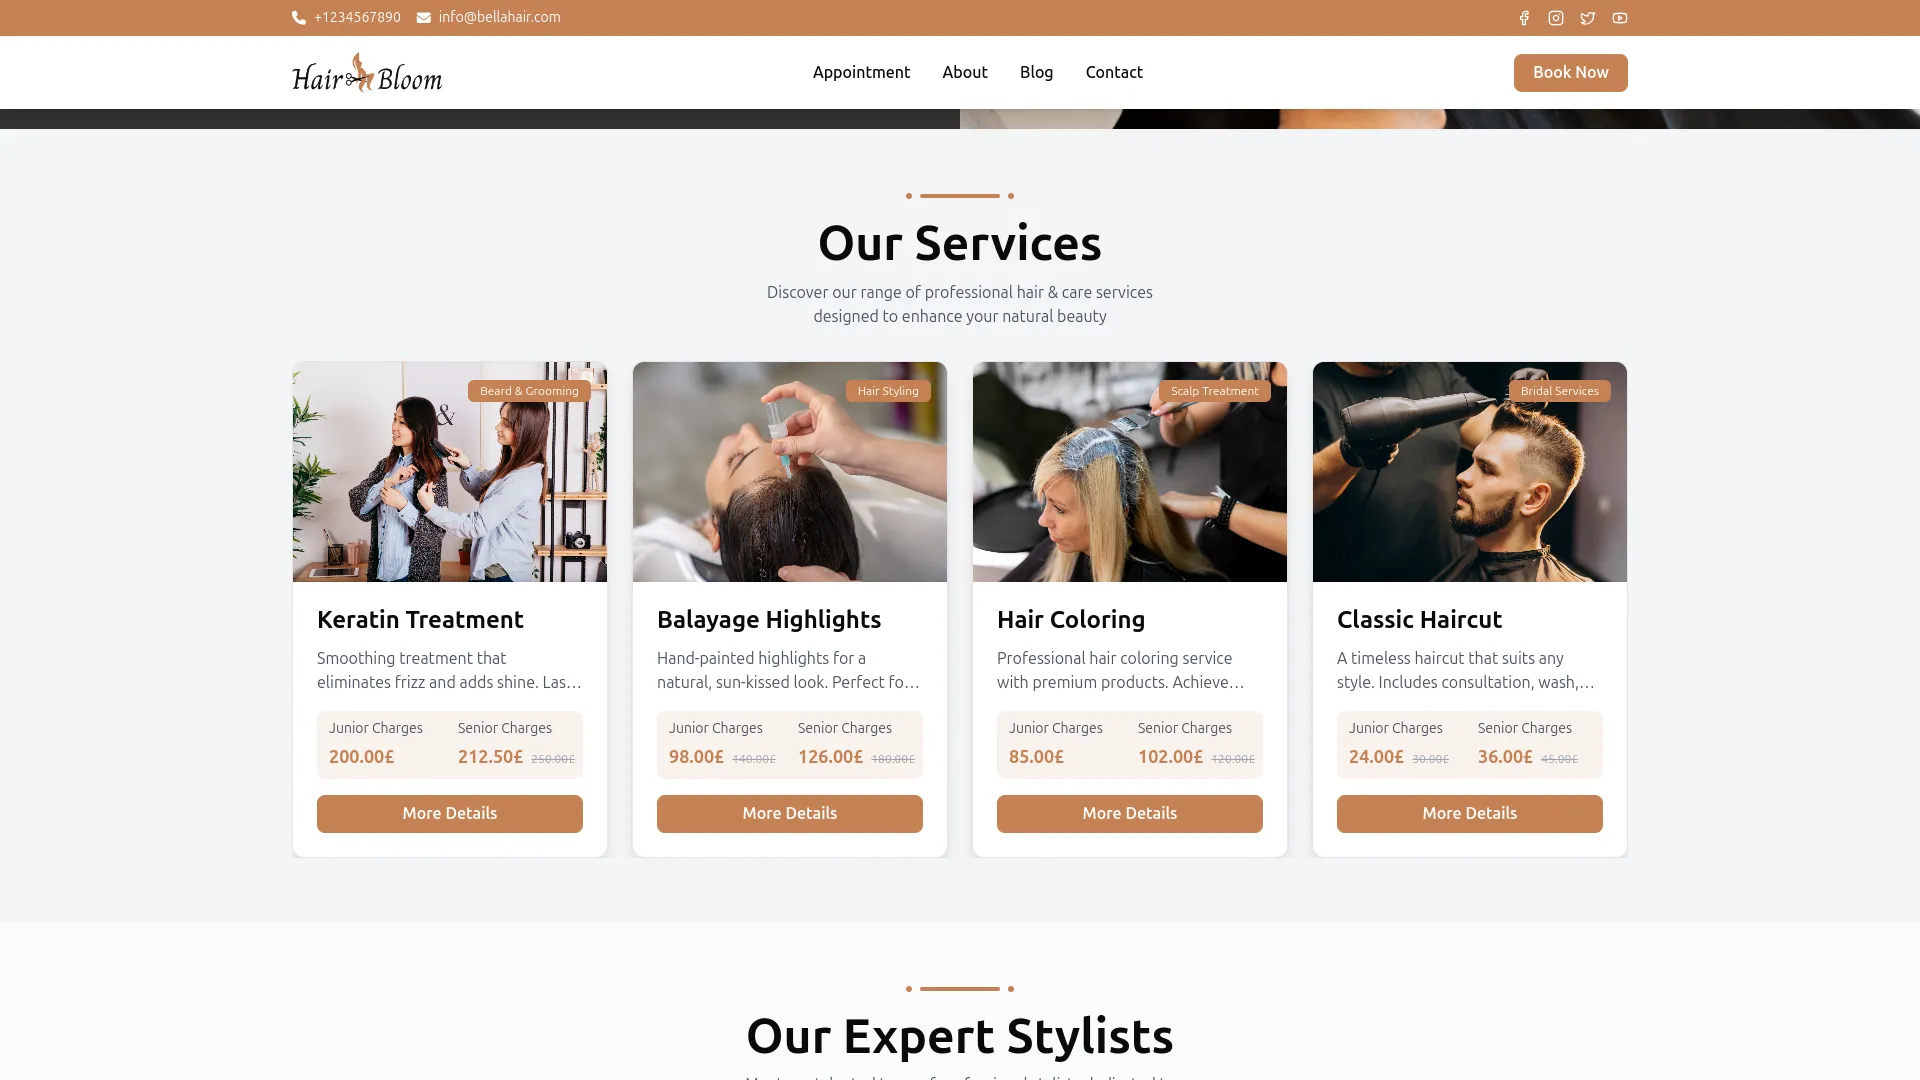
- Once saved, each service will appear as a service card in the Our Services section on the homepage. Each card displays the service image, name, senior and junior pricing, a short description, and a More Details button. The service will also become available as a selectable option in the Select Service dropdown on the Book Your Appointment page, allowing clients to choose it when booking.
Manage Stylists
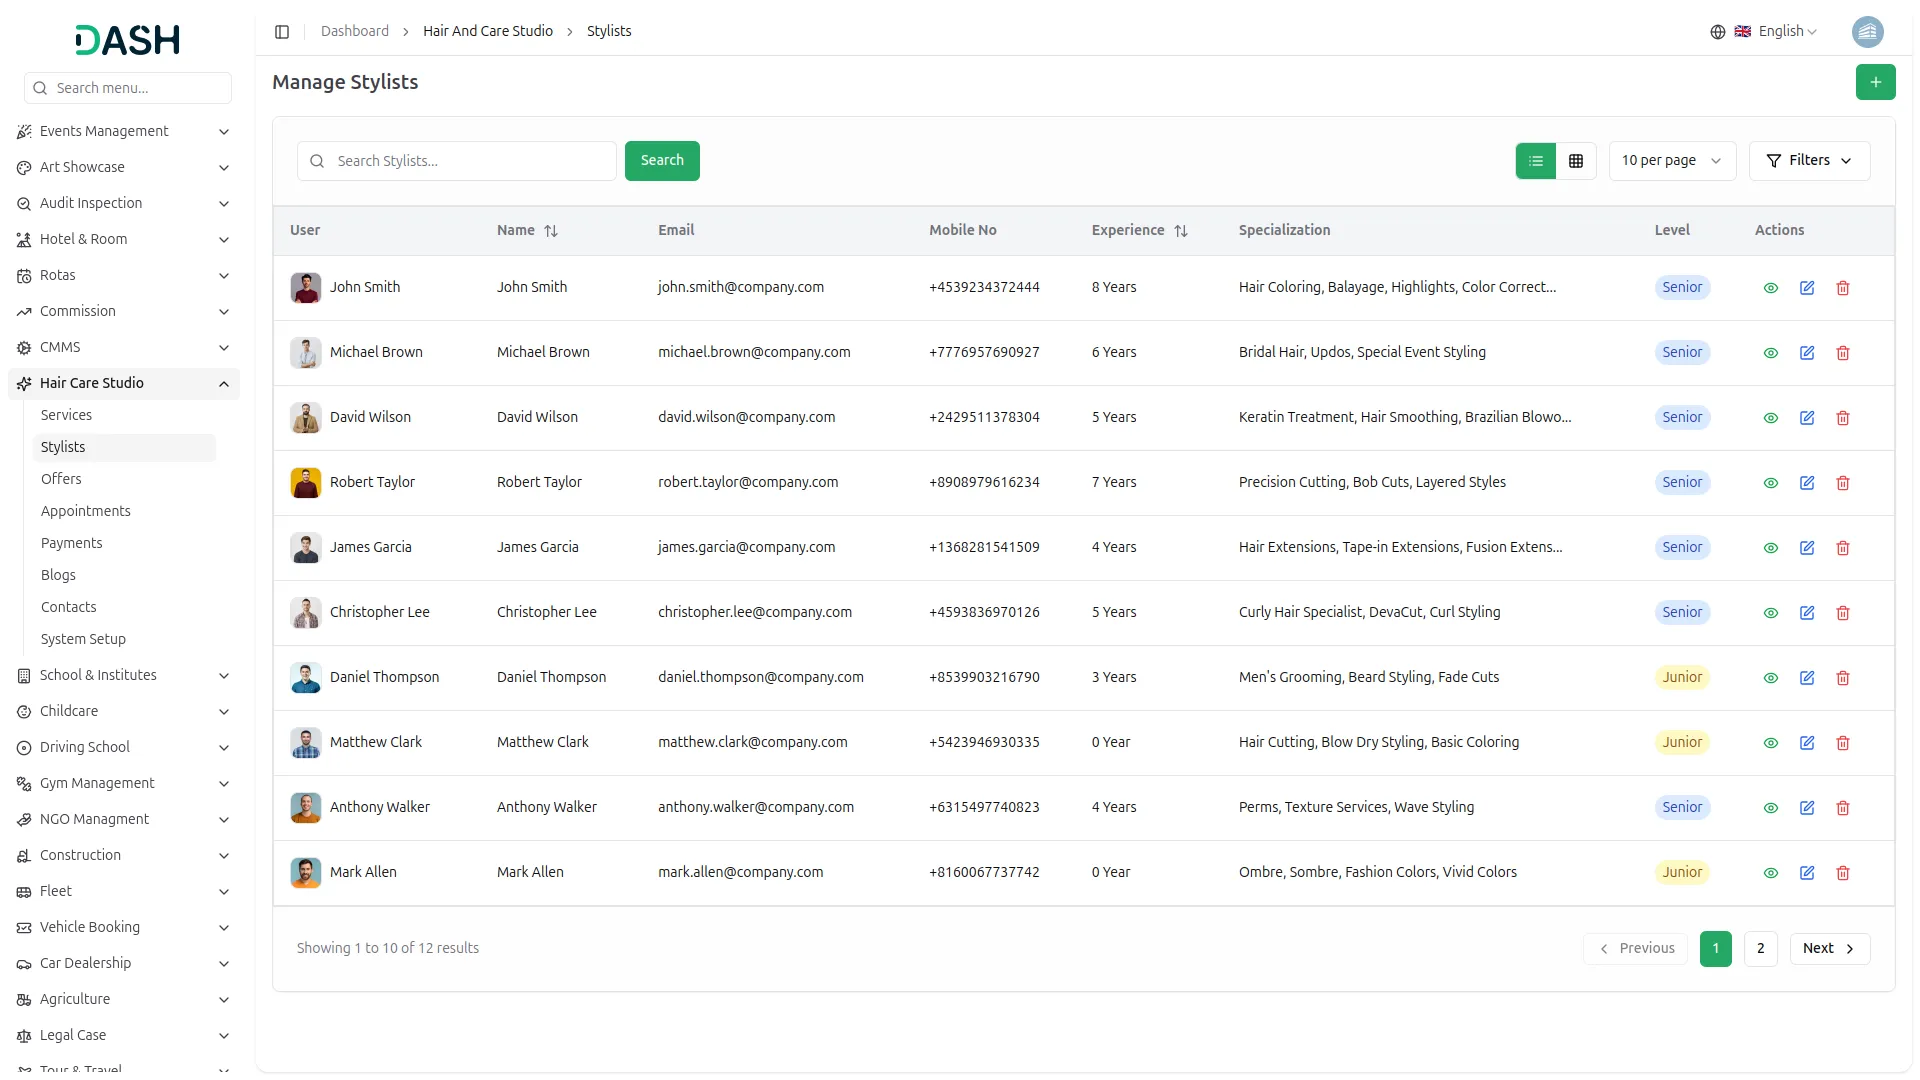
- To add a new stylist, click the “Create” button located on the Manage Stylists page. In the Create Stylist form, select the User from the dropdown (only users not already assigned to another stylist will appear in this list).
- Enter the stylist’s Email, Name, and Mobile No in the format “Create”[country code][phone number]. Enter the number of Experience Years, select the Stylist Level as either Junior or Senior, and enter the stylist’s Specialization.
- The list page displays a table of columns including the stylist’s User, Name, Email, Mobile No, Experience, Specialization, and Level. Use the search bar to find a specific stylist by name. Click the Filters button to filter stylists by Stylist Level. Click Apply to filter the results or Clear to reset them. You can also toggle between list view and grid view using the view options button.
- In the Actions column, you can use the view to see the full stylist profile, the edit to update their information, or the delete to permanently remove them from the system.
- Once saved, each stylist will appear in the Our Expert Stylists section on the homepage, displaying their profile photo, name, and specializations. They will also appear on the About page under the Meet Our Team section.
- Additionally, the stylist’s level, Junior or Senior, will be available as a selectable option in the Stylist Type dropdown on the Book Your Appointment page, allowing clients to choose their preferred stylist level when booking.
Manage Offers
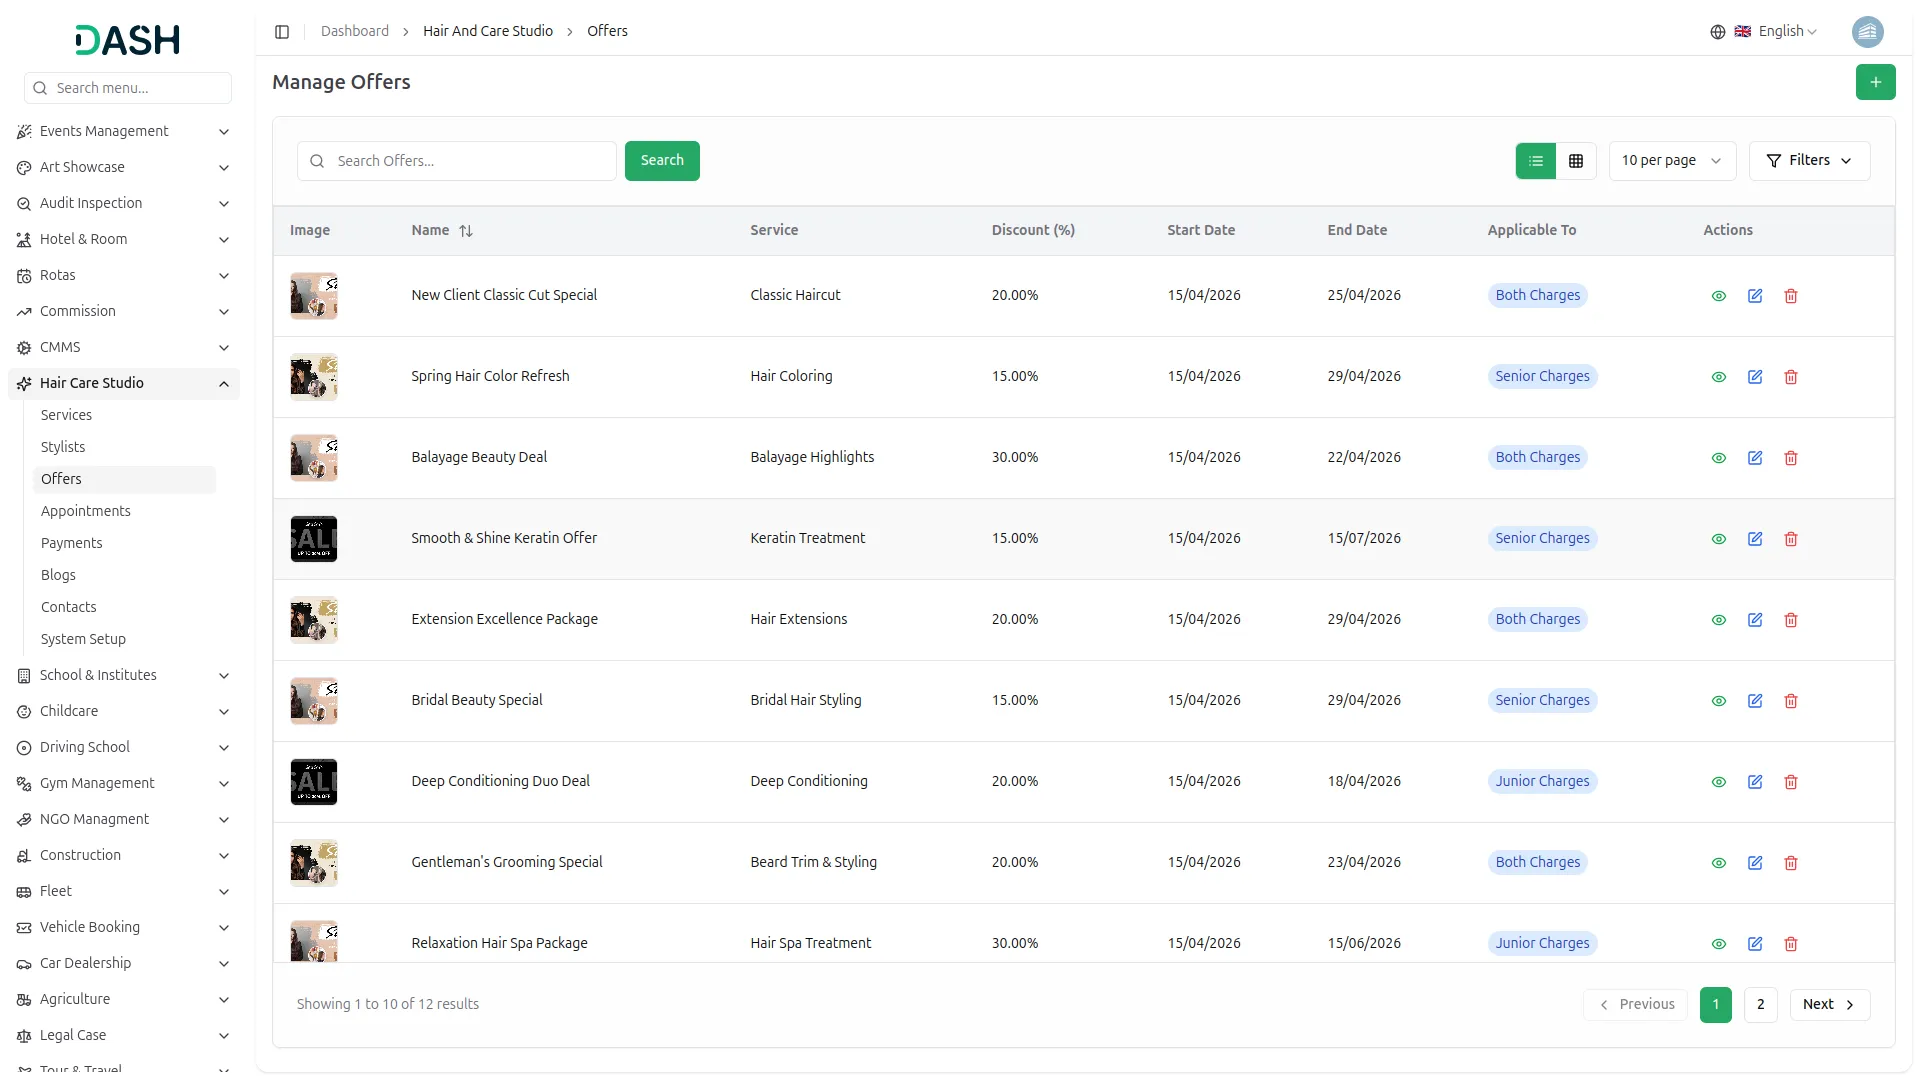
- To add a new offer, click the “Create” button located on the Manage Offers page. In the Create Offer form, upload an offer Image using the Browse button. Enter the offer Name, select the Service it applies to from the dropdown, and set the Start Date and End Date for the offer period.
- Enter the Discount (%) value and select who the offer is Applicable To: Both Charges, Senior Charges, or Junior Charges. Finally, enter the Description.
- The list page displays a table of columns including the offer Image, Name, Service, Discount (%), Start Date, End Date, and Applicable To. Use the search bar to find a specific offer by name.
- Click the Filters button to filter offers by Service or Applicable To. Click Apply to filter the results or Clear to reset them. You can also toggle between list view and grid view using the view options.
- In the Actions column, you can use the view to see the full offer details, the edit to update the offer information, or the delete to permanently remove it from the system.
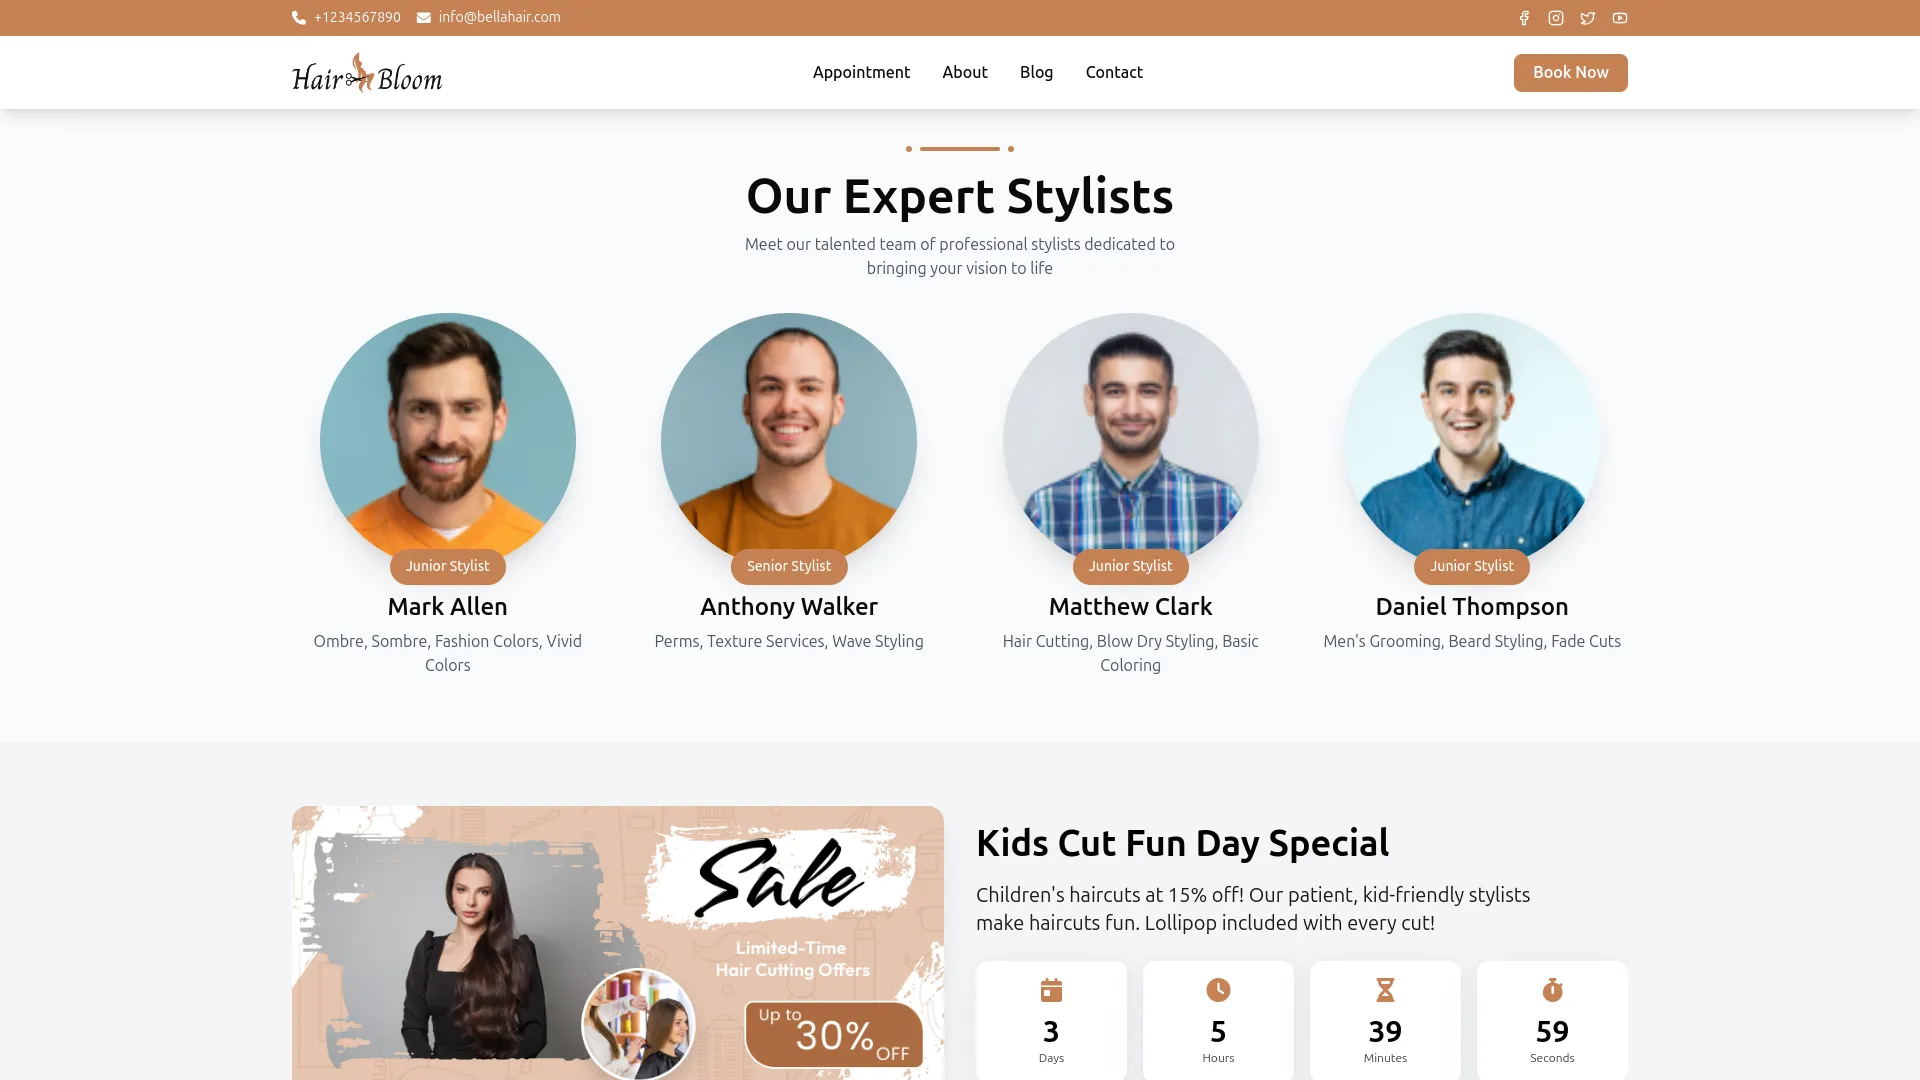
- Once saved, the active offer will appear in the Season Sale section on the homepage, displaying the offer image, name, description, and a live countdown timer showing the remaining time until the offer expires.
- The discount will also be automatically applied to the relevant service pricing on the Our Services section of the homepage, showing clients the updated price based on the applicable charge type.
Manage Appointments
- To add a new appointment, click the “Create” button located on the Manage Appointments page. In the Create Appointment form, enter the customer’s Full Name, Mobile Number, and Email Address.
- Select the Service and Stylist Type from their respective dropdowns, then choose the Preferred Date and Preferred Time. The Charges field will be automatically calculated based on the selected service and stylist type. Select the Stylist from the dropdown, add any Special Request or notes if needed.
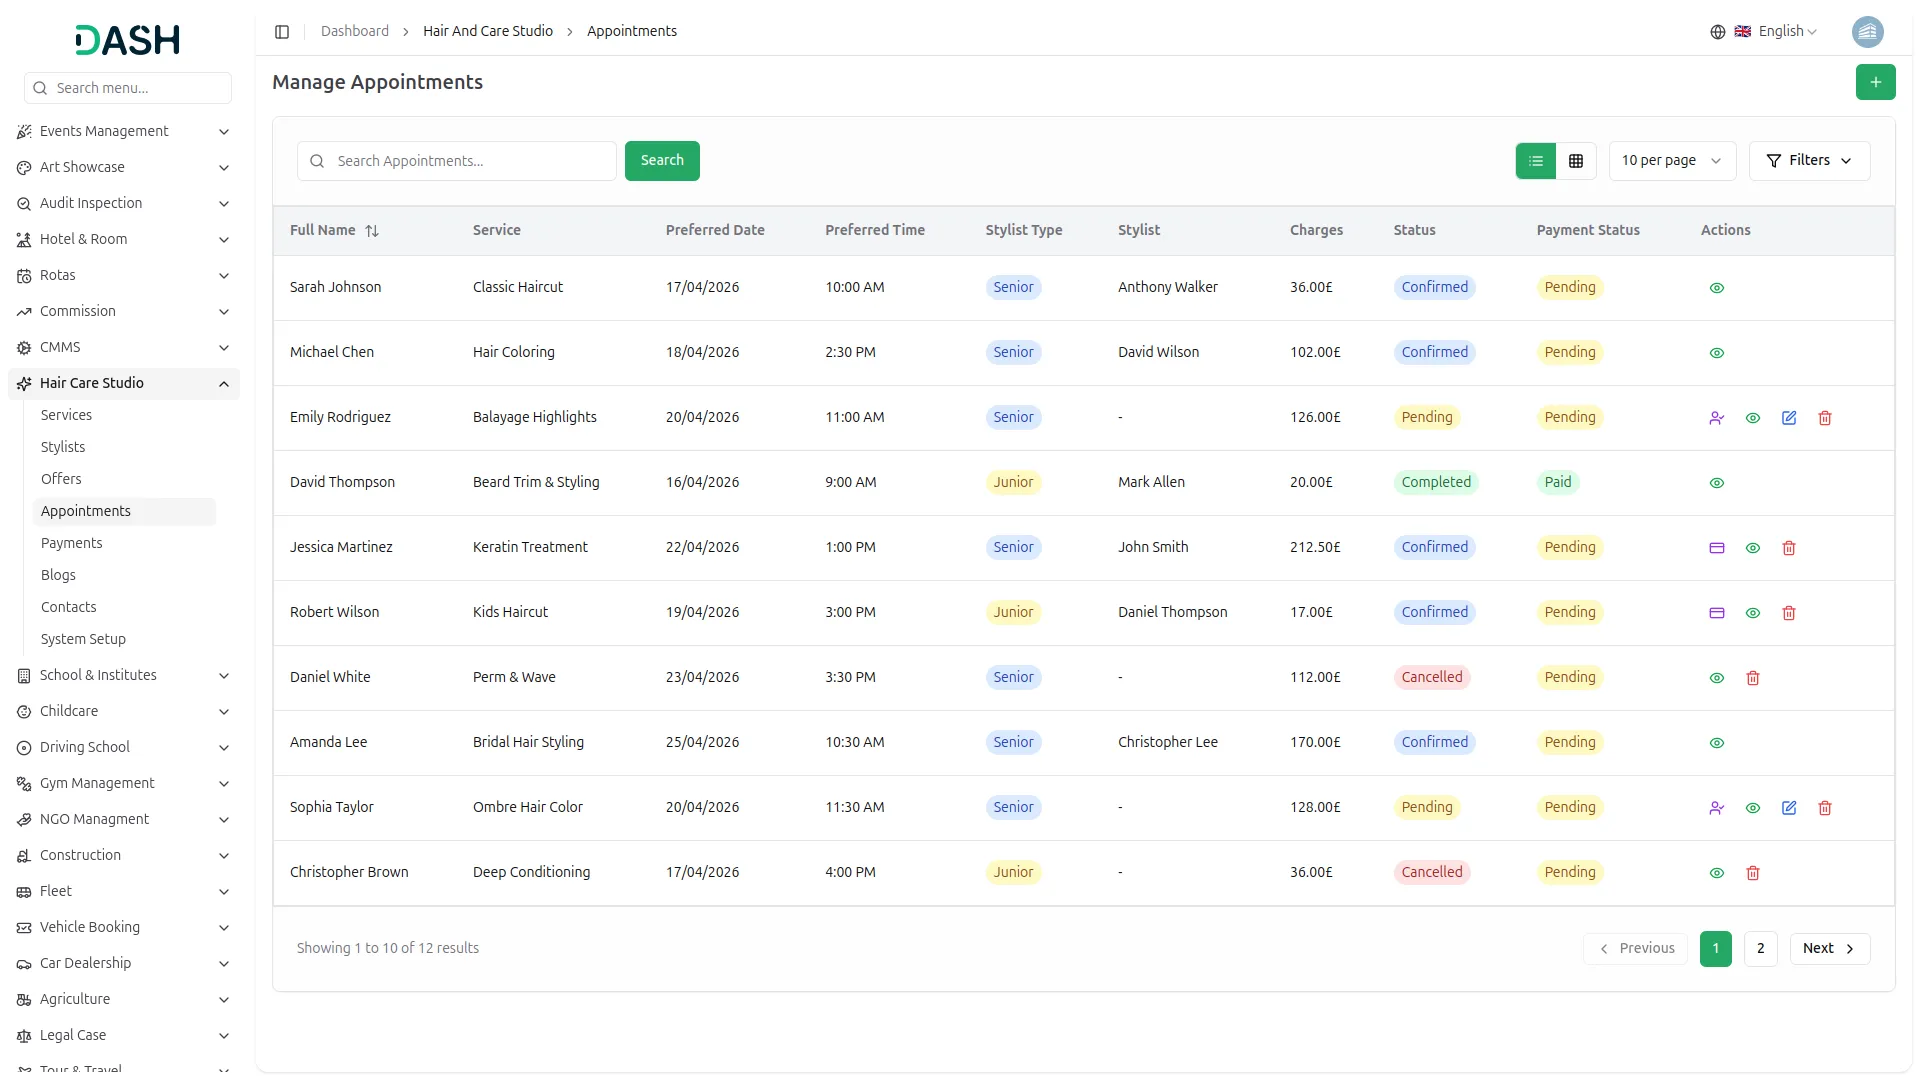
- The list page displays a table of columns including the customer’s Full Name, Service, Preferred Date, Preferred Time, Stylist Type, Stylist, Charges, Status, and Payment Status.
- Use the search bar to find a specific appointment by name. Click the Filters button to filter appointments by Status, Payment Status, and Stylist Type. Click Apply to filter the results or Clear to reset them.
- In the Actions column, you can use the Assign Stylist to assign a stylist to a pending appointment, the Payment to process a manual payment, the view icon to see full appointment details, the edit to update the appointment information, or the delete to permanently remove it from the system.
- To assign a stylist, click the Assign Stylist on the relevant appointment. The Assign Stylist form will open, displaying the full Appointment Details, including the customer name, mobile number, service, preferred date and time, stylist type, and charges. Select a stylist from the Assign Stylist dropdown and click Assign Stylist to confirm.
- To process a payment, click the Payment on the relevant appointment. The Add Payment form will open, displaying the pre-filled Customer Name, Service, and Amount. Confirm the Payment Date, select the Bank Account, enter the Transaction ID, add optional Notes, and click Add Payment to complete the transaction. Once processed, the Payment Status for that appointment will update from Pending to Paid in the appointments list.
- When the payment is created, the Delete button is disabled, and a corresponding payment entry is created in the Payment section.
- On clicking the “Mark as Completed” button, the appointment status is updated to completed in the database.
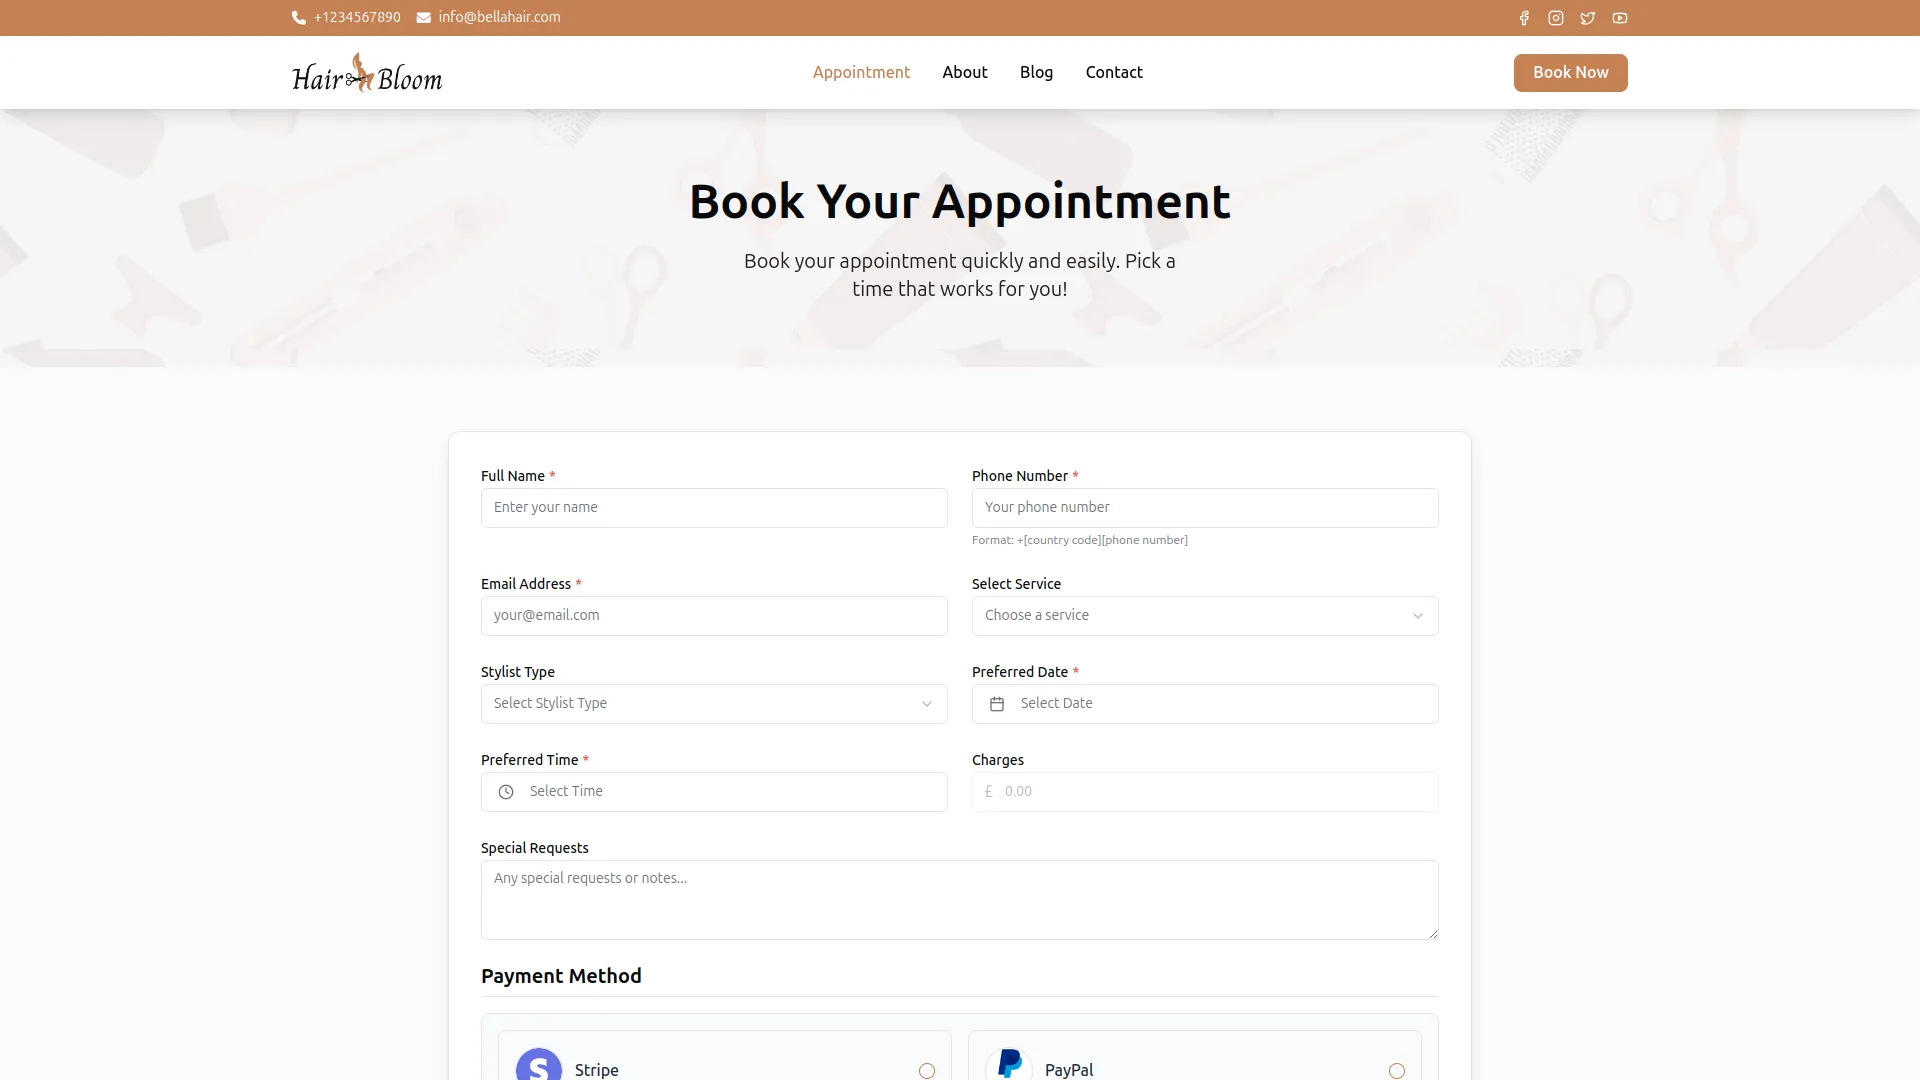
- Once an appointment is submitted through the website, it is automatically recorded and appears in the Manage Appointments section in the backend for the studio to review and manage. On the website, the Book Your Appointment page displays a booking form where visitors can fill in their Full Name, Phone Number, Email Address, Service, Stylist Type, Preferred Date, Preferred Time, Special Requests, and select their preferred Payment Method, Stripe or PayPal.
Manage Payments
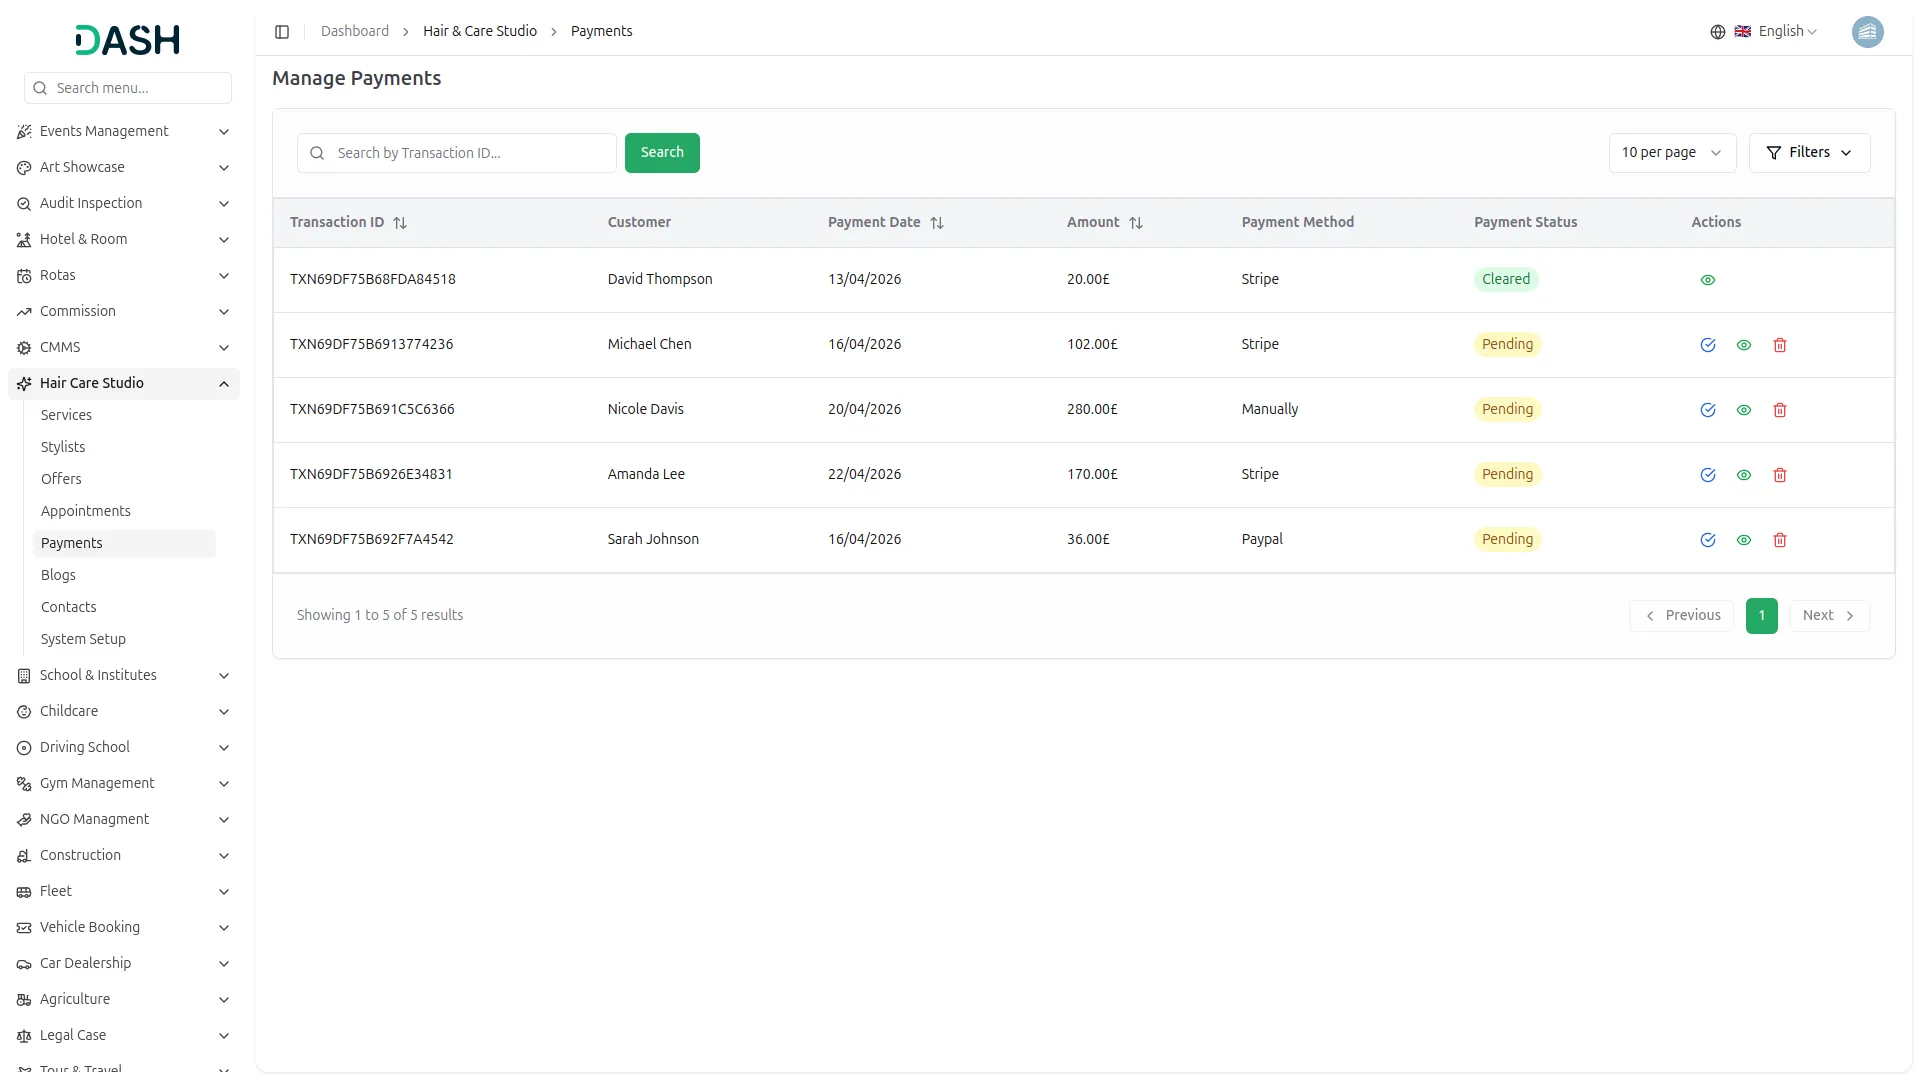
- The Manage Payments section provides a complete overview of all payment transactions recorded in the system. The list page displays a table of columns including the Transaction ID, Customer, Payment Date, Amount, Payment Method, and Payment Status.
- Use the search bar to find a specific payment by Transaction ID. Click the Filters button to filter payments by Payment Status and Payment Date Range. Click Apply to filter the results or Clear to reset them.
- In the Actions column, you can use the Mark as Cleared to manually update a pending payment’s status to cleared, view to see the full payment details, or delete to permanently remove the transaction from the system. The Mark as Cleared and delete options are only available for payments with a Pending status.
- When the user clicks “Mark as Cleared” in the Payment section, the system updates the transaction status from Pending to Cleared in the payments list, reflects the same updated payment status for the related appointment in the Manage Appointments section, and makes the “Mark as Completed” action available in the Appointment section.
Manage Blogs
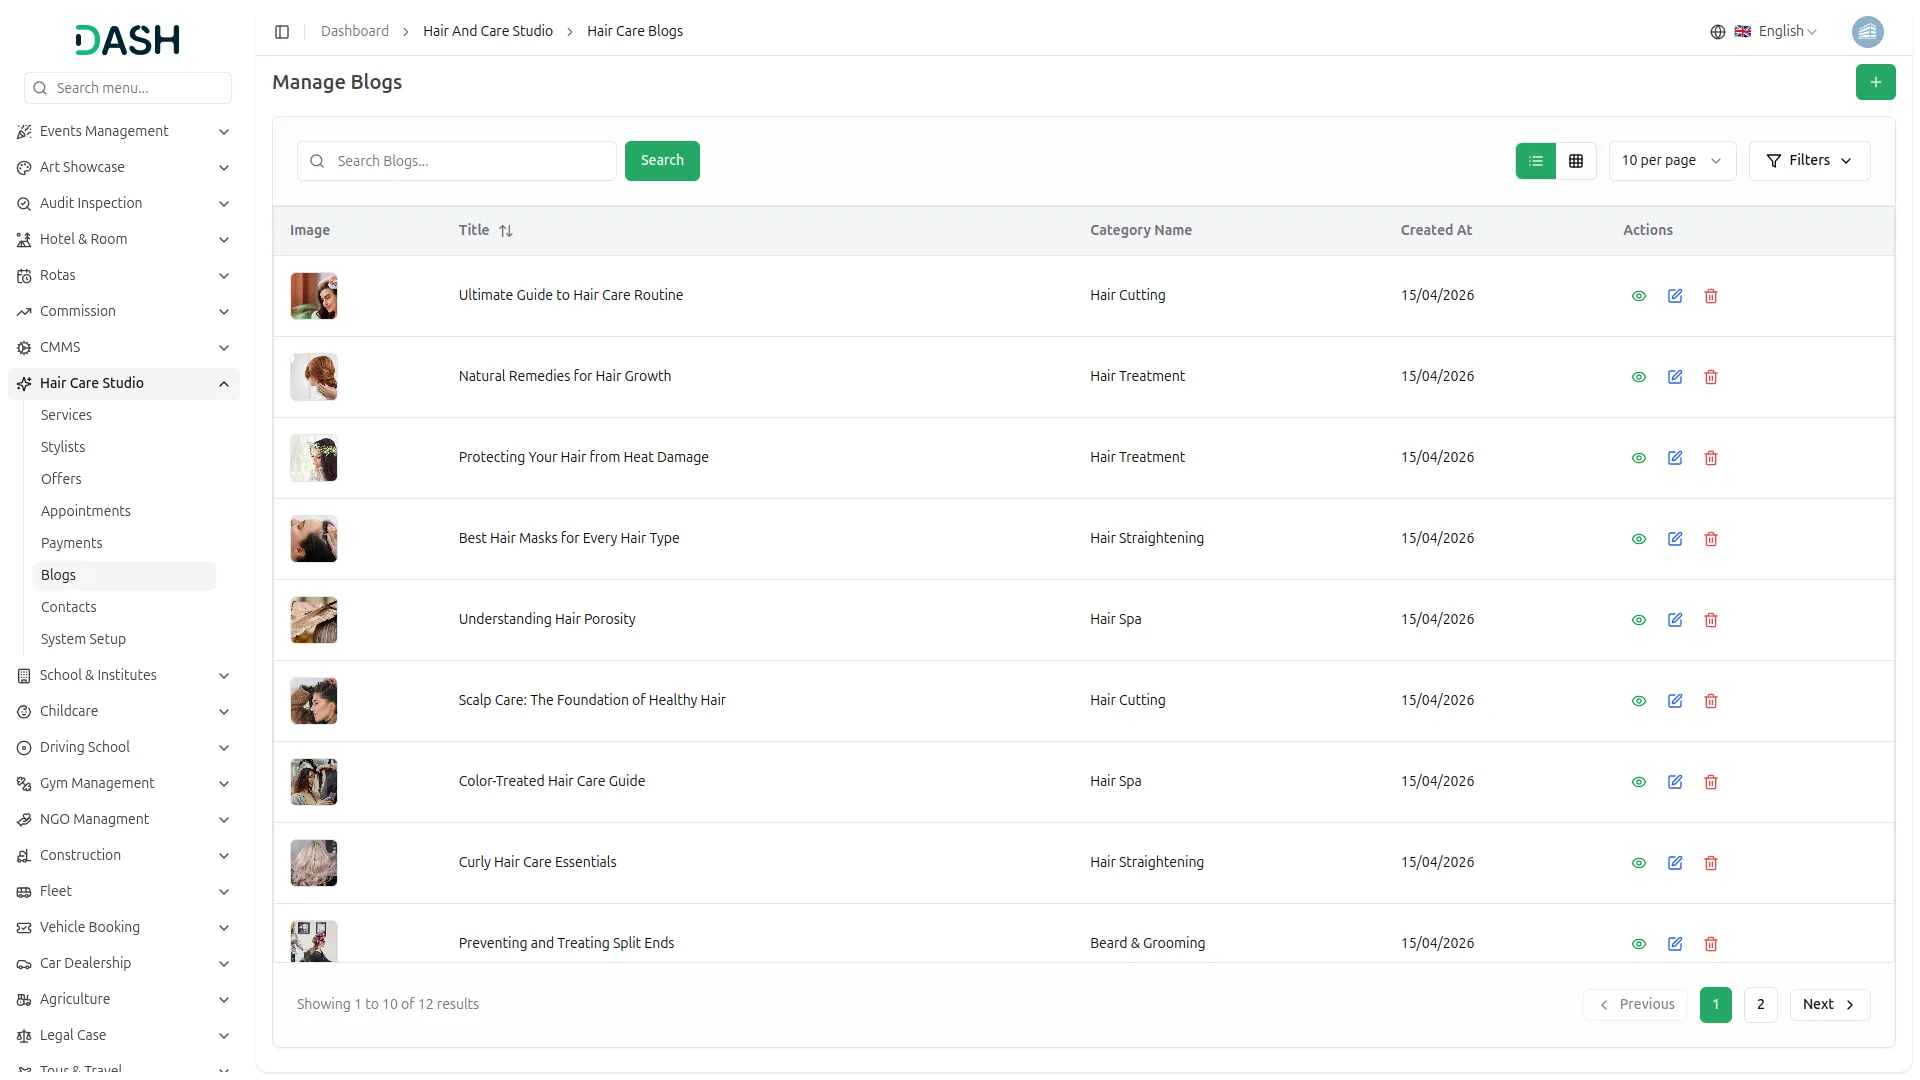
- To add a new blog post, click the “Create” button located on the Manage Blogs page. In the Create Blog form, enter the blog Title and the URL Slug (lowercase letters and hyphens only).
- Select the Category from the dropdown and upload a blog Image using the Browse button. Enter a short Description for the blog preview, then write the full blog Content using the rich text editor. In the Tips section, enter individual tips by filling in each Tip field. To add more tips, click the “Create” Add Tip button.
- The list page displays a table of columns including the blog Image, Title, Category Name, and Created At date. Use the search bar to find a specific blog by title. Click the Filters button to filter blogs by Category. Click Apply to filter the results or Clear to reset them. You can also toggle between list view and grid view using the view options at the top right.
- In the Actions column, you can use the view icon to see the full blog post, the edit icon to update the blog content, or the delete icon to permanently remove it from the system.
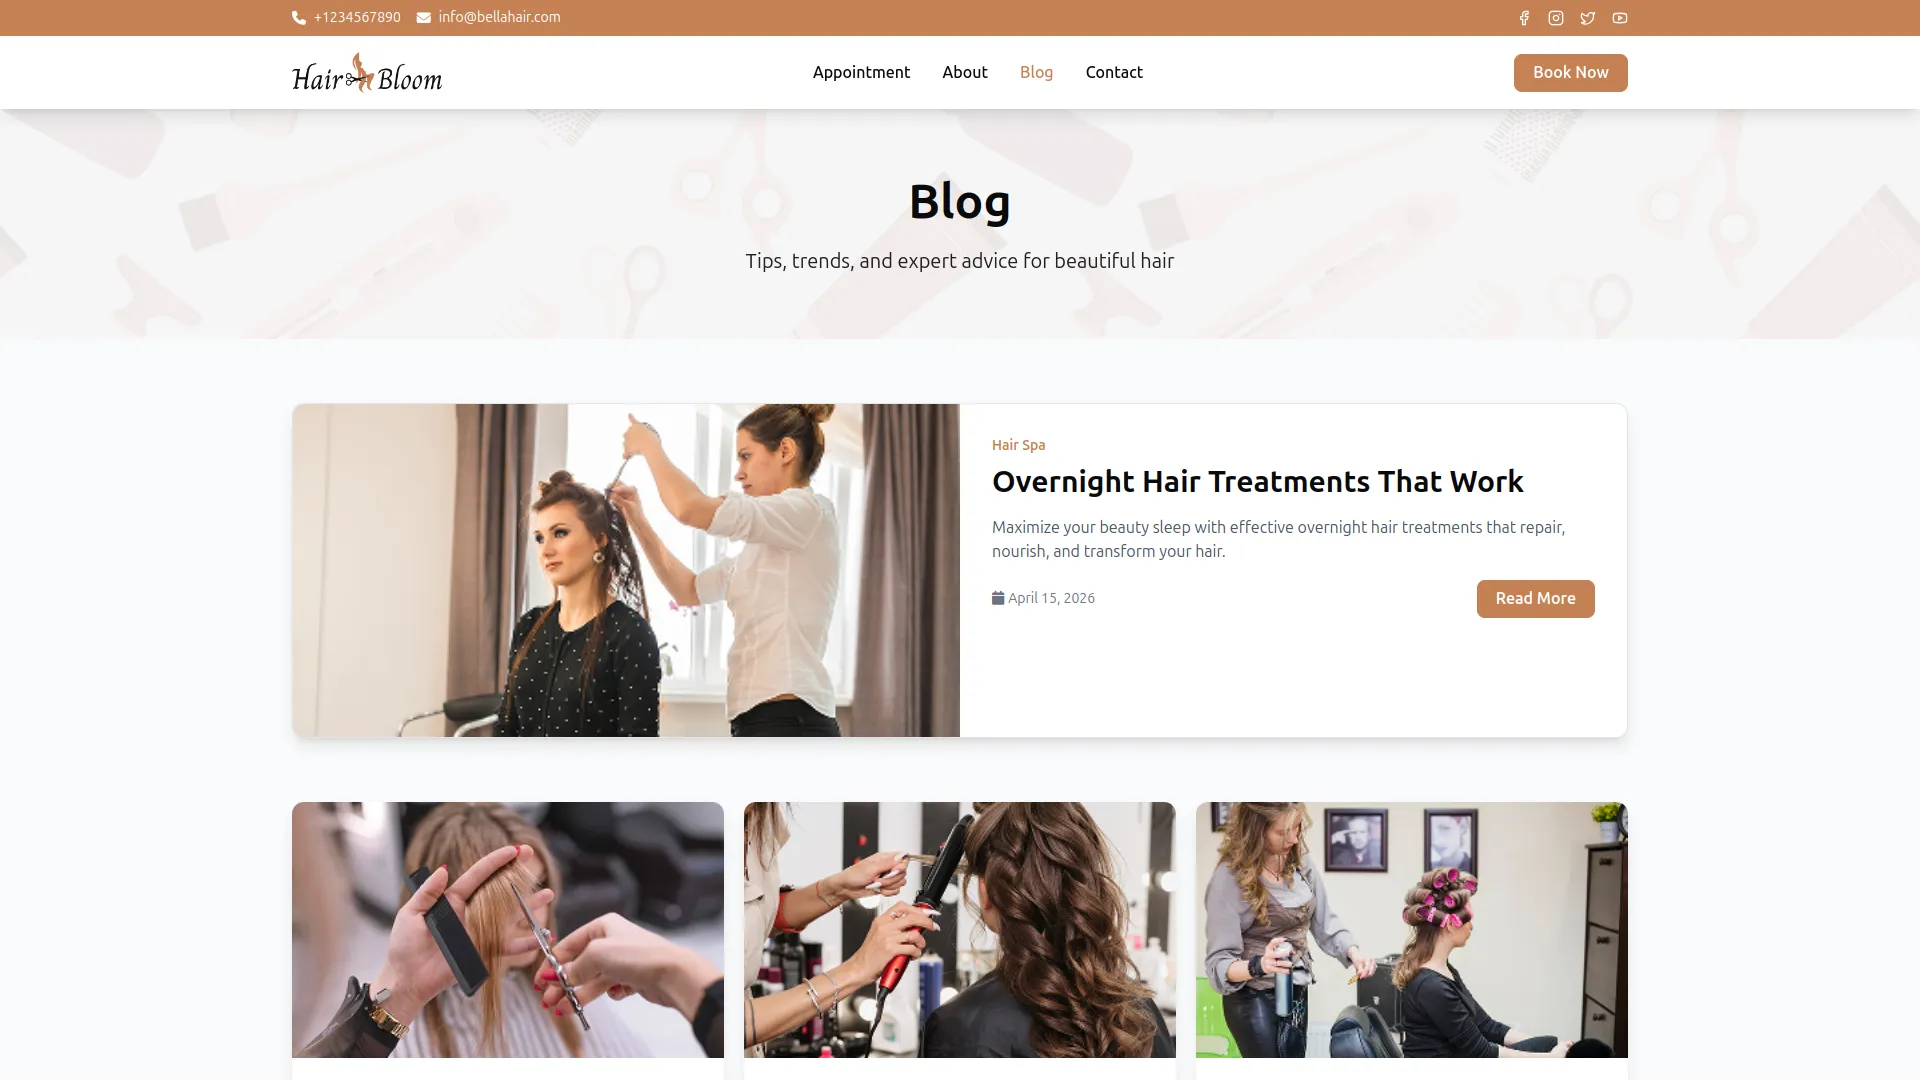
- Once saved, each blog post will appear as a blog card on the Blog page of the website, displaying the blog image, category label, title, short description, publication date, and a Read More button. The most recently added blog post will be featured as the large highlighted card at the top of the Blog page, giving it greater visibility to website visitors.
Manage Contacts
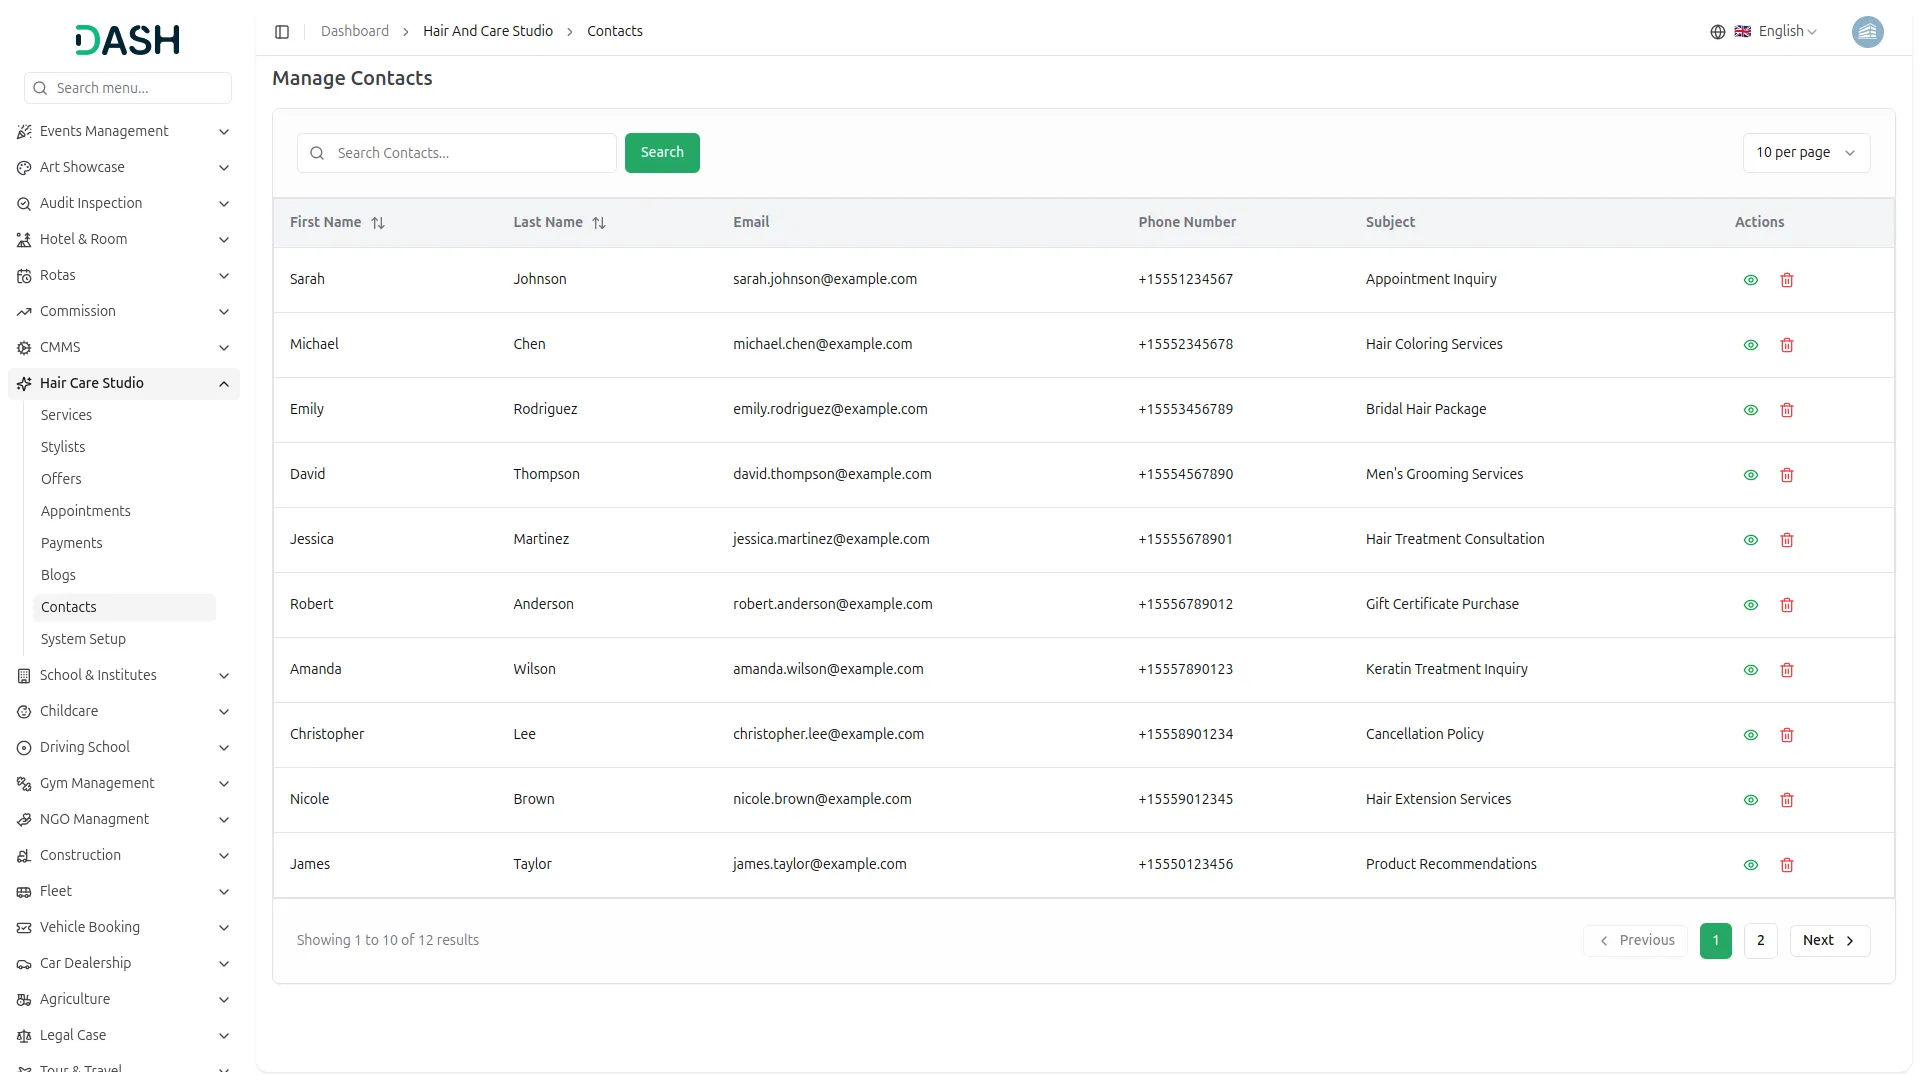
- The Manage Contacts section displays all messages submitted by visitors through the Contact Us page on the website. The list page shows a table of columns including the First Name, Last Name, Email, Phone Number, and Subject of each inquiry. Use the search bar to find a specific contact by name or details.
- In the Actions column, you can use the view icon to read the full message submitted by the visitor, or the delete icon to permanently remove the contact entry from the system.
- Every message submitted through the Send Us a Message form on the Contact page, including the visitor’s first name, last name, email address, phone number, subject, and message- is automatically recorded and appears here in the Manage Contacts section for the studio to review and respond to.
Categories
Related articles
- Google Authentication – BookingGo SaaS Add-On Guide
- WizzChat – eCommerceGo SaaS Add-On Guide
- Shopify Sync – WorkDo Dash SaaS Add-On Guide
- Cashfree – WorkDo Dash SaaS Add-On Guide
- Email Box – WorkDo Dash SaaS Add-On Guide
- Mailchimp – WorkDo Dash SaaS Add-On Guide
- Office Equipment Management – WorkDo Dash SaaS Add-On Guide
- Newspaper Distribution Management – WorkDo Dash SaaS Add-On Guide
- Dairy Cattle Management – WorkDo Dash SaaS Add-On Guide
- Resume Builder – WorkDo Dash SaaS Add-On Guide
- Notice Board – WorkDo Dash SaaS Add-On Guide
- Service Slot Scheduler – BookingGo SaaS Add-On Guide
We're Here to Help - Let's Talk
Have questions about our solutions, customization services, or business tools? Our team is here to help you. let's talk.