
CRM – WorkDo Dash SaaS Add-On Guide
Manage pipelines, leads, deals, customer relationships, and sales workflows.
Introduction
The CRM Add-On is a simple and efficient system for managing your entire sales and marketing process in one place. It helps you set up pipelines, track leads, and convert them into deals with ease. You can manage tasks, calls, files, and team members linked to each lead and deal. The reports section gives you a clear overview of lead and deal performance over time. Overall, it helps you stay organized and improve your sales workflow.
How to Use The CRM Add-On?
CRM Dashboard
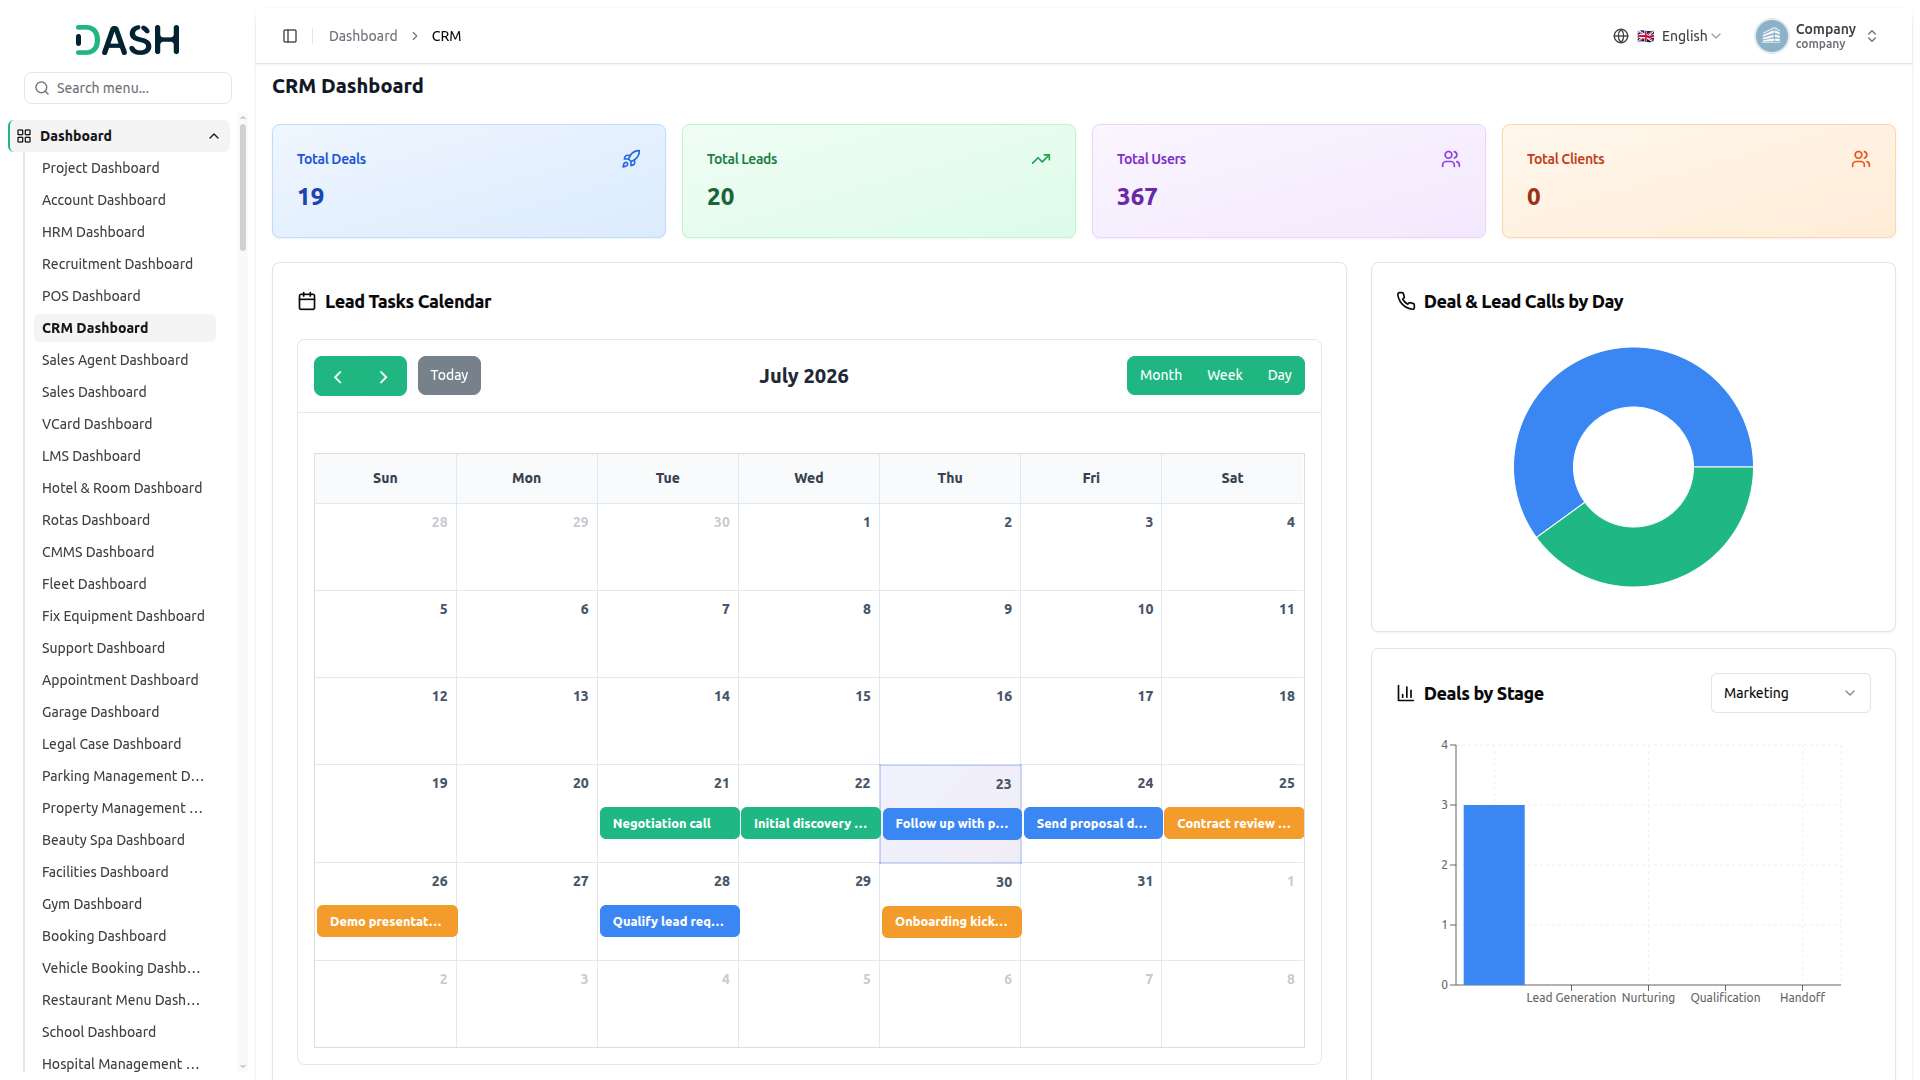
- The CRM Dashboard gives a company-wide overview of your sales and lead activity through a set of summary cards, panels, and a calendar.
- Four cards across the top summarize key metrics, and each card is clickable, taking you straight to its related page for a closer look: Total Deals opens the Deals page, Total Leads opens the Leads page, Total Users opens the Users page, and Total Clients opens the Clients page.
- The Lead Tasks Calendar displays upcoming lead-related tasks as colored bars on a calendar. You can move between periods using the arrows and the “Today” button or switch between Month, Week, and Day views.
- The Deal & Lead Calls by Day panel shows a donut chart summarizing calls made across deals and leads.
- The Deals by Stage panel shows a bar chart of deal counts across each stage (Qualification, Meeting, Proposal, and Close), with a dropdown to switch the view (e.g. Sales).
- The Recently Created Deals panel lists the latest deals, each showing the deal name, its stage (e.g. Proposal, Meeting), and the date created. The Recently Created Leads panel lists the latest leads, each showing the lead name, a short description, and the date created.
System Setup
Pipelines
- To create a new Pipeline, click the “Create” button. You need to enter details such as the Name of the pipeline.
- The Pipelines page under System Setup displays all configured pipelines used across the CRM, with each record showing the Pipeline Name and the action column providing options to edit the pipeline details or delete the pipeline.
Lead Stages
- To create a new Lead Stage, click the “Create” button, which will open the Create Lead Stage form. In this form, you need to enter the Name of the stage and select the Pipeline from the dropdown.
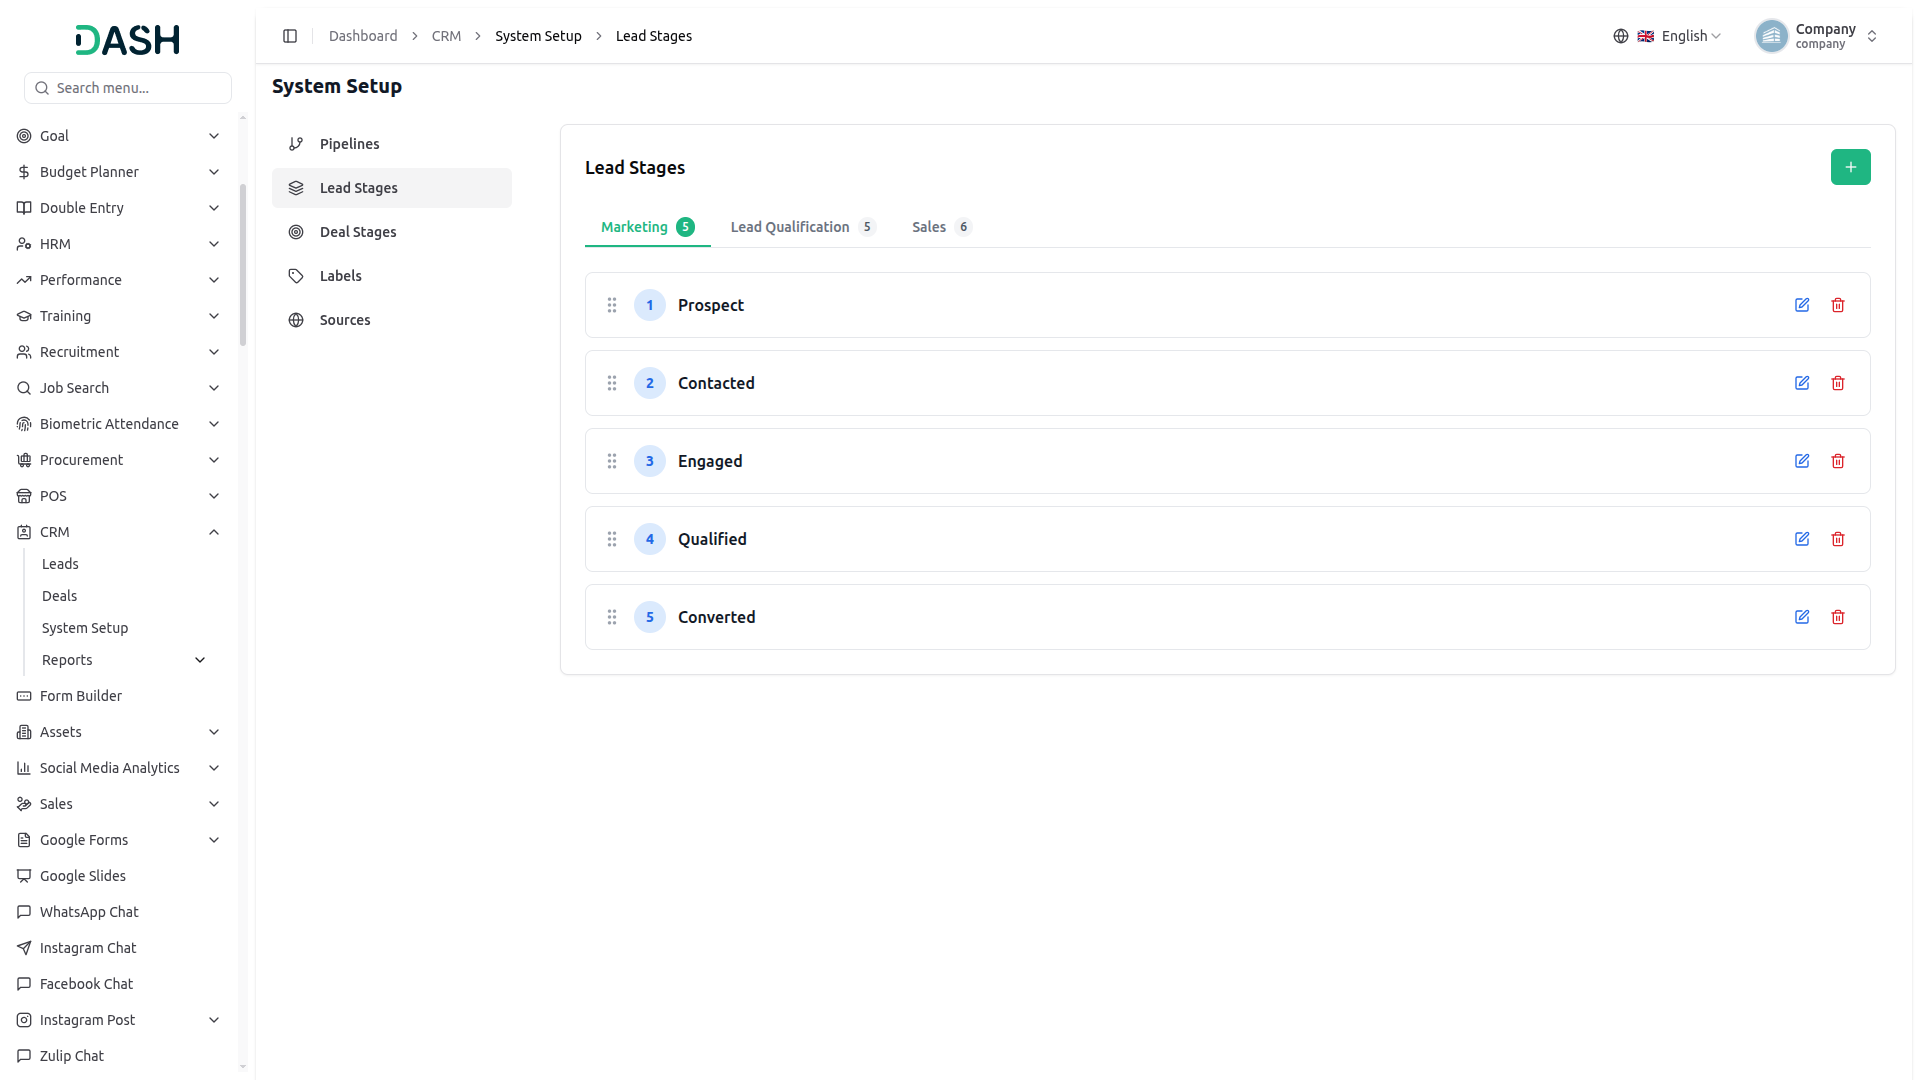
- The Lead Stages page displays all stages used to track lead progression within each pipeline. Stages are organized by multiple pipeline tabs, each showing the total count of stages. Each record shows the stage number and Stage Name. In the action column, use the edit option to modify the details or the delete option to remove the stage.
Deal Stages
- To create a new Deal Stage, click the “Create” button, which will open the Create Deal Stage form. In this form, you need to enter the Name of the stage and select the Pipeline from the dropdown.
- The Deal Stages page displays all stages used to track deal progression within each pipeline. Stages are organized by multiple pipeline tabs, each showing the total count of stages. Each record shows the stage number and Stage Name. In the action column, use the edit option to modify the details or the delete option to remove the stage.
Labels
- To create a new Label, click the “Create” button, which will open the Create Label form. In this form, you need to enter the Name, select the Pipeline from the dropdown, and choose a Color using the color picker. Click “Preview” to see how the label will appear before saving. The selected color will be displayed as a label alongside the name.
- The Labels page displays all labels used to tag and categorize leads and deals within each pipeline. Labels are organized by multiple pipeline tabs, each showing the total count. Each record shows the color indicator and Label Name. In the action column, use the edit option to modify the details or the delete option to remove the label.
Sources
- To create a new Source, click the “Create” button, which will open the Create Source form. In this form, you need to enter the Name of the source.
- The Sources page displays all lead source channels used to track where leads originate. Each record shows the Source Name. In the action column, use the edit option to modify the details or the delete option to remove the source.
Manage Leads
- To add a new lead, click the “Create” button on the lead page. Enter the lead’s Name, Email, Subject, and choose to assign a User from the dropdown (populated from the user management). You can also add a Phone No and set a Follow Up Date.
- The list page displays all Leads with column details, including Name, Subject, Assigned Users, Tasks, Follow-Up Date, Current Stage of the lead, and Actions. The Follow Up Date is shown in red when the date is earlier than the current date (i.e., when it is overdue).
- Use the search bar to find specific leads, and apply filters by User, Stage, and a Follow-Up Date Range using the filter dropdowns, then click “Apply” to filter or “Clear” to reset.
- Use the pipeline dropdown at the top right to switch between pipelines. When you select a pipeline, the system will display only the data related to that specific pipeline. The page can also be toggled to Kanban View using the view switcher button.
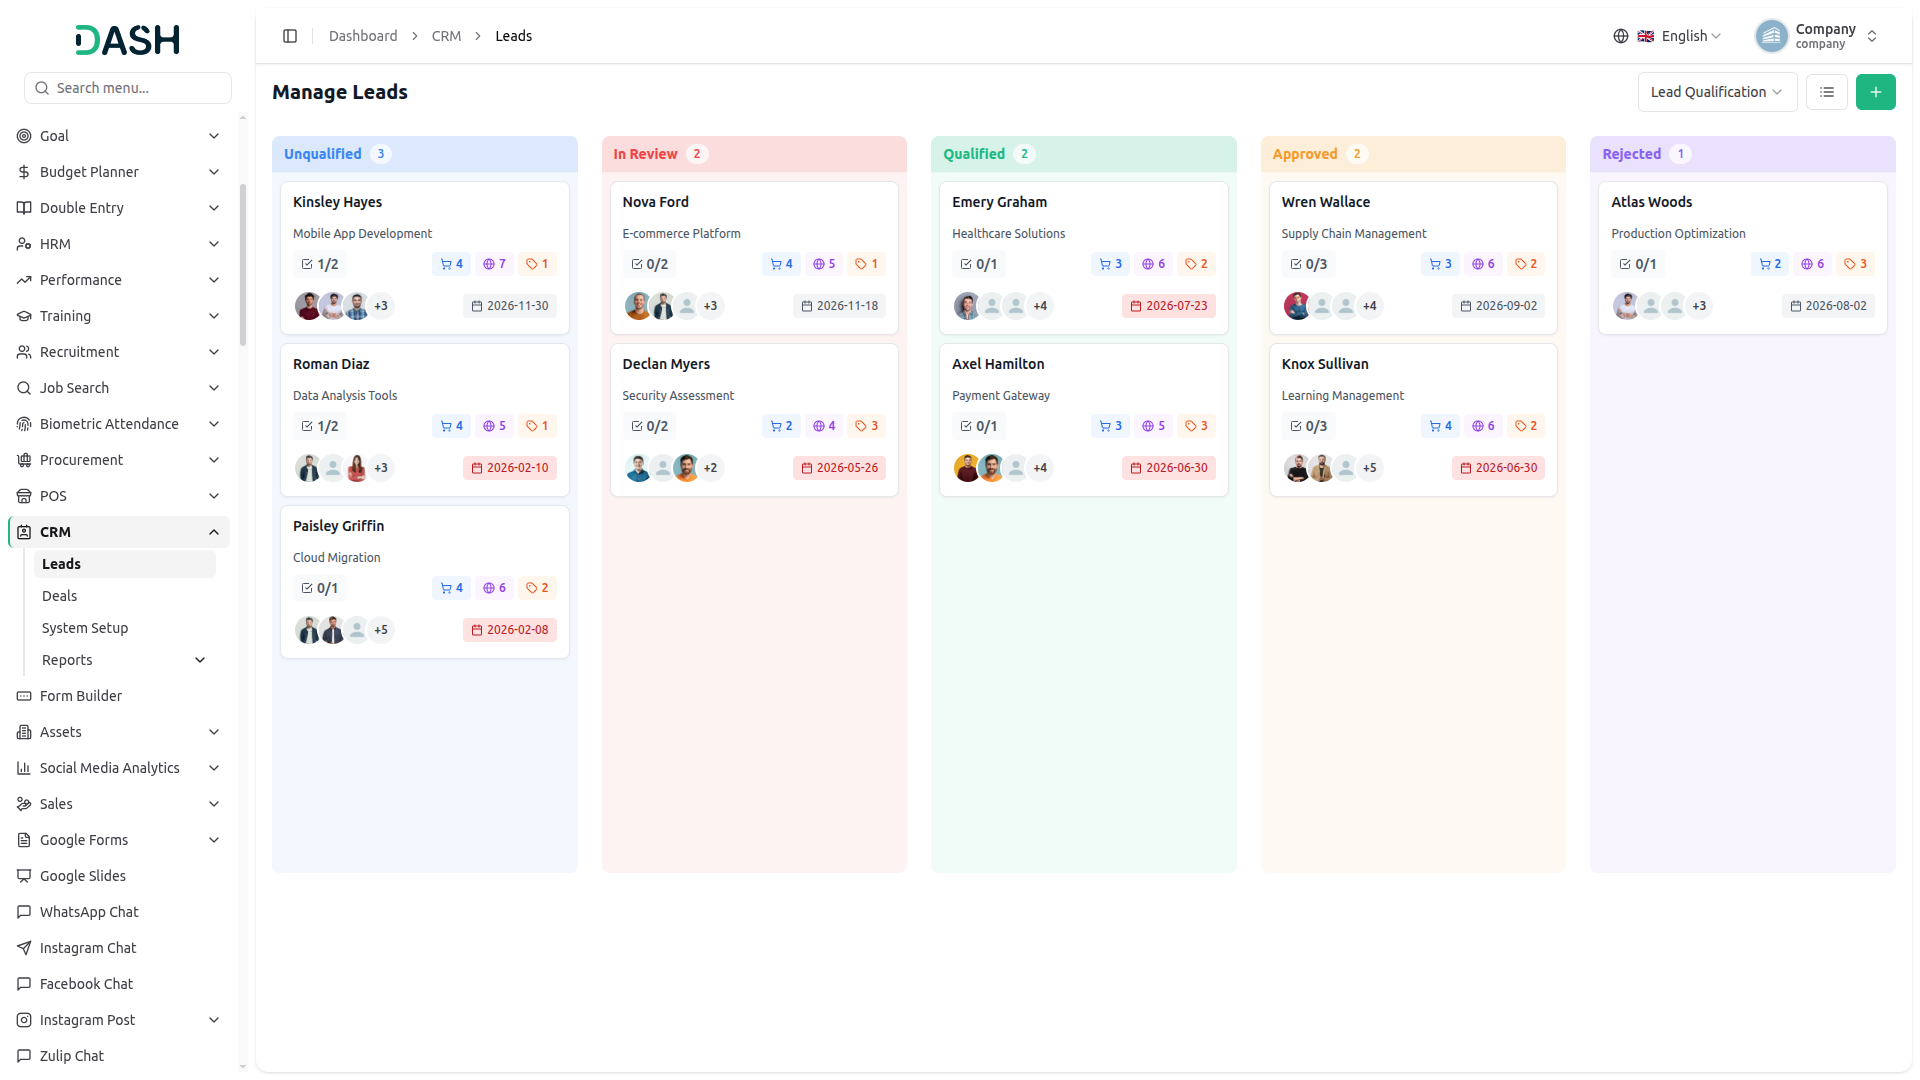
- When you click the Kanban view button, this view shows your leads as cards arranged in columns based on their stage. Each card has small actions and counters you can use. Additionally, you can use the pipeline dropdown to switch between pipelines, the list view option, or the Create Lead option.
- On each lead card, you can click the three-dot menu to View, Edit, or Delete the lead. If you hover over the products counter, you can see the products linked to that lead. If you hover over the source counter, you can see where the lead came from. Leads can be moved between stages by dragging and dropping a card from one column to another.
- In the action column of a list page, use the “Convert to Deal” button to convert the lead into a deal, the “label” button to assign labels to the lead, the “view” button to open Lead Details, the “edit” button to modify the lead, or the “delete” button to remove it.
- Once a lead has been converted, the Convert to Deal button is replaced with a checkmark and an “Already Converted to Deal” indicator, showing that the lead cannot be converted again.
- When you click the “Label” button in a lead’s Actions column, it opens the Lead Labels window, which shows the lead’s name and a counter of how many labels are currently selected.
- Tick the checkboxes to apply the labels configured in system setup. Click “Assign” to apply the selected labels or “Cancel” to close without changes.
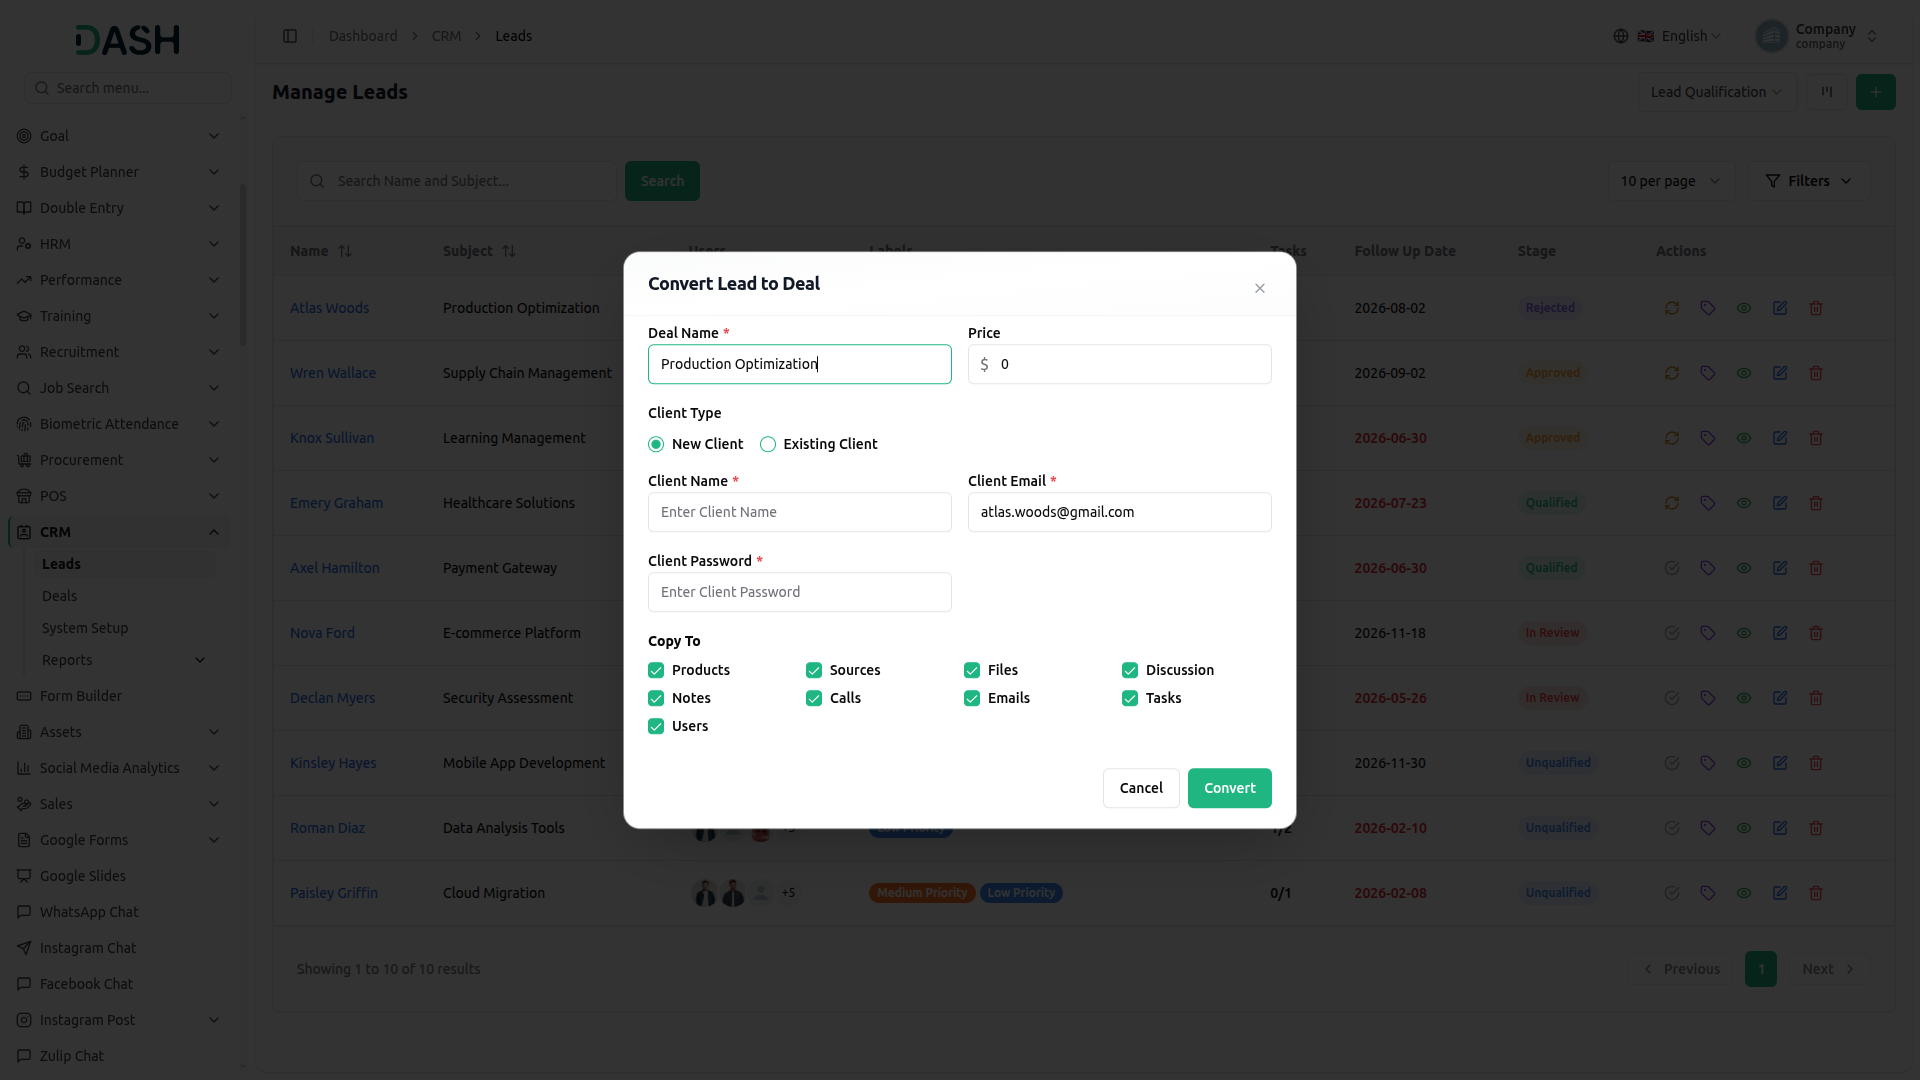
- When you click the “Convert to Deal” button, the Convert Lead to Deal window appears. Enter a Deal Name, which is pre-filled from the lead’s subject, and you can set the deal Price here.
- Under Client Type, choose “New Client” to create a fresh client record or “Existing Client” to link an existing one by using the ratio button. For a new client, enter the Client Name, Client Email, and Client Password. The email is carried over from the lead automatically.
- Use the Copy To checkboxes to select which lead data should be copied to the new deal, including Products, Sources, Files, Discussions, Notes, Calls, Emails, Tasks, and Users. Click Convert to create the deal, or Cancel to close the window without converting the lead.
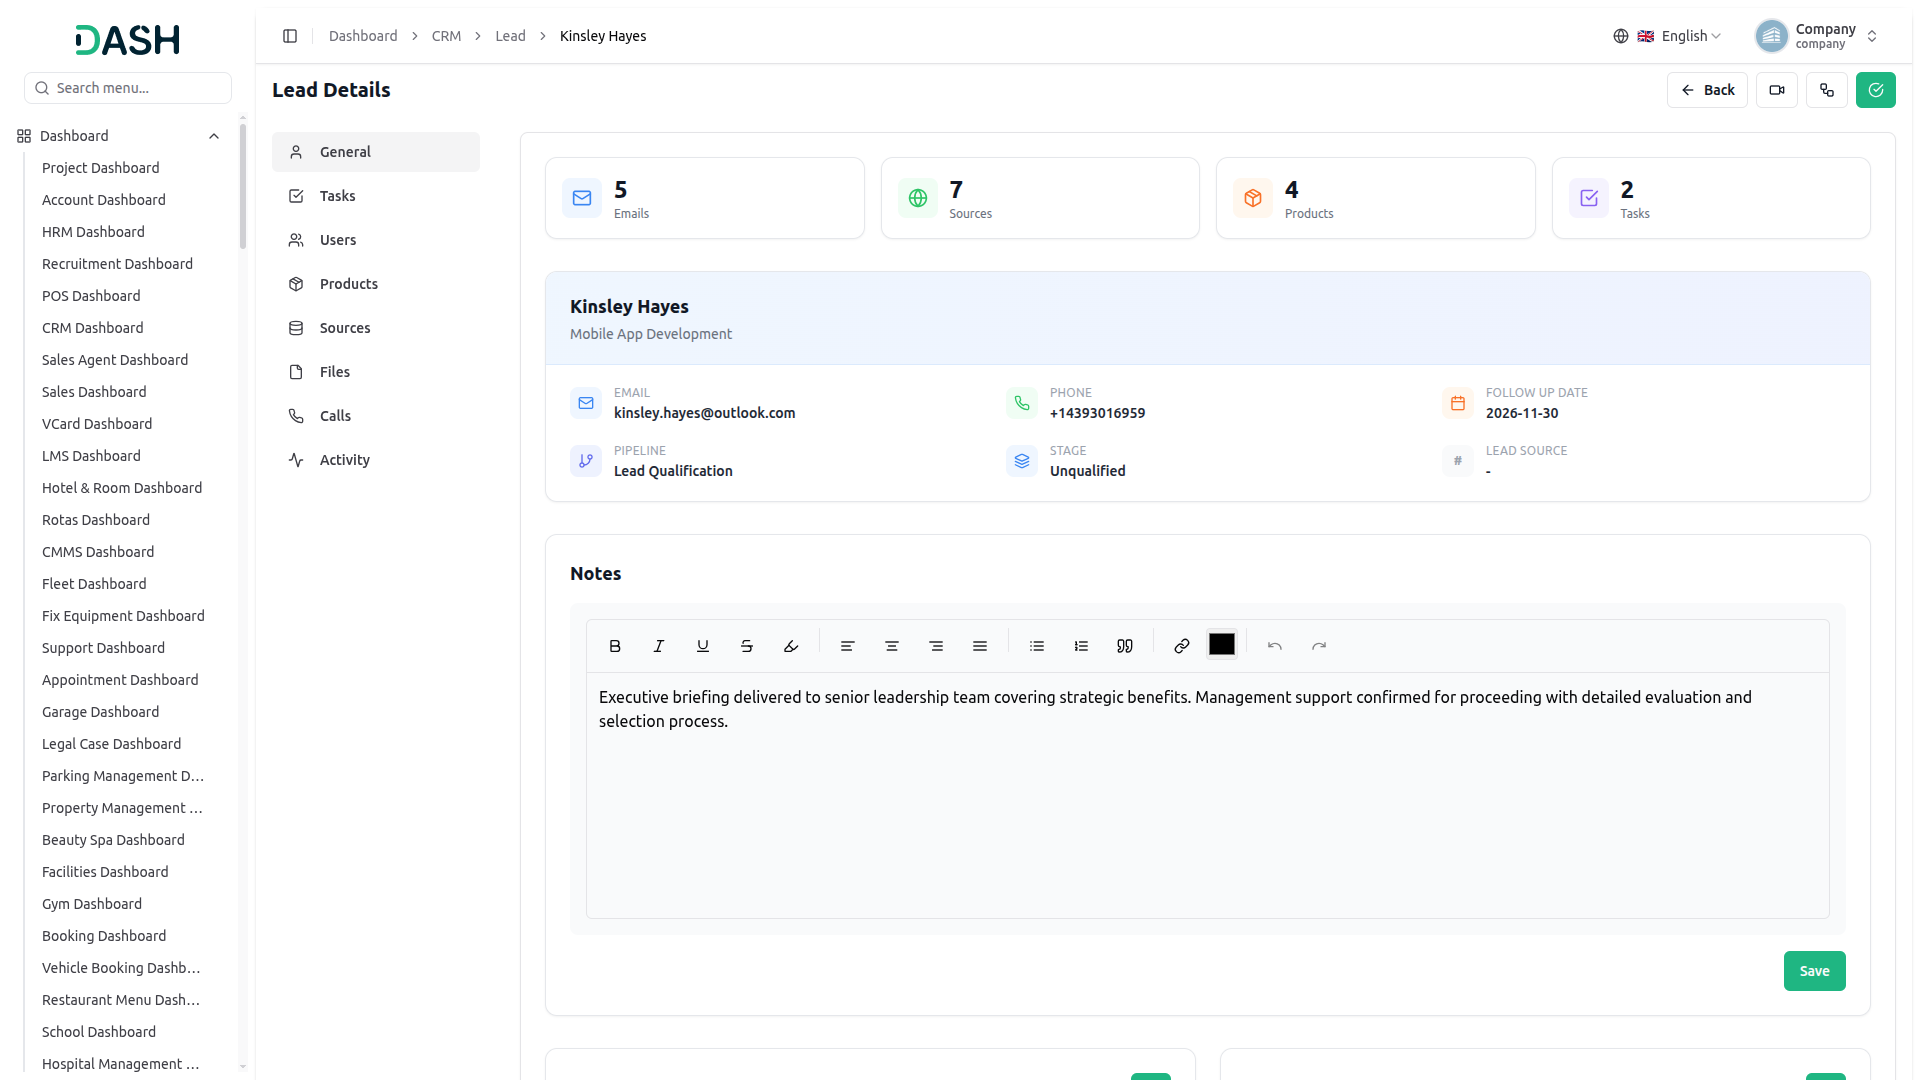
- When you click the “View” button, it opens the Lead Details page. The left sidebar gives quick access to the General, Tasks, Users, Products, Sources, Files, Calls, and Activity sections.
Lead Details
General
- The General tab opens with summary cards showing the number of Emails, Sources, Products, and Tasks linked to the deal. Below these, the deal header displays its name (marked “From Lead”) along with the Price, Phone, Creator, Pipeline, and Stage. Use the status dropdown at the right of the header to update the deal’s status, such as “Active”.
- The Notes section provides a rich text editor where you can record details about the deal. Click “Save” to store your notes.
- Click the “Create” button to open the Send Email window, enter the recipient in the To field, a Subject, and a Description, then click “Send Email”. The Emails section lists every email logged against the deal, showing the recipient address, date and time, subject, and a short preview.
- Click the “Create” button to open the Add Message window, type your message, and click “Save”. The Discussions section records internal notes and conversations, each showing the author, date and time, and message.
Tasks
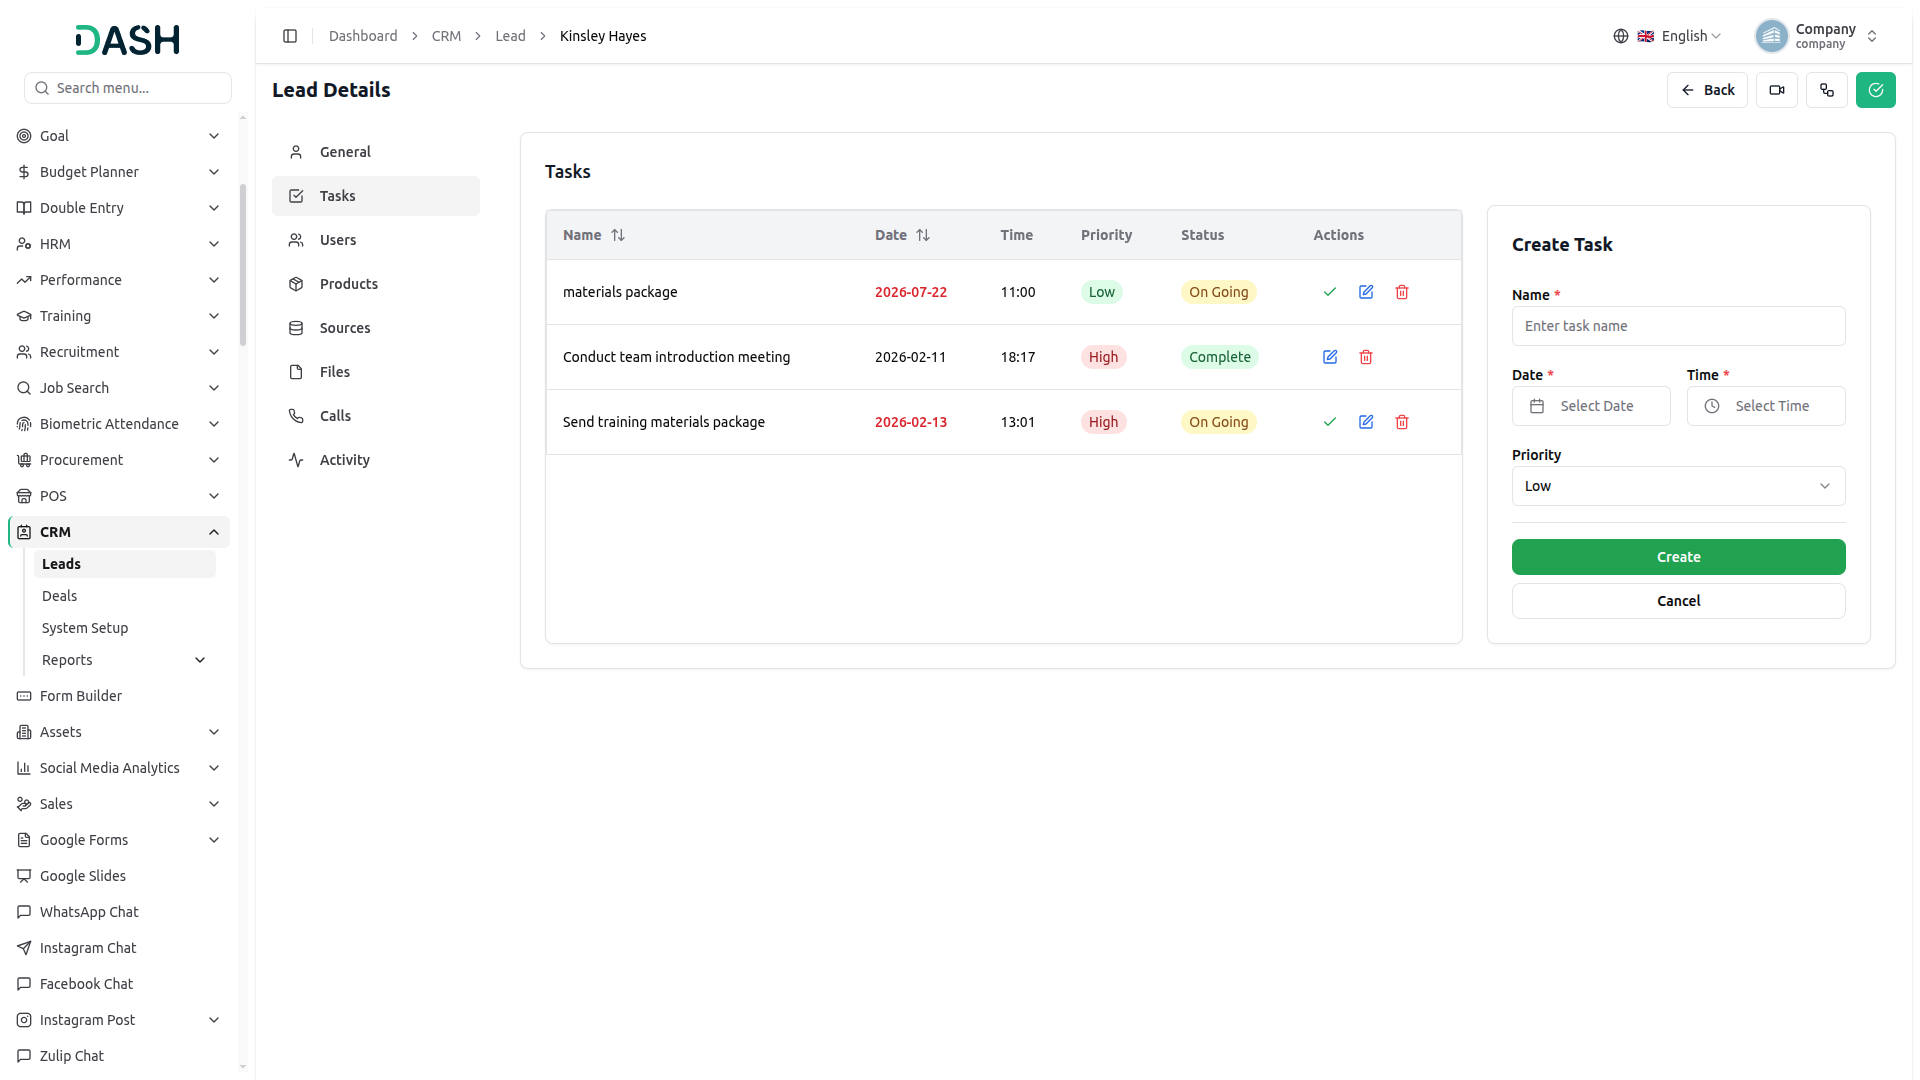
- The Tasks tab under Lead Details is split into two parts: a list of existing tasks on the left and a Create Task form on the right, so you can view and add tasks without switching screens.
- To add a new task, simply enter a Name and pick a Date and optionally choose a Time. Select how urgent it is from the Priority dropdown (Low, Medium, or High).
- Created tasks are automatically set to Ongoing. Once finished, click Complete in the Actions column to mark the task as complete.
- All tasks linked to the lead appear in the table on the left, showing the task’s Name, Date, Time, Priority, and current Status. You can sort tasks by Name or Date using the arrow icons next to those column headers.
- Each task also has a quick action button: click the ‘Complete’ to mark the task as Complete, the ‘Edit’ to update the task details, or the ‘Delete’ to remove it.
Users
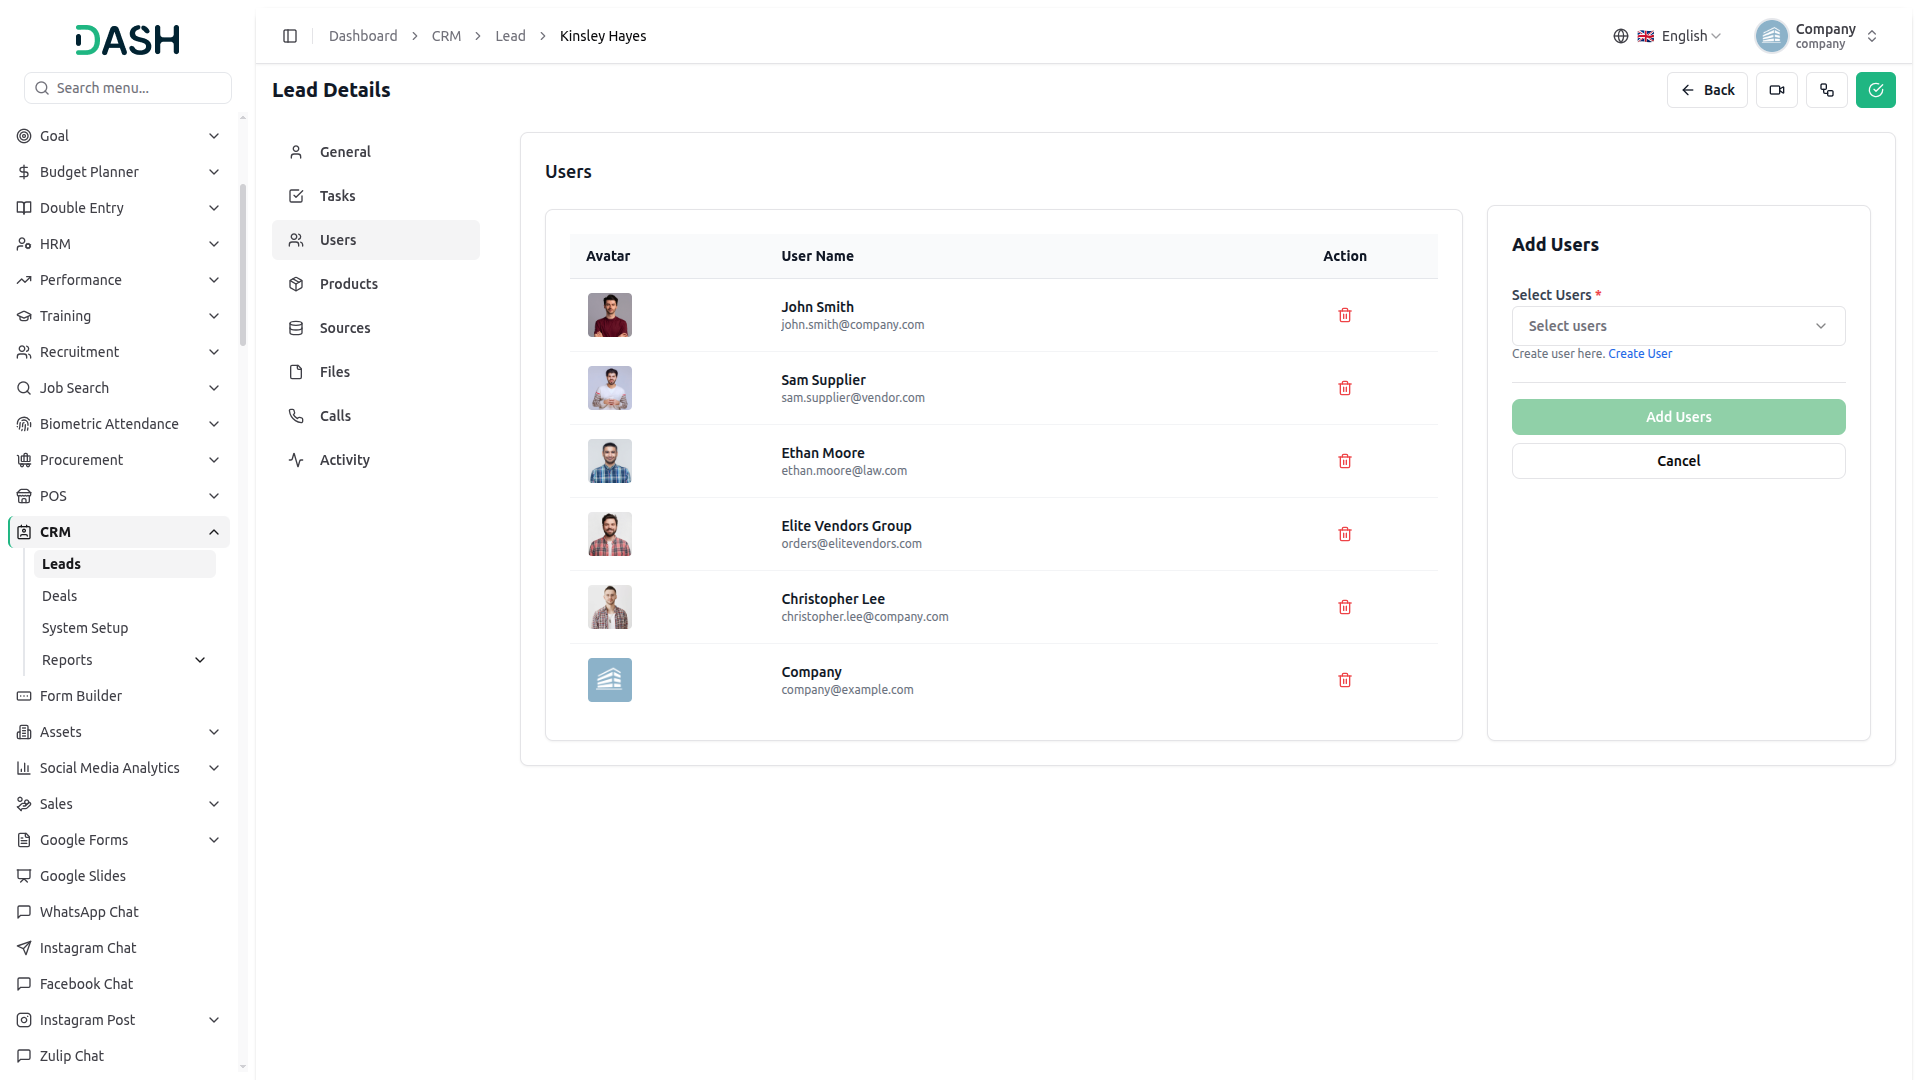
- The Users tab under Lead Details is split into two parts: a list of users linked to the lead on the left and an Add Users form on the right, so you can view and assign users without switching screens.
- To add a user, select one or more from the Select Users dropdown (comes from the user management section), then click Add Users to link them to the lead, or Cancel to close the form without changes. If the user doesn’t exist yet, click Create User to add them first.
- All users linked to the lead appear in the table on the left, showing their Avatar, User Name, and email address. Each user also has a quick action button: click Delete to remove them from the lead.
Products
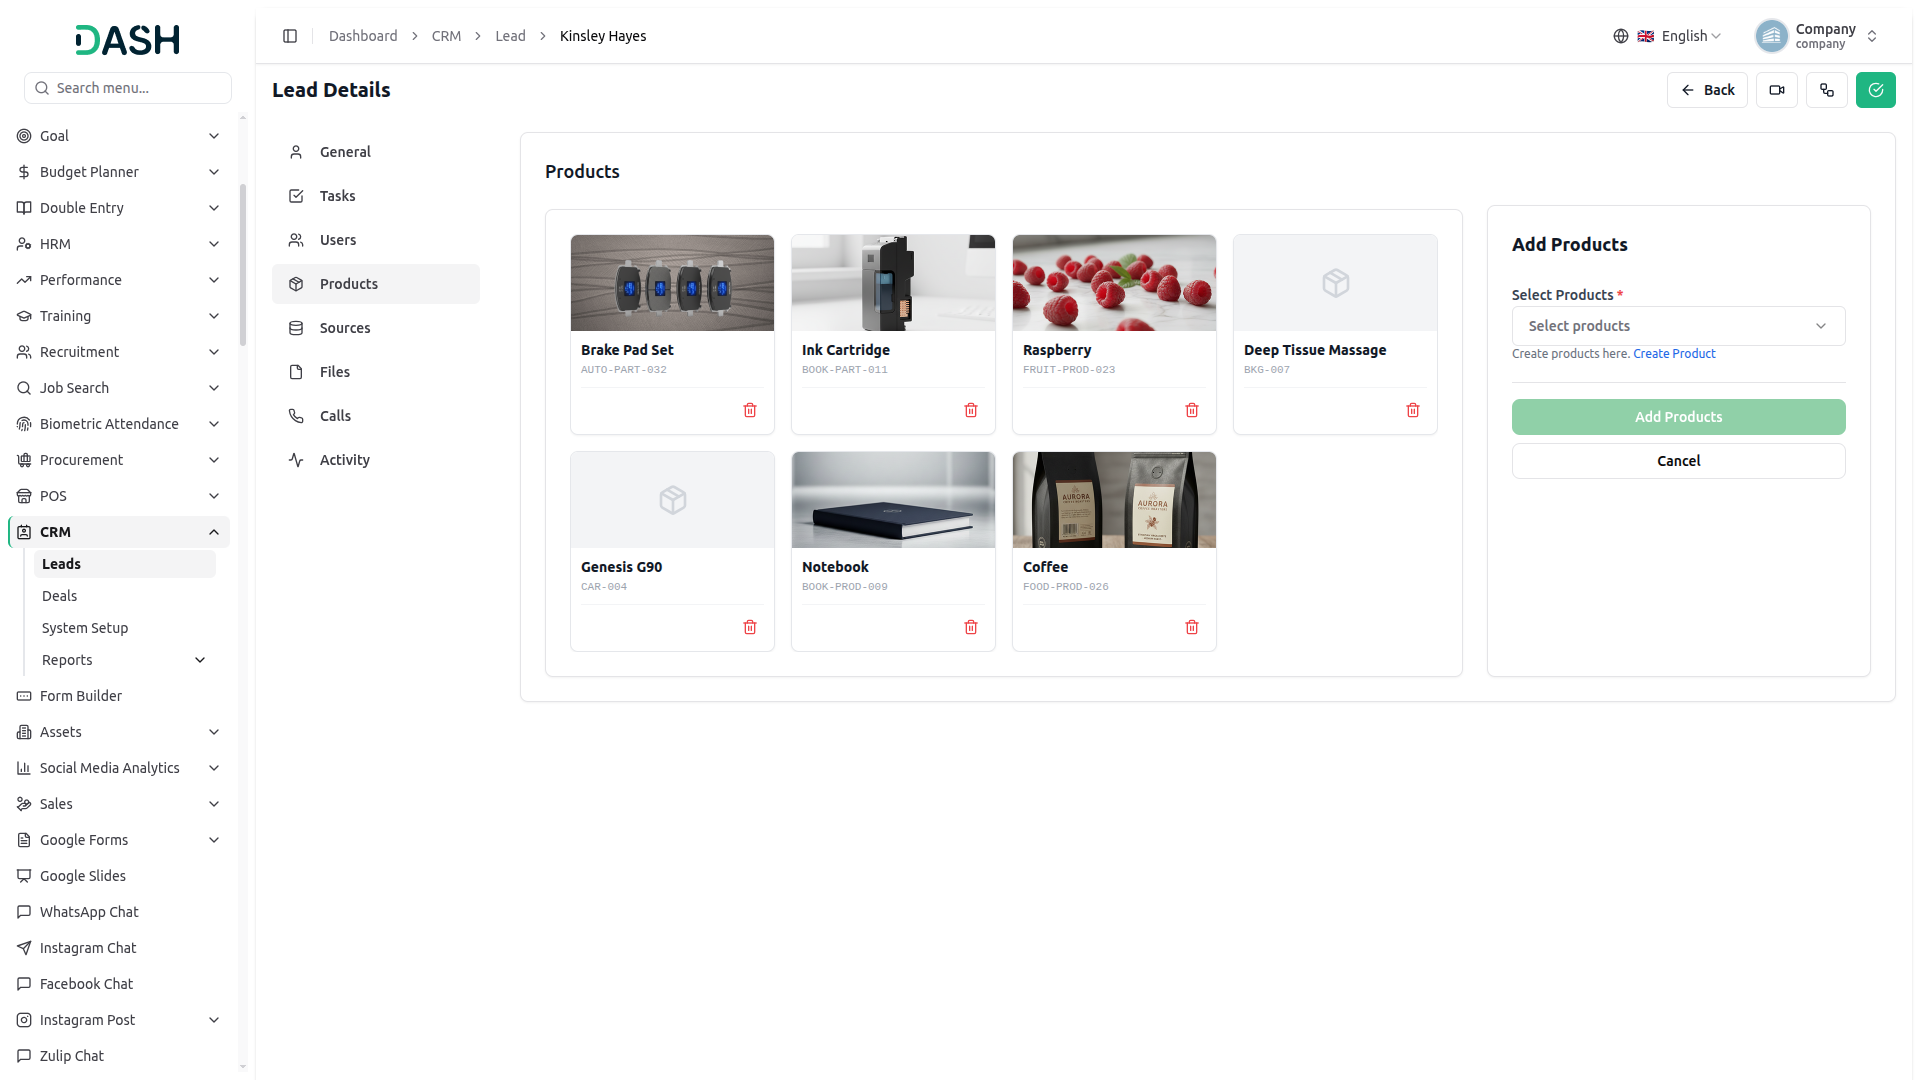
- The Products tab under Lead Details is split into two parts: a card view of products linked to the lead on the left and an Add Products form on the right, so you can view and assign products without switching screens.
- To add a product, select one or more from the Select Products dropdown (these products are pulled from Products & Services), then click Add Products to link them to the lead, or Cancel to close the form without changes. If the product doesn’t exist yet, click Create Product to add it first.
- All products linked to the lead appear as cards on the left, showing the product’s Image, Name, and SKU/code. Each product card also has a quick action button: click Delete to remove it from the lead.
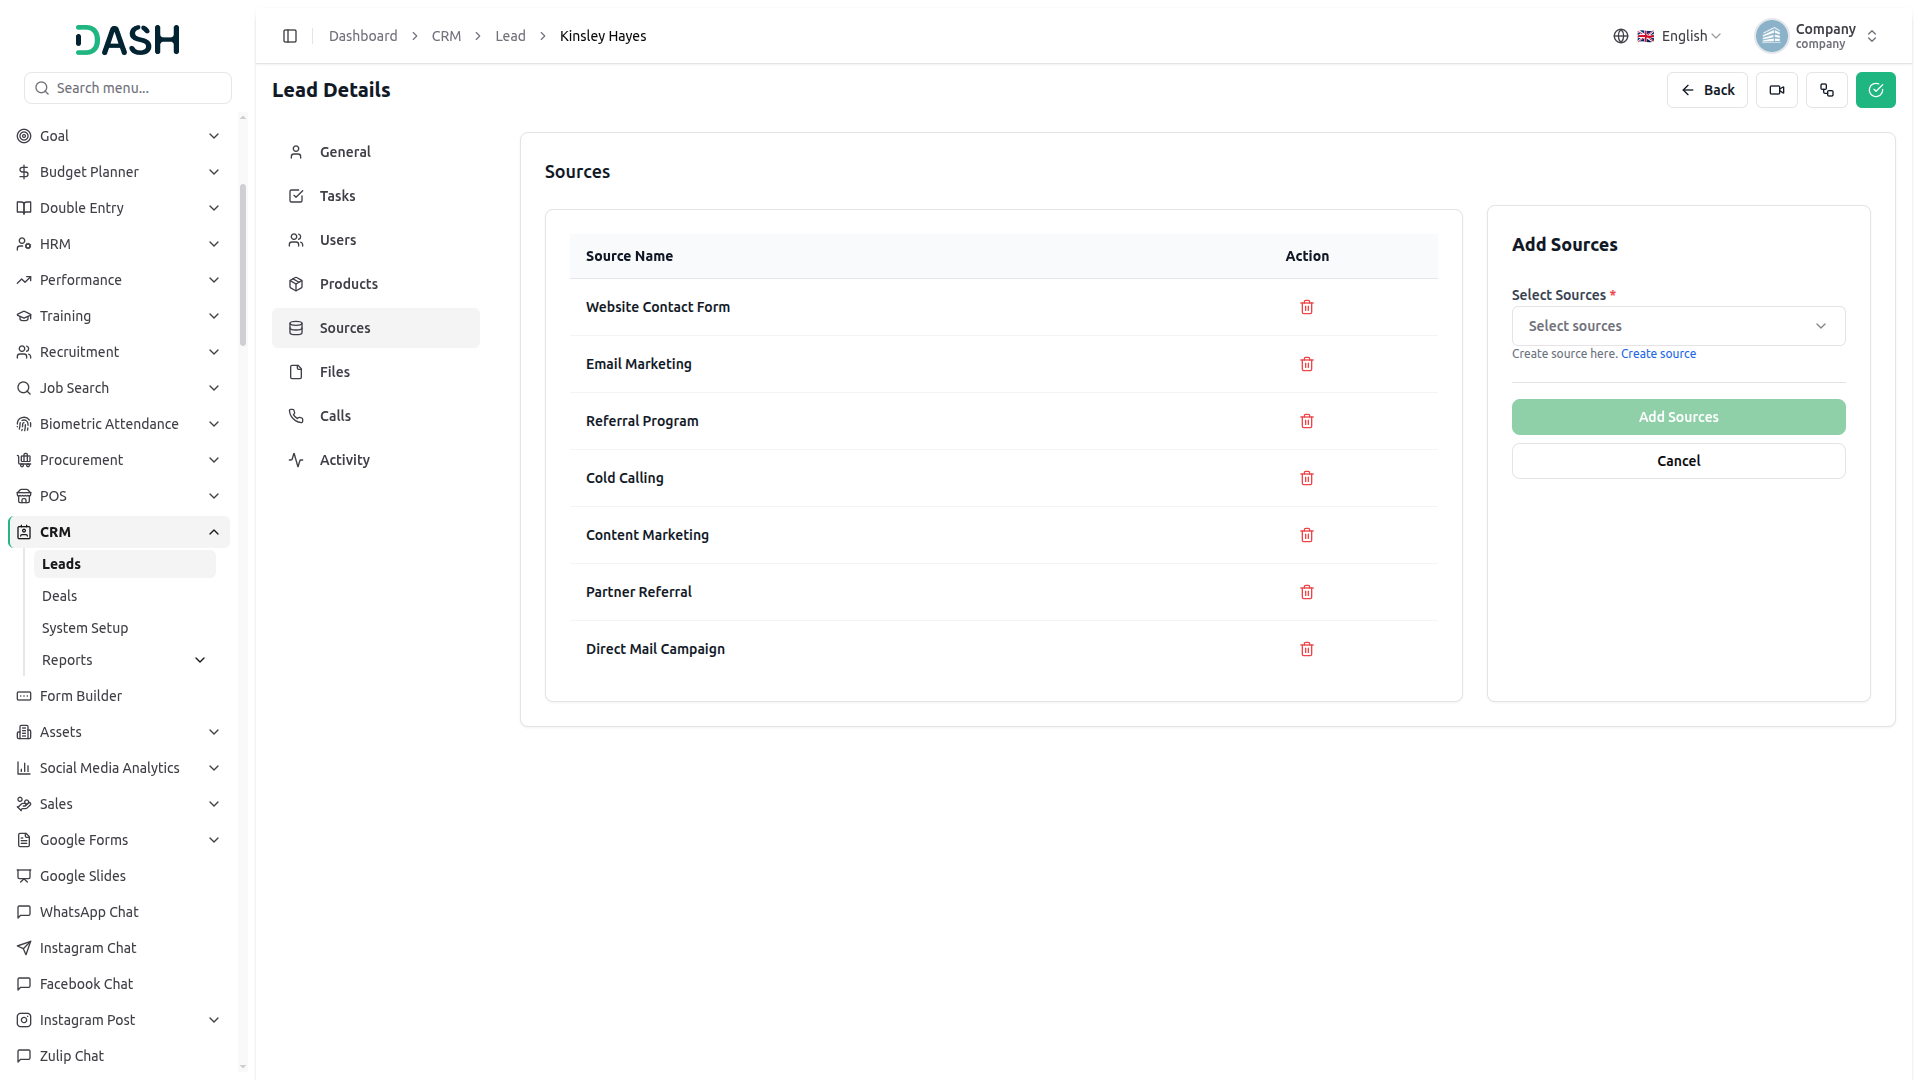
Sources
- The Sources tab under Lead Details is split into two parts: a list of sources linked to the lead on the left and an Add Sources form on the right, so you can view and assign sources without switching screens.
- To add a source, select one or more from the Select Sources dropdown (these sources are configured from System Setup), then click Add Sources to link them to the lead, or Cancel to close the form without changes. If the source doesn’t exist yet, click Create Source to add it first.
- All sources linked to the lead appear in the table on the left, showing the Source Name. Each source also has a quick action button: click Delete to remove it from the lead.
Files
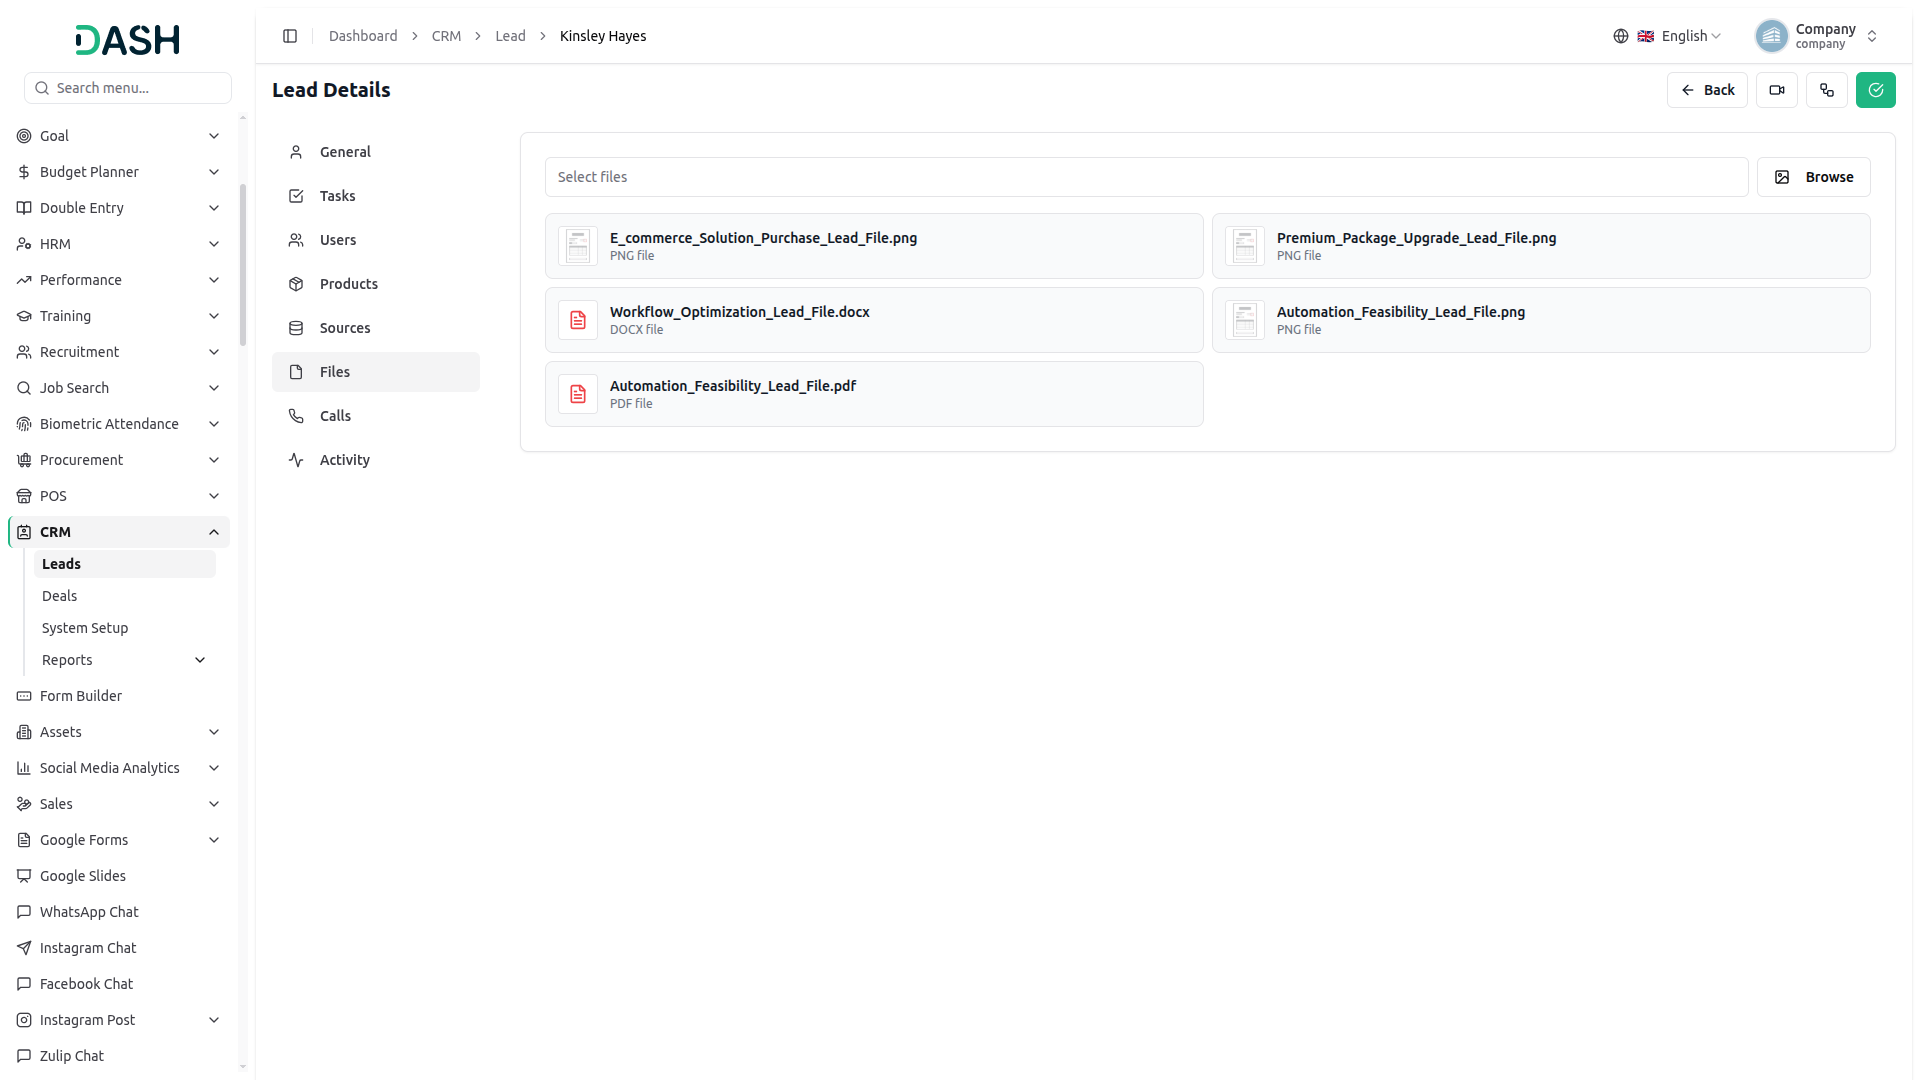
- To upload a new file to the lead, use the file selector at the top of the section and click “Browse” to choose a file from your device.
- The Files section under Lead Details displays all files attached to the lead. Each record shows the file icon, file name, and file type. In the action column, use the view option to preview the file, the download option to save it locally, or the delete option to remove it from the lead.
Calls
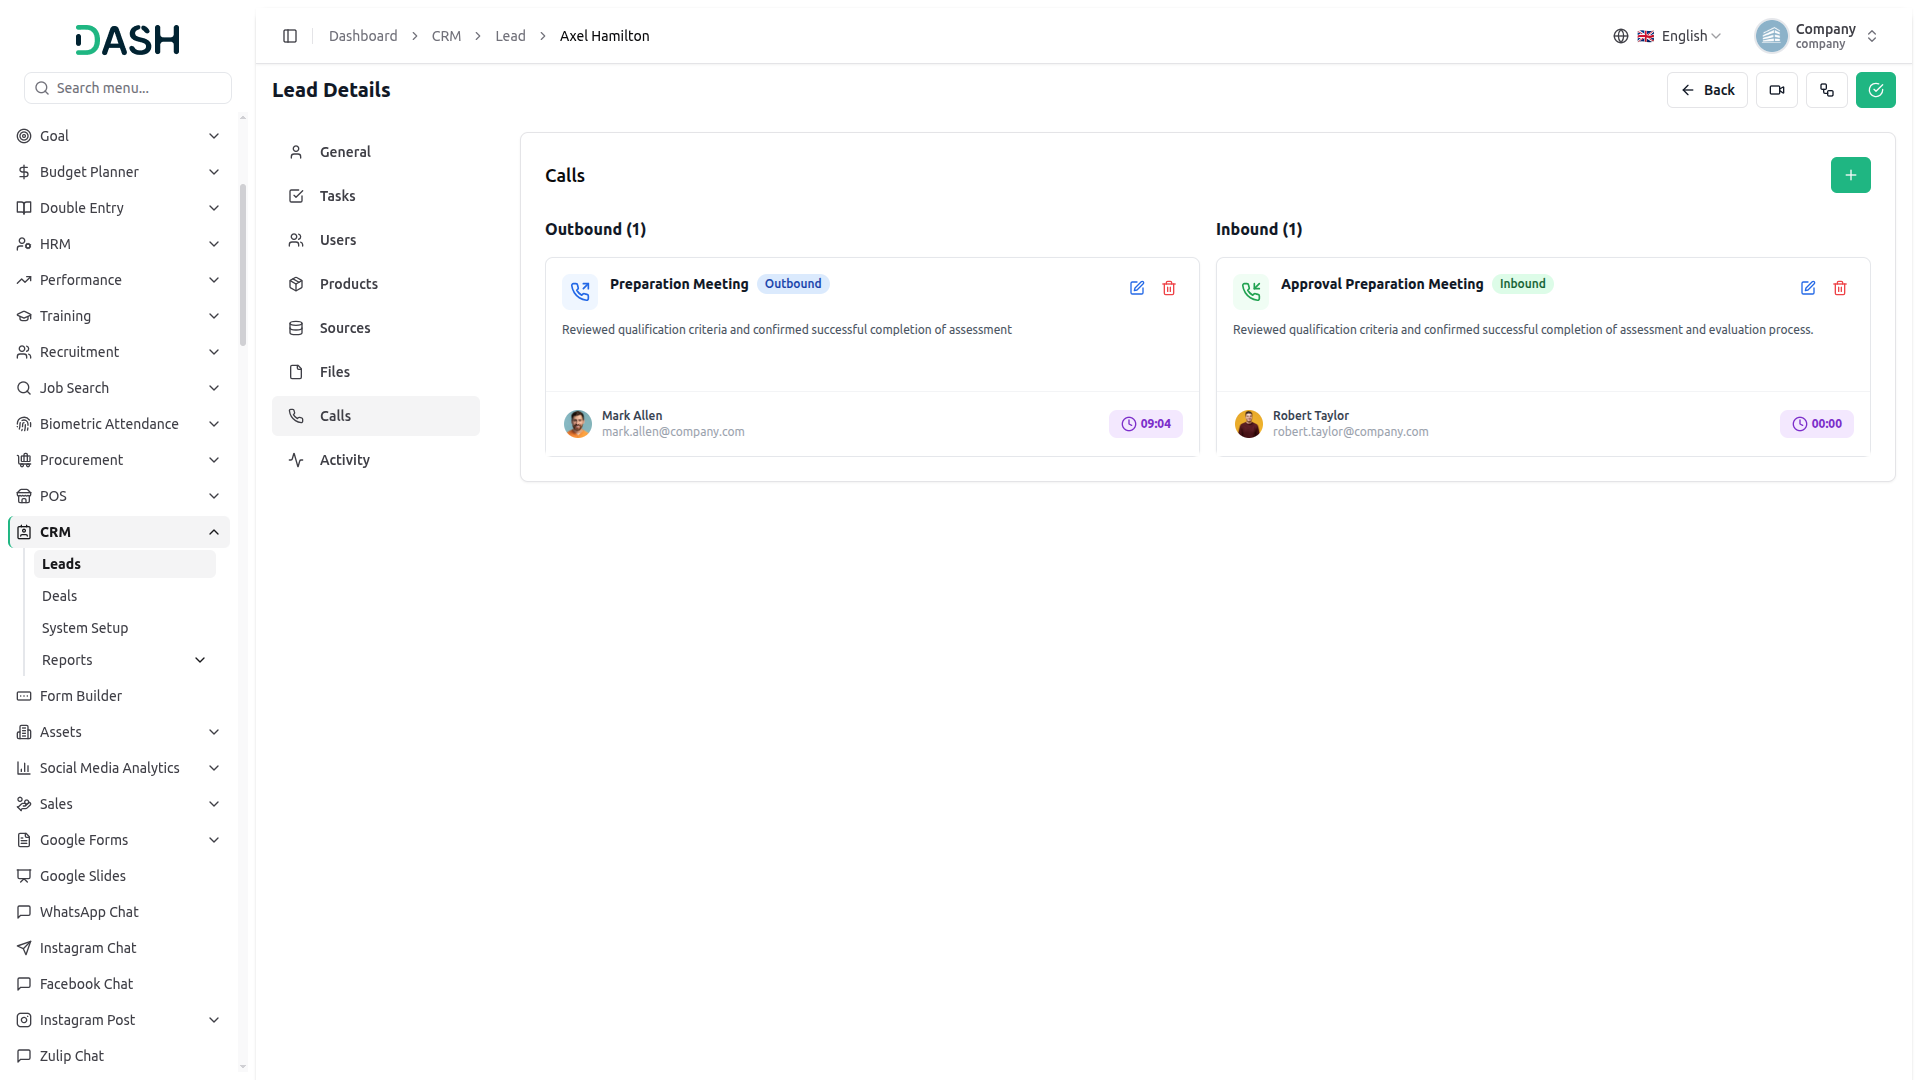
- To log a new Call, click the “Create” button, which will open the Create Call form. In this form, you need to enter the Subject, select the Call Type, select the Duration, and choose an Assignee from the dropdown. Optionally, add a Description and enter the Call Result using the rich text editor.
- The Calls section under Lead Details displays all calls logged against the lead, grouped into Outbound and Inbound columns. Each record shows the Subject, Call Type, Description, associated contact/company, and Duration. In the action column, use the Edit option to modify the call details or the Delete option to remove the call.
Activity
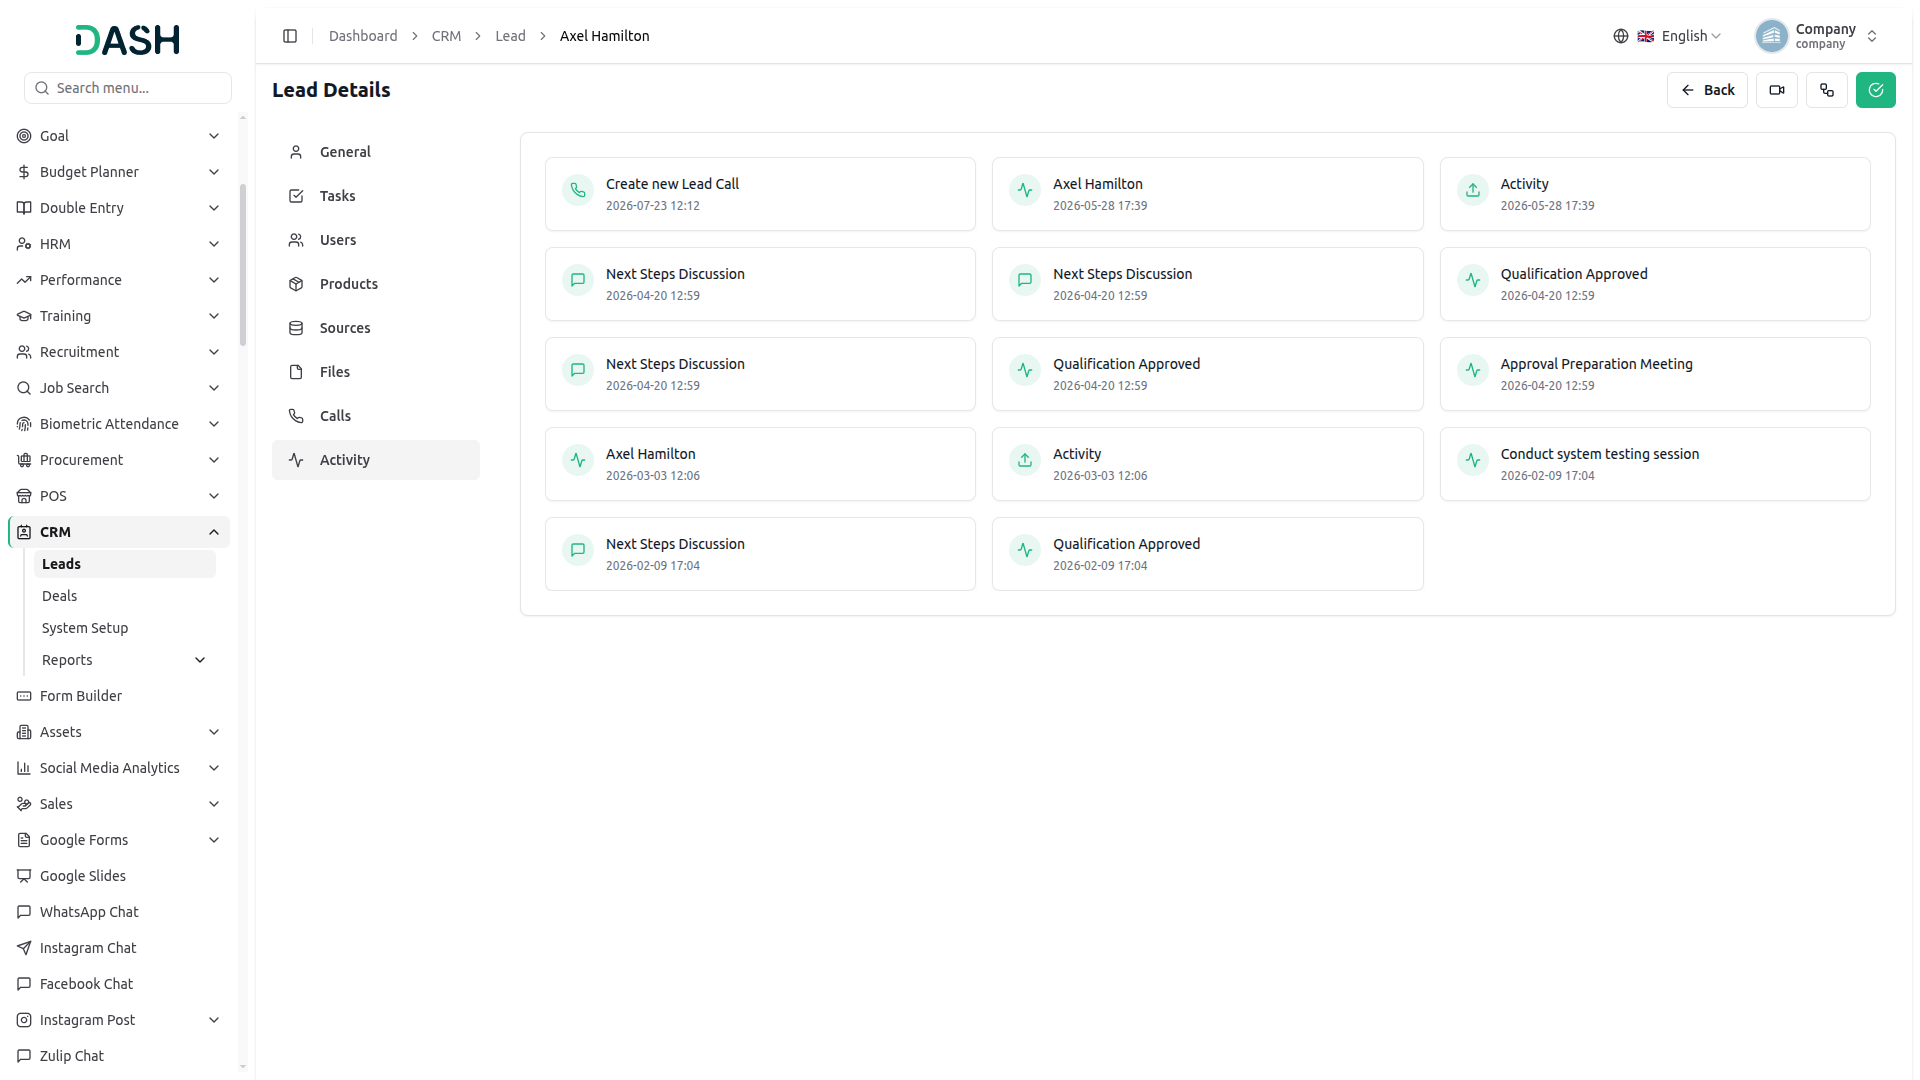
- The Activity section under Lead Details provides a chronological log of all actions and interactions associated with the lead. Each activity card displays the activity title and the date and time it occurred.
- Activities are represented with icons indicating their type — such as a pulse icon for system updates (e.g., product additions, user assignments) and a chat icon for communication-related activities (e.g., calls and discussions).
Manage Deals
- To create a new Deal, click the “Create” button, which will open the Create Deal form. In this form, you need to enter the Deal Name, Price, Phone No, and select the Clients from the dropdown (which comes from the user management).
- The list page displays a column of all deals, including Deal Name, Price, Tasks, Clients, Stage, Status (Won, Loss, or Active), and Actions. Use the search bar to find specific deals, and apply filters by Stage or Status using the filter dropdowns, then click “Apply” to filter or “Clear” to reset.
- Use the pipeline dropdown at the top right to switch between pipelines. When you select a pipeline, the system will display only the data related to that specific pipeline. The page can also be toggled to Kanban View using the view switcher button.
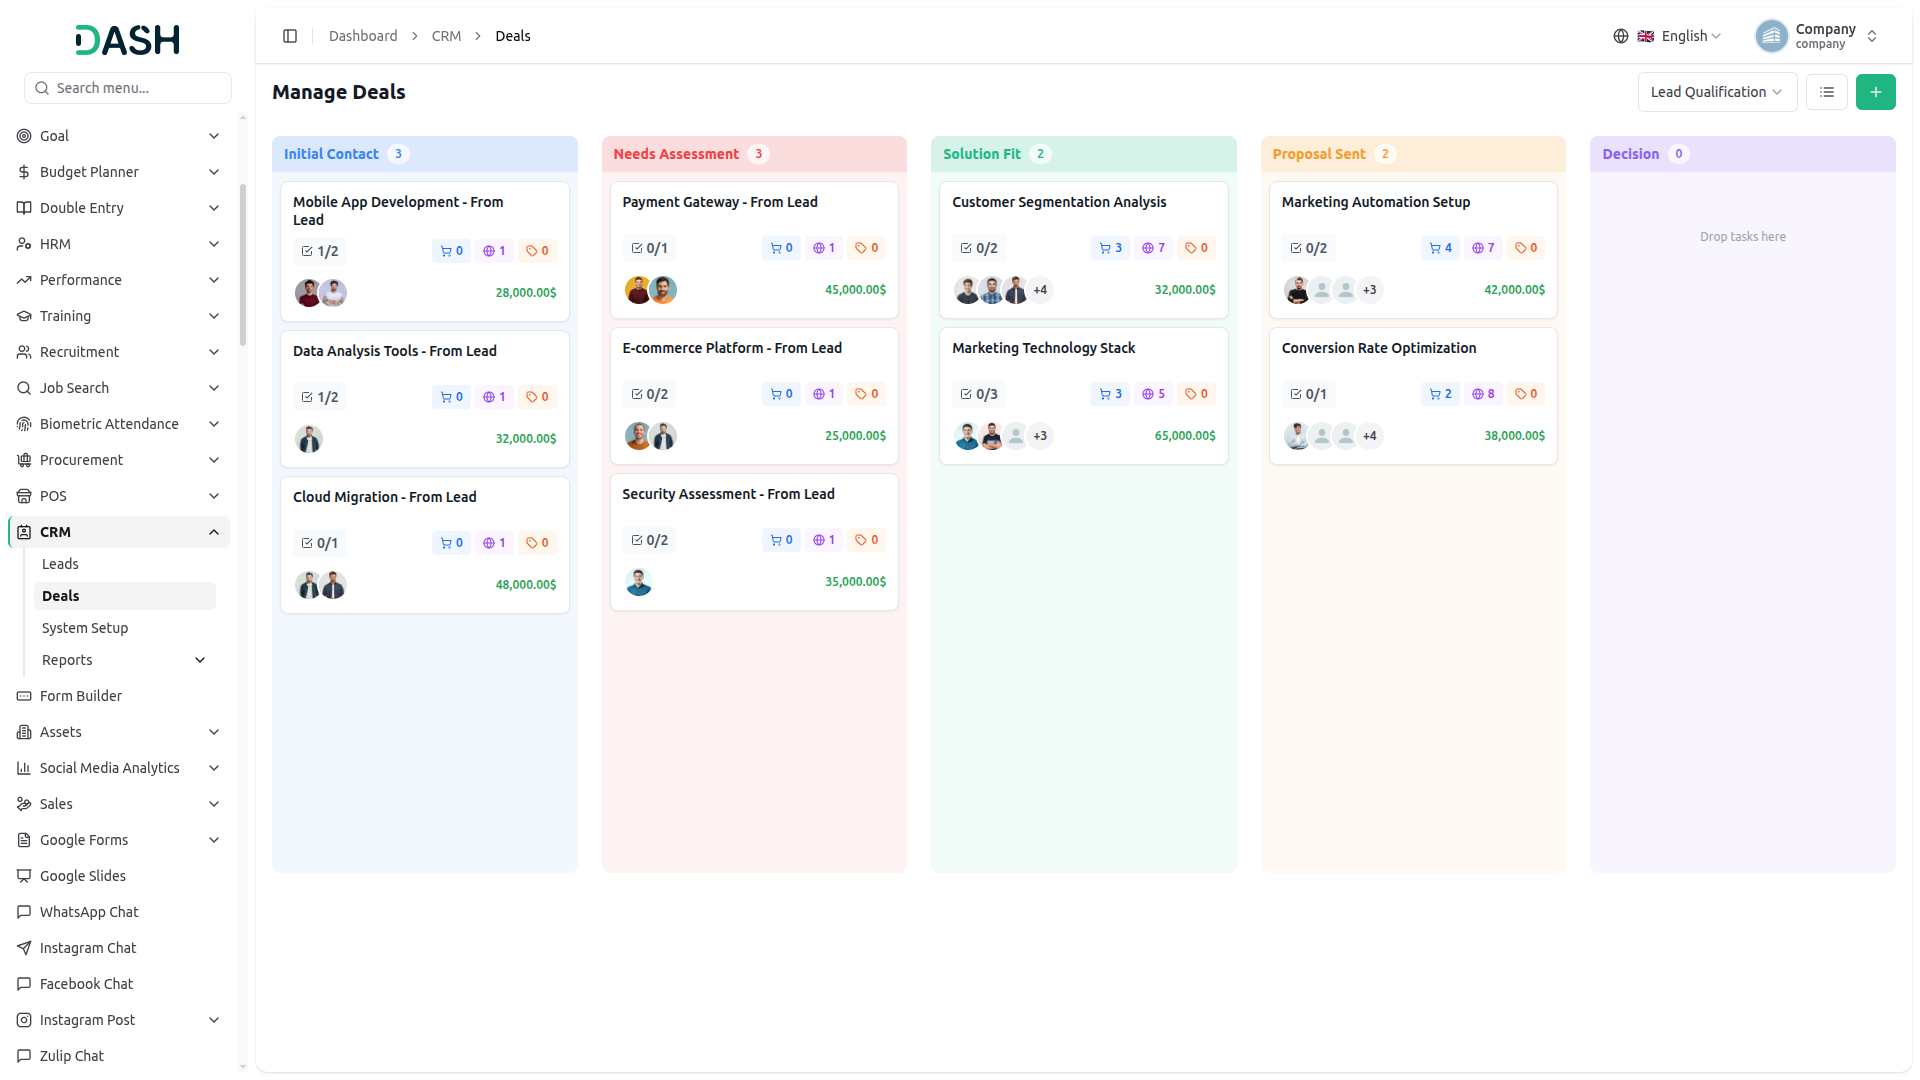
- When you click the Kanban view button, this view shows your deals as cards arranged in columns based on their stage, such as Initial Contact, Qualification, Meeting, Proposal, and Close. Each column displays a count of the deals inside it, and each card has small actions and counters you can use. Additionally, you can use the pipeline dropdown to switch between pipelines, the list view option, or the Create Deal option.
- On each deal card, you can click the three-dot menu to View, Edit, or Delete the deal. If you hover over the products counter, you can see the products linked to that deal. If you hover over the source counter, you can see where the deal came from. You can also drag a card from one column to another to move the deal to a different stage, and each card shows its assigned user along with the deal value. Deals can be moved between stages by dragging and dropping a card from one column to another.
- In the action column of a list page, use the label button to assign labels to the deal, the view button to open Deal Details, the edit button to modify the deal, or the delete button to remove it.
- To assign labels to a deal, click the label button in the Actions column. This opens the Deal Labels panel, which displays the deal name and all available labels for the pipeline. Select one or more labels by checking the corresponding checkboxes, then click “Assign” to apply them. The total number of selected labels is shown at the top right of the panel.
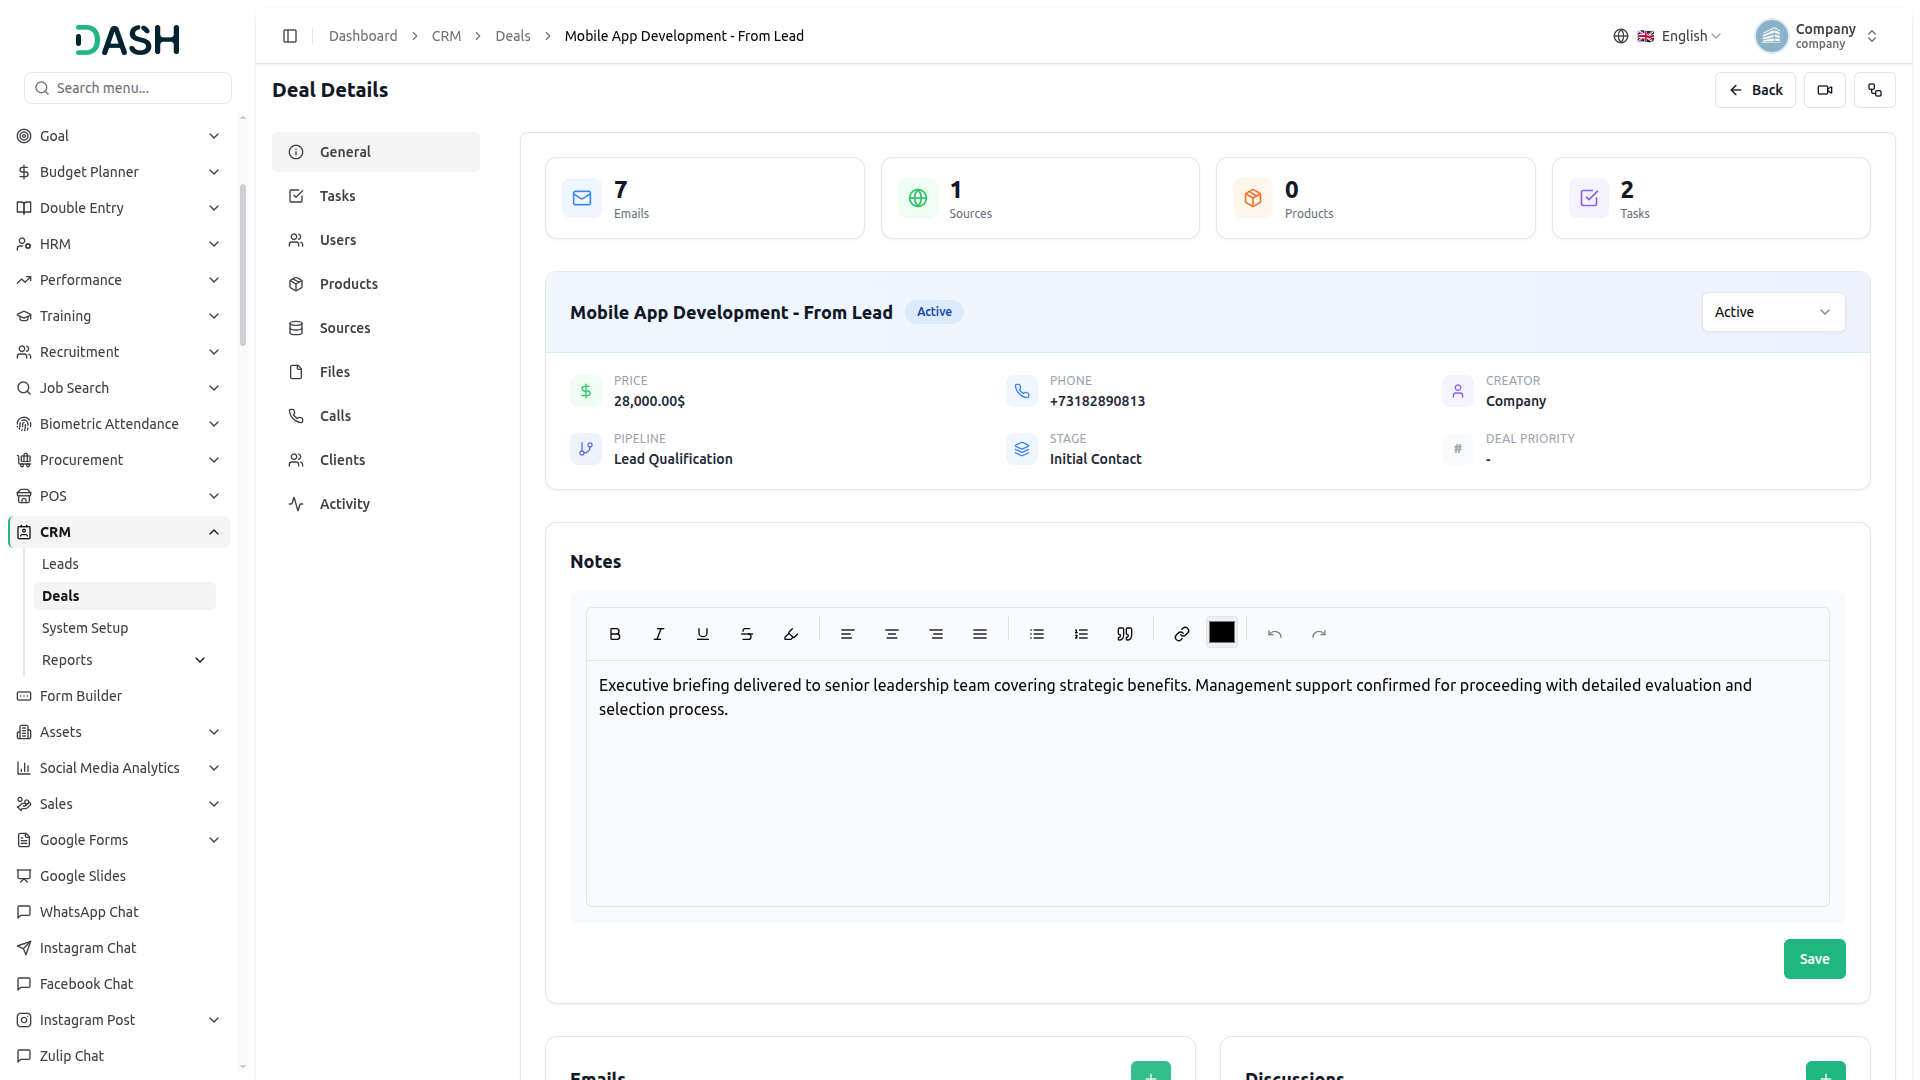
- When you click the “View” button, it opens the Deal Details page. The left sidebar gives quick access to the General, Tasks, Users, Products, Sources, Files, Calls, Clients, and Activity sections.
Deal Details
General
- The General tab opens with summary cards showing the number of Emails, Sources, Products, and Tasks linked to the deal. Below these, the deal header displays its name along with the Price, Phone, Creator, Pipeline, and Stage. Use the status dropdown at the right of the header to update the deal’s status, such as “Active”.
- The Notes section provides a rich text editor where you can record details about the deal. Click “Save” to store your notes.
- Click the “Create” button to open the Send Email window, enter the recipient in the To field, a Subject, and a Description, then click “Send Email”. The Emails section lists every email logged against the deal, showing the recipient address, date and time, subject, and a short preview.
- Click the “Create” button to open the Add Message window, type your message, and click “Save”. The Discussions section records internal notes and conversations, each showing the author, date and time, and message.
Tasks
- The Tasks tab under Deal Details is split into two parts: a list of existing tasks on the left and a Create Task form on the right, so you can view and add tasks without switching screens.
- To add a new task, simply enter a Name and pick a Date and optionally choose a Time. Select how urgent it is from the Priority dropdown (Low, Medium, or High).
- Created tasks are automatically set to Ongoing. Once finished, click the checkmark in the Actions column to mark the task as complete.
- All tasks linked to the deal appear in the table on the left, showing the task’s Name, Date, Time, Priority, and current Status. You can sort tasks by Name or Date using the arrow icons next to those column headers.
- Each task also has quick action buttons: click the checkmark to mark the task as Complete, the pencil icon to Edit the task details, or the‘Delete’ to remove it.
Users
- The Users tab under Deal Details is split into two parts: a list of users linked to the deal on the left and an Add Users form on the right, so you can view and assign users without switching screens.
- To add a user, select one or more from the Select Users dropdown (comes from the user management section), then click Add Users to link them to the deal, or Cancel to close the form without changes. If the user doesn’t exist yet, click Create User to add them first.
- All users linked to the deal appear in the table on the left, showing their Avatar, User Name, and email address. Each user also has a quick action button: click ‘Delete’ to remove them from the deal.
Products
- The Products tab under Deal Details is split into two parts: a list of products linked to the deal on the left and an Add Products form on the right, so you can view and assign products without switching screens.
- To add a product, select one or more from the Select Products dropdown (comes from the product catalog), then click Add Products to link them to the deal, or Cancel to close the form without changes. If the product doesn’t exist yet, click Create Product to add it first.
- All products linked to the deal appear as cards on the left, showing the product’s Image, Name, and SKU/code. Each product card also has a quick action button: click ‘Delete’ to remove them from the deal.
Sources
- The Sources tab under Deal Details is split into two parts: a list of sources linked to the deal on the left and an Add Sources form on the right, so you can view and assign sources without switching screens.
- To add a source, select one or more from the Select Sources dropdown, then click Add Sources to link them to the deal, or Cancel to close the form without changes. If the source doesn’t exist yet, click Create Source to add it first.
- All sources linked to the deal appear in the table on the left, showing the Source Name. Each source also has a quick action button: click ‘Delete’ to remove them from the deal.
Files
- To upload a new file to the deal, use the file selector at the top of the section and click “Browse” to choose a file from your device.
- The Files section under Deal Details displays all files attached to the deal. Each record shows the file icon, file name, and file type. In the action column, use the view option to preview the file, the download option to save it locally, or the delete option to remove it from the deal.
Calls
- To log a new call, click the “Create” button in the top right, which opens the Create Call form. In this form, enter the Subject, select the Call Type, select the Duration, and choose an Assignee from the dropdown. Optionally, add a Description and enter the Call Result using the rich text editor.
- The Calls tab under Deal Details displays all calls logged against the deal, split into Outbound and Inbound columns. Each call card shows the Subject, Call Type badge, Description, associated user, and Duration.
- Each call card also has quick action buttons: click the pencil icon to Edit the call details or click ‘Delete’ to remove the calls.
Clients
- The Clients tab under Deal Details is split into two parts: a list of clients linked to the deal on the left and an Add Clients form on the right, so you can view and assign clients without switching screens.
- To add a client, select Clients from the dropdown (which is pulls from the user management), then click Add Clients to link them to the deal or Cancel to close the form without changes. If the client doesn’t exist yet, click Create Client to add it first.
- All clients linked to the deal appear in the table on the left, showing their Avatar, Client Name, and email address. Each client also has a quick action button: click ‘Delete’ to remove them from the deal.
Activity
- The Activity section under Deal Details provides a chronological log of all actions and interactions associated with the deal. Each activity card displays the activity title and the date and time it occurred.
- Activities are represented with icons indicating their type, such as a pulse icon for system updates (e.g., product additions, user assignments) and a chat icon for communication-related activities (e.g., calls and discussions).
Reports
Lead Reports
The Lead Reports page provides visual analytics on lead activity across three tabs: General Report, Staff Report, and Pipeline Report.
General Report
- The General Report tab displays two key charts. The “This Week Leads Conversions” pie chart shows the daily breakdown of lead conversions for the current week, with each day of the week represented by a different color and its count and percentage shown in the legend.
- The “Sources Conversion” bar chart shows the total number of leads generated from each source.
- Below these charts, the “Per Month Lead” bar chart displays the total number of leads created each month across the year. Use the “Select Month” dropdown at the top right to filter and focus on a specific month’s data.
Staff Report
- The Staff Report tab displays a bar chart showing the number of leads associated with each staff member or client. To generate the report for a specific date range, select a From Date and To Date using the date pickers, then click the “Generate” button. The chart plots each staff member or linked client name along the horizontal axis with their respective lead counts on the vertical axis.
Pipeline Report
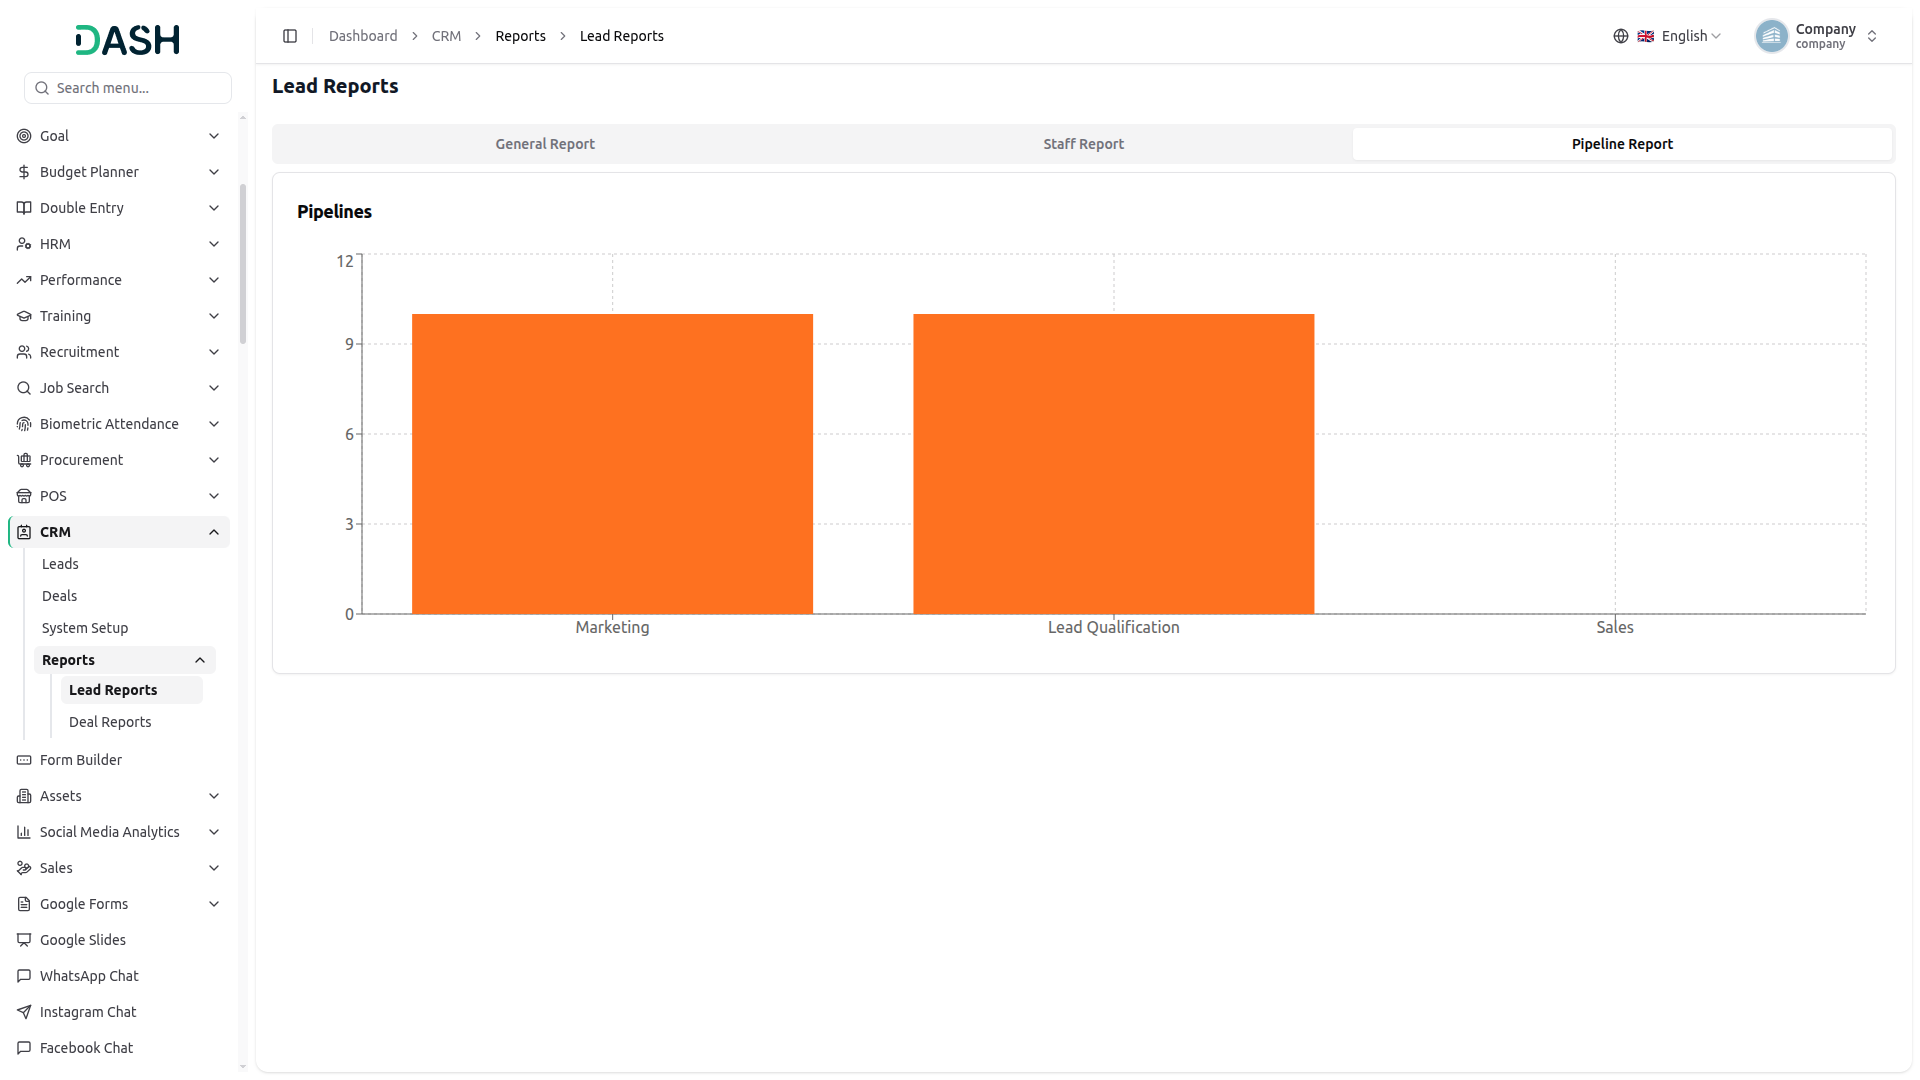
- The Pipeline Report tab displays a bar chart showing the total number of leads distributed across each pipeline, allowing a quick comparison of lead volume by pipeline.
Deal Reports
The Deal Reports page provides visual analytics on deal activity across four tabs: General Report, Staff Report, Client Report, and Pipeline Report.
General Report
- The General Report tab displays two key charts. The “This Week Deal Status” pie chart shows the daily breakdown of deal activity for the current week, with each day represented by a different color and its count and percentage in the legend.
- The “Deal Sources Conversion” bar chart shows the total number of deals generated from each source.
- Below these, the “Per Month Deal” bar chart shows the total number of deals created each month across the year. Use the “Select Month” dropdown to filter by a specific month. Hovering over a bar displays a tooltip showing the month name and deal count.
Staff Report
- To generate the report for a specific date range, select a From Date and To Date using the date pickers, then click the “Generate” button. The chart plots each staff member’s name along the horizontal axis with their respective deal counts on the vertical axis.
- The Staff Report tab displays a bar chart showing the number of deals associated with each staff member.
Client Report
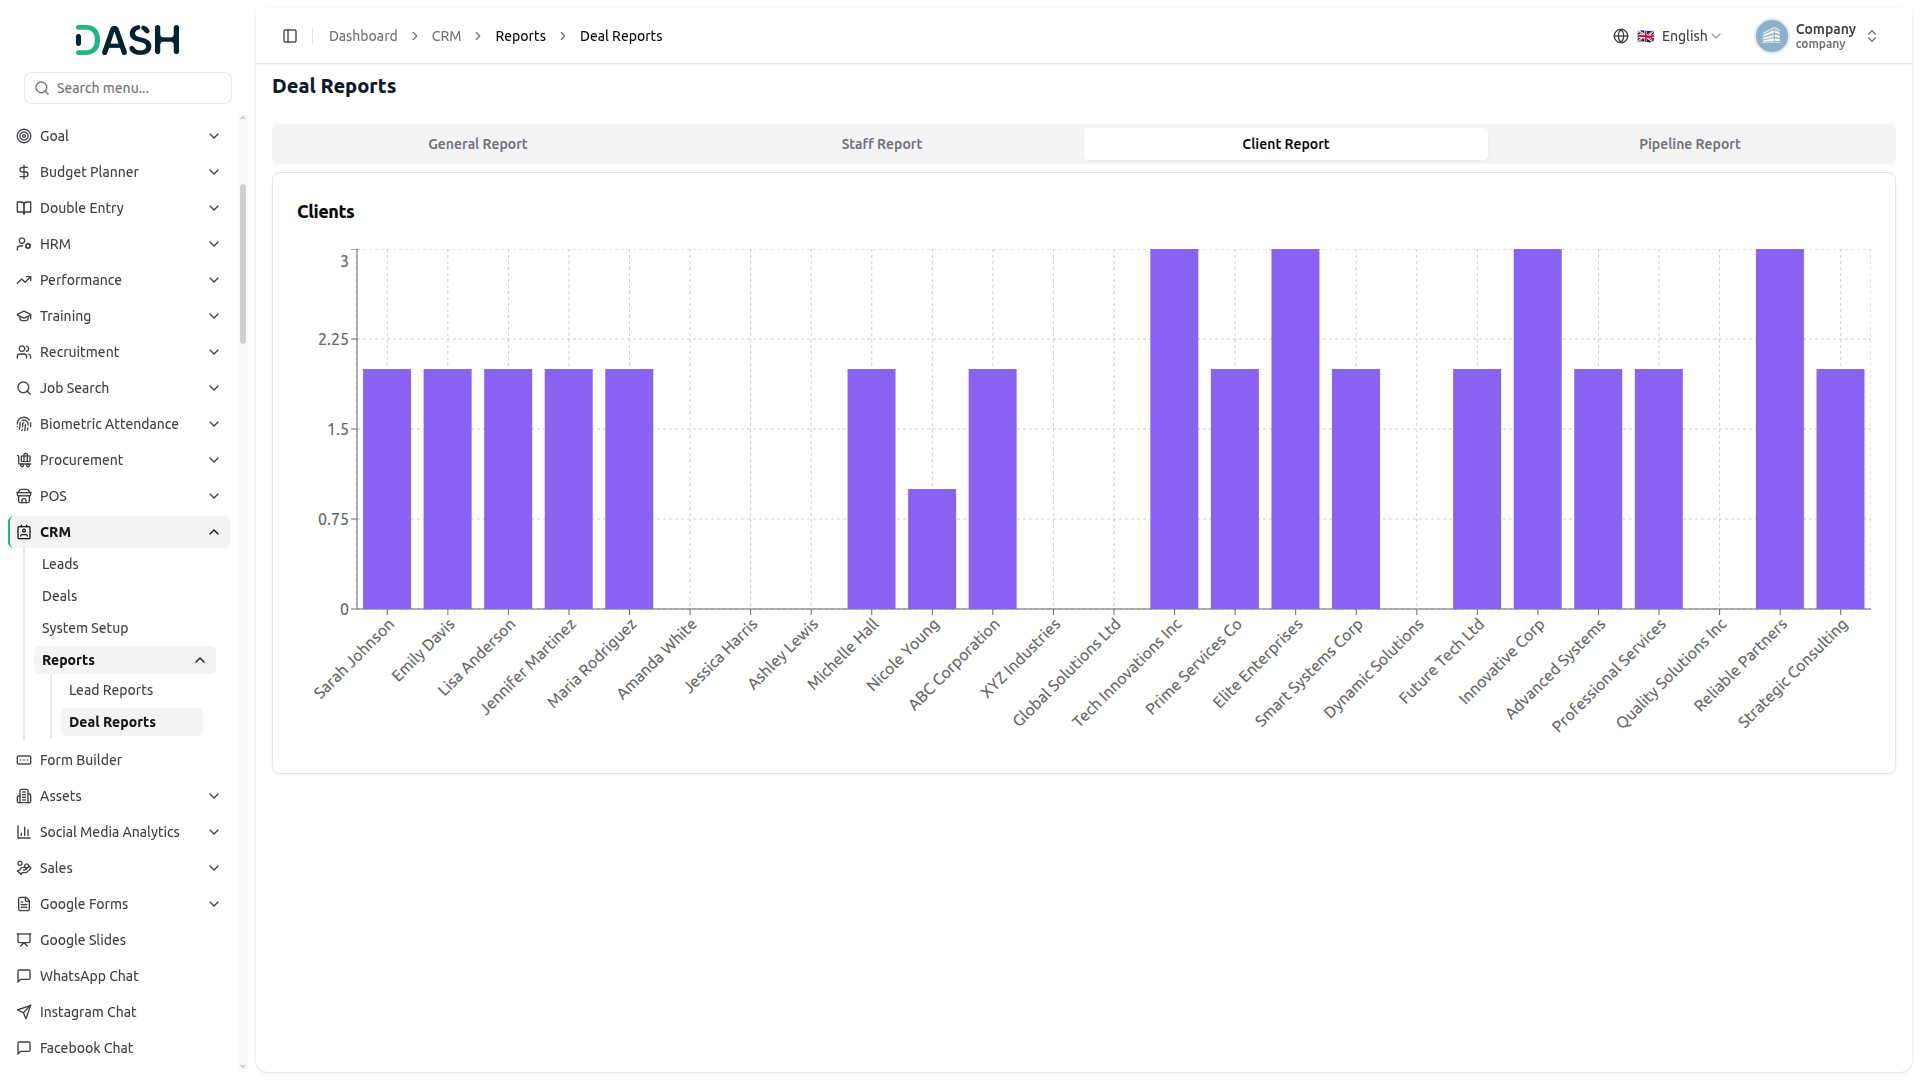
- The Client Report tab displays a bar chart showing the number of deals linked to each client, enabling a quick view of deal activity by client.
Pipeline Report
- The Pipeline Report tab displays a bar chart showing the total number of deals distributed across each pipeline, allowing a quick comparison of deal volume by pipeline.
Client and Staff login
- The system supports two types of user login: client and staff.
- Each user can access and view only their own data and is restricted from viewing or modifying other users’ information. Access to menus, modules, and system features is controlled through role-based permissions, ensuring that users can see only the specific menus they are authorized to access and perform only the actions assigned to them, such as viewing, creating, editing, or deleting records. This permission-based access control enhances data security, privacy, and overall system integrity.
Categories
Related articles
- YooKassa – WorkDo Dash SaaS Add-On Guide
- Fix Equipment – WorkDo Dash SaaS Add-On Guide
- PayPay – WorkDo Dash SaaS Add-On Guide
- Facebook Post – WorkDo Dash SaaS Add-On Guide
- Mercado Pago – WorkDo Dash SaaS Add-On Guide
- ClickSend – WorkDo Dash SaaS Add-On Guide
- Coupon Module Guide – eCommerceGo SaaS
- iCal Exports – BookingGo SaaS Add-On Guide
- SMS Integration – TicketGo Add-On Guide
- Zoom Meeting – BookingGo SaaS Add-On Guide
- PayU – BookingGo SaaS Add-On Guide
- Review Reminder – eCommerceGo SaaS Add-On Guide
We're Here to Help - Let's Talk
Have questions about our solutions, customization services, or business tools? Our team is here to help you. let's talk.