
Accounting – WorkDo Dash SaaS Add-On Guide
Learn accounting setup, banking, customers, vendors, invoices, payments, reports, and workflows.
Introduction
The Accounting Add-On is a simple and efficient system for managing all financial activities in one place. It helps you handle customers, vendors, banking, income, and expenses with ease. The dashboard provides a quick overview of key financial data and transactions. You can also track payments, manage accounts, and view detailed reports. Overall, it helps maintain accurate records and improves financial decision-making.
How to Use The Accounting Add-On?
Account Dashboard
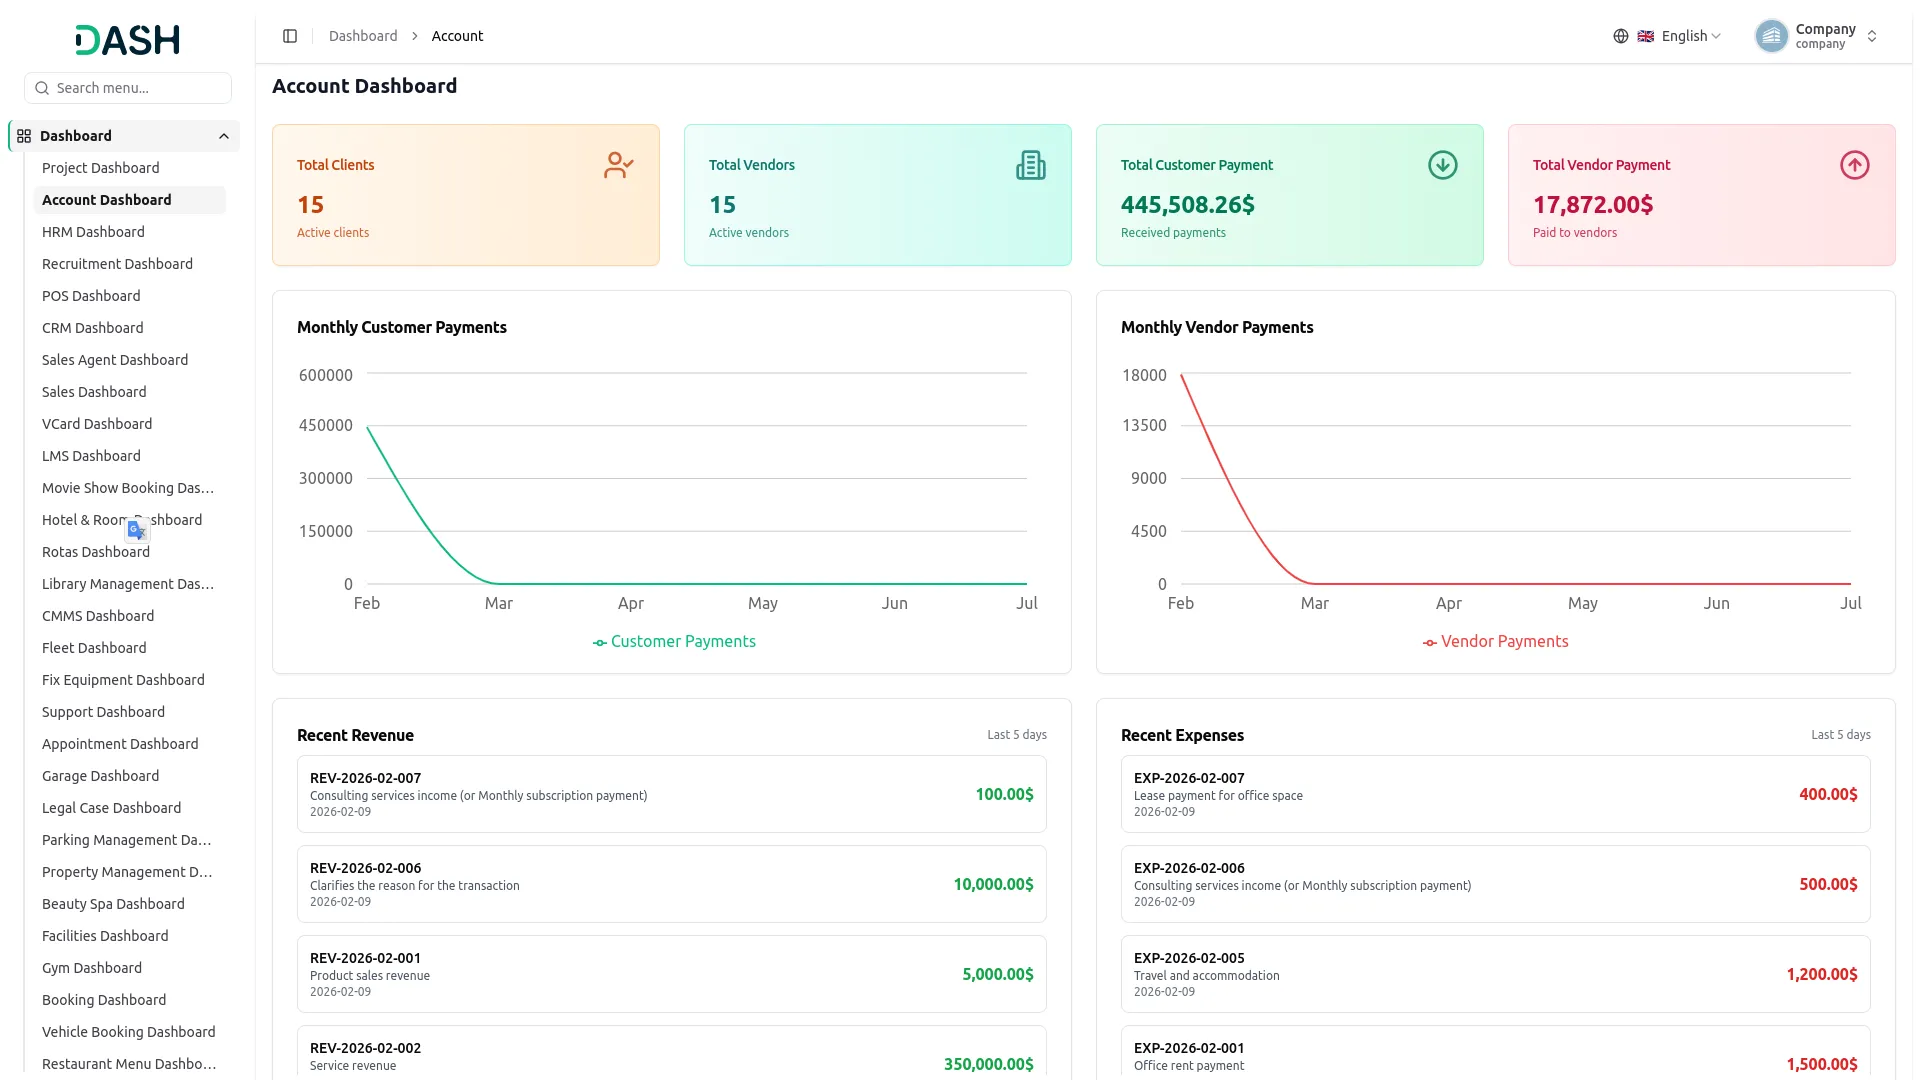
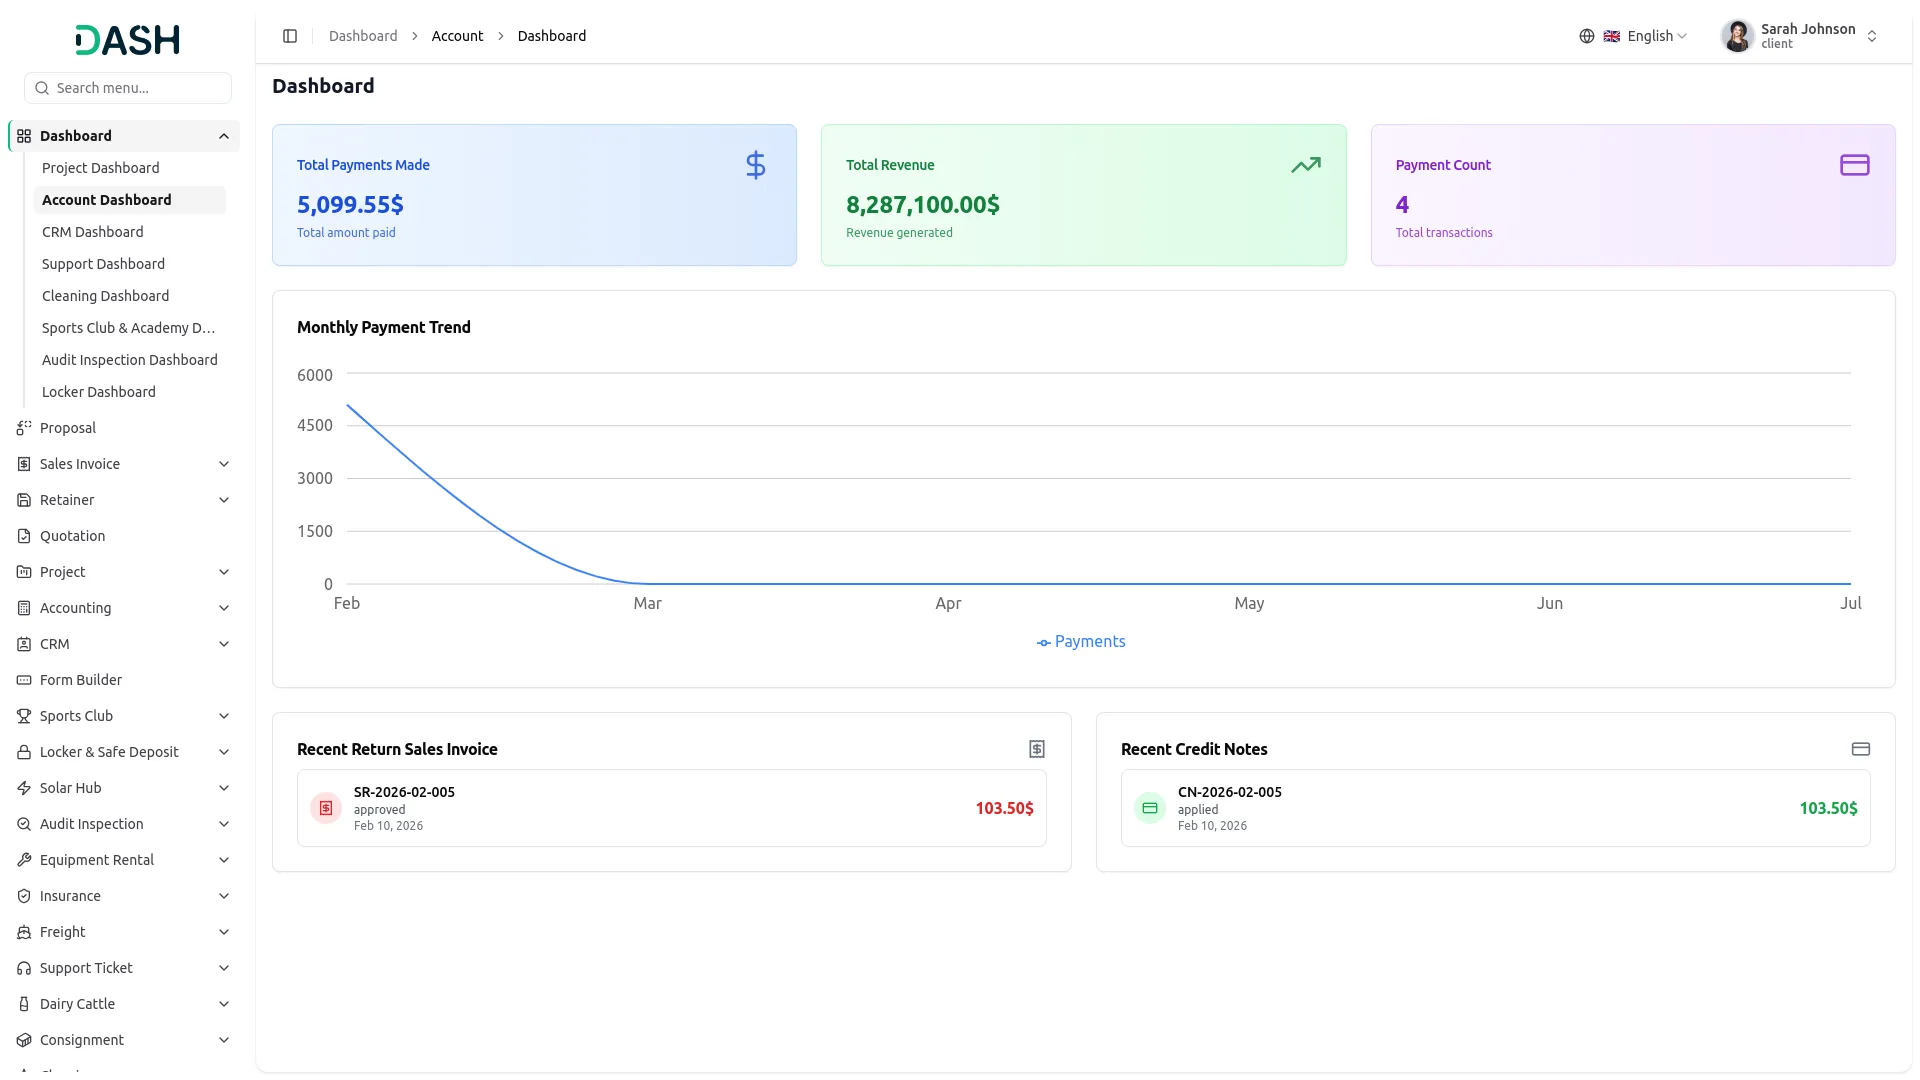
- The Account Dashboard gives a company-wide overview of clients, vendors, and payment activity through a set of summary cards and charts.
- Four cards across the top summarize key metrics. Total Clients shows the number of active clients. Total Vendors shows the number of active vendors. Total Customer Payment shows the total payments received. Total Vendor Payment shows the total amount paid to vendors.
- The Monthly Customer Payments chart plots payments received across the months, and the Monthly Vendor Payments chart plots payments made to vendors across the months. Hover over any point on either chart to see the exact amount for that month.
- The Recent Revenue card lists the latest revenue entries from the last 5 days, each showing the revenue number, description, date, and amount. The Recent Expenses card lists the latest expense entries from the last 5 days, each showing the expense number, description, date, and amount.
System Setup
Account Types
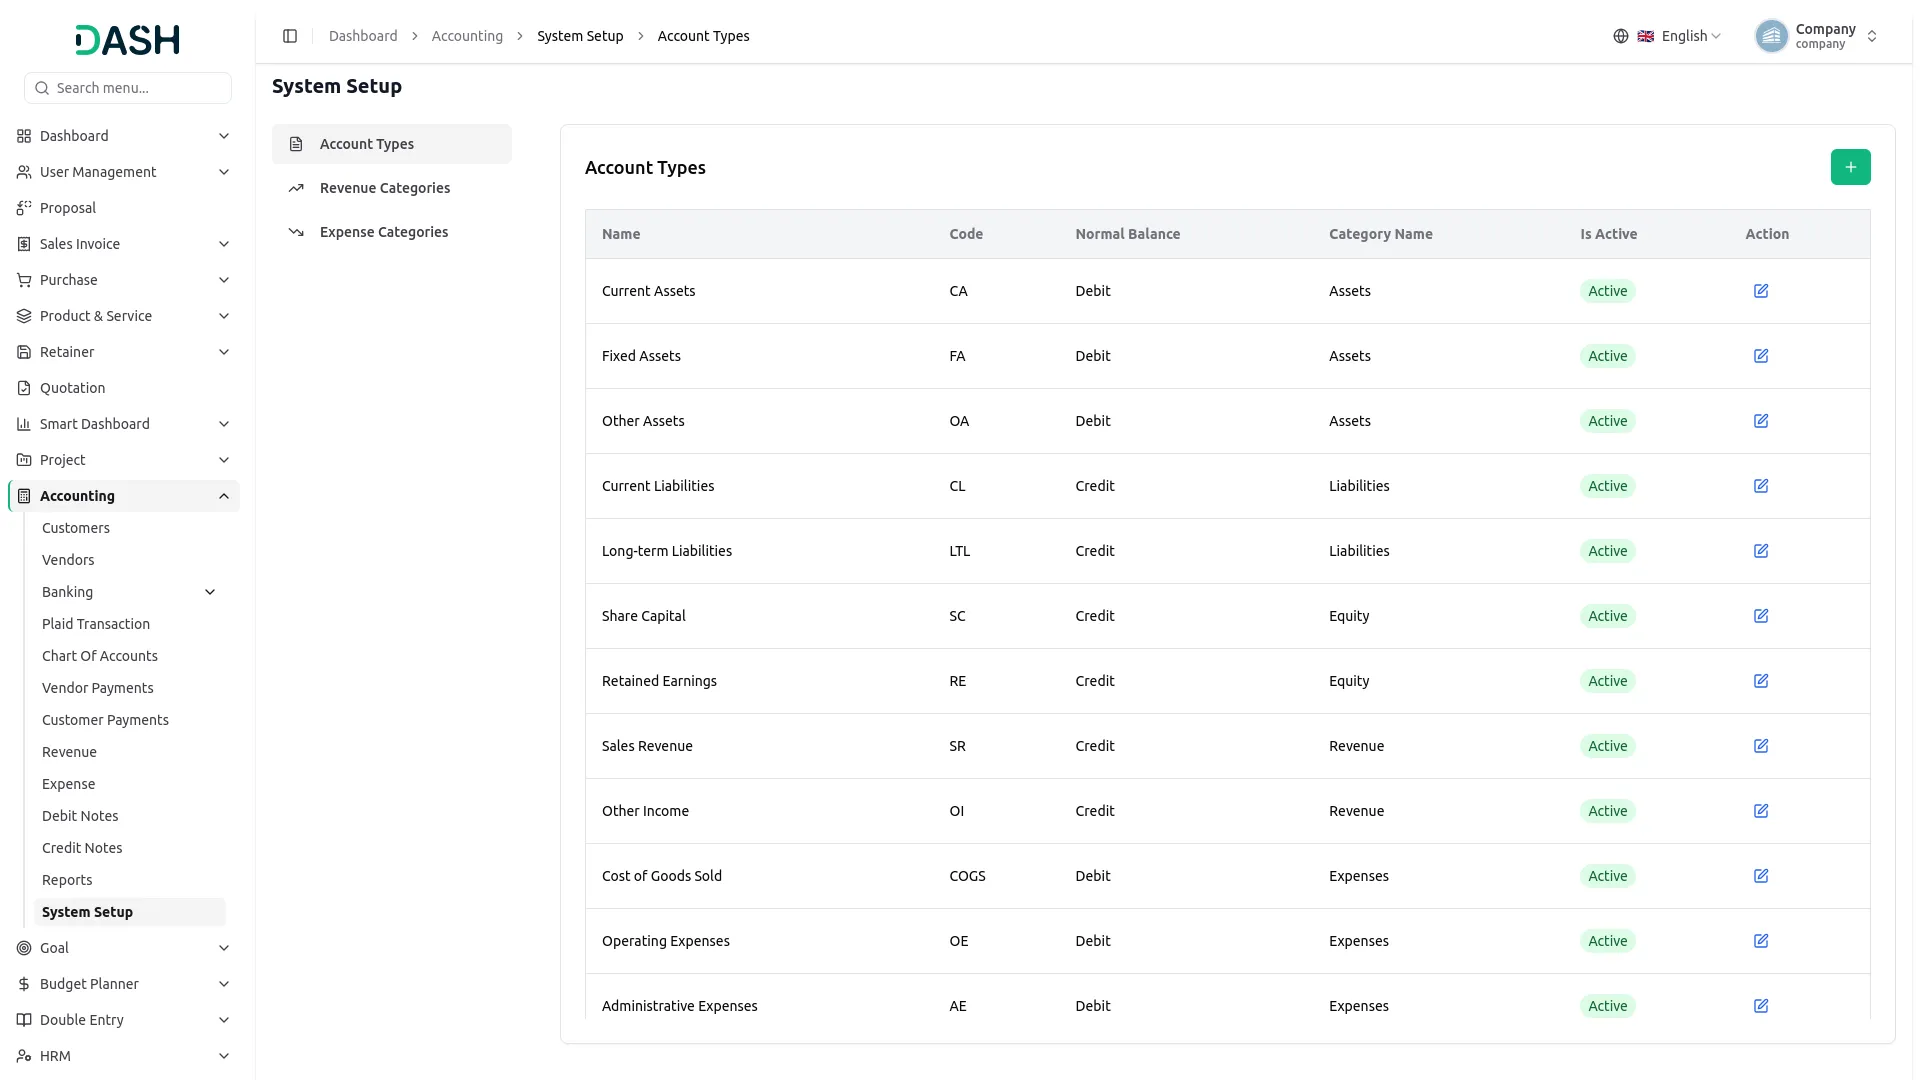
- To create a new Account Type, click the “Create” button. You need to enter details such as the category (select from Assets, Liabilities, Equity, Revenue, or Expenses), name (enter a descriptive account type name), and code (auto-generated from the name but can be modified).
- Select the normal balance, Debit or Credit, based on the nature of the account type. You can also add an optional description for internal reference. Toggle “Is Active” ON to make the account type available for use in the Chart of Accounts.
- The Account Types page under System Setup displays all predefined account type classifications used across the Chart of Accounts. Each record shows the Account Type Name, Code, Normal Balance (Debit or Credit), Category Name (Assets, Liabilities, Equity, Revenue, or Expenses), and Is Active. The available action is the edit option to modify the details.
Revenue Categories
- To create a new revenue category, click the “Create” button, which will open the Create Revenue Categories form. In this form, you need to enter the Category Name, and Category Code.
- Select the Gl Account from the dropdown (comes from the ) and add a Description. The Enabled toggle is ON to make this category available when creating revenue entries.
- Any Chart of Accounts created within the range of 4000 to 4999 will be displayed in the GL Account dropdown.
- The Revenue Categories page displays all categories used to classify revenue entries in the system. Each record shows the Category Name, Category Code, linked GL Account, Description, and Is Active.
- In the action icons, use the edit option to modify the details or the delete option to remove the details.
Expense Categories
- To create a new expense category, click the “Create” button, which will open the Create Expense Categories form. In this form, you need to enter the category name, Category Code, select the Gl Account from the dropdown, and add a Description. The Enabled toggle is ON to make this category available when creating expense entries.
- Any Chart of Accounts created within the range of 5000 to 5999 will be displayed in the GL Account dropdown.
- The Expense Categories page displays all categories used to classify expense entries in the system. Each record shows the Category Name, Category Code, linked GL Account, Description, Is Active.
- In the action icons, use the edit option to modify the details or the delete option to remove the details.
Manage Customers
- To add a new customer, click the “Create” button at the top of the corner on the customer page. Fill in the required details, such as selecting the user from the dropdown. Only unassigned users with the Client role will be available for selection.
- Enter the Company Name, Contact Person, Email, Mobile Number, Tax Number, Payment Terms, Billing Name, Billing Address, Address Line 2, City, State, Country, Zip Code.
- You can select “Shipping address same as billing” to automatically fill in the details. You may also include optional notes if needed. Enter the Shipping Name, Shipping Address, Address Line 2, City, State, Country, Zip Code, and Notes.
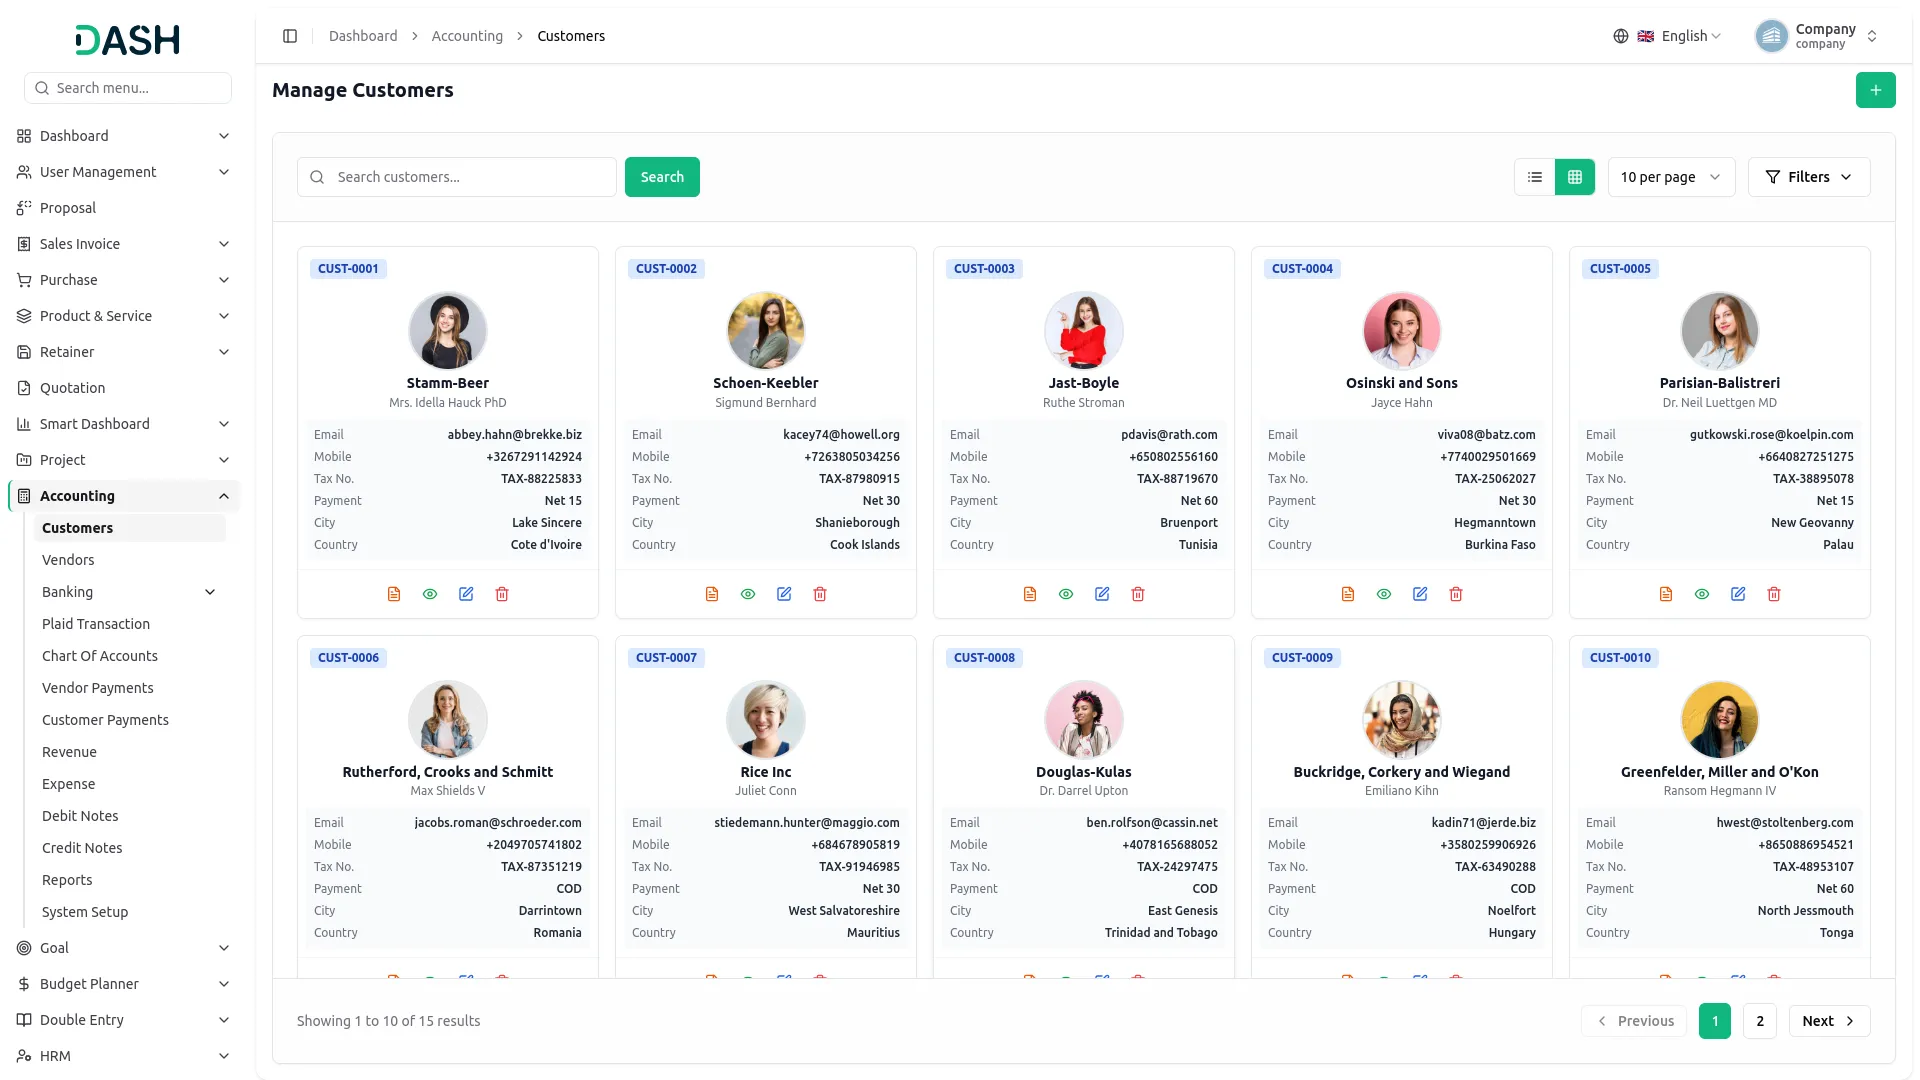
- The Manage Customers page displays all registered customers with details such as User, Customer Code, Company Name, Contact Person, Email, and Tax Number. Use the Search bar to find a specific record.
- And filters to Dropdowns (Customer Code, Company Name, Tax Number) to narrow results. Then click ‘Apply’ to activate filters or ‘Clear’ to reset them. Toggle between List and Grid view using the icons at the top right.
- You can use the Action icons: the View button to see the customer details, the Edit button to modify the details, or the Delete button to remove the details of any customer record.
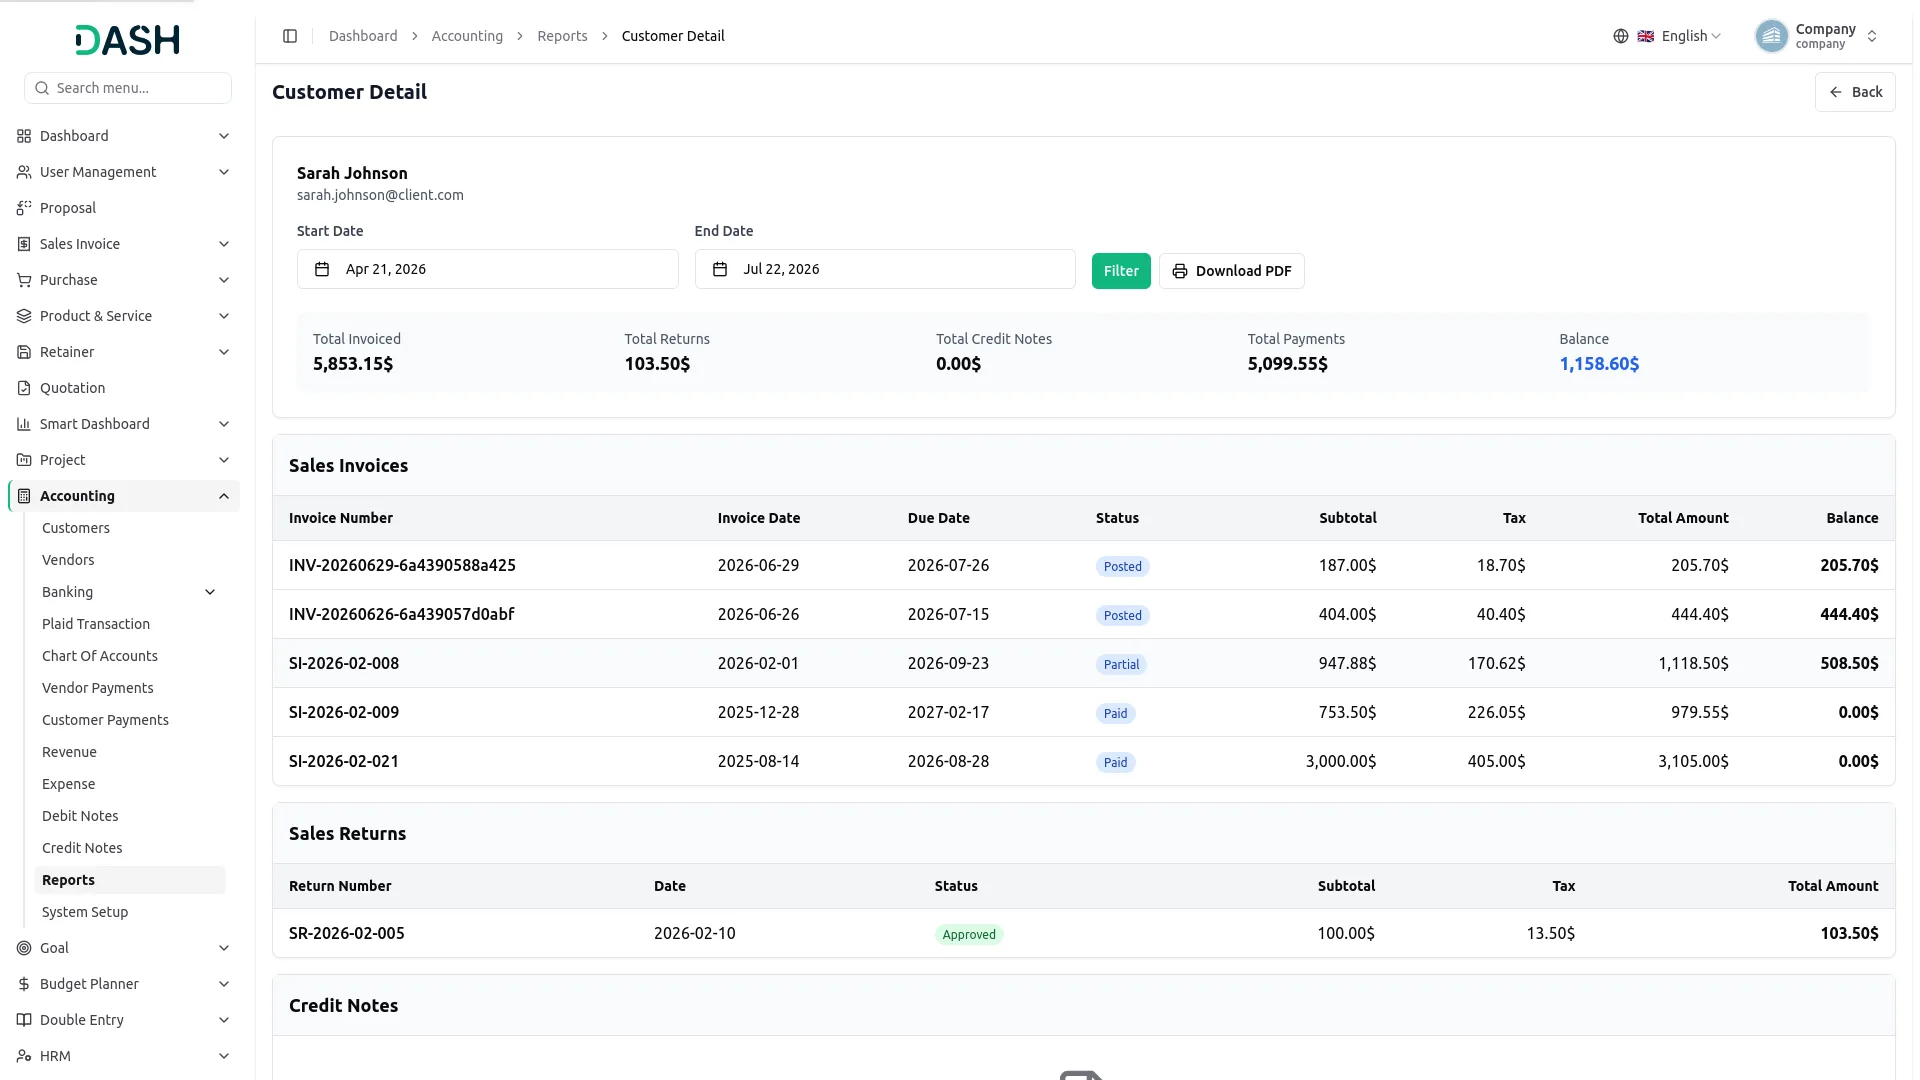
- The View Report button opens the Customer Detail page, which shows a full financial summary for that customer, including Sales Invoiced, Sales Returns, and Total Credit Notes.
- Set a Start Date and End Date, click Generate to load the report, and use Download PDF to export it. Below the summary, the page lists all Sales Invoices, Sales Returns, Credit Notes, and Customer Payments linked to that customer.
- When a customer’s user account is disabled, the actions are locked, and a ‘User is disabled’ note appears in place of the available options.
Manage Vendors
- To add a new vendor, click the “Create” button to open the Create Vendor form. Start by selecting a User from the dropdown; only users with the vendor role who are not already assigned to another vendor will appear in this list. If no user exists, click “Create user” to add one.
- Enter the Company Name, Contact Person, and Email. Add the Mobile Number, Tax Number, Payment Terms, Billing Name, Billing Address, Address Line 2, City, State, Country, Zip Code.
- For the shipping address, either check “Shipping address same as billing” to auto-fill the shipping details. Or manually enter the Shipping Name, Shipping Address, Address Line 2, City, State, Country, and Zip Code. Add any optional Notes if needed.
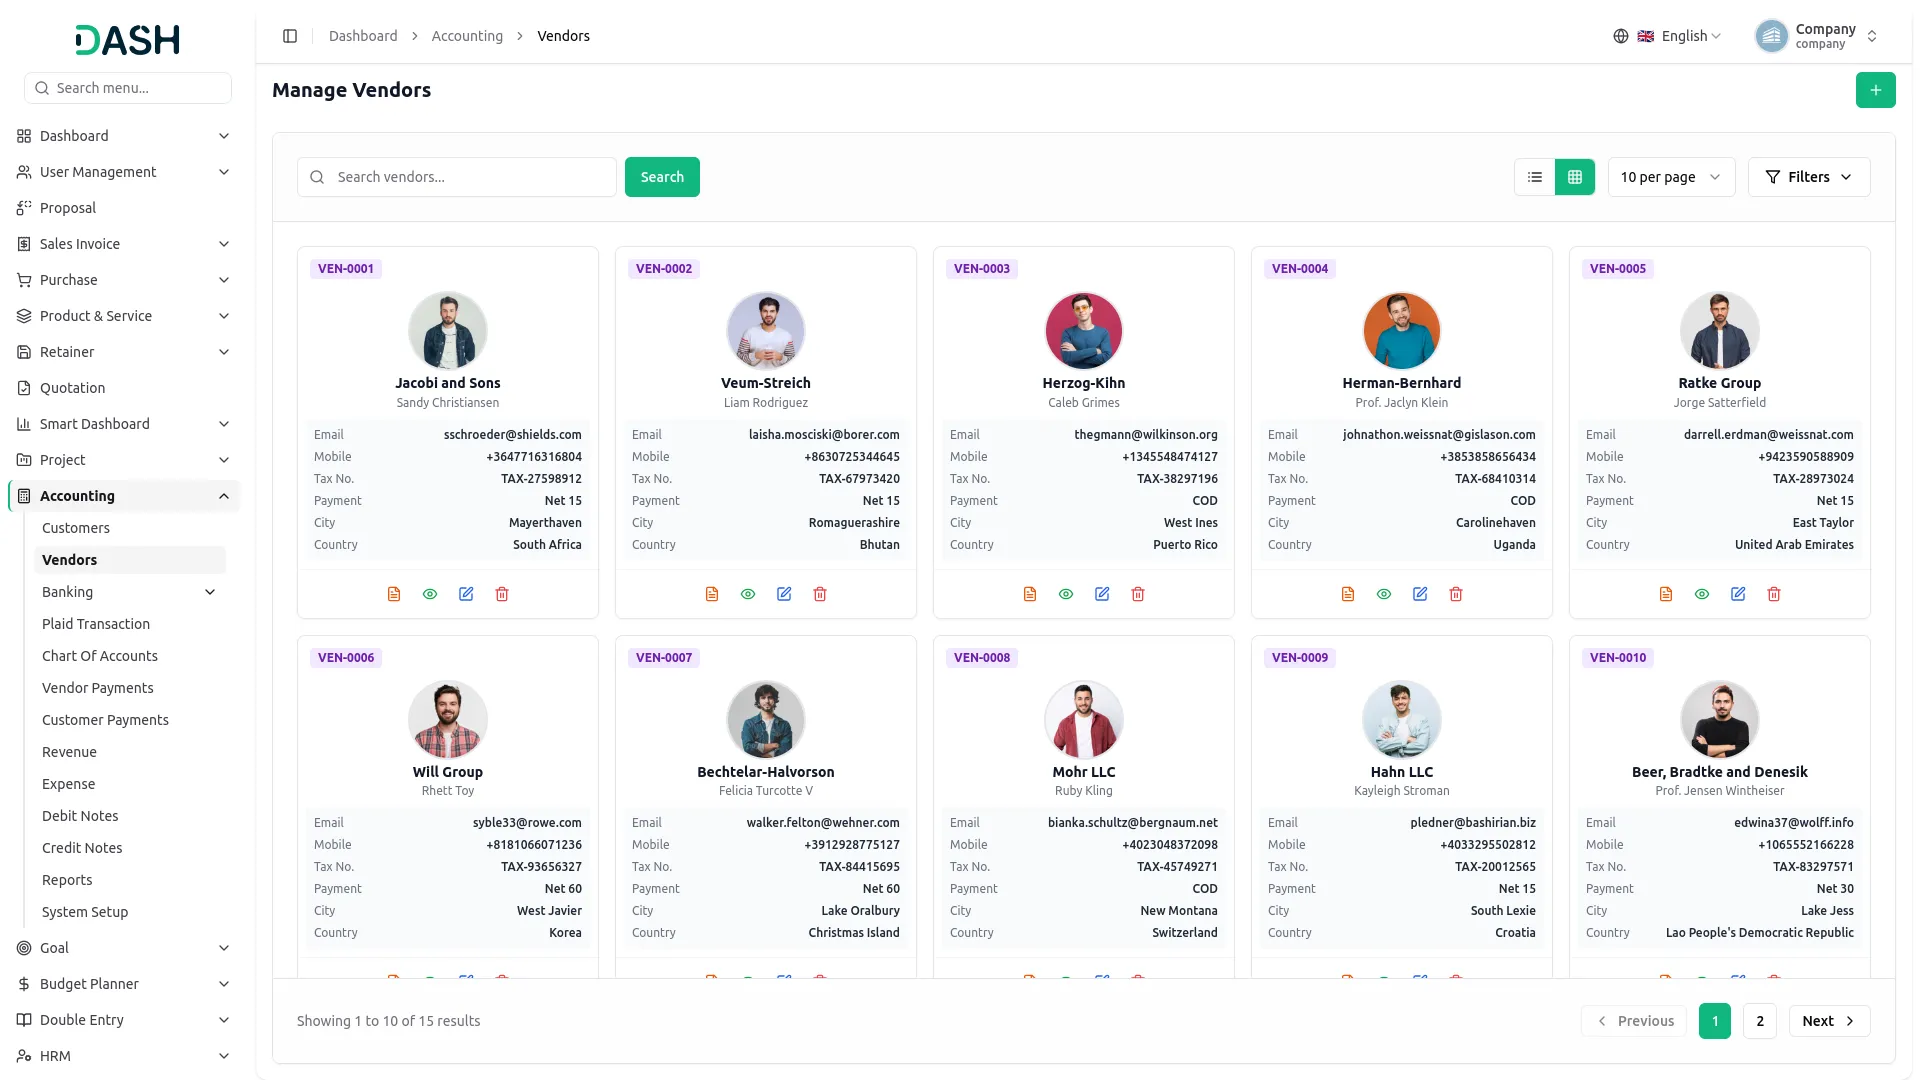
- The Manage Vendors page displays all registered vendors with details such as Vendor Code, Company Name, Contact Person, Email, and Tax Number. Use the Search bar to find a specific vendor, or click Filters to narrow results by Vendor Code, Company Name, and Tax Number, then click Apply to activate the filters or Clear to reset them. Toggle between List and Grid view using the icons at the top right
- In the action column, you can use the View button to see the customer details, the Edit button to modify the details, or the Delete button to remove the details of any customer record.
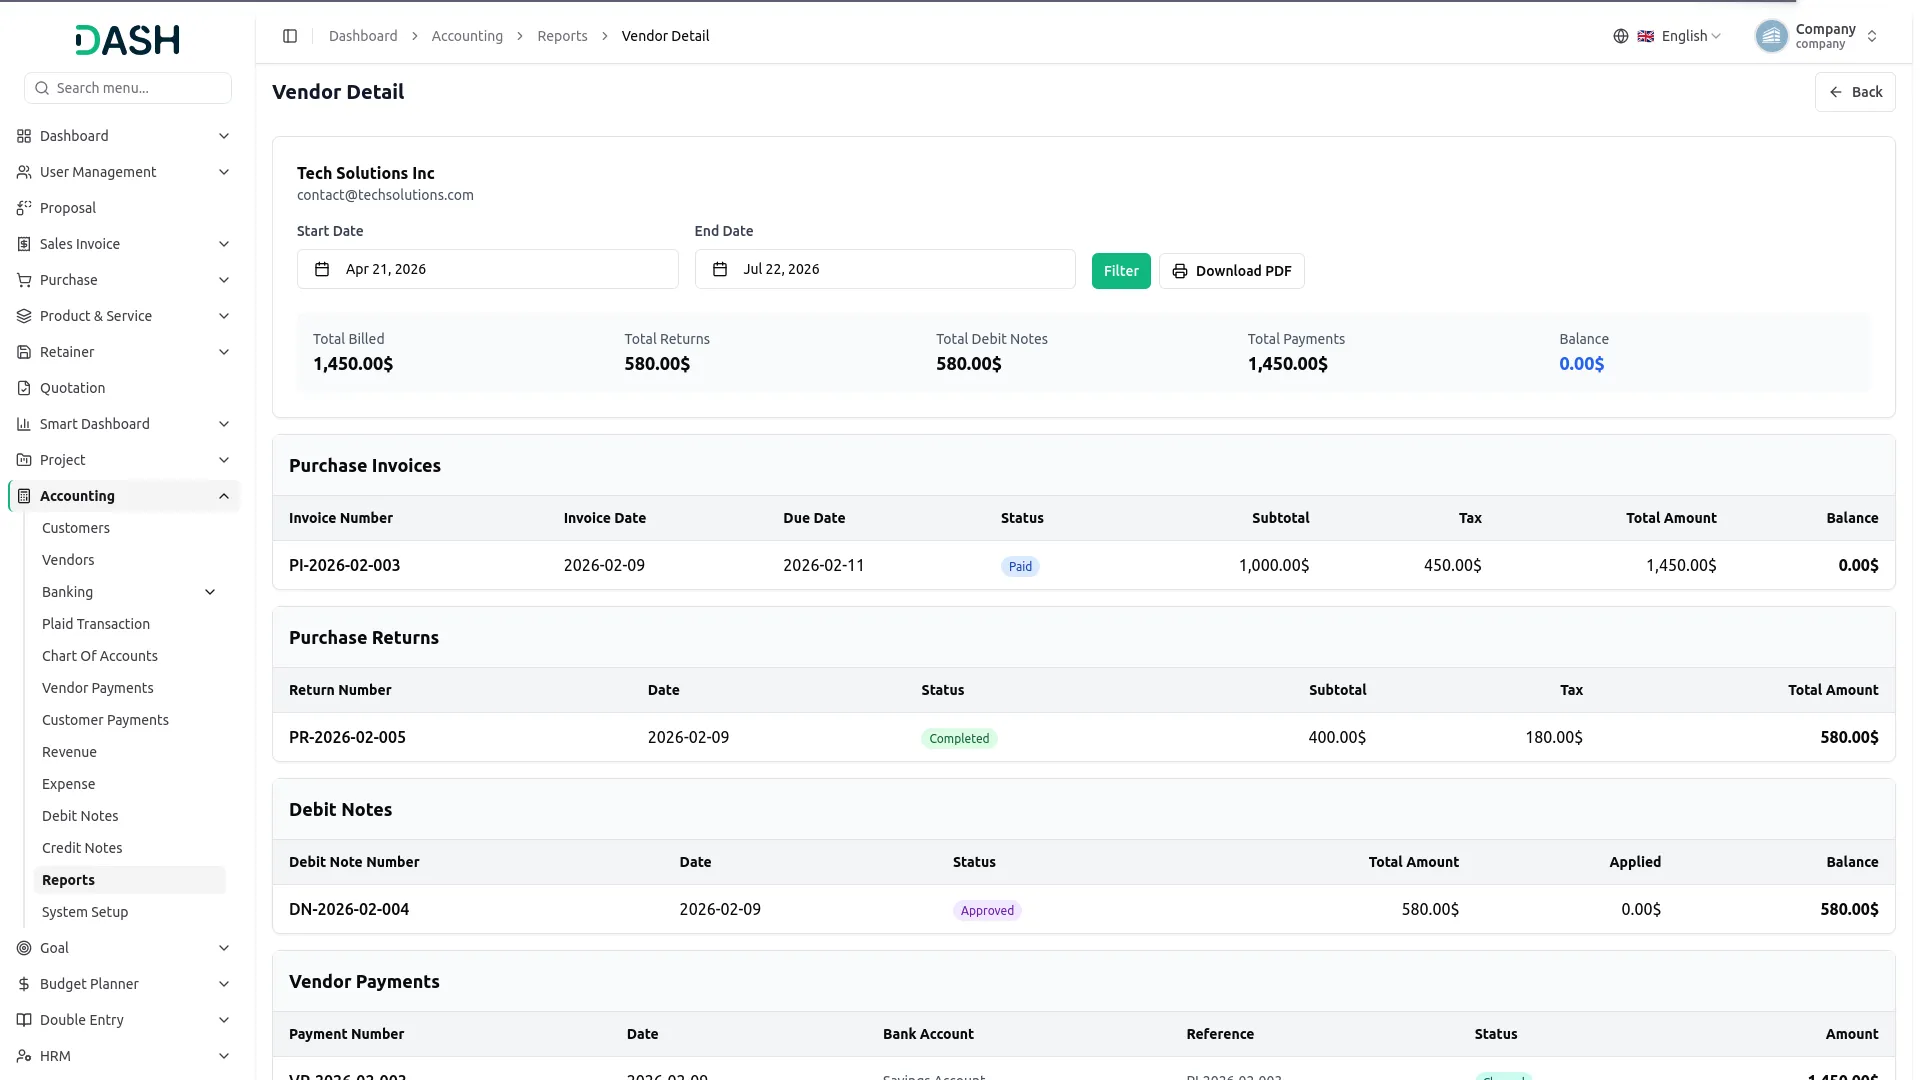
- The View Report button opens the Vendor Detail page, which shows a complete financial overview for that vendor, including Total Billed, Total Returns, Total Debit Notes, Total Payments, and Balance.
- Set a Start Date and End Date, click Generate to load the report, and use Download PDF to export it. Below the summary, the page lists all Purchase Invoices, Purchase Returns, Debit Notes, and Vendor Payments linked to that vendor.
Banking
Bank Accounts
- To add a new bank account, navigate to the Bank Accounts page and click the Create button. Complete the form by entering the required details, including the Account Number, Account Name, and Bank Name. You may also provide the Branch Name if applicable.
- Select the appropriate Account Type using the radio buttons (Checking, Savings, Credit, or Loan). Then, choose the relevant GL Account and Payment Gateway from their respective dropdown lists.
- Chart of Accounts codes created within the range of 1000 to 1099 will be displayed in the GL Account dropdown. When you use this bank account for transactions under the system, the current balance will be updated automatically through debit or credit entries.
- Next, enter the Opening Balance and Current Balance. If available, provide the IBAN, SWIFT Code, and Routing Number for the account. To make the account active immediately after creation, enable the Is Active toggle.
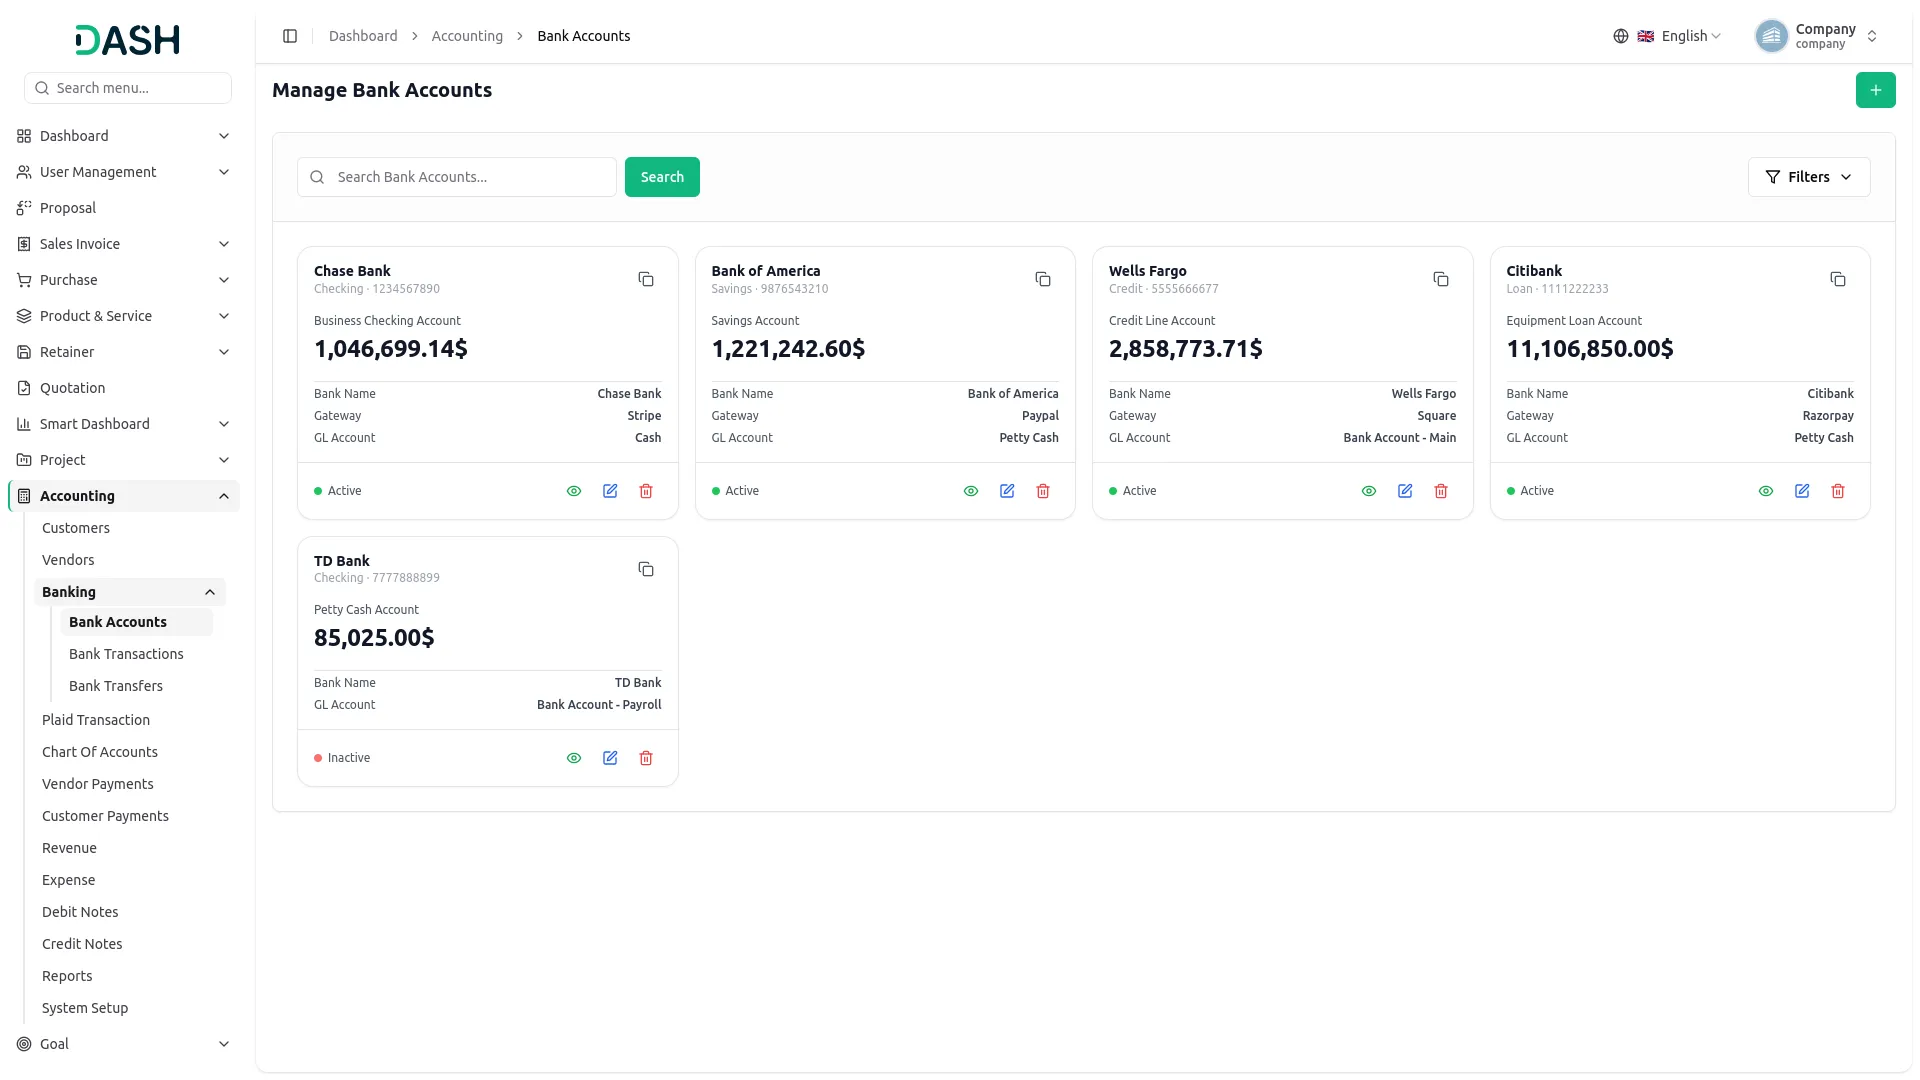
- The Manage Bank Accounts page displays all company bank accounts with details such as Account Number, Account Name, Bank Name, Account Type (Checking, Savings, Credit, or Loan), Current Balance, and Is Active (Active/Inactive).
- Use the Search bar to find a specific bank account, or click Filters to narrow results by Bank Name, Account Type, and Status, then click Apply to activate the filters or Clear to reset them. Toggle between List and Grid view using the icons at the top right.
- Use the Actions column to manage bank account records. Select View to see the account details, Edit to update the information, or Delete to permanently remove the account from the system.
Bank Transactions
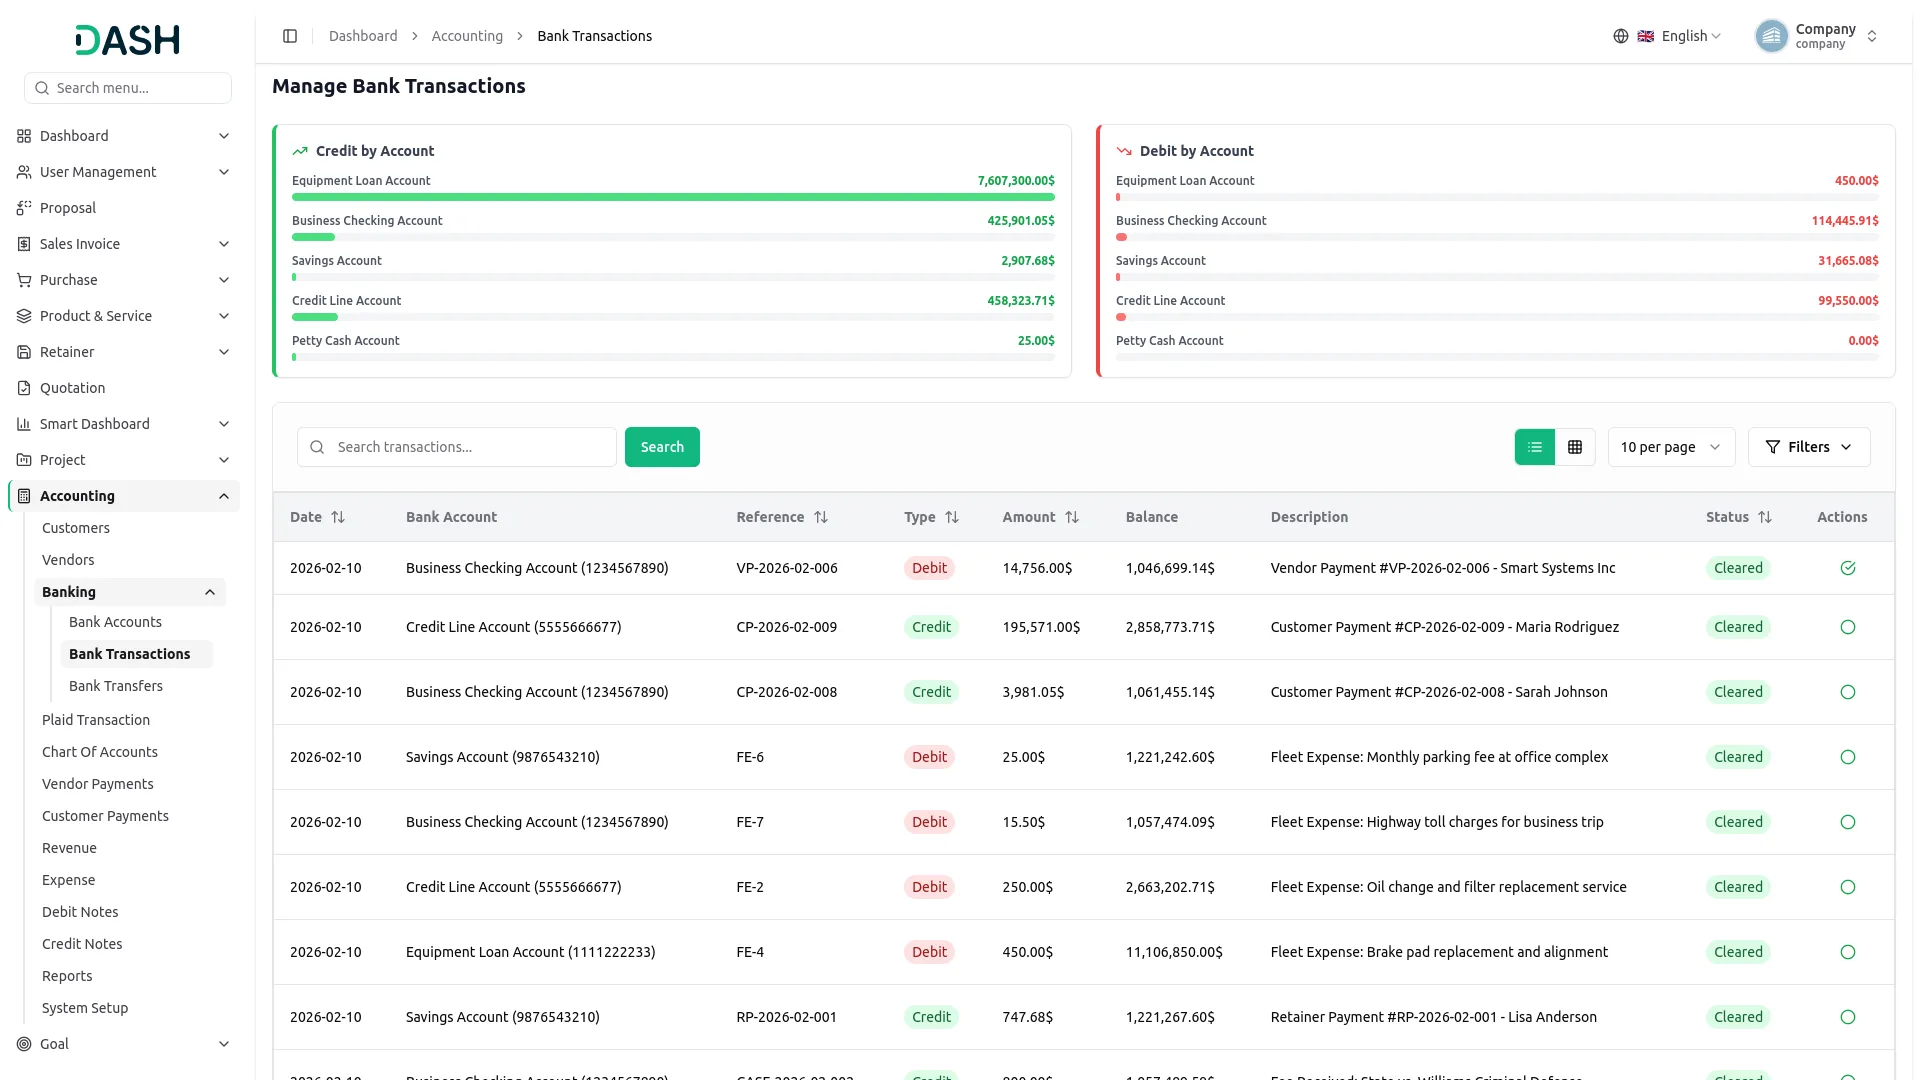
- The Manage Bank Transactions page displays all company bank transactions with details such as Date, Bank Account, Reference, Type (Debit or Credit), Amount, Balance, Description, Status (Cleared), and Actions.
- Use the Search bar to find a specific transaction, or click Filters to narrow results by Bank Account and Transaction Type, then click Apply to activate the filters or Clear to reset them. Toggle between List and Grid view using the icons at the top right.
- When you perform bank transactions in the system, the entries will be shown in the Bank Transaction section. The balance will be updated based on the amount transferred, with corresponding debit and credit entries
- Use the Actions column to reconcile transactions. Click the Mark as Reconciled button; once reconciled, the icon updates to show the transaction as Reconciled.
Bank Transfers
- To add a new bank transfer, click the “create” button at the top of the Bank Transfers page to open the Create Bank Transfer page. Set the Transfer Date, select the From Account and To Account from their dropdown lists, and enter the Transfer Amount. You may also add Transfer Charges and an optional Reference Number. Enter a Description.
- The Manage Bank Transfers page displays all company bank transfers with details such as Transfer Number, Date, From Account, To Account, Amount, Status (Pending or Completed, Failed), and Actions.
- Use the Search bar to find a specific transfer by transfer number or reference, or click Filters to narrow results by Status, From Account, and To Account, then click Apply to activate the filters or Clear to reset them.
- Use the Actions column to manage transfer records. For a pending transfer, click ‘Process Transfer’ to complete it, ‘View’ to see the transfer details, ‘Edit’ to update the information, or ‘ Delete ‘ to remove the record. Once a transfer is completed, only the View option remains available.
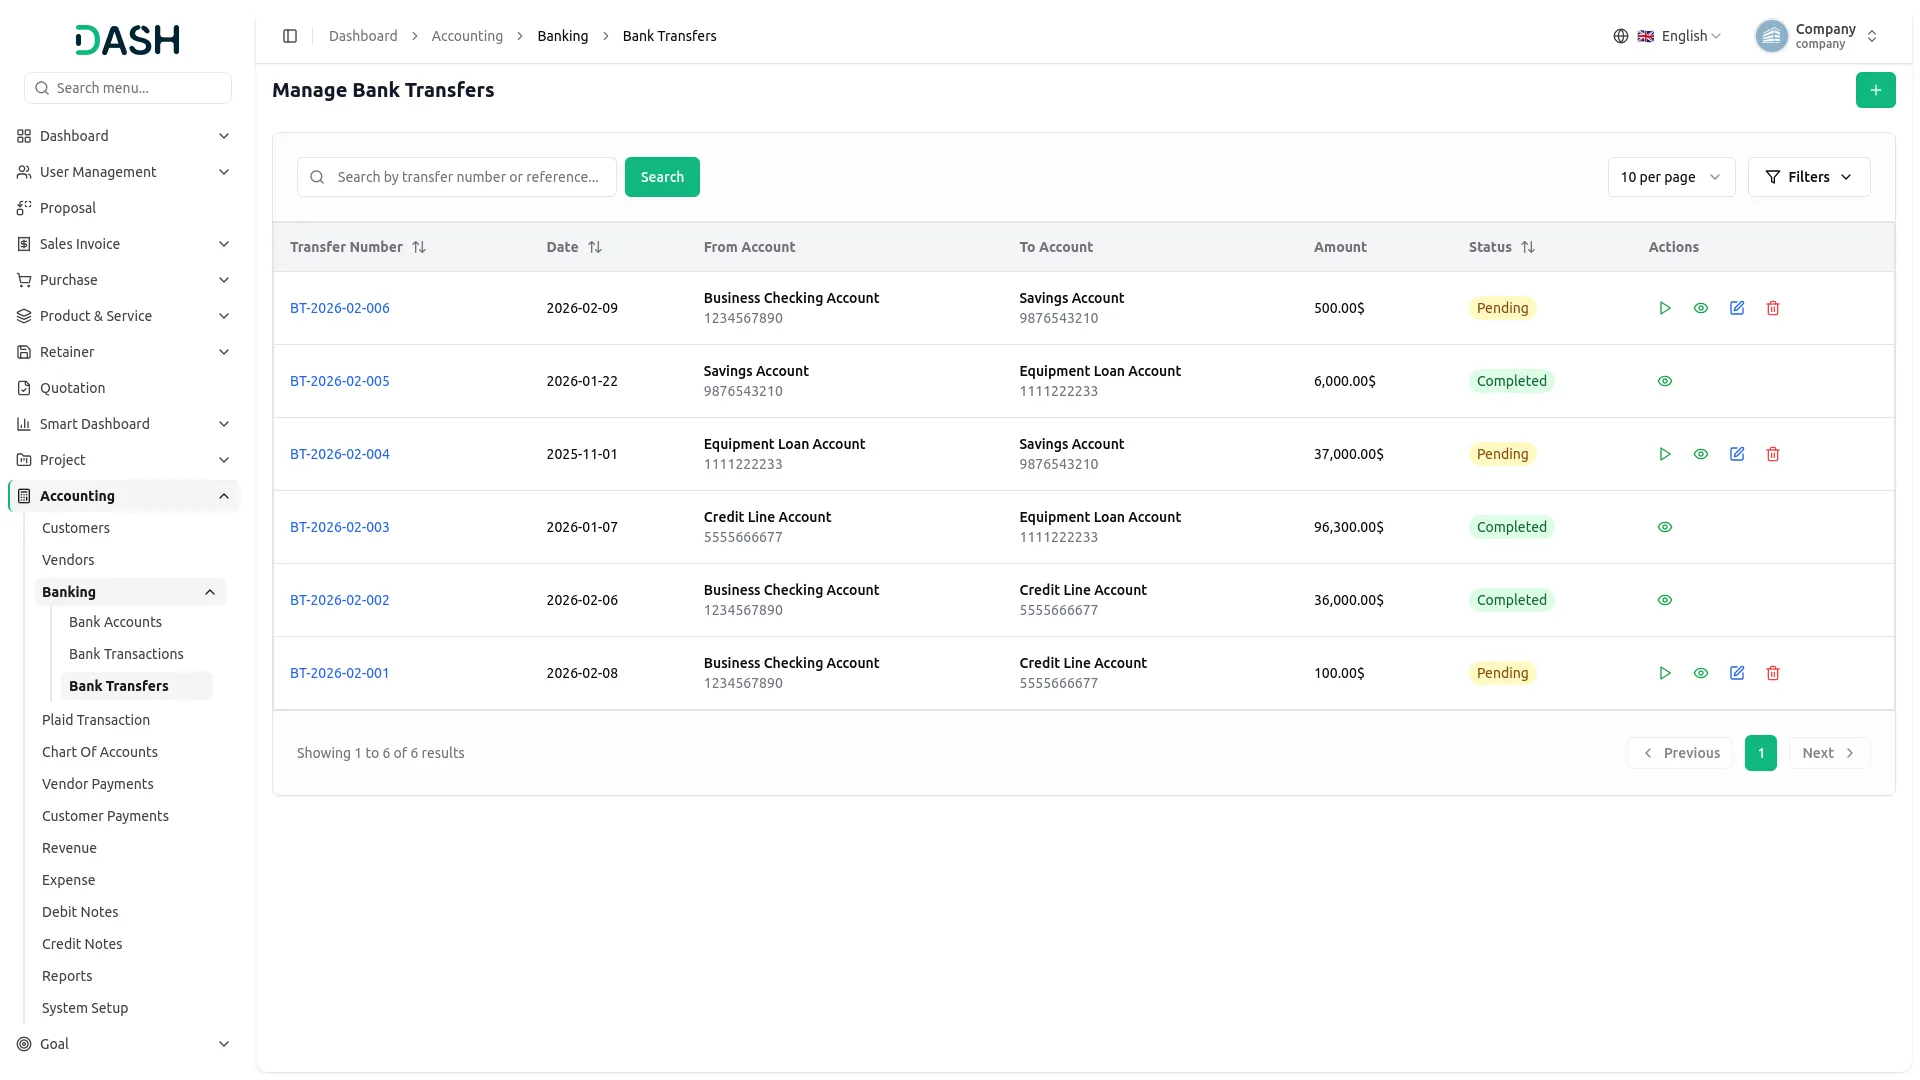
Chart of Accounts
- To add a new account, click the “Create” button at the top of the Chart of Accounts page. Select the Account Type from the dropdown (comes from the system setting), enter the Account Name and Account Code, and set the Normal Balance using the radio buttons (Debit or Credit).
- Enter the Opening Balance and Current Balance. Enable the Is Active toggle to make the account active, or tick Create as sub account to nest it under a parent account. Add an optional Description.
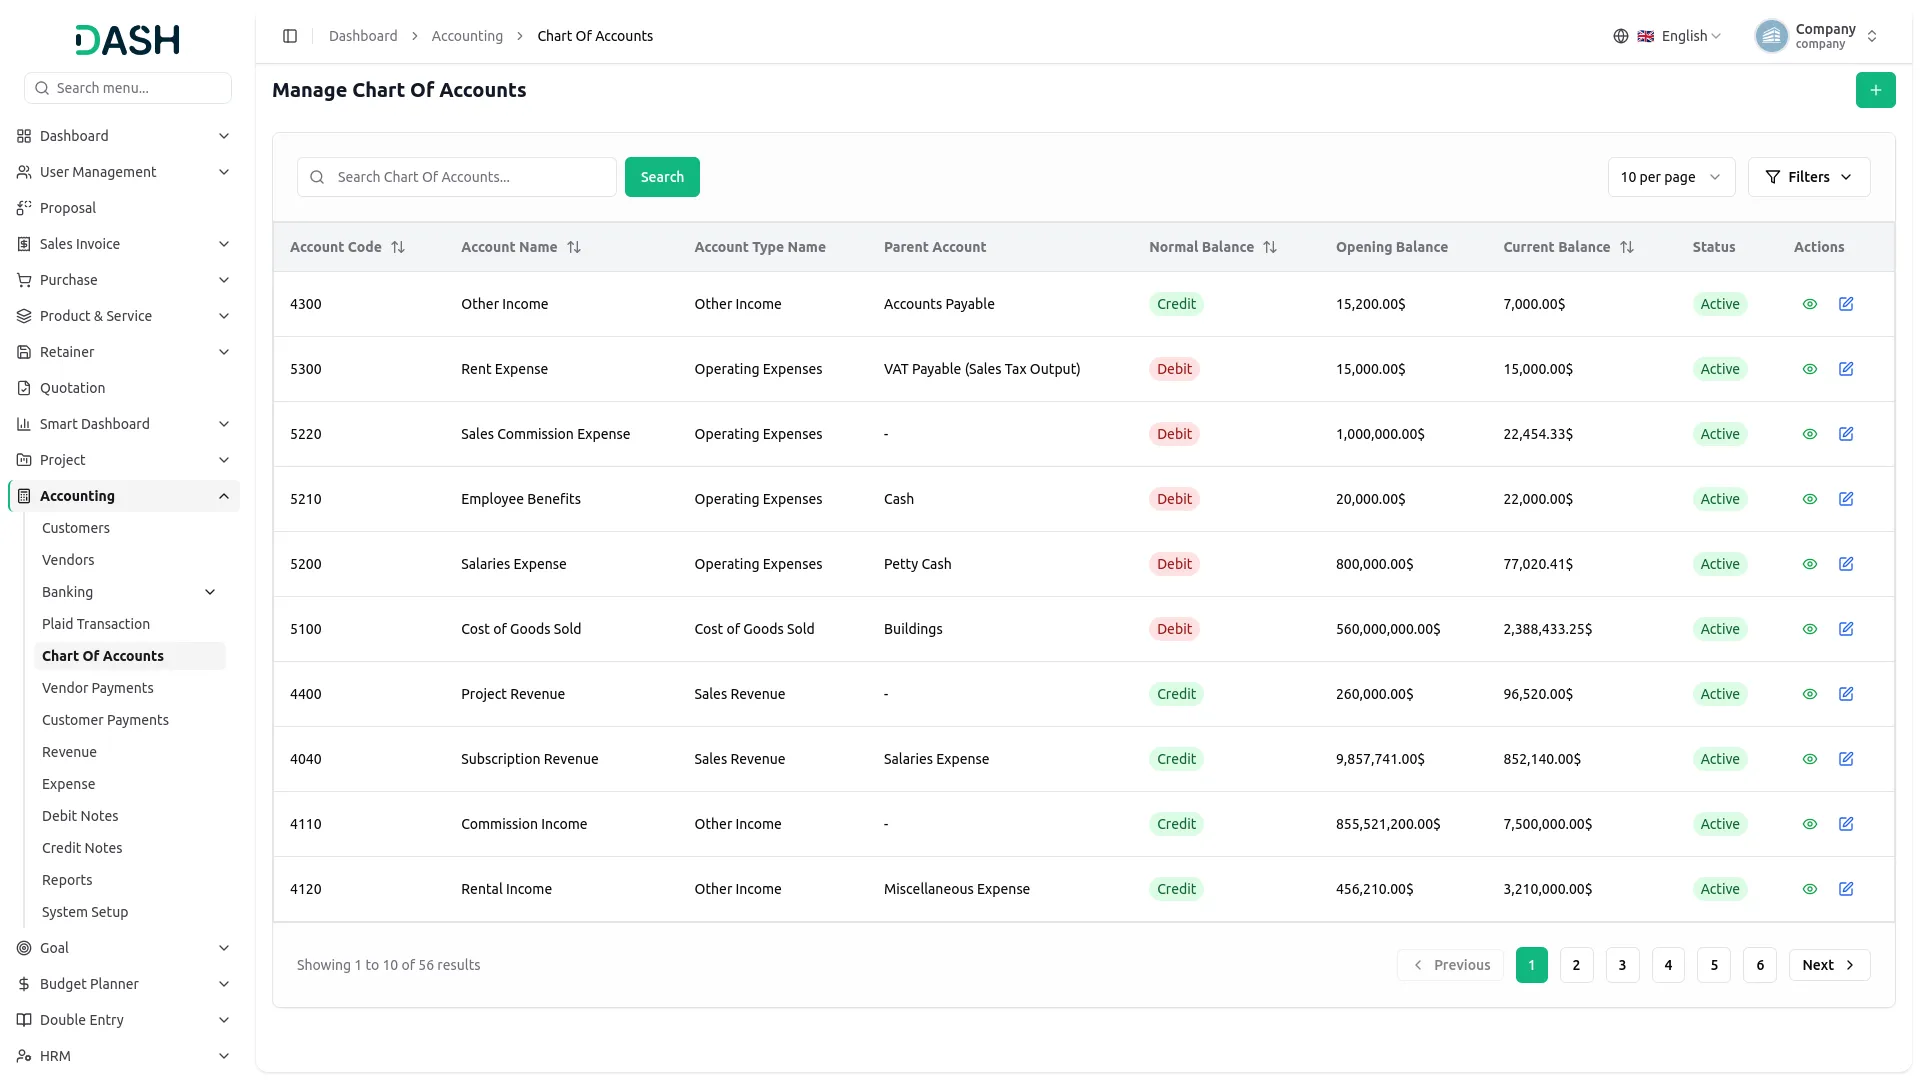
- The Manage Chart Of Accounts page displays all company accounts with details such as Account Code, Account Name, Account Type Name, Parent Account, Normal Balance (Credit or Debit), Opening Balance, Current Balance, Status (Active), and Actions.
- When a new journal entry is created, the Chart of Accounts’ current balance will be updated in debit or credit accordingly.
- Use the Search bar to find a specific account, or click Filters to narrow results by Account Type, Normal Balance, and Status, then click Apply to activate the filters or Clear to reset them.
- Use the Actions column to view or edit an account. Click View to open the account details or Edit to update the information.
- When you click the View button, it opens the View Chart Of Account page for the selected account. The top card shows the account name and code, its Status, Account Type, Parent Account, Nor mal Balance, Level, and Description.
- The cards on the right show the Opening Balance, Current Balance, and Calculated Balance (with its Debit and Credit breakdown). The Transaction History section below lists all transactions for the account; entries appear here once journal entries are posted.
Below is the Chart of Accounts, which explains how it should be used:
| Account Code Range | Account Type | Financial Statement Section |
|---|---|---|
| 1000–1399 | Current Assets | Assets |
| 1400–1599 | Other Assets | Assets |
| 1600–1999 | Fixed Assets | Assets |
| 2000–2499 | Current Liabilities | Liabilities |
| 2500–2999 | Long-term Liabilities | Liabilities |
| 3000–3999 | Equity | Equity |
| 4000–4999 | Revenue | Income Statement Only |
| 5000–5999 | Expenses | Income Statement Only |
Vendor Payments
- To add a new vendor payment, click the “Create” button on the vendor payment page. You need to set the Payment Date, select the Vendor and Bank Account from their dropdowns, and add an optional Reference Number.
- The Outstanding Invoices panel lists the vendor’s unpaid invoices; click Add to apply an invoice, and it appears under Payment Summary where you can set the amount or remove it. Any Available Debit Notes for the vendor appear alongside. Enter the Total Payment Amount, add optional Notes.
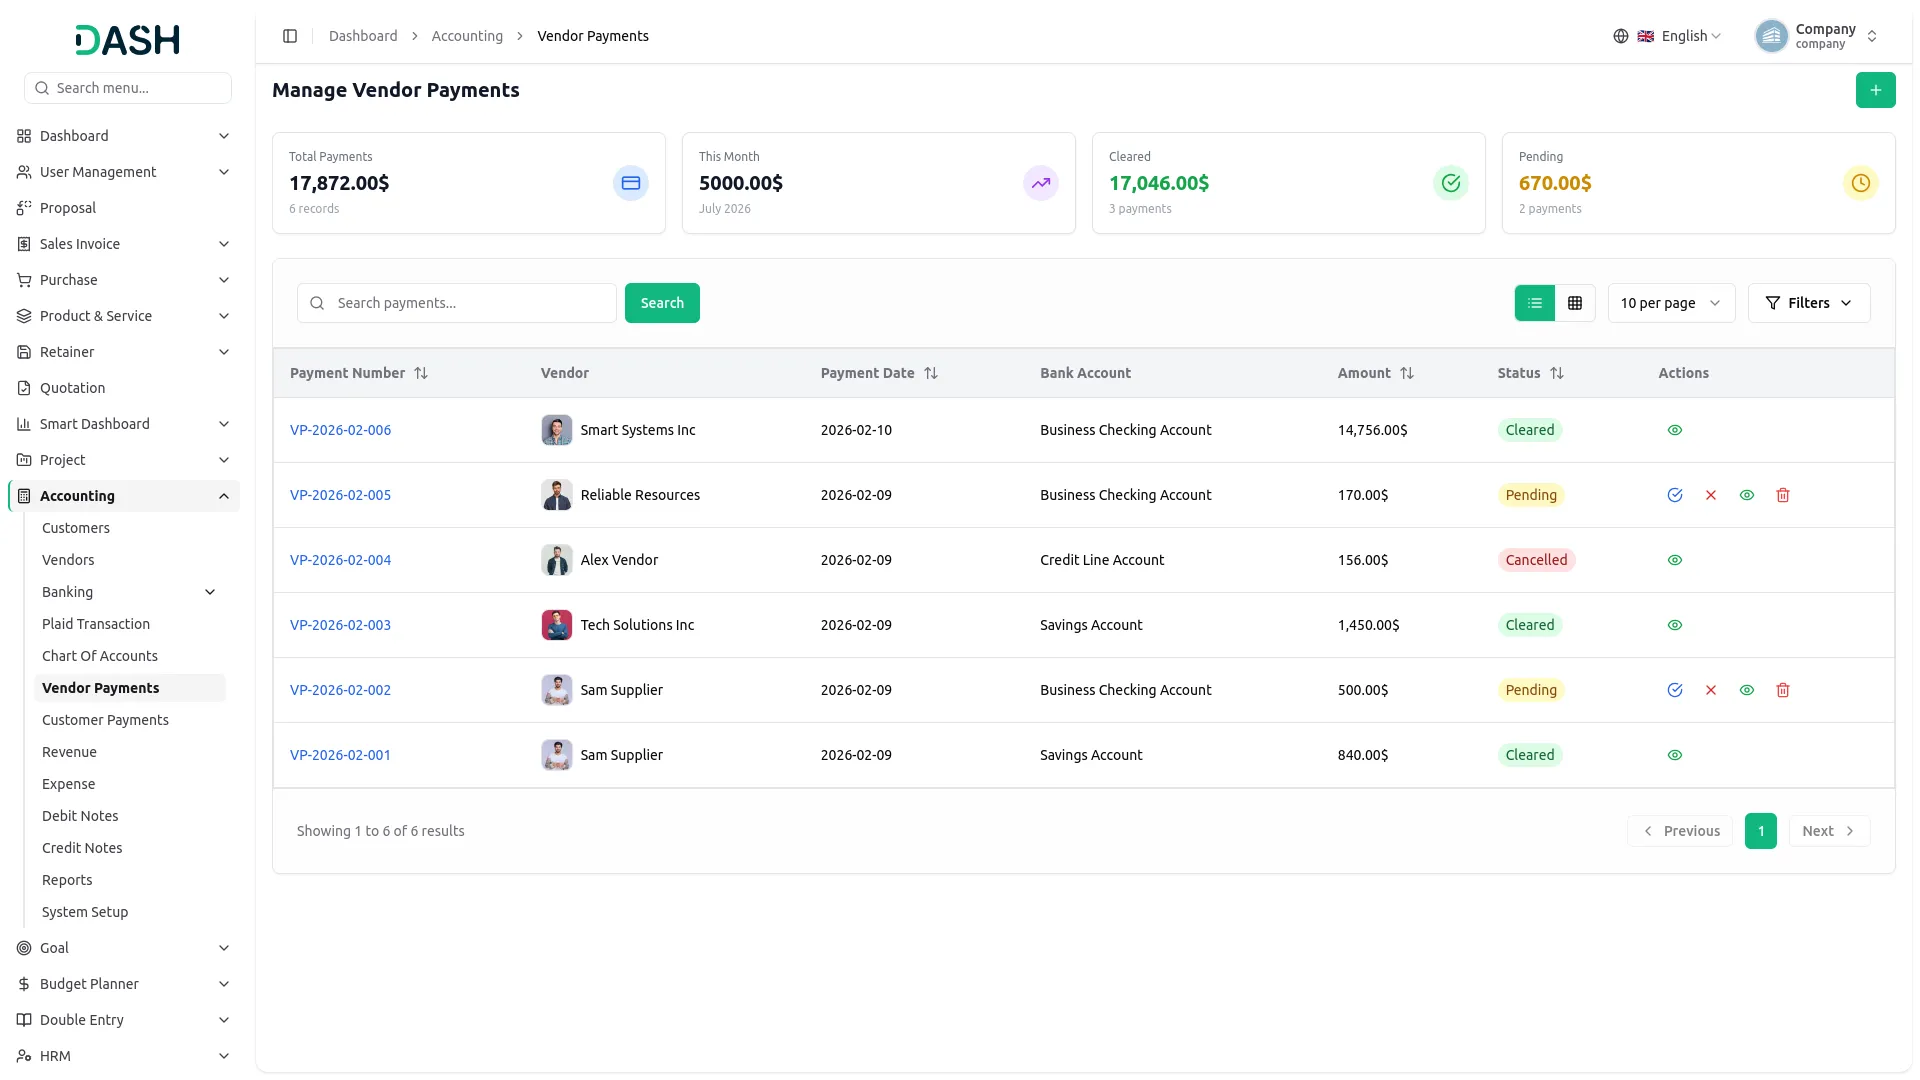
- The Manage Vendor Payments page displays all company vendor payments with details such as Payment Number, Payment Date, Vendor, Bank Account, Amount, Status (Cleared, Pending, or Cancelled), and Actions.
- Use the Search bar to find a specific payment, or click Filters to narrow results by Vendor, Bank Account, Status, and Date Range, then click Apply to activate the filters or Clear to reset them. Toggle between List and Grid view using the icons at the top right.
- Use the Actions column to manage payment records. For a Pending payment, click ‘Mark as Cleared’ to clear it, ‘Cancel Payment’ to cancel it, ‘View’ to see the payment details, or ‘Delete’ to remove the record. Once a payment is cleared or cancelled, only the View option remains available.
- When a payment is created from the vendor side and the status is updated to ‘Mark as Cleared’, the purchase invoice balance will be updated. Journal entries, bank transactions, bank balance, and vendor balance will also be updated accordingly.
Customer Payments
- To add a new customer payment, click the “Create” button on the customer payment page. Set the Payment Date, select the Customer and Bank Account from their dropdowns, and add an optional Reference Number.
- The Outstanding Invoices panel lists the customer’s unpaid invoices; click Add to apply an invoice, and it appears under Payment Summary, where you can set the amount or remove it. Any Available Credit Notes for the customer appear alongside. Enter the Total Payment Amount, add optional Notes.
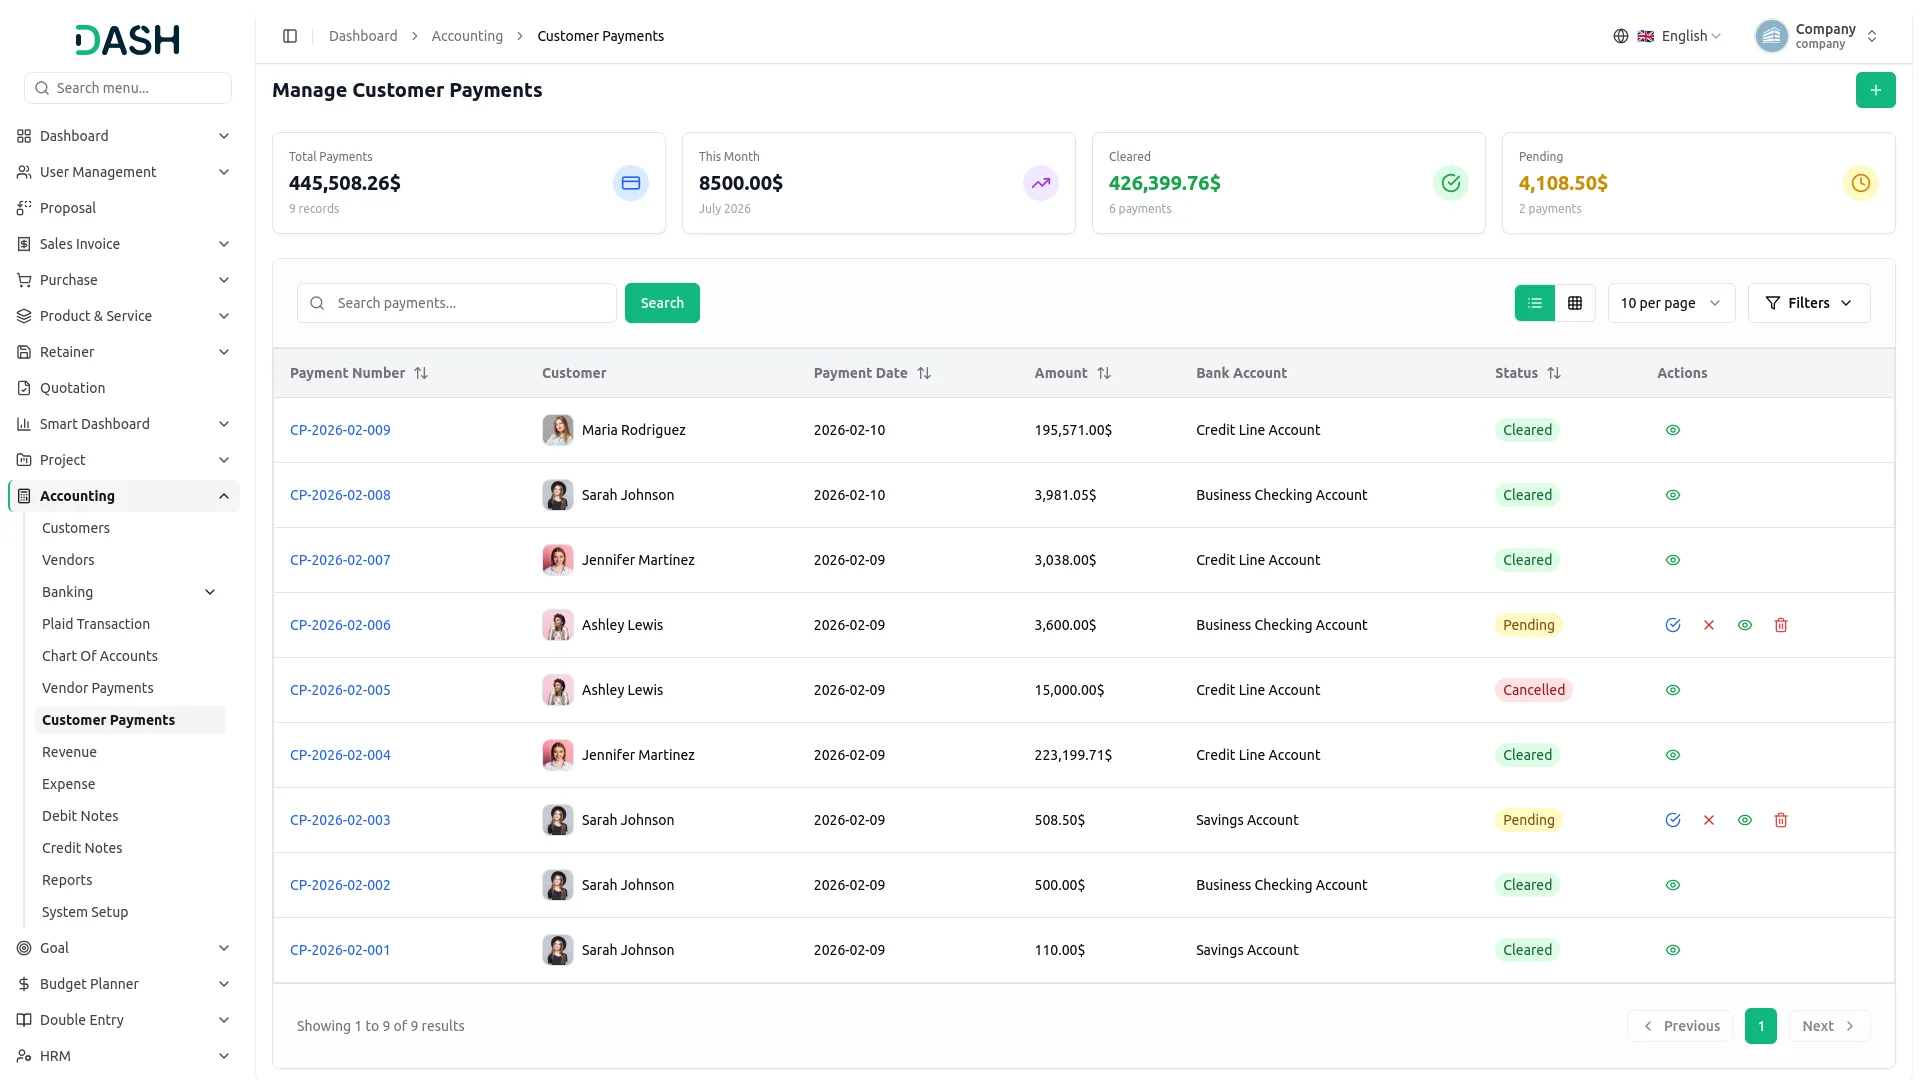
- The Manage Customer Payments page displays all company customer payments with details such as Payment Number, Customer, Payment Date, Amount, Bank Account, Status (Cleared, Pending, or Cancelled), and Actions.
- Use the Search bar to find a specific payment, or click Filters to narrow results by Customer, Status, and Date Range, then click Apply to activate the filters or Clear to reset them. Toggle between List and Grid view using the icons at the top right.
- Use the Actions column to manage payment records. For a Pending payment, click ‘Mark as Cleared’ to clear it, ‘Cancel Payment’ to cancel it, ‘View’ to see the payment details, or ‘Delete’ to remove the record. Once a payment is cleared or cancelled, only the View option remains available.
- When a payment is created from the customer side and the status is updated to ‘Mark as Cleared’, the sales invoice balance will be updated. Journal entries, bank transactions, bank balance, and customer balance will also be updated accordingly.
Manage Revenues
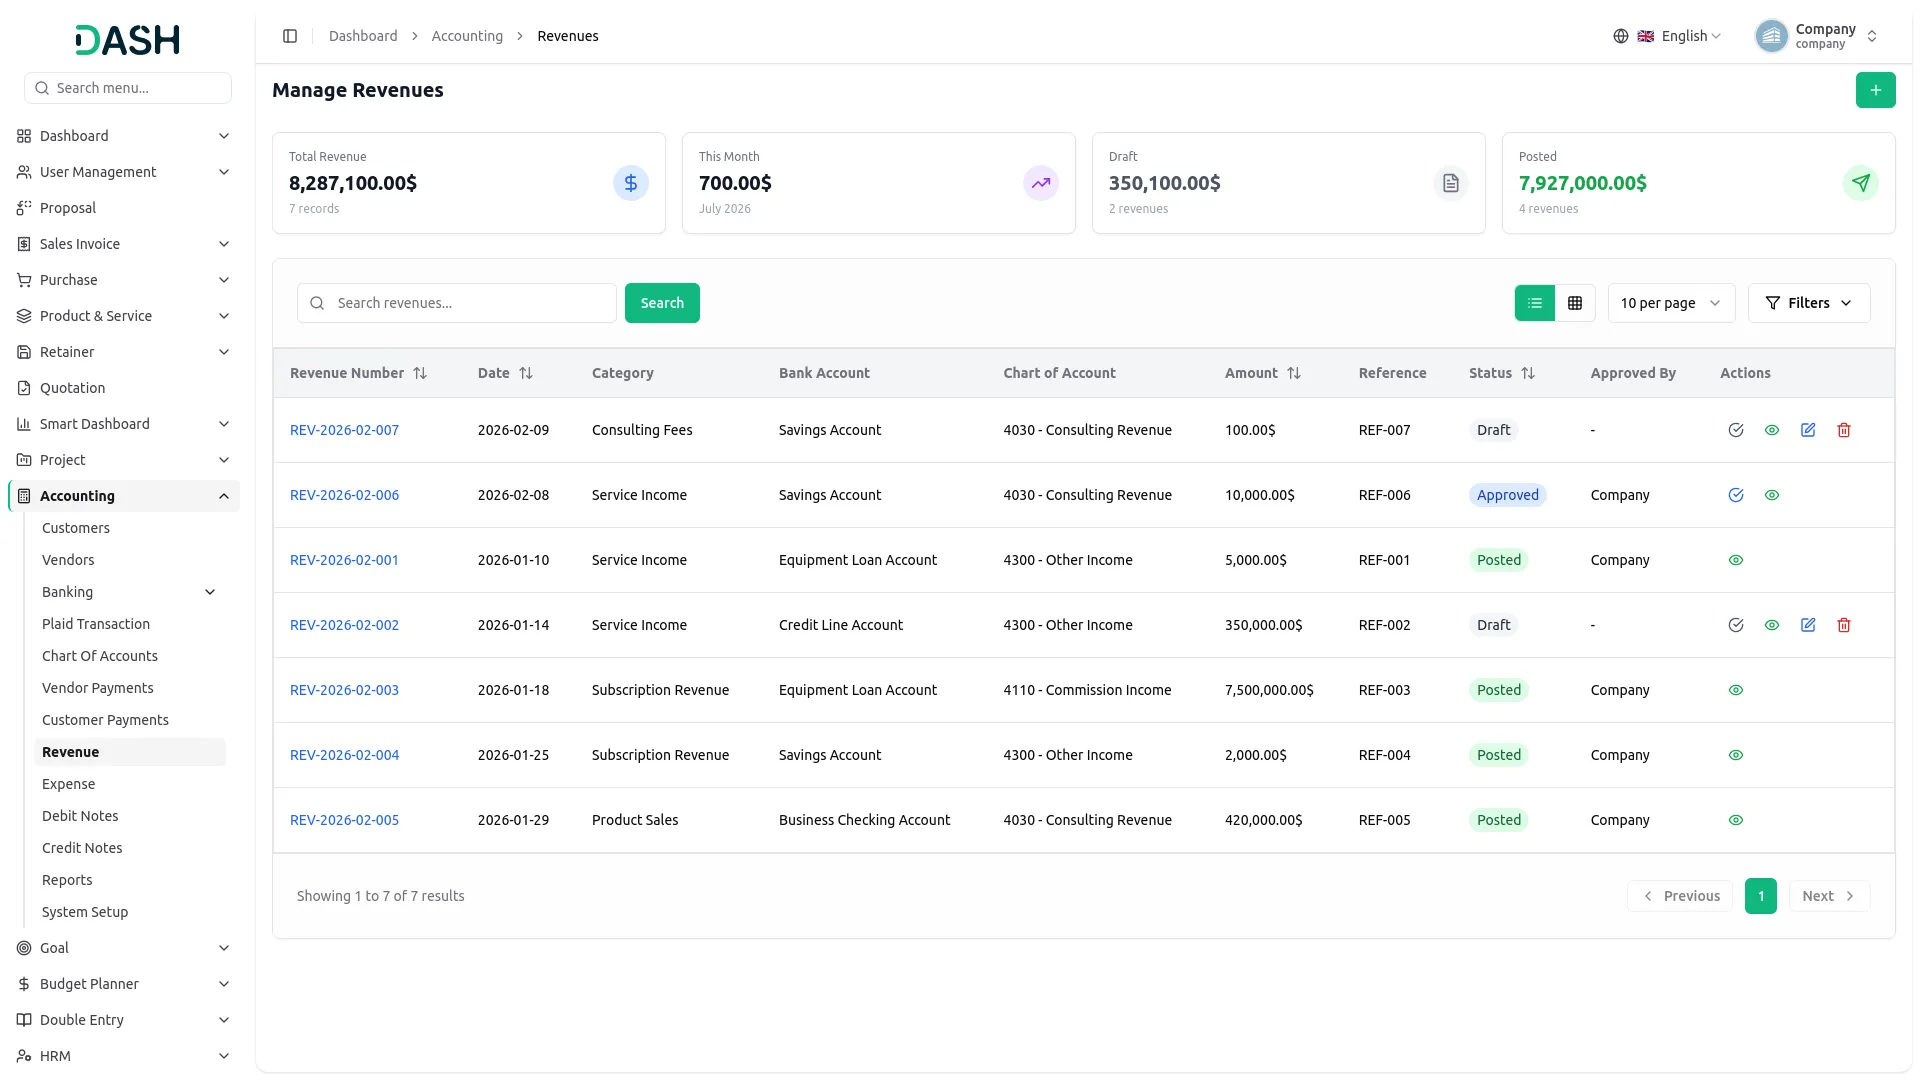
- When a company earns money from sales or services, it is called revenue. It helps in tracking the income of the business.
- To add a new revenue entry, navigate to the Revenue page and click the “Create” button. Select the Revenue Date, then choose the appropriate Category from the dropdown, which is populated from the System Settings.
- Next, select a Bank Account from the dropdown list available from the Banking section and choose the relevant Chart of Account from the Chart of Accounts section.
- Enter the Amount received and optionally provide a Reference Number and Description for additional details.
- When the Revenue Chart of Accounts codes ranging from 4000 to 4999 are used, all transactions posted under this range are classified as operating revenue. These transactions are recorded through journal entries and bank transactions, and the bank balance is updated accordingly along with the related financial records.
- The Manage Revenues page displays all company revenues with details such as Revenue Number, Date, Category, Bank Account, Chart of Accounts, Amount, Reference, Status (Draft, Approved, or Posted), Approved By, and Actions.
- Use the Search bar to find a specific revenue, or click Filters to narrow results by Category, Status, Date Range, and Bank Account, then click Apply to activate the filters or Clear to reset them. Toggle between List and Grid view using the icons at the top right.
- Use the Actions column to manage revenue records. For a Draft revenue, click ‘Approve’ to approve it, ‘View’ to see the revenue details, ‘Edit’ to update the information, or ‘ Delete ‘ to remove the record. Once a revenue is approved, click ‘Post’ to finalise it, with the ‘View’ option also available. Once posted, only the View option remains.
Manage Expenses
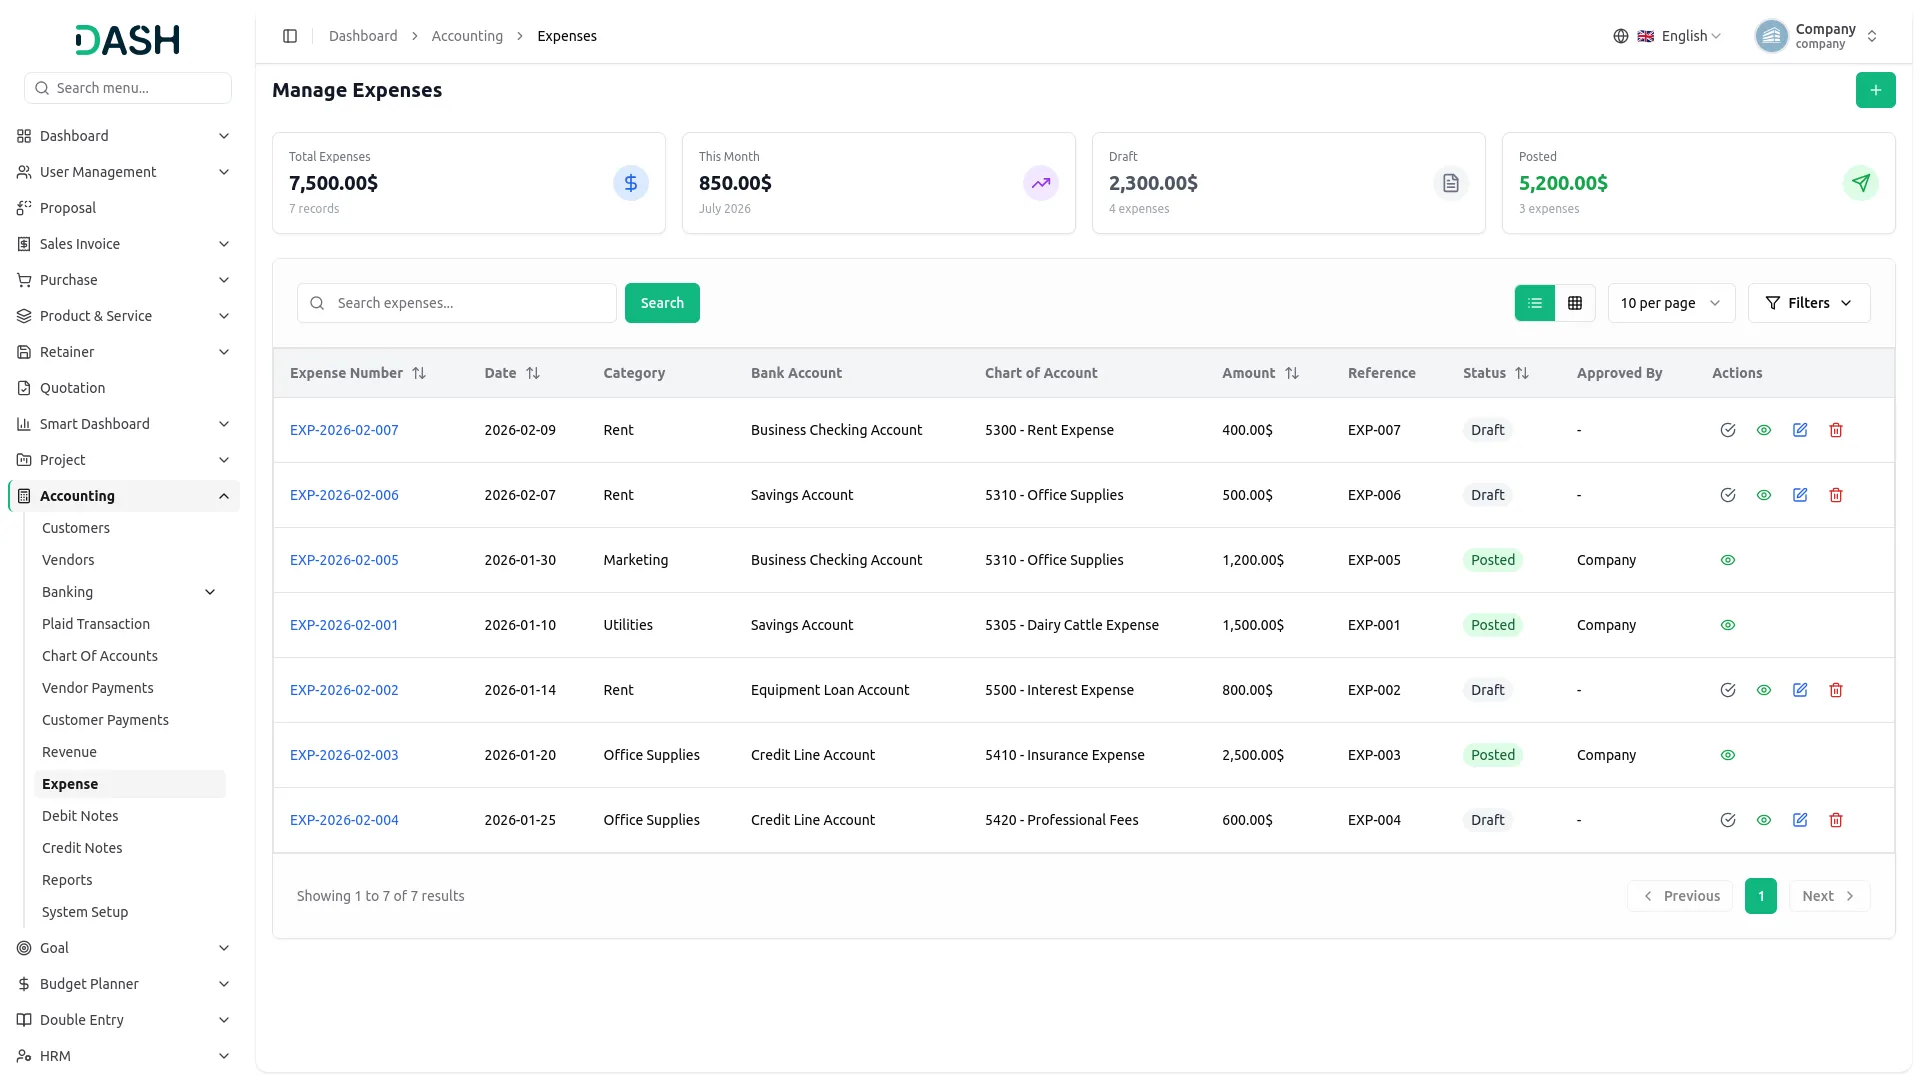
- When a company spends money to run the business, it is called an expense. It helps in tracking the costs of the business.
- To add a new expense, click the “Create” button at the top of the Expenses page. Set the Expense Date, then choose the appropriate Category from the dropdown, which is populated from the System Settings.
- Next, select a Bank Account from the dropdown list available from the Banking section and choose the relevant Chart of Account from the Chart of Accounts section.
- Enter the Amount received and optionally provide a Reference Number and Description for additional details.
- When expense Chart of Accounts codes ranging from 5000 to 6999 are used, all transactions posted under this range are recorded through journal entries and bank transactions, and the bank balance is updated accordingly.
- The Manage Expenses page displays all company expenses with details such as Expense Number, Date, Category, Bank Account, Chart of Account, Amount, Reference, Status (Draft, Approved, or Posted), Approved By, and Actions.
- Use the Search bar to find a specific expense, or click Filters to narrow results by Category, Status, Date Range, and Bank Account; then click Apply to activate the filters or Clear to reset them. Toggle between List and Grid view using the icons at the top right.
- Use the Actions column to manage expense records. For a Draft expense, click ‘Approve’ to approve it, ‘View’ to see the expense details, ‘Edit’ to update the information, or ‘Delete’ to remove the record. Once an expense is approved, click ‘Post’ to finalise it, with the View option also available. Once posted, only the View option remains.
Debit Notes
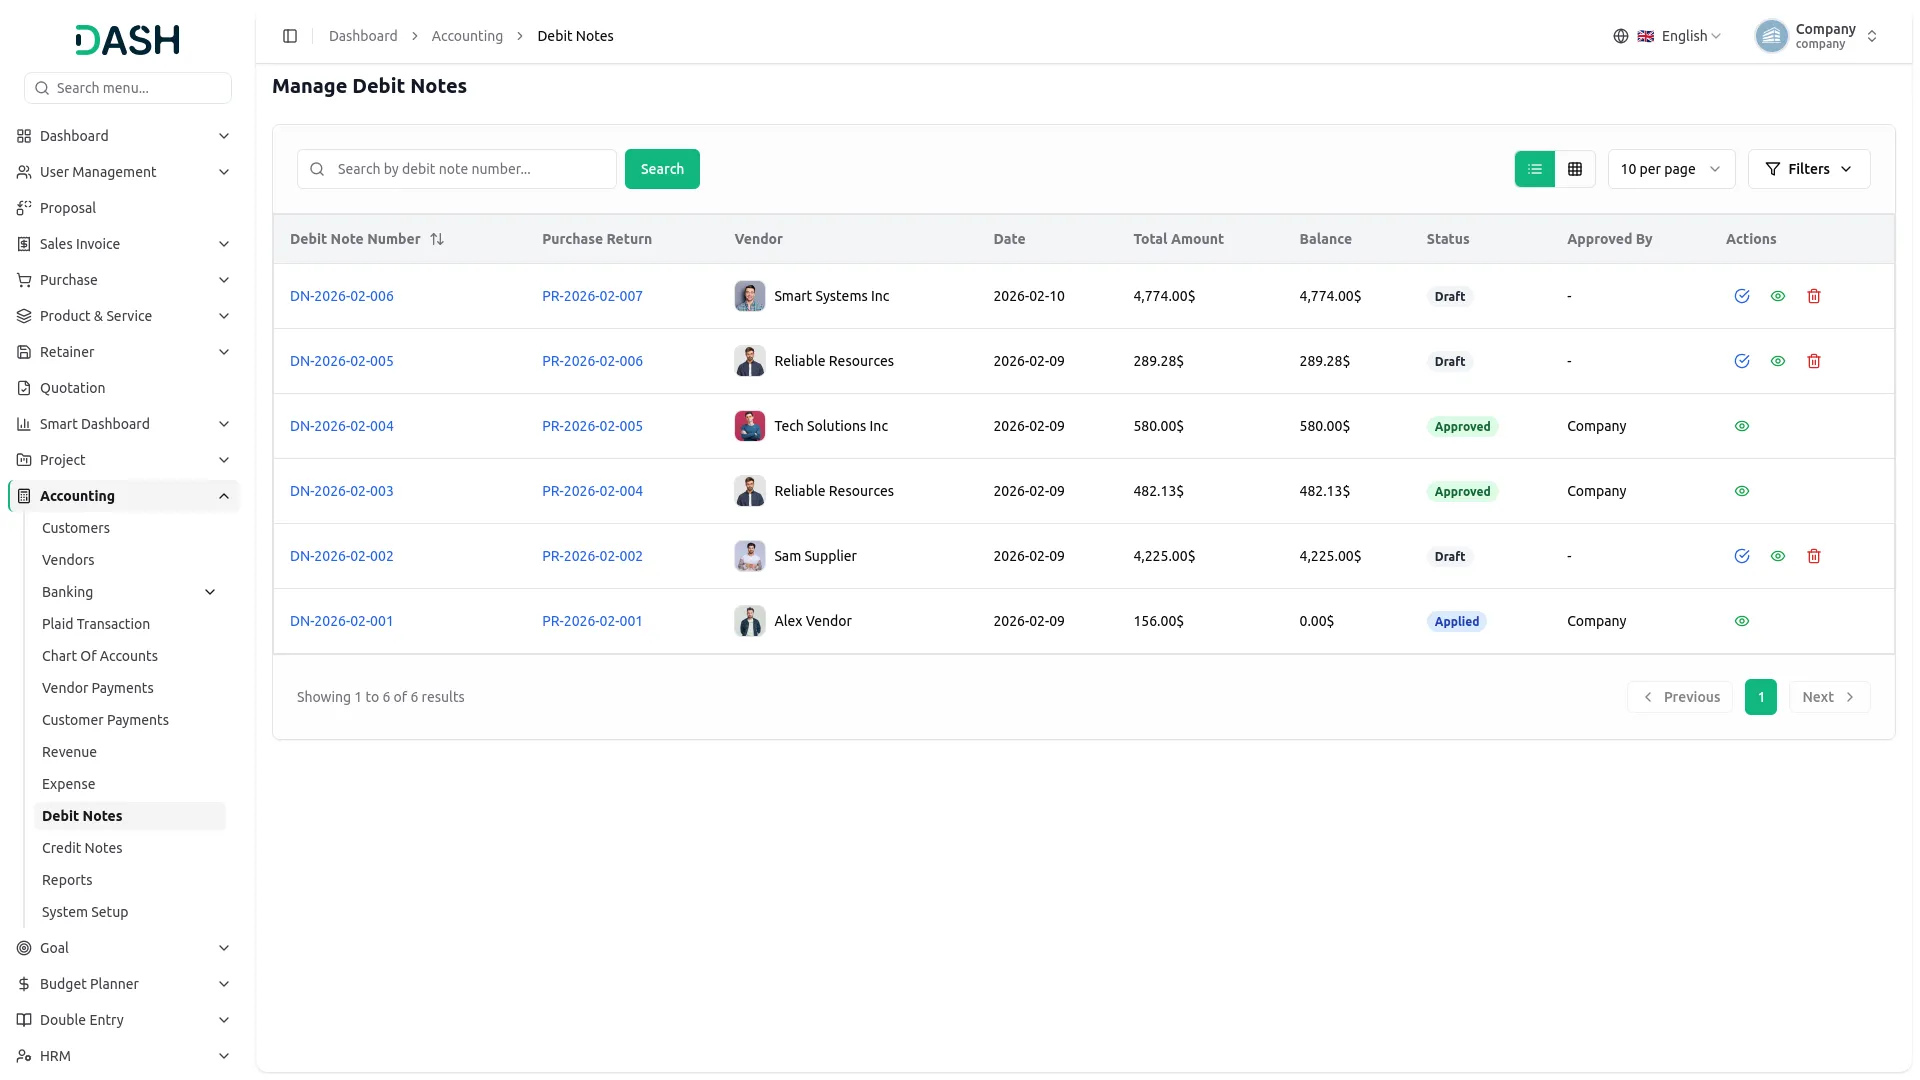
- The Manage Debit Notes page displays all company debit notes with details such as Debit Note Number, Purchase Return, Vendor, Date, Total Amount, Balance, Status (Draft, Approved, or Applied), Approved By, and Actions.
- On clicking any Purchase Return record, the system opens a detailed view page displaying complete purchase return information, including vendor details, shipping address, return items, tax breakdown, and total return amount.
- Use the Search bar to find a specific debit note by number, or click Filters to narrow results by Vendor, Status, and Purchase Return, then click Apply to activate the filters or Clear to reset them. Toggle between List and Grid view using the icons at the top right.
- Use the Actions column to manage debit note records. For a Draft debit note, click ‘Approve’ to approve it, ‘View’ to see the debit note details, or ‘Delete’ to remove the record. Once a debit note is approved or Applied, only the View option remains available.
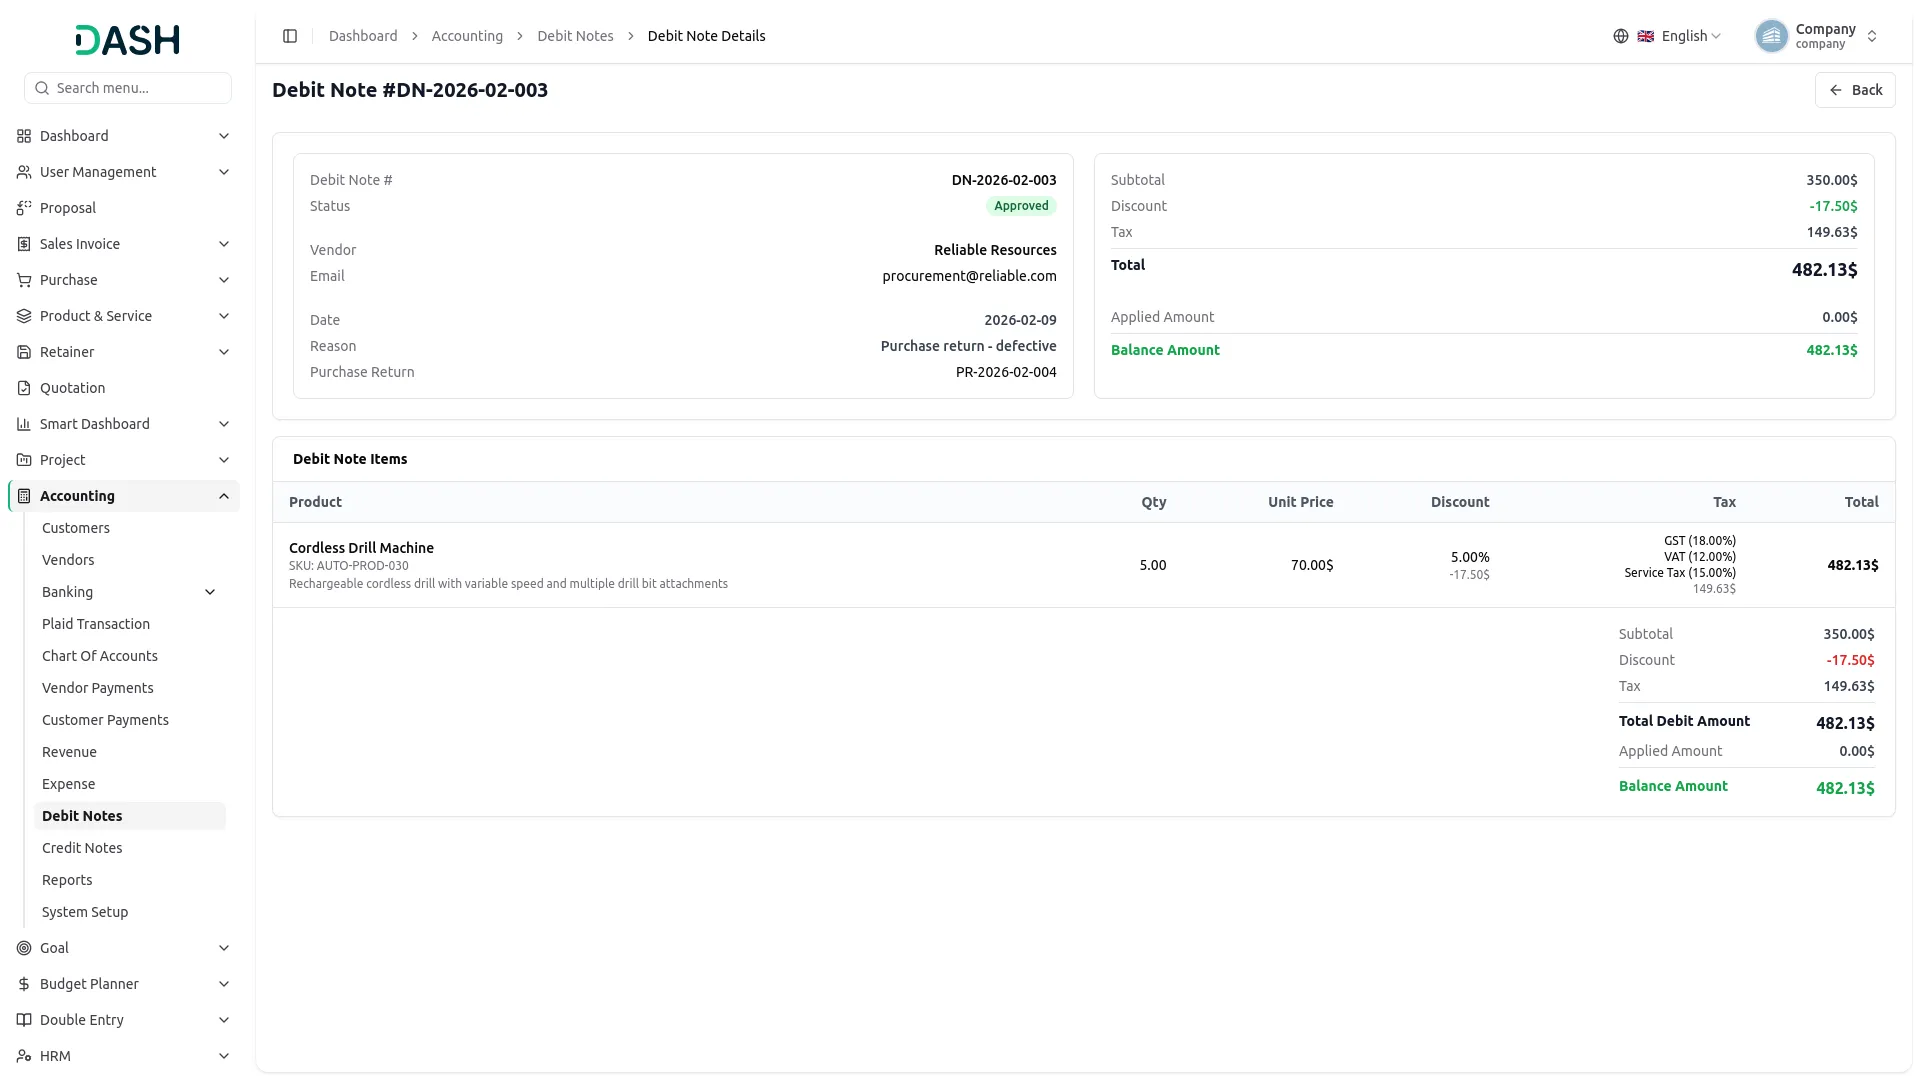
- When you click the View button, it opens the debit note details page. The top section shows the debit note number, Total Amount, and Status (such as Draft), along with the Vendor (with email) and Details (Date, Reason, and the linked Purchase Return). If the debit note is still a Draft, use the Approve Debit Note button to approve it, with the Balance Amount displayed alongside.
- The Debit Note Items table lists each item with its Product (with SKU and description), Qty, Unit Price, Discount, Tax, and Total. Below the table, the summary shows the Subtotal, Tax, Total Debit Amount, Applied Amount, and Balance Amount.
- When a Debit Note is created for a vendor, it is automatically linked to that vendor and can be viewed in the Debit Note section. Once the Debit Note is approved, it becomes available in the Vendor Payment module.
- While creating a Vendor Payment, after selecting the vendor, the system will fetch all approved Debit Notes related to that vendor and display them in the “Available Debit Notes” section.
- Users can then select and apply these Debit Notes during payment creation to adjust the final payable amount.
- In the Reports section, users can view Vendor Balance details under the “Vendor Balance” tab. Additionally, Journal Entries and Vendor-related records can be accessed from the Vendor section by clicking the “View Report” button. This provides a detailed view of all transactions and balance-related information for the selected vendor.
Credit Notes
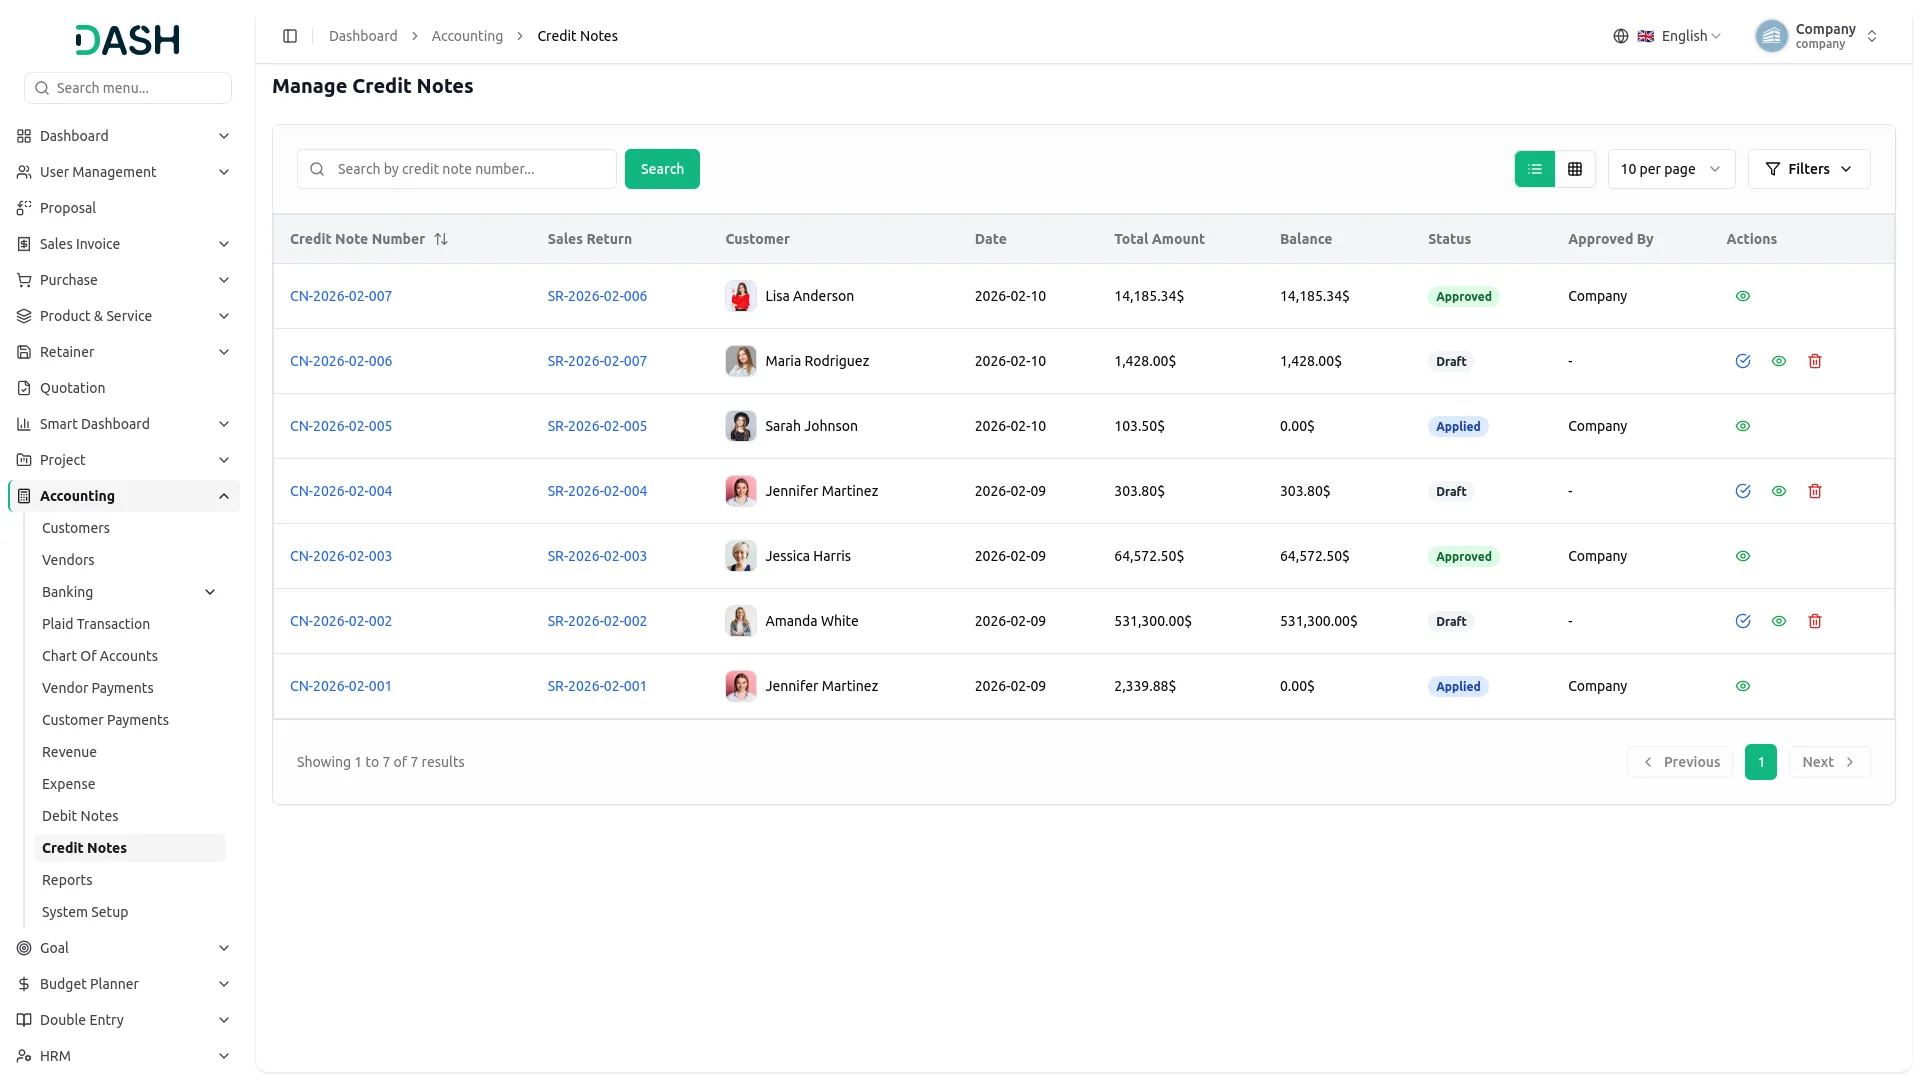
- The Manage Credit Notes page displays all company credit notes with details such as Credit Note Number, Sales Return, Customer, Date, Total Amount, Balance, Status (Draft, Approved, or Applied), Approved By, and Actions.
- Use the Search bar to find a specific credit note by number, or click Filters to narrow results by Customer, Status, and Sales Return, then click Apply to activate the filters or Clear to reset them. Toggle between List and Grid view using the icons at the top right.
- Use the Actions column to manage credit note records. For a Draft credit note, click ‘Approve’ to approve it, ‘View’ to see the credit note details, or ‘Delete’ to remove the record. Once a credit note is approved or Applied, only the View option remains available.
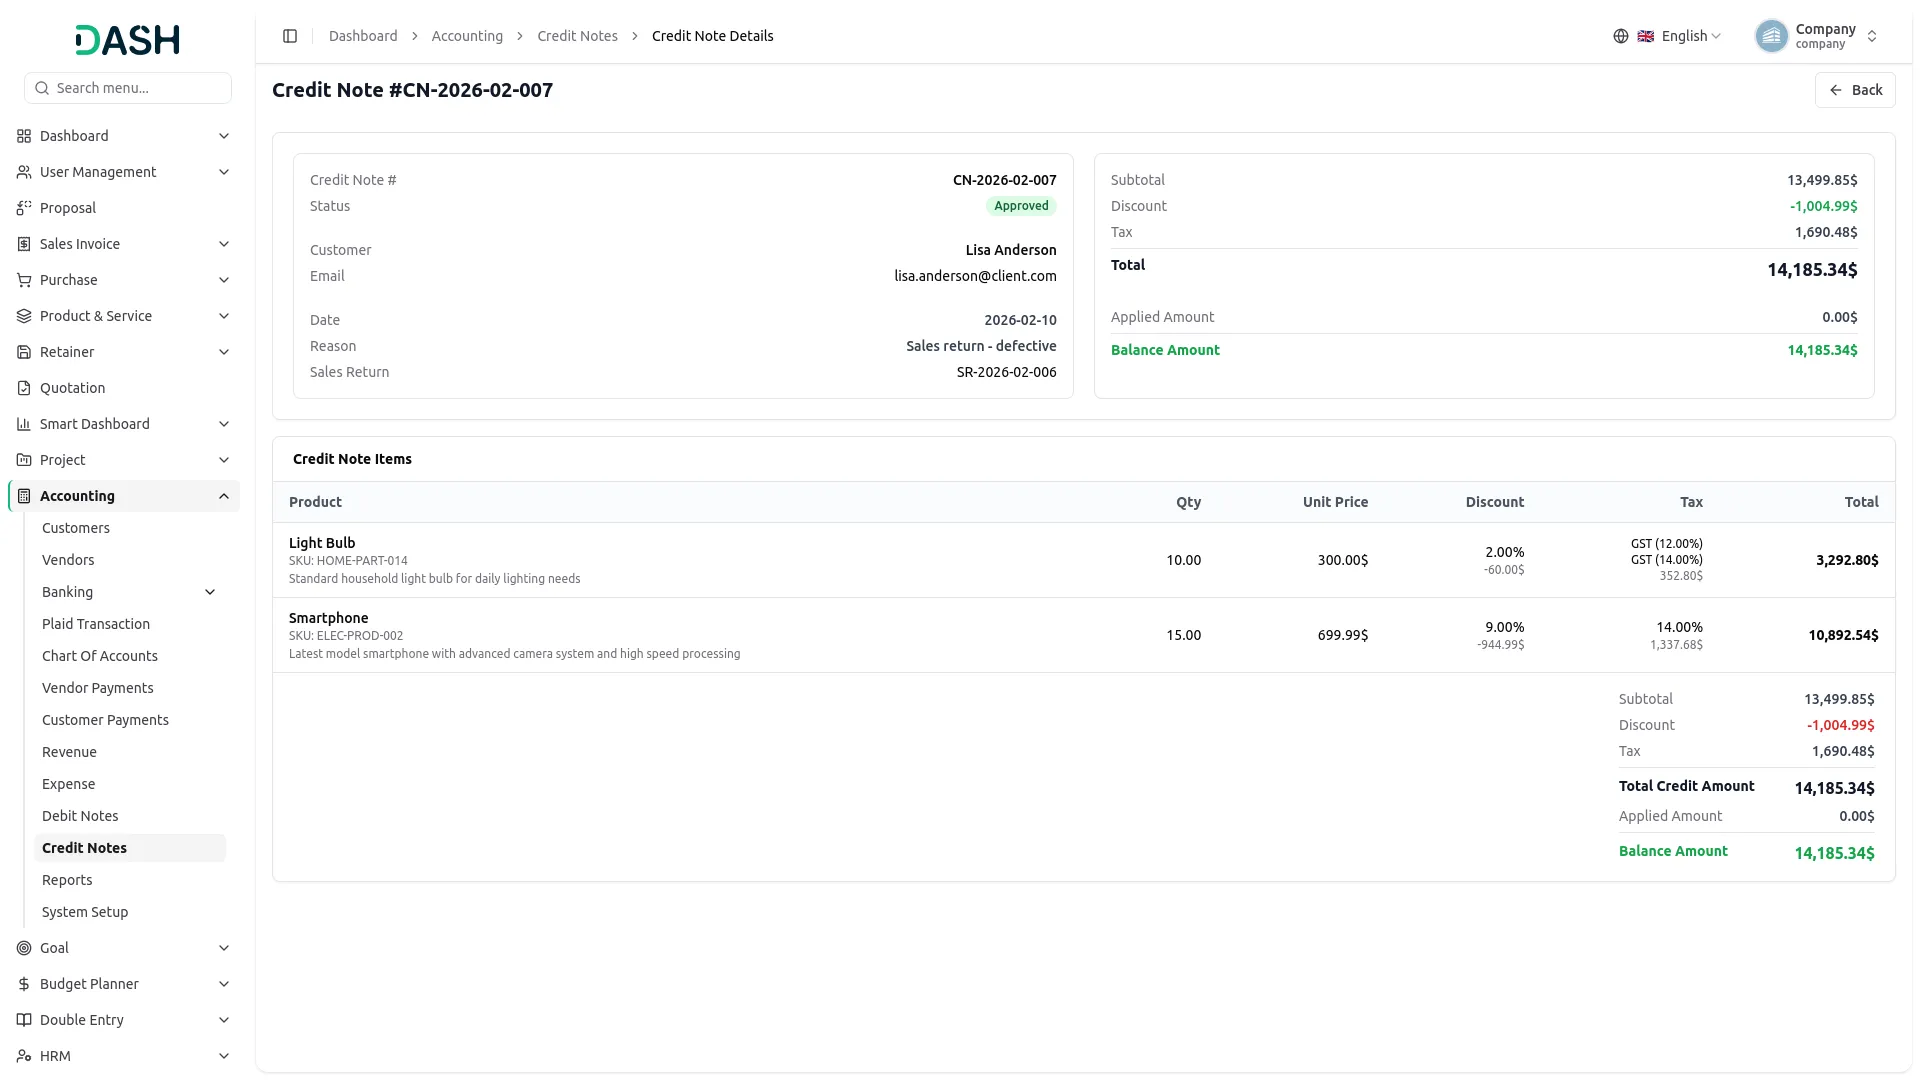
- When you click the View button, it opens the Credit Note page for the selected note. The top section shows the credit note number, the Total Amount, and Status (such as Draft), along with the Customer (with email) and Details (Date, Reason, and the linked Sales Return). If the note is still a Draft, use the Approve Credit Note button to approve it. The Balance Amount is displayed alongside.
- The Credit Note Items table lists each item with its Product (with SKU and description), Qty, Unit Price, Discount, Tax, and Total. Below the table, the summary shows the Subtotal, Tax, Total Credit Amount, Applied Amount, and Balance Amount.
- When a Credit Note is created for a Customer, it is automatically linked to that Customer and can be viewed in the Debit Note section. Once the Debit Note is approved, it becomes available in the Customer Payment module.
- While creating a Customer Payment, after selecting the Customer, the system will fetch all approved Credit Notes related to that Customer and display them in the “Available Credit Notes” section.
- Users can then select and apply these Credit Notes during payment creation to adjust the final payable amount.
- In the Reports section, users can view Customer Balance details under the “Customer Balance” tab. Additionally, Journal Entries and Customer-related records can be accessed from the Customer section by clicking the “View Report” button. This provides a detailed view of all transactions and balance-related information for the selected Customer.
Reports
- The Reports page provides five financial reports, accessible through the tabs at the top: Invoice Aging, Bill Aging, Tax Summary, Customer Balance, and Vendor Balance. For each report, set the date, click Generate to build the report, and use Download PDF to export it.
Invoice Aging Report
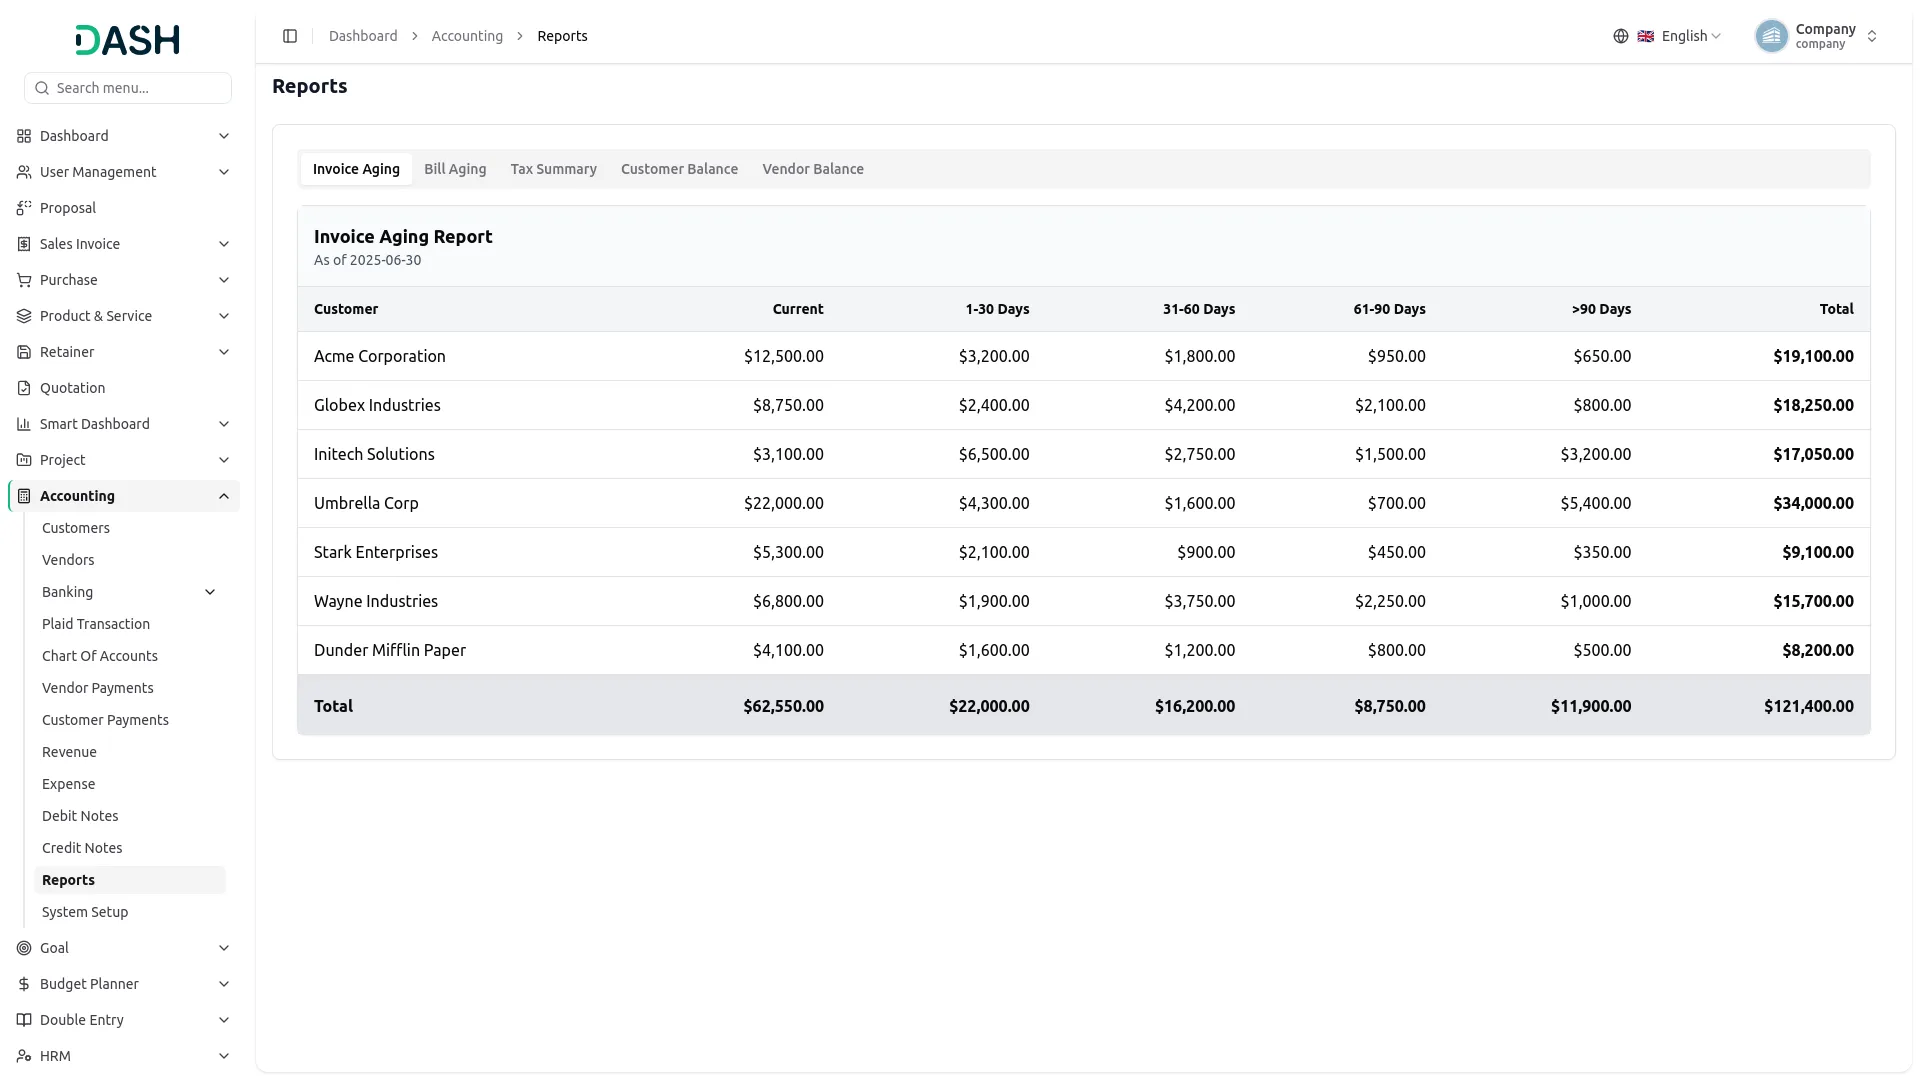
- The Invoice Aging Report shows the outstanding balances owed by customers, categorized by how long the invoices have been overdue. Enter an As Of Date and click Generate to produce the report.
- The report displays each customer’s outstanding balance broken down into aging buckets: Current, 1-30 Days, 31-60 Days, 61-90 Days, and Over 90 Days, along with a Total column.
- The bottom row shows the combined total across all customers for each aging period. Use this report to identify overdue customer accounts and prioritize collection follow-ups. Click Download PDF to export the report.
Bill Aging Report
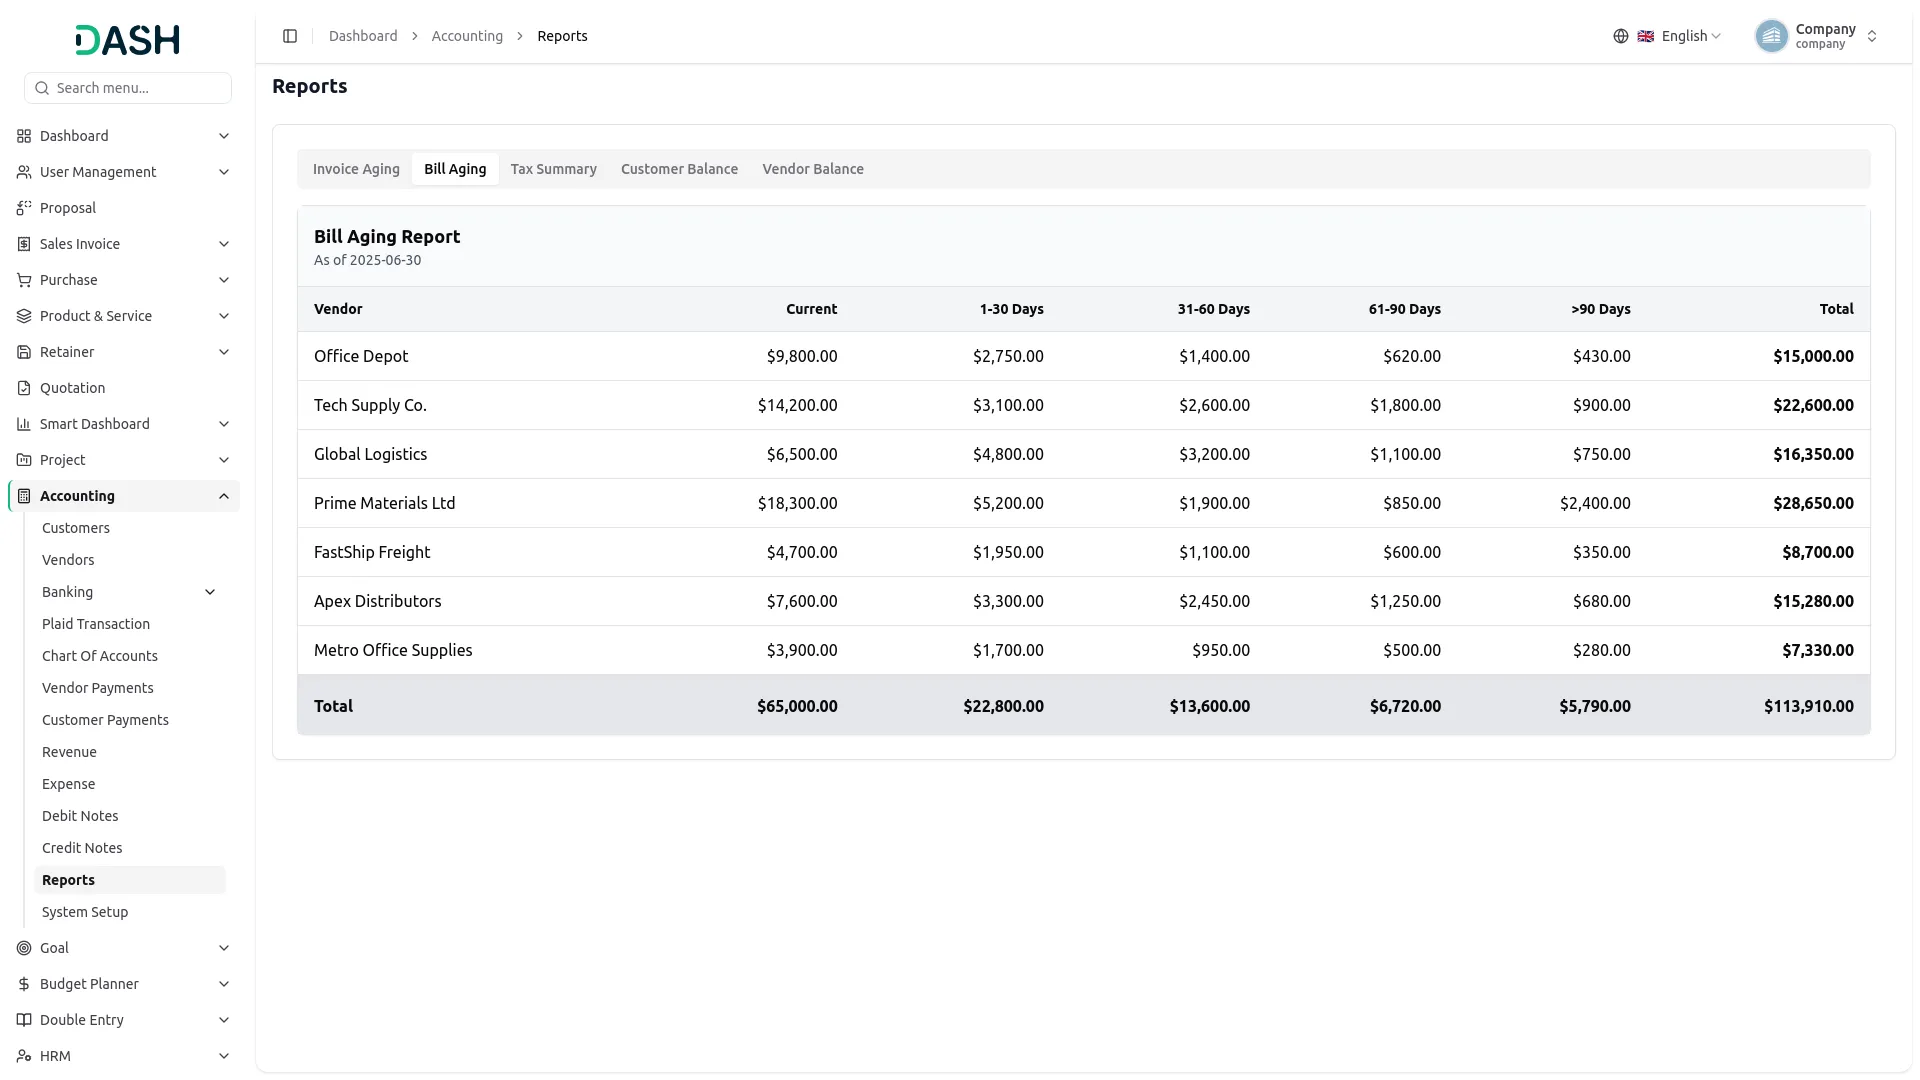
- The Bill Aging Report shows the outstanding balances owed to vendors, categorized by how long the bills have been overdue. Enter an As Of Date and click Generate to produce the report.
- The report displays each vendor’s outstanding payable balance broken down into aging buckets: Current, 1-30 Days, 31-60 Days, 61-90 Days, and Over 90 Days, along with a Total column.
- The bottom row shows the combined total across all vendors for each aging period. Use this report to plan upcoming vendor payments and avoid late payment penalties. Click Download PDF to export the report.
Tax Summary Report
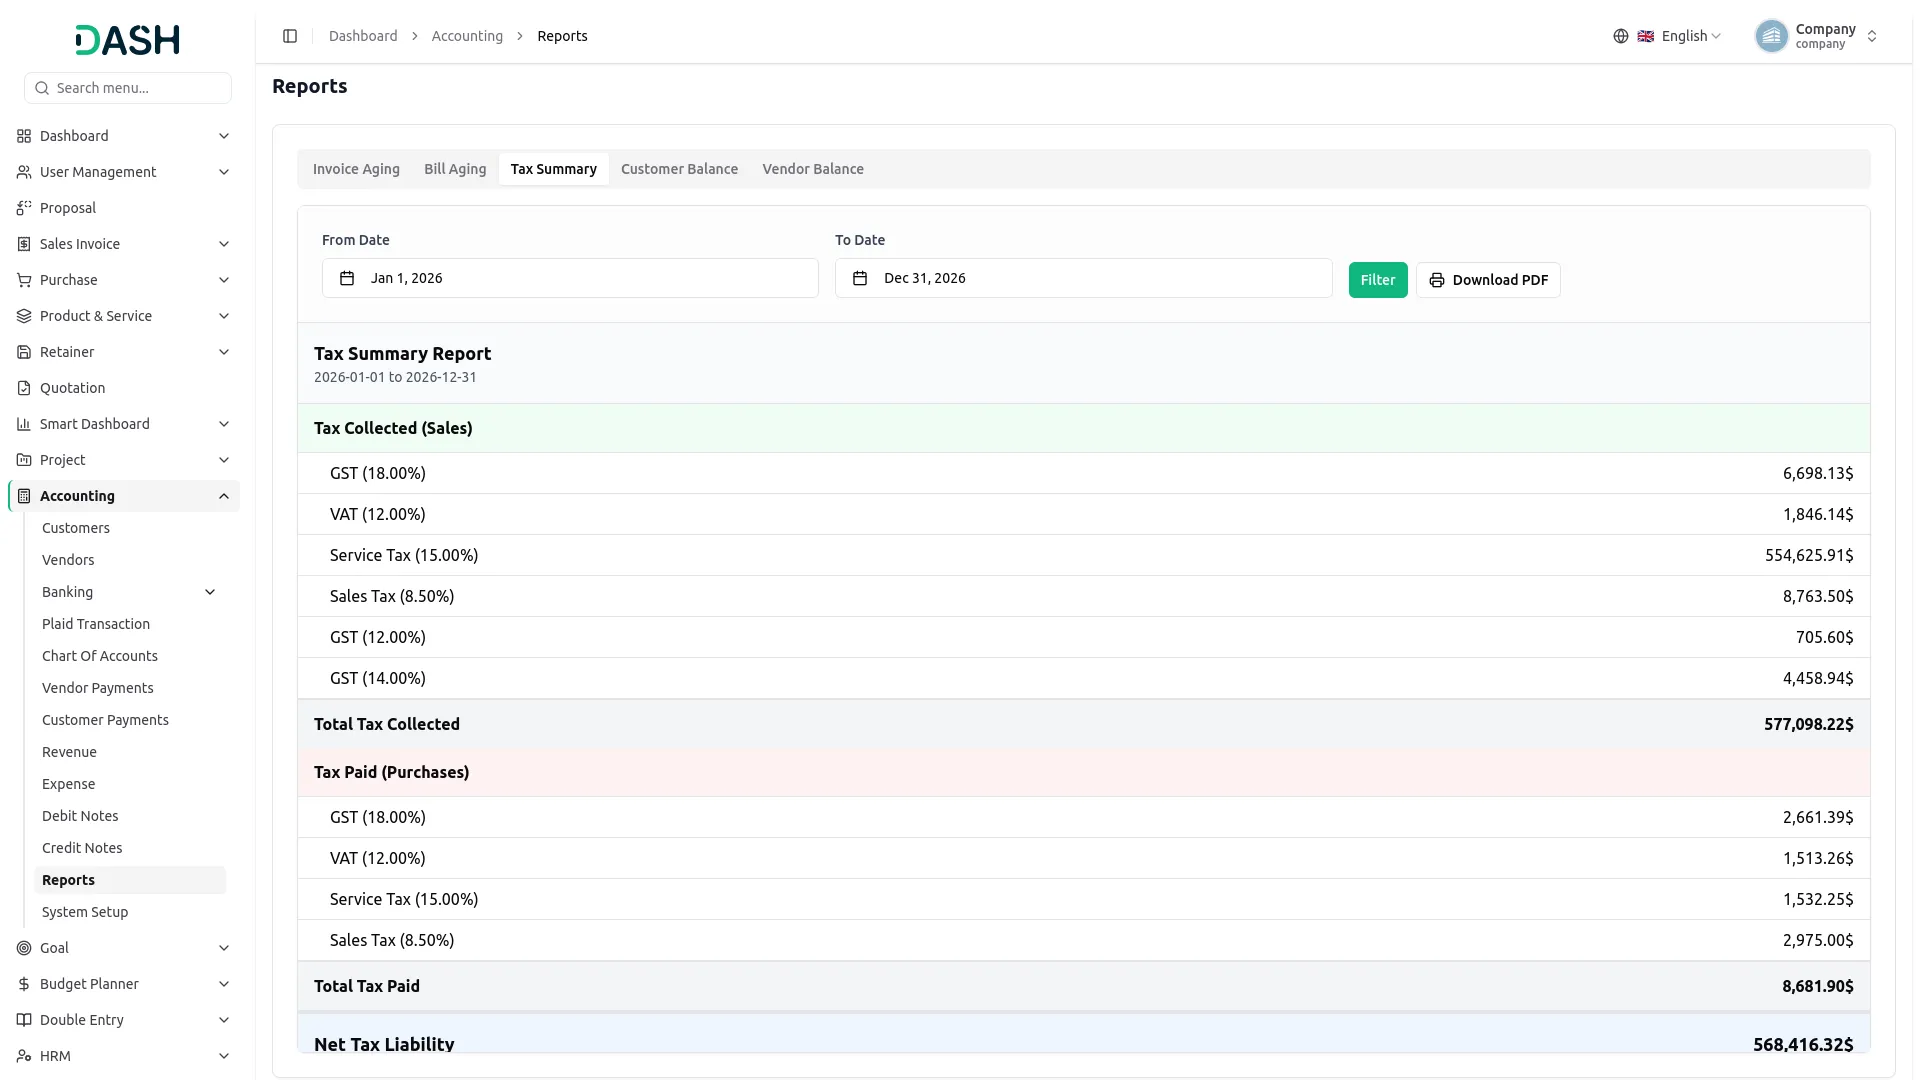
- The Tax Summary Report provides a consolidated overview of all taxes collected on sales and all taxes paid on purchases within a selected period. Set the From Date and To Date, then click Generate to produce the report.
- The report is divided into two sections: Tax Collected (Sales), which lists each tax type (e.g., GST 18%, VAT 12%, Service Tax 15%) and the total amount collected; and Tax Paid (Purchases), which lists taxes paid against each purchase type.
- The Total Tax Collected and Total Tax Paid rows summarize each section. The Net Tax Liability at the bottom shows the difference between tax collected and tax paid; a negative value indicates a tax credit position. Click Download PDF to export the report.
Customer Balance Report
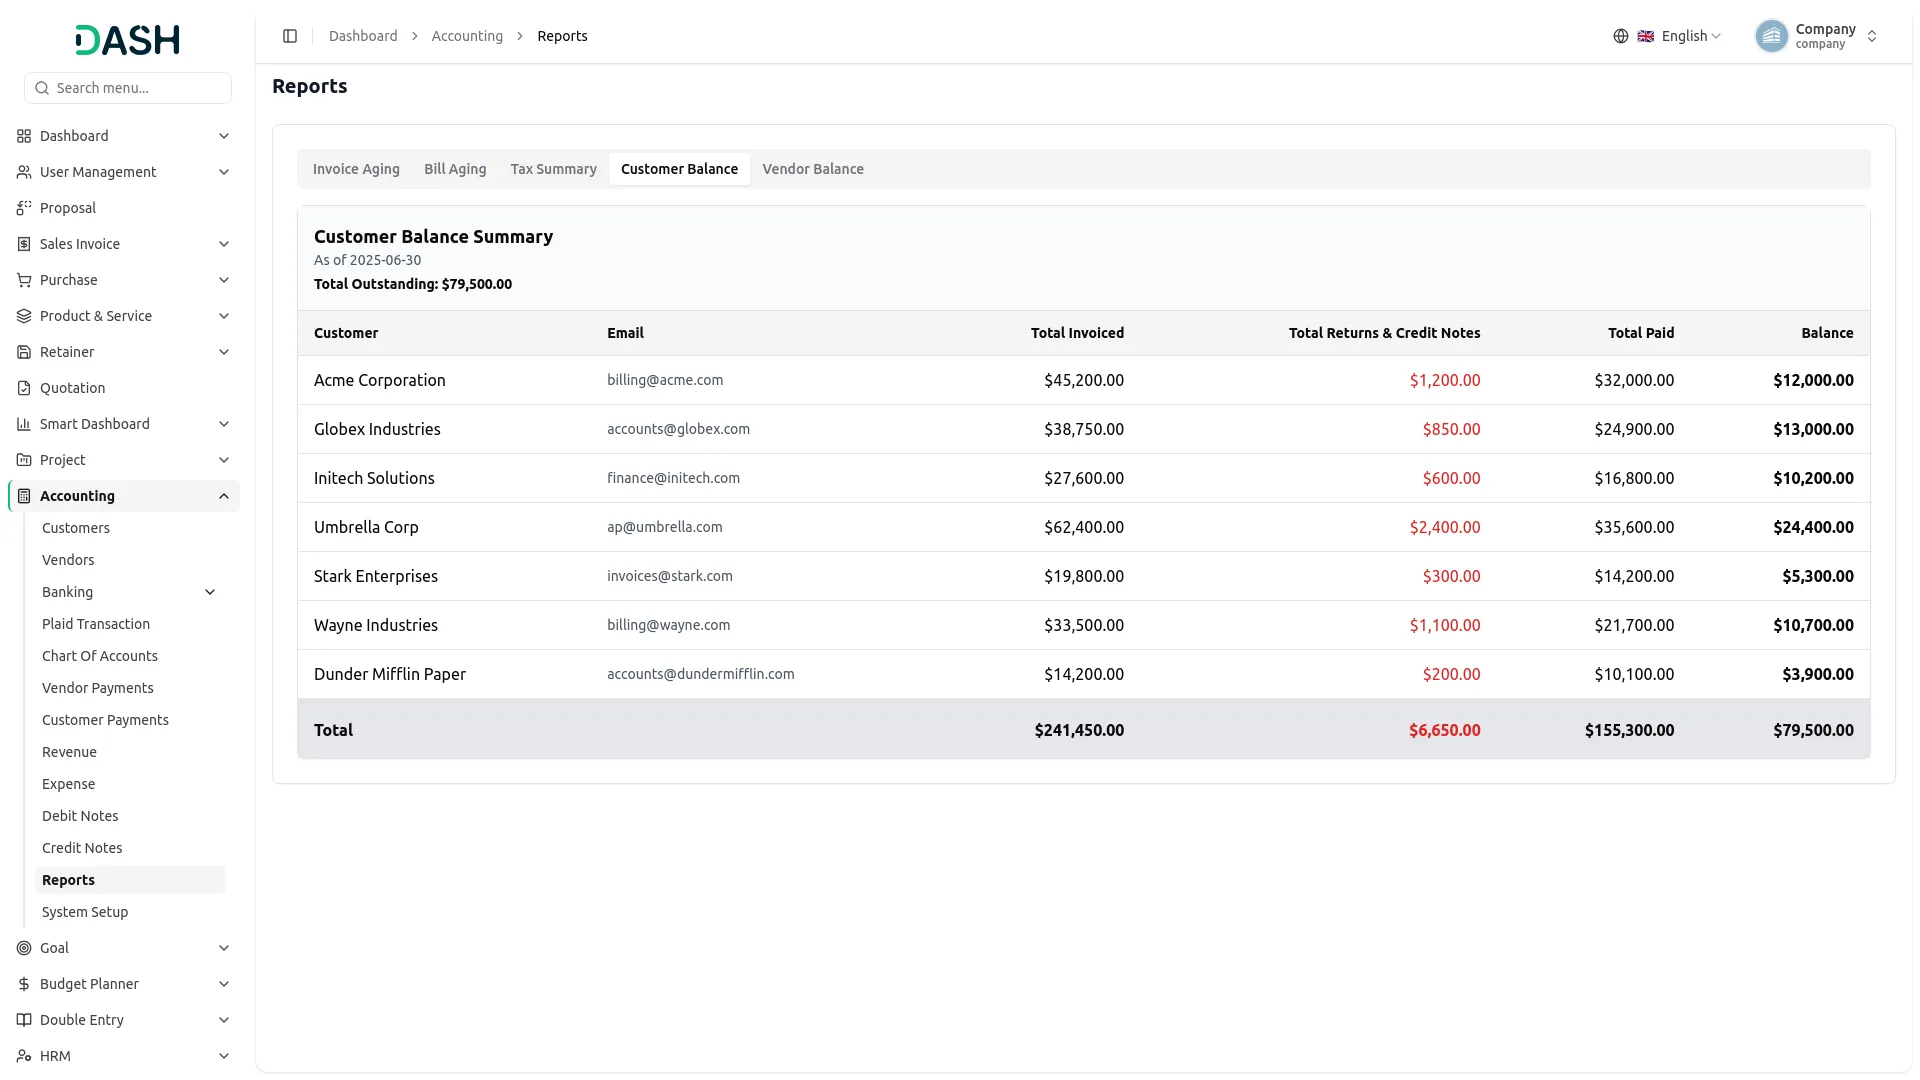
- The Customer Balance Report view page provides a complete summary of the outstanding balance owed by each customer as of the selected date. Users can enter an “As Of Date” and click Generate to load the report based on all transactions up to that date. The Show Zero Balances option allows users to include customers who have no pending amount, ensuring a complete overview of all customer accounts.
- At the top of the report, the Total Outstanding Amount is displayed, which represents the total pending receivable amount from all customers in the system.
- The report displays each customer with key details, including Customer Name, Email, Total Invoiced, Total Returns and Credit Notes (shown in red as deductions), Total Paid, and the final Balance amount.
- The Balance column shows the net receivable amount after adjusting all invoices, payments, and credit notes. A negative balance indicates that the customer has overpaid or has an excess credit available in their account.
- Users can click on any customer name to open the customer detail page, where complete transaction history, journal entries, and payment details can be reviewed.
- The Download PDF option allows users to export the report for accounting, audit, and record-keeping purposes.
Vendor Balance Report
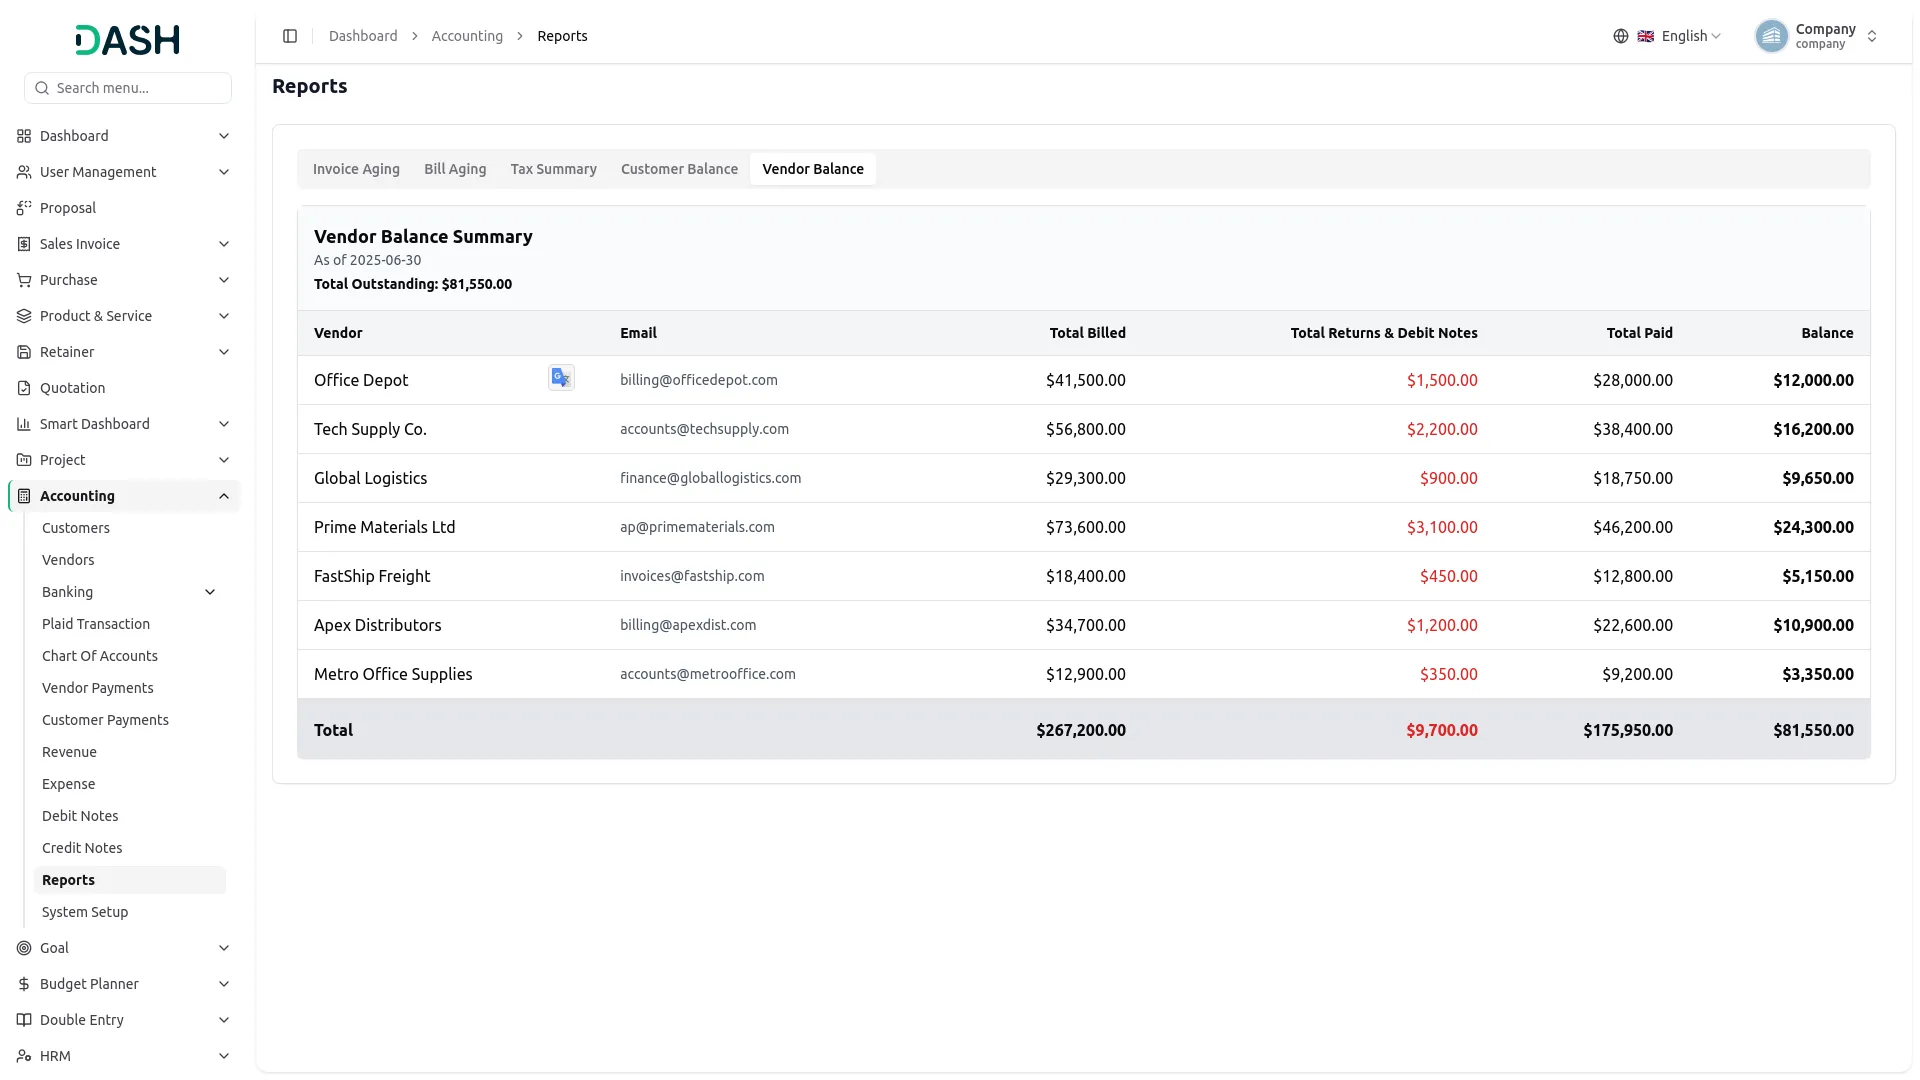
- The Vendor Balance Report view page provides a complete summary of outstanding balances owed to each vendor as of the selected date. Users can enter an “As Of Date” and click Generate to load the report based on all transactions up to that date. The Show Zero Balances option allows users to include vendors who have no pending amount, giving a full view of all vendor accounts.
- At the top of the report, the Total Outstanding Amount is displayed, which represents the total pending payable amount across all vendors in the system.
- The report displays each vendor with key details including Vendor Name, Email, Total Billed, Total Returns and Debit Notes (shown in red as deductions), Total Paid, and the final Balance amount. The Balance column shows the net payable amount after adjusting all bills, payments, and debit notes.
- Users can click on any vendor name to open the vendor detail page, where complete transaction history, journal entries, and payment details are available for review. The Download PDF option allows users to export the report for accounting, audit, and record-keeping purposes.
Vendor and Customer login
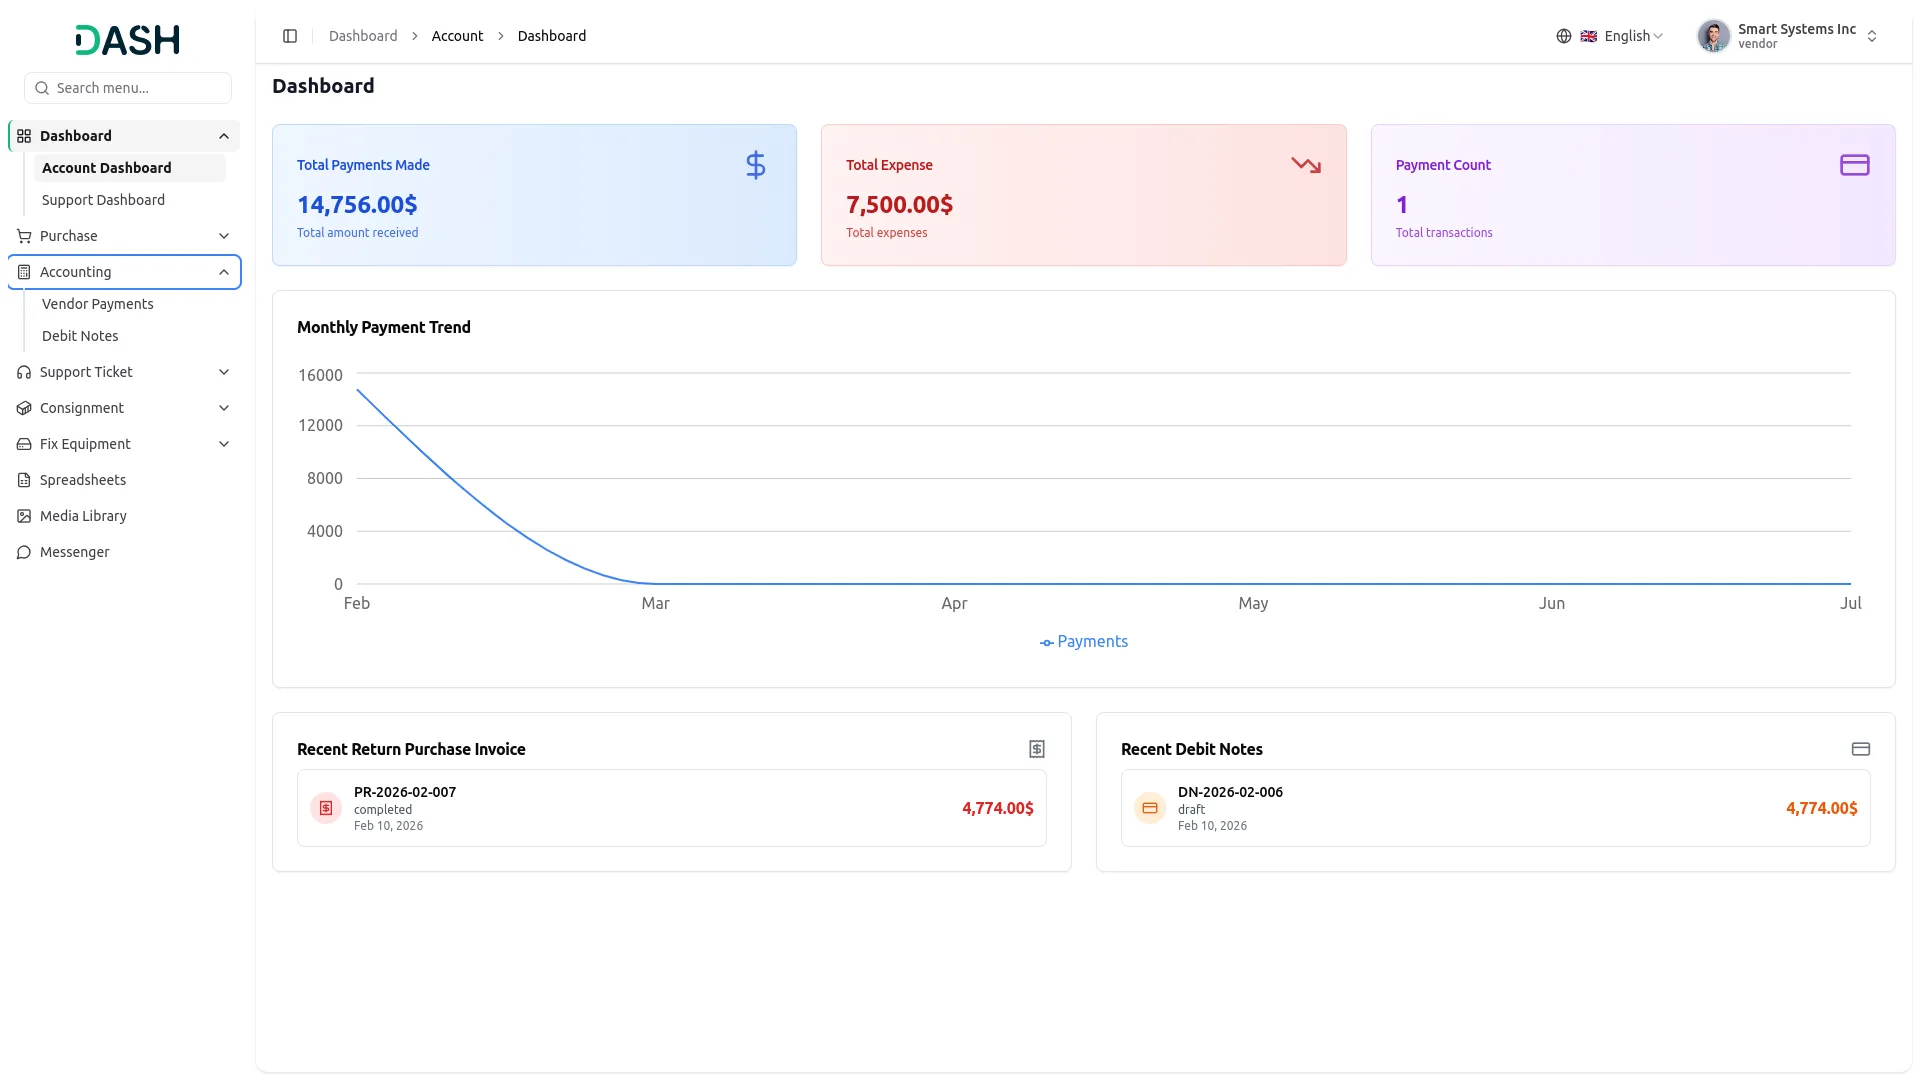
- The system supports two types of user login: Vendor and Customer.
- Each user can access and view only their own data and is restricted from viewing or modifying other users’ information. Access to menus, modules, and system features is controlled through role-based permissions, ensuring that users can see only the specific menus they are authorized to access and perform only the actions assigned to them, such as viewing, creating, editing, or deleting records. This permission-based access control enhances data security, privacy, and overall system integrity.
Categories
Related articles
- Instagram Follow – vCard SaaS Add-On Guide
- Diagram – WorkDo Dash SaaS Add-On Guide
- Sign in with Slack – WorkDo Dash SaaS Add-On Guide
- Digital Product – eCommerceGo SaaS Add-On Guide
- CCTV & Security System – WorkDo Dash SaaS Add-On Guide
- YouTube Content Management – WorkDo Dash SaaS Add-On Guide
- Catering Management – WorkDo Dash SaaS Add-On Guide
- Affiliate Product – eCommerceGo SaaS Add-On Guide
- Skrill – WorkDo Dash SaaS Add-On Guide
- Free Shipping Pop-Up – eCommerceGo SaaS Add-On Guide
- Ozow – WorkDo Dash SaaS Add-On Guide
- User Manual – ERPGo
We're Here to Help - Let's Talk
Have questions about our solutions, customization services, or business tools? Our team is here to help you. let's talk.