
Bookings – WorkDo Dash SaaS Add-On Guide
Learn how to manage bookings, schedules, and appointments in WorkDo Dash SaaS.
Introduction
Bookings is a comprehensive appointment management software designed to streamline business operations for service-based businesses. The system allows you to manage appointments, track customers, handle staff scheduling, and organize services with packages. It includes features for setting business hours, managing locations, tracking appointments through different stages, and providing multiple viewing options, including calendar and kanban board views. The software integrates with HRM Add-On for holiday management and provides detailed reporting through dashboard analytics.
How To Install The Add-On?
To Set Up the Bookings Add-On, you can follow this link: Setup Add-On.
How To Use The Bookings Add-On?
System Setup
Brand Setting
- In the Brand Setting section, you will find fields for Header Logo, Footer Logo, and Favicon. Upload the respective images using the Browse button, then fill in the Title Text, Footer Text, and Footer Description with your organization’s details. Once done, click Save Changes.
- In the Dashboard Welcome Card Settings section, you will find fields for Card Title, Card Description, Button Text, and Button Icon. Enter the relevant details and select an icon for the button, then click Save Changes.
- Once saved, your Header Logo will appear in the top navigation bar of your website, the Footer Logo and Footer Description will display at the bottom of every page, and the Favicon will show as the small icon in the browser tab.
- The Footer Text will appear as the copyright line in the footer, and the Card Title, Card Description, and Button details will appear on the welcome card shown to admins after logging into the dashboard, giving your website a consistent and professional branded look throughout.
Banner Section
- In the Banner Section, you will find fields for Title, Description, and Banner Image. Enter the title and description, then upload the banner image using the Browse button. A live Preview is shown on the right as you make changes. Once done, click Save Changes.
- Once saved, the Title and Description will appear as the main heading and subtext in the homepage hero section, and the Banner Image will display as the illustration beside them, giving visitors an engaging first impression of your service.
Appointment Section
- In the Appointment Section, you will find fields for Title and Description. Below that, under “Why Book With Us?”, enter a Feature for each checklist item you want to highlight. To add more items, click the Add Feature button. Once done, click Save Changes.
- Once saved, the Title and Description will appear as the heading and subtext above the booking widget on the homepage, and each Feature will display as a checklist item under the “Why Book With Us?” panel, reassuring visitors why they should book with you.
Contact Section
- In the Contact Us Section, you will find three panels. In Phone Information, enter the Title, select an Icon, and fill in the Phone Number. In Email Information, enter the Title, select an Icon, and fill in the Email Address.
- In Address Information, enter the Title, select an Icon, and fill in the Street Address, City, Country, and Pincode. Below that, under Map, paste your Map Iframe embed code. Once done, click Save Changes.
- Below that, in the Business Hours panel, toggle each day of the week (Monday–Sunday) On or Off, then set the Opening Time and Closing Time. Once done, click Save Changes.
- Once saved, the Phone, Email, and Address details will appear under the Contact Information panel on the Contact Us page, the Map Iframe will render as the interactive map at the bottom of the page, and the Business Hours will display each day with its open and close times, helping visitors easily reach out and plan their visit.
About Section
- This section controls all content on the About Us page and has three parts. Under the About Us Section, enter the title and description and upload an Image. Under the Mission Section, enter the Title and Description, and add Features by filling in an Icon, Title, and Description for each; click “Add Feature” for more.
- Under the Team Section, add team members by filling in a Name, Position, Image, and Description for each; click “Add Team Member” for more. Click “Save Changes” to apply.
- Once saved, the About Us Section content appears as the “About Our Booking System” heading, description, and image on the About page. The Mission Section Title and Description appear under “Our Mission”, and each Feature appears as a card with its icon, title, and description. Each Team Section entry appears as a card under “Meet Our Team”, showing the member’s photo, name, position, and description.
Custom Pages
- To add a new page, click the “Create” button at the top right. In the Create Custom Page form, enter the Title, URL Slug (only lowercase letters and hyphens allowed, e.g., “privacy-policy”), a Description, and write the page Contents using the editor. Toggle Enable Page Header to show or hide the banner header, then click Create.
- In the Custom Pages section, you will find a list of all existing pages with their Title, Slug, Show in Header status, and Action. In the Action column, you can use the edit option to update the page.
- Once created, the page becomes accessible via its URL Slug, with its Title shown as the page heading and Contents displayed below it. If enabled, its link will also appear in the Useful Links section in the footer, letting visitors click through to read the full page.
Social Links
- In the Social Links section, you will find fields for Icon, Name, and Link for each item. Select the icon (e.g., Facebook, Instagram, Twitter, LinkedIn), enter the name, and paste the full URL. To add more platforms, click the Add Social Link button. Once done, click Save Changes.
- Once saved, the social media icons will appear in the footer section at the bottom of every page, each linking directly to the entered URL, making it easy for visitors to connect with you on social media.
Extra Services
- To add a new service, click the “Create” button at the top right. In the Create Extra Service form, enter the Name and Amount, and toggle Status On or Off, then click Create.
- In the Extra Services section, you will find a list of all existing services with their Name, Amount, Status, and Action. In the Action column, you can use the edit icon to update the service or the delete icon to remove it.
- Once a service’s Status is turned On, it becomes available for customers to select as an Add-On during the booking process, giving them the option to customize their service experience.
Contacts
- In the Contacts section, you will find a list of all inquiries with their Name, Email, Phone, Subject, and Action. Unlike other sections, these entries are not created from the backend; they are generated automatically whenever a customer submits the “Send Us a Message” form on the Contact Us page. In the Action column, you can use View to see the full message or Delete to remove it.
Reviews
- In the Reviews section, you will find a list of all submitted reviews with their Name, Email, Service, Rating, and Action. Like Contacts, these entries are populated automatically whenever a customer submits the “Write a Review” form on a service detail page. In the Action column, you can use View to see the full review or Delete to remove it.
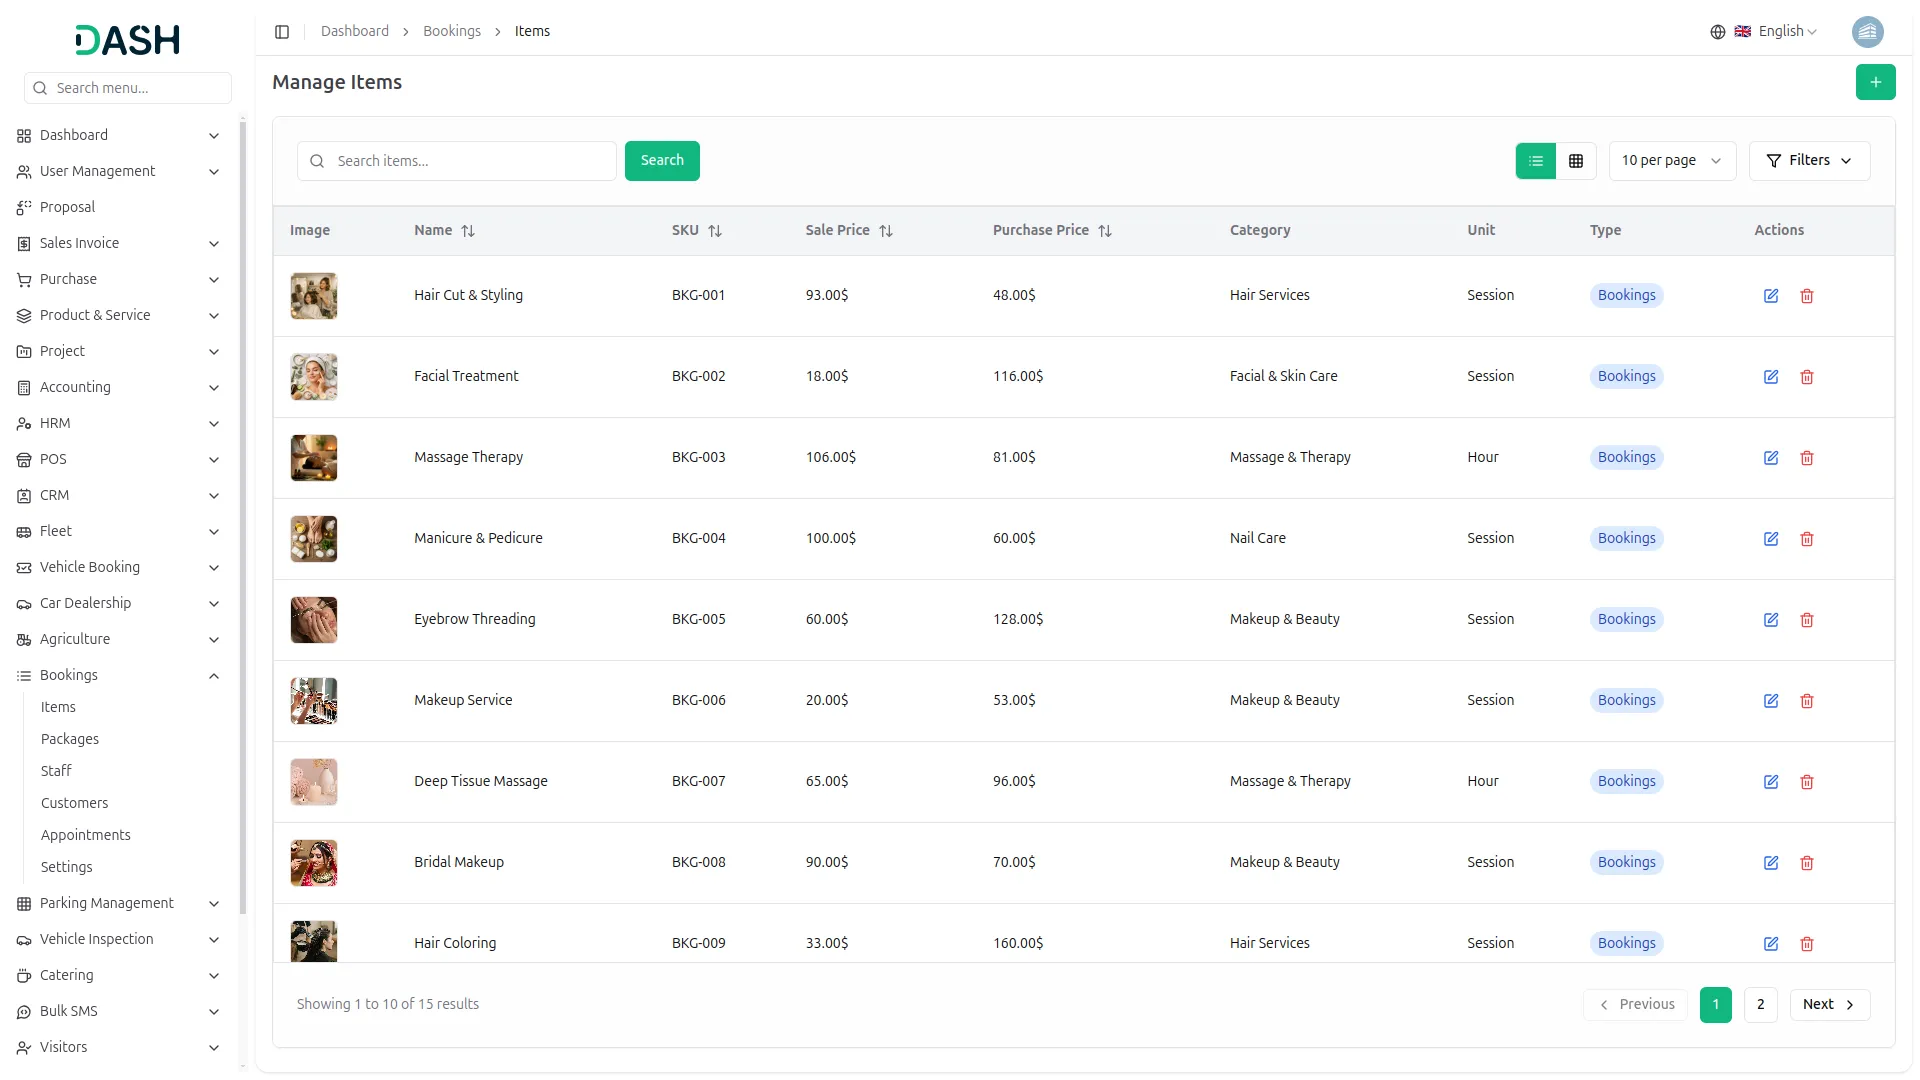
Manage Items
- To add a new item, click the “Create” button and fill in the multi-step form. In Step 1, enter the item’s Name, SKU (or click “Generate” to auto-create one), select the Tax and Category from the dropdowns (which come from the categories created for items), and write a Description. Click “Next” to continue.
- In Step 2, enter the Sale Price and Purchase Price, then select the Unit from the dropdown. Click “Next” to continue, or “Previous” to go back.
- In Step 3, upload a Product Image and any Additional Images using the browse buttons. Click “Next” to continue, or “Previous” to go back.
- In Step 4, select the Duration and enter the Total Slots for the item. Click “Create” to save the item, or “Previous” to go back and edit earlier steps.
- The list page displays a table of the item’s Image, Name, SKU, Sale Price, Purchase Price, Category, Unit, Type, and Action columns. Use the search bar to find a specific item, and toggle between list view and grid view using the icons.
- Click the Filters button to filter data by Category using the dropdown, then click Apply to filter the data or Clear to reset it. In the Action column, you can use the edit option to update the item’s details or the delete option to permanently remove it from the system.
- Once an item is created, it becomes available for selection when setting up bookings or services on the frontend, allowing customers to view and book it with its assigned price, category, and duration.
Manage Packages
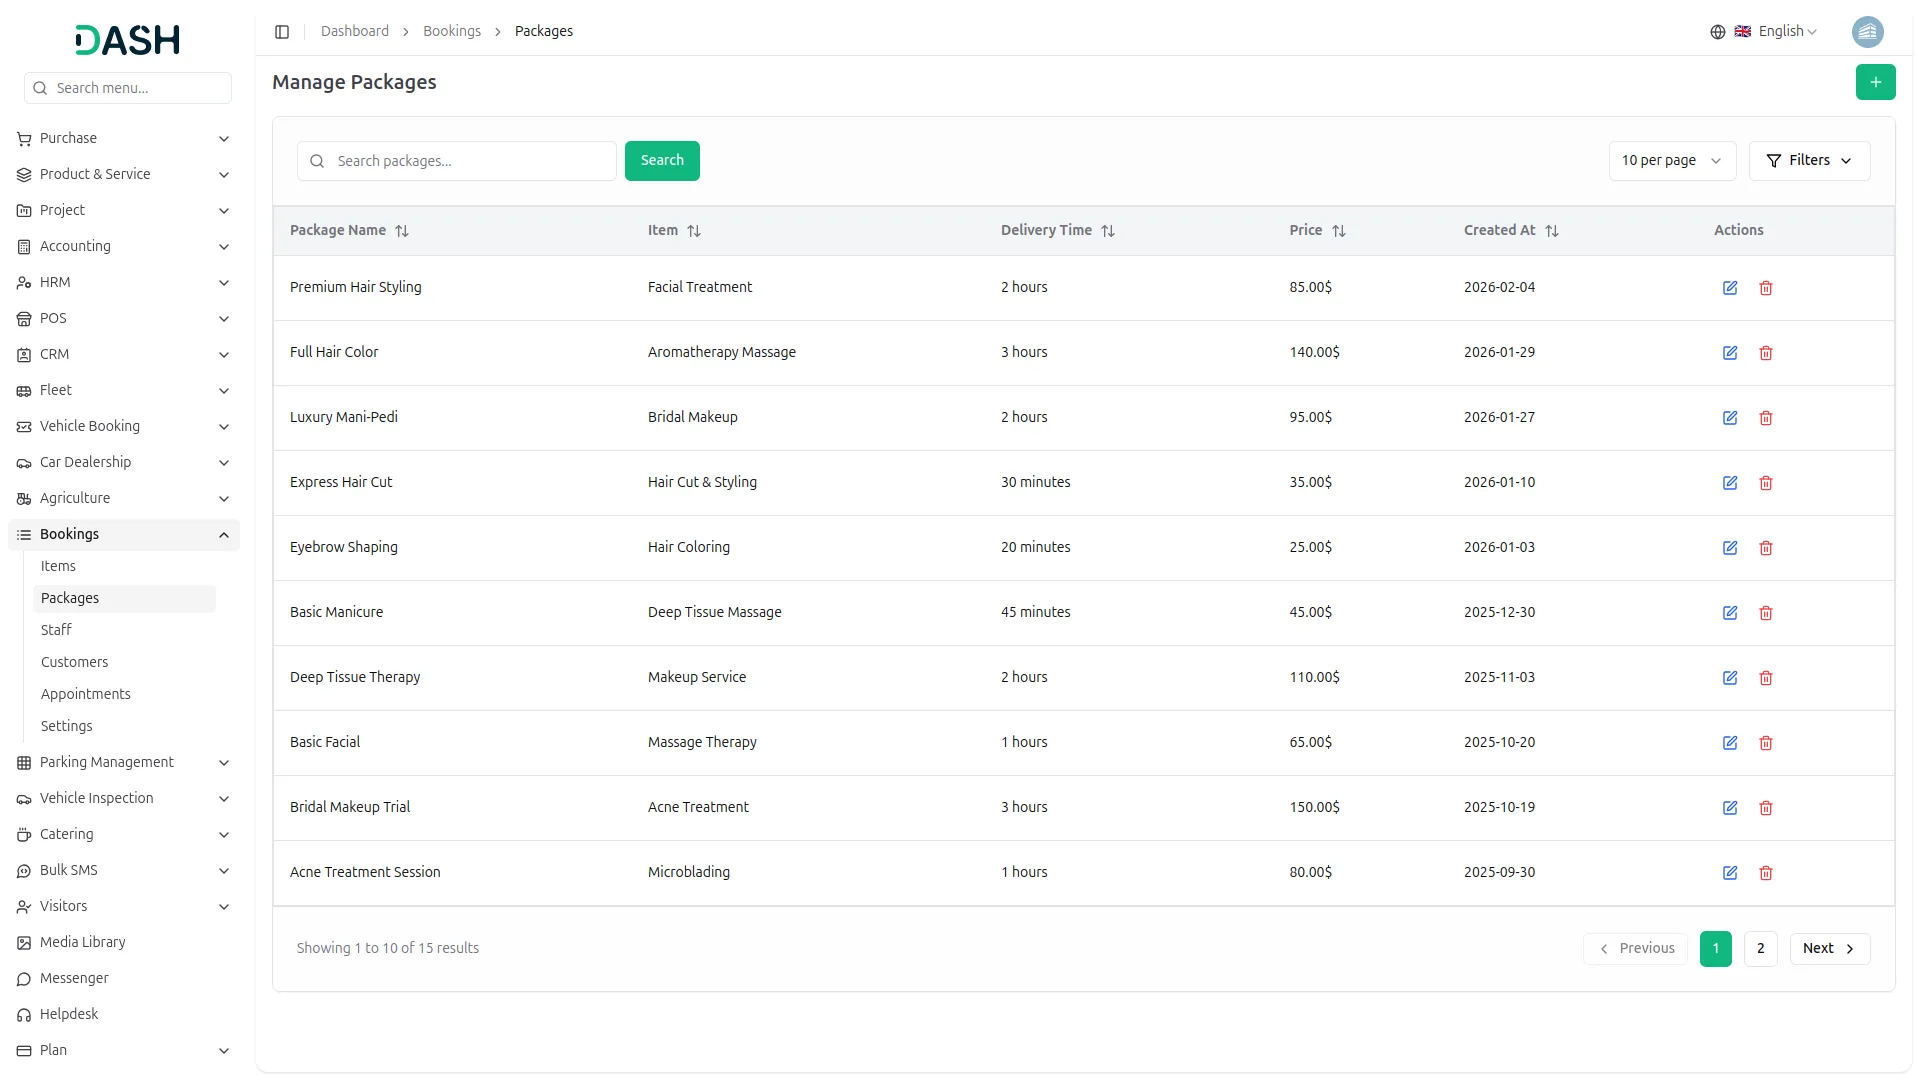
- To add a new package, click the “Create” button and fill in the form. Enter the Package Name, select the Item from the dropdown (created under Manage Items), and select any Extra Services from the dropdown if applicable. Select the Period from the dropdown, then choose the Delivery Time (Minutes, hours). Enter the Price and click “Create” to save the package.
- The list page displays a table of the package’s Package Name, Item, Delivery Time, Price, Created At, and Action columns. Use the search bar to find a specific package.
- Click the Filters button to filter data by Item using the dropdown, then click Apply to filter the data or Clear to reset it.
- In the Action column, you can use the edit option to update the package’s details or the delete option to permanently remove it from the system.
- Once a package is created, it becomes available for customers to select as a Service Package during the booking process on the frontend, letting them choose a pre-configured combination of items, extra services, and pricing for a set delivery time.
Manage Customer
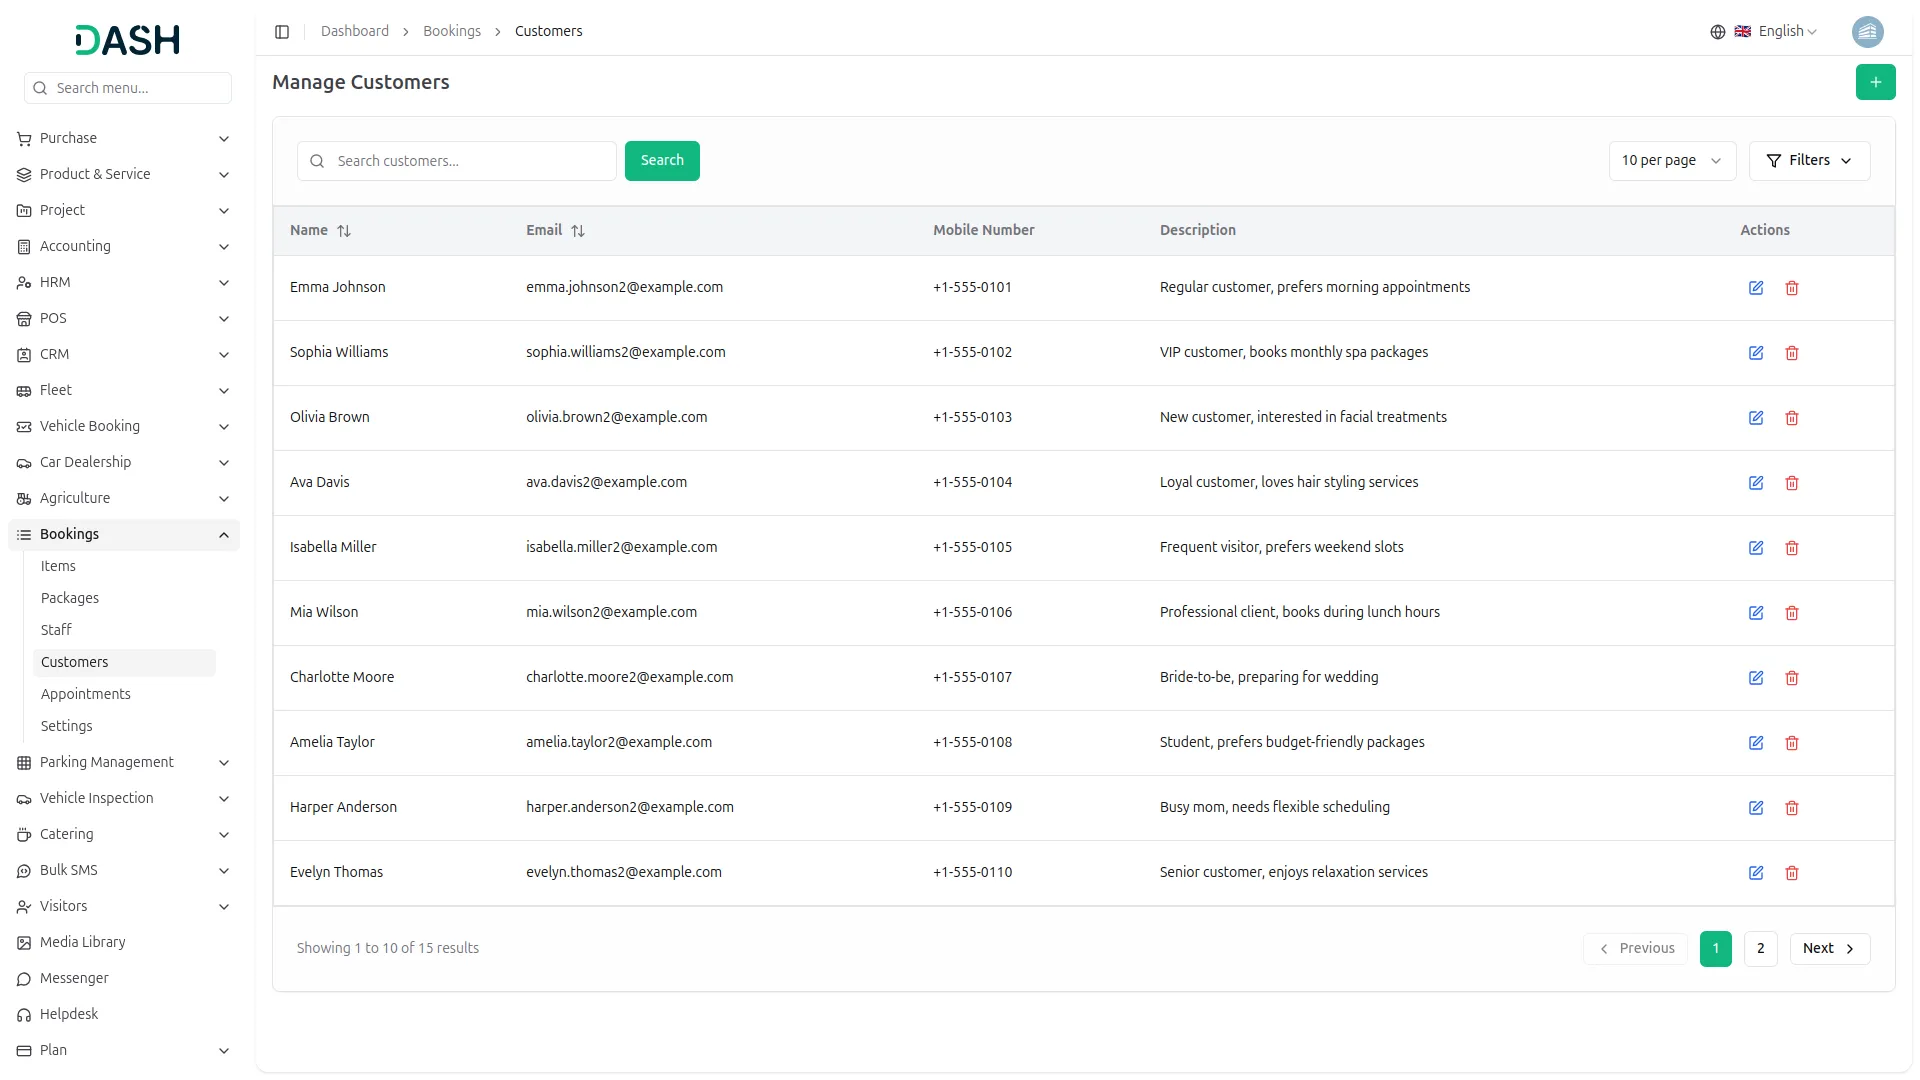
- To add a new customer, click the “Create” button and fill in the form. Enter the customer’s First Name and Last Name, then fill in the Email and Mobile Number. Enter a Description to add any additional notes about the customer. Click “Create” to save the customer.
- The list page displays a table of the customer’s Name, Email, Mobile Number, Description, and Action columns. Use the search bar to find a specific record. Click the Filters button to filter data by Date From and Date To, then click Apply to filter the data or Clear to reset it.
- In the Action column, you can use the edit option to update the customer’s information or the delete option to permanently remove them from the system.
- Once a customer is created, they become available for selection when creating a new booking manually. Customers are also added automatically whenever someone enters their Name, Email, and Phone details during the frontend booking process in the “Your Details” step, ensuring every booking is linked to the correct customer.
Manage Appointments
- To add a new appointment manually, click the “Create” button and fill in the form. Select the Date, then choose the Item and Package from the dropdowns (created under Manage Items and Manage Packages). Select the Customer from the dropdown (created under Manage Customers, or leave blank if the customer will be added later). Click “Create” to save the appointment.
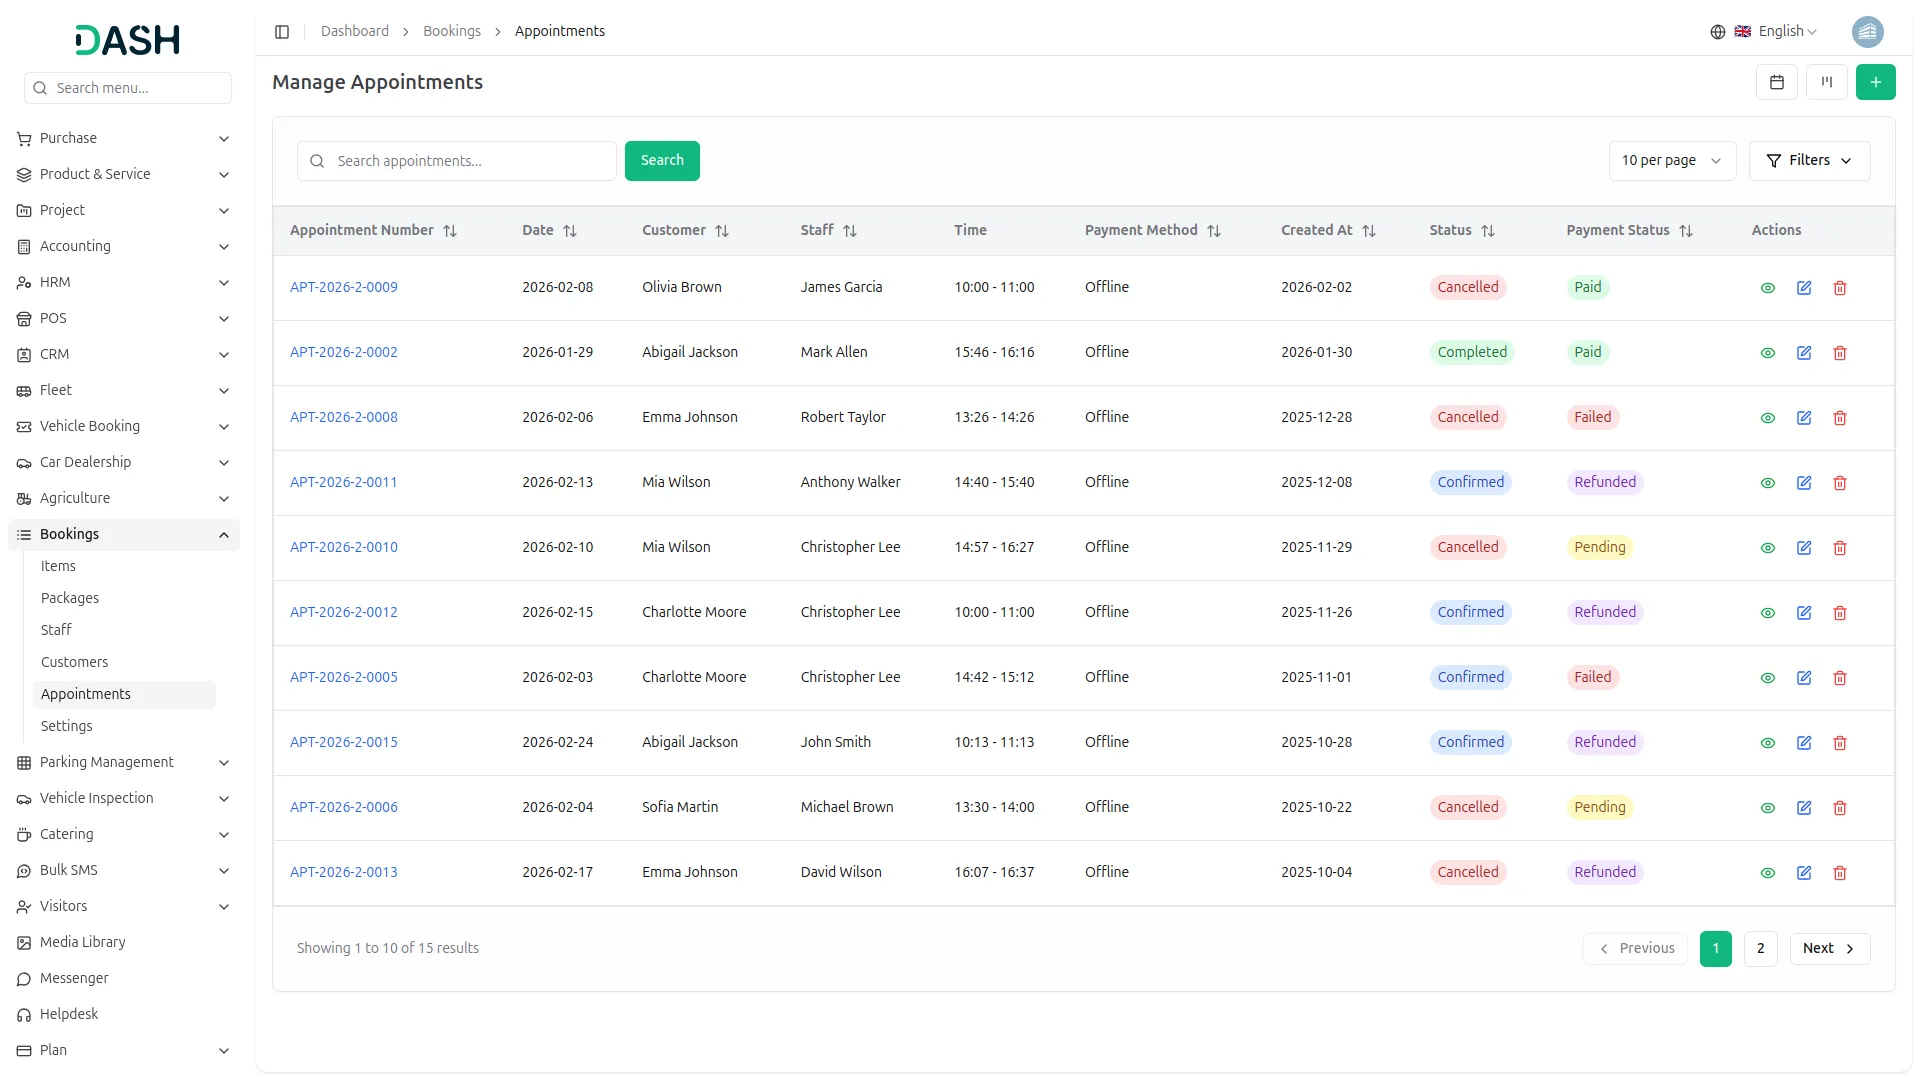
- The list page displays a table of the appointment’s Appointment Number, Date, Customer, Time, Payment Method, Created At, Status, Payment Status, and Action columns. Use the search bar to find a specific appointment.
- Click the Filters button to filter data by Status or Payment Status, then click Apply to filter the data or Clear to reset it.
- In the Action column, for appointments paid Offline, use the Payment option to open the Payment form and record the payment manually, enter the Payment Date, select the Bank Account, add a Reference Number (auto-generated) and Payment Amount, along with any Notes, then click “Add Payment” to confirm.
- Use the view to see the appointment’s full details, the edit option to update it, and the delete option to remove it. For appointments still Pending or Confirmed with a Pending payment, use the Mark the appointment option to mark it as completed directly from the list.
- Click the Kanban view option at the top of the page to switch to a card-based view of all appointments, organized into columns by Status: Pending, Confirmed, Completed, and Cancelled.
- Click the Calendar view option at the top of the page to switch to a calendar layout. Use the Month, Week, or Day buttons to change the view, and the arrow buttons or “Today” button to navigate between dates. Click on any date to see that day’s appointments in the panel on the right.
- Once a customer completes the booking form on the frontend, selecting a Date, Time Slot, Service Type, and service package, and then submitting their details, a new entry is automatically created here, reflecting their selections along with the Payment Method they chose.
Manage Staff
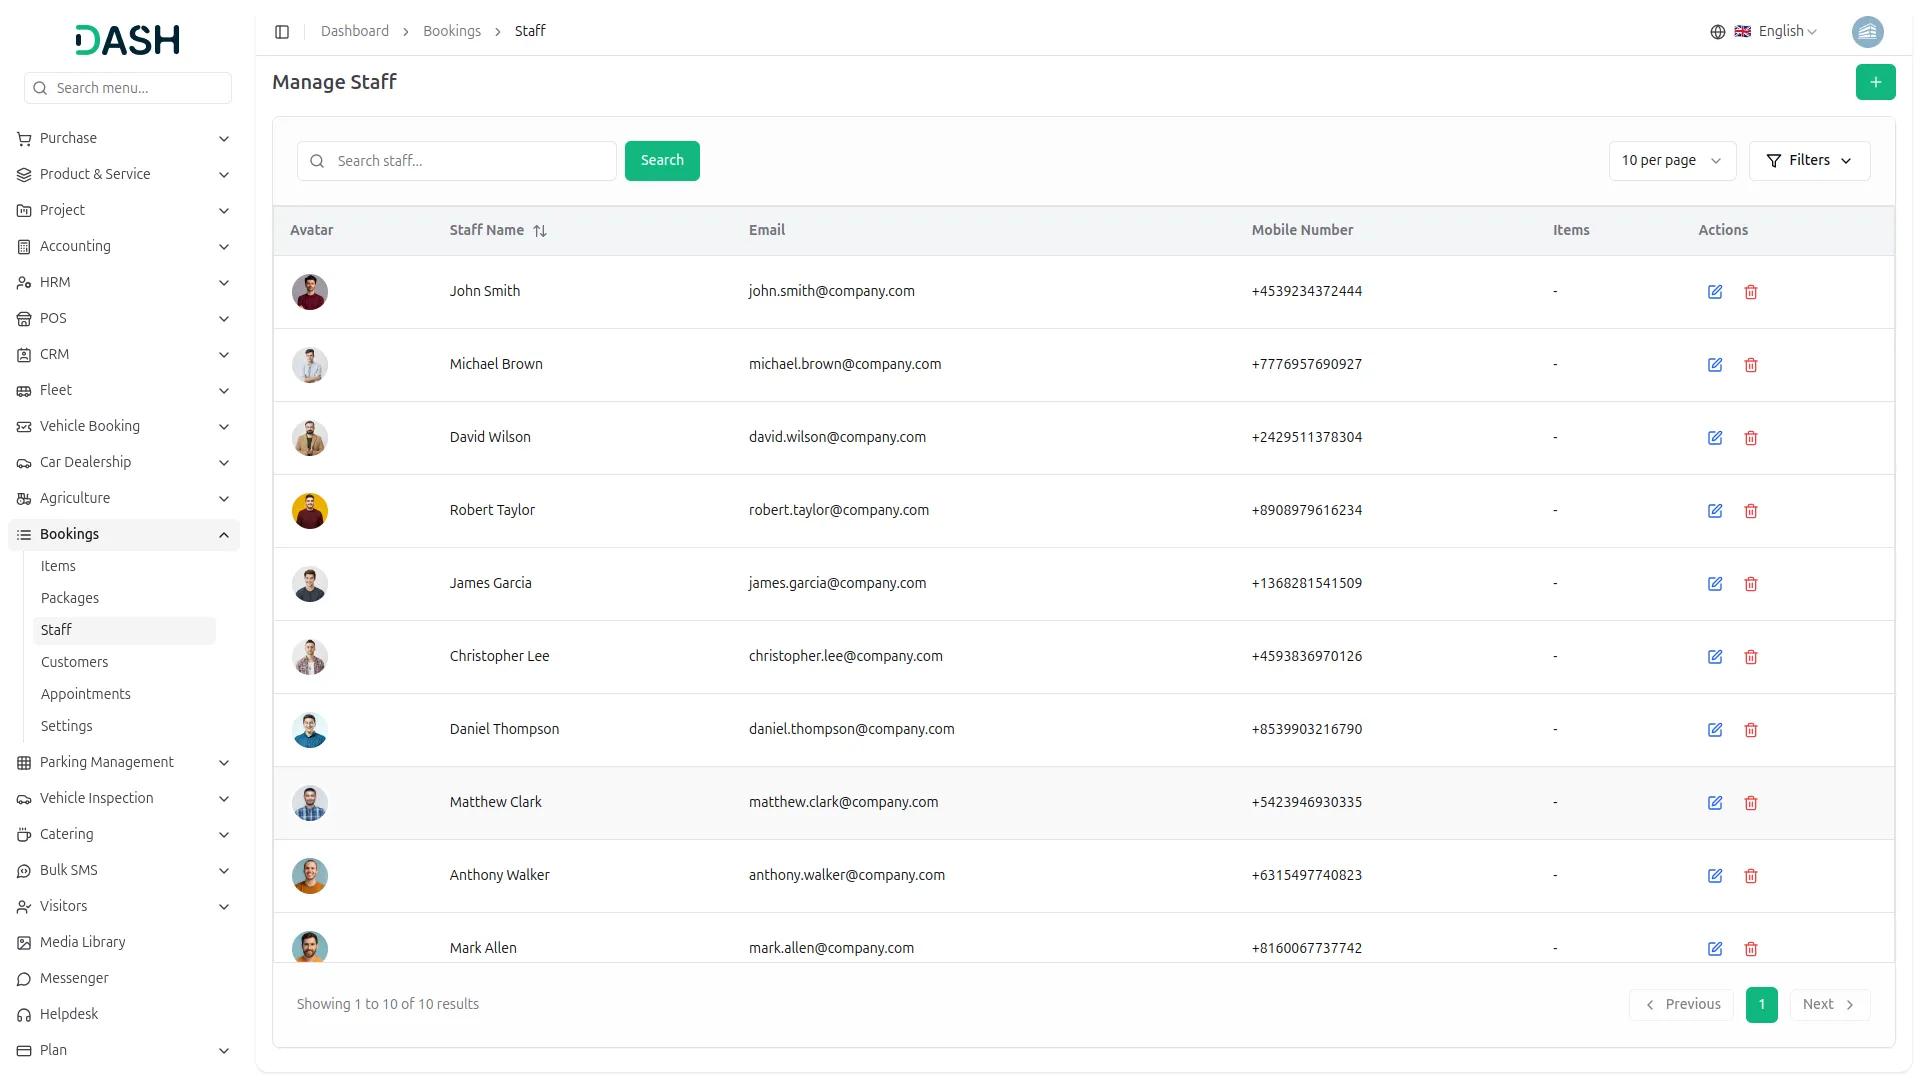
- To assign a staff member to items, click the “Create” button and fill in the form. Select the Staff Member from the dropdown (comes from the user management), then select one or more Booking Items from the dropdown to link with them (comes from the items section). Click “Assign” to save.
- The list page displays a table of the staff’s Avatar, Staff Name, Email, Mobile Number, Items, and Action columns, showing each staff member along with the items assigned to them. Use the search bar to find a specific staff record.
- Click the Filters button to filter data by Staff Member using the dropdown, then click Apply to filter the data or Clear to reset it.
- In the Action column, you can use the edit option to update the staff member’s assigned items or the delete option to remove the record.
- Once a staff member is assigned to items, they become associated with those specific services, allowing the system to link the right staff to the right bookings when customers schedule an appointment.
Manage Payments
- Once a customer selects Online Payment while confirming their booking on the frontend, a new entry is automatically created here, linked to the same Appointment Number and Customer, showing the Amount and initial Payment Status based on the transaction outcome.
- The list page displays a table of the payment’s Reference Number, Appointment, Customer, Amount, Payment Date, Status, Notes, and Action columns. Use the search bar to find a specific payment. Click the Filters button to filter data by Payment Date, then click Apply to filter the data or Clear to reset it.
- In the Action column, the available actions depend on the payment’s current Status. For payments still in Pending status, you can use the option to “Mark As Cleared”, the Reject option to mark the payment Cancelled, or the view option to see details. Once a payment’s Status is marked ‘cleared’ or ‘cancelled’, only the view option remains available to see the payment.
Categories
Related articles
- Tags – TicketGo Add-On Guide
- Delivery Boy – eCommerceGo SaaS Add-On Guide
- Language Manager Guide
- Import Export – eCommerceGo SaaS Add-On Guide
- ToDo – BookingGo SaaS Add-On Guide
- Tawk.to Messenger – BookingGo SaaS Add-On Guide
- WhatsApp Twilio – BookingGo SaaS Add-On Guide
- Fatora – WorkDo Dash SaaS Add-On Guide
- Auto Reply – TicketGo Add-On Guide
- DJ Orchestra – WorkDo Dash SaaS Add-On Guide
- PayFast – BookingGo SaaS Add-On Guide
- Insurance Management – WorkDo Dash SaaS Add-On Guide
We're Here to Help - Let's Talk
Have questions about our solutions, customization services, or business tools? Our team is here to help you. let's talk.